Page 1
Chapter No.3 Experimental Setup
13
CHAPTER # 3
Experimental Setup
3.1) Raw Materials
The raw materials needed for the production of Ethyl Benzoate which is a base
component for production of Hydraulic Brake Fluid on laboratory scale are as follows,
1. Ethanol
2. Benzoic Acid
3. Sulfuric Acid (Concentrated)
4. Sodium Carbonate (Solution)
5. Ether (di-ethyl ether)
3.1.1) Ethanol
Ethanol, also known as ethyl alcohol, alcohol,
Methylcarbinol, grain alcohol, Ethyl hydroxide, Ethyl hydrate,
Algrain, Anhydrol, Tecsol, is a volatile, flammable, colorless
liquid with the structural formula CH3CH2OH, often abbreviated
as C2H5OH or C2H6O. Ethanol is a psychoactive drug and is one
of the oldest recreational drugs still used by humans. Ethanol
can cause alcohol intoxication when consumed. Best known as
the type of alcohol found in alcoholic beverages, it is also used
in thermometers, as a solvent, and as a fuel. In common usage, it
is often referred to simply as alcohol or spirits.
3.1.1.1) Production of Ethanol
Ethanol is produced both as a petrochemical, through the hydration of ethylene
and, via biological processes, by fermenting sugars with yeast. The economics of process
depends on prevailing prices of petroleum and grain feed stocks.
Ethanol for use as an industrial feedstock or solvent is made
from petrochemical feed stocks, primarily by the acid-catalyzed hydration of ethylene,
represented by the chemical equation
C2H4 + H2 3CH2OH
Fig 3.1 Ethanol
Page 2
Chapter No.3 Experimental Setup
14
The catalyst is most commonly phosphoric acid, adsorbed onto a porous support
such as silica gel or diatomaceous earth. This catalyst was first used for large-scale
ethanol production by the Shell Oil Company in 1947. The reaction is carried out with
an excess of high pressure steam at 300 C (572 F).
Ethanol for use in alcoholic beverages, and the vast majority of ethanol for use as
fuel, is produced by fermentation. When certain species of yeast metabolize sugar in
reduced-oxygen conditions they produce ethanol and carbon dioxide. The chemical
equations below summarize the conversion:
C6H12O6 2 CH3CH2OH + 2 CO2
C12H22O11 + H2 3CH2OH + 4 CO2
Fermentation is the process of culturing yeast under favorable thermal conditions
to produce alcohol. This process is carried out at around 35 40 C (95 104 F).
Toxicity of ethanol to yeast limits the ethanol concentration obtainable by brewing;
higher concentrations, therefore, are usually obtained by fortification or distillation.
3.1.1.2) Physical and Chemical Properties of Ethanol
Sr. # Properties
1 Appearance Colorless
2 Density 0.789 g/cm3 (at 20oC)
3 Flash Point -5oF
4 Water Solubility Completely Soluble
5 Flammable Range (LEL UEL) 3.3% 19%
6 Flash Point 48 oF
7 Ignition Temperature 793oF
8 Melting Point −173 oF
9 Boiling Point 173oF
10 Vapor Density 1.49
11 Vapor Pressure 44 mmHg
Page 3
Chapter No.3 Experimental Setup
15
3.1.2) Benzoic Acid
Benzoic Acid is also known as Dracylic acid, Benzene formic acid,
Carboxybenzene, benzene carboxylic acid, with formula C7H6O2 (or C6H5COOH), is a
colorless crystalline solid and a simple aromatic carboxylic acid. The name is derived
from gum benzoin, which was for a long time the only source for benzoic acid. Its salts
are used as food preservatives and benzoic acid is an important precursor for the
synthesis of many other organic substances. The salts and esters of benzoic acid are
known as benzoates.
3.1.2.1) Production of Benzoic Acid
Benzoic acid is produced commercially by partial
oxidation of toluene with oxygen. The process is catalyzed
by cobalt or manganese naphthenates. The process uses cheap raw materials, and
proceeds in high yield.
U.S. production capacity is estimated to be 126,000 tones per year (139,000
tons), much of which is consumed domestically to prepare other industrial chemicals.
Fig 3.2 Benzoic Acid
Page 4
Chapter No.3 Experimental Setup
16
Benzoic acid is cheap and readily available, so the laboratory synthesis of benzoic
acid is mainly practiced for its pedagogical value. It is a common undergraduate
preparation. Benzoic acid can be purified by re-crystallization from water because of its
high solubility in hot water and poor solubility in cold water. The avoidance of organic
solvents for the re-crystallization makes this experiment particularly safe.
3.1.2.2) Physical and Chemical Properties of Ethanol
Sr. # Properties
1 Appearance
colorless crystalline solid
2 Odor Faint, pleasant odor
3 Density 1.2659 g/cm3
4 Water Solubility 2.9 g/L
5 Vapor pressure 0.001 hPa
6 Flash Point 250.7 oF
7 Auto ignition Temperature 1058 oF
8 Melting Point 252.34 oF
9 Boiling Point 480.6 oF
10 Refractive index 1.539
11 Viscosity 1.26 mPa
3.1.3) Sulfuric Acid
Sulfuric acid is a strong mineral acid with the molecular formula H2SO
4. It is
soluble in water at all concentrations. When it is mixed with water, a very exothermic
reaction occurs and the energy released can be enough to heat the mixture to boiling.
Therefore, concentrated sulfuric acid must be diluted by adding slowly to cold water
while the mixture is stirred to dissipate the heat. Sulfuric acid has many applications,
and is one of the top products of the chemical industry. Principal uses include lead-acid
batteries for cars and other vehicles, ore processing, fertilizer manufacturing, oil
refining, wastewater processing, and chemical synthesis. About 65% of sulfuric acid
produced annually is used in the production of agricultural fertilizers.
3.1.3.1) Production of Sulfuric Acid
Sulfuric acid is produced from sulfur, oxygen and water via the conventional
contact process.
Page 5
Chapter No.3 Experimental Setup
17
Contact process:
In the first step, sulfur is burned to produce sulfur dioxide.
S (s) + O2 (g) SO2 (g)
This is then oxidized to sulfur trioxide using oxygen in the presence of a vanadium (V)
oxide catalyst. This reaction is reversible and the formation of the sulfur trioxide is
exothermic.
2 SO2 (g) + O2 (g) 2 SO3
The sulfur trioxide is absorbed into 97 98% H2SO4 to form oleum (H2S2O7), also
known as fuming sulfuric acid. The oleum is then diluted with water to form
concentrated sulfuric acid.
H2SO4 (l) + SO3 H2S2O7 (l)
H2S2O7 (l) + H2O H2SO4 (l)
Note that directly dissolving SO3 in water is not practical due to the
highly exothermic nature of the reaction between sulfur trioxide and water. The reaction
forms a corrosive aerosol that is very difficult to separate, instead of a liquid.
SO3 (g) + H2O H2SO4 (l)
3.1.3.2) Properties of Sulfuric Acid
Sr. # Properties
1 Molecular formula
H2SO
4
2 Molar mass 98.086 g/mol
3 Appearance Clear, colorless, odorless liquid
4 Density 1.84 g/cm3, liquid
5 Melting point 10 oC, 283 K, 50 oF
6 Boiling point 337 oC, 610 K, 639 oF
7 Solubility in water miscible
8 Acidity (pKa) -31.99
9 Viscosity 26.7 cP (20 oC)
10 Flash point Non-flammable
Page 6
Chapter No.3 Experimental Setup
18
3.1.4) Sodium Carbonate
Sodium carbonate (also known as washing soda, soda ash and soda crystals),
Na2CO3, is a sodium salt of carbonic acid (soluble in water). It most commonly occurs as
a crystalline hepta-hydrate, which readily effloresces to form a white powder, the
monohydrate. Pure sodium carbonate is a white, odorless powder that absorbs moisture
from the air, has an alkaline taste, and forms a strongly alkaline water solution. Sodium
carbonate is domestically well known for its everyday use as a water softener.
3.1.4.1) Production of Sodium Carbonate
a) Mining:
Trona, trisodium hydrogendicarbonate dihydrate (Na3HCO3CO3 2O), is mined
in several areas of the US and provides nearly all the domestic consumption of sodium
carbonate. Large natural deposits found in 1938, such as the one near Green River,
Wyoming, have made mining more economical than industrial production in North
America. There are important reserves of Trona in Turkey; two million tons of soda ash
has been extracted from the reserves near Ankara. It is also mined from some alkaline
lakes such as Lake Magadi in Kenya by dredging. Hot saline springs continuously
replenish salt in the lake so that, provided the rate of dredging is no greater than the
replenishment rate, the source is fully sustainable.
b) Leblanc process:
In 1791, the French chemist Nicolas Leblanc patented a process for producing
sodium carbonate from salt, sulfuric acid, limestone, and coal. First, sea salt (sodium
chloride) was boiled in sulfuric acid to yield sodium sulfate and hydrogen chloride gas,
according to the chemical equation
2 NaCl + H2SO4 Na2SO4 + 2 HCl
Next, the sodium sulfate was blended with crushed limestone (calcium carbonate) and
coal, and the mixture was burnt, producing calcium sulfide.
Na2SO4 + CaCO3 + 2 C Na2CO3 + 2 CO2 + CaS
The sodium carbonate was extracted from the ashes with water, and then collected by
allowing the water to evaporate.
The hydrochloric acid produced by the Leblanc process was a major source of air
pollution, and the calcium sulfide byproduct also presented waste disposal issues.
Solvay process:
Page 7
Chapter No.3 Experimental Setup
19
In 1861, the Belgian industrial chemist Ernest Solvay developed a method to
convert sodium chloride to sodium carbonate using ammonia. The Solvay
process centered around a large hollow tower. At the bottom, calcium carbonate
(limestone) was heated to release carbon dioxide:
CaCO3 CaO + CO2
At the top, a concentrated solution of sodium chloride and ammonia entered the tower.
As the carbon dioxide bubbled up through it, sodium bicarbonate precipitated:
NaCl + NH3 + CO2 + H2O NaHCO3 + NH4Cl
The sodium bicarbonate was then converted to sodium carbonate by heating it, releasing
water and carbon dioxide:
2 NaHCO3 Na2CO3 + H2O + CO2
Meanwhile, the ammonia was regenerated from the ammonium chloride byproduct by
treating it with the lime (calcium hydroxide) left over from carbon dioxide generation:
CaO + H2O Ca(OH)2
Ca(OH)2 + 2 NH4Cl CaCl2 + 2 NH3 + 2 H2O
Because the Solvay process recycles its ammonia, it consumes only brine and limestone,
and has calcium chloride as its only waste product. This made it substantially more
economical than the Leblanc process, and it soon came to dominate world sodium
carbonate production.
c) Hou's process:
Developed by Chinese chemist Hou Debang in 1930s. The earlier steam
reforming byproduct carbon dioxide was pumped through a saturated solution of sodium
chloride and ammonia to produce sodium bicarbonate via the following reactions:
NH3 + CO2 + H2O NH4HCO3
NH4HCO3 + NaCl NH4Cl + NaHCO3
The sodium bicarbonate was collected as a precipitate due to its low solubility and then
heated to yield pure sodium carbonate similar to last step of the Solvay.
Page 8
Chapter No.3 Experimental Setup
20
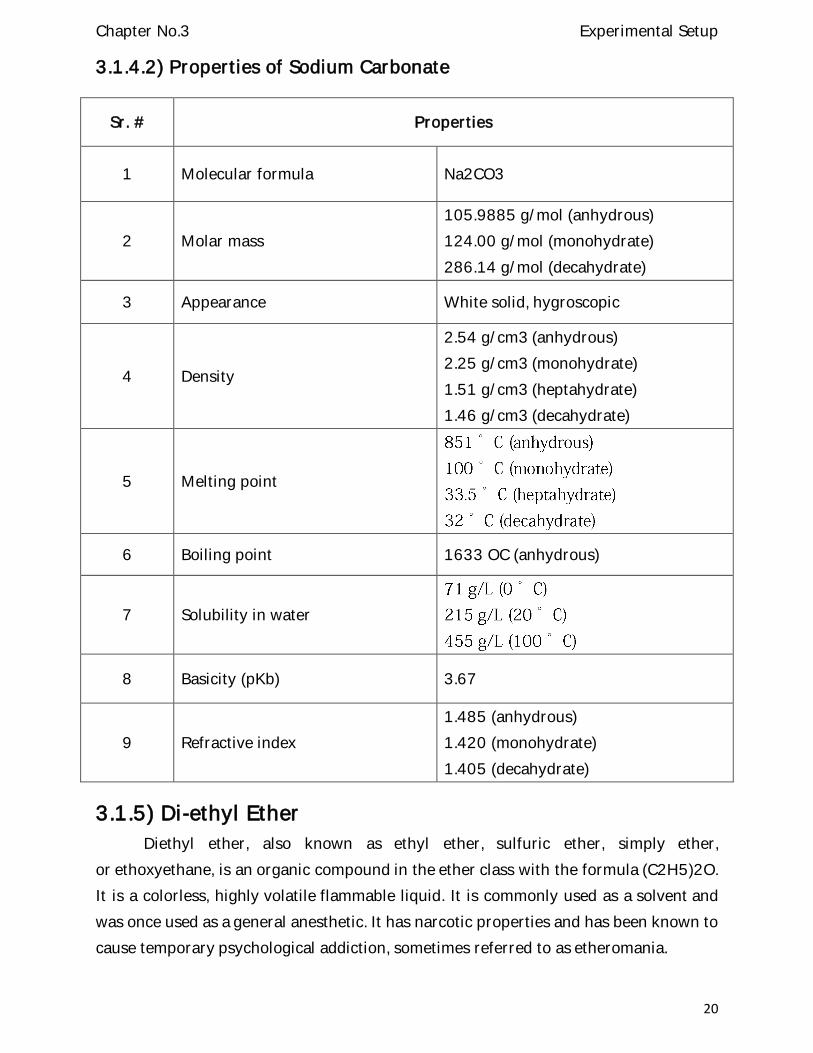
3.1.4.2) Properties of Sodium Carbonate
Sr. # Properties
1 Molecular formula Na2CO3
2 Molar mass
105.9885 g/mol (anhydrous)
124.00 g/mol (monohydrate)
286.14 g/mol (decahydrate)
3 Appearance White solid, hygroscopic
4 Density
2.54 g/cm3 (anhydrous)
2.25 g/cm3 (monohydrate)
1.51 g/cm3 (heptahydrate)
1.46 g/cm3 (decahydrate)
5 Melting point
6 Boiling point 1633 OC (anhydrous)
7 Solubility in water
8 Basicity (pKb) 3.67
9 Refractive index
1.485 (anhydrous)
1.420 (monohydrate)
1.405 (decahydrate)
3.1.5) Di-ethyl Ether
Diethyl ether, also known as ethyl ether, sulfuric ether, simply ether,
or ethoxyethane, is an organic compound in the ether class with the formula (C2H5)2O.
It is a colorless, highly volatile flammable liquid. It is commonly used as a solvent and
was once used as a general anesthetic. It has narcotic properties and has been known to
cause temporary psychological addiction, sometimes referred to as etheromania.
Page 9
Chapter No.3 Experimental Setup
21
3.1.5.1) Production of Di-ethyl Ether
Most diethyl ether is produced as a byproduct of the vapor-
phase hydration of ethylene to make ethanol. This process uses solid-
supported phosphoric acid catalysts and can be adjusted to make more ether if the need
arises. Vapor-phase dehydration of ethanol over some alumina catalysts can give diethyl
ether yields of up to 95%.
Diethyl ether can be prepared both in laboratories and on an industrial scale by
the acid ether synthesis.[23] Ethanol is mixed with a strong acid, typically sulfuric acid,
H2SO4. The acid dissociates in the aqueous environment producing hydronium ions, H3O+.
A hydrogen ion protonates the electronegative oxygen atom of the ethanol, giving the
ethanol molecule a positive charge:
CH3CH2OH + H3O+ 3CH2OH2+ + H2O
A nucleophilic oxygen atom of unprotonated ethanol displaces a water molecule
from the protonated (electrophilic) ethanol molecule, producing water, a hydrogen ion
and diethyl ether.
CH3CH2OH2+ + CH3CH2 2O + H+ + CH3CH2OCH2CH3
This reaction must be carried out at temperatures lower than 150 C in order to
ensure that an elimination product (ethylene) is not a product of the reaction. At higher
temperatures, ethanol will dehydrate to form ethylene. The reaction to make diethyl
ether is reversible, so eventually an equilibrium between reactants and products is
achieved. Getting a good yield of ether requires that ether be distilled out of the reaction
mixture before it reverts to ethanol, taking advantage of Le Chatelier's principle.
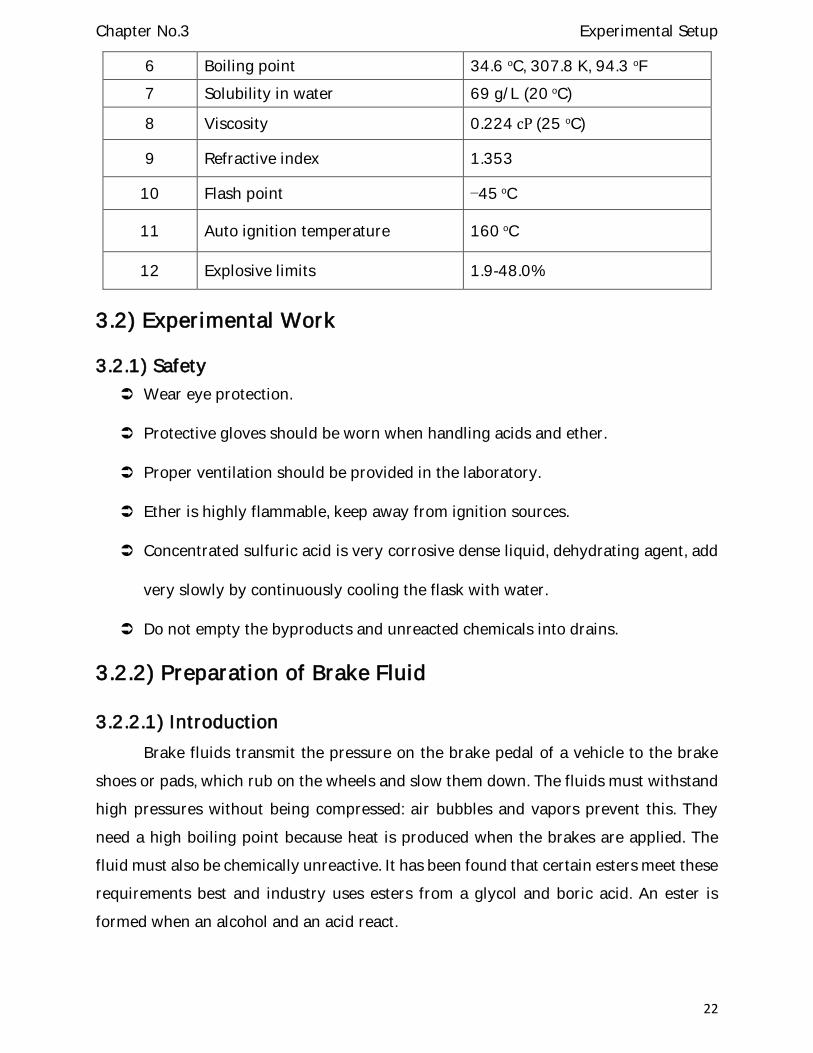
3.1.5.2) Properties of Di-ethyl Ether
Sr. # Properties
1 Molecular formula C4H10O
2 Molar mass 74.12 g mol−1
3 Appearance Colorless liquid
4 Density 0.7134 g/cm3, liquid
5 Melting point −116.3 oC, 156.9 K, −177.3 oF
Page 10
Chapter No.3 Experimental Setup
22
6 Boiling point 34.6 oC, 307.8 K, 94.3 oF
7 Solubility in water 69 g/L (20 oC)
8 Viscosity 0.224 cP (25 oC)
9 Refractive index 1.353
10 Flash point −45 oC
11 Auto ignition temperature 160 oC
12 Explosive limits 1.9-48.0%
3.2) Experimental Work
3.2.1) Safety
Wear eye protection.
Protective gloves should be worn when handling acids and ether.
Proper ventilation should be provided in the laboratory.
Ether is highly flammable, keep away from ignition sources.
Concentrated sulfuric acid is very corrosive dense liquid, dehydrating agent, add
very slowly by continuously cooling the flask with water.
Do not empty the byproducts and unreacted chemicals into drains.
3.2.2) Preparation of Brake Fluid
3.2.2.1) Introduction
Brake fluids transmit the pressure on the brake pedal of a vehicle to the brake
shoes or pads, which rub on the wheels and slow them down. The fluids must withstand
high pressures without being compressed: air bubbles and vapors prevent this. They
need a high boiling point because heat is produced when the brakes are applied. The
fluid must also be chemically unreactive. It has been found that certain esters meet these
requirements best and industry uses esters from a glycol and boric acid. An ester is
formed when an alcohol and an acid react.
Page 11
Chapter No.3 Experimental Setup
23
3.2.2.2) Preparation of an Ester
This experiment is to prepare an ester, ethyl benzoate, from ethanol and benzoic
acid, and then to purify it. The reaction involved is slow and needs heat to get it working
quickly. The reaction, which is reversible, i.e. it will go either way, is:
ACID + ALCOHOL ESTER + WATER
To stop it reforming the acid and the alcohol, the water is removed with
concentrated sulphuric acid. To enable the reaction to be heated for a long time and the
liquid not to be lost, a condenser is placed over the boiling liquid so that the vapors is
cooled and returned to the flask.
Measured 100 cm3 of ethanol into a flask.
Slowly and carefully added 12 cm3 of concentrated sulphuric acid, cooling the
flask as this is being done by placing it under a running tap.
Weighed 28 g of benzoic acid and added to the flask.
Arranged the apparatus as shown in Figure 1 and heated the flask over gauze so
that it boils gently.
Figure 3.3: Heating the mixture under reflux
Page 12
Chapter No.3 Experimental Setup
24
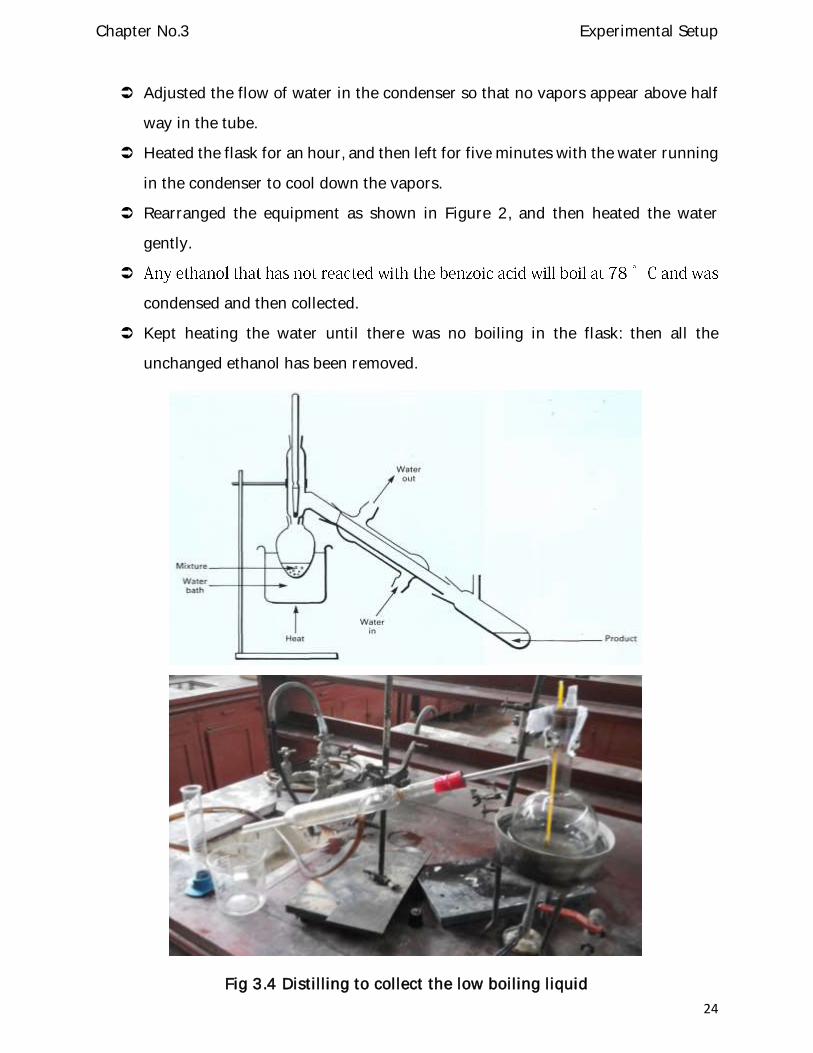
Adjusted the flow of water in the condenser so that no vapors appear above half
way in the tube.
Heated the flask for an hour, and then left for five minutes with the water running
in the condenser to cool down the vapors.
Rearranged the equipment as shown in Figure 2, and then heated the water
gently.
condensed and then collected.
Kept heating the water until there was no boiling in the flask: then all the
unchanged ethanol has been removed.
Fig 3.4 Distilling to collect the low boiling liquid
Page 13
Chapter No.3 Experimental Setup
25
To remove any unchanged benzoic acid, added a solution of sodium carbonate in
water containing 8 g in 100cm3 until the liquid has a pH of 8 (test with universal
indicator paper).
This changed the benzoic acid into sodium benzoate. The ethyl benzoate was
separated from this by using the fact that ethyl benzoate dissolves in ether and
sodium benzoate does not.
Poured the liquid into a separating funnel, added 40 cm3 of ether, stoppered the
funnel and shook for five minutes, removing the stopper occasionally.
Left to settle, and then separated the two layers by pouring off the bottom layer.
Collected the two layers, running the ether layer into a clean, dry flask. Added a
further 10 cm3 of ether to the other liquid and repeated the operation. Add this ether
layer to the original ether in the flask.
To obtain the ethyl benzoate from this solution, distilled off the ether using the
equipment shown in Figure 2.
The ether boils well below the boiling point of water and is condensed and collected
in the tube. This enables the ether to be recollected so that it can be used again. This
recovery of the solvent is very important in industry where solvents are used a lot
and much money can be saved by their recovery.
When all the ether had been boiled off, removed the beaker of water and placed a
tripod and gauze under the flask. Heated strongly with a Bunsen and collected the
liquid boiling at between 200
benzoate which can be used in the tests for suitability as a brake fluid described in
next section.
3.2.3) Tests on Brake Fluid
3.2.3.1) Introduction
To find if a liquid will work well as a brake fluid, its properties must be tested. A
brake fluid should:
a) have a high boiling point;
Page 14
Chapter No.3 Experimental Setup
26
b) b) be tolerant to water mixing;
c) give suitable flow rates over a wide temperature change: the liquid must not be
syrupy (viscous) at low temperatures but must not get too thin at high
temperatures, otherwise it will not lubricate the brake shoes or act as a seal;
d) have no effect on rubber or plastic seals;
e) assist metals to resist corrosion;
f) be resistant to chemical change at high temperatures;
g) provide good lubrication for moving parts in the system;
h) mix with other brake fluids;
i) Not lose much volume by evaporation in working.
Industry needs to test all fluids used in braking systems to make sure that they are
up to standard in each of these respects. Below are some experiments which were carried
out in the laboratory to test whether the above properties are present.
3.2.3.2) Finding the Boiling Point
Apparatus and chemicals required
Round-bottomed flask
Liebig condenser
Thermometer
Bunsen burner
Stand and clamp
Anti-bumping granules
The boiling point of a liquid can be found in the laboratory by following way. The
method involves setting up the equipment as shown in Figure below.
The best way to heat the flask is to use a variac-controlled heating mantle that
fits the flask. However, a Bunsen burner can be used, and the flame was adjusted to give
a constant boiling rate to the liquid. The liquid was heated until it boil, with a condenser
liquid flowing at a rate to keep the vapors condensing and refluxing (the condensed
liquid falls back into the original liquid). Adjusted the heat so that the liquid boil gently
and refluxes at a rate of two to four drops per second. Left for five minutes to allow the
condition to settle, and then taken the temperature reading every 30 seconds for two
minutes and the average result was used.
Page 15
Chapter No.3 Experimental Setup
27
Fig 3.5: Boiling Point Measurement
3.2.3.3) Tolerance to water mixing
In normal use, brake fluids absorb small amounts of water which percolate in
from the surroundings through the brake hoses. This can affect the ability of the fluid to
operate at low temperatures as ice may form in the pipes, blocking the system, and can
lower the boiling point of the fluid, causing vapors to form in the brakes. The effect of
water on the boiling point of a typical brake fluid is shown in the graph in figure.
Figure 4: Effect of moisture on boiling point of Brake Fluid
Page 16
Chapter No.3 Experimental Setup
28
Apparatus and chemicals required
Measuring cylinder 250 cm3
Flask 250 cm3
Syringe 10cm3
Sample tube (2)
Beaker 250 cm3
Fluids to test
A sample of the test fluid can be contaminated with about 3 per cent water by
measuring 200 ml of the fluid in a measuring cylinder and pouring it into a flask, then
adding 6 ml of water from a syringe and shaking the flask for several minutes. This
mixture can then be used for the following tests. Filled a small sample tube with the
mixture, sealed it and left it in a freezer overnight.
Tested the fluid for transparency and clearness by placing the tube over a piece of
graph paper and observing the lines through it. Examined the liquid for traces of solid,
turning it over several times. Another sample tube was taken and filled with liquid and
to allow the liquid to reach
60 oC, then performed the same tests.
3.2.3.4) Viscosity
Apparatus and chemicals required
Glass tube (0.5m long, about 0.5 cm diameter)
Stopper to fit tube (2)
Water bath to fit tube
Fluids to test
A glass tube about 0.5 m long was taken, sealed at the bottom, and filled to within
10 cm of the top with the fluid under test. Stoppered the top, then turned the tube upside
down and found the time needed for the air bubble to travel the length of the tube. Left
the tube in a freezer for half an hour, then repeated the experiment. Placed the tube in
quicker the bubble travels through the tube, the lower the viscosity of the liquid. For a
successful brake fluid, the viscosity should remain constant over a large temperature
range.
Page 17
Chapter No.3 Experimental Setup
29
Another experiment that can be used to measure the flow of a fluid is to take a glass
tube 2 m long and about 2 cm internal diameter, fill it with the liquid under test, then
drop a ball bearing down the tube. Find the time it takes for the ball bearing to reach the
bottom of the tube. This can be tried at different temperatures and using different liquids
to compare their viscosity.
3.2.3.5) Effect on Rubber and Plastic Caps
Apparatus and chemicals required
Rubber sheet
Polypropene sheet
Cork borer
Micrometer screw gauge
Magnifying glass
Brake fluid
Isopropanol
Using a cork borer, cut two pieces of rubber sheet about 2 cm in diameter. Two pieces
of Polypropene about the same size were taken. Measured the diameter of each of the
four pieces using a micrometer gauge. Placed one piece of rubber and one piece of
Polypropene in the fluid under test and left for a week at room temperature. After a
week, removed the rubber and Polypropene from the fluid. Held the pieces with tweezers
and cleaned by rinsing in isopropanol, then dried in warm air. Measured the diameter of
the pieces under test within fifteen minutes of removing them from the fluid. Using a
magnifying glass, examined the surfaces for blistering, pitting, or other signs of
disintegration. Compared these samples with the control samples which were not soaked
in fluid. The fluid should not cause corrosion of any sort or cause the material to expand
by more than 5 per cent.
3.2.3.6) Effect on Metals
Apparatus and chemicals required
Samples of:
Aluminum
Brass
Copper
Page 18
Chapter No.3 Experimental Setup
30
Cast iron
Tinned iron
Steel
Tin cutters
Emery cloth
Isopropanol
Beaker 250 cm3
Tweezers
Brake fluid
Access to balance
A brake fluid must not corrode the metals with which it comes into contact. These
metals may include cast iron, steel, tinned iron (tin plate), aluminum, brass, and copper.
To test this, strips of each metal were suspended in the fluid. The strips were prepared
by cutting pieces about 7 cm long and 1.8 cm across and making a small hole near one
end. The strips can be cleaned with emery cloth and then were washed in isopropanol.
Each strip was then handled only with tweezers. Weighed each piece accurately and
noted the weight. Assembled the metal strips on a steel nail in the order tinned iron,
steel, aluminum, cast iron, brass, and copper, ensuring a gap at the top by bending the
strips slightly. Washed again in isopropanol to remove all dirt. Placed the metal strip
assembly in a beaker and poured sufficient liquid to cover by about 1 cm.
the strips to cool in the fluid at room temperature for an hour. Using tweezers removed
the strips from the fluid; examine the strips for sediment and shook them to remove any
sediment which might be present. Cleaned each strip by rubbing with a cloth soaked in
isopropanol. Inspected each strip with a magnifying glass for signs of pitting and
corrosion. Weighed each strip and found the differences in weight compared with the
original weight. Found the weight loss per unit surface area of the metal (remember
there are two sides to each plate). This is given by the formula:
Weight loss/unit surface area = Weight loss (mg)/Surface area (cm3)
Page 19
Chapter No.3 Experimental Setup
31
3.2.3.7) Compatibility with other Brake Fluids
Apparatus and chemicals required Measuring cylinder 100 cm3
Beaker 250 cm3
Sample tube
Brake fluid
Ester
Used a standard commercial brake fluid supplied in the lab for the following test.
Mixed 50 ml of the fluid under test with 50 ml of the commercial fluid in a 100 ml
measuring cylinder. Mixed the fluid well in a beaker and examined for any solid
deposited and any layers forming. Poured into a sample tube, and then inspected a piece
of graph paper through it to test for deformation of the lines. Placed the sample tube in
the freezer for at least one hour, then repeated the test. Placed in boiling water for fifteen
minutes and carried out the test again. These activities test the compatibility of the fluids
at different temperatures.
3.2.3.8) Loss of Fluid by Evaporation
Apparatus and chemicals required Petri dish
Fluid
Access to balance
It is important that a brake fluid maintains its volume under working conditions or
an air lock may develop, reducing the efficiency of the system and making the brakes
'spongy'. The amount of evaporation in a closed system can be found by weighing an
empty glass Petri dish with its lid on, adding 25 ml of fluid from a measuring cylinder
and then weighing again. The weight of fluid in the dish can then be calculated. Placed
left to cool at room temperature and weighed the dish again. Found the loss of weight
of the fluid and expressed it as a percentage of the original. This can be repeated for
each fluid.
% loss of weight = loose of weight / original weight
Page 20
Chapter No.3 Experimental Setup
32
3.2.3.9) Lubricant
The lubricant properties of a fluid are related to its viscosity. If the fluid is too
thin, it runs off too easily; if it is too viscous, it offers resistance to movement and also
lessens its ability not to corrode the metals involved in the movement.
3.2.3.9) pH Value
It is important that a brake fluid should not produce an acid reaction with the
materials with which it comes into contact. The acceptable range for the pH of a brake
fluid is between 7 and 11.5.
To find the pH of the fluids under test, mixed 25 ml with 25 ml of a mixture of
80 per cent ethanol and 20 per cent water, which had been neutralized to a pH of 7.
Determined the pH of the resulting solution by using universal indicator solution or a
pH meter with a calibrated electrode.