Chapter 1 Creating your first Web service and Web application Chapter Contents Introducing Web service terminology Installing WebSphere Application Server and Rational Developer Setting up a Web project Creating a Web service Creating a Web application Time Required 2 hours Files Required The /solutions/chap01/samples/StockQuote.java file Web services are network-accessible programs that use a standardized messaging protocol to communicate with other programs that want to use their functions. 1
Transcript
Chapter 1
Creating your first Web service and Web application
Chapter Contents
Introducing Web service terminology
Installing WebSphere Application Server and Rational Developer
Setting up a Web project
Creating a Web service
Creating a Web application
Time Required
2 hours
Files Required
The /solutions/chap01/samples/StockQuote.java file
Web services are network-accessible programs that use a standardized messagingprotocol to communicate with other programs that want to use their functions.
1
2
Web services reside on application servers, such as WebSphere ApplicationServer, which can be on the Internet, on your company’s private intranet, or onyour own computer. The functions that Web services provide can be general-purpose, such as looking up the weather forecast for a particular city, or applica-tion-specific, such as creating an order for an e-commerce application. Webservices are also self-describing; that is, they include special descriptions of thefunctions that they provide and how to access those functions. Application pro-grammers use these descriptions to find (discover) and use the services.
Web applications also reside on application servers. These applications consist ofone or more Web pages that users access through a Web browser. They typicallycontain a combination of static and dynamic content, such as text, images, andprograms that run on the server or in the user’s Web browser. Web applicationscan use Web services that reside on the same server, or on any server in the net-work that the Web application has access to. Unless you tell them, users at aWeb browser aren’t aware that the work might be distributed across multipleservers.
Notice that we haven’t said anything about what programming language a Webservice is written in, or what operating system it’s running on. That’s because itdoesn’t matter. The Web service just needs to be available on the network thatthe application is using, and the service and the application need to use the cor-rect protocol to communicate with one another. The application can be written ina different programming language than the service, and run on a different operating system.
In this chapter, you’ll create a simple Web service and Web application that hap-pen to be written in the same programming language (Java) and happen to runon the same machine (yours). In later chapters, however, you’ll use publiclyavailable Web services on the Internet, where you don’t know what language theWeb service is written in or what operating system it’s running on.
Web services and applications communicate with each other using messages ina specific, standardized format. An application builds a message request such
CHAPTER 1: Creating your first Web service and Web application
as “give me the weather forecast for Atlantic, NC,” and sends it to the serverwhere the Web service resides. That server calls the Web service to process therequest. When the Web service returns the result (such as “warm and sunny”),the server builds a message response and sends it back to the application. Atfirst glance, this probably sounds very complicated—building messages andsending them where they need to go. As you’ll see in this book, however,Rational Developer and WebSphere handle most of the work for you, so you can just concentrate on developing your Web service functions andapplication logic.
Introducing Web service terminologyBefore jumping into building Web services and Web applications, you need tounderstand some of the terminology you’ll see when you use Rational Developerand WebSphere. Like most modern technologies, Web services are an alphabetsoup of technical jargon, and the acronyms can make your head spin if you’renot careful. At this point, we’ll look at two of the main building blocks for Webservices: SOAP and WSDL.
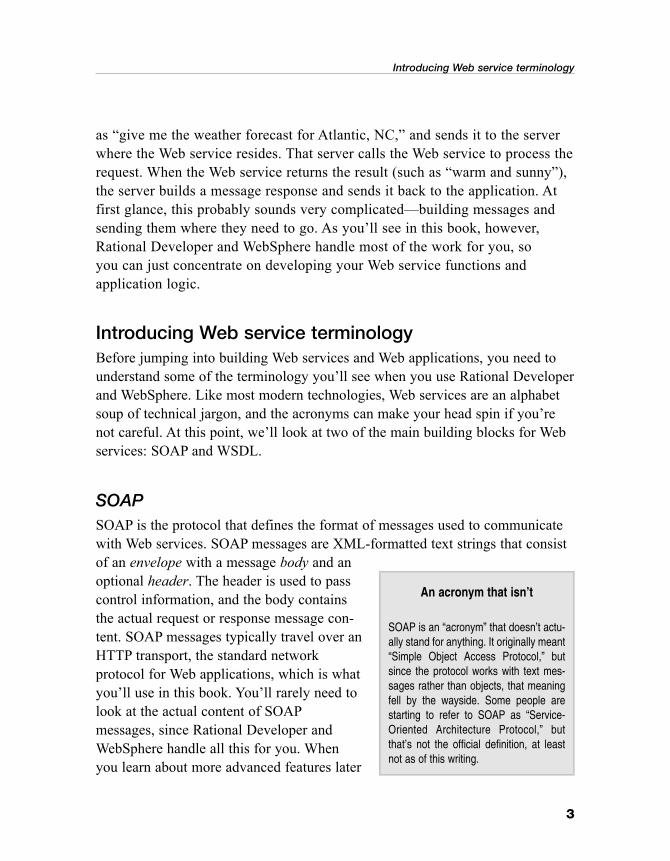
SOAPSOAP is the protocol that defines the format of messages used to communicatewith Web services. SOAP messages are XML-formatted text strings that consistof an envelope with a message body and anoptional header. The header is used to passcontrol information, and the body containsthe actual request or response message con-tent. SOAP messages typically travel over anHTTP transport, the standard network protocol for Web applications, which is whatyou’ll use in this book. You’ll rarely need tolook at the actual content of SOAPmessages, since Rational Developer andWebSphere handle all this for you. Whenyou learn about more advanced features later
3
Introducing Web service terminology
An acronym that isn’t
SOAP is an “acronym” that doesn’t actu-ally stand for anything. It originally meant“Simple Object Access Protocol,” butsince the protocol works with text mes-sages rather than objects, that meaningfell by the wayside. Some people arestarting to refer to SOAP as “Service-Oriented Architecture Protocol,” butthat’s not the official definition, at leastnot as of this writing.
4
in this book, you’ll look at SOAP messages in more detail and consider some ofthe options you can set to control how SOAP messages are built.
WSDLWeb Services Description Language (WSDL) is the XML vocabulary that describesWeb services. WSDL is stored in standard text files with a .wsdl extension,typically on the same application server where the Web service itself is deployed.
As a Web service developer, you use WSDL to describe the functions that yourWeb service provides and how other programs can access those functions. For otherprogrammers to use your Web service, you have to give them access to two things:
Your Web service programThe WSDL file that describes your Web service
From the WSDL, other programmers know the URL to use to invoke your Webservice, the specific format of requests that your Web service handles, parame-ters that need to be supplied to each request, the format of responses, and so on.Basically, the WSDL provides all the rules that a program needs to follow to useyour Web service.
As a Web application developer, you use the WSDL for a particular Web serviceto create the code that locates, builds messages for, and invokes the Web service.Typically, all this logic is placed in a client proxy, which represents the Webservice in your client application. You just call the proxy, and it handles all thedetails of finding and invoking the Web service.
Luckily, you don’t have to be fluent in WSDL to create or work with Web serv-ices, because Rational Developer handles it all for you. When you use the WebService wizard to create a new Web service, the wizard creates the correspon-ding WSDL file. And when you want to use a Web service in a Web application,you just point the Web Service wizard to the WSDL file, and the wizard createsthe client proxy to locate and invoke the service.
CHAPTER 1: Creating your first Web service and Web application
What you’ll buildNow that you’ve got the basics, let’s get started with a real example. You’ll playtwo roles in this chapter. First, you’ll be a Web service developer, using RationalDeveloper to create a Web service that returns the last trading price for a particular stock symbol. Then, you’ll be a Web application developer, using yourWeb service to build a Web application that shows the last trading prices for alist of stocks. Figure 1.1 shows an example of the application you’ll build.
Installing WebSphere Application Server and RationalDeveloperTo follow along with the steps in this book, you need to install IBM WebSphereApplication Server 6.0. You also need to install either IBM Rational WebDeveloper 6.0 or IBM Rational Application Developer 6.0. ApplicationDeveloper contains all the same functions you’ll find in Web Developer (and much more), so you can follow the instructions with either product. Forsimplicity, we refer to the tools as Rational Developer in this book, but you canuse the one you prefer. The screenshots in this book were taken from WebDeveloper, however, so if you’re using Application Developer, you might seemore features than in the screenshots.
5
Installing WebSphere Application Server and Rational Developer
Figure 1.1: The MyStocks application in action.
6
You can install WebSphere Application Server and Rational Developer separately on your machine, or if you prefer, you can install WebSphere Express6.0, which includes both WebSphere Application Server and Rational WebDeveloper. If you don’t already have a copy of WebSphere Express 6.0, you candownload a trial version at www-106.ibm.com/developerworks/websphere/ downloads/EXPRESSsupport.html. See the appendix for installation instructions.After installing Rational Developer, make sure you use the Rational ProductUpdater to install the latest product updates. You’ll need Rational Developer6.0.0.1 or later for the samples in this book.
Note: Make sure you install both WebSphere Application Server andRational Developer on your machine. Rational Developer includes aWebSphere Test Environment that you’ll use to test Web services andWeb applications, but you’ll also need a stand-alone WebSphereApplication Server to set up your “production” server in the next chap-ter and to deploy Web services to it.
Setting up a Web projectBefore you can create your first Web service, you need to do some set-up workin Rational Developer to enable the Workbench capabilities for Web servicesdevelopment, and to specify where your Web service will be saved.
Rational Developer is organized into a variety of perspectives, which are justdifferent ways of looking at a development project based on your role on thedevelopment team. In this book, you’ll mainly use the Web perspective, andwithin the Web perspective, your Web services and applications will be organized into projects and folders, according to their content, such as packagefolders for Java classes. You can switch perspectives whenever you need to.Within a particular perspective, you’ll also see a variety of different editors andviews that are applicable to the work done within that perspective. Don’tworry—we’ll explain how each of these works as we go along.
CHAPTER 1: Creating your first Web service and Web application
Starting Rational Developer1. To start Rational Developer, click Start Programs IBM Rational
Rational Software Development Platform. When you start RationalDeveloper the first time, a window appears asking which directory youwant to use for your workspace (the place where Rational Developersaves your work), as shown in Figure 1.2.
2. Leave the workspace name set to the default, and if you prefer to not beasked about it each time you launch Rational Developer in future, checkthe Use this as the default and do not ask again check box.
3. Click OK. After a few seconds, the Rational Developer Welcome pageappears. On the Welcome page, you can click the various icons to see anoverview of the Rational Software Development Platform, what’s new in the current version, or to go directly to tutorials and samples to learn howto use the tool. We’ll skip the Welcome information for now, but you can always come back to it by selecting Help Welcome in theWorkbench menu.
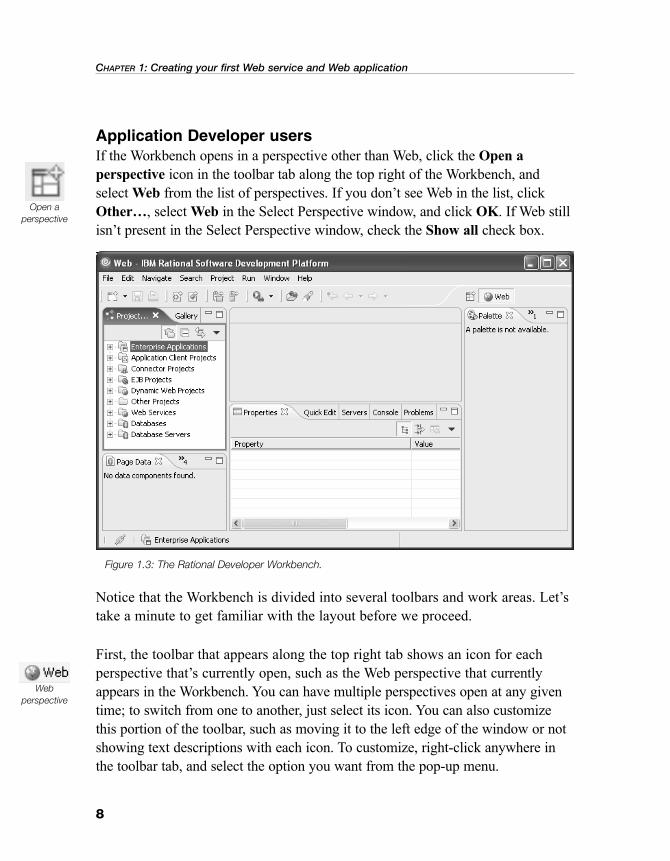
4. Click the X on the Welcome pane tab to close it. The Workbenchappears, as shown in Figure 1.3. The Workbench initially opens in theWeb perspective, which is the perspective you want for working withWeb services and Web applications.
7
Setting up a Web project
Figure 1.2: The Workspace Launcher window.
8
Application Developer users If the Workbench opens in a perspective other than Web, click the Open aperspective icon in the toolbar tab along the top right of the Workbench, andselect Web from the list of perspectives. If you don’t see Web in the list, clickOther…, select Web in the Select Perspective window, and click OK. If Web stillisn’t present in the Select Perspective window, check the Show all check box.
Notice that the Workbench is divided into several toolbars and work areas. Let’stake a minute to get familiar with the layout before we proceed.
First, the toolbar that appears along the top right tab shows an icon for eachperspective that’s currently open, such as the Web perspective that currentlyappears in the Workbench. You can have multiple perspectives open at any giventime; to switch from one to another, just select its icon. You can also customizethis portion of the toolbar, such as moving it to the left edge of the window or notshowing text descriptions with each icon. To customize, right-click anywhere inthe toolbar tab, and select the option you want from the pop-up menu.
CHAPTER 1: Creating your first Web service and Web application
Open aperspective
Web perspective
Figure 1.3: The Rational Developer Workbench.
Next, along the top of the Workbench are the pull-down menus and a toolbar forcommon actions for working within a particular perspective. The menus andtoolbar are tailored to the functions available in a given perspective and the editors that are being used, so you’ll see these items change as you switch fromone perspective to another and as you work with different editors. The toolbarcontains a subset of the actions available from the pull-down menus, and youcan customize it to add, reorganize, or remove toolbar actions to suit your preferences.
Finally, the work areas within the Workbench are also tailored to the functionsavailable in a given perspective and the editors and views being used. In theWeb perspective, you use the Project Explorer to navigate the various foldersand files in your Web projects. When you open a particular file, the editor forthat file type appears in the center of the Workbench. For example, the JavaEditor appears when you are working with Java source files, and the PageDesigner appears when you are working with Web pages. Any associated viewsare shown in the other work areas.
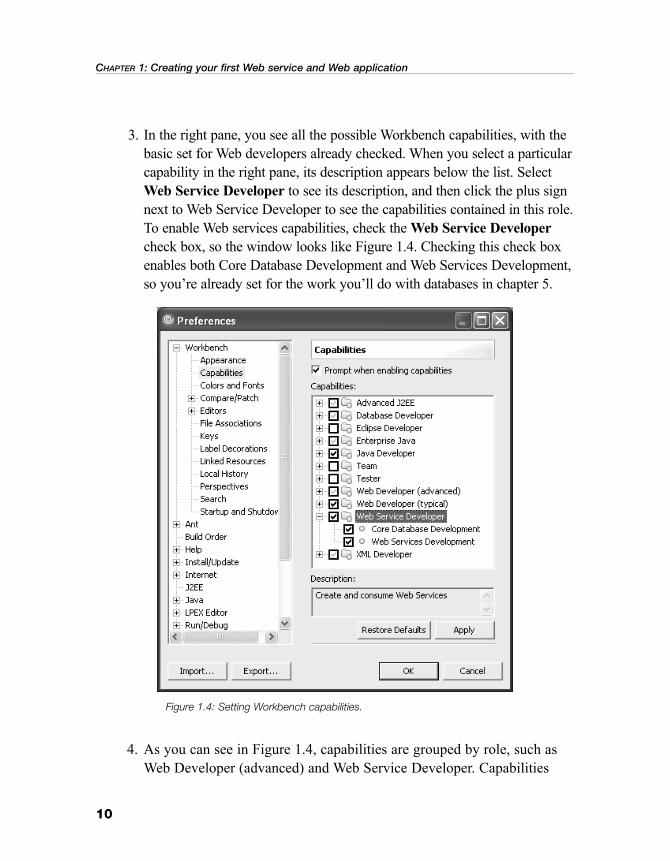
Enabling Workbench capabilitiesThe Workbench comes with the capabilities enabled that a Web developer wouldbe most likely to use, such as working with Java programs and designing Webpages. This simplifies the default options you see in wizards and pop-up menus,so your Workbench isn’t cluttered with a lot of options that you don’t typicallyuse. When you need to use more advanced functions (for example, when youwork with Web services or databases), additional capabilities are enabled automatically. You can also manually enable capabilities by setting yourWorkbench preferences, as follows:
1. Select Window Preferences in the Workbench menu.
2. In the Preferences window that appears, the list in the left pane showsthe default set of categories for which you can set preferences. Click theplus sign next to Workbench to expand the list of Workbench prefer-ences, and select Capabilities.
9
Setting up a Web project
10
3. In the right pane, you see all the possible Workbench capabilities, with thebasic set for Web developers already checked. When you select a particularcapability in the right pane, its description appears below the list. SelectWeb Service Developer to see its description, and then click the plus signnext to Web Service Developer to see the capabilities contained in this role.To enable Web services capabilities, check the Web Service Developercheck box, so the window looks like Figure 1.4. Checking this check boxenables both Core Database Development and Web Services Development,so you’re already set for the work you’ll do with databases in chapter 5.
4. As you can see in Figure 1.4, capabilities are grouped by role, such asWeb Developer (advanced) and Web Service Developer. Capabilities
CHAPTER 1: Creating your first Web service and Web application
Figure 1.4: Setting Workbench capabilities.
that apply to multiple roles, such as Web Services Development, are duplicated under the various roles. When you check the Web ServicesDevelopment check box for one role, you enable the capability for allroles. Click OK.
Tip: Once you enable the Web services capability in the Workbench,you can then set your preferences for working with Web services.Select Window Preferences again, and this time you’ll see Webservices as one of the categories for which you can set preferences.We’ll use the default preferences in this book, but you might find thatyou’ll want to customize some of the preferences when you developyour own Web services.
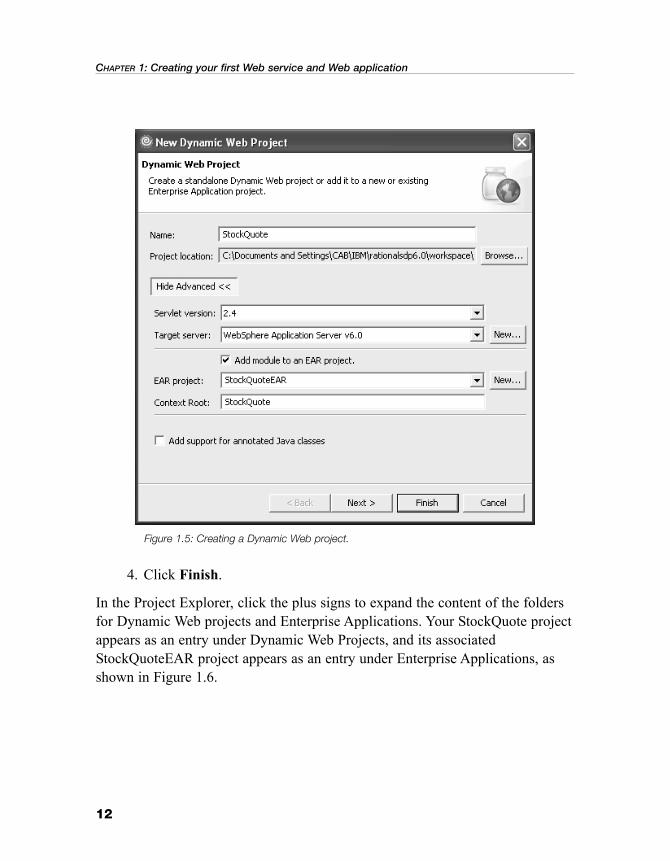
Creating the projectNext, you’ll use the Web perspective to create a new Web project that will contain your Web service. You’ll create the project as a Dynamic Web project,one that contains dynamic content, such as the Java code for your Web service.You’ll also specify an EAR project (called an Enterprise Application), which isused for deploying and testing the Web project on an application server.
1. To create the project, right-click Dynamic Web Projects in the ProjectExplorer, and select New Dynamic Web Project from the pop-up menu.
2. Enter a project name of StockQuote. Notice that the project location isset to the default for your workspace (the directory specified when youfirst started Rational Developer).
3. For your first Web project, you’ll take a closer look at some of theoptions that will be used to create it. Click Show Advanced, so the win-dow looks like Figure 1.5. For the Web projects you create in this book,you’ll take the defaults. That means your Web services and applicationswill use WebSphere Application Server v6.0 as their target server, yourWeb projects will be packaged in their own separate EAR projects, andthe context root (that is, the value used to generate URLs for Web com-ponents within the project) will use the same name as your Web project.
11
Setting up a Web project
12
4. Click Finish.
In the Project Explorer, click the plus signs to expand the content of the foldersfor Dynamic Web projects and Enterprise Applications. Your StockQuote projectappears as an entry under Dynamic Web Projects, and its associatedStockQuoteEAR project appears as an entry under Enterprise Applications, asshown in Figure 1.6.
CHAPTER 1: Creating your first Web service and Web application
Figure 1.5: Creating a Dynamic Web project.
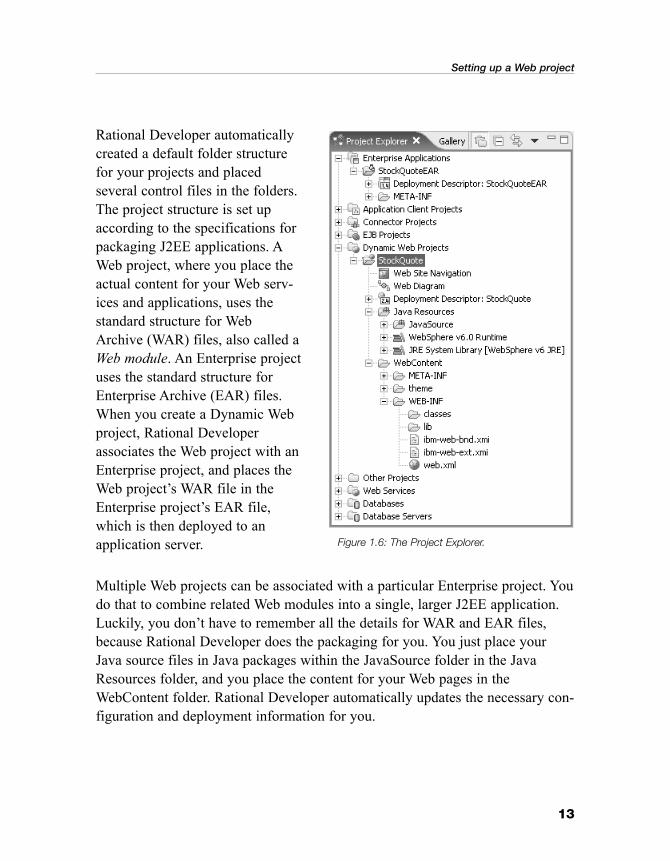
Rational Developer automaticallycreated a default folder structurefor your projects and placed several control files in the folders.The project structure is set upaccording to the specifications forpackaging J2EE applications. AWeb project, where you place theactual content for your Web serv-ices and applications, uses thestandard structure for WebArchive (WAR) files, also called aWeb module. An Enterprise projectuses the standard structure forEnterprise Archive (EAR) files.When you create a Dynamic Webproject, Rational Developer associates the Web project with anEnterprise project, and places theWeb project’s WAR file in theEnterprise project’s EAR file,which is then deployed to anapplication server.
Multiple Web projects can be associated with a particular Enterprise project. Youdo that to combine related Web modules into a single, larger J2EE application.Luckily, you don’t have to remember all the details for WAR and EAR files,because Rational Developer does the packaging for you. You just place yourJava source files in Java packages within the JavaSource folder in the JavaResources folder, and you place the content for your Web pages in theWebContent folder. Rational Developer automatically updates the necessary con-figuration and deployment information for you.
13
Setting up a Web project
Figure 1.6: The Project Explorer.
14
Creating a Web serviceFor your first Web service, you’ll use Rational Developer to turn a Java class intoa Web service. The Java class you’ll use is our version of the StockQuoteServicesample that’s supplied with Rational Developer. Our code is in the solutionsfolder on the CD included with this book. You’ll create a new Java package inyour Web project, import the Java source file into the Workbench, and then usethe Web Service wizard to turn the Java class into a Web service.
Importing the Java sourceTo create a new Java package in your Web project and import the Java sourcefile, follow these steps:
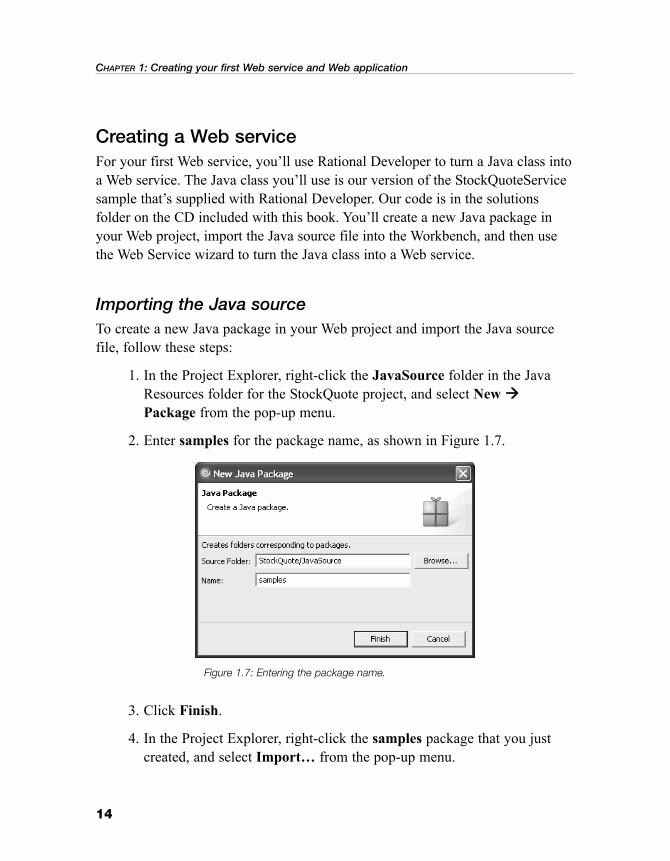
1. In the Project Explorer, right-click the JavaSource folder in the JavaResources folder for the StockQuote project, and select New Package from the pop-up menu.
2. Enter samples for the package name, as shown in Figure 1.7.
3. Click Finish.
4. In the Project Explorer, right-click the samples package that you just created, and select Import… from the pop-up menu.
CHAPTER 1: Creating your first Web service and Web application
Figure 1.7: Entering the package name.
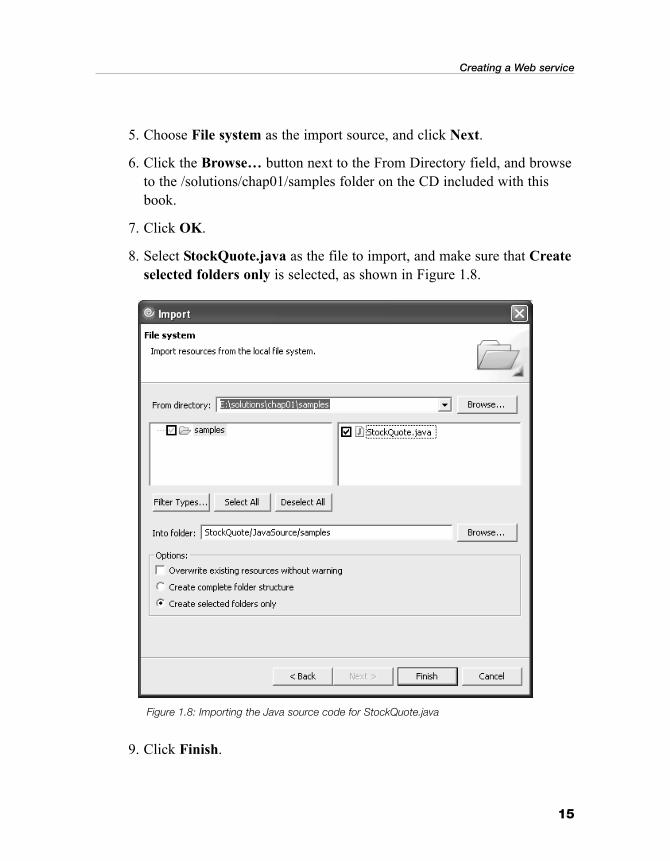
5. Choose File system as the import source, and click Next.
6. Click the Browse… button next to the From Directory field, and browseto the /solutions/chap01/samples folder on the CD included with thisbook.
7. Click OK.
8. Select StockQuote.java as the file to import, and make sure that Createselected folders only is selected, as shown in Figure 1.8.
9. Click Finish.
15
Creating a Web service
Figure 1.8: Importing the Java source code for StockQuote.java
16
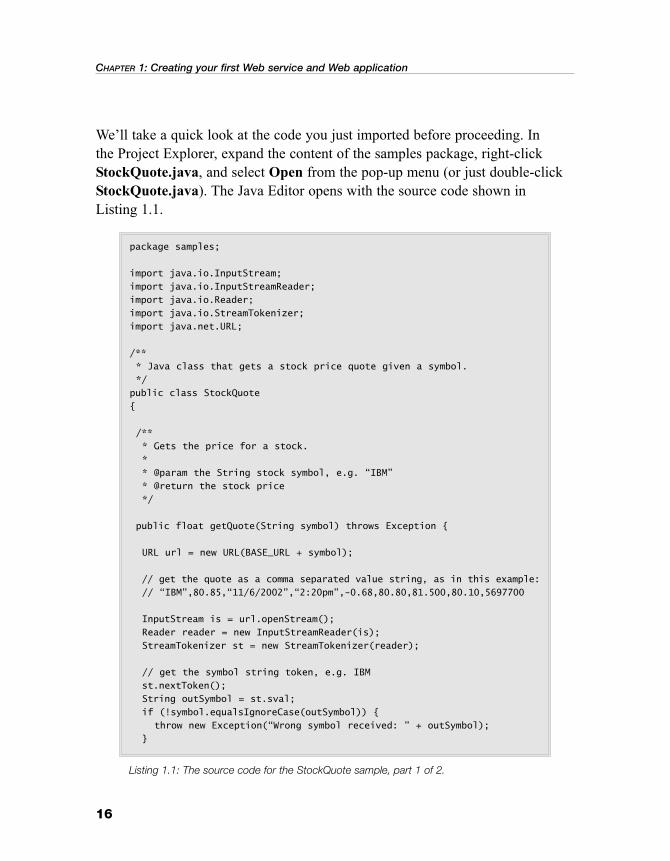
We’ll take a quick look at the code you just imported before proceeding. In the Project Explorer, expand the content of the samples package, right-clickStockQuote.java, and select Open from the pop-up menu (or just double-clickStockQuote.java). The Java Editor opens with the source code shown in Listing 1.1.
CHAPTER 1: Creating your first Web service and Web application
package samples;
import java.io.InputStream;
import java.io.InputStreamReader;
import java.io.Reader;
import java.io.StreamTokenizer;
import java.net.URL;
/**
* Java class that gets a stock price quote given a symbol.
*/
public class StockQuote
{
/**
* Gets the price for a stock.
*
* @param the String stock symbol, e.g. “IBM”
* @return the stock price
*/
public float getQuote(String symbol) throws Exception {
URL url = new URL(BASE_URL + symbol);
// get the quote as a comma separated value string, as in this example:
throw new Exception(“Wrong symbol received: ” + outSymbol);
}
Listing 1.1: The source code for the StockQuote sample, part 1 of 2.
As you can see, the StockQuote class is fairly simple. The caller passes a stocksymbol to the getQuote(String) method. This method uses the stock symbol tobuild a URL to get the price information from the finance.yahoo.comWeb site.The method then extracts the last trading price from the string returned by theWeb site, and returns that value to the caller. When you’re finished looking atthe source code, close the Java Editor.
Tip: The StockQuote sample uses the comma-separated value (CSV)interface provided by the finance.yahoo.com Web site. The format ofthe string returned by the Web site is subject to change, so if you haveproblems running the code, check help.yahoo.com/help/us/fin/quote/quote-05.html to see if the interface has changed, and update thesample accordingly.
Using the Web Service wizardNext, you’ll use the Web Service wizard to turn the StockQuote class into a Webservice. As part of the wizard’s processing, it deploys the Web service to yourWebSphere Test Environment, so you’ll start the server before running the wizard. If you forget to start the server before running the wizard, that’s OK,because the wizard will start the server for you—we just like to do things in anorderly process to keep track of when the server’s started, so that we rememberto stop it when we’re done.
17
Creating a Web service
// skip the comma token and get the price number token, e.g. 80.85
Listing 1.1: The source code for the StockQuote sample, part 2 of 2.
18
1. Click the Servers tab in the Workbench, and select WebSphereApplication Server v6.0. This server is the WebSphere TestEnvironment that you’ll use to run your Web services and applications.
2. Right-click WebSphere Application Server v6.0, and select Start fromthe pop-up menu. After a few moments, you’ll see the server’s statuschange to “Starting” and then “Started.”
Tip: To see the server’s message log, click the Console tab. This showsall the detailed start-up messages, as well as runtime messages whenyour Web service and applications are deployed to the server and run.The log file itself is called SystemOut.log, and you’ll find it in the runtimes/base_v6/profiles/default/logs/server1 folder under thefolder where you installed Rational Developer (for example,C:/Rational60).
3. To create your Web service, right-click StockQuote.java in the ProjectExplorer, and select Web Services Create Web service from the pop-up menu.
4. The Web service’s Options window appears. Make sure the Web servicetype is set to Java bean Web Service, the Start Web service in Webproject check box is checked, and the Create folders when necessarycheck box is checked, as shown in Figure 1.9. (These should all be thedefault settings, unless you’ve changed your preferences.)
Note: The Web Service wizard has many options to control how a Webservice is created, to test and publish the Web service, and to generateand test the client proxy that applications call when they want to use theservice. You’ll see many of the other options later in this book. For now,you’re just creating the Web service using Rational Developer’sdefaults. That means your Web service will be set up to run in theWebSphere Application Server v6.0 runtime environment, which is thedefault runtime environment for Rational Developer.
CHAPTER 1: Creating your first Web service and Web application
5. Click Finish.
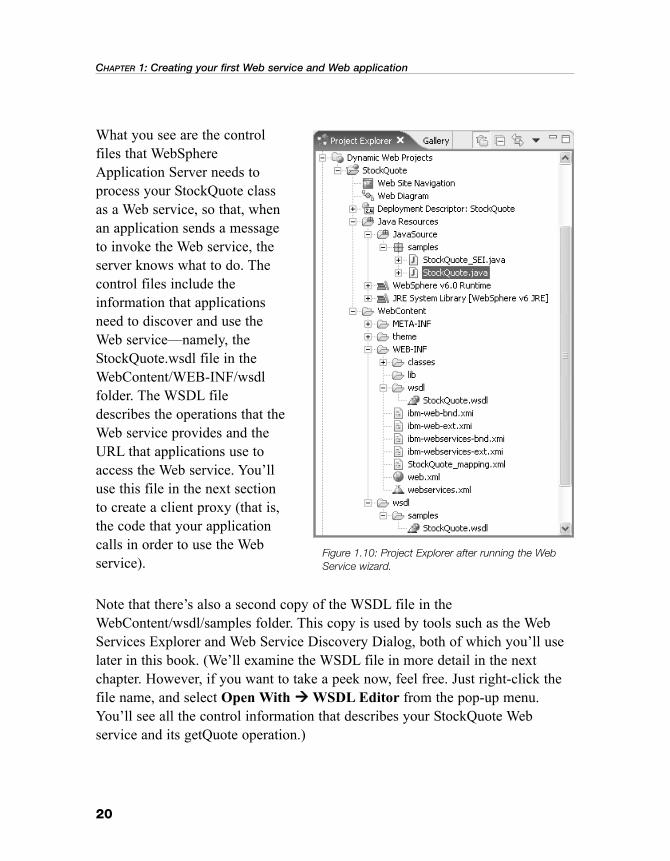
After a few seconds the wizard completes. Let’s take a closer look at what it justdid for you. First, notice that several new files and folders have been added tothe StockQuote project, as shown in Figure 1.10.
19
Creating a Web service
Figure 1.9: The Web service’s Options window.
20
What you see are the controlfiles that WebSphereApplication Server needs toprocess your StockQuote classas a Web service, so that, whenan application sends a messageto invoke the Web service, theserver knows what to do. Thecontrol files include the information that applicationsneed to discover and use theWeb service—namely, theStockQuote.wsdl file in theWebContent/WEB-INF/wsdlfolder. The WSDL filedescribes the operations that theWeb service provides and theURL that applications use toaccess the Web service. You’lluse this file in the next sectionto create a client proxy (that is,the code that your applicationcalls in order to use the Webservice).
Note that there’s also a second copy of the WSDL file in theWebContent/wsdl/samples folder. This copy is used by tools such as the WebServices Explorer and Web Service Discovery Dialog, both of which you’ll uselater in this book. (We’ll examine the WSDL file in more detail in the next chapter. However, if you want to take a peek now, feel free. Just right-click thefile name, and select Open With WSDL Editor from the pop-up menu.You’ll see all the control information that describes your StockQuote Web service and its getQuote operation.)
CHAPTER 1: Creating your first Web service and Web application
Figure 1.10: Project Explorer after running the WebService wizard.
In addition to creating all the necessary control files, the wizard also deployedyour Web service to the WebSphere Test Environment. To see that, either click the Console tab or browse the messages in the server’s SystemOut.log file. That file is in the runtimes/base_v6/profiles/default/logs/server1 folderunder the folder where you installed Rational Developer (for example,C:/Rational60).
Your Web service is now ready to use. In the next section, you’ll change rolesfrom being a Web service developer, to being a Web application developer. Inthat role, you’ll create a Web application to test your Web service.
Creating a Web applicationThe Web application you’ll create to test your Web service is a JavaServer Page(JSP). It contains an HTML table with your favorite stock symbols and their lasttrading prices. You’ll create the application in a new Web project using RationalDeveloper’s Page Designer and the Web Service wizard. Then, you’ll run theJSP in the WebSphere Test Environment (the same server where your Web serv-ice is currently deployed).
21
Creating a Web application
What’s a JSP?
A JavaServer Page (JSP) is a dynamic Web page that contains a combination of static HTML ele-ments and Java code. A JSP file is saved as a standard text file with a .jsp extension. A JSP is com-piled and run on an application server when a user requests the page from a Web browser, and theresulting output is returned to the user.
Some of the elements you’ll commonly see in JSP files are beans, scriptlets, and expressions.Beans are instances of Java classes that you reference within the JSP. Scriptlets are Java codeexecuted at the point they appear in the JSP file. Expressions are Java functions that return stringvalues, which are inserted into the resulting Web page at the point they appear in the JSP file.
22
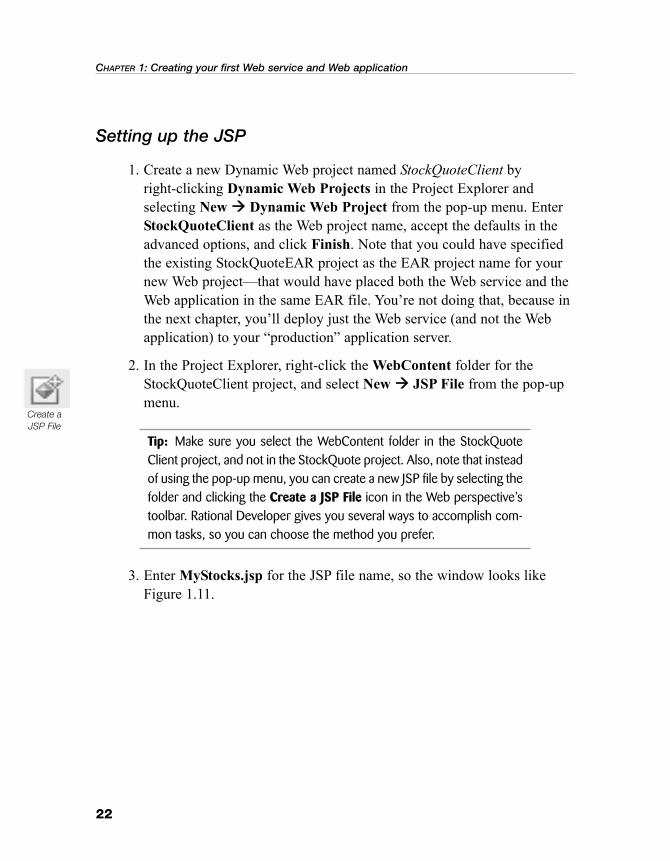
Setting up the JSP
1. Create a new Dynamic Web project named StockQuoteClient by right-clicking Dynamic Web Projects in the Project Explorer and selecting New Dynamic Web Project from the pop-up menu. EnterStockQuoteClient as the Web project name, accept the defaults in theadvanced options, and click Finish. Note that you could have specifiedthe existing StockQuoteEAR project as the EAR project name for yournew Web project—that would have placed both the Web service and theWeb application in the same EAR file. You’re not doing that, because inthe next chapter, you’ll deploy just the Web service (and not the Webapplication) to your “production” application server.
2. In the Project Explorer, right-click the WebContent folder for theStockQuoteClient project, and select New JSP File from the pop-upmenu.
Tip: Make sure you select the WebContent folder in the StockQuoteClient project, and not in the StockQuote project. Also, note that insteadof using the pop-up menu, you can create a new JSP file by selecting thefolder and clicking the Create a JSP File icon in the Web perspective’stoolbar. Rational Developer gives you several ways to accomplish com-mon tasks, so you can choose the method you prefer.
3. Enter MyStocks.jsp for the JSP file name, so the window looks likeFigure 1.11.
CHAPTER 1: Creating your first Web service and Web application
Create aJSP File
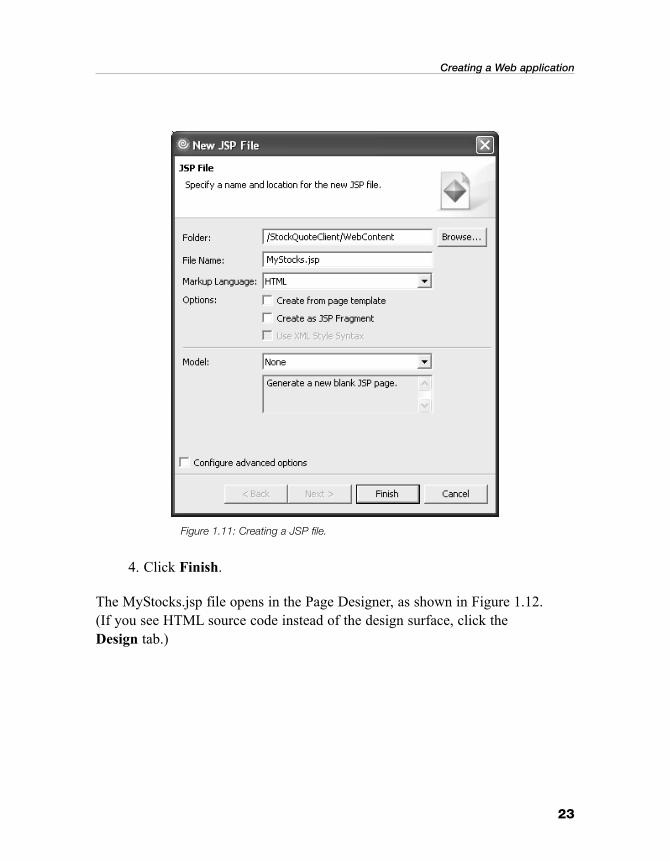
4. Click Finish.
The MyStocks.jsp file opens in the Page Designer, as shown in Figure 1.12. (If you see HTML source code instead of the design surface, click the Design tab.)
23
Creating a Web application
Figure 1.11: Creating a JSP file.
24
Tip: To see the HTML and JSP source for your Web page, click theSource tab in the Page Designer. To see a preview of what the HTMLelements in your Web page will look like in a Web browser, click thePreview tab. The Preview tab won’t show you what the final JSP elements will look like, however, because it’s not actually running in areal application server.
Using the Page DesignerYou use the Page Designer much like any other graphical editor. To add orchange text in the Web page, just type on the design surface. To change theattributes for a particular text string, select the text on the design surface, andthen set the value you want in the Properties view. The Properties view appearsat the bottom of the Workbench, and its layout changes based on the elementthat’s currently selected on the design surface.
To add more complex elements to the Web page, such as tables, images, forms,or JSP logic, select the element you want in the Palette (Figure 1.13), drop it on
CHAPTER 1: Creating your first Web service and Web application
Figure 1.12: A new JSP file in the Page Designer.
the design surface, and set its attributes in the Properties view. The Palette contains all the commonly used elements for Web pages, organized into relatedgroups called drawers. You click the name of a drawer to open it.
Tip: The Properties view should already appear inthe Workbench (click the Properties tab to see it),and the Palette should automatically appear in theWorkbench when you open a file with the PageDesigner. To see a view that isn’t already open, useWindow Show View.
Now, you’ll use the Page Designer to create the staticcontent for your Web application:
1. Select Place content here. on the design surface, and change the text to My Stock List.
2. In the Properties view, select Heading 1 as theParagraph value for the text.
3. Click HTML Tags in the Palette to open thedrawer for HTML elements.
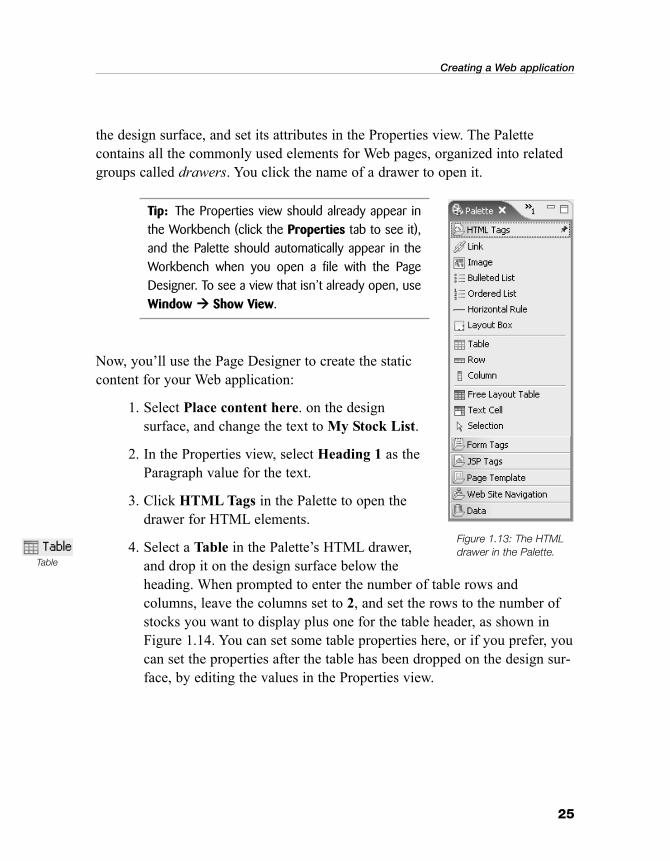
4. Select a Table in the Palette’s HTML drawer,and drop it on the design surface below theheading. When prompted to enter the number of table rows andcolumns, leave the columns set to 2, and set the rows to the number ofstocks you want to display plus one for the table header, as shown inFigure 1.14. You can set some table properties here, or if you prefer, youcan set the properties after the table has been dropped on the design sur-face, by editing the values in the Properties view.
25
Creating a Web application
Figure 1.13: The HTMLdrawer in the Palette.
Table
26
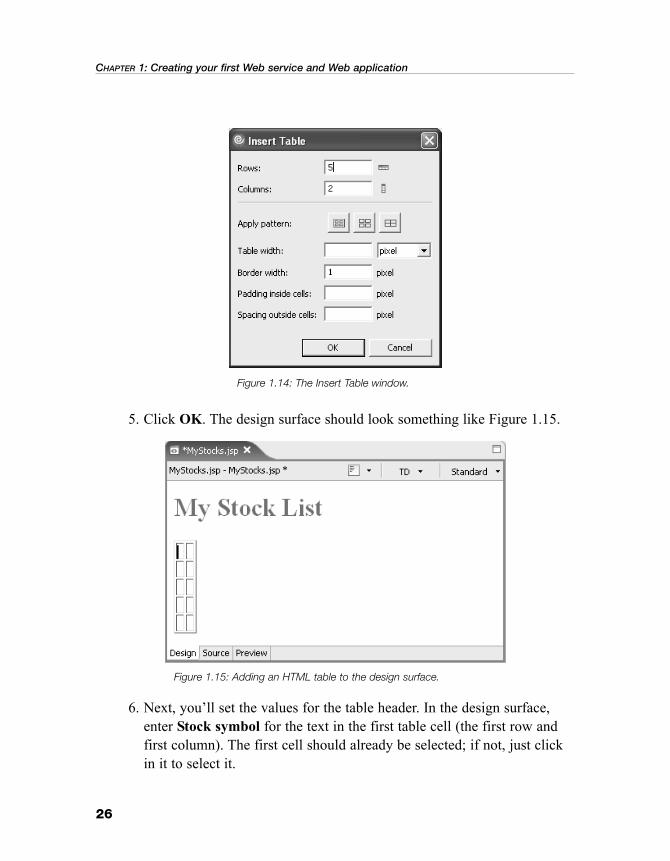
5. Click OK. The design surface should look something like Figure 1.15.
6. Next, you’ll set the values for the table header. In the design surface,enter Stock symbol for the text in the first table cell (the first row andfirst column). The first cell should already be selected; if not, just clickin it to select it.
CHAPTER 1: Creating your first Web service and Web application
Figure 1.14: The Insert Table window.
Figure 1.15: Adding an HTML table to the design surface.
7. In the Properties view, select Header as the cell type.
8. Select the next cell in the design surface (the first row and second column). Enter Price for the text in this cell, and in the Properties view,select Header as the cell type.
9. Enter text values for the stock symbols you want to include in the table,so the design surface looks something like Figure 1.16.
The static content for your Web application is now complete.
Creating a client proxy for the Web serviceIn this section, you’ll use the Web Service wizard to create a client proxy foryour StockQuote Web service, that is, the code that a Web application uses tocall the Web service. To create the client proxy for your Web service, you couldbrowse to the WSDL file in your StockQuote project and launch the WebService wizard from the file in that project, but we’ll show you a more convenient way to access the Web services in your Workbench.
1. Scroll down in the Project Explorer until you see the Web Servicesfolder, and expand the content of the folder. Notice that the folder
27
Creating a Web application
Figure 1.16: Setting the static text for the HTML table.
28
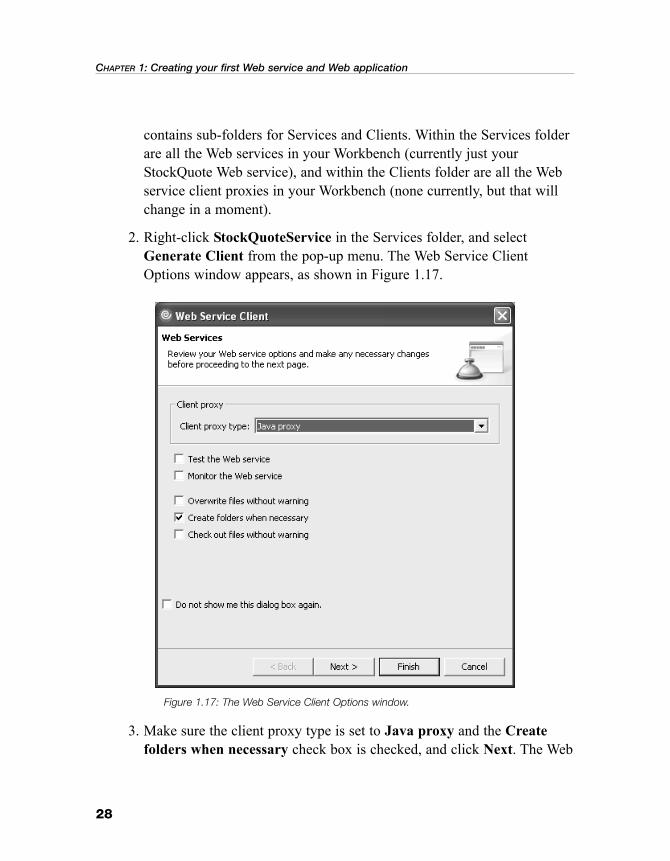
contains sub-folders for Services and Clients. Within the Services folderare all the Web services in your Workbench (currently just yourStockQuote Web service), and within the Clients folder are all the Webservice client proxies in your Workbench (none currently, but that willchange in a moment).
2. Right-click StockQuoteService in the Services folder, and selectGenerate Client from the pop-up menu. The Web Service ClientOptions window appears, as shown in Figure 1.17.
3. Make sure the client proxy type is set to Java proxy and the Createfolders when necessary check box is checked, and click Next. The Web
CHAPTER 1: Creating your first Web service and Web application
Figure 1.17: The Web Service Client Options window.
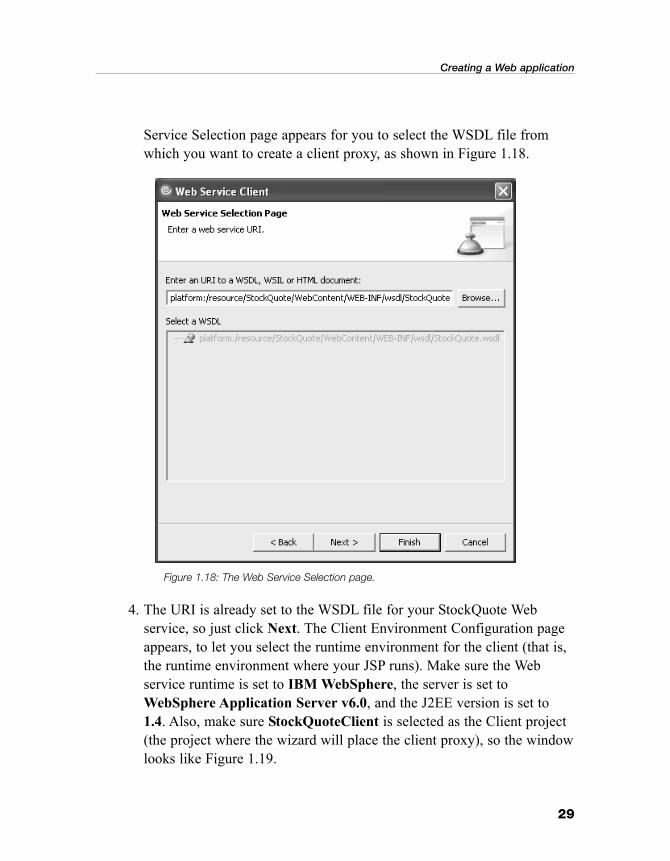
Service Selection page appears for you to select the WSDL file fromwhich you want to create a client proxy, as shown in Figure 1.18.
4. The URI is already set to the WSDL file for your StockQuote Web service, so just click Next. The Client Environment Configuration pageappears, to let you select the runtime environment for the client (that is,the runtime environment where your JSP runs). Make sure the Web service runtime is set to IBM WebSphere, the server is set toWebSphere Application Server v6.0, and the J2EE version is set to1.4. Also, make sure StockQuoteClient is selected as the Client project(the project where the wizard will place the client proxy), so the windowlooks like Figure 1.19.
29
Creating a Web application
Figure 1.18: The Web Service Selection page.
30
5. Click Finish.
6. When prompted to enable overwriting for the web.xml file, click Yes.This lets the wizard add the necessary control information for packagingyour Web application. That’s it—your client proxy has been created.
Note: We’ll skip this last step for the rest of the client proxies that youcreate in this book, by having you check the Overwrite files withoutwarning check box on the first page of the wizard. For this first clientproxy, we wanted you to see all the steps that take place.
CHAPTER 1: Creating your first Web service and Web application
Figure 1.19: The Client Environment Configuration page.
Before proceeding, let’s take a closer look at what the wizard just did for you.Expand the contents of the JavaSource folder in the StockQuoteClient project’sJava Resources folder. You’ll see that it now contains a “samples” package withsix Java source files. These files are the client proxy code that the wizard generated for you from the WSDL file using the default client runtime, that is,the WebSphere Application Server v6.0 runtime environment. If you had chosen a different client runtime, the generated code would look somewhat different, but the concept would still be the same—these are the classes that your application uses to access the Web service.
The client proxy code is very simple to use. First, you create an instance of theproxy class that represents your Web service—that’s StockQuoteProxy for yourStockQuote Web service. Then, you call the proxy’s getQuote(String) method,passing the stock symbol whose trading price you want. That’s it. The proxyclasses do all the work to locate your Web service, send the request message,and return the response (the stock price) to you.
Using the client proxy in the Web applicationLet’s go back to the Page Designer to add the JSP logic that uses the clientproxy to get the stock prices. Click anywhere on the design surface to return thefocus to the Page Designer, and then follow these steps:
1. Click JSP Tags in the Palette to open the drawer for JSP elements.
2. You need an instance of the StockQuoteProxy class (or bean). Select aBean in the Palette, and drop it on the design surface somewhere beforethe table. (Don’t worry if it doesn’t land on the right spot—you can move it later.)
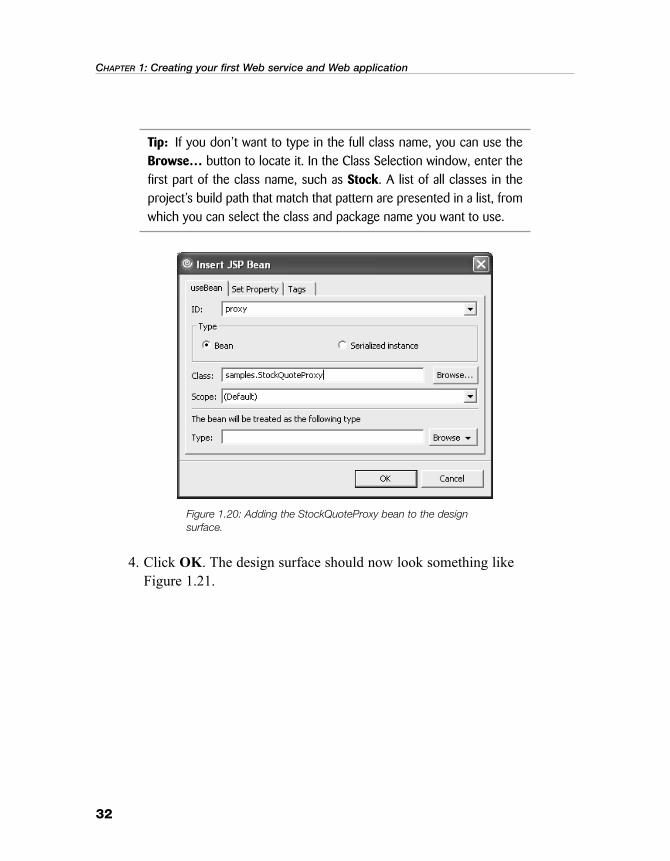
3. In the Insert JSP Bean window that appears, enter proxy for the ID.(This is the name you’ll use to reference the bean.) Entersamples.StockQuoteProxy for the Class name, so the window lookslike Figure 1.20.
31
Creating a Web application
Bean
32
Tip: If you don’t want to type in the full class name, you can use theBrowse… button to locate it. In the Class Selection window, enter thefirst part of the class name, such as Stock. A list of all classes in the project’s build path that match that pattern are presented in a list, fromwhich you can select the class and package name you want to use.
4. Click OK. The design surface should now look something like Figure 1.21.
CHAPTER 1: Creating your first Web service and Web application
Figure 1.20: Adding the StockQuoteProxy bean to the design surface.
Now that you have an instance of the StockQuoteProxy bean, you’ll add Javacode to call the proxy’s getQuote(String) method, which gets the price for eachstock symbol and inserts the resulting values into your Web page.
Tip: If the bean landed somewhere else, such as within the table, usethe mouse to move it. You’ll be referencing this bean within the tablerows to get the stock prices, and the bean instance needs to be createdbefore it can be used.
5. Select an Expression in the Palette, and drop it on the design surface inthe table cell for the first stock price. In the Properties view, enterString.valueOf(proxy.getQuote(“symbol”)) for the expression value,where symbol is the stock symbol, such as String.valueOf(proxy.getQuote(“CSCO”)) for the stock shown in the first row of our example.This code calls the client proxy to get the last trading price for the stocksymbol specified, and then converts the float value returned by theproxy to a String value.
33
Creating a Web application
Figure 1.21: The StockQuoteProxy bean added to the design surface.
Expression
34
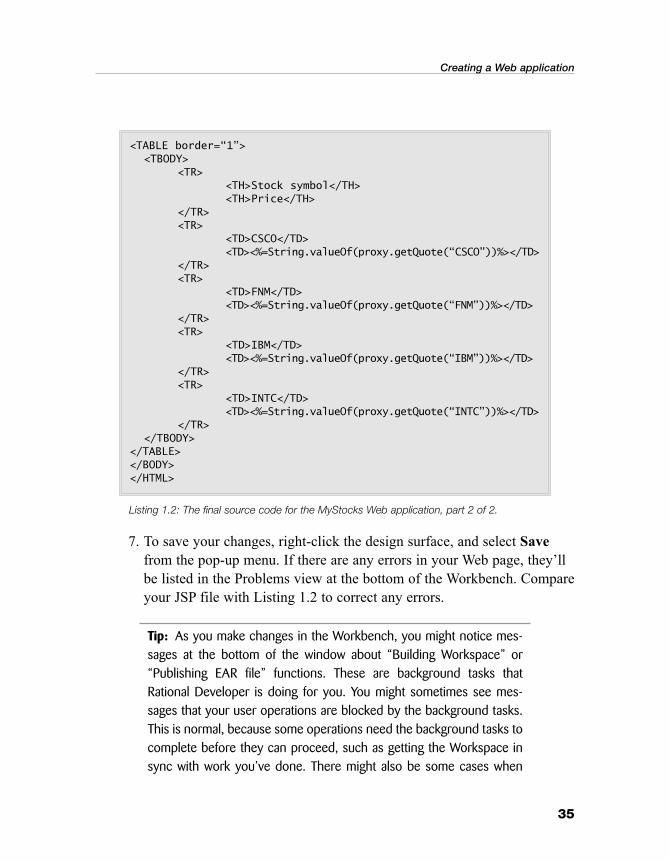
6. Repeat the previous step for each stock symbol in the table. Your designsurface should now look something like Figure 1.22, and the Web pagesource should look like Listing 1.2.
CHAPTER 1: Creating your first Web service and Web application
Figure 1.22: The design surface with all elements added.
<!DOCTYPE HTML PUBLIC “-//W3C//DTD HTML 4.01 Transitional//EN”>
Listing 1.2: The final source code for the MyStocks Web application, part 1 of 2.
7. To save your changes, right-click the design surface, and select Savefrom the pop-up menu. If there are any errors in your Web page, they’llbe listed in the Problems view at the bottom of the Workbench. Compareyour JSP file with Listing 1.2 to correct any errors.
Tip: As you make changes in the Workbench, you might notice mes-sages at the bottom of the window about “Building Workspace” or“Publishing EAR file” functions. These are background tasks thatRational Developer is doing for you. You might sometimes see mes-sages that your user operations are blocked by the background tasks.This is normal, because some operations need the background tasks tocomplete before they can proceed, such as getting the Workspace insync with work you’ve done. There might also be some cases when
Listing 1.2: The final source code for the MyStocks Web application, part 2 of 2.
36
your operation might not be blocked, but you’ll still want to wait for thebackground task to complete, such as waiting for an EAR file to be published before running the Web application or Web service that’scontained in it.
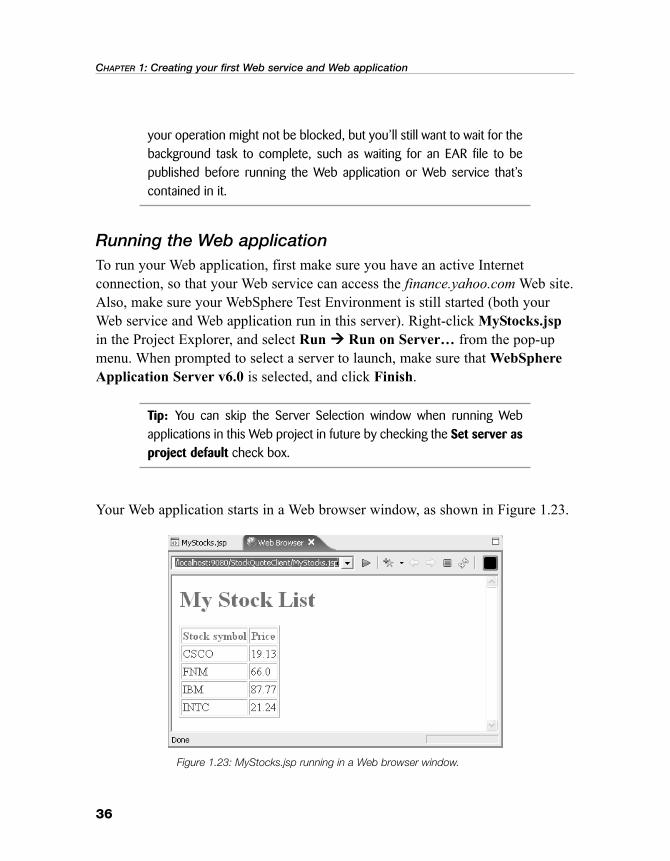
Running the Web applicationTo run your Web application, first make sure you have an active Internet connection, so that your Web service can access the finance.yahoo.comWeb site.Also, make sure your WebSphere Test Environment is still started (both yourWeb service and Web application run in this server). Right-click MyStocks.jspin the Project Explorer, and select Run Run on Server… from the pop-upmenu. When prompted to select a server to launch, make sure that WebSphereApplication Server v6.0 is selected, and click Finish.
Tip: You can skip the Server Selection window when running Webapplications in this Web project in future by checking the Set server asproject default check box.
Your Web application starts in a Web browser window, as shown in Figure 1.23.
CHAPTER 1: Creating your first Web service and Web application
Figure 1.23: MyStocks.jsp running in a Web browser window.
Notice that Rational Developer uses the standard URL format for your Web page,which is http://host:port/context-root/alias. The URL prefix, http://localhost:9080,directs the Web browser to your WebSphere Application Server that’s listening onport 9080 for HTTP requests. The context root is the value you specified when youcreated the Web project (StockQuoteClient, the same name as the Web project).Since you created the JSP file in the WebContent folder, the alias portion of theURL is just the name of your JSP file (MyStocks.jsp).
Tip: If you’re running within an intranet that uses a firewall to accessthe Internet, you might need to specify a proxy server in your Work-bench preferences in order to access the finance.yahoo.com Web site.To specify a proxy server, select Window Preferences, and thenselect Internet – Proxy Settings in the list of Preferences. Check theEnable proxy check box and enter the proxy host name and port (thesame values you’d specify in a Web browser to access the Internet). Ifthe proxy is a SOCKS server, check the Use SOCKS check box. If necessary, also enter authentication values for the proxy.
Importing the solution filesIf you ran into any problems following the instructions in this chapter, importthe solution files in the /solutions/chap01 subdirectory on the CD included withthis book. There are two solution files, one for the Web service and another forthe Web application. Follow these steps to import them:
1. Right-click Enterprise Applications in the Project Explorer, and selectImport… EAR file from the pop-up menu to import the solution filefor the Web service.
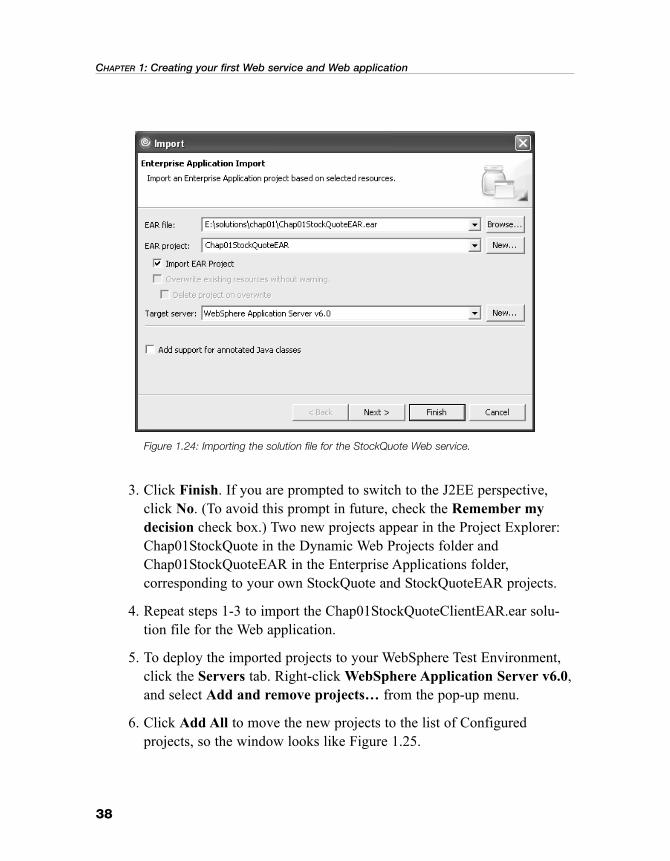
2. Click the Browse… button, and browse to the /solutions/chap01 folderon the CD. Select Chap01StockQuoteEAR.ear, and click Open, so theImport window looks like Figure 1.24. (The project name will be automatically filled in.)
37
Creating a Web application
38
3. Click Finish. If you are prompted to switch to the J2EE perspective,click No. (To avoid this prompt in future, check the Remember my decision check box.) Two new projects appear in the Project Explorer:Chap01StockQuote in the Dynamic Web Projects folder andChap01StockQuoteEAR in the Enterprise Applications folder, corresponding to your own StockQuote and StockQuoteEAR projects.
4. Repeat steps 1-3 to import the Chap01StockQuoteClientEAR.ear solu-tion file for the Web application.
5. To deploy the imported projects to your WebSphere Test Environment,click the Servers tab. Right-click WebSphere Application Server v6.0,and select Add and remove projects… from the pop-up menu.
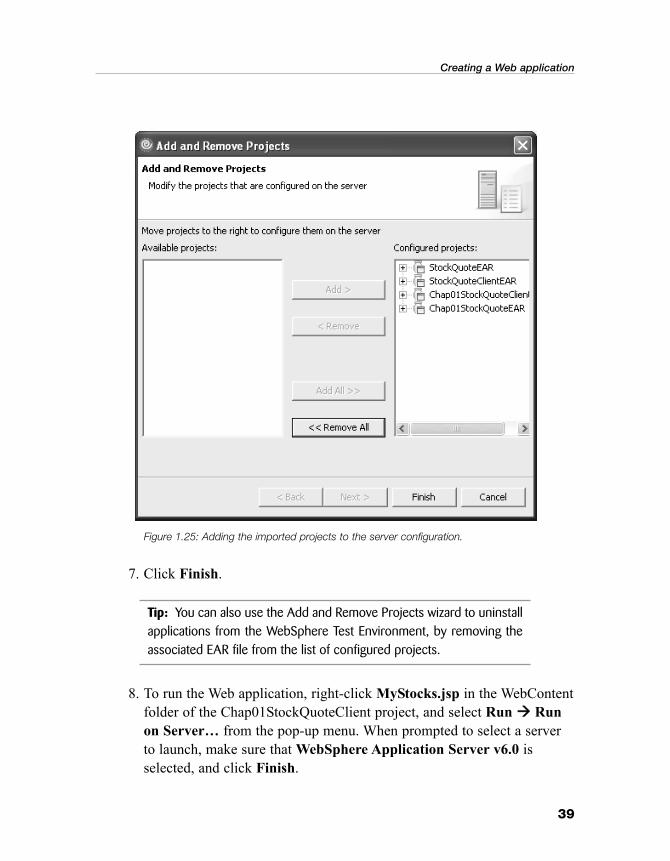
6. Click Add All to move the new projects to the list of Configured projects, so the window looks like Figure 1.25.
CHAPTER 1: Creating your first Web service and Web application
Figure 1.24: Importing the solution file for the StockQuote Web service.
7. Click Finish.
Tip: You can also use the Add and Remove Projects wizard to uninstallapplications from the WebSphere Test Environment, by removing theassociated EAR file from the list of configured projects.
8. To run the Web application, right-click MyStocks.jsp in the WebContentfolder of the Chap01StockQuoteClient project, and select Run Runon Server… from the pop-up menu. When prompted to select a serverto launch, make sure that WebSphere Application Server v6.0 isselected, and click Finish.
39
Creating a Web application
Figure 1.25: Adding the imported projects to the server configuration.
40
Stopping the WebSphere Test EnvironmentThe WebSphere Test Environment doesn’t automatically stop when you exitRational Developer, so to free up resources on your computer, you should try to remember to stop the server when you no longer need it for testing. Followthese steps:
1. Click the Servers tab.
2. Right-click WebSphere Application Server v6.0 in the Servers view,and select Stop from the pop-up menu.
3. If prompted with a message saying that the server is not responding,click OK to terminate the server. The server’s status changes from“Started” to “Stopped.”
In reviewIn this chapter, you learned some of the basic terminology and concepts relatedto Web services. You used Rational Developer to create a simple Web serviceand a Web application that uses the Web service, and then you ran the Web service and application with the WebSphere Application Server (RationalDeveloper’s built-in Test Environment). In the next chapter, you’ll create anotherWebSphere Application Server to act as your production server, deploy yourWeb service to the new server, and then publish it to make it available for otherprogrammers to discover and use.


![Index [editorial.mcpressonline.com]editorial.mcpressonline.com/web/mcpdf.nsf/wdocs/... · Application developer. See IBM Certified Application Developer, DB2 9.7 Application period,](https://static.documents.pub/doc/80x56/5f2f0e5689757c440a5600a3/index-application-developer-see-ibm-certified-application-developer-db2-97.jpg)

![Index [editorial.mcpressonline.com]editorial.mcpressonline.com/web/mcpdf.nsf/wdocs/5127/$FILE/5127_IND.pdf · index access and, 756–758, 757, 819–824 INDEXONLY and, 758 limited](https://static.documents.pub/doc/80x56/5ebb509105077b7cba49df01/index-file5127indpdf-index-access-and-756a758-757-819a824-indexonly.jpg)

![Index [editorial.mcpressonline.com]editorial.mcpressonline.com/web/mcpdf.nsf/wdocs/5140/$FILE/5140… · DB2 Database Manager configuration file and, 65 encryption and, 67 Generic](https://static.documents.pub/doc/80x56/5f075fca7e708231d41caa9a/index-file5140-db2-database-manager-configuration-file-and-65-encryption.jpg)

![INDEX [editorial.mcpressonline.com]editorial.mcpressonline.com/web/mcpdf.nsf/wdocs/5103/$FILE/5103_IND.pdf · authority, continued Change Object owner (CHGOBJOWN) command in, 241](https://static.documents.pub/doc/80x56/5e11df19e6f95849712cac6f/index-file5103indpdf-authority-continued-change-object-owner-chgobjown.jpg)


![Index [editorial.mcpressonline.com]editorial.mcpressonline.com/web/mcpdf.nsf/wdocs/5227/$FILE/5227_IND.pdf30, 38, 162, 393, 414-428 authoring portlet for, 417, 418, 419-427 authoring](https://static.documents.pub/doc/80x56/5ed9ded09a5976737b688214/index-file5227indpdf-30-38-162-393-414-428-authoring-portlet-for-417.jpg)

![Index [editorial.mcpressonline.com]editorial.mcpressonline.com/web/mcpdf.nsf/wdocs/5089/$FILE/5089_IND.pdf · Index A ABEND command, 69t ABEXP, 60t ABIND, 60t access control, 16,](https://static.documents.pub/doc/80x56/5ebb509105077b7cba49df02/index-file5089indpdf-index-a-abend-command-69t-abexp-60t-abind-60t-access.jpg)

