Understanding Illustrator’s Desktop N ot too long ago, commercial artists and illustrators worked by hand, not on computers. You might find it hard to believe, but they spent hours and hours with T-squares, rulers, French curves, and type galleys from their local typesetters. Now, of course, most artists and artist wannabes spend hours and hours with their computers, mouses (or should that be mice?), digitizing tablets, monitors, and onscreen type that they set themselves. Some traditional artists are still out there, but more and more make the transition to the digital world every day. After the complete of that transition, computer artists usually come face-to-face with Illustrator, the industry-standard, graphics-creation software for both print and the Web. The following is a typical example of how people get to know Illustrator. Picasso Meets Illustrator: Getting Started Illustrator arrives and the enthusiastic artist-to-be — we’ll call him Picasso — opens the box, pops in the CD-ROM, and installs the product, while glancing at the quick reference card and thumbing through the manual. A few minutes later Picasso launches Illustrator and is faced with a clean, brand- new, empty document. A world of possibilities awaits, only a few mouse clicks away. But Picasso is a little intimidated by 1 1 CHAPTER ✦ ✦ ✦ ✦ In This Chapter Getting Illustrator started Shortcut keys Working with Illustrator’s Interface Moving around in Illustrator Outline versus Preview Mode Understanding the Edit functions ✦ ✦ ✦ ✦ 03 53906X Ch01.qxd 10/3/03 9:04 AM Page 3
Transcript
UnderstandingIllustrator’sDesktop
Not too long ago, commercial artists and illustratorsworked by hand, not on computers. You might find
it hard to believe, but they spent hours and hours with T-squares, rulers, French curves, and type galleys fromtheir local typesetters.
Now, of course, most artists and artist wannabes spend hoursand hours with their computers, mouses (or should that bemice?), digitizing tablets, monitors, and onscreen type thatthey set themselves. Some traditional artists are still outthere, but more and more make the transition to the digitalworld every day.
After the complete of that transition, computer artists usuallycome face-to-face with Illustrator, the industry-standard,graphics-creation software for both print and the Web. Thefollowing is a typical example of how people get to knowIllustrator.
Picasso Meets Illustrator:Getting Started
Illustrator arrives and the enthusiastic artist-to-be — we’llcall him Picasso — opens the box, pops in the CD-ROM, andinstalls the product, while glancing at the quick referencecard and thumbing through the manual. A few minutes laterPicasso launches Illustrator and is faced with a clean, brand-new, empty document. A world of possibilities awaits, onlya few mouse clicks away. But Picasso is a little intimidated by
11C H A P T E R
✦ ✦ ✦ ✦
In This Chapter
Getting Illustratorstarted
Shortcut keys
Working withIllustrator’s Interface
Moving around inIllustrator
Outline versusPreview Mode
Understanding theEdit functions
✦ ✦ ✦ ✦
03 53906X Ch01.qxd 10/3/03 9:04 AM Page 3
4 Part I ✦ Illustrator Basics
all that white space, just as many budding young writers wince at a new word pro-cessing document with the lone insertion point blinking away.
So, Picasso decides he’ll “play” with the software before designing anything “forreal.” He chooses the rectangle tool first, clicks, drags, and voilà! A rectangleappears on the screen! His confidence soars. He may try the other shape tools next,but sooner or later Picasso starts playing with some of the software’s other fea-tures. Eventually, he eyes the dreaded Pen tool. And thus starts his downward spi-ral into terror.
Confusion ensues. Hours of staring at an Illustrator document and wondering“Why?” take up the majority of his time. Picasso doesn’t really understand fills andstrokes, he doesn’t understand stacking order and layers, and he certainly doesn’tunderstand Bézier curves.
Even Picasso’s painting-factory boss can’t help him much with Illustrator; questionsresult in a knowing nod and the customary tilt and swivel of his head toward theIllustrator manual. Picasso goes through the tutorial three times, but whenever hestrays one iota from the set-in-stone printed steps, nothing works. Picasso becomesconvinced that the Pen tool is Satan’s pitchfork in disguise. Patterns make about asmuch sense as differential equations. Then he encounters things such as effectsthat can be edited later (huh?), miter limits for strokes (yeah, right), and the differ-ence between targeting a group or all the objects in that group (huh? again). All aresubjects that might as well have been written about in a third-century Chinesedialect, such as the hard-to-find Chinese Book of Patterns.
Picasso had never used or seen software as different as Illustrator.
Ah, but you have an advantage over Picasso. You have this book. The following sec-tions in this chapter take you through the interface and common editing commandsthat help you construct better illustrations. The other areas focused on will be thebasic Illustrator functions, from setting up a new document to understandingexactly what paths are and how Illustrator uses them.
Getting started with IllustratorThe first step in getting started is to install the software, which is slightly differentdepending on whether you’re using a Macintosh or a Windows computer. Once thesoftware is installed, you can launch Illustrator in one of the following ways:
✦ Double-click Illustrator’s application icon.
✦ Double-click an Illustrator document, which automatically launchesIllustrator.
✦ In Windows, choose Start ➪ Programs ➪ Adobe Illustrator. In Macintosh,select the Illustrator icon from the Dock.
03 53906X Ch01.qxd 10/3/03 9:04 AM Page 4
5Chapter 1 ✦ Understanding Illustrator’s Desktop
Quitting IllustratorHaving learned how to open the program, it’s time to learn how to close it. You canend your Illustrator session at any time by choosing File ➪ Quit (or Exit). Thisaction closes the current document, and exits the application. If you have not previ-ously saved your document, Illustrator prompts you to do so before exiting theapplication. You can also close Illustrator as follows:
✦ Mac OSX: Click and hold the Illustrator icon in the Dock, and then click Quit,or Control-click the Dock icon and then click Quit. You can also chooseIllustrator ➪ Quit. You also have the option of pressing Ctrl, clicking theIllustrator icon in the dock, and choose Quit or Command+Q.
✦ Windows: Right-click Illustrator’s taskbar icon and click Close, or press Alt +F4 and click Close from the pop-up menu. You can also close Illustrator byright-click the taskbar icon and pick Close, or by pressing Ctrl+Q.
For Mac OS X, the Quit menu item is under the Illustrator menu.
If you run into a situation in which the Quit function doesn’t work, or is unavailable,you can try one of the following options:
✦ Mac OSX: Press the Option key at the same time you press Ô and click thedock. Choose Force Quit. Alternatively, you can press Command+Option+Escto bring up the Force Quit menu and choose Illustrator from the list. Note thatthis causes you to lose any unsaved work. There is no need to restart yourcomputer after force quitting. You do need to restart Illustrator, however, ifyou wish to continue working in Illustrator.
✦ Windows: Press Ctrl+Alt+Delete to enable the Task Manager, which you can useto “force” Illustrator to quit. Note that this can cause you to lose any unsavedwork and may make your system unstable; if you do this, you’ll be better off ifyou take the time to restart your computer before running Illustrator again (orbefore opening any other software applications, for that matter).
Working with Illustrator’s InterfaceUnderstanding the interface is the first step in learning Illustrator. Adobe has keptits products looking consistent so that using all of its programs together is easy.The tools, palettes, and menus are pretty similar when using Illustrator, Photoshop,and InDesign.
Illustrator’s interface holds many elements that let you work in optimum productiv-ity. Once you understand the interface, the creation process is much easier. Whenlooking at Illustrator, you’ll find the following:
Note
03 53906X Ch01.qxd 10/3/03 9:04 AM Page 5
6 Part I ✦ Illustrator Basics
✦ Document window: The Document window appears when you open an exist-ing document or start a new document. The artboard and pasteboard arehoused within the Document window. You create your illustrations usingthese two elements.
✦ Toolbox: The toolbox houses the tools you need to create amazing artwork.The tools are set as icons that represent what the tool looks like.
✦ Palettes: You can move the palettes around (floating) to any location. You canalso close or open palettes, as needed.
✦ Menu: The menus are across the top of the screen (Mac) or window(Windows) and access many of Illustrator’s powerful commands.
✦ Status bar: The Status bar runs along the bottom-left edge of the Illustratordocument window. Here you can set the zoom level and see what the tool cur-rently being used is.
✦ Artboard: The artboard is the part of the work area that contains the art youwant to print. It is shown as a thin black rectangle.
Working in the document windowThe document window is where you perform all your work. It contains two mainelements: the artboard and the page, or pasteboard. The page is always centered inthe artboard, as shown in Figure 1-1. The palettes have been hidden so that youcan see the whole document window. You can move the printable area representedby the dashed lines using the Page tool. More detail on the Page tool is covered inthis chapter.
Illustrator windows act like windows in most other programs. You use the title barat the top of the window to move the window around your screen. On the title baris the name of the document. If you have not yet saved your document, the name ofthe document is Untitled-1, with the number changing for each new document youcreate. (Hint: Save it as soon as you create it!) Next to the title of the document isthe current viewing percentage relative to actual size.
The scroll bars on the right side of the window let you see what is above and belowthe current viewing area.
See “Using the scroll bars to view your document” later in this chapter for more onscrollbars.
Three vital buttons help you close, minimize, and maximize the various windowsyou open in Illustrator. You find these buttons on the upper-left corner in OS X,and on the upper-right corner in Windows. Although these three buttons are self-explanatory, their functions are listed as follows:
Cross-Reference
03 53906X Ch01.qxd 10/3/03 9:04 AM Page 6
7Chapter 1 ✦ Understanding Illustrator’s Desktop
✦ Minimize: When you click this button in Windows, Illustrator replaces thedocument window with an icon on the application window, and a Restore but-ton appears. This Restore button allows you to return the document windowto its former size and position. Similiarly, in OS X, the document changes to anicon in the dock.
✦ Maximize/Zoom: In Windows, the Maximize button makes the documentwindow expand to its largest size in the application window. For Macs, theZoom button allows you to toggle the window between its current and itsmaximum size.
✦ Close: This button closes your window entirely. If you have not yet saved yourfile, clicking the Close button generates a dialog box that allows you to savethe file. You can open multiple document windows simultaneously and havethe title of each window appear at the bottom of the Window menu, where acheckmark indicates the currently active document window.
Figure 1-1: The document window contains the page, surrounded by the artboard.
Menus
Status bar Document window PalettesToolbar
03 53906X Ch01.qxd 10/3/03 9:04 AM Page 7
8 Part I ✦ Illustrator Basics
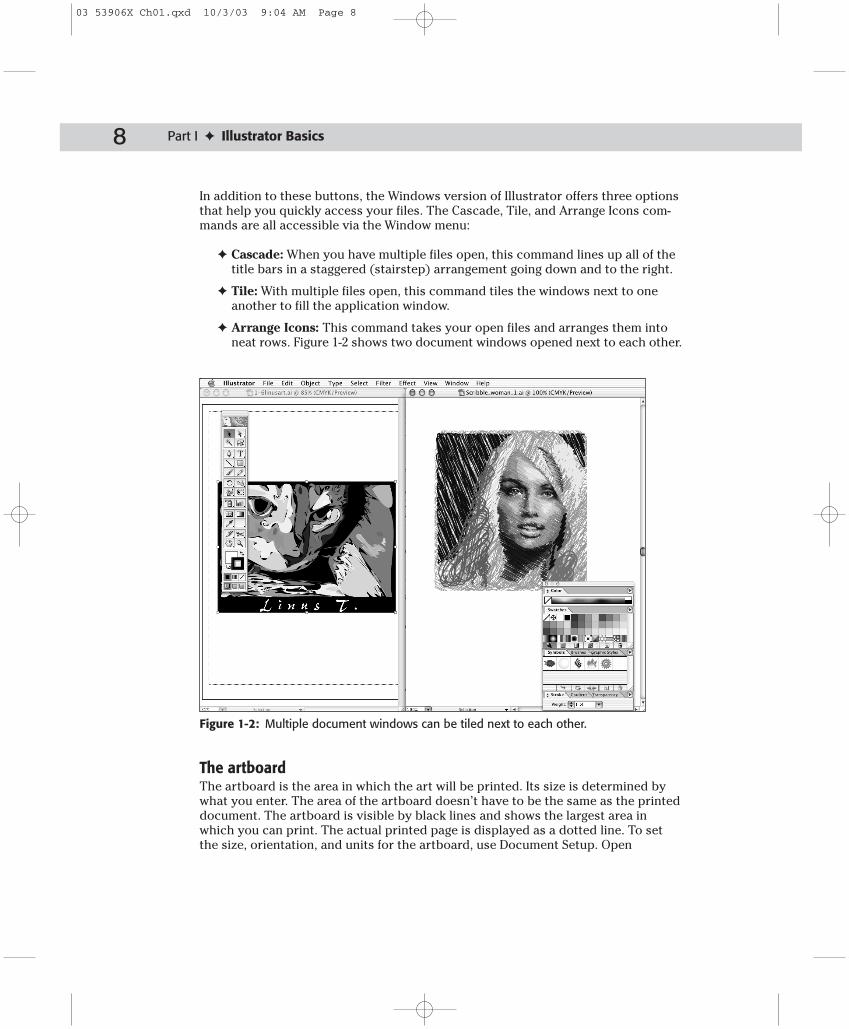
In addition to these buttons, the Windows version of Illustrator offers three optionsthat help you quickly access your files. The Cascade, Tile, and Arrange Icons com-mands are all accessible via the Window menu:
✦ Cascade: When you have multiple files open, this command lines up all of thetitle bars in a staggered (stairstep) arrangement going down and to the right.
✦ Tile: With multiple files open, this command tiles the windows next to oneanother to fill the application window.
✦ Arrange Icons: This command takes your open files and arranges them intoneat rows. Figure 1-2 shows two document windows opened next to each other.
Figure 1-2: Multiple document windows can be tiled next to each other.
The artboardThe artboard is the area in which the art will be printed. Its size is determined bywhat you enter. The area of the artboard doesn’t have to be the same as the printeddocument. The artboard is visible by black lines and shows the largest area inwhich you can print. The actual printed page is displayed as a dotted line. To setthe size, orientation, and units for the artboard, use Document Setup. Open
03 53906X Ch01.qxd 10/3/03 9:04 AM Page 8
9Chapter 1 ✦ Understanding Illustrator’s Desktop
Document Setup by choosing File ➪ Document Setup. To change the page size, usethe Print Setup dialog box and choose Page. To access the Print dialog box, chooseFile ➪ Print.
If you don’t want to see the artboard, choose View ➪ Hide Artboard. Doing thishides the dotted line. To show the artboard again, choose View ➪ Show Artboard.
If you are taking your Illustrator artwork into another application, such as Photoshopor InDesign, the size of the artboard is irrelevant; your entire illustration appears inmost other software applications even if that artwork is larger than the artboard.
The work areaWhen using Illustrator, the worst thing that can happen is for you to lose an illustra-tion on which you are working. “Where’d it all go?” you cry, perhaps adding a fewvulgarities. This can happen very easily in Illustrator. Just click a few times on thegray parts of the scroll bars at the bottom of the document window. Each time youclick, you move about half the width (or height) of your window, and three clickslater, your page and everything on it is no longer in front of you. Instead, you seethe work area’s scratch area, usually a vast expanse of white nothingness.
The work area measures 227.5×227.5 inches, which works out to about 360 squarefeet of drawing space. At actual size, you see only a very small section of the art-board. A little letter-size document looks extremely tiny on a work area this big. Ifyou get lost in the work area, a quick way back is to choose View ➪ Actual Size.Doing this puts your page in the center of the window at 100-percent view, at whichtime you can see at least part of your drawing. To see the whole page quickly,choose View ➪ Fit in Window, which resizes the view down to where you can seethe entire page.
This discussion assumes, of course, that you have actually drawn artwork on thedefined page. Illustrator used to get frantic calls from people who chose Fit inWindow, which immediately resulted in the disappearance of all their artwork. Ittook a while to figure out that these artists had drawn their artwork way off on theside of the work area.
The Page toolThe Page tool, shown in Figure 1-4 and which you access via the Hand tool (seeFigure 1-3), changes how much of your document prints; it does this by moving theprintable area of the document without moving any of the printable objects in thedocument. Clicking and dragging the lower-left corner of the page relocates theprintable area of the page to the place where you release the mouse button.
The Hand tool is located in the Illustrator’s toolbox. For more on the toolbox, seethe next section.
Cross-Reference
03 53906X Ch01.qxd 10/3/03 9:04 AM Page 9
10 Part I ✦ Illustrator Basics
Figure 1-3: Hand tool houses the Page tool in its toolbox slot.
Figure 1-4: You access the Page tool by clicking the Hand tool andthen selecting the tool from the flyout menu that appears.
Double-clicking the Page tool slot resets the printable-area dotted line to its origi-nal position on the page.
The Page tool is useful when your document is larger than the biggest image areayour printer can print. The tool enables you to tile several pages to create one largepage out of several sheets of paper. Tiling is the process in which an image isassembled by using several pieces of paper arranged in a grid formation. A portionof the image prints on each page, and when you fit the pages together you can viewthe image in its entirety. Tiling is really only good for rough laser prints, because ayou need to manually trim a quarter inch around the edge of each paper.
To learn more about how to print and all that process entails, see Chapter 16.
The toolboxThe toolbox appears on top of your document window, covering up part of yourdocument window in the upper-left corner. The toolbox (see Figure 1-5) has noclose box. To close it, you must choose Window ➪ Tools. You make the Toolbox visi-ble by placing a checkmark next to the Window menu’s Tools menu item. You hidethe Toolbox by clicking the checkmarked item, so that no checkmark appears nextto the Tools menu item. The tools are discussed throughout the book in the chap-ters that use those tools.
To hides all palettes, not just the toolbox, press the Tab key.Tip
Cross-Reference
Tip
03 53906X Ch01.qxd 10/3/03 9:04 AM Page 10
11Chapter 1 ✦ Understanding Illustrator’s Desktop
Figure 1-5: The toolbox in its default state
You can show and hide all the palettes except the toolbox by pressing Shift+Tab.
To choose a tool, click the tool you want to use in its slot within the toolbox andrelease the mouse button. Doing this highlights it on the toolbox. You can alsochoose tools by pressing a key on the keyboard. For example, pressing P selects thePen tool. You can only inactivate a tool by selecting another one.
Many tools have additional pop-up tools called flyouts, which are tools that appearonly when you click and hold down the mouse on the default tool. Illustratordenotes the default tools that have pop-up tools with a little triangle in the lower-right corner of the tool. To select a pop-up tool, click and hold a tool with a triangleuntil the pop-up tools appear; and then drag to the pop-up tool you want. The newpop-up tool replaces the default tool in that tool slot. Figure 1-6 shows all the pop-up tools for each toolslot.
You can browse through the tools on any flyouts by pressing Option (Alt) and thenclicking a toolslot. Each click displays the next tool.
Tip
Tip
03 53906X Ch01.qxd 10/3/03 9:04 AM Page 11
12 Part I ✦ Illustrator Basics
Figure 1-6: All of the flyout tools in Illustrator
You can customize the tool shortcuts under the Keyboard Shortcuts dialog boxfound under the Edit menu. In this dialog box, simply select the tool you want tochange and enter the new shortcut letter, number, or symbol. You can also do thisin Adobe Photoshop and Adobe InDesign.
Any tool with a pop-up option also has a tearoff tab on the right side of the flyout.You can make the flyout a free-floating palette by clicking this tearout tab. In Figure1-7, you see an example of the Symbol tool becoming a floating palette after youclick its flyout tab. Use this feature if you find that you are constantly switchingbetween tools in that tearoff. Then you won’t have to click+hold and drag to thenext tool.
Figure 1-7: You can make your tearout tools into free-floating palettes.
Tool TipsWhat if you forget what the function of a specific tool is or you can’t tell the differ-ence between the various tools in Illustrator? No problem! Illustrator comesequipped with a handy Tool Tips feature that identifies tools quickly and easily.When you have the Tool Tips activated, you simply move your cursor over the ele-ment you want to identify, and a yellow text box pops up and tells you its name. Forexample, when you place your cursor over the Type tool (see Figure 1-8), a boxappears with the words Type Tool (T). The letter within the parentheses indicatesthe keyboard shortcut for the tool. In this example, if you press T, you activate theType tool without clicking it. Illustrator provides Tool Tips for every tool in thetoolbox as well as for the palette controls.
Figure 1-8: When you have the Tool Tips feature activated, you canplace your cursor over a tool to see what it is.
Tip
03 53906X Ch01.qxd 10/3/03 9:04 AM Page 12
13Chapter 1 ✦ Understanding Illustrator’s Desktop
Illustrator provides Tool Tips by default. However, if you find them annoying, or ifyou know the tips well enough not to need the Tool Tips, you can disable them inthe General screen of the Preference dialog box. To open the Preference dialog box,simply choose Illustrator (Edit) ➪ Preferences ➪ General and deselect the ToolTips option.
PalettesAll palettes include either a button for toggling between the Minimize and Maximizesizes of the palette (Windows) or a Zoom button for zooming in and out of thepalette (Macintosh OS). A Close button usually appears in the upper corner of thepalette that you can use to hide the palette. This button can toggle between dis-playing only the palette title tab or the entire palette.
Illustrator has over two dozen palettes, all of which can remain open while youwork on your document (providing you can still see your document through allthose palettes). Technically speaking, a palette is a window. Everything on theMac and in Windows is a window except the desktop. Movable modeless windows(palettes) are variations on windows. The big difference between a modelesswindow and a dialog box is that you don’t have to close the modeless window toperform other tasks. Therefore, you can work with the features on one palettewithout having to close another palette.
Unlike windows, palettes are never really active. Instead, the one you are workingin is in the front. If the palette has editable text fields, Illustrator highlights theactive one or makes the text cursor blink. To bring a palette to the forefront — thatis, bring it into focus — simply click it anywhere.
Palettes are like regular windows in many ways. They have a title bar that you canclick and drag to move the palette. The title bar also has buttons for minimizing(Windows) or zooming (Macintosh OS) and closing the palette. Each palette alsohas a tab with the name of the palette within it.
You can use the title tab to toggle between the minimized state (showing only thetitle tab and the maximized state (showing the entire palette) by double-clickingthe title tab.
Occasionally, a palette has a handle, which looks like a triangle with two lines (seeFigure 1-9), on the lower-right corner. You can use this handle for changing thepalette’s size by clicking and dragging the corner containing the handle.
For some palettes, a double arrow icon appears to the left of the title name.Clicking this icon toggles the palette size among several different sizes.
Tip
Note
03 53906X Ch01.qxd 10/3/03 9:04 AM Page 13
14 Part I ✦ Illustrator Basics
Figure 1-9: You can resize a palette that has atriangle with two lines on its lower-right corner.
Linking together and tearing apart palettesYou can place palettes together in different combinations by tabbing and dockingthem. Each palette (except for the toolbox) has a tab on it. Clicking the tab of apalette brings it to the front. Dragging a tab from one palette to another moves thatpalette into another palette. Dragging a tab out of a palette makes the palette sepa-rate from the previous palette. Figure 1-10 includes a set of palettes that have beentabbed together.
By default, Illustrator tabs certain palettes together. You can drag them apart andtab others together to suit your method of working.
Figure 1-10: A palette contains a number of tabs.
You can dock palettes together by dragging the tab of one palette to the bottom ofanother palette. When the bottom of the other palette darkens, releasing the mousebutton “docks” the moved palette to the bottom of the other one. Then, when youmove the other palette, the docked palette moves with it. To separate a palettefrom the others, click and drag the tab away from the original palette.
Working with palettesPalettes are even more powerful when you can control when you can reveal or hidethem. Under the Window menu you can choose which palettes show and whichones hide. Simply check next to a palette to show it, and uncheck next to thepalette to hide it. Some palettes use a keyboard shortcut to access them, others
Note
03 53906X Ch01.qxd 10/3/03 9:04 AM Page 14
15Chapter 1 ✦ Understanding Illustrator’s Desktop
you have to access through the Window menu. To see the shortcuts, look to theright of the palette name. Under the Window menu, you can see what palettes arevisible by the checkmark next to them.
Understanding the palettesThe palettes are discussed throughout the books in various chapters. The palettesare listed as they appear under the Windows menu. The palettes are:
✦ Actions: Use this palette to record a sequence of events to play at any time.
✦ Align: This palette lets you align objects (Shift + F7).
✦ Appearance: Use this palette to check the attributes of a selected object(Shift + F6).
✦ Attributes: Use this palette to view the overprinting and any URL’s associatedwith the selected object (F11).
✦ Brushes: Use this palette to select a brush type (F5).
✦ Color: This palette lets you apply color to your illustrations (F6).
✦ Document Info: Shows information on the document like color mode, art-board dimensions and other options.
✦ Flattener Preview: Use this to see certain areas of flattened artwork. You canalso adjust the flattener options here.
✦ Gradient: This palette is used for changing and applying gradients (F9).
✦ Graphic Styles: This palette lists the default graphic styles, as well as lets yousave graphic styles (Shift + F5).
✦ Info: Displays the info on the selected object like for measuring objects ordistance (F8).
✦ Layers: Lets you put objects on different layers for easier organization (F7).
✦ Links: This lists the placed objects that are linked to the document.
✦ Magic Wand: Lets you adjust the settings for the Magic Wand tool.
✦ Navigator: Use this to quickly move around a large document.
✦ Pathfinder: Use this to combine, split, divide, and more to multiple paths(Shift + F9).
✦ Stroke: This palette lets you adjust the width and style of the stroke (F10).
✦ SVG Interactivity: Use this palette to set options for Scalable Vector Graphics.
✦ Swatches: This palette houses preset colors, gradients, and patterns.
✦ Symbols: This palette houses preset symbols and lets you define new symbols(Shift + F11).
03 53906X Ch01.qxd 10/3/03 9:04 AM Page 15
16 Part I ✦ Illustrator Basics
✦ Tools: This palette contains all of Illustrator’s tools.
✦ Transform: This palette lets you move, scale, and apply other transforma-tions (Shift + F8).
✦ Transparency: Use this palette to adjust the opacity of objects (Shift + F10).
✦ Type: Use this palette to adjust a variety of type options such as Character(cmd-T), Character Styles, Glyphs, OpenType (cmd-shift-option-T), Paragraph(cmd-opt-T), Paragraph Styles, and Tabs (cmd-shift-T).
✦ Variables: This palette is used for data-driven graphics to set the options.
Using Illustrator’s menusAlthough Adobe places more emphasis on Illustrator’s palettes and other elements,such as its toolbox, you may still find some important and useful features inIllustrator’s menus.
Menus are one of the most common interface elements for all software packages.Over time, Adobe has pushed a lot of its functionality to the palettes and otherinterface elements rather than the menus, but menus are still important and offeranother way to work with the program. Some general rules apply to Illustratormenus:
✦ To select a menu item, pull down the menu, highlight the menu item you want,and release or click the mouse button (Macintosh) or click that item(Windows). If the cursor is not on that item but is still highlighted, the com-mand will not take effect.
✦ Whenever an ellipsis appears (three little dots that look like this...), choosingthat menu item brings up a dialog box where you must verify the currentinformation by clicking an OK button or by entering more information andthen clicking OK. If the option has no ellipsis, the action you select takes placeright away.
✦ When you see a key command listed on the right side of the menu — usuallythe Command (Ô) symbol and a character for Macintosh or Ctrl plus a char-acter for Windows, but sometimes the Ô symbol (Ctrl) or another modifierkey plus a character — you can type that key command instead of using themouse to pull down this menu. Using key commands for menu items worksjust like clicking the menu bar and pulling down to that item.
✦ If you see a little triangle next to a menu item, it means the menu possesses asubmenu. You can choose items in the submenu by pulling over to the menuand then pulling up or down to select the menu item needed. Submenus usu-ally appear on the right side of the menu, but due to space limitations on yourmonitor, submenus may appear on the left side for certain menus.
03 53906X Ch01.qxd 10/3/03 9:04 AM Page 16
17Chapter 1 ✦ Understanding Illustrator’s Desktop
Palette menusNot only does the main document window have menus; so do palettes. You can finda variety of features and options to meet your creative needs. To open these menus,simply find and click the round button with the arrow in the middle, located on thetop-right corner of most palettes. Figure 1-11 gives an example of the options youhave available when you access the Character palette’s menu. These options andfeatures change with each palette.
Figure 1-11: You can find a multitude of options byaccessing the palette menu.
Context-sensitive menusIllustrator provides context-sensitive menus that appear right under your cursor asyou’re working. To access them, press Control and then click (right-click) anywherein the document window, and a context-sensitive menu appears. These menus con-tain commands that relate to the type of work you’re doing and the specific toolyou have. Figure 1-12 shows a context-sensitive menu that appears in a documentwhen a rectangle shape is created and selected. This menu would look different ifsome other object were selected.
Figure 1-12: When you right click the document window,Illustrator reveals a context-sensitive menu.
03 53906X Ch01.qxd 10/3/03 9:04 AM Page 17
18 Part I ✦ Illustrator Basics
Typing keyboard commandsKeyboard commands are shortcuts for common activities that you perform inIllustrator. These shortcuts typically use the Ô (Ctrl) key in combination withother keys.
Many of the Illustrator menu items have keyboard shortcuts listed next to theirnames. Pressing the key combination does the same thing as choosing that menuitem from the menu. Some menu items do not have keyboard commands; usually,you have to choose those items from the menu.
On a Macintosh, you commonly use the Ô key along with the Option key (locatedhandily next to the Ô key) and the Shift key. You use the Control key only to simu-late the right mouse button that Windows users have (OS X also has multi-button
Tips for Using Menus Effectively
If you can never remember what is on which menu and you are constantly holding downthe mouse button while slowly running along the menu bar, reading every menu item andlooking for a certain command, you have a disease. Every year millions of people becomeafflicted with Menu Bar Scanning Syndrome (MBSS), defined as “the pathological need ofusers to continually search and hunt for special menu items for which that they just can’tremember the locations.”
MBSS is deadly not only because it wastes time, but also because the user is forced to readevery single menu and pop-up menu. Sure, in the File menu you know that DocumentSetup is where to go to change the size of the page, but as you work your way over, thingsbegin to get a little fuzzy. By the time you get to the Filter menu, your mind is mush. You seethe Distort category and figure that all the submenu items are legal functions. If you canmanage to get to the Windows menu, thewordswouldjustruntogether, making no sensewhatsoever.
Although MBSS wastes valuable production time, costing companies billions of dollars ayear — don’t be surprised if the next time you flip to 60 Minutes, Steve Kroft is doing aninside investigation into the mysteries of MBSS — it is a fairly easily treated disease. You canhelp prevent MBSS by doing one of two things:
✦ Memorize what is in each menu. This is the hardest thing to do, but a few hoursspent memorizing each menu item and where it goes eventually prevents countlessMBSS-related searches.
✦ Use the menus as little as possible. Instead, memorize key commands. Most ofthe menu items have them, so you only need to go up to the menu bar when amenu item doesn’t have a key command. If you set your own keyboard commandsusing the Keyboard Shortcuts command (choose Edit ➪ Keyboard Shortcuts), youcan set a keyboard command for every menu item in Illustrator.
03 53906X Ch01.qxd 10/3/03 9:04 AM Page 18
19Chapter 1 ✦ Understanding Illustrator’s Desktop
mouse support, but the standard Macintosh mouse has but one button). By default,no keyboard commands use the Control key, although you can assign them if youwish. You hold down these keys while you press another key or click the mouse toperform a specific function.
On a Windows system, you use the Ctrl key along with the Alt and Shift keys. If youpress certain combinations of these keys while pressing another key or clicking themouse, the related function activates.
Mousing Around in Illustrator
Illustrator requires the use of a mouse for selecting items, pulling down menus, movingobjects, and clicking buttons. Learning to use the mouse efficiently requires patience, practice,and persistence. In most programs, you can master using the mouse quickly, but you may findusing the mouse with Illustrator’s Pen tool difficult at first. If you’re unfamiliar with using amouse, a fun way to get used to working with one is by playing a mouse-driven game. Afterseveral hours of play (providing you don’t get fired by your employer or kicked out of thehouse by your irritated spouse), you’ll become Master of Your Mousepad, King of Your Klicker,and so on.
You use the mouse to perform five basic functions in Illustrator:
✦ Pointing: Move the cursor around the screen by moving the mouse around yourmousepad.
✦ Clicking: Press and release the mouse button in one step. You click to select points,paths, and objects, and to make windows active. (Windows users: “Clicking” meansclicking with the left mouse button, unless you’ve reconfigured your mouse.)
✦ Dragging: Press the mouse button and keep pressing it while you move the mouse.You drag the cursor to choose items from menus, select contiguous characters oftext, move objects, and create marquees.
✦ Double-clicking: Quickly press and release the mouse button twice in the samelocation. You double-click to select a word of text, select a text field with a value init, access a dialog box for a tool, and run Illustrator (by double-clicking its icon).
✦ Control+clicking (right-clicking): This displays a context-sensitive menu when youpress Control and click the Mac (Windows users only need to press the right mousebutton).
The cursor is the little icon (usually an arrow) that moves in the same direction as the mouse.If the cursor seems to be moving in the opposite direction from the mouse, check that themouse isn’t upside down, or, heaven forbid, that you aren’t upside down yourself. InIllustrator, the cursor often takes the form of a tool that you are using. When the computer isbusy doing whatever a computer does when it is busy, an ugly little watch or a spiraling circle(Macintosh) or hourglass (Windows) takes its place.
03 53906X Ch01.qxd 10/3/03 9:04 AM Page 19
20 Part I ✦ Illustrator Basics
Keyboard commands are as important to an Illustrator artist as the mouse is; witha little practice, you can learn them quickly. Besides, many of the default keyboardcommands are the same from program to program, which makes you an instantexpert in software that you haven’t used yet! Good examples of this are the Cut/Copy/Paste, Select All; and Save commands:
✦ Cut/Copy/Paste: You activate these by pressing Ô+X, Ô +C, or Ô+V,(Ctrl+X, C, V).
✦ Select All: You call select everything in a document by pressing Ô+A (Ctrl+A).
✦ Save: You can quickly save your work by pressing Ô+S (Ctrl+S).
Using the status barThe status bar, located on the lower-left of your document window, has a Zoompop-up list and a button that displays useful and otherwise difficult to find infor-mation. To change the item shown in the status bar, click the triangle and drag upto a different item. Although the default for this button displays the tool that youare currently using, you can change the information to display one of the follow-ing instead:
✦ Current Tool: Select this to show the selected tool’s name.
✦ Date and Time: Use this to show the current date and time.
✦ Number of Undos: This is a handy option that shows the number of queuedundos and redos.
✦ Document Color Profile: This shows the current Color Profile.
Navigating Around Your DocumentBeing able to move through a document easily is a key skill in Illustrator. Rarely canyou fit an entire illustration in the document window at a sufficient magnification tosee much of the image’s detail. Usually you are zooming in, zooming out, or movingoff to the side, above, or below to focus on certain areas of the document.
Understanding the Zoom toolThe most basic navigational concept in Illustrator is the ability to zoom to differentmagnification levels. Illustrator’s magnification levels work like a magnifying glass.In the real world, you use a magnifying glass to see details that aren’t readily visiblewithout it. In the Illustrator world, you use the different magnification levels to seedetails that aren’t readily visible at the 100-percent view.
03 53906X Ch01.qxd 10/3/03 9:04 AM Page 20
21Chapter 1 ✦ Understanding Illustrator’s Desktop
Changing the magnification levels of Illustrator does not affect the illustration. Ifyou zoom in to 200 percent and print, the illustration still prints at the size as itwould if the view were 100 percent. It does not print twice as large. Figure 1-13shows the same Illustrator document at 100 and 200 percent magnification.
Figure 1-13: An Illustrator document at 100 percent (left) and 200 percent (right)magnifications
In Illustrator, 100-percent magnification means that the artwork you see on thescreen has the same physical dimensions when it prints. If you place a printoutnext to the onscreen image at 100 percent magnification, it appears at exactly thesame size, depending on your monitor resolution (the higher the resolution, thesmaller the document looks onscreen).
For those of you who plan to use Illustrator with Photoshop, remember that inPhotoshop, 100-percent view is different. In Photoshop, each pixel onscreen isequal to one pixel in the image. Unless the pixels per inch (ppi) of the imagematch those of the screen (and they would if Web graphics were being designed),the 100-percent view tends to be larger than the printed dimensions of the image.
Using the Zoom toolPerhaps the easiest way to control the magnification of your artwork is with theZoom tool. This tool (which looks like a magnifying glass and is located in the rightcolumn of the toolbox) can magnify a certain area of artwork and then return to thestandard view.
Tip
03 53906X Ch01.qxd 10/3/03 9:04 AM Page 21
22 Part I ✦ Illustrator Basics
To use the Zoom tool to magnify an area, select it in the toolbox by clicking it once.The Zoom cursor takes the place of the Arrow cursor (or whatever tool was previ-ously selected). It looks like a magnifying glass with a plus sign in it. Clicking anyspot in the illustration enlarges the illustration to the next magnification level, withthe place you clicked centered on your screen. The highest magnification level is6,400 percent — which, as all you math aficionados know, is 64 times (not 6,400times!) bigger than the original. Where you click with the Zoom tool is veryimportant:
✦ Clicking the center of the window: This enlarges the illustration to the nextmagnification level.
✦ Clicking the edges (top, bottom, left, and right) of the window: This makesthe edges that you did not click (and possibly some or all of your artwork)disappear as the magnification increases.
✦ Clicking the upper-right corner: This hides mostly the lower-left edges andso forth.
If you are interested in seeing a particular part of the document close up, click thatpart at each magnification level to ensure that it remains in the window.
If you zoom in too far, you can use the Zoom tool to zoom out again. To zoom out,press the Option (Alt) key when you have the Zoom tool active (releasing theOption (Alt) key restores the Zoom In tool). Clicking with the Zoom Out toolreduces the magnification level to the next lowest level. You can zoom out to 3.13percent (1/32 actual size). To access the Zoom out, hold the Option (Alt) key to seethe minus sign indicating that you are zooming out.
When you use the Zoom tool, you magnify everything in the document, not justthe illustration. You magnify all paths, objects, the artboard, and the Page Setupboundaries equally. However, the way certain objects appear (the thickness of pathselections, points, handles, gridlines, guides, and Illustrator user interface (UI) com-ponents such as palettes and windows) does not change when you zoom in.
If you need to zoom in to see a specific area in the document window, use theZoom tool to draw a marquee by clicking and dragging diagonally around theobjects that you want to magnify. The area thus magnifies as much as possible sothat everything inside the box just fits in the window that you have open, as shownin Figure 1-14. If you drag a box as you press and hold the Option (Alt) key to zoomout you do the same thing as if you had just clicked to zoom out.
To move a zoom marquee around while you’re drawing it, press and hold thespacebar after you’ve begun drawing the marquee but before you release themouse button. When you release the spacebar, you can continue to change thesize of the marquee by dragging. A marquee is where you drag diagonally acrossto create a rectangle. Marquees are discussed in the “Using the Zoom tool” sectionin this chapter.
Tip
03 53906X Ch01.qxd 10/3/03 9:04 AM Page 22
23Chapter 1 ✦ Understanding Illustrator’s Desktop
Figure 1-14: Zooming into a certain area in the original image (top) results in the magnification and placement of the image as shown on the bottom.
03 53906X Ch01.qxd 10/3/03 9:04 AM Page 23
24 Part I ✦ Illustrator Basics
Other zooming techniquesYou also can zoom in and out by using commands in the View menu. Choose View ➪Zoom In ( ➪ cmd(Ctrl)++) to zoom in one level at a time until the magnification levelis 6,400 percent. The Zoom In menu item zooms from the center out. Choose View ➪Zoom Out ( ➪ cmd(Ctrl)+-) to zoom out one level at a time until the magnificationlevel is 3.13 percent.
Although Illustrator can zoom to any level, it uses 23 default zoom levels when youclick the Zoom tool or when you access the Zoom In and Zoom Out menu items (ortheir respective keyboard commands). Table 1-1 lists each of the default Zoom Inand Zoom Out default levels.
Table 1-1Zoom In and Zoom Out Default Levels
Zoom Out Ratio Zoom In Ratio
100% 1:1 100% 1:1
66.67% 2:3 150% 3:2
50% 1:2 200% 2:1
33.33% 1:3 300% 3:1
25% 1:4 400% 4:1
16.67% 1:6 600% 6:1
12.5% 1:8 800% 8:1
8.33% 1:12 1,200% 12:1
6.25% 1:16 1,600% 16:1
4.17% 1:24 2,400% 24:1
3.13% 1:32 3,200% 32:1
4,800% 48:1
6,400% 64:1
Zooming to Actual SizeYou can use different methods to automatically zoom to 100-percent view. The firstmethod is to double-click the Zoom tool slot in the toolbox. This action changes theview to 100 percent instantly:
✦ Using the Zoom feature in the Status bar: To do this, simply click the dropdown arrow in the left corner of the Status bar, and select 100%.
03 53906X Ch01.qxd 10/3/03 9:04 AM Page 24
25Chapter 1 ✦ Understanding Illustrator’s Desktop
✦ Using the View menu: This is the best way to zoom to 100-percent magnifica-tion because it not only changes the image size to 100 percent, but also cen-ters the page in the document window. Simply choose View ➪ Actual Size. Thekeyboard shortcut is Ô (Ctrl)+1.
Zooming to Fit in Window sizeFit in Window instantly changes the magnification level of the document so that theentire artboard (not necessarily the artwork, if it isn’t located on the page) fits inthe window and is centered in it. You can choose from two different methods tochange the document view to the Fit in Window size:
✦ Use the View menu: One way to automatically change to the Fit in Windowview is to choose View ➪ Fit in Window ➪ cmd (Ctrl)+0.
✦ Use the Hand tool slot: Simply double-click the Hand tool slot.
You can quickly go to 3.13 percent by Command (Ctrl)+double-clicking the Zoomtool slot in the toolbox.
Zooming to a specific magnificationIf you’d like to view a document at a specific zoom level, double-click the view areaat the bottom-left corner of the active document window (shown in Figure 1-15);type the magnification you want to zoom to, and press Enter or Return.
Figure 1-15: When you enter the exact zoom value in the field at the lower-leftcorner of the document window, you can zoom in or out quickly.
Tip
03 53906X Ch01.qxd 10/3/03 9:04 AM Page 25
26 Part I ✦ Illustrator Basics
When you specify a magnification, you do not change the document. Rather, youchange how you view the document. For this reason, you can never undo any typeof magnification-level change. Choosing Edit ➪ Undo after zooming undoes the lastchange you made to the document before you changed the magnification level, notthe magnification-level change.
Zooming with the Navigator paletteOf course, being able to zoom in very closely to your artwork does have a pitfall.The more you zoom in on an illustration, the less of that illustration you see at onetime. The Navigator palette (shown in Figure 1-16), which you access by choosingWindow ➪ Navigator, helps you out by letting you see the entire illustration as wellas the portion into which you’re zoomed (indicated by a red viewing rectangle).You have several options within the Navigator palette for changing your view:
✦ The red rectangle: You can stay zoomed in and move easily to another sec-tion by dragging the red rectangle (which actually scrolls), in the center of theNavigator palette, to another area.
✦ The pop-up menu: You access this menu by clicking circular icon with a left-pointing arrow located on the upper-right corner of the palette. The Navigatorpalette’s pop-up menu includes a View Artboard Only option. This option setsthe thumbnail in the Navigator palette to show only the extent of the art-board. If this option isn’t set, the thumbnail shows all objects included in thedocument.
✦ The magnification level box: You can type an exact magnification level in thebox in the lower-left corner of the Navigator palette.
✦ The slider: Located at the bottom of the Navigator palette is a slider givingyou yet another way to zoom in and out by dragging the slider to the left orright.
✦ The Zoom In and Zoom Out tools: The Zoom In and Zoom Out tools look likelittle triangles and big triangles on either side of the slider triangle. You canzoom in and out a preset amount (using the same amounts used by the ZoomIn and Zoom Out tools and menu items) by pressing the Zoom In or Zoom Outicons. These buttons are located on either side of the triangle slider.
The Navigator palette can slow down Illustrator if your artwork contains many pat-terns, gradients, and gradient mesh objects. To avoid this slowdown, you can closethe Navigator palette by choosing Window ➪ Navigator.
Caution
03 53906X Ch01.qxd 10/3/03 9:04 AM Page 26
27Chapter 1 ✦ Understanding Illustrator’s Desktop
Figure 1-16: The Navigator palette shows asnapshot of the document.
Using the scroll bars to view your documentSometimes, after you zoom in to a high magnification, part of the drawing that youwant to see is outside the window area. Instead of zooming in and out repeatedly,you can use one of three different scrolling techniques to move around inside thedocument. All techniques use the scroll bars on the right side and bottom edges ofthe document window. The right scroll bar controls where you are vertically in thedocument. The bottom scroll bar controls where you are horizontally in the docu-ment window.
The scroll bars contain three elements: up and down arrows, a gray area, or bar,and a thumb, as called the elevator box, which is the blue oval (on a Mac) or graysquare (in Windows) that rides along the scroll bar. The gray area of the right scrollbar is proportionate to the vertical size of the work area (the space around the art-board). If the little elevator box is at the top of the scroll bar, you are viewing thetop edge of the work area. If it is centered, you are viewing the vertical center of thework area. The techniques are as follows:
✦ Using the up and down arrows: When you click the up arrow, you displaywhat is above the window’s boundaries by pushing everything in the windowdown in little increments. Clicking the down arrow displays what is below thewindow’s boundaries by pushing the document up in little increments.
✦ Using the thumbs: Dragging the thumb up displays what is above the win-dow’s boundaries proportionately by whatever distance you drag it. Draggingthe thumb down displays what is below the window’s boundaries proportion-ately by whatever distance you drag it.
✦ Using the gray bar: Clicking the gray bar above the thumb and between thearrows displays what is above the window’s boundaries in big chunks.Clicking the gray bar below thumb, between the arrows, displays what isbelow the window’s boundaries in big chunks.
Be careful not to drag too far or you will be previewing beyond the top of the artboard.
Caution
03 53906X Ch01.qxd 10/3/03 9:04 AM Page 27
28 Part I ✦ Illustrator Basics
In OS X, if you want to specify how far Illustrator scrolls when you click the graybar, you can set this in the System Preferences. Also, on a Mac, the default is forthe up and down arrows to be together. You can change this in your system’s pref-erences for General to place the scroll bars together or at the top and bottom.
Scrolling with the Hand toolThe Hand tool improves on the scroll bars. The Hand tool — which looks like ahand — is located at the bottom of the first column of tools just above the coloroptions.
Instead of being limited to horizontal and vertical movement only, you can use theHand tool to scroll in any direction, including diagonally. The Hand tool is espe-cially useful for finding your way around a document when you’re viewing it at ahigh magnification level. The higher the magnification level, the more you’re likelyto use the Hand tool.
To use the Hand tool, select it from the Hand tool slot in the toolbox.
To quickly access the Hand tool, press H, or press and hold the spacebar. Clickingand dragging the page moves the document around inside the document windowwhile the spacebar is held down. If you release the spacebar, you return to theprevious tool. This works for all tools, but the Type tool works a little differently. Ifyou’re currently using the Type tool in a text area, press Ô+spacebar (Ctrl+space-bar) to access the Zoom tool, and release Ô (Ctrl) while keeping the spacebarpressed to gain access to the Hand tool.
When you click in the document, be sure to click the side that you want to see.Clicking at the top of the document and dragging down enables you to scroll downthrough almost an entire document at a height of one window. Clicking in the centerand dragging enables you to scroll through only half a window’s size at a time. If thewindow of the document does not take up the entire screen space, you can con-tinue to drag right off the window into the empty screen space. Just be sure to clickfirst within the document that you want to scroll.
Be warned that Illustrator doesn’t include support for a scrolling mouse exceptin Mac OS X. A scrolling mouse includes a wheel button between the two buttons(if it’s a two-button mouse typical with Windows) that you can use to quickly scrollaround a page. The scrolling wheel has no effect on an Illustrator document.
The best thing about the Hand tool is that it works live. As you drag, the documentmoves under “your Hand.” If you don’t like where it is going, you can drag it back,still live. The second best thing is that accessing it requires only one keystroke, apress of the spacebar.
You cannot use Undo to reverse scrolling that you have done with the scroll barsand the Hand tool.
Note
Note
Tip
Note
03 53906X Ch01.qxd 10/3/03 9:04 AM Page 28
29Chapter 1 ✦ Understanding Illustrator’s Desktop
Scrolling with the Navigator paletteUse the red viewing rectangle in the Navigator palette to scroll quickly to anotherlocation within a document. Clicking and dragging within the red rectangle movesthe viewing area around “live,” whereas clicking outside the rectangle “snaps” theview to a new location.
You can change the red rectangle to another color by choosing the Palette Optionsin the Navigator palette pop-up menu.
For more on the features of the Navigator palette, see the section “Zooming withthe Navigator palette” earlier in this chapter.
Opening a new windowSo now you’ve learned how to zoom and pan around the document window, andyou probably have many different sections of your artwork that you want to focuson. Illustrator lets you create a number of windows for the current artwork usingthe Window ➪ New Window option.
This option creates a new window that is the same size as the current window. Youcan then zoom and pan within this new window while maintaining the previous win-dow. You can then place these windows side by side to see the artwork from twounique perspectives. Illustrator gives each new window a different reference num-ber, which appears in the title bar.
Working in Outline modeversus Preview mode
In the old days, everyone worked in Outline mode (previously called Artworkmode). In Outline mode you see only the “guts” of the artwork — the paths withoutthe fills and strokes applied. To see what the illustration looked like with the fillsand strokes applied, you had to switch to Preview mode. Usually the preview wasnot quite what you had in mind, but to make changes, you had to switch back toOutline, and then to Preview again to check, and so forth. Many users of Illustratorfrom that time refer to it as the golden age, with not a little trace of sarcasm.
Today, Illustrator enables you to edit your work in both Outline and Preview modes,each shown in Figure 1-17. You can print a document from either mode. Saving thedocument while you are in Outline mode does not affect anything in the document,but the next time you open it, it displays in Outline mode. The same thing applies toPreview mode: Whatever mode you are in is saved with the artwork.
Cross-Reference
Tip
03 53906X Ch01.qxd 10/3/03 9:04 AM Page 29
30 Part I ✦ Illustrator Basics
Figure 1-17: Artwork shown in both Outline mode (left) and Preview mode (right)
You cannot undo a Preview or Outline mode change (going from Preview to Outline,for example). If you make a Preview or Outline mode change and then close yourdocument, Illustrator asks you if you want to save changes, which in this casewould refer only to the view change.
The current view mode is always displayed in the title bar next to the docu-ment name.
Outline modeYou may find working with a drawing in Outline mode significantly faster than work-ing with it in Preview mode (discussed in the next section). In more complex draw-ings, the difference between Outline mode and Preview mode is significant,especially if you are working on a very slow computer. The speed that you gain iseven greater when the artwork contains gradients, patterns, placed artwork, andblends. Outline mode is much closer to what the printer sees — as paths. Pathsdefine the edges of the objects with which you are working.
For more on paths, see Chapter 3. To learn how to edit and select paths, seeChapter 5.
Getting used to Outline mode can take some time. Eventually, your brain can learnto know what the drawing looks like from seeing just the outlines, which show all of
Cross-Reference
03 53906X Ch01.qxd 10/3/03 9:04 AM Page 30
31Chapter 1 ✦ Understanding Illustrator’s Desktop
the paths. The one big advantage of Outline mode is that you can see every paththat isn’t directly overlapping another path. In Preview mode, many paths can behidden. In Outline mode, invisible masks are normally visible as paths, and you canselect paths that were hidden by the fills of other objects. To select paths in Outlinemode, you must click the paths directly or draw a marquee across them.
To change the current document to Outline mode, choose View ➪ Outline. InOutline mode, the illustration disappears and is replaced onscreen by outlines of allthe filled and stroked paths. Text that has yet to be converted into outlines looksfine, although it is always black. When you are in Outline mode, the View menu onlygives you an option to switch to Preview mode.
You can change how a placed image displays in Outline mode by selecting or des-electing the Show Placed Image option in the Document Setup dialog box. To dis-play the Document Setup dialog box, choose File ➪ Document Setup. A placedimage displays as a box if you check the Show Placed Images option. If you leavethis option unchecked, the image displays only black-and-white surrounded bya box.
Preview modeIn Preview mode, you can see which objects overlap, which objects are in front andin back, where gradations begin and end, and how patterns are set up. In otherwords, the document looks just the way it will look when you print it.
In Preview mode, the color you see on the screen only marginally represents whatthe actual output will be because of the differences between the way computermonitors work (red, green, and blue colors — the more of each color, the brightereach pixel appears) and the way printing works (cyan, magenta, yellow, and blackcolors — the more of each color, the darker each area appears). Monitor manufac-turers make a number of calibration tools that decrease the difference betweenwhat you see on the monitor and the actual output. You can also use softwaresolutions. One software solution, CIE calibration, is built into Adobe Illustrator(choose Edit ➪ Color Settings). OS X users can use ColorSync.
Choosing View ➪ Preview changes the view to Preview mode. When in Previewmode, the View menu only gives you the option to switch to Outline mode.
The biggest disadvantage of the Preview mode is that the Illustrator begins to drawand fill in the various parts of your image, which can take some time, especially ifyour computer is slow. When you change the image, the screen redraws. You canstop screen redraw by pressing Ô+Y (Ctrl+Y) at any time. This feature is useful ifyou want to make a small change but don’t want to wait for the redraw. Of course,pressing Ô+Y (Ctrl+Y) dumps you into Outline mode, but the redraw happenspretty much instantaneously.
Another disadvantage of Preview mode is being unable to select the path you wantto change in the image. Sometimes so much stuff appears on your screen, you don’t
Note
Note
03 53906X Ch01.qxd 10/3/03 9:04 AM Page 31
32 Part I ✦ Illustrator Basics
know what to click! This problem can become more complicated when you includefills in the mix, because the strokes on those paths are also visible. Instead ofselecting a path by clicking it, you can select entire paths by clicking the insides ofthose paths in a filled area.
The option that enables you to select an entire path by clicking in a filled area iscalled Area Select, activated by a checkbox (turned on by default) in the GeneralPreferences dialog box. You can access this dialog box by choosing Edit ➪
Preferences ➪ General.
For more on paths, see Chapter 3. To learn how to edit and select paths, seeChapter 5.
Overprint Preview modeDrawing in Illustrator often results in one or more objects overlapping each other,meaning that the colors of these objects overlap as well. When you print theseobjects, the top color blocks, or knocks out, anything below it. The advantage of usingthis feature is that your illustration becomes cheaper and easier for a printer togenerate. To see how your overprint will look after you’ve set the Overprint feature,you can view it in Overprint Preview mode by choosing View ➪ Overprint Preview.
For more on color and overprinting, see Chapters 6 and 15.
Pixel Preview modeBecause most Web-page graphics are pixel-based, this mode is specifically forgraphics that designers want to place on Web pages. This mode lets you viewimages before converting them to a Web graphics format. Choose View ➪ PixelPreview, and Illustrator places a checkmark next to the Pixel Preview option andthen shows a raster form of your image (see Figure 1-18).
For more on creating Web graphics, see Chapter 16.
Combining Outline and Preview modesUsing the Layers palette, you can easily combine Outline mode with either Previewor Preview Selection mode. You can force individual layers to display in Previewmode while other layers remain in Outline mode. This feature can be useful whenyou have a layer with a placed image, gradients, or patterns (or all three) thatwould normally slow down screen redraw and your workflow. You can place thoseimages on their own layer and set that layer to Outline mode. To combine Outlineand Preview mode in your document, place the object that you want in outline onits own layer and make that layer outline mode by pressing Ô (Ctrl) and clickingthe eyeball icon for that layer. Then leave the rest of the layers in Preview mode.
For a complete discussion on layers, see Chapter 7.Cross-Reference
Cross-Reference
Cross-Reference
Cross-Reference
Note
03 53906X Ch01.qxd 10/3/03 9:04 AM Page 32
33Chapter 1 ✦ Understanding Illustrator’s Desktop
Figure 1-18: With Illustrator’s Pixel Preview option, you can view an image in Previewmode (left) as well as Pixel Preview mode (right).
Using custom viewsIllustrator has a special feature called custom views that enables you to save spe-cial views of an illustration. Custom views contain view information, including mag-nification, location, and whether the illustration is in Outline or Preview mode. Ifyou have various layers or layer sets in Preview mode and others in Outline mode,custom views can also save that information. Custom views, however, do not recordwhether templates, rulers, page tiling, edges, or guides are shown or hidden.
To create a new view, set up the document in the way that you would like to savethe view. Then choose View ➪ New View and name the view in the New View dialogbox, shown in Figure 1-19. Each new view name appears at the bottom of the Viewmenu. No default keyboard shortcuts exist for these views, but you can create yourown shortcuts by using the Keyboard Shortcuts dialog box, available under the Editmenu. You can create up to 25 custom views. Custom views are saved with a docu-ment as long as you save it using the Illustrator format.
03 53906X Ch01.qxd 10/3/03 9:04 AM Page 33
34 Part I ✦ Illustrator Basics
Figure 1-19: This simple dialog box lets you name the new view.
If you find yourself continually going to a certain part of a document, zooming inor out, and changing back and forth between Preview and Outline mode, thatdocument is a prime candidate for creating custom views. Custom views are helpfulfor showing clients artwork that you created in Illustrator. Instead of fumblingaround in the client’s presence, you can, for example, show the detail in a logoinstantly if you have preset the zoom factor and position and have saved the imagein a custom view.
After you create a view, you can edit the view name or delete the view by choosingView ➪ Edit Views option. Doing this opens the Edit Views dialog box, shown inFigure 1-20. To rename the view, select it and type the new name in the Name field.To delete a view, select it and press the Delete button.
Figure 1-20: You can use the Edit Views dialog box to rename or delete custom views.
Using screen modesSo you’ve been working on an illustration for an important client (actually they allare important) and the client scheduled an appointment to see your progress, butthe best part of the work is hidden behind the palettes and the toolbox. You canturn off the palettes and the toolbox in the Window menu or you can press theF key to switch between the different screen modes.
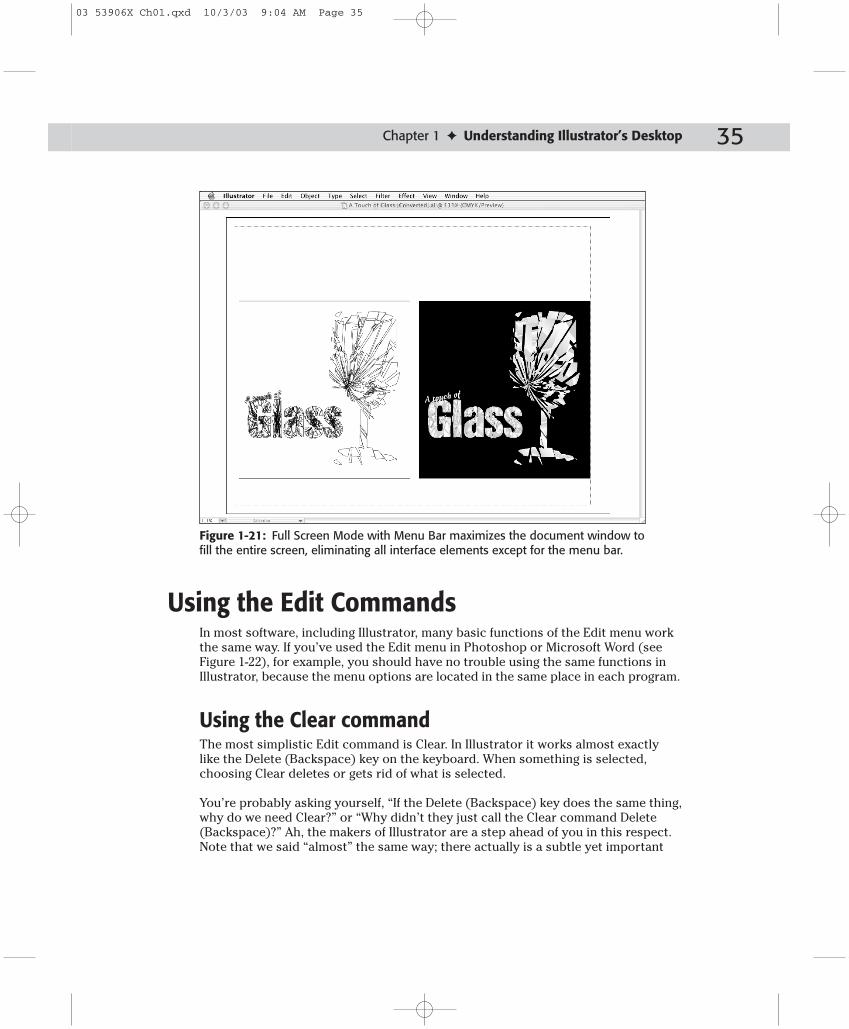
Illustrator uses three different screen modes represented by the three icon buttonsat the bottom of the toolbox. They are Standard Screen Mode, Full Screen Modewith Menu Bar, and Full Screen Mode. You can toggle among these modes using theF keyboard shortcut. Figure 1-21 shows artwork in Full Screen Mode with Menu Bar.
03 53906X Ch01.qxd 10/3/03 9:04 AM Page 34
35Chapter 1 ✦ Understanding Illustrator’s Desktop
Figure 1-21: Full Screen Mode with Menu Bar maximizes the document window to fill the entire screen, eliminating all interface elements except for the menu bar.
Using the Edit CommandsIn most software, including Illustrator, many basic functions of the Edit menu workthe same way. If you’ve used the Edit menu in Photoshop or Microsoft Word (seeFigure 1-22), for example, you should have no trouble using the same functions inIllustrator, because the menu options are located in the same place in each program.
Using the Clear commandThe most simplistic Edit command is Clear. In Illustrator it works almost exactlylike the Delete (Backspace) key on the keyboard. When something is selected,choosing Clear deletes or gets rid of what is selected.
You’re probably asking yourself, “If the Delete (Backspace) key does the same thing,why do we need Clear?” or “Why didn’t they just call the Clear command Delete(Backspace)?” Ah, the makers of Illustrator are a step ahead of you in this respect.Note that we said “almost” the same way; there actually is a subtle yet important
03 53906X Ch01.qxd 10/3/03 9:04 AM Page 35
36 Part I ✦ Illustrator Basics
difference in what the Clear command does and what the Delete (Backspace) keydoes, due to Illustrator’s abundant use of palettes.
Figure 1-22: The various commands underthe Edit menu help you to quickly cut, copy,and paste objects from place to place, as wellas help you undo and redo previously appliedcommands.
If you are working on a palette and have just typed a value in an editable text field,the Delete (Backspace) key deletes the last character typed. If you tabbed down orup to an editable text field, highlighting text or dragged across text in an editabletext field, highlighting text, then the Delete (Backspace) key deletes the highlightedcharacters. In all three situations, the Clear command deletes anything that isselected in the document.
Cutting, copying, and pastingThe Cut, Copy, and Paste commands in Illustrator are very handy. Copying and cut-ting selected objects places them on the clipboard, which is a temporary holdingplace for objects that have been cut or copied. After you place an object on the clip-board, you can paste it in the center of the same document, the same location as thecut or copied object, or another document in Illustrator, InDesign, or Photoshop.
Choosing Cut from the Edit menu deletes the selected objects and copies them tothe clipboard, where they are stored until you cut or copy another object or until
03 53906X Ch01.qxd 10/3/03 9:04 AM Page 36
37Chapter 1 ✦ Understanding Illustrator’s Desktop
you shut down or restart your computer. Quitting Illustrator does not removeobjects from the clipboard. Cut is not available when no object is selected.
Choosing Copy from the Edit menu works like Cut, but it doesn’t delete the selectedobjects. Instead, it just copies them to the Clipboard, at which time you can choosePaste and slap another copy onto your document.
Choosing Paste from the Edit menu places any objects on the Clipboard into thecenter of the document window. If you select text with the Type tool, or copy textfrom another application to the Clipboard, you must select either a Rectangle type,Area type, Path type, or point type area with the Type tool. Paste is not available ifnothing is in the clipboard.
The Type tool is located in the toolbox. For more information on the toolbox, seethe section “The Toolbox” earlier in this chapter.
Alternatively, you can use the Paste in Front (Ô/Ctrl+F) and Paste in Back(Ô/Ctrl+B) options to position the object you are pasting relative to other objects.
Now, the really cool part: Just because you’ve pasted the object somewhere doesn’tmean it isn’t in the clipboard anymore. It is! You can paste again and again, andkeep on pasting until you get bored or until your page is an indecipherable mess,whichever comes first. The most important rule to remember about Cut, Copy, andPaste is that whatever is currently in the clipboard will be replaced by anythingthat subsequently gets cut or copied to the Clipboard.
Cut, Copy, and Paste also work with text that you type in a document. Using theType tools, you can select type, cut or copy it, and then paste it. When you’re past-ing type, it will go wherever your blinking text cursor is located. If you have typeselected (highlighted) and you choose Paste, the type that was selected is replacedby whatever you had on the Clipboard.
You can cut or copy as much or as little of an illustration as you choose; you areonly limited by your hard disk space (which is only used if you run out of RAM). Agood rule of thumb is that, if you ever get a message saying you can’t cut or copybecause you are out of hard disk space, it’s time to start throwing out stuff on yourhard drive that you don’t need. Or, simply get a bigger hard drive.
Thanks to the Adobe PostScript capability on the clipboard, Illustrator can copypaths to other Adobe software, including InDesign, and Photoshop. Paths created inthose packages (with the exception of InDesign) can be pasted into Illustrator. WithPhotoshop, you have the option of pasting your clipboard contents as rasterizedpixels instead of as paths.
You have the ability to drag Illustrator artwork from an Illustrator document rightinto a Photoshop document. In addition, because Adobe lets you move things in
Note
Cross-Reference
03 53906X Ch01.qxd 10/3/03 9:04 AM Page 37
38 Part I ✦ Illustrator Basics
both directions, you can drag a Photoshop selection from any Photoshop documentright into an Illustrator document.
Undoing and redoingYou can keep undoing in Illustrator until you run out of either computer memory orpatience. After you undo, you can redo by choosing Redo, which is found right belowUndo in the Edit menu. And, guess what — you can redo everything you’ve undone.
Choosing Undo from the Edit menu undoes the last activity that was performed onthe document. Successive undos undo more and more activities, until the docu-ment is at the point where it was opened or created or you have run out of memory.
Choosing Redo from the Edit menu redoes the last undo. You can continue to redoundos until you are back to the point where you started undoing or you performanother activity, at which time you can no longer redo any previous undos.
If you undo a couple of times and then do something, you won’t be able to redo. Youhave to undo the last thing you did and then actually do everything again. In otherwords, all the steps that you undid are gone. It’s fine to use the Undo feature to goback and check out what you did, but after you have used multiple undos, don’t doanything if you want to redo back to where you started undoing from. Got that?
SummaryIn this chapter, you learned:
✦ Illustrator may seem difficult to learn at first, but with this book and a bit ofdedication, you can master it.
✦ Illustrator has many keyboard shortcuts that increase productivity.
✦ Adobe has kept the interface similar through its products.
✦ The document window, toolbox, palettes, menu, and status bar look the samein many Adobe applications.
✦ You can view Illustrator documents at virtually any magnification level with-out actually changing them.
✦ Use the Hand tool to scroll around your document.
✦ Illustrator’s Outline mode lets you see paths without their strokes and fills.
✦ Cut, Copy, and Paste are under the Edit menu with Undo and Redo.
✦ Illustrator provides virtually unlimited undos and redos.