Cine-W Owner’s Manual CW-0814 TO THE INSTALLER: BE SURE TO LEAVE THIS MANUAL WITH THE OWNER. • TO THE OWNER • INSTALLATION INSTRUCTIONS • OPERATING THE SCREEN • MAINTENANCE Wall mount Stage fly (hanging) mount T-stand
Transcript
Cine-WOwner’s Manual
CW-0814
TO THE INSTALLER : BE SURE TO LEAVE THIS MANUAL WITH TH E OWNER.
Congratulations on your purchase of one of the finest optical viewingscreens available anywhere in the world!
Please take a moment to review this manual, it will help ensure you manyyears of trouble-free service from your new Stewart Filmscreen product.
About the Cine-W
Your Cine-W fixed frame supports superwide formats such asCinemascope. The frame acts as a projection overscan border. The VeLuxfinish is designed to absorb any overscanning.
The screen fabric attaches to the frame using hooks and grommets.
The standard mount is a wall mount; other options include T-stand self-supporting and stage fly (hanging) mounts.
Using this manual for installation
If you are using this manual to inst all the Cine-W, you should be aware thatit describes procedures for several types of mounts. You must refer to thesection for the type of screen mount. In addition, there are instructions forattaching the screen to the frame that are provided in a separate section.This procedure is to be performed at a specific step in the overall sequence.
For the frame and mount type, refer to the appropriate section:
Wall mount
Stage fly (hanging mount)
T-stand
At the designated point in the inst allation, you will need to refer to thegeneral instructions for attaching the screen to the frame.
2 Stewart Filmscreen Corporation
TO THE OWNER
Professional mounting techniques should be used. Stewart FilmscreenCorporation cannot be liable for substandard or faulty installations.
This section describes assembly of a wall mount screen.
Assembling the frame 1. Connect the frame members by matching the colored, numbered
dots on the ends of the frame pieces. Refer to Figure 1.
2. Secure frame members with the supplied 5/8” hex head bolts.
Cine-W: Owner’s Manual 3
WALL MOUNT
Figure 1: Assembling the frame
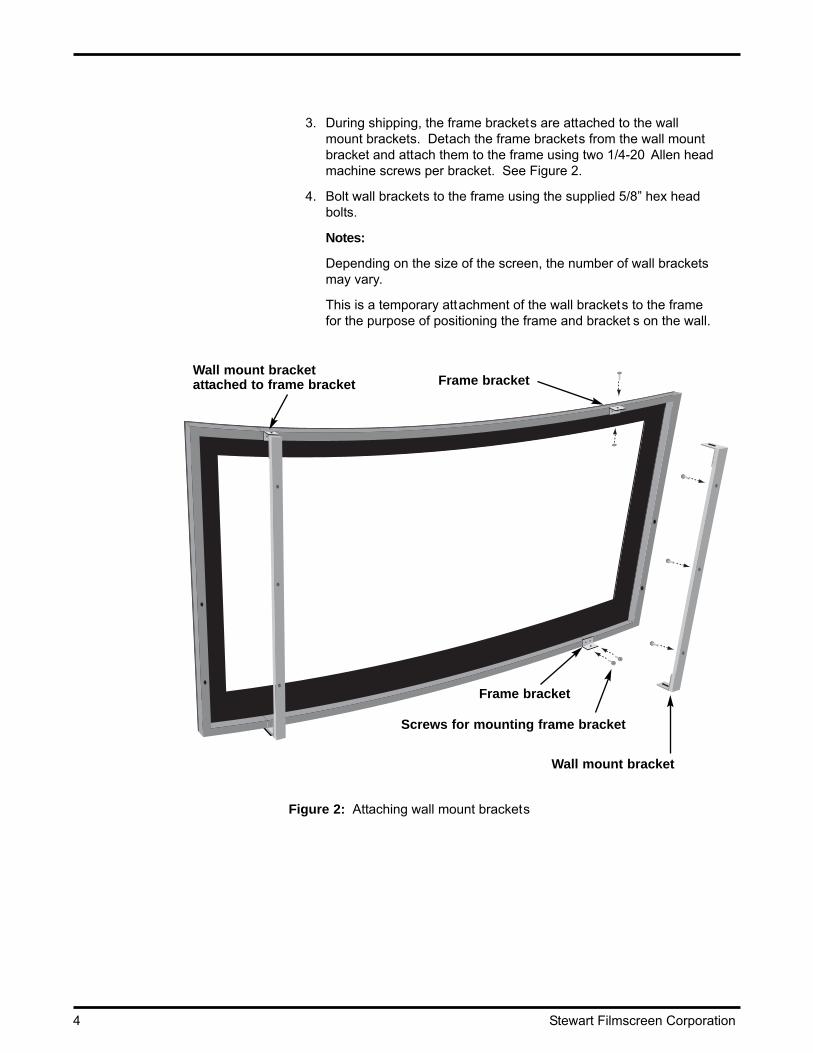
3. During shipping, the frame brackets are attached to the wallmount brackets. Detach the frame brackets from the wall mountbracket and attach them to the frame using two 1/4-20 Allen headmachine screws per bracket. See Figure 2.
4. Bolt wall brackets to the frame using the supplied 5/8” hex headbolts.
Notes:
Depending on the size of the screen, the number of wall bracketsmay vary.
This is a temporary attachment of the wall brackets to the framefor the purpose of positioning the frame and bracket s on the wall.
4 Stewart Filmscreen Corporation
Figure 2: Attaching wall mount brackets
Wall mount bracket
Screws for mounting frame bracket
Frame bracket
Frame bracket
Wall mount bracketattached to frame bracket
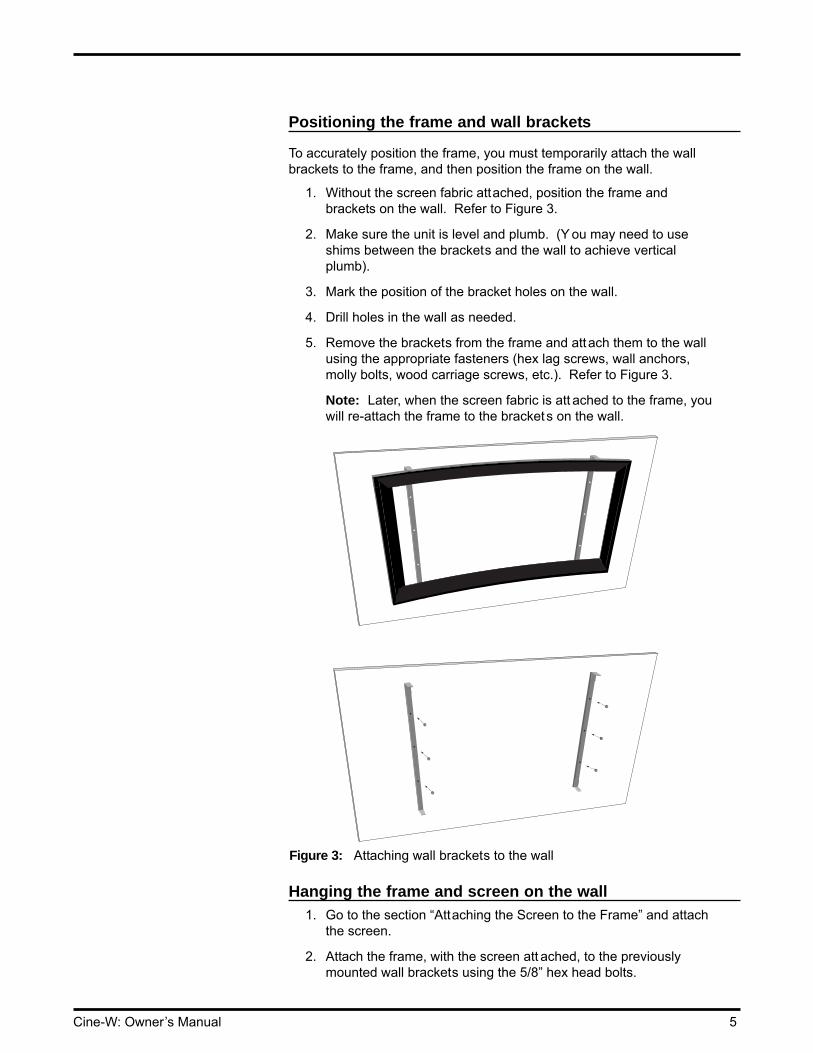
Positioning the frame and wall brackets
To accurately position the frame, you must temporarily attach the wallbrackets to the frame, and then position the frame on the wall.
1. Without the screen fabric attached, position the frame andbrackets on the wall. Refer to Figure 3.
2. Make sure the unit is level and plumb. (Y ou may need to useshims between the brackets and the wall to achieve verticalplumb).
3. Mark the position of the bracket holes on the wall.
4. Drill holes in the wall as needed.
5. Remove the brackets from the frame and attach them to the wallusing the appropriate fasteners (hex lag screws, wall anchors,molly bolts, wood carriage screws, etc.). Refer to Figure 3.
Note: Later, when the screen fabric is att ached to the frame, youwill re-attach the frame to the brackets on the wall.
Hanging the frame and screen on the wall1. Go to the section “Attaching the Screen to the Frame” and attach
the screen.
2. Attach the frame, with the screen att ached, to the previouslymounted wall brackets using the 5/8” hex head bolts.
Cine-W: Owner’s Manual 5
Figure 3: Attaching wall brackets to the wall
Professional mounting techniques should be used. Stewart FilmscreenCorporation cannot be liable for substandard or faulty installations.
As an alternative to the wall mount, you can use the stage fly mount tosuspend the screen.
1. Assemble the frame. Refer to the section “Assembling theFrame” and Figure 1.
2. Go to the section “Attaching the Screen to the Frame” and attachthe screen.
3. Hang the frame from the eyebolts as shown in Figure 4.
6 Stewart Filmscreen Corporation
STAGE FLY (HANGING) MOUNT
Eyebolts
Figure 4: Completed stage fly mount installation
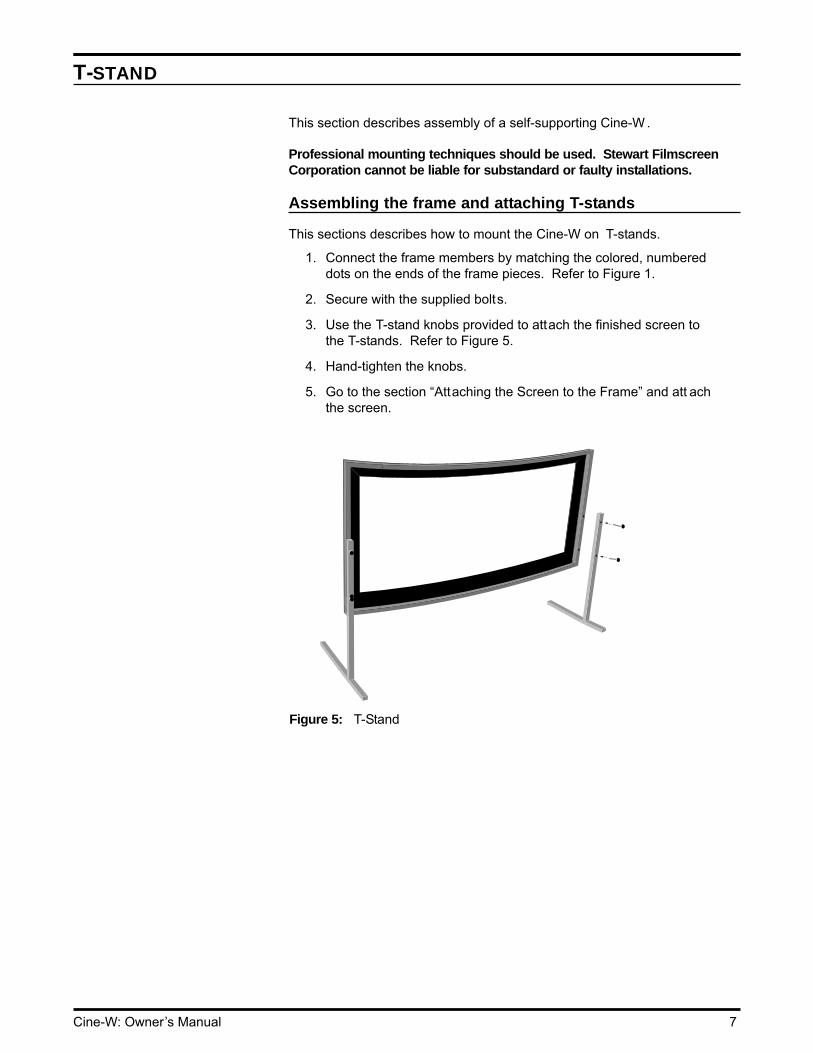
This section describes assembly of a self-supporting Cine-W.
Professional mounting techniques should be used. Stewart FilmscreenCorporation cannot be liable for substandard or faulty installations.
Assembling the frame and attaching T-stands
This sections describes how to mount the Cine-W on T-stands.
1. Connect the frame members by matching the colored, numbereddots on the ends of the frame pieces. Refer to Figure 1.
2. Secure with the supplied bolts.
3. Use the T-stand knobs provided to attach the finished screen tothe T-stands. Refer to Figure 5.
4. Hand-tighten the knobs.
5. Go to the section “Attaching the Screen to the Frame” and att achthe screen.
Cine-W: Owner’s Manual 7
T-STAND
Figure 5: T-Stand
This section provides the instructions for att aching the screen to the frame.DO NOT perform this step UNTIL instructed to do so in the section for thespecific type of mount you are using.
Unpacking and unrolling the screen
The viewing side of the projection screen is rolled to the inside to protectthe optical coating. The screen is rolled lengthwise.
1. Remove the screen from the cardboard shipping tube.
2. On a clean flat surface, unroll screen viewing side up.
Attaching the screen to the frame
You will attach the screen to the top left corner of the frame first, then alongthe top, then the sides, then the bottom. Read the tips and follow theprocedure sequence.
Tips for attaching the screen to the frame
Read all instructions prior to beginning.
During packing and transit, the screen may shrink. The Stewartscreen material has some elasticity, and will stretch and springback. The grommeted edge binding will not stretch past themanufactured outer dimensions. After the screen is attached tothe frame, some tension will be apparent at each grommet.
Handle the screen carefully. Avoid contact of the screen fabricwith fingernails. Grasp the screen edge binding only .
As you finish attaching each section, take a moment to pause andinspect the screen to ensure that it is not pulling or stretching insuch a way that it may tear .
8 Stewart Filmscreen Corporation
ATTACHING THE SCREEN TO THE FRAME
Caution Be careful not to touch or scratch the image surface
with fingernails.
Do not use any tools to fasten the screen to the frame.
Do not fold or crease the screen.
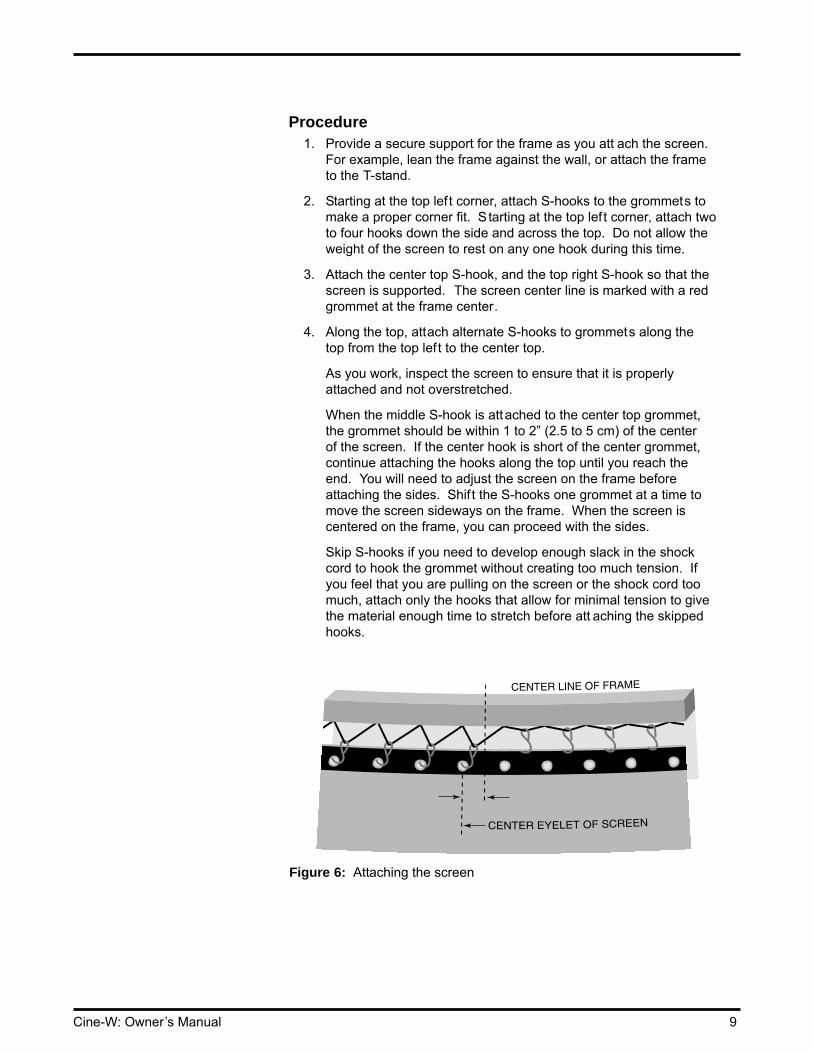
Procedure1. Provide a secure support for the frame as you att ach the screen.
For example, lean the frame against the wall, or attach the frameto the T-stand.
2. Starting at the top lef t corner, attach S-hooks to the grommets tomake a proper corner fit. S tarting at the top lef t corner, attach twoto four hooks down the side and across the top. Do not allow theweight of the screen to rest on any one hook during this time.
3. Attach the center top S-hook, and the top right S-hook so that thescreen is supported. The screen center line is marked with a redgrommet at the frame center.
4. Along the top, attach alternate S-hooks to grommets along thetop from the top lef t to the center top.
As you work, inspect the screen to ensure that it is properlyattached and not overstretched.
When the middle S-hook is attached to the center top grommet,the grommet should be within 1 to 2” (2.5 to 5 cm) of the centerof the screen. If the center hook is short of the center grommet,continue attaching the hooks along the top until you reach theend. You will need to adjust the screen on the frame beforeattaching the sides. Shif t the S-hooks one grommet at a time tomove the screen sideways on the frame. When the screen iscentered on the frame, you can proceed with the sides.
Skip S-hooks if you need to develop enough slack in the shockcord to hook the grommet without creating too much tension. Ifyou feel that you are pulling on the screen or the shock cord toomuch, attach only the hooks that allow for minimal tension to givethe material enough time to stretch before att aching the skippedhooks.
Cine-W: Owner’s Manual 9
Figure 6: Attaching the screen
5. Attach the screen to the sides of the frame, att aching every otherS-hook from the top to the center. If the screen edge is morethan 1 to 2” (2.5 to 5 cm) from the frame on the right side, allow afew minutes for the screen to stretch before continuing. Tensionshould be even; the top of screen and frame should be parallel.
Attach the S-hooks on the lef t side, from top to bottom.
Attach the S-hooks on the right side, from top to bottom.
6. Inspect the screen to ensure that it is properly attached and notoverstretched. Check for even tension.
7. Attach the screen to the bottom of the frame, using thetechniques described below.
Begin attaching the bottom in the corners, being careful not to puttoo much tension on any grommets.
Work from the left corner toward the center, attach every other S-hook.
If there is too much tension, wait to allow the screen time tostretch as needed.
Starting at the right corner, attach the every other S-hook alongthe bottom, working toward the center.
8. When screen fabric is sufficiently stretched, attach all remainingS-hooks along the top, sides, and the bottom.
9. Make a final inspection of the screen to verify that it is attachedproperly and the corners are free from uneven tension.Excessive stress (improper screen alignment) will cause tears toeventually develop.
10 Stewart Filmscreen Corporation
With reasonable care, you may expect many years of trouble-free use ofyour Stewart projection screen.
Refer to the following guidelines if you encounter a di� culty in the operationof your Stewart Filmscreen. Problems related to electrical or motor functionmay require a quali�ed service person or electrician.
Should you have a problem that is not addressed here, call the StewartFilmscreen Corporation.
Cine-W: Owner’s Manual 11
TROUBLESHOOTING
Problem description Probable cause Action to take
Dirt, �ngerprints, marks, etc. on screen surface
Improper handling of screen Brush o� or use a mild detergent solution with clean rag or cotton swab.
Perimeter or corner wrinkling Screen not properly centered onto frame
Readjust screen mounting as required. Check all center attachment points.
With reasonable care, you may expect many years of trouble-free use ofyour Stewart projection screen.
General maintenance
The surface of your screen is delicate. Special attention to theseinstructions should be followed when cleaning.
A draftsman-style brush may be used to lightly whisk away anyloose dirt or dust particles. (This type of brush is usuallyavailable at office supply stores.) Stewart Filmscreen has anoptional screen cleaning kit that contains the proper type ofbrush. Contact your dealer if you would like to obt ain thiscleaning kit.
For tougher spots, use a solution of mild detergent and water .Rub lightly using a sponge. Blot with a damp sponge to absorbexcess water. Residual water marks will evaporate within a fewminutes.
Do not use any other cleaning materials on the screen. Contact the factoryif you have questions about removing difficult spots.
VeLux covering Use a lint roller to remove p articles from the VeLux material.
A brush can be used to comb (lif t) the nap of the VeLux materialto help eliminate depression marks.
Replacement parts and service
No user-serviceable parts are contained within the unit. Contact your dealeror the factory if you require part replacement or service.
12 Stewart Filmscreen Corporation
SCREEN CARE AND CLEANING
CautionDo not use chemicals or liquid to clean the fabric.
LIMITED ONE (1) YEAR WARRANTY ON STEWART FILMSCREENCORP PROJECTION SCREENS SYSTEM
STEWART FILMSCREEN CORPORATION (Stewart) warrants its screens tothe original purchaser only, to be free from defects in materials andworkmanship for a period of one (1) year from the date of purchase by theoriginal purchaser or eighteen (18) months from date of manufacture, asdefined in the serial number, provided they are properly operated andmaintained according to Stewart instructions and are not damaged due toimproper handling or treatment af ter shipment from the factory.
This warranty does not apply to equipment showing evidence of misuse,abuse, or accidental damage, including neglect caused by improperinstallation (i.e. proximity to hot lights, exposure to extreme heat or cold,exposure to excessive humidity, etc.) as well as product that have beentampered with or repaired by any person or third party installation, otherthan authorized Stewart personnel.
Stewart's sole obligation under this warranty shall be to repair or to replace(at Stewart's sole discretion) the defective part of the merchandise. Thiswarranty expressly does not cover any cost s of removal, installation,framing, or other costs incident to replacing the screen or returning it toStewart. Returns for service should be made to your Stewart dealer. If it isnecessary for the dealer to return the screen or part to Stewart,transportation (freight) expenses to and from Stewart are payable by thepurchaser and Stewart is not responsible for damage in shipment. Toprotect yourself against damage or loss in transit, insure the product andprepay all transportation expenses.
This warranty is in lieu of all other warranties, expressed or implied,including warranties as to fitness for use and merchant ability. Any impliedwarranties of fitness for use, or merchant ability, that may be mandated bystatue or rule of law are limited to the one (1) year warranty period. Thiswarranty gives you specific legal rights, and you may also have other rightswhich vary from state-to-state. In no event will Stewart be liable for sums inexcess of the purchase price of the product. No liability is assumed byStewart for expenses or damages resulting from interruption in operation ofequipment, or for incidental, direct, or consequential damages of anynature.
In the event that there is a defect in materials or workmanship of a StewartScreen, you may contact our Customer Service Department at 1161 W Sepulveda Blvd, Torrance, California 90502-2797 (310-784-5300) Toll free (800-762-4999).
IMPORTANT: This warranty shall not be valid and Stewart shall not bebound by this warranty if the product is not operated and maintained inaccordance with Stewart's written instructions.
Stewart Filmscreen Corporation shall not be liable for any and allconsequential damage(s) occasioned by the breach of any written orimplied warranty pertaining to the sale in excess of the purchase priceof the product sold.