Cisco CUCM Setup for Q-SYS Cisco Unified Communications Manager 10.5 Revision 2.0—20 September 2016 Issue date: 20 September 2016 Based on CUCM version 10.5. Concepts apply to other versions of CUCM. Preliminary When you add users and extensions to the Cisco Unified Communications Management (CUCM) system, make sure you have adequate licensing to proceed. The Q-SYS Core is a third-party SIP endpoint in the CUCM system, and therefore each extension may require available licenses. Purchase any needed licenses from Cisco. NOTE: QSC Softphone requires SIP V2 early offer for proper functionality. Security Profile You must first have a Security Profile set up in Cisco Unified CM Management. To create one or to verify that you have an existing one, select System > Security Profile > Phone Security Profile. 1. To find an existing profile, enter the search parameters, patterns, and text, if there are any. Click Find. Click on the record that you need to view. 2. To add a new profile, click Add New. Select Phone Security Profile Type. Then select Third- party SIP Device (Basic). 3. In the Phone Security Profile Configuration page, enter the information shown in Figure 1. Click Save.
Transcript
Cisco CUCM Setup for Q-SYS Cisco Unified Communications Manager 10.5
Revision 2.0—20 September 2016
Issue date: 20 September 2016
Based on CUCM version 10.5. Concepts apply to other versions of CUCM.
Preliminary
When you add users and extensions to the Cisco Unified Communications Management (CUCM)
system, make sure you have adequate licensing to proceed. The Q-SYS Core is a third-party SIP
endpoint in the CUCM system, and therefore each extension may require available licenses. Purchase
any needed licenses from Cisco.
NOTE: QSC Softphone requires SIP V2 early offer for proper functionality.
Security Profile
You must first have a Security Profile set up in Cisco Unified CM Management. To create one or to
verify that you have an existing one, select System > Security Profile > Phone Security Profile.
1. To find an existing profile, enter the search parameters, patterns, and text, if there are any.
Click Find. Click on the record that you need to view.
2. To add a new profile, click Add New. Select Phone Security Profile Type. Then select Third-
party SIP Device (Basic).
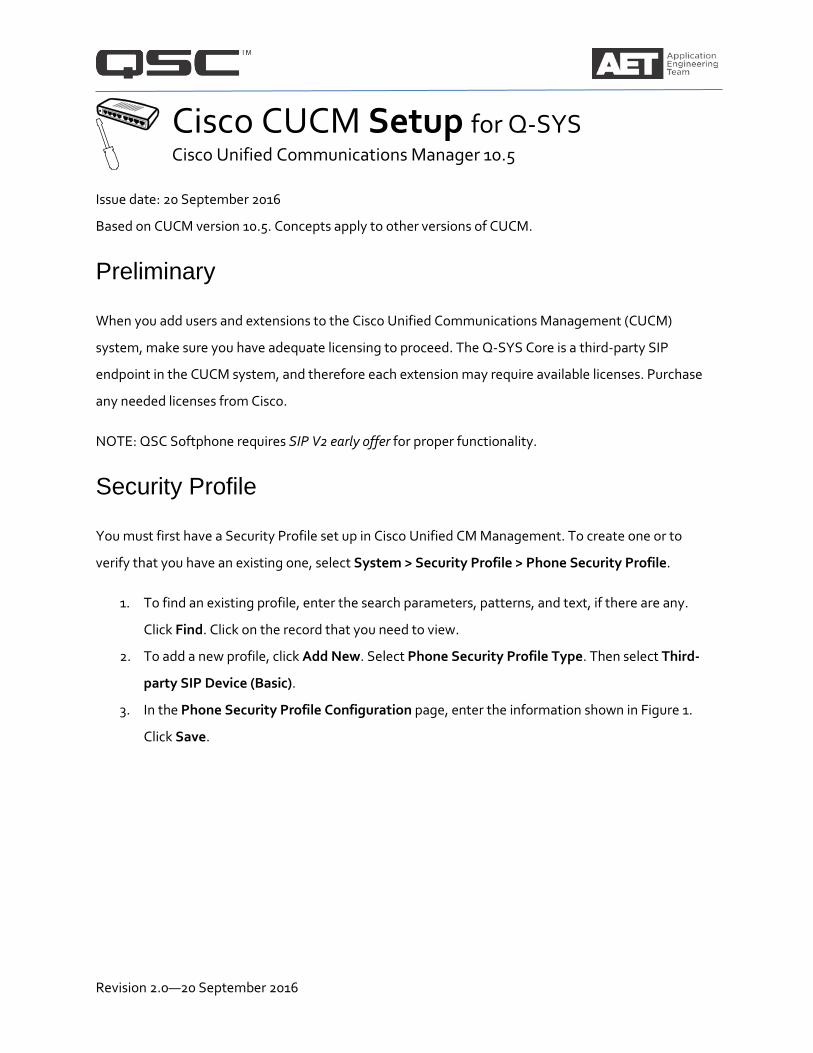
3. In the Phone Security Profile Configuration page, enter the information shown in Figure 1.
Click Save.
Figure 1
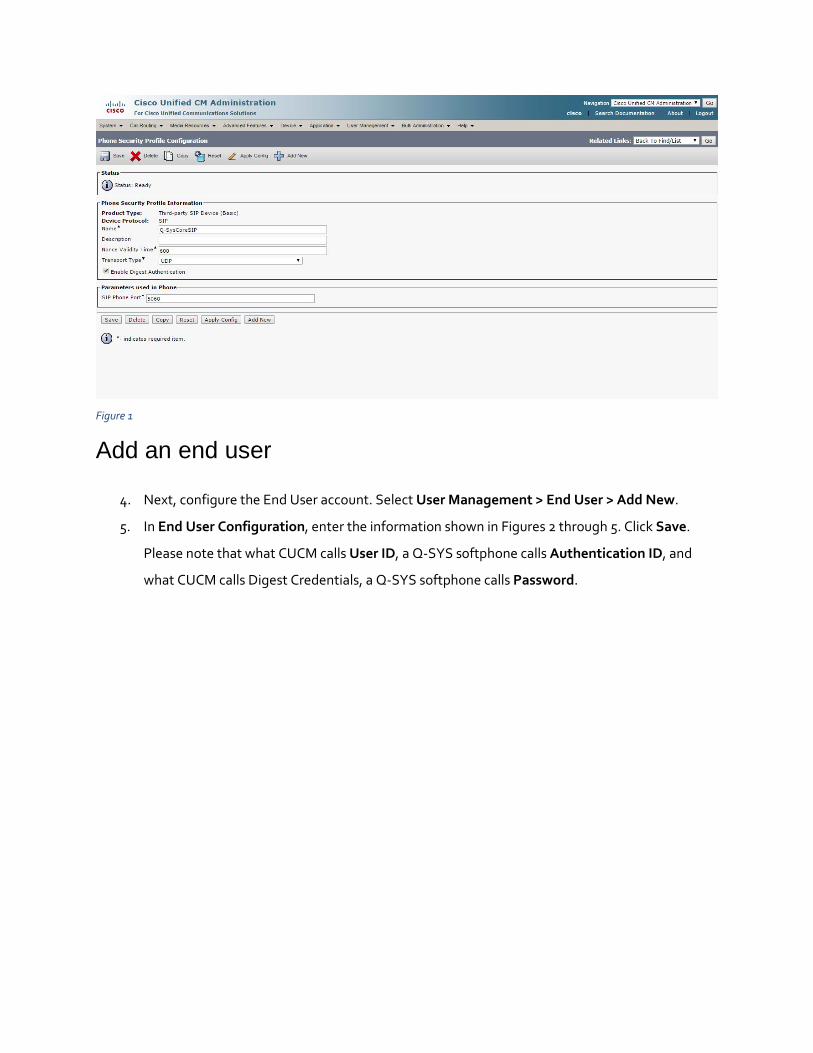
Add an end user
4. Next, configure the End User account. Select User Management > End User > Add New.
5. In End User Configuration, enter the information shown in Figures 2 through 5. Click Save.
Please note that what CUCM calls User ID, a Q-SYS softphone calls Authentication ID, and
what CUCM calls Digest Credentials, a Q-SYS softphone calls Password.
Figure 2. User Information
Figure 3. Service Settings and Device Information
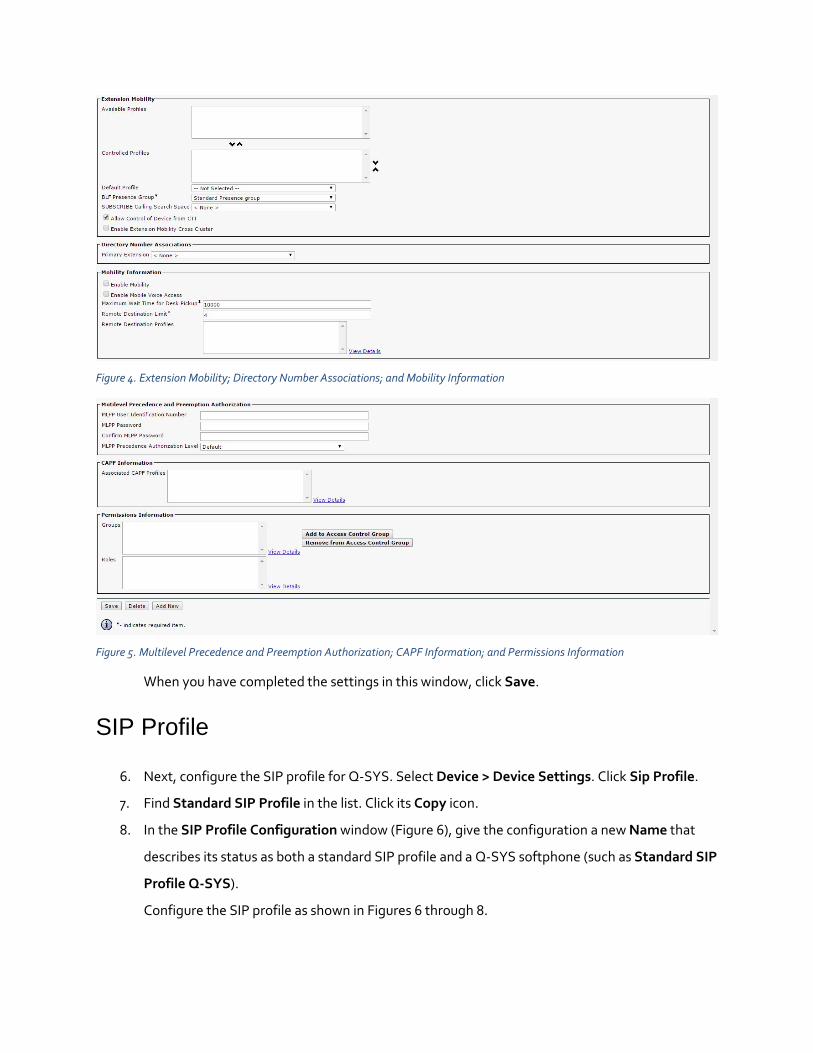
Figure 4. Extension Mobility; Directory Number Associations; and Mobility Information
Figure 5. Multilevel Precedence and Preemption Authorization; CAPF Information; and Permissions Information
When you have completed the settings in this window, click Save.
SIP Profile
6. Next, configure the SIP profile for Q-SYS. Select Device > Device Settings. Click Sip Profile.
7. Find Standard SIP Profile in the list. Click its Copy icon.
8. In the SIP Profile Configuration window (Figure 6), give the configuration a new Name that
describes its status as both a standard SIP profile and a Q-SYS softphone (such as Standard SIP
Profile Q-SYS).
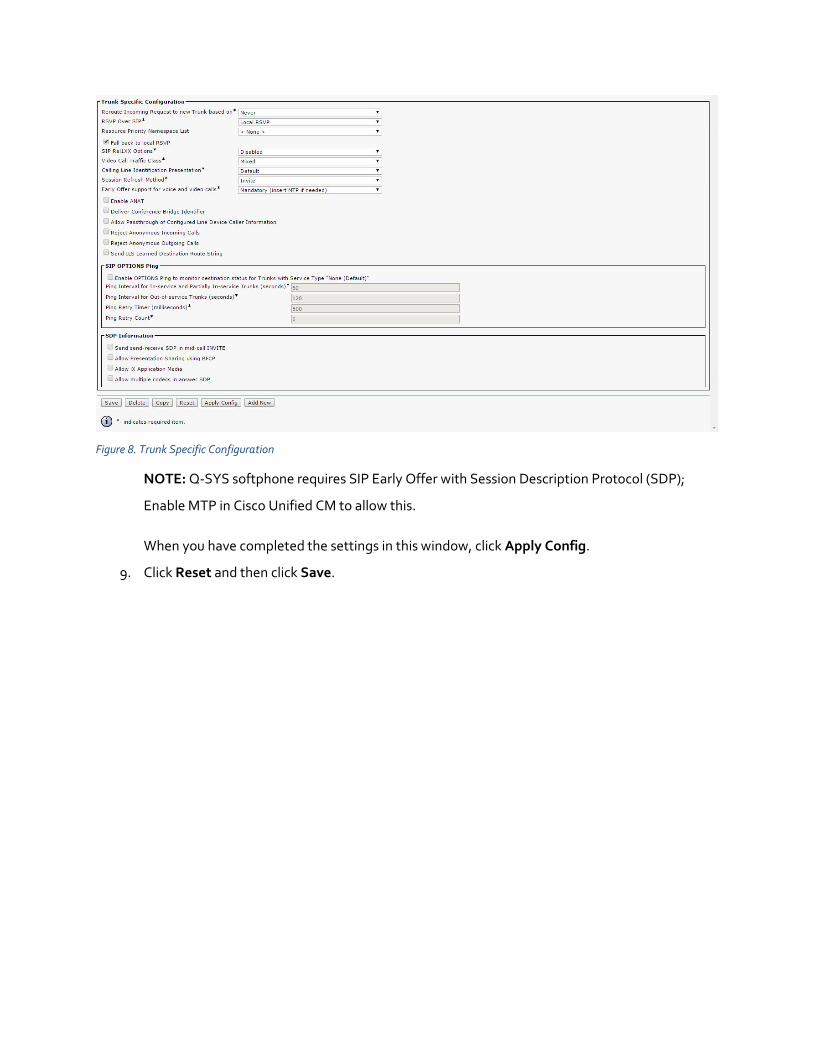
Configure the SIP profile as shown in Figures 6 through 8.
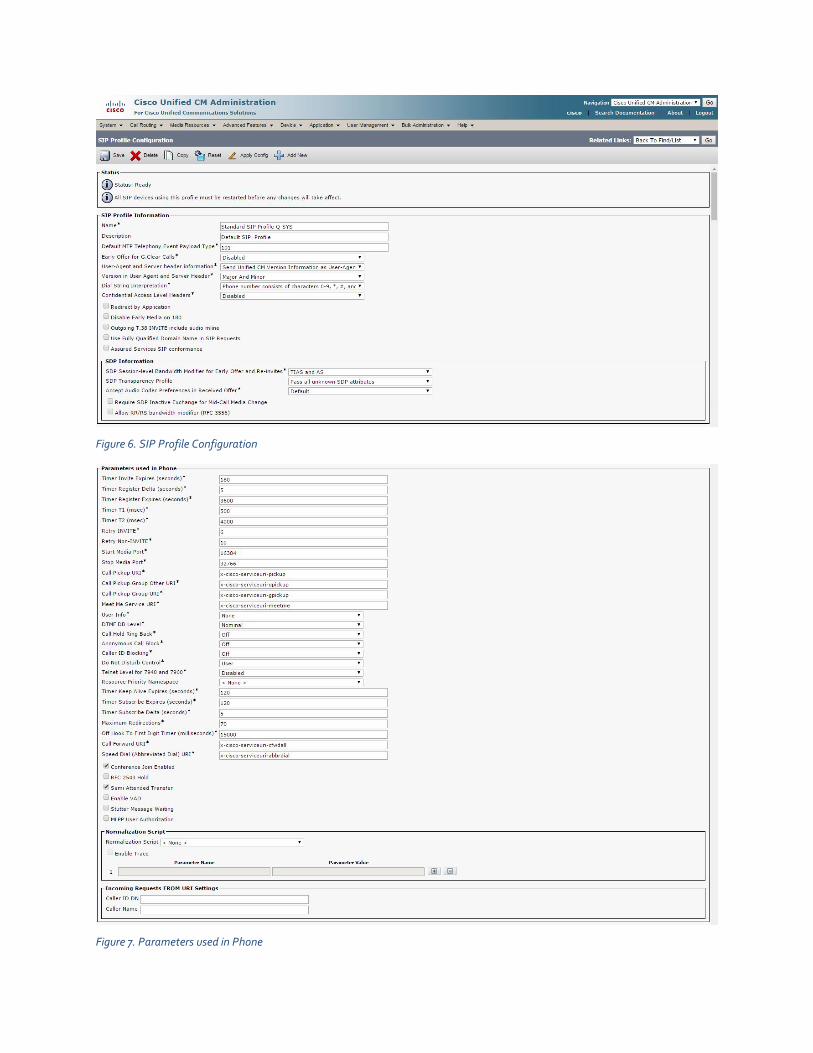
Figure 6. SIP Profile Configuration
Figure 7. Parameters used in Phone
Figure 8. Trunk Specific Configuration
NOTE: Q-SYS softphone requires SIP Early Offer with Session Description Protocol (SDP);
Enable MTP in Cisco Unified CM to allow this.
When you have completed the settings in this window, click Apply Config.
9. Click Reset and then click Save.
Add and configure a Q-SYS phone
10. Select Device > Phone. Click Add New. In Phone Type, select Third-party SIP Device (Basic) and
click Next.
11. Configure the settings as shown in Figures 9 through 11.
Figure 9. Device Information
Figure 10. Number Presentations Transformation; Protocol Specific Information
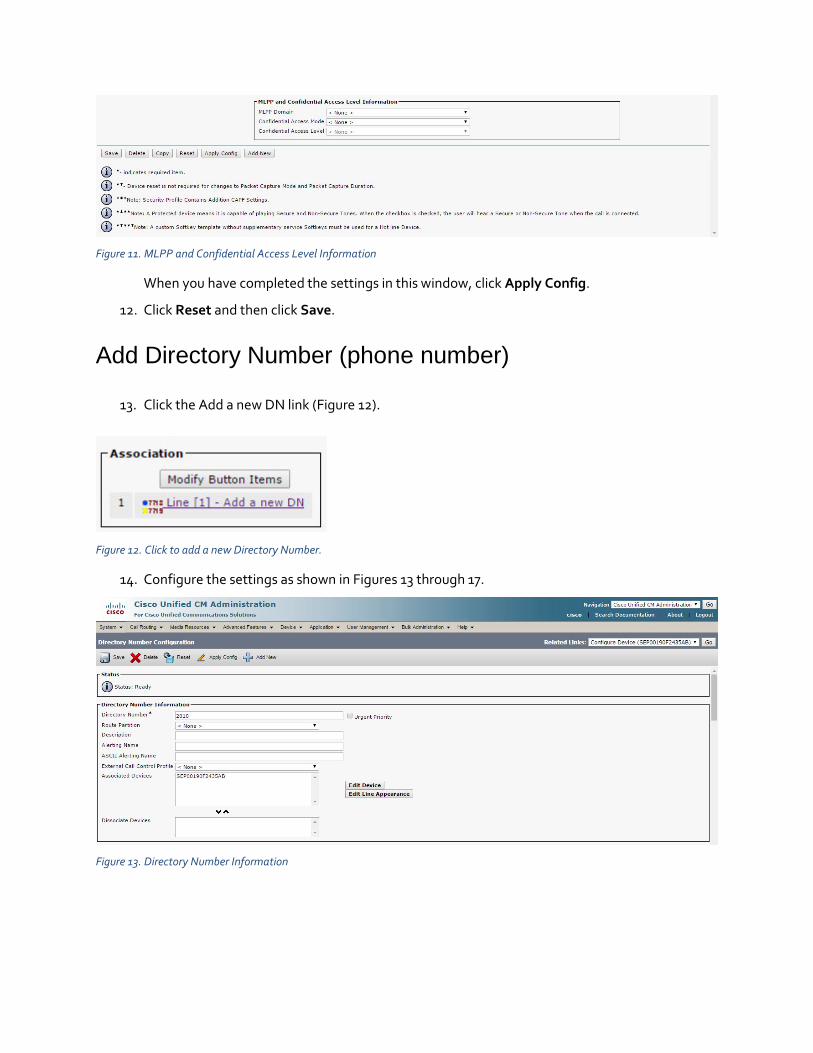
Figure 11. MLPP and Confidential Access Level Information
When you have completed the settings in this window, click Apply Config.
12. Click Reset and then click Save.
Add Directory Number (phone number)
13. Click the Add a new DN link (Figure 12).
Figure 12. Click to add a new Directory Number.
14. Configure the settings as shown in Figures 13 through 17.
Figure 13. Directory Number Information
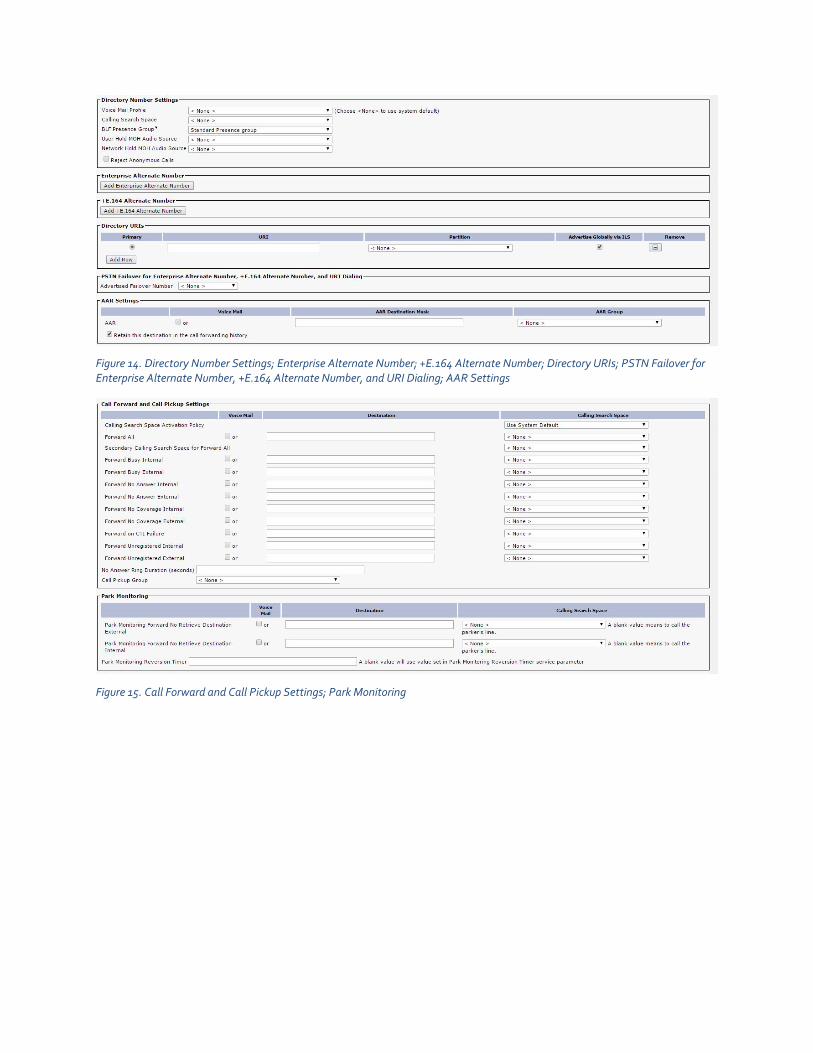
Figure 14. Directory Number Settings; Enterprise Alternate Number; +E.164 Alternate Number; Directory URIs; PSTN Failover for Enterprise Alternate Number, +E.164 Alternate Number, and URI Dialing; AAR Settings
Figure 15. Call Forward and Call Pickup Settings; Park Monitoring
Figure 16. MLPP Alternate Party and Confidential Access Level Settings; Line Settings for All Devices; Line 1 on Device; Multiple Call/Call Waiting Settings on Device
Figure 17. Forwarded Call Information Display on Device; Users Associated with Line
When you have completed the settings in this window, click Apply Config.
15. Click Reset and then click Save.
Set up softphone for CUCM in Q-SYS
16. Open Q-SYS Designer. Go to File > Load from Core & Connect and then select the Core
processor.
17. Go to Tools > Show Q-SYS Administrator. Select Softphone. Double click Softphone-1.
18. Configure the parameters in the Edit Softphone window (Figure 17). Then click OK.
Figure 18. Edit the softphone parameters in Q-SYS Administrator.
19. Also, select only the audio codecs G.722 and either G.711 ulaw or G.711 alaw (largely
depending on the system’s location). In North America, G.711 ulaw is prevalent; outside North
America, G.711 alaw is more common. Contact your phone system admin if you are not sure.
20. Click Update. Registration may take from a few seconds up to a few minutes.
If registration fails select Yes in Enable Logging and click Update again. Use a web browser to
view the Q-SYS Core processor’s SIP web page at http://<IP address of Q-SYS Core>/sip.txt.
The SIP response codes listed should help indicate the type of issue occurring with registration.
View the registered phones in CUCM
21. Cisco Unified CM will list the phones that are successfully registered. To view the list in CUCM,
go to Device > Phone. The phones will be listed by device name.
22. The Q-SYS softphone should appear in the list. Its Status should be Registered with pub as
Figure 19 shows.
Figure 19. View the list of registered phones. The Q-SYS softphone should appear, with status "Registered with pub." In this example, the Q-SYS softphone has the device name SEP00190F2435AB.
23. Click on the Q-SYS softphone’s Device Name. Its Phone Configuration page will appear
(Figure 20).
Figure 20. Real-time Device Status shows the details of the phone's registration with CUCM.
Check gateway and DNS configuration
24. Go to Q-SYS Designer and open Q-SYS Configurator.
25. Click on the Q-SYS core processor (Figure 21).
Figure 21. Check the gateway and DNS configurations.
26. If you are using only one LAN port, configure one gateway, as shown. Do not add gateways in
Static Routes.
27. If you are using more one LAN port, configure only one gateway but add Static Routes for the
second LAN port.
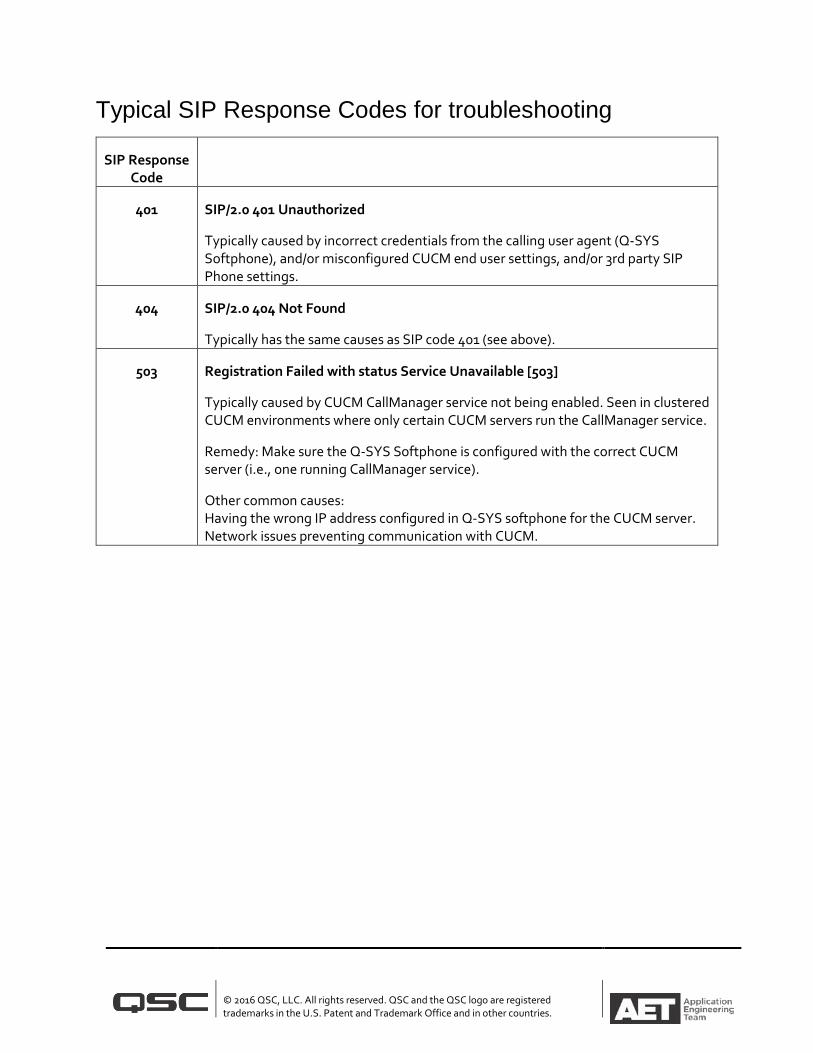
Typical SIP Response Codes for troubleshooting
SIP Response Code
401 SIP/2.0 401 Unauthorized
Typically caused by incorrect credentials from the calling user agent (Q-SYS Softphone), and/or misconfigured CUCM end user settings, and/or 3rd party SIP Phone settings.
404 SIP/2.0 404 Not Found
Typically has the same causes as SIP code 401 (see above).
503 Registration Failed with status Service Unavailable [503]
Typically caused by CUCM CallManager service not being enabled. Seen in clustered CUCM environments where only certain CUCM servers run the CallManager service.
Remedy: Make sure the Q-SYS Softphone is configured with the correct CUCM server (i.e., one running CallManager service).
Other common causes: Having the wrong IP address configured in Q-SYS softphone for the CUCM server. Network issues preventing communication with CUCM.