96
CitiDirect ® WorldLink Payment Services User Guide June 2009
CitiDirect® WorldLink Payment ServicesUser Guide
June 2009

3

Contents
Overview 2
Additional Resources 2
Basics Guides 2
Online Help 2
CitiDirect Customer Support 2
Sign on to CitiDirect® Online Banking 3
WorldLink Payments Process Flow 3
WorldLink Payment Statuses 5
WorldLink Payment Methods 6
Outgoing WorldLink Payment Methods 6
Incoming WorldLink Payment Methods 6
CitiDirect Online Banking Libraries 7
Library Maintenance 7
Payment Libraries 8
My Preferences 9
Available Preference Criteria for Payments 9
Available Preference Criteria for Purchase FX for Payments 10
Library Lookup Favorites 11
Payment Forms 12
Payments Summary Form 12
Payment Detail Form 14
Input/Modify WorldLink Payments 20
Create a WorldLink Payment from a Preformat 20
Create WorldLink Payments Using Quick Entry from Preformats 23
Correct Quick Entry form Preformat Transactions with Errors 24
Create New Outgoing WorldLink Payments 25
Create New Incoming WorldLink Payments 28
Create New WorldLink Payments Using Copy 30
Modify WorldLink Payments 34
On-Site Cheques 37
Create an On-Site Cheque 37
Print an On-Site Cheque from the Print Cheques Tab 40
Print an On-Site Cheque from the Payment Detail Form 43
Void an On-Site Cheque from the Print Cheques Tab 44
Void an On-Site Cheque from the Payment Detail Form 46
Repair WorldLink Payments 48
Authorize WorldLink Payments 51
Authorize WorldLink Payments from the Authorization Req’d Tab 51
Authorize WorldLink Payments from the Payment Detail Form 54
Use Foreign Exchange Rates 56
Obtain Online Foreign Exchange (FX) Rates 56
Obtain and Enter Manual FX Rates 59
Update FX Rates Using the New Rates Button 62
Enter an FX Forward Contract 63
Delete FX Contracts 66
Release WorldLink Payments 69
Release WorldLink Payments from the Release Req’d Tab 70
Release WorldLink Payments from the Payment Detail Form 72
Release Batches of WorldLink Payments 73
Delete WorldLink Payments 77
WorldLink Payment Services 79
Create a Service Request for a Payment Created Within CitiDirect 79
Create a Service Request for a Payment Created Outside of CitiDirect 81
WorldLink Returns and Reconciliation 84
Selecting Contracts with Available Balances 84
Sell Back an Unused FX Contract 86
WorldLink Reports and Inquiries 89
WorldLink Reports 89
WorldLink Inquiries 91
Disclaimer 93
2 Confidential and Proprietary to Citibank, N.A.
WorldLink® Payment Services offers a complete cross-border payments system serving clients worldwide. With WorldLink Payment Services, your organization can issue payments in over 130 currencies and make remittances for those payments in one or more currencies designated by you. Thus, you can participate fully in the global marketplace without having to maintain an account in every currency you issue.
Additional Resources
Basics GuidesIn conjunction with this WorldLink Payment Services guide, you are encouraged to read the CitiDirect Basics guides, available in the “CitiDirect Basics” section of the Learning Center at www.citidirect.com.
The CitiDirect Basics guides provide an overview of CitiDirect, including installation, sign-on procedures, basic navigation and procedures for customizing the CitiDirect navigation bar and summary forms, specifying your global user preferences, running reports and submitting inquiries.
Online Help
For general questions while working in CitiDirect, you can use Online Help. Online Help, a comprehensive self-service capability, contains detailed information and descriptions of terms for all functionality and services offered through CitiDirect.
You can access Online Help by pressing F1 on your keyboard or by clicking the Help button at the bottom of the CitiDirect navigation bar.
For help with your current task, click anywhere on the CitiDirect form displayed in your workspace to ensure that it is active, and then access Online Help.
CitiDirect Customer Support
In addition to Online Help, the following CitiDirect customer support resources are available to you:
www.citidirect.com•• Our website contains FAQs addressing both the use of the application and the website. The Web site also features the “Learning Center” section where you can access training support materials anytime.
Customer Service Centers•• You can contact our CitiDirect® Online Banking Service Representatives who are available to support your technical needs, as well as to assist you with general CitiDirect questions. For a list of representatives in your area, go to the “Contacts” section of www.citidirect.com.
CitiDirect Customer Support
In addition to Online Help, the CitiDirect Customer Support resources described below are available to you.
www.citidirect.com•• Our Web site contains FAQs, which address both the use of the application and the Web site. The Web site also offers the “Learning Center,” referenced in this guide, where you can access training support materials anytime — 24 hours a day, seven days a week.
Overview

3Confidential and Proprietary to Citibank, N.A.
Customer•• Service Centers You can contact our CitiDirect Online Banking Service Representatives who are available to support your technical needs, as well as to assist you with general CitiDirect questions. For a list of representatives in your area, go to the “Contacts” section of www.citidirect.com.
Sign on to CitiDirect® Online BankingIn order to follow all the procedures included in this “WorldLink Payment Services” guide, you must successfully sign on to CitiDirect Online Banking using your SafeWord™ card.
For sign-on procedures, see the CitiDirect Basics: Getting Started guide, available in the Learning Center at www.citidirect.com.
WorldLink Payments Process FlowAs a CitiDirect client, you have the ability to customize the flow of WorldLink payments to meet your specific needs. The basic flow is described below.
Users enter WorldLink payment instructions into CitiDirect. For more information on the various 1. types of payments available, refer to the “WorldLink Payment Methods” section of this guide.
Once entered into CitiDirect, payment must be authorized by the appropriate users according to 2. your flow control requirements.
If the payment currency is different than the funding currency, the payment will appear on the Fund 3. FX Payments tab where a contract must be purchased.
Note: If the payments currency is the same as the funding currency, the payment bypasses the Fund FX Payments tab and goes straight to release. In this case, there is no need to purchase a contract.
After funding, the payment is sent to the Release Req’d tab where the WorldLink payments are 4. released from the system and sent for processing.
4 Confidential and Proprietary to Citibank, N.A.
Once the payments are released, you are required to fund them (manual funding) or the funds are 5. automatically taken from your account (auto-funding).
Note:
With auto-funding, once the payments are released from CitiDirect, Citi automatically debits •your account. You need to hold an account with Citi and funds need to be available.
With manual funding, you send a wire payment from a third-party bank account to credit •Citi’s WorldLink omnibus account. Internally, Citi will match this credit received against your WorldLink payments. Ideally, your WorldLink Client ID should always be balanced (debits = credits).
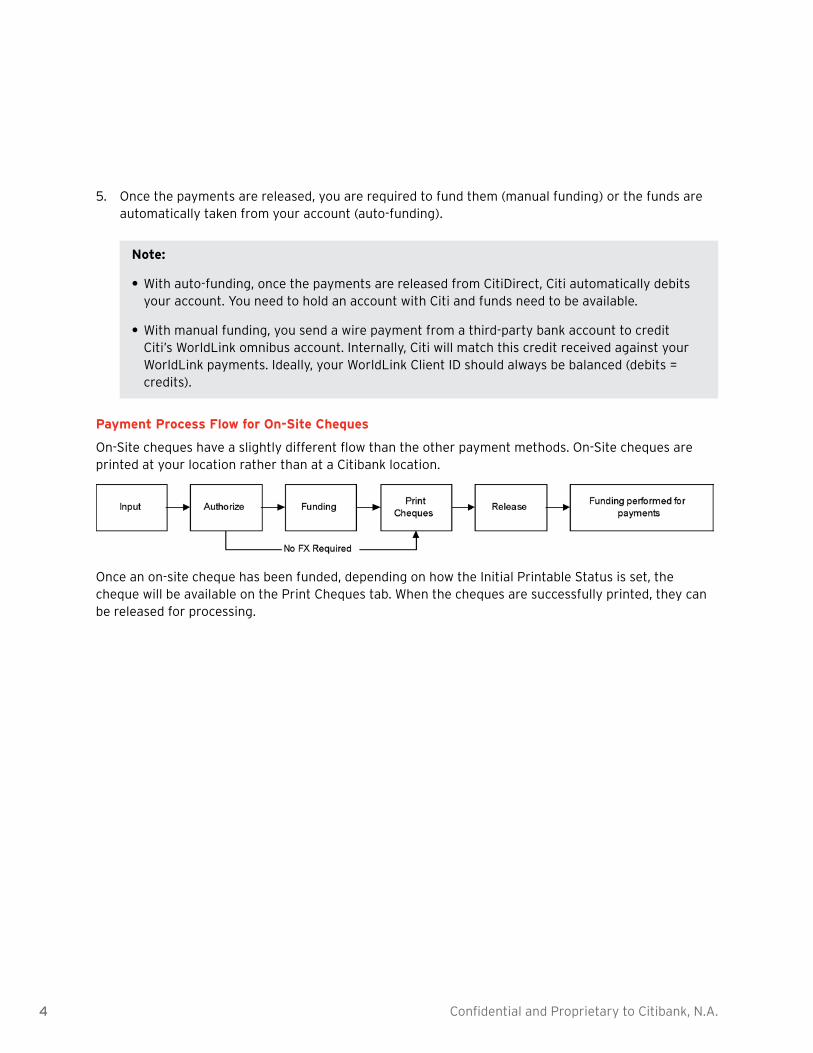
Payment Process Flow for On-Site Cheques
On-Site cheques have a slightly different flow than the other payment methods. On-Site cheques are printed at your location rather than at a Citibank location.
Once an on-site cheque has been funded, depending on how the Initial Printable Status is set, the cheque will be available on the Print Cheques tab. When the cheques are successfully printed, they can be released for processing.
5Confidential and Proprietary to Citibank, N.A.
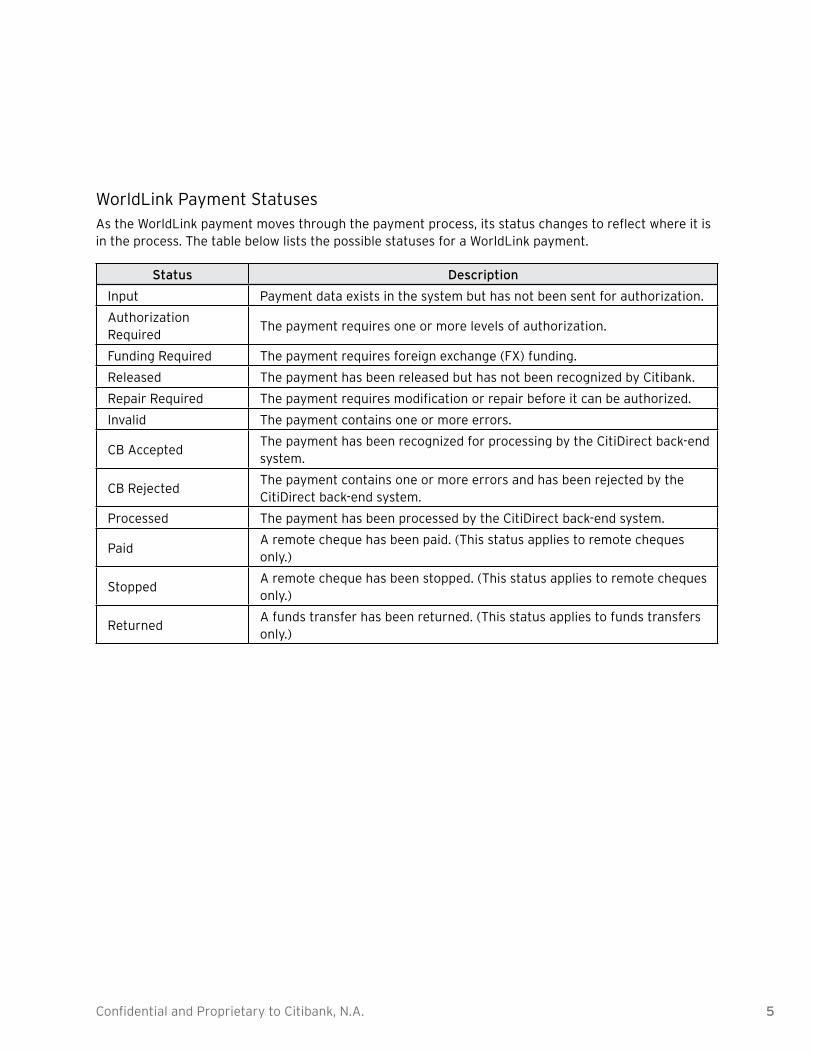
WorldLink Payment StatusesAs the WorldLink payment moves through the payment process, its status changes to reflect where it is in the process. The table below lists the possible statuses for a WorldLink payment.
Status Description
Input Payment data exists in the system but has not been sent for authorization.
Authorization Required
The payment requires one or more levels of authorization.
Funding Required The payment requires foreign exchange (FX) funding.
Released The payment has been released but has not been recognized by Citibank.
Repair Required The payment requires modification or repair before it can be authorized.
Invalid The payment contains one or more errors.
CB AcceptedThe payment has been recognized for processing by the CitiDirect back-end system.
CB RejectedThe payment contains one or more errors and has been rejected by the CitiDirect back-end system.
Processed The payment has been processed by the CitiDirect back-end system.
PaidA remote cheque has been paid. (This status applies to remote cheques only.)
StoppedA remote cheque has been stopped. (This status applies to remote cheques only.)
ReturnedA funds transfer has been returned. (This status applies to funds transfers only.)
6 Confidential and Proprietary to Citibank, N.A.
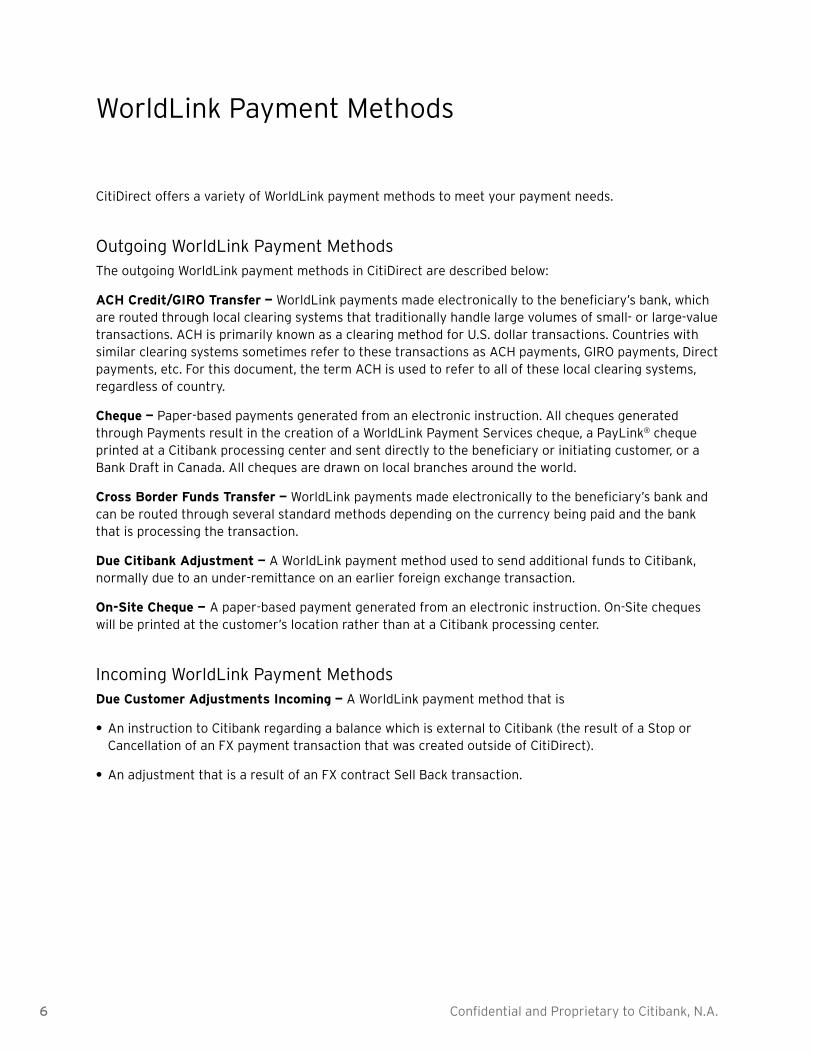
CitiDirect offers a variety of WorldLink payment methods to meet your payment needs.
Outgoing WorldLink Payment MethodsThe outgoing WorldLink payment methods in CitiDirect are described below:
ACH Credit/GIRO Transfer — WorldLink payments made electronically to the beneficiary’s bank, which are routed through local clearing systems that traditionally handle large volumes of small- or large-value transactions. ACH is primarily known as a clearing method for U.S. dollar transactions. Countries with similar clearing systems sometimes refer to these transactions as ACH payments, GIRO payments, Direct payments, etc. For this document, the term ACH is used to refer to all of these local clearing systems, regardless of country.
Cheque — Paper-based payments generated from an electronic instruction. All cheques generated through Payments result in the creation of a WorldLink Payment Services cheque, a PayLink® cheque printed at a Citibank processing center and sent directly to the beneficiary or initiating customer, or a Bank Draft in Canada. All cheques are drawn on local branches around the world.
Cross Border Funds Transfer — WorldLink payments made electronically to the beneficiary’s bank and can be routed through several standard methods depending on the currency being paid and the bank that is processing the transaction.
Due Citibank Adjustment — A WorldLink payment method used to send additional funds to Citibank, normally due to an under-remittance on an earlier foreign exchange transaction.
On-Site Cheque — A paper-based payment generated from an electronic instruction. On-Site cheques will be printed at the customer’s location rather than at a Citibank processing center.
Incoming WorldLink Payment MethodsDue Customer Adjustments Incoming — A WorldLink payment method that is
An instruction to Citibank regarding a balance which is external to Citibank (the result of a Stop or •Cancellation of an FX payment transaction that was created outside of CitiDirect).
An adjustment that is a result of an FX contract Sell Back transaction. •
WorldLink Payment Methods
7Confidential and Proprietary to Citibank, N.A.
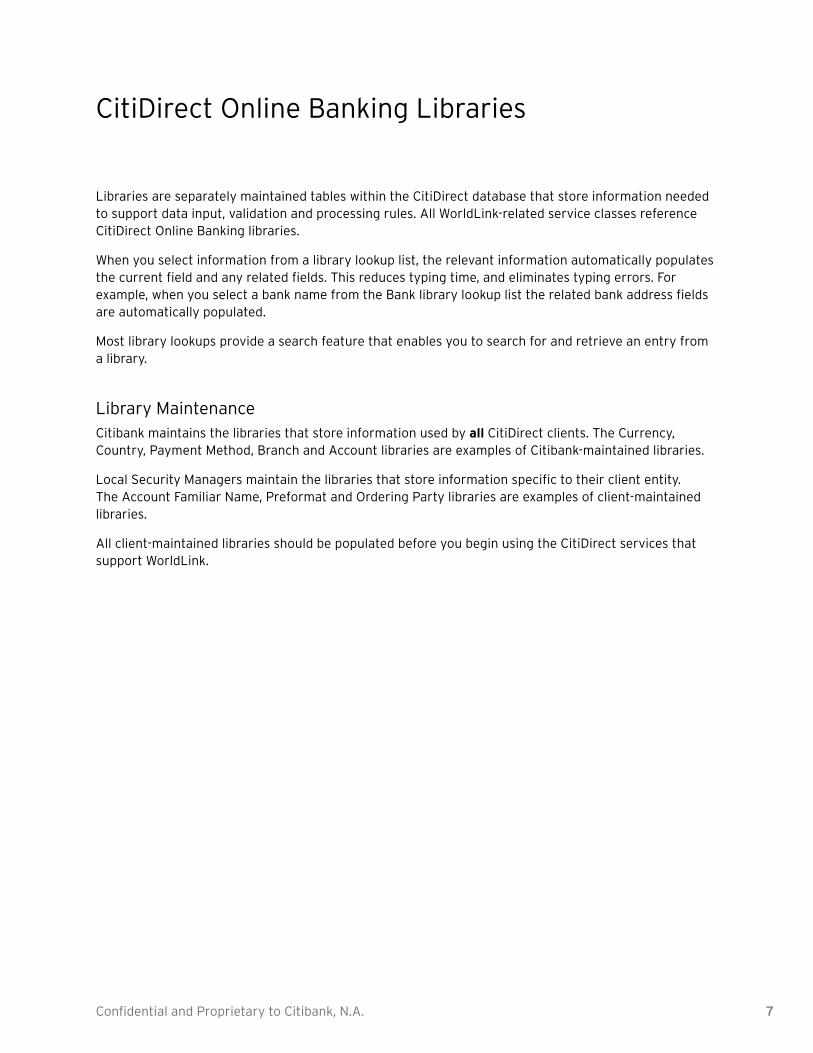
Libraries are separately maintained tables within the CitiDirect database that store information needed to support data input, validation and processing rules. All WorldLink-related service classes reference CitiDirect Online Banking libraries.
When you select information from a library lookup list, the relevant information automatically populates the current field and any related fields. This reduces typing time, and eliminates typing errors. For example, when you select a bank name from the Bank library lookup list the related bank address fields are automatically populated.
Most library lookups provide a search feature that enables you to search for and retrieve an entry from a library.
Library MaintenanceCitibank maintains the libraries that store information used by all CitiDirect clients. The Currency, Country, Payment Method, Branch and Account libraries are examples of Citibank-maintained libraries.
Local Security Managers maintain the libraries that store information specific to their client entity. The Account Familiar Name, Preformat and Ordering Party libraries are examples of client-maintained libraries.
All client-maintained libraries should be populated before you begin using the CitiDirect services that support WorldLink.
CitiDirect Online Banking Libraries
8 Confidential and Proprietary to Citibank, N.A.
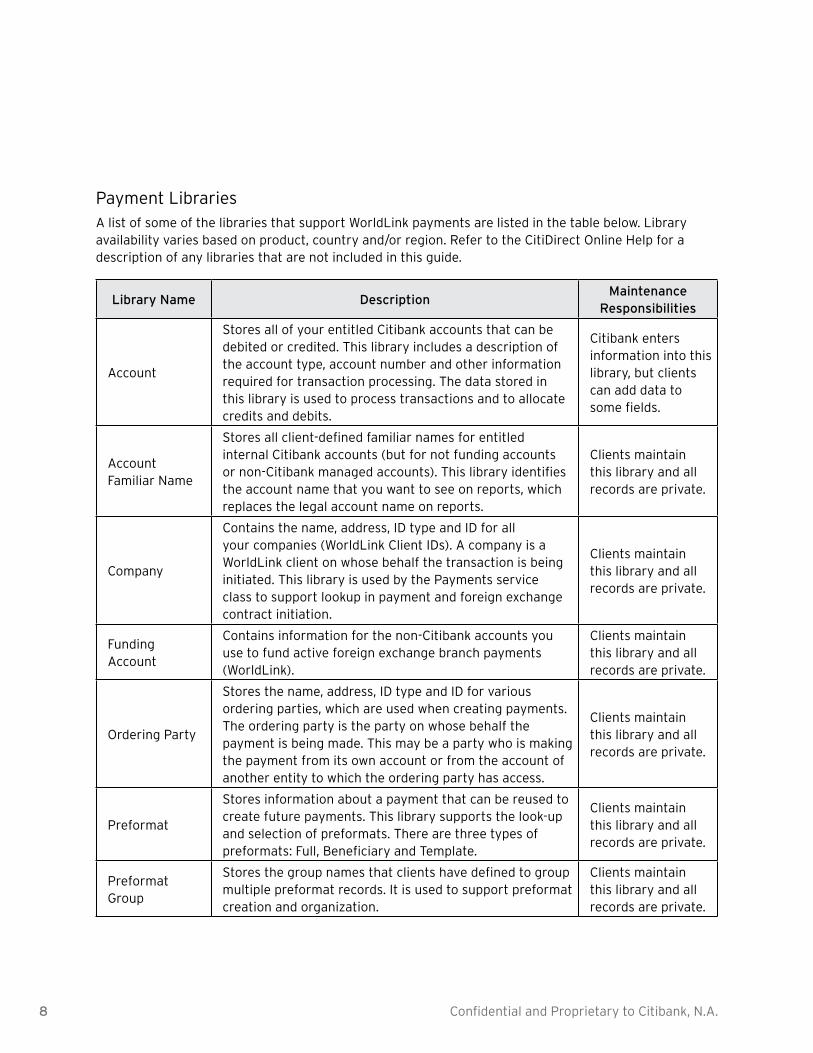
Payment LibrariesA list of some of the libraries that support WorldLink payments are listed in the table below. Library availability varies based on product, country and/or region. Refer to the CitiDirect Online Help for a description of any libraries that are not included in this guide.
Library Name DescriptionMaintenance
Responsibilities
Account
Stores all of your entitled Citibank accounts that can be debited or credited. This library includes a description of the account type, account number and other information required for transaction processing. The data stored in this library is used to process transactions and to allocate credits and debits.
Citibank enters information into this library, but clients can add data to some fields.
Account Familiar Name
Stores all client-defined familiar names for entitled internal Citibank accounts (but for not funding accounts or non-Citibank managed accounts). This library identifies the account name that you want to see on reports, which replaces the legal account name on reports.
Clients maintain this library and all records are private.
Company
Contains the name, address, ID type and ID for all your companies (WorldLink Client IDs). A company is a WorldLink client on whose behalf the transaction is being initiated. This library is used by the Payments service class to support lookup in payment and foreign exchange contract initiation.
Clients maintain this library and all records are private.
Funding Account
Contains information for the non-Citibank accounts you use to fund active foreign exchange branch payments (WorldLink).
Clients maintain this library and all records are private.
Ordering Party
Stores the name, address, ID type and ID for various ordering parties, which are used when creating payments. The ordering party is the party on whose behalf the payment is being made. This may be a party who is making the payment from its own account or from the account of another entity to which the ordering party has access.
Clients maintain this library and all records are private.
Preformat
Stores information about a payment that can be reused to create future payments. This library supports the look-up and selection of preformats. There are three types of preformats: Full, Beneficiary and Template.
Clients maintain this library and all records are private.
Preformat Group
Stores the group names that clients have defined to group multiple preformat records. It is used to support preformat creation and organization.
Clients maintain this library and all records are private.

9Confidential and Proprietary to Citibank, N.A.
Use My Preferences to set your preferences for the Payments and Purchase FX for Payments service classes and to create a Library Lookup Favorites list of the debit and/or credit accounts that you use most often.
Notes:
For step-by-step procedures for setting your preferences, please refer to the • CitiDirect Basics: Setting Your Preferences guide, available in the Learning Center at www.citidirect.com.
Make sure that you set your Global preferences, which include date format, amount format, ••default menu and default application.
All preferences that you define are specific to your CitiDirect sign-on name and ID and cannot be ••shared with or viewed by others.
Available Preference Criteria for PaymentsThe preference criteria available on the My Preferences form for payments are listed in the table below.
Preference Category
Available Preference Criteria
DescriptionCitiDirect Default
Settings
Edit Defaults
Debit AccountThe Account Familiar Name and Account Number that appears on payments forms.
None specified
Credit AccountThe Account Familiar Name and Account Number that appears on payments forms.
None specified
CompanyThe default company that appears on the Payment Detail form.
None specified
Ordering PartyThe Ordering Party Name that appears on the Payment Detail form.
None specified
Default Subsidiary Identifier
The Default Subsidiary Identifier that appears on the Payment Detail form. This option is available if set in Client Preferences.
None specified
Use This Currency for Next Payment
The currency that is to be used for the next payment when the indicator is selected.
None specified
My Preferences
10 Confidential and Proprietary to Citibank, N.A.
Preference Category
Available Preference Criteria
DescriptionCitiDirect Default
Settings
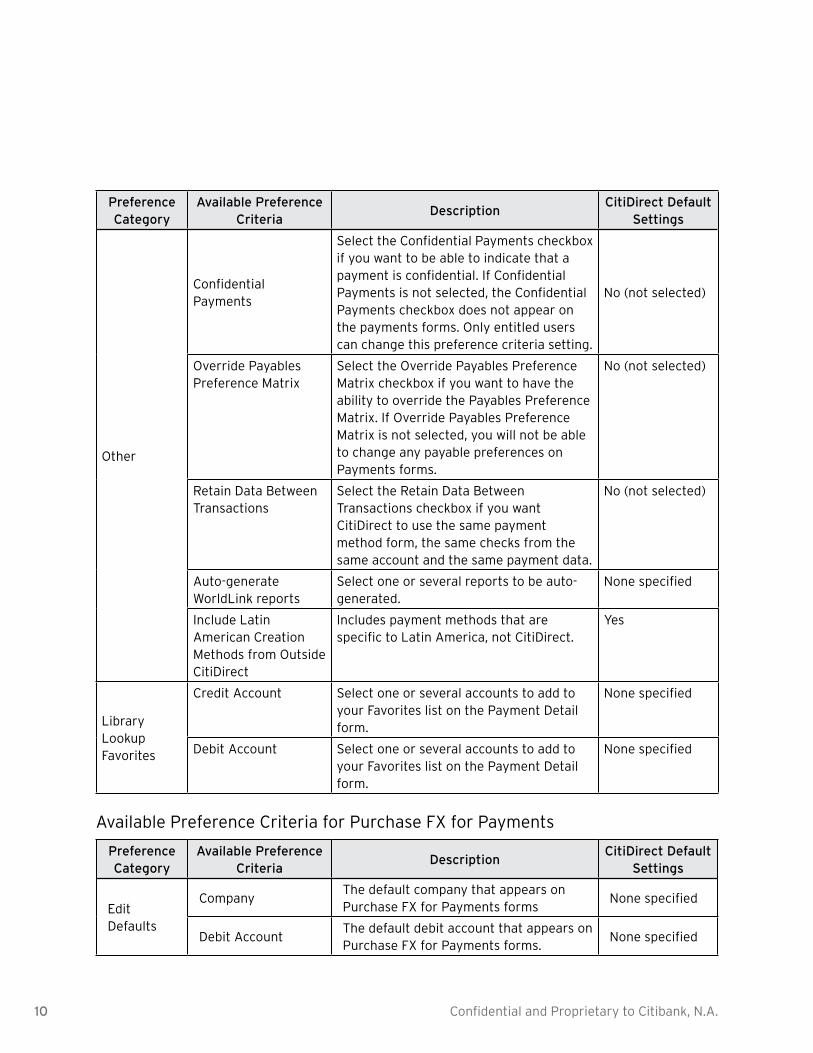
Other
Confidential Payments
Select the Confidential Payments checkbox if you want to be able to indicate that a payment is confidential. If Confidential Payments is not selected, the Confidential Payments checkbox does not appear on the payments forms. Only entitled users can change this preference criteria setting.
No (not selected)
Override Payables Preference Matrix
Select the Override Payables Preference Matrix checkbox if you want to have the ability to override the Payables Preference Matrix. If Override Payables Preference Matrix is not selected, you will not be able to change any payable preferences on Payments forms.
No (not selected)
Retain Data Between Transactions
Select the Retain Data Between Transactions checkbox if you want CitiDirect to use the same payment method form, the same checks from the same account and the same payment data.
No (not selected)
Auto-generate WorldLink reports
Select one or several reports to be auto-generated.
None specified
Include Latin American Creation Methods from Outside CitiDirect
Includes payment methods that are specific to Latin America, not CitiDirect.
Yes
Library Lookup Favorites
Credit Account Select one or several accounts to add to your Favorites list on the Payment Detail form.
None specified
Debit Account Select one or several accounts to add to your Favorites list on the Payment Detail form.
None specified
Available Preference Criteria for Purchase FX for Payments
Preference Category
Available Preference Criteria
DescriptionCitiDirect Default
Settings
Edit Defaults
CompanyThe default company that appears on Purchase FX for Payments forms
None specified
Debit AccountThe default debit account that appears on Purchase FX for Payments forms.
None specified

11Confidential and Proprietary to Citibank, N.A.
Library Lookup FavoritesThe Library Lookup Favorites feature, available on the My Preferences form, allows you to create a list of frequently used debit and credit account numbers that you can easily access when you are entering payment details.
When you set your library lookup favorites, a blue down arrow ( ) will appear in the Library Lookup button next to the Debit or Credit Account fields on the Payment Detail form, indicating that you have created a list of library lookup favorites.
Use the Library Lookup Favorites feature by following the steps below.
On the specific form, click the 6. blue library lookup button. Your Library Lookup Favorites list appears. Your favorite accounts appear in blue text.
Select the account number and click the 7. OK button. The current field and any related fields are populated.
Note: If you want to select an account that you have not identified as a favorite, click the Complete Look Up button to access a complete listing of your entitled account numbers.

12 Confidential and Proprietary to Citibank, N.A.
Payment Forms
All processes are performed using a summary form that displays key fields of information or a detail form that contains all of the information required to make a payment to a beneficiary (payee). You can also access various subforms to enter additional information for a specific payment transaction.
Payments Summary FormSummary forms present data in a tabular format, like a spreadsheet. Individual payment records are displayed in rows within the table, and individual data elements related to each payment are displayed as columns. Use the Payments Summary form to input, view and act on a batch of transactions or an individual transaction.
The tabs within the summary form are determined by the actions that must be taken on a payment or ••a group of payments.
The entitlements included in the access profile assigned to you by your local Security Managers ••determine the tabs that you see and the payment transactions that you can take action on.
Tabs
Click a tab to activate it. All payments that are in the same state within your Payments flow control process are listed on the appropriate tab. Your access profile determines the tabs that you see when you are working in Payments.

13Confidential and Proprietary to Citibank, N.A.
Action Buttons
The Action buttons displayed on the Payments Summary form can vary based on the active tab. The buttons shown in this example appear on the Input/Modify tab.
Submit Button
Click the Submit button to create one or more payment transaction records in the Payments database.
Each selected payment is assigned a system- or user-defined transaction reference number, and the ••payment details are validated against CitiDirect validation rules.
If the payment passes validation, it moves to its next state as determined by your payment flow ••control requirements. If a payment fails validation, its status is updated to Invalid and the payment record appears in red text on the Input/Modify tab.
If your flow control settings indicate that verification, authorization and release are not required, the ••system automatically releases the payments to the processing branch and updates the status of each payment to Released.
New Button
Click the New button to create a new payment transaction. Your access profile determines the creation methods you can use to create new payments: From Preformat, Quick Entry From Preformat or New Outgoing. These options are also available directly on the navigation bar.
Delete Button
Click the Delete button to delete the selected payment transactions.
Go to Details Button
Click the Go to Details button to view all of the details for the selected payment transactions. The Payment Detail form appears. All details of the first selected payment are displayed. For more information, see the “Payment Detail Form” section of this guide.
Other Options Button
The Other Options button that appears in the lower right of the Payments Summary form contains a menu that provides additional actions you can perform.
Click the •• Other Options button and select the Update Screen command to refresh the summary form list with the most recent data.
Other Options menu options are presented throughout this guide. Menu options vary based on ••the status of a transaction and the tab within the Payments Summary form where the payment transaction is listed.

14 Confidential and Proprietary to Citibank, N.A.
Payment Detail FormThe Payment Detail form displays all the details of the payment, along with any corresponding actions that you may need to perform on that payment. Below is an example of the Book Transfer Payment Detail form.
Use the Payment Detail form to enter and submit the details of new payments and to manage and act ••on individual payments.
The Payment Detail form can only be accessed from a summary form; however, once in detail form ••mode, you can move between multiple payments by clicking the Next button.
For every payment that you create, you are required to enter several key details that are common to all payments. A red asterisk identifies required key detail fields.

15Confidential and Proprietary to Citibank, N.A.
Payment Method
The details you enter enable CitiDirect to automatically determine exactly which processing options (payment methods) are available to you, as well as the specific forms and subforms that are needed for each available payment method.
All available processing options appear as selections when you click the drop-down arrow in the ••Payment Method field on the Payment Detail form.
Once the payment method is selected, CitiDirect is able to determine the available payment types, ••load the appropriate Payment Detail form and subforms, apply the appropriate edits and determine the appropriate product processing system.
Payment Type
The Payment Type field is located in the payment method selection section of the Payment Detail form.
The selected payment method determines whether or not the payment type field is available.••
The list of payment types may vary based on region or country.••
Payment types are displayed in the language you selected when you signed on to CitiDirect.••
Payment Amount
The Payment Amount field is formatted for the number of decimal places required for the selected payment currency, and it is checked against any amount limits that may be specified in your access profile. Amounts are evaluated using the exchange rate of the currencies.
Region and/or country level limits can also be defined for the payment amount. The most common region- or country-specific requirement is a maximum number of digits for the payment amount value. This maximum value limitation is performed when you click the Submit button to submit the payment for processing, not when you enter the value in the Payment Amount field.
You cannot enter a negative amount in this field.
Subsidiary Identifier/Name
The Subsidiary Identifier Library allows you to enter client subsidiary information. This subsidiary information is used to identify a client subsidiary within a payment transaction. Additionally, this information allows you to group payment transactions on payment transaction initiation reports by subsidiary. A client preference setting determines whether or not the Subsidiary Identifier/Name fields appear on the Payment Detail form.

16 Confidential and Proprietary to Citibank, N.A.
Transaction Reference Number
To identify the payment, each CitiDirect payment transaction must have a transaction reference number. The method by which the transaction reference number is determined may vary by region; however, the following rules are consistent across all regions.
The transaction reference number assignment is dictated by a client preference setting, which indicates whether it is fully system-assigned, partially system-assigned or manually entered.
If the transaction reference number is • fully system-assigned, the reference number is generated and stored when you click the Submit button on the Payment Detail form. The assigned reference number is not visible until the transaction is displayed on a different tab within the Payments Summary form (e.g., Authorization Req’d).
If the transaction reference number is • partially system-assigned, it is composed of a combination of a predetermined set of characters, based on a client preference setting, and a suffix that you must enter in the appropriate field on the Payment Detail form when you create a new payment transaction.
If the transaction reference number is • manually entered, you must enter it in the appropriate field on the Payment Detail form when you create a new payment transaction.
Note: To avoid duplicate reference numbers, CitiDirect generates a new internal reference number when a payment selected on the Repair Req’d tab is repaired and resubmitted.
Value Dates
As part of the payment creation process, CitiDirect automatically computes a default value date for each payment based upon parameters, such as cutoff time or number of disposition days that apply to the combination of branch, payment method and currency of the payment. For product, country or regional value date considerations, please refer to CitiDirect Online Help.
Library Lookup Favorites Button
If the library lookup button for the debit and/or credit account field contains a blue down-arrow, a Library Lookup Favorites list has been created. This feature enables you to select from a list of the account numbers that you use most frequently. For more information, see “Select Debit/Credit Account Library Lookup Favorites” section of this guide.
Multiple-Line Button
Each field on a Payment Detail form can display a specific number of characters. When a field, such as Payment Details or Bank Details, contains more information than is currently visible, a multiple-line button appears next to that field. When the multiple-line button is present, click it to see all information in the field.

17Confidential and Proprietary to Citibank, N.A.
Subforms
Subforms allow you to enter additional information pertaining to a payment. In general, the display of a subform is triggered when you click a show subform link or button. For example, CitiDirect users in certain regions/countries have the option to enter bank details, central bank reporting information and/or detail information about invoices being paid via the payment being entered.
When a subform link or button is clicked, the subform is displayed in a separate window to allow you to •enter the additional information.
In certain cases where you can choose one of a specific set of subforms, the available subforms are •displayed in a drop-down list. To access the subform, select the desired subform first, and then click the adjacent link.
Actions Buttons
The action buttons displayed on the Payment Detail form can vary based on the tab within the Payments Summary form from which the detail form was accessed. The action buttons shown in this example appear when the Payment Detail form is accessed from the Input/ Modify tab.
Submit Button
Click the Submit button to create one or more payment transaction records in the Payments database. Each payment is assigned a system- or user-defined transaction reference number, and the payment details are validated against CitiDirect validation rules.
If the payment passes validation, it moves to its next state as determined by your payment flow ••control requirements (e.g., Verification Required, Authorization Required or Release Required).
If your flow control settings indicate that verification, authorization and release are not required, ••CitiDirect automatically releases the payment to the processing branch and updates its status to Released.
Submit and Create Preformat Button
If you are entitled to submit payments and create preformats, the Submit and Create Preformat button is available at the bottom of the Payment Detail form.
When you click the • Submit and Create Preformat button, the payment information is validated.
Once validated, the payment proceeds to its next state in your payments process, as determined by •your flow control requirements. The payment details are saved as a preformat record.
The preformat record moves to its next state as determined by your preformat library authorization •requirements.
After the preformat record passes all authorization requirements, it is stored in the preformat library, •where it can be selected and used as a template for creating new payments.
18 Confidential and Proprietary to Citibank, N.A.
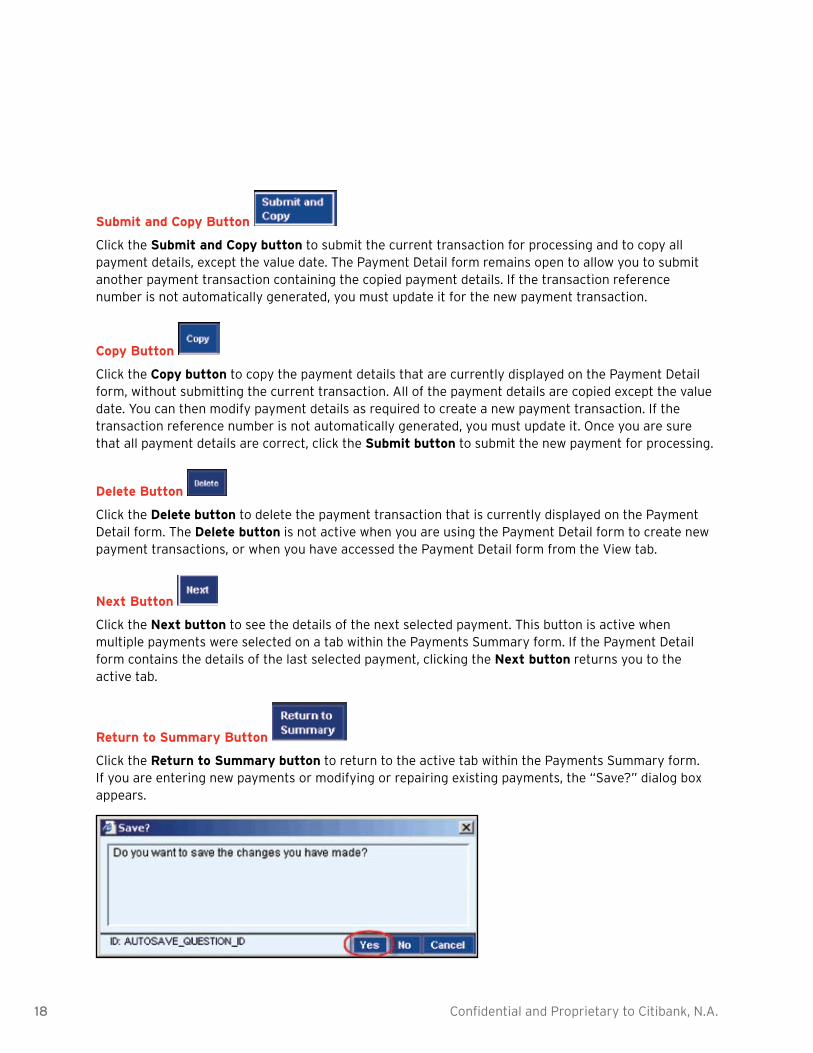
Submit and Copy Button
Click the Submit and Copy button to submit the current transaction for processing and to copy all payment details, except the value date. The Payment Detail form remains open to allow you to submit another payment transaction containing the copied payment details. If the transaction reference number is not automatically generated, you must update it for the new payment transaction.
Copy Button
Click the Copy button to copy the payment details that are currently displayed on the Payment Detail form, without submitting the current transaction. All of the payment details are copied except the value date. You can then modify payment details as required to create a new payment transaction. If the transaction reference number is not automatically generated, you must update it. Once you are sure that all payment details are correct, click the Submit button to submit the new payment for processing.
Delete Button
Click the Delete button to delete the payment transaction that is currently displayed on the Payment Detail form. The Delete button is not active when you are using the Payment Detail form to create new payment transactions, or when you have accessed the Payment Detail form from the View tab.
Next Button
Click the Next button to see the details of the next selected payment. This button is active when multiple payments were selected on a tab within the Payments Summary form. If the Payment Detail form contains the details of the last selected payment, clicking the Next button returns you to the active tab.
Return to Summary Button
Click the Return to Summary button to return to the active tab within the Payments Summary form. If you are entering new payments or modifying or repairing existing payments, the “Save?” dialog box appears.

19Confidential and Proprietary to Citibank, N.A.
Click the Yes button to save any changes. The statuses of new payments are changed to Input, and they are listed on the Input/Modify tab. If you are modifying existing payments, the payment information is listed in orange text to indicate that the payment details may be outdated.
Other Options Button
Click the Other Options button to access a menu. The available menu items, which are described in the following table, may vary based on the tab from which the Payment Detail form is accessed.
Menu Option Select to
Edit Account Number Change the Debit Account Number stored in a preformat.
Enter/View Comments Enter new or view existing comments that are attached to a payment.
Print Detail Print the details of the payment transaction.
Run TI Detail Report for Single Item
Runs the Transaction Initiation Detail Report for the selected transaction.
View Error Messages View any errors associated with the payment transaction.
View Offline Batch DetailsView details of the offline batch, including the batch name, creation date/time, status and authorizer name.
View Submission Status Details
View the submission status of the payment, including the user ID of the user who submitted the transaction, the date and time of submission and any substatus.
View Transaction FlowView a list of transaction flow states that the transaction must go through, based upon the current data values of the payment, before it is sent to Citibank for processing (including its current state).
View Transaction HistoryView the history of all actions taken on a payment including the name of the CitiDirect user who performed each action and the date and time the action was taken.

20 Confidential and Proprietary to Citibank, N.A.
Input/Modify WorldLink Payments
Create a WorldLink Payment from a PreformatPreformats, or templates, can be helpful in handling repetitive payments more efficiently. In order to create payments from preformats, valid preformats must exist in the preformat library.
Preformats are created and saved directly in the preformat library or by clicking the Submit and Create Preformat button on the Payment Detail form when creating new payments.
CitiDirect supports the following types of preformats:
Full — Limited Modifications — • All data fields, except Value Date, Processing Date (as applicable), Payment Amount, Payment/Addenda Details, Beneficiary Reference and Bank Details, are protected/locked and cannot be modified.
Predefined Beneficiary — • All fields containing beneficiary-related data items are protected/locked and cannot be modified.
Editable Template — • All fields are populated with the values saved with the preformat, but they can be modified.
Notes:
Flow control requirements for payments created from preformats apply to payment transactions •created from full preformats only. A payment created from a beneficiary preformat or a template preformat is subject to the flow control requirements defined for free-form entry payment transactions.
Your assigned access profile determines whether or not you can create preformats and the types •of preformats you can create.
Create a new WorldLink payment from preformats by following the steps below.
On the CitiDirect navigation bar, click 1. Payment and then click Input From Preformats. You can also access this option by clicking the New button on the Input/Modify tab.

21Confidential and Proprietary to Citibank, N.A.
A Search Definition Dialog box appears.
Enter search criteria to find the preformats you want to use to create new payments and click the 2. Run Search button. A Library Look Up Dialog box appears that shows all preformats that match your search criteria.
Select the desired preformat and click the 3. OK button. The Payments Summary form appears with the Input/Modify tab active.

22 Confidential and Proprietary to Citibank, N.A.
Proceed with one of the following steps:4.
Modify fields directly on the Input/Modify tab as required. Select all completed transactions and click •the Submit button. Modifiable fields will vary based on the type of preformat you are using.
Click the • Go to Details button. The details of the first selected preformat are displayed on the Payment detail form. Make any necessary changes and click the Submit button to submit the current payment for processing. The details of the next selected preformat appear.
Repeat this process until all payments are submitted.
23Confidential and Proprietary to Citibank, N.A.
Notes:
To change the debit account information stored in the preformat click the • Other Options button on the Payment Detail form. Select the Edit Account Number command. The Edit Account Number dialog box appears. Select a new Debit Account Number and click the OK button.
Your organization may have defined a maximum allowable payment amount for preformats. If •the preformat you selected to create this payment is subject to a maximum allowable payment amount and the payment amount exceeds that maximum, an Error message is displayed. You must change the payment amount before the payment can be submitted for processing.
If you decide that you do not want to create a payment using the details of the preformat that is •currently displayed on the Payment Detail form, click the Next button to view the details of the next selected preformat.
If the details of the last selected preformat are displayed, clicking the •• Next or Submit buttons returns you to the Input/Modify tab.
For procedures for the Submit and Create Preformat and Submit and Copy features on the •Payment Detail form, refer to the “Create New Outgoing Payments” section of this guide.
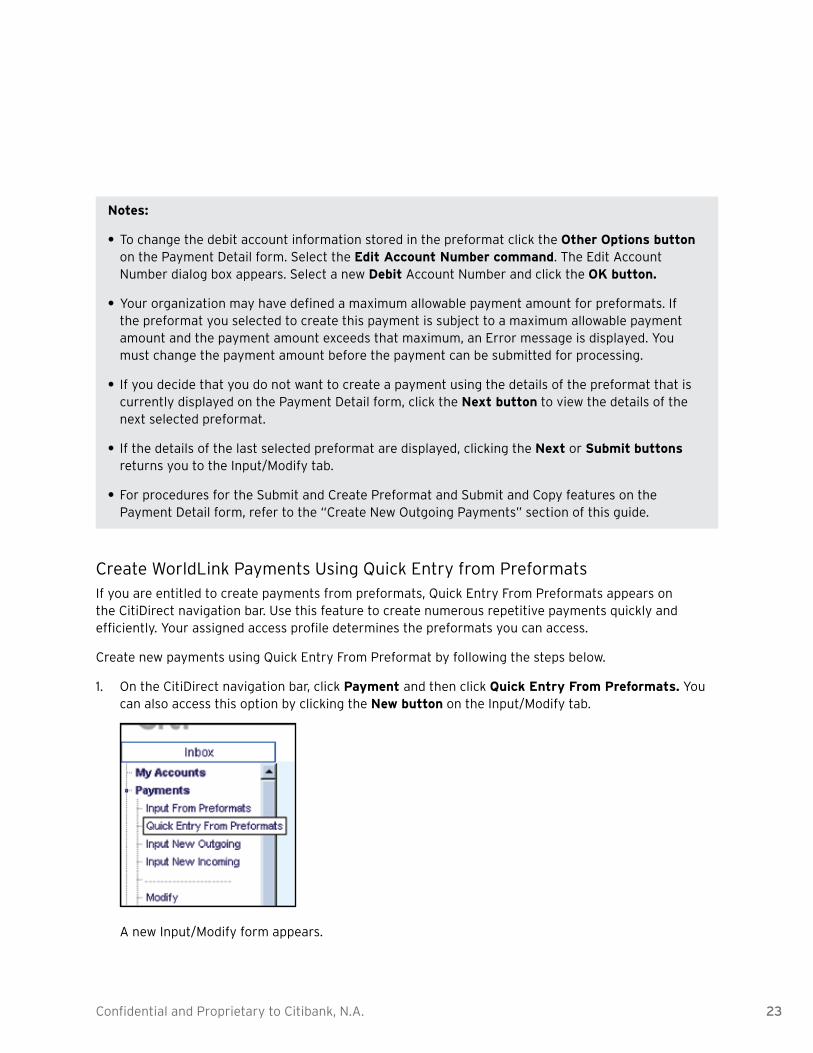
Create WorldLink Payments Using Quick Entry from PreformatsIf you are entitled to create payments from preformats, Quick Entry From Preformats appears on the CitiDirect navigation bar. Use this feature to create numerous repetitive payments quickly and efficiently. Your assigned access profile determines the preformats you can access.
Create new payments using Quick Entry From Preformat by following the steps below.
On the CitiDirect navigation bar, click 1. Payment and then click Quick Entry From Preformats. You can also access this option by clicking the New button on the Input/Modify tab.
A new Input/Modify form appears.
24 Confidential and Proprietary to Citibank, N.A.
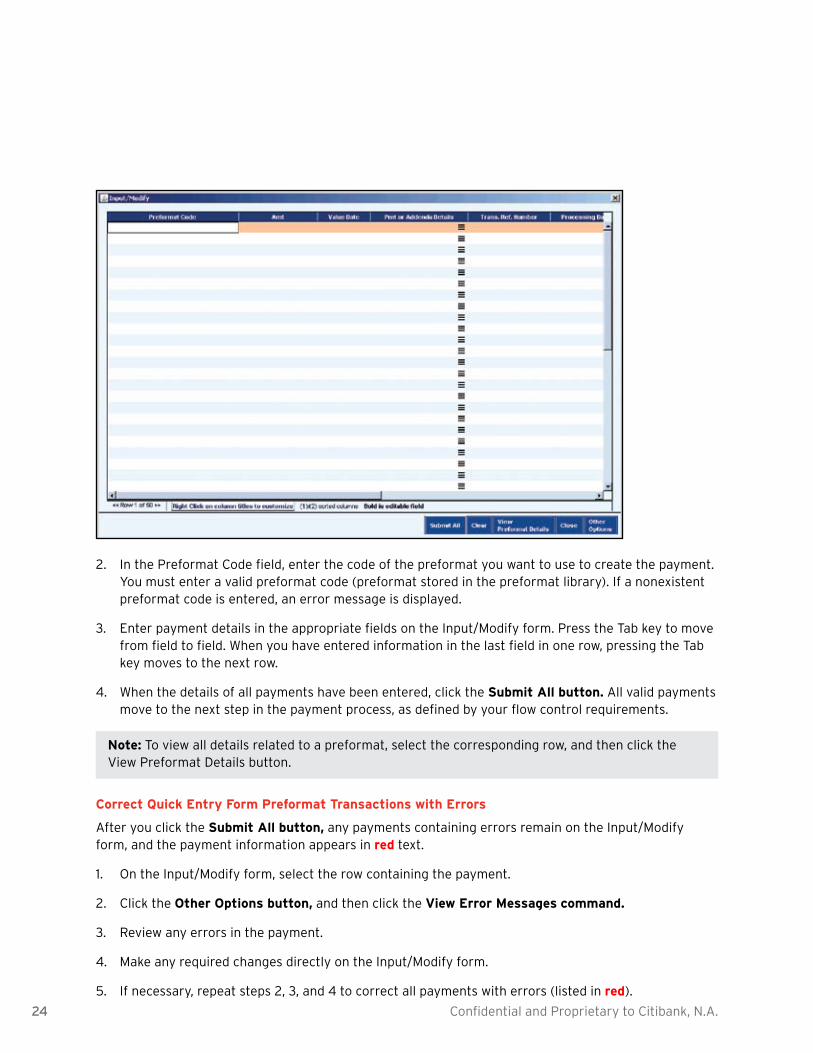
In the Preformat Code field, enter the code of the preformat you want to use to create the payment. 2. You must enter a valid preformat code (preformat stored in the preformat library). If a nonexistent preformat code is entered, an error message is displayed.
Enter payment details in the appropriate fields on the Input/Modify form. Press the Tab key to move 3. from field to field. When you have entered information in the last field in one row, pressing the Tab key moves to the next row.
When the details of all payments have been entered, click the 4. Submit All button. All valid payments move to the next step in the payment process, as defined by your flow control requirements.
Note: To view all details related to a preformat, select the corresponding row, and then click the View Preformat Details button.
Correct Quick Entry Form Preformat Transactions with Errors
After you click the Submit All button, any payments containing errors remain on the Input/Modify form, and the payment information appears in red text.
On the Input/Modify form, select the row containing the payment.1.
Click the 2. Other Options button, and then click the View Error Messages command.
Review any errors in the payment.3.
Make any required changes directly on the Input/Modify form.4.
If necessary, repeat steps 2, 3, and 4 to correct all payments with errors (listed in 5. red).

25Confidential and Proprietary to Citibank, N.A.
Click the 6. Submit All button to resubmit all corrected payments.
Create New Outgoing WorldLink PaymentsYour assigned access profile determines whether or not you can create new outgoing WorldLink Payment and the accounts, payment methods, payment types, currencies, etc. that you can access.
Create a new outgoing payment by following the steps below.
On the CitiDirect navigation bar, click 1. Payment and then click Input New Outgoing. You can also access this option by click the New button on the Input/Modify tab.
The Payment Detail form appears.
26 Confidential and Proprietary to Citibank, N.A.
The Preformat Code field should be left blank when creating a new outgoing payment; however, if 2. you are going to submit a payment using an existing preformat, a preformat code is required.
The Debit Account Number/Currency/Name field defaults to preference settings. If you are entitled 3. to multiple accounts and you want to change the debit account, clear the field, click the library lookup button and select a different account number.
The Payment Currency field defaults to preference settings or the currency of the last payment if 4. the Use This Currency For Next Payment checkbox is selected. If you are entitled to create payments for multiple currencies and you want to change the payment currency, clear the field, click the library lookup button and select a different currency. The Currency Library Lookup will only list currencies that are supported by the branch of the debit account.
In the Payment Amount field, enter the amount of the payment in the selected currency.5.
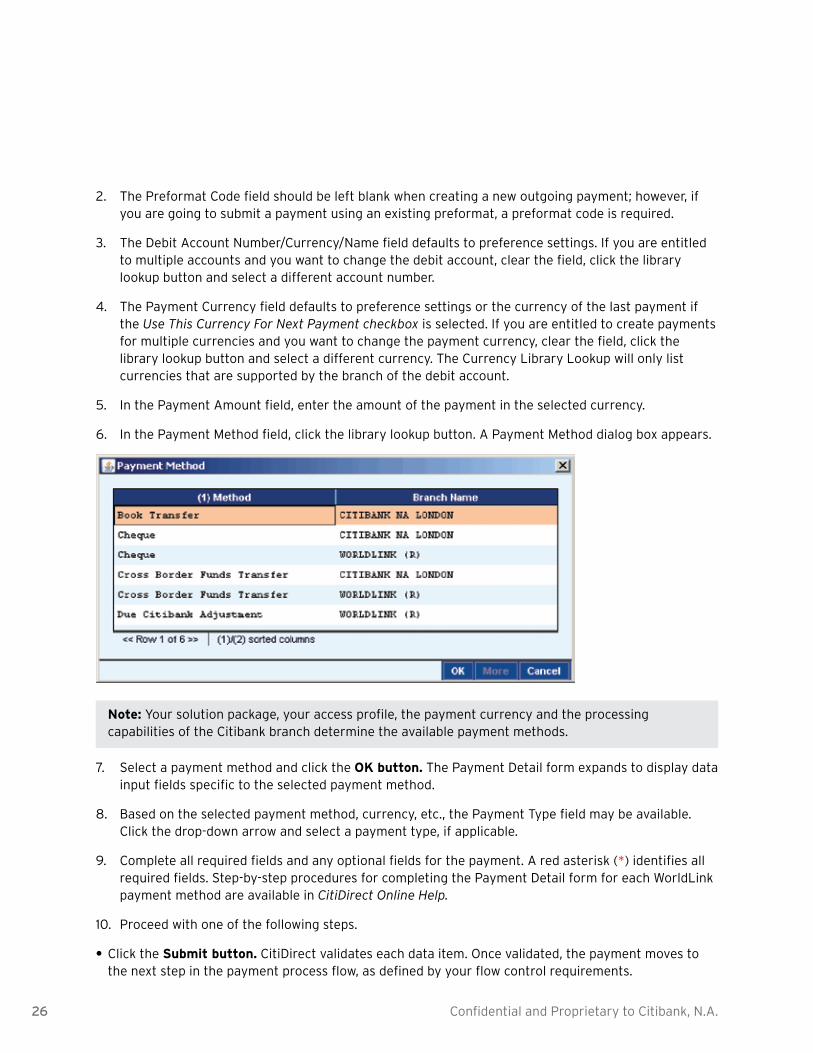
In the Payment Method field, click the library lookup button. A Payment Method dialog box appears.6.
Note: Your solution package, your access profile, the payment currency and the processing capabilities of the Citibank branch determine the available payment methods.
Select a payment method and click the 7. OK button. The Payment Detail form expands to display data input fields specific to the selected payment method.
Based on the selected payment method, currency, etc., the Payment Type field may be available. 8. Click the drop-down arrow and select a payment type, if applicable.
Complete all required fields and any optional fields for the payment. A red asterisk (9. *) identifies all required fields. Step-by-step procedures for completing the Payment Detail form for each WorldLink payment method are available in CitiDirect Online Help.
Proceed with one of the following steps.10.
Click the • Submit button. CitiDirect validates each data item. Once validated, the payment moves to the next step in the payment process flow, as defined by your flow control requirements.

27Confidential and Proprietary to Citibank, N.A.
If the payment does not pass CitiDirect validation, its status is changed to Invalid and it is listed on the Input/Modify tab.
Click the • Submit and Create Preformat button to submit the WorldLink payment for validation and to save the payment information as a preformat.
The Save Preformat dialog box appears. Your access profile determines whether or not you can create preformats.
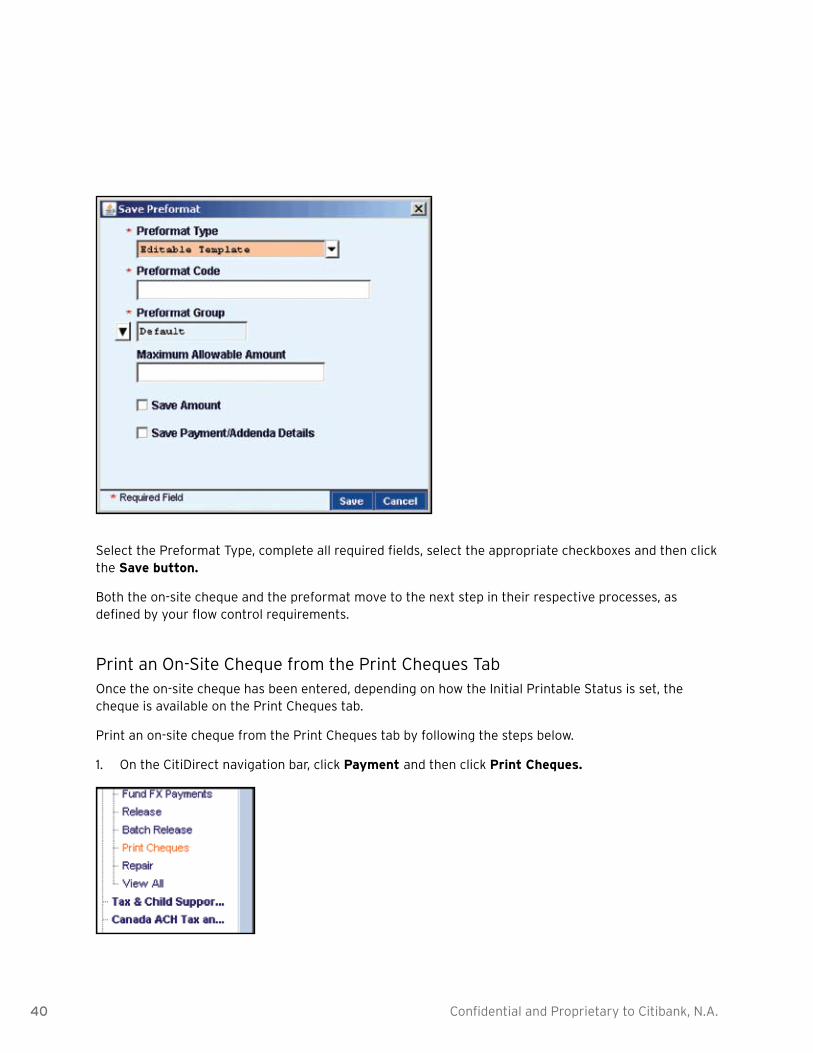
Select the Preformat Type, complete all required fields, select the appropriate checkboxes and then click the Save button.
Both the payment and the preformat move to the next step in their respective processes, as defined by your flow control requirements.
Click the • Submit and Copy button to submit the current WorldLink payment transaction for processing and to copy all transaction details, except the value date.
The payment details remain on the Payment Detail form to allow you to create a new payment using the copied transaction details.
If the transaction reference number is not automatically generated, you must update it for the new payment transaction.
28 Confidential and Proprietary to Citibank, N.A.
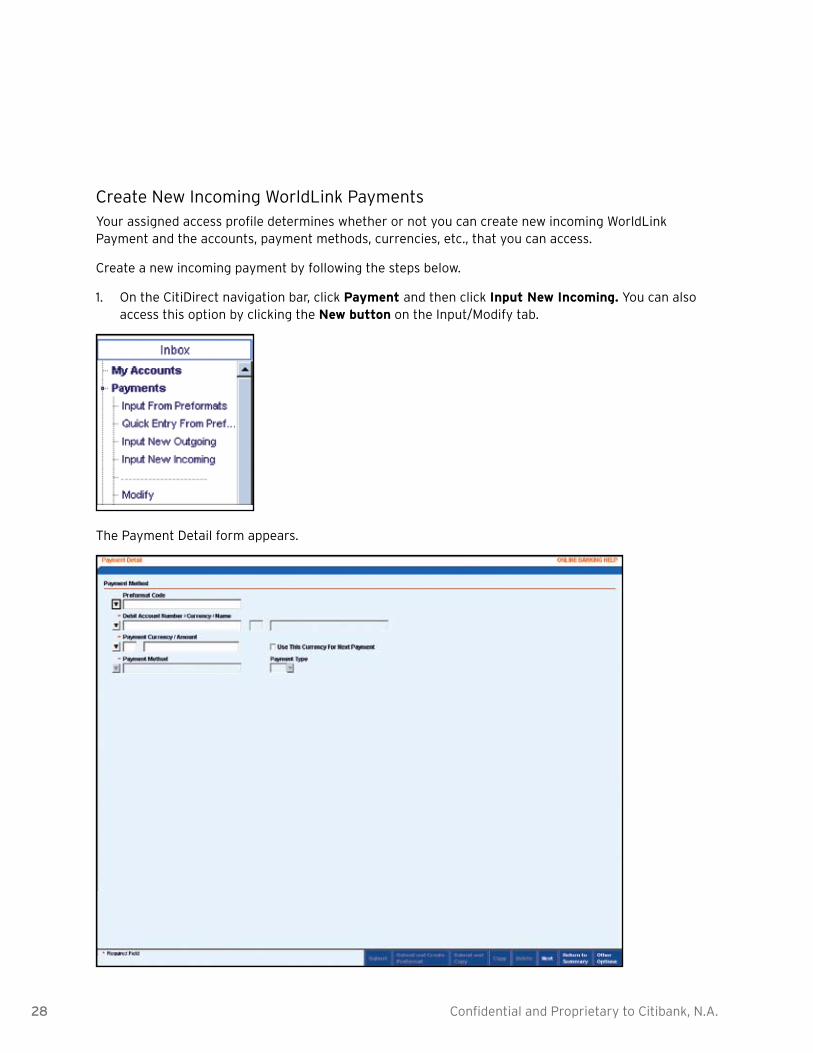
Create New Incoming WorldLink PaymentsYour assigned access profile determines whether or not you can create new incoming WorldLink Payment and the accounts, payment methods, currencies, etc., that you can access.
Create a new incoming payment by following the steps below.
On the CitiDirect navigation bar, click 1. Payment and then click Input New Incoming. You can also access this option by clicking the New button on the Input/Modify tab.
The Payment Detail form appears.

29Confidential and Proprietary to Citibank, N.A.
The Preformat Code field should be left blank.2.
The Credit Account Number/Currency/Name field defaults if preferences have been set. If you are 3. entitled to multiple accounts and you want to change the credit account, clear the field, click the library lookup button, and select a different account.
The Payment Currency field defaults to preference settings or the currency of the last payment if 4. the Use This Currency For Next Payment checkbox is selected. If you are entitled to create WorldLink payments in multiple currencies, clear the field, click the library lookup button and select a different currency.
In the Payment Amount field, enter the amount of the payment in the selected currency.5.
In the Payment Method field, click the library lookup button. A Payment Method dialog box appears.6.
Note: Your solution package, your access profile, the payment currency and the processing capabilities of the Citibank branch determine the available payment methods available.
Select a payment method and click the 7. OK button. The Payment Detail for expands to display detail fields for the selected WorldLink payment method.
Based on the selected payment method, currency, etc., the Payment Type field may become 8. available. Click the drop-down arrow and select a payment type, if applicable.
Proceed with one of the following steps.9.
Click the • Submit button. The payment is sent to CitiDirect where each data item is validated. Once validated, the payment moves to the next step in the payment process, as defined by your flow control requirements.
If the payment does not pass CitiDirect validation, its status is changed to Invalid and it is listed on the Input/Modify tab.
Click the • Submit and Copy button to submit the current WorldLink payment transaction for processing and to copy all transaction details, except the value date.
The payment details remain on the Payment Details form to allow you to create a new payment using the copied transaction details. If the transaction reference number is not automatically generated, you must update it for the new payment transaction.
30 Confidential and Proprietary to Citibank, N.A.
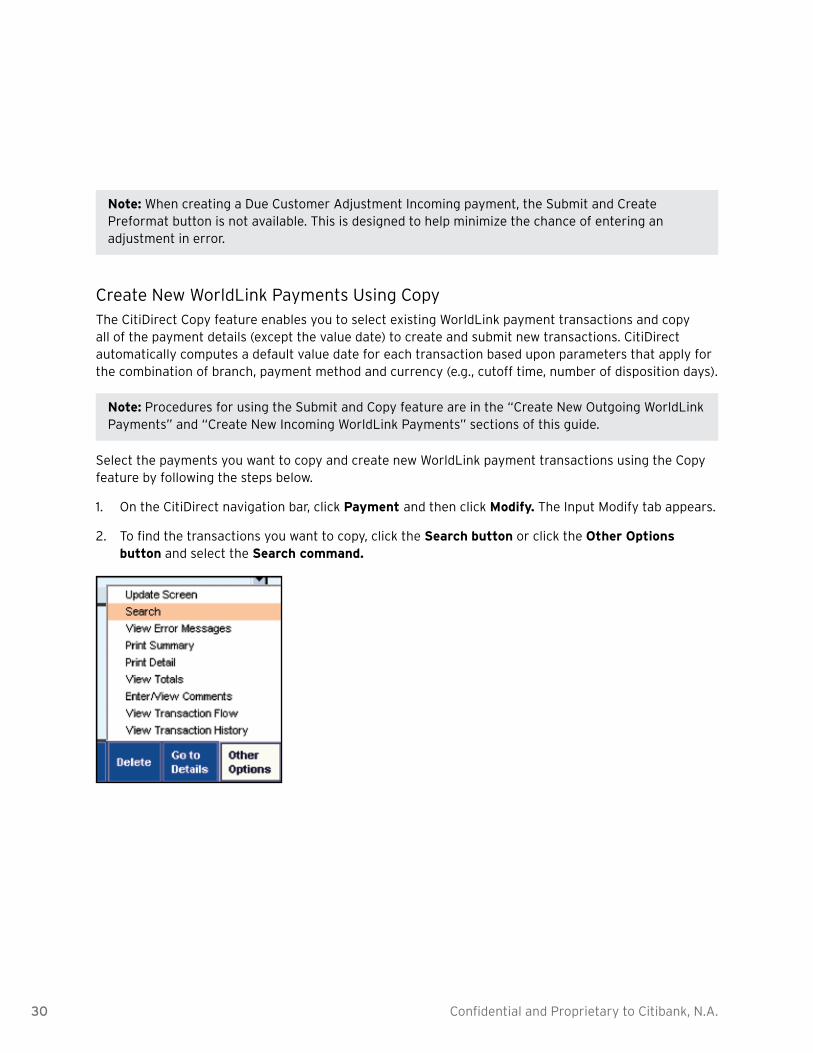
Note: When creating a Due Customer Adjustment Incoming payment, the Submit and Create Preformat button is not available. This is designed to help minimize the chance of entering an adjustment in error.
Create New WorldLink Payments Using CopyThe CitiDirect Copy feature enables you to select existing WorldLink payment transactions and copy all of the payment details (except the value date) to create and submit new transactions. CitiDirect automatically computes a default value date for each transaction based upon parameters that apply for the combination of branch, payment method and currency (e.g., cutoff time, number of disposition days).
Note: Procedures for using the Submit and Copy feature are in the “Create New Outgoing WorldLink Payments” and “Create New Incoming WorldLink Payments” sections of this guide.
Select the payments you want to copy and create new WorldLink payment transactions using the Copy feature by following the steps below.
On the CitiDirect navigation bar, click 1. Payment and then click Modify. The Input Modify tab appears.
To find the transactions you want to copy, click the 2. Search button or click the Other Options button and select the Search command.

31Confidential and Proprietary to Citibank, N.A.
A Search Definition Dialog box appears.
Enter search criteria to find the payment transactions you want to copy, and then click the 3. Run Search button. You can specify criteria to find transactions that are assigned a Released status, which are not available for modify or delete. All payment transactions that match your search criteria are listed on the Input/Modify tab.
32 Confidential and Proprietary to Citibank, N.A.
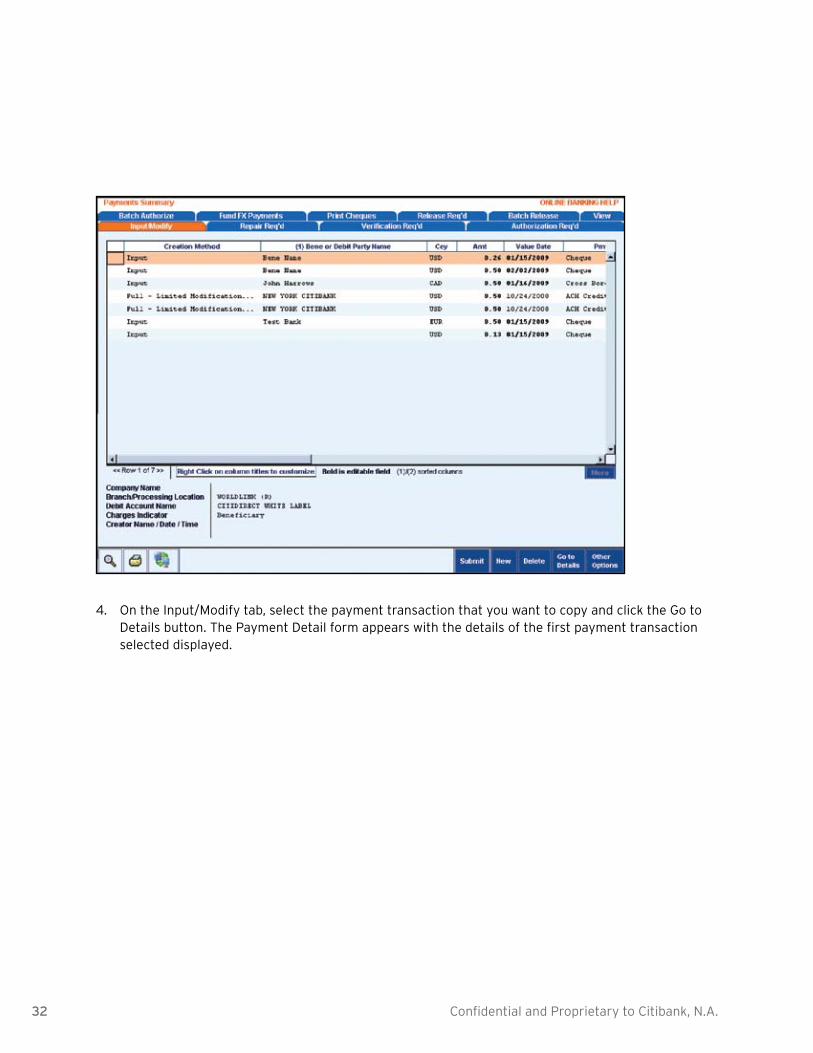
On the Input/Modify tab, select the payment transaction that you want to copy and click the Go to 4. Details button. The Payment Detail form appears with the details of the first payment transaction selected displayed.

33Confidential and Proprietary to Citibank, N.A.
Click the 5. Copy button. An Information dialog box appears.
All details are copied, except for the transaction reference number and value date.
Enter or modify payment details as required. If the transaction reference number is not 6. automatically generated, you must update it for this new payment transaction.
Click the 7. Submit button. The new payment moves to the next step as defined by your flow control requirements. The details of the next selected payment transaction appears.
34 Confidential and Proprietary to Citibank, N.A.
Repeat steps 5, 6 and 7 to create and submit additional new WorldLink payments using the Copy 8. feature.
Notes:
Click the •• Submit and Create Preformat button to submit the current payment for validation and to save the payment information as a preformat. Both the payment and the preformat move to the next step in their respective processes, as defined by your flow control requirements for payment transactions and library records. Your access profile determines whether or not you can create preformats.
Click the •• Submit and Copy button to submit the current payment for validation and to copy all details except the value date. The Payment Detail for remains open to allow you to make any necessary changes to create and submit a new transaction.
If you do not want to copy the payment details that are currently displayed on the Payment Detail ••form, click the Next button. The details of the next selected payment transaction appear. When the Payment Detail form displays the details of the last selected payment, click the Next button returns you to the Input/Modify tab.
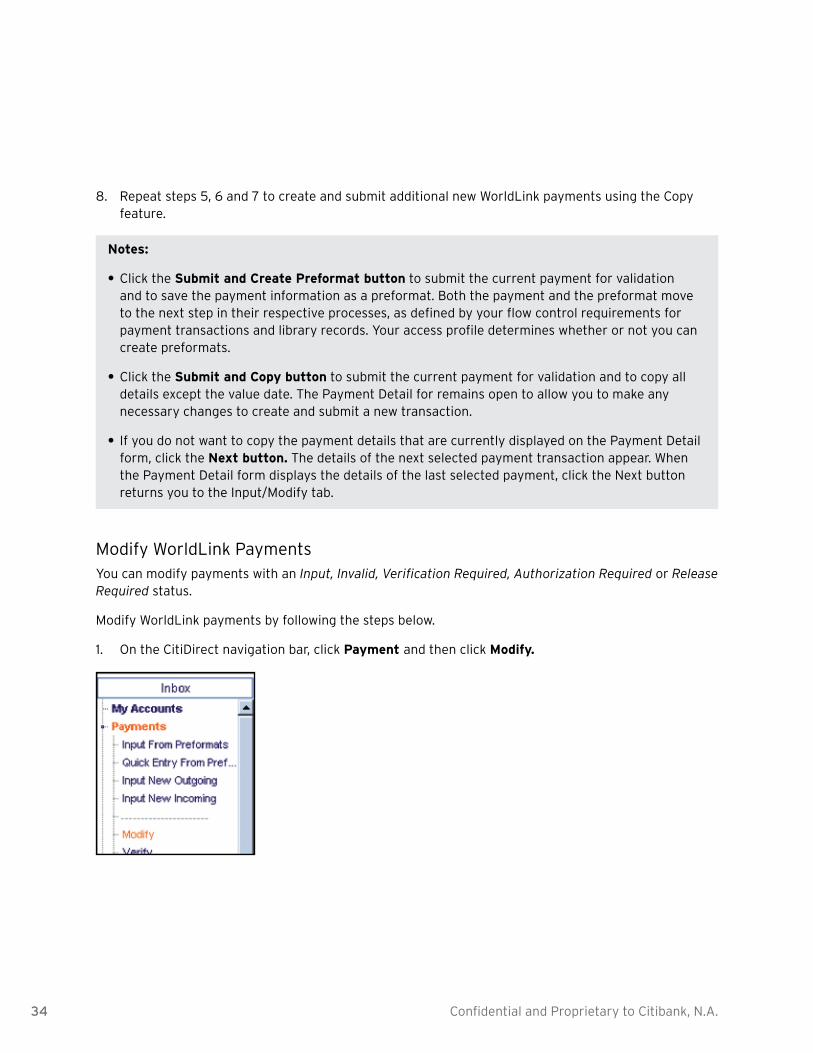
Modify WorldLink PaymentsYou can modify payments with an Input, Invalid, Verification Required, Authorization Required or Release Required status.
Modify WorldLink payments by following the steps below.
On the CitiDirect navigation bar, click 1. Payment and then click Modify.
35Confidential and Proprietary to Citibank, N.A.
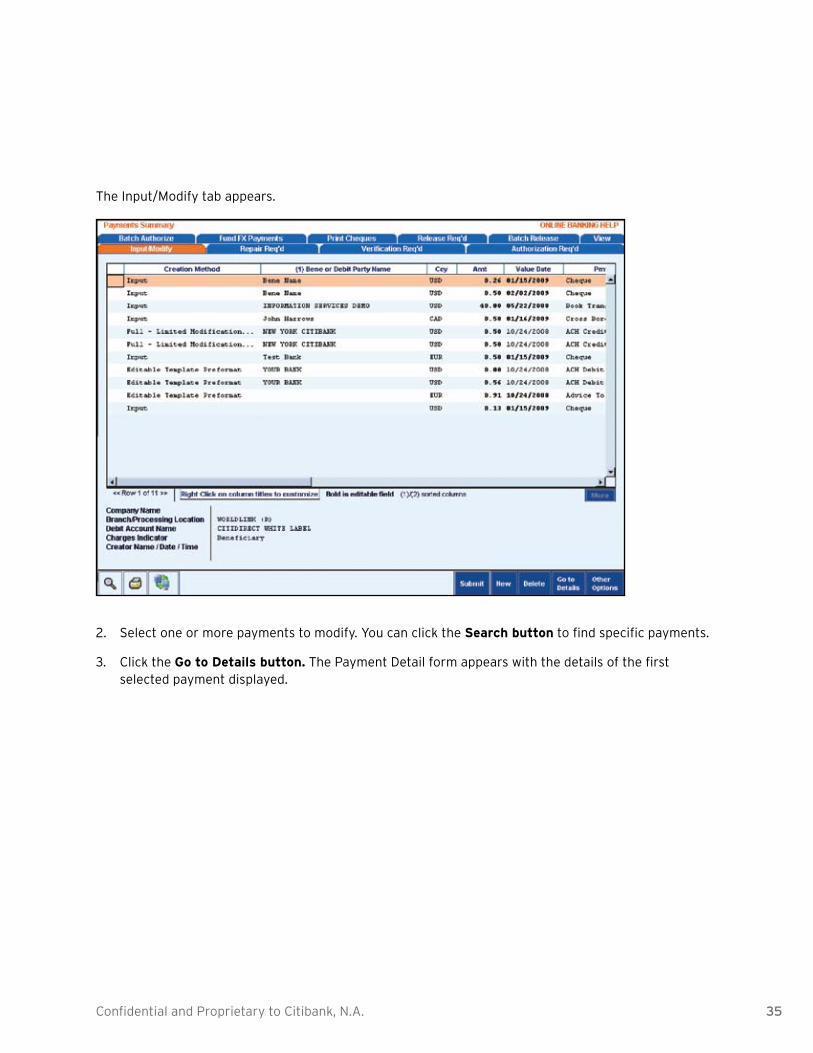
The Input/Modify tab appears.
Select one or more payments to modify. You can click the 2. Search button to find specific payments.
Click the 3. Go to Details button. The Payment Detail form appears with the details of the first selected payment displayed.
36 Confidential and Proprietary to Citibank, N.A.
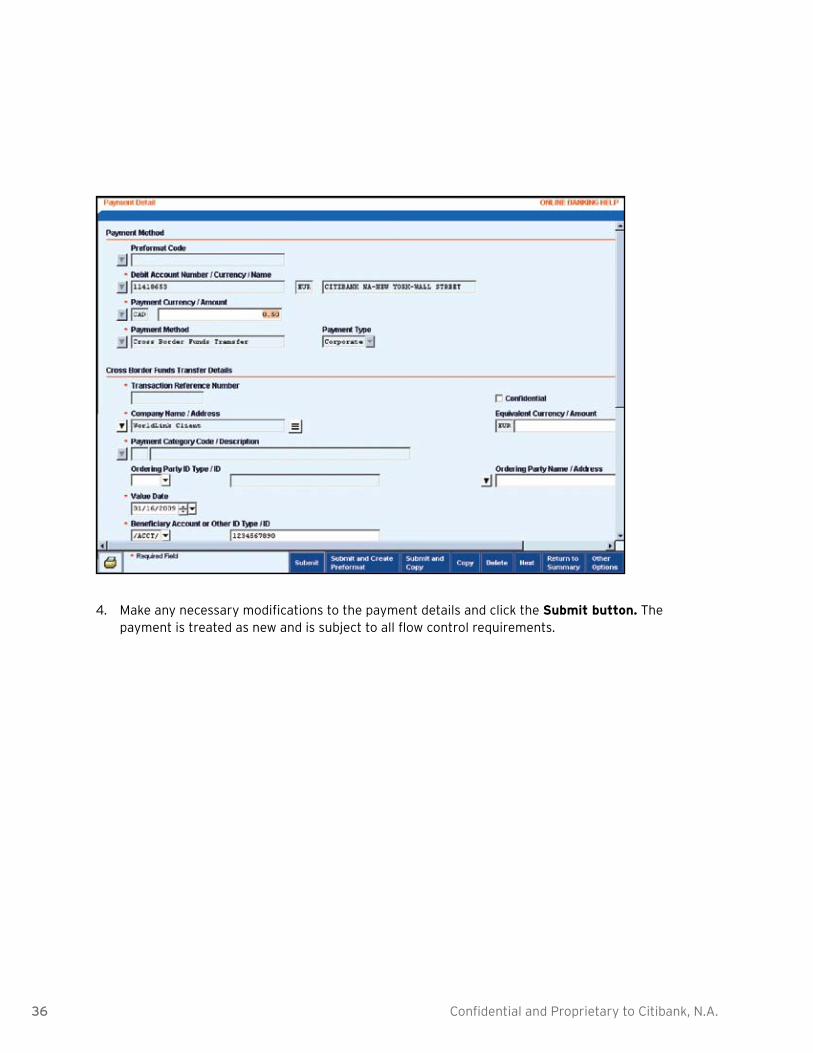
Make any necessary modifications to the payment details and click the 4. Submit button. The payment is treated as new and is subject to all flow control requirements.

37Confidential and Proprietary to Citibank, N.A.
On-site cheques are printed at your location rather than at a Citibank processing center. You can also choose to use pre-encoded on-site cheques. These allow you to print encoded cheques without the need for an MICR-enabled printer. Clients who issue pre-encoded on-site cheques will receive encoded cheque stock for USD, GBP, CAD, EUR through Germany, as well as a multicurrency cheque form. All 16 on-site cheque currencies are available through this offering.
The benefits of using on-site cheques include
Reduced risk of fraud due to the match-pay capabilities of WorldLink Payment Services••
Improved cheque clearing••
Expanded reporting and tracking••
If your organization has specified an initial printable status, an On-Site Cheque transaction is not listed on the Print Cheques tab until its status is updated to that initial printable status.
On-Site cheques can be printed from the Print Cheques tab or the Payment Detail form. The Print Cheques tab is used to select and print On-Site Cheque payments. Payment transactions with a Printed or Voided status cannot be printed.
Your access profile determines whether or not you can print On-Site Cheque payments and the cheque payments that you can print.
Notes:
Not all on-site cheque currencies are supported by the pre-encoded cheque stock.••
The multicurrency cheque form may have additional costs related to clearing as this will not be ••encoded.
Create an On-Site ChequeCreate an on-site cheque by following the steps below.
On the CitiDirect navigation bar, click 1. Payment and then click Input New Outgoing. You can also access this option by clicking the New button on the Input/Modify tab.
On-Site Cheques
38 Confidential and Proprietary to Citibank, N.A.
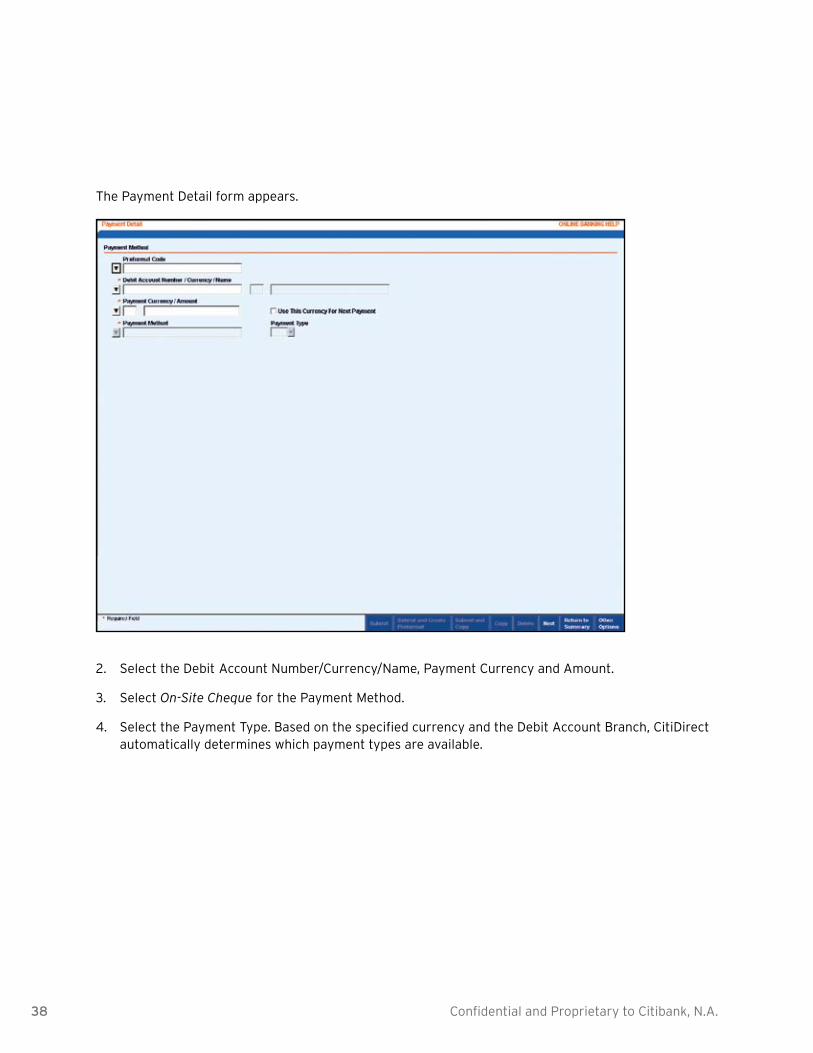
The Payment Detail form appears.
Select the Debit2. Account Number/Currency/Name, Payment Currency and Amount.
Select 3. On-Site Cheque for the Payment Method.
Select the Payment Type. Based on the specified currency and the Debit Account Branch, CitiDirect 4. automatically determines which payment types are available.
39Confidential and Proprietary to Citibank, N.A.
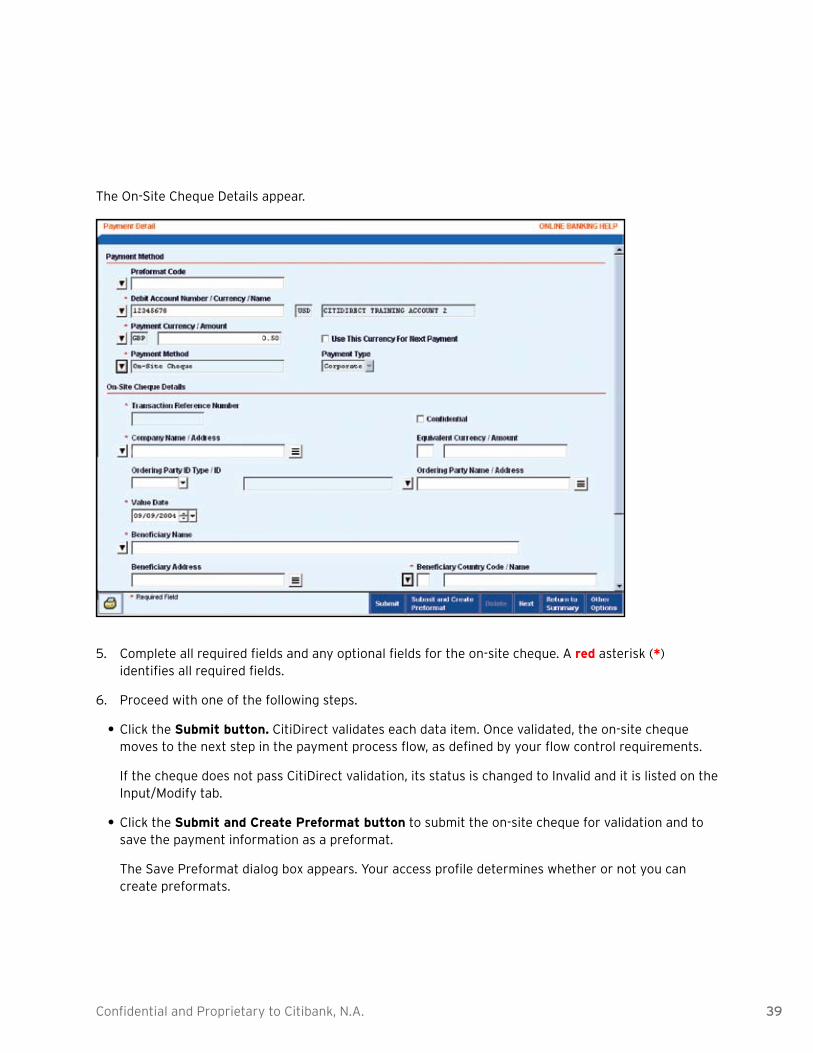
The On-Site Cheque Details appear.
Complete all required fields and any optional fields for the on-site cheque. A 5. red asterisk (*) identifies all required fields.
Proceed with one of the following steps.6.
Click the •• Submit button. CitiDirect validates each data item. Once validated, the on-site cheque moves to the next step in the payment process flow, as defined by your flow control requirements.
If the cheque does not pass CitiDirect validation, its status is changed to Invalid and it is listed on the Input/Modify tab.
Click the •• Submit and Create Preformat button to submit the on-site cheque for validation and to save the payment information as a preformat.
The Save Preformat dialog box appears. Your access profile determines whether or not you can create preformats.
40 Confidential and Proprietary to Citibank, N.A.
Select the Preformat Type, complete all required fields, select the appropriate checkboxes and then click the Save button.
Both the on-site cheque and the preformat move to the next step in their respective processes, as defined by your flow control requirements.
Print an On-Site Cheque from the Print Cheques TabOnce the on-site cheque has been entered, depending on how the Initial Printable Status is set, the cheque is available on the Print Cheques tab.
Print an on-site cheque from the Print Cheques tab by following the steps below.
On the CitiDirect navigation bar, click 1. Payment and then click Print Cheques.
41Confidential and Proprietary to Citibank, N.A.
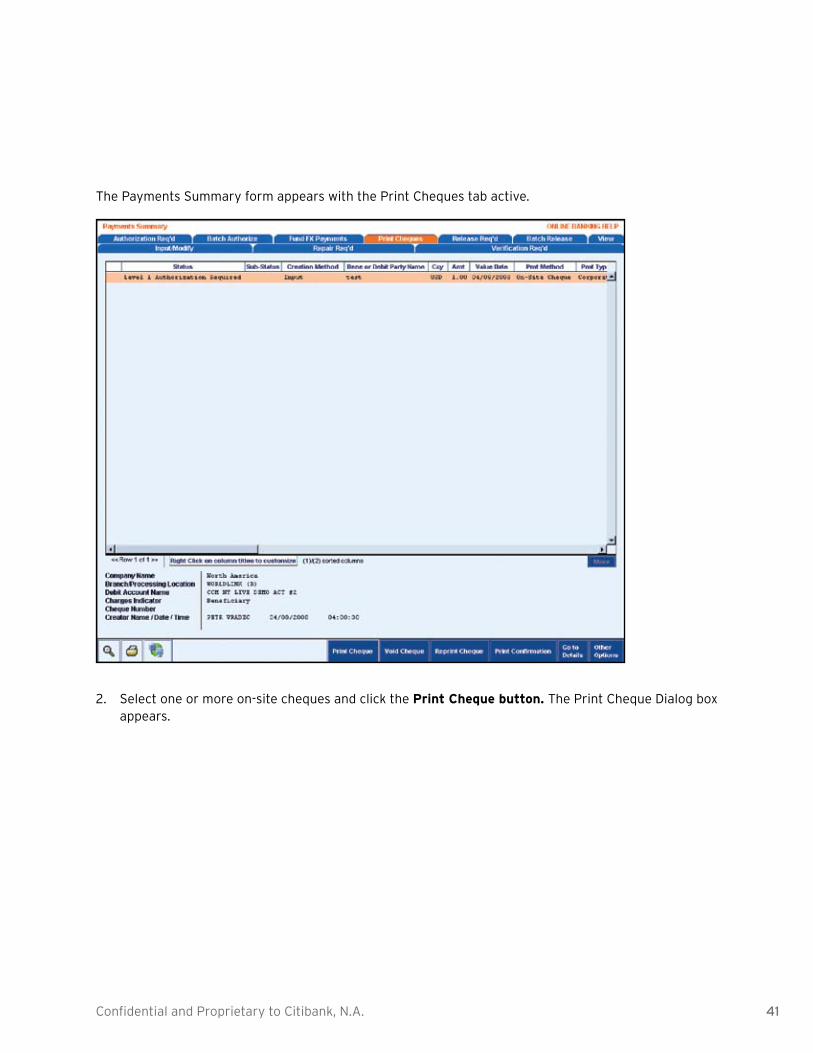
The Payments Summary form appears with the Print Cheques tab active.
Select one or more on-site cheques and click the 2. Print Cheque button. The Print Cheque Dialog box appears.
42 Confidential and Proprietary to Citibank, N.A.
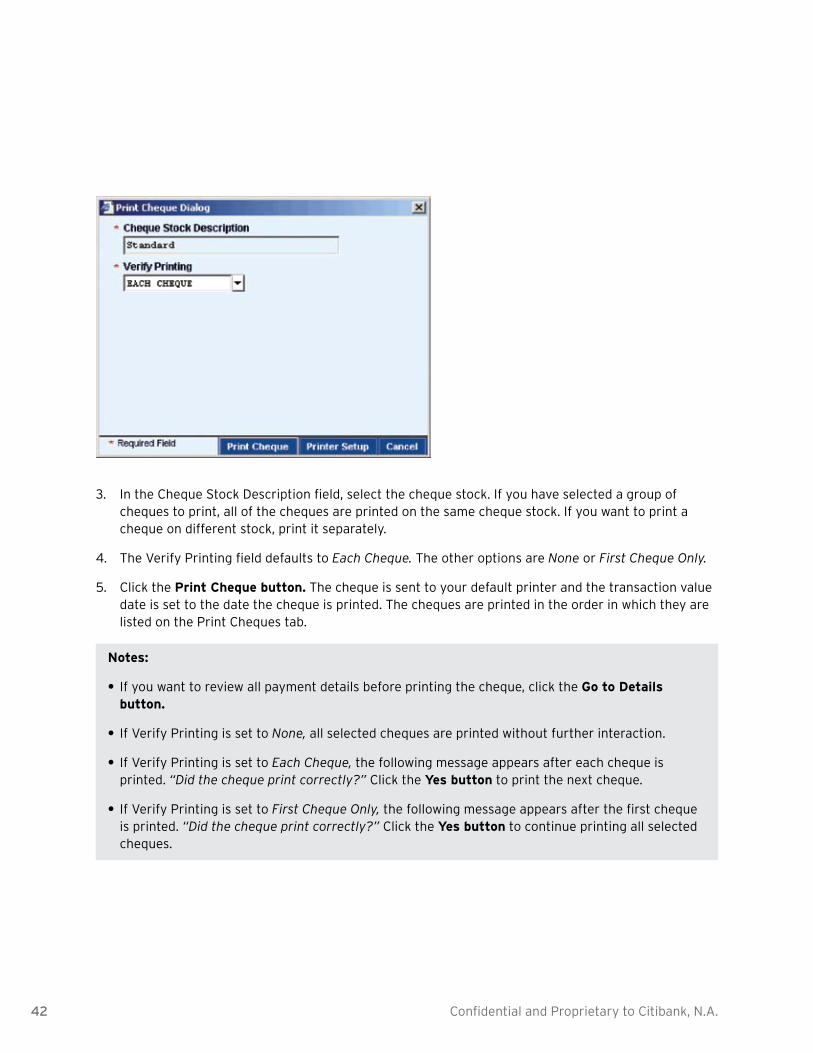
In the Cheque Stock Description field, select the cheque stock. If you have selected a group of 3. cheques to print, all of the cheques are printed on the same cheque stock. If you want to print a cheque on different stock, print it separately.
The Verify Printing field defaults to 4. Each Cheque. The other options are None or First Cheque Only.
Click the 5. Print Cheque button. The cheque is sent to your default printer and the transaction value date is set to the date the cheque is printed. The cheques are printed in the order in which they are listed on the Print Cheques tab.
Notes:
If you want to review all payment details before printing the cheque, click the •• Go to Details button.
If Verify Printing is set to •• None, all selected cheques are printed without further interaction.
If Verify Printing is set to •• Each Cheque, the following message appears after each cheque is printed. “Did the cheque print correctly?” Click the Yes button to print the next cheque.
If Verify Printing is set to •• First Cheque Only, the following message appears after the first cheque is printed. “Did the cheque print correctly?” Click the Yes button to continue printing all selected cheques.
43Confidential and Proprietary to Citibank, N.A.
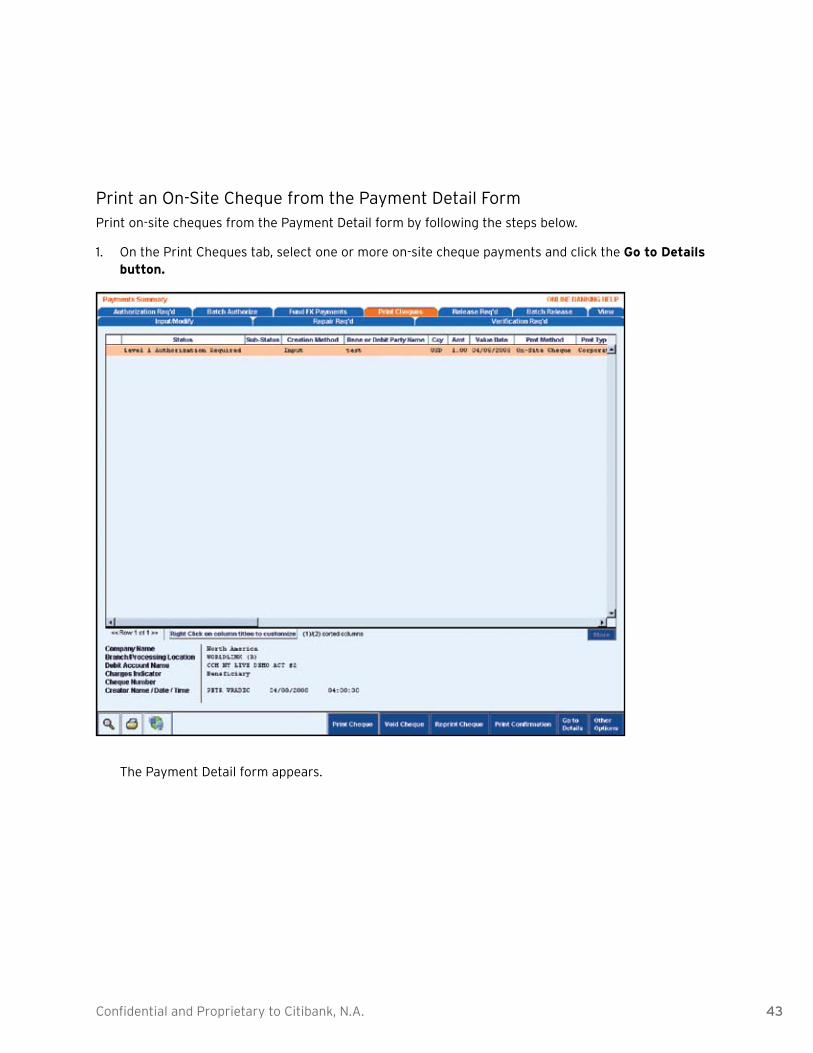
Print an On-Site Cheque from the Payment Detail FormPrint on-site cheques from the Payment Detail form by following the steps below.
On the Print Cheques tab, select one or more on-site cheque payments and click the 1. Go to Details button.
The Payment Detail form appears.
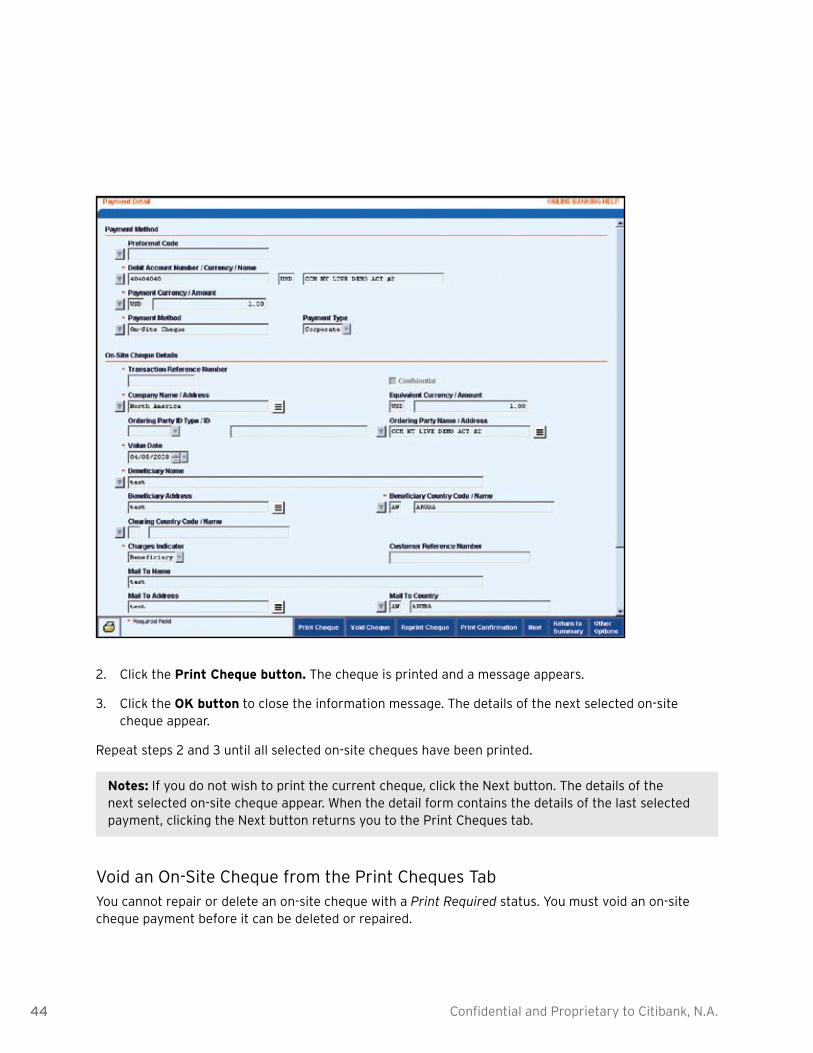
44 Confidential and Proprietary to Citibank, N.A.
Click the 2. Print Cheque button. The cheque is printed and a message appears.
Click the 3. OK button to close the information message. The details of the next selected on-site cheque appear.
Repeat steps 2 and 3 until all selected on-site cheques have been printed.
Notes: If you do not wish to print the current cheque, click the Next button. The details of the next selected on-site cheque appear. When the detail form contains the details of the last selected payment, clicking the Next button returns you to the Print Cheques tab.
Void an On-Site Cheque from the Print Cheques TabYou cannot repair or delete an on-site cheque with a Print Required status. You must void an on-site cheque payment before it can be deleted or repaired.
45Confidential and Proprietary to Citibank, N.A.
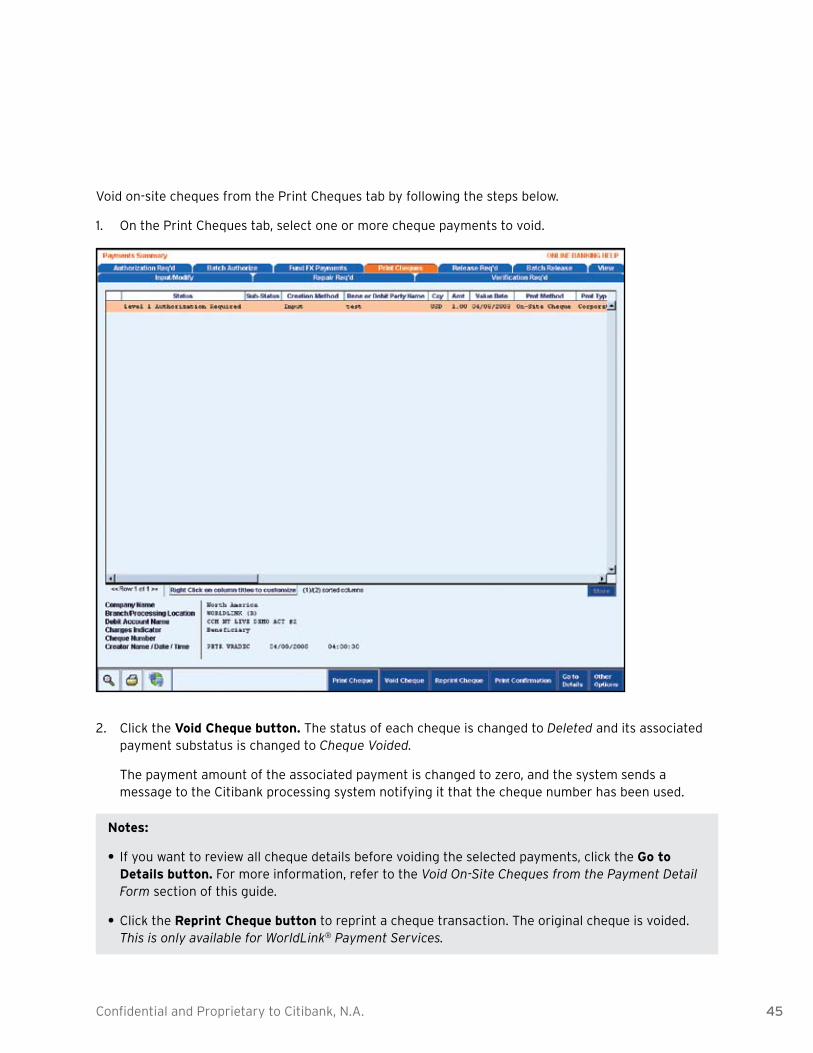
Void on-site cheques from the Print Cheques tab by following the steps below.
On the Print Cheques tab, select one or more cheque payments to void.1.
Click the 2. Void Cheque button. The status of each cheque is changed to Deleted and its associated payment substatus is changed to Cheque Voided.
The payment amount of the associated payment is changed to zero, and the system sends a message to the Citibank processing system notifying it that the cheque number has been used.
Notes:
If you want to review all cheque details before voiding the selected payments, click the •• Go to Details button. For more information, refer to the Void On-Site Cheques from the Payment Detail Form section of this guide.
Click the •• Reprint Cheque button to reprint a cheque transaction. The original cheque is voided. This is only available for WorldLink® Payment Services.
46 Confidential and Proprietary to Citibank, N.A.
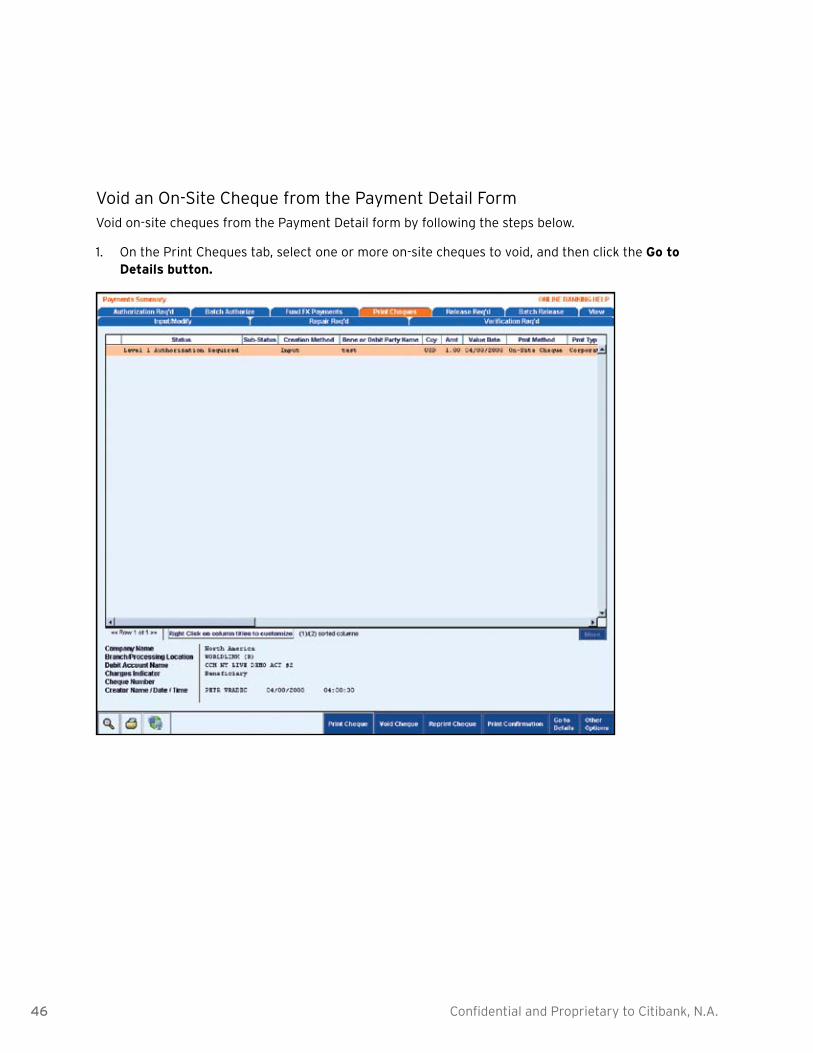
Void an On-Site Cheque from the Payment Detail FormVoid on-site cheques from the Payment Detail form by following the steps below.
On the Print Cheques tab, select one or more on-site cheques to void, and then click the 1. Go to Details button.

47Confidential and Proprietary to Citibank, N.A.
The Payment Detail form appears.
Click the 2. Void Cheque button. The status of the cheque is changed to Deleted and its associated substatus is changed to Cheque Voided.
The payment amount of the associated payment is changed to zero, and the system sends a message to the Citibank processing system notifying it that the cheque number has been used.
Note: Click the Reprint Cheque button to reprint a cheque transaction. The original cheque is voided. This is only available for WorldLink.

48 Confidential and Proprietary to Citibank, N.A.
All payments with a Repair Required, Repair Invalid or CB Rejected status are listed on the Repair Req’d tab and they must be repaired before they can continue through the payments process, as defined by your flow control requirements.
Your access profile determines whether or not you can repair payments and the payments you can repair.
A •• Repair Required status indicates that the payment has been sent to repair during the verification, authorization or release process.
A •• Repair Invalid status indicates that the payment has failed submit from the Repair Req’d tab.
A •• CB Rejected status indicates that the Citibank host processor has rejected the payment.
Repair WorldLink payments by following the steps below.
On the CitiDirect navigation bar, click 1. Payment and then click Repair.
Repair WorldLink Payments
49Confidential and Proprietary to Citibank, N.A.
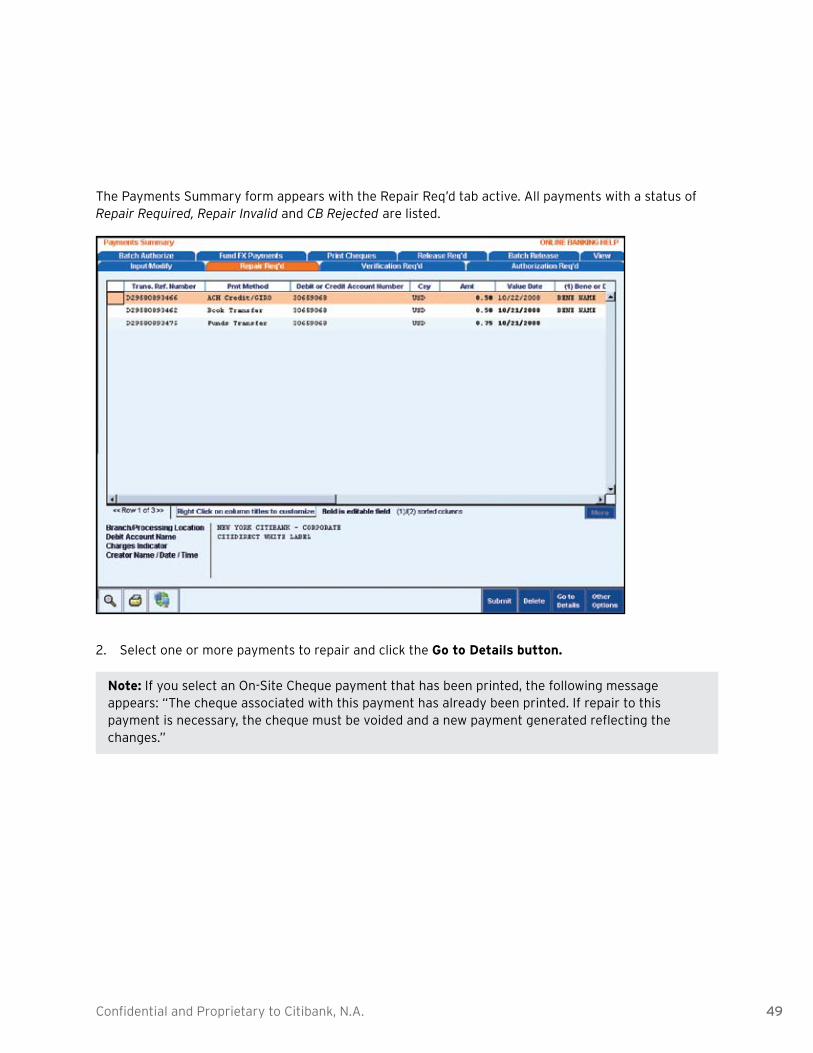
The Payments Summary form appears with the Repair Req’d tab active. All payments with a status of Repair Required, Repair Invalid and CB Rejected are listed.
Select one or more payments to repair and click the 2. Go to Details button.
Note: If you select an On-Site Cheque payment that has been printed, the following message appears: “The cheque associated with this payment has already been printed. If repair to this payment is necessary, the cheque must be voided and a new payment generated reflecting the changes.”
50 Confidential and Proprietary to Citibank, N.A.
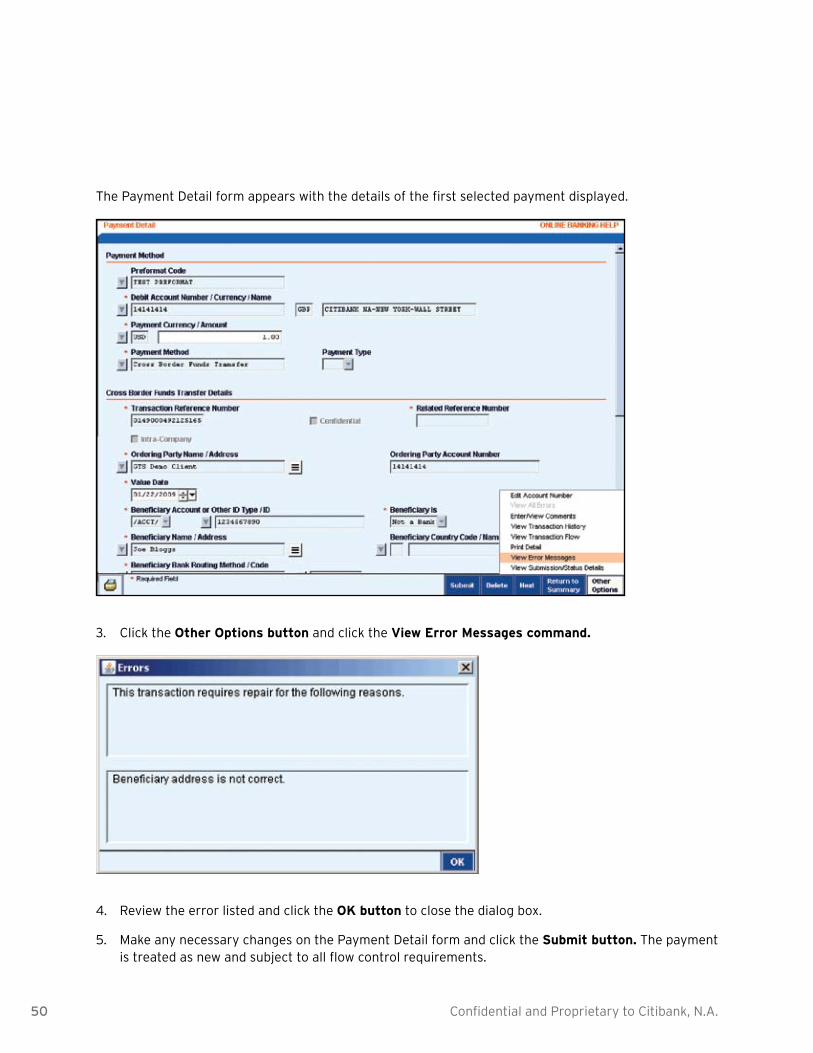
The Payment Detail form appears with the details of the first selected payment displayed.
Click the 3. Other Options button and click the View Error Messages command.
Review the error listed and click the 4. OK button to close the dialog box.
Make any necessary changes on the Payment Detail form and click the 5. Submit button. The payment is treated as new and subject to all flow control requirements.
51Confidential and Proprietary to Citibank, N.A.
If multiple payments were selected, the details of the next selected payment appear. When the Payment Detail form contains the details of the last selected payment, clicking the Next button returns you to the Repair Req’d tab.
Authorize WorldLink PaymentsWhen payments are ready for authorization, they are listed on the Authorization Req’d tab, where they can be selected and authorized by an entitled user. During the authorization process, payments can be authorized, sent to repair or deleted.
CitiDirect supports nine levels of authorization. If your organization requires multiple authorizations, payments remain accessible on the Authorization Req’d tab until they pass all required authorizations.
Your access profile determines whether or not you are entitled to authorize payments and the payment transactions you can authorize. If you submit the payment, you cannot authorize it.
Notes:
Payments can be authorized from the Authorization Req’d tab or the Payment Detail form.••
CitiDirect clients can require that all payments be authorized from the Payment Detail form. If ••your organization has stipulated this requirement, a message appears when you attempt to select and authorize payments directly on the Authorization Req’d tab. For more information, see the “Authorize WorldLink Payments from the Payment Detail Form” section.
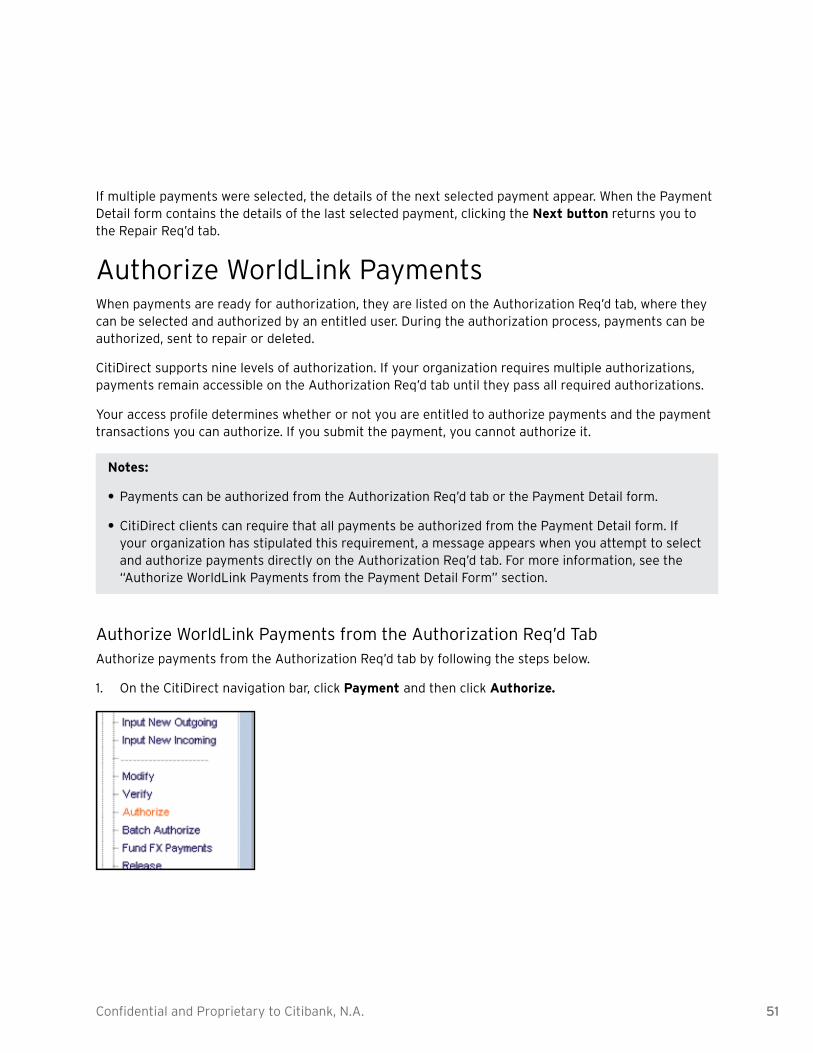
Authorize WorldLink Payments from the Authorization Req’d TabAuthorize payments from the Authorization Req’d tab by following the steps below.
On the CitiDirect navigation bar, click 1. Payment and then click Authorize.
52 Confidential and Proprietary to Citibank, N.A.
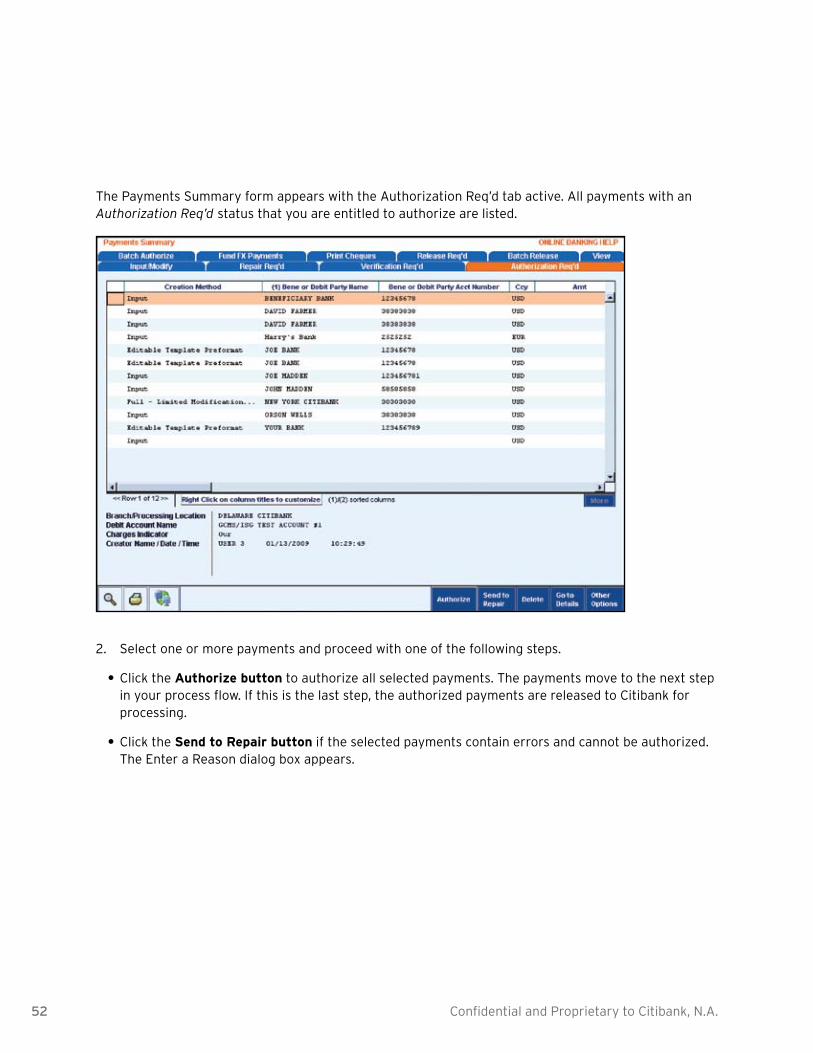
The Payments Summary form appears with the Authorization Req’d tab active. All payments with an Authorization Req’d status that you are entitled to authorize are listed.
Select one or more payments and proceed with one of the following steps.2.
Click the •• Authorize button to authorize all selected payments. The payments move to the next step in your process flow. If this is the last step, the authorized payments are released to Citibank for processing.
Click the •• Send to Repair button if the selected payments contain errors and cannot be authorized. The Enter a Reason dialog box appears.
53Confidential and Proprietary to Citibank, N.A.
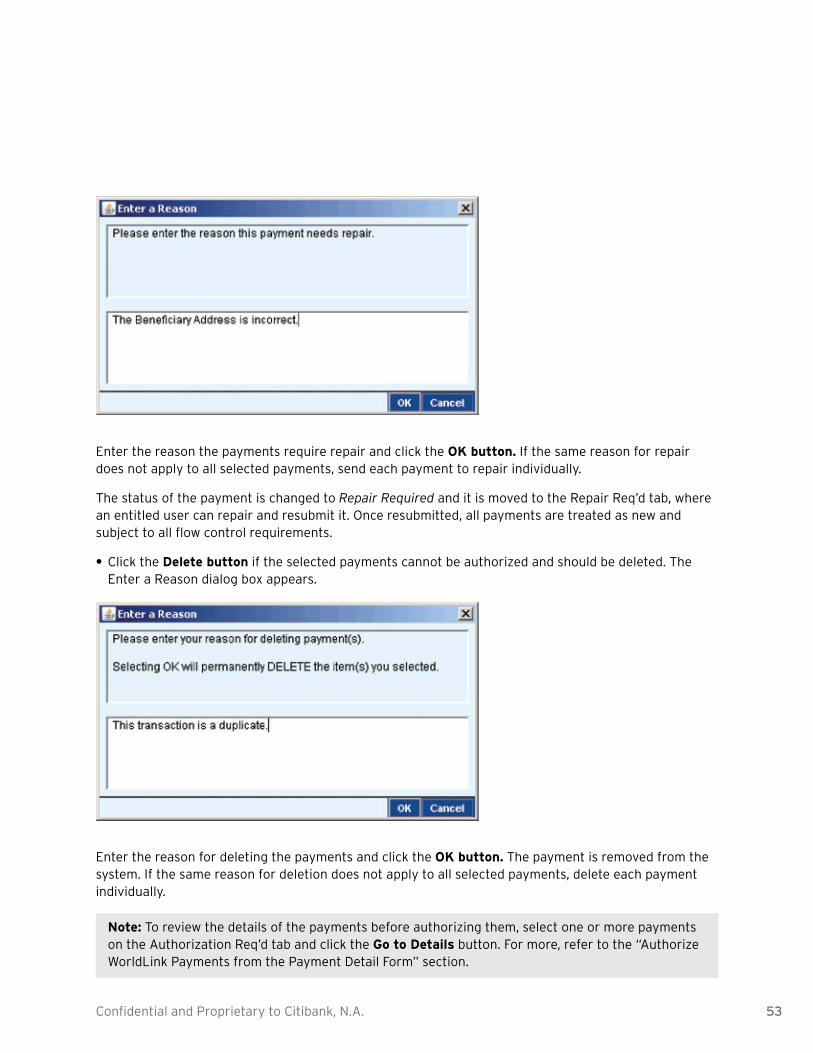
Enter the reason the payments require repair and click the OK button. If the same reason for repair does not apply to all selected payments, send each payment to repair individually.
The status of the payment is changed to Repair Required and it is moved to the Repair Req’d tab, where an entitled user can repair and resubmit it. Once resubmitted, all payments are treated as new and subject to all flow control requirements.
Click the •• Delete button if the selected payments cannot be authorized and should be deleted. The Enter a Reason dialog box appears.
Enter the reason for deleting the payments and click the OK button. The payment is removed from the system. If the same reason for deletion does not apply to all selected payments, delete each payment individually.
Note: To review the details of the payments before authorizing them, select one or more payments on the Authorization Req’d tab and click the Go to Details button. For more, refer to the “Authorize WorldLink Payments from the Payment Detail Form” section.
54 Confidential and Proprietary to Citibank, N.A.
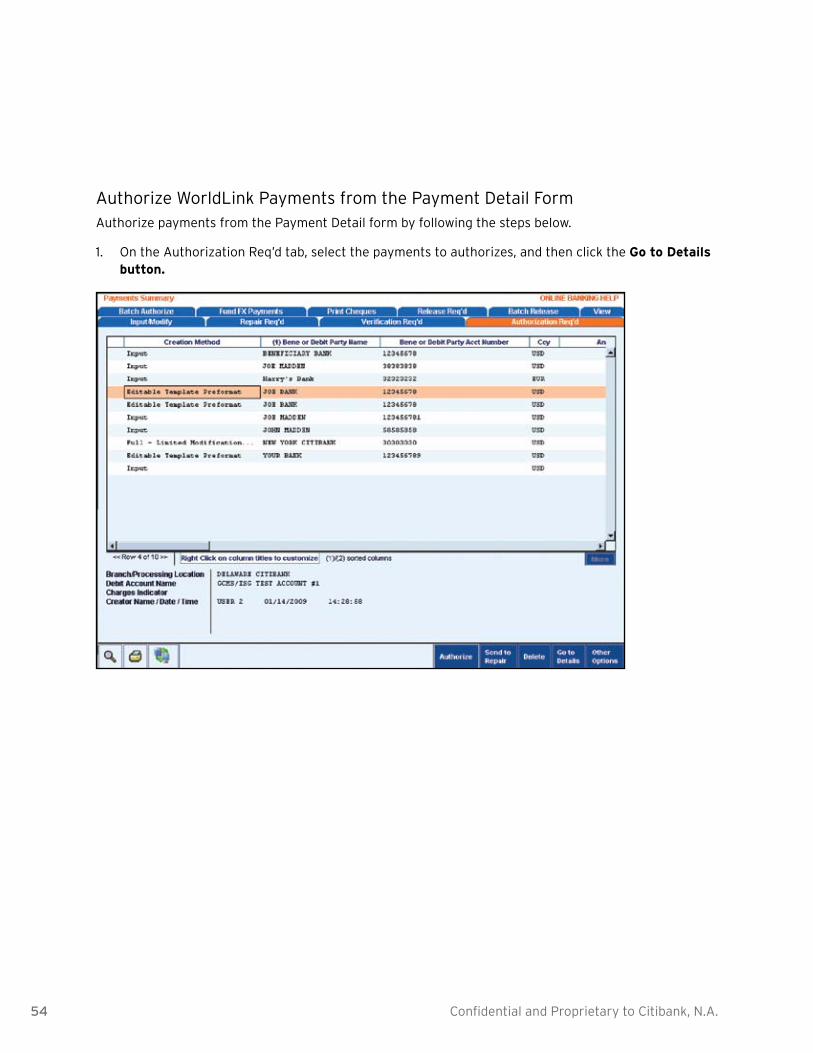
Authorize WorldLink Payments from the Payment Detail FormAuthorize payments from the Payment Detail form by following the steps below.
On the Authorization Req’d tab, select the payments to authorizes, and then click the 1. Go to Details button.

55Confidential and Proprietary to Citibank, N.A.
The Payment Details form appears.
Review all payment details and proceed with one of the following steps.2.
Click the • Authorize button to authorize the payment. The payment moves to the next step in your payments process flow and the details of the next selected payment appear on the Payment Detail form. If this is the last step in your payments process flow, the payment is released to Citibank for processing.
Click the •• Send to Repair button if the payment contains errors and cannot be authorized. Enter a reason for repair in the Enter a Reason dialog box and click the OK button.
The payment status is changed to Repair Required and it is moved to the Repair Req’d tab, where an entitled user can repair and resubmit it. Once resubmitted, the payment is treated as new and subject to all flow control requirements. The details of the next selected payment appear.
Click the •• Delete button if the payment cannot be authorized and should be deleted. Enter the reason for deleting the payment in the Enter a Reason dialog box and click the OK button.The payment is deleted from the system and the details of the next selected payment appear.
Click the •• Next button if you do not want to authorize the current payment. The details of the next selected payment appear.

56 Confidential and Proprietary to Citibank, N.A.
Notes:
When the Payment Detail form contains the details of the last selected payment, clicking the ••Authorize or Next buttons returns you to the Authorization Req’d tab.
Payments requiring multiple levels of authorization remain on the •• Authorization Required state until they pass all required levels.
Use Foreign Exchange RatesWorldLink payments often require obtaining foreign exchange rates to complete a payment transaction. Getting the latest foreign exchange (FX) rates, whether online or from a Trading Representative, is critical to a satisfactory outcome for your customers.
With CitiDirect, you can obtain FX rates in one of two ways. You can request online rates or you can obtain and enter manual rates.
Obtain Online Foreign Exchange (FX) RatesObtain foreign exchange rates online by following the steps below.
On the CitiDirect navigation bar, click 1. Payment and then click Fund FX Payments.

57Confidential and Proprietary to Citibank, N.A.
The Payments Summary form appears with the Fund FX Payments tab active. All payments that are pending FX are displayed.
Select the payments for which you want to obtain FX rates and click the 2. Get FX Rates button. The Purchase FX for Payments dialog box appears.

58 Confidential and Proprietary to Citibank, N.A.
Notes:
When you click the •• Get FX Rates button, the system consolidates your selected payments by currency and value date, applies any outstanding FX balances to your current purchases, calculates the amount of foreign currency you need for this purchase, gets the most recent online FX rates, calculates the equivalent amounts, displays the value date of the contracts.
If you are utilizing more than one WorldLink client number within a client setup, you cannot •purchase currency across client numbers.
When the system finishes the calculations, the FX Rate field is populated. Click the 3. Accept button to lock in the FX rate.

59Confidential and Proprietary to Citibank, N.A.
Notes:
The Contract number is assigned once the FX rates are accepted. •
Click the •• New Rate button to get the latest rates online.
Click the •• Update Screen button to update the screen with the latest information.
Click the •• Go to Details button to view the details of the selected contract.
Click the •• Other Options button to print the information displayed in the dialog box, including column titles.
Click the 4. Done button to exit the FX for Payments dialog box.
Note: Once the FX rates are locked in, the payment moves to the Release Req’d tab.
Obtain and Enter Manual FX RatesWhen foreign exchange rates are readily available, you can quickly enter the data manually.
Obtain and enter manual foreign exchange rates by following the steps below.
First, call your WorldLink Trading Representative.1.
Note:
Trading Representatives can be reached at the following numbers: • UK: 0044207500 4646 Singapore: 654268128 Ireland: 0035316227800 New York: 1 800 274 7774
Give the Trading Representative the Payment Currency, Payment Amount, the Account Currency 2. and your WorldLink Client number.
The WorldLink Trading Representative will then give you the Contract Rate, Contract3. Number and Contract Value.
On the CitiDirect navigation bar, click 4. Payments and then click Fund FX Payments.
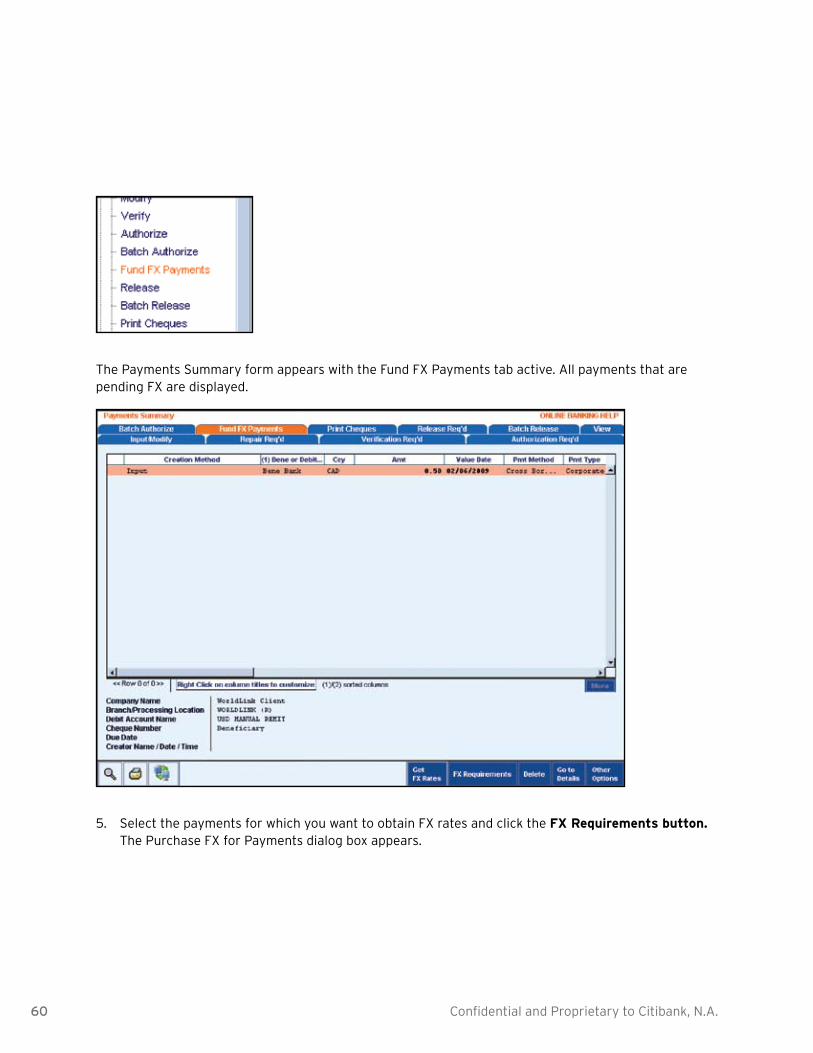
60 Confidential and Proprietary to Citibank, N.A.
The Payments Summary form appears with the Fund FX Payments tab active. All payments that are pending FX are displayed.
Select the payments for which you want to obtain FX rates and click the 5. FX Requirements button. The Purchase FX for Payments dialog box appears.
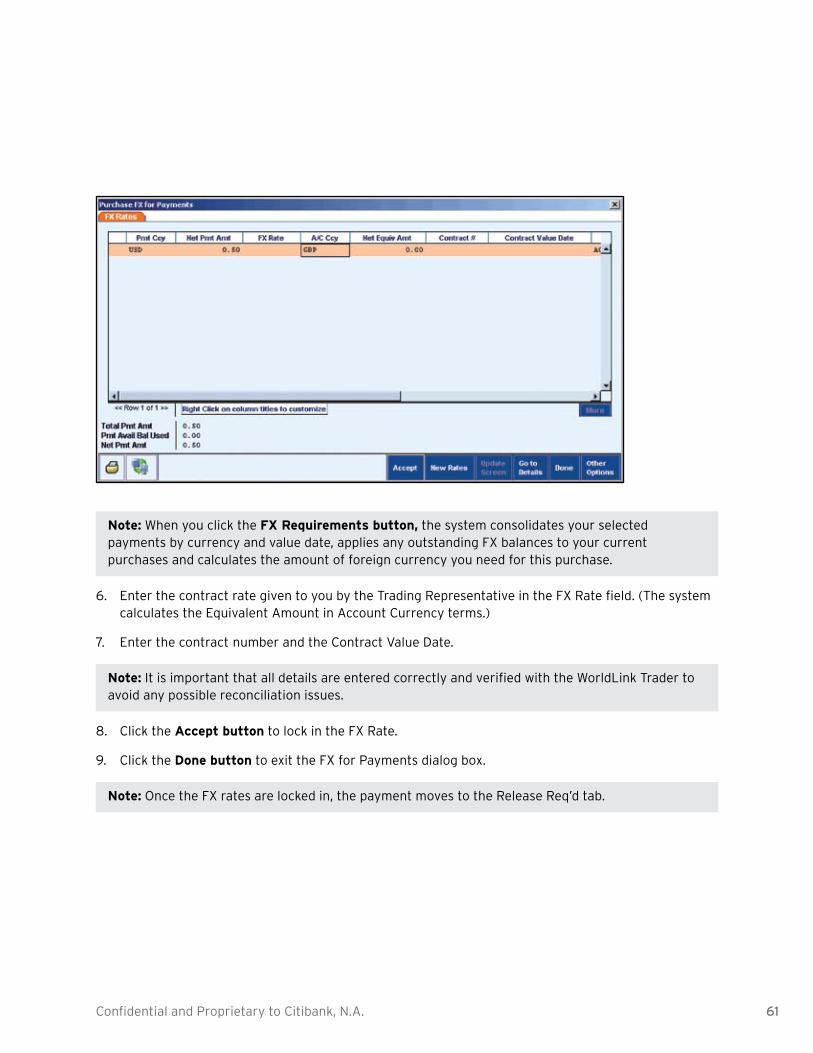
61Confidential and Proprietary to Citibank, N.A.
Note: When you click the FX Requirements button, the system consolidates your selected payments by currency and value date, applies any outstanding FX balances to your current purchases and calculates the amount of foreign currency you need for this purchase.
Enter the contract rate given to you by the Trading Representative in the FX Rate field. (The system 6. calculates the Equivalent Amount in Account Currency terms.)
Enter the contract7. number and the Contract Value Date.
Note: It is important that all details are entered correctly and verified with the WorldLink Trader to avoid any possible reconciliation issues.
Click the 8. Accept button to lock in the FX Rate.
Click the 9. Done button to exit the FX for Payments dialog box.
Note: Once the FX rates are locked in, the payment moves to the Release Req’d tab.

62 Confidential and Proprietary to Citibank, N.A.
Update FX Rates Using the New Rates ButtonYou can update foreign exchange rates that have recently changed by using the New Rates button on the Purchase FX for Payments dialog box.
Update foreign exchange rates by following the steps below.
On the CitiDirect navigation bar, click 1. Payments and then click Fund FX Payments.
The Payments Summary form appears with the Fund FX Payments tab active. All payments that are pending FX are displayed.
63Confidential and Proprietary to Citibank, N.A.
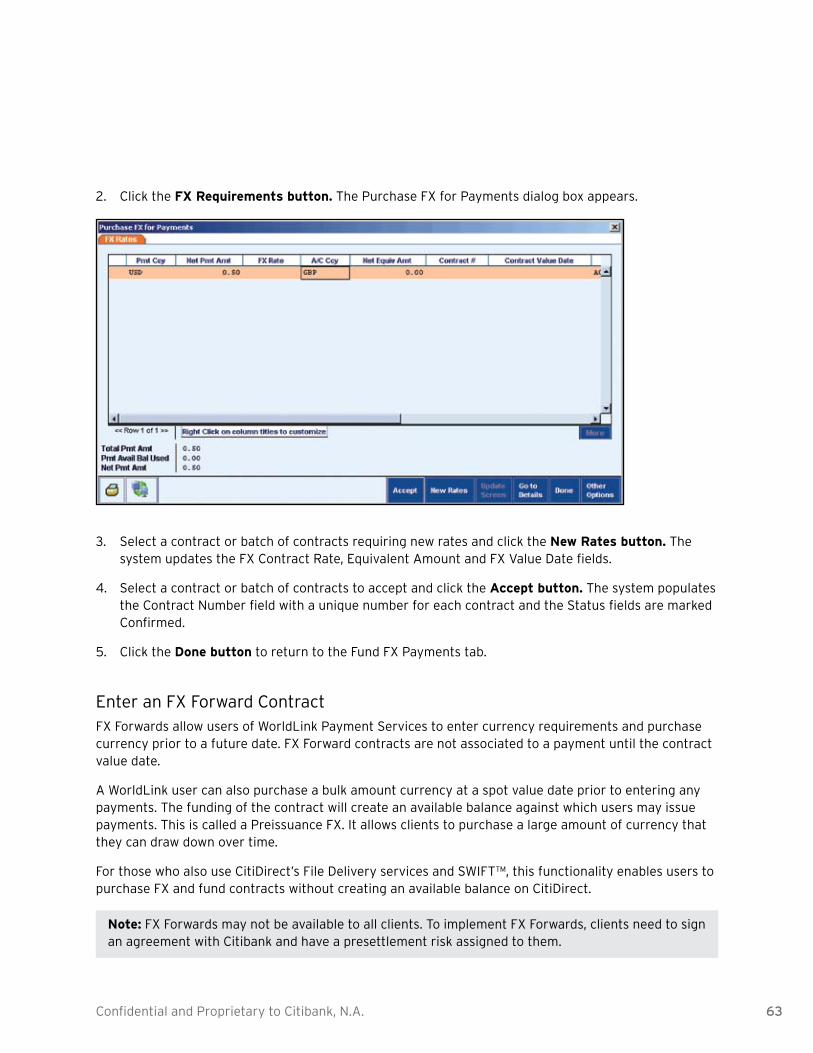
Click the 2. FX Requirements button. The Purchase FX for Payments dialog box appears.
Select a contract or batch of contracts requiring new rates and click the 3. New Rates button. The system updates the FX Contract Rate, Equivalent Amount and FX Value Date fields.
Select a contract or batch of contracts to accept and click the 4. Accept button. The system populates the Contract Number field with a unique number for each contract and the Status fields are marked Confirmed.
Click the 5. Done button to return to the Fund FX Payments tab.
Enter an FX Forward ContractFX Forwards allow users of WorldLink Payment Services to enter currency requirements and purchase currency prior to a future date. FX Forward contracts are not associated to a payment until the contract value date.
A WorldLink user can also purchase a bulk amount currency at a spot value date prior to entering any payments. The funding of the contract will create an available balance against which users may issue payments. This is called a Preissuance FX. It allows clients to purchase a large amount of currency that they can draw down over time.
For those who also use CitiDirect’s File Delivery services and SWIFT™, this functionality enables users to purchase FX and fund contracts without creating an available balance on CitiDirect.
Note: FX Forwards may not be available to all clients. To implement FX Forwards, clients need to sign an agreement with Citibank and have a presettlement risk assigned to them.

64 Confidential and Proprietary to Citibank, N.A.
Enter a Forward contract by following the steps below.
On the CitiDirect navigation bar, click 1. Purchase FX for Payments.
The Purchase FX for Payments summary form appears.
Click the 2. New button. The Purchase FX for Payments detail form appears.
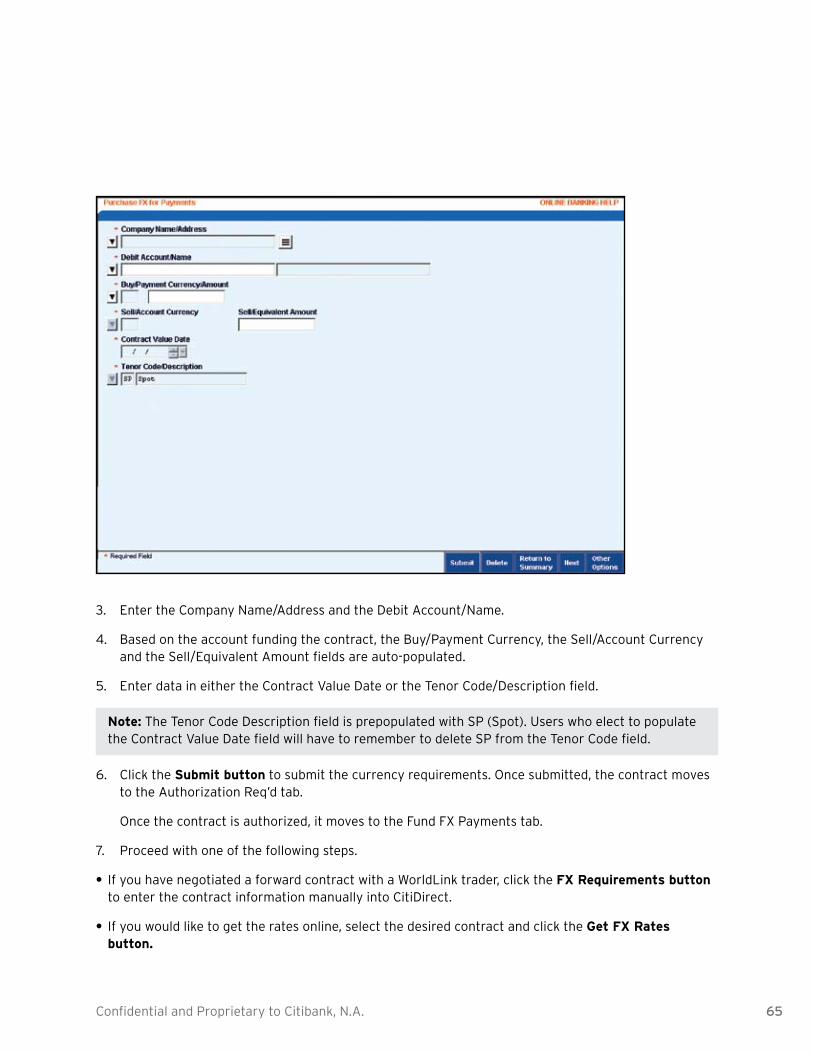
65Confidential and Proprietary to Citibank, N.A.
Enter the Company Name/Address and the Debit Account/Name.3.
Based on the account funding the contract, the Buy/Payment Currency, the Sell/Account Currency 4. and the Sell/Equivalent Amount fields are auto-populated.
Enter data in either the Contract Value Date or the Tenor Code/Description field.5.
Note: The Tenor Code Description field is prepopulated with SP (Spot). Users who elect to populate the Contract Value Date field will have to remember to delete SP from the Tenor Code field.
Click the 6. Submit button to submit the currency requirements. Once submitted, the contract moves to the Authorization Req’d tab.
Once the contract is authorized, it moves to the Fund FX Payments tab.
Proceed with one of the following steps.7.
If you have negotiated a forward contract with a WorldLink trader, click the •• FX Requirements button to enter the contract information manually into CitiDirect.
If you would like to get the rates online, select the desired contract and click the •• Get FX Rates button.
66 Confidential and Proprietary to Citibank, N.A.
Once you have acceptable rates, click the 8. Accept button to lock in the rates. The status of the contract is updated to Confirmed and the system returns a Contract number.
Click the 9. Done button to exit the FX Purchase for Payments dialog box. The contract now moves to the Batch Release Req’d tab.
Note: The Batch Release Req’d tab may also contain contracts that have been booked at a spot rate. When you select a batch of contracts that contains a value date greater than spot, the following message appears. “You have selected a contract for release with a forward value date. Do you wish to proceed?”
On the Batch Release Req’d tab, click the 10. Release button. Upon release, the client’s account will be debited and an available FX balance will be created in CitiDirect.
Delete FX ContractsIf it is necessary to delete an FX contract, it is important to remember that you will still be required to telephone your WorldLink Trading Representative to cancel the FX deal.
Delete an FX contract by following the steps below.
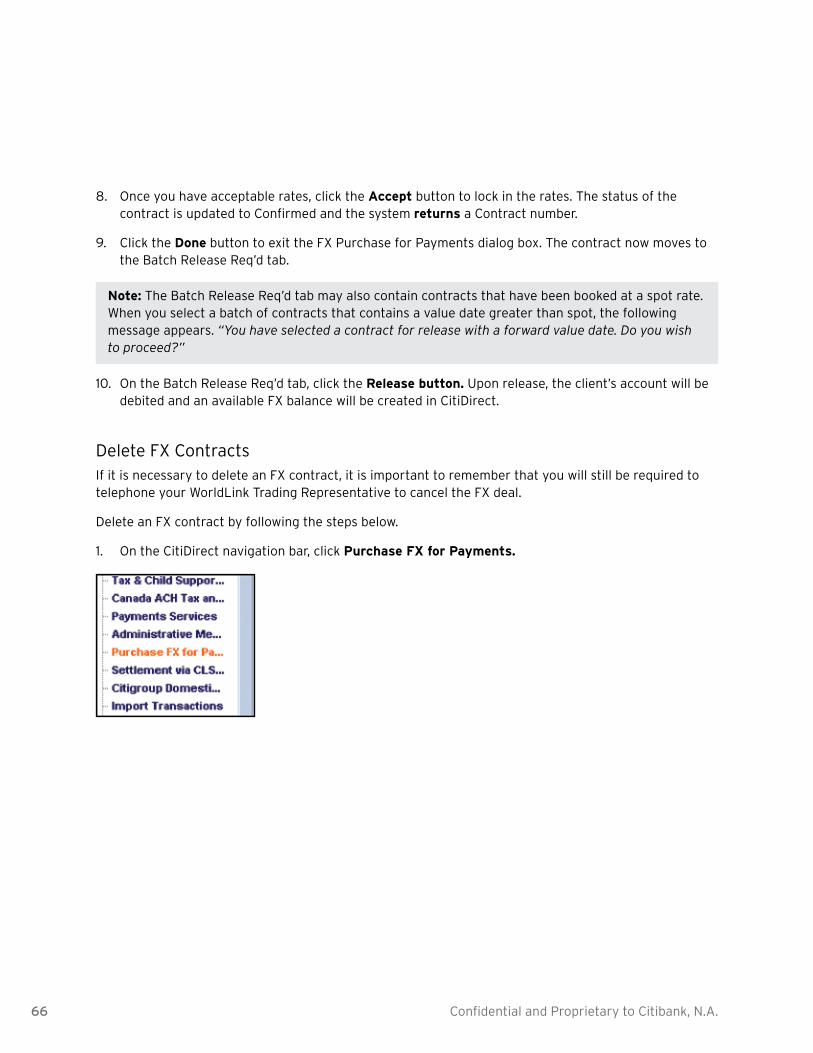
On the CitiDirect navigation bar, click 1. Purchase FX for Payments.
67Confidential and Proprietary to Citibank, N.A.
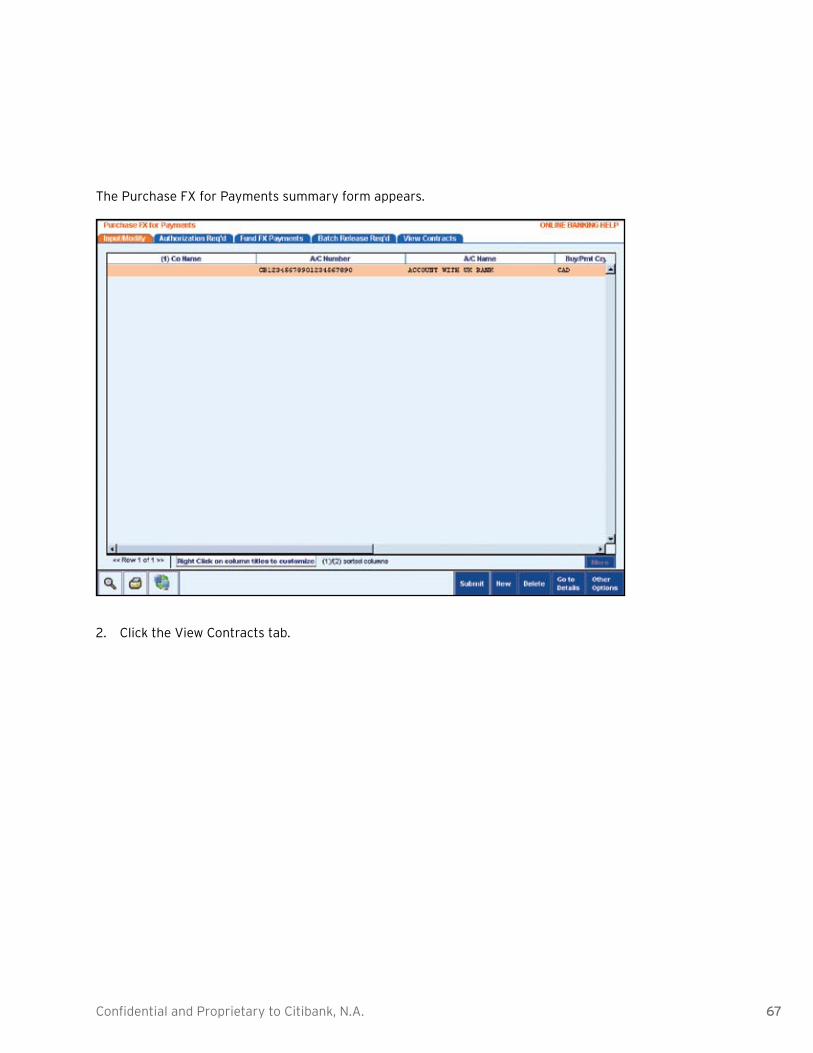
The Purchase FX for Payments summary form appears.
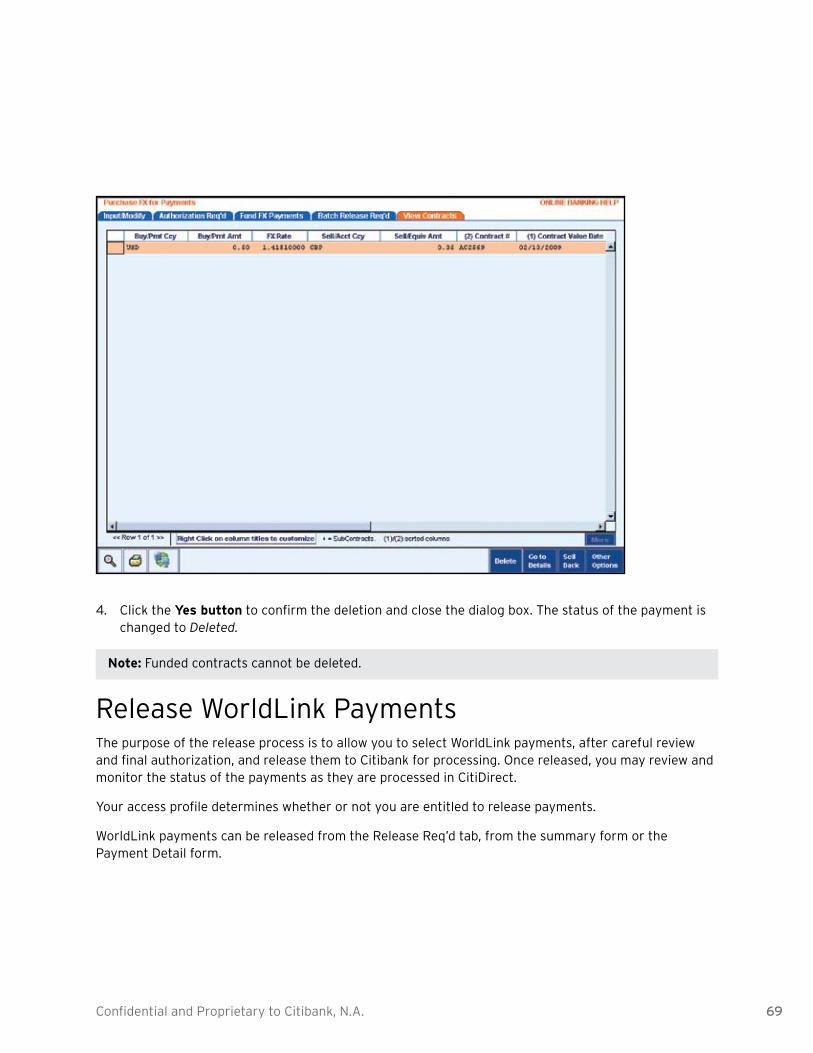
Click the View Contracts tab.2.
68 Confidential and Proprietary to Citibank, N.A.
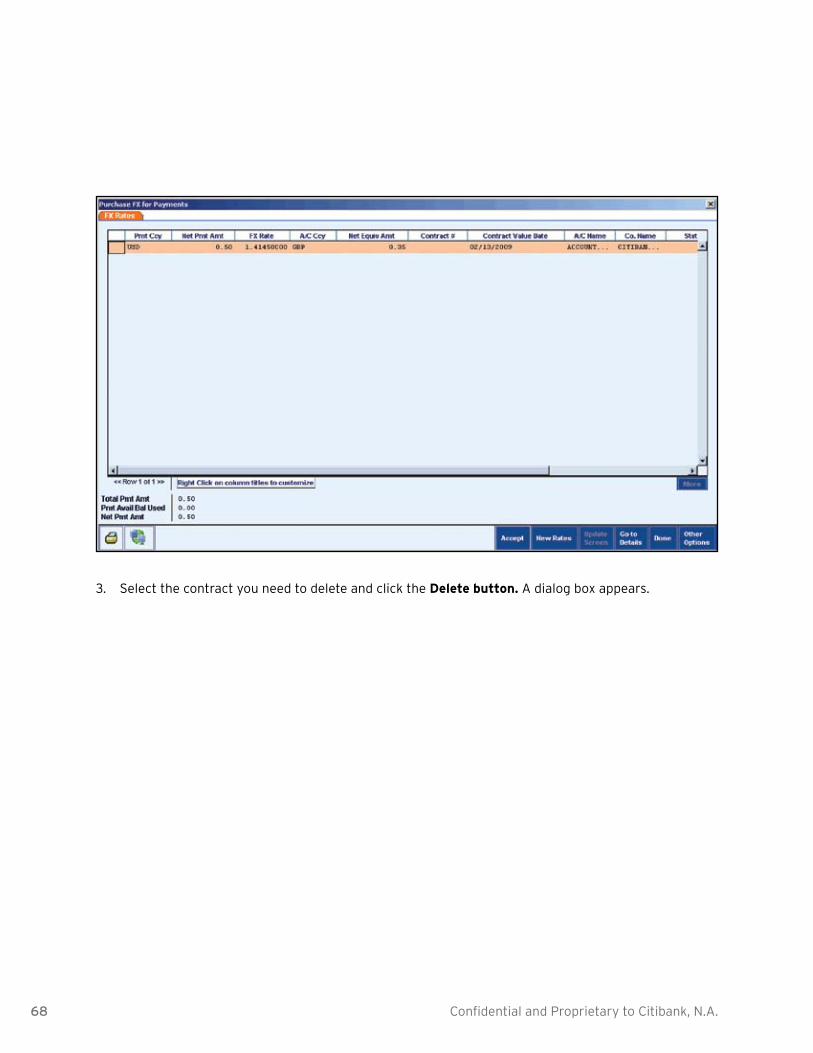
Select the contract you need to delete and click the 3. Delete button. A dialog box appears.
69Confidential and Proprietary to Citibank, N.A.
Click the 4. Yes button to confirm the deletion and close the dialog box. The status of the payment is changed to Deleted.
Note: Funded contracts cannot be deleted.
Release WorldLink PaymentsThe purpose of the release process is to allow you to select WorldLink payments, after careful review and final authorization, and release them to Citibank for processing. Once released, you may review and monitor the status of the payments as they are processed in CitiDirect.
Your access profile determines whether or not you are entitled to release payments.
WorldLink payments can be released from the Release Req’d tab, from the summary form or the Payment Detail form.
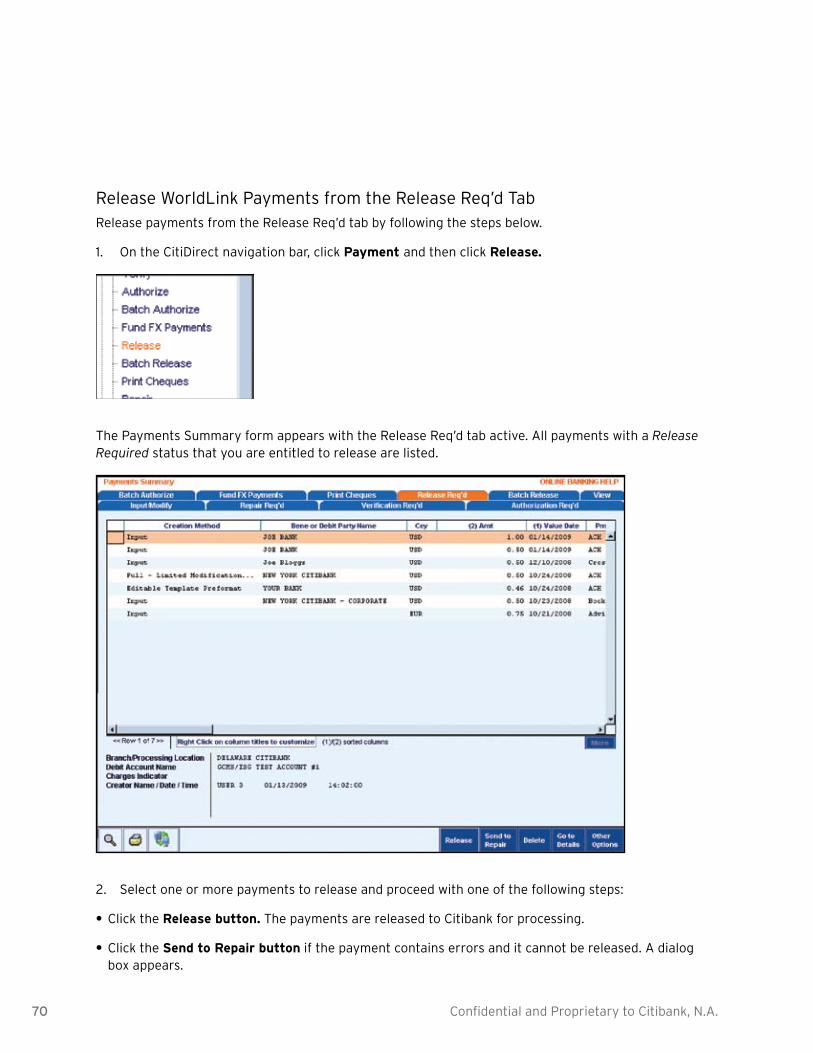
70 Confidential and Proprietary to Citibank, N.A.
Release WorldLink Payments from the Release Req’d TabRelease payments from the Release Req’d tab by following the steps below.
On the CitiDirect navigation bar, click 1. Payment and then click Release.
The Payments Summary form appears with the Release Req’d tab active. All payments with a Release Required status that you are entitled to release are listed.
Select one or more payments to release and proceed with one of the following steps:2.
Click the •• Release button. The payments are released to Citibank for processing.
Click the •• Send to Repair button if the payment contains errors and it cannot be released. A dialog box appears.
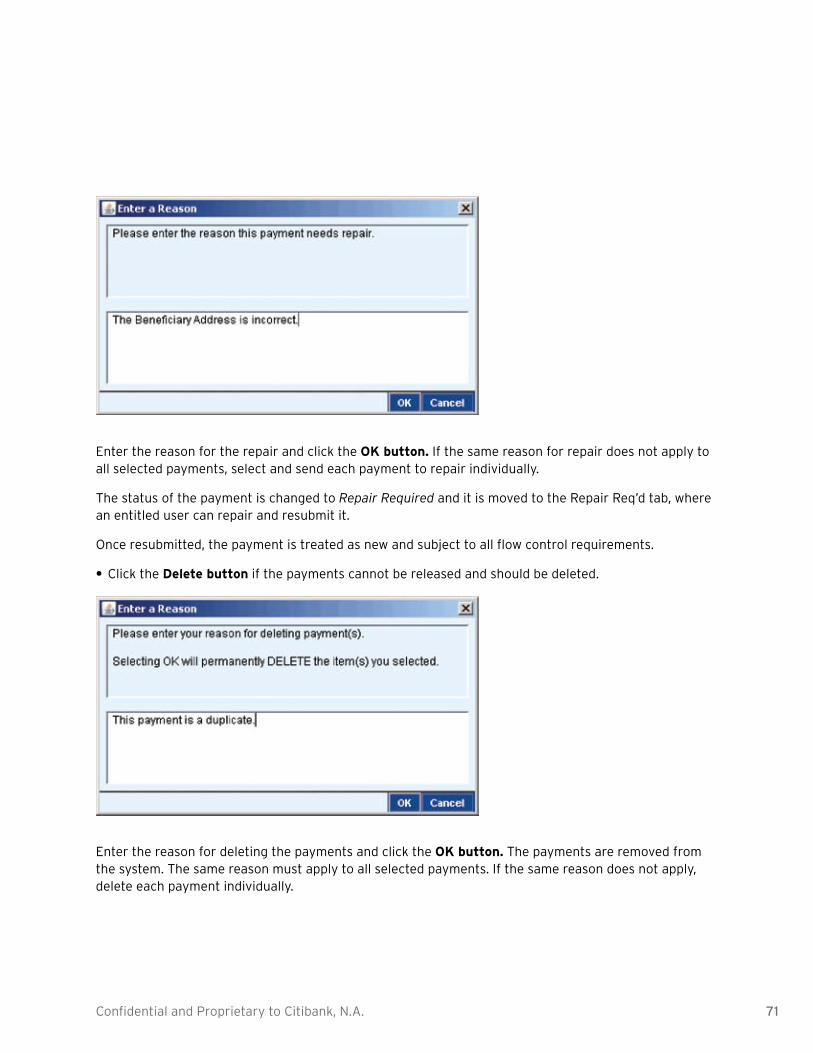
71Confidential and Proprietary to Citibank, N.A.
Enter the reason for the repair and click the OK button. If the same reason for repair does not apply to all selected payments, select and send each payment to repair individually.
The status of the payment is changed to Repair Required and it is moved to the Repair Req’d tab, where an entitled user can repair and resubmit it.
Once resubmitted, the payment is treated as new and subject to all flow control requirements.
Click the • Delete button if the payments cannot be released and should be deleted.
Enter the reason for deleting the payments and click the OK button. The payments are removed from the system. The same reason must apply to all selected payments. If the same reason does not apply, delete each payment individually.
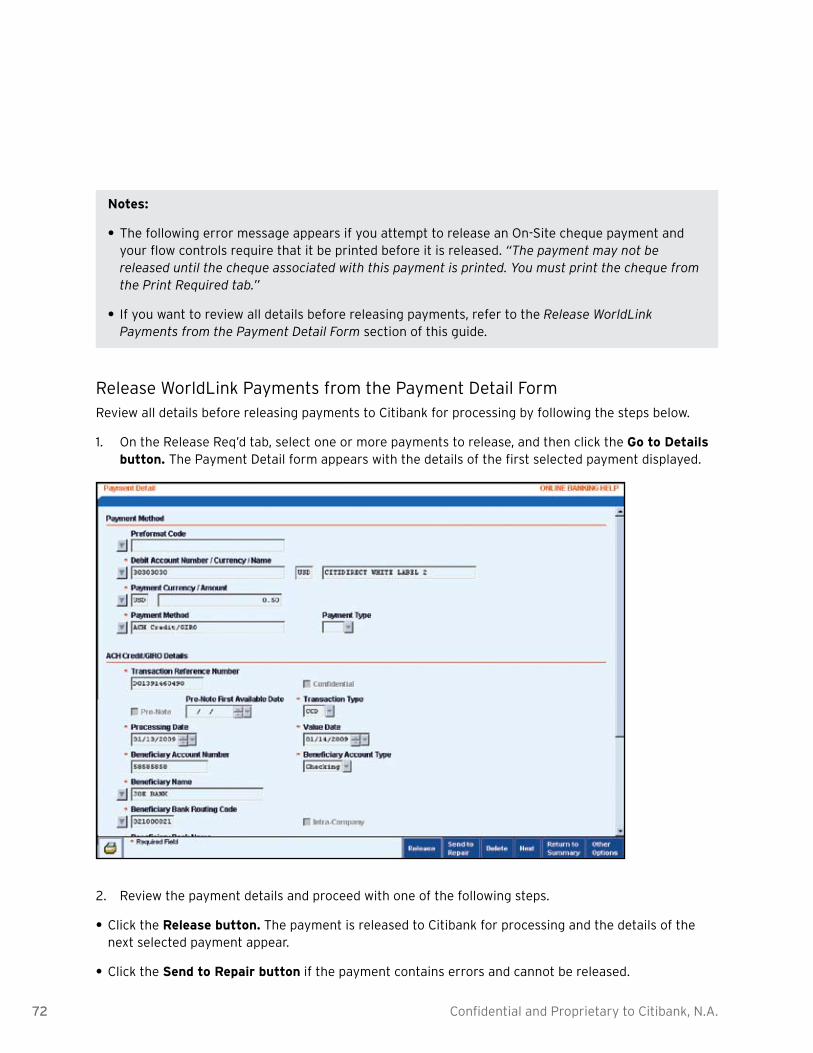
72 Confidential and Proprietary to Citibank, N.A.
Notes:
The following error message appears if you attempt to release an On-Site cheque payment and ••your flow controls require that it be printed before it is released. “The payment may not be released until the cheque associated with this payment is printed. You must print the cheque from the Print Required tab.”
If you want to review all details before releasing payments, refer to the •• Release WorldLink Payments from the Payment Detail Form section of this guide.
Release WorldLink Payments from the Payment Detail FormReview all details before releasing payments to Citibank for processing by following the steps below.
On the Release Req’d tab, select one or more payments to release, and then click the 1. Go to Details button. The Payment Detail form appears with the details of the first selected payment displayed.
Review the payment details and proceed with one of the following steps.2.
Click the •• Release button. The payment is released to Citibank for processing and the details of the next selected payment appear.
Click the •• Send to Repair button if the payment contains errors and cannot be released.
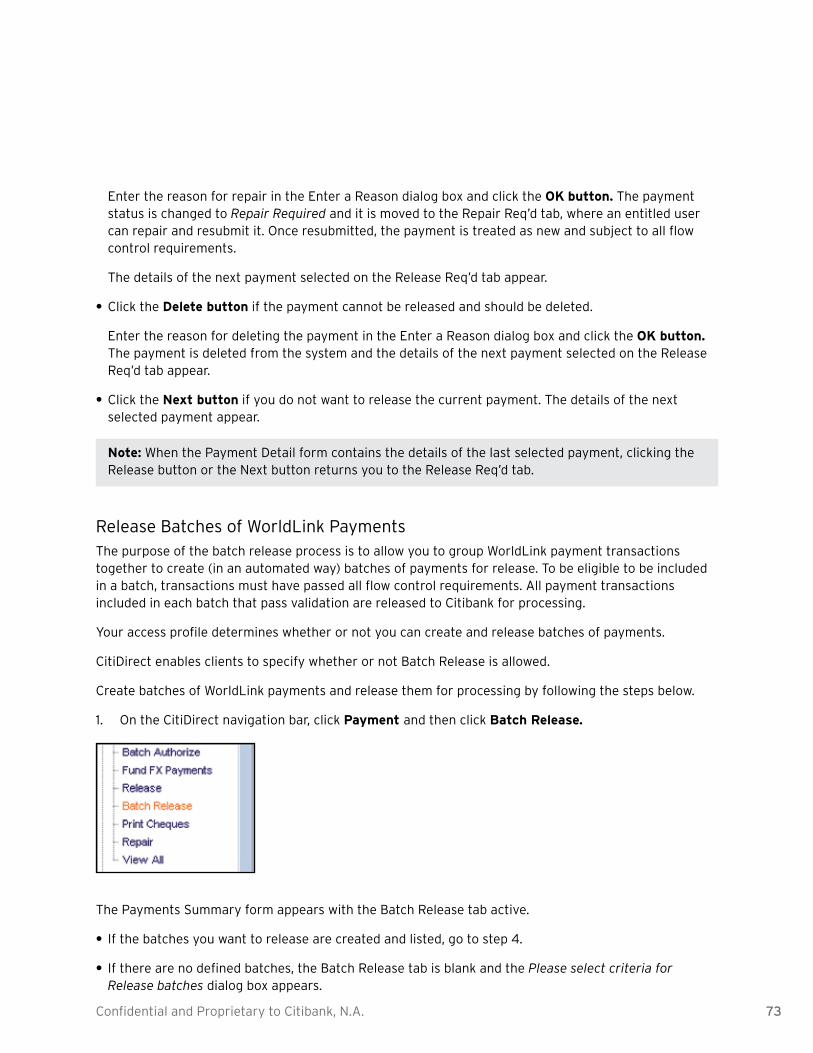
73Confidential and Proprietary to Citibank, N.A.
Enter the reason for repair in the Enter a Reason dialog box and click the OK button. The payment status is changed to Repair Required and it is moved to the Repair Req’d tab, where an entitled user can repair and resubmit it. Once resubmitted, the payment is treated as new and subject to all flow control requirements.
The details of the next payment selected on the Release Req’d tab appear.
Click the •• Delete button if the payment cannot be released and should be deleted.
Enter the reason for deleting the payment in the Enter a Reason dialog box and click the OK button. The payment is deleted from the system and the details of the next payment selected on the Release Req’d tab appear.
Click the •• Next button if you do not want to release the current payment. The details of the next selected payment appear.
Note: When the Payment Detail form contains the details of the last selected payment, clicking the Release button or the Next button returns you to the Release Req’d tab.
Release Batches of WorldLink PaymentsThe purpose of the batch release process is to allow you to group WorldLink payment transactions together to create (in an automated way) batches of payments for release. To be eligible to be included in a batch, transactions must have passed all flow control requirements. All payment transactions included in each batch that pass validation are released to Citibank for processing.
Your access profile determines whether or not you can create and release batches of payments.
CitiDirect enables clients to specify whether or not Batch Release is allowed.
Create batches of WorldLink payments and release them for processing by following the steps below.
On the CitiDirect navigation bar, click 1. Payment and then click Batch Release.
The Payments Summary form appears with the Batch Release tab active.
If the batches you want to release are created and listed, go to step 4.••
If there are no defined batches, the Batch Release tab is blank and the •• Please select criteria for Release batches dialog box appears.

74 Confidential and Proprietary to Citibank, N.A.
If this dialog box does not appear automatically, click the New Batches button.
Enter criteria to batch payments by any combination of File Run ID/Name/Completion Date and 2. Time (for imported payments), Account Number, Payment Currency or Payment Value Date and then click the OK button to create a batch of payments to release.
Click the 3. OK button to close the message.
When all batches to be released are listed on the Batch Release tab, select the batches you want to 4. release, and click the Release button.
If there are no error conditions, the batch status is changed to Completed, all payments included in the batch are released and the following information message appears.
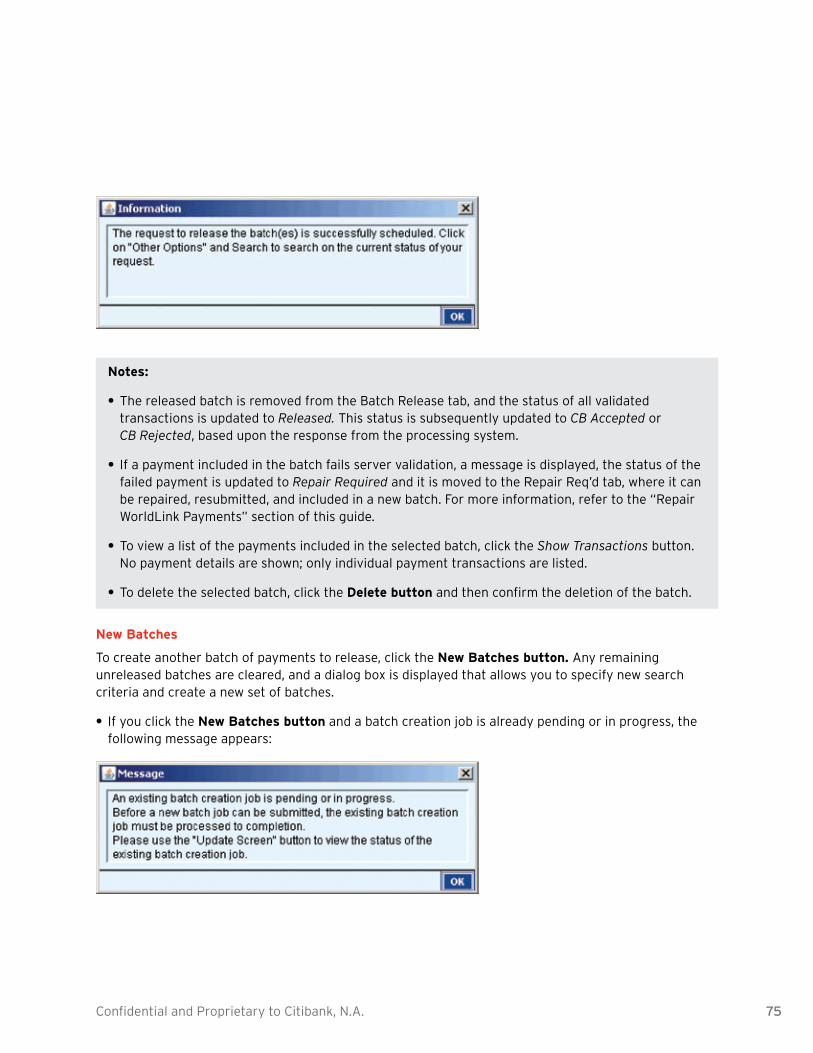
75Confidential and Proprietary to Citibank, N.A.
Notes:
The released batch is removed from the Batch Release tab, and the status of all validated ••transactions is updated to Released. This status is subsequently updated to CB Accepted or CB Rejected, based upon the response from the processing system.
If a payment included in the batch fails server validation, a message is displayed, the status of the ••failed payment is updated to Repair Required and it is moved to the Repair Req’d tab, where it can be repaired, resubmitted, and included in a new batch. For more information, refer to the “Repair WorldLink Payments” section of this guide.
To view a list of the payments included in the selected batch, click the •• Show Transactions button. No payment details are shown; only individual payment transactions are listed.
To delete the selected batch, click the •• Delete button and then confirm the deletion of the batch.
New Batches
To create another batch of payments to release, click the New Batches button. Any remaining unreleased batches are cleared, and a dialog box is displayed that allows you to specify new search criteria and create a new set of batches.
If you click the •• New Batches button and a batch creation job is already pending or in progress, the following message appears:

76 Confidential and Proprietary to Citibank, N.A.
Update Screen
The following messages appear when you click the Update Screen button during batch release.
If batches are still being processed in the background, the following message appears:••
If no batches are being processed in the background, the following message appears:••

77Confidential and Proprietary to Citibank, N.A.
Delete WorldLink PaymentsYou can delete WorldLink payments with an Input, Invalid, Verification Required, Authorization Required or Release Required status. Your assigned access profile determines the payments that you can delete.
Delete WorldLink payments by following the steps below.
On the CitiDirect navigation bar, click 1. Payment and then click Modify.
The Input/Modify tab of the Payments Summary form appears.
Select one or more payments to delete. 2.

78 Confidential and Proprietary to Citibank, N.A.
Note: On the Input/Modify tab, only payments with a status of Input or Invalid appear. If you wish to delete a payment in any other status, you can click the Search button to find specific payments with the desired status.
Click the 3. Delete button. The Enter a Reason dialog box appears.
Enter a reason for deleting the payment and click the 4. OK button. If the same reason for deletion does not apply to all selected payments, you must delete each payment separately. A dialog box appears.
Click the 5. OK button to close the message. The payments are removed from the system.
Notes:
You can delete payments from the Input/Modify tab and the Payment Detail form.••
If you want to view all details of a selected payment before deleting it, click the •• Go to Details button and then click the Delete button on the Payment Detail form.
If you have selected an On-Site Cheque payment and the cheque has been printed, the following ••message appears if you attempt to delete it. “The payment may not be deleted as a cheque has already been printed. To delete this payment, you must void the cheque on the Print Required tab.” For more information, see the “On-Site Cheques” section of this guide.
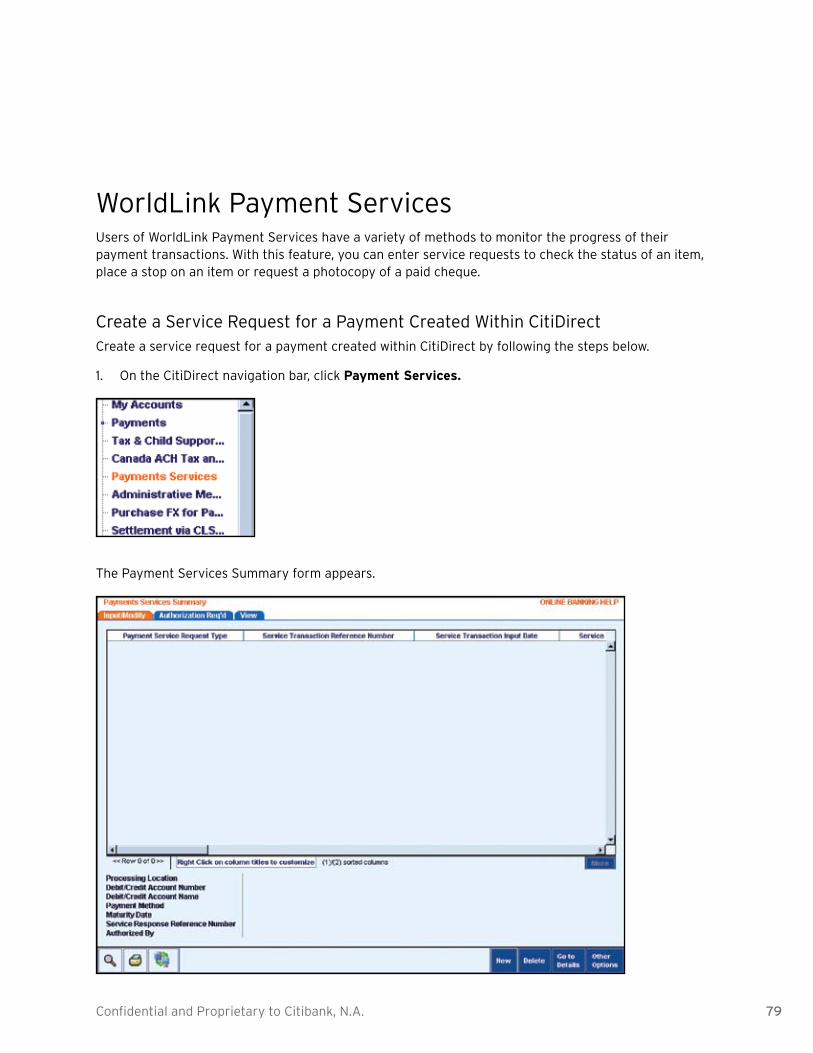
79Confidential and Proprietary to Citibank, N.A.
WorldLink Payment ServicesUsers of WorldLink Payment Services have a variety of methods to monitor the progress of their payment transactions. With this feature, you can enter service requests to check the status of an item, place a stop on an item or request a photocopy of a paid cheque.
Create a Service Request for a Payment Created Within CitiDirectCreate a service request for a payment created within CitiDirect by following the steps below.
On the CitiDirect navigation bar, click 1. Payment Services.
The Payment Services Summary form appears.
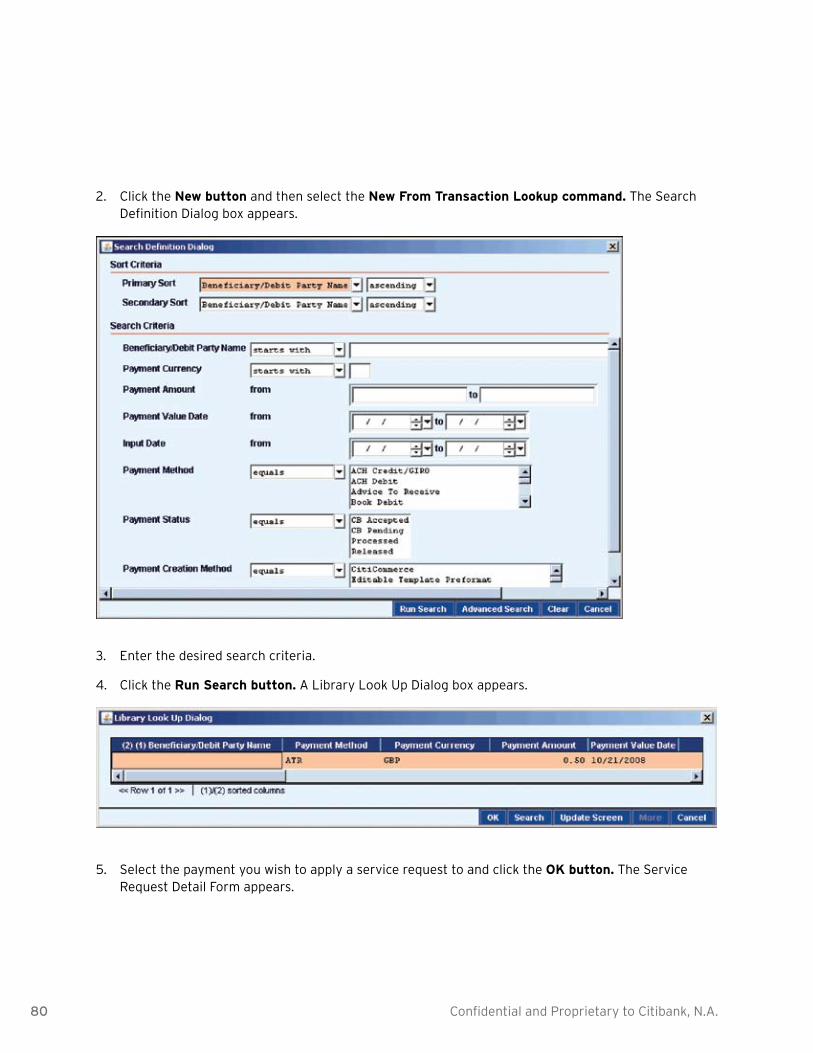
80 Confidential and Proprietary to Citibank, N.A.
Click the 2. New button and then select the New From Transaction Lookup command. The Search Definition Dialog box appears.
Enter the desired search criteria.3.
Click the 4. Run Search button. A Library Look Up Dialog box appears.
Select the payment you wish to apply a service request to and click the 5. OK button. The Service Request Detail Form appears.
81Confidential and Proprietary to Citibank, N.A.
Select one of the following Payment Service Request Types.6.
Photo Copy Request•• allows you to request a photocopy of a cheque. It is delivered by standard mail.
Status Request•• is used to request the current status of a transaction.
Stop Cheque•• is used to place a stop on a cheque.
The Service Request Detail Form expands based on the service request type selected and the details 7. of the selected transaction are automatically populated.
Enter all fields as required.8.
Click the 9. Submit button.
Notes:
CitiDirect will display a prompt confirmation or an immediate notification that the request could or ••could not be processed and why.
Depending on your flow control requirements, the service request may need to be authorized.••
Create a Service Request for a Payment Created Outside of CitiDirectCreate a service request for a payment created outside of CitiDirect by following the steps below.
On the CitiDirect navigation bar, click 1. Payment Services.
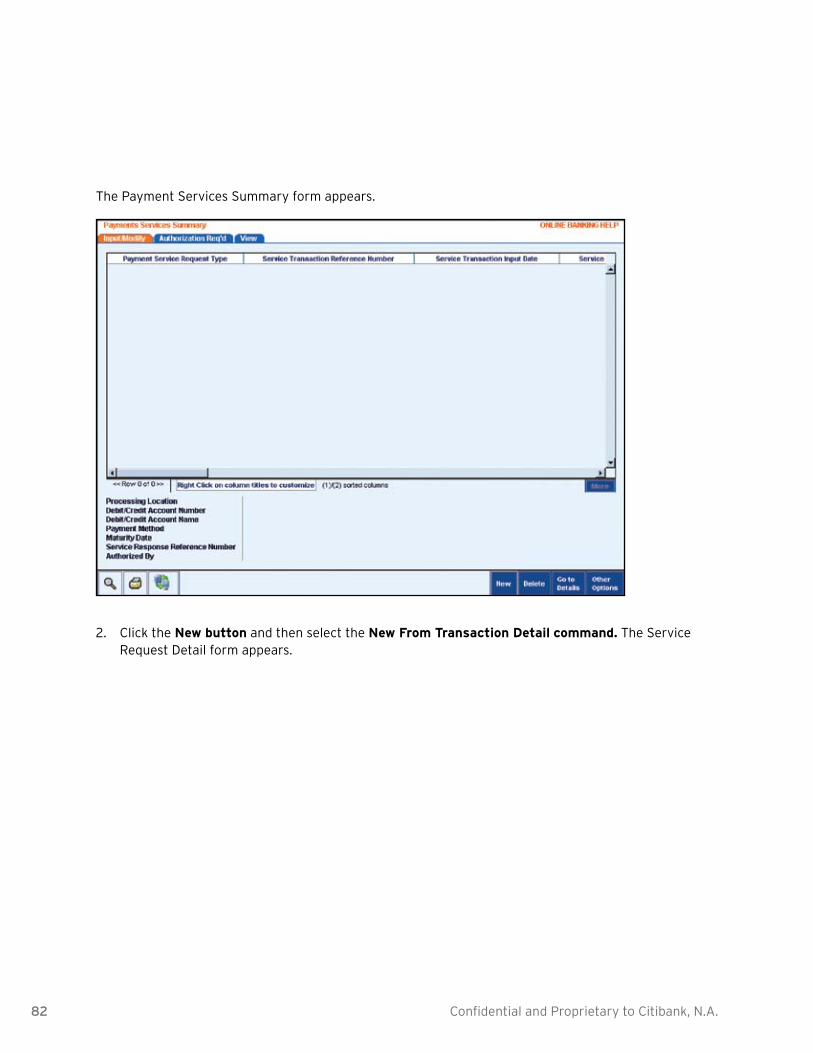
82 Confidential and Proprietary to Citibank, N.A.
The Payment Services Summary form appears.
Click the 2. New button and then select the New From Transaction Detail command. The Service Request Detail form appears.

83Confidential and Proprietary to Citibank, N.A.
Select the Payment Method.3.
Select the Payment Service Request Type. The Service Request Detail Form expands based on the 4. request type selected.
Enter all fields as required. The required fields are Payment Transaction Reference Number, 5. Currency/Amount and Payment Value Date. If the service request is for a cheque, you should also provide the Cheque Serial Number.
Click the 6. Submit button.
Notes:
CitiDirect will send a prompt confirmation or an immediate notification that the request could or ••could not be processed and why.
Depending on your flow control requirements, the service request may need to be authorized.••
84 Confidential and Proprietary to Citibank, N.A.
WorldLink Returns and Reconciliation
If a payment is returned with a contract associated with it, it is returned as an available balance. If a payment is returned in the funding currency, it is returned as a Due Customer Adjustment on the Input/Modify tab.
When a WorldLink cheque is deleted, cancelled or stopped in CitiDirect and the payment was funded with a foreign exchange (FX) contract, an available currency balance is automatically created against the original FX contract. This balance can be retained and used to fund future payments issued in the same currency and funded from the same account.
Depending on your client settings, CitiDirect may automatically use any available balances prior to purchasing additional currency to cover your payments. If the available currency balance is more than is needed to fund your next issuance, a new available balance is create and can be used toward future payments.
Selecting Contracts with Available BalancesView FX contracts with available balances by following the steps below.
On the CitiDirect navigation bar, click 1. Purchase FX for Payments.
Click the 2. View Contracts tab. The summary form displays all contracts.
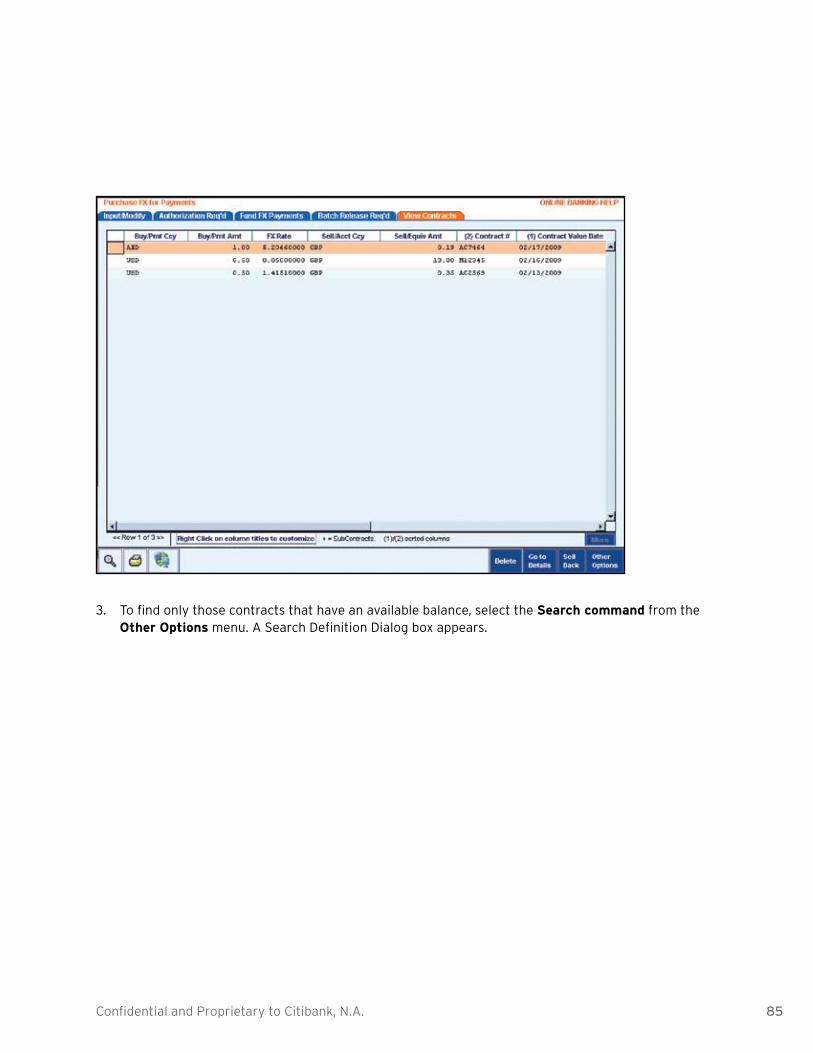
85Confidential and Proprietary to Citibank, N.A.
To find only those contracts that have an available balance, select the 3. Search command from the Other Options menu. A Search Definition Dialog box appears.

86 Confidential and Proprietary to Citibank, N.A.
Select greater than as the operator and enter 0 (zero) in the Available Balance field.4.
Click the 5. Run Search button. The screen displays all contracts that have an available balance.
Sell Back an Unused FX ContractIf you do not wish to retain the available currency balance for future payments, you can sell the currency back to Citibank using the sell back function on the View Contracts tab of the Purchase FX for Payments form. You can request a refund to your account or apply the refund to your next remittance due. If there is a loss associated with the sell back of the currency, this FX loss is passed through to the customer.

87Confidential and Proprietary to Citibank, N.A.
Sell back an unused FX contract by following the steps below.
On the CitiDirect navigation bar, click 1. Purchase FX for Payments.
The Purchase FX for Payments summary form appears.
Click the 2. View Contracts tab.
88 Confidential and Proprietary to Citibank, N.A.
Select a contract with an available balance and a funded status, and then click the 3. Sell Back button. The Payment Detail form appears.
Note: Contracts with a “+” sign next to them contain underlying subcontracts. In this case, click the Go to Details button, select the underlying subcontract, and then click the Sell Back button.
The Credit Account Number/Currency/Name and Adjustment Currency/Amount fields are 4. automatically populated based on the selected FX contract. The Payment Method is automatically populated with Due Customer Adjustment.
In the Adjustment Option field, select Refund or Apply to Remit.5.
Notes:
Apply to Remit applies a credit to your remittance.••
Refund refunds your account.••
Enter the remaining fields as necessary and click the 6. Submit button.
Notes:
The payment now follows the normal payment process based on your flow control requirements.••
To apply funds to your remittance, you must release it together with your payments.••

89Confidential and Proprietary to Citibank, N.A.
This section of the guide presents a description of WorldLink-related reports and inquiries. For a description of all CitiDirect Online Banking reports and inquiries, refer to the Online Help.
WorldLink ReportsThe All Reports category on the CitiDirect navigation bar contains service classes that are used to group reports designed for specific business purposes. Your solution package and access profile determine the reports that are available to you and the account and transaction information you can view.
CitiDirect allows you to select a report and edit its content so that your report includes only the ••information you need.
When editing report content, you can specify whether or not the report should include page breaks.••
Note: The procedures for selecting, editing, running and viewing reports are the same for all CitiDirect reports. For step-by-step procedures, refer to the CitiDirect Basics: Reports and Inquiry guide, available in the Learning Center at www.citidirect.com.
WorldLink Reports Service Class
Adjustment Activity Report —•• Shows adjustment activity for a specified company, regardless or status. Adjustment activity arises out of Foreign Exchange transactions. Information is grouped by Refunds, Apply to Remit (Due Citibank) and Apply to Remit (Due Customer).
Available Balance Report —•• Used to review currency funding balances. The total contract amount currently available for allocation to payments and the rate are shown for both confirmed and funded contracts with available balances.
Cheque Document Report —•• Shows all the transaction information that was or will be printed on a cheque. It serves as a copy of the actual printed cheque. This report is sorted by Company Name, Debit Account Number and Cheque Number.
Cheque Register Report —•• Lists a summary of on-site cheque transactions. This report can be printed for all cheques, regardless of status.
Contract Release Report —•• Lists one line of information for each contract released (funded). Use this report as a record of contracts that were funded during payment release.
FI Contract Release Report —•• Displays the list of FI contracts that were released (funded) during the specified date range. Information in this report is sorted by WorldLink® Client Number, Release Date and Sell Currency.
FI Funding Summary Report —•• Displays the total amount due Citibank, the amount collected from the customer and the amount of fees earned for each funding account for the specified day. Information in this report is sorted by WorldLink® Client Number, Release Date and Funding Account.
WorldLink Reports and Inquiries

90 Confidential and Proprietary to Citibank, N.A.
FI Transaction Release Report —•• Displays a list of payments that were released during a specified date range. The report calculates the total funding required in the equivalent currency. Information in this report is sorted by WorldLink Client Number, Release Date, Funding Account and Transaction Type.
Funding Detail Report —•• Allows WorldLink users to view the payment details and FX contract associated with each debit to the client funding account. This report consists of three sections. The first section is a summary of the funding account information. The next section lists the contract details for the selected criteria and the last section splits out the payment transaction details and adjustment transaction details. There is also a section with payment summary details before the contract details.
Funding Summary Report —•• List the funding amounts required for each of your funding accounts.
FX Contract Allocation Report —•• Lists all payments funded using an agreed-upon foreign exchange rate. This report provides you with a record of all payments associated with an agreed-upon FX rate. This report also gives you the balance for which an agreed-upon FX rate is available for that currency pair. Payments associated with an agreed-upon rate are separated by the accounts from which they were funded. Subaccounts are listed separately beneath the header of the report.
Ordering Party Library Report —•• Lists payments by name of the entity on whose behalf the payment is made.
Payments by Beneficiary Name Report —•• Lists all transactions for all dates sorted by Beneficiary.
Payments by Currency Report —•• Provides currency sub- and grand totals for selected transactions.
Payments by Customer Reference Number Report —•• Lists transaction sorted by company and funding account, with transaction date on one line.
Payments by Ordering Party Report•• — Lists payments made on behalf of the requesting or ordering party.
Payments by Preformat Code Report —•• Lists all payment made using preformats. Use this report to track payments made to beneficiaries using preformats.
Payments by Status Report —•• Used to track the statuses of payments.
Transaction Audit Report —•• Used as an audit trail to identify who participated in the processing of transactions. It shows key data for each transaction and identifies the user who performed each major function on the payment and the date it was performed. It also shows the number of authorizations required and the number performed. This report also shows all contracts and contract numbers allocated to the payment. If more than one, this is displayed as Multiple in the Funding Detail report.
Transaction Release Report —•• Lists one line of information for each closed payment or adjustment and provides the total funding currency equivalent. Use this report as a record of transactions that have been closed. Information is grouped by Payment Transactions, Adjustment Transactions (Due Citibank) and Adjustments Transactions (Due Customer).
WorldLink Preformat Library Detail Report•• — Lists detailed information of all fields in each preformat. Use this report as a printed record of your preformats. From this report, you can drill down to the WorldLink Preformat Library Detail Report with Flow Information.
91Confidential and Proprietary to Citibank, N.A.
WorldLink Preformat Library Summary Report —•• Lists all the fields included in preformats. Use as a printed record of your preformats.
WorldLink InquiriesInquiries provide a point-in-time view of data, which is displayed while you are signed on to CitiDirect® Online Banking. Typically, CitiDirect inquiries are run for real-time reporting, when you prefer to view the information on your screen. If you need to access information fast, and you do not have a requirement to store the retrieved information or secure a printout that may also be used as a legal document, an inquiry will serve the purpose.
An inquiry is generally faster than a report, and is usually submitted when you want a crucial piece of ••information immediately.
An inquiry can be printed, but the end result is similar to a basic Microsoft•• ® Excel spreadsheet, with gridlines.
The time stamps for both when an inquiry was run and when it was printed are labeled on the inquiry ••screen and on the printed inquiry.
Once the inquiry is closed, the information is lost and criteria cannot be saved.••
Note: For detailed procedures for submitting inquiries, refer to the CitiDirect Basics: Reports and Inquiry guide, available in the Learning Center at www.citidirect.com.
WorldLink® Inquiries Service Class
FI Currency Rates Inquiry — • Enables you to select a Company/Base Currency combination by which to view the daily FX rates — Settlement Rates and Sell Rates (Cheque and Transfer) for established currency pairs.
FI Sell Rates Inquiry — • Enables you to select a Company/Base Currency combination by which to view the daily FX rates — Sell Rates (Cheque and Transfer) for established currency pairs. The Sell Rate Inquiry is identical to the FI Currency Rates Inquiry except that it does not display the Settlement Rate.

92 Confidential and Proprietary to Citibank, N.A.
93Confidential and Proprietary to Citibank, N.A.
DisclaimerThe authoritative and official text of this CitiDirect® Online Banking documentation shall be in the English language as used in the United States of America. Any translation of any CitiDirect documentation from English to another language is done solely for the convenience of the reader, and any inconsistencies, or inaccuracies between the English text and that translation shall be resolved in favor of the English text.
These materials are proprietary and confidential to Citibank, N.A., and are intended for the exclusive use of CitiDirect Online Banking customers. The foregoing statement shall appear on all copies of these materials made by you in whatever form and by whatever means, electronic or mechanical, including photocopying or in any information storage system. In addition, no copy of these materials shall be disclosed to third parties without express written authorization of Citibank, N.A.
Customer shall be solely responsible for the use of any User identifications, passwords and authentication codes that may be provided to it, from time to time, in connection with CitiDirect Online Banking (collectively, “User IDs”). Customer agrees to keep all User IDs strictly confidential at all times. Customer shall immediately cease use of CitiDirect Online Banking if it receives notification from Citibank, or otherwise becomes aware of, or suspects, a technical failure or security breach. Customer shall immediately notify Citibank if it becomes aware of, or suspects, a technical failure or security breach.
www.citidirect.com
June 2009

Global Transaction Services www.transactionservices.citi.com © 2012 Citibank, N.A. All rights reserved. Citi and Arc Design are registered service marks of Citigroup Inc.
495885 GTS25248 5/09


