Page 1
Class II cavity
Location:
Proximal surfaces of premolars and molars
Materials:
Amalgam
Composite
Inlay
Indication for material selection
Amalgam: medium to large cavities.
Composite: small to medium cavities, excellent oral hygiene and the possibility of securing a
completely dry working field required.
Inlay: large cavities, excellent oral hygiene required.
PREPARATION FOR AMALGAM
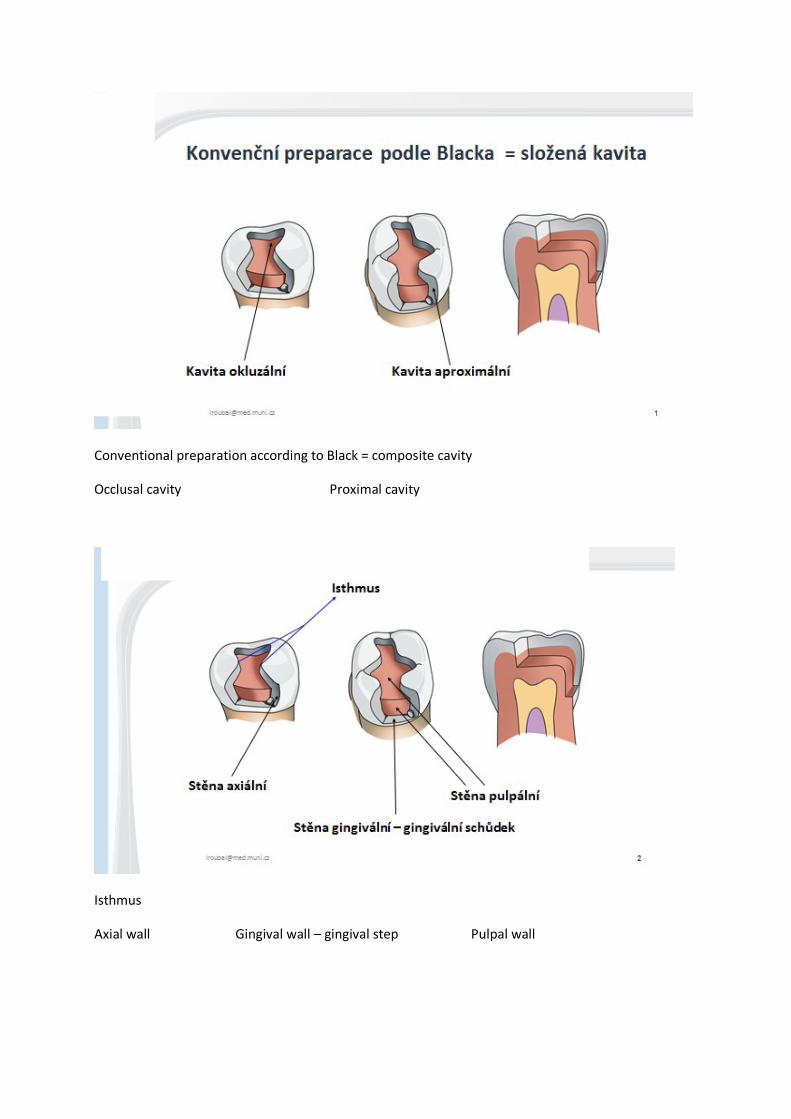
During the classic preparation, we create a composite cavity which has two parts – occlusal and
proximal. One proximal surface (mesial or distal) may be affected. Then such cavity is called MO
(mesio-occlusal), OD (occluso-distal), or DO (disto-occlusal). Both proximal surfaces may be affected
in which case the cavity is called MOD (mesio-occluso-distal). The transition between the occlusal
and proximal cavity is termed isthmus. This is the narrowest place of preparation and it is of
fundamental significance for retention of the filling.
Fig. 1: Composite cavity, its parts and names of individual walls
Page 2
Conventional preparation according to Black = composite cavity
Occlusal cavity Proximal cavity
Isthmus
Axial wall Gingival wall – gingival step Pulpal wall
Page 3
Gaining access:
Before starting the preparation, we always protect the adjacent tooth. We use a metal band which
we fix with a wedge or clip (crocodile clip).
Fig. 2: Protection of the adjacent tooth with a band with a wedge
We gain access to the carious lesion, which is hidden under the contact point, from the occlusal
surface with a fissure drill or with a diamond cylinder bur or pear-shaped bur of standard grit (blue
code). We begin in the central fissure and guide the preparatory instrument in the direction towards
the affected proximal surface. We penetrate the carious lesion. We prepare the cavity on the
occlusal surface according to the principles for Class I.
Page 4
Fig. 3 a, b: Initiation of the preparation
It is important to place correctly the axial walls and the gingival wall on the proximal surface. Fig. 4c
and 5
The gingival wall (gingival step) is located 0.5 mm under the edge of free gingiva during standard
preparation.
It is parallel to the cement-enamel border (cervical line).
To place the proximal walls correctly, it is important to consider that the filling must restore the
contact point. The contact point must be made of the filling. The filling exceeds the contact area on
the vestibular and oral part by approximately 0.5 mm. The so-called American rule may serve for a
rough orientation. We lead tangents from the middle of the prepared tooth to the adjacent tooth,
and the border of proximal cavity should be where these lines cross the outline of the prepared
tooth. However, if we follow only this rule without a thorough evaluation of the contact point, we
would open the cavity proximally too much. It is therefore better to examine the contact area of the
Page 5
teeth. The contact point on the treated tooth is always made of filling, the axial wall and the external
contour of the tooth are in 90°angle.
Fig. 4: Preparation of proximal cavity
Fig. 5: View into the prepared cavity
Source of the pictures 3,5 – new batch march 2016 (M. Pešová) 6
We place gingival wall 0.5 mm under
the edge of gingiva, and guide it
parallel to the cement-enamel
border. Axial walls may diverge
gingivally (see the principle of
retention)
The contact point is always made of
filling, axial walls are placed in such
a way that the filling forms the
contact point and exceeds it from
both vestibular and oral side by
approximately 0.5 mm.
Page 6
Fig. 6:
Vyjmout obrázky ze slidu
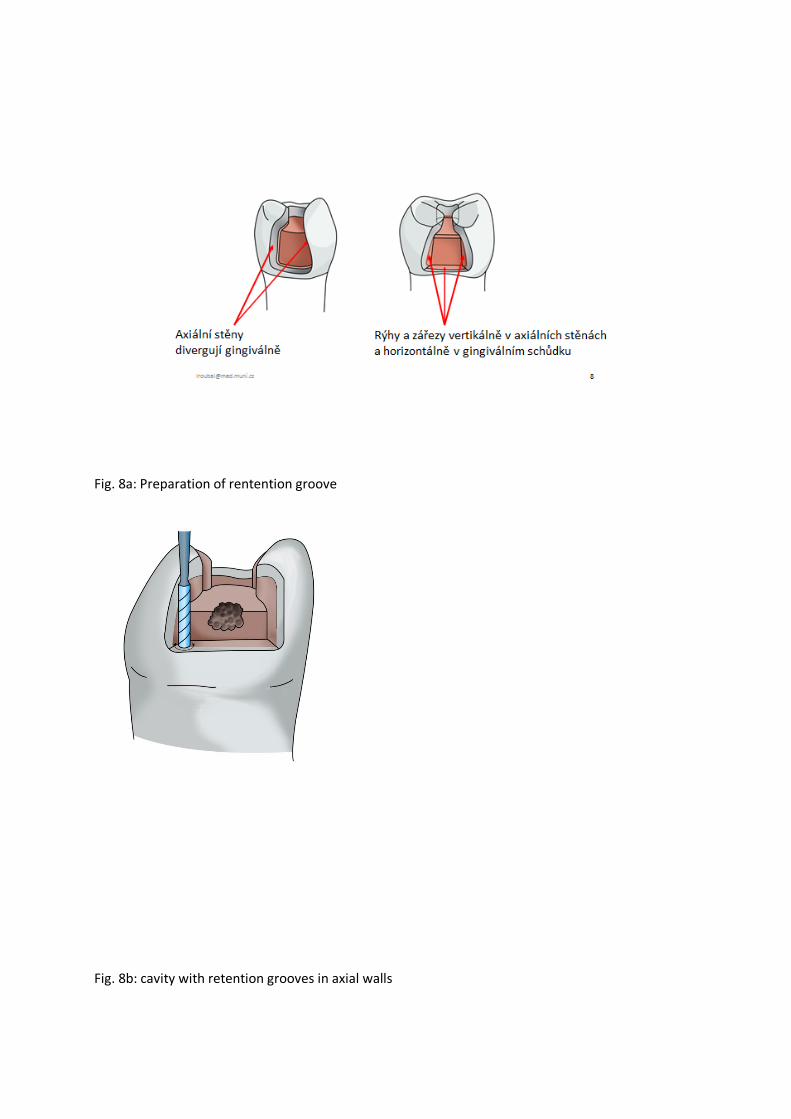
The principle of retention
According to the classic rules, the preparation of a cavity on the occlusal surface is significant for
retention. We also prepare undercuts in the cavity on the occlusal surface, the walls of the proximal
cavity diverge gingivally. It is also possible to prepare longitudinal grooves in proximal walls and a
transverse groove in the gingival step in the close proximity of pulpal wall.
The width of isthmus is also important for retention – it is the narrowest place of the cavity, ca 1/4 to
1/3 of the distance between two dental tubercles.
Fig. 7: View of the proximal cavity
Page 7
)
Fig. 8a: Preparation of rentention groove
Fig. 8b: cavity with retention grooves in axial walls
Page 8
The principle of resistance
We never leave enamel unsupported by dentin at the edge of the cavity. All edges and transitions
must be rounded. The commonest mistake is a sharp transition between both pulpal walls (the
occlusal one and the proximal one). This leads to a fracture of the filling in isthmus.
In terms of resistance, the configuration of the gingival step is also important. The gingival step
should be about 1 mm wide, which is important for supporting the filling. It is perpendicular to the
proximal pulpal wall, or alternatively it slopes down to this wall (in this case there in about 85° angle).
If the gingival wall slopes down in the opposite direction (i.e. the angle was more than 90°), the filling
will be forced into the interdental space during chewing and it will break horizontally in the isthmus.
The isthmus must not be too narrow, because then there is a risk of fracture in this exposed area.
We also need to pay attention to the axial walls which must not diverge too much proximally, but
they should form about 90° angle with the contour of the tooth (cavosurface angle). If this angle is
greater, the filling forms thin projections which may break away. If the angle is smaller, there is a risk
that a thin projection of axial wall breaks off. See Fig. 3
Fig. 9: The transition between pulpal walls in the occlusal and proximal cavity must be rounded.
Page 9
The gingival wall forms a 90° angle with the pulpal wall.
We finish the preparation by smoothening the cavity walls by a fine diamond bur (red code), the
outer edge of the gingival step as well as the axial walls may be prepared by enamel chisels. The aim
is to remove undermined enamel prisms.
Fig. 10: Treating cavity edges with chisels
Modification of Class II cavities
Page 10
Slot cavity
We prepare slot cavities in small caries if the oral hygiene is good. In this case we do not prepare the
cavity on the occlusal surface, the proximal cavity opens on the occlusal surface only as an aperture
which does not extend beyond the marginal ridge.
Retention of the filling is provided by divergence of proximal walls in the direction towards the
gingival ones, we also prepare retention grooves in axial walls as well as in the gingival step.
Moreover, axial walls may first converge and then diverge in mesiodistal direction. Fig. 6: Preparation
of slot requires small instruments and work with loupes.
Fig. 11a, b:
Slot preparation when viewed from proximal and occlucal side.
Fig. 7a:
Fig. 7b:
Page 11
Fig. 7c:
Preparation with cusp ablation or alternatively with anchoring into the pulp chamber.
If the cusp is undermined with carries, it is possible to ablate it and replace it with filling. In place of
the cusp the filling must be thicker (ca 3 – 4 mm). In terms of retention, auxiliary grooves, small
cavities – pins (in which the condensed amalgam creates small pins) are of advantage, we can also
prepare small apertures (slots).
Fig. 9a: A cavity with ablation of the cusp and retention grooves
Page 12
Fig. 9b: A defect after ablation of a cusp and finishing of the walls
In teeth without pulp (after an endodontic treatment) amalgam may be condensed into the pulp
chamber. However, in this case amalgam partly or fully covers the occlusal surface (so-called
amalgam overall), its thickness is 3–4 mm.
Fig. 10: Finishing with cusps replacement – anchoring into the pulp chamber.
Fig. 10b: Preparation with anchoring into the pulp chamber
Page 13
Preparation for composite
Preparation for composite differs from preparation for amalgam as follows: we do not create
undercuts and we bevel enamel in the proximal cavity. We bevel axial walls and also the outer edge
of the gingival step if it is located in the enamel part of the tooth. If the gingival step is located
elsewhere than in the enamel, we do not bevel it but only smoothen it. We do not bevel enamel in
the occlusal cavity where we again only smoothen the walls. The smallest cavity for composite is
adhesive slot – an aperture of a simple shape without undercuts, it opens in the direction of the
occlusal surface without exceeding the marginal ridges.
Page 14
Fig. 11 a: Proximal cavity prepared for composite, view from occlusal side
Fig. 11b: Proximal cavity prepared for composite, view from proximal side
Page 15
Fig. 11 c: Enamel bevelling on the external edge of gingival step
Fig. 11 d: Slot cavity for composite
Page 16
Fig. 11 d: Difference in preparation of axial walls – green for composite (bevelled), red for amalgam
(no bevelling)
Preparation for inlay/onlay
The cavity has simple contours without undercuts, the walls diverge in occlusal direction.
Fig. 13: Cavity prepared for inlay
Page 17
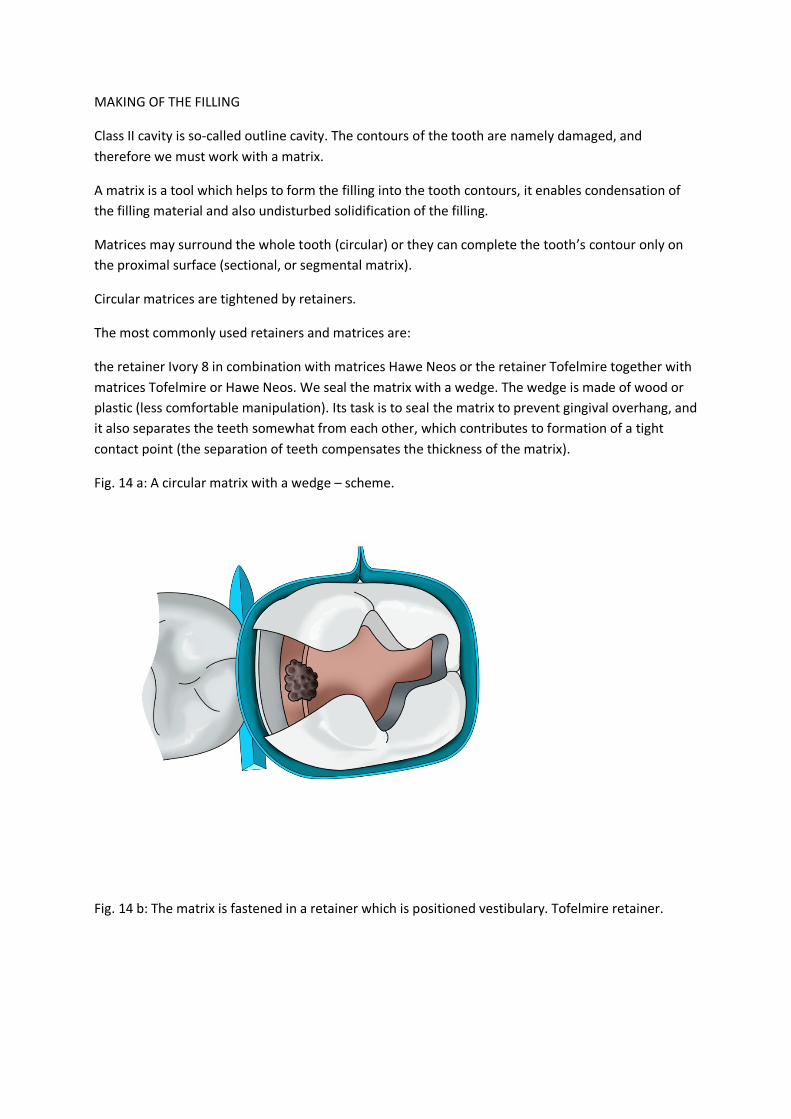
MAKING OF THE FILLING
Class II cavity is so-called outline cavity. The contours of the tooth are namely damaged, and
therefore we must work with a matrix.
A matrix is a tool which helps to form the filling into the tooth contours, it enables condensation of
the filling material and also undisturbed solidification of the filling.
Matrices may surround the whole tooth (circular) or they can complete the tooth’s contour only on
the proximal surface (sectional, or segmental matrix).
Circular matrices are tightened by retainers.
The most commonly used retainers and matrices are:
the retainer Ivory 8 in combination with matrices Hawe Neos or the retainer Tofelmire together with
matrices Tofelmire or Hawe Neos. We seal the matrix with a wedge. The wedge is made of wood or
plastic (less comfortable manipulation). Its task is to seal the matrix to prevent gingival overhang, and
it also separates the teeth somewhat from each other, which contributes to formation of a tight
contact point (the separation of teeth compensates the thickness of the matrix).
Fig. 14 a: A circular matrix with a wedge – scheme.
Fig. 14 b: The matrix is fastened in a retainer which is positioned vestibulary. Tofelmire retainer.
Page 18
Matrices Hawe Neos are of various sizes and shapes – for cavities of types MO, OD, MOD, premolars,
and molars. Their thickness is 0.03 or 0.05 mm. Some matrices are convex in order to form a better
contact point.
Fig. 15 a: Various types of Hawe Neos matrices
Vhodné znovu vyfotit
Fig. 15 b: Hawe Neos retainers – paired
Page 19
Vhodné znovu vyfotit a vyfotit i univerzální napínač
Fig. 16: Tofelmire retainers and matrices
Ivory 8 retainers may be universal (they have a rectangular window) or paired (they have a trapezoid
window).
Page 20
The retainer is placed from the vestibular side of the treated tooth while the matrix surrounds the
circumference of the tooth. In case we use a paired retainer, the narrower side of the window is
positioned gingivally; the retainer therefore serves for the upper left and bottom right quadrant or
for upper right and bottom left quadrant. The advantage of a paired retainer is somewhat better
adaptation of the matrix.
In Tofelmire retainer, the position of the band may be changed, and the retainer is therefore suitable
for the whole dental arch. It is again positioned vestibulary.
By tightening the screws of the retainer, the matrix band is sealed around the tooth.
A wedge must be used for a flawless adaptation of the matrix band. Wedges are usually made of
wood, shaped according to the anatomy of the proximal area and are available in various sizes. It is
necessary to choose the correct size of the wedge so that it seals the matrix but does not prevent
forming the contours of the filling. The wedge also separates slightly the teeth which contributes to a
better formation of contact point (after removing the wedge, this slight distance between the teeth
disappears and contact point is renewed, the thickness of matrix is also compensated in this way).
Fig. 17: Various wedges
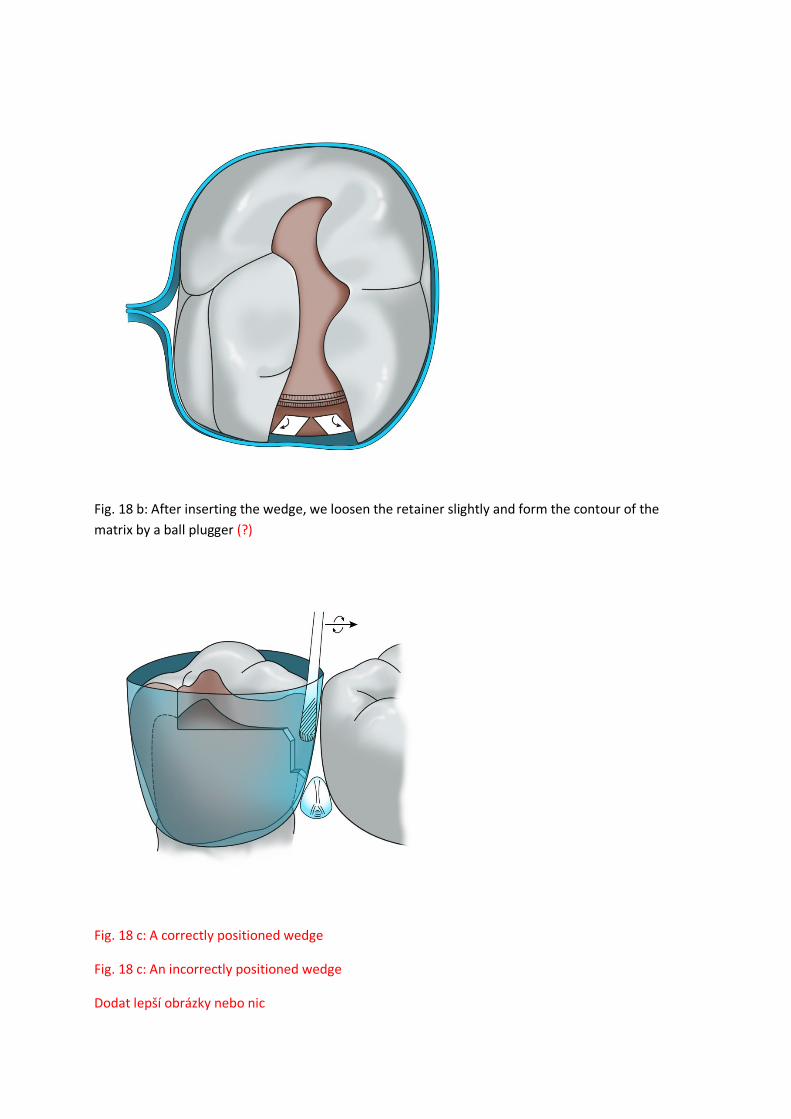
After tightening the matrix, we can form the contours proximally e.g. with a plugger
Fig. 18 a: The matrix after tightening is drawn into the cavity slightly
Page 21
Fig. 18 b: After inserting the wedge, we loosen the retainer slightly and form the contour of the
matrix by a ball plugger (?)
Fig. 18 c: A correctly positioned wedge
Fig. 18 c: An incorrectly positioned wedge
Dodat lepší obrázky nebo nic
Page 22
Fig. 18 e:
The consequence of an unsuitable (too big) wedge
MAKING OF THE FILLING
AMALGAM
After completing the preparation, we choose a suitable matrix and a retainer, place the matrix into
the retainer, fasten the matrix there and apply it onto the tooth. We tighten the retainer and insert a
suitable wedge. We loosen the screw of the retainer very little (about 1/4 of a revolution) and check
the contact point, it is possible to shape contour in the matrix by a ball plugger so that the contact
point is as natural as possible. Then we can proceed with depositing amalgam in portions (with an
amalgam gun or carrier), and condense it as long as the cavity is filled with a slight excess.
Fig. 18 a, b, c
Fig. 19 a, b: A thorough condensation of amalgam in proximal cavity.
First we condense amalgam transversally into the edges of the cavity vestibulary and orally, then
perpendicullary to the gingival step.
Page 23
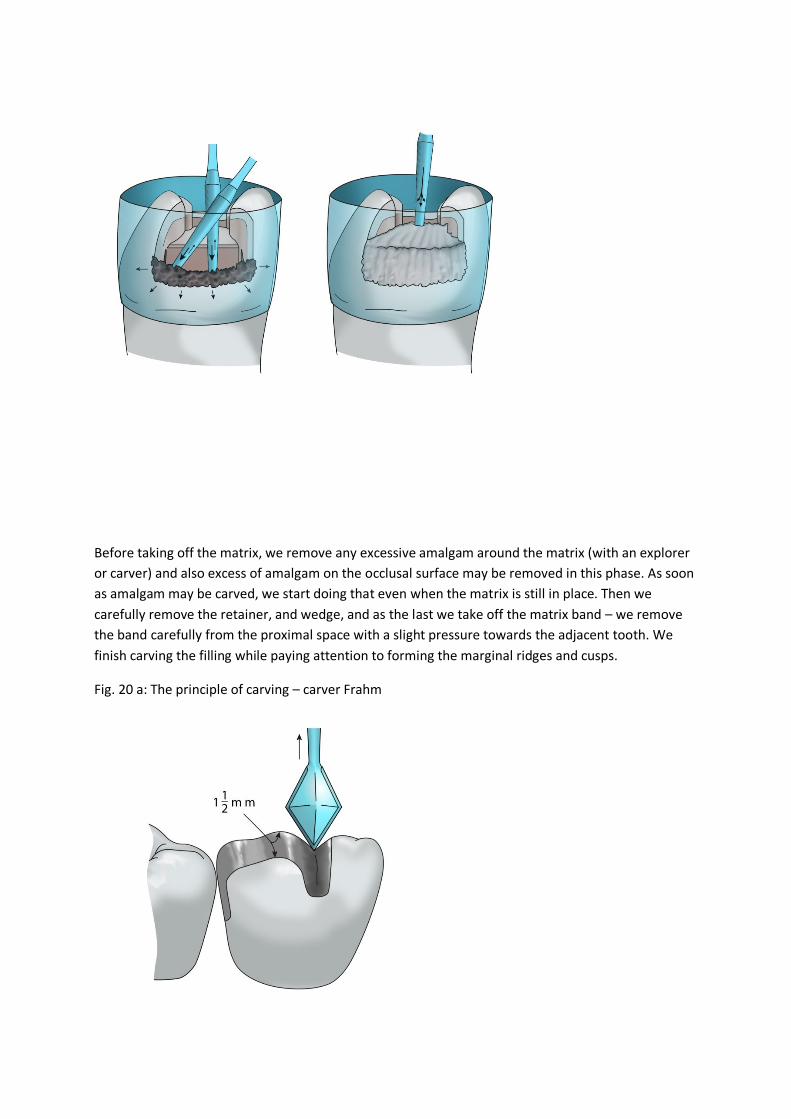
Before taking off the matrix, we remove any excessive amalgam around the matrix (with an explorer
or carver) and also excess of amalgam on the occlusal surface may be removed in this phase. As soon
as amalgam may be carved, we start doing that even when the matrix is still in place. Then we
carefully remove the retainer, and wedge, and as the last we take off the matrix band – we remove
the band carefully from the proximal space with a slight pressure towards the adjacent tooth. We
finish carving the filling while paying attention to forming the marginal ridges and cusps.
Fig. 20 a: The principle of carving – carver Frahm
Page 24
Fig. 20 b: The principle of carving – carver Discoid-Cleoid
Fig. 20 c, d: Removal of excess amalgam proximally – Carver Wiland
We articulate the filling very precisely – we ask the patient to bite gently, in the place of higher filling
a shiny little area forms. In the end we bevel the filling, in the occlusal cavity we move from the
middle of the filling to its edges and in the proximal part from the edges to the middle of the filling.
We polish the filling during the next appointment with rotary instruments (finishing and polishing
instruments). Finishing instruments (shallow grooves between blades) remove any unevenness,
polishing instruments (without blades) hammer out the filling slightly. In the occlusal part of the
cavity we polish from the middle to the edges, and in the proximal part from the edge to the middle.
Fig. 21 a: The direction of guiding the polishing instrument
Page 25
Fig. 21b: Polishing with rubber cups
Page 26
Fig. 22: Completed filling
Page 27
Carvers
COMPOSITE
We make composite filling with circular or sectional matrix, sectional matrix is used in combination
with a separator (a ring which is manipulated with pliers on the cofferdam clamps). Making the
contact point is namely much more complicated than in amalgam filling. We begin with the surface
of contact point – making the proximal wall and in this way, we transform the “outline cavity” to
“central cavity” (class I). Composite is deposited in layers – max. 1.5 mm, each layer must be cured
thoroughly.