Main page ............................................................................................................................................... 6
Vario ................................................................................................................................................. 13
Units .................................................................................................................................................. 13
How to power on and off ................................................................................................................... 22
External power supply ....................................................................................................................... 22
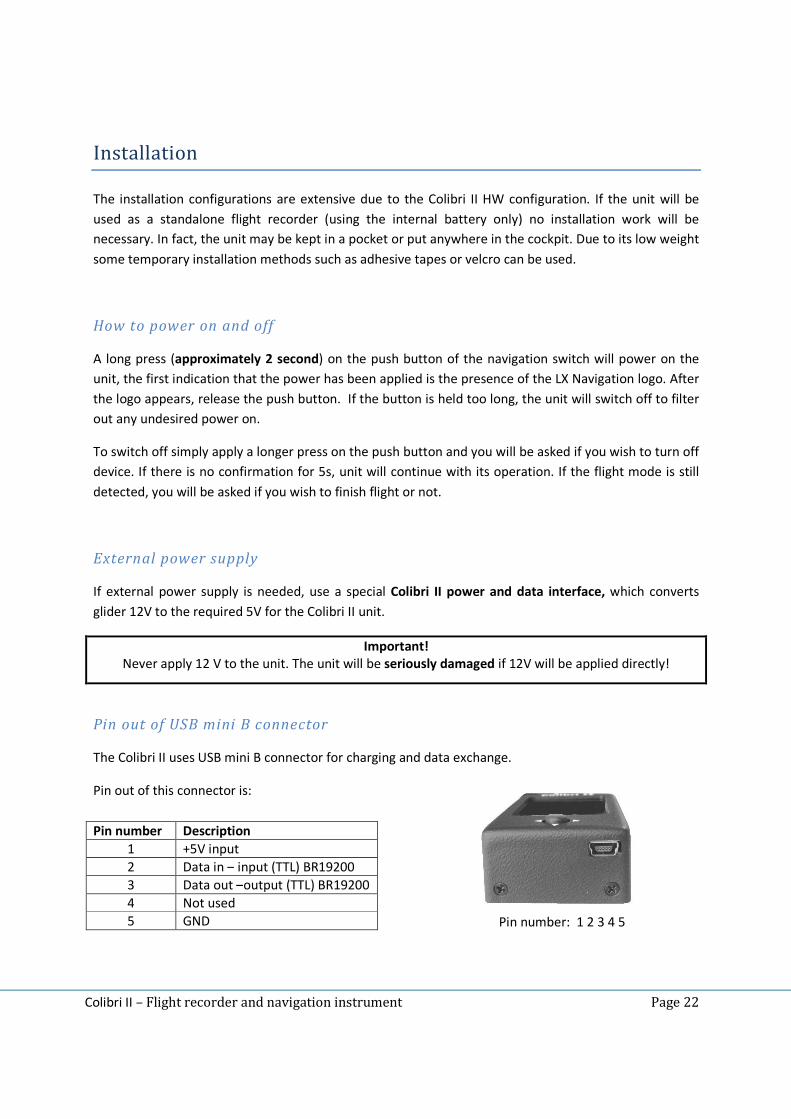
Pin out of USB mini B connector ........................................................................................................ 22
Flying with Colibri II ............................................................................................................................... 23
List of standard parts and options.......................................................................................................... 24
Connection Flarm to Colibri II ............................................................................................................ 25
Revision history ..................................................................................................................................... 26
Colibri II – Flight recorder and navigation instrument Page 4
Introduction
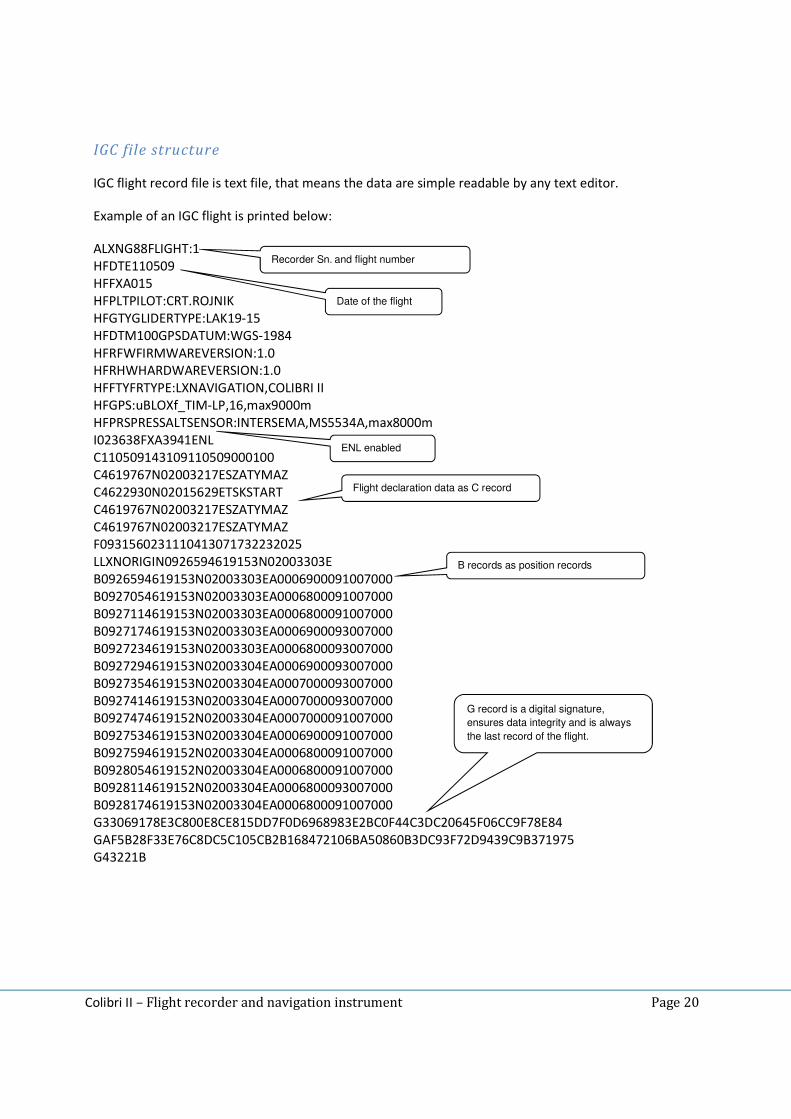
The unit’s main function is flight data recording and the generation of files that meet IGC regulations.
Due to its excellent HW configuration many supplemental navigation functions are also offered to the
pilot. The most important feature is sunshine readable color display with a unique variometer function
including both an audio and needle presentation.
Key features are:
-Extremely small outline: 40 x 62 x 22 mm
-Completely new design approach
-Sunshine readable color display as a central part of the system
-Simple manipulation via one multifunction switch
-Built in GPS receiver and GPS antenna
-NMEA output
-Internal battery ensures up to 10 hours of autonomy
-Built in battery charger (5V via USB cable)
-External power input
-micro SD card for data transfer
-Variometer with audio as a standard solution
-Basic navigation
-IGC Approved Flight recorder
GPS receiver
A highly sensitive GPS receiver with built in antenna is an integral part of the unit so there is no longer a
requirement for an external antenna. The internal antenna allows for either a vertical or horizontal
installation of the unit. For horizontal installations, the unit must be mounted with the display up for
proper GPS reception.
Power supply
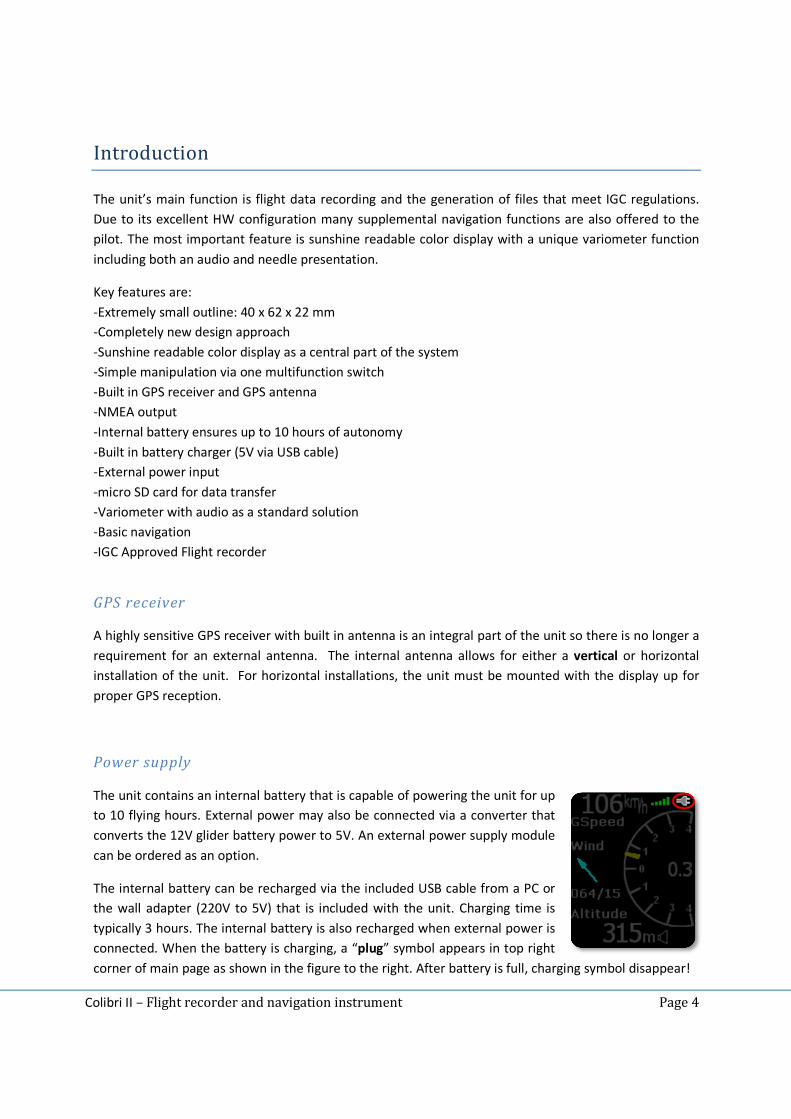
The unit contains an internal battery that is capable of powering the unit for up
to 10 flying hours. External power may also be connected via a converter that
converts the 12V glider battery power to 5V. An external power supply module
can be ordered as an option.
The internal battery can be recharged via the included USB cable from a PC or
the wall adapter (220V to 5V) that is included with the unit. Charging time is
typically 3 hours. The internal battery is also recharged when external power is
connected. When the battery is charging, a “plug” symbol appears in top right
corner of main page as shown in the figure to the right. After battery is full, charging symbol disappear!
Colibri II – Flight recorder and navigation instrument Page 5
Controls
There is one multifunction switch, the navigation switch, on the front of the unit
that is used to control the Colibri II. The navigation switch allows five motions:
- Move up or down
- Move left or right
- Push button (in) = Enter
Connectors
An USB Mini B type plug is located on the right bottom side of the unit and is used for external
power supply of the unit and for communication via the Colibri II power and data interface.
Note!
There is no USB port carried out, this means no direct communication from the Colibri II to a PC via USB.
It can only be used for external power in (5V max) and NMEA data out to external units.
SD card reader
The unit has an integral micro SD card reader positioned on the left side.
The SD card is used to:
-Upload TP (CUP format)
-Upload task (CUP format)
-Download flights from the internal memory (IGC format)
-Upload the flight declaration in LX format (.HDR )
Note!
Flight data is stored in the internal memory, so the SD card does not need to be inserted during flight.
Colibri II – Flight recorder and navigation instrument Page 6
Main page
The main page consists of basic flight parameters. In the left upper corner
ground speed information is shown. To the right of the ground speed display,
the GPS signal status is shown (green bars), where 1 bar represent 3 satellites
and 5 bars for more than 6 satellites. The battery indicator is shown in the top
right corner. When the internal charger is charging the battery, the battery
indicator is replaced with the charging “plug” symbol. The central part of the
main page is the vario indicator with yellow needle and numeric average
indicator in middle. The vario needle deflection is ±4m/s (±8knots) but the
numerical average is not limited.
A wind indicator in the central left part of the display shows the wind direction and speed. An arrow
shows the wind direction with respect to your track. The first wind indication will appear after 2 full
turns. The lower part of the page shows a QNH altitude and the vario volume.
Note!
Altitude reading doesn’t correspond to IGC recorded altitude, if QNH setting is different than 1013.
Buttons:
Left -> setup page
Right -> TP navigation page
Up, down -> vario volume change
In = Enter -> thermal assistant
Thermal assistant
Pressing the enter button in the main page will activate the thermal assistant.
An automatic switch from the main page is also possible by selecting the
Thermal assistant item in the setup/vario menu. The Thermal assistant page
shows the thermal profile in colors as percent of the maximum climb rate in the
last circle. Red dots represent 70% or more, yellow 50-70% and blue less than
50% of the maximum. No dot means negative vario and the white dot shows the
maximum. The top right corner of the screen shows the overall thermal average
which is the average climb rate from the start of the thermal until the end of the
thermal (total average). In the bottom right corner altitude gain for the thermal
is shown. The numeric figures inside the circle show the current vario and the arrow shows wind
direction.
Buttons:
Left -> setup page
Right -> TP navigation page / Flarm radar page
Up, down -> no effect
Enter -> main page
Colibri II – Flight recorder and navigation instrument Page 7
Flarm radar page
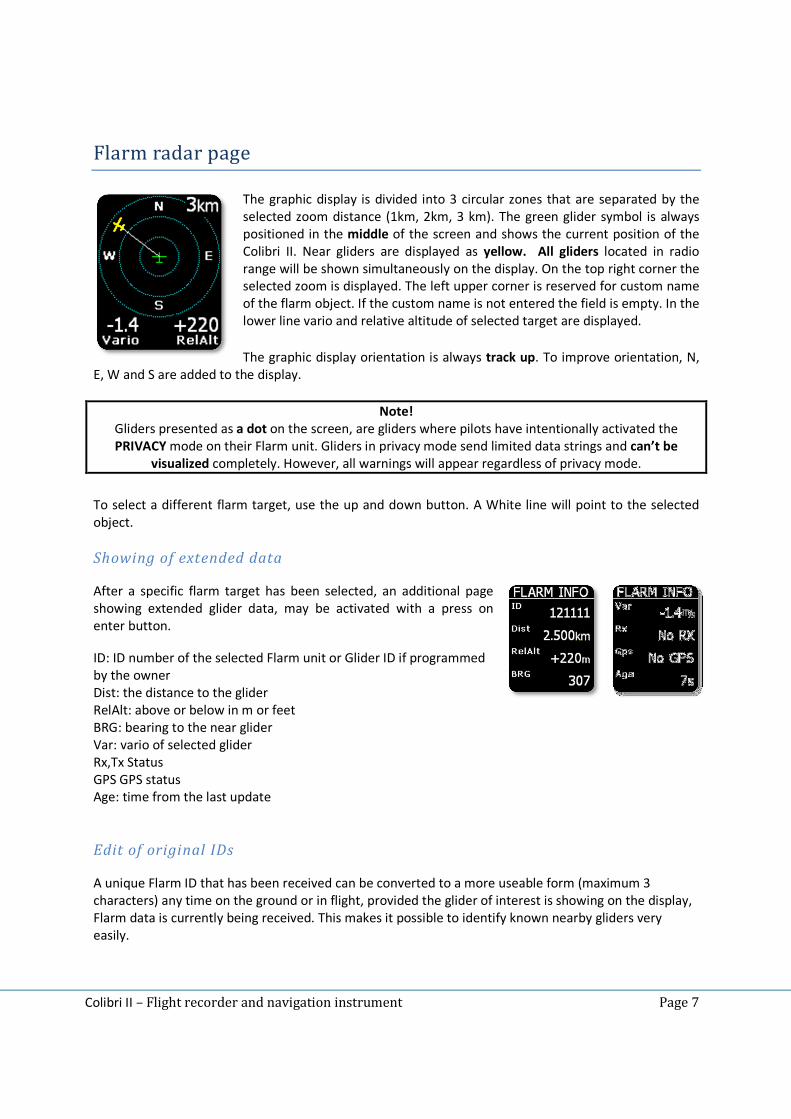
The graphic display is divided into 3 circular zones that are separated by the
selected zoom distance (1km, 2km, 3 km). The green glider symbol is always
positioned in the middle of the screen and shows the current position of the
Colibri II. Near gliders are displayed as yellow. All gliders located in radio
range will be shown simultaneously on the display. On the top right corner the
selected zoom is displayed. The left upper corner is reserved for custom name
of the flarm object. If the custom name is not entered the field is empty. In the
lower line vario and relative altitude of selected target are displayed.
The graphic display orientation is always track up. To improve orientation, N,
E, W and S are added to the display.
Note!
Gliders presented as a dot on the screen, are gliders where pilots have intentionally activated the
PRIVACY mode on their Flarm unit. Gliders in privacy mode send limited data strings and can’t be
visualized completely. However, all warnings will appear regardless of privacy mode.
To select a different flarm target, use the up and down button. A White line will point to the selected
object.
Showing of extended data
After a specific flarm target has been selected, an additional page
showing extended glider data, may be activated with a press on
enter button.
ID: ID number of the selected Flarm unit or Glider ID if programmed
by the owner
Dist: the distance to the glider
RelAlt: above or below in m or feet
BRG: bearing to the near glider
Var: vario of selected glider
Rx,Tx Status
GPS GPS status
Age: time from the last update
Edit of original IDs
A unique Flarm ID that has been received can be converted to a more useable form (maximum 3
characters) any time on the ground or in flight, provided the glider of interest is showing on the display,
Flarm data is currently being received. This makes it possible to identify known nearby gliders very
easily.
Colibri II – Flight recorder and navigation instrument Page 8
Note!
This unique ID may only be created when Flarm data is being received from the other unit There is space
to store up to 50 unique IDs. These ID’s will be saved in the Colibri II for future flights.
The procedure:
- Select the glider of interest using the up and down button in the
main graphic screen
- Press enter and the extended glider data screen will appear
- Press enter again, and select the number under which the unique
ID will be stored (0-49). Press enter to continue.
- Unique ID input field will became active, enter the unique ID using
the up and down buttons. The left and right buttons move the cursor. Unique ID’s may consist of up to 3
alphanumeric characters.
Expression of collision warnings in graphic
After a warning is sent from the Flarm unit a new
screen will appear on the display with above/below
and the distance of the target. An audible beep will
also be provided with the same volume as vario beep.
Colibri II – Flight recorder and navigation instrument Page 9
TP Navigation page
On this page the pilot will find basic information about navigation and also any
TP stored in the internal TP database can be selected. In the top left corner the
TP name is displayed, followed by the distance. The yellow arrow is a North
indicator. In the central upper position steering information is shown. On the
bottom of the display there are two navigation boxes that show track and
bearing. Navigation is always track up.
Pressing the enter button, allows for the selection of any TP stored in the
unit’s internal memory. It is suggested to use the filter (replace stars in the
selection with letters or numbers) to reduce the number of points in the selection list. To look for a
point of interest, use the Up/Down buttons. After the TP of interest is found, press the enter button and
the turn point will be selected. The unit will change over to the navigation page.
Note!
TP files can only be loaded into the internal memory via the SD card, use Setup menu, SD Card.
Buttons:
Left -> main page / Flarm radar page
Right -> TSK navigation page
Up, down -> changes TP
Enter -> TP select with filter
TSK Navigation page
The task page guides the pilot from the start point over turn points and then to
the finish line. All points of a task should be included in the unit’s internal TP
file. The task page provides navigation information to the pilot towards the
selected TP from a task. The screen shows the same layout and information as
the TP Navigation page and navigation is always orientated track up.
In addition to the information on the TP Navigation page, the TSK page shows
the TP zone is yellow and a green line shows the required track towards the
next TP of the task. When you enter inside TP zone, acoustic beep will be
generated and “Inside” word will be displayed on screen above TRK navbox.
Pressing the up or down button changes the zoom. After pressing the Enter button the task edit
function appears.
Colibri II – Flight recorder and navigation instrument Page 10
If auto next mode is selected for a task TP then the navigation will switch to next TP automatically upon
zone entry. For AAT, auto mode should not be used and the switch to the next TP must be done
manually (refer to Task TP navigation section below).
Buttons:
Left -> TSK navigation page
Right -> GPS info page
Up, down -> changes zoom
Enter -> Task edit menu
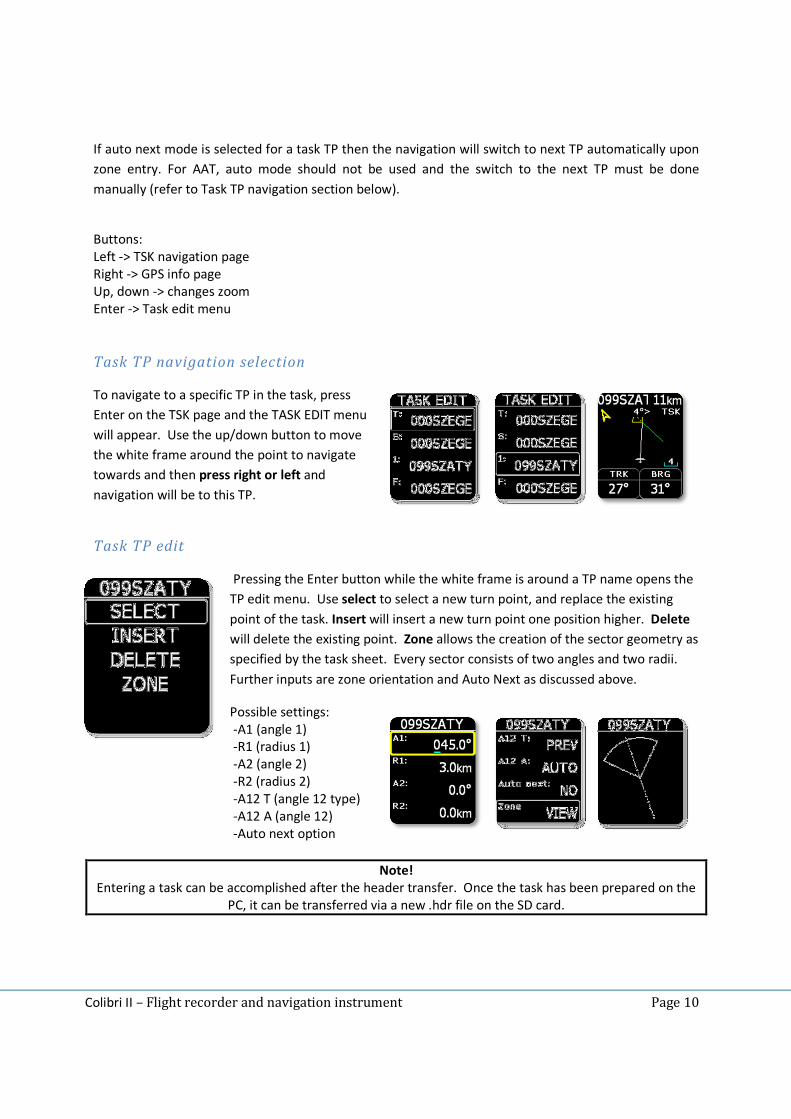
Task TP navigation selection
To navigate to a specific TP in the task, press
Enter on the TSK page and the TASK EDIT menu
will appear. Use the up/down button to move
the white frame around the point to navigate
towards and then press right or left and
navigation will be to this TP.
Task TP edit
Pressing the Enter button while the white frame is around a TP name opens the
TP edit menu. Use select to select a new turn point, and replace the existing
point of the task. Insert will insert a new turn point one position higher. Delete
will delete the existing point. Zone allows the creation of the sector geometry as
specified by the task sheet. Every sector consists of two angles and two radii.
Further inputs are zone orientation and Auto Next as discussed above.
Possible settings:
-A1 (angle 1)
-R1 (radius 1)
-A2 (angle 2)
-R2 (radius 2)
-A12 T (angle 12 type)
-A12 A (angle 12)
-Auto next option
Note!
Entering a task can be accomplished after the header transfer. Once the task has been prepared on the
PC, it can be transferred via a new .hdr file on the SD card.
Colibri II – Flight recorder and navigation instrument Page 11
GPS information page
The GPS page shows basic GPS receiver information. The first line shows the
status and number of received satellites. When a good signal with a good
position fix is detected “3D” will appear followed by the number of received
satellites. When no satellites are received, “LAST FIX/0” is shown and means
that the coordinates, (latitude and longitude), are from the last known
position. The second and third line shows latitude and longitude information.
Below the coordinates the UTC time corrected by the local UTC offset as set in
the setup/units menu is shown. The bottom line on this page shows the
internal battery voltage.
Note!
Pressing Enter on this screen will activate the Pilot Event “PEV” marker. After the PEV has been
activated more frequent recording will start for a limited period.
Buttons:
Left -> TSK navigation page
Right -> logbook/statistic page
Enter -> triggers event
Up, down -> no effect
Logbook/statisticpage
While flying, this page provides flight statistic to the pilot such as flight time,
maximum IGC altitude reached during the flight and the maximum climb and
sink speeds.
Buttons:
Left -> GPS information page
Right -> Setup page
Up, down, enter -> no effect
After flight, the statistic information will be replaced with the logbook showing
the date of flight, takeoff time, landing time and flight time.