Page 1
Collider User Training 1 Nov 2020
Collider-Accelerator Department
(C-AD)
COLLIDER
USER
TRAINING
Radiation Safety
Conventional Safety
Access Control
INFORMATION GUIDE
NOTE ! After completing this training, if you are unsure of how to properly enter and exit the
Primary Area through the PASS gates, then seek and receive assistance prior to, or in
conjunction with, your first entry since improper operation can cause programmatic delay. If
you need assistance, you may consult with your experiment Shift Leader, with another trained
co-worker or User, or contact the C-AD training office at x7007.
Page 2
Collider User Training 2 Nov 2020
INDEX
Why Take This Course? 4
Liaison Physicists 6
General Facility Description 7
C-AD Conduct of Operations 11
Restrictions For Medical Reasons 12
Radiation Hazards 12
Experiment and Equipment Reviews 13
Radiological Training 14
Deliveries to C-AD Facilities 21
Shipping Off Site 22
Particle Accelerator Safety System: PASS 23
(Intersection Region (IR) Entry and Exit Procedure)
Beam Immanent Alarm & Crash Cords 31
Barriers, Signs, Labels, Warning Tags, Alarms 32
Barricade Tape 32
Sealed Radiation Sources 33
Electrical Safety 34
Flash Hazard 35
Lockout/Tagout (LOTO) 35
Radiation Safety Lockout/Tagout (RS LOTO) 37
Yellow Caution Tags 38
Ground Fault Circuit Interrupter (GFCI) Electrical Outlets 39
Chipmunks and Radiation Surveys 40
Security System Orange Tags 41
Radiation Safety Services 41
Information on Hazards, Your Right to Know 42
High Noise Areas 43
Chemical Safety 43
Page 3
Collider User Training 3 Nov 2020
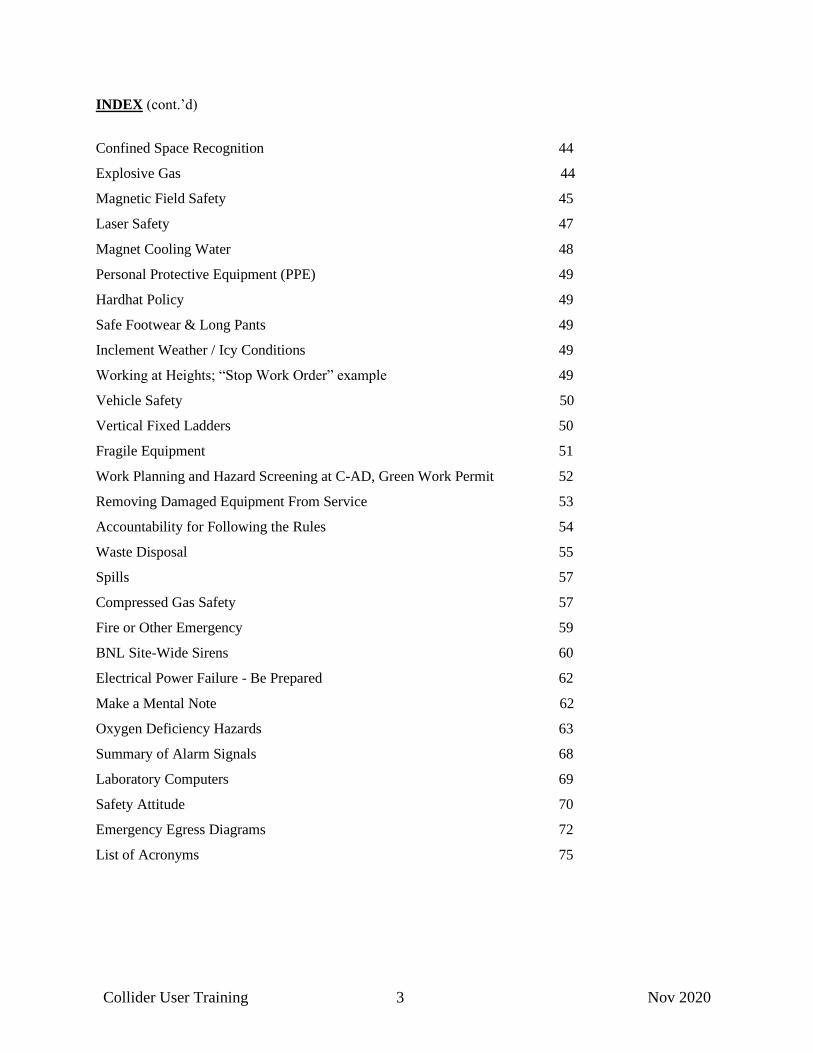
INDEX (cont.’d)
Confined Space Recognition 44
Explosive Gas 44
Magnetic Field Safety 45
Laser Safety 47
Magnet Cooling Water 48
Personal Protective Equipment (PPE) 49
Hardhat Policy 49
Safe Footwear & Long Pants 49
Inclement Weather / Icy Conditions 49
Working at Heights; “Stop Work Order” example 49
Vehicle Safety 50
Vertical Fixed Ladders 50
Fragile Equipment 51
Work Planning and Hazard Screening at C-AD, Green Work Permit 52
Removing Damaged Equipment From Service 53
Accountability for Following the Rules 54
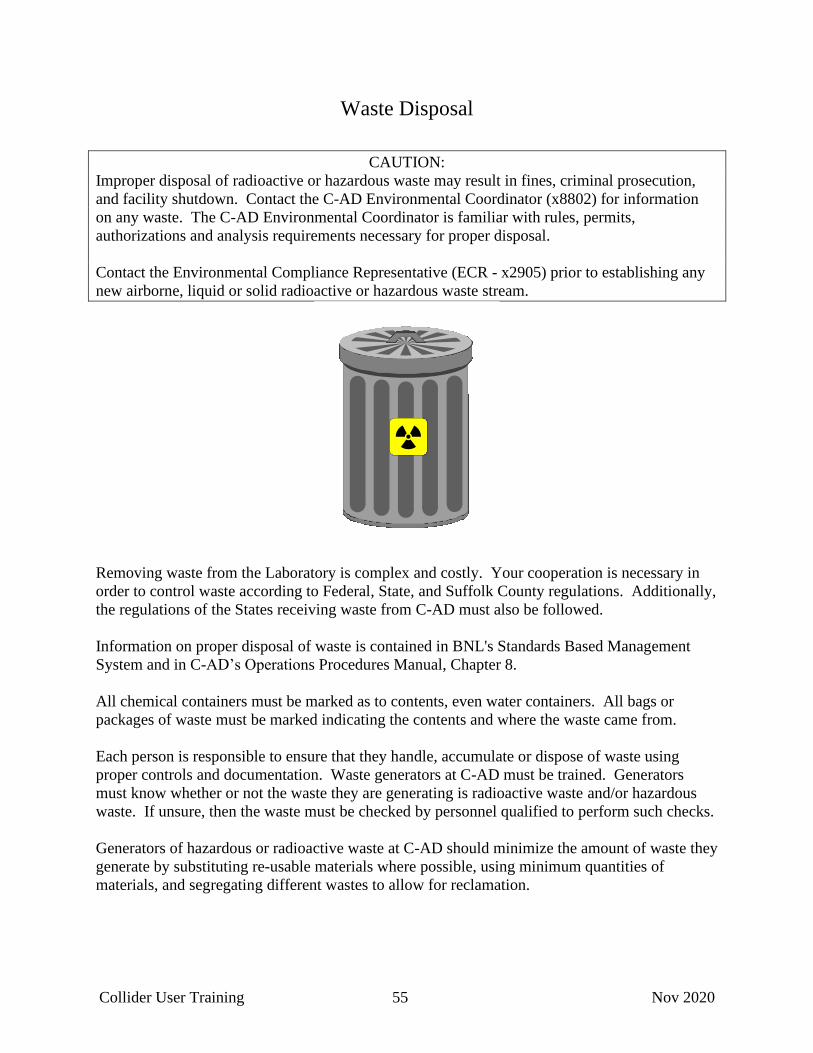
Waste Disposal 55
Spills 57
Compressed Gas Safety 57
Fire or Other Emergency 59
BNL Site-Wide Sirens 60
Electrical Power Failure - Be Prepared 62
Make a Mental Note 62
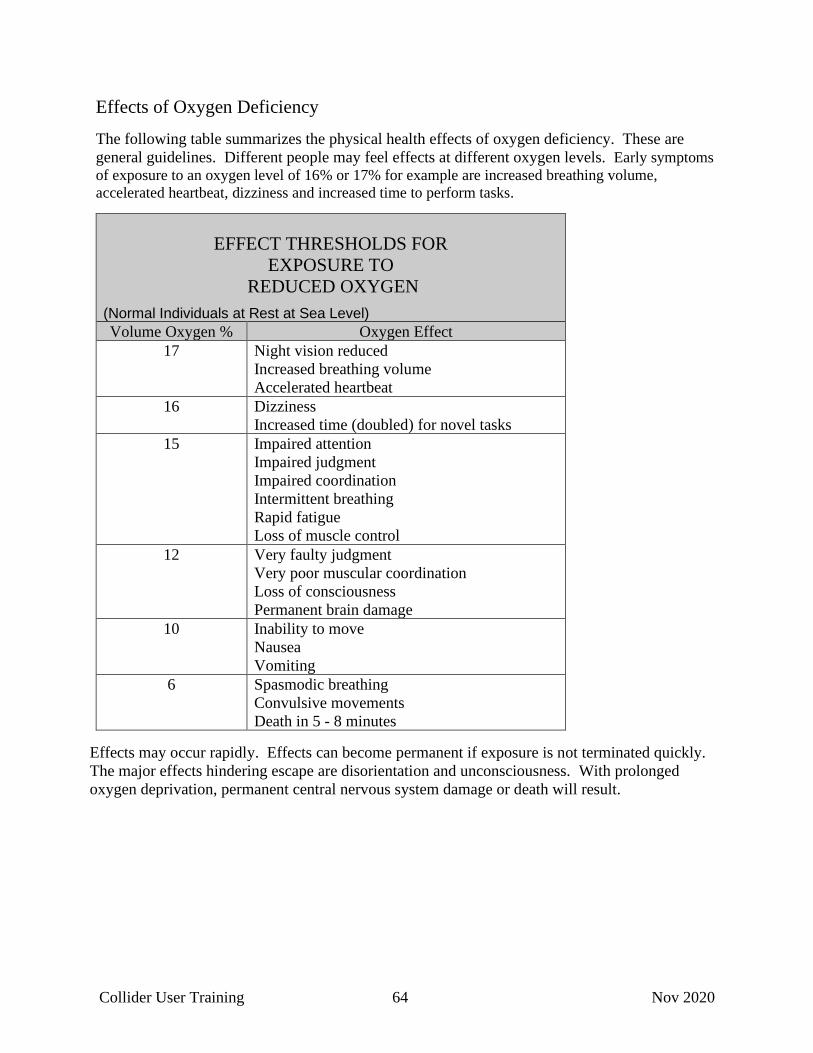
Oxygen Deficiency Hazards 63
Summary of Alarm Signals 68
Laboratory Computers 69
Safety Attitude 70
Emergency Egress Diagrams 72
List of Acronyms 75
Page 4
Collider User Training 4 Nov 2020
COLLIDER USER TRAINING
Why Take This Course? (Learning Objectives)
This course is required if you want unescorted access to the Relativistic Heavy Ion Collider
(RHIC) complex. This includes the STAR and sPHENIX experimental areas. Unescorted
access requires that you have facility-specific knowledge. This training alone, however, does not
qualify you to perform work at your experimental area. As a minimum to perform work, you are
required to read a low-hazard work plan document specific to your experiment. The STAR work
plan document is provided on-line for you to read. Go to
https://www.bnl.gov/training/courses/web/ and click STAR Low Hazard Worker-Planned Work
for Users (RC-SOCSTAR). After reading the document, your BNL training record will be
updated to indicate you have read the document. Further information about the work plan
document may be obtained from your Experiment Spokesperson or from the Collider-
Accelerator Department (C-AD) Liaison Physicist for your experiment. The sPHENIX work
plan document will be available when sPHENIX is established at the RHIC experimental area.
In addition to this Collider User Training, Users are required to complete the following online training:
Cyber Security (GE-CYBERSEC)
Guest Site Orientation (TQ-GSO)
General Employee Radiation Training (TQ-GERT)
Oxygen Deficiency Hazard (TQ-ODH)
Note: TQ-GERT and TQ-ODH were previously included when attending live on-site Collider User
initial classroom training. In an effort to reduce in-person contact with and among individuals
coming to BNL from other areas of the country and world during the COVID pandemic, Users are
completing Collider User Training on line. This requires that TQ-GERT and TQ-ODH be taken
separately. They are both conveniently available on line.
Also, as of the writing of this training guide, all Users are required to complete COVID-19 Staff
Return to Work (TQ-COVID) on-line training.
The above on-line training is available at https://www.bnl.gov/training/courses/web/.
Other additional training may be required depending on your work activities. Here are examples
of work activities that may require additional training:
operating electrical circuit breakers or disconnect switches,
performing work on electrical circuits or equipment,
performing work on electrical circuits or equipment while energized,
working at heights (work plan may allow within limits),
climbing portable ladders,
climbing vertical fixed type ladders,
handling compressed gas cylinders,
entering confined spaces,
performing LOTO (lockout/tagout),
entering magnetic field areas,
operating a crane,
use of a man-lift or aerial lift,
use of a scaffold,
Page 5
Collider User Training 5 Nov 2020
entering noise hazard areas,
entering Radiation Areas,
entering areas that require a TLD (for example, much of the Collider Tunnel),
using machine shop equipment,
use of portable power tools.
This is not intended to be an all-inclusive list. You should consult with your Spokesperson,
Liaison Physicist or experiment Work Control Coordinator regarding additional training. A job-
specific BNL Work Permit may be required as well.
If you are a Shift Leader at STAR or sPHENIX you are required to complete additional training
which includes Read & Acknowledgement (R&A) of certain C-AD procedures, including
Emergency Procedures for your experimental area.
For STAR:
Go to https://www.bnl.gov/guv
Click “Training”
Click “Relativistic Heavy Ion Collider”
Click “STAR”
Click “Shift Leader”
Then under “C-A Operating Procedures” complete the four Read & Acknowledgements (R&As)
on line.
For sPHENIX :
Shift Leader R&A training will be reestablished when sPHENIX is established at the RHIC
experimental area.
Information about Shift Leader training may be obtained from your Experiment Spokesperson,
the C-AD Liaison Physicist for your experiment or the C-AD training office x7007.
This course provides you with basic information about the access control system at the Collider, the
physical and administrative controls that prevent accidental exposures to radiation in Primary Areas,
Work Planning, and certain conventional safety hazards.
During run periods, the RHIC complex is posted as a Controlled Area. A Controlled Area is established
to protect individuals from exposure to radiation and/or radioactive materials. RHIC Users are required to
complete BNL’s General Employee Radiological Training (GERT), which allows access to Controlled
Areas. At C-AD, however, GERT does not generally allow you entry into Controlled Areas that require
personal dosimetry. The practice at C-AD is that you complete BNL’s higher level Radiation Worker-1
training for access to TLD areas. Most Users at RHIC require only the lower level GERT training. The
typical dosimeter used at C-AD and BNL is the thermo luminescent dosimeter (TLD).
Page 6
Collider User Training 6 Nov 2020
In addition to ionizing radiation hazards, experimental areas may contain hazards posed by:
• heavy objects • mechanical equipment • overhead cranes • working at heights • climbing ladders • magnetic fields • electricity/electrical energy (high-voltage and high-current electrical systems) • lasers • hot and cold surfaces
• high noise
• oxygen deficiency from release of helium or nitrogen
• radio-frequency (RF) radiation
• contamination and oxygen deficiency from smoke and fire
• slips, trips and falls
• compressed gas
• startle hazards; e.g.: from equipment auto starts and pressure reliefs
We strive to maintain an excellent safety record in such a complex environment without undue
inconvenience to the User. With your help, we can avoid injuries, environmental releases, personnel
radiation dose, fire losses and reportable occurrences. We can assure the continuity of our safety
record only by having the active cooperation of each individual who has access to the experimental
areas.
Liaison Physicists
Your Liaison Physicist (LP) is your primary contact for Environmental, Safety and Health issues
concerning the experiment. A list of Liaison Physicists can be found at:
https://www.c-ad.bnl.gov/esfd/liaisons/LP_LE.html. For RHIC experimental areas:
Experimental Area Liaison Physicist Telephone
STAR Robert Pak 4380
sPHENIX Andrei Poblaguev 7508
PP2PP Kin Yip 4116
eLens Xiaofeng Gu 4724
CeC Angelica Drees 2348
Page 7
Collider User Training 7 Nov 2020
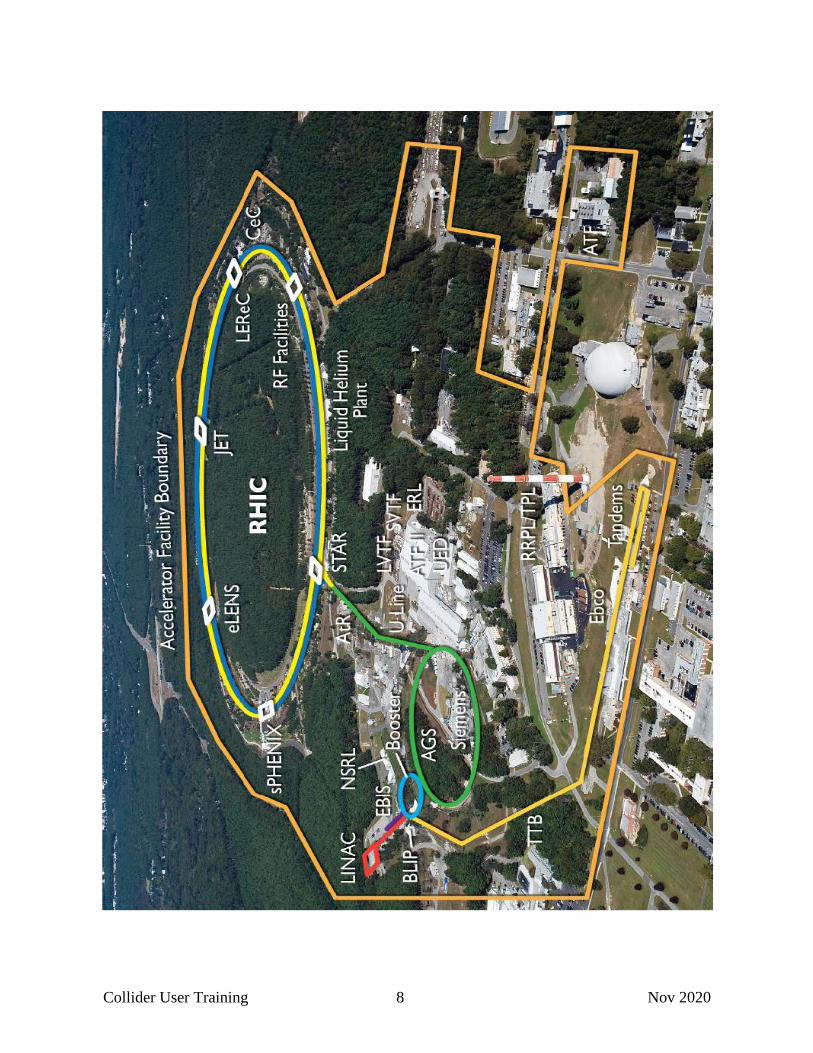
General Facility Description
The Collider-Accelerator complex includes the Linear Accelerator (LINAC), Electron Beam Ion
Source (EBIS), Tandem Van De Graaff, Booster and Alternating Gradient Synchrotron (AGS)
accelerators, which deliver particles to the Relativistic Heavy Ion Collider (RHIC).
TANDEM
Linac
EBIS
NSRL
AtR
Booster
AGS
RHIC
U, V and W Lines
TtB
X Y
Page 8
Collider User Training 8 Nov 2020
Page 9
Collider User Training 9 Nov 2020
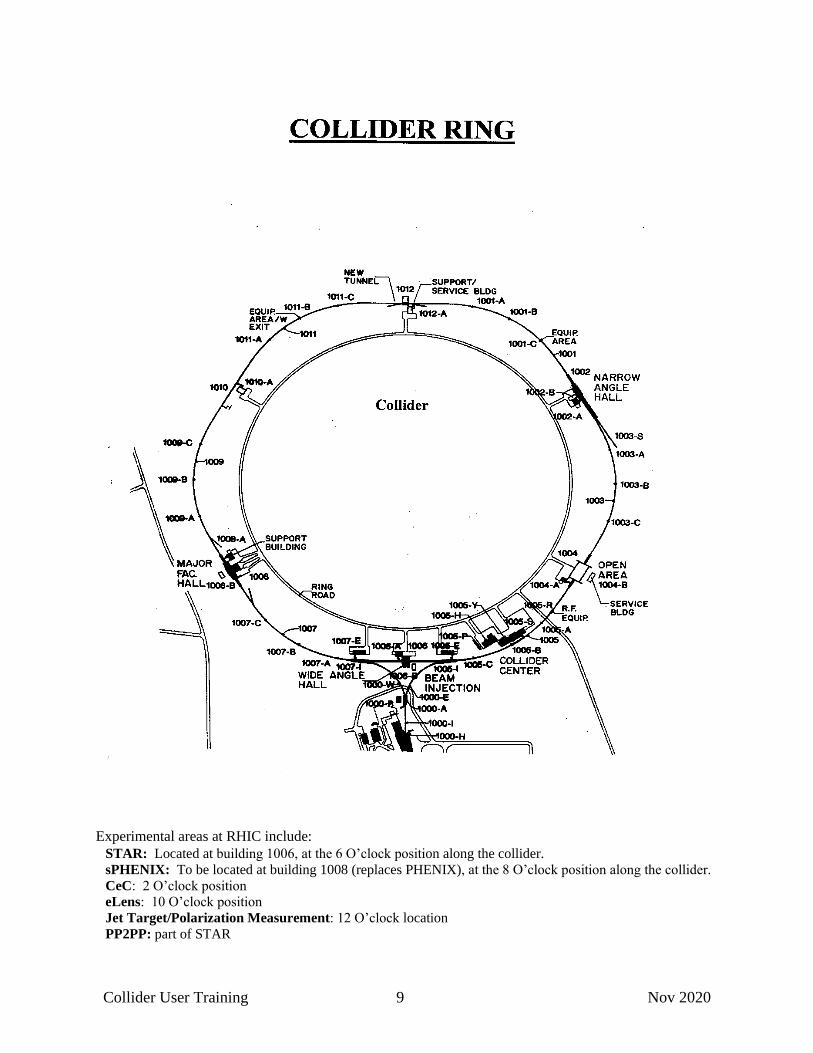
Experimental areas at RHIC include:
STAR: Located at building 1006, at the 6 O’clock position along the collider.
sPHENIX: To be located at building 1008 (replaces PHENIX), at the 8 O’clock position along the collider.
CeC: 2 O’clock position
eLens: 10 O’clock position
Jet Target/Polarization Measurement: 12 O’clock location
PP2PP: part of STAR
Page 10
Collider User Training 10 Nov 2020
Page 11
Collider User Training 11 Nov 2020
C-AD Conduct of Operations
The Collider-Accelerator Department (C-AD) has made a written commitment to the U.S.
Department of Energy (DOE) that it will manage and operated its accelerator facilities under a
"Conduct of Operations" program. This requires that C-AD follow certain rules and regulations.
As part of this program, visiting Users/experimenters and employee staff members must be
aware that we must:
• Have definitive lines of authority
• Use written procedures for most operations
• Use trained & qualified personnel where required
• Have appropriate authorizations and work permits before beginning a job
During operating periods, responsibility for the safe and reliable operation of the C-AD complex
resides with the on-duty Operations Coordinator (OC). The OC is located in the C-AD Main
Control Room (MCR) in Bldg 911. The OC is the focal point for all questions or problems
related to operations and can be reached at phone extension 4662 during operating periods.
For urgent matters during operating periods, the OC can make the necessary notifications and
arrange for assistance. To call MCR from a cell phone: (631) 344-4662.
You can determine if the accelerators or Collider (RHIC) are in an operating or shutdown status
by reading this information on TV monitors located throughout the C-AD complex. Also,
control panels at access control gates to each experiment's Intersection Region (IR) (your
primary beam area) will display a RED, YELLOW or GREEN light indicating an access control
mode for that gate. The access control system is discussed in more detail later. The system is
known as PASS: Particle Accelerator Safety System.
During maintenance or shutdown periods, operational-related maintenance must be coordinated
through the C-AD Maintenance Coordinator and must have the required authorization. Required
authorizations are listed in the C-AD Operations Procedures Manual. Lead personnel are to be
appropriately trained. If requested, you must satisfy C-AD requirements for authorization to
work on certain systems; for example, to work on a system declared as a “critical” system.
Contacts for RHIC Users include:
Experiment Work Control Coordinator
Experiment Spokesperson
C-AD Liaison Physicist for the experiment
C-AD Liaison Engineer for the experiment
C-AD Environment Safety & Health Representative (ESHR)
C-AD Environment Safety, Security, Health & Quality (ESSHQ) Division
Page 12
Collider User Training 12 Nov 2020
Restrictions for Medical Reasons
What is your Responsibility?
If you have a permanent or temporary medical condition that you believe should restrict or limit
your expected activities here at BNL, please understand it is your responsibility to inform your
Experiment Spokesperson of this situation. Our intent is to protect your health and safety as well
as the health and safety of the people around you without undue infringement on your privacy. A
few examples of restrictions that might be required due to some medical condition are
(depending on your expected work activities):
- no work at heights above 5 feet
- no climbing vertical fixed ladders
- no work requiring color discrimination
- no entry into magnetic field areas
Note: Entry into posted magnetic field areas by medical device wearers is generally not allowed.
Medical devices are defined as: electronic medical devices, cardiac pacemakers, ferromagnetic
medical devices and other implants affected by magnetic fields. In some cases, approval by the
BNL Occupational Medicine Clinic (OMC) may be given to enter, depending on the medical
device or implant and the magnetic field strength.
The BNL OMC performs routine periodic medical exams (annual Physicals) that identify
restrictions for employees. However, for guests/Users, please understand it is your
responsibility to notify your Experiment Spokesperson if you believe you have some medical
condition that should restrict or limit your expected activities here at BNL.
Radiation Hazards
PROMPT RADIATION - The most significant source of radiation at the Collider is prompt
radiation. Prompt radiation occurs while the Collider is in operation (when beam is on). Prompt
radiation is found in primary beam lines and at the intersection region of each experiment when
beam is on. It is radiation occurring during beam-to-beam collisions or during collision of the
beam with other matter; e.g.: beam pipe, beam stop, targets. Primary beam areas have
interlocked enclosures designed to prevent personnel access when beam is on. These areas
include, but are not limited to, the Collider tunnel and experiment intersection regions, AGS to
RHIC (AtR) Transfer line, U and W lines. A fatal dose of radiation may occur as a result of
exposure to prompt radiation in an area of primary beam, or in an area of operating RF (radio
frequency) systems. RF Storage and Acceleration Cavities located in the beam line at the 4
o’clock location of RHIC are an x-ray hazard. No occupancy is permitted in primary areas
where beam or RF cavities are enabled or on.
RESIDUAL RADIATION - Residual radiation exists as a result of material being activated from
the accelerated beam, and exists even after the beam is turned off. Activation occurs from the
beam colliding with material directly, or from secondary particles colliding with material or
being absorbed into the material. This activation process can occur in the beam stop locations as
well as other high interaction or beam loss areas. These areas are posted with radiological signs.
Page 13
Collider User Training 13 Nov 2020
Experiment and Equipment Reviews
All experiments and experimental support equipment must be reviewed by the C-AD
Experimental Safety Review Committee (ESRC). Once approved, an experiment may not be
changed or added-to without re-review and approval by the C-AD ESRC. For example, any
material placed in or near the primary beam needs to be reviewed by the ESRC and the ALARA
Committee for potential gaseous or particulate releases that could contaminate the area,
equipment or personnel, and must be reviewed for potential overheating. (ALARA: As Low as
Reasonably Achievable).
Procurement of new equipment (Electrical or non-Electrical): Procured items or products for use
at BNL may be required to be listed by a Nationally Recognized Test Laboratory (NRTL). The
primary focus in the past had been on electrical equipment, however this applies to non-electrical
equipment as well. If an NRTL-listed item or product is not available for what is needed, BNL
subject matter experts may be allowed to review and examine the unlisted equipment and permit
its use. In the case of electrical equipment, if an NRTL-listed item cannot be found, the
equipment must be reviewed by an LESC-approved Electrical Equipment Inspector (EEI). If
you have any questions regarding NRTL requirements, contact the C-AD ESRC.
Procurement of Pressure Vessels: (NOTE: the discussion here is for awareness. The BNL
Subject Area on Pressure Safety should be consulted regarding pressure vessels, pressure piping
and piping system components.)
When purchasing a new pressure vessel, or a vacuum vessel that could possibly be
unintentionally backfilled with >15 psig, the vessel may be required to be ASME-certified and
U-stamped in order to be used at BNL. ASME-certified vessels are fabricated and stamped by
an ASME-certified manufacturer and registered with the National Board of Boiler and Pressure
Vessel Inspectors (NBBI). ASME: American Society of Mechanical Engineers.
When ASME codes are not applicable (because of pressure range, vessel geometry, use of
special materials, etc.), we must still implement measures to provide equivalent protection and
ensure a level of safety greater than or equal to the level of protection afforded by the ASME or
applicable state or local code.
Repairs and alterations: Repairs and alterations of pressure vessels, pressure piping and piping
system components must be pre-evaluated. Repairs and alterations of ASME-certified pressure
vessels, pressure piping and piping system components must be approved by an ASME-certified
“R” stamp holder to maintain ASME certification. Trained staff must perform the repair or
alteration.
If you have questions regarding requirements for pressure vessels or pressure piping and piping
system components, contacts available to you are:
- C-AD Chief Mechanical Engineer
- BNL Pressure and Cryogenic Safety Subcommittee (a subcommittee of the Laboratory
Environment, Safety & Health Committee (LESHC))
Page 14
Collider User Training 14 Nov 2020
Radiological Training
RHIC Users are required to complete BNL’s General Employee Radiological Training (GERT). It is
available on line here: https://www.bnl.gov/training/courses/web/; course # TQ-GERT. The training
allows access to Controlled Areas, and Radioactive Material Areas (RMAs) within Controlled Areas. It
does not allow access to higher level areas such as Radiation Area, High Radiation Area or
Contamination Area, for example. A large portion of the RHIC complex is posted as a Controlled Area
during operating periods.
At C-AD, GERT does not generally allow you entry into a Controlled Areas that also requires that you be
wearing a personal dosimeter. The typical dosimeter used at C-AD and BNL is the thermo luminescent
dosimeter (TLD). Most of the RHIC tunnel, for example, is posted as a Controlled Area requiring a TLD.
Your experiment intersection region (IR) currently does not require a TLD. Pay attention to postings.
The practice at C-AD is that you complete BNL’s Radiation Worker-1 training for unescorted access to
TLD areas. Most Users at RHIC require only GERT. The intersection regions at STAR and sPHENIX
(common areas that RHIC Users access) do not require a TLD at this time.
The C-AD practice of not generally allowing entry into a TLD area with just GERT may differ elsewhere at
BNL. That is, some BNL departments may issue TLDs, and allow entry into Controlled Areas requiring a
TLD, with just GERT. One reason for the C-AD practice is that there are many posted "Radiation Areas"
within the C-AD complex. For entry into posted Radiation Areas, a TLD and Radworker-1 training are
required and you must sign/log onto a Radiological Work Permit (RWP) prior to entry. With many Radiation
Areas as well as Controlled Areas throughout the C-A complex, the C-A Department must avoid individuals
mistakenly thinking that they may enter Radiation Areas simply because they have been issued and are
wearing a TLD. Therefore, we do not generally issue TLDs without the higher level Radworker-1 training.
Tiered Dose Limits and Administrative Control Levels (ACL):
- The Federal Government has established, as law, a maximum radiation dose limit of 5,000 mrem/year
for radiological workers.
- DOE has established an Administrative Control Level of 2,000 mrem/year to assure we do not exceed
the Federal Limit.
- BNL has established an Administrative Control Level of 1,250 mrem/year to assure we do not exceed
the DOE level.
- C-AD has established an Administrative Control Level of 1,000 mrem/year to assure we do not
exceed the BNL level. In addition, the ALARA Committee reviews the necessity for allowing an
individual to exceed 500 mrem in a year at C-AD, and allowance must be approved by the C-AD
Chairman.
Maximum Expected Exposure: Individuals trained to the GERT level who are not issued personal
dosimetry (e.g.: TLD) are not expected to receive in excess of 100 mrem/year. GERT trained individuals
utilizing personal dosimetry (not the common practice at C-AD) may encounter radiation dose rates
resulting in a small potential for cumulative doses to exceed 100 mrem in a year, although this is not
expected since access is restricted to posted Controlled Areas and Radioactive Material Areas.
Page 15
Collider User Training 15 Nov 2020
RADIOLOGICAL POSTINGS
Read all radiological postings carefully. They are used to alert personnel to radiation and
radioactive materials. They indicate requirements for entry and exit of the area.
The following are examples of typical postings encountered at the Collider complex.
Northbound approach to RHIC on Renaissance road: CONTROLLED AREA
During operation, the above posting is displayed on northbound Renaissance Road before the
berm, on approach to the RHIC inner ring road. At the successful completion of this course and
BNL’s GERT you would be permitted past this posting. It indicates Controlled Area. It does not
indicate that a TLD is required. During extended shutdown periods, this posting might be
removed for convenience. The Collider tunnel, however, usually remains posted as a Controlled
Area requiring a TLD even during an extended shutdown period. The experiment intersection
regions (IRs) typically do not require a TLD. Please observe postings.
Page 16
Collider User Training 16 Nov 2020
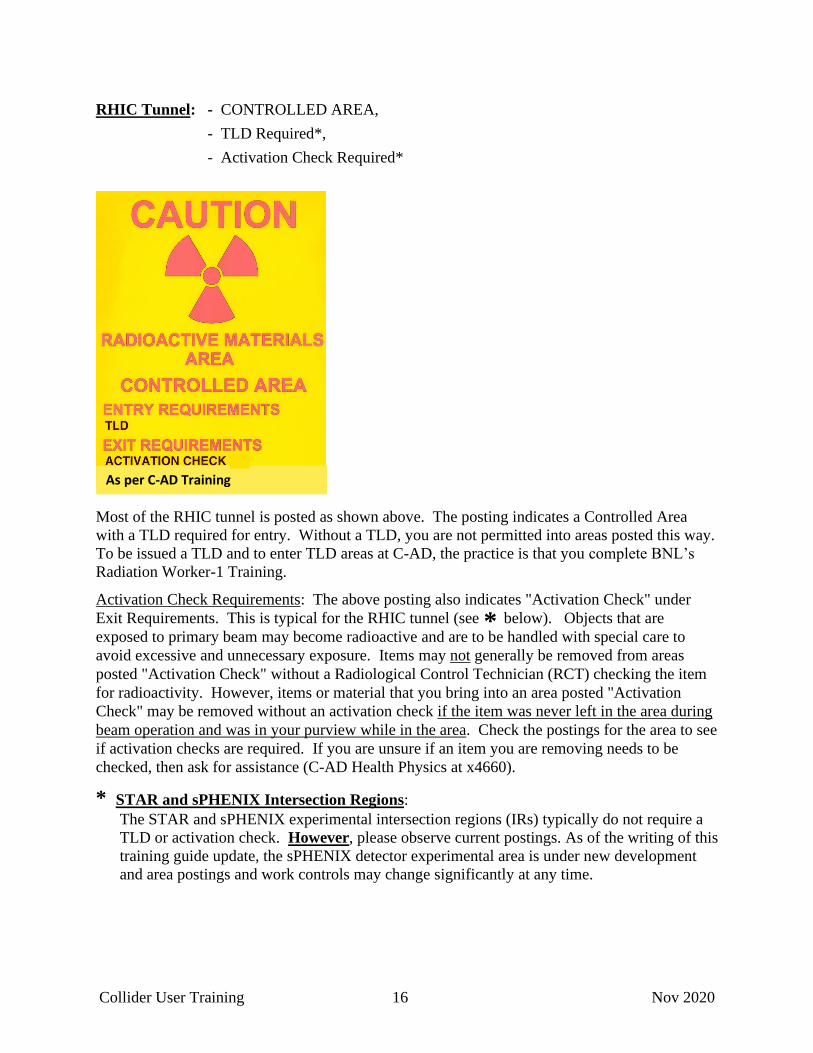
RHIC Tunnel: - CONTROLLED AREA,
- TLD Required*,
- Activation Check Required*
Most of the RHIC tunnel is posted as shown above. The posting indicates a Controlled Area
with a TLD required for entry. Without a TLD, you are not permitted into areas posted this way.
To be issued a TLD and to enter TLD areas at C-AD, the practice is that you complete BNL’s
Radiation Worker-1 Training.
Activation Check Requirements: The above posting also indicates "Activation Check" under
Exit Requirements. This is typical for the RHIC tunnel (see * below). Objects that are
exposed to primary beam may become radioactive and are to be handled with special care to
avoid excessive and unnecessary exposure. Items may not generally be removed from areas
posted "Activation Check" without a Radiological Control Technician (RCT) checking the item
for radioactivity. However, items or material that you bring into an area posted "Activation
Check" may be removed without an activation check if the item was never left in the area during
beam operation and was in your purview while in the area. Check the postings for the area to see
if activation checks are required. If you are unsure if an item you are removing needs to be
checked, then ask for assistance (C-AD Health Physics at x4660).
* STAR and sPHENIX Intersection Regions:
The STAR and sPHENIX experimental intersection regions (IRs) typically do not require a
TLD or activation check. However, please observe current postings. As of the writing of this
training guide update, the sPHENIX detector experimental area is under new development
and area postings and work controls may change significantly at any time.
As per C-AD Training
Page 17
Collider User Training 17 Nov 2020
RADIATION LEVELS, AREA NAMES, AND TRAINING REQUIRED
Radiation Level Area Name Training Required (for unescorted access)
< 5 mrem per hour
< 100 mrem per year (for
area not requiring
personal dosimetry)
Controlled Area
GERT
And
For RHIC areas:
Collider User Training
> 5 mrem per hour
< 100 mrem per hour
Radiation Area Radworker-1 Training
And
For RHIC areas:
Collider User Training
> 100 mrem/hr at 30cm
< 500,000 mrem/hr at
1m
High Radiation Area Radworker-1 Training
And
For C-AD areas:
Other designated C-A
Facility-Specific Training
Page 18
Collider User Training 18 Nov 2020
PERSONAL DOSIMETRY (Thermo luminescent Dosimeter badge - TLD)
The practice at C-AD is that you complete BNL’s Radiation Worker-1 training to be issued a TLD and to
enter TLD areas unescorted. The typical dosimeter used at C-AD and BNL is the thermo luminescent
dosimeter (TLD). Most of the RHIC tunnel, for example, is posted as a Controlled Area requiring a TLD.
Pay attention to postings.
The TLD monitors your exposure to beta, gamma, and neutron radiation. It offers no protection
from radiation. TLDs are exchanged on a monthly basis. The TLD is the basis for the legal
record of your occupational dose. Requirements for TLD use include:
• TLDs are worn when required by signs or postings, Radiological Work Permits, and when
directed by Facility Support personnel.
• TLDs must be worn on the front of the torso, between the waist and the neck unless directed
otherwise by Facility Support personnel.
• Either immediately following a job or at the end of the work shift, return the TLD to the badge
board. Be careful to place it in the correct slot. Temporary ("TEMP") badges should not be
placed in slots designated for permanent badges. Permanent badge slots have assigned numbers.
• If you leave BNL (employment is terminated or your guest appointment has expired), be sure to
leave your TLD on a badge board, or return your TLD to Facility Support personnel (x4660 at C-
AD) or to the individual who issued you the TLD.
• TLDs issued at BNL should not be worn at another facility and dosimetry issued from another
facility should not be worn at BNL. The concern is that your dose should be recorded only once
for any time period monitored, and that it be associated with the proper facility.
• You must never use someone else’s TLD and never lend your TLD for someone else to use.
Violation of this policy can result in serious disciplinary actions.
• Persons successfully completing GERT may be issued a TLD at BNL, although the C-AD
practice is that you have Radworker-1 training to be issued a TLD. Trained personnel receive a
TLD with a blue or yellow stripe on the front of the badge. The color alternates monthly. A red
stripe on the front of the badge identifies an untrained visitor TLD. Individuals wearing an
untrained visitor TLD require escort in an area requiring dosimetry. If you encounter an
unescorted untrained (RED-striped TLD) visitor within a TLD area, immediately escort them out
of the area. DO NOT REMAIN IN THE AREA AS THEIR ESCORT UNLESS YOU HAVE
BEEN PROPERLY APPROVED TO DO SO. (Note: entry into a ‘Controlled Area’, even if a
non-TLD area, still requires an escort and a signed/approved escort form for an untrained person).
• Never open or tamper with the TLD. If you suspect the TLD has been misused or damaged in
any way, (such as having been put through the laundry cycle or been worn during a medical x-
ray), you should notify Facility Support personnel (x4660 at C-AD) or the C-AD ESSHQ
Division Head (x5636).
• If while in a TLD area your TLD is lost, damaged, or contaminated, place your work activities in
a safe condition, immediately exit the area and notify Facility Support personnel (x4660 at C-AD)
or the C-AD ESSHQ Division Head (x5636).
• Report any lost TLD badge immediately.
Page 19
Collider User Training 19 Nov 2020
Regarding the seriousness of proper use of personnel monitoring devices:
In past years there have been noncompliances concerning the use of thermo luminescent
dosimeters (TLDs) at Brookhaven National Laboratory. For example: worker wears another
person’s TLD; worker does not exchange TLD at month’s end but wears it for many months.
One of these issues resulted in BNL having to report the noncompliance in the Department of
Energy's (DOE) Noncompliance Tracking System (NTS), which is the DOE system for
reporting nuclear and worker safety noncompliances. It is important that trained radiological
workers and escorts follow the requirements for use of personnel monitoring devices.
RADIATION EXPOSURE CONTROL
People have always been exposed to radiation from natural sources. We are exposed to this
radiation from our environment, from materials inside our bodies, and from certain man made
sources such as medical x-rays and other medical procedures. The average radiation dose to a
member of the general population in the United States is about 620 mrem/year. This amount is a
combination of both natural background and man-made sources of radiation.
Once an experiment is configured and enabled, valuable scientific information is obtained. It is
difficult to estimate the economic or other worth of this information. It is assumed that this
research has a net benefit. Eating, drinking, or smoking in a radiological area increases the time
spent in the area, and correspondingly the dose, without increasing the net benefit. Therefore,
eating, drinking, and smoking are prohibited in all Radiation and High Radiation Areas.
ALARA STRATEGIES
The basic ALARA strategy on the part of the User revolves around reducing dose by the efficient
use of time, distance, and shielding. Reduce the time spent in radiological areas, increase the
distance from sources of radiation, and use shielding whenever possible. ALARA is also
incorporated into design and operations. For example, the access control system at C-AD
prevents inadvertent entry into Primary Areas with beam on. Obey all signs and postings. Do
not enter any area restricted for radiological purposes unless qualified or properly escorted.
Our greatest dose reduction at the C-AD complex has come by the way of improvement projects.
We have improved the reliability of the vacuum system, injection system, and extraction system.
Improvements, redesign and the use of radiation tolerant materials have resulted in fewer repairs
of activated equipment, thereby reducing personnel dose incurred for maintenance.
C-AD EXPOSURE PHILOSOPHY
Radiation Exposure at C-AD Must:
• Have a Net Benefit
• Be As Low As Reasonably Achievable (ALARA)
Page 20
Collider User Training 20 Nov 2020
PRICE-ANDERSON AMENDMENTS ACT (PAAA)
It is important to make you aware of the absolute requirement to follow all safety requirements
(both radiological and non-radiological) at C-AD and BNL facilities. The Price-Anderson
Amendments Act (PAAA) is a Congressional Act which provides the Federal Government the
ability to impose enforcement penalties if you do not follow the requirements fully. If safety
requirements are violated, enforcement penalties may be imposed against Brookhaven Science
Associates (BSA), or even against individuals. Personnel have been the subject of criminal
investigations when found to willfully violate safety requirements, such as removing a radiation
barrier.
When signing documents related to radiological or non-radiological safety, an employee or User
is essentially confirming that he or she will do his or her assigned work according to the rules.
The signature does not mean that the individual is guaranteeing that the work will be carried out
perfectly or that there is no potential for a violation. It does mean that the individual is
performing his or her duties to the best of their ability and has made a good faith effort to comply
with the safety requirements. A "good faith effort to comply” means that the employee or User
has familiarized him or her-self with the requirements that fall within his or her area of
responsibility.
DOE has put nuclear and radiological safety requirements into the Code of Federal Regulations
(CFR), Title 10 (Energy), Part 835 Occupational Radiation Protection. This is referred to as:
10 CFR 835.
DOE has also more recently put safety requirements (non-radiological) into the Code of Federal
Regulations (CFR), Title 10 (Energy), Part 851 Worker Safety and Health Program. This is
referred to as: 10 CFR 851.
The intent of the Price-Anderson Amendments Act is to protect the health and safety of workers and the
general public.
WARNING
It should be understood that any User or employee who intentionally violates any safety requirement,
regardless of whether the User or employee signs any document related to compliance, might be subject
to criminal prosecution or other disciplinary action.
Page 21
Collider User Training 21 Nov 2020
Deliveries to C-AD Facilities
BNL and C-AD must prevent outside delivery personnel from inadvertently entering areas that
they are not qualified to enter while attempting to find the recipient of a package. For example,
an untrained Fed Ex or UPS delivery person entering an area controlled for radiation protection
could receive unnecessary exposure and the occurrence could be a PAAA violation. To prevent
this type of incident, the C-A Department requires that, during normal working hours, deliveries
for the C-A complex be made to Shipping & Receiving, Building 98. Arrangements can be
made with the C-AD Main Control Room (MCR) (x4662) for off-hour deliveries. You must
make such arrangements in advance. When the delivery is made to Bldg 98 or to the MCR,
personnel there will then contact you, the addressee. Under no circumstances are deliveries to be
made to other buildings in the C-A complex without approval of the C-A ESSHQ Division Head
(x5636).
When placing an order or having any delivery made, inform the vendor or addresser to address
the package to Bldg 98 (or MCR under rare circumstances and if advance arrangements are made
with MCR). In addition, it is important that you inform the vendor or addresser to also put your
name and contact information on the package so that Bldg 98 or MCR personnel have a way to
contact you. Packages arriving without a name may be sent back.
Page 22
Collider User Training 22 Nov 2020
Shipping Off Site
If you are shipping material from the C-AD complex to off-site,
then ask yourself these questions:
Note: If the material may be Mixed Waste, there are specific labeling and processing
requirements. See BNL Subject Area “Waste” (Mixed Waste section) for details. Mixed Waste
is waste that is both Hazardous and Radioactive.
Page 23
Collider User Training 23 Nov 2020
Particle Accelerator Safety System
(PASS)
NOTE ! After completing this training, if you are unsure of how to properly enter and exit the
Primary Area through the PASS gates, then seek and receive assistance prior to, or in
conjunction with, your first entry since improper operation can cause programmatic delay. If
you need assistance, you may consult with your experiment Shift Leader, with another trained
co-worker or User, or contact the C-AD training office at x7007.
The main purpose and design of PASS is to protect personnel from radiation.
The Particle Accelerator Safety System located within the Collider portion of the C-AD complex
is designed to control access to primary beam areas, and it provides for a beam-imminent
warning alarm. The system also detects excessive radiation levels outside shielded areas using
area radiation monitors, sometimes called ‘chipmunks’. Additionally, the system detects Oxygen
Deficiency Hazard (ODH) conditions with in-place oxygen monitors, it activates ODH alarms
and activates ventilation equipment if low oxygen is detected.
The system includes the many locked gates that lead to primary beam areas. The gates control or
limit access to the primary beam areas. Entry through the gates is with the use of a plastic card-
key (which is typically a pink color for RHIC Users) OR by use of an RFID tag pulled from a
key-tree (using iris recognition).
Unescorted PASS gate entries require one key for one person only! Each person must enter
with his or her own key (unless special escort procedures are followed). More than one person
entering under one key is considered a serious violation of procedure, and is subject to
disciplinary action. If there is a need to escort an untrained individual (who doesn't have their
own key) into a gated area, contact the C-AD ESSHQ Division.
Entry Modes and Status Indicators
There are 3 basic entry modes that the Particle Accelerator Safety System (PASS), or a particular
gate, may be in:
(RED) PROHIBITED ACCESS Mode
(YELLOW) CONTROLLED ACCESS Mode
(GREEN) RESTRICTED ACCESS Mode (least restrictive)
Page 24
Collider User Training 24 Nov 2020
ENTRY and EXIT
CONTROL PANELS
Control panels are located at entrances and exits of PASS gates. A system of lights on the panels
indicates the machine’s operational access status, or the access control mode of that particular
gate. Users typically enter and exit gates that lead to the Intersection Region (IR) of their
experiment. Some Users enter the tunnel (TLD area) beyond the IR.
Note: Several gates have been replaced with a ‘newer’ type door. The older gates are chain link
type. The newer type is a solid door with a window. The entry and exit procedures are
essentially the same, except there is no mechanical latch assembly with the door knob holding
the newer door closed. Instead, there is a magnet installed at the top of the door frame that holds
the door closed. See “*” on page 30 for further details.
Example: STAR gate
RED Light Indicates
Prohibited Access Mode
YELLOW Light Indicates
Controlled Access Mode
GREEN Light Indicates
Restricted Access Mode
Edge Reader
Control Panel
Page 25
Collider User Training 25 Nov 2020
RED LIGHT - - PROHIBITED ACCESS
No access is allowed. Beam is on, or beam may be imminent.
YELLOW LIGHT - - CONTROLLED ACCESS
During Controlled Access Mode, each individual entering the area is being accounted-for (unlike
during Restricted Access). During Controlled Access mode, we must positively verify that every
person who enters the area, also exits the area. You must enter and exit the same gate. For entry
into the intersection region at STAR or sPHENIX, or into the 12 O’clock RHIC location, you
will obtain a key & RFID tag from a key tree. Key trees are located at each experimental area.
Iris Scanner
Key-tree key, with RFID Tag
In order to obtain a key & RFID tag from the key tree, you must first have your irises enrolled. If
you are unsure if you need to have your irises enrolled for access during Controlled Access Mode,
contact your Experiment Spokesperson, Liaison Physicist, Shift Leader or supervisor. The C-A
Department ESSHQ Division performs iris enrollment in Bldg 911, Room A128 (telephone x7007).
Page 26
Collider User Training 26 Nov 2020
Note: If you need to enter the Intersection region (IR) during Controlled Access Mode,
confirm accessibility to the area with the experiment Shift Leader.
IR Entry & Exit procedure during Controlled Access Mode
Note: For initial iris enrollment, new Users go to Bldg 911, Room A128 (telephone x7007).
1) Go to the experimental access area. From a distance of about 10 inches look into the iris
scanner and center the bridge of your nose with the green dot seen in mirror.
Note: There are two up/down buttons on either side of the scanner to adjust the scanner
alignment to suit your height.
2) The iris scanner will speak instruction back to you if you are too far or too close. Follow the
instructions of the iris scanner automated voice command.
3) Choose key #1 or the next sequentially available key from the Key-Tree. You have four
seconds to retrieve a key after iris recognition. Turn the key 180 degrees counterclockwise and
pull to remove it.
Note: Once a key is removed, the Key-Tree cannot be accessed again until a second iris scan.
The same individual cannot retrieve two keys at the same time without a violation.
Note: Each key has an RFID tag attached. Each tag has a unique ID based on its slot position in
the Key-Tree. Each key is labeled with the number of its corresponding key slot.
4) Take the key with RFID tag to the control panel at the access gate. Observe that the
YELLOW Controlled Access light is on (2nd light from top).
5) Request access from MCR Operations via the telephone:
Identify yourself to the MCR operator by giving your name, and ask for a release
(opening) of that particular gate, identifying the gate by number.
For example: “This is John Doe. Please release Gate 6GE1”.
Note: An MCR Operator is observing you and the gate area remotely by camera.
6) Present the RFID tag within approximately 1 & 1/2 inches of the Edge Reader until the
indicator light at the top of the Edge Reader illuminates Green.
Note: The Edge Reader is the black box labeled "HID Edge Reader" located on the control
panel.
Note: Do not open the gate until you receive the green light on the Edge Reader. Failure to
do so will require the MCR to re-Sweep the area which will cause programmatic delay.
Page 27
Collider User Training 27 Nov 2020
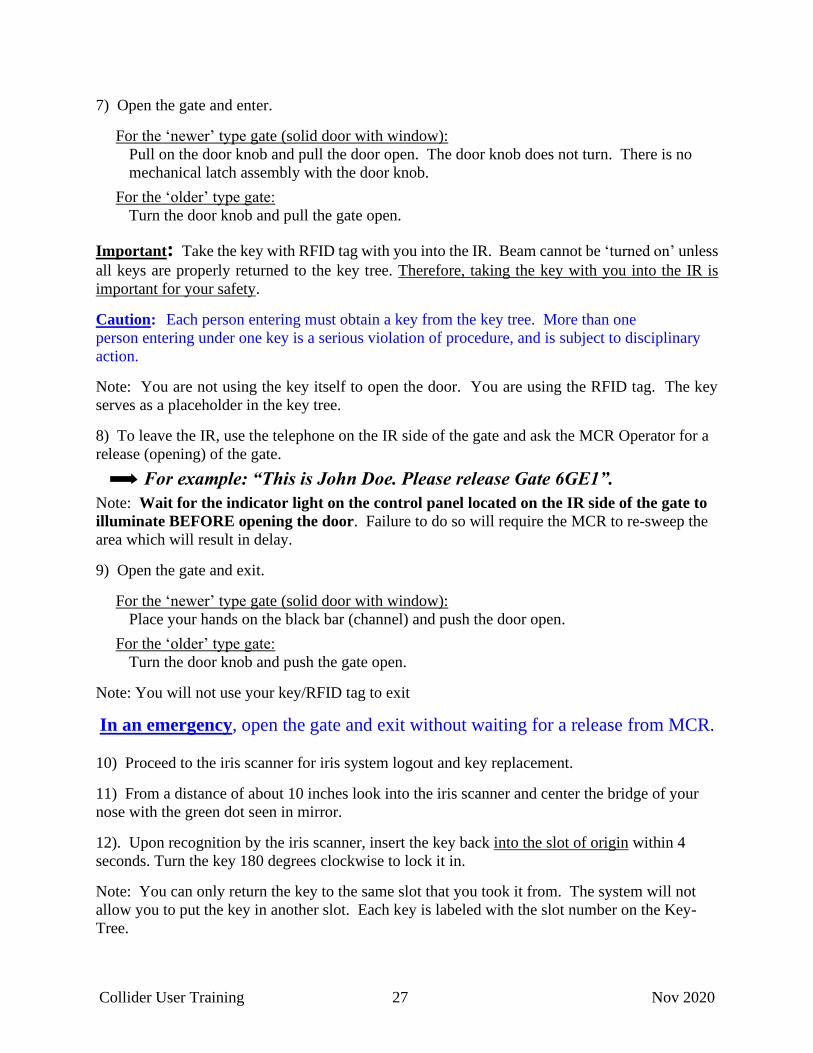
7) Open the gate and enter.
For the ‘newer’ type gate (solid door with window):
Pull on the door knob and pull the door open. The door knob does not turn. There is no
mechanical latch assembly with the door knob.
For the ‘older’ type gate:
Turn the door knob and pull the gate open.
Important: Take the key with RFID tag with you into the IR. Beam cannot be ‘turned on’ unless
all keys are properly returned to the key tree. Therefore, taking the key with you into the IR is
important for your safety.
Caution: Each person entering must obtain a key from the key tree. More than one
person entering under one key is a serious violation of procedure, and is subject to disciplinary
action.
Note: You are not using the key itself to open the door. You are using the RFID tag. The key
serves as a placeholder in the key tree.
8) To leave the IR, use the telephone on the IR side of the gate and ask the MCR Operator for a
release (opening) of the gate.
For example: “This is John Doe. Please release Gate 6GE1”.
Note: Wait for the indicator light on the control panel located on the IR side of the gate to
illuminate BEFORE opening the door. Failure to do so will require the MCR to re-sweep the
area which will result in delay.
9) Open the gate and exit.
For the ‘newer’ type gate (solid door with window):
Place your hands on the black bar (channel) and push the door open.
For the ‘older’ type gate:
Turn the door knob and push the gate open.
Note: You will not use your key/RFID tag to exit
In an emergency, open the gate and exit without waiting for a release from MCR.
10) Proceed to the iris scanner for iris system logout and key replacement.
11) From a distance of about 10 inches look into the iris scanner and center the bridge of your
nose with the green dot seen in mirror.
12). Upon recognition by the iris scanner, insert the key back into the slot of origin within 4
seconds. Turn the key 180 degrees clockwise to lock it in.
Note: You can only return the key to the same slot that you took it from. The system will not
allow you to put the key in another slot. Each key is labeled with the slot number on the Key-
Tree.
Page 28
Collider User Training 28 Nov 2020
GREEN LIGHT - - RESTRICTED ACCESS (least restrictive mode)
For the ‘newer’ type gate (solid door with window):
To enter during Restricted Access Mode, place your access card-key on the card reader. A
small green light on the reader will come on. Open gate by pulling on the door knob. The
door knob does not turn. There is no mechanical latch assembly with the door knob.
To exit, push on the black bar (channel) with your hands, and push the door open (you do not
need to use your card-key to exit).
For the ‘older’ type gate:
To enter during Restricted Access Mode, place your access card-key on the card reader and
get the small green light on reader to come on. Turn the door knob and pull the gate open.
To exit, turn the door knob and push open the gate (you do not need to use your card-key to
exit).
During Restricted Access Mode, personnel are not being accounted for. The card reader stores
information for later use if needed, however you are not being tracked or accounted-for during
this mode.
Pink Access Card-Key Card Reader
Small green light will
come on
Page 29
Collider User Training 29 Nov 2020
If multiple people want to enter with one opening of the gate
Essentially the same rules apply as before. However, here are important notes:
For entry during Controlled Access Mode:
Each individual still scans their own irises and pulls their own key from the key tree.
Using the phone at the access gate one person contacts the C-AD Main Control Room (MCR) to
request access and a release of the gate.
The person communicating with MCR informs the MCR Operator of how many people would
like to enter with one opening of the gate.
The MCR Operator decides whether or not he or she will allow multiple people to enter. (It is
usually allowed, however it is at the discretion of the on-duty Operations Coordinator).
Assuming MCR is allowing multiple people to enter, identify each individual to MCR by giving
the name of each individual to the MCR Operator. This may take a couple of moments so please
be patient. Also give the gate number to the MCR Operator.
The individual communicating with MCR presents their RFID tag (attached to the key) to the
edge reader to open the access gate.
All individuals may enter while the gate is open.
IMPORTANT: Each individual MUST still bring in their own individual key with
RFID tag that they took from the Key-Tree by scanning their own irises. This is
important for your safety. As a courtesy to the MCR Operator watching remotely by
video camera, each person entering should hold up and show their key to the camera
while entering.
For entry during Restricted Access Mode:
During Restricted Access Mode, more than one person may enter through the door with one
opening of the door provided each individual still scans their own access card-key on the card
reader key pad and the small green light on the card reader comes on. The required training of
each individual must be current.
Page 30
Collider User Training 30 Nov 2020
* Example of newer type access gate (solid door with window):
With this ‘newer’ type door, there is no mechanical door knob latch mechanism. The door is held closed
by a magnet installed at the top of the door frame. To exit, simply push on the black bar (channel)
with your hand, and push the door open. (REMEMBER: During CONTROLLED ACCESS Mode,
contact MCR BEFORE opening door). Within the bar (channel) is housed a capacitive sensor.
The act of a person touching it will release the magnet, allowing the door to be easily pushed open.
With these newer type access doors, there is a RED button located on the inside as well as the
outside of the gated area. These buttons are for EMERGENCY USE ONLY. In the event of an
emergency, lift the plastic cover and push the Red Button. This will release the magnet and
allow the door to be pushed open from the inside, or pulled open from the outside.
At top of door
At top of door frame
For emergency use Black bar (channel)
with capacitive
sensor housed inside
View from inside
Page 31
Collider User Training 31 Nov 2020
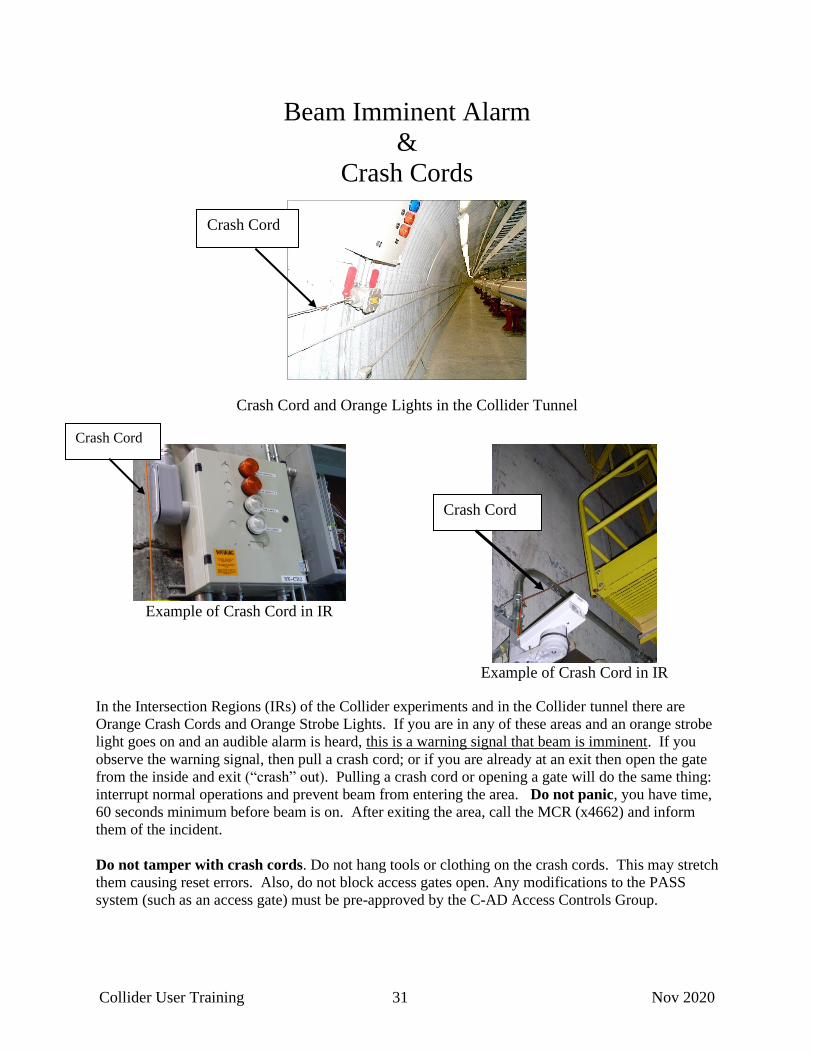
Beam Imminent Alarm
&
Crash Cords
Crash Cord and Orange Lights in the Collider Tunnel
Example of Crash Cord in IR
Example of Crash Cord in IR
In the Intersection Regions (IRs) of the Collider experiments and in the Collider tunnel there are
Orange Crash Cords and Orange Strobe Lights. If you are in any of these areas and an orange strobe
light goes on and an audible alarm is heard, this is a warning signal that beam is imminent. If you
observe the warning signal, then pull a crash cord; or if you are already at an exit then open the gate
from the inside and exit (“crash” out). Pulling a crash cord or opening a gate will do the same thing:
interrupt normal operations and prevent beam from entering the area. Do not panic, you have time,
60 seconds minimum before beam is on. After exiting the area, call the MCR (x4662) and inform
them of the incident.
Do not tamper with crash cords. Do not hang tools or clothing on the crash cords. This may stretch
them causing reset errors. Also, do not block access gates open. Any modifications to the PASS
system (such as an access gate) must be pre-approved by the C-AD Access Controls Group.
Crash Cord
Crash Cord
Crash Cord
Page 32
Collider User Training 32 Nov 2020
Barriers, Signs, Labels, Warning Tags, Alarms
Throughout the C-AD complex there are radiation barriers, electrical barriers (and other type
barriers), signs, labels, warning tags, and detectors that activate visual and audible alarms to warn of
hazards.
• Do not climb over or defeat barriers, regardless of machine status.
• Do not ignore signs, labels, warning tags or alarms, regardless of machine status.
Barricade Tape
Specific barricade tape is used at BNL for the purpose of limiting or preventing entry into an area
with a hazard. It must be either the YELLOW Caution or RED Danger tape. It must have the
specific wording shown here:
CAUTION ENTRY REQUIRES PERMISSION
or
DANGER DO NOT ENTER
You must complete BNL training TQ-BARRICADES to be allowed to install barricade tape.
Violating barricade tape may result in disciplinary action.
A tag or sign is required to accompany the tape. The tag or sign must include description of the
hazard, contact name of the group or individual who installed the barrier and installation date.
Tags may be ordered through the BNL Production Services Group.
The tape may be ordered through BNL stock.
If you have questions regarding:
When should this barricade tape be used,
Who is allowed to put up barricade tape,
How to order BNL-acceptable barricade tape or tags,
How to install barricade tape or tags, or
How to acquire permission to enter an area that is barricaded*,
then contact your experiment Work Control Coordinator or Liaison Physicist.
* Summary of entry rules:
- Entry to areas with DANGER DO NOT ENTER is limited to:
Individuals indicated in the work planning process, or
Individuals authorized by a method established by the installing organization, or
Individuals escorted and always in the presence of the person who installed the barrier.
Entrants must be wearing the PPE required for the area and for the hazards.
- For areas with CAUTION ENTRY REQUIRES PERMISSION:
Entrants must meet all entry requirements for the area (e.g.: training, medical clearances …
etc. as required), and
Must obtain permission of the person who installed the barrier.
Entrants must be wearing the PPE required for the area and for the hazards.
Page 33
Collider User Training 33 Nov 2020
Sealed Radiation Sources
If you are using a sealed radioactive source in your work, you are required to complete BNL
training course: Sealed Radioactive Source Control (web-based). You may also need C-A
department-specific training or a briefing.
When not in use, sources should be stored in shielded containers. Many experimental areas have
containers (source boxes) like the one shown above.
If you are using a source in your work, then the following rules apply, even if you obtained the
source from another BNL Department or Division:
- Contact the C-AD Source Custodian if you are a new sealed source user at C-AD or if you are
bringing a source to a C-AD area.
- Contact the C-AD Source Custodian if you plan to procure any new source. Sources are
required to be inventoried.
- Have sources inventoried and leak-checked every six months by the C-AD Health Physics
Office.
- Complete the “Sealed Radioactive Source Data Form” and the “Sealed Radioactive Source
Inventory-Leak Test Form” found in the SBMS Subject Area. Forward a copy of the
completed forms to the C-AD Source Custodian. Keep a copy with the source.
- Notify the BNL Nuclear Materials Management (NMM) Group prior to shipping a source to or
from BNL. Also contact the BNL Environmental Protection Division if shipping off site.
- Contact the C-AD Source Custodian if you are going to remove a source from the C-AD
facility.
If you are responsible for a sealed source, then DOE Orders require than you keep track of it in a
way that can be audited by the Federal government.
Beta, gamma and neutron sources produce radiation levels that may
travel many feet in air. The radiation level drops rapidly as the inverse
square of distance from the source. This is because most sources are
point-like objects. Federal rules define sealed sources as any radioactive
item manufactured for the sole purpose of using the emitted radiation. A
common example of a sealed source is an instrument calibration source.
If you need to use a sealed source and are not sure about the definition or
rules for use, then contact the C-AD Health Physics Office (x4660) or the
C-AD ESSHQ Division in order to make a determination regarding the
rules.
Page 34
Collider User Training 34 Nov 2020
Electrical Safety
As of January 17, 2019, completion of new/updated BNL electrical safety training is required
prior to performing certain electrical tasks.
This Collider User Training alone does not qualify you to work on electrical equipment or
circuits that are physically connected to a power source, or that have stored electric charge
(capacitors) or magnetic fields (inductors). Connection may be through circuit breakers,
disconnect switches and/or fuses.
This Collider User Training does not qualify you to work on or near exposed energized
conductors above 50 V. Additional training, personal protective equipment (PPE) and
authorization are required.
In general, additional training and authorization is required to perform electrical work, including
operating electrical breakers or switches, where there is an electrical hazard: either a shock
hazard or an arc flash hazard.
Certain low hazard electrical work, however, is permitted for STAR Users within certain
limits and if rules are followed. This is discussed in the STAR low-hazard work plan
document, which Users are required to read:
Go to https://www.bnl.gov/training/courses/web/ and click on STAR Low Hazard
Worker-Planned Work for Users (RC-SOCSTAR). You are required to complete RC-
SOCSTAR to perform any work at the STAR experimental area.
The sPHENIX work plan document will be available when sPHENIX is established at the
RHIC experimental area.
Operation of circuit breakers or disconnect switches
During operation of circuit breakers or disconnect switches there is a potential for arc flash.
Additional training and authorization is required, as well as PPE, for operation of such devices;
even for a common 120-Volt circuit breaker.
Use of electric power tools also requires separate additional safety training. The minimum
training is called Advanced Electrical Safety Awareness CBT (TQ-ESA-W) available on line
here https://www.bnl.gov/training/courses/web/.
If you have questions regarding the electrical safety or training requirements for your specific
situation, then stop and consult with your Liaison Physicist or the Work Control Coordinator for
your experiment.
Additional available contacts are:
C-AD ESSHQ Division
C-AD Work Control Manager
C-AD Training Manager
C-AD Chief Electrical Engineer
Page 35
Collider User Training 35 Nov 2020
Flash Hazard
A flash hazard is present when the potential exists for electrical equipment to arc, producing a
shock hazard as well as possible sparks and molten metal spray. For example, this can occur
during operation of a circuit breaker or switch, or in situations where electronic components and
connections are exposed during testing. If a conductive tool is dropped into these areas a flash
event may occur. Care is required in these areas to prevent any inadvertent electrical contact.
The potential for electrocution is well known, but arc flash hazard may not be as well known.
LockOut/TagOut (LOTO)
Personnel performing LOTO must complete BNL training (classroom initially, web-based
annually, and Job Performance Measure (JPM) initially & annually) and also must have C-A
Department-specific authorization. This Collider User Training does not allow you to place or
remove locks or tags. An Authorized employee is trained to recognize hazardous energy sources
and methods and means to isolate and control these energy sources.
LOTO refers to the specific practices and procedures to protect workers from injury due to the
unexpected energization or startup of machinery and equipment, or the release of hazardous
energy during servicing, maintenance, installation, and demolition.
It is recognized by the presence of a red-&-white striped tag and a lock, and it requires that you
obey specific OSHA requirements. In some cases equipment cannot be easily locked with the
typical padlock, and LOTO boots or other commercially available locking devices may be used
to establish LOTO.
Beginning Jan 5, 2015 the LOTO
tag used by BNL staff was
changed to a BNL-produced two
sided red-&-white striped tag —
Stock Number S81043. The older
red tags (below) that were in
place on January 5, 2015 were
allowed to remain until January 5,
2016.
Contractors may use a different
OSHA-compliant tag that is
similar in appearance (striped red
borders). Contractor tags might
be printed on one side only.
Page 36
Collider User Training 36 Nov 2020
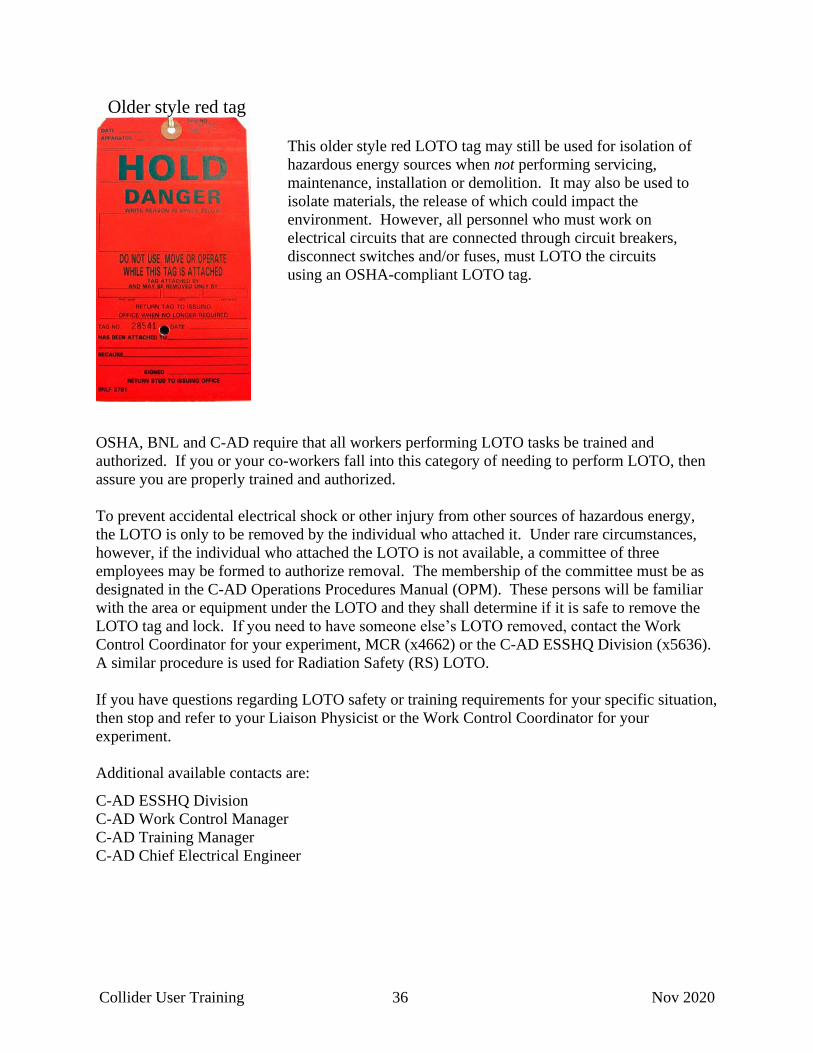
Older style red tag
OSHA, BNL and C-AD require that all workers performing LOTO tasks be trained and
authorized. If you or your co-workers fall into this category of needing to perform LOTO, then
assure you are properly trained and authorized.
To prevent accidental electrical shock or other injury from other sources of hazardous energy,
the LOTO is only to be removed by the individual who attached it. Under rare circumstances,
however, if the individual who attached the LOTO is not available, a committee of three
employees may be formed to authorize removal. The membership of the committee must be as
designated in the C-AD Operations Procedures Manual (OPM). These persons will be familiar
with the area or equipment under the LOTO and they shall determine if it is safe to remove the
LOTO tag and lock. If you need to have someone else’s LOTO removed, contact the Work
Control Coordinator for your experiment, MCR (x4662) or the C-AD ESSHQ Division (x5636).
A similar procedure is used for Radiation Safety (RS) LOTO.
If you have questions regarding LOTO safety or training requirements for your specific situation,
then stop and refer to your Liaison Physicist or the Work Control Coordinator for your
experiment.
Additional available contacts are:
C-AD ESSHQ Division
C-AD Work Control Manager
C-AD Training Manager
C-AD Chief Electrical Engineer
This older style red LOTO tag may still be used for isolation of
hazardous energy sources when not performing servicing,
maintenance, installation or demolition. It may also be used to
isolate materials, the release of which could impact the
environment. However, all personnel who must work on
electrical circuits that are connected through circuit breakers,
disconnect switches and/or fuses, must LOTO the circuits
using an OSHA-compliant LOTO tag.
Page 37
Collider User Training 37 Nov 2020
Radiation Safety LockOut/TagOut
(RS LOTO)
Liaison Physicists, Liaison Engineers, Access Controls Group staff, Operations Coordinators
(OC), members of the Radiation Safety Committee, and certain other personnel perform RS
LOTO. They must follow a specific procedure in order to lock out and tag out equipment or
beam lines for radiation protection. Equipment or beam lines are generally locked out during
barrier modifications or barrier removals, or whenever the PASS system alone does not provide
the required protection. This lockout is required in order to limit beam parameters such as
polarity and intensity, or whenever a beam line is not authorized to operate. DO NOT alter or
otherwise tamper with equipment that bears the RS LOTO tag.
Page 38
Collider User Training 38 Nov 2020
Yellow “DO NOT OPERATE" Tags
Yellow "Do Not Operate" Tags are used to inform and warn personnel that altering the equipment
may cause damage to the equipment or system, or can have adverse programmatic impact. They
may also be used to remind staff of required equipment configuration. For example, the tag on the
right could instruct an operator to open a throttle valve 2 turns during system operation. The
equipment should not be altered without consulting the owner of the tag or the system specialist.
Only personnel listed as authorized operators may operate the equipment, or may authorize others
to temporarily operate the equipment. Note: These tags may never be used for personnel
protection. If personnel protection is involved, then LOTO shall be used.
Ref: C-AD OPM Procedure 2.13, Use of “Do Not Operate” and “Caution“ Tags for Equipment
and Systems
Page 39
Collider User Training 39 Nov 2020
Ground Fault Circuit Interrupter (GFCI) Electrical Outlets
Personnel may notice warning stickers on GFCI electric outlets in bathrooms or kitchen areas, or
elsewhere. These GFCI receptacles are designed to constantly monitor the flow of current
through the protected circuit and sense any loss of current to an outside path. If the current
flowing into the protected device differs by a very small amount from what flows out of the
device, the GFCI instantly interrupts the current flow, protecting the user of the device from a
potentially fatal electric shock.
- GFCIs subject to continuous use are to be tested monthly by the Building Manager or
Designee.
- GFCIs subject to infrequent use are to be tested prior to use by the user.
- Extension cords must be protected by a ground fault circuit interrupter (GFCI). The GFCI can
consist of a special circuit breaker, a GFCI outlet, or an extension cord with a built-in GFCI.
Testing the GFCI is easy. Testing is with the self-test button and a routine load. A portable light
or radio, for example, may be used as a load. Simply press the test button on the front of the
outlet. You should hear a click and the reset button should pop out. The load should go off. Push
the reset button back in and you are ready to use the outlet. If you push the test button and
nothing happens, do not use the outlet and report the problem to the Building Manager or ESH
Representative as soon as possible.
There are also commercially available inexpensive GFCI receptacle testers:
Page 40
Collider User Training 40 Nov 2020
Chipmunks and Radiation Surveys
Radiation monitor – Chipmunk
During a running period, radiation surveys are performed and updated periodically by the Health
Physics Group, and continuous area monitoring is performed by instruments called Chipmunks.
There are approximately 100 chipmunks located throughout the C-AD complex at this time.
Most of these instruments alarm in the Main Control Room, as well as locally, when a pre-set
alarm level is reached. Many also have interlock set-points that will shut down the beam. Set
points are established by the Radiation Safety Committee.
Main Control Room Operators are trained to respond to alarms and interlocks, and investigate
the cause, even if it means interrupting the physics program. Do not move or tamper with
chipmunks.
Chipmunk readings are recorded continuously and maintained in a database for later retrieval
and review if desired. They are stationed at fixed locations in order to monitor high occupancy
areas and other areas of interest. Retrospective exposure rates for an area of interest can be
determined by the C-AD Health Physics Group.
The Chipmunk is set up like a street light with red, yellow and green indicators. A Chipmunk
will display a red blinking light for radiation levels greater than 20 mrem/h, and a yellow
blinking light for levels approximately 2.5 to 20 mrem/hr. Normally, Chipmunks operate in the
green range indicating nominal radiation levels. If you observe a Chipmunk indicating in the
yellow or red range, leave the immediate area, alert your collaborators to leave the immediate
area, and then contact the Main Control Room (x4662) for instructions. Inform them of the
Chipmunk location as best you can; most Chipmunks have an “NM” number listed on an
attached tag. Note: In some cases at C-AD, it may be expected that a Chipmunk will be
indicating in the yellow range. This is not typically expected for areas at RHIC however.
During shutdowns, radiation surveys are done initially, and whenever a job specific Radiological
Work Permit (RWP) is used, or when deemed necessary or appropriate by the C-AD Health
Physics Group. Records of surveys are maintained by the C-AD Health Physics Group. Survey
data is normally attached to the permits and copies are maintained at the job site.
Do not move or tamper
with Chipmunks
Page 41
Collider User Training 41 Nov 2020
Security System Orange Tags
Devices that are part of the security system (PASS) must remain correctly connected and
correctly located. (The term “Security System” here is synonymous with Particle Accelerator
Safety System, PASS). In order to help ensure that personnel do not disconnect or alter these
devices without following approved procedure, the Access Controls Group will identify such
devices with an orange warning tag. In the experimental areas, these tags alert personnel that
the device is critical to safety and to the operation of the PASS system. Do not move these
devices since relocation will compromise their effectiveness. Contact the Main Control Room if
these devices are inhibiting your work.
• Program disruption and/or electrical shock may occur by overlooking an orange warning
tag.
• Tags and signs are often placed only on the front of equipment. Look at the front of
equipment.
Radiation Safety Services
• C-AD Health Physics Office: Telephone x4660
The BNL Radiological Control Division provides the C-A Department with radiation safety
services. They provide dose records, radiation surveys, Radiological Control Technician (RCT)
coverage for high-dose jobs, and review of RWPs for ALARA. They also assist in interpreting
abnormal radiation levels.
During running periods, RCT coverage is provided on all shifts. During shutdown, services are
provided from 8:30 a.m. to 4:30 p.m., Monday through Friday. Assistance is obtained by
contacting the Health Physics Office (x4660), or by contacting the C-A Main Control Room
(MCR) at x4662. The MCR can then contact an RCT by radio.
Special shifts for RCTs may be pre-assigned allowing for specific round-the-clock coverage
when needed during a shutdown. Please make arrangements in advance.
Page 42
Collider User Training 42 Nov 2020
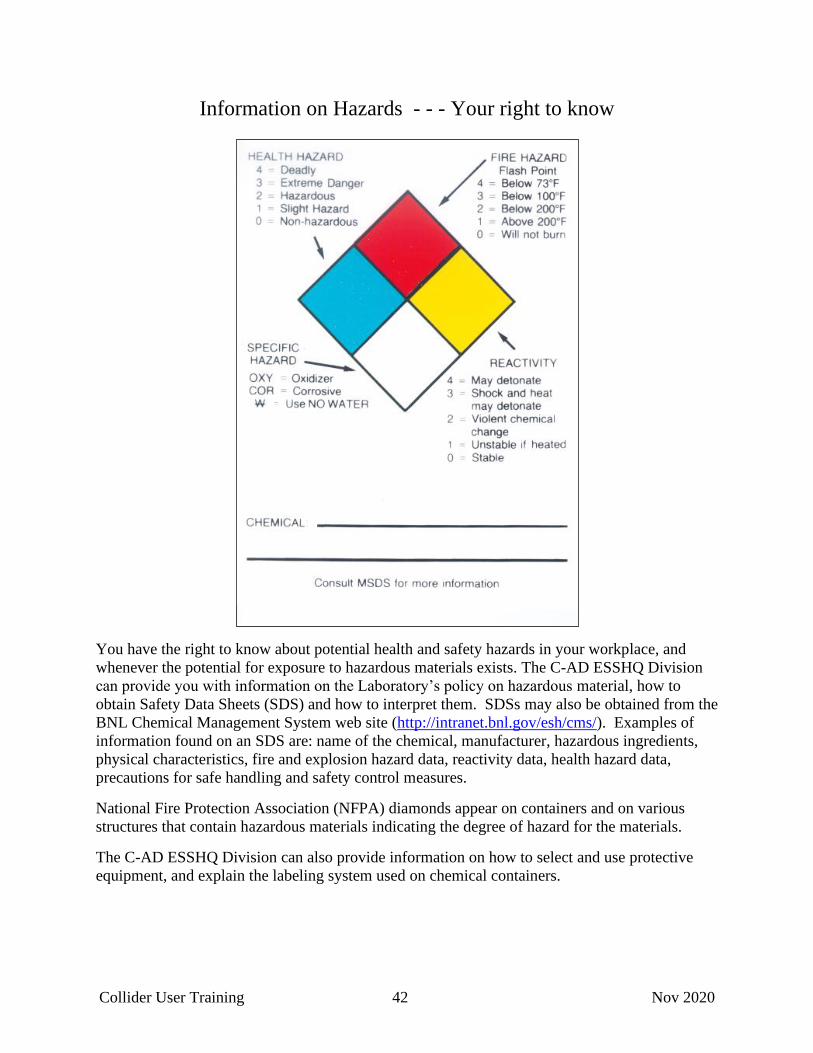
Information on Hazards - - - Your right to know
You have the right to know about potential health and safety hazards in your workplace, and
whenever the potential for exposure to hazardous materials exists. The C-AD ESSHQ Division
can provide you with information on the Laboratory’s policy on hazardous material, how to
obtain Safety Data Sheets (SDS) and how to interpret them. SDSs may also be obtained from the
BNL Chemical Management System web site (http://intranet.bnl.gov/esh/cms/). Examples of
information found on an SDS are: name of the chemical, manufacturer, hazardous ingredients,
physical characteristics, fire and explosion hazard data, reactivity data, health hazard data,
precautions for safe handling and safety control measures.
National Fire Protection Association (NFPA) diamonds appear on containers and on various
structures that contain hazardous materials indicating the degree of hazard for the materials.
The C-AD ESSHQ Division can also provide information on how to select and use protective
equipment, and explain the labeling system used on chemical containers.
Page 43
Collider User Training 43 Nov 2020
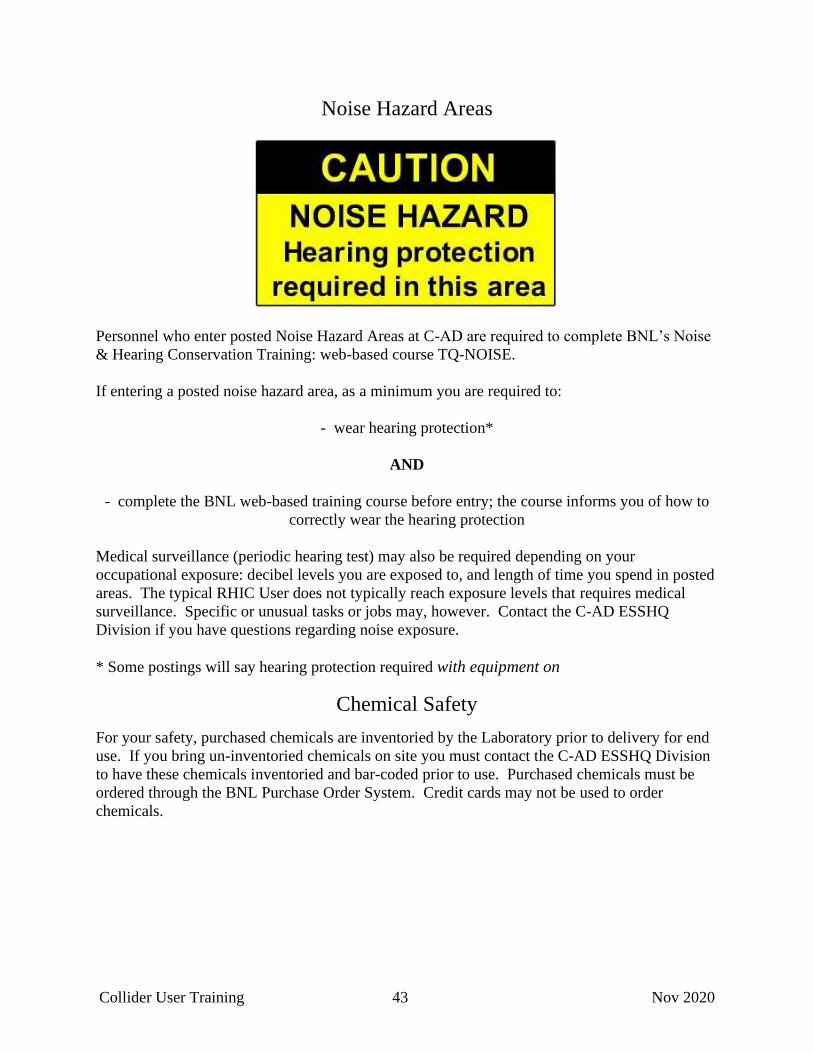
Noise Hazard Areas
Personnel who enter posted Noise Hazard Areas at C-AD are required to complete BNL’s Noise
& Hearing Conservation Training: web-based course TQ-NOISE.
If entering a posted noise hazard area, as a minimum you are required to:
- wear hearing protection*
AND
- complete the BNL web-based training course before entry; the course informs you of how to
correctly wear the hearing protection
Medical surveillance (periodic hearing test) may also be required depending on your
occupational exposure: decibel levels you are exposed to, and length of time you spend in posted
areas. The typical RHIC User does not typically reach exposure levels that requires medical
surveillance. Specific or unusual tasks or jobs may, however. Contact the C-AD ESSHQ
Division if you have questions regarding noise exposure.
* Some postings will say hearing protection required with equipment on
Chemical Safety
For your safety, purchased chemicals are inventoried by the Laboratory prior to delivery for end
use. If you bring un-inventoried chemicals on site you must contact the C-AD ESSHQ Division
to have these chemicals inventoried and bar-coded prior to use. Purchased chemicals must be
ordered through the BNL Purchase Order System. Credit cards may not be used to order
chemicals.
Page 44
Collider User Training 44 Nov 2020
Confined Space Recognition
This Collider User Training does not qualify you to enter a Confined Space. The information
here is for awareness.
General Definition: A confined space is a space that (even if not posted “Confined Space”):
1. Is large enough and so configured that personnel can bodily enter and perform assigned
work,
2. Has limited or restricted means for entry or exit (e.g., tanks, vessels, silos, storage bins,
hoppers, vaults, and pits), and
3. Is not designed for continuous personnel occupancy.
If you are entering a space with these characteristics, even if the area is not posted, and:
• you are not sure of the regulatory or safety requirements for entry, or
• you are not sure of the requirements for working within the space, or
• you are introducing any hazard
then contact the C-AD ESSHQ Division prior to entry.
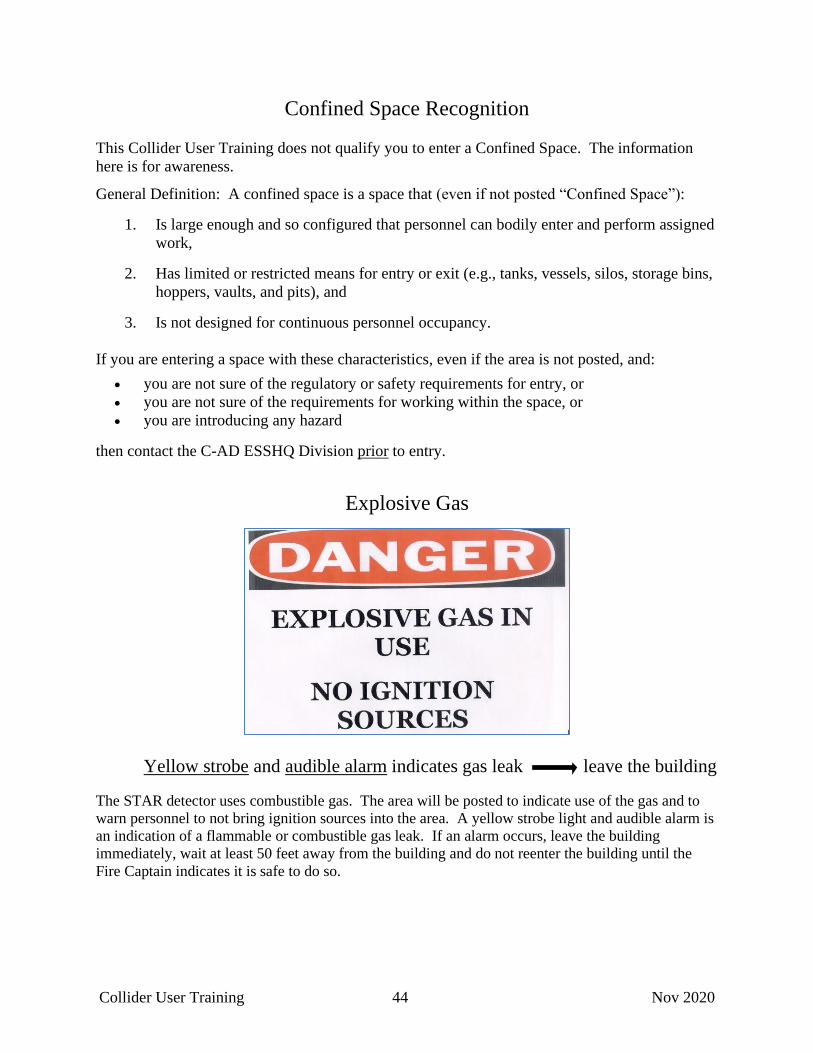
Explosive Gas
Yellow strobe and audible alarm indicates gas leak leave the building
The STAR detector uses combustible gas. The area will be posted to indicate use of the gas and to
warn personnel to not bring ignition sources into the area. A yellow strobe light and audible alarm is
an indication of a flammable or combustible gas leak. If an alarm occurs, leave the building
immediately, wait at least 50 feet away from the building and do not reenter the building until the
Fire Captain indicates it is safe to do so.
Page 45
Collider User Training 45 Nov 2020
Magnetic Field Safety
NOTE: If you will be exposed to magnetic fields 0.5 milli-Tesla (5 Gauss) or greater, medical
clearance is required. Contact the BNL Occupational Medicine Clinic (OMC) in Bldg 490 for
instruction and clearance, or contact the C-AD training office x7007. OMC will ask you questions to
help determine if it is safe for you to enter the magnetic field area.
Where magnetic fields may be present, the area is posted. Some areas remain posted long-term, and
some may be temporarily posted for magnet testing.
Following is an example of a lower level BNL posting for magnetic fields. It indicates greater-than-
or-equal-to 0.5 milli Tesla (5 Gauss).
The next higher level postings could be:
60 mT (600 G)
600 mT (6,000 G)
2,000 mT (20,000 G) … etc
Be aware that postings may be customized, and they may not all have the same appearance. For
example, signs may have different wording, may have a pictogram, or may state the maximum time
allowed in an area. Please read postings carefully.
0.5 mT (5 Gauss) is posted on doors of assembly buildings, experimental areas, the Collider tunnel
and other areas throughout the C-AD complex. Even for this lower level posted area, if you wear a
medical device or have a medical implant, entry is not allowed unless evaluated and approved by the
BNL Clinic. Medical devices & implants include cardiac pacemakers, electronic medicals devices,
ferromagnetic medical devices, and implants affected by magnetic fields. The BNL Clinic and your
personal physician can determine the magnetic field strength that can adversely affect your device or
implant. If in doubt about the requirements or about your specific situation, contacts available to you
include the C-AD ESSHQ Division and the BNL Clinic.
For entry into higher level posted areas additional training is required and work planning must assure
limits set by the BNL Subject Area on Static Magnetic Fields are not exceeded. The subject area has
exposure limits for:
- 8-hour Time-Weighted Average, and
- Ceiling (max)
CAUTION STATIC MAGNETIC FIELD Low Field Density ≥ 0.5mT (5 G)
• Entry by Medical Device Wearers is NOT allowed.
• Magnetic Memory Material May Be Damaged.
Page 46
Collider User Training 46 Nov 2020
Potential hazards include: (depending on field strength)
- Uncontrolled movement of ferromagnetic objects in high magnetic fields that cause injuries
such as pinched fingers or being struck by metallic objects rapidly pulled towards the source
- Interference with the functioning of cardiac pacemakers, insulin pumps and similar devices
- Internal bodily injuries from the movement of ferromagnetic implants and prostheses
Another potential concern:
- Deletion of information on magnetic memory materials, such as credit cards, identification
badges, computer disks and video tapes.
Working around magnets with large gaps
Use extreme caution with iron and steel objects when working around magnets with large gaps
such as spectrometer magnets. The magnetic field can cause these objects to become dangerous
projectiles. Be sure that magnets are not energized or that a magnet safety plan is followed
before free access is allowed to the area. Remember that the field may be effective at a
surprisingly long distance.
Example: East Face of the STAR Magnet.
Posting on fence indicates high magnetic field.
When conducting tours:
When conducting tours with visitors in magnetic fields areas, plan routes to not exceed exposure
limits. Inform tour groups of the restriction that anyone with a cardiac pacemaker, insulin pump
or other medical device or implant, may not enter areas equal to or greater than 0.5 mT (5
Gauss). The C-AD escort form prompts the escort (tour guide) to inform the visitors of this.
Page 47
Collider User Training 47 Nov 2020
Laser Safety
Lasers must be registered with the BNL Laser Safety Officer. This includes higher hazard class
lasers (Classes IIIb and IV) as well as lower hazard class lasers (Classes II and IIIa). Examples
of Class II or IIIa lasers include alignment lasers, and devices incorporating pointing lasers.
Use of higher class lasers, Classes IIIb and IV, requires additional Laboratory training as well as
completion of a Laboratory Standard Operating Procedure (SOP). You must be given
permission by the laser owner before use.
Class II and IIIa lasers require a permit.
Make sure you are aware of the safety requirements established for lasers in your area.
If you have questions regarding lasers, you may contact the C-AD ESSHQ Division.
Lasers located at STAR
Page 48
Collider User Training 48 Nov 2020
Magnet Cooling Water
Magnet cooling water systems may incorporate electrical buses. The water systems operate
under pressure and special training is required to work on them. Depending upon the location in
the C-A complex, some magnet cooling water systems may have a radiation field associated with
them. These are clearly labeled and should not be handled without proper training and
authorization.
STAR Magnet Cooling System
Page 49
Collider User Training 49 Nov 2020
Personal Protective Equipment (PPE) Department safety policy states that each workplace should be created and maintained in a
manner that minimizes safety and health problems. For some jobs or for some areas it may not
be practical to eliminate the hazards completely, and protective clothing and/or protective
equipment may be required for safety. Plan your work in advance. Consider whether PPE may
be needed. Contact the C-AD ESSHQ Division for reviews and approvals whenever PPE is to be
used, or if you have questions on PPE requirements.
Hardhat Policy You are required to wear a hardhat:
- When people are working overhead (on scaffolding for example)
- When overhead cranes are operating above you
- At all times at a construction site
Safe Footwear & Long Pants You must wear footwear that is appropriate for the area and activities in which you are involved.
The footwear should fully enclose the foot and provide stable footing for walking on uneven
surfaces. Safety shoes are required where there is a potential hazard from falling, rolling or
piercing objects or when heavy objects are handled.
Safety shoes are also required for some electrical work activities, such as working on or near
energized conductors. These shoes will have a safety toe that is non-metallic.
Short pants must not be worn in industrial work areas, such as at RHIC. Long pants are required.
It is especially important to remember this during warm weather when we might prefer footwear
and clothing for warm-weather comfort.
Inclement weather
Icy conditions The winters in this part of the U.S. are cold, rainy, snowy and icy. This is a hazard. Be aware of
this especially when walking in such conditions, since there is a significant increased potential
for a slip & fall, and possibly significant injury to yourself.
Working at Heights Work at heights (above 4 ft) is performed in experimental areas using scaffolds, aerial lifts,
ladders or other elevated surfaces. Working at heights must be performed in a safe manner, with
proper work planning, fall protection, training and PPE as applicable. If you are not sure of
the requirements for your work, contact your Work Control Coordinator before starting.
Issue “Stop Work” Order if Dangerous Activity is Observed
Example: If you observe a coworker working at heights in a dangerous manner, for example
standing on a scaffold railing without proper fall protection, what should you do?
Answer: Issue a Stop Work Order
Page 50
Collider User Training 50 Nov 2020
Vehicle Safety
You must have a valid driver’s license to use a motor vehicle, including a government motor
vehicle. Lock government vehicles when not in use. Do not leave government vehicles running
unattended, including Kubotas during warm-up.
Vertical Fixed Ladders
Note: This is not applicable to stairs or ship’s stairs (also known as ship’s ladders) including the
alternating-step type of ship’s stairs.
If you climb any ladder (vertical fixed; or portable over 4 ft) at C-AD, you must complete web-
based training course TQ-LADDER. Go to https://www.bnl.gov/training/courses/web/ and click
on Ladder Safety (TQ-LADDER).
BNL has issued SBMS Subject Area “Fixed Ladders, Design, Inspection, and Use” (April 9,
2019 Rev 1.4 as of this writing) to assure vertical fixed ladders are inspected for compliance with
industry standards, and to assure work controls are in place for safe use. To comply with BNL
requirements, existing vertical fixed ladders at C-AD have been inspected to determine if they
meet industry standards. These type inspections can only be done by trained engineers and
safety staff. The training for this is given by the BNL Central ESH Division.
Inspected ladders are indicated by a color marked (e.g. painted) on the side rail, visible at the
point of use. Ladders are classified by the following:
Green
Ladder was inspected and found in compliance with standards. The ladder may be used by
physically fit and trained personnel.
Yellow
Ladder was inspected and some non-compliances with standards were noted. However, with the
use of additional provisions, the ladder can be used safely by physically fit and trained personnel.
These ladders are posted with a caution tag listing the problems found during the inspection, and
are marked (e.g. painted) yellow at the top and bottom entry points. The information on the
posting helps the user understand the nature of the non-compliances for that particular ladder.
The ladder cannot be used if the caution posting is not attached.
Red
Ladder was inspected and one or more non-compliances with standards were noted and the
ladder has been taken out of service. An “Out of Service” Warning posting is attached to the
ladder and it is red-marked. Do not use the ladder until the ladder has been corrected, re-
inspected and approved for use; or in some cases a red-marked ladder may be used with proper
work planning and any required fall protection.
Page 51
Collider User Training 51 Nov 2020
If there is no indication that an inspection was performed, then you may not use the ladder.
Contact the Work Control Coordinator for your experiment to have the ladder inspected.
Requirements for use of Vertical Fixed Ladders at C-AD:
- Complete BNL’s Ladder Safety web-based training TQ-LADDER
- Be physically fit to climb. (Requires clearance by the BNL Occupational Medicine Clinic).
- Before use of a yellow-marked ladder, review the yellow caution posting to assess and
identify the non-complaint issues with that specific ladder.
Supervisors: For your employees: Assure that “90 degree Vertical Fixed Ladders > 4 ft high” is
marked on the Job Assessment Form (JAF) of staff who might climb a vertical fixed ladder, and
that the Clinic has not indicated any restrictions for climbing ladders or for working at heights.
Remember:
- Use 3 points of contact when ascending or descending the ladder
- Don’t carry heavy or bulky tools or materials up a ladder
- Make sure you feel physically fit to use the ladder that day and that your ladder training is
current
- On a vertical ladder in particular, there is always a force (your weight) that will cause you to
fall off the ladder if you lose your grip or footing
- For yellow-marked ladders, review the caution posting before you use the ladder
If any unexpected or unidentified issues are discovered while using the ladder, notify your
experiment Work Control Coordinator promptly.
Fragile Equipment
Many experiments at the C-AD complex employ devices and equipment that are fragile such as
vacuum windows, scintillation detectors, prototype detectors, electronic cards, connectors and
cables. All of these devices require proper training and authorization prior to performing work on
them.
Collider experiments have beryllium beam pipes installed. This material is fragile, and toxic.
Protection is provided to prevent physical damage.
Care is always required in experimental areas to prevent damage to fragile components of the
experiment.
Page 52
Collider User Training 52 Nov 2020
Work Planning & Hazard Screening at C-AD
and the
Green Work Permit
All work at the Collider-Accelerator Department must be screened by a qualified Work Control
Coordinator (WCC) for each of the following attributes:
ESSH (environment, safety, security and health),
Work Complexity, and
Work Coordination.
All work must be done by trained/qualified personnel and with appropriate work permits and
authorizations.
The qualified Work Control Coordinator (WCC) determines the method by which the work is to
be planned:
(1) worker planned,
(2) prescribed, or
(3) permit planned.
Page 53
Collider User Training 53 Nov 2020
(1) The "worker planned work" concept recognizes the skill levels and technical capabilities of
the workers. Worker planned job activities do not require the level of rigor detailed in permit
planned work. Worker planned work can only be performed when there are adequate barriers in
place to reduce the hazards to acceptable levels in the areas of ESSH, work complexity, and
work coordination as determined by the Screening Tool for Worker Planned Work.
(2) The “prescribed work” practice relies on instructional work documents (e.g., written and
approved internal procedures, contractor health and safety plan, contractor procedure, or vendor
or manufacturer operating or maintenance manuals).
(3) The “permit planned work” practice requires use of a BNL Work Permit Form (green form)
when the ESSH, work complexity, or coordination do not have sufficient barriers to reduce the
hazards to acceptable levels and the work is not covered by prescribed work documents.
Additional details and specific requirements for work planning at C-AD are found in C-AD
Operations Procedures Manual (OPM) Procedure 2.28, C-A Procedure for Work Planning and
Control for Operations. Your Work Control Coordinator will help assure work is planned in
accordance with the intent of C-AD procedures.
STAR and sPHENIX Users: You are required to read a low-hazard work plan document written
for your experiment. For STAR, the document is available on line for you to read: Go to
https://www.bnl.gov/training/courses/web/ and click “STAR Low Hazard Worker-Planned Work
for Users (RC-SOCSTAR)”. You are required to complete this read of the work plan document
prior to performing any work at the experimental area. The work plan document describes the
type of low hazard work and associated hazards that Users may perform at an experiment. Other
additional training may be required depending on your work activities. It is the Experiment
Spokesperson’s responsibility to ensure that all work is planned in accordance with the intent of
the C-AD work planning policy.
Further information about the work plan document may be obtained from your Experiment
Spokesperson or from the Collider-Accelerator Department (C-AD) Liaison Physicist for your
experiment.
The low-hazard work plan document for sPHENIX will be available when sPHENIX is
established at the RHIC experimental area.
Removing Damaged Equipment From Service
If any equipment presents an immediate hazard that could reasonably be expected to cause injury
or environmental harm, then remove it from service (e.g., broken ladders, frayed slings, defective
power cords, leaking tanks). If you have questions on how to remove an item from service,
contact the C-AD ESSHQ Division or your experiment’s Work Control Coordinator for
assistance.
Page 54
Collider User Training 54 Nov 2020
Accountability for Following the Rules
You are responsible for following C-AD rules and procedures for which you have been trained.
If you cannot follow the rules and procedures in order to perform your work, you must seek to
have the rule or procedure officially changed to suit what is needed prior to performing the work.
Rules and procedures shall be followed even if staffing levels are low. Do not violate safety
requirements to get the job done.
This policy applies to C-AD staff as well as Users and will be enforced everywhere.
Page 55
Collider User Training 55 Nov 2020
Waste Disposal
CAUTION:
Improper disposal of radioactive or hazardous waste may result in fines, criminal prosecution,
and facility shutdown. Contact the C-AD Environmental Coordinator (x8802) for information
on any waste. The C-AD Environmental Coordinator is familiar with rules, permits,
authorizations and analysis requirements necessary for proper disposal.
Contact the Environmental Compliance Representative (ECR - x2905) prior to establishing any
new airborne, liquid or solid radioactive or hazardous waste stream.
Removing waste from the Laboratory is complex and costly. Your cooperation is necessary in
order to control waste according to Federal, State, and Suffolk County regulations. Additionally,
the regulations of the States receiving waste from C-AD must also be followed.
Information on proper disposal of waste is contained in BNL's Standards Based Management
System and in C-AD’s Operations Procedures Manual, Chapter 8.
All chemical containers must be marked as to contents, even water containers. All bags or
packages of waste must be marked indicating the contents and where the waste came from.
Each person is responsible to ensure that they handle, accumulate or dispose of waste using
proper controls and documentation. Waste generators at C-AD must be trained. Generators
must know whether or not the waste they are generating is radioactive waste and/or hazardous
waste. If unsure, then the waste must be checked by personnel qualified to perform such checks.
Generators of hazardous or radioactive waste at C-AD should minimize the amount of waste they
generate by substituting re-usable materials where possible, using minimum quantities of
materials, and segregating different wastes to allow for reclamation.
Page 56
Collider User Training 56 Nov 2020
Storage of hazardous waste is subject to time limits and volume limits that must be strictly
adhered to. Generally, accumulation of more than 55 gallons at a satellite accumulation area is
not allowed. Once the waste is moved to the C-AD Hazardous Waste Trailer, a 90-day clock
starts. The waste must leave the C-AD complex within this 90-day period. Containers must be
appropriate for the type of waste being collected and be dated and labeled. Your cooperation in
this area is important in order to maintain C-AD’s good reputation in the surrounding
community.
Mixed Waste: Activated lead is an example of mixed waste. It is both hazardous and
radioactive. Do not put mixed waste in radioactive waste cans.
Clean metals: Do not throw clean metals into waste cans used for ordinary clean waste. Non-
radioactive metals should be re-cycled. Metals in our clean waste stream are a problem since the
Brookhaven Town Landfill will refuse BNL’s clean waste if they find metal in it.
Question: You need to throw out empty cans of a liquid chemical that you used to clean
equipment. You realize the liquid itself required special handling, but the containers are now
empty and dry. What do you do?
Answer: Initially treat the container as hazardous waste and contact the C-AD Environmental
Coordinator (x8802) to determine how to properly dispose of the waste.
Some general rules:
• Do not place clean materials in radioactive waste bins
• Do not place radioactive materials in the green 3-yard bins used for clean waste
• Substitute reusable materials where possible in order to reduce waste
• Use minimum quantities of materials
• Segregate wastes
• Do not leave unnecessary items in primary areas since they may become radioactive
waste
• Do not throw clean metals into waste cans used for ordinary clean waste
Page 57
Collider User Training 57 Nov 2020
Spills
The C-A Department is required to report spills: internally within BNL, or to external/outside
agencies, or both. C-AD & BNL must report to external/outside agencies on spills that impact
the environment. Reporting must be made within certain time constraints therefore it is
important that you notify appropriate people of a spill promptly. Even minor events, such as
spilling any amount of oil in an outdoor area, require reporting. The rules are such that we must
consider reporting spills of any type or size. For any spill, notify your Experimental
Spokesperson, Liaison Physicist or your Work Control Coordinator.
If you spill any hazardous or industrial material outdoors on the ground, or anywhere inside and
the spill is beyond your control, call x2222 or 911 to report the spill. Then call the C-AD Main
Control Room (x4662), the C-AD ESSHQ Division Head (x5636) or the C-AD Environmental
Coordinator (x8802) as soon as possible. Do not leave a message on an answering machine as
notification.
When reporting a spill, give your name and information on the spill location, type of material
and approximate amount as best you can.
For further information on spills, see BNL's SBMS Subject Area Spill Response.
Compressed Gas Safety
Note: If you will be working with compressed gas cylinders, you must complete BNL web-
based course Compressed Gas Safety (TQ-COMPGAS1). The short discussion in this training
manual does not replace the requirement to complete TQ-COMPGAS1.
All compressed gases are hazardous due to high pressure. Because of the different hazards
associated with different gases, it's important that cylinders be properly labeled. When a
cylinder is delivered to the BNL gas warehouse, an experimental area or a job site, it should
have:
• content identification,
• DOT label, and
• a valve protection cap.
UNDER NO CIRCUMSTANCE should the means of identification be removed from a cylinder.
The valve protection cap should remain in place until the user has secured the cylinder to a fixed
support at the point of use and is ready to attach a pressure regulator to withdraw the contents.
Personnel at the BNL gas warehouse will attach a Cylinder Status Tag on the cylinder when it is
received. The gas cylinder user will tear off the bottom of the Cylinder Status Tag and write the
name of the assigned user on the tag indicating that the cylinder is in use.
Regulators: The regulator must be compatible with the gas used and no Teflon tape may be used
to connect the cylinder to the regulator/supply piping. Never use an adaptor to allow a cylinder
valve to match up with another component (e.g. regulator).
Page 58
Collider User Training 58 Nov 2020
Some general rules for cylinder handling:
• Do not drop cylinders or permit them to violently strike each other.
• Do not roll cylinders in a horizontal position.
• Do not drag cylinders.
• Do not handle cylinders with oily hands or oily gloves. This is especially important
when handling oxygen and other oxidizers.
• If hoisting is necessary, use a suitable cradle or platform.
• Do not lift a cylinder by its cap.
• Do not attempt to pry off caps that are stuck. You may use a strap wrench as
designed, but no cheater bar.
• Keep cylinder caps on the cylinder whenever they are not in use.
• Transport cylinders using a cart or hand truck designed for that purpose.
• Cylinders may not be re-filled if past the hydrostatic test date (typically 5-year retest).
Compressed gas cylinder safe storage:
• Storage areas should be dry, cool, and well ventilated, and where practical, fire
resistant.
• Gases of different types are to be grouped by type and non-compatible types
should be separated. Flammable gases shall not be stored within 20 ft of
oxidizing gases, unless a proper fire wall is installed.
• Cylinder storage areas are to be prominently posted with the types of gases
stored.
• Charged and empty cylinders should be stored separately.
• Cylinders should be arranged so that old stock can be removed first with a
minimum handling of other cylinders.
• Cylinders should not be stored at temperatures above 125 0F, (510 C) or near
sources of heat.
• Cylinders should not be stored near highly flammable or combustible materials.
• When cylinders are being moved on a cylinder cart, they must be secured to the cart.
• Cylinders are not to be stored on carts unless specifically designed for storage. They
may not be on a cart without the cylinder valve protective cap in place unless
attended; or unless approved safeguards are in place.
Page 59
Collider User Training 59 Nov 2020
Fire or Other Emergency
From an on-site BNL phone: 2222 or 911
From a cell phone: (631) 344-2222
Fire Alarm Box
In any emergency, you may (and are encouraged to) pull/activate a fire alarm, even if there is no
fire. Also call 2222 or 911* and inform the Fire/Rescue Group of the emergency. Fire alarm
boxes are located throughout the complex; at the experimental halls, and in the Collider tunnel.
This is the best way to simultaneously alert the C-AD Main Control Room (MCR) and the BNL
Fire/Rescue Group. Pulling/activating a fire alarm and telephoning 2222 or 911* brings the
Fire/Rescue Group to your specific alarm box location within a few minutes, and appropriate
additional personnel can be summoned quickly.
Medical Emergency: If there is a medical emergency involving an injury or illness for
which immediate medical attention is wanted, then pull/activate a fire alarm (if an alarm box is
in the area) and call 2222 or 911*. Inform the Fire/Rescue Group it is an injury or illness (as
opposed to a fire) so that the ambulance & Emergency Medical Technician (EMT) are
dispatched to the scene.
Unless an injury is very minor: Never transport the injured person to the BNL Occupational
Medicine Clinic yourself. The Clinic is not intended for emergency care. Wait for the
Fire/Rescue Group to arrive with the ambulance and Emergency Medical Technician. If you
transport the person yourself to the Clinic, time may be wasted in having the ambulance track
you down. In addition, you may be stuck with an injured person who passes out or stops
breathing, etc., on the way to the Clinic, or you could be nervous and have an accident on the
way to the Clinic.
BNL on-site Fire/Rescue Group:
Page 60
Collider User Training 60 Nov 2020
Medical non-Emergency: If you are injured but do not require emergency attention,
then report as soon as possible to the BNL Occupational Medicine Clinic, which is located in
Building 490. Your supervisor or Liaison Physicist should accompany you. If your supervisor
or Liaison Physicist are not available, you should call upon another member of supervision or
management in your Department, Division or experimental area to go with you. In most
circumstances, it is expected that you report to the Clinic immediately after the injury. If this is
not possible, you are required to notify the Clinic immediately, and then report to the Clinic with
your supervisor or alternate member of management before the end of the work shift in which
the injury occurred or at the start of your next work-shift. If employees fail to notify and report to
the Clinic as required, any resulting missed work may be considered unauthorized leave and will
be ineligible for sick leave.
Fire Alarm: If you hear a Fire Alarm Bell, evacuate the area after placing your equipment in
a safe condition and go to the Outdoor Assembly Area. Indoor and Outdoor Assembly Areas are
posted at building entrances. A fire alarm bell has a metal clanging sound.
In the Collider (RHIC) tunnel, vertical and horizontal emergency exits alternate and are located
throughout the tunnel. Exits from the experimental intersection regions lead to the assembly
halls and you may then exit the assembly halls to the outdoor area and road.
Once outside a smoky area, report to the Local Emergency Coordinator (LEC) or the Department
Emergency Coordinator (DEC) if they are present. They will be wearing hats (like baseball
caps) marked DEC or LEC. Do not chat with the Fire Captain or other emergency response
personnel in the area. Obey the directions of the Fire Captain, DEC or LEC.
The accelerator and Collider tunnels are restricted spaces. If fire should break out, then smoke
could quickly impair visibility, and asphyxiation from contained gases can occur.
Fire Safety: The fire safety program at BNL emphasizes prevention and mitigation through
the design of buildings, automatic fire protection systems, building inspections, use of cutting
and welding permits & controls, fire safety training, and an on-site Fire/Rescue Group.
If you suspect a fire: If you suspect a fire, pull/activate a fire alarm and call 2222 or 911*,
Fire/Rescue Group. Alert everyone in the area and evacuate as required. If you think you can
combat the fire without putting yourself in danger, a fire extinguisher may be effective. Never
let the fire get between you and your escape route. Use a fire extinguisher only if you are
trained and it can be done safely. Only use a fire extinguisher if you’re confident in your ability
to put out the fire safely. Determine what is burning and select the appropriate fire extinguisher.
Fire extinguishers are classified according to their ability to handle specific types and size fires.
If you have any doubts, let firefighters handle the situation.
* IMPORTANT: From an on-site BNL phone, 911 is the same as 2222. From a cell phone, use
(631) 344-2222. If you use 911 from a cell phone you will get the off-site county police as
opposed to the on-site BNL Fire/Rescue Group directly. This might result in some delay getting
you the help you need for your situation here on site.
Page 61
Collider User Training 61 Nov 2020
BNL Site-Wide Sirens
- If you hear a continuous site-wide siren for five minutes, go to the Indoor Assembly Area.
Indoor and Outdoor Assembly Areas are posted at building entrances.
- If you hear a pulsating site-wide siren, then evacuate the BNL site.
The site evacuation plan covers C-AD as well as other facilities on-site.
C-AD Main Control Room (MCR) personnel will remain on station if they have emergency
duties, but will evacuate during imminent danger situations
Siren testing: The site-wide sirens are tested each Monday at noon. You will hear the sirens
being tested.
Inside the RHIC tunnel:
The BNL site-wide sirens may not be heard within the RHIC tunnel.
If the site-wide continuous siren is activated:
This indicates personnel should report to an Indoor Assembly Area. Individuals within the tunnel
are likely safe. However, C-AD Management would evaluate the situation and make a decision
on whether or not to evacuate individuals who may be within the tunnel, and would decide on
how best to do this at that time.
If the site-wide pulsating siren is activated:
This indicates a site-wide evacuation. To alert staff who may be in the RHIC tunnel, or at the
STAR or sPHENIX intersection regions, C-AD procedure instructs MCR and Collider
Accelerator Support (CAS) personnel to make an announcement over the Public Address system.
(Ref: C-AD OPM Procedure 3.22)
Page 62
Collider User Training 62 Nov 2020
Electrical Power Failure - Be Prepared
In the event of an electrical power failure, the accelerator tunnels and experimental areas could
become pitch black if emergency back-up power also fails to turn on. It is strongly
recommended that you bring a flashlight with you if you enter any of these areas.
Make a Mental Note
In your work area, make a mental note of the following:
• Exits
• Fire Alarm Pull Boxes
• Crash buttons
• Crash cords
• Postings
• Emergency exhaust, if any
• Telephones
Page 63
Collider User Training 63 Nov 2020
Oxygen Deficiency Hazards
All RHIC Users are required to complete BNL’s on line Oxygen Deficiency Hazard (ODH)
Training, available here https://www.bnl.gov/training/courses/web/ as course number TQ-ODH. The
RHIC tunnel during operating periods and other areas at RHIC are posted as ODH Class 0 Areas.
This Collider User Training alone does not qualify you to enter such areas.
It is possible that the ODH classification for the RHIC tunnel may be increased to Class “1”.
This could be the case if certain safety systems are not operable such as oxygen monitors,
ventilation fans or pressure switches that would detect a helium leak into the cryostat vacuum
space. This is unlikely but possible. If increased to Class 1, then postings at the entrances to the
tunnel would be changed accordingly to Class 1. Entering a Class 1 area requires additional
training, medical clearance, and a breathing-air escape pack and personal oxygen monitor. Pay
attention to postings.
In an ODH event, it is important to remember that you are not to enter or re-enter an oxygen
deficient or alarming area in an attempt to rescue others. Let the Fire/Rescue Group handle it.
ODH deaths usually come in pairs. More than 50% of ODH deaths are of people entering or re-
entering an area trying to save another person. One or two breaths could cause loss of
consciousness under certain conditions, and lung damage is possible if the gas cloud temperature
is -50 to -70 ºC. You may not enter or re-enter even if you have a breathing-air escape pack and
are qualified and medically cleared to use it. The escape pack is for escape only.
What causes oxygen deficiency?
Cryogenic systems at RHIC use large amounts of helium and nitrogen. Both liquids expand
about 700-800 times when released into air. This could happen quickly, such as with a major
release as a result of catastrophic failure. In a major release, one might see a rapidly expanding
white cloud and hear a "whooshing " sound. However, the leak could also be slow, invisible and
silent. Both helium and nitrogen are colorless and odorless. Other causes of oxygen deficiency
are use of compressed gasses, chemical reactions, fire/combustion, welding, and use of fire
suppressants. All of these in a confined space or area of low ventilation are significant concerns.
Page 64
Collider User Training 64 Nov 2020
Effects of Oxygen Deficiency
The following table summarizes the physical health effects of oxygen deficiency. These are
general guidelines. Different people may feel effects at different oxygen levels. Early symptoms
of exposure to an oxygen level of 16% or 17% for example are increased breathing volume,
accelerated heartbeat, dizziness and increased time to perform tasks.
EFFECT THRESHOLDS FOR
EXPOSURE TO
REDUCED OXYGEN
(Normal Individuals at Rest at Sea Level)
Volume Oxygen % Oxygen Effect
17 Night vision reduced
Increased breathing volume
Accelerated heartbeat
16 Dizziness
Increased time (doubled) for novel tasks
15 Impaired attention
Impaired judgment
Impaired coordination
Intermittent breathing
Rapid fatigue
Loss of muscle control
12 Very faulty judgment
Very poor muscular coordination
Loss of consciousness
Permanent brain damage
10 Inability to move
Nausea
Vomiting
6 Spasmodic breathing
Convulsive movements
Death in 5 - 8 minutes
Effects may occur rapidly. Effects can become permanent if exposure is not terminated quickly.
The major effects hindering escape are disorientation and unconsciousness. With prolonged
oxygen deprivation, permanent central nervous system damage or death will result.
Page 65
Collider User Training 65 Nov 2020
The RHIC tunnel is Class 0 (unless posted otherwise). Some but not all Users access the tunnel.
The Intersection Regions at STAR and sPHENIX are not typically posted for ODH (neither
Class 0 nor Class 1).
In addition to the RHIC tunnel, the following are a few other areas at the RHIC complex posted
ODH Class 0. They are mentioned here although Users typically do not need to enter these
buildings.
• Building 1005E (west end, Helium Reliquifier section)
• Compressor Building 1005H
• Service and support buildings with helium valve boxes: 1002B, 1004B, 1006B,
1008B, 1010A, 1012A
• CeC support building 1002A
• Bldg 1010A mezzanine
The RHIC Refrigerator Building 1005R is posted a Class 1 area at the RHIC complex during
operating months. It is mentioned here although Users typically do not need to enter this
building. Additional training, medical approval, and use of a breathing air escape pack and
personal oxygen monitor are required for entry into a Class 1 ODH area.
When is evacuation of an area required?
Any one or combination of the following requires an immediate evacuation of an ODH area:
• The in-place oxygen monitors activate an alarm. At the RHIC complex, the alarm is a
BLUE strobe light accompanied by an audible alarm.
• A vapor cloud is observed inside the ODH area or a loud "whooshing" sound is heard
(even if no alarm is seen or heard).
You should also evacuate if you feel early symptoms of exposure to low oxygen (16% or 17% for
example):
- increased breathing volume
- accelerated heartbeat
- dizziness
- increased time to perform tasks
Page 66
Collider User Training 66 Nov 2020
The evacuation procedure is as follows:
• Immediately leave the area, moving away from any vapor cloud, loud “wooshing”
sound or other potential problem. The release could be a lethal freezing hazard to
your lungs if you are close to the release point, as well as an oxygen deficiency
hazard.
• Stay Low. Do not use vertical escape exits, such as the vertical ladders at RHIC. Use
only ‘horizontal’ exits.
• If someone is in danger, hurt or feeling ill, call 2222 or 911 (from a cell phone: (631)
344-2222) . Otherwise, call the C-AD Main Control Room (x4662) and inform them
of the incident.
• Notify your supervisor and the C-AD ESSHQ Division.
Cryogenic gases may be lighter or heavier than air. This is important in knowing where the
released cryogen will accumulate and therefore in deciding on your best escape path. Both
helium and nitrogen are used at RHIC.
Regarding helium: Helium is lighter than air so it will rise and accumulate (displacing air &
oxygen) at higher elevations, and continue accumulating downward as the helium release
continues. This is why we instruct not to use the vertical exits (the vertical escape ladders) at
RHIC to evacuate in an ODH event.
Regarding nitrogen: The evacuation instruction is generally the same as above: Stay Low;
Do not use vertical escape exits; Use ‘horizontal’ exits. Nitrogen, however, can be slightly
heavier than air when ‘cold’ (when first released) and may accumulate in low lying areas at first,
such as in trenches or pits. Therefore, for nitrogen, evacuate low lying areas immediately. As it
‘warms’ soon after the release, it will rise.
During RHIC run months, which is when most Users are here, helium is generally the hazard.
During summer shutdowns we routinely circulate N2. However, the temperature of the N2
would not be low enough to expand to cause an ODH event during that process. This N2 process
is not going on during the RHIC run periods. If we were to use N2 or other cryogen in some
other way that could cause an ODH concern, procedures would require that areas be posted and
clearly marked for ODH. We may also require that a Personal Oxygen Monitor (POM) be worn
by individuals entering a specific posted area.
Page 67
Collider User Training 67 Nov 2020
RHIC Tunnel change from ODH-1 back to ODH-0
The Collider-Accelerator Department recently completed a major modification that allowed the
RHIC tunnel to go back to an ODH-0 Area posting. It had been Class 1 for several years.
Newly installed pressure switches on the RHIC magnet cryostats throughout the tunnel will
detect a magnet cooling line failure and helium leak much sooner than the in-place oxygen
monitors installed in the tunnel. The new system works by detecting pressure within the vacuum
space of the magnet cryostat if there is a helium leak, which is early indication of a helium leak.
This will activate ODH alarms and start ventilation systems sooner than the oxygen monitors
installed in the tunnel. The new system will also automatically close cryogen isolation valves,
thereby minimizing the inventory of Helium available to leak into the tunnel. The original in-
place oxygen monitors installed in the tunnel are also still maintained operable.
Typical Pressure Switch
Typical Cryostat relief.
Opens at ~ 1.2 atm.
Page 68
Collider User Training 68 Nov 2020
Summary of C-AD Alarm Signals
Orange Strobe and Audible Alarm: Beam is Imminent Pull crash cord and exit through a Primary Area
access gate. Contact MCR.
Blue Strobe and Audible Alarm: Oxygen Deficiency Event Exit the area through horizontal exit at RHIC, stay low.
Move away from any vapor cloud or "wooshing" noise.
Yellow Strobe and Audible Alarm (two-tone horn): Combustible/explosive
Exit the area, report to outdoor assembly area. or Flammable Gas Leak
For example, the STAR detector uses a flammable/explosive gas
mixture.
Fire Alarm Bell (the typical metal clanging bell sound): Fire
Exit the area, report to outdoor assembly area
DO NOT RE-ENTER buildings/areas. Wait for further instructions from the Fire Captain, Local
Emergency Coordinator (LEC), Department Emergency Coordinator (DEC) or the C-AD ESH
Representative.
Indoor and Outdoor Assembly Areas are posted at building entrances.
Page 69
Collider User Training 69 Nov 2020
Laboratory Computers
Any User who has access to the BNL Network and its computing resources must complete a
BNL Course titled "Cyber Security". Essentially all Users will be required to complete this
training.
Page 70
Collider User Training 70 Nov 2020
Safety Attitude
Several years ago in New Jersey an Exxon worker did not turn off an ignition source, which was
the truck he drove to a gas storage site, he did not wear his protective clothing to perform the job,
and he did not follow a procedure that minimized gas leakage when he opened valves. These
individual failures added up to a tragedy. A film describing this incident is available for viewing
(~1 hour long) from the BNL Safety and Health Services Division. See the C-AD Training
Coordinator if you want to view this film. Likewise, simple failures have added up to major
disruptions at BNL, such as not installing groundwater monitoring wells south of an on-site
research reactor, or not installing an interlock on the C-line diffuser at AGS. The risk of losing
500 jobs due to a forced shutdown is very real at BNL since our work is radiological in nature.
We do not have to ignite a few million gallons of gasoline in order to have upheaval and
misfortune.
Many “errors” in series must usually occur to cause an accident. For a single accident there may
be many causes and sub-causes, and certain combinations of these give rise to accidents. From a
simple viewpoint, the causes can be grouped into the following two categories:
a) Behavioral - This category includes factors pertaining to the worker, such as improper attitude
like the Exxon worker, or lack of knowledge, lack of skills and inadequate physical and mental
condition. In the case of the Exxon worker, his attitude was based on years of experience in
which nothing ever went wrong for him whenever he took a short cut.
b) Environmental - This category includes improper protection from hazardous work elements
and degradation of equipment through use and unsafe procedures and inadequate maintenance.
Major accidents are rarely, if ever, the result of a single cause or act. You can view an accident
as toppling dominoes. The accident will occur if the sequence of events lets all the dominoes
topple to the last. If one or more of the dominoes is removed, then the last domino toppling,
which is the accident, probably won’t occur.
After an accident, most people tend to look for "things" to blame, because it's easier than looking
for "root causes," such as those listed below. Consider the underlying accident causes described
below. Have you been guilty of any of these attitudes or behaviors? If so, you may not have
been injured, but next time you may not be so lucky.
• Taking Shortcuts: Every day we make decisions we hope will make the job faster and
more efficient. But do these time savers ever risk your own safety, or that of coworkers?
• Being Over Confident: Confidence is a good thing. Overconfidence is too much of a
good thing. "It'll never happen to me" is an attitude that can lead to improper use of
procedures, tools, or methods in your work.
• Starting a Task with Incomplete Instructions: To do the job safely and correctly the
first time you need complete information. Have you ever been sent to do a job, having
been given only a part of the job's instructions? Don't be shy about asking for
explanations about work procedures and safety precautions. It isn't dumb to ask
questions; it's dumb not to.
Page 71
Collider User Training 71 Nov 2020
• Poor Housekeeping: When managers, supervisors or safety professionals walk through
your work site, housekeeping is almost always an accurate indicator of your attitude
about safety. Poor housekeeping creates hazards of all types.
• Ignoring Safety Procedures: Purposely failing to observe safety procedures can
endanger you and your coworkers and cost you your job.
• Mental Distractions from Work: Having a bad day at home and worrying about it at
work is a hazardous combination, and visa versa. Dropping your 'mental' guard can pull
your focus away from performing any task safely including changing the gas bottle on
your barbecue. You can also be distracted when you're busy at work and a friend comes
by to talk while you are trying to do a hazardous job. Don't become a statistic because
you took your eyes off the job at hand "just for a minute."
• Failure to Pre-Plan the Work: Job Hazard Analysis and Enhanced Work Permits are an
effective way to figure out the smartest ways to work safely and effectively. Being hasty
in starting a task or not thinking through the process can put you in harm’s way. Instead,
Plan Your Work and then Work Your Plan.
Alcohol/substance Abuse:
Employees or Guests of the Laboratory who abuse alcohol and/or controlled substances pose
unacceptable risks to the safe and efficient operation of the Laboratory. In addition to
jeopardizing employee safety and/or impacting performance, conduct and reliability, substance
abuse is illegal.
Page 72
Collider User Training 72 Nov 2020
Emergency Egress Diagrams
Upon entering any building or experimental area/hall at the C-A complex one should note the
locations of emergency equipment as well as the exit points.
EXITS FROM COLLIDER TUNNEL
Page 73
Collider User Training 73 Nov 2020
EXITS FROM PHENIX
Roll Up Door
EXIT
EMERGENCY
EXIT EXIT
EXIT EXIT
PHENIX
CRASH CORDS
Page 74
Collider User Training 74 Nov 2020
EXITS FROM STAR
Roll Up Doors
Shield Wall
Wide Angle
Hall
Assembly
Hall
EXIT
EXIT EXIT
EXIT
Collider Tunnel Collider Tunnel
EXITS FROM STAR
Crash Cords
Page 75
Collider User Training 75 Nov 2020
Acronyms
ACL - Administrative Control Level (radiation dose)
AGS - Alternating Gradient Synchrotron
ALARA - As Low As Reasonably Achievable
ASME - American Society of Mechanical Engineers
BNL - Brookhaven National Laboratory
BSA - Brookhaven Science Associates
C-AD - Collider-Accelerator Department
CAS - Collider Accelerator Support Group
CeC - Coherent Electron Cooling
CFR - Code of Federal Regulations
DEC - Department Emergency Coordinator
DOE - United States Department of Energy
ESH - Environment, Safety & Health
ESHR - Environment, Safety & Health Representative
ESSH - Environment, Safety, Security & Health
ESRC - Experiment Safety Review Committee
ESSHQ - Environment, Safety, Security, Health & Quality
GERT - General Employee Radiological Training
HP - Health Physics
IR - Intersection Region
LE - Liaison Engineer
LEC - Local Emergency Coordinator
LESC - Lab Electrical Safety Committee
LOTO - Lock Out / Tag Out
LP - Liaison Physicist
MCR - Main Control Room
NBBI - National Board of Boiler and Pressure Vessel Inspectors
NRTL - Nationally Recognized Test Laboratory
OC - Operations Coordinator
ODH - Oxygen Deficiency Hazard
OSHA - Occupational Safety and Health Administration
PAAA - Price-Anderson Amendments Act
PASS - Particle Accelerator Safety System
PPE - Personal Protective Equipment
RCT - Radiological Control Technician
RHIC - Relativistic Heavy Ion Collider
RWP - Radiological Work Permit
SBMS - Standards Based Management System
SOP - Standard Operating Procedure
SRD - Self-Reading Dosimeter
TLD - Thermo-Luminescent Dosimeter