190
Commerce Service Center Version 11.2 Installation and Programming Guide

Commerce Service Center
Version 11.2
Installation and Programming Guide

Commerce Service Center Installation and Programming Guide
Product version: 11.2
Release date: 10-22-15
Document identifier: CSCInstallationAndProgrammingGuide1603081515
Copyright © 1997, 2016 Oracle and/or its affiliates. All rights reserved.
This software and related documentation are provided under a license agreement containing restrictions on use and disclosure and are
protected by intellectual property laws. Except as expressly permitted in your license agreement or allowed by law, you may not use, copy,
reproduce, translate, broadcast, modify, license, transmit, distribute, exhibit, perform, publish, or display any part, in any form, or by any
means. Reverse engineering, disassembly, or decompilation of this software, unless required by law for interoperability, is prohibited.
The information contained herein is subject to change without notice and is not warranted to be error-free. If you find any errors, please
report them to us in writing.
If this is software or related documentation that is delivered to the U.S. Government or anyone licensing it on behalf of the U.S. Government,
the following notice is applicable:
U.S. GOVERNMENT END USERS: Oracle programs, including any operating system, integrated software, any programs installed on the
hardware, and/or documentation, delivered to U.S. Government end users are "commercial computer software" pursuant to the applicable
Federal Acquisition Regulation and agency-specific supplemental regulations. As such, use, duplication, disclosure, modification, and
adaptation of the programs, including any operating system, integrated software, any programs installed on the hardware, and/or
documentation, shall be subject to license terms and license restrictions applicable to the programs. No other rights are granted to the U.S.
Government.
This software or hardware is developed for general use in a variety of information management applications. It is not developed or intended
for use in any inherently dangerous applications, including applications that may create a risk of personal injury. If you use this software or
hardware in dangerous applications, then you shall be responsible to take all appropriate fail-safe, backup, redundancy, and other measures
to ensure its safe use. Oracle Corporation and its affiliates disclaim any liability for any damages caused by use of this software or hardware in
dangerous applications.
Oracle and Java are registered trademarks of Oracle and/or its affiliates. Other names may be trademarks of their respective owners.
Intel and Intel Xeon are trademarks or registered trademarks of Intel Corporation. All SPARC trademarks are used under license and are
trademarks or registered trademarks of SPARC International, Inc. AMD, Opteron, the AMD logo, and the AMD Opteron logo are trademarks or
registered trademarks of Advanced Micro Devices. UNIX is a registered trademark of The Open Group.
This software or hardware and documentation may provide access to or information about content, products, and services from third parties.
Oracle Corporation and its affiliates are not responsible for and expressly disclaim all warranties of any kind with respect to third-party
content, products, and services unless otherwise set forth in an applicable agreement between you and Oracle. Oracle Corporation and
its affiliates will not be responsible for any loss, costs, or damages incurred due to your access to or use of third-party content, products, or
services, except as set forth in an applicable agreement between you and Oracle.
For information about Oracle's commitment to accessibility, visit the Oracle Accessibility Program website at http://www.oracle.com/pls/
topic/lookup?ctx=acc&id=docacc.
Access to Oracle Support: Oracle customers that have purchased support have access to electronic support through My Oracle Support. For
information, visit http://www.oracle.com/pls/topic/lookup?ctx=acc&id=info or visit http://www.oracle.com/pls/topic/lookup?ctx=acc&id=trs
if you are hearing impaired.

Commerce Service Center Installation and Programming Guide iii
Table of Contents
1. Introduction . . . . . . . . . . . . . . . . . . . . . . . . . . . . . . . . . . . . . . . . . . . . . . . . . . . . . . . . . . . . . . . . . . . . . . . . . . . . . . . . . . . . . . . . . . . . . . . . . . . . . . . . . . . . . . . . . . . . . 1
Audience . . . . . . . . . . . . . . . . . . . . . . . . . . . . . . . . . . . . . . . . . . . . . . . . . . . . . . . . . . . . . . . . . . . . . . . . . . . . . . . . . . . . . . . . . . . . . . . . . . . . . . . . . . . . . . . . . . . . 1
Documentation Conventions . . . . . . . . . . . . . . . . . . . . . . . . . . . . . . . . . . . . . . . . . . . . . . . . . . . . . . . . . . . . . . . . . . . . . . . . . . . . . . . . . . . . . . . . . . . . 1
Related Documents . . . . . . . . . . . . . . . . . . . . . . . . . . . . . . . . . . . . . . . . . . . . . . . . . . . . . . . . . . . . . . . . . . . . . . . . . . . . . . . . . . . . . . . . . . . . . . . . . . . . . . . 2
Before You Begin . . . . . . . . . . . . . . . . . . . . . . . . . . . . . . . . . . . . . . . . . . . . . . . . . . . . . . . . . . . . . . . . . . . . . . . . . . . . . . . . . . . . . . . . . . . . . . . . . . . . . . . . . . 3
Browser and Environment Requirements . . . . . . . . . . . . . . . . . . . . . . . . . . . . . . . . . . . . . . . . . . . . . . . . . . . . . . . . . . . . . . . . . . . . . . . . . . . . . 3
2. Commerce Service Center Server Architecture . . . . . . . . . . . . . . . . . . . . . . . . . . . . . . . . . . . . . . . . . . . . . . . . . . . . . . . . . . . . . . . . . . . . . . . . . . . . 5
Customer-Facing Server Configuration . . . . . . . . . . . . . . . . . . . . . . . . . . . . . . . . . . . . . . . . . . . . . . . . . . . . . . . . . . . . . . . . . . . . . . . . . . . . . . . . 6
Agent-Facing Server Configuration . . . . . . . . . . . . . . . . . . . . . . . . . . . . . . . . . . . . . . . . . . . . . . . . . . . . . . . . . . . . . . . . . . . . . . . . . . . . . . . . . . . . . 7
3. Installing and Configuring the Commerce Service Center Server . . . . . . . . . . . . . . . . . . . . . . . . . . . . . . . . . . . . . . . . . . . . . . . . . . . . . . 9
Requirements for Commerce Service Center . . . . . . . . . . . . . . . . . . . . . . . . . . . . . . . . . . . . . . . . . . . . . . . . . . . . . . . . . . . . . . . . . . . . . . . . . 9
Database and Schema Requirements . . . . . . . . . . . . . . . . . . . . . . . . . . . . . . . . . . . . . . . . . . . . . . . . . . . . . . . . . . . . . . . . . . . . . . . . . . 9
Installing with the Configuration and Installation Manager . . . . . . . . . . . . . . . . . . . . . . . . . . . . . . . . . . . . . . . . . . . . . . . . . . . . . . 10
Repositories . . . . . . . . . . . . . . . . . . . . . . . . . . . . . . . . . . . . . . . . . . . . . . . . . . . . . . . . . . . . . . . . . . . . . . . . . . . . . . . . . . . . . . . . . . . . . . . . . . . . . . . 11
Using IDGenerators . . . . . . . . . . . . . . . . . . . . . . . . . . . . . . . . . . . . . . . . . . . . . . . . . . . . . . . . . . . . . . . . . . . . . . . . . . . . . . . . . . . . . . . . . . . . . . 12
Understanding Lock Management . . . . . . . . . . . . . . . . . . . . . . . . . . . . . . . . . . . . . . . . . . . . . . . . . . . . . . . . . . . . . . . . . . . . . . . . . . . 12
Accessing Commerce Service Center . . . . . . . . . . . . . . . . . . . . . . . . . . . . . . . . . . . . . . . . . . . . . . . . . . . . . . . . . . . . . . . . . . . . . . . . . . . . . . . . . 13
Working with Multiple Sites . . . . . . . . . . . . . . . . . . . . . . . . . . . . . . . . . . . . . . . . . . . . . . . . . . . . . . . . . . . . . . . . . . . . . . . . . . . . . . . . . . . . . . . . . . . . 14
Enabling Multisite . . . . . . . . . . . . . . . . . . . . . . . . . . . . . . . . . . . . . . . . . . . . . . . . . . . . . . . . . . . . . . . . . . . . . . . . . . . . . . . . . . . . . . . . . . . . . . . . 14
Configuring the Default Site . . . . . . . . . . . . . . . . . . . . . . . . . . . . . . . . . . . . . . . . . . . . . . . . . . . . . . . . . . . . . . . . . . . . . . . . . . . . . . . . . . . 15
Configuring the Default Site Icon . . . . . . . . . . . . . . . . . . . . . . . . . . . . . . . . . . . . . . . . . . . . . . . . . . . . . . . . . . . . . . . . . . . . . . . . . . . . . 15
Configuring a Site Icon . . . . . . . . . . . . . . . . . . . . . . . . . . . . . . . . . . . . . . . . . . . . . . . . . . . . . . . . . . . . . . . . . . . . . . . . . . . . . . . . . . . . . . . . . . 15
Configuring Shareables . . . . . . . . . . . . . . . . . . . . . . . . . . . . . . . . . . . . . . . . . . . . . . . . . . . . . . . . . . . . . . . . . . . . . . . . . . . . . . . . . . . . . . . . . 15
4. Configuring Order and Profile Search . . . . . . . . . . . . . . . . . . . . . . . . . . . . . . . . . . . . . . . . . . . . . . . . . . . . . . . . . . . . . . . . . . . . . . . . . . . . . . . . . . . . . 17
Order and Profile Search Overview . . . . . . . . . . . . . . . . . . . . . . . . . . . . . . . . . . . . . . . . . . . . . . . . . . . . . . . . . . . . . . . . . . . . . . . . . . . . . . . . . . . 17
Configuring Order and Profile Search . . . . . . . . . . . . . . . . . . . . . . . . . . . . . . . . . . . . . . . . . . . . . . . . . . . . . . . . . . . . . . . . . . . . . . . . . . . . . . . . 17
Order and Profile Search Components . . . . . . . . . . . . . . . . . . . . . . . . . . . . . . . . . . . . . . . . . . . . . . . . . . . . . . . . . . . . . . . . . . . . . . . 18
Indexing Methods . . . . . . . . . . . . . . . . . . . . . . . . . . . . . . . . . . . . . . . . . . . . . . . . . . . . . . . . . . . . . . . . . . . . . . . . . . . . . . . . . . . . . . . . . . . . . . . . 22
Configuring Text Search Database Environments . . . . . . . . . . . . . . . . . . . . . . . . . . . . . . . . . . . . . . . . . . . . . . . . . . . . . . . . . . . . . . . . . . 23
Creating Indexes in IBM DB2 Environments . . . . . . . . . . . . . . . . . . . . . . . . . . . . . . . . . . . . . . . . . . . . . . . . . . . . . . . . . . . . . . . . . 23
Creating Indexes in MSSQL Environments . . . . . . . . . . . . . . . . . . . . . . . . . . . . . . . . . . . . . . . . . . . . . . . . . . . . . . . . . . . . . . . . . . . 25
Performing Indexing Administration . . . . . . . . . . . . . . . . . . . . . . . . . . . . . . . . . . . . . . . . . . . . . . . . . . . . . . . . . . . . . . . . . . . . . . . . . . . . . . . . . 25
Preloading the Index . . . . . . . . . . . . . . . . . . . . . . . . . . . . . . . . . . . . . . . . . . . . . . . . . . . . . . . . . . . . . . . . . . . . . . . . . . . . . . . . . . . . . . . . . . . . 26
Changing Default Incremental Indexing Schedules . . . . . . . . . . . . . . . . . . . . . . . . . . . . . . . . . . . . . . . . . . . . . . . . . . . . . . . . 26
Scheduling Indexing . . . . . . . . . . . . . . . . . . . . . . . . . . . . . . . . . . . . . . . . . . . . . . . . . . . . . . . . . . . . . . . . . . . . . . . . . . . . . . . . . . . . . . . . . . . . . 26
Performing a Manual Re-Index . . . . . . . . . . . . . . . . . . . . . . . . . . . . . . . . . . . . . . . . . . . . . . . . . . . . . . . . . . . . . . . . . . . . . . . . . . . . . . . . 27
Adding Properties to the Index . . . . . . . . . . . . . . . . . . . . . . . . . . . . . . . . . . . . . . . . . . . . . . . . . . . . . . . . . . . . . . . . . . . . . . . . . . . . . . . . . . . . . . . 29
5. Configuring Catalog Search . . . . . . . . . . . . . . . . . . . . . . . . . . . . . . . . . . . . . . . . . . . . . . . . . . . . . . . . . . . . . . . . . . . . . . . . . . . . . . . . . . . . . . . . . . . . . . . . . 33
Catalog Search with MDEX Engine Prerequisites . . . . . . . . . . . . . . . . . . . . . . . . . . . . . . . . . . . . . . . . . . . . . . . . . . . . . . . . . . . . . . . . . . . 33
Using Live Indexing and MDEX Catalog Search . . . . . . . . . . . . . . . . . . . . . . . . . . . . . . . . . . . . . . . . . . . . . . . . . . . . . . . . . . . . 33
Overview of Catalog Search with MDEX . . . . . . . . . . . . . . . . . . . . . . . . . . . . . . . . . . . . . . . . . . . . . . . . . . . . . . . . . . . . . . . . . . . . . . . . . . . . . 34
Initiating an MDEX Catalog Search Request . . . . . . . . . . . . . . . . . . . . . . . . . . . . . . . . . . . . . . . . . . . . . . . . . . . . . . . . . . . . . . . . . . . . . . . . . 34
Determining Content URI . . . . . . . . . . . . . . . . . . . . . . . . . . . . . . . . . . . . . . . . . . . . . . . . . . . . . . . . . . . . . . . . . . . . . . . . . . . . . . . . . . . . . . . 35
Filtering the Requests . . . . . . . . . . . . . . . . . . . . . . . . . . . . . . . . . . . . . . . . . . . . . . . . . . . . . . . . . . . . . . . . . . . . . . . . . . . . . . . . . . . . . . . . . . . 35
UI Page Fragments . . . . . . . . . . . . . . . . . . . . . . . . . . . . . . . . . . . . . . . . . . . . . . . . . . . . . . . . . . . . . . . . . . . . . . . . . . . . . . . . . . . . . . . . . . . . . . . 35
Encoding Framework URL . . . . . . . . . . . . . . . . . . . . . . . . . . . . . . . . . . . . . . . . . . . . . . . . . . . . . . . . . . . . . . . . . . . . . . . . . . . . . . . . . . . . . . 36
Defining Navigation Actions . . . . . . . . . . . . . . . . . . . . . . . . . . . . . . . . . . . . . . . . . . . . . . . . . . . . . . . . . . . . . . . . . . . . . . . . . . . . . . . . . . . 36
CSRInvokeAssembler . . . . . . . . . . . . . . . . . . . . . . . . . . . . . . . . . . . . . . . . . . . . . . . . . . . . . . . . . . . . . . . . . . . . . . . . . . . . . . . . . . . . . . . . . . . . 36
Setting the Agent Profile . . . . . . . . . . . . . . . . . . . . . . . . . . . . . . . . . . . . . . . . . . . . . . . . . . . . . . . . . . . . . . . . . . . . . . . . . . . . . . . . . . . . . . . 37
Configuring an MDEX Catalog Search . . . . . . . . . . . . . . . . . . . . . . . . . . . . . . . . . . . . . . . . . . . . . . . . . . . . . . . . . . . . . . . . . . . . . . . . . . . . . . . . 37
Catalog Search Servlet Beans and Form Handlers . . . . . . . . . . . . . . . . . . . . . . . . . . . . . . . . . . . . . . . . . . . . . . . . . . . . . . . . . . . . . . . . . 39

iv Commerce Service Center Installation and Programming Guide
Content Request URL Droplet Servlet Bean . . . . . . . . . . . . . . . . . . . . . . . . . . . . . . . . . . . . . . . . . . . . . . . . . . . . . . . . . . . . . . . . . 39
Content Item Results Droplet . . . . . . . . . . . . . . . . . . . . . . . . . . . . . . . . . . . . . . . . . . . . . . . . . . . . . . . . . . . . . . . . . . . . . . . . . . . . . . . . . . 41
Paging Droplet . . . . . . . . . . . . . . . . . . . . . . . . . . . . . . . . . . . . . . . . . . . . . . . . . . . . . . . . . . . . . . . . . . . . . . . . . . . . . . . . . . . . . . . . . . . . . . . . . . . 41
Site Scope Form Handler . . . . . . . . . . . . . . . . . . . . . . . . . . . . . . . . . . . . . . . . . . . . . . . . . . . . . . . . . . . . . . . . . . . . . . . . . . . . . . . . . . . . . . . 42
Configuring Auto-Suggestions . . . . . . . . . . . . . . . . . . . . . . . . . . . . . . . . . . . . . . . . . . . . . . . . . . . . . . . . . . . . . . . . . . . . . . . . . . . . . . . . . . . . . . . . . 42
Implementing Auto-Suggestions . . . . . . . . . . . . . . . . . . . . . . . . . . . . . . . . . . . . . . . . . . . . . . . . . . . . . . . . . . . . . . . . . . . . . . . . . . . . . . 42
Displaying Auto-Suggestions . . . . . . . . . . . . . . . . . . . . . . . . . . . . . . . . . . . . . . . . . . . . . . . . . . . . . . . . . . . . . . . . . . . . . . . . . . . . . . . . . . 43
Working with MDEX Breadcrumbs . . . . . . . . . . . . . . . . . . . . . . . . . . . . . . . . . . . . . . . . . . . . . . . . . . . . . . . . . . . . . . . . . . . . . . . . . . . . . . . . . . . . 43
Customizing Search Results . . . . . . . . . . . . . . . . . . . . . . . . . . . . . . . . . . . . . . . . . . . . . . . . . . . . . . . . . . . . . . . . . . . . . . . . . . . . . . . . . . . . . . . . . . . . 44
Catalog Search Page Fragments . . . . . . . . . . . . . . . . . . . . . . . . . . . . . . . . . . . . . . . . . . . . . . . . . . . . . . . . . . . . . . . . . . . . . . . . . . . . . . . 44
Using MDEX Engine Resourced Values . . . . . . . . . . . . . . . . . . . . . . . . . . . . . . . . . . . . . . . . . . . . . . . . . . . . . . . . . . . . . . . . . . . . . . . 46
Displaying Alternate Content . . . . . . . . . . . . . . . . . . . . . . . . . . . . . . . . . . . . . . . . . . . . . . . . . . . . . . . . . . . . . . . . . . . . . . . . . . . . . . . . . . 46
Configuring Oracle for SQL Catalog Searching . . . . . . . . . . . . . . . . . . . . . . . . . . . . . . . . . . . . . . . . . . . . . . . . . . . . . . . . . . . . . . . . . . . . . 47
6. Programming Commerce Service Center . . . . . . . . . . . . . . . . . . . . . . . . . . . . . . . . . . . . . . . . . . . . . . . . . . . . . . . . . . . . . . . . . . . . . . . . . . . . . . . . . 49
Using the CSRConfigurator Component . . . . . . . . . . . . . . . . . . . . . . . . . . . . . . . . . . . . . . . . . . . . . . . . . . . . . . . . . . . . . . . . . . . . . . . . . . . . . 49
7. Working with Wish and Gift Lists . . . . . . . . . . . . . . . . . . . . . . . . . . . . . . . . . . . . . . . . . . . . . . . . . . . . . . . . . . . . . . . . . . . . . . . . . . . . . . . . . . . . . . . . . . 53
Modifying Gift List Forms . . . . . . . . . . . . . . . . . . . . . . . . . . . . . . . . . . . . . . . . . . . . . . . . . . . . . . . . . . . . . . . . . . . . . . . . . . . . . . . . . . . . . . . . . . . . . . . 53
Rendering Gift Lists . . . . . . . . . . . . . . . . . . . . . . . . . . . . . . . . . . . . . . . . . . . . . . . . . . . . . . . . . . . . . . . . . . . . . . . . . . . . . . . . . . . . . . . . . . . . . . . . . . . . . . 54
Displaying Gift List Information . . . . . . . . . . . . . . . . . . . . . . . . . . . . . . . . . . . . . . . . . . . . . . . . . . . . . . . . . . . . . . . . . . . . . . . . . . . . . . . . . . . . . . . 55
Configuring Gift List Search . . . . . . . . . . . . . . . . . . . . . . . . . . . . . . . . . . . . . . . . . . . . . . . . . . . . . . . . . . . . . . . . . . . . . . . . . . . . . . . . . . . . . . . . . . . . 56
Gift List Form Handlers . . . . . . . . . . . . . . . . . . . . . . . . . . . . . . . . . . . . . . . . . . . . . . . . . . . . . . . . . . . . . . . . . . . . . . . . . . . . . . . . . . . . . . . . . . . . . . . . . . 57
CSRGiftlistFormHandler . . . . . . . . . . . . . . . . . . . . . . . . . . . . . . . . . . . . . . . . . . . . . . . . . . . . . . . . . . . . . . . . . . . . . . . . . . . . . . . . . . . . . . . . . 57
GiftlistTableFormHandler . . . . . . . . . . . . . . . . . . . . . . . . . . . . . . . . . . . . . . . . . . . . . . . . . . . . . . . . . . . . . . . . . . . . . . . . . . . . . . . . . . . . . . . 57
Auditing Gift Lists . . . . . . . . . . . . . . . . . . . . . . . . . . . . . . . . . . . . . . . . . . . . . . . . . . . . . . . . . . . . . . . . . . . . . . . . . . . . . . . . . . . . . . . . . . . . . . . . . . . . . . . . 58
8. Issuing Returns, Exchanges, Refunds and Appeasements . . . . . . . . . . . . . . . . . . . . . . . . . . . . . . . . . . . . . . . . . . . . . . . . . . . . . . . . . . . . . 59
Providing Appeasements Access . . . . . . . . . . . . . . . . . . . . . . . . . . . . . . . . . . . . . . . . . . . . . . . . . . . . . . . . . . . . . . . . . . . . . . . . . . . . . . . . . . . . . . 59
Commerce Service Center-Specific Return Components . . . . . . . . . . . . . . . . . . . . . . . . . . . . . . . . . . . . . . . . . . . . . . . . . . . . . . . . . . 59
Return Form Handler . . . . . . . . . . . . . . . . . . . . . . . . . . . . . . . . . . . . . . . . . . . . . . . . . . . . . . . . . . . . . . . . . . . . . . . . . . . . . . . . . . . . . . . . . . . . 59
Is Item Returnable Droplet Servlet Bean . . . . . . . . . . . . . . . . . . . . . . . . . . . . . . . . . . . . . . . . . . . . . . . . . . . . . . . . . . . . . . . . . . . . . 60
Order Is Returnable Droplet Servlet Bean . . . . . . . . . . . . . . . . . . . . . . . . . . . . . . . . . . . . . . . . . . . . . . . . . . . . . . . . . . . . . . . . . . . 60
Prepare Replacement Order Pipeline . . . . . . . . . . . . . . . . . . . . . . . . . . . . . . . . . . . . . . . . . . . . . . . . . . . . . . . . . . . . . . . . . . . . . . . . . 60
Working with Exchange Orders . . . . . . . . . . . . . . . . . . . . . . . . . . . . . . . . . . . . . . . . . . . . . . . . . . . . . . . . . . . . . . . . . . . . . . . . . . . . . . . . . . . . . . . 61
Exchange Calculators . . . . . . . . . . . . . . . . . . . . . . . . . . . . . . . . . . . . . . . . . . . . . . . . . . . . . . . . . . . . . . . . . . . . . . . . . . . . . . . . . . . . . . . . . . . . 61
Tiered Pricing and Exchanges . . . . . . . . . . . . . . . . . . . . . . . . . . . . . . . . . . . . . . . . . . . . . . . . . . . . . . . . . . . . . . . . . . . . . . . . . . . . . . . . . . 62
Applying Promotions to Exchange Orders . . . . . . . . . . . . . . . . . . . . . . . . . . . . . . . . . . . . . . . . . . . . . . . . . . . . . . . . . . . . . . . . . . 62
Commerce Service Center-Specific Appeasement Components . . . . . . . . . . . . . . . . . . . . . . . . . . . . . . . . . . . . . . . . . . . . . . . . . 63
Appeasement Form Handler . . . . . . . . . . . . . . . . . . . . . . . . . . . . . . . . . . . . . . . . . . . . . . . . . . . . . . . . . . . . . . . . . . . . . . . . . . . . . . . . . . . 63
Start Appeasement Form Handler . . . . . . . . . . . . . . . . . . . . . . . . . . . . . . . . . . . . . . . . . . . . . . . . . . . . . . . . . . . . . . . . . . . . . . . . . . . . 63
Get Appeasement Order Balance Droplet Servlet Bean . . . . . . . . . . . . . . . . . . . . . . . . . . . . . . . . . . . . . . . . . . . . . . . . . . . 64
Get Appeasement Shipping Balance Droplet Servlet Bean . . . . . . . . . . . . . . . . . . . . . . . . . . . . . . . . . . . . . . . . . . . . . . . 64
Get Order Appeasements Droplet Servlet Bean . . . . . . . . . . . . . . . . . . . . . . . . . . . . . . . . . . . . . . . . . . . . . . . . . . . . . . . . . . . . 65
Get Total Amount Of Appeasement By Type Droplet Servlet Bean . . . . . . . . . . . . . . . . . . . . . . . . . . . . . . . . . . . . . 66
Is Appeasement Pending Approval Droplet Servlet Bean . . . . . . . . . . . . . . . . . . . . . . . . . . . . . . . . . . . . . . . . . . . . . . . . . 66
Load Appeasement Droplet . . . . . . . . . . . . . . . . . . . . . . . . . . . . . . . . . . . . . . . . . . . . . . . . . . . . . . . . . . . . . . . . . . . . . . . . . . . . . . . . . . . . 67
Order Is Appeasable Droplet Servlet Bean . . . . . . . . . . . . . . . . . . . . . . . . . . . . . . . . . . . . . . . . . . . . . . . . . . . . . . . . . . . . . . . . . . 67
Create Appeasement Pipeline . . . . . . . . . . . . . . . . . . . . . . . . . . . . . . . . . . . . . . . . . . . . . . . . . . . . . . . . . . . . . . . . . . . . . . . . . . . . . . . . . 67
Settle Approved Appeasement Pipeline . . . . . . . . . . . . . . . . . . . . . . . . . . . . . . . . . . . . . . . . . . . . . . . . . . . . . . . . . . . . . . . . . . . . . 68
Submit Appeasement Pipeline . . . . . . . . . . . . . . . . . . . . . . . . . . . . . . . . . . . . . . . . . . . . . . . . . . . . . . . . . . . . . . . . . . . . . . . . . . . . . . . . 68
9. Working with Scheduled Orders . . . . . . . . . . . . . . . . . . . . . . . . . . . . . . . . . . . . . . . . . . . . . . . . . . . . . . . . . . . . . . . . . . . . . . . . . . . . . . . . . . . . . . . . . . . 69
Configuring Scheduled Orders . . . . . . . . . . . . . . . . . . . . . . . . . . . . . . . . . . . . . . . . . . . . . . . . . . . . . . . . . . . . . . . . . . . . . . . . . . . . . . . . . . . . . . . . 69
Enabling and Disabling Scheduled Orders . . . . . . . . . . . . . . . . . . . . . . . . . . . . . . . . . . . . . . . . . . . . . . . . . . . . . . . . . . . . . . . . . . 69
Configuring Price Lists . . . . . . . . . . . . . . . . . . . . . . . . . . . . . . . . . . . . . . . . . . . . . . . . . . . . . . . . . . . . . . . . . . . . . . . . . . . . . . . . . . . . . . . . . . 70
Customizing Scheduled Orders . . . . . . . . . . . . . . . . . . . . . . . . . . . . . . . . . . . . . . . . . . . . . . . . . . . . . . . . . . . . . . . . . . . . . . . . . . . . . . . . . . . . . . . . 71

Commerce Service Center Installation and Programming Guide v
Scheduled Order Form Handler . . . . . . . . . . . . . . . . . . . . . . . . . . . . . . . . . . . . . . . . . . . . . . . . . . . . . . . . . . . . . . . . . . . . . . . . . . . . . . . 71
Displaying Scheduling Information . . . . . . . . . . . . . . . . . . . . . . . . . . . . . . . . . . . . . . . . . . . . . . . . . . . . . . . . . . . . . . . . . . . . . . . . . . . 72
Scheduled Order Components . . . . . . . . . . . . . . . . . . . . . . . . . . . . . . . . . . . . . . . . . . . . . . . . . . . . . . . . . . . . . . . . . . . . . . . . . . . . . . . . 72
Scheduled Orders Pipeline Additions . . . . . . . . . . . . . . . . . . . . . . . . . . . . . . . . . . . . . . . . . . . . . . . . . . . . . . . . . . . . . . . . . . . . . . . . 73
10. Issuing Promotions . . . . . . . . . . . . . . . . . . . . . . . . . . . . . . . . . . . . . . . . . . . . . . . . . . . . . . . . . . . . . . . . . . . . . . . . . . . . . . . . . . . . . . . . . . . . . . . . . . . . . . . . . . 75
Providing Promotions Browser Access . . . . . . . . . . . . . . . . . . . . . . . . . . . . . . . . . . . . . . . . . . . . . . . . . . . . . . . . . . . . . . . . . . . . . . . . . . . . . . . 75
Customizing Gift with Purchase Promotions . . . . . . . . . . . . . . . . . . . . . . . . . . . . . . . . . . . . . . . . . . . . . . . . . . . . . . . . . . . . . . . . . . . . . . . . 75
Gift With Purchase Page Fragments . . . . . . . . . . . . . . . . . . . . . . . . . . . . . . . . . . . . . . . . . . . . . . . . . . . . . . . . . . . . . . . . . . . . . . . . . . 76
Returns and Exchanges of Gifts with Purchases . . . . . . . . . . . . . . . . . . . . . . . . . . . . . . . . . . . . . . . . . . . . . . . . . . . . . . . . . . . . 76
Reconciling Gift with Purchase Orders . . . . . . . . . . . . . . . . . . . . . . . . . . . . . . . . . . . . . . . . . . . . . . . . . . . . . . . . . . . . . . . . . . . . . . . 77
11. Using Order Approvals . . . . . . . . . . . . . . . . . . . . . . . . . . . . . . . . . . . . . . . . . . . . . . . . . . . . . . . . . . . . . . . . . . . . . . . . . . . . . . . . . . . . . . . . . . . . . . . . . . . . . 79
Configuring Order Approval . . . . . . . . . . . . . . . . . . . . . . . . . . . . . . . . . . . . . . . . . . . . . . . . . . . . . . . . . . . . . . . . . . . . . . . . . . . . . . . . . . . . . . . . . . . 79
Enabling the Order Approval Process . . . . . . . . . . . . . . . . . . . . . . . . . . . . . . . . . . . . . . . . . . . . . . . . . . . . . . . . . . . . . . . . . . . . . . . . 80
Setting Global Appeasement Limits . . . . . . . . . . . . . . . . . . . . . . . . . . . . . . . . . . . . . . . . . . . . . . . . . . . . . . . . . . . . . . . . . . . . . . . . . . 80
Modifying Individual Appeasement Limits . . . . . . . . . . . . . . . . . . . . . . . . . . . . . . . . . . . . . . . . . . . . . . . . . . . . . . . . . . . . . . . . . . 80
Providing Approval Authorization . . . . . . . . . . . . . . . . . . . . . . . . . . . . . . . . . . . . . . . . . . . . . . . . . . . . . . . . . . . . . . . . . . . . . . . . . . . . 81
Servlet Beans and Form Handlers for Approving Orders . . . . . . . . . . . . . . . . . . . . . . . . . . . . . . . . . . . . . . . . . . . . . . . . . . 81
12. Setting Up Internal Access Control . . . . . . . . . . . . . . . . . . . . . . . . . . . . . . . . . . . . . . . . . . . . . . . . . . . . . . . . . . . . . . . . . . . . . . . . . . . . . . . . . . . . . . . 85
Access Control Overview . . . . . . . . . . . . . . . . . . . . . . . . . . . . . . . . . . . . . . . . . . . . . . . . . . . . . . . . . . . . . . . . . . . . . . . . . . . . . . . . . . . . . . . . . . . . . . . 85
Default Internal User Access Control Configuration . . . . . . . . . . . . . . . . . . . . . . . . . . . . . . . . . . . . . . . . . . . . . . . . . . . . . . . . . . . . . . . 86
Access Controllers . . . . . . . . . . . . . . . . . . . . . . . . . . . . . . . . . . . . . . . . . . . . . . . . . . . . . . . . . . . . . . . . . . . . . . . . . . . . . . . . . . . . . . . . . . . . . . . . 86
Commerce Service Center Roles . . . . . . . . . . . . . . . . . . . . . . . . . . . . . . . . . . . . . . . . . . . . . . . . . . . . . . . . . . . . . . . . . . . . . . . . . . . . . . . 87
Controlling Site Access . . . . . . . . . . . . . . . . . . . . . . . . . . . . . . . . . . . . . . . . . . . . . . . . . . . . . . . . . . . . . . . . . . . . . . . . . . . . . . . . . . . . . . . . . . 87
Creating Agent Profiles . . . . . . . . . . . . . . . . . . . . . . . . . . . . . . . . . . . . . . . . . . . . . . . . . . . . . . . . . . . . . . . . . . . . . . . . . . . . . . . . . . . . . . . . . . . . . . . . . 89
Creating a New Agent Role . . . . . . . . . . . . . . . . . . . . . . . . . . . . . . . . . . . . . . . . . . . . . . . . . . . . . . . . . . . . . . . . . . . . . . . . . . . . . . . . . . . . 89
Creating a New Agent Profile . . . . . . . . . . . . . . . . . . . . . . . . . . . . . . . . . . . . . . . . . . . . . . . . . . . . . . . . . . . . . . . . . . . . . . . . . . . . . . . . . . 91
Customizing the Default Landing Page . . . . . . . . . . . . . . . . . . . . . . . . . . . . . . . . . . . . . . . . . . . . . . . . . . . . . . . . . . . . . . . . . . . . . . 91
13. Configuring E-mail . . . . . . . . . . . . . . . . . . . . . . . . . . . . . . . . . . . . . . . . . . . . . . . . . . . . . . . . . . . . . . . . . . . . . . . . . . . . . . . . . . . . . . . . . . . . . . . . . . . . . . . . . . 93
Customizing E-Mail . . . . . . . . . . . . . . . . . . . . . . . . . . . . . . . . . . . . . . . . . . . . . . . . . . . . . . . . . . . . . . . . . . . . . . . . . . . . . . . . . . . . . . . . . . . . . . . . . . . . . . 93
Configuring E-mail Notifications . . . . . . . . . . . . . . . . . . . . . . . . . . . . . . . . . . . . . . . . . . . . . . . . . . . . . . . . . . . . . . . . . . . . . . . . . . . . . . 93
Configuring New Passwords . . . . . . . . . . . . . . . . . . . . . . . . . . . . . . . . . . . . . . . . . . . . . . . . . . . . . . . . . . . . . . . . . . . . . . . . . . . . . . . . . . . 94
Configuring Order Confirmation E-Mails . . . . . . . . . . . . . . . . . . . . . . . . . . . . . . . . . . . . . . . . . . . . . . . . . . . . . . . . . . . . . . . . . . . . . 94
Configuring E-Mail Templates . . . . . . . . . . . . . . . . . . . . . . . . . . . . . . . . . . . . . . . . . . . . . . . . . . . . . . . . . . . . . . . . . . . . . . . . . . . . . . . . . . 95
14. Using Catalogs and Price Lists . . . . . . . . . . . . . . . . . . . . . . . . . . . . . . . . . . . . . . . . . . . . . . . . . . . . . . . . . . . . . . . . . . . . . . . . . . . . . . . . . . . . . . . . . . . . 97
Configuring Current Catalog and Price Lists . . . . . . . . . . . . . . . . . . . . . . . . . . . . . . . . . . . . . . . . . . . . . . . . . . . . . . . . . . . . . . . . . . . . . . . . 97
Using the Current Catalog . . . . . . . . . . . . . . . . . . . . . . . . . . . . . . . . . . . . . . . . . . . . . . . . . . . . . . . . . . . . . . . . . . . . . . . . . . . . . . . . . . . . . . 97
Using the Current Price List . . . . . . . . . . . . . . . . . . . . . . . . . . . . . . . . . . . . . . . . . . . . . . . . . . . . . . . . . . . . . . . . . . . . . . . . . . . . . . . . . . . . 98
Defining the Default Catalog . . . . . . . . . . . . . . . . . . . . . . . . . . . . . . . . . . . . . . . . . . . . . . . . . . . . . . . . . . . . . . . . . . . . . . . . . . . . . . . . . . 99
Defining the Default Price List . . . . . . . . . . . . . . . . . . . . . . . . . . . . . . . . . . . . . . . . . . . . . . . . . . . . . . . . . . . . . . . . . . . . . . . . . . . . . . . . . 99
Setting the Pricing Locale . . . . . . . . . . . . . . . . . . . . . . . . . . . . . . . . . . . . . . . . . . . . . . . . . . . . . . . . . . . . . . . . . . . . . . . . . . . . . . . . . . . . . . 99
Specifying Quick Access Catalogs and Price Lists . . . . . . . . . . . . . . . . . . . . . . . . . . . . . . . . . . . . . . . . . . . . . . . . . . . . . . . . . . 99
15. Understanding Environment Monitoring . . . . . . . . . . . . . . . . . . . . . . . . . . . . . . . . . . . . . . . . . . . . . . . . . . . . . . . . . . . . . . . . . . . . . . . . . . . . . . 101
Overview of Environment Monitoring . . . . . . . . . . . . . . . . . . . . . . . . . . . . . . . . . . . . . . . . . . . . . . . . . . . . . . . . . . . . . . . . . . . . . . . . . . . . . . 101
Environment Monitoring Components . . . . . . . . . . . . . . . . . . . . . . . . . . . . . . . . . . . . . . . . . . . . . . . . . . . . . . . . . . . . . . . . . . . . . . . . . . . . . 101
CSREnvironmentTools . . . . . . . . . . . . . . . . . . . . . . . . . . . . . . . . . . . . . . . . . . . . . . . . . . . . . . . . . . . . . . . . . . . . . . . . . . . . . . . . . . . . . . . . . . 102
CSREnvironmentMonitor . . . . . . . . . . . . . . . . . . . . . . . . . . . . . . . . . . . . . . . . . . . . . . . . . . . . . . . . . . . . . . . . . . . . . . . . . . . . . . . . . . . . . . 102
CSREnvironmentConstants . . . . . . . . . . . . . . . . . . . . . . . . . . . . . . . . . . . . . . . . . . . . . . . . . . . . . . . . . . . . . . . . . . . . . . . . . . . . . . . . . . . . 102
EnvironmentChangeFormHandler, ChangeOrder . . . . . . . . . . . . . . . . . . . . . . . . . . . . . . . . . . . . . . . . . . . . . . . . . . . . . . . . . 103
Ticket Disposition Monitoring . . . . . . . . . . . . . . . . . . . . . . . . . . . . . . . . . . . . . . . . . . . . . . . . . . . . . . . . . . . . . . . . . . . . . . . . . . . . . . . . 104
EnvironmentTools . . . . . . . . . . . . . . . . . . . . . . . . . . . . . . . . . . . . . . . . . . . . . . . . . . . . . . . . . . . . . . . . . . . . . . . . . . . . . . . . . . . . . . . . . . . . . . 104
Environment Management and Site Context . . . . . . . . . . . . . . . . . . . . . . . . . . . . . . . . . . . . . . . . . . . . . . . . . . . . . . . . . . . . . . 105
16. Pricing in Commerce Service Center . . . . . . . . . . . . . . . . . . . . . . . . . . . . . . . . . . . . . . . . . . . . . . . . . . . . . . . . . . . . . . . . . . . . . . . . . . . . . . . . . . . 107
Loading Orders and Pricing . . . . . . . . . . . . . . . . . . . . . . . . . . . . . . . . . . . . . . . . . . . . . . . . . . . . . . . . . . . . . . . . . . . . . . . . . . . . . . . . . . . . . . . . . . . 107

vi Commerce Service Center Installation and Programming Guide
Determining if Orders are Modifiable . . . . . . . . . . . . . . . . . . . . . . . . . . . . . . . . . . . . . . . . . . . . . . . . . . . . . . . . . . . . . . . . . . . . . . . 107
Determining if Orders are Submitted . . . . . . . . . . . . . . . . . . . . . . . . . . . . . . . . . . . . . . . . . . . . . . . . . . . . . . . . . . . . . . . . . . . . . . . 108
Price Lists and Pricing . . . . . . . . . . . . . . . . . . . . . . . . . . . . . . . . . . . . . . . . . . . . . . . . . . . . . . . . . . . . . . . . . . . . . . . . . . . . . . . . . . . . . . . . . . . . . . . . . 108
Automatic Removal of Items . . . . . . . . . . . . . . . . . . . . . . . . . . . . . . . . . . . . . . . . . . . . . . . . . . . . . . . . . . . . . . . . . . . . . . . . . . . . . . . . . . . . . . . . . 109
Promotions . . . . . . . . . . . . . . . . . . . . . . . . . . . . . . . . . . . . . . . . . . . . . . . . . . . . . . . . . . . . . . . . . . . . . . . . . . . . . . . . . . . . . . . . . . . . . . . . . . . . . . . . . . . . . . . 109
Incomplete Orders or Schedule Order Templates . . . . . . . . . . . . . . . . . . . . . . . . . . . . . . . . . . . . . . . . . . . . . . . . . . . . . . . . . 110
Submitted Orders . . . . . . . . . . . . . . . . . . . . . . . . . . . . . . . . . . . . . . . . . . . . . . . . . . . . . . . . . . . . . . . . . . . . . . . . . . . . . . . . . . . . . . . . . . . . . . . 110
Determining the Correct PricingModelHolder . . . . . . . . . . . . . . . . . . . . . . . . . . . . . . . . . . . . . . . . . . . . . . . . . . . . . . . . . . . . . . . . . . . . . 110
Configuring Manual Pricing Adjustments . . . . . . . . . . . . . . . . . . . . . . . . . . . . . . . . . . . . . . . . . . . . . . . . . . . . . . . . . . . . . . . . . . . . . . . . . . 110
17. Working with Shipping and Payment Groups . . . . . . . . . . . . . . . . . . . . . . . . . . . . . . . . . . . . . . . . . . . . . . . . . . . . . . . . . . . . . . . . . . . . . . . . 113
Shipping Group Page Fragments . . . . . . . . . . . . . . . . . . . . . . . . . . . . . . . . . . . . . . . . . . . . . . . . . . . . . . . . . . . . . . . . . . . . . . . . . . . . . . . . . . . . 113
Working with Shipping Group Page Fragments . . . . . . . . . . . . . . . . . . . . . . . . . . . . . . . . . . . . . . . . . . . . . . . . . . . . . . . . . . . 114
Customizing a Shipping Group Type . . . . . . . . . . . . . . . . . . . . . . . . . . . . . . . . . . . . . . . . . . . . . . . . . . . . . . . . . . . . . . . . . . . . . . . . 118
Payment Group Page Fragments . . . . . . . . . . . . . . . . . . . . . . . . . . . . . . . . . . . . . . . . . . . . . . . . . . . . . . . . . . . . . . . . . . . . . . . . . . . . . . . . . . . . 119
Working with Payment Group Page Fragments . . . . . . . . . . . . . . . . . . . . . . . . . . . . . . . . . . . . . . . . . . . . . . . . . . . . . . . . . . . 120
Customizing a Payment Group Type . . . . . . . . . . . . . . . . . . . . . . . . . . . . . . . . . . . . . . . . . . . . . . . . . . . . . . . . . . . . . . . . . . . . . . . . 124
Limiting Amounts for Payment Groups . . . . . . . . . . . . . . . . . . . . . . . . . . . . . . . . . . . . . . . . . . . . . . . . . . . . . . . . . . . . . . . . . . . . . 125
Copying Payment Group Types . . . . . . . . . . . . . . . . . . . . . . . . . . . . . . . . . . . . . . . . . . . . . . . . . . . . . . . . . . . . . . . . . . . . . . . . . . . . . . 126
Configuring Shipping Addresses . . . . . . . . . . . . . . . . . . . . . . . . . . . . . . . . . . . . . . . . . . . . . . . . . . . . . . . . . . . . . . . . . . . . . . . . . . . . . . . . . . . . . 126
Configuring Return Shipping Addresses . . . . . . . . . . . . . . . . . . . . . . . . . . . . . . . . . . . . . . . . . . . . . . . . . . . . . . . . . . . . . . . . . . . 126
Shipping and Payment Group Servlet Beans and Form Handlers . . . . . . . . . . . . . . . . . . . . . . . . . . . . . . . . . . . . . . . . . . . . . . 127
Available Priced Shipping Methods Droplet Servlet Bean . . . . . . . . . . . . . . . . . . . . . . . . . . . . . . . . . . . . . . . . . . . . . . . 127
CSRShippingGroupFormHandler . . . . . . . . . . . . . . . . . . . . . . . . . . . . . . . . . . . . . . . . . . . . . . . . . . . . . . . . . . . . . . . . . . . . . . . . . . . . . 128
CSRPaymentGroupFormHandler . . . . . . . . . . . . . . . . . . . . . . . . . . . . . . . . . . . . . . . . . . . . . . . . . . . . . . . . . . . . . . . . . . . . . . . . . . . . . 128
Configuring In-Store Pickup . . . . . . . . . . . . . . . . . . . . . . . . . . . . . . . . . . . . . . . . . . . . . . . . . . . . . . . . . . . . . . . . . . . . . . . . . . . . . . . . . . . . . . . . . . 129
Enabling In-Store Pickup . . . . . . . . . . . . . . . . . . . . . . . . . . . . . . . . . . . . . . . . . . . . . . . . . . . . . . . . . . . . . . . . . . . . . . . . . . . . . . . . . . . . . . 129
Setting Distances for Searches . . . . . . . . . . . . . . . . . . . . . . . . . . . . . . . . . . . . . . . . . . . . . . . . . . . . . . . . . . . . . . . . . . . . . . . . . . . . . . . 129
Setting Recipient Authorization for In-Store Pickup . . . . . . . . . . . . . . . . . . . . . . . . . . . . . . . . . . . . . . . . . . . . . . . . . . . . . . 130
Displaying the Cash Payment Group . . . . . . . . . . . . . . . . . . . . . . . . . . . . . . . . . . . . . . . . . . . . . . . . . . . . . . . . . . . . . . . . . . . . . . . . 130
Working with Addresses . . . . . . . . . . . . . . . . . . . . . . . . . . . . . . . . . . . . . . . . . . . . . . . . . . . . . . . . . . . . . . . . . . . . . . . . . . . . . . . . . . . . . . . . . . . . . . . 130
Enabling and Disabling Copies . . . . . . . . . . . . . . . . . . . . . . . . . . . . . . . . . . . . . . . . . . . . . . . . . . . . . . . . . . . . . . . . . . . . . . . . . . . . . . . 130
Disabling Address Sharing . . . . . . . . . . . . . . . . . . . . . . . . . . . . . . . . . . . . . . . . . . . . . . . . . . . . . . . . . . . . . . . . . . . . . . . . . . . . . . . . . . . . 131
18. Working with Submitted Orders . . . . . . . . . . . . . . . . . . . . . . . . . . . . . . . . . . . . . . . . . . . . . . . . . . . . . . . . . . . . . . . . . . . . . . . . . . . . . . . . . . . . . . . . 133
Modifying Submitted Orders . . . . . . . . . . . . . . . . . . . . . . . . . . . . . . . . . . . . . . . . . . . . . . . . . . . . . . . . . . . . . . . . . . . . . . . . . . . . . . . . . . . . . . . . . 133
Handling and Fulfillment . . . . . . . . . . . . . . . . . . . . . . . . . . . . . . . . . . . . . . . . . . . . . . . . . . . . . . . . . . . . . . . . . . . . . . . . . . . . . . . . . . . . . . 134
Fulfillment Notification for Order Modifications . . . . . . . . . . . . . . . . . . . . . . . . . . . . . . . . . . . . . . . . . . . . . . . . . . . . . . . . . . 135
Cloning Orders . . . . . . . . . . . . . . . . . . . . . . . . . . . . . . . . . . . . . . . . . . . . . . . . . . . . . . . . . . . . . . . . . . . . . . . . . . . . . . . . . . . . . . . . . . . . . . . . . . . . . . . . . . 136
Cloning Pipeline Chains . . . . . . . . . . . . . . . . . . . . . . . . . . . . . . . . . . . . . . . . . . . . . . . . . . . . . . . . . . . . . . . . . . . . . . . . . . . . . . . . . . . . . . . 136
Cloning Core Classes . . . . . . . . . . . . . . . . . . . . . . . . . . . . . . . . . . . . . . . . . . . . . . . . . . . . . . . . . . . . . . . . . . . . . . . . . . . . . . . . . . . . . . . . . . . 139
Extending Objects for Cloning . . . . . . . . . . . . . . . . . . . . . . . . . . . . . . . . . . . . . . . . . . . . . . . . . . . . . . . . . . . . . . . . . . . . . . . . . . . . . . . 142
19. Configuring Scenarios . . . . . . . . . . . . . . . . . . . . . . . . . . . . . . . . . . . . . . . . . . . . . . . . . . . . . . . . . . . . . . . . . . . . . . . . . . . . . . . . . . . . . . . . . . . . . . . . . . . . . 145
Using Scenarios . . . . . . . . . . . . . . . . . . . . . . . . . . . . . . . . . . . . . . . . . . . . . . . . . . . . . . . . . . . . . . . . . . . . . . . . . . . . . . . . . . . . . . . . . . . . . . . . . . . . . . . . . 145
Configuring Scenario Events . . . . . . . . . . . . . . . . . . . . . . . . . . . . . . . . . . . . . . . . . . . . . . . . . . . . . . . . . . . . . . . . . . . . . . . . . . . . . . . . . . 145
Working with Scenario Managers . . . . . . . . . . . . . . . . . . . . . . . . . . . . . . . . . . . . . . . . . . . . . . . . . . . . . . . . . . . . . . . . . . . . . . . . . . . 146
Configuring Process Editor Servers . . . . . . . . . . . . . . . . . . . . . . . . . . . . . . . . . . . . . . . . . . . . . . . . . . . . . . . . . . . . . . . . . . . . . . . . . . . . . . . . . . 148
Configuring the Customer-Facing Scenario Manager . . . . . . . . . . . . . . . . . . . . . . . . . . . . . . . . . . . . . . . . . . . . . . . . . . . . 148
Configuring the Agent-Facing Scenario Managers . . . . . . . . . . . . . . . . . . . . . . . . . . . . . . . . . . . . . . . . . . . . . . . . . . . . . . . 148
20. Reporting and Logging . . . . . . . . . . . . . . . . . . . . . . . . . . . . . . . . . . . . . . . . . . . . . . . . . . . . . . . . . . . . . . . . . . . . . . . . . . . . . . . . . . . . . . . . . . . . . . . . . . . 151
Commerce Service Center Reporting Framework . . . . . . . . . . . . . . . . . . . . . . . . . . . . . . . . . . . . . . . . . . . . . . . . . . . . . . . . . . . . . . . . . 151
Data Collection Overview . . . . . . . . . . . . . . . . . . . . . . . . . . . . . . . . . . . . . . . . . . . . . . . . . . . . . . . . . . . . . . . . . . . . . . . . . . . . . . . . . . . . . 151
Loader Pipeline Overview . . . . . . . . . . . . . . . . . . . . . . . . . . . . . . . . . . . . . . . . . . . . . . . . . . . . . . . . . . . . . . . . . . . . . . . . . . . . . . . . . . . . . 154
Configuring Audit Logging . . . . . . . . . . . . . . . . . . . . . . . . . . . . . . . . . . . . . . . . . . . . . . . . . . . . . . . . . . . . . . . . . . . . . . . . . . . . . . . . . . . . . . . . . . . 159
Viewing Audit Logs . . . . . . . . . . . . . . . . . . . . . . . . . . . . . . . . . . . . . . . . . . . . . . . . . . . . . . . . . . . . . . . . . . . . . . . . . . . . . . . . . . . . . . . . . . . . 159

Commerce Service Center Installation and Programming Guide vii
Adding a New Agent Audit Log Record . . . . . . . . . . . . . . . . . . . . . . . . . . . . . . . . . . . . . . . . . . . . . . . . . . . . . . . . . . . . . . . . . . . . 160
Disabling Audit Logging Events . . . . . . . . . . . . . . . . . . . . . . . . . . . . . . . . . . . . . . . . . . . . . . . . . . . . . . . . . . . . . . . . . . . . . . . . . . . . . 162
Using Window Scoped Failover . . . . . . . . . . . . . . . . . . . . . . . . . . . . . . . . . . . . . . . . . . . . . . . . . . . . . . . . . . . . . . . . . . . . . . . . . . . . . . . . . . . . . . 164
Adding Additional Components . . . . . . . . . . . . . . . . . . . . . . . . . . . . . . . . . . . . . . . . . . . . . . . . . . . . . . . . . . . . . . . . . . . . . . . . . . . . . 165
21. Appendix A: Commerce Service Center Access Rights . . . . . . . . . . . . . . . . . . . . . . . . . . . . . . . . . . . . . . . . . . . . . . . . . . . . . . . . . . . . . . 167
22. Appendix B: CIM Configuration Components . . . . . . . . . . . . . . . . . . . . . . . . . . . . . . . . . . . . . . . . . . . . . . . . . . . . . . . . . . . . . . . . . . . . . . . . . 171
Available Added Functionality . . . . . . . . . . . . . . . . . . . . . . . . . . . . . . . . . . . . . . . . . . . . . . . . . . . . . . . . . . . . . . . . . . . . . . . . . . . . . . . . . . . . . . . 171
Server Instances . . . . . . . . . . . . . . . . . . . . . . . . . . . . . . . . . . . . . . . . . . . . . . . . . . . . . . . . . . . . . . . . . . . . . . . . . . . . . . . . . . . . . . . . . . . . . . . . . . . . . . . . . 171
Add On Modifications . . . . . . . . . . . . . . . . . . . . . . . . . . . . . . . . . . . . . . . . . . . . . . . . . . . . . . . . . . . . . . . . . . . . . . . . . . . . . . . . . . . . . . . . . 172
Data Source Configuration . . . . . . . . . . . . . . . . . . . . . . . . . . . . . . . . . . . . . . . . . . . . . . . . . . . . . . . . . . . . . . . . . . . . . . . . . . . . . . . . . . . . . . . . . . . . 173
JTDataSource for Agent . . . . . . . . . . . . . . . . . . . . . . . . . . . . . . . . . . . . . . . . . . . . . . . . . . . . . . . . . . . . . . . . . . . . . . . . . . . . . . . . . . . . . . . 173
JTDataSource for Production . . . . . . . . . . . . . . . . . . . . . . . . . . . . . . . . . . . . . . . . . . . . . . . . . . . . . . . . . . . . . . . . . . . . . . . . . . . . . . . . . 173
Switching Data Source . . . . . . . . . . . . . . . . . . . . . . . . . . . . . . . . . . . . . . . . . . . . . . . . . . . . . . . . . . . . . . . . . . . . . . . . . . . . . . . . . . . . . . . . . 173
Profile and Order Searches with Switching Environments . . . . . . . . . . . . . . . . . . . . . . . . . . . . . . . . . . . . . . . . . . . . . . 174
CIM File Configuration . . . . . . . . . . . . . . . . . . . . . . . . . . . . . . . . . . . . . . . . . . . . . . . . . . . . . . . . . . . . . . . . . . . . . . . . . . . . . . . . . . . . . . . . . . . . . . . . . 175
Production Server File Configurations . . . . . . . . . . . . . . . . . . . . . . . . . . . . . . . . . . . . . . . . . . . . . . . . . . . . . . . . . . . . . . . . . . . . . . 175
Agent Server File Configurations . . . . . . . . . . . . . . . . . . . . . . . . . . . . . . . . . . . . . . . . . . . . . . . . . . . . . . . . . . . . . . . . . . . . . . . . . . . . 175
Prerequisites for Running CIM . . . . . . . . . . . . . . . . . . . . . . . . . . . . . . . . . . . . . . . . . . . . . . . . . . . . . . . . . . . . . . . . . . . . . . . . . . . . . . . . . . . . . . . . 176
Running CIM . . . . . . . . . . . . . . . . . . . . . . . . . . . . . . . . . . . . . . . . . . . . . . . . . . . . . . . . . . . . . . . . . . . . . . . . . . . . . . . . . . . . . . . . . . . . . . . . . . . . . . . . . . . . . 176
Index . . . . . . . . . . . . . . . . . . . . . . . . . . . . . . . . . . . . . . . . . . . . . . . . . . . . . . . . . . . . . . . . . . . . . . . . . . . . . . . . . . . . . . . . . . . . . . . . . . . . . . . . . . . . . . . . . . . . . . . . . . . . . . 179

viii Commerce Service Center Installation and Programming Guide

1 Introduction 1
1 Introduction
Oracle Commerce Service Center is a customizable and deployable customer service application that enables an
agent to perform the following tasks for an Oracle Commerce Core Commerce site:
• Create and manage customer profiles
• Create and manage orders
• Issue refunds, appeasements and exchanges
• Process returned items
• Research customer activity
For information about Core Commerce, see the Guide to Setting Up a Store and the Core Commerce Programming
Guide.
Audience
This manual is intended for System Administrators, Site Administrators and Programmers responsible for
installing, configuring and customizing Commerce Service Center.
Documentation Conventions
The following conventions are used in this manual:
• Installation Directory
<ATG11dir> — The installation directory for Oracle Commerce Platform 11.2. For example, the default
location for installations is /ATG/ATG11.2
• Menu Navigation
The “ > “ (greater than) symbol indicates menu choices. For example, File > Save means you should select the
Save option on the File menu.

2 1 Introduction
Related Documents
The following documentation provides additional reference information:
Document Description
Commerce Service Center User Guide Describes Commerce Service Center concepts and tasks for
agents and end users.
Service Center UI Programming Guide Describes the architecture and customization of the
Commerce Service Center UI.
Ticketing User Guide Describes the architecture and implementation of ATG
Ticketing.
ATG API Reference for Commerce Service Center Contains information from the Commerce Service Center
API.
Platform Installation and Configuration Guide Describes how to install and configure Oracle Commerce
Platform applications running on different Web applications.
Personalization Programming Guide Describes programming tasks for the Oracle Commerce
Personalization and Scenarios module. Includes information
on setting up profile repositories, creating targeting rules
and services, configuring scenario servers, and adding
custom scenario events and actions.
Guide to Setting Up a Store Describes how to use Core Commerce to create an online
store. Intended for business users and page developers.
Core Commerce Programming Guide Describes how to install and customize Core Commerce.
Intended for programmers and site administrators.
Business Control Center User's Guide Describes how to use Oracle Commerce Business Control
Center’s Web interface to manage user profiles and
organizations; create and assign roles; segment site visitors;
and define rules for personalizing site content. Also includes
setup and configuration information. Intended for all
audiences.
Repository Guide Describes the Oracle Commerce Platform repository API.
Presents programming concepts for advanced users,
including SQL repositories, LDAP repositories, secured
repositories, and composite repositories. Includes examples
and reference information to help programmers develop
applications using the repository API.

1 Introduction 3
Before You Begin
This section provides a high-level description of the tasks you need to perform before running Commerce
Service Center:
1. Ensure that supported versions of your Web application software is installed.
2. Install a supported application server. Consult the Platform Installation and Configuration Guide for your
application server.
3. Install Oracle Commerce Platform 11.2.
4. Install a supported database.
Browser and Environment Requirements
For information about the supported browsers, environments, and configurations, refer to the Oracle Commerce
Supported Environments Matrix document in the My Oracle Support knowledge base.
Users must enable cookies and scripting in their browsers to access Commerce Service Center.

4 1 Introduction

2 Commerce Service Center Server Architecture 5
2 Commerce Service Center Server
Architecture
Oracle Commerce Service Center is comprised of both customer-facing and agent-facing clusters. The customer-
facing cluster contains such applications as Oracle Commerce Core Commerce stores and other components
that customers use. The agent-facing cluster contains application such as Commerce Service Center and other
components that agents use.
Commerce Service Center Environment
Commerce Service Center works in tandem with Core Commerce and other Oracle Commerce Platform
applications. The following diagram displays a complete architectural schematic of Commerce Service Center
within a typical environment. Note that your environment may or may not look similar based upon the
applications that you have installed.

6 2 Commerce Service Center Server Architecture
Commerce Service Center Architecture
Customer-Facing Server Configuration
Customer-facing servers display the sites that customers log into. These servers contain versioned information
that is deployed using standard Oracle Commerce Publishing. Repository information is accessed through data
sources that connect to production or switching databases.
In the customer-facing server configuration, the JTDataSource component is used for all repositories other
than the product catalog.
Customer-Facing Server Configuration
2 Commerce Service Center Server Architecture 7
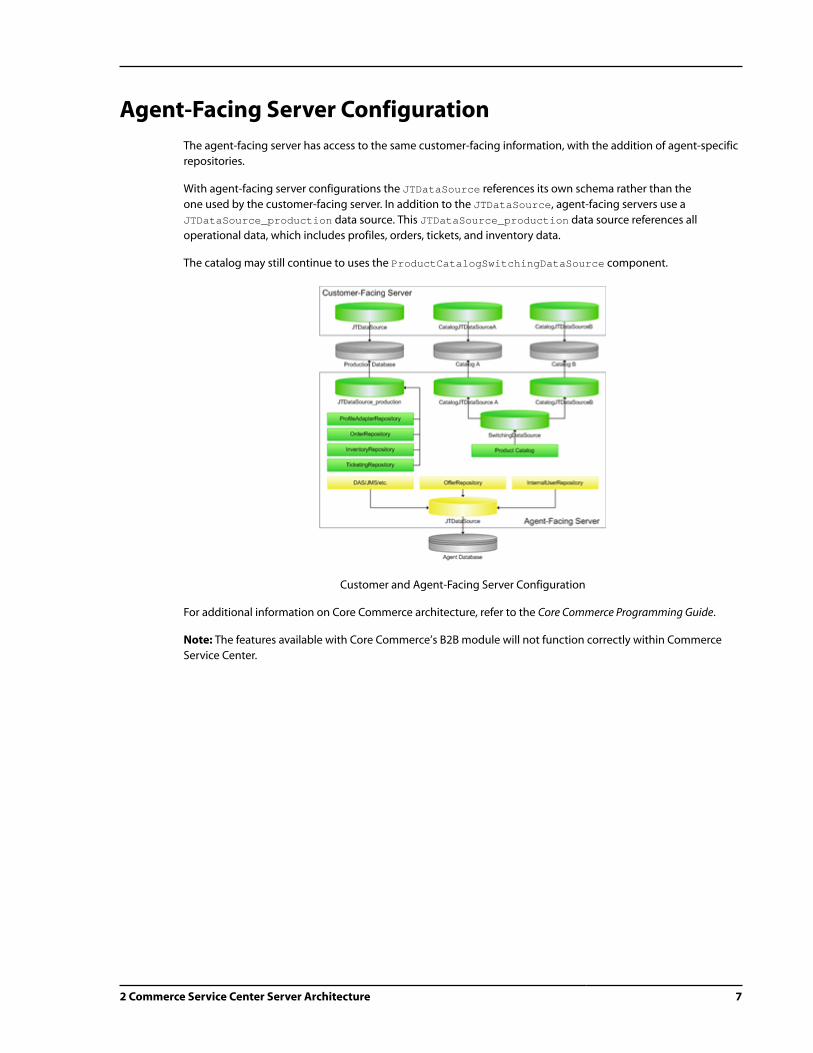
Agent-Facing Server Configuration
The agent-facing server has access to the same customer-facing information, with the addition of agent-specific
repositories.
With agent-facing server configurations the JTDataSource references its own schema rather than the
one used by the customer-facing server. In addition to the JTDataSource, agent-facing servers use a
JTDataSource_production data source. This JTDataSource_production data source references all
operational data, which includes profiles, orders, tickets, and inventory data.
The catalog may still continue to uses the ProductCatalogSwitchingDataSource component.
Customer and Agent-Facing Server Configuration
For additional information on Core Commerce architecture, refer to the Core Commerce Programming Guide.
Note: The features available with Core Commerce’s B2B module will not function correctly within Commerce
Service Center.

8 2 Commerce Service Center Server Architecture

3 Installing and Configuring the Commerce Service Center Server 9
3 Installing and Configuring the
Commerce Service Center Server
This section discusses the installation of Oracle Commerce Service Center. It is strongly suggested that you
install Commerce Service Center using the Configuration and Installation Manager (CIM).
Requirements for Commerce Service Center
Before you proceed, you must have the following installed or configured:
• Java JDK 1.7.0_72 or the latest supported version. Refer to the Oracle Commerce Supported Environments
Matrix document in the My Oracle Support knowledge base. Ensure that the JAVA_HOME and JAVA_HOME/
bin variables are set in your path correctly
• A supported application server, such as Oracle WebLogic. Consult the Platform Installation and Configuration
Guide for your application server
• A supported database, such as Oracle. Create two database users for your database to use, for example admin
and svcagent users
• The Oracle Commerce Platform 11.2
• Oracle Commerce Core Commerce 11.2 or Oracle Commerce Reference Store 11.2
Note: Commerce Service Center does not enable the Core Commerce B2B features. Any orders that contain
cost center, purchase order, invoice requests, order approvals or organization information will be read-only
and cannot be modified by an agent.
Database and Schema Requirements
Commerce Service Center requires two different database user accounts for database configuration. Create the
following accounts before configuring the database:
Database Schema Contents
svcagent
(Agent)
Versioned repository tables. Referred to in this document as the agent schema.
This schema is accessed from the agent-facing servers.
10 3 Installing and Configuring the Commerce Service Center Server
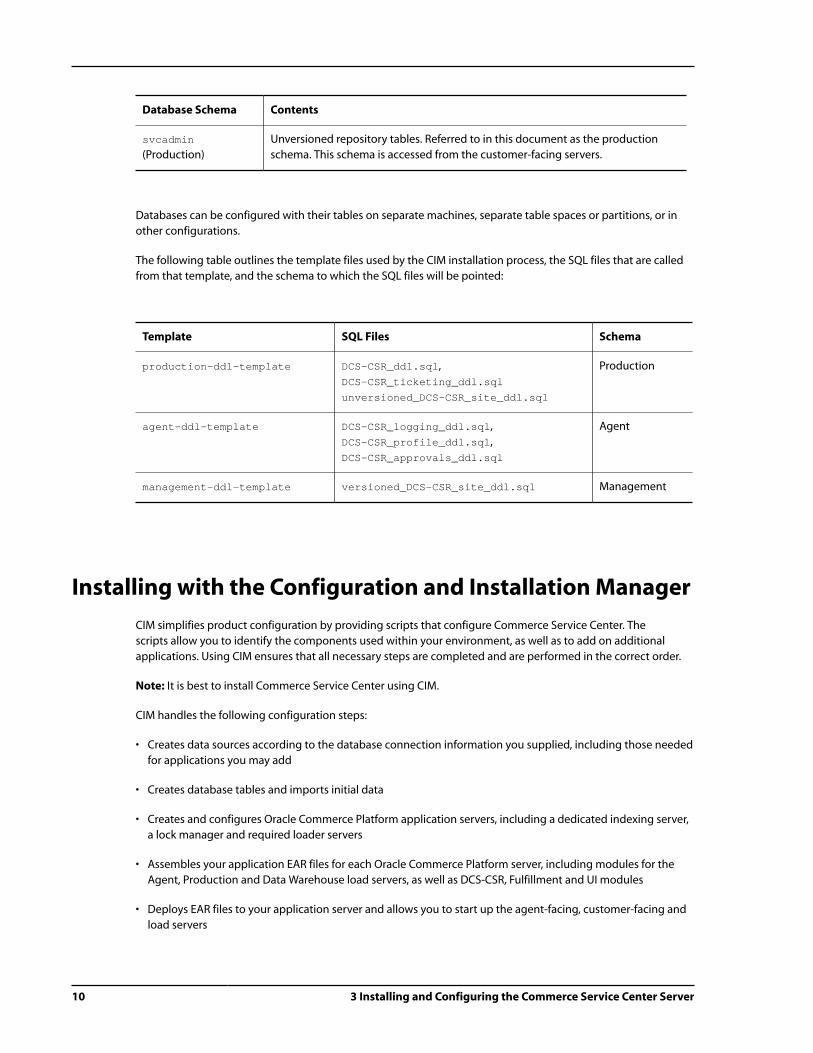
Database Schema Contents
svcadmin
(Production)
Unversioned repository tables. Referred to in this document as the production
schema. This schema is accessed from the customer-facing servers.
Databases can be configured with their tables on separate machines, separate table spaces or partitions, or in
other configurations.
The following table outlines the template files used by the CIM installation process, the SQL files that are called
from that template, and the schema to which the SQL files will be pointed:
Template SQL Files Schema
production-ddl-template DCS-CSR_ddl.sql,
DCS-CSR_ticketing_ddl.sql
unversioned_DCS-CSR_site_ddl.sql
Production
agent-ddl-template DCS-CSR_logging_ddl.sql,
DCS-CSR_profile_ddl.sql,
DCS-CSR_approvals_ddl.sql
Agent
management-ddl-template versioned_DCS-CSR_site_ddl.sql Management
Installing with the Configuration and Installation Manager
CIM simplifies product configuration by providing scripts that configure Commerce Service Center. The
scripts allow you to identify the components used within your environment, as well as to add on additional
applications. Using CIM ensures that all necessary steps are completed and are performed in the correct order.
Note: It is best to install Commerce Service Center using CIM.
CIM handles the following configuration steps:
• Creates data sources according to the database connection information you supplied, including those needed
for applications you may add
• Creates database tables and imports initial data
• Creates and configures Oracle Commerce Platform application servers, including a dedicated indexing server,
a lock manager and required loader servers
• Assembles your application EAR files for each Oracle Commerce Platform server, including modules for the
Agent, Production and Data Warehouse load servers, as well as DCS-CSR, Fulfillment and UI modules
• Deploys EAR files to your application server and allows you to start up the agent-facing, customer-facing and
load servers

3 Installing and Configuring the Commerce Service Center Server 11
• Allows you to add custom modules
Refer to the CIM script help and the Platform Installation and Configuration Guide for additional information on
CIM.
To install Commerce Service Center using CIM, do the following:
1. Install your application server.
2. Install your application files.
3. To start CIM, go to <ATG11dir>/home/bin and launch the CIM script:
./cim.sh | bat
4. Select the products you want to install.
5. Select the add-ons that you want to install.
6. Follow the CIM script according to the prompts. You can type H at any prompt for additional information.
For detailed information on Commerce Service Center CIM installations, refer to the Appendix B: CIM
Configuration Components (page 171)
Repositories
Repositories are configured using the CIM Database Configuration menu. The Commerce Service Center
database tables are used by several repositories. Depending on your needs, you may need to change the
configuration of these repositories, such as their data sources. For information on configuring repositories, refer
to the Repository Guide.
The following repositories are shared between your customer-facing server and Commerce Service Center:
• /atg/commerce/catalog/ProductCatalog
• /atg/commerce/claimable/ClaimableRepository
• /atg/commerce/contracts/Contracts
• /atg/commerce/custsvc/CsrRepository
• /atg/commerce/custsvc/approvals/ApprovalsRepository
• /atg/commerce/gifts/Giftlists
• /atg/commerce/inventory/InventoryRepository
• /atg/commerce/locations/LocationRepository
• /atg/commerce/order/OrderRepository
• /atg/commerce/pricing/priceLists/PriceLists
• /atg/userprofiling/PersonalizationRepository
CIM configures all repositories to use the /atg/dynamo/service/jdbc/JTDataSource_production

12 3 Installing and Configuring the Commerce Service Center Server
data source, which should reference the production schema.
For each repository, CIM configures the following properties by default. If you create new repositories, you
should ensure that these properties are configured:
Property Suggested Value
dataSource /atg/dynamo/service/jdbc/JTDataSource_production
idGenerator /atg/dynamo/service/IdGenerator_production
lockManager /atg/dynamo/service/ClientLockManager_production
eventServer /atg/dynamo/server/SQLRepositoryEventServer_production
subscriberRepository /atg/dynamo/service/jdbc/SQLRepository_production
Using IDGenerators
CIM ensures that all repositories share the same IDGenerator component. By default, any repository defined in
the customer-facing cluster should use the /atg/dynamo/service/
IDGenerator_production IDGenerator component on the agent-facing server.
For detailed information on the IDGenerator component, refer to the Platform Programming Guide
Understanding Lock Management
CIM allows you to configure dedicated lock manager servers during the installation process.
Lock servers synchronize caches among Oracle Commerce Platform servers to maintain data integrity, even if an
item is modified at the same time by different servers. CIM configures the ClientLockManager.properties
and the ServerLockManager.properties files to ensure all servers are using the correct ports. For additional
information on ClientLockManager and ServerLockManager properties, refer to the SQL Repository Caching
section in the Repository Guide.
CIM locates the default client lock manager to LockManager=/atg/dynamo/
service/ClientLockManager. By default, the ClientLockManager component has its useLockServer
property set to false, which disables the lock server. To use locked mode repository caching, this property must
be set to true. For example:
$class=atg.service.lockmanager.ClientLockManagerlockServerAddress=tartini,corellilockServerPort=9010,9010useLockServer=true
ServerLockManager on the Customer-Facing Server
The customer-facing server cluster defines a primary ServerLockManager instance. Additionally, there is a
defined ClientLockManager, which points to the primary ServerLockManager.

3 Installing and Configuring the Commerce Service Center Server 13
You can configure backup ServerLockManager instances for redundancy if needed. The following diagram
shows a typical customer-facing configuration with three commerce servers that have ClientLockManagers
that each point to the primary ServerLockManager:
Customer-Facing Lock Management
For information on setting up the ServerLockManager, refer to the Platform Installation and Configuration
Guide and the Repository Guide.
ClientLockManagers on the Agent-Facing Server
Agent-facing servers use the customer-facing server lock manager for any shared repositories, and individually
scheduled services.
The agent-facing clusters define a ClientLockManager_production, which points to the
ServerLockManager used by the customer-facing server. The following diagram displays both the customer-
facing server described above and the agent-facing server configuration. The agent-facing configuration
displays the two Commerce Service Center instances that each contain a ClientLockManager_production
that points to the ServerLockManager used by the three customer-facing commerce servers. The two
Commerce Service Center instances contain their own ClientLockManagers that each point to the agent-
facing ServerLockManager:
Customer and Agent-Facing Lock Management
For detailed information on configuring LockManagers, refer to the Repository Guide.
Accessing Commerce Service Center
Before you can access Commerce Service Center, you must start the servers by entering the appropriate run
command in your application server. Refer to your application server documentation for further information.
Once your servers are running in accordance with your application server, you can access the Commerce Service
Center application using the following URL:

14 3 Installing and Configuring the Commerce Service Center Server
http://hostname:port/agent
The hostname is the name of the machine on which Commerce Service Center is running. The port is the port
number that your application server uses to listen for requests; see the Platform Installation and Configuration
Guide for your application server for the default port number.
Working with Multiple Sites
If you have multiple customer-facing sites created, you can configure Commerce Service Center, using Site
Administration, to share data between the sites. Sites can be used for such things as providing localized store
information, branded segments, or creating running promotions.
Multiple sites within Commerce Service Center allow the agent to select a specific site, search throughout sites,
and to set site context. Site context ensures that configuration of the current site will affect the Commerce
Service Center display and control the availability of assets such as products, SKUs, catalogs, and price lists.
When an agent changes from one site to another the site context and potentially the available assets will also
change.
When configuring your system, you identify the assets that are available to each site using Site Administration
or Oracle Commerce Merchandising. The sites that can be accessed by Commerce Service Center are configured
using Site Administration in the Business Control Center. These settings include:
• Enabled Site – Sites that are available to Oracle Commerce Platform applications such as Commerce Service
Center
• Commerce Site – Sites that are displayed in a Core Commerce application
• Site Icon – An icon that identifies each site. The pixel limit for icons is 16x16
• Default Site – Sets the site context when the agent logs in. This information is obtained from the site
repository
• Default Catalog – The catalog to use with a site unless other selection logic is available
• Default Price List and Sale Price List – Price lists to use with a site unless other selection logic is available
• Site Priority – Identifies the priority of the site if it is a member of multiple sites
For additional information on configuring Commerce Service Center using Site Administration, refer to the
Multisite Administration Guide.
Additionally, you can configure agent access to individual sites or site groups. Site access control allows you to
configure an environment where agents from the same call center may not have access to all of your customer-
facing sites. For information on setting site security, refer to the Controlling Site Access (page 87) section.
Enabling Multisite
Commerce Service Center can be configured to recognize and use multiple sites with the siteManager
multiSiteEnabled property. The isMultiSiteEnabled method allows you to conditionally render the

3 Installing and Configuring the Commerce Service Center Server 15
Commerce Service Center UI for multiple sites. Refer to the Multisite Administration Guide for additional
information.
Configuring the Default Site
To configure the default site, use the /atg/commerce/custsvc/util/CSRConfigurator component to set
the defaultSiteId property. This sets the default current site when agents log into Commerce Service Center.
Refer to the Using the CSRConfigurator Component (page 49) section for additional information. To load an
agent-specific default site, override the getAgentDefaultSiteId method in CSRAgentTools.
Configuring the Default Site Icon
Commerce Service Center can display a default site icon, should a site not have an associated icon. Use the /
atg/commerce/custsvc/util/CSRConfigurator component to set the defaultSiteIconURL property to
display the default icon. Refer to the Using the CSRConfigurator Component (page 49) section for additional
information.
Configuring a Site Icon
You can configure site icons to display on specific pages. The images are configured for each site within the
site repository and must be downloaded to their appropriate location. To set a site icon, you must update the
siteConfiguration item descriptor and add a siteIcon property with the location. The following example
sets a siteIcon property value for Site A and for Site B:
<update-item item-descriptor="siteConfiguration" id="SiteA"> <set-property name="siteIcon"> <![CDATA[/DCS-CSR/images/icons/icon_site_a.gif]]> </set-property></update-item>
<update-item item-descriptor="siteConfiguration" id="SiteB"> <set-property name="siteIcon"><![CDATA[/DCS-CSR/images/icons/icon_site_b.gif]]> </set-property></update-item>
Configuring Shareables
When you configure Core Commerce, you identify the shareables that are used in both Core Commerce
and Commerce Service Center. For information on configuring these shareables, refer to the Core Commerce
Programming Guide and the Multisite Administration Guide.

16 3 Installing and Configuring the Commerce Service Center Server

4 Configuring Order and Profile Search 17
4 Configuring Order and Profile
Search
This chapter describes the following Oracle Commerce Service Center configurations for configuring order and
profile searches.
Order and Profile Search Overview
When you install Commerce Service Center using Oracle Commerce Platform Configuration and Installation
Manager (CIM), the TextSearch modules are added to your environment. These modules install the
components that allow you to search for orders and profiles using standard Full Text Searching (FTS) SQL
queries. FTS is performed using standard search tokens within the supported databases: Oracle, MSSQL and
DB2. Note that MySQL database searches are also supported, but not for production environments.
A tokens table and index for both orders and profiles is created in the database and referenced as repository
items in the appropriate Search repository. By default, a listener is attached to each repository and is triggered
when an update, delete, or insert operation occurs. The listener updates the modified table to indicate that
during the next scheduled incremental execution, the updated order or profile indexing tokens will be
regenerated and the token will be updated. As a result, the index reflects the new tokens. This can occur in real-
time, be performed manually or as a bulk index.
When performing a bulk load, or baseline indexing operation, a staging table is populated with the search
tokens. These tokens are then merged into the token table and indexed, allowing the indexing process to occur
without disrupting agent searches.
Note: This search process is not used for ticket, product or catalog searches.
Configuring Order and Profile Search
Note: Before configuring your system for order and profile search, ensure that you have the necessary
components from your database vendor for performing Full Text Searches. Refer to your database vendor’s
documentation for information.
To set up your search environment, perform the following steps:

18 4 Configuring Order and Profile Search
1. Install Commerce Service Center, which installs the search repositories that contain tables that track modified
orders and profiles for indexing, and items that contain the properties that have been translated into
search tokens. Refer to the Installing with the Configuration and Installation Manager (page 10) section for
information on installing Commerce Service Center.
2. Configure the database settings for your database as described in the Configuring Text Search Database
Environments (page 23) section.
3. Populating the index by performing a bulk load in the Dynamo Server Admin as described in the Preloading
the Index (page 26) section. This creates a base-line index against which future searches and indexes will
be run.
4. Configure manual indexes as necessary using the Dynamo Server Admin, as outlined in the Changing Default
Incremental Indexing Schedules (page 26) section.
Order and Profile Search Components
The order and profile search configuration is administered using the Dynamo Server Admin and is comprised of
the following components:
• The atg.textsearch.indexing.IndexingOutputConfig class, which specifies output options that
define properties used during the indexing process. This component works with the following components:
• The /atg/commerce/textsearch/OrderOutputConfig component that configures the text search SQL
and associated indices for orders
• The /atg/userprofiling/textsearch/ProfileOutputConfig component that configures the SQL
and text search indices for profiles
• Indexing Sessions – The sessions identify the database indexing configurations.
• The /atg/textsearch/repository/SearchRepository that defines the search token and modification
tables.
Full Text Search Components
The following primary classes and interfaces are used for order and profile searches.
Location and Name Description
/atg/textsearch/client/
SearchClientService
This component sets the LiveIndexingSupported
and LiveSearchingSupported properties. It also
delegates all the calls to the defined database client
and indexing session.

4 Configuring Order and Profile Search 19
Location and Name Description
/atg/textsearch/client/
CSCDB2Client.properties,
CSCMSSQLClient.properties,
CSCMySQLClient.properties,
CSCOracleClient.properties
Identifies the database that is installed, the column
of the search table that contains search tokens, and
other database specific configurations. It also is used
to identify the databaseToTextLanguage property,
which identifies the databases used:
oracle=ORACLE_CONTEXT
db2=DB2_TEXT_EXT
msSQL=MSSQL_TSQL
MySQL=MYSQL_TEXT_SQL
/atg/textsearch/indexing/
session/DatabaseIndexing
Session
Configures indexing functions that construct
operations maps. Operation maps are built using
resource keys that link messages and SQL statements
together.
/atg/textsearch/indexing/
operation/common/
NumberOfItemsToIndex.properties
PopulateStaging.properties
TruncateStaging.properties
Contains information detailing generic SQL
that can be executed against any database. SQL
can have placeholders that identify common
tables, index names, etc., and are resolved
by the IndexingOutputConfig file. The
NumberOfItemsToIndex defines the SQL that
obtains the total number of items that will be
indexed as part of the baseline index process.
PopulateStaging defines the SQL and placeholder
values that are needed to produce the tokens used
when performing searches. TruncateStaging
defines the SQL and place holder values used to clear
the staging table.
/atg/textsearch/indexing/
operation/DatabaseOperation
Executes the SQL for the indexing process, and maps
the SQL place holder values.
/atg/textsearch/indexing/
operation/database-vendor/
MergeStagingToTokens.properties
Contains database-specific SQL information needed
to merge data from staging tables into the token
tables. Only items that have been changed or are
not in the token table will be merged. This file also
defines messages that are displayed in the UI, and
a map of placeholder values that link to properties
used in the IndexingOutputConfig file.
/atg/textsearch/indexing/
session/IndexingSession
Provides the interface for all types of indexing:
baseline – Wipes all data and reloads it.
manual – Allows definition of specified re-indexing
criteria.
increment – Performs scheduled live updates of
items.

20 4 Configuring Order and Profile Search
Location and Name Description
/atg/textsearch/indexing/
DB2IndexingSession,
MSSQLIndexingSession,
MySQLIndexingSession,
OracleIndexingSession
The necessary methods to build the database vendor-
specific SQL needed to perform bulk, incremental
and live updates on a specific database type. Each
database type has a properties file that provides
configuration information as well as the following
properties:
indexingOperations – A key=value format that
defines the steps involved in the indexing operations.
The key links the SQL and the UI messages used
when performing the database operation. The
valuedefines the SQL to run during the operation.
baselineOperations – Defines the list
of database operations to perform, such as
NumberOfItemsToIndex, PopulateStaging,
TruncateStaging and MergeStagingToTokens.
/atg/textsearch/indexing/
IndexingOutputConfig
Specified output options defining properties for
indexing along with SQL to generate the necessary
search tokens.
/atg/textsearch/indexing/schedule/
BaseIndexingOutputConfigScheduleImpl
The base class for scheduling indexing operations.
Extends the SingletonScheduleService.
Order Search Components
The following components are used when performing order searches. These components reside in the
DCS.TextSearch module.
Location and Name Description
OrderIndexingAdditional
Information
Used to provide any additional information for each
database vendor type. For example, if your database type
requires specific numbering formats, etc.
OrderIndexingSQL Identifies the database SQL to perform order indexing.
OrderManualIndexRequestByCreation
DateRange
Allows an administrator to re-index orders by creation date
range. For information on performing manual indexing,
refer to the Performing a Manual Re-Index (page 27)
section.
OrderManualIndexRequestById Allows an administrator to re-index orders by ID. For
information on performing manual indexing, refer to the
Performing a Manual Re-Index (page 27) section.

4 Configuring Order and Profile Search 21
Location and Name Description
OrderManualIndexRequestByLas
tModifiedDateRange
Allows an administrator to re-index orders by the last
modified date range. For information on performing
manual indexing, refer to the Performing a Manual Re-
Index (page 27) section.
OrderManualIndexRequestBySubmitted
DateRange
Allows an administrator to re-index orders by the
submitted date range. For information on performing
manual indexing, refer to the Performing a Manual Re-
Index (page 27) section.
OrderModifiedListenerConfig Sets the repositoryItemName to listen to for changes,
and the modifiableProperties that trigger a re-index.
By default, changes to the lastModifiedDate property
trigger a re-index.
OrderOutputConfig The OrderOutputConfig configures data and
components needed for performing indexing of order
items.
The component class IndexingOutputConfig creates
the AdminServlet, which drives the UI in the Dynamo
Server Admin. The UI is used to perform indexing
operations, as described earlier in this table.
The OrderOutputConfig in the /LiveIndex directory
allows you to identify the indexing sessions that perform
baseline, incremental or manual indexing of orders by
setting the order /atg/commerce/
textsearch/indexing/session/indexingSession
property.
OrderBaselineScheduleConfig Contains the order baseline scheduling and lock
management information.
Profile Search Components
The following components are used when performing profile searches. These components reside in the
DPS.TextSearch module.
Location and Name Description
ProfileContactInfoModified
Listener Config
Identifies the repository item to listen to for changes, the RQL
details that indicate an index can be performed and properties
that, when modified, trigger an index.
ProfileIndexingAdditional
Information
Used to provide any additional information for each database.
ProfileIndexingSQL Database SQL for profile searches.

22 4 Configuring Order and Profile Search
Location and Name Description
ProfileManualIndexinRequestByID Allows an administrator to re-index profiles by ID. For
information on performing manual indexing, refer to the
Performing a Manual Re-Index (page 27) section.
ProfileManualIndexRequestByLast
ModifiedDateRange
Allows an administrator to re-index profiles by the last modified
date range. For information on performing manual indexing,
refer to the Performing a Manual Re-Index (page 27) section.
ProfileModifiedLIstenerConfig Sets the repositoryItemName to listen to for changes, and
the modifiableProperties that trigger a re-index. By default,
changes to the following properties trigger a re-index:
login
firstName
lastName
shippingAddress
billingAddress
secondaryAddresses
creditCards
ProfileOutputConfig The ProfileOutputConfig configures data and components
needed for performing indexing of profile items.
The component class IndexingOutputConfig creates the
AdminServlet, which drives the UI in the Dynamo Server
Admin. The UI is used to perform indexing operations, as
described earlier in this table.
The ProfileOutputConfig in the /LiveIndex directory
allows you to identify the indexing sessions that perform
baseline, incremental or manual indexing of profiles by setting
the profile /atg/userprofiling/textsearch/
indexing/session/indexingSession property..
ProfileBaselineScheduleConfig Contains the profile baseline scheduling and lock management
information.
Indexing Methods
Order and profile search support incremental, manual, scheduled and bulk indexing. Incremental indexing
occurs in real time, and as such, requires the tables and database index to be created.
• Incremental Indexing – Enabled by default, it is configured by default to check for modifications to orders and
profiles every twenty seconds. By default, Commerce Service Center performs incremental indexing only on
components that are located in the LiveIndex module.
• Manual Indexing – Started from the /atg/userprofiling/textsearch/
ProfileOutputConfig or the /atg/commerce/textsearch/OrderOutputConfig component in the
Dynamo Server Admin. Manual indexes can be started by providing criteria for the specific manual index
request.

4 Configuring Order and Profile Search 23
• Scheduled Indexing – Baseline indexing can be scheduled by configuring the
OrderBaselineScheduleConfig or the ProfileBaselineScheduleConfig. Scheduling uses the
atg.service.scheduler.SingletonScheduleService, which is described in detail in the Platform
Programming Guide. By default, scheduling is disabled.
• Bulk Indexing – Started from the /atg/userprofiling/textsearch/
ProfileOutputConfig or the /atg/commerce/textsearch/OrderOutputConfig component in the
Dynamo Server Admin.
Note: You cannot search for incomplete orders. Incomplete orders, or orders that have yet to be submitted, are
not indexed, and as such, are not contained within the search index.
Configuring Text Search Database Environments
To perform order and profile searches in Commerce Service Center, there are some database-specific actions
required for configuration before you can populate your index.
Creating Indexes in IBM DB2 Environments
When creating full text search environments in IBM DB2, you must set up the indexes manually. This
configuration is performed when you set up a new environment, however, if the schema is dropped, you must
re-configure the indexes.
Note that the tables must be set up using CIM before the index can be applied. The creation of the text search
indexes must be done by procedure calls as CIM does not support CallableStatements.
Note: Ensure that you have the latest IBM DB2 fix packs. This ensures that you can grant the necessary privileges
required for text searches, as well as use procedure calls. Refer to your IBM DB2 documentation for detailed
information on working with text searches.
Creating the Order Index
Call the stored procedure with the (optional) desired update frequency. For example, to call a stored procedure
that creates an index with no incremental updates:
CALL SYSPROC.SYSTS_ADMIN_CMD ('create index SRCH_SEARCH_ORDER_IDX for texton SRCH_ORDER_TOKENS(TOKENS','en_US', ?)
To run a stored procedure that creates an index that incrementally updates every minute:
CALL SYSPROC.SYSTS_ADMIN_CMD ('create index SRCH_SEARCH_ORDER_IDX for texton SRCH_ORDER_TOKENS(TOKENS) update frequency D(*) H(*) M(0,1,2,3,4,5,6,7,8, 9,10, 11,12,13,14,15,16,17,18,19,20,21,22,23,24,25,26,27,28,29,30,31,32,33,34,35,36,37,38,39,40,41,42,43,44,45,46,47,48,49,50,51,52,53,54,55,56,57,58,59)','en_US', ?)
Altering the Order Index
If you have created the index without an update frequency, you may alter the index specifying the update
frequency by calling the stored procedure on the index:
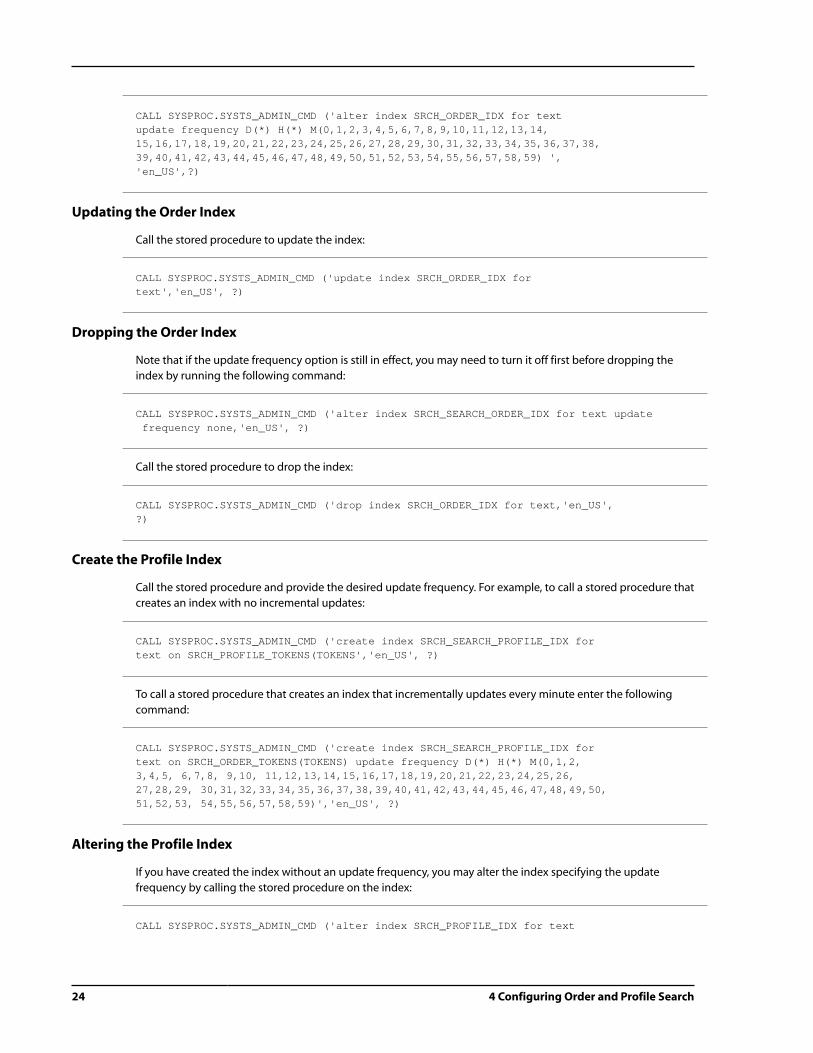
24 4 Configuring Order and Profile Search
CALL SYSPROC.SYSTS_ADMIN_CMD ('alter index SRCH_ORDER_IDX for textupdate frequency D(*) H(*) M(0,1,2,3,4,5,6,7,8,9,10,11,12,13,14,15,16,17,18,19,20,21,22,23,24,25,26,27,28,29,30,31,32,33,34,35,36,37,38,39,40,41,42,43,44,45,46,47,48,49,50,51,52,53,54,55,56,57,58,59) ','en_US',?)
Updating the Order Index
Call the stored procedure to update the index:
CALL SYSPROC.SYSTS_ADMIN_CMD ('update index SRCH_ORDER_IDX fortext','en_US', ?)
Dropping the Order Index
Note that if the update frequency option is still in effect, you may need to turn it off first before dropping the
index by running the following command:
CALL SYSPROC.SYSTS_ADMIN_CMD ('alter index SRCH_SEARCH_ORDER_IDX for text update frequency none,'en_US', ?)
Call the stored procedure to drop the index:
CALL SYSPROC.SYSTS_ADMIN_CMD ('drop index SRCH_ORDER_IDX for text,'en_US',?)
Create the Profile Index
Call the stored procedure and provide the desired update frequency. For example, to call a stored procedure that
creates an index with no incremental updates:
CALL SYSPROC.SYSTS_ADMIN_CMD ('create index SRCH_SEARCH_PROFILE_IDX fortext on SRCH_PROFILE_TOKENS(TOKENS','en_US', ?)
To call a stored procedure that creates an index that incrementally updates every minute enter the following
command:
CALL SYSPROC.SYSTS_ADMIN_CMD ('create index SRCH_SEARCH_PROFILE_IDX fortext on SRCH_ORDER_TOKENS(TOKENS) update frequency D(*) H(*) M(0,1,2,3,4,5, 6,7,8, 9,10, 11,12,13,14,15,16,17,18,19,20,21,22,23,24,25,26,27,28,29, 30,31,32,33,34,35,36,37,38,39,40,41,42,43,44,45,46,47,48,49,50,51,52,53, 54,55,56,57,58,59)','en_US', ?)
Altering the Profile Index
If you have created the index without an update frequency, you may alter the index specifying the update
frequency by calling the stored procedure on the index:
CALL SYSPROC.SYSTS_ADMIN_CMD ('alter index SRCH_PROFILE_IDX for text

4 Configuring Order and Profile Search 25
update frequency D(*) H(*) M(0,1,2,3,4,5,6,7,8,9,10,11,12,13,14,15,16,17,18,19,20,21,22,23,24,25,26,27,28,29,30,31,32,33,34,35,36,37,38,39,40,41,42,43,44,45,46,47,48,49,50,51,52,53,54,55,56,57,58,59) ','en_US',?)
Updating the Profile Index
Call the stored procedure to update the index:
CALL SYSPROC.SYSTS_ADMIN_CMD ('update index SRCH_PROFILE_IDX fortext','en_US', ?)
Dropping the Profile Index
Note that if the update frequency option is still in effect, you may need to turn it off first before dropping the
index by running the following command:
CALL SYSPROC.SYSTS_ADMIN_CMD ('alter index SRCH_PROFILE_IDX for text update frequency none,'en_US', ?)
Call the stored procedure to drop the index:
CALL SYSPROC.SYSTS_ADMIN_CMD ('drop index SRCH_PROFILE_IDX fortext,'en_US',?)
Creating Indexes in MSSQL Environments
In MSSQL database environments, you must create a function that removes non-alphanumeric characters by
creating the following function. When installing, CIM will create all of the necessary tables, objects, and indexes.
By default, these are configured to update in real-time. Refer to your MSSQL documentation for additional
information.
CREATE FUNCTION dbo.fnRemovePatternFromString(@BUFFER VARCHAR(MAX), @PATTERNVARCHAR(128)) RETURNS VARCHAR(MAX) ASBEGIN DECLARE @POS INT = PATINDEX(@PATTERN, @BUFFER) WHILE @POS > 0 BEGIN SET @BUFFER = STUFF(@BUFFER, @POS, 1, '') SET @POS = PATINDEX(@PATTERN, @BUFFER) END RETURN @BUFFEREND
Performing Indexing Administration
There are a number of administrative tasks that you can perform when indexing orders and profiles.

26 4 Configuring Order and Profile Search
The following examples use the Dynamo Server Admin. Note that changes made in the Dynamo Server Admin
are not made to the configuration files.
Preloading the Index
If you would like to preload the index with existing orders and/or profiles, perform the following steps:
1. Using the Dynamo Server Admin, open the /atg/commerce/textsearch/
OrderOutputConfig component to preload orders, or the /atg/userprofiling/
textsearch/ProfileOutputConfig component to preload profiles.
2. Invoke the bulkload method by clicking the Submit button. This recreates the index with orders and/or
profiles in the database.
Changing Default Incremental Indexing Schedules
Indexes are not updated automatically when their associated data is inserted, updated or deleted. Instead, the
system uses incremental indexing, which is a real-time process that polls every twenty seconds for changes
made to the database tables. When changes are found, the process adjusts index entries only for profiles and
orders that have been modified since the last poll. The IndexingoutputConfigIncrementalScheduleImpl
class identifies if incremental scheduling is enabled, and starts the scheduling service. In Commerce Service
Center, by default, incremental indexing updates are performed only on components that are located within the
LiveIndex modules.
Note that by default, incremental scheduling is enabled, and is scheduled to run every 20 seconds.
To modify the incremental indexing schedule
1. Using the Dynamo Server Admin, open the /atg/commerce/textsearch/
OrderIncrementalScheduleConfig component to modify order indexing, or the /atg/userprofiling/
textsearch/ProfileIncrementalScheduleConfig component to modify profile indexing.
2. Select the schedule property.
3. Enter the schedule interval in seconds.
You can also disable incremental indexing by opening the Enabled property and changing it from true to
false. Note that disabling incremental indexing will not stop an incremental index that is currently running.
Setting the property to false will stop the call to the incremental process in the admin session. Updates, inserts
and deletions are still written to the modified tables, but are not reflected in the tokens table until incremental
indexing has been re-enabled.
Scheduling Indexing
You can schedule profile and order indexing to occur on a schedule. To ensure that indexing can occur,
indexing requests are sent to the IndexAdmin for lock management, and obtains the IndexLock from the
IndexingOutputConfig. The IndexingLockManager obtains exclusive write lock, which prevents other
processes from impacting the indexing process.
The scheduling process uses the atg.service.schedule.SingletonSchedulableService, which works in
conjunction with lock managers to guarantee that only one instance of the schedule service is running at any
given time. For detailed information on the SingletonSchedulableService, refer to the Scheduler Services
section of the Platform Programming Guide.

4 Configuring Order and Profile Search 27
By default, scheduling is disabled. To enable scheduling, you must extend the
OrderBaselineScheduleConfig or ProfileBaselineScheduleConfig files in your /localconfig
directory by:
1. Adding schedule details as described in the Schedule Settings section of the Platform Programming Guide.
Using the CalendarSchedule format:
schedule=calendar mos dates wkdays mo-occurs hrs mins
2. Enabling the scheduling operation.
The following is an example of a ProfileBaselineScheduleConfig file that is scheduled to run on the last
Sunday of every month at 1:00 a.m.
# Profile baseline information/
$class=atg.textsearch.indexing.schedule.IndexingOutputConfigBaselineScheduleImpl$scope=global$description=Schedule information for baseline of Profiles.
# SingletonSchedulableService lock manager details.clientLockManager=/atg/dynamo/service/ClientLockManagerlockName=ProfileBaselineScedule_LOCKlockTimeOut=2000scheduler=/atg/dynamo/service/SchedulerjobName=ProfileBaselineSchedulejobDescription=Performs a baseline of Profiles
schedule=calendar * . 1 last 1 0
enable=true
indexingOutputConfig=\ /atg/userprofiling/textsearch/ProfileOutputConfig
Performing a Manual Re-Index
You can perform manual re-indexing of profile and orders by accessing the Dynamo Server Admin and
accessing the /commerce/textsearch/OrderOutputConfig or the /atg/userprofiling/textsearch/
ProfileOutputConfig components.
Manually Re-Indexing Orders
It is possible to manually re-index orders. By default, you can re-index orders using the following criteria:
• Orders created within a specified date range
• Orders modified within a specified date range
• Orders that were submitted within a specified date range
• A list of Order IDs
The /atg/commerce/textsearch/OrderOutputConfig component contains the manualIndexRequests
property that enumerates the types of queries used to manually re-index orders. The default queries perform
indexing by creation date, last modified date, submitted date, or ID:

28 4 Configuring Order and Profile Search
manualIndexRequests=\ /atg/commerce/textsearch/OrderManualIndexRequestByCreationDateRange,\ /atg/commerce/textsearch/OrderManualIndexRequestByLastModifiedDateRange,\ /atg/commerce/textsearch/OrderManualIndexRequestBySubmittedDateRange,\ /atg/commerce/textsearch/OrderManualIndexRequestById
Each of the ManualIndexRequests define an SQL query that sets the criteria for the indexing request.
To manually re-index:
1. Using the Dynamo Server Admin, access the OrderOutputConfig component to re-index orders.
2. Select Manually Re-Index a Subset of Orders.
3. Enter the parameters for performing a re-index. The following example displays a manual re-indexing of a
subset of orders that have been modified between December 1, 2013 and December 31, 2013.
Note: The date range must be entered in the yyyy-mm-dd hh:mm:ss format and must include the time in 24
hour format. For example, in 2014 February 28th at 7:30 p.m. would be 2014-02-28 19:30:00.
4. Click Submit to begin the re-indexing process.
The screen will present a message indicating how many items were queued for indexing.
Manually Re-Indexing Profiles
It is possible to manually re-index profiles. By default, you can re-index profiles using the following criteria:

4 Configuring Order and Profile Search 29
• Profiles modified within a specified date range
• A list of Profile IDs
The /atg/userprofiling/textsearch/ProfileOutputConfig contains the manualIndexRequests
property. By default, queries perform indexing for profiles by last modification date or by ID:
manualIndexRequests=\ /atg/userprofiling/textsearch/ProfilesManualIndexRequestById,\ /atg/userprofiling/textsearch/ ProfileManualIndexRequestByLastModifiedDateRange
Each of the ManualIndexRequests define an SQL query that sets the criteria for the indexing request.
To manually re-index:
1. Using the Dynamo Server Admin, access the ProfileOutputConfig component to re-index profiles.
2. Select Manually Re-Index a Subset of User.
3. Enter the parameters for performing a re-index. The following example displays a manual re-indexing of a
subset of orders that have been modified between January 1, 2013 and January 1, 2014.
Note: The date range must be entered in the yyyy-mm-dd hh:mm:ss format and must include the time in 24
hour format. For example, in 2014 February 28th at 7:30 p.m. would be 2014-02-28 19:30:00.
Adding Properties to the Index
When performing searches, you may want to return search results by a specific criterion. This criterion must
be indexed before it can be searched. If your existing index does not contain the property you want to use for
searching, you must add it. For a property to be added to the index, you must add it to the token table.
The /atg/commerce/textsearch/OrderIndexingSQL and the /atg/userprofiling/

30 4 Configuring Order and Profile Search
textsearch/ProfileIndexingSQL configuration files define which properties are selected as tokens.
For example, the following OrderIndexingSQL snippet shows, in the first column, how it returns the order_id
properties for an Oracle database. The second column is produced by appending all of the values in the columns
together with their prefix and separated by a space:
SELECT o.order_id \, NVL2(o.order_id, ''orid'' || o.order_id || '' '', '''') \|| NVL2(o.state, ''orst'' || o.state || '' '', '''') \|| NVL2(u.id, ''pfid'' || u.id || '' '', '''') \|| NVL2(u.login, ''pflg'' || u.login || '' '', '''') \|| NVL2(u.first_name, ''pffn'' || u.first_name || '' '', '''') \|| NVL2(u.last_name , ''pfln'' || u.last_name || '' '', '''') \|| NVL2(u.email , ''pfem'' || u.email || '' '', '''') \AS tokens \
Note that properties are identified with the SQL column name, and a prefix name. The prefix name is defined
in either the OrderSearchTreeQueryFormHandler or the CustomerSearchTreeQueryFormHandler
configuration file. These files provide a map that matches the SQL column name to the name of the repository
item.
For example, the following OrderSearchTreeQueryFormHandler snippet associates repository items with
SQL prefixes:
uiFieldNameToIndexPrefixMap=\id=orid,\state=orst,\profile.profile_id=pfid,\profile.login=pflg,\profile.firstName=pffn,\profile.lastName=pfln,\profile.email=pfem,\
To add a property to the index:
1. Add the property, and its associated prefix, to the list of tokens via the SQL statement.
For example, to add middle_name as an indexed property, you would add it to the OrderIndexingSQL
configuration file:
SELECT o.order_id \
, NVL2(o.order_id, ''orid'' || o.order_id || '' '', '''') \
|| NVL2(o.state, ''orst'' || o.state || '' '', '''') \
|| NVL2(u.id, ''pfid'' || u.id || '' '', '''') \
|| NVL2(u.login, ''pflg'' || u.login || '' '', '''') \
|| NVL2(u.first_name, ''pffn'' || u.first_name || '' '', '''') \
|| NVL2(u.middle_name,.''pfmn'' || u.middle_name || '' '', '''') \
|| NVL2(u.last_name , ''pfln'' || u.last_name || '' '', '''') \
|| NVL2(u.email , ''pfem'' || u.email || '' '', '''') \
AS tokens \
Note that the u.middle_name is associated with the pfmn prefix.
2. In the OrderSearchTreeQueryFormHandler, associate the middleName property of the profile repository
item with SQL column name prefix that was added to the OrderIndexingSQL file:

4 Configuring Order and Profile Search 31
uiFieldNameToIndexPrefixMap=\
id=orid,\
state=orst,\
profile.profile_id=pfid,\
profile.login=pflg,\
profile.firstName=pffn,\
profile.middleName=pfmn,\
profile.lastName=pfln,\
profile.email=pfem,\
Note that when creating prefixes, it is best to keep their names to four characters or less.
3. Once you have added the new properties to the database SQL as tokens, perform a bulkload operation as
outlined in the Preloading the Index (page 26) section. This will add the new property to the index.
4. Create a UI component with the name profile.middleName. Refer to the Service Center UI Programming
Guide for details on creating and modifying UI components.
Once you have added a property to an index, it can be used to sort search results.

32 4 Configuring Order and Profile Search

5 Configuring Catalog Search 33
5 Configuring Catalog Search
Oracle Commerce Service Center, by default, uses SQL for searching the product catalog. It is possible to extend
the search capabilities of the catalog search feature by integrating with Oracle Commerce MDEX Engine.
When you configure your Commerce Service Center using CIM, you can select the option to install MDEX
Engine-based Catalog Search. Commerce Service Center uses the Oracle Commerce Experience Manager
configuration that you have established for storefront applications, which generates the same search results
for the agent as produced for the storefront. Commerce Service Center provides a generic, yet customizable,
presentation of the search results.
Configuring catalog search using the MDEX Engine enables an agent to perform the same search as a customer.
An MDEX Engine-based catalog search:
• Displays the same search results to the agent as displayed to the customer
• Provides guided navigation to the agent with result paging and sorting
• Allows an agent to add search term queries and obtain auto suggestions
• Provide site-based catalog configuration and filtering
• Uses Commerce Service Center-specific page displays, such as dimensions, breadcrumbs and search
refinements
Catalog Search with MDEX Engine Prerequisites
Before you can configure Commerce Service Center catalog search to work with the MDEX Engine, you must
have installed and configured an MDEX Engine server. Commerce Service Center’s implementation depends
upon the storefront’s integration with MDEX and the Oracle Commerce Experience Manager configurations that
have already been created. Refer to the MDEX Engine documentation for additional information on setting up
and configuring an MDEX Engine server.
The DCS-CSR-UI.Endeca module contains the configuration property files that Commerce Service Center uses
to integrate with the storefront’s MDEX Engine. To continue performing SQL catalog browses and searches, do
not include the DCS-CSR-UI.Endeca module in the startup list and use only the DCS-CSR-UI module.
Using Live Indexing and MDEX Catalog Search
When setting up an environment that uses an MDEX server, Commerce Service Center relies on the Oracle
Commerce Reference Store deployment template. This template, which is created after using CIM to create the

34 5 Configuring Catalog Search
MDEX server, configures the LiveAppServerCluster.xml file for production servers only. As such, you must
manually edit the LiveAppServerCluster.xml file to include your agent servers to be in the cluster.
To add a new app server to the cluster:
1. Edit the LiveAppServerCluster.xml file with the following:
<app-server-cluster id="LiveAppServerCluster">
<app-server ref="LiveCRS" />
<app-server ref="LiveAgent" />
</app-server-cluster>
2. Then define the app server:
<app-server id="LiveAgent" hostName="localhost" port="8280">
<web-app ref="AgentWebApp1" />
</app-server>
3. Set up the web-app and context path by adding the following:
<web-app id="AgentWebApp1" contextPath="/dyn/admin/assemblerAdmin"/>
Note that this configuration must only be done once during initial setup.
Overview of Catalog Search with MDEX
The search process starts with Commerce Service Center issuing a request, based upon the search criteria
entered by the agent. The request incorporates the following:
• Issues a service framework request for the search results panel stack. The request may optionally contain an
MDEX Engine content URI as an input parameter. A default URI is used when one is not provided
• The search result panel invokes the CSRInvokeAssembler droplet, which issues the search request to the
Oracle Commerce Assembler using the given content URI
• The search results, in the storefront’s format, is parsed into a map of content items that is keyed by the
content item type
• A series of page fragments render the content items by type. For example, there are fragments that render
Breadcrumbs, RefinementMenus and ResultList content items
• Any follow-on content URIs rendered in the result, such as NavigationActions, are wrapped in a service
framework request for the search result panel stack by the ContentRequestURI droplet
Initiating an MDEX Catalog Search Request
Requests for search content are made through the catalog search panel stack. The cmcProductCatalogSearch
panel JSP, /panels/catalog/endeca/

5 Configuring Catalog Search 35
productCatalogSearch.jsp calls the CSRInvokeAssembler servlet bean and includes all of the page
fragments used to display product records, dimensions, refinements, paging controls, sorting controls and the
search term query form.
Note: Auto Suggestions are sent through a separate request. For information on how auto suggestions work
refer to the Configuring Auto-Suggestions (page 42) section.
Determining Content URI
The productCatalogSearch page determines the correct content URI using the contentURI parameter.
If the contentURI is not found, the page looks at the cached content URI from the SearchState,
which is a session-scoped component that holds data on the most recently requested content URI. If the
contentURI is still not found, the page uses the defaultcontentURI value that has been entered in the
configuration.properties file. It then updates the cache contentURI in the SearchState:
<c:if test="${empty endecaContentURI}"> <c:set var="endecaContentURI" value="${searchState.lastContentURI}"/> <c:if test="${empty endecaContentURI}"> <c:set var="endecaContentURI" value="${endecaConfig.defaultContentURI}"/> </c:if></c:if><dsp:setvalue bean="/atg/commerce/custsvc/catalog/ endeca/SearchState.lastContentURI" value="${endecaContentURI}"/>
Filtering the Requests
The MDEX site and catalog filters are applied during all requests to ensure that the correct data is returned. The
CSRSiteFilterBuilder extends SiteFilterBuilder to set the current site filter based on the current site
scope in the search state object. The CSRCatalogFilterBuilder sets the catalog filter based on the current
site scope, using either the current catalog, or all of the catalogs in the current cart sharing group. For detailed
information on the SiteFilterBuilder and CatalogFilterBuilder, refer to the Platform-Guided Search
Integration Guide.
UI Page Fragments
A PageFragment is a component that defines the URL path and servlet context for a specific JSP page. A number
of these components are used to render the MDEX Engine catalog browse and navigation. These components
are located under /atg/commerce/custsvc/ui/fragments/catalog/endeca.
The following is an example of the ResultsListContentItem page fragment:
$class=atg.web.PageFragmentURL=/include/catalog/endeca/displayResultListContentItem.jspservletContext=DCS-CSR
Note that the URL and servlet context can be changed when making customizations to the UI. For defaulted
information on working with page fragments, refer to the Page Developer's Guide. For additional information on
working with customizing catalog search page fragments, refer to the Customizing Search Results (page 44)
section.

36 5 Configuring Catalog Search
Encoding Framework URL
All navigation requests to the Commerce Service Center UI must use the framework.jsp servlet bean.
Therefore, the service framework URL is encoded on all anchor tags, forms and navigation requests. For example,
the following URL navigates to the catalog search page:
/framework.jsp?ps=cmcCatalogPS&p=cmcProductCatalogSearch
Each request for search results also includes an MDEX content URI, such as “/browse”. The content URI is
encoded on the service framework URL as a URL parameter. For example:
/framework.jsp?_windowid=1&ps=cmcCatalogPS&p=cmcCatalogSearchP&contentURI=/browse/_/N-1z141n6
This encoding is performed on all anchor tags or success URLs that generate search results. The
contentRequestURL droplet can be used to generate URLs for requesting search results. Refer to the Content
Request URL Droplet Servlet Bean (page 39) section.
Defining Navigation Actions
MDEX Engine NavigationActions objects contain the meta data for changing the current navigation state,
such as selecting a refinement, or paging through the result screens.
The following is an example of a refinement NavigationAction in JSON format.
"@class": "com.endeca.infront.cartridge.model.Refinement","multiSelect": true,"navigationState": "/Canyon/_/N-1z141qc?Nrpp=12&format=json","contentPath": "/browse","count": 13,"siteRootPath": "/pages","label": "Canyon","properties": { }
The content URI for a NavigationAction is constructed by the ContentRequestUrlDroplet. Using the
above example, the content URI result would be:
/browse/Canyon/_/N-1z141qc?Nrpp=12&format=json
And the resulting URL would be:
/framework.jsp?_windowid=1&ps=cmcCatalogPS&p=cmcCatalogSearchP&contentURI=/browse/_/N-1z141qc&Nrpp=12&format=json
CSRInvokeAssembler
Commerce Service Center uses the CSRInvokeAssembler servlet bean to make the request to the
Assembler. The servlet bean parses the result from MDEX into a map of ContentItems keyed by type
(Map<String.List<? ContentItem), which is included as an output parameter named contentItemMap.

5 Configuring Catalog Search 37
The raw search results are also returned as an output parameter. The contentItemMap is a convenience object
used for quickly accessing specific content items in the result:
<dsp:droplet name="/atg/commerce/custsvc/catalog/endeca/InvokeAssembler"> <dsp:param name="includePath" value="${endecaContentURI}"/> <dsp:oparam name="output"> <dsp:getvalueof var="contentItemResult" param="contentItem"/> <dsp:getvalueof var="contentItemMap" param="contentItemMap"/> </dsp:oparam></dsp:droplet>
Setting the Agent Profile
Because Commerce Service Center is an agent-facing application, the agent’s internal profile is the active
session profile for all requests. To generate customer-specific results from the Assembler, Commerce Service
Center swaps the active customer profile for the duration of the call to the Assembler. To do this, Commerce
Service Center implements the Assembler’s GenericInvokeAssemblerCallbackImp callback interface. This
implementation is configured using the AssemblerTools component:
AssemblerTools.properties:callbacks=+ProfileInvokeAssemblerCallback
Configuring an MDEX Catalog Search
Once the content items and types are identified, they are associated with a page fragment through the /atg/
commerce/custsvc/catalog/endeca/configuration.properties file. This configuration file contains
the following properties, which are used to configure various aspects of catalog search:
Property Description
alternateResultContentItemTypes A list of content item types that, if located in the results,
will be displayed in the result area of the UI just below
the traditional results list. This list also defines the order
in which they are displayed. For example:
alternatResultsContentItemTypes=
MyContentItem
autoSuggestMinLength The minimum number of characters that must be typed
into the search term box before auto suggestions occur.
The default is 3.
autoSuggestURI The URI used for requesting auto suggestion content. If
null, the auto suggestion feature is disabled.
breadcrumbContentItemType The content item type used for breadcrumbs. The
default is Breadcrumbs.

38 5 Configuring Catalog Search
Property Description
collectionPropertyNames Identifies which property name of the content item
contains the collection to display.
defaultContentURI The root URI for MDEX search requests. The default
content URI is expected to be the “root” content URI,
which is set in /atg/commerce/custsvc/catalog/
endeca/configuration.properties using the
defaultContentURI property. Refer to theConfiguring
Catalog Search (page 33) section for additional
information. The default value is /browse.
defaultObjectRenderingPageFragment Identifies the page fragment used to render objects
from the collection on a result content item. By
default, all objects will be handled as products.
If multiple record types are being returned in
the collection, you can perform type-specific
rendering by specifying page fragments using the
objectRenderingPageFragmentsByType property.
defaultResultContentItemPageFragment The page fragment used by default to render
result content items. The default fragment displays
a collection of records or repository items that
are attached to the content item. The property
that contains the collection is specified by the
collectionPropertyName property.
endecaResourcedValuePropertyNames This property maps the UI key name to a property name.
The map is then used to display resource values in the
UI. For example, the refinementMenu.title key
determines the property name of the content item that
contains the text to display on a refinement menu title.
There are three resourced value property names used by
default in Commerce Service Center:
refinementMenu.title=displayName
sortOption.label=label
dimensionSearchGroup.displayName=
displayName
endecaResourceValuesResourceBundle Identifies the resource bundle to use if the
showRawEndecaResourceValue is false.
objectRenderingPageFragmentsByType This property maps objects types to a page fragment
used to render the object in the display. To render by
type, MDEX records must have a record type property
defined by recordTypePropertyName.
recordProductIdPropertyName Specifies the key in the record attribute map that
references the Product ID. This property is used by the
page fragment that renders a record as a product.

5 Configuring Catalog Search 39
Property Description
recordTypePropertyName Specifies the key in the record attribute map that
contains the type value, which is required to specify
different rendering page fragments by type.
refinementMenuContentItemType The content item type used for refinement menus. The
default is RefinementMenu.
resultContentItemPageFragments Use this property to map custom page
fragments to specific result content item
types. If a type is not specified in the map, the
defaultResultContentItemPagFragment
is used. The default setting for this property is
resultContentItemPageFragments=
ResultsList=/atg/commerce/custsvc/ui/
fragments/catalog/endeca/
ResultListContentItem
defaultResultContentItemPageFragment Identifies the page fragment used to render a
content item when its type is not configured by the
resultContentItemPageFragments property.
resultContentItemTitleLookupKeys Looks up the property name that contains the title for
the records contained in the content item displayed in
the results.
resultsListContentItemType The content item type used for the result list. The default
is ResultsList.
showRawEndecaResourcedValues Displays the value of the MDEX property in its raw form
when true. If false, the value will be used as a key to look
up a resourced value in the configured resource bundle.
Catalog Search Servlet Beans and Form Handlers
The following servlet beans and form handlers are used for MDEX Engine Catalog Searches.
Content Request URL Droplet Servlet Bean
The ContentRequestUrlDroplet, which extends the FrameworkUrlDroplet, generates a URL with the
content URI or content collection name encoded as a URL parameter. The droplet generates URLs for category
browse navigation links, default and follow-on content URIs, as well as the auto suggest collection content.
Class atg.commerce.csr.catalog.endeca.ContentRequestUrlDroplet
Components /atg/commerce/custsvc/catalog/endeca/ContentRequestUrlDroplet

40 5 Configuring Catalog Search
The servlet bean identifies the default URL for the search results page using the searchResultsPageURL
property. By default, the value is set to /framework.jsp?ps=cmcCatalogPS&
p=cmcProductCatalogSearch. The ContentRequestUrlDroplet contains the following parameters. Note
that only a single dimensionId, contentPath or navigationAction parameter can be used to determine
the content URI. If no value is provided for contentPath or navigationAction, the default content URI will be
used:
Input Parameters
• url – Optional. The base URL on which the ContentURI parameter will be encoded. If this parameter is not
provided, the value will default to the configured searchResultsPageURL
• dimensionId – Optional. This identifies the dimension ID. When an value is specified, the default content URI
is used with a navigation filter parameter (N=x) to specify the dimension value
• contentPath – Optional. This parameter specifies a value to use as the content URI in the resulting URL
• navigationAction – Optional. An MDEX NavigationAction object from which to construct the content
URI
• recordOffset – Optional. The result record offset for paging. When a value is provided, the
navigationAction should be a paging template where record offset can be substituted into the URI
• recordsPerPage – Optional. Specifies the number of records per page for the results. When a value is
provided, the navigationAction should be a paging template where records per page can be substituted
into the URI
Open Parameters
• output – This parameter is rendered only once.
Examples
The following example identifies the defaultContentURI as the content path:
<dsp:droplet name="ContentRequestURLDroplet"> <dsp:param name="contentPath" value="${endecaConfig.defaultContentURI}" /> <dsp:oparam name="output"> <dsp:getvalueof var="contentURL" bean="ContentRequestURLDroplet.url" /> </dsp:oparam></dsp:droplet>
The following example uses a navigationAction:
<dsp:droplet name="ContentRequestUrlDroplet"> <dsp:param name="navigationAction" value="${sortOption}" /> <dsp:oparam name="output"> <dsp:getvalueof var="contentURL" bean="ContentRequestURLDroplet.url" /> </dsp:oparam></dsp:droplet>
The following is an example of a navigation action with a record offset:
<dsp:droplet name="ContentRequestURLDroplet"><dsp:param name="navigationAction" value="${resultsListContentItem['pagingActionTemplate']}"/>

5 Configuring Catalog Search 41
<dsp:param name="recordOffset" value="${pageRecordIndex}"/><dsp:param name="recordsPerPage" value="${recsPerPage}"/><dsp:oparam name="output"> <dsp:getvalueof var="contentURL" bean="ContentRequestURLDroplet.url"/> <a href="#" onclick="atgSubmitAction({url: '${contentURL}'});return false;"> <c:out value="${pageNumber}"/></a></dsp:oparam></dsp:droplet>
Content Item Results Droplet
This servlet bean iterates over a collection of objects referenced by a ContentItem and determines the page
fragment that should be used to render each object in the collection.
Class atg.commerce.csr.catalog.endeca.ContentItemResultslDroplet
Components /atg/commerce/custsvc/catalog/endeca/ContentItemResultsDroplet
Input Parameters
• contentItem – The contentItem containing the collection
Output Parameters
• renderingPageFragment – The PageFragment for rendering the object in the collection.
• objectType – The type of the object in the collection, which is either a repository item descriptor name, or
an MDEX record type
Paging Droplet
This servlet bean is used to render the paging controls for catalog search results. Refer to the ATG API Reference
for Commerce Service Center for additional information on the servlet bean.
Class atg.commerce.csr.catalog.endeca.PagingDroplet
Components /atg/commerce/custsvc/catalog/endeca/PagingDroplet
Input Parameters
• recordsPerPage – The number of records displayed on a page
• currentRecordOffset – The index of the first record displayed
• totalRecords – The total number of records returned in the result
Open Parameters

42 5 Configuring Catalog Search
• prevPageGroup – Rendered once if there is a previous record group. A previous record group is the group of
records previous to the current record group. For example, if the current page group is 4,5,6, a previous page
group exists for pages 1,2,3. If the current page group is 1,2,3, this oparam would not be rendered because
you are currently on the first page group
• page – Rendered once for each page in the current page group with the exception of the current page, which
has its own oparam so that it can be uniquely identified
• currentPage – Rendered once for the current page
• nextPageGroup – Rendered once when there is a next record group. The next record group is the group next
in line from the current record group. For example, if the current page group is 7,8,9, the next page group
would be 10,11,12. If there is no page 10, the nextPageGroup is not rendered
Output Parameters
• prevPageGroupRecordIndex – The record index of the first record on the last page of the previous page
group
• nextPageGroupRecordIndex – The record index of the first record on the first page of the next page group
• pageNumber – The page number
• pageRecordIndex – The record index for the first record on the page
Site Scope Form Handler
The SiteScopeFormHandler is responsible for setting the SearchState’s siteScope value, which is used to
filter the search results by site.
Form Handler /atg/commerce/csr/catalog/Endeca/SiteScopeFormHandler
Components /atg/commerce/custsvc/catalog/Endeca/SiteScopeFormHandler
Configuring Auto-Suggestions
The search term page performs term queries as well as dynamic auto-suggestions. Note: The auto-suggestion
feature must be enabled in your MDEX Engine configuration before it can be configured in Commerce Service
Center. Refer to your MDEX Engine documentation for information.
If auto-suggestions are configured, when an agent enters a search term, the UI will automatically provide
dimension suggestions based on the terms entered.
Implementing Auto-Suggestions
Auto-suggestions are generated using a dimension search based on a search terms entered by the agent. Auto-
suggestions are not accessed using the catalog search results page, but the autoSuggestJson.jsp page,
which is designed specifically for requesting auto-suggestion content collections from the Assembler and then
rendering the results.
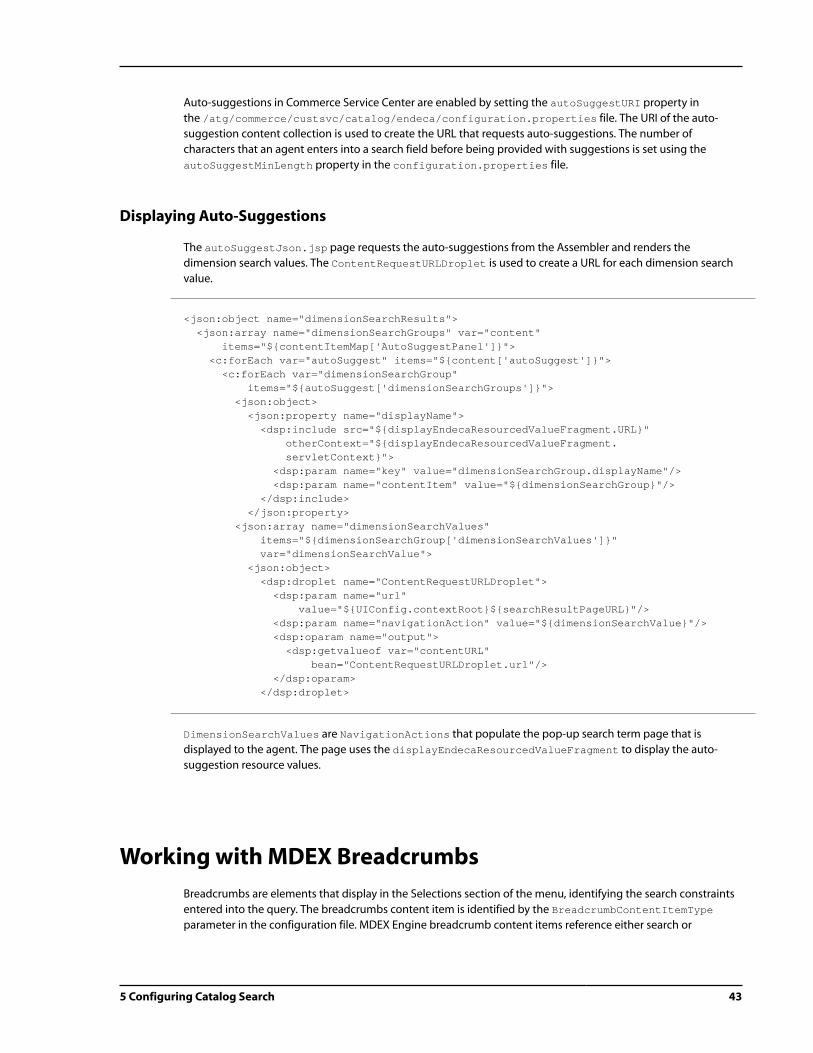
5 Configuring Catalog Search 43
Auto-suggestions in Commerce Service Center are enabled by setting the autoSuggestURI property in
the /atg/commerce/custsvc/catalog/endeca/configuration.properties file. The URI of the auto-
suggestion content collection is used to create the URL that requests auto-suggestions. The number of
characters that an agent enters into a search field before being provided with suggestions is set using the
autoSuggestMinLength property in the configuration.properties file.
Displaying Auto-Suggestions
The autoSuggestJson.jsp page requests the auto-suggestions from the Assembler and renders the
dimension search values. The ContentRequestURLDroplet is used to create a URL for each dimension search
value.
<json:object name="dimensionSearchResults"> <json:array name="dimensionSearchGroups" var="content" items="${contentItemMap['AutoSuggestPanel']}"> <c:forEach var="autoSuggest" items="${content['autoSuggest']}"> <c:forEach var="dimensionSearchGroup" items="${autoSuggest['dimensionSearchGroups']}"> <json:object> <json:property name="displayName"> <dsp:include src="${displayEndecaResourcedValueFragment.URL}" otherContext="${displayEndecaResourcedValueFragment. servletContext}"> <dsp:param name="key" value="dimensionSearchGroup.displayName"/> <dsp:param name="contentItem" value="${dimensionSearchGroup}"/> </dsp:include> </json:property> <json:array name="dimensionSearchValues" items="${dimensionSearchGroup['dimensionSearchValues']}" var="dimensionSearchValue"> <json:object> <dsp:droplet name="ContentRequestURLDroplet"> <dsp:param name="url" value="${UIConfig.contextRoot}${searchResultPageURL}"/> <dsp:param name="navigationAction" value="${dimensionSearchValue}"/> <dsp:oparam name="output"> <dsp:getvalueof var="contentURL" bean="ContentRequestURLDroplet.url"/> </dsp:oparam> </dsp:droplet>
DimensionSearchValues are NavigationActions that populate the pop-up search term page that is
displayed to the agent. The page uses the displayEndecaResourcedValueFragment to display the auto-
suggestion resource values.
Working with MDEX Breadcrumbs
Breadcrumbs are elements that display in the Selections section of the menu, identifying the search constraints
entered into the query. The breadcrumbs content item is identified by the BreadcrumbContentItemType
parameter in the configuration file. MDEX Engine breadcrumb content items reference either search or

44 5 Configuring Catalog Search
refinement breadcrumbs. The breadcrumb page fragment uses the type of the breadcrumb to determine the
correct JSP renderer.
Search breadcrumbs contain information about an active keyword search, such as a search term, and is rendered
by the search breadcrumb page fragment at /atg/commerce/custsvc/ui/fragments/
catalog/Endeca/SearchCrumb.
Refinement breadcrumbs contain information about a refinement and is rendered by the refinement
breadcrumb page fragment located at /atg/commerce/custsvc/ui/fragments/
catalog/Endeca/RefinementCrumb.
The following example shows how refinement breadcrumbs are displayed:
<c:forEach items="${refinementCrumbs}" var="refinementCrumb"> <dsp:include src="${refinementCrumbDisplayFragment.URL}" otherContext="${refinementCrumbDisplayFragment.servletContext}"> <dsp:param name="refinementCrumb" value="${refinementCrumb}"/> <dsp:param name="breadCrumb" value="${breadCrumb}"/> <dsp:param name="contentItemMap" value="${contentItemMap}"/> <dsp:param name="contentItemResult" value="${contentItemResult}"/> </dsp:include></c:forEach>
Customizing Search Results
You can customize the way that the search results are displayed, including paging and navigation, by working
with page fragments. For detailed information on working with page fragments, refer to the Page Developer's
Guide.
Catalog Search Page Fragments
The main container page for search results is the productCatalogSearch.jsp page. All catalog search page
fragments exist in the /atg/commerce/custsvc/ui/fragments/catalog/endeca name space:
Page Fragment Description
AutoSuggestJson Displays the auto-suggestion page and pop-up.
Breadcrumbs Display the current refinement selections.
CategoryTree Displays the top three levels of the category tree and navigation
components.
DisplayCollectionWithTitle Renders a collection of objects in a content item as a table with a
title in the Results area.
DisplayEndecaResourcedValue Displays a resourced value, such as a refinement menu or a sort
option label.

5 Configuring Catalog Search 45
Page Fragment Description
DisplayProduct Renders the product information from an MDEX record or
product repository item in the Results area.
DisplayResultContentTitle Displays the heading title for the table of results.
DisplaySubcategories Displays sub-category trees in the browser popup menu.
NoResults Displays when no result list or alternate content is found in the
results.
RefinementCrumb Display and individual refinement breadcrumb.
Refinements Displays the refinement menus. Each refinement menu contains
of list of refinement navigation actions. Refinements also display
More and Less links for displaying addition or less data.
ResultListContentItem Displays the ResultList content item.
Results Displays the results area.
ResultsPaging Displays the paging controls for the results.
ResultsSortOptions Displays the sort options from the ResultsList.
RootCategories Displays a root category list for browse pop-up menu.
SearchCrumb Displays an individual search term breadcrumb.
SearchTermInput Displays the search term input controls.
SiteScope Displays the site scope selection controls.
SubCategories Displays subcategories for a root category in the browse popup
menu.
The /panels/catalog/endeca/productCatalogSearch.jsp file is the page associated with the results
panel and can be changed by modifying the serviceFramework.xml configuration file. The following example
is a definition of the results panel:
<panel-definition> <id> cmcProductCatalogSearchP </id> <title-key> cmcEndecaCatalogSearchP </title-key> <content-url> /panels/catalog/endeca/productCatalogSearch.jsp </content-url></panel-definition>

46 5 Configuring Catalog Search
Using MDEX Engine Resourced Values
There are values that are displayed in the results UI that can be localized into the agent’s language. The
refinement titles, sort option labels and dimension search group labels are values that can be localized for
display.
Commerce Service Center provides two ways to deal with the display of these values. You can display the raw
value from the MDEX result, or you can treat the value as a key to a value in a resource bundle. The following
components and configuration define how these resources are displayed:
• DisplayEndecaResourcedValue - This page fragment component defines the JSP page for rendering the
resource values. This fragments takes the following parameters:
• key – the UI key for the value being resourced. These are Commerce Service Center-defined values that
identify the MDEX Engine resource values. This key is used to identify the configured property name in the
content item that contains the resourced value
• contentItem – The content item that contains the resourced value
For example:
<dsp:include src="${displayEndecaResourcedValueFragment.URL}"
otherContext="${displayEndecaResourcedValueFragment.servletContext}">
<dsp:param name="key" value="refinementMenu.title"/>
<dsp:param name="contentItem" value="${refinementMenu}"/>
</dsp:include>
• endecaResourcedValuePropertyName – This configuration maps the Commerce Service Center UI key to a
content item property name. For example:
endecaResourcedValuePropertyNames=refinementMenu.title=displayName,\
sortOption.label=label,\
dimensionSearchGroup.displayName=displayName
• showRawEndecaResourcedValues – This Boolean configuration value determines if the content item’s raw
value is display in the UI. If false, the content item’s raw value is used as a key to a resource bundle lookup
• endecaResourcedValuesResourceBundle – This configuration value provides the name on the resource
bundle for doing lookups
Displaying Alternate Content
Commerce Service Center provides a configurable way to render content in the results area other than the
traditional results list. For example, depending on the current refinements, the Assembler may produce results
that do not include a traditional ResultList content item, but may include other content that should be
displayed to the agent. Or, you may want to render some content in addition to the traditional result list. This
feature is referred to as displaying alternate content.
To display alternate content on the results page, perform the following:
1. Identify the content item types that contain the data to be displayed. By default, the alternate content will be
displayed below the standard result list display when it is present.
2. Edit the configuration file to add your new content item:
alternateResultContentItemTypes=NewContentItemType1, NewContentItemType2,
NewContentItemType3

5 Configuring Catalog Search 47
Note: If you are creating multiple new content item types, the order they are listed in the configuration will
determine the order that they are displayed.
3. Define a PageFragment component that identifies the JSP for rendering the alternate content. Configure this
page in Commerce Service Center:
resultsContentItemPageFragments=NewContentItemType1=/com/app/
NewContentItemType1PageFragment
4. Commerce Service Center provides a default page fragment for rendering the alternate content. This default
page assumes that there is a collection of product records or repository items on the content item and
renders them as a list with a title heading. The property name containing the new list must be configured to
use this default page:
collectionPropertyNames=+ NewContentItemType1=records
5. Configure the property containing the title:
resultsContentItemTitlePropertyName+=
NewContentItemType1=newContentItemTitleProperty
Configuring Oracle for SQL Catalog Searching
If you are configuring your system to perform SQL catalog searches using an Oracle database, you must perform
the following:
1. Configure your Oracle ConText settings to index the columns that the catalog search queries.
2. Create the following properties files in your configuration directory:
/atg/commerce/catalog/ProductCatalog.properties
/atg/commerce/pricing/PriceLists.properties
3. In each of these new properties file, set the simulateTextSearchQueries property to true.
Note: When running on a production environment, setting simulateTextSearchQueries to TRUE, may
affect performance.
4. Add a new index:
create index
dcs_prd_chldsku_sid_idx on dcs_prd_chldsku (sku_id) indextype is
ctxsys.context;
This is needed because the following SQL is generated when searching by SKU:
SELECT DISTINCT t1.product_id,t1.product_type
FROM dcs_product t1, dcs_prd_chldsku t2, dcs_prd_catalogs t3
WHERE t2.product_id=t1.product_id
AND t3.product_id=t1.product_id
AND (CONTAINS(t2.sku_id,'xsku1126',0) > 1
AND t3.catalog_id = 'masterCatalog')

48 5 Configuring Catalog Search

6 Programming Commerce Service Center 49
6 Programming Commerce Service
Center
Oracle Commerce Service Center can be modified to fit the needs of your environment. There are a number
of ways in which you may customize Commerce Service Center. You can modify the properties of Nucleus
components to enable or disable functionality, or you can extend Commerce Service Center classes and create
new components from these classes.
The CSRConfigurator component is used to set and customize a number of Nucleus component properties
that configure Commerce Service Center.
Using the CSRConfigurator Component
The /atg/commerce/custsvc/util/CSRConfigurator component configures Commerce Service Center
settings, through the following properties:
Property Name Description
cartShareableTypeId Checks if two sites are in the same cart sharing site
group. Also finds sites in the cart sharing site group.
This variable is used with environment management. For
information on environment management, refer to the
Ticketing User Guide.
catalogTools Specifies the catalogTools component to use. The
default is /atg/commerce/catalog
/CatalogTools, For information on the catalogTools
component, refer to the Core Commerce Programming
Guide.
commerceSiteType Indicates the Site Type, as configured in the Site
Administration Console in the Oracle Commerce
Business Control Center Home page. The default for
Commerce Service Center is set to commerce. For
additional information on site types, refer to the Multisite
Administration Guide.

50 6 Programming Commerce Service Center
Property Name Description
defaultAppeasementLimits Sets the default appeasement limit that an agent can
offer. The default format for the limit is USD=500.00. For
additional information on this property, refer to Setting
Global Appeasement Limits (page 80).
defaultCatalogId Identifies the default catalog to use when an anonymous
user profile is created. For additional information on this
property, refer to Configuring Current Catalog and Price
Lists (page 97).
defaultSiteIconURL Sets a default icon to use if there is no icon identified for
the site. For additional information on this property, refer
to Configuring the Default Site Icon (page 15).
defaultSiteId Specifies the global default site that is loaded when
the agent logs in. For additional information on this
property, refer to Configuring the Default Site (page 15).
maximumAlmostQualifiedFor
PromotionsInShortList
The number of promotion closeness qualifiers to display
on the shopping cart. The default number is set to 10.
paymentGroupTypeConfigurations Identifies the payment group type configurations to
display. For additional information on this property, refer
to Customizing a Payment Group Type (page 124).
paymentGroupTypesToBeInitialized The type of payment groups that can be initialized by
the Payment Group Droplet. These include creditCard,
storeCredit and giftCertificate. For additional
information on this property, refer to Customizing a
Payment Group Type (page 124).
pricingTools Sets the location of the pricing tools used for the running
commerce application. The default location is set
to /atg/commerce/pricing/PricingTools. For
additional information on pricingTools, refer to the
Core Commerce Programming Guide.
processReturnRequestImmediately If set to true, then the return request process will begin
immediately. The default is set to false.
quantityInputTagMaxLength The maximum number of characters that the
quantity field will accept. The default number
is set to 10. Fractional quantities can be
implemented on products and SKUs by setting the
FractionalQuantitiesAllowed property of the
SKU to true. For information on using product and
SKU fractional quantities, refer to the Core Commerce
Programming Guide.

6 Programming Commerce Service Center 51
Property Name Description
quantityInputTagSize The display size of the quantity input field. If the
quantityInputTagMaxLength size is set to 10, yet the
quantityInputTagSize is set to 5, the user will be able
to enter 10 characters, but only 5 of the 10 characters will
be displayed. The default number is set to 10.
shippingGroupTypeConfigurations Identifies the shipping group type configurations to
display. For additional information on this property, refer
to Customizing a Shipping Group Type (page 118).
shippingGroupTypeToBeInitialized The type of shipping groups that can be
initialized by the Shipping Group Droplet.
This includes hardgoodShippingGroup and
electronicShippingGroup. For additional
information on this property, refer to Customizing a
Shipping Group Type (page 118).
supportedPaymentGroupTypes Identifies the supported payment group types for
modified orders. If an order has a type that is not in the
configuration file, it will not load the order. For additional
information on this property, refer to Customizing a
Payment Group Type (page 124).
usingGiftLists If set to true, indicates that the running commerce
application uses gift lists. For additional information
on this property, refer to Working with Wish and Gift
Lists (page 53).
usingInStorePickup Specifies if the Oracle Commerce Core Commerce In
Store Pickup features are enabled. The default is true. In
Store Pickup uses the InStorePickupPaymentGroup
and CashPaymentGroup, as well as the
InStoreShippingGroup. Refer to the Working with
Shipping and Payment Groups (page 113) section for
information. For setting up In Store Pickup features, refer
to the Core Commerce Programming Guide.
usingOrderApprovals Specifies if Order Approvals are enabled. The default is
true. For additional information on this property, refer
to Enabling the Order Approval Process (page 80).
usingPriceLists If set to true, indicates that the running commerce
application uses price lists. For additional information
on this property, refer to the Using the Current Price
List (page 98).
usingSalesPriceLists Indicates if a sales price list has been enabled. For
information on this property, refer to the Add On
Modifications (page 172) section of Appendix B: CIM
Configuration Components (page 171)

52 6 Programming Commerce Service Center
Property Name Description
usingScheduledOrders Specifies if Scheduled Orders are enabled. The default
is true. For additional information on this property,
refer to Enabling and Disabling Scheduled Orders (page
69)
7 Working with Wish and Gift Lists 53
7 Working with Wish and Gift Lists
Gift and wish lists are Oracle Commerce Core Commerce features that allow customers who visit your site to add
items to a list that can be accessed by other customers, or saved and referenced for future purchases. Oracle
Commerce Service Center extends this functionality by enabling an agent to assist a registered customer with
the creation and management of their lists. Agents can also assist a customer who wants to search and purchase
items from another customer’s list. However, agents cannot create gift or wish lists for anonymous shoppers, nor
can they delete an item from a gift list, or delete a gift registry.
Note: If you have configured your environment with multiple sites, and have set up site access control, the
amount of information that an agent will be able to see will be limited based on their site access. Refer to the
Controlling Site Access (page 87) section for additional information.
For detailed information on working with gift and wish lists in Commerce, refer to the Setting up Gift Lists and
Wish Lists section of the Core Commerce Programming Guide.
Modifying Gift List Forms
Within Commerce Service Center, agents create gift lists using the Gift List menu in the customer’s profile. This
form is displayed if the usingGiftlists property of the CSRConfigurator is enabled. Refer to theUsing the
CSRConfigurator Component (page 49) section for additional information.
Note that the agent must also have access rights that enable them to create a gift or wish list. Refer to Setting Up
Internal Access Control (page 85) for information on agent access rights.
By default, agents can create a new gift list by providing the following information:
• Event Name
• Event Description
• Event Date
• Event Type
• Shipping Address
• Public or Private List
• Special Instructions
The gift list form can be modified to include fields or information. There are two properties files that can be
configured, the default configuration and the extended configuration.

54 7 Working with Wish and Gift Lists
The default configuration for the Create Gift List form, which is located in /DCS-CSR-UI/config/
atg/commerce/custsvc/ui/fragments/gift/GiftListCreateDefault.properties, contains the
following settings:
URL=/include/gift/giftlist/giftlistCreateUIFragment.jspservletContext=DCS-CSR
The JSP file that creates the Gift List form is located at /panels/gift/giftlistCreate.jsp and is configured
to import the following page fragments:
<dsp: importbean var="defaultPageFragment" bean="/atg/commerce/custsvc/ui/fragments/gift/GiftListCreateDefault" />
<dsp: importbean var="extendedPageFragment" bean="/atg/commerce/custsvc/ui/fragments/gift/GiftListCreateExtended" />
The extended configuration properties file, GiftListCreateExtended.properties, does not contain a
reference to a JSP file.
For additional information on configuring and modifying page fragments, refer to the Service Center UI
Programming Guide.
Rendering Gift Lists
Gift lists are rendered using the DCS-CSR-UI module and the /atg/commerce/custsvc/ui/
renderers/ProductSkuRenderer component pageOptions property:
pageOptions=\ actionRenderer=/renderers/order/sku/skuBrowserAction.jsp,\ giftlistActionRenderer=/renderers/gift/skuGiftlistBrowserAction.jsp,\ formHandler=/atg/commerce/custsvc/order/CartModifierFormHandler,\ successPanelStacks=cmcCatalogPS,\ errorPanelStacks=cmcCatalogPS,\ successUrlProperty=addItemToOrderSuccessURL,\ errorUrlProperty=addItemToOrderErrorURL
The skuGiftlistBrowserAction.jsp file defines the drop-down menu that displays available gift lists, as
well as the controls that allow agents to add to lists.
The /atg/commerce/custsvc/gifts/CSRGiftlistFormHandler, which is located in the DCS-CSR module,
extends the Commerce GiftlistFormHandler, and enables agents to create and add lists. For information on
the CSRGiftlistFormHandler, refer to the CSRGiftlistFormHandler (page 57) section.

7 Working with Wish and Gift Lists 55
Displaying Gift List Information
The DCS-CSR-UI module’s /atg/commerce/custsvc/ui/fragments/gift/
GiftlistDetailsViewDefault page fragment displays list information.
$class=atg.web.PageFragmentURL=/include/gift/giftlist/giftlistDetailsViewUIFragment.jspservletContext=DCS-CSR
The JSP displays the following information:
• Event Name
• Event Type
• Event Date
• Status (Public or Private)
• Site (If running in multisite mode)
• Shipping Address
When items are contained within gift or wish lists , they are displayed in one of two components that use the
servlet bean atg.svc.agent.ui.tables.TableConfiguration. The components are located in the /atg/
commerce/custsvc/ui/tables/gift/ directory:
List View Results Edit Results
Gift
Lists
/giftlist/GiftlistViewResultsTable /giftlist/GiftlistEditResultsTable
Wish
Lists
/wishlist/WishlistViewResultsTable /wishlist/WishlistEditResultsTable
The following is an example of the GiftlistViewResultsTable:
$class=atg.svc.agent.ui.tables.TableConfiguration$scope=globalcolumns=\ /atg/commerce/custsvc/ui/tables/gift/giftlist/Site,\ /atg/commerce/custsvc/ui/tables/gift/giftlist/ItemImage,\ /atg/commerce/custsvc/ui/tables/gift/giftlist/ItemDescription,\ /atg/commerce/custsvc/ui/tables/gift/giftlist/Desired,\ /atg/commerce/custsvc/ui/tables/gift/giftlist/Purchased
tablePath=/atg/commerce/custsvc/ui/tables/gift/giftlist/GiftlistViewResultsTabletablePage=/atg/commerce/custsvc/ui/tables/gift/giftlist/GiftlistTablePage

56 7 Working with Wish and Gift Lists
Configuring Gift List Search
The gift list search instance can be customized to include additional fields or information. Both default and
extended properties files can be modified.
The default configuration property file is available at /DCS-CSR-UI/config/atg/commerce/
custsvc/ui/fragments/gift/GiftListSearchDefault.properties and contains the following:
URL=/include/gift/search/giftlistSearchUIFragment.jspservletContext=DCS-CSR
The following JSP files are used for configuring the Gift List Search form:
JSP File Description
/panels/gift/
giftlistsearch.jsp
Calls the following page fragments:
<dsp: importbean var="defaultPageFragment"
bean="/atg/commerce/custsvc/ui/fragments/gift/
GiftListSearchDefault" />
<dsp: importbean var="extendedPageFragment"
bean="/atg/commerce/custsvc/ui/fragments/gift/
GiftListSearchExtended" />
/panels/gift/
searchResults.jsp
Calls the following page fragments:
<dsp: importbean var="defaultPageFragment"
bean="/atg/commerce/custsvc/ui/fragments/gift/
GiftListSearchResultsDefault" />
<dsp: importbean var="extendedPageFragment"
bean="/atg/commerce/custsvc/ui/fragments/gift/
GiftListSearchResultsExtended" />
The /panels/gift/giftListSearchGrid.jsp provides the gift list search results grid:
/atg/commerce/custsvc/ui/tables/gift/GiftlistGrid.properties$class=atg.svc.agent.ui.tables.GridConfigurationcolumns=\ /atg/commerce/custsvc/ui/tables/gift/search/EventName,\ /atg/commerce/custsvc/ui/tables/gift/search/LastName,\ /atg/commerce/custsvc/ui/tables/gift/search/FirstName,\ /atg/commerce/custsvc/ui/tables/gift/search/CustomerID,\ /atg/commerce/custsvc/ui/tables/gift/search/EventType,\ /atg/commerce/custsvc/ui/tables/gift/search/EventDate,\rowsPerPage=10gridHeight=450pxgridInstanceId=atg.commerce.csr.gift.giftlistInstancegridPath=/atg/commerce/custsvc/ui/tables/gift/search/GiftlistGridgridWidgetId=atg_commerce_csr_customer_gift_GiftlistTableprogressNodeId=atg_commerce_csr_gift_GiftlistGridStatus

7 Working with Wish and Gift Lists 57
searchFormId=atg_commerce_csr_giftlistSearchFormdataModelPage=/atg/commerce/custsvc/ui/tables/gift/search/GiftsistDataPagegridPage=/atg/commerce/custsvc/ui/tables/gift/search/GiftlistGridPage
The extended configuration property, GiftListSearchExtended.properties, does not contain links to a JSP
file.
Gift List Form Handlers
The following form handlers can be used when customizing gift list forms:
CSRGiftlistFormHandler
This form handler sets the messaging, environment and profile tools, as well as populates the gift lists with the
gift items. This form handler extends the GifListFormHandler.
Form Handler atg.commerce.csr.gifts.CSRGiftlistFormHandler
Components /atg/commerce/custsvc/gifts/CSRGiftlistFormHandler.properties
GiftlistTableFormHandler
This form handler populates the customer gift list grid on the customer view page.
Form Handler atg.commerce.csr.gifts.GiftlistTableFormHandler
Components /atg/commerce/custsvc/gifts/GiftlistTableFormHandler.properties
This form handler uses the following properties:
• DoOwnerSearch – By default, this property is set to true indicating that the search query will always return
results based on the gift list owner property
• DoSiteFilterSearch – By default, this property is set to true so when multisite is enabled the search query
will only return results that have a valid site. By default, any gift list with a site that has been disabled will still
be returned as part of the search results
• IncludeDisabledSites – Can be set to false to omit Disabled Sites from the search results
For more information on Commerce Service Center-specific Gift List form handlers, refer to the ATG API Reference
for Commerce Service Center.

58 7 Working with Wish and Gift Lists
Auditing Gift Lists
Audit events are created for gift and wish lists whenever lists are created or deleted, or whenever items are
added or removed from a list. Audit events are also created whenever quantities are changed within a list. The
audit events are stored in the csr_giftlist_event table.
Recorded events are configured in the GiftItemEventRecorder.properties file. By default, the properties
recorded are giftlistId, eventName, catalogRefId, OldQuantity and newQuantity.
For information on configuring auditing, refer to the Reporting and Logging (page 151) section.

8 Issuing Returns, Exchanges, Refunds and Appeasements 59
8 Issuing Returns, Exchanges, Refunds
and Appeasements
The following sections provide information on the returns, exchange, and appeasement processes and
calculators that are specific to Oracle Commerce Service Center.
Note: If you have configured your environment with multiple sites, and have set up site access control, the
amount of information that an agent will be able to see will be limited based on their site access. Refer to the
Controlling Site Access (page 87) section for additional information.
Commerce Service Center extends the Oracle Commerce Core Commerce returns features for generating
returns. Refer to the Core Commerce Programming Guide for detailed information on the returns process.
Providing Appeasements Access
For an agent to access the appeasements functionality, they must have cmcAppeasements access rights. These
access rights are provided in the csrOrders and csrManagers roles.
Commerce Service Center-Specific Return Components
Return Form Handler
This form handler contains Commerce Service Center-specific UI handlers and extensions of the
BaseReturnFormHandler.
Form Handler atg.commerce.csr.returns.ReturnFormHandler
Components /atg/commerce/custsvc/returns/ReturnFormHandler.properties
This form handler uses the following properties and components:

60 8 Issuing Returns, Exchanges, Refunds and Appeasements
Components Description
handleReceiveReturnItems This handler receives items that are being returned.
postConfirmReturn Sends e-mail notifications, associates the active ticket with
the replacement order and creates a new active order in the
Commerce Service Center environment.
For more information on this form handler, refer to the ATG API Reference for Commerce Service Center.
Is Item Returnable Droplet Servlet Bean
This servlet bean extends the Commerce IsReturnable servlet bean and identifies an item as returnable in
Commerce Service Center.
Class atg.commerce.csr.order.IsItemReturnable
Components /atg/commerce/custsvc/order/IsItemReturnable.properties
Order Is Returnable Droplet Servlet Bean
This servlet bean determines if an order is in a state where a return or exchange can occur in Commerce Service
Center.
Class atg.commerce.csr.order.OrderIsReturnable
Components /atg/commerce/custsvc/order/OrderIsReturnable.properties
The OrderIsReturnable servlet bean contains the following:
Input Parameters
• order– The ID of the order
Oparams
• true – Rendered if there is a return in progress
• false – Rendered if there is no return in progress
• error – Rendered if there is an error
Prepare Replacement Order Pipeline
This pipeline chain, which is defined in Commerce, is executed when an exchange is confirmed. It prepares the
replacement order for submission and includes the following processors:
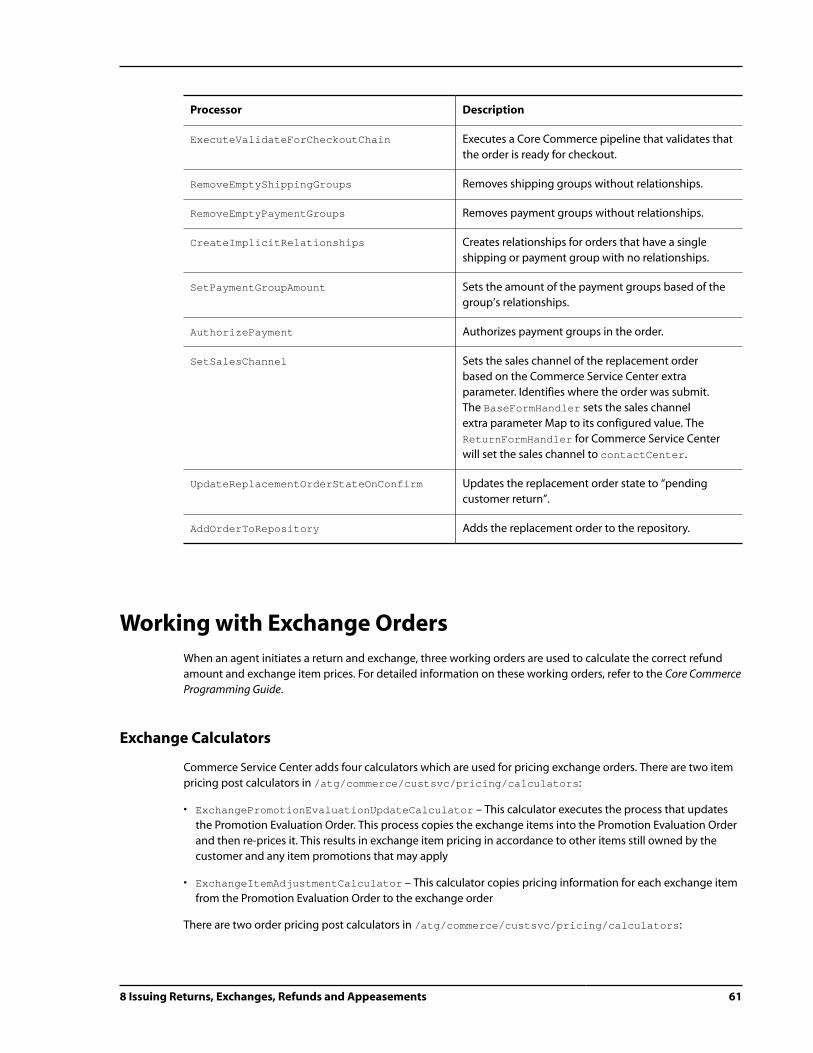
8 Issuing Returns, Exchanges, Refunds and Appeasements 61
Processor Description
ExecuteValidateForCheckoutChain Executes a Core Commerce pipeline that validates that
the order is ready for checkout.
RemoveEmptyShippingGroups Removes shipping groups without relationships.
RemoveEmptyPaymentGroups Removes payment groups without relationships.
CreateImplicitRelationships Creates relationships for orders that have a single
shipping or payment group with no relationships.
SetPaymentGroupAmount Sets the amount of the payment groups based of the
group’s relationships.
AuthorizePayment Authorizes payment groups in the order.
SetSalesChannel Sets the sales channel of the replacement order
based on the Commerce Service Center extra
parameter. Identifies where the order was submit.
The BaseFormHandler sets the sales channel
extra parameter Map to its configured value. The
ReturnFormHandler for Commerce Service Center
will set the sales channel to contactCenter.
UpdateReplacementOrderStateOnConfirm Updates the replacement order state to “pending
customer return”.
AddOrderToRepository Adds the replacement order to the repository.
Working with Exchange Orders
When an agent initiates a return and exchange, three working orders are used to calculate the correct refund
amount and exchange item prices. For detailed information on these working orders, refer to the Core Commerce
Programming Guide.
Exchange Calculators
Commerce Service Center adds four calculators which are used for pricing exchange orders. There are two item
pricing post calculators in /atg/commerce/custsvc/pricing/calculators:
• ExchangePromotionEvaluationUpdateCalculator – This calculator executes the process that updates
the Promotion Evaluation Order. This process copies the exchange items into the Promotion Evaluation Order
and then re-prices it. This results in exchange item pricing in accordance to other items still owned by the
customer and any item promotions that may apply
• ExchangeItemAdjustmentCalculator – This calculator copies pricing information for each exchange item
from the Promotion Evaluation Order to the exchange order
There are two order pricing post calculators in /atg/commerce/custsvc/pricing/calculators:

62 8 Issuing Returns, Exchanges, Refunds and Appeasements
• ExchangeOrderAdjustmentCalculator – This calculator applies order promotions to the exchange order
that are applied to the Promotion Evaluation Order. The promotion adjustment value is based on the order
discount share value applied to the exchange items
• ExchangeOrderDiscountCalculator – This calculator applies manual adjustments that are applied to the
Promotion Evaluation Order to the exchange order. The manual adjustment value is based on the manual
adjustment share value applied to the exchange items
The ItemPricingEngine configuration contains the ExchangeItemAdjustmentCalculator item pricing
calculator. This calculator adjusts the ItemPriceInfo of an item in the Exchange Order based on pricing of
the corresponding item in the Promotion Evaluation Order and copies that information from the Promotion
Evaluation Order to the ItemPriceInfo created for the exchange item. This includes the amount, all
PricingAdjustments and DetailedItemPricingInfos. This prices the item in the Exchange Order with the
exact pricing it received in the Promotion Evaluation Order, including any item level promotions that may have
been applied.
If manual adjustments are applied to the Promotion Evaluation Order, they are applied to the exchange order
by the OrderPricingEngine post calculator OrderAdjustmentCalculator. This calculator implements
priceOrder to trigger the calculation or the manual adjustment value map when pricing an Exchange Order,
then determines if manual adjustments should be applied to the exchange order. If necessary, the calculator
overrides the adjustOrderSubTotal to adjust the order subtotal based on the pre-calculated value of each
manual adjustment.
Tiered Pricing and Exchanges
When you work with exchanges, tiered pricing produces the correct results, but exhibits the following behavior
as a result of how the cost of exchange items is determined.
For example, in an order with a quantity of 7 items within the same tier levels, the original item would be priced
at 2 at 50, 3 at 40, 2 at 30. In an exchange of 1 for 1, the expected refund would be $30 and the exchange order
item would be $30, with a net no charge. However, because of the methodology used in pricing the exchange
items in the promotion evaluation order, the exchange order item is priced at 50, and the refund is calculated
at $50. This results in the expected net no charge for the 1 item in the exchange order. Additionally, if exchange
order quantity increases to 2, the total would be $100 and the refund would be $70, with an expected net
change of $30 for the additional item.
For additional information on Core Commerce pricing calculators, refer to the Pricing Overview section of the
Core Commerce Programming Guide.
Applying Promotions to Exchange Orders
No new promotions will be applied to an exchange order. New promotions include all promotions available to
the shopper for their next new order checkout. Promotions that were applied to the original purchase can still
be applied to the exchange order. For example, a promotion that is “buy X and get Y free” will still be applied if Y
is exchanged for another Y.
However, once a promotion no longer applies to the order it cannot be applied on subsequent exchanges.
For example, a promotion that is “buy X and get Y free” will not be applied if Y is exchanged for Z, and
then Z is exchanged for Y. The system calculates and saves the changes in the promotion value within the
ReturnRequest. This value is also saved in the repository with the return request item.

8 Issuing Returns, Exchanges, Refunds and Appeasements 63
Commerce Service Center-Specific Appeasement
Components
This section of the document provides information on the components used to process agent-applied
appeasements on fulfilled orders.
Appeasement Form Handler
This form handler contains Commerce Service Center-specific UI handlers and extensions of the
PurchaseProcessFormHandler.
Form Handler atg.commerce.csr.order.appeasement.AppeasementFormHandler
Components /atg/commerce/custsvc/appeasement/AppeasementFormHandler.properties
This form handler uses the following properties and components:
Components Description
handleApplyAppeasementRefunds This handler initializes the appeasement refund payment
options.
handleCancelAppeasement This handler cancels the appeasement.
handleSendConfirmationMessage This handler sends a confirmation email to the customer
indicating the status of the appeasement.
handleSubmitAppeasement This handler submits the current appeasement, and on
successful completion of the appeasement issues the
refund and marks the appeasement as complete.
handleValidateAppeasementValues This handler validates the amount entered for the payment
options to verify they don’t exceed the value of the
appeasement and that the allocations to the refund
methods match the value of the appeasement .
For more information on this form handler, refer to the ATG API Reference for Commerce Service Center.
Start Appeasement Form Handler
This form handler provides support for initiating the appeasement process by invoking the
CreateAppeasement pipeline chain.

64 8 Issuing Returns, Exchanges, Refunds and Appeasements
Form Handler atg.commerce.csr.order.appeasement.StartAppeasementFormHandler
Components /atg/commerce/custsvc/appeasement/
StartAppeasementFormHandler.properties
This form handler uses the following properties and components:
Components Description
handlePipelineError This handler adds a pipeline error to the list of form
exceptions.
Get Appeasement Order Balance Droplet Servlet Bean
This servlet bean returns the current items total for the fulfilled order to which the appeasement is applied. The
current items total is the order total less shipping and minus tax and minus any return item refunds made so far.
Class atg.commerce.csr.order.appeasement.
GetAppeasementOrderBalanceDroplet
Components /atg/commerce/custsvc/order/
GetAppeasementorderBalanceDroplet.properties
The GetAppeasementorderBalanceDroplet servlet bean contains the following:
Input Parameters
• orderId– The ID of the order
Oparams
• output – The current items total of the current order
• error – Rendered if there is an error
Get Appeasement Shipping Balance Droplet Servlet Bean
This servlet bean returns the current shipping total amount for the fulfilled order to which the appeasement is
applied. The current shipping total amount is the order shipping total less any shipping refunds made so far.

8 Issuing Returns, Exchanges, Refunds and Appeasements 65
Class atg.commerce.csr.order.appeasement.
GetAppeasementShippingBalanceDroplet
Components /atg/commerce/custsvc/order/
GetAvailableShippingTotalForOrder.properties
The GetAppeasementShippingbalanceDroplet servlet bean contains the following:
Input Parameters
• orderId– The ID of the order
Oparams
• output – The shipping balance amount available to the current order
• error – Rendered if there is an error
Get Order Appeasements Droplet Servlet Bean
This servlet bean provides the appeasements for a specified order. If the order is a replacement order then the
appeasements for the replaced order are also returned.
Class atg.commerce.csr.order.appeasement.GetOrderAppeasementsDroplet
Components /atg/commerce/custsvc/order/GetOrderAppeasementsDroplet.properties
The GetOrderAppeasementsDroplet servlet bean contains the following:
Input Parameters
• orderId– The ID of the order
• restrictToOrder – This is a boolean parameter which, if set to true, instructs the servlet bean to only return
appeasements directly linked to the specified order. The default value is false.
• state – This specifies an appeasement state to include in the search. If this is not specified, then all
appeasement states are included.
Oparams
• output – Rendered once if there are appeasements
• empty – Rendered once if there are no appeasements
Output Parameters
• appeasements – An array of appeasements

66 8 Issuing Returns, Exchanges, Refunds and Appeasements
Get Total Amount Of Appeasement By Type Droplet Servlet Bean
This servlet bean provides the cumulative total for all appeasements of the given type that have been applied to
the specified order
Class atg.commerce.csr.order.appeasement.
GetTotalAmountOfAppeasementByTypeDroplet
Components /atg/commerce/custsvc/order/
GetTotalAmountOfAppeasementByTypeDroplet.properties
The GetTotalAmountOfAppeasementByTypeDroplet servlet bean contains the following:
Input Parameters
• orderId– The ID of the order
• appeasementType – This specifies whether to return values for items or shipping appeasements.
Oparams
• output – The total value of appeasements of the given type applied to the specified order.
Is Appeasement Pending Approval Droplet Servlet Bean
This servlet bean checks if there are any appeasements in PENDING status for the selected order.
Class atg.commerce.csr.order.appeasement.
IsAppeasementPendingApprovalDroplet
Components /atg/commerce/custsvc/appeasement/
IsAppeasementPendingApprovalDroplet.properties
The IsAppeasementPendingApprovalDroplet servlet bean contains the following:
Input Parameters
• orderId– The ID of the order
Oparams
• true – Rendered if there is an appeasement in progress
• false – Rendered if there is no appeasement in progress
• error – Rendered if there is an error

8 Issuing Returns, Exchanges, Refunds and Appeasements 67
Load Appeasement Droplet
This servlet bean returns the appeasement with the specified appeasement ID.
Class atg.commerce.csr.order.appeasement.LoadAppeasementDroplet
Components /atg/commerce/custsvc/order/LoadAppeasementDroplet.properties
The LoadAppeasementDroplet servlet bean contains the following:
Input Parameters
• appeasementId– The ID of the appeasement
Oparams
• output – Rendered once if there are appeasements
• empty – Rendered once if there are no appeasements
Output Parameters
• appeasement – An instance of atg.commerce.csr.appeasement.Appeasement
Order Is Appeasable Droplet Servlet Bean
This servlet bean checks whether appeasements may be applied to a specified order.
Class atg.commerce.csr.order.appeasement.OrderIsAppeasableDroplet
Components /atg/commerce/custsvc/order/OrderIsAppeasableDroplet.properties
The OrderIsAppeasableDroplet servlet bean contains the following:
Input Parameters
• orderId– The ID of the order
Oparams
• true – Rendered if an appeasement can be applied to the order
• false – Rendered if an appeasement cannot be applied to the order
• error – Rendered if there is an error
Create Appeasement Pipeline
This pipeline chain is executed when an appeasement is created. It initializes the appeasement, and includes the
following processors:

68 8 Issuing Returns, Exchanges, Refunds and Appeasements
Processor Description
ApplyAppeasementRefunds Initializes the refund object for the appeasement.
ValidateAppeasementRefundAllocations Validates the refund total and the amounts allocated
to different payment methods.
Settle Approved Appeasement Pipeline
This pipeline chain is executed when an appeasement that required approval is settled. This pipeline chain
includes the following processor:
Processor Description
SettleAppeasement Settles the appeasement refund and issues the credits.
Submit Appeasement Pipeline
This pipeline chain is executed when an appeasement is submitted. It checks to see if the appeasement requires
authorization, issues the appeasement and marks the appeasement as processed. This pipeline chain includes
the following processors:
Processor Description
AddStoreCreditAllocations Creates the store credit refund option for the
appeasement and adds the store credit allocation to
the appeasement.
SaveAppeasement Creates the appeasement in the repository and
updates the appeasement as required.
SendAppeasementSubmittedEvent Triggers an event to mark the successful submission of
an appeasement.
CheckIfAppeasementRequiresApproval Checks to see if the total appeasement applied to an
order exceeds the agent’s appeasement limit.
SettleAppeasement Settles the appeasement refund and issues the credits.

9 Working with Scheduled Orders 69
9 Working with Scheduled Orders
Scheduled Orders is a feature available in Oracle Commerce Core Commerce that sets up automated recurring
orders. For additional information on scheduled orders, refer to the Core Commerce Programming Guide. Agents
can assist customers with setting up scheduled orders.
Configuring Scheduled Orders
A scheduled order is comprised of a template order and a schedule. A template order contains all of the order
information but is not submitted. A template can be associated with one or many schedules. Based on the
schedule(s) associated with the template, the template object is cloned to create an order object, which is then
submitted.
Agents can create scheduled order templates using the new order checkout process, or by copying an existing
order. Scheduled orders can be reviewed from the customer’s profile. Agents can also display all schedules for a
specific template, and submit an ad hoc order from a scheduled order.
Agents set up scheduled orders based on a daily, weekly, or monthly schedule. The schedule may be periodic,
which is based on an interval of time between each scheduled run, or calendar-based, which is based on specific
day to run. For periodic schedules, Oracle Commerce Service Center allows an agent to choose intervals based
on a number of days or weeks. For calendar-based schedules, Commerce Service Center allows an agent to
specify days of the week or dates of the month. A schedule also defines a start end date, which can be used to
limit the period of time that the schedule is active.
Enabling and Disabling Scheduled Orders
Scheduled orders are enabled by default. To disable the scheduled orders feature, modify the
CSRConfigurator component, setting usingScheduledOrders to false.
For example, to disable scheduled orders:
$class=atg.commerce.csr.util.CSRConfiguratorscope=global
usingScheduledOrders=false
The usingScheduledOrders option controls the availability of the scheduling options at the end of checkout,
the scheduled orders panel on the Profile View screen and the scheduled order view screen for template orders.

70 9 Working with Scheduled Orders
Configuring Price Lists
Note: If your site uses price lists, you must configure the use of price lists as outlined in Defining the Default
Price List (page 99) later in this document.
The following section describes configuration that affects the pricing of scheduled orders when using price lists
in combination with scheduled orders. This configuration affects the pricing of scheduled orders when:
• Pricing a new scheduled order for submission
This occurs in Core Commerce via the ScheduledOrderService and ScheduledOrderTools components
when scheduled orders are automatically created and submitted based on their pre-defined schedules.
• Pricing a scheduled order template for view in Commerce Service Center
Scheduled order templates are priced whenever an agent selects one for viewing on the scheduled order
view. This ensures that the agent always views the current day pricing when looking at a scheduled order
template. The result of this pricing operation is not saved to the repository, and is only temporary for the view.
• Pricing a new scheduled order instance when the agent clicks Submit Now in Commerce Service Center
The Submit Now process allows an agent to manually create and submit an order from a scheduled order
template.
Working with Scheduled Order Templates
Commerce Service Center always uses the CustomerPricingModels PricingModelHolder for pricing order
templates. Scheduled order templates are priced this way to provide the agent with pricing information that
reflects the current day pricing. This gives the agent an accurate representation of the order total if an order
were to be submitted from the template on that day.
Modifying scheduled order templates also uses clone editing and therefore, pricing changes are not saved to the
template unless the post create checkout process is completed for the template.
Scheduled Order Templates are also unique because they are priced before being viewed by an agent. For
example, if an agent views the contents of a template in read-only mode before actually selecting the template
to work on, the view would reflect current day pricing for the template. However, any pricing changes made
for viewing the template are not persisted to the repository; they are only performed to provide the agent with
current day pricing in the view.
ScheduledOrderTools
This Core Commerce component automatically generates and submits scheduled orders based on their
pre-defined schedules and contains configuration specific to the pricing of the scheduled orders they have
submitted.
The property useOrderPriceListsFirst controls how ScheduledOrderTools determines the correct
price lists to use. Set by default to false, the price list assignment is determined by looking at the price
lists assigned to the customer profile that owns the scheduled order. Because price list assignments are an
optional feature in Core Commerce, if price list assignments are not implemented, the price list will come from
the PriceListManager default configuration of defaultPriceList and defaultSalesPricelist. For
additional information on Core Commerce price lists, refer to the Using Price Lists section of the Core Commerce
Programming Guide.
If ScheduledOrderTools.isUseOrderPriceListsFirst is set to true, it will first attempt to get the
price lists by extracting them from the template. Pricing information must be stored with the scheduled

9 Working with Scheduled Orders 71
order template when it is created to be able to extract price lists from order templates. It may not be possible
to extract both price lists from the template. If the items in the order are all on sale, the list price cannot
be determined. Conversely, if no items are on sale, the sale price list cannot be determined. If the price list
cannot be determined from the template, the price list assignment is obtained from the customer profile that
owns the scheduled order. If price list assignments are not implemented, the price list will come from the
PriceListManager default configuration of defaultPriceList and defaultSalesPricelist.
If running in a multisite environment, the getPriceListFromSite method determines the price list for the
site associated with the order. The useSitePriceLists property retrieves price lists from the site using the
scheduled order and defaults to true.
It is important to note that there are situations that may occur when using either of these methods:
• When a site changes customer price list assignments based on storefront selection, it is possible for an agent
to set up a scheduled order based on the current assignments for a customer. If the customer switches
storefronts, any new scheduled orders will be priced using the new assignments
• If the price list on a customer’s profile is updated, and Commerce Service Center has been configured to
obtain price lists from the order items first, the change will not be applied to any scheduled orders
Customizing Scheduled Orders
Once you have enabled your site to use scheduled orders the following customizations can be made. For
additional information on customization of scheduled orders, refer to the Core Commerce Programming Guide.
Scheduled Order Form Handler
The CSRScheduledOrderFormHandler creates two variables, the CalendarSchedule variable used
for specific days, and the PeriodicSchedule that is used for interval schedules. Additionally, the
CSRScheduledOrderFormHandler is responsible for creating and updating the scheduled order repository
item based on the input provided from the agent.
In addition to these two schedule types, Commerce Service Center provides an additional N number of
intervals option used with PeriodicSchedule that an agent can use to limit the number of scheduled
intervals. This schedule option automatically calculates the schedule’s end date by calculating the schedule’s
nextRunTime n number of times starting from the specified start time.
Note: The number of intervals is used only to calculate the end date and will not be available when a schedule is
viewed or updated.
CSRScheduledOrderFormHandler contains the following configurable values for controlling the default
selections on the schedule creation form.
Property Description
defaultScheduleType Identifies the default schedule type. Possible values are Calendar or
Interval.

72 9 Working with Scheduled Orders
Property Description
defaultDaysOption Controls which CalendarSchedule day selection is the default.
Possible values are allDays, selectedDays, or selectedDates.
defaultMonthsOption Controls which CalendarSchedule month selection is the default.
Possible values are allMonths or selectedMonths.
defaultEndDateOption Controls which Schedule End Date option is the default. Possible
values are none, endBy or endAfterOccurrences.
defaultOccurrencesOption Controls which CalendarSchedule occurrences option
is the default. Possible values are allOcurrences or
selectedOccurrences.
defaultInterval Controls the default interval for a PeriodicSchedule.
defaultIntervalOption Controls the default interval option for PeriodicSchedules.
Possible values are days or weeks.
Displaying Scheduling Information
Commerce Service Center provides an extension to the Core Commerce ScheduledOrderInfo servlet bean
that provides additional output parameters that describe the contents of the schedule. Refer to the Core
Commerce Programming Guide for information on ScheduledOrderInfo.
CSCScheduledOrderInfo has the following additional output parameters:
• readableDays
• readableDates
• readableHours
• readableMinutes
• readableMonths
• readableOccurrences
Scheduled Order Components
The following components are all members of the atg.commerce.csr.order.scheduled class located in the
/atg/commerce/custsvc/order/scheduled/ directory and are used for scheduled orders:
Components Description
CSRScheduledOrderTools Contains various helper APIs.
CSRScheduledOrderFormHandler Form handler used to create and update schedules.

9 Working with Scheduled Orders 73
Components Description
DuplicateAndSubmit Form handler used by the Submit Now feature.
IsScheduledOrder Servlet bean used to determine if an order is a scheduled
order template.
ScheduledOrderTableFormHandler Form handler used to generate the content displayed in the
customer’s scheduled orders panel.
SchedulesTableFormHandler Form handler used to generate the content displayed in the
scheduled order view’s schedules panel.
SubmittedOrdersTableFormHandler Form handler used to generate the content displayed in the
scheduled order view’s submitted orders panel.
ActivateSchedule Form handler used in the LoadAndExecuteAction class to
activate a schedule from the schedule order view.
DeactivateSchedule Form handler used in the LoadAndExecuteAction class to
deactivate a schedule from the schedule order view.
Scheduled Orders Pipeline Additions
The following are additions to the commercepipeline.xml that defines various purchase process pipelines
used by Commerce Service Center.
Pipeline Chain Description
initScheduledOrderEdit This chain is executed by the CloneEditManager to prepare for updating
a previously created scheduled order template.
reconcileScheduledOrder This chain is executed by the CloneEditManager to reconcile changes
made to a previously created scheduled order template.
processTemplateOrder This chain is executed by the CSRCommitOrderFormHandler when the
Schedule option is used at the end of new order checkout. It validates that
a new order is ready to be saved as a scheduled order template.

74 9 Working with Scheduled Orders

10 Issuing Promotions 75
10 Issuing Promotions
Oracle Commerce Service Center allows agents to access a number of promotion methods. Promotions such a
are displayed to the agent in the promotions browser. For detailed information on configuring promotions, refer
to the Core Commerce Programming Guide.
Providing Promotions Browser Access
The Promotions Browser allows an agent to view all of the promotions that are available, or may become
available, to a user. Agents can view promotions that have been granted and the discount amount applied by
each promotion. Additionally, agents can search through promotions and grant a promotion manually.
For an agent to access the Promotions Browser, they must have the cmcPromotionsP and commerce-
custsvs-browse-promotions-privilege access rights. These access rights are provided in the csrOrders
role.
Note: If you have configured your environment with multiple sites, and have set up site access control, the
amount of information that an agent will be able to see will be limited based on their site access. Refer to the
Controlling Site Access (page 87) section for additional information.
Customizing Gift with Purchase Promotions
In addition to the standard promotions that are available to customers, Commerce Service Center supports the
Oracle Commerce Core Commerce Gift with Purchase promotion. This promotion can automatically add a free
item to the shopping cart when the order qualifies for a promotion. The gifts can be defined as an SKU, product
or a single selection from a category or content group.
When an agent adds an item to an order that qualifies it for a free gift, the free gift is automatically added to the
cart with the total price of the item set to $0.00. Note: The gift is added automatically only if the gift is defined as
an SKU or product. When a gift is part of a multiple selection, it cannot be automatically added to the cart.
If an agent adds an item to the order that qualifies it for a gift that must be selected from multiple choices, a gift
selector becomes available. Once the selected gift has been added to the cart, a Change Gift option is available if
the agent needs to make any changes.

76 10 Issuing Promotions
Gift With Purchase Page Fragments
The following three PageFragment components are used to render the Gift with Purchase links on the cart page
and the gift selection pop-up. The page fragments are stored in the /DCS-CSR-UI/config/
atg/commerce/custsvc/ui/fragments/gwp directory:
• ChangeGiftListPageFragment – This fragment renders the Change Gift link next to an item when it
contains a gift that has multiple choices
• SelectGiftLinkPageFragment – This fragment renders a gift selection link for any gift that has not yet
been added to the order. The fragment uses the GiftWithPurchaseSelectionsDroplet to obtain the
GiftWithPurchaseSelection objects for the current order. Any GiftWithPurchaseSelection that is
found with a quantityMissingFromOrder greater than 0 will have a link rendered for it. If the giftType
is category or contentGroup, a selection link is rendered for each unit that is missing from the order. If the
giftType is sku or product, a single selection is rendered that adds the entire missing quantity to the cart
• SelectGiftPopupPageFragment – The SelectGiftPopupPageFragment is used to render the gift
selection pop-up. It requires several input parameters for determining the gift choices and initializing the
GiftWithPurchaseFormHandler values:
• itemId – Indicates which commerce item references the changed gift selection. The value is optionally
provided to the GiftWithPurchaseFormHandler
• promotionId – The ID of the promotion. Required by the GiftWithPurchaseFormHandler
• quantity – Required by the GiftWithPurhcaseFormHandler, this provides the quantity of the gift
selection
• giftHashCode – Required by the GiftWithPurchaseFormHandler, this identifies the promotion hash
code
• giftType – Identifies the gift type, and is required for the
GiftWithPurchaseSelectionChoicesDroplet
• giftDetail – Provides gift detail information and is required for the
GiftWithPurchaseSelectionChoicesDroplet
For additional information on the GiftWithPurchaseSelectionChoicesDroplet, refer to the Core
Commerce Programming Guide.
Should the agent proceed with checkout without first selecting eligible gifts for the order, the
postMoveToPutchaseInfo method in the CSRCartModifierFormHandler will issue a message to inform the
agent that the order qualifies for the gifts that are missing from the order.
The Core Commerce GWPManager queries all Gift with Purchase selections for the order. If any of them have a
quantityMissingFromOrder greater than 0, an informational message is posted for the agent, such as “This
order qualifies for a free gift that has not yet been selected.”
For additional information on Gift with Purchase configuration, refer to the Extending Objects for Cloning (page
142) section.
Returns and Exchanges of Gifts with Purchases
If an item that qualified a promotion is returned, by default, the gift will not be automatically removed from
the order. It will be left in the order and re-priced at full value, offsetting the value of the refund. For additional

10 Issuing Promotions 77
information on how the returns and exchange pricing engine works, refer to the Pricing in Commerce Service
Center (page 107) section.
To provide gift selection links in the cart view of the change order, Commerce Service Center generates
GiftWithPurchaseSelection objects based on the gifts being returned and then stores them in the
ReturnRequest. Commerce Service Center extends the GiftWithPruchaseSelectionsDroplet to return
the ReturnRequest selection objects when rendering the selection links in the cart view of the exchange order.
Each time the cart view is rendered, the generated GiftWithPurhcaseSelection objects are filtered by the
ReturnManager generateFilteredReturnRequestSelections API to ensure that selection links are not
rendered for gifts that may have already been selected in the exchange order. For detailed information on gift
with purchase exchange orders, refer to the Working with Exchange Orders (page 61) section.
Reconciling Gift with Purchase Orders
The Gift with Purchase feature extends the CommerceItem object to store Gift with Purchase meta data within
repository markers.
Commerce Service Center’s clone editing feature supports the cloning and reconciliation of the Gift with
Purchase commerce item markers when an order containing gifts is modified by an agent.
The SubPropertyHandler interface defines the requirements for implementing a CloneEditHandler for
objects referenced by a sub-property of another parent object. The parent object is the Item and the markers
are the objects referenced by the sub-property gwpMarkers.
The subclass CollectionSubPropertyEditHandler extends the CollectionEditHandler class and
implements a SubPropertyHandler for handling collection sub-properties.
The CommerceItemMarkerEditHandler class extends the CollectionSubPropertyHandler class to handle
a collection property that contains commerce item markers. A component of this type, which is named /atg/
commerce/custsvc/order/edit/CommerceItemGWPMarkerHandler, is defined by Commerce Service
Center to handle clone and reconciliation of Gift with Purchase commerce item markers.
The following is an example of the CommerceItemGWPMarkerHandler:
$class=atg.commerce.order.edit.CommerceItemMarkerEditHandler
keyPropertyName=repositoryIdsortPropertyName=creationDatecollectionPropertyName=gwpMarkerscloneEditManager=/atg/commerce/custsvc/order/edit/CloneEditManager
propertiesToCopyOnUpdate=\ gwpCommerceItemMarker=key,,value,,data,,targetedQuantity,, automaticQuantity,,selectedQuantity
The CollectionEditHandler implementation supports the integration of multiple SubPropertyHandler
components. These components are configured on the CollectionEditHandler through the
subPropertyHandlers property.
The /atg/commerce/custsvc/order/edit/CommerceItemHandler contains a CollectionEditHandler
that handles commerce items and references the SubPropertyHandler for GWP markers:
$class=atg.commerce.csr.order.edit.CSRCommerceItemEditHandler

78 10 Issuing Promotions
subPropertyHandlers=/atg/commerce/custsvc/order/edit/CommerceItemMarkerHandler,\ /atg/commerce/custsvc/order/edit/CommerceItemGWPMarkerHandler
Note that the CommerceItemHandler references two subPropertyHandlers; one for each marker property
defined on a CommerceItem.
Note: The Commerce Service Center Copy Order and Submit Now features exclude commerce item markers
when making a copy of the order. This means that no Gift with Purchase related information, such as which
items are manually selected gifts, will be carried over to the new order.

11 Using Order Approvals 79
11 Using Order Approvals
Agents can provide appeasements for customers by providing price overrides and manual adjustments in
orders.
Configuring Order Approval
When the order is submitted, the total of the order’s price overrides and manual adjustments can be verified
against a preset appeasement limit. If the appeasement surpasses the limit, an approval is required to continue
the order submission.
The approval system for Oracle Commerce Service Center is based on the Oracle Commerce Platform approval
process, and provides the process for submitting new orders that have appeasement discounts. The system
consists of processes that:
• Determines if an approval is required
• Saves the data required to complete the action when approved
• Interrupts the action
• Approves or rejects the action after review
For detailed information on the Oracle Commerce Platform approval process, refer to the Core Commerce
Programming Guide.
The Commerce Service Center approval system generates instances of atg.commerce.csr.approvals.
Approval class to create an Order Approval object that is verified by the /atg/commerce/custsvc/
approvals/order/OrderApprovalHandler, which is the ApprovalHandler that processes order approvals.
The pipeline CheckIfOrderApprovalRequired processor calls into the ApprovalHandler to determine if the
approval is required.
The atg.commerce.csr.approvals.ApprovalsManager class calls other classes that create new approval
objects and repository items, determine if an approval is required, save or load approval objects to or from
their corresponding repository items, query the approvals repository and approve or reject an approval item.
The ApprovalManager also maintains the state of the approval, which can be PENDING, APPROVED, or
REJECTED. The ApprovalsManager uses the ApprovalType property of the Approval object to determine
which ApprovalHandler to use. The ApprovalHandler determines if approval is required. If approval is
required, the object will be saved in the approvals repository.
Agent access to the approvals process is granted through the cmcApprovals access right, which is incorporated
into the CSR-Manager role. For additional information on access rights, refer to Setting Up Internal Access
Control (page 85).

80 11 Using Order Approvals
The OrderApprovalHandler checks to see if the agent placing the order does not require approval by
checking that they have the cmcApprovals access right. Then the handler checks that an appeasement limit
exists by first checking the agent’s appeasement for the currency in question and then checking the default
appeasement limit for the currency in question. Finally the handler totals the price overrides and manual
adjustments and compares them with the appeasement limit.
After the order has been sent through the approval process, an e-mail is generated using the e-mail address
associated with the approval record and e-mail templates OrderApprovalAcceptedTemplate and
OrderApprovalRejectedTemplate. The sendConfirmationEmailmethod of CSRAgentTools creates the e-
mail. If there is no e-mail address associated with the approval record, e-mail will not be sent.
Enabling the Order Approval Process
The use of appeasement limits is configured with the /atg/commerce/custsvc/util/
CSRConfigurator component usingOrderApprovals property. The default setting of this property, which is
true, enables the order approval process. You can disable the process by setting the property to false.
Setting Global Appeasement Limits
An agent’s profile defines their appeasement limit. If an agent does not have a specified appeasement limit
available in their profile, Commerce Service Center will use the global default appeasement limit for that
currency. The default appeasement limit is configured in the /atg/commerce/custsvc/util/
CSRConfigurator component with the defaultAppeasementLimits property. The appeasement limit is
based upon the currency of the order, such as:
defaultAppeasementLimits=USD=500.00
To allow an agent to have an unlimited appeasement limit, set the defaultAppeasementLImits to a value of
-1, or update the agent’s access rights to contain the cmcApprovals access right.
Modifying Individual Appeasement Limits
User profiles contain an extension that allows you to set appeasement limits in multiple values. Limits can
be set per currency. If no appeasement limit is set, the limit will default to the appeasement limits set in the
CSRConfigurator component.
By default, the appeasement limit for individuals is set to -1 in US Dollars. This removes all appeasement
verification.
To Modify an Agent’s Appeasement Limit
1. Open the BCC Home page > Access Control > Users panel. Select the agent.
2. Scroll to the General pane.
3. Click the Add button to add the appeasement limits. Enter the appeasement limit key and value.
4. Save the agent’s profile.

11 Using Order Approvals 81
Providing Approval Authorization
The cmcApprovals access right controls the agent’s ability to see the Order Approvals panel. The
cmcApprovals access right is listed in the CSR-Manager role. Agents that are granted the cmcApprovals
access right or the CSR-Manager role will be able to review orders that need approval, as well as the ability to
approve and reject orders. Appeasement limits that are applied against agents with these rights will be ignored.
Servlet Beans and Form Handlers for Approving Orders
The following servlet beans and form handlers are used for approving orders.
Find Pending Approvals Droplet Servlet Bean
Returns all approval items for the given approvalType with a state of PENDING. If no approvalType is
provided, all approvalTypes are returned.
Class atg.commerce.csr.approvals.FindPendingApprovalsDroplet
Components /atg/commerce/custsvc/approvals/FindPendingApprovalsDroplet
The FindPendingApprovalsDroplet contains the following:
Input Parameters:
• approvalType – Looks for items that are pending
• elementName – The name of the return element
Oparams:
• output – if an order has any appeasements
• empty – if there are no appeasements
Output Parameters
• element – the total appeasements for the order
Get Total Approvals For State Droplet Servlet Bean
This servlet bean queries the approvals repository and returns the total number of results for a given type of
approval.
Class atg.commerce.csr.approvals.GetTotalApprovalsForStateDroplet
Components /atg/commerce/custsvc/approvals/order/
GetTotalPendingOrderApprovalsDroplet
The GetTotalPendingOrderApprovalsDroplet contains the following:

82 11 Using Order Approvals
Input Parameters
• elementName – The name of the return element
Oparams
• output – if an order has any appeasements
• empty – if there are no appeasements
Output Parameters
• element – the total appeasements for the order
Is Order Pending Approval Droplet Servlet Bean
This servlet bean determines if an order is currently pending approval and returns the approval ID that is
associated with the order.
The servlet bean is used on confirmation pages to determine if an order emerged from the submission process
in a PENDING approval state. It is also used on the Order View page to determine if “Approve” or “Reject”
elements should appear.
Class atg.commerce.csr.approvals.order.IsOrderPendingApprovalDroplet
Components /atg/commerce/custsvc/approvals/order/
IsOrderPendingApprovalDroplet
The IsOrderPendingApprovalDroplet contains the following:
Input Parameters
• orderId
• elementName – The name of the return element
Oparams
• true – if an approval is found for the order
• false – If no approval is found for the order
• error – If an error occurred while looking up the approval
Output Parameters
• element – If found, the approval item for the order.
The following is an example of the droplet:
<dsp:droplet name="/atg/commerce/custsvc/approvals/order/IsOrderPendingApproval"> <dsp:param name="orderId" value="orderId"> <dsp:oparam name="output"> <dsp:valueof param="element"/> </dsp:oparam>

11 Using Order Approvals 83
</dsp:droplet>
Get Total Order Appeasements Droplet Servlet Bean
This servlet bean determines if an order has any appeasements applied to it, and returns the total number of
appeasements if any are found.
Class atg.commerce.csr.order.GetTotalOrderAppeasementsDroplet
Components /atg/commerce/custsvc/order/
GetTotalAppeasementsForOrderDroplet.properties
The GetTotalOrderAppeasementDroplet contains the following:
Input Parameters
• order – The ID of the order
• elementName – The name of the return element
Oparams
• output – if an order has any appeasements
• empty – if there are no appeasements
Output Parameters
• element – the total appeasements for the order
For example:
<dsp:droplet name="/atg/commerce/custsvc/approvals/order/ GetTotalOrderAppeasements"> <dsp:param name="order" value="order"> <dsp:oparam name="output"> <dsp:valueof param="element"/> </dsp:oparam></dsp:droplet>
Order Approval Form Handler
The OrderApprovalFormHandler generates the order approval within the UI and extends the
EnvironmentChangeFormHandler. This form handler provides handlers for both approving and rejecting an
approval request. It also contains e-mail templates for approvals and rejections.
Form Handler atg.commerce.csr.approvals.order.OrderApprovalFormHandler
Components /atg/commerce/custsvc/approvals/order/OrderApprovalFormHandler

84 11 Using Order Approvals
Approval Repository Query Form Handler
The ApprovalRepositoryQueryFormHandler finds approvals of a specified state and type. It handles the
search request from the UI and returns a list of search results, as well as handles paging of the search results. This
form handler extends the RepositoryQueryTableFormHandler.
Form Handler atg.commerce.csr.approvals.order.
ApprovalRepositoryQueryFormHandler
Components /atg/commerce/custsvc/approvals/order/
ApprovalRepositoryQueryFormHandler
Update Order Approval Customer Email Form Handler
The UpdateOrderApprovalCustomerEmailFormHandler updates the customer e-mail address on an order
approval object.
Form Handler atg.commerce.csr.approvals.order.
UpdateOrderApprovalCustomerEmailFormHandler
Components /atg/commerce/custsvc/approvals/order/
UpdateOrderApprovalCustomerEmailFormHandler
For more information on Commerce Service Center specific Gift List form handlers, refer to the ATG API Reference
for Commerce Service Center.

12 Setting Up Internal Access Control 85
12 Setting Up Internal Access Control
When Oracle Commerce Service Center is installed, it is preconfigured with access rights, roles, and access
controllers. These elements allow you to restrict access to features, sites, pages and panels in Commerce Service
Center.
Access Control Overview
Access control in Commerce Service Center allows you to configure different levels of access to the application
depending on the jobs that agent perform. When you set up access control, you control who has access to
various functionality of Commerce Service Center. There are several elements that define access control:
• Users – Agents are internal users who are given access to Commerce Service Center by an administrator. When
internal users are created, they are added to an organization. Organizations have associated roles, which
provide different levels of access to Commerce Service Center
Customers are external users. Configuring external user access to different sites or shops is done by creating
segments, as described in the Personalization Programming Guide and/or by creating scenarios and targeters,
as described in the Personalization Guide for Business Users
• Organizations – You group users by making them members of an organization. For example, you might set
up organizations that are based on different geographic areas, or on different business units within your
company. For additional information on creating and working with organizations, refer to the Business Control
Center Administration and Development Guide
• Roles – Roles determine the set of rights that are assigned to a user. Once you have created roles, you
associate rights and users with the role. Global roles work across all users and organizations, whereas
organization-based roles correspond to tasks or specific functions. Similar roles, or roles for a specific
application or service, can be grouped into a role folder
• Access Rights – Access rights define tasks that the user can perform, for example, creating a new customer
profile. Access rights are granted to a role, which is then granted to a user. Commerce Service Center comes
preconfigured with several access rights that correspond to agent-specific roles. Assign the appropriate roles
to internal users to provide the correct level of access
• Sites – An administrator can control an internal user’s access to a site, and as a result, their access to
information that is associated with that site. For additional information, refer to the Controlling Site
Access (page 87) section
For a detailed list of access rights by role, refer to theAppendix A: Commerce Service Center Access Rights (page
167)

86 12 Setting Up Internal Access Control
Default Internal User Access Control Configuration
When you install Commerce Service Center a number of access controllers, which are Nucleus components, are
added to your environment. Access rights and roles are repository data that you import into your database (from
supplied XML files) as a configuration step after you install Commerce Service Center.
Access Controllers
Access controllers are registered by the /atg/userprofiling/AccessControlServlet and used to control
access to some or all pages within Commerce Service Center based on access rights associated with roles. For
detailed information on using and configuring access controllers, refer to the Working with User Profiles section
of the Personalization Programming Guide.
Access rights are configured using the allowedAccessRightNames property of the security properties files
located in /atg/commerce/custsvc/security directory. If the user’s role and access rights match the page’s
access right, the user may access the page. The following security files identify the following access rights:
Access Right Controller Description
AnyProfileAccessRightController Allow an agent to access and work with customer profiles:
commerce-custsvc-change-customer-password-
privilege
commerce-custsvc-create-profiles-privilege
commerce-custsvc-edit-profiles-privilege
commerce-custsvc-view-profiles-privilege
AnyReturnAccessRightController Allow an agent to create returns and mark items as returned:
commerce-custsvc-create-return-privilege
commerce-custsvc-record-merchandise-
return-privilege
ChangePasswordAccessRight
Controller
Allows an agent to change customer passwords:
commerce-custsvc-change-customer-password-
privilege
CreateOrdersAccessRight
Controller
Allows an agent to create an order:
commerce-custsvc-create-orders-privilege
CreateProfileAccessRight
Controller
Allows an agent to create a new customer profile:
commerce-custsvc-create-profiles-privilege
EditOrdersAccessRightController Allows an agent to edit a customer order:
commerce-custsvc-edit-orders-privilege
EditProfileAccessRight
Controller
Allows an agent to edit a customer profile:
commerce-custsvc-edit-profile-privilege

12 Setting Up Internal Access Control 87
Access Right Controller Description
IssueStoreCreditAccessRight
Controller
commerce-custsvc-issue-credit-privilege
Commerce Service Center Roles
When you create an agent’s profile in the Internal User Profile Repository, you assign the agent a role that
corresponds to the tasks you want the agent to perform. For example, an agent may be able to create and
modify orders, but only a manager can override prices and issue credits.
Commerce Service Center comes preconfigured with four global roles for setting access rights granted to
agents. These roles can be used as templates when creating new roles:
• csrTicketing – Includes the access rights necessary to access Commerce Service Center and to use ticketing
components
• csrOrders – Includes the access rights needed to create and modify orders. In addition, this role includes
csrTicketing as a template role, so all ticketing access rights are included. This role also includes the access
rights necessary to grant promotions using the Promotions Browser. This role does not provide authorization
to create new customer profiles, or the other rights specific to csrProfiles
• csrProfiles – Includes the access rights needed to create and modify customer profiles, set up and review
gift lists and respond to customers via e-mail. In addition, this role includes csrTicketing as a template
role, so all ticketing access rights are included. This role does not include the scheduling access rights that are
included in csrOrders
• csrManager – Includes all of the rights within both csrOrders (and thus csrTicketing) and
csrProfiles, as well as allowing price overrides
For a list of all access rights for each role, refer toAppendix A: Commerce Service Center Access Rights (page 167)
For information on creating roles, refer to the Creating a New Agent Role (page 89) section.
Controlling Site Access
If your environment is set up to use multiple sites, as described in the Multisite Administration Guide, you can
configure the access that an agent has to a site or to a site group. This allows you to create an environment
where agents from the same call center can only access site information for which they have authorization.
Note: Although site access is defined in the agent’s profile, it is not dependant on the roles or access rights
associated with the profile.
There are two site and site group access levels recognized by Commerce Service Center:
• Full Access – Allows the agent to view and edit all information. If an agent is given Read-Only access to a site, it
is interpreted by Commerce Service Center as Full access
• No Access – The agent cannot edit or modify any information on this site
Enabling Site Access Control
Site access control, which is configured using the Agent Business Control Center, is set to enable by default
using the CSREnvironmentTools.SiteAccessControlOn property. When enabled, the agent’s access to

88 12 Setting Up Internal Access Control
sites will be limited to the access defined in their user profile. To disable the use of site access control, set the
SiteAccessControlOn property to disable.
When you enable site access control, agents have access to the sites and site groups that you identified in their
profile in the Agent Business Control Center. When agents perform tasks, such as searching for orders or editing
customer profiles, the information that they can retrieve or view is limited to the sites to which they have full
access.
When an agent initiates a search in Commerce Service Center, the CSREnvironmentMonitor
uses the chooseInitialSite method to select the initial site context. By accessing the
CSRAgentTools.getAgentAccessibleSites method (which retrieves site access information for the current
agent) the system obtains a list of the sites accessible by the agent, which is cross referenced with the sites
returned by the default site.
Commerce Service Center’s UI uses the IsSiteAccessibleDroplet to check the
getAgentAccessibleSites method to determine if a site is accessible when the agent performs tasks that are
limited by site access. If the site is not accessible, it will not be displayed in the UI.
Site Access and Site Groups
Site access is also configurable through site groups. Site groups are a logical grouping of sites that allow you
to administer and manage sites that are similar, or to set up sharing between sites. You can add as many sites
as necessary to a site group, and sites can be added to multiple site groups. Within Commerce Service Center,
setting up site groups allows you to create a shopping cart that is shared within all of the sites within the group.
For detailed information on site groups, refer to the Multisite Administration Guide.
Using the Agent Business Control Center, you can set site access based on site groups in the same manner
as sites. If an agent has full access to a site group, he has full access to all of the sites within the group, unless
specific sites have been explicitly been denied. If an agent has full access to an individual site within a site group,
the agent will not have access any other sites within the site group.
The SiteAccessSiteGroupManager retrieves the list of sites and site groups that the agent can access.
Note: When you add registered shareables, such as a shopping cart, to a site group, it is shared with all of the
sites within the group. However, a situation can occur where an agent may not have access to all sites within the
site group, or to the site group itself. In this instance, an agent may not be able to edit or modify all of the items
in a customer’s cart. For additional information on shareables refer to the Multisite Administration Guide.
Site Access and Profile Realms
Site access is also based on profile realms. A profile realm is an organizational group of external user profiles
that are associated with one or more sites. A site may be a member of only one profile realm. By default, profile
realms are enabled, however, there is only a single profile realm. All sites, by default, are added to this profile
realm. For additional information on working with profile realms, refer to the Multisite Administration Guide.
Agents can view all customer profiles when they are provided full access to a site within a profile realm. Even
though an agent may not have access to all of the sites within the profile realm, the agent will have access to all
of the customer profiles within that realm.
Profile realms are relevant when an agent searches for customers, orders and tickets. The list of profile realms
to which an agent has access is identified in the getAgentAccessibleRealmIds method in CRSAgentTools.
This method creates a list of profile realm IDs that the agent may access, which is referred to during order,
customer and ticket search processes. When an agent searches for a customer profile, Commerce Service Center
verifies that the agent has access to the profile realm before any search information is returned.
Setting Site Access
Use the Agent Business Control Center to set site access by performing the following steps:

12 Setting Up Internal Access Control 89
1. Open the Agent Server Business Control Center Home page > Access Control page to access internal users.
2. Select the User button to display a list of available users.
3. Select the user and click the Site Access tab. The Site Access Overview table displays a read-only list of the
sites within your environment and the access level associated with the site.
4. Using the Full Access panel, use the site picker to provide the name of the sites or site groups to which the
agent has access.
5. To specifically deny site access, use the No Access panel to enter the name of the site or site groups to which
the agent has no access.
6. Click Save to save your changes.
Creating Agent Profiles
By default, Commerce Service Center is not preconfigured with any agent profiles. As part of setting up
Commerce Service Center, you need to:
1. Create the necessary organization, roles and access rights. Refer to the Business Control Center Administration
and Development Guide for detailed information.
2. Create a profile for each agent.
3. Assign each agent profile the necessary roles or access rights.
For additional information on creating users, refer to the Business Control Center User's Guide.
Creating a New Agent Role
You can create new roles based on the requirements of your agents. For detailed information on viewing and
creating roles, refer to the Business Control Center Administration and Development Guide.
Use the Agent BCC to create new rules by performing the following steps:
1. Open the Agent Server Business Control Center Home page > Access Control page.
2. Select the Roles button to display both role folders and roles.
3. Select the location to store the role, or create a new role folder by accessing the + action menu.
4. Enter the name and description of the new role.
5. In the Access Rights pane add specific access rights or incorporate the access rights from existing roles by
using the Template Role field. All of the access rights associated with this role will appear in the All Access
Rights pane.
6. Click Create to save your changes and create the new role.
Modifying a Copy of an Existing Role
In some situations, you may want to modify an existing role that contains a number of access rights. The
quickest way to do this is to use the Dynamo Server Admin to copy the existing role and modify the copy. The

90 12 Setting Up Internal Access Control
following example shows how to copy an existing role and then create an access right for a Summer-only agent
who does not have the ability to modify orders or perform scheduled orders, exchanges or returns. For a list of
all available access rights, refer to theAppendix A: Commerce Service Center Access Rights (page 167)
1. Open the Dynamo Server Admin and select the /atg/userprofiling/
InternalProfileRepositoy. Select the Roles component.
2. To copy one of the roles, use the <print-item> command. The following example shows how you might
copy the csrManager role:
<print-item item-descriptor="role" id="csrManager"/>
This returns the following:
<add-item item-descriptor="role" id="csrManager">
<set-property name="description"><![CDATA[Role for the CSR
manager]]></set-property>
<set-property name="accessRights"><![CDATA[cmcConfirmReturnP,
cmcOrderReturnsP,issueCredit,cmcProductViewP,cmcRelatedTicketsP,
cmcApprovals,cmcConfirmNewScheduleP,cmcCustomerCreateP,adjustPrice,
cmcOrderHistoryP,cmcPromotionsP,cmcMoreCatalogsP,cmcShoppingCartP,
cmcScheduleCreateP,cmcRefundTypeP,cmcGiftlistsViewP,cmcReturnItemsP,
cmcOrderSearchP,cmcOrderResultsP,cmcSubmittedOrdersP,
cmcCustomerResultsP,cmcConfirmOrderP,cmcAddProductByIdP,
cmcConfirmExchangeP,cmcBillingP,cmcCompleteOrderP,cmcReturnsHistoryP,
commerceTab,cmcProductCatalogSearchP,cmcShippingMethodP,cmcSchedulesP,
cmcExchangeSummaryP,cmcReturnSummaryP,cmcPurchasedItemsHistoryP,
cmcGiftlistViewPurchaseModeP,cmcRelatedOrdersP,
cmcExistingScheduledOrderP,cmcCrossSellP,cmcCustomerInfoP,
cmcTicketHistoryP,cmcCompleteExchangeP,cmcScheduleUpdateP,
cmcMorePriceListsP,cmcConfirmUpdateScheduleP,cmcReturnDetailsP,
cmcGiftlistSearchP,cmcExistingOrderP,cmcShippingAddressP,
RespondComposeMessagePanel,cmcCompleteReturnP,respondTab,
cmcScheduledOrdersP,cmcPurchaseHistoryP,cmcMultisiteSelectionPickerP,
cmcProductCatalogBrowseP,cmcCustomerSearchP,cmcCustomerP]]>
</set-property>
<!-- rdonly <set-property name="version"><![CDATA[2]]></set-property> -->
<set-property name="templateRoles"><![CDATA[csrOrders,csrProfiles]]>
</set-property>
<set-property name="name"><![CDATA[CSR-Manager]]></set-property>
</add-item>
3. Copy and paste this into the Run XML Operations Tag field.
4. Rename the ID, Description and Name. For example, change all references to CSR Manager to CSR Summer.
5. Remove any access rights you do not want. For example, modify the existing CSRManager role by removing
rights for approvals, exchanges, returns and any other rights that the agent should not have. For example:
<add-item item-descriptor="role" id="csrSummer">
<set-property name="description"><![CDATA[Role for the CSR
Summer Staff]]></set-property>
<set-property name="accessRights"><
12 Setting Up Internal Access Control 91
cmcSubmittedOrdersP,cmcCustomerResultsP,cmcConfirmOrderP,
cmcAddProductByIdP,cmcBillingP,cmcCompleteOrderP,cmcReturnsHistoryP,
commerceTab,cmcProductCatalogSearchP,cmcShippingMethodP,
cmcPurchasedItemsHistoryP,cmcGiftlistViewPurchaseModeP,
cmcRelatedOrdersP,cmcCrossSellP,cmcCustomerInfoP,cmcTicketHistoryP,
cmcMorePriceListsP,cmcGiftlistSearchP,cmcExistingOrderP,
cmcShippingAddressP,cmcPurchaseHistoryP,cmcMultisiteSelectionPickerP,
cmcProductCatalogBrowseP,cmcCustomerSearchP,cmcCustomerP]]>
</set-property>
<!-- rdonly <set-property name="version"><![CDATA[2]]></set-property> -->
<set-property name="templateRoles"><![CDATA[csrOrders,csrProfiles]]>
</set-property>
<set-property name="name"><![CDATA[CSR-Summer]]></set-property>
</add-item>
6. Click Enter to add the new role. Once the role is added, you can modify or edit it using the Business Control
Center Home page.
7. Log into the Business Control Center Home page on the Agent Server.
8. Using the Access Control screen, select the new role.
9. Make any modifications to the role that you require and add it to the agents’ profile.
Creating a New Agent Profile
Once you have create a role, you can create the agent profile and assign the new role or any existing roles:
1. From the Agent Server Business Control Center Home Page, select Access Control.
2. Select the User button.
3. Click the + action icon to create a new Internal User.
4. Enter the agent information.
5. Click the Organization & Roles tab to set the agent’s organization and roles. Assign the appropriate roles for
the agent. You can also set site restrictions and user preferences.
For example, to create an agent who can work with existing orders but not create new customers, you would
select the csrOrders template role. This role contains all of the order access permissions needed to see
orders and work with orders, yet it does not contain the create customer profile permissions. Note: Both the
csrOrders and csrProfiles roles include the csrTicketing role, which allows access to the application,
the log in screen, etc. For a list of all of the access rights, refer to theAppendix A: Commerce Service Center
Access Rights (page 167)
6. Once you have provided all the necessary information, click Create to save the profile.
Customizing the Default Landing Page
You can create a default landing page for the agents by configuring /DCS-CSR/install/
data/csrOptions file. Change the defaultValue property of the GlobalOption item-descriptor with the
id="AgentUserDefaultHomeTab” to the desired value.

92 12 Setting Up Internal Access Control
For example, change the <set-property name="defaultValue" value="commerceTab"/> to <set-
property name="defaultValue" value="orderTab"/> to change the default landing page to the order
page.

13 Configuring E-mail 93
13 Configuring E-mail
Customizing E-Mail
Note: These components are modified using the ACC.
Configuring E-mail Notifications
When an agent creates a new customer profile, a password is automatically generated for the customer’s
account, and a notification is typically sent to the customer’s e-mail address. The /atg/svc/agent/UI/
Formhandlers/CustomerProfileFormHandler component uses the following properties to manage new
account e-mail notifications:
Property Name Description
newAccountTemplateEmailInfo The /atg/svc/email/
DefaultTemplateEmailInfo component creates
the e-mail message.
persistNewAccountEmails If true, new account e-mails are persisted in the
customer’s profile before they are sent. Default is
false.
sendNewAccountEmailInSeparateThread If it is a new account, e-mail is sent in a separate
thread. The default is true.
sendNewAccountEmails If true, an e-mail containing the new account login
and password is generated and sent to the customer.
Default is true.
For information about configuring a TemplateEmailInfo component, see the Personalization Programming
Guide.
Automatically Sending E-mail for Orders
To configure an automatic e-mail to be sent when an order is created or updated, use the /atg/commerce/
custsvc/order/CommitOrderFormHandler.properties:
# Confirmation Email Settings

94 13 Configuring E-mail
autoSendEmail=falseautoSendNewOrderEmail=falseautoSendUpdateOrderEmail=false
By default, these properties are set to false. To enable an automatic e-mail whenever a new order is created,
the autoSendEmail and autoSendNewOrderEmail properties should be set to true. To enable an automatic
e-mail whenever an order is updated, the autoSendEmail and autoSendUpdateOrderEmail properties
should be set to true.
Configuring New Passwords
When an agent generates a new password for a customer in Oracle Commerce Service Center, the customer’s
profile must have a valid e-mail address so the new password can be e-mailed to the customer. The /atg/svc/
agent/UI/Formhandlers/CustomerProfileFormHandler component uses the following properties to
manage passwords:
Property Name Description
persistResetPasswordEmails If true, new passwords are persisted in the
customer’s profile before they are sent. Default is
false.
resetPasswordtemplateEmailInfo The resetPasswordTemplateEmailInfo
component that creates the e-mail message. Default
is ForgotEmailTemplateInfo (in /atg/svc/
email/).
sendResetPasswordEmailInSeparateThread If true, the reset password e-mail is sent in a
separate thread. The default is true.
sendResetPasswordEmails If true, an e-mail containing the new password is
generated and sent to the customer. Default is true.
For information about configuring a TemplateEmailInfo component, see the Personalization Programming
Guide.
Configuring Order Confirmation E-Mails
It is possible to configure e-mail confirmations that occur once an order has been placed. The /atg/commerce/
custsvc/util/CSRAgentTools component configurationEmailMap allows you to configure order
confirmation e-mails.
Property Name Description
APPROVAL_ACCEPTED /atg/commerce/custsvc/profile/ApprovalAcceptedEmailInfo
APPROVAL_REJECTED /atg/commerce/custsvc/profile/ApprovalRejectedEmailInfo

13 Configuring E-mail 95
Property Name Description
NEW_ORDER /atg/commerce/custsvc/profile/NewOrderEmailInfo
ORDER_EXCHANGE /atg/commerce/custsvc/profile/OrderExchangeEmailInfo
ORDER_RETURN /atg/commerce/custsvc/profile/OrderReturnEmailInfo
ORDER_UPDATE /atg/commerce/custsvc/profile/OrderUpdateEmailInfo
SCHEDULED_ORDER
_UPDATE
/atg/commerce/custsvc/profile/
ScheduledOrderUpdateEmailInfo
SCHEDULED_ORDER_ADD /atg/commerce/custsvc/profile/ScheduledOrderAddEmailInfo
A new e-mail information component can be associated with any of the keys to override the default e-mail
component.
If you are working in a multisite environment, you can configure the site in the order objects to include site
information in different parts of the configuration e-mail. For example, you could enter all of the From field
values into a branch based on the order’s submit site. Additionally, you could add a property to the From site
object and reference that property based on the order’s submit site.
Configuring E-Mail Templates
The TemplateEmailSender service is responsible for sending template-based e-mail. Using
TemplateEmailInfo, it renders the page specified using the templateURL. For information on working with e-
mail notifications and templates, refer to the Personalization Programming Guide.
Commerce Service Center provides a default e-mail template implementation for each of the following actions:
• New Account Registration
• New Account Registration Following Checkout
• Password Reset
• New Order Confirmation
• Order Modification Confirmation
• Return Confirmation
• Exchange Confirmation
The e-mail information component can be reconfigured to use a different templateURL property, which points
to a different JSP page specifying a different template.
To change an e-mail template, modify the templateURL property of any of the following TemplateEmailInfo
components:
• /atg/svc/email/NewAccountTemplateEmailInfo
• /atg/commerce/custsvc/profile/NewAccountEmailInfo

96 13 Configuring E-mail
• /atg/svc/email/ResetPasswordTemplateEmailInfo
• /atg/commerce/custsvc/profile/NewOrderEmailInfo
• /atg/commerce/custsvc/profile/OrderExchangeEmailInfo
• /atg/commerce/custsvc/profile/OrderReturnEmailInfo
• /atg/commerce/custsvc/profile/OrderUpdateEmailInfo

14 Using Catalogs and Price Lists 97
14 Using Catalogs and Price Lists
The following section provides information on configuring catalogs and price lists in Oracle Commerce Service
Center.
Configuring Current Catalog and Price Lists
Commerce Service Center contains two global environment objects used by the application to manage catalogs
and orders: current catalog and current price list. The current settings of these objects can be viewed and
changed in the Commerce page submenu.
The current catalog and price list used are specified in the agent’s profile. The catalog and price list
are initialized using information from the current customer. When the agent logs in, the current
catalog and price list are initialized based on the CSRConfigurator.defaultCatalogId and
PriceListManager.defaultPriceList settings. However, when the agent selects a new customer, the
current catalog and price list settings automatically adjust to whatever has been assigned to the customer.
Using the Current Catalog
The current catalog determines which catalog is used by the agent when browsing and searching the catalog. If
using a multisite environment, the catalogs are site-aware.
The value of the current catalog can be set by the following actions:
• When the agent first logs in, a new, transient profile is automatically loaded as the active customer. The
current catalog is set from the new profile’s assigned catalog. If the profile does not have an assigned catalog,
the current catalog is set based on the CSRConfigurator defaultCatalogId property
• When the agent selects a customer from the profile repository to be the active customer, the current catalog
is set based on the selected profile’s assigned catalog
• If multisite has been enabled, when an agent selects a site, the default catalog associated with that site will
become the current catalog
• The agent can manually select a different catalog using the UI. Once an agent has explicitly selected a catalog,
that catalog remains active even if a new customer with a different assigned catalog is selected from the
repository. Starting a new call will reset the current catalog and remove the agent’s explicitly selected catalog

98 14 Using Catalogs and Price Lists
Using the Current Price List
The current price list is used when price lists are employed as it determines which price list is used for catalog
and order pricing operations. Price lists also determine the pricing locale. Prices within a price list can be
inherited from other price lists. Price lists can also set volume pricing and time-based prices for products or
SKUs. Note that price lists themselves can be time-based. For detailed information on price lists, refer to the Core
Commerce Programming Guide.
The CSRConfigurtor has a property called usingPriceLists, which must be set to true when the
application is using price lists.
The values of the current price list can be set by the following actions:
• When the agent first logs in, a new, transient profile is automatically loaded as the active customer. The
current price list is set from the new profile’s assigned price list. If the profile doesn’t have an assigned price
list, the current price list is set based on the PriceListManager defaultPriceList
• When the agent selects a customer from the profile repository to be the active customer, the current price list
is set based on the selected profile’s assigned price list
• When the agent selects an order from the repository to be the active order, the current price list is set based
on the first commerce item in the order with a price list assigned. A commerce item’s price info contains a
reference to the price list used to the price it
• If multisite is enabled, when the agent selects a site, the price list will change to the price list for that site
• The agent can manually select a different price list using the UI. Once an agent has explicitly selected a price
list, that price list remains active even if a new customer with a different assigned price list is selected from the
repository. Starting a new call will also reset the current price list and remove the agent’s explicitly selected
price list
CSREnvironmentTools
This component contains the API for gaining access to the current catalog and current price list.
Class atg.commerce.csr.environment.CSREnvironmentTools
Component /atg/commerce/custsvc/environment/CSREnvironmentTools
CSRAgentTools
This component contains the API for generating a parameter map for pricing operations that contains the active
price list.
Class atg.commerce.csr.util.CSRAgentTools
Component /atg/commerce/custsvc/util/CSRAgentTools
ChangeCatalogAndPricelist Form Handler
This form handler component is used to manually change the catalog and price list through the UI.

14 Using Catalogs and Price Lists 99
Form Handler atg.svc.agent.environment.EnvironmentChangeFormHandler
Component /atg/commerce/custsvc/environment/
ChangeCatalogAndPricelist
Defining the Default Catalog
The catalog displayed to the user is derived from the catalog assigned in their profile. If there is no catalog
assigned, the defaultCatalogId property of the /atg/commerce/custsvc/util/CSRConfigurator
component specifies the catalog to use for anonymous shoppers.
Defining the Default Price List
If your site uses price lists, you must configure the following:
• The /atg/commerce/custsvc/util/CSRConfigurator component property usingPriceLists must be
set to true. This enables the use of price lists
• Each customer must be assigned a price list. The defaultPriceListId property of the /atg/commerce/
pricing/pricelists/PriceListManager component specifies the price list to use for anonymous
shoppers
Setting the Pricing Locale
The active customer pricing locale drives the currency and currency codes of prices used in Commerce Service
Center. The active pricing locale may be customized based on the supported currencies of the store. This
component is modified using CRSAgentTools.
Class atg.commerce.csr.util.CSRAgentTools
Component /atg/commerce/custsvc/util/CSRAgentTools
The getActiveCustomerPricingLocale() method provides access to the pricing locale and will return the
price list locale (if one is specified and price lists are being used). If the price list locale is unavailable, the locale
stored in the customer profile is used. Failing that, if /atg/commerce/custsvc/util/
CSRAgentTools.useRequestLocale=true, the current request locale is used. If all of these attributes are
unavailable, the value of the /atg/commerce/pricing/PricingTools.defaultLocale is used.
Specifying Quick Access Catalogs and Price Lists
Quick access catalogs and price lists are available as sub-navigational menus from the catalog and price list
menus, allowing agents quick access to the most commonly used catalogs and price lists.
Quick access catalogs and price lists are configured by creating SiteOption items in the /atg/svc/option/
OptionRepository and specifying the catalog or price list IDs of the catalogs or price lists that should appear

100 14 Using Catalogs and Price Lists
in the quick-access menus. The defaultValue property specifies a list of catalog or price list IDs for the catalogs
or price lists to display.
The following is an example of a quick-access catalog site:
<add-item item-descriptor="SiteOption" id="QuickAccessCatalogs"> <set-property name="name" value="QuickAccessCatalogs"/> <set-property name="accessRight" value="serviceAdminDefaultRight"/> <set-property name="multiValued" value="true"/> <set-property name="dataType" value="String"/> <set-property name="defaultValue" value="catalog10002,masterCatalog"/> </add-item>
The following is an example of a quick-access price list site:
<add-item item-descriptor="SiteOption" id="QuickAccessPriceLists"> <set-property name="name" value="QuickAccessPriceLists"/> <set-property name="accessRight" value="serviceAdminDefaultRight"/> <set-property name="multiValued" value="true"/> <set-property name="dataType" value="String"/> <set-property name="defaultValue" value="listPrices,plist20003,salePrices"/> </add-item>
For additional information on configuring catalogs and price lists, refer to the Core Commerce Programming
Guide.

15 Understanding Environment Monitoring 101
15 Understanding Environment
Monitoring
An environment is the collective state of an agent’s current working context. Environment monitoring defines
the integration of applications within an environment and coordinates changes to global environment objects.
Overview of Environment Monitoring
Oracle Commerce Service Center exposes the following global objects to the environment management system:
• Current Order – The order the agent is currently working on
• Current Catalog – The catalog context the agent is current working in
• Current Pricelist – The currently selected price list. This price list is used for pricing operations on the catalog,
cart and checkout pages
• Current Site – The currently selected site. Agent actions, such as change order, or start new call will maintain
the appropriate state per site
• Site versus Catalog Mapping – In the product catalog page, by default the site’s default catalog is used for
browsing and searching. If the agent chooses a different catalog for the site, the currently selected catalog
is used for browse and product searches. The mapping is cleared when the agent switches from the current
sharing group to another sharing group
Environment Monitoring Components
The following components are used to configure environment monitoring.

102 15 Understanding Environment Monitoring
CSREnvironmentTools
Class atg.commerce.csr.environment.CSREnvironmentTools
Component /atg/commerce/custsvc/environment/CSREnvironmentTools
This component provides the core API for applying changes to the Commerce Service Center environment
objects. It also provides the API for accessing the Commerce Service Center-managed environment objects.
The CSREnvironmentTools component contains the doSitesShare method, which checks to see if the
current site and the desired new site share the same site group. If both sites share the same site group, the
method returns true.
CSREnvironmentMonitor
Class atg.commerce.csr.environment.CSREnvironmentMonitor
Component /atg/commerce/custsvc/environment/CSREnvironmentMonitor
This component detects changes, generates warnings and applies changes for Commerce Service Center-
managed objects.
The CSREnviornmentMonitor component contains the following methods:
• getUsersCatalog() calls the Oracle Commerce Core Commerce API to find the right catalog
• getUsersPriceList() calls the Core Commerce API to find the right price list
• getUsersSalePriceList() calls the Core Commerce API to find the right sales pricelist
• generateDependentDetailsForActiveSiteChange() will change the order, catalog, pricelist and sale
price list if the site is changed
• generateSiteChangeForOrderChange() generates the site change for the order change. If the order
contains the submitted state, the submitted site is loaded as the current site
CSREnvironmentConstants
Class atg.commerce.csr.environment.CSREnvironmentConstants
This static class exposes the environment change keys and their input parameters defined by Commerce
Service Center. The orderId parameter is an example of an input parameter name required to execute the
changeOrder change.

15 Understanding Environment Monitoring 103
EnvironmentChangeFormHandler, ChangeOrder
These components are used to perform Commerce Service Center environment changes from UI gestures.
Form Handler atg.svc.agent.environment.EnvironmentChangeFormHandler
atg.commerce.csr.environment.ChangeOrder
Components /atg/commerce/custsvc/environment/ChangeCatalogAndPriceList
/atg/commerce/custsvc/environment/ChangeOrder
/atg/commerce/custsvc/environment/CreateNewOrder
/atg/svc/agent/environment/ChangeSiteFormHandler
The existing EnvironmentChangeFormHandler is used to change a site. The following is the sample form for
changing sites:
<svc-ui: frameworkUrl var="errorURL" panelStacks=""/> <svc-ui: frameworkUrl var="successfulSiteChangeURL" panelStacks="globalPanels,cmcShoppingCartPS" tab="commerceTab"/> <%/*form used to change a site */%> <dsp: form style="display: none" id="atg_commerce_csr_loadExistingSiteForm" formid="atg_commerce_csr_loadExistingSiteForm"> <dsp: input type="hidden" name="errorURL" value="${errorURL}" bean="/atg/svc/agent/environment/ChangeSiteFormHandler.errorURL" /> <dsp: input type="hidden" name="successURL" value="${successfulSiteChangeURL}" bean="/atg/svc/agent/environment/ChangeSiteFormHandler.successURL" /> <dsp: input type="hidden" name="siteId" bean="/atg/svc/agent/environment/ ChangeSiteFormHandler.inputParameters.siteId" value=""/> <dsp: input type="hidden" priority="-10" bean="/atg/svc/agent/environment/ChangeSiteFormHandler.changeEnvironment" value=""/> </dsp: form>
The following is the ChangeSiteFormHandler.properties configuration for changing sites:
/atg/svc/agent/environment/ChangeSiteFormHandler.properties$class=atg.svc.agent.environment.EnvironmentChangeFormHandler$scope=request environmentTools=/atg/svc/agent/environment/EnvironmentTools transactionManager=/atg/dynamo/transaction/TransactionManager messageTools=/atg/web/messaging/MessageTools confirmURL=include/environment/confirm.jsp confirmPromptURL=include/environment/changePrompt.jsp environmentChangeKey=changeSite environmentChangeState=/atg/svc/agent/environment/EnvironmentChangeState doWarnings=true doTicketDispositionPrompt=true applicationName^=/atg/svc/agent/environment/ EnvironmentTools.agentApplicationName ticketingTools=/atg/svc/agent/ticketing/TicketingTools
For additional information on this form handler, refer to the ATG API Reference for Commerce Service Center.
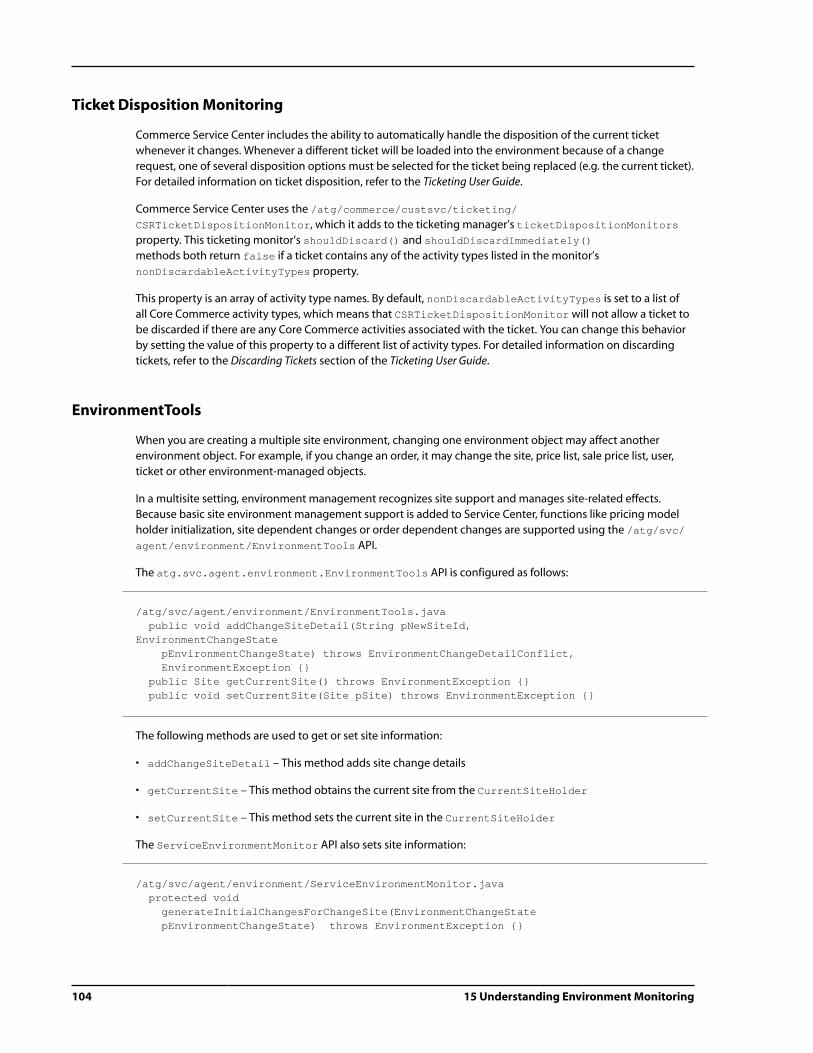
104 15 Understanding Environment Monitoring
Ticket Disposition Monitoring
Commerce Service Center includes the ability to automatically handle the disposition of the current ticket
whenever it changes. Whenever a different ticket will be loaded into the environment because of a change
request, one of several disposition options must be selected for the ticket being replaced (e.g. the current ticket).
For detailed information on ticket disposition, refer to the Ticketing User Guide.
Commerce Service Center uses the /atg/commerce/custsvc/ticketing/
CSRTicketDispositionMonitor, which it adds to the ticketing manager’s ticketDispositionMonitors
property. This ticketing monitor’s shouldDiscard() and shouldDiscardImmediately()
methods both return false if a ticket contains any of the activity types listed in the monitor’s
nonDiscardableActivityTypes property.
This property is an array of activity type names. By default, nonDiscardableActivityTypes is set to a list of
all Core Commerce activity types, which means that CSRTicketDispositionMonitor will not allow a ticket to
be discarded if there are any Core Commerce activities associated with the ticket. You can change this behavior
by setting the value of this property to a different list of activity types. For detailed information on discarding
tickets, refer to the Discarding Tickets section of the Ticketing User Guide.
EnvironmentTools
When you are creating a multiple site environment, changing one environment object may affect another
environment object. For example, if you change an order, it may change the site, price list, sale price list, user,
ticket or other environment-managed objects.
In a multisite setting, environment management recognizes site support and manages site-related effects.
Because basic site environment management support is added to Service Center, functions like pricing model
holder initialization, site dependent changes or order dependent changes are supported using the /atg/svc/
agent/environment/EnvironmentTools API.
The atg.svc.agent.environment.EnvironmentTools API is configured as follows:
/atg/svc/agent/environment/EnvironmentTools.java public void addChangeSiteDetail(String pNewSiteId,EnvironmentChangeState pEnvironmentChangeState) throws EnvironmentChangeDetailConflict, EnvironmentException {} public Site getCurrentSite() throws EnvironmentException {} public void setCurrentSite(Site pSite) throws EnvironmentException {}
The following methods are used to get or set site information:
• addChangeSiteDetail – This method adds site change details
• getCurrentSite – This method obtains the current site from the CurrentSiteHolder
• setCurrentSite – This method sets the current site in the CurrentSiteHolder
The ServiceEnvironmentMonitor API also sets site information:
/atg/svc/agent/environment/ServiceEnvironmentMonitor.java protected void generateInitialChangesForChangeSite(EnvironmentChangeState pEnvironmentChangeState) throws EnvironmentException {}

15 Understanding Environment Monitoring 105
public void revertSiteChangeDetail(EnvironmentChangeDetail pEnvironmentChangeDetail,EnvironmentChangeState pEnvironmentChangeState) {} public void applySiteChangeDetail(EnvironmentChangeDetail pEnvironmentChangeDetail, EnvironmentChangeState pEnvironmentChangeState)throws EnvironmentException {}
The ServiceEnvironmentMonitor uses the following methods:
• generateInitialChangesForChangeSite – generates initial changes for the change site
• applySiteChangeDetail – This method applies the site change information in the CurrentSiteHolder
• revertSiteChangeDetail – This method reverts site details to the old site details that are set in the
CurrentSiteHolder
Environment Management and Site Context
Sites are defined with a Site ID. Environment management monitors the site environment using the
CurrentSiteHolder object. Whenever the site is changed, the CurrentSiteHolder is updated with the
current site.
For each request siteContext is set using the CurrentSiteContextRuleFilter component in
atg.multisite.SiteContextPipelineServlet. If CurrentSiteContextRuleFilter returns a siteId,
then the siteId is set as the site context for the entire request. The CurrentSiteContextRuleFilter gets
the current site from the CurrentSiteHolder.
If the CurrentSiteHolder.currentSite is empty, then the site context is not set. If the site context is not set,
then environment management picks the catalog and price list based on the current user. If the site context is
set, then environment management picks the catalog and price list based on the current site and user.

106 15 Understanding Environment Monitoring

16 Pricing in Commerce Service Center 107
16 Pricing in Commerce Service Center
The following section outlines how pricing is performed in Oracle Commerce Service Center and describes
the components and API that can be used or modified to change pricing behavior. For information on Oracle
Commerce Core Commerce pricing, refer to the Core Commerce Programming Guide.
Loading Orders and Pricing
When a modifiable order is loaded into the current global context, or selected by an agent, it is priced by
Commerce Service Center using the CSREnvironmentMonitoring component. The entire order is priced using
PricingConstants.OP_REPRICE_ORDER_TOTAL as the pricing operation.
Only modifiable orders are priced when selected for the global context, however, it is possible to configure
which orders can be modified by Commerce Service Center based on the state of the order. CSRAgentTools
contains API and configurable properties for determining which orders are considered modifiable by state.
Determining if Orders are Modifiable
The CSRAgentTools.isOrderModifiable(Order pOrder) method determines if an order is modifiable by
comparing the order’s current state to the configured values and can be extended if necessary.
An order is not modifiable when:
• Any items in the order have been shipped
• Any payment groups in the order are in a non-modifiable state
• The order is in a non-modifiable order state
The following example displays the configurable properties in /atg/commerce/custsvc/util/
CSRAgentTools:
#both nonModifiableOrderStates and nonModifiablePaymentGroupStates are#used to determine a non-modifiable order.
#states that indicate an order cannot be modifiednonModifiableOrderStates=REMOVED,\ QUOTED,\ NO_PENDING_ACTION,\ PENDING_REMOVE,\ PENDING_CUSTOMER_RETURN,\

108 16 Pricing in Commerce Service Center
AGENT_REJECTED
nonModifiablePaymentGroupStates^=\/atg/commerce/order/PaymentGroupManager.nonModifiablePaymentGroupStates=REMOVED,\ SETTLED
Determining if Orders are Submitted
The CSRAgentTools.isOrderSubmitted method determines if an order is in a submitted state. Submitted
order states are configured using the submittedOrderStates property of CSRAgentTools:
submitedOrderStates=SUBMITTED, PROCESSING, PENDING MERCHANT ACTION
Commerce Service Center uses this API to:
• Determine which pipelines to use for clone edit initialization and reconciliation. All orders that the API
considers submitted use pipelines configured for the submitted state
• Determine if the original order prices should be used to price the order
• Present dynamic page content when working on a submitted order. For example, disabling the Promotion
Browser when working on a submitted order
Price Lists and Pricing
When configured to use price lists, Commerce Service Center provides two global context price lists: one for
list prices and another for sale prices. Commerce Service Center takes advantage of a Core Commerce feature
that allows the price lists to be passed into the pricing engine through the extra parameter map to override the
default behavior that determines which price list to use. The following Core Commerce PricingTools API is
used for pricing orders. For additional information, refer to the Core Commerce Programming Guide. Note the Map
parameter that is included on the API:
public OrderPriceInfo priceOrderTotal(Order pOrder, PricingModelHolder pPricingModels, Locale pLocale, RepositoryItem pProfile, Map pExtraParameters)
The CSRAgentTools API generates a map that contains the IDs of the current global context price list
selections. This API is used by Commerce Service Center to generate the extra parameter map for pricing
operations. Commerce Service Center has also extended createRepriceParameterMap of all the
PurchaseProcessFormHandlers to call this API:
public Map addPriceListParameter(Map pExtraParameters)
The CSRAgentTools API is used for pricing an order that will call addPriceListParameter as part of the
process:

16 Pricing in Commerce Service Center 109
public void repriceOrder(String pRepricingOperation, Order pOrder, PricingModelHolder pUserPricingModels, Locale pLocale, RepositoryItem pCustomerProfile, RepositoryItem pAgentProfile,Map pExtraParameters, PipelineErrorHandler pErrorHandler)
When loading an order into the global context, Commerce Service Center attempts to extract the correct
price lists from the order itself. If the price lists can be determined from the order, they will load into the global
context at the same time as the order.
CSREnvironmentTools contains the API for accessing the global context price list selections, setting new
global context price list selections and extracting a price list from an order:
public RepositoryItem getCurrentPriceList()public RepositoryItem getCurrentSalePriceList()public void setCurrentPriceList(RepositoryItem pPriceList)public void setCurrentSalePriceList(RepositoryItem pPriceList)public RepositoryItem getListPriceListFromOrder(Order pOrder)public RepositoryItem getSaleListPriceListFromOrder(Order pOrder)
For additional information on environment monitoring, refer to the Understanding Environment Monitoring (page
101) section
Automatic Removal of Items
If Commerce Service Center is configured to use price lists, it will automatically remove items from the order that
cannot be priced by the current global context price list. This avoids pricing errors when the order is first loaded.
When loading an order into global context, Commerce Service Center attempts to determine the correct price
lists (list price list and sale price list) to use by extracting them from the order being loaded. This helps eliminate
the problem of removing items from an order because an incorrect price list is in global context when the order
is loaded. Commerce Service Center automatically changes the global context price list selections to match
those found in the order.
Promotions
Commerce Service Center defines two PricingModelHolders for pricing orders. Commerce Service Center
decides which one to use based on the state of the order and each holder is initialized with promotions
differently.
• /atg/commerce/custsvc/pricing/CustomerPricingModels – this holder is used when pricing
incomplete orders. It is initialized with the active customer’s current promotions
• /atg/commerce/custsvc/pricing/SubmittedOrderPricingModels – this holder is used when pricing
submitted orders. It is initialized with the order’s applied promotions

110 16 Pricing in Commerce Service Center
Incomplete Orders or Schedule Order Templates
Commerce Service Center uses the active customer’s current promotions when pricing incomplete (e.g. orders
not submitted) orders.
Submitted Orders
For orders that have already been submitted to fulfillment, Commerce Service Center uses the promotions that
were originally applied to the order when it was submitted.
Note that this is not the same as the promotions that were available at the time the order was submitted. It only
includes the promotions that were applied to the order when it was submitted. For example, if a buy-two-get-
one-free promotion was available when the order was submitted but only one was purchased and therefore
not applied to the order, that promotion will not be in the SubmittedOrderPricingModels when the order is
modified after submission to add the second item.
Determining the Correct PricingModelHolder
CSREnvironmentTools contains an API that returns the correct pricing model holder for the order currently
loaded into the global context. CSREnvironmentMonitor and all of the Commerce Service Center extensions
to the PurchaseProcessFormHandler call this API to determine the correct pricing model holder for pricing
operations.
public PricingModelHolder getCurrentOrderPricingModelHolder
Configuring Manual Pricing Adjustments
It is possible to adjust an order total by a fixed amount. Adjustments can either be a fixed increase (debit) or
decrease (credit) to the order total. The details of a manual adjustment such as the amount, adjustment type and
reason code are permanently stored within the database. For information on the corresponding Core Commerce
API, refer to the Core Commerce Programming Guide.
All manual adjustments are created as transient repository items. Subsequent processing in the updateOrder
pipeline determines if the adjustments is permanently added to the repository based on the following rules.
• All adjustments created for submitted orders are unconditionally persisted to the repository. As configured
by default, this is the only time Core Commerce and Commerce Service Center unconditionally saves
adjustments to the repository
• All adjustments created for persistent, incomplete orders are conditionally saved based on configuration.
Commerce Service Center uses a Boolean configuration setting, whose default value is false, that
determines if adjustments should be saved immediately for persistent, incomplete orders
The Core Commerce updateOrder pipeline contains a processor that saves the manual adjustment items to the
repository when appropriate. saveManualAdjustment executes the /atg/commerce/order/

16 Pricing in Commerce Service Center 111
processor/SaveManualAdjustments processor with the following two processor configurations:
## The processor will save the manual adjustments to the repository for# orders in these states, depending on the value of saveIncomplete# saveForIncompleteOrders#incompleteStates^=/atg/commerce/order/OrderLookupService.incompleteStates## The processor will save the manual adjustments to the repository for# orders in the configured incomplete states if this property is true.# Otherwise, the manual adjustments are not saved for incomplete orders.#saveIncompleteOrderAdjustments=false
Important: Be aware of a condition that may occur when saving incomplete manual adjustments. Manual
adjustments are, by default, applied unconditionally. Once added to the order, manual adjustments affect the
order’s price despite the contents of the order. This is important if an incomplete order is saved with manual
adjustments as subsequent changes to the order at checkout time will not change any adjustments that have
been applied. For example, if an agent applies a $20 credit adjustment to an order with $100 merchandise and
saves it in an incomplete state, the customer could return and remove $80 worth of merchandise from the order
and checkout with a $0 total. As such, the processor is configured by default to not save manual adjustments for
incomplete orders.
The OrderAdjustmentCalculator adjusts the order’s subtotal based on the manual adjustments associated
with the order. The /atg/commerce/pricing/calculators/
OrderAdjustmentCalculator component contains the following configuration:
$class=atg.commerce.pricing.OrderAdjustmentCalculatorpricingTools=/atg/commerce/pricing/PricingTools
The adjustment calculator is added as a postCalculator in the /atg/commerce/pricing/
OrderPricingEngine. As such, the calculator runs after the pre-calculators and all calculators associated with
any promotions for the order. The configuration for the OrderPricingEngine is:
postCalculators+=\ calculators/OrderAdjustmentCalculator
For additional information on pricing and calculators, refer to the Working with Exchange Orders (page 61)
section and the Core Commerce Programming Guide.

112 16 Pricing in Commerce Service Center

17 Working with Shipping and Payment Groups 113
17 Working with Shipping and
Payment Groups
Oracle Commerce Service Center supports, by default, three shipping group types: Hard Goods, Electronic and
In Store Pickup. Commerce Service Center also supports, by default, the following payment group types: Gift
Certificate, Credit Card, Store Credit, Pay In-Store and Cash.
You can customize shipping groups and payment groups to do things such as add custom fields or add support
for a new shipping group type. For additional information on working with shipping and payment groups, refer
to the Core Commerce Programming Guide.
For detailed information on working with the Commerce Service Center UI and using page fragments, refer to
the Service Center UI Programming Guide.
Shipping Group Page Fragments
Shipping and payment group configuration is defined using the atg.commerce.csr.order.
CommerceTypeConfiguration class. The class contains the following:
protected PageFragment mAddPageFragment;protected PageFragment mEditPageFragment;protected PageFragment mDisplayPageFragment;protected PageFragment mImagePageFragment;protected String mResourceBundle;protected String mType;protected String mAddPageFragmentTitleKey;protected String mEditPageFragmentTitleKey;protected String mImageHoverTextKey;
The CommerceTypeConfiguration class uses the following properties:
Property Description
addPageFragment Adds a specific shipping or payment group type.
editPageFragment Edits a specific shipping or payment group type.

114 17 Working with Shipping and Payment Groups
Property Description
displayPageFragment Displays a specific shipping or payment group type.
imagePageFragment Displays an image used with a specific shipping or payment group type.
resourceBundle The configuration used to obtain the resourced values.
type The primary key used to identify the shipping or payment group type
configuration. The key is used as a map key for the system-generated
shipping or payment group configuration map, which locates the
configuration type.
addPageFragmentTitleKey Defines the text used in the AddPageFragment title.
editPageFragmentTitleKey Defines the text used in the EditPageFragment title.
imageHoverTextKey Defines the text displayed when a user hovers over the image defined in
the ImagePageFragment.
Commerce Service Center provides the following default shipping group types: hard goods, electronic goods
and in-store pickup. Shipping group types are configured using the atg.commerce.csr.order.
CommerceTypeConfiguration class. The following information describes how to reconfigure the default
shipping group types or to configure new types.
The shipping group configuration files and the shipping group page fragment configuration files are available at
the following locations:
File Location
Configuration File /DCS-CSR-UI/config/atg/commerce/custsvc/ui/
Page Fragments /DCS-CSR-UI/j2ee-apps/DCS-CSR-UI/include/order/
Display JSPs /DCS-CSR-UI/j2ee-apps/DCS-CSR-UI/include/order/
Add and Edit JSPs /DCS-CSR-UI/j2ee-apps/DCS-CSR-UI/panels/order/shipping/
Working with Shipping Group Page Fragments
To change how your shipping groups are displayed, you must modify the displayPageFragment property
page fragment file. Each shipping group type defines three display values that appear on various pages. A
display value consists of a title and content and is configured in the display page fragment JSP file, where the
three display values are identified in the file as value1, value2 and status.
You can customize the default display values for the existing shipping group types. However, if you create new
shipping group types, each new shipping group type must have a defined set of display values.
The following display values are configured for the hard good shipping type:

17 Working with Shipping and Payment Groups 115
Value Title Content Example
Value1 Shipping Address [first] [last]
[address 1]
[address 2]
[city], [state] [zip code]
[country]
[phone number]
Bob Smith
119 Grand Street
Apt. 1509
Brooklyn, NY 10023
USA
212-555-4321
Value2 Shipping Method [shipping method] Ground
Status Status [shipping group status] Ready to Ship
The following display details are configured for the electronic shipping group type:
Value Title Content Example
Value1 Electronic Address [email address] [email protected]
Value2 Blank [blank] Blank
Status Status [shipping group status] Emailed
The following display values are configured for the in-store pickup shipping group type:
Value Title Content Example
Value1 Store Address [store name]
[address 1]
[address 2]
[city], [state] [zip code]
[country]
[phone number]
The Big Store
11 Flatbush Street
Suite 1509
Brooklyn, NY 10023
USA
212-555-9874
Value2 Blank [blank] Blank
Status Status [shipping group status] The goods are ready for
pickup.
Display details are used on the following pages for all shipping group types, unless otherwise indicated:

116 17 Working with Shipping and Payment Groups
Display Location Value1 Value2 Status
Shipping Addresses Page
Shipping Method Page (hard good only)
Billing
X
Order Review Page
Return Items Page
Confirmation Emails
X X
Order View Page
Scheduled Orders Page
X X X
The /DCS-CSR-UI/atg/commerce/custsvc/ui/HardGoodShippingGroupConfiguration.
properties, ElectronicGoodShippingGroupConfiguration.properties and
InStorePickupShippingGroupConfiguration.properties files hold all of the properties of the page
fragments. The following is an example of the HardGoodShippingGroupConfiguration.properties file:
$class=atg.commerce.csr.order.CommerceTypeConfiguration
addPageFragment=/atg/commerce/custsvc/ui/fragments/order/ AddHardgoodShippingGroupeditPageFragment=/atg/commerce/custsvc/ui/fragments/order/ EditHardgoodShippingGroupdisplayPageFragment=/atg/commerce/custsvc/ui/fragments/order/ DisplayHardgoodShippingGroupimagePageFragment=/atg/commerce/custsvc/ui/fragments/order/ HardgoodShippingGroupImagetype=hardgoodShippingGroupaddPageFragmentTitleKey=addHardgoodShippingGroupTitleeditPageFragmentTitleKey=editHardgoodShippingGroupTitleimageHoverTextKey=hardgoodShippingGroupImageHoverTextresourceBundle=atg.commerce.csr.order.WebAppResources
The DisplayHardgoodShippingGroupConfiguration.properties file identifies the location of your page
fragment JSP file and the servletContext. For example:
$class=atg.web.PageFragment
URL=/include/order/displayHardgoodShippingGroup.jspservletContext=DCS-CSR
The displayHardgoodShippingGroup.jsp file contains the values for the display details, including the title
and the content. You must modify the value1, value2 and status properties with your custom information.
The combination of these parameters defines one display value, such as value1:
• displayValue – This optional parameter is used to display the value of the desired field
• displayHeading – This optional parameter is used to display the heading of the desired field

17 Working with Shipping and Payment Groups 117
Example: Shipping Group Display Page Fragment Components
The following is a portion of the default configuration of the displayhardgoodShippingGroup.jsp file. In
this example, the displayHeading parameter, which defines the display value1 title, is set to use the Shipping
Address header. The displayValue parameter, which defines the display value1 content, is set to use the
addressView.jsp fragment:
<c: if test="${propertyName == 'value1'}"> <c: if test="${displayHeading == true}"> <fmt: message key="shipping.address.header"/> </c: if> <c: if test="${displayValue == true}"> <dsp: include src="/include/addresses/addressView.jsp" otherContext="${csrConfigurator.contextRoot}"> <dsp: param name="address" value="${address}"/> </dsp: include> </c: if>
To display your customized shipping group title and content, modify the displayHeading and
displayValues accordingly. For example, in the displayElectronicShippingGroup.jsp file, the value1
title has been modified to define the displayHeading as Electronic Address and the displayValue as
emailAddress:
<c: if test="${propertyName == 'value1'}"> <c: if test="${displayHeading == true}"> <fmt: message key='shippingSummary.electronicAddress.header'/> </c: if> <c: if test="${displayValue == true}"> <li> <c: out value="${shippingGroup.emailAddress}"/> </li> </c: if></c: if>
As noted above, the title and content for value1 is shown on the Shipping Addresses, Shipping Method (hard
good only), Order Review, Return Items, Order View, Scheduled Orders pages and on confirmation e-mails. You
may also modify the value2 property as needed. Note that electronic shipping groups do not use the value2
property by default, so it is left blank. You may add the displayHeading and displayvalues to the property
as required.
Other components that can be customized within the display page fragment include the status property.
This property is used to identify the status of the group object and displayed only on the Order View and the
Scheduled Order pages. The default title for both the hard good and electronic shipping group is Status, and the
content defaults to shippingGroup.stateAsString. Modify the heading of the display value to point to your
customized information as needed:
<c: if test="${propertyName == 'status'}"> <c: if test="${displayHeading == true}"> <fmt: message key='shippingSummary.shippingStatus.header'/> </c: if> <c: if test="${displayValue == true}"> <dsp: droplet name="ShippingGroupStateDescriptions"> <dsp: param name="state" value="${shippingGroup.stateAsString}"/> <dsp: param name="elementName" value="stateDescription"/> <dsp: oparam name="output">

118 17 Working with Shipping and Payment Groups
<dsp: droplet name="IsHighlightedState"> <dsp: param name="obj" value="${shippingGroup}"/> <dsp: oparam name="true"> <span class="atg_commerce_csr_dataHighlight"><dsp: valueof param="stateDescription"></dsp: valueof></span> </dsp: oparam> <dsp: oparam name="false"> <dsp: valueof param="stateDescription"></dsp: valueof> </dsp: oparam> </dsp: droplet> </dsp: oparam> </dsp: droplet> </c: if></c: if>
The selectOptionText property is used to identify the information that is presented in the address drop down
on the Ship to Multiple Addresses and Split Quantity pages. By setting the displayValue, you configure what
address information is presented in the drop down. For example, the default configuration for the hard good
shipping group contains the following:
<c: if test="${propertyName == 'selectOptionText'}"> <c: if test="${displayValue == true}"> ${fn: escapeXml(address.address1)}${!empty address.address2 ? ' ' : '' }${!empty address.address2 ? fn: escapeXml(address.address2) : '' } </c: if></c: if>
The electronic shipping group selectOptionText property has been modified to include the following:
<c: if test="${propertyName == 'selectOptionText'}"> <c: if test="${displayValue == true}"> ${fn: escapeXml (shippingGroup.emailAddress)} </c: if></c: if>
Modify the display value with your customized page fragment.
Customizing a Shipping Group Type
For additional information on creating customized Shipping Groups, refer to the Working with Purchase Process
Objects chapter of the Core Commerce Programming Guide.
1. Refer to the Order Tools section of the Core Commerce Programming Guide to create a new shipping group
type. This includes defining the type-to-class name mapping for ShippingGroup objects.
2. Refer to the Create a Shipping Group section of the Core Commerce Programming Guide to create the shipping
group.
Note: If you do not want to initialize the custom shipping group types using the ShippinGroupDroplet,
continue on to step 5.
3. Write a new ShippingGroupInitializer implementation. The initializeShippingGroups() method
should gather the user’s ShippingGroups by type and add them to the ShippingGroupMapContainer
referenced by the ShippingGroupFormHandler.

17 Working with Shipping and Payment Groups 119
4. Open your custom application and modify ShippingGroupDroplet.properties
shippingGroupInitializers parameter by adding your new shipping group type. For example:
/DCS-CSR-UI/atg/commerce/custsvc/order/ShippingGroupDroplet.properties
## ServiceMap of shippingGroupTypes to ShippingGroupInitializer
Nucleus components
shippingGroupInitializers+=\
newShippingGroup=/atg/commerce/custsvc/order/NewShippingGroupInitializer
5. Update the /atg/commerce/custsvc/util/CSRConfigurator.properties file
shippingGroupTypesToBeInitialized property and shippingGroupTypeConfigurations property
to include your new shipping group type. This configuration initializes shipping group types in the
ShippingGroupDroplet.
Initialize your new shipping group type by adding your new shipping group type to the
shippingGroupTypesToBeInitialized property. For example:
/atg/commerce/custsvc/util/CSRConfigurator.properties
## Shipping group fragment settings
shippingGroupTypesToBeInitialized= newShippingGroup
shippingGroupTypeConfigurations+=\
/atg/commerce/custsvc/ui/NewShipingGroupConfiguration
6. Add the CommerceTypeConfiguration component to the shippingGroupTypeConfigurations
property for any new supported shipping group type.
Payment Group Page Fragments
Payment group type configuration is defined using the atg.commerce.csr.order.
PaymentGroupTypeConfiguration class. The class contains the following:
atg.commerce.csr.order.PaymentGroupTypeConfiguration extends atg.commerce.csr.order.CommerceTypeConfiguration protected PageFragment mEditRefundMethodPageFragment; protected PageFragment mDisplayRefundMethodPageFragment; mEditRefundMethodPageFragmentTitleKey;
The PaymentGroupTypeConfiguration class configures the payment group and refund methods. The base
class properties configure the payment group. The refund methods are used for the returns and exchange
pages. For detailed information on the PaymentGroupTypeConfiguration class, refer to the ATG API Reference
for Commerce Service Center.
Payment group types are provided in these locations:
File Location
Configuration File /DCS-CSR-UI/config/atg/commerce/custsvc/ui/
Page Fragments /DCS-CSR-UI/j2ee-apps/DCS-CSR-UI/include/order/
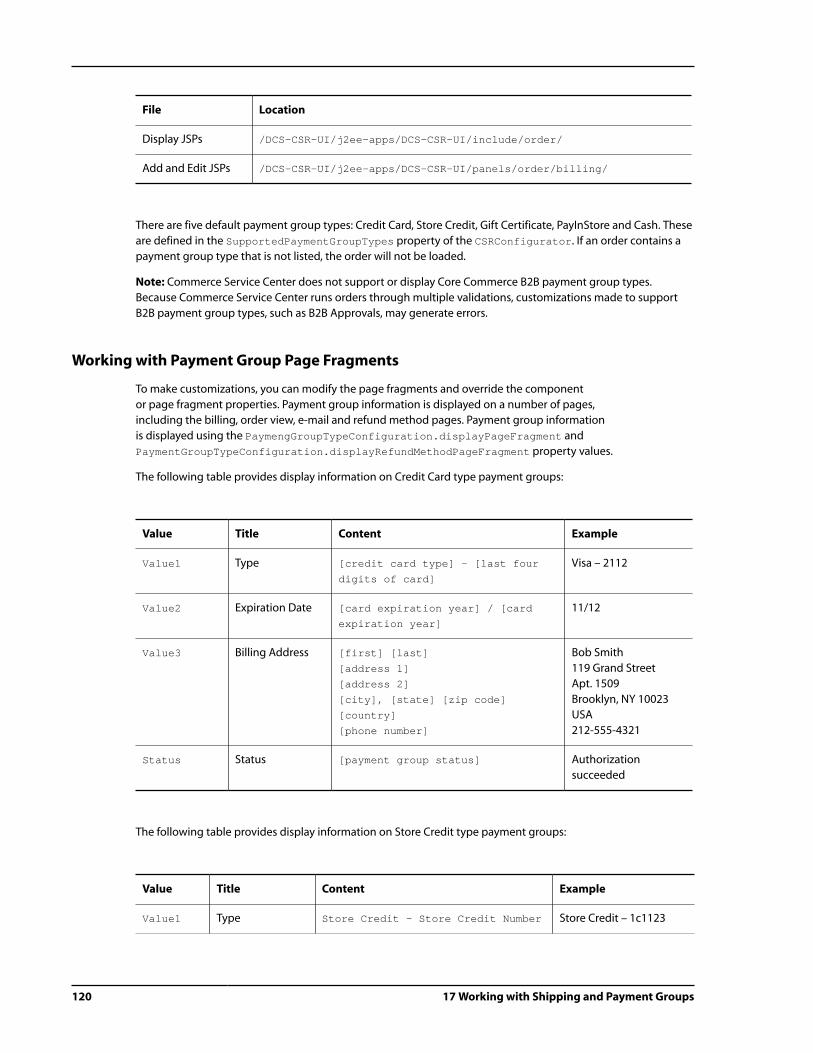
120 17 Working with Shipping and Payment Groups
File Location
Display JSPs /DCS-CSR-UI/j2ee-apps/DCS-CSR-UI/include/order/
Add and Edit JSPs /DCS-CSR-UI/j2ee-apps/DCS-CSR-UI/panels/order/billing/
There are five default payment group types: Credit Card, Store Credit, Gift Certificate, PayInStore and Cash. These
are defined in the SupportedPaymentGroupTypes property of the CSRConfigurator. If an order contains a
payment group type that is not listed, the order will not be loaded.
Note: Commerce Service Center does not support or display Core Commerce B2B payment group types.
Because Commerce Service Center runs orders through multiple validations, customizations made to support
B2B payment group types, such as B2B Approvals, may generate errors.
Working with Payment Group Page Fragments
To make customizations, you can modify the page fragments and override the component
or page fragment properties. Payment group information is displayed on a number of pages,
including the billing, order view, e-mail and refund method pages. Payment group information
is displayed using the PaymengGroupTypeConfiguration.displayPageFragment and
PaymentGroupTypeConfiguration.displayRefundMethodPageFragment property values.
The following table provides display information on Credit Card type payment groups:
Value Title Content Example
Value1 Type [credit card type] – [last four
digits of card]
Visa – 2112
Value2 Expiration Date [card expiration year] / [card
expiration year]
11/12
Value3 Billing Address [first] [last]
[address 1]
[address 2]
[city], [state] [zip code]
[country]
[phone number]
Bob Smith
119 Grand Street
Apt. 1509
Brooklyn, NY 10023
USA
212-555-4321
Status Status [payment group status] Authorization
succeeded
The following table provides display information on Store Credit type payment groups:
Value Title Content Example
Value1 Type Store Credit – Store Credit Number Store Credit – 1c1123

17 Working with Shipping and Payment Groups 121
Value Title Content Example
Value2 Amt. Remaining [store credit remaining] 15.32
Value3 Blank [blank] blank
Status Status [payment group status] Debited
The following table provides display information on Gift Certificate type payment groups:
Value Title Content Example
Value1 Type Gift Certificate – Gift
Certificate Number
Gift Certificate – 1g4332
Value2 Amt. Remaining [amount remaining] 15.32
Value3 Blank [blank] blank
Status Status [payment group status] Debited
The following table provides display information on Pay In-store type payment groups:
Value Title Content Example
Value1 Type Pay In Store Pay In Store
Value2 Blank [blank] blank
Value3 Blank [blank] blank
Status Blank [blank] blank
The following table provides display information on Cash type payment groups:
Value Title Content Example
Value1 Type Cash Cash
Value2 Blank [blank] blank
Value3 Blank [blank] blank
Status Blank [blank] blank

122 17 Working with Shipping and Payment Groups
The display values are used in the following locations:
Display Pages Value1 Value2 Value3 Status
Billing
Order Review
Refund Type
Confirmation Emails
X X X
Order View
Scheduled Orders
Refund Review
X X X X
The /atg/commerce/custsvc/ui/CreditCardConfiguration.properties,
StoreCreditConfiguration.properties and GiftCertificateConfiguration.properties files in
the /DCS-CSR-UI directory hold all of the properties of the page fragments. The configuration file contains the
page fragment location.
The following examples use the Credit Card payment group; however, all three payment group types have
corresponding files.
The following is an example of the CreditCardConfiguration.properties file:
$class=atg.commerce.csr.order.PaymentGroupTypeConfigurationaddPageFragment=/atg/commerce/custsvc/ui/fragments/order/AddCreditCardeditPageFragment=/atg/commerce/custsvc/ui/fragments/order/EditCreditCarddisplayPageFragment=/atg/commerce/custsvc/ui/fragments/order/ DisplayCreditCard
type=creditCardaddPageFragmentTitleKey=addCreditCardTitleeditPageFragmentTitleKey=editCreditCardTitleresourceBundle=atg.commerce.csr.order.WebAppResources
editRefundMethodPageFragment=/atg/commerce/custsvc/ui/fragments/order/ EditCreditCardRefundMethoddisplayRefundMethodPageFragment=/atg/commerce/custsvc/ui/fragments/order/ DisplayCreditCardRefundMethodeditRefundMethodPageFragmentTitleKey=editCreditCardRefundMethodTitle
The CreditCardConfiguration.properties file identifies the location of the page fragment, which in turn,
defines your page fragment JSP file and the servletContext. For example:
$class=atg.web.PageFragment
URL=/include/order/displayCreditCard.jspservletContext=DCS-CSR
The displayCreditCard.jsp file contains the values for the display details, including the title and the
content. You must modify the default value1, value2, value3 and status properties with your custom
information. The combination of these parameters defines one display value, such as value1:

17 Working with Shipping and Payment Groups 123
• displayValue – This optional parameter is used to display the value of the desired field
• displayHeading – This optional parameter is used to display the heading of the desired field
Example: Payment Group Display Page Fragment Components
The following is a portion of the default configuration of the displayCreditCard.jsp file. In this example,
the displayHeading parameter, which defines the display value1 title, is set to use the Billing Summary
header. The displayValue parameter, which defines the display value1 content, is set to display the credit
card information:
<c: if test="${propertyName == 'value1'}"> <c: if test="${displayHeading == true}"> <fmt: message key='billingSummary.commerceItem.header.type'/> </c: if> <c: if test="${displayValue == true}"> <csr: displayCreditCardType creditCard="${paymentGroup}"/> </c: if></c: if>
To display your customized payment group title and content, modify the displayHeading and
displayValues accordingly. For example, in the GiftCertificate.jsp file, the value1 title has
been modified to use the same displayHeading but the displayValue has been modified to use the
newOrderBilling gift certificate value:
<c: if test="${propertyName == 'value1'}"> <c: if test="${displayHeading == true}"> <fmt: message key='billingSummary.commerceItem.header.type'/> </c: if> <c: if test="${displayValue == true}"> <fmt: message key="newOrderBilling.displayPaymentMethods.giftCertificate"/> <c: if test="${!empty paymentGroup && !empty paymentGroup.giftCertificateNumber }"> <fmt: message key="common.hyphen"/> <c: out value="${paymentGroup.giftCertificateNumber}"/> </c: if> </c: if></c: if>
As noted above, the title and content for value1 is shown on the Billing, Order Review, Refund Type, Order
View, Scheduled Orders, and Refund Review pages as well as on confirmation e-mails. You may also modify the
value2 and value3 property as needed. Note that Store Credit and Gift Certificate payment groups do not use
the value3 property by default, so it is left blank. You may add the displayHeading and displayvalues to
the property as required.
Other properties that can be customized within the display page fragment include the status property. This
property is used to identify the status of the group object and is displayed only on the Order View, Scheduled
Orders and Refund Review pages. The default title for all payment groups is Status. Modify the display value to
point to your customized information as needed. The following is an example of the displayCreditCard.jsp
status:
<c: if test="${propertyName == 'status'}"> <c: if test="${displayHeading == true}">

124 17 Working with Shipping and Payment Groups
<fmt: message key='billingSummary.commerceItem.header.state/> </c: if> <c: if test="${displayValue == true}"> <dsp: droplet name="PaymentGroupStateDescriptions"> <dsp: param name="state" value="${paymentGroup.stateAsString}"/> <dsp: param name="elementName" value="stateDescription"/> <dsp: oparam name="output"> <dsp: droplet name="IsHighlightedState"> <dsp: param name="obj" value="${paymentGroup}"/> <dsp: oparam name="true"> <span class="atg_commerce_csr_dataHighlight"><dsp: valueof param="stateDescription"></dsp: valueof></span> </dsp: oparam> <dsp: oparam name="false"> <dsp: valueof param="stateDescription"></dsp: valueof> </dsp: oparam> </dsp: droplet> </dsp: oparam> </dsp: droplet> </c: if></c: if>
Note that there are DSP tag files that, once copied into your customization library, can be used to extend default
JSP files. For example, the displayCreditCardType.tag file displays the credit card name and renders the last
four digits of the credit card number. For information on working with DSP tag files, refer to the Page Developer's
Guide.
Customizing a Payment Group Type
For additional information on creating customized Payment Groups, refer to the Working with Purchase Process
Objects chapter of the Core Commerce Programming Guide.
1. Refer to the Order Tools section of the Core Commerce Programming Guide to create a new payment group
type. This includes defining the type-to-class name mapping for PaymentGroup objects.
2. Refer to the Extending the Payment Process to Support a New Payment Method section of the Core Commerce
Programming Guide to create the payment group.
Note: If you do not want to initialize the customer payment group type using the PaymentGroupDroplet,
continue to Step 5.
3. Write a new PaymentGroupInitializer implementation. The initializePaymentGroups() method
should gather the user’s PaymentGroups by type and add them to the PaymentGroupMapContainer
referenced by the PaymentGroupFormHandler.
4. Within your custom application, create a new PaymentGroupInitializer implementation and add it to the
ServiceMap in the PaymentGroupDroplet.properties file paymentGroupInitializers property. For
example:
/atg/commerce/custsvc/order/PaymentGroupDroplet.properties
## ServiceMap of paymentGroupTypes to PaymentGroupInitializer
Nucleus components
paymentGroupInitializers+=\
newPayment=/atg/commerce/custsvc/order/NewPaymentInitializer
5. Update the /atg/commerce/custsvc/util/CSRConfigurator.properties file

17 Working with Shipping and Payment Groups 125
paymentGroupTypesToBeInitialized and paymentGroupTypeConfigurations properties to include
your new payment group type.
This configuration initializes payment group types in the PaymentGroupDroplet. By default, this
property initializes the creditCard and storeCredit types. To initialize a new payment group
type, add your new payment group type to the paymentGroupTypesToBeInitialized and
paymentGroupTypeConfigurations properties. For example:
/atg/commerce/custsvc/util/CSRConfigurator.properties
## Payment group fragment settings
paymentGroupTypesToBeInitialized=creditCard,storeCredit,newPayment
paymentGroupTypeConfigurations+=\
/atg/commerce/custsvc/ui/NewPaymentGroupConfiguration
Note: Ensure that the payment group type value matches the key defined in
OrderTools.paymentTypeClassMap property.
Limiting Amounts for Payment Groups
When working on the Billing page an agent can enter any amount for a payment group. If the payment group is
associated with a claimable item, the agent will not be allowed to enter more than the remaining or maximum -
allowed amount.
You can limit the amount of your customized payment group types by extending the
CSRPaymentGroupRemainingAmount servlet group droplet to set the payment group maximum-allowed and
remaining amount limits.
CSR Payment Group Remaining Amount Servlet Bean Droplet
The CSRPaymentGroupRemainingAmount servlet bean droplet returns both the remaining and maximum-
allowed amounts for the payment group. This droplet sets a maximum -allowed amount limitation in the Billing
page and displays the remaining amount of the payment group on the Billing, Order View and Order Review
pages.
Class atg.commerce.csr.order.CSRPaymentGroupRemainingAmount
Components /atg/commerce/custsvc/order/
GetTotalAppeasementsForOrderDroplet.properties
The GetTotalOrderAppeasementDroplet contains the following:
Input Parameters
• order –( Optional) This parameter is added for custom extensions that may need to work with the order.
• paymentGroup – (Required) This parameter obtains the remaining and max allowed amount
Oparams
• output – if an order has any payment groups
Output Parameters

126 17 Working with Shipping and Payment Groups
• remainingAmount – The remaining amount is calculated for the payment group and returned in this
parameter. The remaining amount is only calculated for store credit and gift certificates. This parameter
returns the PaymentGroup remaining amount that is backed by the claimable item
• maxAllowedAmount – This parameter calculates and returns the maximum-allowed amount for the payment
group. This parameter is used only in the billing page
You can calculate the remaining or maximum-allowed amounts for any custom payment groups by extending
the getRemainingAmount() and getMaxAllowedAmount() methods within the droplet.
Copying Payment Group Types
When an agent starts the exchange process an exchange order is created. Relevant payment groups must
be copied from the original order to the exchange order. The following payment groups are copied from the
original order:
• Credit Card – copied by default from the original to the exchange order
• Store Credit – copied if there a remaining amount
• Gift Certificate – copied if there is a remaining amount
To copy additional payment group types, add the payment group type to the
PaymentGroupCopyManager.properties file.
/atg/commerce/custsvc/returns/PaymentGroupCopyManager.properties## ServiceMap of paymentGroupTypes to Copier Nucleus componentscopiers+=\newPaymentGroupType=Component to copy new payment group
Note: The newPaymentGroupType should be one of the supported payment group types, outlined in the /atg/
commerce/order/OrderTools.paymentTypeClassMap file.
Configuring Shipping Addresses
You must configure shipping addresses for the following types of addresses:
• Returns
• Electronic
Configuring Return Shipping Addresses
To configure the shipping address for returns, perform the following steps:
1. Create a JSP file that contains your shipping address. For example:
<ul class="atg_commerce_csr_simpleList">
<li><strong>Ship return items to: </strong></li>

17 Working with Shipping and Payment Groups 127
<li>My Company</li>
<li>Attn: Returns</li>
<li>100 Main Street</li>
<li>My City, My State</li>
<li>My Zip</li>
</ul>
2. Open the /atg/commerce/custsvc/ui/renderers/
ReturnShippingAddressRenderer.properties file and provide the location of the new JSP file and the
contextRoot variable. For example:
# This is the default renderer for the returns line item page, default
# renderers will all have their id property set to "default". This
# property is primarily useful in targeting rules.
id=default
# The JSP that renders the returns line item
url=/panels/order/returns/NewreturnShippingAddress.jsp
contextRoot=/NewDCS-CSR
3. Save the ReturnShippingAddressRenderer.properties file.
For additional information on working with renderers, refer to the Service Center UI Programming Guide.
Shipping and Payment Group Servlet Beans and Form
Handlers
This section discusses some of the classes in Commerce Service Center that you may want to extend.
Available Priced Shipping Methods Droplet Servlet Bean
This droplet provides the available shipping method with price. Displays the available shipping methods with
pricing for a particular shipping group. This extends the atg.commerce.pricing.
AvailableShippingMethodsDroplet.
Class atg.commerce.csr.pricing.AvailablePricedShippingMethodsDroplet
Components /atg/commerce/custsvc/pricing/
AvailablePricedShippingMethodsDroplet
The AvailablePricedShippingMethodsDroplet contains the following:
Input Parameters
• shippingGroup – The shipping group that requires pricing
• order – The order that is being priced

128 17 Working with Shipping and Payment Groups
• pricingModels – A collection of shipping pricing models
• profile – The user RepositoryItem requesting the shipping method
• locale – Optional. The locale of the user requesting the shipping method
Oparams
• error – Contains any errors that occur
• output – Includes the availablePricedShippingMethods
Output Parameters
• availablePricedShippingMethods – The remaining amount is calculated for the payment group and
returned in this parameter. The remaining amount is only calculated for store credit and gift certificates. This
parameter returns the PaymentGroup remaining amount that is backed by the claimable item
• errorMessage – The message of any error that may have occurred
CSRShippingGroupFormHandler
The CSRShippingGroupFormHandler class is a form handler that manages single and multiple shipping
stages of the checkout process. The CSRShippingGroupFormHandler extends the Core Commerce class
atg.commerce.order.purchase.ShippingGroupFormHandler and allows you to add shipping-related
audit-logging events.
Form Handler atg.commerce.csr.order.CSRShippingGroupFormHandler
Component /atg/commerce/custsvc/order/
ShippingGroupFormHandler
For additional information on this form handler, refer to the ATG API Reference for Commerce Service Center.
CSRPaymentGroupFormHandler
The CSRPaymentGroupFormHandler class is a form handler that manages the billing stage of
the checkout process. The CSRPaymentGroupFormHandler extends the Core Commerce class
atg.commerce.order.purchase.PaymentGroupFormHandler and provides the ability to claim a store
credit, gift certificate or coupon. By default, the allowCouponClaim flag is set to false.
Form Handler atg.commerce.csr.order.CSRPaymentGroupFormHandler
Component /atg/commerce/custsvc/order/
PaymentGroupFormHandler
For additional information on this form handler, refer to the ATG API Reference for Commerce Service Center.

17 Working with Shipping and Payment Groups 129
Configuring In-Store Pickup
In-store pickup is a Core Commerce feature that allows your customers to choose to receive merchandise they
order at a local store. Commerce Service Center uses and extends these Core Commerce components to enable
agents to assist with these types of orders.
When in-store pickup is enabled, agents can identify an item to be picked up in store. This launches the Core
Commerce GeolocatorServices, which can either list all applicable stores, or provide a form that the agent
can use to search for stores located at specified distances.
In addition to the stores location, Commerce Service Center can retrieve the store’s inventory status for
the product selected. Refer to the Core Commerce Programming Guide for information on configuring Core
Commerce locations, and setting inventory to work with in-store pickup.
When an agent views a product, the Pickup In-Store button is displayed for items that are eligible for in-store
pickup. Items are eligible when they are recognized as hard goods, and are not flagged as available online only.
Items are flagged as online only in Core Commerce using the isOnlineOnly method in CatalogTools. For
detailed information on setting this flag, refer to the Core Commerce Programming Guide.
When the agent continues through the checkout process, any in-store pickup items are displayed as such.
The items are identified as part of the InStorePickupShippingGroup and one of two of the in-store pickup
payment groups: InStorePaymentPaymentGroup , or Cash.
The InStorePaymentPaymentGroup acts as a place holder for payment until the recipient
picks up the order. The InStorePaymentPaymentGroup, which is based on the Core Commerce
allowInStorePaymentWhenOtherShippingGroupTypesExist, displays the Pay In Store payment option
on the billing page. When the customer has picked up and paid for the merchandise, the payment group type
changes to credit card or cash.
The Cash payment group type supports in-store pickup orders that were paid for in cash when the recipient
picked up the item. This payment group cannot be used when the agent is generating a Web order, and is only
available on submitted orders.
Enabling In-Store Pickup
To enable in-store pickup, use the CSRConfigurator.usingInStorePickup property. By default, this is set to
true. To disable, set the property to false.
Setting Distances for Searches
When the /atg/commerce/locations/GeoLocatorService.provider is set to null, the service returns all
available stores. If the GeoLocatorService is set to use a provider that you have configured, a search form is
displayed to the agent. The search form supports either a city/state search, or a postal code search.
To configure the list of distances used in the search criteria drop down menu, modify the /atg/commerce/
order/purchase/InStorePIckupDistanceList.distances property in the DCS-CSR-UI module. For
example:
$class=atg.commerce.order.purchase.InStorePickupDistanceList$scope=globaldistances=\ 5,\
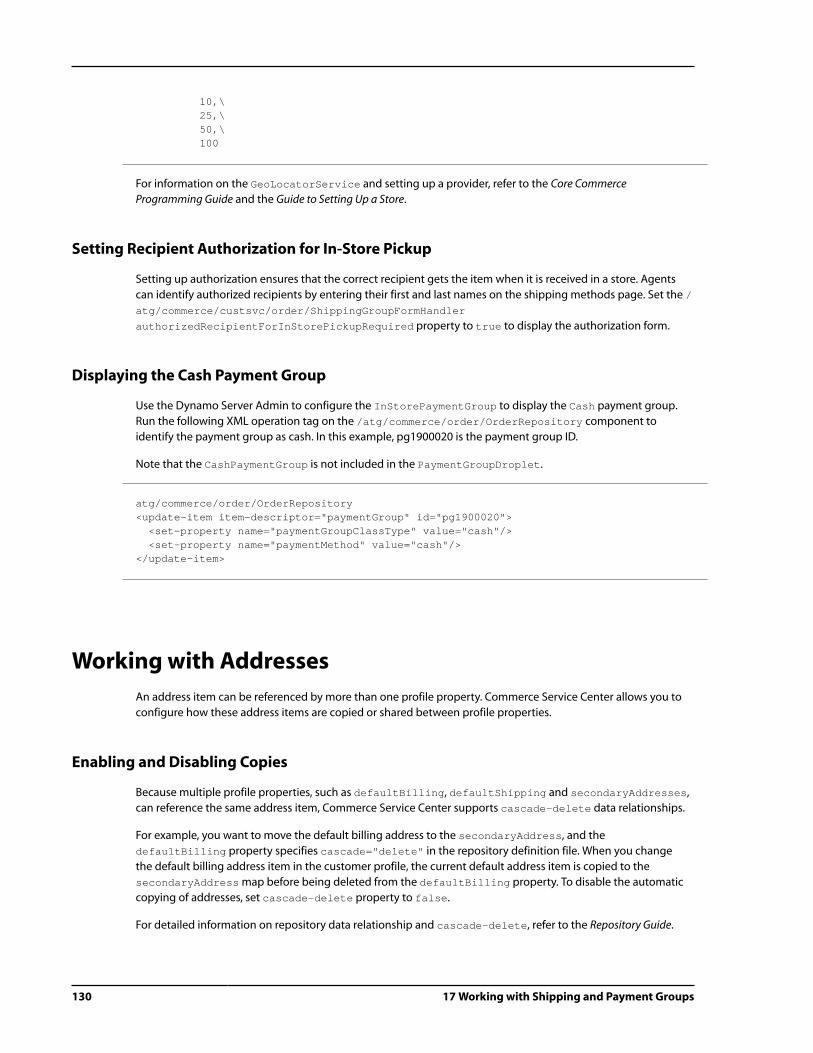
130 17 Working with Shipping and Payment Groups
10,\ 25,\ 50,\ 100
For information on the GeoLocatorService and setting up a provider, refer to the Core Commerce
Programming Guide and the Guide to Setting Up a Store.
Setting Recipient Authorization for In-Store Pickup
Setting up authorization ensures that the correct recipient gets the item when it is received in a store. Agents
can identify authorized recipients by entering their first and last names on the shipping methods page. Set the /
atg/commerce/custsvc/order/ShippingGroupFormHandler
authorizedRecipientForInStorePickupRequired property to true to display the authorization form.
Displaying the Cash Payment Group
Use the Dynamo Server Admin to configure the InStorePaymentGroup to display the Cash payment group.
Run the following XML operation tag on the /atg/commerce/order/OrderRepository component to
identify the payment group as cash. In this example, pg1900020 is the payment group ID.
Note that the CashPaymentGroup is not included in the PaymentGroupDroplet.
atg/commerce/order/OrderRepository<update-item item-descriptor="paymentGroup" id="pg1900020"> <set-property name="paymentGroupClassType" value="cash"/> <set-property name="paymentMethod" value="cash"/></update-item>
Working with Addresses
An address item can be referenced by more than one profile property. Commerce Service Center allows you to
configure how these address items are copied or shared between profile properties.
Enabling and Disabling Copies
Because multiple profile properties, such as defaultBilling, defaultShipping and secondaryAddresses,
can reference the same address item, Commerce Service Center supports cascade-delete data relationships.
For example, you want to move the default billing address to the secondaryAddress, and the
defaultBilling property specifies cascade="delete" in the repository definition file. When you change
the default billing address item in the customer profile, the current default address item is copied to the
secondaryAddress map before being deleted from the defaultBilling property. To disable the automatic
copying of addresses, set cascade-delete property to false.
For detailed information on repository data relationship and cascade-delete, refer to the Repository Guide.

17 Working with Shipping and Payment Groups 131
Disabling Address Sharing
Commerce Service Center allows you to identify an address as requiring exclusive access, or preventing multiple
properties from sharing the same address. Using the AddressCollectionReferenceManager, you can set the
exclusiveReferenceProperties to indicate which properties require an exclusive reference to an address.
This disables the sharing of addresses between properties.
For example, to indicate that the secondaryAddresses cannot be the same as the creditCardAddresses,
you would set the following:
AddressCollectionReferenceManger.properties:# properties of the ProfileexclusiveReferenceProperties=creditCards.address,secondaryAddresses
To indicate that all properties require an exclusive reference, configure the following:
AddressCollectionReferenceManger.properties:# properties of the ProfileexclusiveReferenceProperties=*
To indicate that single-value addresses require exclusive references, use the
DefaultAddressReferenceManager to set the exclusiveReference property to true.

132 17 Working with Shipping and Payment Groups

18 Working with Submitted Orders 133
18 Working with Submitted Orders
Oracle Commerce Service Center allows the modification of orders that have been submitted but not yet
fulfilled. When an agent modifies an order, the order’s state determines how the edit process is handled.
Modifying Submitted Orders
When a submitted order is modified, the order is cloned into a transient order that captures all of the
modifications made by the agent. The transient order is then reconciled with the original order in a single
transaction. Updates are not committed to the original order unless the reconciliation process is successful. If the
agent abandons the transient order, any modifications made will be lost.
The cloning technique is performed on selected orders based on their state. The CSROrderHolder
shouldCloneOrder(Order pOrder) API determines if a particular order qualifies for this process. This API
returns a result based on the following criteria:
• CSRAgentTools.isOrderModifiable – Compares the order’s state against the listed non-modifiable states
• CSRAgentTools.cloneEditOrderStates – Compares the order’s state against the listed states that may
be cloned. The configured states include: SUBMITTED, PROCESSING, PENDING_MERCHANT_ACTION, TEMPLATE
and PENDING_AGENT_APPROVAL
Additional states can be added by modifying these two properties in CSRAgentTools.
CSROrderHolder
This class defines the shopping cart used by an agent to modify customer orders. It provides an API for
determining when the application is in clone edit mode, for storing the clone edit state object and for masking
the current working order ID with the original order ID. The loadOrder(Order) API initiates the clone edit
process for a given order and stores the clone edit state object.
Classes atg.commerce.csr.order.CSROrderHolder
Components /atg/commerce/custsvc/order/ShoppingCart
CSRAgentTools
This class provides the more generic API used by the application. This includes the configuration for submitted
order states and the API for determining if an order should used the cloning feature.

134 18 Working with Submitted Orders
Classes atg.commerce.csr.util.CSRAgentTools
Components /atg/commerce/custsvc/util/CSRAgentTools
CSRCommitOrderFormHandler
This form handler class provides the handlers for triggering the reconciliation process.
Form Handler atg.commerce.csr.order.CSRCommitOrderFormHandler
Components /atg/commerce/custsvc/order/CommitOrderFormHandler
For additional information on this form handler, refer to the ATG API Reference for Commerce Service Center.
Handling and Fulfillment
When a site that uses the Fulfillment module submits an order, the order and some of its contained objects will
change state once the notification is received by the fulfillment sub-system.
Note: You must run the Fulfillment modules on both the Agent and Production clusters.
Object State after submit State after received by fulfillment
Order Submitted to
Fulfillment
Processing
ShippingGroup Initial Pending shipment
ShippingGroupRelationship Initial Pending delivery
A pipeline is executed to reconcile the changes with the original order. At the end of this chain there is a link
that triggers the fulfillment notification messages. This process creates and sends the fulfillment Modification
objects for changes made to the original order.
When the submitted order is modified by the Agent in the UI, new shipping groups and relationships may be
created as a result. In this case, the new shipping groups and shipping group relationships will be saved in their
Initial state. An application must extend the reconciliation process to perform any state modifications to
these objects (for example, to mark them in their pending shipment and pending delivery states). This could be
accomplished by either extending the reconciliation pipeline chain or responding the modification fulfillment
events generated by the process.
For additional information on handling and fulfillment, refer to the Core Commerce Programming Guide.

18 Working with Submitted Orders 135
Fulfillment Notification for Order Modifications
Commerce Service Center sends standard fulfillment notification messages for all changes made to the order.
They are sent out in the form of the following Oracle Commerce Core Commerce objects:
atg.commerce.fulfillment.PaymentGroupUpdateatg.commerce.fulfillment.ShippingGroupUpdateatg.commerce.fulfillment.GenericAddatg.commerce.fulfillment.GenericRemove
Commerce Service Center uses the Core Commerce OrderFulfillmentTools API to create these
objects. For example, when a new payment group is added, Commerce Service Center calls the following
OrderFulfillmentTools API to generate the modification object.
createGenericAddValueToValueModification(Modification.TARGET_PAYMENT_GROUP, pPaymentGroup, Modification.TARGET_ORDER, pOrder);
For new Core Commerce items, shipping groups and payment groups Commerce Service Center sends
GenericAdd messages. For updated Core Commerce items, shipping groups and payment groups, Commerce
Service Center sends GenericUpdate, ShippingGroupUpdate and PaymentGroupUpdate objects
respectively. Commerce items are the only objects for which Commerce Service Center sends GenericRemove
events. For updates made to other Order properties, Commerce Service Center generates GenericUpdate
events.
All the events are generated by the clone edit handlers during the reconciliation process that occurs when an
agent commits his updates from the order review page.
Customizing Order Fulfillment
Commerce Service Center emits fulfillment ModifyOrderNotification events for the changes made to the
order. Each event has an array of Modification objects attached that provide detail about the changes. The
reconciliation pipeline triggers the creation of these objects:
<pipelinelink name="sendFulfillmentNotifications" transaction="TX_MANDATORY"><processor jndi="/atg/commerce/custsvc/order/edit/processor/ SendFulfillmentNotifications"/><transition returnvalue="1" link="sendAgentEvents"/></pipelinelink>
OrderFulfillmentTools contains the API for generating ModifyOrderNotification and Modification
objects. The Commerce Service Center CloneEditHandlers use this API to generate the Modification
objects based on the changes they manage on the order.
For example, when a payment group is added to the order, the payment group edit handler might generate a
Modification object like this:
Modification mod = fullfillmentTools.createGenericAddValueToValueModification(Modification.TARGET_PAYMENT_GROUP,pPaymentGroup,Modification. TARGET_ORDER,pOrder);

136 18 Working with Submitted Orders
The modification would be attached to a ModifyOrderNotification event, along with all the other
Modification objects, and then sent.
ModifyOrderNotification msg = new ModifyOrderNotification();msg.setOrderId(order.getId());msg.setModifications(pArrayOfModifications);sendCommerceMessage(msg);
Cloning Orders
The order is cloned in an initialization pipeline that uses Repository cloning from RepositoryUtils. The order
repository item is cloned to make a copy, and the copy is then loaded using OrderManager loadOrder API.
When the order has been cloned for modification, the application is in clone-edit mode. When an agent
is working on a clone order there will be no indication in the UI. The UI always shows the original order
ID. The isCloneEditMode() API in the CSROrderHolder determines when this mode is active. The
getOriginalOrder() API returns the original order when required.
Cloning Pipeline Chains
The entire cloning process is facilitated by a pair of pipeline chains, which are defined in the /atg/commerce/
commercepipeline.xml file:
• The initSubmittedOrderEdit chain prepares the order for editing by creating the
clone copy. The pipeline that will be executed is determined by the order’s state and the
CloneEditManager.reconcileOrderChains property
• The reconcileSubmittedOrder chain reconciles the changes with the original order when everything
is committed by the agent. The pipeline that will be executed is determined by the order’s state and the
CloneEditManager.
reconcileOrderChain property
These two chains are executed based on the state of the order. For example, different chains could be defined
for handling orders in different states. Core Commerce provides one set of chains for handling all orders in a
submitted state as defined by the submitted order states configured in CSRAgentTools. These two chains can
be modified using standard configuration override techniques.
When clone editing orders, the orders are copied into a transient state for the edit process, and any changes
applied by initial pricing operations on the order are not immediately saved to the repository. This maintains the
integrity of the original order.
The CloneEditManager component contains the configuration for mapping order states to the chain names
using the initializeEditChains and reconcileOrderChains properties. The following describes each link
in the two chains.
Chain: initSubmittedOrderEdit – executed at the start of the edit process:

18 Working with Submitted Orders 137
Link Processor Component Description
cloneOrderForEdit /atg/commerce/custsvc/
order/edit/processor/
CloneOrderForEdit
Performs the cloning of the order at
the repository level and creates the
Core Commerce objects from the
newly created order item by calling
loadOrder.
validateCloneForEdit /atg/commerce/custsvc/
order/edit/processor/
ValidateCloneForEdit
Validates the clone order after it has
been created.
initializeCloneEdit
State
/atg/commerce/custsvc/
order/edit/processor/
InitializeCloneEdit
State
Initializes a state object based on
the two orders, which is used to later
reconcile the changes back to the
original order.
setOriginalOrder
PromotionCounts
/atg/commerce/custsvc/
order/edit/processor/
SetOriginalOrder
PromotionCounts
Stores the original promotion counts
in the clone edit state so that they can
be compared to the promotion counts
after applying updates. Changes in the
promotion count are used to identify the
promotions to consume.
saveCouponTracking /atg/commerce/custsvc/
order/edit/processor/
SaveCouponTracking
Saves coupon tracking meta-data in the
clone edit state so that it can be restored
after applying updates in reconciliation.
Chain: reconcileSubmittedOrder – execute to reconcile the changes with the original order:
Link Processor Component Description
initialize
Reconcilitation
/atg/commerce/custsvc/
order/edit/processor/
Initialize
Reconciliation
Prepares the state object for
reconciliation.
applyChanges /atg/commerce/custsvc/
order/edit/processor/
ApplyChanges
Copies the changes to the original order
based on the contents of the clone order
and information stored in the clone edit
state object created in the initialization
pipeline.
executeValidate
OriginalOrder
/atg/commerce/order/
processor/Execute
ValidateForCheckout
Chain
Executes the Core Commerce process
that validates the original order for
checkout.
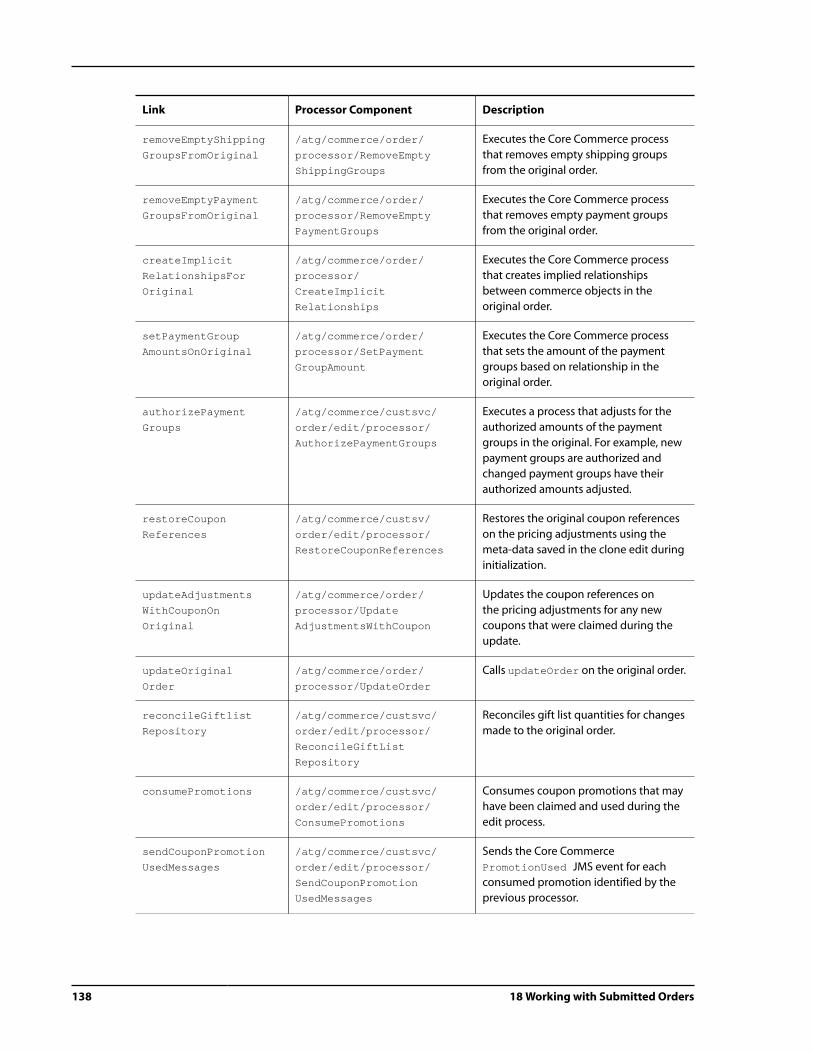
138 18 Working with Submitted Orders
Link Processor Component Description
removeEmptyShipping
GroupsFromOriginal
/atg/commerce/order/
processor/RemoveEmpty
ShippingGroups
Executes the Core Commerce process
that removes empty shipping groups
from the original order.
removeEmptyPayment
GroupsFromOriginal
/atg/commerce/order/
processor/RemoveEmpty
PaymentGroups
Executes the Core Commerce process
that removes empty payment groups
from the original order.
createImplicit
RelationshipsFor
Original
/atg/commerce/order/
processor/
CreateImplicit
Relationships
Executes the Core Commerce process
that creates implied relationships
between commerce objects in the
original order.
setPaymentGroup
AmountsOnOriginal
/atg/commerce/order/
processor/SetPayment
GroupAmount
Executes the Core Commerce process
that sets the amount of the payment
groups based on relationship in the
original order.
authorizePayment
Groups
/atg/commerce/custsvc/
order/edit/processor/
AuthorizePaymentGroups
Executes a process that adjusts for the
authorized amounts of the payment
groups in the original. For example, new
payment groups are authorized and
changed payment groups have their
authorized amounts adjusted.
restoreCoupon
References
/atg/commerce/custsv/
order/edit/processor/
RestoreCouponReferences
Restores the original coupon references
on the pricing adjustments using the
meta-data saved in the clone edit during
initialization.
updateAdjustments
WithCouponOn
Original
/atg/commerce/order/
processor/Update
AdjustmentsWithCoupon
Updates the coupon references on
the pricing adjustments for any new
coupons that were claimed during the
update.
updateOriginal
Order
/atg/commerce/order/
processor/UpdateOrder
Calls updateOrder on the original order.
reconcileGiftlist
Repository
/atg/commerce/custsvc/
order/edit/processor/
ReconcileGiftList
Repository
Reconciles gift list quantities for changes
made to the original order.
consumePromotions /atg/commerce/custsvc/
order/edit/processor/
ConsumePromotions
Consumes coupon promotions that may
have been claimed and used during the
edit process.
sendCouponPromotion
UsedMessages
/atg/commerce/custsvc/
order/edit/processor/
SendCouponPromotion
UsedMessages
Sends the Core Commerce
PromotionUsed JMS event for each
consumed promotion identified by the
previous processor.

18 Working with Submitted Orders 139
Link Processor Component Description
sendFulfillment
Notifications
/atg/commerce/custsvc/
order/edit/processor/
SendFulfillment
Notifications
Sends fulfillment JMS events for each
change applied to the original order.
sendAgentEvents /atg/commerce/custsvc/
order/edit/processor/
SendAgentEvents
Sends agent audit events for each
change made to the original order.
Submitted Orders and Clone Editing
When an agent selects an order that is considered modifiable, Commerce Service Center makes a copy of that
order when it is considered to be in a clone edit state.
Because the order is copied into a transient state for the edit process, the changes applied by initial pricing
operations on the order are not immediately saved to the repository. They are only saved if the agent completes
the post-submit checkout of the order.
Cloning Core Classes
The following describes a few of the core classes and components that implement the clone edit feature and are
the likely places for applications to apply overrides and extensions.
Clone Edit Manager
The CloneEditManager class provides the API for executing the pipeline chains and performing call backs to
the CloneEditHandlers throughout the entire process. First, the original order is cloned at the repository level
and executed, and then the changes in the clone order are reconciled with the original order. Refer to the ATG
Platform API Reference for detailed information. These handlers are accessed using the main DCS module.
Classes atg.commerce.order.edit.CloneEditManager
Component /atg/commerce/custsvc/returns
Configuration cloneEditHandlers provide a list of CloneEditHandler components.
intializeEditChains is a map of pipeline chains used in the initialization process.
Keyed by order state.
reconcileOrderChains is a map of pipeline chains used in the reconciliation
process. Keyed by order state.
Clone Edit Handler
This abstract class is used for creating application classes that participate in the entire process through a callback
interface. Components of this type are configured in the Core Commerce CloneEditManager class and are
executed at various points in the initialization and reconciliation processes. This handler is accessed through the
DCS module.

140 18 Working with Submitted Orders
Class atg.commerce.order.edit.CloneEditHandler
Subclasses atg.commerce.order.edit.CollectionEditHandler
atg.commerce.order.edit.CommerceItemEditHandler
atg.commerce.order.edit.CommerceItemMarkerEditHandler
atg.commerce.order.edit.PaymentGroupEditHandler
atg.commerce.order.edit.ShippingGroupEditHandler
atg.commerce.order.edit.ManualAdjustmentEditHandler
atg.commerce.order.edit.RelationshipEditHandler
atg.commerce.order.edit.HandlingInstructionEditHandler
atg.commerce.order.edit.MarkerEditHandler
atg.commerce.order.edit.OrderPropertyEditHandler
Components /atg/commerce/custsvc/order/edit/
CommerceItemHandler
ShippingGroupHandler
PaymentGroupHandler
CSR Clone Edit Handler
This class is used for extends the Core Commerce CloneEditHandler class. Components of this type
are configured in the CSRCloneEditManager and are executed at various points in the initialization and
reconciliation processes. These handlers are accessed through the DCS-CSR module.
Class atg.commerce.order.edit.CSRCloneEditHandler
Subclasses atg.commerce.order.edit.CollectionEditHandler
atg.commerce.order.edit.CSRCommerceItemEditHandler
atg.commerce.order.edit.CSRPaymentGroupEditHandler
atg.commerce.order.edit.CSRShippingGroupEditHandler
atg.commerce.order.edit.CSRManualAdjustmentEditHandler
atg.commerce.order.edit.AgentCommentEditHandler
Components /atg/commerce/custsvc/order/edit/
AgentCommentHandler
CloneEditManager
CommerceItemGWPMakerHandler
CommerceItemHandler
CommerceItemMarkerHandler
GWPOrderMarkerHandler
HandlingInstructionHandler
ManualAdjustmentHandler
MarkerHandler
OrderPropertyHandler
PaymentGroupHandler
RelationshipHandler
ShippingGroupHandler
The CloneEditHandlers components are called during various points in the clone edit process:

18 Working with Submitted Orders 141
1. Post-repository cloning.
The handlers are called just after the original order is cloned at the repository level. You can extend the
cloneOrder method to customize cloning of data.
2. Verifying the clone.
The validateCloneOrder handlers are called after the clone order has been created and loaded.
3. Initializing the CloneEditState.
Once the clone order has been generated and verified, the initializeCloneEditState handlers are called
to initialize any meta-data or objects that are needed for the CloneEditState object. For example, this
is where the CommerceItemHandler maps the commerce items in the original order to those used in the
clone order. These maps are used in the reconciliation process to identify those items that have been added,
deleted or updated.
4. Reconciling the clone.
After all updates are completed on the clone order, the reconciliation process executes the handlers
to perform reconciliation of the data between the clone and the original order. For example, the
CommerceItemHandler determines which items were added, removed or updated and updates the original
order accordingly.
5. Creating post-reconciliation process events.
After the reconciliation process is complete, the handlers are called to generate any fulfillment notification
events for any changes they may have applied to the original order.
Clone Edit State
This class defines the state object used by the clone edit process. It provides access to the original and
clone orders, as well as the API for adding and retrieving state information. It is created and returned by the
initialization process and is required as input to the reconciliation process.
Classes atg.commerce.order.edit.CloneEditState
Commerce Service Center stores this object in the window scoped CSROrderHolder, which can be accessed
using the getCloneEditState API.
CSR Order Holder
This class defines the shopping cart used by an agent to modify customer orders. It provides an API for
determining when the application is in clone edit mode, for storing the clone edit state object and for masking
the current working order ID with the original order ID. The loadOrder(Order) API initiates the clone edit
process for a given order and stores the clone edit state object.
Classes atg.commerce.csr.order.CSROrderHolder
Components /atg/commerce/custsvc/order/ShoppingCart

142 18 Working with Submitted Orders
For more information on this component, refer to the ATG API Reference for Commerce Service Center.
CSR Agent Tools
This class provides the more generic API used by the application. This includes the configuration for submitted
order states and the API for determining if an order should used the cloning feature.
Classes atg.commerce.csr.util.CSRAgentTools
Components /atg/commerce/custsvc/util/CSRAgentTools
For more information on this component, refer to the ATG API Reference for Commerce Service Center.
CSR Commit Order Form Handler
This form handler class provides the handlers for triggering the reconciliation process.
Classes atg.commerce.csr.order.CSRCommitOrderFormHandler
Components /atg/commerce/custsvc/order/CommitOrderFormHandler
For more information on this form handler, refer to the ATG API Reference for Commerce Service Center.
Extending Objects for Cloning
When an application has added new properties to the Core Commerce objects, it may be necessary to modify
the cloning process. Usually, all repository items referenced by the cloned item are also cloned into new
transient repository items. This is known as the deep clone. However, you may want a shallow cloning of new
properties or you may want to eliminate certain properties entirely from the cloning process.
Adding Objects for Cloning
You may extend Core Commerce objects, for example: Order, ShippingGroup, PaymentGroup,
Relationship. For example, you may have extended the default OrderImpl object type by creating a
MyOrderImpl to add new properties. The configuration of the clone editing components may require
adjustments or you may have to create class extensions.
If you have extended the Core Commerce objects, the new object type and its new properties must be identified
to the clone editing feature so that the new properties are copied to their original order counterpart during
the reconciliation process. You must map which properties should be copied based on the type of object. The
following is an example of the configuration for the atg.commerce.order.OrderImpl object type.
/atg/commerce/custsvc/order/edit/OrderPropertyHandler.properties$$class=atg.commerce.order.edit.OrderPropertyEditHandler
cloneEditManager=/atg/commerce/custsvc/order/edit/CloneEditManagerkeyPropertyName=id

18 Working with Submitted Orders 143
# map of payment group properties that are copied from the clone to the original# during reconcilation. The class name is the keypropertiesToCopyOnUpdate=\ atg.commerce.order.OrderImpl=description,,state,,stateDetail,,taxPriceInfo ,,priceInfo,,specialInstructions
To add a new object type named MyOrderImpl, you would create an /atg/commerce/custsvc/
order/edit/OrderPropertyHandler.properties file in your customization directory and add the new
object type and its properties, which will be appended to the default OrderPropertyHandler file:
propertiesToCopyOnUpdate=\myapp.commerce.order.MyOrderImpl=language,,locale
Note: Only new properties of the class need to be defined as all inherited properties are already covered by
the super-type configurations. Additionally, it is not necessary to specify any new properties that will not be
updated during the modification process.
The same type of configuration change is needed for extensions to the CommerceItem, ShippingGroup,
PaymentGroup and Relationship objects. See CommerceItemHandler, ShippingGroupHandler,
PaymentGroupHandler and RelationshipHandler respectively.
There are two ways that the repository cloning process can be managed: By excluding properties entirely from
the cloning process, or by specifying which properties should use deep versus shallow cloning.
Excluding Properties from Cloning
The cloning feature can be configured to exclude certain properties from the clone process in the
/atg/commerce/custsvc/order/edit/processor/CloneOrderForEdit component. The
excludedOrderProperties property maps order repository item types to a list of properties that should be
excluded from the cloning process. The following is the default configuration that excludes the pricelist and
pricingModel properties from the cloning process:
excludedOrderProperties= itemPriceInfo=priceList, pricingAdjustment=pricingModel
In this example, all properties that reference an item type of itemPriceInfo or pricingAdjustment will be
cloned, but the pricelist and pricingModel properties will not be cloned and will be left null.
To exclude multiple properties:
excludedOrderProperties= itemPriceInfo=priceList|discounted|currencyCode
Specifying Deep Versus Shallow Clone
To specify the level of clone, extend the CloneOrderForEdit processor’s
createCloningPropExceptionsMap API to create a hierarchical map that specifies which properties have
special handling called property exceptions.
The keys used in this map are property names while values are null or another map if the property is an item.

144 18 Working with Submitted Orders
The following example performs a shallow clone on any property named priceinfo:
Map priceInfoExc = new HashMap();priceInfoExc.put("priceInfo",null);return priceInfoExc;
The following example performs a shallow clone of only the property named pricelist on any item found in a
property named priceInfo:
Map priceInfoExc = new HashMap();Map priceInfoProps = new HashMap();priceInfoProps.put("pricelist",null);priceInfoExc.put("priceInfo", priceInfoProps);return priceInfoExc;
An application can also introduce a custom CloneEditHandler to perform special handling on any
application-specific properties. For example, an application may want to exclude a custom property from the
repository and handle the cloning process another way. The CloneEditHandler callback interface is executed
after the repository cloning process is finished and provides an opportunity for applications to execute post-
cloning logic.

19 Configuring Scenarios 145
19 Configuring Scenarios
You can use scenarios to configure actions that are taken when Oracle Commerce Service Center internal
users perform various tasks. Scenarios are also used to configure events that are available to external users,
such as cross-sells or promotions. For general information on creating and working with scenarios, refer to
the Personalization Guide for Business Users. For information on scenarios used with Oracle Commerce Core
Commerce, refer to the Using Commerce Elements in Scenarios chapter of the Guide to Setting Up a Store.
Using Scenarios
The following section describes how to configure and use scenarios.
Configuring Scenario Events
When you use the ATG Control Center (ACC) scenario editor on an Oracle Commerce Platform instance running
Commerce Service Center, the scenarios you create are internal scenarios that respond to actions performed by
internal users such as agents, not external users such as customers.
Commerce Service Center includes a number of scenario events that can be triggered by agent activities. You
can incorporate these events in internal scenarios that you create.
The following table lists the scenario events included with Commerce Service Center:
Event display name Triggered when . . .
Agent adds item to order Agent adds an item to an order.
Agent adds payment group Agent adds a payment group to an order.
Agent adds shipping group Agent adds a shipping group to an order.
Agent cancels order Agent cancels an order.
Agent changes item quantity Agent changes an item’s quantity.
Agent claims item Agent claims a coupon, gift certificate, or store credit.
Agent create order Agent creates a new order.

146 19 Configuring Scenarios
Event display name Triggered when . . .
Agent creates an order comment Agent creates a new order comment.
Agent edits payment group Agent edits a payment group.
Agent edits shipping group Agent edits a shipping group.
Agent exchanges order Agent exchanges an order.
Agent issues store credit Agent issues a store credit to a customer.
Agent overrides a price Agent overrides the price of a shipping group or commerce item.
Agent receives a return item Agent receives an item that has been returned.
Agent removes item from order Agent removes an item from an order.
Agent returns order Agent returns an order.
Agent splits a shipping group Agent splits a shipping group’s commerce items between shipping
groups.
Agent submits order Agent submits an order.
Agent views credit card Agent views a credit card.
Agent views order Agent views an order.
Agent views order payment Agent views an order’s payment information.
Agent views order returns Agent views order return information.
Working with Scenario Managers
Scenarios are managed and run by the Scenario Manager services, ScenarioManager and
InternalScenarioManager. Depending on the subject of the scenario, the agent or the customer, you must
know which Scenario Manager to run.
ScenarioManager and InternalScenarioManager
Just as you need to be aware of whether your slots and scenarios are displaying content targeted to the agent
or the customer they are helping, you need to be aware of where those scenarios need to be created. In a
production environment, Oracle Commerce Platform applications run on an internal server cluster and your
external website runs on an external server cluster. Each instance in the internal cluster uses two separate
scenario managers: the standard scenario manager, ScenarioManager, which handles scenarios in which the
main subject of the scenario is the customer and the internal scenario manager, InternalScenarioManager,
which handles scenarios in which the main subject of the scenario is the agent. Each instance of the external
cluster only has a standard scenario manager in which you create scenarios where the main subject of the
scenario is the customer. When you author a scenario that populates a slot, the scenario must be created in the
appropriate cluster (internal or external) depending on its use.

19 Configuring Scenarios 147
• Scenarios in which the customer is the subject of the scenario belong in the standard scenario manager.
These scenarios should be created in the external cluster. (Examples include when the customer’s profile
drives the scenario, or the customer’s behavior on the external website drives the scenario)
• Scenarios in which the agent is the subject of the scenario belong in the internal scenario manager. These
scenarios should be created in the internal cluster. (Examples include when the agent’s profile drives the
scenario, or if actions the agent takes in Service Center drives the scenario)
This means that you will have to create one set of scenarios for delivering content in which the agent is the
subject of the scenario (in the InternalScenarioManager service) and one set of scenarios for delivering
content in which the customer is the subject of the scenario (in the ScenarioManager service).
As with any environment in which you are using scenarios, one of the scenario instances in each cluster will have
to be configured as the Scenario Editor Server. Internal scenarios are created and updated while pointing to
the Scenario Editor Server designated for the internal cluster. External scenarios are created and updated while
pointing to the Scenario Editor Server designated for the external cluster.
Scenario Managers in a Development Environment
If you are working in a development environment where the external and internal environments are running
on the same machine, you will need to point your ACC to either the standard Scenario Manager or the
InternalScenarioManager service. The ACC can only display one of these at a time; it is configured to
show the Standard ScenarioManager by default. You must manually configure the ACC to point to the
InternalScenarioManager to create scenarios for the internal environment. See Configuring the ACC to Point
to the InternalScenarioManager (page 148) for instructions on how to do this.
Scenario Managers in a Production Environment
If you have a production environment running, you will have two clusters: one for your internal applications
(such as the Oracle Commerce Platform application) and one for your external sites (such as your external
website). In this situation, the ACC in the internal cluster can still point to both the InternalScenarioManager
and the standard ScenarioManager. However, the external cluster, which uses only the standard
ScenarioManager, should be used to create or update scenarios in which the customer is the main subject.
The ScenarioManager on the external cluster shares the same database as the ScenarioManager on
the internal cluster. This enables you to create your customer-subject scenarios in just one place. The
scenarios created in the ScenarioManager on the external cluster will not show up automatically in the
ScenarioManager for the internal cluster. You must update the scenarios across the clusters.
Updating Scenarios Across Clusters
If you create or update any of the scenarios running on the ScenarioManager in the external cluster, you
will need to manually update the ScenarioManager in the internal cluster. This update ensures that the two
ScenarioManagers are not out of sync.
To make this update you will need to go to the Dynamo Server Admin console and navigate to the
ProcessUpdateService component and invoke the updateAllProcesses method. This will update all
scenarios in all instances of the ScenarioManager in the internal cluster.
The path to the ProcessUpdateService component is:
<ATG11dir>/nucleus/atg/svc/scenario/ProcessUpdateService/
If you are running in a development environment and/or are not using an external website, you do not need to
worry about using the ProcessUpdateService to communicate scenario changes across clusters.

148 19 Configuring Scenarios
Configuring the ACC to Point to the InternalScenarioManager
In a development environment you must configure the ACC to point to the InternalScenarioManager. To do
this you need to specifically include the DSS.InternalUser.ACC module when creating your environment.
For detailed information on working with scenarios, refer to the Personalization Programming Guide.
Configuring Process Editor Servers
The agent-facing server is configured with two Scenario Manager Configuration files, where you specify the
location of the Process Editor Server and any global servers:
• /atg/scenario/scenarioManager.xml – configuration for external users
• /atg/scenario/internalScenarioManager.xml – configuration for internal users
Configuring the Customer-Facing Scenario Manager
The management server is aware of scenarios only for external users (users of the customer-facing website). You
configure the scenarioManager.xml file to have one Process Editor Server, which is a Service Center instance:
<?xml version="1.0" encoding="ISO-8859-1" ?><process-manager-configuration> <process-editor-server> <server-name>ATG CSC_Host: 8851</server-name> </process-editor-server></process-manager-configuration>
Configuring the Agent-Facing Scenario Managers
The agent-facing server is aware of scenarios for both internal users and external users. You must configure the
agent-facing server as follows:
• internalScenarioManager.xml – include the Service Center server as a Process Editor Server, so that you
can create and edit scenarios for internal users:
<?xml version="1.0" encoding="ISO-8859-1" ?>
<process-manager-configuration>
<process-editor-server>
<server-name>ATG CSC_Host:8851</server-name>
</process-editor-server>
</process-manager-configuration>
• scenarioManager.xml – include a management server as a Process Editor Server, so that you can create and
edit scenarios for external users:
<?xml version="1.0" encoding="ISO-8859-1" ?>
<process-manager-configuration>

19 Configuring Scenarios 149
<process-editor-server>
<server-name>ATG Customer-facing_Host:8851</server-name>
</process-editor-server>
</process-manager-configuration>

150 19 Configuring Scenarios

20 Reporting and Logging 151
20 Reporting and Logging
Oracle Commerce Service Center provides the ability to configure reporting and logging of a number of
customer and agent actions.
Commerce Service Center Reporting Framework
The reporting framework used by Commerce Service Center is similar to the framework used by Oracle
Commerce Core Commerce. Commerce Service Center gathers log files that contains order and agent
information and loads it into the warehouse. For information on setting up and configuring the Core Commerce
reporting framework, refer to the Preparing to Use Commerce Reporting section in the Core Commerce
Programming Guide. For information on using Commerce Service Center reports, refer to the Reports Guide.
Data Collection Overview
As with all reporting, Commerce Service Center reporting data collection starts with the firing of a log-
worthy event. The EventListener listens for the events, gets the appropriate object and passes it to
the LogEntryQueueSink. The EventListener Nucleus component is configured with the property
dataListeners=LogEntryQueueSink.
The LogEntryQueueSink property is a DataCollectorQueue type property and ensures the correct
timing of writing to the log files. The LogEntryQueueSink component is configured with the property
dataListeners=LogEntryGenerator to ensure that message will be passed on to the LogEntryGenerator.
The LogEntryGenerator property is used to generate a LogEntry object. This object is passed to the
LogEntryLogger that has been configured with the parameters dataListeners=LogEntryFileLogger. The
LogEntryLogger component of the RotationAwareFormattingFileLogger class logs items to the named
file, and then rotates the log file based on a schedule and data threshold. It also contains a formatFields
property that is used to indicate properties that should be written to the file.
Returns and Exchanges Data Collection Properties
The returns and exchange data collection process starts with the firing of the return/exchange event. The
ReturnFormHandler fires the ReturnOrder event. The ReturnEventListener listens to the events.
The ReturnEventListener file is configured as follows:
$class=atg.commerce.reporting.ReturnEventListenerenabled^=/atg/dynamo/service/DWDataCollectionConfig.enabled

152 20 Reporting and Logging
dataListeners=ReturnLogEntryQueueSinkreturnOrderJMSType=atg.commerce.csr.ReturnOrderexchangeOrderJMSType=atg.commerce.csr.ExchangeOrder
The ReturnLogEntryQueueSink listens to messages from event listener and queues the log entries
to avoid performance bottleneck. Calls made to this component are queued and then passed to the
ReturnLogEntryGenerator. The ReturnLogEntryQueue configuration file is configured as follows:
$class=atg.service.datacollection.DataCollectorQueuedataListeners=ReturnLogEntryGenerator
The LogEntryQueue passes the data to the ReturnLogEntryGenerator that generates the ReturnLogEntry
and passes it to the ReturnLogEntryLogger. The ReturnLogEntryGenerator file is configured as follows:
$class=atg.commerce.reporting.ReturnLogEntryGeneratordataListeners=ReturnFileLoggerenabled^=/atg/dynamo/service/DWDataCollectionConfig.enabled
The ReturnFileLogger component is responsible for writing logs items to the named file, as well as rotating
log files based on schedule and data thresholds. The ReturnFileLogger component also has formatFields
property that indicates which properties should be written to file. The ReturnFileLoggerLogger
configuration file contains the following:
#class$class=atg.service.datacollection.RotationAwareFormattingFileLogger# directory and file name of log filelogFileName=csc_return_# Rotate log files automatically every 1 hourschedule=every 1 hour# Or rotate when there are 10,000 records in the filedataItemThreshold=10000# The directory to place all the log data filesdefaultRoot^=/atg/dynamo/service/DWDataCollectionConfig.defaultRoot# The centralized Dynamo schedulerscheduler=/atg/dynamo/service/Scheduler# Add a timestamp to all the names of the log filestimestampLogFileName=true# Use this extension after the timestamplogFileExtension=.data# Format the time stamp like so (month-day-year_hour-minute-second-# millisecond)timestampDateFormat=MM-dd-yyyy_HH-mm-ss-SS# properties to log (in order)formatFields=timestampAsDate: MM/dd/yyyy HH: mm: ss,returnOrder.returnRequestIdenabled^=/atg/dynamo/service/DWDataCollectionConfig.enabled# Add a Unique ID to all the names of the log filesUIDLogFileName=true# IdGeneratoridGenerator=/atg/dynamo/service/IdGenerator# The JMS message typelogRotationMessageType=atg.reporting.ReturnOrder# The messageSource component to send log rotation messagemessageSource=/atg/dynamo/service/LogRotationMessageSource

20 Reporting and Logging 153
Returns and exchanges log files are written to the /atg/dynamo/service/
DWDataCollectionConfig.defaultRoot directory.
Call Data Collection Properties
When a call is initiated, a unique call ID is generated and assigned for each call. The call ID is used
when starting and ending call events. The atg.agent.events.CallEvent event extends the
atg.agent.events.AgentEvent event by adding callId, startTime and endTime properties. The
startTime and endTime properties are recorded to the database as audit logs, while the callId is added to
the audit database record.
The /atg/agent/logging/AgentAuditQueue listens for all agent events and passes the control to the
AgentAuditLogger and provides an additional AgentFileLogger listener. This listener writes the data item to
the file system. The TypedEventDataListener contains the AgentAuditLogger, the AgentFileLogger and
the SelfServiceAuditLogger components.
The CallLogEntry and CallLogEntryGenerator classes provide the ability to add additional data to the log
processes.
The CallFileLogger logs the data to the file system and creates an entry for the end call event. This logger
will not log an entry for the start call event. When an agent ends a call the end call event is fired. Should an
agent forget to end the call, when the window is closed or the CallState component is out of scope, the
doStopService method will end the call event.
The CallFileLogger is configured with the following:
#class$class=atg.service.datacollection.RotationAwareFormattingFileLogger# directory and file name of log filelogFileName=svc_end_call_# Rotate log files automatically every 1 hourschedule=every 1 hour#Or rotate when there are 10,000 records in the filedataItemThreshold=10000# The directory to place all the log data filesdefaultRoot^=/atg/dynamo/service/DWDataCollectionConfig.defaultRoot# The centralized Dynamo schedulerscheduler=/atg/dynamo/service/Scheduler# Add a timestamp to all the names of the log filestimestampLogFileName=true# Use this extension after the timestamplogFileExtension=.data# Format the time stamp like so (month-day-year_hour-minute-second-# millisecond)timestampDateFormat=MM-dd-yyyy_HH-mm-ss-SS# properties to log (in order)formatFields=timestampAsDate: MM/dd/yyyy HH: mm: ss, callId,startTimeAsDate: MM/dd/yyyy HH: mm: ss, endTimeAsDate: MM/dd/yyyyHH: mm:ss,customerId, agentIdenabled^=/atg/dynamo/service/DWDataCollectionConfig.enabled# Add a Unique ID to all the names of the log filesUIDLogFileName=true# IdGeneratoridGenerator=/atg/dynamo/service/IdGenerator# The JMS message typelogRotationMessageType=atg.reporting.svc.Call# The messageSource component to send log rotation messagemessageSource=/atg/dynamo/service/LogRotationMessageSource

154 20 Reporting and Logging
Loader Pipeline Overview
Loading the return item into a transactional fact table is a process that requires a number of stages to obtain and
work with the data in different ways. To clarify this process, it is presented as a data flow in which data flows from
one processor to the next. Along the way the data is transformed until the final processor records the data into
the transactional fact table.
Data loading starts with the implementation of the Loader. The atg.reporting.datawarehouse.
loader.Loader.Loader component uses the queueName property to point to a log file. The Loader runs
using a scheduler, creates a log file reader for returned items and invokes the processReader method of the
PipelineDriver component.
The PipelineDriver reads delimited lines from the log file then parses them and populates a pipeline
parameter. The parameter is then sent down a pipeline chain. The atg.reporting.datawarehouse.
loader.FilePipelineDriver.PipelineDriver component uses the properties paramPropertyNames and
paramClasses properties to specify the names and types of parameters that are read.
The PipelineManager runs the pipeline chain described in the pipeline.xml file. Pipelines consist of several
processors. These processors collect data, prepare line items and insert them in into the data warehouse.
Returns and Exchanges Pipeline Processors
The following processors are used in the Submit Return pipeline:
Pipeline Link Description
fetchReturn
/atg/reporting/datawarehouse/
processes/custsvc/
FetchReturnProcessor
$class=atg.reporting.datawarehouse.
commerce.csr.FetchReturnProcessor
Uses the return ID to look up the return/exchange in
the repository.
returnRequestLookup
atg/reporting/datawarehouse/process/
custsvc/ReturnRequestLookupProcessor
$class=atg.reporting.datawarehouse.
process.LookupPipelineProcessor
This processor fetches all return items in the
warehouse for the current return ID. If there are return
items the parameter map entry is created for the
resultPropertyName value.
checkReturnExists
/atg/reporting/datawarehouse/process/
WarehouseItemExistsProcessor
$class=atg.reporting.datawarehouse.
process.WarehouseItemExistsProcessor
This processor allows a switch to be implemented in
the pipeline by determining if a warehouse item exists
in the properties. If a warehouseItemPropertyName
value exists in the parameter map, the current log
record does not need to be processed. If the map
entry does not exist the pipeline will process the next
link.

20 Reporting and Logging 155
Pipeline Link Description
createReturnLineItems
/atg/reporting/datawarehouse/process/
custsvc/
CreateReturnLineItemsProcessor
$class=atg.reporting.datawarehouse.
commerce.csr.CreateLineItemsProcessor
This processor creates an array or the returned items
map.
allocateOtherRefund
/atg/reporting/datawarehouse/process/
custsvc/OtherRefundAllocatorProcessor
.properties
$class=atg.reporting.datawarehouse.
commerce.AmountAllocatorProcessor
This processor gets refund information from
returnRequest.
actualOtherRefund and then distributes the refund
amount based on return item refund amount or
quantity. The ItemRefundLineItemAlocator looks
at the return item refund subtotal. If the subtotal
is greater than zero, then it distributes the amount
based on the item refund amount.
allocateReturnFee
/atg/reporting/datawarehouse/process/
custsvc/ReturnFeeAllocatorProcessor.
properties
$class=atg.reporting.datawarehouse.
commerce.AmountAllocatorProcessor
This processor gets the return fee from
returnRequest.
returnFee and uses the
ItemRefundLineItemAlocator to distribute the
return fee across all return items.
calculateTotalAdjustments
/atg/reporting/datawarehouse/process/
custsvc/LineItemTotalAdjustments
Processor
$class=atg.reporting.datawarehouse.
commerce.ComputerLineItemTotal
Processor
This process sums up all adjustments for each
returned item, such as shipping share, tax share, and
other return fee allocation amounts. The suggested
shares are used to calculate the actual share. If the
suggested share is zero, the share will be calculated
based on the return item’s quantity.
calculateTotal
/atg/reporting/datawarehouse/process/
custsvc/LineItemTotalRefundProcessor
$class=atg.reporting.datawarehouse.
commerce.ComputerLineItemTotal
Processor
This processor sums up all total adjustments and item
refund items.
localCurrencyLookup
/atg/reporting/datawarehouse/process/
custsvc/LocalCurrencyLookupProcessor
$class=atg.reporting.datawarehouse.
commerce.CurrencyConverterProcessor
This processor converts local currency to standard
currency values.

156 20 Reporting and Logging
Pipeline Link Description
CurrencyConverter
/atg/reporting/datawarehouse/process/
custsvc/CurrencyConverterProcessor
$class=atg.reporting.datawarehouse.
commerce.CurrencyConverterProcessor
This processor converts shipping, tax and other
refunds, the return fee, total adjustments and refunds.
dayLookup
/atg/reporting/datawarehouse/process/
custsvc/DayLookupPipelineProcessor
$class=atg.reporting.datawarehouse.
process.DayLookupProcessor
This processor looks for the ID of the day for a given
time stamp. This processor uses the return request
createdDate property to return the ID.
timeLookup
/atg/reporting/datawarehouse/process/
custsvc/TimeLookupPipelineProcessor
$class=atg.reporting.datawarehouse.
process.TimeLookupProcessor
This processor looks for the ID of the time for a given
time stamp. This processor uses the return request
createdDate property to return the ID.
customerLookup
/atg/reporting/datawarehouse/process/
custsvc/CustomerLookupProcessor
$class=atg.reporting.datawarehouse.
process.RepositoryItemLookupProcessor
$scope=global
This processor gets the customer ID from the
returnRequest.
order.profileId. If the customer is not found in the
data warehouse, it will look in the production schema.
If found in neither schemas, the processor will return
Unspecified.
agentLookup
/atg/reporting/datawarehouse/process/
custsvc/InternalUserLookupProcessor
$class=atg.reporting.datawarehouse.
process.InternalUserLookupProcessor
$scope=global
This processor gets the agent ID from the
returnRequest.
agent.repositoryId. If the agent is not found
in the data warehouse, it will look in the production
schema. If found in neither schemas, the processor will
return Unspecified.
returnSalesChannelLookup
/atg/reporting/datawarehouse/process/
custsvc/ReturnSalesChannelLookup
Processor
$class=atg.reporting.datawarehouse.
process.EnumeratedPropertyLookup
Processor
This processor looks up the return channel ID in the
data warehouse.

20 Reporting and Logging 157
Pipeline Link Description
runReturnLineItemPipelineChain
/atg/reporting/datawarehouse/process/
custsvc/ReturnItemPipelineProcessor
This processor runs the return item pipeline for each
element of the LineItems array.
The following processors are available in the returnItem chain:
Pipeline Link Description
lookupReturnSku
/atg/reporting/datawarehouse/process/
custsvc/SkuLookupProcessor
$class=atg.reporting.datawarehouse.
process.LookupPipelineProcessor
This processor looks up the SKU ID for each return
item in the data warehouse.
lookupReturnProduct
/atg/reporting/datawarehouse/process/
custsvc/ProductLookupProcessor
$class=atg.reporting.datawarehouse.
process.LookupPipelineProcessor
This processor looks up the product ID for each return
item in the data warehouse.
lookupReturnReason
/atg/reporting/datawarehouse/process/
custsvc/ReturnReasonLookupProcessor
$class=atg.reporting.datawarehouse.
process.LookupPipelineProcessor
This processor looks up the return reason ID for each
return item in the data warehouse.
logReturnItem
/atg/reporting/datawarehouse/process/
custsvc/ReturnItemLoggerProcessor
$class=atg.reporting.datawarehouse.
process.RepositoryLoggerProcessor
This processor creates a repository item for the logged
data that is based upon the lookup properties.
Calls Pipeline Processors
The following processors are used in the call pipeline chain:

158 20 Reporting and Logging
Pipeline Link Description
callLookup
/atg/reporting/datawarehouse/process
/svc/CallLookupProcessor.properties
$class=atg.reporting.datawarehouse.
process.LookupPipelineProcessor
This processor obtains the call item for the call ID.
If the call item exists, the parameter map entry is
created for the resultPropertyName.
checkCallExists
/atg/reporting/datawarehouse/process/
WarehouseItemExistsProcessor
$class=atg.reporting.datawarehouse.
process.WarehouseItemExistsProcessor
This processor implements a switch in the pipeline
by determining if a warehouse item exists in the
properties. If a warehouseItemPropertyName value
exists in the parameter map, the current log record
does not need to be processed. If the map entry does
not exist, the pipeline will process the next link.
customerLookup
/atg/reporting/datawarehouse/process/
custsvc/CustomerLookupProcessor
$class=atg.reporting.datawarehouse.
process.RepositoryItemLookupProcessor
$scope=global
This processor gets the customer ID from the
parameter map. If the customer is not found in the
data warehouse, it will look in the production schema.
If found in neither schemas, the processor will return
Unspecified.
agentLookup
/atg/reporting/datawarehouse/process/
custsvc/InternalUserLookupProcessor
$class=atg.reporting.datawarehouse.
process.InternalUserLookupProcessor
$scope=global
This processor gets the agent ID from the parameter
map. If the agent is not found in the data warehouse,
it will look in the production schema. If found
in neither schemas, the processor will return
Unspecified.
dayLookup
/atg/reporting/datawarehouse/process/
custsvc/DayLookupPipelineProcessor
$class=atg.reporting.datawarehouse.
process.DayLookupProcessor
This processor looks for the start time timestamp
from the parameter map as well as the lookup for the
day of the time stamp.
timeLookup
/atg/reporting/datawarehouse/process/
custsvc/TimeLookupPipelineProcessor
$class=atg.reporting.datawarehouse.
process.TimeLookupProcessor
This processor looks for the start time timestamp
from the parameter map as well as the lookup for the
time of the time stamp.

20 Reporting and Logging 159
Pipeline Link Description
enddayLookup
/atg/reporting/datawarehouse/process/
custsvc/DayLookupPipelineProcessor
$class=atg.reporting.datawarehouse.
process.DayLookupProcessor
This processor looks for the end time timestamp from
the parameter map as well as the lookup for the end
day of the time stamp.
endtimeLookup
/atg/reporting/datawarehouse/process/
custsvc/TimeLookupPipelineProcessor
$class=atg.reporting.datawarehouse.
process.TimeLookupProcessor
This processor looks for the end time timestamp from
the parameter map as well as the lookup for the end
time of the time stamp.
totalTime This processor calculates the total amount of call time
in seconds.
callLogger
$class=atg.reporting.datawarehouse.
process.RepositoryLoggerProcessor
This processor creates a repository item for the
logged data based on the lookup properties.
Configuring Audit Logging
Commerce Service Center uses audit logging to record actions performed by Commerce Service Center agents
in the agent audit repository.
Audit log records are saved in a standard GSA repository /atg/agent/logging/AuditRepository. The audit
log repository items provide an audit trail of actions performed by the agent.
Although audit log repository items can be added, update, or removed using the standard GSA repository API, a
series of components and classes are available to standardize the process of adding new items to the repository.
Note: There is no public API, other than direct GSA access, to update or remove audit log repository items.
Viewing Audit Logs
Commerce Service Center uses a system called audit logging to record actions performed by agents. Each type
of action has a corresponding repository item type. These repository item types are used to log agent activity in
the agent audit repository.
You can use the ACC to view these repository items:
1. Select the Content task area from the main ACC menu.
2. Select AuditAgentRepository from the submenu.
3. From the Items of Type drop-down list, select the type of item to view, and then click List.

160 20 Reporting and Logging
If you select the first entry in the drop-down list, Agent Audit Record, the system displays all of the items
in the repository, regardless of type. If you select any other entry, the system displays only the items of the
specified type.
4. In the left pane, click the item to view.
The system displays the log information in the right pane. For example:
Adding a New Agent Audit Log Record
The following steps occur when creating an audit log record:
1. Generate an atg.agent.events.AgentEvent event object that contains all the relevant data to be
recorded. The AgentEvent identifies the item-descriptor type of audit record and has properties containing
relevant information for the log.
2. Fire the AgentEvent object through the AgentMessageSource.sendAgentEventMessage API.
AgentMessageSource is defined as the message source for all AgentEvent events.
3. The AgentAuditLogger component is defined as a message sink and receives the AgentEvent and queues
it for distribution to the appropriate AgentAuditRecorder instance.
4. AuditLogRecorder receives the AgentEvent from the AgentAuditLogger and creates the appropriate
RepositoryItem sub-type of the agent_audit item-descriptor, as defined in the AgentEvent's type
property. The AuditLogRecorder then, sets the item’s properties from the AgentEvent data, and adds it to
the AuditRepository.
When creating new audit log records, you must extend the AgentEvent class to pass your new event
properties. You should then extend the agent_audit item-descriptor with a new sub-type to store your
properties. Finally, you should extend the AgentAuditRecorder.populateCustomProperties() method to
copy your custom AgentEvent's properties to your agent_event RepositoryItem sub-type.
Creating a New Agent Audit Log Record
The process outlined below uses creating a loyalty point redemption event as an example.
1. Add a new AgentAudit event subclass for the new audit record.
This may not be necessary if the AgentAudit class has all the necessary properties. In this case, you only
need to set the proper type of the event. Every event must extend AgentEvent. The following is an example
of a RedeemedLoyaltyPointsEvent:
package atg.commerce.csr.events;
import atg.agent.events.AgentEvent;

20 Reporting and Logging 161
public class RedeemedLoyaltyPointsEvent extends AgentEvent {
public static final String CLASS_VERSION = "$Id: $$Change: $";
private static final long serialVersionUID = -5747213631038504108L;
int mPointsRedeemed;
public void setPointsRedeemed(int pPointsRedeemed) {
mPointsRedeemed = pPointsRedeemed;
}
public int getPointsRedeemed() {
return mPointsRedeemed;
}
2. Add the new audit log repository item definition for the new type.
Add an item-descriptor to the audit repository for the new agent audit in the/atg/agent/logging/
auditrepository.properties file. Add an option to auditType property of the agent_audit item
descriptor. For example:
//Add the item descriptor
<item-descriptor name="RedeemedLoyaltyPoints" super-type="agent_audit"
sub-type-value="RedeemedLoyaltyPoints">
<table name="csr_loyalty" id-column-name="id">
<property name="pointsRedeemed" data-type="int" column-
name="points_redeemed" display-name-resource="pointsRedeemed"/>
<property name="orderId" data-type="string" column-name="order_id"
display-name-resource="orderId"/>
</table>
</item-descriptor>
//Add the auditType
<option value="RedeemedLoyaltyPoints" code="1020"/>
3. Create an AgentAuditLogger component using one of the base classes provided or an extension. This
component will receive the AgentAudit events of the new type. For example:
/atg/commerce/custsvc/logging/RedeemedLoyaltyPointsEventRecorder
$class=atg.agent.logging.ConfigurableAgentAuditRecorder
customProperties=\
pointsRedeemed=pointsRedeemed,\
orderId=orderId
ConfigurableAgentAuditRecorder provides a convenient way of defining a recorder where the
properties of the event map directly to the properties on the audit log repository item.
4. Configure the AgentAuditLogger with the new AgentAuditRecorder component mapped to the
appropriate audit type. Add an entry into the eventTypeToRecorderMap property of the /atg/agent/
logging/
AgentAuditLogger.properties component to provide information on the new event recorder. For
example,
eventTypeToListenerMap+=RedeemedLoyaltyPoints=/atg/commerce/custsvc/
logging/RedeemedLoyaltyPointsEventRecorder
5. Create an instance of the AgentAudit object and send it using the
AgentMessagesource.sendAgentEventMessage API.
private void sendRedeemedLoyaltyPointsEvent
(

162 20 Reporting and Logging
String pAgentId,
String pCustomerId,
String pOrderId,
int pPointsRedeemed,
String pTicketId
)
{
RedeemedLoyaltyPointsEvent redeemedLoyaltyPointsEvent = null;
redeemedLoyaltyPointsEvent =
getAgentMessagingTools().createRedeemedLoyaltyPointsEvent();
redeemedLoyaltyPointsEvent.setActivityType
CSRAgentMessagingTools.REDEEMED_LOYALTY_POINTS_TYPE);
redeemedLoyaltyPointsEvent.setPointsRedemeed (pPointsRedeemed);
getAgentMessagingTools().getAgentMessageSource().sendAgentEventMessage
(redeemedLoyaltyPointsEvent, null,
"myApp.events.RedeemedLoyaltyPoint");
return;
}
Disabling Audit Logging Events
To reduce the amount of data stored, you may want the audit logging system to record only certain activities
and not others.
You can disable logging of an individual activity type by adding it to the disabledTypes property of the /atg/
agent/logging/AgentAuditLogger component. This property is an array of the names of the activity types
for which recording is disabled. For example, if you want to disable the recording of profile view events and
order view events, you could set this property to ProfileViewed, ViewOrder.
If you want to disable audit logging entirely, set the logEvents property of AgentAuditLogger to false. The
following is a list of the eventTypeToListenerMap properties:
Event Type Recorder in /atg/commerce/custsvc/
logging/
ActivateScheduledOrder ScheduledOrderEventRecorder
AddOrderFixedAmountAdjustment OrderManualAdjustmentRecorder
AddPaymentGroup PaymentGroupEventRecorder
AddScheduledOrder ScheduledOrderEventRecorder
AddShippingGroup ShippingGroupEventRecorder
ApproveOrder OrderEventRecorder
CancelOrder OrderEventRecorder
ClaimItem ClaimItemRecorder
CreateGiftlist GiftlistEventRecorder

20 Reporting and Logging 163
Event Type Recorder in /atg/commerce/custsvc/
logging/
CreateOrder OrderEventRecorder
CreateOrderComment CreateOrderCommentRecorder
DeactivateScheduledOrder ScheduledOrderEventRecorder
DeleteGiftlist GiftlistEventRecorder
EditPaymentGroup PaymentGroupEventRecorder
EditShippingGroup ShippingGroupEventRecorder
ExchangeOrder ReturnOrderRecorder
GiftItemAddedToGiftlist GiftitemEventRecorder
GiftItemQuantityChanged GiftitemEventRecorder
GiftItemRemovedFromGiftList GiftitemEventRecorder
GrantAppeasement GrantAppeasementRecorder
GrantPromotionEvent GrantPromotionEventRecorder
IgnorePromotionEvent IgnorePromotionEventRecorder
ItemAddedToOrder CommerceItemEventRecorder
ItemAddedToWishlist GiftItemEventRecorder
ItemQuantityChanged CommerceItemEventRecorder
ItemRemovedFromOrder CommerceItemEventRecorder
ModifyGiftlist GiftlistEventRecorder
OrderApprovalAddedEvent OrderApprovalRecorder
OrderApprovalApprovedEvent OrderApprovalRecorder
OrderApprovalRejectedEvent OrderApprovalRecorder
PriceOverride PriceOverrideRecorder
ReceiveReturnItem ReceiveReturnItemRecorder
RejectOrder OrderEventRecorder
RemoveOrderFixedAmountAdjustment OrderManualAdjustmentRecorder
RemovePaymentGroup PaymentGroupEventRecorder
RemoveShippingGroup ShippingGroupEventRecorder

164 20 Reporting and Logging
Event Type Recorder in /atg/commerce/custsvc/
logging/
ReturnOrder ReturnOrderRecorder
SaveOrder OrderEventRecorder
SplitCostCenter SplitCostCenterRecorder
SplitShippingGroup SplitShippingGroupRecorder
SubmitOrder OrderEventRecorder
UpdateScheduledOrder ScheduledOrderEventRecorder
ViewCreditCard ViewCreditCardRecorder
ViewOrder OrderEventRecorder
ViewOrderCostCenters OrderEventRecorder
ViewOrderPayment OrderEventRecorder
ViewOrderPromotions OrderEventRecorder
ViewOrderReturns OrderEventRecorder
ViewOrderShipping OrderEventRecorder
Using Window Scoped Failover
With window scoped failover, upon server failure, an agent working on Commerce Service Center remains
logged in with the current order, ticket, and profile information displayed in the global context area. The agent
sees no change because of the failover.
Properties of window scoped components can be targeted for window backup by adding them to the
windowBackupPropertyList property of the /atg/dynamo/servlet/pipeline/
WindowScopeManager component. Upon session failover, the configured property values will be restored.
These component property values must implement Serializable to be properly backed up.
The following components are failed over by default:
• /atg/commerce/custsvc/order/ShoppingCart.current
• /atg/commerce/custsvc/order/ShoppingCart.restorableOrders
• /atg/commerce/custsvc/order/ShoppingCart.cloneEditState
• /atg/commerce/custsvc/order/ShoppingCart.loadTime
• /atg/commerce/custsvc/order/ShoppingCart.returnRequest
• /atg/commerce/custsvc/order/ViewOrderHolder.current

20 Reporting and Logging 165
• /atg/commerce/custsvc/order/ViewOrderHolder.restorableOrders
• /atg/commerce/custsvc/order/ConfirmationInfo.order
• /atg/commerce/custsvc/order/ConfirmationInfo.profile
• /atg/commerce/custsvc/order/ConfirmationInfo.toEmailAddress
• /atg/commerce/custsvc/order/ConfirmationInfo.templateName
• /atg/commerce/custsvc/order/ConfirmationInfo.
autoConfirmationEmailAddress
• /atg/commerce/custsvc/order/ConfirmationInfo.extraData
• /atg/commerce/custsvc/returns/ReturnsDataHolder.returnRequestID
• /atg/commerce/custsvc/environment/CurrentPriceListHolder
• /atg/commerce/custsvc/environment/CurrentCatalogHolder
• /atg/commerce/custsvc/profile/AddressHolder.addresses
• /atg/svc/agent/environment/CurrentSiteHolder.currentSite
The following are also window scoped:
• /atg/commerce/order/purchase/PaymentGroupContainerService
• /atg/commerce/order/purchase/ShippingGroupContainerService
Adding Additional Components
Note: Making modifications to the existing window scoped and session scoped properties files may cause
failover to not work as expected.
Add failover components for any customized code that you have written by modifying the
WindowScopeManager.properties file in your custom module to add your customized components into the
windowBackupPropertyList+=/new/custom/component.properties list.

166 20 Reporting and Logging

21 Appendix A: Commerce Service Center Access Rights 167
21 Appendix A: Commerce Service
Center Access Rights
The following table displays the access rights for Oracle Commerce Service Center roles. Access rights allow a
user to access a specific UI feature, such as a panel. For example access to the Cross Sell panel is specified with
the cmcCrossSellP access right. Access rights also provide access to specific functionality, for example, the
adjustPrice access right allows a user to perform price overrides and adjustments.
Access Right CSR
Ticketing
Role
CSR
Profiles
Role
CSR
Orders
Role
CSR
Manager
Role
adjustPrice X
browsePromotions X X
cmcAddProductByIdP X X X X
cmcAppeasements X X
cmcApprovals X
cmcBillingP X X X X
cmcCompleteExchangeP X X X X
cmcCompleteOrderP X X X X
cmcCompleteReturnP X X X X
cmcConfirmExchangeP X X X X
cmcConfirmNewScheduleP X X
cmcConfirmOrderP X X X X
cmcConfirmReturnP X X X X
cmcConfirmUpdateScheduleP X X
cmcCrossSellP X X X X

168 21 Appendix A: Commerce Service Center Access Rights
Access Right CSR
Ticketing
Role
CSR
Profiles
Role
CSR
Orders
Role
CSR
Manager
Role
cmcCustomerCreateP X X X X
cmcCustomerInfoP X X X X
cmcCustomerP X X X X
cmcCustomerResultsP X X X X
cmcCustomerSearchP X X X X
cmcExchangeSummaryP X X X X
cmcExistingOrderP X X X X
cmcExistingScheduledOrderP X X X X
cmcGiftlistSearchP X X
cmcGiftlistsViewP X X
cmcGiftlistViewPurchaseModeP X X
cmcMoreCatalogsP X X X X
cmcMorePriceListsP X X X X
cmcMultisiteSelectionPickerP X X X X
cmcOrderHistoryP X X X X
cmcOrderResultsP X X X X
cmcOrderReturnsP X X X X
cmcOrderSearchP X X X X
cmcProductCatalogBrowseP X X X X
cmcProductCatalogSearchP X X X X
cmcProductViewP X X X X
cmcPromotionsP X X X X
cmcPurchasedItemsHistoryP X X X X
cmcPurchaseHistoryP X X X X
cmcRefundTypeP X X X X
cmcRelatedOrdersP X X X X

21 Appendix A: Commerce Service Center Access Rights 169
Access Right CSR
Ticketing
Role
CSR
Profiles
Role
CSR
Orders
Role
CSR
Manager
Role
cmcRelatedTicketsP X X X X
cmcReturnDetailsP X X X X
cmcReturnItemsP X X X X
cmcReturnsHistoryP X X X X
cmcReturnSummaryP X X X X
cmcScheduleCreateP X X
cmcScheduledOrdersP X X X X
cmcSchedulesP X X X X
cmcScheduleUpdateP X X
cmcShippingAddressP X X X X
cmcShipppingMethodP X X X X
cmcShoppingCartP X X X X
cmcSubmittedOrdersP X X X X
cmcTicketHistoryP X X X X
commerceTab X X X X
CustomerInformationPanel X X X X
CustomerOrderHistoryPanel X X X X
CustomerResultsPanel X X X X
CustomerSearchPanel X X X X
customersTab X X X X
CustomerTicketHistoryPanel X X X X
GlobalPanel X X X X
HelpfulOpenByIDPanel X X X X
HelpfulRecentTicketsPanel X X X X
HelpfulTicketHistoryPanel X X X X
HelpfulTicketSummary X X X X

170 21 Appendix A: Commerce Service Center Access Rights
Access Right CSR
Ticketing
Role
CSR
Profiles
Role
CSR
Orders
Role
CSR
Manager
Role
issueCredit X
RespondComposeMessagePanel X
respondTab X
svcCreateProfile X X
TasksAllTicketsPanel X X X X
TasksMyTicketsPanel X X X X
tasksTab X X X X
TicketActivityPanel X X X X
TicketsCustomerInformationPanel X X X X
TicketsResultsPanel X X X X
TIcketsSearchPanel X X X X
TicketsSummaryPanel X X X X
ticketsTab X X X X
workspaceLogin X X X X
For additional information, refer to the Setting Up Internal Access Control (page 85) chapter.

22 Appendix B: CIM Configuration Components 171
22 Appendix B: CIM Configuration
Components
The Oracle Commerce Platform Configuration and Installation Manager (CIM) script configures your Commerce
Service Center environment.
When using CIM, you have the option to install a number of Oracle Commerce Platform applications, including
Oracle Commerce Service Center. Depending on your requirements, you can run a single Commerce Service
Center installation or install additional components to run your Commerce Service Center environment.
CIM also allows you to configure servers, including staging, preview and dedicated lock servers.
Available Added Functionality
The following functionality add-ons can also be configured when installing Commerce Service Center.
• Oracle Commerce MDEX Engine-based Catalog Search
• Oracle Click-to-Connect Cloud Service
• Data Warehouse (Reporting)
• Multisite
• Publishing deployment and switching data sources for catalogs and price lists
Server Instances
The following server instances are configured when running CIM:

172 22 Appendix B: CIM Configuration Components
Server
Instance
Module List Required Data Sources
Agent Fulfillment
DCS.AbandonedOrderServices
DCS-CSR-UI
DAF.Search.Base.QueryConsole
DCS.Search.Order.LiveIndex
JTDataSource
JTDataSource_production
Production DCS-CSR-UI
DCS.AbandonedOrderServices
JTDataSource
Production and
Management
DCS-CSR.Management
DCS.Search.Order.Index
JTDataSource
JTDataSource_production
Add On Modifications
The following modifications occur to the server instances when using these optional add-ons:
Add On Server Instance Changes to Server Instance
Data Warehouse Data Warehouse
and Data
Warehouse
Loader
Adds DCS.DW, Service.DW and DCS-CSR.DW DDLs
Adds DCS-CSR.DW to module list
This adds the /atg/reporting/datawarehouse/
JTDataSource and atg/reporting/datawarehouse/loader/
JTDataSource values.
Price Lists Agent Sets /atg/commerce/custsvc/util/
CSRConfigurator.usingPriceLists=true and /atg/
commerce/custsvc/util/
CSRConfigurator.usingSalePriceLists=true
MDEX Engine
Catalog Search
Agent Adds the DCS-CSR-UI.Endeca module, which enables
communication with MDEX servers for catalog search.
ClickToConnect Agent and
Production
Adds the DCS-CSR.ClickToConnect module and the
JTDataSource and JTDataSource_production values.
Merch UI Publishing If using Oracle Commerce Merchandising, Commerce Service Center
must be added to the deployment topology as a deployment
target. Additionally, if switching data sources are enabled in Oracle
Commerce Core Commerce, deployment services must be aware of
this to perform a switch on deployment
Multisite All Sets multisite capabilities by enabling multisite and setting the
default Site ID and default Catalog ID in the /atg/commerce/
custsvc/util/CSRConfigurator.

22 Appendix B: CIM Configuration Components 173
Data Source Configuration
The following data source information is configured for each of the server instances.
JTDataSource for Agent
The following information is configured for the agent JTDataSource. The JTDataSource information for the
agent is stored in the DCS-CSR startup module.
SQL File
The SQL file used for the JTDataSource is <ATG11dir>/CSC11.2/DCS-CSR/sql/
db_components/vendor/DCS-CSR_logging_ddl.sql.
Data Imports
The following files are imported using the DCS-CSR module:
Repository Imported File Versioned
/atg/userprofiling/
InternalProfileRepository
<ATG11dir>/CSC/DCS-CSR/
install/data/internalUserData.xml
No
/atg/svc/option/OptionRepository <ATG11dir>/CSC/DCS-CSR/
install/data/csrOptions.xml
Yes
/atg/svc/option/
OptionRepository_production
<ATG11dir>/CSC/DCS-CSR/
install/data/csrOptions.xml
No
JTDataSource for Production
The following information is configured for the production JTDataSource, which is the
JTDataSource_production data source in the agent instance. The JTDataSource information for production
is stored in the DCS-CSR startup module.
SQL File
The SQL files used for the JTDataSource are:
<ATG11dir>/CSC/DCS-CSR/sql/db_components/vendor/DCS-CSR_ddl.sql and <ATG11dir>/CSC/DCS-
CSR/sql/db_components/vendor/DCS-CSR_ticketing_ddl.sql
Switching Data Source
The following information is configured for the switching data sources, which configures the JTDataSource
data source in the production instance. The switchingdatasource add-on adds the switching
switchingCore data source, as well as switchingA and switchingB data sources.
Note: Using a switching data source will also impact the catalog and pricing data sources for Commerce Service
Center.
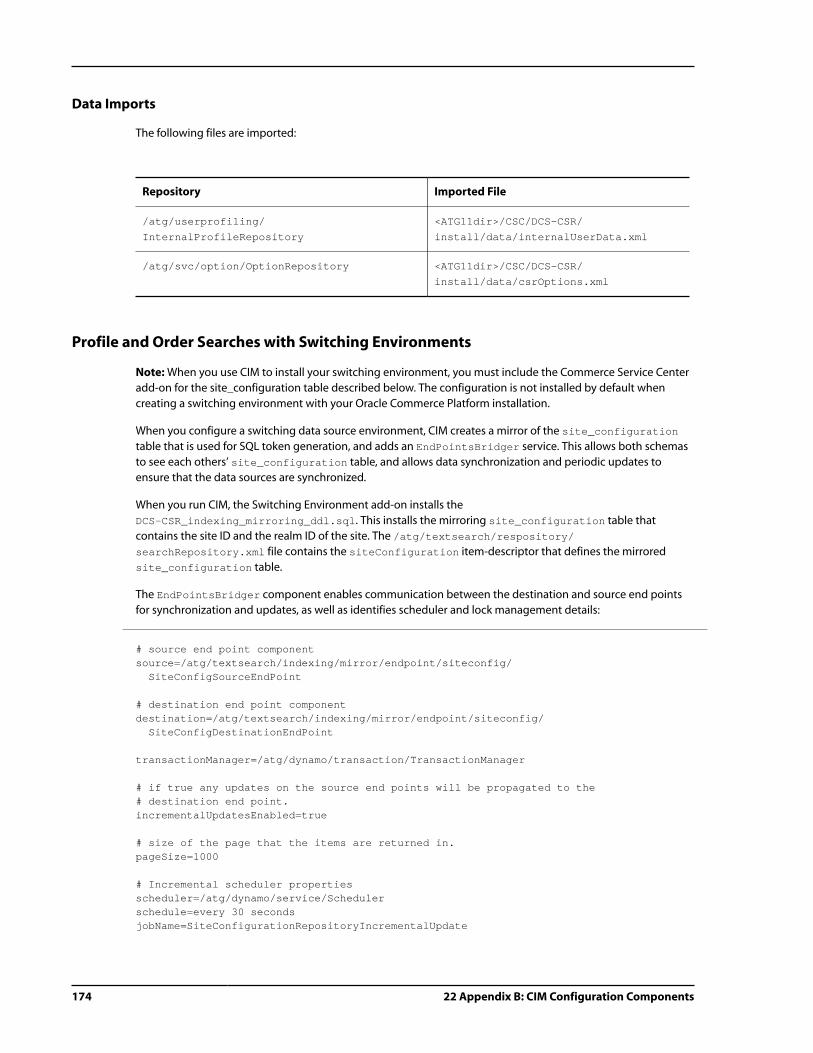
174 22 Appendix B: CIM Configuration Components
Data Imports
The following files are imported:
Repository Imported File
/atg/userprofiling/
InternalProfileRepository
<ATG11dir>/CSC/DCS-CSR/
install/data/internalUserData.xml
/atg/svc/option/OptionRepository <ATG11dir>/CSC/DCS-CSR/
install/data/csrOptions.xml
Profile and Order Searches with Switching Environments
Note: When you use CIM to install your switching environment, you must include the Commerce Service Center
add-on for the site_configuration table described below. The configuration is not installed by default when
creating a switching environment with your Oracle Commerce Platform installation.
When you configure a switching data source environment, CIM creates a mirror of the site_configuration
table that is used for SQL token generation, and adds an EndPointsBridger service. This allows both schemas
to see each others’ site_configuration table, and allows data synchronization and periodic updates to
ensure that the data sources are synchronized.
When you run CIM, the Switching Environment add-on installs the
DCS-CSR_indexing_mirroring_ddl.sql. This installs the mirroring site_configuration table that
contains the site ID and the realm ID of the site. The /atg/textsearch/respository/
searchRepository.xml file contains the siteConfiguration item-descriptor that defines the mirrored
site_configuration table.
The EndPointsBridger component enables communication between the destination and source end points
for synchronization and updates, as well as identifies scheduler and lock management details:
# source end point componentsource=/atg/textsearch/indexing/mirror/endpoint/siteconfig/ SiteConfigSourceEndPoint
# destination end point componentdestination=/atg/textsearch/indexing/mirror/endpoint/siteconfig/ SiteConfigDestinationEndPoint
transactionManager=/atg/dynamo/transaction/TransactionManager
# if true any updates on the source end points will be propagated to the# destination end point.incrementalUpdatesEnabled=true
# size of the page that the items are returned in.pageSize=1000
# Incremental scheduler propertiesscheduler=/atg/dynamo/service/Schedulerschedule=every 30 secondsjobName=SiteConfigurationRepositoryIncrementalUpdate

22 Appendix B: CIM Configuration Components 175
jobDescription=Site Configuration Repository Incremental Update
# SingletonSchedulableService lock manager details.clientLockManager=/atg/dynamo/service/ClientLockManagerlockName=EndPointBridger_LOCKlockTimeOut=2000
The BridgerIndexingLock component identifies indexing lock information used to ensure that the lock
management occurs correctly, ensuring that the SingletonSchedulableService allows only a single
service to perform a scheduled task. For additional information on profile and order searches and associated
components, refer to the Configuring Order and Profile Search (page 17) section.
CIM File Configuration
When running CIM, the following files are configured using these default settings:
Production Server File Configurations
The following property file configurations are set for the production server.
Search Property File Configuration
The LaunchingService.properties file searchEngine and deployShare properties are installed on the
Commerce Service Center production server.
The IndexingPeriodicService.properties file is set to enable=true to identify the production server as a
server that will be used by the indexing server to queue profile and order indexing requests.
The /atg/userprofiling/search/ProfileOutputConfig.incrementalUpdateSeconds and the /atg/
commerce/search/OrderOutputConfig.incrementalUpdateSeconds properties, which determine the
frequency for live indexing requests, are set to 5 seconds.
Note: If the server on which this is being configured is not the indexing server, set the
incrementalUpdateSeconds to -1. It is best to configure a non-DRP server as your indexing server.
Agent Server File Configurations
The following configuration changes are made on the agent server.
Search Property File Configuration
The LaunchingService.properties file searchEngine and deployShare properties are installed on the
Commerce Service Center agent server.
The IndexingPeriodicService.properties file is set to enable=true to identify the management server
as a server that will perform queuing of index changes.
The /atg/userprofiling/search/ProfileOutputConfig.incrementalUpdateSeconds and the /atg/
commerce/search/OrderOutputConfig.incrementalUpdateSeconds properties, which determine the
frequency for live indexing requests, are set to 5 seconds.

176 22 Appendix B: CIM Configuration Components
Note: If the server on which this is being configured is not the indexing server, set the
incrementalUpdateSeconds to -1. It is best to configure a non-DRP server as your indexing server.
Price Lists Add On Configuration
The following information is configured if installing Price Lists. The following information is stored in the /atg/
commerce/custsvc/util/CSRConfigurator.properties file:
usingPriceLists=trueusingSalesPriceLists=true
Prerequisites for Running CIM
You will need the following Commerce Service Center information before running the CIM process:
1. Four Oracle database accounts, such as: agent, production, publishing and reporting _loader_data-
warehouse
2. If you are configuring a switching data source, you will need two additional Oracle database accounts:
Switching_A and Switching_B
3. Ensure that the supported version of your Web application server is installed.
4. Ensure that the supported version of the Java JDK is installed.
5. Ensure that the correct product versions have been installed in your environment using CIM. For information
on installing these products, refer to your Oracle Commerce Platform application documentation:
• Oracle 11g client / drivers (ojdbc5.jar or ojdbc6.jar)
• The Oracle Commerce Platform
• Oracle Commerce Reference Store or Oracle Commerce Core Commerce
Note: If Commerce Service Center has previously been installed, you must drop each of the schemas before
recreating them. You can do this by using cim.sh in the existing installation to drop the schemas. You will also
need to rename the old directory if this exists.
You will also need to remove any servers you have previously created in your Web application, as running CIM
will create new server instances.
Running CIM
When running the CIM script, you will be prompted to install all products or just Commerce Service Center. For
information on installing Oracle Commerce Platform applications, refer to your application documentation, and
the Platform Installation and Configuration Guide.
22 Appendix B: CIM Configuration Components 177
CIM presents you with a sequence of menus and menu options that allow you to configure installed products.
Multiple selections can be separated by a space. You can confirm your selections by typing D for Done.
To start CIM in the current window, run the following command:
./cim.sh or cim.bat
Once the products have been downloaded and installed, use CIM to configure them. If you wish to keep a record
of your selections for future reference, CIM can create an output file.
When you run the CIM script, use the –record option to create an output file that records your selections that
you can use to recreate your environment.

178 22 Appendix B: CIM Configuration Components

Index 179
Index
Aaccess rights, 85
agent, 87
approval, 81
customer profiles, 87
manager level, 87
orders, 87
Ticketing, 87
with roles, 167
address, 130
copying, 130
multiple shipping, 118
sharing, 131
shipping group page fragment, 114
shipping header, 117
shipping, configuring, 126
adjustments, 79
exchange calculations, 61
manual price, 110
admin database, 9
agent, 89
-facing lock management, 13
-facing scenarios, 148
-facing server, 5, 7
access rights, 87
access to Promotion Browser, 59, 75
appeasement limits, 80
approval access, 79
configuring default landing page, 91
database, 9
profiles, creating, 89
appeasements (see approvals)
Approval Management System, 79
approvals, 79
enabling process, 80
form handlers, 81
global limits, 80
limits, 80
setting authorization, 81
audit logging, 159, 159
database, 153
auto-suggestions, 35, 42
Ccalculators, 107
exchange item adjustment, 62
exchange order pricing, 61
order adjustment, 111
catalog, 47
configuring current, 97
configuring default, 99
configuring quick access, 99
generating search URL, 39
search, 34
search alternate results, 46
search localized results, 46
search page fragments, 35, 44
search with auto-suggestions, 35, 42
searches with Oracle, 47
SQL search, 33
with multisite, 14
CIM, 9, 10
add-ons, 172
configuration components, 171
cloning, 133
core classes, 139
extended, 142
pipelines, 136
CSRConfigurator, 49, 49
CSREnvironmentTools, 109
csrManager role, 87
csrOrders role, 87
csrProfiles role, 87
csrTicketing role, 87
customer profile, 130
access rights to, 87
and gift lists, 53
and price locale, 99
and scheduled orders, 70
e-mail configuration, 93
search, 17
customer-facing, 5
lock management, 13
scenarios, 148
server, 5
Ddata sharing, 14
multiple sites, 14
sites, 101
data sources, 10, 12, 171, 173
agent-facing, 7
configuring with CIM, 10
database, 9, 10, 11
180 Index
admin, 9
agent, 9
audit log, 153
Oracle, 47
scenario manager, 147
user accounts, 9, 9
database indexing, 23
default landing page, 91
Ee-mail, 93
address for approvals, 80
order confirmation, 94
password, 94
templates, 95
EAR files, 10
environment monitoring, 101
form handlers, 103
site context and, 105
tickets, 104
exchanges, 77
and promotions, 62
customizing, 59
pricing, 61
Ffailover, 164
form handlers
approval, 81
catalog and price list, 98
environment monitoring, 103
gift list, 57
payment group, 127
reconciliation process, 134, 142
scheduled order, 71
fulfillment of orders, 134
GGeoLocatorService, 129, 129
gift lists, 53
access right, 87
configuring search, 56
form handlers, 57
modifying form, 53
properties, 53
Gift Registry Search, 56
gift with purchase, 75
form handlers, 76
returns and exchanges, 76
IIDGenerator, 12
in-store pickup, 129
authorization, 130
enable, 129
item eligability, 129
payment groups, 129
setting locations, 129
shipping group, 129
indexing
adding properties to, 29
bulk, 22
database, 23
incremental, 26
manual, 27, 28
preloading, 26
installation, 9
prerequisites, 3
using CIM, 9
inventory status, 129
JJava version required, 9
Llanding page, 91
lock managers, 12
on agent-facing server, 13
on customer-facing server, 12
server, 12
with CIM, 10
logs, 159
audit, 162
Mmanual adjustments, 79
multiple sites
and environment objects, 104
enabling, 15
OOracle Commerce Experience Manager (see Oracle
Commerce MDEX Engine)
Oracle Commerce MDEX Engine, 33
Oracle Commerce Platform Configuration and Installation
Manager (see CIM)
orders, 9
access rights, 91
and promotions, 110
approval rights, 81
approvals, enabling, 80
configuring automatic e-mail, 93
confirmation e-mail, 94
manual adjustments of, 110

Index 181
modifiable, 107
modification and fulfillment, 135
modifying, 133
price adjustments, 79
pricing, 107, 108
promotions and exchanges, 62
scheduled, 69
scheduled, configuring, 71
scheduled, templates, 70
submitted, 108, 110, 133
Ppage fragments, 114
catalog search, 35, 44
default payment group types, 122
example, 117
gift list, 54
gift with purchase, 76
shipping group configuration, 114
shipping groups, 120
passwords, e-mailing, 94
payment group, 113
cash, 121, 129, 130
credit card, 120
customization, 119
default, 119
form handlers, 127
gift certificate, 113, 121
limiting amounts of, 125
pay in store, 121
store credit, 120
payment group types, 124, 126
price lists, 108
and site context, 105
configuring current, 97
configuring default, 99
configuring quick access, 99
configuring with scheduled orders, 70
with multisite, 14
price overrides, 79
pricing, 107
errors, 109
locale, 99
manual adjustments, 110
promotions, 109
scheduled orders, 70
profiles, 7
agent, 89
customer, password, 94
customers, pricing locale, 99
promotions, 109
and submitted orders, 110
applying item level, 62
gift with purchase, 75
viewing, 75
with exchanges, 62
Promotions Browser, 75
Rreporting, 151
data collection, 151
load pipeline, 154
repositories, 9
approval, 79
configuring, 11
settings, 12
shared, 11
user profile, 87
returns
customizing, 59
gift with purchase, 76
roles, 85
agent, creating, 89
and access rights, 167
csrManager, 87
csrOrders, 87
csrProfiles, 87
csrTicketing, 87
preconfigured, 87
Sscenarios, 145
configuring, 148
scheduled orders, 69
components, 72
customizing, 71
form handler, 71
ScheduledOrderTools, 70
templates, 70
searches, 101
Oracle catalog, 47
server, 5
agent-facing, 7
customer-facing, 5
shareables, 15
shipping group, 113
customization, 113, 114
default types, 114
electronic, 113
hard goods, 113
page fragments, 120
types, 113
Site Administration, 14
sites
context, 14, 105
default, 15

182 Index
icons, 15
properties, 14
SQL files, 10
Ttables, 9
database, 11
templates
e-mail, 80, 83, 93
installation, 10
order, 69
scheduled order, 69, 70
UURLs
Commerce Service Center, 13
generating catalog search, 39
Wwish lists, 53


