24
SEPTEMBER, 2018 Connecticut Election Management System Head Moderator/Data Entry User Manual Version 3.1

SEPTEMBER, 2018
Connecticut Election
Management System
Head Moderator/Data
Entry User Manual
Version 3.1

______________________________________________________________________________________
Page | 2
Contents 1. SYSTEM REQUIREMENTS..................................................................................................................... 3
2. HEAD MODERATOR/DATA ENTRY LOGIN ........................................................................................... 3
How to Log In ...................................................................................................................................... 4
How to Change a Password ................................................................................................................ 4
3. HEAD MODERATOR’S RETURN ............................................................................................................ 5
How to Enter Candidate Vote Results ................................................................................................. 5
Unknown Votes Calculation for Cross Endorsed Candidates ............................................................. 9
How to Submit and Certify Candidate Vote Results ......................................................................... 11
How to Request State Admin to Unlock Head Moderator’s Return for Amendment ...................... 13
4. ENTER/VIEW STATS ........................................................................................................................... 14
How to Enter Stats ............................................................................................................................ 14
How to Submit and Certify Stats ....................................................................................................... 16
How to Request State Admin to Unlock Stats for an Amendment ................................................... 17
5. ENTER/VIEW QUESTIONS RESULTS ................................................................................................... 18
How to Enter Questions Results ....................................................................................................... 18
How to Submit and Certify Questions Results .................................................................................. 21
How to Request State Admin to Unlock Questions Results for Amendment ................................... 22
6. REPORT A PROBLEM OR GET HELP ................................................................................................... 23
______________________________________________________________________________________
Page | 3
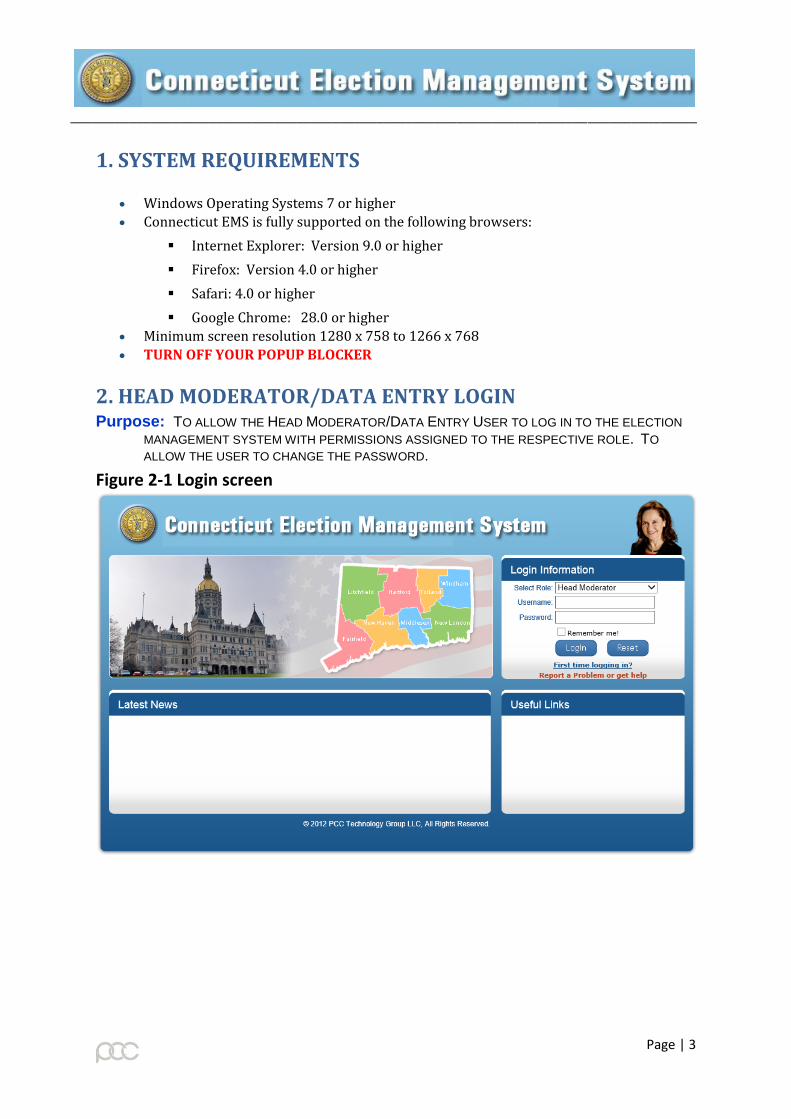
1. SYSTEM REQUIREMENTS
Windows Operating Systems 7 or higher
Connecticut EMS is fully supported on the following browsers:
Internet Explorer: Version 9.0 or higher
Firefox: Version 4.0 or higher
Safari: 4.0 or higher
Google Chrome: 28.0 or higher
Minimum screen resolution 1280 x 758 to 1266 x 768
TURN OFF YOUR POPUP BLOCKER
2. HEAD MODERATOR/DATA ENTRY LOGIN Purpose: TO ALLOW THE HEAD MODERATOR/DATA ENTRY USER TO LOG IN TO THE ELECTION
MANAGEMENT SYSTEM WITH PERMISSIONS ASSIGNED TO THE RESPECTIVE ROLE. TO
ALLOW THE USER TO CHANGE THE PASSWORD.
Figure 2-1 Login screen

______________________________________________________________________________________
Page | 4
How to Log In
1 Enter the URL in the browser’s address bar and click Enter.
2 Select “Head Moderator” or “Data Entry” from the “Select Role” dropdown and enter the
Username and Password (Fig. 2-1).
3 Click the “Login” button.
4 The Registrar in your town will provide you with a Username and Password.
NOTES:_____________________________________________________________________________________________________________________________________________________________________________________________________________________________
How to Change a Password
1. To change your password, click on the “Change Password” tab to display the Change
Password screen (Fig. 2-2).
Figure 2-2 Change Password screen
2. Enter the Old Password, enter the New Password, and re-enter the New Password. Click
the “Change Password” button. The system will display an alert message.
3. Passwords expire in 90 days, at which time the user is prompted to enter a new
password. The prompt for the password change will begin 10 days prior to the
expiration date. Please note that you may not use any of your last 3 passwords.
Note: Passwords must be between 8-26 characters long and must contain at least one
character from three of these four-character types:
Uppercase alpha
Lowercase alpha Numeric Special character

______________________________________________________________________________________
Page | 5
3. HEAD MODERATOR’S RETURN Purpose: TO ALLOW THE HEAD MODERATOR/DATA ENTRY USER TO ENTER AND SAVE
RESULTS. THE HEAD MODERATOR CAN ALSO SUBMIT RESULTS FOR ALL DISTRICTS, CERTIFY THE HEAD MODERATOR’S RETURN, AND REQUEST STATE ADMIN TO UNLOCK THE
RETURNS FOR AN AMENDMENT.
How to Enter Candidate Vote Results
1. Once the user has logged in successfully, the system will display the Head Moderator’s
Return screen. The user can access the Head Moderator/Data Entry functions by
clicking the tabs across the top of the screen.
2. Until a Head Moderator’s Return has been entered, the system displays “No Data Found”
(Fig. 3-1).
Figure 3-1 Head Moderator’s Return screen
3. To filter returns by election, if returns have been previously entered, select the
election/primary from the Election dropdown and click the “Search” button. The
system will display returns for the selected election.
4. To enter a new Head Moderator Return, click the “New Head Moderator Return” button
to display the Search Election screen (Fig. 3-2).
Figure 3-2 Head Moderator’s Return screen - Search Election
5. Select an election from the Election dropdown. Click the “Search” button to display the
Head Moderator’s Return grid for candidate vote results. On the left side of the screen,
each voting district/polling place is displayed. If no polling places have been assigned
the system will display “No Data Found” (Fig. 3-3).

______________________________________________________________________________________
Page | 6
Figure 3-3 Head Moderator’s Return grid – Begin Process
6. To enter candidate, vote results by voting district/polling place, click on “Begin Process”
(Green, to the right of the voting district name).
7. The system will enable the data entry fields for the selected voting district. The selected
voting district/polling place will be highlighted in dark blue, and “End Process” (Red)
will display next to the voting district name (Fig. 3-4).
Figure 3-4 Head Moderator’s Return – Data entry grid

______________________________________________________________________________________
Page | 7
8. A row with data entry fields is displayed for each candidate. If a candidate is cross-
endorsed, the system displays multiple rows for the candidate, one for each party for
which that candidate is cross endorsed. For cross-endorsed candidates, there is also an
additional row with the candidate’s name and “unknown” following the candidate’s
name.
9. Enter the votes for tabulator vote results, write-in vote results, and hand count vote
results in the appropriate columns for each category of votes:
Polling Place
Absentee Ballots
Election Day Registration.
10. Navigate from box to box using the mouse, the tab key, or the up, down, left, right arrow
keys on the keypad.
11. The system will calculate the total votes for each vote category as votes are entered for
that category and populate the total vote result for each category in the respective
“Total” column (highlighted in yellow).
12. The unknown vote total for a cross endorsed candidate will appear in red on the far
right in the light blue highlighted “TOTAL” column.
13. To allocate the unknown votes to a candidate, click the “Calculate” link in the “TOTAL
with Unknown Votes” column (Fig. 3-5). The system will allocate the unknown votes.
Figure 3-5 Unknown Vote Total
14. NOTE: If the unknown vote result is updated, you MUST select “Calculate” again to
reallocate the unknown votes. In the event that you forget the calculation is done
automatically by clicking the Save button.
______________________________________________________________________________________
Page | 8
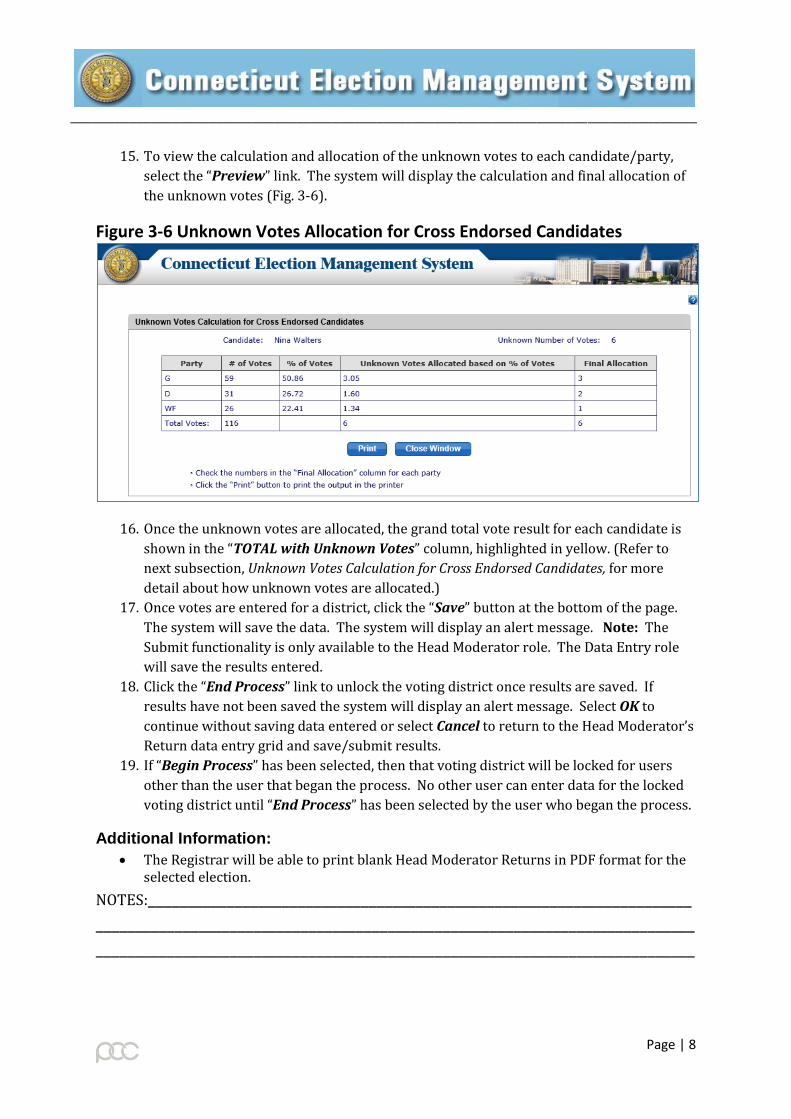
15. To view the calculation and allocation of the unknown votes to each candidate/party,
select the “Preview” link. The system will display the calculation and final allocation of
the unknown votes (Fig. 3-6).
Figure 3-6 Unknown Votes Allocation for Cross Endorsed Candidates
16. Once the unknown votes are allocated, the grand total vote result for each candidate is
shown in the “TOTAL with Unknown Votes” column, highlighted in yellow. (Refer to
next subsection, Unknown Votes Calculation for Cross Endorsed Candidates, for more
detail about how unknown votes are allocated.)
17. Once votes are entered for a district, click the “Save” button at the bottom of the page.
The system will save the data. The system will display an alert message. Note: The
Submit functionality is only available to the Head Moderator role. The Data Entry role
will save the results entered.
18. Click the “End Process” link to unlock the voting district once results are saved. If
results have not been saved the system will display an alert message. Select OK to
continue without saving data entered or select Cancel to return to the Head Moderator’s
Return data entry grid and save/submit results.
19. If “Begin Process” has been selected, then that voting district will be locked for users
other than the user that began the process. No other user can enter data for the locked
voting district until “End Process” has been selected by the user who began the process.
Additional Information:
The Registrar will be able to print blank Head Moderator Returns in PDF format for the selected election.
NOTES:_____________________________________________________________________________________________________________________________________________________________________________________________________________________________

______________________________________________________________________________________
Page | 9
Unknown Votes Calculation for Cross Endorsed Candidates
The system will allocate unknown votes to cross-endorsed candidates using the rules below.
Rule 1:
If the Unknown Votes Allocated based on Vote Percentage is less than 1 for any one party, and
if the number of parties is more than the unknown votes, then the system will allocate all
unknown votes to the majority party (Fig. 3-7).
Figure 3-7 Example 1
Party Candidate No. of Votes
Vote Percentage (No. of Votes/ Total Votes)
Unknown Votes Allocated
Final Allocation as per Rule#1 (Based on Vote
Percentage)
Dem Dan Malloy 750 98.94% 1.98 2
Green Dan Malloy 3 0.40% 0.01 0
WF Dan Malloy 5 0.66% 0.01 0
Unknown Dan Malloy 2
Total Votes 758 100% 2 2
Total Votes = Sum of Number of Votes except “Unknown”
Votes Percentage = (Number of Votes / Total Votes) x 100
In Example 1, Votes Percentage for Dem = (750/758) x 100 = 98.94%
Unknown Votes Allocated = Number of Unknown Votes x Vote Percentage
In Example 1, Unknown Votes Allocated for Dem = 2 x 98.94% = 1.98
Rule 2:
If the Unknown Votes Allocated based on Votes Percentage value is less than 1 for any one
party, and if the number of parties is less than the unknown votes, then the system will allocate
at least one vote to the party that has a value less than 1 (Fig. 3-8).
Figure 3-8 Example 2
Party Candidate No. of Votes
Votes Percentage Unknown Votes Allocated based on Votes Percentage
Final Allocation as per Rule#2 (No. of Votes/
Total Votes)
Dem Dan Malloy 750 98.94% 3.96 2
Green Dan Malloy 3 0.40% 0.02 1
WF Dan Malloy 5 0.66% 0.03 1
Unknown Dan Malloy 4
Total Votes 758 100.00% 4 4

______________________________________________________________________________________
Page | 10
However, if the Unknown Votes Allocated based on Votes Percentage is greater than unknown
votes, then the system will allocate the unknown votes as follows (Fig. 3-9):
a. Allocate at least one vote to the party that has a percentage less than 1. In Example
3, that party is Independent.
b. Calculate the remaining unknown votes. In Example 3, the number of remaining
unknown votes is 21.
c. Allocate the remaining unknown votes again based on the percentage for the
parties that have a percentage greater than or equal to 1. In Example 3, those
parties are Dem, Green, and WF.
d. Allocate the remaining votes to the majority party. In Example 3, the remaining
vote is allocated to the Democrat party.
Figure 3-9 Example 3
Rule 3:
If the Unknown Votes Allocated based on Votes Percentage value is greater than or equal to 1
for all parties, then the system will round the value to the nearest integer, as in Example 4 (Fig 3.-
10).
NOTE: After allocating Unknown votes, if there are any Unknown votes remaining, then the remaining Unknown votes are allocated to the majority party.
Party CandidateNo. of
Votes
Votes
Percentage
(No. of
Votes/
Total
Votes)
Unknown
Votes
Allocated
based on
Votes
Percentage
Allocation
as per Rule
#2a
Unknown Votes
Allocated based
on Votes
Percentage
recalculated for
the remaining
unknown votes
(21)
Allocation
as per Rule
#2c
Final
Allocation
as per Rule
#2d
(Allocate
the
remaining
vote to
majority
party)
Dem Dan Malloy 700 63.75% 14.03 14 13.39 13 14
Green Dan Malloy 300 27.32% 6.01 6 5.74 6 6
WF Dan Malloy 75 6.83% 1.5 2 1.43 1 1
Independ
entDan Malloy 23 2.09% 0.46 1 1 1 1
Unknown Dan Malloy 22
Total
Votes1098 22 23 21 22

______________________________________________________________________________________
Page | 11
Figure 3-10 Example 4
Party Candidate No. of Votes
Votes Percentage
Unknown Votes Allocated Final
Allocation as per Rule#3 (No. of Votes/
Total Votes)
(Based on Vote Percentage)
Dem Dan Malloy 250 45.45% 1.82 2
Green Dan Malloy 150 27.27% 1.09 1
WF Dan Malloy 150 27.27% 1.09 1
Unknown Dan Malloy 4
Total Votes 550 100.00% 4 4
How to Submit and Certify Candidate Vote Results
1. Once the results for all districts have been entered, click the “Submit All Districts to
State” button to submit the candidate vote results for all districts.
2. If all the polling places are unlocked, the system will display the Certify Head
Moderator’s Return screen (Fig. 3-11).
Figure 3-11 Certify Head Moderator’s Return screen
3. Check the box “I hereby electronically sign and certify the Head Moderator’s Return.”
4. Click on the “Certify and submit to State” button. An alert message will display.
5. Select OK to submit all the voting district totals to the state. The system returns to the
Head Moderator’s Return screen, where a summary row for the Head Moderator’s
Return will be displayed (Fig. 3-12).

______________________________________________________________________________________
Page | 12
Figure 3-12 Head Moderator’s Return screen – with summary row
6. If any polling place is locked when the Head Moderator clicks the “Submit All Districts
to State” button, the system will display an alert message.
7. Only the role of Head Moderator can submit all districts and certify vote results.
8. To generate the Head Moderator’s Return in a PDF format (Fig 3-13), click “Generate
Report” under the “Actions” column.
Figure 3-13 Head Moderator’s Return - PDF
NOTES:_____________________________________________________________________
____________________________________________________________________________
____________________________________________________________________________
______________________________________________________________________________________
Page | 13
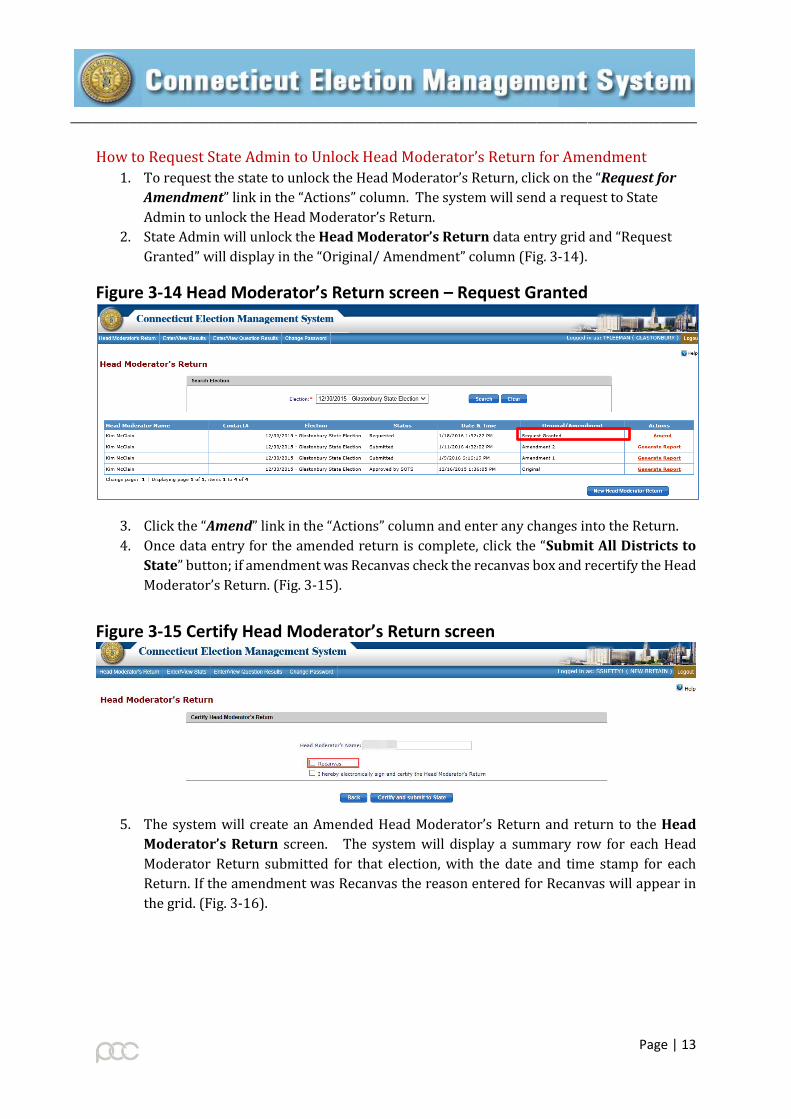
How to Request State Admin to Unlock Head Moderator’s Return for Amendment
1. To request the state to unlock the Head Moderator’s Return, click on the “Request for
Amendment” link in the “Actions” column. The system will send a request to State
Admin to unlock the Head Moderator’s Return.
2. State Admin will unlock the Head Moderator’s Return data entry grid and “Request
Granted” will display in the “Original/ Amendment” column (Fig. 3-14).
Figure 3-14 Head Moderator’s Return screen – Request Granted
3. Click the “Amend” link in the “Actions” column and enter any changes into the Return.
4. Once data entry for the amended return is complete, click the “Submit All Districts to
State” button; if amendment was Recanvas check the recanvas box and recertify the Head
Moderator’s Return. (Fig. 3-15).
Figure 3-15 Certify Head Moderator’s Return screen
5. The system will create an Amended Head Moderator’s Return and return to the Head
Moderator’s Return screen. The system will display a summary row for each Head
Moderator Return submitted for that election, with the date and time stamp for each
Return. If the amendment was Recanvas the reason entered for Recanvas will appear in
the grid. (Fig. 3-16).

______________________________________________________________________________________
Page | 14
Figure 3-16 Head Moderator’s Return Summary screen
6. Amendments to the returns and vote results will be allowed from Election Day until a date
and time set by the state.
7. To submit an amendment after the Returns are locked, the Head Moderator must request
the state to unlock the Return.
8. Only a user with the role of Head Moderator can request the state to unlock Head
Moderator’s Return for an amendment.
NOTES:_____________________________________________________________________________________________________________________________________________________________________________________________________________________________
4. ENTER/VIEW STATS Purpose: TO ALLOW THE HEAD MODERATOR TO ENTER AND SUBMIT STATS BY DISTRICT
ASSIGNED TO AN ELECTION. THE HEAD MODERATOR CAN ALSO SUBMIT RESULTS FOR ALL
DISTRICTS, CERTIFY THE STATS, AND REQUEST STATE ADMIN TO UNLOCK THE STATS FOR AN
AMENDMENT TO BE PROCESSED.
How to Enter Stats
1. Click on “Enter/View Stats” tab from the Menu Bar to display the Enter/View Stats
screen. Until stats have been entered, the system displays “No Data found” (Fig. 4-1).

______________________________________________________________________________________
Page | 15
Figure 4-1 Enter/View Stats screen
2. To search for stats by election, if stats have been previously entered, select the
election/primary from the Election dropdown and click the “Search” button. Stats for
the selected election will be displayed.
3. To enter new stats, select an election from the dropdown and click the “Enter Stats”
button. The system will display an alert message.
4. Select OK to display the Enter/View Stats data entry screen (Fig. 4-2). To display the
Enter/View Stats data entry screen for a different election, select the desired election
from the dropdown and click the “Search” button.
Figure 4-2 Enter/View Stats – Data Entry screen
5. The stats data entry fields by category are
Names on the Official Check List (Active List, Names Restored to active list on
election day, EDR applicant and Overseas, Presidential)
Number Checked as Having Voted at the polls
Absentee Ballots - Total received from Town Clerk for counting and Total
Rejected at counting.
Military Ballots (includes 45 & 90 days)- Total received from Town Clerk for
counting and Total Rejected at counting.
Overseas Ballots total – Total received from Town Clerk for counting and Total
Rejected at counting.

______________________________________________________________________________________
Page | 16
Election Day Registration – Total Issued and Total Rejected at counting
Presidential Ballots - Total Issued by Town Clerk and Total Rejected
Provisional Ballots - Total Issued and Total Rejected
6. Enter the stats by voting district/polling place. Use the scroll bar at the bottom of the
screen to view and enter stats into each category. As data is entered, the system will
calculate “Percentage” and “Total Counted” and populate the yellow highlighted
columns.
7. The Head Moderator submit the stats for all polling places to State Admin.
8. Before submitting notice, the “Total number of names checked as having voted” column.
If the totals are equal to Head Moderator’s return the total will display in green. If the
total is less than the Head Moderator’s return then the total will display in blue. If the
total is greater than the Head Moderator’s return then the total will display in green.
9. Only the role of Head Moderator is able to submit stats.
How to Submit and Certify Stats
1. Once the stats are entered for every district/polling place, click the “Submit All districts
to State” button to submit the stats for all districts. Only the role of Head Moderator can
submit all districts and certify to State Admin. (Fig 4-3)
Figure 4-3 Submit Stats for District
2. The system will display the Certify Stats screen (Fig. 4-4).

______________________________________________________________________________________
Page | 17
Figure 4-4 Certify Stats screen
3. Check the box, “I hereby electronically sign and certify the Stats.”
4. Click the “Certify and submit to State” button. The system will display an alert
message.
5. Select OK to certify and submit the stats to the state. The system returns to the
Enter/View Stats screen, where a summary row for the Head Moderator’s Stats will be
displayed (Fig. 4-5).
Figure 4-5 Enter/View Stats screen – with Statistics Report summary row
NOTES:_____________________________________________________________________________________________________________________________________________________________________________________________________________________________
How to Request State Admin to Unlock Stats for an Amendment
1. To request the state to unlock the Stats Return, click on “Request Amendment” in the
“Original/ Amendment” column. The system will send a request to State Admin to
unlock the Stats Return. The State Admin will unlock the Stats Return and “Request
Granted” will display in the “Original/Amendment” column.
2. Click the “Amend” link in the “Actions” column and enter any changes.
______________________________________________________________________________________
Page | 18
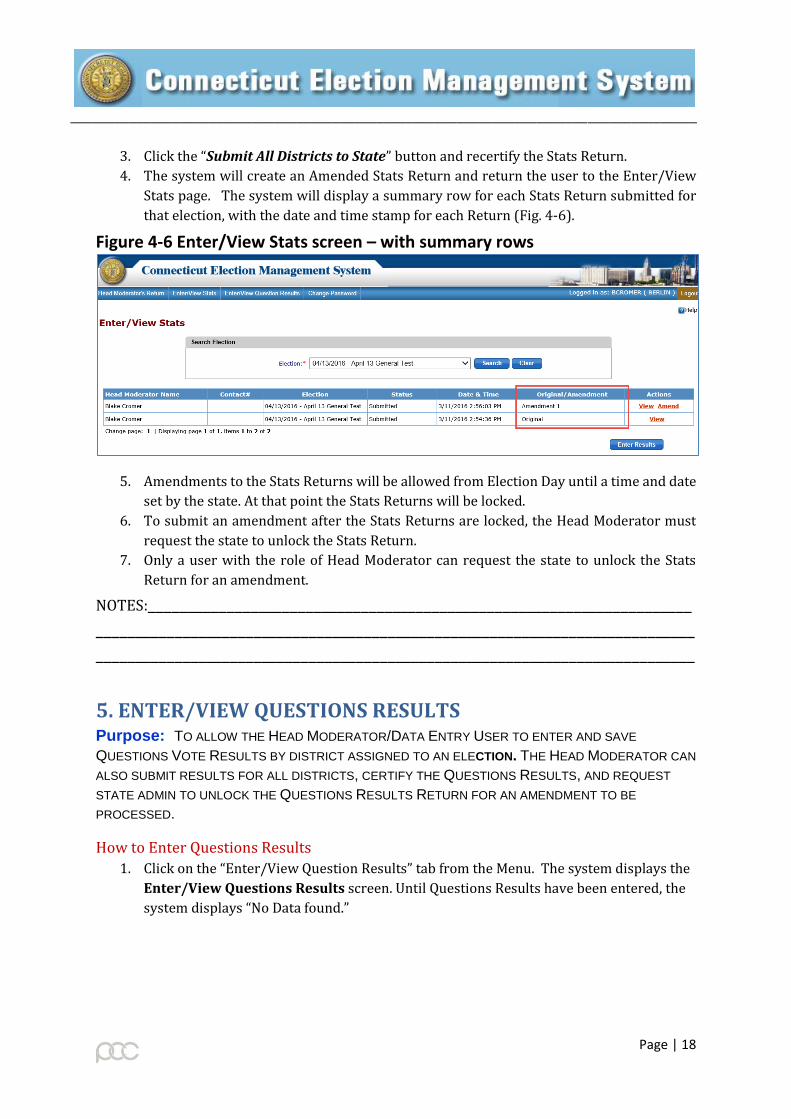
3. Click the “Submit All Districts to State” button and recertify the Stats Return.
4. The system will create an Amended Stats Return and return the user to the Enter/View
Stats page. The system will display a summary row for each Stats Return submitted for
that election, with the date and time stamp for each Return (Fig. 4-6).
Figure 4-6 Enter/View Stats screen – with summary rows
5. Amendments to the Stats Returns will be allowed from Election Day until a time and date
set by the state. At that point the Stats Returns will be locked.
6. To submit an amendment after the Stats Returns are locked, the Head Moderator must
request the state to unlock the Stats Return.
7. Only a user with the role of Head Moderator can request the state to unlock the Stats
Return for an amendment.
NOTES:_____________________________________________________________________________________________________________________________________________________________________________________________________________________________
5. ENTER/VIEW QUESTIONS RESULTS Purpose: TO ALLOW THE HEAD MODERATOR/DATA ENTRY USER TO ENTER AND SAVE
QUESTIONS VOTE RESULTS BY DISTRICT ASSIGNED TO AN ELECTION. THE HEAD MODERATOR CAN
ALSO SUBMIT RESULTS FOR ALL DISTRICTS, CERTIFY THE QUESTIONS RESULTS, AND REQUEST
STATE ADMIN TO UNLOCK THE QUESTIONS RESULTS RETURN FOR AN AMENDMENT TO BE
PROCESSED.
How to Enter Questions Results
1. Click on the “Enter/View Question Results” tab from the Menu. The system displays the
Enter/View Questions Results screen. Until Questions Results have been entered, the
system displays “No Data found.”
______________________________________________________________________________________
Page | 19
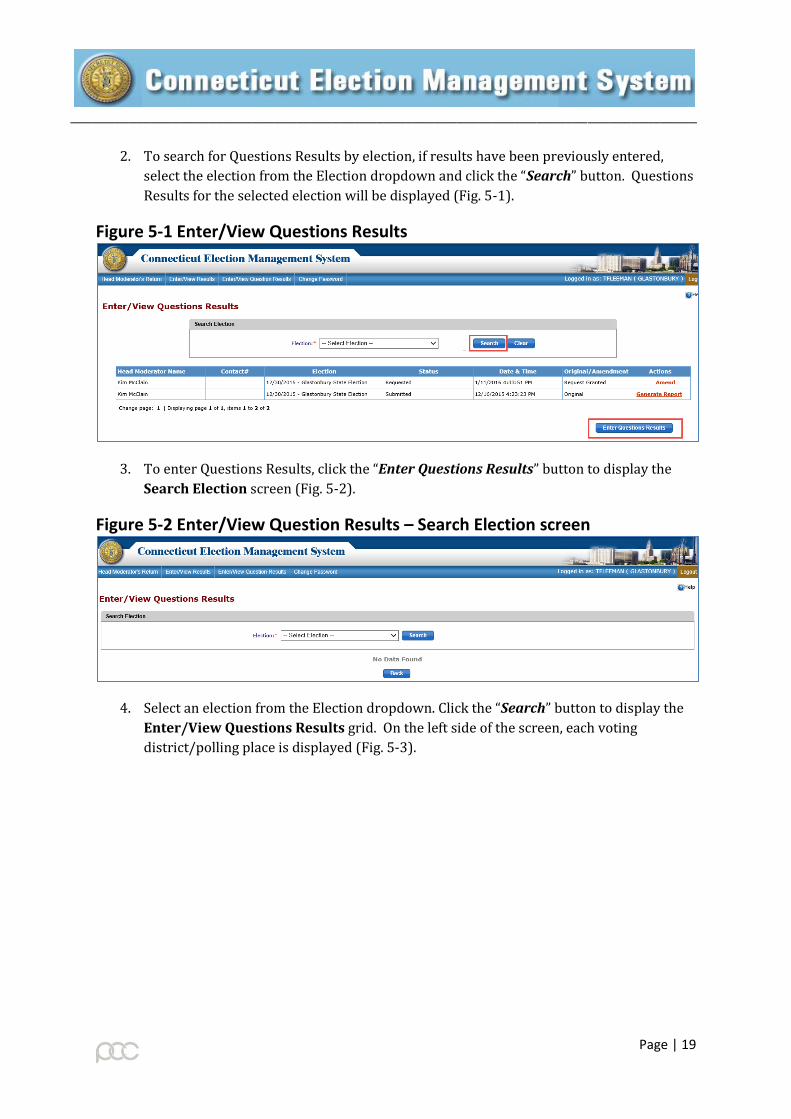
2. To search for Questions Results by election, if results have been previously entered,
select the election from the Election dropdown and click the “Search” button. Questions
Results for the selected election will be displayed (Fig. 5-1).
Figure 5-1 Enter/View Questions Results
3. To enter Questions Results, click the “Enter Questions Results” button to display the
Search Election screen (Fig. 5-2).
Figure 5-2 Enter/View Question Results – Search Election screen
4. Select an election from the Election dropdown. Click the “Search” button to display the
Enter/View Questions Results grid. On the left side of the screen, each voting
district/polling place is displayed (Fig. 5-3).

______________________________________________________________________________________
Page | 20
Figure 5-3 Enter/View Question Results grid – Begin Process
5. To enter the questions, vote results by voting district/polling place, click on “Begin
Process” (Green, to the right of the voting district/polling place name).
6. The system will display the data entry grid for the selected voting district. The selected
voting district/polling place will be highlighted in dark blue, and “End Process” (Red)
will display next to the voting district name (Fig. 5-4).
Figure 5-4 Enter/View Question Results –Data Entry grid
7. Enter the votes for tabulator vote results, write-in vote results, and hand count vote
results for totals in the appropriate columns for each category of votes:
Polling Place
Absentee Ballots
Election Day Registration.
8. Navigate from box to box using the mouse, the tab key, or the up, down, left, right arrow
keys in the keypad.
9. The system will calculate the total votes for each vote category as votes are entered for
that category and will populate the total vote result for the category in the “Total”

______________________________________________________________________________________
Page | 21
columns (highlighted in yellow). The system will calculate the total of all categories and
populate the “Grand TOTAL” column (highlighted in light blue).
10. Once votes are entered for a voting district, click the “Save” button. The system will save
the data that voting district only. Note: The Submit functionality is only available to the
Head Moderator role. The Data Entry role will save the results.
11. Click on “End Process” to unlock the voting district once results are saved. If results
have not been saved the system will display an alert message. Select OK to continue
without saving data entered or select Cancel to return to the data entry screen and save
results.
12. If “Begin Process” has been selected, then that voting district will be locked for all users
other than the user that began the process. No other user can enter data for the voting
district until “End Process” has been selected by the user who began the process.
How to Submit and Certify Questions Results
1. Once results for all districts are entered, click the “Submit All districts to State” button
to submit the question results for all districts.
2. If all the districts are unlocked, the system will display the Certify Questions Results
screen (Fig. 5-5).
Figure 5-5 Enter/View Questions Results – Certify Questions Results screen
3. Check the box, “I hereby electronically sign and certify the Questions Results.”
4. Click on the “Certify and submit to State” button. An alert message will display.
5. Select OK to submit all the voting district/polling place totals to state. The system will
return to the Questions Results screen, where a summary row for the Questions
Results will be displayed (Fig. 5-6).

______________________________________________________________________________________
Page | 22
Figure 5-6 Enter/View Question Results screen – with summary row
6. If any voting district is locked when the Head Moderator clicks the “Submit All Districts
to State” button, the system will display an alert message.
7. Only the role of Head Moderator can submit all districts to State Admin and certify
Questions Results.
8. To generate the Questions Results in PDF format, click “Generate Report” under the
“Actions” column. The system will display an alert message.
9. Select OK to generate the report in a PDF format. You can save the report or print the
report to a configured printer.
NOTES:_____________________________________________________________________________________________________________________________________________________________________________________________________________________________
How to Request State Admin to Unlock Questions Results for Amendment
1. To request State Admin to unlock the Questions Results, click the “Request for
Amendment” link in the “Actions” column. The system will send a request to State
Admin to unlock the Questions Result Return for the town.
2. State Admin will unlock the Questions Results Return and “Request Granted” will
display in the “Original/Amendment” column.
3. Click the “Amend” link in the “Actions” column and enter any changes.
4. Click the “Submit All Districts to State” and recertify the Questions Results Return.
5. The system will create an Amended Questions Results Return and return the user to the
Questions Results screen, where a summary row for each Questions Results Return
submitted for that election will be displayed with the date and time stamp for each Return
(Fig. 5-7).

______________________________________________________________________________________
Page | 23
Figure 5-7 Enter/View Question Results screen – with summary rows
6. Amendments to the Questions Results will be allowed from Election Day until a date and
time set by the state. At that point, the Questions Results will be locked.
7. To submit an amendment after the Questions Results Returns are locked, the Head
Moderator must request State Admin to unlock the Returns.
8. Only a user with the role of Head Moderator can request the state to unlock the Questions
Results Returns for an amendment.
NOTES:_____________________________________________________________________________________________________________________________________________________________________________________________________________________________
6. REPORT A PROBLEM OR GET HELP
Purpose: TO ALLOW THE HEAD MODERATOR/DATA ENTRY USER TO REPORT A PROBLEM TO
OR GET HELP FROM STATE ADMIN (SOTS).
1. From the Login page, click on the “Report a Problem or Get Help” link (Fig. 6-1).
Figure 6-1 Login screen

______________________________________________________________________________________
Page | 24
2. The system will display the Report a Problem or Get Help screen (Fig. 6-2).
Figure 6-2 Report a Problem or Get Help screen
3. Enter information and summarize your problem or question in the Message section. Be
sure to include your email address. You may attach a file using the “Browse” feature.
4. Click the “Send Message” button. Your message, attachments, and contact information
will be sent to the State Admin EMS dashboard.
NOTES:_____________________________________________________________________________________________________________________________________________________________________________________________________________________________


