Construction, Installation, & Trouble-shooting of Kanchan Arsenic Filter (KAF) Refresher Entrepreneurs Training on the Promotion of Kanchan Arsenic Filter in Nepal December 19-20, 2004 @ Nepal Red Cross Society, Birgunj, Nepal (revised January 30, 2005) Tommy Ngai, Researcher, Massachusetts Institute of Technology Bipin Dangol, Engineer, ENPHO Presentation Outline • Major Filter Components • Filter Construction • Filter Installation • Trouble-shooting
Transcript
1
Construction, Installation, & Trouble-shootingof
Kanchan Arsenic Filter (KAF)
Refresher Entrepreneurs Training on the Promotionof
Kanchan Arsenic Filter in NepalDecember 19-20, 2004
@ Nepal Red Cross Society, Birgunj, Nepal
(revised January 30, 2005)
Tommy Ngai, Researcher, Massachusetts Institute of TechnologyBipin Dangol, Engineer, ENPHO
Presentation Outline
• Major Filter Components• Filter Construction• Filter Installation• Trouble-shooting
2
Major Filter Components
Major Filter Components
Gravel
Fine Sand
Coarse Sand
Water
Diffuser Basin
Lid
Container
Pipe
Iron NailsBrick chips or Plate
3
Diffuser Basin
Lid
Container
Major Filter Components
Specifications:
Container & LidGem model 505
Diffuser BasinGem model 1700
Major Filter Components
Diffuser BasinGem model 1700
Container & LidGem model 505
4
PVC Pipe
Major Filter Components
Specifications:Pipe (PVC or GI)
½ inch
Pipe fittings (PVC or GI)3 elbows1 tank nipple1 socket
Tank Nipple
Elbows
Elbow
PVC Pipe
Socket
Major Filter Components
5
Gravel
Fine Sand
Coarse Sand
Major Filter ComponentsSpecifications:
Fine Sand20 to 22 Litersless than 1mm diameter
Coarse Sand4 Liters3 to 6 mm diameter
Gravel6 Liters6 to 15 mm diameter
Major Filter Components
Sand and Gravel can be obtained from nearby rivers or crushers
6
Major Filter Components
Ideal gravel – correct size, uniform size, clean with no silt, dirt, small particles or other visual contaminations
Poor gravel – too big size, mixed up large and small sizes
Major Filter Components
Ideal coarse sand- correct size, clean with no silt, dirt, small particles or other visual contaminations
Poor coarse sand– non uniform size, mixed up with lots of dirt, silt, and fine sand
7
Major Filter Components
Ideal fine sand- correct size, no large particles or visual contamination
Poor fine sand– non uniform size, mixed up with lots of dirt, silt, and large particles
Major Filter Components
Avoid sand/gravel sources with animal contamination
Use gauge 2 screen for gravel, gauge 5 for coarse sand, gauge 14 for fine sand
8
Major Filter Components
Gauge 2 sieve (1/2 inch) Discard
Gauge 5 sieve (1/4 inch) Gravel
Gauge 14 sieve (1mm) Coarse Sand
Remaining Fine Sand
Major Filter Components• Fine sand should be washed fairly clean.• If sand is placed in a clear glass of water, and the sand is stirred, the suspended solids should be minimal.
Ideal Not washed enough
9
Iron Nails
Major Filter ComponentsSpecifications:
Iron nails5 kgsmallest size is bestlength < 20mmmust be non-
galvanized (must rust)
Brick chipsany brick is fineabout 5 to 10 cm
diameter
Plateany perforated
plate that can protect the iron nails
Brick chips or Plate
Major Filter Components
Choose the smallest, cheapest, non-galvanized iron nails from your local dealers. Buying in bulk to save money.
10
Filter Construction
1. Measure and cut two pieces of PVC pipe (10 inches and 4 inches long)
2. Thread both ends of both PVC sections
Filter Construction
Tank nipple
Elbow
Elbow
Elbow
10” PVC pipe
4” PVC pipe
11
Filter Construction
3. Attach elbows and tank nipple. Tighten the pipe fittings to the PVC pipe using a pair of wrenches (spanners)
Filter Construction
4. Pipes should be properly sealed with Teflon Tape and Glue to avoid leakage
12
5. Make a fire to heat a ½ inch G.I. Pipe6. Draw a line at 2 inches from the bottom of the Gem505.
Puncture one hole below the line using the hot pipe
Filter Construction
Filter Construction
13
Filter Construction
10. Drill two holes on PVC pipe (at location 2 inches from the sealed end, and at 2 inches from open end), using a hot bicycle spike/rod.
7. Measure and cut a PVC pipe 8 inches long
8. Seal one end of the PVC pipe with a cap
9. Connect the PVC pipe to a socket
Filter Construction
12. The holes should be on the bottom (down) side
11. Fix the PVC piping system by connecting the outer and inner pipes
14
Filter Construction
Two holes, 2 mm diameter
Sealed end
Tank nipple
Socket
Drainage pipe
13. Heat bicycle wheel rod.14. Puncture holes on the
bottom side of basin
Filter Construction
40 evenly distributed holes
15
15. Fill up the container to full with water16. Visually check for leakage from the outside17. Check time needed to fill a 1L jug (Gem016). Time should be
between 2 to 3 minutes.
Filter Construction
Filter Construction18. If time is less than 2 minutes
(i.e. flow rate too fast), then19. Use your fingers to close the
two holes in the drainage pipe. There should be no flow
20. If there is no flow the hole is too big. Need to make a new drainage pipe
21. If there is flow check for leakage
16
22. Check for leakage at the socket/ tank nipple connection
23. Tighten if necessary24. Otherwise the filter
construction is finished
Filter Construction
Filter Installation
17
Filter Installation1. Use bricks to prepare a flat surface. The surface must be very flat or the filter may become unstable and be broken
2. Put a thick layer (at least 3 cm) of mud and sand on the brick surface. This mud/sand layer should be flat.
3. Place the filter securely on the layer of mud and sand.
Brick layer
Mud and sand layer
4. Add two bottles of Piyush in 10 Liters of water.
5. Pour Piyush water into filter
Filter Installation
18
7. Slowly add gravel to the filter. Flatten the gravel surface with your hand. The gravel should cover the entire drainage pipe. If not, then the drainage pipe was incorrectly setup. Either the hole in the Gem505 is at the wrong location, or the tank nipple was not tight enough. Secure the outer PVC pipe may also help to level (lower) the drainage pipe inside.
6. Using a Gem016 jug (1 L capacity), measure 6 L of previously washed gravel.
8. Using a Gem016 jug, measure 4 L of previously washed coarse sand.
9. Slowly add coarse sand to the filter. Make sure the interface is flat, and do not mix the gravel and sand
10. Using the Gem016 again, slowly add 5 L of water (non-Piyush) to the container. Do not disturb the sand and/or gravel layers.
19
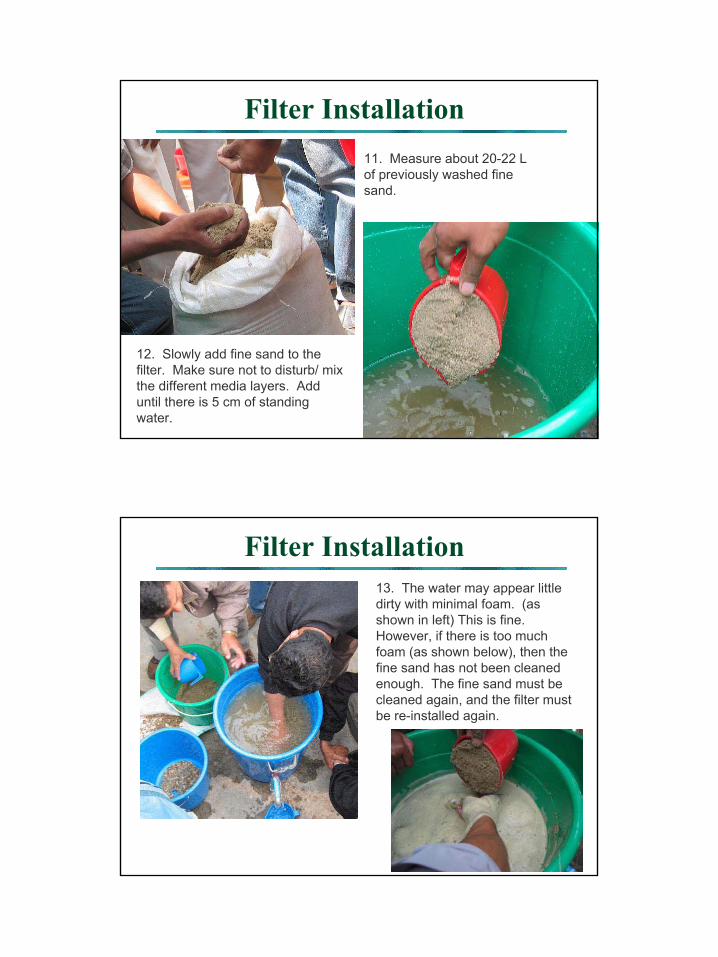
11. Measure about 20-22 L of previously washed fine sand.
12. Slowly add fine sand to the filter. Make sure not to disturb/ mix the different media layers. Add until there is 5 cm of standing water.
Filter Installation
13. The water may appear little dirty with minimal foam. (as shown in left) This is fine.However, if there is too much foam (as shown below), then the fine sand has not been cleaned enough. The fine sand must be cleaned again, and the filter must be re-installed again.
Filter Installation
20
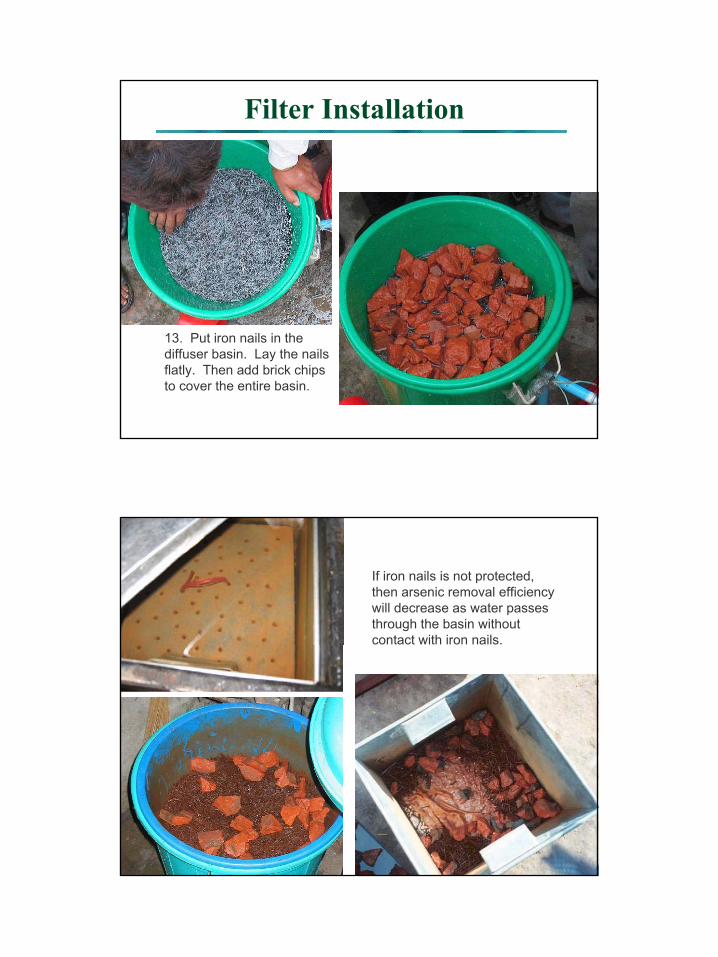
13. Put iron nails in the diffuser basin. Lay the nails flatly. Then add brick chips to cover the entire basin.
Filter Installation
If iron nails is not protected, then arsenic removal efficiency will decrease as water passes through the basin without contact with iron nails.
21
Filter Installation
14. Cover with lid.15. Wait for 48 hours for
Piyush to disinfect the sand and gravel.
16. After 48 hours, perform filter maintenance, that is, to clean the top layer of sand according to maintenance procedure.
17. Clean the top layer of sand until you get clear water
Filter Installation
22
Filter Installation
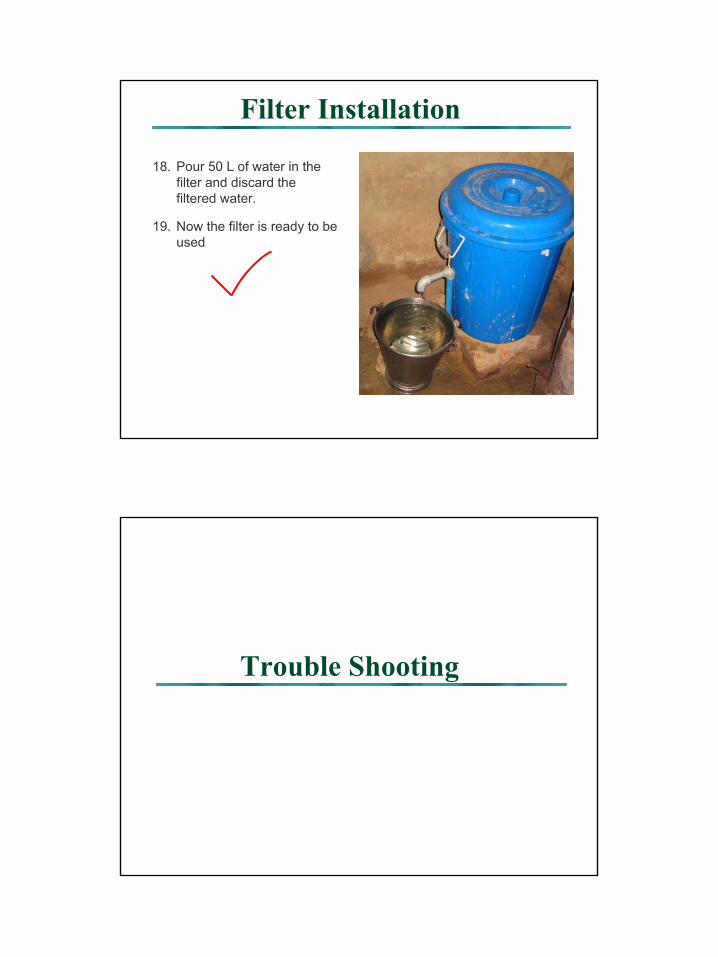
18. Pour 50 L of water in the filter and discard the filtered water.
19. Now the filter is ready to be used
Trouble Shooting
23
Trouble-ShootingProblem No.1 - Too low flow rate (less than 5 Liters per hour)
1. Filter maintenance. Clean the top layer of sand. If doesn’t work, then
2. Check clogging in the diffuser basin. Take the basin out and pour water into the basin. If basin clogs, then remove and wash ironnails and brick chip to clean out the dirt. Also wash the basin and clear out any holes that has been blocked by iron sludge/ dirt. If doesn’t work, then
3. Remove all sand and gravel. Check for blockage in the pipe. Sieve sand and gravel. Re-install gravel and sand. Keep in mind that that there should be always water in the filter before adding gravel and/or sand to avoid trapped air bubbles. If doesn’t work, then
4. Contact ENPHO. This is interesting. We also want to know why.
Top sand layer will clog. It is normal. It is because of the accumulation of dirt, dust, iron particles, and/or other contaminant particles.
Filter maintenance (i.e. cleaning the top layer of sand) can often return the flow rate to normal
24
Remove the diffuser basin to check for clogging in the basin
Iron nails and/or brick chips can be very dirty. They must be washed to remove dirt and sand particles before placing into the diffuser basin
Iron nails and/or brick chips were not washed prior to installation. Dirt from nails and/or brick clogs the holes in the diffuser basin.
Holes too small will get clogged easily.Holes too large will allow iron nails to pass.Proper size is necessary.
25
Problem No.2 – Gem505 container breakage
1. The filter should be placed on a flat, stable surface.
2. The filter should be placed indoors, away from the sun. Sun’s UV ray may damage the plastic, making it fragile.
3. Be careful when making the hold in the Gem505 filter. Small crack near the hole may become a big crack, and eventually damage the container.
Trouble-Shooting
Problem No.3 – Leakage
1. If the leakage in on the outside pipe system, re-seal with Telfontape and/or glue. If not, then
3. Remove all sand and gravel. Check for seal for the entire pipingsystem. Re-seal if necessary. The tank nipple rings may be jammed. Replace entire pipe or fitting parts if necessary. If doesn’t work, then
4. Replacement of the plastic Gem505 container may be needed. If doesn’t work, then
5. Contact ENPHO. This is interesting. We also want to know why.
Trouble-Shooting
2. Check leakage at the bottom of the Gem505 container. There may be a crack. Seal with glue. Put the filter on a very flat surface with a 3cm layer of mud and sand. If not, then
26
Trouble-Shooting
Leakage is commonly found here. Possible reasons may include: Inadequate tightening of the tank nipple, tank nipple ring jammed, insufficient Telfon tape.
Trouble-Shooting
Due to the pressure of the sand and water, the bottom of the Gem505 container may crack. To prevent this problem, the filter must be placed on a very flat surface with a 3cm thick layer of sand and mud. This will help support the pressure of the sand and water.