Contract No. IST 2005-034891 Hydra Networked Embedded System middleware for Heterogeneous physical devices in a distributed architecture D12.5 External Developers Workshops Teaching Material II Integrated Project SO 2.5.3 Embedded systems Project start date: 1st July 2006 Duration: 48 months Published by the Hydra Consortium 30 December 2008 - version 1.0 Coordinating Partner: Fraunhofer Institute FIT. Project co-funded by the European Commission within the Sixth Framework Programme (2002 -2006) Dissemination Level: Public
Transcript
Contract No. IST 2005-034891
Hydra
Networked Embedded System middleware for Heterogeneous physical devices in a distributed architecture
D12.5 External Developers Workshops Teaching Material II
Integrated Project SO 2.5.3 Embedded systems
Project start date: 1st July 2006 Duration: 48 months Published by the Hydra Consortium 30 December 2008 - version 1.0 Coordinating Partner: Fraunhofer Institute FIT.
Project co-funded by the European Commission within the Sixth Framework Programme (2002 -2006)
Dissemination Level: Public
Hydra D12.5 External Developers Workshops Teaching Material II
Version 0.60 Page 2 of 106 22 December 2008
Document file: D12.5 External Developers Workshops Teaching Material II_1.0.doc Work package: WP12 – Training Task: T12.1 – Training Document owner: University of Reading (UR) Document history: Version Author(s) Date Changes made
0.2 Atta Badii, Harry Bragg (UR) Julian Schutte (SIT), Andre Brinkman, Sascha Effert (UoP), Weishan Zhang, Joao Fernandes (UAAR)
0.4 Atta Badii, Harry Bragg, Sebastian Zickau, Junaid Khan, Michael Crouch, Adedayo Adetoye (UR) Peter Kostelnik, Martin Sarnovsky (TUK) Peeter Kool, Peter Rosengren (CNET) Pablo Antolin Rafael, Francisco Milagro Lardies (TID) Weishan Zhang, Joao Fernandes (UAAR)
Final version submitted to the European Commission
Internal review history: Reviewed by Date Comments
Heinz-Josef Eikerling 18-08-2006 Structuring / appearance slightly changed. General comments / to be done: (i) the chapters should be aligned to each other particularly concerning installation instructions. (ii) decision of whether having references and links in the chapters. (iii) starting with subsection 3.8 the structuring should be rethought (proposal: start new chapter). (iv) clarification of notion Hydra-enabling / empowering.
Pablo Antolin Rafael 19-08-2008 Comments integrated
Hydra D12.5 External Developers Workshops Teaching Material II
2. Introduction ............................................................................................ 6 2.1 Purpose, context and scope of this deliverable .......................................... 6
Hydra D12.5 External Developers Workshops Teaching Material II
Version 0.60 Page 5 of 106 22 December 2008
1. Executive summary
This document is the “External Developers Workshops Teaching Material II” which forms the deliverable D12.5 as part of the WP12 work package. Its purpose is to expose third party developers to the Hydra platform and APIs via in-depth tutorials utilising examples that demonstrate how a developer can use and interact with the Hydra managers and software components.
To set the context of this deliverable with regards to the other deliverable D12.2 and D12.9 in the same “External Developers Workshops Teaching Materials” series, it should be noted that the tutorials in this deliverable are based on the currently available implementations of Hydra managers and software tools and components. The majority of these tutorials are new materials, describing managers and software tools and components that have seen considerable improvements since the writing of D12.2. Managers or software components that have not been significantly extended since the submission of the new D12.2 are not repeated in this deliverable. It is expected that as new functionalities will be added and improvements will be made to the middleware between now and the Hydra project’s end, which will be documented the final version D12.9 of this deliverable series. The deliverable D12.9 – “Final External Developers’ Workshops Teaching Material” will contain a description of the latest features and tutorials about the feature sets of the middleware at the time of its writing. Since significant middleware implementation would have ended by the time (M46) of completion of D12.9, it is expected that D12.9 will be the final definitive guide to third party developers interested in using the Hydra middleware.
To summarise, the tutorials in this deliverable detail how an external developer may use the facilities provided by the Hydra middleware to create their own programs. The tutorials are split into three sections, namely, Managers, Tools, and Devices.
The Managers section directly specifies how to use each individual Hydra manager. The devices section specifies how a developer might use Hydra to communicate with devices and how devices are integrated into the Hydra middleware framework. Finally, the Tools section shows some extra tools and features of the Hydra middleware that will facilitate the development of Hydra-based applications.
The Managers described in this deliverable include the Storage Manager, Context Manager, Event Manager, Resource Manager, Ontology Manager, Network Manager and the Policy Manager. Under the Devices section, tutorials include “Talking to Hydra Devices using C#”, “Talking to Hydra Devices using Java”, and “Talking to Hydra Devices using PHP”. Under the Tools section we describe tools to support Secure Communications, Architectural Scripting and Test bed. Furthermore, under the Tools section Flamenco, Limbo, and Device Application Catalogue Browser and Policy Administration Component are described. There are some managers which were described in D12.2 but which are not included in this deliverable because there are no significant changes to them. These include the Trust Manager, Crypto Manager, and Diagnosis Manager1. The QoS and the Orchestration Managers have not yet been described and are planned for the deliverable D12.9.
1 It should be noted however that Flamenco which is described in this deliverable is part of the Diagnosis Manager. Also, although the Crypto Manager is not described, it is used in the implementation of Communication Security – which is described in this deliverable.
Hydra D12.5 External Developers Workshops Teaching Material II
Version 0.60 Page 6 of 106 22 December 2008
2. Introduction
2.1 Purpose, context and scope of this deliverable
The training dimension of the Hydra project is essential to guarantee the project’s long-term impact and hence, several training activities have been planned. Some are directed towards consortium members and offer inside training in use of technology and software tools, while others are directed towards external developers developing embedded software systems.
This document is the ‘External Developers Workshops Teaching Material II’ which forms the deliverable D12.5 as part of the WP12 work package. It gives a brief overview of the Hydra architecture and introduces the external developer to the managers and software components within Hydra via specific tutorials showing how the developer might use these components of the Hydra middleware to develop their applications on top of the Hydra middleware platform.
This document will help the trainees to understand how to use Hydra in developing programs for communication involving networked embedded devices and give guidance in the design of Hydra-based applications and the usage of Hydra middleware managers and software tools.
This training document is directed mainly towards third-party application developers, but may also be of use to individuals interested in having a general overview of how to use the Hydra middleware components and tools. Device manufacturers interested in knowing about the design of a specific Hydra middleware component or the whole middleware and what is required to make their devices Hydra-compliant may also gain some insight from this deliverable. The reader will also learn about the kind of security Hydra will provide as well as tools available for implementing Hydra-based solutions.
Hydra D12.5 External Developers Workshops Teaching Material II
Version 0.60 Page 7 of 106 22 December 2008
3. Manager Tutorials
This section presents various Hydra Managers, describing the purpose of each manager and how the manager may be used to realise a Hydra-based solution.
3.1 Network Manager
3.1.1 Introduction
3.1.1.1 Introduction of the Tutorial
This tutorial is an introduction to using the Network Manager component. The Network Manager is a component of the Hydra middleware responsible of HID propagation in the Hydra network and communication between Hydra enabled devices. As the Network Manager is to be deployed on every Hydra Enabled device and all the “inside” Hydra communications flow over it, therefore it is essential to provide sufficient information about the installation and requirements of this component for the developers.
3.1.1.2 Aims and Objectives
The goal of this tutorial is to introduce the developers with the several functionalities of Network Manager. There are two basic objectives of the tutorial:
- To provide the Network Manager installation instructions
- To guide the developer throughout the basic usage of Network Manager
3.1.1.3 Who the Tutorial is aimed at
This tutorial is directed towards the following group of people:
Individuals interested in having a general overview of HYDRA middleware.
Application developers that need to use HYDRA Network Manager.
3.1.2 Preparation
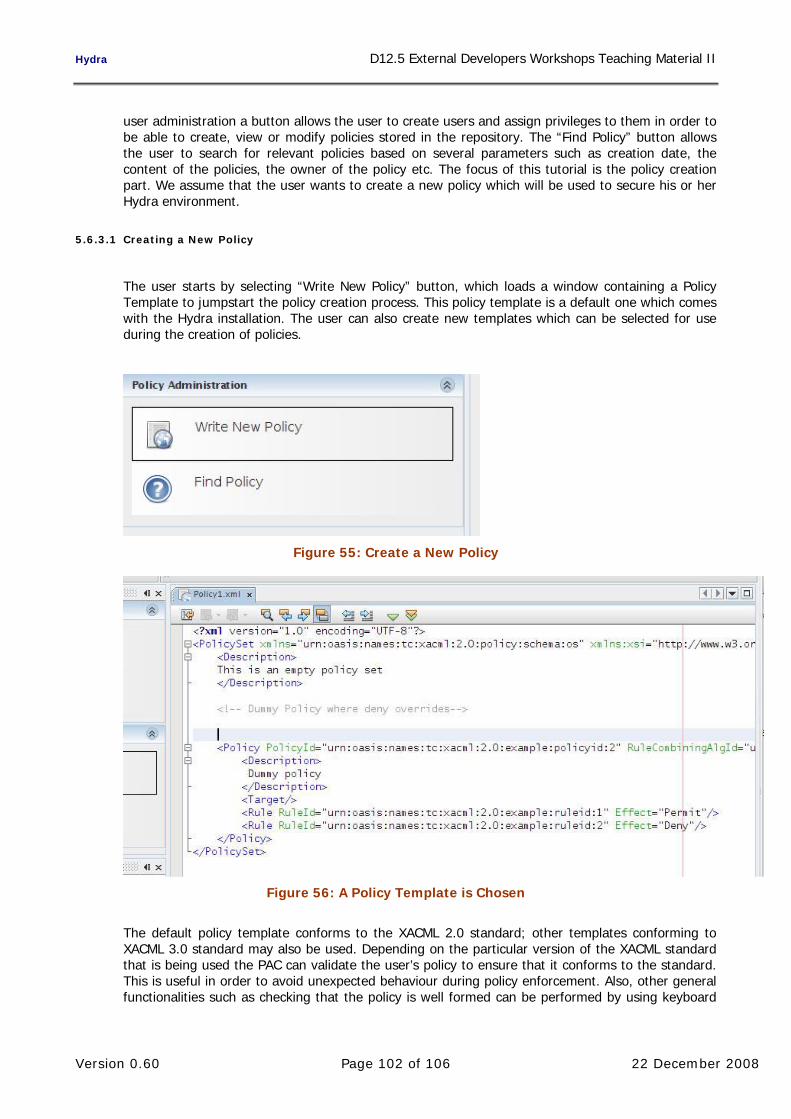
3.1.2.1 Hardware Requirements
For this tutorial you'll need a standard PC. As the tutorial examples can be run locally, you don't have to have the connection to the internet.
3.1.2.2 Software Requirements
You'll need the Java JRE 1.5 (or higher), Tomcat 5.x (or higher) application server and the Axis 1.4. As this Network Manager Bundle (version 1.2.1) is migrated to the OSGi framework, before installation it is needed to download it.
Currently, we selected two of them Equinox and Knopflerfish 2. Installation instructions will cover both of them. Network Manager also requires SOAP tunnelling component, please refer to SOAP tunnelling documentation for how to install it
Hydra D12.5 External Developers Workshops Teaching Material II
Version 0.60 Page 8 of 106 22 December 2008
3.1.2.3 Installation of Application Network Manager
3.1.2.3.1 Installation under Eclipse (Equinox)
Eclipse runs on top of an Equinox OSGi framework. First, check out the following projects one by one from the Hydra SVN (in the folder middleware/NetworkManagerOSGi):
AxisBundle
NetworkManagerBundle
Log4j
NetworkManagerConfigurator
When checking out these projects, they are automatically detected as Java projects.
After download sometimes errors appear in the code. To resolve them go to project/clean and select these projects to clean the compilation folder.
Once they have been downloaded, the user has to create an OSGi run configuration. For doing this, go to run/Open Run dialog and create a new OSGi Framework.
In the Bundles tag, select the previously downloaded bundles in the workspace section and the following bundles in the Target platform section:
- javax.servlet
- org.apache.commons.logging
- org.apache.log4j
- org.eclipse.equinox.cm
- org.eclipse.equinox.ds
- org.eclipse.equinox.http.jetty
- org.eclipse.equniox.http.servlet
- org.eclipse.osgi
- org.eclipse.osgi.services
- org.mortbay.jetty
In the Arguments tag, in the VM arguments, put the following option in order to change the port number where the Http server will be running
-Dorg.osgi.service.http.port=8082
Remember this value, because it will be needed later on in the Network Manager configuration.
Optionally, if your Hydra gateway device will be running behind an http proxy, add the following commands to the VM arguments:
Finally, save the configuration and run it. After a few seconds of execution, stop it and you can see that under the Eclipse folder a folder for the Network Manager has been created. Under the config folder, change the following lines:
Hydra D12.5 External Developers Workshops Teaching Material II
Version 0.60 Page 9 of 106 22 December 2008
Choosing other HID for the Network Manager and changing the port to the selected before.
Also check that the mode is set to Node and the Multimedia port is free in your device.
Now restart the framework; the bundles will start automatically. A Network Manager Tester GUI will show up. This GUI is used for testing and configuration.
Check that it works, opening a web browser in the following direction:
http://localhost:8082/axis/services
Here there should appear the Network Manager services. If the installation has been successful, go to the Security Configuration section.
3.1.2.3.2 Installation under Knopflerfish 2
First of all, the user has to modify the props.xargs file in order to change the port number where the Http server will be running:
-Dorg.osgi.service.http.port=8082
Remember the port where the http server is running because it will be needed later on.
The framework is started with the following command using the console in the path knopflerfish2/knopflerfish.org/osgi:
java –jar framework.jar
Once the framework has been started, a graphical user interface is shown as in .
In the Bundle Repository, download the commons-logging bundle, under the lib folder and start it.
Figure 1: Knoplerfish GUI
Hydra D12.5 External Developers Workshops Teaching Material II
Version 0.60 Page 10 of 106 22 December 2008
As Hydra doesn’t have any bundle repository (OBR) the user has to download the bundles from the Hydra SVN. The bundles are in a folder under:
middleware/NetworkManagerOSGi/CompiledBundles
Please, download the following bundles:
org.apache.log4j_1.2.13.v200706111418.jar
Log4j_1.1.0.jar
org.os4os.forge.axisbundle_3.0.6.jar
NetworkManagerBundle_1.2.1.jar
NetworkManagerConfigurator_1.0.1.jar
Install these bundles: File -> Open Bundles and select the bundles to install
Once they are installed, close the framework and you can see that under
knopflerfish2/knopflerfish.org/osgi
folder it has been created a folder for the Network Manager. Under the config folder, change the following lines:
Choosing other HID for the Network Manager and changing the port to the selected before (the one selected in prop.xargs).
Now start again the framework and the bundles will start automatically. A Network Manager Tester GUI will show up. This GUI is used for testing and configuration.
Check that it works, opening a web browser in the following direction:
http://localhost:8082/axis/services
Here there should appear the Network Manager services. If the installation has been successful, go to the Security Configuration section.
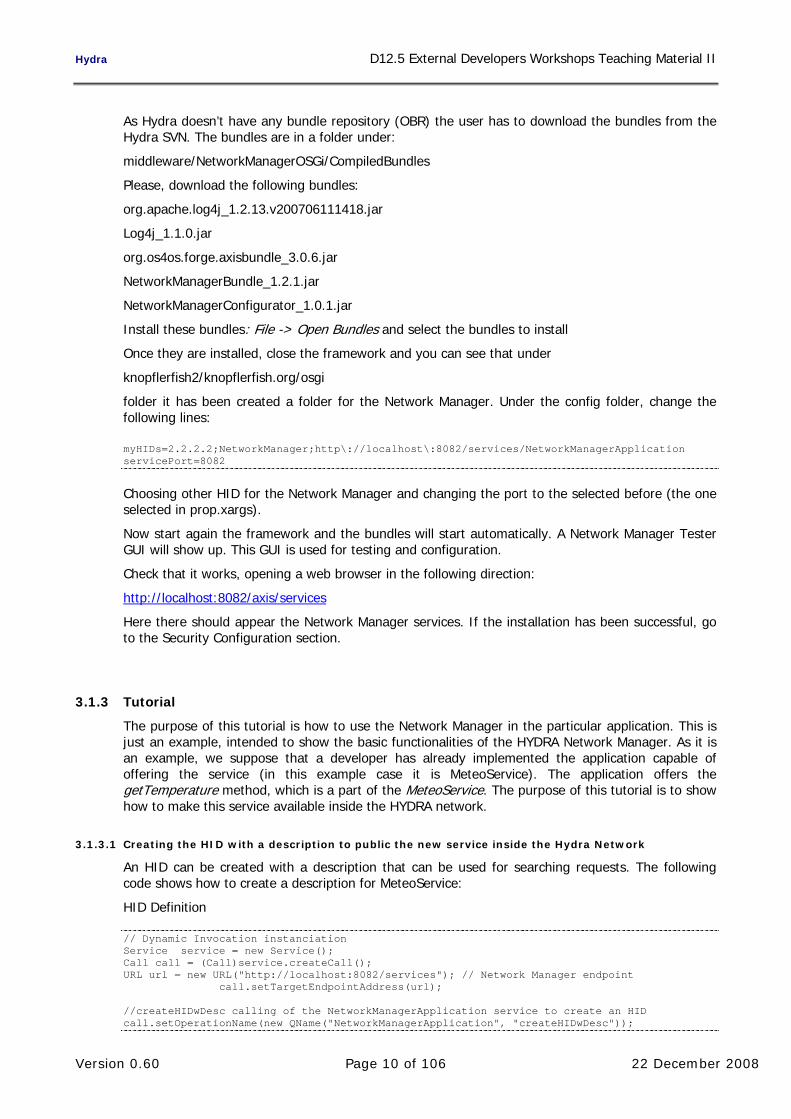
3.1.3 Tutorial
The purpose of this tutorial is how to use the Network Manager in the particular application. This is just an example, intended to show the basic functionalities of the HYDRA Network Manager. As it is an example, we suppose that a developer has already implemented the application capable of offering the service (in this example case it is MeteoService). The application offers the getTemperature method, which is a part of the MeteoService. The purpose of this tutorial is to show how to make this service available inside the HYDRA network.
3.1.3.1 Creating the HID with a description to public the new service inside the Hydra Network
An HID can be created with a description that can be used for searching requests. The following code shows how to create a description for MeteoService:
HID Definition
// Dynamic Invocation instanciation Service service = new Service(); Call call = (Call)service.createCall(); URL url = new URL("http://localhost:8082/services"); // Network Manager endpoint call.setTargetEndpointAddress(url); //createHIDwDesc calling of the NetworkManagerApplication service to create an HID call.setOperationName(new QName("NetworkManagerApplication", "createHIDwDesc"));
Hydra D12.5 External Developers Workshops Teaching Material II
3.1.3.2 Invoking the new service through a Network Manager
Then, the services can be invoked from another host using the SOAP Tunnelling. In this example, we show, how to call a method provided by MeteoService (in this case the method is int getTemperature(String countryCode, String city))
public class ServiceInvocation { private static Logger logger = Logger.getLogger(testLogin.class.getName()); // SOAP Tunneling parameters String senderHID = "0.0.111.3890138773214463873"; // HID of the application that call the service String receiverHID = "0.0.999.3890138773214463873"; // HID of the service to be invoked // getTemperature parameters String countryCode = "FRA"; String city = "Brest"; public void main(String[] args) { Integer temperature; try { // Dynamic Invocation instanciation Service service = new Service(); Call call = (Call)service.createCall(); String targetUrlHydra = "http://localhost:8082/SOAPTunneling/" + senderHID + "/" + receiverHID + "/0/hola"; call.setTargetEndpointAddress(new URL(targetUrlHydra)); // getTemperature method call call.setOperationName(new QName("MeteoService", "getTemperature")); // Parameters call.addParameter("countryCode", XMLType.SOAP_STRING, ParameterMode.IN); call.addParameter("city", XMLType.SOAP_STRING, ParameterMode.IN); call.setReturnType(XMLType.SOAP_INT); // Service invocation temperature = (Integer)call.invoke(new Object[] {countryCode, city}); } catch (MalformedURLException e) { logger.error("Exception: " +e); } }
3.1.4 Summary
This tutorial was aimed to describe how to install the Network Manager. The purpose of the tutorial chapter was to introduce an example on how to create the HID and publish the provided service inside the HYDRA network and how to invoke the particular service method using the SOAP Tunnelling.
Hydra D12.5 External Developers Workshops Teaching Material II
Version 0.60 Page 12 of 106 22 December 2008
3.2 Storage Manager
3.2.1 Introduction
The Storage Manager acts as an abstraction of available storage in Hydra. The storage can be accessed using the Device Storage Manager which maps the data to local storage or to remote storage provided by another Storage Manager. The storage in Hydra devices can have highly divagating qualities in size, speed, and reliability. Therefore, the Storage Manager has to care about these qualities and should be able to build up higher quality storage by combining different physical components, e.g. a bigger storage by concatenating two physical devices. The functions to build up such storage and to use it are combined in the Storage Manager.
The Storage Manager is realized as a web service reachable through the Network Manager. For better usage it is built and deployed as an OSGi bundle. Information about file systems is stored in an XML format in a local file. The Storage Manager is under development, sample code about its usage is appended to this document.
3.2.1.1 Aims and Objectives
The Storage Manager is designed to provide two kinds of storage: A simple hash table to store cookie-like data and a whole file system including directories and links. The persistent hash table is realized using a Cookie Manager working on top of the Storage Manager.
A typical use case to store a file may involve the following steps
1. The application connects to a Storage Manager and chooses a file system to store data
2. The application asks for a list of entries in the file system and for some directories
3. The application creates or removes directories
4. The application reads metadata of files or directories like time of creation or time of last modification
5. The application creates and deletes files
6. The application reads and writes files
The application needs also functions to get information about the file system like free space or about other qualities, like it reliability and the applied redundancy schemes. It requires also the provision of functions to create and remove file systems.
3.2.2 Tutorial
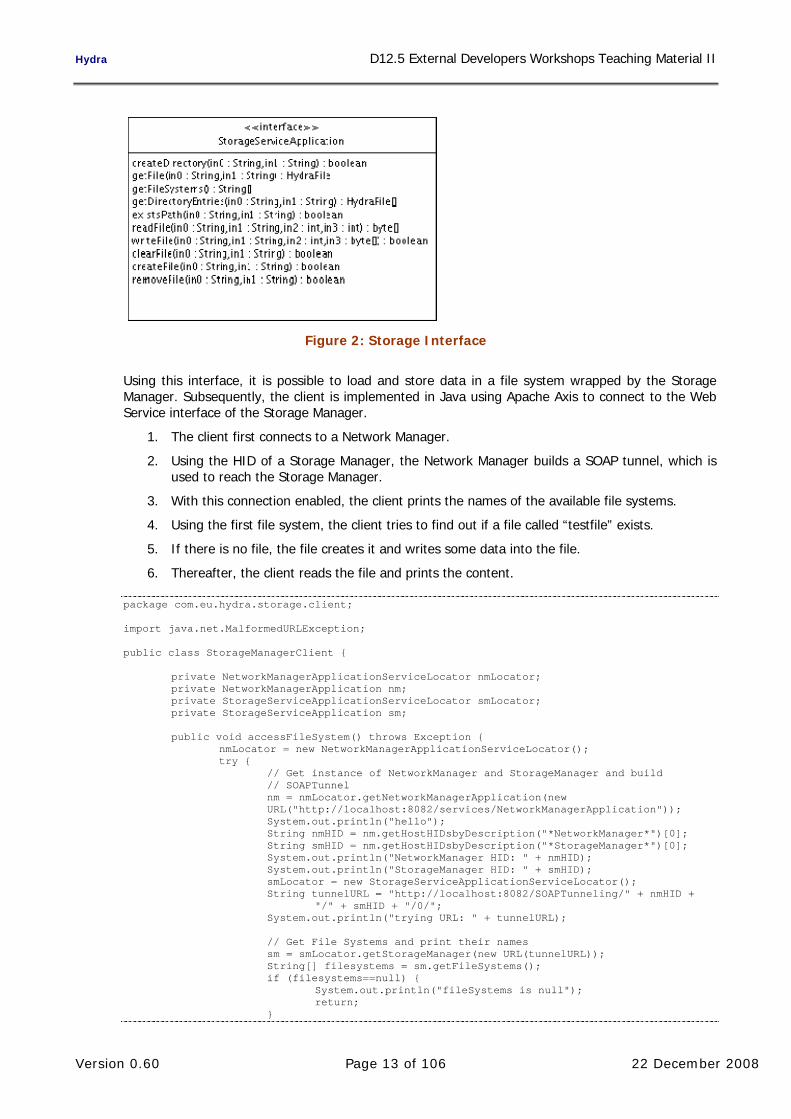
The first version of the Storage Manager includes the essential functions to read and write files stored in directories. Functions for creating and removing file systems will be added later. Also functions for file locking will be implemented in a second step. Therefore the Storage Manager offers the following interface:
Hydra D12.5 External Developers Workshops Teaching Material II
Version 0.60 Page 13 of 106 22 December 2008
Figure 2: Storage Interface
Using this interface, it is possible to load and store data in a file system wrapped by the Storage Manager. Subsequently, the client is implemented in Java using Apache Axis to connect to the Web Service interface of the Storage Manager.
1. The client first connects to a Network Manager.
2. Using the HID of a Storage Manager, the Network Manager builds a SOAP tunnel, which is used to reach the Storage Manager.
3. With this connection enabled, the client prints the names of the available file systems.
4. Using the first file system, the client tries to find out if a file called “testfile” exists.
5. If there is no file, the file creates it and writes some data into the file.
6. Thereafter, the client reads the file and prints the content.
package com.eu.hydra.storage.client; import java.net.MalformedURLException; public class StorageManagerClient { private NetworkManagerApplicationServiceLocator nmLocator; private NetworkManagerApplication nm; private StorageServiceApplicationServiceLocator smLocator; private StorageServiceApplication sm; public void accessFileSystem() throws Exception { nmLocator = new NetworkManagerApplicationServiceLocator(); try { // Get instance of NetworkManager and StorageManager and build // SOAPTunnel nm = nmLocator.getNetworkManagerApplication(new URL("http://localhost:8082/services/NetworkManagerApplication")); System.out.println("hello"); String nmHID = nm.getHostHIDsbyDescription("*NetworkManager*")[0]; String smHID = nm.getHostHIDsbyDescription("*StorageManager*")[0]; System.out.println("NetworkManager HID: " + nmHID); System.out.println("StorageManager HID: " + smHID); smLocator = new StorageServiceApplicationServiceLocator(); String tunnelURL = "http://localhost:8082/SOAPTunneling/" + nmHID + "/" + smHID + "/0/"; System.out.println("trying URL: " + tunnelURL); // Get File Systems and print their names sm = smLocator.getStorageManager(new URL(tunnelURL)); String[] filesystems = sm.getFileSystems(); if (filesystems==null) { System.out.println("fileSystems is null"); return; }
Hydra D12.5 External Developers Workshops Teaching Material II
Version 0.60 Page 14 of 106 22 December 2008
for (int i = 0; i<filesystems.length; i++) { if (filesystems[i]==null) { System.out.println("filesystem " + i + " is null"); return; } System.out.println("Filesystem: " + filesystems[i]); } // Test if “testfile” exists, if not create and write it. if (!sm.existsPath(filesystems[0], "testfile")) { System.out.println("Generating testfile"); sm.createFile(filesystems[0], "testfile"); System.out.println("Created. Will put some data in now."); String text = "Hello, Hydra!"; sm.writeFile(filesystems[0], "testfile", 0, text.getBytes()); System.out.println("written data"); } // Read “testfile” and print data. System.out.println("will read data now"); byte[] data = sm.readFile(filesystems[0], "testfile", 0, Integer.MAX_VALUE); System.out.println("readen data"); if (data==null) { System.out.println("data is null"); return; } String outtext = new String(data); System.out.println("I read: " + outtext); } catch (MalformedURLException e) { e.printStackTrace(); } catch (ServiceException e) { e.printStackTrace(); } catch (RemoteException e) { e.printStackTrace(); } } }
Hydra D12.5 External Developers Workshops Teaching Material II
Version 0.60 Page 15 of 106 22 December 2008
3.3 Context Manager
3.3.1 Introduction
3.3.1.1 Introduction of the Tutorial
This tutorial should illustrate how the rules-engine of the Context Manager can be used in the middleware to make the developer’s application context aware. Context is used in the meaning that it describes any kind of data suited to characterize a situation. Context in the Hydra world is the representation of sensor data, application data or any other imaginable and storable data, e.g. location, time or, temperature.
The Context Manager depends also on other components in the Hydra middleware. For the current version it is connected to the Network Manager and to the Event Manager. The dependency to other managers, especially to the Ontology Manager and Storage Manager has to be further defined.
3.3.1.2 Aims and Objectives
The aim of this component is to provide the developer with a mechanism to set up, to handle the incoming data and to react upon context changes.
The objectives of this component are that it provides a generic way of how to handle data in an application. The main aim of the manager is to handle context changes. This means in general that if the situation has changed a predefined rule for this new context will be executed. This can also be described as a reaction to an event.
The Context Manager can be deployed to all scenarios, which can be implemented with the Hydra middleware. It can handle context information of sensors, actuators, applications and users.
3.3.1.3 Who the Tutorial is aimed at
This tutorial is addressing the Hydra application developers in the first place. It also addresses the Hydra users, who might later get the possibility to write rules concerning their needs in configuring the Hydra applications.
3.3.2 Preparation
3.3.2.1 Hardware Requirements
The hardware requirements are not well defined at the moment, but it is envisaged that the Context Manager can be run on a reasonable machine, also together with relevant other Hydra components.
3.3.2.2 Software Requirements
The component is developed under the Eclipse IDE for Java. For the time being it requires the following software components:
- Java JRE 1.6
- Eclipse for RCP/Plug-in Developers
- packages for OSGi configuration (see below)
- Drools – Rule Language as an Eclipse plug-in
- eXist-XML Database
- Hydra Event Manager
- Hydra Network Manager
Hydra D12.5 External Developers Workshops Teaching Material II
Version 0.60 Page 16 of 106 22 December 2008
Needed Hydra bundles (found at Hydra Network Manager implementation):
- org.apache.log4j_1.2.13.v200706111418.jar
- Log4j_1.1.0.jar
- org.os4os.forge.axisbundle_3.0.6.jar
- NetworkManagerBundle_1.2.1.jar
Needed software bundles for OSGi version:
- javax.servlet
- org.apache.logging.commons
- org.apache.log4j
- org.eclipse.equinox.cm
- org.eclipse.equinox.dm
- org.eclipse.equinox.http.jetty
- org.eclipse.equinox.http.servlet
- org.eclipse.osgi
- org.eclipse.osgi.services
- org.mortbay.jetty
3.3.2.3 Setup Procedure
To run and configure the Context Manager one needs to install the source code inside eclipse as a new project.
In order to run it as an OSGi bundle you need to install the needed plugins, as described in the Network Manager chapter.
The Context Manager makes use of an XML Database, to install this download eXist [3] and follow the install howto.
3.3.3 Tutorial
This example shows how the Context Manager is used for processing events comprising incoming data. In this case the results of the power consumption of the electronic devices is been recognized and a message is given to the user, if the consumption exceeds a certain value which is defined in the rules of this context.
Hydra D12.5 External Developers Workshops Teaching Material II
Version 0.60 Page 17 of 106 22 December 2008
Figure 3: Writing rules in context manager
The following examples contained in the Context Manager source code show its usage in the 2nd year review demonstrator scenario.
Create HID for Context Manager, under which it is accessible:
Hydra D12.5 External Developers Workshops Teaching Material II
Version 0.60 Page 18 of 106 22 December 2008
//load up the rulebase RuleBase ruleBase = readRule(); WorkingMemory workingMemory = ruleBase.newStatefulSession(); //set new values if(key != null && value != null) { if(value != null) { if(metadata.equalsIgnoreCase("on")) { allPowerConsumption = allPowerConsumption + Integer.parseInt(value); } if(metadata.equalsIgnoreCase("off")) { allPowerConsumption = allPowerConsumption - Integer.parseInt(value); } } if(allPowerConsumption < 0) allPowerConsumption = 0; //Hydra Context Object HydraContextType hct = new HydraContextType(); KeyValueMetaDataType.KVMD kvmd = new KeyValueMetaDataType.KVMD(); //store context tdata hct.setContextID(key); kvmd.setKey("power"); kvmd.setValue(allPowerConsumptionAsString); kvmd.setMetaData(metadata); //put data in rule engine and execute rules workingMemory.insert(hct); workingMemory.insert(kvmd); workingMemory.fireAllRules(); } } catch (Throwable t) { t.printStackTrace(); } }
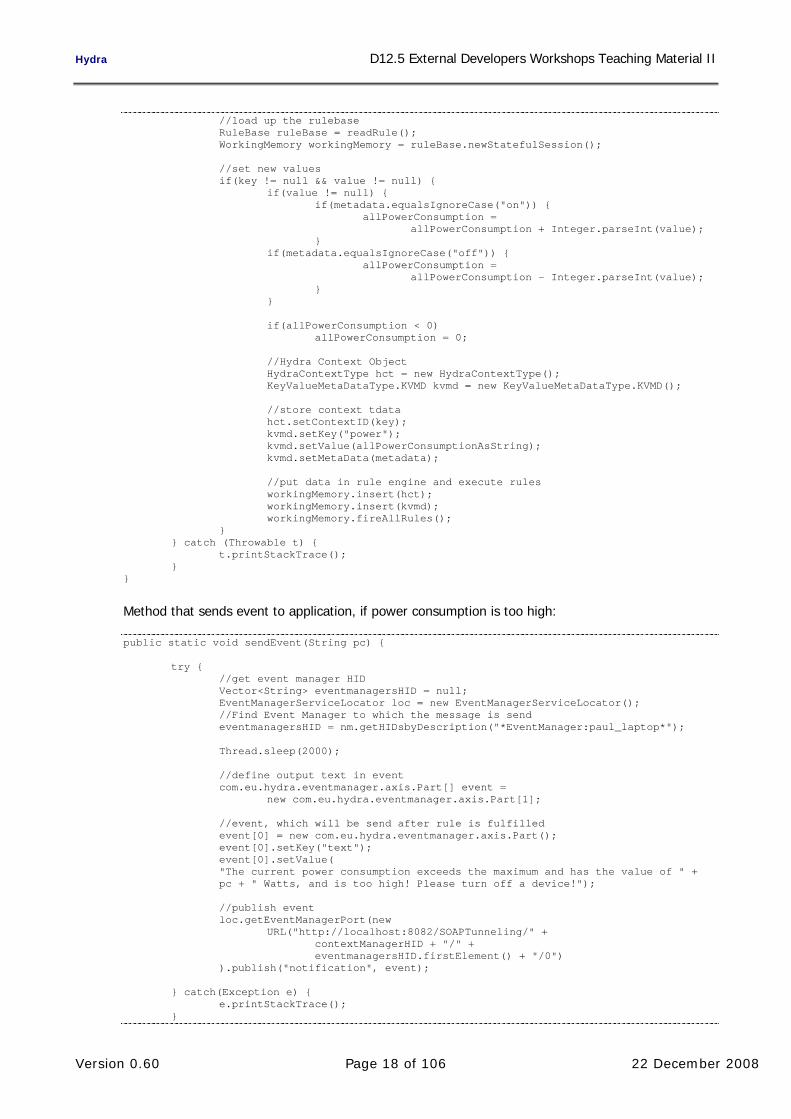
Method that sends event to application, if power consumption is too high:
public static void sendEvent(String pc) { try { //get event manager HID Vector<String> eventmanagersHID = null; EventManagerServiceLocator loc = new EventManagerServiceLocator(); //Find Event Manager to which the message is send eventmanagersHID = nm.getHIDsbyDescription("*EventManager:paul_laptop*"); Thread.sleep(2000); //define output text in event com.eu.hydra.eventmanager.axis.Part[] event = new com.eu.hydra.eventmanager.axis.Part[1]; //event, which will be send after rule is fulfilled event[0] = new com.eu.hydra.eventmanager.axis.Part(); event[0].setKey("text"); event[0].setValue( "The current power consumption exceeds the maximum and has the value of " + pc + " Watts, and is too high! Please turn off a device!"); //publish event loc.getEventManagerPort(new URL("http://localhost:8082/SOAPTunneling/" + contextManagerHID + "/" + eventmanagersHID.firstElement() + "/0") ).publish("notification", event); } catch(Exception e) { e.printStackTrace(); }
Hydra D12.5 External Developers Workshops Teaching Material II
Version 0.60 Page 19 of 106 22 December 2008
}
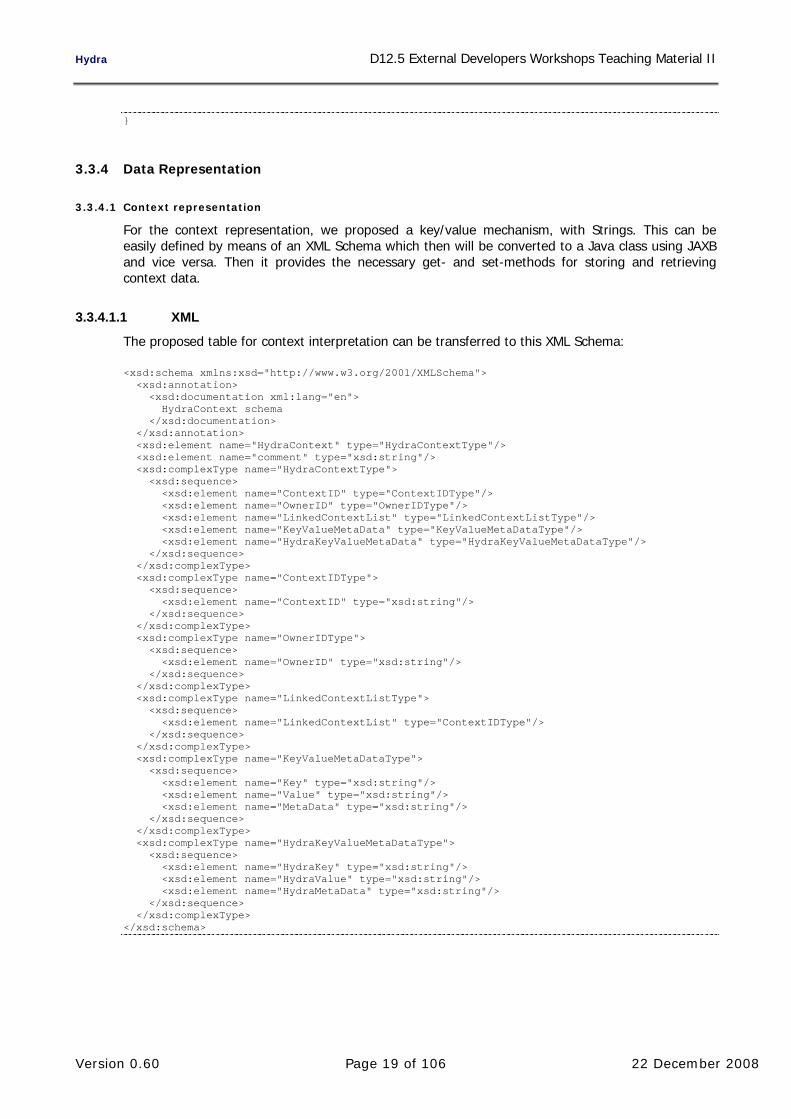
3.3.4 Data Representation
3.3.4.1 Context representation
For the context representation, we proposed a key/value mechanism, with Strings. This can be easily defined by means of an XML Schema which then will be converted to a Java class using JAXB and vice versa. Then it provides the necessary get- and set-methods for storing and retrieving context data.
3.3.4.1.1 XML
The proposed table for context interpretation can be transferred to this XML Schema:
Hydra D12.5 External Developers Workshops Teaching Material II
Version 0.60 Page 20 of 106 22 December 2008
3.3.4.1.2 JAXB
Java Architecture for XML Binding (JAXB) allows Java developers to map Java classes to XML representations. JAXB provides two main features: the ability to marshal Java objects into XML and the inverse, i.e. to unmarshal XML back into Java objects. [5]
3.3.4.2 Rules
One of the main aims of the context framework is to react upon context changes. Therefore a mechanism is needed to map such situations to according actions. We use JBoss’ Drools [2] as the rule language.
3.3.4.2.1 Drools
You can get more information about drools on this website:
http://www.jboss.org/drools/
Drools is a business Rule Management System (BRMS) and an enhanced Rules Engine implementation, ReteOO, based on Charles Forgy's Rete algorithm tailored for the Java language.
Drools can be easily integrated into Java and the Eclipse IDEs. It is very powerful in combination with Java code.
3.3.4.2.2 Example
This example shows the rule for the power consumption. The example illustrates that after receiving a value of more then ‘61’ the method sendEvent is called.
rule "Power" when $kvmd : KeyValueMetaDataType.KVMD(key == "power", value matches "[6-9][1-9]") then ContextManagerApplicationSoapBindingImpl.sendEvent ($kvmd.getValue()); end
3.3.4.2.3 Regular Expressions
For the definition of values in the rules engine, Drools uses regular expressions [4].
Example: [0-8]?[0-9] defines a integer value from “0” to “89”
3.3.5 Summary, Lessons Learnt and Facts
The example showed how he Context Manager can be used for fulfilling its task in a Hydra environment and to support an application which runs on top of it.
The rule engine was introduced and used for a proof of concept. However, a lesson learnt from this is that the developer has to program with a new and predefined engine, which he might not be familiar with. Because of that it might be useful to search for another concept concerning rules in the whole Hydra middleware.
The use of semantics (i.e., ontologies) in the Hydra Context Framework is still a matter of discussion. It has to be evaluated how they can be useful in the concept of context. Also the use of the proposed Hydra Storage Manager for storing the historic context data should be considered in the next version.
Hydra D12.5 External Developers Workshops Teaching Material II
Version 0.60 Page 21 of 106 22 December 2008
To secure the mostly sensible data of sensors and applications, it has to be ensured that either through a dependency of the Hydra Policy Manager or another security method that only applications and people can access (historic) context data who are allowed to.
3.3.6 References
[1] Badii, Hoffmann, Heider: MobiPETS-GRID, draft for the ACM Special Issues on Personalisation and Privacy Enhanced Technologies, Oct 2005
[2] Drools Business Rules Management System, http://www.jboss.org/drools/
[3] eXist XML Database, http://exist-db.org/
[4] Information about regular expressions (Wikipedia), http://en.wikipedia.org/wiki/Regular_expression
Hydra D12.5 External Developers Workshops Teaching Material II
Version 0.60 Page 22 of 106 22 December 2008
3.4 Event Manager
3.4.1 Introduction
The Hydra Event Manager provides publish/subscribe functionality, i.e., the ability for publishers to send a notification to multiple subscribers while being decoupled from them (in terms of, e.g., not holding direct references to subscribers). The specific variant of publish/subscribe implemented is topic-based publish/subscribe where event are key/value pairs.
The operations provided by the EventManager can be used by an application developer who wants to develop “listeners” and “publishers” to specific events without the need to have subscribers’ references. The subscriptions are made using a specific topic denoted by a String value and the subscriber’s endpoint. A publication is composed by a topic and the event data (String key/value pairs). The following diagram shows a typical interaction with the Event Manager.
Figure 4: Example of interaction with the Event Manager
First a subscriber subscribes to a specific topic, providing also its endpoint. When a publisher publishes an event with the same topic has the subscriber subscribed to, the EventManager will notify all the subscribers of this topic providing the event data.
The EventManager can also be deployed together with the NetworkManager, if so the EventManager can also receive subscriptions where the subscriber can provide its HID instead of the endpoint by calling subscribeWithHID operation, in case of notification to this subscriber the notify will be done through the NetworkManager.
3.4.2 Preparation
The Event Manager is deployed as a service in the Hydra network and it provides two web service interfaces. The EventManager interface is used by both publishers and subscribers where publishers invoke publish() and subscribers invoke subscribe() and unsubscribe(). Furthermore, subscribers need to implement the EventSubscriber interface to be able to receive events with topics that they subscribed to. The EventManager is an OSGi bundle, using OSGi declarative services. The EventManager can be found at: /svn/trunk/middleware/managers/EventManagerServerBundle. In the root of the project you can find an EventManager.properties file, in this file you can set some properties of the EventManager. The file has the following structure:
The first property specifies the EventManager endpoint, the second property specifies the EventManager port, the third property specifies if you want to run the EventManager with the NetworkManager, this property can be set to true or false, in case of true the EventManager will be
Hydra D12.5 External Developers Workshops Teaching Material II
Version 0.60 Page 23 of 106 22 December 2008
able to answer to subscribeWithHID, unsubscribeWithHID, etc. The next property specifies the NetoworkManager endpoint, the fifth property specifies the address of the NetworkManager SOAPTunneler, the last property is a description of the EventManager, this description will be used by the EventManager to create its HID in the NetworkManager.
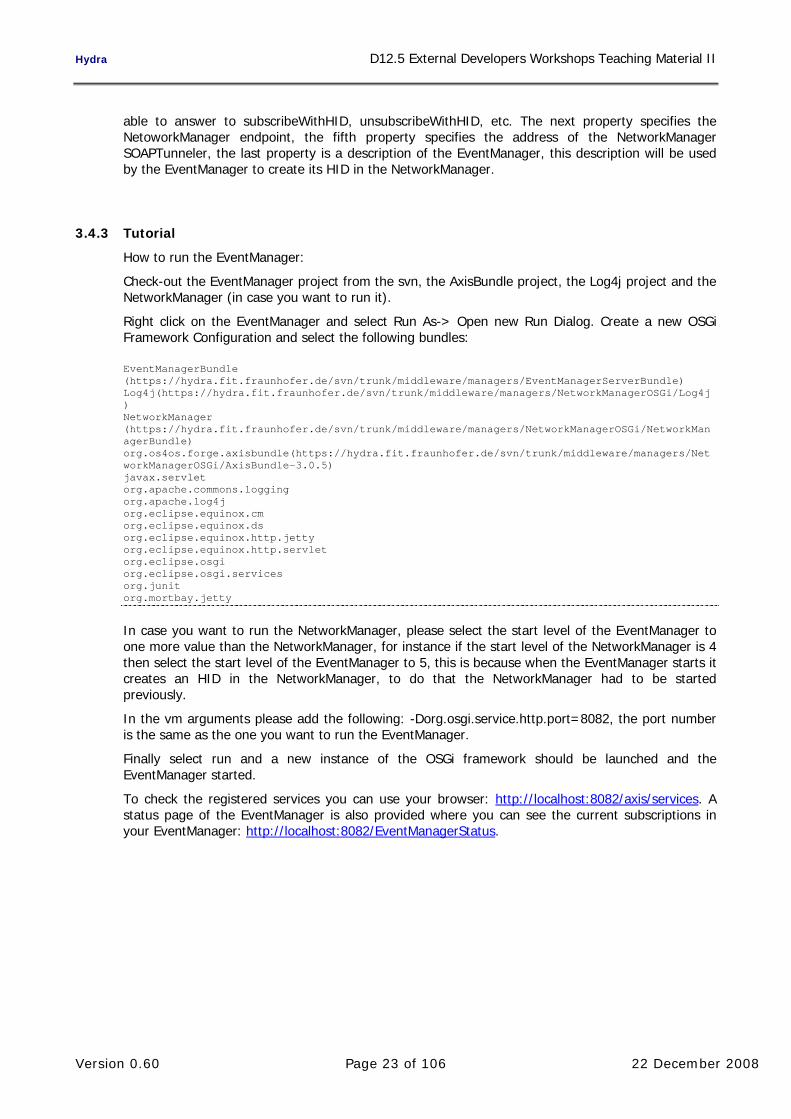
3.4.3 Tutorial
How to run the EventManager:
Check-out the EventManager project from the svn, the AxisBundle project, the Log4j project and the NetworkManager (in case you want to run it).
Right click on the EventManager and select Run As-> Open new Run Dialog. Create a new OSGi Framework Configuration and select the following bundles:
In case you want to run the NetworkManager, please select the start level of the EventManager to one more value than the NetworkManager, for instance if the start level of the NetworkManager is 4 then select the start level of the EventManager to 5, this is because when the EventManager starts it creates an HID in the NetworkManager, to do that the NetworkManager had to be started previously.
In the vm arguments please add the following: -Dorg.osgi.service.http.port=8082, the port number is the same as the one you want to run the EventManager.
Finally select run and a new instance of the OSGi framework should be launched and the EventManager started.
To check the registered services you can use your browser: http://localhost:8082/axis/services. A status page of the EventManager is also provided where you can see the current subscriptions in your EventManager: http://localhost:8082/EventManagerStatus.
Hydra D12.5 External Developers Workshops Teaching Material II
Version 0.60 Page 24 of 106 22 December 2008
3.5 Resource Manager
3.5.1 Introduction
The Hydra Resource Manager is responsible for representing and notifying on device and operating system resources. We distinguish between two different levels of resources: Base resources that are directly provided by a system (memory, disk space, network bandwidth, etc.) and Composite resources that are composed of the use base resources (services, clusters, total memory of a device, etc.). Currently the resource manager is a very simple access to loading bundles by reading an initiation file with instructions as to which bundles should be loaded initially. For resource handling a management bundle was developed in order to provide a web service interface for managing the bundles on a server. This is done by allowing the user to either; install, remove or replace bundles on the server.
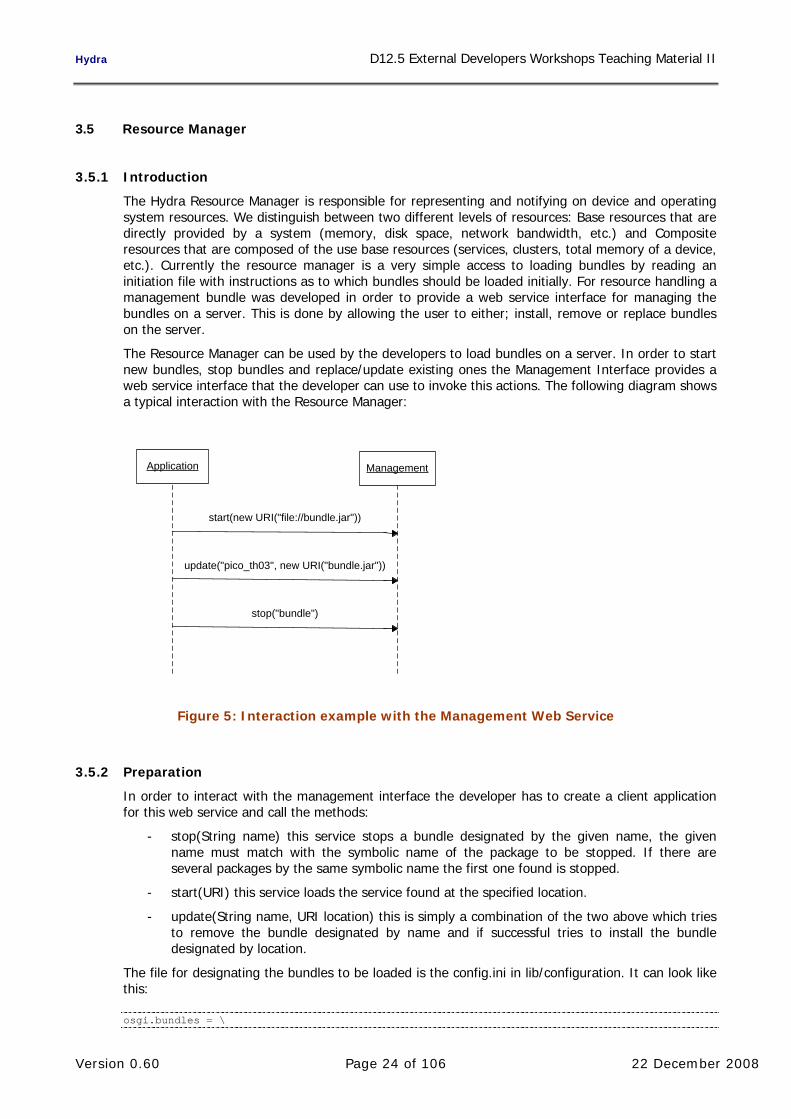
The Resource Manager can be used by the developers to load bundles on a server. In order to start new bundles, stop bundles and replace/update existing ones the Management Interface provides a web service interface that the developer can use to invoke this actions. The following diagram shows a typical interaction with the Resource Manager:
Application Management
start(new URI("file://bundle.jar"))
update("pico_th03", new URI("bundle.jar"))
stop("bundle")
Figure 5: Interaction example with the Management Web Service
3.5.2 Preparation
In order to interact with the management interface the developer has to create a client application for this web service and call the methods:
- stop(String name) this service stops a bundle designated by the given name, the given name must match with the symbolic name of the package to be stopped. If there are several packages by the same symbolic name the first one found is stopped.
- start(URI) this service loads the service found at the specified location.
- update(String name, URI location) this is simply a combination of the two above which tries to remove the bundle designated by name and if successful tries to install the bundle designated by location.
The file for designating the bundles to be loaded is the config.ini in lib/configuration. It can look like this:
osgi.bundles = \
Hydra D12.5 External Developers Workshops Teaching Material II
Where BundlePath is the relative path to the jar file containing the bundle, # is used for assigning the order in which the bundles are started - bundles with the same numbers are started at the same time. Notice that only the last line does not end in, \
3.5.3 Tutorial
3.5.3.1 Resource Manager
Set up SVN to download the source folder from: /trunk/middleware/managers/ResourceManager/ResourceManager
Edit the config.ini file according to the description above.
Run the java file under the src folder.
You now have a console in which you can interact with the OSGi for instance using writing ss to get a short status of what is running or using stop 6 to stop bundle number 6. If you start a resolved bundle it will try to start again and this time you get the exceptions.
3.5.3.2 Management Bundle
Set up SVN to download the source folder from: /trunk/middleware/managers/ResourceManager/Management
Compile the jar file using the default ant target: jar in the build file.
You should now have a new folder in management called dist and a file herein called management.jar. This is the bundle to load.
Load the management bundle using, for example the resource manager.
If you just want to try out the update or stop service in the next step load some other bundle, for example the abloy_el582 bundle.
Check which bundles are running (for example by typing ss in the console that is running a resource manager)
Create a client to make a call to management according to the WSDL file in .../Management/wsdl/ calling for instance:
You can use the test class ManualTester in the bundle for this - this is launched using the runManualTest ant target.
The ManualTest application has two text boxes for inputting the name and the address and will perform an update when the corresponding button is used.
Be aware that the parameters are very sensitive.
Hydra D12.5 External Developers Workshops Teaching Material II
Version 0.60 Page 26 of 106 22 December 2008
Check which bundles are running now to see that you have achieved the desired effect.
3.5.4 Extra Information
The current implementation of the resource manager is rather simple. In the future we will extend it for self-management purposes. The Architectural Scripting Language is currently an extension to the Resource Manager.
Application Developer
start bundle
stop bundle
update bundle
Figure 6: Use case diagram of the Resource Manager (Management Interface)
Figure 7: Management interface of the Resource Manager
Hydra D12.5 External Developers Workshops Teaching Material II
Version 0.60 Page 27 of 106 22 December 2008
3.6 Application Ontology Manager
3.6.1 Introduction
3.6.1.1 Introduction of the Tutorial
This tutorial gives an introduction to using the Application Ontology Manager component. The Application Ontology Manager serves as the interface to the Device Ontology which contains the knowledge model of devices. The Device Ontology contains all information describing the devices, their properties and functionality in terms of service and discovery information models, hardware and software properties, malfunction models, quality of service capabilities, security properties, state machines, etc.
The Application Ontology Manager runs as an Apache Axis service and serves as the supporting tool for any semantic/knowledge operations in the HYDRA ontology’s required by HYDRA managers or the standalone application specific clients.
3.6.1.2 Aims and Objectives
The goal of this tutorial is to familiarise a developer with the several functionalities of the Application Ontology Manager. There are three basic objectives of the tutorial:
- To provide the Application Ontology Manager installation instructions
- To guide the developer through the basic usage of Ontology Manager web interface
- To show, how to create standalone application specific Application Ontology Manager client
3.6.1.3 Who the Tutorial is aimed at
This tutorial is directed to the following group of people:
Individuals interested in having a general overview of HYDRA middleware.
Application developers interested in usage of HYDRA ontology’s.
3.6.2 Preparation
3.6.2.1 Hardware Requirements
For this tutorial you'll need a standard PC. As the tutorial examples can be run locally, you do not have to have the connection to the internet.
3.6.2.2 Software Requirements
You will need the Java JRE 1.5 (or higher), Tomcat 5.x (or higher) application server and the Axis 1.4.
3.6.2.3 Installation of Application Ontology Manager
The installation can be easily done by the following steps:
Download Application Ontology Manager source code from HYDRA SVN.
In the ant build.xml file located in the source root directory update the installation specific properties:
service.endpoint: set the endpoint for your local Axis ontology manager service. Default setting: http://localhost:8080/axis/services/ApplicationOntologyManager
Hydra D12.5 External Developers Workshops Teaching Material II
Version 0.60 Page 28 of 106 22 December 2008
axis.jar.location: set the path of the lib directory of your local Axis 1.4 installation. Default setting: TOMCAT_HOME/webapps/axis/WEB-INF/lib/
axis.servlet: set the address of the AxisServlet required for deployment of the web service. Default setting: http://localhost:8080/axis/servlet/AxisServlet
Launch Tomcat, move to the source code root directory and type: ant. The script will compile the web service interface, generate artefacts and deploy the service to your axis installation.installation. The product of building process is also the Application Ontology Manager web interface.
When the script finishes, the restart of Tomcat is required. Before restarting Tomcat, deploy the manager web interface. In the sources root directory, the file ontology-manager.war appears. Deploy it as Tomcat web application and restart the tomcat.
Verification of successful installation: in the list of available axis services, the Application Ontology Manager web service should appear. The list of Axis services is by default available at the default address: http://localhost:8080/axis/servlet/AxisServlet
3.6.3 Tutorial
The tutorial is composed of two parts: the guide through the manager web interface and the process of creating the standalone application specific web client.
3.6.3.1 The Application Ontology Manager web interface
Run deployed manager web interface (default address: http://localhost:8080/ontology-manager). You will get the window with various tabs implementing the special kinds of functionality. Device sniffer and Device Comparator tabs are out of scope of this tutorial. TheseThese tabs implement the tools performing the special kind of searches developed as the experimental modules (the proof of the concept) for demonstration purposes. Anyway, feel free to play with it in the intuitive way.
The usage of tabs will be described in the more detailed way.
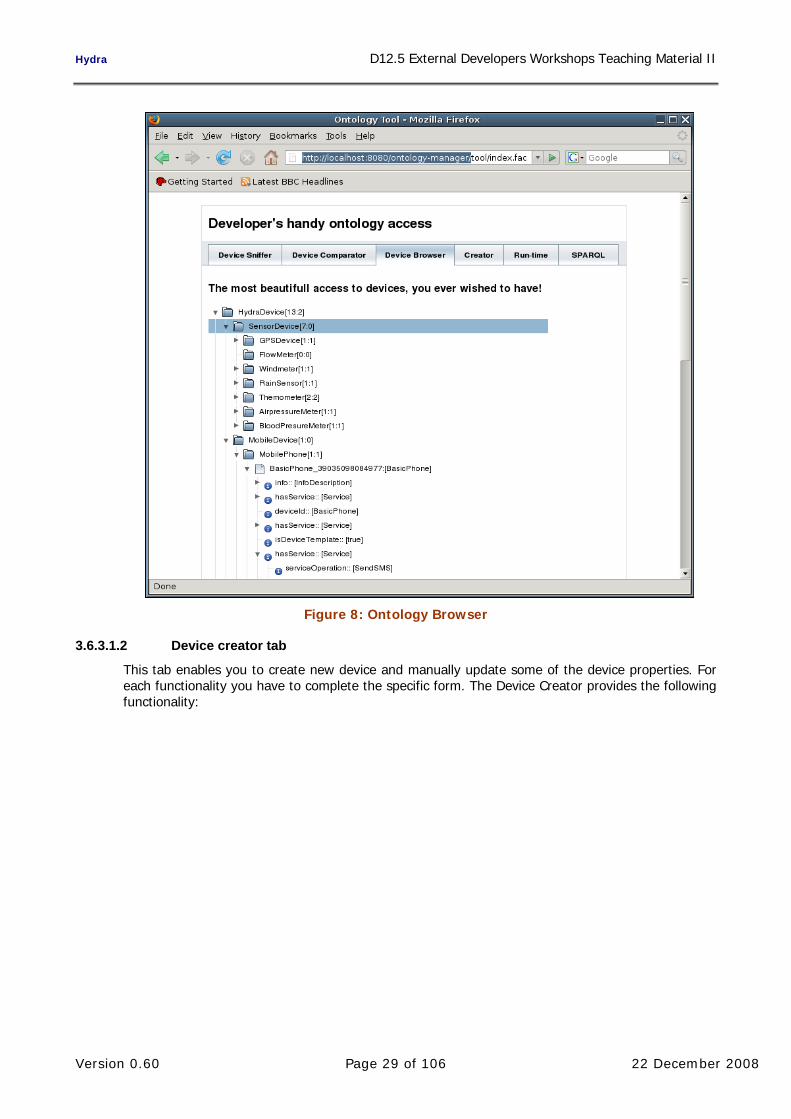
3.6.3.1.1 Device Browser tab
Used as the flexible ontology browser from the view of device taxonomy. You can navigate in the device classification and browse the device instances (concrete implementation of ontology concept, e.g: HTCP3300 phone is the instance of MobilePhone concept). You can also browse the instance properties. Example of the browser view is shown in Figure 8.
Hydra D12.5 External Developers Workshops Teaching Material II
Version 0.60 Page 29 of 106 22 December 2008
Figure 8: Ontology Browser
3.6.3.1.2 Device creator tab
This tab enables you to create new device and manually update some of the device properties. For each functionality you have to complete the specific form. The Device Creator provides the following functionality:
Hydra D12.5 External Developers Workshops Teaching Material II
Version 0.60 Page 30 of 106 22 December 2008
Figure 9: Device creator
Create new device: select the device type and fill in the new deviceId property (deviceId should be unique string for each device). The new device instance will be created for you.
Set device description: Choose the existing device instance and fill-in the prepared XML containing the manufacturer and model information. This way you can update the basic device description.
Handle device malfunctions: The same way as in the previous case you can update the malfunctions and remedies for specific devices. The XML describing malfunctions can be manually extended (you can update more malfunctions, cases and remedies in one step). You just have to be aware of XML structure.
Generate device services from (SA)WSDL: This tool enables you to automatically generate device service models from WSDL file or annotated SAWSDL. Just select the existing device instance and fill-in the URL address of (SA)WSDL file. The services of device will be substituted by service description contained in provided (SA)WSDL file.
Simulate run-time device creation: This functionality just simulates the semantic discovery process and should be used only for verification purposes. If you'll fill-in the text box with the device discovery information formulated as XML with predefined structure, the tool will perform the semantic discovery matching and create the device run-time instance in the case of success. The description of discovery info XML structure is out of scope of this tutorial (see DAC tutorial for more information, how to acquire the device discovery information).
The illustration example is on the Figure 9.
3.6.3.1.3 Run-time tab
This tab contains the list of run-time device instances. Run-time instance is created in the semantic device discovery process and serves as the run-time application model of specific device, which may be continually updated by the application, containing all actual device information. Run-time instances also serve as the actual device models for any kind of application specific searches.
Hydra D12.5 External Developers Workshops Teaching Material II
Version 0.60 Page 31 of 106 22 December 2008
3.6.3.1.4 SPARQL tab
Advanced developers familiar with the Device Ontology structure and the SPARQL query syntax may perform any specific ontology searches directly by formulating the SPARQL query (see figure 3).
Figure 10: SPARQL querying
3.6.3.2 The application specific standalone client
In some cases, there is a need for developing the application specific client using the methods defined in Application Ontology Manager web-service interface. The client development process follows the steps required for implementation of any ordinary Axis 1.4 web service client:
Generate web-service artefacts (service stubs) from the Application Ontology Manager WSDL file URL (in your client application code, include the axis jars into your classpath and use the ant task axis-wsdl2java, which will generate the artefacts for you automatically)
Include the generated artefacts at your classpath to enable their usage in your code.
In your code just include the generated artefacts and create and use the service proxy in the common way:
ApplicationOntologyManagerServiceLocator lc = new ApplicationOntologyManagerServiceLocator(); ApplicationOntologyManagerSoapBindingStub stub = (ApplicationOntologyManagerSoapBindingStub)lc.getApplicationOntologyManager(); String xmlResult = stub.getDeviceDescriptions(); Object result = stub.callAnyService();
3.6.4 Summary
This tutorial described how to install and use the Application Ontology Manager in two different ways. The guide through the basic functionality of the manager web interface was described and the basic steps of creating the application specific standalone web-service client were outlined.
Hydra D12.5 External Developers Workshops Teaching Material II
Version 0.60 Page 32 of 106 22 December 2008
3.7 Policy Manager
3.7.1 Introduction
3.7.1.1 Introduction of the Tutorial
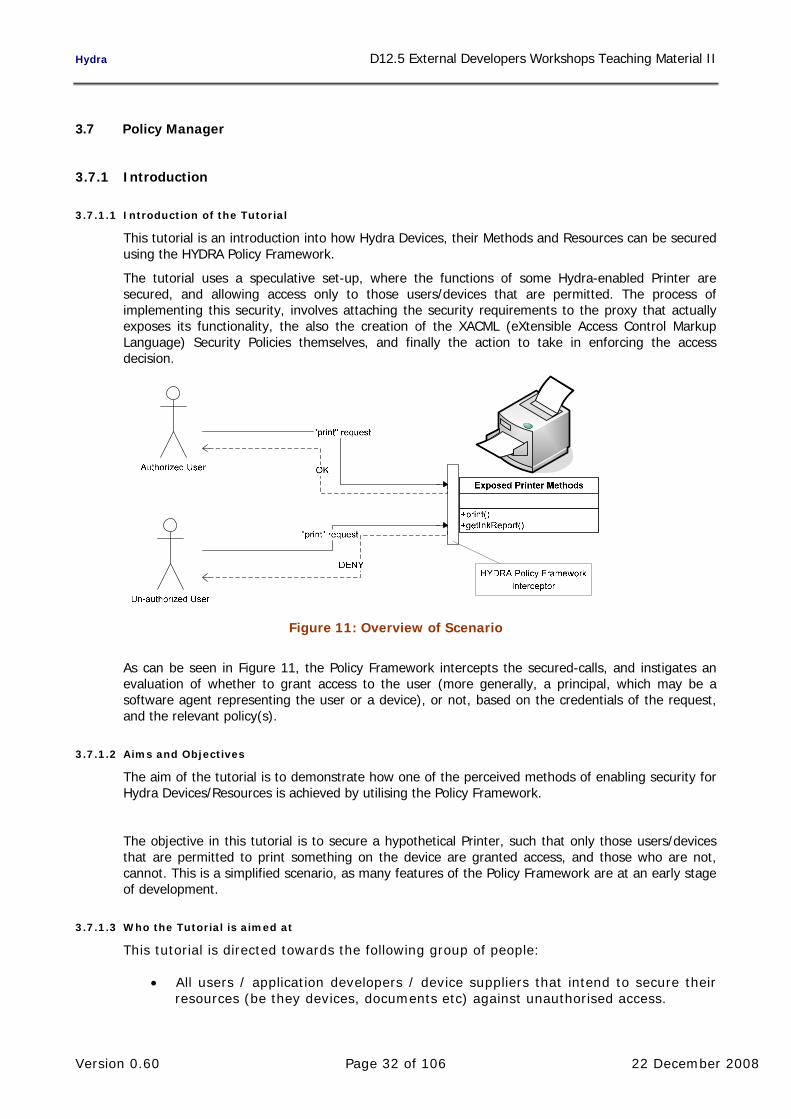
This tutorial is an introduction into how Hydra Devices, their Methods and Resources can be secured using the HYDRA Policy Framework.
The tutorial uses a speculative set-up, where the functions of some Hydra-enabled Printer are secured, and allowing access only to those users/devices that are permitted. The process of implementing this security, involves attaching the security requirements to the proxy that actually exposes its functionality, the also the creation of the XACML (eXtensible Access Control Markup Language) Security Policies themselves, and finally the action to take in enforcing the access decision.
Figure 11: Overview of Scenario
As can be seen in Figure 11, the Policy Framework intercepts the secured-calls, and instigates an evaluation of whether to grant access to the user (more generally, a principal, which may be a software agent representing the user or a device), or not, based on the credentials of the request, and the relevant policy(s).
3.7.1.2 Aims and Objectives
The aim of the tutorial is to demonstrate how one of the perceived methods of enabling security for Hydra Devices/Resources is achieved by utilising the Policy Framework.
The objective in this tutorial is to secure a hypothetical Printer, such that only those users/devices that are permitted to print something on the device are granted access, and those who are not, cannot. This is a simplified scenario, as many features of the Policy Framework are at an early stage of development.
3.7.1.3 Who the Tutorial is aimed at
This tutorial is directed towards the following group of people:
• All users / application developers / device suppliers that intend to secure their resources (be they devices, documents etc) against unauthorised access.
Hydra D12.5 External Developers Workshops Teaching Material II
Version 0.60 Page 33 of 106 22 December 2008
3.7.2 Preparation
3.7.2.1 Hardware Requirements
For this tutorial, a standard PC is required. Although the tutorial implies interaction with a hardware device (a Printer), this connection is, for the moment, entirely virtual.
3.7.2.2 Software Requirements
The tutorial required Java Runtime Environment 1.5 or later, in addition to an OS capable of running it. The tutorial application is created and executed using NetBeans 6.1, but any other Java-based IDE should be fine (i.e. Eclipse).
3.7.2.3 Setup Procedure
No specific setup is required.
3.7.3 Tutorial
The Policy Framework, within Hydra, provides the ability to implement access control. This is achieved in Hydra with the use of the XACML (eXtensible Access Control Markup Language) standard. XACML is both a declarative access control policy language, and a processing model that dictates how the policies are to be interpreted.
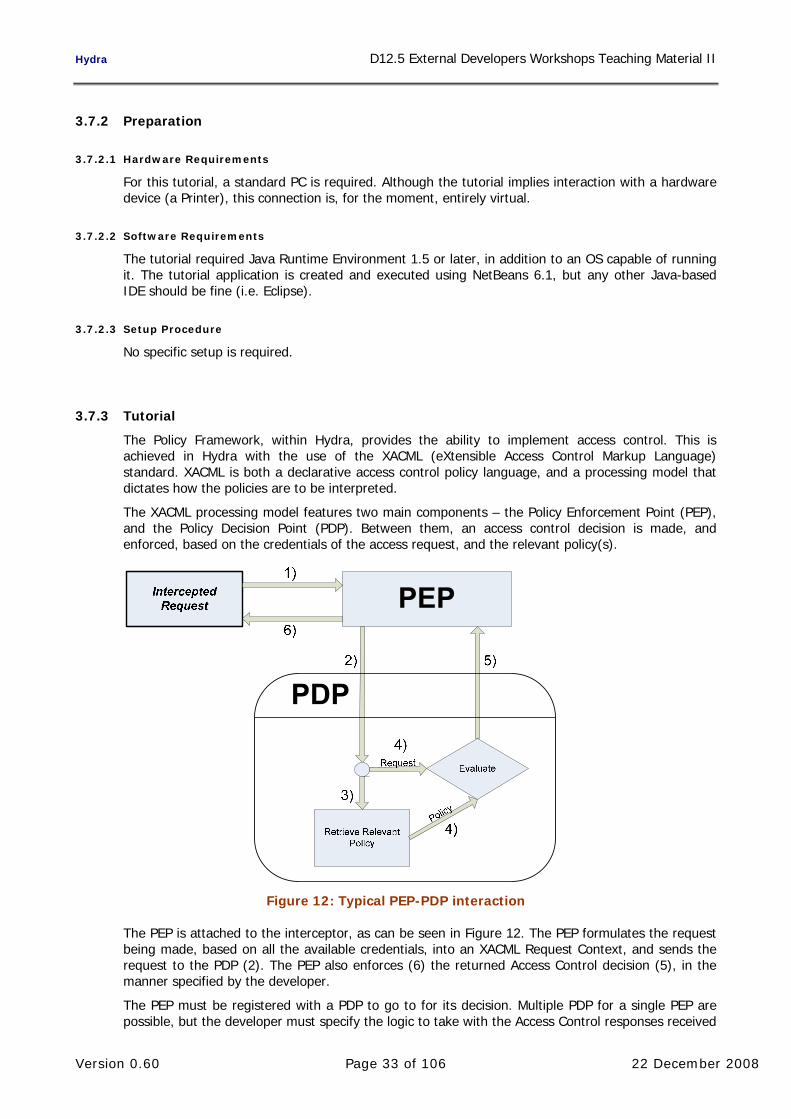
The XACML processing model features two main components – the Policy Enforcement Point (PEP), and the Policy Decision Point (PDP). Between them, an access control decision is made, and enforced, based on the credentials of the access request, and the relevant policy(s).
Figure 12: Typical PEP-PDP interaction
The PEP is attached to the interceptor, as can be seen in Figure 12. The PEP formulates the request being made, based on all the available credentials, into an XACML Request Context, and sends the request to the PDP (2). The PEP also enforces (6) the returned Access Control decision (5), in the manner specified by the developer.
The PEP must be registered with a PDP to go to for its decision. Multiple PDP for a single PEP are possible, but the developer must specify the logic to take with the Access Control responses received
Hydra D12.5 External Developers Workshops Teaching Material II
Version 0.60 Page 34 of 106 22 December 2008
from each PDP. Take, for example, the case where one PDP may return a “Permit” decision, whereas the other returns “Deny”. The action to take in this scenario may be specific to the application in which it is being used.
The PDP is the core component of the processing model, in that it is has access to the policies themselves, and makes the actual access control decisions. The PDP receives the XACML Request Context from the PEP (2). With this Request Context, the PDP retrieves the relevant policy (3) – a policy whose targets (subject/action/resource) match with the request being made – and then makes the decision based on the conditions/rules specified by the policy (4). An XACML Response Context is returned to the PEP (5), containing the decision made.
As outlined in the introduction, this tutorial shows how to secure a hypothetical “Printer” device using the Policy Framework. To achieve this, we need to implement three classes. These are:
MyPEP
Formulates the request, and enforces the decision returned, possibly including obligations.
MyPDP
Finds the relevant Policy for the request, and makes a decision for it, which is returned to the PEP
MyPrinter
This is our “Printer” class, that we are securing, containing the functions to perform actions over it.
In addition to these classes, we must write policies to govern the usage of the Printer, as well as application to orchestrate this example.
3.7.3.1 MyPEP
The core PEP functionality is in the HydraPEP class (com.eu.hydra.policy.pep), which has a set of default functions and is required to be extended by any PEP implementation by the developer. There are two main functions that the developer would want to override for their PEP. These are:
getAccessDecision
Formulates the Request Context with the provided credentials
Retrieves an Access Decision from the PDP
enforce
Specifies the logic for enforcing the Access Decision
Firstly though, we must create the MyPEP class, as shown in the snippet below, extending HydraPEP:
package com.eu.hydra.policy.test; import com.eu.hydra.policy.pep.HydraPEP; public class MyPEP extends HydraPEP { }
The actual credentials to be used in Hydra security is currently still in a state of discussion, with regards to being able to actually identify a user/device uniquely on the network. This is necessary in order to be able to create policies for a specific device and to be able to set an identifier for those users/devices trying to access a protected device/resource. Subsequently, the development of the procedure for extracting the desired credentials has seen little progress to this point.
For this tutorial, we will pass a simple ‘id’ as a parameter in the function call. In future, we expect that the ‘id’ of the subject will be retrieved from the Network Manager for the call made (via a protected Web Service) to the device in question.
Hydra D12.5 External Developers Workshops Teaching Material II
Version 0.60 Page 35 of 106 22 December 2008
The getAccessDecision function is responsible for retrieving those credentials, and formulating all details of the request, into a Request Context. This request is then sent to the PDP(s) registered with the PEP. The request, in this case, will specify the subject as the first parameter passed. The action of the request is set as the name of the function being called, and finally the resource will be simply the package/class name of the object being protected. This, again, is a result of the lack of a identifying mechanism, and is a problem that will be resolved.
The code snippet below shows the implemented getAccessDecision function, that extracts the credentials as discussed previously, from the details of the function call. Additionally, there are some helper-functions to aid the creation of the XACML Request Context:
import com.sun.xacml.ctx.RequestCtx; import java.util.Set; /** * Formulate RequestCtx & get Decision * @param className The name of the class with the secured function * @param methodName The name of the secured method * @param methodDescription Description of the method * @param timestamp A generated timestamp for the access request * @param methodParams List of the parameters passed * @param methodParamTypes List of the types of the parameters passed * @return */ @Override public void getAccessDecision(String className, String methodName, String methodDescription, String timestamp, Object[] methodParams, String[] methodParamTypes) { //Create Request Ctx //Subject id set as first param //resource is className //action is methodName Set subject = setSubjects((String)methodParams[0]); Set resource = setResource(className); Set action = setAction(methodName); Set env = setEnvironment(); RequestCtx req= new RequestCtx(subject, resource, action, env); evaluate(req, timestamp); }
As shown above, the XACML RequestCtx is created by passing four Sets, one each for the subject, resource, action and environment, using the helper functions shown below. The getAccessDecision function must then call the evaluate function, passing the request and the timestamp. This is a function of the HydraPEP class that handles the process of the interaction with the registered PDP, and retrieves the decision.
import com.sun.xacml.EvaluationCtx; import com.sun.xacml.attr.DateTimeAttribute; import com.sun.xacml.attr.StringAttribute; import com.sun.xacml.ctx.Attribute; import com.sun.xacml.ctx.RequestCtx; import com.sun.xacml.ctx.Subject; import java.net.URI; import java.net.URISyntaxException; import java.util.HashSet; /** * Creates a Subject HashSet for the given identification String * @param id * @return */ private Set setSubjects(String id) { try { Set attributes = new HashSet(); URI subjectId = new URI("urn:oasis:names:tc:xacml:1.0:subject:subject-id");
Hydra D12.5 External Developers Workshops Teaching Material II
Version 0.60 Page 36 of 106 22 December 2008
Attribute subjectAttr = new Attribute(subjectId, null, new DateTimeAttribute(), new StringAttribute(id)); attributes.add(subjectAttr); Set subjects = new HashSet(); subjects.add( new Subject(attributes)); return subjects; } catch(URISyntaxException ex) { ex.printStackTrace(); return new HashSet(); } } /** * Creates a Resource HashSet for the given Resource identifier * @param id * @return */ private Set setResource(String id) { try { Set resource = new HashSet(); Attribute resourceAttr = new Attribute(new URI(EvaluationCtx.RESOURCE_ID), null, new DateTimeAttribute(), new StringAttribute(id)); resource.add(resourceAttr); return resource; } catch(URISyntaxException ex) { ex.printStackTrace(); return new HashSet(); } } /** * Creates an Action HashSet for the given action * @param actionName * @return */ private Set setAction(String actionName) { try { Set action = new HashSet(); URI actionId = new URI("urn:oasis:names:tc:xacml:1.0:action:action-id"); Attribute actionAttr = new Attribute(actionId, null, new DateTimeAttribute(), new StringAttribute(actionName)); action.add(actionAttr); return action; } catch(URISyntaxException ex) { ex.printStackTrace(); return new HashSet(); } } /** * Returns an empty HashSet - no Ennvironmental variables are required * @return */ private Set setEnvironment() { return new HashSet(); }
Hydra D12.5 External Developers Workshops Teaching Material II
Version 0.60 Page 37 of 106 22 December 2008
Further details about the creation of a Request Context can be found in the documentation for Sun’s XACML Implementation [1].
Finally, we need to implement the enforce function, to take appropriate action based each of the decision responses that can be returned by the PDP. The code for this is shown below:
import com.eu.hydra.policy.AccessDecisionObject; import java.security.AccessControlException; @Override /** * Enforces the AccessDecision returned, for each possible case */ public void enforce(AccessDecisionObject accessDecision) { String denyMsg = ""; switch(accessDecision.getDecision()) { case PERMIT : { return; } case DENY : { denyMsg = "Access Denied [DENY]"; throw new AccessControlException(denyMsg); } case INDETERMINATE : { denyMsg = "Access Denied [INDETERMINATE]"; throw new AccessControlException(denyMsg); } case NOTAPPLICABLE : { denyMsg = "Access Denied [NOTAPPLICABLE]"; throw new AccessControlException(denyMsg); } case FURTHER_QUERY : { denyMsg = "Access Denied [FURTHER_QUERY]"; throw new AccessControlException(denyMsg); } } //No identified decision returned denyMsg = "Access Denied [UNKNOWN]"; throw new AccessControlException(denyMsg); }
The enforce method given above, is also the default implementation of the enforce method in the HydraPEP class. As can be seen, the default logic is to only allow access for requests that have been permitted by the PEP. For the cases where access is to be denied (all other cases), an exception is thrown that stops the flow of the code, such that the target function is never actually called.
3.7.3.2 MyPDP
Configuring the PDP is a much simpler process as the PDP, as it is a relatively straight-forward process, at least when dealing with simple configurations.
The PDP needs to be configured with access to a Policy Repository. This could be an XMLDB, or even just a folder on a file system or in fact any repository which is network accessible. For this, it requires one or more PolicyFinderModules to be implemented, which can retrieve the relevant Policy to the request. The PolicyFinderModule can transparently retrieve the policy regardless of where it is stored. The details of the retrieval mechanism protocol is internal to the PolicyFinderModule, which makes the architecture and the design of the PDP more simple because of the modularity. Howeverm for this tutorial, we will use a LocalFolderPolicyFinderModule, via which a local folder can be specified as the Policy Repository for the PDP. This is initialised in the PDP configuration
Hydra D12.5 External Developers Workshops Teaching Material II
Version 0.60 Page 38 of 106 22 December 2008
package com.eu.hydra.policy.test; import com.eu.hydra.policy.pdp.DefaultHydraPDP; import com.eu.hydra.policy.pdp.config.HydraPDPConfig; import com.eu.hydra.policy.pdp.finder.LocalFolderPolicyFinderModule; import com.sun.xacml.finder.impl.CurrentEnvModule; public class MyPDP extends DefaultHydraPDP{ public MyPDP() { config = new HydraPDPConfig(); config.addAttributeFinderModule(new CurrentEnvModule()); config.addPolicyFinderModule(new LocalFolderPolicyFinderModule("E:/HYDRA/HydraTestPolicies")); } }
For simple cases, this is all that is required to set up the PDP – extending the default implementation. The PDP, and the XACML specification itself, can be extended through adding additional custom modules, but that is not necessary for this simple tutorial.
The config object (defined in DefaultHydraPDP) stores the PDP’s configuration, which is then utilised during the decision making process. As shown, all policies created are stored in the “E:/HYDRA/HydraTestPolicies” directory.
3.7.3.3 MyPrinter
This is the simple class representing the Printer itself, and its two functions – print and getInkReport:
package com.eu.hydra.policy.test; import com.eu.hydra.policy.annotation.HydraSecure; public class MyPrinter { /** * @param args the command line arguments */ @HydraSecure(policyDecisionStub="com.eu.hydra.policy.test.MyPDP", policyEnforcementClass="com.eu.hydra.policy.test.MyPEP") public void print(String id, String toPrint) { System.out.println(toPrint); } @HydraSecure(policyDecisionStub="com.eu.hydra.policy.test.MyPDP", policyEnforcementClass="com.eu.hydra.policy.test.MyPEP") public String getInkReport(String id) { return "98%"; } }
As mentioned previously, for this tutorial we are simply passing the users id through the function parameters, as shown above. The functions themselves have very little functionality, but the only purpose of the function in this tutorial is to see whether they are run or not.
The functions are annotated with the @HydraSecure annotation, which provides the security configuration. The “policyEnforcementClass” parameter designates the PEP class for the Access Control, and is set as the MyPEP class created in 3.7.3.1. Secondly, the “policyDecisionStub” parameter specifies the PDP to be used by the given PEP. In future, this stub will be a pointer to a PDP Web Service, however for this tutorial the PDP is used as a class-reference.
Hydra D12.5 External Developers Workshops Teaching Material II
Version 0.60 Page 39 of 106 22 December 2008
3.7.3.4 XACML Policies
Next, we shall create a couple of simple policies to govern access for each of the MyPrinter functions. The two separate policies below could have been combined into one single Policy, but for simplicity’s sake, they have been kept apart. The XACML specification can be found at [2].
As the annotations to the policy given above show, this policy only permits the user ‘authUser1’ to have access to the “print” function of our Printer.
In addition to this, an argument must be added to the VM at runtime, to direct the VM towards the custom annotation class containing the @HydraSecure notation. This is achieved by passing the location of the JAR containing the Policy Instrumentation classes in the following argument:
Upon running the test application shown above, we see the following output:
Test 1: Authorised User -> print Hello Test 2: Unauthorised User -> print Access Denied [DENY] Test 3: Authorised User -> getInkReport 98% Test 4: Unauthorised User -> getInkReport 98%
As can be seen, the Policy Framework has successfully restricted access to the protected action “print” to only the user authorised to use it – “authUser1”. Additionally, all users have been allowed access to the “getInkReport” function.
3.7.4 Summary and Facts
This tutorial has demonstrated how developers/users can apply Access Control using the HYDRA Policy Framework and XACML Policies. Although at an early stage of development, we can see the full process in action, from request to enforcement of a decision.
Further development of the HYDRA Policy Framework will see the introduction of Web Services into the process, enabling remote PDPs and Policy repositories.
3.7.5 References
[1] Sun Microsystems: Sun’s XACML Implementation, http://sunxacml.sourceforge.net/
[2] OASIS: OASIS eXtensible Access Control Markup Language (XACML) TC, http://www.oasis-open.org/committees/tc_home.php?wg_abbrev=xacml
Unrestricted access
Hydra D12.5 External Developers Workshops Teaching Material II
Version 0.60 Page 42 of 106 22 December 2008
4. Communicating with Hydra Devices
This section demonstrates the programming workflow involved in communication with Hydra-enabled devices via standard web services mechanisms. The tutorials demonstrate the versatility of the Hydra approach because the programmer can choose a programming platform and language most suitable for his or her solution as long as such a platform and language support standard web-services mechanisms. This is demonstrated by showing how to program Hydra-enabled devices using the C# programming language, Java programming language, and the PHP scripting language.
4.1 Talking to Hydra Devices: C#
4.1.1 Introduction
4.1.1.1 Introduction of the Tutorial
Everything within Hydra uses Web Services for communication, from the managers to individual devices. As a result it is important for Hydra developers to become familiar with talking to other components using Web Services.
This tutorial is an introduction on how to program Hydra-enabled devices using C# in Visual Studio 2005. It is based on the “Hydra for Dummies” demo produced by CNET2 which controls a variety of devices that have been encapsulated in Web Services. In this tutorial, the orchestration of the devices to achieve the application’s functional objective is achieved directly by the developer’s program, which is directly controlling the devices and is not via the middleware orchestration manager.
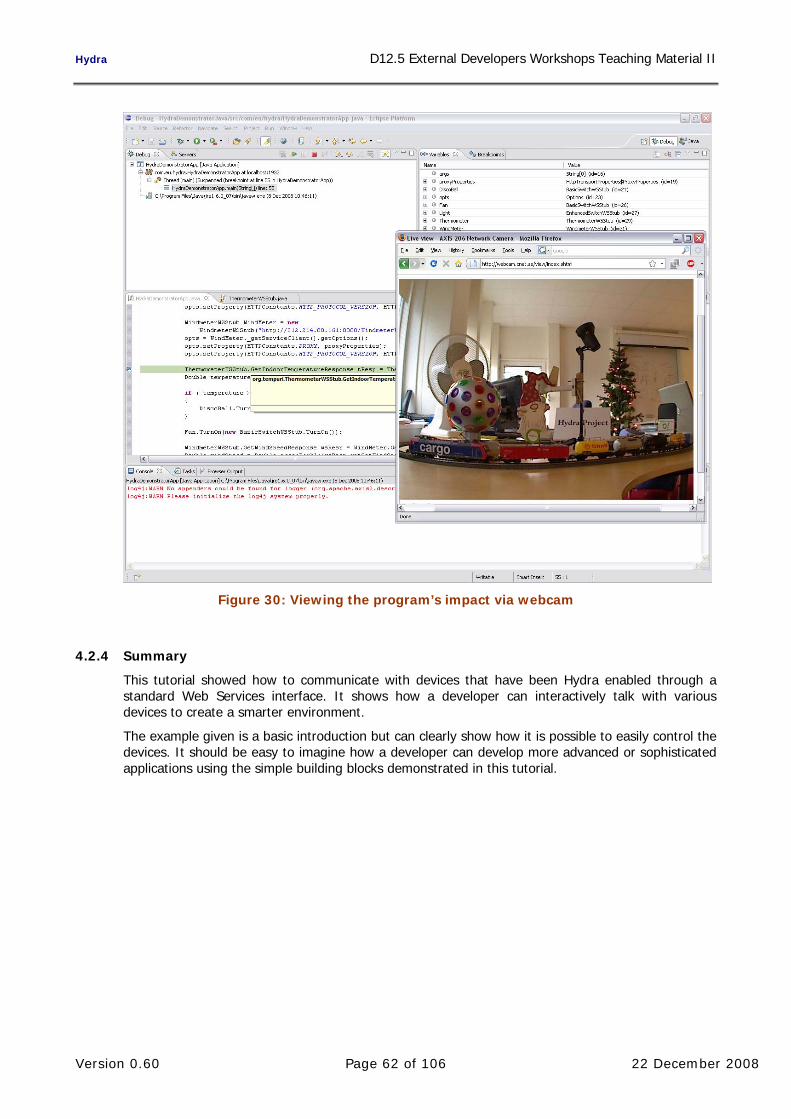
The tutorial uses a prebuilt environment that is accessible to everyone over the internet and provides a group of devices to interact with. To view the actions performed by this tutorial a real-time web cam is available at: http://webcam.cnet.se/view/index.shtml, where the developer can see the effect of his or her program on the devices.
Hydra D12.5 External Developers Workshops Teaching Material II
Version 0.60 Page 43 of 106 22 December 2008
Figure 13: Webcam view of the devices
4.1.1.2 Aims and Objectives
The goal of this tutorial is to familiarise a developer with communicating with devices through web services and Hydra.
For the purpose of discussion, let us assume that the developer wants to write an application using previously Hydra-enabled devices listed below so that the application has the following functional description:
If the temperature is above 20 degrees Celsius the DiscoBall should be rotating.
When Windspeed exceeds 2 the Light should flash 3 times.
Windspeed can be altered by turning on the Fan in front of the Windmeter.
When leaving application the Fan and the DiscoBall should be turned off.
4.1.1.3 Who the tutorial is aimed at
This tutorial is directed towards the following group of people:
Individuals interested in having a general overview of Hydra middleware.
Application developers interested to have a first overview of:
- Impact of Hydra technology in their solutions.
- Technical innovation of Hydra with respect to the state-of-the-art.
Hydra D12.5 External Developers Workshops Teaching Material II
Version 0.60 Page 44 of 106 22 December 2008
4.1.2 Preparation
4.1.2.1 Hardware Requirements
For this tutorial you will need a standard PC running a modern version of Windows, Windows 2000 or newer and is connected to the internet.
4.1.2.2 Software Requirements
On top of windows, Visual Studio 2005 or newer is required to create and execute this program.
4.1.2.3 Setup Procedure
No specific setup is required.
4.1.3 Tutorial
This tutorial is split into a small set of easy to follow steps that will guide the user to creating a simple Hydra application.
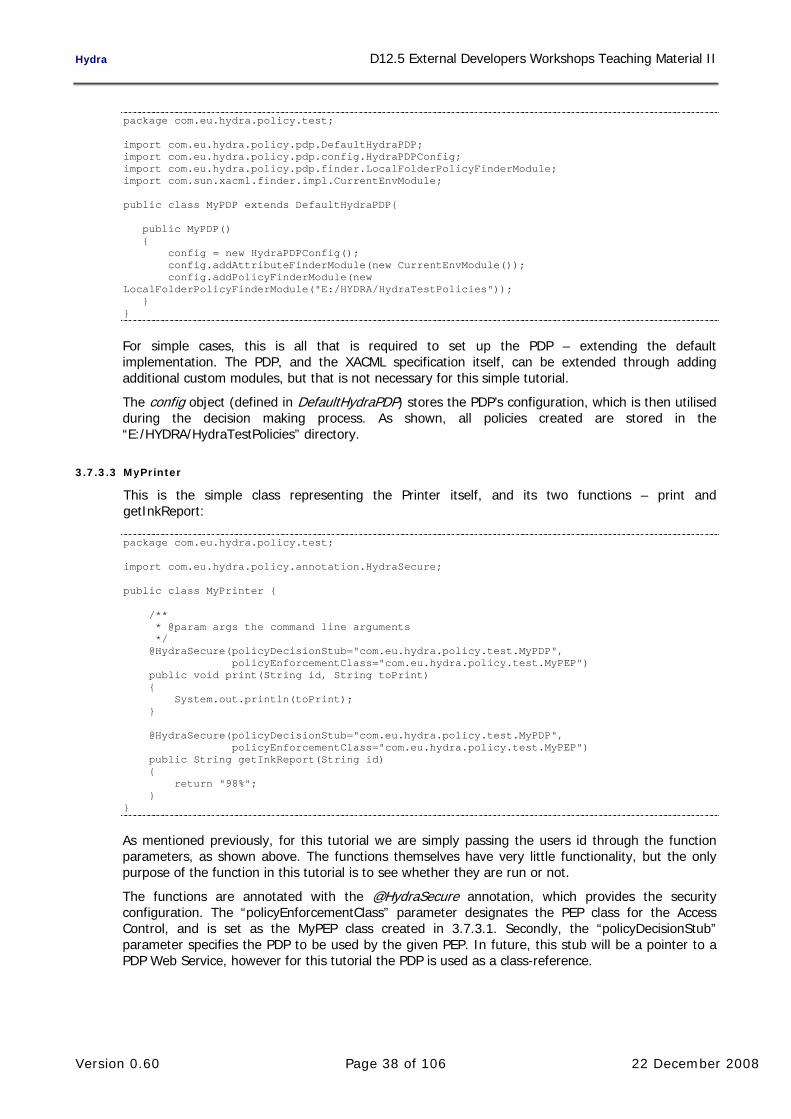
4.1.3.1 Create the Visual Studio Project
This time we shall create a project in Visual Studio.
Start Visual Studio
Click on the Create Project link, or go through File > New > Project.
In the new dialog, select Visual C# project type, and select the Console Application template.
Type in the name of the project.
Click ok.
Hydra D12.5 External Developers Workshops Teaching Material II
Version 0.60 Page 45 of 106 22 December 2008
Figure 14: New Project in Visual Studio
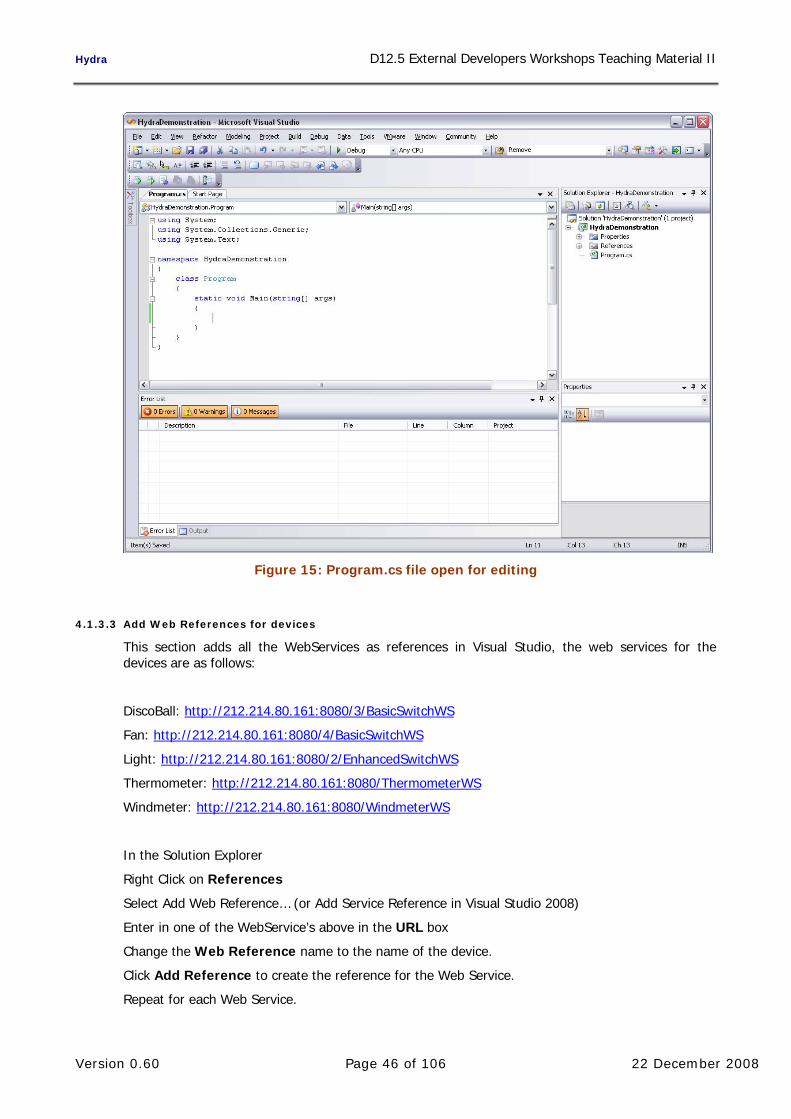
4.1.3.2 Open the program.cs file
Double click on the program.cs file in the Solution Explorer.
Hydra D12.5 External Developers Workshops Teaching Material II
Version 0.60 Page 46 of 106 22 December 2008
Figure 15: Program.cs file open for editing
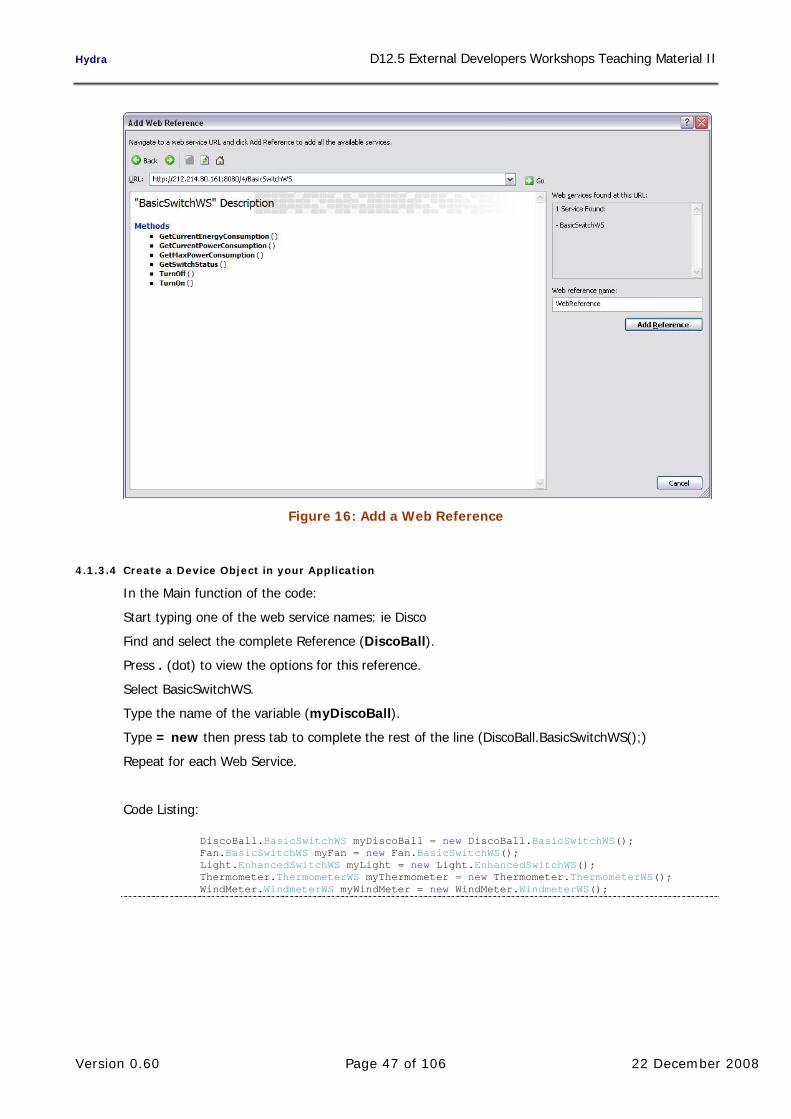
4.1.3.3 Add Web References for devices
This section adds all the WebServices as references in Visual Studio, the web services for the devices are as follows:
Select Add Web Reference… (or Add Service Reference in Visual Studio 2008)
Enter in one of the WebService’s above in the URL box
Change the Web Reference name to the name of the device.
Click Add Reference to create the reference for the Web Service.
Repeat for each Web Service.
Hydra D12.5 External Developers Workshops Teaching Material II
Version 0.60 Page 47 of 106 22 December 2008
Figure 16: Add a Web Reference
4.1.3.4 Create a Device Object in your Application
In the Main function of the code:
Start typing one of the web service names: ie Disco
Find and select the complete Reference (DiscoBall).
Press . (dot) to view the options for this reference.
Select BasicSwitchWS.
Type the name of the variable (myDiscoBall).
Type = new then press tab to complete the rest of the line (DiscoBall.BasicSwitchWS();)
Repeat for each Web Service.
Code Listing:
DiscoBall.BasicSwitchWS myDiscoBall = new DiscoBall.BasicSwitchWS(); Fan.BasicSwitchWS myFan = new Fan.BasicSwitchWS(); Light.EnhancedSwitchWS myLight = new Light.EnhancedSwitchWS(); Thermometer.ThermometerWS myThermometer = new Thermometer.ThermometerWS(); WindMeter.WindmeterWS myWindMeter = new WindMeter.WindmeterWS();
Hydra D12.5 External Developers Workshops Teaching Material II
Version 0.60 Page 48 of 106 22 December 2008
Figure 17: Adding a device to the code
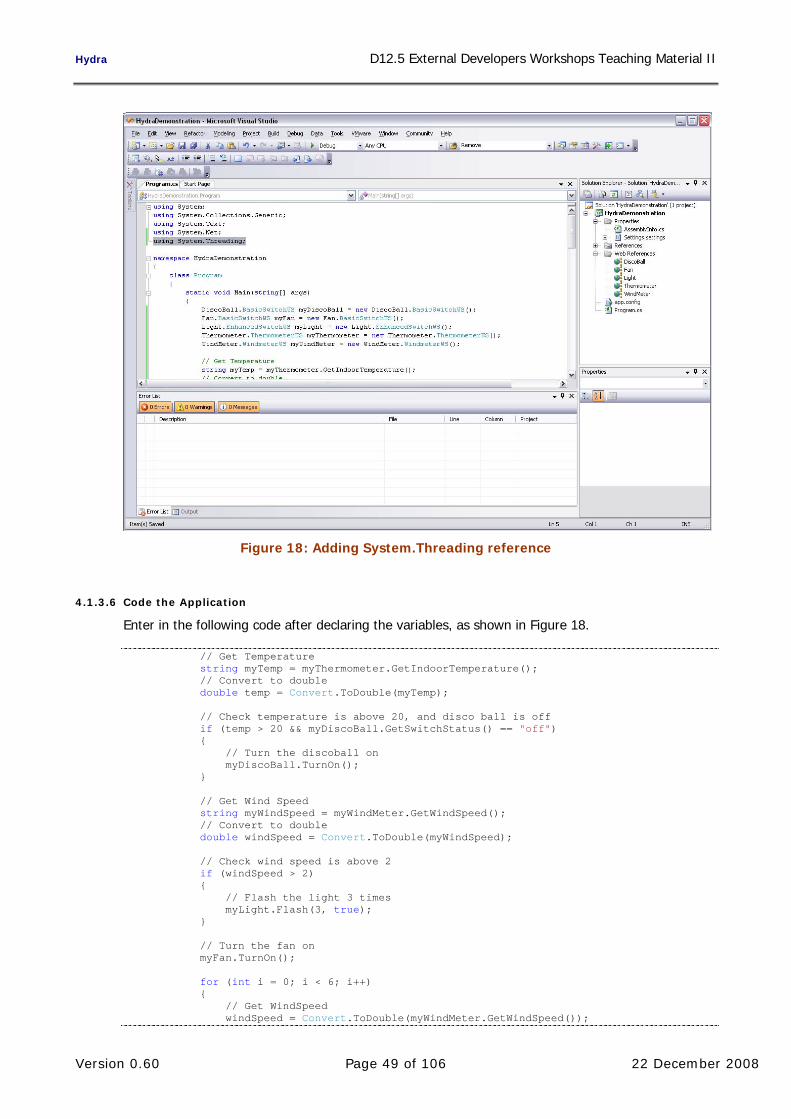
4.1.3.5 Add the System.Threading reference
Go to the beginning of the file.
Add the following line to the program:
using System.Threading;
Hydra D12.5 External Developers Workshops Teaching Material II
Version 0.60 Page 49 of 106 22 December 2008
Figure 18: Adding System.Threading reference
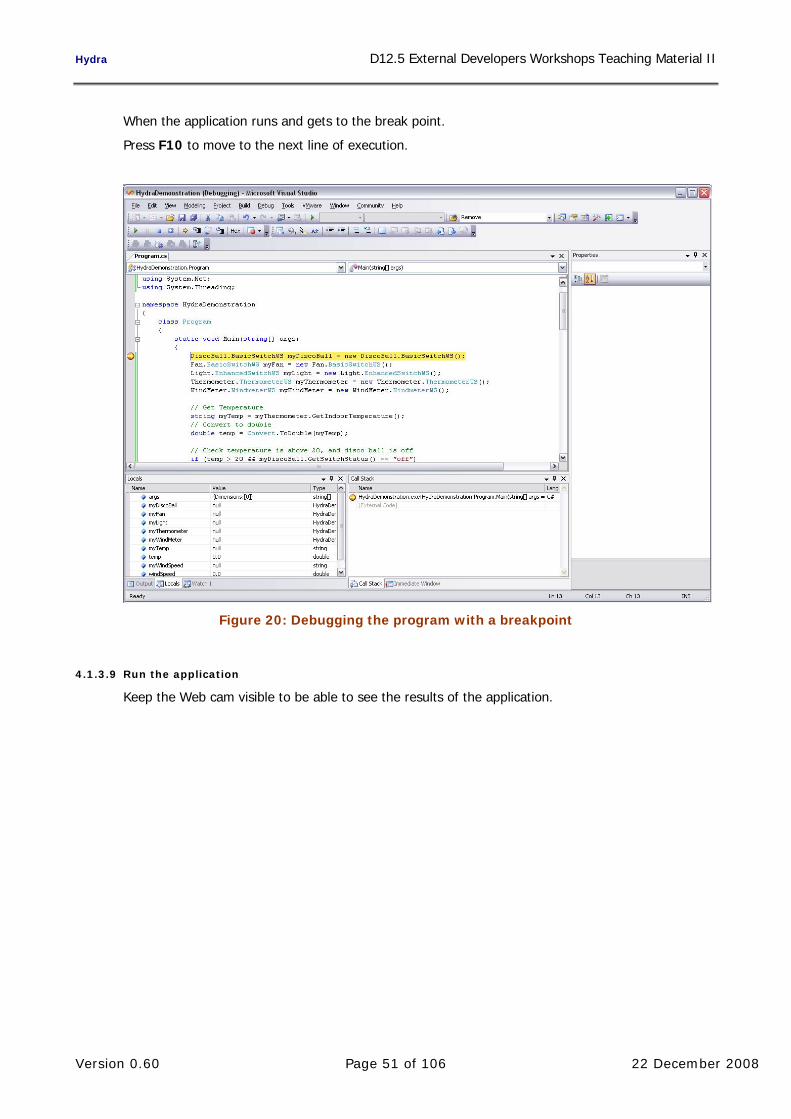
4.1.3.6 Code the Application
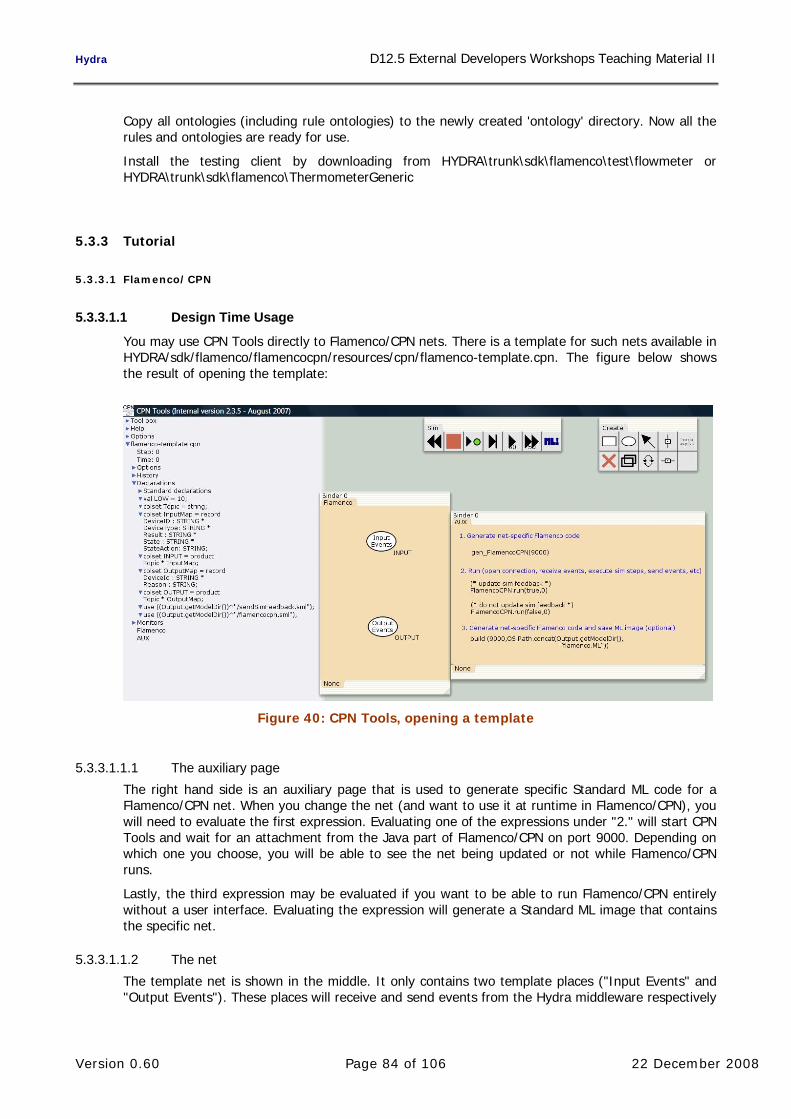
Enter in the following code after declaring the variables, as shown in Figure 18.
// Get Temperature string myTemp = myThermometer.GetIndoorTemperature(); // Convert to double double temp = Convert.ToDouble(myTemp); // Check temperature is above 20, and disco ball is off if (temp > 20 && myDiscoBall.GetSwitchStatus() == "off") { // Turn the discoball on myDiscoBall.TurnOn(); } // Get Wind Speed string myWindSpeed = myWindMeter.GetWindSpeed(); // Convert to double double windSpeed = Convert.ToDouble(myWindSpeed); // Check wind speed is above 2 if (windSpeed > 2) { // Flash the light 3 times myLight.Flash(3, true); } // Turn the fan on myFan.TurnOn(); for (int i = 0; i < 6; i++) { // Get WindSpeed windSpeed = Convert.ToDouble(myWindMeter.GetWindSpeed());
Hydra D12.5 External Developers Workshops Teaching Material II
Version 0.60 Page 50 of 106 22 December 2008
// Check wind speed limit if (windSpeed > 2) { // Flash the light 3 times. myLight.Flash(3, true); } // Sleep for 30 seconds to wait for wind meter to update Thread.Sleep(30000); } // Turn the fan off myFan.TurnOff(); // Allow RF Switch to reset Thread.Sleep(2000); // Turn the DiscoBall off myDiscoBall.TurnOff();
4.1.3.7 Build the Application
Go to Build > Build Solution.
Figure 19: Building the project
4.1.3.8 Add a break point and run the Application
Click on the grey bar at the left to create a break point.
Press the green Play button, or go to Debug > Start Debugging.
Hydra D12.5 External Developers Workshops Teaching Material II
Version 0.60 Page 51 of 106 22 December 2008
When the application runs and gets to the break point.
Press F10 to move to the next line of execution.
Figure 20: Debugging the program with a breakpoint
4.1.3.9 Run the application
Keep the Web cam visible to be able to see the results of the application.
Hydra D12.5 External Developers Workshops Teaching Material II
Version 0.60 Page 52 of 106 22 December 2008
Figure 21: Running the application with the web cam view
4.1.4 Summary
This tutorial showed how to communicate with devices that have been Hydra-enabled through a standard Web Services interface. It shows how a developer can interactively talk with various devices to create a smarter environment.
The example given is a basic introduction but can clearly show how it is possible to easily control the devices, and allow a developer to create more complicated scenarios with different devices.
Hydra D12.5 External Developers Workshops Teaching Material II
Version 0.60 Page 53 of 106 22 December 2008
4.2 Talking to Hydra Devices: Java
4.2.1 Introduction
4.2.1.1 Introduction of the Tutorial
Everything within Hydra uses Web Services for integration and communication from the managers to individual devices. As a result it is important for Hydra developers to become familiar with talking to other components using Web Services.
This tutorial is an introduction on how to talk to devices using Java in Eclipse. It is based on the “Hydra for Dummies” demo produced by TID3 which talks to a variety of devices that have been encapsulated in Web Services. Talking to the devices in question will not be done through Hydra, but instead each device will be communicated with directly.
The tutorial uses a prebuilt environment that is accessible to everyone over the internet and provides a group of devices to interact with. To view the actions performed by this tutorial a web cam is available at: http://webcam.cnet.se/view/index.shtml that provides a view of the devices that can be used.
Hydra D12.5 External Developers Workshops Teaching Material II
Version 0.60 Page 54 of 106 22 December 2008
4.2.1.2 Aims and Objectives
The goal of this tutorial is to familiarise a developer with communicating with devices through web services and Hydra.
The required functionalities of the application are as follows:
If the temperature is above 20 degrees Celsius the DiscoBall should be rotating.
When Windspeed exceeds 2 the Light should flash 3 times.
Windspeed can be altered by turning on the Fan in front of the Windmeter.
When leaving application the Fan and the DiscoBall should be turned off.
4.2.1.3 Target
This tutorial is directed towards the following group of people:
Individuals interested in having a general overview of Hydra middleware.
Application developers interested to have a first overview of:
- Impact of Hydra technology in their solutions.
- Technical innovation of Hydra with respect to the state-of-the-art.
4.2.2 Preparation
4.2.2.1 Hardware Requirements
There are no special hardware requirements for this tutorial. Any hardware capable of running Eclipse is sufficient. This tutorial was written for Windows and as a result uses terminology specific to Windows.
4.2.2.2 Software Requirements
4.2.2.2.1 Eclipse
Eclipse is used for this tutorial as the IDE.
Eclipse: http://www.eclipse.org/
4.2.2.2.2 Axis 2
For this tutorial Axis 2 is required.
Axis2: http://ws.apache.org/axis2/
4.2.2.3 Setup Procedure
To setup axis 2 follow the ‘Standalone Server using the Standard Binary Distribution’ instructions on http://ws.apache.org/axis2/1_4_1/installationguide.html.
Hydra D12.5 External Developers Workshops Teaching Material II
Version 0.60 Page 55 of 106 22 December 2008
4.2.3 Tutorial
This tutorial is split into a small set of easy to follow steps that will guide the user to creating a simple Hydra application.
4.2.3.1 Create the Eclipse Project
For this part we shall create a project in Eclipse.
Start Eclipse
Go to File > New > Java Project.
In the new dialog, enter in the Project name.
Click Finish.
Figure 23: New Java Project
Hydra D12.5 External Developers Workshops Teaching Material II
Version 0.60 Page 56 of 106 22 December 2008
4.2.3.2 Create a new class.
Right click on the src folder in the project, and select New > Class.
For Package: enter in com.eu.hydra.
Enter in HydraDemonstratorApp as the Name.
Select create public static method stub.
Click Finish.
Figure 24: New PHP File
4.2.3.3 Add Axis 2 Libraries
This section adds all the required Axis 2 libraries to the project.
Right click on the Project in the Package Explorer.
Select Build Path > Add External Archives….
Hydra D12.5 External Developers Workshops Teaching Material II
Version 0.60 Page 57 of 106 22 December 2008
Navigate to your Axis2 directory.
Open the lib folder.
Select everything and click Open.
Figure 25: Importing Axis2 Libraries
4.2.3.4 Create Web Service stubs
For this section we will be creating the Web Service stubs from the Web Services listed below
Hydra D12.5 External Developers Workshops Teaching Material II
Version 0.60 Page 58 of 106 22 December 2008
Figure 26: Created Web Service Stubs in Eclipse
4.2.3.5 Call the Web Service Stubs
For each Web Service Stub create a variable by:
BasicSwitchWSStub DiscoBall = new BasicSwitchWSStub("http://212.214.80.161:8080/3/BasicSwitchWS");
Enter in this code for the other Web Services…
BasicSwitchWSStub Fan = new BasicSwitchWSStub("http://212.214.80.161:8080/4/BasicSwitchWS"); EnhancedSwitchWSStub Light = new EnhancedSwitchWSStub("http://212.214.80.161:8080/2/EnhancedSwitchWS"); ThermometerWSStub Thermometer = new ThermometerWSStub("http://212.214.80.161:8080/ThermometerWS"); WindmeterWSStub WindMeter = new WindmeterWSStub("http://212.214.80.161:8080/WindmeterWS");
Surround the calls with a try and catch to handle any faults with Axis
Hydra D12.5 External Developers Workshops Teaching Material II
Hydra D12.5 External Developers Workshops Teaching Material II
Version 0.60 Page 61 of 106 22 December 2008
Figure 29: Adding a Breakpoint
Click on the Bug icon on the tool bar to open the debug view.
Press F6 to step through the code, 1 line at a time.
Look at the webcam (http://webcam.cnet.se/view/index.shtml) to see the results of the code taking place.
Hydra D12.5 External Developers Workshops Teaching Material II
Version 0.60 Page 62 of 106 22 December 2008
Figure 30: Viewing the program’s impact via webcam
4.2.4 Summary
This tutorial showed how to communicate with devices that have been Hydra enabled through a standard Web Services interface. It shows how a developer can interactively talk with various devices to create a smarter environment.
The example given is a basic introduction but can clearly show how it is possible to easily control the devices. It should be easy to imagine how a developer can develop more advanced or sophisticated applications using the simple building blocks demonstrated in this tutorial.
Hydra D12.5 External Developers Workshops Teaching Material II
Version 0.60 Page 63 of 106 22 December 2008
4.3 Talking to Hydra Devices: PHP
4.3.1 Introduction
4.3.1.1 Introduction of the Tutorial
Everything within Hydra uses Web Services for communication, from the managers to individual devices. As a result it is important for Hydra developers to become familiar with talking to other components using Web Services.
This tutorial is an introduction on how to talk to devices using PHP in Eclipse. It is based on the “Hydra for Dummies” demo produced by TID4 which talks to a variety of devices that have been encapsulated in Web Services. Talking to the devices in question will not be done through Hydra, but instead each device will be communicated with directly.
The tutorial uses a prebuilt environment that is accessible to everyone over the internet and provides a group of devices to interact with. To view the actions performed by this tutorial a web cam is available at: http://webcam.cnet.se/view/index.shtml, this provides a view of the devices that can be used.
// Create PHP SOAP clients to access the services $tempMeter = new SoapClient("http://212.214.80.161:8080/ThermometerWS?wsdl"); $discoBall = new SoapClient("http://212.214.80.161:8080/3/BasicSwitchWS?wsdl");
Hydra D12.5 External Developers Workshops Teaching Material II
Version 0.60 Page 70 of 106 22 December 2008
$fan = new SoapClient("http://212.214.80.161:8080/4/BasicSwitchWS?wsdl"); $light = new SoapClient("http://212.214.80.161:8080/2/EnhancedSwitchWS?wsdl"); $windMeter = new SoapClient("http://212.214.80.161:8080/WindmeterWS?wsdl");
Figure 37: Adding SOAP Clients in PHP
4.3.3.4 Code the Application
Before implementing the SOAP clients, add the following line to ensure the program does not time out too early.
// set a large execution time (5 mins) set_time_limit(300);
Enter in the following code after declaring the SOAP clients
// Get Temperature $result = $tempMeter->GetIndoorTemperature(); $temp = $result->GetIndoorTemperatureResult; printf( "Temperature: %s<br />\n", $temp); flush(); // If temperature is above 20 if ($temp > 20) { // Rotate the Disco Ball $discoBall->TurnOn(); }
Hydra D12.5 External Developers Workshops Teaching Material II
Version 0.60 Page 71 of 106 22 December 2008
// Turn the fan on $fan->TurnOn(); $windSpeed = 0; while ( $windSpeed < 2 ) { $result = $windMeter->GetWindSpeed(); $windSpeed = $result->GetWindSpeedResult; printf( "WindSpeed: %s<br />\n", $windSpeed); flush(); if ( $windSpeed > 2 ) { // Blink the light $light->Flash(3); } // sleep for 5 seconds to wait for wind meter sleep(5); } // Turn off the fan and the disco ball $fan->TurnOff(); $discoBall->TurnOff();
Figure 38: Entire application code
4.3.3.5 Test the Application
Open up your internet browser and go to:
http://localhost:port/HydraDemonstrator
Hydra D12.5 External Developers Workshops Teaching Material II
Version 0.60 Page 72 of 106 22 December 2008
Check everything is working with the live cam
http://webcam.cnet.se/view/index.shtml
Figure 39: Viewing the program output via webcam
4.3.4 Summary
This tutorial showed how to communicate with devices that have been Hydra enabled through a standard Web Services interface. It reflects how a developer can interactively talk with various devices to create a smarter environment.
The example given is a basic introduction, but it clearly shows how it is possible to control the Hydra-enabled devices, and allow a developer to create more advanced scenarios with different devices. Extensions to this introductory examples using more advanced combination of internal Hydra managers to provide higher-level services and functionalities are planned for the next edition D12.9 of this deliverable series.
Hydra D12.5 External Developers Workshops Teaching Material II
Version 0.60 Page 73 of 106 22 December 2008
5. Hydra Tools Tutorials
This section presents various tools and software components available as part of the Hydra middleware SDK which helps the developer to achieve various objectives such as security, self management and automatic artefact generation during the software development cycle of Hydra based applications.
5.1 Communication Security
5.1.1 Introduction
5.1.1.1 Introduction of the Tutorial
Services (“managers”) in Hydra are able to communicate in a secure way with each other. This means that all messages sent within the middleware are automatically protected against eavesdropping and tampering. Further, messages cannot be spoofed or re-played by illegitimate parties.
This communication security is thought to be as transparent to the developer user as possible. In the ideal case, the protection mechanisms will be effective without needing any extra developer intervention. However, there might be situations in which developers need to reconfigure the communication security to their needs or even have to switch it off completely (e.g. for debugging purposes or in the case of very resource-restricted platforms). In this tutorial, we will explain how communication security is implemented in Hydra, how it can be used in a straight-forward way and what the configuration possibilities are.
5.1.1.2 Aims and Objectives
The aim of this tutorial is to explain the usage of Hydra's communication security mechanisms for developer users. After reading the tutorial, the developer should have an understanding of what the protection mechanisms can provide, how a protected connection between two managers can be set up and how changes to the configuration can be made.
5.1.1.3 Who the Tutorial is aimed at
This tutorial is aimed at developers using the Hydra middleware to build intelligent environments. The reader should bring experience in Java and an understanding of web services. A basic understanding of IT security is helpful, although no profound knowledge in protocols or cryptography is required.
5.1.2 Preparation
5.1.2.1 Hardware Requirements
There are no special hardware requirements. The software is written in Java and contains no platform-specific parts.
Hydra D12.5 External Developers Workshops Teaching Material II
Version 0.60 Page 74 of 106 22 December 2008
5.1.2.2 Software Requirements
5.1.2.2.1 Two Hydra Hydra managers, based on Axis
In order for the communication protection to work, one should have at least two Hydra managers running. As at the moment we provide only a Java implementation, both managers should also be implemented in Java. For the rest of the tutorial, we will use a connection between the NetworkManager and the EventManager as an example.
For an easy integration of the security module, we provide an Axis handler. So, both managers are required to run on Axis 1.4 (This requirement is just for an easy integration. Please refer to the implementation of those Axis handlers to learn how to write your own integration module)
The communication protection is based on the bouncycastle security provider which needs to be installed in the Java virtual machine. This setup has to be done only once and is described in detail in the next section.
5.1.2.3 Setup Procedure
5.1.2.3.1 Installing Bouncycastle
Setting up secure communication requires at first an installation of the bouncycastle security provider:
Usually, due to restrictions on cryptography in some countries, the Java VM comes with a limited crypto-functionality. In order to use the bouncycastle keystore and cryptographic keys longer than 128bit, the "JCE unlimited strength policy files" needs to be installed. It is available at http://java.sun.com/javase/downloads/index_jdk5.jsp but is also contained in the directory “required_files” in the security library project. Both files local_policy.jar and US_export_policy.jar must be copied to $JAVA_HOME/jre/lib/security (overwriting existing files).
In order to make the bouncycastle crypto provider available, it needs to be installed as a global java security provider:
Copy lib/bcprov-jdk14-138.jar to $JAVA_HOME/jre/ext
in $JAVA_HOME/jre/lib/security/java.security, add bouncycastle to the available crypto providers: security.provider.2=org.bouncycastle.jce.provider.BouncyCastleProvider (Don't set bouncycastle as the first provider. This is a known bug and won't work.)
5.1.3 Tutorial
There is only one step required for applying the communication protection via the Axis handler: The Hydra manager needs to be configured to use the Axis handler.
Two different configuration files are used for this purpose: client-config.wsdd contains the client-side configuration and is used to configure outgoing calls to a Hydra manager. deploy.wsdd is the server-side configuration and is used to configure incoming calls into a Hydra manager. In this tutorial we will assume that we want to set up a secure communication between the EventManager and the NetworkManager.
Hydra D12.5 External Developers Workshops Teaching Material II
Version 0.60 Page 75 of 106 22 December 2008
5.1.3.1 Purpose of communication security
The purpose of protecting messages between Hydra managers is mainly to ensure authenticity and confidentiality. As Hydra managers will run distributed on different devices, all communication between them has to be considered public. Without any communication protection, everybody would be able to read all plain text messages, to modify them at will or to inject arbitrary messages into all Hydra managers. As Hydra managers are used to control devices and to provide functionality to control the middleware, attackers would be able to use all device's functionality and could make any changes to the middleware at runtime.
However, communication security must not be mistaken for access control. Although communication security provides some access restrictions (in the sense that only parties knowing the correct key can use Hydra managers in the proper way), there will be a dedicated access-control mechanism in Hydra that regulates access to each single method of a Hydra manager, which is not possible using only communication security.
5.1.3.2 Server-side configuration
To enable the NetworkManager to process incoming protected Hydra messages, simply plug in the Axis handler for the security library by adding the following lines to the deploy.wsdd file under the service element:
The requestFlow element defines the handler for incoming messages. It references the CoreSecurityRequestHandler that is provided with Hydra's Axis service (so, no additional libraries have to be included in the managers). The parameter scope should always be set to session and the parameter include should reference the endpoints of the services to which communication should be protected. In the example, incoming messages from the EventManager and the NetworkManager itself will be protected.
In a productive setup of the Hydra middleware, we strongly recommend to set the include parameter to “*” in order to protect all communication between Hydra managers.
The responseFlow element should be defined analogous to the requestFlow element to make sure that outgoing messages from the manager are protected as well.
5.1.3.3 Client-side configuration
The configuration at client side is almost the same as at the server side, only the file client-config.wsdd has to be used instead of deploy.wsdd. The following configuration code should be added under the globalConfiguration element:
At the client side, the requestFlow element specifies what should happen to outgoing messages while responseFlow refers to incoming responses. For both directions, a URLMapper needs to be configured to ensure the normal functionality of the web service calls. Additionally, the Hydra security handlers for requests and responses are integrated again. The include parameter in the requestFlow section limits communication protection only to calls to the NetworkManager. All other calls from the EventManager will be left unprotected (for a productive environment, we recommend of course to omit the include parameter).
In the responseFlow, no include parameter is provided. This means that the security handler is applied to all incoming requests. Note that the security handler can currently deal with both protected and unprotected messages. In case a plain Hydra message without any security should arrive, the security handler will simply pass it on to the service and write a warning to the log file. This behaviour is very helpful for integration purposes, however, in the future it will probably be changed to a default “no plaintext” mode in which unprotected messages will be rejected.
5.1.3.4 Key configuration
In order to create protected messages, secret keys have to be used. The keys are contained in the file keystore.bks in the AxisBundle project and are automatically used by the security handler. So, no further configuration is required. At the moment, keys can be generated and deployed to the keystore.bks by using tools like Keytool IUI5. For the future, it is envisioned to provide developers with an integrated key generation tool as part of the IDE.
5.1.4 Summary and Facts
Communication security is an essential part of setting up a secure and reliable middleware. In this tutorial we have explained how Hydra's library for communication security can be easily integrated into Axis- and OSGi-based Hydra managers by simply providing two configuration files. Of course, the communication security feature is neither limited to Axis nor OSGi nor Java. However, the current implementation is only available in Java and the integration is the simplest when using the AxisBundle provided by Hydra.
5 http://yellowcat1.free.fr/index_ktl.html
Hydra D12.5 External Developers Workshops Teaching Material II
Version 0.60 Page 77 of 106 22 December 2008
5.2 Architectural Scripting and Test bed
5.2.1 Introduction
This tutorial provides a walkthrough of setting up ASL for ANT and running a simple Hello world script. It does not explain the inner workings of the implementation, nor how to extend it. ASL is the Architectural Scripting Language, but it is not a programming language, just a specification of a set of operations that express changes to a software architecture ontology instance. That instance may be a real, running system as in this tutorial. In this tutorial, the environment in which ASL is interpreted is a Test bed that implements the ASL operations. Here are some reasons why architectural scripting may be useful:
Tools like ANT and Make are convenient, but only cover the development-time---or the module view in architectural terms; they do not help you with setting up and running complex deployments of a system
For experimental researchers in software engineering, using a scripted routine to run a program can help ensure reproducibility of experiments. That may not be an issue for standalone applications, but it is more and more often the case that experiments concern several interacting components/services.
For testing, an architectural script provides an operational way to describe test scenarios, e.g. a failing device can be modelled by stopping a device and starting it again.
Although it is not covered in this tutorial (because it is only about Ant/ASL) an architectural script can describe reconfigurations of a system and be executed to enact them, which can be useful in self-* (-adapting) systems.
5.2.2 Preparation
5.2.2.1 Software Requirements
Either Eclipse or Ant will be required.
5.2.2.1.1 Eclipse
Eclipse is used for this tutorial as the IDE.
Eclipse: http://www.eclipse.org/
5.2.2.1.2 Ant
Ant: http://ant.apache.org/
Follow the download and installation instructions on the website
5.2.3 Tutorial
The testbed codebase consists of:
a jar file: ASL_osgi.jar
a set of third-party libraries contained in the lib folder,
an ant script, define.xml, which sets up the tasks defined in ASl_osgi.jar for use with ANT.
Hydra D12.5 External Developers Workshops Teaching Material II
Version 0.60 Page 78 of 106 22 December 2008
testbed resources: the ASL_osgi.jar relies on a set of resources for providing its functionality. Currently it supports starting an Equinox OSGi platform and deploying bundles to it, so it relies on the Eclipse Equinox jar in order to do that.
5.2.3.1 Installation
To obtain the testbed with ANT bindings for ASL, checkout
trunk/scratch/Testbed
from the Hydra SVN. It is an eclipse project, but if you only want to use the testbed and not modify it it’s not important to use Eclipse; in fact everything can be compiled with the ANT scripts included in the module.
For simple applications that only use the existing contents of the testbed, we need only the contents of the folder distribution in the checked out module.
The folder distribution has a readme file which describes the steps needed to start using the testbed. The content of that readme file is repeated here for convenience:
5.2.3.1.1 To deploy ASL independently of this Eclipse project:
Copy this directory to the desired location.
An ant script relying on ASL operations must include this line as a top-level task:
<import file="<path to define.xml>" >
Start using the tasks in your script ! If the tasks rely on resources such as a jar for the equinox osgi platform, those are probably included in this distribution.
However if you want to use a newer or customized version, please update the define.xml
Here’s a walkthrough of these steps:
As a precondition for doing this, you’ll need to have a working ANT installation. The scripts can be executed either inside Eclipse or from a command prompt – they rely only on ANT, not Eclipse.
Start out by making a working directory; we will call that wdir in this tutorial. (Or, make a new project in eclipse and copy the distribution folder to it)
Copy the distribution folder to wdir. Note that the distribution folder includes a .svn directory; this can be deleted if you want, ASL doesn’t use svn.
Next, open your shell of choice and go to wdir and type
ant –f distribution/define.xml
That should give you the following output:
Buildfile: distribution/define.xml [echo] Defined new asl-operation as task "init_device0" [echo] Defined new asl-operation as task "start_device" [echo] Defined new asl-operation as task "stop_device" [echo] Defined new asl-operation as task "init_component" [echo] Defined new asl-operation as task "deploy_component" [echo] Defined new asl-operation as task "undeploy_component" [echo] Defined new asl-operation as task "print_status" [echo] Defined new asl-operation as task "init_service" [echo] Defined new asl-operation as task "start_service" [echo] Defined new asl-operation as task "stop_service" [echo] Defined new asl-operation as task "bind_services" [echo] Defined new asl-operation as task "unbind_services"
Hydra D12.5 External Developers Workshops Teaching Material II
Version 0.60 Page 79 of 106 22 December 2008
depends: default: BUILD SUCCESSFUL Total time: 0 seconds
When executed the buildfile echo’s the name of all operations available in the ASL distribution (please disregard the init_device0, it’s only for internal use).
You are now ready to start using the testbed and ASL for Equinox OSGi.
5.2.3.2 Hello World
In this part of the tutorial we will:
- start an instance of the Equinox OSGi platform
- deploy a component to it
- start the component
- stop the component
- shutdown the platform
To accomplish this, create a new directory, helloworld, in wdir.
Next, we need to provide the component that we will install. Since we are using OSGi, that is a bundle jar file. We will use a simple bundle helloprovider_1.0.0.jar which can be found in the test/helloworld/ folder in the trunk/scratch/Testbed project checked out earlier.
Copy the hello.jar from the test/helloworld/bundles to wdir/test/helloworld/bundles.
Next, create the file wdir/test/helloworld/hello.xml (or copy it from the test/helloworld dir)
The following file is an ANT script and should minimally have the following contents (it is also available in the same dir):
<?xml version="1.0"?> <project name="helloworld" default="run" basedir="."> <description> Starts an equinox instance and the helloprovider1 and hello.interfaces bundle. </description> <import file="../../distribution/define.xml"/> </project>
This file just declares a new ant project and imports the ASL operations so they can be used in ant. To actually do something, we make a task that initializes a device, two components and a service so they can later be manipulated:
Hydra D12.5 External Developers Workshops Teaching Material II
Version 0.60 Page 80 of 106 22 December 2008
This task defines the handles to the components, devices and a service that we wish to use in this script.
The operation init_device takes just the id of the device as an argument, and adds it to the internal ASL registry of devices without starting the device – it basically defines the variable we will use as a handle to the actual OSGi platform instance we will start later.
The operation init_component defines a handle to a binary component, and tells ASL what file corresponds to the component on the local host – note that the path is relative to the basedir given as an attribute in the project element of the ANT script.
A service in ASL is instantiated from a component and runs on a particular device. Therefore the init_service which defines a service must specify which device the service will run on, and from which component it is instantiated.
Now the elements defined above can be used; we define another task, run, which depends on the definition in order to be executed:
The start_device operation, when executed, results in the following behaviour: First, a new instance of the JVM is started in a separate OS process, and it loads an ASL class which connects to the ASL code running in the JVM currently started to run ANT, our script. Second, the operation will start the Equinox OSGi platform on the new JVM. This gives us a running JVM/Equinox platform which can be controlled through ASL operations in the current script execution.
The operation print_status just prints the results of the osgi console command ss, on the device designated by the handle given as an argument.
Next, the two components are deployed using the deploy_component operation. All the required handles have been defined, so it just takes as arguments which component to deploy, and on which device it should be deployed. After these two calls to deploy_component, we have a JVM running Equinox, with two bundles installed (but not started).
ASL is intended to support different kinds of component models, not just OSGi. Therefore its operations are defined in terms of an abstract runtime architecture ontology. It includes components, services, devices, interfaces and bindings.
That abstract ontology is mapped to OSGi in a straightforward way – a component is a binary unit of deployment – for OSGi that’s a bundle jar-file. A service is a unit of runtime software accessible by other services – in osgi it’s a running bundle. A device is an OSGi platform.
To run the script, open a shell, go to wdir and
ant –f test/helloworld/hello.xml
ANT will then print the following output:
Buildfile: /Users/ingstrup/Documents/workspaces/Hydra/ASL/test/helloworld/hello.xml [echo] Defined new asl-operation as task "init_device0" [echo] Defined new asl-operation as task "start_device" [echo] Defined new asl-operation as task "stop_device" [echo] Defined new asl-operation as task "init_component" [echo] Defined new asl-operation as task "deploy_component" [echo] Defined new asl-operation as task "undeploy_component" [echo] Defined new asl-operation as task "print_status" [echo] Defined new asl-operation as task "init_service" [echo] Defined new asl-operation as task "start_service"
Hydra D12.5 External Developers Workshops Teaching Material II
Version 0.60 Page 81 of 106 22 December 2008
[echo] Defined new asl-operation as task "stop_service" [echo] Defined new asl-operation as task "bind_services" [echo] Defined new asl-operation as task "unbind_services"
This part just defines the operations like earlier, in the imported file define.xml, and shows that the ASL is set up and imported correctly into our script.
Next, each operation will print some output to the console as it is executed:
define: [init_device0] Creating repository [init_device0] Connecting: [init_device0] java.net.ConnectException: Connection refused [init_device0] Waiting 2 seconds before trying again... [init_device0] Connecting: [init_device0] Device initiated (d1) [init_component] Component initiated (hellointerfaces, at bundles/eu.hydra.asl.interfaces_1.0.0.jar) [init_component] Component initiated (helloprovider1, at bundles/eu.hydra.helloprovider1_1.0.0.jar) [init_service] Initiated service handlesp1 to component testbed.Equinox_OSGI_Component@69a4cbon devicetestbed.OSGI_Device_Connector$ClientRole@c20eb7
This starts the separate JVM, and defines the two components and the service. The init-device operation will print that it is waiting – it is waiting for the JVM that runs the Equinox platform to be launched.
clean_aslresources:
This runs a target from the define.xml file, which cleans the configuration area for the resources that comes with the distribution of ASL. The Eclipse Equinox OSGi platform bundle makes a config directory upon each invocation. This target just cleans that dir.
run: [start_device] Starting device (d1) [print_status] Status for device d1: [print_status] ID STATUS NAME [print_status] 0 ACTIVE org.eclipse.osgi
This prints the status for the empty, but started device – as can be seen it only has the mandatory bundle org.eclipse.osgi.
[deploy_component] Deploying component testbed.Equinox_OSGI_Component@34151fto devicetestbed.OSGI_Device_Connector$ClientRole@c20eb7 [deploy_component] Deploying component testbed.Equinox_OSGI_Component@69a4cbto devicetestbed.OSGI_Device_Connector$ClientRole@c20eb7 [print_status] Status for device d1: [print_status] ID STATUS NAME [print_status] 0 ACTIVE org.eclipse.osgi [print_status] 1 INSTALLED eu.hydra.asl.interfaces [print_status] 2 INSTALLED eu.hydra.helloprovider1 [init_service] Initiated service handlesp1 to component testbed.Equinox_OSGI_Component@69a4cbon devicetestbed.OSGI_Device_Connector$ClientRole@c20eb7 BUILD SUCCESSFUL Total time: 2 seconds
Next, the two bundles are installed, and the service is started.
This output is just from the console used by the JVM that runs ANT, our script, and not from the separate JVM that was launched to run the OSGi platform. Since that console does not exist, a logging window is opened to show the output from the bundles running on the OSGi platform. The hello world bundle which prints hello world will print to that console. Here are the contents of that console for the simple hello-world test:
Hydra D12.5 External Developers Workshops Teaching Material II
Version 0.60 Page 82 of 106 22 December 2008
TESTING: Starting server creating server role... Serversocket started... <start_device invoked at 5154.789> startingclass org.eclipse.core.runtime.adaptor.EclipseStarter Started... device started <print_status invoked at 5155.185> org.eclipse.osgi.framework.internal.core.BundleContextImpl@5d3ac0 bundles writing ack <deploy_component invoked at 5155.189> bundles/eu.hydra.asl.interfaces_1.0.0.jar deploying:bundles/eu.hydra.asl.interfaces_1.0.0.jar org.eclipse.osgi.framework.internal.core.BundleContextImpl@5d3ac0 Component deployed. <deploy_component invoked at 5155.202> bundles/eu.hydra.helloprovider1_1.0.0.jar deploying:bundles/eu.hydra.helloprovider1_1.0.0.jar org.eclipse.osgi.framework.internal.core.BundleContextImpl@5d3ac0 Component deployed. <print_status invoked at 5155.217> org.eclipse.osgi.framework.internal.core.BundleContextImpl@5d3ac0 bundles writing ack <start_service invoked at 5155.220> Hello World!!! (registering: eu.hydra.asl.interfaces.Hello) *-java.io.EOFException socket stream eof, assuming disconnect from client. Disconnecting from client
It logs each time an operation is invoked and the timing of that operations invocation locally on the OSGi platform. The time is in milliseconds, but modulo 10 seconds, so it only shows the relative timing of the operations on the client-side and cannot be reliably correlated with the timing of the script’s execution in the present implementation.
5.2.4 Points to Note
The operations in ASL are programmed so they are synchronous – in particular, execution of one will complete before the next one is executed.
Since the JVM executing the Equinox platform uses some Swing GUI classes for printing the logging, it will not stop automatically, and needs to be closed. If you do not close the logging window before executing the script again, the clean-target found in define.xml will probably not be able to clear the configuration area (because the files are in use) and therefore the same bundles that were loaded in the previous invocation will be loaded again – so you will see that the first print_status executed before any components are deployed will show that the bundles are already installed -- before the deploy-operations are executed.
The relationship between ASL and OSGI Declarative Services is uncertain at present.
There is currently no interactive mode for ASL-ANT – only a script contained in a file can be executed.
Hydra D12.5 External Developers Workshops Teaching Material II
Version 0.60 Page 83 of 106 22 December 2008
5.3 Flamenco
5.3.1 Introduction
Flamenco is a tool for supporting self-management in Hydra-based systems. It currently exists in two versions:
- Flamenco/CPN in which Petri Nets is used as a basis
- Flamenco/SW in which Semantic Web technologies are used as a basis
In the following we will guide users through a simple example of self-management and how to use Flamenco to realize a scenario of managing a flow meter-based agricultural system.
5.3.2 Preparation
5.3.2.1 Flamenco/CPN
5.3.2.1.1 Software Requirements
Windows XP or Vista (CPN Tools only runs on Windows or Linux)
Java 5 or later
CPN Tools. Request a license and download the tool from: http://wiki.daimi.au.dk/cpntools/cpntools.wiki
Access to the Hydra SVN repository
Eclipse Europa or later for running Flamenco
5.3.2.2 Flamenco/SW
5.3.2.2.1 Software Requirements
Currently the OWL/SWRL based Diagnosis manager is tested on Windows Vista and Java 6, but it should run on any operating system with Java 5 or later.
Here is the list of tools needed for running it:
Tomcat 5 or later
Protege 3.4 build 130 or later (with new patches sent to us)
5.3.2.2.2 Installation
Install Tomcat. Change the HTTP port to 9999, create a directory called 'ontology' under the directory 'webapps', Tomcat can be download from this link (version 5.5): http://tomcat.apache.org/download-55.cgi
Install Protege. The current SWRL APIs needs to access the ontologies coming with Protege, therefore, the running of OWL/SWRL based Diagnosis manager needs to point to the Protege installing directory. Protege can be downloaded from this link: http://protege.stanford.edu/download/registered.html
Download the Flamenco/SW from Hydra SVN: HYDRA\trunk\sdk\flamenco\ontodiagnosis. All ontologies are located in \ontodiagnosis\resources directory.
Hydra D12.5 External Developers Workshops Teaching Material II
Version 0.60 Page 84 of 106 22 December 2008
Copy all ontologies (including rule ontologies) to the newly created 'ontology' directory. Now all the rules and ontologies are ready for use.
Install the testing client by downloading from HYDRA\trunk\sdk\flamenco\test\flowmeter or HYDRA\trunk\sdk\flamenco\ThermometerGeneric
5.3.3 Tutorial
5.3.3.1 Flamenco/CPN
5.3.3.1.1 Design Time Usage
You may use CPN Tools directly to Flamenco/CPN nets. There is a template for such nets available in HYDRA/sdk/flamenco/flamencocpn/resources/cpn/flamenco-template.cpn. The figure below shows the result of opening the template:
Figure 40: CPN Tools, opening a template
5.3.3.1.1.1 The auxiliary page The right hand side is an auxiliary page that is used to generate specific Standard ML code for a Flamenco/CPN net. When you change the net (and want to use it at runtime in Flamenco/CPN), you will need to evaluate the first expression. Evaluating one of the expressions under "2." will start CPN Tools and wait for an attachment from the Java part of Flamenco/CPN on port 9000. Depending on which one you choose, you will be able to see the net being updated or not while Flamenco/CPN runs.
Lastly, the third expression may be evaluated if you want to be able to run Flamenco/CPN entirely without a user interface. Evaluating the expression will generate a Standard ML image that contains the specific net.
5.3.3.1.1.2 The net The template net is shown in the middle. It only contains two template places ("Input Events" and "Output Events"). These places will receive and send events from the Hydra middleware respectively
Hydra D12.5 External Developers Workshops Teaching Material II
Version 0.60 Page 85 of 106 22 December 2008
at runtime. In general there should be one place with the colour INPUT and one place with the colour OUTPUT
5.3.3.1.1.3 The declarations The declarations to the right define the colour of the input and output events and should be extended as needed.
5.3.3.1.2 Run Time Usage
A full Flamenco/CPN example may be found in HYDRA/sdk/flamenco/flamencocpn/resources/cpn/flamenco-scenario1.cpn. The net for this is shown in the figure below:
Figure 41: Full CPN example net
To run Flamenco/CPN, you will need to
Open CPN Tools on a Flamenco/CPN net as described in the previous section and evaluate the appropriate auxiliary declarations.
Run the Hydra Event Manager
Run the Java part of Flamenco/CPN. The easiest way currently is to start Eclipse on the FlamencoCPN project (in HYDRA/sdk/flamenco/flamencocpn/) and then run com.eu.hydra.flamenco.cpn.Flamenco.
Run a number of devices that will produce events
For simulating the last step, you may consider using the FlamencoTest project (in HYDRA/sdk/flamenco/test/flamencotester/). The class com.eu.hydra.flamenco.cpn.FlowTester will produce events from the flow meter scenario. If you have start CPN Tools with user interface updates, you will see tokens being produced and consumed in the net.
Hydra D12.5 External Developers Workshops Teaching Material II
Version 0.60 Page 86 of 106 22 December 2008
5.3.3.2 Flamenco/SW
5.3.3.2.1 Usage
Flamenco/SW listens to topic of '/statemachine/statechange', '/flamenco/socketwatch'. Therefore if you want to diagnose a system/application/device, you must publish events on these topics. And of course there should be a state machine corresponding to a device in order to be diagnosed. Another issue is that the Flamenco/SW should be subscribing to the same Event Manager as the one you are going to use for publishing events, in order to make use of the Network Manager and Trust Manager functionalities.
Please follow these steps:
Start Tomcat
Check that the Event manager is running (for the moment it is using EventManager_CNET). Start Event manager or else.
Start Network manager
Change the build file of Flamenco/SW. Only this tag in the build file: <jvmarg value="-Dprotege.dir=c:/protege/3"/> need to be changed to the Protege installation directory that you have. After this start the diagnosis manager with ant build. Alternatively, you can start Flamenco/SW by running as Java application by click on class
Start one of the test clients. In this tutorial we use the flowmeter client which is in the SVN directory: HYDRA\sdk\flamenco\test\Flowmeter. Build it with the ant build file in order to create a jar file, called Flowmeter.jar. Copy the Flowmeter.jar to Resource manager (resource manager is under HYDRA\trunk\middleware\managers\ResourceManager\ResourceManager) lib directory, and then change the config.ini under the lib\configuration as follows:
The last line is used to start the flowmeter test client. Now start the client by simply running it as a Java application. Now you can see that the client is sending measurements, and when the event manager publishes the state changes, the Diagnosis Manager will conduct a diagnosis based on the changed states, and publish it.
You can try the thermometer scenario by the thermometer client under svn: \HYDRA\sdk\flamenco\test\ThermometerGeneric. Remember to change the config.ini and change Flowmeter.jar to Thermometer.jar (the jar name built from thermometer client).
One thing to note is that if you try the testing multiple times using ant build file coming with Flamenco/SW, you may have to kill the Java process with the task manager (in windows Vista/XP we experienced this problem), remember to leave the one for Tomcat5.5, which is usually using around 45-50M memory. But this will not happen to running the approach of running as java application directly.
5.3.3.2.2 Development
There may be two kinds of developers who can utilize the Flamenco/SW Diagnosis Manager SDK: knowledge developers, who are responsible for the development of rules and the addition of diagnosis cases based on the existing ontologies, and Java application developers who make use of the rules and ontologies for realizing the diagnosis.
Hydra D12.5 External Developers Workshops Teaching Material II
Version 0.60 Page 87 of 106 22 December 2008
For knowledge developers, and most probably they are the developers who need use the SW Diagnosis Manager SDK:
To use the SW for your own development, the simplest case is to add a device to an existing system. Please use the ontologies in HYDRA\trunk\sdk\flamenco\ontodiagnosis\resources as the starting point.
The first thing needed is to add this device instance to the Device ontology, and then add this device instance to the HydraSystem concept in the Device ontology, which only needs to add related diagnosis rule and the device state machine. For example the steps for adding a flow meter to the Pig system in agriculture domain is:
Add the flowmeter device to the Pig system concept in the Device ontology, as shown in the following figure.
Figure 42: Adding a flowmeter device in the Device Ontology
Add the flowmeter state machine instance to the StateMachine ontology. It is called "Flowmeter_sm" in our case, if it does not exist. This step can refer to the WP4 ontology tutorial.
Add the flowmeter state machine instance to the hasStateMachine property of the "Flowmeter" device.
Add flowmeter diagnosis rule to the DeviceRule ontology, for example, one rule to diagnosis flowmeter is:
The adding of rules can be facilitated by using the SWRL tab in the Protege tool as shown in the following figure.
Figure 43: Rules in the Protege Tool
Add the diagnosis case to the Malfunction ontology. For example, we can add the "flowToohigh" instance to the "DeviceError" concept, with the "pipeBroken" as the case for the "hasCase" property by clicking the "Add new resource" button, and then fill the "pipeBroken" by adding "cause" as "pipe broken" and "remedy" as "replace pipe".
5.3.3.2.2.1 Java application developer: Suppose the rules added by the knowledge developer are only related to one device. Then there is no need to do anything as the APIs can handle the diagnosis cases.
In case a developer needs to process a rule, then a key class to use is RuleProcessing in package com.eu.hydra.flamenco.ruleprocessing. It can be used like this:
RuleProcessing rp=new RuleProcessing("http://localhost:9999/ontology/DeviceRule.owl"); HashSet<String> set=a.getAllSWRLInferred(); // get all inferred information, and can get inferred // individual or property separately using // getSWRLInferredIndividual(), getSWRLInferredProperty(). rp.checkNormalTwoColumnRule("deviceTypeChecking"); // execute rule called "deviceTypeChecking"
There are different methods for processing different types of rules: checkSingleColumnRule() which is used to process a rule returns only one column result but may have multiple rows. Similarly there are other rules processing methods.
As there may be many rules, but different rules are used for different purpose, therefore, a separate rule group can be build and executed as needed. The rule group feature can be used like this:
Hydra D12.5 External Developers Workshops Teaching Material II
Version 0.60 Page 89 of 106 22 December 2008
RuleGroupProcessing a=new RuleGroupProcessing("http://localhost:9999/ontology/DeviceRule.owl"); a.processRuleGroup("pig"); //create a rule group called "pig" HashSet<String> set=a.processRuleGroup("pig"); //This will execute all rules whose name contains 'Pig' HashSet<String> set1=a.processRuleGroup("pig", "battery", "and"); //This will execute all rules whose name contains 'Pig' and 'battery'. HashSet<String> set2=a.processRuleGroup("pig", "battery", "or"); //This will execute all rules whose name contains 'Pig' or 'battery.
Now the rule grouping feature can be used to diagnosis as followed:
DiagnosisInitializingData.getDiagnosisInitializingDataInstance(); DiagnosisInitiation pig=DiagnosisInitiation.getPigRuleInstance(); //prepare for infered result parsing as a observer to InferredResult InferredResultParsing parser=InferredResultParsing.getInferredResultParsingInstance(); InferredResult result=InferredResult.getInferredResultInstance(); result.addObserver(parser); pig.Diagnosis("pig"); pig.Diagnosis("ventilator"); pig.Diagnosis("flowmeter");
Hydra D12.5 External Developers Workshops Teaching Material II
Version 0.60 Page 90 of 106 22 December 2008
5.4 Limbo
5.4.1 Introduction
There is a growing trend to deploy web services in pervasive computing environments. Implementing web services on networked, embedded devices leads to a set of challenges, including productivity of the development, efficiency of web services, handling of variability and dependencies of hardware and software platforms. To address these challenges, we developed a web service compiler called Limbo, in which Web Ontology Language (OWL) ontologies are used to make the Limbo compiler aware of its compilation context, such as device hardware and software details, platform dependencies, and resource/power consumption, which are used to configure Limbo for generating resource efficient web service code. Limbo is designed according to the Blackboard architectural style and implemented based on OSGi which provides high flexibility for adding new compiling features.
In order to help the developers to generate web service code we have developed the Limbo compiler. Limbo generates client and server code in “JSE” or “JME” and the servers can be “standalone” or “osgi” based. To generate the code the developer has to provide some arguments that we will explain in detail in the next section, providing a wsdl description of the web service to generate.
5.4.2 Preparation
In the next table we explain the possible arguments that are provided to Limbo:
Parameter Explanation Possible Values
-s Language variant in which the generated code will be written.
“JSE” or “JME”
-t Generated components. “client”, “server” or “all”
-o Target system. Limbo can generate standalone servers or osgi based servers.
“standalone” or “osgi”
-h Specifies if the developer wants of not to generate a Standard Hydra Web Service.
“true” or “false”
wsdl Relative path for the wsdl description of the web service.
“test/com/eu/hydra/limb o/th03-ontology.wsdl”
5.4.3 Tutorial
We will explain how to run Limbo plug-in with the UPnP component.
Get limbo, limbo_osgi, upnp and libraries_bundle projects from the Hydra Subversion:trunk/sdk/limbo, trunk/sdk/limbo_osgi, trunk/sdk/limbo_plugins/upnp and trunk/sdk/limbo_plugins/libraries_bundle
Hydra D12.5 External Developers Workshops Teaching Material II
Version 0.60 Page 91 of 106 22 December 2008
Run the Ant target "export-plugin" in the Ant file "build-plugin.xml" in the root of the projects: limbo, upnp and libraries_bundle. This will create a bundle in the directory dist/plugins of each project.
Copy the generated jar files into the lib folder of the limbo_osgi project.
Run the limbo_osgi project as a Java Application and specify the arguments that will be used to run Limbo, p.e., ("-s" "jse" "-t" "all" "-o" "osgi" “-h” “false” "test/com/eu/hydra/limbo/th03-ontology.wsdl"). The OSGiLimboManager will read the config.ini file and start the specified bundles.
Create a new java project and copy the generated code. Run the UPnPServlet class.
To check that a new device discoverable by UPnP protocol you can download the Intel UPnP tools from: http://www.intel.com/cd/ids/developer/asmo-na/eng/downloads/upnp/tools/index.htm and run the Device Spy tool. In this case we can see the PicoTh03 device information which comes from a Hydra-enabled device.
Limbo will generate the following classes:
Server side classes:
Package com.eu.hydra.limbo:
StringTokenizer.java: Replacing for this class being non-existent in JME.
TH03Endpoint.java: Abstract Endpoint class for the Web Service.
TH03LimboServer.java: The main class for the Pico Web Service
TH03OpsImpl.java: Implementation of the service methods.
TH03Parser.java: Parser for SOAP messages.
TH03Service.java: Service class.
Package com.eu.hydra.limbo.upnp:
TH03Handler.java: Abstract class for handler.
TH03Handlers.java: Class managing the service handlers.
TH03HandlerService.java: Interface defining the handler method.
TH03LogHandler.java: Handler for logging features
TH03SOAPHandler.java: Handler responsible for handling SOAP messages.
Package com.eu.hydra.limbo.upnp:
TH03ServiceUPnPOpsImpl.java: Class defining the implementation of the operations provided by UPnP.
UPnPMulticastThread.java: Thread responsible for handling messages in the UPnP multicast address.
UPnPServer.java: The UPnP server.
PicoTh03.xml: Thermometer PicoTh03 UPnP device description, including, model name, device type and so on.
Th03Service_scpd.xml: Thermometer service as defined in the TH03 WSDL file, following the UPnP specification.
Client side classes:
LimboClient.java - Client main method to call the thermometer services.
th03LimboClientParser.java - Parser for SOAP messages.
Hydra D12.5 External Developers Workshops Teaching Material II
Version 0.60 Page 92 of 106 22 December 2008
th03LimboClientPort.java - Stub methods for the thermometer services.
th03LimboClientPortImpl.java - Implementation for the stub methods.
5.4.4 Other Information
Other plug-ins where developed also to add extra-generation features to the services generated by Limbo mainly: statemachine plug-in that generates state machine code used to handle self-management features in Hydra; probe plug-in adds probe features for diagnostics proposes. What the developer needs is to add the bundles to the configuration file in the limbo_osgi project.
Hydra D12.5 External Developers Workshops Teaching Material II
Version 0.60 Page 93 of 106 22 December 2008
5.5 Device Application Catalogue Browser
5.5.1 Introduction
5.5.1.1 Introduction of the Tutorial
The Device Application Catalogue (DAC) is a fundamental part in every Hydra-based application is , which is managed by the Application Device Manager. This is a runtime component that keeps track of and manages all devices that are currently active within an application. The Hydra Device Application Catalogue serves all Hydra middleware managers with the information and meta data they need regarding devices, their services, and their status.
This tutorial is an introduction to using the Device Application Catalogue browser, which was developed to allow a user/developer to graphically browse the Hydra network and inspect properties and services of devices.
5.5.1.2 Aims and Objectives
The goal of this tutorial is to familiarise a developer with the several functionalities of Device Application Catalogue browser.
5.5.1.3 Who the Tutorial is aimed at
This tutorial is directed to the followng group of people:
Individuals interested in having a general overview of HYDRA middleware.
Application developers.
5.5.2 Preparation
5.5.2.1 Hardware Requirements
Memory depending on OS but 512 Mb as minimum. Disk space 3MB needed on disk
5.5.2.2 Software Requirements
Windows XP or later (Windows 2003 Server and Vista also works). Microsoft .net 3.0 must be installed. (Can be downloaded from http://www.microsoft.com/downloads/details.aspx?familyid=10cc340b-f857-4a14-83f5-25634c3bf043&displaylang=en)
5.5.2.3 Setup procedure
Copy the DAC files to any directory
Edit Hydra DAC.exe.config to reflect the current installation i.e. change the following values:
gateway should be set to the machine (gateway) name.
ontologyurl should be set to point to the ontologymanager endpoint.
eventmanagerurl should be set to point to the event manager endpoint.
networkmanagerurl should be set to point to the network manager endpoint.
Start Hydra DAC.exe
Finished.
Hydra D12.5 External Developers Workshops Teaching Material II
Version 0.60 Page 94 of 106 22 December 2008
5.5.3 Tutorial
A fundamental part in every Hydra-based application is the Device Application Catalogue (DAC), which is managed by the Application Device Manager, as was explained in previous chapters. This is a runtime component that keeps track of and manages all devices that are currently active within an application. The Hydra Device Application Catalogue serves all Hydra middleware managers with the information and meta-data they need regarding devices, their services, and their status.
The Hydra DAC uses the Hydra Device Ontology and models for discovery to recognise new devices when they enter into a Hydra network. Based on the discovery model it queries the Device Ontology to deduce what type of device has entered the network. The Hydra DAC can be queried by different middleware managers to retrieve a service interface for different devices.
A Hydra DAC browser has been developed to allow a user/developer to graphically browse the Hydra network and inspect properties and services of devices. The browser tool also allows the user to invoke the different services offered by devices.
Figure 44: The Hydra DAC Browser
By manually invoking the different services we can also actually illustrate the role the Device Application Catalogue plays in the Hydra middleware. As can be seen above, 5 different Discovery Managers are available in the network, each of them is dedicated to discover a certain type of physical device (Bluetooth, RF Switches, ZigBee etc).
Each Discovery Manager keeps track of the device it has discovered and tries to elicit as much information as possible from the device. All this physical discovery information can be accessed by calling the service “Get Device Physical Discovery”.
Hydra D12.5 External Developers Workshops Teaching Material II
Version 0.60 Page 95 of 106 22 December 2008
Figure 45: Retrieving discovery information from the physical device
This discovery information is returned as an XML document, which can be seen in the figure below:
Figure 46: Discovery information from a Bluetooth Device
In the figure we can see that it is a Bluetooth Device that has been discovered, it has the Bluetooth Major DeviceType “Phone” and Minor DeviceType “CellPhonePhone” (Major DeviceType and Minor DeviceType are part of the Bluetooth standard.
Hydra D12.5 External Developers Workshops Teaching Material II
Version 0.60 Page 96 of 106 22 December 2008
The Bluetooth Discovery Manager has also managed to extract the different Bluetooth services offered by the device. This discovery information can now be used to reason about what type of device has been discovered. The physical discovery XML is given to the Device Ontology, that deducts that this device corresponds to a “Basic Phone” in the Hydra Device Ontology.
Figure 47: Resolving a physical device into a Hydra Device
By invoking the service “Resolve Device” we can now tell the Bluetooth Discovery Manager that this is a “Basic Phone”. The idea is of course to do this programmatically, but here we do it manually for illustration purposes.
Figure 48: Resolve information is transmitted as an XML structure to the Discovery Manager
The Discovery Manager then creates and publishes the device to the network as a “Basic Phone” device. The Basic Phone device is now available together with the services offered by a Basic Phone (in this case a set of SMS read/send functions).
Hydra D12.5 External Developers Workshops Teaching Material II
Version 0.60 Page 97 of 106 22 December 2008
Figure 49: A physical device with unknown functionality has been transformed into Basic Phone Device with services for reading/sending SMS
These services can now be invoked directly from the DAC Browser, and we can now for instance send an SMS.
Figure 50: Sending an SMS through the Basic Phone Device
In summary, the Discovery process follows this sequence:
Hydra D12.5 External Developers Workshops Teaching Material II
Version 0.60 Page 98 of 106 22 December 2008
Figure 51: As a device is discovered in the network, its type is resolved against the device ontology, and then entered into the DAC notifying the Hydra application
Finally we can also use the DAC Browser to retrieve a WSDL (Web Service Description Language) service description for a web service that allows us to access the device programmatically:
Figure 52: Using the DAC to retrieve a WSDL description for the device
Hydra D12.5 External Developers Workshops Teaching Material II
Version 0.60 Page 99 of 106 22 December 2008
Figure 53: A WSDL for the device
5.5.4 Summary
This tutorial described how to use the basic Device Application Catalogue functionalities, supporting the HYDRA application developer.
Hydra D12.5 External Developers Workshops Teaching Material II
Version 0.60 Page 100 of 106 22 December 2008
5.6 Policy Administration Component
5.6.1 Introduction
The Policy Administration Component (PAC) of the Hydra Policy Manager provides support for the developers and end-users of Hydra to interact with the Hydra security policy framework. The PAC promises to provide an effective user interface for the creation and management of Hydra policies. It currently comprises a Policy Editor Interface, Policy Storage and Policy Database management interface as well as an interface for the creation of policy users – that is, people or rather principals that are allowed to create, view, or otherwise edit existing policies. In the future, the PAC will also be integrated with the conflict-resolution component of the Hydra Policy Manager to help identify errors and conflicting policy specifications in particular when dealing with policy combinations and merging across different administrative sites.
The current description focuses on the creation of policies by the One of the main aspects of policy enforcement workflow is the creation of policies.
5.6.1.1 Aims and Objectives
Being one of the main aspects of the policy enforcement workflow, the current description focuses on the creation of Hydra security policies. The user interface is described and some of the convenience features that make the creation policies easier are introduced.
5.6.1.2 Who the Tutorial is aimed at
This tutorial is aimed at Hydra developer users intending to create pre-installed policies in their Hydra-based applications and power end-users that understand the syntax, concepts, and the mechanisms of the XACML policy framework.
5.6.2 Preparation
5.6.2.1 Hardware Requirements
The PAC does not have any special hardware requirement. However, since its current implementation is a Java-based, it should be able to run on any platform that can execute Java programs.
5.6.2.2 Software Requirements
The PAC is written in Java and therefore requires a Java runtime environment that supports at least version 1.5.
5.6.2.3 Setup Procedure
In order to use the PAC it must be downloaded from the Hydra software repository. The PAC can either be run as a standalone application for the creation and management of Hydra policies or it can be run as a NetBeans plugin within NetBeans by developers who use the NetBeans IDE. For this tutorial we shall assume that the user is running the PAC as a standalone application.
The PAC is currently distributed as ZIP, JNLP and Mac OS X application. The JNLP can be run directly from the distribution website and installed locally on the user’s machine. Also the OS X application can be directly installed as usual. The ZIP archive which can be inflated (“unzipped”) on many platforms. Depending on the platform the unzipped file contains a bin folder which contains a convenience platform-specific launcher via which the application can be launched. This launcher sets all the necessary parameters and environments needed by the Java runtime environment to properly
Hydra D12.5 External Developers Workshops Teaching Material II
Version 0.60 Page 101 of 106 22 December 2008
execute the application. Otherwise the user can also directly invoke the application from the command line as usual with the relevant options.
5.6.3 Using the Policy Administration Component
The Policy Administration Component or PAC provides support for the developers and end-users of Hydra to interact with the Hydra security policy framework. This is achieved by providing an easy-to-use interface for the creation and management of Hydra policies. The current tutorial focuses on the creation of policies, showing how the PAC makes the writing of Hydra policies a little bit easier.
The first step is to download the software from the Hydra website and install it locally. We are assuming in this tutorial that the ZIP distribution is being used. After unzipping the software into a suitable directory the user will find a bin subfolder which contains a file policyadmingui which is a shell script for launching the PAC application on Linux and other Unix-based systems. This folder also contains policyadmingui.exe and policyadmingui_w.exe which are launchers of the Windows family of operating systems. The file policyadmingui_w.exe will launch the GUI application directly, whereas policyadmingui.exe launches the application from the command prompt. In most cases it is more convenient to simply launch the application directly with policyadmingui_w.exe on Windows. On launching the application the developer is taken to the main window where many of the features of the PAC are quickly accessible.
Figure 54: Empty Policy Administration Component Dashboard The left panel on the screen presents buttons to common tasks such as policy database administration, user access privilege administration, policy creation and searching. Under the first button which deals with the management of the policy database, the user can create a policy repository (which is backed up by an XMLDB-compliant database) where he or she can store future policies. This also allows the user to perform other administrative tasks on the policy repository. The
Hydra D12.5 External Developers Workshops Teaching Material II
Version 0.60 Page 102 of 106 22 December 2008
user administration a button allows the user to create users and assign privileges to them in order to be able to create, view or modify policies stored in the repository. The “Find Policy” button allows the user to search for relevant policies based on several parameters such as creation date, the content of the policies, the owner of the policy etc. The focus of this tutorial is the policy creation part. We assume that the user wants to create a new policy which will be used to secure his or her Hydra environment.
5.6.3.1 Creating a New Policy
The user starts by selecting “Write New Policy” button, which loads a window containing a Policy Template to jumpstart the policy creation process. This policy template is a default one which comes with the Hydra installation. The user can also create new templates which can be selected for use during the creation of policies.
Figure 55: Create a New Policy
Figure 56: A Policy Template is Chosen
The default policy template conforms to the XACML 2.0 standard; other templates conforming to XACML 3.0 standard may also be used. Depending on the particular version of the XACML standard that is being used the PAC can validate the user’s policy to ensure that it conforms to the standard. This is useful in order to avoid unexpected behaviour during policy enforcement. Also, other general functionalities such as checking that the policy is well formed can be performed by using keyboard
Hydra D12.5 External Developers Workshops Teaching Material II
Version 0.60 Page 103 of 106 22 December 2008
shortcuts, the mouse context menus or by clicking appropriate buttons in the user interface. These important convenience features make it easier to quickly find errors during policy creation.
A Policy Navigator panel also provides the user with a high-level overview of the policies for easy navigation. By using the drop-down menus, the user can easily navigate through the policy based on the structure and content of the policy. This can be very useful for very large policies. Other important features include syntax highlighting of the policy which makes reading policies easier on the eye. By providing visual cues the policy author can easily identify important aspects of the policy. The syntax colouring is configurable. The windows are also dockable so that the user can move the visual presentation of the panels around on the screen to better suit his or her workflow.
Figure 57: Policy Auto-Completion Feature An important feature for policy writers is the context-sensitive auto-completion offered by the policy editor of the PAC. By pressing CTRL+SPACEBAR in any editing context a pop-up appears suggesting the relevant possibilities in that context. This can significantly speed up the policy creation/editing process. The auto-completion is also activated by typing the “<” tag, and narrows down to the most relevant options as the user types along. The user may however select an option at any point. The auto-completion also automatically inserts the mandatory attributes when an element is selected.
Hydra D12.5 External Developers Workshops Teaching Material II
Version 0.60 Page 104 of 106 22 December 2008
For example, in the Figure below, by typing “<P” in the context of “PolicySet”, the popup suggests the <Policy> element which is valid in that context based on the schema, and by selecting this element, the requited PolicyId and RuleCombiningAlgId tags are automatically filled in, placing the cursor in a convenient location to continue customising the PolicyId tag.
Figure 58: Policy Navigator
Hydra D12.5 External Developers Workshops Teaching Material II
Version 0.60 Page 105 of 106 22 December 2008
Figure 59: Windows can be docked
5.6.4 Summary and Facts
Policy creation is an important aspect of the policy enforcement workflow. This tutorial demonstrates some useful convenience features of the Policy Administration Component of the Hydra Policy manager, which makes the creation of policies easier for the end-user or developer user of Hydra.
Hydra D12.5 External Developers Workshops Teaching Material II
Version 0.60 Page 106 of 106 22 December 2008
6. Summary
This document is the ‘External Developer Workshops Teaching Material II’ which forms the deliverable D12.5 as part of the WP12. Its purpose is to expose third party developers to the Hydra platform and APIs via in-depth tutorials utilising examples a developer can use to interact with the Hydra managers and software components.
To summarise, the tutorials in this document detail how an external developer may use the facilities provided by the Hydra middleware to create their own programs. The tutorials are split into three categories, namely, Managers, Tools, and Devices.
The Managers section directly specifies how to use each individual Hydra manager. The devices section specifies how a developer might use Hydra to talk with devices and how devices are integrated into the Hydra middleware framework. Finally, the Tools section shows some extra tools and features of the Hydra middleware that will facilitate the development of Hydra-based applications.
The Managers described in this deliverable include the Storage Manager, Context Manager, Event Manager, Resource Manager, Ontology Manager, Network Manager and the Policy Manager. Under the Devices section, tutorials include “Communicating with Hydra Devices using C#”, “Communicating with Hydra Devices using Java”, and “Communicating with Hydra Devices using PHP”. Under the Tools section we describe tools to support Secure Communications, Architectural Scripting and Test bed. Furthermore, under the Tools section Flamenco, Limbo, and Device Application Catalogue Browser and Policy Administration Component are described.
It is planned that as new functionalities are added and improvements are made to the middleware, these will be documented in preparation for the final version D12.9 of this deliverable series. In the interim information about new developments in the middleware will be made available on the Hydra website in form of HOWTO documents and video tutorials. The deliverable D12.9 – “Final External Developers’ Workshops Teaching Material”, which is the final edition of this deliverable series will contain the latest and most up-to-date descriptions and tutorials about the feature sets of the middleware. It is expected that D12.9 will be the final definitive guide to third party developers interested in using the Hydra middleware to Hydra-enable devices and to write applications on top of the Hydra middleware platform.