31
Versio n 3 WHO’S NEXT? Counselor / Receptionist User Guide Version 3.0.83
Version
3 WHO’S NEXT? Counselor / Receptionist User Guide Version 3.0.83
B L U E E O N ™ S O L U T I O N S , L T D
Counselor / Receptionist User Guide
© Blue Eon™ Solutions 4007 McCullough Avenue • Suite 458
San Antonio, TX 78212 Phone 1.866.317.0256 • Fax 210.680.3633
Table of ContentsIntroduction and Application Requirements……........................ 1
Who Should Use the Database Constructor? ................................. 1 System Requirements (Database/Server)....................................... 1 System Requirements (Client Workstation) .................................... 2
Installation ................................................................................. 3 Standard MSI Package ................................................................... 3 Installer File..................................................................................... 3
Running the Application............................................................. 3 Welcome Screen............................................................................. 4 Product Key Required Screen......................................................... 5 Local Datasource Properties Screen .............................................. 6 Local Installation Information Screen .............................................. 7 Confirmation Installation Screen ..................................................... 8 Installation Complete Screen .......................................................... 9
Index ....................................................................................... 10
Chapter
1
Introduction and Application Requirements
ho’s Next? is a highly sophisticated software program designed to allow counselors, advisors, and other student service areas to track students they service on a regular basis. Who’s Next? has been specially designed for colleges, universities, and other higher educational institutions. W
Which Departments Should Use Who’s Next? Some of the areas that may benefit from Who’s Next? are Counseling and Advising centers, Admission & Records, disAbility Support Services (DSS), Registrar offices, and other higher education offices. Basically any area that has a high traffic flow of students that need to be recorded and tracked on a regular basis. For a listing of other areas that could use this software, please feel free to contact us.
System Requirements for Who’s Next?• Microsoft© Windows© Windows XP or Vista.
• Microsoft .NET Framework 2.0 or above.
• Microsoft Windows Installer 3.0 or higher.
• Microsoft Internet Explorer© 5.01 or higher.
• Microsoft Data Access Components (MDAC) 2.8 or higher. For more information about MDAC, or to obtain the latest version, please visit http://support.microsoft.com.
• Intel Pentium II processor or higher.
• 25 MB of available hard disk space.
• 50 MB of available RAM (minimum).
1
Chapter
2
Installation ho’s Next? 3.0 is packaged into a standard Microsoft Installation Package (MSI) file. In order to install this file, you will need to have the Microsoft Windows Installer 3.0 or higher on your computer. W
Desktop ShortcuTo begin insWhosNext.Minstructions. Osee a Who’s Ne
t talling the Who’s Next? 3.0, simply launch the ain3.Setup.msi file and follow the installation nce the application is finished installing, you should xt 3.0 shortcut on your Desktop.
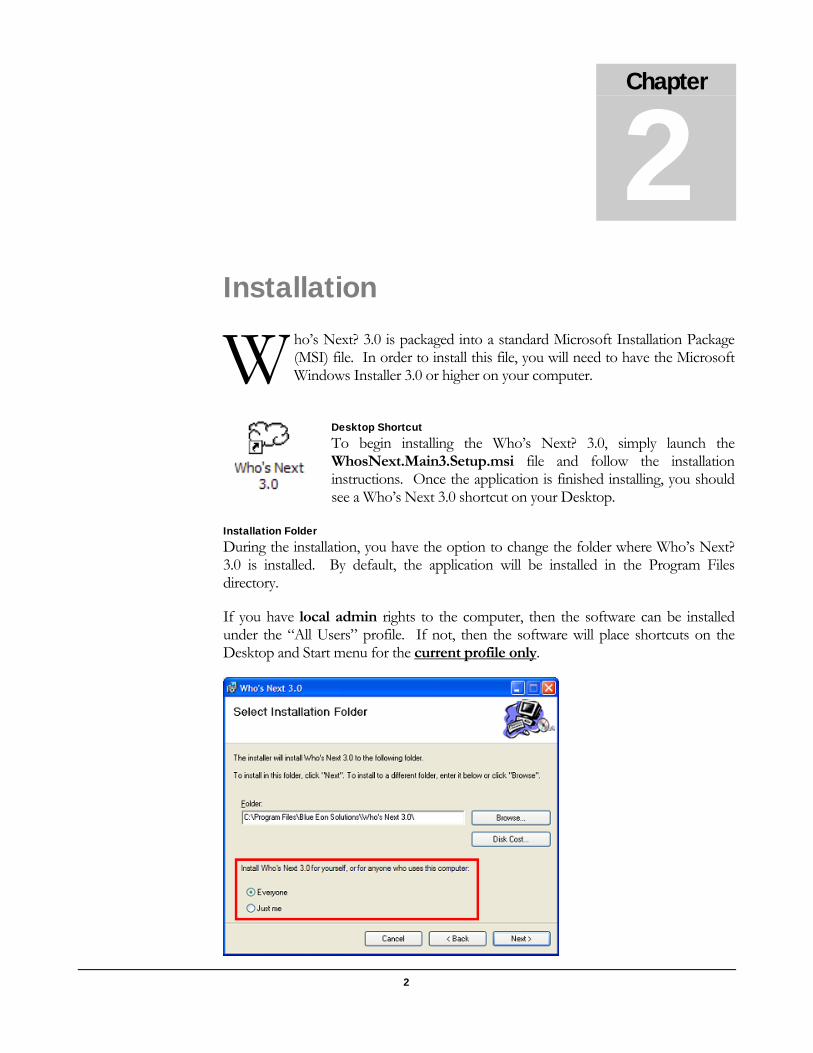
Installation Folder During the installation, you have the option to change the folder where Who’s Next? 3.0 is installed. By default, the application will be installed in the Program Files directory.
If you have local admin rights to the computer, then the software can be installed under the “All Users” profile. If not, then the software will place shortcuts on the Desktop and Start menu for the current profile only.
2
Chapter
3 Running Who’s Next?
o launch Who’s Next? 3.0 simply double-click on its shortcut from the Desktop or the Start menu.
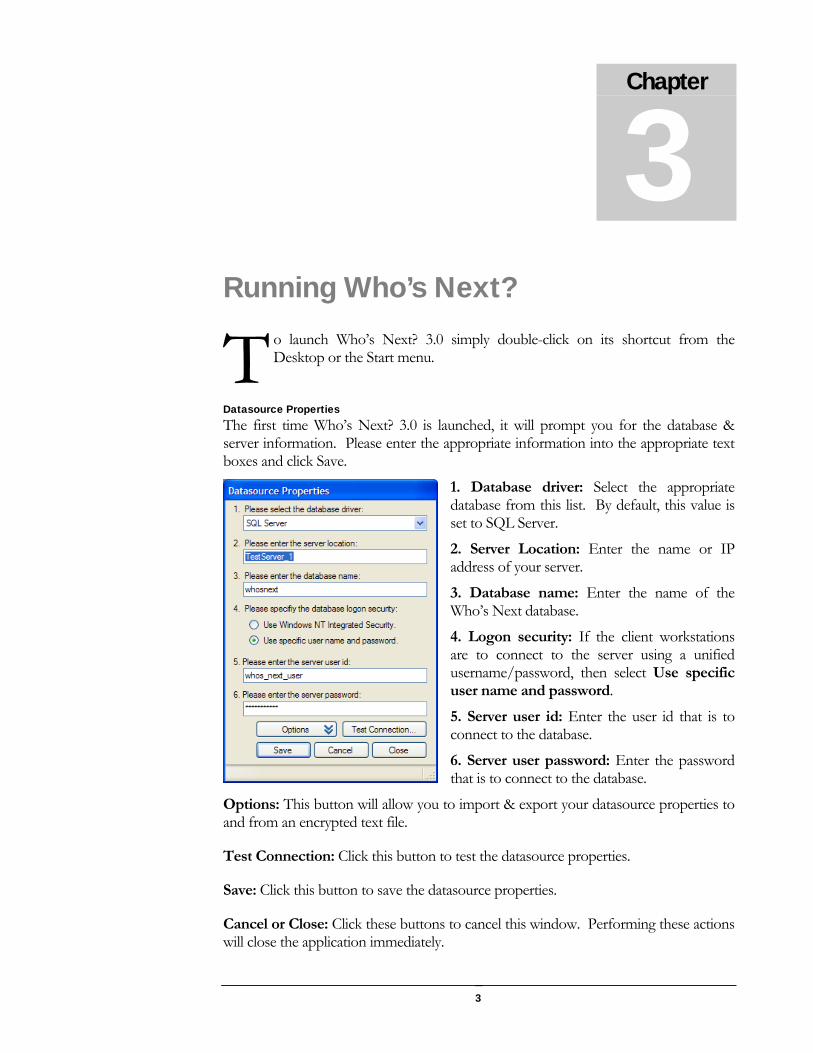
Datasource Properties
T The first time Who’s Next? 3.0 is launched, it will prompt you for the database & server information. Please enter the appropriate information into the appropriate text boxes and click Save.
1. Database driver: Select the appropriate database from this list. By default, this value is set to SQL Server.
2. Server Location: Enter the name or IP address of your server.
3. Database name: Enter the name of the Who’s Next database.
4. Logon security: If the client workstations are to connect to the server using a unified username/password, then select Use specific user name and password.
5. Server user id: Enter the user id that is to connect to the database.
6. Server user password: Enter the password that is to connect to the database.
Options: This button will allow you to import & export your datasource properties to and from an encrypted text file.
Test Connection: Click this button to test the datasource properties.
Save: Click this button to save the datasource properties.
Cancel or Close: Click these buttons to cancel this window. Performing these actions will close the application immediately.
3
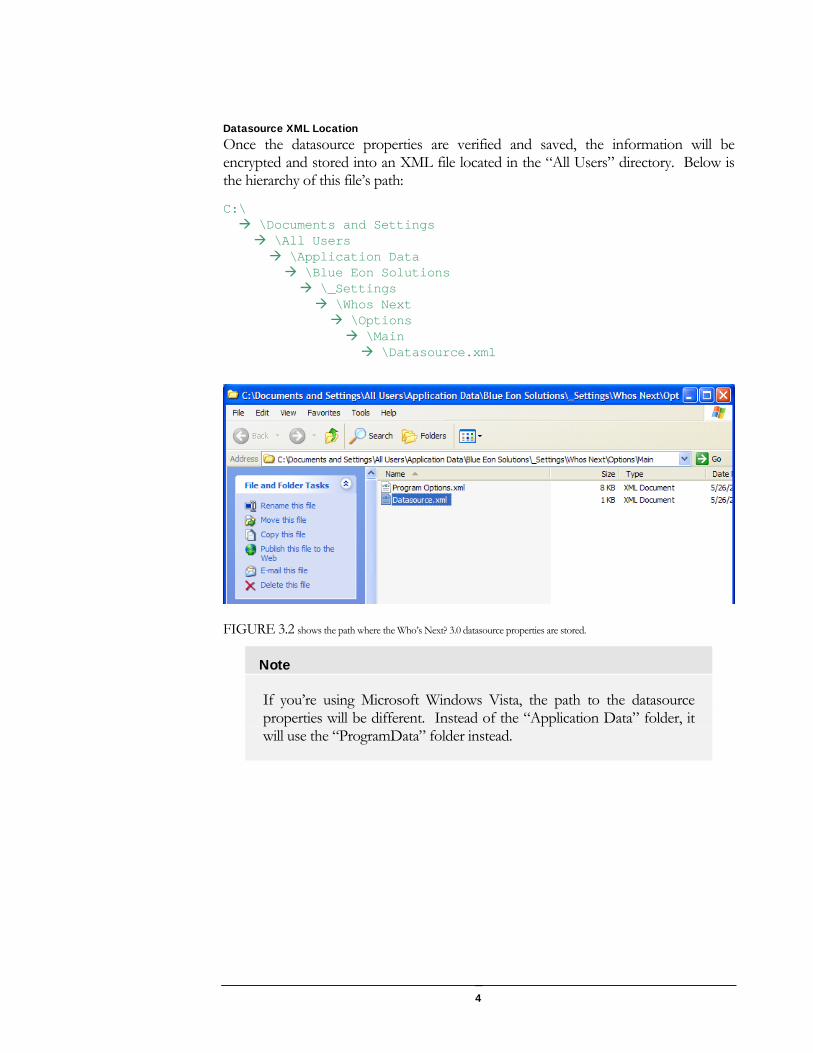
Datasource XML Location Once the datasource properties are verified and saved, the information will be encrypted and stored into an XML file located in the “All Users” directory. Below is the hierarchy of this file’s path: C:\ \Documents and Settings \All Users \Application Data \Blue Eon Solutions \_Settings \Whos Next \Options \Main \Datasource.xml
FIGURE 3.2 shows the path where the Who’s Next? 3.0 datasource properties are stored.
Note
If you’re using Microsoft Windows Vista, the path to the datasource properties will be different. Instead of the “Application Data” folder, it will use the “ProgramData” folder instead.
4
Chapter
4 Logging into Who’s Next?
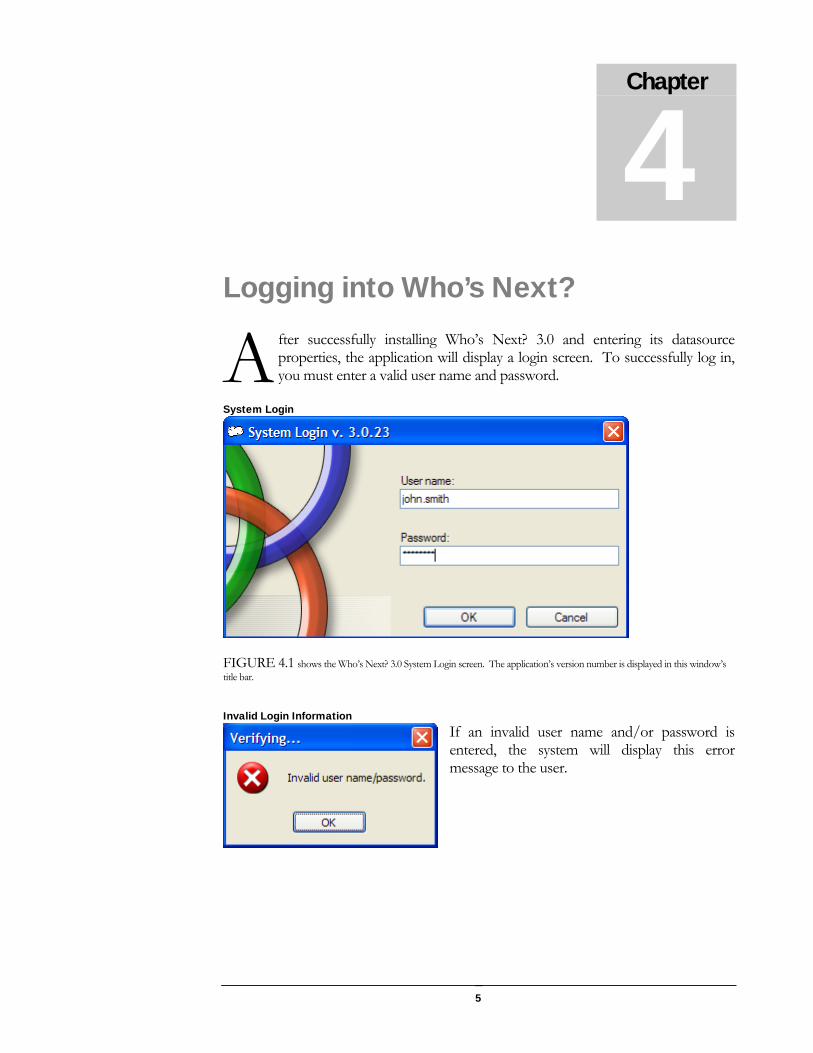
fter successfully installing Who’s Next? 3.0 and entering its datasource properties, the application will display a login screen. To successfully log in, you must enter a valid user name and password.
System Login
A
FIGURE 4.1 shows the Who’s Next? 3.0 System Login screen. The application’s version number is displayed in this window’s title bar.
Invalid Login Information
If an invalid user name and/or password is entered, the system will display this error message to the user.
5
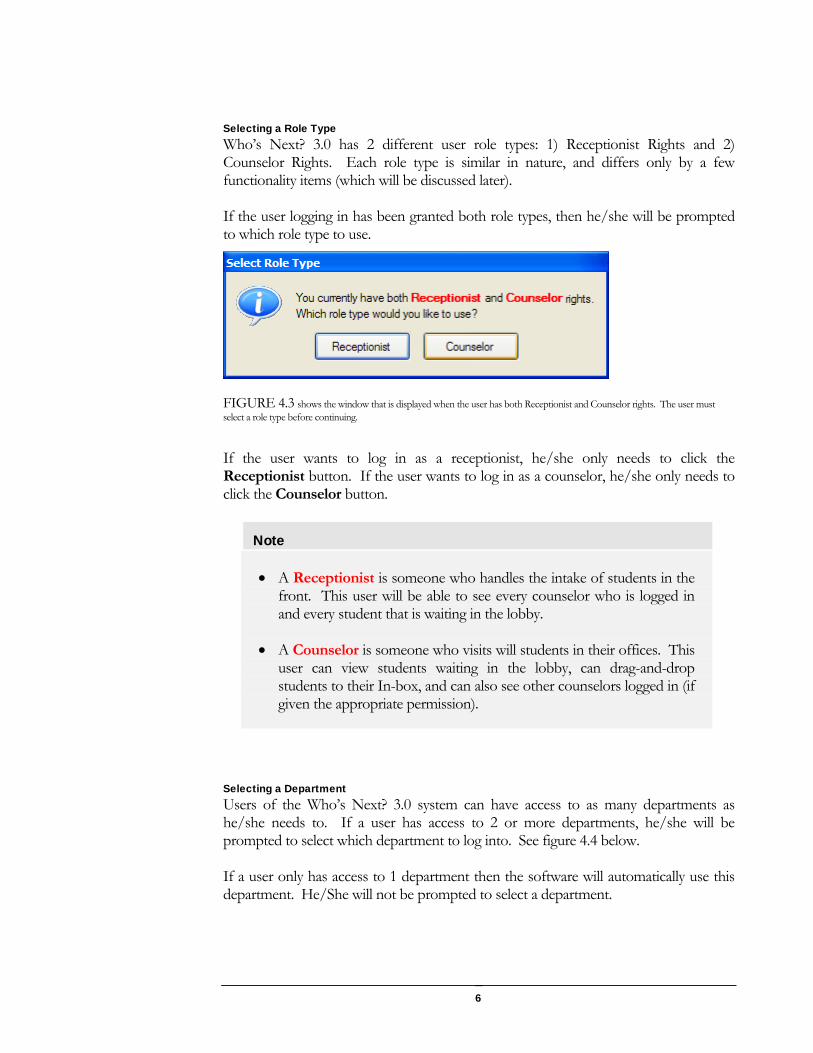
Selecting a Role Type Who’s Next? 3.0 has 2 different user role types: 1) Receptionist Rights and 2) Counselor Rights. Each role type is similar in nature, and differs only by a few functionality items (which will be discussed later). If the user logging in has been granted both role types, then he/she will be prompted to which role type to use.
FIGURE 4.3 shows the window that is displayed when the user has both Receptionist and Counselor rights. The user must select a role type before continuing.
If the user wants to log in as a receptionist, he/she only needs to click the Receptionist button. If the user wants to log in as a counselor, he/she only needs to click the Counselor button.
Note
• A Receptionist is someone who handles the intake of students in the front. This user will be able to see every counselor who is logged in and every student that is waiting in the lobby.
• A Counselor is someone who visits will students in their offices. This user can view students waiting in the lobby, can drag-and-drop students to their In-box, and can also see other counselors logged in (if given the appropriate permission).
Selecting a Department Users of the Who’s Next? 3.0 system can have access to as many departments as he/she needs to. If a user has access to 2 or more departments, he/she will be prompted to select which department to log into. See figure 4.4 below. If a user only has access to 1 department then the software will automatically use this department. He/She will not be prompted to select a department.
6
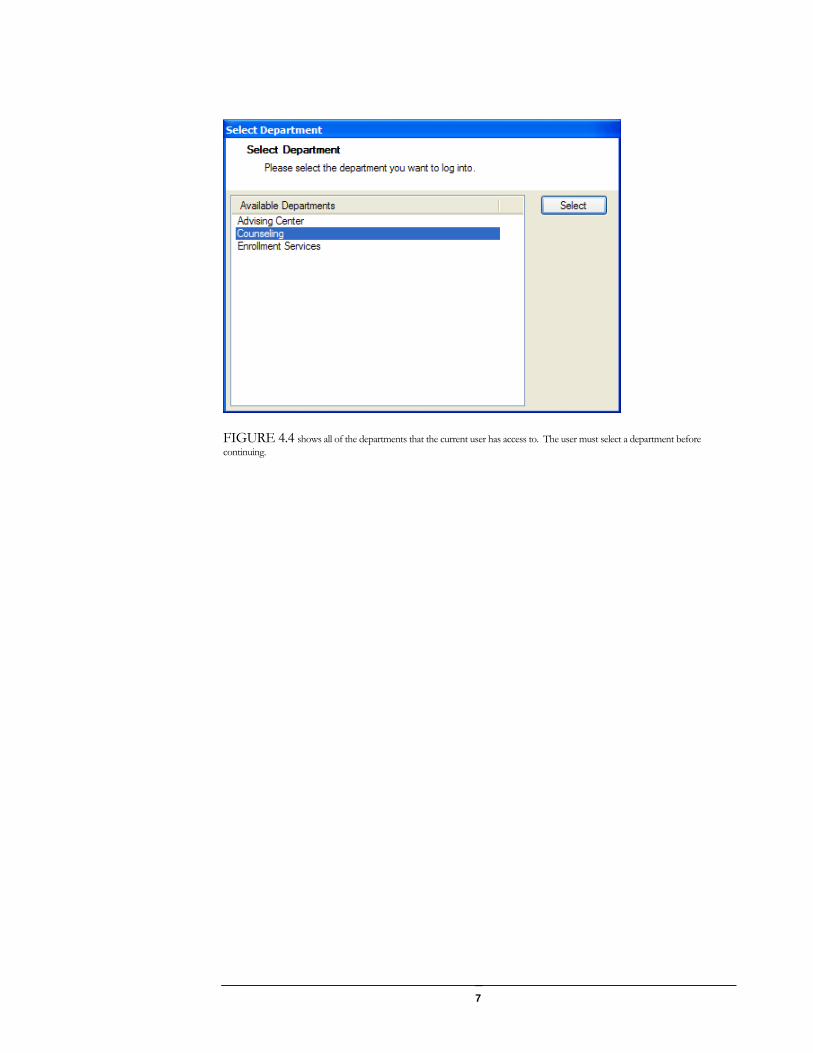
FIGURE 4.4 shows all of the departments that the current user has access to. The user must select a department before continuing.
7
Chapter
5 How do I use Who’s Next?
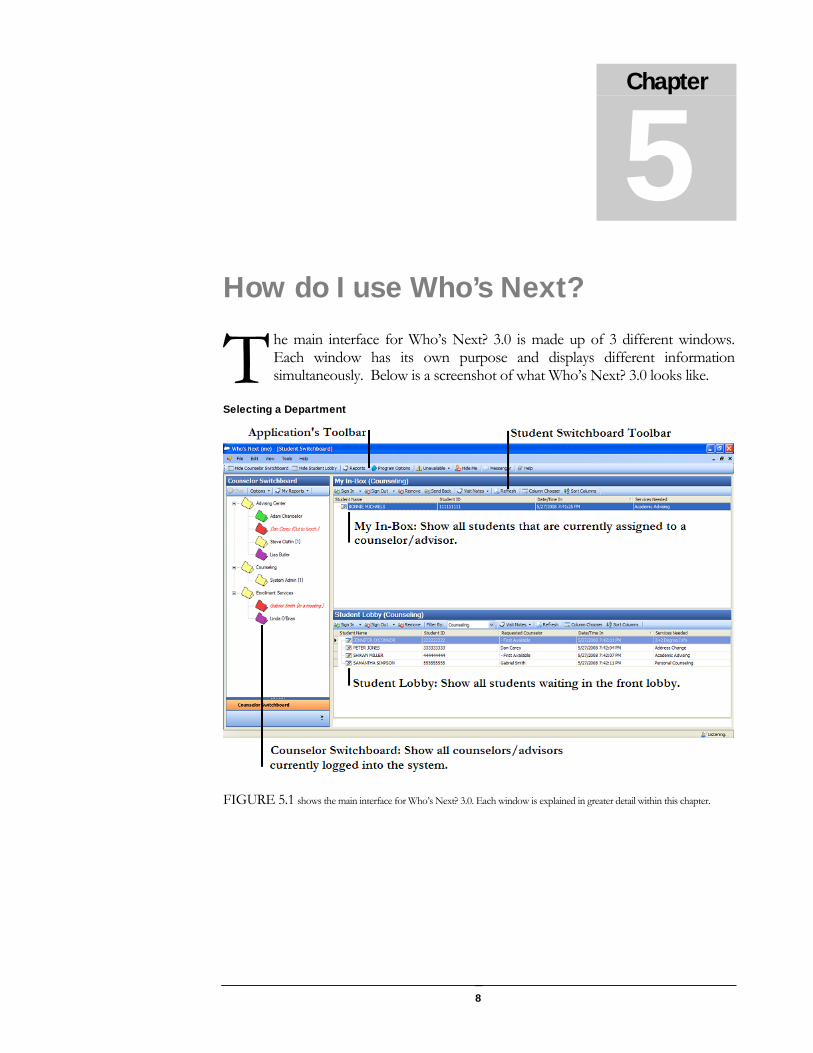
he main interface for Who’s Next? 3.0 is made up of 3 different windows. Each window has its own purpose and displays different information simultaneously. Below is a screenshot of what Who’s Next? 3.0 looks like.
Selecting a Department
T
FIGURE 5.1 shows the main interface for Who’s Next? 3.0. Each window is explained in greater detail within this chapter.
8
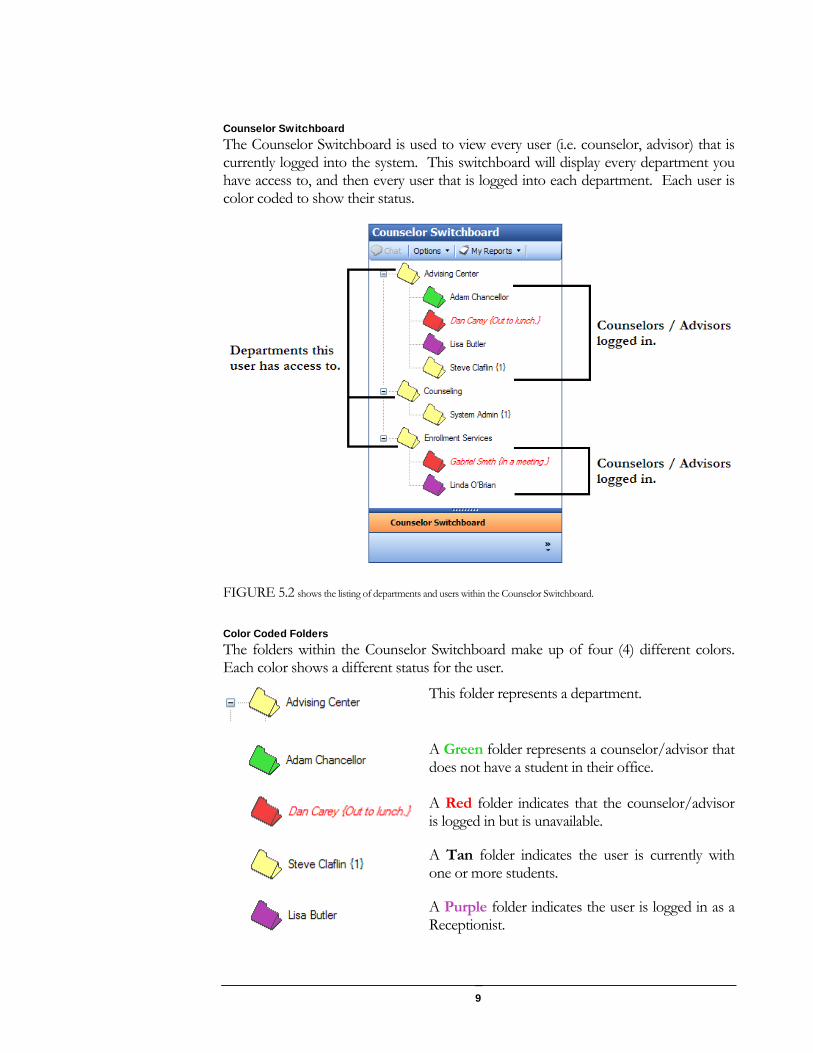
Counselor Switchboard The Counselor Switchboard is used to view every user (i.e. counselor, advisor) that is currently logged into the system. This switchboard will display every department you have access to, and then every user that is logged into each department. Each user is color coded to show their status.
FIGURE 5.2 shows the listing of departments and users within the Counselor Switchboard.
Color Coded Folders The folders within the Counselor Switchboard make up of four (4) different colors. Each color shows a different status for the user.
This folder represents a department.
A Green folder represents a counselor/advisor that does not have a student in their office.
A Red folder indicates that the counselor/advisor is logged in but is unavailable.
A Tan folder indicates the user is currently with one or more students.
A Purple folder indicates the user is logged in as a Receptionist.
9
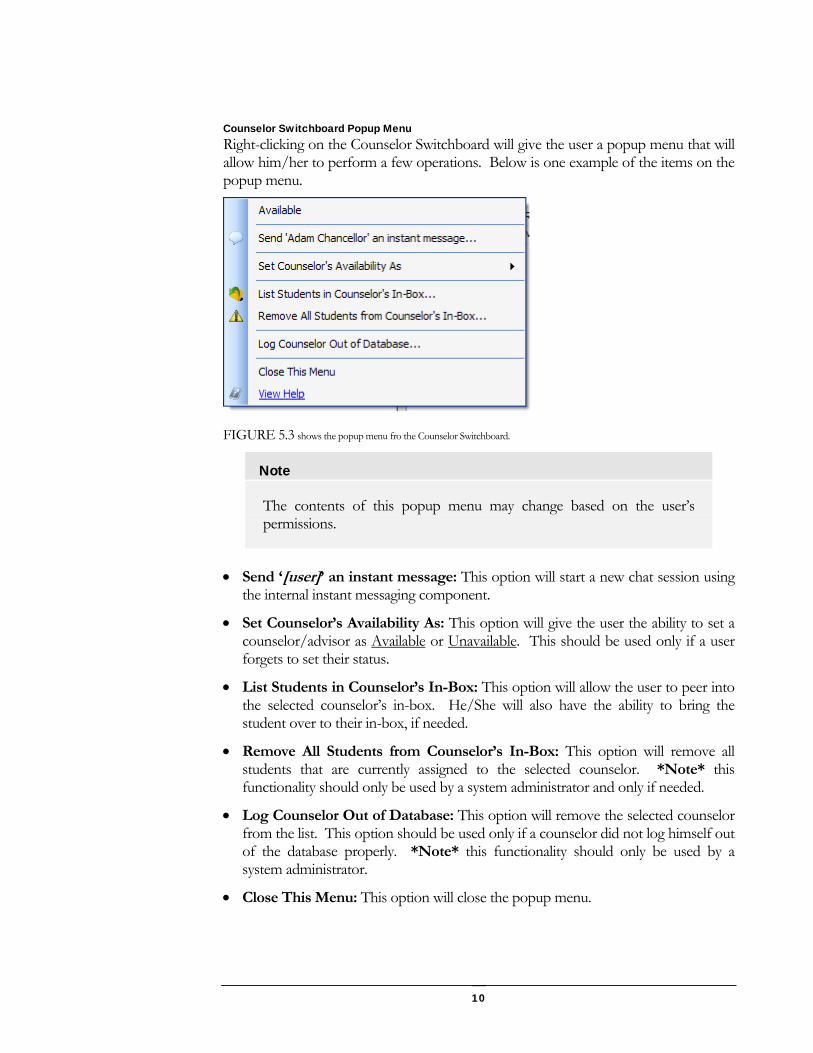
Counselor Switchboard Popup Menu Right-clicking on the Counselor Switchboard will give the user a popup menu that will allow him/her to perform a few operations. Below is one example of the items on the popup menu.
FIGURE 5.3 shows the popup menu fro the Counselor Switchboard.
Note
The contents of this popup menu may change based on the user’s permissions.
• Send ‘[user]’ an instant message: This option will start a new chat session using the internal instant messaging component.
• Set Counselor’s Availability As: This option will give the user the ability to set a counselor/advisor as Available or Unavailable. This should be used only if a user forgets to set their status.
• List Students in Counselor’s In-Box: This option will allow the user to peer into the selected counselor’s in-box. He/She will also have the ability to bring the student over to their in-box, if needed.
• Remove All Students from Counselor’s In-Box: This option will remove all students that are currently assigned to the selected counselor. *Note* this functionality should only be used by a system administrator and only if needed.
• Log Counselor Out of Database: This option will remove the selected counselor from the list. This option should be used only if a counselor did not log himself out of the database properly. *Note* this functionality should only be used by a system administrator.
• Close This Menu: This option will close the popup menu.
10
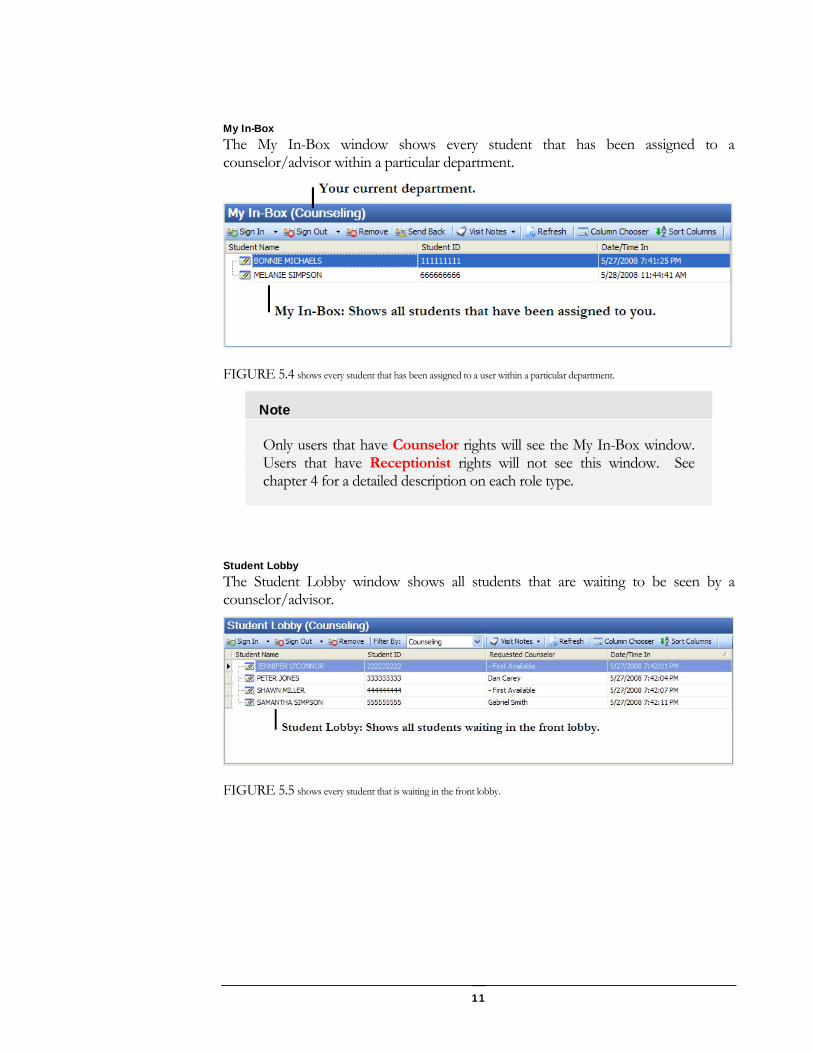
My In-Box The My In-Box window shows every student that has been assigned to a counselor/advisor within a particular department.
FIGURE 5.4 shows every student that has been assigned to a user within a particular department.
Note
Only users that have Counselor rights will see the My In-Box window. Users that have Receptionist rights will not see this window. See chapter 4 for a detailed description on each role type.
Student Lobby The Student Lobby window shows all students that are waiting to be seen by a counselor/advisor.
FIGURE 5.5 shows every student that is waiting in the front lobby.
11
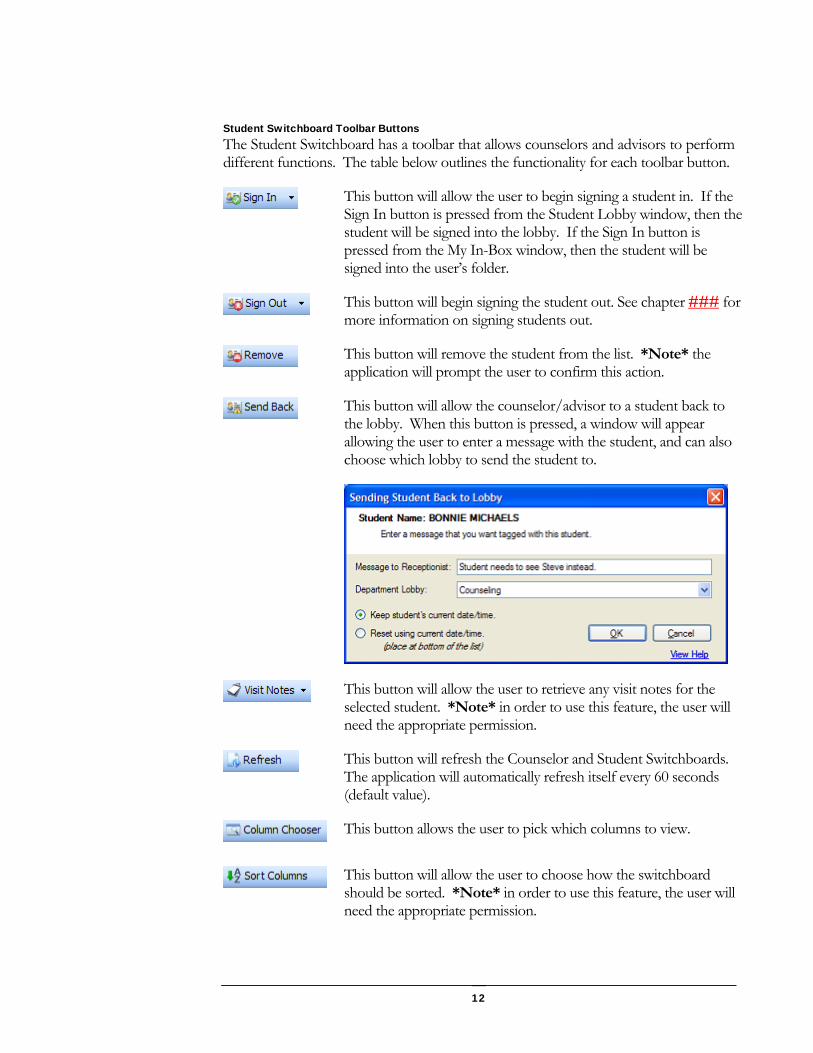
Student Switchboard Toolbar Buttons The Student Switchboard has a toolbar that allows counselors and advisors to perform different functions. The table below outlines the functionality for each toolbar button.
This button will allow the user to begin signing a student in. If the Sign In button is pressed from the Student Lobby window, then the student will be signed into the lobby. If the Sign In button is pressed from the My In-Box window, then the student will be signed into the user’s folder.
This button will begin signing the student out. See chapter ### for more information on signing students out.
This button will remove the student from the list. *Note* the application will prompt the user to confirm this action.
This button will allow the counselor/advisor to a student back to the lobby. When this button is pressed, a window will appear allowing the user to enter a message with the student, and can also choose which lobby to send the student to.
This button will allow the user to retrieve any visit notes for the selected student. *Note* in order to use this feature, the user will need the appropriate permission.
This button will refresh the Counselor and Student Switchboards. The application will automatically refresh itself every 60 seconds (default value).
This button allows the user to pick which columns to view.
This button will allow the user to choose how the switchboard should be sorted. *Note* in order to use this feature, the user will need the appropriate permission.
12
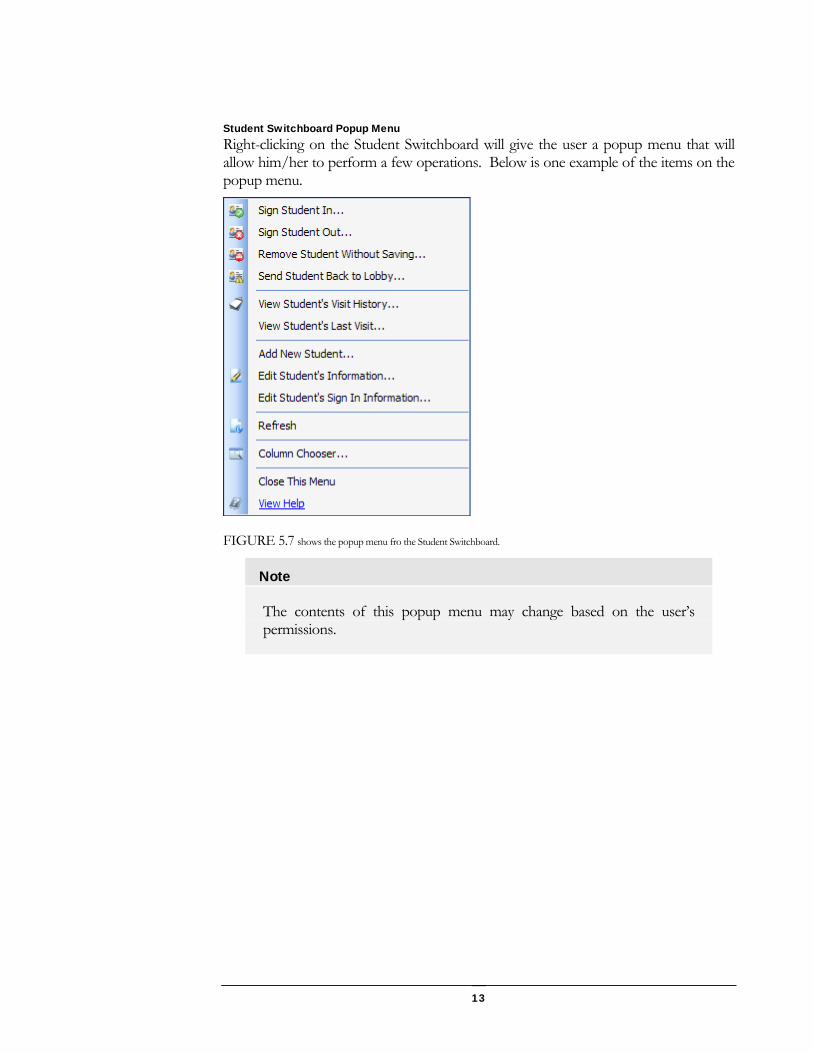
Student Switchboard Popup Menu Right-clicking on the Student Switchboard will give the user a popup menu that will allow him/her to perform a few operations. Below is one example of the items on the popup menu.
FIGURE 5.7 shows the popup menu fro the Student Switchboard.
Note
The contents of this popup menu may change based on the user’s permissions.
13

Chapter
6 Assigning Students to a Counselor / Advisor
o assign a student to a counselor/advisor, simply drag-and-drop the student from the Student Switchboard over to the Counselor Switchboard. Once the student has been assigned, the color of the folder will change to a Tan color (see figure 6.1).
T Assigning a Student to a Counselor/Advisor
FIGURE 6.1 shows how assign a student by dragging a student from the Student Lobby over to the Counselor Switchboard.
Once a student is assigned to a counselor/advisor, the folder’s color will change to Tan. The number in brackets
indicates how many students currently reside in the user’s In-Box.
14
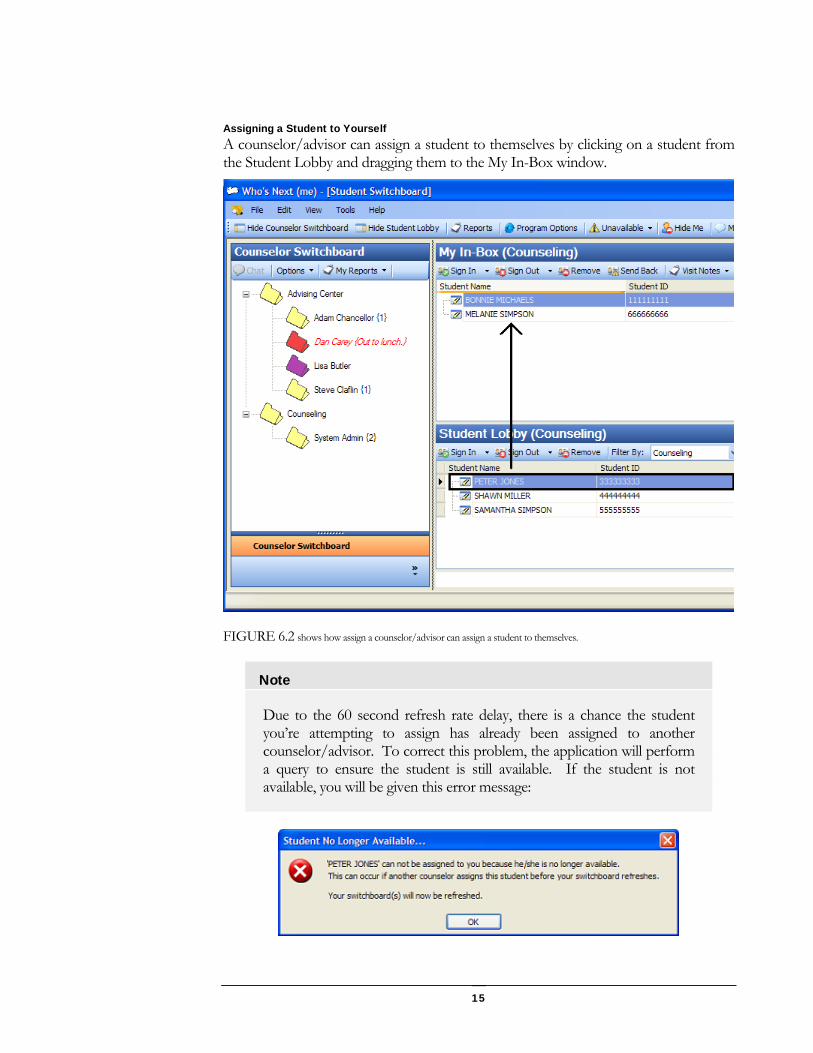
Assigning a Student to Yourself A counselor/advisor can assign a student to themselves by clicking on a student from the Student Lobby and dragging them to the My In-Box window.
FIGURE 6.2 shows how assign a counselor/advisor can assign a student to themselves.
Note
Due to the 60 second refresh rate delay, there is a chance the student you’re attempting to assign has already been assigned to another counselor/advisor. To correct this problem, the application will perform a query to ensure the student is still available. If the student is not available, you will be given this error message:
15
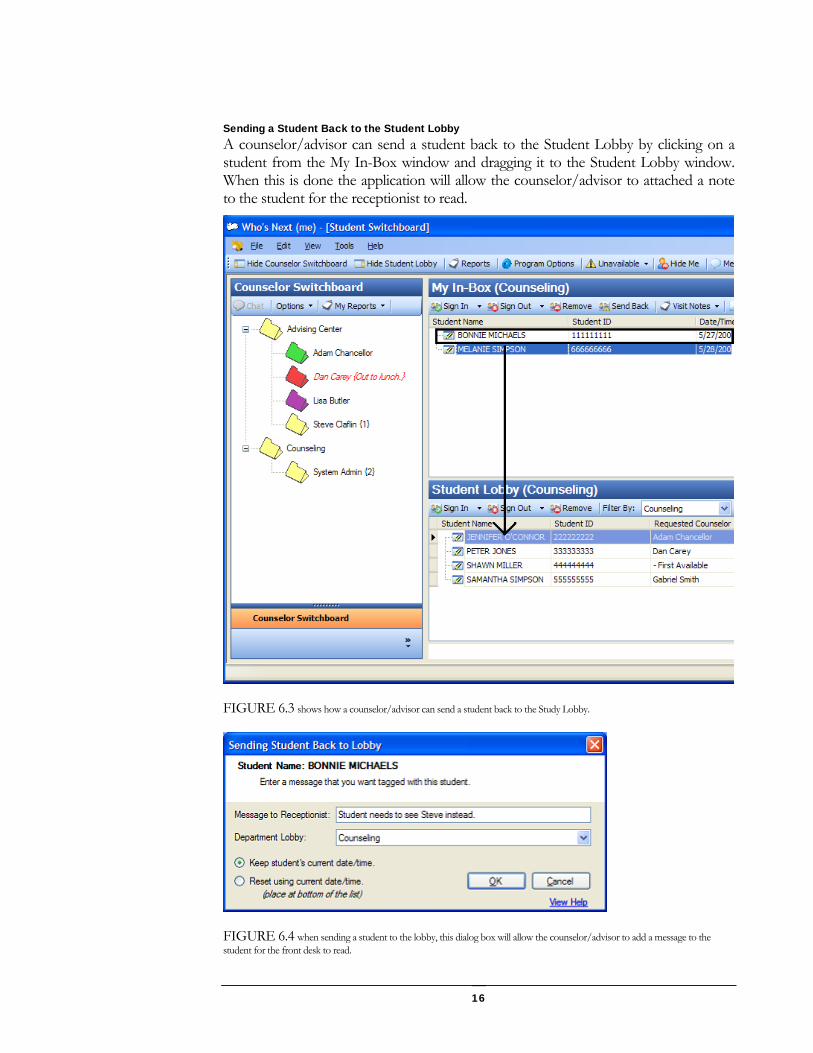
Sending a Student Back to the Student Lobby A counselor/advisor can send a student back to the Student Lobby by clicking on a student from the My In-Box window and dragging it to the Student Lobby window. When this is done the application will allow the counselor/advisor to attached a note to the student for the receptionist to read.
FIGURE 6.3 shows how a counselor/advisor can send a student back to the Study Lobby.
FIGURE 6.4 when sending a student to the lobby, this dialog box will allow the counselor/advisor to add a message to the student for the front desk to read.
16
Chapter
7 Signing Students In
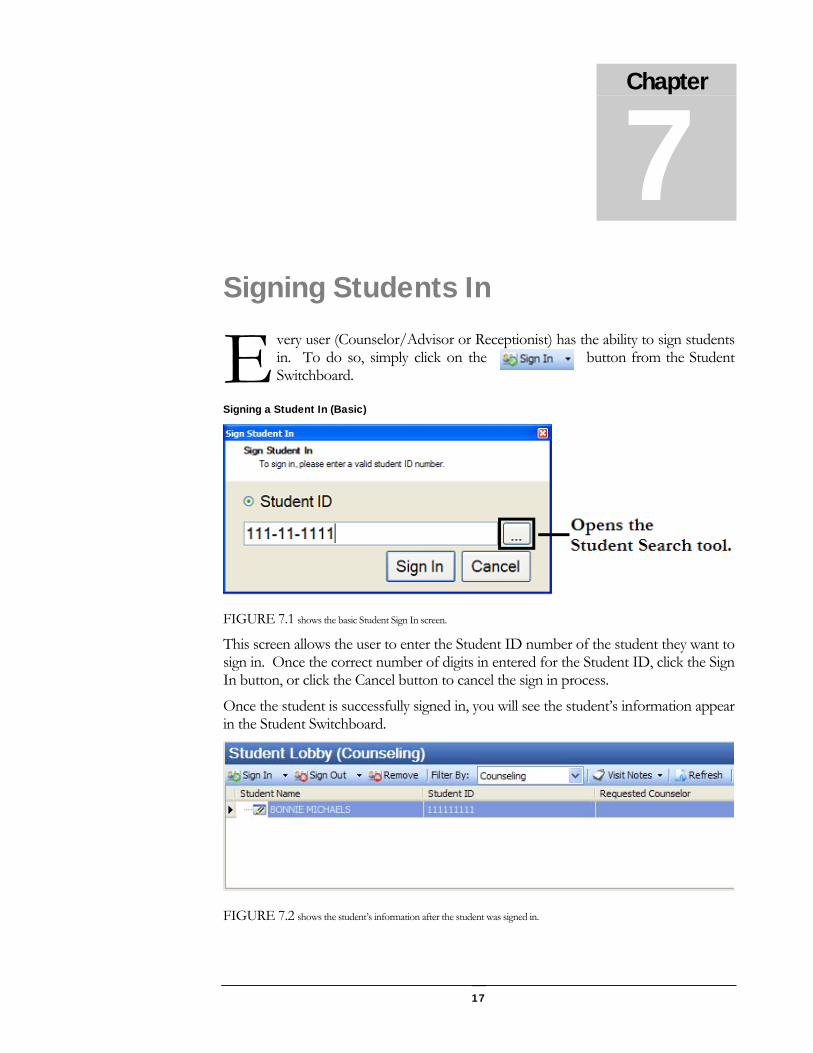
very user (Counselor/Advisor or Receptionist) has the ability to sign students in. To do so, simply click on the button from the Student Switchboard.
Signing a Student In (Basic)
E
FIGURE 7.1 shows the basic Student Sign In screen.
This screen allows the user to enter the Student ID number of the student they want to sign in. Once the correct number of digits in entered for the Student ID, click the Sign In button, or click the Cancel button to cancel the sign in process.
Once the student is successfully signed in, you will see the student’s information appear in the Student Switchboard.
FIGURE 7.2 shows the student’s information after the student was signed in.
17
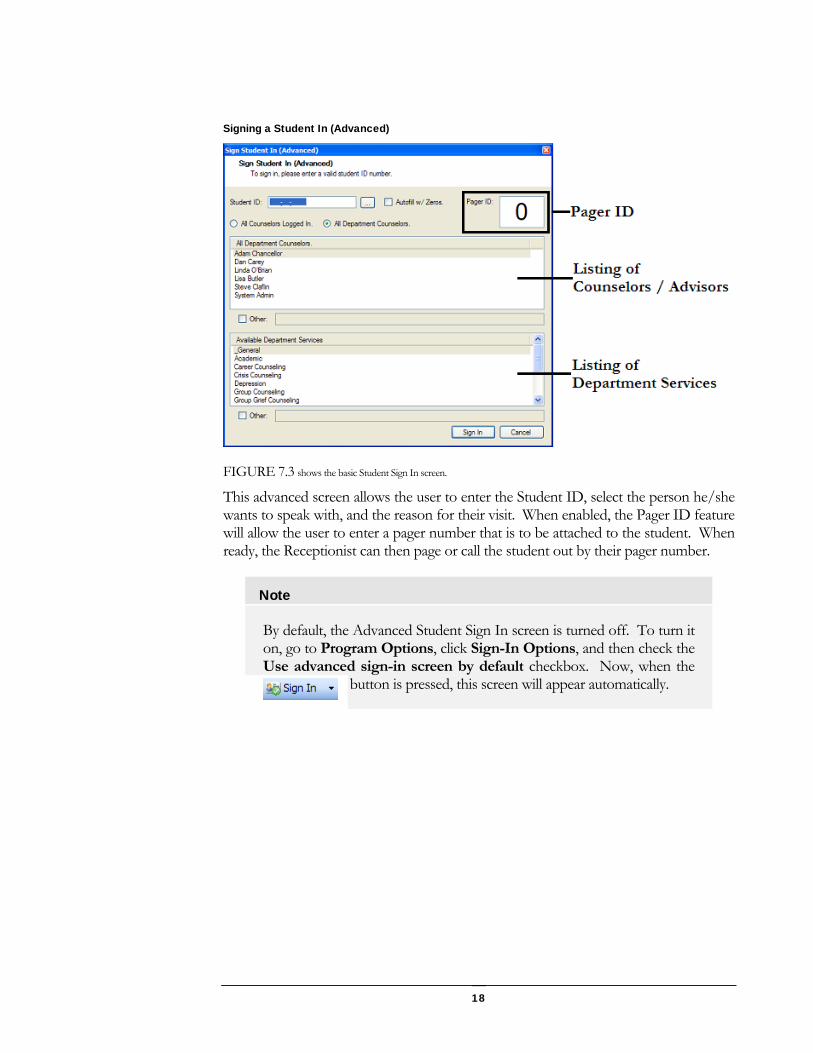
Signing a Student In (Advanced)
FIGURE 7.3 shows the basic Student Sign In screen.
This advanced screen allows the user to enter the Student ID, select the person he/she wants to speak with, and the reason for their visit. When enabled, the Pager ID feature will allow the user to enter a pager number that is to be attached to the student. When ready, the Receptionist can then page or call the student out by their pager number.
Note
By default, the Advanced Student Sign In screen is turned off. To turn it on, go to Program Options, click Sign-In Options, and then check the Use advanced sign-in screen by default checkbox. Now, when the
button is pressed, this screen will appear automatically.
18
Chapter
8 Saving Student Visits
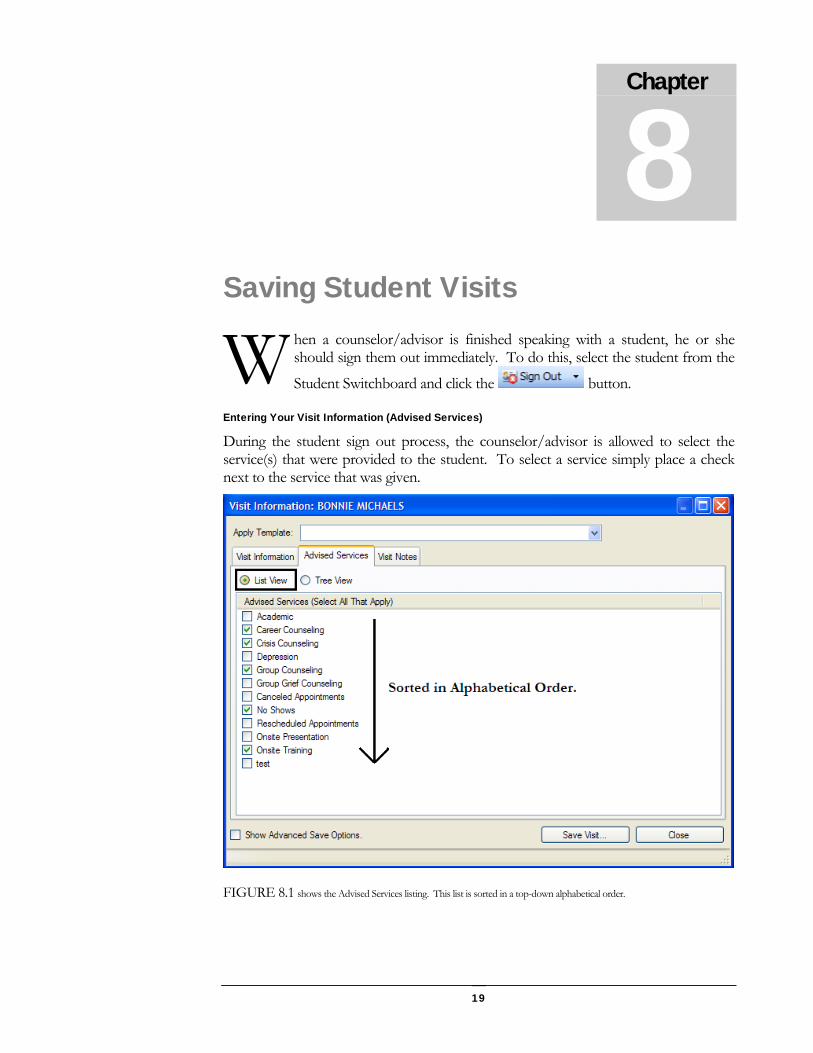
hen a counselor/advisor is finished speaking with a student, he or she should sign them out immediately. To do this, select the student from the
Student Switchboard and click the button. WEntering Your Visit Information (Advised Services)
During the student sign out process, the counselor/advisor is allowed to select the service(s) that were provided to the student. To select a service simply place a check next to the service that was given.
FIGURE 8.1 shows the Advised Services listing. This list is sorted in a top-down alphabetical order.
19
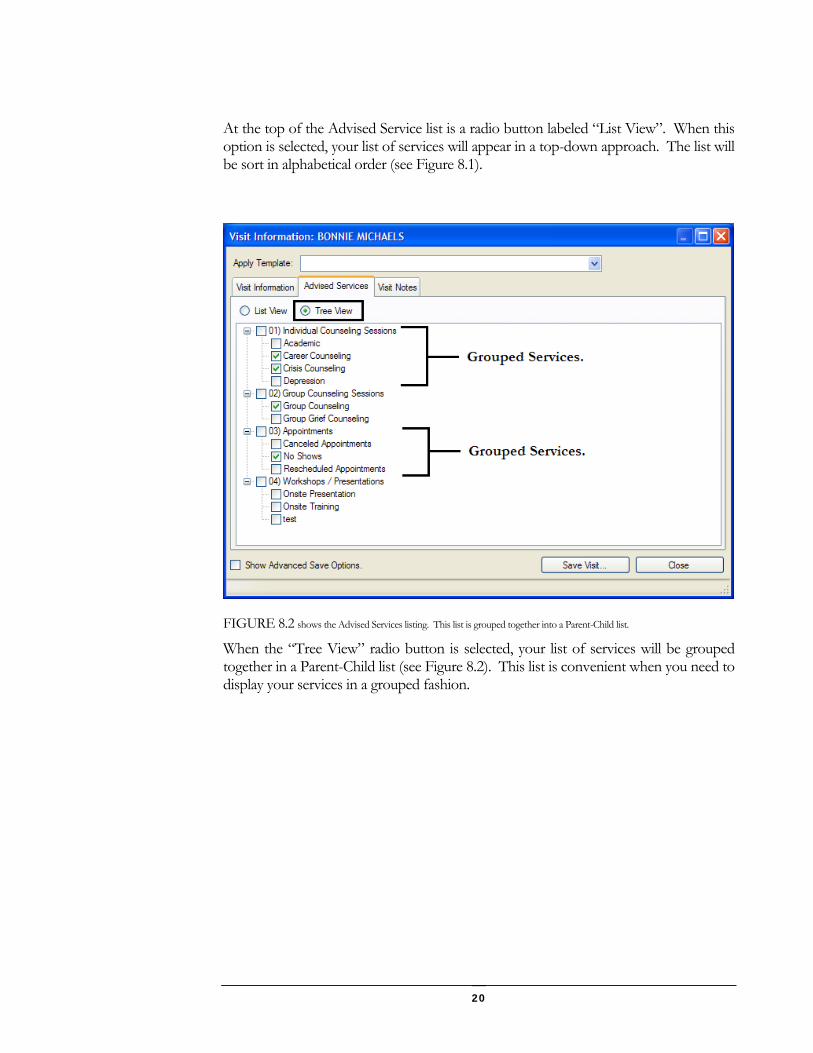
At the top of the Advised Service list is a radio button labeled “List View”. When this option is selected, your list of services will appear in a top-down approach. The list will be sort in alphabetical order (see Figure 8.1).
FIGURE 8.2 shows the Advised Services listing. This list is grouped together into a Parent-Child list.
When the “Tree View” radio button is selected, your list of services will be grouped together in a Parent-Child list (see Figure 8.2). This list is convenient when you need to display your services in a grouped fashion.
20
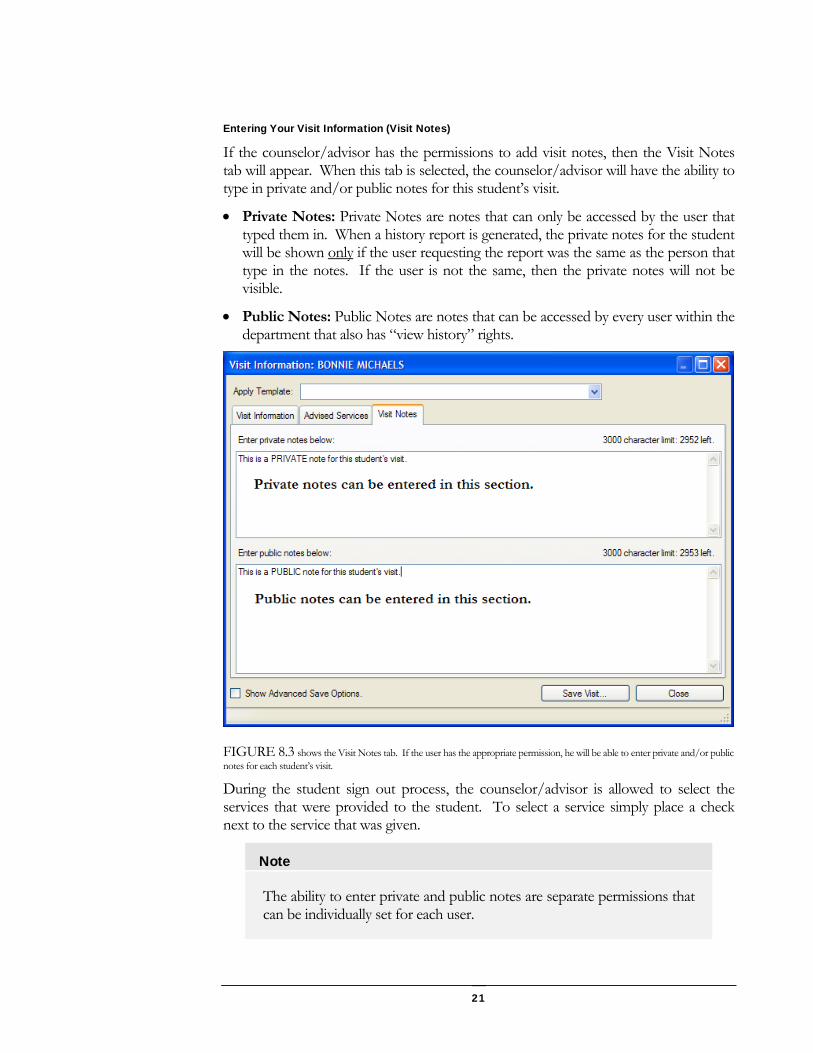
Entering Your Visit Information (Visit Notes)
If the counselor/advisor has the permissions to add visit notes, then the Visit Notes tab will appear. When this tab is selected, the counselor/advisor will have the ability to type in private and/or public notes for this student’s visit.
• Private Notes: Private Notes are notes that can only be accessed by the user that typed them in. When a history report is generated, the private notes for the student will be shown only if the user requesting the report was the same as the person that type in the notes. If the user is not the same, then the private notes will not be visible.
• Public Notes: Public Notes are notes that can be accessed by every user within the department that also has “view history” rights.
FIGURE 8.3 shows the Visit Notes tab. If the user has the appropriate permission, he will be able to enter private and/or public notes for each student’s visit.
During the student sign out process, the counselor/advisor is allowed to select the services that were provided to the student. To select a service simply place a check next to the service that was given.
Note
The ability to enter private and public notes are separate permissions that can be individually set for each user.
21
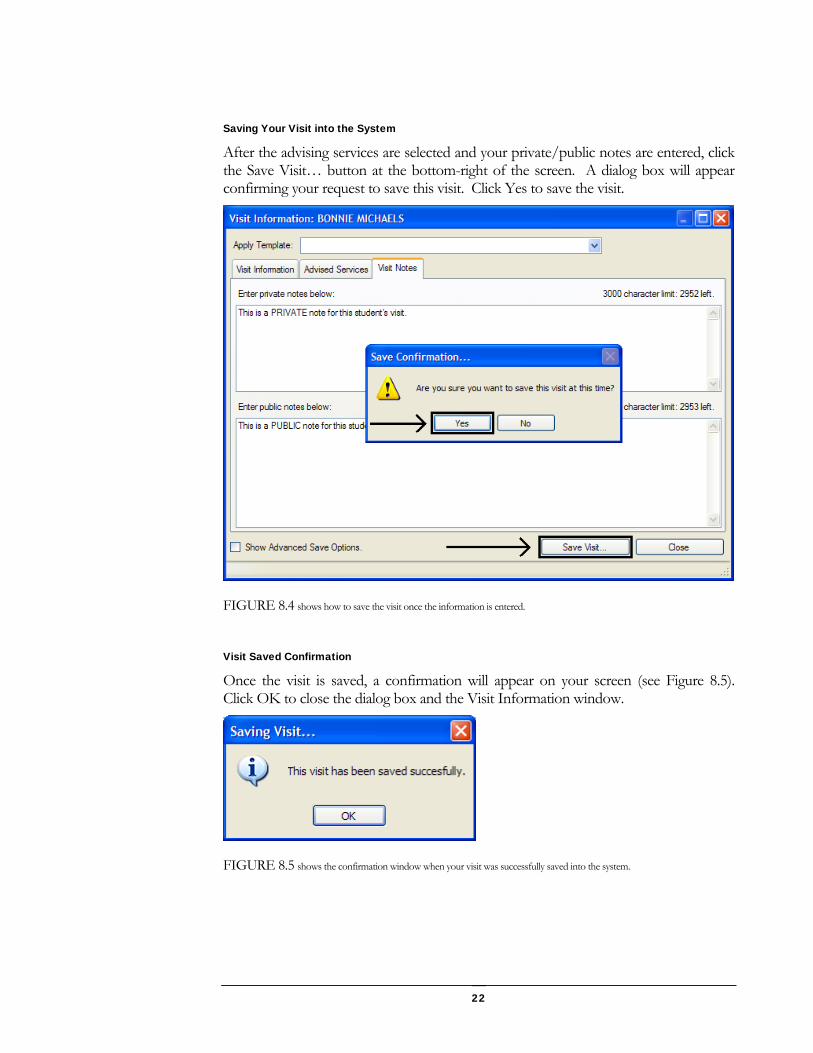
Saving Your Visit into the System
After the advising services are selected and your private/public notes are entered, click the Save Visit… button at the bottom-right of the screen. A dialog box will appear confirming your request to save this visit. Click Yes to save the visit.
FIGURE 8.4 shows how to save the visit once the information is entered.
Visit Saved Confirmation
Once the visit is saved, a confirmation will appear on your screen (see Figure 8.5). Click OK to close the dialog box and the Visit Information window.
FIGURE 8.5 shows the confirmation window when your visit was successfully saved into the system.
22
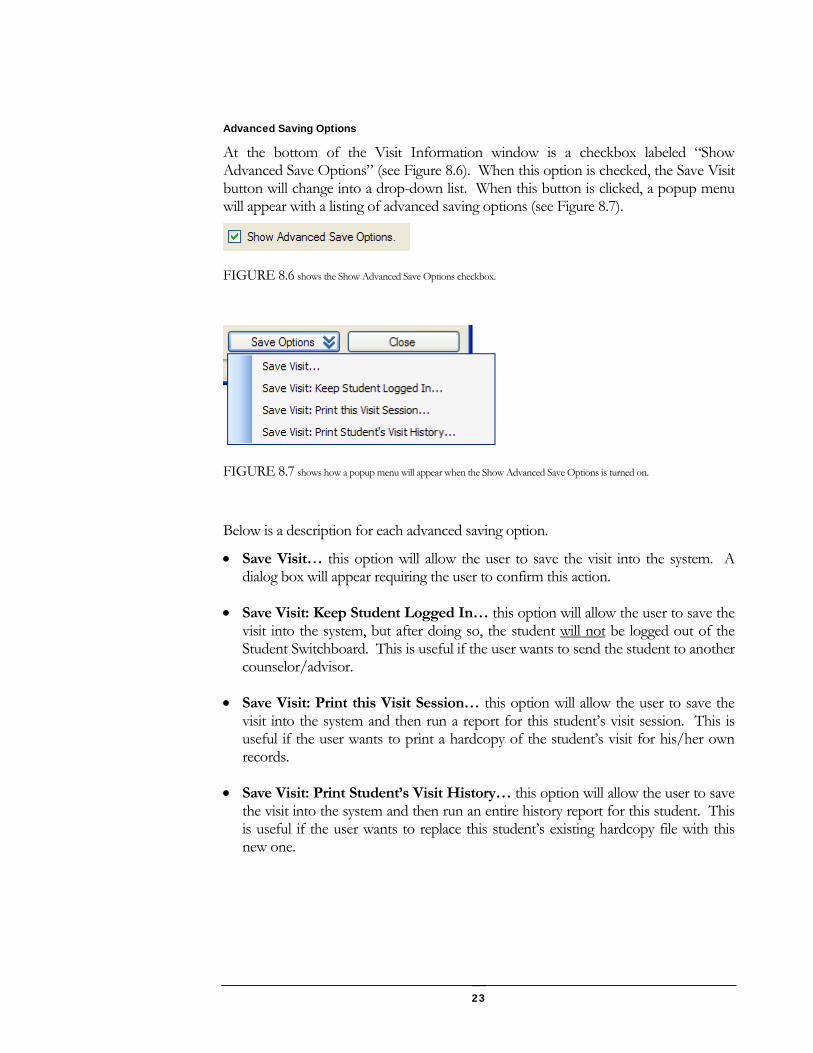
Advanced Saving Options
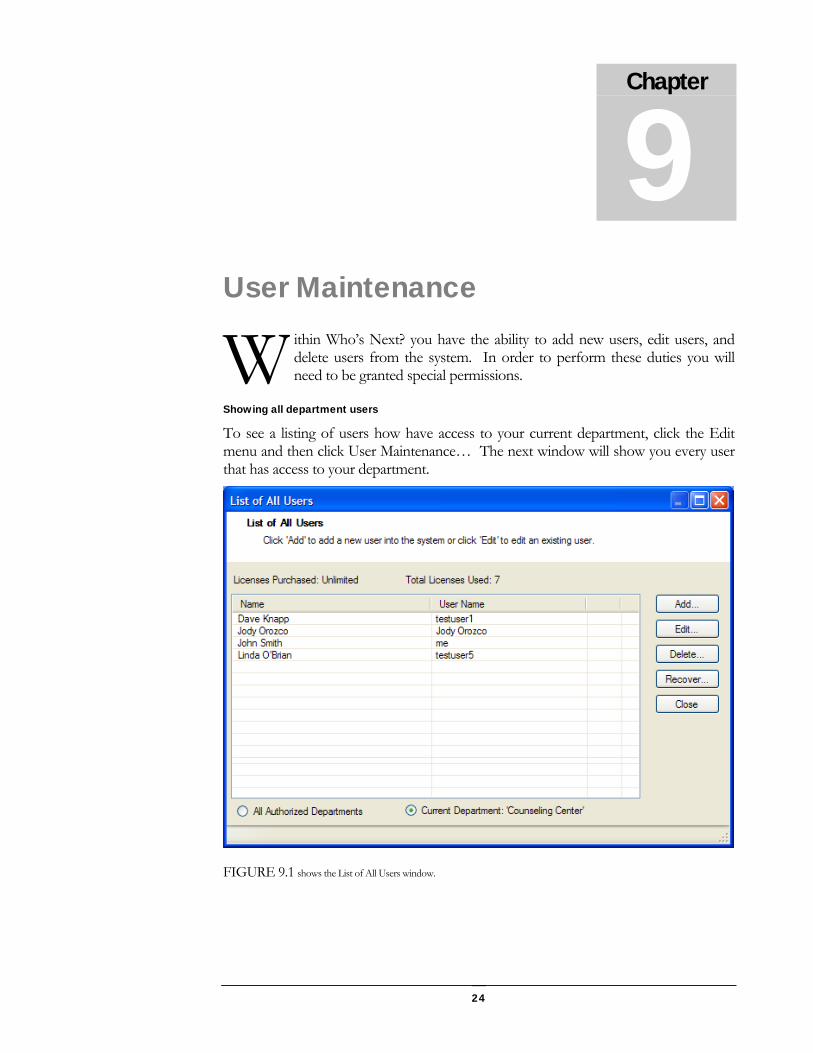
At the bottom of the Visit Information window is a checkbox labeled “Show Advanced Save Options” (see Figure 8.6). When this option is checked, the Save Visit button will change into a drop-down list. When this button is clicked, a popup menu will appear with a listing of advanced saving options (see Figure 8.7).
FIGURE 8.6 shows the Show Advanced Save Options checkbox.
FIGURE 8.7 shows how a popup menu will appear when the Show Advanced Save Options is turned on.
Below is a description for each advanced saving option.
• Save Visit… this option will allow the user to save the visit into the system. A dialog box will appear requiring the user to confirm this action.
• Save Visit: Keep Student Logged In… this option will allow the user to save the visit into the system, but after doing so, the student will not be logged out of the Student Switchboard. This is useful if the user wants to send the student to another counselor/advisor.
• Save Visit: Print this Visit Session… this option will allow the user to save the visit into the system and then run a report for this student’s visit session. This is useful if the user wants to print a hardcopy of the student’s visit for his/her own records.
• Save Visit: Print Student’s Visit History… this option will allow the user to save the visit into the system and then run an entire history report for this student. This is useful if the user wants to replace this student’s existing hardcopy file with this new one.
23
Chapter
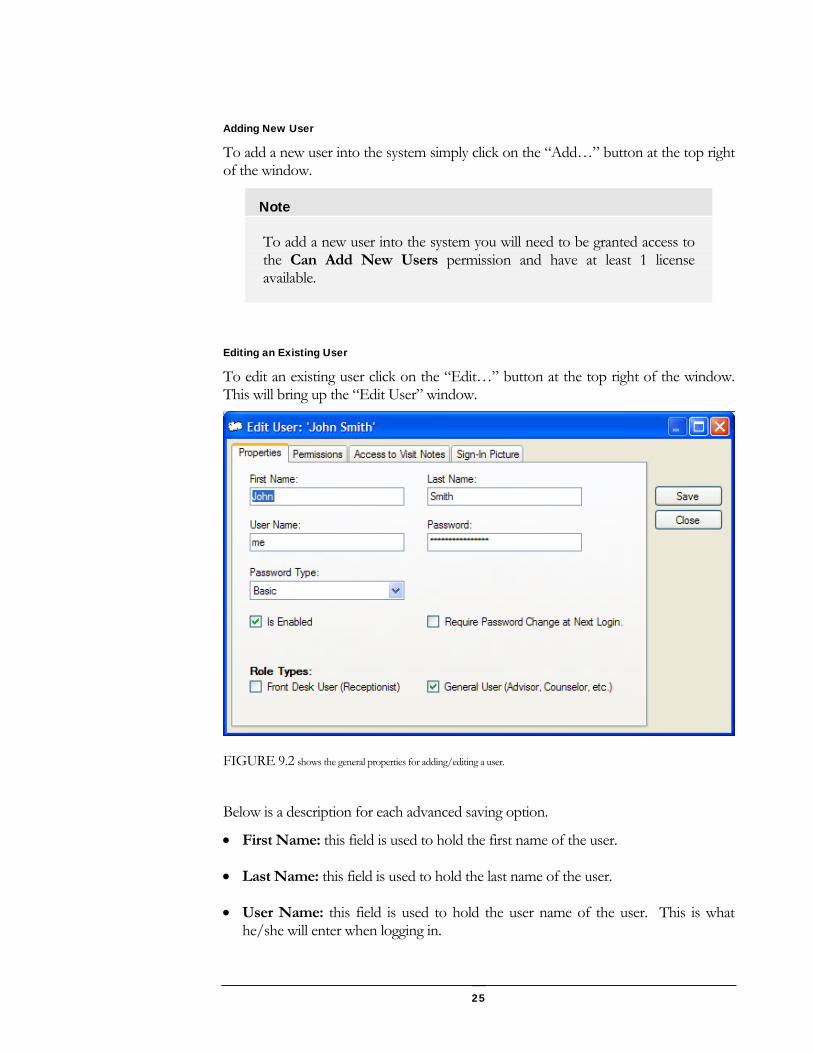
9 User Maintenance
ithin Who’s Next? you have the ability to add new users, edit users, and delete users from the system. In order to perform these duties you will need to be granted special permissions.
Showing all department users
WTo see a listing of users how have access to your current department, click the Edit menu and then click User Maintenance… The next window will show you every user that has access to your department.
FIGURE 9.1 shows the List of All Users window.
24
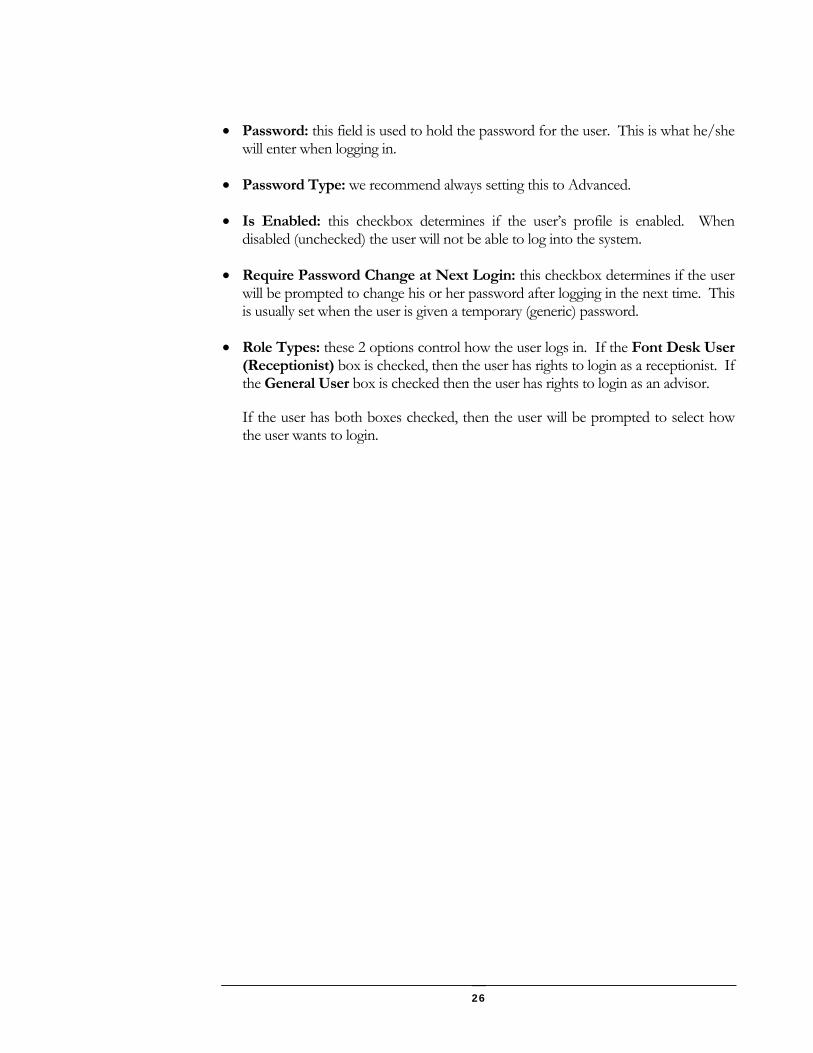
Adding New User
To add a new user into the system simply click on the “Add…” button at the top right of the window.
Note
To add a new user into the system you will need to be granted access to the Can Add New Users permission and have at least 1 license available.
Editing an Existing User
To edit an existing user click on the “Edit…” button at the top right of the window. This will bring up the “Edit User” window.
FIGURE 9.2 shows the general properties for adding/editing a user.
Below is a description for each advanced saving option.
• First Name: this field is used to hold the first name of the user.
• Last Name: this field is used to hold the last name of the user.
• User Name: this field is used to hold the user name of the user. This is what he/she will enter when logging in.
25
• Password: this field is used to hold the password for the user. This is what he/she will enter when logging in.
• Password Type: we recommend always setting this to Advanced.
• Is Enabled: this checkbox determines if the user’s profile is enabled. When disabled (unchecked) the user will not be able to log into the system.
• Require Password Change at Next Login: this checkbox determines if the user will be prompted to change his or her password after logging in the next time. This is usually set when the user is given a temporary (generic) password.
• Role Types: these 2 options control how the user logs in. If the Font Desk User (Receptionist) box is checked, then the user has rights to login as a receptionist. If the General User box is checked then the user has rights to login as an advisor.
If the user has both boxes checked, then the user will be prompted to select how the user wants to login.
26
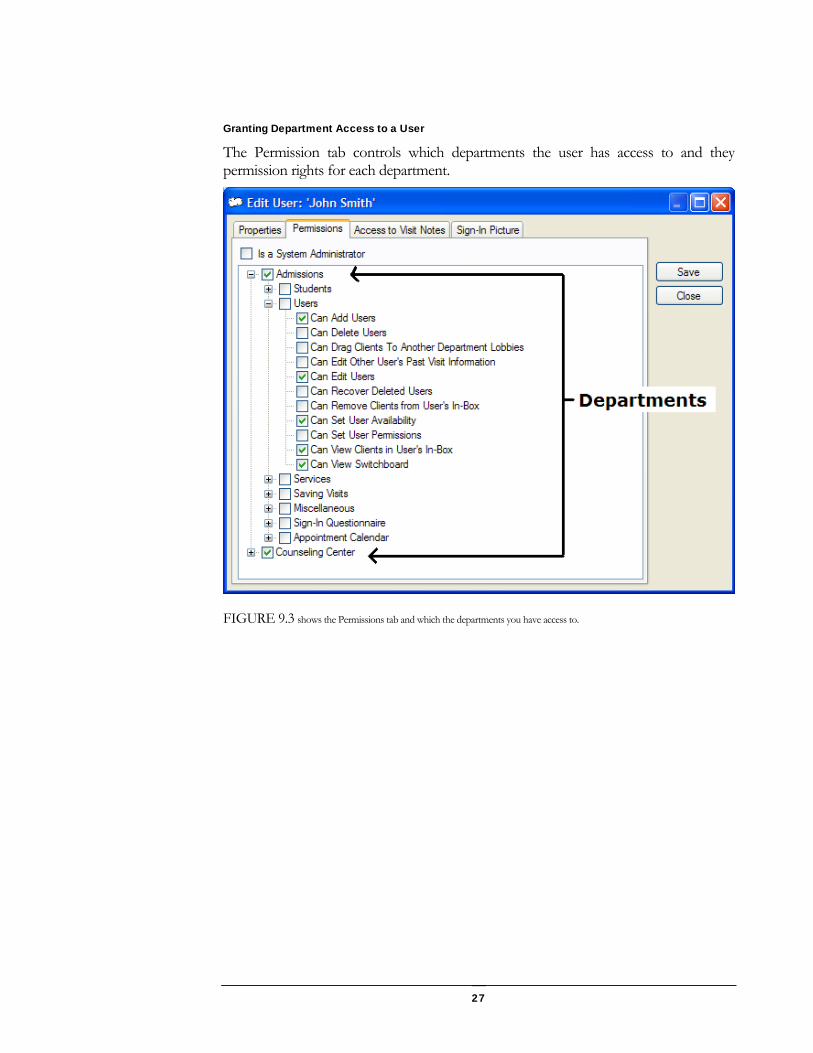
Granting Department Access to a User
The Permission tab controls which departments the user has access to and they permission rights for each department.
FIGURE 9.3 shows the Permissions tab and which the departments you have access to.
27

Granting Permission Access to a User
Every department has the same permission options. To give a user to access a permission simply expand the appropriate permission group and check/uncheck certain options.
FIGURE 9.4 shows the Permissions tab and every permission that is available for each department.
Note
To grant a user permission to run reports for a department, expand the Miscellaneous option and check the Can Run Reports permission.
Saving the User
To save the user’s information simply click on the Save button at the top-right of the window. You will get a message stating the save was successful.
28


