Customizing the Ribbon and Quick Access Toolbar They’re meant to be a convenience, so they are readily adaptable to better meet an individual’s preferences. To adjust, click on File tab to bring up the “backstage” view Choose Options from the list Customize Ribbon allows you to add new commands to the ribbon, remove ones you don’t expect to use, reorganize how they are sorted, etc. You can even add entire new tabs, new groups within a tab, or rename commands to meet your preferences Set new keyboard shortcuts Import/export your customizations so you can use them on another machine without setting them all individually again
Transcript
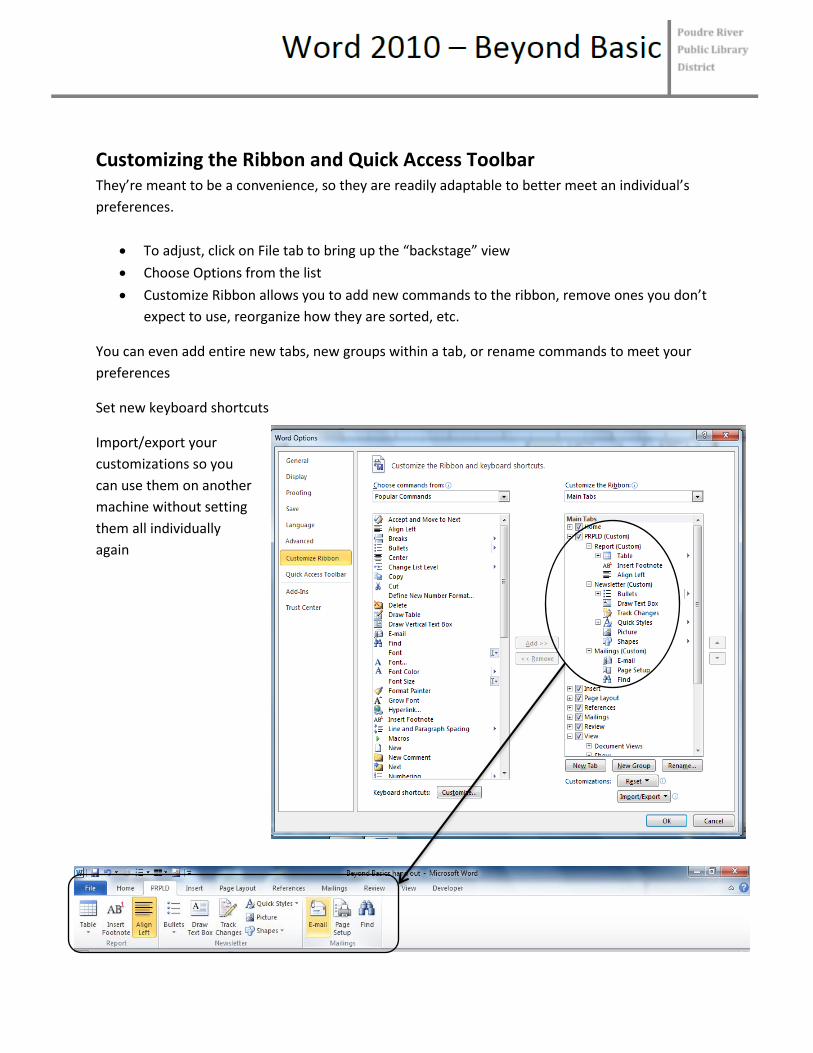
Customizing the Ribbon and Quick Access Toolbar They’re meant to be a convenience, so they are readily adaptable to better meet an individual’s
preferences.
To adjust, click on File tab to bring up the “backstage” view
Choose Options from the list
Customize Ribbon allows you to add new commands to the ribbon, remove ones you don’t
expect to use, reorganize how they are sorted, etc.
You can even add entire new tabs, new groups within a tab, or rename commands to meet your
preferences
Set new keyboard shortcuts
Import/export your
customizations so you
can use them on another
machine without setting
them all individually
again
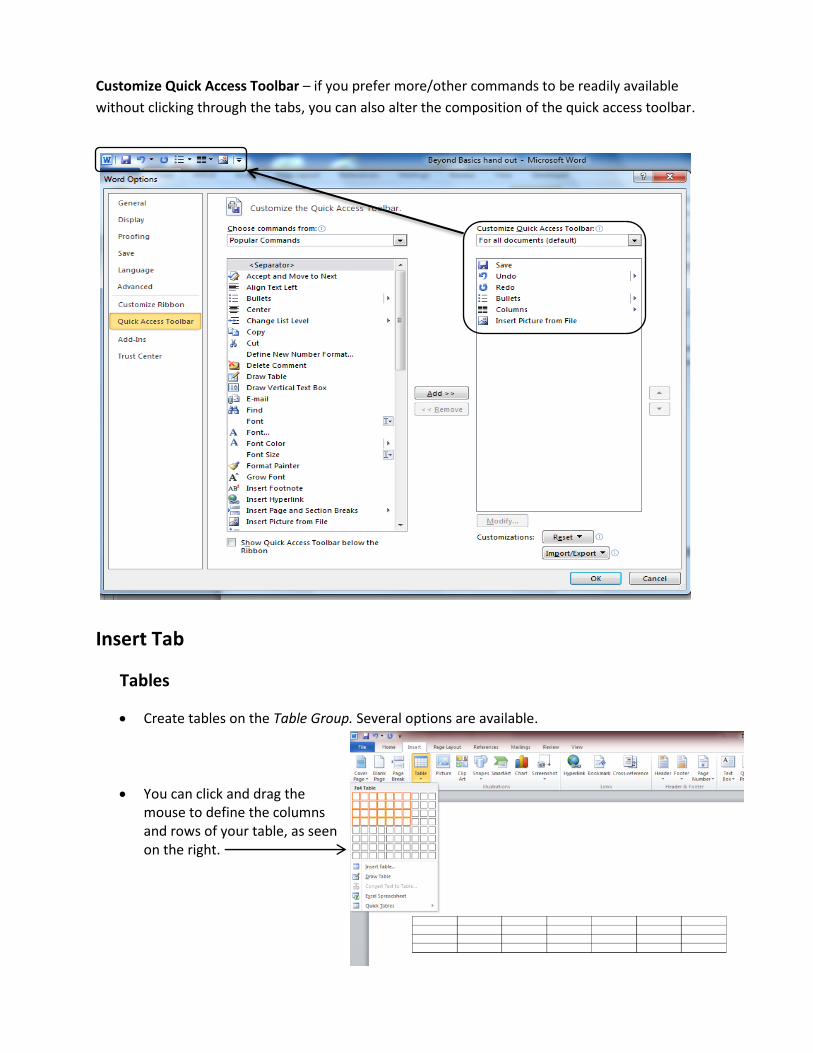
Customize Quick Access Toolbar – if you prefer more/other commands to be readily available
without clicking through the tabs, you can also alter the composition of the quick access toolbar.
Insert Tab
Tables
Create tables on the Table Group. Several options are available.
You can click and drag the mouse to define the columns and rows of your table, as seen on the right.
You can convert text separated by paragraphs, tabs, commas, or pre-defined characters into tables. Select text, Insert table, Convert Text to Table
Graduation Time ,Attend, Cards, Money, Gift Parker Jessica Zoey Andrew Kelly Justin
Graduation
Time
Attend Cards Money Gift
Parker
Jessica
Zoey
Andrew
Kelly
Justin
Cells Each box within the paragraph is a cell. Cells can be split, combined (merged), and expanded; can add and delete cells; can create an alignment that pertains just to that cell. Adding & Deleting Cells
Adding cells – hit tab at the end of the last row to add another row or use commands from the Layout tab (appears when you add a table) to add columns to the left or right of your current column, or rows above or below.
Removing cells – highlight the unwanted cells and choose the desired option from the Delete drop-down menu on the Layout tab.
Whenever your cursor is on the table and you click your mouse, the Table Tools contextual tab automatically comes up offering a variety of design and formatting options.
Right Click If you Right Click with your mouse while on the table, you get a menu of options allowing you to format and customize your table.
If you click on the Layout tab under the Table Tools Contextual Tab, a menu will come up that will allow you to make multiple changes quickly.
Graphics
Can add shapes, clip art, pictures, word art, symbols, charts, etc., all from the Insert tab.
After you click on the Insert tab, most of the graphics are in the Illustrations group
Click on the item you want to use.
Picture allows you to choose a picture from a file, typically on your computer or on a CD or flash/USB drive
Clip Art is a collection of pre-generated, free illustrations available for your use. The 2010 version of Word usually checks office.com by default. Whenever you insert a picture or clip art the Picture Tools Contextual Tab comes up which offers a variety of ways to alter your graphic.
Pictures and clip art will generally appear near where your cursor is.
Shapes will be formed by clicking your mouse to mark starting and ending points. You can adjust further after formation by clicking on one of the corners. You can change the color of the outline and the fill (or have no fill) once the shape is made. Select the shape, the Drawing Tool Contextual Tab will come up and give you options in Shape Styles.
Text Box (in Text group) creates a box for text (for instance, to add to a picture.) Click where you want it to start and drag to your desired size. Text within the box can be adjusted just like regular text.
Word Art (also in Text group) allows for fun visual effects with text. It works best with short amounts of text that you want to make stand out in a fun way.
Headers and Footers
Allows you to put a recurring piece of information at the top or bottom of each page.
Could be page number, text of your choice (such as your name as author, document title, etc.,)
Page Layout
Themes is a one-stop area to address formatting needs in one place.
Page Setup Group allows you can adjust margins and change orientation of paper to portrait or landscape. You also change your paper size or envelope size under on this tab. If you want columns, this is the area where you set it up see below).
Page Background Group you can add a variety of page borders, change the page color, and add watermarks.
Paragraph Group allows you to change indent and spacing just as you can on the Paragraph Group on the Home tab.
Arrange Group offers more options to layout and manipulate your graphics, such as Pictures, Clip Art, Shapes, SmartArt, Charts
Columns
Columns are used in many types of documents, but they are most commonly used in newspapers, magazines, academic journals, and newsletters.
Select Page Layout tab, select Columns in Page Setup group. From here you can select Preset columns or from More Columns determine the number of columns, width, and spacing. Can also apply to whole document or this point forward.