109
FC4200-UM-251-08-9370 CUTTING PLOTTER SERVICE MANUAL MANUAL NO. FC4200-UM-251 ������ - ��� / ������� - �� ������ - �� �

FC4200-UM-251-08-9370
CUTTING PLOTTER
SERVICE MANUALMANUAL NO. FC4200-UM-251
������-���/�������-��
������-��
�

CONTENTS
FC4200-UM-251-9370 ii
HISTORY OF REVISIONS
NO. Date issued Description of revision Page Edition1 01/10/23 First Printing 1 to 87 012 05/01/20 FC4210-60 information added. 1 to 101 023 05/03/22 The parts number for the writing panel of the FC4200-50 is corrected. 75 034 05/07/11 Procedure to change the displayed language added. 11 045 06/01/17 Procedure into the mark sensor-adjusting mode is corrected. 39 056 06/11/30 Correcponded to the RoHS directive. 51,72,86,87,104 067 07/02/28 The parts number for the main board was corrected. 72 078 08/02/26 Parts number for the LCD assembly was corrected. 72,83 08
FC4200-UM-251-9370 iii
CONTENTS
CONTENTS
1. INTRODUCTION ........................................................................................................................... 11.1 Specifications ........................................................................................................................................11.2 Options ..................................................................................................................................................31.3 External Dimensions .............................................................................................................................4
2. NAMES OF THE MAIN PARTS ..................................................................................................... 62.1 Plotter Nomenclature .............................................................................................................................62.2 Control Panel .........................................................................................................................................8
3. The Tree Structure of Menus ....................................................................................................... 10How to change the displayed language .................................................................................................... 11
4. DAILY MAINTENANCE AND STORAGE .................................................................................... 12
5. LIST OF TOOLS .......................................................................................................................... 13
6. REPLACEMENT PROCEDURES ............................................................................................... 146.1 Precautions .........................................................................................................................................146.2 Removing the Y Rail Cover .................................................................................................................156.3 Removing the Front and Rear Y End Covers ......................................................................................156.4 Removing the Corner Cover ................................................................................................................166.5 Removing the Right Side Cover ..........................................................................................................166.6 Removing the Interface Cover .............................................................................................................176.7 Removing the Rear Cover ...................................................................................................................176.8 Removing the Operation Panel ...........................................................................................................186.9 Removing the Operation Tray .............................................................................................................186.10 Changing Pen Blocks ........................................................................................................................196.11 Adjusting the Pen Block Height .........................................................................................................216.12 Adjusting the X Belt Tension ..............................................................................................................226.13 Adjusting Y Belt Tension ....................................................................................................................236.14 Adjusting the X and Y Motor Synchro Belt Tension ...........................................................................246.15 Setting the Origin Position (FC4200-50) ...........................................................................................256.16 Setting the Origin Position (FC4200-60) ...........................................................................................266.17 Setting the Origin Position (FC4210-60) ...........................................................................................276.18 About the Position of the Register Sensor Height .............................................................................286.19 Measure Seal Pasting Position (FC4200-50) ....................................................................................296.20 Measure Seal Pasting Position (FC4200-60) ....................................................................................306.21 Measure Seal Pasting Position (FC4210-60) ....................................................................................316.22 Pen Sense Rubber Pasting Position (FC4200-50 / -60 only) ............................................................326.23 Replacing the Main Board .................................................................................................................33
CONTENTS
FC4200-UM-251-9370 iv
7. ELECTRICAL SECTION ............................................................................................................. 347.1 List of DIP Switches ............................................................................................................................347.2 Writing to Flash Memory .....................................................................................................................357.3 Clearing Non-Volatile RAM ..................................................................................................................377.4 Setting Suffix .......................................................................................................................................387.5 Adjusting the Mark Sensor Level .........................................................................................................397.6 Adjusting the Pen Pressure .................................................................................................................407.7 Adjusting Pen Exchange (FC4200-50 / 60 only) .................................................................................417.8 Adjusting the Home Position ...............................................................................................................427.9 Adjusting the Distance Accuracy .........................................................................................................437.10 Adjusting the Mark Sensor Mechanical Position ...............................................................................457.11 Verifying the Carriage Check Position (FC4200-50 / 60 only) ...........................................................467.12 Adjusting the Gain .............................................................................................................................477.13 Recording Adjustment Data ...............................................................................................................487.14 List of Readjustment Items ................................................................................................................497.15 Location of Parts on the Main Board .................................................................................................507.16 Setting the Power Unit’s Supply Voltage (PS089B) ..........................................................................51
8. TEST MODES ............................................................................................................................. 528.1 Printing a List of the Currently Selected Conditions ............................................................................528.2 Running the SELF TEST .....................................................................................................................538.3 Using the Character Dump Mode ........................................................................................................54
9. TROUBLE SHOOTING ............................................................................................................... 559.1 The Plotter Doesn’t Operate After Being Turned On ...........................................................................559.2 The Cut Results Are Unsatisfactory ....................................................................................................569.3 The Coordinate Axes Cannot Be Correctly Aligned .............................................................................589.4 General Error Messages .....................................................................................................................599.5 Error Messages in GP-GL Command Mode .......................................................................................609.6 Error Messages in HP-GL Command Mode ........................................................................................61
10. SPECIFYING THE PEN CONDITIONS ..................................................................................... 6210.1 The Cutter Pen’s Conditions .............................................................................................................6210.2 Selecting a Set of Cutting Conditions ................................................................................................6410.3 Specifying the Cutting Conditions .....................................................................................................6510.4 Running a Cutting Test ......................................................................................................................70
11. PART LIST ................................................................................................................................. 7211.1 Recommended List of Parts ..............................................................................................................7211.2 External Casing .................................................................................................................................7311.3 Main Frame, X Slide Section, and X Drive Section ...........................................................................7511.4 Y Bar, Y Slide Section, Y Drive Section, and Pen Block Section .......................................................7811.5 Electrical Section ...............................................................................................................................8311.6 Accessories, and Others ....................................................................................................................8511.7 Option Stand for FC4200-60 and FC4210-60 (ST0032) ...................................................................85

FC4200-UM-251-9370 v
CONTENTS12. CIRCIT DIAGRAMS .................................................................................................................. 86
12.1 Wiring Diagram ..................................................................................................................................8612.2 Main Board ........................................................................................................................................9012.3 Control Panel Relay Board ..............................................................................................................10012.4 Y Motor Relay Board .......................................................................................................................10112.5 Pen Board .......................................................................................................................................10212.6 Power Relay Board (RoHS model) ..................................................................................................104

FC4200-UM-251-9370 1
INTRODUCTION
1. INTRODUCTIONThis plotter incorporates a digital servo drive to perform cutting and plotting operations at high speed and high precision. Besides being used to cut marking film and other media, this plotter can also be used as a pen plotter.
1.1 SpecificationsSpecifications for the FC4200-50 and the FC4200-60
FC4200-50 FC4200-60CPU 32-bit CPUConfiguration Flatbed cutting plotterDrive system Fully-digital servo driveMax. cutting area 590 × 430 mm 910 × 610 mmCompatible media width 500 mm 666 mmMax. cutting speed 65 cm/sSpecifiable cutting speeds 1, 2, 3, 4, 5, 6, 7, 8, 9, 10, 15, 20, 25, 30, 35, 40, 45, 50, 55, 60,65 cm/sCutting force 10 to 600 gfMin. character size about 5 mm for alphanumerics (varies with the medium and font used)Mechanical step size 0.005 mmProgrammable step size GP-GL: 0.1, 0.05, 0.025, 0.01 mm; HP-GL™: 0.025 mm*1
Repeatability precision*2 0.1 mm or lessDistance precision*2 [Travelling distance × ±0.2% or less] or ±0.1 mm, whichever is largerPerpendicular precision 0.3/430 mm or les 0.4/610 mm or lessRegistration mark reading precision*3 within 0.3 mmMax. no. of pens 2 pens can be concurrently mountedCompatible blade type Supersteel, ceramic, and sapphire bladesCompatible pen types Water- and oil-based ballpoint pensCompatible cutting media Marking film (polyvinyl, fluorescent, reflective)
Paper of 0.5-mm thickness or less (pattern paper, oilboard)*4
Compressed polystyrene sheets of 0.8-mm thickness or less*5
Sandblasting rubber of 1.5-mm thickness or less*5
High-luminance reflective film*6
Interfaces RS-232-C serial and Centronics-compatible parallel interfaces (automatic selection)
Buffer capacity 2 MbytesResident command sets GP-GL and HP-GL™ (selected at the control panel)LCD display 20 characters x 2 linesRated power 100 to 120 VAC, 50/60 Hz; 220 to 240 VAC, 50 Hz (specify when ordering)Power consumption 120 VA or lessOperating environment 10 to 35°C, 35 to 75% R.H. (non-condensing)External dimensions (WxDxH) approx. 857 x 780 x 200 mm approx. 1172 x 964 x 200 mmWeight (without stand) approx. 19 kg approx. 26 kg*1 HP-GL is a registered trademark of Hewlett-Packard Company.*2 The figure varies with the type of Graphtec-designated medium used and the currently selected cutting conditions.*3 Based on the precision when using the pen provided and high-grade paper to read this plotter’s resident pattern.*4 For use with the CB15U or CB15U-K30 cutter blade.*5 For use with the CB15U-K30 cutter blade.*6 For use with the CB15UA cutter blade.

FC4200-UM-251-9370 2
INTRODUCTIONSpecifications for the FC4210-60
FC4210-60CPU 32-bit CPUConfiguration Flatbed cutting plotterDrive system Fully-digital servo driveMax. cutting area 860 × 600 mmCompatible media width 666 mmMax. cutting speed 65 cm/sSpecifiable cutting speeds 1, 2, 3, 4, 5, 6, 7, 8, 9, 10, 15, 20, 25, 30, 35, 40, 45, 50, 55, 60,65 cm/sCutting force 0.098 to 5.88 N (10 to 600 gf)Minmum character size about 5 mm for alphanumeric characters (varies depending on the medium
and fonts used)Mechanical resolution 0.005 mmProgrammable resolution GP-GL: 0.1, 0.05, 0.025, 0.01 mm; HP-GL™: 0.025 mm*1
Repeatability precision*2 0.1 mm or lessDistance precision*2 Travelling distance × ±0.2% or less or ±0.1 mm, whichever is largerPerpendicular precision 0.4/610 mm or lessRegistration mark reading precision*3 within 0.2 mmMaximum number of tools 2Compatible blade type Supersteel bladeCompatible pen types Creasing/scoring tool, water- and oil-based ballpoint pensUsatible cutting media Marking film (polyvinyl, fluorescent, reflective)
Cardboard of a thickness of 0.5 mm or lessPaper of 0.5mm thickness or less (pattern paper, oilboard)*4
F, G grade microfluteClear sheet for packaging
Interfaces RS-232-C serial and Centronics (automatic selected)Buffer capacity 2 MBResident command sets GP-GL and HP-GL™ (selected at the control panel)LCD display 20 characters x 2 linesRated power-supply voltage 100 to 120 VAC, 50/60 Hz; 220 to 240 VAC, 50 Hz (specify when ordering)Power consumption 120 VA or lessOperating environment 10 to 35°C, 35 to 75% R.H. (no condensation allowed)External dimensions (WxDxH) approx. 1172 x 964 x 200 mmWeight (without stand) approx. 27 kg*1 HP-GL is a registered trademark of Hewlett-Packard Company.*2 Depends on Graphtec-designated medium used and the currently selected cutting conditions.*3 As determined by reading the plotter using the pen (included with the plotter) and high-grade paper.*4 For use with the CB15U or CB15U-K30 cutter blade.

FC4200-UM-251-9370 3
INTRODUCTION
1.2 OptionsName Part no. DescriptionStand ST0032 Dedicated stand for the FC4200-60 and FC4210-60

FC4200-UM-251-9370 4
INTRODUCTION
1.3 External Dimensions
The FC4200-50 Model
200
857
780
Unit: mmDimensional precision error: ±5 mm

FC4200-UM-251-9370 5
INTRODUCTIONThe FC4200-60 and FC4210-60 Model (Excluding the Optional Stand)
200
1172
964
Unit: mmDimensional precision error: ±5 mm

FC4200-UM-251-9370 6
NAMES OF THE MAIN PARTS
2. NAMES OF THE MAIN PARTS2.1 Plotter NomenclatureFC4200-50 / FC4200-60(1) Pen carriage : Drives the cutter/pen to the left/right.(2) Pen holder : Holds the cutter/pen and drives it up/down.(3) Pen station : Holds a pen for plotting.(4) Y bar : Holds the pen carriage; moves left/right.(5) Writing panel : Cutting/plotting is performed here.(6) Control panel : Used to set and use the plotter’s various functions.(7) Centronics parallel interface : Used to connect the plotter to a computer by cable via the Centronics-
connector compatible parallel interface.(8) RS-232C serial interface : Used to connect the plotter to a computer by cable via the RS-232C
connector serial interface.(9) AC line inlet : Connect one end of the power cord here and the other end to an
electri cal socket.(10) Power switch : Controls the on/off status of the power supply to the plotter.(11) CHART HOLD key (–50 only) : Used to hold the medium.
(8)
(7)
(10)
(9) (1)
(2)
(3)
(6) (11)Pen holder 1
Pen holder 2
Pen station
(4)
(5)

FC4200-UM-251-9370 7
NAMES OF THE MAIN PARTSFC4210-60(1) Pen carriage : Drives the cutter/pen to the left/right.(2) Pen holder : Holds the cutter/pen and drives it up/down.(3) Y bar : Holds the pen carriage; moves left/right.(4) Writing panel : Cutting/plotting is performed here.(5) Control panel : Used to set and use the plotter’s various functions.(6) Centronics parallel interface : Used to connect the plotter to a computer by cable via the Centronics-
connector compatible parallel interface.(7) RS-232C serial interface : Used to connect the plotter to a computer by cable via the RS-232C
connector serial interface.(8) AC line inlet : Connect one end of the power cord here and the other end to an
electri cal socket.(9) Power switch : Controls the on/off status of the power supply to the plotter.
(6)
(7)
(1)
(3)
(4)
(2)
(5)
Pen holder 1 Pen holder 2
(8)
(9)

FC4200-UM-251-9370 8
NAMES OF THE MAIN PARTS
2.2 Control Panel
POWERPROMPT
FORCE
SPEED
OFFSET
QUALITY
F1 F3
F4F2
Indicator LampsPOWERPOWER The POWER lamp remains lit (green) while the plotter is on.
PROMPT The PROMPT lamp lights (red) when the plotter receives data that will cause the pen carriage to move outside the effective cutting area.
Function KeysThe four function keys F1 through F4 are used to select a menu or to select a function on a displayed menu.
F1 Press the F1 key to select a function during Menu mode, to select Cutter Conditions 1 during Online status, or to change the cutting FORCE setting after the CONDITIONS key has been pressed.
F2 Press the F2 key to select a function during Menu mode, to select Cutter Conditions 2 during Online status, or to change the cutting SPEED setting after the CONDITIONS key has been pressed.
F3 Press the F3 key to select a function during Menu mode, to select Cutter Conditions 3 during Online status, or to change the cutter OFFSET setting after the CONDITIONS key has been pressed.
F4 Press the F4 key to select a function during Menu mode, to select Cutter Conditions 4 during Online status, or to change the cutting QUALITY setting after the CONDITIONS key has been pressed.
POSITION KeysThese POSITION keys function differently according to the plotter’s operat-ing status. They are used to change a setting on a displayed menu during Menu mode, but are used to move the pen carriage at all other times. When a key is first initially pressed, the pen carriage moves slowly. When you con-tinue to hold down the key, the pen carriage starts moving more quickly.

FC4200-UM-251-9370 9
NAMES OF THE MAIN PARTS Menu Keys
PAUSE key: Press this key to enter Menu mode and light its green lamp. Press it again to cancel Menu mode and turn off the lamp. Press this key when you wish to proceed to set a function. If the plotter receives data after this key is pressed, it will temporarily store the data in its data buffer.
ENTER key: Press this key to register the selected setting when specifying a function. In Pause status, you can reset the plotter by concurrently pressing the ENTER and ORIGIN keys.
ORIGIN key: Used to change the position of the coordinate system’s origin point. When the automatic detection of registration marks is enabled, press this key to initiate automatic detection.
COPY key: Used to repeat the cutting operation defined by the data in the plotter’s buffer.
CONDITIONS key: Press this key to change any of the cutting conditions appearing on the plotter’s display panel.
TEST key: Press this key to run a test to check whether the currently selected cutting conditions are suitable for the medium loaded.
NEXT PAGE key: Press this key during Menu mode to proceed to the next menu page.
CANCEL/VIEW key: During a cutting operation, press this key to immediately stop cutting. While the Ready message is being shown on the plotter’s display panel, press this key to move the pen outside of the maximum cutting/plotting area. To return the pen to its original position, press this key again.

FC4200-UM-251-9370 10
THE TREE STRUCTURE OF MENUS
3. The Tree Structure of Menus In Menu mode for FC4200-50 and FC4200-60
Page Main Menu Submenu
MARK
INTERFACE STEP SIZE �(GP-GL mode only)
ORIGIN POINT �(HP-GL mode only)
ROTATE
OPTION1
L UNIT
FILM
FUNCTION
PEN WIDTH
UP SPEED
OPTION2
CLEAR
PEN U/D
SELECT PEN
RS-232CCOMMAND
AREA
MIRRORSORT
THICK
OFST FCEOFST ANGSTP PASS
DIST ADJTEST
NEXT PAGE
NEXT PAGE
NEXT PAGE
PAUSE
F1
F2
F2
F4
F3
F4
FC4200-UM-251-9370 11
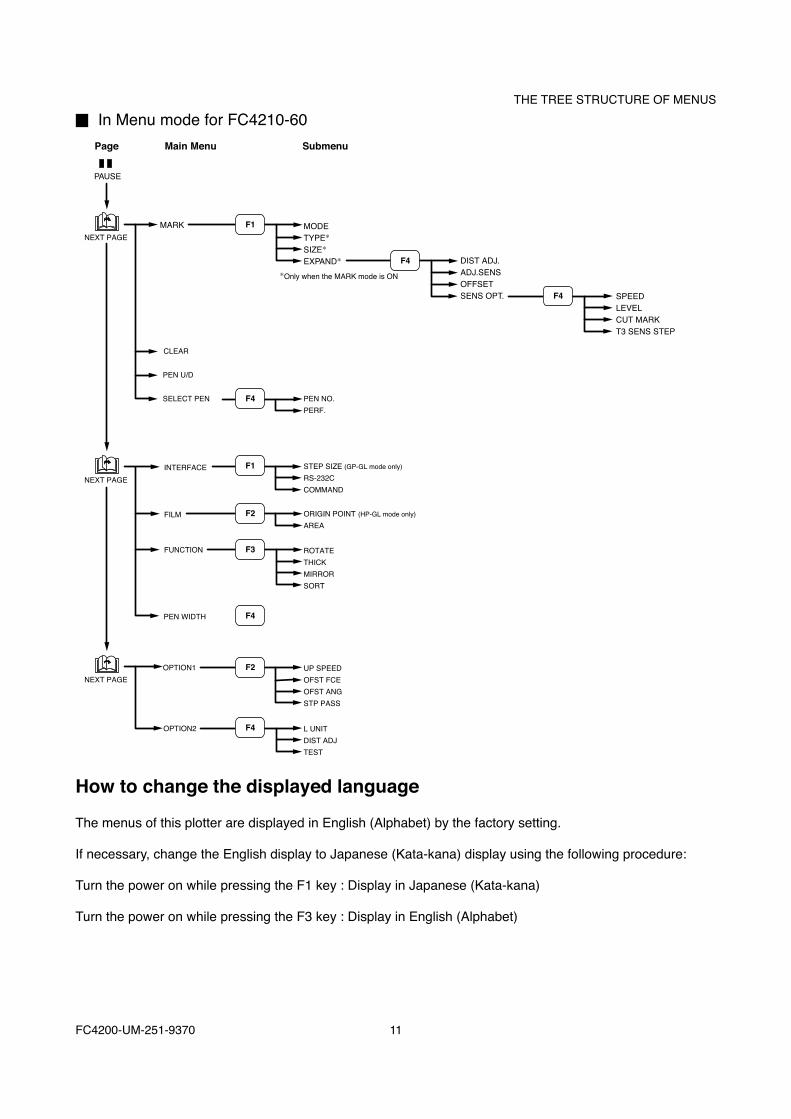
THE TREE STRUCTURE OF MENUS In Menu mode for FC4210-60
INTERFACE
OPTION1
FILM
FUNCTION
PEN WIDTH
UP SPEEDOFST FCEOFST ANGSTP PASS
L UNITDIST ADJTEST
OPTION2
CLEAR
PEN U/D
SELECT PEN
NEXT PAGE
NEXT PAGE
NEXT PAGE
F1
F2
F2
F4
F3
F1
F4
F4
F4
F4
SPEEDLEVELCUT MARKT3 SENS STEP
DIST ADJ.ADJ.SENSOFFSETSENS OPT.
MODETYPE�SIZE�EXPAND�
MARK
PAUSE
Page Main Menu Submenu
ORIGIN POINT (HP-GL mode only)AREA
ROTATETHICKMIRRORSORT
PEN NO.PERF.
STEP SIZE (GP-GL mode only)RS-232CCOMMAND
�Only when the MARK mode is ON
How to change the displayed language
The menus of this plotter are displayed in English (Alphabet) by the factory setting.
If necessary, change the English display to Japanese (Kata-kana) display using the following procedure:
Turn the power on while pressing the F1 key : Display in Japanese (Kata-kana)
Turn the power on while pressing the F3 key : Display in English (Alphabet)

FC4200-UM-251-9370 12
DAILY MAINTENANCE AND STORAGE
4. DAILY MAINTENANCE AND STORAGE
Daily Maintenance During the course of daily plotter operation, be sure to observe the following precautions. Never lubricate the mechanisms of the plotter. If the plotter’s casing becomes dirty, wipe the soiled areas using a dry cloth or a cloth that has been moist-ened in a neutral detergent diluted with water.
Never use thinner, benzine, alcohol, or similar solvents; they will damage the casing’s finish. If the writing panel becomes dirty, wipe it using a dry cloth. In case of stubborn stains, use a cloth that has been moistened in a neutral detergent diluted with water.
Never use benzine, thinner, alcohol, or similar solvents to clean the panel.
Storing Your Plotter To store the plotter when it is not being used, be sure to observe the following points:
Remove the cutter and/or plotter pen attached to the pen holder and cover its tip with the protective cap provided.
To protect the plotter from dust and dirt, cover it with a cloth. Avoid storing the plotter in places subject to direct sunlight or high temperatures.

FC4200-UM-251-9370 13
LIST OF TOOLS
5. LIST OF TOOLS• Colex gauges (20g, 50g, 100g, 200g, 500g)
• Push-pull gauges (1kg, 2kg, 10kg)
• Ceramic Pen
• Cutter Pen Plunger
• Steal Scale (Up to 30mm)
• Personal Computer
• Centronics Interface Cable
• Gain Adjustment program

FC4200-UM-251-9370 14
REPLACEMENT PROCEDURES
6. REPLACEMENT PROCEDURES6.1 Precautions
6.1.1 Safety ConfirmationTo prevent the plotter from malfunctioning and to ensure the safety of operators, please follow the instructions below:
• Before turning on the power for the plotter, take care that your hands, hair, or clothing are not caught up in the pen carriage or sliding mechanism.
• Before performing any work, turn off the power switch and unplug the power cord to ensure electrical safety.
6.1.2 Confirmation Before and After OperationsBefore and after any operation, perform the following steps:
• Mark the part attachment positions with a pencil to ensure that parts can be restored to their proper positions.
• Confirm the order of parts assembly.
• Perform condition printing and self and cutting tests to check the plotter status before performing any operation. Confirm whether the plotter settings have changed and whether the plotter has trouble mov-ing smoothly.
FC4200-UM-251-9370 15
REPLACEMENT PROCEDURES
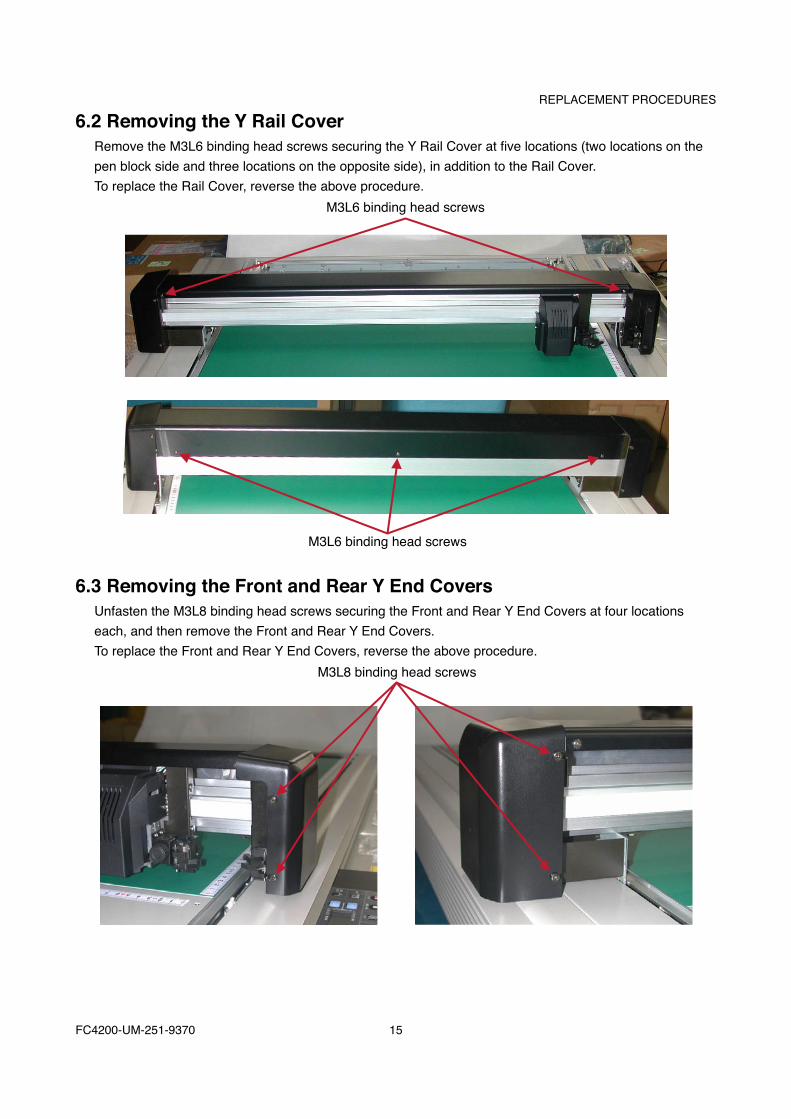
6.2 Removing the Y Rail CoverRemove the M3L6 binding head screws securing the Y Rail Cover at five locations (two locations on the pen block side and three locations on the opposite side), in addition to the Rail Cover. To replace the Rail Cover, reverse the above procedure.
M3L6 binding head screws
M3L6 binding head screws
6.3 Removing the Front and Rear Y End CoversUnfasten the M3L8 binding head screws securing the Front and Rear Y End Covers at four locations each, and then remove the Front and Rear Y End Covers. To replace the Front and Rear Y End Covers, reverse the above procedure.
M3L8 binding head screws

FC4200-UM-251-9370 16
REPLACEMENT PROCEDURES
6.4 Removing the Corner CoverRemove the two screws securing the Corner Cover 50L (left side) and Corner Cover 50R (right side) at the corners on the operation side (M3L10 tapping screw and M4L8 binding head screw, one pc. each), followed by the Corner Cover 50L and Corner Cover 50R. Remove the M4L8 binding head screws securing the Corner Cover A (on right back side) and Corner Cover B (on left back side) on the main unit’s rear side, followed by Corner Covers A and B. To replace the Corner Cover, reverse the above procedure.
Corner Cover BCorner Cover 50L
M4L8 binding head screw
M3L10 tapping screw
M4L8 binding head screw
6.5 Removing the Right Side CoverRemove the four M4L8 binding head screws securing Panel R, and then Panel R. Remove Corner Cover A (on the right back side) and Corner Cover 50R. Remove the seven screws securing the Side Cover (three screws at the top and four TP screws at the bottom), followed by the Side Cover. To replace the Right Side Cover, reverse the above procedure.
M4L6 binding head screw
FC4200-UM-251-9370 17
REPLACEMENT PROCEDURES
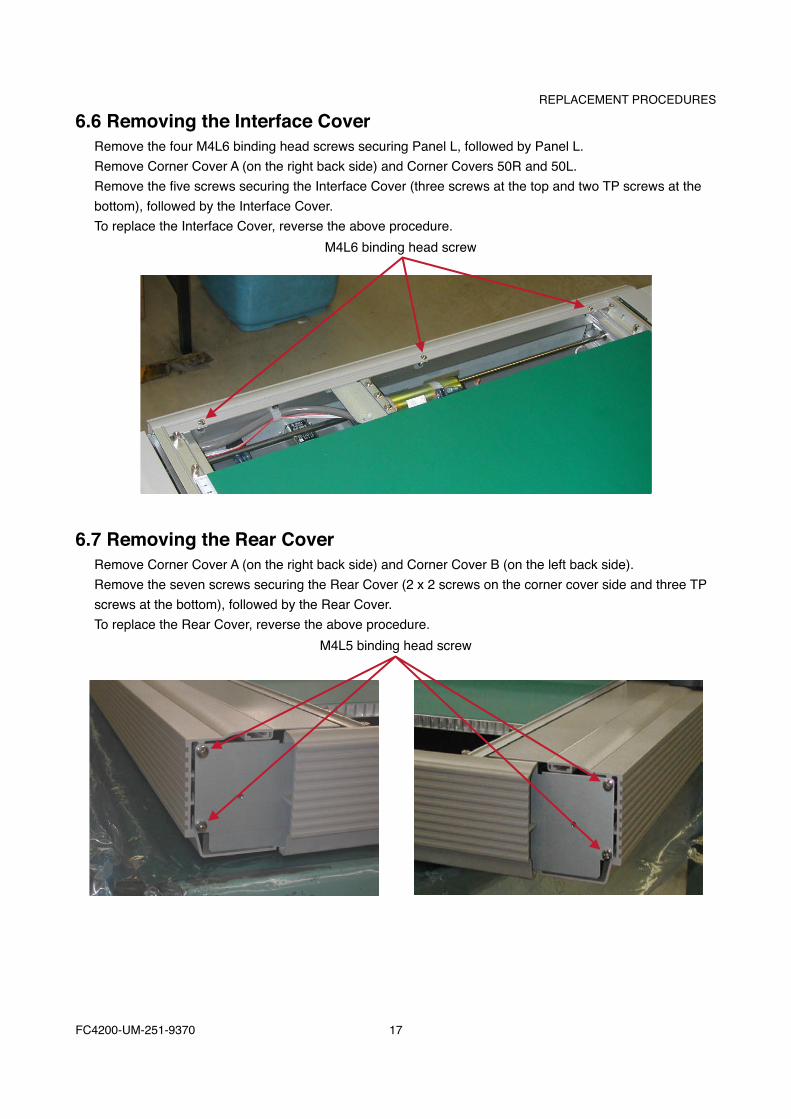
6.6 Removing the Interface CoverRemove the four M4L6 binding head screws securing Panel L, followed by Panel L. Remove Corner Cover A (on the right back side) and Corner Covers 50R and 50L. Remove the five screws securing the Interface Cover (three screws at the top and two TP screws at the bottom), followed by the Interface Cover. To replace the Interface Cover, reverse the above procedure.
M4L6 binding head screw
6.7 Removing the Rear CoverRemove Corner Cover A (on the right back side) and Corner Cover B (on the left back side). Remove the seven screws securing the Rear Cover (2 x 2 screws on the corner cover side and three TP screws at the bottom), followed by the Rear Cover. To replace the Rear Cover, reverse the above procedure.
M4L5 binding head screw

FC4200-UM-251-9370 18
REPLACEMENT PROCEDURES
6.8 Removing the Operation PanelRemove the two screws securing the Corner Cover 50L (left side) at the corner on the operation side (M3L10 tapping screw and M4L8 binding head screw, one pc. each), followed by Corner Cover 50L. Remove the four M3L6 binding head screws securing the Operation Panel, followed by the Operation Panel. To replace the Operation Panel, reverse the above procedure.
M3L6 binding head screw
6.9 Removing the Operation TrayRemove the two screws securing the Corner Cover 50L (left side) at the corner on the operation side (M3L10 tapping screw and M4L8 binding head screw, one pc. each), followed by Corner Cover 50L. Remove the seven screws securing the Operation Tray (2 x 2 screws on the corner cover side and three TP screws at the bottom), followed by the Operation Tray. To replace the Operation Tray, reverse the above procedure.
M4L15 binding head screw
FC4200-UM-251-9370 19
REPLACEMENT PROCEDURES
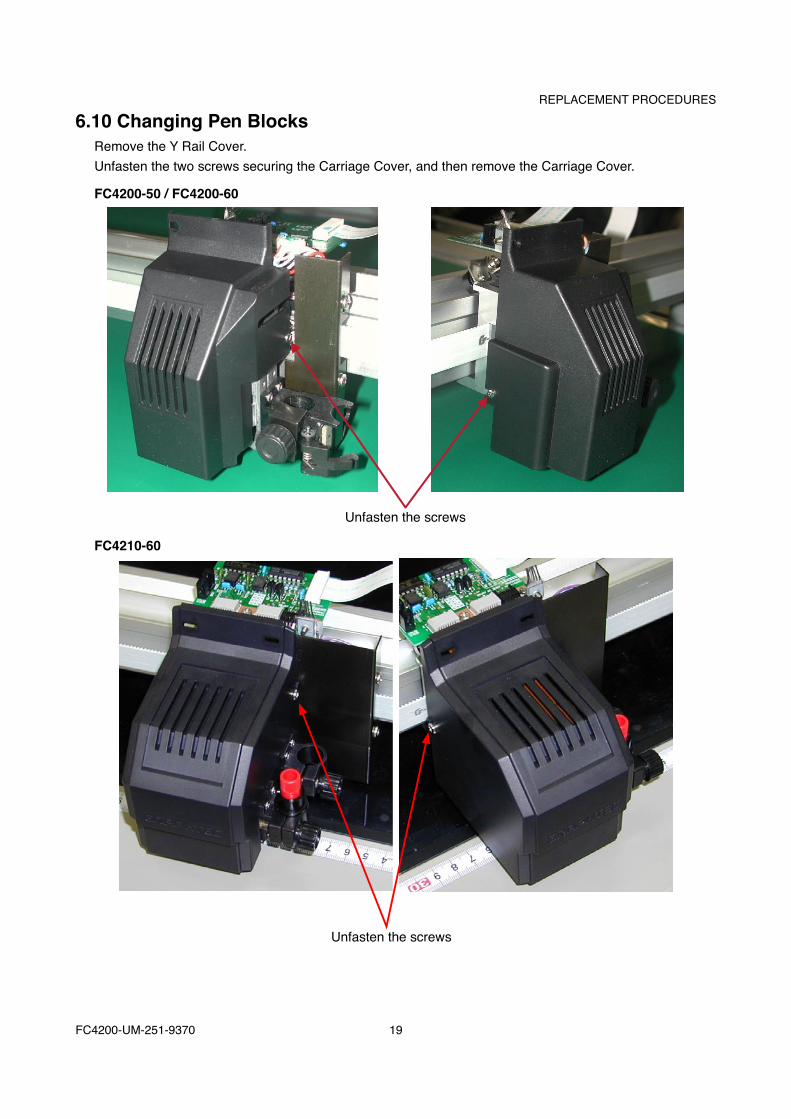
6.10 Changing Pen BlocksRemove the Y Rail Cover. Unfasten the two screws securing the Carriage Cover, and then remove the Carriage Cover.
FC4200-50 / FC4200-60
Unfasten the screws
FC4210-60
Unfasten the screws
FC4200-UM-251-9370 20
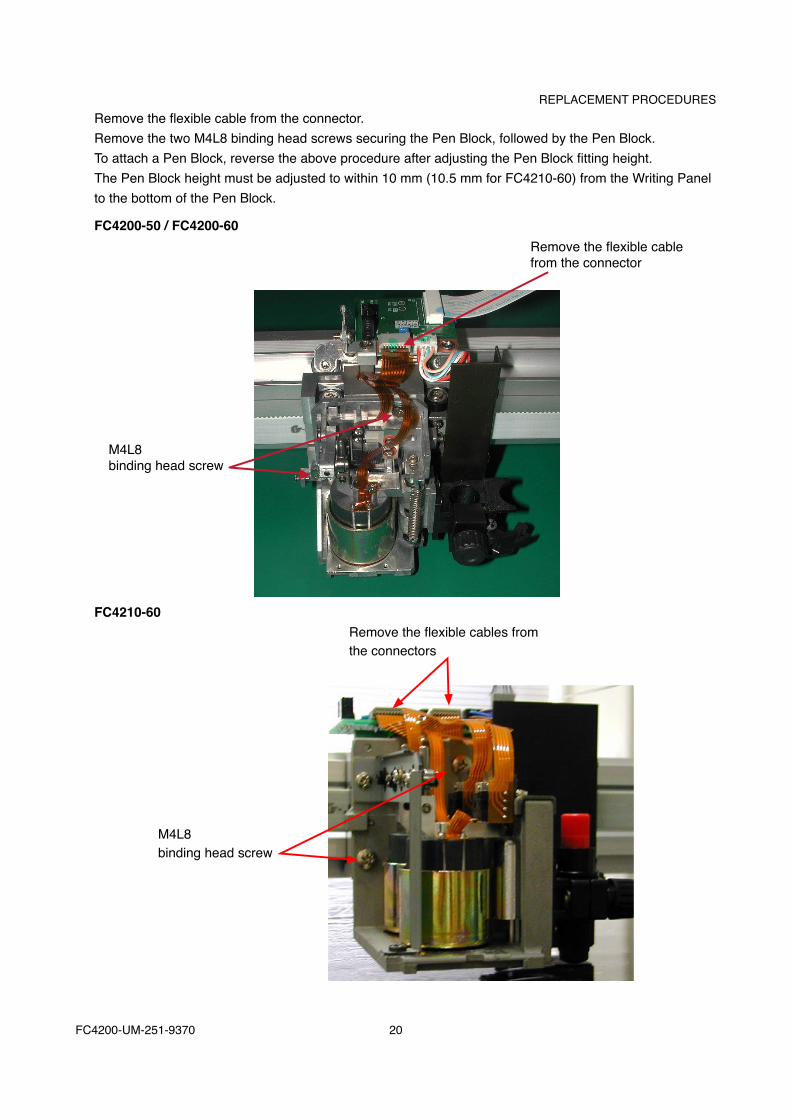
REPLACEMENT PROCEDURESRemove the flexible cable from the connector. Remove the two M4L8 binding head screws securing the Pen Block, followed by the Pen Block. To attach a Pen Block, reverse the above procedure after adjusting the Pen Block fitting height. The Pen Block height must be adjusted to within 10 mm (10.5 mm for FC4210-60) from the Writing Panel to the bottom of the Pen Block.
FC4200-50 / FC4200-60
M4L8�binding head screw
Remove the flexible cable�from the connector
FC4210-60
M4L8binding head screw
Remove the flexible cables from the connectors

FC4200-UM-251-9370 21
REPLACEMENT PROCEDURES
6.11 Adjusting the Pen Block HeightThe Pen Block height needs be adjusted when attaching a Pen Block. Position the Pen Block within 10 mm (10.5 mm for FC4210-60) from the Writing Panel to the bottom of the Pen Block.

FC4200-UM-251-9370 22
REPLACEMENT PROCEDURES
6.12 Adjusting the X Belt TensionMove the Y Rail toward the home side stopper (left side of the main unit). Press the belt downward at the middle part of the X Rail (where a screw hole is opened), and at the position where the belt is in contact with the X Rail, adjust the X belt tension to the following values: FC4200-50: 500 ± 25 gf FC4200-60 / FC4210-60: 300 ± 25 gfApply suitable quantity of the silicon grease to the X belt when you replace to new one.

FC4200-UM-251-9370 23
REPLACEMENT PROCEDURES
6.13 Adjusting Y Belt TensionMove the Y Slider toward the upper stopper. Press the rail-side belt at the middle part of the Y Rail, and at the position where the belt is in contact with the Y Rail, adjust the Y belt tension to the following values: FC4200-50: 600 ± 20 gf FC4200-60 / FC4210-60: 450 ± 20 gfApply suitable quantity of the silicon grease to the Y belt when you replace to new one.
FC4200-UM-251-9370 24
REPLACEMENT PROCEDURES
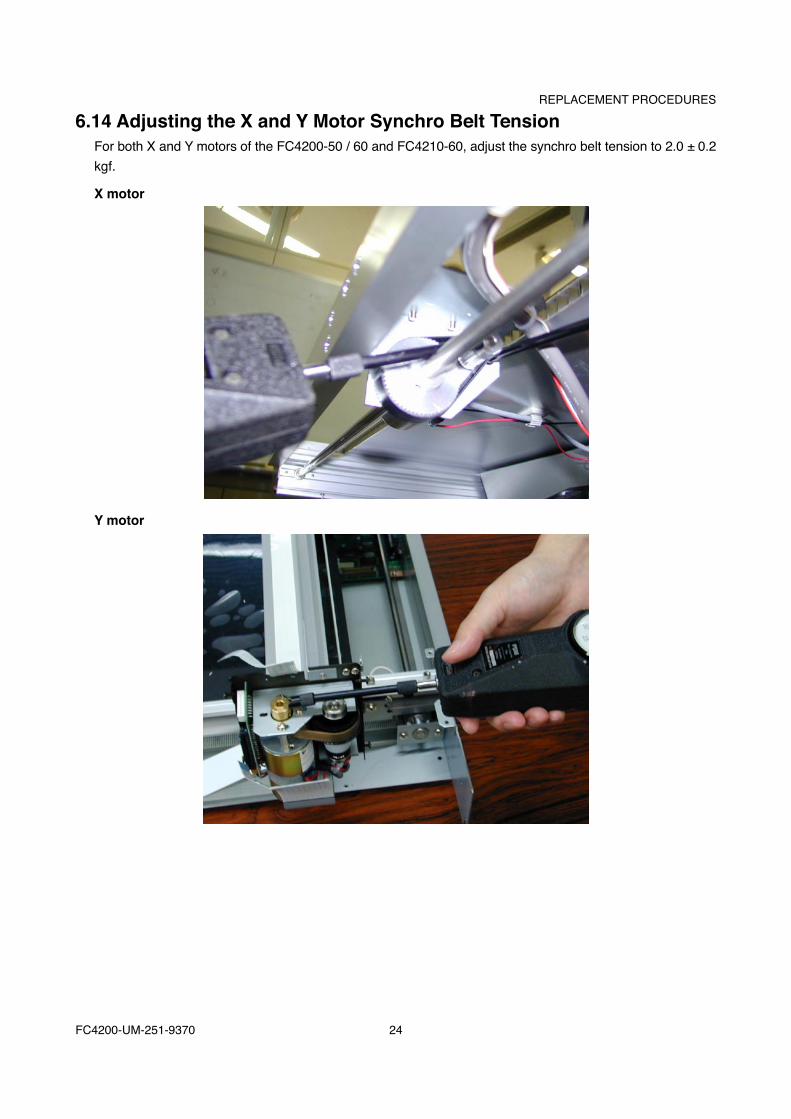
6.14 Adjusting the X and Y Motor Synchro Belt TensionFor both X and Y motors of the FC4200-50 / 60 and FC4210-60, adjust the synchro belt tension to 2.0 ± 0.2 kgf.
X motor
Y motor
FC4200-UM-251-9370 25
REPLACEMENT PROCEDURES
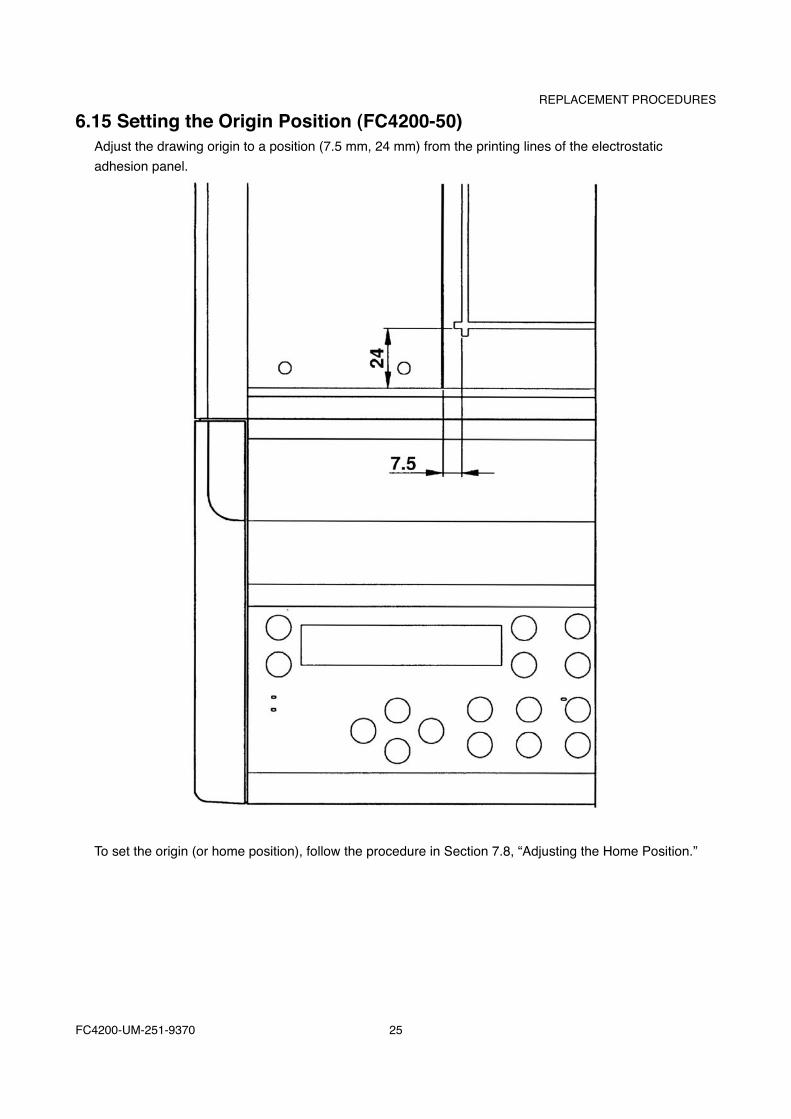
6.15 Setting the Origin Position (FC4200-50)Adjust the drawing origin to a position (7.5 mm, 24 mm) from the printing lines of the electrostatic adhesion panel.
To set the origin (or home position), follow the procedure in Section 7.8, “Adjusting the Home Position.”
FC4200-UM-251-9370 26
REPLACEMENT PROCEDURES
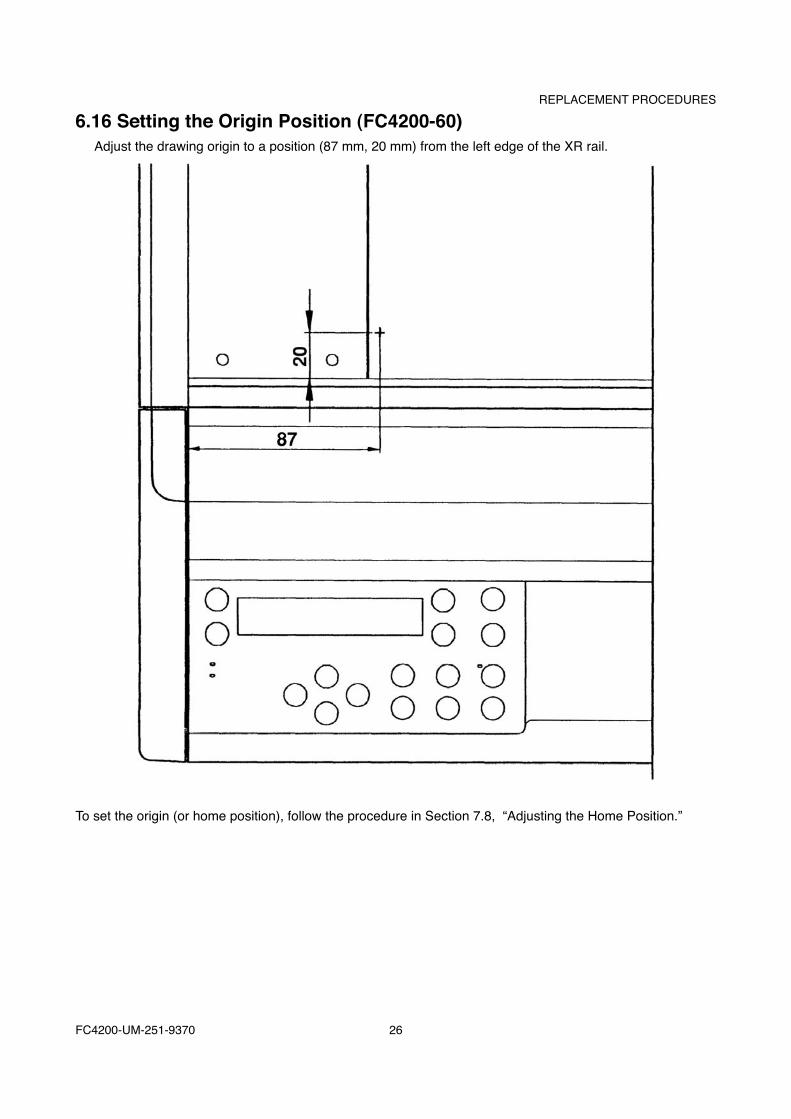
6.16 Setting the Origin Position (FC4200-60)Adjust the drawing origin to a position (87 mm, 20 mm) from the left edge of the XR rail.
To set the origin (or home position), follow the procedure in Section 7.8, “Adjusting the Home Position.”

FC4200-UM-251-9370 27
REPLACEMENT PROCEDURES
6.17 Setting the Origin Position (FC4210-60)Adjust the drawing origin to a position (13 mm, 20 mm) from the bottom left edge of the writing panel.
To set the origin (or home position), follow the procedure in Section 7.8, “Adjusting the Home Position.”
FC4200-UM-251-9370 28
REPLACEMENT PROCEDURES
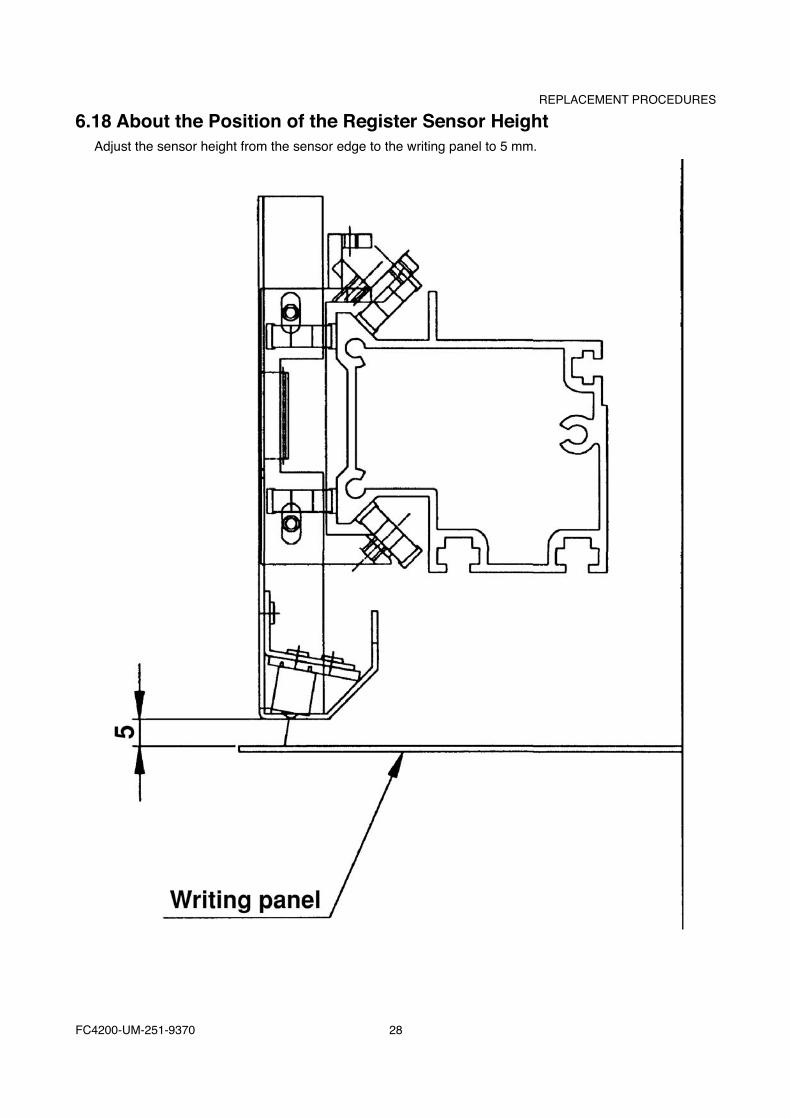
6.18 About the Position of the Register Sensor HeightAdjust the sensor height from the sensor edge to the writing panel to 5 mm.
FC4200-UM-251-9370 29
REPLACEMENT PROCEDURES
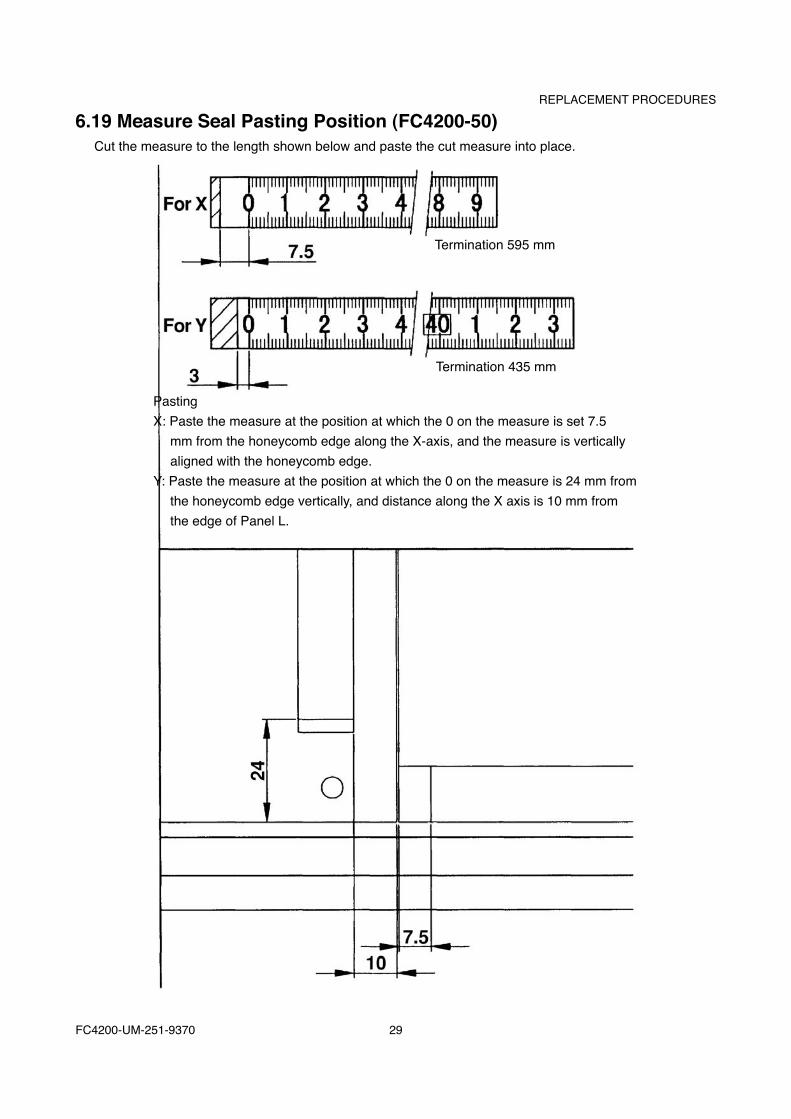
6.19 Measure Seal Pasting Position (FC4200-50)Cut the measure to the length shown below and paste the cut measure into place.
Termination 435 mm
PastingX: Paste the measure at the position at which the 0 on the measure is set 7.5
mm from the honeycomb edge along the X-axis, and the measure is vertically aligned with the honeycomb edge.
Y: Paste the measure at the position at which the 0 on the measure is 24 mm from the honeycomb edge vertically, and distance along the X axis is 10 mm from the edge of Panel L.
Termination 595 mm

FC4200-UM-251-9370 30
REPLACEMENT PROCEDURES
6.20 Measure Seal Pasting Position (FC4200-60)Cut the measure to the length shown below, then paste it into place.
PastingX: Paste the measure at the position at which the 0 on the measure is 5 mm from
the left edge of the X Rail along the X-axis, and the measure is vertically aligned with the honeycomb edge.
Y: Paste the measure at the position at which the 0 on the measure is 20 mm from the honeycomb edge vertically, and the distance along the X-axis is 10 mm from the edge of Panel L.
Termination 915 mm
Termination 615 mm
FC4200-UM-251-9370 31
REPLACEMENT PROCEDURES
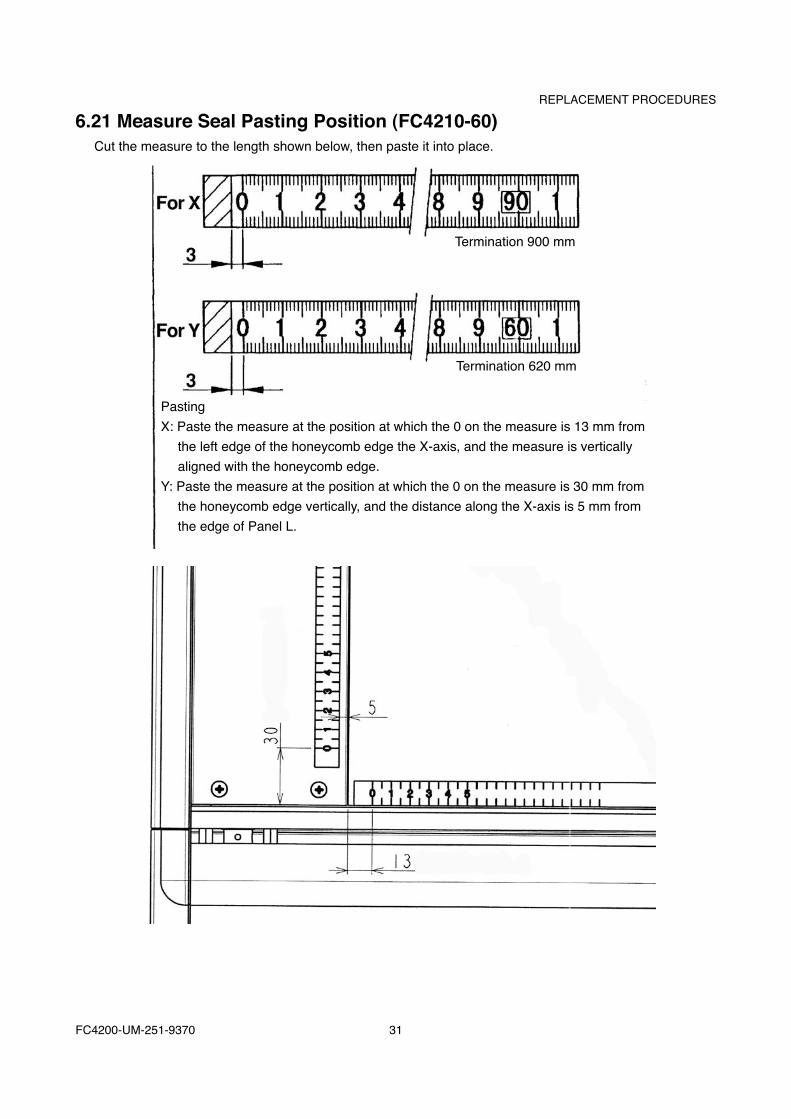
6.21 Measure Seal Pasting Position (FC4210-60)Cut the measure to the length shown below, then paste it into place.
PastingX: Paste the measure at the position at which the 0 on the measure is 13 mm from
the left edge of the honeycomb edge the X-axis, and the measure is vertically aligned with the honeycomb edge.
Y: Paste the measure at the position at which the 0 on the measure is 30 mm from the honeycomb edge vertically, and the distance along the X-axis is 5 mm from the edge of Panel L.
Termination 900 mm
Termination 620 mm
FC4200-UM-251-9370 32
REPLACEMENT PROCEDURES
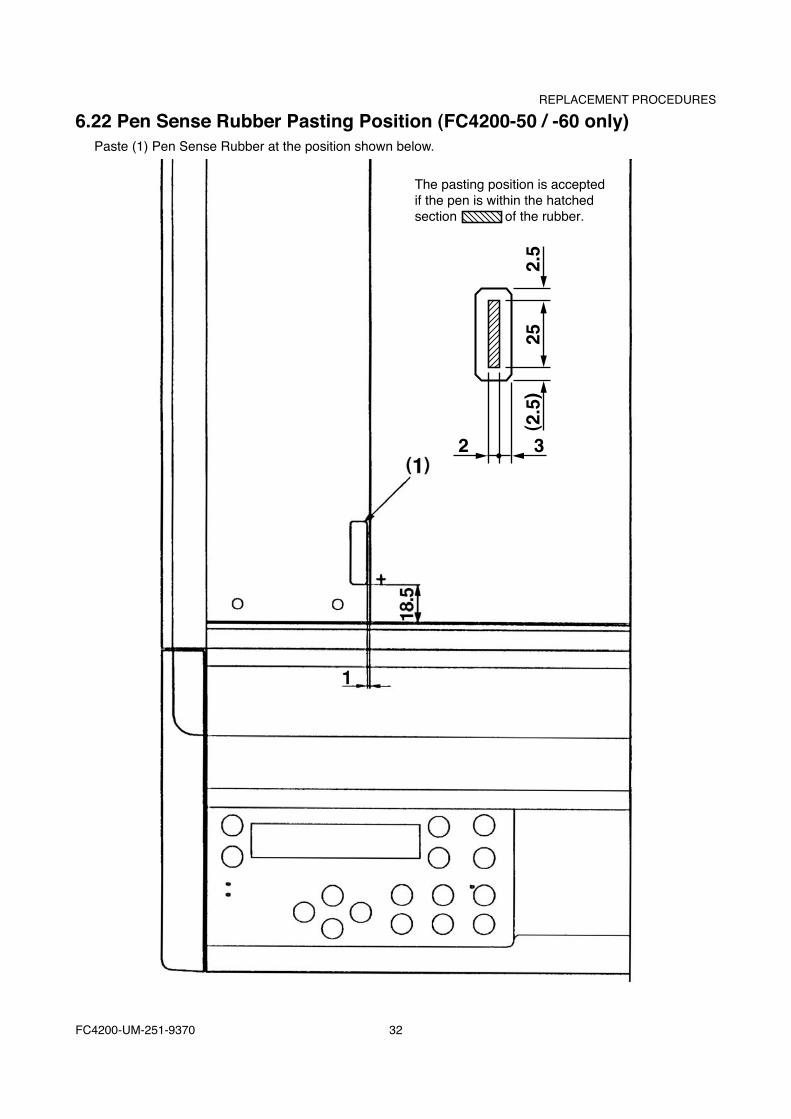
6.22 Pen Sense Rubber Pasting Position (FC4200-50 / -60 only)Paste (1) Pen Sense Rubber at the position shown below.
32
2.5
25( 2
.5)
The pasting position is accepted if the pen is within the hatched section of the rubber.

FC4200-UM-251-9370 33
REPLACEMENT PROCEDURES
6.23 Replacing the Main BoardOpen the main control box.
Main Board
Disconnect all cables from the main board.Remove the all screws securing the main board.To replace the main board, reverse the above procedure.Execute the adjustment item of chapter 7-14.

FC4200-UM-251-9370 34
ELECTRICAL SECTION
7. ELECTRICAL SECTION7.1 List of DIP Switches
1. Normal mode (factory settings)
1
ONOFF
2 3 4 5FC4200-60 / FC4210-60
6 7 8 1
ONOFF
2 3 4 5FC4200-50
6 7 8
2. Adjustment mode
1
ONOFF
2 3 4 5FC4200-60 / FC4210-60
6 7 8 1
ONOFF
2 3 4 5FC4200-50
6 7 8
3. NOVRAM clear
1
ONOFF
2 3 4 5FC4200-60 / FC4210-60
6 7 8 1
ONOFF
2 3 4 5FC4200-50
6 7 8
4. Emergency gain adjustment mode If gain adjustment resulted in registering an inappropriate value, setting off a position alarm, use this mode to rewrite the gain value.
1
ONOFF
2 3 4 5 6 7 8

FC4200-UM-251-9370 35
ELECTRICAL SECTION
7.2 Writing to Flash MemoryTo update the system frmware you need to have the following files. In addition, you need to use a com-puter.Firmware :FC4200-50 / 60 or FC4210SEND.EXE :Utillity to transfer files using WindowsSENDB.EXE :Utillity to transfer files using DOS
1. Check that the power supply (J14) and control panel unit (J10) are connected to the main board. Connect a personal computer to the Centronics terminal (J18).
Caution: If you are writing to a new board for the first time, remove the motor and flex cable connectors before performing the write.
2. Set the DIP switch to “Normal mode” or “Adjustment mode.”
3. Hold down both the “Right” and “Left” POSITION keys while turning on the power. When you hear a short buzzer tone, release the keys. The LCD should display the following:
FORCE
SPEED
OFFSET
QUALITY
F1 F3
F4F2
INPUT PASSWORD
4. Press the POSITION keys in the sequence “Up”, “Down”, “Right” and “Left”. A buzzer will sound, and the LCD will display the following:
FORCE
SPEED
OFFSET
QUALITY
F1 F3
F4F2
SELECT SEND MODEGET-ACK ACK-GET
Press [F2] or [F4] depending on the type of computer you are using. (Normally, press [F2].)The display changes to display the following:
FORCE
SPEED
OFFSET
QUALITY
F1 F3
F4F2
PLEASE SEND PROGRAM! PLOTTER (GET-ACK)

FC4200-UM-251-9370 36
ELECTRICAL SECTION5. Transfer firmware data from the personal computer.
Send frmware to the plotter from the computer.Drag and drop the frmware file onto the SEND.EXE icon when using Windows.For DOS mode, use SENDB.EXE as shown below.(For example: Firmware file name is "v2.40")>SENDB v.2.40The display changes to display the following:
FORCE
SPEED
OFFSET
QUALITY
F1 F3
F4F2
PROGRAM RECEIVING ** KB COMPLETE
Number of bytes transferredAs the firmware data is successfully transferred, the number of transferred bytes shown on the LCD increases. When the transfer finishes, the display automatically changes to “FLASH MEMORY CLEAR” and “FLASH MEMORY WRITE,” and the system begins writing to flash memory.Note: If you are writing to a new board, the system will automatically perform a NOVRAM clear operation follow-ing the write.
6. Switch off power when you’re done.

FC4200-UM-251-9370 37
ELECTRICAL SECTION
7.3 Clearing Non-Volatile RAMCaution: Always perform the operation described here when using a new board for the first time. Note that this operation deletes all previously set settings.
A NOVRAM clear is executed automatically after you write firmware to a new board. To execute a sepa-rate NOVRAM (that is, not as part of this operation), follow the procedure given below.
Check that the operation unit (J14) and power supply (J10) are connected to the main board. Set the DIP switch as shown below and switch on power.
1
ONOFF
2 3 4 5FC4200-60 / FC4210-60
6 7 8 1
ONOFF
2 3 4 5FC4200-50
6 7 8
1. The LCD displays the following screen, and the system begins initializing the NOVRAM.
FORCE
SPEED
OFFSET
QUALITY
F1 F3
F4F2
NOV RAM CLEAR MODE OK!!
(The PROMPT lamp flashes as initialization proceeds.)
2. The system proceeds to write the initial values to the NOVRAM.
FORCE
SPEED
OFFSET
QUALITY
F1 F3
F4F2
SET SUFFIX STD[V2.10]
3. The following appears when initialization is complete.
FORCE
SPEED
OFFSET
QUALITY
F1 F3
F4F2
SUFFIX SET MODE POWER OFF THEN ON!
4. Switch off power.
FC4200-UM-251-9370 38
ELECTRICAL SECTION
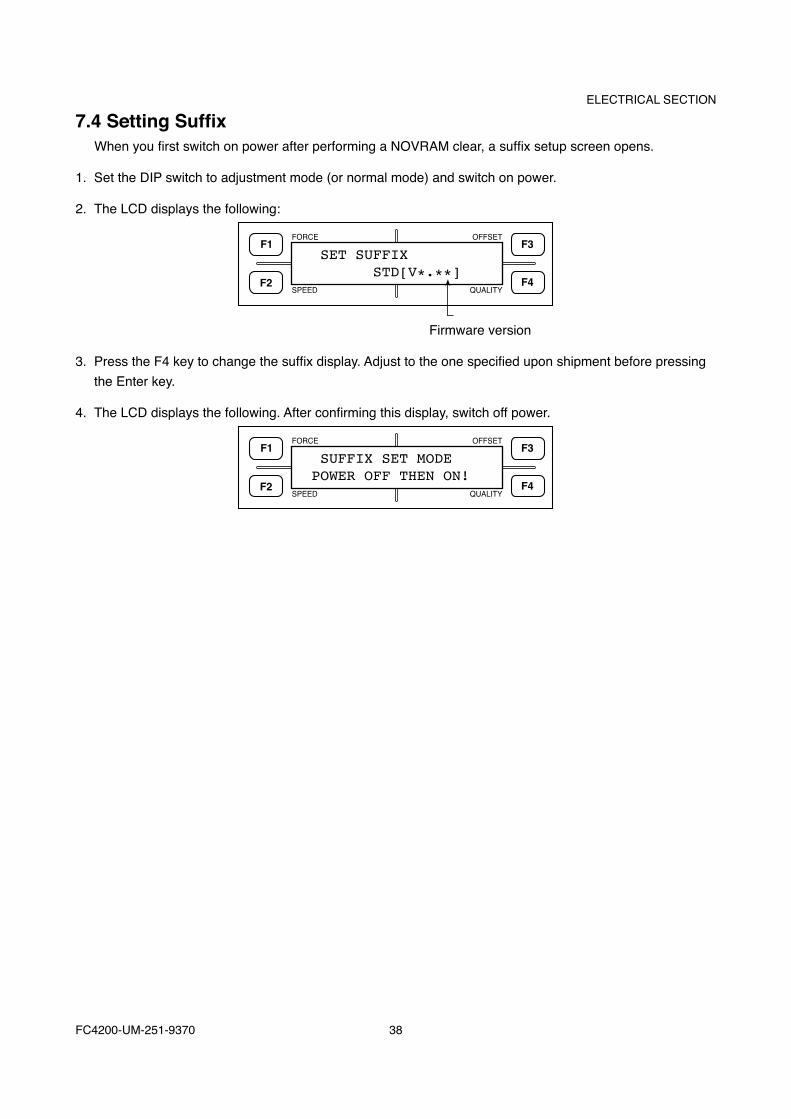
7.4 Setting SuffixWhen you first switch on power after performing a NOVRAM clear, a suffix setup screen opens.
1. Set the DIP switch to adjustment mode (or normal mode) and switch on power.
2. The LCD displays the following:
FORCE
SPEED
OFFSET
QUALITY
F1 F3
F4F2
SET SUFFIX STD[V*.**]
Firmware version
3. Press the F4 key to change the suffix display. Adjust to the one specified upon shipment before pressing the Enter key.
4. The LCD displays the following. After confirming this display, switch off power.
FORCE
SPEED
OFFSET
QUALITY
F1 F3
F4F2
SUFFIX SET MODE POWER OFF THEN ON!

FC4200-UM-251-9370 39
ELECTRICAL SECTION
7.5 Adjusting the Mark Sensor Level
Correctly connect the connectors for all wire materials before performing the operation described below.
1. Set the DIP switch to adjustment mode (or normal mode).
2. Hold down the POSITION keys “Left” and “Lower” while switching on power. The LCD displays the follow-ing:
FORCE
SPEED
OFFSET
QUALITY
F1 F3
F4F2
0 0% MAX
3. Place white paper for adjustment use on the panel, making sure that no part of it is raised above the sur-face. Move the mark sensor by hand to the position exactly above the paper. The bar graph shown in the lower row of the LCD will indicate, as a percentage value, the amount detected of reflected sensor light. On the main board, turn VR1 clockwise or counterclockwise to adjust the indicated value in the range 27–30%.
4. Switch off power.
FC4200-UM-251-9370 40
ELECTRICAL SECTION
7.6 Adjusting the Pen Pressure
Required jigs and tools • Collet gauges (500 g, 300 g, 50 g) • Cutter plunger
1. Check that the carriage cover is in place. Fit the cutter plunger from which the blade has been removed into the cutter holder.
2. Set the DIP switch to adjustment mode and switch on power.
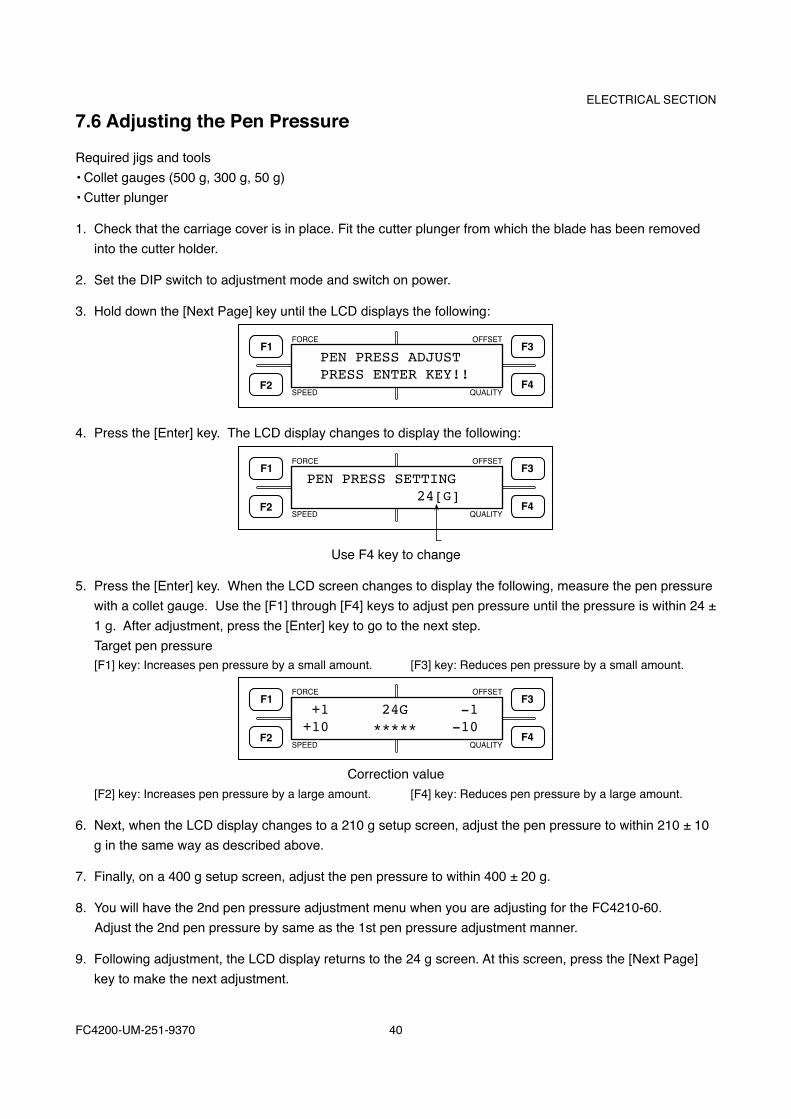
3. Hold down the [Next Page] key until the LCD displays the following:
FORCE
SPEED
OFFSET
QUALITY
F1 F3
F4F2
PEN PRESS ADJUST PRESS ENTER KEY!!
4. Press the [Enter] key. The LCD display changes to display the following:
FORCE
SPEED
OFFSET
QUALITY
F1 F3
F4F2
PEN PRESS SETTING 24[G]
Use F4 key to change
5. Press the [Enter] key. When the LCD screen changes to display the following, measure the pen pressure with a collet gauge. Use the [F1] through [F4] keys to adjust pen pressure until the pressure is within 24 ± 1 g. After adjustment, press the [Enter] key to go to the next step.Target pen pressure[F1] key: Increases pen pressure by a small amount. [F3] key: Reduces pen pressure by a small amount.
FORCE
SPEED
OFFSET
QUALITY
F1 F3
F4F2
+1 24G -1+10 ***** -10
Correction value[F2] key: Increases pen pressure by a large amount. [F4] key: Reduces pen pressure by a large amount.
6. Next, when the LCD display changes to a 210 g setup screen, adjust the pen pressure to within 210 ± 10 g in the same way as described above.
7. Finally, on a 400 g setup screen, adjust the pen pressure to within 400 ± 20 g.
8. You will have the 2nd pen pressure adjustment menu when you are adjusting for the FC4210-60.Adjust the 2nd pen pressure by same as the 1st pen pressure adjustment manner.
9. Following adjustment, the LCD display returns to the 24 g screen. At this screen, press the [Next Page] key to make the next adjustment.

FC4200-UM-251-9370 41
ELECTRICAL SECTION
7.7 Adjusting Pen Exchange (FC4200-50 / 60 only)
1. Set the DIP switch to adjustment mode and switch on power.
2. Hold down the [Next Page] key until the LCD displays the following:
FORCE
SPEED
OFFSET
QUALITY
F1 F3
F4F2
PEN EXCHANG ADJUST PRESS ENTER KEY!!
3. Attach pens to the pen station.
4. Press the [Enter] key. The LCD display changes to display the following: Modify the correction value Change pens
FORCE
SPEED
OFFSET
QUALITY
F1 F3
F4F2
UP CHANGY=+000 H=+000
Move the cursor to the left Move the cursor to the right Thrust amount adjustment value Pen exchange height adjustment value
5. Press the [F3] key to prompt the plotter to perform a pen exchange and pen placement operations. Adjust the Y and H values until the plotter can execute pen exchange and pen placement operations normally.
To move in the reverse direction, decrement the Y value.To move in the thrust direction, increment the Y value. (Y is expressed in increments of 0.1 mm.)
To raise the pen holder, decrement the H value. To lower the pen holder, increment the H value. (H is expressed in increments of 0.1 mm.)
Note:Hold down the [F3] key as the plotter begins moving to get access to a pen. This causes the plotter to stop, allowing you to easily check the pen height.
6. If the plotter has no problems changing pens, press the [Enter] key to finish.
7. Switch off power, or proceed to the next adjustment.

FC4200-UM-251-9370 42
ELECTRICAL SECTION
7.8 Adjusting the Home Position
1. Set the DIP switch to adjustment mode and switch on power.
2. Hold down the [Next Page] key until the LCD displays the following:
FORCE
SPEED
OFFSET
QUALITY
F1 F3
F4F2
HOME ADJ. PRESS ENTER KEY!!
3. Press the [Enter] key. The plotter starts reading the home sensor. The LCD screen will switch to display the following:
FORCE
SPEED
OFFSET
QUALITY
F1 F3
F4F2
MOVE HOME POINT PRESS ENTER KEY!!
4. Attach a pen-type magnifier to the cutter holder, and move to the home position using the position key. After confirming the position, press the [Enter] key.
Note:For more information on the mechanical dimensions of the home position, see the mechanism manufac-turing specifications.
5. The plotter starts reading the home sensor again and returns to the display in 3. If the position is good, press the [Enter] key to finish.
6. Switch off power, or proceed to the next adjustment.
Reference:This adjustment does not affect the plotter’s pen exchange adjustment.

FC4200-UM-251-9370 43
ELECTRICAL SECTION
7.9 Adjusting the Distance Accuracy
1. Set the DIP switch to adjustment mode and set micro trace. Attach a ceramic pen to the cutter holder and switch on power.
2. Hold down the [Next Page] key until the LCD displays the following:
FORCE
SPEED
OFFSET
QUALITY
F1 F3
F4F2
DISTANCE ADJUST PRESS ENTER KEY!!
3. Press the [Enter] key. The LCD display changes to display the following:
FORCE
SPEED
OFFSET
QUALITY
F1 F3
F4F2
ORIGNAL CLEARADJ.DRAW INPUT
F1: Plots a distance adjustment pattern before distance adjustment. F2: Plots a distance adjustment pattern after distance adjustment. F3: Clears the set value for distance adjustment. F4: Goes to a distance adjustment value input screen.Select F1 to draw a distance adjustment pattern. After removing the paper, measure the lengths of X and Y reference lines and diagonal lines.
4. Select F4 to switch to a distance adjustment value input screen.
FORCE
SPEED
OFFSET
QUALITY
F1 F3
F4F2
DISTANCE ADJUSTX =+10 Y =-10
Enter differences in increments of 0.1 mm relative to X = 500 mm and Y = 400 mm.F1: Increments the X axis difference value by 0.1 mmF2: Decrements the X axis difference value by 0.1 mmF3: Increments the Y axis difference value by 0.1 mmF4: Decrements the Y axis difference value by 0.1 mm* If the measured value is smaller than the reference value, enter a positive value.
5. After setting the values, press the [Enter] key. The LCD screen will switch to an X-Y length adjustment input screen.
FORCE
SPEED
OFFSET
QUALITY
F1 F3
F4F2
+0.1 X-Y LENG -0.1+0.01 L=640.31 -0.01
Enter the measured values of diagonal lines using F1 through F4. Press the [Enter] key to confirm the values you’ve entered.
6. Attach the paper again and press the [F2] key to draw a post-adjustment pattern and verify distance ac-curacy.

FC4200-UM-251-9370 44
ELECTRICAL SECTION7. When the adjustment is complete, press the [Next Page] key to finish.
FC4200-UM-251-9370 45
ELECTRICAL SECTION
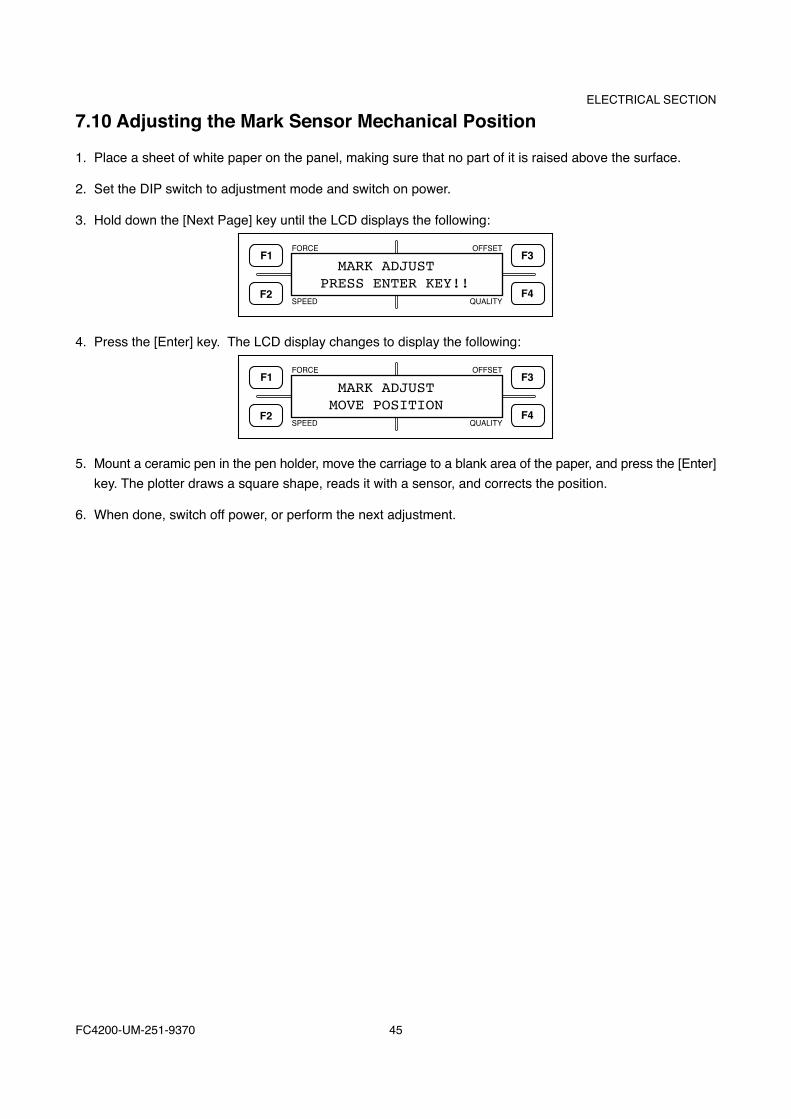
7.10 Adjusting the Mark Sensor Mechanical Position
1. Place a sheet of white paper on the panel, making sure that no part of it is raised above the surface.
2. Set the DIP switch to adjustment mode and switch on power.
3. Hold down the [Next Page] key until the LCD displays the following:
FORCE
SPEED
OFFSET
QUALITY
F1 F3
F4F2
MARK ADJUST PRESS ENTER KEY!!
4. Press the [Enter] key. The LCD display changes to display the following:
FORCE
SPEED
OFFSET
QUALITY
F1 F3
F4F2
MARK ADJUST MOVE POSITION
5. Mount a ceramic pen in the pen holder, move the carriage to a blank area of the paper, and press the [Enter] key. The plotter draws a square shape, reads it with a sensor, and corrects the position.
6. When done, switch off power, or perform the next adjustment.
FC4200-UM-251-9370 46
ELECTRICAL SECTION
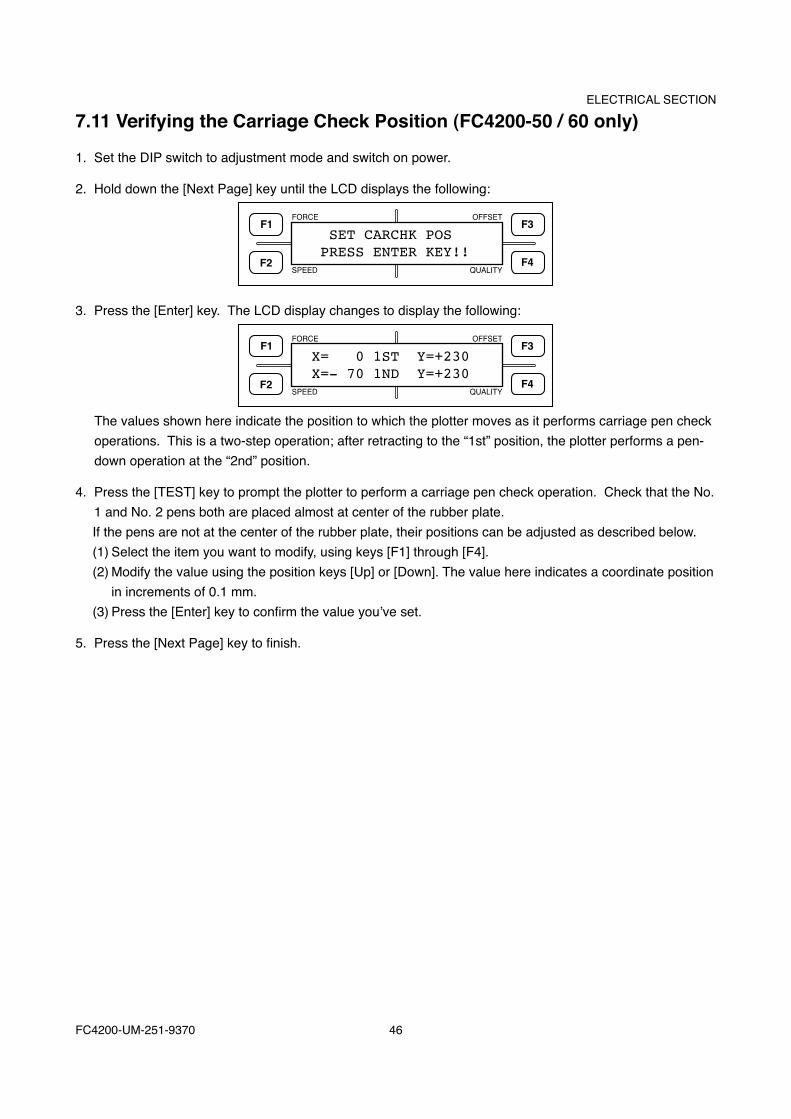
7.11 Verifying the Carriage Check Position (FC4200-50 / 60 only)
1. Set the DIP switch to adjustment mode and switch on power.
2. Hold down the [Next Page] key until the LCD displays the following:
FORCE
SPEED
OFFSET
QUALITY
F1 F3
F4F2
SET CARCHK POS PRESS ENTER KEY!!
3. Press the [Enter] key. The LCD display changes to display the following:
FORCE
SPEED
OFFSET
QUALITY
F1 F3
F4F2
X= 0 1ST Y=+230 X=- 70 1ND Y=+230
The values shown here indicate the position to which the plotter moves as it performs carriage pen check operations. This is a two-step operation; after retracting to the “1st” position, the plotter performs a pen-down operation at the “2nd” position.
4. Press the [TEST] key to prompt the plotter to perform a carriage pen check operation. Check that the No. 1 and No. 2 pens both are placed almost at center of the rubber plate.If the pens are not at the center of the rubber plate, their positions can be adjusted as described below.(1) Select the item you want to modify, using keys [F1] through [F4].(2) Modify the value using the position keys [Up] or [Down]. The value here indicates a coordinate position
in increments of 0.1 mm.(3) Press the [Enter] key to confirm the value you’ve set.
5. Press the [Next Page] key to finish.

FC4200-UM-251-9370 47
ELECTRICAL SECTION
7.12 Adjusting the Gain
1. Set the DIP switch to normal mode.
2. Hold down the [Left] position key while switching on power.
3. After an initialization operation, execute a gain adjustment program from the personal computer. The LCD displays the following:
FORCE
SPEED
OFFSET
QUALITY
F1 F3
F4F2
GAIN SETX= 65 Y= 60
4. Adjust the gain until MAX ERROR is equal to or less than 7.[F1]: Increases the X gain. [F3]: Increases the Y gain.[F2]: Reduces the X gain. [F4]: Reduces the Y gain.After adjusting the gains, press the [Enter] key and confirm that a beeper sounds.
5. If NG, check the X and Y motor belt tension and repeat the gain adjustment from the beginning.
6. If OK, switch off power.
FC4200-UM-251-9370 48
ELECTRICAL SECTION
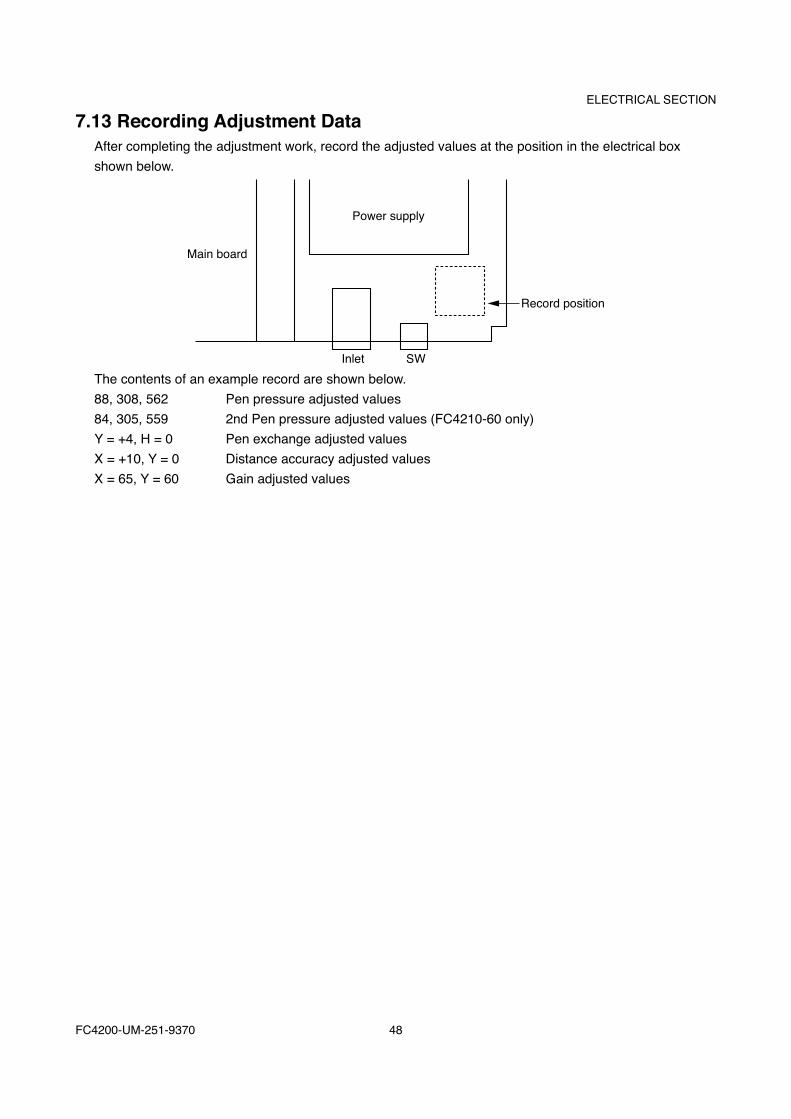
7.13 Recording Adjustment DataAfter completing the adjustment work, record the adjusted values at the position in the electrical box shown below.
Power supply
Inlet SW
Record position
Main board
The contents of an example record are shown below.88, 308, 562 Pen pressure adjusted values84, 305, 559 2nd Pen pressure adjusted values (FC4210-60 only)Y = +4, H = 0 Pen exchange adjusted valuesX = +10, Y = 0 Distance accuracy adjusted valuesX = 65, Y = 60 Gain adjusted values
FC4200-UM-251-9370 49
ELECTRICAL SECTION
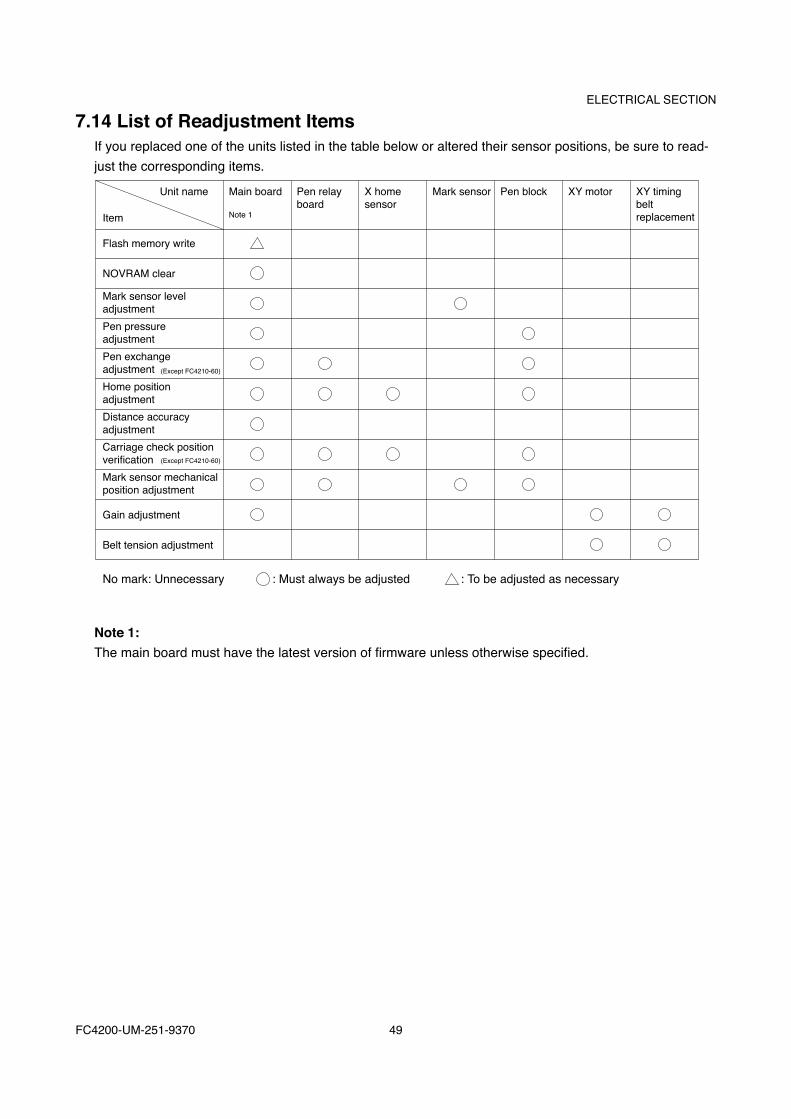
7.14 List of Readjustment ItemsIf you replaced one of the units listed in the table below or altered their sensor positions, be sure to read-just the corresponding items.
Unit name
Item
Flash memory write
NOVRAM clear
Mark sensor leveladjustmentPen pressureadjustmentPen exchangeadjustmentHome positionadjustment
Gain adjustment
Distance accuracyadjustment
Main board
Note 1
Pen relayboard
X homesensor
Mark sensor Pen block XY motor XY timingbeltreplacement
No mark: Unnecessary : Must always be adjusted : To be adjusted as necessary
Belt tension adjustment
Carriage check positionverificationMark sensor mechanicalposition adjustment
(Except FC4210-60)
(Except FC4210-60)
Note 1:The main board must have the latest version of firmware unless otherwise specified.
FC4200-UM-251-9370 50
ELECTRICAL SECTION
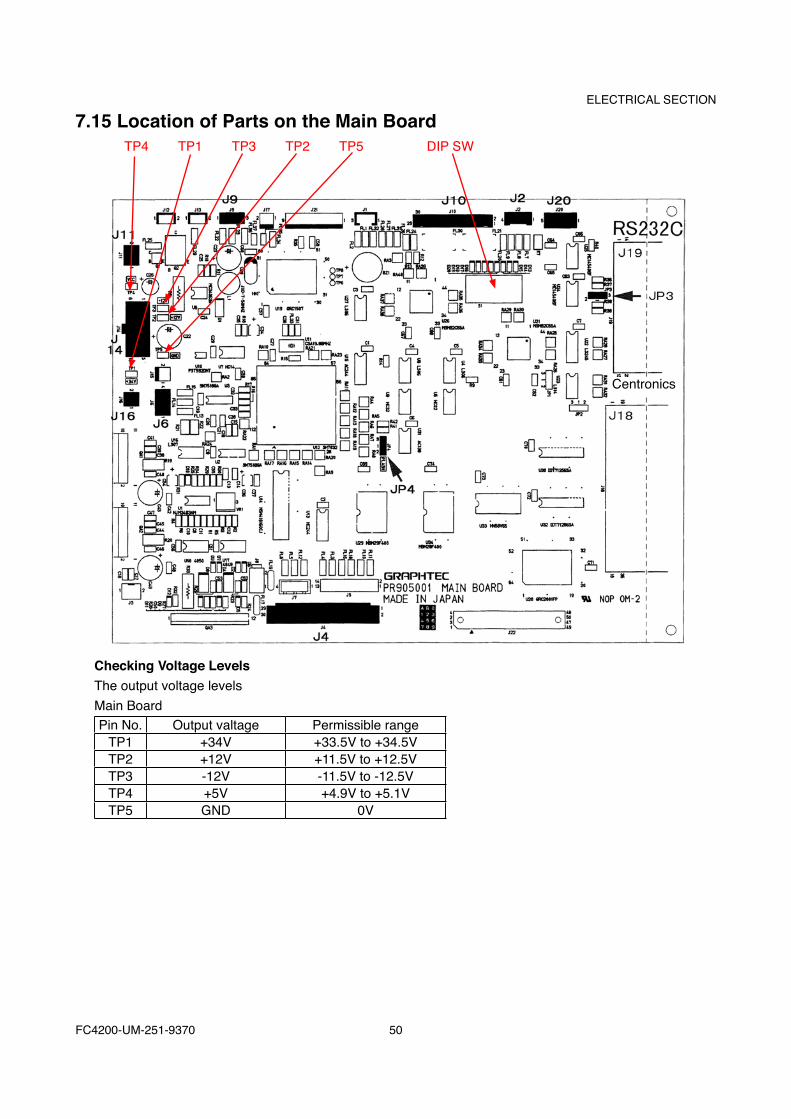
7.15 Location of Parts on the Main BoardTP4 DIP SWTP1 TP3 TP2 TP5
Centronics
Checking Voltage LevelsThe output voltage levelsMain BoardPin No. Output valtage Permissible range
TP1 +34V +33.5V to +34.5VTP2 +12V +11.5V to +12.5VTP3 -12V -11.5V to -12.5VTP4 +5V +4.9V to +5.1VTP5 GND 0V

FC4200-UM-251-9370 51
ELECTRICAL SECTION
7.16 Setting the Power Unit’s Supply Voltage (PS089B)If your plotter has the PS089B power supply board then perform following procedure.
The LEP100F-36 power supply board doesn’t need to set the power unit’s supply voltage.
(1) Check that the plotter’s POWER switch is off.(2) Open the chassis of the Main Control Box.
Power Unit
(3) Connect the power unit’s cable to the required connector.Voltage series Corresponding area Connector
100 V JAP 110T/K WGl117UL CN2200 V CEE SEV BS AS CN3
FC4200-UM-251-9370 52
TEST MODES
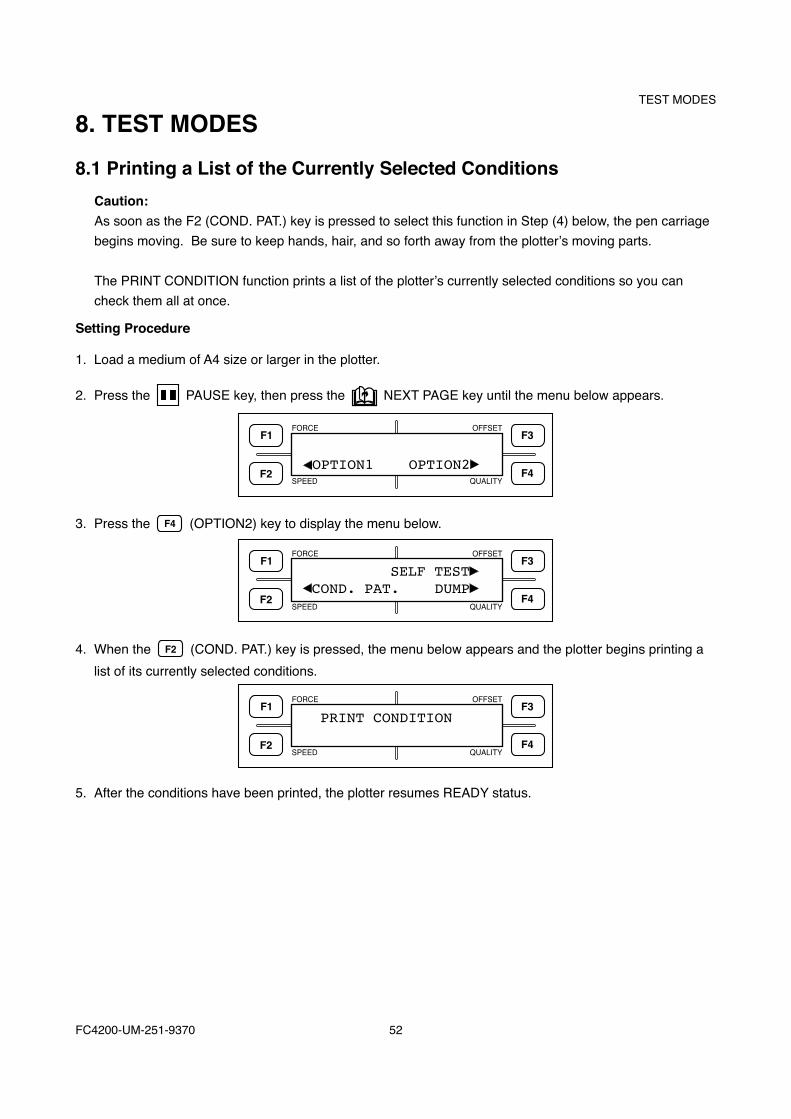
8. TEST MODES8.1 Printing a List of the Currently Selected Conditions
Caution: As soon as the F2 (COND. PAT.) key is pressed to select this function in Step (4) below, the pen carriage begins moving. Be sure to keep hands, hair, and so forth away from the plotter’s moving parts.
The PRINT CONDITION function prints a list of the plotter’s currently selected conditions so you can check them all at once.
Setting Procedure
1. Load a medium of A4 size or larger in the plotter.
2. Press the PAUSE key, then press the NEXT PAGE key until the menu below appears.
FORCE
SPEED
OFFSET
QUALITY
F1 F3
F4F2OPTION1 OPTION2
3. Press the F4 (OPTION2) key to display the menu below.
FORCE
SPEED
OFFSET
QUALITY
F1 F3
F4F2
SELF TESTCOND. PAT. DUMP
4. When the F2 (COND. PAT.) key is pressed, the menu below appears and the plotter begins printing a list of its currently selected conditions.
FORCE
SPEED
OFFSET
QUALITY
F1 F3
F4F2
PRINT CONDITION
5. After the conditions have been printed, the plotter resumes READY status.

FC4200-UM-251-9370 53
TEST MODES
8.2 Running the SELF TESTCaution:
As soon as the F3 (SELF TEST) key is pressed to select this function in Step (4) below, the pen carriage begins moving. Be sure to keep hands, hair, and so forth away from the plotter’s moving parts. The SELF TEST function prints a test pattern that allows you to check the plotter’s operation independent of its interface functions.
Setting Procedure
1. Load a medium of A3 size or larger in the plotter.
2. Press the PAUSE key, then press the NEXT PAGE key until the menu below appears.
FORCE
SPEED
OFFSET
QUALITY
F1 F3
F4F2OPTION1 OPTION2
3. Press the F4 (OPTION2) key to display the menu below.
FORCE
SPEED
OFFSET
QUALITY
F1 F3
F4F2
SELF TESTCOND. PAT. DUMP
4. When the F3 (SELF TEST) key is pressed, the menu below appears and the plotter begins plotting the self test pattern.
FORCE
SPEED
OFFSET
QUALITY
F1 F3
F4F2
SELF TEST
5. The plotter repeatedly plots the self test pattern until it is turned off. To terminate the self test, therefore, turn off the plotter.
FC4200-UM-251-9370 54
TEST MODES
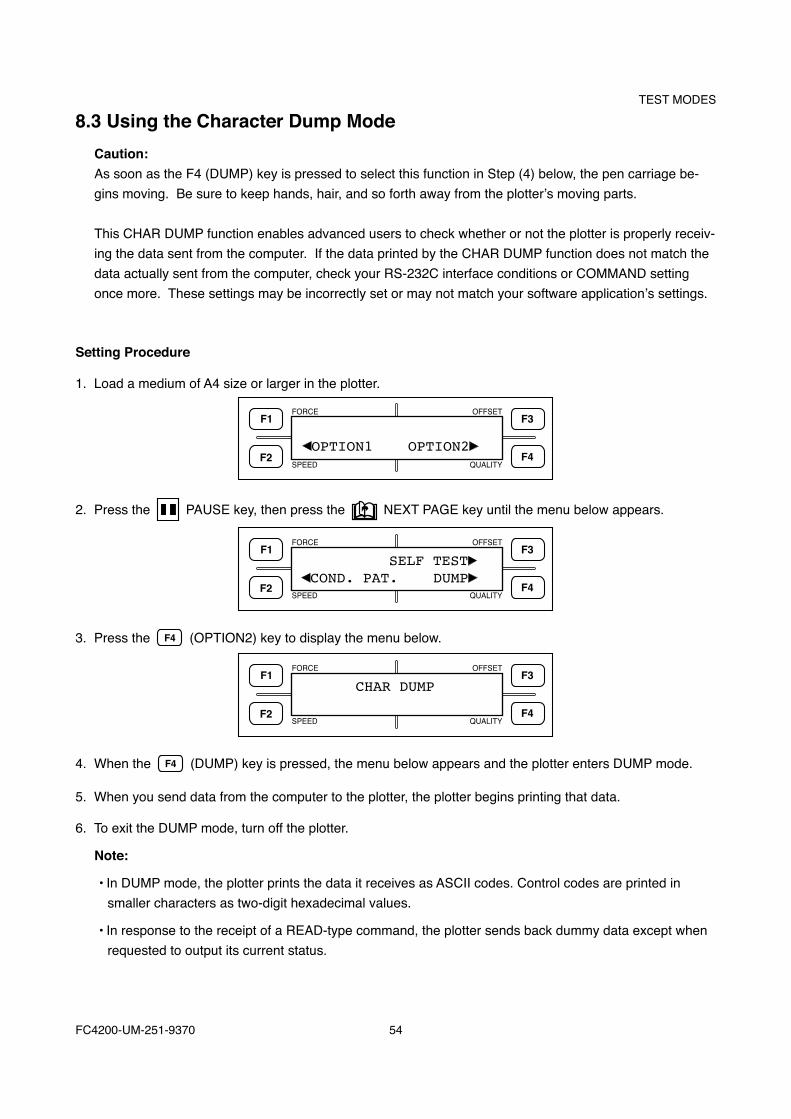
8.3 Using the Character Dump ModeCaution:As soon as the F4 (DUMP) key is pressed to select this function in Step (4) below, the pen carriage be-gins moving. Be sure to keep hands, hair, and so forth away from the plotter’s moving parts.
This CHAR DUMP function enables advanced users to check whether or not the plotter is properly receiv-ing the data sent from the computer. If the data printed by the CHAR DUMP function does not match the data actually sent from the computer, check your RS-232C interface conditions or COMMAND setting once more. These settings may be incorrectly set or may not match your software application’s settings.
Setting Procedure
1. Load a medium of A4 size or larger in the plotter.
FORCE
SPEED
OFFSET
QUALITY
F1 F3
F4F2OPTION1 OPTION2
2. Press the PAUSE key, then press the NEXT PAGE key until the menu below appears.
FORCE
SPEED
OFFSET
QUALITY
F1 F3
F4F2
SELF TESTCOND. PAT. DUMP
3. Press the F4 (OPTION2) key to display the menu below.
FORCE
SPEED
OFFSET
QUALITY
F1 F3
F4F2
CHAR DUMP
4. When the F4 (DUMP) key is pressed, the menu below appears and the plotter enters DUMP mode.
5. When you send data from the computer to the plotter, the plotter begins printing that data.
6. To exit the DUMP mode, turn off the plotter.
Note:
• In DUMP mode, the plotter prints the data it receives as ASCII codes. Control codes are printed in smaller characters as two-digit hexadecimal values.
• In response to the receipt of a READ-type command, the plotter sends back dummy data except when requested to output its current status.

FC4200-UM-251-9370 55
TROUBLE SHOOTING
9. TROUBLE SHOOTINGIf your plotter is not operating properly, try the solution(s) described in the following tables before contacting your sales representative or nearest Graphtec vendor to request a service call.
9.1 The Plotter Doesn’t Operate After Being Turned OnSymptom Cause Solution
The control panel’s POWER lamp does not light.The display panel is blank.The POWER lamp lights but the plotter doesn’t operate.
The plotter isn’t being supplied with power.
Check that the power cord is properly plugged into the plotter’s AC inlet and the electrical outlet.
The plotter has broken down. Replace the power supply unit.Replace the main board.
The control panel’s POWER lamp lights, but the plotter doesn’t operate.The control panel’s PAUSE lamp is flashing.The display panel is blank.
The ROM and RAM are defective. Replace the main board.
The control panel’s POWER lamp lights, but the plotter doesn’t operate.The “Sum-ck-ROM ERROR!!” message appears on the display panel.
The ROM and RAM are defective. Replace the main board.

FC4200-UM-251-9370 56
TROUBLE SHOOTING
9.2 The Cut Results Are UnsatisfactorySymptom Cause Solution
• The cut corners are too round• The cut corners are too pointed
The OFFSET setting is not suitable for the blade type being used.
Adjust the OFFSET setting.a Corners are too rounded: Raise the
OFFSET value.a Corners are too pointed: Lower the
OFFSET value The cutter blade wobbles only when
it starts to cutThe blade does not rotate smoothly in the holder.
Remove any foreign matter in the holder.
The OFFSET FORCE setting is too low.
Raise the OFFSET FORCE setting.* The cutter pen’s OFFSET FORCE
and the cutting FORCE are two different functions.
The spring has come loose from the CB09UA blade.
Replace the blade with a new one equipped with a spring.
• Solid lines are cut as dotted lines (the blade skips).
• The cutter blade seems to undulate when cutting solid lines.
The cutter’s blade is extended too far.
Adjust the extended length of the cutter’s blade.
The cutting speed is too fast. Lower the SPEED setting to reduce the cutting speed.
Curved lines become zigzagged. The software application’s cutting data is too coarse.
Rewrite the software application’s cutting data to specify more coordinate points for smoother curves.
The OFFSET ANGLE setting is too low.
Raise the OFFSET ANGLE setting.
• The medium’s corners peel off.• The medium peels off when cutting
small characters.
The cutter’s blade is extended too far.
Adjust the extended length of the cutter’s blade.
The OFFSET setting is not suitable for the blade type being used.
Adjust the OFFSET setting.
The cutting speed is too fast. Lower the SPEED setting to reduce the cutting speed.
The cutter’s blade is too dull to cut the medium.
Replace the blade.
The QUALITY setting is too high. Lower the QUALITY setting.• The blade cuts even into the backing
sheet.The cutter’s blade is extended too far.
Adjust the extended length of the cutter’s blade.
The cutting FORCE setting is too high.
Lower the FORCE setting.
• The blade falls out of the cutter plunger.
The cutter plunger’s diameter is too large for the blade being used.
Use a cutter plunger of the proper diameter for your blade.
• The medium is being cut but remaining scraps are hard to remove.
• The processed film cannot be picked up with a retack sheet.
The retack sheet’s adhesion is too weak.
Use a retack sheet with greater adhesive power.
The medium gets entangled where cutting has been performed.
• Retract the extended length of the cutter’s blade.
• Lower the cutting FORCE setting.After processing, the medium was left without promptly peeling off remaining scraps.
Peel off remaining scraps as promptly as possible.

FC4200-UM-251-9370 57
TROUBLE SHOOTINGSymptom Cause Solution
• The cutter unit generates an abnormal noise during operation.
• The medium becomes discolored wherever the blade passes.
The tip of the cutter plunger is rubbing against the medium.
Adjust the extended length of the cutter’s blade and the cutting FORCE setting.
• The resulting image is not the specified size.
The software application and plotter are not set to the same STEP SIZE setting.
Specify the same STEP SIZE setting for both your software application and for the plotter.
Scaling is enabled at your software application.
Check the scaling setting.
• The PROMPT lamp lights when data is output (an off-scale error has occurred)
• Certain areas of the medium cannot be cut.
The software application and plotter are not set to the same STEP SIZE setting.
Specify the same STEP SIZE setting for both your software application and for the plotter.
Computer output to the plotter contains data specifying coordinate points outside of the specified AREA setting.
Re-specify the AREA setting.
Computer output to the plotter specifies an image that exceeds the effective area.
Rewrite your data to specify a smaller image.
• Cutting conditions cannot be retained or changed.
The CONDITION PRIORITY setting is PROGRAM.
Switch the setting to MANUAL.
The ENTER key wasn’t pressed after changing a setting.
Check your setting procedure.
• Characters and lines become deformed when plotting.
The plotter is set to Cutter mode. At the CONDITIONS menu, switch the pen type setting from a blade type to PEN.
• The plotter does not cut/plot the specified length (slight error in distance precision).
The DIST. ADJ. function is improperly specified.
Adjust the distance precision.
• Characters become deformed.• Complex images become deformed.
The STEP PASS setting is too high.
Lower the STEP PASS setting.
• The starting and end points of an image do not match.
The cutting data has not been written so that the points meet.
Check your cutting data by plotting it with a pen.
The OFFSET FORCE setting is too weak.
Raise the OFFSET FORCE setting.
The medium’s backing sheet is too limp.
Switch to a medium with a stiff backing sheet.
The blade does not rotate smoothly.
Check if any foreign matter has adhered to the blade. If so, remove it.

FC4200-UM-251-9370 58
TROUBLE SHOOTING
9.3 The Coordinate Axes Cannot Be Correctly AlignedSymptom Cause Solution
During automatic registration mark alignment, the MARK SEARCH ERROR message is displayed or the coordinate axes cannot be properly aligned.
There is foreign matter or plotting on the area where the mark sensor passes.
Ensure that the detection area is free of foreign matter or plotting.
The medium is loose or wrinkled where the mark sensor passes.
• Firmly secure the medium so that it will not come loose.
• Use a medium without any wrinkles, creases, or folds.
The medium is not white. Use a white medium.The registration marks are not printed using black ink.
Print the registration marks using black ink.
The lines of the printed registration marks are too thin or are not cleanly printed.
Print clean registration marks with a line width of at least 0.3 mm.
Strong light is irradiating the vicinity of the mark sensor.
Ensure that no light from an external source irradiates the vicinity of the mark sensor.
If none of the above solutions are feasible, perform registration mark alignment manually.

FC4200-UM-251-9370 59
TROUBLE SHOOTING
9.4 General Error MessagesError message Cause Solution
[X POSITION ALARM POWER OFF THEN ON]or[Y POSITION ALARM POWER OFF THEN ON]
The cutting conditions specified for the medium to be cut are unreasonable.
Lower the SPEED setting. Lower the FORCE setting.
Something is obstructing the pen carriage’s movement.
After removing the obstacle, turn the plotter off then back on again.
An external load was applied to the pen carriage during operation.
After removing the obstacle, turn the plotter off then back on again.
Fragments of the cut medium have entered into the plotter’s moving parts and are impeding their movement.
After removing the obstacle(s), turn the plotter off then back on again.
• The beeper sounds.• The PROMPT lamp lights.
The table of acceleration rates is faulty.
Replace the X motor or the Y motor.Replace the main board.

FC4200-UM-251-9370 60
TROUBLE SHOOTING
9.5 Error Messages in GP-GL Command ModeError message Cause Solution
ERROR 1Command Error
The plotter received an unrecognizable command.
Press the plotter’s ENTER key.
When turning on the plotter to which your software application has output data, noise mixed into the data input.Your software application’s output device setting has changed.
Configure your software application menu to permit Graphtec plotter control.Re-specify the software application’s interface conditions.
The plotter’s interface conditions have changed.
Re-specify the plotter’s interface conditions.
ERROR 4Parameter Overflow
The numeric parameter of an input command exceeds its permissible range.
Configure your software application menu to permit Graphtec plotter control.Re-specify the software application’s interface conditions.Your software application’s output
device setting has changed.The plotter’s interface conditions have changed.
Re-specify the plotter’s interface conditions.
ERROR 5I/O Error
An error related to the receipt of data occurred within the interface.
Configure your software application menu to permit Graphtec plotter controlRe-specify the software application’s interface conditions..
Your software application’s output device setting has changed.The plotter’s interface conditions have changed.
Re-specify the plotter’s interface conditions.

FC4200-UM-251-9370 61
TROUBLE SHOOTING
9.6 Error Messages in HP-GL Command ModeIf any of the HP-GL command error messages listed in the following table is displayed, the cause can nearly always be traced to one of the causes below:(1) The software application’s output device setting has changed; or(2) The plotter’s interface conditions have changed.If a command error occurs while the COMMAND setting is HP-GL, therefore, first check the two corre-sponding points below.(1) Configure the software to drive your plotter and ensure that the software’s interface conditions are cor-
rectly set; and(2) Re-specify the plotter’s interface conditions.
Error message Cause SolutionERROR 1Instruction not recognized
An unrecognizable command was issued.
Issue a command that the plotter will recognize.
ERROR 2Wrong number of parameters
A command was issued with the wrong number of parameters.
Re-issue the command with the correct number of parameters.
ERROR 3Out of range parameters
A command containing an invalid parameter was issued.
Re-issue the command with its parameters specified within their permissible ranges.
ERROR 5Unknown character set
An unknown character set was specified.
Specify a character set that the plotter will recognize.
ERROR 6Position overflow
A command was issued with coordinate data that exceeds the effective cutting/plotting area.
Issue the command with its coordinate data specified within the effective cutting/plotting area.
ERROR 7Buffer overflow
The data being input exceed the capacity of the downloadable character buffer, polygon buffer, etc.
Increase the buffer size.
ERROR 10Invalid I/O output request
While executing an output command, the plotter received another output command.
Check the programmed data.
ERROR 11Invalid byte following ESC
Receipt of the ESC character was followed by an invalid byte.
Check the programmed data.
ERROR 12Invalid byte in I/O Control
A device control command containing an invalid byte was received.
Check the programmed data.
ERROR 13Out of range I/O parameter
An I/O control command was issued with parameter outside of the permissible numeric range.
Check the programmed data.
ERROR 14Too many I/O parameters
An I/O control command was issued with too many parameters.
Check the programmed data.
ERROR 15Error in I/O transmission
During data transfer, a framing error, parity error, or overrun error occurred.
Check the settings of the RS-232C interface conditions.
ERROR 16I/O buffer overflow
The I/O buffer received data faster than it could process the data.
Check the settings of the RS-232C interface conditions.

FC4200-UM-251-9370 62
SPECIFYING THE PEN CONDITIONS
10. SPECIFYING THE PEN CONDITIONSIn preparation for starting a cutting operation, this chapter provides instructions on achieving optimum cutting conditions by specifying the cutter pen’s blade type as well as the cutting FORCE, cutting SPEED, cutter OFFSET, and cutting QUALITY settings.The cutter pen conditions for cutting media consists of the following five elements.(1) Extended length of the cutter blade: See the table below to adjust the extended length of the cutter
blade to suit the thickness of the medium being used. For instructions, see Section 2.4, “Adjusting the Length of the Cutter Blade.”
(2) Cutting FORCE: Specify the FORCE setting based on the reference FORCE values listed in the table below.
(3) Cutting SPEED: Specify the SPEED setting based on the reference SPEED values listed in the table below.
(4) Cutter OFFSET: Specify the OFFSET setting based on the reference values listed in the table below.(5) Cutting QUALITY: Specify the QUALITY setting based on the reference values listed in the table
below.
10.1 The Cutter Pen’s ConditionsOptimum Cutting Conditions by Media Type
Medium Thickness (mm) Blade used FORCE SPEED QUALITYFilm for outdoor signs 0.05 to 0.08 CB09UA 10 to 14 30 or less 2 to 3Decorative film 0.08 to 0.1 CB09UA 14 to 17 30 or less 2 to 3Transparent orsemi-transparent film
0.08 to 0.1 CB09UA 14 to 20 30 or less 2 to 3
Reflective film 0.08 to 0.1 CB09UA 14 to 20 30 or less 2 to 3Fluorescent film 0.20 to 0.25 CB09UA, CB15U 20 to 24 10 to 20 2 to 3Rubber for sandblasting 0.5 to 1.5 CB15U-K30 17 to 36 10 to 20 1 to 3Thick paper 0.3 to 0.5 CB15U 28 to 40 10 to 20 1 to 2Compressed styrofoam 0.8 CB15U-K30 37 to 42 10 to 20 1 to 2High-luminance reflective film 0.25 to 0.3 CB15UA 23 to 24 5 to 25 1
Blade Part Nos., Displayed Blade Types, and OFFSET Values
Blade material Blade’s part no.Display indication Specifiable
rangeDefault
OFFSETBlade type Displayed OFFSET
Supersteel blades
CB09UA 09U 0 ±5 17CB15-10U 15-10U 0 ±5 18
CB15U 15U 0 ±5 28CB15U-K30 15U-K30 0 ±5 28
Ceramic blade CB15-10C 15-10C 0 ±5 18Sapphire blade CB15-05S 15-05S 0 ±5 9Other OTHER 1 1 to 45 1Plotting pen PEN None None 0When a blade type has been selected, the default OFFSET value can be adjusted within a ±5 range.Select OTHER when you will use a hard-to-cut medium that requires an OFFSET setting that is not listed under any of the blade types.Select PEN for a plotting pen.

FC4200-UM-251-9370 63
SPECIFYING THE PEN CONDITIONSReference Values for Plotting Conditions
Pen type FORCE SPEED QUALITYWater-based ballpoint pen 20 to 23 40 2 to 3Oil-based ballpoint pen 18 to 23 40 2 to 3To avoid unnecessary wear on the pen’s tip, specify the FORCE value to its lowest permissible setting. When speci-fying the SPEED value, check that the plotted results are not too faint or otherwise unsatisfactory.
Note:
• Raising the SPEED and QUALITY settings results in a coarser finish but shortens the overall cutting/plotting time.
• Lowering the SPEED and QUALITY settings results in a finer finish but lengthens the overall cutting/plotting time.
Precautions on Cutting Rubber for Sandblasting
1. The amount of rubber that can be cut in one session varies with the characteristics of the medium (thick-ness, hardness, and weight) and the pattern to be cut. Use the medium that will actually be cut to alter-nately adjust the cutting conditions and run a cutting test.
2. If the rubber tends to curl, rubber that has been cut may come loose and contact the travelling cutter blade, thereby preventing the starting and end points of cutting from accurately matching.

FC4200-UM-251-9370 64
SPECIFYING THE PEN CONDITIONS
10.2 Selecting a Set of Cutting Conditions
Four different sets of user-defined cutting conditions can be registered in the plotter’s memory as COND Nos. 1 through 4. To specify a set of cutting conditions, you must first select the destination COND No. By selecting a different COND No., you can easily switch between pre-defined cutting conditions for four types of media.
Procedure
1. Press a function key ( F1 , F2 , F3 , or F4 ) to select a pre-defined set of cutting conditions of the corresponding number.
2. The selected set of cutting conditions are loaded to the plotter and become the currently selected cutting conditions.
FC4200-UM-251-9370 65
SPECIFYING THE PEN CONDITIONS
10.3 Specifying the Cutting Conditions
This section describes how to specify the cutter pen’s blade type and its cutting FORCE, cutting SPEED, cut-ter OFFSET, and cutting QUALITY parameters.
Note:Before specifying the cutting conditions, first perform the setting procedure described in Section 5.6, “Specifying the Pen Conditions.”
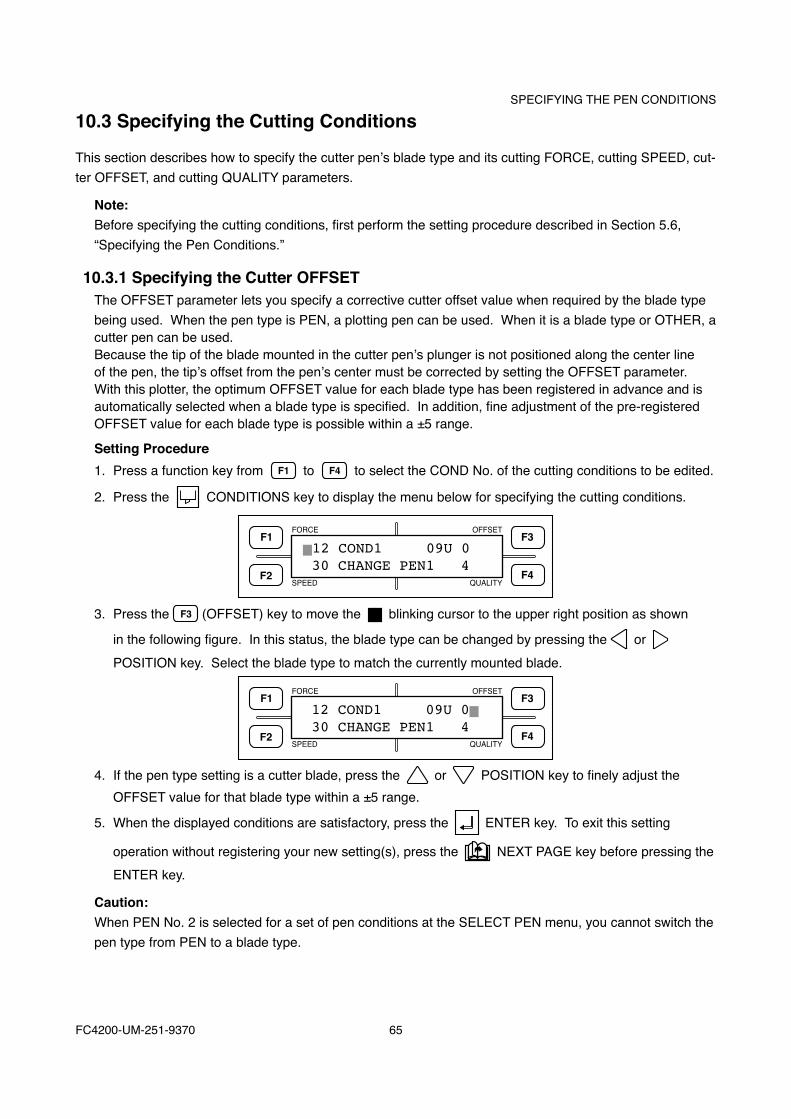
10.3.1 Specifying the Cutter OFFSETThe OFFSET parameter lets you specify a corrective cutter offset value when required by the blade type being used. When the pen type is PEN, a plotting pen can be used. When it is a blade type or OTHER, a cutter pen can be used. Because the tip of the blade mounted in the cutter pen’s plunger is not positioned along the center line of the pen, the tip’s offset from the pen’s center must be corrected by setting the OFFSET parameter. With this plotter, the optimum OFFSET value for each blade type has been registered in advance and is automatically selected when a blade type is specified. In addition, fine adjustment of the pre-registered OFFSET value for each blade type is possible within a ±5 range.
Setting Procedure1. Press a function key from F1 to F4 to select the COND No. of the cutting conditions to be edited.
2. Press the CONDITIONS key to display the menu below for specifying the cutting conditions.
FORCE
SPEED
OFFSET
QUALITY
F1 F3
F4F2
12 COND1 09U 0 30 CHANGE PEN1 4
3. Press the F3 (OFFSET) key to move the blinking cursor to the upper right position as shown
in the following figure. In this status, the blade type can be changed by pressing the or POSITION key. Select the blade type to match the currently mounted blade.
FORCE
SPEED
OFFSET
QUALITY
F1 F3
F4F2
12 COND1 09U 0 30 CHANGE PEN1 4
4. If the pen type setting is a cutter blade, press the or POSITION key to finely adjust the OFFSET value for that blade type within a ±5 range.
5. When the displayed conditions are satisfactory, press the ENTER key. To exit this setting
operation without registering your new setting(s), press the NEXT PAGE key before pressing the ENTER key.
Caution:When PEN No. 2 is selected for a set of pen conditions at the SELECT PEN menu, you cannot switch the pen type from PEN to a blade type.
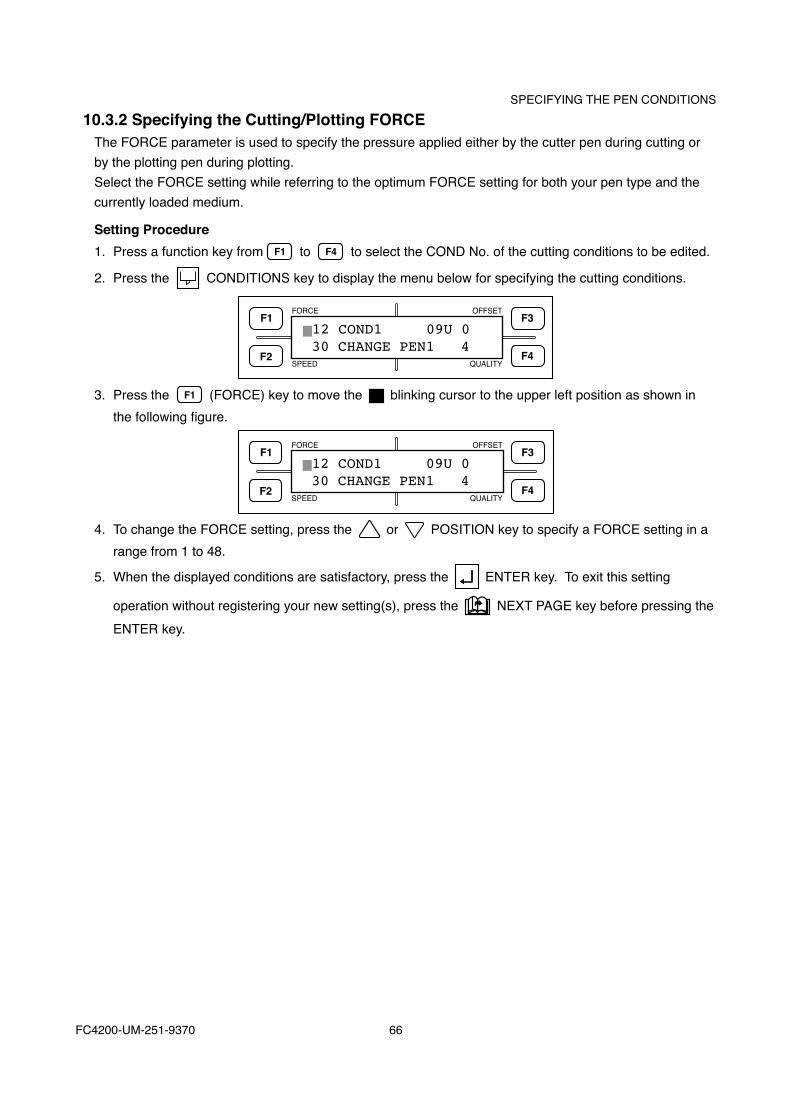
FC4200-UM-251-9370 66
SPECIFYING THE PEN CONDITIONS10.3.2 Specifying the Cutting/Plotting FORCE
The FORCE parameter is used to specify the pressure applied either by the cutter pen during cutting or by the plotting pen during plotting. Select the FORCE setting while referring to the optimum FORCE setting for both your pen type and the currently loaded medium.
Setting Procedure1. Press a function key from F1 to F4 to select the COND No. of the cutting conditions to be edited.
2. Press the CONDITIONS key to display the menu below for specifying the cutting conditions.
FORCE
SPEED
OFFSET
QUALITY
F1 F3
F4F2
12 COND1 09U 0 30 CHANGE PEN1 4
3. Press the F1 (FORCE) key to move the blinking cursor to the upper left position as shown in the following figure.
FORCE
SPEED
OFFSET
QUALITY
F1 F3
F4F2
12 COND1 09U 0 30 CHANGE PEN1 4
4. To change the FORCE setting, press the or POSITION key to specify a FORCE setting in a range from 1 to 48.
5. When the displayed conditions are satisfactory, press the ENTER key. To exit this setting
operation without registering your new setting(s), press the NEXT PAGE key before pressing the ENTER key.
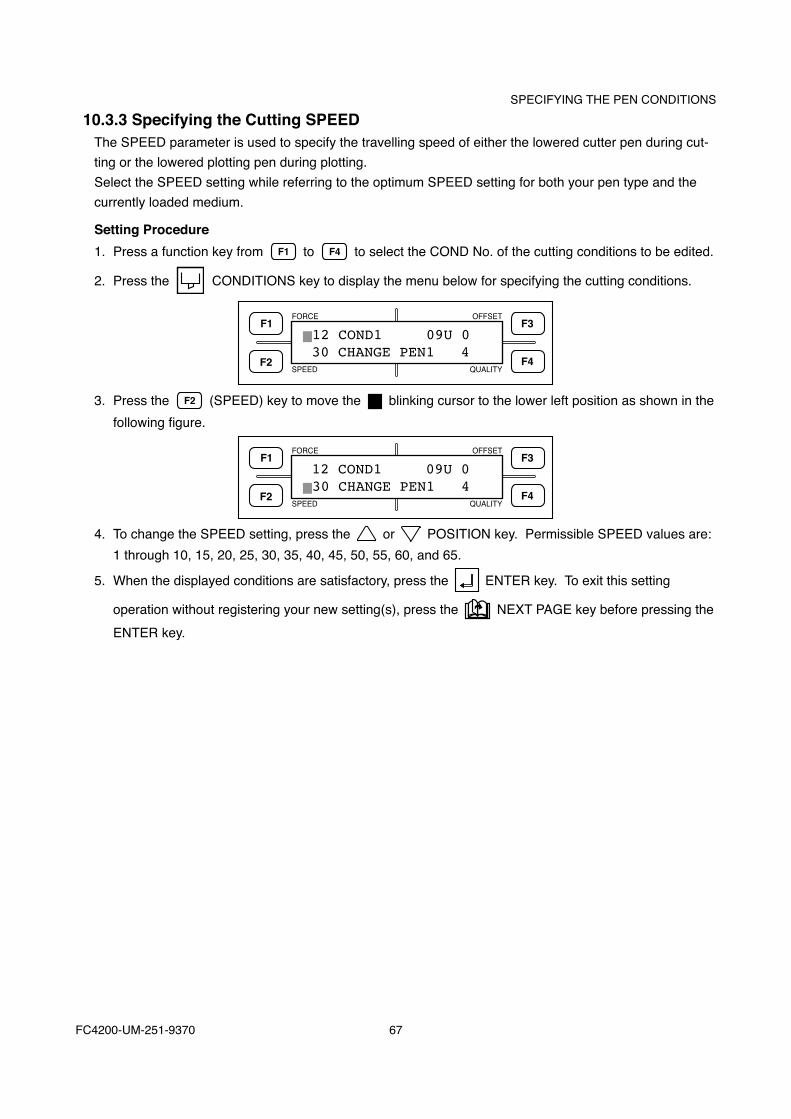
FC4200-UM-251-9370 67
SPECIFYING THE PEN CONDITIONS10.3.3 Specifying the Cutting SPEED
The SPEED parameter is used to specify the travelling speed of either the lowered cutter pen during cut-ting or the lowered plotting pen during plotting. Select the SPEED setting while referring to the optimum SPEED setting for both your pen type and the currently loaded medium.
Setting Procedure1. Press a function key from F1 to F4 to select the COND No. of the cutting conditions to be edited.
2. Press the CONDITIONS key to display the menu below for specifying the cutting conditions.
FORCE
SPEED
OFFSET
QUALITY
F1 F3
F4F2
12 COND1 09U 0 30 CHANGE PEN1 4
3. Press the F2 (SPEED) key to move the blinking cursor to the lower left position as shown in the following figure.
FORCE
SPEED
OFFSET
QUALITY
F1 F3
F4F2
12 COND1 09U 030 CHANGE PEN1 4
4. To change the SPEED setting, press the or POSITION key. Permissible SPEED values are: 1 through 10, 15, 20, 25, 30, 35, 40, 45, 50, 55, 60, and 65.
5. When the displayed conditions are satisfactory, press the ENTER key. To exit this setting
operation without registering your new setting(s), press the NEXT PAGE key before pressing the ENTER key.

FC4200-UM-251-9370 68
SPECIFYING THE PEN CONDITIONS10.3.4 Selecting the Cutting QUALITY
The QUALITY parameter is used to specify the acceleration rate during cutting or plotting. Select the QUALITY setting while referring to the optimum QUALITY setting for both your pen type and the currently loaded medium.
Setting Procedure1. Press a function key from F1 to F4 to select the COND No. of the cutting conditions to be edited.
2. Press the CONDITIONS key to display the menu below for specifying the cutting conditions.
FORCE
SPEED
OFFSET
QUALITY
F1 F3
F4F2
12 COND1 09U 0 30 CHANGE PEN1 4
3. Press the F4 (QUALITY) key to move the blinking cursor to the lower right position as shown in the following figure.
FORCE
SPEED
OFFSET
QUALITY
F1 F3
F4F2
12 COND1 09U 0 30 CHANGE PEN1 4
4. To change the QUALITY setting, press the or POSITION key to specify the QUALITY setting in a range from 1 to 6. A lower value selects a slower acceleration rate which results in higher quality.
5. When the displayed conditions are satisfactory, press the ENTER key. To exit this setting
operation without registering your new setting(s), press the NEXT PAGE key before pressing the ENTER key.

FC4200-UM-251-9370 69
SPECIFYING THE PEN CONDITIONS10.3.5 Setting Cutting Conditions in THICK MODE
Select the THICK MODE setting when you will be cutting either thick media (such as masking rubber for sandblasting or thick paper for apparel patterns) or thin but hard media (such as acrylic film).
Note:For more information about the THICK MODE parameter, see Section 6.4, “Enabling the THICK MODE Setting.”
Setting Procedure1. When the THICK MODE setting has been enabled for the currently selected COND No., the display
appears as follows.
FORCE
SPEED
OFFSET
QUALITY
F1 F3
F4F2
12 COND1 09U 0 30 READY PEN1 4
2. Press the CONDITIONS key to display the menu below for specifying the cutting conditions.
FORCE
SPEED
OFFSET
QUALITY
F1 F3
F4F2
12 COND1 09U 0 30 CHANGE PEN1 4
3. Press the ENTER key to display the THICK MODE menu shown below.
FORCE
SPEED
OFFSET
QUALITY
F1 F3
F4F2
*MODE1 THICK MODE2STR. 0MM END. 0MM
4. Press the F1 (MODE 1) or F3 (MODE 2) key to move the asterisk symbol and select MODE 1 or 2.
MODE 1 : Overcutting is performed at the starting and end points of cutting as well as at corners with a sharp angle in order to prevent incomplete cut areas of the medium. Moreover, because the blade is moved across the medium’s surface in one stroke when the cutter’s blade must rotate by a wide angle, this mode allows you to cut thicker media or perform more detailed cutting than is possible in MODE 2.
MODE 2 : Overcutting is only performed at the starting and end points of cutting. Because MODE 2 performs simpler blade control of the travelling cutter blade than MODE 1, the overall cut-ting time is shorter.
Press the F2 (STR.) or F4 (END) key to move the blinking cursor next to the STR. or END setting. In this status, press the or POSITION key to specify the overcut distance.
5. When the displayed conditions are satisfactory, press the ENTER key. To exit this setting
operation without registering your new setting(s), press the NEXT PAGE key before pressing the ENTER key.

FC4200-UM-251-9370 70
SPECIFYING THE PEN CONDITIONS
10.4 Running a Cutting Test
After specifying the blade type, FORCE, and SPEED settings, run a cutting test to actually confirm the com-bined impact of your settings. Check how deeply the medium has been cut and the roundness of the cut cor-ners. If the cut results are not satisfactory, specify your cutting conditions once more and then run another cutting test. Repeat these two steps until the optimum cutting conditions are achieved.
Setting Procedure
1. Load the medium that will actually be used for cutting.
2. Press a function key from F1 to F4 to select the target COND No.
3. Press the TEST key to display the TEST menu below.
FORCE
SPEED
OFFSET
QUALITY
F1 F3
F4F2
TEST1 TEST2CUTTING PRO
4. Using the , , , POSITION keys, move the carriage to the position on the medium from which you wish to start the cutting test.
Caution: The cutter pen will start moving as soon as the TEST function is selected, so be sure to keep your hands, hair, and so forth away from the plotter’s moving parts.
5. Press the F1 (TEST 1) key to cut a single test pattern, consisting of a triangle within a square, at the cutter pen’s current position. Press the F3 (TEST 2) key to cut three test patterns, each consisting of a triangle within a square, at the cutter pen’s current position. Among the three patterns, the first pattern is cut using the current FORCE setting minus 1, the second pattern is cut using the current FORCE setting, and the third pattern is cut using the current FORCE setting plus 1. Press the F2 (CUTTING PRO) key to display the CUTTING PRO prompt menu shown below.
FORCE
SPEED
OFFSET
QUALITY
F1 F3
F4F2
CUTTING PRO OK ?YES NO
While the above menu is displayed, press the F2 (YES) key to cut out the CUTTING PRO characters from the cutter pen’s current position. To return to Step (3) without running the CUTTING PRO test, press the F4 (NO) key.

FC4200-UM-251-9370 71
SPECIFYING THE PEN CONDITIONS6. Check the cut pattern(s). Peel off the four outside corners of the test pattern(s) that you cut by selecting
TEST 1 or 2, and then look at the corners of the inner triangle. If the corners are rounded, the OFFSET setting is too low. Conversely, if the corners are too pointed, the OFFSET setting is too high.
Insufficent offset�Raise the OFFSET value �
(+1 to +5)
Ideal offset Excessive offset�Lower the OFFSET value�
(-1 to -5)��
7. Next, peel off the corners of the triangle(s). Ideally, only slight traces of the cutter blade should remain on the medium’s base sheet. If the base sheet has been cut through, either the FORCE setting is too high or the cutter blade’s tip is extended too far. If the base sheet shows only a few traces of the cutter blade, either the FORCE setting is too low or the cutter blade’s tip is not sufficiently extended.
8. Press the CONDITIONS key to display the menu for specifying the cutting conditions, then adjust
the FORCE and OFFSET settings.
9. Repeat Steps (3) through (8) until you achieve satisfactory test results.
10. When satisfactory test results are achieved, press the ENTER or NEXT PAGE key to return the
plotter to READY status.

FC4200-UM-251-9370 72
PART LIST
11. PART LIST11.1 Recommended List of Parts
Part No. Description Name Remarks792420100 4200 Main Board772219530 4200 Pen Board FC4200-50, FC4200-60772121520 4210 Pen Board FC4210-60792219701 Pen Block FC4200-50, FC4200-60792121701 4210 Pen Block Assy FC4210-60772219510 4200 Relay772219520 4200 Mark Sensor Assy FC4200-50, FC4200-60772121530 4210 Mark Sensor Assy FC4210-60500050535 KR1228 Mark Sensor772219500 4200 X Sensor370801091 X Drive Belt Belt 120S2M160U622190411 Y Slide Belt 4250 Y Belt 4250 FC4200-50622191411 Y Slide Belt 4260 Y Belt 4260 FC4200-60, FC4210-60618122100 X Intermediate Pulley X Intermediate Pulley 60622190130 X Tension Pulley X Tension Pulley622190151 Pulley S2M-Z30 Pulley S2M-Z30622190401 X Belt 4250 X Belt 4250 FC4200-50622191401 X Belt 4260 X Belt 4260 FC4200-60, FC4210-60622190140 P4 Y Tension Pulley P4 Y Tension Pulley622190350 Inertia Pulley Z24 Inertia Pulley Z24500050538 4200 Fan TUDC24B4-602772219560 4200 Control Panel Relay Board Control Panel Relay Board772219600 4250 Elect-static Panel SW FC4200-50622190490 Pen Sense Rubber FC4200-50, FC4200-60772219550 Operation Sheet (domestic)622190420 Inertia Wheel Inertia 42771900580 LCD Assembly LCD GND2020B122527140 Y Flex Cable FCA2252014 FC32775421810 X Motor FP90775421830 Y Motor FP90691800520 X Flex Cable A1 FPC,06710 FC4200-60, FC4210-60,FP91691800530 X Flex Cable A2 FPC,67110 FC4200-50, FP92775421740 High Voltage Unit FC4200-50, FP90510000051 Power Supply Unit PS089B Non-RoHS Model682247530 Power Supply Unit LEP100F-36 RoHS Model772219660 Power Relay Board PN5042-04 RoHS Model054112100 20Z Pulley 14 FP61772160580 Y Drive Pulley FC21379500004 Y Drive Belt 100TN15-10W GX10035132220 P Deenergize Brush MP50054212140 Wiper FP80054212201 L Roller S FP80054212211 L Roller L FP80054212221 L Roller SC FP80054212231 L Roller LC FP80095013010 Roller BB13 GX10031009020 Positioning Seal MP30508000025 Power Supply SW JWA2120-0033 3120313068820 Roller B 688ZZNRAV2S

FC4200-UM-251-9370 73
PART LIST
11.2 External CasingNo. Part No. Description Name Remarks Q’ty1 022550180 Corner Cover 50L 12 022550190 Corner Cover 50R 13 054215240 Corner Cover -A FP80 14 054215250 Corner Cover -B FP80 15 622190490 Pen Sense Rubber FC4200-50, FC4200-60 only 16 622195061 Operation Tray 4250 FC4200-50 1
622195561 Operation Tray 4260 FC4200-60, FC4210-60 17 022550130 Front Cover 50H FC4200-50 1
622195540 Front Cover 4260 FC4200-60, FC4210-60 18 054225030 Front Cover A2 FC4200-50 1
622195551 Rear Cover 4260 FC4200-60, FC4210-60 19 622195121 Side Cover 50 FC4200-50 1
622195621 Side Cover 60 FC4200-60, FC4210-60 110 622195132 Interface Cover 50 FC4200-50 1
622195632 Interface Cover 60 FC4200-60, FC4210-60 111 622190250 Plate Nut12 308002001 Measure ST13-01BP 1
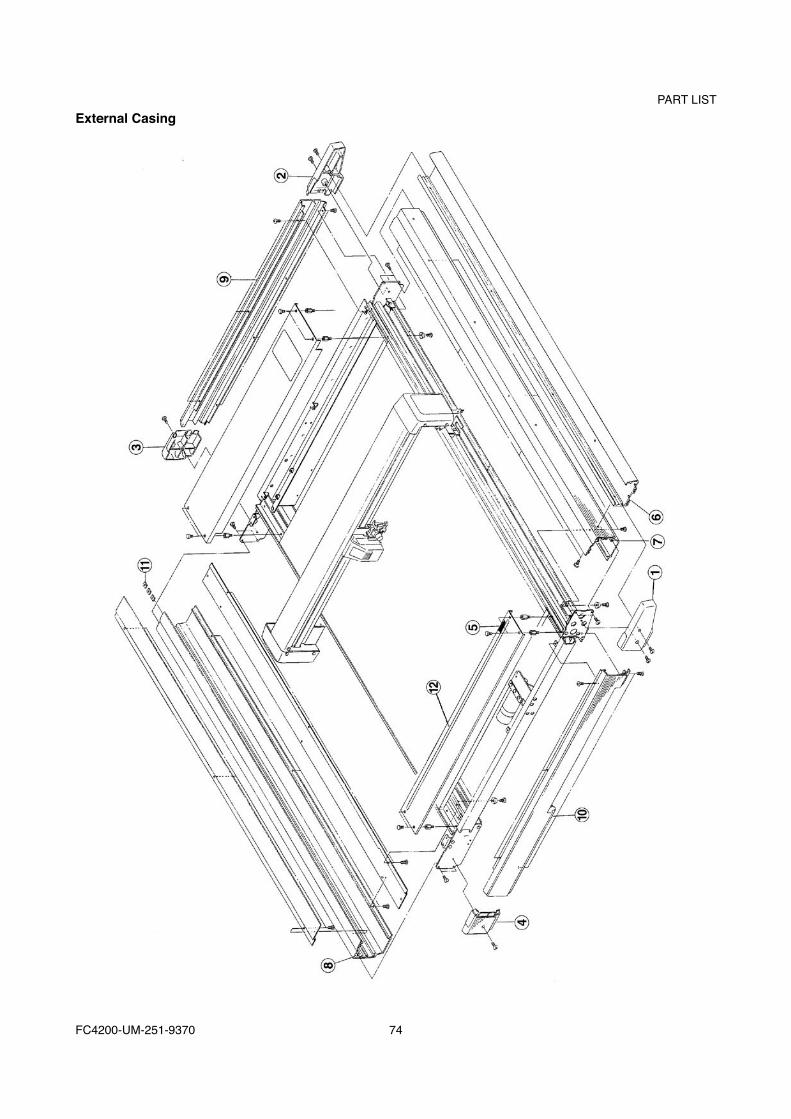
FC4200-UM-251-9370 74
PART LISTExternal Casing
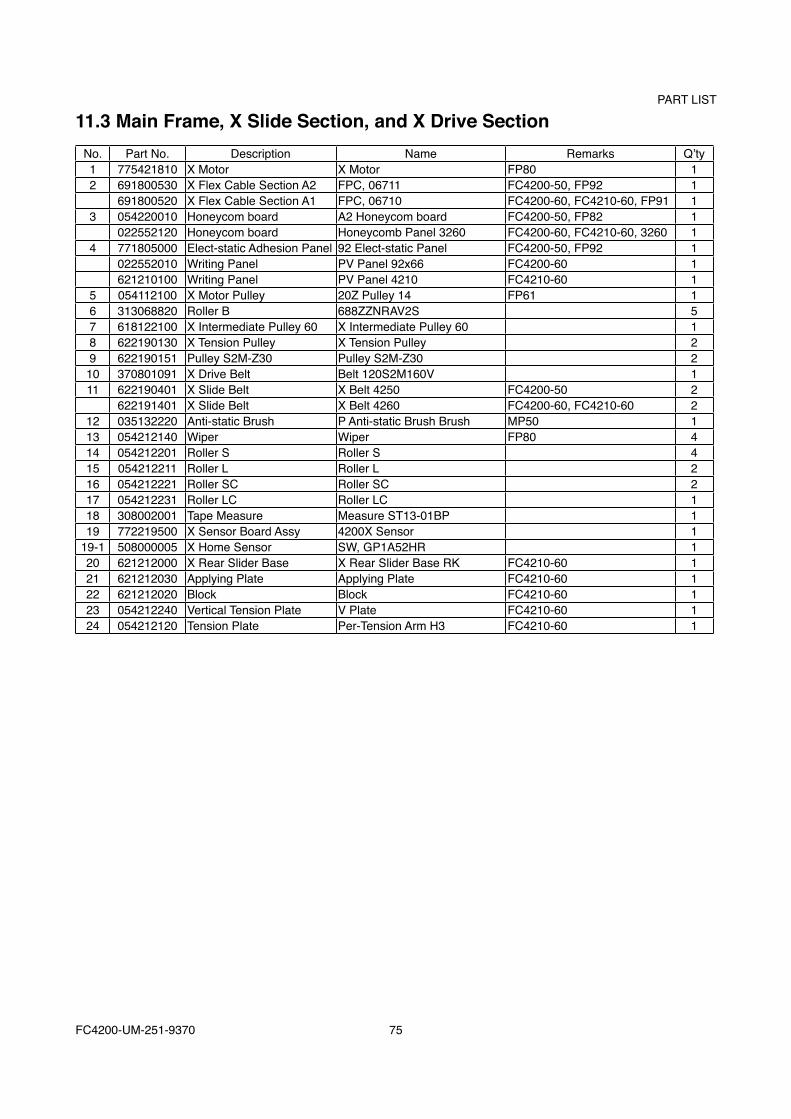
FC4200-UM-251-9370 75
PART LIST
11.3 Main Frame, X Slide Section, and X Drive SectionNo. Part No. Description Name Remarks Q’ty1 775421810 X Motor X Motor FP80 12 691800530 X Flex Cable Section A2 FPC, 06711 FC4200-50, FP92 1
691800520 X Flex Cable Section A1 FPC, 06710 FC4200-60, FC4210-60, FP91 13 054220010 Honeycom board A2 Honeycom board FC4200-50, FP82 1
022552120 Honeycom board Honeycomb Panel 3260 FC4200-60, FC4210-60, 3260 14 771805000 Elect-static Adhesion Panel 92 Elect-static Panel FC4200-50, FP92 1
022552010 Writing Panel PV Panel 92x66 FC4200-60 1621210100 Writing Panel PV Panel 4210 FC4210-60 1
5 054112100 X Motor Pulley 20Z Pulley 14 FP61 16 313068820 Roller B 688ZZNRAV2S 57 618122100 X Intermediate Pulley 60 X Intermediate Pulley 60 18 622190130 X Tension Pulley X Tension Pulley 29 622190151 Pulley S2M-Z30 Pulley S2M-Z30 2
10 370801091 X Drive Belt Belt 120S2M160V 111 622190401 X Slide Belt X Belt 4250 FC4200-50 2
622191401 X Slide Belt X Belt 4260 FC4200-60, FC4210-60 212 035132220 Anti-static Brush P Anti-static Brush Brush MP50 113 054212140 Wiper Wiper FP80 414 054212201 Roller S Roller S 415 054212211 Roller L Roller L 216 054212221 Roller SC Roller SC 217 054212231 Roller LC Roller LC 118 308002001 Tape Measure Measure ST13-01BP 119 772219500 X Sensor Board Assy 4200X Sensor 1
19-1 508000005 X Home Sensor SW, GP1A52HR 120 621212000 X Rear Slider Base X Rear Slider Base RK FC4210-60 121 621212030 Applying Plate Applying Plate FC4210-60 122 621212020 Block Block FC4210-60 123 054212240 Vertical Tension Plate V Plate FC4210-60 124 054212120 Tension Plate Per-Tension Arm H3 FC4210-60 1

FC4200-UM-251-9370 76
PART LISTMain Frame, X Slide Section, and X Drive Section
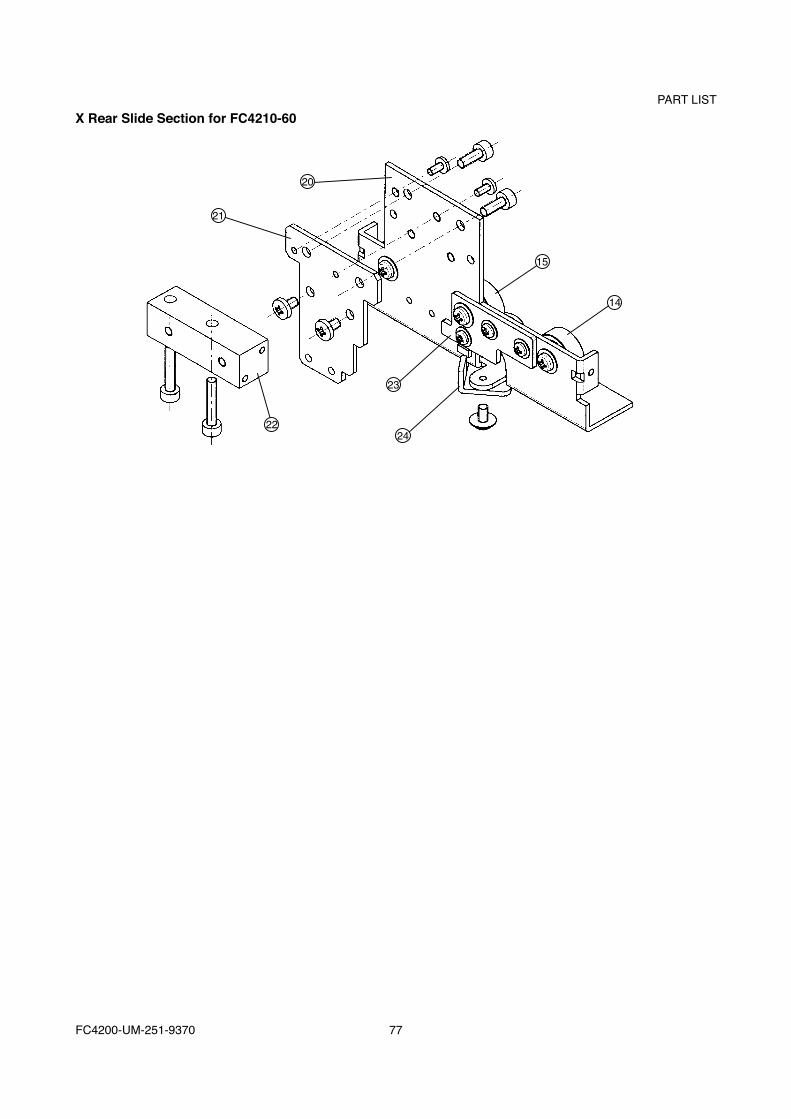
FC4200-UM-251-9370 77
PART LISTX Rear Slide Section for FC4210-60
14
15
23
24
21
22
20
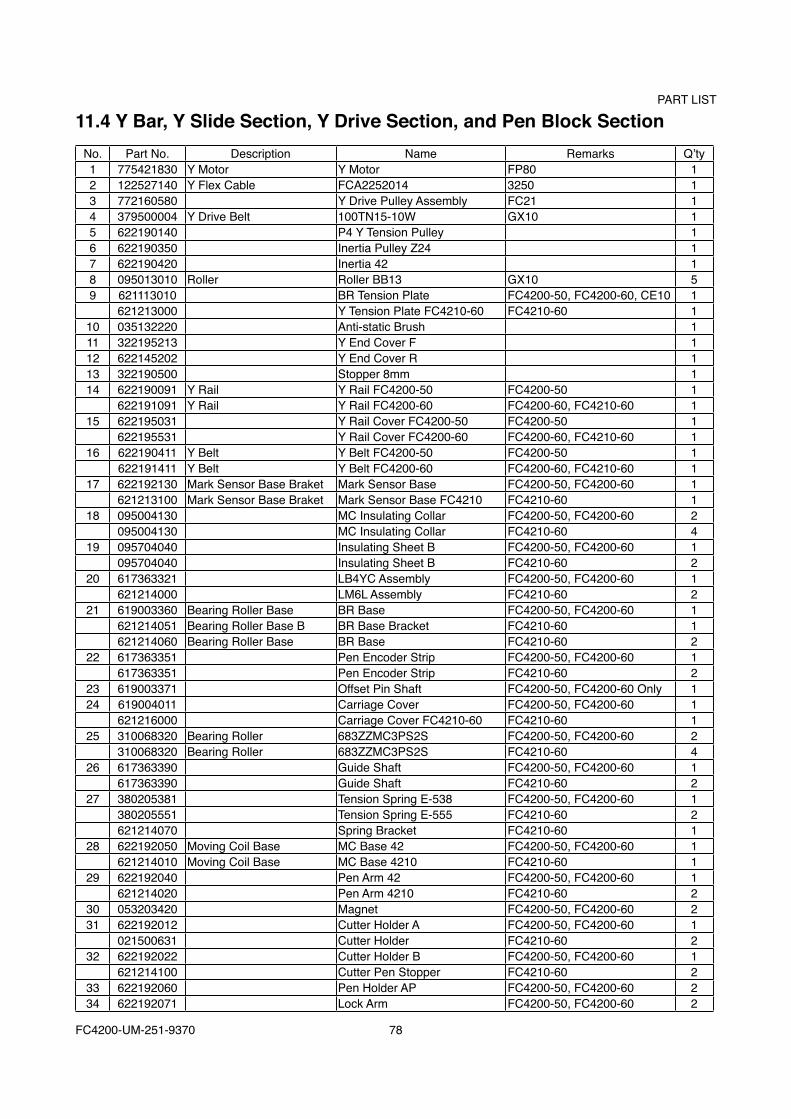
FC4200-UM-251-9370 78
PART LIST
11.4 Y Bar, Y Slide Section, Y Drive Section, and Pen Block SectionNo. Part No. Description Name Remarks Q’ty1 775421830 Y Motor Y Motor FP80 12 122527140 Y Flex Cable FCA2252014 3250 13 772160580 Y Drive Pulley Assembly FC21 14 379500004 Y Drive Belt 100TN15-10W GX10 15 622190140 P4 Y Tension Pulley 16 622190350 Inertia Pulley Z24 17 622190420 Inertia 42 18 095013010 Roller Roller BB13 GX10 59 621113010 BR Tension Plate FC4200-50, FC4200-60, CE10 1
621213000 Y Tension Plate FC4210-60 FC4210-60 110 035132220 Anti-static Brush 111 322195213 Y End Cover F 112 622145202 Y End Cover R 113 322190500 Stopper 8mm 114 622190091 Y Rail Y Rail FC4200-50 FC4200-50 1
622191091 Y Rail Y Rail FC4200-60 FC4200-60, FC4210-60 115 622195031 Y Rail Cover FC4200-50 FC4200-50 1
622195531 Y Rail Cover FC4200-60 FC4200-60, FC4210-60 116 622190411 Y Belt Y Belt FC4200-50 FC4200-50 1
622191411 Y Belt Y Belt FC4200-60 FC4200-60, FC4210-60 117 622192130 Mark Sensor Base Braket Mark Sensor Base FC4200-50, FC4200-60 1
621213100 Mark Sensor Base Braket Mark Sensor Base FC4210 FC4210-60 118 095004130 MC Insulating Collar FC4200-50, FC4200-60 2
095004130 MC Insulating Collar FC4210-60 419 095704040 Insulating Sheet B FC4200-50, FC4200-60 1
095704040 Insulating Sheet B FC4210-60 220 617363321 LB4YC Assembly FC4200-50, FC4200-60 1
621214000 LM6L Assembly FC4210-60 221 619003360 Bearing Roller Base BR Base FC4200-50, FC4200-60 1
621214051 Bearing Roller Base B BR Base Bracket FC4210-60 1621214060 Bearing Roller Base BR Base FC4210-60 2
22 617363351 Pen Encoder Strip FC4200-50, FC4200-60 1617363351 Pen Encoder Strip FC4210-60 2
23 619003371 Offset Pin Shaft FC4200-50, FC4200-60 Only 124 619004011 Carriage Cover FC4200-50, FC4200-60 1
621216000 Carriage Cover FC4210-60 FC4210-60 125 310068320 Bearing Roller 683ZZMC3PS2S FC4200-50, FC4200-60 2
310068320 Bearing Roller 683ZZMC3PS2S FC4210-60 426 617363390 Guide Shaft FC4200-50, FC4200-60 1
617363390 Guide Shaft FC4210-60 227 380205381 Tension Spring E-538 FC4200-50, FC4200-60 1
380205551 Tension Spring E-555 FC4210-60 2621214070 Spring Bracket FC4210-60 1
28 622192050 Moving Coil Base MC Base 42 FC4200-50, FC4200-60 1621214010 Moving Coil Base MC Base 4210 FC4210-60 1
29 622192040 Pen Arm 42 FC4200-50, FC4200-60 1621214020 Pen Arm 4210 FC4210-60 2
30 053203420 Magnet FC4200-50, FC4200-60 231 622192012 Cutter Holder A FC4200-50, FC4200-60 1
021500631 Cutter Holder FC4210-60 232 622192022 Cutter Holder B FC4200-50, FC4200-60 1
621214100 Cutter Pen Stopper FC4210-60 233 622192060 Pen Holder AP FC4200-50, FC4200-60 234 622192071 Lock Arm FC4200-50, FC4200-60 2

FC4200-UM-251-9370 79
PART LISTNo. Part No. Description Name Remarks Q’ty35 622192081 Arm Spring 1 FC4200-50, FC4200-60 136 622192091 Arm Spring 2 FC4200-50, FC4200-60 137 621113590 Thumb Screw L10 FC4200-50, FC4200-60 1
621113580 Thumb Screw L14 FC4210-6038 772219510 4200 Relay Board 139 772219520 4200 Mark Sensor Board FC4200-50, FC4200-60 1
772121530 4210 Mark Sensor Board FC4210-60 239-1 500050535 Mark Sensor KR1228 FC4200-50, FC4200-60 1
500050535 Mark Sensor KR1228 FC4210-60 240 772219530 4200 Pen Board FC4200-50, FC4200-60 1
772121520 4210 Pen Board FC4210-60 140-1 508000015 Y Home Sensor GP1A53HR 141 500050122 Encoder HEDS-9720#P50 142 792219701 FC4200 Pen Block Assy 1
792121701 FC4210 Pen Block Assy 143 621213000 Y Slider Pre-Tension Plate FC4210-60 144 622192200 Y Slider 145 792219702 Pen Holder AP Assy FC4200-50, FC4200-60 146 792219703 Pen Station AP Assy FC4200-50, FC4200-60 147 622190500 Stopper 8MM FC4210-60 248 621212010 Flexible Cable Guide K FC4210-60 149 621212020 Flexible Cable Guide B FC4210-60 1
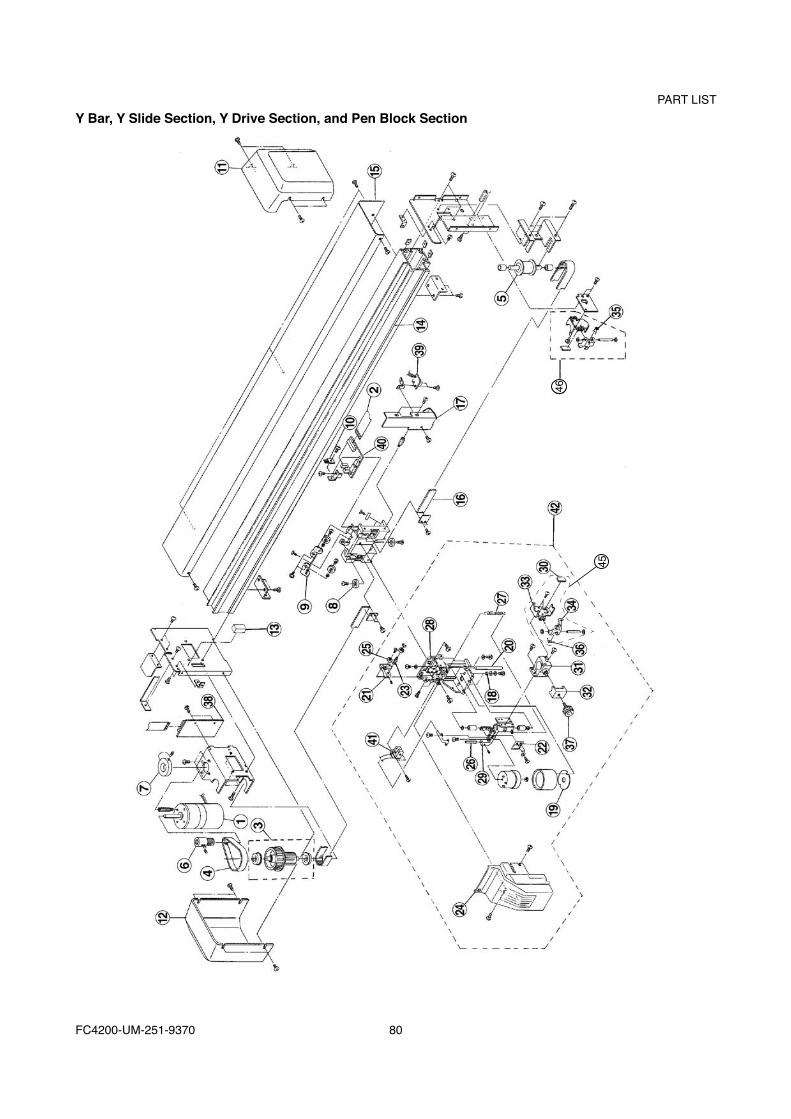
FC4200-UM-251-9370 80
PART LISTY Bar, Y Slide Section, Y Drive Section, and Pen Block Section
46
45

FC4200-UM-251-9370 81
PART LISTY Slide Section for FC4210-60
43
44
8
40 10
Y Drive Section for FC4210-60
48
47
49
Pen Block Section for FC4210-60
31
42
32
37
24

FC4200-UM-251-9370 82
PART LISTRegistration Mark Sensor Section for FC4210-60
39
17

FC4200-UM-251-9370 83
PART LIST
11.5 Electrical SectionNo. Part No. Description Name Remarks Q’ty1 771900580 LCD (New) GMD2020B Assembly New LCD 12 122527110 Control Panel Cable CA2252-11 13 510000051 Switching Power Supply PS089B Non-RoHS Model 1
682247530 Switching Power Supply LEP100F-36 RoHS Model 1772219660 Power Relay Board PN5042-04 RoHS Model 1
4 772219560 Control Panel Relay Board 4200 Control Panel Relay Board 15 508000025 Power Supply SW JWA2120-0033 16 518000033 Inlet SUP-B3G-E 17 792420100 4200 Main Board 4200 Main Board 18 500050538 Fan TUDC24B4-602 19 772219550 FC4200 Control Panel Sheet FC4200 Control Panel Sheet 1
10 622191293 Chassis 60 (Non-RoHS Model) Chassis 60 FC4200-60/FC4210-60 1622191294 Chassis 60 (RoHS Model) Chassis 60 FC4200-60/FC4210-60 1622190293 Chassis 50 (Non-RoHS Model) Chassis 50 FC4200-50 1622190294 Chassis 50 (RoHS Model) Chassis 50 FC4200-50 1
11 775421740 High-voltage Unit 4250 High-voltage Board FC4200-50 112 772219600 4250 Elect-static Panel SW 4250 Elect-static Panel SW FC4200-50 113 692819010 Cable Power Supply to Main Board CA90500114 692819110 Cable, Switch to LEP100F-36 CA905011 RoHS Model 115 692819120 Cable, LEP100F-36 to Power Relay Board CA905012 RoHS Model 1

FC4200-UM-251-9370 84
PART LISTElectrical Section
10
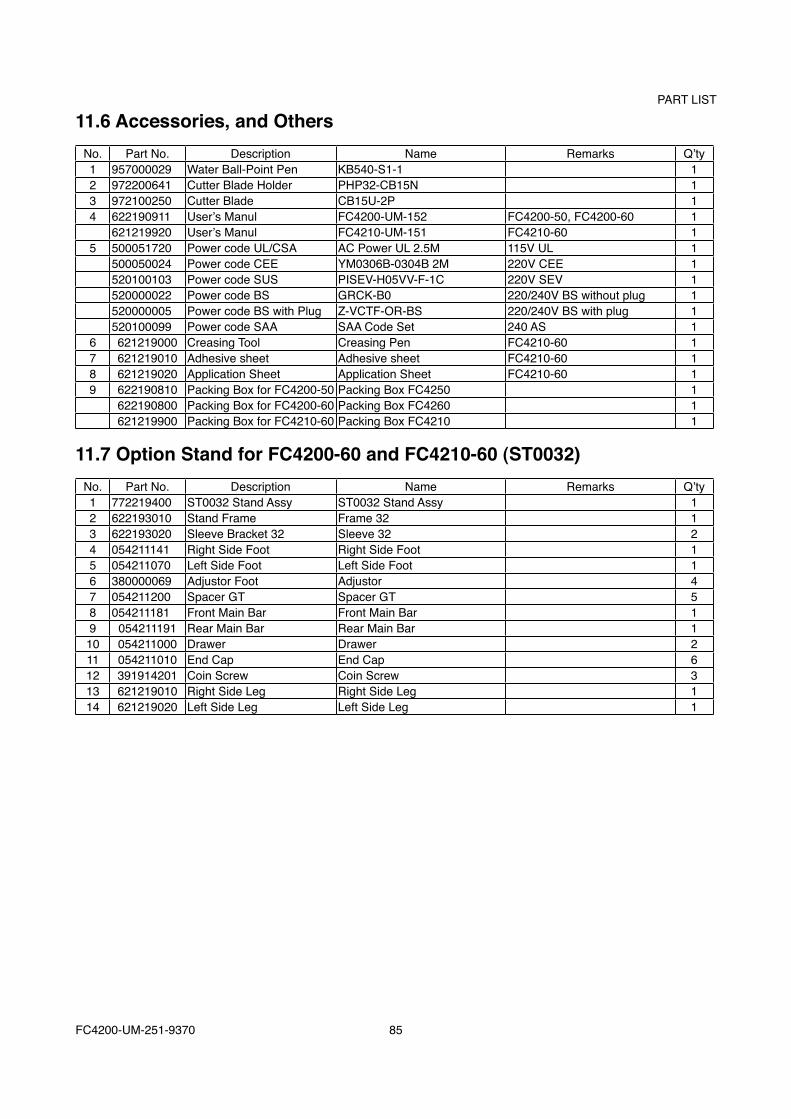
FC4200-UM-251-9370 85
PART LIST
11.6 Accessories, and OthersNo. Part No. Description Name Remarks Q’ty1 957000029 Water Ball-Point Pen KB540-S1-1 12 972200641 Cutter Blade Holder PHP32-CB15N 13 972100250 Cutter Blade CB15U-2P 14 622190911 User’s Manul FC4200-UM-152 FC4200-50, FC4200-60 1
621219920 User’s Manul FC4210-UM-151 FC4210-60 15 500051720 Power code UL/CSA AC Power UL 2.5M 115V UL 1
500050024 Power code CEE YM0306B-0304B 2M 220V CEE 1520100103 Power code SUS PISEV-H05VV-F-1C 220V SEV 1520000022 Power code BS GRCK-B0 220/240V BS without plug 1520000005 Power code BS with Plug Z-VCTF-OR-BS 220/240V BS with plug 1520100099 Power code SAA SAA Code Set 240 AS 1
6 621219000 Creasing Tool Creasing Pen FC4210-60 17 621219010 Adhesive sheet Adhesive sheet FC4210-60 18 621219020 Application Sheet Application Sheet FC4210-60 19 622190810 Packing Box for FC4200-50 Packing Box FC4250 1
622190800 Packing Box for FC4200-60 Packing Box FC4260 1621219900 Packing Box for FC4210-60 Packing Box FC4210 1
11.7 Option Stand for FC4200-60 and FC4210-60 (ST0032)No. Part No. Description Name Remarks Q’ty1 772219400 ST0032 Stand Assy ST0032 Stand Assy 12 622193010 Stand Frame Frame 32 13 622193020 Sleeve Bracket 32 Sleeve 32 24 054211141 Right Side Foot Right Side Foot 15 054211070 Left Side Foot Left Side Foot 16 380000069 Adjustor Foot Adjustor 47 054211200 Spacer GT Spacer GT 58 054211181 Front Main Bar Front Main Bar 19 054211191 Rear Main Bar Rear Main Bar 1
10 054211000 Drawer Drawer 211 054211010 End Cap End Cap 612 391914201 Coin Screw Coin Screw 313 621219010 Right Side Leg Right Side Leg 114 621219020 Left Side Leg Left Side Leg 1

FC4200-UM-251-9370 86
CIRCIT DIAGRAMS
12. CIRCIT DIAGRAMS12.1 Wiring Diagram12.1.1 Wiring Diagram for FC4200-50 and FC4200-60 (Non-RoHS model)
CA3
260-
92
CA3
260-
91
CA2
1609
6A
POW
ER S
UPP
LYPS
089B
X M
OTO
R
CA0
6707
AJ1
1
J14
J16
Y FL
EX.
PR90
5004
A
FPC
6011
03
ENC
OR
ER
MC
CA9
0500
3
PR90
5005
J3
J4J2
J4
J4 J3
X FL
EX.
J2
J22 Y
MO
TOR
NC
J18
CEN
TRO
NIC
S
PR90
5001
MAI
N B
OAR
D
J9J1
0J2
J20
RS-
232C
J19
FC42
00-5
0 O
NLY
CA9
0500
4
J5J1J3
J2J4
PR90
5002
CA2
252-
11
PR06
704
CA9
0500
2
PR90
5006
MEM
BRAN
E SW
X H
OM
E SE
NSO
R
SW
LCD
GM
L202
0A
TW-V
F-14
-0.1
*0.6
-180
NC
J5FC
A225
2014
PR90
5003
A
F420
0-60
:
FPC
0671
0
F420
0-50
:
FPC
0671
1
J6
CA9
0500
1
CA3
260-
94C
A326
0-95
POW
ER S
W
CA6
150-
6A
PR31
003C
FC42
00-5
0 O
NLY
WR
ITIN
GPA
NEL
CA0
8917
B
AC IN
LET
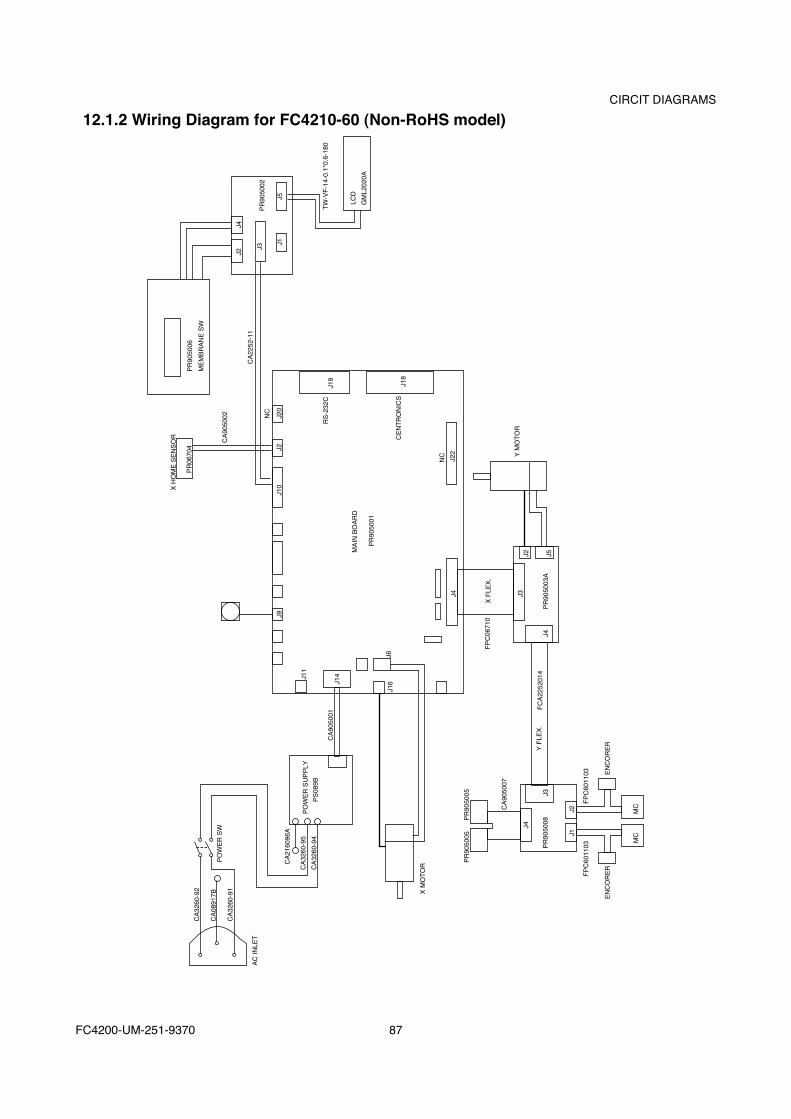
FC4200-UM-251-9370 87
CIRCIT DIAGRAMS12.1.2 Wiring Diagram for FC4210-60 (Non-RoHS model)
CA3
260-
92
CA3
260-
91
CA2
1609
6A
POW
ER S
UPP
LYPS
089B
X M
OTO
R
J11
J14
J16
Y FL
EX.
PR90
5008
FPC
6011
03
ENC
OR
ER
MC
FPC
6011
03 ENC
OR
ER
MCCA9
0500
7
PR90
5005
PR90
5005 J3
J1
J4
J2
J4
J4 J3
X FL
EX.
J2
J22 Y
MO
TOR
NC
J18
CEN
TRO
NIC
S
PR90
5001
MAI
N B
OAR
D
J9J1
0J2
J20
RS-
232C
J19
J5J1J3
J2J4
PR90
5002
CA2
252-
11
PR06
704
CA9
0500
2
PR90
5006
MEM
BRAN
E SW
X H
OM
E SE
NSO
R
LCD
GM
L202
0A
TW-V
F-14
-0.1
*0.6
-180
NC
J5FC
A225
2014
PR90
5003
A
FPC
0671
0
J6
CA9
0500
1
CA3
260-
94C
A326
0-95
POW
ER S
WC
A089
17B
AC IN
LET

FC4200-UM-251-9370 88
CIRCIT DIAGRAMS12.1.3 Wiring Diagram for FC4200-50 and FC4200-60 (RoHS model)
CA3
260-
92
CA3
260-
91
CA9
0501
1PO
WER
SU
PPLY
LEP1
00F-
36
POW
ER R
ELAY
BO
ARD
PN50
42-0
4
X M
OTO
R
CA0
6707
AJ1
1
J14
J16
Y FL
EX.
PR90
5004
A
FPC
6011
03
ENC
OR
ER
MC
CA9
0500
3
PR90
5005
J3
J4J2
J4
J4 J3
X FL
EX.
J2
J22 Y
MO
TOR
NC
J18
CEN
TRO
NIC
S
PR90
5001
MAI
N B
OAR
D
J9J1
0J2
J20
RS-
232C
J19
FC42
00-5
0 O
NLY
CA9
0500
4
J5J1J3
J2J4
PR90
5002
CA2
252-
11
PR06
704
CA9
0500
2
PR90
5006
MEM
BRAN
E SW
X H
OM
E SE
NSO
R
SW
LCD
GM
L202
0A
TW-V
F-14
-0.1
*0.6
-180
NC
J5FC
A225
2014
PR90
5003
A
F420
0-60
:
FPC
0671
0
F420
0-50
:
FPC
0671
1
J6
CA9
0500
1
CA9
0501
2
POW
ER S
W
CA6
150-
6A
PR31
003C
FC42
00-5
0 O
NLY
WR
ITIN
GPA
NEL
CA0
8917
B
AC IN
LET

FC4200-UM-251-9370 89
CIRCIT DIAGRAMS12.1.4 Wiring Diagram for FC4210-60 (RoHS model)
CA3
260-
92
CA3
260-
91
CA9
0501
1
X M
OTO
R
J11
J14
J16
Y FL
EX.
PR90
5008
FPC
6011
03
ENC
OR
ER
MC
FPC
6011
03 ENC
OR
ER
MCCA9
0500
7
PR90
5005
PR90
5005 J3
J1
J4
J2
J4
J4 J3
X FL
EX.
J2
J22 Y
MO
TOR
NC
J18
CEN
TRO
NIC
S
PR90
5001
MAI
N B
OAR
D
J9J1
0J2
J20
RS-
232C
J19
J5J1J3
J2J4
PR90
5002
CA2
252-
11
PR06
704
CA9
0500
2
PR90
5006
MEM
BRAN
E SW
X H
OM
E SE
NSO
R
LCD
GM
L202
0A
TW-V
F-14
-0.1
*0.6
-180
NC
J5FC
A225
2014
PR90
5003
A
FPC
0671
0
J6
CA9
0500
1
POW
ER S
WC
A089
17B
AC IN
LET
POW
ER S
UPP
LYLE
P100
F-36
POW
ER R
ELAY
BO
ARD
PN50
42-0
4
CA9
0501
2

FC4200-UM-251-9370 90
CIRCIT DIAGRAMS
12.2 Main BoardMain Board (1/10)
CP
U
CP
U
IF
NV
_BU
SY
ZF
R_B
US
YZ
A[2
1 1]
D[1
5 0]
RD
DZ
WR
HZ
WR
LZR
AS
ZC
AS
HZ
CA
SLZ
RO
MC
SZ
CS
4ZC
S6Z
CLK
19.6
6MW
AT
ZR
ES
ET
ZR
ES
ET
SF
RE
EF
AN
_ON
ZA
DR
RG
ZO
FF
SLE
D
TX
D0
RT
S0Z
DT
R0Z
TX
D1
RD
ZA
[21
1]D
[15
0] A[2
1 1]
D[1
5 0]
RX
D0
CT
S0Z
DS
R0Z
RX
D1
RX
D1
DS
R0Z
CT
S0Z
RX
D0
C1
104
C2
104
C3
104
C4
104
C5
104
C6
104
C7
104
VC
C
TM
BLE
D
RE
SE
T
(Val
ue)
(Val
ue)
(Val
ue)
(Val
ue)
DR
IVE
RC
ON
NE
CT
CO
NN
EC
T
CO
NN
EC
T1
G_A
RR
AY
DR
AM
ME
MO
RY
(Val
ue)
INT
[2 0
]
TX
D1
DT
R0Z
RT
S0Z
TX
D0
CE
NC
SZ
A[2
1 1]
D[1
5 0]
RD
ZW
RLZ
CE
NIN
TZ
KE
YB
[7 0
]K
CO
NT
ZZ
XC
OM
AX
CO
MB
YC
OM
AY
CO
MB
PN
CO
MA
PN
CO
MB
SF
RZ
XC
OM
AX
CO
MB
YC
OM
AY
CO
MB
PN
CO
MA
PN
CO
MB
SF
RZ
XE
NA
XE
NB
YE
NA
YE
NB
PN
EN
AP
NE
NB
LOC
ALZ
SN
S6
SN
S5
SN
S1
SN
S4
LCD
B[6
0]
SN
S[8
0]
KE
YB
[7 0
]
CA
MIN
TZ
FA
N_O
NZ
INT
KE
YZ
LOC
ALL
ED
OF
FS
LED
KC
ON
T0Z
KC
ON
T1Z
LCD
B[6
0]
KE
YB
[7 0
]
YM
PY
MM
MC
PM
CM
TM
BLE
DT
OM
BO
PA
+X
PA
-XP
A+
YY
HO
ME
Z
YM
PY
MM
MC
PM
CM
SN
S5
SN
S6
SN
S3
SN
S4
SN
S2
SN
S0
SN
S1
PE
NF
B
XE
NA
XE
NB
YE
NA
YE
NB
PN
EN
AP
NE
NB
LOC
ALZ
PA
+X
PA
-XK
CO
NT
0ZK
CO
NT
1ZK
CO
NT
2ZLC
DB
[6 0
]
LOC
ALL
ED
PE
NF
BC
AM
INT
ZT
OM
BO
RA
SZ
CA
SH
ZC
AS
LZR
DD
ZW
RLZ
A[2
1 1]
D[1
5 0]
RO
MC
SZ
SR
AM
CS
ZK
RO
MC
SZ
NV
RA
MC
SZ
WR
HZ
WR
LZR
DZ
RE
SE
TZ
NV
_BU
SY
ZF
R_B
US
YZ
SR
AM
CS
ZN
VR
AM
CS
ZK
RO
MC
SZ
A[2
1 1]
D[1
5 0]
RD
DZ
WR
LZC
S4Z
CS
6ZC
LK19
.66M
WA
ITZ
RE
SE
TS
FR
EE
SR
VIN
TZ
LOC
ALI
NT
Z
CIN
TIN
ZC
INT
OU
TZ
INT
0IN
T1
INT
2
GA IOIO
CS
1ZC
EN
CS
ZA
DT
RG
Z
IOC
S1Z
CE
NC
SZ
AD
TR
GZ
A[2
1 1]
D[1
5 0]
RD
ZW
RLZ
IOC
S1Z
RE
SE
TY
HO
ME
CA
MZ
SN
S0
SN
S1
SN
S2
INT
1IN
T2
LOC
ALI
NT
ZC
EN
INT
Z
INT
KE
YZ
SR
VIN
Z
PA
+Y
SN
S3
INT
0
(Val
ue)
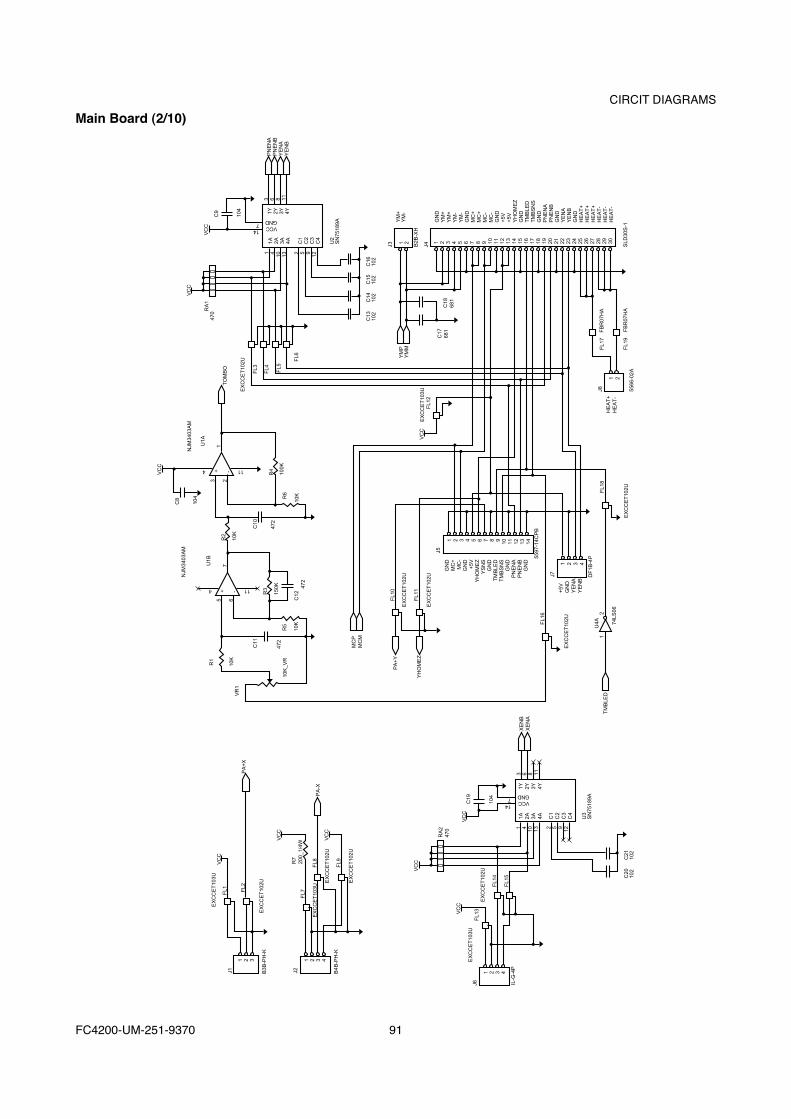
FC4200-UM-251-9370 91
CIRCIT DIAGRAMSMain Board (2/10)
C20
102
C21
102
1A 2A 3A 4A
1Y 2Y 3Y 4Y
XENB
XENA
104
C19
VCC
VCC
VCC
VCC
PA-X
PA+X
VR1
R1
R2
R4
R6
10K
100K
TOMBO
VCC
VCC
VCC
C17
681
C18
681
C9
104
RA1
470
FL3
FL4 FL5
FL6
C13
102
C14
102
C15
102
C16
102
U2
SN75189A
YMP
YMM
YM+
YM-
J3 J4B2B
-XH
SLD
30S-1
1 21A 2A 3A 4A
1Y 2Y 3Y 4Y
PNENA
PNENB
YENA
YENB
C1
C2
C3
C4
1 4 10 13
3 6 8 11
2 5 9 12
EXCCET102U
R3
10K
10K
150K
10K
MCP
MCM
PA+Y
YHOMEZ
FL10
FL11
FL12
FL17
J8
FL19
5566-02A
HEAT+
HEAT-
1 2
FBR07HA
FBR07HA
FL16
FL18
U4A 74LS
06
5597-14C
PB
12
J5
EXCCET102U
EXCCET103U
EXCCET102U
EXCCET102U
TMBLE
D
DF1B
-4P
+5V
GND
YENA
YENB
1 2 3 4
J7
EXCCET102U
GND
MC+
MC-
GND
+5V
YHOMEZ
YSNS
GND
TMBLE
DTMBSNS
GND
PNENA
PNENB
GND
GND
YM+
YM+
YM-
YM-
GND
MC+
MC+
MC-
MC-
GND
+5V
+5V
YHOMEZ
GND
TMBLE
DTMBSNS
GND
PNENA
PNENB
GND
YENA
YENB
GND
HEAT+
HEAT+
HEAT+
HEAT-
HEAT-
HEAT-
1 2 3 4 5 6 7 8 9 10 11 12 13 14 15 16 17 18 19 20 21 22 23 24 25 26 27 28 29 30
1 2 3 4 5 6 7 8 9 10 11 12 13 14
C11
C10
C12
472
472
57
1
4 11
4 11
U1B
6
3 2
-+-+
472
R5
10K_V
RVCC
NJM
3403AM
NJM
3403AM
VCC
U1A
C8
104
VCC
FL14
FL15
FL13
FL9
FL8
FL7FL2
FL1
EXCCET102U
EXCCET102U
B4B
-PH-K
B3B
-PH-K
J2J1
EXCCET102U
R7
200_1/4W
EXCCET103U
EXCCET103U
EXCCET103U
EXCCET102U
J6 IL-G-4P
RA2
470
VCCGND
VCCGND
147
147
C1
C2
C3
C4
2 5 9 12
1 2 3 4
1 2 3 41 2 3
1 4 10 13
3 6 8 11
U3
SN75189A
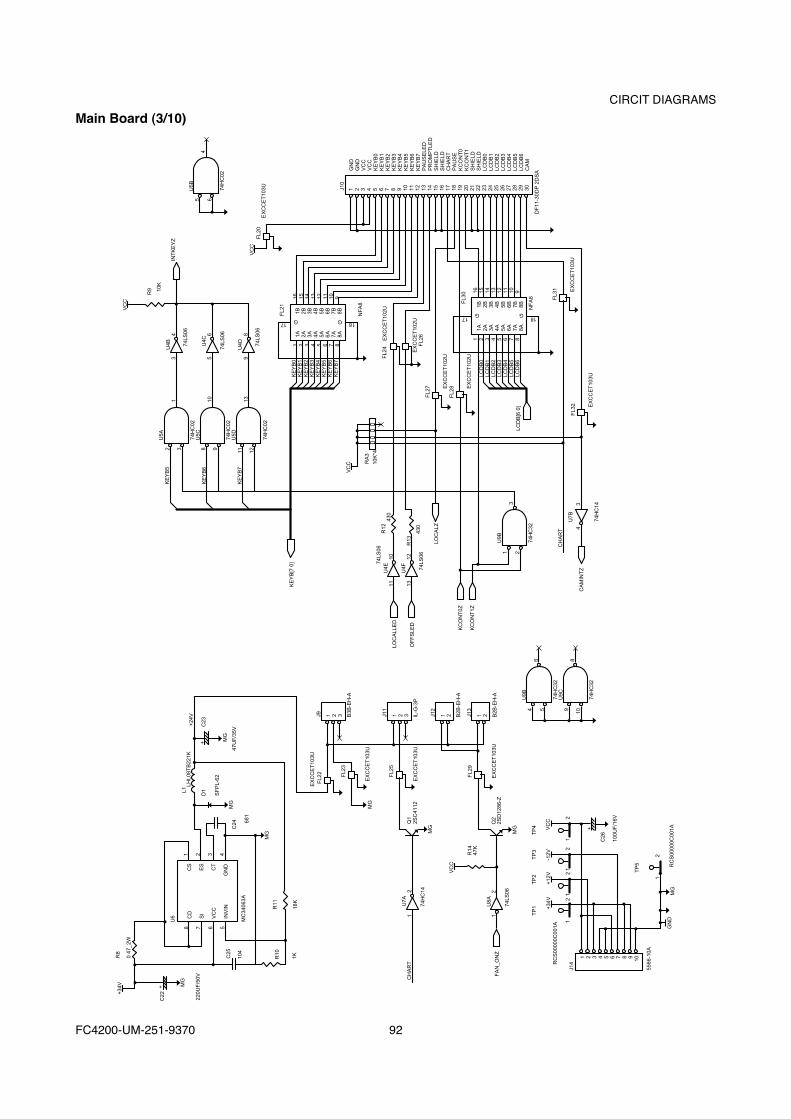
FC4200-UM-251-9370 92
CIRCIT DIAGRAMSMain Board (3/10)
+34
V
C22
+
C25
104
R10
1K18
K
R11
MG
U6
8 7 6 5
1 2 3 4
CD
SI
VC
C
INV
IN
C24 68
1
MG
MG
MG
MG
MG
GN
D
U7A
74H
C14
VC
C
R14
47K
U8A
74LS
06
Q2
2SD
1286
-ZF
AN
_ON
Z
RC
S00
000C
001A
RC
S00
000C
001A
TP
1
5566
-10A
11
2
12
22
2
+
11
TP
2T
P3
TP
4
TP
5
1 2 3 4 5 6 7 8 9 10
J14
+34
V+
12V
-12V
C26
100U
F/1
6V
VC
C
12
CH
AR
T1
2
EX
CC
ET
103U
EX
CC
ET
103U
EX
CC
ET
103U
EX
CC
ET
103U
FL2
2 FL2
3
FL2
5
FL2
9
Q1
2SC
4112
J9 J11
1 2 3 1 2 3B3B
-EH
-A
IL-G
-3P
J12
1 2 B2B
-EH
-A
J13
1 2 B2B
-EH
-A
KC
ON
T1Z
CA
MIN
TZ
CH
AR
T
U7B
43
KC
ON
T0Z
OF
FS
LED
LOC
ALL
ED
11 13
10
74LS
06
74LS
06
LOC
ALZ
U4E
U4F
R12
430
VC
C RA
3
10K
*4
430
R13
12
U9B
4 5 9
6 810
U9C
74H
C32
U9B
1 23
74H
C32
U5B
5 64
74H
C02
U5A
U5C
U5D
2 3 8 9 11 12
1 10
KE
YB
5
KE
YB
6
KE
YB
713
74H
C02
74H
C02
74H
C02
74H
C14
FL3
2 EX
CC
ET
103U
FL2
0
J10
VC
C
EX
CC
ET
103U
INT
KE
YZ
10K
R9
VC
C
U4C
U4B 74
LS06
74LS
06
74LS
0689
65
43
U4D
FL3
1 EX
CC
ET
103U
FL2
7
FL2
8
FL3
0
NF
A8
DF
11-3
0DP
2D
SA
FL2
6
FL2
4
FL2
1
NF
A8
EX
CC
ET
102U
EX
CC
ET
102U
LCD
B[6
0]
KE
YB
[7 0
]
LCD
B0
LCD
B1
LCD
B2
LCD
B3
LCD
B4
LCD
B5
LCD
B6
1 2 3 4 5 6 7 8
1A 2A 3A 4A 5A 6A 7A 8A
1B 2B 3B 4B 5B 6B 7B 8B
1 2 3 4 5 6 7 8 9 10 11 12 13 14 15 16 17 18 19 20 21 22 23 24 25 26 27 28 29 30
GN
DG
ND
VC
CV
CC
KE
YB
0K
EY
B1
KE
YB
2K
EY
B3
KE
YB
4K
EY
B5
KE
YB
6K
EY
B7
PA
US
ELE
DP
RO
MP
TLE
DS
HIE
LDS
HIE
LDC
HA
RT
PA
US
EK
CO
NT
0K
CO
NT
1S
HIE
LDS
HIE
LDLC
DB
0LC
DB
1LC
DB
2LC
DB
3LC
DB
4LC
DB
5LC
DB
6C
AM
16 15 14 13 12 11 10 9
G G
KE
YB
0K
EY
B1
KE
YB
2K
EY
B3
KE
YB
4K
EY
B5
KE
YB
6K
EY
B7
1 2 3 4 5 6 7 8
1A 2A 3A 4A 5A 6A 7A 8A
1B 2B 3B 4B 5B 6B 7B 8B
16 15 14 13 12 11 10 9
G G 1717
1818
EX
CC
ET
102U
EX
CC
ET
102U
74H
C32
MG
MG
47U
F/3
5V
SF
PL-
62
+24
V
C23
+D
1L1LH
L08T
B22
1K
MC
3406
3A
CS
ES
CT
GN
D
220U
F/5
0V
R8
0 47
_2W
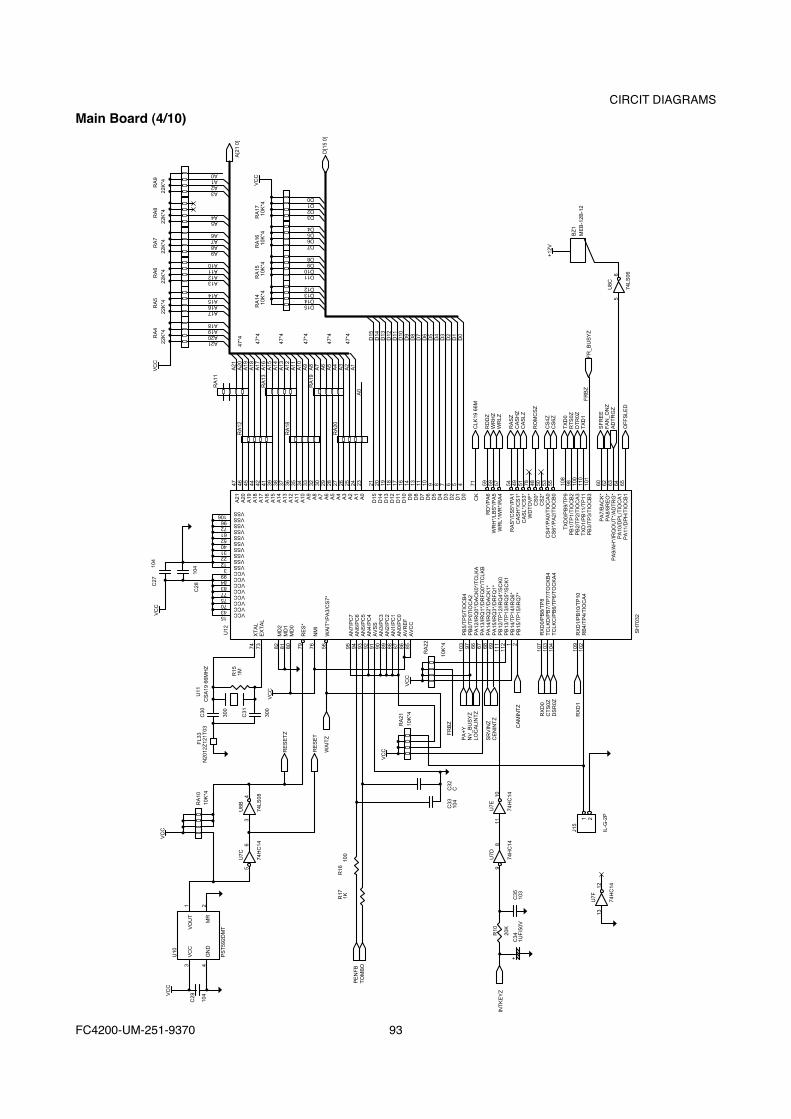
FC4200-UM-251-9370 93
CIRCIT DIAGRAMSMain Board (4/10)
VC
CV
CC
FL3
3C
30U
11
R15
U12
74X
TA
LE
XT
AL
MD
2M
D1
MD
0
RE
S*
NM
I
WA
IT*/
PA
3/C
S7*
AN
7/P
C7
AN
6/P
C6
AN
5/P
C5
AN
4/P
C4
AV
SS
AN
3/P
C3
AN
2/P
C2
AN
1/P
C1
AN
0/P
C0
AV
RE
FA
VC
C
A21
A20
A19
A18
A17
A16
A15
A14
A13
A12
A11
A10 A
9A
8A
7A
6A
5A
4A
3A
2A
1A
0
VCCVCCVCCVCCVCCVCCVCCVCCVSSVSSVSSVSSVSSVSSVSSVSSVSSVSS
154370757783849931222314052617296106
A21A20A19A18
A17A16A15A14
D15D14D13D12
D11D10D9D8
D7D6D5D4
D3D2D1D0
A13A12A11A10
A9A8A7A6
A3A2A1A0
A5A4
D15
D14
D13
D12
D11
D10 D
9D
8D
7D
6D
5D
4D
3D
2D
1D
0
CK
RD
*/P
A6
WR
H*/
LBS
*/P
A5
WR
L*/W
R*/
RA
4
RA
S*/
CS
5*/P
A1
CA
SH
*/C
S1*
CA
SL*
/CS
3*W
DT
OV
F*
CS
0*C
S2*
CS
4*/P
A0/
TIO
CA
0C
S6*
/PA
2/T
IOC
B0
TX
D0/
PB
9/T
P9
PB
1/T
P1/
TIO
CB
2P
B2/
TP
2/T
IOC
A3
TX
D1/
PB
11/T
P11
PB
3/T
P3/
TIO
CB
3
PA
7/B
AC
K*
PA
8/8R
EO
*P
A9/
AH
*/IR
QO
UT
*/A
DT
RG
*P
A10
/DP
L/T
IOC
A1
PA
11/D
PH
/TIO
CB
1
47 46 45 44 42 41 39 38 37 36 35 34 33 32 30 29 28 27 26 25 24 23
A21
A20
A19
A18
A17
A16
A15
A14
A13
A12
A11
A10
A9
A8
A7
A6
A5
A4
A3
A2
A1
RA
12
RA
18
RA
20
A0
RA
19
RA
13
RA
11
21 20 19 18 17 16 14 13 11 10 9 8 7 6 5 4
D15
D14
D13
D12
D11
D10
D9
D8
D7
D6
D5
D4
D3
D2
D1
D0
71 59 59 57 54 49 51 78 48 50 53 55 108
98 100
110
101
60 62 63 64 65
CLK
19 6
6M
RD
DZ
WR
HZ
WR
LZ
RA
SZ
CA
SH
ZC
AS
LZ
RO
MC
SZ
CS
4ZC
S6Z
TX
D0
RT
S0Z
DT
R0Z
TX
D1
SF
RE
EF
AN
_ON
ZA
DT
RG
Z
OF
FS
LED
FR
BZ
FR
_BU
SY
Z
PB
5/T
P5/
TIO
CB
4P
B0/
TP
0TIO
CA
2P
A12
/IRQ
0*/D
AC
K0*
/TC
LKA
PA
13/IR
Q1*
/DR
FQ
0*/T
CLK
BP
A14
/IRQ
2*/D
AC
K1*
PA
15/IR
Q3*
/DR
FQ
1*P
B12
/TP
12/IR
Q4*
/SC
K0
PB
13/T
P13
/IRQ
5*/S
CK
1P
B14
/TP
14/IR
Q6*
PB
15/T
P15
/IRQ
7*
RX
D1/
PB
10/T
P10
RB
4/T
P4/
TIO
CA
4
RX
D0/
PB
8/T
P8
TC
LKD
/PB
7/T
P7/
TO
CK
B4
TC
LKC
/PB
6/T
P6/
TO
CK
A4
PA
+Y
NV
_BU
SY
ZLO
CA
LIN
TZ RX
D0
CT
S0Z
DS
R0Z
RX
D1
SH
7032
SR
VIN
ZC
EN
INT
Z
73 79 76 5682 81 80 95 94 93 92 91 90 89 88 87 86 85 103 97 66 67 68 69 111
112 1 2
107
103
104
109
102
1M
CS
A19
66M
HZ
300
C27
C28
104
104
VC
CR
A4
22K
*4
RA
5
22K
*4
RA
6
22K
*4
RA
7
22K
*4
RA
8
22K
*4
RA
9
22K
*4
VC
C
A[2
1 0]
47*4
47*4
RA
1410
K*4
RA
1510
K*4
RA
1610
K*4
RA
17V
CC
D[1
5 0]
10K
*4
47*4
47*4
47*4
47*4
300
RE
SE
TZ
VC
C
RA
21
10K
*4
C32
C33
104
C35
103
C34
1UF
/50V
R10
INT
KE
YZ
20K
+
C
R17
1KR
1610
0
PE
NF
BT
OM
BO
RE
SE
T
WA
ITZ
VC
C
VC
C
RA
22
10K
*4F
RB
Z
C31
N20
12Z
121T
03R
A10
10K
*4
U7C
74H
C14
56
U7D
74H
C14
98
U7E
74H
C14
1110
U7F
J15
IL-G
-2P
1 2
74H
C14
1312
U8B
74LS
08
34
U10
PS
T59
2DM
T
VC
CV
OU
T
MR
GN
D
3 4
1 2
C29
104
CA
MIN
TZ
U8C
74LS
06
BZ
1M
EB
-12B
-12
+12
V
56

FC4200-UM-251-9370 94
CIRCIT DIAGRAMSMain Board (5/10)
A[2
1 1]
A[2
1 1]
A1
A2
A3
A4
A5
A6
A7
A8
A9
A10
VC
C
RA
23
1K*4
RA
SZ
CA
SH
ZC
AS
LZR
DD
ZW
RLZ
2 4 6 8 11 13 15 17 1 191G 2G 74
HC
244
U13
1A1
1A2
1A3
1A4
2A1
2A2
2A3
2A4
1Y1
1Y2
1Y3
1Y4
2Y1
2Y2
2Y3
2Y4
18 16 14 12 9 7 5 3
2 4 6 8 11 13 15 17 1 191G 2G 74
AC
244
RD
Z
U15
1A1
1A2
1A3
1A4
2A1
2A2
2A3
2A4
1Y1
1Y2
1Y3
1Y4
2Y1
2Y2
2Y3
2Y4
18 16 14 12 9 7 5 3
17 18 19 20 23 24 25 26 27 28 16 15 14 30 31 13 29
RA
SU
CA
SLC
AS
WE
OE
M5M
4181
60C
J
VC
CC
36 C37
10U
F/1
6V
D[1
5 0]
D[1
5 0]
104
+
U14A0
A1
A2
A3
A4
A5
A6
A7
A8
A9
NC
NC
DQ
0D
Q1
DQ
2D
Q3
DQ
4D
Q5
DQ
6D
Q7
DQ
8D
Q9
DQ
10D
Q11
DQ
12D
Q13
DQ
14D
Q15
VCCVCCVCCVSSVSSVSS
2 3 4 5 7 8 9 10 33 34 35 36 38 39 40 41
1621223742
D0
D1
D2
D3
D4
D5
D6
D7
D8
D9
D10
D11
D12
D13
D14
D15

FC4200-UM-251-9370 95
CIRCIT DIAGRAMSMain Board (6/10)
PE
NF
B C54
1SS
352
U1D
NJM
3403
AM
D10
1412
R34
1K
R29 1K
R30
+12
V
U18
4050
C56
103
MG
I6 I5 I4 I3 I2 I1 VD
D
15 12 10 6 4 2 8
O6
O5
O4
O3
O2
O1
VS
S
14 11 9 7 5 3 1
+12
V
U17
4049
D2
+12
V
D3
1SS
352
1SS
352
D6
D7
C52
220U
F/5
0V
103/
50V
C48
C47
224
C44
153
R20
39_1
W
C45
153
C46
152
IN1
IN2
EN
A
SN
S
VR
EF
5 7 11 10 9
3 4 1 8
OU
T1
BO
OT
1
OU
T2
BO
OT
2
2
6GND
VS
C49
+
+
473
C53 47
3
R28
D11
D12R
32
100
100
1SS
352
R24
D5
100
C50
103/
50V
11 10 9 7 6 4 3 2
S4
D4
S3
D3
S2
D2
S1
D1
12G
4
G3
G2
G1
R33
MC
M
MC
P
YM
M
YM
P
0 47
_2W
MG
MG
8 5 1
1SS
352
QA
3
SM
A51
03
R27
D9
100
1SS
352
1SS
352
D8
R26
10K
R23
10K
D4
1SS
352
1SS
352
MA
1Z10
0
MA
1Z10
0
+34
V
QA
2L8
203
SF
RZ
+34
V
+34
V
C51
103
MG
MG
I6 I5 I4 I3 I2 I1 VD
D
15 12 10 6 4 2 8
O6
O5
O4
O3
O2
O1
VS
S
14 11 9 7 5 3 1
1K
C55
311
13- +
11 4
1UF
/50V
R31
30K
+
MG
MG
MG
220U
F/5
0V
103/
50V
C42
C41
224
C38
153
R19
39_1
W
J16
1 2 IL-G
-2P
C39
153
C40
152
IN1
IN2
EN
A
SN
S
VR
EF
5 7 11 10 9
3 4 1 8
OU
T1
BO
OT
1
OU
T2
BO
OT
2
2
6GND
VS
C43
QA
1L8
203
SF
RZ
SF
RZ
VC
C
1K*4
RA
24
74LS
07
U16
A
XC
OM
A
XC
OM
B
12
74LS
07
U16
B3
4
74LS
07
U16
C
YC
OM
A
YC
OM
B
56
74LS
07
U16
D9
8
NJM
3403
AM
U1C
10
9
R22
R21
+ -
74LS
07
74LS
07
R25
15K
U16
E
U16
F
11
1K_1
/4W
PN
CO
MA
PN
CO
MB
1K_1
/4W
10
1312
+12
V
114
8+
34V
MG
MG
MG
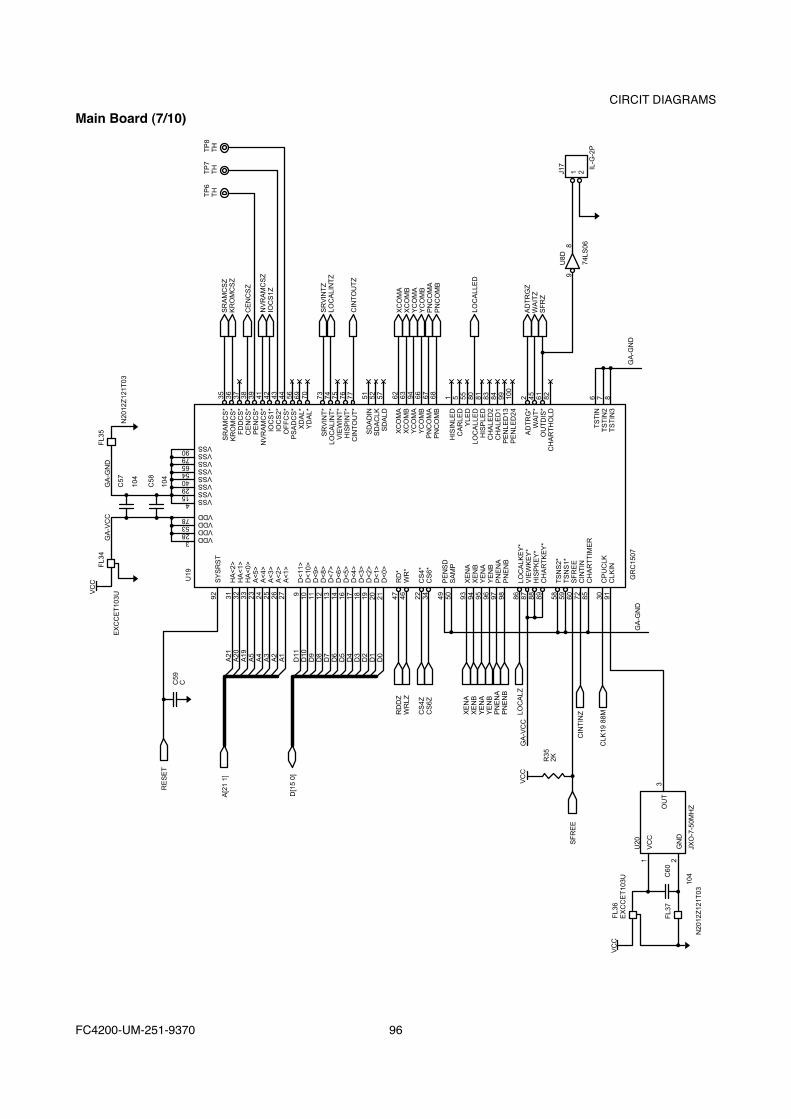
FC4200-UM-251-9370 96
CIRCIT DIAGRAMSMain Board (7/10)
VC
C
104C
60
U20S
FR
EE
CIN
TIN
Z
CLK
19 8
8M
VC
C
R35
2K
GA
-VC
C
GA
-GN
DG
A-G
ND
LOC
ALZ
XE
NA
XE
NB
YE
NA
YE
NB
PN
EN
AP
NE
NB
RD
DZ
WR
LZ
D[1
5 0]
A[2
1 1]
RE
SE
T
C59
C
EX
CC
ET
103U
VC
CF
L34
FL3
5
C57
104
N20
12Z
121T
03
C58
104
GA
-VC
CG
A-G
ND
RD
*W
R*
SY
SR
ST
92
U19
HA
<2>
HA
<1>
HA
<0>
A<
5>A
<4>
A<
3>A
<2>
A<
1>
A21
A20
A19
A5
A4
A3
A2
A1
31 32 33 23 24 25 26 27
SR
AM
CS
*K
RO
MC
S*
FD
DC
S*
CE
NC
S*
PE
NC
S*
NV
RA
MC
S*
IOC
S1*
IOC
S2*
OF
FC
S*
PS
AD
CS
*X
DA
L*Y
DA
L*
VDDVDDVDDVDD
VSSVSSVSSVSSVSSVSSVSSVSS
3285378
415294054657990
SR
AM
CS
ZK
RO
MC
SZ
TP
6T
HT
P7
TH
TP
8T
H
CE
NC
SZ
SR
VIN
T*
LOC
ALI
NT
*V
IEW
INT
*H
ISP
INT
*C
INT
OU
T*
SR
VIN
TZ
LOC
ALI
NT
Z
CIN
TO
UT
Z
LOC
ALL
ED
SD
AD
INS
DA
CLK
SD
ALD
XC
OM
AX
CO
MB
YC
OM
AY
CO
MB
PN
CO
MA
PN
CO
MB
HIS
INLE
DC
AR
LED
YLE
DLO
CA
LLE
DH
ISP
LED
CH
ALE
D2
CH
ALE
D1
PE
NLE
D13
PE
NLE
D24
AD
TR
G*
WA
IT*
OU
TD
IS*
CH
AR
TH
OLD
TS
TIN
TS
TIN
2T
ST
IN3
35 36 37 38 39 41 42 43 44 56 69 70 73 74 75 76 77 51 52 57 62 63 94 66 67 68
XC
OM
AX
CO
MB
YC
OM
AY
CO
MB
PN
CO
MA
PN
CO
MB
1 5 55 80 81 83 84 99 100
2 45 61 82
AD
TR
GZ
WA
ITZ
SF
RZ
U8D
74LS
06IL
-G-2
P
J17
1 2
98
6 7 8
D<
11>
D<
10>
D<
9>D
<8>
D<
7>D
<6>
D<
5>D
<4>
D<
3>D
<2>
D<
1>D
<0>
D11
D10
D9
D8
D7
D6
D5
D4
D3
D2
D1
D0
9 10 11 12 13 14 16 17 18 19 20 21
CS
4ZC
S6Z
CS
4*C
S6*
PE
NS
DS
AM
P
47 46 22 34 49 50 93 94 95 96 97 98 86 87 88 89 58 59 60 72 85 30 91
XE
NA
XE
NB
YE
NA
YE
NB
PN
EN
AP
NE
NB
LOC
ALK
EY
*V
IEW
KE
Y*
HIS
PK
EY
*C
HA
RT
KE
Y*
TS
NS
2*T
SN
S1*
SF
RE
EC
INT
INC
HA
RT
TIM
ER
CP
UC
LKC
LKIN
GR
C15
07
VC
C
OU
T
JXO
-7-5
0MH
Z
GN
D
1 2
3
FL3
6E
XC
CE
T10
3U
FL3
7
N20
12Z
121T
03
NV
RA
MC
SZ
IOC
S1Z
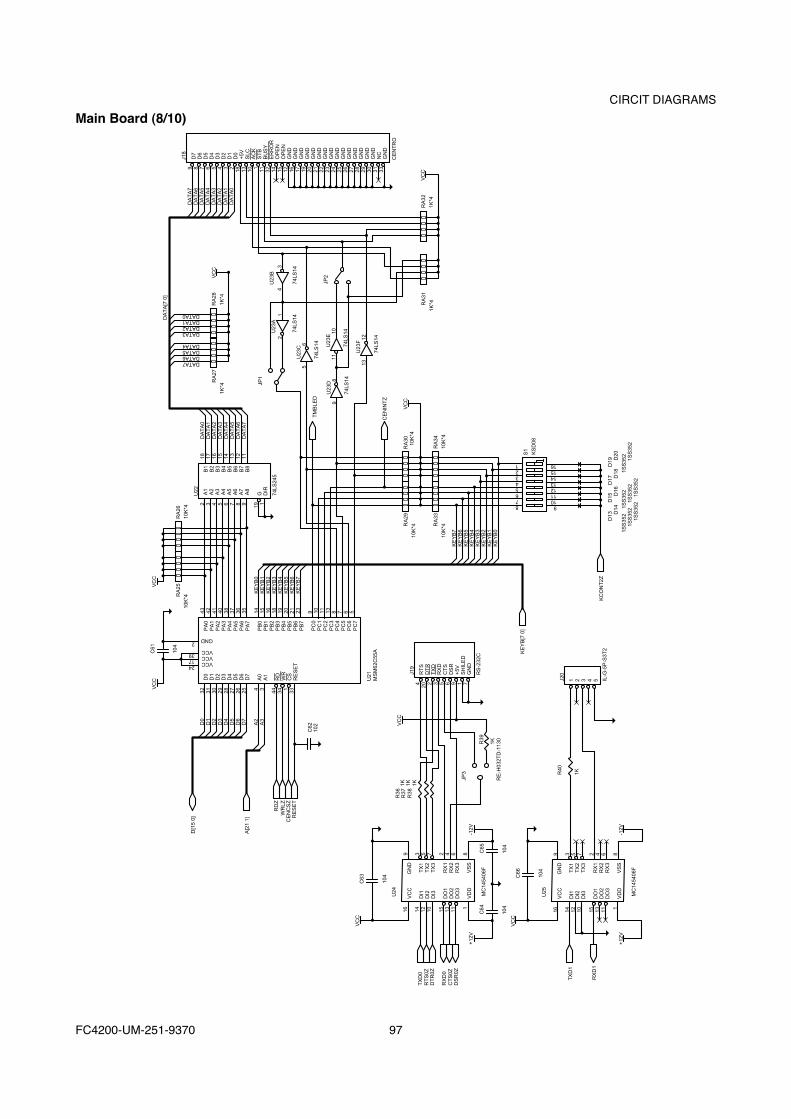
FC4200-UM-251-9370 97
CIRCIT DIAGRAMSMain Board (8/10)
RD
WR
CS
RE
SE
T
RX
D1
TX
D1
+12
V
MC
1454
06F
111131510121416
VD
D
DO
3D
O2
DO
1
DI3
DI2
DI1
VC
C
VC
CC
66
U25
104
R40
J20
1 2 3 4 5 IL-G
-5P
-S3T
2KE
YB
[7 0
]
KC
ON
T2Z
D13 D
14
1SS
352
1SS
352
1SS
352
1SS
352
1SS
352
1SS
352
1SS
352
1SS
352
KS
D08
RA
33
RA
29
10K
*4
10K
*4
RA
34
RA
30V
CC
CE
NIN
TZ
TM
BLE
D
74LS
14
U23
F13
12
74LS
14
U23
D9
8
74LS
14
U23
E11
10
74LS
14
U23
C5
6
74LS
14
U23
A2
1
74LS
14
JP2
U23
B
43
10K
*4
10K
*4
RA
31
1K*4
RA
32V
CC
CE
NT
RO
1K*4
910111213141516
KE
YB
7K
EY
B6
KE
YB
5K
EY
B4
KE
YB
3K
EY
B2
KE
YB
1K
EY
B0
KE
YB
0K
EY
B1
KE
YB
2K
EY
B3
KE
YB
4K
EY
B5
KE
YB
6K
EY
B7
14 15 16 18 19 20 21 2343 42 41 40 38 37 36 35 9 10 11 13 8 7 6 5
PB
0P
B1
PB
2P
B3
PB
4P
B5
PB
6P
B7
PA
0P
A1
PA
2P
A3
PA
4P
A5
PA
6P
A7
D0
D1
D2
D3
D4
D5
D6
D7
VCCVCCVCC
GND
241739
2
A0
A1
G DIR
32 31 30 29 28 27 26 25
A1
A2
A3
A4
A5
A6
A7
A8
B1
B2
B3
B4
B5
B6
B7
B8
18 17 16 15 14 13 12 11
DA
TA
0D
AT
A1
DA
TA
2D
AT
A3
DA
TA
4D
AT
A5
DA
TA
6D
AT
A7
DATA7DATA6DATA5DATA4
DATA3DATA2DATA1DATA0
DA
TA
7D
AT
A6
DA
TA
5D
AT
A4
DA
TA
3D
AT
A2
DA
TA
1D
AT
A0
9 8 7 6 5 4 3 2 18 13 10 1 11 32 14 15 12 16 17 19 20 21 22 23 24 25 26 27 28 29 30 31 33
D7
D6
D5
D4
D3
D2
D1
D0
+5V
SLC
AC
KS
TB
BU
SY
ER
RO
RO
PE
NO
PE
NG
ND
GN
DG
ND
GN
DG
ND
GN
DG
ND
GN
DG
ND
GN
DG
ND
GN
DG
ND
GN
DG
ND
NC
GN
D
2 3 4 5 6 7 8 9
44 34 1 334 319 1
A2
A3
D0
D1
D2
D3
D4
D5
D6
D7
PC
0P
C1
PC
2P
C3
PC
4P
C5
PC
6P
C7
87654321
S1
D15 D
16D
17 D18
D19 D
20
RE
-H03
2TD
-113
0
RS
-232
C
RT
SD
TR
TX
DR
XD
CT
SD
SR
+5V
SH
ILE
DG
ND
4 20 2 3 5 6 9 1 7
J19
1K
8-1
2V
6427539
VS
S
RX
3R
X2
RX
1
TX
3T
X2
TX
1
GN
D
RX
D0
TX
D0
RT
S0Z
DT
R0Z
CT
S0Z
DS
R0Z
+12
V
MC
1454
06F
111131510121416
VD
D
DO
3D
O2
DO
1
DI3
DI2
DI1
VC
C
VC
C
VC
C
VC
CV
CC
C61
RA
2510
4
10K
*4
RA
26
10K
*4
U22
RA
27
1K*4
VC
C
J18
RA
28
DA
TA
[7 0
]
1K*4
JP1
74LS
245
C62
102
A[2
1 1]
D[1
5 0]
RD
Z
RE
SE
TC
EN
CS
ZW
RLZ
U21
MS
M62
C55
A
C63
C64
104
C65
R36
R37
R38
1K 1K 1K
JP3
R39
1K
104
U24
104
8-1
2V
6427539
VS
S
RX
3R
X2
RX
1
TX
3T
X2
TX
1
GN
D
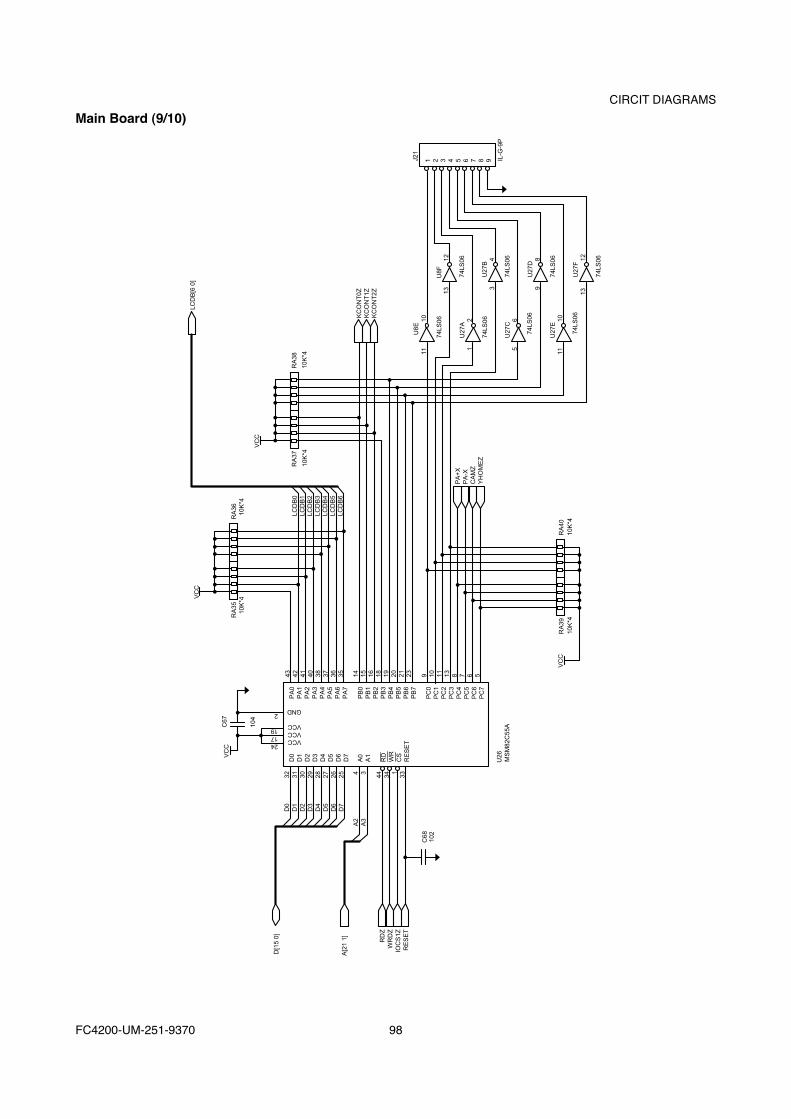
FC4200-UM-251-9370 98
CIRCIT DIAGRAMSMain Board (9/10)
A0
A1
RD
WR
CS
RE
SE
T
D[1
5 0]
D0
D1
D2
D3
D4
D5
D6
D7
A2
A3
32 31 30 29 28 27 26 25
PA
0P
A1
PA
2P
A3
PA
4P
A5
PA
6P
A7
43 42 41 40 38 37 36 35
LCD
B0
LCD
B1
LCD
B2
LCD
B3
LCD
B4
LCD
B5
LCD
B6
PA
+X
PA
-XC
AM
ZY
HO
ME
Z
KC
ON
T0Z
KC
ON
T1Z
KC
ON
T2Z
14 15 16 18 19 20 21 23
1 2 3 4 5 6 7 8 9
9 10 11 13 8 7 6 5
PB
0P
B1
PB
2P
B3
PB
4P
B5
PB
6P
B7
PC
0P
C1
PC
2P
C3
PC
4P
C5
PC
6P
C7
4 3 44 34 1 33
D0
D1
D2
D3
D4
D5
D6
D7
A[2
1 1]
VC
C
VC
C
RA
3510
K*4
VC
CR
A39
10K
*4R
A40
10K
*4
RA
3610
K*4
VC
C
LCD
B[6
0]
RA
37
10K
*4
RA
38
10K
*4
J21
IL-G
-9P
U8E
74LS
06
1110
U8F
74LS
06
1312
U27
A
74LS
06
12
U27
C
74LS
06
56
U27
E
74LS
06
1110
U27
B
74LS
06
34
U27
D
74LS
06
98
U27
F
74LS
06
1312
C67
104
241719
VCCVCCVCC
2GND
C68
U26
MS
M82
C55
A
102
RD
ZW
RD
ZIO
CS
1ZR
ES
ET
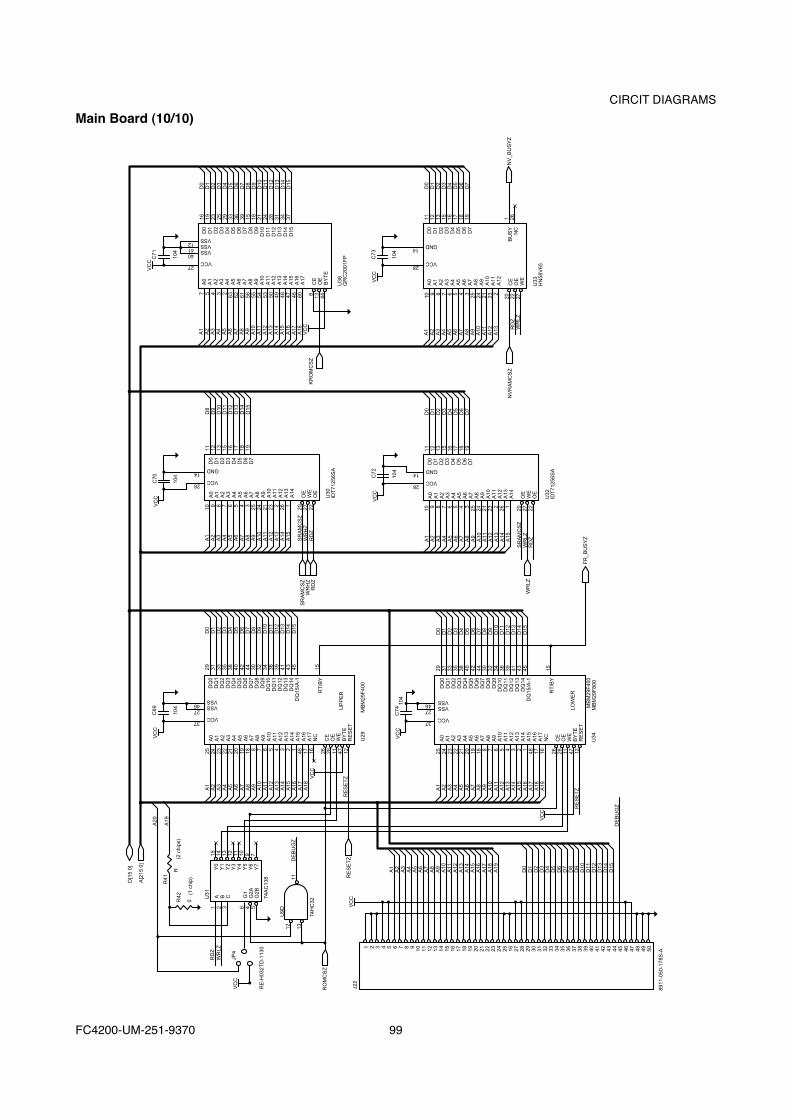
FC4200-UM-251-9370 99
CIRCIT DIAGRAMSMain Board (10/10)
D[1
5 0]
A[2
15 0
]
R41
R42
R
0(1
chi
p)
(2 c
hips
)
A20
A19
RD
ZW
RLZ
VC
C
VC
C
VC
C
VC
C
RE
SE
TZ
U34
MB
M29
F80
0
FR
_BU
SY
Z
WR
LZW
RLZ
RD
Z
SR
AM
CS
Z
LOW
ER
MB
M29
F40
0
DE
BU
GZ
C74
104
VC
C
RE
SE
TZ
RE
SE
TZ
J22
8911
-050
-178
S-A
JP4
RE
-H03
2TD
-113
0
RO
MC
SZ
U31
74A
C13
8
U9D
74H
C32
12 1311
DE
BU
GZ
A B C G1
G2A
G2B
Y0
Y1
Y2
Y3
Y4
Y5
Y6
Y7
1 2 3 4 5 6 7 8 9 10 11 12 13 14 15 16 17 18 19 20 21 22 23 24 25 16 27 28 29 30 31 32 33 34 35 36 37 38 39 40 41 42 43 44 45 46 47 48 49 50
25 24 23 22 21 20 19 18 8 7 6 5 4 3 2 1 48 17 16 26 28 11 47 12
DQ
0D
Q1
DQ
2D
Q3
DQ
4D
Q5
DQ
6D
Q7
DQ
8D
Q9
DQ
10D
Q11
DQ
12D
Q13
DQ
14D
Q15
/A-1
RT
/BY
VCC
VSSVSS
1 2 3 6 4 5
15 14 13 12 11 10 9 7
A1
A2
A3
A4
A5
A6
A7
A8
A9
A10
A11
A12
A13
A14
A15
A16
A17
A18
A19
A1
A2
A3
A4
A5
A6
A7
A8
A9
A10
A11
A12
A13
A14
A15
A16
A17
A18
A19
A0
A1
A2
A3
A4
A5
A6
A7
A8
A9
A10
A11
A12
A13
A14
A15
A16
A17
NC
CE
OE
WE
BY
TE
RE
SE
T
25 24 23 22 21 20 19 18 8 7 6 5 4 3 2 1 48 17 16 26 28 11 47 12
10 9 8 7 6 5 4 3 25 24 21 23 2 26 1 20 27 22
7 5 4 3 2 63 62 61 56 55 54 53 50 49 48 47 46 60
11 12 13 15 16 17 18 19
A1
A2
A3
A4
A5
A6
A7
A8
A9
A10
A11
A12
A13
A14
A15
A16
A17
A18
A1
A2
A3
A4
A5
A6
A7
A8
A9
A10
A11
A12
A13
A14
A15
SR
AM
CS
ZW
RH
ZR
DZ
A1
A2
A3
A4
A5
A6
A7
A8
A9
A10
A11
A12
A13
A14
A15
A16
A17
A18
10 9 8 7 6 5 4 3 25 24 21 23 2
A1
A2
A3
A4
A5
A6
A7
A8
A9
A10
A11
A12
A13
D0
D1
D2
D3
D4
D5
D6
D7
D8
D9
D10
D11
D12
D13
D14
D15
16 19 23 25 29 33 36 39 15 18 21 24 28 31 34 37
D0
D1
D2
D3
D4
D5
D6
D7
D8
D9
D10
D11
D12
D13
D14
D15
D0
D1
D2
D3
D4
D5
D6
D7
D8
D9
D10
D11
D12
D13
D14
D15
11 12 13 15 16 17 18 19
D0
D1
D2
D3
D4
D5
D6
D7
BU
SY
NC
D0
D1
D2
D3
D4
D5
D6
D7
A0
A1
A2
A3
A4
A5
A6
A7
A8
A9
A10
A11
A12
A13
A14
A15
A16
A17
NC
CE
OE
WE
BY
TE
RE
SE
T
29 31 33 35 38 40 42 44 30 32 34 36 39 41 43 45 15
D0
D1
D2
D3
D4
D5
D6
D7
D8
D9
D10
D11
D12
D13
D14
D15
37
2746
VC
CC
69
104
VCC
VSSVSS
VCC
VSSVSSVSS
VCC
GND
VCC
GND
37
2746
VC
C
SR
AM
CS
ZW
RH
ZR
DZ
U30
IDT
7125
6SA
KR
OM
CS
Z
NV
RA
MC
SZ
RD
ZW
RLZ
VC
C
VC
CC
73
104
U38
GR
C20
01F
P
C70
104
VC
CC
72
104
28
14
28
14
VC
CC
71
104
27
404112
D0
D1
D2
D3
D4
D5
D6
D7
D8
D9
D10
D11
D12
D13
D14
D15
U29
UP
PE
R
MB
M29
F40
0
DQ
0D
Q1
DQ
2D
Q3
DQ
4D
Q5
DQ
6D
Q7
DQ
8D
Q9
DQ
10D
Q11
DQ
12D
Q13
DQ
14D
Q15
/A-1
RT
/BY
29 31 33 35 38 40 42 44 30 32 34 36 39 41 43 45 15
D0
D1
D2
D3
D4
D5
D6
D7
D8
D9
D10
D11
D12
D13
D14
D15
A0
A1
A2
A3
A4
A5
A6
A7
A8
A9
A10
A11
A12
A13
A14
OE
WE
OE
10 9 8 7 6 5 4 3 25 24 21 23 2 26 1 20 27 22
11 12 13 15 16 17 18 19
A1
A2
A3
A4
A5
A6
A7
A8
A9
A10
A11
A12
A13
A14
A15
D0
D1
D2
D3
D4
D5
D6
D7
D0
D1
D2
D3
D4
D5
D6
D7
VCC
GND
U32
IDT
7125
6SA
28
14
A0
A1
A2
A3
A4
A5
A6
A7
A8
A9
A10
A11
A12
A13
A14
OE
WE
OE
A0
A1
A2
A3
A4
A5
A6
A7
A8
A9
A10
A11
A12
A13
A14
A15
A16
A17
CE
OE
BY
TE
U33
HN
58V
65
NV
_BU
SY
Z
A0
A1
A2
A3
A4
A5
A6
A7
A8
A9
A10
A11
A12
CE
OE
WE
1 2620 22 27
8 13 44
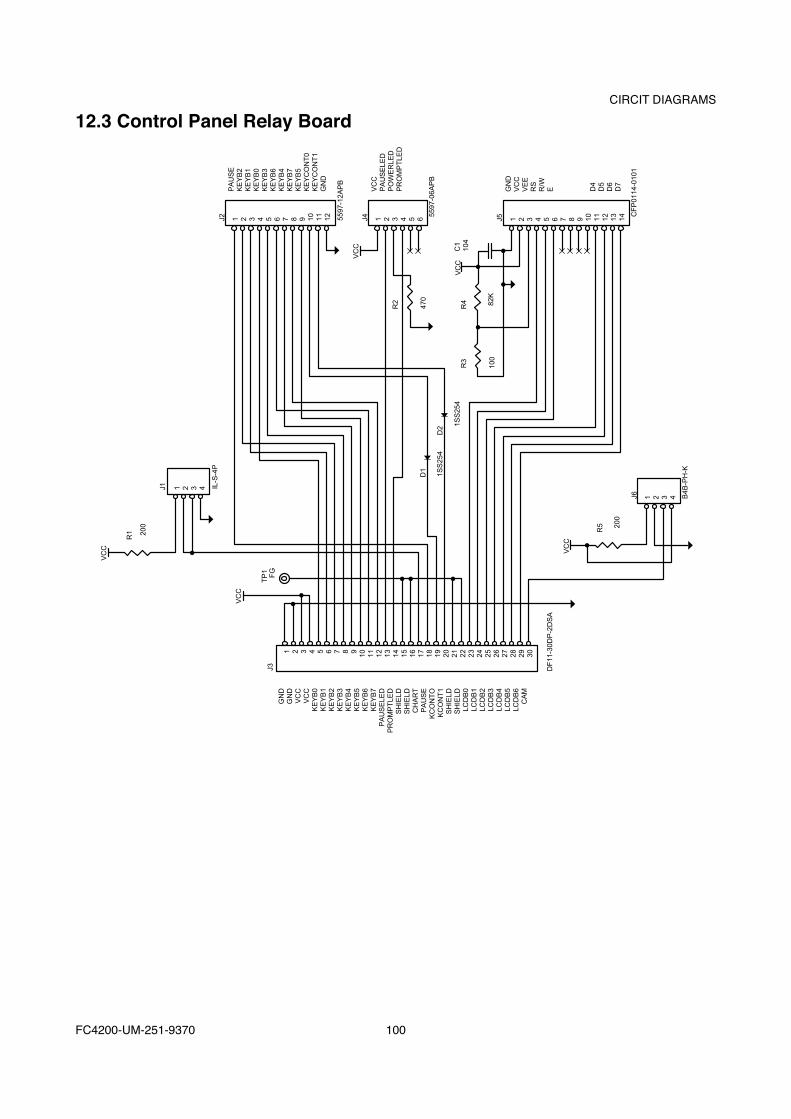
FC4200-UM-251-9370 100
CIRCIT DIAGRAMS
12.3 Control Panel Relay Board
GND
GND
VCC
VCC
KEYB0
KEYB1
KEYB2
KEYB3
KEYB4
KEYB5
KEYB6
KEYB7
PAUSELE
DPROMPTLE
DSHIELD
SHIELD
CHART
PAUSE
KCONTO
KCONT1
SHIELD
SHIELD
LCDB0
LCDB1
LCDB2
LCDB3
LCDB4
LCDB5
LCDB6
CAM
1 2 3 4 5 6 7 8 9 10 11 12 13 14 15 16 17 18 19 20 21 22 23 24 25 26 27 28 29 30
J3
VCC
IL-S-4P
1 2 3 4J1
R1
VCC
D1
D2
1SS254
1SS254
DF11-30D
P-2DSA
VCC
R5 200
J6 1 2 3 4 B4B
-PH-K
CFP0114-0101
D4
D5
D6
D7
1 2 3 4 5 6 7 8 9 10 11 12 13 14
GND
VCC
VEE
RS
R/W
E
J582K
100
R3
R4
R2
VCC
J4 1 2 3 4 5 6
5597-06A
PB
5597-12A
PB
VCC
PAUSELE
DPOWERLE
DPROMPTLE
D
J2 1 2 3 4 5 6 7 8 9 10 11 12
PAUSE
KEYB2
KEYB1
KEYB0
KEYB3
KEYB6
KEYB4
KEYB7
KEYB5
KEYCONT0
KEYCONT1
GND
470
VCC
C1
104
200
TP1
FG
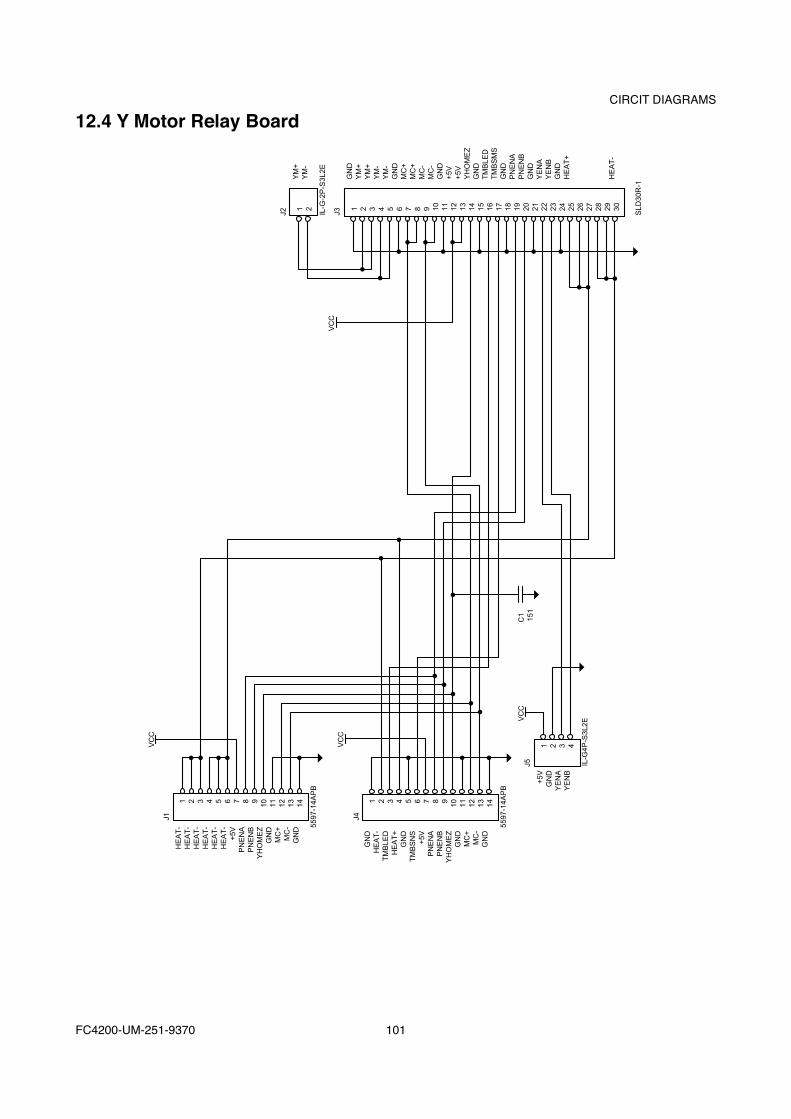
FC4200-UM-251-9370 101
CIRCIT DIAGRAMS
12.4 Y Motor Relay Board
HEAT-
HEAT-
HEAT-
HEAT-
HEAT-
HEAT-
+5V
PNENA
PNENB
YHOMEZ
GND
MC+
MC-
GND
1 2
YM+
YM-
1 2 3 4 5 6 7 8 9 10 11 12 13 14 15 16 17 18 19 20 21 22 23 24 25 26 27 28 29 30
GND
YM+
YM+
YM-
YM-
GND
MC+
MC+
MC-
MC-
GND
+5V
+5V
YHOMEZ
GND
TMBLE
DTMBSMS
GND
PNENA
PNENB
GND
YENA
YENB
GND
HEAT+
HEAT-
1 2 3 4 5 6 7 8 9 10 11 12 13 14
J1
VCC
VCC
VCC
VCC
IL-G-2P-S3L2E
J3J2
C1
151
5597-14A
PB
GND
HEAT-
TMBLE
DHEAT+
GND
TMBSNS
+5V
PNENA
PNENB
YHOMEZ
GND
MC+
MC-
GND
1 2 3 4 5 6 7 8 9 10 11 12 13 14
J4
5597-14A
PB
+5V
GND
YENA
YENB
1 2 3 4
J5 IL-G4P
-S3L2E
SLD
30R-1
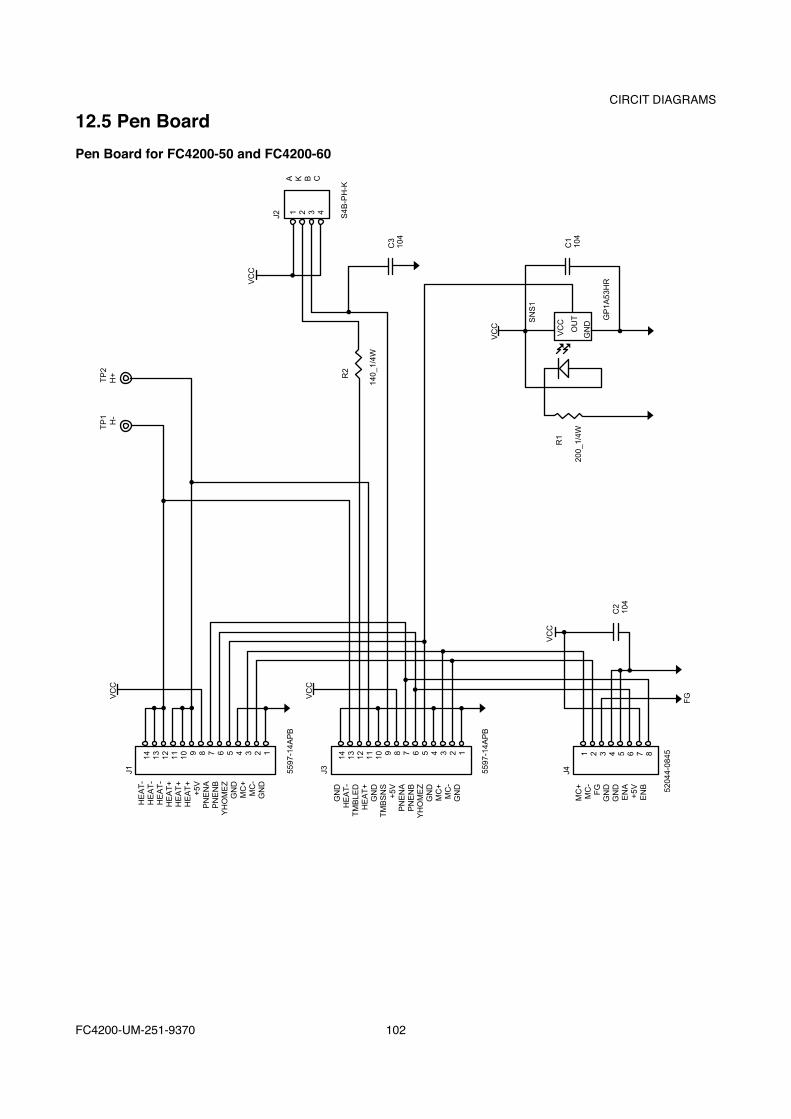
FC4200-UM-251-9370 102
CIRCIT DIAGRAMS
12.5 Pen BoardPen Board for FC4200-50 and FC4200-60
HEAT-
HEAT-
HEAT-
HEAT+
HEAT+
HEAT+
+5V
PNENA
PNENB
YHOMEZ
GND
MC+
MC-
GND
14 13 12 11 10 9 8 7 6 5 4 3 2 1
J1
VCC
VCC
5597-14A
PB
GND
HEAT-
TMBLE
DHEAT+
GND
TMBSNS
+5V
PNENA
PNENB
YHOMEZ
GND
MC+
MC-
GND
14 13 12 11 10 9 8 7 6 5 4 3 2 1
J3 5597-14A
PB
VCC
C2
104
FG
MC+
MC-
FG
GND
GND
ENA
+5V
ENB
1 2 3 4 5 6 7 8
J4
J2
52044-0845
VCC
VCC
TP1
H-
TP2
H+
VCC
C1
104
C3
S4B
-PH-K
104
A K B C
1 2 3 4
SNS1
R1
200_1/4W
R2
140_1/4W
GP1A
53HR
GND
OUT
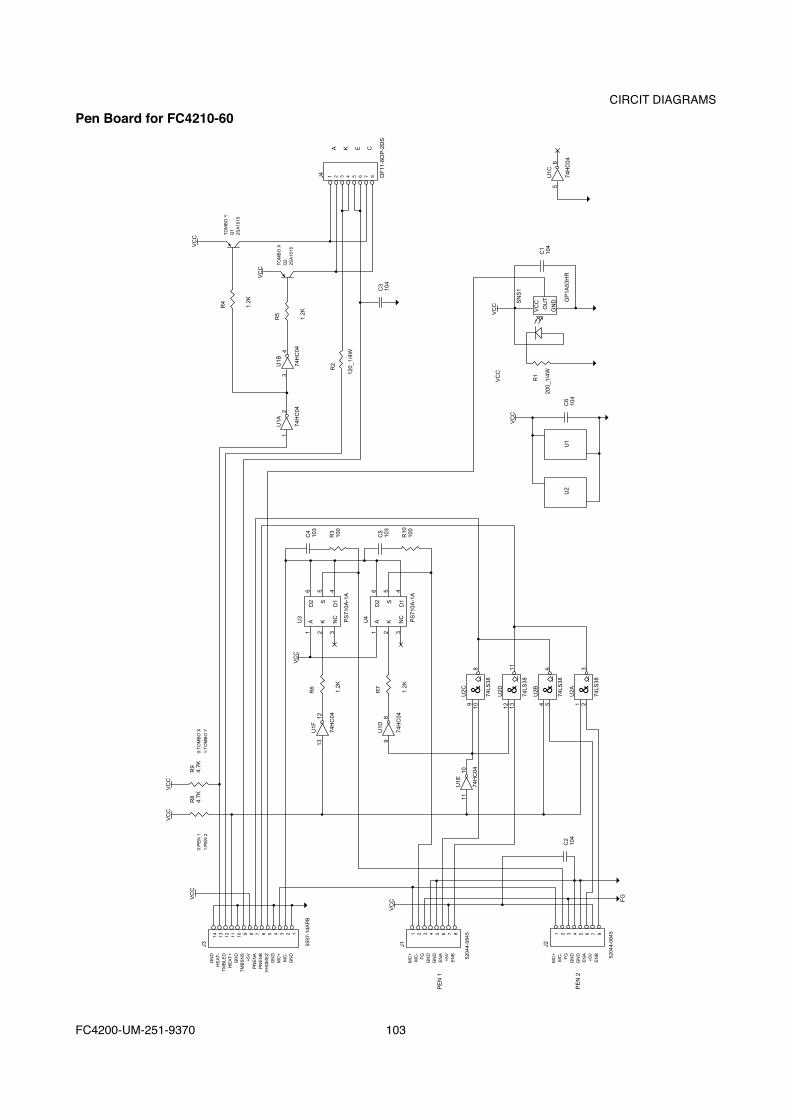
FC4200-UM-251-9370 103
CIRCIT DIAGRAMSPen Board for FC4210-60
GN
DH
EA
T-
TM
BLE
DH
EA
T+
GN
DT
MB
SN
S+
5VP
NE
NA
PN
EN
BY
HO
ME
ZG
ND
MC
+M
C-
GN
D
14 13 12 11 10 9 8 7 6 5 4 3 2 1
J3
VC
C
VC
C
R8
4.7K
1312
U1F
74H
C04
12
U1A
74H
C04
56
U1C
74H
C04
34
U1B
74H
C04
R4
J4 DF
11-8
OP
-2D
S
A K E C
1.2K
VC
C
C3
104
VC
CV
CC
U2
U1
C6
104
R1
200_
1/4W
VC
C
C1
104
SN
S1
VC
C
OU
T
GN
D GP
1A53
HR
TO
MB
O X
Q2
2SA
1015
VC
C
TO
MB
O Y
Q1
2SA
1015
R5
1.2K
R2
120_
1/4W
1110
U1E
74H
C04
9 108
&U2C
74LS
38
R6
1.2K
98
U1D
74H
C04
R7
1.2K
VC
CU
3
C4
103
R3
100
C5
103
R10
100
1 2 3
A K NC PS
710A
-1A
D2 S
D1
6 5 4
U4
1 2 3
A K NC PS
710A
-1A
D2 S
D1
6 5 4
R9
4.7K
0:P
EN
1
1:P
EN
2
0:T
OM
BO
X
1:T
OM
BO
Y
VC
C
5597
-14A
PB
MC
+M
C-
FG
GN
DG
ND
EN
A+
5VE
NB
1 2 3 4 5 6 7 8
1 2 3 4 5 6 7 8
J1
PE
N 1
VC
C
5204
4-08
45
MC
+M
C-
FG
GN
DG
ND
EN
A+
5VE
NB
1 2 3 4 5 6 7 8
J2
FG
C2
104
PE
N 2
5204
4-08
45
12 1311
&U2D
74LS
38
4 56
&U2B
74LS
38
1 23
&U2A
74LS
38
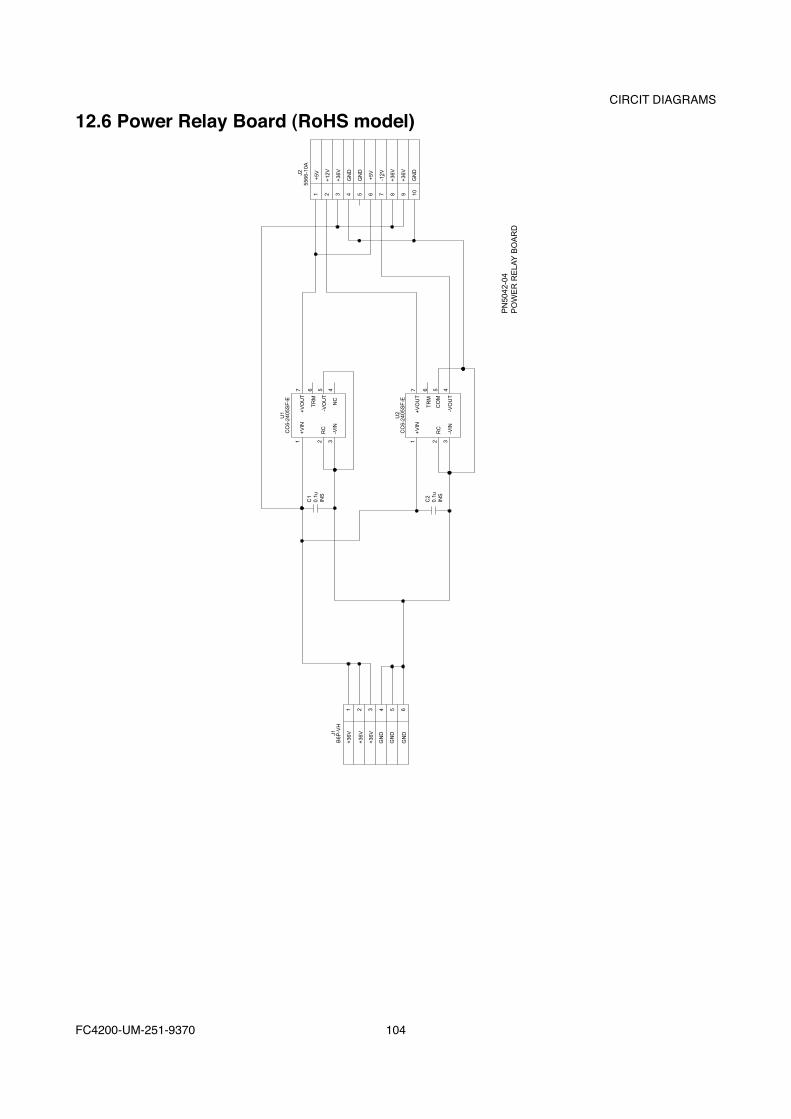
FC4200-UM-251-9370 104
CIRCIT DIAGRAMS
12.6 Power Relay Board (RoHS model)
J1
+36
V
+36
V
+36
V
GN
D
GN
D
GN
D
1 2 3 4 5 6
B6P
-VH
J2
-12V
+5V
+5V
+36
V
+36
V
+12
V
+36
V
GN
D
GN
D
GN
D
1 2 3 4 5 6 7 8 9 10
5566
-10A
U1
7 6 5 4
1 2 3
+V
IN
RC
-VIN
+V
OU
T
-VO
UT
TR
M
NC
C1
0.1u
INS
C2
0.1u
INS
CC
6-24
05S
F-E
U2
7 6 5 4
1 2 3
+V
IN
RC
-VIN
+V
OU
T
-VO
UT
TR
M
CO
M
CC
6-24
05S
F-E
PN
5042
-04
PO
WE
R R
ELA
Y B
OA
RD


