30
www.support.hitsw.com Data Replication Setup Guide Version 9.6.0.50 Software Release Date: 9/12/2019

www.support.hitsw.com
Data Replication Setup Guide Version 9.6.0.50 Software Release Date: 9/12/2019

Data Replication
Setup Guide > Data Replication > 9.6.0.50 > Page i
Document History Version Author Date Reviewer Date Approver Date Comments
1 JHLorenzin 4/30/14 VFarruggio 5/5/14 MSandrini 5/5/14 2 JHLorenzin 10/12/16 ALaspertini 10/18/16 VFarruggio 10/18/16 3 JHLorenzin 8/2/18 ALaspertini VFarruggio 4 JHLorenzin 8/12/19 ALaspertini VFarruggio
Data Replication
Setup Guide > Data Replication > 9.6.0.50 > Page ii
Table of Contents Setup Summary ........................................................................................................................................................ 1
Download and Install Syniti DR................................................................................................................................ 2
Source and Target Database Setup Guidelines ...................................................................................................... 2
Source Database Guidelines ................................................................................................................................. 3
Target Database Guidelines .................................................................................................................................. 8
Determine Replication Strategy .............................................................................................................................. 8
Log Reader ............................................................................................................................................................... 8
Log Server Agent ..................................................................................................................................................... 8
Triggers .................................................................................................................................................................... 10
Log Reader API ....................................................................................................................................................... 10
Set up the DBMoto Environment ........................................................................................................................... 10
1. Set Up Source Database Connection ................................................................................................................... 11
2. Enable Transactional Replication ........................................................................................................................ 14
3. Set Up Target Database Connection .................................................................................................................. 15
4. Create a Target Table ........................................................................................................................................... 16
5. Define the Replication .......................................................................................................................................... 19
6. Run the Replication .............................................................................................................................................. 23
Replicating Data to Analytics Databases and Big Data Targets ......................................................................... 23
Data Replication
Copyright © 2019 HiT Software, Inc d/b/a Syniti and/or its affiliates. All rights reserved. This document contains confidential and proprietary information and reproduction is prohibited unless authorized by Syniti. Names appearing within the product manuals may be trademarks of their respective owners.
Setup Guide > Data Replication > 9.6.0.50 > Page 1 of 27
This guide describes how to set up your Syniti Data Replication environment to replicate data. Syniti DR allows you to replicate data in three different ways, or modes:
• Refresh A one-time complete replication from source to target table, according to replication settings and scripts. You can control the timing of the replication, identify the columns to be replicated and add scripts to transform data during replication.
• One-way mirroring A continuous update of a replicated table based on changes to the source database that have been recorded in the database server log. Typically, this involves an initial refresh operation, as described above, to set up the target table. Then you can define the replication settings to check the transaction log on the source database at regular intervals. Any changes found in the log would be applied to the target database.
• Synchronization (two-way mirroring) Syncronization is appropriate when changes occur in both tables involved in the replication. Your replication settings ensure that both tables maintain the same state by checking the logs on each table and performing updates on each table as needed.
This guide describes the setup process for one-way mirroring and synchronization. Please also obtain the Syniti DR Setup Notes for your database from the Help Center. The setup process for a refresh replication can usually be completed using the Syniti DR wizards without additional documentation because it does not involve access to the database log.
Setup Summary This section provides a summary of all the steps required for setting up and using Syniti DR. Use the link for each step for more information.
User Permissions
(See Setup Notes in the Help Center)
Permissions required for mirroring from your source database. Check the Setup Notes for your source database in the Help Center.
• For replication setup and execution: permission to select catalogs, tables
• For replication setup only: login with write permissions and possibly other privileges;
• For replication setup and execution: permission to access the log/journal.
Source Database System Settings
(See Source and Target Database Setup Guidelines and Setup Notes in the Help Center)
Settings required on either the source database or the system where the database is running. Review the summary for all databases in this document, but also check the Setup Notes for your source database in the Help Center.

Data Replication
Copyright © 2019 HiT Software, Inc d/b/a Syniti and/or its affiliates. All rights reserved. This document contains confidential and proprietary information and reproduction is prohibited unless authorized by Syniti. Names appearing within the product manuals may be trademarks of their respective owners.
Setup Guide > Data Replication > 9.6.0.50 > Page 2 of 27
Download and Install Syniti DR
(See Download and Install Syniti DR below)
Download the latest version of Syniti DR.
• If you are new to Syniti DR, download by filling out the form in the Syniti web site.
• If you already have an installed copy of Syniti DR, download by submitting a request to the support team in the Help Center.
Replication Strategy
(See Determine Replication Strategy)
Based on your source database, consider which replication option best suits your needs:
• Refresh
• Mirroring or Change Data Capture
• Synchronization
Syniti DR Setup
(See Set up the Syniti DR Environment below and Setup Notes in the Help Center)
In the Syniti DR Management Center:
1. In the Metadata Explorer, create a source connection in the Add Source Connection wizard.
2. At the end of the wizard, choose the option to Enable Transactional Replication.
In the Enable Transactional Replication wizard, set up access to the database log according to instructions in the Setup Notes for your database. (Setup notes are available in the Help Center under Documentation.)
3. In the Metadata Explorer, create a target connection in the Add Target Connection wizard.
4. Create one or more replications using the Create Replication wizard or the Multiple Replications wizard.
5. Run the replication(s).
Download and Install Syniti DR 1. On the system where you plan to install Syniti DR, make sure that you are running Microsoft .NET
Framework 4.6 or higher.
2. Download Syniti DR as follows:
• If you are new to Syniti DR, download by filling out the form in the BackOffice Associates web site.
• If you already have an installed copy of Syniti DR, download by submitting a request to the support team in the Help Center. Be sure to put Syniti DR Download in the subject line.
3. If using the registration form, be sure to put an email address where you can easily retrieve the registration key.
4. Unzip the downloaded file.
5. Once you have received the registration key via email, install the product using setup.exe.
6. Enter the license key information during installation.
Source and Target Database Setup Guidelines Before attempting to run a replication, check that your source and target databases are set up to work with Syniti DR. In most cases, you will need to make no changes or very minor changes in your source

Data Replication
Copyright © 2019 HiT Software, Inc d/b/a Syniti and/or its affiliates. All rights reserved. This document contains confidential and proprietary information and reproduction is prohibited unless authorized by Syniti. Names appearing within the product manuals may be trademarks of their respective owners.
Setup Guide > Data Replication > 9.6.0.50 > Page 3 of 27
database setup, such as introducing a login specific to Syniti DR users or setting up a specific file on the database server. However, if you skip the recommended steps, your replication may not work as expected.
Source Database Guidelines NOTE: If you are setting up synchronization between two or more databases, all databases are effectively "source" databases. Look for instructions on all databases in this section. You do not need to go to the section on Target Database Guidelines.
RDBMS RDBMS Setup Summary Links to Details
IBM Db2 for i (iSeries/AS400)
Mirroring Source/Synchronization:
• Set user ID authorities appropriately (DBMS tools)
• Make sure tables are journaled and receivers are set up appropriately (DBMS tools)
• Create a library on Db2 (Syniti DR Management Center)
Refresh: No changes needed
Help Center Database Access Provider List (.NET and ODBC)
Setup Notes for IBM Db2 for i Transactional Replications
IBM Db2 LUW (via transaction log)
Mirroring Source/Synchronization:
• DBADM or SYSADM Login ID.
• Db2 Log settings as follows: LOGRETAIN: Recovery LOGARCHMETH1:LOGRETAIN or DISK
• Copy file from <DBMotoInstallDir>/ServerFiles/DB2UDB to <Db2 Home Directory>/function on Db2 server.
• Rename copied file to db2udbreadlog02.dll (db2udbreadlog02 for LINUX/AIX)
Refresh: No changes needed
Help Center Database Access Provider List (.NET and ODBC)
Setup Notes for IBM Db2 LUW Transactional Replications

Data Replication
Copyright © 2019 HiT Software, Inc d/b/a Syniti and/or its affiliates. All rights reserved. This document contains confidential and proprietary information and reproduction is prohibited unless authorized by Syniti. Names appearing within the product manuals may be trademarks of their respective owners.
Setup Guide > Data Replication > 9.6.0.50 > Page 4 of 27
IBM Db2 LUW and z/OS (via triggers)
Mirroring Source/Synchronization:
• Use Db2 UDB v. 7.2 or higher, or Db2 for OS390 v6 or higher
• Obtain Package creation privileges for the first connection (DBMS tools)
• Set security mechanism in Syniti DR (Management Center)
Refresh: No changes needed
Help Center Database Access Provider List (.NET and ODBC)
Setup Notes for Trigger-based Transactional Replications
IBM Informix (via transaction log)
Mirroring Source/Synchronization:
• Use Informix v 11.5 FC3 or above
• Execute the script syscdcv1.sql on the server
• Database should have logging enabled
• Syniti DR user should have CONNECT and DBA privilegesto source database and syscdcv1 database
• Install and test the latest Informix Client SDK (currently version 3.70) with the ESQL option and the .NET Data Provider
Refresh: No changes needed
Help Center Database Access Provider List (.NET and ODBC)
Setup Notes for IBM Informix Transactional Replications
IBM Informix (via triggers)
Mirroring Source/Synchronization:
• Create or assign tables for Master Table and Log Table (DBMS tools)
• Assign a tablespace for the Master table and Log Tables (DBMS tools)
Refresh: No changes needed
Help Center Database Access Provider List (.NET and ODBC)
Setup Notes for Trigger-based Transactional Replications
IBM PureData (Netezza)
Mirroring Source:
• Set user ID authorities appropriately (DBMS tools). CREATE TABLE authority needed for setup
Refresh: No changes needed
Help Center Database Access Provider List (.NET and ODBC)
Setup Notes for IBM PureData Transactional Replications
Data Replication
Copyright © 2019 HiT Software, Inc d/b/a Syniti and/or its affiliates. All rights reserved. This document contains confidential and proprietary information and reproduction is prohibited unless authorized by Syniti. Names appearing within the product manuals may be trademarks of their respective owners.
Setup Guide > Data Replication > 9.6.0.50 > Page 5 of 27
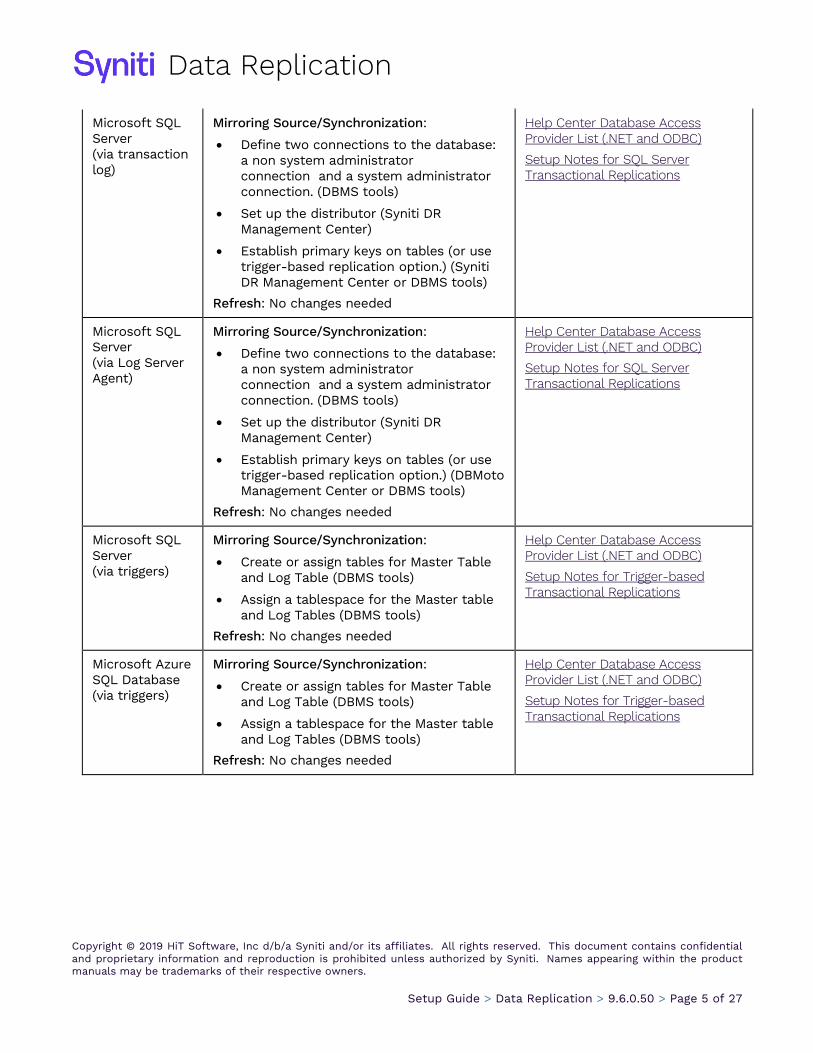
Microsoft SQL Server (via transaction log)
Mirroring Source/Synchronization:
• Define two connections to the database: a non system administrator connection and a system administrator connection. (DBMS tools)
• Set up the distributor (Syniti DR Management Center)
• Establish primary keys on tables (or use trigger-based replication option.) (Syniti DR Management Center or DBMS tools)
Refresh: No changes needed
Help Center Database Access Provider List (.NET and ODBC)
Setup Notes for SQL Server Transactional Replications
Microsoft SQL Server (via Log Server Agent)
Mirroring Source/Synchronization:
• Define two connections to the database: a non system administrator connection and a system administrator connection. (DBMS tools)
• Set up the distributor (Syniti DR Management Center)
• Establish primary keys on tables (or use trigger-based replication option.) (DBMoto Management Center or DBMS tools)
Refresh: No changes needed
Help Center Database Access Provider List (.NET and ODBC)
Setup Notes for SQL Server Transactional Replications
Microsoft SQL Server (via triggers)
Mirroring Source/Synchronization:
• Create or assign tables for Master Table and Log Table (DBMS tools)
• Assign a tablespace for the Master table and Log Tables (DBMS tools)
Refresh: No changes needed
Help Center Database Access Provider List (.NET and ODBC)
Setup Notes for Trigger-based Transactional Replications
Microsoft Azure SQL Database (via triggers)
Mirroring Source/Synchronization:
• Create or assign tables for Master Table and Log Table (DBMS tools)
• Assign a tablespace for the Master table and Log Tables (DBMS tools)
Refresh: No changes needed
Help Center Database Access Provider List (.NET and ODBC)
Setup Notes for Trigger-based Transactional Replications
Data Replication
Copyright © 2019 HiT Software, Inc d/b/a Syniti and/or its affiliates. All rights reserved. This document contains confidential and proprietary information and reproduction is prohibited unless authorized by Syniti. Names appearing within the product manuals may be trademarks of their respective owners.
Setup Guide > Data Replication > 9.6.0.50 > Page 6 of 27
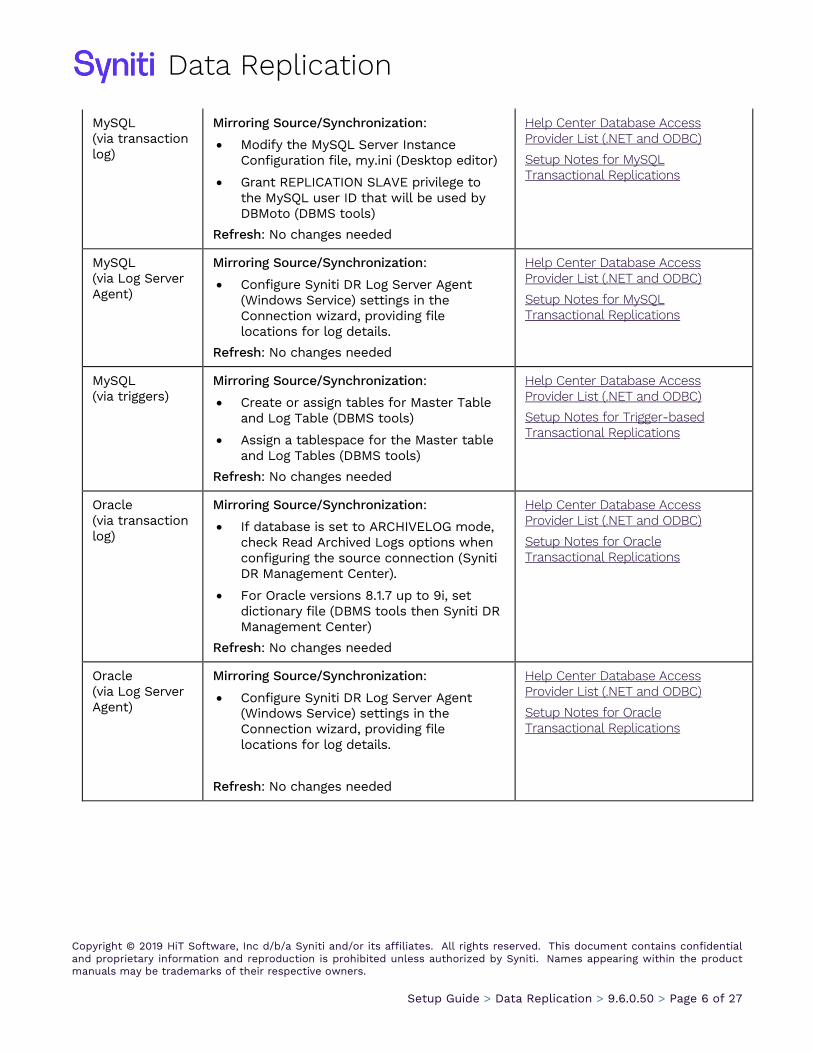
MySQL (via transaction log)
Mirroring Source/Synchronization:
• Modify the MySQL Server Instance Configuration file, my.ini (Desktop editor)
• Grant REPLICATION SLAVE privilege to the MySQL user ID that will be used by DBMoto (DBMS tools)
Refresh: No changes needed
Help Center Database Access Provider List (.NET and ODBC)
Setup Notes for MySQL Transactional Replications
MySQL (via Log Server Agent)
Mirroring Source/Synchronization:
• Configure Syniti DR Log Server Agent (Windows Service) settings in the Connection wizard, providing file locations for log details.
Refresh: No changes needed
Help Center Database Access Provider List (.NET and ODBC)
Setup Notes for MySQL Transactional Replications
MySQL (via triggers)
Mirroring Source/Synchronization:
• Create or assign tables for Master Table and Log Table (DBMS tools)
• Assign a tablespace for the Master table and Log Tables (DBMS tools)
Refresh: No changes needed
Help Center Database Access Provider List (.NET and ODBC)
Setup Notes for Trigger-based Transactional Replications
Oracle (via transaction log)
Mirroring Source/Synchronization:
• If database is set to ARCHIVELOG mode, check Read Archived Logs options when configuring the source connection (Syniti DR Management Center).
• For Oracle versions 8.1.7 up to 9i, set dictionary file (DBMS tools then Syniti DR Management Center)
Refresh: No changes needed
Help Center Database Access Provider List (.NET and ODBC)
Setup Notes for Oracle Transactional Replications
Oracle (via Log Server Agent)
Mirroring Source/Synchronization:
• Configure Syniti DR Log Server Agent (Windows Service) settings in the Connection wizard, providing file locations for log details.
Refresh: No changes needed
Help Center Database Access Provider List (.NET and ODBC)
Setup Notes for Oracle Transactional Replications
Data Replication
Copyright © 2019 HiT Software, Inc d/b/a Syniti and/or its affiliates. All rights reserved. This document contains confidential and proprietary information and reproduction is prohibited unless authorized by Syniti. Names appearing within the product manuals may be trademarks of their respective owners.
Setup Guide > Data Replication > 9.6.0.50 > Page 7 of 27
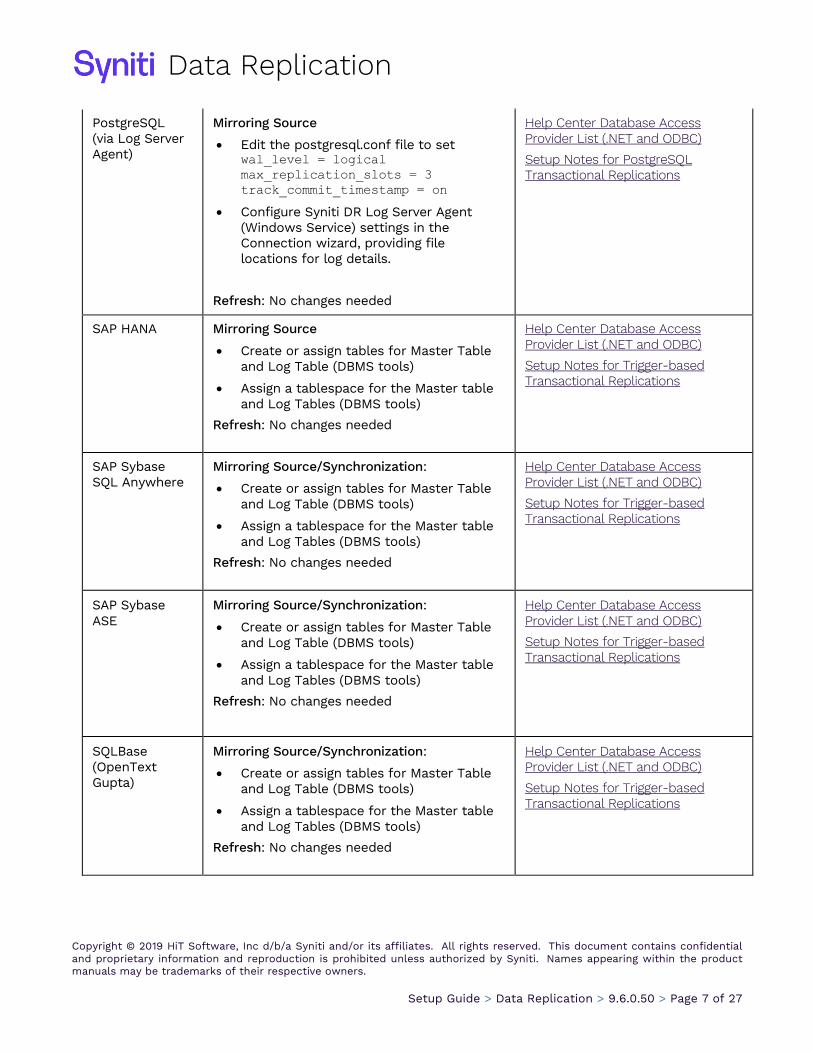
PostgreSQL (via Log Server Agent)
Mirroring Source
• Edit the postgresql.conf file to set wal_level = logical
max_replication_slots = 3
track_commit_timestamp = on
• Configure Syniti DR Log Server Agent (Windows Service) settings in the Connection wizard, providing file locations for log details.
Refresh: No changes needed
Help Center Database Access Provider List (.NET and ODBC)
Setup Notes for PostgreSQL Transactional Replications
SAP HANA Mirroring Source
• Create or assign tables for Master Table and Log Table (DBMS tools)
• Assign a tablespace for the Master table and Log Tables (DBMS tools)
Refresh: No changes needed
Help Center Database Access Provider List (.NET and ODBC)
Setup Notes for Trigger-based Transactional Replications
SAP Sybase SQL Anywhere
Mirroring Source/Synchronization:
• Create or assign tables for Master Table and Log Table (DBMS tools)
• Assign a tablespace for the Master table and Log Tables (DBMS tools)
Refresh: No changes needed
Help Center Database Access Provider List (.NET and ODBC)
Setup Notes for Trigger-based Transactional Replications
SAP Sybase ASE
Mirroring Source/Synchronization:
• Create or assign tables for Master Table and Log Table (DBMS tools)
• Assign a tablespace for the Master table and Log Tables (DBMS tools)
Refresh: No changes needed
Help Center Database Access Provider List (.NET and ODBC)
Setup Notes for Trigger-based Transactional Replications
SQLBase (OpenText Gupta)
Mirroring Source/Synchronization:
• Create or assign tables for Master Table and Log Table (DBMS tools)
• Assign a tablespace for the Master table and Log Tables (DBMS tools)
Refresh: No changes needed
Help Center Database Access Provider List (.NET and ODBC)
Setup Notes for Trigger-based Transactional Replications

Data Replication
Copyright © 2019 HiT Software, Inc d/b/a Syniti and/or its affiliates. All rights reserved. This document contains confidential and proprietary information and reproduction is prohibited unless authorized by Syniti. Names appearing within the product manuals may be trademarks of their respective owners.
Setup Guide > Data Replication > 9.6.0.50 > Page 8 of 27
Target Database Guidelines NOTE: If you are setting up synchronization between two databases, both databases are effectively "source" databases. Look for instructions on both databases in the Source Database Guidelines section.
For mirroring and refresh replications, no special setup steps are needed for target databases (including IBM PureData, Teradata, Actian Vector and Vertica), other than checking that you are using a Supported Data Provider/Version (.NET, OLE DB and ODBC.) See the section on Replicating Data to Analytics Databases for more information. For replication to Hadoop, the target is a file.
SAP HANA and SAP Sybase IQ Targets
For mirroring and refresh replications to SAP HANA and SAP Sybase IQ targets:
• Set the FTP Server, FTP Port, FTP User, FTP Password and Import Path properties in the Connection Properties dialog.
• For an SAP Sybase IQ target, enable the allow_read_client_file and allow_write_client_file options of the Sybase IQ 15.0 server. See http://infocenter.sybase.com/help/index.jsp?topic=/com.sybase.infocenter.dc00608.0480/html/etl_ug/BABEJIGI.htm
Determine Replication Strategy Syniti DR allows you to replicate data in three different ways, or modes:
• Refresh A one-time complete replication from source to target table, according to replication settings and scripts. You can control the timing of the replication, identify the columns to be replicated and add scripts to transform data during replication. (Refresh replications are not covered in this guide.)
• One-way mirroring A continuous update of a replicated table based on changes to the source database that have been recorded in the database server log. Typically, this involves an initial refresh operation, as described above, to set up the target table. Then you can define the replication settings to check the transaction log on the source database at regular intervals. Any changes found in the log would be applied to the target database. Depending on the source database, available options for identifying data changes are Log Reader, Log Server Agent and Triggers
• Synchronization (two-way mirroring) Syncronization is appropriate when changes occur in both tables involved in the replication. Your replication settings ensure that both tables maintain the same state by checking the logs on each table and performing updates on each table as needed.
The Enable Transactional Replication wizard allows you to configure access to data changes on a source database (for mirroring and synchronization) or a target database (for synchronization). Depending on the source database, available options for identifying data changes are:
Log Reader Reads the native database transaction log using a Syniti DR reader thread for each replication. This option is the default choice and works well if you have a limited number of replications and do not want to install additional services on the system that is running the Syniti DR Server Agent component.
Log Server Agent Creates a Windows service on the system running the Syniti DR Server Agent that makes only a single connection to the database to read the binary log for all replications in a source connection. The service autonomously reads the native database transaction log and writes all changes from the tables being
Data Replication
Copyright © 2019 HiT Software, Inc d/b/a Syniti and/or its affiliates. All rights reserved. This document contains confidential and proprietary information and reproduction is prohibited unless authorized by Syniti. Names appearing within the product manuals may be trademarks of their respective owners.
Setup Guide > Data Replication > 9.6.0.50 > Page 9 of 27
replicated into intermediate binary log files (a Syniti DR proprietary format) in a specified folder. The Syniti DR Replication Agent reads the changes from the intermediate binary log files.
Choose this option if you plan to add many replications and you need a scalable solution that optimizes access to the native database transaction log.
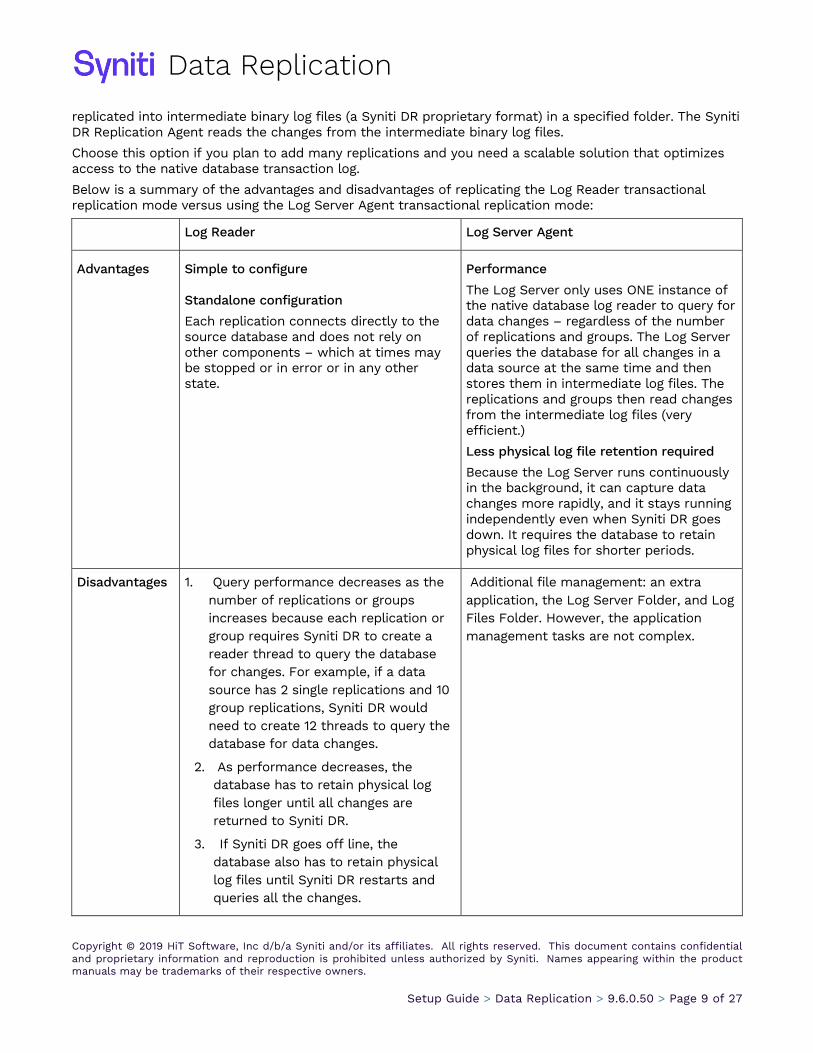
Below is a summary of the advantages and disadvantages of replicating the Log Reader transactional replication mode versus using the Log Server Agent transactional replication mode:
Log Reader Log Server Agent
Advantages Simple to configure Standalone configuration
Each replication connects directly to the source database and does not rely on other components – which at times may be stopped or in error or in any other state.
Performance
The Log Server only uses ONE instance of the native database log reader to query for data changes – regardless of the number of replications and groups. The Log Server queries the database for all changes in a data source at the same time and then stores them in intermediate log files. The replications and groups then read changes from the intermediate log files (very efficient.)
Less physical log file retention required
Because the Log Server runs continuously in the background, it can capture data changes more rapidly, and it stays running independently even when Syniti DR goes down. It requires the database to retain physical log files for shorter periods.
Disadvantages 1. Query performance decreases as the number of replications or groups increases because each replication or group requires Syniti DR to create a reader thread to query the database for changes. For example, if a data source has 2 single replications and 10 group replications, Syniti DR would need to create 12 threads to query the database for data changes.
2. As performance decreases, the database has to retain physical log files longer until all changes are returned to Syniti DR.
3. If Syniti DR goes off line, the database also has to retain physical log files until Syniti DR restarts and queries all the changes.
Additional file management: an extra application, the Log Server Folder, and Log Files Folder. However, the application management tasks are not complex.

Data Replication
Copyright © 2019 HiT Software, Inc d/b/a Syniti and/or its affiliates. All rights reserved. This document contains confidential and proprietary information and reproduction is prohibited unless authorized by Syniti. Names appearing within the product manuals may be trademarks of their respective owners.
Setup Guide > Data Replication > 9.6.0.50 > Page 10 of 27
Triggers
Creates a trigger on the database for each replication to log data from committed transactions. This option is useful when neither the Log Reader or the Log Server Agent meet the needs of your environment. For example, use triggers when:
• There are no primary keys and the source is Microsoft SQL Server.
• All column data (before and after image) is needed. Some standard log readers only return record changed values
• Performance is better because only relevant information is logged and DBMoto does not read the entire database log
• The source database is MySQL versions prior to 5.1.5 or you are preforming MySQL synchronization replications
Log Reader API This option is available only when replicating from IBM Db2 for i, and is specifically designed for replications that include Large Object Binaries.
Set up the DBMoto Environment 1. Check that the user ID you are planning to use has sufficient permissions to complete all operations
in Syniti DR. The user ID should have permissions to connect, select tables, insert/update/delete records, access journals and so on. For complete details, see the Syniti DR Setup Notes for your database in the Help Center.
2. Start the Syniti DR Management Center. Syniti DR provides a default database (Microsoft SQL Server CE) for your Syniti DR metadata, all the information that Syniti DR needs to store about your replication setup.

Data Replication
Copyright © 2019 HiT Software, Inc d/b/a Syniti and/or its affiliates. All rights reserved. This document contains confidential and proprietary information and reproduction is prohibited unless authorized by Syniti. Names appearing within the product manuals may be trademarks of their respective owners.
Setup Guide > Data Replication > 9.6.0.50 > Page 11 of 27
1. Set Up Source Database Connection 1. In the Metadata Explorer, expand the metadata node to view the Sources and Targets nodes.
2. Select the Sources node.
3. From the right mouse button menu, choose Add New Connection.
4. In the Add Source Connection wizard, follow steps to add a connection string and test the connection to the database.

Data Replication
Copyright © 2019 HiT Software, Inc d/b/a Syniti and/or its affiliates. All rights reserved. This document contains confidential and proprietary information and reproduction is prohibited unless authorized by Syniti. Names appearing within the product manuals may be trademarks of their respective owners.
Setup Guide > Data Replication > 9.6.0.50 > Page 12 of 27
• Check the Supported Provider List in the Help Center before entering a value in the Assembly field.
• Check the Setup Notes for your source database in the Help Center. Add Source Connection Wizard section.
In the Set Connection String screen, edit at least the Required connection properties by clicking in the property value field and typing a new value. The Data Source field should contain the IP address of your database server. For Synchronization Replications: The login/user ID that you provide must be unique to Syniti DR. It should not be used for any transactions occurring in either database involved in the synchronization. Syniti DR does not replicate transactions by the user you specify in this connection. This user ID is used by Syniti DR during synchronization to read the database logs and perform the synchronization operations. Therefore, any transactions found in the logs with this user ID are not replicated as part of the synchronization data. The list of Optional properties for .NET and OLE DB providers contains the most commonly used properties for the providers. Edit these as needed. Note that some properties are displayed with default values (no bold text.) Any values that you add or edit are displayed in bold text. Check the documentation for your provider for a complete list of properties. You can set the value of the ExtendedProperties property to define additional property-value pairs. The syntax for defining property-value pairs is: prop1=val1;prop2=val2;.... Click Edit to open a text entry window where you can paste or type a connection string for your provider. This is offered as an alternative to the Connection Properties grid, but should be used with great care because an error in the connection string can cause a connection to fail or to have unexpected properties. This window displays any connection information that you have already
Data Replication
Copyright © 2019 HiT Software, Inc d/b/a Syniti and/or its affiliates. All rights reserved. This document contains confidential and proprietary information and reproduction is prohibited unless authorized by Syniti. Names appearing within the product manuals may be trademarks of their respective owners.
Setup Guide > Data Replication > 9.6.0.50 > Page 13 of 27
entered in connection string format. Note that default values are not displayed as part of the connection string. Test Click Test to make sure that the connection correctly opens a database connection.
5. Click Next to continue.
6. In the Select Tables screen, choose the tables that you plan to replicate.
7. In the Select Tables screen, choose one or more objects from the tree to associate with the source connection. Objects include tables, views and aliases. When creating a replication, you will be able to select an object for replication from those that you have chosen in this wizard. If you create multiple replications, you can select an object for each replication that you are defining. Use the Select All Tables and Deselect All Tables buttons to work with multiple tables. Use the Hide System Tables checkbox to limit the number of tables displayed.
Select a database owner/schema, then click this button to check all tables under the owner/schema.
Select a database owner/schema, then click this button to uncheck all tables under the owner/schema.
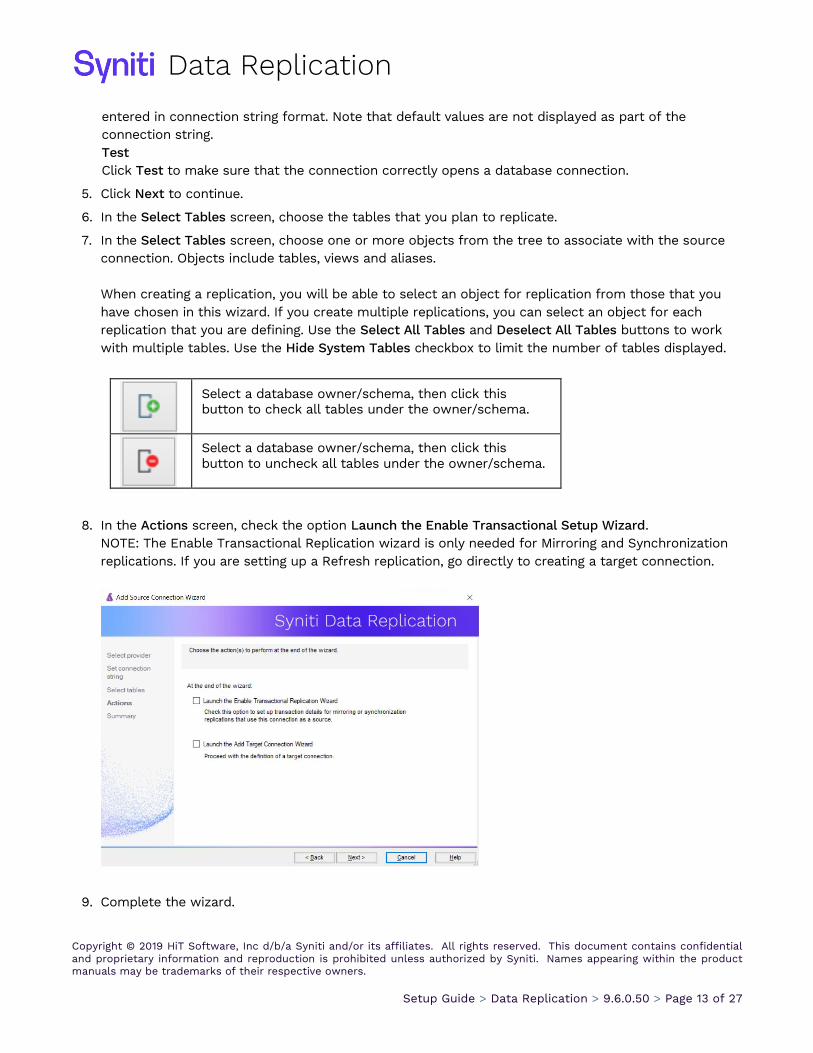
8. In the Actions screen, check the option Launch the Enable Transactional Setup Wizard. NOTE: The Enable Transactional Replication wizard is only needed for Mirroring and Synchronization replications. If you are setting up a Refresh replication, go directly to creating a target connection.
9. Complete the wizard.

Data Replication
Copyright © 2019 HiT Software, Inc d/b/a Syniti and/or its affiliates. All rights reserved. This document contains confidential and proprietary information and reproduction is prohibited unless authorized by Syniti. Names appearing within the product manuals may be trademarks of their respective owners.
Setup Guide > Data Replication > 9.6.0.50 > Page 14 of 27
2. Enable Transactional Replication This section assumes you have checked the Source Connection wizard option to launch the Enable Transactional Replication wizard. To open the wizard from the Management Center, choose the connection in the Metadata Explorer, then right-click to choose Transactonal Setup > Enable... NOTE: The Enable Transactional Replication wizard is only needed for Mirroring and Synchronization replications. If you are setting up a Refresh replication, go directly to creating a target connection.
In the Enable Transactional Replication wizard:
1. Select the type of transactional replication to use. The options depend on the source database and can include log reader, log server agent, triggers, plus log reader API (for IBM Db2 for i only.)
2. Click Next to enter the log settings. The fields and appropriate values depend on the database and log type.
Check the Setup Notes for your source database in the Help Center. Enable Transactional Replication Wizard section.
3. All Log Server Agent setups require the following Agent Settings to establish details for the Windows service and log files:
Log Files Folder An existing folder where all the intermediate binary logs files are written. The folder is also used to contain trace files. Prefix A prefix for all files created in the folder. This provides easy identification and management of files associated with your connection. The primary purpose for the prefix is to support the case when you configure more than one connection to use the same folder. In general, however, it is advisable to use different folders for different connections.
Data Replication
Copyright © 2019 HiT Software, Inc d/b/a Syniti and/or its affiliates. All rights reserved. This document contains confidential and proprietary information and reproduction is prohibited unless authorized by Syniti. Names appearing within the product manuals may be trademarks of their respective owners.
Setup Guide > Data Replication > 9.6.0.50 > Page 15 of 27
Log File Size The maximum size of each binary log file in megabytes. Keep Max Files The maximum number of binary log files to keep. Combined with the log file size, this number needs to be large enough to make sure that all the files are read by Syniti DR before they get deleted. Trace Unchecked by default. When checked, enables tracing for diagnostics and problem reporting. Trace files are saved in the Log Server folder. Windows Service Name
Prefix: This value is provided and cannot be changed. It allows you to easily identify the service in the Microsoft Windows Services tool.
Name: Specify a unique name for the Windows service. Each connection runs its own instance of the DBMoto Log Server as a Windows service.
Start service after completing the wizard: When checked, starts the service automatically after you click Finish to complete the wizard.
4. Click Next to verify your settings against the source connection to the database. If any information is missing, you will not be able to proceed.
5. In the Actions screen, check the option to launch the Add Target Connection wizard.
6. Click Next to review your changes.
7. Click Finish to complete the wizard.
The source connection is now set up for transactional replications.
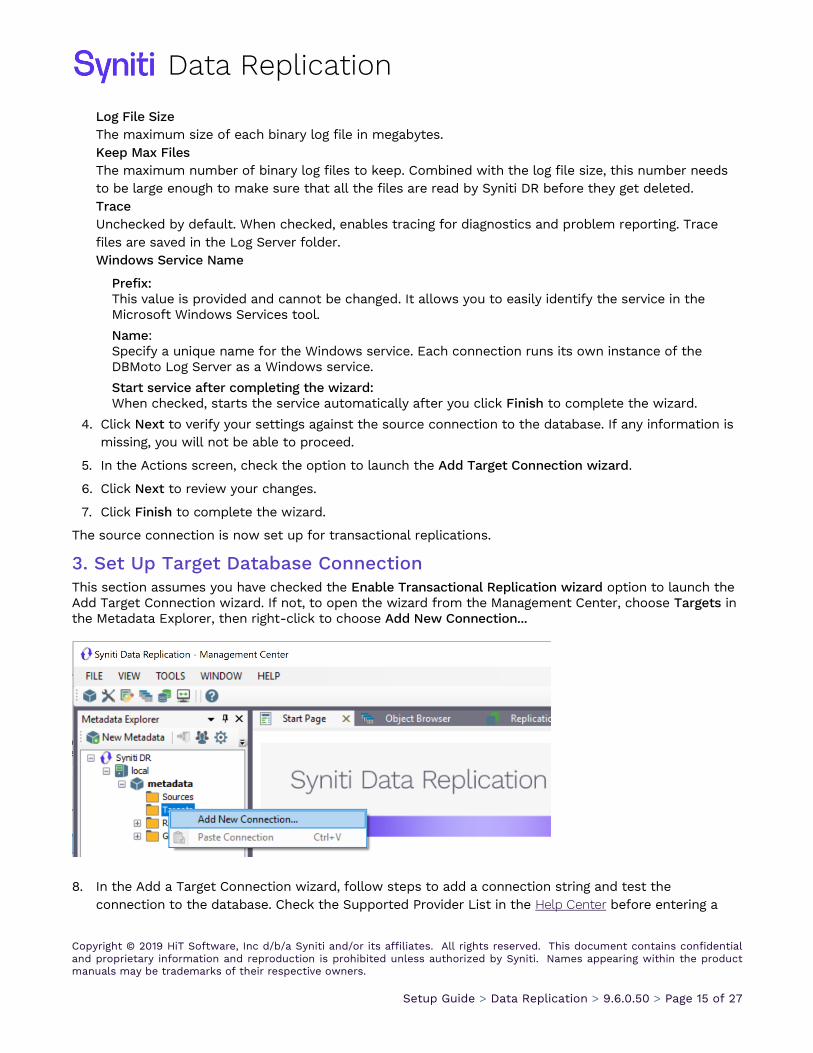
3. Set Up Target Database Connection This section assumes you have checked the Enable Transactional Replication wizard option to launch the Add Target Connection wizard. If not, to open the wizard from the Management Center, choose Targets in the Metadata Explorer, then right-click to choose Add New Connection...
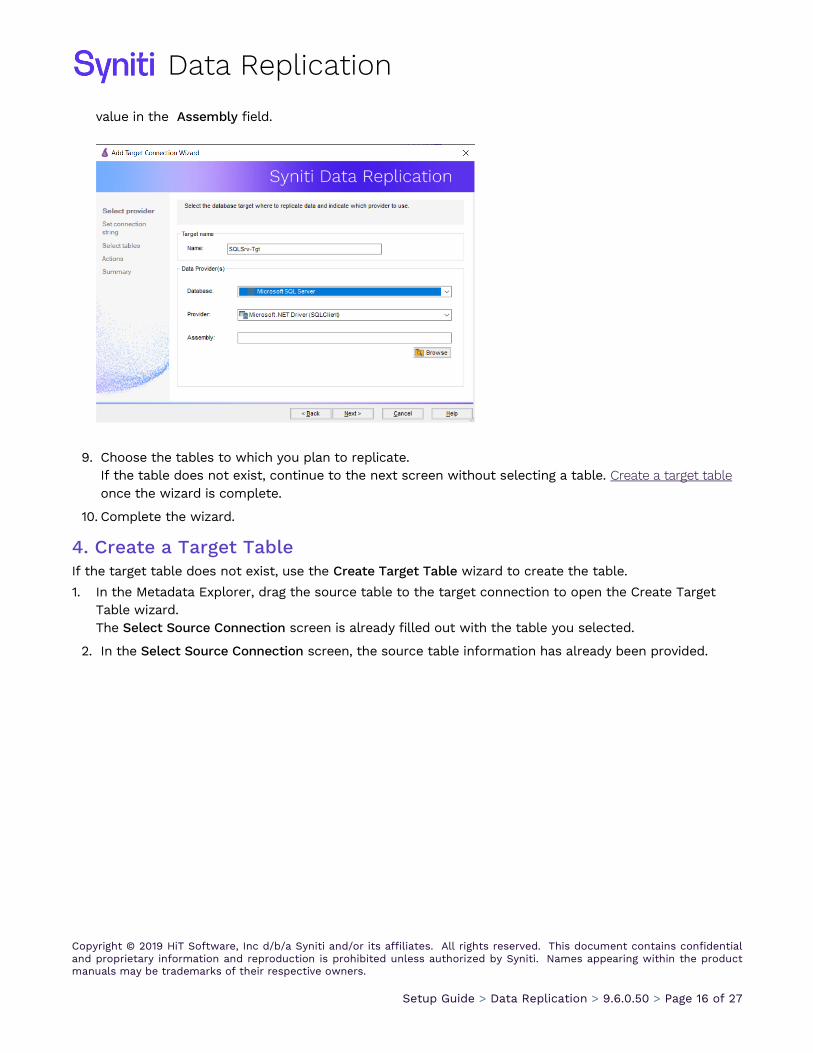
8. In the Add a Target Connection wizard, follow steps to add a connection string and test the connection to the database. Check the Supported Provider List in the Help Center before entering a
Data Replication
Copyright © 2019 HiT Software, Inc d/b/a Syniti and/or its affiliates. All rights reserved. This document contains confidential and proprietary information and reproduction is prohibited unless authorized by Syniti. Names appearing within the product manuals may be trademarks of their respective owners.
Setup Guide > Data Replication > 9.6.0.50 > Page 16 of 27
value in the Assembly field.
9. Choose the tables to which you plan to replicate. If the table does not exist, continue to the next screen without selecting a table. Create a target table once the wizard is complete.
10. Complete the wizard.
4. Create a Target Table If the target table does not exist, use the Create Target Table wizard to create the table.
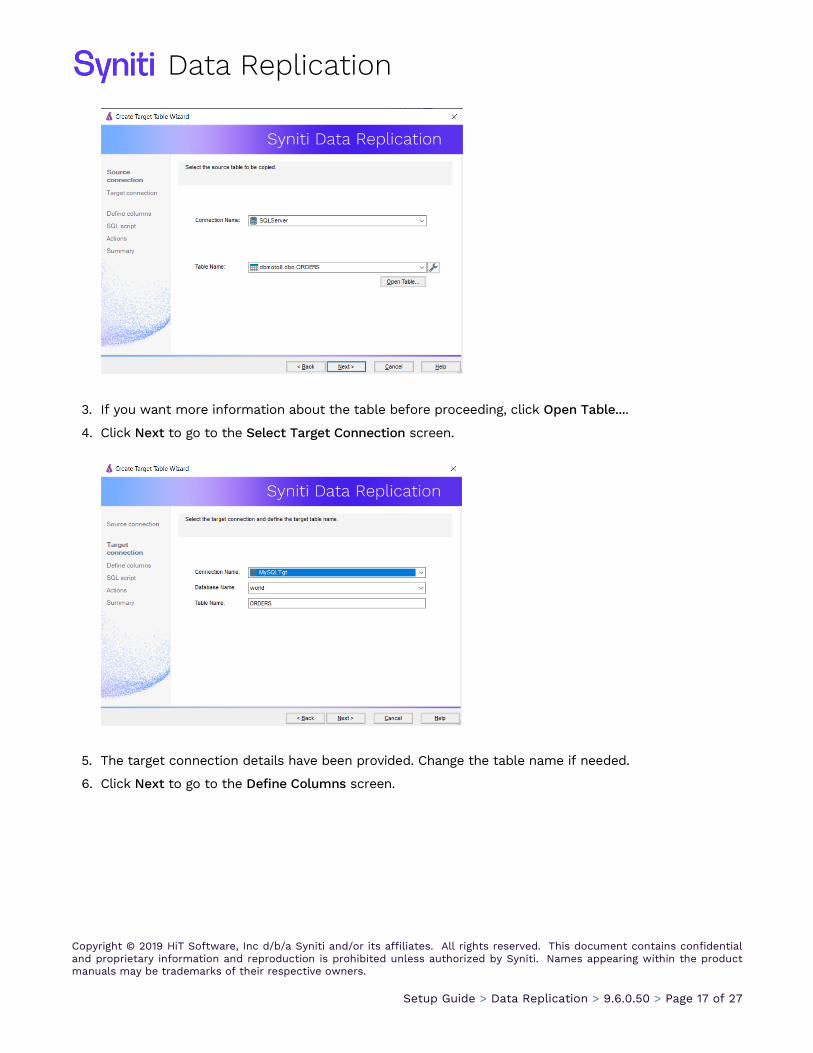
1. In the Metadata Explorer, drag the source table to the target connection to open the Create Target Table wizard. The Select Source Connection screen is already filled out with the table you selected.
2. In the Select Source Connection screen, the source table information has already been provided.
Data Replication
Copyright © 2019 HiT Software, Inc d/b/a Syniti and/or its affiliates. All rights reserved. This document contains confidential and proprietary information and reproduction is prohibited unless authorized by Syniti. Names appearing within the product manuals may be trademarks of their respective owners.
Setup Guide > Data Replication > 9.6.0.50 > Page 17 of 27
3. If you want more information about the table before proceeding, click Open Table....
4. Click Next to go to the Select Target Connection screen.
5. The target connection details have been provided. Change the table name if needed.
6. Click Next to go to the Define Columns screen.
Data Replication
Copyright © 2019 HiT Software, Inc d/b/a Syniti and/or its affiliates. All rights reserved. This document contains confidential and proprietary information and reproduction is prohibited unless authorized by Syniti. Names appearing within the product manuals may be trademarks of their respective owners.
Setup Guide > Data Replication > 9.6.0.50 > Page 18 of 27
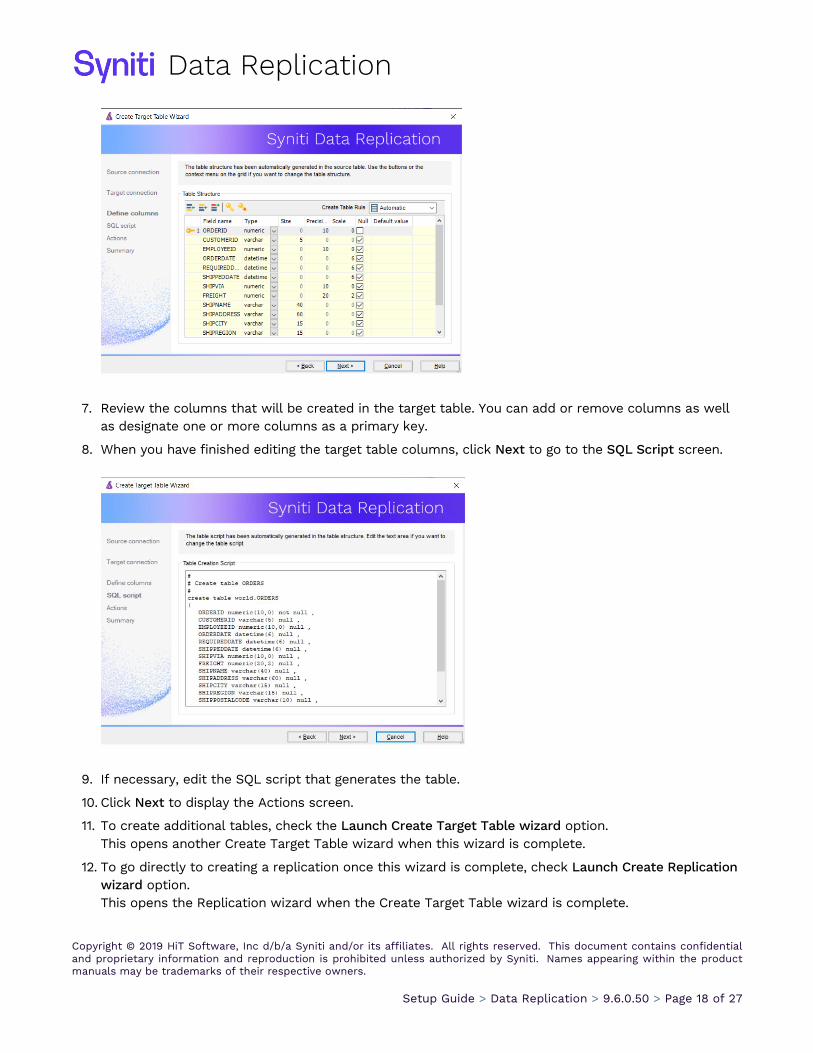
7. Review the columns that will be created in the target table. You can add or remove columns as well as designate one or more columns as a primary key.
8. When you have finished editing the target table columns, click Next to go to the SQL Script screen.
9. If necessary, edit the SQL script that generates the table.
10. Click Next to display the Actions screen.
11. To create additional tables, check the Launch Create Target Table wizard option. This opens another Create Target Table wizard when this wizard is complete.
12. To go directly to creating a replication once this wizard is complete, check Launch Create Replication wizard option. This opens the Replication wizard when the Create Target Table wizard is complete.
Data Replication
Copyright © 2019 HiT Software, Inc d/b/a Syniti and/or its affiliates. All rights reserved. This document contains confidential and proprietary information and reproduction is prohibited unless authorized by Syniti. Names appearing within the product manuals may be trademarks of their respective owners.
Setup Guide > Data Replication > 9.6.0.50 > Page 19 of 27
NOTE: If you are setting up replications with multiple tables in the same database, it is more efficient to use the Multiple Replications wizard. Check the Syniti DR User’s Guide from the Help menu in the Management Center for more information.
13. Click Next to view a summary.
14. Click Finish to create the target table.
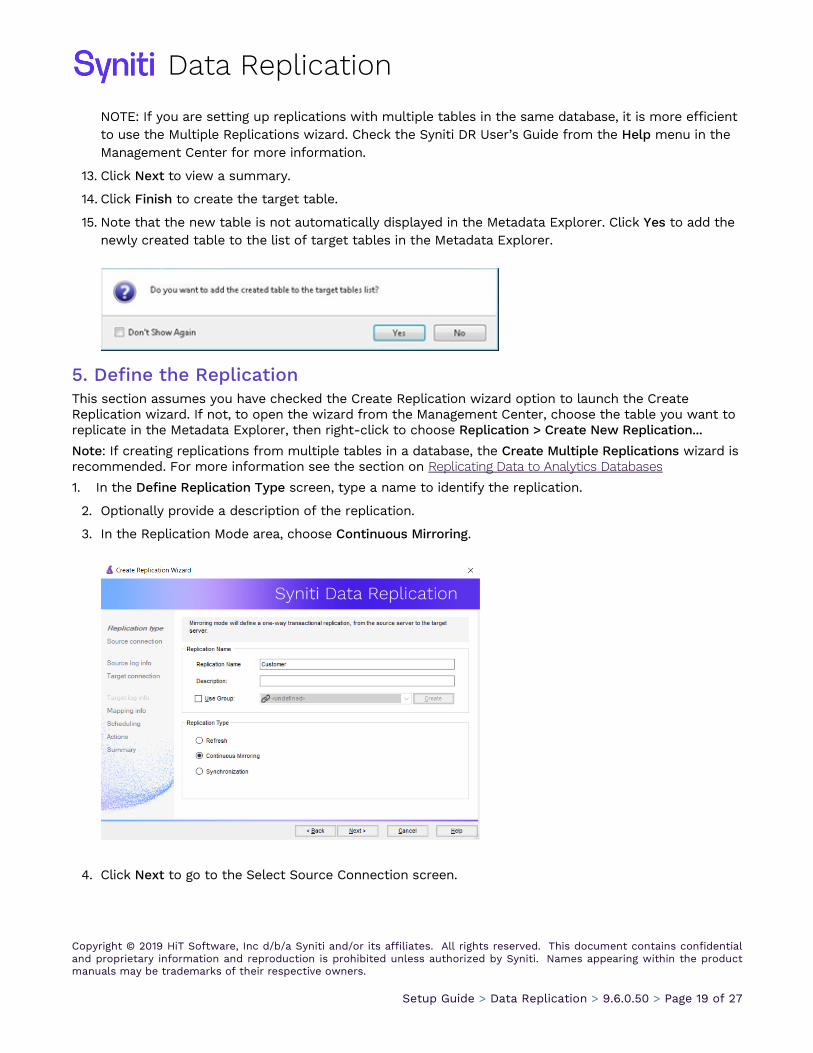
15. Note that the new table is not automatically displayed in the Metadata Explorer. Click Yes to add the newly created table to the list of target tables in the Metadata Explorer.
5. Define the Replication This section assumes you have checked the Create Replication wizard option to launch the Create Replication wizard. If not, to open the wizard from the Management Center, choose the table you want to replicate in the Metadata Explorer, then right-click to choose Replication > Create New Replication...
Note: If creating replications from multiple tables in a database, the Create Multiple Replications wizard is recommended. For more information see the section on Replicating Data to Analytics Databases
1. In the Define Replication Type screen, type a name to identify the replication.
2. Optionally provide a description of the replication.
3. In the Replication Mode area, choose Continuous Mirroring.
4. Click Next to go to the Select Source Connection screen.
Data Replication
Copyright © 2019 HiT Software, Inc d/b/a Syniti and/or its affiliates. All rights reserved. This document contains confidential and proprietary information and reproduction is prohibited unless authorized by Syniti. Names appearing within the product manuals may be trademarks of their respective owners.
Setup Guide > Data Replication > 9.6.0.50 > Page 20 of 27
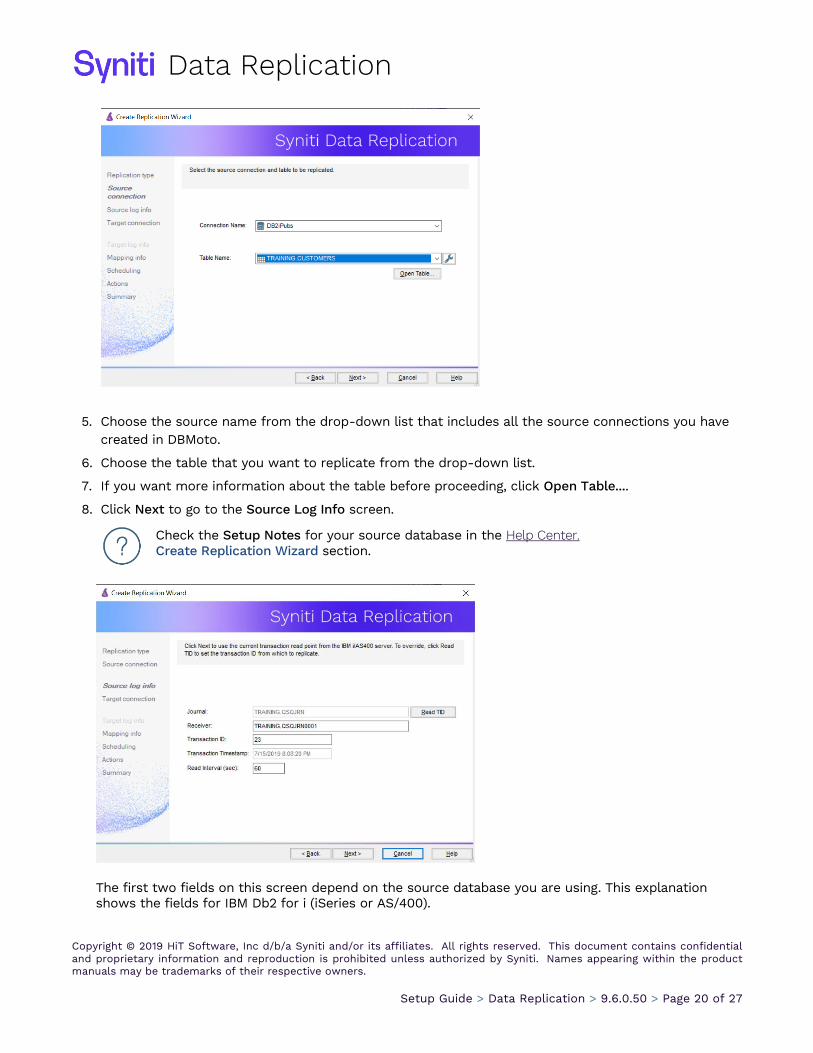
5. Choose the source name from the drop-down list that includes all the source connections you have created in DBMoto.
6. Choose the table that you want to replicate from the drop-down list.
7. If you want more information about the table before proceeding, click Open Table....
8. Click Next to go to the Source Log Info screen.
Check the Setup Notes for your source database in the Help Center. Create Replication Wizard section.
The first two fields on this screen depend on the source database you are using. This explanation shows the fields for IBM Db2 for i (iSeries or AS/400).

Data Replication
Copyright © 2019 HiT Software, Inc d/b/a Syniti and/or its affiliates. All rights reserved. This document contains confidential and proprietary information and reproduction is prohibited unless authorized by Syniti. Names appearing within the product manuals may be trademarks of their respective owners.
Setup Guide > Data Replication > 9.6.0.50 > Page 21 of 27
The Log/Journal fields are automatically filled in by retrieving the information from the database. You do not usually need to modify these fields.
9. In the Transaction ID field, click Read to open the Read Point dialog.
10. Choose either the current transaction or a transaction ID based on a time and date.
11. Click OK to add the value to the Source Log Info screen.
12. Set the value of the Read Interval field to the frequency with which you want DBMoto to check the transaction log for new events to mirror.
13. Click Next to go to the Select Target Connection screen.
14. Choose a target source name from the drop-down list that includes all the target connections you have created in DBmoto.
15. Choose the table to which you want to replicate from the drop-down list. If no tables are listed, you need to exit the wizard and add or create a target table.
16. If you want more information about the table before proceeding, click Open Table....
Click Next to go to the Set Mapping Info screen.
Data Replication
Copyright © 2019 HiT Software, Inc d/b/a Syniti and/or its affiliates. All rights reserved. This document contains confidential and proprietary information and reproduction is prohibited unless authorized by Syniti. Names appearing within the product manuals may be trademarks of their respective owners.
Setup Guide > Data Replication > 9.6.0.50 > Page 22 of 27
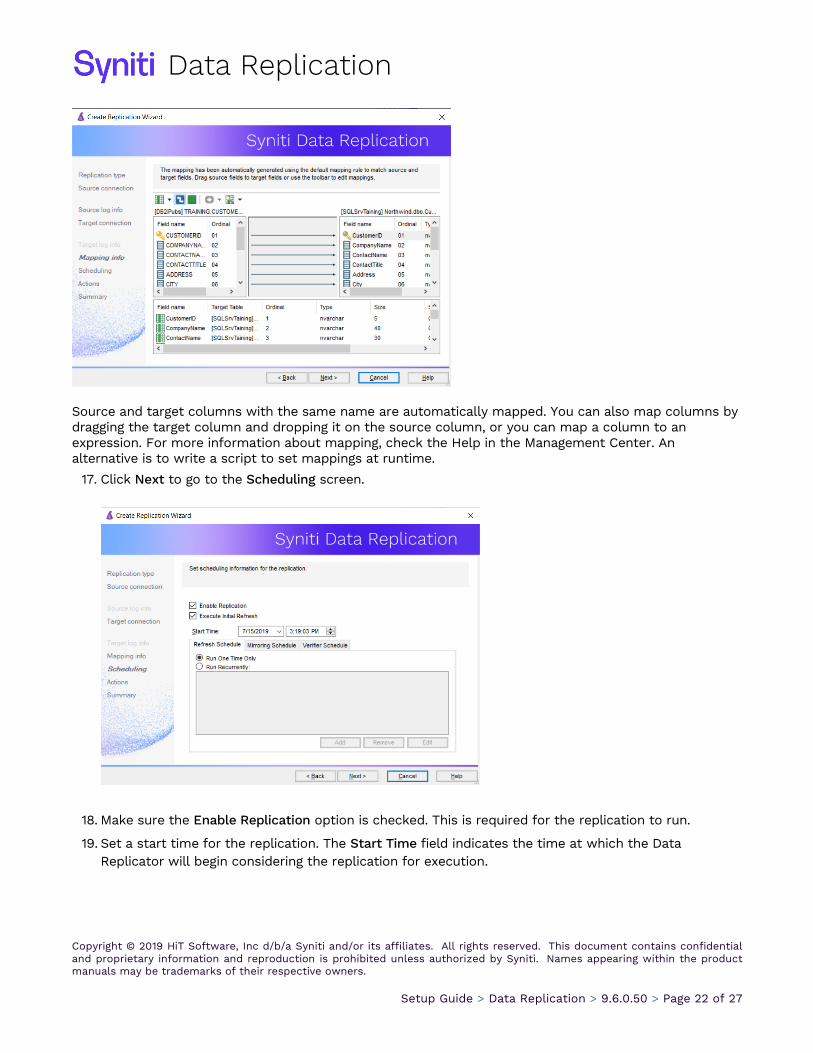
Source and target columns with the same name are automatically mapped. You can also map columns by dragging the target column and dropping it on the source column, or you can map a column to an expression. For more information about mapping, check the Help in the Management Center. An alternative is to write a script to set mappings at runtime.
17. Click Next to go to the Scheduling screen.
18. Make sure the Enable Replication option is checked. This is required for the replication to run.
19. Set a start time for the replication. The Start Time field indicates the time at which the Data Replicator will begin considering the replication for execution.
Data Replication
Copyright © 2019 HiT Software, Inc d/b/a Syniti and/or its affiliates. All rights reserved. This document contains confidential and proprietary information and reproduction is prohibited unless authorized by Syniti. Names appearing within the product manuals may be trademarks of their respective owners.
Setup Guide > Data Replication > 9.6.0.50 > Page 23 of 27
20. Check the option to Execute Initial Refresh if needed. If you check this option, a full replication will be performed from the source to the target table, prior to starting the mirroring process where only incremental changes will be replicated.
21. Go to the Mirroring Schedule tab.
22. Select how you want to run the replication:
• Run Continuously: the transaction log will be checked for changes to the table using the frequency that you specified on the Set Log Info tab. Any changes will be replicated to the target table.
• Schedule Interruptions: the replication process will run as above, except for interruptions specified when you click the Schedule button in the Scheduler dialog.
23. Click Next to go to the Summary screen.
24. Click Finish to complete the wizard.
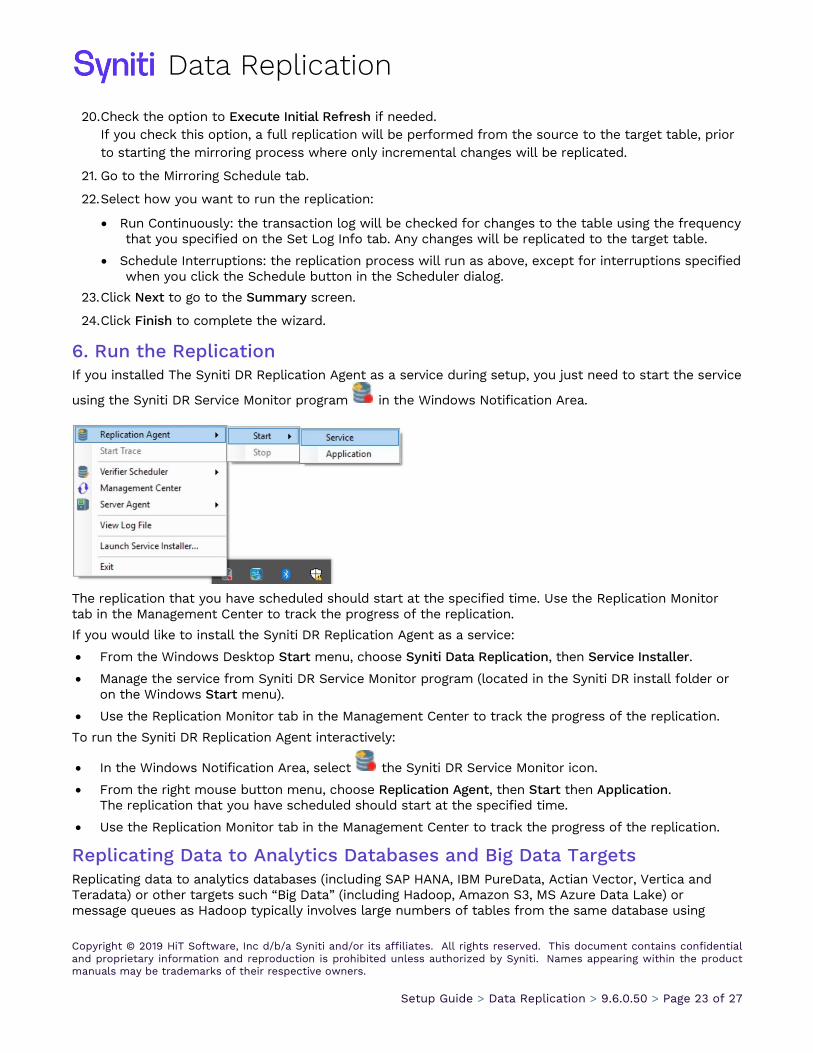
6. Run the Replication If you installed The Syniti DR Replication Agent as a service during setup, you just need to start the service
using the Syniti DR Service Monitor program in the Windows Notification Area.
The replication that you have scheduled should start at the specified time. Use the Replication Monitor tab in the Management Center to track the progress of the replication.
If you would like to install the Syniti DR Replication Agent as a service:
• From the Windows Desktop Start menu, choose Syniti Data Replication, then Service Installer.
• Manage the service from Syniti DR Service Monitor program (located in the Syniti DR install folder or on the Windows Start menu).
• Use the Replication Monitor tab in the Management Center to track the progress of the replication.
To run the Syniti DR Replication Agent interactively:
• In the Windows Notification Area, select the Syniti DR Service Monitor icon.
• From the right mouse button menu, choose Replication Agent, then Start then Application. The replication that you have scheduled should start at the specified time.
• Use the Replication Monitor tab in the Management Center to track the progress of the replication.
Replicating Data to Analytics Databases and Big Data Targets Replicating data to analytics databases (including SAP HANA, IBM PureData, Actian Vector, Vertica and Teradata) or other targets such “Big Data” (including Hadoop, Amazon S3, MS Azure Data Lake) or message queues as Hadoop typically involves large numbers of tables from the same database using
Data Replication
Copyright © 2019 HiT Software, Inc d/b/a Syniti and/or its affiliates. All rights reserved. This document contains confidential and proprietary information and reproduction is prohibited unless authorized by Syniti. Names appearing within the product manuals may be trademarks of their respective owners.
Setup Guide > Data Replication > 9.6.0.50 > Page 24 of 27
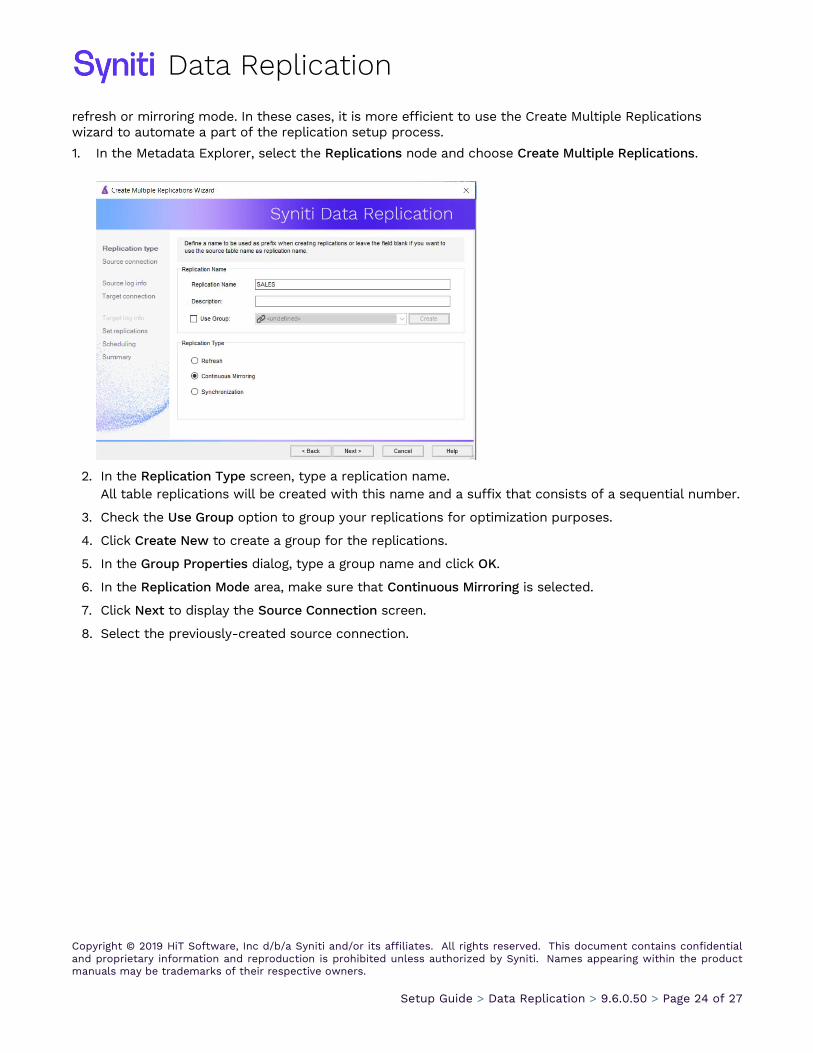
refresh or mirroring mode. In these cases, it is more efficient to use the Create Multiple Replications wizard to automate a part of the replication setup process.
1. In the Metadata Explorer, select the Replications node and choose Create Multiple Replications.
2. In the Replication Type screen, type a replication name. All table replications will be created with this name and a suffix that consists of a sequential number.
3. Check the Use Group option to group your replications for optimization purposes.
4. Click Create New to create a group for the replications.
5. In the Group Properties dialog, type a group name and click OK.
6. In the Replication Mode area, make sure that Continuous Mirroring is selected.
7. Click Next to display the Source Connection screen.
8. Select the previously-created source connection.
Data Replication
Copyright © 2019 HiT Software, Inc d/b/a Syniti and/or its affiliates. All rights reserved. This document contains confidential and proprietary information and reproduction is prohibited unless authorized by Syniti. Names appearing within the product manuals may be trademarks of their respective owners.
Setup Guide > Data Replication > 9.6.0.50 > Page 25 of 27
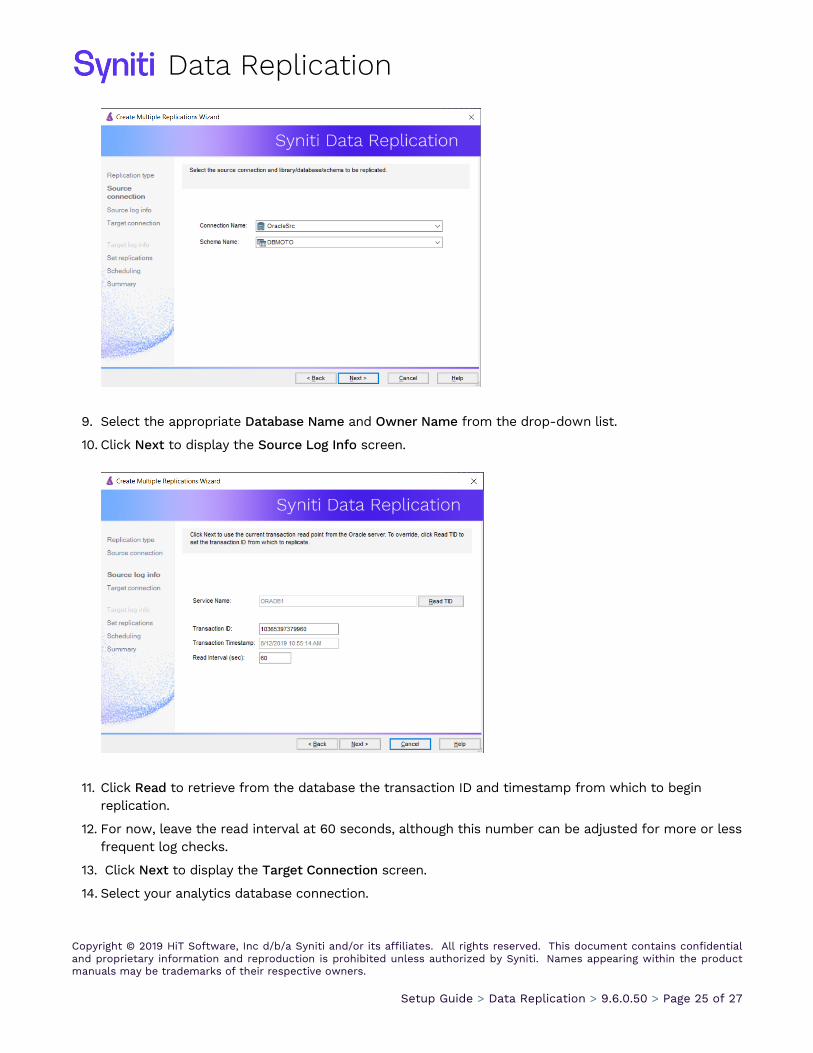
9. Select the appropriate Database Name and Owner Name from the drop-down list.
10. Click Next to display the Source Log Info screen.
11. Click Read to retrieve from the database the transaction ID and timestamp from which to begin replication.
12. For now, leave the read interval at 60 seconds, although this number can be adjusted for more or less frequent log checks.
13. Click Next to display the Target Connection screen.
14. Select your analytics database connection.
Data Replication
Copyright © 2019 HiT Software, Inc d/b/a Syniti and/or its affiliates. All rights reserved. This document contains confidential and proprietary information and reproduction is prohibited unless authorized by Syniti. Names appearing within the product manuals may be trademarks of their respective owners.
Setup Guide > Data Replication > 9.6.0.50 > Page 26 of 27
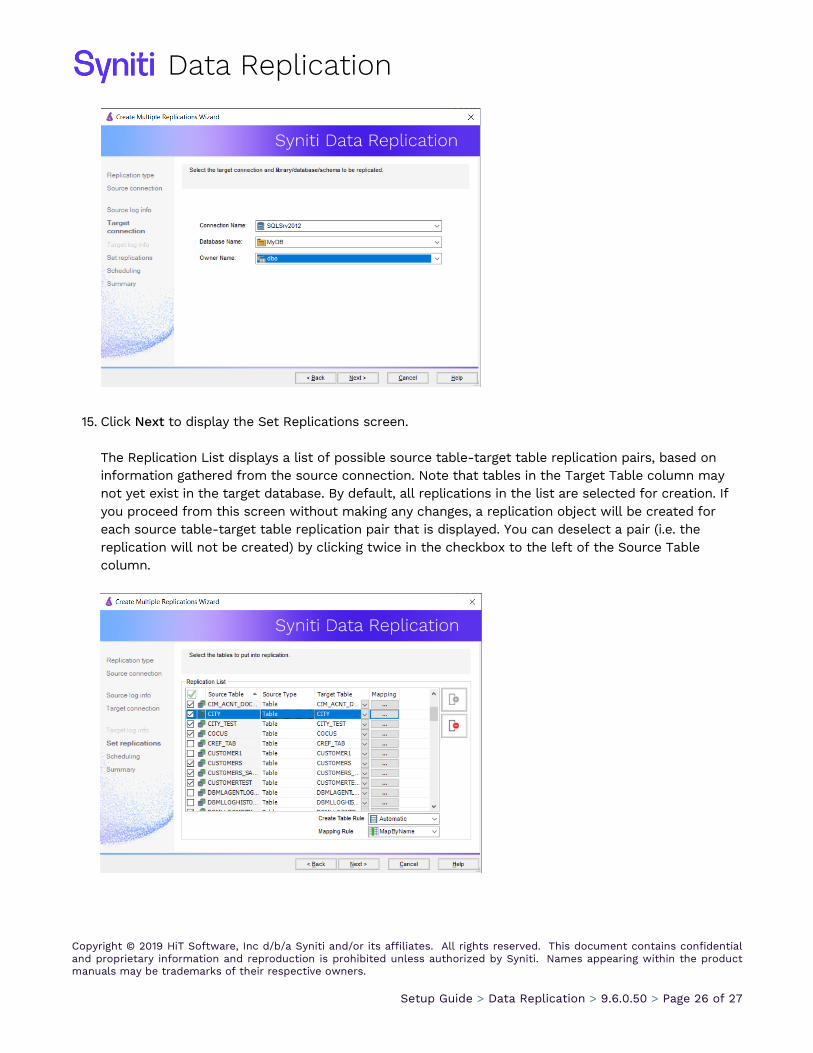
15. Click Next to display the Set Replications screen. The Replication List displays a list of possible source table-target table replication pairs, based on information gathered from the source connection. Note that tables in the Target Table column may not yet exist in the target database. By default, all replications in the list are selected for creation. If you proceed from this screen without making any changes, a replication object will be created for each source table-target table replication pair that is displayed. You can deselect a pair (i.e. the replication will not be created) by clicking twice in the checkbox to the left of the Source Table column.

Data Replication
Copyright © 2019 HiT Software, Inc d/b/a Syniti and/or its affiliates. All rights reserved. This document contains confidential and proprietary information and reproduction is prohibited unless authorized by Syniti. Names appearing within the product manuals may be trademarks of their respective owners.
Setup Guide > Data Replication > 9.6.0.50 > Page 27 of 27
16. Click Next to go to the Scheduling screen.
17. Make sure the Enable Replication option is checked. This is required for the replication to run.
18. Set a start time for the replication. The Start Time field indicates the time at which the Data Replicator will begin considering the replication for execution.
19. Select how you want to run the replication:
• Once only: the replication will run once at the time specified in Start Time.
• Recurrently: the replication will run according to the schedule you set by clicking the Schedule button to open the Scheduler dialog.
20. Click Next to go to the Summary screen.
21. Click Finish to complete the wizard. If the tables you indicated as target tables do not exist in your analytics database, DBMoto provides a dialog with the option to create them while setting up the replications.
22. You may need to edit the default block size for the amount of data to be loaded at any one time. To change this value, in the Metadata Explorer, select the replication. From the right mouse button menu, choose Replication Properties.
23. In the Preferences tab, enter a value in the appropriate Block Size field.
24. Click OK to complete the change.
25. Run the replications as described above in 6. Run the Replication.
Last Updated on 9/24/2019


