Page 1
DC-DC Converter for Electric Vehicle
By
Jason Zhou
Nicholas Mah
Senior Project
Project Advisor: Professor Taufik
ELECTRICAL ENGINEERING DEPARTMENT
California Polytechnic State University
San Luis Obispo
June 2019
Page 2
2
Table of Contents
DC-DC Converter for Electric Vehicle ........................................................................... 1
List of Figures ..................................................................................................................... 3
List of Tables ..................................................................................................................... 4
Abstract .............................................................................................................................. 5
1. Introduction ............................................................................................................... 6
2. Background ............................................................................................................... 8
3. Design Requirements .............................................................................................. 11
4. Design and Simulation Results ............................................................................... 17
5. Hardware Test and Results ..................................................................................... 42
6. Conclusion .............................................................................................................. 54
7. References ............................................................................................................... 57
8. Appendix ................................................................................................................. 58
Code for Transformer Design ....................................................................................... 58
Timeline of Tasks and Milestones ................................................................................ 67
Bill of Materials ............................................................................................................ 68
Analysis of Senior Project Design ................................................................................ 76
Page 3
3
List of Figures
Figure 3-1: Level 0 Block Diagram .................................................................................. 15
Figure 3-2: Level 1 Block Diagram .................................................................................. 15
Figure 4-1: Switch Configuration ..................................................................................... 26
Figure 4-2: Final Simulation Schematic ........................................................................... 30
Figure 4-3: Efficiency Plot of Optimal Configuration ...................................................... 30
Figure 4-4: DC-DC Top Schematic .................................................................................. 39
Figure 4-5: LT8311 Schematic ......................................................................................... 39
Figure 4-6: Forward Active Schematic ............................................................................. 39
Figure 4-7: Flyback Schematic ......................................................................................... 39
Figure 4-8: LT3752-1 Schematic ...................................................................................... 40
Figure 4-9: OptoIsolator Schematic .................................................................................. 40
Figure 4-10: Input Fusing and RVP Schematic ................................................................ 40
Figure 4-11: DC-DC Disable Schematic .......................................................................... 40
Figure 4-12: Sync Transformer Schematic ....................................................................... 41
Figure 4-13: Gate Driver Schematic ................................................................................. 41
Figure 5-1: Final Constructed Transformer ...................................................................... 42
Figure 5-2: Low Leakage Winding Depiction .................................................................. 43
Figure 5-3: Crossover Winding Depiction ........................................................................ 43
Figure 5-4: Transformer Measured Primary Side AC Resistance .................................... 45
Figure 5-5: Transformer Measured Secondary Side AC Resistance ................................ 45
Figure 5-6: Transformer Turns Ratio Validation .............................................................. 46
Page 4
4
Figure 5-7: DC-DC Main Board Layout ........................................................................... 47
Figure 5-8: DC-DC 3D Render ......................................................................................... 48
Figure 5-9: DC-DC Final Constructed Board ................................................................... 48
Figure 5-10: DC-DC Multimeter, Supply, and Load Block Diagram .............................. 49
Figure 5-11: DC-DC Oscilloscope Measurement Point Setup ......................................... 50
Figure 5-12: LT3752-1 and LT8311 Controller Signal Waveforms (Ignore Blue
Waveforms)................................................................................................................................... 51
Figure 5-13: DC1929A OUT and SWP ............................................................................ 52
Figure 5-14: DC1929A FG and FSW ............................................................................... 52
Figure 5-15 ........................................................................................................................ 52
Figure 5-16 ........................................................................................................................ 53
Figure 8-1 .......................................................................................................................... 68
Figure 8-2 .......................................................................................................................... 68
Figure 8-3 .......................................................................................................................... 79
Figure 8-4 .......................................................................................................................... 79
List of Tables
Table 3-1: Requirements List............................................................................................ 16
Table 5-1: Transformer Design Test Data ........................................................................ 44
Table 5-2: Efficiency Test Results .................................................................................... 51
Table 5-3: DC1929A Demo Board Waveforms ............................................................... 52
Table 8-1: Final Board Bill of Materials ........................................................................... 69
Table 8-2: Original Cost Estimate .................................................................................... 78
Page 5
5
Abstract
In this work, a DC-DC converter is designed for an electric vehicle. The DC-DC
converter is designed to provide 500W with a 200-400V input and a 12-15V adjustable output.
Electric vehicle sales are beginning to increase in popularity and the need for DC-DC converters
to siphon power from the tractive system is not yet fully satisfied, especially for single-seater
class vehicles. Additionally, improving performance in efficiency without sacrificing wide input
voltage range can benefit future DC-DC converter designs. In the end, a forward active clamp
DC-DC converter is designed and tested. Additionally, spreadsheet calculators, LTSpice
simulations, and Matlab scripts were made to assist in work for the DC-DC.
Page 6
6
1. Introduction
Electric Vehicle (EV) sales have grown dramatically since 2010 [1]. The first mass-
produced EV, the EV1, sported a range of 70 to 100 miles, while a base-model Tesla Model 3
has a range of 264 miles [2] [3]for similar costs. Improvements in total range and lifetime of
EV’s is mostly responsible for this massive increase in popularity. The two main ways of
improving EV range is through system efficiency and improved battery technology.
System efficiency improvements are mostly due to the use and improvement of power
electronics systems within the vehicle. Power electronics refers to the use of switching
electronics for power conversion and distribution. There are six main categories of power
converters: AC-DC converters (rectifiers), AC-AC converters, DC-AC converters, static
switches, and DC-DC converters. AC-DC, DC-DC, and DC-AC converters. These play
important roles for EV usage. AC-DC converters are often used for on-board charging systems,
which allows the EV to be charged from the grid. DC-AC converters are typically used to drive
the main motors of the vehicle, providing propulsion [4]. In most EV’s, there is a high voltage
system consisting of the vehicle’s battery pack and drive system, and a low voltage system,
containing the vehicle’s media entertainment, sensors and telemetry, control unit, etc. To reduce
weight and improve vehicle packaging, most EV’s use a DC-DC converter with power capability
on the order of kilowatts to efficiently step down the vehicle’s battery pack voltage, 200V-800V,
to the vehicle’s low voltage system operating voltage, usually 12 or 24V [5].
There are many different types of DC-DC converters, but they can be divided into two
main categories, isolated and non-isolated. Isolated designs incorporate a galvanic isolation
between the input and output while non-isolated systems do not. Isolated designs offer a high
Page 7
7
degree of safety because failures on the input side are generally isolated from the output, but
non-isolated designs are typically smaller because they do not require a galvanic isolating device.
A standard DC-DC converter will contain a switching device, an inductor, and input and output
capacitors. In an isolated device, a transformer will typically be included as the method of
galvanic isolation.
In order to increase knowledge in experience in automotive development, the Society of
Automotive Engineers (SAE) at Cal Poly State University created the Formula SAE Student
Design Competition (FSAE). In FSAE, students design, build and compete a single-seater race-
car. Currently, there are both an Internal Combustion (IC) and EV competition. Internally, the
EV race-car contains many similar components to a commercial EV, including a HV (High
Voltage) to LV (Low Voltage) DC-DC converter. For race-car, development size and weight are
among the most important design metrics. Reducing weight and size allows the vehicle to turn
and accelerate much faster, improving the race-car’s chances of winning the race. By extension,
system efficiency is also very important because improving the range of a vehicle will allow
designers to reduce the total volume and mass of batteries required. This project will explore the
design of a DC-DC converter for an FSAE EV.
Page 8
8
2. Background
Cal Poly’s Formula SAE club, Cal Poly Racing, needs a smaller, higher voltage rated
DC-DC converter because their existing solution, the RSP-500-12 [6], is only rated at 370 VDC,
which a slight 0.4 V more than the expected maximum operating voltage of 369.6 VDC. The
purpose of the DC-DC converter is to use the “high-voltage” 316 V battery pack, which is used
to drive the electric motor, to power all of the low voltage electronics while the car operates.
During times when the high-voltage battery is disconnected, a “low-voltage” 14 V battery is used
to maintain low voltage electronics. Although a low voltage battery could be used instead of a
DC-DC converter, the size of such a battery is infeasible for the packaging constraints of a
Formula SAE Electric vehicle.
The Formula SAE Electric vehicle can draw 500W of power continuously on the low
voltage system and the high voltage battery pack voltage can vary from less than 246 V to 370
V. Additionally, the DC-DC converters must fit in a narrow enclosure next to the battery pack in
order to pass high voltage isolation rules. These requirements can be summarized as a DC-DC
converter that must be able to transform 200-400 VDC to 14 VDC at a power level of 500 W in
the smallest package possible.
Because climate change has become a greater concern in the 21st century, the automotive
industry is slowly moving towards hybrid and fully-electric vehicles. As a result, the use of DC-
DC converters in electric vehicles has been a topic of development and research in the
automotive industry. Most DC-DC converters used in hybrid or electric vehicles consist of both
unidirectional and bidirectional DC-DC converters. The unidirectional converters generally have
Page 9
9
been used for vehicle sensors, controls, entertainment, utility, and safety purposes. Whereas the
bidirectional DC-DC converters have found their use in battery charging and regenerative
braking. Many modern day DC-DC converters use soft-switching technique to achieve higher
efficiency and are isolated to provide safety to the load. However, the use of transformers leads
to leakage inductance, which creates larger voltage stress on converter components due to
ringing and semiconductor output capacitance. The presence of leakage inductance has also led
to the use of passive snubbers, active-clamping, and soft-switching. Additionally, transformers
increase converter area, volume, weight, cost, and EMI. Although the development of
bidirectional full-bridge converters are in high demand, half-bridge topologies have seen
significant development, with their reduction in number of components. As a result, converters
such as full-bridge primary and half-bridge secondary with synchronous rectification using
coupled inductors have contributed a three times size reduction compared to its full-bridge
counterpart. Lastly, wide band gap semiconductors are slowly being incorporated into EV DC-
DC converters as they have better thermal conductivity, breakdown, and maximum operating
junction temperature than silicon. Thus, SiC (Silicon Carbide) and GaN (Gallium Nitride) based
semiconductors will reduce temperature issues, and have been used in hybrid vehicles like the
Toyota Prius II.
The University of Wisconsin-Madison’s Formula SAE team, Wisconsin Racing,
published their Electrical Safety Form, documenting their solution to the DC-DC stage design.
Wisconsin Racing utilized the Vicor Power DCM290P138T600A40 DC-DC module in
conjunction with the LTC4417 PowerPath Controller to supply power to the Low Voltage
system. With this DC-DC module, they were able to package a system with power flow control,
pre-charge and discharge circuitry, a shutdown circuit, and a battery management system, in an
Page 10
10
enclosure approximately 3.6 by 5 in. enclosure [7]. Unfortunately, information from other
Formula SAE teams is not available. As such, most research is limited to general DC-DC
converter designs. However, the DCM290P138T600A40 is also used by Cal Poly Racing for this
year’s car design. The Vicor DC-DC module boasts over 90% efficiency at 500 W from 200-400
VDC input with internal transformer in a 1 by 2 in. enclosure. The Vicor DC-DC achieved this
with a 600 to 1000 kHz variable switching frequency, ZVS controller. However, the Vicor DC-
DC converter is not a fully standalone controller and it requires 1 mF of external output
capacitance and heat-sinks. Additionally, despite its high frequency operation, the Vicor DC-DC
has approximately 400mV p-p of ripple [8].
Another potential DC-DC module available is the Cosel SNDBS700B12. Unfortunately,
not much information can be gathered regarding the overall performance. The Cosel DC-DC is a
8.75 by 3.8 in. DC-DC converter with an efficiency of 90% from 200 to 400 V. An external heat-
sink is also required for the Cosel DC-DC. Although limited information is available for the
Cosel DC-DC, the given information implies that this solution is inferior to the Vicor DC-DC
[9].
This project is to design, build, and test of a 500W, 200-400 VDC in to 14 VDC out, high
efficiency, compact DC-DC converter. The Vicor DC-DC module is so much smaller than the
RSP-500-12 that Cal Poly Racing cannot take full advantage of the packaging. Our DC-DC
design will aim to produce a higher efficiency, lower output ripple DC-DC converter with a size
between the Vicor DC-DC and the RSP-500-12 that doesn’t require any external hardware.
Page 11
11
3. Design Requirements
This chapter explains technical design requirements for the project. It encompasses those
requirements related to electrical performance as well as physical dimension.
Technical Requirements
● Input Voltage Range
A 200-400 VDC input voltage range is a required design specification. The 88s8p LiIon
battery configuration means that the tractive system voltage will vary from 220V to 369V
during normal operation. Extending the range to 200-400V allows for a 20V safety
margin.
● Adjustable Output Voltage
A 12-15V adjustable output voltage is needed to integrate with the low voltage battery.
The low voltage battery used has its operating voltage vary from 11.2 to 14.4V. Cal Poly
Racing does not expect the LV battery to drop to the minimum 11.2V state of charge, so
a 12V minimum operating voltage is acceptable.
● Control and Sense Ports
DC-DC converter voltage and current data must be able to be constantly monitored to
ensure safe operation. Cal Poly Racing also expects adjustable output voltage with
external control.
● Continuous Output Power Rating
Cal Poly Racing expects to draw up to 400W of 12V power throughout the course of an
endurance. Although the power draw is not continuous throughout the entire race, the
Page 12
12
high power “bursts” can last for minutes, necessitating a continuous power rating of
500W.
● Input/Output Overcurrent Protection
Cal Poly Racing has a constant influx of new members. As such, assembly and operating
errors occur that project leads are not able to fully prevent. Because of this, output short
circuits are a possible event. In order to protect the DC-DC itself as well as the connected
harness, overcurrent protection must be included in the design.
● Input/Output Overvoltage Protection
It is possible for an overvoltage condition to exist during regenerative braking, or if an
incorrectly set voltage source is connected. The DC-DC must protect itself in order to
prevent the need for purchasing a replacement DC-DC.
● Input/Output Reverse Voltage Protection
As mentioned previously, assembly and operational mistakes are possible in the DC-
DC’s lifespan. Another common error that occurs is reverse voltage events. These events
are possible on the input and output of the device since energy sources in the form of
batteries are connected on both sides. Because of this, the device must withstand input
and output reverse voltage during a fault without permanent damage to ensure reliable
operation.
Page 13
13
● Rated for Automotive Conditions
Device undergoes rigorous vibrations as it is operated within a moving vehicle. Thus,
most if not all components should be AEC-Q100 rated or better.
● Isolated Design
In accordance with 2019 Formula SAE Electric rules, EV.6.1.7, HV and LV on separate,
clearly defined areas of the PCB, HV and LV areas are clearly marked, spacing between
traces under conformal coating is more than 4mm. In accordance with EV.6.1.5, HV and
LV within an enclosure is separated by moisture resistant, UL rated insulating materials
rated for 150 degrees C or higher, and the spacing through air is greater than 30mm.
Additionally, at this power level, the design is isolated to prevent damage to low voltage
components during a fault.
● IP31 Rated
In accordance with 2019 Formula SAE Electric rules, EV.6.5.3, the enclosure and
connectors are protected from moisture with approximately an IP31 rating., meaning that
the device is resistant to dripping water and greater than 2.5mm probes Although the rain
test involves spraying water through a sprinkler directly into the car, The battery box
enclosure that will contain the DC-DC converter will provide spray protection.
● Small Volume
Because Cal Poly Racing requires smaller components to improve vehicle packaging, the
DC-DC converter must be roughly half the size of the currently used Meanwell RSP-500-
15 DC-DC converter, which implies physical size less than 115mm x 127mm x 40.5mm.
Page 14
14
● Lightweight
In order to be a usable replacement for the current module RSP-500-12, the DC-DC
should be significantly lighter that the 2.866 lbs of the RSP-500-12. A target of less than
2 lbs total is a reasonable target.
● Efficiency
As a result of the previous requirements, converter’s overall efficiency of at least 90% is
required. The losses from the LV system is small compared to the total power
consumption.
● Line and Load regulations
Because of the large voltage and load range required of the DC-DC converter, a strict line
and load regulation is also required in order to keep the voltage from deviating too far
away from the nominal value. A maximum regulation of 5% was selected for both line
and load regulations.
Page 15
15
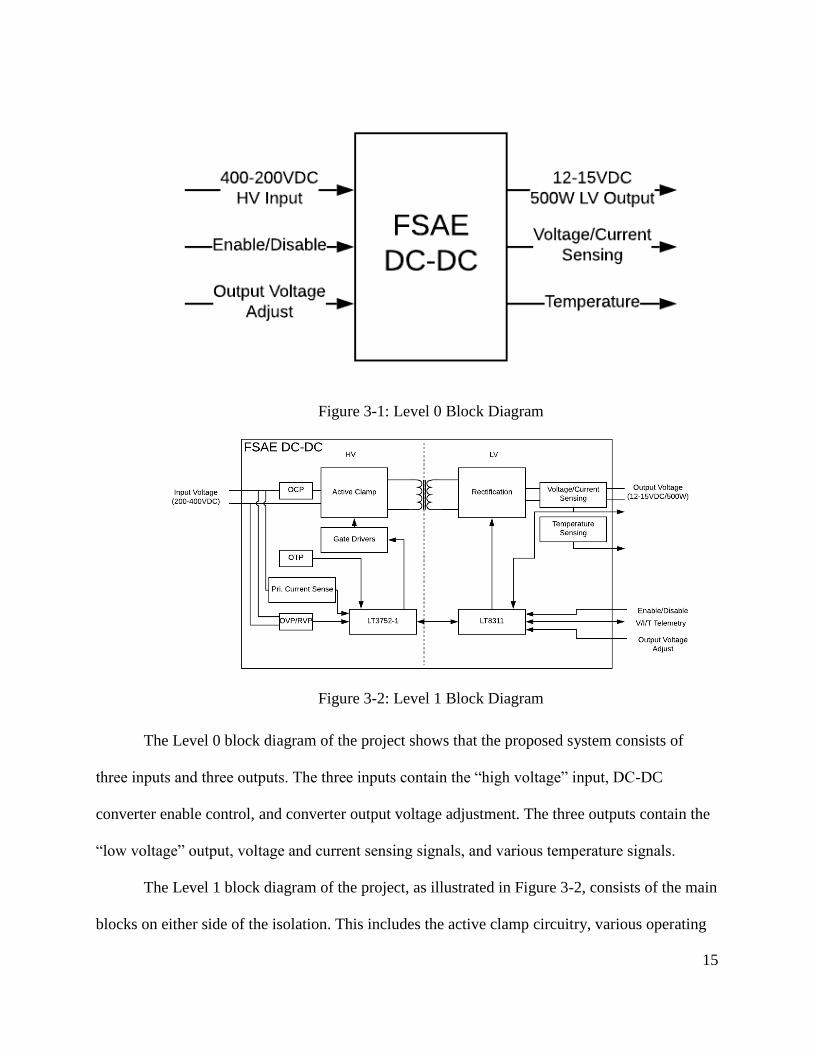
Figure 3-1: Level 0 Block Diagram
Figure 3-2: Level 1 Block Diagram
The Level 0 block diagram of the project shows that the proposed system consists of
three inputs and three outputs. The three inputs contain the “high voltage” input, DC-DC
converter enable control, and converter output voltage adjustment. The three outputs contain the
“low voltage” output, voltage and current sensing signals, and various temperature signals.
The Level 1 block diagram of the project, as illustrated in Figure 3-2, consists of the main
blocks on either side of the isolation. This includes the active clamp circuitry, various operating
Page 16
16
protections, the two controller ICs, and various sensing blocks. Table 3-1 summarizes the design
requirements for the project.
Table 3-1: Requirements List
Requirement Value
Input voltage range 200-400V
Output Voltage Range 12-15V
Efficiency > 90%
Additional Features Control and Sense Ports
Power Rating 500W Continuous
Input/Output Protection Overvoltage, Overcurrent and Reverse
Voltage Protection
Ratings Isolated, IP31, and Vibration Resistant
Size < 115mm x 127mm x 40.5mm
Weight 2 lbs.
Page 17
17
4. Design and Simulation Results
The Linear Technology LT3752-1 Active Forward Clamp Controller met all of the design
requirements for the project. The IC is capable of ZVS and has a housekeeping controller. ZVS
allows for improved switching efficiency, and the housekeeping controller reduces the size of the
board by removing the need for an additional IC [6]. Additionally, the LT3752 has built-in
integration with the LT8311 Synchronous Rectifier Controller with Opto-Coupler Driver for
Forward Converters. This allows for synchronous rectification, which improves efficiency [7].
Excel calculators were made to determine component values.
Compared to other existing designs, our DC-DC converter uses a 300 kHz switching
frequency, compared to the LT3752 Demo Board’s 100 kHz switching frequency. This higher
switching frequency allows us to achieve a comparable size to the demo board while carrying 2.5
times the power [8].
Page 18
18
Output Inductor
Equation 4-1: Output Inductor Value Based on Output Current Ripple
The output current ripple was originally designed to be the recommended 40% of IOUT(MAX), but
due to continuous and saturation current ratings of available inductors in our desired dimensions,
the current ripple was increased. The increased current ripple should be compensated by the
programmable slope compensation setting of the LT3752-1.
Primary MOSFET
Primary MOSFET selection depends on the maximum expected drain voltage and current.
Additionally, the power losses due to conduction, gate driver, and transition losses are used to
determine the best fit for the converter.
Page 19
19
Equation 4-2: Maximum expected steady state drain voltage
MOSFET BVDSS rating was at least 20% larger than the steady state VDS value to account for
tolerances in duty cycle, load transients, voltage ripple, and spikes caused by leakage inductance.
Equation 4-3: Total Primary MOSFET Losses at Maximum Output Current
Several MOSFETs with different RDS(ON) and QG values were considered for the primary
MOSFET, with the conduction loss being the primary loss. Additionally, the junction-to-case
and junction-to-ambient coefficients were considered when determining heatsinks and overall
package size. As a result, the LMG3410R050 Integrated GaN power state was chosen for its low
loss and low junction-to-ambient coefficient [9].
Equation 4-4: Primary MOSFET Conduction Losses
Equation 4-5: Primary MOSFET Gate Driver Losses
Gate driver losses were not able to be calculated for the chosen MOSFET, the LMG3410R050,
because of it’s fully integrated GaN design. Instead, the operating current value was used to
calculate the gate driver loss.
Page 20
20
Equation 4-6: Primary MOSFET Transition Losses
Transition losses only consist of turn-on losses, as it is assumed that ZVS is occurring on turn-off
and will prevent any turn-off losses. The ZVS on turn-off is guaranteed, but depending on clamp
switching timing, ZVS may be achieved upon turn-on, eliminating transition losses entirely.
Clamp MOSFET
Clamp MOSFET selection also depends on the maximum drain voltage and current. The main
optimization goal is also to reduce RDS(ON) and QG, while meeting peak drain and body diode
current ratings. Additionally, the maximum VDSS is the same value as the primary MOSFET.
Equation 4-7: Clamp MOSFET Maximum Drain Current
The maximum drain current of the clamp is significantly smaller than the primary MOSFET
drain current and is double for safety margin due to tolerances in magnetizing inductance and
transients.
Page 21
21
Equation 4-8: Clamp MOSFET Maximum Body Diode Current
The pulsed body diode current occurs due to the active clamp topology, where the energy in the
transformer’s leakage inductance is conducted through the clamp body diode after the primary
MOSFET turns off and before the clamp MOSFET is turned on.
Catch MOSFET
Catch MOSFET selection depends on the maximum drain-source voltage and current as well as
maximum gate-source voltage. The main optimization goal is also to reduce RDS(ON) and QG.
Equation 4-9: Catch MOSFET Maximum Drain-Source Voltage
The catch MOSFET margin was chosen to be 1.5, and is typically between 1.5 to 2, to allow for
a safety margin the VDS(MAX) equation. This accounts for voltage spikes from the leakage
inductance of the transformer’s secondary winding.
Equation 4-10: Catch MOSFET Maximum RMS Drain Current
Page 22
22
Equation 4-11: Secondary MOSFET Peak Current
The peak current, which is the peak inductor current, applies to both forward and catch
MOSFETs.
Forward MOSFET
Forward MOSFET selection, like the catch MOSFET, depends on the maximum drain-source
voltage and current as well as maximum gate-source voltage. The main optimization goal is also
to reduce RDS(ON) and QG.
Equation 4-12: Forward MOSFET Maximum Drain-Source Voltage
MOSFET VDSS rating was at least 20% larger than the calculated VDS(MAX) value due to energy
being transferred between the magnetizing inductance and the clamp capacitor causing voltage
“bowing”.
Equation 4-13: Forward MOSFET Maximum RMS Drain Current
Page 23
23
Equation 4-14: Total Gate Charge Power Loss for Both Catch and Forward MOSFETs
Active Clamp Capacitor
Active clamp capacitance selection depends on the voltage ripple allowed by the components
connected to SWP. Low clamp capacitance values will generate larger voltage ripple and thus,
larger drain voltage on the primary MOSFET, but will require less magnetizing current.
Equation 4-15: Clamp Capacitance Value
Equation 4-16: Clamp Snubbing Capacitance
Equation 4-17: Clamp Snubbing Resistance
A snubber circuit will limit the peak voltages at the primary MOSFET drain during transients.
Page 24
24
Mosfet Heatsinking
The packages for the Clamp Mosfet and the Catch Mosfet were TO-220 and required heatsinks
to be chosen for them. The Primary Mosfet and the Forward Mosfets were surface mount and did
not require any additional heatsinking beyond the recommended layout.
Equation 4-18: Calculation of Ambient Temperature without Heatsinking
Equation 4-19: Calculation of Minimum Heatsink Performance
Page 25
25
Active Clamp Switch Timing
In order to correctly perform ZVS for the primary MOSFET, AOUT, the clamp MOSFET gate
signal, to OUT, the primary MOSFET gate signal, (tAO) and OUT to AOUT (tOA) delays need to
be programmed. Both timings are generated from a single resistor RTAO, which programs the
clamp gate signal falling edge to the primary gate signal rising edge delay, or clamp MOSFET
turn-off to primary MOSFET turn-on.
Equation 4-20: Minimum Timing from AOUT to OUT (Clamp Off, Primary On)
The minimum time between the clamp gate signal to the primary gate signal is determined using
the chosen MOSFETs datasheet signal delay values. Having a larger tAO value allows the main
transformer’s magnetizing current to discharge the primary MOSFET’s drain voltage towards
VIN before turn-on.
Equation 4-21: Switching Timing AOUT to OUT Resistor
The tOA value is automatically generated and checked to make sure the clamp MOSFET does not
turn on until the primary and forward MOSFETs are turned off to prevent shoot-through.
Page 26
26
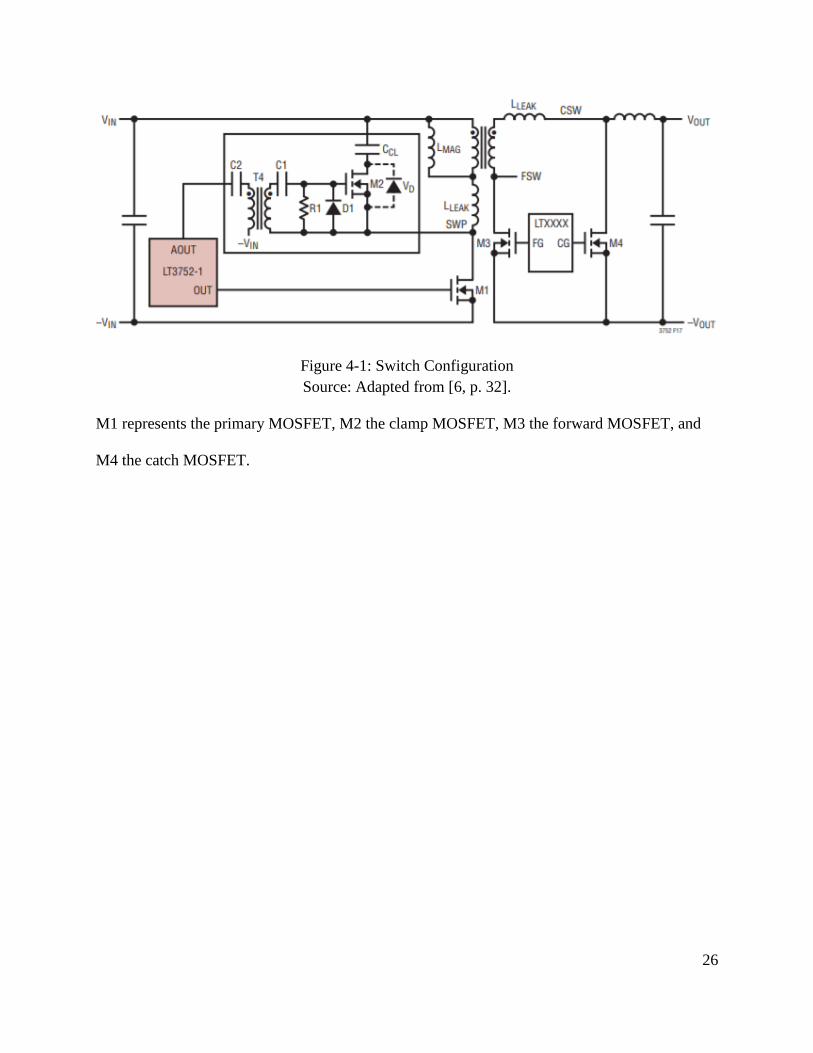
Figure 4-1: Switch Configuration
Source: Adapted from [6, p. 32].
M1 represents the primary MOSFET, M2 the clamp MOSFET, M3 the forward MOSFET, and
M4 the catch MOSFET.
Page 27
27
Synchronous Rectifier Timing
To synchronize the primary switching to the secondary side synchronous rectification, SOUT,
the control signal to the secondary side, to OUT (tSO), and OUT to SOUT (tOS) need to be
programmed for highest efficiency. Both timings are generated from a two resistors RTAS, which
programs the catch gate signal falling edge to the primary gate signal rising edge delay, or catch
MOSFET turn-off to primary MOSFET turn-on, and RTOS, which programs the primary gate
signal falling edge to the catch gate rising edge delay, or primary MOSFET turn-off to catch
MOSFET turn-on.
Equation 4-22: Minimum Timing from SOUT to OUT (Catch Off, Primary On)
The minimum time between the catch gate signal to the primary gate signal is determined using
the chosen MOSFETs datasheet signal delay values. The catch MOSFET should always be
turned on when the primary MOSFET is turned off for continuous conduction. This results in
very short non-overlap times between the SOUT and OUT gate signals.
Equation 4-23: Minimum Timing from AOUT to OUT (Clamp Off, Primary On)
The tSO delay is defined by the AOUT to OUT and AOUT to SOUT individual timings, so once
the tSO value is found, the tAS value is determined to set the clamp off to primary on delay.
Page 28
28
Equation 4-24: Switching Timing AOUT to SOUT Resistor
Equation 4-25: Minimum Timing from OUT to SOUT (Primary Off, Catch On)
Lastly, the tOS is defined, which defines the primary MOSFET turn-off to catch MOSFET turn-
on delay. This timing is programmed through the RTOS resistor value.
Equation 4-26: Switching Timing OUT to SOUT Resistor
Simulation
Simulations were run many times over the course of the design in order to validate design
equations, determine optimal values for parameters not covered by the datasheet, and retrieve
data from hard to calculate expressions. The simulation depicted in Figure x is the final
simulated schematic we used. This schematic was the test bed for all previous simulations. The
schematic runs the converter through 5 load values, 0%, 25%, 50%, 75%, and 100% load, and
and with 3 different input voltage levels, 200V, 316V, and 400V. It should be noted that the
schematic is not representative of the final design due to simulation issues. The first difference is
Page 29
29
that most of the OC and other non-critical set resistors were not used because simulation errors
sometimes resulted in a triggering of the various protection circuits that we do not expect to
happen in actual operation. The second difference is that many of the mosfets are not
representative of the actual mosfets we used. This is because most of the mosfets that we used
did not have LTSpice models. The most notable of these is the primary mosfet, which has an
auxiliary boost converter inside of it. As a result, the switch timing resistors were not
implemented because the timings would not be representative of the actual system. Third, the
input filter network is not included because our supply is an ideal voltage source in simulation
and thus, would only slow down the simulation time. Finally, the gate driver is not present in the
simulation. A gate driver LTSpice model was found, but the LTSpice solver was not able to
reach convergence despite many simulation setting changes.
From simulation, we were able to confirm that the clamp and snubber network were still
effective at 300 kHz, 500W. Additionally, we determined that a turns ratio of 4 and a primary
inductance of 200 uH was the optimal combination for the main transformer. Deviating from this
optimal point ended up in increased losses, due to the clamp network no longer performing
optimally. Additionally, we found that reducing the current sense resistor on the main mosfet
improved efficiency noticeably and improved operation at higher power levels. Finally, we were
able to determine the average winding currents, which was critical information for determining
the winding losses in the transformer. Components in the housekeeping supply, sync transformer
and optoisolator were found to not significantly affect performance. The peak efficiency of our
best simulation achieved 94.5% efficiency.
Page 30
30
Figure 4-2: Final Simulation Schematic
Source: Adapted from [10].
Figure 4-3: Efficiency Plot of Optimal Configuration
Page 31
31
Transformer Design
The differing power and frequency between the demo board and our chosen design necessitated
the design of a transformer. The transformer core was chosen using the area product method and
the final design was finalized through a MATLAB script (see Appen. A).
The first step in designing a transformer is determining as many overall parameters as
possible. Through simulation, we determined that we would be using a 300 kHz active clamp
switching waveform, 400V max primary voltage, approximately 4:1 turns ratio, and 200 uH of
primary side inductance. From here, the next step is to choose a core. A common method of
selecting a core is through the area product method. The area product method looks at a core’s
cross-sectional core area and its cross-sectional winding area. This product can give a rough
estimate of the total power handling of the core.
Equation 4-27: AP Product Guidance Equation
Source: Adapted from [11].
From here, we chose a core topology and size. We ended up choosing a N87 core material, ETD
core (specifically, the B66358) from TDK. Choosing core topology will not be discussed further
in the report. However, the ETD core was chosen due to the ease of winding and increased
availability compared to PQ and other core types.
Page 32
32
In the code, the first step is to calculate the skin depth. The skin effect is a phenomena in high
frequency wires, where the flowing current induces an eddy current within the wire, causing the
current density to increase around the edges of the wire, reducing the effective wire gauge. The
skin depth is the depth where 30% of the current is present within that distance from the surface
of the conductor.
Equation 4-28: Skin depth equation
For a copper wire at 300 kHz, the skin depth is approximately 119 micron.
Since we started with a maximum allowable duty cycle, we are able to correlate that duty cycle
to a maximum flux density, which was chosen to be 200mT. This flux density was chosen
because it is the highest flux density that is characterized in the core loss plots for our chosen
core.
Page 33
33
Equation 4-29: Calculation of required primary turns
The actual operating flux density is determined by multiplying the max flux density for
the chosen primary turns by the ratio of the operating duty cycle to the maximum duty cycle:
Equation 4-30: Calculation of Operating Flux Density
Now that we know the operating flux density, we can determine the core loss. TDK’s
website has core loss parameters for a given temperature and flux density, in units of mW/kg.
These plots were inserted into the MATLAB script, interpolated, and multiplied by the core mass
to determine loss. Lower flux densities will result in lower loss, which is why it is important to
make the distinction between the maximum allowed duty cycle and the actual operating duty
cycle.
Next, we must determine the core material and gapping required to achieve our desired
primary inductance. In our research, most transformer designs are made without accounting for
the transformer inductance, with the exception of designs for flyback supplies. However, our
simulation indicated that failure to achieve a 200uH primary inductance would lead to decreased
Page 34
34
efficiency and possible failure to operate. By changing the core material and gapping the core,
we can reduce the effective permeability of the core enough to reduce the primary inductance to
an acceptable value. A figure of calculating the inductance of a winding is the Al value. The Al
value is in units of nH/N^2, where N is the number of turns. Our core datasheet gave us the Al
values for different cores and gaps. From here, we choose the gap that will give us an inductance
that is closest to 200 uH.
Next is to calculate winding losses. From simulation data, we determined that 3.865A
will flow through the primary windings on average during worst case, max power. Multiplying
that current by the turns ratio will give us the secondary winding current. The length of the
primary and secondary windings is determined by multiplying the number of turns by the mean
path length, a parameter given by the bobbin datasheet.
From here there two potential methods for designing the transformer windings. The first
method is to use single wire strands, the second is using Litz wire.
There are two different types of effects that increase resistance in transformer windings:
skin effect and proximity effect. The skin effect is the increase in resistance caused by eddy
currents causing the current to concentrate near the surface of the conductor. The proximity
effect increase resistance in parallel wires due to interaction in their magnetic fields, which
further crowds the current. The skin effect can be easily circumvented by using thinner gauge
wire. On the other hand, the proximity effect can be reduced by interleaving the primary
windings between secondary windings, since the secondary windings have currents that are out
of phase with the primary windings, or by not paralleling wires. Because these are competing
parameters and proximity effect losses are not easily calculable without EM simulation, the
safest option is to use a small gauge wire to reduce skin effect losses and to interleave primary
Page 35
35
and secondary windings until the all of the winding area is consumed. However, this will lead to
a very difficult to manufacture transformer and the capacitance between the windings will be
greatly increased.
When designing this way, it is important to make sure that the J, current density, between
the primary and secondary windings are equal. This will ensure that the winding losses will be
equal, which is the lowest loss point.
Litz wire is a bundle of electrically insulated wires that are twisted in a special way so
every strand spends and equal amount of distance in every part of the cross-sectional area of the
bundle. This allows Litz wire to have a larger effective diameter wire that bypasses the skin
effect due to the thin wire and also fully use all of the wires in the strands because each wire is
exposed to the same proximity effect forces at some point in the wire. This causes the initial
resistance of the Litz wire to decrease as strand count increases. Because the proximity effect
will increase resistance, the effective resistance of the litz wire will eventually start to increase as
the number of parallel strands are added to the litz wire. Generally, the resistance of Litz wire is
represented by F, which is the scaling factor of Rac / Rdc. Taking the DC resistance of the Litz
wire and multiplying it by F will give you the actual resistance of the Litz wire.
Equation 4-31: Calculation of F for Litz Wire
Page 36
36
Equation 4-32: Calculation of Rac
Because Rac will only be minimal over a very specific bundle outer diameter for a given
strand diameter, and because only a limited combinations of Litz wire exist, it is not important to
enforce an equal current density. Instead, it is better to test every combination of litz wires and
interleaving, then picking the lowest loss combination. In our design, it was determined that no
interleaving was required to reach the optimal litz wire solution.
While choosing different litz wire options, it is important to ensure that the total occupied
area fits within the winding area. Winding are occupied is affected by the number of interleaving
layers, the cross sectional area of the wire, and the number of turns. The relationship between the
number of turns and the winding is why the area product equations exist. The larger the cross-
sectional area of the core, the less turns are required for any given flux density, which increases
the amount of winding area available for parallel wires. When using the litz wire, it is important
to recognize that the actual area of the litz wire is does not scale linearly linearly with the number
of strands. Additionally, we must take into account the wasted space between the round cavities
when laying wires together. This was accounted for by increasing the wire area by 25%.
Page 37
37
Equation 4-33: Empirical Formula for Calculating Litz Cross-Sectional Area
The MATLAB script takes all of these equations and uses them to find the lowest loss
solution. First, the script creates an array of different possible B. For each different B, we
calculate the core loss, then try every combination of litz wire and interleaving to find the best
winding combination that will fit within the winding area. With this information, we have the
best possible total loss in the transformer for a single B. As we iterate through the different B’s
in the array, we keep track of the losses. When the loop completes, the script selects the B and
winding combination with the lowest loss.
Page 38
38
Final Design
Figures 4-x through 4-x represent the final design of the DC-DC converter. All component
values calculated through the previous simulation and design equations are used in the
schematic. Additionally, test points, reverse voltage and overcurrent protection, jumpers, and an
enable pin are included. When power is not supplied to the enable pin, it blocks the supply
voltage to the LT3752 undervoltage lockout pin in order to force the converter into shutdown
pin. The jumpers allow the user to force the DC-DC to be off through the same method as the
enable pin, or disable the overcurrent protection. During simulation overcurrent protection was
occasionally an issue, so a disable was added in the event that false overcurrents were occuring.
The reverse voltage protection and overcurrent protection are achieved through a fuse-diode
circuit. Under normal conditions, current flows through the fuse and the diode is reverse biased.
In the event of an overcurrent, the fuse blows, protecting the DC-DC. In the event of a reverse
voltage, the diode becomes forward bias and short circuits the supply through the fuse. This
causes the fuse to blow, disconnecting the circuit from ground.
Page 39
39
Figure 4-4: DC-DC Top Schematic
Figure 4-5: LT8311 Schematic
Figure 4-6: Forward Active Schematic
Figure 4-7: Flyback Schematic
Page 40
40
Figure 4-8: LT3752-1 Schematic
Figure 4-9: OptoIsolator Schematic
Figure 4-10: Input Fusing and RVP
Schematic
Figure 4-11: DC-DC Disable
Schematic
Page 41
41
Figure 4-12: Sync Transformer
Schematic
Figure 4-13: Gate Driver Schematic
Page 42
42
5. Hardware Test and Results
The construction of the DC-DC is separated into two parts: the construction of the
transformer, and the main board.
After purchasing the required transformer materials that were chosen in Chapter 4, we
began winding the transformer. The primary windings were the inner layer and the secondary on
the outer layer. As mentioned in Chapter 4, there was no need for interleaving. The inner layer
was used for the primary winding in order to reduce leakage inductance on the primary side.
Additionally, the gapping needed to achieve the correct leakage inductance will cause the inner
layer to experience higher proximity effect resistance. Therefore, it is better to have the higher
current, secondary winding further away from the center leg of the core since the secondary
winding experiences higher currents.
Figure 5-1: Final Constructed Transformer
While winding the transformer, we tried two separate methods for winding the
transformer, which we called low leakage, and crossover. The low leakage winding method
reduces the total leakage inductance while the crossover method lowers the maximum voltage
between adjacent windings. As seen in Table 5-1, there are no significant changes in Rac
Page 43
43
between the two methods; therefore, we chose to follow the crossover winding method to reduce
the risk of arcing in the transformer.
The primary side inductance matched calculations very well. The chosen 0.2mm gap
gave us a primary side inductance of approximately 454uH, which is close to the predicted
400uH. Because the datasheet did not provide data on gaps formed by combinations of different
gaps, we tested all the different combinations of gaps and found that a 0.4mm total gap gave the
closest primary side inductance to 200uH. On the other hand, Rac measurements deviated
significantly from the calculated data. Most Rac measurements were found to be over 30 times
greater than expected.
Figure 5-2: Low Leakage Winding Depiction
Figure 5-3: Crossover Winding Depiction
Page 44
44
Table 5-1: Transformer Design Test Data
Primary
Winding Gap
L@300kHz
(uH) Rac@300kHz Rdc (mOhm) Winding
.4mm gap 268.8 2.2 Not Measured Lleak attempt
.3mm gap 334 2.436 Not Measured Lleak attempt
.2mm gap 454.6 3.097 Not Measured Lleak attempt
.1mm gap 721 5.3 Not Measured Lleak attempt
0 gap 2.5 123 Not Measured Lleak attempt
.4mm gap 269 2.53 50.93 Crossover
.3mm gap 336.3 2.77 50.93 Crossover
.2mm gap 454.2 3.6 50.93 Crossover
.1mm gap 709 6.8 50.93 Crossover
0 gap 2.49 124.4 50.93 Crossover
Secondary
Winding
.4mm gap 21.09 0.3439 4.065
Calc'd N1/N2 3.571394703
Page 45
45
Figure 5-4: Transformer Measured Primary Side AC Resistance
Figure 5-5: Transformer Measured Secondary Side AC Resistance
Page 46
46
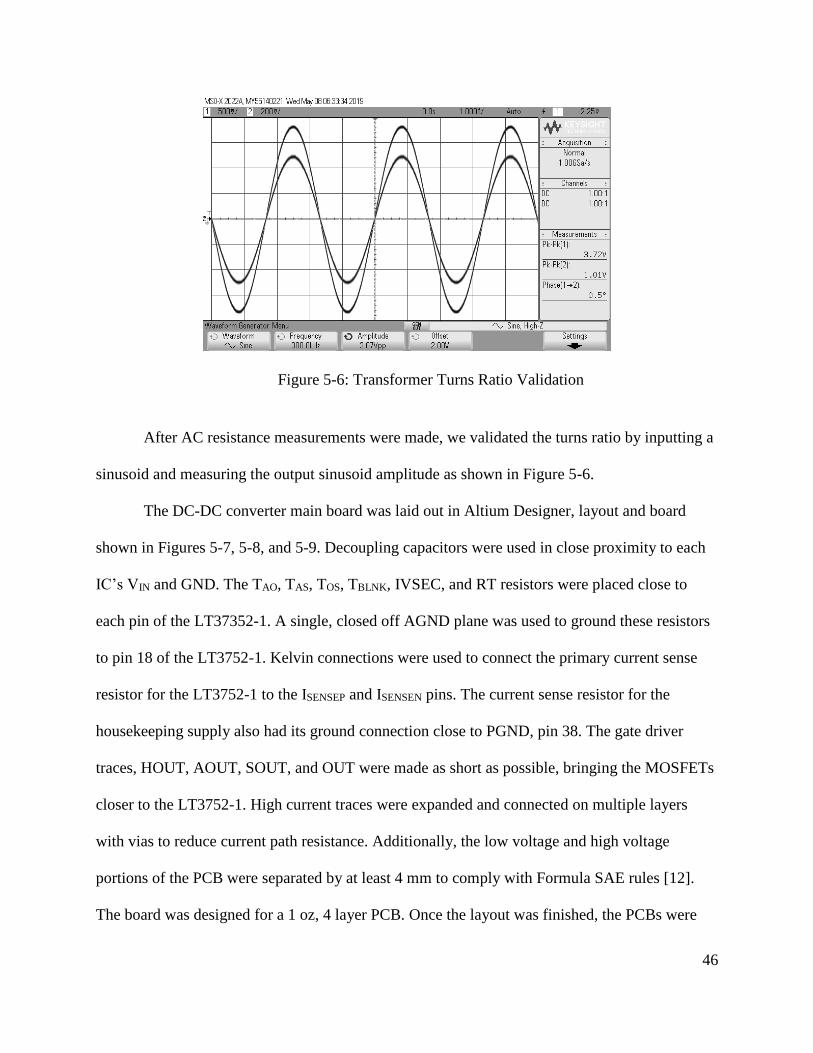
Figure 5-6: Transformer Turns Ratio Validation
After AC resistance measurements were made, we validated the turns ratio by inputting a
sinusoid and measuring the output sinusoid amplitude as shown in Figure 5-6.
The DC-DC converter main board was laid out in Altium Designer, layout and board
shown in Figures 5-7, 5-8, and 5-9. Decoupling capacitors were used in close proximity to each
IC’s VIN and GND. The TAO, TAS, TOS, TBLNK, IVSEC, and RT resistors were placed close to
each pin of the LT37352-1. A single, closed off AGND plane was used to ground these resistors
to pin 18 of the LT3752-1. Kelvin connections were used to connect the primary current sense
resistor for the LT3752-1 to the ISENSEP and ISENSEN pins. The current sense resistor for the
housekeeping supply also had its ground connection close to PGND, pin 38. The gate driver
traces, HOUT, AOUT, SOUT, and OUT were made as short as possible, bringing the MOSFETs
closer to the LT3752-1. High current traces were expanded and connected on multiple layers
with vias to reduce current path resistance. Additionally, the low voltage and high voltage
portions of the PCB were separated by at least 4 mm to comply with Formula SAE rules [12].
The board was designed for a 1 oz, 4 layer PCB. Once the layout was finished, the PCBs were
Page 47
47
etched by Bay Area Circuits. To solder the board, homemade stencils were created to decrease
manufacturing time. The base stencil material consisted of two layers of Kapton tape stuck on
either side of a piece of a paper. The Kapton-paper composite was then cut on a laser cutter using
the paste layer from the Altium board layout, forming a makeshift stencil. Solder paste was
applied and all non-through hole components on the top layer were placed and reflowed using a
microscope and toaster oven. The remaining through-hole and bottom layer components were
soldered by hand. For the through-hole MOSFETs, their heat sinks were bolted on using plastic
bolts and nuts with insulating thermal pads.
Figure 5-7: DC-DC Main Board Layout
Page 48
48
Figure 5-8: DC-DC 3D Render
Figure 5-9: DC-DC Final Constructed Board
To sufficiently monitor all relevant signals and rails of the converter, multiple
oscilloscopes and differential probes were used to measure and characterize the converter. The
basis of the test setup consisted of monitoring the input and output voltage and current. The final
test setup consisted of two 600V, 1.5A power supplies in parallel, sourcing the converter as
shown Figure 5-10. The HV current path was conducted through an ammeter, and eventually to
Page 49
49
the DC-DC converter. Additionally, the input voltage of the DC-DC converter was monitored
using a multimeter after the input fuse of the converter to indicate whether or not the converter
had passed its overcurrent limit. The output voltage was monitored using another multimeter,
and the output current was measured using a BK Precision electronic load when the converter
was loaded.
Figure 5-10: DC-DC Multimeter, Supply, and Load Block Diagram
As for the signals and power rails of the converter, three different oscilloscopes were
used and synchronized to measure all the relevant signals. However, the ground prong of each
oscilloscope connected the chassis together and thus, the grounds of each oscilloscope probe
were connected together. Because of the nature of isolated power supplies, signals on the high
voltage and low voltage sides of the converter could not be normally measured by neither the
same oscilloscope, nor multiple oscilloscopes. To measure the signals on both sides of the
converter, the signals on one of the sides needed to be measured differentially, with probes from
all three oscilloscopes grounded to the same point. In this case, all probes from all three
oscilloscopes were grounded to the high voltage ground. This meant that high voltage signals
could be measured normally, while all low voltage signals needed to be measured differentially.
Page 50
50
The high voltage signals were measured using Rigol 1, as shown in Figure 5-11. In order to use
probes efficiently, only one probes from the Rigol 2 and Keysight oscilloscopes were used to
measure the low voltage ground signal. A Matlab script was used to perform math on the
measured data to subtract the Rigol 2 and Keysight signals from their measured ground signal to
extract the signal waveforms after the fact. Additionally, this Matlab script synchronized the data
measured from each oscilloscope to the same time scale. To accomplish this, each oscilloscope
used the same time division scale and were externally triggered to each other. In total, 7 signals,
(9 including low voltage grounds), were measured, including OUT (primary MOSFET gate
signal), AOUT (clamp MOSFET gate signal), SWP ( primary MOSFET drain voltage and
bottom leg of primary side of the transformer), FSW (forward MOSFET drain voltage and
bottom leg of secondary side of the transformer), CSW (catch MOSFET drain voltage and top
leg of secondary side of the transformer), FG (forward MOSFET gate signal), CG (catch
MOSFET gate signal), and HV IN (high voltage input and top leg of the primary side of the
transformer).
Figure 5-11: DC-DC Oscilloscope Measurement Point Setup
Page 51
51
Due to multiple failures of the DC-DC converter, we were unable to properly characterize
the operation of the DC-DC. At the time of writing, the DC-DC converter suffered from excess
ringing that lead to the failure of the converter.
Table 5-2: Efficiency Test Results
Input Voltage Load Efficiency Output Voltage
200V 0% N/A 9V
200V 25% 93% 7V
Figure 5-12: LT3752-1 and LT8311 Controller Signal Waveforms (Ignore Blue
Waveforms)
Source: Adapted from [7, p. 14]
Page 52
52
According to Figure 5-12 from the datasheet, SWP and FSW mirror each other with FSW
being stepped down by the turns ratio. This is accomplished by transformer action on opposing
legs of the transformer. Additionally, CSW, the top leg of the secondary side, resembles a square
wave with ringing at the rising edge.
Table 5-3: DC1929A Demo Board Waveforms1
Figure 5-13: DC1929A OUT and SWP
Figure 5-14: DC1929A FG and FSW
Figure 5-15: DC1929A CG and CSW
1 All signals tested using 316V input at 2A load.
Page 53
53
The DC1929A Demo Board was tested to serve as example control signals of how the
DC-DC converter should look. As shown in Figure 5-14, the FSW waveform closely resembles a
square wave with ringing on the rising and falling edge. The voltage steps shown in the datasheet
waveforms are small, and not clearly seen in the SWP and FSW waveforms in Figures 5-13 and
5-14. However, both waveforms roughly resemble a square wave.
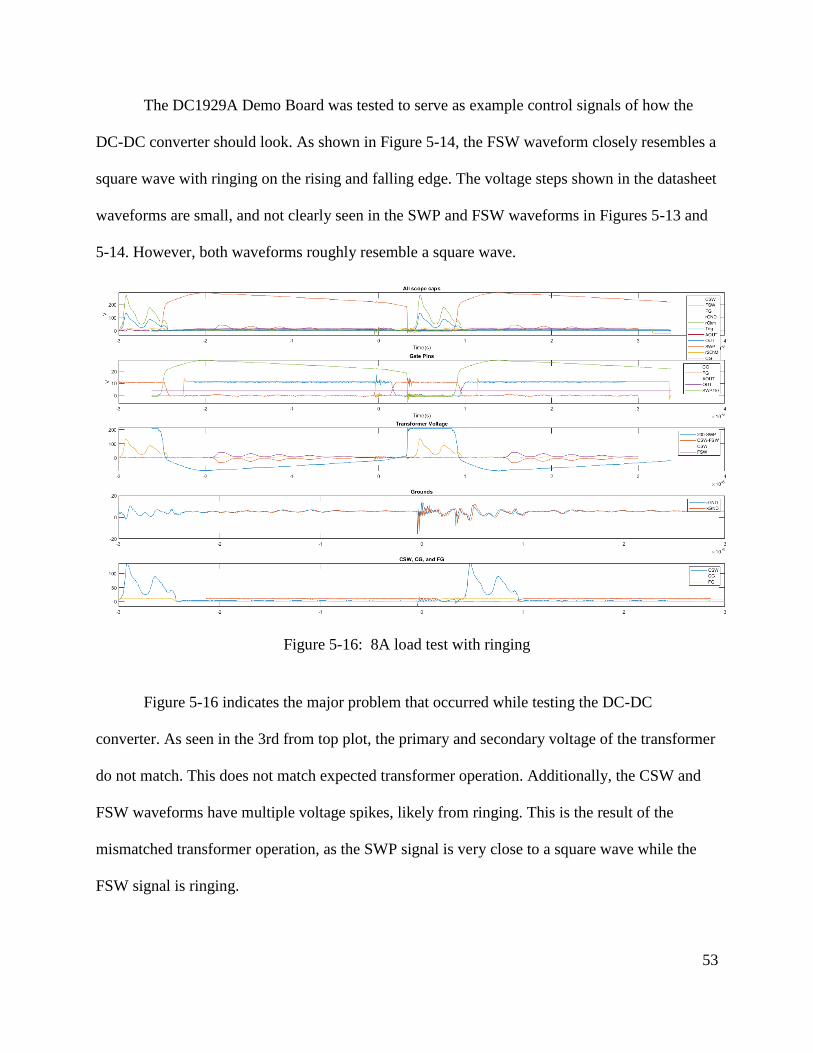
Figure 5-16: 8A load test with ringing
Figure 5-16 indicates the major problem that occurred while testing the DC-DC
converter. As seen in the 3rd from top plot, the primary and secondary voltage of the transformer
do not match. This does not match expected transformer operation. Additionally, the CSW and
FSW waveforms have multiple voltage spikes, likely from ringing. This is the result of the
mismatched transformer operation, as the SWP signal is very close to a square wave while the
FSW signal is ringing.
Page 54
54
6. Conclusion
This project entails the design and construction of the HV (High Voltage) to LV (Low
Voltage) DC-DC converter for the Formula SAE Student Design Competition (FSAE) electric
vehicle car. The final DC-DC converter was able to demonstrate successfully a high frequency
power transformer design, which further provides a useful framework to assist in the speed of
development of future DC-DC projects. There were some issues encountered during the testing
of the converter, which include meeting the load specifications due to excess ringing on the
primary and secondary side leading to eventual failure of the power MOSFETs during light load
operation. Additional learning experience gained from the project is the knowledge needed for
proper heatsink selection and the balancing of switching and conduction losses to improve
efficiency. Finally, we also developed a measurement system to allow for the synchronization of
multiple oscilloscopes for differential probe measurements.
Future improvements falls into two categories: improvements that could help the DC-DC
meet specifications, and improvements that should be implemented after meeting specifications.
Improvements focused on helping the DC-DC meet specifications are centered around
fixing the ringing, as we believe it is the primary source of component failure and heating in the
DC-DC. The intensity of the ringing is potentially due to the measurement setup. Using high
voltage differential probes would significantly decrease the complexity of the measurement setup
by reducing the amount of probes required. Additionally, the parasitic capacitance of the
oscilloscope probes should also be reduced by using differential probes. Another source of
resonance is through the input capacitance of the secondary side MOSFETs.
Page 55
55
The frequency of the ringing also decreased after increasing the output inductor value, so
having a larger output inductor may help as well. In the Demo Board results, the voltage at the
top leg of the transformer resembled the top half of a sine wave with significant ringing. This
may indicate that a higher frequency resonance is superimposed on a lower frequency resonance,
with the higher frequency resonance being switching or leakage inductance related, and the
lower frequency resonance being related to the resonance between the output inductor and output
capacitance.
As another improvement, the transformer needs more testing and validation. Because we
lacked a proper test fixture, we were unable to test our transformer for leakage inductance, power
handling and load regulation capabilities. Transformer characterization is important because high
secondary side leakage inductance could be the reason why the ringing is only present on the
secondary side. Designing an H-bridge or fixed timing active clamp forward converter would
help characterizing the source of the ringing.
Improvements focused on improving a functional DC-DC center on performance
improvements and quality of life changes. One improvement includes reducing the overall size
of the converter in the width and length dimensions. These improvements will mainly decrease
the power path length, reducing resistance, and benefit packaging for future Formula SAE
Electric vehicles.
In terms of improving our ability to debug the converter, the clamp MOSFET should be
moved or become a surface mount package, which would assist the removal of the transformer
core during board reworks. Additionally, the clamp MOSFET heatsink was oversized and can be
reduced. Several nets of converter were missing that would benefit debugging should be added.
Some of these nets include the HV net before the input filter, the output voltage, and primary
Page 56
56
MOSFET pins. The output connector system bolting wire lugs to M3 screws was tedious to
connect and remove and should be altered to improve removal.
In order to further reduce size, water cooling could be included to decrease the required
cooling effort. This would allow designers to use smaller switching IC's, which should improve
efficiency, as the switching energy will decrease. This would also decrease the total required
mass for heatsinks.
Another potential improvement is the addition of a complete microcontroller system. This
would significantly improve the tunability of the design as well as the amount of telemetry that
could be sent back. In this project, voltage and current sensing were not able to be easily
transmitted to an external processor. Additionally, the output voltage could only be adjusted
manually. Both of these operations could be accomplished using a microcontroller system.
Page 57
57
7. References
[1] L. McDonald, “US EV Sales Surpass 2% In 2018 — 9 EV Sales Charts,” CleanTechnica,
13-Jan-2019. [Online]. Available: https://cleantechnica.com/2019/01/12/us-ev-sales-surpass-
2-for-2018-8-more-sales-charts/. [Accessed: 01-Feb-2019].
[2] “EV-1 White Paper,” 11-Sep-2002. [Online]. Available:
https://web.archive.org/web/20090726034344/http://www.cleanup-gm.com/ev1.html.
[Accessed: 01-Feb-2019].
[3] “Model 3 | Tesla.” [Online]. Available: https://www.tesla.com/model3. [Accessed: 01-Feb-
2019].
[4] N. Sridhar, “Driving the Future of HEV/EV With High-Voltage Solutions.” [Online].
Available: http://www.ti.com/lit/wp/slyy052b/slyy052b.pdf. [Accessed: 18-Feb-2019].
[5] “DC-DC converter for Hybrid Electric Vehicle and EV,” 2013.
[6] “LT3752/LT3752-1 Active Clamp Synchronous Forward Controllers with Internal
Housekeeping Controller.” [Online]. Available: https://www.analog.com/media/en/technical-
documentation/data-sheets/3752fb.pdf. [Accessed: 10-Jun-2019].
[7] “LT8311 Synchronous Rectifier Controller with Opto-Coupler Driver for Forward
Converters.” [Online]. Available: https://www.analog.com/media/en/technical-
documentation/data-sheets/8311f.pdf. [Accessed: 10-Jun-2019].
[8] “DEMO MANUAL DC1929A LT3752-1/LT8311 200W Active Clamp Forward Converter
with Input Voltage 150V to 400V.” [Online]. Available:
https://www.analog.com/media/en/dsp-documentation/evaluation-kit-
manuals/dc1929afa.pdf. [Accessed: 10-Jun-2019].
[9] “LMG341xR050 600-V 50-mΩ Integrated GaN power stage with overcurrent protection.”
[Online]. Available: http://www.ti.com/lit/ds/symlink/lmg3410r050.pdf. [Accessed: 10-Jun-
2019].
[10] “LT3752 LT3752-1 Datasheet and Product Info | Analog Devices.” [Online]. Available:
https://www.analog.com/en/products/lt3752.html#product-tools. [Accessed: 10-Jun-2019].
[11] “Power Transformer Design.” [Online]. Available:
https://www.ti.com/lit/ml/slup126/slup126.pdf. [Accessed: 10-Jun-2019].
[12] “FSAE Rules.” [Online]. Available:
https://www.fsaeonline.com/page.aspx?pageid=e179e647-cb8c-4ab0-860c-ec69aae080a3.
[Accessed: 10-Jun-2019].
Page 58
58
8. Appendix
Code for Transformer Design
Transformer.m
%% Initializations
clearvars
load('wireSizes.mat'); % Loading wire gauge tables
load('litzOptions.mat'); % Loadings Litz wires of form (Nstrand,
Gauge)
% Litz wires available from
https://www.mikeselectronicparts.com/litz-wire/
Bdes = (0.005:0.001:.2)'; % Desired Flux Swing (Arbitrary Starting
Value)
K = 0.014; % Compensation Factor
%% Constants
rho_cu = 1.68e-8; % Copper Resistivity (ohm m)
%% Desired Values
Lpri_des = 200e-6; % Desired Primary Inductance
TR = 4; % Desired Turns Ratio
Jdes = 2.2; % Desired Current Density (A/mm^2)
eta = 0.3; % Expected Efficiency
DutyLim = 0.75; % Max Duty Cycle
DutyOp = 0.3; % Operating Duty Cycle
Ninter = 4; % Max interleaving layers
T = TransformerModel2(500, 300e3, DutyLim, DutyOp, 400,200, 0.75);
AP = (T.Po./(K.*Bdes.*T.ft)).^(3/4); % Estimated Area Product
Required (cm^4)
%% Core Properties
% B66358
T.Core = Core(0.93, 70.4, 76, 5350, 97, 19.4, 52.8, 28,...
[1470 1610 1670 457 281 148 91], 0.3, ...
[2000 2200 2250 621 383 201 124],...
[0.025, 0.050, 0.100, 0.200;
0.00333, 0.014433 0.084536 0.500732],...
[0 0 0 .1 .2 .5 1]);
Page 59
59
T.wPri = LitzWire();
T.wSec = LitzWire();
%% General Design Calculations
%T = V*s/m^2
Np1 = ceil(T.VinMax .* T.Dlim.* 1e4
./(2.*Bdes.*T.ft.*T.Core.Ae*0.01));
Bmact = T.VinMax .* T.Dlim.* 1e4 ./(2 .* Np1 .* T.ft .*
T.Core.Ae*0.01); % Actual Max Allowed B
Bact = Bmact.*T.Ddes./T.Dlim; %Getting Actual used B
Np2 = ceil(Np1/TR);
TR_act = Np1./Np2;
Al_req = Lpri_des ./ Np1.^2 *10^9;
% Determining the correct Al for the job
gChosen = zeros(1,length(Al_req));
AlChosen = zeros(1,length(Al_req));
LChosen = zeros(1,length(Al_req));
for i=1:length(Bdes)
Altemp = T.Core.Al(T.Core.Al > 1.2.*Al_req(i));
muiChosen = T.Core.mui(length(Altemp));
gChosen(i) = T.Core.g(length(Altemp));
AlChosen(i)= Altemp(end);
LChosen(i) = AlChosen(i) * Np1(i)^2*1e-9;
end
clear Altemp
T.Ipri = 3.865; % Measured Values
Isec = T.Ipri*TR_act;
LenPri = Np1 * T.Core.LN * 0.001; % Primary Wire
Length in m
LenSec = Np2 * T.Core.LN * 0.001;
Pcore = T.Core.getCL(Bact);
A = T;
A = repmat(A,1,length(Bdes));
for Bindex = 1:length(Bdes)
T.Np1 = Np1(Bindex);
T.Np2 = Np2(Bindex);
T.Isec = Isec(Bindex);
T.Bop = Bact(i);
T.Lpri = LChosen(i);
T.Core.gOpt = gChosen(i);
Page 60
60
T.Core.AlOpt = AlChosen(i);
T.TR = TR_act(i);
T.Pcore = Pcore(i);
T.Bmax = Bmact(i);
A(Bindex) = T.findLitz(LitzOptions, LenPri(Bindex),
LenSec(Bindex), ...
Ninter);
end
% Finding Optimal Operating Point
[val, i] = max([A.eta]);
T = A(i);
%% Plots
figure(1)
plot(Bdes,[A.eta])
xlabel('Bmax')
ylabel('Efficiency(%)')
title('Efficiency vs. Max B')
TransformerModel.m
classdef TransformerModel2
%TRANSFORMER Holds all of the relevant information to the final
%transformer design
% Detailed explanation goes here
properties
%% Objects
Core % Model of Transformer Core
wPri % Primary Wire Model
wSec % Secondary Wire Model
%% Vars
AwPri % Area used by primary windings
AwSec % Area used by secondary windings
Bmax % Max B used
Bop % Nominal B used
Dlim % Max Possible Duty Cycle
Ddes % Desired Duty Cycle
eta % Efficiency
ff % Winding Fill Factor
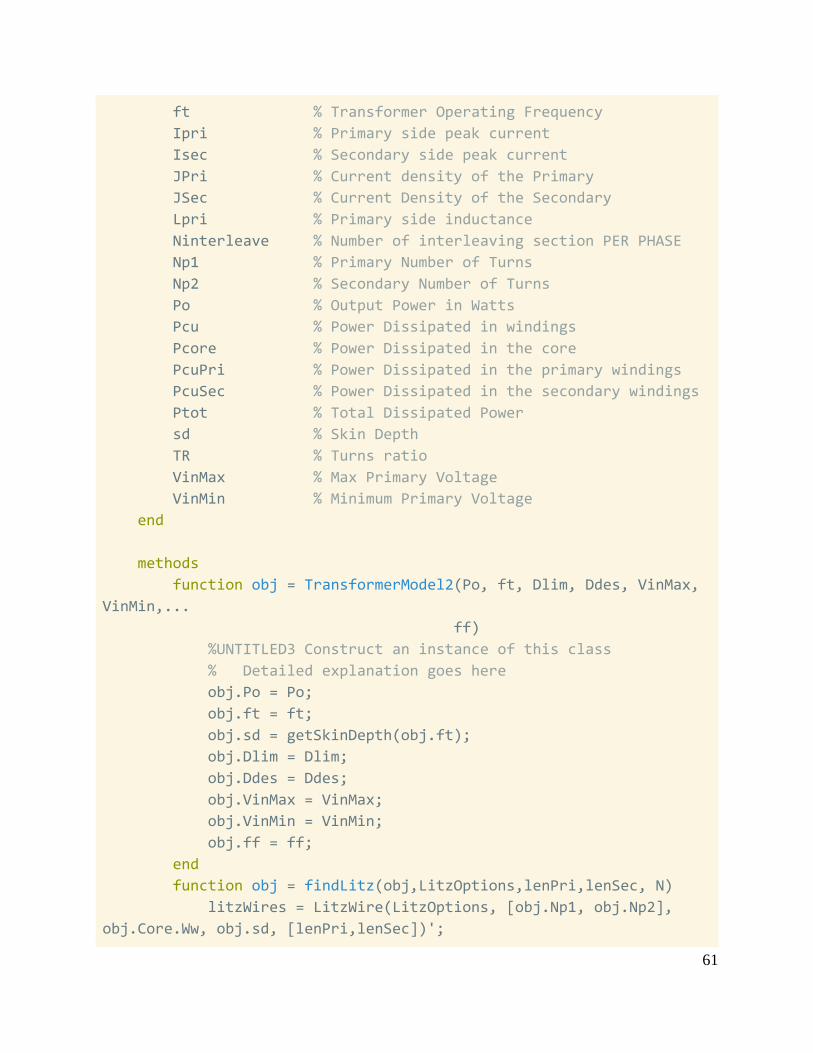
Page 61
61
ft % Transformer Operating Frequency
Ipri % Primary side peak current
Isec % Secondary side peak current
JPri % Current density of the Primary
JSec % Current Density of the Secondary
Lpri % Primary side inductance
Ninterleave % Number of interleaving section PER PHASE
Np1 % Primary Number of Turns
Np2 % Secondary Number of Turns
Po % Output Power in Watts
Pcu % Power Dissipated in windings
Pcore % Power Dissipated in the core
PcuPri % Power Dissipated in the primary windings
PcuSec % Power Dissipated in the secondary windings
Ptot % Total Dissipated Power
sd % Skin Depth
TR % Turns ratio
VinMax % Max Primary Voltage
VinMin % Minimum Primary Voltage
end
methods
function obj = TransformerModel2(Po, ft, Dlim, Ddes, VinMax,
VinMin,...
ff)
%UNTITLED3 Construct an instance of this class
% Detailed explanation goes here
obj.Po = Po;
obj.ft = ft;
obj.sd = getSkinDepth(obj.ft);
obj.Dlim = Dlim;
obj.Ddes = Ddes;
obj.VinMax = VinMax;
obj.VinMin = VinMin;
obj.ff = ff;
end
function obj = findLitz(obj,LitzOptions,lenPri,lenSec, N)
litzWires = LitzWire(LitzOptions, [obj.Np1, obj.Np2],
obj.Core.Ww, obj.sd, [lenPri,lenSec])';
Page 62
62
Ninterleaves = (1:1:N); %Number of interleaved blocks
per side (4 primaries)
AwPriM =
repmat(reshape(.01:.01:(obj.Core.Aw*0.8*obj.ff/obj.Np1),1,1,[])...
,1,length(Ninterleaves),1)./Ninterleaves; %List of
optional Aw's
AwSecM = (obj.Core.Aw*0.8*obj.ff -
AwPriM.*Ninterleaves.*obj.Np1)/obj.Np2./Ninterleaves;
RPriAC = repmat(litzWires.getRac(1)'./Ninterleaves, 1, 1,
length(AwPriM));
RsecAC = repmat(litzWires.getRac(2)'./Ninterleaves, 1, 1,
length(AwSecM));
RPriAC(AwPriM - ...
repmat(Ninterleaves.*[litzWires.Ao]', 1, 1,
length(AwPriM)) < 0) = NaN;
RsecAC(AwSecM - ...
repmat(Ninterleaves.*[litzWires.Ao]', 1, 1,
length(AwSecM)) < 0) = NaN;
PpriAC = obj.Ipri^2.*RPriAC;
PsecAC = obj.Isec^2.*RsecAC;
[obj.Pcu, indexAw] = min(min(min(PsecAC)+min(PpriAC)));
[~, indexInter] = min(min(PsecAC)+min(PpriAC)); %
Determining the optimal configuration
[obj.PcuSec, indexSec] =
min(PsecAC(:,indexInter(indexAw),indexAw));
[obj.PcuPri, indexPri] =
min(PpriAC(:,indexInter(indexAw),indexAw));
obj.Ninterleave = indexInter(indexAw);
obj.AwPri = AwPriM(indexAw);
obj.AwSec = AwSecM(indexAw);
obj.wPri = litzWires(indexPri);
obj.wSec = litzWires(indexSec);
obj.JPri = obj.Ipri/obj.AwPri;
obj.JSec = obj.Isec/obj.AwSec;
obj.Ptot = obj.Pcore + obj.Pcu;
obj.eta = (obj.Po-obj.Ptot) / obj.Po*100;
end
end
end
Page 63
63
LitzWire.m
classdef LitzWire < Wire
%LITZWIRE Class that holds information of the Litz Wire to be
used
% Detailed explanation goes here
properties
Ao % Total Area (not copper area)
Aw % Total wire Area
Fr % Rac/Rdc (will have two values(one for primary, one
for secondary)
Nstrand % Number of strands in the Litz Wire
OD % Outer Diameter of wire + 10% safety factor
Rac % AC Resistance
Rdc % DC Resistance of bundle
end
methods
function obj = LitzWire(objArray, Ns,b, sd, len)
%LITZWIRE Construct an instance of this class
% Detailed explanation goes here
if nargin ~= 0
m = size(objArray,1);
obj(m) = obj; % Create an array of objects
for i=1:m
obj(i).Nstrand = objArray(i,1);
obj(i).awg = objArray(i,2);
obj(i).d = objArray(i,3);
obj(i).a = objArray(i,4);
obj(i).len = len;
obj(i).R = obj(i).calcR();
obj(i).Fr = obj(i).calcFr(Ns, b, sd);
obj(i).Rdc = obj(i).calcRdc();
obj(i).Rac = obj(i).calcRac();
obj(i).OD = 1.1*(1.28 *
sqrt(obj(i).Nstrand)*obj(i).d);
obj(i).Ao = pi*(obj(i).OD/2)^2;
obj(i).Aw = obj(i).Nstrand * obj(i).a;
Page 64
64
end
end
end
function Fr = calcFr(obj,Ns,b, sd)
Fr = 1+((pi.*obj.Nstrand.*Ns).^2.*(obj.d).^6)...
./(192*(sd.*1000).^4.*b^2);
end
function Rdc = calcRdc(obj)
Rdc = obj.R./obj.Nstrand;
end
function Rac = calcRac(obj)
Rac = obj.Rdc .* obj.Fr;
end
function Rdc = getRdc(obj, index)
Rdc = zeros(1,length(obj));
for i = 1:length(obj)
Rdc(i) = obj(i).Rdc(index);
end
end
function Rac = getRac(obj,index)
Rac = zeros(1,length(obj));
for i = 1:length(obj)
Rac(i) = obj(i).Rac(index);
end
end
end
end
Wire.m
classdef Wire
%WIRE Summarizes property of Wire
% Detailed explanation goes here
properties
a % Area of wire (mm^2)
awg % Wire Gauge number
Page 65
65
d % Diameter of wire (mm)
len % Required Length of wire for T
R % Single Wire Resistance
rho_cu = 1.68e-8; % Copper Resistivity (ohm m)
end
methods
function obj = Wire(awg, d, a)
%WIRE Construct an instance of this class
% Detailed explanation goes here
if nargin ~= 0
obj.awg = awg;
obj.d = d;
obj.a = a;
end
end
function R = calcR(obj)
R = (obj.rho_cu .* obj.len ./ (obj.a*0.001^2));
end
end
end
getSkinDepth.m
function [skinDepth] = getSkinDepth(f)
%GETSKINDEPTH Returns the skip depth, assuming the material is made
out of
%copper
% Detailed explanation goes here
rho = 1.678e-8; % resistivity of copper (ohm *m)
mur = 0.999991; % relative permeability
mu0 = 4*pi*1e-7; % free space permeability
skinDepth = sqrt(rho / (pi*f*mur*mu0));
end
Page 66
66
Core.m
classdef Core
%CORE Summary of this class goes here
% Detailed explanation goes here
properties
CF % Core Factor (mm^-1)
Le % Effective magnetic path length (mm)
Ae % Effective Cross-Sectional Area (mm^2)
Ve % Effective Core Volume (mm^3)
Aw % Winding Area
Ww % Minimum winding width
LN % Average Turn Length (mm)
m % Mass (g/set)
AP % Area Product
mui % Initial Permeability
Bsat % Saturation Magnetic Flux Density (Estimate)
Al % AL-Value @ 1kHz, 0.5mA(nH/N^2)
AlOpt % Optimal Al
CL % Core Loss @ 80C, 300kHz, W/g
g % Air gap in
gOpt % Optimal Air Gap
end
methods
function obj = Core(CF, Le, Ae, Ve, Aw, Ww, LN, m, mui, ...
Bsat, Al, CL, g)
%CORE Construct an instance of this class
% Detailed explanation goes here
obj.CF = CF;
obj.Le = Le;
obj.Ae = Ae;
obj.Ve = Ve;
obj.Aw = Aw;
obj.Ww = Ww;
obj.LN = LN;
Page 67
67
obj.m = m;
obj.AP = getAP(Ae,Aw);
obj.mui= mui;
obj.Bsat = Bsat;
obj.Al = Al;
obj.CL = CL;
obj.g = g;
end
function Pcore = getCL(obj,Bact)
%METHOD1 Summary of this method goes here
% Detailed explanation goes here
Pcore = obj.m * interp1(obj.CL(1,:)',obj.CL(2,:)', Bact);
end
end
end
getAP.m
function [AP] = getAP(Ae,Aw)
%getAP Returns Area Product in cm^4 from mm^2 inputs
% Detailed explanation goes here
AP = (Ae*.01*Aw*.01);
end
getCL.m
function CL = getCL(CL_table,B)
%GETCL Returns the core loss for a given B using interpolation
% Detailed explanation goes here
CL = interp1(CL_table(1,:)',CL_table(2,:)', B);
end
Timeline of Tasks and Milestones
Page 68
68
Figure 8-1: Winter Quarter Timeline
Figure 8-2: Spring Quarter Timeline
Bill of Materials
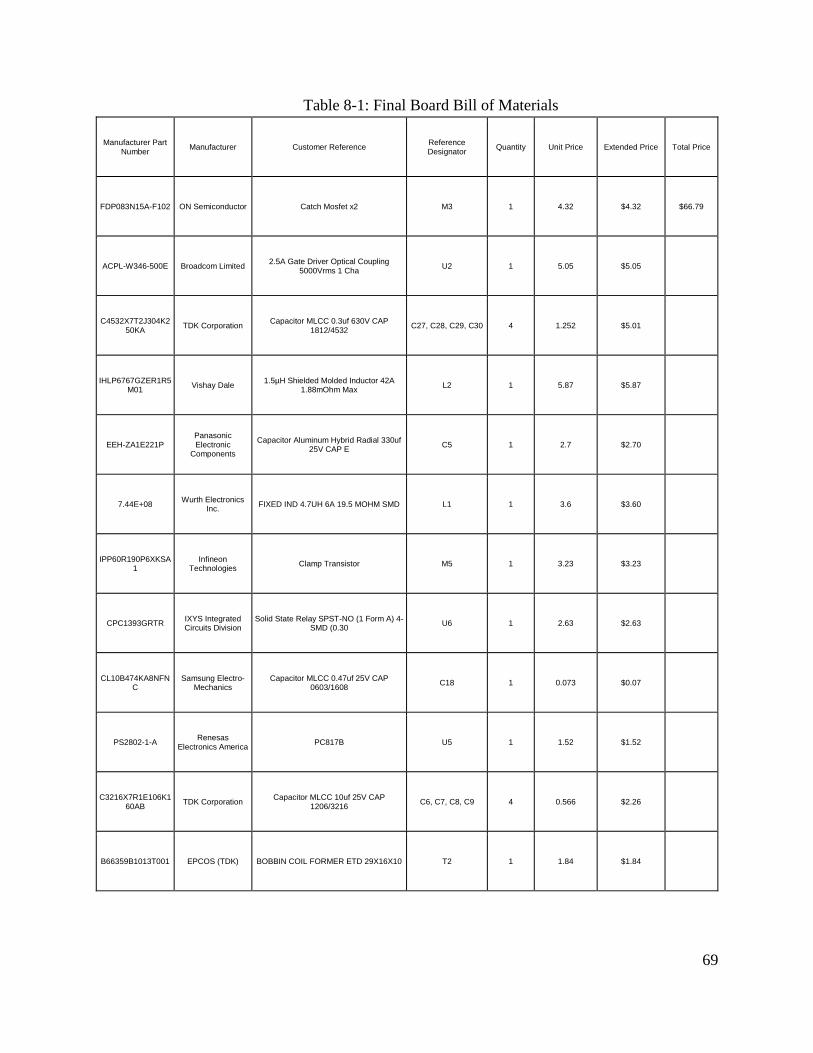
The final price of a single board (purchased in bulk quantity of 5 boards) is
$66.79
Page 69
69
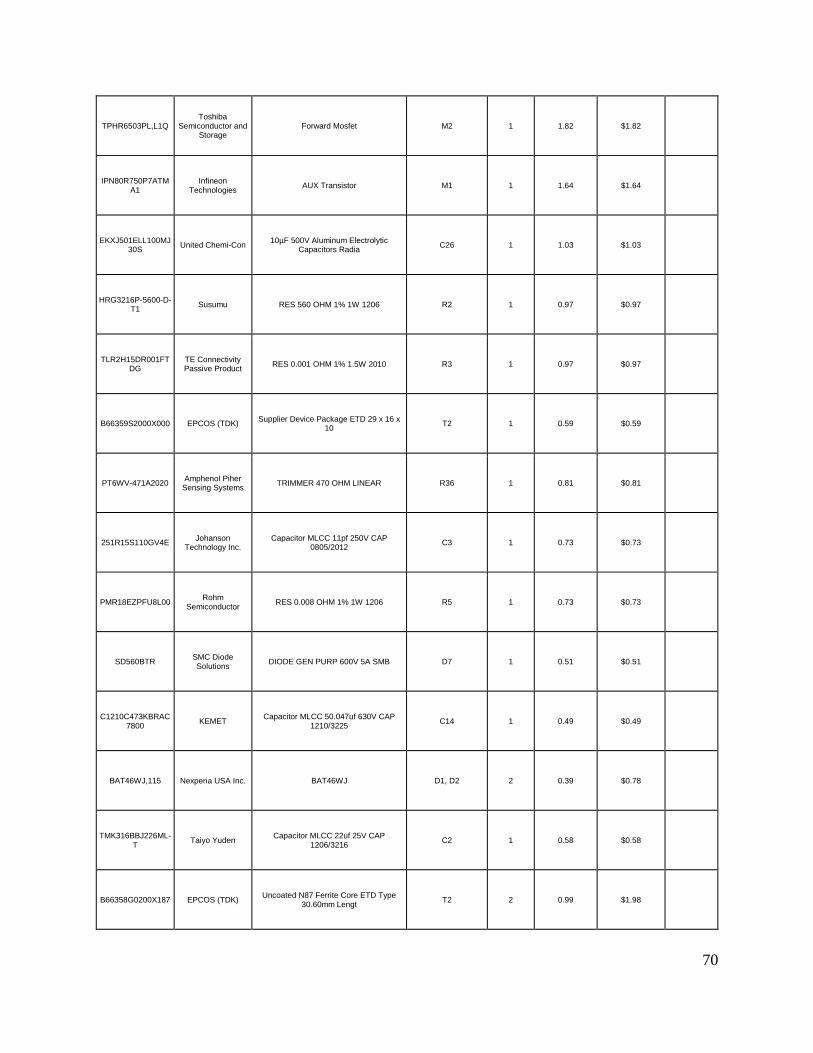
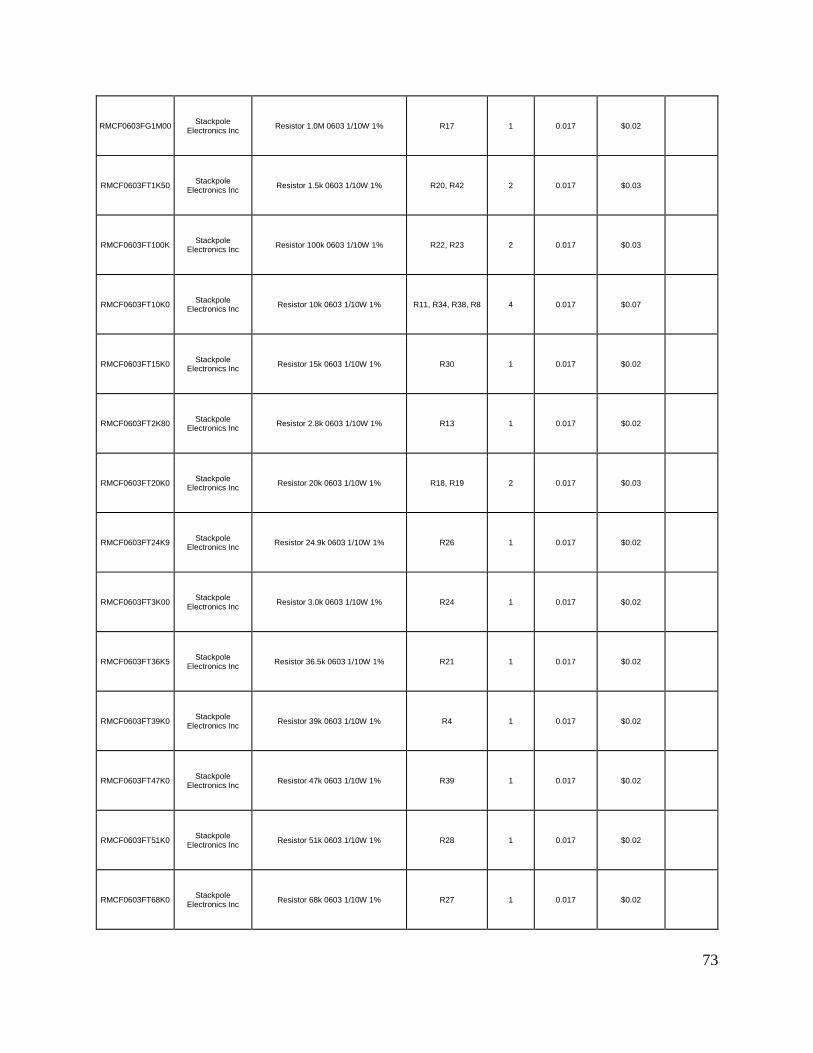
Table 8-1: Final Board Bill of Materials
Manufacturer Part Number
Manufacturer Customer Reference Reference Designator
Quantity Unit Price Extended Price Total Price
FDP083N15A-F102 ON Semiconductor Catch Mosfet x2 M3 1 4.32 $4.32 $66.79
ACPL-W346-500E Broadcom Limited 2.5A Gate Driver Optical Coupling
5000Vrms 1 Cha U2 1 5.05 $5.05
C4532X7T2J304K250KA
TDK Corporation Capacitor MLCC 0.3uf 630V CAP
1812/4532 C27, C28, C29, C30 4 1.252 $5.01
IHLP6767GZER1R5M01
Vishay Dale 1.5µH Shielded Molded Inductor 42A
1.88mOhm Max L2 1 5.87 $5.87
EEH-ZA1E221P Panasonic Electronic
Components
Capacitor Aluminum Hybrid Radial 330uf 25V CAP E
C5 1 2.7 $2.70
7.44E+08 Wurth Electronics
Inc. FIXED IND 4.7UH 6A 19.5 MOHM SMD L1 1 3.6 $3.60
IPP60R190P6XKSA1
Infineon Technologies
Clamp Transistor M5 1 3.23 $3.23
CPC1393GRTR IXYS Integrated Circuits Division
Solid State Relay SPST-NO (1 Form A) 4-SMD (0.30
U6 1 2.63 $2.63
CL10B474KA8NFNC
Samsung Electro-Mechanics
Capacitor MLCC 0.47uf 25V CAP 0603/1608
C18 1 0.073 $0.07
PS2802-1-A Renesas
Electronics America PC817B U5 1 1.52 $1.52
C3216X7R1E106K160AB
TDK Corporation Capacitor MLCC 10uf 25V CAP
1206/3216 C6, C7, C8, C9 4 0.566 $2.26
B66359B1013T001 EPCOS (TDK) BOBBIN COIL FORMER ETD 29X16X10 T2 1 1.84 $1.84
Page 70
70
TPHR6503PL,L1Q Toshiba
Semiconductor and Storage
Forward Mosfet M2 1 1.82 $1.82
IPN80R750P7ATMA1
Infineon Technologies
AUX Transistor M1 1 1.64 $1.64
EKXJ501ELL100MJ30S
United Chemi-Con 10µF 500V Aluminum Electrolytic
Capacitors Radia C26 1 1.03 $1.03
HRG3216P-5600-D-T1
Susumu RES 560 OHM 1% 1W 1206 R2 1 0.97 $0.97
TLR2H15DR001FTDG
TE Connectivity Passive Product
RES 0.001 OHM 1% 1.5W 2010 R3 1 0.97 $0.97
B66359S2000X000 EPCOS (TDK) Supplier Device Package ETD 29 x 16 x
10 T2 1 0.59 $0.59
PT6WV-471A2020 Amphenol Piher
Sensing Systems TRIMMER 470 OHM LINEAR R36 1 0.81 $0.81
251R15S110GV4E Johanson
Technology Inc. Capacitor MLCC 11pf 250V CAP
0805/2012 C3 1 0.73 $0.73
PMR18EZPFU8L00 Rohm
Semiconductor RES 0.008 OHM 1% 1W 1206 R5 1 0.73 $0.73
SD560BTR SMC Diode Solutions
DIODE GEN PURP 600V 5A SMB D7 1 0.51 $0.51
C1210C473KBRAC7800
KEMET Capacitor MLCC 50.047uf 630V CAP
1210/3225 C14 1 0.49 $0.49
BAT46WJ,115 Nexperia USA Inc. BAT46WJ D1, D2 2 0.39 $0.78
TMK316BBJ226ML-T
Taiyo Yuden Capacitor MLCC 22uf 25V CAP
1206/3216 C2 1 0.58 $0.58
B66358G0200X187 EPCOS (TDK) Uncoated N87 Ferrite Core ETD Type
30.60mm Lengt T2 2 0.99 $1.98
Page 71
71
GRM21BR61E226ME44L
Murata Electronics North America
Capacitor MLCC 22uf 25V CAP 0805/2012
C16 1 0.49 $0.49
CL10B224KB8VPNC
Samsung Electro-Mechanics
Capacitor MLCC 0.22uf 50V CAP 0603/1608
C11, C15 2 0.21 $0.42
LH R974-LP-1 OSRAM Opto
Semiconductors Inc. LED RED DIFFUSED 0805 SMD D5 1 0.33 $0.33
CL21A475KAQNNNE
Samsung Electro-Mechanics
Capacitor MLCC 4.7uf 25V CAP 0805/2012
C1, C17, C21 3 0.129 $0.39
CL10X106MO8NRNC
Samsung Electro-Mechanics
Capacitor MLCC 10uf 16V CAP 0603/1608
C10 1 0.29 $0.29
SR0805JR-7W10RL Yageo Resistor 10 0805 1/4W 10% R16 1 0.27 $0.27
1N4148W-7-F Diodes Incorporated DIODE GEN PURP 100V 300MA
SOD123 D4, D6 2 0.16 $0.32
RS1MTR SMC Diode Solutions
DIODE GEN PURP 1KV 1A SMA D3 1 0.17 $0.17
RNCP0805FTD1K00
Stackpole Electronics Inc
Resistor 1.0k 0805 1/4W 5% R25 1 0.072 $0.07
CC0805JRNPOABN680
Yageo Capacitor MLCC 68pf 200V CAP
0805/2012 C4 1 0.18 $0.18
CC0603JRNPO8BN221
Yageo Capacitor MLCC 220pf 25V CAP
0603/1608 C25 1 0.069 $0.07
TMK107B7223KA-T Taiyo Yuden Capacitor MLCC 0.022uf 16V CAP
0603/1608 C22 1 0.068 $0.07
ERJ-3EKF4990V Panasonic Electronic
Components Resistor 499 0603 1/10W 1% R14 1 0.066 $0.07
CL10B105KA8NNNC
Samsung Electro-Mechanics
Capacitor MLCC 1.0uf 25V CAP 0603/1608
C24 1 0.06 $0.06
Page 72
72
MCR18ERTFL1R30 Rohm
Semiconductor RES 1.3 OHM 1% 1/4W 1206 R6 1 0.1 $0.10
RNCP0805FTD4R70
Stackpole Electronics Inc
Resistor 4.7 0805 1/4W 1% R7 1 0.1 $0.10
CRM0805-FX-51R0ELF
Bourns Inc. Resistor 51 0805 1/4W 1% R41 1 0.1 $0.10
RMCF1206FT715K Stackpole
Electronics Inc Resistor 715k 1206 1/4W 1% R15 1 0.036 $0.04
CRGCQ0603F150R TE Connectivity Passive Product
Resistor 150 0603 1/10W 5% R10 1 0.031 $0.03
CRGCQ0603F560R TE Connectivity Passive Product
Resistor 560 0603 1/10W 1% R40, R43 2 0.031 $0.06
CL10B104KA8NNNC
Samsung Electro-Mechanics
Capacitor MLCC 0.10uf 25V CAP 0603/1608
C19 1 0.029 $0.03
8.85E+11 Wurth Electronics
Inc. Capacitor MLCC 68pf 25V CAP
0603/1608 C20 1 0.027 $0.03
8.85E+11 Wurth Electronics
Inc. Capacitor MLCC 0.033uf 16V CAP
0603/1608 C23 1 0.026 $0.03
8.85E+11 Wurth Electronics
Inc. Capacitor MLCC 470pf 50V CAP
0603/1608 C13 1 0.023 $0.02
CRGCQ0603J220R TE Connectivity Passive Product
Resistor 220 0603 1/10W 5% R9 1 0.022 $0.02
RMCF0603FT360R Stackpole
Electronics Inc Resistor 360 0603 1/10W 1% R32, R33, R37 3 0.017 $0.05
RMCF0603FT806R Stackpole
Electronics Inc Resistor 806 0603 1/10W 1% R12 1 0.017 $0.02
RMCF0603FT820R Stackpole
Electronics Inc Resistor 820 0603 1/10W 1% R35 1 0.017 $0.02
Page 73
73
RMCF0603FG1M00 Stackpole
Electronics Inc Resistor 1.0M 0603 1/10W 1% R17 1 0.017 $0.02
RMCF0603FT1K50 Stackpole
Electronics Inc Resistor 1.5k 0603 1/10W 1% R20, R42 2 0.017 $0.03
RMCF0603FT100K Stackpole
Electronics Inc Resistor 100k 0603 1/10W 1% R22, R23 2 0.017 $0.03
RMCF0603FT10K0 Stackpole
Electronics Inc Resistor 10k 0603 1/10W 1% R11, R34, R38, R8 4 0.017 $0.07
RMCF0603FT15K0 Stackpole
Electronics Inc Resistor 15k 0603 1/10W 1% R30 1 0.017 $0.02
RMCF0603FT2K80 Stackpole
Electronics Inc Resistor 2.8k 0603 1/10W 1% R13 1 0.017 $0.02
RMCF0603FT20K0 Stackpole
Electronics Inc Resistor 20k 0603 1/10W 1% R18, R19 2 0.017 $0.03
RMCF0603FT24K9 Stackpole
Electronics Inc Resistor 24.9k 0603 1/10W 1% R26 1 0.017 $0.02
RMCF0603FT3K00 Stackpole
Electronics Inc Resistor 3.0k 0603 1/10W 1% R24 1 0.017 $0.02
RMCF0603FT36K5 Stackpole
Electronics Inc Resistor 36.5k 0603 1/10W 1% R21 1 0.017 $0.02
RMCF0603FT39K0 Stackpole
Electronics Inc Resistor 39k 0603 1/10W 1% R4 1 0.017 $0.02
RMCF0603FT47K0 Stackpole
Electronics Inc Resistor 47k 0603 1/10W 1% R39 1 0.017 $0.02
RMCF0603FT51K0 Stackpole
Electronics Inc Resistor 51k 0603 1/10W 1% R28 1 0.017 $0.02
RMCF0603FT68K0 Stackpole
Electronics Inc Resistor 68k 0603 1/10W 1% R27 1 0.017 $0.02
Page 74
74
RMCF0603FT7K50 Stackpole
Electronics Inc Resistor 7.5k 0603 1/10W 1% R31 1 0.017 $0.02
RMCF0603FT76K8 Stackpole
Electronics Inc Resistor 76.8k 0603 1/10 1% R29 1 0.017 $0.02
GRM188R61E225KA12D
Murata Electronics North America
Capacitor MLCC 2.2uf 25V CAP 0603/1608
C12 1 0.17 $0.17
V6560X Assmann WSW
Components 1 na 1 0.67 $0.67
578622B03200G Aavid, Thermal Division of Boyd
Corporation 1 na 1 1.4 $1.40
NMS-306 Essentra
Components 1 na 3 0.171 $0.51
HN-M3-79 Essentra
Components 1 na 3 0.167 $0.50
CSRF0603FT2L50 Stackpole
Electronics Inc 2.5 mOhms ±1% 0.25W, 1/4W Chip
Resistor 0603 (16 R1 1 0.63 $0.63
XG8T-0231 Omron Electronics
Inc-EMC Div W1,W2 2 0.19 $0.38
QPC02SXGN-RC Sullins Connector
Solutions W1,W2 2 0.1 $0.20
DDZ9701-7 Diodes Incorporated Zener Diode 14V 500mW ±5% Surface
Mount SOD-123 D8 1 Sample $0.00
04853.15DR LittelFuse FUSE BOARD MNT 3.15A 600VDC
2SMD F1 1 Sample $0.00
74404020100 Wurth Electronics
Inc. 10µH Shielded Wirewound Inductor
500mA 850mOhm Nonstandard L3 1 Sample $0.00
750817020 Wurth Electronics
Inc. Auxilliary Transformer for DC-DC Senior
Project T1 1 Sample $0.00
Page 75
75
PE-68386NLT Pulse Electronics
Power PULSE XFMR 1:1 785UH T3 1 Sample $0.00
5029 Keystone
Electronics Test point TP1 Thru TP35 32 Sample $0.00
XLMG3410R050RWHT
Texas Instruments N-Channel 600-V 50mOhm GaN with
integrated driver and protection U1 1 Sample $0.00
LT3752FE-1 Linear Technology
Forward Converter Regulator Positive, Isolation Capable Output Step-Up/Step-
Down DC-DC Controller IC 6.5-100V Input
U3 1 Sample $0.00
LT8311FE Linear Technology Power Supply Controller Secondary-Side
Controller U4 1 Sample $0.00
43650-0402 Molex X1 1 Sample $0.00
7466113 Wurth Electronics
Inc. 1 Pin Shank Terminal M3 Surface Mount X2, X3 2 Sample $0.00
N/A Mike's Electronics
Parts 6604/44 Litz Wire T2 1.558656 1.294 $2.02
Mike's Electronics
Parts 420/46 Litz Wire T2 5.715072 0.764 $4.37
Page 76
76
Analysis of Senior Project Design
a) Summary of Functional Requirements
This project will accept a 200-420VDC input from the Cal Poly Racing, Formula
SAE Electric Vehicle's battery pack and output 12-15VDC at loads up to 500W.
The output voltage will be programmable and telemetry data reporting the status
of the DC-DC's performance will be outputted. Many shutdown conditions are
possible for the DC-DC. Overcurrent, overvoltage, and reverse voltage protection
circuits will be included on the input and output in order to shut the device down.
Additionally, a discrete shutdown/enable input will be included in order to disable
the device when necessary.
b) Primary Constraints
The primary constraint for the design of the DC-DC is the Formula SAE
Rulebook. Nearly all safety requirements for the DC-DC are derived the Formula
SAE Rulebook. Failure to abide by these constraints will result in a failure to be
useful for our largest market. Furthermore, failure to follow these rules will also
significantly degrade the general safety of the product. Additionally, the system
must be able to operate under harsh environmental conditions, such as rain and
high temperature. Finally, the DC-DC must be small and light in order to be
competitive in the automotive industry.
Page 77
77
c) Economic
What economic impacts result?
i) Human Capital
This device will create new jobs in engineering, manufacturing, sales and
technical support.
ii) Financial Capital
This product will not create a lot of business for suppliers because small-
series EV manufacturers and Formula SAE teams represent a very small
portion of the total EV market. However, this product will assist the
customer due to its $40-$200 price improvement.
iii) Natural Capital
Aluminum sheet or plastic will be required to create the enclosure of the
DC-DC. FR-4 material and a board fab house will be needed to create the
main board. Finally, the stock from various IC and passive companies are
needed to populate the board. Significant amounts of water is used in to
create ICs.
When and where do costs and benefits accrue throughout the project lifecycle?
Costs to the senior project team includes, design costs, manufacturing
costs, testing costs, and material costs. Costs to the customer include the upfront
cost, repackaging costs, harness integration cost, and the code costs. These will all
occur at the initial implementation of the product. After successful integration, the
customer will benefit from improved efficiency, reduced weight, and increased
packaging headroom throughout the lifetime of the product.
Page 78
78
What inputs does the experiment require? How much does the project cost? Who
Pays?
Table 8-2: Original Cost Estimate
Item Quantity Cost
DAW System/Switching
Controllers
1 $15
Switching Device 8 $5
Gate Drivers 1 $50
Magnetics 1 $50
Other ICs $60
Printed Circuit Board 1 $150
Connectors, Enclosure,
and Hardware
$60
With a very aggressive budgeting, we believe that a total cost of
approximately $400 will be required to develop this project. These prices are
within the $200 per person grant given to EE senior projects. Moreover, we
expect to be able to nullify a large portion of the costs through existing materials
in the Cal Poly Racing inventory, and partnerships with Linear Technology and
Bay Area Circuits.
How much does the product earn? Who profits?
The predicted cost of manufacturing is approximately $95. To obtain a
margin of 40%, we will be selling our device at $130. Therefore, each device will
result in $35 of profit. The profit from selling of these devices will be split
between the two designers of the project: Nick Mah and Jason Zhou. We expect
Page 79
79
to sell 20-30 units to other Formula SAE teams, leading to a potential profit of
$800-$1200.
Timing
The DC-DC will be released after the senior project expo. Afterwards, we
will begin marketing to Formula SAE teams, while probing the commercial
market for interest in our device. If there is interest, we will begin further testing
to certify our device for commercial use. After completion of testing, the device
will immediately be released to Cal Poly Racing, as they are the primary
contractor.
Figure 8-3: Winter Quarter Timeline
Figure 8-4: Spring Quarter Timeline
Page 80
80
d) If Manufactured on a Commercial Basis:
Estimated number of devices sold per year: 500 (40-50 from Formula SAE and
Formula Student, the rest from small EV manufacturers)
Estimated Manufacturing Cost for Each Device: $95
Estimated Purchase Price for Each Device: $130
Estimated Profit Per Year: $17500
Estimated Cost for User to Operate Device: 𝐶𝑜𝑠𝑡
𝐻𝑜𝑢𝑟= 𝐶𝑒𝑙𝑒𝑐 ∗ 𝑃𝑚𝑎𝑥 ∗ 𝜂 =
$0.12
𝑘𝑊ℎ∗
0.5𝑘𝑊 ∗ 0.9 = $0.54
ℎ𝑜𝑢𝑟
e) Environmental
This product will impact the environment at all points of its use. The
creation of the DC-DC will involve the manufacturing of electrical components,
PCBs and metal enclosures. All of the above stress the environment with water
usage, waste chemicals and materials, emissions and energy usage. During usage,
the efficiency of the device will cause some wasted electricity. Since this is an
electric vehicle-oriented device, the environmental impacts of electric vehicles
should also be considered. The large battery packs of electric vehicles can lead to
very large electrical waste deposits. On the other hand, the high efficiency of
electric vehicles could offset the pollution costs associated with ICE vehicles.
Finally, at end of life, the device will need to be recycled. Because the device is
used in student-built vehicles. There is a high chance of proper electronics
recycling occurring. Additionally, because of the big ewaste hazard electric
Page 81
81
vehicles pose, there is a strong likelihood that the DC-DC will be properly
recycled along with the rest of the EV.
f) Manufacturability
A lot of effort will need to be put into the construction of the device.
Although vibration and temperature environments are not as extreme as in an ICE
vehicle, a high amount of care must be put into the reliability of the device.
Therefore, our manufacturing process will require rigorous vibration, thermal,
endurance, and isolation testing throughout the manufacturing process to ensure
customer safety.
g) Sustainability
Describe any issues or challenges associated with maintaining the completed
device or system
The primary challenge with maintaining the device is environmental
conditions. Automobiles undergo very harsh environmental and startup
conditions. Our DC-DC must be able to withstand high vibration and ambient
temperatures as well as constant power cycling. Additionally, a balance between
an environmentally proof enclosure and effective thermal dissipation will need to
be found.
Describe how the project impacts the sustainable use of resources
This product stresses the natural resources during production and end of
life. The primary stresses are water usage, ewaste, pollution/chemical emissions,
and energy usage. However, successful implementation of the DC-DC could
Page 82
82
result in increased EV usage, which would help reduce the total pollution impact
of personal transportation.
Describe any upgrades that would improve the design of the project
In order to further reduce size, water cooling could be included to decrease
the required cooling effort. This would allow designers to use smaller switching
IC's, which should improve efficiency, as the switching energy will decrease. This
would also decrease the total required mass for heatsinks.
Another potential improvement is the addition of a complete
microcontroller system. This would significantly improve the tunability of the
design as well as the amount of telemetry that could be sent back.
A final potential improvement is the splitting the DC-DC into two,
separate, lower power outputs. By having two separate outputs, more flexibility of
design is afforded. The output has two separate output voltages, reducing the
amount of voltage regulators required on other boards in the car.
Describe any issues or challenges associated with upgrading the design
Water-cooling will increase the difficulty of manufacturing significantly.
Another issue with water-cooling is that we lose flexibility from our value
proposition.
The addition of a microcontroller will reduce the ease of integration for
our device. Additionally, our personal costs of development time and
manufacturing costs will go up now that we will need to support a more
complicated firmware package.
Page 83
83
The addition of a microcontroller will reduce the ease of integration for
our device. Additionally, our personal costs of development time and
manufacturing costs will go up now that we will need to support a more
complicated firmware package.
Splitting of the outputs will improve the flexibility of design. However, it
will increase the size and weight of the DC-DC, which is a primary component of
our value proposition.
h) Ethical
The DC-DC has multiple ethical concerns. The DC-DC must be made
such that it is compliant with the Formula SAE Rulebook. Workarounds that
"technically" pass the rules are also unethical as they betray the intent of the rule.
Additionally, the DC-DC must be extremely reliable. Any product going into
automotive use is purchased in faith that the device will work reliably. Any failure
modes possible with the DC-DC must be documented for the customer. Any
failure modes that could result in potentially dangerous situations must be
accounted for and prevented before release to the customer. An example of a
dangerous failure mode is a loss of isolation, which could result in the death of the
driver. Unfortunately, the designers of the product cannot control how the DC-DC
is operated. Modifications, such as reflashing the controller, could result in a
harmful system. Finally, usage of the device must be safe. High voltages are
present at the input of the device. The designers must be cognizant of this danger
and make installation safe and well documented.
Page 84
84
i) Health and Safety
The primary safety concern for the DC-DC are failure modes and
interaction with the DC-DC. Loss of isolation of the DC-DC could result in
permanently damaging electric shock. Additionally, if the failure of a component
is not well contained by the enclosure, it could result in the destruction of nearby
electronics. Finally, connecting the input leads to the DC-DC could result in
electric shock as well if proper installation procedures are not followed.
j) Social and Political
Because this device is designed to be completely Formula SAE rules
compliant while maintaining a competitive price compared to existing solutions,
the competition may see a decrease in revenue. This can affect the livelihood of
employees. Because integration of the device is very simple, we expect our DC-
DC to help equalize the disparity between well-funded and underfunded race
teams.
k) Development
This project will require development in knowledge of thermal dissipation
in electronics, isolated power supply design, power electronics, environmental-
rated components, automated testing, and magnetic design.