Reproduction in any manner whatsoever without the written permission of Dell Computer Corporation is strictly forbidden.
Trademarks used in this text: Dell, the DELL logo, PowerConnect, Dimension, Inspiron, OptiPlex, Latitude, Dell Precision, and DellNet are trademarks of Dell Computer Corporation; Microsoft and Windows are registered trademarks of Microsoft Corporation.
Other trademarks and trade names may be used in this document to refer to either the entities claiming the marks and names or their products. Dell Computer Corporation disclaims any proprietary interest in trademarks and trade names other than its own.
January 2003 P/N 1J052 Rev. A04
NOTE: A NOTE indicates important information that helps you make better use of your computer.
NOTICE: A NOTICE indicates either potential damage to hardware or loss of data and tells you how to avoid the problem.
CAUTION: A CAUTION indicates a potential for property damage, personal injury, or death.
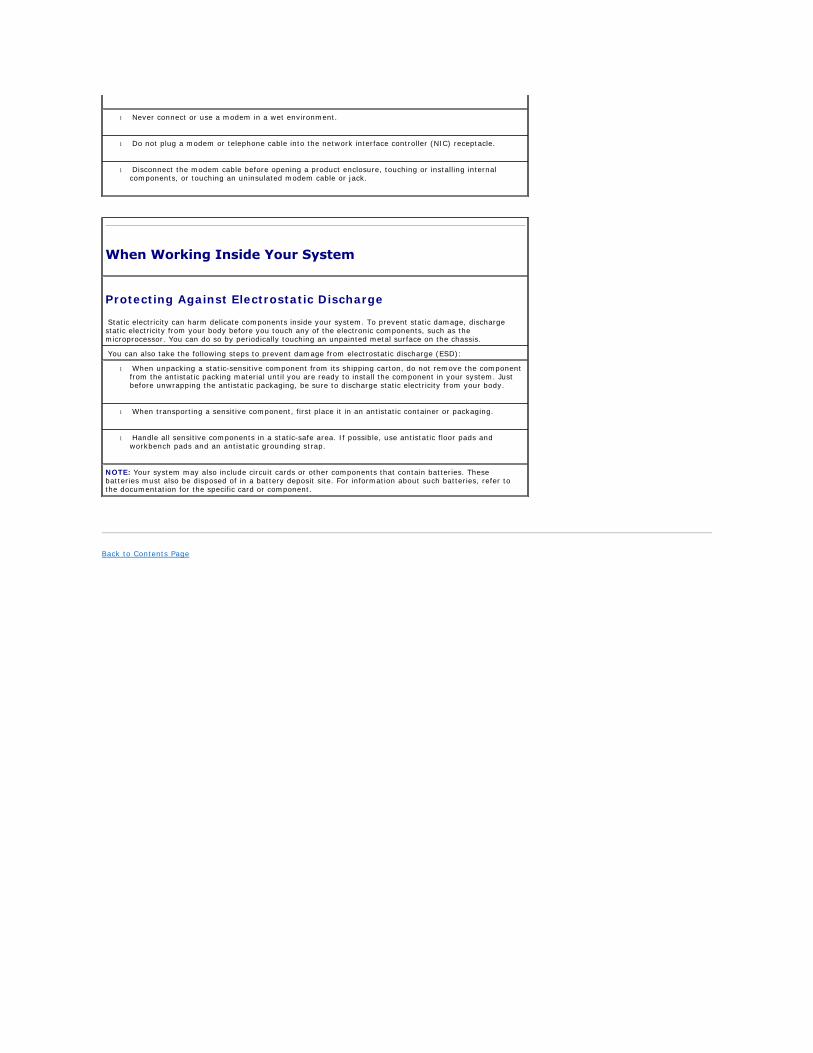
Back to Contents Page
Introduction Dell™ PowerConnect™ 3024 Systems User's Guide
Features
Front Panel Indicators
Rear Panel Descriptions
Management
Features
The PowerConnect 3024 Fast Ethernet Managed Switch offers the following features:
l IP Assignment Mode
l SNMP Host Authorization Table
l User Authentication Mode — RADIUS Server IP Address, RADIUS Shared Secret, IP Filtering, and Allowed IP Addresses
l Layer 3 Priority — DiffServ
l Configuration File Management
l Enhanced Security Administration
l More Statistics/Utilization Summary
l 24 10/100BASE-T auto-sensing Fast Ethernet switching ports
l 2 10/100/1000BASE-T auto-sensing Gigabit Ethernet switching ports, each with a matching gigabit interface converter (GBIC) slot
l 2 gigabit stacking ports for daisy-chain stacking of up to 6 units
l IEEE 802.3u, IEEE 802.3z, and IEEE 802.3ab compliant
l Up to 8K-entry, media access control (MAC) address cache with hardware-assisted aging
l IEEE 802.3x flow control for full duplex operation
l IEEE 802.1Q based tagged VLAN
l IEEE 802.1p class of service (CoS) through dual priority queues for each port
l IEEE 802.3ad link aggregation: up to 4 aggregated trunks per switch
l Spanning tree protocol
l Internet group management protocol (IGMP) snooping support
l Back pressure flow control for half-duplex operation
l Port mirroring
l Auto MDI/MDIX support for the 10/100BASE-T and the 10/100/1000BASE-T ports
l MAC addresses lookup based on port, virtual local area network (VLAN) ID, and MAC addresses
l System LED and per port LEDs
l Standard 1U chassis
l 19-inch rack-mountable
l 3024/3024 mixed stack supported
Management Features
l Web-based management with embedded HTTP server
l Text-based management through 3 in-band Telnet sessions, and an out-of-band RS232 console port (VT100)
l Simple network management protocol (SNMP)-based network management via an SNMP management console application
l Network boot and software upload via TFTP
l Hardware assisted remote monitoring (RMON) statistic collection
l Management information base (MIB) II (RFC1213)
l Ethernet Interface MIB (RFC1643)
l Bridge MIB (RFC1493)
l 4-Group RMON (RFC1757)
Front Panel Indicators
The front panel of the system contains the console port, all of the Ethernet ports, and the LEDs. As shown in the figure below, there are one system LED, two LEDs for each Fast Ethernet port, and three LEDs for each Gigabit Ethernet port on the switch. The following sections describe the front panel in more detail.
Power LED
The power LED shows the general operating status of the system as reflected by the following indicators:
l Off — The unit is off.
l Green — The unit is on and ready for operation.
l Yellow — The unit is in boot mode.
l Blinking Yellow — The unit fails during initialization.
The normal sequence after power-on or system reset is Green (initialization success), Yellow (booting applications), and Green again (system ready).
Console Port
The console interface can be accessed from the RS232 serial port or a telnet connection. The console port uses a standard null-modem cable. For instructions on configuring your switch using the console, see "Console Interface."
Port LEDs
Two LEDs show the operating status of each Fast Ethernet port and three LEDs show the operating status of each Gigabit Ethernet port as reflected by the indicators in each of the following sections:
Fast Ethernet Ports
Link Status and Activity (LINK/ACT)
l Green — A 100-Mbps link is up and there is no activity.
l Blinking Green — A 100-Mbps link is up and there is activity.
l Yellow — A 10-Mbps link is up and there is no activity.
l Blinking Yellow — A 10-Mbps link is up and there is activity.
l Off — The link is down.
Duplex Mode and Collisions (FULL/COL)
l Green — A full-duplex link is up.
l Yellow — A half-duplex link is up and no collisions are occurring.
l Blinking Yellow — A half-duplex link is up and collisions are occurring.
l Off — The link is down.
Gigabit Ethernet Ports
Gigabit Link Status and Activity (GIGA)
l Green — A 1000-Mbps link is up and there is no activity.
l Blinking Green — A 1000-Mbps link is up and there is activity.
l Off — A 10/100-Mbps link is up or the link is down.
10/100-Mbps Link Status and Activity (LINK/ACT)
l Green — A 100-Mbps link is up and there is no activity.
l Blinking Green — A 100-Mbps link is up and there is activity.
l Yellow — A 10-Mbps link is up and there is no activity.
l Blinking Yellow — A 10-Mbps link is up and there is activity.
l Off — The link is down.
Duplex Mode and Collisions (FULL/COL)
l Green — A full-duplex link is up.
l Yellow — A half-duplex link is up and no collisions are occurring.
l Blinking Yellow — A half-duplex link is up and collisions are occurring.
l Off — The link is down.
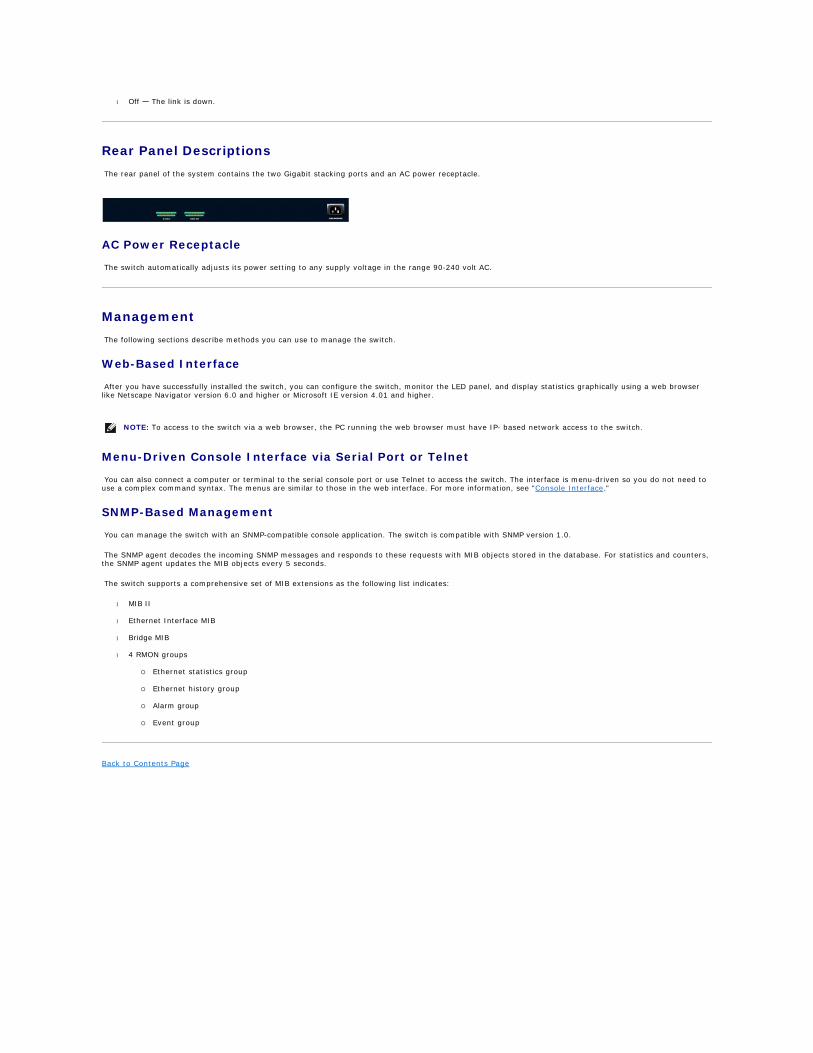
Rear Panel Descriptions
The rear panel of the system contains the two Gigabit stacking ports and an AC power receptacle.
AC Power Receptacle
The switch automatically adjusts its power setting to any supply voltage in the range 90-240 volt AC.
Management
The following sections describe methods you can use to manage the switch.
Web-Based Interface
After you have successfully installed the switch, you can configure the switch, monitor the LED panel, and display statistics graphically using a web browser like Netscape Navigator version 6.0 and higher or Microsoft IE version 4.01 and higher.
Menu-Driven Console Interface via Serial Port or Telnet
You can also connect a computer or terminal to the serial console port or use Telnet to access the switch. The interface is menu-driven so you do not need to use a complex command syntax. The menus are similar to those in the web interface. For more information, see "Console Interface."
SNMP-Based Management
You can manage the switch with an SNMP-compatible console application. The switch is compatible with SNMP version 1.0.
The SNMP agent decodes the incoming SNMP messages and responds to these requests with MIB objects stored in the database. For statistics and counters, the SNMP agent updates the MIB objects every 5 seconds.
The switch supports a comprehensive set of MIB extensions as the following list indicates:
l MIB II
l Ethernet Interface MIB
l Bridge MIB
l 4 RMON groups
¡ Ethernet statistics group
¡ Ethernet history group
¡ Alarm group
¡ Event group
Back to Contents Page
NOTE: To access to the switch via a web browser, the PC running the web browser must have IP- based network access to the switch.
Back to Contents Page
Installation Dell™ PowerConnect™ 3024 Systems User's Guide
Package Contents
Before You Connect to the Network: Mounting Kit Instructions
Connecting the Console Port
Password Protection
IP Address Assignment
Stacking
Connecting Devices to the Switch
Package Contents
Before you begin installing the switch, confirm that your package contains the following items:
l Switch
l Stacking cable
l AC power cord
l Null modem cable
l Self-adhesive rubber pads for desktop installation
l Rackmount kit for rack installation
l PowerConnect Systems System Information Guide
Before You Connect to the Network: Mounting Kit Instructions
Before you connect to the network, you must install the switch on a flat surface or in a rack, set up a terminal emulation program, and plug in the power cord. Then you will set up a password and IP address.
The switch is supplied with rubber feet for stationing it on a flat surface and mounting brackets and screws for mounting it in a rack.
Installing on a Flat Surface
The switch can be installed on any appropriate level surface that can safely support the weight of the hubs and their attached cables. There must be adequate space around the switch for ventilation and access to cable connectors.
To install the switch on a flat surface, complete the following steps:
1. Set the switch on the flat surface and check for proper ventilation.
Allow at least 2 inches (5.1 cm) on each side for proper ventilation and 5 inches (12.7 cm) at the back for power cord clearance.
2. Attach rubber feet on each marked location on the bottom of the chassis.
The rubber feet are optional but recommended to keep the unit from slipping.
Installing in a Rack
The switch can be installed in most standard 19-inch (48.3-cm) racks.
To install the switch in a rack, complete the following steps:
1. Use the supplied screws to attach a mounting bracket to each side of the switch.
2. Position the switch in the rack and align the holes in the mounting bracket with the holes in the rack.
3. Insert and tighten two screws appropriate for your rack through each of the mounting brackets.
Connecting the Console Port
NOTICE: Do not connect the switch to the network until you have established the correct Internet Protocol (IP) settings.
NOTE: For racks that are not prethreaded, cage nuts are provided.
The switch provides an RS-232 serial port that enables a connection to a PC or terminal for monitoring and configuring the switch. This port is a male DB-9 connector, implemented as a data terminal equipment (DTE) connection.
To use the console port, you need the following equipment:
l A terminal or TTY-compatible terminal, or a PC or portable system with a serial port and the ability to emulate a terminal.
l A null modem or crossover RS-232 cable with a female DB-9 connector for the console port on the switch.
To connect a terminal to the console port, complete the following steps:
1. Connect the female connector of the RS-232 cable directly to the console port on the switch, and tighten the captive retaining screws.
2. Connect the other end of the cable to a terminal or the serial connector of a PC running terminal emulation software.
Make sure the terminal emulation software is set as follows:
a. Select the appropriate serial port (serial port 1 or serial port 2).
b. Set the data rate to 9600 baud.
c. Set the data format to 8 data bits, 1 stop bit, and no parity.
d. Set flow control to none.
e. Under Properties, select VT100 for Emulation mode.
f. Select Terminal keys for Function, Arrow, and Ctrl keys. Make sure the setting is for Terminal keys, not Windows keys.
3. Once you have set up the terminal correctly, plug the power cord into the power receptacle on the back of the switch. The boot sequence appears in the terminal.
Password Protection
From the initial welcome screen, you must enter a password to proceed, if password protection is enabled. If password protection is disabled, the Main Menu is displayed and you immediately have access to the switch management interface. By default, password protection is disabled. If enabled, the default user name is root and the password is switch.
To prevent unauthorized access to the switch, you can turn on password protection.
1. Select System Manager and press <Enter>.
Use the <Tab> key to navigate the menu.
2. Select Security Admin.
3. Type your password and press <Enter>.
NOTICE: When using HyperTerminal with Microsoft® Windows® 2000, make sure that you have Windows 2000 Service Pack 2 or later installed. Windows 2000 Service Pack 2 fixes the problem of arrow keys not functioning in HyperTerminal's VT100 emulation. See www.microsoft.com for information on Windows 2000 service packs.
NOTE: The first time you set up Password Protection, you must do it from the console screen. Once the switch is set up, it can be managed through the web interface. See "Web Interface" for more information.
4. Type your password again to confirm it. Press <Enter>.
5. Press <Ctrl><w> to save your changes.
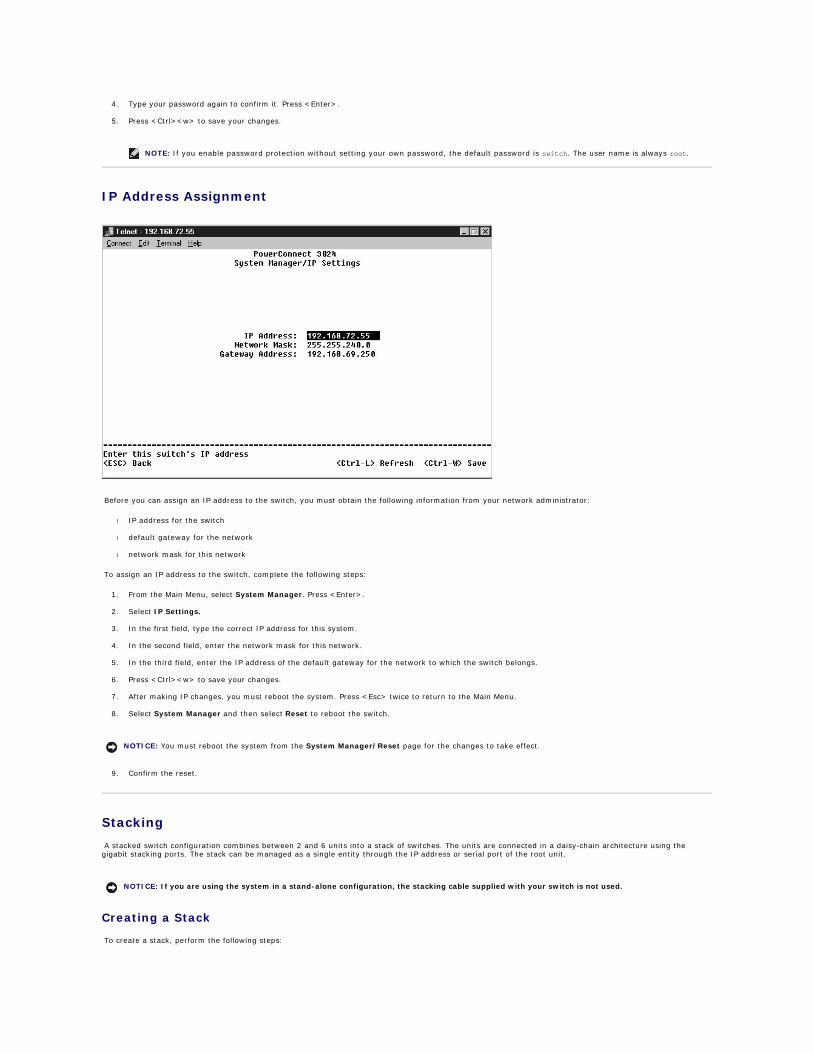
IP Address Assignment
Before you can assign an IP address to the switch, you must obtain the following information from your network administrator:
l IP address for the switch
l default gateway for the network
l network mask for this network
To assign an IP address to the switch, complete the following steps:
1. From the Main Menu, select System Manager. Press <Enter>.
2. Select IP Settings.
3. In the first field, type the correct IP address for this system.
4. In the second field, enter the network mask for this network.
5. In the third field, enter the IP address of the default gateway for the network to which the switch belongs.
6. Press <Ctrl><w> to save your changes.
7. After making IP changes, you must reboot the system. Press <Esc> twice to return to the Main Menu.
8. Select System Manager and then select Reset to reboot the switch.
9. Confirm the reset.
Stacking
A stacked switch configuration combines between 2 and 6 units into a stack of switches. The units are connected in a daisy-chain architecture using the gigabit stacking ports. The stack can be managed as a single entity through the IP address or serial port of the root unit.
Creating a Stack
To create a stack, perform the following steps:
NOTE: If you enable password protection without setting your own password, the default password is switch. The user name is always root.
NOTICE: You must reboot the system from the System Manager/Reset page for the changes to take effect.
NOTICE: If you are using the system in a stand-alone configuration, the stacking cable supplied with your switch is not used.
1. Perform Password Protection and IP Address Assignment for the root unit, the first unit of the stack.
2. Make sure to unplug the power cords of all the units in the stack.
3. Place or mount all units of the stack on top of each other with the root unit at the bottom of the stack.
4. Connect the stacking cable of the root unit to its STACK OUT port on the back of the unit.
5. Connect the stacking cable of the root unit to the STACK IN port of the second unit in the stack.
6. Repeat steps 4 and 5 for each additional unit in the stack. That is, connect the STACK IN port of each unit to the STACK OUT port of the previous unit.
7. Plug in the power cords of the stack units starting with the unit on the top and proceed in order, with the root unit being the last unit to be powered up.
The stack is now operational and can be managed through the root unit.
Removing a Unit from a Stack
Perform the following steps to remove a unit from a stack.
1. Disconnect the power cords of all units in the stack.
2. Disconnect all devices from the last unit in the stack.
3. Disconnect the stacking cable connected to the STACK IN port on the last unit in the stack.
4. Remove the unit from the stack.
5. Disconnect the stacking cable connected to the STACK OUT port of the now last unit in the stack. This stacking cable is no longer used in the stack.
6. Plug in the power cords of the stack units starting with the unit on the top and proceed in order, with the root unit being the last unit to be powered up.
The stack is now operational and can be managed through the root unit.
Adding a Unit to a Stack
Perform the following steps to add a unit to a stack.
1. Disconnect the power cords of all units in the current stack and the new unit to be added to the stack.
2. Connect the new unit's stacking cable to the STACK OUT port of the topmost unit in the current stack.
3. Place or mount the new unit on the top of the stack.
4. Connect the unattached end of the stacking cable described in step 2 to the new unit's STACK IN port.
5. Plug in the power cords of the stack units starting with the new unit on the top and proceed in order, with the root unit being the last unit to be powered up.
The stack is now operational and can be managed through the root unit.
Connecting Devices to the Switch
At this point, you are ready to use appropriate network cabling to connect devices to the switch's RJ-45 connectors.
To connect a device to a GBIC port, do the following:
1. Use your cabling requirements to select an appropriate GBIC module type.
2. Insert the GBIC module (sold separately) into the GBIC slot.
NOTICE: The STACK IN port of the root unit is always unconnected.
NOTICE: The STACK OUT port of the last unit in the stack is always unconnected.
NOTICE: Never unplug a stacking cable while the unit is powered up.
NOTICE: The STACK OUT port of the last unit in the stack is always unconnected.
NOTICE: Never unplug a stacking cable while the unit is powered up.
NOTICE: The STACK OUT port of the last unit in the stack is always unconnected.
3. Use the appropriate network cabling to connect a device to the connectors on the GBIC module.
4. Enable the GBIC port in the web or console management interface by performing the following steps:
Web interface:
¡ Select Port Manager, then select GBIC.
¡ To enable the GBIC module, select GBIC for the desired port.
Console interface
¡ Select Port Manager.
¡ Place the cursor over the desired port number and press the spacebar to enable the GBIC module.
Back to Contents Page
NOTICE: Enabling the GBIC port disables the associated built-in 10/100/1000BASE-T port.
Back to Contents Page
Web Interface Dell™ PowerConnect™ 3024 Systems User's Guide
With web-based management, you can configure the PowerConnect 3024 Fast Ethernet Managed Switch and monitor the system using a web browser.
Most web pages for the switch feature the following buttons:
l Reload — Displays the current values for the system related to the web page that is open.
l Apply — Makes changes to the system and refreshes the page. These changes do not persist past the current session.
l Add — Adds new entries to the system and refreshes the page.
l Remove — Removes selected entries from the system and refreshes the page.
Web Pages
When you connect to the management mode of the switch with a web browser, a login screen is displayed (if password protection has been enabled). The user name is always root. Enter the password to access the switch's management mode.
You can manage a stack of up to six units through the web interface. On most pages, you must select the unit in the stack you want to see in the web interface. Where space permits, all six units of the stack are displayed, but only those units that are actually present in the stack are active; the units not used are grayed out.
The following menus are available from the web interface:
l Home
l System Manager
l Port Manager
l Address Manager
l Spanning Tree
l VLAN and CoS
l Port Trunking
l Port Mirroring
l SNMP
l Multimedia Support
l Statistics
l Save Configuration
Home
The Home page describes the dynamic switch applet.
Web Pages
Home
System Manager
Port Manager
Address Manager
Spanning Tree
VLAN & CoS
Port Trunking
Port Mirroring
SNMP
Multimedia Support
Statistics
Save Configuration
NOTICE: For changes to persist beyond the current session, you must save the new configuration from the Save Configuration page.
NOTE: The default password is switch.
NOTE: If the system is used in a stack configuration, the arrow keys on the left side of the applet allow you to select a unit in the stack. The dynamic applet will display the status for the selected unit.
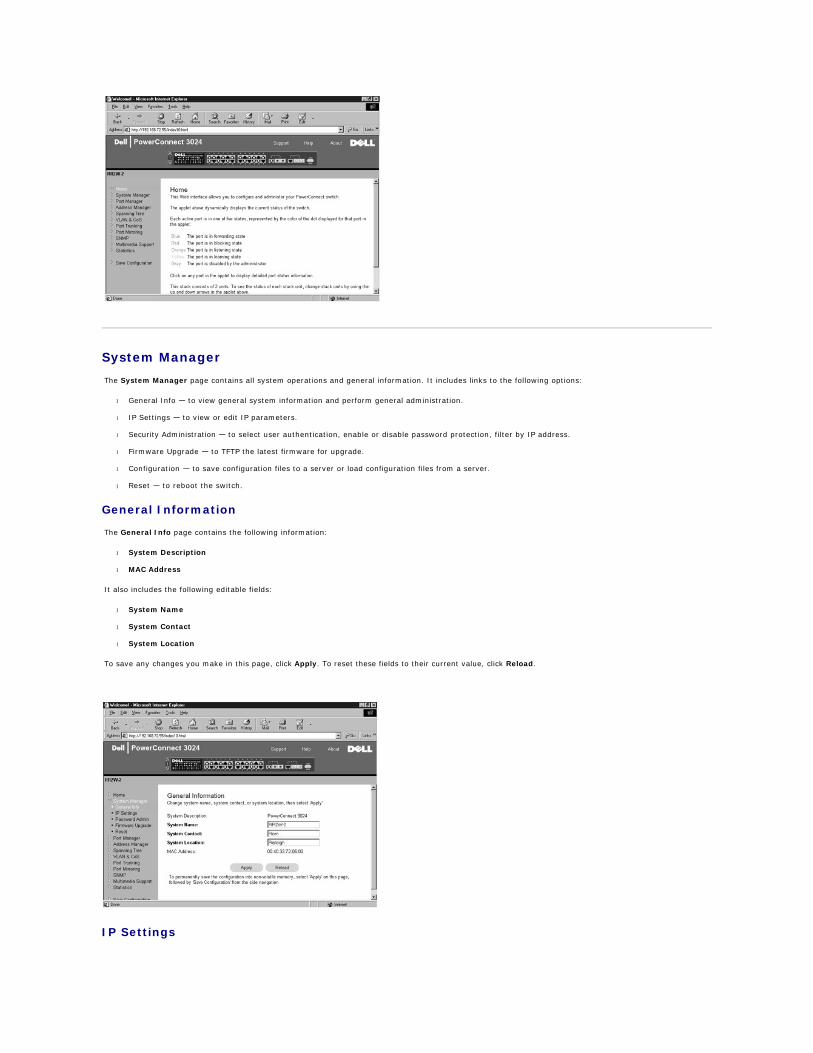
System Manager
The System Manager page contains all system operations and general information. It includes links to the following options:
l General Info — to view general system information and perform general administration.
l IP Settings — to view or edit IP parameters.
l Security Administration — to select user authentication, enable or disable password protection, filter by IP address.
l Firmware Upgrade — to TFTP the latest firmware for upgrade.
l Configuration — to save configuration files to a server or load configuration files from a server.
l Reset — to reboot the switch.
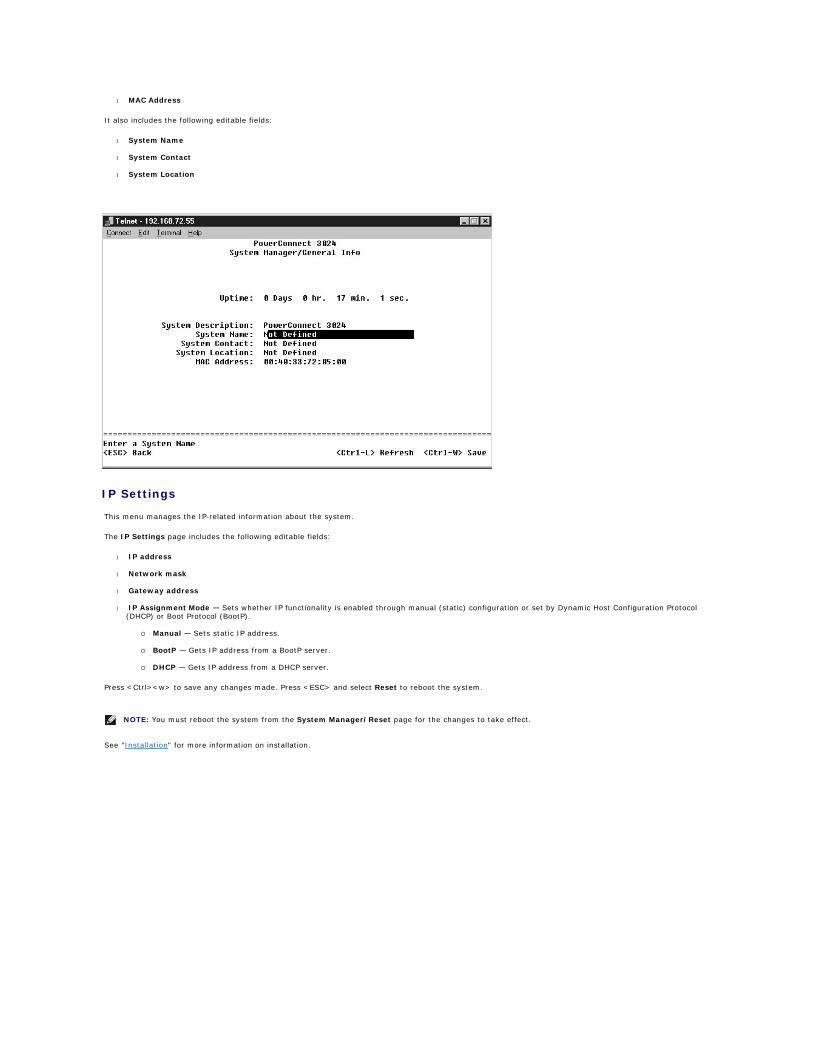
General Information
The General Info page contains the following information:
l System Description
l MAC Address
It also includes the following editable fields:
l System Name
l System Contact
l System Location
To save any changes you make in this page, click Apply. To reset these fields to their current value, click Reload.
IP Settings
In the IP Settings page, you can manage the IP related information about the system. The page includes the following editable fields:
l IP address
l Gateway address
l Network mask
l IP Assignment Mode — Sets whether IP functionality is enabled through manual (static) configuration or set by Dynamic Host Configuration Protocol (DHCP) or Boot Protocol (BootP).
¡ Manual — Sets static IP address.
¡ BootP — Gets IP address from a BootP server.
¡ DHCP — Gets IP address from a DHCP server.
To save any changes you make in this page for the current session, click Apply. To reset these fields to their current value, click Reload.
For IP address changes to take effect, perform the following steps:
1. From the Save Configuration page, save your changes beyond the current session.
2. Reboot the system from the System Manager/Reset page.
Security Administration
l User Authentication Mode — Selects the authentication or authentication sequence required.
¡ Local Only — The switch authenticates the user.
¡ Local then Remote — The switch attempts to authenticate the user first, and then a RADIUS server attempts to authenticate the user.
¡ Remote then Local — A RADIUS server attempts to authenticate the user first, and then the switch attempts to authenticate the user.
¡ Remote Only — A RADIUS server authenticates the user.
l RADIUS Server IP Address — Identifies the IP address of the RADIUS server.
l RADIUS Shared Secret — Specifies the text string that is shared between the switch and the RADIUS server.
l IP Filtering — Allows up to 16 IP addresses to access the switch management function, if enabled.
l Password Admin — Enables or disables password protection.
l Allowed IP Addresses — Provides an option to enter up to 16 IP addresses in the Allowed IP Address table.
l Disable Telnet/Web Access (Console Only) — Provides an option to enable or disable Telnet or Web access to the switch.
To save any changes you make in this page, click Apply. To reset these fields to their current value, click Reload.
NOTE: The default password is switch.
Firmware Upgrade
From the Firmware Upgrade page, you can configure the system to download a new version of the management software. You can also set the system to use the new software without overwriting the previous version. See "Software Upgrades" for more information about this process.
The Firmware Upgrade page contains the following information:
l Current Hardware Version
l Current Boot ROM Version
l Current Software Version
It also contains the following editable fields:
l Next Boot from — to indicate the location of the software version you want to run. The following options are available:
¡ Net option — This is the default setting. Use this option to try out a new version of the software before upgrading. This option runs the software from an internet location you specify. You must also complete the TFTP Server IP Address and TFTP Path/Filename fields.
¡ Net & save option — This option overwrites the current version of the software with the downloaded file. You must also complete the TFTP Server IP Address and TFTP Path/Filename fields.
¡ Last Saved option — This option automatically shows up after the Net & save option is selected and the system is reset.
l TFTP Server IP Address — to indicate the server from which the system must retrieve the new version of the software resides.
l TFTP Path/Filename — to indicate the path and name of the software file to download.
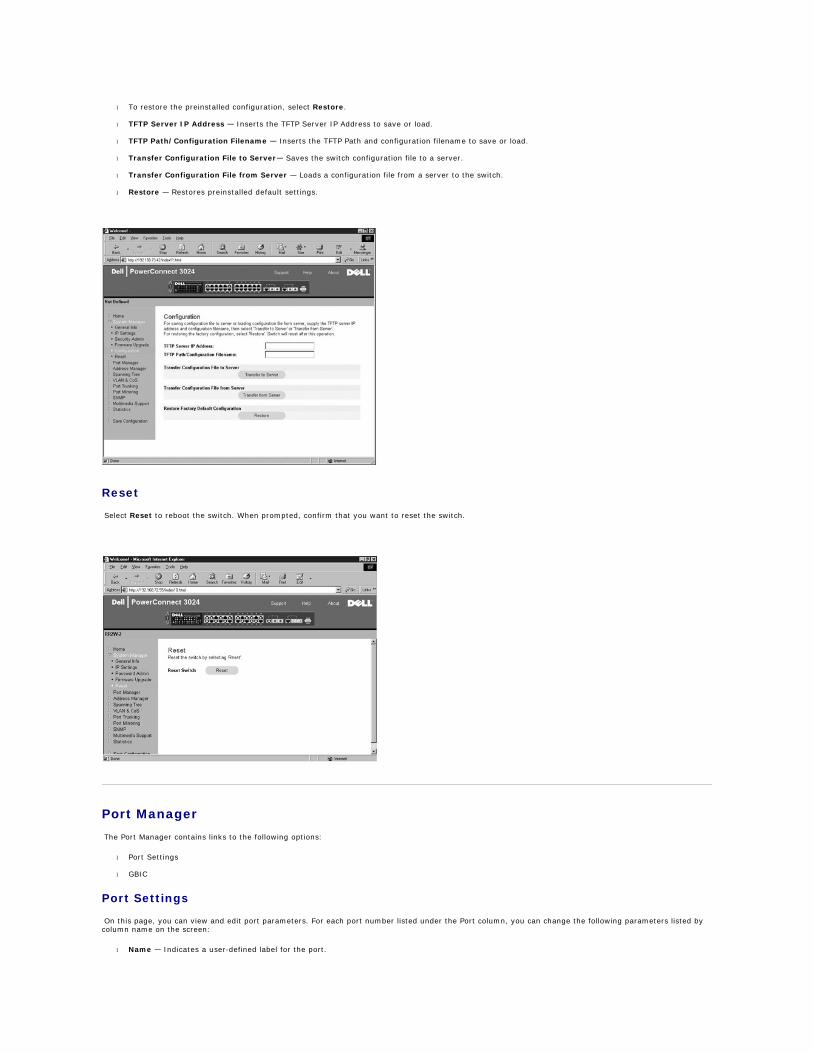
Configuration
l To save the switch's current configuration file to a server, supply the TFTP server IP address and configuration filename, and then select Transfer Configuration File to Server. To load a configuration file from a server, supply the TPTP server IP address and configuration filename, and then select Transfer Configuration File from Server.
NOTICE: For changes to persist beyond the current session, you must save the new configuration from the Save Configuration page. You must reboot the system from the System Manager/Reset page to start the firmware upgrade.
l To restore the preinstalled configuration, select Restore.
l TFTP Server IP Address — Inserts the TFTP Server IP Address to save or load.
l TFTP Path/Configuration Filename — Inserts the TFTP Path and configuration filename to save or load.
l Transfer Configuration File to Server— Saves the switch configuration file to a server.
l Transfer Configuration File from Server — Loads a configuration file from a server to the switch.
l Restore — Restores preinstalled default settings.
Reset
Select Reset to reboot the switch. When prompted, confirm that you want to reset the switch.
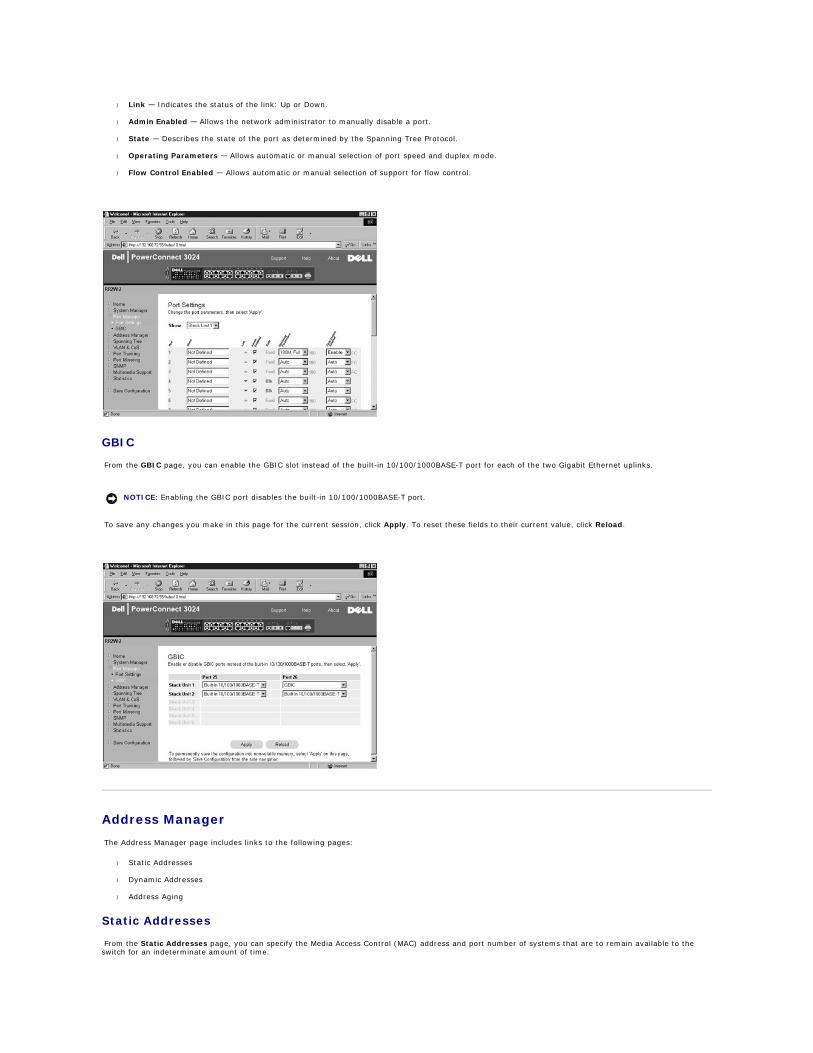
Port Manager
The Port Manager contains links to the following options:
l Port Settings
l GBIC
Port Settings
On this page, you can view and edit port parameters. For each port number listed under the Port column, you can change the following parameters listed by column name on the screen:
l Name — Indicates a user-defined label for the port.
l Link — Indicates the status of the link: Up or Down.
l Admin Enabled — Allows the network administrator to manually disable a port.
l State — Describes the state of the port as determined by the Spanning Tree Protocol.
l Operating Parameters — Allows automatic or manual selection of port speed and duplex mode.
l Flow Control Enabled — Allows automatic or manual selection of support for flow control.
GBIC
From the GBIC page, you can enable the GBIC slot instead of the built-in 10/100/1000BASE-T port for each of the two Gigabit Ethernet uplinks.
To save any changes you make in this page for the current session, click Apply. To reset these fields to their current value, click Reload.
Address Manager
The Address Manager page includes links to the following pages:
l Static Addresses
l Dynamic Addresses
l Address Aging
Static Addresses
From the Static Addresses page, you can specify the Media Access Control (MAC) address and port number of systems that are to remain available to the switch for an indeterminate amount of time.
NOTICE: Enabling the GBIC port disables the built-in 10/100/1000BASE-T port.
The following options are available:
l MAC Address — to enter the MAC address of a system you want to set as static.
l Port Selection — to select the port associated with that system.
l List box—lists all static addresses.
l Add — adds any address when you select it from the list box and click the Add button.
l Remove — removes any address when you select it from the list box and click the Remove button.
To save any changes you make in this page for the current session, click Apply. To reset these fields to their current value, click Reload.
Dynamic Addresses
The Dynamic Address lookup table allows you to view the MAC addresses that are currently in the address database. When addresses are in the database, the packets intended for those addresses are forwarded directly to those ports. You can filter out the table by port, VLAN, and MAC address by checking those fields.
Dynamic MAC address learning is enabled by default. This is the standard mode for a network switch. In some networks, the administrator may want to create a secured network by disabling the dynamic address learning capabilities. When this is done, all current dynamic address entries will be locked in. These addresses will not age out and new addresses will not be learned.
In addition, if a new address is detected on a port, the switch will disable the port with the new address, save the current settings to NVRAM, and send out a Simple Network Management Protocol (SNMP) trap warning. This feature is used to block computers that were not on the network before the lockdown from attempting to access the network. Once a port is automatically disabled, the administrator can reenable the port manually. The NVRAM will only be saved the first time a given port detects a new address. The aging time should be raised before disabling the dynamic address learning to provide enough time for the switch to learn all current MAC addresses without the possibility of aging out.
This page contains the following options by which to query the dynamic MAC address table:
l Port — check the option box and select a port from the drop-down list.
l VLAN ID — check the option box and type the appropriate VLAN ID.
l MAC Address — check the option box and select the address from the list box provided.
l Query button — click this button to execute the query once you have selected the criteria for the query.
l Dynamic Address Learning — Enable or disable dynamic address learning.
Address Aging
In the Address Aging page, you can specify how long an address stays available to the switch if it is not configured as static.
The following option is available:
l Aging Time — sets the time before an address is purged from system. You can change this value to any number between 10 and 1,000,000 seconds.
To save any changes you make in this page, click Apply. To reset these fields to their current value, click Reload.
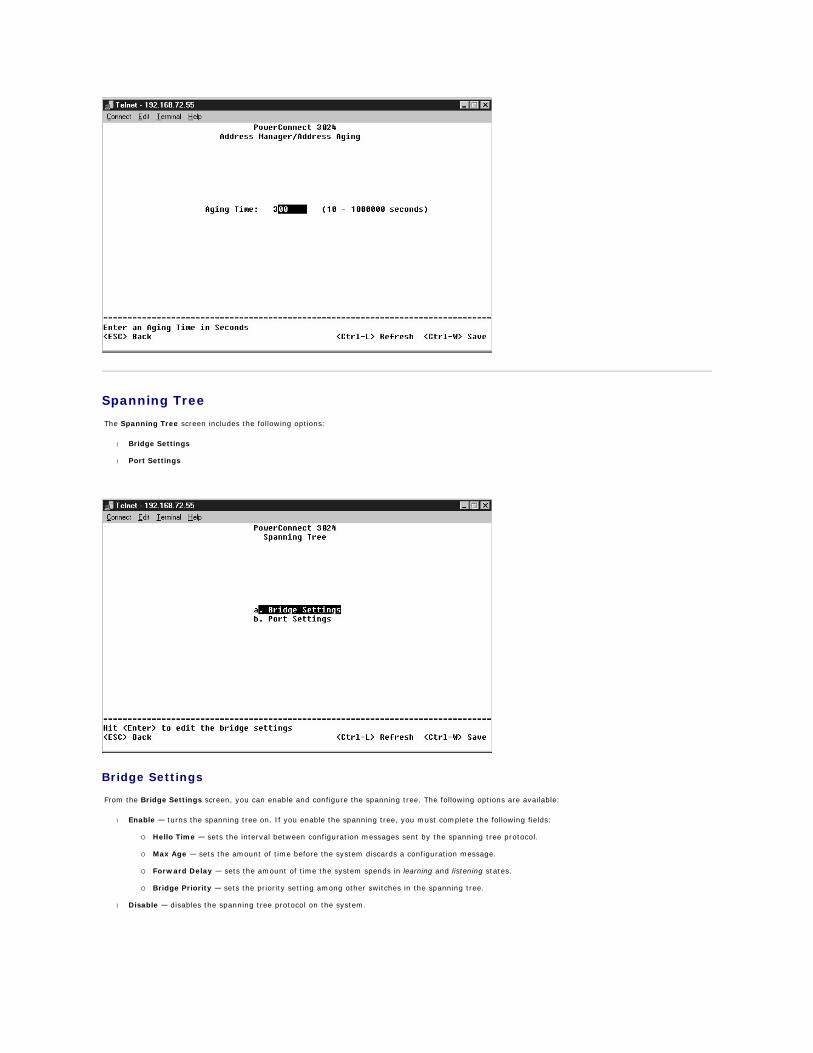
Spanning Tree
The Spanning Tree page contains links to the following pages that allow you to specify the parameters of the spanning tree protocol:
l Bridge Settings
l Port Settings
Bridge Settings
From the Bridge Settings page, you can enable and configure the Spanning Tree. The following options are available:
l Enable — turns the Spanning Tree on. If you enable the Spanning Tree, you must complete the following fields:
¡ Hello Time — sets the interval between configuration messages sent by the spanning tree protocol.
¡ Max Age — sets the amount of time before the system discards a configuration message.
¡ Forward Delay — sets the amount of time the system spends in learning and listening states.
¡ Bridge Priority — sets the priority setting among other switches in the spanning tree.
l Disable — disables the spanning tree protocol on the system.
To save any changes you make in this page for the current session, click Apply. To reset these fields to their current value, click Reload.
Port Settings
In the Port Settings page, you can specify spanning tree parameters for each port. This page is in a table format. For each port number listed under the Port column, the following fields are available:
l Priority — Priority assigned to this port for the Spanning Tree Protocol (0 - 255). A port with a higher priority is less likely to be blocked if the Spanning Tree Protocol is detecting network loops. Low numeric value indicates a high priority.
l Cost — Cost assigned to this port for the Spanning Tree Protocol (1- 65536). A port with a lower cost is less likely to be blocked if the Spanning Tree Protocol is detecting network loops.
l Fast Link — Fast Link immediately enables the port in forwarding state when a link comes up. The port is not part of the Spanning Tree at that time, but will participate in future Spanning Tree Resolutions.
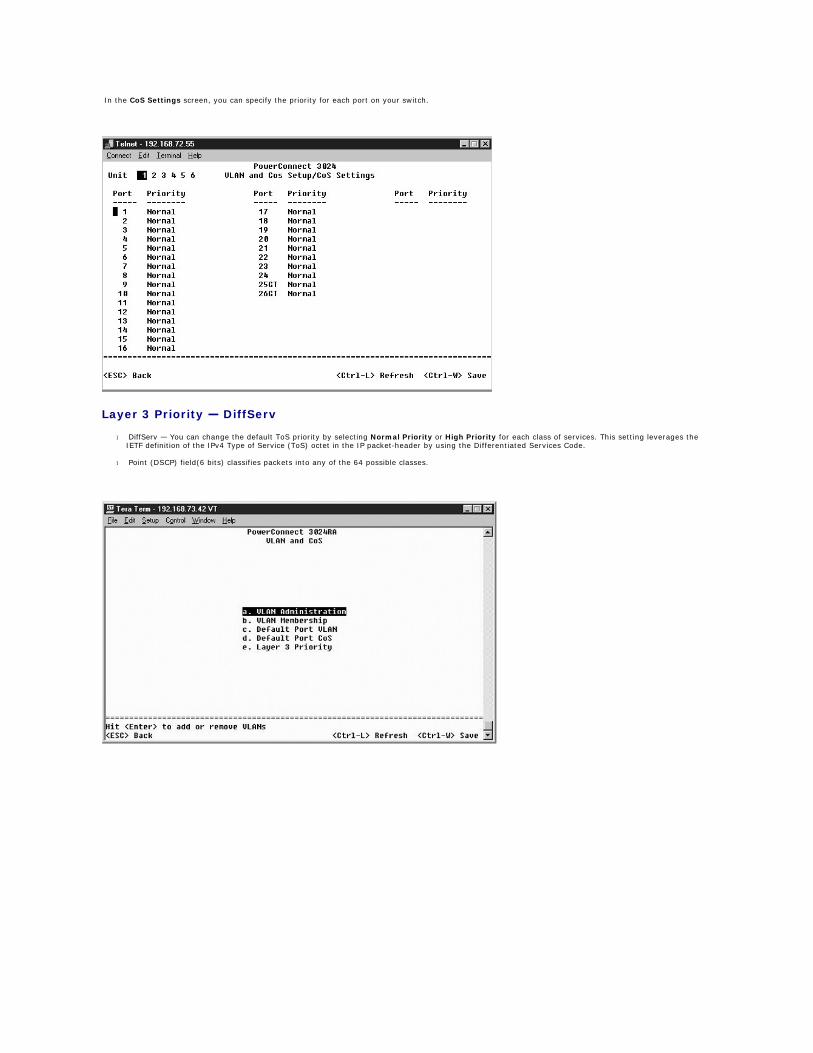
VLAN & CoS
The VLAN & CoS page includes links to the following pages:
l VLAN & CoS Tagging
l Default Port VLAN
l Default Port CoS
l Layer 3 Priority — DiffServ
VLAN & CoS Tagging
In the Membership page, you define VLAN groups. The following options are available:
l Show VLAN — Select the VLAN for which you want to edit the membership setting.
NOTE: This option is useful if a device is connected to a port that requires network access immediately when the link comes up and cannot wait for a Spanning Tree resolution.
l Name — User-defined name of the VLAN
l VLAN ID — Numeric ID of the VLAN (1 - 4094)
l Remove VLAN checkbox — Check this box to remove an existing VLAN
l Port Toggle Buttons — Select VLAN membership for each port by toggling the value of the port button:
¡ <U>: Port is a member of the VLAN. All packets transmitted by the port will be untagged, that is, not carry a tag and therefore not carry VLAN or CoS information.
¡ <T>: Port is a member of the VLAN. All packets transmitted by the port will be tagged, that is, carry a tag and therefore carry VLAN or CoS information.
¡ <BLANK>: Port is not a member of the VLAN. Packets associated with this VLAN will not be transmitted by the port.
The VLAN tagging option is a standard set by the IEEE to facilitate the spanning of VLANs across multiple switches. For more information, see the "Appendix" and IEEE Std 802.1Q-1998 Virtual Bridged Local Area Networks.
To save any changes you make in this page, click Apply. To reset these fields to their current value, click Reload.
The following tasks can be completed from this page:
Add VLAN Group
1. Under the Show VLAN drop-down menu, select Add a new VLAN.
2. Complete the VLAN Name and VLAN ID fields.
3. Add VLAN members.
See the procedure "Add VLAN Membership" later in this section for more information.
4. Click Apply.
Remove VLAN Group
1. Under the Show VLAN drop-down menu, select the VLAN you want to remove.
2. Check the Remove VLAN box for the VLAN you want to remove.
3. Click Apply.
Add VLAN Membership
1. Under the Show VLAN drop-down menu, select the VLAN you want to edit.
2. Change the VLAN member by clicking on the port icon until the desired state [T (tagged) or U (untagged)] or blank appears.
3. Click Apply.
Remove VLAN Membership
1. Under the Show VLAN drop-down menu, select the VLAN you want to edit.
2. Change the VLAN member by clicking on the port icon until the desired state (blank) appears.
3. Click Apply.
Default Port VLAN
In the Default Port VLAN page, you can specify the default port VLAN ID (PVID) for each port on your switch. All untagged packets entering the switch are tagged by default with the ID specified by the port's PVID.
This page is set up in a table format. For each port listed in the Port column, you can type a PVID in the PVID column.
Default Port CoS
Port Priority allows the user to specify which ports have greater precedence in situations where traffic may be buffered in the switch due to congestion. The ports with a setting of "high" will transmit their packets before those with a "normal" setting. The settings on this page only affect ingress packets that are not already tagged for priority. To raise the priority of a given port, switch the port's setting from "normal" to "high." The default and normal setting for a port is "normal."
In the Default Port CoS page, you can specify the priority for each port on your switch.
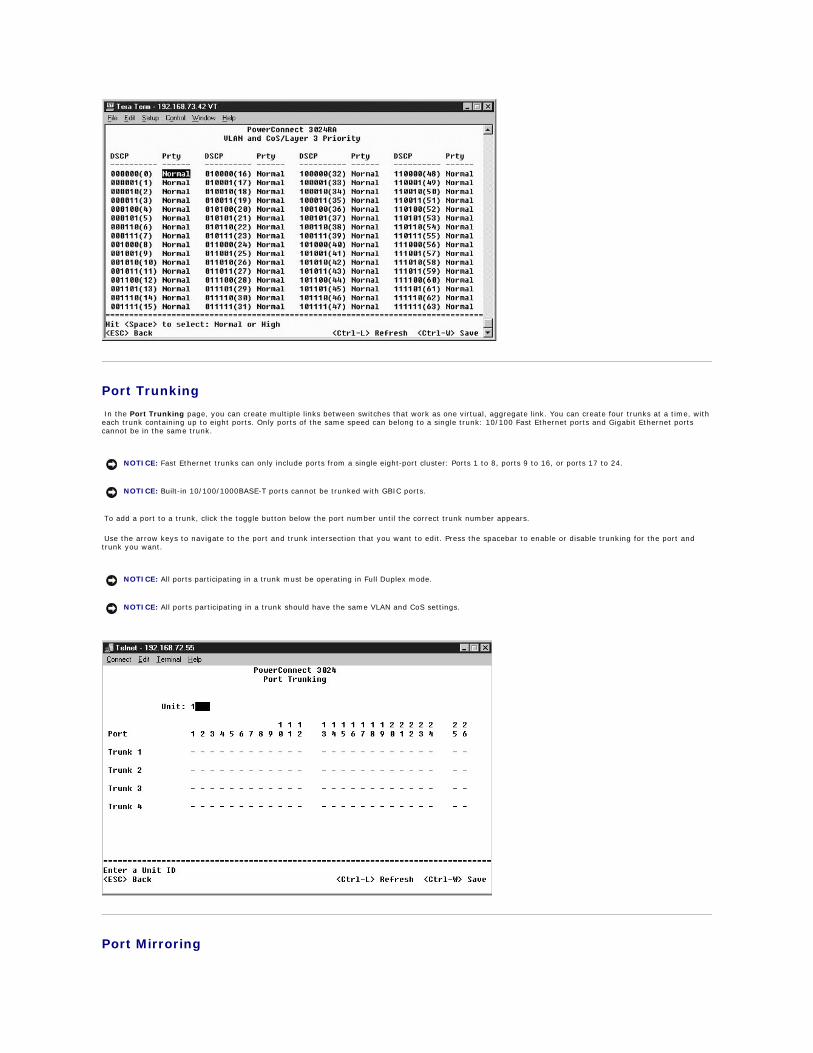
Layer 3 Priority — DiffServ
l DiffServ — You can change the default ToS priority by selecting Normal Priority or High Priority for each class of services. This setting leverages the IETF definition of the IPv4 Type of Service (ToS) octet in the IP packet-header by using the Differentiated Services Code.
l Point (DSCP) field (6 bits) classifies packets into any of the 64 possible classes.
Port Trunking
In the Port Trunking page, you can create multiple links between switches that work as one virtual, aggregate link. You can create four trunks at a time, with each trunk containing up to eight ports. Only ports of the same speed can belong to a single trunk: 10/100 Fast Ethernet ports and Gigabit Ethernet ports cannot be in the same trunk.
To add a port to a trunk, click the toggle button below the port number until the correct trunk number appears.
To save any changes you make in this page, click Apply. To reset these fields to their current value, click Reload.
Port Mirroring
From the Port Mirroring page, you can enable or disable port mirroring. You can also set the source port and monitor ports. Port mirroring helps you debug a network.
The following options are available:
NOTICE: Fast Ethernet trunks can only include ports from a single eight-port cluster: Ports 1 to 8, ports 9 to 16, or ports 17 to 24.
NOTICE: Built-in 10/100/1000BASE-T ports cannot be trunked with GBIC ports.
NOTICE: All ports participating in a trunk must be operating in Full Duplex mode.
NOTICE: All ports participating in a trunk should have the same VLAN and CoS settings.
l Port Mirroring — Enables or disables port mirroring.
l Source Port — Port from which all traffic will be mirrored to the monitor port.
l Monitor Port — Port that receives a copy of all traffic that the source port receives.
To save any changes you make in this page for the current session, click Apply. To reset these fields to their current value, click Reload.
SNMP
The SNMP menu contains links to the following pages:
l Community Table
l Host Table
l Trap Settings
Community Table
In the Community Table page, you can create different communities and customize access. The public string has Get privileges by default.
The following options are available:
l Community Name — Type the name of the community you want to create.
l Get — Allows read access to the switch's SNMP information for members of the SNMP community.
l Set — Allows write access to the switch's SNMP information for members of the SNMP community.
l Trap — Allows members of the SNMP community to receive SNMP traps.
To save any changes you make in this page, click Apply. To reset these fields to their current value, click Reload.
Host Table
From the SNMP Host Table page, you can add and remove hosts from access rights that have been granted to community groups. The permissions GET, SET, and TRAP are assigned to a community name and then these permissions are assigned to individual machines by adding those machines and their IP address to the appropriate community string. Host authorization can be enabled or disabled.
If the host authorization is disabled (the default setting), the switch allows any SNMP manager to access the switch. If the host authorization is enabled, the administrator can specify up to 16 SNMP managers on the host table that can access the switch.
You must enable host authorization before you can use the host table. Host authorization is a security feature to limit people who are not listed in the host table from accessing the switch.
Once you have enabled host authorization, you must add the host to this table through the console port connection. Otherwise, the switch cannot access the end station using SNMP.
The following fields are available:
l Host Name — User-defined name of the SNMP host.
l Host IP Address — IP address of the SNMP host authorized to communicate with the switch via SNMP.
l Community — Community name of the SNMP community that the host is a member of.
Trap Settings
The SNMP Trap Setting allows for the setup of authentication traps.
Authentication traps can be enabled or disabled:
l Enabled — The system generates an SNMP trap upon a host authorization failure.
l Disabled — The system does not generate authentication traps.
All hosts in community strings with trap privileges are notified when a trap condition occurs.
NOTE: The community name specified here must exist in the switch's SNMP Community Table.
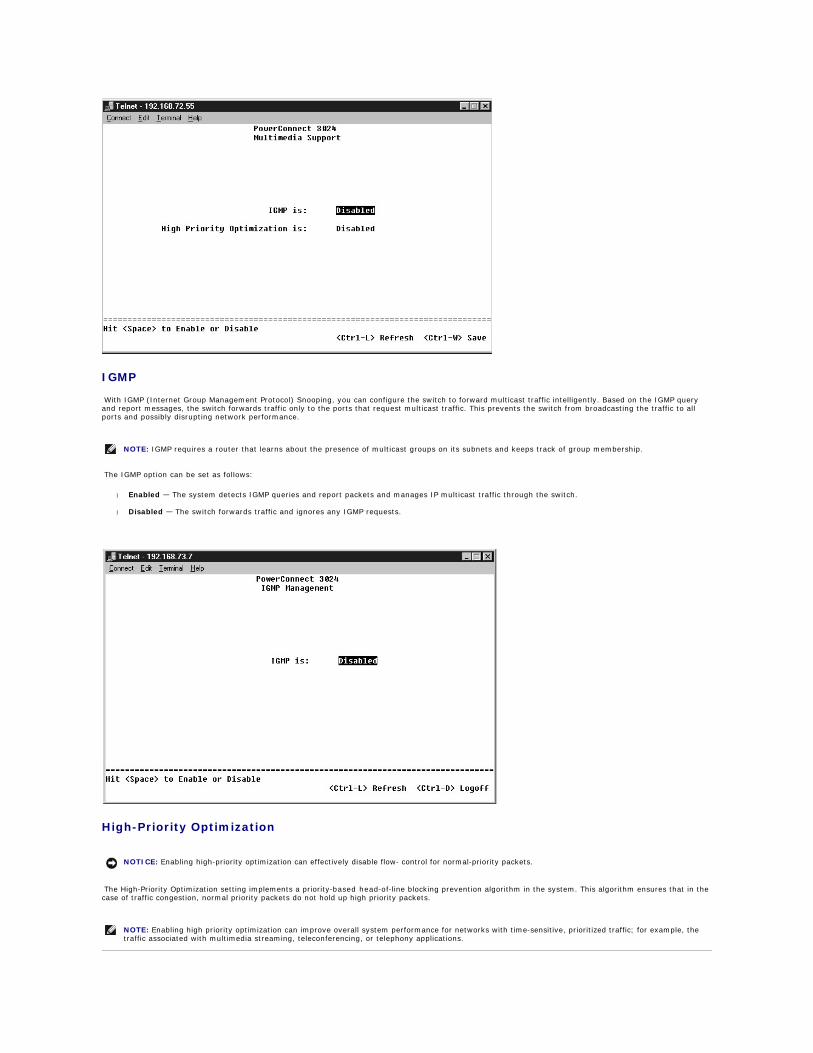
Multimedia Support
There are two settings available from this page: IGMP and High Priority Optimization.
IGMP
With IGMP (Internet Group Management Protocol) Snooping, you can configure the switch to forward multicast traffic intelligently. Based on the IGMP query and report messages, the switch forwards traffic only to the ports that request multicast traffic. This prevents the switch from broadcasting the traffic to all ports and possibly disrupting network performance.
The IGMP option can be set as follows:
l Enabled — The system detects IGMP queries and report packets and manages IP multicast traffic through the switch.
l Disabled — The switch forwards traffic and ignores any IGMP requests.
High-Priority Optimization
The High-Priority Optimization setting implements a priority-based head-of-line blocking prevention algorithm in the system. This algorithm ensures that in the case of traffic congestion, normal priority packets do not hold up high priority packets.
NOTE: IGMP requires a router that learns about the presence of multicast groups on its subnets and keeps track of group membership.
NOTICE: Enabling high-priority optimization can effectively disable flow- control for normal-priority packets.
NOTE: Enabling high priority optimization can improve overall system performance for networks with time-sensitive, prioritized traffic, for example, the traffic associated with multimedia streaming, teleconferencing, or telephony applications.
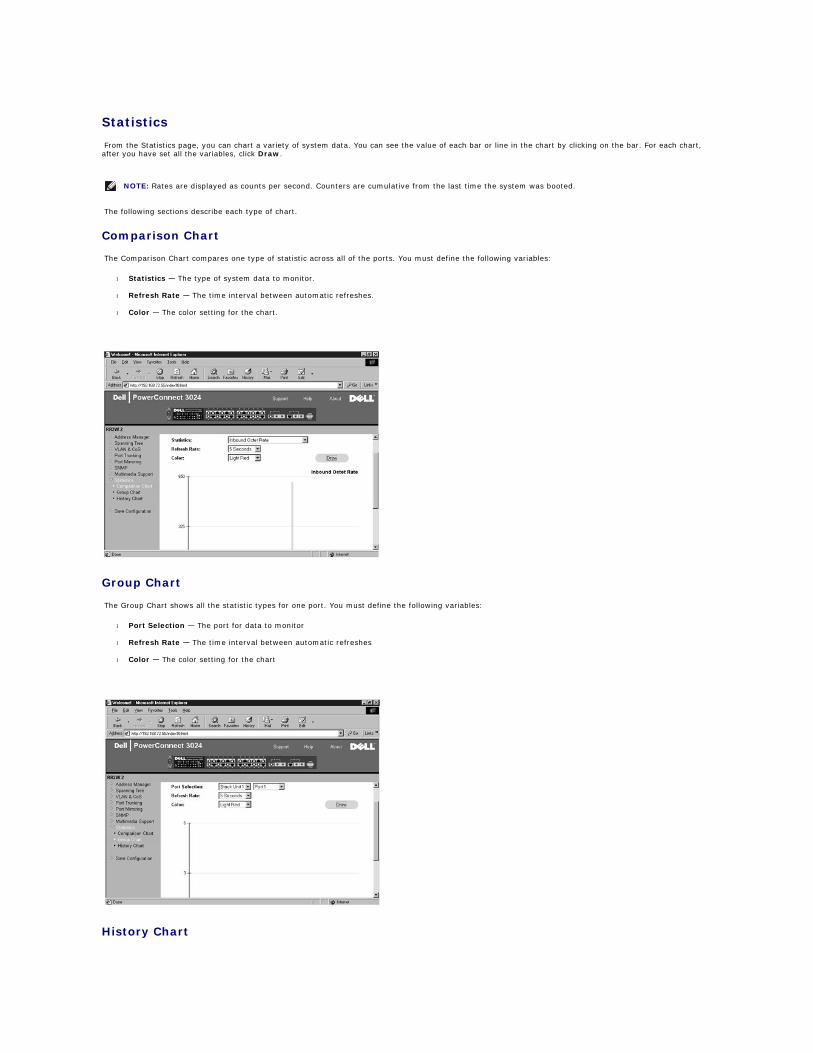
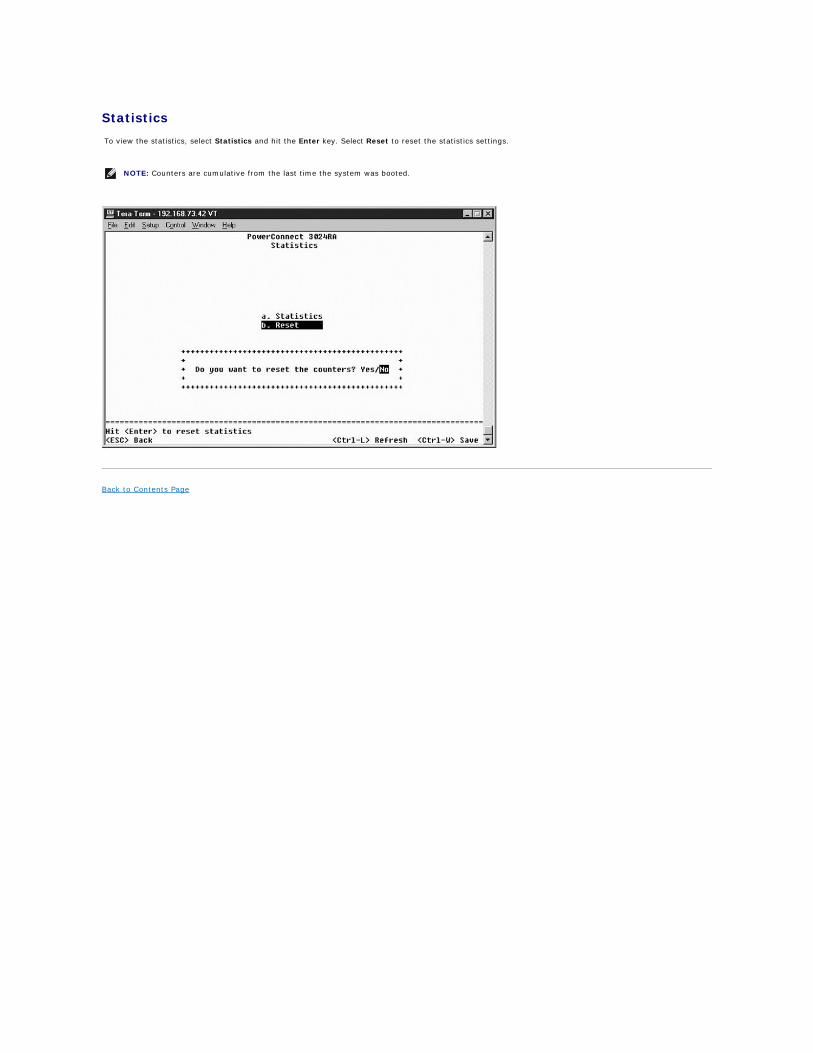
Statistics
From the Statistics page, you can chart a variety of system data. You can see the value of each bar or line in the chart by clicking on the bar. For each chart, after you have set all the variables, click Draw.
The following sections describe each type of chart.
Comparison Chart
The Comparison Chart compares one type of statistic across all of the ports. You must define the following variables:
l Statistics — The type of system data to monitor.
l Refresh Rate — The time interval between automatic refreshes.
l Color — The color setting for the chart.
Group Chart
The Group Chart shows all the statistic types for one port. You must define the following variables:
l Port Selection — The port for data to monitor
l Refresh Rate — The time interval between automatic refreshes
l Color — The color setting for the chart
History Chart
NOTE: Rates are displayed as counts per second. Counters are cumulative from the last time the system was booted.
The History Chart charts one type of statistic for any combination of ports. The chart presents data across a set time period so that you can monitor fluctuations over time.
l Statistics — The type of system data to monitor
l Refresh Rate — The time interval between automatic refreshes
l Port Selection — The port for data to monitor
Counter Reset
The Counter Reset page allows you to reset all statistics counters.
Utilization Summary
The Utilization Summary page allows you to view (by port) the link status; percent utilization; and ratios of incoming unicast, nonunicast, and error packets.
Click the Refresh button to refresh the Utilization Summary page.
Counter Summary
The Counter Summary page allows you to view all ports accumulated, transmitted, and received unicast, nonunicast, and error packets.
Click the Refresh button to refresh the Counter Summary page.
Save Configuration
If you make any changes to the system through the Web interface, you must save the changes in the Save Configuration page.
The following options are available:
l Save Configuration to NVRAM — Saves changes to the system configuration.
l Restore Factory Defaults — Resets the system configuration to its original default settings.
NOTE: Network IP settings like IP address, gateway address, and network mask are not restored by this command.
Back to Contents Page
Back to Contents Page
Console Interface Dell™ PowerConnect™ 3024 Systems User's Guide
You can access the console, using VT100 terminal emulation, from the RS232 serial port or a telnet connection. The switch offers password protection for this interface.
When the telnet session opens, select Terminal->Properties. In the Terminal Preferences dialog, verify the following settings:
l Under Terminal Options, do the following:
¡ Select VT100 Arrows.
¡ Set Buffer Size to 25.
l Under Emulation, select the VT-100/ANSI radio button.
User Interface
The switch offers a menu-driven console interface. Use the arrow keys to move within menus and sub-screens. To select a menu, press the appropriate <arrow> key to highlight the menu, and then press <Enter>. You can also type the letter in front of each menu option to select that option.
The bottom of every screen displays key commands available for that particular screen and sometimes other helpful information. The following list describes common key commands:
l <Esc> — Return to the previous menu or screen, or abort editing
l <Ctrl><l> — Refresh the screen
l <Ctrl><d> — Log off
l <Ctrl><w> — Saves current configuration to NVRAM
l <Spacebar> — Toggle between possible settings for a field
l <Enter> — Select a menu item, edit a field, or accept a value after editing a field
l <Ctrl><x> — Delete a table entry
Navigating in the Console Interface
Once you configure your system terminal and start the switch, you can log in to the console interface. The first time you log in, you must use the default password, which is switch.
The bottom of most screens includes information about navigating in and issuing commands from the console interface. In general, the following information applies:
l To select an option, press the key that is in brackets ([ ]) in the menu and then press the <Enter> key.
l Use the arrow keys to navigate to editable fields.
l Use the space bar to toggle through options in other fields.
l From any screen, press the <q> key and press <Enter> to return to the previous screen.
You can manage a stack of up to six units through the console interface. On most pages, you must select the unit in the stack you want to display. Use the arrow keys to navigate to the unit to display and press <Enter>. Press <Esc> to go back to unit selection.
Password Protection
From the initial welcome screen, you must enter a password to proceed, if password protection is enabled. If password protection is disabled, the Main Menu is displayed and you immediately have access to the switch management interface. By default, password protection is disabled. If enabled, the default
User Interface
Navigating in the Console Interface
Password Protection
Main Menu
System Manager
Port Manager
Address Manager
Spanning Tree
VLAN and CoS Setup
Port Trunking
Port Mirroring
SNMP Management
Multimedia Support
Statistics
NOTICE: When using HyperTerminal with Windows 2000, make sure that you have Windows 2000 Service Pack 2 or later installed. Windows 2000 Service Pack 2 fixes the problem of arrow keys not functioning in HyperTerminal's VT100 emulation. See www.microsoft.com for information on Windows 2000 service packs.
password is switch. For more information about password protection, see "Security Admin."
Main Menu
The main menu displays all the sub-menus and pages that are available.
The following menu items are available:
l System Manager
l Port Manager
l Address Manager
l Spanning Tree
l VLAN and CoS Setup
l Port Trunking
l Port Mirroring
l SNMP Management
l Multimedia Support
l Statistics
l Save Configuration
To log out of the user interface, press <Ctrl><d> at any time during your telnet session. This returns you to the login screen.
System Manager
The system manager contains all system operations and general information. It includes the following menus:
l General Info — to view general system information and perform general administration.
l IP Settings — to view or edit IP parameters.
l Security Admin — to select user authentication, enable or disable password protection, or filter by IP address.
l Configuration — to save configuration files to a server or load configuration files from a server.
l Firmware Upgrade — to TFTP the latest firmware for upgrade.
l Reset — to reboot the switch.
General Info
The General Info screen contains the following information:
l System Description
l MAC Address
It also includes the following editable fields:
l System Name
l System Contact
l System Location
IP Settings
This menu manages the IP-related information about the system.
The IP Settings page includes the following editable fields:
l IP address
l Network mask
l Gateway address
l IP Assignment Mode — Sets whether IP functionality is enabled through manual (static) configuration or set by Dynamic Host Configuration Protocol (DHCP) or Boot Protocol (BootP).
¡ Manual — Sets static IP address.
¡ BootP — Gets IP address from a BootP server.
¡ DHCP — Gets IP address from a DHCP server.
Press <Ctrl><w> to save any changes made. Press <ESC> and select Reset to reboot the system.
See "Installation" for more information on installation.
NOTE: You must reboot the system from the System Manager/Reset page for the changes to take effect.
Security Admin
l User Authentication Mode — Selects the authentication or authentication sequence required.
¡ Local Only — The switch authenticates the user.
¡ Local then Remote — The switch attempts to authenticate the user first, and then a RADIUS server attempts to authenticate the user.
¡ Remote then Local — A RADIUS server attempts to authenticate the user first, and then the switch attempts to authenticate the user.
¡ Remote Only — A RADIUS server authenticates the user.
l RADIUS Server IP Address — Identifies the IP address of the RADIUS server.
l RADIUS Shared Secret — Specifies the text string that is shared between the switch and the RADIUS server.
l IP Filtering — Allows up to 16 IP addresses to access the switch management function, if enabled.
l Password Admin — Enables or disables password protection.
l Allowed IP Addresses — You can enter up to 16 IP addresses in the Allowed IP Address table.
l Disable Telnet/Web Access (Console Only) — Provides an option to enable or disable Telnet or Web access to the switch.
NOTE: The default password is switch.
Configuration
l To save the switch's current configuration file to a server, supply the TFTP server IP address and configuration filename, and then select Transfer Configuration File to Server. To load a configuration file from a server, supply the TPTP server IP address and configuration filename, and then select Transfer Configuration File from Server.
l To restore the preinstalled configuration, select Restore.
l TFTP Server IP Address — Inserts the TFTP Server IP Address to save or load.
l TFTP Path/Configuration Filename — Inserts the TFTP Path and configuration filename to save or load.
l Transfer Configuration File to Server— Saves the switch configuration file to a server.
l Transfer Configuration File from Server — Loads a configuration file from a server to the switch.
l Restore — Restores preinstalled default settings.
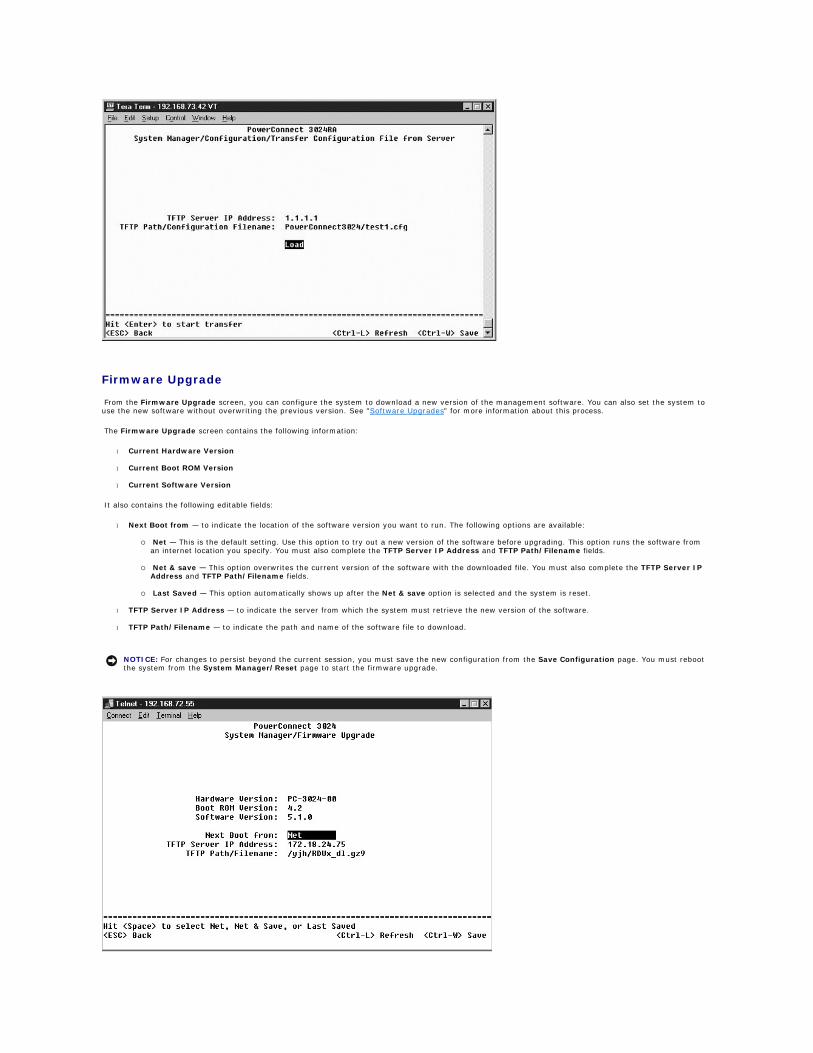
Firmware Upgrade
From the Firmware Upgrade screen, you can configure the system to download a new version of the management software. You can also set the system to use the new software without overwriting the previous version. See "Software Upgrades" for more information about this process.
The Firmware Upgrade screen contains the following information:
l Current Hardware Version
l Current Boot ROM Version
l Current Software Version
It also contains the following editable fields:
l Next Boot from — to indicate the location of the software version you want to run. The following options are available:
¡ Net — This is the default setting. Use this option to try out a new version of the software before upgrading. This option runs the software from an internet location you specify. You must also complete the TFTP Server IP Address and TFTP Path/Filename fields.
¡ Net & save — This option overwrites the current version of the software with the downloaded file. You must also complete the TFTP Server IP Address and TFTP Path/Filename fields.
¡ Last Saved — This option automatically shows up after the Net & save option is selected and the system is reset.
l TFTP Server IP Address — to indicate the server from which the system must retrieve the new version of the software.
l TFTP Path/Filename — to indicate the path and name of the software file to download.
NOTICE: For changes to persist beyond the current session, you must save the new configuration from the Save Configuration page. You must reboot the system from the System Manager/Reset page to start the firmware upgrade.
Reset
If you make any changes to the system through the console interface, you must save the changes in the Save Configuration screen. Once you save changes in this screen, you must go to the Reset screen and select the Reset menu option to reboot the system before the changes can take effect.
Port Manager
You can arrange the port characteristics related to link operations. To change settings for any parameter on this page, select the current value and press the space bar. This toggles between the available values for the parameter.
For each port number listed under the Port column, you can change the following parameters listed by column name on the screen:
l Admin — allows you to enable or disable the port.
l Data Rate — allows you to select the speed at which the port operates. The choices are 10Mbps, 100Mbps, 1000Mbps, and Auto, which automatically determines and negotiates with the speed of the attached device.
l Duplex — offers the choice of Full, Half, or Auto, which automatically detects the value of the attached device and sets the port duplex mode accordingly.
l Flow Control — if enabled, stops the sender from sending data until the receiver can accept it.
l Comments — allows you to name the port or make comments.
To enable a GBIC module instead of the built-in 10/100/1000BASE-T port for a Gigabit Ethernet uplink, navigate to the desired port number and press the spacebar to enable the GBIC module.
NOTICE: Enabling the GBIC port disables the associated built-in 10/100/1000BASE-T port.
Address Manager
The Address Manager screen includes the following options:
l Static Addresses
l Dynamic Addresses
l Address Aging
Static Addresses
From the Static Addresses screen, you can specify the MAC address and port number of systems that are to remain available to the switch for an indeterminate amount of time.
The following information is required to add a static MAC address:
l Address — to enter the MAC address of a system you want to set as static.
l Port — to select the port associated with that system.
If all the information is correct, the new entry appears in the screen in order by port ID.
Dynamic Addresses
The Dynamic Addresses lookup table allows you to view the MAC addresses that are currently in the address database. When addresses are in the database, the packets intended for those addresses are forwarded directly to those ports. You can filter out the table by port, VLAN, and MAC address by checking those fields.
Dynamic MAC address learning is enabled by default. This is the standard mode for a network switch. In some networks, you may want to create a secured network by disabling the dynamic address learning capabilities. When this is done, all current dynamic address entries will be locked in. These addresses will not age out and new addresses will not be learned.
In addition, if a new address is detected on a port, the switch will disable the port with the new address, save the current settings to NVRAM, and send out a Simple Network Management Protocol (SNMP) trap warning. This is useful for locking out systems that attempt to access the network that were not on the network previous to the lockdown. Once a port is automatically disabled, you can reenable the port manually. The NVRAM will only be saved the first time a given port detects a new address. If the aging time is raised prior to disabling the dynamic address learning, it will allow enough time for all current MAC address to be learned by the switch without the possibility of aging out.
Address Aging
In the Address Aging screen, you can specify how long an address stays available to the switch if it is not configured as static.
The following field is available:
l Aging Time — sets the time before an address is purged from system. You can change this value to any number between 10 and 1,000,000 seconds.
NOTE: The console interface can display up to 28 address entries. To see more than 28 entries, use the web interface.
Spanning Tree
The Spanning Tree screen includes the following options:
l Bridge Settings
l Port Settings
Bridge Settings
From the Bridge Settings screen, you can enable and configure the spanning tree. The following options are available:
l Enable — turns the spanning tree on. If you enable the spanning tree, you must complete the following fields:
¡ Hello Time — sets the interval between configuration messages sent by the spanning tree protocol.
¡ Max Age — sets the amount of time before the system discards a configuration message.
¡ Forward Delay — sets the amount of time the system spends in learning and listening states.
¡ Bridge Priority — sets the priority setting among other switches in the spanning tree.
l Disable — disables the spanning tree protocol on the system.
Port Settings
In the Port Settings screen, you can specify spanning tree parameters for each port. This screen is in a table format. For each port number listed under the Port column, the following fields are available:
l Priority — Priority assigned to this port for the Spanning Tree Protocol (0 - 255). A port with a higher priority is less likely to be blocked if the Spanning Tree Protocol is detecting network loops. Low numeric value indicates a high priority.
l Cost — Cost assigned to this port for the Spanning Tree Protocol (1-65536). A port with a lower cost is less likely to be blocked if the Spanning Tree Protocol is detecting network loops.
l Fast Link — Fast Link immediately enables the port in forwarding state when a link comes up. The port is not part of the Spanning Tree at that time, but will participate in future Spanning Tree Resolutions.
VLAN and CoS Setup
From the VLAN Management menu, you can configure up to 64 802.1Q VLANs.
VLANs allows PCs, workstations, and other resources, including printers and file servers, to be organized into logical, broadcast domains so that only devices within the same domain can communicate with each other.
The VLAN Management screen shows the information regarding all configured VLANs. All ports of the switch are configured as untagged members in VLAN 1 with VLAN ID 1 by default. Users can create VLANs, delete VLANs, or reset the VLAN configuration back to default in this menu.
NOTE: This option is useful if a device is connected to a port that requires network access immediately when the link comes up and cannot wait for a Spanning Tree resolution.
The VLAN Setup screen includes the following options:
l VLAN Administration
l VLAN Membership
l PVID Settings
l CoS Settings
l Layer 3 Priority — DiffServ
VLAN Administration
You can add up to 64 VLANs with unique ID numbers and names. VLAN ID numbers must be in the range of 1 to 4094.
Add a VLAN
l Type a unique numeric VLAN ID and press <Enter>.
l Type a unique VLAN name and press <Enter>.
Remove a port or an entire VLAN
To remove an entire VLAN, just press <Ctrl><x> anywhere on that line.
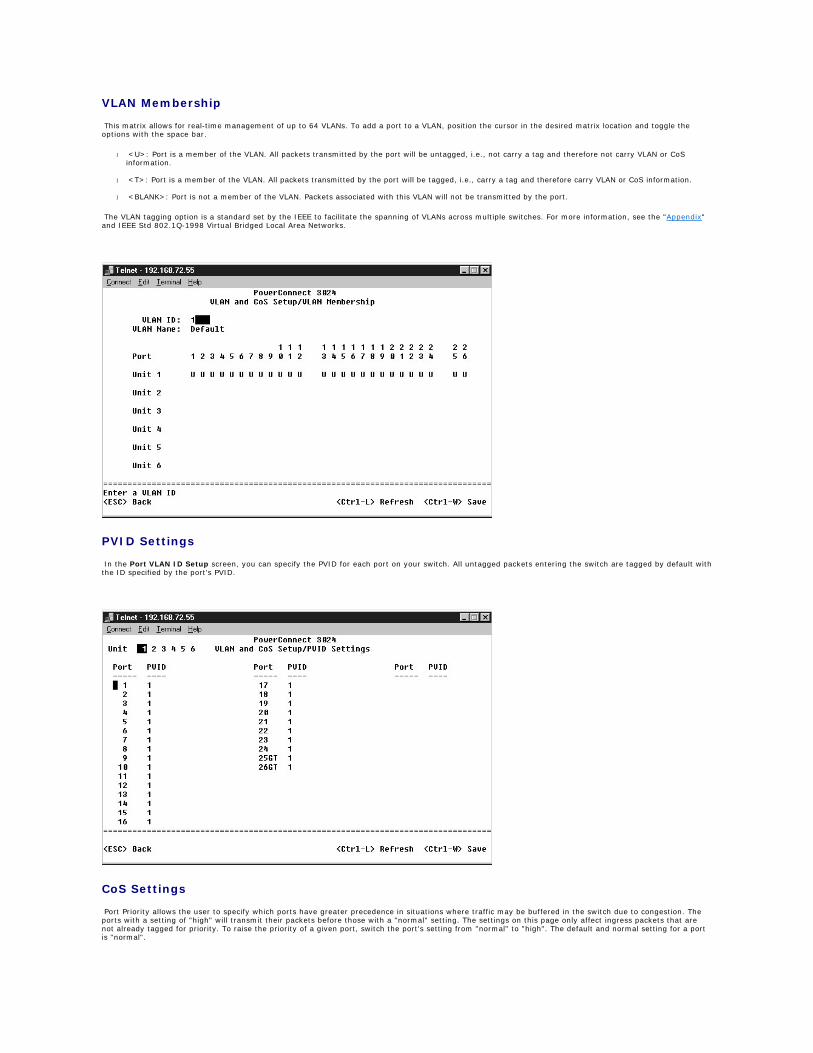
VLAN Membership
This matrix allows for real-time management of up to 64 VLANs. To add a port to a VLAN, position the cursor in the desired matrix location and toggle the options with the space bar.
l <U>: Port is a member of the VLAN. All packets transmitted by the port will be untagged, i.e., not carry a tag and therefore not carry VLAN or CoS information.
l <T>: Port is a member of the VLAN. All packets transmitted by the port will be tagged, i.e., carry a tag and therefore carry VLAN or CoS information.
l <BLANK>: Port is not a member of the VLAN. Packets associated with this VLAN will not be transmitted by the port.
The VLAN tagging option is a standard set by the IEEE to facilitate the spanning of VLANs across multiple switches. For more information, see the "Appendix" and IEEE Std 802.1Q-1998 Virtual Bridged Local Area Networks.
PVID Settings
In the Port VLAN ID Setup screen, you can specify the PVID for each port on your switch. All untagged packets entering the switch are tagged by default with the ID specified by the port's PVID.
CoS Settings
Port Priority allows the user to specify which ports have greater precedence in situations where traffic may be buffered in the switch due to congestion. The ports with a setting of "high" will transmit their packets before those with a "normal" setting. The settings on this page only affect ingress packets that are not already tagged for priority. To raise the priority of a given port, switch the port's setting from "normal" to "high". The default and normal setting for a port is "normal".
In the CoS Settings screen, you can specify the priority for each port on your switch.
Layer 3 Priority — DiffServ
l DiffServ — You can change the default ToS priority by selecting Normal Priority or High Priority for each class of services. This setting leverages the IETF definition of the IPv4 Type of Service (ToS) octet in the IP packet-header by using the Differentiated Services Code.
l Point (DSCP) field(6 bits) classifies packets into any of the 64 possible classes.
Port Trunking
In the Port Trunking page, you can create multiple links between switches that work as one virtual, aggregate link. You can create four trunks at a time, with each trunk containing up to eight ports. Only ports of the same speed can belong to a single trunk: 10/100 Fast Ethernet ports and Gigabit Ethernet ports cannot be in the same trunk.
To add a port to a trunk, click the toggle button below the port number until the correct trunk number appears.
Use the arrow keys to navigate to the port and trunk intersection that you want to edit. Press the spacebar to enable or disable trunking for the port and trunk you want.
Port Mirroring
NOTICE: Fast Ethernet trunks can only include ports from a single eight-port cluster: Ports 1 to 8, ports 9 to 16, or ports 17 to 24.
NOTICE: Built-in 10/100/1000BASE-T ports cannot be trunked with GBIC ports.
NOTICE: All ports participating in a trunk must be operating in Full Duplex mode.
NOTICE: All ports participating in a trunk should have the same VLAN and CoS settings.
From the Port Mirroring menu, you can monitor traffic on a specific port. The switch can monitor only single direction traffic, either transmission or reception. When port mirroring is enabled, all the transmission or receiving traffic of the mirrored port is forwarded to the mirroring port.
The following options are available:
l Port Mirroring — Enables or disables port mirroring.
l Source Port — Port from which all traffic will be mirrored to the monitor port.
l Monitor Port — Port that receives a copy of all traffic that the source port receives.
SNMP Management
The SNMP menu includes the following options:
l Community Table
l Host Table
l Trap Settings
Community Table
In the Community Table page, you can create different communities and customize access. The public string has Get privileges by default.
The following options are available:
l Community Name — Type the name of the community you want to create.
l Get — Allows read access to the switch's SNMP information for members of the SNMP community.
l Set — Allows write access to the switch's SNMP information for members of the SNMP community.
l Trap — Allows members of the SNMP community to receive SNMP traps.
Host Table
From the SNMP Host Table page, you can add and remove hosts from access rights that have been granted to community groups. The permissions GET, SET, and TRAP are assigned to a community name and then these permissions are assigned to individual machines by adding those machines and their IP addresses to the appropriate community string. Host authorization can be enabled or disabled.
If the host authorization is disabled (the default setting), the switch allows any SNMP manager to access the switch. If the host authorization is enabled, the administrator can specify up to 16 SNMP managers on the host table that can access the switch.
You must enable host authorization before you can use the host table. Host authorization is a security feature to limit people who are not listed in the host table from accessing the switch.
Once you have enabled host authorization, you must add the host to this table through the console port connection. Otherwise, the switch cannot access the end station using SNMP.
Add host
1. Enter the host name, IP address, and the community string. Press <Enter> after each entry to move to the next field.
2. In the Status field, press the spacebar until the desired status is displayed.
3. Press <Ctrl><w> to save all changes.
Trap Settings
The SNMP Trap Setting allows for the setup of authentication traps. The following options are available:
l Authentication Trap
¡ Enabled — The system generates an SNMP trap upon a host authorization failure.
¡ Disabled — The system does not generate authentication traps.
All hosts in community strings with trap privileges are notified when a trap condition occurs.
Multimedia Support
There are two settings available from this page: IGMP and High Priority Optimization.
IGMP
With IGMP (Internet Group Management Protocol) Snooping, you can configure the switch to forward multicast traffic intelligently. Based on the IGMP query and report messages, the switch forwards traffic only to the ports that request multicast traffic. This prevents the switch from broadcasting the traffic to all ports and possibly disrupting network performance.
The IGMP option can be set as follows:
l Enabled — The system detects IGMP queries and report packets and manages IP multicast traffic through the switch.
l Disabled — The switch forwards traffic and ignores any IGMP requests.
High-Priority Optimization
The High-Priority Optimization setting implements a priority-based head-of-line blocking prevention algorithm in the system. This algorithm ensures that in the case of traffic congestion, normal priority packets do not hold up high priority packets.
NOTE: IGMP requires a router that learns about the presence of multicast groups on its subnets and keeps track of group membership.
NOTICE: Enabling high-priority optimization can effectively disable flow- control for normal-priority packets.
NOTE: Enabling high priority optimization can improve overall system performance for networks with time-sensitive, prioritized traffic; for example, the traffic associated with multimedia streaming, teleconferencing, or telephony applications.
Statistics
To view the statistics, select Statistics and hit the Enter key. Select Reset to reset the statistics settings.
Back to Contents Page
NOTE: Counters are cumulative from the last time the system was booted.
Back to Contents Page
Software Upgrades Dell™ PowerConnect™ 3024 Systems User's Guide
Upgrade Procedure
The application software is field upgradable. The new software must reside on a TFTP server that can be accessed by the switch.
Before you upgrade the firmware, ensure that Port Trunking is disabled.
1. Write down the current Port Trunking configurations.
2. Unplug all but one port from each of the trunks.
3. Delete all trunks through the management interface.
4. Save all configurations to NVRAM.
5. Reset the switch to perform the firmware upgrade.
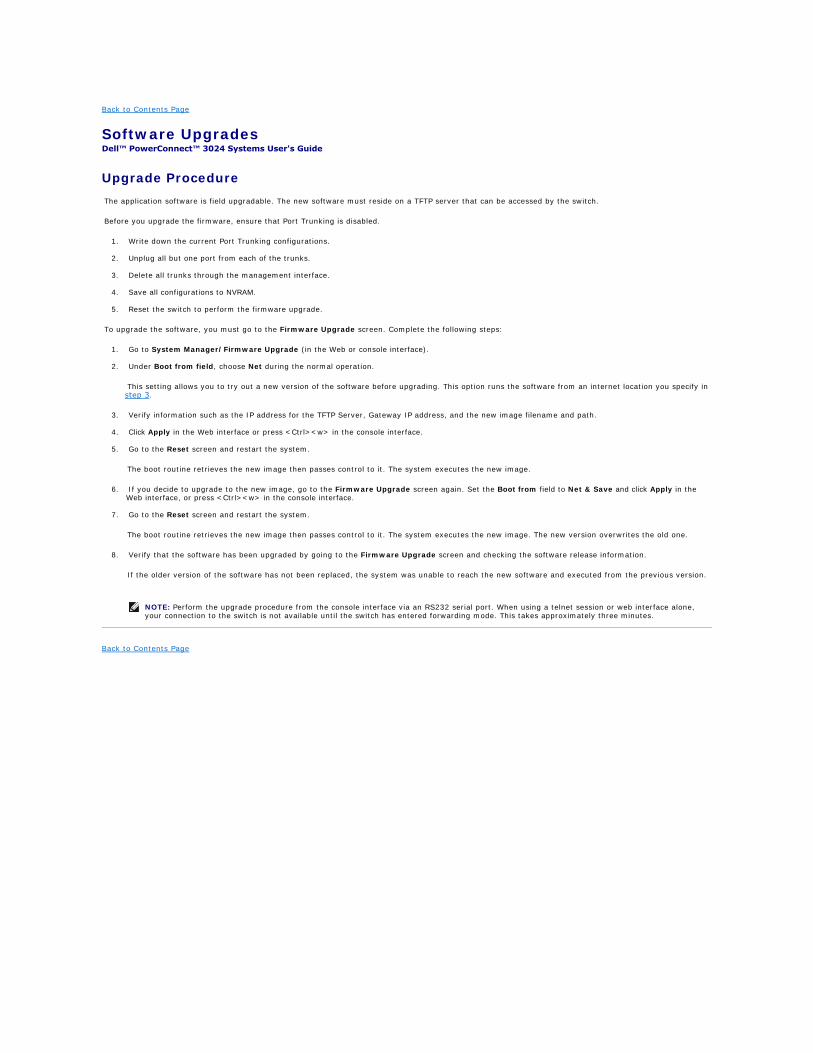
To upgrade the software, you must go to the Firmware Upgrade screen. Complete the following steps:
1. Go to System Manager/Firmware Upgrade (in the Web or console interface).
2. Under Boot from field, choose Net during the normal operation.
This setting allows you to try out a new version of the software before upgrading. This option runs the software from an internet location you specify in step 3.
3. Verify information such as the IP address for the TFTP Server, Gateway IP address, and the new image filename and path.
4. Click Apply in the Web interface or press <Ctrl><w> in the console interface.
5. Go to the Reset screen and restart the system.
The boot routine retrieves the new image then passes control to it. The system executes the new image.
6. If you decide to upgrade to the new image, go to the Firmware Upgrade screen again. Set the Boot from field to Net & Save and click Apply in the Web interface, or press <Ctrl><w> in the console interface.
7. Go to the Reset screen and restart the system.
The boot routine retrieves the new image then passes control to it. The system executes the new image. The new version overwrites the old one.
8. Verify that the software has been upgraded by going to the Firmware Upgrade screen and checking the software release information.
If the older version of the software has not been replaced, the system was unable to reach the new software and executed from the previous version.
Back to Contents Page
NOTE: Perform the upgrade procedure from the console interface via an RS232 serial port. When using a telnet session or web interface alone, your connection to the switch is not available until the switch has entered forwarding mode. This takes approximately three minutes.
Back to Contents Page
Appendix Dell™ PowerConnect™ 3024 Systems User's Guide
VLAN Description
Packets received by the switch are treated in the following ways:
l When an untagged packet enters a port, the system automatically tags it with the port's default VLAN ID tag number. Each port has a default VLAN ID setting that is user configurable. The default setting is 1. You can change the default VLAN ID setting for each port from the Port Manager screen.
l When a tagged packet enters a port, the default VLAN ID setting has no effect on the tag.
¡ The packet proceeds to the VLAN specified by its VLAN ID tag number.
¡ If the port in which the packet entered does not belong to the VLAN specified by the packet's VLAN ID tag, the system drops the packet.
¡ If the port belongs to the VLAN specified by the packet's VLAN ID, the system can send the packet to other ports with the same VLAN ID.
l Packets leaving the switch are either tagged or untagged depending on that port's membership properties.
l A U for a given port and VLAN means that packets leaving the switch from that port and VLAN are untagged. A T for a given port and VLAN means that packets leaving the switch from that port and VLAN are tagged with the respective ID for the VLAN to which that port belongs.
VLAN Examples
In the following two examples, example 1 steps through a simple two-group VLAN setup. Example 2 steps through a more elaborate setup illustrating all possible scenarios for a comprehensive understanding of tagged VLANs.
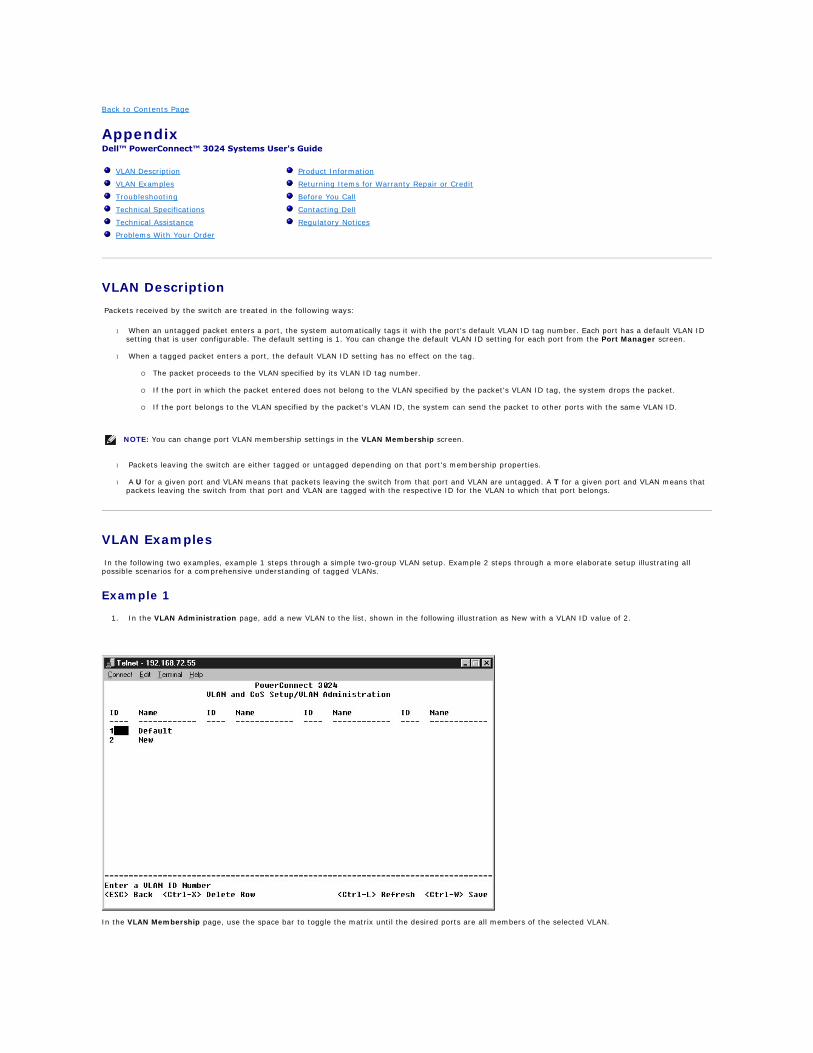
Example 1
1. In the VLAN Administration page, add a new VLAN to the list, shown in the following illustration as New with a VLAN ID value of 2.
In the VLAN Membership page, use the space bar to toggle the matrix until the desired ports are all members of the selected VLAN.
VLAN Description
VLAN Examples
Troubleshooting
Technical Specifications
Technical Assistance
Problems With Your Order
Product Information
Returning Items for Warranty Repair or Credit
Before You Call
Contacting Dell
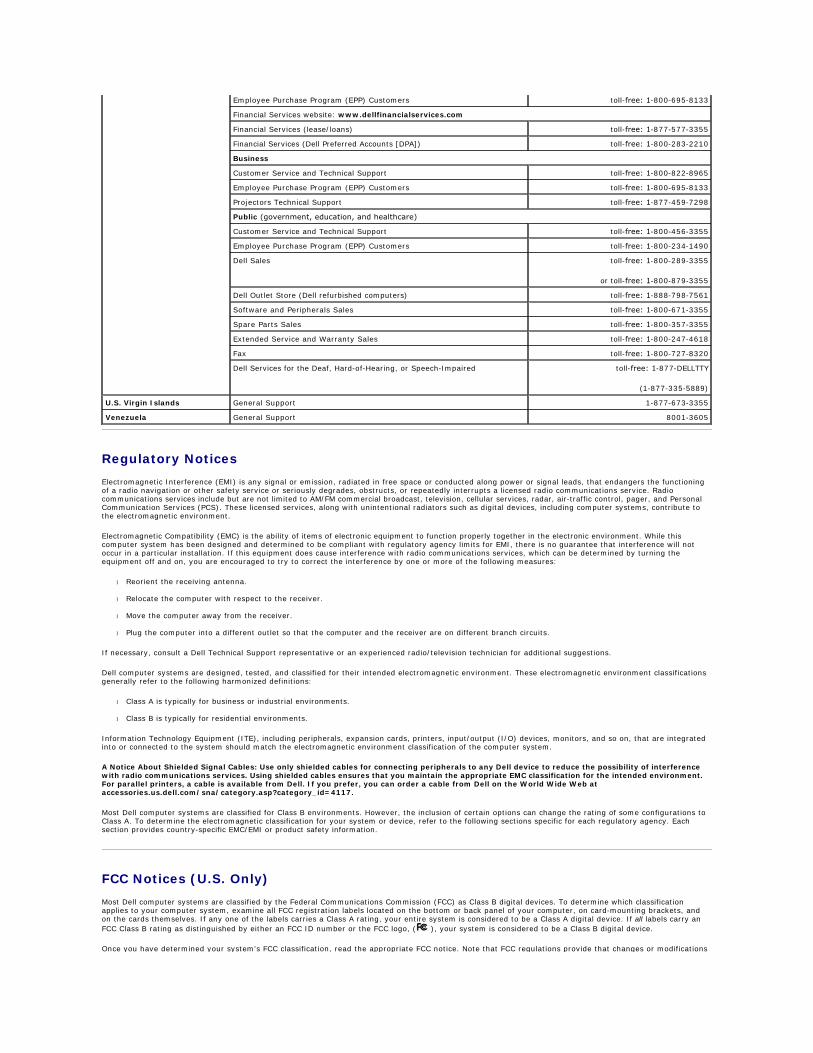
Regulatory Notices
NOTE: You can change port VLAN membership settings in the VLAN Membership screen.
3. To allow untagged packets to participate in the new VLAN, change the Port VLAN IDs for the relevant ports.
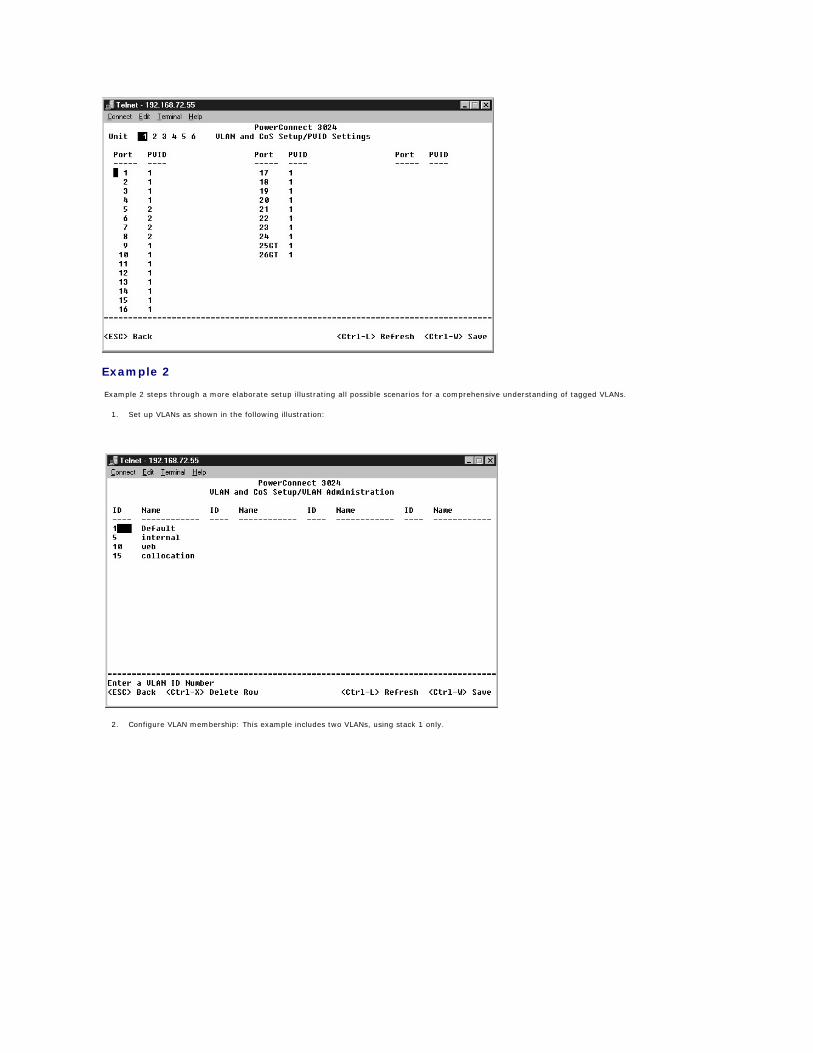
Example 2
Example 2 steps through a more elaborate setup illustrating all possible scenarios for a comprehensive understanding of tagged VLANs.
1. Set up VLANs as shown in the following illustration:
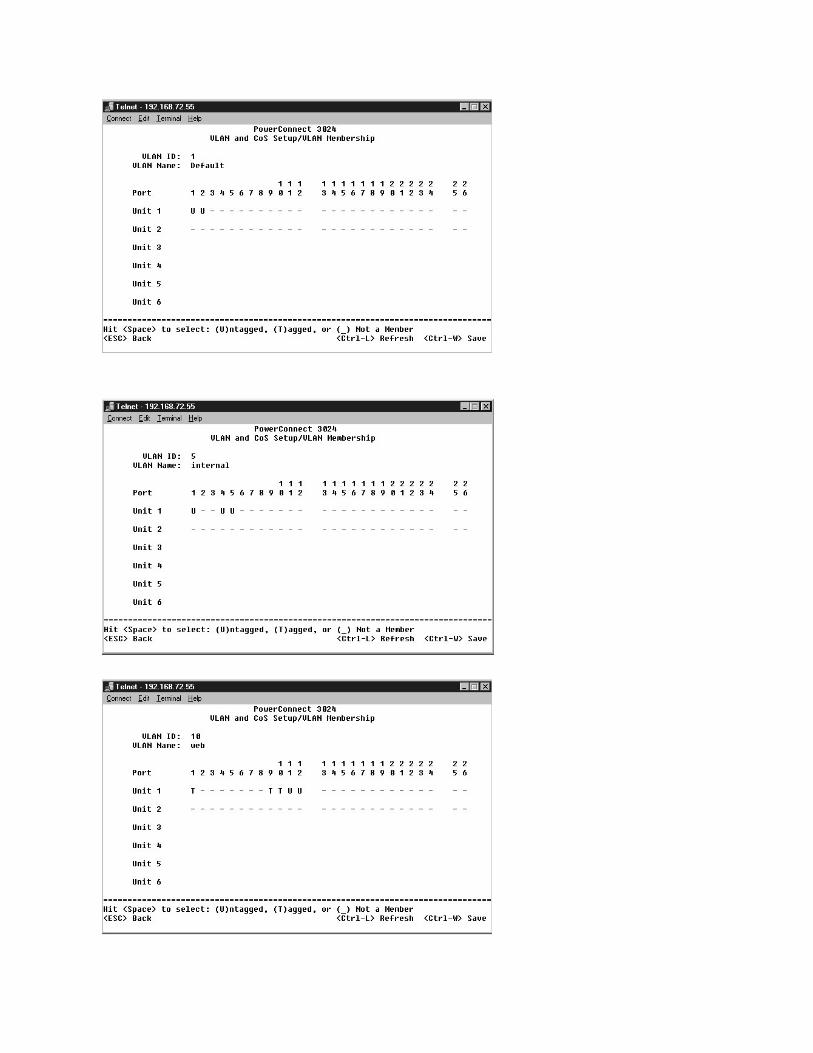
2. Configure VLAN membership: This example includes two VLANs, using stack 1 only.
3. Set up the Port VLAN IDs as shown in the following illustration:
The specific ports shown in the previous illustration have the following port VLAN ID settings. The port VLAN ID settings for each port are configured in the PVID Settings page:
The VLANs set up in the preceding procedure produce results as follows:
l If an untagged packet enters Port 4, the switch tags it with a VLAN tag value of 1. Since Port 4 does not have membership with VLAN ID 1, the default, the system drops the packet.
l If a tagged packet with a VLAN tag value 5 enters Port 4, the packet has access to Ports 3 and 1. If the packet leaves Port 3 and/or 1, it is stripped of its tag as it leaves the switch and becomes an untagged packet.
l If an untagged packet enters Port 1, the switch tags it with a VLAN tag value of 2. It is then dropped since Port 1 has no membership with VLAN ID 2.
l If a tagged packet with a VLAN tag value 10 enters Port 9, it has access to Ports 1, 10, 11, and 12. If the packets leave Port 1 or 10, they are tagged with a VLAN ID value of 10. If the packet leaves Port 11 or 12, it leaves as an untagged packet.
l If a tagged packet with a VLAN tag value 1 enters Port 9, it is dropped since Port 9 does not have membership with VLAN ID 1.
Port 01: 2 Port 05: 5 Port 09: 10 Port 13: 10
Port 02: 1 Port 06: 1 Port 10: 10 Port 14: 15
Port 03: 1 Port 07: 1 Port 11: 10 Port 15: 1
Port 04: 1 Port 08: 1 Port 12: 10 Port 16: 1
Troubleshooting
This section explains how to isolate and diagnose problems with the switch. If you have a problem that is not listed here and you can not solve it, please contact your supplier.
LEDs
The following sections discuss troubleshooting associated with the LEDs:
l All LEDs are off
Check the following:
¡ The cable to connect the switch. Ensure that you're using an RJ-45 (network) cable and not an RJ-11 (telephone) cable.
¡ Ensure that the power cord is firmly connected to the relevant switch unit and to the supply outlet. If the connection is secure and there is still no power, you may have a faulty power cord.
¡ Verify that there is sufficient space for adequate airflow on both sides of the switch.
l On powering-up, the Self-test LED lights orange.
¡ The relevant switch unit has failed its power on Self-test because of an internal problem. See "Technical Assistance" for more information.
Ports
The following section discusses troubleshooting associated with ports:
l Port does not work
Check the following:
¡ The cable connections are secure and the cables are connected to the correct ports at both ends of the link.
¡ The port status is configured at "Enable" and the auto-negotiation feature is enabled at the switch. See "Port Manager" for more information.
Interfaces
The following sections discuss troubleshooting related to the switch interfaces:
l The terminal cannot access the switch
Check the following:
¡ Your terminal is correctly configured to operate as a VT100 terminal.
¡ You are using a proper null modem cable.
¡ The settings on your terminal are correct. See "Installation" for more information.
l The Web browser cannot access the switch
Check the following:
¡ The IP information for the switch is correctly configured.
¡ The switch is powered-up.
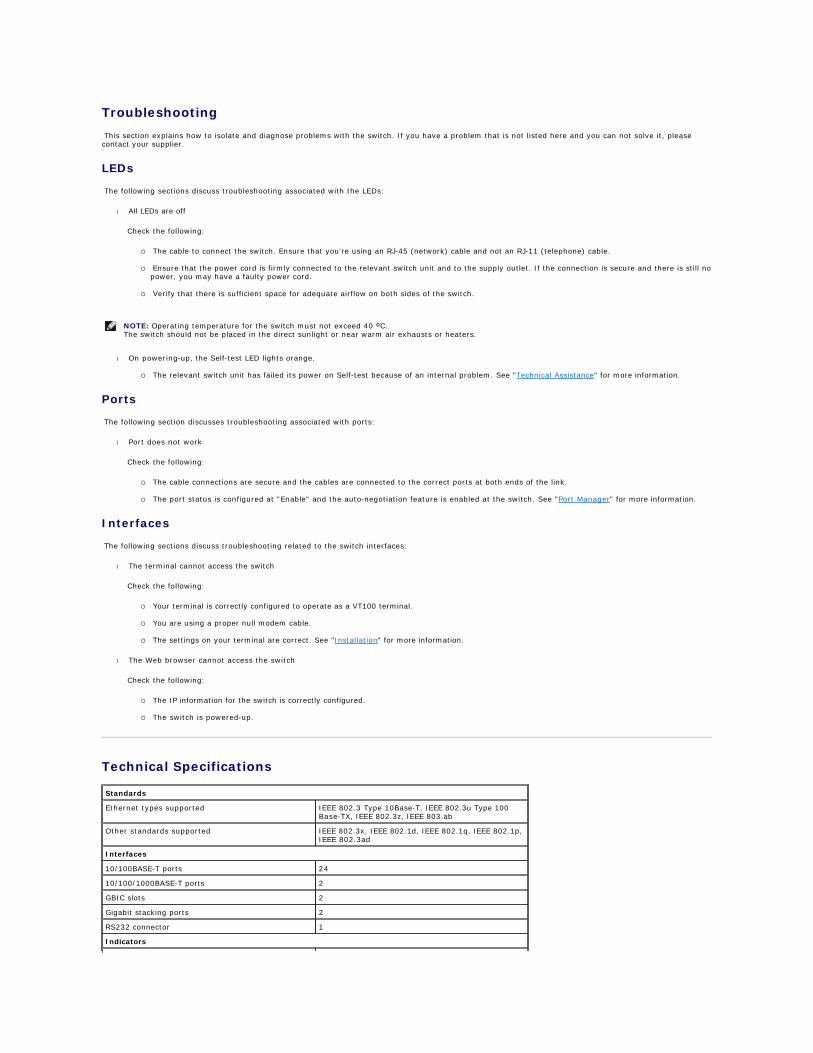
Technical Specifications
NOTE: Operating temperature for the switch must not exceed 40 ºC. The switch should not be placed in the direct sunlight or near warm air exhausts or heaters.
Standards
Ethernet types supported IEEE 802.3 Type 10Base-T, IEEE 802.3u Type 100 Base-TX, IEEE 802.3z, IEEE 803.ab
If you need help with a technical problem, Dell is ready to assist you.
1. Make a copy of the Diagnostics Checklist and fill it out.
2. Use Dell's extensive suite of online services available at Dell | Support (support.dell.com) for help with installation and troubleshooting procedures.
3. If the preceding steps have not resolved the problem, contact Dell.
When prompted by Dell's automated telephone system, enter your Express Service Code to route the call directly to the proper support personnel. If you do not have an Express Service Code, open the Dell Accessories folder, double-click the Express Service Code icon, and follow the directions.
For instructions on using the technical support service, see "Technical Support Service."
Online Services
You can access Dell Support at support.dell.com. Select your region on the WELCOME TO DELL SUPPORT page, and fill in the requested details to access help tools and information.
You can contact Dell electronically using the following addresses:
l World Wide Web
www.dell.com/
www.dell.com/ap/ (for Asian/Pacific countries only)
www.euro.dell.com (for Europe only)
www.dell.com/la/ (for Latin American countries)
l Anonymous file transfer protocol (FTP)
ftp.dell.com/
Log in as user: anonymous, and use your e-mail address as your password.
NOTE: Call technical support from a telephone near or at the computer so that technical support can assist you with any necessary procedures.
NOTE: Dell's Express Service Code system may not be available in all countries.
NOTE: Some of the following services are not always available in all locations outside the continental U.S. Call your local Dell representative for information on availability.
Dell's automated technical support service—AutoTech—provides recorded answers to the questions most frequently asked by Dell customers about their portable and desktop computers.
When you call AutoTech, use your touch-tone telephone to select the subjects that correspond to your questions.
The AutoTech service is available 24 hours a day, 7 days a week. You can also access this service through the technical support service. For the telephone number to call, see the contact numbers for your region.
Automated Order-Status Service
To check on the status of any Dell products that you have ordered, you can go to support.dell.com, or you can call the automated order-status service. A recording prompts you for the information needed to locate and report on your order. For the telephone number to call, see the contact numbers for your region.
Technical Support Service
Dell's technical support service is available 24 hours a day, 7 days a week, to answer your questions about Dell hardware. Our technical support staff uses computer-based diagnostics to provide fast, accurate answers.
To contact Dell's technical support service, see "Technical Assistance" and then call the number for your country as listed in "Contacting Dell."
Problems With Your Order
If you have a problem with your order, such as missing parts, wrong parts, or incorrect billing, contact Dell for customer assistance. Have your invoice or packing slip handy when you call. For the telephone number to call, see the contact numbers for your region.
Product Information
If you need information about additional products available from Dell, or if you would like to place an order, visit the Dell website at www.dell.com. For the telephone number to call to speak to a sales specialist, see the contact numbers for your region.
Returning Items for Warranty Repair or Credit
Prepare all items being returned, whether for repair or credit, as follows:
1. Call Dell to obtain a Return Material Authorization Number, and write it clearly and prominently on the outside of the box.
For the telephone number to call, see the contact numbers for your region.
2. Include a copy of the invoice and a letter describing the reason for the return.
3. Include a copy of the Diagnostics Checklist indicating the tests you have run and any error messages reported by the Dell Diagnostics.
4. Include any accessories that belong with the item(s) being returned (power cables, software floppy disks, guides, and so on) if the return is for credit.
5. Pack the equipment to be returned in the original (or equivalent) packing materials.
You are responsible for paying shipping expenses. You are also responsible for insuring any product returned, and you assume the risk of loss during shipment to Dell. Collect On Delivery (C.O.D.) packages are not accepted.
Returns that are missing any of the preceding requirements will be refused at Dell's receiving dock and returned to you.
Before You Call
Remember to fill out the Diagnostics Checklist. If possible, turn on your computer before you call Dell for technical assistance and call from a telephone at or near the computer. You may be asked to type some commands at the keyboard, relay detailed information during operations, or try other troubleshooting steps possible only at the computer itself. Ensure that the computer documentation is available.
NOTE: Have your Express Service Code ready when you call. The code helps Dell's automated-support telephone system direct your call more efficiently.
Contacting Dell
To contact Dell electronically, you can access the following websites:
l www.dell.com
l support.dell.com (technical support)
l premiersupport.dell.com (technical support for educational, government, healthcare, and medium/large business customers, including Premier, Platinum, and Gold customers)
For specific web addresses for your country, find the appropriate country section in the table below.
When you need to contact Dell, use the electronic addresses, telephone numbers, and codes provided in the following table. If you need assistance in determining which codes to use, contact a local or an international operator.
Diagnostics Checklist
Name:
Date:
Address:
Phone number:
Service tag (bar code on the back of the computer):
Express Service Code:
Return Material Authorization Number (if provided by Dell support technician):
Switch Name and Firmware Version:
Error message, beep code, or diagnostic code:
Description of problem and troubleshooting procedures you performed:
NOTE: Toll-free numbers are for use within the country for which they are listed.
Country (City) International Access Code Country Code City Code
Department Name or Service Area, Website and E-Mail Address
Area Codes, Local Numbers, and Toll-Free Numbers
Anguilla General Support toll-free: 800-335-0031
Antigua and Barbuda General Support 1-800-805-5924
Argentina (Buenos Aires)
International Access Code: 00
Country Code: 54
City Code: 11
Website: www.dell.com.ar
Tech Support and Customer Care toll-free: 0-800-444-0733
Technical Support (Corporate/Preferred Accounts/PAD [1000+ employees]) 0870 908 0500
Technical Support (direct/PAD and general) 0870 908 0800
Global Accounts Customer Care 01344 373 185
or 01344 373 186
Home and Small Business Customer Care 0870 906 0010
Corporate Customer Care 0870 908 0500
Preferred Accounts (500–5000 employees) Customer Care 01344 373 196
Central Government Customer Care 01344 373 193
Local Government & Education Customer Care 01344 373 199
Health Customer Care 01344 373 194
Home and Small Business Sales 0870 907 4000
Corporate/Public Sector Sales 01344 860 456
Uruguay General Support toll-free: 000-413-598-2521
U.S.A. (Austin, Texas)
International Access Code: 011
Country Code: 1
Automated Order-Status Service toll-free: 1-800-433-9014
AutoTech (portable and desktop computers) toll-free: 1-800-247-9362
Consumer (Home and Home Office)
Technical Support toll-free: 1-800-624-9896
Customer Service toll-free: 1-800-624-9897
DellNet™ Service and Support toll-free: 1-877-Dellnet
(1-877-335-5638)
Regulatory Notices
Electromagnetic Interference (EMI) is any signal or emission, radiated in free space or conducted along power or signal leads, that endangers the functioning of a radio navigation or other safety service or seriously degrades, obstructs, or repeatedly interrupts a licensed radio communications service. Radio communications services include but are not limited to AM/FM commercial broadcast, television, cellular services, radar, air-traffic control, pager, and Personal Communication Services (PCS). These licensed services, along with unintentional radiators such as digital devices, including computer systems, contribute to the electromagnetic environment.
Electromagnetic Compatibility (EMC) is the ability of items of electronic equipment to function properly together in the electronic environment. While this computer system has been designed and determined to be compliant with regulatory agency limits for EMI, there is no guarantee that interference will not occur in a particular installation. If this equipment does cause interference with radio communications services, which can be determined by turning the equipment off and on, you are encouraged to try to correct the interference by one or more of the following measures:
l Reorient the receiving antenna.
l Relocate the computer with respect to the receiver.
l Move the computer away from the receiver.
l Plug the computer into a different outlet so that the computer and the receiver are on different branch circuits.
If necessary, consult a Dell Technical Support representative or an experienced radio/television technician for additional suggestions.
Dell computer systems are designed, tested, and classified for their intended electromagnetic environment. These electromagnetic environment classifications generally refer to the following harmonized definitions:
l Class A is typically for business or industrial environments.
l Class B is typically for residential environments.
Information Technology Equipment (ITE), including peripherals, expansion cards, printers, input/output (I/O) devices, monitors, and so on, that are integrated into or connected to the system should match the electromagnetic environment classification of the computer system.
A Notice About Shielded Signal Cables: Use only shielded cables for connecting peripherals to any Dell device to reduce the possibility of interference with radio communications services. Using shielded cables ensures that you maintain the appropriate EMC classification for the intended environment. For parallel printers, a cable is available from Dell. If you prefer, you can order a cable from Dell on the World Wide Web at accessories.us.dell.com/sna/category.asp?category_id=4117.
Most Dell computer systems are classified for Class B environments. However, the inclusion of certain options can change the rating of some configurations to Class A. To determine the electromagnetic classification for your system or device, refer to the following sections specific for each regulatory agency. Each section provides country-specific EMC/EMI or product safety information.
FCC Notices (U.S. Only)
Most Dell computer systems are classified by the Federal Communications Commission (FCC) as Class B digital devices. To determine which classification applies to your computer system, examine all FCC registration labels located on the bottom or back panel of your computer, on card-mounting brackets, and on the cards themselves. If any one of the labels carries a Class A rating, your entire system is considered to be a Class A digital device. If all labels carry an
FCC Class B rating as distinguished by either an FCC ID number or the FCC logo, ( ), your system is considered to be a Class B digital device.
Once you have determined your system's FCC classification, read the appropriate FCC notice. Note that FCC regulations provide that changes or modifications
Employee Purchase Program (EPP) Customers toll-free: 1-800-695-8133
Customer Service and Technical Support toll-free: 1-800-822-8965
Employee Purchase Program (EPP) Customers toll-free: 1-800-695-8133
Projectors Technical Support toll-free: 1-877-459-7298
Public (government, education, and healthcare)
Customer Service and Technical Support toll-free: 1-800-456-3355
Employee Purchase Program (EPP) Customers toll-free: 1-800-234-1490
Dell Sales toll-free: 1-800-289-3355
or toll-free: 1-800-879-3355
Dell Outlet Store (Dell refurbished computers) toll-free: 1-888-798-7561
Software and Peripherals Sales toll-free: 1-800-671-3355
Spare Parts Sales toll-free: 1-800-357-3355
Extended Service and Warranty Sales toll-free: 1-800-247-4618
Fax toll-free: 1-800-727-8320
Dell Services for the Deaf, Hard-of-Hearing, or Speech-Impaired toll-free: 1-877-DELLTTY
(1-877-335-5889)
U.S. Virgin Islands General Support 1-877-673-3355
Venezuela General Support 8001-3605
not expressly approved by Dell could void your authority to operate this equipment.
This device complies with Part 15 of the FCC Rules. Operation is subject to the following two conditions:
l This device may not cause harmful interference.
l This device must accept any interference received, including interference that may cause undesired operation.
Class A
This equipment has been tested and found to comply with the limits for a Class A digital device pursuant to Part 15 of the FCC Rules. These limits are designed to provide reasonable protection against harmful interference when the equipment is operated in a commercial environment. This equipment generates, uses, and can radiate radio frequency energy and, if not installed and used in accordance with the manufacturer's instruction manual, may cause harmful interference with radio communications. Operation of this equipment in a residential area is likely to cause harmful interference, in which case you will be required to correct the interference at your own expense.
Class B
This equipment has been tested and found to comply with the limits for a Class B digital device pursuant to Part 15 of the FCC Rules. These limits are designed to provide reasonable protection against harmful interference in a residential installation. This equipment generates, uses, and can radiate radio frequency energy and, if not installed and used in accordance with the manufacturer's instruction manual, may cause interference with radio communications. However, there is no guarantee that interference will not occur in a particular installation. If this equipment does cause harmful interference to radio or television reception, which can be determined by turning the equipment off and on, you are encouraged to try to correct the interference by one or more of the following measures:
l Reorient or relocate the receiving antenna.
l Increase the separation between the equipment and the receiver.
l Connect the equipment into an outlet on a circuit different from that to which the receiver is connected.
l Consult the dealer or an experienced radio/television technician for help.
The following information is provided on the device or devices covered in this document in compliance with FCC regulations:
l Model number: PowerConnect 3024
l Company name: Dell Computer Corporation One Dell Way Round Rock, Texas 78682 USA (512) 338-4400
IC Notice (Canada Only)
Most Dell computer systems (and other Dell digital apparatus) are classified by the Industry Canada (IC) Interference-Causing Equipment Standard #3 (ICES-003) as Class B digital devices. To determine which classification (Class A or B) applies to your computer system (or other Dell digital apparatus), examine all registration labels located on the bottom or the back panel of your computer (or other digital apparatus). A statement in the form of "IC Class A ICES-003" or "IC Class B ICES-003" will be located on one of these labels. Note that Industry Canada regulations provide that changes or modifications not expressly approved by Dell could void your authority to operate this equipment.
CE Notice (European Union)
Marking by the symbol indicates compliance of this Dell computer to the EMC Directive and the Low Voltage Directive of the European Union. Such marking is indicative that this Dell system meets the following technical standards:
l EN 55022 — "Information Technology Equipment — Radio Disturbance Characteristics — Limits and Methods of Measurement."
l EN 55024 — "Information Technology Equipment - Immunity Characteristics - Limits and Methods of Measurement."
l EN 61000-3-2 — "Electromagnetic Compatibility (EMC) - Part 3: Limits - Section 2: Limits for Harmonic Current Emissions (Equipment Input Current Up to and Including 16 A Per Phase)."
l EN 61000-3-3 — "Electromagnetic Compatibility (EMC) - Part 3: Limits - Section 3: Limitation of Voltage Fluctuations and Flicker in Low-Voltage Supply Systems for Equipment With Rated Current Up to and Including 16 A."
l EN 60950 — "Safety of Information Technology Equipment."
NOTE: EN 55022 emissions requirements provide for two classifications:
l Class A is for typical commercial areas.
l Class B is for typical domestic areas.
This Dell device is classified for use in a typical Class B domestic environment.
A "Declaration of Conformity" in accordance with the preceding directives and standards has been made and is on file at Dell Computer Corporation Products Europe BV, Limerick, Ireland.
ENERGY STAR® Compliance
Certain configurations of Dell™ computers comply with the requirements set forth by the Environmental Protection Agency (EPA) for energy-efficient computers. If your computer bears the ENERGY STAR® Emblem, your original configuration complies with these requirements and all ENERGY STAR® power management features of the computer are enabled.
NOTE: Any Dell computer bearing the ENERGY STAR® Emblem is certified to comply with EPA ENERGY STAR® requirements as configured when shipped by Dell. Any changes you make to this configuration (such as installing additional expansion cards or drives) may increase the computer's power consumption beyond the limits set by the EPA's ENERGY STAR® Computers program.
ENERGY STAR® Emblem
The EPA's ENERGY STAR® Computers program is a joint effort between the EPA and computer manufacturers to reduce air pollution by promoting energy-efficient computer products. The EPA estimates that use of ENERGY STAR® computer products can save computer users up to two billion dollars annually in electricity costs. In turn, this reduction in electricity usage can reduce emissions of carbon dioxide, the gas primarily responsible for the greenhouse effect, and sulfur dioxide and nitrogen oxides, the primary causes of acid rain.
You can also help reduce electricity usage and its side effects by turning off your computer when it is not in use for extended periods of time, particularly at night and on weekends.
Simplified Chinese Class A Warning Notice (China Only)
On Class A systems, the following warning will appear near the regulatory label:
Warning: This is a Class A product. In a domestic environment this product may cause radio interference, in which case the user may be required to take adequate measures.
EN 55022 Compliance (Czech Republic Only)
VCCI Notice (Japan Only)
Most Dell computer systems are classified by the Voluntary Control Council for Interference (VCCI) as Class B information technology equipment (ITE). However, the inclusion of certain options can change the rating of some configurations to Class A. ITE, including peripherals, expansion cards, printers, input/output (I/O) devices, monitors, and so on, integrated into or connected to the system should match the electromagnetic environment classification (Class A or B) of the computer system.
To determine which classification applies to your computer system, examine the regulatory labels/markings (see "VCCI Class A ITE Regulatory Mark" and "VCCI Class B ITE Regulatory Mark") located on the bottom, side, or back panel of your computer. Once you have determined your system's VCCI classification, read the appropriate VCCI notice.
Class A ITE
This is a Class A product based on the standard of the Voluntary Control Council for Interference (VCCI) for information technology equipment. If this equipment is used in a domestic environment, radio disturbance may arise. When such trouble occurs, the user may be required to take corrective actions.
VCCI Class A ITE Regulatory Mark
If the regulatory label includes the following marking, your computer is a Class A product:
Class B ITE
This is a Class B product based on the standard of the Voluntary Control Council for Interference (VCCI) for information technology equipment. If this equipment is used near a radio or television receiver in a domestic environment, it may cause radio interference. Install and use the equipment according to the instruction manual.
VCCI Class B ITE Regulatory Mark
If the regulatory label includes the following marking, your computer is a Class B product:
MIC Notice (Republic of Korea Only)
To determine which classification (Class A or B) applies to your computer (or other Dell digital device), examine the Republic of Korean Ministry of Information and Communications (MIC) registration labels located on your computer (or other Dell digital device). The MIC label may be located separately from the other regulatory marking applied to your product. Line two of the label identifies the emissions class for the product—"(A)" for Class A products or "(B)" for Class B products.
NOTE: MIC emissions requirements provide for two classifications:
l Class A devices are for business purposes.
l Class B devices are for nonbusiness purposes.
Class A Device
Please note that this device has been approved for business purposes with regard to electromagnetic interference. If you find that this device is not suitable for your use, you may exchange it for a nonbusiness-purpose device.
MIC Class A Regulatory Label
If the regulatory label includes the following marking, your computer is a Class A product:
Class B Device
Please note that this device has been approved for nonbusiness purposes and may be used in any environment, including residential areas.
MIC Class B Regulatory Label
If the regulatory label includes the following marking, your computer is a Class B product.
Polish Center for Testing and Certification Notice
The equipment should draw power from a socket with an attached protection circuit (a 3-prong socket). All equipment that works together (computer, monitor, printer, and so on) should have the same power supply source.
The phasing conductor of the room's electrical installation should have a reserve short-circuit protection device in the form of a fuse with a nominal value no larger than 16 amperes (A).
To completely switch off the equipment, the power supply cable must be removed from the power supply socket, which should be located near the equipment and easily accessible.
A protection mark "B" confirms that the equipment is in compliance with the protection usage requirements of standards PN-93/T-42107 and PN-EN 55022: 1996.
BSMI Notice (Taiwan Only)
If you find a or mark on the regulatory label on the bottom, side, or back panel of your computer, the following section is applicable:
NOM Information (Mexico Only)
The following information is provided on the device(s) described in this document in compliance with the requirements of the official Mexican standards (NOM):
Back to Contents Page
Exporter: Dell Computer Corporation One Dell Way Round Rock, TX 78682
Importer: Dell Computer de México, S.A. de C.V. Paseo de la Reforma 2620 - 11° Piso Col. Lomas Altas 11950 México, D.F.
Ship to: Dell Computer de México, S.A. de C.V. al Cuidado de Kuehne & Nagel de México S. de R.I. Avenida Soles No. 55 Col. Peñon de los Baños 15520 México, D.F.
Model number: PowerConnect 3024
Supply voltage: 100–240 VAC
Frequency: 50–60 Hz
Input current rating: 1.5 A
Back to Contents Page
Caution: Safety Instructions Dell™ PowerConnect™ 3024 Systems User's Guide
Use the following safety guidelines to ensure your own personal safety and to help protect your system from potential damage.
General
l Observe and follow service markings. Do not service any product except as explained in your system documentation. Opening or removing covers that are marked with the triangular symbol with a lightning bolt may expose you to electrical shock. Components inside these compartments should be serviced only by a trained service technician.
l If any of the following conditions occur, unplug the product from the electrical outlet and replace the part or contact your trained service provider:
¡ The power cable, extension cable, or plug is damaged.
¡ An object has fallen into the product.
¡ The product has been exposed to water.
¡ The product has been dropped or damaged.
¡ The product does not operate correctly when you follow the operating instructions.
l Keep your system away from radiators and heat sources. Also, do not block cooling vents.
l Do not spill food or liquids on your system components, and never operate the product in a wet environment. If the system gets wet, see the appropriate section in your troubleshooting guide or contact your trained service provider.
l Do not push any objects into the openings of your system. Doing so can cause fire or electric shock by shorting out interior components.
l Use the product only with approved equipment.
l Allow the product to cool before removing covers or touching internal components.
l Operate the product only from the type of external power source indicated on the electrical ratings label. If you are not sure of the type of power source required, consult your service provider or local power company.
l Use only approved power cable(s). If you have not been provided with a power cable for your system or for any AC-powered option intended for your system, purchase a power cable that is approved for use in your country. The power cable must be rated for the product and for the voltage and current marked on the product's electrical ratings label. The voltage and current rating of the cable should be greater than the ratings marked on the product.
NOTICE: To help avoid damaging your system, be sure the voltage selection switch (if provided) on the power supply is set for the voltage that most closely matches the AC power available in your location. Also be sure that your monitor and attached devices are electrically rated to operate with the power available in your location.
l To help prevent electric shock, plug the system and peripheral power cables into properly grounded electrical outlets. These cables are equipped with three-prong plugs to help ensure proper grounding. Do not use adapter plugs or remove the grounding prong from a cable. If you must use an extension cable, use a 3-wire cable with properly grounded plugs.
l Observe extension cable and power strip ratings. Make sure that the total ampere rating of all products plugged into the extension cable or power strip does not exceed 80 percent of the ampere ratings limit for the extension cable or power strip.
l To help protect your system from sudden, transient increases and decreases in electrical power, use a surge suppressor, line conditioner, or un-interruptible power supply (UPS).
l Position system cables and power cables carefully; route cables so that they cannot be stepped on or tripped over. Be sure that nothing rests on any cables.
l Do not modify power cables or plugs. Consult a licensed electrician or your power company for site modifications. Always follow your local/national wiring rules.
l When connecting or disconnecting power to hot-pluggable power supplies, if offered with your
system, observe the following guidelines: ¡ Install the power supply before connecting the power cable to the power supply.
¡ Unplug the power cable before removing the power supply.
¡ If the system has multiple sources of power, disconnect power from the system by unplugging
all power cables from the power supplies.
l Move products with care; ensure that all casters and/or stabilizers are firmly connected to the system. Avoid sudden stops and uneven surfaces.
Rack Mounting of Systems
Observe the following precautions for rack stability and safety. Also refer to the rack installation documentation accompanying the system and the rack for specific caution statements and procedures.
Systems are considered to be components in a rack. Thus, "component" refers to any system as well as to various peripherals or supporting hardware.
CAUTION: Installing systems in a rack without the front and side stabilizers installed could cause the rack to tip over, potentially resulting in bodily injury under certain circumstances. Therefore, always install the stabilizers before installing components in the rack. After installing system/components in a rack, never pull more than one component out of the rack on its slide assemblies at one time. The weight of more than one extended component could cause the rack to tip over and may result in serious injury.
NOTE: Your system is safety-certified as a free-standing unit and as a component for use in a Dell rack cabinet using the customer rack kit. The installation of your system and rack kit in any other rack cabinet has not been approved by any safety agencies. It is your responsibility to have the final combination of system and rack kit in a rack cabinet evaluated for suitability by a certified safety agency. Dell disclaims all liability and warranties in connection with such combinations.
l System rack kits are intended to be installed in a rack by trained service technicians. If you install the kit in any other rack, be sure that the rack meets the specifications of a Dell rack.
CAUTION: Do not move racks by yourself. Due to the height and weight of the rack, a minimum of two people should accomplish this task.
l Before working on the rack, make sure that the stabilizers are secured to the rack, extended to the floor, and that the full weight of the rack rests on the floor. Install front and side stabilizers on a single rack or front stabilizers for joined multiple racks before working on the rack.
l Always load the rack from the bottom up, and load the heaviest item in the rack first.
l Make sure that the rack is level and stable before extending a component from the rack.
l Use caution when pressing the component rail release latches and sliding a component into or out of a rack; the slide rails can pinch your fingers.
l After a component is inserted into the rack, carefully extend the rail into a locking position, and then slide the component into the rack.
l Do not overload the AC supply branch circuit that provides power to the rack. The total rack load should not exceed 80 percent of the branch circuit rating.
l Ensure that proper airflow is provided to components in the rack.
l Do not step on or stand on any component when servicing other components in a rack.
CAUTION: A qualified electrician must perform all connections to DC power and to safety grounds. All electrical wiring must comply with applicable local or national codes and practices.
CAUTION: Never defeat the ground conductor or operate the equipment in the absence of a suitably installed ground conductor. Contact the appropriate electrical inspection authority or an electrician if you are uncertain that suitable grounding is available.
CAUTION: The system chassis must be positively grounded to the rack cabinet frame. Do not attempt to connect power to the system until grounding cables are connected. Completed power and safety ground wiring must be inspected by a qualified electrical inspector. An energy hazard will exist if the safety ground cable is omitted or disconnected.
Modems, Telecommunications, or Local Area Network Options
l Do not connect or use a modem during a lightning storm. There may be a risk of electrical shock from lightning.
Back to Contents Page
l Never connect or use a modem in a wet environment.
l Do not plug a modem or telephone cable into the network interface controller (NIC) receptacle.
l Disconnect the modem cable before opening a product enclosure, touching or installing internal components, or touching an uninsulated modem cable or jack.
When Working Inside Your System
Protecting Against Electrostatic Discharge
Static electricity can harm delicate components inside your system. To prevent static damage, discharge static electricity from your body before you touch any of the electronic components, such as the microprocessor. You can do so by periodically touching an unpainted metal surface on the chassis.
You can also take the following steps to prevent damage from electrostatic discharge (ESD):
l When unpacking a static-sensitive component from its shipping carton, do not remove the component from the antistatic packing material until you are ready to install the component in your system. Just before unwrapping the antistatic packaging, be sure to discharge static electricity from your body.
l When transporting a sensitive component, first place it in an antistatic container or packaging.
l Handle all sensitive components in a static-safe area. If possible, use antistatic floor pads and workbench pads and an antistatic grounding strap.
NOTE: Your system may also include circuit cards or other components that contain batteries. These batteries must also be disposed of in a battery deposit site. For information about such batteries, refer to the documentation for the specific card or component.