Description English Plate Evaporator 1 EN EN Description Main components Bolt protection Support column Frame plate Tightening bolts Press the channel plates together Connections Holes through the frame plate, permit- ting the media to enter into the plate evaporator. Threaded studs around the holes se- cure the pipes to the apparatus. Metallic linings may be used to protect the holes against corrosion. Cassettes Heat is transferred from one medium to the other through the thin plates. The number of cassettes determines the total heat transfer surface. Guiding bar Keeps the cassettes in line at their lower end. Protective sheets Supplied on request. Carrying bar Carries the cassettes and the pressure plate. Pressure plate Moveable steel plate, could have connections Lifting eyes To used for lifting and transport securing
Transcript
Description English
Plate Evaporator 1EN
EN
Description
Main components
Bolt protection
Support column
Frame plate
Tightening boltsPress the channel platestogether
ConnectionsHoles through the frame plate, permit-ting the media to enter into the plate evaporator.
Threaded studs around the holes se-cure the pipes to the apparatus. Metallic linings may be used to protect the holes against corrosion.
CassettesHeat is transferred from one medium to the other through the thin plates.
The number of cassettes determines the total heat transfer surface.
Guiding barKeeps the cassettes in line at their lower end.
Protective sheetsSupplied on request.
Carrying barCarries the cassettes and the pressure plate.
Pressure plateMoveable steel plate, could have connections
Lifting eyesTo used for lifting and transport securing
English Description
2 Plate EvaporatorEN
EN
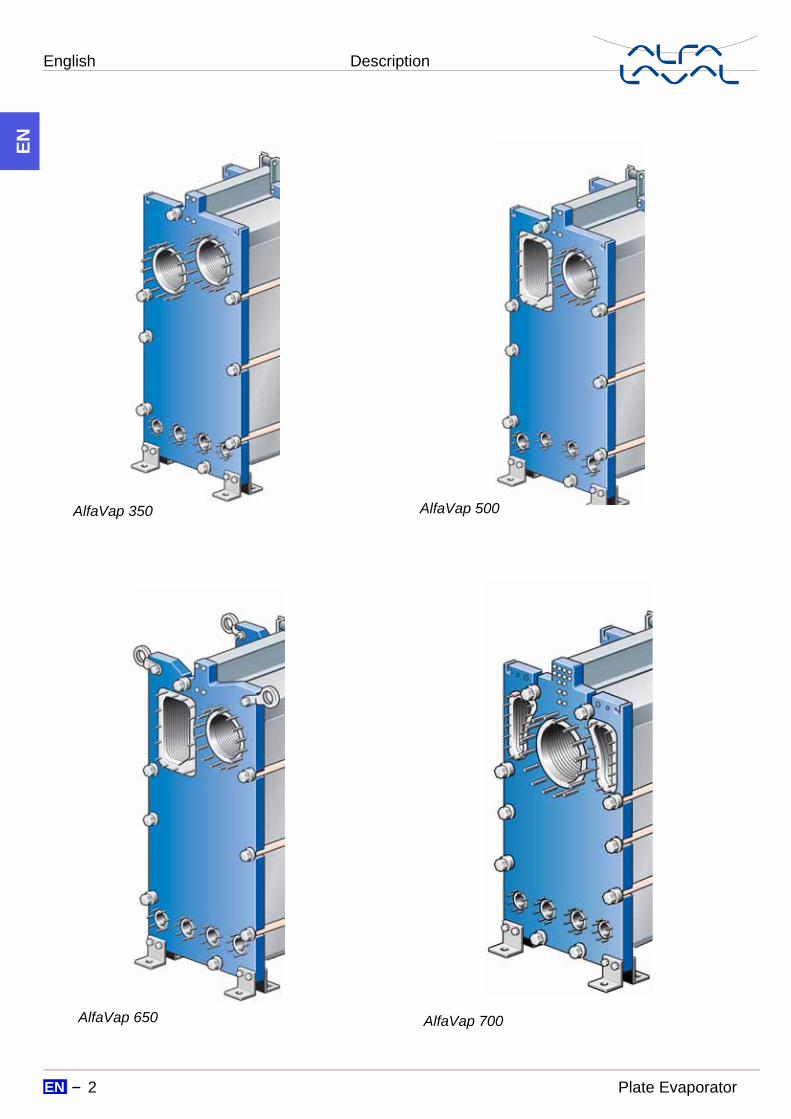
AlfaVap 350 AlfaVap 500
AlfaVap 650 AlfaVap 700
Description English
Plate Evaporator 3EN
EN
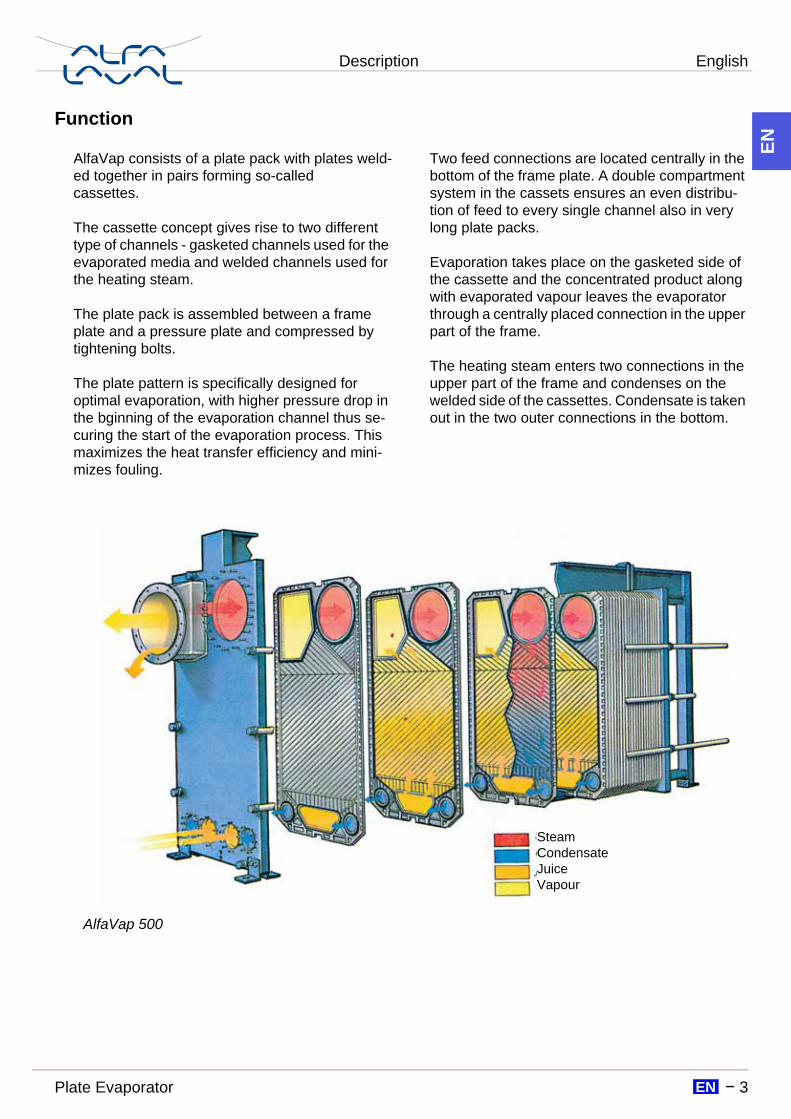
Function
AlfaVap consists of a plate pack with plates weld-ed together in pairs forming so-calledcassettes.
The cassette concept gives rise to two different type of channels - gasketed channels used for the evaporated media and welded channels used for the heating steam.
The plate pack is assembled between a frame plate and a pressure plate and compressed by tightening bolts.
The plate pattern is specifically designed for optimal evaporation, with higher pressure drop in the bginning of the evaporation channel thus se-curing the start of the evaporation process. This maximizes the heat transfer efficiency and mini-mizes fouling.
Two feed connections are located centrally in the bottom of the frame plate. A double compartment system in the cassets ensures an even distribu-tion of feed to every single channel also in very long plate packs.
Evaporation takes place on the gasketed side of the cassette and the concentrated product along with evaporated vapour leaves the evaporator through a centrally placed connection in the upper part of the frame.
The heating steam enters two connections in the upper part of the frame and condenses on the welded side of the cassettes. Condensate is taken out in the two outer connections in the bottom.
SteamCondensateJuiceVapour
AlfaVap 500
English Installation
4 Plate EvaporatorEN
EN
InstallationRequirements
Note!• Before connecting any piping, make
sure all foreign objects have been rinsed out of the system.
• When connecting the pipe system make sure the pipes do not subject the plate evaporator to stress or strain.
• To avoid water hammer, do not use fast-closing valves.
• Before start-up, check that all tightening bolts are properly tightened.
Safety valves should be installed according to current pressure vessel regulations.
If the plate evaporator surface temperature isexpected to be hot or cold, the evaporator should be insulated.
It is recommended that protective sheets are used to cover the plate evaporator.
For each model, design pressures and tempera-tures are marked on the identification plate. Those must not be exceeded.
Shut-off valvesShut-off valves should be provided in the media con-nections.
Space1500 mm minimum free space is needed for lifting plates in and out.
FoundationInstall on a flat foundation giving enough support to the frame.
Vapour
Heating steam
Condensate
Product
Installation English
Plate Evaporator 5EN
EN
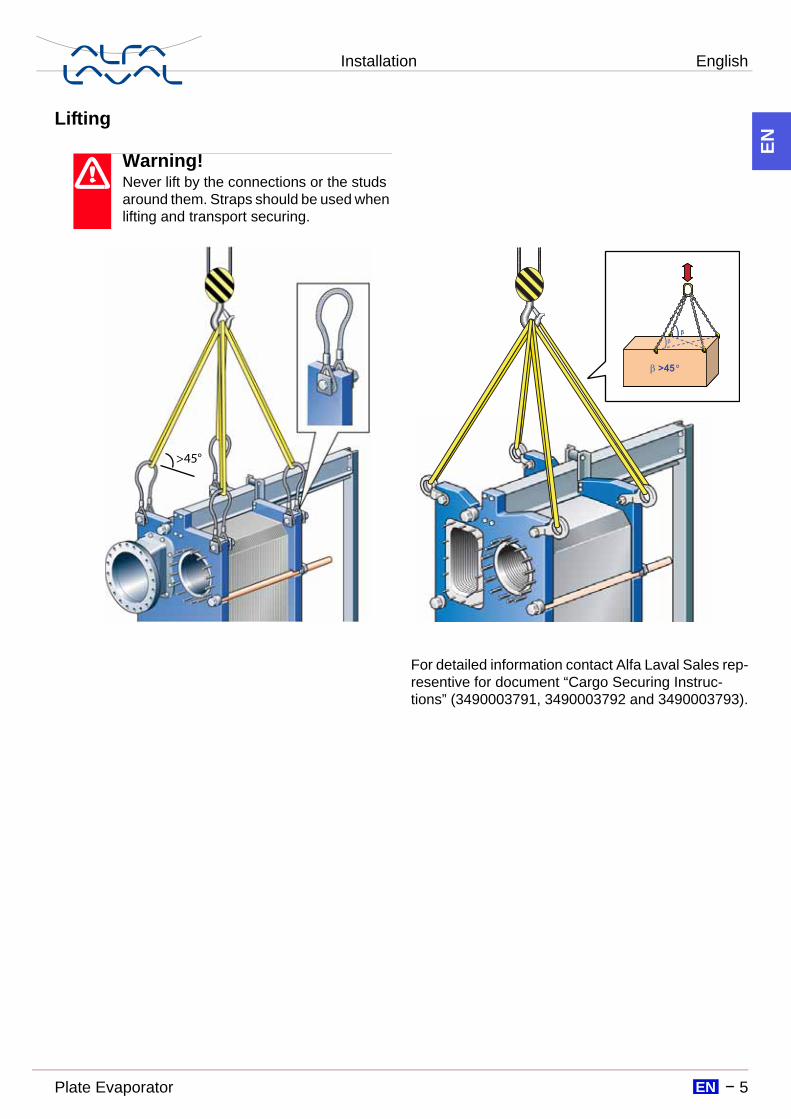
Lifting
For detailed information contact Alfa Laval Sales rep-resentive for document “Cargo Securing Instruc-tions” (3490003791, 3490003792 and 3490003793).
Warning!Never lift by the connections or the studs around them. Straps should be used when lifting and transport securing.
>45°
ββ
β 45°
ββ
β >45 °
English Installation
6 Plate EvaporatorEN
EN
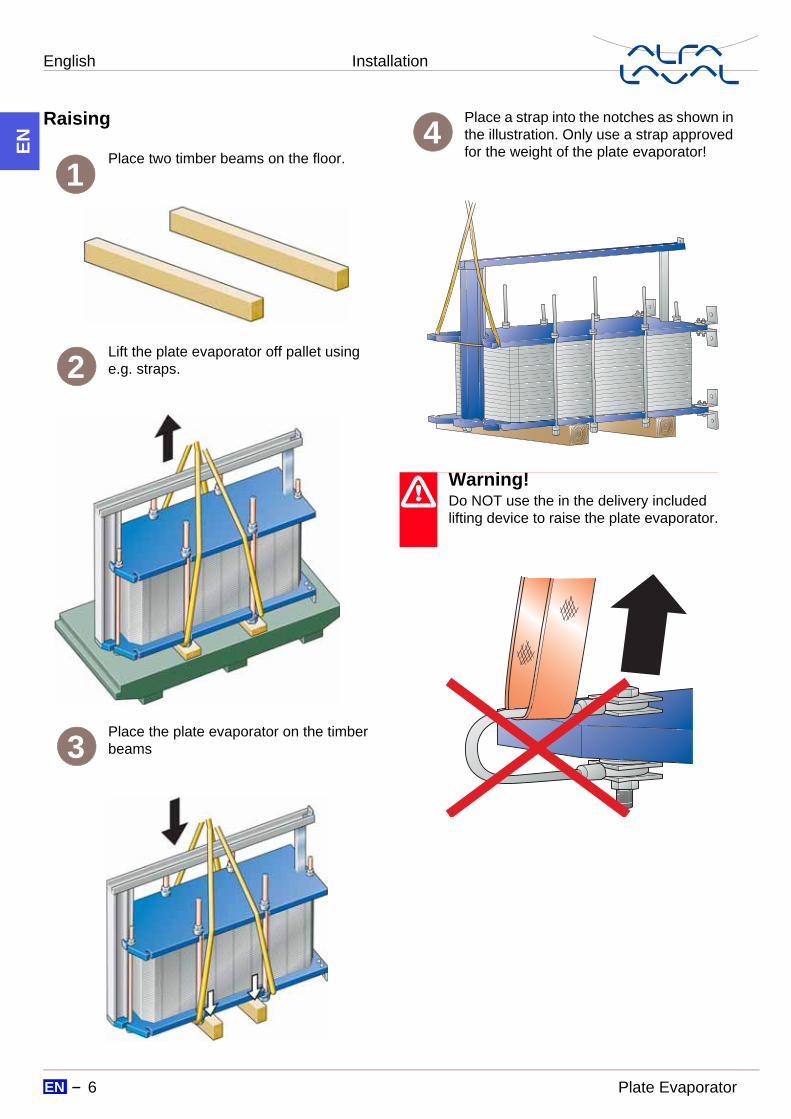
Raising
Place two timber beams on the floor.
Lift the plate evaporator off pallet using e.g. straps.
Place the plate evaporator on the timber beams
Place a strap into the notches as shown in the illustration. Only use a strap approved for the weight of the plate evaporator!
1
2
3
4
Warning!Do NOT use the in the delivery included lifting device to raise the plate evaporator.
Installation English
Plate Evaporator 7EN
EN
Lift the plate evaporator off the timber beams. Keep the strap stretched during the whole lifting procedure. Make sure the strap stays in place. Protect the feet of the plate evaporator from damaging.
Lower the plate evaporator to horizontal position and place it on the floor.Mount the enclosed lifting devices.
5 6
English Operation
8 Plate EvaporatorEN
EN
OperationStart-up
Before start-up, check that all tightening bolts are properly tightened and that measurement A is correct. For A, see enclosed Plate Evaporator drawing.
Check that the Plate Evaporator is fully iso-lated, i.e. all valves in connected pipework should be closed.
Open all valves in the condensate lines. This will allow non-condensable gases to leave the heat exchanger.
On the product side, check that the valve is closed between the pump and the unit con-trolling the system flow rate.
If there is an airvent valve at the exit, make sure it is fully open.
Start the product supply pump and open the supply valve/s slowly.
IWhen all air is out, close the air vent valve.
Open the steam valve gradually.
.
Note!The following instructions are general and apply only to the Plate Evaporator – not to the installed system.
Note!If several pumps and valves are included in the system, make sure you know which ones should be opened first.
Note!Adjustments of cooling water flow rate should be made slowly in order to avoidthe risk of water hammer.
Water hammer is a shortlasting pressure peak that can appear during start-up or shut-down of a system, causing liquidsto travel along a pipe as a wave at the speed of sound. This can cause con-siderable damage to the equipment.
1
2
Closed
Open
3
4
5
6
7
8
Operation English
Plate Evaporator 9EN
EN
Unit in operation
During operation, check that
media temperatures and pressures are within the limits stated on the plate evaporator drawing
no leakages appear due to faulty tightening of the plate pack or to defective or damaged gaskets
carrying bar and guiding bar are kept clean and greased
the bolts are kept clean and greased.
Always consult your local Alfa Laval office for advice on
• new plate pack dimensions if you intend to change number of plates
• selection of gasket material if operatingtemperatures and pressures are permanently changed, or if another medium is to be processed in the plate evaporator.
Shut-down
Steam supplySlowly close the steam supply valves.
Product supplySlowly close the product supply valve.
When the valve is closed, stop the pump.
Continue to fully isolate the Plate Evapora-tor, i.e. all valves in connected pipework should be closed.
Adjust the pressure to atmospheric pressure (only when opening the Plate Evaporator).
If the Plate Evaporator is shut down for several days or longer, it should be drained. Draining should also be done if the process is shut down and the ambient temperature is below freezing temperature of the media.
Note!Adjustments of flow rates should be made slowly in order to protect the system against sudden and extreme variations of temperature and pressure.
Clean andgreased
No leakage
Note!The following instructions are general and apply only to the Plate Evaporator – not to the installed system.
Note!If several pumps and valves are included in the system make sure you know which ones should be closed first.
1
2
3
Close
4
5
6
English Maintenance
10 Plate EvaporatorEN
EN
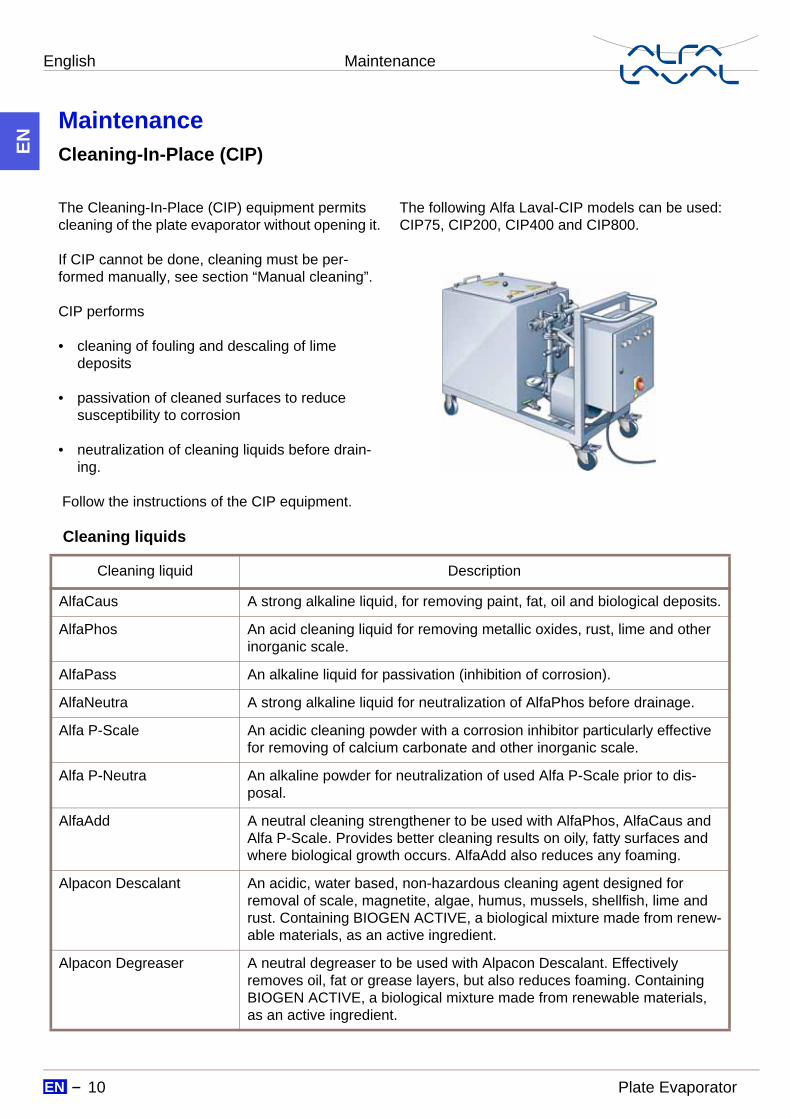
MaintenanceCleaning-In-Place (CIP)
The Cleaning-In-Place (CIP) equipment permits cleaning of the plate evaporator without opening it.
If CIP cannot be done, cleaning must be per-formed manually, see section “Manual cleaning”.
CIP performs
• cleaning of fouling and descaling of lime deposits
• passivation of cleaned surfaces to reduce susceptibility to corrosion
• neutralization of cleaning liquids before drain-ing.
Follow the instructions of the CIP equipment.
The following Alfa Laval-CIP models can be used: CIP75, CIP200, CIP400 and CIP800.
Cleaning liquids
Cleaning liquid Description
AlfaCaus A strong alkaline liquid, for removing paint, fat, oil and biological deposits.
AlfaPhos An acid cleaning liquid for removing metallic oxides, rust, lime and other inorganic scale.
AlfaPass An alkaline liquid for passivation (inhibition of corrosion).
AlfaNeutra A strong alkaline liquid for neutralization of AlfaPhos before drainage.
Alfa P-Scale An acidic cleaning powder with a corrosion inhibitor particularly effective for removing of calcium carbonate and other inorganic scale.
Alfa P-Neutra An alkaline powder for neutralization of used Alfa P-Scale prior to dis-posal.
AlfaAdd A neutral cleaning strengthener to be used with AlfaPhos, AlfaCaus and Alfa P-Scale. Provides better cleaning results on oily, fatty surfaces and where biological growth occurs. AlfaAdd also reduces any foaming.
Alpacon Descalant An acidic, water based, non-hazardous cleaning agent designed for removal of scale, magnetite, algae, humus, mussels, shellfish, lime and rust. Containing BIOGEN ACTIVE, a biological mixture made from renew-able materials, as an active ingredient.
Alpacon Degreaser A neutral degreaser to be used with Alpacon Descalant. Effectively removes oil, fat or grease layers, but also reduces foaming. Containing BIOGEN ACTIVE, a biological mixture made from renewable materials, as an active ingredient.
Maintenance English
Plate Evaporator 11EN
EN
Manual cleaning
Opening
Drain the plate evaporator.
Inspect the sliding surfaces of the carrying bar and wipe clean.
Mark the plate assembly on the outside by a diagonal line.
Warning!To avoid hand injuries owing to sharp edges, protective gloves should always be worn when handling cassettes and protective sheets.
Warning!If the plate evaporator is hot, wait until it has cooled down to about 40 °C (104 °F).
1
2
3
Mark
English Maintenance
12 Plate EvaporatorEN
EN
Measure and note down the dimension A.
Loosen the bolts which are not fitted with bearing boxes and remove them.
The pairs of bolts that are fitted with bear-ing boxes are opened alternately and diag-onally in two steps, see figures below.
Be careful so that the frame plate and pressure plate are always in parallel. Skewing of the pressure plate during open-ing must not exceed 10 mm (2 turns per bolt) across the width and 25 mm (5 turns per bolt) vertically.
Step 1: Loosen the four bolts alternately and diagonally until the plate package measures 1,05A.
Step 2: Loosen the two diagonal pairs of bolts are loosened alternately, as shown in the figure below.
4
5
Removethe bolts
Removethe bolts
Step Bolt No. To dimension
1 1 – 2 – 3 – 4 1,05 A
2 1 – 2 or 3 – 4 Opening
6
Maintenance English
Plate Evaporator 13EN
EN
Open the plate pack by letting the pressure plate glide on the carrying bar.
If cassettes are to be numbered, do this before removing the cassettes.
Cassettes need not to be removed if clean-ing is done using only water, i.e. without cleaning agent.
Note!AlfaVap 650: Loosen the five bolts alternate-ly until the plate package measures 1,05A
1
4
2
3
5
7
Removethe cassettes
English Maintenance
14 Plate EvaporatorEN
EN
Manual cleaning of opened units
Deposits removable with water and brush
Plates need not to be removed from the plate evaporator during cleaning.
Remove deposits using a soft brush and running water.
Rinse with water using a high pressure hose.
Deposits not removable with water and brush
Plates must be removed from the plate evaporator during cleaning.
Brush with cleaning agent. Rinse with water.
Caution!Never use hydrochloric acid with stainless steel plates. Water of more than 330 ppm Cl may not be used forthe preparation of cleaning solutions.
Note!Be careful not to damage the gasket during manual cleaning.
1 2
1 2
Maintenance English
Plate Evaporator 15EN
EN Cleaning agents – Incrustation, scaling
Concentration max 4 %Temperature max 60 °C (140 °F)
Incrustation – Scaling Sediment Cleaning agent
Calcium carbonate Corrosion products Nitric acid
Calcium sulphate Metal oxides Sulfamic acid
Silicates Silt Citric acid
Alumina Phosphoric acid
Diatomic organisms and their excrement of various colours
Cleaning agents – Biological growth, slime Concentration max 4 %
Temperature max 80 °C (176 °F)
Biological growth – Slime Cleaning agent
Bacteria Sodium hydroxide
Nematodes Sodium carbonate
Protozoa Cleaning effect can be considerably increased by the addition of small quantities of hypochlorite or agents for the formation of com-plexes and surfactants.
Caution!The following solutions should not be used:• Ketones (e.g. Acetone, Methyletylke-
Brush the threads of the bolts clean, using a steel wire brush. Lubricate the threads with a thin layer of grease, e.g. Gleitmo 800 or equivalent.
Attach gaskets to the cassettes or check that all the gaskets are properly attached.
Insert the cassettes with the gaskets turned towards the frame plate.
Press the plate assembly together. Tight-ening is done in two steps, see figures be-low. Be careful so that the frame plate and the pressure plate are always in parallel.
Step 1: Tighten the two diagonal pairs of bolts alternately until the plate package measures 1,10A.
Step 2: After that bolts are tightened alter-nately and diagonally, as shown in the fig-ure below. Check the dimension A during tightening at the positions of the bolts that are being used.
1
2
3Note!If the gasket is wrongly positioned, it will show by the fact that it rises out of thegasket groove or that it is positioned outside the groove.
4
Step Bolt No. To dimension
1 1 – 2 or 3 – 4 1,10 A
2 1 – 2 – 3 – 4 A
5
Maintenance English
Plate Evaporator 17EN
EN
Max tightening torque
For manual tightening, the tightening torque has to be estimated.
If dimension A cannot be reached
• Check the number of cassettes and the dimen-sion A.
• Check that all the nuts and bearing boxes are running freely. If not, clean and lubricate, or replace.
The dimension A can be exceeded to A + 1 % in exceptional cases.
Place the other bolts in position.
• Inspect the washers.• When fully tightened, the bolts should
all be equally tensioned.• The difference between the plate pack-
age lengths (the dimension A) meas-ured at adjacent bolts should not exceed:– 2 mm when A < 1000 mm– 4 mm when A > 1000 mm.
• The plate package length at all bolts must not differ more than 1 %.
• If the unit does not seal fully, it can be tightened to give dimension A - 1 %. The maximum tightening torque must not, however, be exceeded.
If the cassettes are correctly assembled, the edges form a “honeycomb” pattern, see picture below.
If the plate pack has been marked on the outside (see step 3 in section “Opening”), check that the cassettes have been assembled in correct order.
Bolt size
Bolt with bearing box
Bolt with washers
Nm Kpm Nm Kpm
M39 1300 130 2000 200
M48 2100 210 3300 330
Note!AlfaVap 650: Tighten the five bolts alternate-ly until the plate package measures 1,10A.
4
2
3 1
5
Note!When a pneumatic tightening device is used, see table below for maximum torque. Measure dimension A during tightening.
6
7
English Maintenance
18 Plate EvaporatorEN
EN
Regasketing
Open the plate evaporator according to page 8.
Glued gasketsSeparate gluing instructions will be deliv-ered together with the glue.
Clip-on gasketsRemove the old gaskets.
Attach the clip-on gasket to the cassette. Slip the gasket prongs under the edge of the cassette.
Close the plate evaporator according to page 13.
1
2
3
4
Note!Make sure the two gasket prongs are in correct position.
5
Clip-on gaskets
Glued gaskets
Maintenance English
Plate Evaporator 19EN
EN
Pressure test after maintenance
Before start-up of production, whenever plates or gaskets have been removed, inserted or exchanged, it is strongly recommended to perform a pressure test to confirm the internal and external sealing func-tion of the PHE. At this test, one media side at the time must be tested with the other side open to the atmosphere.
The recommended test time is 10 minutes.
Please note that PHE units for refrigeration applica-tions and units with media not mixable with water must be dried after hydrostatic pressure testing.
Please consult the local office/representative of the supplier for advice on the pressure testing procedure
Caution!The pressure testing shall be performed at a pressure equal to the operating pressure of the actual unit but never above the de-sign pressure as stated on the nameplate.