84
rel. 03.00 Operator Manual DigiBook 300r2

rel. 03.00
Operator Manual
DigiBook 300r2
Operator Manual Digibook 300
2
rev. 3.00
Summary
1 INTRODUCTION __________________________________________________ 5
1.1 SYMBOLS OF SAFETY _______________________________________________________________ 7
1.2 SYMBOLS OF PROHIBITION AND OBLIGATORINESS _______________________________________ 8
1.3 THE SAFETY DURING THE USE OF THE MACHINE _________________________________________ 9
1.3.1 general ________________________________________________________________________ 9
1.3.2 SAFETY WARNINGS ______________________________________________________________ 9
1.4 SAFETY CLOTHING _______________________________________________________________ 10
1.5 INSTALLATION OF ELECTRICAL CABLES AND PIPES ______________________________________ 11
1.6 SAFETY EQUIPMENTS IN THE PERFECT BINDER _________________________________________ 11
1.6.1 Emergency button ______________________________________________________________ 11
1.6.2 Green button for start cycle ____________________________________________________ 12
1.6.3 SAFETY light curtains ___________________________________________________________ 12
1.6.4 Protection plate of the milling station ____________________________________________ 13
1.6.5 MAIN SWITCH __________________________________________________________________ 13
1.7 RISKS __________________________________________________________________________ 14
1.8 PURPOSE _______________________________________________________________________ 15
1.8.1 uses not provided, uses prohibited _______________________________________________ 15
2 TECHNICAL SHEET MASTERBOOK300 ________________________________ 16
2.1.1 Electrical _____________________________________________________________________ 18
2.1.2 Pneumatics ____________________________________________________________________ 18
Air quality provided to the Perfect Binder _______________________________________________ 19
DIN ISO 8573-1 – air quality class ________________________________________________________ 19
3 ACCESSORIES __________________________________________________ 20
4 TRANSPORTATION ______________________________________________ 21
5 STORAGE _____________________________________________________ 23
6 LAYOUT ______________________________________________________ 24
7 POSITIONING AND WORKSPACES ____________________________________ 24
8 INSTALLATION _________________________________________________ 26
8.1 TECHNICAL STAFF FOR THE INSTALLATION ___________________________________________ 26
8.2 PHYSICAL CHARACTERISTICS OF THE AREA OF PLACEMENT ______________________________ 26
8.3 SUPPORT SURFACE _______________________________________________________________ 26
8.4 WEATHER PROTECTION ___________________________________________________________ 26
8.5 LIGHT _________________________________________________________________________ 27
8.6 ENVIRONMENTAL CONDITIONS ______________________________________________________ 27
8.7 ELECTRICAL CONNECTION _________________________________________________________ 28
8.7.1 Ground connection _____________________________________________________________ 28
Operator Manual Digibook 300
3
rev. 3.00
9 TRAINING OF THE OPERATOR ______________________________________ 29
10 POWER ON ____________________________________________________ 30
10.1 FUNDAMENTALS ____________________________________________________________________ 31
10.2 ELECTRICAL CONNECTION _____________________________________________________________ 33
10.3 PNEUMATIC CONNECTION _____________________________________________________________ 33
10.4 DESCRIPTION OF THE GROUPS __________________________________________________________ 34
10.5 CHIPS ASPIRATOR ___________________________________________________________________ 37
10.7 PUR TANK OPENING AND CLOSING, AND GLUE LOADING. _________________________________________ 39
10.7.1 Opening of the PUR tank ________________________________________________________ 39
WARNINGS ON THE OPENESS OF PUR TANK ________________________________________________ 39
10.7.2 preparation and loading of the pur glue __________________________________________ 41
10.7.3 Cleaner loading ________________________________________________________________ 43
11 FUNCTIONS OF THE PERFECT BINDER ________________________________ 45
11.1 HOME PAGE ________________________________________________ ERROR! BOOKMARK NOT DEFINED.
11.2 HOME PAGE ________________________________________________ ERROR! BOOKMARK NOT DEFINED.
11.3 NAVIGATION MENU OF THE PARAMETER PAGES ________________________ ERROR! BOOKMARK NOT DEFINED.
11.4 FAST CONFIGURATION OF THE BOOK _______________________________ ERROR! BOOKMARK NOT DEFINED.
11.4.1 Navigation Through the menus _____________________________ Error! Bookmark not defined.
11.4.2 Page to display production meters _________________________ Error! Bookmark not defined.
12 PAGE FOR TIMER MANAGEMENT ____________ ERROR! BOOKMARK NOT DEFINED.
13 PAGES OF ALARMS ______________________ ERROR! BOOKMARK NOT DEFINED.
14 PARAMETERIZATION OF EACH GROUP _______________________________ 51
14.1 PARAMETER OF CLAMP / FEEDER _________________________________ ERROR! BOOKMARK NOT DEFINED.
14.2 PARAMETER OF THE MILLING STATION ______________________________ ERROR! BOOKMARK NOT DEFINED.
14.3 PARAMETER OF THE GLUE HEAD __________________________________ ERROR! BOOKMARK NOT DEFINED.
14.4 TEMPERATURE OF THE HEAD AND THE PRE-MELTING UNIT ________________ ERROR! BOOKMARK NOT DEFINED.
14.4.1 Head glue processing information __________________________ Error! Bookmark not defined.
14.5 PARAMETER OF THE PRESS _____________________________________ ERROR! BOOKMARK NOT DEFINED.
14.6 PARAMETER OF THE COVER _____________________________________ ERROR! BOOKMARK NOT DEFINED.
15 ACCESS TO THE PAGES OF THE MANUAL HANDLINGERROR! BOOKMARK NOT DEFINED.
15.1 MANUAL MOVEMENTS OF THE CLAMP _______________________________ ERROR! BOOKMARK NOT DEFINED.
MANUAL MOVEMENTS OF THE FEEDER ___________________________________ ERROR! BOOKMARK NOT DEFINED.
15.2 MANUAL MOVEMENTS OF THE MILLING STATION _______________________ ERROR! BOOKMARK NOT DEFINED.
15.3 MANUAL MOVEMENTS OF THE GLUE HEAD ___________________________ ERROR! BOOKMARK NOT DEFINED.
15.4 MANUAL MOVEMENTS OF THE PRESS _______________________________ ERROR! BOOKMARK NOT DEFINED.
15.5 MANUAL MOVEMENT OF THE COVER _______________________________ ERROR! BOOKMARK NOT DEFINED.
16 OPERATION OF THE SYSTEM IN STANDBY _____ ERROR! BOOKMARK NOT DEFINED.
17 CLEANING USING CLEANER AND LOADING GLUE ERROR! BOOKMARK NOT DEFINED.
18 PAGE OF JOB MANAGEMENT _______________ ERROR! BOOKMARK NOT DEFINED.
Operator Manual Digibook 300
4
rev. 3.00
18.1 PAGE OF JOB MANAGEMENT _____________________________________ ERROR! BOOKMARK NOT DEFINED.
19 GLUE RECOVERY PROCEDURE ______________________________________ 64
20 COVER POSITIONING _____________________________________________ 67
PREPARATION OF THE MACHINE TO PRODUCE A BOOK. _____________________ 69
21 CLEANING THE MACHINE _________________________________________ 72
21.1 PROCEDURE TO CLEAN THE SPINE GLUE EXTRUDER. ____________________________________________ 73
21.2 PROCEDURE TO CLEAN THE GLUE SIDE EXTRUDERS. ____________________________________________ 75
21.3 “END OF JOB” CLEANING _____________________________________________________________ 78
21.4 DETAILS CLEANING _________________________________________________________________ 80
22 PROBLEMS - SOLUTIONS __________________________________________ 83
22.1 CHIPS ASPIRATOR – LESS VACUUM: ___________________________________________________ 83
22.2 CLAMP – IT DOES’T START: ____________________________________________________________ 83
22.3 IRREGULAR GLUE START / STOP : ___________________________________________________ 83
22.4 MILLING STATION – IRREGULAR CUT AND NOTCHING: _______________________________________ 83
22.5 COVER PLATE MILLING STATION – IT DOES’T OPEN / CLOSE CORRECTLY: _________________________ 83
22.6 HEAD - OUT OF TOO MUCH OR LITTLE GLUE: ___________________________________________ 83
22.7 PRESS ________________________________________________________________________ 84
Operator Manual Digibook 300
5
rev. 3.00
1 INTRODUCTION
THE READING OF THIS OPERATOR AND MAINTE-
NANCE MANUAL IS FUNDAMENTAL FOR THE SAFETY
OF THE USER AND FOR THE PROPER USE OF THE
EQUIPMENT.
We thank you to have bought our product. This machine has been designed specifically
for your job and your applications, and provides a high quality production and a wide
range of functions.
This manual describes how to use the machine, starting from the configuration phase to
the most important operations. This manual has been written in order to be easily un-
derstood also by user not trained about the use of this kind of machine. For the best use
of the equipment, please read carefully this manual before to use the machine. After
reading, we suggest saving the manual in a safety place and don’t hesitate to read him
when necessary.

Operator Manual Digibook 300
6
rev. 3.00
DECLARATION THAT THE MACHINE IS IN SPECIFICATION TO THE EEC
DIRECTIVE CONTROLLING THE MACHINES 2006/42/CE,
(AND FOLLOWING EEC DIRECTIVES)
We declare that the production of:
Product: Perfect Binder
Model/Type: Digibook 300
Serial Number: MB300-....
Year of construction: 2012
Follows the actual releases of the EEC Controlling Directives:
EEC Directive 2006/42/CE;
EMC Directive 89/336/CEE;
Directive controlling the Low Voltage 2006/95/CEE
And in particular the following Directives:
EN 1010
EN 60 204-1
EN 61 000-6-2, EN 61 000-6-3, EN 61 000-6-4
Assago , (MI) Italy
__/__/2012
K.G.S. S.R.L.

Operator Manual Digibook 300
7
rev. 3.00
SAFETY
1.1 SYMBOLS OF SAFETY
In the manual some symbols are used to inform about dangerous situations for people
and/or things.
The following symbols mean dangerous situations for people and/or things.
If you don’t follow carefully the appropriate procedures, damages can occur to people
and/or things and in extreme situations also fatal accidents. Together with the symbols
it is written also what to do.
Attention – General danger!
Attention – Electrical voltage!
Risk of electric shock.
Attention – Sharp blades!
Risk of cut.
Attention – Hot surfaces!
Risk of burn.
Attention – Risk of rolling parts!
Risk of crushing.
Attention – Risk of moving chain!
Risk of crushing.
Operator Manual Digibook 300
8
rev. 3.00
In case of not warning of the symbols damages, also great, can hap-
pen to the machine and to the accessories.
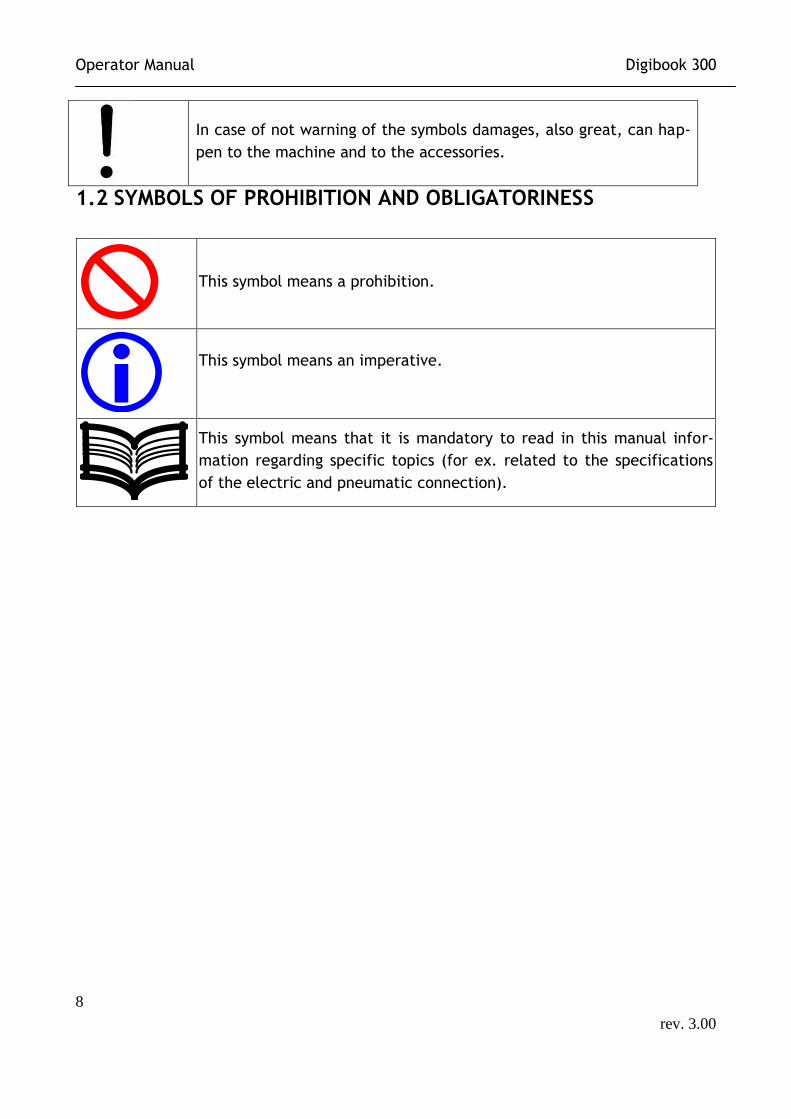
1.2 SYMBOLS OF PROHIBITION AND OBLIGATORINESS
This symbol means a prohibition.
This symbol means an imperative.
This symbol means that it is mandatory to read in this manual infor-
mation regarding specific topics (for ex. related to the specifications
of the electric and pneumatic connection).
Operator Manual Digibook 300
9
rev. 3.00
1.3 THE SAFETY DURING THE USE OF THE MACHINE
1.3.1 GENERAL
The manufacturer guarantees that the contents of this manual are in specification with
the procedures required by the machine. The manufacturer therefore will be not re-
sponsible if the machine will be used in a different way.
1.3.2 SAFETY WARNINGS
Before the use of the machine, please read carefully the manual.
Save the manual for further needs.
By apply different procedures, and not the specific procedures described in the manual,
can produce operational problems.
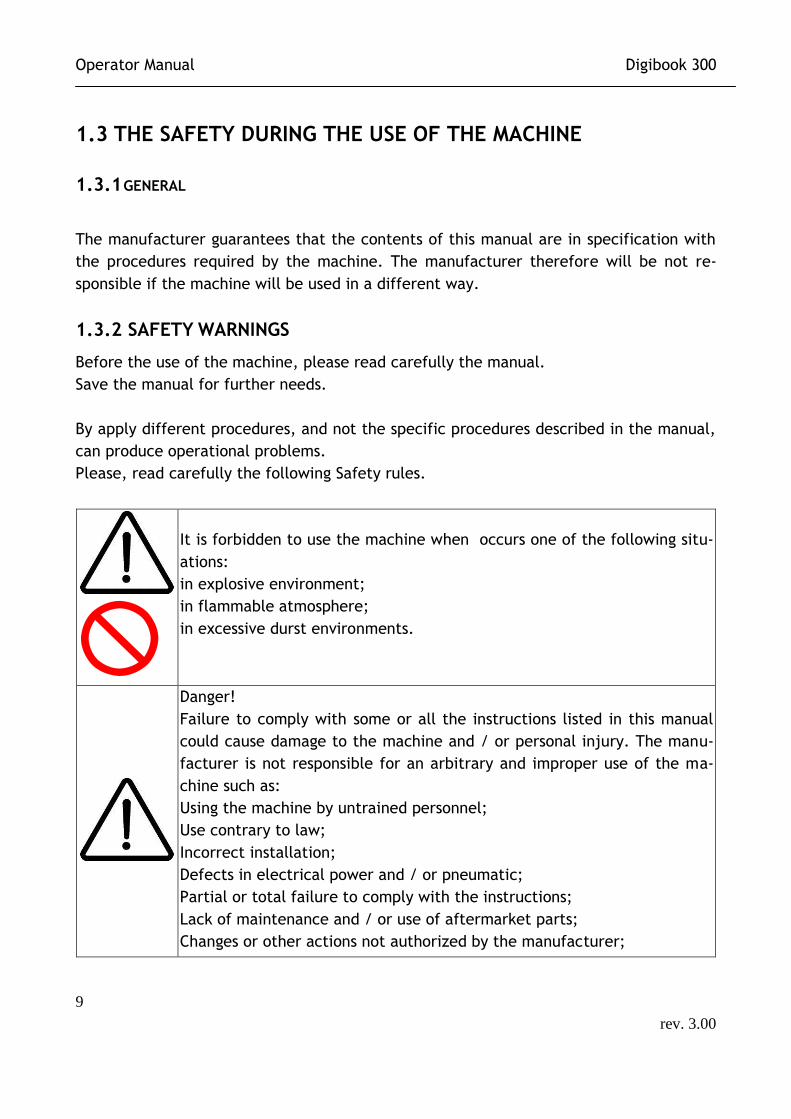
Please, read carefully the following Safety rules.
It is forbidden to use the machine when occurs one of the following situ-
ations:
in explosive environment;
in flammable atmosphere;
in excessive durst environments.
Danger!
Failure to comply with some or all the instructions listed in this manual
could cause damage to the machine and / or personal injury. The manu-
facturer is not responsible for an arbitrary and improper use of the ma-
chine such as:
Using the machine by untrained personnel;
Use contrary to law;
Incorrect installation;
Defects in electrical power and / or pneumatic;
Partial or total failure to comply with the instructions;
Lack of maintenance and / or use of aftermarket parts;
Changes or other actions not authorized by the manufacturer;
Operator Manual Digibook 300
10
rev. 3.00
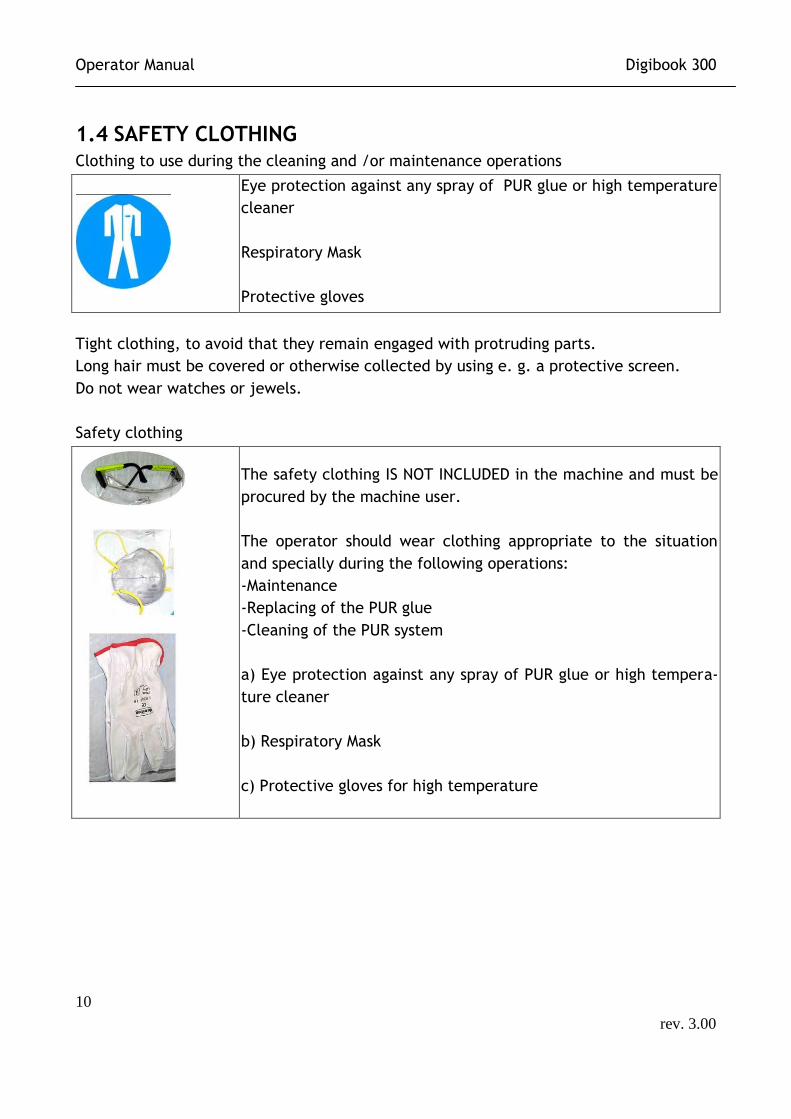
1.4 SAFETY CLOTHING
Clothing to use during the cleaning and /or maintenance operations
Eye protection against any spray of PUR glue or high temperature
cleaner
Respiratory Mask
Protective gloves
Tight clothing, to avoid that they remain engaged with protruding parts.
Long hair must be covered or otherwise collected by using e. g. a protective screen.
Do not wear watches or jewels.
Safety clothing
The safety clothing IS NOT INCLUDED in the machine and must be
procured by the machine user.
The operator should wear clothing appropriate to the situation
and specially during the following operations:
-Maintenance
-Replacing of the PUR glue
-Cleaning of the PUR system
a) Eye protection against any spray of PUR glue or high tempera-
ture cleaner
b) Respiratory Mask
c) Protective gloves for high temperature
Operator Manual Digibook 300
11
rev. 3.00
1.5 INSTALLATION OF ELECTRICAL CABLES AND PIPES
Cables and pipes must be put inside of special cable channels to avoid the people to
stumble and get hurt.
1.6 SAFETY EQUIPMENTS IN THE PERFECT BINDER
DANGER! It is forbidden to remove or render ineffective the safety
guards for the safety of persons, and to tamper and / or modify, even
partially, safety devices installed on the machine. In case of alarm sig-
nals due to the intervention of the safety, the operator must request the
immediate intervention of technical people trained on the maintenance.
The manufacturer is not responsible of any damage to persons or animals
caused by tampering with the guards."
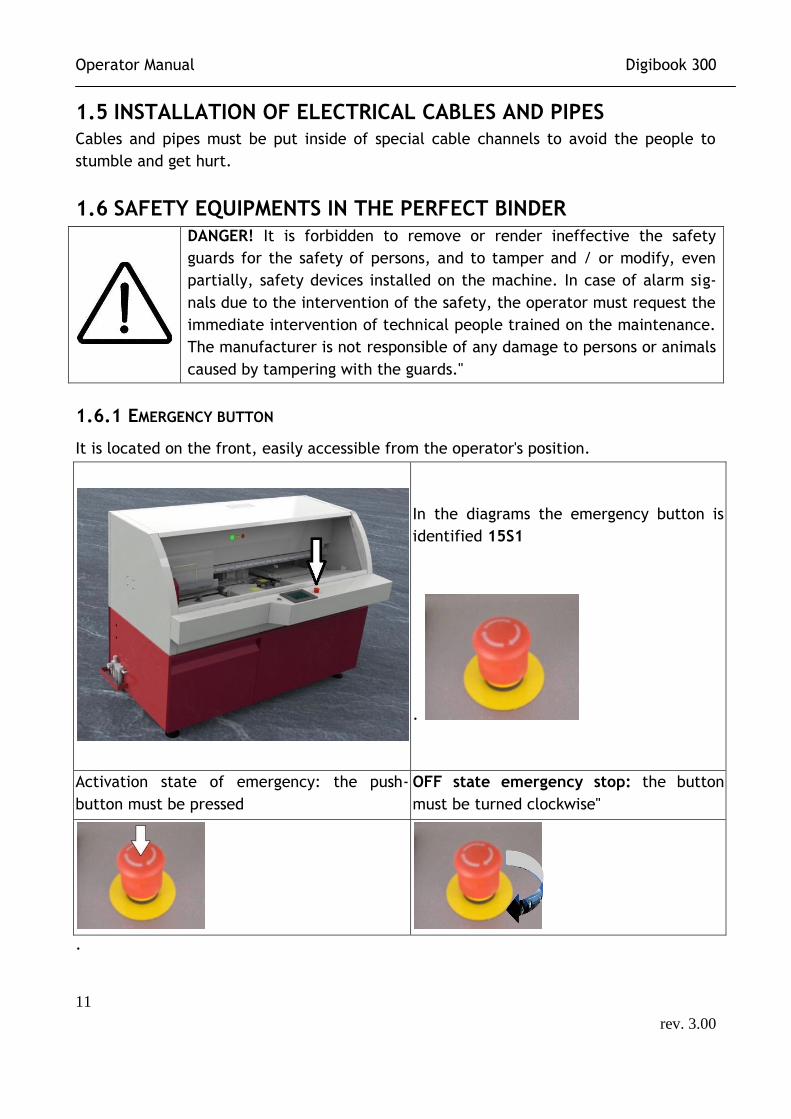
1.6.1 EMERGENCY BUTTON
It is located on the front, easily accessible from the operator's position.
In the diagrams the emergency button is
identified 15S1
.
Activation state of emergency: the push-
button must be pressed
OFF state emergency stop: the button
must be turned clockwise"
.
Operator Manual Digibook 300
12
rev. 3.00
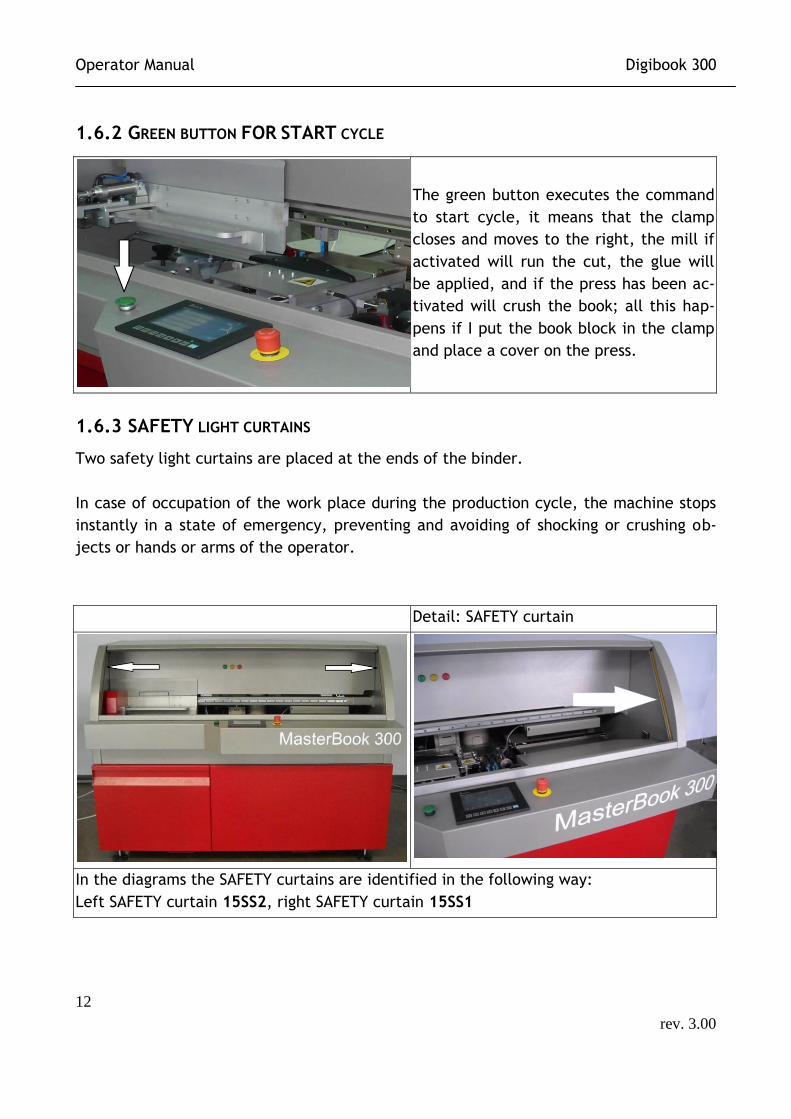
1.6.2 GREEN BUTTON FOR START CYCLE
The green button executes the command
to start cycle, it means that the clamp
closes and moves to the right, the mill if
activated will run the cut, the glue will
be applied, and if the press has been ac-
tivated will crush the book; all this hap-
pens if I put the book block in the clamp
and place a cover on the press.
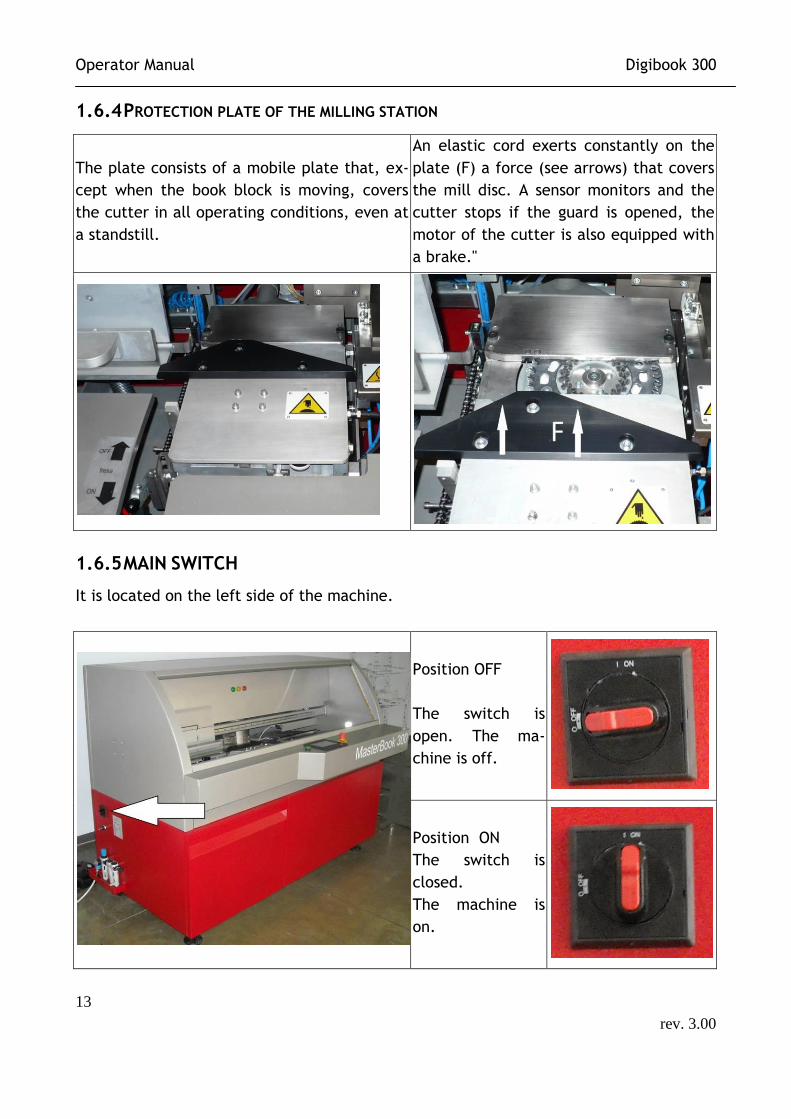
1.6.3 SAFETY LIGHT CURTAINS
Two safety light curtains are placed at the ends of the binder.
In case of occupation of the work place during the production cycle, the machine stops
instantly in a state of emergency, preventing and avoiding of shocking or crushing ob-
jects or hands or arms of the operator.
Detail: SAFETY curtain
In the diagrams the SAFETY curtains are identified in the following way:
Left SAFETY curtain 15SS2, right SAFETY curtain 15SS1
Operator Manual Digibook 300
13
rev. 3.00
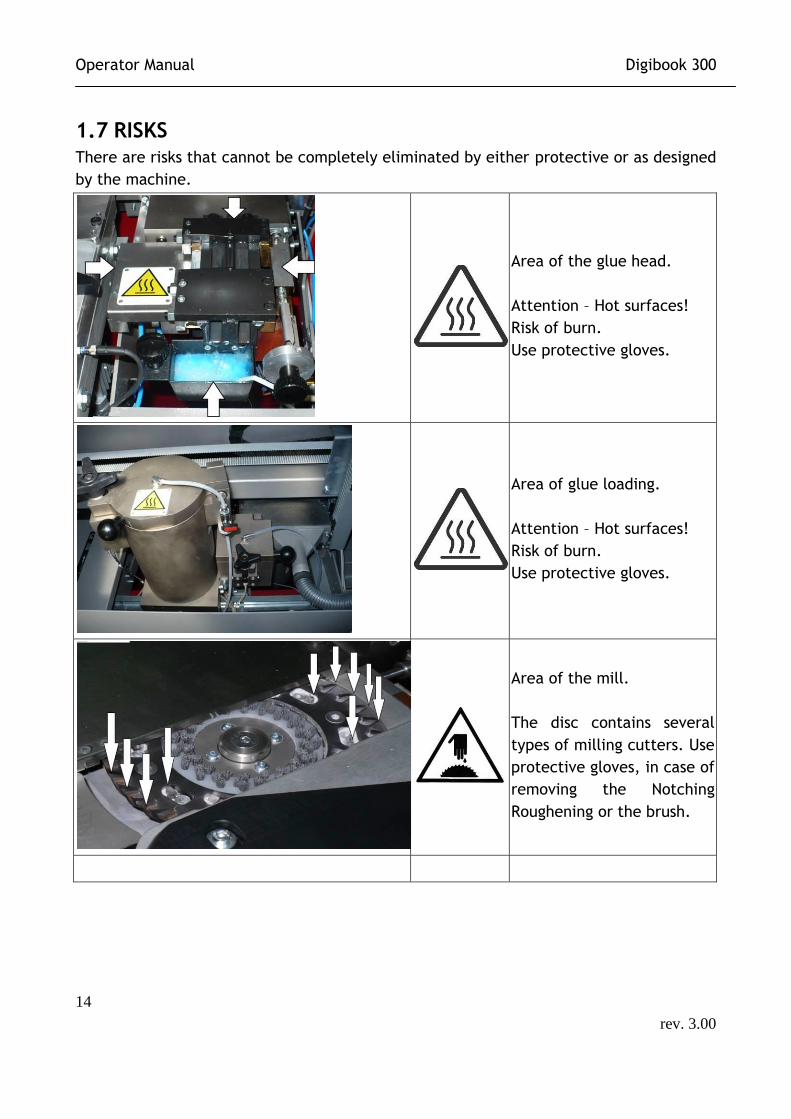
1.6.4 PROTECTION PLATE OF THE MILLING STATION
The plate consists of a mobile plate that, ex-
cept when the book block is moving, covers
the cutter in all operating conditions, even at
a standstill.
An elastic cord exerts constantly on the
plate (F) a force (see arrows) that covers
the mill disc. A sensor monitors and the
cutter stops if the guard is opened, the
motor of the cutter is also equipped with
a brake."
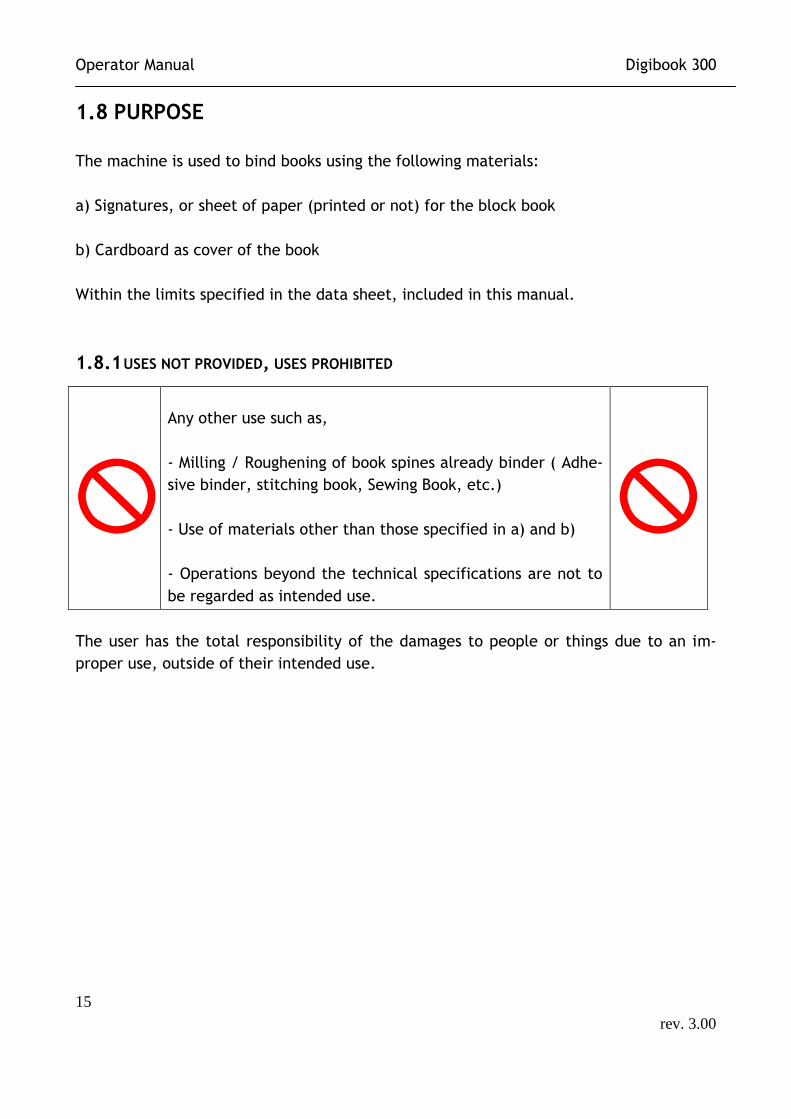
1.6.5 MAIN SWITCH
It is located on the left side of the machine.
Position OFF
The switch is
open. The ma-
chine is off.
Position ON
The switch is
closed.
The machine is
on.
Operator Manual Digibook 300
14
rev. 3.00
1.7 RISKS
There are risks that cannot be completely eliminated by either protective or as designed
by the machine.
Area of the glue head.
Attention – Hot surfaces!
Risk of burn.
Use protective gloves.
Area of glue loading.
Attention – Hot surfaces!
Risk of burn.
Use protective gloves.
Area of the mill.
The disc contains several
types of milling cutters. Use
protective gloves, in case of
removing the Notching
Roughening or the brush.
Operator Manual Digibook 300
15
rev. 3.00
1.8 PURPOSE
The machine is used to bind books using the following materials:
a) Signatures, or sheet of paper (printed or not) for the block book
b) Cardboard as cover of the book
Within the limits specified in the data sheet, included in this manual.
1.8.1 USES NOT PROVIDED, USES PROHIBITED
Any other use such as,
- Milling / Roughening of book spines already binder ( Adhe-
sive binder, stitching book, Sewing Book, etc.)
- Use of materials other than those specified in a) and b)
- Operations beyond the technical specifications are not to
be regarded as intended use.
The user has the total responsibility of the damages to people or things due to an im-
proper use, outside of their intended use.
Operator Manual Digibook 300
16
rev. 3.00
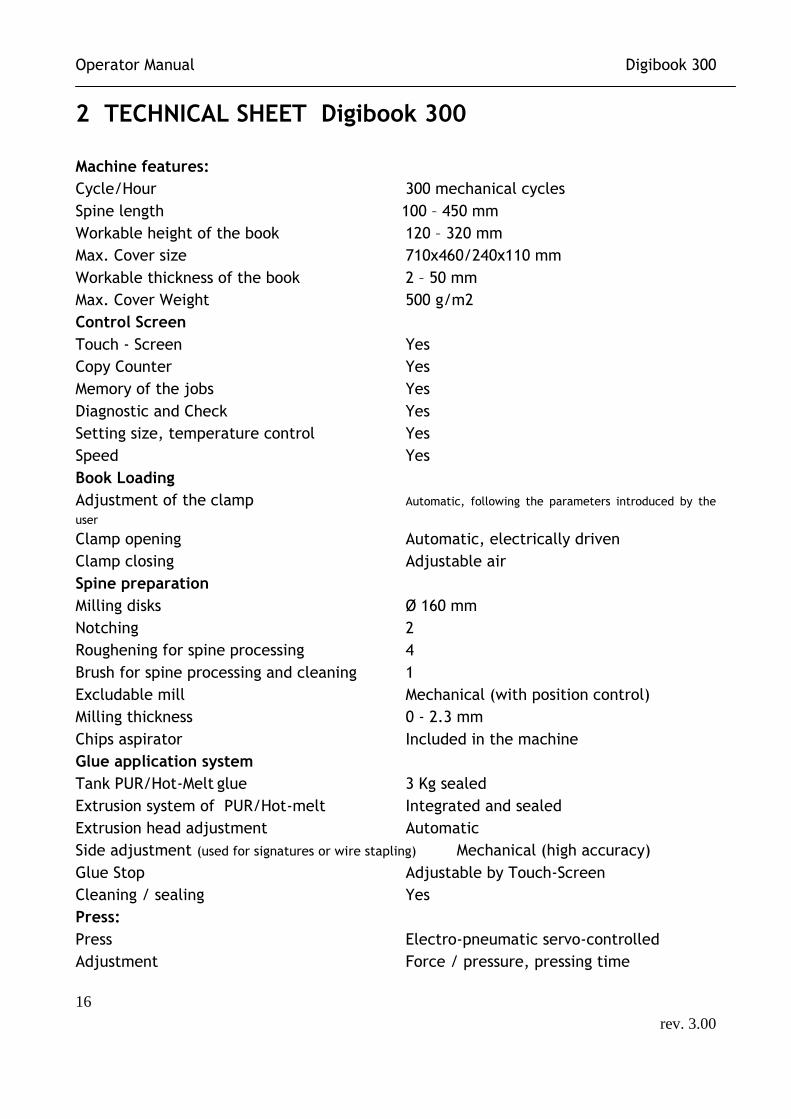
2 TECHNICAL SHEET Digibook 300
Machine features:
Cycle/Hour 300 mechanical cycles
Spine length 100 – 450 mm
Workable height of the book 120 – 320 mm
Max. Cover size 710x460/240x110 mm
Workable thickness of the book 2 – 50 mm
Max. Cover Weight 500 g/m2
Control Screen
Touch - Screen Yes
Copy Counter Yes
Memory of the jobs Yes
Diagnostic and Check Yes
Setting size, temperature control Yes
Speed Yes
Book Loading
Adjustment of the clamp Automatic, following the parameters introduced by the
user
Clamp opening Automatic, electrically driven
Clamp closing Adjustable air
Spine preparation
Milling disks Ø 160 mm
Notching 2
Roughening for spine processing 4
Brush for spine processing and cleaning 1
Excludable mill Mechanical (with position control)
Milling thickness 0 - 2.3 mm
Chips aspirator Included in the machine
Glue application system
Tank PUR/Hot-Melt glue 3 Kg sealed
Extrusion system of PUR/Hot-melt Integrated and sealed
Extrusion head adjustment Automatic
Side adjustment (used for signatures or wire stapling) Mechanical (high accuracy)
Glue Stop Adjustable by Touch-Screen
Cleaning / sealing Yes
Press:
Press Electro-pneumatic servo-controlled
Adjustment Force / pressure, pressing time
Operator Manual Digibook 300
17
rev. 3.00
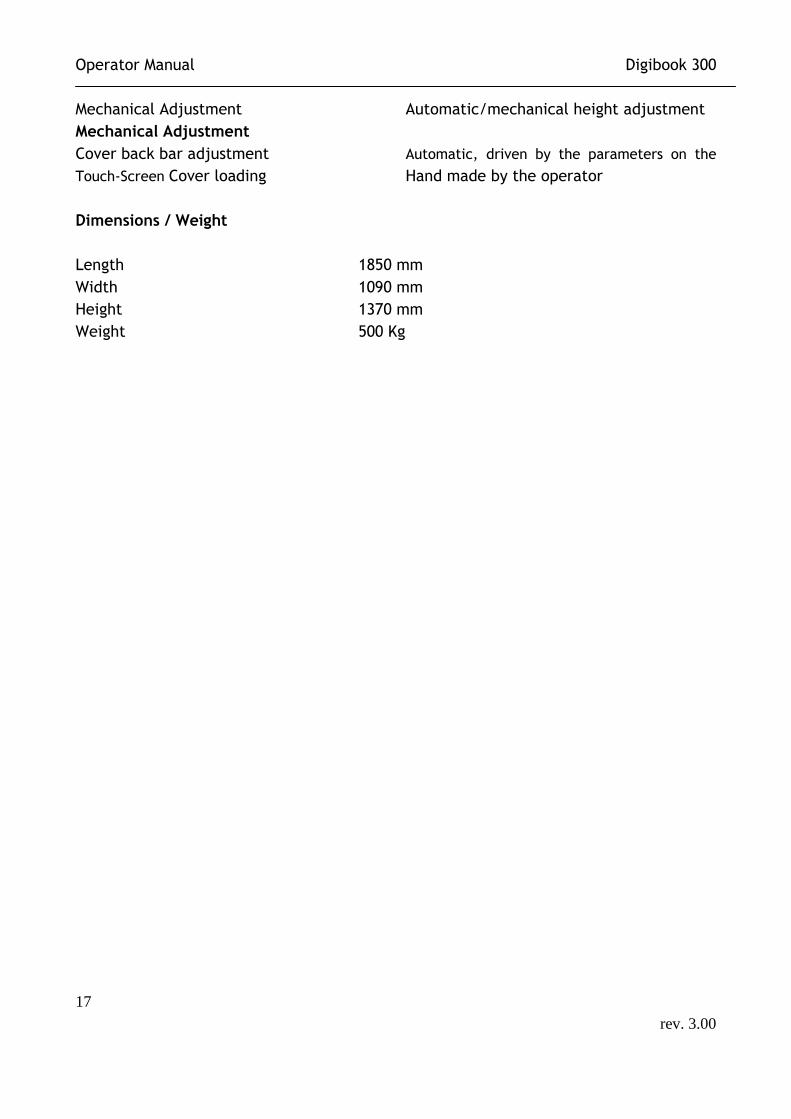
Mechanical Adjustment Automatic/mechanical height adjustment
Mechanical Adjustment
Cover back bar adjustment Automatic, driven by the parameters on the
Touch-Screen Cover loading Hand made by the operator
Dimensions / Weight
Length 1850 mm
Width 1090 mm
Height 1370 mm
Weight 500 Kg
Operator Manual Digibook 300
18
rev. 3.00
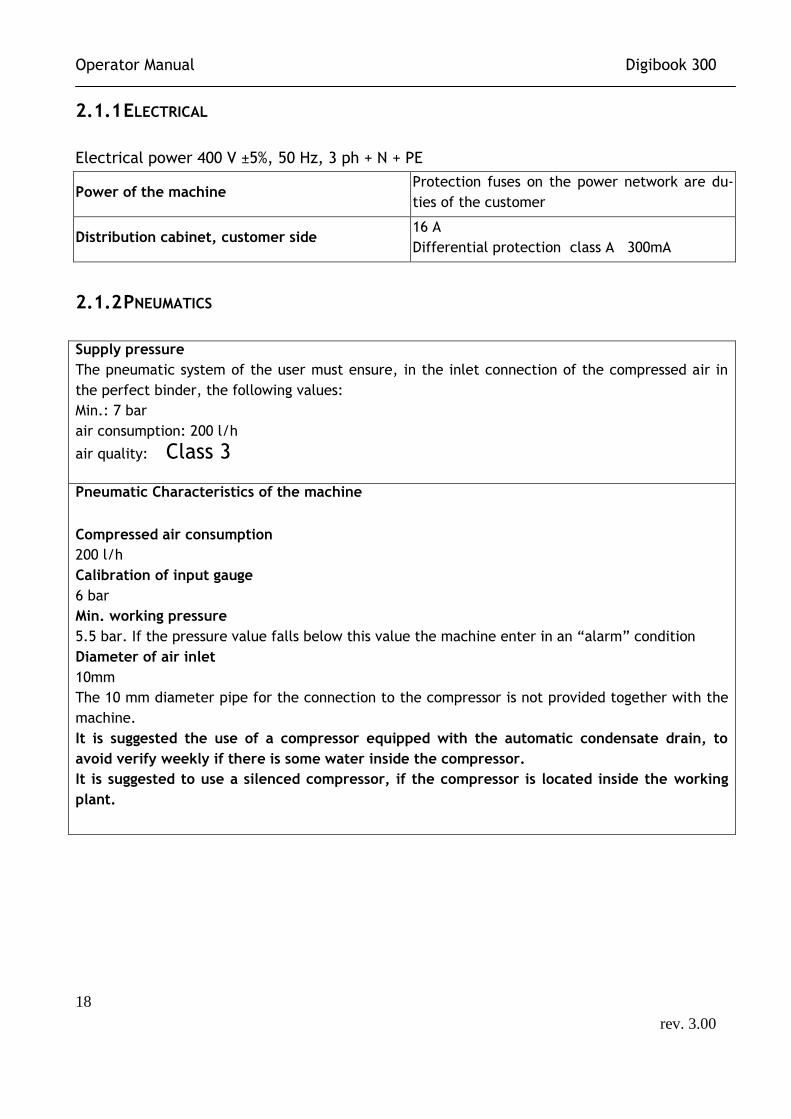
2.1.1 ELECTRICAL
Electrical power 400 V ±5%, 50 Hz, 3 ph + N + PE
Power of the machine Protection fuses on the power network are du-
ties of the customer
Distribution cabinet, customer side 16 A
Differential protection class A 300mA
2.1.2 PNEUMATICS
Supply pressure
The pneumatic system of the user must ensure, in the inlet connection of the compressed air in
the perfect binder, the following values:
Min.: 7 bar
air consumption: 200 l/h
air quality: Class 3
Pneumatic Characteristics of the machine
Compressed air consumption
200 l/h
Calibration of input gauge
6 bar
Min. working pressure
5.5 bar. If the pressure value falls below this value the machine enter in an “alarm” condition
Diameter of air inlet
10mm
The 10 mm diameter pipe for the connection to the compressor is not provided together with the
machine.
It is suggested the use of a compressor equipped with the automatic condensate drain, to
avoid verify weekly if there is some water inside the compressor.
It is suggested to use a silenced compressor, if the compressor is located inside the working
plant.
Operator Manual Digibook 300
19
rev. 3.00
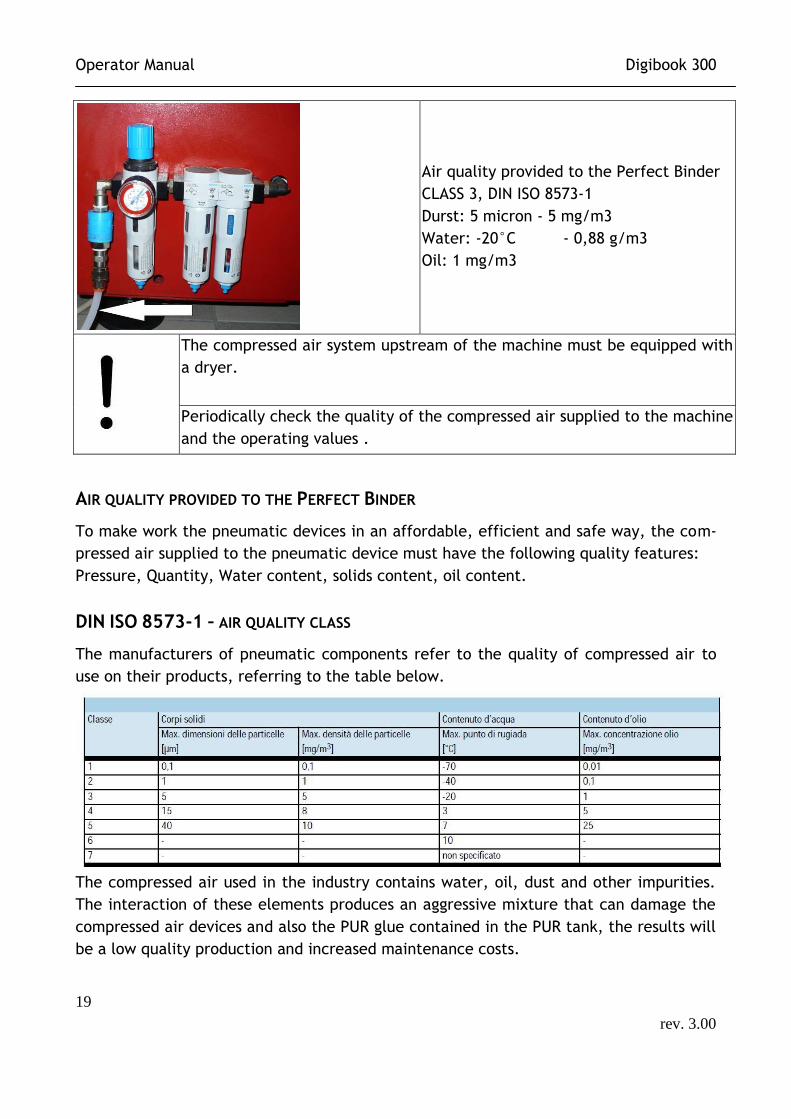
Air quality provided to the Perfect Binder
CLASS 3, DIN ISO 8573-1
Durst: 5 micron - 5 mg/m3
Water: -20°C - 0,88 g/m3
Oil: 1 mg/m3
The compressed air system upstream of the machine must be equipped with
a dryer.
Periodically check the quality of the compressed air supplied to the machine
and the operating values .
AIR QUALITY PROVIDED TO THE PERFECT BINDER
To make work the pneumatic devices in an affordable, efficient and safe way, the com-
pressed air supplied to the pneumatic device must have the following quality features:
Pressure, Quantity, Water content, solids content, oil content.
DIN ISO 8573-1 – AIR QUALITY CLASS
The manufacturers of pneumatic components refer to the quality of compressed air to
use on their products, referring to the table below.
The compressed air used in the industry contains water, oil, dust and other impurities.
The interaction of these elements produces an aggressive mixture that can damage the
compressed air devices and also the PUR glue contained in the PUR tank, the results will
be a low quality production and increased maintenance costs.
Operator Manual Digibook 300
20
rev. 3.00
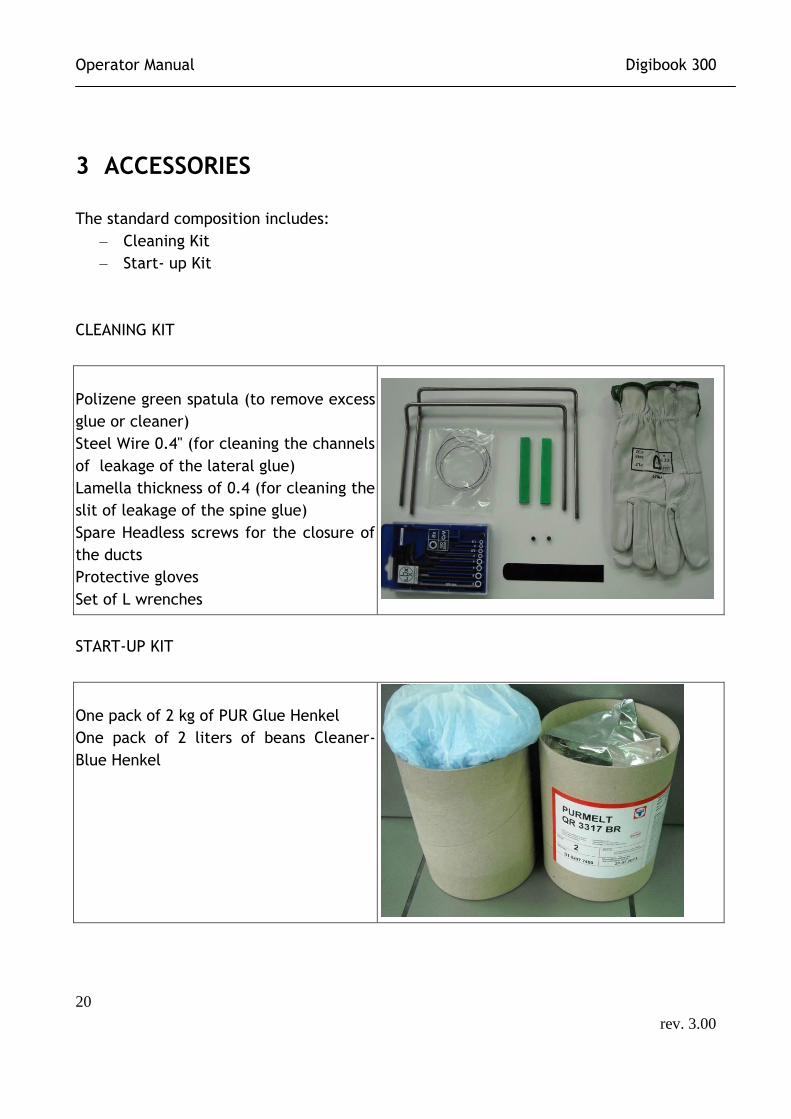
3 ACCESSORIES
The standard composition includes:
– Cleaning Kit
– Start- up Kit
CLEANING KIT
Polizene green spatula (to remove excess
glue or cleaner)
Steel Wire 0.4" (for cleaning the channels
of leakage of the lateral glue)
Lamella thickness of 0.4 (for cleaning the
slit of leakage of the spine glue)
Spare Headless screws for the closure of
the ducts
Protective gloves
Set of L wrenches
START-UP KIT
One pack of 2 kg of PUR Glue Henkel
One pack of 2 liters of beans Cleaner-
Blue Henkel
Operator Manual Digibook 300
21
rev. 3.00
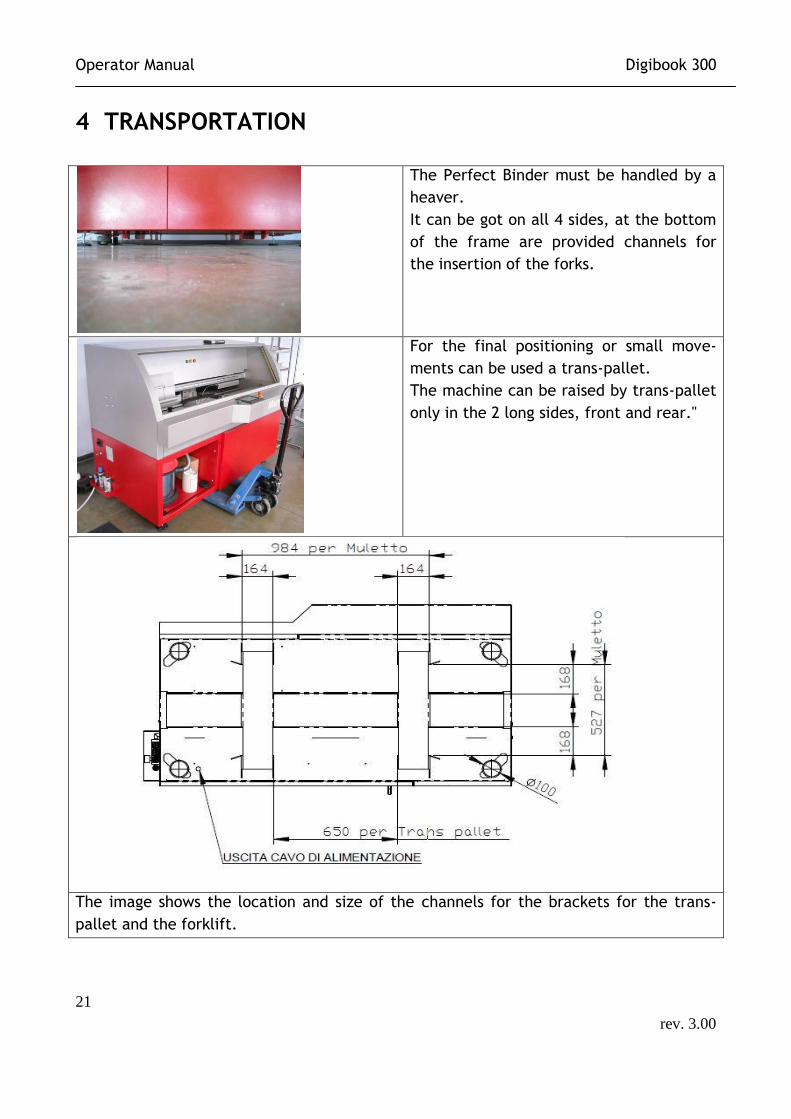
4 TRANSPORTATION
The Perfect Binder must be handled by a
heaver.
It can be got on all 4 sides, at the bottom
of the frame are provided channels for
the insertion of the forks.
For the final positioning or small move-
ments can be used a trans-pallet.
The machine can be raised by trans-pallet
only in the 2 long sides, front and rear."
The image shows the location and size of the channels for the brackets for the trans-
pallet and the forklift.
Operator Manual Digibook 300
22
rev. 3.00
DANGER! For no reason the staff is authorized to pass under a suspended
load during transport or in the proximity of. The producer is not respon-
sible for what happens during this operation, to be carried out by quali-
fied and authorized personnel, with the necessary individual safety pro-
tections (Suit, shoes, gloves, helmet, and glasses).
Attention! The machine is balanced. In any case keep the forks low.
In case of unbalance use weights. It is forbidden to hold by the hands the
projecting parts. The machine and its parts must be protected from the
weather outside. In particular, water, dust and moisture can oxidize cer-
tain elements of the machine, damaging them irreversibly. Follow the
usual precautions to avoid falls and bumps.
IMPORTANT
a) We do not provide tools for docking and lifting.
b) The disposal of packaging materials will be provided by the recipient and must be
conducted in accordance with the local regulations.
c) Remove dust and dirt accumulated during the transportation.
Operator Manual Digibook 300
23
rev. 3.00
5 STORAGE
The information contained in this section must be observed in case of temporary storage
of the machine that may occur in the following situations:
Installation of the machine not immediately after its delivery.
Uninstalling the machine.
Storage awaiting a new location.
The machine must be stored and transported under conditions of SAFETY as shown in the
table below.
Conditions of transportation and storage
Temperature average -5/+55°C
Humidity average 30/90%
Lighting Adequate natural and / or artificial
Weather Adequate weather protection
Space required Adequate to allow the operations of
lifting and carrying in SAFETY.
Horizontal ground plane Horizontal ground plane must have a
capacity in excess of the total mass of
the machine.
In the case of removal or unused for long
periods (over 30 days), it is necessary to
drain the glue system and to put inside
the protection cleaner.
The damage caused by this failure
will void the warranty of the glue de-
vice.
During periods of downtime you should
not open the tank containing the glue;
otherwise it accelerates the deterioration
creating serious permanent damage to the
glue device.
The damage caused by this failure
will void the warranty of the glue de-
vice.
Protect with anti-corrosive products the
parts subject to wear and work plans. Ref.
to the section “maintenance”.
Do not climb or place any objects on top of
the machine
Operator Manual Digibook 300
24
rev. 3.00
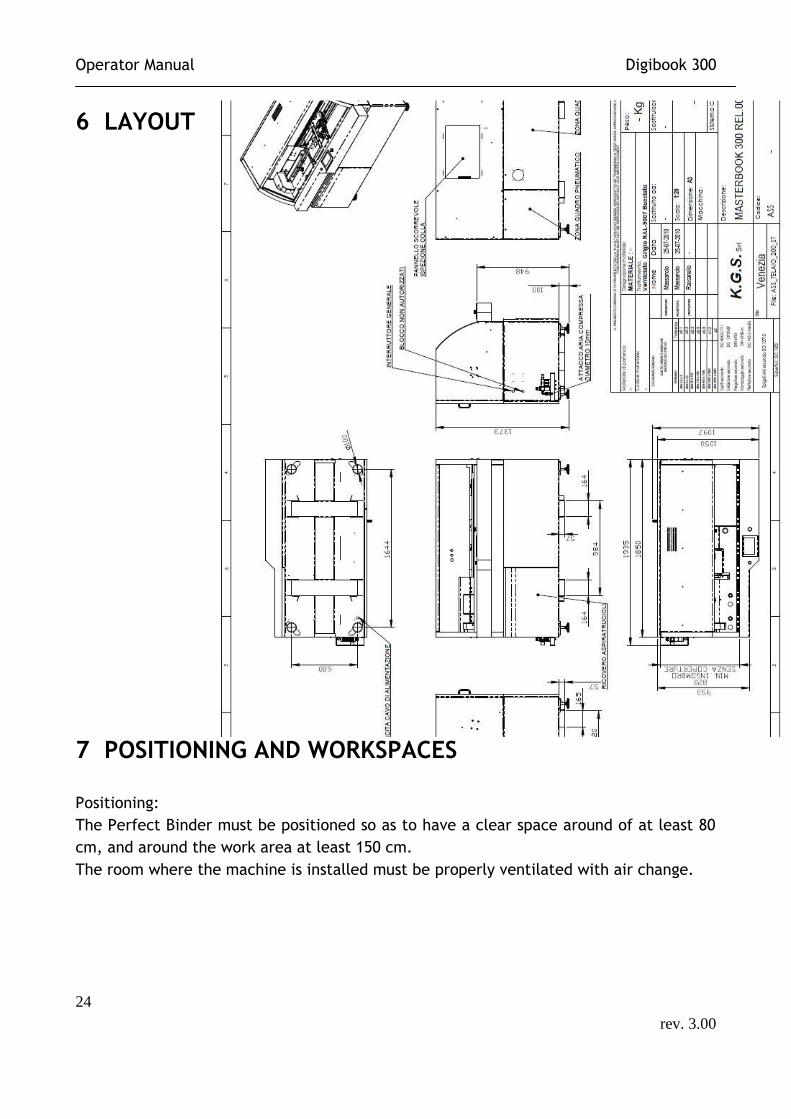
6 LAYOUT
7 POSITIONING AND WORKSPACES
Positioning:
The Perfect Binder must be positioned so as to have a clear space around of at least 80
cm, and around the work area at least 150 cm.
The room where the machine is installed must be properly ventilated with air change.

Operator Manual Digibook 300
25
rev. 3.00
Workspaces
Glue loading area Glue loading area, the operator enter in this area to load the
glue in the machine.
Access area for the maintenance, for access to the electrical
and pneumatic panel.
Transit area Used to transit from the work area to the glue loading area.
Operator’s work area Operator’s work area during the normal use of the machine.
Right side of the ma-
chine It is not necessary to leave a space available.
Operator Manual Digibook 300
26
rev. 3.00
8 INSTALLATION
8.1 TECHNICAL STAFF FOR THE INSTALLATION
The machine must be installed by people specifically trained and authorized by K.G.S. .
8.2 PHYSICAL CHARACTERISTICS OF THE AREA OF PLACEMENT
In addition to the overall dimensions of the machine given in the previous chapter, you
must also meet the following conditions:
Near the area of placement of the machine should be arranged the sources of electric
power and pneumatic following what is written in this manual.
Provide sufficient space for normal use, maintenance of machinery, for any command
and for additional equipments to connect. Refer to the draft in the chapter of the posi-
tioning.
The chosen site should not be close to deposits of flammable materials, or to operation-
al sites that may create flammable or explosive atmospheres.
For the installation you must choose an operational area depending on the size of the
machine parts and lifting equipment selected, pay attention to the presence of any ob-
stacles on the road (equipments, walls, etc.).
8.3 SUPPORT SURFACE
The machine requires no special foundations. It must be ensured the availability of an
industrial floor.
The producer has no responsibility about the enforcement of foundations (resistance
calculation, thick reinforced concrete, etc.), which are under responsibility of the cus-
tomer or company performing the design and construction of the foundations them-
selves.
The Perfect Binder rests on four feet of 100 mm diameter.
8.4 WEATHER PROTECTION The machine must be placed in a covered room, protected from direct contact with at-
mospheric agents.
Operator Manual Digibook 300
27
rev. 3.00
8.5 LIGHT
To use and maintain in a safety way the machine a good light is needed. The room light-
ing should have a value that should allow normal operations without causing risks to the
shadows.
8.6 ENVIRONMENTAL CONDITIONS
The values of temperature and humidity should be within the values in the table below.
In case of use of the system in corrosive environments it is important to intervene in the
maintenance of the machine with adequate time to avoid excessive wear of compo-
nents.
MIN MAX
Room temperature 5°C 40°C
Relative humidity 20% 80%
Operator Manual Digibook 300
28
rev. 3.00
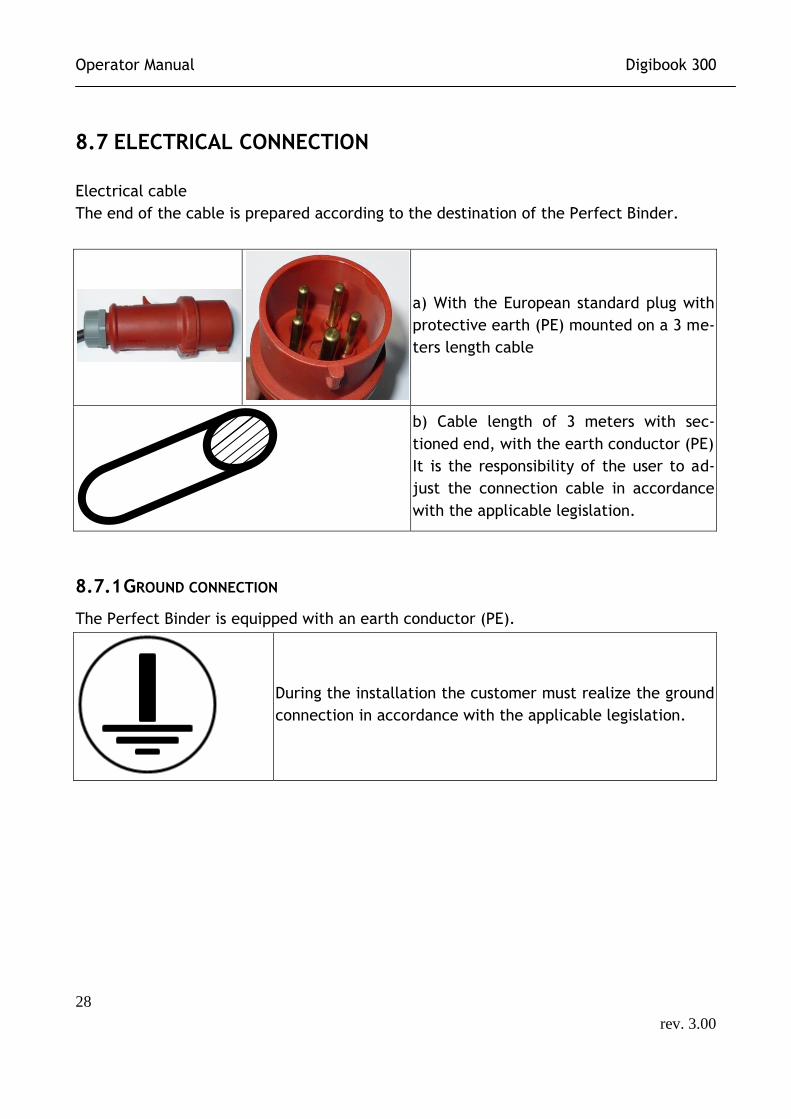
8.7 ELECTRICAL CONNECTION
Electrical cable
The end of the cable is prepared according to the destination of the Perfect Binder.
a) With the European standard plug with
protective earth (PE) mounted on a 3 me-
ters length cable
b) Cable length of 3 meters with sec-
tioned end, with the earth conductor (PE)
It is the responsibility of the user to ad-
just the connection cable in accordance
with the applicable legislation.
8.7.1 GROUND CONNECTION
The Perfect Binder is equipped with an earth conductor (PE).
During the installation the customer must realize the ground
connection in accordance with the applicable legislation.
Operator Manual Digibook 300
29
rev. 3.00
9 TRAINING OF THE OPERATOR
DANGER! The operator must be trained about the operations to perform during
the occurrence of possible faults, malfunctions or conditions of danger to themselves or
others, and anyway he must perform the following procedures:
Stop the machine quickly by pressing the emergency button (red button installed aboard
of the machine herself);
Do not carry out operations that go beyond the specific knowledge and techniques;
Immediately inform their superior head, avoiding taking personal initiatives.
It is assumed that the operating and maintenance personnel possess the following mini-
mum requirements:
Culture in general and specific enough, each to his ability, to read and understand
the contents of the manual including the correct interpretation of drawings and
diagrams, pneumatic and hydraulic;
Ability to understand correctly the symbols and video messages;
Overall knowledge of the machine and the plant in which it is installed;
Specific experience in the applied technology;
Knowledge on what to do in an emergency, the availability of personal protection
equipment and how to use them.
Operator Manual Digibook 300
30
rev. 3.00
10 POWER ON
1) Be sure that the machine is correctly fed by air.
2) Turn on the machine turning the general switch.
3) Open the valve on the premelter
4) Close the rear inspection panel.
On display you will see:
machine in emergency
machine with cleaner
machine not in temperature
The red light is on
5) Press once the green key,
Green is blinking
Orange is on
Red is blinking
On display:
Machine with cleaner
Low temperature
6) Exit from the alarms page using the arrow, in case the machine is equipped with
the table to measure thickness, you must press “OK” to set to zero the table.
7) When the temperature icon becomes green, press the green key. The machine
sets to zero the axes.
8) Press the key “glue cleaner” to load the glue.
9) Set values for the book you are going to manufacture and press the green key.
Orange light is on, the green one is blinking
10) Put the book in the clamp, position the cover and press the green key.
Once the book is completed, remove carefully the book and position a new cover
and a book block. The machine will start again as soon as it will have:
The book in the clamp
The cover in the nipping station
Safety photocells free
Operator Manual Digibook 300
31
rev. 3.00
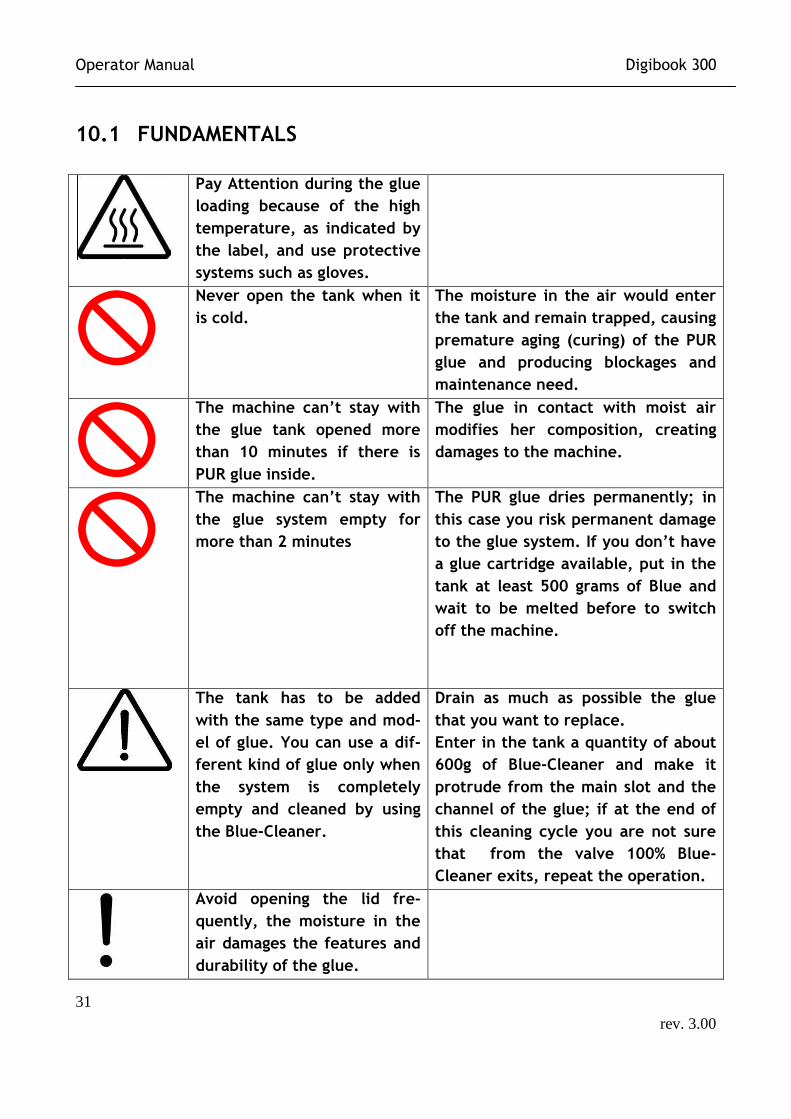
10.1 FUNDAMENTALS
Pay Attention during the glue
loading because of the high
temperature, as indicated by
the label, and use protective
systems such as gloves.
Never open the tank when it
is cold.
The moisture in the air would enter
the tank and remain trapped, causing
premature aging (curing) of the PUR
glue and producing blockages and
maintenance need.
The machine can’t stay with
the glue tank opened more
than 10 minutes if there is
PUR glue inside.
The glue in contact with moist air
modifies her composition, creating
damages to the machine.
The machine can’t stay with
the glue system empty for
more than 2 minutes
The PUR glue dries permanently; in
this case you risk permanent damage
to the glue system. If you don’t have
a glue cartridge available, put in the
tank at least 500 grams of Blue and
wait to be melted before to switch
off the machine.
The tank has to be added
with the same type and mod-
el of glue. You can use a dif-
ferent kind of glue only when
the system is completely
empty and cleaned by using
the Blue-Cleaner.
Drain as much as possible the glue
that you want to replace.
Enter in the tank a quantity of about
600g of Blue-Cleaner and make it
protrude from the main slot and the
channel of the glue; if at the end of
this cleaning cycle you are not sure
that from the valve 100% Blue-
Cleaner exits, repeat the operation.
Avoid opening the lid fre-
quently, the moisture in the
air damages the features and
durability of the glue.

Operator Manual Digibook 300
32
rev. 3.00
The depletion of the glue is
found in two ways:
the lack of glue on the book;
issuing at the extrusion zone
glue clear glue mixed with air
vents and glue bubbles.
When you finish the glue and
insert a new cartridge you
have to wait about 10 min
before the new glue melts.
The machine is not opera-
tional until the set tempera-
ture is reached.
Red light on Machine in emergency with
auxiliary turned off
Red light
blinking
Machine on cycle with warn-
ings
Red light off Machine in emergency and
without alarms on
Orange light
on
Machine with fed auxiliary
Orange light
blinking
Auxiliaries turned on or off in
Orange light
off
Auxiliaries turned off
Green light
on
Machine on cycle
Green light
blinking
Machine not on cycle
Green light
off
Machine not ready
Operator Manual Digibook 300
33
rev. 3.00
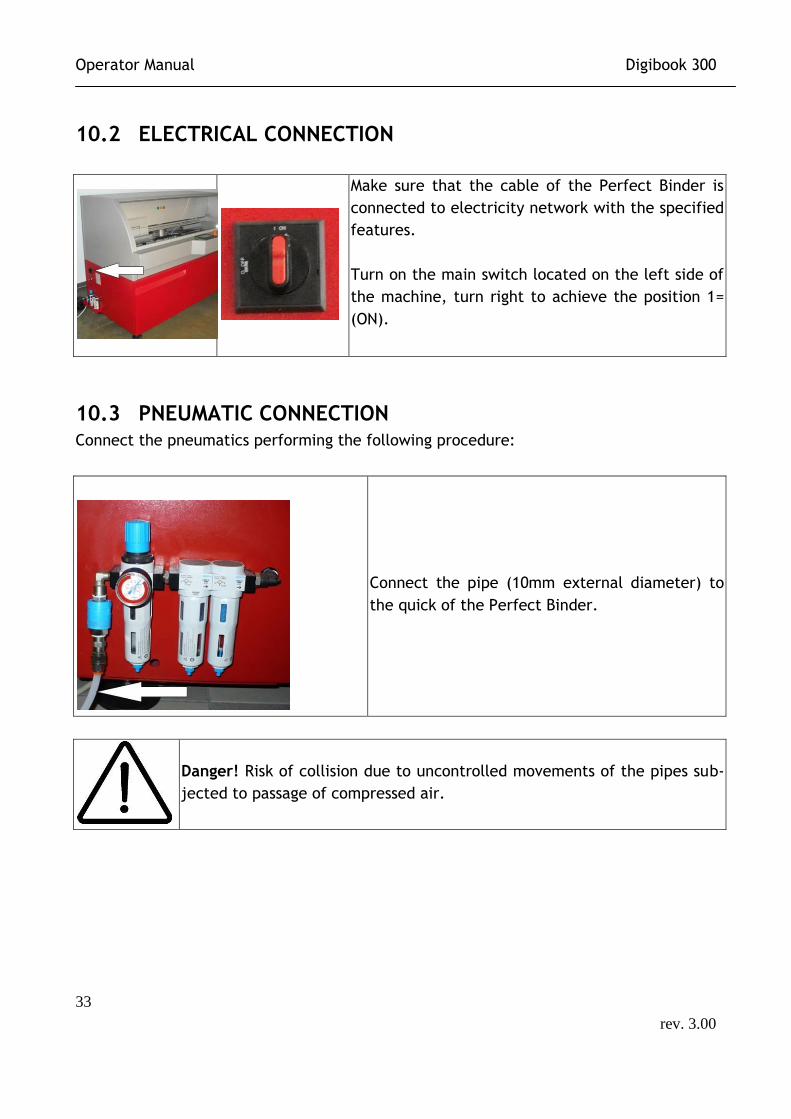
10.2 ELECTRICAL CONNECTION
Make sure that the cable of the Perfect Binder is
connected to electricity network with the specified
features.
Turn on the main switch located on the left side of
the machine, turn right to achieve the position 1=
(ON).
10.3 PNEUMATIC CONNECTION
Connect the pneumatics performing the following procedure:
Connect the pipe (10mm external diameter) to
the quick of the Perfect Binder.
Danger! Risk of collision due to uncontrolled movements of the pipes sub-
jected to passage of compressed air.

Operator Manual Digibook 300
34
rev. 3.00
10.4 DESCRIPTION OF THE GROUPS
Position OFF
Main switch
open.
The machine is
off.
Position ON
Main switch
closed.
The machine is
on.
1) CLAMP
2) MILLING STATION
A Glue pressure regulator
Allows to adjust the amount of glue
coming out of the extruder.
Approximate values
Pressure = 0 lack of glue (don’t use)
Pressure = 1.2 - 1.8 (books up to a
5mm)
Pressure = 1.8 - 2 bar (books 5 - 10mm)
Pressure= 2 - 3 bar (books 10 - 30mm)
Pressure = > 3 bar (books 30 - 50mm)
B Press pressure regulator
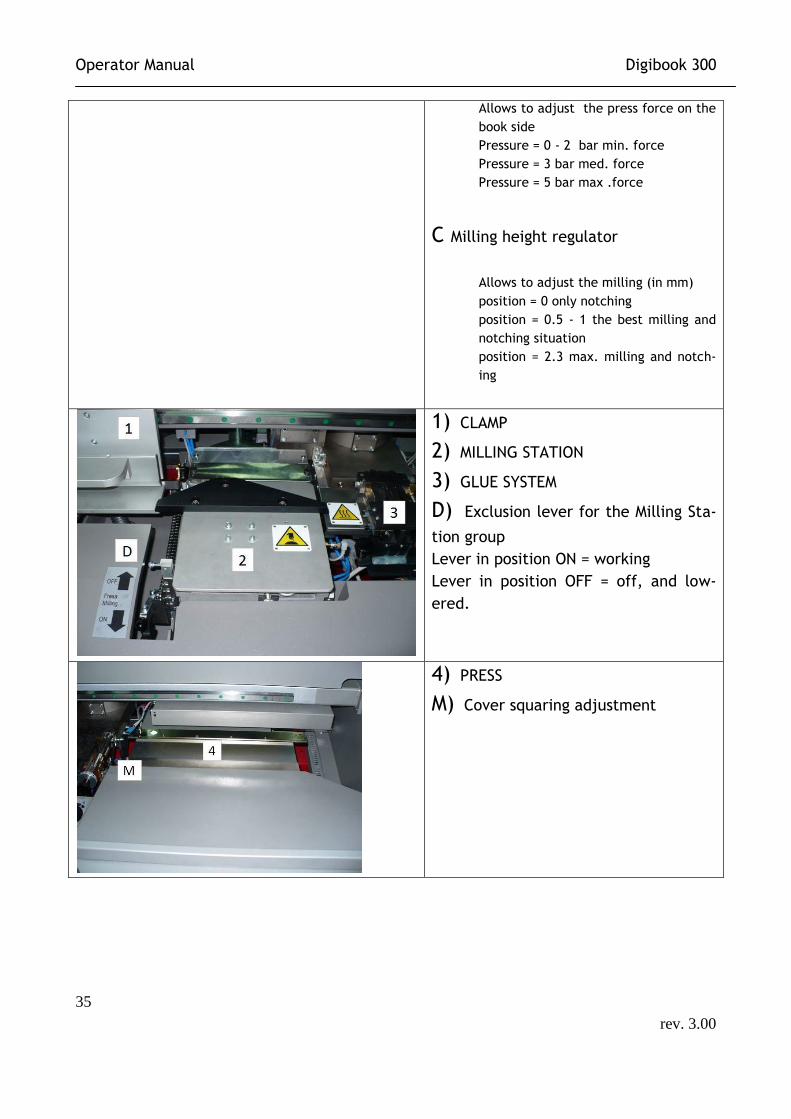
Operator Manual Digibook 300
35
rev. 3.00
Allows to adjust the press force on the
book side
Pressure = 0 - 2 bar min. force
Pressure = 3 bar med. force
Pressure = 5 bar max .force
C Milling height regulator
Allows to adjust the milling (in mm)
position = 0 only notching
position = 0.5 - 1 the best milling and
notching situation
position = 2.3 max. milling and notch-
ing
1) CLAMP
2) MILLING STATION
3) GLUE SYSTEM
D) Exclusion lever for the Milling Sta-
tion group
Lever in position ON = working
Lever in position OFF = off, and low-
ered.
4) PRESS
M) Cover squaring adjustment
Operator Manual Digibook 300
36
rev. 3.00
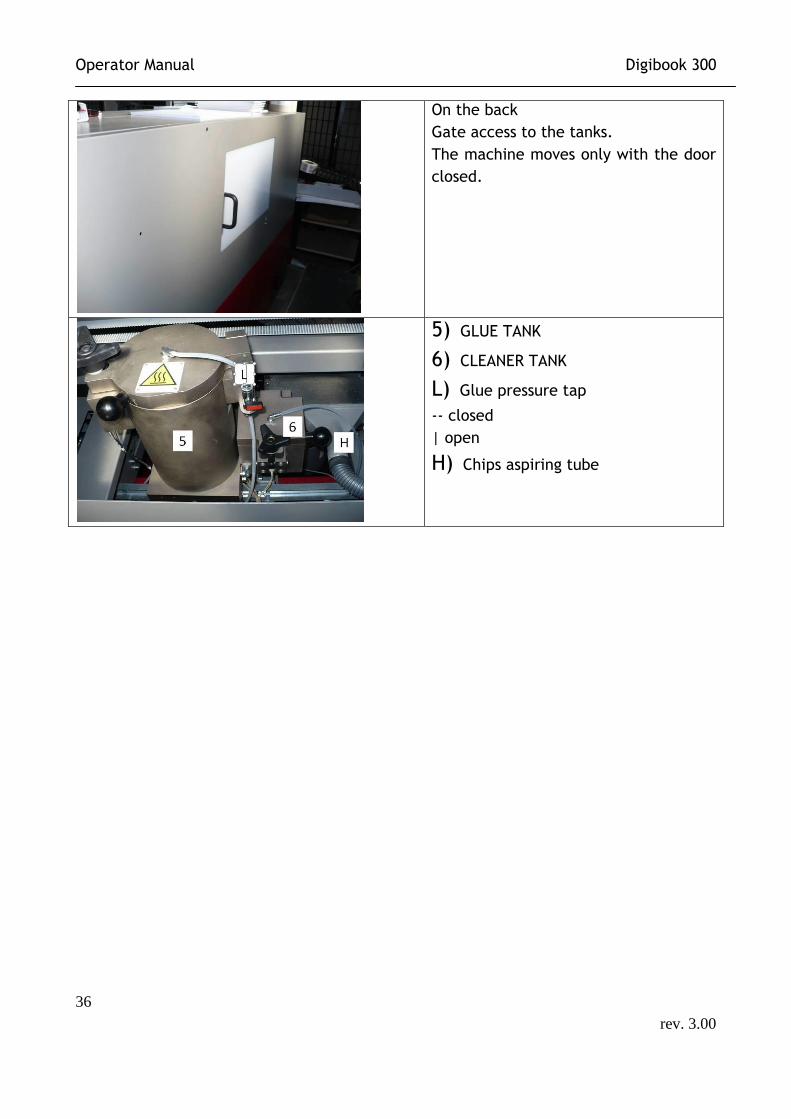
On the back
Gate access to the tanks.
The machine moves only with the door
closed.
5) GLUE TANK
6) CLEANER TANK
L) Glue pressure tap
-- closed
| open
H) Chips aspiring tube
Operator Manual Digibook 300
37
rev. 3.00
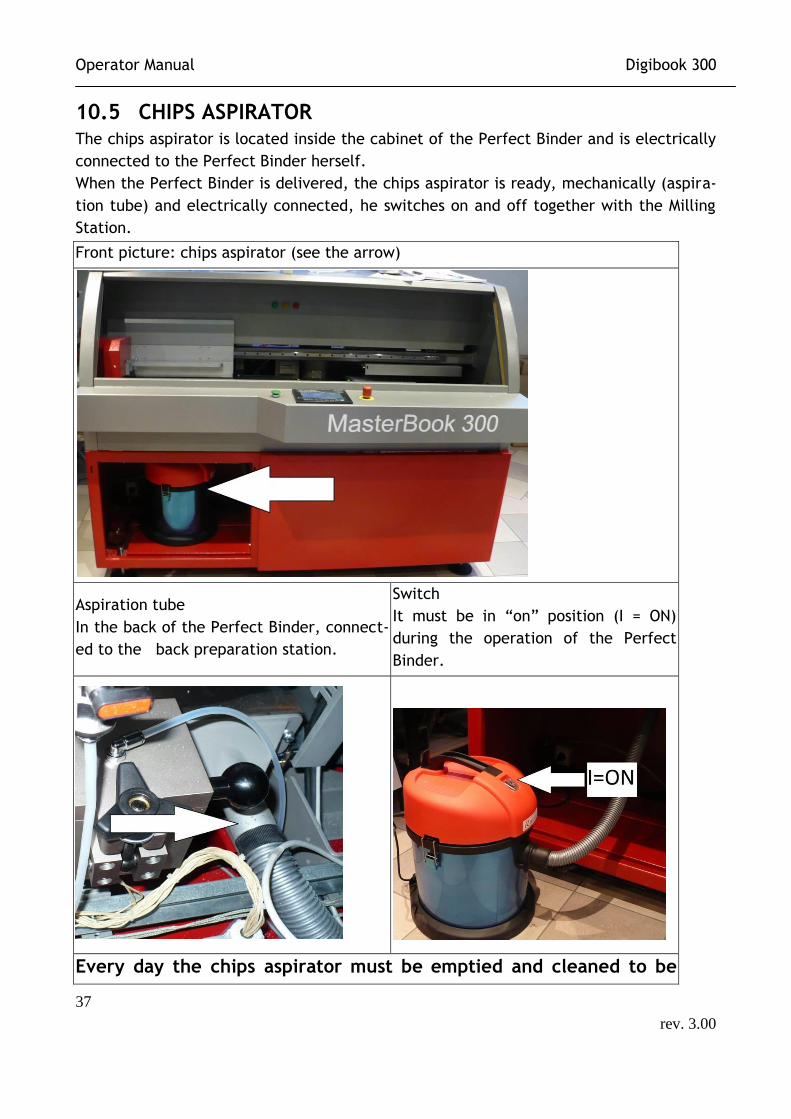
10.5 CHIPS ASPIRATOR
The chips aspirator is located inside the cabinet of the Perfect Binder and is electrically
connected to the Perfect Binder herself.
When the Perfect Binder is delivered, the chips aspirator is ready, mechanically (aspira-
tion tube) and electrically connected, he switches on and off together with the Milling
Station.
Front picture: chips aspirator (see the arrow)
Aspiration tube
In the back of the Perfect Binder, connect-
ed to the back preparation station.
Switch
It must be in “on” position (I = ON)
during the operation of the Perfect
Binder.
Every day the chips aspirator must be emptied and cleaned to be

Operator Manual Digibook 300
38
rev. 3.00
ever efficient.
Operator Manual Digibook 300
39
rev. 3.00
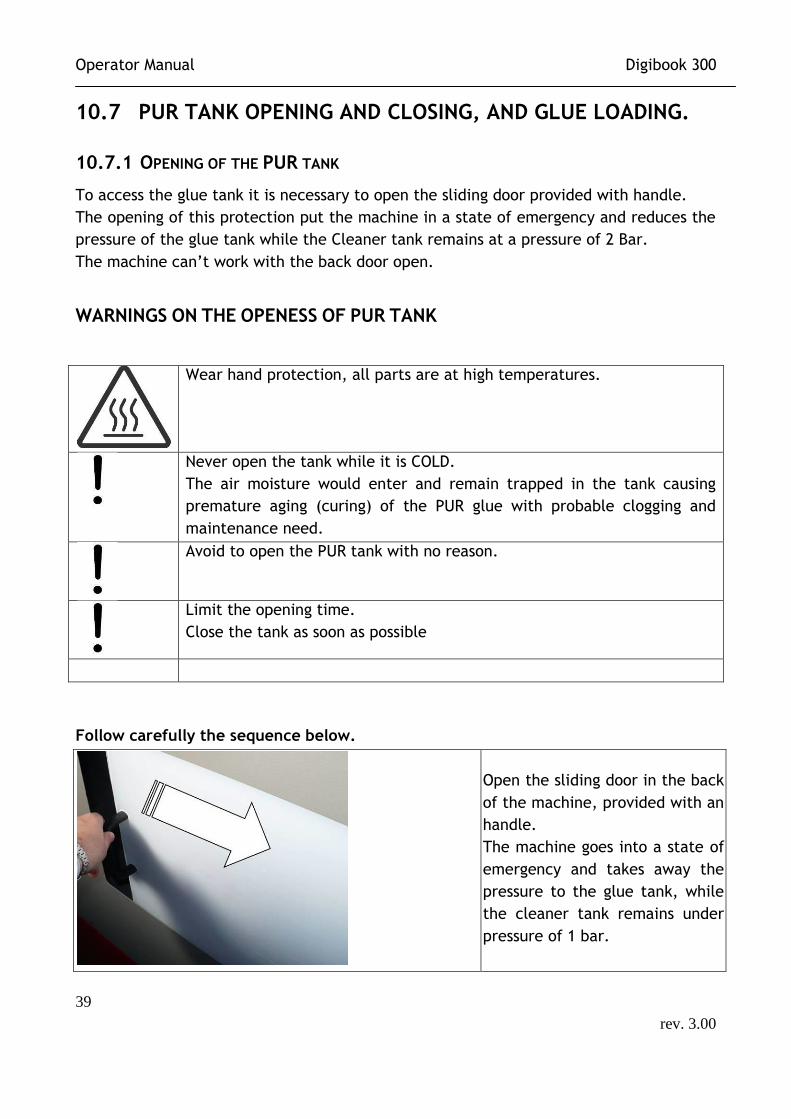
10.7 PUR TANK OPENING AND CLOSING, AND GLUE LOADING.
10.7.1 OPENING OF THE PUR TANK
To access the glue tank it is necessary to open the sliding door provided with handle.
The opening of this protection put the machine in a state of emergency and reduces the
pressure of the glue tank while the Cleaner tank remains at a pressure of 2 Bar.
The machine can’t work with the back door open.
WARNINGS ON THE OPENESS OF PUR TANK
Wear hand protection, all parts are at high temperatures.
Never open the tank while it is COLD.
The air moisture would enter and remain trapped in the tank causing
premature aging (curing) of the PUR glue with probable clogging and
maintenance need.
Avoid to open the PUR tank with no reason.
Limit the opening time.
Close the tank as soon as possible
Follow carefully the sequence below.
Open the sliding door in the back
of the machine, provided with an
handle.
The machine goes into a state of
emergency and takes away the
pressure to the glue tank, while
the cleaner tank remains under
pressure of 1 bar.
Operator Manual Digibook 300
40
rev. 3.00
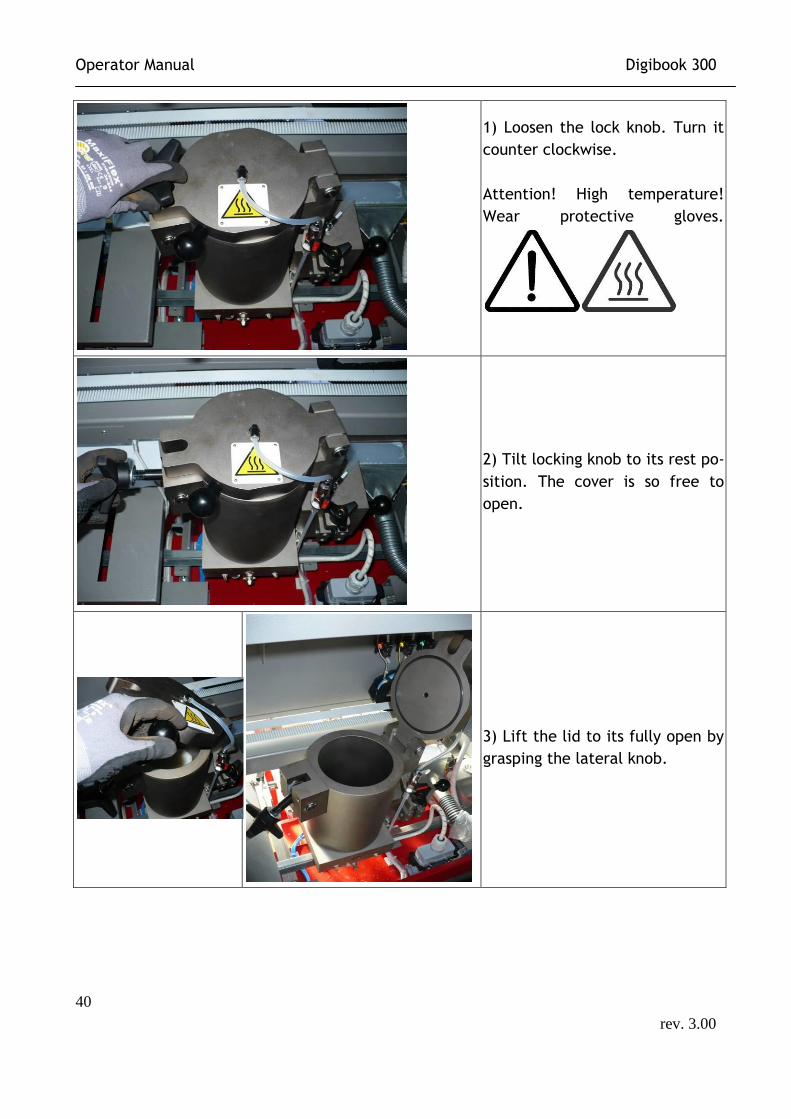
1) Loosen the lock knob. Turn it
counter clockwise.
Attention! High temperature!
Wear protective gloves.
2) Tilt locking knob to its rest po-
sition. The cover is so free to
open.
3) Lift the lid to its fully open by
grasping the lateral knob.
Operator Manual Digibook 300
41
rev. 3.00
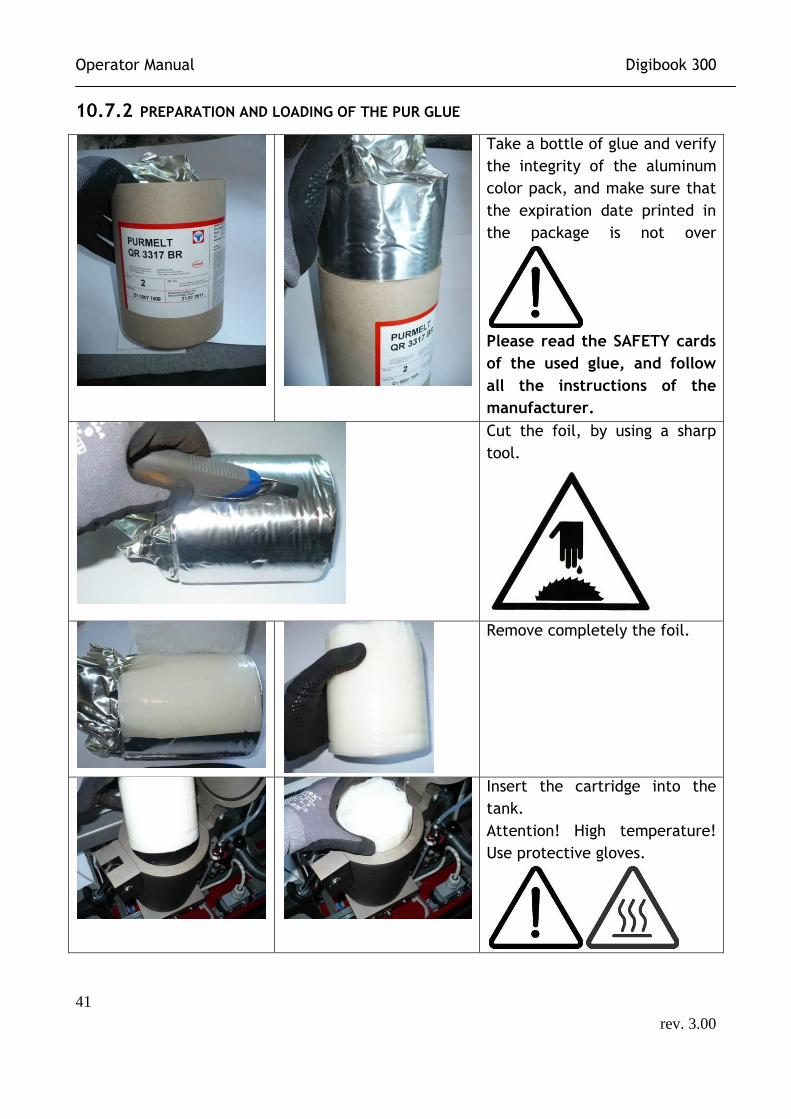
10.7.2 PREPARATION AND LOADING OF THE PUR GLUE
Take a bottle of glue and verify
the integrity of the aluminum
color pack, and make sure that
the expiration date printed in
the package is not over
Please read the SAFETY cards
of the used glue, and follow
all the instructions of the
manufacturer.
Cut the foil, by using a sharp
tool.
Remove completely the foil.
Insert the cartridge into the
tank.
Attention! High temperature!
Use protective gloves.
Operator Manual Digibook 300
42
rev. 3.00
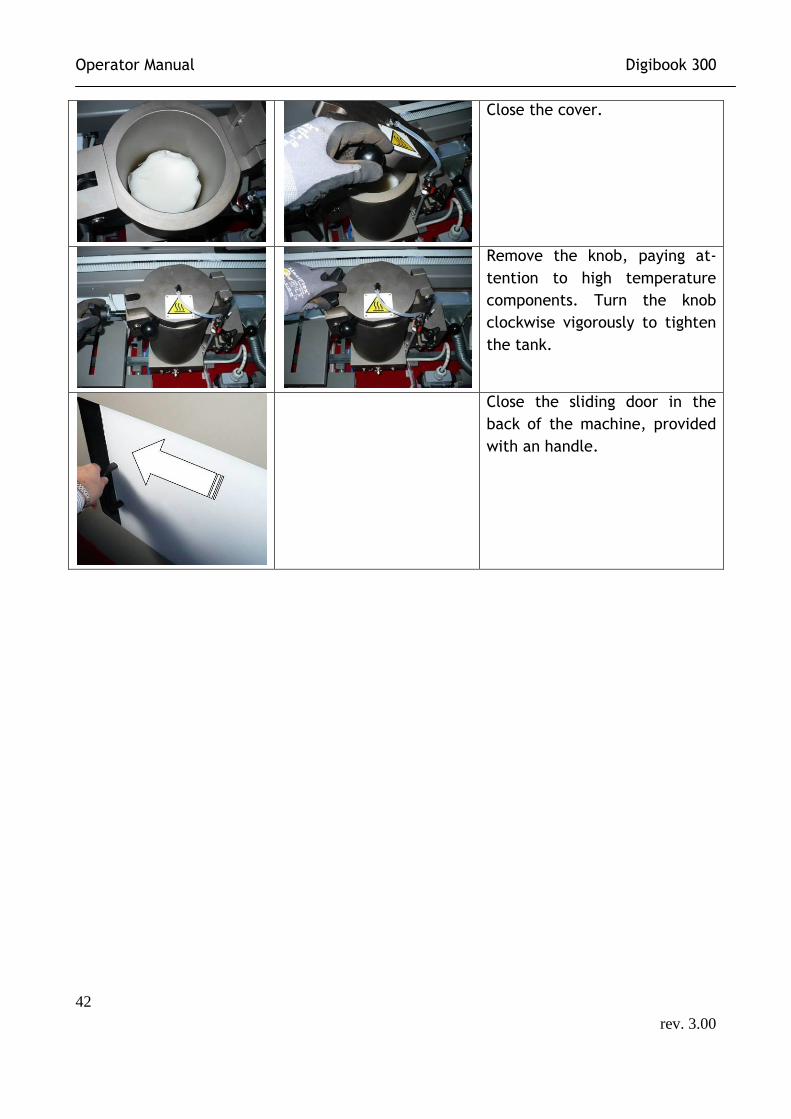
Close the cover.
Remove the knob, paying at-
tention to high temperature
components. Turn the knob
clockwise vigorously to tighten
the tank.
Close the sliding door in the
back of the machine, provided
with an handle.
Operator Manual Digibook 300
43
rev. 3.00
10.7.3 CLEANER LOADING
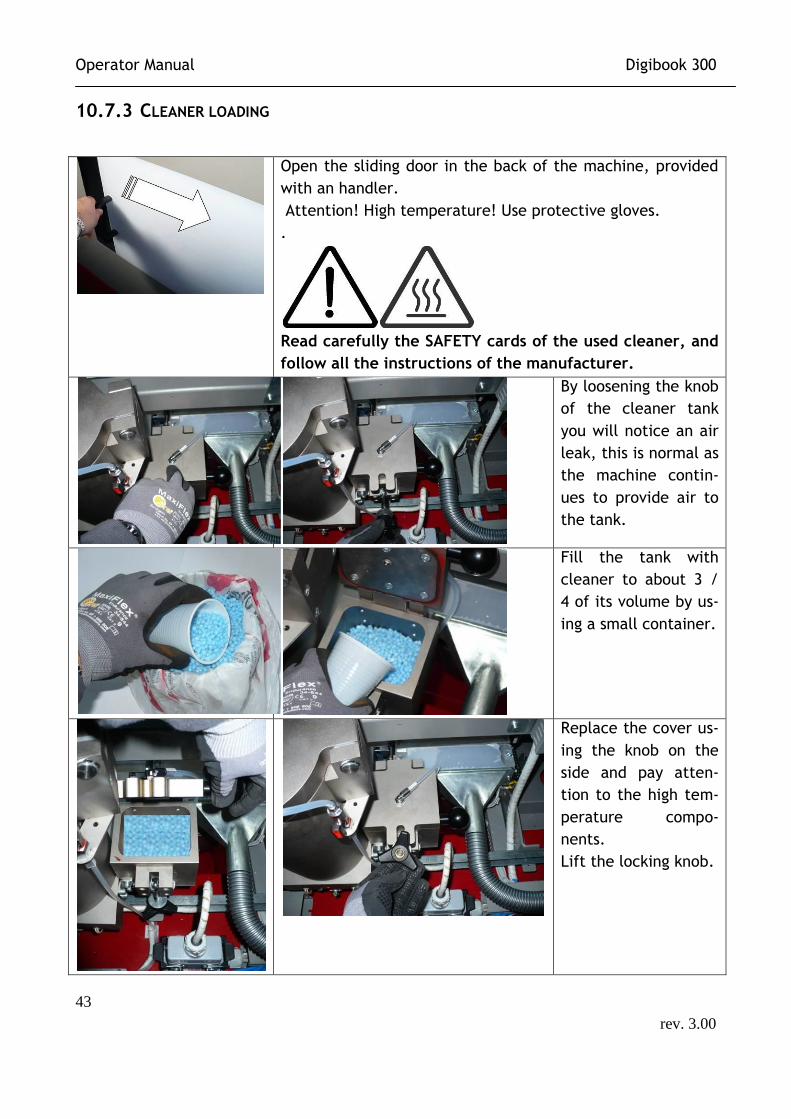
Open the sliding door in the back of the machine, provided
with an handler.
Attention! High temperature! Use protective gloves.
.
Read carefully the SAFETY cards of the used cleaner, and
follow all the instructions of the manufacturer.
By loosening the knob
of the cleaner tank
you will notice an air
leak, this is normal as
the machine contin-
ues to provide air to
the tank.
Fill the tank with
cleaner to about 3 /
4 of its volume by us-
ing a small container.
Replace the cover us-
ing the knob on the
side and pay atten-
tion to the high tem-
perature compo-
nents.
Lift the locking knob.
Operator Manual Digibook 300
44
rev. 3.00
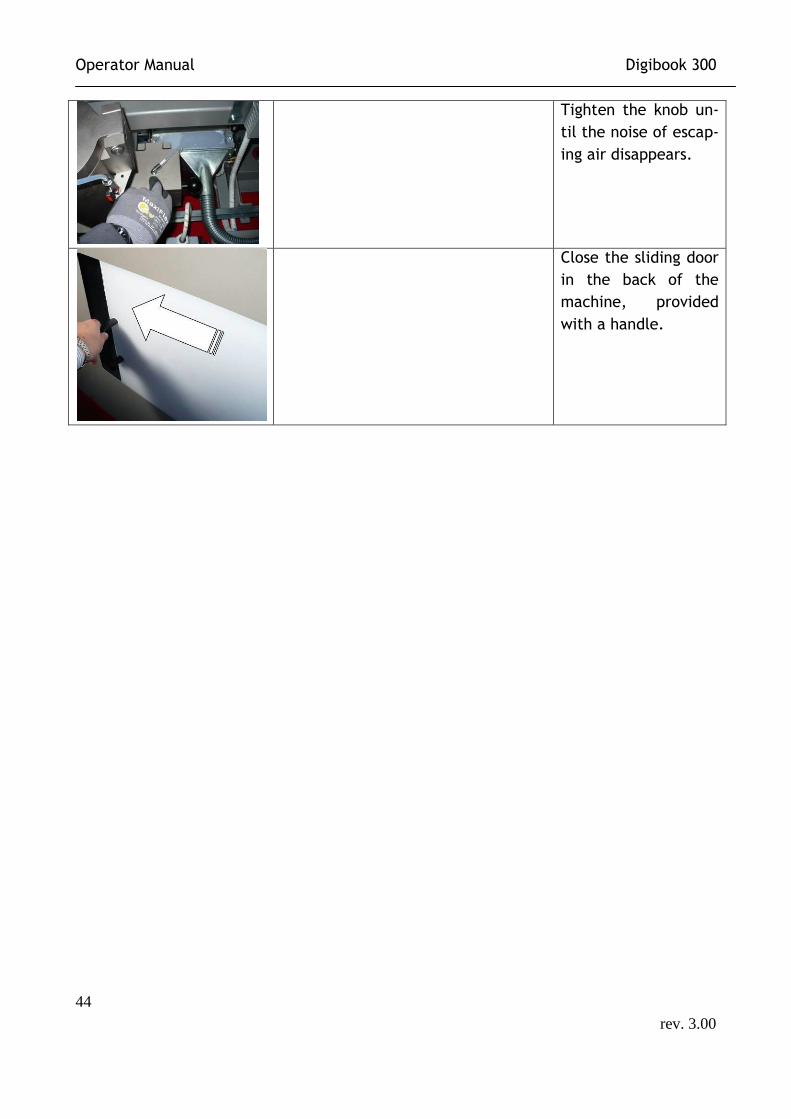
Tighten the knob un-
til the noise of escap-
ing air disappears.
Close the sliding door
in the back of the
machine, provided
with a handle.
Operator Manual Digibook 300
45
rev. 3.00
11 FUNCTIONS OF THE PERFECT BINDER
11.1 START UP PAGE
Areas division
Area 1
-Selector for the book type
-Front glue stop
-Rear glue stop
-Cover set
-Book thickness
Optional:
Thickness detection for the book.
Position a book onto the measurement ta-
ble and press the key, the machine will
modify the clamp dimension and also the
dimensions of the glue station.
Operator Manual Digibook 300
46
rev. 3.00
Area 2
Meters display
Selector for permanence time of the book
in the clamp.
Management page for working JOB. Go to
page 63
Speed selector
1-2-3
Alarms
It will blinking red in case there are alarms
or warnings.
Area 3
Clamp set up
Glue station set up
See page 54
Nipping station set up
Operator Manual Digibook 300
47
rev. 3.00
Cleaning procedure with CLEANER or GLUE loading
Advanced set up
Area 4
Groups status bar
If red, turned off
If yellow, value modified in the advanced
set up
Status bar.
1 book in the clamp
2 milling station
3 glue station
4 cover
Operator Manual Digibook 300
48
rev. 3.00
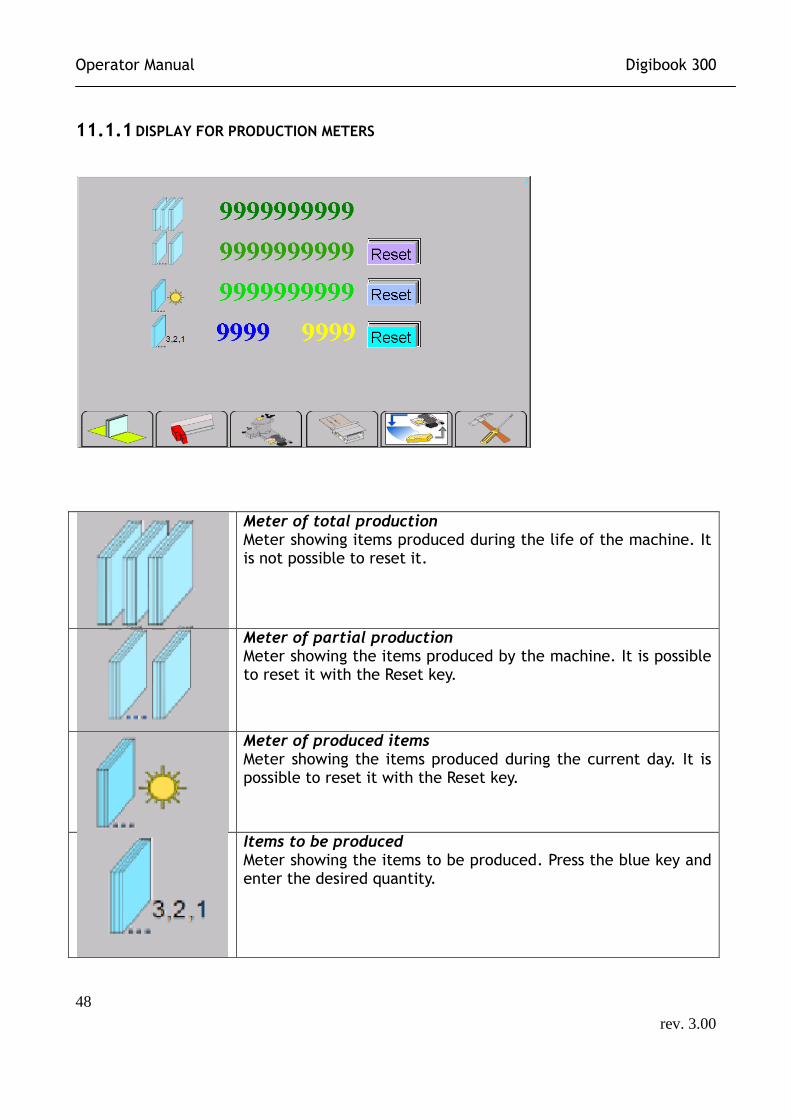
11.1.1 DISPLAY FOR PRODUCTION METERS
Meter of total production Meter showing items produced during the life of the machine. It is not possible to reset it.
Meter of partial production Meter showing the items produced by the machine. It is possible to reset it with the Reset key.
Meter of produced items Meter showing the items produced during the current day. It is possible to reset it with the Reset key.
Items to be produced Meter showing the items to be produced. Press the blue key and enter the desired quantity.
Operator Manual Digibook 300
49
rev. 3.00
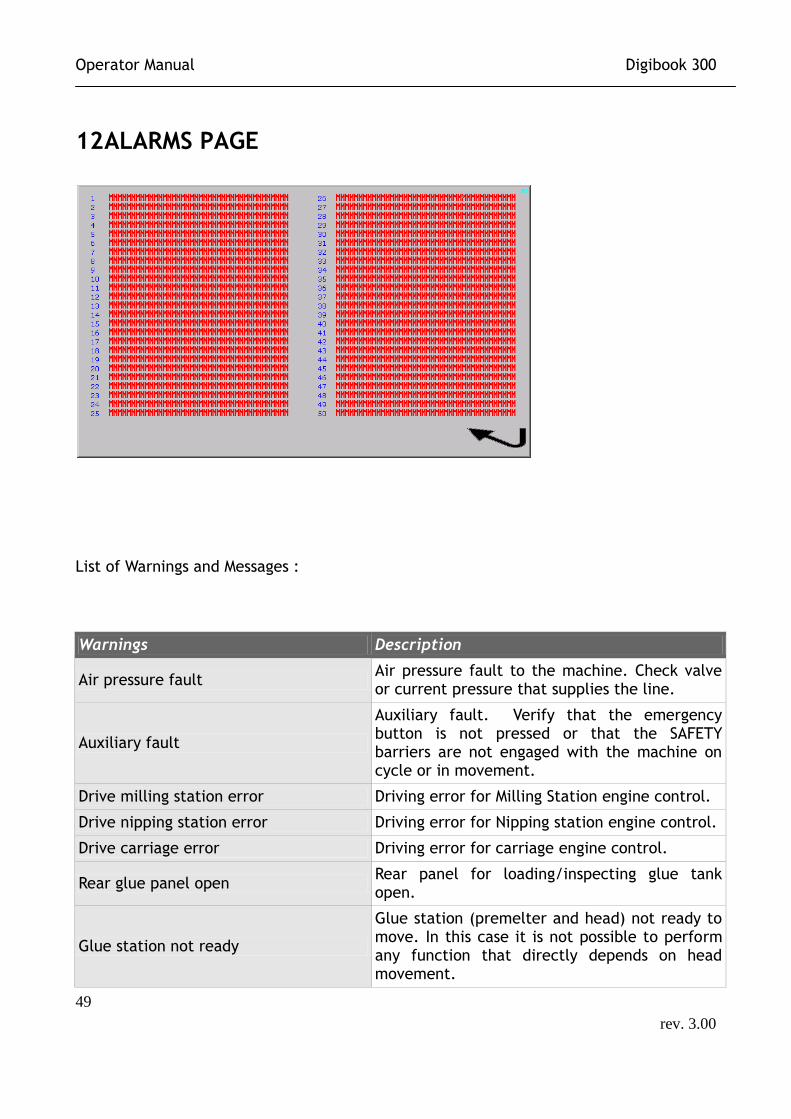
12 ALARMS PAGE
List of Warnings and Messages :
Warnings Description
Air pressure fault Air pressure fault to the machine. Check valve or current pressure that supplies the line.
Auxiliary fault
Auxiliary fault. Verify that the emergency button is not pressed or that the SAFETY barriers are not engaged with the machine on cycle or in movement.
Drive milling station error Driving error for Milling Station engine control.
Drive nipping station error Driving error for Nipping station engine control.
Drive carriage error Driving error for carriage engine control.
Rear glue panel open Rear panel for loading/inspecting glue tank open.
Glue station not ready
Glue station (premelter and head) not ready to move. In this case it is not possible to perform any function that directly depends on head movement.

Operator Manual Digibook 300
50
rev. 3.00
Book in the nipping station
It requires to start a cycle with a book in the nipping station. If there is no book, verify if the cover is perfectly aligned to the nipping station and does not accidentally shroud the sensor for book presence.
Cover not present It requires to start a cycle, but there is no cover on the nipping station.
Verify book in the clamp It requires to start a cycle but there is no book pack the clamp.
Inability to perform PRESET. Head temperature not reached
It is not possible to position the machine because the glue station is not ready. Wait for heating.
Glue head not in position The glue head is in a lower position compared to that one set to allow the passage of the book.
Set to ZERO!! It requires a set to ZERO
Head in standby The head is locked in a manual standby.
Active cleaning cycle for the head Active cleaning cycle for the head
Set up for the axis Request for positioning the machine in order to start the cycle
Milling station off, set the jogger to ZERO
The lever for excluding the milling disk was lowered, it is necessary to lower the grip trimmer to the ZERO position.
Milling station not in position The lever for excluding the milling disk is not in an acceptable position UP or DOWN.
Cleaner into head, load glue At shutdown of the machine the head cleaning has been made with the automatic cycle of the cleaner. Eject the cleaner and load the glue.
Operator Manual Digibook 300
51
rev. 3.00
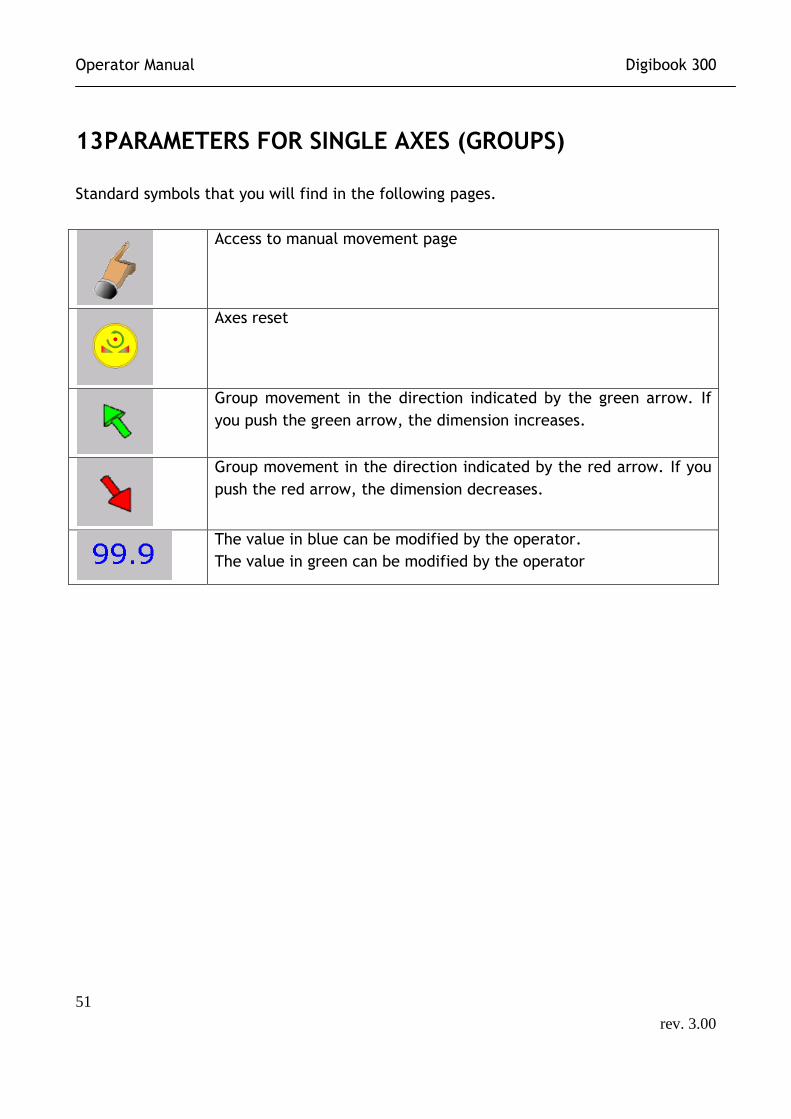
13 PARAMETERS FOR SINGLE AXES (GROUPS)
Standard symbols that you will find in the following pages.
Access to manual movement page
Axes reset
Group movement in the direction indicated by the green arrow. If
you push the green arrow, the dimension increases.
Group movement in the direction indicated by the red arrow. If you
push the red arrow, the dimension decreases.
The value in blue can be modified by the operator.
The value in green can be modified by the operator
Operator Manual Digibook 300
52
rev. 3.00
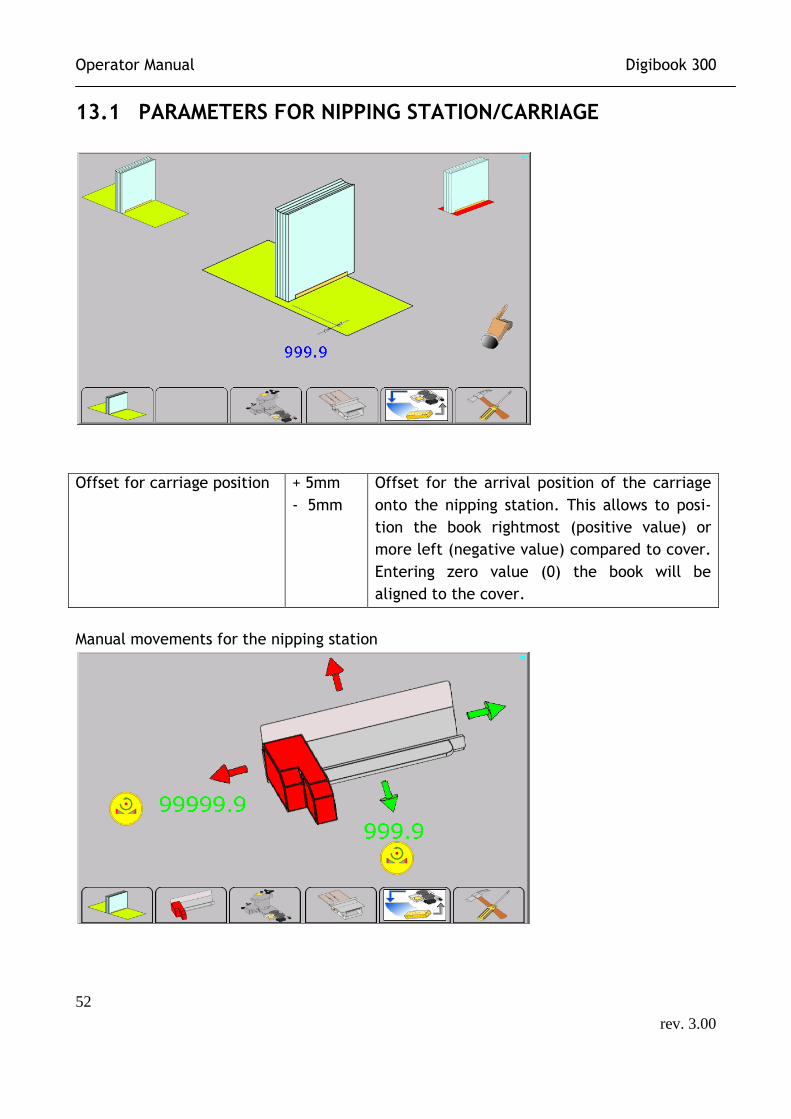
13.1 PARAMETERS FOR NIPPING STATION/CARRIAGE
Offset for carriage position + 5mm
- 5mm
Offset for the arrival position of the carriage
onto the nipping station. This allows to posi-
tion the book rightmost (positive value) or
more left (negative value) compared to cover.
Entering zero value (0) the book will be
aligned to the cover.
Manual movements for the nipping station
Operator Manual Digibook 300
53
rev. 3.00
13.2 PARAMETERS FOR THE HEAD OF THE GLUE STATION
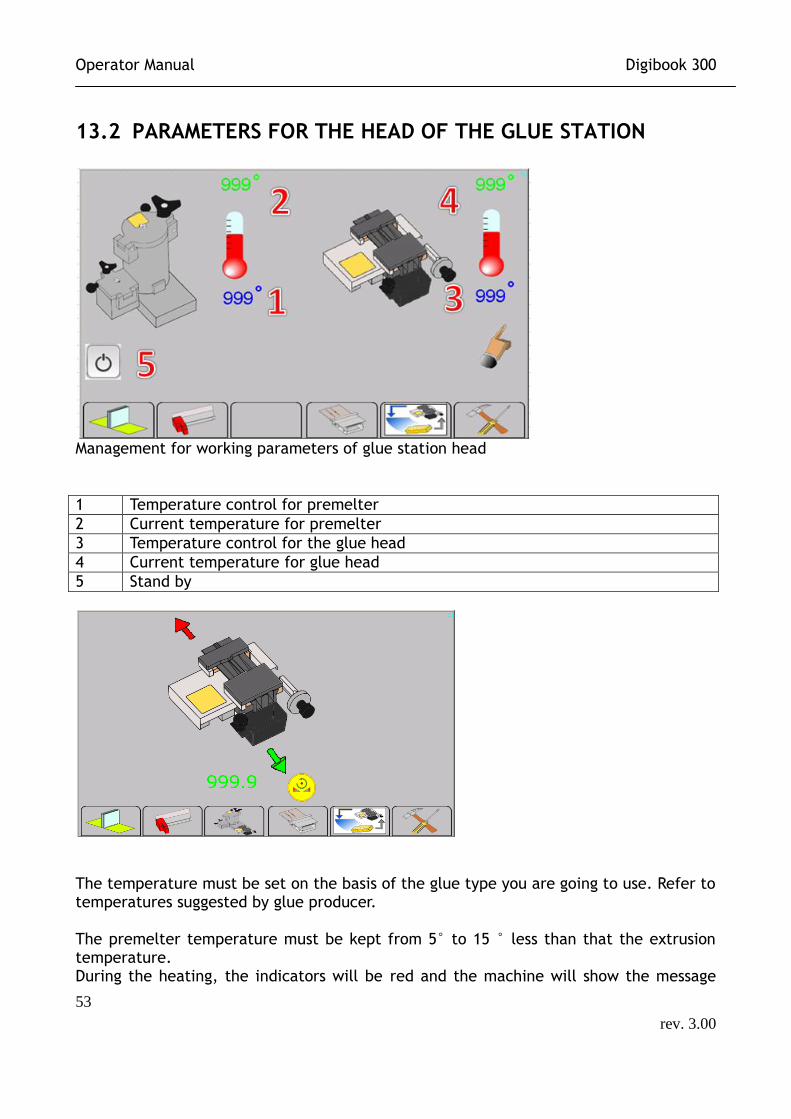
Management for working parameters of glue station head
1 Temperature control for premelter
2 Current temperature for premelter
3 Temperature control for the glue head
4 Current temperature for glue head
5 Stand by
The temperature must be set on the basis of the glue type you are going to use. Refer to temperatures suggested by glue producer. The premelter temperature must be kept from 5° to 15 ° less than that the extrusion temperature. During the heating, the indicators will be red and the machine will show the message
Operator Manual Digibook 300
54
rev. 3.00
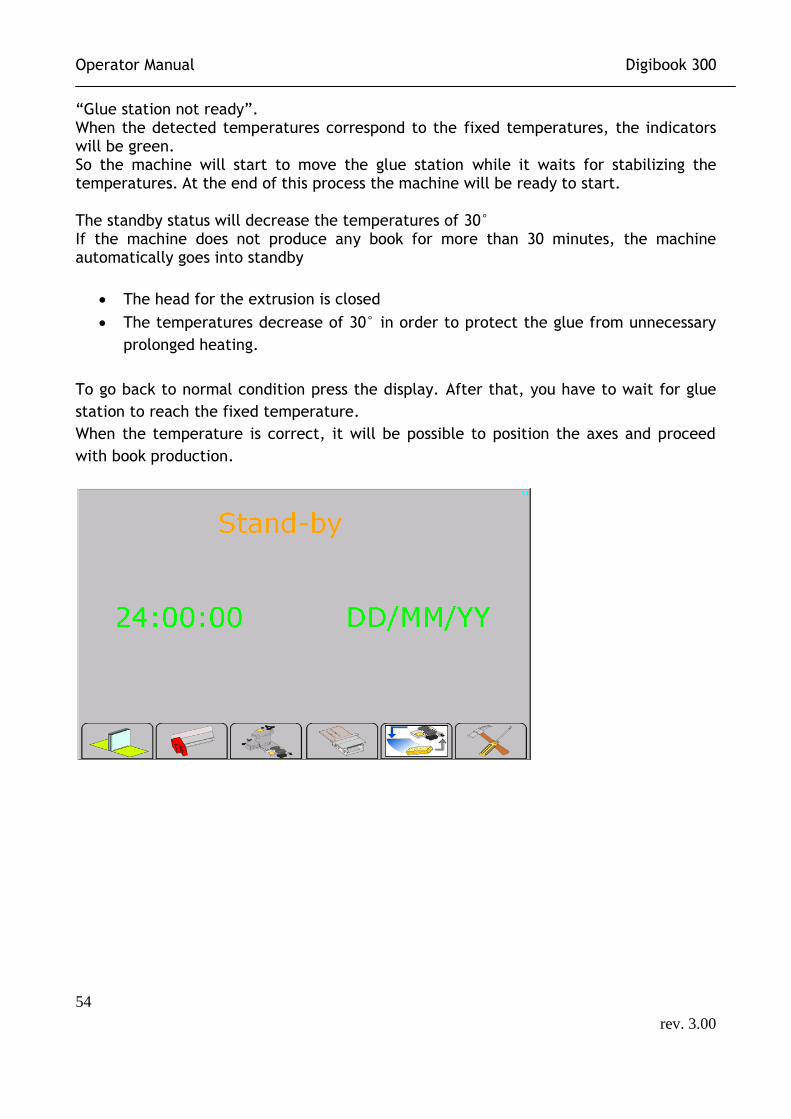
“Glue station not ready”. When the detected temperatures correspond to the fixed temperatures, the indicators will be green. So the machine will start to move the glue station while it waits for stabilizing the temperatures. At the end of this process the machine will be ready to start. The standby status will decrease the temperatures of 30° If the machine does not produce any book for more than 30 minutes, the machine automatically goes into standby
The head for the extrusion is closed
The temperatures decrease of 30° in order to protect the glue from unnecessary
prolonged heating.
To go back to normal condition press the display. After that, you have to wait for glue
station to reach the fixed temperature.
When the temperature is correct, it will be possible to position the axes and proceed
with book production.
Operator Manual Digibook 300
55
rev. 3.00
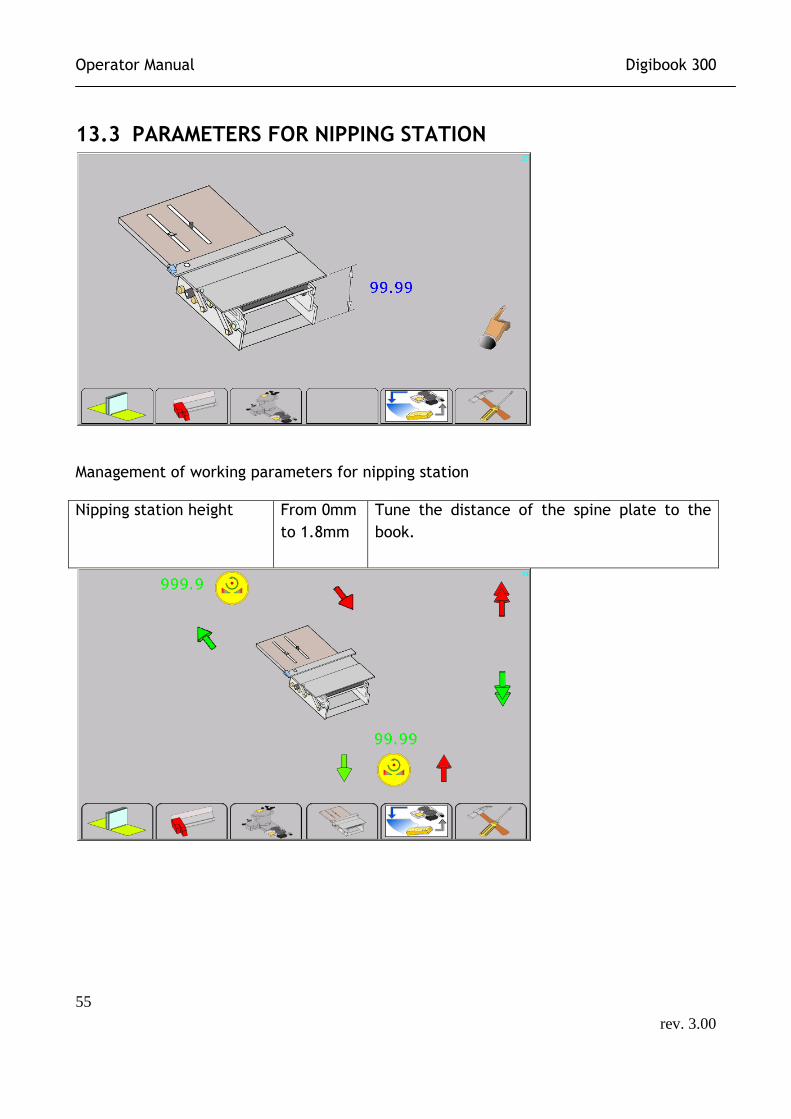
13.3 PARAMETERS FOR NIPPING STATION
Management of working parameters for nipping station
Nipping station height From 0mm
to 1.8mm
Tune the distance of the spine plate to the
book.

Operator Manual Digibook 300
56
rev. 3.00
13.4 CLEANER AND GLUE LOADING
See chapter 19 and 21.
Operator Manual Digibook 300
57
rev. 3.00
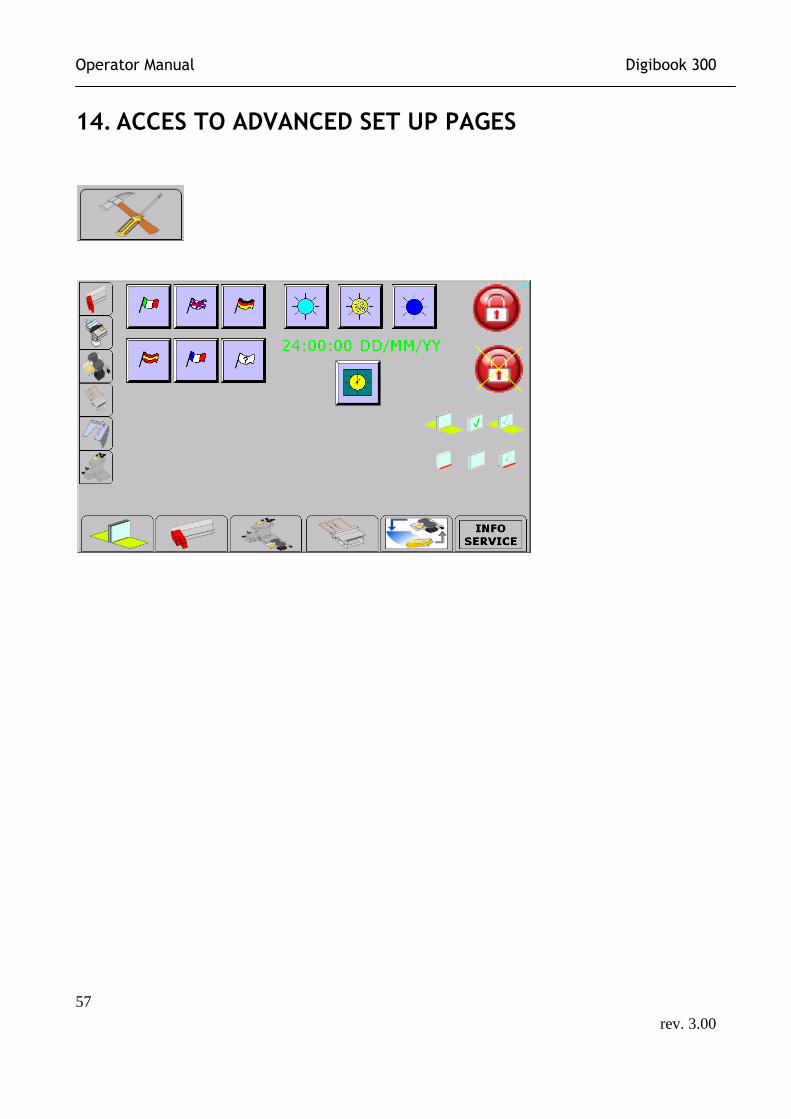
14 . ACCES TO ADVANCED SET UP PAGES
Operator Manual Digibook 300
58
rev. 3.00
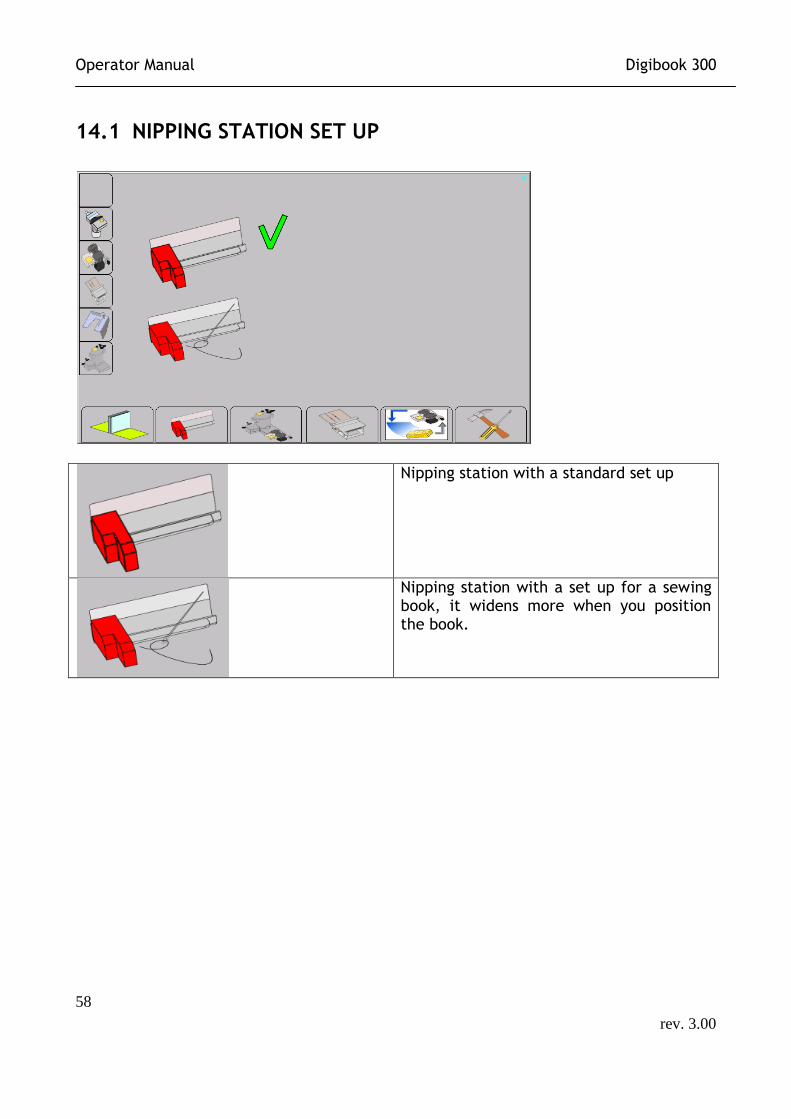
14.1 NIPPING STATION SET UP
Nipping station with a standard set up
Nipping station with a set up for a sewing book, it widens more when you position the book.
Operator Manual Digibook 300
59
rev. 3.00
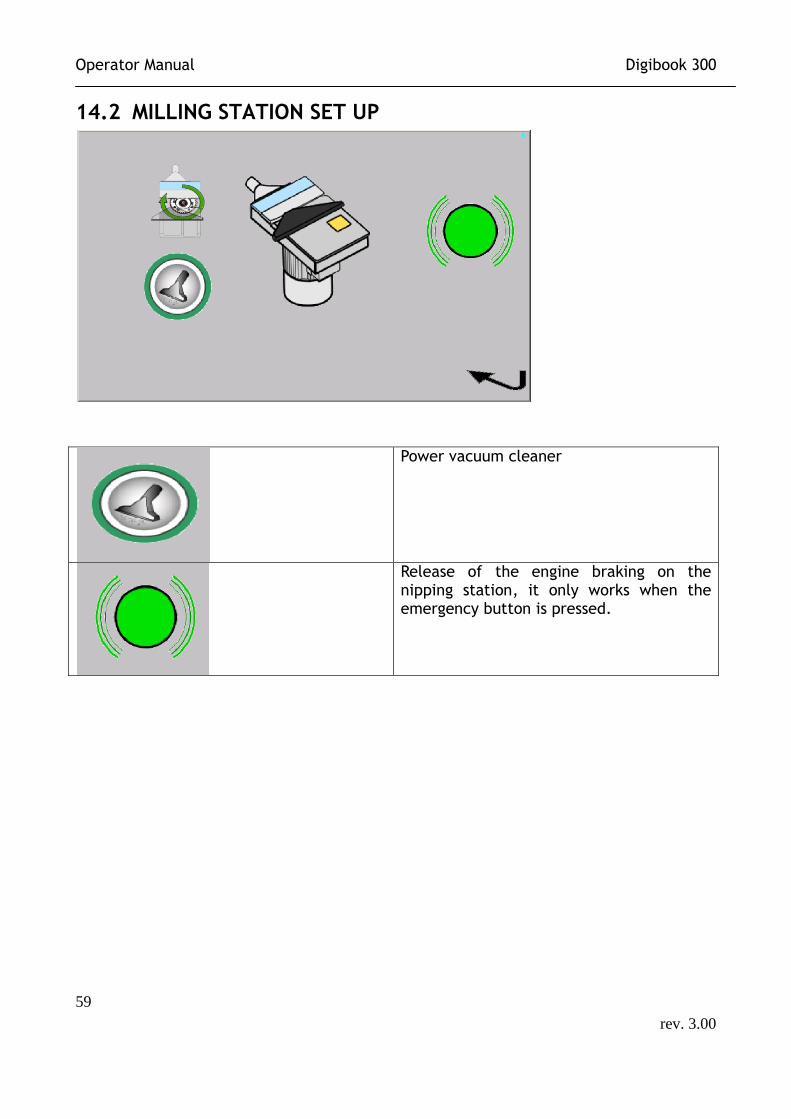
14.2 MILLING STATION SET UP
Power vacuum cleaner
Release of the engine braking on the nipping station, it only works when the emergency button is pressed.
Operator Manual Digibook 300
60
rev. 3.00
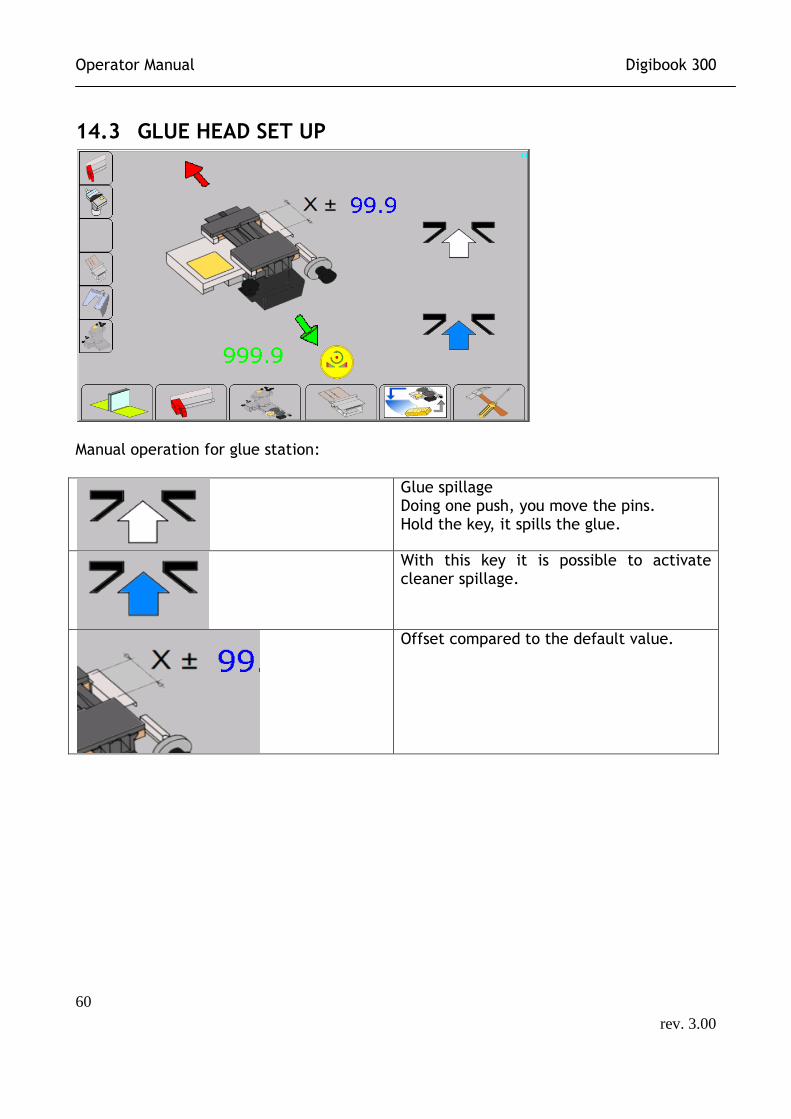
14.3 GLUE HEAD SET UP
Manual operation for glue station:
Glue spillage Doing one push, you move the pins. Hold the key, it spills the glue.
With this key it is possible to activate cleaner spillage.
Offset compared to the default value.
Operator Manual Digibook 300
61
rev. 3.00
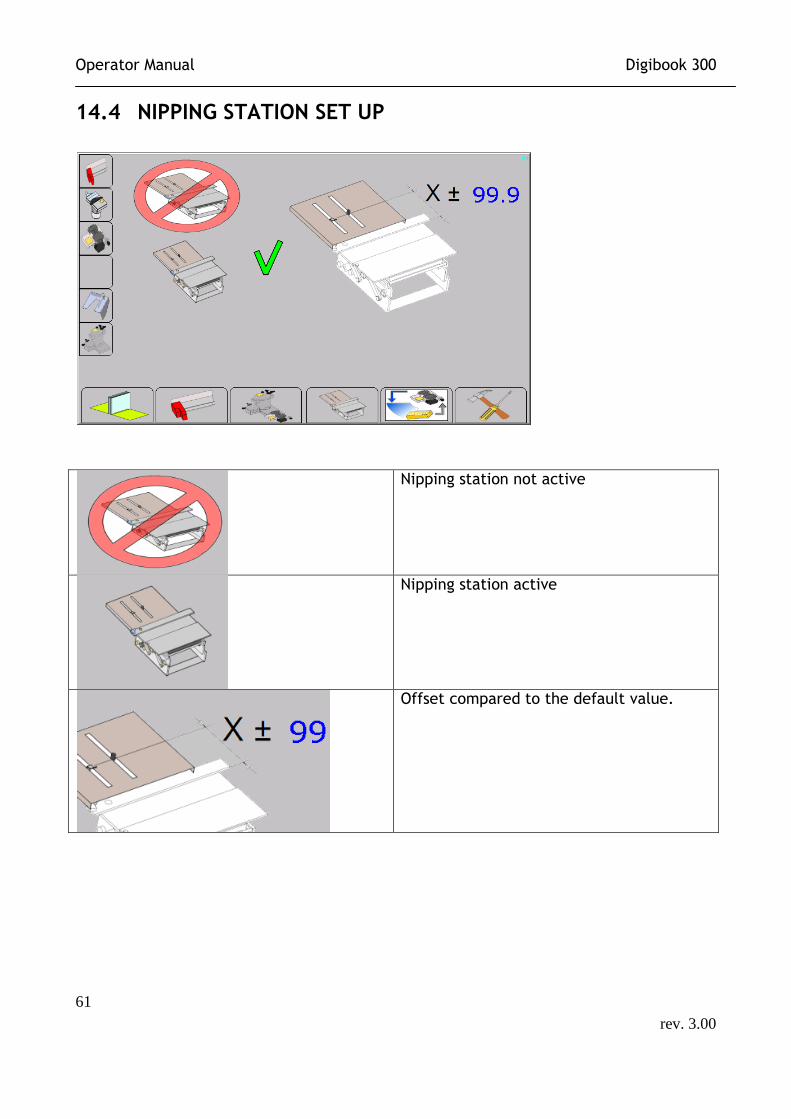
14.4 NIPPING STATION SET UP
Nipping station not active
Nipping station active
Offset compared to the default value.
Operator Manual Digibook 300
62
rev. 3.00
15 MANAGEMENT PAGE FOR WORKING JOB
15.1 MANAGEMENT OF THE JOBS
It is possible to save until 100 working JOBS.
Using the green and red arrows pick a free page and hold the key “SALVA DATI” to save
the set up you have used to manufacture the current product. In addition to that it is
possible to complete the JOB adding all the information you need inside the green
boxes. After you have completed the green boxes, save the JOB.
Operator Manual Digibook 300
63
rev. 3.00
Using the arrows UP and DOWN pick the page with the desired JOB and hold the key
“CARICA DATI”. The machine will update all the positions of the automatic axes. It is
necessary to manually operate for manual settings.
Operator Manual Digibook 300
64
rev. 3.00
16 GLUE RECOVERY PROCEDURE
The glue recovery procedure must be performed every time the machine has been
switched off by using the procedure “End of job”.
If the machine has been switched off by using the procedure “End of job”, it will be im-
possible to start again to work without the glue recovery procedure; an error message
will be displayed: cleaner error in the glue group.
Primary condition:
machine in temperature
tank valve open, vertically.
Press and hold the BUTTON
for a few seconds to start
the glue recovery process
The head of the glue group opens.
Operator Manual Digibook 300
65
rev. 3.00
Remove the headless screws using the L
wrench and take the manometer of the glue
at pressure 1 bar
Press the button OK
Press the button “ANCORA COLLA” until
the traces of Blue cleaner disappear.
Help the glue to exit from the bin by us-
ing the green spatula.
Clean carefully all the excess spillage us-
ing the spatula and paper towels
Replace the headless screws using the L-
wrench provided (beware of tempera-
ture), press OK.
Attention! Headless screws max. protrude
1 mm
Operator Manual Digibook 300
66
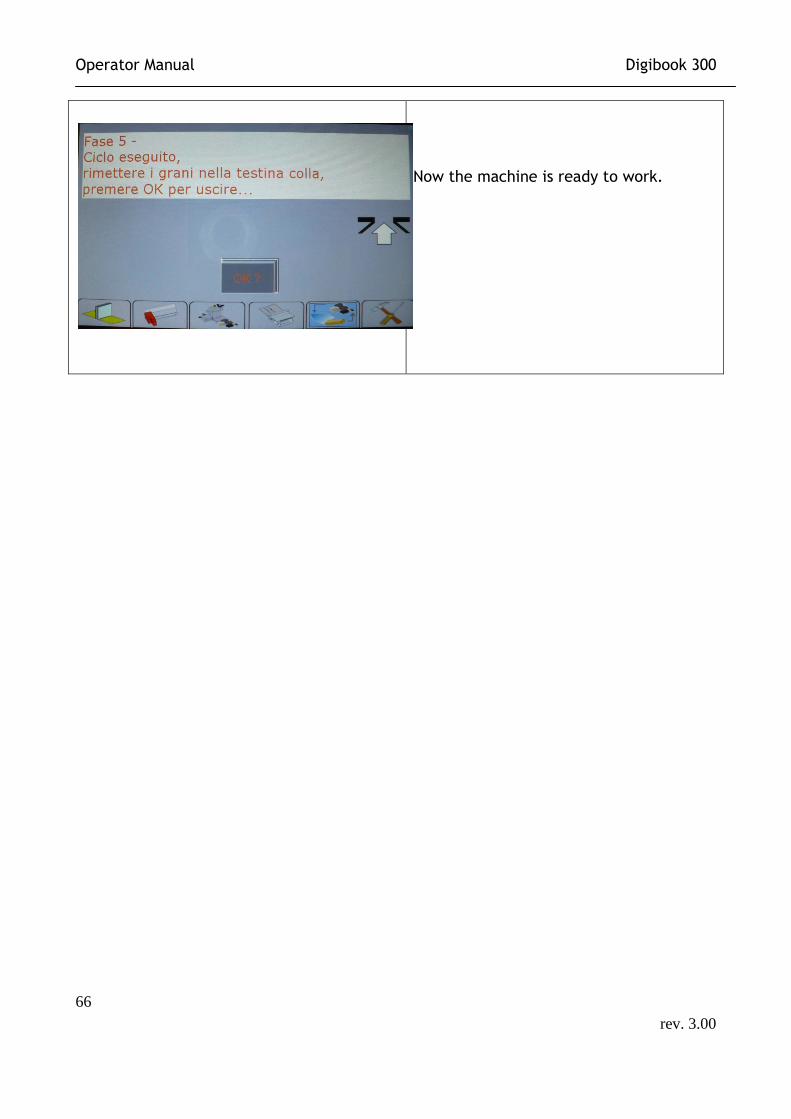
rev. 3.00
Now the machine is ready to work.
Operator Manual Digibook 300
67
rev. 3.00
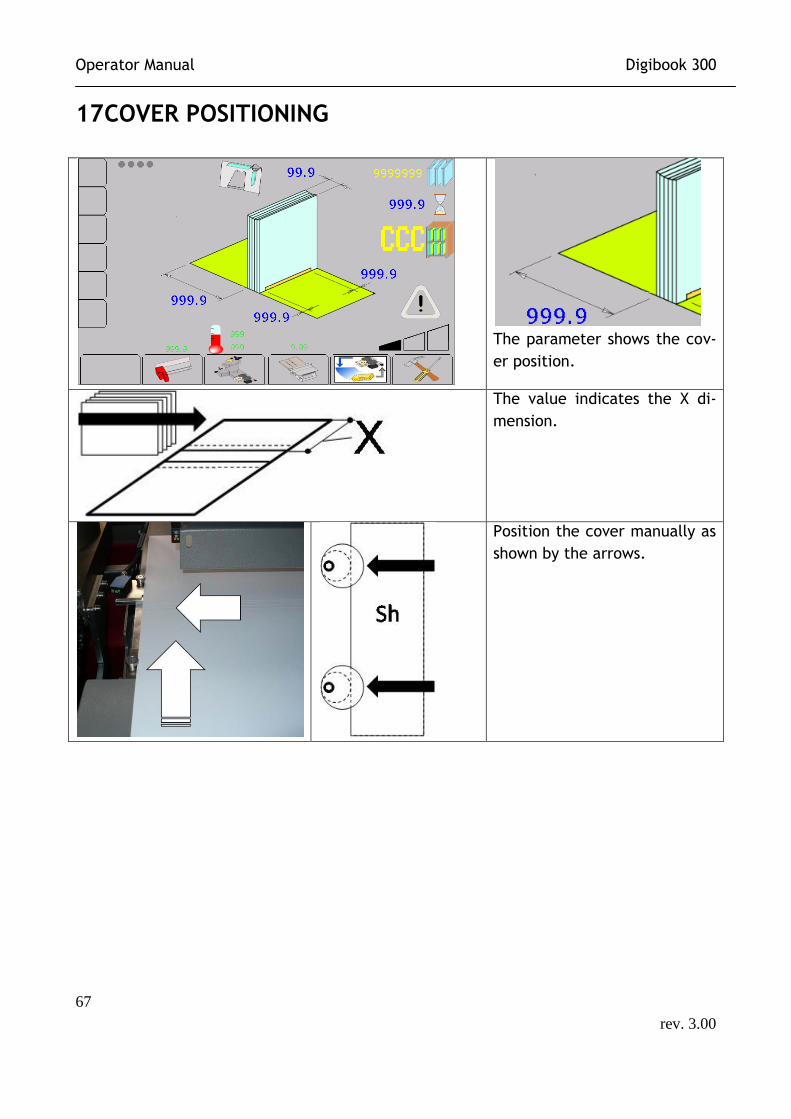
17 COVER POSITIONING
The parameter shows the cov-
er position.
The value indicates the X di-
mension.
Position the cover manually as
shown by the arrows.
Operator Manual Digibook 300
68
rev. 3.00
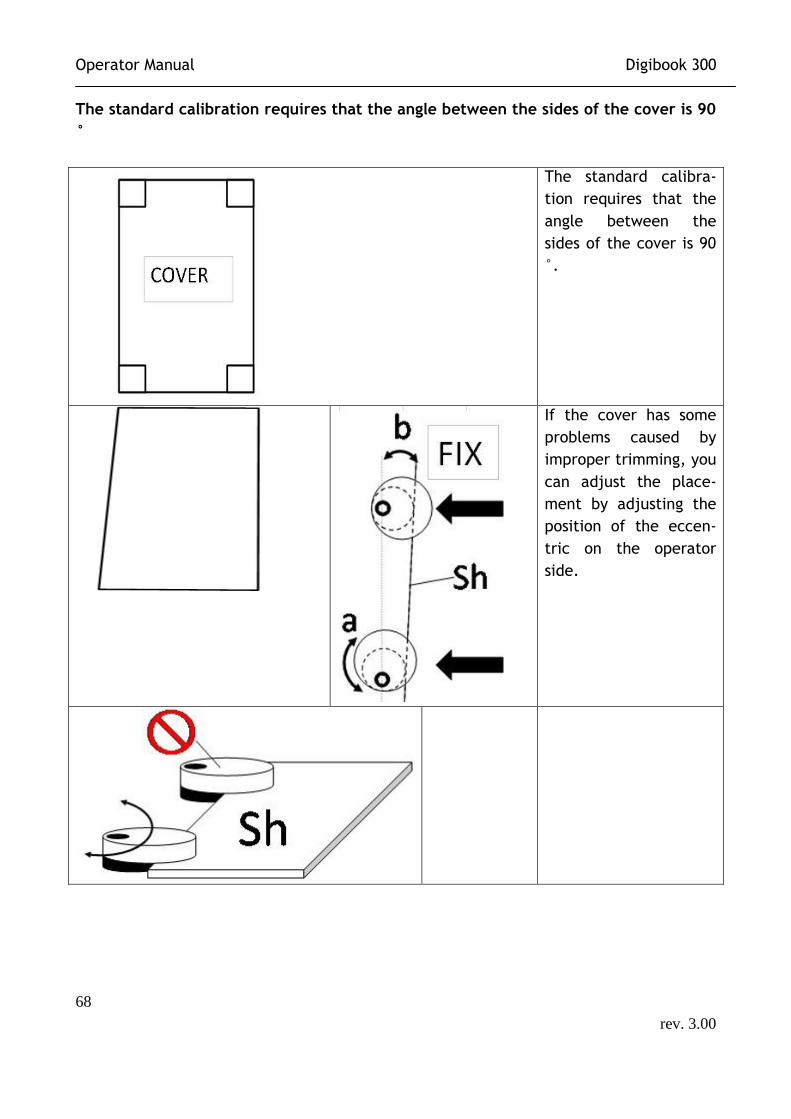
The standard calibration requires that the angle between the sides of the cover is 90
°
The standard calibra-
tion requires that the
angle between the
sides of the cover is 90
°.
If the cover has some
problems caused by
improper trimming, you
can adjust the place-
ment by adjusting the
position of the eccen-
tric on the operator
side.
Operator Manual Digibook 300
69
rev. 3.00
Preparation of the machine to produce a book.
CONTROLS TO PERFORM BEFORE STARTING THE JOB Before to use the Perfect Binder perform the following controls:
The operator must have read and understood this manual, including
the important information concerning the SAFETY.
Make sure you have appropriate clothing to work and, if necessary,
also safety clothing.
Ensure that the Perfect Binder is properly powered and connected
to ground (PE)
Ensure that the pneumatic system of the Perfect Binder is properly
fed and if the main switch oh the factory is open.
Verify that the chips aspirator is connected to the Perfect Binder
and its power switch is in position 1 = ON.
Check that in the tank there is a minimal amount of glue to allow to
process several books, otherwise insert a new cartridge of glue in-
side the tank.
Glue collection tank flushed.
Ensure that the Perfect Binder is clean and without books or covers,
especially: Clamp, Silent Plate, Milling Station, PUR head, Press.
Check that the temperature settings are correct for the used glue
and that have been achieved the correct values to work.
Refer to the technical sheets of the glue/cleaner manufacturer.
Verify that the values of temperatures have reached their work val-
ues.
Both temperature indicators must be lit.
If necessary, remove the layer of Blue-Cleaner from the PUR head.
Operator Manual Digibook 300
70
rev. 3.00
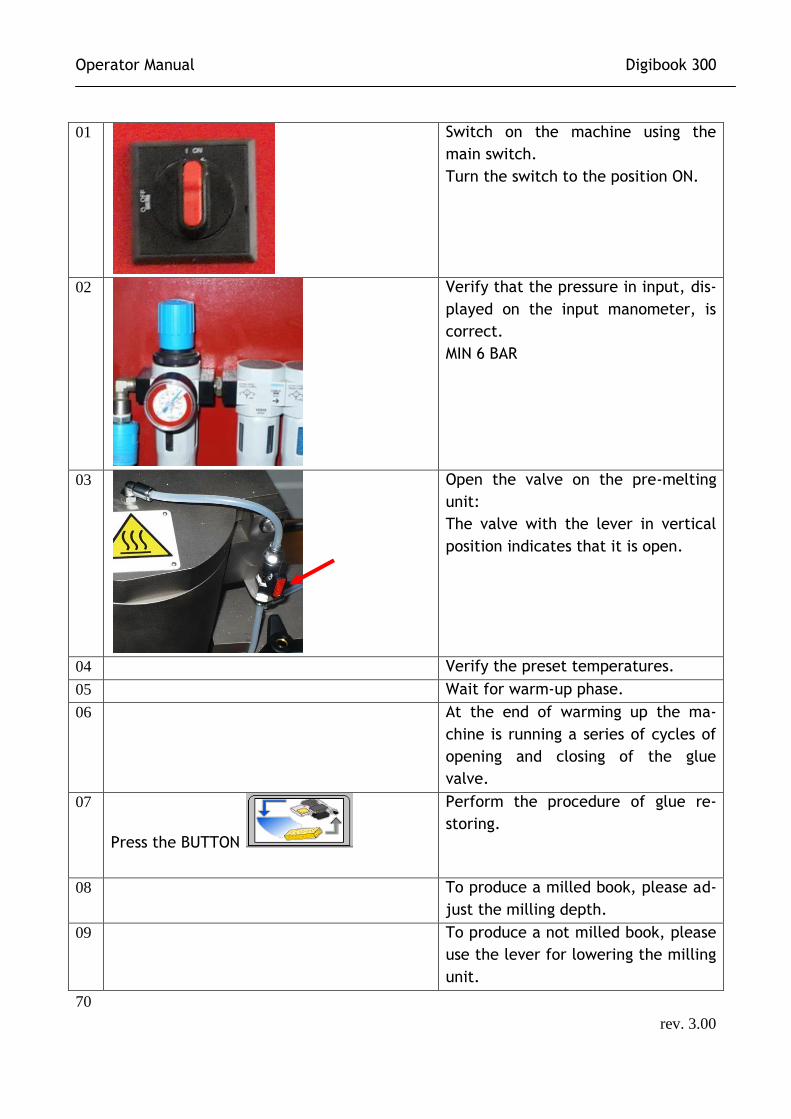
01
Switch on the machine using the
main switch.
Turn the switch to the position ON.
02
Verify that the pressure in input, dis-
played on the input manometer, is
correct.
MIN 6 BAR
03
Open the valve on the pre-melting
unit:
The valve with the lever in vertical
position indicates that it is open.
04 Verify the preset temperatures.
05 Wait for warm-up phase.
06 At the end of warming up the ma-
chine is running a series of cycles of
opening and closing of the glue
valve.
07
Press the BUTTON
Perform the procedure of glue re-
storing.
08
To produce a milled book, please ad-
just the milling depth.
09 To produce a not milled book, please
use the lever for lowering the milling
unit.
Operator Manual Digibook 300
71
rev. 3.00
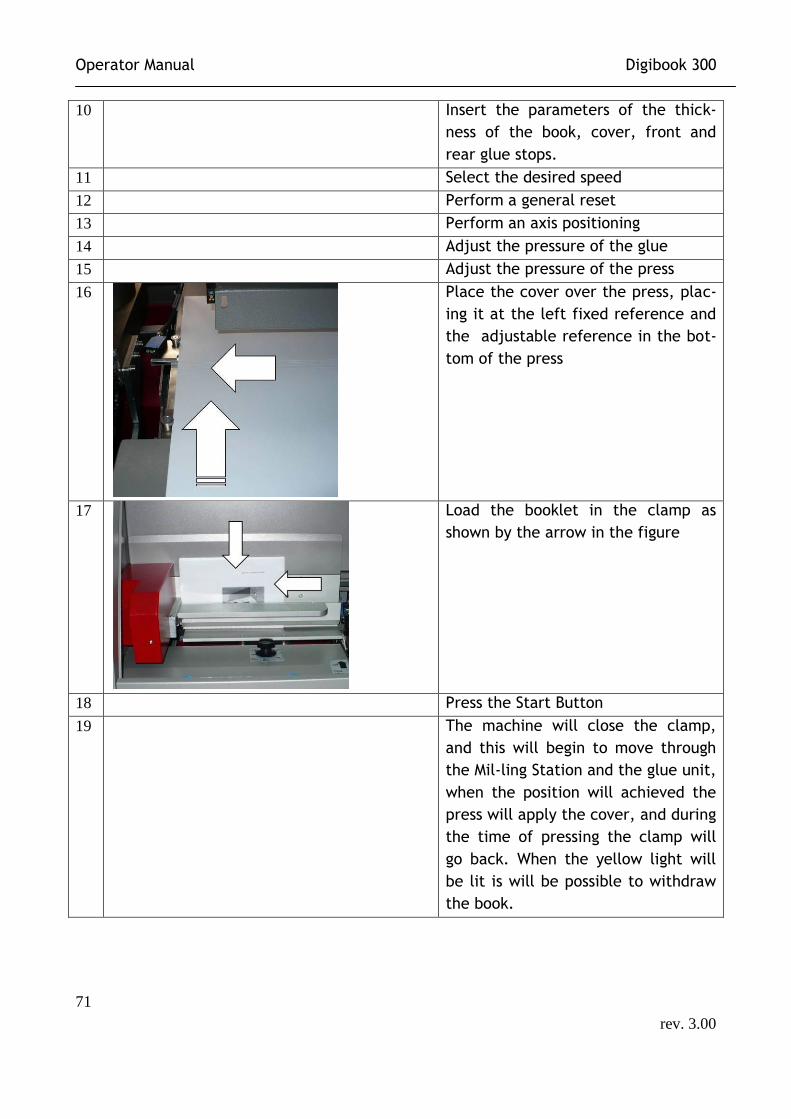
10 Insert the parameters of the thick-
ness of the book, cover, front and
rear glue stops.
11 Select the desired speed
12 Perform a general reset
13 Perform an axis positioning
14 Adjust the pressure of the glue
15 Adjust the pressure of the press
16
Place the cover over the press, plac-
ing it at the left fixed reference and
the adjustable reference in the bot-
tom of the press
17
Load the booklet in the clamp as
shown by the arrow in the figure
18 Press the Start Button
19 The machine will close the clamp,
and this will begin to move through
the Mil-ling Station and the glue unit,
when the position will achieved the
press will apply the cover, and during
the time of pressing the clamp will
go back. When the yellow light will
be lit is will be possible to withdraw
the book.
Operator Manual Digibook 300
72
rev. 3.00
18 CLEANING THE MACHINE
When the machine work using PUR glue, it is imperative and essential an accurate clean-
ing of the glue.
The dried glue is no more refundable.
Residue of glue during the drying process can cause blockages or a uneven extrusion of the glue. The glue group must be kept clean with the deposits of glue, PUR glue residues harden over time and cause damages to the equipment. Performing the “End of job cleaning” it is possible to save the machine turned off
containing PUR glue for 2 weeks.
COMPULSORY CLEANING for proper operation of the machine.
"If the machine is switched off or unused for more than 120 minutes it is necessary to
make the cycle of "End of job cleaning".
EVERY DAY: END OF JOB CLEANING
EMPTY THE CHIPS ASPIRATOR
ONCE IN THE WHEEK: CLEANING SIDE EXTRUDER
CLEANING SPINE EXTRUDER
CLEANING DETAILS
In case of:
Some pages are not glued Perform the spine extruder cleaning
The glue on the side is not uniform Perform the side extruder cleaning
.
Operator Manual Digibook 300
73
rev. 3.00
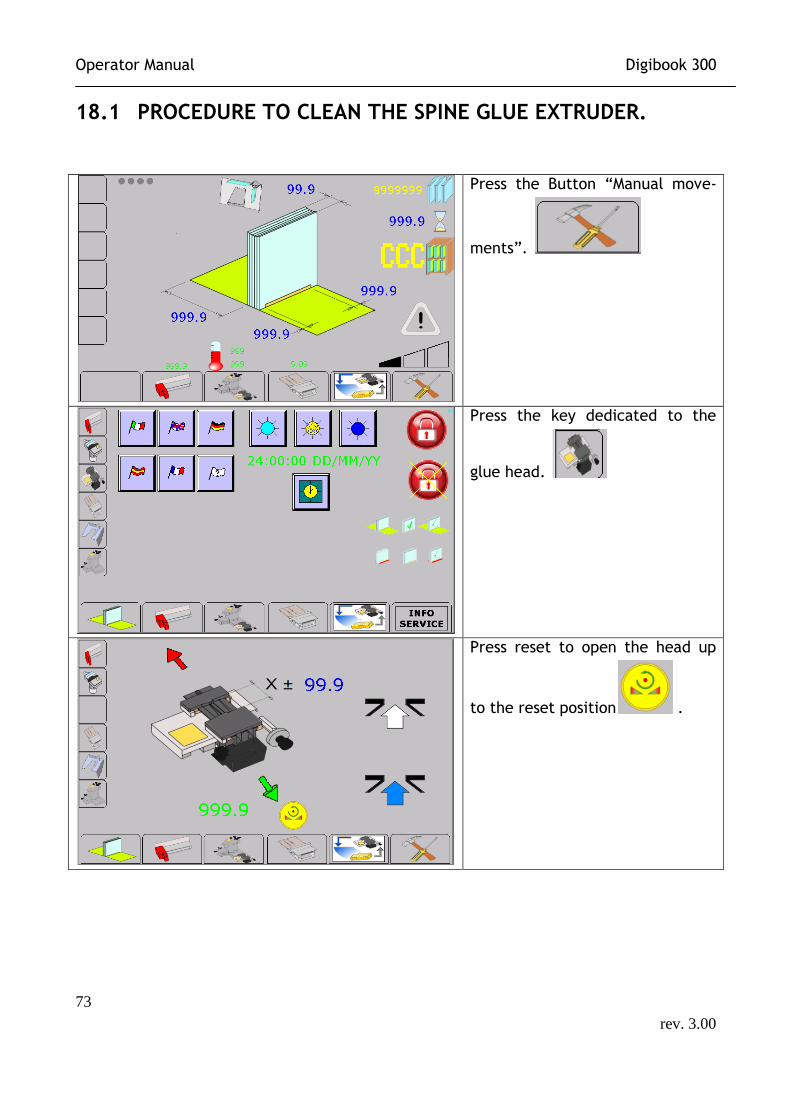
18.1 PROCEDURE TO CLEAN THE SPINE GLUE EXTRUDER.
Press the Button “Manual move-
ments”.
Press the key dedicated to the
glue head.
Press reset to open the head up
to the reset position .
Operator Manual Digibook 300
74
rev. 3.00
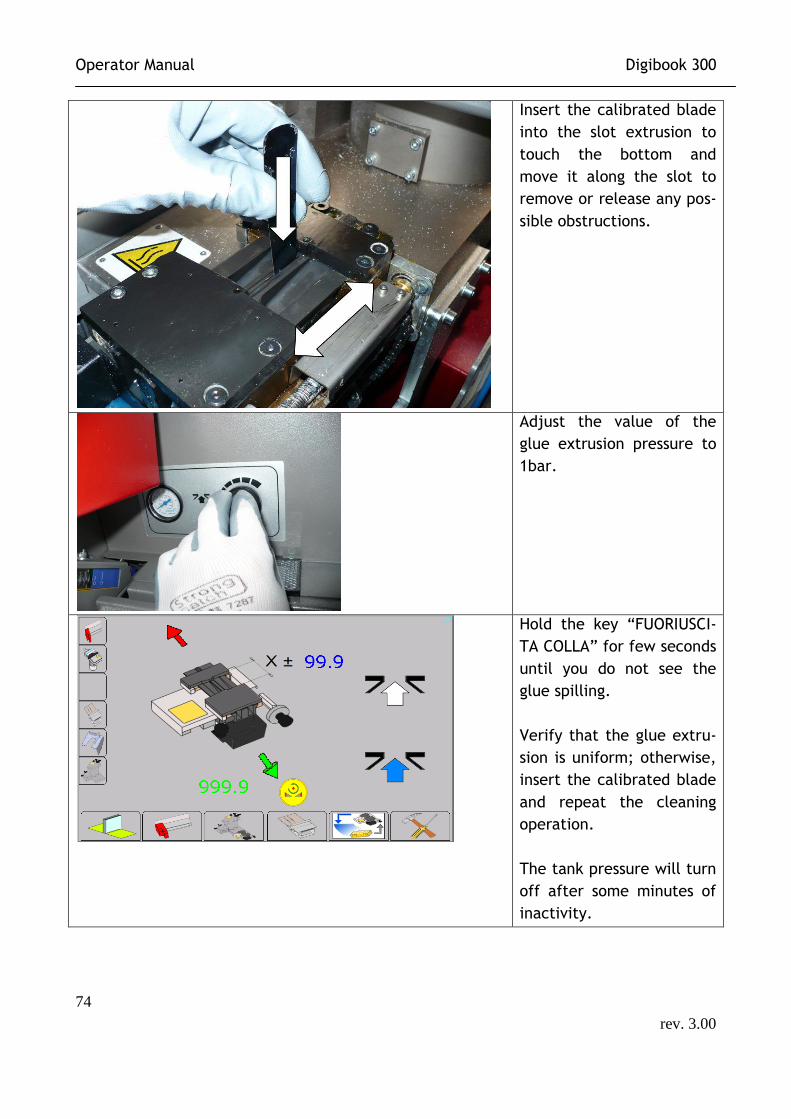
Insert the calibrated blade
into the slot extrusion to
touch the bottom and
move it along the slot to
remove or release any pos-
sible obstructions.
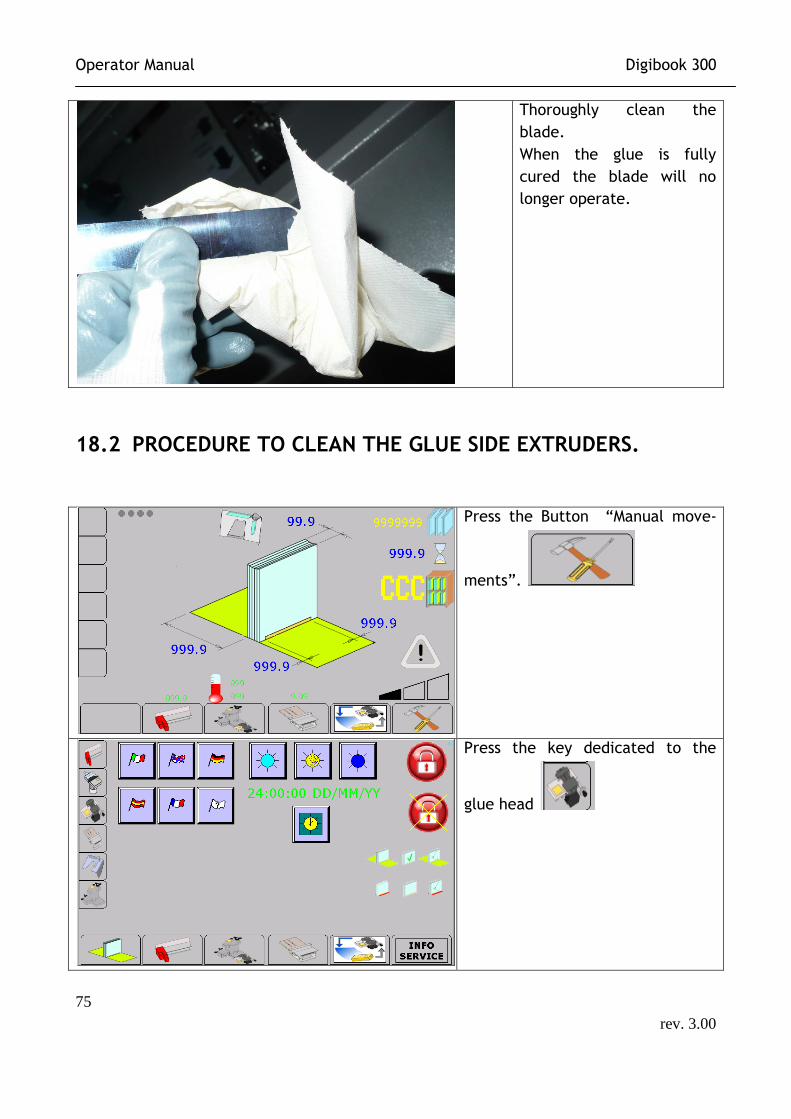
Adjust the value of the
glue extrusion pressure to
1bar.
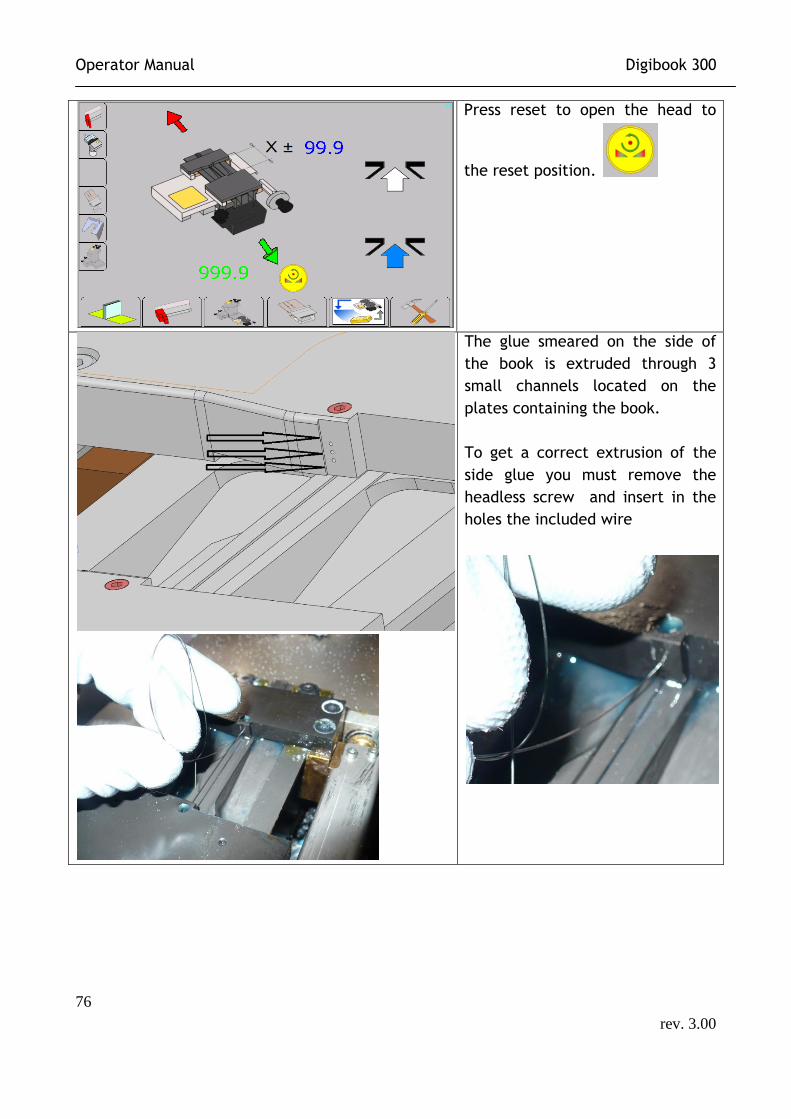
Hold the key “FUORIUSCI-
TA COLLA” for few seconds
until you do not see the
glue spilling.
Verify that the glue extru-
sion is uniform; otherwise,
insert the calibrated blade
and repeat the cleaning
operation.
The tank pressure will turn
off after some minutes of
inactivity.
Operator Manual Digibook 300
75
rev. 3.00
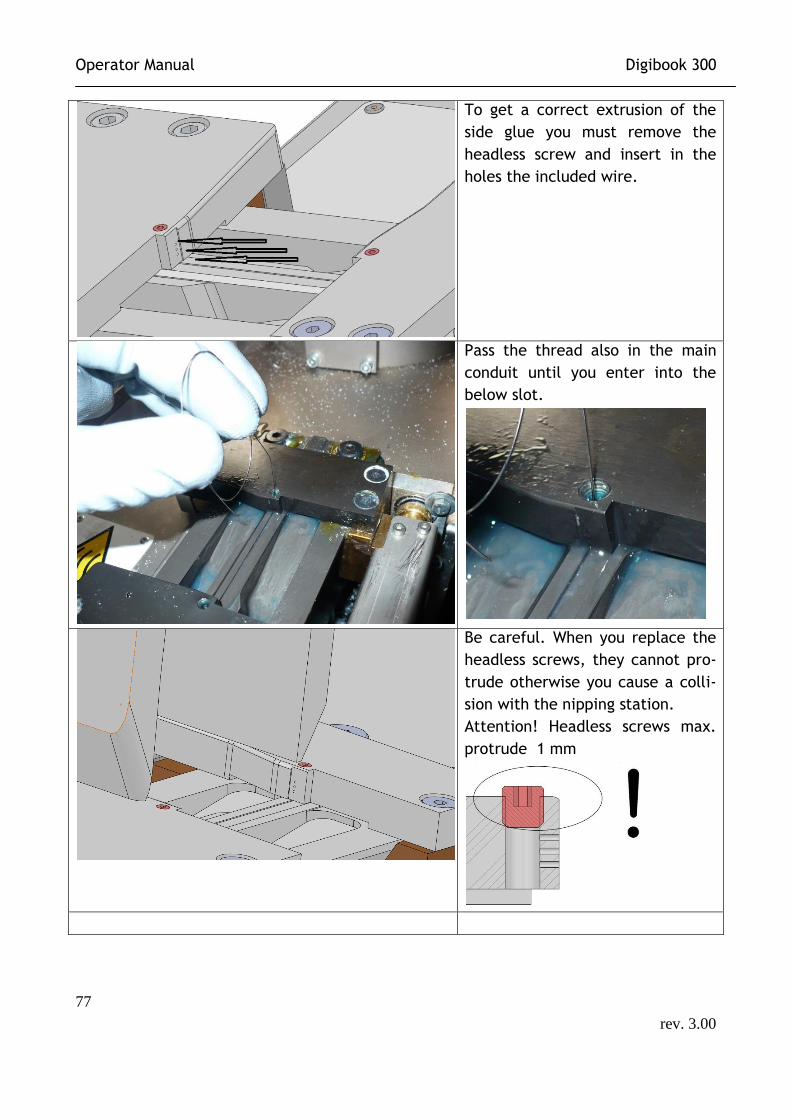
Thoroughly clean the
blade.
When the glue is fully
cured the blade will no
longer operate.
18.2 PROCEDURE TO CLEAN THE GLUE SIDE EXTRUDERS.
Press the Button “Manual move-
ments”.
Press the key dedicated to the
glue head
Operator Manual Digibook 300
76
rev. 3.00
Press reset to open the head to
the reset position.
The glue smeared on the side of
the book is extruded through 3
small channels located on the
plates containing the book.
To get a correct extrusion of the
side glue you must remove the
headless screw and insert in the
holes the included wire
Operator Manual Digibook 300
77
rev. 3.00
To get a correct extrusion of the
side glue you must remove the
headless screw and insert in the
holes the included wire.
Pass the thread also in the main
conduit until you enter into the
below slot.
Be careful. When you replace the
headless screws, they cannot pro-
trude otherwise you cause a colli-
sion with the nipping station.
Attention! Headless screws max.
protrude 1 mm
Operator Manual Digibook 300
78
rev. 3.00
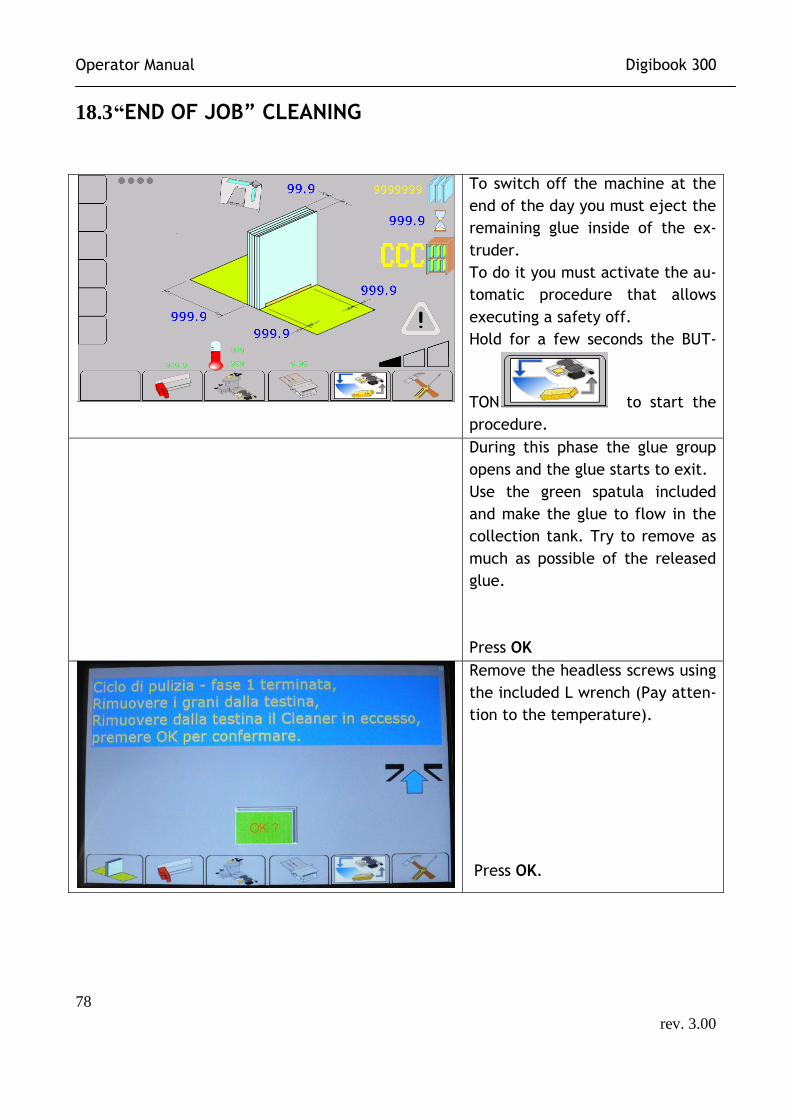
18.3 “END OF JOB” CLEANING
To switch off the machine at the
end of the day you must eject the
remaining glue inside of the ex-
truder.
To do it you must activate the au-
tomatic procedure that allows
executing a safety off.
Hold for a few seconds the BUT-
TON to start the
procedure.
During this phase the glue group
opens and the glue starts to exit.
Use the green spatula included
and make the glue to flow in the
collection tank. Try to remove as
much as possible of the released
glue.
Press OK
Remove the headless screws using
the included L wrench (Pay atten-
tion to the temperature).
Press OK.
Operator Manual Digibook 300
79
rev. 3.00
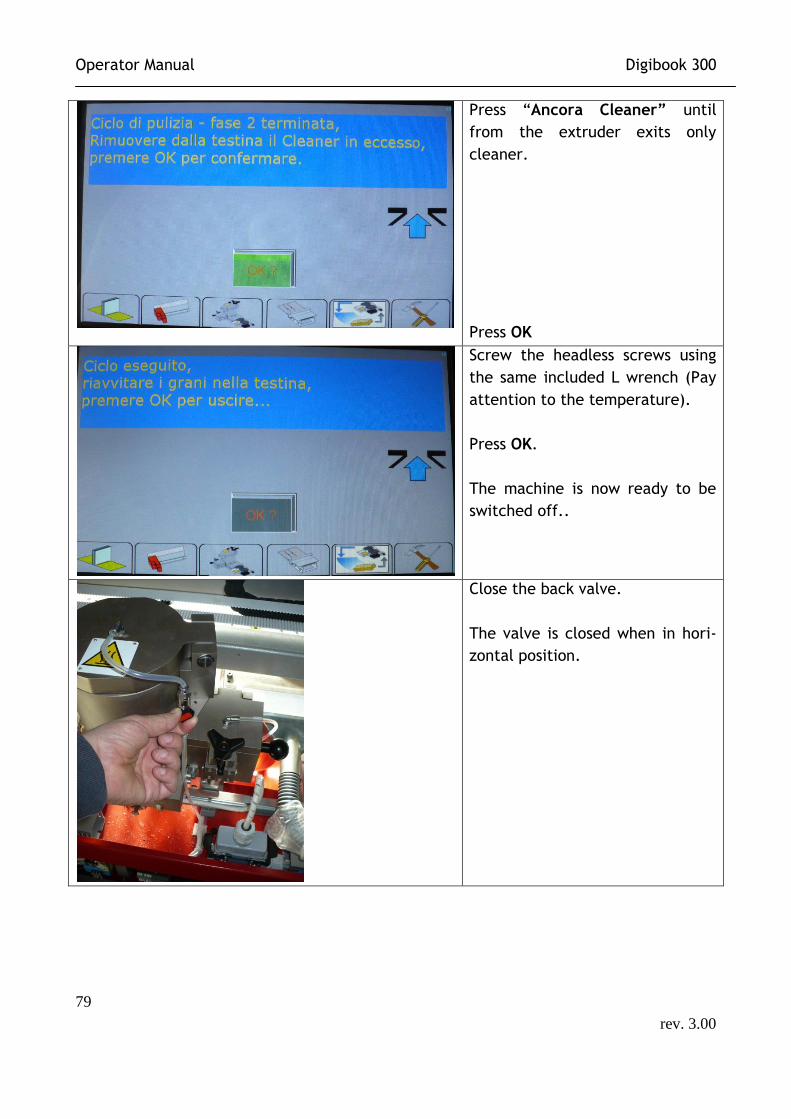
Press “Ancora Cleaner” until
from the extruder exits only
cleaner.
Press OK
Screw the headless screws using
the same included L wrench (Pay
attention to the temperature).
Press OK.
The machine is now ready to be
switched off..
Close the back valve.
The valve is closed when in hori-
zontal position.
Operator Manual Digibook 300
80
rev. 3.00
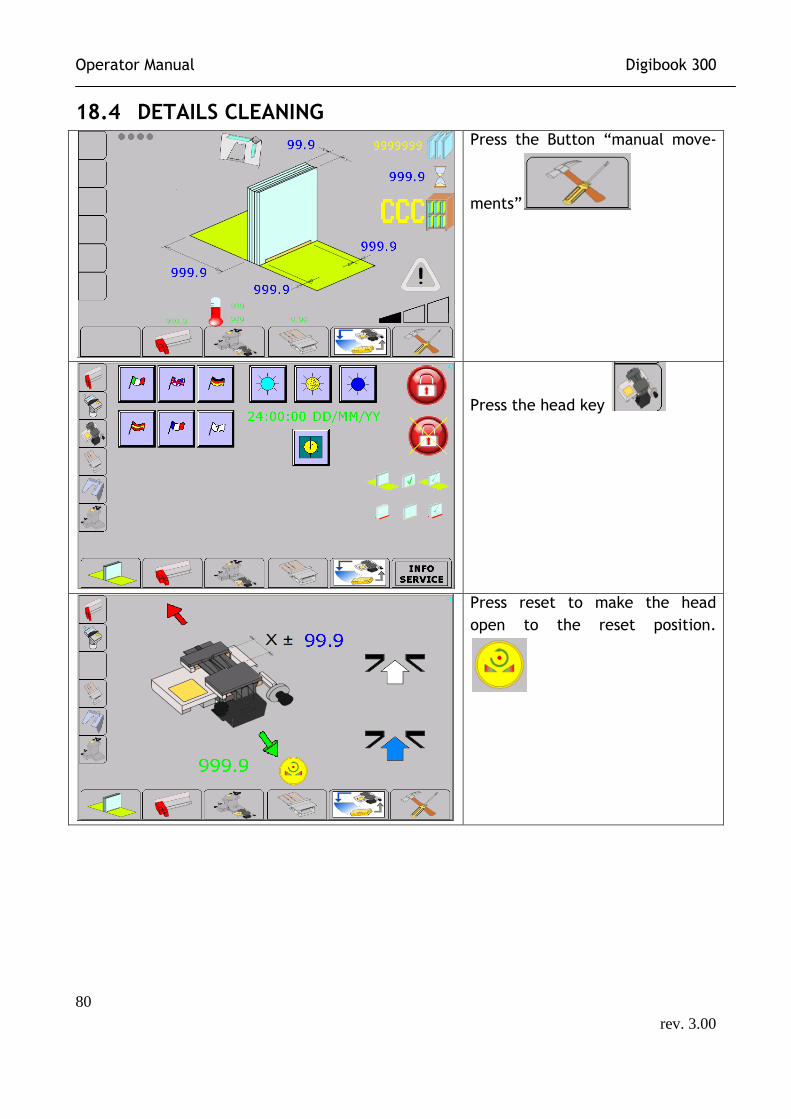
18.4 DETAILS CLEANING
Press the Button “manual move-
ments”
Press the head key
Press reset to make the head
open to the reset position.
Operator Manual Digibook 300
81
rev. 3.00
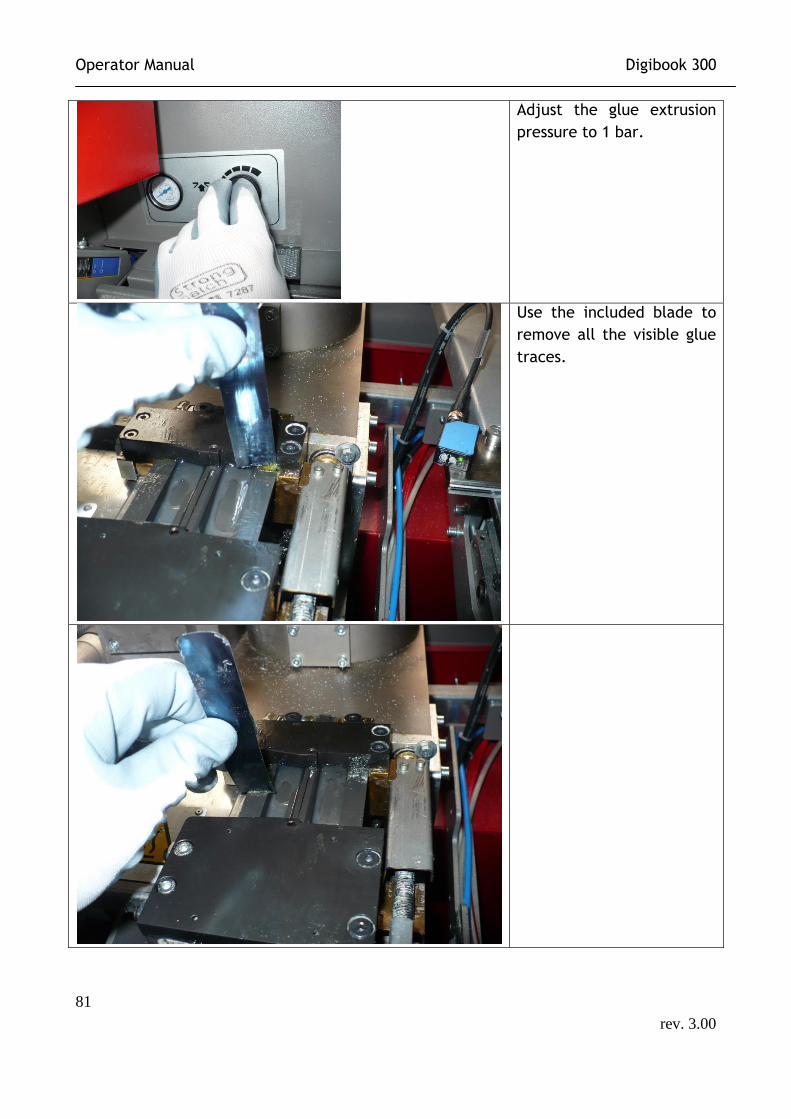
Adjust the glue extrusion
pressure to 1 bar.
Use the included blade to
remove all the visible glue
traces.
Operator Manual Digibook 300
82
rev. 3.00
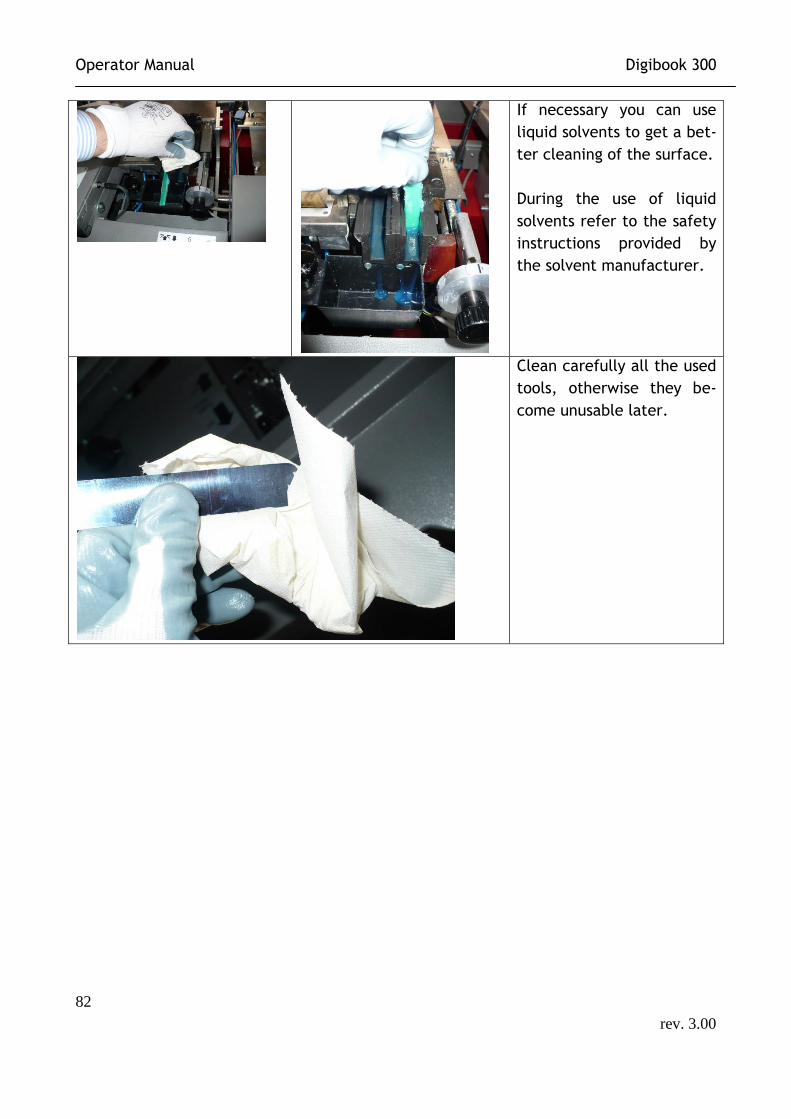
If necessary you can use
liquid solvents to get a bet-
ter cleaning of the surface.
During the use of liquid
solvents refer to the safety
instructions provided by
the solvent manufacturer.
Clean carefully all the used
tools, otherwise they be-
come unusable later.
Operator Manual Digibook 300
83
rev. 3.00
19 Problems - Solutions
19.1 CHIPS ASPIRATOR – LESS VACUUM:
Verify that the plexiglass inspection, located on the Milling Station, is free.
Verify that the chips aspirator tank is empty.
Verify that the chips aspirator tube is not full of chips.
Verify that the aspirator filter is clean. 19.2 CLAMP – IT DOES’T START:
Verify the presence of a book.
Verify that the emergency switch is disabled.
Verify that the barrier light is completely free.
Verify that the book detecting photocell and the related reflector are clean.
Verify that the photocell or the reflector of the press is free from books, pieces of paper or durst.
Verify that the clamp jaws are free from glue residues.
Verify the air pressure in the machine.
19.3 IRREGULAR GLUE START / STOP :
Clean the photocell and the reflector positioned between the silent plane and the Milling Station.
19.4 MILLING STATION – IRREGULAR CUT AND NOTCHING:
Verify that the Milling disk is not broken or damaged. This could happen by the management of books already bound with glue (TO AVOID).
19.5 COVER PLATE MILLING STATION – IT DOES’T OPEN / CLOSE CORRECTLY:
Remove the 4 screws by using an wrench 4. Remove the cover plate Milling Station releasing the strap. Clean inside of the milling station box.
Shorten the strap by a node close to the interior of the Milling Station box, increasing the strength of the plate closure.
19.6 HEAD - OUT OF TOO MUCH OR LITTLE GLUE:
Verify the air pressure of the glue group.
Verify that the head shutter is free, using the provided blade.
Verify that the side holes are free, using the provided steel wire.
Verify that the injectors are working properly (they must move back and forth 3-4 mm).
Verify the glue presence in the tank.
Verify that the glue in the tank is not hard-glue.
Verify that the tank valve is open.
Verify the position of the internal lateral jaw: it must be 0.10 tenths back from the edge of the clamp.

Operator Manual Digibook 300
84
rev. 3.00
Verify the head height: if it comes out a little glue lower the head and in-crease the air pressure of the glue group, if it comes out to much glue raise the head and lower the air pressure of the glue.
22.7 PRESS
Press so much: lower the air pressure of the press group or the spine height.
Round spine: increase the press height.
Edge pinched: contact technical support.
Not uniform spine: contact technical support.


![Registries: oase of fata morgana? - NVTAG · Microsoft PowerPoint - NVTAG registries oase of fata morgana [Read-Only] Author: CAME Created Date: 1/14/2016 2:11:50 PM ...](https://static.documents.pub/doc/80x56/604755b632eb2414c221e233/registries-oase-of-fata-morgana-microsoft-powerpoint-nvtag-registries-oase.jpg)

