64
CSC DINGHY SAILING MANUAL February 2021
CSC DINGHY SAILING MANUAL
February 2021
Introduction
There's no substitute for actual sailing if you want to learn to sail. This booklet is only intended as a technical reference, to reinforce sailing lessons. If you're new to sailing, relax—you're in good company. Most new members of the Cal Sailing Club do not know how to sail when they join. Put this book down until later, and go sailing.
Credits
Editor: John Bongiovani
Author: John Bergmann
Change History
Anonymous. First published Edition. The club began about a century ago as an offshoot of a loose association of UC students and professors who were interested in sailing. Perhaps there was a manual—who knows?
A manual for sailing was put together using a typewriter and hand drawn pictures, distributed in booklet format. The most memorable part was a cartoon telling how to get onto a Lido from the water, showing a shark. Fitting conveniently in a pocket, most copies were turned into pulp during the new owner's first lesson. Sometime in the 1970s.
Various minor changes stemming from disputes over gybing and other pettifoggery. Sometime during the disco era.
The advent of the computer in revising the manual, but keeping the same organization. Major discovery: pdf's don't fit in pockets. Sometime in the Clinton era.
Major revisions to reflect the end of the Lido, which had served the club (poorly) since 1959. Sometime in the Bush II years
V11. Joel Brandt June, 2011
Dinghy Manual.
February 2021
Cal Sailing Club
Page 2

V12 John Bergmann, updated content and format, added detail on the RS Ventures, March, 2016
V13 Made corrections, added content on Quests, added more figures, and added a table of figures.
V14 No more Bahias, online dinghy log, and other 2017 and 2018 changes to the club
V15 Updated descriptions of the Quests as well as CSC procedures on working with them.
Table of Contents
Introduction.................................................................................................................................2
Credits..........................................................................................................................................2
Change History...........................................................................................................................2
Table of Contents.........................................................................................................................3
Table of Figures...........................................................................................................................6
1 Safety First..............................................................................................................................7
2 Wind........................................................................................................................................8
2.1 Best info on the wind:........................................................................................10
3 Weight....................................................................................................................................11
4 Learning To Sail...................................................................................................................11
5 Sailing basics.........................................................................................................................12
5.1 Coming About and Gybing..............................................................................13
5.2 The Meaning of Port and Starboard Tacks.....................................................13
5.3 Right of Way.......................................................................................................14
5.4 Collision Courses...............................................................................................14
5.5 Points of Sail.......................................................................................................15
5.6 Parts of the Sail...................................................................................................16
5.7 Sail Trim..............................................................................................................17
6 Dinghy Sailing Maneuvers.................................................................................................19
Dinghy Manual.
February 2021
Cal Sailing Club
Page 3

6.1 Leaving the Dock...............................................................................................19
6.2 Docking................................................................................................................20
6.3 Sailing upwind...................................................................................................20
6.4 Coming About (aka Tacking)...........................................................................21
6.5 Heaving To..........................................................................................................22
6.6 Gybing.................................................................................................................22
6.7 Circles Around a Buoy......................................................................................24
6.8 Steering While Drifting Backwards.................................................................24
6.9 Man Overboard Drill.........................................................................................25
6.10 Avoiding Capsizes...........................................................................................26
6.11 Recovering from a Capsize.............................................................................26
6.12 Anchoring..........................................................................................................29
6.13 In Case of Grounding......................................................................................29
6.14 Equipment Failure...........................................................................................30
7 Knots......................................................................................................................................31
7.1 Bowline................................................................................................................31
7.2 Bead knot.............................................................................................................32
7.3 Triple Half Hitch on a Bight.............................................................................32
7.4 Cleat Hitch..........................................................................................................33
7.5 Figure Eight Knot...............................................................................................33
7.6 Reef Knot.............................................................................................................33
7.7 Slip Knot..............................................................................................................34
7.8 Sheet Bends.........................................................................................................34
8 General instructions on how to rig a dinghy....................................................................34
8.1 Getting started....................................................................................................34
8.2 Using the Hoist...................................................................................................35
8.3 Before casting off................................................................................................38
8.4 Derigging.............................................................................................................40
Dinghy Manual.
February 2021
Cal Sailing Club
Page 4

9 RS Venture and Quest Dinghies.........................................................................................43
9.1 Introduction........................................................................................................43
9.2 Rigging.................................................................................................................43
9.3 Reefing.................................................................................................................48
9.4 Gennaker.............................................................................................................50
9.5 Derigging.............................................................................................................50
10 Repairs.................................................................................................................................52
10.1 Ripped Sails......................................................................................................52
10.2 Broken/missing boat parts..............................................................................53
10.3 Frayed lines.......................................................................................................53
10.4 Mast and Booms...............................................................................................54
10.5 Internal Reefing and Outhaul Lines on the Ventures.................................54
10.6 Hull damage.....................................................................................................54
11 Teaching..............................................................................................................................55
12 Club rules for Junior Skippers..........................................................................................56
13 Introductory sailing books................................................................................................58
14 Sailing dictionary = Glossary............................................................................................59
Dinghy Manual.
February 2021
Cal Sailing Club
Page 5

Table of Figures
Sailing “directions”.........................................................................................................12
Points of Sail....................................................................................................................15
Sail parts...........................................................................................................................16
Sail trim............................................................................................................................17
Luffing Mainsail..............................................................................................................17
Reading Telltales.............................................................................................................18
Coming About, or “Tacking”.........................................................................................21
Gybing..............................................................................................................................23
Bowline.............................................................................................................................31
Bowline on halyard.........................................................................................................31
Securing Halyard To Mainsail With Bead Knot.........................................................32
Triple half hitch on bight...............................................................................................32
Cleat hitch........................................................................................................................33
Figure eight......................................................................................................................33
Reef knot...........................................................................................................................33
Slip knot............................................................................................................................34
Sheet bends: Single (A) and Double (B).......................................................................34
Quest Rudder...................................................................................................................36
Venture Hull Drainplug.................................................................................................36
Sling Location..................................................................................................................36
Main halyard cleats: Horn (A) and Jam (B) Cleats.....................................................38
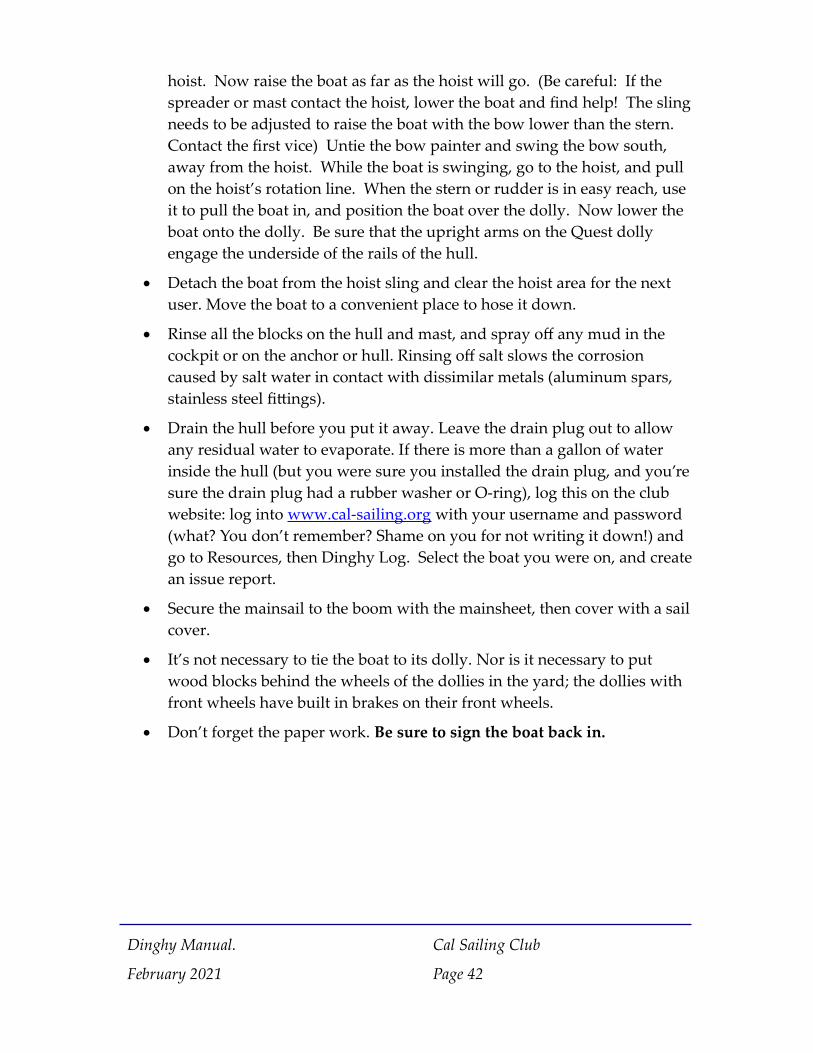
Quest forestay tension starts with the highfield lever...............................................44
Sling Attachment to Venture Stern...............................................................................45
Quest Jib Furling.............................................................................................................48
Venture Furling Line and Cleat....................................................................................48
Dinghy Manual.
February 2021
Cal Sailing Club
Page 6
Venture Outhaul and Reefing Lines.............................................................................49
Quest Outhaul. On some Quests, the outhaul line has been rerouted forward on the mast............................................................................................................................49
Quest Reefing System.....................................................................................................50
Dollies...............................................................................................................................51
Venture jib sail cover on main versus gennaker halyard..........................................51
Venture Reefing and Outhaul Lines.............................................................................54
1 Safety First
While sailing is less dangerous than other outdoor sports, there are certain risks you should guard against:
Always wear a lifejacket when out on a boat, and practice floating in it if you're not comfortable with going in the water. We have several sizes and styles of life jackets (AKA personal flotation devices or PFDs). Most of our PFDs are Class III which are intended for conscious users, in inland waters, where rescue will be quickly forthcoming. If this doesn’t suit your needs, choose a bulkier Class II or I PFD that provides more flotation (see coast guard definition).
Watch out for the boom, and don't stand up in the boat unless you're absolutely sure it's safe to do so. If the boat capsizes, shield your head with your arms to avoid getting clobbered. The club has loaner helmets, wear one to provide sure protection.
Dinghies are very easily tipped by your weight on the boat. Don’t stand up without holding onto something, and pay attention when you step onto an empty dinghy—it can easily tip you into the water. When you are first getting used to dinghies, crawl onto the boat supporting your weight on your hands and knees so as not to fall between the boat and the dock. This way, your center of mass will be low and you will be more stable. Also, when moving around in an empty dinghy keep your body as close to the center line of the boat to avoid tipping it over. Slippery shoes, bare
Dinghy Manual.
February 2021
Cal Sailing Club
Page 7
feet, and wet hands can cause you to take a hard fall. Wear windsurfer booties or shoes that won't slip on wet plastic, as well as gloves with non-slip palms (preferably with open fingers for untying knots and twiddling with hardware).
If there's wind, sailing can be wet and cold. Wear a warm hat; it can reduce heat loss dramatically. To reduce heat loss from your body in our sailing conditions, a wet suit is ideal, and the club has lots of loaners, thanks to the Department of Parks, Division of Boating and Waterways1. If you prefer not to wear a wetsuit, polypropylene fleece and wool are best for warmth because they hold in heat even when wet. Avoid cotton clothing, when wet it loses lots of heat and weighs a ton. The club has loaner foul weather gear that you can wear over a wet suit or warm clothing to cut the wind and shed some of the water. Be alert for hypothermia, first signaled by uncontrollable shivering, that can slow your reactions and distort your judgment.
Sunburn is painful and can lead to skin cancer. Wear a hat with a wide brim and plenty of sunscreen. The club keeps a gallon jug in the clubhouse.
A broken part can leave you stranded out on the water, and it may be some time before you will be rescued. Learn how to check your equipment over carefully and thoroughly before you go. Learning to identify damage and to repair equipment is a major focus of the club’s teaching program (see Repairs section near the end of this booklet).
2 Wind
It’s what makes sailboats go, so it’s the most important thing to learn about. You “read” the wind by looking at the water and at flags and other sails, by feeling it with your body, and by the telltales and sails on your boat.
1 Cal Sailing Club has received generous grants from the State of California Department of Parks, Division of Boating and Waterways (Formerly the California Department of Boating and Waterways that we’ve used to buy equipment to teach boating safety. The grants bought most of our dinghies, sails, PFD’s and wetsuits as well as equipment for our keelboat sailing and windsurfing classes.
Dinghy Manual.
February 2021
Cal Sailing Club
Page 8
The water is a good indicator of the wind’s strength. The water is glassy smooth in light wind, develops wind ripples (little ripples a few inches apart) as the wind increases, darkens where gusts pass over it, shows white capped waves in strong wind, and has blown over breaking waves in really strong winds. Remember that the stronger the wind is, the more skill and weight you need to sail a dinghy in it. If the expert windsurfers are having a great day, it’s gonna be wet and wild in a dinghy.
The best way to feel the wind’s direction with your body is to use your ears and nose—when your nose is pointed straight into the wind, the wind feels equally strong on both ears (provided you don’t have an 80’s style asymmetrical hairdo). The telltales (yarn or tape streamers) on the boat’s shrouds indicate the wind flowing across the boat, which is influenced by the boat’s movement, and if you turn the boat into the wind, the flapping sails indicate the true source of the wind the way a flag does.
Summer afternoon winds are generally strongest, especially when there’s a high pressure ridge aloft offshore, low pressure inland, and higher temperatures in the Central Valley than in the Bay. The strongest wind in Berkeley comes from the southwest, because the main flow through the Golden Gate turns to cross Richmond to head for the Delta. Winter storms can bring south winds that only expert windsurfers should go out in, or north winds that will shred sails. Between these two extremes are plenty of days when the wind will provide hours of pleasant sailing, especially if you’re willing to wait long enough for the wind to get really good.
Dinghy Manual.
February 2021
Cal Sailing Club
Page 9
2.1 Best info on the wind:• http://cal-sailing.appspot.com/wind
View CURRENT conditions at Cal-Sailing and forecasts of tide and wind!
• http://www.iwindsurf.com/windandwhere.iws? regionID=125&geographicalAreaID=999
Shows wind direction from various sensors around the Bay
• http://www.sailflow.com/map#37.908,-122.012,10,1,!409,2
(Free) memberships give (temporary) access to Berkeley wind sensor and excellent forecasts
• http://static.lawrencehallofscience.org/scienceview/ scienceview.berkeley.edu/html/view/index.php
Web cam on the Bay from the Berkeley hills, good for current weather
• http://www.wrh.noaa.gov/mtr/getcwfzone.php? sid=MTR&zone=PZ530
General forecast for the SF Bay, not too accurate for Berkeley
• https://www.wunderground.com/hourly/us/ca/berkeley/ KCABERKE145?cm_ven=localwx_hourHourly forecast including temperature for West Berkeley
• http://tidesandcurrents.noaa.gov/ports/ports.html? id=9414847&mode=threedayswl
Tables of recent conditions around SF Bay
Dinghy Manual.
February 2021
Cal Sailing Club
Page 10
3 Weight
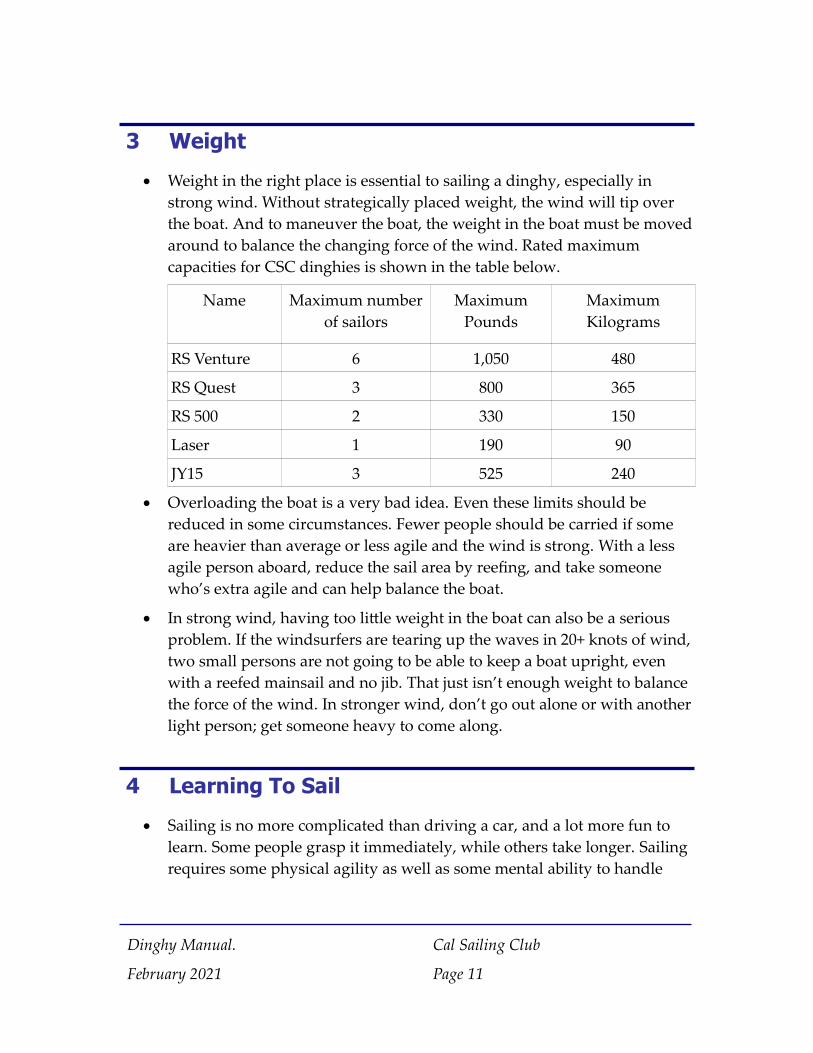
Weight in the right place is essential to sailing a dinghy, especially in strong wind. Without strategically placed weight, the wind will tip over the boat. And to maneuver the boat, the weight in the boat must be moved around to balance the changing force of the wind. Rated maximum capacities for CSC dinghies is shown in the table below.
Name Maximum number of sailors
Maximum Pounds
Maximum Kilograms
RS Venture 6 1,050 480
RS Quest 3 800 365
RS 500 2 330 150
Laser 1 190 90
JY15 3 525 240
Overloading the boat is a very bad idea. Even these limits should be reduced in some circumstances. Fewer people should be carried if some are heavier than average or less agile and the wind is strong. With a less agile person aboard, reduce the sail area by reefing, and take someone who’s extra agile and can help balance the boat.
In strong wind, having too little weight in the boat can also be a serious problem. If the windsurfers are tearing up the waves in 20+ knots of wind, two small persons are not going to be able to keep a boat upright, even with a reefed mainsail and no jib. That just isn’t enough weight to balance the force of the wind. In stronger wind, don’t go out alone or with another light person; get someone heavy to come along.
4 Learning To Sail
Sailing is no more complicated than driving a car, and a lot more fun to learn. Some people grasp it immediately, while others take longer. Sailing requires some physical agility as well as some mental ability to handle
Dinghy Manual.
February 2021
Cal Sailing Club
Page 11
new concepts and language. To make it easier, don’t try to take on everything at once. In the sailing lessons, concentrate on practicing sailing, and leave sailing theory to later, when you can read a good book (see list near the end of this booklet) or discuss things at the club.
Out on the water, you should first learn to steer a boat with a tiller. Once you’ve got that down, move on to learning to trim the sails. Along the way, you learn how to turn around and go the other way (coming about or tacking, maybe even gybing too). Then you learn to use your body weight to balance a dinghy sailboat. Unlike a keelboat, which has a big lead weight underneath, a dinghy sailboat stays upright mostly because the skipper and crew use their weight to balance the force from the sails.
You will also learn how to sail slowly up to a dock, use the anchor in an emergency, reef the sails to handle strong wind, heave to, and a bunch of other useful ‘maneuvers’. Your teachers may have different ideas about how to teach, but hopefully they’ll ask about your progress and challenge you without overwhelming you. If they screw up, please give them a break, they’re only volunteers. Sometimes there will be big waves and strong wind, other times there will be little if any wind. The boat will handle differently, and there will be different things to learn. Have fun, and get that Jr. Skipper rating so that you, in turn, can teach new sailors.
5 Sailing basics
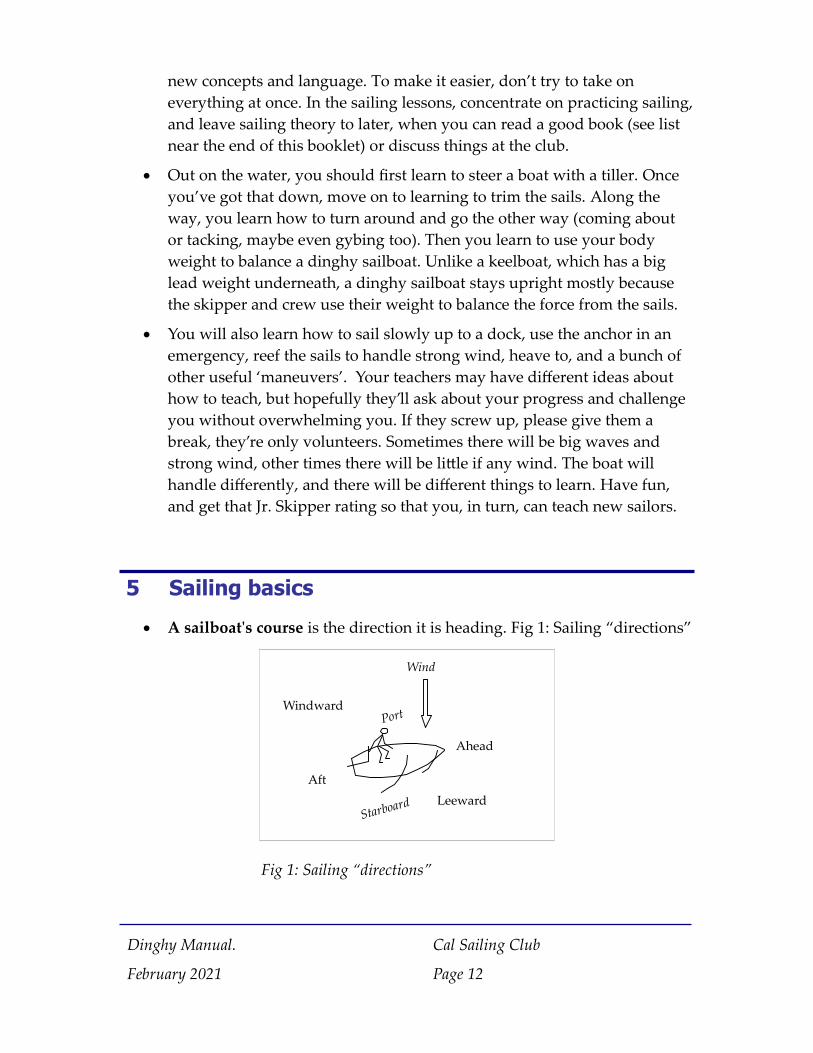
A sailboat's course is the direction it is heading. Fig 1: Sailing “directions”
Dinghy Manual.
February 2021
Cal Sailing Club
Page 12
Fig 1: Sailing “directions”
Windward
Wind
Ahead
AftLeeward
Starboard
Port
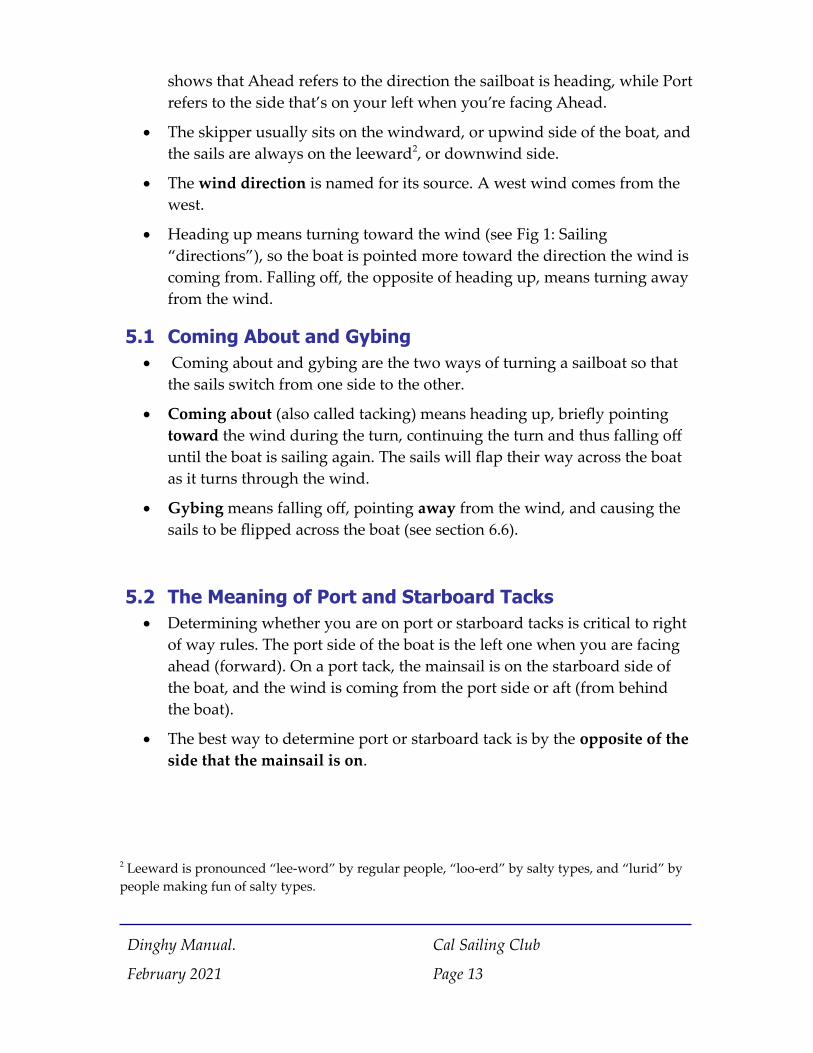
shows that Ahead refers to the direction the sailboat is heading, while Port refers to the side that’s on your left when you’re facing Ahead.
The skipper usually sits on the windward, or upwind side of the boat, and the sails are always on the leeward2, or downwind side.
The wind direction is named for its source. A west wind comes from the west.
Heading up means turning toward the wind (see Fig 1: Sailing “directions”), so the boat is pointed more toward the direction the wind is coming from. Falling off, the opposite of heading up, means turning away from the wind.
5.1 Coming About and Gybing Coming about and gybing are the two ways of turning a sailboat so that
the sails switch from one side to the other.
Coming about (also called tacking) means heading up, briefly pointing toward the wind during the turn, continuing the turn and thus falling off until the boat is sailing again. The sails will flap their way across the boat as it turns through the wind.
Gybing means falling off, pointing away from the wind, and causing the sails to be flipped across the boat (see section 6.6).
5.2 The Meaning of Port and Starboard Tacks Determining whether you are on port or starboard tacks is critical to right
of way rules. The port side of the boat is the left one when you are facing ahead (forward). On a port tack, the mainsail is on the starboard side of the boat, and the wind is coming from the port side or aft (from behind the boat).
The best way to determine port or starboard tack is by the opposite of the side that the mainsail is on.
2 Leeward is pronounced “lee-word” by regular people, “loo-erd” by salty types, and “lurid” by people making fun of salty types.
Dinghy Manual.
February 2021
Cal Sailing Club
Page 13
5.3 Right of Way
The right of way rules have been adapted from the US Coast Guard's Navigation Rules Onli ne and apply to situations in the Berkeley South Sailing Basin.
Generally, sailboats have right-of-way over power boats. The exceptions are when a sailboat is passing (overtaking) a power boat, the boat being passed has right of way. If a power boat is towing (e.g., a windsurfer or a sailboat), it has right-of-way.
These rules should only be applied when two sailcraft (boat or windsurfer) are equally able to maneuver. If one sailcraft faces obstacles, is towing another vessel, is confined to a dredged channel, or is not able to maneuver (hove-to) it automatically gets right of way.
When the two sailcraft are on different tacks, the one on starboard tack has right of way. (If your boat has the mainsail on the your port side and the other sailboat has their mainsail on their starboard side, you have the right of way.
If both sailcraft are on the same tack, the downwind or leeward one has right of way.
If you have right of way, hold your course. Yell and gesture to the other boat or windsurfer if it looks like they're on a collision course with you and they don't see you. If they don't make eye contact with you and respond by changing their course, change your own course to avoid the collision. A quick tack is often the best emergency maneuver to avoid a collision, but sometimes it’s better to just change course (without tacking) or gybe.
In the Novice Area, stay away from windsurfers, especially on weekends. They are just learning and are focusing on other things than right-of-way rules.
In summer, give even more room to boats in Cal Adventures’ beginner classes for kids! They have lots of fun, and can capsize hard without warning.
5.4 Collision Courses Check frequently for other boats or windsurfers coming your way, and
always do so before coming about, gybing, or turning suddenly. A boat or
Dinghy Manual.
February 2021
Cal Sailing Club
Page 14
windsurfer coming at you is be on a collision course if it appears to stay in a fixed position relative to a fixed point on your boat. Look at the boat or windsurfer and line it up at a spot on your hull. As they get closer, see whether the spot on your hull moves. If it does, you're not on a collision course; if it does not, you are.
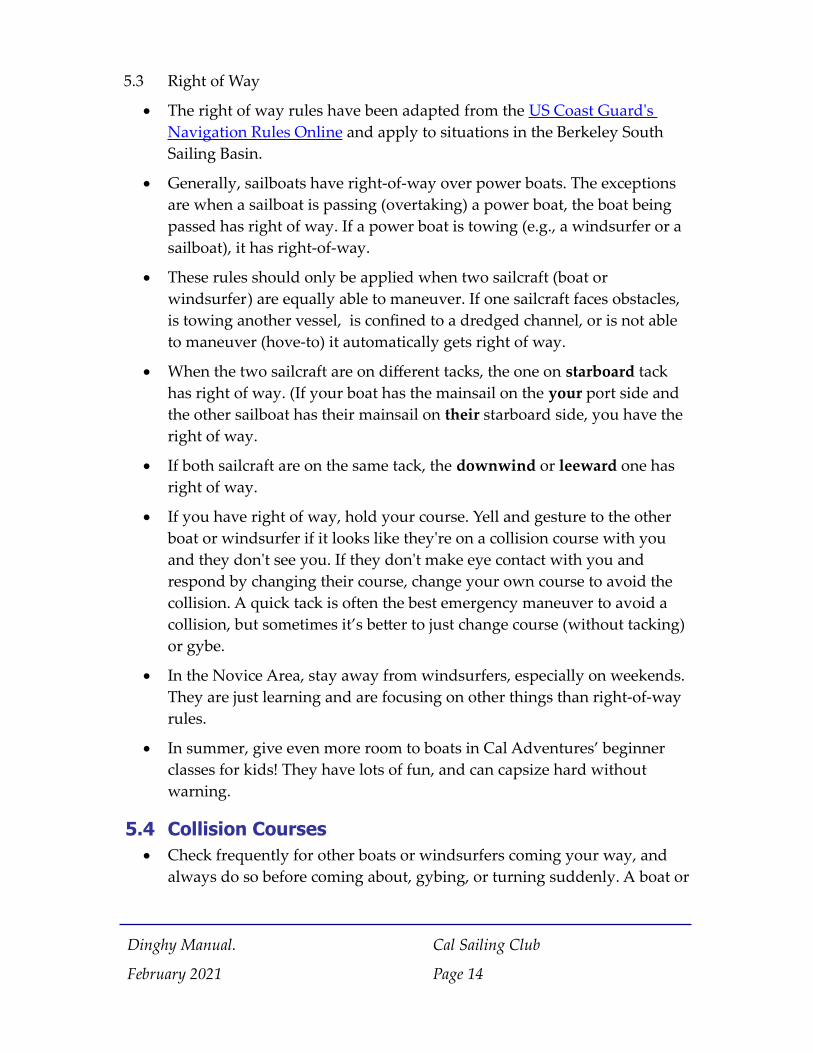
5.5 Points of Sail Points of sail are names for the
angle between a sailboat’s course and the wind. In irons means the boat is headed directly into the wind (an angle of 0 degrees).
Close hauled means the boat is headed as high as it can into the wind, which is about 45 degrees to the wind.
The fastest way to get directly upwind is to sail close hauled, coming about in 90 degree turns to switch direction. Zigzagging upwind in this manner is called beating, possibly because of the wind and spray suffered by the crew in heavy weather (high winds and waves).
A close reach is any upwind course at an angle between about 45 and 90 degrees.
A beam reach is when the wind direction is at about 90 degrees to the boat's direction of travel.
A broad reach is more than 90 degrees and less than about 135 (=90+45) degrees.
A run is when the wind is aft (behind the boat). A dead run is sailing straight downwind.
By the lee is when the wind is coming from the same side of the boat that the sail is on. Sailing by the lee can be dangerous-- if the boat turns or the
Dinghy Manual.
February 2021
Cal Sailing Club
Page 15
Fig 2: Points of Sail
wind shifts, the boat cam accidentally gybe.
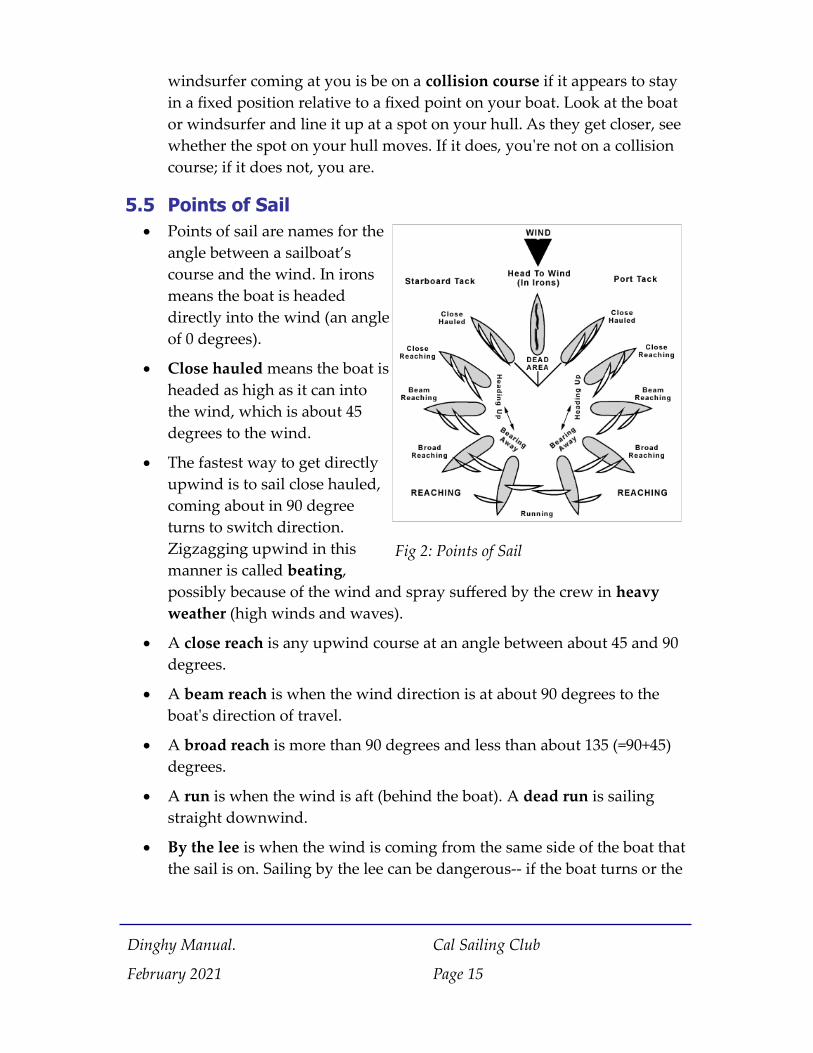
5.6 Parts of the Sail
• On our Dinghies, the sails are roughly triangular.• Edges:
▪ Foot: bottom edge▪ Luff: front edge. On the main, it is the edge closest to the mast. On
the jib it is attached to the jibstay or roller furling.▪ Leech: aft edge of the sail.
• Corners: ▪ Tack: bottom front corner (connecting the foot to the luff).▪ Clew: bottom aft corner (connecting the foot to the leech).▪ Head: top of the sail (where the halyard is attached).
Dinghy Manual.
February 2021
Cal Sailing Club
Page 16
Fig 3: Sail parts
Main Jib
Mast
tackclew
head
foot
luff
leech
foot
luff
leech
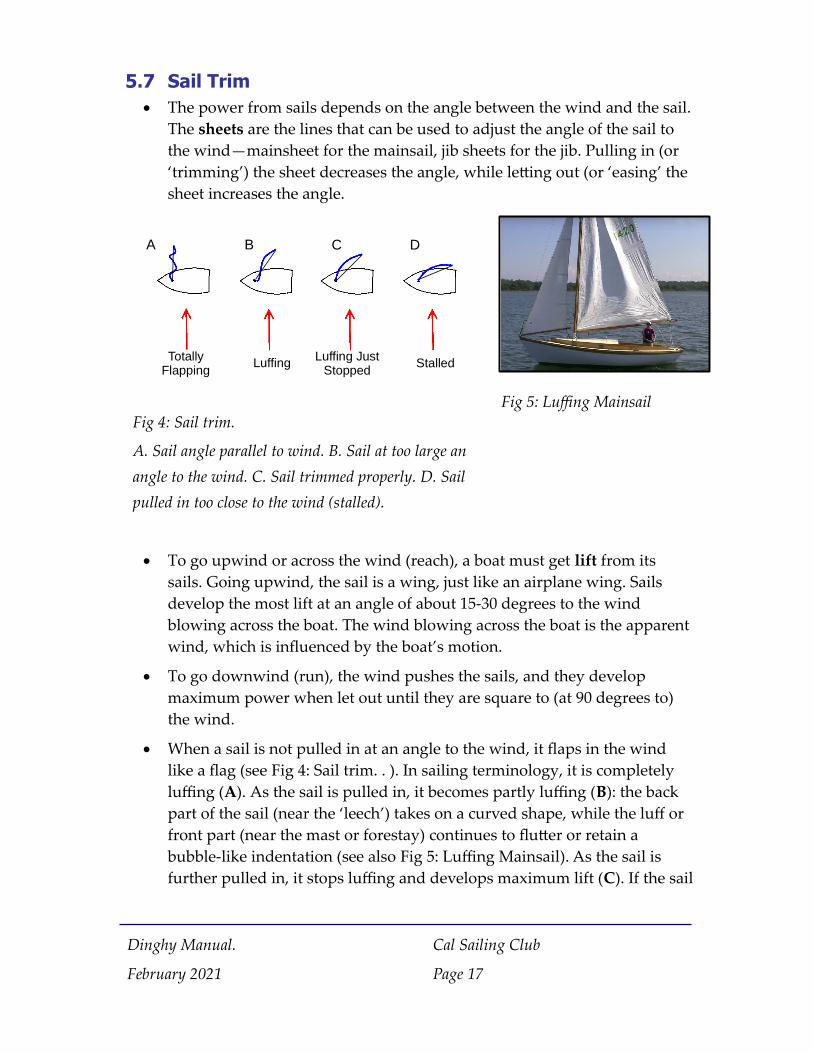
5.7 Sail Trim The power from sails depends on the angle between the wind and the sail.
The sheets are the lines that can be used to adjust the angle of the sail to the wind—mainsheet for the mainsail, jib sheets for the jib. Pulling in (or ‘trimming’) the sheet decreases the angle, while letting out (or ‘easing’ the sheet increases the angle.
To go upwind or across the wind (reach), a boat must get lift from its sails. Going upwind, the sail is a wing, just like an airplane wing. Sails develop the most lift at an angle of about 15-30 degrees to the wind blowing across the boat. The wind blowing across the boat is the apparent wind, which is influenced by the boat’s motion.
To go downwind (run), the wind pushes the sails, and they develop maximum power when let out until they are square to (at 90 degrees to) the wind.
When a sail is not pulled in at an angle to the wind, it flaps in the wind like a flag (see Fig 4: Sail trim. . ). In sailing terminology, it is completely luffing (A). As the sail is pulled in, it becomes partly luffing (B): the back part of the sail (near the ‘leech’) takes on a curved shape, while the luff or front part (near the mast or forestay) continues to flutter or retain a bubble-like indentation (see also Fig 5: Luffing Mainsail). As the sail is further pulled in, it stops luffing and develops maximum lift (C). If the sail
Dinghy Manual.
February 2021
Cal Sailing Club
Page 17
Totally Flapping
Luffing Luffing Just Stopped
Stalled
A B C D
Fig 4: Sail trim.
A. Sail angle parallel to wind. B. Sail at too large an angle to the wind. C. Sail trimmed properly. D. Sail pulled in too close to the wind (stalled).
Fig 5: Luffing Mainsail
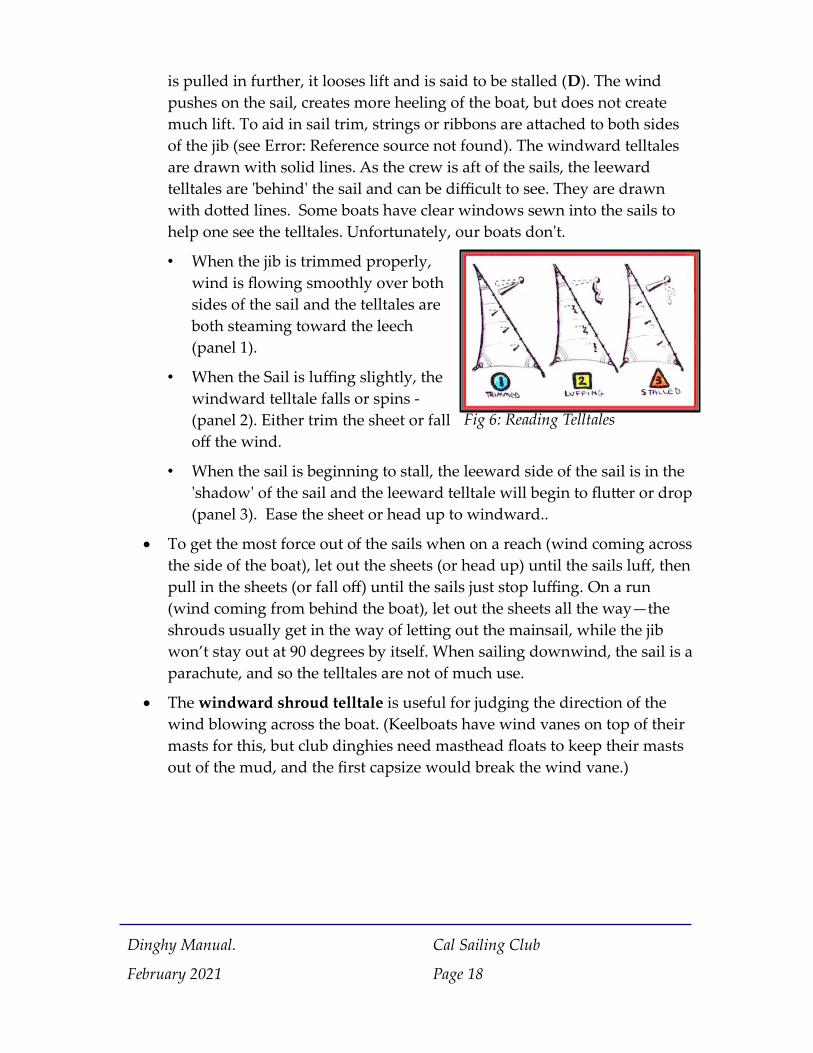
is pulled in further, it looses lift and is said to be stalled (D). The wind pushes on the sail, creates more heeling of the boat, but does not create much lift. To aid in sail trim, strings or ribbons are attached to both sides of the jib (see Error: Reference source not found). The windward telltales are drawn with solid lines. As the crew is aft of the sails, the leeward telltales are 'behind' the sail and can be difficult to see. They are drawn with dotted lines. Some boats have clear windows sewn into the sails to help one see the telltales. Unfortunately, our boats don't.
• When the jib is trimmed properly, wind is flowing smoothly over both sides of the sail and the telltales are both steaming toward the leech (panel 1).
• When the Sail is luffing slightly, the windward telltale falls or spins - (panel 2). Either trim the sheet or fall off the wind.
• When the sail is beginning to stall, the leeward side of the sail is in the 'shadow' of the sail and the leeward telltale will begin to flutter or drop (panel 3). Ease the sheet or head up to windward..
To get the most force out of the sails when on a reach (wind coming across the side of the boat), let out the sheets (or head up) until the sails luff, then pull in the sheets (or fall off) until the sails just stop luffing. On a run (wind coming from behind the boat), let out the sheets all the way—the shrouds usually get in the way of letting out the mainsail, while the jib won’t stay out at 90 degrees by itself. When sailing downwind, the sail is a parachute, and so the telltales are not of much use.
The windward shroud telltale is useful for judging the direction of the wind blowing across the boat. (Keelboats have wind vanes on top of their masts for this, but club dinghies need masthead floats to keep their masts out of the mud, and the first capsize would break the wind vane.)
Dinghy Manual.
February 2021
Cal Sailing Club
Page 18
Fig 6: Reading Telltales
6 Dinghy Sailing Maneuvers
The maneuvers described below—leaving the dock, coming about, gybing, sailing in small circles, sailing backwards, righting after a capsize, anchoring, and docking—involve skills that are absolutely necessary to safely handle a small boat. For this reason, they are included in a Junior Skipper sailing test.
The maneuvers can be done in different ways, and not all the possible ways to do them are described below. Also described below are how to deal with groundings (getting stuck in the mud) and equipment failures on the water.
6.1 Leaving the Dock Before leaving the dock, check the boat over carefully, especially:
Are all the hull drain plugs in place? This can’t be stressed too much, particularly on the Venture. Leave the dock with the hull drain plug out, and you’re in a world of hurt. Bonus tip: the hull drain plug on a Venture is below the lower rudder gudgeon, it isn’t inside the cockpit.
Is everyone's lifejacket on securely?
Is the rudder all the way down (unless it’s low tide) with the downhaul line cleated?
Always check for traffic carefully before casting off. Look for boats or windsurfers approaching the dock, as well as boats or windsurfers who are also about to cast off.
If the dock is extremely crowded with boats, you may have to sail backwards to get away. (Sailing backwards is not at all easy in all our dinghies at low tide, when the centerboard and rudder must be partway up to keep them out of the mud.)
On the Quest and Venture, the jib should be furled (rolled up) when at the dock. As you leave the dock, release the furling line (pull the skinny line out of its cleat) and pull the jib sheet to unfurl the jib.
Dinghy Manual.
February 2021
Cal Sailing Club
Page 19
6.2 Docking It’s generally best to approach the downwind side of the dock on a close
reach, so that you can ‘slow sail’ up to the dock, in good control of the boat's speed and direction.
Brief your crew well away of the dock on what they need to do: furl the jib when you tell them, step off the boat with the dock line in hand. Prepare them for a possible quick turn at the dock to bleed off speed if you come in too hot.
Start your approach from a point well downwind of the dock, so that you have plenty of room. Note the wind direction and strength at the dock, and check carefully for boats or windsurfers that may be leaving the dock. A close reach is about 60° to the true wind, so check the windsock at the dock to plan your course.
Sail to the dock in control with a small amount of speed all the time. You need speed to control the boat, but not too much. Accelerate by pulling in on the falls, brake by letting the mainsail out. Do not let your speed get to zero before you get to the dock, or your next acceleration will drive you sideways. Ideally, you'll let the mainsheet out and glide to the dock and just touch it.
If you come in too slow, you can grab the falls and "goose it" to get a little more speed to the dock. If you come in too fast, make a sharp turn just before you hit the dock. Turn into the wind. You should decide early which way to turn. If in doubt, turn away from the sea wall.
Let the crew know that they'll have to go forward to tie the boat up. If you're alone, get someone on the dock to catch your boat, come in alongside another docked boat and grasp it, or crawl forward yourself as the boat reaches the dock.
If you have a problem docking or leaving the dock, never try to gybe the boat next to the seawall. Instead, head the boat up toward the dock, even if this means drifting gently onto other boats.
6.3 Sailing upwind When you sail upwind, there's a sidways force from the sail that increases
with wind speed. The centerboard prevents the boat from going sideways, so the force tilts the boat over (heels it). As the boat heels, you need to
Dinghy Manual.
February 2021
Cal Sailing Club
Page 20
counter that force. You have three controls: your weight, the mainsheet, and the tiller. As the boat heels, you can move your weight out farther, ease the mainsheet a bit, and steer slightly higher into the wind. With experience, you'll understand how much of each to use. In most winds, you'll need to be on the side opposite the mainsail to balance the sideways wind force with your weight.
In light wind, the wind may not have enough force to hold the sail and boom over, so you'll need more weight on the leeward (downwind) side to heel the boat. You'll use gravity to pull the sail and boom over and to form the sail shape, which the light wind will then fill, and the boat will go.
Especially in lighter winds, you want to start out more downwind after a tack to build up speed before you go as high as you can to the wind.
6.4 Coming About (aka Tacking)Here’s a great video showing the steps in coming about: https://youtu.be/qEzESnb0Fu8
Be sure to check for windsurfers or other boats behind and upwind of you before coming about, or you may collide with them when you come about.
Be sure your crew is ready to come about. Call out "Ready about" and wait for their "Ready" signal before beginning; then call out "Helm's a-lee" or "Coming About" as you actually head up.
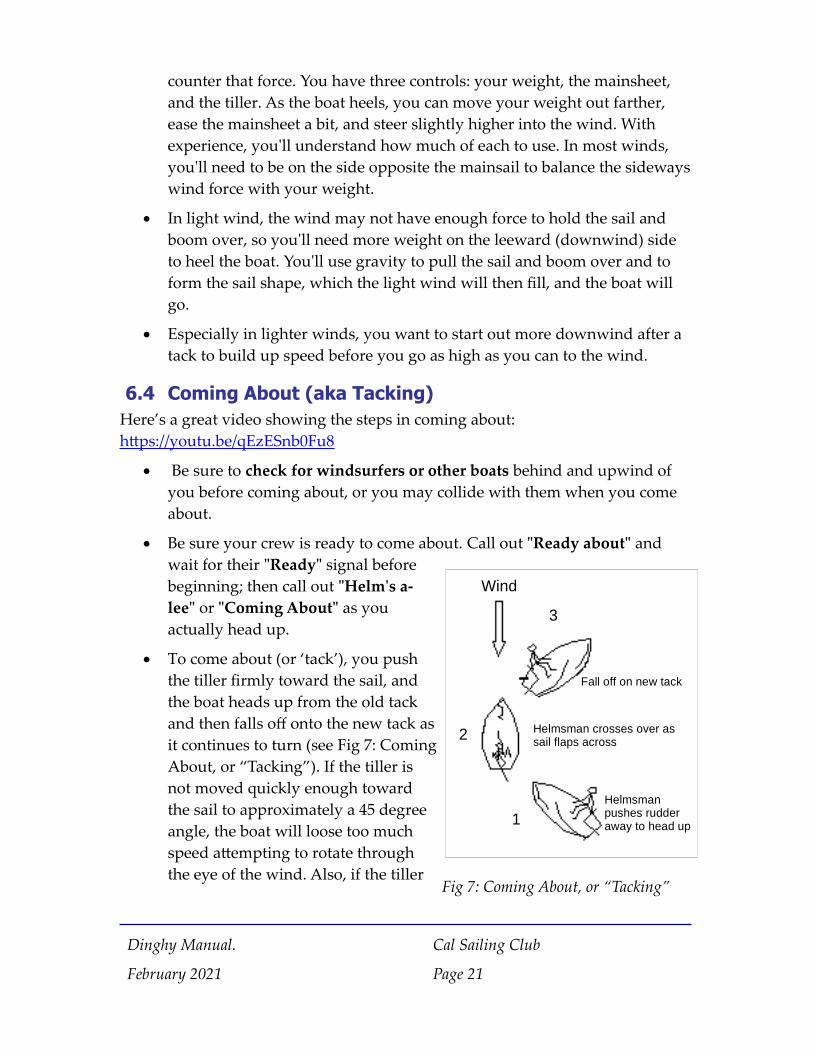
To come about (or ‘tack’), you push the tiller firmly toward the sail, and the boat heads up from the old tack and then falls off onto the new tack as it continues to turn (see Fig 7: ComingAbout, or “Tacking”). If the tiller is not moved quickly enough toward the sail to approximately a 45 degree angle, the boat will loose too much speed attempting to rotate through the eye of the wind. Also, if the tiller
Dinghy Manual.
February 2021
Cal Sailing Club
Page 21
Fig 7: Coming About, or “Tacking”
Fall off on new tack
Helmsman crosses over as sail flaps across
Helmsman pushes rudder away to head up1
2
3
Wind
is pushed more than 45 degrees over, it will act partially as a brake to the forward motion of the boat.
You should cross from one side to the other as the boom comes across, so your weight balances the boat as the sails depower and then repower on the new tack. To avoid a capsize, uncleat the mainsheet before the tack. During the tack, you can let go of the mainsheet, but don't drop the tiller.
If you are hiked out (sitting out on the rail above the seat to balance the boat in strong wind) before the come about, fold the hiking stick (tiller extension) as you come into the boat, and hold both the hiking stick and tiller together as you cross. When you get up on the rail on the other side, you can unfold the hiking stick again.
The crew should release the jib when it starts to luff, and let the wind carry it across to the other side, then bring the jib in when it starts to fill on the other tack. In very light wind, the crew can hold the jib sheet tight as the bow comes thru the wind and back fills the jib and pulls the bow across.
6.5 Heaving To Heaving to is used to stabilize the boat for offshore picnics, changing
drivers out on the water, or making adjustments to or fixing problems on the boat. To initiate the heave to maneuver, move the tiller toward the mainsail as if you were coming about.In this case, the jib is left in place and the mainsail is let out completely so that the mainsail is not repowered on the new tack. As the boat slows, work the tiller to the other side. In lighter wind, pay attention to the jib as you do this. If the jib starts to luff, center the tiller to prevent the jib from tacking back, and then slowly work it back into position. In higher winds, the boat will stop quickly, and you won't have to worry about this.
Heaving to can also be used to allow a person fallen overboard to swim back to the boat. If done immediately, heaving to keeps the boat fairly close.
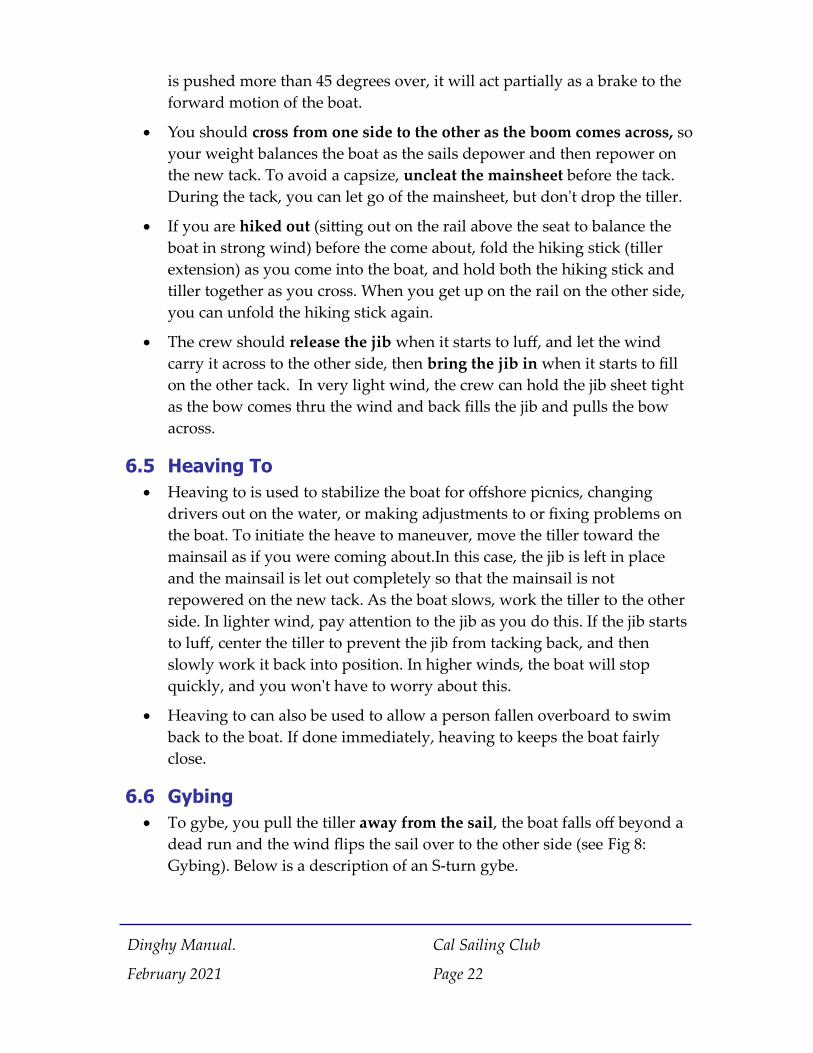
6.6 Gybing To gybe, you pull the tiller away from the sail, the boat falls off beyond a
dead run and the wind flips the sail over to the other side (see Fig 8: Gybing). Below is a description of an S-turn gybe.
Dinghy Manual.
February 2021
Cal Sailing Club
Page 22
First get the dinghy sailing on a dead run by pulling the tiller away from the sail and preparing the crew for the gybe. The jib sail will become limp as it is hidden from the wind by the mainsail. Prior to the gybe, place yourself between the tiller and the boom. Your weight should be shifting to the future windward side of the dinghy. Take the fall (the parts of the main sheet between the blocks) in your outside hand (closest to the boom). Make sure the crew is ready for the gybe. (“READY TO GYBE? HEADS DOWN!)
In higher winds it is safer to uncleat the gnav (blow the gnav). Further safety can be achieved by raising the center board.
After hearing affirmative responses from you crew, resume or continue turning the stern of the boat thru the wind. (this is the first part of the S.) As you feel the tension release from the falls, guide the boom across boat by pushing down on the falls. As the wind carries the boom across, slow the boom down with the falls, call out GYBING (gibe ho, or DUCK!!), and simultaneously move your weight to the new windward side.
Never start a gybe without warning the crew, since they could get their
Dinghy Manual.
February 2021
Cal Sailing Club
Page 23
Fig 8: Gybing
skull cracked by the boom swinging across. You should also remember to stay low during the gybe, lest the boom tell you how it got its name.
As soon as the boom goes across, pull back on the tiller to stop the turn and stay in a run. (This can be seen as the 2nd part of an S turn). It is important to prevent a broach (spinout and tip over) and capsize. Do NOT turn back too far. This will cause you to make an accidental, unexpected gybe back. This quick tiller maneuver is the key to a successful gybe. As you gybe, counter-steer the tiller a few inches to the other side of center, and then quickly center it. You need to stay downwind, and this will do it. Here are some additional suggestions:
Before gybing, you fall off (tiller away from the sail) toward a run. While on a broad reach, your weight may be needed to balance the boat, but as soon as you reach a run, move to the center of the boat. It’s best to squat so you are on your feet when gybing, rather than kneel and be caught trying to climb to your feet if the boat tips over.
The tiller can be rested against the side of your hip, butt, or thigh, so you can steer by pushing on the tiller with your body, leaving both hands free to grab the mainsheet.
You can tell when the gybe is just about to happen because the mainsheet goes slack. In heavy wind and waves, try to pull in the boom just as a wave passes underneath the boat, and gybe just as the next wave passes underneath. When the boat is moving fastest, the force on the sail is least.
6.7 Circles Around a Buoy Sailing in a small circle around a buoy requires that you do fast upwind
turns with a tack and fast downwind turns with a gybe.
Get instruction on this critical Junior maneuver, as it is quite difficult.
You may never do full circles in real life, but you may have to do fast turns with a tack or gybe to avoid a collision.
6.8 Steering While Drifting Backwards Steering while the dinghy drifts backwards is required to leave a crowded
dock, and can be useful to recover control if you stop while coming about.
When the boat is drifting backwards, the tiller works the opposite way compared to when the boat is sailing forwards. If you move the tiller to
Dinghy Manual.
February 2021
Cal Sailing Club
Page 24
port, the bow moves to port.
When sailing backwards, it can help to face backwards, as you're steering the stern and it's a lot clearer how you do it.To practice steering while drifting backward, head up until the boat is in irons. Let it coast to a stop while in irons. The bubbles in the water alongside the boat will indicate when you start to drift backwards.
When you start going backwards, steer to keep the boom over the middle of the boat. You have to keep the sails from filling, which would cause the boat to sail forward.
If the boom swings to one side, swing the tiller toward the opposite side, so that the rudder will push the stern back underneath the boom. At first, you will have to hold the tiller hard over to get any effect, but as the boat drifts faster less tiller movement will be necessary. If you face backwards, you will find that the line of the tiller will indicate the direction the stern will take as the boat drifts backwards.
6.9 Man Overboard Drill When a person falls off a boat, it’s critically important to keep them in
sight so you don't lose them. Assign someone to watch them.
To pick them up safely, the boat must be going slowly enough that they can be brought in.
The man overboard drill (the man overboard is two plastic jugs tied together) tests these skills, as well as the skills for docking safely. The drill requires sailing slowly with good control, which is the right way to dock a boat.
To go slowly with good control, a boat must be on a close reach with the sails partly luffing.
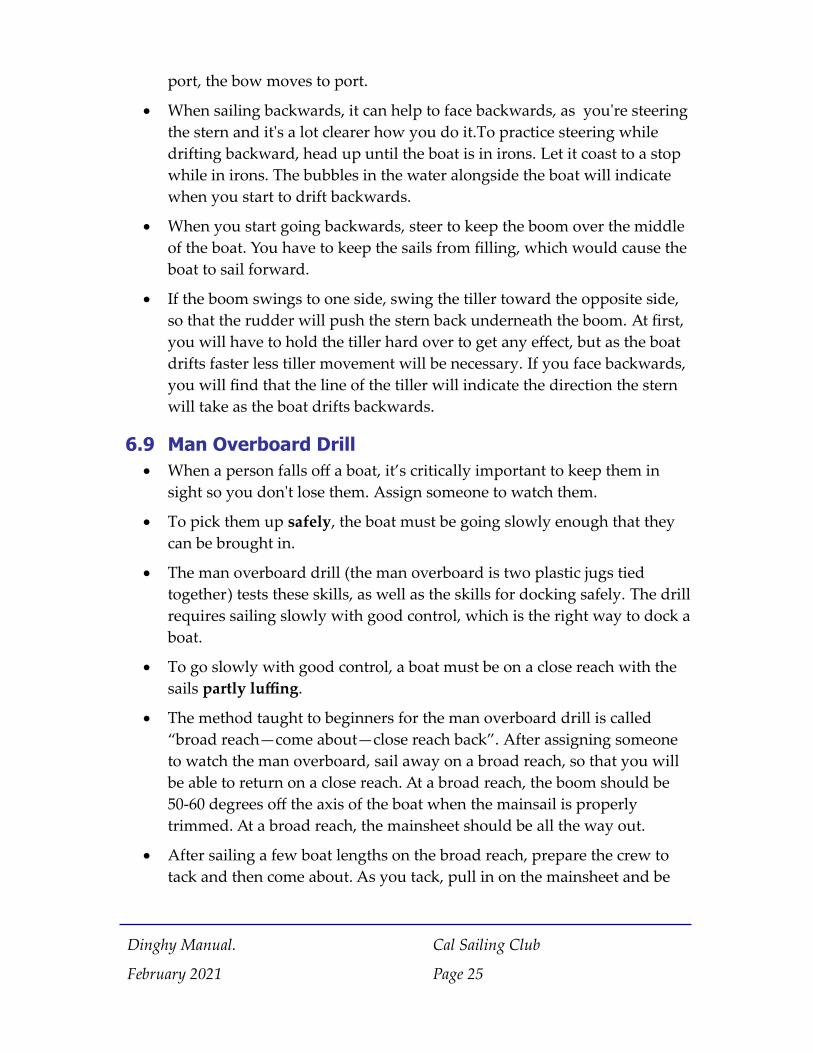
The method taught to beginners for the man overboard drill is called “broad reach—come about—close reach back”. After assigning someone to watch the man overboard, sail away on a broad reach, so that you will be able to return on a close reach. At a broad reach, the boom should be 50-60 degrees off the axis of the boat when the mainsail is properly trimmed. At a broad reach, the mainsheet should be all the way out.
After sailing a few boat lengths on the broad reach, prepare the crew to tack and then come about. As you tack, pull in on the mainsheet and be
Dinghy Manual.
February 2021
Cal Sailing Club
Page 25
ready to hike out in higher winds as the boat heels.
If you went to a broad reach, you'll be on a close reach pointing at the MOB. Test it by letting the sheets out and seeing if you get a strong luff in the sail, and by sheeting in on the falls to see if you can accelerate. If both of these happen, just slow sail to the MOB. If not, you'll have to correct.Then fall off to a close reach. On the new course, the boom should be at about 45 degrees to the boat when the main is trimmed and will luff if you turn up further into the wind.
Tell the crew to furl the jib (or on JY15, ease the jib sheet) when you're within about 20 feet from the man overboard.
As you approach, keep the boat pointed at the man overboard, or a little upwind to compensate for sideslip from wind and waves. The boat should come to a near stop with the man overboard on the upwind side.
6.10 Avoiding Capsizes Capsizes can almost always be prevented. If the boat gets really
overpowered, let the sheets out (fastest response), hike out, or head up into the wind.
Always keep the mainsheet handy so you can immediately release it if the boat heels suddenly in a gust. Always be ready to move your weight suddenly if necessary, and scramble for the high side if the boat heels suddenly.
Never sail with the boat heeled over so far that it's only an inch or two away from taking on water That not only puts you closer to a capsize but also slows you down. Head up a little and let the sails luff more.
If you do capsize, keep calm and plan your actions so you'll be back sailing more quickly. Never swim away from the boat or cling to the high side of a capsized boat.
6.11 Recovering from a Capsize First check that everyone is OK.
No one should leave the boat to swim after any paddles or clothing.
No one should climb over the top until the other tasks below are completed.
Dinghy Manual.
February 2021
Cal Sailing Club
Page 26
6.11.1 Before righting the boat
Uncleat all the sheets
It's best to point the bow into the wind by holding onto the bow while you float in the water. Because your body acts as a sea anchor, the wind will push the hull downwind. If you’re alone, hold the bow to point it into the wind, then quickly get onto the centerboard. If you’re out with crew, assign one person to hold the bow while another rights the boat.
If it’s really windy, anchor. Anchoring makes sure the hull won’t float away from anyone faster than they can swim. Anchoring also points the bow into the wind.
In very windy conditions it is also advisable to lower the sails or loosen the gnav or vang BEFORE righting. Loosening the gnav or vang completely will allow the mainsail to spill most of the wind which will make it easier to right the boat and keep it upright. Lowering the sails is even more effective, but requires more time to accomplish and to raise the sails again afterwards.
When single-handing, anchor the boat to avoid having it sail away without you after you right it.
Make sure the boom end is not stuck in the mud. It may be necessary to pull in the mainsheet to raise the boom to check. If the boom is lodged in the mud, the boat can't be easily righted. Pulling in the mainsheet will help pull the boom end out of the mud. Then cleat in the mainsheet partway to prevent the boom falling back into the mud.
Anyone not needed to point the bow into the wind or to right the boat can float between the hull and the boom, holding onto a hiking strap (but not putting any weight on the hull). As the boat comes upright, they should pull themselves into the cockpit using the hiking strap.
Next make sure all the sheets are uncleated.
To right the dinghy, stand on the centerboard and pull on the hull to tip it back upright.
6.11.2 Righting the boat
To get into position on the centerboard, climb up the hiking straps inside the cockpit, then onto the mast and up over the hull onto the centerboard. Or, while your crew holds the painter, swim over to the centerboard, and
Dinghy Manual.
February 2021
Cal Sailing Club
Page 27
climb up onto it.
Here’s a video of someone doing this at the dock, without going into the water (this is called a “dry capsize”): https://photos.google.com/share/AF1QipNQuIcxHyUyTjsFBxg1h0rNX6nWq4C4gR7Fnr8rf5CuFyUS29IQdjVzXHD8gmI30w/photo/AF1QipM2Og6O7wIS74H7vicpdddftVfbrth9OVRCLFPF?key=bTlGcjhqU0Y1UWlvQWp5N3BZU25zbUdvNlFYSHh3
On the Venture, there’s a righting line you can pull on to right the boat. It’s under the rail. On the Quest, you can pull on a jibsheet, but make sure you are pulling on the part that leads to the stopper knot, not the part that leads to the sail.
Once you have leaned back while standing on the centerboard, it may take a few seconds before your weight can break the sails free of the water.
It’s OK to step out on the centerboard. Putting all your weight on the centerboard isn’t as much stress as the centerboard normally bears while sailing in strong wind. But don't jump up and down on the centerboard; it could break it.
If you have trouble righting the boat, release the gnav or vang control line, or uncleat the main halyard and pull down the sail. Furl or lower the jib as well. Having the gnav or vang completely released, or taking the sails down makes the boat much easier to right and keep upright because the wind can more easily spill from the mainsail.
If the boat capsizes with the mast downwind, righting the boat slowly will cause the boat to head up towards the wind as the boat rights, and you can cause the boat to end up upright, on a close reach, with the sails luffing. Righting the boat too quickly can cause the boat to end up upright on a beam reach with the sails full, which causes the boat to heel and can result in a capsize.
If the boat capsizes with the mast upwind of the hull, the best course for a beginning sailor is to (have your crew) hold the bow painter until the capsized boat drifts around so the bow points directly upwind, then right the boat. More advanced sailors can try this: Right the boat with the mast still upwind of the hull (WATCH YOUR HEAD, WEAR A HELMET), but get in the boat earlier than you would when the mast is downwind of the hull. If you get in with your leg over, you can get to the center of the boat
Dinghy Manual.
February 2021
Cal Sailing Club
Page 28
before the boom leaves the water and crouch as it comes over. This can allow you to avoid having to hold the bow painter so the capsized hull drifts around so the bow points upwind, but still stop a recapsize after the boat rights.
6.12 Anchoring The anchor line should always be tied to the boat and should be laid
neatly so that the anchor is always ready for use. Anchor if you capsize near the rocks, if the boat breaks, or if you are having any trouble righting after a capsize.
The anchor should be let down over the side, not thrown. Make sure to let down the anchor in front of the shrouds on the side where it's rigged (opposite the jib furling line). Take care not to wrap the anchor line around the forestay or mast. In addition, make sure the anchor line is free of the jib sheets, shrouds, or bow painter. Play the anchor out slowly.
Once the anchor is resting on the bottom, let the line out slowly as the boat drifts down wind so that the line cannot kink or knot between you and the anchor. Once you’ve let out about twenty feet of anchor line (so that the line enters the water at a 45 degree angle), pull sharply on the line to set the anchor and to test that it is holding. If the anchor doesn’t grip, pull it back in, check for a snagged line, and let it out again. If it grips, let out the rest of the line as the dinghy continues to drift downwind until the anchor line is fully extended.
To make sure that you are not dragging the anchor, site two stationary objects that are appear next to each other and that are roughly perpendicular to the direction you may be drifting. It is important that one of the objects is actually closer to you than the other. If the objects seem to be moving relative to one another, you are drifting and you should try again to set the anchor. If necessary, you may need to pull in the anchor, make sure it is not covered with seaweed or otherwise fouled before trying to anchor again.
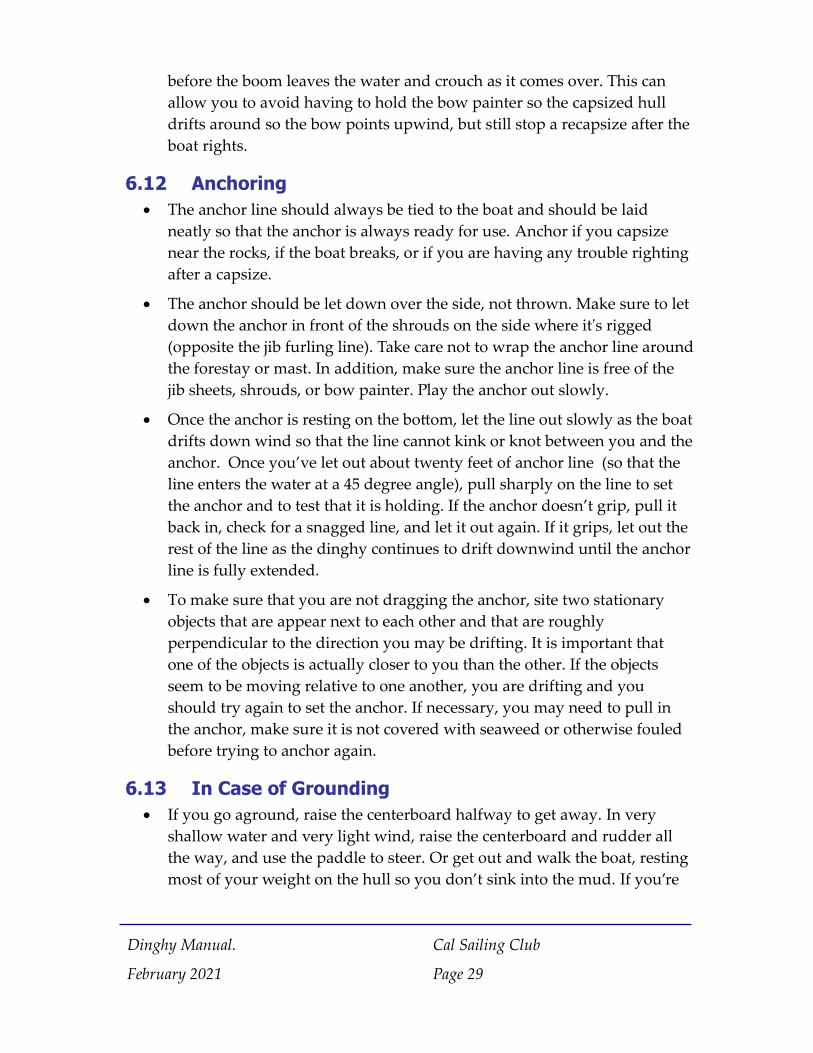
6.13 In Case of Grounding If you go aground, raise the centerboard halfway to get away. In very
shallow water and very light wind, raise the centerboard and rudder all the way, and use the paddle to steer. Or get out and walk the boat, resting most of your weight on the hull so you don’t sink into the mud. If you’re
Dinghy Manual.
February 2021
Cal Sailing Club
Page 29
near the rocks, don’t get out unless you’re wearing foot gear, the rocks can cut up bare feet. In strong wind and big waves or if there's a risk of going on the rocks, put out the anchor and signal for a tow. You will probably need to get out and fetch a line thrown to you by the skiff, which will have to anchor in deeper water in order to rescue you.
6.14 Equipment Failure If any club equipment breaks while you are sailing, return to the dock
immediately and fix it as soon as possible (see section on Repairs). If you can't sail back, anchor and try to fix it; if you can’t fix it, then signal for a tow.
The distress signal consists of standing up and waving your arms up and down at your sides. To get a tow from the rescue skiff, you should tie the bow painter to the skiff's tow line with bowline knots. Raise your centerboard before being towed.
Dinghy Manual.
February 2021
Cal Sailing Club
Page 30
7 Knots
Note—really good animated knots:
http://www.animatedknots.com
Note—really good video about a knot:
https://www.youtube.com/watch?v=TUHgGK-tImY
7.1 Bowline Pronounced bo'-linn, this is the most useful knot for sailors, since it forms
a loop that will not slip or jam, and can be untied easily even after being used for heavy loads.
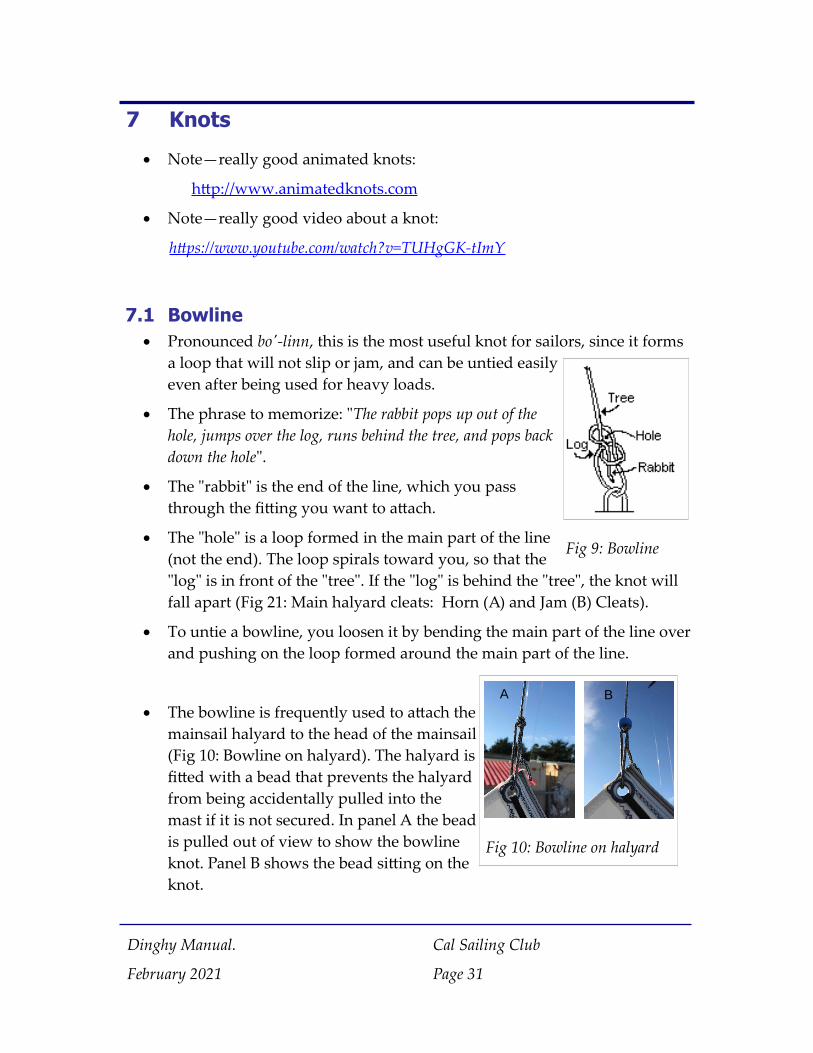
The phrase to memorize: "The rabbit pops up out of the hole, jumps over the log, runs behind the tree, and pops back down the hole".
The "rabbit" is the end of the line, which you pass through the fitting you want to attach.
The "hole" is a loop formed in the main part of the line (not the end). The loop spirals toward you, so that the "log" is in front of the "tree". If the "log" is behind the "tree", the knot will fall apart (Fig 21: Main halyard cleats: Horn (A) and Jam (B) Cleats).
To untie a bowline, you loosen it by bending the main part of the line over and pushing on the loop formed around the main part of the line.
The bowline is frequently used to attach the mainsail halyard to the head of the mainsail (Fig 10: Bowline on halyard). The halyard is fitted with a bead that prevents the halyard from being accidentally pulled into the mast if it is not secured. In panel A the bead is pulled out of view to show the bowline knot. Panel B shows the bead sitting on the knot.
Dinghy Manual.
February 2021
Cal Sailing Club
Page 31
Fig 10: Bowline on halyard
A B
Fig 9: Bowline
7.2 Bead knot
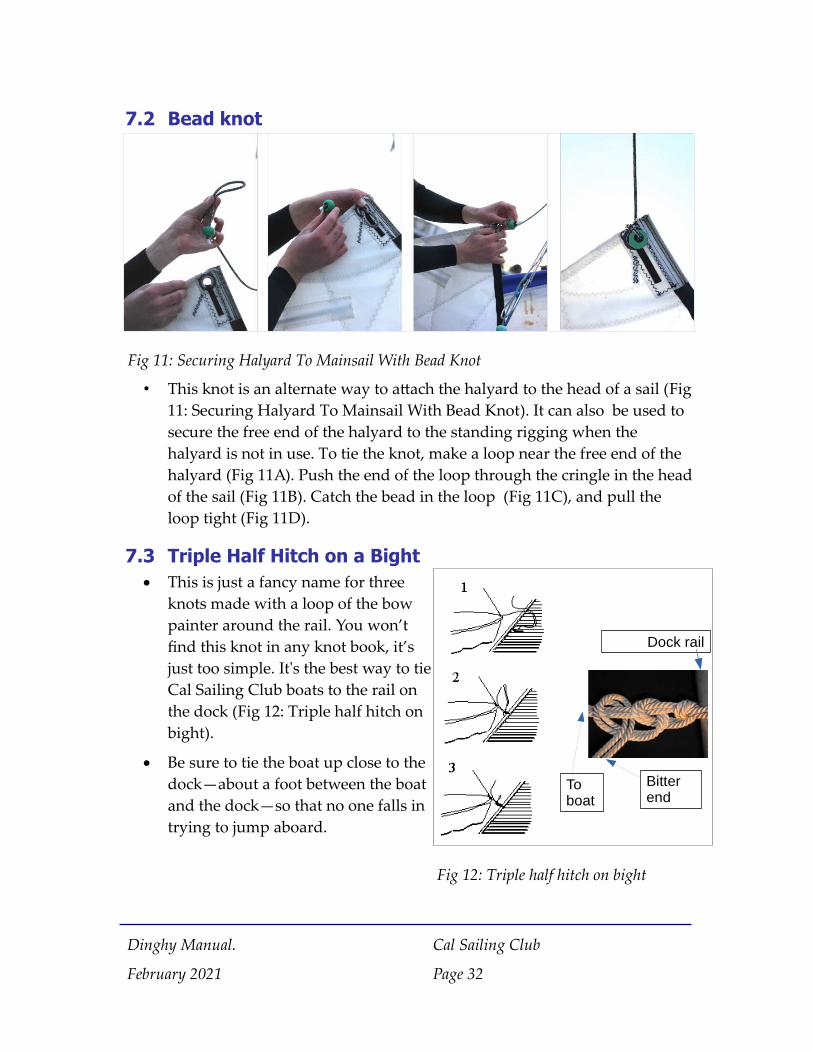
• This knot is an alternate way to attach the halyard to the head of a sail (Fig11: Securing Halyard To Mainsail With Bead Knot). It can also be used to secure the free end of the halyard to the standing rigging when the halyard is not in use. To tie the knot, make a loop near the free end of the halyard (Fig 11A). Push the end of the loop through the cringle in the head of the sail (Fig 11B). Catch the bead in the loop (Fig 11C), and pull the loop tight (Fig 11D).
7.3 Triple Half Hitch on a Bight This is just a fancy name for three
knots made with a loop of the bow painter around the rail. You won’t find this knot in any knot book, it’s just too simple. It's the best way to tie Cal Sailing Club boats to the rail on the dock (Fig 12: Triple half hitch on bight).
Be sure to tie the boat up close to the dock—about a foot between the boat and the dock—so that no one falls in trying to jump aboard.
Dinghy Manual.
February 2021
Cal Sailing Club
Page 32
Fig 12: Triple half hitch on bight
Dock rail
To boat
Bitter end
Fig 11: Securing Halyard To Mainsail With Bead Knot

7.4 Cleat Hitch The cleat hitch is the best way to tie a line
around a cleat to secure the halyards (Fig 13: Cleat hitch). First loop the line around the cleat, then diagonally over it.
Next form a loop in the end of the line, and slip the loop over the cleat, twisting the loop so that the end of the line is trapped under a diagonal across the cleat. This is a “locking hitch” that keeps the line from coming undone. When securing a halyard to a cleat on the mast, he locking hitch should be on the upper horn of the cleat so that gravity holds it on rather than pulling it off the cleat.
You should end up with the line crossing the cleat twice in one diagonal direction underneath another diagonal crossing in the other direction.
Good video on cleat hitch: https://www.youtube.com/watch?v=KaF9lFn0Inw
7.5 Figure Eight Knot• This knot is used as a stopper in the end of the
mainsheet and each jib sheet (Fig 14: Figure eight). Make a loop, then take the end around the main part of the line before bringing it through the loop. Stopper knots are most easily untied by bending over the main part of the line, then pushing the loop to loosen the knot.
7.6 Reef Knot• This is the trusty square knot of Scouting fame. In a reef knot, you cross
the lines one way for the first knot, then the other way for the second knot (Fig 15: Reef knot). In an ordinary double knot (also called a granny knot) you cross them the same way both times. The reef knot is more reliable and can be untied easily even after carrying a heavy load. Just pull one end against the main part of the line nearest it.
Dinghy Manual.
February 2021
Cal Sailing Club
Page 33
Fig 15: Reef knot
Fig 13: Cleat hitch
Fig 14: Figure eight
The reef knot should not be used to tie two lines under varying loads, as it can come undone easily when the lines slacken. Instead, use a knot with the word "bend" in its name.
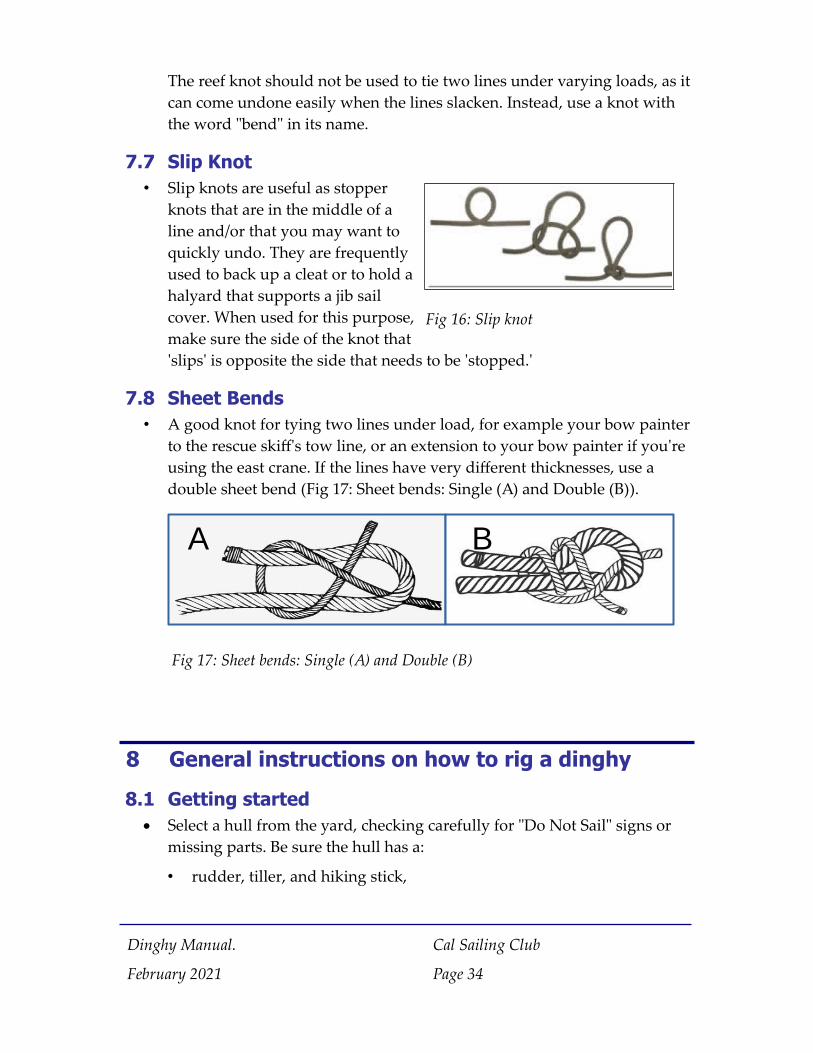
7.7 Slip Knot• Slip knots are useful as stopper
knots that are in the middle of a line and/or that you may want to quickly undo. They are frequently used to back up a cleat or to hold a halyard that supports a jib sail cover. When used for this purpose, make sure the side of the knot that 'slips' is opposite the side that needs to be 'stopped.'
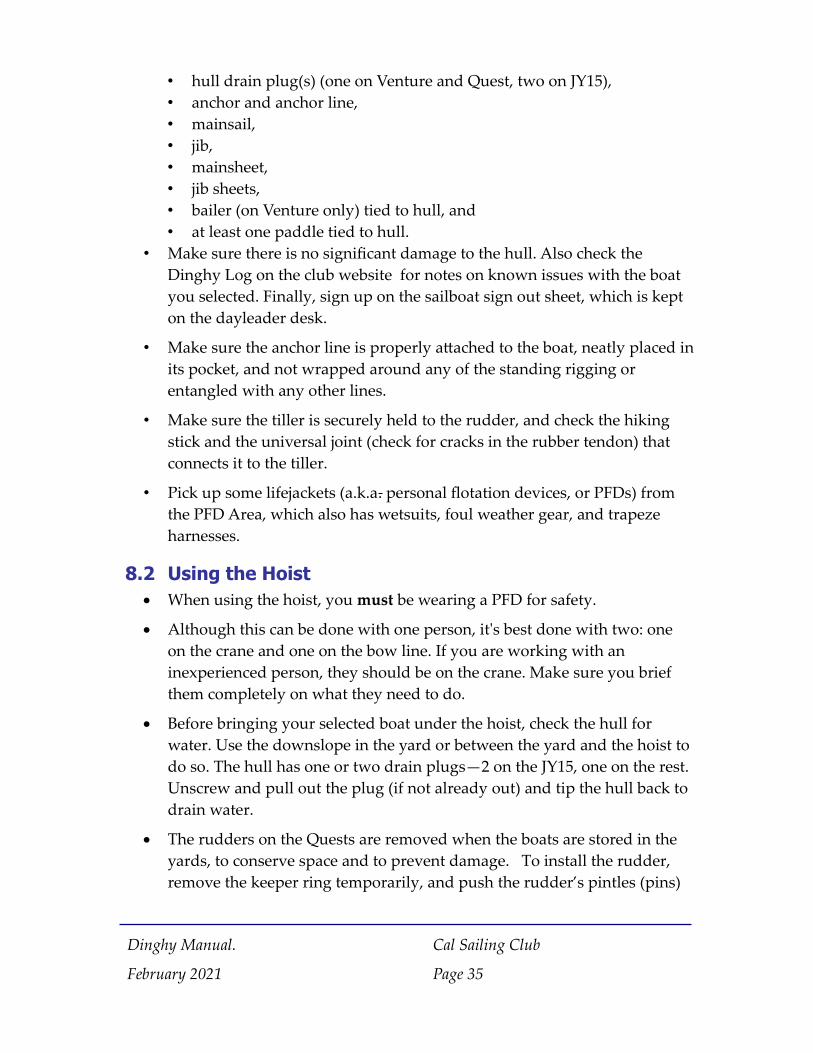
7.8 Sheet Bends• A good knot for tying two lines under load, for example your bow painter
to the rescue skiff's tow line, or an extension to your bow painter if you're using the east crane. If the lines have very different thicknesses, use a double sheet bend (Fig 17: Sheet bends: Single (A) and Double (B)).
8 General instructions on how to rig a dinghy
8.1 Getting started Select a hull from the yard, checking carefully for "Do Not Sail" signs or
missing parts. Be sure the hull has a:
• rudder, tiller, and hiking stick,
Dinghy Manual.
February 2021
Cal Sailing Club
Page 34
Fig 16: Slip knot
Fig 17: Sheet bends: Single (A) and Double (B)
A B
• hull drain plug(s) (one on Venture and Quest, two on JY15), • anchor and anchor line, • mainsail, • jib, • mainsheet, • jib sheets, • bailer (on Venture only) tied to hull, and • at least one paddle tied to hull.
• Make sure there is no significant damage to the hull. Also check the Dinghy Log on the club website for notes on known issues with the boat you selected. Finally, sign up on the sailboat sign out sheet, which is kept on the dayleader desk.
• Make sure the anchor line is properly attached to the boat, neatly placed in its pocket, and not wrapped around any of the standing rigging or entangled with any other lines.
• Make sure the tiller is securely held to the rudder, and check the hiking stick and the universal joint (check for cracks in the rubber tendon) that connects it to the tiller.
• Pick up some lifejackets (a.k.a. personal flotation devices, or PFDs) from the PFD Area, which also has wetsuits, foul weather gear, and trapeze harnesses.
8.2 Using the Hoist When using the hoist, you must be wearing a PFD for safety.
Although this can be done with one person, it's best done with two: one on the crane and one on the bow line. If you are working with an inexperienced person, they should be on the crane. Make sure you brief them completely on what they need to do.
Before bringing your selected boat under the hoist, check the hull for water. Use the downslope in the yard or between the yard and the hoist to do so. The hull has one or two drain plugs—2 on the JY15, one on the rest. Unscrew and pull out the plug (if not already out) and tip the hull back to drain water.
The rudders on the Quests are removed when the boats are stored in the yards, to conserve space and to prevent damage. To install the rudder, remove the keeper ring temporarily, and push the rudder’s pintles (pins)
Dinghy Manual.
February 2021
Cal Sailing Club
Page 35
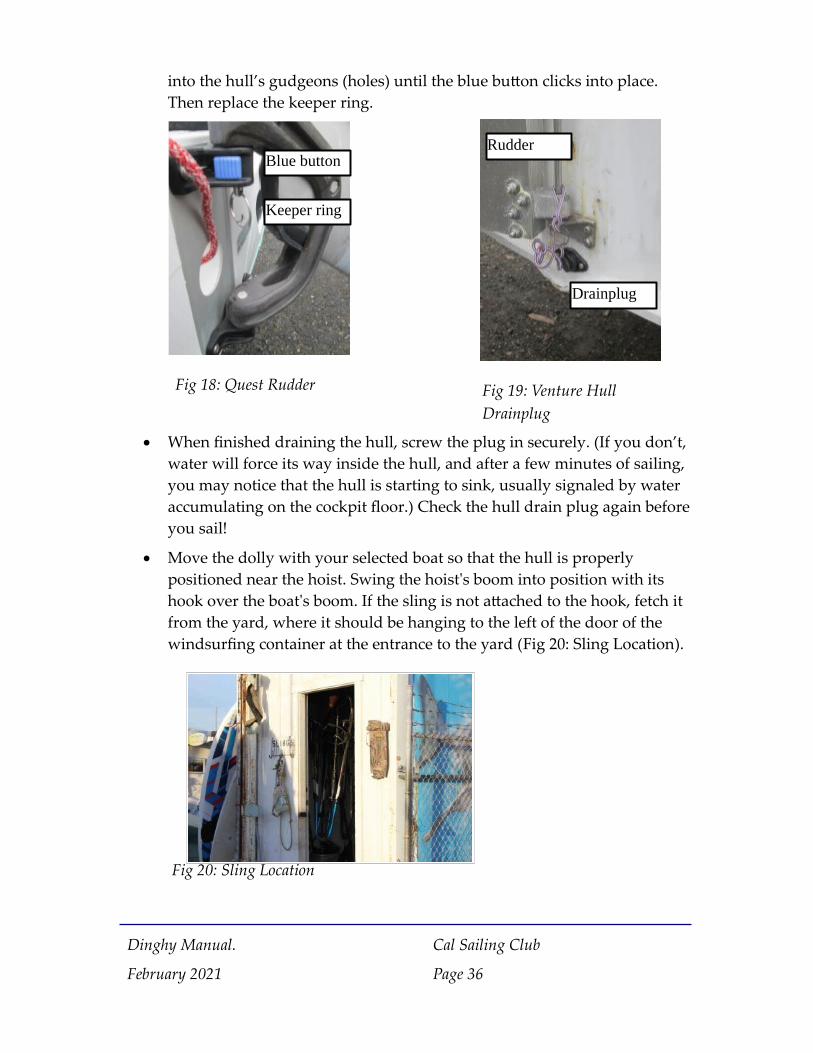
into the hull’s gudgeons (holes) until the blue button clicks into place. Then replace the keeper ring.
When finished draining the hull, screw the plug in securely. (If you don’t, water will force its way inside the hull, and after a few minutes of sailing, you may notice that the hull is starting to sink, usually signaled by water accumulating on the cockpit floor.) Check the hull drain plug again before you sail!
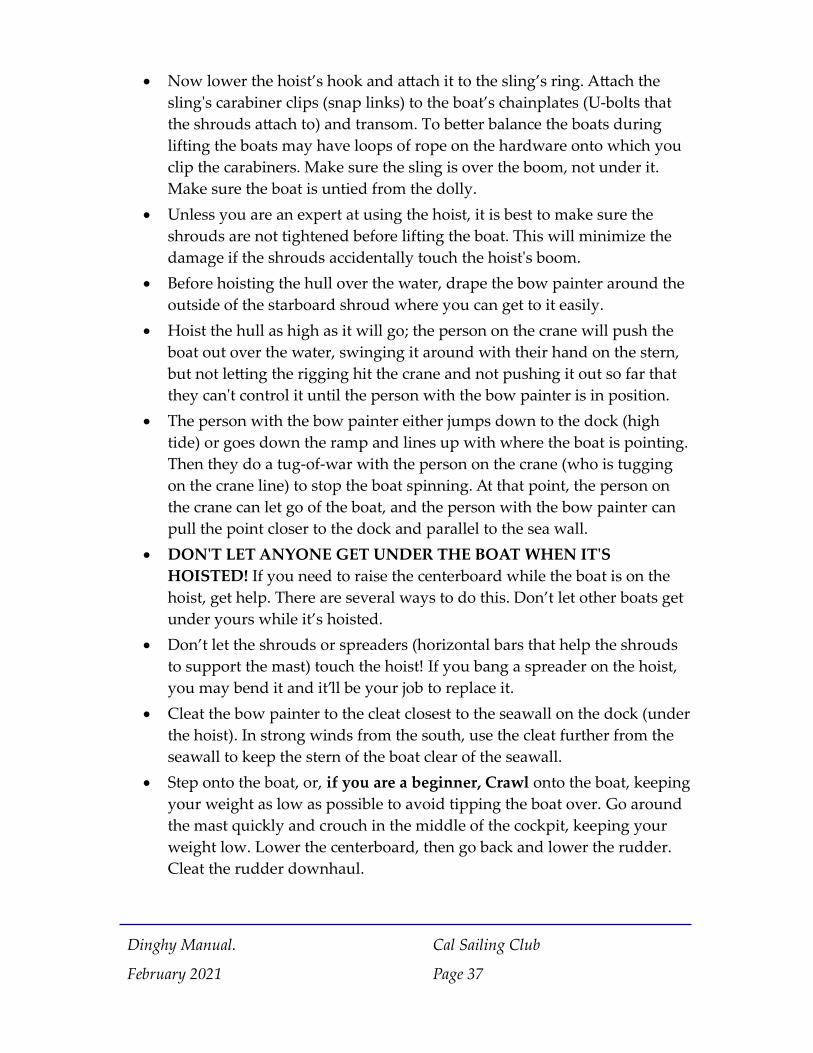
Move the dolly with your selected boat so that the hull is properly positioned near the hoist. Swing the hoist's boom into position with its hook over the boat's boom. If the sling is not attached to the hook, fetch it from the yard, where it should be hanging to the left of the door of the windsurfing container at the entrance to the yard (Fig 20: Sling Location).
Dinghy Manual.
February 2021
Cal Sailing Club
Page 36
Fig 20: Sling Location
Fig 18: Quest Rudder
Blue button
Keeper ring
Fig 19: Venture Hull Drainplug
Rudder
Drainplug
Now lower the hoist’s hook and attach it to the sling’s ring. Attach the sling's carabiner clips (snap links) to the boat’s chainplates (U-bolts that the shrouds attach to) and transom. To better balance the boats during lifting the boats may have loops of rope on the hardware onto which you clip the carabiners. Make sure the sling is over the boom, not under it. Make sure the boat is untied from the dolly.
Unless you are an expert at using the hoist, it is best to make sure the shrouds are not tightened before lifting the boat. This will minimize the damage if the shrouds accidentally touch the hoist's boom.
Before hoisting the hull over the water, drape the bow painter around the outside of the starboard shroud where you can get to it easily.
Hoist the hull as high as it will go; the person on the crane will push the boat out over the water, swinging it around with their hand on the stern, but not letting the rigging hit the crane and not pushing it out so far that they can't control it until the person with the bow painter is in position.
The person with the bow painter either jumps down to the dock (high tide) or goes down the ramp and lines up with where the boat is pointing. Then they do a tug-of-war with the person on the crane (who is tugging on the crane line) to stop the boat spinning. At that point, the person on the crane can let go of the boat, and the person with the bow painter can pull the point closer to the dock and parallel to the sea wall.
DON'T LET ANYONE GET UNDER THE BOAT WHEN IT'S HOISTED! If you need to raise the centerboard while the boat is on the hoist, get help. There are several ways to do this. Don’t let other boats get under yours while it’s hoisted.
Don’t let the shrouds or spreaders (horizontal bars that help the shrouds to support the mast) touch the hoist! If you bang a spreader on the hoist, you may bend it and it’ll be your job to replace it.
Cleat the bow painter to the cleat closest to the seawall on the dock (under the hoist). In strong winds from the south, use the cleat further from the seawall to keep the stern of the boat clear of the seawall.
Step onto the boat, or, if you are a beginner, Crawl onto the boat, keeping your weight as low as possible to avoid tipping the boat over. Go around the mast quickly and crouch in the middle of the cockpit, keeping your weight low. Lower the centerboard, then go back and lower the rudder. Cleat the rudder downhaul.
Dinghy Manual.
February 2021
Cal Sailing Club
Page 37
If the tide is low, only lower the centerboard and rudder partway. Lower them until they hit the mud, then raise them an inch or two above the mud. Lower them all the way once the boat is out in deep enough water. IMPORTANT: You can break the rudder if it’s not down all the way.
Now take off the sling and crawl back off the boat.
Raise the sling back up to the top of the hoist.
Move your boat down the dock. The last third of the dock is reserved for windsurfers. Secure the boat as far out on the two-thirds section of the dock reserved for dinghies and at a safe distance from other dinghies that are already tied up. Don’t leave the boat under the hoist when others are waiting to use the hoist.
8.3 Before casting off Double check to make sure the hull drains are properly fastened and that
the hull is not taking on water!
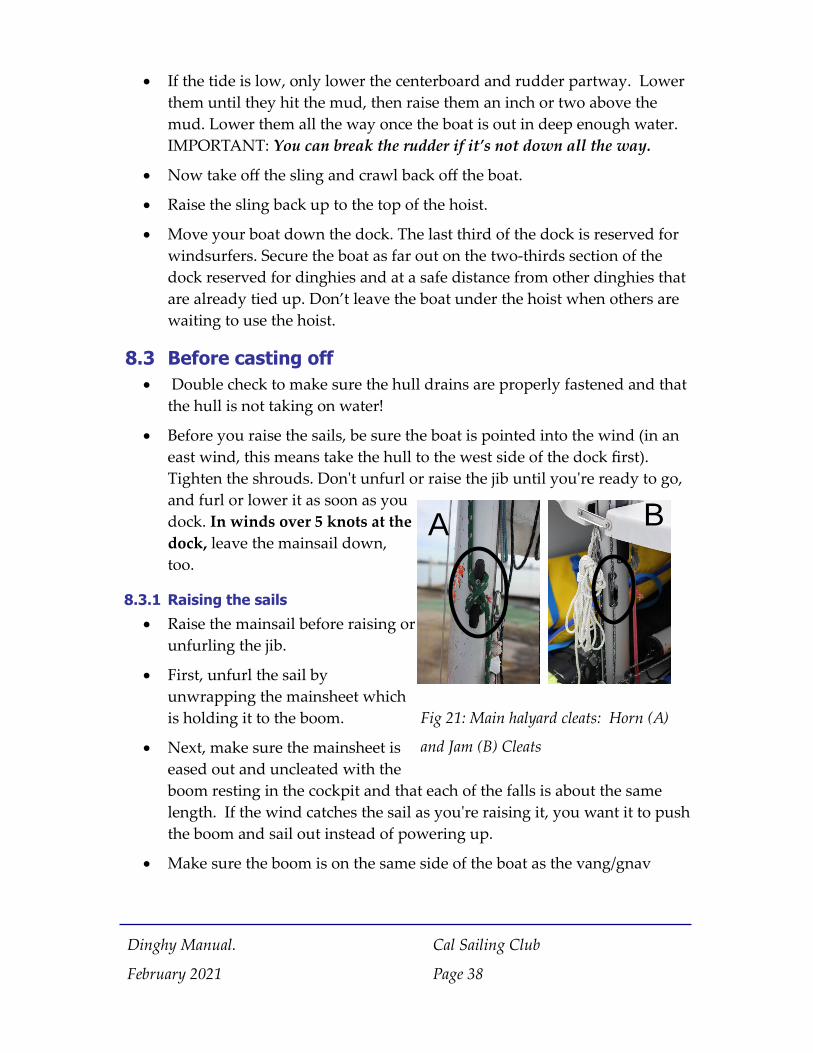
Before you raise the sails, be sure the boat is pointed into the wind (in an east wind, this means take the hull to the west side of the dock first). Tighten the shrouds. Don't unfurl or raise the jib until you're ready to go, and furl or lower it as soon as you dock. In winds over 5 knots at the dock, leave the mainsail down, too.
8.3.1 Raising the sails
Raise the mainsail before raising or unfurling the jib.
First, unfurl the sail by unwrapping the mainsheet which is holding it to the boom.
Next, make sure the mainsheet is eased out and uncleated with the boom resting in the cockpit and that each of the falls is about the same length. If the wind catches the sail as you're raising it, you want it to push the boom and sail out instead of powering up.
Make sure the boom is on the same side of the boat as the vang/gnav
Dinghy Manual.
February 2021
Cal Sailing Club
Page 38
Fig 21: Main halyard cleats: Horn (A)
and Jam (B) Cleats
A B
fitting is bolted onto the mast. Otherwise, the vang/gnav fitting will cross the mast track and the sail might catch in it as you're raising it.
Check that the “CORVA” lines are loose. CORVA stands Cunningham, Outhaul, Reefing, and Vang/Gnav Adjuster.
✔ The Cunningham should be totally loose or not attached to the grommet just above the tack of the sail. You don't want to fight the Cunningham when you are raising the mainsail.
✔ The Outhaul is eased and uncleated so that the foot of the sail remains slack and the tack (and entire luff) can move forward toward the mast. This allows the bolt rope or the slugs to slide easily in the mast slot.
✔ Similarly, the Reefing lines are loose and not cleated as they will pull the sail down toward the boom.
✔ To relax the leech of the sail, the Vang/gnav Adjuster should be eased out and uncleated.
If these adjustments are not loosened, they may prevent you from raising the mainsail completely.
Even if you wish to reef the mainsail, the lines should remain relaxed until the mainsail is nearly up (see reefing below). As you raise the mainsail, you may have to stop, lower an inch or two, and raise again to get the sail’s plastic batten pocket ends past the gnav. If it's hard to raise all the way, recheck the CORVA controls to make sure they have not accidentally recleated themselves.
For dinghy specific information on raising the mainsail (see section 9.2.1 Raising the Mainsail).
8.3.2 Reefing
Reef the mainsail if the wind speed is so high and/or the crew's weight is so low that you can’t keep the boat from heeling excessively on a close reach, even with the mainsail luffing at times. This is a judgement call, as it depends on your skill and crew weight and competence. You can always heave-to and reef on the water.
Don’t luff the mainsail continually, it damages the cloth. Reef instead—you can easily unreef when the wind comes down or you turn downwind.
Dinghy Manual.
February 2021
Cal Sailing Club
Page 39
8.3.3 Taking Over A Pre-Rigged Boat
If you take over a boat someone else rigged, check their job carefully.
Are the drain plugs securely in place? If it’s a Venture, check the drain plug three times. It’s under the rudder in back. A drain plug left out can mean a sunk boat, a long tow back to the dock, and a lot of time draining the hull.
Is the anchor line properly attached and free to run out without getting caught in the rigging or entangled with any other lines?
Is the paddle properly stowed? It should be tied to the hull.
Make sure the tiller is securely held to the rudder, and check the hiking stick and the universal joint (check for cracks in the rubber tendon) that connects it to the tiller.
Ask the person who had rigged the boat whether there were any issues they had noticed.
Check the Dinghy Log on the club website for notes on known issues with the boat you selected.
Finally, sign up on the sailboat sign out sheet.
8.3.4 Casting off
• Once you have prepared the boat for sailing with the centerboard and rudder down, the mainsail hoisted, and all the CORVA lines properly set for the wind conditions, you are ready to cast off.
• The maneuvers can be done in different ways, and not all the possible ways to do them are described below. Also described below are how to deal with groundings (getting stuck in the mud) and equipment failures on the water (see section 6.1 Leaving the Dock).
• Cast off and have fun!
8.4 Derigging First dock the dinghy (see 6.2 Docking).
If someone else wants your boat when you're done, be sure to sign it back in and make sure they sign it out. Otherwise you're responsible for derigging it and putting it away properly.
Lower the mainsail and raise the centerboard and rudder and cleat their
Dinghy Manual.
February 2021
Cal Sailing Club
Page 40
uphauls. Get the dolly under the hoist before you lift the hull.
Make sure you have the right dolly! Dollies for RS Quests have upright arms that support the rails of the hull at about its middle. Dollies for RS Ventures have no uprights, only plastic covering on the dolly’s metal cross member that goes under the hull at about its middle. Dollies for JY15’s have upright arms with a webbing strap hung between the two arms.
Loosen the jib halyard an inch or two so the shrouds are detensioned, to make it easier to attach the sling.
It’s best to have two people available when hoisting the hull from the water (but one person can do it without much trouble, see below). One person will operate the hoist. This person should fetch the appropriate dolly for you boat and position it so under the hoist. Next the hoist operator lowers the sling to the second person (below) who attaches the sling to the chainplates and transom (see 8.2 Using the Hoist). The person on the dock then steps back onto the dock and uncleats the bow painter while leaving the bow painter hooked under both horns of the cleat to retain control of the boat. As the hoist operator raises the boat, the person on the dock keeps the bow slightly lower than the stern using the bow painter and the cleat. This maneuver will help keep the mast away from the boom of the hoist thus preventing the mast, shrouds, and (especially) the spreaders from striking the hoist. Once the boat is fully raised, this tilt is no longer necessary and the bow painter can be completely relaxed.
Next, the person on the dock gently swings the bow away from the seawall as the hoist operator slowly swings the hoist boom over the dolly. These maneuvers will allow the hoist operator to grab the stern of the boat. Only after the hoist operator has control of the boat, the person on the dock can release the bow painter or, even better, toss it into the boat above. NOTE: Rotation of the boat should always be under the control of either the person on the dock (using the bow painter) or the hoist operator.
After transfer of control to the hoist operator, the person on the dock can go up to the dolly and help guide the hull onto the dolly.
One person can manage hoisting by themselves if they do as follows: after attaching the sling, uncleat the bow painter and tie it to the ramp temporarily. Then go up to the hoist and arrange the hoist’s rotation line (the line that you can use to rotate the hoist) so you can easily rotate the
Dinghy Manual.
February 2021
Cal Sailing Club
Page 41
hoist. Now raise the boat as far as the hoist will go. (Be careful: If the spreader or mast contact the hoist, lower the boat and find help! The sling needs to be adjusted to raise the boat with the bow lower than the stern. Contact the first vice) Untie the bow painter and swing the bow south, away from the hoist. While the boat is swinging, go to the hoist, and pull on the hoist’s rotation line. When the stern or rudder is in easy reach, use it to pull the boat in, and position the boat over the dolly. Now lower the boat onto the dolly. Be sure that the upright arms on the Quest dolly engage the underside of the rails of the hull.
Detach the boat from the hoist sling and clear the hoist area for the next user. Move the boat to a convenient place to hose it down.
Rinse all the blocks on the hull and mast, and spray off any mud in the cockpit or on the anchor or hull. Rinsing off salt slows the corrosion caused by salt water in contact with dissimilar metals (aluminum spars, stainless steel fittings).
Drain the hull before you put it away. Leave the drain plug out to allow any residual water to evaporate. If there is more than a gallon of water inside the hull (but you were sure you installed the drain plug, and you’re sure the drain plug had a rubber washer or O-ring), log this on the club website: log into www.cal-sailing.org with your username and password (what? You don’t remember? Shame on you for not writing it down!) and go to Resources, then Dinghy Log. Select the boat you were on, and create an issue report.
Secure the mainsail to the boom with the mainsheet, then cover with a sail cover.
It’s not necessary to tie the boat to its dolly. Nor is it necessary to put wood blocks behind the wheels of the dollies in the yard; the dollies with front wheels have built in brakes on their front wheels.
Don’t forget the paper work. Be sure to sign the boat back in.
Dinghy Manual.
February 2021
Cal Sailing Club
Page 42
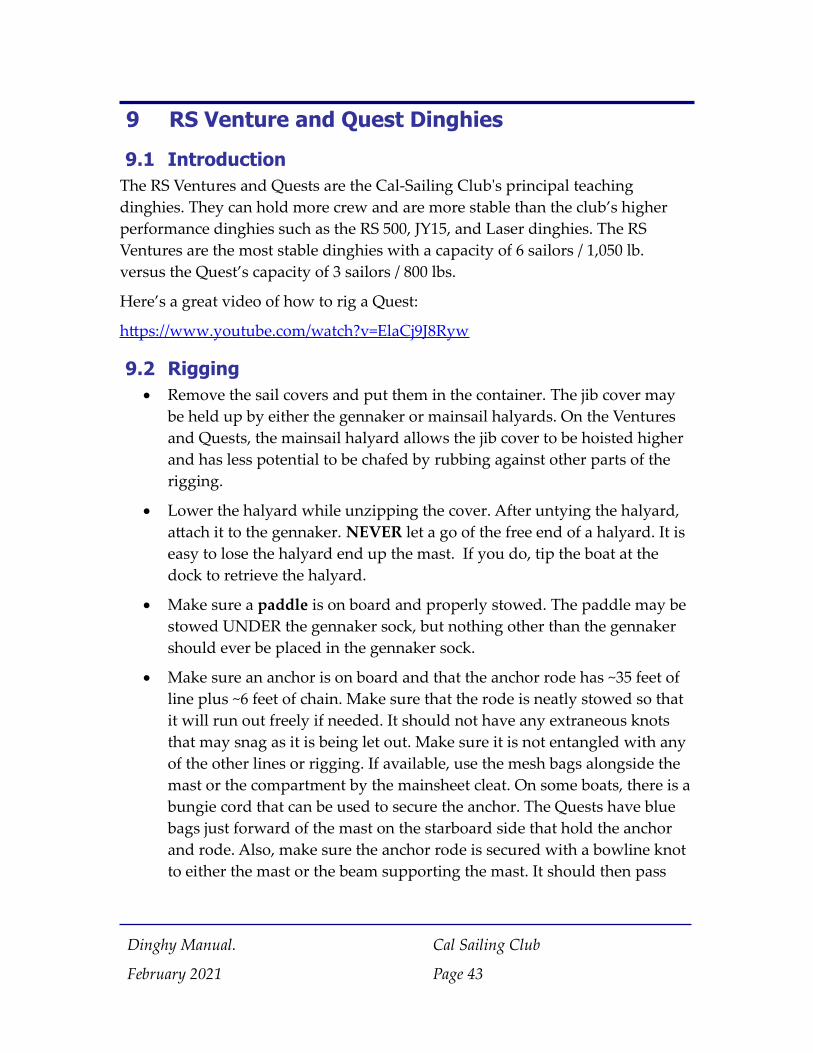
9 RS Venture and Quest Dinghies
9.1 IntroductionThe RS Ventures and Quests are the Cal-Sailing Club's principal teaching dinghies. They can hold more crew and are more stable than the club’s higher performance dinghies such as the RS 500, JY15, and Laser dinghies. The RS Ventures are the most stable dinghies with a capacity of 6 sailors / 1,050 lb. versus the Quest’s capacity of 3 sailors / 800 lbs.
Here’s a great video of how to rig a Quest:
https://www.youtube.com/watch?v=ElaCj9J8Ryw
9.2 Rigging Remove the sail covers and put them in the container. The jib cover may
be held up by either the gennaker or mainsail halyards. On the Ventures and Quests, the mainsail halyard allows the jib cover to be hoisted higher and has less potential to be chafed by rubbing against other parts of the rigging.
Lower the halyard while unzipping the cover. After untying the halyard, attach it to the gennaker. NEVER let a go of the free end of a halyard. It is easy to lose the halyard end up the mast. If you do, tip the boat at the dock to retrieve the halyard.
Make sure a paddle is on board and properly stowed. The paddle may be stowed UNDER the gennaker sock, but nothing other than the gennaker should ever be placed in the gennaker sock.
Make sure an anchor is on board and that the anchor rode has ~35 feet of line plus ~6 feet of chain. Make sure that the rode is neatly stowed so that it will run out freely if needed. It should not have any extraneous knots that may snag as it is being let out. Make sure it is not entangled with any of the other lines or rigging. If available, use the mesh bags alongside the mast or the compartment by the mainsheet cleat. On some boats, there is a bungie cord that can be used to secure the anchor. The Quests have blue bags just forward of the mast on the starboard side that hold the anchor and rode. Also, make sure the anchor rode is secured with a bowline knot to either the mast or the beam supporting the mast. It should then pass
Dinghy Manual.
February 2021
Cal Sailing Club
Page 43
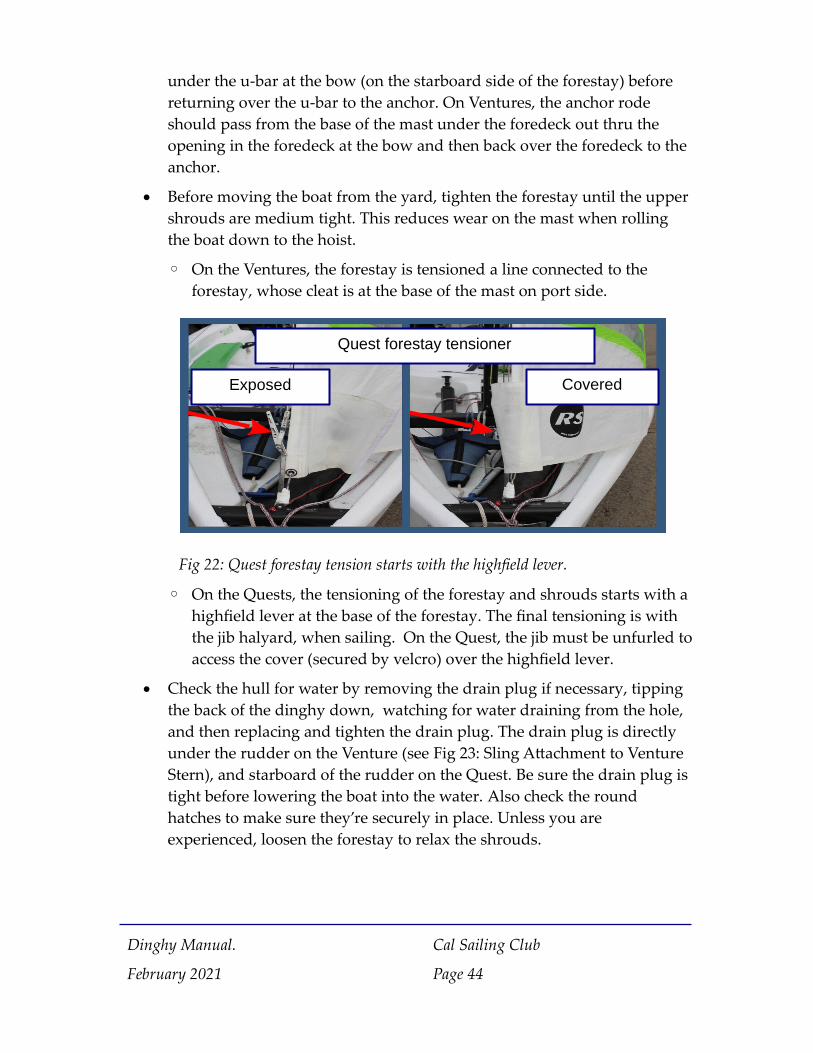
under the u-bar at the bow (on the starboard side of the forestay) before returning over the u-bar to the anchor. On Ventures, the anchor rode should pass from the base of the mast under the foredeck out thru the opening in the foredeck at the bow and then back over the foredeck to the anchor.
Before moving the boat from the yard, tighten the forestay until the upper shrouds are medium tight. This reduces wear on the mast when rolling the boat down to the hoist.
◦ On the Ventures, the forestay is tensioned a line connected to the forestay, whose cleat is at the base of the mast on port side.
◦ On the Quests, the tensioning of the forestay and shrouds starts with a highfield lever at the base of the forestay. The final tensioning is with the jib halyard, when sailing. On the Quest, the jib must be unfurled to access the cover (secured by velcro) over the highfield lever.
Check the hull for water by removing the drain plug if necessary, tipping the back of the dinghy down, watching for water draining from the hole, and then replacing and tighten the drain plug. The drain plug is directly under the rudder on the Venture (see Fig 23: Sling Attachment to Venture Stern), and starboard of the rudder on the Quest. Be sure the drain plug is tight before lowering the boat into the water. Also check the round hatches to make sure they’re securely in place. Unless you are experienced, loosen the forestay to relax the shrouds.
Dinghy Manual.
February 2021
Cal Sailing Club
Page 44
Fig 22: Quest forestay tension starts with the highfield lever.
Quest forestay tensioner
CoveredExposed
Attach the hoisting sling to the heavy loops of line on the U-bolts holding the shrouds and on the stern. Be very careful of the spreaders, mast, and shrouds when using the hoist.
Put the boat in the water and, if you are a beginner, CRAWL onto the boat. It is really tippy and easy to capsize at the dock. Keep your weight low and centered in the boat. Uncleat the jib furling line and jib sheets before you crawl on, so they won’t snag you. To lower the centerboard, release the uphaul line and push back on the top of the centerboard. An elastic cord holds down the centerboard. On the Quests, pull back at the top (forward end) of the centerboard. The positioning of the centerboard is retained simply by friction.
To lower the Venture or JY15 rudder, release the uphaul line on tiller, pull and cleat downhaul line, tighten clamp on side of rudder. Note: the cleat for the Venture’s downhaul line will automatically flip open and uncleat if the rudder hits something, allowing the rudder to swing up. Just push the rudder back down, flip the cleat back over and click it into place, and recleat the downhaul line.
On the Quests, the rudder has neither uphaul or downhaul lines. The rudder has three possible positions (up, intermediate, and down) which are set by raising the tiller (that drops the rudder) and pulling it forward part way to raise the rudder to the intermediate or fully raised position. Lowering the tiller in one of those positions locks in the rudder height. In the yard be careful of accidentally dropping the rudder onto your foot because the tiller was inadvertently raised.
Dinghy Manual.
February 2021
Cal Sailing Club
Page 45
Fig 23: Sling Attachment to Venture Stern
Loop of line for attaching sling
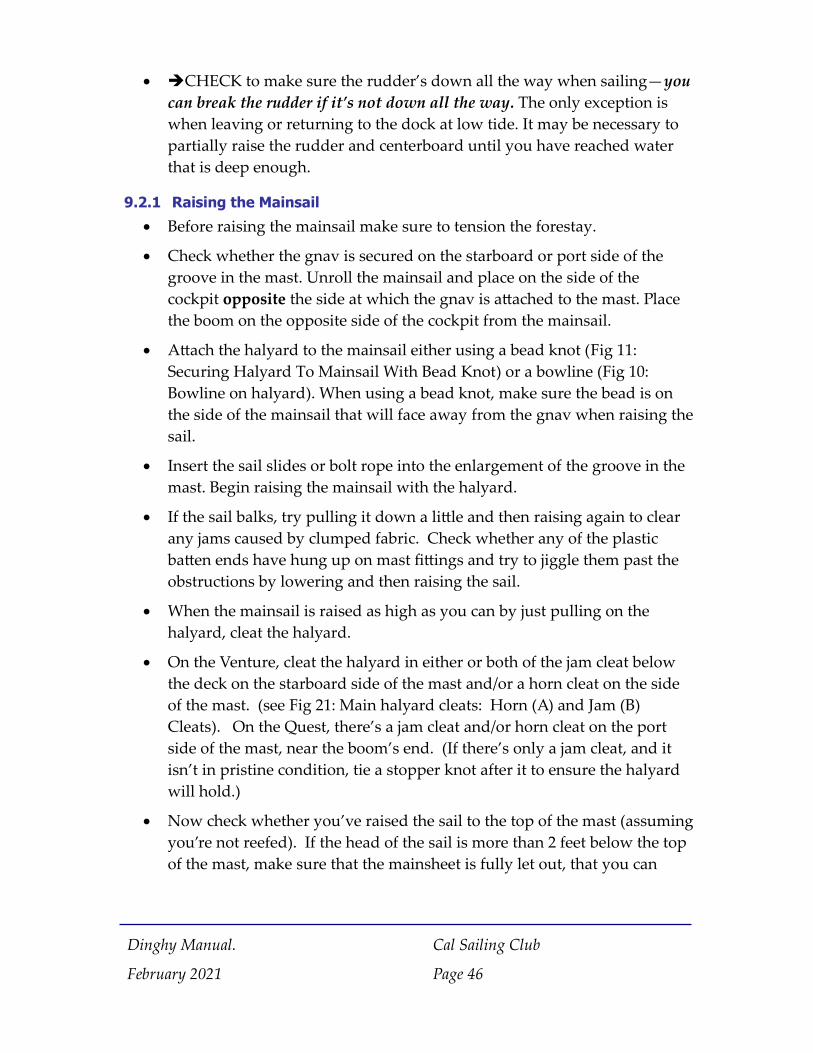
CHECK to make sure the rudder’s down all the way when sailing—you can break the rudder if it’s not down all the way. The only exception is when leaving or returning to the dock at low tide. It may be necessary to partially raise the rudder and centerboard until you have reached water that is deep enough.
9.2.1 Raising the Mainsail
Before raising the mainsail make sure to tension the forestay.
Check whether the gnav is secured on the starboard or port side of the groove in the mast. Unroll the mainsail and place on the side of the cockpit opposite the side at which the gnav is attached to the mast. Place the boom on the opposite side of the cockpit from the mainsail.
Attach the halyard to the mainsail either using a bead knot (Fig 11: Securing Halyard To Mainsail With Bead Knot) or a bowline (Fig 10: Bowline on halyard). When using a bead knot, make sure the bead is on the side of the mainsail that will face away from the gnav when raising the sail.
Insert the sail slides or bolt rope into the enlargement of the groove in the mast. Begin raising the mainsail with the halyard.
If the sail balks, try pulling it down a little and then raising again to clear any jams caused by clumped fabric. Check whether any of the plastic batten ends have hung up on mast fittings and try to jiggle them past the obstructions by lowering and then raising the sail.
When the mainsail is raised as high as you can by just pulling on the halyard, cleat the halyard.
On the Venture, cleat the halyard in either or both of the jam cleat below the deck on the starboard side of the mast and/or a horn cleat on the side of the mast. (see Fig 21: Main halyard cleats: Horn (A) and Jam (B) Cleats). On the Quest, there’s a jam cleat and/or horn cleat on the port side of the mast, near the boom’s end. (If there’s only a jam cleat, and it isn’t in pristine condition, tie a stopper knot after it to ensure the halyard will hold.)
Now check whether you’ve raised the sail to the top of the mast (assuming you’re not reefed). If the head of the sail is more than 2 feet below the top of the mast, make sure that the mainsheet is fully let out, that you can
Dinghy Manual.
February 2021
Cal Sailing Club
Page 46
raise the end of the boom, that all the CORVA controls are still loose, and that the reefing lines are not snagged.
If the sail isn’t fully raised, try “sweating” the halyard. While the halyard is taut and at least partially secured to its cleat, pull horizontally on the halyard between the cleat and the point at which the halyard is attached to the mast. (You will get the maximum advantage when the halyard is taut and pulling as far as possible from either the cleat or the other attachment point.) This should raise the sail a few inches. Then pull down on the halyard. While pulling down with one hand, use your other hand to retighten the halyard at the cleat without “giving back” the line you gained with your sweating maneuver. Repeat these moves until the mainsail is fully hoisted and fully cleat the main halyard.
If sweating doesn’t work, get off the boat and tip it over at the dock by pulling the forestay over while pushing away at the dock. You may need to have a foot or two of slack in the bow painter, with the boat still tied to the dock. Once the boat is partway tipped over, work your way hand over hand up a shroud until you can grasp the mast and pull it down to dock level. Then you can pull the sail to the top of the mast with the mast held horizontally. After that, raise the mast to uncapsize the boat, and get aboard to bail out the water and straighten out the tangled lines.
Once the mainsail is fully raised, coil the free end of the main halyard and stow it between the halyard and the mast. Note: push the coil in position from the cockpit side (aft) of the mast. This way, it is easier to grab if you want to quickly pull down the main.
After the mainsail has been hoisted, tighten the Outhaul and Gnav (a gnav is an upside down vang – notice, Gnav" is "Vang" spelled backwards). On the Venture, the outhaul cleat is the aft of the two cleats at the forward end of boom. On the Quest, the outhaul cleat is on the side of the boom. The gnav control is the black plastic swivel cleat at the bottom of the sail track, near the bottom of the mast.
Tighten the gnav to reduce sail twist, loosen to increase sail twist and depower the sails in very strong winds.
If the lower shrouds seem too loose: consult a senior or someone very involved with maintenance before taking out the boat or making any changes.
Dinghy Manual.
February 2021
Cal Sailing Club
Page 47
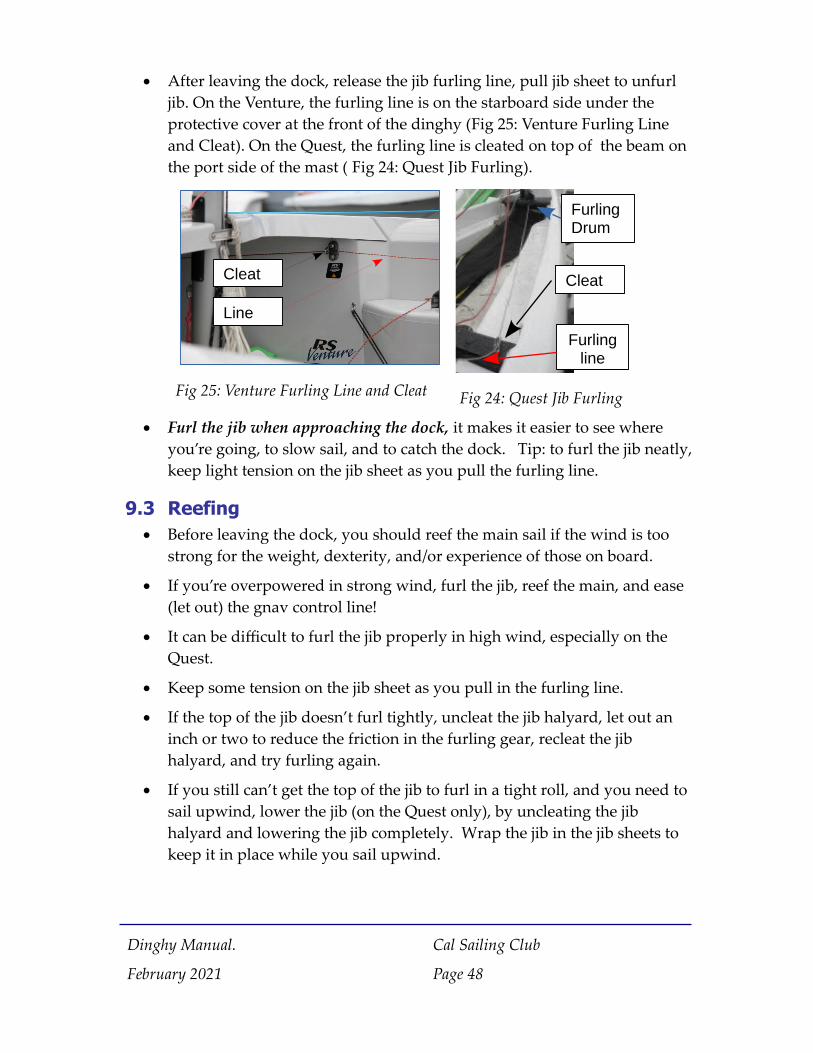
After leaving the dock, release the jib furling line, pull jib sheet to unfurl jib. On the Venture, the furling line is on the starboard side under the protective cover at the front of the dinghy (Fig 25: Venture Furling Line and Cleat). On the Quest, the furling line is cleated on top of the beam on the port side of the mast ( Fig 24: Quest Jib Furling).
Furl the jib when approaching the dock, it makes it easier to see where you’re going, to slow sail, and to catch the dock. Tip: to furl the jib neatly, keep light tension on the jib sheet as you pull the furling line.
9.3 Reefing Before leaving the dock, you should reef the main sail if the wind is too
strong for the weight, dexterity, and/or experience of those on board.
If you’re overpowered in strong wind, furl the jib, reef the main, and ease (let out) the gnav control line!
It can be difficult to furl the jib properly in high wind, especially on the Quest.
Keep some tension on the jib sheet as you pull in the furling line.
If the top of the jib doesn’t furl tightly, uncleat the jib halyard, let out an inch or two to reduce the friction in the furling gear, recleat the jib halyard, and try furling again.
If you still can’t get the top of the jib to furl in a tight roll, and you need to sail upwind, lower the jib (on the Quest only), by uncleating the jib halyard and lowering the jib completely. Wrap the jib in the jib sheets to keep it in place while you sail upwind.
Dinghy Manual.
February 2021
Cal Sailing Club
Page 48
Fig 25: Venture Furling Line and Cleat
Cleat
Line
Fig 24: Quest Jib Furling
Furling line
Cleat
Furling Drum
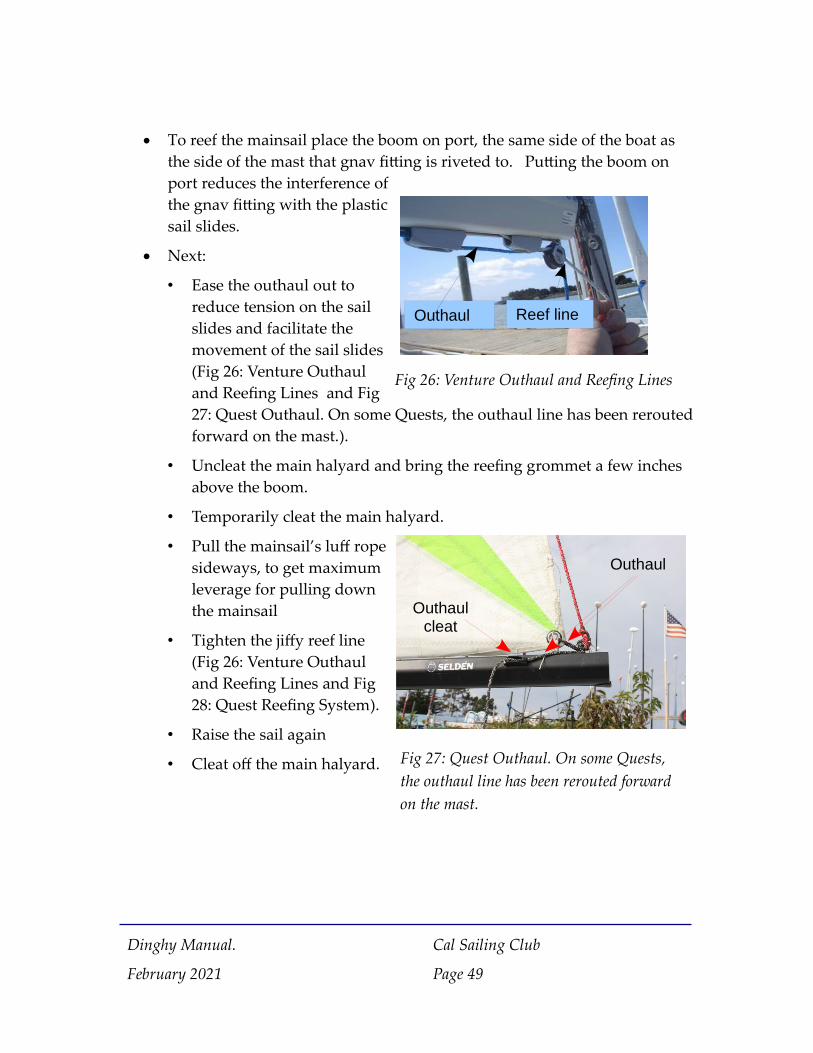
To reef the mainsail place the boom on port, the same side of the boat as the side of the mast that gnav fitting is riveted to. Putting the boom on port reduces the interference of the gnav fitting with the plastic sail slides.
Next:
• Ease the outhaul out to reduce tension on the sail slides and facilitate the movement of the sail slides (Fig 26: Venture Outhaul and Reefing Lines and Fig 27: Quest Outhaul. On some Quests, the outhaul line has been reroutedforward on the mast.).
• Uncleat the main halyard and bring the reefing grommet a few inches above the boom.
• Temporarily cleat the main halyard.
• Pull the mainsail’s luff rope sideways, to get maximum leverage for pulling down the mainsail
• Tighten the jiffy reef line (Fig 26: Venture Outhaul and Reefing Lines and Fig 28: Quest Reefing System).
• Raise the sail again
• Cleat off the main halyard.
Dinghy Manual.
February 2021
Cal Sailing Club
Page 49
Fig 26: Venture Outhaul and Reefing Lines
Reef lineOuthaul
Fig 27: Quest Outhaul. On some Quests, the outhaul line has been rerouted forward on the mast.
Outhaul cleat
Outhaul
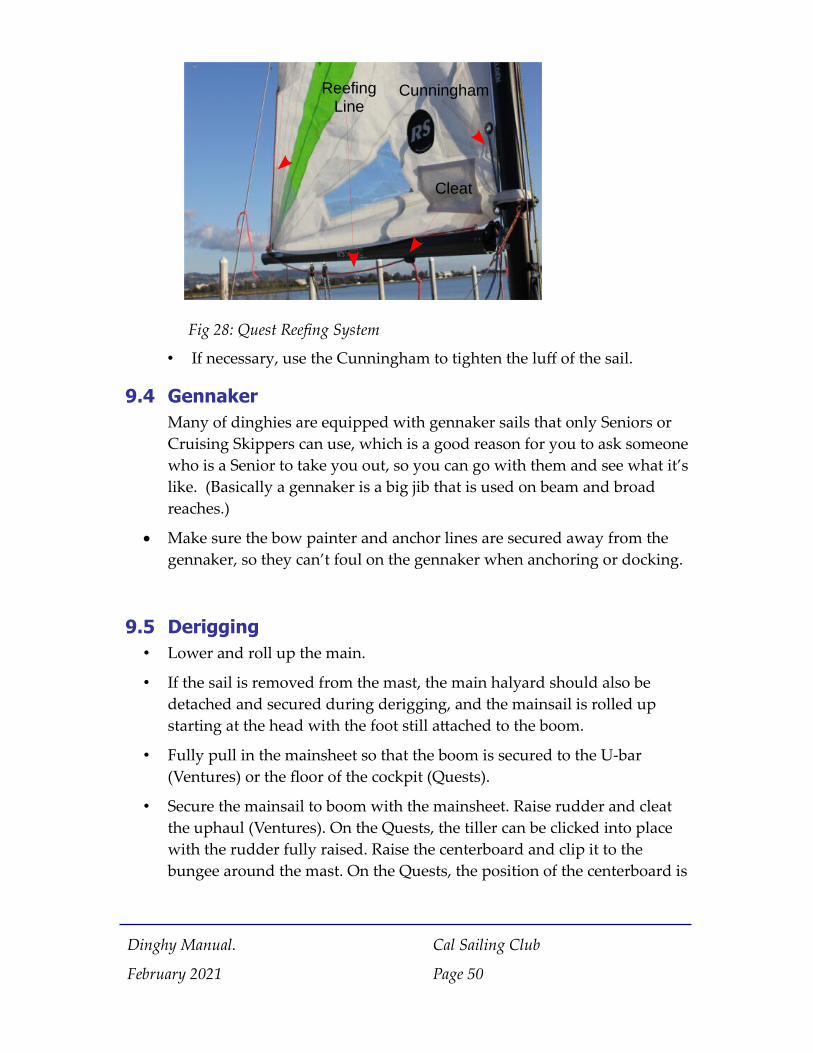
• If necessary, use the Cunningham to tighten the luff of the sail.
9.4 Gennaker Many of dinghies are equipped with gennaker sails that only Seniors or Cruising Skippers can use, which is a good reason for you to ask someone who is a Senior to take you out, so you can go with them and see what it’s like. (Basically a gennaker is a big jib that is used on beam and broad reaches.)
Make sure the bow painter and anchor lines are secured away from the gennaker, so they can’t foul on the gennaker when anchoring or docking.
9.5 Derigging• Lower and roll up the main.
• If the sail is removed from the mast, the main halyard should also be detached and secured during derigging, and the mainsail is rolled up starting at the head with the foot still attached to the boom.
• Fully pull in the mainsheet so that the boom is secured to the U-bar (Ventures) or the floor of the cockpit (Quests).
• Secure the mainsail to boom with the mainsheet. Raise rudder and cleat the uphaul (Ventures). On the Quests, the tiller can be clicked into place with the rudder fully raised. Raise the centerboard and clip it to the bungee around the mast. On the Quests, the position of the centerboard is
Dinghy Manual.
February 2021
Cal Sailing Club
Page 50
Fig 28: Quest Reefing System
Cleat
Reefing Line
Cunningham
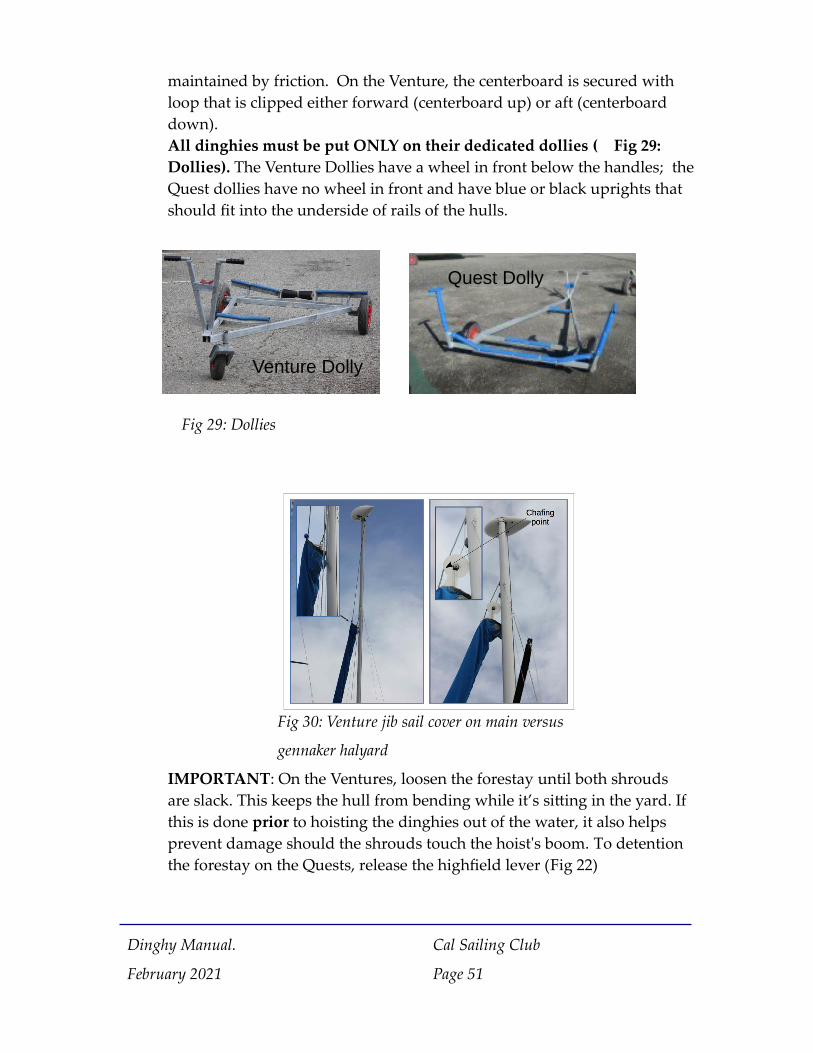
maintained by friction. On the Venture, the centerboard is secured with loop that is clipped either forward (centerboard up) or aft (centerboard down).All dinghies must be put ONLY on their dedicated dollies ( Fig 29: Dollies). The Venture Dollies have a wheel in front below the handles; the Quest dollies have no wheel in front and have blue or black uprights that should fit into the underside of rails of the hulls.
IMPORTANT: On the Ventures, loosen the forestay until both shrouds are slack. This keeps the hull from bending while it’s sitting in the yard. If this is done prior to hoisting the dinghies out of the water, it also helps prevent damage should the shrouds touch the hoist's boom. To detention the forestay on the Quests, release the highfield lever (Fig 22)
Dinghy Manual.
February 2021
Cal Sailing Club
Page 51
Fig 29: Dollies
Quest Dolly
Venture Dolly
Fig 30: Venture jib sail cover on main versus
gennaker halyard
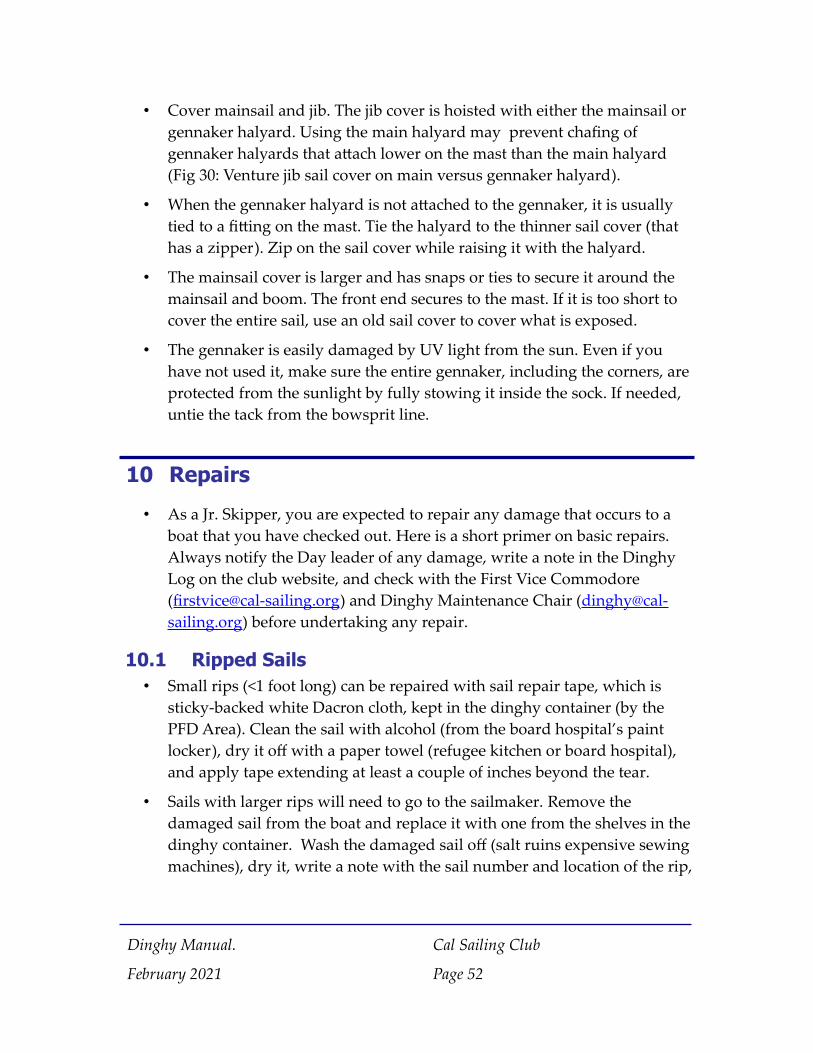
• Cover mainsail and jib. The jib cover is hoisted with either the mainsail or gennaker halyard. Using the main halyard may prevent chafing of gennaker halyards that attach lower on the mast than the main halyard (Fig 30: Venture jib sail cover on main versus gennaker halyard).
• When the gennaker halyard is not attached to the gennaker, it is usually tied to a fitting on the mast. Tie the halyard to the thinner sail cover (that has a zipper). Zip on the sail cover while raising it with the halyard.
• The mainsail cover is larger and has snaps or ties to secure it around the mainsail and boom. The front end secures to the mast. If it is too short to cover the entire sail, use an old sail cover to cover what is exposed.
• The gennaker is easily damaged by UV light from the sun. Even if you have not used it, make sure the entire gennaker, including the corners, are protected from the sunlight by fully stowing it inside the sock. If needed, untie the tack from the bowsprit line.
10 Repairs
• As a Jr. Skipper, you are expected to repair any damage that occurs to a boat that you have checked out. Here is a short primer on basic repairs. Always notify the Day leader of any damage, write a note in the Dinghy Log on the club website, and check with the First Vice Commodore ([email protected]) and Dinghy Maintenance Chair ([email protected]) before undertaking any repair.
10.1 Ripped Sails• Small rips (<1 foot long) can be repaired with sail repair tape, which is
sticky-backed white Dacron cloth, kept in the dinghy container (by the PFD Area). Clean the sail with alcohol (from the board hospital’s paint locker), dry it off with a paper towel (refugee kitchen or board hospital), and apply tape extending at least a couple of inches beyond the tear.
• Sails with larger rips will need to go to the sailmaker. Remove the damaged sail from the boat and replace it with one from the shelves in the dinghy container. Wash the damaged sail off (salt ruins expensive sewing machines), dry it, write a note with the sail number and location of the rip,
Dinghy Manual.
February 2021
Cal Sailing Club
Page 52
roll the sail, and tape the note to the rolled sail, then put the rolled sail in the keelboat shed. Log into the club website with your username and password, and create an issue report in the online Dinghy Log, for the boat the sail came from.
• Battens falling out—sew the batten pocket back up with a sailmakers needle and palm, kept in the dinghy container (or ask Mitsu).
10.2 Broken/missing boat parts• If you need new parts, note this in the online Dinghy Log. Make sure that
the box is checked to send an email to the First Vice Commodore or the Dinghy Maintenance Chair. New parts are kept on the shelves in the dinghy container. When needed, they can be ordered by our first vice commodores using our wholesale accounts at West Marine, Svendsen's Chandlery, and West Coast Sailing. Don’t rob other boats for parts, not even ones that are out of service. If you do, the First Vice Commodore and the Dinghy Maintenance Chair will use your own personal belongings as a source of spares to replace any of theirs that they’d like to upgrade.
10.2.1 Correct Attachment of an Anchor
The anchor rode (line plus chain) that attaches the boat to the anchor should be ~ 36 feet long including 5 feet of chain. The anchor will hold in 8 feet or less of water. This should prevent the dinghies from being blown onto rocks near the shore. It is not sufficient to securely anchor the boat in deeper water, but it will slow movement of the boat.
The chain at the end of the anchor rode is important as it weighs the rode down near the anchor. The near horizontal chain near the anchor helps it dig into the mud. Without the chain, the same length of anchor line will only hold the boat in about 4 feet of water.
The anchor painter should be led out at the front of boat so that the anchor will keep the boat pointed into the wind. The end of the line is attached to the chain using a bowline with a half hitch knot. The chain is attached to the anchor with a stainless steel shackle.
10.3 Frayed lines• Use a rope cutter (like a hot knife) to melt the ends of lines. The rope cutter
and new rope are kept in the dinghy container. Whip the ends of sheets and painters with whipping twine.
Dinghy Manual.
February 2021
Cal Sailing Club
Page 53

10.4 Mast and Booms• Use 3/16" stainless steel rivets or oversize (1/4") aluminum rivets to attach
new fittings to masts and booms. Insulate between stainless steel and aluminum with anti-corrosion compound (yellow barium paint or grey anti-seize) or plastic.
10.5 Internal Reefing and Outhaul Lines on the Ventures• The Ventures’ reefing and outhaul lines run inside the boom. If any line
breaks or comes out, it can be replaced with the aid of a long windsurf batten or garden hose and some tape to push the line through the boom, no need to remove the boom. To thread the lines through the blocks in the boom ends, use a length of thread as a pilot, reach in and grab its end with needle-nose pliers, and tape the line to the thread and pull through.
10.6 Hull damage• JY15 and RS Venture hulls can be repaired with epoxy resin and hardener,
filler, and (for larger dings or breaks) glass cloth. Quest hulls are polyethylene, which is extremely resistant to damage, but any serious hull damage requires special glue plus reinforcement.
• Never try complicated hull repairs if you’ve never fixed a simple ding on a flat surface. For fiberglass repairs, allow the damaged hull to dry before attempting a repair. Clean the damaged area with alcohol, sand with 80 grit paper, clean again with alcohol. Epoxy resin is in gallon cans, hardener is in quarts, both have metering pumps—one squirt from each
Dinghy Manual.
February 2021
Cal Sailing Club
Page 54
Fig 31: Venture Reefing and Outhaul Lines
can gives the right proportion. Resin and hardener need to be thoroughly mixed, mix for at least two minutes. Filler provides some strength to repairs, cloth provides more if it’s wetted thoroughly. Paint the finished epoxy repair or the sun will break down the epoxy.
11 Teaching
• Junior Skippers are encouraged to teach in the regular Monday/Thursday afternoon and Saturday morning lessons. If it’s your first time, ask the students to cut you some slack.
• Always start your lesson by asking the students about number of lessons they’ve had, and make sure everyone has a PFD on securely, glasses straps for Rx glasses, appropriate clothing, and no appointments in the next hour or so.
• The point of sailing lessons is to give students a chance to take the helm, work the jibs, and observe someone sailing. There are plenty of good sailing books out there, so don’t give a lecture on sailing when students could be actually sailing. Instead, try to give clear, short directions, and keep your students busy sailing the boat.
• To prevent capsizes, sit near the mainsheet where you can uncleat it in a jiffy. Be ready to hike out if the boat starts to tip. Unless your student is very good, it’s not a good idea to hike out with them, because then you can’t hike out any harder if the boat starts to tip.
• Try to advance students through a simple progression of maneuvers that will develop their skills without confusing them: steering, sail trim, hiking out; coming about, gybing; slow sailing, reefing underway, sailing backwards, anchoring. Don’t move on to the next step if the student hasn’t mastered a prerequisite. Complicated maneuvers like gybing can be broken down—sail downwind while squatting in the center of the boat, pull in the sheets, gybe while always on a run, gybe from beam reach to beam reach.
• Capsize clinics are a great way to help students advance. Get all the students into wet suits, anchor the boat near the beach, and give everyone a chance to right the boat. Capsizing and righting the boat erases the most common fear that students have.
Dinghy Manual.
February 2021
Cal Sailing Club
Page 55
12 Club rules for Junior Skippers
See the club operating rules at https://www.cal-sailing.org/images/stories/files/club_docs/CSCOperatingRulesrev072118.pdf
• Junior Skippers may sail club boats in the Junior Skipper area only as allowed by the Day Leader. The Day Leader (club member with Day leader rating) may restrict or prohibit sailing based on weather conditions, member’s ability, or other reason as needed for safety and club operations.
• Stay in sight of the clubhouse (you have to come back in if the fog comes in and cuts visibility).
• In addition, the Junior Skipper Area boundaries are:
• 100 yards away from any downwind shore except when the dock is on the downwind shore
• East of a line between Hs. Lordships restaurant and the Emeryville Peninsula
• North of Ashby Ave line (goes through the Claremont Hotel and the radio tower, extends out into the bay)
• Club activities take precedence over individual's use of club boats. These activities include:
• Regularly scheduled lessons (Monday/Thursday afternoon, Saturday morning),
• Fast track classes,• Open Houses,• Club cruises, and• Races
• The Day leader can prohibit sailing at any time, and can suspend any member’s sailing privileges for up to 36 hours for a violation of club rules.
• Special checkouts are needed to sail the JY15 and Lasers.
• Jr Skippers may not use gennakers.
• Jibs must be furled or lowered at the dock, and mainsails must also be lowered at the dock if the wind exceeds 5 knots.
• Observe the weight and crew loading maxima in Section 3 Weight above.
Dinghy Manual.
February 2021
Cal Sailing Club
Page 56
• Junior rated members must reef the mainsail whenever the wind is such that the crew weight is insufficient, or the crew agility such that they cannot properly control the boat without reefing. Sailing with the boat heeled over and the mainsail flogging is strictly prohibited because it damages sails.
• All boats must be signed out and in. Damage must be reported to Day leader, and noted in dinghy log. Members are responsible for checking over equipment (boats, PFDs, etc.) carefully before using them. Skippers must promptly repair any damage that occurs to a boat that they have checked out. Don’t begin repairs without first checking with the First Vice Commodore and Dinghy Maintenance Chair.
• Personal Flotation Devices (CSC life jackets or Coast Guard approved PFD's) must be worn at all times when away from the dock in a boat and when tending to sailing equipment on the dock or working the hoist. Wetsuits are strongly recommended on dinghies when the wind is strong.
• To obtain the Junior Skipper rating, you must complete:
• Online Written test on CSC rules, sailing theory, etc. (Log in with your username and password at www.cal-sailing.org and go to Ratings-
Written Test- Junior Skipper Sailboat. Yes, you can take the written → →test in French.)
• Dinghy rigging and sailing tests from a Senior, Senior Dinghy or Cruising Skipper
• Sailing test requires wind over 10 knots as well as waves.• To maintain a Junior Skipper rating, you must be a current member,
contribute the minimum 2 hours per quarter (and record it and get it approved on the club website), and fulfill your other obligations as a member.
Dinghy Manual.
February 2021
Cal Sailing Club
Page 57
13 Introductory sailing books
• Links to the manuals for the club dinghies can be found at: http://www.cal-sailing.org/resources/csc-files
• Check your public library, and check Amazon if you want your own copy! These are just a few of the excellent introductory sailing books out there.
• Start Sailing Right, US Sailing, Derrick Fries
• Learning to Sail: the Annapolis Sailing School Guide, Diane Goodman and Ian Brodie
• Sailing for Dummies, J. J. and Peter Isler
• Colgate’s Basic Sailing, Steve Colgate
• The Everything Sailing Book, Michael and Nikki Smorenburg
• DK Complete Sailing Manual, Steve Sleight
• The Complete Sailor: Learning the Art of Sailing, David Seidman
• Sailing Fundamentals, Gary Jobson
• Sailing the Bay, Kimball Livingston
• An A-Z of sailing terms, Ian Dear and Peter Kemp
• And the oldest introductory sailing book…
• Practical Boat Sailing, Douglas Frazar, 1879 (available online, Google books)
Dinghy Manual.
February 2021
Cal Sailing Club
Page 58
14 Sailing dictionary = Glossary
• abaft extra super salty talk for "aft of", as in "abaft the mast".• aft toward the stern of a boat or behind it.• anchor metal device for taking mud samples and keeping dinghies off
rocks.• apparent wind: The Wind direction as seen by a moving observer. In fact
it is the vectorial sum of the true wind and of the boat speed.• backwind hold a sail so the wind pushes its backside.• battens semi-rigid slats that are inserted in the main sail's leech to support
the roach.• beam reach sailing at 90 degrees to the wind's direction.• bear away turn the boat more downwind. Also called fall off.• beating zigzagging upwind, sailing close hauled and coming about.• bend a knot used to join two lines. See also hitch.• bitter end The last part or loose end of a line. • block nautical term for a pulley.• boom horizontal pole that holds the bottom of the mainsail; named after
the sound it makes when hitting your head.• boom vang line that pulls the boom down toward the mast and controls
the angle of the boom to the mast (see also gnav).• bow the front (pointy) end of the boat.• bow painter line attached to the bow; used to tie the boat to the dock, etc.• bowline pronounced bo' linn, super salty knot with loopy end--see knots
section.• bowsprit A spar projecting from the bow used as an anchor for the
gennaker's tack• broach to round up uncontrollably from a run to a beam reach, heeling
over. "If broaching sideway to the sea, our dropsied ship may founder by the lee".
• broad reach sailing at 90 to 135 degrees to the wind direction. When you get in a broad reach on a starboard tack you will likely head towards a large white building in Emeryville, which is therefore known as the Broad Reach Condo.
• capsize when a boat tips over.
Dinghy Manual.
February 2021
Cal Sailing Club
Page 59
• center of effort The point of origin of net aerodynamic force on sails, roughly located in the geometric center of a sail, but the actual position of the center of effort will vary with sail plan, sail trim or airfoil profile, boat trim, and point of sail. Also known as center (or centre) of pressure
• center of lateral resistance the point of origin of net hydrodynamic resistance on the submerged structure of a boat, especially a sailboat. This is the pivot point about which the boat turns when unbalanced external forces are applied, similar to the center of gravity. On a balanced sailboat the center of effort should align vertically with the center of lateral resistance. If this is not the case the boat will be unbalanced and exhibit either lee helm or weather helm and will be difficult to control.
• centerboard fin under boat to prevent sideways sailing; swings up for storage.
• centerboard downhaul usually a stretchy cord that pulls to make centerboard go down.
• centerboard uphaul regular line, pull and cleat it to hold centerboard in up or partially up position.
• chainplate or ‘U-bolts”- metal piece on boat that attaches shrouds (wires that hold mast up).
• cleat (noun) device for holding lines such as jib sheets or halyards.• cleat (verb) fasten a line using a cleat.• clew aft corner of a sail (where the outhaul pulls it out, "without a clew") –
see Parts of the Sail.• close hauled sailing at about 45 degrees to the wind direction.• close reach sailing at between 45 and 90 degrees to the wind direction.• come about to turn the boat up into the wind and over to change the side
the sails are on (also called "tack").• cunningham line used to pull down on the luff (front edge) of the sail.• dinghy a little open boat.• fairlead ring used to guide lines.• falls the part of the main sheet between the 2 blocks• fall off turn the boat more downwind. Also called bear away.• foot bottom edge of a sail – see Parts of the Sail.• forestay the wire between the bow and mast, which keeps the mast from
falling backwards when the jib is off.• furl to roll or gather a sail against a mast, spar, or mostly in our case, the
jib on the forestay
Dinghy Manual.
February 2021
Cal Sailing Club
Page 60
• gennaker a large, lightweight sail used for sailing a fore-and-aft rig down (such as on our dinghies) or across the wind, intermediate between a genoa and a spinnaker.
• gnav a bar that extends from the top side of the boom to the mast above. The gnav pushes down on the boom to control the angle between the boom and the mast and indirectly the amount of twist in the mainsail.
• gunwale upper edge of the hull.• gooseneck fitting that attaches the boom to the mast with a flexible joint.• gybe turn away from the wind to cause the sails to flip over to the other
side of the boat.• halyard line used to lift the sails; from "haul yard" since square-rigged
boats had yards that were hauled up to lift their sails.• hank plastic or metal clip or snap to hold jib on forestay.• head top corner of the sail – see Parts of the Sail.• header a change in the wind direction which forces the helmsman of a
close hauled sailboat to steer away from its current course to a less favorable one. This is the opposite of a lift.
• heading the direction a thing's nose is pointing.• head up turn the boat more upwind.• heavy weather strong winds and waves, possible 60's origin.• heel leaning over to one side, usually because of the wind. • helm a boat's steering mechanism, that can be a a tiller or a ship's wheel.• helmsman now you are a cruising skipper, you are not going to have the
tiller anymore – you leave it to your student helmsmen (women)• hike out move your weight to balance the sails' force, by sitting out on the
rail above the seat.• hiking stick or ‘tiller extension’ a stick attached to the tiller by a flexible
joint, for steering while hiked out.• hitch a knot used to tie a line to a fixed object. Also see bend.• hull the floating parts of a boat, not including the sails• in irons pointing into the wind far enough so that you cannot power the
sails , therefore you are “shackled” in irons and left to rot in oblivion.• jib small sail in front of boat, hooked onto forestay.• jib sheet line that controls the trim (angle to the wind) of the jib.• kedging salty talk for throwing out the anchor and hauling in to move the
boat. A good alternative to walking hip deep in the mud dragging the boat when there is no water in the South Basin.
Dinghy Manual.
February 2021
Cal Sailing Club
Page 61
• keelhauling maritime punishment: to punish by dragging under the keel of a boat. Fortunately our keelboats are free of barnacles so the subject will pretty much get through this unscathed.
• knots nautical miles per hour; 1 knot = approx. 1.1 mph.• leech aft (rear) edge of a sail. Not to confound with leeches, which are
found on the rear end of sailors who don't know how to kedge when stuck in the mud – see Parts of the Sail.
• lee helm the tendency of a sailboat to turn to leeward in a strong wind when there is no change in the rudder's position. This is the opposite of weather helm and is the result of a dynamically unbalanced condition. See also Center of lateral resistance.
• leeward downwind; pronounced “lee-word” by most people, "lew' ard" by idiots, “downwind” by geniuses, and “lurid” by smartasses messing with the idiots.
• lee shore a shore downwind of a boat. A sailboat which cannot sail well to windward risks being blown onto a lee shore and grounded. Its skipper is liable to get keelhauled.
• leeway the amount that a boat is blown leeward by the wind. Also the amount of open free sailing space available to leeward before encountering hazards.
• lift an enabling wind shift that allows a close hauled sailboat to point up from its current course to a more favorable one. This is the opposite of a header.
• line the correct nautical term for the majority of the cordage or "ropes" used on a vessel. A line will always have a more specific name, such as halyard, uphaul, downhaul that specifies its use.
• luff noun forward edge of the sail – see Parts of the Sail..• luff verb when sails flap because they're not pulled in, or to turn the boat
into the wind (“luff up”) or let out the sails so that the sails luff.• luff up to steer a sailing vessel more towards the direction of the wind
until the pressure is eased on the sheet.• mainsail big sail in back.• mainsheet line that controls the trim (angle to the wind) of the mainsail.• mast long vertical pole that holds the sails up.• outhaul line that pulls on the clew of the mainsail to tighten the foot of the
sail.• padeye metal dohickey with a ring on it for attaching stuff.
Dinghy Manual.
February 2021
Cal Sailing Club
Page 62
• PFD Personal Floatation Device, lifejacket, or what it’s like when there’s no wind.
• pinching sailing at less than 45 degrees to the wind, with the sails partly luffing.
• pintle the pin or bolt on which a boat's rudder pivots. The pintle rests in the gudgeon.
• pitchpole to capsize a boat stern over bow, rather than by rolling over. • plane to skim over the water at high speed rather than push through it.• port left side of the boat when you are facing forward.• port tack sailing with the mainsail on the starboard side of the boat.• rail part of the gunwale on a dinghy, where sailors sit to hike out.• rake to incline from the perpendicular; something so inclined is raked or
raking, e.g., a raked or raking stem, stern, mast, funnel, etc.• reach sailing with the wind coming over the side of the boat.• reefing tying up the bottom of the sail to reduce sail area.• rigging the hardware on a boat, or putting the sails and other pieces on a
boat.• roach the curved part of the mainsail that extends abaft of the straight line
between the head and the clew.• rudder big movable fin that helps one to steer a boat.• run (opposite of reach) sailing with the wind coming over the stern. If it is
directly away from the wind, it is a dead run.• running rigging rigging used to manipulate sails, spars, etc. in order to
control the movement of the ship. Cf. standing rigging.• sculling rowing the boat, i.e. by swinging the tiller back and forth.• shackle snap or locking ring used to connect lines, sails, spars, and blocks.• shroud a wire that keeps the mast from falling over sideways.• shrouds standing rigging running from a mast to the sides of a boat to
support the mast sideways. The shrouds work with the stays, which run forward and aft, to support the mast's weight.
• skipper the person who is in command of a vessel, who should be the one who signs a CSC boat out.
• spar a wooden, in later years also iron or steel pole used to support various pieces of rigging and sails.
• spreader a spar on a sailboat used to deflect the shrouds to allow them to better support the mast.
Dinghy Manual.
February 2021
Cal Sailing Club
Page 63
• stand-on a vessel that is supposed to keep her course and speed where two vessels are approaching one another so as to involve a risk of collision.
• standing rigging rigging which is used to support masts and spars, and is not normally manipulated during normal operations. Cf. running rigging.
• starboard right side of the boat when you are facing forward.• starboard tack sailing with the mainsail on the port side of the boat.• stay rigging running fore (forestay) and aft (backstay) from a mast to the
hull. The stays support a mast's weight forward and aft.• stern the back end of a boat, usually the square end.• tack verb change tacks, usually by coming about.• tack noun the forward and lower corner of a sail, ("tack it down") – see
Parts of the Sail• tack noun as in port tack and starboard tack; a boat's heading as
determined by the side that its sails are on.• tell tale a light piece of string, yarn, rope or plastic (often magnetic audio
tape) attached to a stay or a shroudto indicate the local wind direction. They may also be attached to the surface and/or the leech of a sail to indicate the state of the air flow over the surface of the sail. They are referenced when optimizing the trim of the sails to achieve the best boat speed in the prevailing wind conditions.
• tiller stick for steering, attached to the rudder.• transom the flat part of the stern.• trim adjustments made to sails to maximize their efficiency. Sheeting in or
easing out are examples of trimming.• true wind the wind direction as seen by a stationary observer.• turtling in dinghy sailing especially (but can include other boats), a boat is
said to be turtling or to turn turtle when the boat is fully inverted with the mast pointing down to the lake bottom or seabed. In general it is also accompanied by a costly dismasting.
• weather helm the tendency of a sailboat to turn to windward in a strong wind when there is no change in the rudder's position. This is the opposite of lee helm and is the result of a dynamically unbalanced condition. See also Center of lateral resistance.
• whitecaps white foamy tops on the waves caused by high winds.• windward upwind; also called "to weather".
Dinghy Manual.
February 2021
Cal Sailing Club
Page 64


