135
DocAve ® 6 Archiver User Guide Service Pack 11, Cumulative Update 1 Issued January 2019 The Enterprise-Class Management Platform for SharePoint ® Governance
DocAve® 6 Archiver User Guide
Service Pack 11, Cumulative Update 1
Issued January 2019
The Enterprise-Class Management Platform for SharePoint® Governance
DocAve®
6 Archiver 1
Table of Contents
What’s New in this Guide ............................................................................................................................................. 5
About DocAve Archiver ............................................................................................................................................... 6
Complementary Products ............................................................................................................................................ 7
Submitting Documentation Feedback to AvePoint ............................................................................................... 8
Before You Begin ........................................................................................................................................................... 9
AvePoint’s Testing Policy and Environment Support ........................................................................................................ 9
Supported Software Environments ..................................................................................................................................... 9
Supported Hardware ................................................................................................................................................................ 9
Supported Backup and Recovery ...................................................................................................................................... 10
Configuration ................................................................................................................................................................................. 10
Agents ............................................................................................................................................................................................... 10
Required Permissions ................................................................................................................................................................. 10
SharePoint 2010, 2013, 2016, and 2019 ......................................................................................................................... 10
Registered Office 365 Objects ........................................................................................................................................... 13
Local System Permissions .................................................................................................................................................... 14
Supported Storage Types in DocAve 6 Archiver .............................................................................................................. 15
Health Analyzer ............................................................................................................................................................................. 15
Getting Started ............................................................................................................................................................. 16
Launching Archiver ...................................................................................................................................................................... 16
Navigating DocAve ...................................................................................................................................................................... 17
User Interface Overview ............................................................................................................................................................. 18
Selecting Farms and Nodes ...................................................................................................................................................... 19
Pre-Archiver Job Configurations ............................................................................................................................. 20
Configuring Devices and Setting up Storage Policies ................................................................................................... 20
Configuring the Archiver Database ....................................................................................................................................... 20
Configuring the Archiver Index Device ................................................................................................................................ 24
Configuring the Processing Pool ........................................................................................................................................... 25
Configuring Archiver Jobs ........................................................................................................................................ 27
DocAve®
6 Archiver 2
Creating an Archiver Profile in Profile Manager .............................................................................................................. 27
Creating and Configuring Archiver Rules ........................................................................................................................... 29
Creating Archiver Rules ......................................................................................................................................................... 29
Configuring Archiver Rules .................................................................................................................................................. 30
Configuring Settings ................................................................................................................................................................... 43
Applying Configurations and Running Archiver Jobs ........................................................................................ 45
Applying a Profile to a Selected Node and Running a Job ......................................................................................... 45
Applying Rules to a Selected Node and Running a Job ............................................................................................... 46
Archiver Job Running Status .................................................................................................................................................... 48
Archiver Job ............................................................................................................................................................................... 48
Content Lifecycle Job ............................................................................................................................................................. 48
Managing Archiver Rules .......................................................................................................................................... 50
Applying or Stopping Inheritance ......................................................................................................................................... 50
Helpful Notes for Applying Inheritance ......................................................................................................................... 50
Helpful Notes for Stopping Inheritance ......................................................................................................................... 51
Editing or Removing Archiver Rules ..................................................................................................................................... 51
Editing Existing Archiver Rules ........................................................................................................................................... 51
Removing Existing Rules from Nodes ............................................................................................................................. 52
Enabling and Disabling Rules .................................................................................................................................................. 52
Disabling an Existing Rule .................................................................................................................................................... 52
Enabling a Disabled Rule ...................................................................................................................................................... 53
Using Rule Viewer ........................................................................................................................................................................ 53
Rule Based Viewing ................................................................................................................................................................ 53
Deleting Rules ........................................................................................................................................................................... 54
Scope Based Viewing ............................................................................................................................................................. 54
Viewing Details of the Created Rules .............................................................................................................................. 54
Removing Rules ....................................................................................................................................................................... 55
Reviewing Archiving Data ......................................................................................................................................... 56
Configuring Approval Alert Settings .................................................................................................................................... 57
Reviewing Retention Data ........................................................................................................................................ 59
Managing Archived Data ........................................................................................................................................... 61
General Mode ................................................................................................................................................................................ 61
Performing an In Place Restore ......................................................................................................................................... 63
Exporting Data .......................................................................................................................................................................... 65
Calculating Statistics .............................................................................................................................................................. 66

DocAve®
6 Archiver 3
Using Advanced Search ........................................................................................................................................................ 66
Full Text Index Mode .................................................................................................................................................................. 67
Checking a Job Status ............................................................................................................................................... 69
Archiver Tools .............................................................................................................................................................. 70
End-User Archiving ..................................................................................................................................................... 71
End-User Archiving Permissions ............................................................................................................................................. 71
Installing and Using End-User Archiver ............................................................................................................................... 73
Searching Archived Content .................................................................................................................................................... 79
Installing and Using the Error Page Solution .................................................................................................................... 81
Configuring the Error Message ......................................................................................................................................... 81
Appendix A: Criteria Filter Conditions ................................................................................................................... 82
Site Collection Object Level...................................................................................................................................................... 82
Site Object Level ........................................................................................................................................................................... 85
List/Library Object Level ............................................................................................................................................................ 89
Folder Object Level ...................................................................................................................................................................... 91
Document Object Level ............................................................................................................................................................. 93
Document Version Object Level ............................................................................................................................................. 98
Item Object Level........................................................................................................................................................................ 100
Item Version Object Level ....................................................................................................................................................... 105
Attachment Object Level ......................................................................................................................................................... 106
Newsfeed Post Object Level .................................................................................................................................................. 108
Running Report Center Jobs .................................................................................................................................................. 110
Appendix B: Supported and Unsupported Web Parts ..................................................................................... 112
Appendix C: Customization Support Table ......................................................................................................... 119
Supported and Unsupported Workflows .......................................................................................................................... 122
Appendix D: Advanced Settings in Configuration Files .................................................................................... 123
AgentCommonWrapperConfig.config ............................................................................................................................... 123
Restoring Specified Web Properties .............................................................................................................................. 123
Choosing the Last Accessed Time Rule ........................................................................................................................ 123
AgentCommonStorageEnv.cfg .............................................................................................................................................. 124
DocAve®
6 Archiver 4
Updating the Last Accessed Time for Storage Manager Stubs .......................................................................... 124
Configuring the Conflict Resolution .............................................................................................................................. 125
Configuring List Templates for Archiving .................................................................................................................... 126
Configuring the Validity Period ....................................................................................................................................... 126
Configuring the Processing Pool .................................................................................................................................... 126
Configuring Skipping Files ................................................................................................................................................. 126
Configuring Declared Record Setting ........................................................................................................................... 127
Configuring the Modified Time Comparison ............................................................................................................. 127
Configuring User Profile Backup and Restore Settings .......................................................................................... 127
Configuring End-User Archiver Backup Content ...................................................................................................... 127
Configuring the Choice Type Column Value Restore Setting ............................................................................. 128
Enabling Archive and Restore for Connector Links ................................................................................................. 128
Permission Synchronization for Content Level Objects ......................................................................................... 128
ControlArchiverSettings.config ............................................................................................................................................. 129
Configuring Display Properties for Other Details Column ................................................................................... 129
Enabling Newsfeed Post for SharePoint 2019 ........................................................................................................... 130
Configuration Files for Exporting Content into VEO Files .......................................................................................... 130
Defining Metadata Values for VEO Files of Container ........................................................................................... 130
Defining Metadata Values for VEO Files of Content ............................................................................................... 131
Defining Metadata for the Manifest File ...................................................................................................................... 131
Merging VEO files ................................................................................................................................................................. 132
Notices and Copyright Information ...................................................................................................................... 134
DocAve®
6 Archiver 5
What’s New in this Guide • Updated the Required Permissions section.
DocAve®
6 Archiver 6
About DocAve Archiver DocAve Archiver is the industry’s first truly seamless, business rule aware, granular archiving
solution for Microsoft SharePoint with full text index, federated search, tiered storage
management, and backup and recovery support.
With SharePoint data volumes increasing rapidly, companies need a solution to attenuate data
growth, manage long-term retention, and save money by leveraging a tiered storage system.
Archiver helps your company save thousands just in license fees. End users can seamlessly
search and view the archived content from SharePoint.
*Note: DocAve Archiver supports SharePoint 2010, 2013, 2016, and 2019 on-premises, and
SharePoint Online.
DocAve®
6 Archiver 7
Complementary Products Many products and product suites on the DocAve 6 platform work in conjunction with one
another. The following products are recommended for use with Archiver:
• DocAve Connector for collaborating upon network file shares and cloud storage
resources directly through SharePoint without migration. The connected content
appears as normal SharePoint content, and can be leveraged as if it were residing
within a SharePoint document library.
• DocAve Content Manager for moving, copying, and restructuring SharePoint
sites, Apps, content, and topology within or across SharePoint on-premises and
online environments.
• DocAve Report Center for SharePoint to examine pain points in the SharePoint
infrastructure and report on SharePoint user behavior and changes.
• DocAve Data Protection for setting backup and recovery points prior to adjusting
SharePoint governance policies in this product.
• DocAve Replicator to perform live or event-driven replication, as well as
scheduled or offline replication. Synchronization and management of all content,
configurations, and securities is performed with full fidelity.
DocAve®
6 Archiver 8
Submitting Documentation Feedback to AvePoint AvePoint encourages customers to provide feedback regarding our product documentation. You
can Submit Your Feedback on our website.
DocAve®
6 Archiver 9
Before You Begin Refer to the following sections for system and farm requirements that must be in place prior to
installing and using DocAve Archiver.
AvePoint’s Testing Policy and Environment Support
Supported Software Environments
AvePoint is committed to testing against all major versions and service packs of SharePoint as
well as the latest versions of Windows Server and SQL Server, as Microsoft announces support
and compatibility.
*Note: AvePoint does not recommend or support installing DocAve on client operating systems.
Supported Hardware
AvePoint is committed to maintaining a hardware agnostic platform to ensure that DocAve
operates on common Windows file sharing and virtualization platforms. To ensure that DocAve
is hardware agnostic, AvePoint tests hardware that is intended to support SharePoint and
DocAve infrastructure, storage targets, and hardware-based backup and recovery solutions, as
supported by AvePoint’s partnerships. AvePoint directly integrates with the following platforms:
any Net Share, FTP, Amazon S3, AT&T Synaptic, Box, Caringo Storage, Cleversafe, Amazon S3-
Compatible Storage, DELL DX Storage, Dropbox, EMC Atmos, EMC Centera, Google Drive, HDS
Hitachi Content Platform, IBM Spectrum Scale Object, IBM Storwize Family, Microsoft Azure
Storage, NetApp Data ONTAP, NFS, OneDrive, Rackspace Cloud Files, and TSM.
All other hardware platforms that support UNC addressable storage devices are supported.
*Note: AvePoint has ended the test and development for Caringo Storage and DELL DX Storage
in DocAve since DocAve 6 SP7 CU1, as the providers of these two platforms have stopped the
platform maintenance.
*Note: Due to changes in the IBM Tivoli Storage Manager API, DocAve 6 Service Pack 6 and
later versions require that TSM Client version 7.1.2 is installed on the Control Service and Media
Service servers.
*Note: Most of the hardware partnerships referenced in this guide are intended to make use of
advanced functionality (such as snapshot mirroring, BLOB snapshots, indexing, long-term
storage, WORM storage, etc.), and are not indications that any changes to the product are
required for basic support. In most cases, hardware can be supported with no change to the
product.
DocAve®
6 Archiver 10
Supported Backup and Recovery
DocAve supports BLOB backup storage according to the list of hardware platforms above. BLOB
snapshot function, however, is currently only supported on OEM versions and NetApp hardware.
DocAve supports SQL content and Application database backups via the SharePoint Volume
Shadow Copy Service (VSS) on all Windows and SQL server platforms listed above. DocAve also
supports snapshot-based SharePoint VSS on all hardware listed above where the hardware
partner has certified support with Microsoft.
DocAve supports application and configuration server backups for all the supported software
environments listed above. DocAve 6 SP5 or later supports VM backup via Hyper-V/VMWare for
the following operating systems: Windows Server 2008 R2, Windows Server 2012, Windows
Server 2012 R2, and Microsoft Hyper-V Server 2012 R2.
Configuration To use DocAve Archiver, the DocAve 6 platform must be installed and configured properly on
your farm.
Agents DocAve Agents are responsible for running DocAve jobs and interacting with the SharePoint
object model. DocAve Agents enable the DocAve Manager to communicate with the respective
servers, allowing for Archiver commands to function properly.
*Note: The use of system resources on a server increases when the installed Agent is performing
actions. This may affect server performance. However, if the Agent installed on a server is not
being used, the use of system resources is very low and, therefore, the impact on server
performance is negligible.
For instructions on installing the DocAve Platform, DocAve Manager, and DocAve Agents, see
the DocAve 6 Installation Guide.
Required Permissions To install and use Archiver properly, ensure that the Agent account has the following
permissions.
SharePoint 2010, 2013, 2016, and 2019
To install and use Archiver for SharePoint 2010, 2013, 2016, and 2019 nodes properly, ensure the
Agent account has the following permissions.
DocAve®
6 Archiver 11
1. Local System Permissions: These permissions are automatically configured by DocAve
during installation. Refer to Local System Permissions for a list of the permissions
automatically configured upon installation.
If there are no strict limitations within your organization on the permissions that can be
applied, you can simply add the DocAve Agent Account to the local Administrators
group to apply all the required permissions. This is required to deploy any Archiver
solution.
2. SharePoint Permissions: These permissions must be manually configured prior to using
DocAve 6 Archiver:
• User is a member of the Farm Administrators group. Since Archiver works across
farms and on all SharePoint settings and configurations, this account is needed in
order to provide the best and most complete quality of service.
• Full Control to all zones of all Web applications via User Policy for Web
Applications
• User Profile Service Application permissions for SharePoint 2010:
o Member of the Administrators group with Full Control
o Use Personal Features
o Create Personal Site
o Use Social Features
• User Profile Service Application permissions for SharePoint 2013, 2016, and 2019:
o Member of the Administrators group with Full Control
o Full Control connection permission (required for the Newsfeed Post
object level)
o Create Personal Site (required for personal storage, newsfeed, and
followed content)
o Follow People and Edit Profile
o Use Tags and Notes
• Managed Metadata Service:
o Term Store Administrator
o Member of the Administrator group with Full Control
• Business Data Connectivity Service – Full Control
• Search Service – Full Control
DocAve®
6 Archiver 12
3. SQL Permissions: These permissions must be manually configured prior to using DocAve
6 Archiver:
• The permission for all databases related to SharePoint, including Content
Databases, SharePoint Configuration Database, and Central Administration
Content Database:
o For SharePoint 2010, 2016, and 2019, the Database Role of db_owner is
required.
o For SharePoint 2013, the Database Role of SharePoint_Shell_Access is
required; however, when the DocAve Agent account has this role for
Content Databases, Archiver has some limitations regarding archived or
restored objects. For more information, see the following AvePoint
Knowledge Base article:
http://www.avepoint.com/community/kb/limitations-for-docave-6-
products-if-docave-agent-account-has-the-sharepoint_shell_access-role.
AvePoint recommends that you assign the db_owner role of Content
Databases to the DocAve Agent account.
*Note: The SharePoint_Shell_Access role can only be assigned via
SharePoint 2013 Management Shell. For instructions on how to assign this
role to a user, refer to the following Microsoft technical article:
https://technet.microsoft.com/en-us/library/ff607596.aspx.
*Note: If the Leave a stub in SharePoint for each document (uses
Storage Manager) action is selected in an Archiver rule or the Leave
Stubs in SharePoint action is selected in a content lifecycle rule, make
sure the Agent account has the permissions required by Storage Manager.
• Database Role of db_owner for the Archiver Database, User Profile Database,
Nintex Workflow Database, and FBA Authentication Database
*Note: If you choose to use Windows Authentication when configuring the
Archiver Database, make sure the Agent account has this permission. If you
choose to use SQL Authentication, make sure the user specified has this
permission.
• Database Role of db_rbs_admin for the SharePoint 2013 Content Databases that
have RBS enabled.
*Note: This is only required when the DocAve Agent account has the Database
Role of SharePoint_Shell_Access for all databases related to SharePoint 2013.
This permission is not necessary when the account has the Database Role of
db_owner.
DocAve®
6 Archiver 13
• Server Role of dbcreator to SQL Server
Registered Office 365 Objects
The following permissions are required for Archiver to manage registered SharePoint Online site
collections, OneDrive for Business, and Office 365 group team sites.
Local System Permissions for DocAve Agent Account
The DocAve Agent account is on the DocAve Agent machine that has network connection or has
configured Agent Proxy Settings before Office 365 objects are registered. To use Archiver for
Office 365 objects properly, the DocAve Agent account must have the following permissions:
• Local System Permissions: DocAve automatically configures the Local System
permissions during installation. Refer to Local System Permissions for a list of the
permissions automatically configured upon installation. If there are no strict
limitations within your organization on the permissions that can be applied, you
can simply add the DocAve Agent Account to the local Administrators group
to apply all the required permissions.
• SQL Permissions: User has the database role of db_owner for the Archiver
Database.
Required Permissions for the Account Used to Register Office 365 Objects
The required permissions for the Office 365 account that is used to register Office 365 objects
via Control Panel vary with registration methods and object types. Refer to the tables below for
the details.
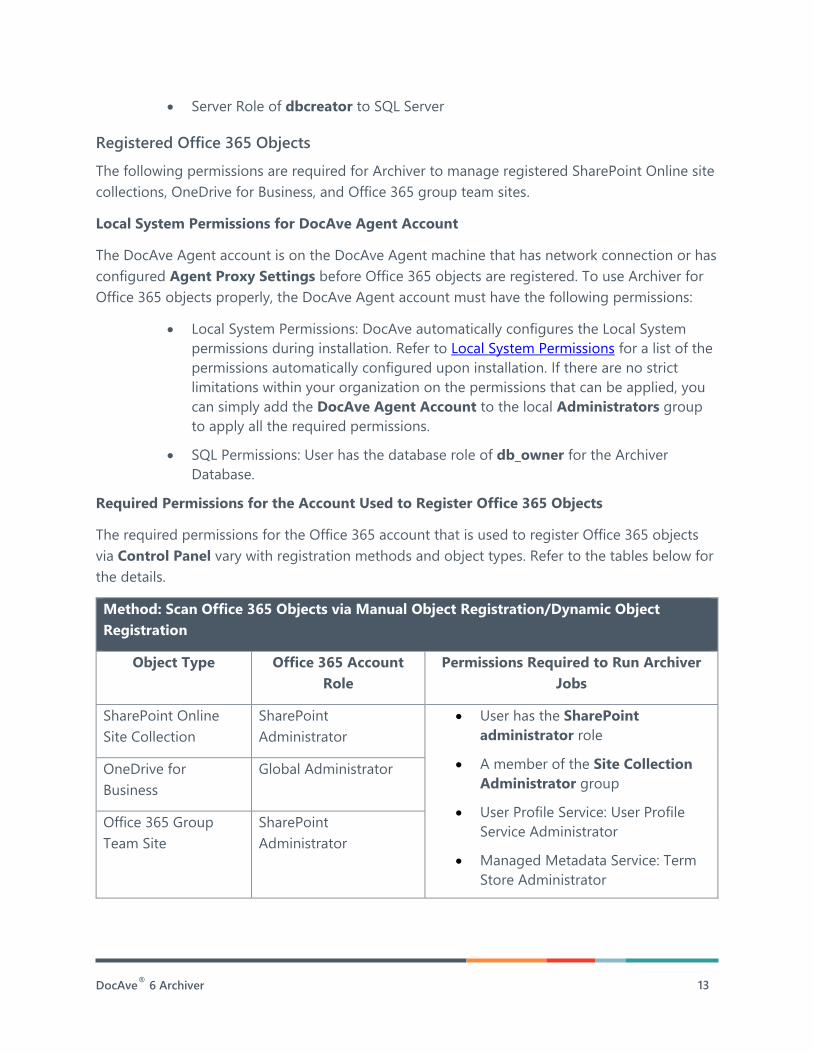
Method: Scan Office 365 Objects via Manual Object Registration/Dynamic Object
Registration
Object Type Office 365 Account
Role
Permissions Required to Run Archiver
Jobs
SharePoint Online
Site Collection
SharePoint
Administrator
• User has the SharePoint
administrator role
• A member of the Site Collection
Administrator group
• User Profile Service: User Profile
Service Administrator
• Managed Metadata Service: Term
Store Administrator
OneDrive for
Business
Global Administrator
Office 365 Group
Team Site
SharePoint
Administrator
DocAve®
6 Archiver 14
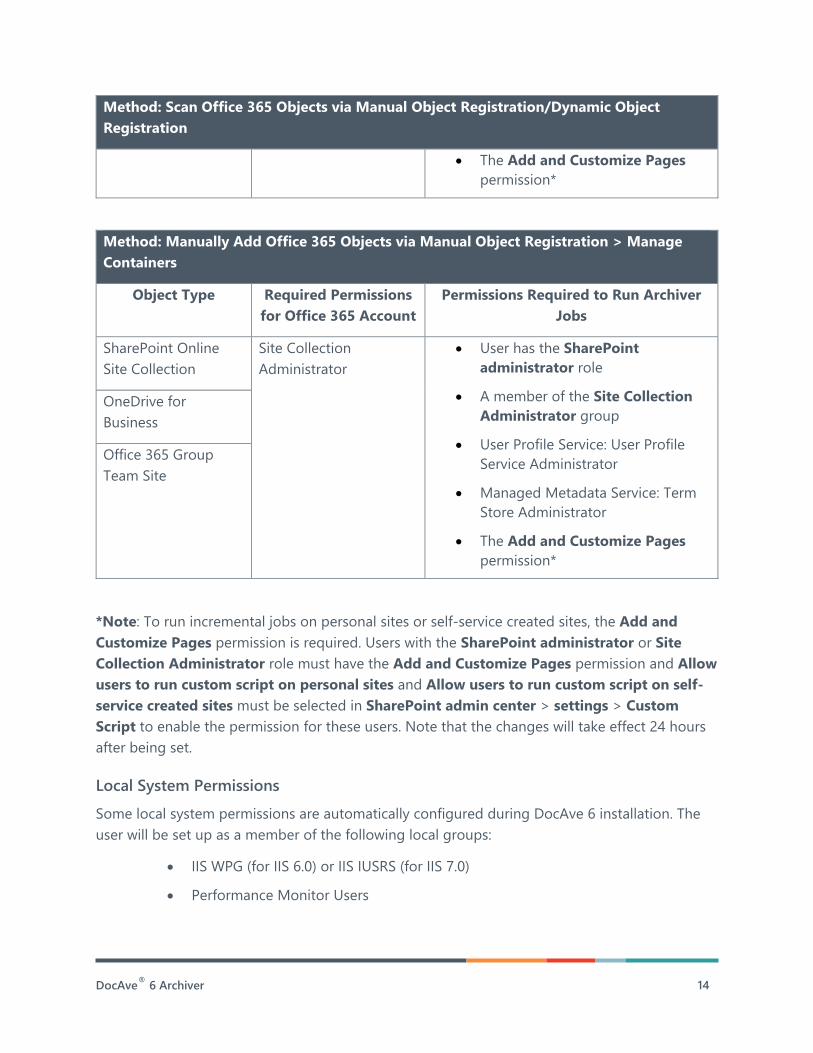
Method: Scan Office 365 Objects via Manual Object Registration/Dynamic Object
Registration
• The Add and Customize Pages
permission*
Method: Manually Add Office 365 Objects via Manual Object Registration > Manage
Containers
Object Type Required Permissions
for Office 365 Account
Permissions Required to Run Archiver
Jobs
SharePoint Online
Site Collection
Site Collection
Administrator
• User has the SharePoint
administrator role
• A member of the Site Collection
Administrator group
• User Profile Service: User Profile
Service Administrator
• Managed Metadata Service: Term
Store Administrator
• The Add and Customize Pages
permission*
OneDrive for
Business
Office 365 Group
Team Site
*Note: To run incremental jobs on personal sites or self-service created sites, the Add and
Customize Pages permission is required. Users with the SharePoint administrator or Site
Collection Administrator role must have the Add and Customize Pages permission and Allow
users to run custom script on personal sites and Allow users to run custom script on self-
service created sites must be selected in SharePoint admin center > settings > Custom
Script to enable the permission for these users. Note that the changes will take effect 24 hours
after being set.
Local System Permissions
Some local system permissions are automatically configured during DocAve 6 installation. The
user will be set up as a member of the following local groups:
• IIS WPG (for IIS 6.0) or IIS IUSRS (for IIS 7.0)
• Performance Monitor Users
DocAve®
6 Archiver 15
• DocAve Users (the group is created by DocAve automatically; it has the following
permissions):
Full Control to the Registry of
HKEY_LOCAL_MACHINE\SOFTWARE\AvePoint\DocAve6
Full Control to the Registry of
HKEY_LOCAL_MACHINE\System\CurrentControlSet\Services\EventLog
Full Control to the Communication Certificate
Permission of Log on as a batch job (it can be found within Control
Panel > Administrative Tools > Local Security Policy > Security
Settings > Local Policies > User Rights Assignment)
Full Control permission for DocAve Agent installation directory
Supported Storage Types in DocAve 6 Archiver Net Share, FTP, Amazon S3, Amazon S3-Compatible Storage, AT&T Synaptic, Dropbox, EMC
Atmos, Rackspace Cloud Files, OneDrive, Microsoft Azure Storage, IBM Spectrum Scale Object,
IBM Storwize Family, TSM, EMC Centera, DELL DX Storage, Caringo Storage, NetApp Data
ONTAP (NetApp FAS CIFS), and HDS Hitachi Content Platform are supported.
Health Analyzer AvePoint recommends using Health Analyzer to verify that you meet the prerequisites necessary
to use DocAve Archiver.
*Note: Only users in the Administrators group can use Health Analyzer.
For more information about Health Analyzer, refer to DocAve 6 Installation Guide.
DocAve®
6 Archiver 16
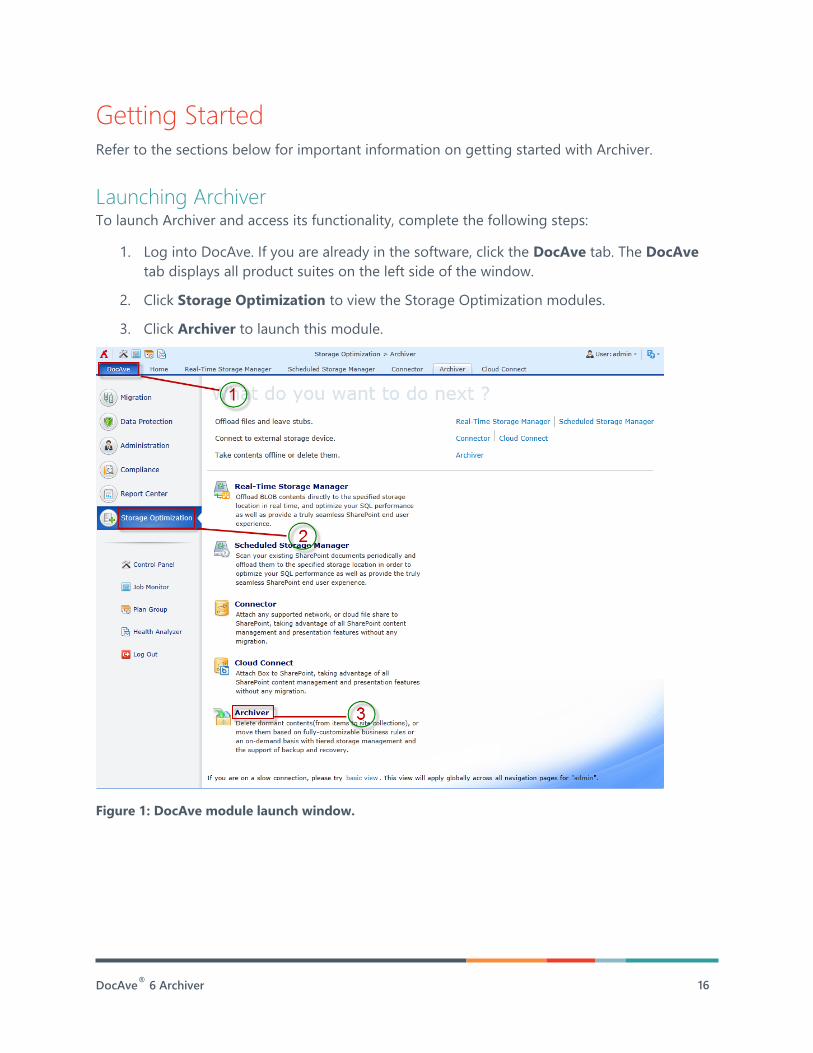
Getting Started Refer to the sections below for important information on getting started with Archiver.
Launching Archiver To launch Archiver and access its functionality, complete the following steps:
1. Log into DocAve. If you are already in the software, click the DocAve tab. The DocAve
tab displays all product suites on the left side of the window.
2. Click Storage Optimization to view the Storage Optimization modules.
3. Click Archiver to launch this module.
Figure 1: DocAve module launch window.

DocAve®
6 Archiver 17
Navigating DocAve DocAve mimics the look and feel of many Windows products, making for an intuitive and
familiar working environment. While there are many windows, pop-up displays, and messages
within DocAve products, they share similar features and are navigated in the same ways.
Below is a sample window in DocAve. It features a familiar, dynamic ribbon, and a searchable,
content list view.
Figure 2: Navigating DocAve.
1. Ribbon Tabs – Allows users to navigate to the DocAve Welcome page and within the
active module.
2. Ribbon Panes – Allows users to access the functionality of the active DocAve module.
3. Manage columns ( ) – Allows users to manage which columns are displayed in the list.
Click the manage columns ( ) button, and then select the checkbox next to the column
name in the drop-down list.
4. Hide the column ( ) – Allows users to hide the selected column.
DocAve®
6 Archiver 18
5. Filter the column ( ) – Allows users to filter the information in the List View. Click the
filter the column ( ) button next to the column and then select the checkbox next to the
column name.
6. Search – Allows users to search the List View pane for a keyword or phrase. You can
select Search all pages or Search current page to define the search scope.
*Note: The search function is not case sensitive.
7. Management Pane – Displays the actionable content of the DocAve module.
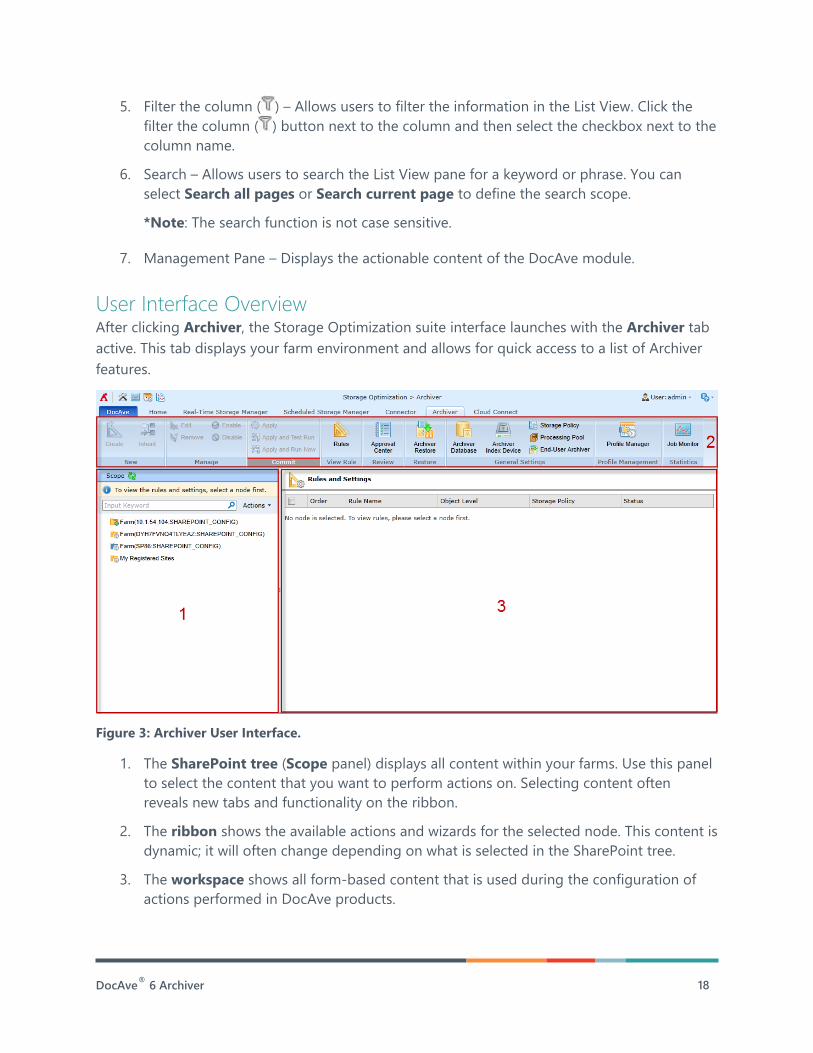
User Interface Overview After clicking Archiver, the Storage Optimization suite interface launches with the Archiver tab
active. This tab displays your farm environment and allows for quick access to a list of Archiver
features.
Figure 3: Archiver User Interface.
1. The SharePoint tree (Scope panel) displays all content within your farms. Use this panel
to select the content that you want to perform actions on. Selecting content often
reveals new tabs and functionality on the ribbon.
2. The ribbon shows the available actions and wizards for the selected node. This content is
dynamic; it will often change depending on what is selected in the SharePoint tree.
3. The workspace shows all form-based content that is used during the configuration of
actions performed in DocAve products.
DocAve®
6 Archiver 19
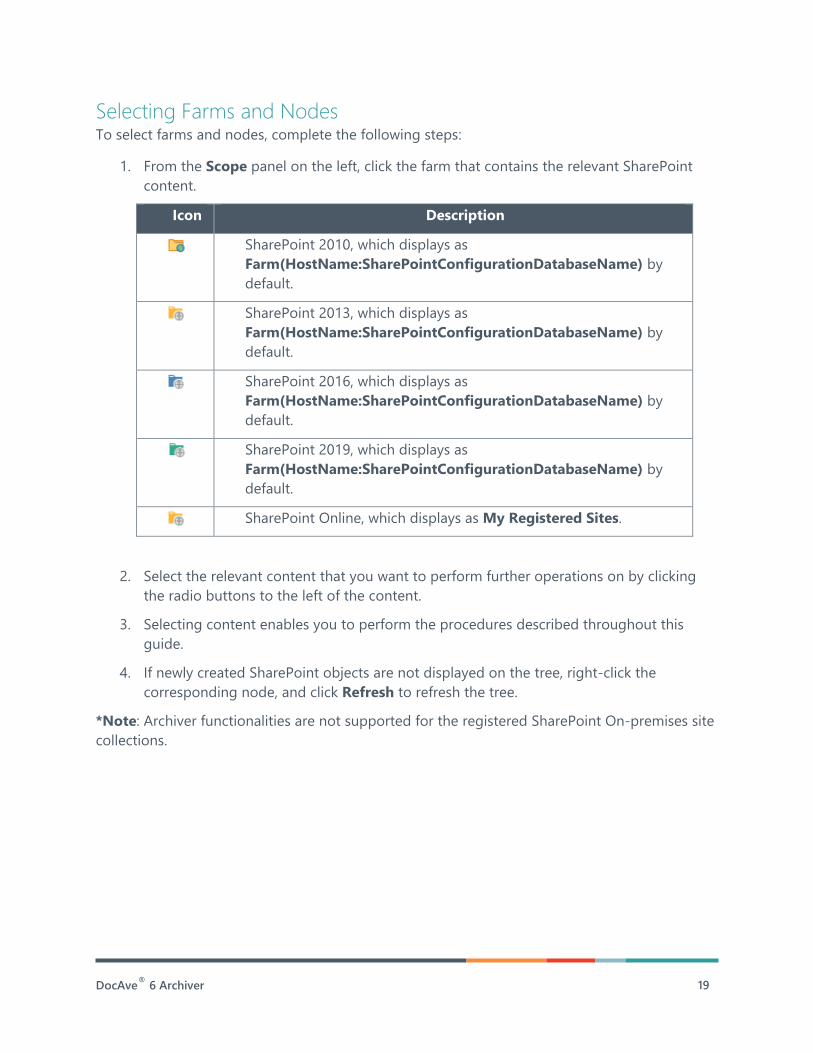
Selecting Farms and Nodes To select farms and nodes, complete the following steps:
1. From the Scope panel on the left, click the farm that contains the relevant SharePoint
content.
Icon Description
SharePoint 2010, which displays as
Farm(HostName:SharePointConfigurationDatabaseName) by
default.
SharePoint 2013, which displays as
Farm(HostName:SharePointConfigurationDatabaseName) by
default.
SharePoint 2016, which displays as
Farm(HostName:SharePointConfigurationDatabaseName) by
default.
SharePoint 2019, which displays as
Farm(HostName:SharePointConfigurationDatabaseName) by
default.
SharePoint Online, which displays as My Registered Sites.
2. Select the relevant content that you want to perform further operations on by clicking
the radio buttons to the left of the content.
3. Selecting content enables you to perform the procedures described throughout this
guide.
4. If newly created SharePoint objects are not displayed on the tree, right-click the
corresponding node, and click Refresh to refresh the tree.
*Note: Archiver functionalities are not supported for the registered SharePoint On-premises site
collections.
DocAve®
6 Archiver 20
Pre-Archiver Job Configurations The sections below detail the configurations to make prior to setting up an Archiver job.
Configuring Archiver involves performing the following steps in the order given:
1. Configuring Devices and Setting up Storage Policies
2. Configuring the Archiver Database
3. Configuring the Archiver Index Device
4. Configuring the Processing Pool
*Note: Step 4 is optional but recommended. Archiver comes with a default processing
pool configuration, but the configuration should be modified according to your
requirements.
Configuring Devices and Setting up Storage Policies In order to perform an Archiver job, you must configure at least one logical device and at least
one storage policy. Archiver can write to any of the following storage devices: Net Share, FTP,
Amazon S3, Amazon S3-Compatible Storage, AT&T Synaptic, Dropbox, EMC Atmos, Rackspace
Cloud Files, OneDrive, Microsoft Azure Storage, IBM Spectrum Scale Object, IBM Storwize
Family, TSM, EMC Centera, DELL DX Storage, Caringo Storage, NetApp Data ONTAP (NetApp
FAS CIFS), and HDS Hitachi Content Platform.
DocAve has the ability to treat multiple Net Share physical storage devices as a single logical
unit (known as a Logical Device) when saving archived data. This is especially useful for large
archive plans, as many small devices can be combined. Storage Policies define which logical
devices, Media Service, and retention rule to use for each Archiver job. You can also pre-scan the
expiring retention policies of archived data by configuring storage policies.
For instructions on defining logical devices and setting up storage policies, refer to the DocAve
6 Control Panel Reference Guide.
Configuring the Archiver Database After setting up the storage policy, configure an Archiver Database. An Archiver Database stores
a table of scan results that are used by DocAve Archiver and the optional Governance
Automation product. The Archiver Database can be configured on any SQL server on the farm.
The scan results or “records” that are written to the Archiver database are marked as Approved
when manual approval is not enabled and they are marked as Waiting for Approval when
manual approval is enabled. Archiver or the Governance Automation product reads the scan
results of Archiver jobs, using the manual approval process, and determines which objects to
DocAve®
6 Archiver 21
archive. When the Archiver job finishes, the applicable data is archived and the corresponding
records are marked as Archived in the Archiver Database.
To configure an Archiver database, complete the following steps:
1. Navigate to: Archiver tab > General Settings group > Archiver Database. The
Archiver Database tab appears.
2. Select the SharePoint farm node or My Registered Sites node that will use the Archiver
database.
3. On the Archiver Database tab, click Configure in the Manage group to configure the
database for the selected node. You can also click Configure to the right of the selected
node.
4. After being redirected to the configuration page, configure the Database Server and
Database Name in the Configure Archiver Database field.
• Database Server – Enter the hostname or IP address of the selected database
server.
• Database Name – Enter the Archiver Database’s name.
5. In the Authentication area, Windows authentication is selected unless manually
configured. If desired, select SQL authentication to use SQL authentication instead, and
then enter the Account and Password used to connect to the specified SQL Server. If
desired, select the Failover Database Server checkbox, and then enter a disaster
recovery database server.
6. Click Advanced to expand the advanced configuration. Use the Connection String
feature to create and configure Archiver databases using command lines. Select the
Manually Input Connection String checkbox to use the Connection String method to
create and connect the Archiver Database using Windows authentication or SQL
authentication.
*Note: If you select Manually Input Connection String, the Authentication field is
grayed out and unavailable.
To create an Archiver database using Windows authentication, enter the following
information:
• Server – Enter the name of an SQL Server instance. The value must be either the
server’s name on the network, an IP address, or the name of a Configuration
Manager alias. To connect to the default instance on the local server, refer to the
following examples:
o Server=.;
o Server= IP Address;
DocAve®
6 Archiver 22
o Server=localhost;
o Server=localDatabase\instancename;
• Database – Enter the database name. If a database is not manually entered, the
default database defined for the login is used. To connect to the database, refer
to the following example: Database=Database’s name.
• Trusted_Connection – Select the true value to use Windows Authentication
Mode for login validation.
• DataSource – Enter the instance’s name, the hostname, or the IP address of an
SQL Server. If this field is not specified, a connection is made to the default
instance on the local computer.
• Failover Partner – Enter the name of the failover server used for database
mirroring.
• Initial Catalog – Enter the Archiver database’s name.
• Integrated Security – Select the true value to accept the value “SSPI” for
Windows Authentication.
To create an Archiver database using SQL authentication, input the following
information:
*Note: Each instruction’s key and value must be connected with “=”. The instructions are
separated using “;”.
• Server – Enter the name of an SQL Server instance. The value must be either the
server’s name on the network, an IP address, or the name of a Configuration
Manager alias. To connect to the default instance on the local server, refer to the
following examples:
o Server=.;
o Server=IP Address;
o Server=localhost;
o Server= localDatabase\instancename;
• Database – Enter the database name. If a database is not manually entered, the
default database defined for the login is used. To connect to the database, refer
to the following example: Database=Database’s name.
• Trusted_Connection – Select the False value to not use the Windows
Authentication Mode for login validation. You can specify the credentials that will
be used to connect to the database.
• User ID – Enter the login name.
DocAve®
6 Archiver 23
• Password – Enter the password.
• DataSource – Enter the instance’s name, the hostname, or the IP address of an
SQL Server. If not manually entered, a connection is made to the default instance
on the local computer.
• Failover Partner – Enter the name of the failover server used for database
mirroring.
• Initial Catalog – Enter the Archiver database’s name.
7. Click Save to apply the configuration.
DocAve®
6 Archiver 24
Configuring the Archiver Index Device In order to set an Archiver rule on a given node, the node must have an Archiver index device
configured for it. The index device stores the index of data archived during an Archiver job. This
index is needed in order to restore archived data from a file system to SharePoint. It is
recommended that you back up the Archiver index device frequently to ensure availability of
content should a catastrophic database failure occur.
The size of the index is related to the complexity of the data being indexed. Normally, the
Archiver index does not increase in size quickly. As archive content is pruned, so is the related
data in the index.
While there are no particular recommendations as to where to configure an index device, it may
be most convenient to do so at the farm level.
To configure an Archiver index device, complete the following steps:
1. Navigate to: Archiver tab > General Settings group > Archiver Index Device. The
Archiver Index Device tab appears.
2. Click the root farm node and expand the tree structure. From the Object column, select
where to apply the Archiver index device. All farms that have DocAve Agents installed
and the Archiver module enabled are listed.
*Note: When selecting the farm node, the Archiver index device is only applied to all
existing Web applications and site collections in that farm. The Archiver index device is
not configured for newly created Web application or site collections. If you do not
configure an Archiver index device for a newly added Web application or site collection,
then the newly added node inherits its upper-level node’s index device. When selecting
the My Registered Sites node, which is the SharePoint Online farm, the Archiver index
device is only applied to all existing containers and registered SharePoint sites.
3. To configure the Archiver index device for the selected objects, there are two conditions
to consider:
• To configure the index device for the selected nodes and their sub-nodes, click
Configure in the Manage group.
• To configure the index device for a selected node only, click Configure to the
right of the selected node.
*Note: When creating a new Archiver rule on a selected node, DocAve verifies that an
index device has been configured for the node. If there are no Archiver index devices
DocAve®
6 Archiver 25
configured for the node, you must manually configure an index device for the selected
node in order to create an Archiver rule on that node.
4. Select one Logical Device from the drop-down menu for the selected objects in the
Archiver Index Device field.
*Note: Only the logical devices in the Net Share storage type can be displayed in the
drop-down menu.
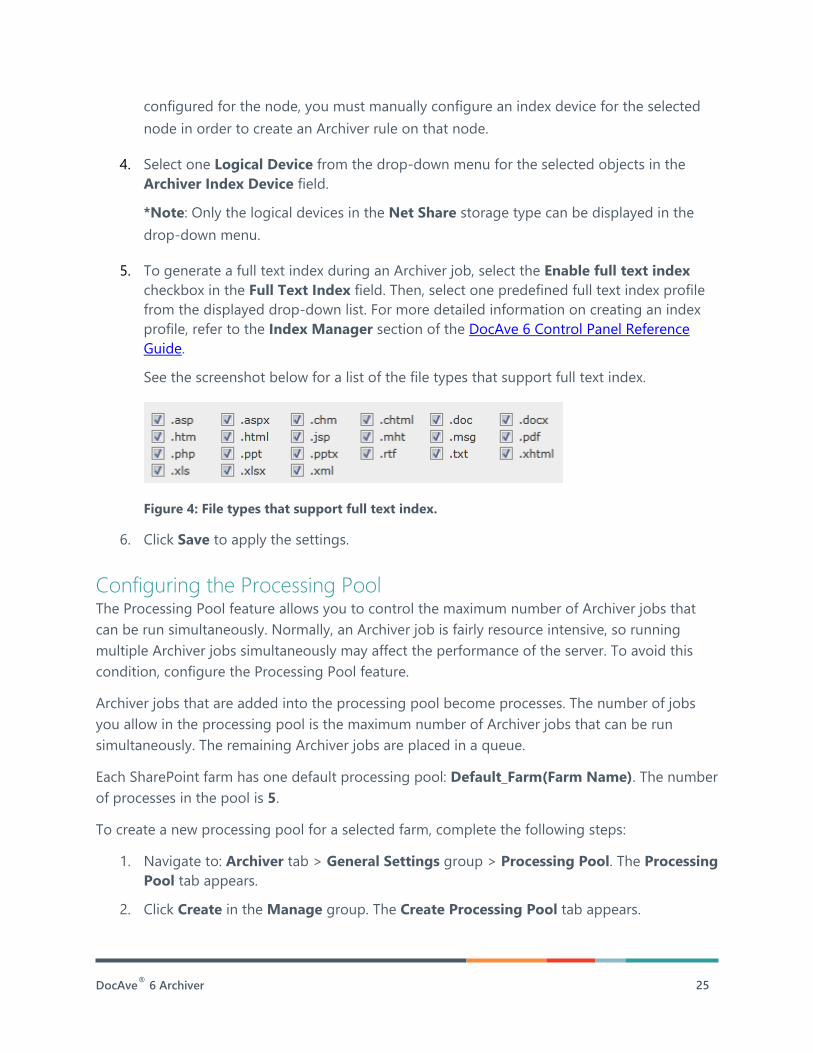
5. To generate a full text index during an Archiver job, select the Enable full text index
checkbox in the Full Text Index field. Then, select one predefined full text index profile
from the displayed drop-down list. For more detailed information on creating an index
profile, refer to the Index Manager section of the DocAve 6 Control Panel Reference
Guide.
See the screenshot below for a list of the file types that support full text index.
Figure 4: File types that support full text index.
6. Click Save to apply the settings.
Configuring the Processing Pool The Processing Pool feature allows you to control the maximum number of Archiver jobs that
can be run simultaneously. Normally, an Archiver job is fairly resource intensive, so running
multiple Archiver jobs simultaneously may affect the performance of the server. To avoid this
condition, configure the Processing Pool feature.
Archiver jobs that are added into the processing pool become processes. The number of jobs
you allow in the processing pool is the maximum number of Archiver jobs that can be run
simultaneously. The remaining Archiver jobs are placed in a queue.
Each SharePoint farm has one default processing pool: Default_Farm(Farm Name). The number
of processes in the pool is 5.
To create a new processing pool for a selected farm, complete the following steps:
1. Navigate to: Archiver tab > General Settings group > Processing Pool. The Processing
Pool tab appears.
2. Click Create in the Manage group. The Create Processing Pool tab appears.
DocAve®
6 Archiver 26
3. Processing Pool Name – Enter a processing pool Name and an optional Description.
4. Farm – Select the Farm from the drop-down list.
5. Agent Group – Select an Agent group from the drop-down list. The Agents in the
selected Agent group are used by this processing pool to perform Archiver jobs. For
more information about creating Agent groups, refer to the DocAve 6 Control Panel
Reference Guide.
*Note: When you select a container or a node below on the tree, only processing pools
where the selected Agent group is the same as that configured for the container will be
selectable in the processing pool drop-down list.
6. Maximum Number of Jobs – Specify the Maximum number of jobs that can run
simultaneously. For example, if you enter 8 in the text box, as many as eight Archiver
jobs can be run at the same time.
To view detailed information on an existing processing pool, complete the following steps:
1. Navigate to: Archiver tab > General Settings group > Processing Pool.
2. Select a pool from the Processing Pool tab.
3. Click View Details in the Manage group.
To edit an existing processing pool, complete the following steps:
1. Navigate to: Archiver tab > General Settings group > Processing Pool.
2. Select a pool from the Processing Pool tab.
3. Click Edit in the Manage group.
To delete existing processing pools, complete the following steps:
1. Navigate to: Archiver tab > General Settings group > Processing Pool.
2. Select one or more pools from the Processing Pool tab.
3. Click Delete in the Manage group.
*Note: The default processing pool for each farm cannot be deleted.
DocAve®
6 Archiver 27
Configuring Archiver Jobs To run an Archiver job, a node must have one or more Archiver rules applied to it, as well as
configured settings. Archiver rules and settings define which content in the selected node is
included in the job and where the content is saved, along with the processing pool information,
notification settings, and job schedule.
Archiver jobs can be configured via two methods:
1. Create an Archiver profile and apply it to a selected node. An Archiver profile integrates
rules and settings configurations into one saved profile. If you’ve created an Archiver
profile, you can apply the profile to one or more nodes without having to re-apply the
same rules and settings repeatedly. This method should be used if multiple nodes in
your farm require the same configurations and/or criteria.
2. Configure rules on a selected node, manually configure the settings for that node, and
then apply both the rules and the settings to the node. This method should be used on
nodes that require uncommon configurations or criteria that is, configurations or criteria
that are not likely to be reused elsewhere in the farm.
Creating an Archiver Profile in Profile Manager The Profile Manager is used to configure an Archiver profile, and then integrate rules and
settings configurations into one saved profile. This feature allows you to instantly apply the
same set of rules and settings to multiple nodes without having to repeatedly configure the
same settings for each node.
To create and configure an Archiver profile, complete the following steps:
1. From within Archiver, click Profile Manager in the Profile Management group on the
ribbon. The Profile Manager tab appears.
2. Select a mode for the profile: Archiving Profile or Lifecycle Profile.
3. Click Create in the Manage group on the ribbon. The General Settings configuration
page appears in the Create Profile tab.
4. Configure the following settings:
• Profile Name – Enter the profile Name, followed by an optional Description.
• Farm – Select a farm or My Registered Sites from the drop-down list to create
the profile.
• Category – Enter an optional category name for this profile to be easily
recognized by users.
5. When finished, click Next in the Commit group or on the lower-right corner of the page.
The Rules page appears.
DocAve®
6 Archiver 28
6. Click Create in the Rule Management group to create an Archiver rule. For detailed
information on creating Archiver rules, refer to Creating and Configuring Archiver Rules.
*Note: If no rules are defined for this profile, a message appears on the upper pane of
the table in the Rules page instructing you to click Create. The Archiver Rule/Content
Lifecycle Rule pop-up window appears.
*Note: A profile can have multiple rules. However, only the rules with the same type can
be added to a profile.
7. When finished, click Next in the Commit group or on the lower-right corner of the page.
The Settings page appears.
8. Configure the settings for the profile. For detailed information on configuring settings,
refer to Configuring Settings.
9. When finished, click Next in the Commit group. The Overview page appears.
10. The settings configured above are displayed in the Overview page. To make changes to
the configured rules or settings, click Edit in the row next to the particular page you
want to edit.
11. When satisfied with the configurations, click Finish in the Commit group to return to the
Profile Manager tab.
12. The created profile is displayed in the Profile Manager tab. To view, edit, or delete an
existing profile, select the checkbox to the left of the profile name and click View
Details, Edit, or Delete in the Manage group. Click Close to close this tab and return to
the Archiver tab.
13. For instructions on applying the created profile and running a job, refer to Applying a
Profile to a Selected Node and Running a Job.
DocAve®
6 Archiver 29
Creating and Configuring Archiver Rules An Archiver rule defines the criteria, object level, storage policy, and data management
configurations for the selected node.
Creating Archiver Rules
To create an Archiver rule, complete the following steps:
1. Select a node from the Scope panel.
If working with a large environment, enter the site collection URL into the Input
Keyword text box to search for the desired site collection. You can only search for the
nodes whose names are displayed in the tree that is currently expanded. The nodes
which are not displayed in the tree cannot be searched. Use the Advanced Search
function to search the desired nodes by the configured search criteria. Right-click a farm,
Web application, sites, or lists node and select the Advanced Search option from the
drop-down menu. The Advanced Search pop-up window appears. You can use the
Advanced Search function to search for Web application, site collections, sites, lists, and
libraries.
2. Select the data management mode: Archiving Mode or Content Lifecycle Mode.
3. Access the Archiver Rule/Content Lifecycle Rule interface using one of the following
methods:
• Click Create in the New group on the Archiver tab. The Archiver Rule/Content
Lifecycle Rule pop-up window appears.
• In the Configure Rules and Settings field, select Create my own rules and
settings. If no rules are defined for the selected node, a message appears above
the Data Management Mode field instructing you to click Create. The Archiver
Rule/Content Lifecycle Rule pop-up window appears.
4. In the Archiver Rule/Content Lifecycle Rule interface, configure a desired rule. For
more information, refer to Configuring Archiver Rules.
5. After creating the Archiver rule, it will be displayed in the Rules and Settings pane.
• For an Archiver rule, you can view the general information (Order, Rule Name,
Object Level, Storage Policy, and Status) of the rule. For more detailed
information, click it and observe the Details pane.
• For a content lifecycle rule, you can view the rule name, order, and whether the
rule is enabled. Clicking the down arrow ( ) button allows you to see the details
of the rule. You can also change the order of a rule by selecting another order
from the order drop-down menu.
DocAve®
6 Archiver 30
6. For instructions on applying the created rule and running a job, refer to Applying Rules
to a Selected Node and Running a Job.
Configuring Archiver Rules
Depending upon the selected data management mode, the Archiver Rule or Content Lifecycle
Rule interface will appear. Refer to the following sections to create Archiver rules in different
interfaces.
Configuring an Archiver Rule
To configure an Archiver regular rule in the Archiver Rule interface, complete the following
steps:
1. How would you like to archive the SharePoint content? – Select one of the following
options:
• Reuse an existing rule – Select an existing rule from the drop-down list.
*Note: An existing rule cannot be modified from this screen.
• Copy from an existing rule – Select an existing rule to copy from the drop-
down list. Use this selection to modify the settings of an existing rule and save
the modification as a new rule with a different rule name.
• Create a new rule – Enter a Name for the new rule, and optionally, enter a
Description.
2. What type of content would you like to archive? – Select the type of content for this
Archiver rule from the drop-down list.
*Note: You can only select a type of content that is at an equivalent or lower level than
the node you selected in the Scope panel. Only one type of content can be selected for
each rule.
3. How would you like to define the content to be archived? – Configure the criteria for
the selected type of content. Refer to Appendix A: Criteria Filter Conditions for more
information.
*Note: Multiple criteria can be added to the Criteria field; however, to create a rule
successfully, at least one criterion is required.
• When you’ve finished setting a criterion, click Add to add the new criterion. You
can change the logical relationship between the criteria by clicking the And links
after the rules (And is the default logical relationship).
And – The content that meets all the rules is archived.
Or – The content that meets any one of the rules is archived.
DocAve®
6 Archiver 31
• Under Basic Filter Conditions, view the Archiver rules logical relationship. For
example, if the logical relationship is ((1 And 2) Or 3), the content that meets
both the criterion 1 and criterion 2 or meets the criterion 3 is archived.
4. What would you like to do with the SharePoint data? – Select one option to control
the SharePoint data which will be archived or backed up.
• Archive and remove data from SharePoint – Select this option to archive the
data that meets the criteria configured above in the selected node and store it in
a storage location based on the selected storage policy below. The
corresponding data in SharePoint will be deleted.
*Note: When you select Site Collection in the What type of content would you
like to archive? field, entire SharePoint Online site collections associated with
this rule will be removed. It is recommended not deleting the site collections
from the container in Control Panel to make sure the removed SharePoint Online
site collections can be restored.
• Archive and keep data in SharePoint – Select this option to archive the data
that meets the criteria configured above in the selected node and store it in a
storage location based on the selected storage policy below. The data will not be
deleted from SharePoint after the archive/backup. Once you select this option,
you can also select the following options for further configurations:
Leave a stub in SharePoint for each document (uses Storage
Manager) – Select this checkbox to extend the data in the selected node
and leave stubs in SharePoint.
▪ Logical device – Select an existing logical device from the drop-
down list to store the data that is extended from SharePoint. If
there is no logical device already configured, click New Logical
Device to create a new logical device.
*Note: Make sure the BLOB providers and stub databases have
been configured for the selected scope in Storage Manager.
*Note: This checkbox is not available for SharePoint Online nodes.
Declare each document/item as a SharePoint record – Select this
checkbox to declare the data or stub that exists in SharePoint as a record
and make the data read-only.
*Note: If this checkbox is selected in a rule and the rule is applied to a
node, the documents/items that meet the rule on the selected node will
be backed up and the In Place Records Management feature in the
DocAve®
6 Archiver 32
corresponding site collection will be activated automatically after the job
has started.
Tag each document/item with: – Select this checkbox to back up the
data on the selected node and then add one or multiple columns to
indicate the status of the data.
▪ Archived (Yes/No column) – If the data is archived successfully,
the value will be displayed as Yes.
▪ Archived By – The column value is displayed as the name of the
user who archived the data.
*Note: For SharePoint Online, the display name of the user who
registers the site collection where the selected node is located will
be the column value.
▪ Archived Time – The column value is displayed as the time when
the data was archived.
▪ Custom Metadata: – Create the column that is customized by the
user. Select the column type and then enter the name and value
for this column. If the data is archived successfully, the customized
column and its value will be displayed.
*Note: If you select Newsfeed Post to archive and the Archive and keep data in
SharePoint option, only the Lock newsfeed conversations checkbox can be
selected. Select this checkbox to lock conversations on the selected node.
• Move and declare documents as SharePoint records – Select this option to
move the source documents to the selected destination library and declare the
moved documents as SharePoint records. Enter the full URL in the text box to
specify the destination library.
*Note: Ensure the DocAve Agent account has the following permission to the
destination:
o A member of the Farm Administrators group.
o Full Control to all zones of the Web application where the library resides.
*Note: If the selected source node is a SharePoint Online node, an account with
its password that has the Site Collection Administrator permission to the entered
SharePoint Online library is required. This account must have the SharePoint
administrator to the SharePoint Online admin center.
DocAve®
6 Archiver 33
*Note: Only the library whose template is Document Library or Record Library in
the same farm as the selected source node can be selected as the destination
library.
o Leave a link for each source document – Select this option to leave a
link for each moved document in its original location. The name of the
link is renamed by adding the suffix .stub.apsx to the moved document’s
full name. For example, the link of the moved document Test.docx will be
renamed as Test.docx.stub.apsx. Click a link, and you can see the
following message:
The document has been moved to another location.
You can also view the following properties of the moved document:
▪ Document Name – The name of the moved document.
▪ Destination Location – The location where the document is
moved.
▪ Moved Time – The time when the document is moved.
▪ Moved By – The user by whom the document is moved.
o Move all document versions – Select this option to move all versions of
documents that meet the criteria configured above.
• Export without archiving – Select this option to perform the export job only.
o Export type selection – Select an export type for the data from the drop-
down list.
▪ Autonomy Integration means the exported content can be
managed in the Autonomy platform.
▪ Concordance Load File means the exported content can be
imported to the Concordance platform for management.
▪ EDRM XML means the exported content can be managed by
EDRM (Electronic Discovery Reference Model).
▪ VEO File means the exported content meets the Victorian
Electronic Records Strategy (VERS) Standard (PROS 99/007).
*Note: To use this export type, configuration files can be
configured to customize metadata and values for VEO files prior to
running the job. For detailed information on configuring the
DocAve®
6 Archiver 34
configuration files, refer to Configuration Files for Exporting
Content into VEO Files.
o Select an export location – Select an export location from the drop-
down list where you want to store the exported data. You can also choose
to create a new one by clicking New Export Location.
*Note: The export location in the Net Share storage type can be used for
all export types. The export location in the SFTP storage type can only be
used when the Autonomy Integration export type is selected.
5. Would you like to enable manual approval before archiving? – Select the Enable
manual approval checkbox to enable this function. If you choose to enable this
function, the content in the selected node that meets the Archiver rule needs to be
reviewed before the archive. Only the approved objects will be archived. To review
pending objects, refer to Reviewing Archiving Data.
*Note: This field only appears when the Archive and remove data from SharePoint
option is selected.
6. Would you like to export the SharePoint data before archiving? – Select the Export
before archiving checkbox to perform an Archiver job after exporting the SharePoint
data that meets the specified Archiver rule to the configured location.
• Export type selection – Select an export type from the drop-down list.
o Autonomy Integration means the exported content can be managed in
the Autonomy platform.
o Concordance Load File means the exported content can be imported to
the Concordance platform for management.
o EDRM XML means the exported content can be managed by EDRM
(Electronic Discovery Reference Model).
o VEO File means the exported content meets the Victorian Electronic
Records Strategy (VERS) Standard (PROS 99/007).
*Note: To use this export type, configuration files can be configured prior
to using the job to customize metadata of VEO files. For detailed
information on configuring the configuration files, refer to Configuration
Files for Exporting Content into VEO Files.
• Select an export location – Select an export location from the drop-down list
where you want to store the exported data. You can also choose to create a new
one by clicking New Export Location.
DocAve®
6 Archiver 35
*Note: The export location in the Net Share storage type can be used for all
export types. The export location in the SFTP storage type can only be used
when the Autonomy Integration export type is selected.
7. Where would you like to store the archived data? – Select one of the configured
storage policies for the archived data from the drop-down list or select New Storage
Policy to create a new one.
8. What content types would you like to use? – Select one option to define the content
types for the moved documents in the destination.
*Note: This field only appears when the Move and declare documents as SharePoint
records option is selected.
• Preserve content types from source – Select this option to move the source
content types to the destination together with the moved documents. For
detailed information on the content type conflict resolution, refer to Conflict
Resolution for Archiving.
• Automatically match source documents with existing content types in
destination – Select this option to use existing destination content types for the
moved documents. If the content type of a document cannot be found in the
destination library or the site where the library resides, this document will be
skipped. You can also select Generate an XML file to capture source metadata
for each document to generate an XML file for each moved document to record
the source metadata and store it in the destination library.
9. Which conflict resolution would you like to use for documents? – Select the conflict
resolution for documents.
*Note: This field only appears when the Move and declare documents as SharePoint
records option is selected.
• Skip – If a document with the same name exists in the destination library, the
source document will be skipped to move to the destination library.
• Overwrite – If a document with the same name exists in the destination library,
the source document will be moved to the destination library and will overwrite
the existing one.
• Append – If a document with the same name exists in the destination library, the
destination document will be kept, and the source document will be added to the
destination library by a sequential number suffix.
10. Data Compression – If you want to enable data compression, select the Compression
checkbox, choose a compression level using the slider, and then select whether to
DocAve®
6 Archiver 36
leverage DocAve Media Server (Media Service) resources or SharePoint Server
(SharePoint Agent) resources for compression.
*Note: A low compression level results in a faster compression rate but a larger data set.
A high compression level results in a slower compression rate but a smaller and better
quality data set. Small data sets may cause slower backup and recovery times.
11. Data Encryption – If you want to enable data encryption, select the Encryption
checkbox, and configure the following options:
*Note: Encrypting data causes slower backup and recovery times.
• Choose whether you want to leverage DocAve Media Server (Media Service)
resources or SharePoint Server (SharePoint Agent) resources for encryption.
• Choose a security profile from the Security profile drop-down list or select New
Security Profile to create a new one. For more information on creating a security
profile, refer to the DocAve 6 Control Panel Reference Guide.
12. Click Save to save the configurations and create this new rule or click Cancel.
Configuring a Content Lifecycle Rule
To configure an Archiver lifecycle rule in the Content Lifecycle Rule interface, complete the
following steps:
1. How would you like to archive the SharePoint content? – Select one of the following
radio buttons:
• Reuse an existing rule – Select an existing rule from the drop-down list.
*Note: An existing rule cannot be modified from this screen.
• Copy from an existing rule – Select an existing rule to copy from the drop-
down list. Use this selection to modify the settings of an existing rule and save
the modification as a new rule with a different rule name.
• Create a new rule – Enter a Name for the new rule, and optionally, enter a
Description.
2. What type of content would you like to archive? – Select the type of content from the
drop-down list.
*Note: Only the Document and Item object levels can be selected in a content lifecycle
rule, and only one type of content can be selected for each rule.
3. Configure settings for stage 1.
DocAve®
6 Archiver 37
• How would you like to define the content to be archived? – Configure the
criteria for the selected type of content. Refer to Appendix A: Criteria Filter
Conditions for more information.
*Note: Multiple criteria can be added to the Criteria field; however, to create a
rule successfully, at least one criterion is required.
o When you’ve finished setting a criterion, click Add to add the new
criterion. You change the logical relationship between the criteria by
clicking the And links after the rules (And is the default logical
relationship).
▪ And – The content that meets all the rules is archived.
▪ Or – The content that meets any one of the rules is archived.
o Under Basic Filter Conditions, view the Archiver rules logical relationship.
For example, if the logical relationship is ((1 And 2) Or 3), the content
that meets both the criterion 1 and criterion 2 or meets the criterion 3 is
archived.
• What action do you want to perform? – Configure the action to be taken on
the content that meets the criteria configured above. Click Add Action and the
Add Action pop-up window appears. For more information, refer to Adding an
Action.
*Note: Only one action can be configured for each stage.
• When do you want to take action on the content? – Choose when you want to
take action on the content that meets the criteria configured above.
o Take action immediately
o Perform the action specific Day(s)/Month(s)/Year(s) after being scanned
o Use manual approval process for actions
*Note: This option is only available for the Archive and Remove Data
and Delete from SharePoint actions.
• Would you like to send an e-mail notification? – Choose whether to send an
e-mail notification on the Archiver job. Select Notify users about actions taken
in this stage to send the e-mail notification on the objects that have been
scanned and match criteria configured for this stage.
o Who would you like to notify? – Select the type of users to whom the e-
mail notification will be sent.

DocAve®
6 Archiver 38
▪ Site Collection Administrators – Users in the Site Collection
Administrators group of the site collection where the objects
reside will all receive the e-mail notification.
▪ Content Owners – Users who are the owners of the objects will
receive the e-mail notification.
o When would you like recipients to receive notifications? – Select the
situation under which the e-mail notification will be sent.
▪ When content that matches the criteria has been scanned –
The e-mail notification will be sent after the content that meets
the criteria configured above has been scanned.
▪ Immediately after the action in this stage has completed – The
e-mail notification will be sent after the action in this stage has
completed.
4. Click Add Stage to add stage 2 to this content lifecycle rule.
5. Configure settings for stage 2.
• How would you like to define the content to be archived? – Select the Define
criteria for this stage checkbox to configure the criteria for the selected type of
content. Select the Define a start time for this stage checkbox to define the
start time for this stage. A setting will appear below the Criteria area.
Enter a number in the text box and select a time unit to configure the time range.
This stage will begin after the specified time range since the action in the
previous stage has completed.
*Note: At least one checkbox mentioned above must be selected.
o If only the Define a start time for this stage checkbox is selected, stages
in the content lifecycle rule are sequential. The content that meets the
criteria configured in the stage 1 will also be taken the action defined in
the stage 2 when the start time for the stage 2 is reached.
o If only the Define criteria for this stage checkbox is selected, stages in
this content lifecycle rule are parallel. The last stage will be checked first.
The action in a stage will be performed once the content that meets the
criteria in this stage is scanned. If the criteria in stages are the same, and
the content that meets the criteria is scanned, only the action in the last
stage will be performed.
o If both the Define criteria for this stage and Define a start time for this
stage checkboxes are selected, stages in the content lifecycle rule are
DocAve®
6 Archiver 39
sequential. The content that meets the criteria in each stage will be taken
the action in the stage when the start time for the stage is reached.
• What action do you want to perform? – Configure the action to be taken in
this stage. Click Add Action and the Add Action pop-up window appears. For
more information, refer to Adding an Action.
*Note: Only one action can be configured for each stage. For actions in different
stages of a content lifecycle rule, only the Export and Tag actions can be
selected more than once.
• When do you want to take action on the content? – Choose when you want to
take the action. Settings in this field is the same as that of stage 1.
• Would you like to send an e-mail notification? – Choose whether to send an
e-mail notification on the Archiver job. Settings in this field is the same as that of
stage 1.
6. Repeat the step 4 and step 5 to add more stages.
7. Click Save to save the content lifecycle rule or click Cancel to return to the Archiver tab
without saving the rule.
Adding an Action
Click Add Action and the Add Action pop-up window appears. Configure the following
settings:
1. Action Selection – Select the action you want to add.
*Note: An action can only be added to one stage of a content lifecycle rule except for
the Tag and Export actions.
2. Configure the subsequent settings.
*Note: Depending upon the selected action, the subsequent settings are dynamic.
• Select the Archive and Remove Data action, and configure the following
settings:
o Where would you like to store the archived data? – Select one of the
configured storage policies for the archived data from the drop-down list
or select New Storage Policy to create a new one.
o Data Compression – If you want to enable data compression, select the
Compression checkbox, choose a compression level using the slider, and
then select whether to leverage DocAve Media Server (Media Service)
resources or SharePoint Server (SharePoint Agent) resources for
compression.
DocAve®
6 Archiver 40
*Note: A low compression level results in a faster compression rate but a
larger data set. A high compression level results in a slower compression
rate but a smaller and better quality data set. Small data sets may cause
slower backup and recovery times.
o Data Encryption – If you want to enable data encryption, select the
Encryption checkbox, and configure the following options:
*Note: Encrypting data causes slower backup and recovery times.
▪ Choose whether you want to leverage DocAve Media Server
(Media Service) resources or SharePoint Server (SharePoint
Agent) resources for encryption.
▪ Choose a security profile from the Security profile drop-down list
or select New Security Profile to create a new one. For more
information on creating a security profile, refer to the DocAve 6
Control Panel Reference Guide.
• Select the Delete from SharePoint action to delete data from SharePoint. The
deleted data cannot be restored.
• Select the Declare as a Record action and configure the Record Declaration
Options setting.
o Declare each document/item as a SharePoint record – Select this
option to declare the data or stub that exists in SharePoint as a record
and make the data read-only.
*Note: If this checkbox is selected in a rule and the rule is applied to a
node, the In Place Records Management feature in the corresponding
site collection will be activated automatically after the job has started.
o Move and declare documents as SharePoint records – Select this
option to move the source documents to the selected destination library
and declare the moved documents as SharePoint records. The documents
in the source will be deleted. If the version settings are enabled in the
source, only the current versions of the source documents will be moved
to the selected destination library.
Enter the full URL in the text box to specify the destination library.
*Note: Only the library whose template is Document Library or Record
Library in the same farm as the selected source node can be selected as
the destination library.
DocAve®
6 Archiver 41
Once the Move and declare documents as SharePoint records option is
selected, the following settings appear:
o What content types would you like to use? – Select one option to
define the content types for the moved documents in the destination.
▪ Preserve content types from source – Select this option to move
the source content types to the destination with the moved
documents. For detailed information on the content type conflict
resolution, refer to Conflict Resolution for Archiving.
▪ Automatically match source documents with existing content
types in destination – Select this option to use existing
destination content types for the moved documents. If the content
type of a document cannot be found in the destination library or
the site where the library resides, this document will be skipped to
move to the destination library. You can also select Generate an
XML file to capture source metadata for each document to
generate an XML file for each moved document to record the
source metadata and store it in the destination library.
o Which conflict resolution would you like to use for documents? –
Select the conflict resolution for documents.
▪ Skip – If a document with the same name exists in the destination
library, the source document will be skipped to move to the
destination library.
▪ Overwrite – If a document with the same name exists in the
destination library, the source document will be moved to the
destination library and will overwrite the existing one.
▪ Append – If a document with the same name exists in the
destination library, the destination document will be kept, and the
source document will be added to the destination library by a
sequential number suffix.
• Select the Export action and configure the Export Settings.
*Note: For the Export action in different stages, Export Settings can be
configured diversely to export content to different locations in different export
types.
o Export type selection – Select an export type from the drop-down list.
▪ Autonomy Integration means the content can be managed in
the Autonomy platform.
DocAve®
6 Archiver 42
▪ Concordance Load File means the exported content can be
imported to the Concordance platform for management.
▪ EDRM XML means the exported content can be managed by
EDRM (Electronic Discovery Reference Model).
▪ VEO File means the exported content meets the Victorian
Electronic Records Strategy (VERS) Standard (PROS 99/007).
*Note: To use this export type, configuration files must be
configured prior to using the job. For detailed information on
configuring the configuration files, refer to Configuration Files for
Exporting Content into VEO Files.
o Select an export location – Select an export location from the drop-
down list where you want to store the exported data. You can also choose
to create a new one by clicking New Export Location.
• Select the Leave Stubs in SharePoint action, and configure the Logical Device
setting. Select an existing logical device from the drop-down list to store the data
that is extended from SharePoint. If there is no logical device already configured,
click New Logical Device to create a new logical device.
*Note: Make sure the BLOB providers and stub databases have been configured
for the selected scope in Storage Manager.
*Note: This action is not available for SharePoint Online.
• Select the Tag action and configure the Tag Type setting.
o Archived (Yes/No column) – If the data is archived successfully, the
value will be displayed as Yes.
o Archived By – The column value is displayed as the name of the user who
archived the data.
*Note: For SharePoint Online, the display name of the user who registers
the site collection where the selected node locates will be the column
value.
o Archived Time – The column value is displayed as the archived time of
the data.
o Custom Metadata: – Create the column that is customized by the user.
Select the column type and then enter the name and value for this
column. If the data is archived successfully, the customized column and its
related value will be displayed.
DocAve®
6 Archiver 43
3. Click Save to save the action or click Cancel to return to the Content Lifecycle Rule
interface without saving the action.
Configuring Settings In addition to rules, a selected node must also have settings configured in the Rules and
Settings workspace.
*Note: If you have configured and applied an Archiver profile to the selected node by using the
Reuse an existing profile option, then the settings will not be editable, as they now reference
the settings defined in the profile.
To configure Archiver job settings, complete the following steps under Settings:
1. Processing Pool – Select an existing processing pool or click New Processing Pool to
create a new pool. For more information, refer to Configuring the Processing Pool.
2. Workflow – Define how you want to manage the workflows in the SharePoint objects to
be archived by optionally selecting one or both checkboxes:
• Include workflow definition – Archives only the definition of existing source
workflows.
• Include workflow instance – Archives the definition and history of existing
source workflows.
*Note: This option is only selectable when the Include workflow definition
option is selected. For SharePoint Online nodes, this option is unavailable.
3. SnapMirror ─ Choose whether or not to update the SnapMirror for NetApp Data
ONTAP (NetApp FAS CIFS) storage devices after completing the Archiver job. Select the
Update SnapMirror for device after operation checkbox to update the SnapMirror.
4. SnapVault ─ Choose whether or not to update the SnapVault for NetApp Data ONTAP
(NetApp FAS CIFS) storage devices after completing the Archiver job. Select the Update
SnapVault for device after operation checkbox to update the SnapVault.
5. Notification ─ Select how to be notified of executed Archiver jobs. Select the desired
notification profile from the drop-down list. For instructions on setting up a notification
profile, refer to the DocAve 6 Control Panel Reference Guide.
6. Schedule ─ Select one of the following scheduling options:
• No Schedule – Select this option to run the Archiver job immediately.
• Configure the schedule myself – Select this option to configure a customized
schedule and run the Archiver job by schedule. Fill in the parameters according to
DocAve®
6 Archiver 44
your desired schedule. After configuring the schedule, click Calendar View to
view the scheduled search by day, week, or month.
7. Incremental Scan – Select whether to run an incremental scan. If you want to run an
incremental scan, select a method of content discovery and configure the schedule
settings for the scan.
*Note: This field only appears when the Archiving Mode is selected for a list level node
or above.
• Use SharePoint Change Logs – Select this checkbox to go through the Change
Log to see if the eligible content can be processed further according to the rules
you have defined. Select this option if you are using metadata-based or size-
based criteria for your rules.
• Use Report Center Item Caching Service – Select this checkbox to use the
information from the DocAve Report Center Item Caching Service in order to see
if the eligible content can be processed further according to rules you have
defined. Select this option if you are using time-based criteria for your rules.
*Note: To use this option, the Item Caching Service in Report Center must first be
configured and the Item Caching Service Collector job must be run. If either the
service is not configured or the collector job is not run, a full scan will be run
instead.
*Note: This option is not available for SharePoint Online.
After one or both checkboxes are selected, the following settings appear:
a. Start time – Set up the time to start the incremental scan. Time Zone can be
changed under the Start time.
*Note: The start time cannot be earlier than the current time.
b. Interval – Configure an interval for the incremental scan. Enter an integer greater
than zero in the text box and choose a unit for the interval from the drop-down
menu. The units are: Hour(s), Day(s), and Month(s).
c. No end date – Select this option to repeat running the incremental scan until it is
manually stopped.
d. End after specified occurrence(s) – Select this option to stop the incremental
scan after the specified number of occurrences.
e. End by – Set up the time to end the recurrence of the incremental scan.
*Note: This function is only available at the content level.
DocAve®
6 Archiver 45
Applying Configurations and Running Archiver Jobs Before you can run an Archiver job, you must first apply rules or profiles to the selected node.
Refer to the information below to apply your applicable configurations to a selected node and
run an Archiver job.
Applying a Profile to a Selected Node and Running a Job To apply a created profile to a selected node and run the job, complete the following steps:
1. Select a node from the Scope panel.
2. In the Configure Rules and Settings field on the right, select one of the following
options to apply a profile to the node selected on the farm tree.
*Note: Any modified rules are also applied to rules in the selected profile; however,
modified settings do not affect the original settings.
• To create new rules and settings based on an existing profile, select Create new
rules and settings based on an existing profile and select a profile from the
drop-down list. The rules and settings configured for the selected profile are
displayed in the Rules and Settings workspace and can be edited as needed. If
you have never created a profile, click the New Profile link in the drop-down list
to create a new profile. For more information, refer to Creating an Archiver Profile
in Profile Manager.
• To reuse an existing profile, select Reuse an existing profile and select a profile
from the drop-down list.
*Note: The existing profile cannot be modified from this screen.
3. Click Apply in the Commit group to apply the selected profile. The selected profile is
applied to the selected node, and all nodes below the selected node inherit the profile
rules and settings. For more information on the inheritance, refer to Applying or
Stopping Inheritance.
4. From the Commit group, click Run Now to run the job immediately. Running jobs can
be observed in the Job Monitor. Optionally, click Test Run to run a test job immediately.
*Note: Alternatively, click Apply and Run Now to both apply the profile and run the job
with one click. You can also click Apply and Test Run to both apply the profile and run a
test job immediately. Performing an Archiver Test Run job can verify whether the profile
will be successfully applied and run during the Archiver job. The test run will also identify
which data can be archived.

DocAve®
6 Archiver 46
*Note: If you click Run Now, Test Run, Apply and Run Now, or Apply and Test Run
with the Use SharePoint Change Logs and/or Use Report Center Item Caching
Service checkbox selected in the profile, a Run Now or Test Run pop-up window
appears. You can select the scan type for the current job. Select the Evaluate all content
option to run a full scan for the selected node. Select the Evaluate modified content
only option to run an incremental scan for the selected node.
Applying Rules to a Selected Node and Running a Job To apply a rule to a selected node and then run an Archiver job, complete the following steps:
1. Select a node from the Scope panel. All rules created for that particular node are
displayed in the Configure Rules and Settings pane of the Rules and Settings
workspace.
2. If desired, create more Archiver rules or specify which rule will run first by changing the
number in the Order column. To reorder rules, modify the values in the Order column.
*Note: Only the rules in the same object level or in the Document, Document Version,
Item, Item Version, and Newsfeed Post object levels are configurable.
3. Click Apply in the Commit group to apply all configured rules and corresponding
settings. The configured rules and settings are applied to the selected node and all
nodes below it. After refreshing the tree scope, the rule ( ) icon is added to the lower-
right corner of the selected SharePoint 2010 node’s icon to indicate that the node has a
rule configured. The rule ( ) icon is added to the lower-right corner of the selected
SharePoint 2013, SharePoint 2016, SharePoint 2019, or My Registered Sites node’s icon.
*Note: No icon is added to nodes without configured rules or nodes that inherit from
the parent nodes’ rules and settings. For nodes that have configured and applied rules
that are either disabled or unavailable, the rule icon is added to the lower-right corner
and the warning ( ) icon is added to the upper-left corner of the node’s icon.
For more information on the inheritance, see Applying or Stopping Inheritance.
4. Click Run Now to run the applied rules and settings immediately (the running jobs can
be viewed in the Job Monitor) or click Apply and Run Now to both apply the rule and
run the job immediately.
If you are not sure whether the created rule will run successfully, click Apply and Test
Run to both apply the rule and run a test job immediately. Performing an Archiver Test
Run job can verify whether the created rule and settings will be successfully applied and
run during the Archiver job. The test run will also identify which data can be archived.

DocAve®
6 Archiver 47
*Note: If you click Run Now, Test Run, Apply and Run Now, or Apply and Test Run
with the Use SharePoint Change Logs and/or Use Report Center Item Caching
Service checkbox selected, a Run Now or Test Run pop-up window appears. You can
select the scan type for the current job. Select the Evaluate all content option to run a
full scan for the selected node. Select the Evaluate modified content only option to run
an incremental scan for the selected node.
DocAve®
6 Archiver 48
Archiver Job Running Status To view Archiver jobs that are running, click Job Monitor in the Statistics group.
Archiver Job
During the job process, the first three tasks listed below are run, one by one, during the Archiver
job. If the Enable full text index checkbox was selected during the Archiver index device
configuration, then the fourth task is performed as well.
1. Scan/Incremental Scan – The first task searches for data that matches the
corresponding Archiver rule. In the Details tab of this task, you can find the Rule Name
column. If an object meets a configured Archiver rule, the rule name will be the object’s
column value. If an object does not meet any configured rules, the column value will be
N/A. If there is no data matching the rule, the Merge Index task will not be run. Scan
jobs are not performed for end-user archiving jobs because the user directly selects the
content to be archived in SharePoint. For more information, refer to End-User Archiving.
2. Archive – The second task archives the data that was located in the first task according
to the storage policy and other configured settings. If no data has been archived in this
task, then the Merge Index task described below will not be performed.
3. Merge Index – The third task is the Merge Index task. Site collections have a major
index, and the minor index generated by each Archiver job must be merged into the
major index. The major index increases in size as the archived data size increases. As
such, the index may become large in size. In the event that the merge index job status
reads Failed/Finished with Exception, the generated minor indexes can be re-merged
to the major index by clicking Start in Job Monitor and starting the corresponding
merge index job again.
4. Archiver Full Text Index – If the Enable full text index checkbox was selected in the
Archiver Index Device configuration page and the Archiver index device was applied to
the selected node in the farm tree, and then the Archiver job run on this node will
generate a full text index of the archived content.
Content Lifecycle Job
During the job process, the first two tasks listed below are run in order, during the content
lifecycle job. If the Archive and Remove Data action is selected in the content lifecycle rule, and
the data that matches the configured content lifecycle rule is scanned, the third task is
performed. If the Enable full text index checkbox was selected in the Archiver Index Device
configuration page, the fourth task is performed as well.
1. Scan – The first task searches for data that matches the corresponding content lifecycle
rule. In the Details tab of this task, you can find the Rule Name column. If an object
meets a configured content lifecycle rule, the Rule Name(Stage) will be the object’s

DocAve®
6 Archiver 49
column value. For example, Rule A(2). If an object does not meet any configured rules,
the column value will be N/A.
2. Lifecycle Archive – The second task performs the action configured in the rule on the
data that was located in the first task according to other configured settings.
3. Merge Index – The third task is the Merge Index task. Site collections have a major
index, and the minor index generated by each job must be merged into the major index.
The major index increases in size as the data size increases. As such, the index may
become large in size. In the event that the merge index job status reads Failed/Finished
with Exception, the generated minor indexes can be re-merged to the major index by
clicking Start in Job Monitor and starting the corresponding merge index job again.
4. Archiver Full Text Index – If the Enable full text index checkbox was selected in the
Archiver Index Device configuration page and the Archiver index device was applied to
the selected node in the farm tree, and then the content lifecycle job run on this node
will generate a full text index of the content that has been perform the configured
actions.
DocAve®
6 Archiver 50
Managing Archiver Rules Once created and applied, Archiver rules can be edited, removed, disabled, and deleted. In
addition, inheritance can be applied or stopped. Review the following sections for information
on managing Archiver rules.
Applying or Stopping Inheritance After setting up and applying an Archiver rule on a selected node, its sub-nodes automatically
inherit the rule that is applied to their parent node. The Stop Inheriting option logically
separates the rule in the lower level node from the upper level node; this rule is useful, for
example, to ensure that often used data in a particular list is not archived accidentally.
To create a new rule or edit an existing rule that is applied to the current node or lower level
nodes, you must break the inheritance first. To break the inheritance, click Stop Inheriting in
the New group on the ribbon.
To manually apply an Archiver rule inheritance to a node, complete the following steps:
1. Select the node that will inherit the parent node’s Archiver rule.
2. Click Inherit in the New group on the ribbon to inherit the rule. This button changes to
Stop Inheriting.
Helpful Notes for Applying Inheritance
Review the following notes to help you apply inheritance when managing Archiver rules:
• An Archiver rule configured for a higher level is inherited by lower-level nodes
unless manually configured.
• You cannot create a new rule on a node if it inherits Archiver rules from a higher-
level node.
• An inherited Archiver rule cannot be edited or removed and can only be viewed.
• Inheriting rules from the upper-level node again after already breaking
inheritance, the following situations will happen:
o All rules that are added after breaking the inheritance from the upper-
level node will be removed from this node.
This node will inherit all rules of the upper-level node.
*Note: The removed rules are not deleted; they still exist in the Archiver Rules list
for re-application.
• If multiple rules are created in an Archiver profile, then only the rules whose
object level is lower than or equal to the selected node level can be applied.
DocAve®
6 Archiver 51
• If the object level of a rule inherited from a higher-level node is higher than the
level of the currently selected node, then the rules in this profile cannot be
applied to the selected node.
Helpful Notes for Stopping Inheritance
Review the following notes to help you stop inheritance when managing Archiver rules:
• When breaking a rule’s inheritance at a selected level, the inheritance is only
broken at this level; the rule’s lower level inheritance is not broken.
• After the rule’s inheritance is broken, you can apply new rules and edit the
corresponding rule settings at the lower level.
• If you break rule inheritance on a node and then disable the inherited rule, this
rule can still be used by an upper level.
• If you break rule inheritance on a node and then edit the inherited rule, the
changes will affect all the SharePoint objects that use this rule.
• If you run an Archiver job at a higher level after breaking a rule’s inheritance on a
selected node, there are two conditions:
If the object level of a higher level’s Archiver rule is higher than the level
of the selected node, the lower-level node is included in the scope of the
Archiver job.
If the object level of a higher level’s Archiver rule is lower than or equal to
the level of the selected node, the lower-level node is not included in the
Archiver job.
Editing or Removing Archiver Rules Existing Archiver rules can be edited or removed from nodes. See the information below.
Editing Existing Archiver Rules
Certain Archiver rule settings can be modified using the Edit feature. All rule settings can be
edited, except for the rule name. The Rule Name is a fixed setting and cannot be changed using
the Edit feature.
To edit an existing Archiver rule, complete the following steps:
1. Select the node in the Scope panel that contains the rule you would like to edit.
2. Select the rule from the Rules and Settings workspace by selecting the checkbox to the
left of the rule.
3. Click Edit in the Manage group on the ribbon.
DocAve®
6 Archiver 52
4. The Archiver Rule/Content Lifecycle Rule pop-up window appears; you can edit the
settings of this rule. For more information, refer to Creating and Configuring Archiver
Rules.
Removing Existing Rules from Nodes
When a created rule is no longer useful for the nodes on the farm tree, you can remove this rule
from the node. Use the Remove feature to simplify rules management and remove unnecessary
rules from the nodes.
To remove an existing Archiver rule, complete the following steps:
1. Select the node in the Scope panel that contains the rule or rules you would like to
remove.
2. Select one or more rules from the Rules and Settings workspace by selecting the
checkboxes to the left of the rule.
3. Click Remove in the Manage group on the ribbon.
4. Click Apply in the Commit group on the ribbon.
5. The rule or rules are removed from the selected node and sub-nodes on the tree.
*Note: Removed rules still exist in the Archiver Rules list for re-application.
*Note: If a node inherits a rule from an upper-level node, you must first stop inheriting from the
upper-level node before performing a Create, an Edit, or a Remove.
Enabling and Disabling Rules Once rules are created and applied to a node, they can be enabled (to be included in a run) and
disabled (to be omitted from a run) as desired. Disabling is useful, for example, when some of
the rules do not need to be run in a particular job but will be required in subsequent jobs. As
opposed to deleting the rule, which removes it from the Archiver Rules list entirely, disabling the
rule omits it from that particular run but saves it in the Archiver Rules list for future use.
Review the following two sections for information on disabling and enabling rules.
Disabling an Existing Rule
After creating and applying the rule, the Status of rule in the Rules and Settings workspace
reads Enabled by default. In some situations, you may desire to disable a rule for a particular
job.
To disable an enabled Archiver rule, complete the following steps:
DocAve®
6 Archiver 53
1. Select the node in the Scope panel that contains the rule or rules you would like to
disable.
2. Select one or more rules from the Rules and Settings workspace by selecting the
checkboxes to the left of the rules.
3. Click Disable in the Manage group on the ribbon to disable the selected rules.
4. Click Apply in the Commit group on the ribbon. The rule statuses change to Disabled.
Enabling a Disabled Rule
To enable an existing disabled Archiver rule, complete the following steps:
1. Select the node in the Scope panel that contains the rule or rules you would like to
enable.
2. Select one or more rules from the Rules and Settings workspace by selecting the
checkboxes to the left of the rules.
3. Click Enable in the Manage group on the ribbon to enable the selected rules.
4. Click Apply in the Commit group on the ribbon. The rule statuses change to Enabled.
Using Rule Viewer Use the Rule Viewer to search for and manage created Archiver rules. The basic operations
described below are:
• Viewing and searching for rules using a Rule Based view
• Viewing and searching for rules using a Scope Based view
• Viewing the details of the rules which are created on the selected node using
View Details
• Deleting rules that are useless to the whole farm tree
• Removing rules from the selected scopes
To launch the Rule Viewer, click Rules in the View Rule group on the ribbon. The Archiver
Rules tab appears. See the following sections for information on using the Rule Viewer.
Rule Based Viewing
The Rule Based table view initially displays all rules sorted alphabetically in the Rule Name
column. There are three other columns: Scope (the scope that the rule is applied to), Profile
Name (the name of the profile that the rule belongs to), Module (the module that the rule
belongs to), and Rule Type (the mode that the rule belongs to).
DocAve®
6 Archiver 54
*Note: The Scope, Profile Name, Module, and Rule Type columns can be deselected from the
column list by clicking the Manage columns ( ) button, deselecting the checkboxes of these
columns, and then clicking OK. You can also hover the mouse over one of these columns and
click the Hide the column ( ) button to hide the column from the current view.
Deleting Rules
Delete a created rule when it no longer has a use for any node within the entire farm tree.
Deleting a rule permanently removes the rule from the Archive Rules list.
To delete an Archiver rule in the Rule Based view, complete the following steps:
1. Click the Archiver tab.
2. Click Rules in the View Rule group on the ribbon. The Archiver Rules tab opens.
3. Click Rule Based in the View group.
4. Select the rules you want to delete in the table by selecting the checkboxes to the left of
the rules.
5. Click Delete in the Manage group to delete the selected rules. The rules are
permanently deleted from the Archiver Rules list.
*Note: Since the delete operation cannot be undone, make sure that the rules you are deleting
are no longer needed.
Scope Based Viewing
The Scope Based table view initially displays all rule-related URLs sorted alphabetically in the
Scope column and includes the Node Level (the level of the node that the rule is applied to),
Rule Name (the name of the rule), Farm Name (the name of the farm where the node with this
rule applied resides), and Profile Name (the name of the profile that the rule belongs to)
columns as well. The Rule Name column lists every rule applied to the scope in the same row.
The Node Level, Rule Name, Farm Name, and Profile Name columns can be deselected from
the column list by clicking the Manage columns ( ) button, deselecting the checkboxes of these
columns, and then clicking OK. You can also hover the mouse over one of these columns and
click the Hide the column ( ) button to hide the column from the current view.
Viewing Details of the Created Rules
This function allows you to view detailed information on Archiver rules that are created on the
selected node.
To view Archiver rules that have been created in DocAve, follow the steps below.
1. Click the Archiver tab.
DocAve®
6 Archiver 55
2. Click Rules in the View Rule group on the ribbon.
3. In the Archiver Rules tab, select one existing rule from the Rule Based/Scope Based
table and click View Details in the Manage group on the ribbon.
4. In the View Details page, detailed information on the selected Archiver rule is displayed.
Removing Rules
To remove an Archiver rule from the Scope Based view, complete the following steps:
1. Click the Archiver tab.
2. Click Rules in the View Rule group on the ribbon.
3. In the Archiver Rules tab, click Scope Based in the View group on the ribbon.
4. Select the scopes where you want to remove the rules in the table by selecting the
checkboxes to the left of the scopes.
5. Click Remove in the Manage group to remove all rules from the selected scopes.
For more information, refer to Removing Existing Rules from Nodes.
DocAve®
6 Archiver 56
Reviewing Archiving Data If the Enable manual approval checkbox is selected in the applied Archiver rule of a node or
the Use manual approval process for actions option is selected in the applied content lifecycle
rule of a node, then all objects that meet the applied rule within the node need to be reviewed
in the Approval Center.
To review objects, export the approval setting report to an export location, configure the
approval settings for the exported objects, and then import the approval settings to update the
approval status for the objects. The approved objects will be archived in the next scheduled
archive job, or you can trigger archiving by running an Archiver job with the same settings.
Refer to the following steps to perform the review:
1. Click the Archiver tab.
2. In the Review group on the ribbon, click Approval Center. The Approval Center page
appears with the Archiver Mode selected.
3. On the Scope tree, select a farm tree or the My Registered Sites node to load Web
applications and site collections.
4. Select the site collections where the objects you want to review by selecting the
checkboxes to the left of the site collections. The number of scanned objects that meet
the Archiver rule in each site collection will be displayed in the brackets next to the site
collection node.
5. Click Export in the Manage group on the ribbon. The Export Settings pop-up window
appears.
6. In the pop-up window, select the export location for the approval setting report.
• Export the report to a UNC path: – Select this option and select an existing
export location from the drop-down list to export the report and store it in the
specified export location. You can also click New Export Location to create a
new one.
• Export the report to a Document Library: – Select this option to export the
report to a SharePoint Document Library in the same farm as the selected site
collections. Enter the full URL of the library in the text box. Click Validation Test
to test whether the entered URL is valid.
*Note: If the selected site collections are SharePoint Online site collections, then
the report can be exported to a SharePoint Document Library in a SharePoint
Online site collection where the SharePoint admin center is different from that of
the selected site collections.
DocAve®
6 Archiver 57
*Note: If the entered library is a SharePoint Online library, an account with the Add
Items list permission to the library must be entered below. Click Save to export the
report to the specified export location.
7. Navigate to the export location and find the Archiver Approval Report folder. In the
folder, you can find a .zip file named by Archiver Approval
Report_ApprovalCenterExportJobID.
8. Extract the .zip file and you can find the approval report in the extracted folder.
9. Review the objects in the report and configure the approval setting.
• Find the Approval Status column in the report, and then edit the approval status
for each object. The default approval status is Waiting for Approval. The
entered approval status is NOT case sensitive.
o Approve – Enter Approve/Approved as the approval status of an object.
The object will be archived in the next scheduled archive job or the
Archiver job with the same settings.
o Reject – Enter Reject/Rejected as the approval status of an object. The
object will not be included in the next scheduled archive job or the
Archiver job with the same settings. If the object meets the rule criteria in
another Archiver job, it will be marked as Waiting for Approval again.
o Delay – Enter Delay/Delayed as the approval status of an object. In the
delay period, the object will not be scanned by any Archiver jobs even if it
meets the rule criteria. When the next scheduled archive job or the
Archiver job with the same settings is run after the delay period, the
object will be scanned and included in the report again.
• Find and configure the Delay Approval (days) column if Delay/Delayed is
entered in the Approval Status column. Enter an integer to define the delay
period. The delay period starts from the time when the report file has been
imported into the Approval Center.
10. Save changes to the report file and close it.
11. Click Import in the Manage group on the ribbon, select the modified report file in the
pop-up window, and then click Open to update the approval status of the exported
objects.
12. In the next scheduled archive job or the Archiver job on the same node with the same
Archiver rules and settings, the approved objects will be archived.
Configuring Approval Alert Settings Refer to the following steps to configure approval alert settings:

DocAve®
6 Archiver 58
1. In the Approval Center interface, click Approval Alert in the Settings group on the
ribbon. The Approval Alert pop-up window appears.
2. Select the checkbox next to the SharePoint farm or My Registered Sites that you want to
enable the approval alert settings.
3. Click Configure in the Manage group to configure the approval alert settings for the
selected node. You can also click Configure to the right of the selected node.
4. After being redirected to the configuration page, configure the following settings:
• Enable Approval Alert – Select the Yes option to enable the approval alert
settings.
• Notification – Select how to be notified of the pending objects. Select an
existing notification profile from the drop-down list. Click View to view details of
the selected profile. You can also click New Notification Profile in the drop-
down menu to create a notification profile. For instructions on setting up a
notification profile, refer to the DocAve 6 Control Panel Reference Guide.
• Schedule Settings – Specify dates and times to send approval alerts to
recipients. Specify the frequency of these alerts and whether or not to have an
end date.
o Start time – Set up the time to start the approval alert. Time Zone can be
changed under the Start time.
*Note: The start time cannot be earlier than the current time.
o Interval – Specify an interval for the approval alert. Enter an integer
greater than zero in the text box and choose a unit for the interval from
the drop-down menu. The units are: Hour(s), Day(s), and Month(s).
o No end date – Select this option to repeat running the approval alert
until it is manually stopped.
o End after specified occurrence(s) – Select this option to stop the
approval alert after the specified occurrences that you configure in the
text box.
o End by – Set up the time to end the recurrence of the approval alert.
5. Click Save to save approval alert settings.
DocAve®
6 Archiver 59
Reviewing Retention Data If the Enable manual approval checkbox is selected in the storage policy used in an Archiver
job, then the archived data that meets the retention rule in the storage device of this storage
policy need to be reviewed in the Approval Center before being pruned.
Export the approval report to an export location, review the data archived in each job, configure
the approval settings for the jobs, and then import the approval settings to update the approval
status for the jobs. The data that is archived by the approved jobs will be deleted from the
storage device in the next scheduled retention job.
Refer to the following steps to perform the review:
1. Click the Archiver tab.
2. In the Review group on the ribbon, click Approval Center. The Approval Center page
appears with the Archiver Mode selected.
3. Click Retention Mode in the View group on the ribbon.
4. On the Retention Approval Scope tree, select a farm tree or the My Registered Sites
node to load Web applications and site collections.
5. Select the Web application or site collection where Archiver jobs you want to review.
Archiver jobs that archive the data in the selected Web application or site collection and
the archived data meets the retention rule in the used storage policy will be listed on the
right pane with Archived Time and Storage Location.
6. Click Export in the Manage group on the ribbon. The Export Settings window appears.
7. Select an existing export location from the drop-down list to export the report and store
it in the specified export location. You can also click New Export Location to create a
new one. Click Save to export the report.
8. Navigate to the export location and find the Retention Approval Report folder.
9. Locate the folder of the Retention Approval Export job. In the job folder, you can find the
Retention Approval Report and the pruning data reports. The number of pruning data
reports is the same as the number of Archiver jobs that have been run for the selected
Web application or site collection.
10. Review the data in each pruning data report, and then configure the approval settings in
the Retention Approval Report.
• Find the Approval Status column in the report, and then edit the approval status
for each job. The entered approval status is NOT case sensitive.
DocAve®
6 Archiver 60
o Approve – Enter Approve/Approved/Approval as the approval status of
a job. The data archived by the job will be deleted from the storage device
in the next scheduled retention job of the storage policy.
o Reject – Leave the Approval Status column value empty for a job. The
data archived by the job will not be included in the next scheduled
retention job of the storage policy.
o Delay – Enter Delay as the approval status of a job. In the delay period,
the job will not be scanned by any retention jobs even if it meets the
retention rule. When the next scheduled retention job is run after the
delay period, the job will be scanned and included in the report again.
*Note: The Delay approval status cannot be configured for a job that has
been approved before.
• Find and configure the Delay Approval (days) column if Delay or no value is
entered in the Approval Status column. Enter an integer to define the delay
period. The delay period starts from the time when the report file has been
imported into the Approval Center.
11. Save changes to the report file and close it.
12. Click Import in the Manage group on the ribbon, select the modified report file in the
pop-up window, and then click Open to update the approval status of the exported jobs.
13. In the next scheduled retention job of the storage policy, the data archived in the
approved jobs will be deleted from the storage device.

DocAve®
6 Archiver 61
Managing Archived Data Any data archived using DocAve Archiver can be managed in Archived Data Center by clicking
Archived Data Center in the Data group.
DocAve provides two data restore modes:
• General Mode – The General Mode supports a restore of data down to the
item/item version level. Integrated with the Advanced Search function, General
Mode restores the specified archived data regardless of whether a full text index
was generated during an archive job. In this mode, the following two Archiver
restores are provided:
In place restore – Restores the archived data to its original location.
Restore to file system – Used for out-of-place restoring of content
directly to the file system.
• Full Text Index Mode – The Full Text Index Mode restore performs a Restore to
file system job on the archived data that contains a generated full text index. The
full text index allows a user to search the actual document content using
specified criteria, allowing for a more granular approach to a restore. The
available scope is site collection level or above.
General Mode The steps for selecting the content to manage are identical. Complete the following steps, and
then proceed to the section relevant to the type of action you want to perform.
1. Click Archived Data Center in the Data group. The Archived Data Center tab appears.
By default, General Mode is selected in the View group on the ribbon.
2. Data Selection – Select the archived data from the tree structure that you want to
restore.
*Note: To search for specific objects or data within each SharePoint level, use the
Advanced Search feature. For more information, refer to Using Advanced Search.
• In the Archiver Data pane, expand the tree and select the desired node.
Regardless of the object level you selected when creating the Archiver rule, it is
possible to restore data down to the item/item version level.
*Note: The site collection radio buttons on the tree can be deselected even when
the nodes under them are selected.
• When selecting certain nodes, the Security and Property checkboxes appear and
are selected unless manually configured.
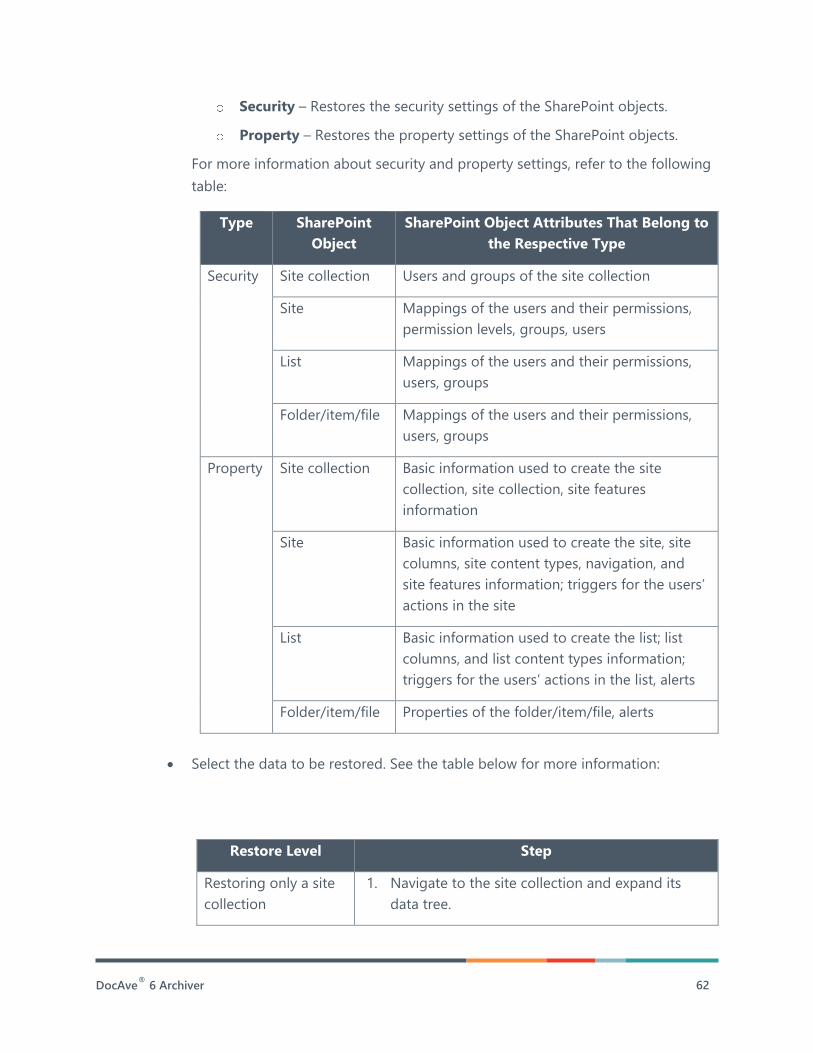
DocAve®
6 Archiver 62
Security – Restores the security settings of the SharePoint objects.
Property – Restores the property settings of the SharePoint objects.
For more information about security and property settings, refer to the following
table:
Type SharePoint
Object
SharePoint Object Attributes That Belong to
the Respective Type
Security Site collection Users and groups of the site collection
Site Mappings of the users and their permissions,
permission levels, groups, users
List Mappings of the users and their permissions,
users, groups
Folder/item/file Mappings of the users and their permissions,
users, groups
Property Site collection Basic information used to create the site
collection, site collection, site features
information
Site Basic information used to create the site, site
columns, site content types, navigation, and
site features information; triggers for the users’
actions in the site
List Basic information used to create the list; list
columns, and list content types information;
triggers for the users’ actions in the list, alerts
Folder/item/file Properties of the folder/item/file, alerts
• Select the data to be restored. See the table below for more information:
Restore Level Step
Restoring only a site
collection
1. Navigate to the site collection and expand its
data tree.
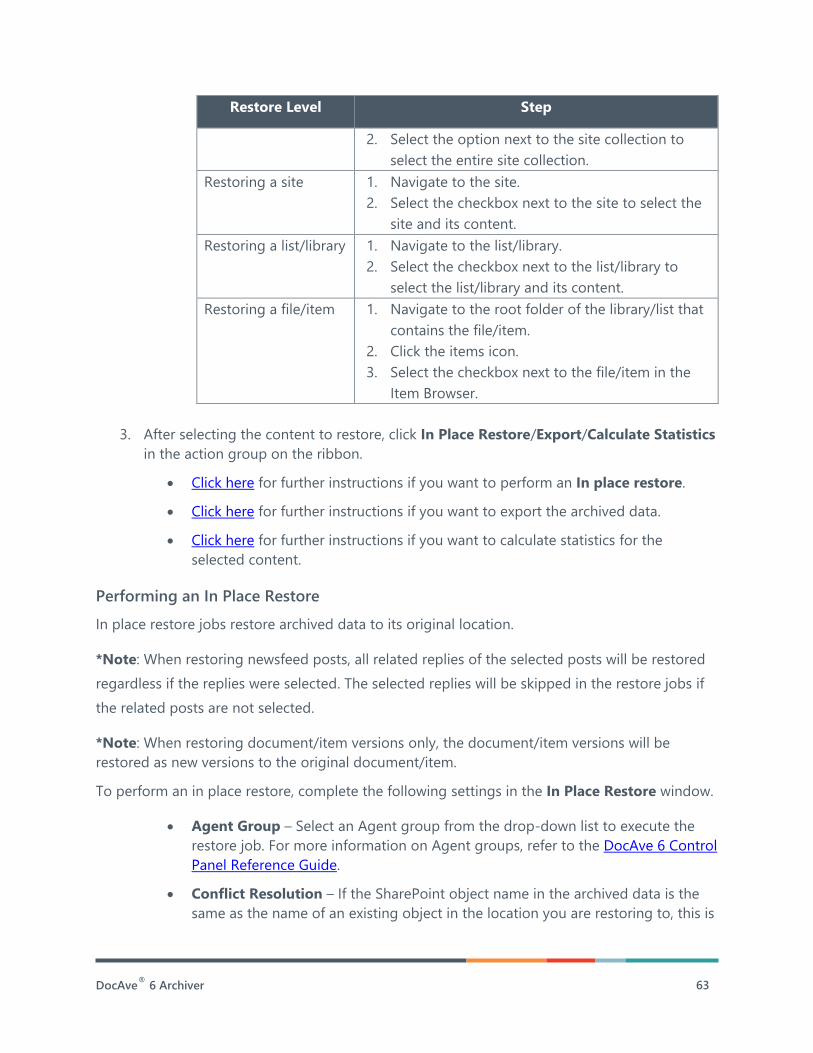
DocAve®
6 Archiver 63
Restore Level Step
2. Select the option next to the site collection to
select the entire site collection.
Restoring a site 1. Navigate to the site.
2. Select the checkbox next to the site to select the
site and its content.
Restoring a list/library 1. Navigate to the list/library.
2. Select the checkbox next to the list/library to
select the list/library and its content.
Restoring a file/item 1. Navigate to the root folder of the library/list that
contains the file/item.
2. Click the items icon.
3. Select the checkbox next to the file/item in the
Item Browser.
3. After selecting the content to restore, click In Place Restore/Export/Calculate Statistics
in the action group on the ribbon.
• Click here for further instructions if you want to perform an In place restore.
• Click here for further instructions if you want to export the archived data.
• Click here for further instructions if you want to calculate statistics for the
selected content.
Performing an In Place Restore
In place restore jobs restore archived data to its original location.
*Note: When restoring newsfeed posts, all related replies of the selected posts will be restored
regardless if the replies were selected. The selected replies will be skipped in the restore jobs if
the related posts are not selected.
*Note: When restoring document/item versions only, the document/item versions will be
restored as new versions to the original document/item.
To perform an in place restore, complete the following settings in the In Place Restore window.
• Agent Group – Select an Agent group from the drop-down list to execute the
restore job. For more information on Agent groups, refer to the DocAve 6 Control
Panel Reference Guide.
• Conflict Resolution – If the SharePoint object name in the archived data is the
same as the name of an existing object in the location you are restoring to, this is
DocAve®
6 Archiver 64
considered as a “conflict.” Select one of the following options for resolving
conflicts:
Overwrite – Copies the archived item/document to the original location
by overwriting the original item with the same ID or the document with
the same name.
Skip – Keeps the original item/document as it is and does not restore the
archived item/document.
• Workflow – Select the Include workflow definition checkbox to restore the
definition of the source workflows to the SharePoint container. Select the Include
workflow instance checkbox to recover the state, history, and tasks of the
source workflows.
*Note: The Include workflow instance option is only selectable when the
Include workflow definition option is selected. The workflow instance of the
checked out file does not support being restored. For SharePoint Online nodes,
the Include workflow instance option is unavailable.
The following checkboxes can only be selected if the Include workflow instance
checkbox is selected:
o Include completed workflows – Recovers the state, history, and tasks of
source completed workflows.
o Include running workflows – Recovers the state, history, and tasks of
source running workflows. This checkbox is optional. If you select this
checkbox, the following radio buttons are available:
▪ Cancel running workflows after restoring – Cancels the running
workflows after restoring the selected data. By default, this radio
button is selected.
▪ Cancel and restart running workflows after restoring – Cancels
the running workflows after restoring the selected data, and then
restarts the canceled workflows automatically.
• Notification – Configure e-mail notification settings. Select the desired
notification profile from the drop-down list. For instructions on setting up a
notification profile, refer to the DocAve 6 Control Panel Reference Guide.
• Schedule Settings – Select when to restore the content to SharePoint.
Restore now – Run the plan immediately after you have finished using
the wizard.
Start time – Configure a start time to start the restore. Click the link
below the start time to set your time zone.
DocAve®
6 Archiver 65
Exporting Data
Export jobs export the archived data to a storage location.
Complete the following steps in the Export window to export the archived data:
• Export Type – Select an export type to export the archived data to your desired
location.
Keep original format – Select this option to keep the original format of
the data that you want to export.
*Note: This is only available for documents.
In Concordance format – Select this option to use the third-party
software Concordance to view the metadata of the data to be exported.
This function also allows the user to view metadata for the full text index
generated during an archive job.
Upon completion of an export job, the selected archived data is exported
to the specified location. The following three files exist in this same
directory, which enables you to view metadata using Concordance:
▪ MetaData.dat – This file records the exported data’s metadata.
▪ CommonCreateConcordanceDB.cpl – After importing the
MetaData.dat file into Concordance, use this Concordance file to
view the exported data’s metadata.
▪ CommonCreateHyperlinks.cpl – After importing the
MetaData.dat file into Concordance, use this file to view and
open the hyperlink to the exported data.
EDRM XML format – Select this option to use the third-party software
EDRM to view the data to be exported.
• Newsfeed Option – Select the Export all related replies with original post
checkbox to export all of the related replies of the selected posts. If the checkbox
is deselected, only the selected posts and replies will be exported to the
destination.
*Note: This area only appears when you select the In Concordance format or
EDRM XML format in the Export Type field for SharePoint 2013, 2016, or 2019
content.
• Destination – Specify the location where you want to export the archived data.
Enter a UNC path and select a managed account profile. Click Validation Test to
validate the entered configuration.
DocAve®
6 Archiver 66
• Conflict Resolution – If the SharePoint object name in the archived data is the
same as the name of an existing object in the location you are exporting to, this
is considered a “conflict.” Select one of the following options for resolving
conflicts:
o Overwrite – Copies the archived item/document to the selected location
by overwriting the item with the same ID or the document with the same
name in the specified location.
o Skip – Keeps the item/document in the specified location as it is and does
not export the archived item/document.
*Note: This area only appears when you select the Keep original format option
in the Export Type field.
• Notification – Configure e-mail notification settings. Select the desired
notification profile from the drop-down list. For instructions on setting up a
notification profile, refer to the DocAve 6 Control Panel Reference Guide.
• Schedule Settings – Select when to export the content to your desired location.
Export immediately – Export the data when you click Save.
Start time – Configure a start time to start the export. Click the link below
the start time to switch the time zone.
Calculating Statistics
To view statistics of the selected content, click Calculate Statistics in the Action group on the
ribbon. The Calculate Statistics window appears and displays the detailed information on the
archived objects in the selected node. Click Close to exit and close the window.
Using Advanced Search
Advanced search provides a quick method of selecting specific objects or data within each
SharePoint level (from the Web application down to the item level) for management in General
Mode. To use advanced search, complete the following steps:
1. From the Archived Data Center tab (see Managing Archived Data), select the node you
want to search and click Advanced Search in the Advanced group on the ribbon.
2. In the Advanced Search pane, the SharePoint levels equal to or lower than what you
selected in the original data tree are listed in the level drop-down list. The value is not
case sensitive and supports wildcards. Click Add a Filter Level Group, and then select
one level from the drop-down list.
3. Click Add a Criterion to add a new filter rule in the filter group at the selected level.
Change the rule settings in the Rule, Condition, and Value columns. Change logical
DocAve®
6 Archiver 67
relationship between the filter rules by clicking the logic icon after the rule. There are two
logic options: And and Or.
• And – Searches for content that meets all the rules.
• Or – Searches for content that meets any one of the rules.
Under Basic Filter Condition, view the filter rules’ logical relationship. For example, if the
logical relationship is ((1 And 2) Or 3), the content that meets both the filter rule 1 and
filter rule 2, or that meets the filter rule 3, is included in the search results.
4. You can select the Archived Time: checkbox, select a condition from the drop-down list,
and configure the time to define the Archived Time filter rule.
5. Click Search to execute the search operation. The search results are displayed under the
tab Search Result (1).
Full Text Index Mode The steps for selecting the content to manage are identical to the General Mode. The Full Text
Index Mode enriches the search function by allowing the user to search not only by filter level
criterion, but also by file content. The Full Text Index Mode supports the following levels:
document, document version, item, item version, and attachment.
*Note: To correctly search for content using Full Text Index Mode, AvePoint recommends that
you install the iFilter plug-in that is related to the corresponding file format on the server where
the Media Service for full text index is installed before generating the full text index.
To use Full Text Index Mode, complete the following steps:
1. Click Archived Data Center in the Data group. The Archived Data Center tab appears.
Switch the mode by clicking Full Text Index Mode in the View group on the ribbon.
2. Data Selection – Expand the farm tree and select the node on which the Archiver Full
Text Index job has been performed.
*Note: The farm radio button in the tree can be deselected even when the nodes under
it are selected.
3. Use the Search text box to search for the archived data that you want to manage. You
can enter the keywords and characters here. These characters are not case sensitive. To
specify the files that you want to search for, enter the criteria name and the value
connected with =. Then, click Search to search for the corresponding files.
To add a Filter Level Group and Criterion to perform the search, click Advanced in the
Search text box.
DocAve®
6 Archiver 68
*Note: Insert a forward slash (\) before characters such as + - && || ! ( ) { } [ ] ^ " ~ ?. If
this is not done, the archived data will not be searched properly. The * character is
treated as a normal character if a forward slash (\) is inserted before it. Otherwise, the *
character is considered a wildcard.
*Note: When the archived data which is specified on the selected node is not found after
the search finishes, the corresponding index profiles will be listed in the pop-up window
when clicking View Details. The detailed information will be displayed.
*Note: When the Attachment filter level group is selected, the archived attachments can
be searched by property values of the related items using the following filter rules:
• Column: Text
• Column: Number
• Column: Yes/No
• Column: Date and Time
4. Select the objects that you want to manage in the Search Results section and click
Export/Calculate Statistics in the Action group on the ribbon.
• For detailed information on configuring settings in the Export window, refer to
the Exporting Data section.
*Note: The Keep original format export type is not available here.
• For detailed information on calculating statistics, refer to the Calculating Statistics
section.
DocAve®
6 Archiver 69
Checking a Job Status Archiver contains a Job Monitor button where users can view the status of Archiver jobs. This
module is useful for monitoring jobs or troubleshooting errors.
Refer to the DocAve 6 Job Monitor Reference Guide for more information.
DocAve®
6 Archiver 70
Archiver Tools Some tools are provided with the Archiver module.
• Manager Tool Dell DX Client ─ Use the ManagerToolDELLDXClient tool to
display and update the retention time, compression type, and the date of
deferred compression of DocAve Archiver data that is saved on a Dell DX
Storage server.
• Manager Tool HCP Client ─ This tool is used to display and update the
properties (Retention time, Hold, Shred, and Index) of DocAve Archiver data
that is saved on an HDS Hitachi Content Platform server.
For more information, refer to DocAve 6 Supplementary Tools User Guide.
DocAve®
6 Archiver 71
End-User Archiving The End-User Archiving feature allows end users who have the required permissions to archive
SharePoint content manually at the site collection, site, library, list, folder, document, and item
levels. After an end user initiates an Archiver job, the job process and detailed information can
be viewed in Job Monitor. Once content is archived, users have the ability to search through
archived content and restore content, if desired.
Job records are also generated in Job Monitor during end-user archiving jobs. If you are using
end-user archiving frequently, it is highly recommended that you configure a job pruning policy
to ensure databases do not become overloaded with job data. For instructions on defining job
pruning policies, refer to the DocAve 6 Control Panel Reference Guide.
*Note: To search archived data in the Archiver Tools page in SharePoint, a full text index must
be generated during an end-user archiving job.
The following sections contain further information on activating the feature and performing
end-user archiving.
End-User Archiving Permissions Refer to the following table for the detailed information about the archiving permissions to
different object level.
Object Level Required Permission Description
Site collection Site Collection
Administrator
Only the Site Collection
Administrator can access the page.
Site
Full Control of the site
AddAndCustomizePages
AddDelPrivateWebParts
AddListItems
ApplyStyleSheets
ApplyThemeAndBorder
ApproveItems
BrowseDirectories
BrowseUserInfo
CancelCheckout
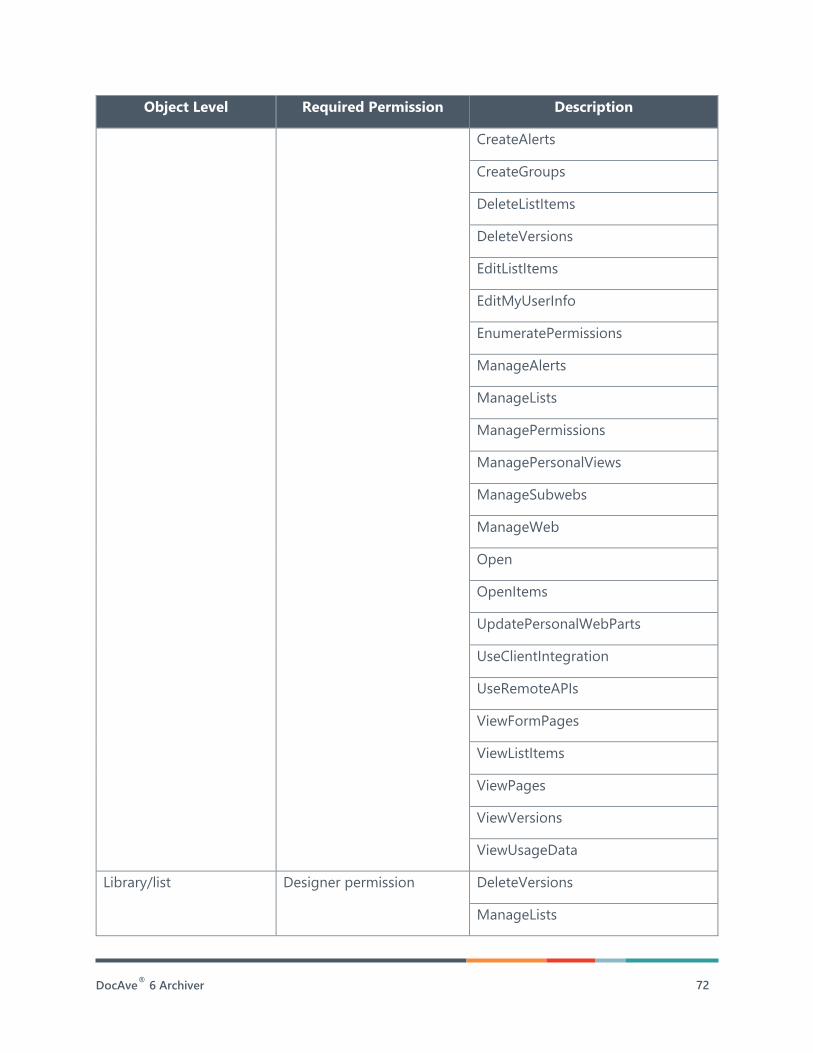
DocAve®
6 Archiver 72
Object Level Required Permission Description
CreateAlerts
CreateGroups
DeleteListItems
DeleteVersions
EditListItems
EditMyUserInfo
EnumeratePermissions
ManageAlerts
ManageLists
ManagePermissions
ManagePersonalViews
ManageSubwebs
ManageWeb
Open
OpenItems
UpdatePersonalWebParts
UseClientIntegration
UseRemoteAPIs
ViewFormPages
ViewListItems
ViewPages
ViewVersions
ViewUsageData
Library/list
Designer permission
DeleteVersions
ManageLists
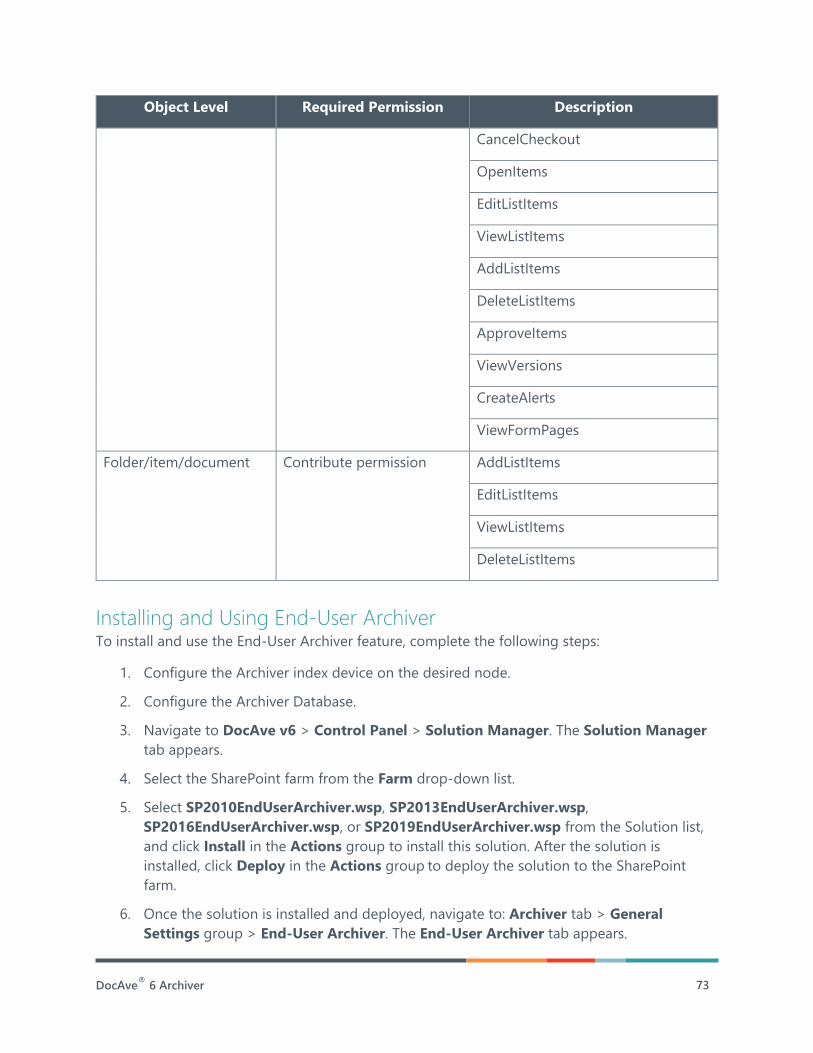
DocAve®
6 Archiver 73
Object Level Required Permission Description
CancelCheckout
OpenItems
EditListItems
ViewListItems
AddListItems
DeleteListItems
ApproveItems
ViewVersions
CreateAlerts
ViewFormPages
Folder/item/document Contribute permission AddListItems
EditListItems
ViewListItems
DeleteListItems
Installing and Using End-User Archiver To install and use the End-User Archiver feature, complete the following steps:
1. Configure the Archiver index device on the desired node.
2. Configure the Archiver Database.
3. Navigate to DocAve v6 > Control Panel > Solution Manager. The Solution Manager
tab appears.
4. Select the SharePoint farm from the Farm drop-down list.
5. Select SP2010EndUserArchiver.wsp, SP2013EndUserArchiver.wsp,
SP2016EndUserArchiver.wsp, or SP2019EndUserArchiver.wsp from the Solution list,
and click Install in the Actions group to install this solution. After the solution is
installed, click Deploy in the Actions group to deploy the solution to the SharePoint
farm.
6. Once the solution is installed and deployed, navigate to: Archiver tab > General
Settings group > End-User Archiver. The End-User Archiver tab appears.
DocAve®
6 Archiver 74
7. On the End-User Archiving tab, expand the farm tree in the Scope pane and select the
node where you want to perform the End-User Archiver. Click Configure in the End-
User Archiver Settings group to configure the End-User Archiver Settings and End-User
Restore Settings.
• Where would you like to store the archived data? – Select a storage policy
from the drop-down list. For detailed information on configuring a storage policy,
refer to the Storage Policy section of the DocAve 6 Control Panel Reference
Guide.
• What would you like to do with the SharePoint data? – Select the archival
type for end users:
*Note: At least one of the following checkboxes must be selected for end users,
so they can perform or select the archive action:
End users can archive and remove data from SharePoint – Select End
users can archive and remove data from SharePoint to enable end
users to archive the selected data in the selected nodes and store it in the
configured location of the selected storage policy. Then, the
corresponding data in SharePoint will be deleted.
End users can archive and keep data in SharePoint – End users can
archive the applicable data in the selected node and store it in the
configured location of the selected storage policy. Data will not be
deleted from SharePoint after the archive/backup. Once you select this
option, you can also select the following options for further configuration:
▪ Leave a stub in SharePoint for each document (uses Storage
Manager) – Extends the applicable data on the selected node and
leave their stubs in SharePoint.
▪ Declare each document/item as a SharePoint record – Declares
the data or stub that exists in SharePoint as a record and make it
read-only.
▪ Tag each document/item with: – Backs up applicable data on
the selected node and then adds one or multiple columns to each
file to indicate the status of the data.
*Note: If this checkbox is selected in a rule and the rule is applied to a
node, the documents/items that meet the rule in the selected node will be
backed up and the In Place Records Management feature in the
corresponding site collection will be activated automatically after the job
that selects this node is started. The options above cannot be selected by
end users in SharePoint.
DocAve®
6 Archiver 75
For detailed information, refer to Creating and Configuring Archiver Rules.
• Permission Requirements – Select a permission mode for the end users who
have the corresponding permissions to archive the content in SharePoint. Refer
to the following information for details about the three permission modes:
Users with standard permissions – Select the Users with standard
permissions mode to specify the end users who have the required
permission to perform an End-User Archiver job for the selected node. For
details about the required permissions for archiving, refer to End-User
Archiving Permissions.
Site collection administrators – Select the Site collection
administrators mode to specify the end users who have the site
collection administrator permission to perform an End-User Archiver job
for the selected node.
Users in the specified SharePoint groups – Select the Users in the
specified SharePoint groups mode to specify the end users in the
specified SharePoint groups who have the permission to perform an End-
User Archiver job for the selected node.
*Note: The specified SharePoint groups must have at least the standard
permissions required for archiving SharePoint objects.
• Workflow – Select how you want to manage the workflows that are related to
the SharePoint objects to be archived.
Include workflow definition – Archives only the definition of existing
source workflows.
Include workflow instance – Archives definition and history of existing
source workflows.
*Note: This option is only selectable when the Include workflow
definition option is selected.
• Data Compression – Select an optional Data Compression setting. Select the
Compression checkbox to enable data compression, and then choose a
compression level using the slider. A low compression level results in a faster
compression rate but a larger data set, while a high compression level results in a
slower compression rate but a smaller and better quality data set.
*Note: Small data sets may cause slower backup and recovery times. Select
whether to leverage DocAve Media Server (Media Service) resources or
SharePoint Server (SharePoint Agent) resources for compression.
DocAve®
6 Archiver 76
• Data Encryption – Select the Encryption checkbox (optional) to enable data
encryption. Note that encrypting data causes slower backup and recovery times.
Select whether to leverage DocAve Media Server (Media Service) resources or
SharePoint Server (SharePoint Agent) resources for encryption. Then, choose a
security profile from the Security Profile drop-down list. You can also click the
New Security Profile link to create a new security profile. For more information
on creating a security profile, refer to the DocAve 6 Control Panel Reference
Guide.
• Tagging Archived Data – Track archived content for search. You can add
multiple criteria to specify multiple tracking policies for the archived data you
want to track.
List URL – Enter the URL address in the text box to track the archived data
in this list.
Column Name – Enter the column name in the text box to track the
metadata in this column. Make sure the column exists in the list specified
above.
Display Name – Enter the display name of the column specified in
Column Name to track the metadata in that column. In this field, you can
enter any name for this tag; the name will display when the content is
archived.
• Data Retention – Select the End users can customize the retention rule
checkbox to enable the customization of retention rule for end users.
When a user selects to archive and remove a file from SharePoint, they can also
set the retention policy for the archived file. They can select to follow the
retention rule configured by the administrator or configure the time period to
retain the archived file.
*Note: This only works when the Enable retention rule checkbox is selected in
the storage policy configured in the Where would you like to store the
archived data? section.
• Archived Data View and Restore Settings – Select a permission mode for the
end users who have the corresponding permissions to view and restore the
archived content back to SharePoint. Refer to the following details about the
three permission modes:
Site collection administrators – Select the Site collection
administrators mode to specify the end users who have the site
collection administrator permission to perform an End-User Archiver
restore job for the selected node.
DocAve®
6 Archiver 77
Users in the specified SharePoint groups – Select the Users in the
specified SharePoint groups mode to specify the end users in the
specified SharePoint groups who have the required permission to perform
an End-User Archiver restore job for the corresponding object level.
*Note: The users in the specified SharePoint groups have the permission
to perform End-User Archiver restore jobs for the entire site collection,
including the object levels that have broken inheritance from the site
collection.
Users with the specified permissions – Select the users who have the
specified permissions mode and select the exact permissions listed in the
Select Permissions window. The end users who have the specified
permissions in the Select Permissions window can perform an End-User
Archiver restore job for the corresponding object level.
*Note: The workflow instance of the checked out file cannot be restored.
• Permission Sync Schedule Settings – Select No schedule to not synchronize
permissions for end users with a schedule. Select Configure the schedule myself
and configure the following settings to synchronize container level objects’
restore permissions for end users:
o Start time – Configure the start time for the scheduled synchronization
job. To change the time zone, click the time zone under the configured
start time.
o Interval – Configure the frequency to run this recurring schedule.
o Click Calendar View to view all scheduled synchronization jobs in the
calendar by Day, Week, or Month.
*Note: This section only appears when Users with the specified permissions is
selected above.
To synchronize content level objects’ restore permissions for end users, refer to
Permission Synchronization for Content Level Objects.
8. After finishing the configuration, click Apply to apply the configurations to the selected
node.
9. Click Activate in the End-User Archiver Settings group to activate the End-User
Archiver feature on the selected nodes.
The status of the End-User Archiver feature, the storage policy used by the
corresponding scope, and the status of the Error Page Redirection feature can be
viewed in the Scope pane. Hovering over the specified scope, you can click Activate to
DocAve®
6 Archiver 78
activate the End-User Archiver feature and click Configure to configure the Archiver
rule being used.
10. With this feature activated, the user can go to the SharePoint site that contains the
activated feature and perform End-User Archiver on the selected data.
Use End-User Archiver in a SharePoint 2010 environment to archive a:
• Site collection, navigate to Site Actions > Site Settings > Site Collection
Administration > Archive this site collection.
• Site, navigate to Site Actions > Site Settings > Site Administration > Archive
this Site.
• Library, navigate to Library Tools > Library > Library Settings > Archive this
list or library.
• List, navigate to List Tools > List > List Settings > Archive this list or library.
• Folder/file/item, right-click on the object and select Archive from the drop-down
menu. If archiving multiple files or items, select the checkboxes of the
corresponding item and click Archive in the Manage group on the ribbon to
archive these selected objects.
Use End-User Archiver in a SharePoint 2013 environment to archive a:
• Site collection, click the settings ( ) button and navigate to Site settings > Site
Collection Administration > Archive this site collection.
• Site, click the settings ( ) button and navigate to Site Settings > Site
Administration > Archive this site.
• Library, navigate to LIBRARY > Library Settings > Archive this list or library.
• List, navigate to LIST > List Settings > Archive this list or library.
• Folder/file/item, right-click on the object and select Archive from the drop-down
menu. If archiving multiple files or items, select the checkboxes of the
corresponding items and click Archive in the Manage group on the ribbon to
archive these selected objects.
Use End-User Archiver in a SharePoint 2016/2019 environment to archive a:
• Site collection, click the settings ( ) button and navigate to Site settings > Site
Collection Administration > Archive this site collection.
• Site, click the settings ( ) button and navigate to Site settings > Site
Administration > Archive this site.
• Library, navigate to LIBRARY > Library Settings > Archive this list or library.
DocAve®
6 Archiver 79
• List, navigate to LIST > List Settings > Archive this list or library.
• Folder/file/item, right-click on the object, select Advanced from the drop-down
menu, and then select Archive. If archiving multiple files or items, select the files
or items and click Archive in the Manage group on the ribbon to archive these
selected objects.
Searching Archived Content For a user to search archived content, a full index must be generated during an Archiver job.
Refer to Configuring the Archiver Index Device for instructions on enabling this feature.
After an Archiver job completes:
• On a SharePoint 2010 farm, the archived site or site collection data can be viewed
by accessing the SharePoint site and choosing one of the following methods:
o Navigate to Site Actions > Site Settings > Site Administration > View
archived content of this site (for a site) or Site Actions > Site Settings
> Site Collection Administration > View archived content of this site
collection (for a site collection).
o Navigate to Site Actions > View archived content of this site.
• On a SharePoint 2013, 2016, or 2019 farm, the archived site or site collection data
can be viewed by accessing the SharePoint site and choosing one of the
following methods:
o Click the settings ( ) button and navigate to Site settings > Site
Administration > View archived content of this site (for a site) or
navigate to Site settings > Site Collection Administration > View
archived content of this site collection (for a site collection).
o Click the settings ( ) button and select the View archived content of
this site option from the drop-down menu.
In the Archiver Tools page, the libraries/lists that contain archived content are displayed in the
pane. A selected library/list can be restored back to its original location in SharePoint. You can
also click the list to view the details of the archived contents and specify which archived data to
restore, as well as view the properties or download the archived data to the specified local path.
Additionally, use the Search function in the Archiver Tools page to search the archived data.
Click Search on the ribbon to access the search page.
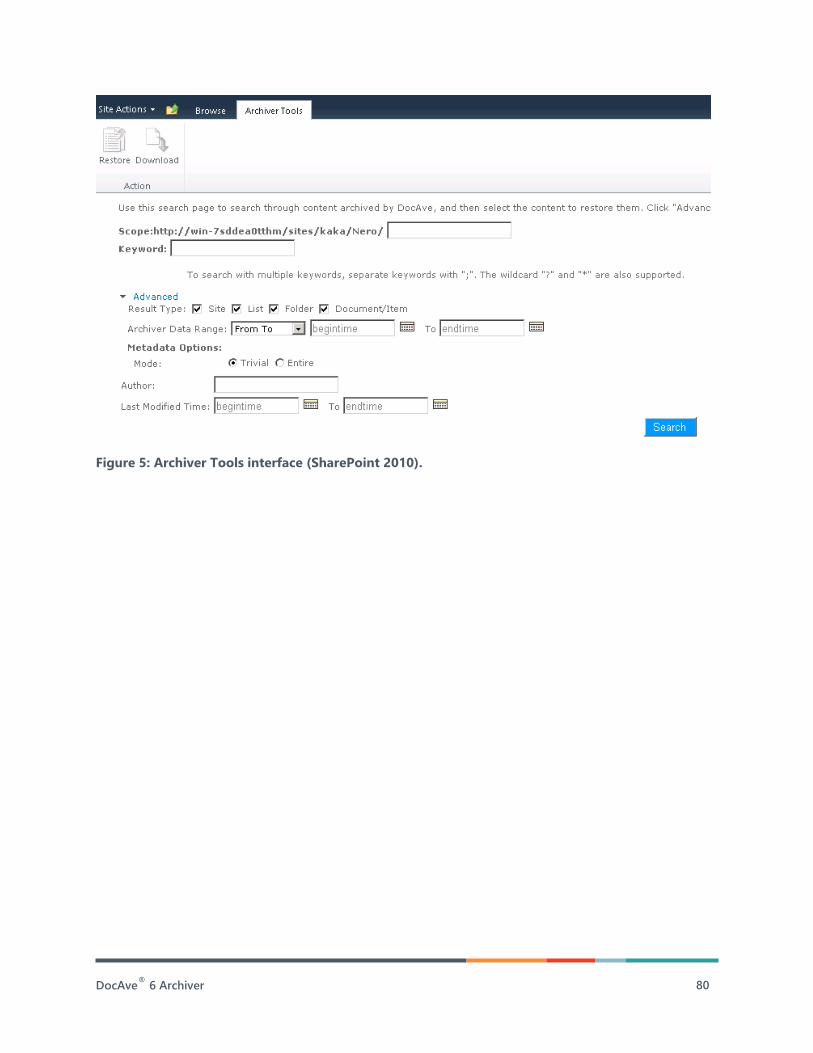
DocAve®
6 Archiver 80
Figure 5: Archiver Tools interface (SharePoint 2010).
DocAve®
6 Archiver 81
Installing and Using the Error Page Solution When a file is archived from SharePoint, it cannot be accessed through its original URL. Using
the Error Page for DocAve Archived Data feature, DocAve will inform a user that the data
cannot be accessed because it has been archived from SharePoint.
To activate the error page solution, complete the following steps:
1. Navigate to: DocAve v6 > Control Panel > Solution Manager. The Solution Manager
window appears.
2. Select the SharePoint farm from the Farm drop-down list. Then, select the
SP2010ErrorPageforArchivedData.wsp, SP2013ErrorPageforArchivedData.wsp,
SP2016ErrorPageforArchivedData.wsp, or SP2019ErrorPageforArchivedData.wsp
according to the SharePoint farm you currently use, and click Install to install this
solution.
3. After the solution installs, click Deploy to deploy the solution to the SharePoint farm.
4. Navigate to: DocAve v6 > Storage Optimization > Archiver. The Archiver page
appears.
5. Click End-User Archiver in the General Settings group on the ribbon. The End-User
Archiver tab appears. To activate this feature on the corresponding Web application,
expand the farm tree and select the Web applications on which you want to apply the
feature. Then, click Activate in the Error Page Settings group to activate this feature
and apply it on the selected Web application.
Configuring the Error Message
After activating the Error Page feature, you can configure the error message to be displayed in
the error pages of the selected nodes for End-User Archiver. To configure the error message,
complete the following steps:
1. In the End-User Archiver tab, select a Web application and click Error Message in the
Error Page Settings group.
2. In the Error Message Configuration pop-up window, enter the text that you want to
display in the error pages in the Error Message field. The default text is: The object that
you are trying to access has been archived. Please contact your administrator for
more information.
*Note: If an error message has not been configured for this node, the default text will
display in the Error Message field automatically. If you select more than one node and
click Reset on the ribbon, the default text will also display in the Error Message field.
3. Click Save to save the error message. Or click Reset in the Action group to reset the
message.
DocAve®
6 Archiver 82
Appendix A: Criteria Filter Conditions The following appendix identifies the criteria filter conditions for each object level.
*Note: Multiple criteria can be added into the Criteria row. But, to create a rule successfully, at
least one criteria row is required.
*Note: Before you set an Archiver rule with the criteria of Custom Property, the corresponding
property must be added in the lists/libraries, sites or site collections in advance.
*Note: If you select the Last Accessed Time rule in the Criteria field, make sure the node you
select to use this criterion has run the corresponding Report Center job.
For details about running the Report Center job, refer to Running Report Center Jobs.
Site Collection Object Level 1. URL – Enter the URL of a site collection.
*Note: It is not case sensitive when entering the URL/Title/Name in each object level.
• Matches – Wildcards such as “*” and “?” are available when using Matches; it is
the most flexible way of specifying the objects you would like to archive. The
content that matches the entered text will be archived.
• Does not Match – As with Matches, wildcards are available. However, this
selection archives all the site collections that do not match the entered URL.
• Contains – Wildcards cannot be used in this field; all the objects that contain the
entered URL will be archived.
• Does not Contain – This selection archives all the site collections that do not
contain the entered URL. Wildcards are unavailable.
• Equals – Enter the site collection URL. This selection archives the site collection
that matches the entered URL. Wildcards are unavailable.
• Does Not Equal – Enter the complete site collection URL. This selection archives
all the site collections except for the one that matches the entered URL.
Wildcards are unavailable.
2. Title – Enter the title of a site collection.
• Matches – Wildcards such as “*” and “?” are available when using Matches; it is
the most flexible way of specifying the objects you would like to archive. The
content that matches the entered title will be archived.
• Does not Match – As with Matches, wildcards are available. However, this
selection archives all the site collections that do not match the entered title.
DocAve®
6 Archiver 83
• Contains – Wildcards cannot be used in this field; all the objects that contain the
entered title will be archived.
• Does not Contain – You can enter part of the site collection title here. This
selection archives all the site collections that do not contain the entered title.
Wildcards are unavailable.
• Equals – Enter the complete site collection title. This selection archives the site
collection that matches the entered title. Wildcards are unavailable.
• Does Not Equal – Enter the complete site collection title. This selection archives
all the site collections except for the one that matches the entered title. Wildcards
are unavailable.
3. Modified Time – Set a date range for the modified site collections.
• From … To – Archives all site collections that are modified between the two
dates selected.
• Before – Archives all site collections modified before the date selected.
• Older Than – Archives all site collections with a modification date that is older
than the Days, Weeks, Months, or Years selected from the drop-down list.
4. Created Time – Set a date range for the created site collections.
• From … To – Archives all site collections that were created between the two
dates selected.
• Before – Archives all site collections that were created before the date selected.
• Older Than – Archives all site collections with a creation date that is older than
the Days, Weeks, Months, or Years selected from the drop-down list.
5. Primary Administrator – Enter the name of the administrator.
• Contains – You can enter part of the administrator’s name here. This selection
archives all the site collections whose primary administrator’s name contains the
entered value. Wildcards are unavailable.
• Equals – Enter the primary administrator’s complete name. This selection archives
the site collection whose primary administrator’s name matches the entered
value. Wildcards are unavailable.
6. Site Collection Size Trigger – Enter a data size value for the site collection. The units for
this value can be selected as KB, MB, or GB from the drop-down list.
• >= – Archives all the site collections whose data size is equal to or exceeds the
entered value.
7. Custom Property (Text) – Enter the property name that is customized by users,
followed by the text content.
DocAve®
6 Archiver 84
• Matches – Wildcards such as “*” and “?” are available when using Matches; it is
the most flexible way of specifying the objects you would like to archive. The
content that matches the entered text will be archived.
• Does not Match – As with Matches, wildcards are available. However, this
selection archives all the site collections whose custom property does not match
the entered text.
• Contains – Wildcards cannot be used in this field; all the objects that contain the
entered URL will be archived.
• Does not Contain – You can enter part of the site collection property text here.
This selection archives all the site collections whose property name does not
contain the entered text. Wildcards are unavailable.
• Equals – Enter the complete site collection property text. This selection archives
the site collection whose property name matches the entered text. Wildcards are
unavailable.
• Does Not Equal – Enter the complete site collection property text. This selection
archives all the site collections except for those whose property name matches
the entered text. Wildcards are unavailable.
8. Custom Property (Number) – Enter the property name that is customized by users,
followed by an Arabic number.
• >= – Archive the site collections whose Custom Number Property value is equal
to or greater than the entered number.
• <= – Archive all site collections whose Custom Number Property value is equal to
or less than the entered number.
• = – Archive the site collections whose Custom Number Property value is equal to
the entered number.
9. Custom Property (Yes/No) – Enter the property name that is customized by users and
select Yes or No.
• Yes – If selected, archives the site collections whose Custom Yes/No Property
value is Yes.
• No – If selected, archives the site collections whose Custom Yes/No Property
value is No.
10. Custom Property (Date and Time) – Enter the property name that is customized by
users and set the Date and Time.
• From … To – Archive the site collections whose Custom Date/Time Property is
within the selected Date/Time period.

DocAve®
6 Archiver 85
• Before – Archive the site collections whose Custom Date/Time Property is earlier
than the selected Date/Time period.
• Older Than – Archive the site collections whose Custom Date/Time Property is
older than the current date for the number of Days/Weeks/Months/Years.
11. Last Accessed Time – Set a date range for the last accessed time of the site collections
retrieved by the Report Center Audit Controller job.
*Note: This rule is not available for SharePoint Online.
• From … To – Archives all site collections that were last accessed between the two
dates selected.
• Before – Archives all site collections that were last accessed before the date
selected.
• Older Than – Archives all site collections that are with a last accessing date that
is older than the Days, Weeks, Months, or Years selected from the drop-down
list.
Site Object Level 1. URL – Enter the URL of a site.
*Note: It is not case sensitive when entering the URL/Title/Name in each object level.
• Matches – Wildcards such as “*” and “?” are available when using Matches; it is
the most flexible way of specifying the objects you would like to archive. The
content that matches the entered text will be archived.
• Does not Match – As with Matches, wildcards are available. However, this
selection archives all the sites that do not match the entered URL.
• Contains – Wildcards cannot be used in this field; all the objects that contain the
entered URL will be archived.
• Does not Contain – You can enter part of the site URL here. This selection
archives all the sites that do not contain the entered URL. Wildcards are
unavailable.
• Equals – Enter the site URL. This selection archives the site that matches the
entered URL. Wildcards are unavailable.
• Does Not Equal – Enter the site URL. This selection archives all the sites except
for the one that matches the entered URL. Wildcards are unavailable.
2. Title – Enter the title of a site.
DocAve®
6 Archiver 86
• Matches – Wildcards such as “*” and “?” are available when using Matches; it is
the most flexible way of specifying the objects you would like to archive. The
content that matches the entered text will be archived.
• Does not Match – As with Matches, wildcards are available. However, this
selection archives all the sites that do not match the entered title.
• Contains – Wildcards cannot be used in this field; all the objects that contain the
entered Title will be archived.
• Does not Contain – You can enter part of the site title here. This selection
archives all the sites that do not contain the entered title. Wildcards are
unavailable.
• Equals – Enter the site title. This selection archives the site that matches the
entered title. Wildcards are unavailable.
• Does Not Equal – Enter the complete site title. This selection archives all the sites
except for the one that matches the entered title. Wildcards are unavailable.
3. Modified Time – Set a date range for the modified site.
• From … To – Archive all sites that are modified between the two dates selected.
• Before – Archive all sites modified before the date selected.
• Older Than – Archive all sites with a modification date that is older than the
Days, Weeks, Months, or Years selected from the drop-down list.
4. Created Time – Set a date range for the created site.
• From … To – Archive all sites that were created between the two dates selected.
• Before – Archive all sites that were created before the date selected.
• Older Than – Archive all sites with a creation date that is older than the Days,
Weeks, Months, or Years selected from the drop-down list.
5. Created By – Enter the name of the user who created the site.
*Note: This rule is not available for SharePoint Online.
• Contains – You can enter part of the creator’s name here. This selection archives
all the sites whose creator’s name contains the entered value. Wildcards are
unavailable.
• Equals – Enter the creator’s complete name. This selection archives the site
whose creator’s name matches the entered value. Wildcards are unavailable.
*Note: The user name has two different forms (Log on Name and Displayed
Name):
DocAve®
6 Archiver 87
Log on Name – If entering a log on name with Equals, enter the value as
Domain\Username.
Displayed Name – If entering a displayed name with Equals, enter the
username exactly how it displays in SharePoint.
6. Custom Property (Text) – Enter the property name that is customized by users,
followed by the text content.
• Matches – Wildcards such as “*” and “?” are available when using Matches; it is
the most flexible way of specifying the objects you would like to archive. The
content that matches the entered text will be archived.
• Does not Match – As with Matches, wildcards are available. However, this
selection archives all the sites whose custom property does not match the
entered text.
• Contains – Wildcards cannot be used in this field; all the objects that contain the
entered Custom Property Text will be archived.
• Does not Contain – You can enter part of the site property text here. This
selection archives all the sites whose property name does not contain the entered
text. Wildcards are unavailable.
• Equals – Enter the complete site property text. This selection archives the site
whose property name matches the entered text. Wildcards are unavailable.
• Does Not Equal – Enter the complete site property text. This selection archives
all the sites except for those whose property name matches the entered text.
Wildcards are unavailable.
7. Custom Property (Number) – Enter the property name that is customized by users,
followed by an Arabic number.
• >= – Archive the sites whose Custom Number Property value is equal to or
greater than the entered number.
• <= – Archive all the sites whose Custom Number Property value is equal to or
less than the entered number.
• = – Archive the sites whose Custom Number Property value is equal to the
entered number.
8. Custom Property (Yes/No) – Enter the property name that is customized by users and
select Yes or No.
• Yes – If selected, archives the sites whose Custom Yes/No Property value is Yes.
• No – If selected, archives the sites whose Custom Yes/No Property value is No.
9. Custom Property (Date and Time) – Enter the property name that is customized by
users and set the Date and Time.

DocAve®
6 Archiver 88
• From … To – Archive the sites whose Custom Date/Time Property is within the
selected Date/Time period.
• Before – Archive the sites whose Custom Date/Time Property is earlier than the
selected Date/Time period.
• Older Than – Archive the sites whose Custom Date/Time Property is older than
the current date for the number of Days/Weeks/Months/Years.
10. Last Accessed Time – Set a date range for the last accessed time of the sites retrieved
by the Report Center Audit Controller job.
*Note: This rule is not available for SharePoint Online.
• From … To – Archives all sites that were last accessed between the two dates
selected.
• Before – Archives all sites that were last accessed before the date selected.
• Older Than – Archives all sites that have a last accessed date that is older than
the Days, Weeks, Months, or Years selected from the drop-down list.
DocAve®
6 Archiver 89
List/Library Object Level 1. Name – Enter the name of a list/library.
• Matches – Wildcards such as “*” and “?” are available when using Matches; it is
the most flexible way of specifying the objects you would like to archive. The
content that matches the entered text will be archived.
• Does not Match – As with Matches, wildcards are available. However, this
selection archives all the lists/libraries that do not match the entered name.
• Contains – Wildcards cannot be used in this field; all the objects that contain the
entered Name will be archived.
• Does not Contain – You can enter part of the list/library name here. This
selection archives all the lists/libraries that do not contain the entered name.
Wildcards are unavailable.
• Equals – Enter the complete list/library name. This selection archives the
list/library that matches the entered name. Wildcards are unavailable.
• Does Not Equal – Enter the complete list/library name. This selection archives all
the lists/libraries except for those that match the entered name. Wildcards are
unavailable.
2. Modified Time – Set a date range for the modified list/library.
• From … To – Archive all lists/libraries that are modified between the two dates
selected.
• Before – Archive all lists/libraries modified before the date selected.
• Older Than – Archive all lists/libraries with a modification date that is older than
the Days, Weeks, Months, or Years selected from the drop-down list.
3. Created Time – Set a date range for the created lists/libraries.
• From … To – Archive all lists/libraries that were created between the two dates
selected.
• Before – Archive all lists/libraries that were created before the date selected.
• Older Than – Archives all lists/libraries with a creation date that is older than the
Days, Weeks, Months, or Years selected from the drop-down list.
4. Created By – Enter the name of the user who created the list/library.
*Note: This rule is not available for SharePoint Online.
• Contains – You can enter part of the creator’s name here. This selection archives
all the lists/libraries whose creator’s name contains the entered value. Wildcards
are unavailable.
DocAve®
6 Archiver 90
• Equals – Enter the creator’s complete name. This selection archives the
lists/libraries whose creator’s name matches the entered value. Wildcards are
unavailable.
5. Custom Property (Text) – Enter the property name that is customized by users,
followed by the text content.
• Matches – Wildcards such as “*” and “?” are available when using Matches; it is
the most flexible way of specifying the objects you would like to archive. The
content that matches the entered text will be archived.
• Does not Match – As with Matches, wildcards are available. However, this
selection archives all the lists/libraries whose custom property does not match
the entered text.
• Contains – Wildcards cannot be used in this field; all the objects that contain the
entered Custom Property Text will be archived.
• Does not Contain – You can enter part of the list/library property text here. This
selection archives all the lists/libraries whose property name does not contain the
entered text. Wildcards are unavailable.
• Equals – Enter the complete list/library property text. This selection archives the
list/library whose property name matches the entered text. Wildcards are
unavailable.
• Does Not Equal – Enter the complete list/library property text. This selection
archives all the lists/libraries except for those whose property name matches the
entered text. Wildcards are unavailable.
6. Custom Property (Number) – Enter the property name that is customized by users,
followed by an Arabic number.
• >= – Archive the lists/libraries whose Custom Number Property value is equal to
or greater than the entered number.
• <= – Archive all lists/libraries whose Custom Number Property value is equal to
or less than the entered number.
• = – Archive the lists/libraries whose Custom Number Property value is equal to
the entered number.
7. Custom Property (Yes/No) – Enter the property name that is customized by users and
select Yes or No.
• Yes – If selected, archives the lists/libraries whose Custom Yes/No Property value
is Yes.
• No – If selected, archives the lists/libraries whose Custom Yes/No Property value
is No.
DocAve®
6 Archiver 91
8. Custom Property (Date and Time) – Enter the property name that is customized by
users and set the Date and Time.
• From … To – Archive the lists/libraries whose Custom Date/Time Property is
within the selected Date/Time period.
• Before – Archive the lists/libraries whose Custom Date/Time Property is earlier
than the selected Date/Time period.
• Older Than – Archive the lists/libraries whose Custom Date/Time Property is
older than the current date for the number of Days/Weeks/Months/Years.
9. Last Accessed Time – Set a date range for the last accessed time of the lists/libraries
retrieved by the Report Center Audit Controller job.
*Note: This rule is not available for SharePoint Online.
• From … To – Archives all lists/libraries that were last accessed between the two
dates selected.
• Before – Archives all lists/libraries that were last accessed before the date
selected.
• Older Than – Archives all lists/libraries that have a last accessed date that is older
than the Days, Weeks, Months, or Years selected from the drop-down list.
Folder Object Level 1. Name – Enter the name of the folder.
• Matches – Wildcards such as “*” and “?” are available when using Matches; it is
the most flexible way of specifying the folders you would like to archive. The
folder that matches the entered name will be archived.
• Does Not Match – As with Matches, wildcards are available, but, this selection
archives all folders that do not match the entered name.
• Contains – Wildcards cannot be used in this field; all folders that contain the
entered name will be archived.
• Does Not Contain – You can enter part of the folder name here. This selection
archives all folders that do not contain the entered name. Wildcards are
unavailable.
• Equals – Enter the complete folder name. This selection archives the folder that
matches the entered name. Wildcards are unavailable.
• Does Not Equal – Enter the complete folder name. This selection archives all
folders except for those that match the entered name. Wildcards are unavailable.
2. Modified Time – Set a date range for the modified folder.

DocAve®
6 Archiver 92
• From … To – Archive all folders that are modified between the two dates
selected.
• Before – Archive all folders modified before the date selected.
• Older Than – Archive all folders with a modification date that is older than the
Days, Weeks, Months, or Years selected from the drop-down list.
3. Created Time – Set a date range for the created folder.
• From … To – Archive all folders that were created between the two dates
selected.
• Before – Archive all folders that were created before the date selected.
• Older Than – Archive all folders with a creation date that is older than the Days,
Weeks, Months, or Years selected from the drop-down list.
4. Created By – Enter the name of the user who created the folder.
• Contains – You can enter part of the creator’s name here. This selection archives
all folders whose creator’s name contains the entered value. Wildcards are
unavailable.
• Equals – Enter the creator’s complete name. This selection archives the folders
whose creator’s name matches the entered value. Wildcards are unavailable.
5. Content Type – Enter a name for the folder content type.
• Matches – Wildcards such as “*” and “?” are available when using Matches; it is
the most flexible way of specifying the folders you would like to archive. The
folder whose content type name matches the entered text will be archived.
• Does Not Match – As with Matches, wildcards are available. However, this
selection archives all folders whose content type name does not match the
entered text.
• Contains – Wildcards cannot be used in this field; all folders whose content type
names contain the entered text will be archived.
• Does Not Contain – You can enter part of the folder content type name here.
This selection archives all folders whose content type name does not contain the
entered content type name. Wildcards are unavailable.
• Equals – Enter the complete content type name. This selection archives the
folders whose content type name matches the entered name. Wildcards are
unavailable.
• Does Not Equal – Enter the complete content type name. This selection archives
all folders whose content type name does not match the entered name.
Wildcards are unavailable.
DocAve®
6 Archiver 93
6. Column (Text) – Enter the customized column name, followed by the text content.
• Matches – Wildcards such as “*” and “?” are available when using Matches; it is
the most flexible way of specifying the folders you would like to archive. The
folder that matches the entered text will be archived.
• Does Not Match – As with Matches, wildcards are available. However, this
selection archives all folders containing a text column whose value does not
match the entered value.
• Contains – Wildcards cannot be used in this field; all folders that contain the
entered text column will be archived.
• Does Not Contain – This selection archives all folders whose text column does
not contain the entered value. Wildcards are unavailable.
• Equals – Enter the complete text column value. This selection archives the folders
whose text column value matches the entered value. Wildcards are unavailable.
• Does Not Equal – Enter the complete text column value. This selection archives
all folders whose text column value does not match the entered value. Wildcards
are unavailable.
7. Column (Number) – Enter the column name, followed by an Arabic number.
• >= – Archive folders whose number column value is equal to or greater than the
entered number.
• <= – Archive folders whose number column value is equal to or less than the
entered number.
• = – Archive folders whose number column value is equal to the entered number.
8. Column (Yes/No) – Enter the column name and set Yes or No.
• Yes – If selected, archives the folders whose Yes/No column value is Yes.
• No – If selected, archives the folders whose Yes/No column value is No.
9. Column (Date and Time) – Enter the column name and set date and time.
• From … To – Archives all folders whose Date and Time column value is between
the two dates selected.
• Before – Archives all folders whose Date and Time column value is before the
date selected.
• Older Than – Archives all folders whose Date and Time column value is older
than the Days, Weeks, Months, or Years selected from the drop-down list.
Document Object Level 1. Name – Enter the name of the document.
DocAve®
6 Archiver 94
• Matches – Wildcards such as “*” and “?” are available when using Matches; it is
the most flexible way of specifying the objects you would like to archive. The
content that matches the entered text will be archived.
• Does not Match – As with Matches, wildcards are available. However, this
selection archives all the documents that do not match the entered name.
• Contains – Wildcards cannot be used in this field; all the objects that contain the
entered Name will be archived.
• Does not Contain – You can enter part of the document name here. This
selection archives all the documents that do not contain the entered name.
Wildcards are unavailable.
• Equals – Enter the complete document name. This selection archives the
document that matches the entered name. Wildcards are unavailable.
• Does Not Equal – Enter the complete document name. This selection archives all
the documents except for those that match the entered name. Wildcards are
unavailable.
2. Document Size – Enter a data size value for the document. The units for this value can
be selected as KB, MB or GB from the drop-down list.
• >= – Archive all documents whose size is equal to or greater than the entered
size.
• <= – Archive all documents whose size is equal to or less than the entered size.
3. Modified Time – Set a date range for the modified documents.
• From … To – Archive all documents that are modified between the two dates
selected.
• Before – Archive all documents modified before the date selected.
• Older Than – Archive all documents with a modification date that is older than
the Days, Weeks, Months, or Years selected from the drop-down list.
4. Created Time – Set a date range for the created documents.
• From … To – Archive all documents that were created between the two dates
selected.
• Before – Archive all documents that were created before the date selected.
• Older Than – Archive all documents with a creation date that is older than the
Days, Weeks, Months, or Years selected from the drop-down list.
5. Created By – Enter the name of the user who created the document.
DocAve®
6 Archiver 95
• Contains – You can enter part of the creator’s name here. This selection archives
all the documents whose creator’s name contains the entered value. Wildcards
are unavailable.
• Equals – Enter the creator’s complete name. This selection archives the
documents whose creator’s name matches the entered value. Wildcards are
unavailable.
6. Modified By – Enter the Name of the user who latest modified the documents.
• Contains – You can enter part of the modifier’s name. This selection archives all
the documents whose modifier’s name contains the entered value. Wildcards are
unavailable.
• Equals – Enter the modifier’s complete name. This selection archives the
documents whose modifier’s name matches the entered value. Wildcards are
unavailable.
*Note: The user name has two different forms (Log on Name and Displayed
Name):
Log on Name – If entering a log on name with Equals, enter the value as
Domain\Username.
Displayed Name – If entering a displayed name with Equals, enter the
username exactly how it displays in SharePoint.
7. Content Type – Enter a name for the document content type.
• Matches – Wildcards such as “*” and “?” are available when using Matches; it is
the most flexible way of specifying the objects you would like to archive. The
content that matches the entered text will be archived.
• Does not Match – As with Matches, wildcards are available. However, this
selection archives all the documents whose content type name does not match
the entered content type name.
• Contains – Wildcards cannot be used in this field; all the objects that contain the
entered content type will be archived.
• Does not Contain – You can enter part of the document content type name
here. This selection archives all the documents whose content type name does
not contain the entered content type name. Wildcards are unavailable.
• Equals – Enter the complete content type name. This selection archives the
documents whose content type name matches the entered name. Wildcards are
unavailable.
DocAve®
6 Archiver 96
• Does Not Equal – Enter the complete content type name. This selection archives
all the documents whose content type name does not match the entered name.
Wildcards are unavailable.
8. Column (Text) – Enter the customized column name, followed by the text content.
• Matches – Wildcards such as “*” and “?” are available when using Matches; it is
the most flexible way of specifying the objects you would like to archive. The
content that matches the entered text will be archived.
• Does not Match – As with Matches, wildcards are available. However, this
selection archives all the documents containing a text column whose value does
not match the entered value.
• Contains – Wildcards cannot be used in this field; all the objects that contain the
entered text column will be archived.
• Does not Contain – This selection archives all the documents whose text column
does not contain the entered value. Wildcards are unavailable.
• Equals – Enter the complete text column value. This selection archives the
documents whose text column value matches the entered value. Wildcards are
unavailable.
• Does Not Equal – Enter the complete text column value. This selection archives
all the documents whose text column value does not match the entered value.
Wildcards are unavailable.
9. Column (Number) – Enter the column name, followed by an Arabic number.
• >= – Archive documents whose number column value is equal to or greater than
the entered number.
• <= – Archive documents whose number column value is equal to or less than the
entered number.
• = – Archive documents whose number column value is equal to the entered
number.
10. Column (Yes/No) – Enter the column name and set Yes or No.
• Yes – If selected, archives the documents whose Yes/No column value is Yes.
• No – If selected, archives the documents whose Yes/No column value is No.
11. Column (Date and Time) – Enter the column name and set date and time.
• From … To – Archives all documents whose Date and Time column value is
between the two dates selected.
• Before – Archives all documents whose Date and Time column value is before
the date selected.

DocAve®
6 Archiver 97
• Older Than – Archives the documents whose Date and Time column value is
older than the Days, Weeks, Months, or Years selected from the drop-down list.
12. Parent List Type ID – Enter the item’s parent list’s ID number.
• Equals – Enter the item’s parent list’s ID value. This selection archives the
documents in the specified list whose ID number matches the entered value.
Wildcards are unavailable.
• Does Not Equal – Enter the item’s parent list’s ID value. This selection archives all
the documents in the specified list whose ID number does not match the entered
value. Wildcards are unavailable.
13. Last Accessed Time – Set a date range for the last accessed time of the documents
retrieved by the Report Center Audit Controller or SharePoint Online Audit Log Collector
job.
• From … To – Archives all documents that were last accessed between the two
dates selected.
• Before – Archives all documents that were last accessed before the date selected.
• Older Than – Archives all documents that have a last accessed date that is older
than the Days, Weeks, Months, or Years selected from the drop-down list.
14. Parent Site Custom Property (Text) – Enter the customized column name, followed by
the text content.
• Matches – Wildcards such as “*” and “?” are available when using Matches; it is
the most flexible way of specifying the documents you would like to archive. The
documents whose parent site contains the text column and the column value
matches the entered text will be archived.
• Does not Match – As with Matches, wildcards are available; however, this
selection archives all documents whose parent site contains the text column and
the column value that does not match the entered text.
• Contains – Wildcards cannot be used in this field; all documents whose parent
site contains the text column and the column value contains the entered text will
be archived.
• Does not Contain – Wildcards cannot be used in this field; this selection archives
all documents whose parent site contains the text column and the column value
that does not contain the entered text.
• Equals – Wildcards cannot be used in this field; enter the complete text column
value. This selection archives the documents whose parent site contains the text
column and the column value is the entered value.
DocAve®
6 Archiver 98
• Does Not Equal – Wildcards cannot be used in this field; enter the complete text
column value. This selection archives all documents whose parent site contains
the text column and the column value that is not the entered text.
15. Parent Site Collection Custom Property (Text) – Enter the customized column name,
followed by the text content.
*Note: To archive documents in top-level sites, this rule should be used instead of the
Parent Site Custom Property (Text) rule.
• Matches – Wildcards such as “*” and “?” are available when using Matches; it is
the most flexible way of specifying the documents you would like to archive. The
documents whose parent site collection contains the text column and the column
value matches the entered text will be archived.
• Does not Match – As with Matches, wildcards are available; however, this
selection archives all of the documents whose parent site collection contains the
text column and the column value that does not match the entered text.
• Contains – Wildcards cannot be used in this field; all documents whose parent
site collection contains the text column and the column value contains the
entered text will be archived.
• Does not Contain – Wildcards cannot be used in this field; this selection archives
all documents whose parent site collection contains the text column and the
column value that does not contain the entered text.
• Equals – Wildcards cannot be used in this field; enter the complete text column
value. This selection archives the documents whose parent site collection
contains the text column and the column value is the entered value.
• Does Not Equal – Wildcards cannot be used in this field; enter the complete text
column value. This selection archives all documents whose parent site collection
contains the text column and the column value that is not the entered text.
Document Version Object Level 1. Title – Enter the Title of a document version.
• Matches – Wildcards such as “*” and “?” are available when using Matches; it is
the most flexible way of specifying the objects you would like to archive. The
content that matches the entered text will be archived.
• Does not Match – As with Matches, wildcards are available. However, this
selection archives all the document versions whose title does not match the
entered title.
• Contains – Wildcards cannot be used in this field; all the objects that contain the
entered title will be archived.
DocAve®
6 Archiver 99
• Does not Contain – You can enter part of the document version title here. This
selection archives all the document versions that do not contain the entered title.
Wildcards are unavailable.
• Equals – Enter the complete document version title. This selection archives the
document version whose title matches the entered title. Wildcards are
unavailable.
• Does Not Equal – Enter the complete document version title. This selection
archives all document versions except for those whose titles match the entered
title. Wildcards are unavailable.
2. Size – Enter a data size value for the document version. The units for this value can be
selected as KB, MB or GB from the drop-down list.
• >= – Archives all document versions whose size is equal to or greater than the
entered size.
• <= – Archives all document versions whose size is equal to or less than the
entered size.
3. Modified Time – Set a date range for the modified document versions.
• From … To – Archives all document versions which were modified between the
two dates selected.
• Before – Archives all document versions which were modified before the date
selected.
• Older Than – Archives all document versions whose modification date is older
than the Days, Weeks, Months, or Years selected from the drop-down list.
4. Modified By – Enter the name of the user who latest modified the document versions.
• Contains – You can enter part of the modifier’s name here. This selection
archives all the document versions whose modifier’s name contains the entered
value. Wildcards are unavailable.
• Equals – Enter the modifier’s complete name. This selection archives the
document versions whose modifier’s name matches the entered value. Wildcards
are unavailable.
5. Keep the Latest Version – The number of document versions you set in the text box are
left in SharePoint. The rest of the versions are archived. The following are the version
options:
• Major and Minor Versions – Archives all document versions except for the latest
configured number of major and minor versions.
• Major Versions, No Minor – Archives all document versions except for the latest
configured number of major versions.
DocAve®
6 Archiver 100
• Minor Versions of each Major (with all Major Versions) – Archives all
document minor versions except for the latest configured number of minor
versions for each major version.
• Minor Versions of the Latest Major (with all Major Versions) – Archives all
document minor versions except for the latest configured number of minor
versions of the latest major version.
6. Parent List Type ID – Enter the list’s ID number.
• Equals – Enter the list’s complete ID value. This selection archives the document
versions in the specified list whose ID number matches the entered value.
Wildcards are unavailable.
• Does Not Equal – Enter the complete list’s ID value. This selection archives all the
document versions in the specified list whose ID number does not match the
entered value. Wildcards are unavailable.
7. Last Accessed Time – Set a date range for the last accessed time of the document
versions.
*Note: This rule is not available for SharePoint Online.
• From … To – Archives all the document versions that were last accessed between
the two dates selected.
• Before – Archives all document versions that were last accessed before the date
selected.
• Older Than – Archives all document versions that are with a last accessing date
that is older than the Days, Weeks, Months, or Years selected from the drop-
down list.
*Note: This rule only works when you select to use the stub accessed time rule for
SharePoint 2010 nodes. To use the stub accessed time rule, refer to Choosing the Last
Accessed Time Rule.
Item Object Level 1. Title – Enter the title of the item.
• Matches – Wildcards such as “*” and “?” are available when using Matches; it is
the most flexible way of specifying the objects you would like to archive. The
content that matches the entered text will be archived.
• Does not Match – As with Matches, wildcards are available. However, this
selection archives all the items whose title does not match the entered title.
• Contains – Wildcards cannot be used in this field; all the objects that contain the
entered title will be archived.
DocAve®
6 Archiver 101
• Does not Contain – You can enter part of the item title here. This selection
archives all the items that do not contain the entered title. Wildcards are
unavailable.
• Equals – Enter the complete item title. This selection archives the item whose title
matches the entered title. Wildcards are unavailable.
• Does Not Equal – Enter the complete item title. This selection archives all the
items except for those that match the entered title. Wildcards are unavailable.
2. Modified Time – Set a date range for the modified items.
• From … To – Archive all items that are modified between the two dates selected.
• Before – Archive all items modified before the date selected.
• Older Than – Archive all items with a modification date that is older than the
Days, Weeks, Months, or Years selected from the drop-down list.
3. Created Time – Set a date range for the created items.
• From … To – Archive all items that were created between the two dates selected.
• Before – Archive all items that were created before the date selected.
• Older Than – Archive all items with a creation date that is older than the Days,
Weeks, Months, or Years selected from the drop-down list.
4. Created By – Enter the name of the user who created the items.
• Contains – You can enter part of the creator’s name here. This selection archives
all the items whose creator’s name contains the entered value. Wildcards are
unavailable.
• Equals – Enter the creator’s complete name. This selection archives the items
whose creator’s name matches the entered value. Wildcards are unavailable.
5. Modified By – Enter the Name of the user who latest modified the items.
• Contains – You can enter part of the modifier’s name here. This selection
archives all the items whose modifier’s name contains the entered value.
Wildcards are unavailable.
• Equals – Enter the modifier’s complete name. This selection archives the items
whose modifier’s name matches the entered value. Wildcards are unavailable.
6. Content Type – Enter a name for the item content type.
• Matches – Wildcards such as “*” and “?” are available when using Matches; it is
the most flexible way of specifying the objects you would like to archive. The
content that matches the entered text will be archived.
DocAve®
6 Archiver 102
• Does not Match – As with Matches, wildcards are available. However, this
selection archives all the items whose content type name does not match the
entered name.
• Contains – Wildcards cannot be used in this field; all the objects that contain the
entered content type name will be archived.
• Does not Contain – You can enter part of the item content name here. This
selection archives all the items whose content type name do not contain the
entered content type name. Wildcards are unavailable.
• Equals – Enter the complete content type name. This selection archives the items
whose content type name matches the entered name. Wildcards are unavailable.
• Does Not Equal – Enter the complete content type name. This selection archives
all the items whose content type name does not match the entered name.
Wildcards are unavailable.
7. Column (Text) – Enter the column name that is customized by users, followed by the
text content.
• Matches – Wildcards such as “*” and “?” are available when using Matches; it is
the most flexible way of specifying the objects you would like to archive. The
content that matches the entered text will be archived.
• Does not Match – As with Matches, wildcards are available. However, this
selection archives all the items containing text column whose value does not
match the entered value.
• Contains – Wildcards cannot be used in this field; all the objects that contain the
entered text column will be archived.
• Does not Contain – This selection archives all the items whose text column does
not contain the entered value. Wildcards are unavailable.
• Equals – Enter the complete text column value. This selection archives the items
whose text column value matches the entered value. Wildcards are unavailable.
• Does Not Equal – Enter the complete text column value. This selection archives
all the items whose text column value does not match the entered value.
Wildcards are unavailable.
8. Column (Number) – Enter the column name, followed by an Arabic number.
• >= – Archive items whose number column value is equal to or greater than the
entered number.
• <= – Archive items whose number column value is equal to or less than the
entered number.
• = – Archive items whose number column value is equal to the entered number.
DocAve®
6 Archiver 103
9. Column (Yes/No) – Enter the column name and set Yes or No.
• Yes – If selected, archives the items whose Yes/No column value is Yes.
• No – If selected, archives the items whose Yes/No column value is No.
10. Column (Date and Time) – Enter the column name and set date and time.
• From … To – Archive all items whose Date and Time column value is between
the two dates selected.
• Before – Archive all items whose Date and Time column value is before the date
selected.
• Older Than – Archive all items whose Date and Time column value is older than
the Days, Weeks, Months, or Years selected from the drop-down list.
11. Parent List Type ID – Enter the list’s ID number.
• Equals – Enter the list’s complete ID value. This selection archives the items in the
specified list whose ID number matches the entered value. Wildcards are
unavailable.
• Does Not Equal – Enter the list’s complete ID value. This selection archives all the
items in the specified list whose ID number does not match the entered value.
Wildcards are unavailable.
12. Last Accessed Time – Set a date range for the last accessed time of the items retrieved
by the Report Center Audit Controller job.
*Note: This rule is not available for SharePoint Online.
• From … To – Archives all items that were last accessed between the two dates
selected.
• Before – Archives all items that were last accessed before the date selected.
• Older Than – Archives all items that have a last accessed date that is older than
the Days, Weeks, Months, or Years selected from the drop-down list.
13. Parent Site Custom Property (Text) – Enter the customized column name, followed by
the text content.
• Matches – Wildcards such as “*” and “?” are available when using Matches; it is
the most flexible way of specifying the items you would like to archive. The items
whose parent site contains the text column and the column value matches the
entered text will be archived.
• Does not Match – As with Matches, wildcards are available; however, this
selection archives all items whose parent site contains the text column and the
column value that does not match the entered text.
DocAve®
6 Archiver 104
• Contains – Wildcards cannot be used in this field; all items whose parent site
contains the text column and the column value contains the entered text will be
archived.
• Does not Contain – Wildcards cannot be used in this field; this selection archives
all items whose parent site contains the text column and the column value that
does not contain the entered text.
• Equals – Wildcards cannot be used in this field. Enter the complete text column
value. This selection archives the items whose parent site contains the text
column and the column value is the entered value.
• Does Not Equal – Wildcards cannot be used in this field. Enter the complete text
column value. This selection archives all items whose parent site contains the text
column and the column value that is not the entered text.
14. Parent Site Collection Custom Property (Text) – Enter the customized column name,
followed by the text content.
*Note: To archive items in top-level sites, this rule should be used instead of the Parent
Site Custom Property (Text) rule.
• Matches – Wildcards such as “*” and “?” are available when using Matches; it is
the most flexible way of specifying the documents you would like to archive. The
items whose parent site collection contains the text column and the column value
matches the entered text will be archived.
• Does not Match – As with Matches, wildcards are available; however, this
selection archives all of the items whose parent site collection contains the text
column and the column value that does not match the entered text.
• Contains – Wildcards cannot be used in this field; all items whose parent site
collection contains the text column and the column value contains the entered
text will be archived.
• Does not Contain – Wildcards cannot be used in this field; this selection archives
all items whose parent site collection contains the text column and the column
value that does not contain the entered text.
• Equals – Wildcards cannot be used in this field. Enter the complete text column
value. This selection archives the items whose parent site collection contains the
text column and the column value is the entered value.
• Does Not Equal – Wildcards cannot be used in this field. Enter the complete text
column value. This selection archives all items whose parent site collection
contains the text column and the column value that is not the entered text.
DocAve®
6 Archiver 105
Item Version Object Level 1. Title – Enter the Title of the item version.
• Matches – Wildcards such as “*” and “?” are available when using Matches; it is
the most flexible way of specifying the objects you would like to archive. The
content that matches the entered text will be archived.
• Does not Match – As with Matches, wildcards are available. However, this
selection archives all the item versions whose title does not match the entered
title.
• Contains – Wildcards cannot be used in this field; all the objects that contain the
entered title will be archived.
• Does not Contain – You can enter part of the item version title here. This
selection archives all the item versions that do not contain the entered title.
Wildcards are unavailable.
• Equals – Enter the complete item version title. This selection archives the item
version whose title matches the entered title. Wildcards are unavailable.
• Does Not Equal – Enter the complete item version title. This selection archives all
the item versions except for those whose titles that match the entered title.
Wildcards are unavailable.
2. Modified Time – Set a date range for the modified item versions.
• From … To – Archive all item versions that were modified between the two dates
selected.
• Before – Archive all item versions that were modified before the date selected.
• Older Than – Archive all item versions whose modification date is older than the
Days, Weeks, Months, or Years selected from the drop-down list.
3. Modified By – Enter the name of the user who latest modified the item versions.
• Contains – You can enter part of the modifier’s name here. This selection
archives all the item versions whose modifier’s name contains the entered value.
Wildcards are unavailable.
• Equals – Enter the modifier’s complete name. This selection archives the item
versions whose modifier’s name matches the entered value. Wildcards are
unavailable.
4. Keep the Latest Version – The number of item versions (Major Versions) you set in the
text box are left in SharePoint. The rest of the versions are archived.
5. Parent List Type ID – Enter the list’s ID number.
DocAve®
6 Archiver 106
• Equals – Enter the list’s complete ID value. This selection archives the item
versions in the specified list whose ID number matches the entered value.
Wildcards are unavailable.
• Does Not Equal – Enter the list’s complete ID value. This selection archives all the
item versions in the specified list whose ID number does not match the entered
value. Wildcards are unavailable.
Attachment Object Level 1. Name – Enter the name of the attachment.
• Matches – Wildcards such as “*” and “?” are available when using Matches; it is
the most flexible way of specifying the objects you would like to archive. The
content that matches the entered text will be archived.
• Does not Match – As with Matches, wildcards are available. However, this
selection archives all the attachments that do not match the entered name.
• Contains – Wildcards cannot be used in this field; all the objects that contain the
entered name will be archived.
• Does not Contain – You can enter part of the attachment name here. This
selection archives all the attachments that do not contain the entered name.
Wildcards are unavailable.
• Equals – Enter the complete attachment name. This selection archives the
attachment that matches the entered name. Wildcards are unavailable.
• Does Not Equal – Enter the complete attachment name. This selection archives
all the attachments except for those that match the entered name. Wildcards are
unavailable.
2. Size – Enter a data size value for the attachment. The units for this value can be selected
as KB, MB or GB from the drop-down list.
• >= – Archive all attachments whose size is equal to or greater than the entered
size.
• <= – Archive all attachments whose size is equal to or less than the entered size.
3. Created Time – Set a date range for the created attachments.
• From … To – Archive all attachments that were created between the two dates
selected.
• Before – Archive all attachments that were created before the date selected.
• Older Than – Archive all attachments with a creation date that is older than the
Days, Weeks, Months, or Years selected from the drop-down list.
DocAve®
6 Archiver 107
4. Created By – Enter the name of the user who created the attachment.
• Contains – You can enter part of the creator’s name here. This selection archives
all the attachments whose creator’s name contains the entered value. Wildcards
are unavailable.
• Equals – Enter the creator’s complete name. This selection archives the
attachments whose creator’s name matches the entered value. Wildcards are
unavailable.
5. Column (Text) – Enter the column name, followed by the text content.
• Matches – Wildcards such as “*” and “?” are available when using Matches; it is
the most flexible way of specifying the attachments you would like to archive. The
attachment that the related item matches the entered text will be archived.
• Does not Match – As with Matches, wildcards are available. However, this
selection archives all the attachments that the related item’s text column does
not match the entered value.
• Contains – Wildcards cannot be used in this field; all the attachments that the
related items contain the entered text column will be archived.
• Does not Contain – This selection archives all the attachments that the related
item’s text column does not contain the entered text column. Wildcards are
unavailable.
• Equals – Enter the complete text column value. This selection archives the
attachments that the related item’s text column value matches the entered value.
Wildcards are unavailable.
• Does Not Equal – Enter the complete text column value. This selection archives
all the attachments that the related item’s text column value does not match the
entered value. Wildcards are unavailable.
6. Column (Number) – Enter the column name, followed by an Arabic number.
• >= – Archive attachments that the related item’s Number column value is equal
to or greater than the entered number.
• <= – Archive attachments that the related item’s Number column value is equal
to or less than the entered number.
• = – Archive attachments that the related item’s Number column value is equal to
the entered number.
7. Column (Yes/No) – Enter the column name and set Yes or No.
• Yes – If selected, archives the attachments that the related item’s Yes/No column
value is Yes.
DocAve®
6 Archiver 108
• No – If selected, archives the attachments that the related item’s Yes/No column
value is No.
8. Column (Date and Time) – Enter the column name and set date and time.
• From … To – Archive all attachments that the related item’s Date and Time
column value is between the two dates selected.
• Before – Archive all attachments that the related item’s Date and Time column
value is before the date selected.
• Older Than – Archive all attachments that the related item’s Date and Time
column value is older than the Days, Weeks, Months, or Years selected from the
drop-down list.
9. Parent List Type ID – Enter the list’s ID number.
• Equals – Enter the list’s complete ID value. This selection archives the
attachments in the specified list whose ID number matches the entered value.
Wildcards are unavailable.
• Does Not Equal – Enter the list’s complete ID value. This selection archives all the
attachments in the specified list whose ID number does not match the entered
value. Wildcards are unavailable.
10. Last Accessed Time – Set a date range for the last accessed time of the attachments
retrieved by the Report Center Audit Controller job.
*Note: This rule is not available for SharePoint 2016 and SharePoint Online.
• From … To – Archive all attachments that were last accessed between the two
dates selected.
• Before – Archive all attachments that were last accessed before the date
selected.
• Older Than – Archive all attachments that have a last accessed date that is older
than the Days, Weeks, Months, or Years selected from the drop-down list.
Newsfeed Post Object Level *Note: This object level only works for SharePoint 2013 and 2016. To enable rules of this object
level for SharePoint 2019, refer to the Enabling Newsfeed Post for SharePoint 2019 section.
1. Conversation Content – Enter the content of the conversation.
• Matches – Wildcards such as “*” and “?” are available when using Matches; it is
the most flexible way of specifying the objects you would like to archive. The
conversation with content that matches the entered text will be archived.
DocAve®
6 Archiver 109
• Does not Match – As with Matches, wildcards are available. However, this
selection archives all conversations with content that does not match the entered
text.
• Contains – Wildcards cannot be used in this field; all conversations that contain
the entered content will be archived.
• Does not Contain – You can enter part of the content here. This selection
archives all conversations that do not contain the entered content. Wildcards are
unavailable.
• Equals – Enter the complete content. This selection archives the conversation that
matches the entered content. Wildcards are unavailable.
• Does Not Equal – Enter the complete content. This selection archives all
conversations except for those that match the entered content. Wildcards are
unavailable.
2. Participant – Enter the name of the participant.
• Contains – Wildcards cannot be used in this field; all conversations with a
participant name that contains the entered names will be archived.
• Equals – Enter the complete name. This selection archives the conversation with a
participant name that matches the entered name. Wildcards are unavailable.
3. Posted By – Enter the name of the user who posted the post.
• Contains – Wildcards cannot be used in this field; all conversations with a poster
name that contains the entered name will be archived.
• Equals – Enter the complete name. This selection archives the conversation with a
poster name that matches the entered name. Wildcards are unavailable.
4. Replied By – Enter the name of the user who replied to the post.
• Contains – Wildcards cannot be used in this field; all conversations with a replier
name that contains the entered name will be archived.
• Equals – Enter the complete name. This selection archives the conversation with a
replier name that matches the entered name. Wildcards are unavailable.
5. Liked By – Enter the name of the user who liked the post.
• Contains – Wildcards cannot be used in this field; all conversations that are liked
by the users with names that contain the entered name will be archived.
• Equals – Enter the complete name. This selection archives the conversation that
is liked by the user with a name that matches the entered name. Wildcards are
unavailable.
6. Mentioned Name – Enter the name of the user who was mentioned in the post.
DocAve®
6 Archiver 110
• Contains – Wildcards cannot be used in this field; all the conversations
containing the entered name will be archived.
• Equals – Enter the complete name. This selection archives the conversation with a
mentioned name that matches the entered name. Wildcards are unavailable.
7. Hashtag – Enter the content of the hashtag.
• Matches – Wildcards such as “*” and “?” are available when using Matches; it is
the most flexible way of specifying the content you would like to archive. The
conversation with content that matches the entered text will be archived.
• Does not Match – As with Matches, wildcards are available. However, this
selection archives all conversation with content that does not match the entered
text.
• Contains – Wildcards cannot be used in this field; all conversations that contain
the entered content will be archived.
• Does not Contain – You can enter part of the content here. This selection
archives all of the conversations that do not contain the entered content.
Wildcards are unavailable.
• Equals – Enter the complete content. This selection archives the conversation that
matches the entered content. Wildcards are unavailable.
• Does Not Equal – Enter the complete content. This selection archives all
conversations except for those that match the entered content. Wildcards are
unavailable.
Running Report Center Jobs To use the Last Accessed Time rule on SharePoint 2010, 2013, 2016, or 2019 nodes, a Report
Center Audit Controller job in the Retrieve Last Accessed Time Data type must be run. To use
this rule on SharePoint Online nodes, a Report Center SharePoint Online Audit Log Collector
job must be run.
To run an Audit Controller job, complete the following steps:
*Note: Make sure the Site collection audit settings have been configured in SharePoint prior
to running an Audit Controller job. If the last accessed time of an object is not retrieved by the
Report Center job, the time when the Site collection audit settings have been configured in
the site collection where the object resides will be used in the time comparison. The last
accessed time/settings’ configuration time will be compared with the object’s last modified time.
The later time will be used as the last accessed time of the object in Archiver rules.
1. Navigate to DocAve v6 > Report Center > Settings > Audit Controller.
2. Create an auditing plan for the selected node.
DocAve®
6 Archiver 111
*Note: Make sure the Report Center license has been applied.
3. Select the Retrieve Data checkbox in the Which operations would you like to do with
this plan? field.
4. Select the Track object last accessed time checkbox in the Would you like to
configure advanced settings for retrieving data? field.
5. Save the plan.
*Note: By default, only the data retrieved in the Audit Controller jobs run within seven days
from the current time can be used by the last accessed time rule. To change the validity period,
refer to Configuring the Validity Period section of this guide.
To run a SharePoint Online Audit Log Collector job, complete the following steps:
1. Navigate to DocAve v6 > Report Center > Settings > Data Collection.
2. Select SharePoint Online Audit Log Collector and click Edit on the ribbon to edit
settings of the collector.
*Note: For detailed information on configuring the collector settings, refer to the
DocAve 6 Report Center User Guide.
3. After editing settings of the collector, return to the Data Collection page and click
Collect Now on the ribbon to run the collector job.
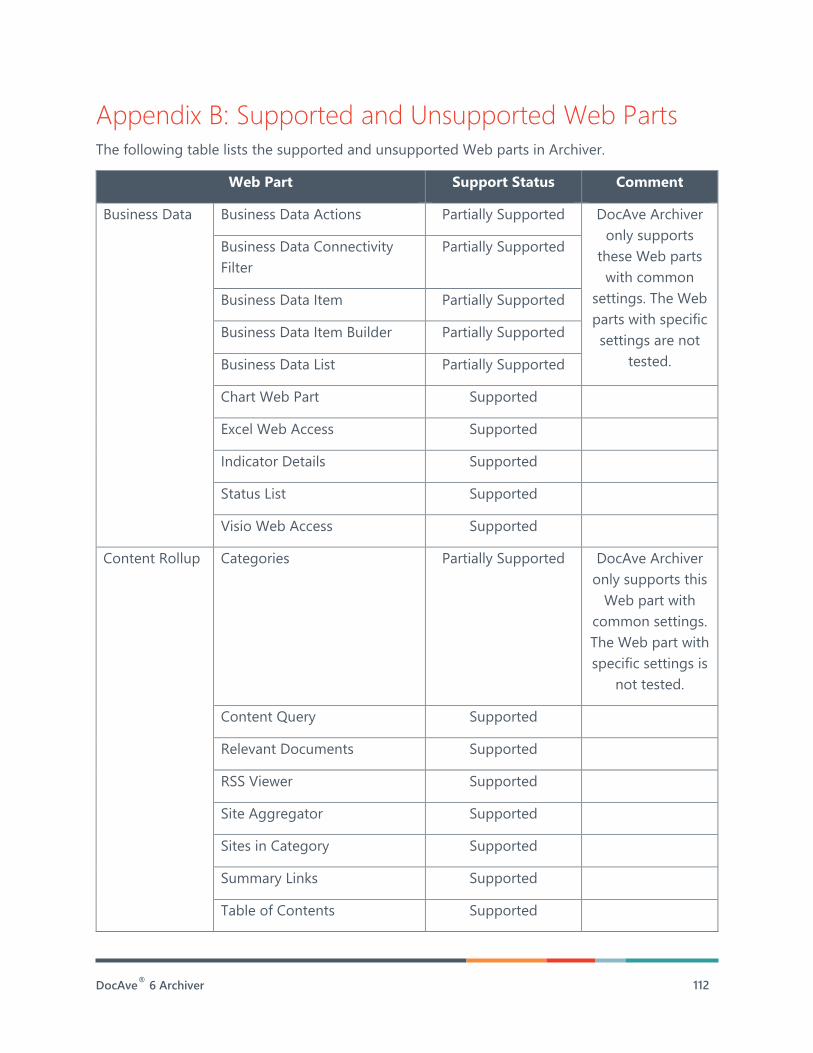
DocAve®
6 Archiver 112
Appendix B: Supported and Unsupported Web Parts The following table lists the supported and unsupported Web parts in Archiver.
Web Part Support Status Comment
Business Data
Business Data Actions Partially Supported DocAve Archiver
only supports
these Web parts
with common
settings. The Web
parts with specific
settings are not
tested.
Business Data Connectivity
Filter
Partially Supported
Business Data Item Partially Supported
Business Data Item Builder Partially Supported
Business Data List Partially Supported
Chart Web Part Supported
Excel Web Access Supported
Indicator Details Supported
Status List Supported
Visio Web Access Supported
Content Rollup
Categories Partially Supported DocAve Archiver
only supports this
Web part with
common settings.
The Web part with
specific settings is
not tested.
Content Query Supported
Relevant Documents Supported
RSS Viewer Supported
Site Aggregator Supported
Sites in Category Supported
Summary Links Supported
Table of Contents Supported
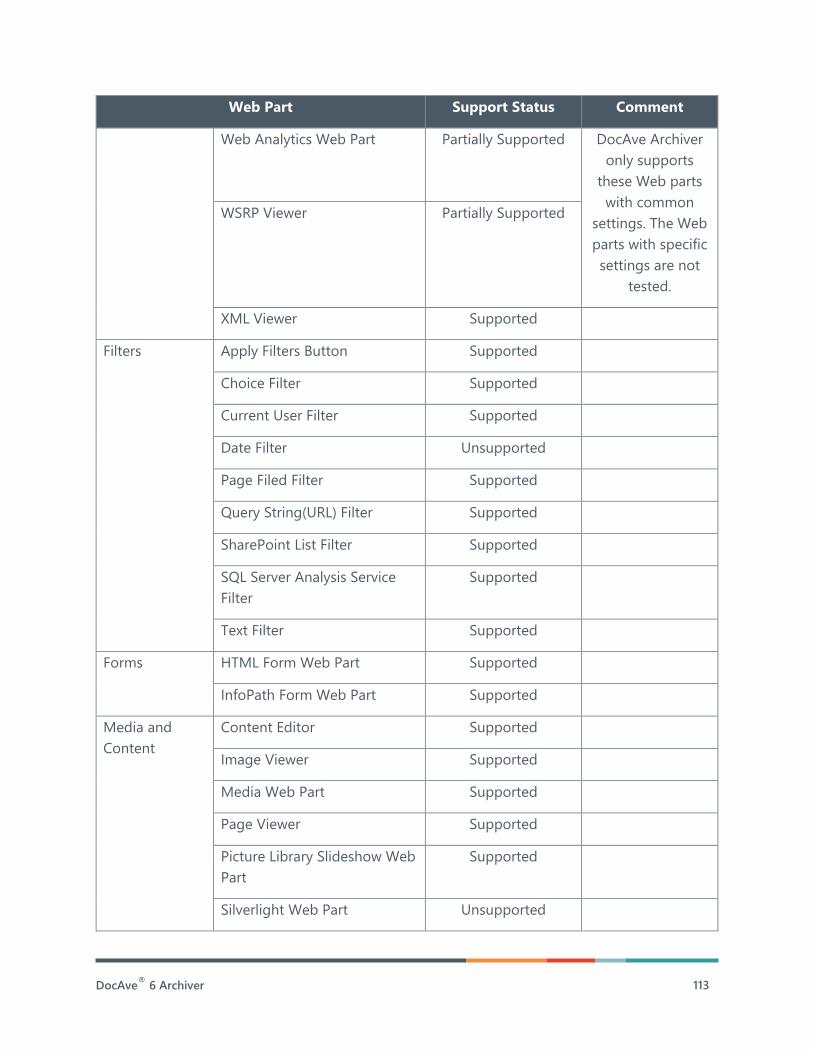
DocAve®
6 Archiver 113
Web Part Support Status Comment
Web Analytics Web Part Partially Supported DocAve Archiver
only supports
these Web parts
with common
settings. The Web
parts with specific
settings are not
tested.
WSRP Viewer Partially Supported
XML Viewer Supported
Filters
Apply Filters Button Supported
Choice Filter Supported
Current User Filter Supported
Date Filter Unsupported
Page Filed Filter Supported
Query String(URL) Filter Supported
SharePoint List Filter Supported
SQL Server Analysis Service
Filter
Supported
Text Filter Supported
Forms
HTML Form Web Part Supported
InfoPath Form Web Part Supported
Media and
Content
Content Editor Supported
Image Viewer Supported
Media Web Part Supported
Page Viewer Supported
Picture Library Slideshow Web
Part
Supported
Silverlight Web Part Unsupported
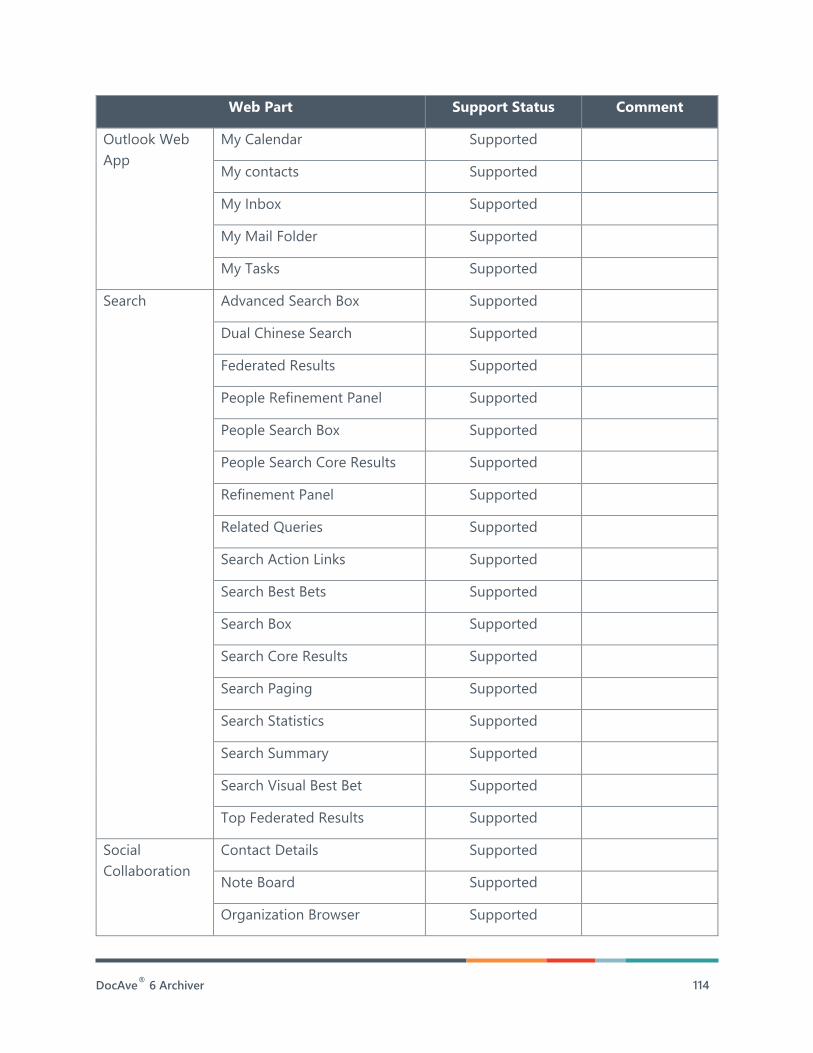
DocAve®
6 Archiver 114
Web Part Support Status Comment
Outlook Web
App
My Calendar Supported
My contacts Supported
My Inbox Supported
My Mail Folder Supported
My Tasks Supported
Search
Advanced Search Box Supported
Dual Chinese Search Supported
Federated Results Supported
People Refinement Panel Supported
People Search Box Supported
People Search Core Results Supported
Refinement Panel Supported
Related Queries Supported
Search Action Links Supported
Search Best Bets Supported
Search Box Supported
Search Core Results Supported
Search Paging Supported
Search Statistics Supported
Search Summary Supported
Search Visual Best Bet Supported
Top Federated Results Supported
Social
Collaboration
Contact Details Supported
Note Board Supported
Organization Browser Supported
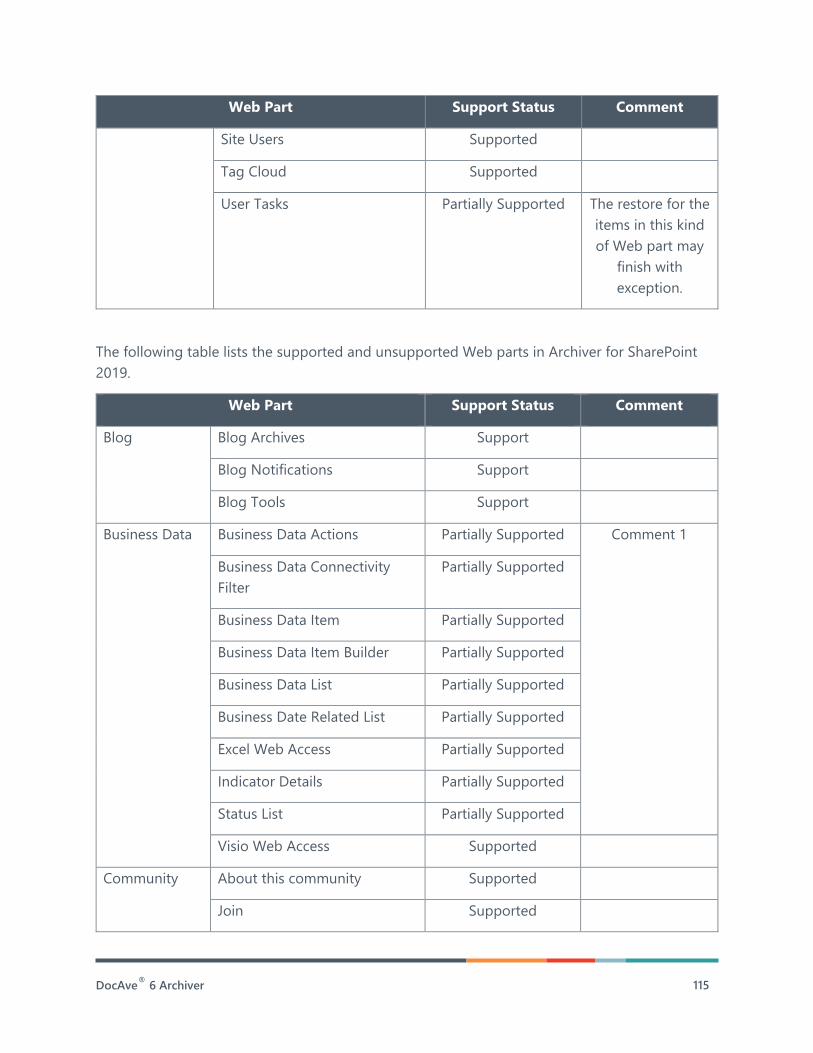
DocAve®
6 Archiver 115
Web Part Support Status Comment
Site Users Supported
Tag Cloud Supported
User Tasks Partially Supported The restore for the
items in this kind
of Web part may
finish with
exception.
The following table lists the supported and unsupported Web parts in Archiver for SharePoint
2019.
Web Part Support Status Comment
Blog Blog Archives Support
Blog Notifications Support
Blog Tools Support
Business Data
Business Data Actions Partially Supported Comment 1
Business Data Connectivity
Filter
Partially Supported
Business Data Item Partially Supported
Business Data Item Builder Partially Supported
Business Data List Partially Supported
Business Date Related List Partially Supported
Excel Web Access Partially Supported
Indicator Details Partially Supported
Status List Partially Supported
Visio Web Access Supported
Community About this community Supported
Join Supported
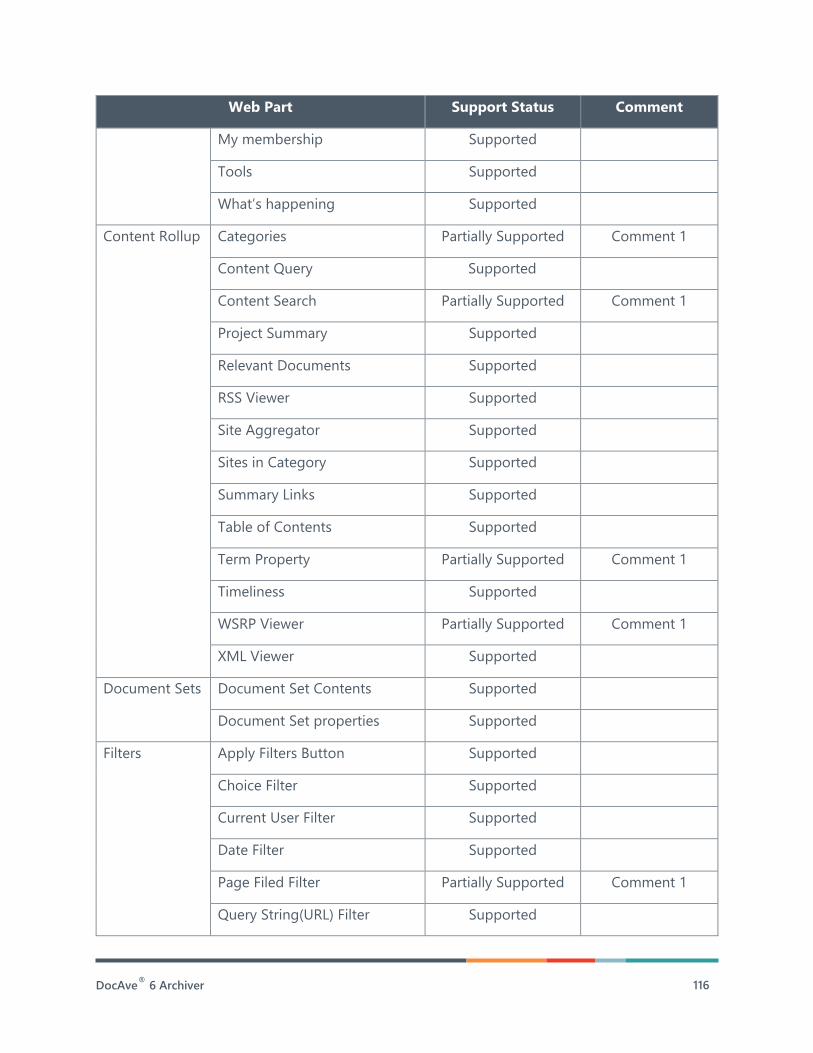
DocAve®
6 Archiver 116
Web Part Support Status Comment
My membership Supported
Tools Supported
What’s happening Supported
Content Rollup
Categories Partially Supported Comment 1
Content Query Supported
Content Search Partially Supported Comment 1
Project Summary Supported
Relevant Documents Supported
RSS Viewer Supported
Site Aggregator Supported
Sites in Category Supported
Summary Links Supported
Table of Contents Supported
Term Property Partially Supported Comment 1
Timeliness Supported
WSRP Viewer Partially Supported Comment 1
XML Viewer Supported
Document Sets Document Set Contents Supported
Document Set properties Supported
Filters
Apply Filters Button Supported
Choice Filter Supported
Current User Filter Supported
Date Filter Supported
Page Filed Filter Partially Supported Comment 1
Query String(URL) Filter Supported
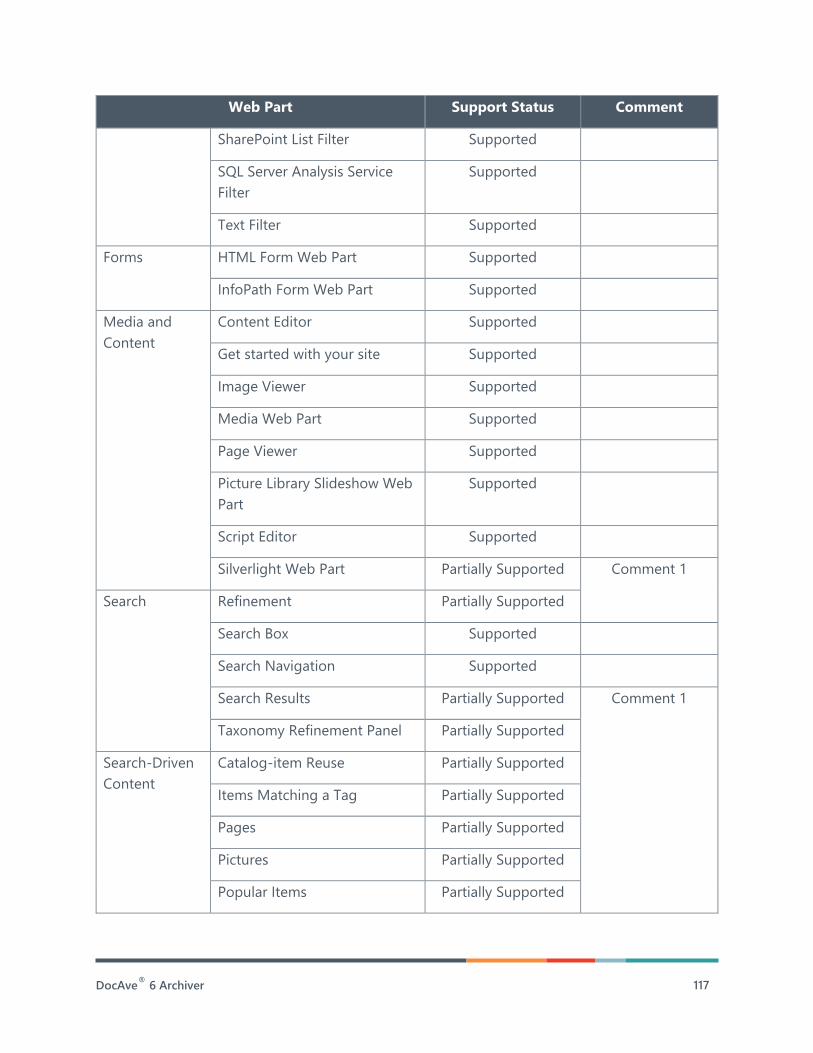
DocAve®
6 Archiver 117
Web Part Support Status Comment
SharePoint List Filter Supported
SQL Server Analysis Service
Filter
Supported
Text Filter Supported
Forms
HTML Form Web Part Supported
InfoPath Form Web Part Supported
Media and
Content
Content Editor Supported
Get started with your site Supported
Image Viewer Supported
Media Web Part Supported
Page Viewer Supported
Picture Library Slideshow Web
Part
Supported
Script Editor Supported
Silverlight Web Part Partially Supported Comment 1
Search
Refinement Partially Supported
Search Box Supported
Search Navigation Supported
Search Results Partially Supported Comment 1
Taxonomy Refinement Panel Partially Supported
Search-Driven
Content
Catalog-item Reuse Partially Supported
Items Matching a Tag Partially Supported
Pages Partially Supported
Pictures Partially Supported
Popular Items Partially Supported
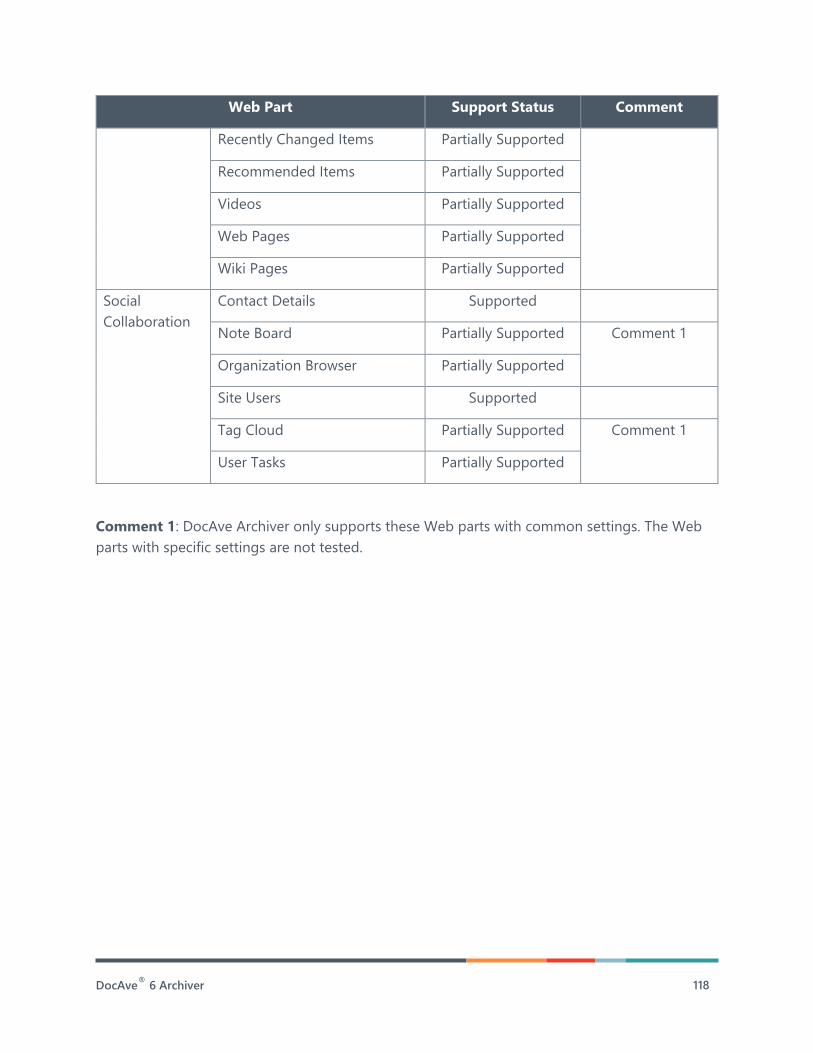
DocAve®
6 Archiver 118
Web Part Support Status Comment
Recently Changed Items Partially Supported
Recommended Items Partially Supported
Videos Partially Supported
Web Pages Partially Supported
Wiki Pages Partially Supported
Social
Collaboration
Contact Details Supported
Note Board Partially Supported Comment 1
Organization Browser Partially Supported
Site Users Supported
Tag Cloud Partially Supported Comment 1
User Tasks Partially Supported
Comment 1: DocAve Archiver only supports these Web parts with common settings. The Web
parts with specific settings are not tested.
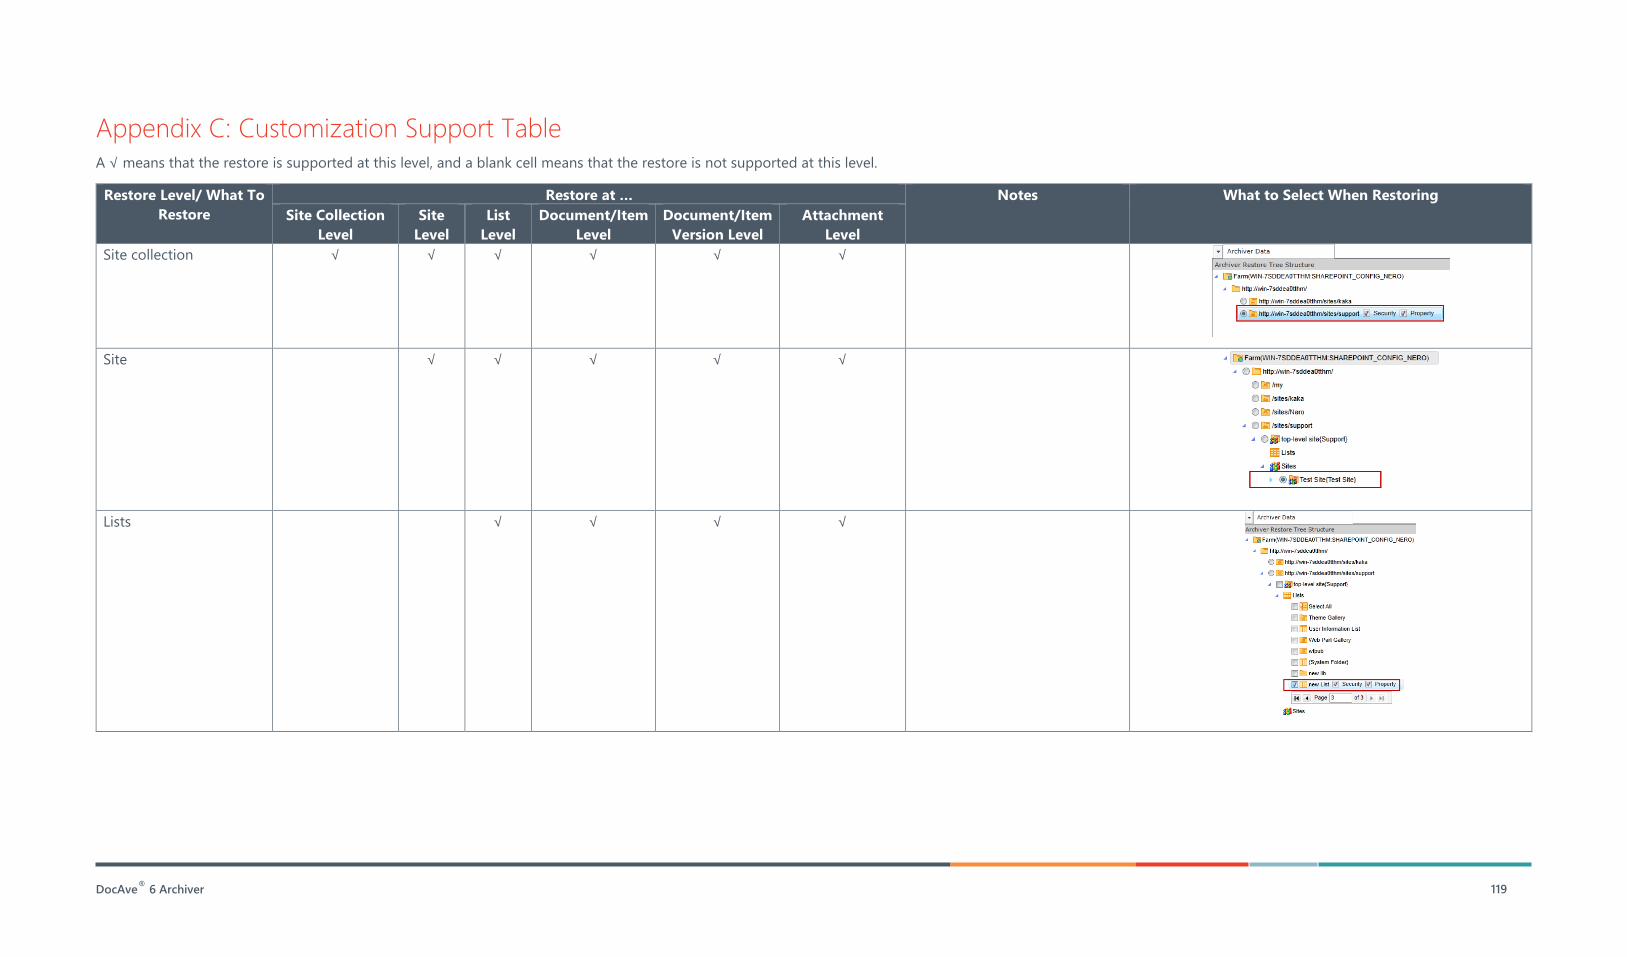
DocAve®
6 Archiver 119
Appendix C: Customization Support Table A √ means that the restore is supported at this level, and a blank cell means that the restore is not supported at this level.
Restore Level/ What To
Restore
Restore at … Notes What to Select When Restoring
Site Collection
Level
Site
Level
List
Level
Document/Item
Level
Document/Item
Version Level
Attachment
Level
Site collection √ √ √ √ √ √
Site √ √ √ √ √
Lists √ √ √ √
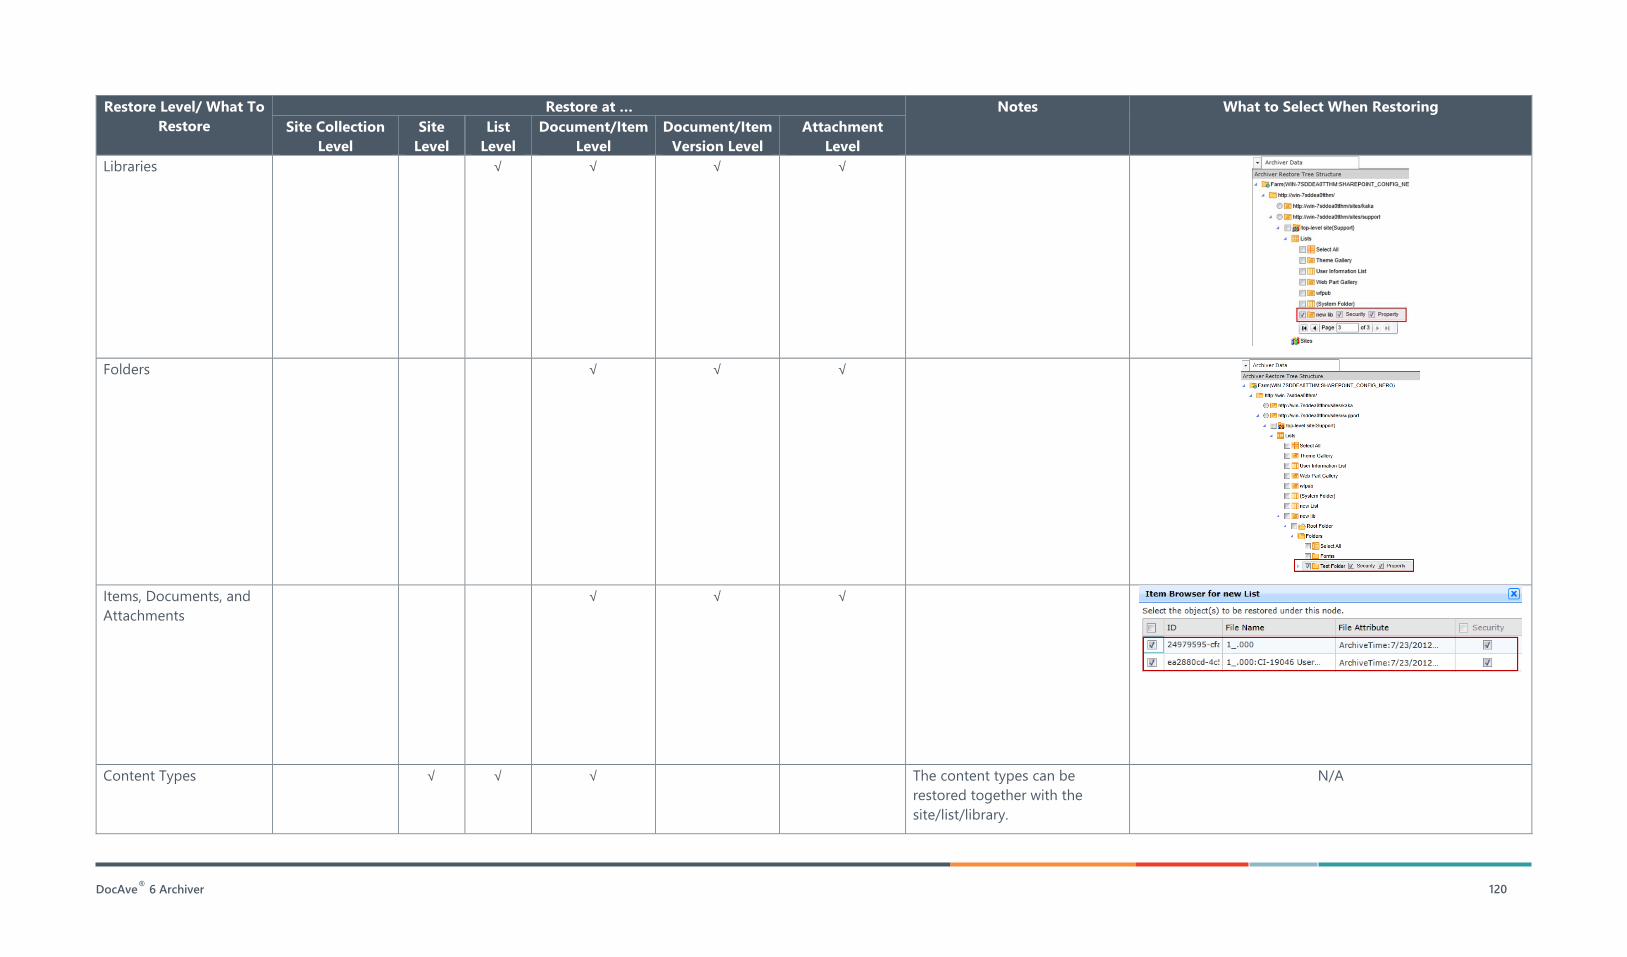
DocAve®
6 Archiver 120
Restore Level/ What To
Restore
Restore at … Notes What to Select When Restoring
Site Collection
Level
Site
Level
List
Level
Document/Item
Level
Document/Item
Version Level
Attachment
Level
Libraries √ √ √ √
Folders √ √ √
Items, Documents, and
Attachments
√ √ √
Content Types √ √ √ The content types can be
restored together with the
site/list/library.
N/A
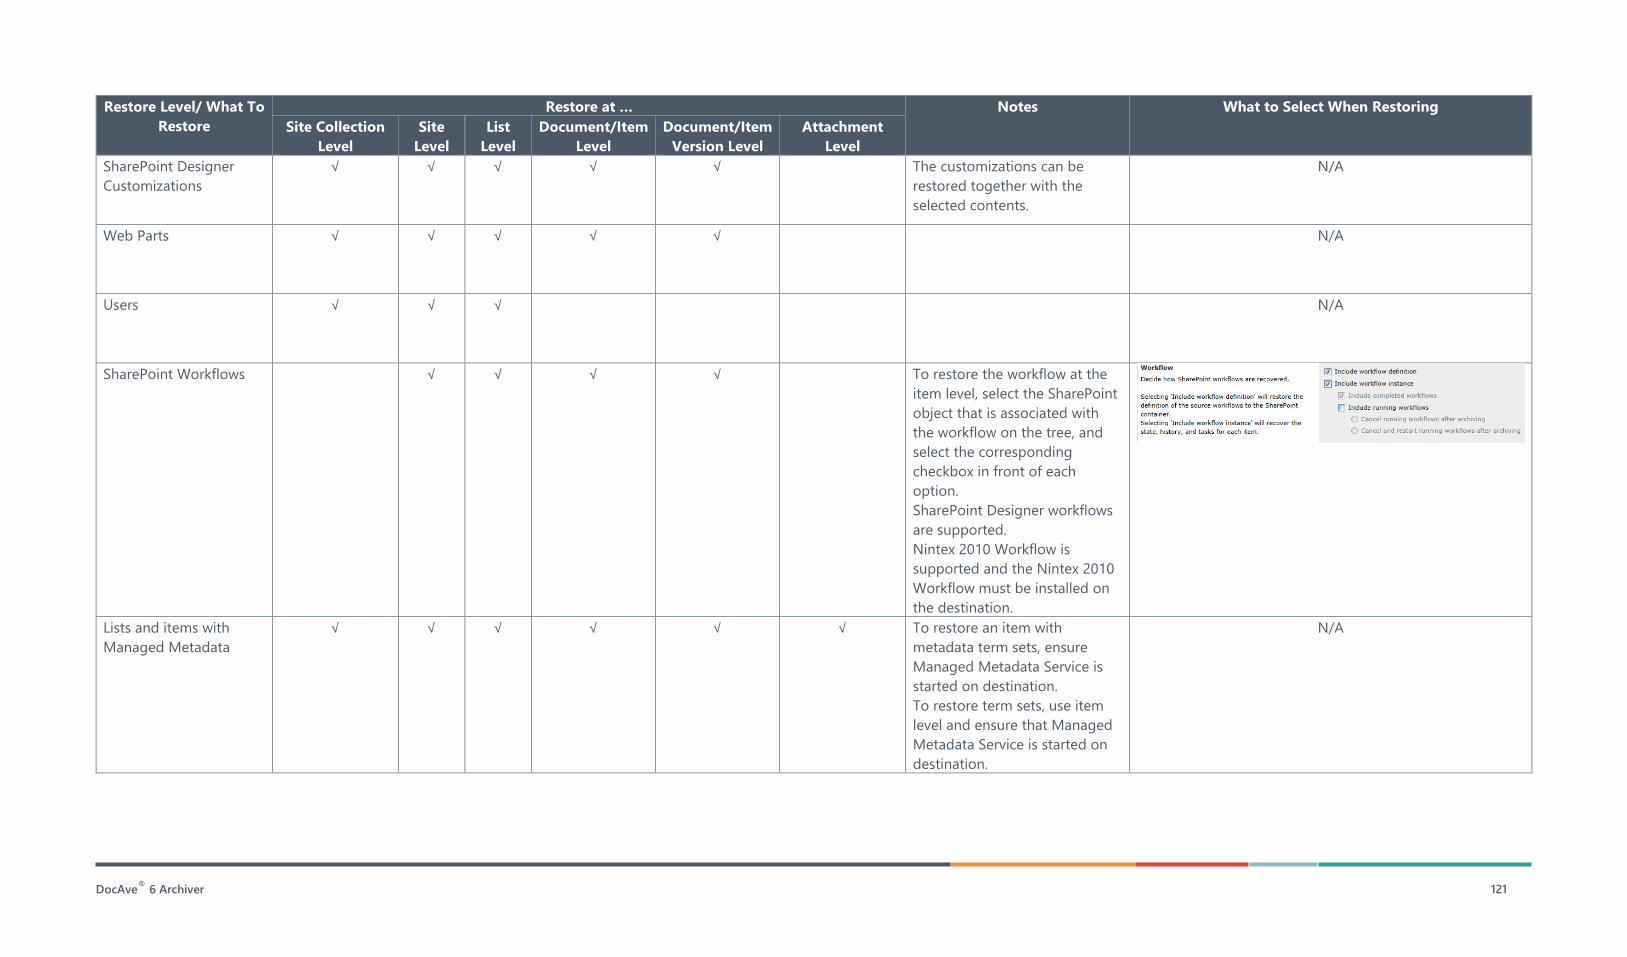
DocAve®
6 Archiver 121
Restore Level/ What To
Restore
Restore at … Notes What to Select When Restoring
Site Collection
Level
Site
Level
List
Level
Document/Item
Level
Document/Item
Version Level
Attachment
Level
SharePoint Designer
Customizations
√ √ √ √ √ The customizations can be
restored together with the
selected contents.
N/A
Web Parts √ √ √ √ √ N/A
Users √ √ √ N/A
SharePoint Workflows √ √ √ √ To restore the workflow at the
item level, select the SharePoint
object that is associated with
the workflow on the tree, and
select the corresponding
checkbox in front of each
option.
SharePoint Designer workflows
are supported.
Nintex 2010 Workflow is
supported and the Nintex 2010
Workflow must be installed on
the destination.
Lists and items with
Managed Metadata
√ √ √ √ √ √ To restore an item with
metadata term sets, ensure
Managed Metadata Service is
started on destination.
To restore term sets, use item
level and ensure that Managed
Metadata Service is started on
destination.
N/A
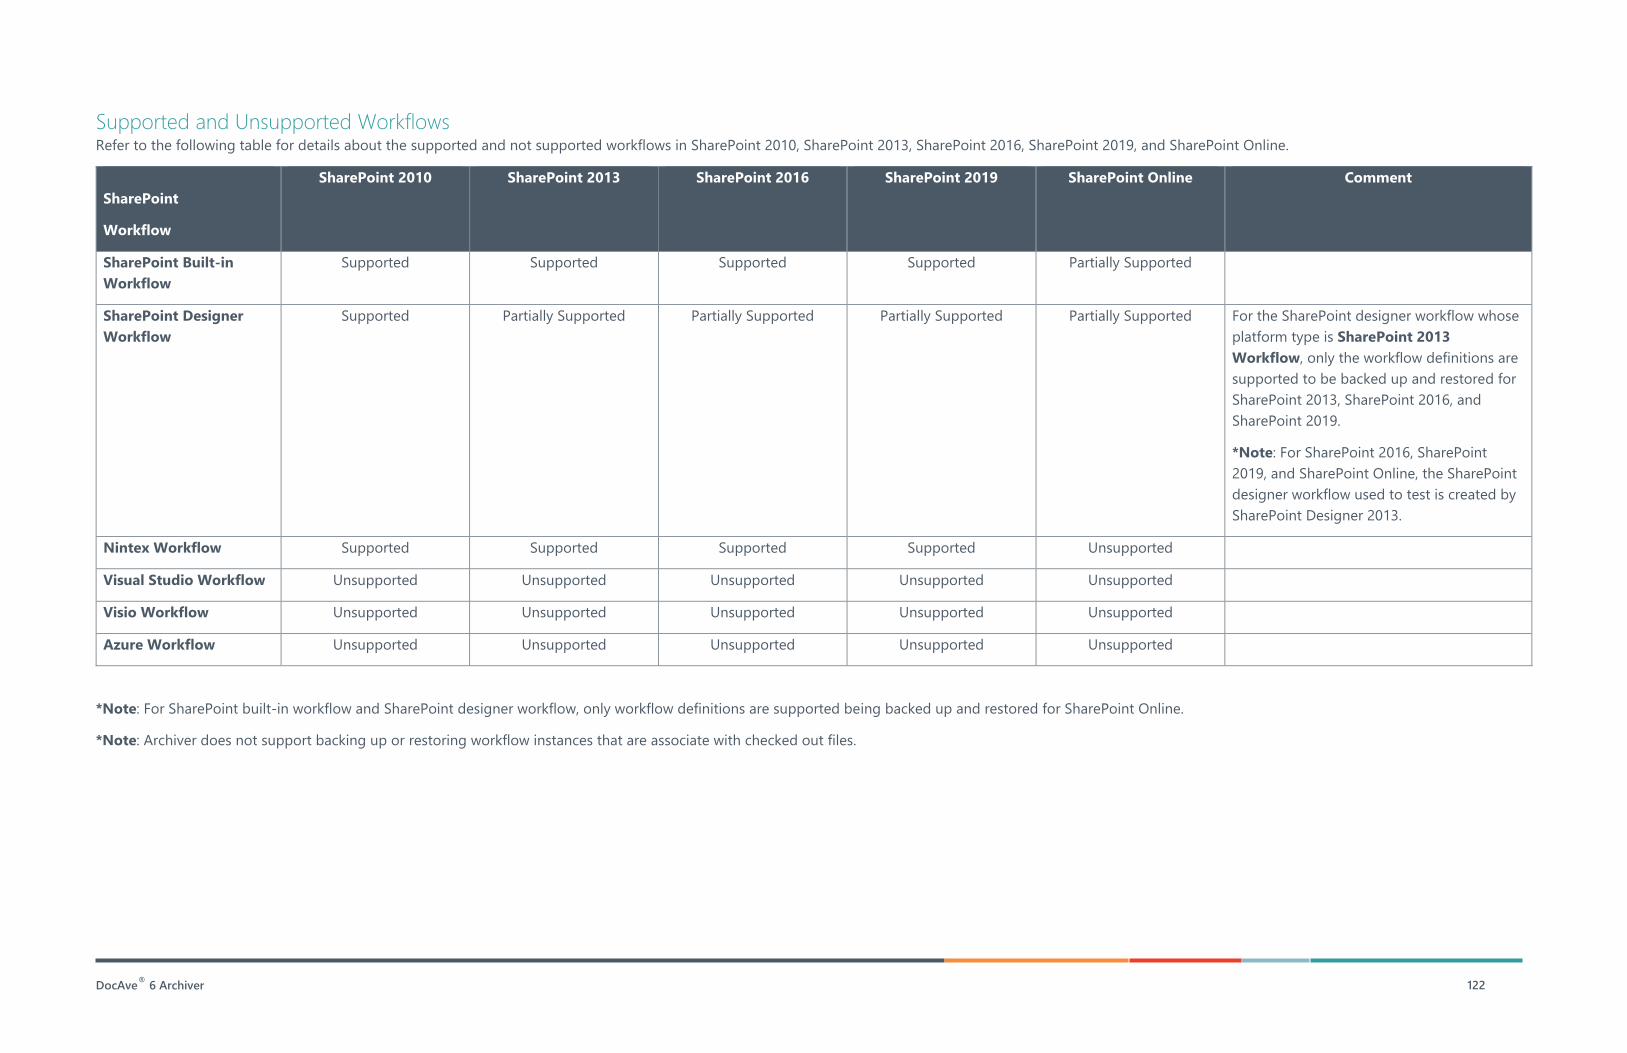
DocAve®
6 Archiver 122
Supported and Unsupported Workflows Refer to the following table for details about the supported and not supported workflows in SharePoint 2010, SharePoint 2013, SharePoint 2016, SharePoint 2019, and SharePoint Online.
SharePoint
Workflow
SharePoint 2010 SharePoint 2013 SharePoint 2016 SharePoint 2019 SharePoint Online Comment
SharePoint Built-in
Workflow
Supported Supported Supported Supported Partially Supported
SharePoint Designer
Workflow
Supported Partially Supported Partially Supported Partially Supported Partially Supported For the SharePoint designer workflow whose
platform type is SharePoint 2013
Workflow, only the workflow definitions are
supported to be backed up and restored for
SharePoint 2013, SharePoint 2016, and
SharePoint 2019.
*Note: For SharePoint 2016, SharePoint
2019, and SharePoint Online, the SharePoint
designer workflow used to test is created by
SharePoint Designer 2013.
Nintex Workflow Supported Supported Supported Supported Unsupported
Visual Studio Workflow Unsupported Unsupported Unsupported Unsupported Unsupported
Visio Workflow Unsupported Unsupported Unsupported Unsupported Unsupported
Azure Workflow Unsupported Unsupported Unsupported Unsupported Unsupported
*Note: For SharePoint built-in workflow and SharePoint designer workflow, only workflow definitions are supported being backed up and restored for SharePoint Online.
*Note: Archiver does not support backing up or restoring workflow instances that are associate with checked out files.
DocAve®
6 Archiver 123
Appendix D: Advanced Settings in Configuration Files Specify whether to restore custom properties in the SharePoint property bag and choose the
last accessed time rule by configuring the AgentCommonWrapperConfig.config file. Update
the last accessed time for Storage Manager stubs, configure settings for content type conflict
resolution, modify the time period for the last accessed time retrieved by the Audit Controller
Retrieve Data job, and choose whether to run only one Archiver job at a time by configuring the
AgentCommonStorageEnv.cfg file. Customize the column values of the Other Details column
in the job report by configuring the ControlArchiverSettings.config file.
For detailed information, refer to the following sections.
AgentCommonWrapperConfig.config Configure the AgentCommonWrapperConfig.config file to specify whether to restore custom
properties in the SharePoint property bag and choose the last accessed time rule.
Access a machine that has a DocAve Agent installed on it. Open the …
\AvePoint\DocAve6\Agent\bin directory to find the AgentCommonWrapperConfig.config file.
Restoring Specified Web Properties
Open the AgentCommonWrapperConfig.config file and find the WrapperCommon node.
Within this node, find the <RestoredAllWebProperties>False</RestoredAllWebProperties>
node and the <SpecialWebPropertyNames></SpecialWebPropertyNames> node. These
two nodes are added to the configuration file automatically when you first run an Archiving or
Restore job.
• If you do not want to restore the custom properties in the property bag, use the
default False value. When using the False value, you can also add specific custom
properties in the SpecialWebPropertyNames node. The custom properties you
specify will be restored. Use a semicolon to separate custom properties. Note
that the built-in properties in the property bag are all restored.
• If you want to restore all properties, including the custom and built-in properties,
change False to True. When using the True value, you can add specific
properties in the SpecialWebPropertyNames node. The properties you specify
will not be restored.
Choosing the Last Accessed Time Rule
Open the AgentCommonWrapperConfig.config file and find the WrapperCommon node.
Within this node, find the <UseStubAccessTimeRule>False</UseStubAccessTimeRule> node.
DocAve®
6 Archiver 124
• False – The default value is false, which means the time used by this rule is the
last accessed time of the selected
documents/items/attachments/lists/libraries/sites/site collections that retrieved
by Audit Controller Retrieve Data jobs.
*Note: If the value of this parameter is set to false, the document version level
last accessed time rule will not work for SharePoint 2010, 2013, or 2016 nodes.
• True – The time of documents/document versions/attachments used by this rule
will be changed to the last accessed time of the corresponding Storage Manager
stubs in SharePoint.
*Note: If the value of this parameter is set to true, the document/document
version/attachment level last accessed time rule will only work for SharePoint
2010 nodes.
*Note: The last accessed time of Storage Manager stubs must be updated prior to using the
stub accessed time rule. To update the Storage Manager stubs’ last accessed time, refer to
Updating the Last Accessed Time for Storage Manager Stubs.
AgentCommonStorageEnv.cfg Configure the AgentCommonStorageEnv.cfg file to update the last accessed time for Storage
Manager stubs, configure settings for content type conflict resolution, modify the validity period
for last accessed time retrieved by the Audit Controller Retrieve Data job, and choose whether to
run only one Archiver job at a time.
Access a machine that has a DocAve Agent installed on it. Open the
…\AvePoint\DocAve6\Agent\data\SP2019\Arch, …\AvePoint\DocAve6\Agent\data\SP2016\Arch,
…\AvePoint\DocAve6\Agent\data\SP2013\Arch, or …\AvePoint\DocAve6\Agent\data\SP2010\Arch
directory according to the farm where the data you want to archive and find the
AgentCommonStorageEnv.cfg file.
Updating the Last Accessed Time for Storage Manager Stubs
By default, the last accessed time for Storage Manager stubs are not updated. Refer to the
following steps to update the last accessed time for Storage Manager stubs:
1. Open the AgentCommonStorageEnv.cfg file and find the
UpdateLastAccessTime="false" parameter.
2. Change the value of this parameter to true.
3. Save changes to this file and close it.
DocAve®
6 Archiver 125
Configuring the Conflict Resolution
By configuring the AgentCommonStorageEnv.cfg file, you can also configure settings for
content type conflict resolution.
Conflict Resolution for Archiver Restore
To configure settings of the conflict resolution for Archiver restore, refer to the following steps:
1. Open the AgentCommonStorageEnv.cfg file.
2. Find and configure the DependenceConflictOperation=" " and ConflictOption=" "
nodes.
• DependenceConflictOperation=" " – Use this parameter to choose whether or
not to restore the items when the related content type conflicts with the existing
content type in the destination. Set the true value to restore these items. The
default value is true.
• ConflictOption=" " – Use this parameter to specify the action to take on the
conflicting content type. The default value is 3.
o Enter 2 as the parameter value, the conflicting content type will be
skipped restoring to the destination.
o Enter 3 as the parameter value, the conflicting content type will be
restored to the destination and overwrite the existing content type in the
destination.
o Enter 4 as the parameter value, the conflicting content type will be
restored to the destination and added a suffix (_1, _2, _3, …).
Conflict Resolution for Archiving
Refer to the following steps to configure the conflict resolution for the content types in the
Archiver job, when the Move and declare documents as SharePoint records and Preserve
content types from source options are selected:
1. Open the AgentCommonStorageEnv.cfg file.
2. Find and configure the RecordManagerConflictOption=" " node. The default value is 3.
• Enter 2 as the parameter value, the conflicted content type will be skipped
restoring to the destination.
• Enter 3 as the parameter value, the conflicted content type will be restored to the
destination and overwrite the existing content type in the destination.
• Enter 4 as the parameter value, the conflicted content type will be restored to the
destination and added a suffix (_1, _2, _3, …).

DocAve®
6 Archiver 126
Configuring List Templates for Archiving
Refer to the following steps to define the scope of list template types. Lists and libraries whose
templates are in the defined scope are able to be scanned and archived in Archiver jobs.
1. Open the AgentCommonStorageEnv.cfg file.
2. Find and configure the listTemplate=" " node. The default value is 100 101 103 104
106 107 108 109 119 171 433 500 544 700 751 850 851 1302. Enter the ID of the list
template type you want to include in Archiver jobs.
Configuring the Validity Period
By default, the validity period for the last accessed time retrieved by the Audit Controller
Retrieve Data job is seven days. The Audit Controller Retrieve Data job must run within seven
days from the current time in order for the Archiver job to run successfully and for the retrieved
data to be used in the Archiver job that has configured the last accessed time rule. Otherwise,
the Archiver job will be finished with exception, and no data in the selected node will be
archived.
To configure the validity period, complete the following steps:
1. Open the AgentCommonStorageEnv.cfg file.
2. Find the Archive node.
3. Within this node, find the Daysbetween= "7" parameter.
4. Change the value to a desired one. The time unit is Day.
Configuring the Processing Pool
Open the AgentCommonStorageEnv.cfg file and find the <SP2019 …>/<SP2016
…>/<SP2013 …>/<SP2010 …> node. Add the UseMultipleProcess= " " parameter to the end
of this node.
• True – Only one Archiver job can be run at a time in one processing pool. If there
are two or more jobs, two or more processing pools will be used to run the jobs.
• False – This is the default logic. The number specified in the Maximum Number
of Jobs field will be used when run Archiver jobs simultaneously.
Configuring Skipping Files
Open the AgentCommonStorageEnv.cfg file and find the skip=".aspx .js .css" parameter.
Files with the .aspx, .js, or .css extension will be skipped in Archiver jobs.
• If the jobs are in archiving mode, such files will be scanned but not be performed
with further actions.
DocAve®
6 Archiver 127
For example: If the Move and declare documents as SharePoint records action
is selected in the jobs, the documents that meet the configured criteria will be
moved to the destination and declared as SharePoint records. However, the
documents in the original location will not be deleted.
• If the jobs are in content lifecycle mode, such files will be neither scanned nor
performed with further actions.
Add more extensions to be the parameter value to skip more types of files in Archiver jobs.
Configuring Declared Record Setting
Open the AgentCommonStorageEnv.cfg file and find the IsDeleteRecord="false" parameter.
If documents have been declared as SharePoint records, the SharePoint records will not be
processed by later Archiver jobs even when they meet the configured criteria. Configure the
parameter value to true to process such SharePoint records by an Archiver job.
*Note: This parameter does not work for Archiver jobs where content lifecycle rules are used.
Configuring the Modified Time Comparison
Open the AgentCommonStorageEnv.cfg file and find the isCheckModifyTime="true" parameter.
If documents are configured to be archived and removed from SharePoint, the last modified
time of the documents will be compared with the time when they are backed up by an Archiver
job. If the last modified time of the documents is later than the backup time, the documents will
not be removed from SharePoint. Configure the parameter value to false to disable the
comparison.
Configuring User Profile Backup and Restore Settings
Open the AgentCommonStorageEnv.cfg file and find the backupUserprofile="false"
parameter.
When backing up site collections by an Archiver job, the user profile information of the users
that are related to the site collections will not be backed up. Configure the parameter value to
true to back up the user profile information.
When restoring these site collections, the user profile information will not be restored. To
restore the user profile information, find the RestoreUserProfile="false" parameter and
change the value to true.
Configuring End-User Archiver Backup Content
Open the AgentCommonStorageEnv.cfg file and find the
EndUserArchiverAdvancedMode="true" parameter.
DocAve®
6 Archiver 128
When archiving a document/document version/item/item version using the End-User Archiver
function in SharePoint, the document/document version/item/item version will be backed up
together with the complete information on the container level of the document/document
version/item/item version. Configure the parameter value to false to back up the basic
information on the container level of the document/document version/item/item version.
Configuring the Choice Type Column Value Restore Setting
Open the AgentCommonStorageEnv.cfg file and find the IsOverwriteChoiceColumn="true"
parameter.
If column values of the Choice type of columns are modified after being backed up, the backed
up column values will be restored by default.
Configure the parameter value to false to restore the backed up column values together with
the modified column values.
Enabling Archive and Restore for Connector Links
Open the AgentCommonStorageEnv.cfg file and find the
BackupLinkFileRealContent="false" parameter. Change the parameter value to True to
backup Link files in Connector libraries.
*Note: When restoring the backup Link files to a library that is not a Connector library, the Link
files will be restored to real content.
Permission Synchronization for Content Level Objects
To synchronize content level objects’ restore permissions for end users, open the
AgentCommonStorageEnv.cfg file and add the IsSyncItemPermission="true" parameter to
the <Archive …> node.
*Note: The permission synchronization only works when a schedule has been configured in the
Permissions Sync Schedule Settings section in the Configure End-User Archiver window.
Configuring Newsfeed Settings for SharePoint 2019
After Enabling Newsfeed Post for SharePoint 2019, you can configure whether to archive and
restore newsfeed as an item. By default, newsfeed in SharePoint is archived or restored as an
item. To archive or restore newsfeed normally, complete the following steps:
1. Access a machine that has a DocAve Agent installed on it.
2. Open the …\AvePoint\DocAve6\Agent\data\SP2019\Arch directory, and find the
AgentCommonStorageEnv.cfg file.
3. Open the AgentCommonStorageEnv.cfg file with Notepad.
DocAve®
6 Archiver 129
4. Find the IsBackupNewsfeed="false" attribute and change the attribute value to true.
5. Save changes to the file and close it.
ControlArchiverSettings.config Configure the ControlArchiverSettings.config file to configure the display properties for the
Other Details column in the Deletion Details tab of the job report, or enable the Newsfeed
Post rule for SharePoint 2019.
Access a machine where DocAve Manager is installed., Navigate to the
…\AvePoint\DocAve6\Manager\Control\Config\Archiver directory and find the
ControlArchiverSettings.config file.
Configuring Display Properties for Other Details Column
For the Archiver job where the Archive and remove data from SharePoint or Archive and
keep data in SharePoint action is selected, you can find the Other Details column in the
Deletion Details tab of the job report. The column values are some of the object’s properties
and the detailed information about the Archiver rule.
By default, the following information will be displayed as the column value:
<Info><RuleName> </RuleName> <RuleCriteria> </RuleCriteria></Info>
• <RuleName> </RuleName> – The name of the Archiver rule that the object
meets.
• <RuleCriteria> </RuleCriteria> – The criteria configured in the Archiver rule.
To display other properties of the object, complete the following steps:
1. Open the ControlArchiverSettings.config file with Notepad.
2. Find the <ExtraDeletionInformation DeletionDetailsColumnName="Rule Name;Rule
Criteria;"/> node and add the properties you want to display in the Other Details
column behind the Rule Criteria parameter. Separate properties with a semicolon.
The following properties are also supported to be displayed in the column:
• Created By – The user who created the object.
• Content Type – The content type of the object.
• Last Modified Date – The last modified time of the object.
• Version – The current version of the object.
• Name – The name of the object.
• Title – The title of the object.
DocAve®
6 Archiver 130
3. Save changes to the file and close it.
Enabling Newsfeed Post for SharePoint 2019
To enable the Newsfeed Post rule for SharePoint 2019, complete the following steps:
1. Open the ControlArchiverSettings.config file with Notepad.
2. Find the <supportNewsfeedSP2019>false</supportNewsfeedSP2019> node.
3. Change the value to true.
4. Save changes to the file and close it.
Configuration Files for Exporting Content into VEO Files Before exporting SharePoint data into VEO files, configuration files can be edited to define
metadata and values for the VEO files and the manifest XML file.
Access a machine that has a DocAve Agent installed on it. Open the
…\AvePoint\DocAve6\Agent\data\SP2010\Compliance, …\AvePoint\DocAve6\Agent\data\SP2013\
Compliance, …\AvePoint\DocAve6\Agent\data\SP2016\Compliance, or
…\AvePoint\DocAve6\Agent\data\SP2019\Compliance directory according to the farm where the
data you want to export into VEO files and find the following files:
• SP2010(2013/2016/2019)FileVEO.xml
• SP2010(2013/2016/2019)RecordVEO.xml
• SP2010(2013/2016/2019)ManifestVEO.xml
Defining Metadata Values for VEO Files of Container
Configuring the FileVEO.xml file for exporting container level of objects into VEO files. Define
metadata and values for VEO files.
Refer to the following steps to configure the FileVEO.xml file.
1. Open the FileVEO.xml file.
2. Fine the <FileVEOXML> … </FileVEOXML> node.
3. Edit the nodes in it.
• MetadataName – The metadata name of VEO files.
• SharePointMetadata – A SharePoint managed property, column, or the
following format: @xxx@
• SharePointMetadataAsSource – The status whether or not to use the
SharePointMetadata parameter value to be mapped to the metadata.
DocAve®
6 Archiver 131
• DefaultValue – The default value of the metadata.
*Note: This parameter value will be used only when the
SharePointMetadataAsSource parameter value is false.
4. Save changes to this file and close it.
Defining Metadata Values for VEO Files of Content
Configuring the RecordVEO.xml file for exporting content level of objects into VEO files. Define
metadata and values for VEO files.
Refer to the following steps to configure the RecordVEO.xml file.
1. Open the RecordVEO.xml file.
2. Find the <RecordVEOXML> … </RecordVEOXML> node.
3. Edit the nodes in it.
• MetadataName – The metadata name of VEO files.
• SharePointMetadata – A SharePoint managed property, column, or the
following format: @xxx@
• SharePointMetadataAsSource – The status whether or not to use the
SharePointMetadata parameter value to be mapped to the metadata.
• DefaultValue – The default value of the metadata.
*Note: This parameter value will be used only when the
SharePointMetadataAsSource parameter value is false.
4. Save changes to this file and close it.
Defining Metadata for the Manifest File
Configuring the ManifestVEO.xml file to define the metadata collected for the job and each
item in the manifest XML file.
Refer to the following steps to configure the ManifestVEO.xml file.
1. Open the ManifestVEO.xml file.
2. Find the <ManifestXML> … </ManifestXML> node.
3. Modify or assign values of the following parameters in each node:
• ElementName – The XML element name of a metadata in VEO files.
• DefaultValue – The default value of the metadata.
DocAve®
6 Archiver 132
*Note: The default value will be assigned to an item only when there is no value
of the configured element.
4. Save changes to the file and close it.
Merging VEO files
When you run an Archiver job to export data into VEO files, a folder will be created for each site
collection where the content meets the rule criteria in the export location configured in the rule.
The content that meets the rule criteria will be exported as VEO files to the corresponding
folder. A Manifest.xml file will also be exported to the folder to record some metadata of the
VEO files. The folder will be named in the following format: JobID_Suffix (starts from 000). For
example, AR20160711114512686584A0_000.
By configuring the ControlArchiverSettings.config file, you can merge VEO files that are
exported by an Archiver job from multiple folders in an export location into one or a few folders
based on the configured settings. The Manifest.xml files will also be merged to record
metadata for VEO files in the merged folders.
1. On the DocAve Manager server, navigate to the
…\AvePoint\DocAve6\Manager\Control\Config\Archiver directory.
2. Find the ControlArchiverSettings.config file and open it with Notepad.
3. Configure the following nodes to customize your settings for merging VEO files.
• <archiverVEOMerge enable =" "> – Choose whether to merge VEO files from
multiple folders in an export location into one or a few folders.
o Set the true value to enable this feature, and then configure the nodes
below. The default value is true.
o Set the false value to disable this feature.
• <isDeleteOldFile> </isDeleteOldFile> – Choose whether to delete VEO files
from their original folders after merging them into new folders.
o Set the true value to delete VEO files from their original folders after the
merge. The folders will be deleted together.
o Set the false value to keep VEO files in their original folders after the
merge. The default value is false.
• <fileSize> </fileSize> – Configure this node to merge VEO files by size. A
number with two decimal places is supported. The size unit is GB. By default, VEO
files whose total size is 1 GB will be merged into a folder.
• <fileNumber> </fileNumber> – Configure this node to merge VEO files by the
number of VEO files. By default, 300 VEO files will be merged into a folder.
DocAve®
6 Archiver 133
*Note: If the two nodes above are all configured, the second folder will be
created once either of the two conditions is met.
• <folderName>Merged Folder</folderName> – Define the prefix for the
folders that will be created to store the merged VEO files. The folders will be
named in the following format: Prefix_JobID_Suffix (starts from 000). For
example, Merged Folder_AR20160711114512686584A0_000.
4. Save changes to the file and close it.
5. When the merge VEO feature is enabled, a VEO Merge job will automatically start after
the Archive/Lifecycle Archive job finishes to merge the Manifest.xml and VEO files.
*Note: If the settings configured in this configuration file are invalid, the default settings will be
used to run the VEO Merge job.
DocAve®
6 Archiver 134
Notices and Copyright Information Notice
The materials contained in this publication are owned or provided by AvePoint, Inc. and are the property
of AvePoint or its licensors, and are protected by copyright, trademark and other intellectual property
laws. No trademark or copyright notice in this publication may be removed or altered in any way.
Copyright
Copyright © 2012-2019 AvePoint, Inc. All rights reserved. All materials contained in this publication are
protected by United States and international copyright laws and no part of this publication may be
reproduced, modified, displayed, stored in a retrieval system, or transmitted in any form or by any means,
electronic, mechanical, photocopying, recording or otherwise, without the prior written consent of
AvePoint, 525 Washington Blvd, Suite 1400, Jersey City, NJ 07310, USA or, in the case of materials in this
publication owned by third parties, without such third party’s consent. Notwithstanding the foregoing, to
the extent any AvePoint material in this publication is reproduced or modified in any way (including
derivative works and transformative works), by you or on your behalf, then such reproduced or modified
materials shall be automatically assigned to AvePoint without any further act and you agree on behalf of
yourself and your successors, assigns, heirs, beneficiaries, and executors, to promptly do all things and
sign all documents to confirm the transfer of such reproduced or modified materials to AvePoint.
Trademarks
AvePoint®, DocAve®, the AvePoint logo, and the AvePoint Pyramid logo are registered trademarks of
AvePoint, Inc. with the United States Patent and Trademark Office. These registered trademarks, along
with all other trademarks of AvePoint used in this publication are the exclusive property of AvePoint and
may not be used without prior written consent.
Microsoft, MS-DOS, Internet Explorer, Office, Office 365, SharePoint, Windows PowerShell, SQL Server,
Outlook, Windows Server, Active Directory, and Dynamics CRM 2013 are either registered trademarks or
trademarks of Microsoft Corporation in the United States and/or other countries.
Adobe Acrobat and Acrobat Reader are trademarks of Adobe Systems, Inc.
All other trademarks contained in this publication are the property of their respective owners and may not
be used without such party’s consent.
Changes
The material in this publication is for information purposes only and is subject to change without notice.
While reasonable efforts have been made in the preparation of this publication to ensure its accuracy,
AvePoint makes no representation or warranty, expressed or implied, as to its completeness, accuracy, or
suitability, and assumes no liability resulting from errors or omissions in this publication or from the use of
the information contained herein. AvePoint reserves the right to make changes in the Graphical User
Interface of the AvePoint software without reservation and without notification to its users.
AvePoint, Inc.
525 Washington Blvd
Suite 1400
Jersey City, NJ 07310
USA


