DRONE ® 2 Owners Manual www.macdev.net (c) Copyright 2015 Mac Developments Pty Ltd (MacDev). MacDev - Proudly Australian The Drone paintball marker is covered by the following granted patents as well as internaonal pending patents: U.S. Patent Nos. 5,228,427; 5,755,213; 5,957,119; 6,260,821; 6,349,711; 6,494,195; 6,644,295; 6,644,296; 6,823,857; 6,694,963; 6,810,871; 7,017,497; 7,044,119. Clone, MacDev, Shiſt, MacDev Milia, Drone and Gladiator are all Trademarks of MacDev.
Transcript
DRONE® 2Owners Manual
www.macdev.net
(c) Copyright 2015 Mac Developments Pty Ltd (MacDev).MacDev - Proudly Australian
The Drone paintball marker is covered by the following granted patents as well as international pending patents: U.S. Patent Nos. 5,228,427; 5,755,213; 5,957,119; 6,260,821; 6,349,711; 6,494,195; 6,644,295; 6,644,296; 6,823,857;
6,694,963; 6,810,871; 7,017,497; 7,044,119.Clone, MacDev, Shift, MacDev Militia, Drone and Gladiator are all Trademarks of MacDev.
Drone 2 Model Owners ManualV1.00
Copyright Mac Developments Pty. Ltd. 2015All rights reserved
No part of this document may be copied or reproduced in any form or by any means without the prior written consent of Mac Developments Pty. Ltd.
Notice is hereby given that this manual is part of the article owned in whole by Mac Developments Pty. Ltd., known as indicated in this manual and drawings. All rights of manufacture and reproduction of such articles or any part thereof are reserved by Mac Developments Pty Ltd. Neither said article nor any part thereof may be manufactured or reproduced without the written authorization from Mac Developments Pty. Ltd. All proprietary rights and information are the sole property of Mac Developments Pty. Ltd.MacDev, Clone, Conquest, Gladiator, MatchStick, Cyborg, Shift and Drone are all trademarks of Mac Developments Pty Ltd.
Statement of LiabilityMac Developments Pty. Ltd. makes no warranties with respect to this documentation and disclaims any implied warranties of merchantability or fitness for a particular purpose. The information in this document is subject to change without notice. Mac Developments Pty. Ltd. assumes no responsibility for its resale or safe handling. Mac Developments Pty. Ltd. assumes no responsibility for physical injury or property damage resulting from its use.
MacDev WarrantyMacDev offers a 12 month limited warranty period on your MacDev manufactured electro-pneumatic marker. The MacDev electro-pneumatic marker is warranted to be free from all manufacturing and pro-duction defects for a period of 12 months from the date of manufacture, unless a proof of purchase is pro-vided (within 30 days of purchase) in which case the 12 month period will begin from the time of original purchase. Warranty cover is dependent on successful completion of warranty registration via www.macdev.net/warranty. Warranty exceptions include, but are not limited to, accidental damage, mis-adventure, reasonable wear and tear and consumable components such as O-rings, detents, batteries and eyes. Warranty work must be undertaken by an authorized MacDev Tech Centre or at a MacDev sanctioned Tech Support booth.
Warning!
This is not a toy. Misuse may cause serious injury or death. Eye protection designed specifically for paintball must be worn by user and persons within range. Recommend 18 years or older
to purchase. Persons under 18 must have adult supervision. READ OWNER’S MANUAL BEFORE USING.
2
CONTENTSKnow your Drone (Page 5)All users should read this section to learn the parts of your marker and their names.
Quick Setup (page 7)Learn how to set your marker up for use the first time.
Switching your marker on and off Firing your marker Understanding the beam sensor Disabling the beam sensor Installing a preset air system Turning the air on and off Using a loader with your marker Installing a loader onto your marker Removing your loaderUsing your Marker (Page 10)Essential reading on how to use your marker. Adjusting the velocity Adjusting the trigger Replacing the batteryAdvanced Setup (Page 11)A section for those who are comfortable with making fine adjustments to their marker. About the tourney lock Programming the software Debounce Dwell Fire mode Rate of fire Ball settle delay Anti mechanical bounce
Anti bolt stick Factory setting Cycle filter Eye mode Bolt tracking delay Test mode dwell Resetting the software Using an RF transmitterMaintenance (Page 17)Maintaining your purchase is essential to long term product satisfaction. Basic cleaning Maintaining the drivetrain Maintaining the inline regulatorTroubleshooting (Page 21)Solving common difficulties. Common problems and solutions Technical assistanceSpecifications (Page 24)
4
KNOW YOUR DRONE®2
1 3
4
5
7
910
6
8
Congratulations on purchasing the new Drone 2 marker. The Drone 2 is manufactured using high quality aluminium and features precision machned and moulded components designed to yield the maximum performance from the marker.
Prior to using your Drone 2 for the first time, please take a moment to familiarise yourself with the key components and assemblies, as it will greatly assist your understanding when reading this manual.
The figure on the left shows the following numbered parts: 1. Shift2 Lite 2 piece barrel with comfort grip2. Feed clamp lever (used to affix your loader)3. Drivetrain, unscrew to remove (note: marker must be degassed first)4. Eye covers and screws5. Velocity adjustment screw (anti clockwise to increase velocity)6. Trigger with screw adjustments7. LED display used to view gun status/settings8. Membrane pad with power and programming buttons9. Venting ASA, screw your air system in here10. Venting ASA on/off cap (used to turn the air on or off)11. Wrap around grip, remove this side to access battery and tourney lock
6
11
QUICK SETUPSwitching your marker on and offThe power button is located on a membrane pad on the rear of the frame. Push the button with the power symbol ( ), when done correctly, your LED will display a red light (if no ball is loaded) or a green light (if a ball is loaded) and the marker will be set with the beam sensor system on and ready to fire. Turn your marker off by holding the power button down until the LED goes blank.
Firing your markerIf a paintball is loaded in your marker, and the power is switched on, you may fire the marker by pulling the trigger. please refer to the section below named “disabling the beam sensor” to fire the marker without paint.
Understanding the beam sensorYour marker is equipped with a visible light sensor to determine if a paintball is correctly loaded. This system is used to prevent accidental ball breakage due to misloaded paintballs. The LED indicator on the back of your grip will show you the status of the beam sensor:
Ball loaded - green (or special colour for non semi mode)Ball not loaded - redSensor error - flashing orange
Disabling the beam sensorTo disable the sensor (for dry firing), hold the scroll button on the membrane pad ( ) until the LED starts flashing. You can re-enable the beam sensor the same way.
Power button (for power on/off)
Scroll button (for eyes on/off and programming)
Installing a preset air systemYour marker comes equipped with a high quality venting ASA (Air System Adaptor) that is designed for use with commercially available air/nitrogen systems. To install your preset air system, unscrew the ASA cap by approxi-mately 3 turns (do not unscrew it further, as the cap can come off completely). Once this is done, carefully screw your air system into the ASA until it stops.
Turning the air on and offTo pressurise your marker, screw the ASA cap down until it stops. This will depress the pin on the end of your air system and pressurise the marker (provided you have sufficient air in your air system). To depressurise your marker, unscrew the ASA cap until you hear the air being vented from the cap. Your air system is now turned off and safe to remove.
8
NOTE: WHEN YOU UNSCREW THE ASA CAP, YOUR MARKER MAY STORE ONE SHOT. POINT THE MARKER IN A SAFE DIRECTION AND FIRE OFF THAT SHOT BEFORE ENTERING A SAFE AREA.
NOTE: USE ONLY LP OR SLP AIR SYSTEMS. AIR SYSTEMS OVER 600PSI OUTPUT SHOULD NOT BE USED.
USING YOUR MARKERTo get the most out of your marker, make sure that you follow the instructions in this section to ensure that the marker is adjusted correctly.
Adjusting the velocityThe velocity of your marker is adjusted via an adjustment screw on the bottom your inline regulator. To increase velocity, use a 1/8” allen key to turn the adjustment screw anti clockwise. Always adjust your velocity gently and use a chronograph.
Adjusting the triggerYour trigger has two adjustment screws, they are located in the front face of the trigger in the following order from top to bottom: - Switch actuation point - Pull lengthYou can easily adjust these screws to personalise the feel of your trigger.
Using a loader with your markerYour marker can operate using any commercially available loader. The software and beam sensor will compensate for the speed of the hopper, ensuring that the marker fires as quickly as the loader allows.
Installing a loader onto your markerOpen the cam lever as shown. This should allow your loader neck to fit into the feed tube as shown. If your loader does not fit into the feed tube, then you may have to loosen the cam lever - this is done by rotating the cam lever (anticlockwise). Once your loader is pushed all the way down into the feed tube, close the cam lever. If your loader is loose, you may need to open the cam lever, and tighten it (by turning clockwise) to adjust the cam system to hold your hopper tightly. Only ever adjust your cam lever by one turn at a time to prevent overtightening.
Removing your loaderOpen the clamp by swinging the lever on its hinge. This will loosen the loader and allow you to remove it easily. If it does not remove easily, then it means that you have the cam lever overtightened.
DO NOT ADJUST YOUR VELOCITY ABOVE 300FPS, AND ALWAYS OBEY LOCAL LAWS AND REQUIREMENTS.
10
DO NOT OVER TIGHTEN YOUR FEED CLAMP! OVERTIGHTENING MAY RESULT IN DAMAGE TO YOUR LOADER OR CLAMP.
Replacing the batteryRemove the three screws holding the wrap around grip onto the left hand side of your grip frame. Gently remove the battery from the clip on harness. Replace the battery with a high quality alkaline 9V battery (type 6LR61).
ADVANCED SETUPAbout the tourney lockYour board is equipped with a tourney lock system. When the tourney lock system is activated, settings on the board cannot be changed.
The lock status can be changed by opening the left hand side of the marker wrap around grip to gain access to the front of your circuit board. The tournament lock is a white button above the word MACDEV, as shown in the picture on page 12.
When the board is powered on, hold the tourney lock button down. The LED will flash a series of green and red, end-ing in either green (tourney lock off, or red (tourney lock on).
Programming the marker softwareTo program the board, first ensure that the tournament lock is off, then turn the marker off. Hold down the trigger whilst turning the marker on. Continue to hold the trigger while the LED shines white. When the LED changes to blue, you may release the button and trigger, and proceed to adjust your settings. Click the trigger if you would like to advance to the next colour. When you would like to adjust a setting, hold the trigger until the LED goes blank. After releasing the trigger, the LED will flash, the number of flashes shows you the last setting. When the board has finished flashing, pull the trigger the number of times you would like to input your new setting.
Each setting is colour coded. The colours are given in the following table:
LED Colour Setting DefaultBlue Debounce (1/2ms increments) 10Red Dwell (1ms increments) 10White Fire mode 1 (semi)
Green Max ROF - capped modes only 10 (12.5bps)Yellow Ball settle delay (1/2ms increments) 15Teal Anti mechanical bounce 2Purple Anti bolt stick 3Flickering Blue Factory Setting -Flickering Red Cycle filter 2Flickering White Eye mode 2 (forced)Flickering Green Bolt tracking delay (ms) 10Flickering Yellow Test mode dwell (ms) 2
Each program setting is described in detail below:
Debounce (Blue)The debounce setting of your marker is used to control the amount of ”bounce” in your trigger. A very low debounce setting will result in a lot of bounce. In some tournaments or fields, it will be necessary to reduce the amount of bounce by increasing the debounce setting. Always increase the debounce slowly, because settings higher than 15 will result in your marker feeling unresponsive. 12
Tourney lock button
Dwell (Red)The dwell setting controls the amount of time that your solenoid is held open. A very low dwell will result in very poor performance from your marker, whilst a very high value will result in a very slow maximum rate of fire and excess air usage. The factory setting is recommended as a base line, you may use small increments for fine tuning.
Fire mode (White)Your marker is equipped with 8 different fire modes. These fire modes will allow you to use your marker in many different situations - tournament play, recreational and scenario. Always follow the rules and local regulations when selecting your fire mode. The available fire modes are given below:
1 Uncapped semi2 Capped semi3 Uncapped 3 shot burst4 Capped 3 shot burst5 Uncapped full auto
Rate of fire - ROF (Green)Your marker can electronically limit its maximum ROF. This is required in some tournaments or fields. In uncapped modes, the ROF will only be limited by the speed of the marker and hopper. If you use a capped mode (like PSP or Millennium), the mode will obey the maximum ROF. The ROF is adjustable from 8bps in 1/2bps increments (1=8, 2=8.5, 3=9 ... 26=uncapped).
Ball Settle Delay (Yellow)This is a small dwell included to allow the ball to settle into your marker breach before firing. For a very fast loader, this may be set to 1, for slow hoppers it should be higher. If your ball settle delay is set too low for your loader, then you may experience paintballs breaking in the breech.
Anti mechanical bounce (Teal)Primarily, you should use the debounce register to remove bounce from your marker. However, if you experience excessive bounce, it may be from a mechanical source. This AMB filter is designed to remove excessive bounce, and it should be incremented slowly to remove bounce when bounce cannot be removed using the debounce register.
Anti bolt stick (Purple)When your marker is idle for long periods, friction and settling effects can cause your bolt or other moving parts to be sticky. The ABS system is used to overcome this on the first shot by temporarily increasing the dwell set-ting. The ABS is adjustable from 1-10ms where the setting is the temporary increase in dwell, and a setting of 1 removes the ABS completely.
Factory setting (Flickering blue)This setting is only used by the MacDev Factory, do not alter this setting unless directed by a MacDev tech.
14
Cycle filter (Flickering red)Your software allows the buffering of a single shot in case you pull the trigger during a cycle. This filter can be used to reduce the time allowed to buffer this shot. Adjustable from 1 (full buffer) to 10 full cycle filter. Higher settings will reduce the amount of mechanical bounce in the marker, whilst low settings will make the marker feel aggres-sive and responsive.
Eye mode (Flickering white)Your marker can utilise the beam sensor (eye) in different ways. This setting can be used to select which way you would like to have the sensor used. The system can use a delayed mode, where if a ball is not detected in the breech, a shot will be fired after a half second delay. This mode is useful if you are using a sound activated loader, or if you would like your gun to indicate to you when you are out of paintballs. Another option is the forced mode. In this mode, the marker will only fire if a ball is detected. However, the user can force a shot to be fired by holding the trigger until the marker fires.
The beam sensor can also be used to test the speed of your marker by watching the bolt during dry firing. To allow this, your marker has two test modes - test mode with full dwell, and test mode with adjusted dwell. When fired in these modes, your marker will report back to you the approximate speed achieved via the colour of the indicator LED. The colours are given below:red : less than 10bpsyellow : 10-15bpsgreen : 15-20bps
blue : 20-25bpswhite : 25+bps.
To set your eye mode, use the following register settings:
The test mode with full dwell uses the same dwell that you are currently using with your marker, the test mode with adjustable dwell allows you to conveniently change the test mode dwell without changing the usual operat-ing dwell of your marker. To adjust this dwell, use the last register (Test mode dwell).
Bolt tracking delay (Flickering green)The bolt tracking delay is a parameter used to ensure that bolt tracking is working correctly. Do not adjust this unless you are advised by a MacDev tech.
Test mode dwell (Flickering yellow)The test mode dwell is used to adjust the dwell used when the user selects the test mode with adjustable dwell in the eye mode register (Described above). The user may adjust this setting from 1-30ms.
Resetting the softwareIf you would like to reset your software to the factory default settings, gain access to the tourney button your board, then enter the programming mode. While in programming mode, press and hold the tourney lock button. After approximately 10 seconds, your indicator LED will flash all colours indicating a reset has been completed.
16
1 - delayed 2 - forced
3 - test mode with full dwell4 - test mode with adjusted dwell
MAINTENANCE
If you take 10 minutes after every day of play to maintain your marker, you will be rewarded with consistent reliable performance.
You should perform basic cleaning after every day of play, and you should perform drivetrain and inline regulator main-tenance after at least every 2 full days of play or around 10,000 shots. You can clean and maintain your marker more often, it is up to you.
When maintaining your marker, use only MacDev accessories. Your marker is packaged with an allen key set and a small tub of MacDev Militia® lube, only use MacDev Militia® lube to lubricate your marker.
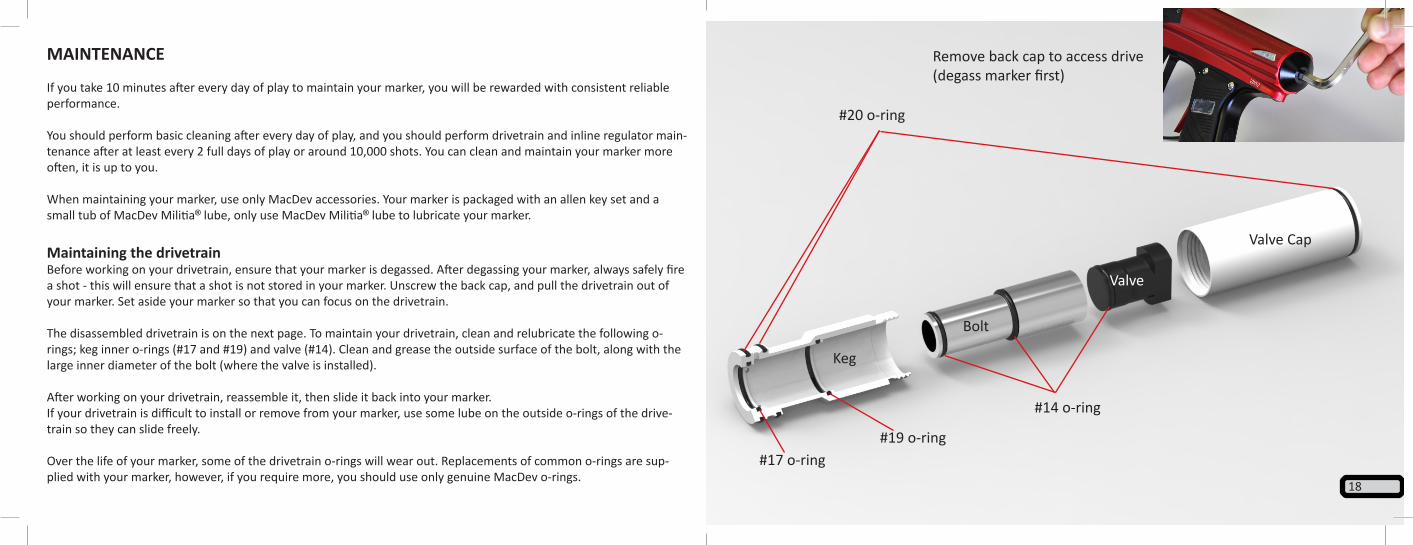
Maintaining the drivetrainBefore working on your drivetrain, ensure that your marker is degassed. After degassing your marker, always safely fire a shot - this will ensure that a shot is not stored in your marker. Unscrew the back cap, and pull the drivetrain out of your marker. Set aside your marker so that you can focus on the drivetrain.
The disassembled drivetrain is on the next page. To maintain your drivetrain, clean and relubricate the following o-rings; keg inner o-rings (#17 and #19) and valve (#14). Clean and grease the outside surface of the bolt, along with the large inner diameter of the bolt (where the valve is installed). After working on your drivetrain, reassemble it, then slide it back into your marker. If your drivetrain is difficult to install or remove from your marker, use some lube on the outside o-rings of the drive-train so they can slide freely.
Over the life of your marker, some of the drivetrain o-rings will wear out. Replacements of common o-rings are sup-plied with your marker, however, if you require more, you should use only genuine MacDev o-rings.
18
Keg
Bolt
Valve
Valve Cap
#17 o-ring
#20 o-ring
#19 o-ring
#14 o-ring
Remove back cap to access drive (degass marker first)
2020
Maintaining the inline regulatorYour inline regulator, regulates the pressure from your air system down to the pressure used to fire your marker. It is very important that your inline regulator is working well, if not, you may experience problems with velocity fluctuation or shootdown.
Before working on your inline reg, make certain that the air supply is turned off (via the venting ASA), and safely fire any gas out of the gun to ensure it does not have any residual pressure.
To access the regulator, remove the left hand side of your wra around grip. This will allow you to unscrew the body of the regulator.
Clean the inside of the frame bore with a q-tip, and remove old grease from the regulator piston. Apply new grease to the piston shaft, and the #11 o-ring on the piston, as well as the #8 o-ring.
Apply new grease to the inside of the frame bore before re-installing your regulator.
#11 o-ring
Piston
#8 o-ring
#11 o-ring
#12 o-ringFilter
Piston stem(Lubricate here)
Spring Unscrew regulator from frame(degass marker first)
22
TROUBLESHOOTINGIf you are experiencing difficulties with your marker, please check this table first to see if there is an easy solution listed. If at any time you are unsure about how to work on your marker, please contact a certified MacDev technician or service centre, details on page 23.
Symptom Possible Cause SolutionAlthough a fresh battery has been fitted, your marker will not turn on
The battery has not been fitted cor-rectly
Ensure that the battery is firmly connected to both terminals. Ensure that the positive (+) terminal is connected to the positive terminal on your battery.
Your marker leaks from the solenoid
Leaking keg o-ring Clean and relubricate the drivetrain with particular attention to the keg inner #17 and #19 o-rings. Replace if necessary.
Low air pressure Ensure that your air system is full, and that the velocity adjustment is not set too low.
Overpressure Ensure that your regulator is not set too high. If the gun has been overpressured, there is a chance the solenoid seals have been dam-aged by pressure, contact a MacDev tech.
Your marker uses excessive air
Dwell set too high Check that your Dwell setting is not over 10ms.
General leak Make certain that there are no leaks from your gun or air system wasting your air supply.
Symptom Possible Cause SolutionYour marker is chopping paintballs
Beam sensor is turned off Always play with the beam sensor enabled.
Beam sensor is dirty or blocked Clean the breach, bolt and sensor.Loader is set on a force setting too high for your paintballs
Some force fed loaders can apply enough force to break a fragile paintball. If this is the case, consult your loader manual to reduce the force setting.
Detents are missing or incorrectly installed
Replace or re-install your detents.
Ball settle delay too low Increase the ball settle delayYour marker will not fire The trigger is set up incorrectly Ensure that the trigger actuates the micro-
switch by adjusting the actuator screw.The beam sensor is on, and there are no paintballs loaded
Load some paintballs.
The solenoid is not plugged in Plug the solenoid into the board.Your marker fires high on the first shot or inconsistently.
Creeping inline regulator Clean and lubricate the inline regulator, ensure that the seat and piston are in good condition.
Your marker fires low on the first shot
Sticking drivetrain Clean and relubricate the drivetrain. If you continue to have problems:-increase the dwell by 1-2 ms.-increase the ABS parameter on your board.
24
MACDEV TECHNICAL ASSISTANCE
If you require technical assistance, please contact your local MacDev service centre. You can also find assistance on the MacDev support website www.macdev.net (select support from the main menu), or by emailing [email protected].
Please note that all parts are available for purchase on macdev.net, along with detailed schematics available for download.
Alternatively, you can contact MacDev directly. MacDev Australia (Sydney, Australia) Ph: +612 9668 9099 Visit: www.macdev.net Mail: [email protected]
MacDev USA (San Francisco, USA) Ph: +1 707 241 5570 Mail: [email protected]
MAXS Sport (Europe) (Friedberg, Germany) Mr Tom Wolf Ph: (+49)6031 162657 Am Strassbach 1 61169 Friedberg (Germany)
DRONE 2 SPECIFICATIONS
PhysicalLength 210mm (528mm with barrel)Width 34mmHeight 201mmWeight 875g (including barrel and battery)Barrel Threads Autococker
PerformanceOperating pressure 100psiRate of Fire 30 BPS
ElectronicsSoftware Militia Soft LED Version 7.0Hardware Militia LED Version 3.0 (Lead Free)Display Tri colour LED high visibilityPower 9V standard battery 6LR61Fire modes Semi, burst, full auto, PSP, Millenium (where available)Solenoid 5V 1W, 2 port