309
| Date post: | 09-Feb-2018 |
| Category: |
Documents |
| Upload: | vuthy-chey |
| View: | 219 times |
| Download: | 0 times |

7/22/2019 Easy Microsoft Office 2010
http://slidepdf.com/reader/full/easy-microsoft-office-2010 1/309
7/22/2019 Easy Microsoft Office 2010
http://slidepdf.com/reader/full/easy-microsoft-office-2010 2/309
CHAPTER 1
Introducing the New Features in Office 2010 ...........................................
PART 1: Word 2010
CHAPTER 2
Beginning a New Word Project . ........................................................................ P
CHAPTER 3
Adjusting the Structure of Your Document . ......................................... Pg
CHAPTER 4Changing Project Appearance . .................... ..................... ..................... ........... Pg
CHAPTER 5
Creating a Table for a Schedule . .................. ..................... ..................... .......... Pg
CHAPTER 6
Working with Graphics and Effects . ............................................................. Pg
CHAPTER 7
Reviewing Documents and Working Online . ......................................... Pg
PART 2: Excel 2010
CHAPTER 8
Getting Started with Excel . ..................... ..................... .................... ..................... Pg
CHAPTER 9
Working with Data, Functions, and Formulas . .................................... Pg
CHAPTER 10
Create Charts, Data Tables, and PivotTable . ...................................... Pg
CHAPTER 11
Sharing Your Project Online with Microsoft Office
Web Apps . ..................... .................... ..................... ..................... ..................... ................... PgPART 3: PowerPoint 2010
CHAPTER 12
Getting Started with PowerPoint 2010 . ................... ..................... .......... Pg
CHAPTER 13
Telling Your Story with Effective Slides . ................................................. Pg
CHAPTER 14
Adding Transitions, Animation, and Video . ......................................... Pg
CHAPTER 15
Completing the Presentation . ........................................................................... Pg
Part 4: OneNote
CHAPTER 16
Organize Your Project with OneNote . ................................................... Pg.
PART 5: Outlook 2010
CHAPTER 17
Coordinating Your Activities with Outlook . ....................................... Pg.
easy Microsoft Office®
2010
800 East 96th Street
Indianapolis, Indiana 46240
Tom Bunzel
7/22/2019 Easy Microsoft Office 2010
http://slidepdf.com/reader/full/easy-microsoft-office-2010 3/309
ii
CHAPTER 1 INTRODUCING THE NEW FEATURES IN OFFICE 2010 . ....
Opening Backstage View . .........................................................................................
Creating a New Blank Document . ........................................................................
Introducing the Navigation Pane . ........................................................................
Saving in Different Formats . ..................................................................................
Printing in Backstage View . .....................................................................................
CHAPTER 2 BEGINNING A NEW WORD PROJECT . ................................................
Creating a New Letter from a Template . ........................................................
Revising the Letter Template . ...............................................................................
Formatting Text in Your Document. ....................................................................
Inserting Symbols and Changing the Date Style . ......................................
Adding Bullets and Numbered Lists. ..................................................................
Searching and Replacing in the Document . ..................................................
CHAPTER 3 ADJUSTING THE STRUCTURE OF YOUR DOCUMENT . .....
Changing the Margins in Your Project . ............................................................
Changing Page Orientation . ....................................................................................
Inserting Page Numbers . ...........................................................................................
Inserting Headers and Footers . ............................................................................
Adding Footnotes and Endnotes . .........................................................................
Using Copy and Paste Preview . ............................................................................
Creating Columns in a Longer Document
or Newsletter . ...................................................................................................................
CONTENTS

7/22/2019 Easy Microsoft Office 2010
http://slidepdf.com/reader/full/easy-microsoft-office-2010 4/309
CHAPTER 4 CHANGING PROJECT APPEARANCE . ................................................
Applying a Quick Style . ..............................................................................................
Creating a Quick Style . ................................................................................................
Modifying a Quick Style . ...........................................................................................
Updating Headings to Match a Selection . .......................................................
Copying Styles and/or Formatting with
Format Painter . ................................................................................................................
Inserting a Cover Page . ..............................................................................................
Creating a New Quick Parts Entry . ......................................................................
Using the Building Blocks Organizer . .................................................................
Applying a Theme to a Document. .......................................................................
CHAPTER 5 CREATING A TABLE FOR A SCHEDULE . ............................................
Creating a Table. ...............................................................................................................
Selecting and Changing Text Alignment .
Adding or Deleting Rows or Columns .
Merging Cells .
Modifying Borders . .........................................................................................................
Using the Table Styles Gallery . ..............................................................................
Using Quick Tables . .......................................................................................................
CHAPTER 6 WORKING WITH GRAPHICS AND EFFECTS . .................................
Inserting a Picture . .........................................................................................................
Adding a Clip Art Image . .............................................................................................
Moving a Graphic . ............................................................................................................
Resizing a Graphic . .........................................................................................................
Cropping an Image . ........................................................................................................
Applying Picture Styles and Effects . .................................................................
Inserting a SmartArt Diagram . ................................................................................
Using OpenType Ligatures . ......................................................................................
Using Screenshots or Screen Clippings . .........................................................
ControlPanel
7/22/2019 Easy Microsoft Office 2010
http://slidepdf.com/reader/full/easy-microsoft-office-2010 5/309
iv
CHAPTER 7 REVIEWING DOCUMENTS AND WORKING ONLINE . .........
Tracking Changes with Reviewers . ......................................................................
Accept and Reject Reviewers’ Changes . .........................................................
Hiding and Showing Markup . ..................................................................................
Creating a Folder for Web Applications . .......................................................
Uploading a File to Your Folder . ..........................................................................
Creating a New Web Application File . ..............................................................
CHAPTER 8 GETTING STARTED WITH EXCEL . ..........................................................
Aligning and Formatting Text . ................................................................................
Inputting and Formatting Numbers . ..................................................................
Filling in Your Data . .......................................................................................................
Inserting a New Column or Row . ...........................................................................
Hiding and Unhiding Columns . ...............................................................................
Adding and Renaming a Worksheet . ..................................................................
Using Cell Styles . ............................................................................................................
CHAPTER 9 WORKING WITH DATA, FUNCTIONS, AND FORMULAS . . .
Finding Data . .....................................................................................................................
Filling a Series. ...................................................................................................................
Entering Dates and Times . .......................................................................................
Using Functions: AutoSum . ......................................................................................
Using Functions: Average. .........................................................................................
Using Formulas for Calculations . .........................................................................
Formatting and Tracing Formula Results . .....................................................

7/22/2019 Easy Microsoft Office 2010
http://slidepdf.com/reader/full/easy-microsoft-office-2010 6/309
p a g e
CHAPTER 10 CREATE CHARTS, DATA TABLES, AND PIVOTTABLE . ..........
Creating a Chart Using the Ribbon . ...................................................................
Changing the Chart Type . .........................................................................................
Formatting Chart Elements . ...................................................................................
Moving a Chart . ...............................................................................................................
Sorting Data in a Table . ...............................................................................................
Adding Sparklines . .........................................................................................................
Using a Pivot Table . ........................................................................................................
Filtering a Pivot Table with the Slicer . .............................................................
Highlighting Data with Conditional Formats . ..............................................
CHAPTER 11 SHARING YOUR PROJECT ONLINE WITH MICROSOFT
OFFICE WEB APPS . .................................................................................................
Opening Your Uploaded Project. .........................................................................
Revising Data in the Web Application . .............................................................
Appending and Sorting a Data Table . ................................................................
Opening Online Files Locally . ................................................................................
Printing an Excel Worksheet . ................................................................................
CHAPTER 12 GETTING STARTED WITH POWERPOINT 2010 . .......................
Adding and Editing Text . .............................................................................................
Adding a Slide with Bullets . ....................................................................................
Adding a New Section . ................................................................................................
Moving Slides (Slide Sorter View) . ......................................................................
Applying a Theme from the Design Tab . ........................................................
Using Slide Masters . .....................................................................................................
7/22/2019 Easy Microsoft Office 2010
http://slidepdf.com/reader/full/easy-microsoft-office-2010 7/309
vi
CHAPTER 13 TELLING YOUR STORY WITH EFFECTIVE SLIDES . ...............
Creating a Table for Information . ........................................................................
Adding a Chart . .................................................................................................................
Editing or Formatting a Chart . ................................................................................
Inserting a Picture . .........................................................................................................
Converting Bullets to SmartArt . ...........................................................................
CHAPTER 14 ADDING TRANSITIONS, ANIMATION, AND VIDEO . ...............
Adding Slide Transitions . ...........................................................................................
Adding Animation to Content. ...............................................................................
Using the Animation Painter Tool . ......................................................................
Inserting and Trimming Video . ................................................................................
Using Online Video . .......................................................................................................
CHAPTER 15 COMPLETING THE PRESENTATION . .....................................................
Previewing Slides in Reading View . .....................................................................
Recording Your Presentation . ................................................................................
Creating a Video of Your Show . .............................................................................
Printing Notes and Handouts . ................................................................................
Using Presenter View . .................................................................................................
Presenting from the PowerPoint Web App . ................................................

7/22/2019 Easy Microsoft Office 2010
http://slidepdf.com/reader/full/easy-microsoft-office-2010 8/309
CHAPTER 16 ORGANIZE YOUR PROJECT WITH ONENOTE . ........................ 2
Starting a New Notebook . .........................................................................................
Adding a Note to a Page . ............................................................................................
Adding Web Content to a New Page . ..................................................................
Using OneNote Search . ...............................................................................................
Using Tags for Organization . .....................................................................................
Using a Side Note . ...........................................................................................................
Sending a Task to Outlook . ........................................................................................
Sending a File to OneNote . .......................................................................................
Saving Your Section or Notebook . ........................................................................
Sharing Your Notebook . ..............................................................................................
CHAPTER 17 COORDINATING YOUR ACTIVITIES WITH OUTLOOK . . . . 2
Sending an Email Message with an Attachment . .........................................
Using the New Quick Steps . .....................................................................................
Using Conversation and Reading Pane Views . .............................................
Scheduling a Meeting with Email . .........................................................................
Using Schedule View and OneNote . ...................................................................
Using Themes and Colors in Email . ......................................................................
Using RSS Feeds in Outlook’s Inbox . ..................................................................
Filtering and Searching Messages . ........................................................................
Using the Search Tab . ....................................................................................................
Creating Email Rules for Spam and Routing . ................................................
Managing Your Contacts . ...........................................................................................
Creating a New Contact Group . ............................................................................
Publishing or Sharing Your Calendar Online. ................................................

7/22/2019 Easy Microsoft Office 2010
http://slidepdf.com/reader/full/easy-microsoft-office-2010 9/309
viii
EASY MICROSOFT OFFICE® 2010Copyright © 2010 by Pearson Education, Inc.
All rights reserved. No part of this book shall be reproduced, stored in a retrieval
system, or transmitted by any means, electronic, mechanical, photocopying, record-
ing, or otherwise, without written permission from the publisher. No patent liability is
assumed with respect to the use of the information contained herein. Although everyprecaution has been taken in the preparation of this book, the publisher and author as-
sume no responsibility for errors or omissions. Nor is any liability assumed for damages
resulting from the use of the information contained herein.
ISBN-13: 978-0-7897-4328-2
ISBN-10: 0-7897-4328-0
U.K. ISBN-13: 978-0-7897-4373-2
U.K. ISBN-10: 0-7897-4373-6
Library of Congress Cataloging-in-Publication Data
Bunzel, Tom.
Easy Microsoft Office 2010 / Tom Bunzel. p. cm.
Includes index.
ISBN-13: 978-0-7897-4328-2
ISBN-10: 0-7897-4328-0
1. Microsoft Office. 2. Business--Computer programs. I. Title.
HF5548.4.M525B847 2010
005.5--dc22
2010012723
Printed in the United States of America
First Printing: June 2010
TRADEMARKSAll terms mentioned in this book that are known to be trademarks or service marks
have been appropriately capitalized. Que Publishing cannot attest to the accuracy of
this information. Use of a term in this book should not be regarded as affecting the
validity of any trademark or service mark.
Associate Publisher
Greg Wiegand
Acquisitions Editor
Michelle Newcomb
Development Editor
Todd Brakke
Managing Editor
Sandra Schroeder
Project Editor
Mandie Frank
Copy Editor
Chuck Hutchinson
Indexer
Ken JohnsonProofreader
Language Logistics, LL
Technical Editor
Vince Averello
Publishing Coordinato
Cindy Teeters
Designer
Anne Jones
CompositorStudio Galou, LLC
WARNING AND DISCLAIMEREvery effort has been made to make this book as complete and as accurate as possible, but no warranty or fitness
plied. The information provided is on an “as is” basis. The author and the publisher shall have neither liability nor re
bility to any person or entity with respect to any loss or damages arising from the information contained in this boo
BULK SALESQue Publishing offers excellent discounts on this book when ordered in quantity for bulk purchases or special sale
more information, please contact
U.S. Corporate and Government Sales
1-800-382-3419
For sales outside of the U.S., please contact
International Sales
7/22/2019 Easy Microsoft Office 2010
http://slidepdf.com/reader/full/easy-microsoft-office-2010 10/309
ABOUT THE AUTHOR
Tom Bunzel specializes in knowing what present-
ers need and how to make technology work. He has
appeared on Tech TV’s Call for Help as “Professor
PowerPoint” and has been a featured speaker at
InfoComm and PowerPoint LIVE. In addition, hehas worked as a technology coach for corporations
including Iomega, MTA Films, Nurses in Partnership,
and the Neuroscience Education Institute. He has
taught regularly at Learning Tree International, West
LA College Extension, and privately around South-
ern California and does presentation and video
consulting in Southern California.
He has written a number of books; the latest was
Master Visually Microsoft Office 2007. He also has
served as the Office Reference Guide for InformIT.
com. In 2006, he published Solving the PowerPoint
Predicament: Using Digital Media for Effective Com-
munication, which is a detailed, project-oriented
approach to creating effective multimedia presenta-
tions. His new eBook, Do Your Own Ning Thing: A
Step-By-Step Guide to Launching an Effective Social
Network, is available at http://www.professorppt.
com/ning_how.htm.
Among Bunzel’s other books are Sams Teach Your-self PowerPoint 2003 in 24 Hours, Easy Digital Music,
Easy Creating CDs and DVDs, How to Use Ulead
DVD Workshop, Digital Video on the PC, and the
update to the PeachPit Press book Visual QuickStart
Guide to PowerPoint 2002/2001. He can be reached
through his website (www.professorppt.com) or his
blog (tbunzel.blogspot.com).
DEDICATIONThis book is dedicated to my motherand father.
ACKNOWLEDGMENTS
I want to convey my appreciation to my agent
Haller, and to Michelle Newcomb, Todd Brakk
Mandie Frank at Que for making this book ha
I would also like to deeply thank Debra Swihar
Orli Peter, Freeman Michaels, and Terrence Gfor their tremendous support during this proc
WE WANT TO HEAR
FROM YOU!
As the reader of this book, you are our most i
tant critic and commentator. We value your op
and want to know what we’re doing right, wha
could do better, what areas you’d like to see u
lish in, and any other words of wisdom you’re to pass our way.
As an associate publisher for Que Publishing,
welcome your comments. You can email or wr
directly to let me know what you did or didn’t
about this book—as well as what we can do to
our books better.
Please note that I cannot help you with techni
problems related to the topic of this book. We
have a User Services group, however, where I wward specific technical questions related to th
When you write, please be sure to include thi
book’s title and author as well as your name, e
address, and phone number. I will carefully rev
your comments and share them with the auth
editors who worked on the book.
Email: [email protected]
Mail: Greg Wiegand
Associate PublisherQue Publishing
800 East 96th Street
Indianapolis, IN 46240 USA

7/22/2019 Easy Microsoft Office 2010
http://slidepdf.com/reader/full/easy-microsoft-office-2010 11/309
x
READER SERVICES
Visit our website and register this book at
www.informit.com/title/9780789743282for
convenient access to any updates, downloads,
or errata that might be available for this book.
7/22/2019 Easy Microsoft Office 2010
http://slidepdf.com/reader/full/easy-microsoft-office-2010 12/309
WHAT’S IN THIS BOOK
First, we cover Microsoft Word as the main
example, introducing some of the newer featu
Office 2010, including its Navigation pane and
Backstage view, which is present in Word, Exc
PowerPoint, and OneNote. Backstage view m
easy to perform many of the most important t
from one central location.
Then we continue with Word, creating some b
documents using its newer features, including
and Paste Preview, Ligatures, and Screenshot
Screen Clippings.
We conclude our discussion of Word with a c
on sharing and reviewing your work with othe
is here that we introduce the first web applica
the online version of Excel 2010, and how the
web storage, file system, and uploading works
while using the same project documents we c
in the first few chapters.
We continue with Excel and its newer feature
making calculations and working with data. O
project covers both, in terms of using formula
functions and filtering and sorting in a data ta
In our chapters, we cover some of the newer E2010 features, such as the Sparklines and Dat
Slicer, which help visualize and analyze data fr
sample files.
At the end of the section on Excel, we dig into
Excel web application as we actually work wit
different parts of a spreadsheet entirely onlin
download it to our desktop, and print a final v
We also cover how other users can access ou
and collaborate with us, with permission to acthe online workspace.
INTRODUCTION
Office 2010 is the latest version of Microsoft’s
famous productivity suite, which includes Word,
Excel, and PowerPoint, along with Outlook for email
and OneNote for information tracking.
Because so many users have already worked with
one or more versions of Office, this book makes
it easy to get up to speed on many of the newer
features while reviewing and expanding on the most
common and important tasks you need to perform at
work or for leisure.
What sets this version of Office apart is that Word,
Excel, PowerPoint, and OneNote have light versions
that can work in your web browser and store files
online. Although some users have this functionalityas part of SharePoint services, we cover the web
applications that are available on the Windows
Live site. Because these programs are so new, the
versions you see online may vary slightly from those
covered here, but you will be able to get up to speed
quickly.
To make things more realistic, wherever possible we
have shown the features and tasks of the programs
relative to an ongoing project; this is an imaginary
incentive travel agency that has corporate clients.
As we cover the various programs, as many of the
samples as possible relate to real-world situations
and work, representing several tasks and functions
that a company might need to do in the various
programs.

7/22/2019 Easy Microsoft Office 2010
http://slidepdf.com/reader/full/easy-microsoft-office-2010 13/309
xii
PowerPoint 2010 has quite a few new features that
we cover, including recording your presentation (with
narration), making a video of your slide show, adding
sections to slides, and previewing your slide show in
the new Reading view.
We also cover some of the tips and techniques for
getting ready to present and then show you how
to actually present from the PowerPoint 2010 web
application directly online.
OneNote is a powerful organizational tool, and we
show how our imaginary travel agency can use it to
store and sort through important information and
also integrate important tasks with Outlook 2010.
Outlook 2010 is the email client, calendar, and
contact management tool with some new wrinkles.
There are new Conversation view features, new
Quick Steps to perform common tasks quickly, and
ways to share your calendar online. (Outlook is
not a web application yet, but some tasks such as
publishing a calendar are available.)
After going through the visual steps of these
chapters, whether you’ve used Office in the past or
are new to the programs, you’ll be able to perform
many of the most important tasks and also becomefamiliar with the newest features.
7/22/2019 Easy Microsoft Office 2010
http://slidepdf.com/reader/full/easy-microsoft-office-2010 14/309
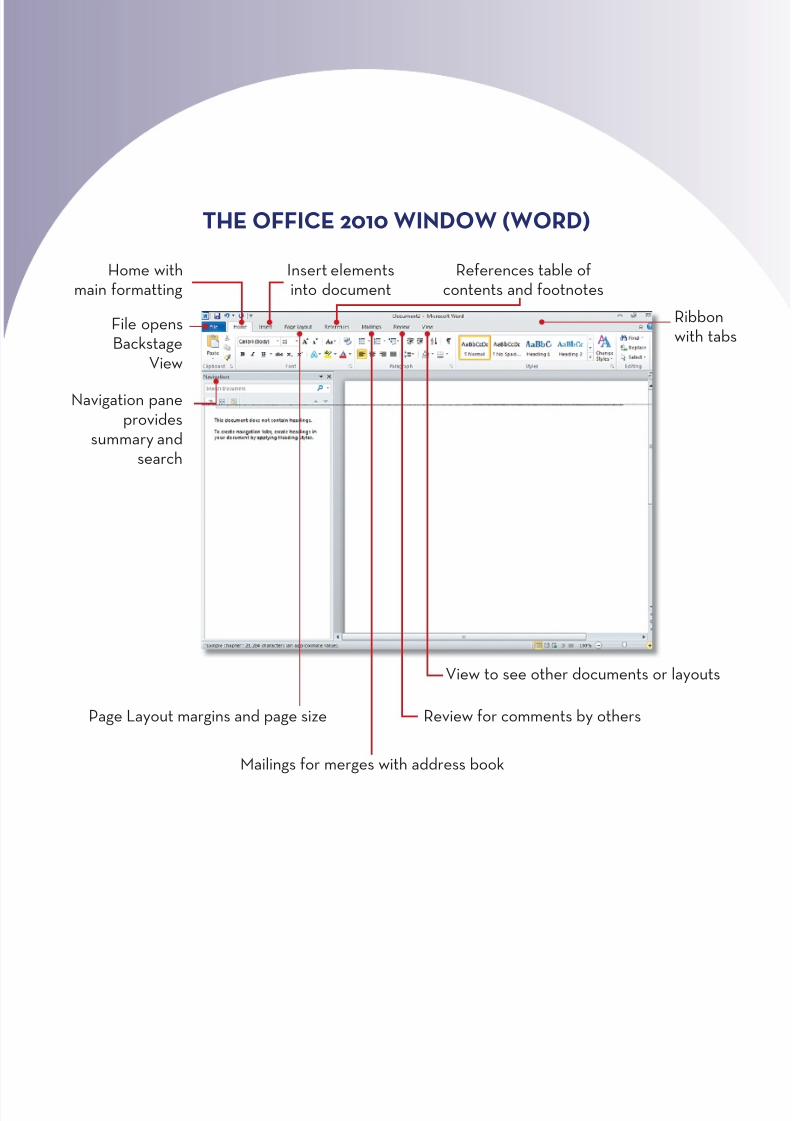
INTRODUCING THE NEW FEATURES IN OFFICE 2010The new version of Microsoft Office focuses on making many of your daily tasks
more accessible and easy to perform.Office 2010 uses the Ribbon, with its new File tab, along with other tabs toprovide quick ways to work with documents, presentations, and spreadsheets.You open or create new files, change their appearance and format, and viewand revise the content by working between the various tabs.
In Office 2010, clicking File opens Backstage view. This new feature in Word,Excel, and PowerPoint gives you numerous options to open, close, or save files;access information about a file; print or share a file; or access help.
A Navigation pane in Office 2010 also lets you see and move through your files
by headings, thumbnails, or with a search window.
The main window of Office 2010 is designed to give you quick access to all itsfeatures and let you view and move through any file quickly and easily.
Chapter 1
7/22/2019 Easy Microsoft Office 2010
http://slidepdf.com/reader/full/easy-microsoft-office-2010 15/309
THE OFFICE 2010 WINDOW (WORD)
File opensBackstage
View
Home withmain formatting
Insert elementsinto document
References table ofcontents and footnotes
Navigation paneprovides
summary andsearch
Review for comments by othersPage Layout margins and page size
Mailings for merges with address book
View to see other documents or layo
Ribbwith

7/22/2019 Easy Microsoft Office 2010
http://slidepdf.com/reader/full/easy-microsoft-office-2010 16/309
333
S SS t tta aar rrt tt
OPENING BACKSTAGE VIEW
Backstage view is a quick way to access many of your most common tasks, includingopening and saving files, printing, setting options, sharing files, and getting help.
Click File.
Backstage view opens the Info window with information about the file.
Click Help.
Info The Info window is the main part of Backstage
view where you can check permissions, prepare for
sharing, and open or delete other versions of the
current file. In the right column, you also get a preview
of the document and information about its properties
and when it was created or modified .
TIP Exit Clicking Exit at the bottom of the left
begins to close the document and asks if you
to save any changes. If you click Cancel, you
to the main Home tab in the Ribbon. You can
to the Backstage view by clicking File again.
TIP
C ontinue

7/22/2019 Easy Microsoft Office 2010
http://slidepdf.com/reader/full/easy-microsoft-office-2010 17/309
S SS t tta aar rrt tt
E nd
You can click Check for Updates under Tools for Working With Office.
To use the other features of Backstage view, click the appropriate button in the left c
Options The Options button in Backstage view
gives you a way to make changes to various aspects
of the program, including how it is displayed. Im-
portant options include the ability to customize the
Ribbon and add and remove items from the Quick
Access Toolbar.
TIP
Recent The Recent button provides a list o
files previously created and/or modified by th
program. This feature gives you a quick way t
open and work with any of those files. At the
tom of the window is the option Recover Uns
Documents, which opens a Drafts folder to re
unsaved files.
NOTE

7/22/2019 Easy Microsoft Office 2010
http://slidepdf.com/reader/full/easy-microsoft-office-2010 18/309
5
S SS t tta aar rrt tt
If Backstage view is not already open, click File to open it.
CREATING A NEW BLANK DOCUMENT
The New Document window in Backstage view lets you quickly create a new blank doment, blog post, or file based on templates. You can also create a new document basean existing file that was previously saved.
Click Blank Document.
Click New.
Click Create.
Office Templates In the New Document window, the Office 2010 programs come with
sample templates. You can also search and access templates from the Office website if you
have a working Web connection. (See “Revising the Letter Template” in Chapter 2.
TIP
C ontinued
7/22/2019 Easy Microsoft Office 2010
http://slidepdf.com/reader/full/easy-microsoft-office-2010 19/309
Blog Post After you become a registered user of many online
blogging programs, including Google Blogger, you can publish a
blog post after creating one under Available Templates. Open the
Blog post template, create the post, click Publish, and enter your
blog’s username and password.
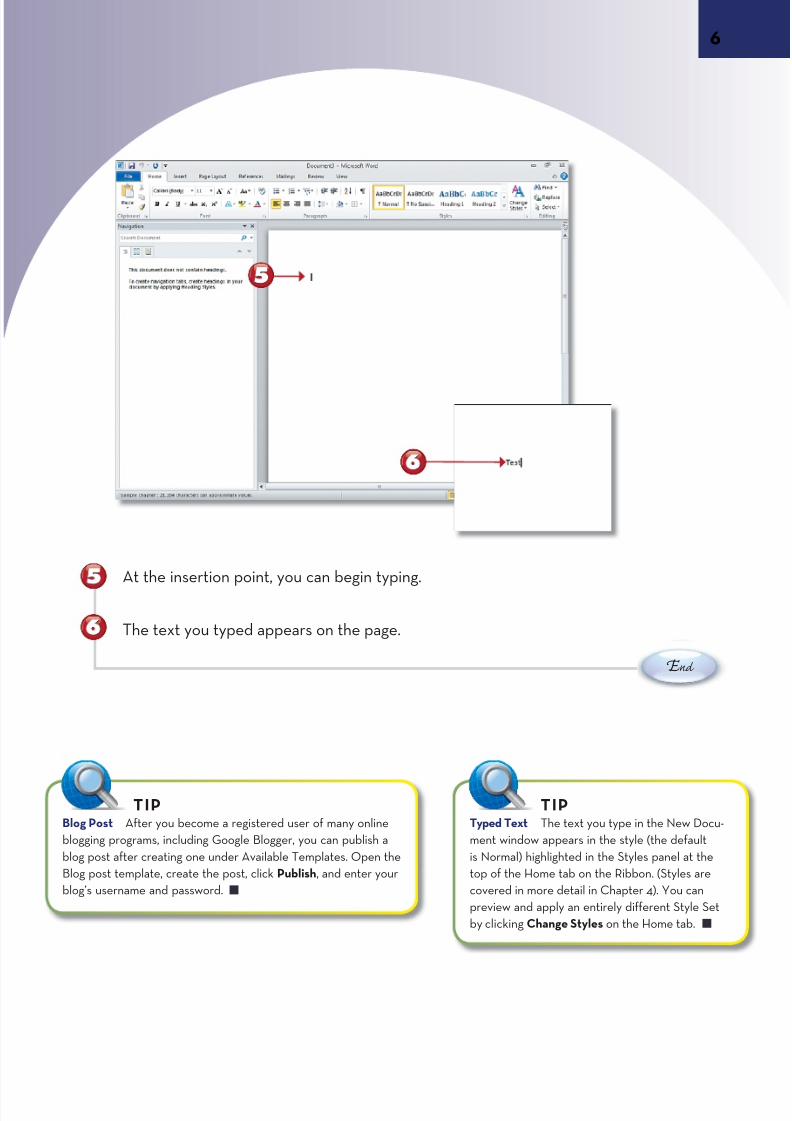
TIPTyped Text The text you type in the New D
ment window appears in the style (the defau
is Normal) highlighted in the Styles panel at t
top of the Home tab on the Ribbon. (Styles a
covered in more detail in Chapter 4). You can
preview and apply an entirely different Style
by clicking Change Styles on the Home tab.
TIP
At the insertion point, you can begin typing.
The text you typed appears on the page.
E nd

7/22/2019 Easy Microsoft Office 2010
http://slidepdf.com/reader/full/easy-microsoft-office-2010 20/309
7
S SS t tta aar rrt tt
Select typed text you want to use as a heading.
Click Heading 1 in the Styles panel.
When the style changes, the heading appears in the Navigation pane.
Click x to close the Navigation pane.
INTRODUCING THE NAVIGATION PANE The Navigation pane in Office 2010 lets you quickly move through a document by hea
browse thumbnails of pages, or search the document. You can close this pane any timview the document in the full window and reopen the Navigation pane from the Viewthe Ribbon. (This replaces the Document Map view from previous versions of Word.)
Understanding Headings To see headings and
move to them directly in the Navigation pane, you
must format them with a heading style from the
Styles window.
NOTE
Working with the Navigation Pane You can move, size,
close the Navigation pane by clicking the small down arro
the left of the x (close) button at the top. You can also clic
Thumbnail tab to see images of your pages or the Search
to enter a search term.
TIP
C ont
7/22/2019 Easy Microsoft Office 2010
http://slidepdf.com/reader/full/easy-microsoft-office-2010 21/309
S SS t tta aar rrt tt
E nd
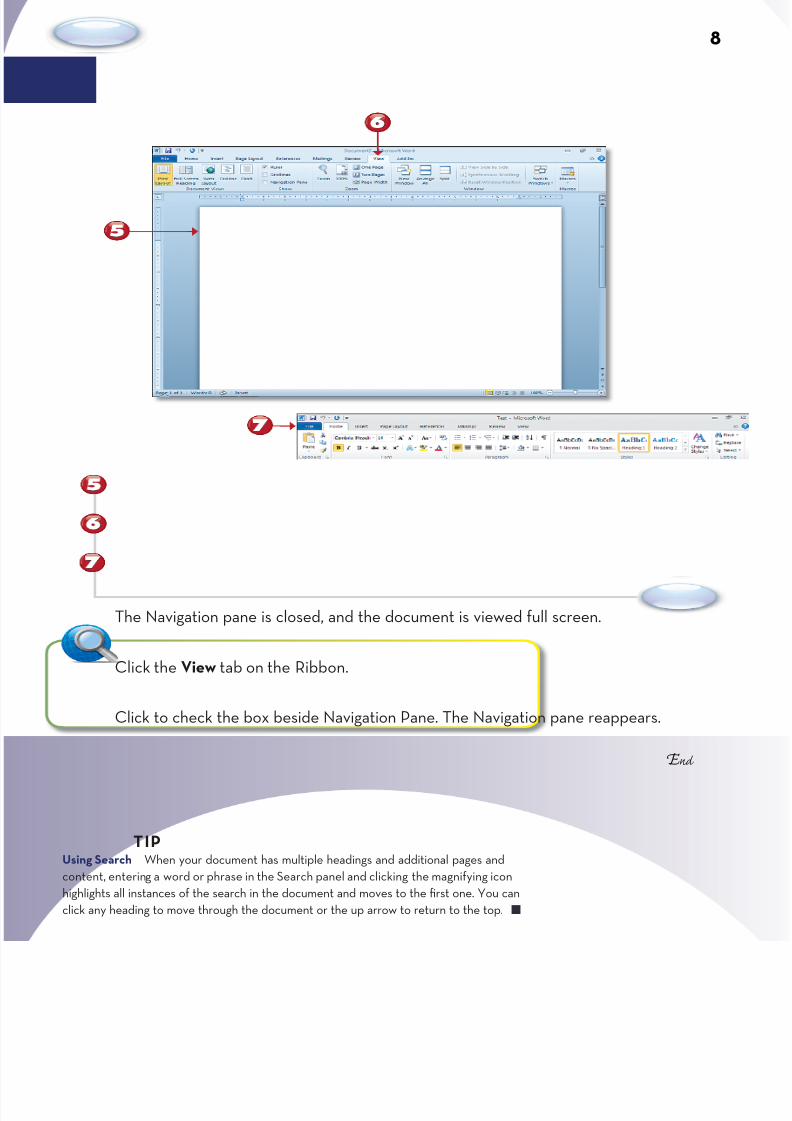
The Navigation pane is closed, and the document is viewed full screen.
Click the View tab on the Ribbon.
Click to check the box beside Navigation Pane. The Navigation pane reappears.
Using Search When your document has multiple headings and additional pages and
content, entering a word or phrase in the Search panel and clicking the magnifying icon
highlights all instances of the search in the document and moves to the first one. You can
click any heading to move through the document or the up arrow to return to the top.
TIP
7/22/2019 Easy Microsoft Office 2010
http://slidepdf.com/reader/full/easy-microsoft-office-2010 22/309
9
S SS t tta aar rrt tt
SAVING IN DIFFERENT FORMATS
After you complete a document, you can save it in any of many different formats. Thedefault format is Word, Excel, or PowerPoint in Office 2010. However, you can save it earlier version (97–2003) for users who are not working in Office 2010, as a web page,PDF or XPS file, or in various other formats that provide compatibility with other apptions. The Office 2010 format is also compatible with files from Office 2007.
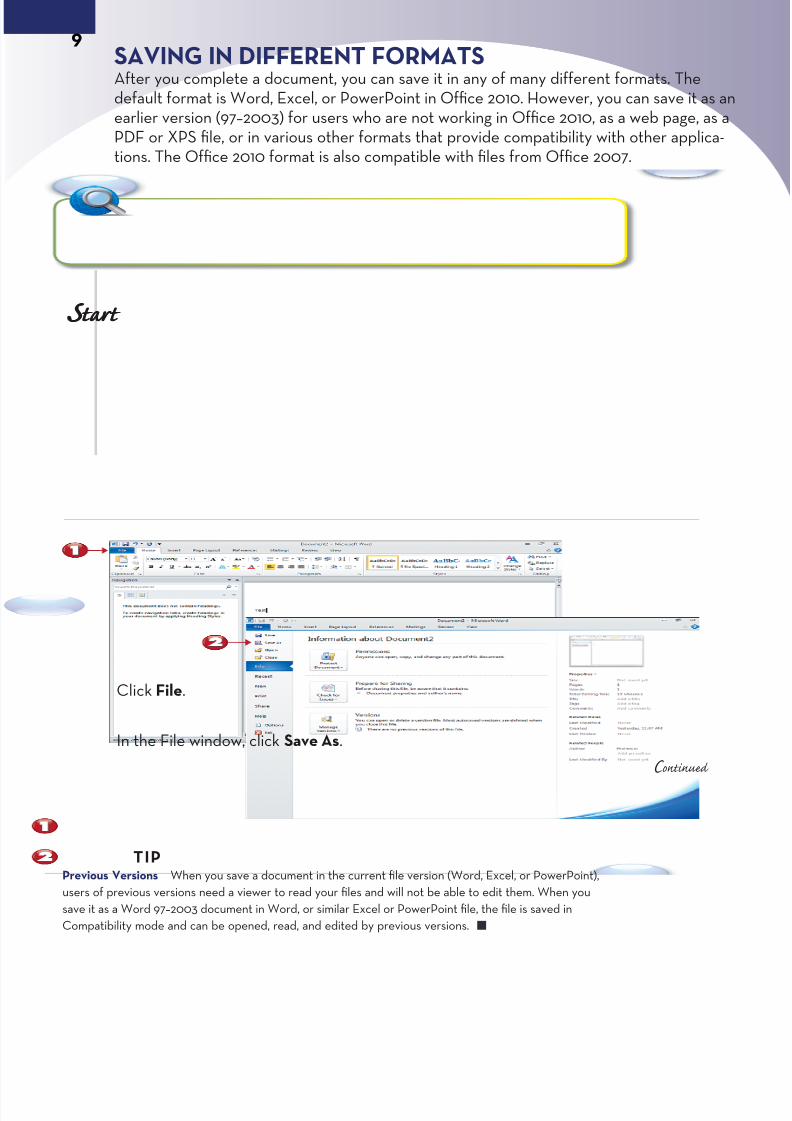
Click File.
In the File window, click Save As.
Previous Versions When you save a document in the current file version (Word, Excel, or PowerPoint),
users of previous versions need a viewer to read your files and will not be able to edit them. When you
save it as a Word 97–2003 document in Word, or similar Excel or PowerPoint file, the file is saved in
Compatibility mode and can be opened, read, and edited by previous versions.
TIP
C ontinue

7/22/2019 Easy Microsoft Office 2010
http://slidepdf.com/reader/full/easy-microsoft-office-2010 23/309
S SS t tta aar rrt tt
E nd
You can type in a new name for the document if desired.
Click the Save as type drop-down arrow.
Select the type of file to save as.
Click Save.
Converting Files If you open or save a document in
97–2003 format so that it is in Compatibility mode, a
Convert option appears in the Info panel of Backstage
view. It lets you convert the document to the current
format to enable all the features of Office 2010.
TIP
Saving as Templates Saving in one of the various te
formats makes the file available in your Recent Templ
folder in Backstage view. You can also save a new tem
file directly to your My Templates folder to access it w
you click to create a new document in Backstage view
TIP
7/22/2019 Easy Microsoft Office 2010
http://slidepdf.com/reader/full/easy-microsoft-office-2010 24/309
11
S SS t tta aar rrt tt
C ontinue
PRINTING IN BACKSTAGE VIEW After completing and saving a new file, you might want to print the document. To prin
Office 2010, you use Backstage view, where you get a full range of printing options allavailable in one page, including a preview of the document.
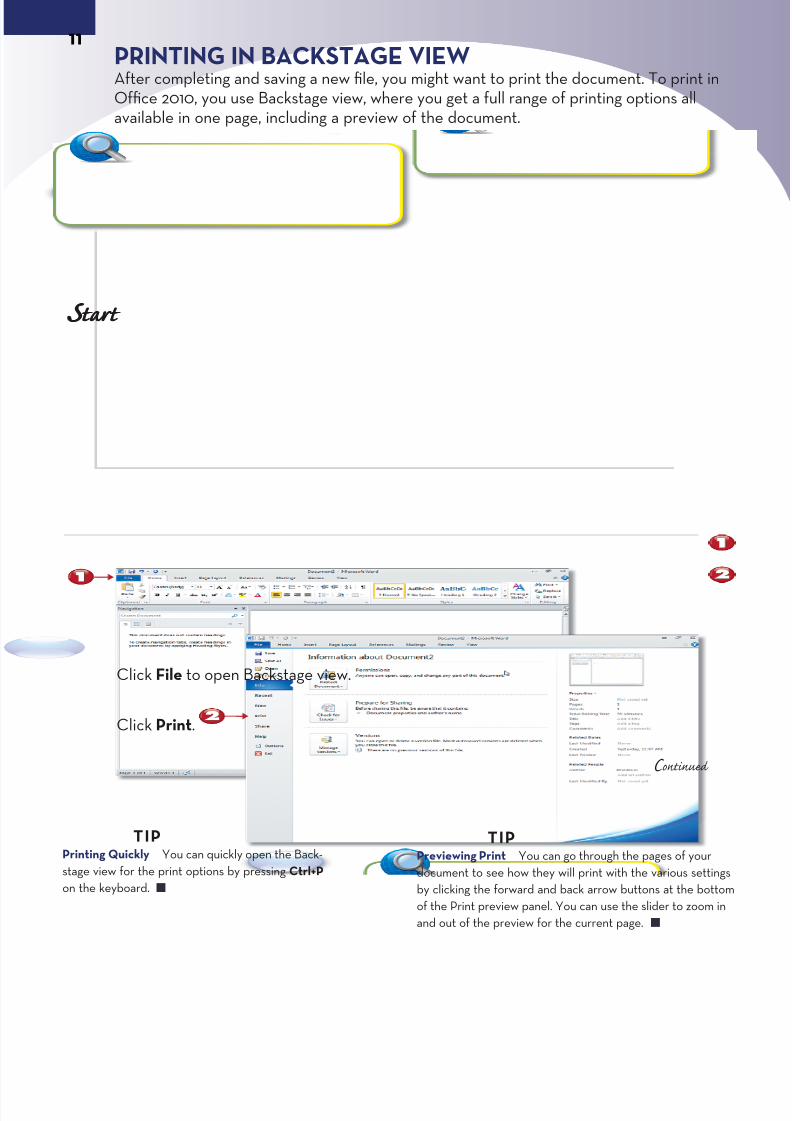
Click File to open Backstage view.
Click Print.
Printing Quickly You can quickly open the Back-
stage view for the print options by pressing Ctrl+P
on the keyboard.
TIP Previewing Print You can go through the pages of yo
document to see how they will print with the various se
by clicking the forward and back arrow buttons at the b
of the Print preview panel. You can use the slider to zo
and out of the preview for the current page.
TIP
7/22/2019 Easy Microsoft Office 2010
http://slidepdf.com/reader/full/easy-microsoft-office-2010 25/309
S SS t tta aar rrt tt
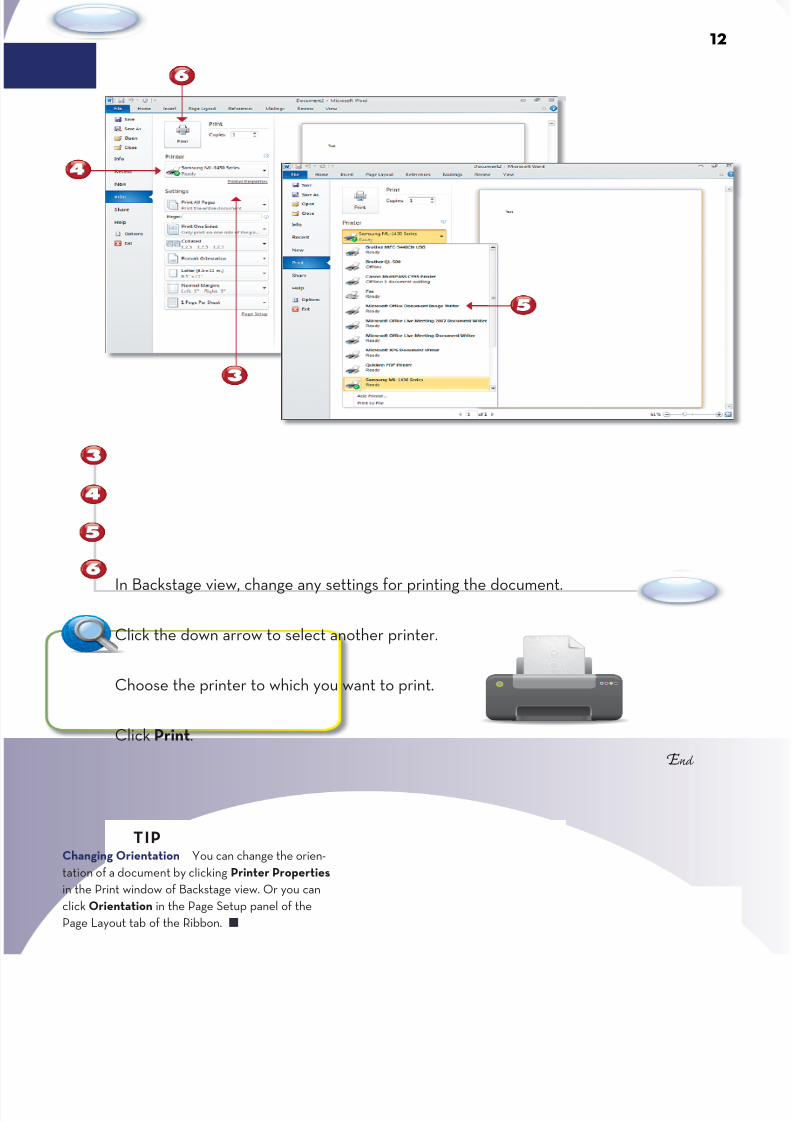
E nd
In Backstage view, change any settings for printing the document.
Click the down arrow to select another printer.
Choose the printer to which you want to print.
Click Print.
Changing Orientation You can change the orien-
tation of a document by clicking Printer Properties
in the Print window of Backstage view. Or you can
click Orientation in the Page Setup panel of the
Page Layout tab of the Ribbon.
TIP

7/22/2019 Easy Microsoft Office 2010
http://slidepdf.com/reader/full/easy-microsoft-office-2010 26/309
BEGINNING A NEW WORD PROJECTYou can create a new Word document from Backstage view’s New Documentwindow, and Word provides a number of preset templates to make it easierto get started. By using a template, you can quickly create a particular kind
of document, like an introductory letter for your company, and just fill in yourinformation to complete the project.
Whether you begin with a new blank document or a template, you can imme-diately begin adding text by typing at the insertion point. You can move text bydragging your mouse through the text to select it and then dragging it to anotherlocation or copying or cutting and pasting it elsewhere.
To move through a document in Word, you can drag the slider on the right sideof the window or use the down arrow on your keypad. With longer files, theDocument Browser lets you go to specific parts of your document that you
select; you can use the Find tool or browse to the next heading or browse toany of a number of elements in your file.
After selecting text, you can format it by changing the font, font size, or font coloror making it bold, italic, or underline. You also can make further adjustments.
Chapter 2

7/22/2019 Easy Microsoft Office 2010
http://slidepdf.com/reader/full/easy-microsoft-office-2010 27/309
Backstageoptions to
print, share,convert and
more
New (selected)letter template
Ribbon tabs (return to main document window)
Lettertemplates
with formats
Scroll down to see moretemplates
Preview
selectetemplat
DocumTemplaoption
Create launches new file
USING THE BACKSTAGE VIEW SAMPLE TEMPLATES
7/22/2019 Easy Microsoft Office 2010
http://slidepdf.com/reader/full/easy-microsoft-office-2010 28/309
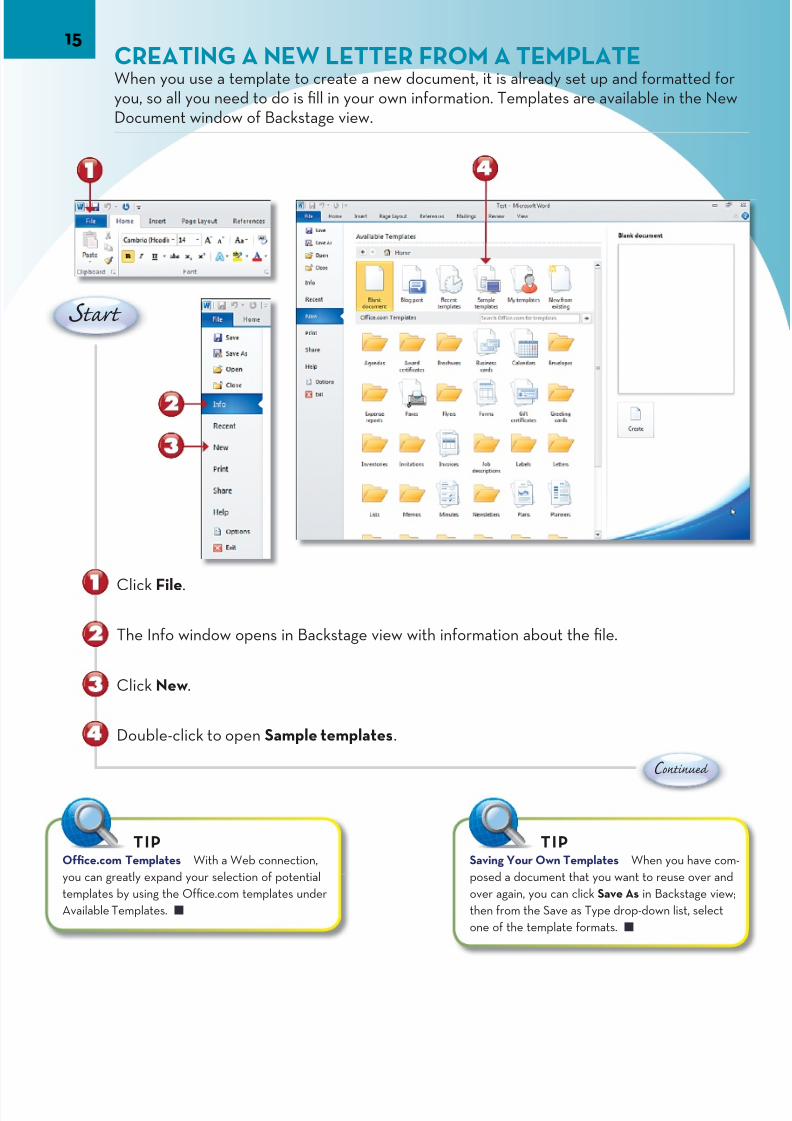
15CREATING A NEW LETTER FROM A TEMPLATE
When you use a template to create a new document, it is already set up and formatteyou, so all you need to do is fill in your own information. Templates are available in theDocument window of Backstage view.
C ontinue
Click File.
The Info window opens in Backstage view with information about the file.
Click New.
Double-click to open Sample templates.
S tart
Office.com Templates With a Web connection,
you can greatly expand your selection of potential
templates by using the Office.com templates under
Available Templates.
TIPSaving Your Own Templates When you ha
posed a document that you want to reuse ov
over again, you can click Save As in Backstag
then from the Save as Type drop-down list, s
one of the template formats.
TIP

7/22/2019 Easy Microsoft Office 2010
http://slidepdf.com/reader/full/easy-microsoft-office-2010 29/309
E nd
Scroll down through the Available Templates to select one.
Click one to select it.
Click Create.
A new document is created for you to revise.
Recent Templates The Recent Templates area shows you the
various templates you’ve opened in the past. Using it is a good
way to locate popular templates, particularly from Office.com,
without searching through the various folders for them again.
TIP
7/22/2019 Easy Microsoft Office 2010
http://slidepdf.com/reader/full/easy-microsoft-office-2010 30/309
17
C ontinue
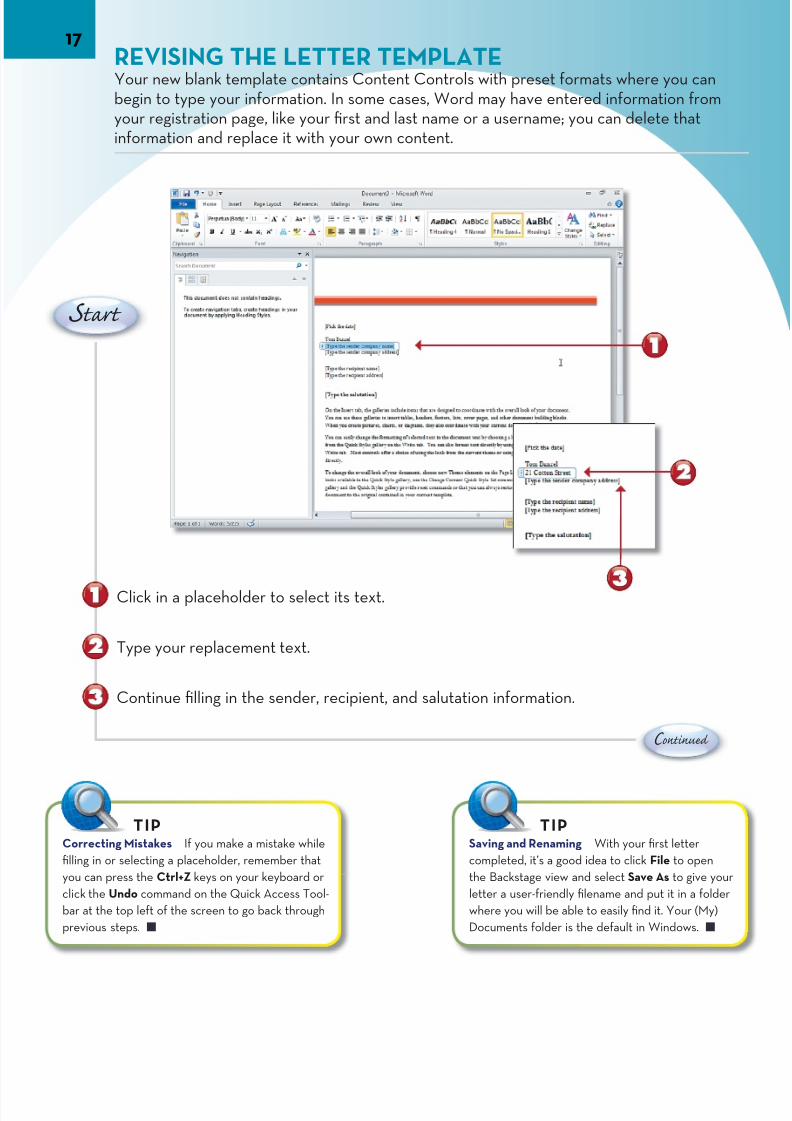
Click in a placeholder to select its text.
Type your replacement text.
Continue filling in the sender, recipient, and salutation information.
REVISING THE LETTER TEMPLATE
Your new blank template contains Content Controls with preset formats where you cbegin to type your information. In some cases, Word may have entered information fryour registration page, like your first and last name or a username; you can delete thatinformation and replace it with your own content.
Correcting Mistakes If you make a mistake while
filling in or selecting a placeholder, remember that
you can press the Ctrl+Z keys on your keyboard or
click the Undo command on the Quick Access Tool-
bar at the top left of the screen to go back through
previous steps.
TIP Saving and Renaming With your first letter
completed, it’s a good idea to click File to op
the Backstage view and select Save As to giv
letter a user-friendly filename and put it in a
where you will be able to easily find it. Your (
Documents folder is the default in Windows.
TIP
S tart

7/22/2019 Easy Microsoft Office 2010
http://slidepdf.com/reader/full/easy-microsoft-office-2010 31/309
Click in the body of the letter to select the text and then replace it with your own verof the letter.
Fill in the rest of the placeholders to complete your first letter.
Removing Content Controls If you don’t want
a Content Control in the current template, the
easiest way to get rid of it is to right-click and select
Remove Content Control.
TIP
Filling in the Date The date is a special Co
Control with a calendar. You can click the dro
down arrow to open the calendar to the curre
month and select the current date, or you can
another date on the calendar.
TIP
E nd

7/22/2019 Easy Microsoft Office 2010
http://slidepdf.com/reader/full/easy-microsoft-office-2010 32/309
19FORMATTING TEXT IN YOUR DOCUMENT
The Home tab in Office 2010 lets you quickly apply formatting changes to selected teyour document. You can change the Font, Font size, or Case and apply bold, italic, unscore, or strikethrough text. You can also add sub and superscript. For former formatoptions, click the Dialog Launch Icon in the Font group.
Click to make sure you are in the Home tab of the Ribbon.
Drag through the typed text to select text to reformat.
Click to select Bold, Italic, and/or Underline in the Font group.
Quick Formatting With your text selected, you
can right-click it to bring up a set of menus with
options for many of your most popular formatting
and style options.
NOTE
Quick Selection For quick selection, press t
Shift+Ctrl keys with the right arrow on the key
to select by word. Double-click a word to selec
triple-click to select a whole paragraph.
TIP
C ontinue
S tart

7/22/2019 Easy Microsoft Office 2010
http://slidepdf.com/reader/full/easy-microsoft-office-2010 33/309
Click the Fonts drop-down arrow.
Click to select a different font for the selected text.
Your text is formatted with the choices you made.
E nd
Clear Formatting In addition to Undo (Ctrl+Z),
clicking the Clear Formatting button in the Fonts
group also removes all formatting from a selected
block of text and returns it to its original format.
TIPAdditional Advanced Formats You click the Dia
Launch icon (small diagonal arrow) at the lower ri
the Fonts group (or any other group in any tab of
Ribbon) to bring up additional options. For fonts,
see more Font options and Advanced options.
TIP
7/22/2019 Easy Microsoft Office 2010
http://slidepdf.com/reader/full/easy-microsoft-office-2010 34/309
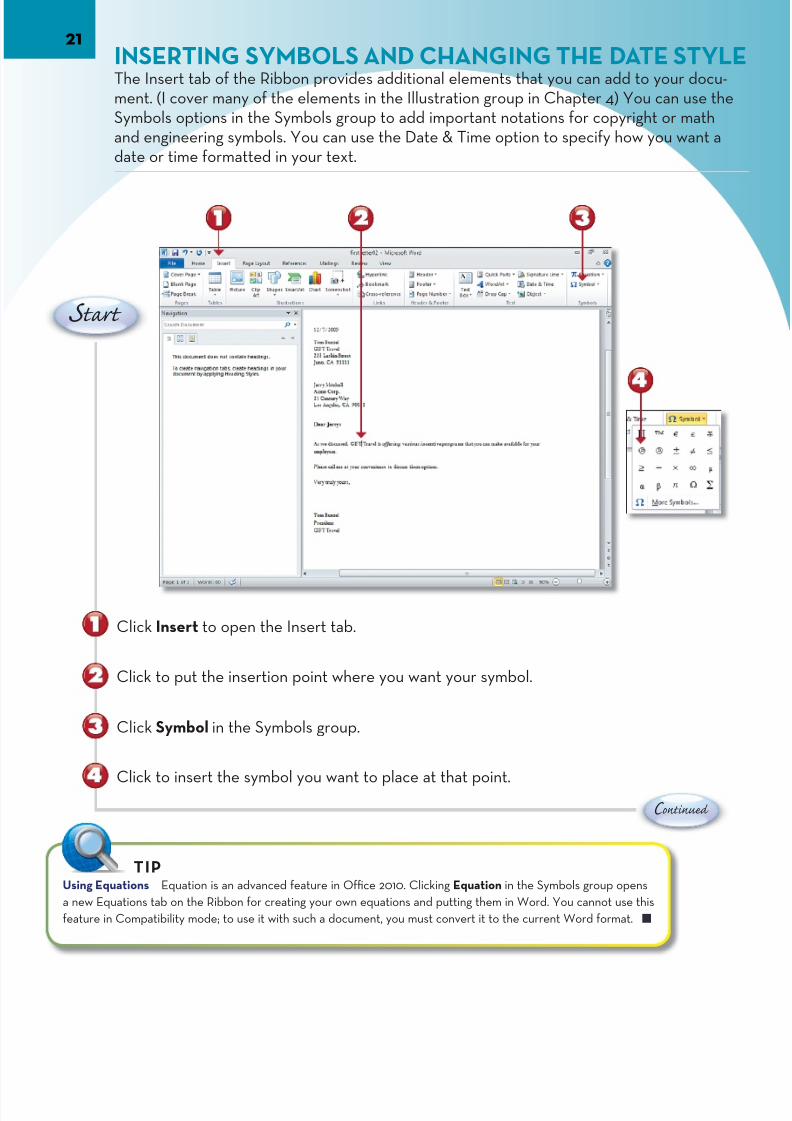
21INSERTING SYMBOLS AND CHANGING THE DATE STThe Insert tab of the Ribbon provides additional elements that you can add to your dment. (I cover many of the elements in the Illustration group in Chapter 4) You can usSymbols options in the Symbols group to add important notations for copyright or maand engineering symbols. You can use the Date & Time option to specify how you wandate or time formatted in your text.
Click Insert to open the Insert tab.
Click to put the insertion point where you want your symbol.
Click Symbol in the Symbols group.
Click to insert the symbol you want to place at that point.
S tart
C ontinue
Using Equations Equation is an advanced feature in Office 2010. Clicking Equation in the Symbols group opens
a new Equations tab on the Ribbon for creating your own equations and putting them in Word. You cannot use this
feature in Compatibility mode; to use it with such a document, you must convert it to the current Word format.
TIP
7/22/2019 Easy Microsoft Office 2010
http://slidepdf.com/reader/full/easy-microsoft-office-2010 35/309
E nd
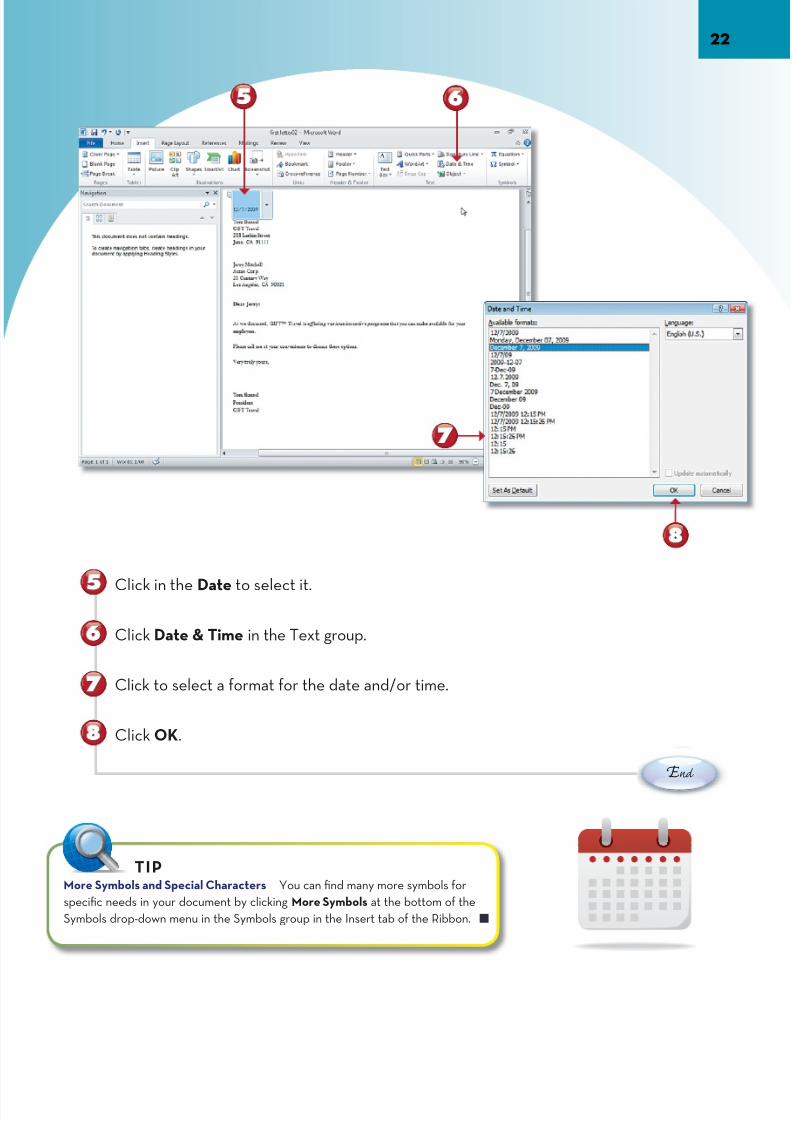
Click in the Date to select it.
Click Date & Time in the Text group.
Click to select a format for the date and/or time.
Click OK.
More Symbols and Special Characters You can find many more symbols for
specific needs in your document by clicking More Symbols at the bottom of the
Symbols drop-down menu in the Symbols group in the Insert tab of the Ribbon.
TIP

7/22/2019 Easy Microsoft Office 2010
http://slidepdf.com/reader/full/easy-microsoft-office-2010 36/309
23ADDING BULLETS AND NUMBERED LISTS
To make lists of related items stand out or look more polished, you can apply a bullet numbered list from the Paragraph group of the Home tab. You can use preset styles fbullets and numbers, or you can define your own format.
Click to make sure you’re in the Home tab.
Drag to select your list.
Click the Bullets drop-down arrow.
Click to select and apply a bullet style.
The list has the bullet style selected.
Removing Bullets or Numbers To return to an ordinary list from bullets or numbers, select the list and
click None in the Bullets or Numbers drop-down menu (or you can press Ctrl+Z or click Undo).
TIP
C ontinue
S tart
7/22/2019 Easy Microsoft Office 2010
http://slidepdf.com/reader/full/easy-microsoft-office-2010 37/309
E nd
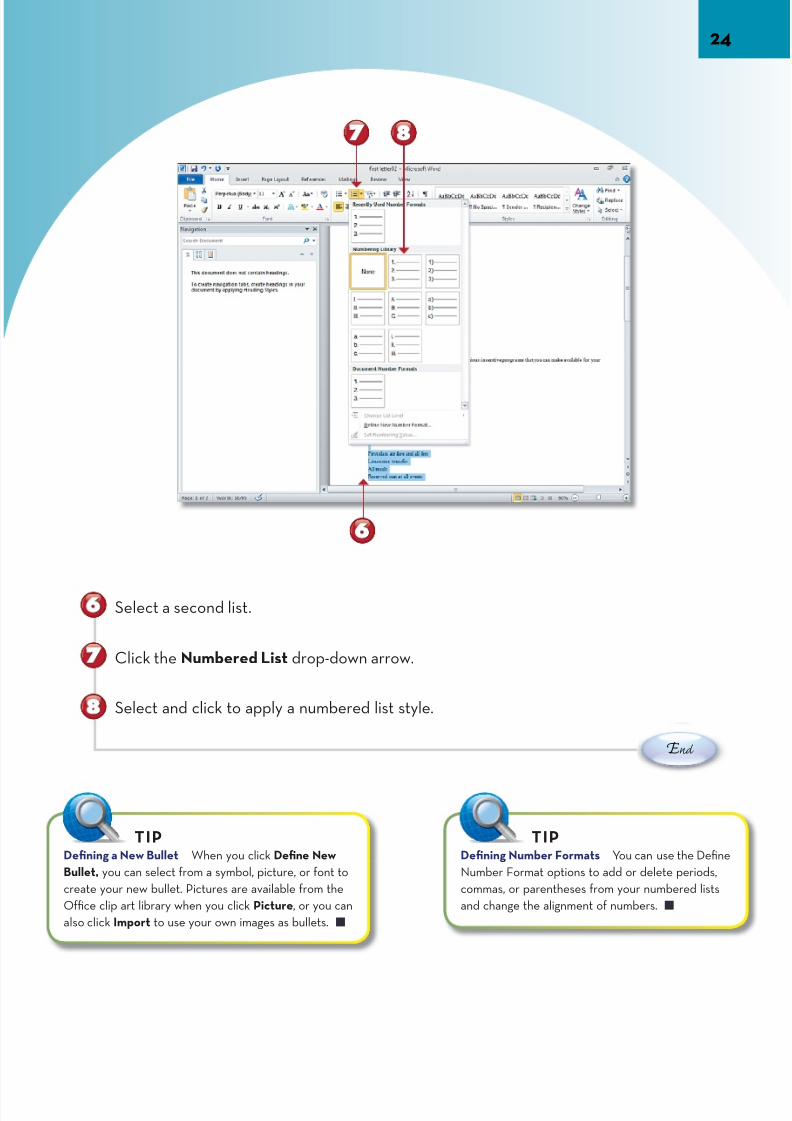
Select a second list.
Click the Numbered List drop-down arrow.
Select and click to apply a numbered list style.
Defining a New Bullet When you click Define New
Bullet, you can select from a symbol, picture, or font to
create your new bullet. Pictures are available from the
Office clip art library when you click Picture, or you can
also click Import to use your own images as bullets.
TIP Defining Number Formats You can use the D
Number Format options to add or delete perio
commas, or parentheses from your numbered
and change the alignment of numbers.
TIP
7/22/2019 Easy Microsoft Office 2010
http://slidepdf.com/reader/full/easy-microsoft-office-2010 38/309
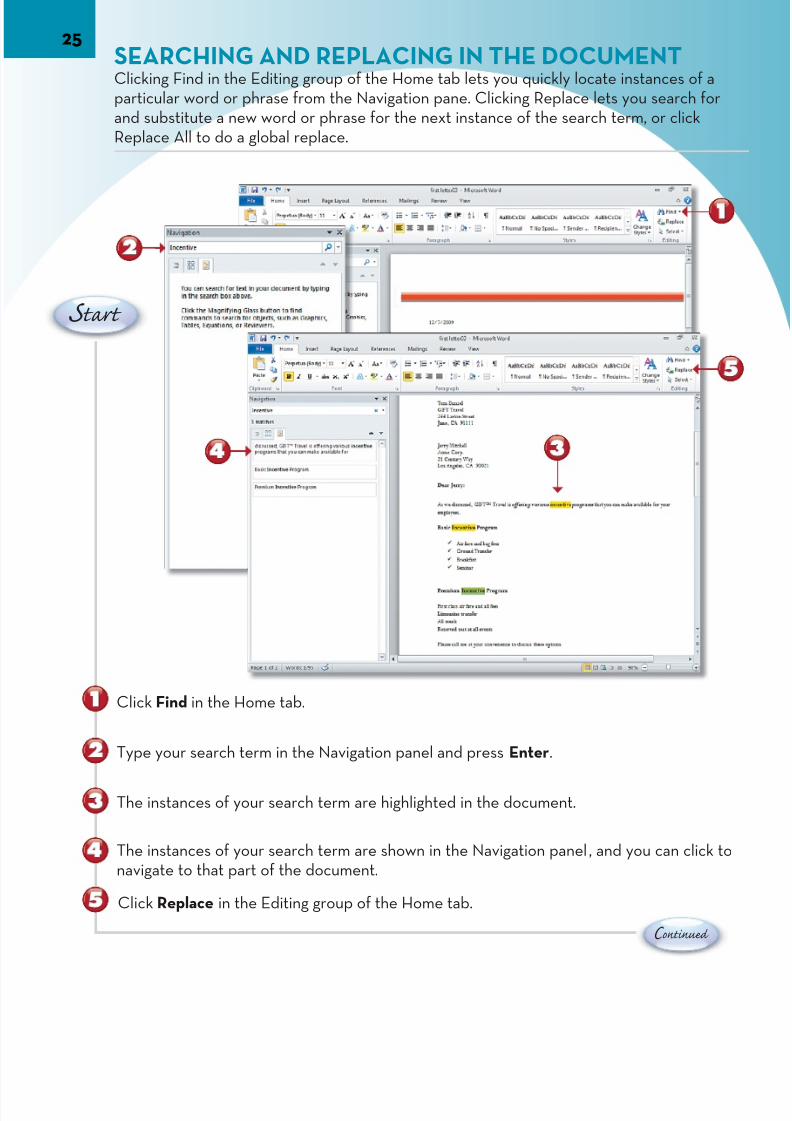
25SEARCHING AND REPLACING IN THE DOCUMENTClicking Find in the Editing group of the Home tab lets you quickly locate instances oparticular word or phrase from the Navigation pane. Clicking Replace lets you search and substitute a new word or phrase for the next instance of the search term, or clickReplace All to do a global replace.
Click Find in the Home tab.
Type your search term in the Navigation panel and press Enter.
The instances of your search term are highlighted in the document.
The instances of your search term are shown in the Navigation panel, and you can clinavigate to that part of the document.
Click Replace in the Editing group of the Home tab.
C ontinue
S tart

7/22/2019 Easy Microsoft Office 2010
http://slidepdf.com/reader/full/easy-microsoft-office-2010 39/309
E nd
The word you selected is already in the Find what field. Enter a word you want to repwith in the Replace with field.
Click Replace All to find and replace all instances of the chosen word.
The multiple instances are replaced.
Find and the Navigation Pane If the Navigation
pane is closed, clicking Find in the Editing group
of the Home tab opens it and puts your cursor
into the Search panel. If this pane is already open,
this action simply enables the search.
TIP
Changing Search Parameters When you click the
nifying glass icon in the Search panel of the Navigat
pane, you are shown options to fine-tune your searc
You can search by various parts of your document,
as comments, headings, graphics, and more.
TIP
A dialog box tells you the number of replacements.

7/22/2019 Easy Microsoft Office 2010
http://slidepdf.com/reader/full/easy-microsoft-office-2010 40/309
Chapter 3
ADJUSTING THE STRUCTURE OF YOUR DOCUMENTOpening a document and typing text are only the start of creating a finished
project in Word. It is also important to be able to change the document’s ap-pearance for print or other distribution and determine how margins and otherpage elements work.
When you want to maneuver in your document, the Ribbon provides instantaccess to various formatting and other features. On the Ribbon, the View tabgives you options to work in the document in the way it will print, for readers oncomputer screens, as a web page, or on a larger screen without a Ruler. There isalso an Outline view to help you organize your text.
After you begin a document in Word, the program provides numerous features
to let you view it in different ways and change its layout and orientation. Youalso can add page numbers, headers, and footers.
You can add reference materials like footnotes or endnotes and reshape a pageinto columns.
7/22/2019 Easy Microsoft Office 2010
http://slidepdf.com/reader/full/easy-microsoft-office-2010 41/309
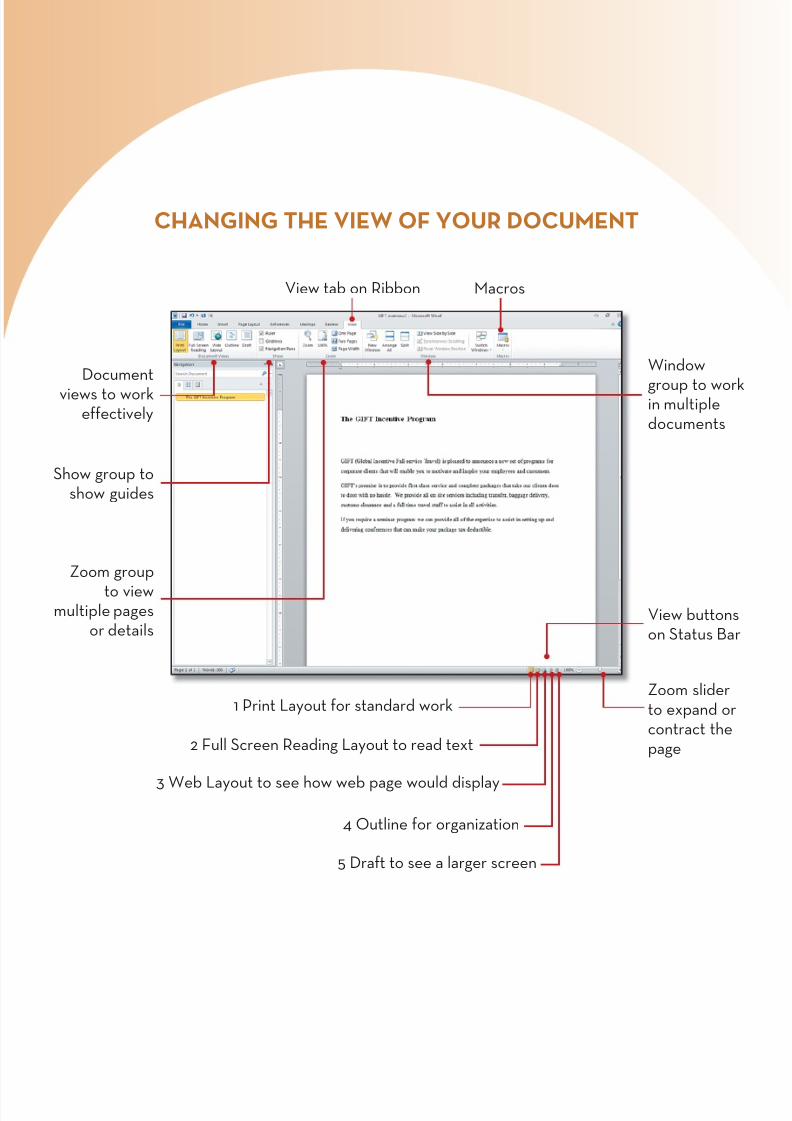
CHANGING THE VIEW OF YOUR DOCUMENT
Document
views to workeffectively
Window
group toin multidocume
View buon Stat
Zoom sto expacontracpage
Show group toshow guides
Zoom group
to viewmultiple pages
or details
View tab on Ribbon
1 Print Layout for standard work
2 Full Screen Reading Layout to read text
3 Web Layout to see how web page would display
4 Outline for organization
5 Draft to see a larger screen
Macros

7/22/2019 Easy Microsoft Office 2010
http://slidepdf.com/reader/full/easy-microsoft-office-2010 42/309
29CHANGING THE MARGINS IN YOUR PROJECTBy using the Page Layout tab of the Ribbon, you can make various changes to the appeaof your document. Probably the most basic change is to alter the margins in the docum
Click the Page Layout tab.
Click Margins.
Click to select a different set of margins.
S tart
C ontinue
Manual Margins You can change the margins manually for
individual parts of your document by first selecting the text.
Then make sure the Ruler is visible by clicking its check box in
the View tab of the Ribbon or the View Ruler button on the
right scrollbar. Then you can drag out margins or line indents
manually for the selected text.
TIP
Margins for Part of a Document When you
the Breaks button in the Page Setup group, yo
insert either a Continuous or Next Page sectio
the document at the insertion point. Then you
adjust the margins for that section manually o
Apply To: This Point Forward in the Advance
Setup dialog box after setting your margins.
TIP

7/22/2019 Easy Microsoft Office 2010
http://slidepdf.com/reader/full/easy-microsoft-office-2010 43/309
E nd
Click the Dialog Launch icon in the Page Setup group.
Click the Margins tab.
Change the margins.
Click OK.
Recent Templates The Recent Templates area shows
you the various templates you’ve opened in the past.
Using it is a good way to locate popular templates,
particularly from Office.com, without searching through
the various folders for them again.
TIP
7/22/2019 Easy Microsoft Office 2010
http://slidepdf.com/reader/full/easy-microsoft-office-2010 44/309
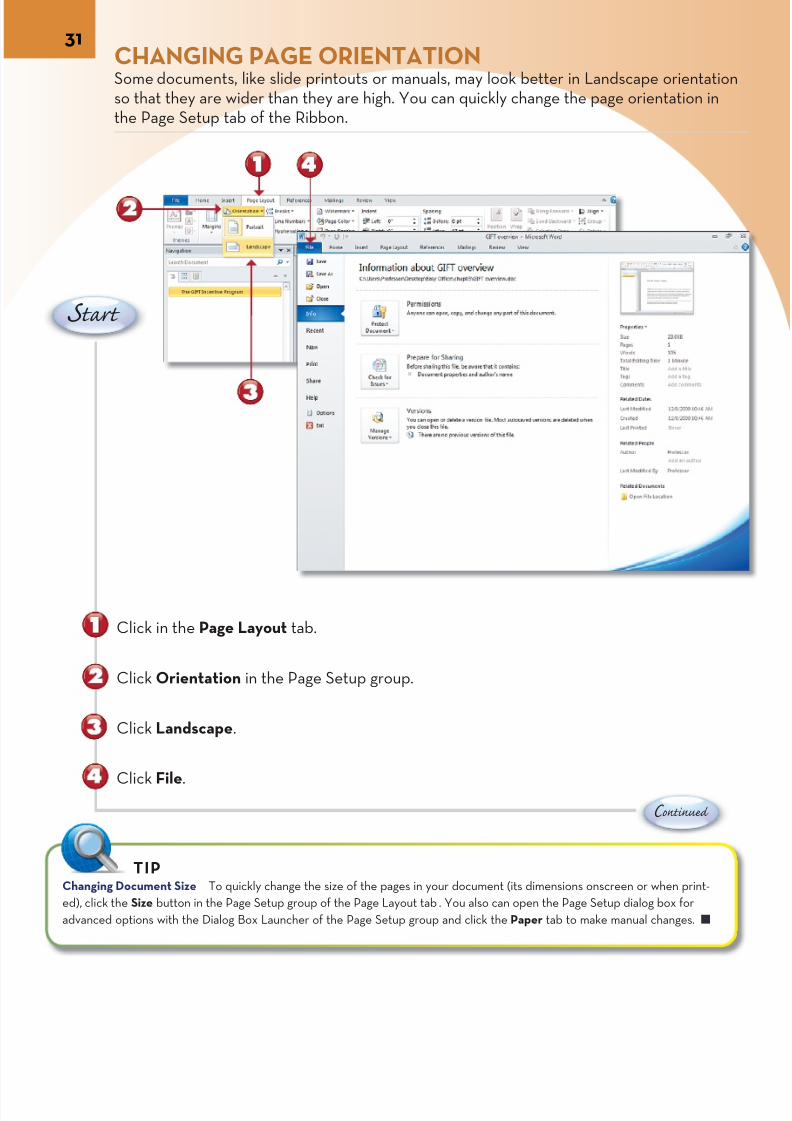
31CHANGING PAGE ORIENTATIONSome documents, like slide printouts or manuals, may look better in Landscape orienso that they are wider than they are high. You can quickly change the page orientationthe Page Setup tab of the Ribbon.
Click in the Page Layout tab.
Click Orientation in the Page Setup group.
Click Landscape.
Click File.
C ontinue
S tart
Changing Document Size To quickly change the size of the pages in your document (its dimensions onscreen or when prin
ed), click the Size button in the Page Setup group of the Page Layout tab . You also can open the Page Setup dialog box for
advanced options with the Dialog Box Launcher of the Page Setup group and click the Paper tab to make manual changes.
TIP

7/22/2019 Easy Microsoft Office 2010
http://slidepdf.com/reader/full/easy-microsoft-office-2010 45/309
E nd
Click Print.
Print Preview confirms your document is in Landscape orientation.
Document settings are available for further revisions.
You can reopen Page Setup in Print Preview to change the setup of your document.
Viewing Multiple Pages If you have other pages in the document and want to see how two or more pages will
look in the new orientation, click the View tab and select Two Pages in the Zoom group or use the zoom slider
in the lower right of the document to zoom away from the document (decreasing the page display size). You can
click Page Width in the Zoom group of the View tab to make your preview page fill the window again.
TIP
7/22/2019 Easy Microsoft Office 2010
http://slidepdf.com/reader/full/easy-microsoft-office-2010 46/309
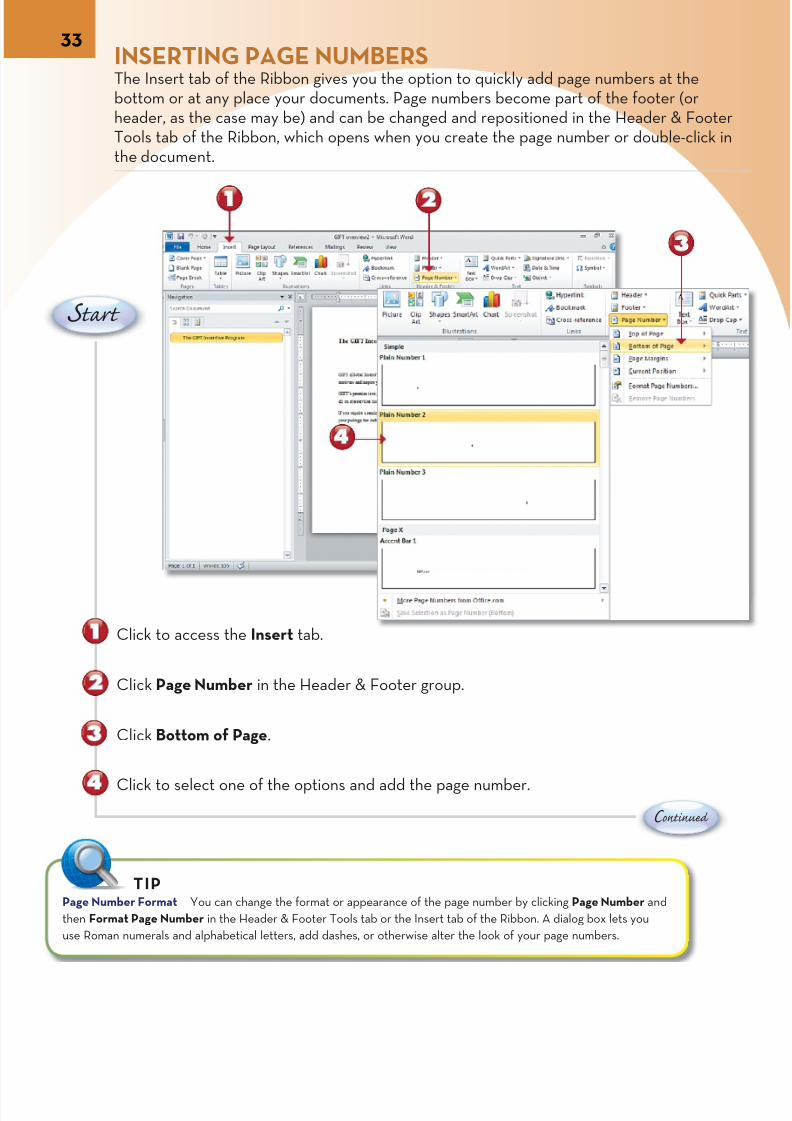
33INSERTING PAGE NUMBERSThe Insert tab of the Ribbon gives you the option to quickly add page numbers at thebottom or at any place your documents. Page numbers become part of the footer (orheader, as the case may be) and can be changed and repositioned in the Header & FoTools tab of the Ribbon, which opens when you create the page number or double-clithe document.
Click to access the Insert tab.
Click Page Number in the Header & Footer group.
Click Bottom of Page.
Click to select one of the options and add the page number.
C ontinue
S tart
Page Number Format You can change the format or appearance of the page number by clicking Page Number and
then Format Page Number in the Header & Footer Tools tab or the Insert tab of the Ribbon. A dialog box lets you
use Roman numerals and alphabetical letters, add dashes, or otherwise alter the look of your page numbers.
TIP

7/22/2019 Easy Microsoft Office 2010
http://slidepdf.com/reader/full/easy-microsoft-office-2010 47/309
The Header & Footer Tools tab of the Ribbon opens in the Design tab.
Select the page number.
Click the Home tab of the Ribbon.
Click to change the font, font color, or font size of the page number.
E nd
Double-click the Footer or Header tabs (or click back in the main document) to close
Header & Footer.
Removing a Page Number The easiest way to
remove a page number is to click Footer and then
Remove Footer in the Header & Footer Tools tab.
TIP
7/22/2019 Easy Microsoft Office 2010
http://slidepdf.com/reader/full/easy-microsoft-office-2010 48/309
35
C ontinue
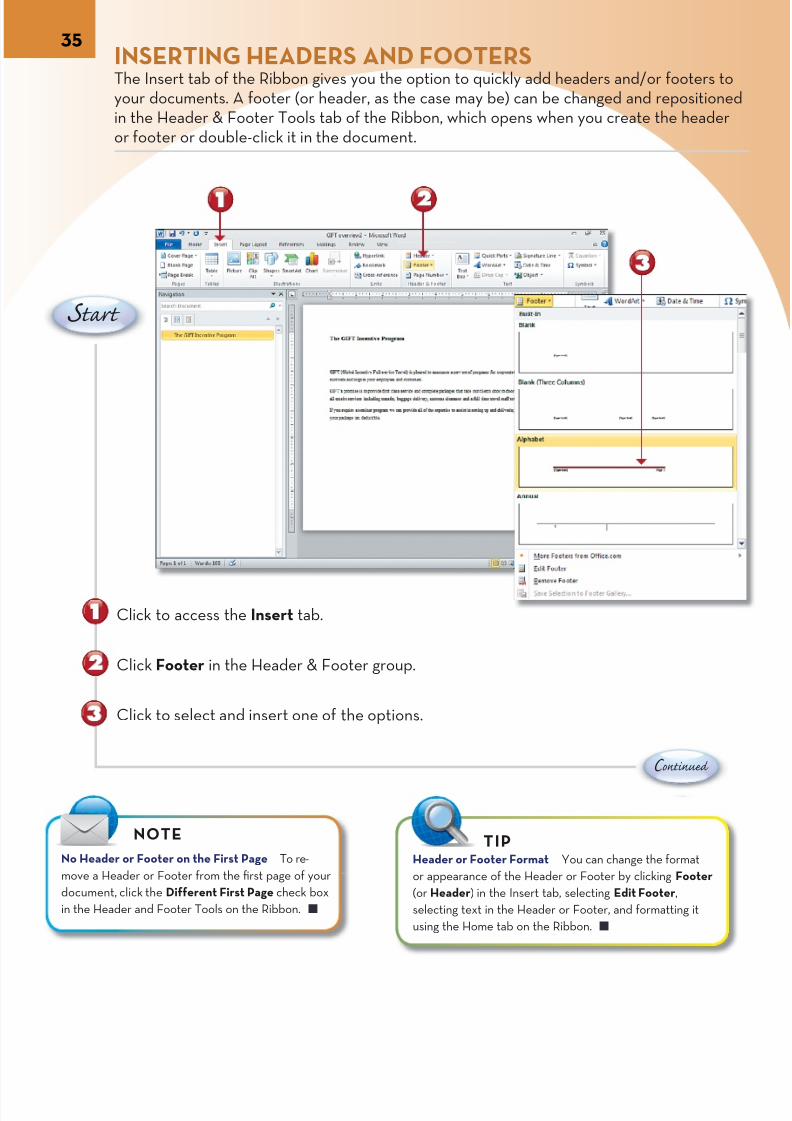
INSERTING HEADERS AND FOOTERSThe Insert tab of the Ribbon gives you the option to quickly add headers and/or footeyour documents. A footer (or header, as the case may be) can be changed and reposiin the Header & Footer Tools tab of the Ribbon, which opens when you create the heor footer or double-click it in the document.
Click to access the Insert tab.
Click Footer in the Header & Footer group.
Click to select and insert one of the options.
No Header or Footer on the First Page To re-
move a Header or Footer from the first page of your
document, click the Different First Page check box
in the Header and Footer Tools on the Ribbon.
NOTE
Header or Footer Format You can change the format
or appearance of the Header or Footer by clicking Foot
(or Header) in the Insert tab, selecting Edit Footer,
selecting text in the Header or Footer, and formatting it
using the Home tab on the Ribbon.
TIP
S tart
7/22/2019 Easy Microsoft Office 2010
http://slidepdf.com/reader/full/easy-microsoft-office-2010 49/309
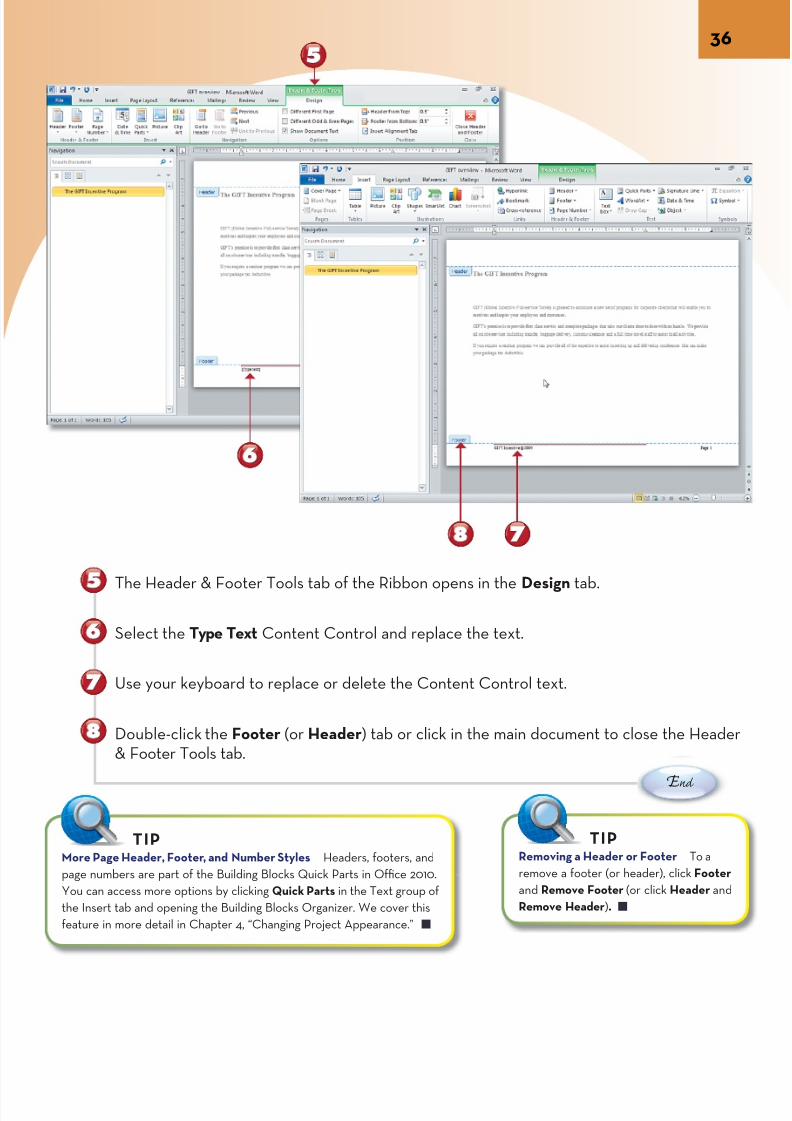
The Header & Footer Tools tab of the Ribbon opens in the Design tab.
Select the Type Text Content Control and replace the text.
Use your keyboard to replace or delete the Content Control text.
Double-click the Footer (or Header) tab or click in the main document to close the H& Footer Tools tab.
E nd
More Page Header, Footer, and Number Styles Headers, footers, and
page numbers are part of the Building Blocks Quick Parts in Office 2010.
You can access more options by clicking Quick Parts in the Text group of
the Insert tab and opening the Building Blocks Organizer. We cover this
feature in more detail in Chapter 4, “Changing Project Appearance.”
TIPRemoving a Header or Footer To
remove a footer (or header), click F
and Remove Footer (or click Head
Remove Header).
TIP

7/22/2019 Easy Microsoft Office 2010
http://slidepdf.com/reader/full/easy-microsoft-office-2010 50/309
37
C ontinue
ADDING FOOTNOTES AND ENDNOTESThe References tab of the Ribbon lets you automatically add footnotes or endnotes tdocument in the Footnotes group. Footnotes and Endnotes will automatically renumbwhen added and provide space at the bottom of the page (Footnote) or end of the do(Endnote) for citations, web addresses, or other supplemental information. You can aa Table of Contents using your Headings from features in the Table of Contents group
Click to put your insertion point where you want the footnote.
Click References to open the References tab.
Click Insert Footnote.
A superscript footnote number is added at the insertion point and at the bottom of tdocument.
Type your text for the footnote.
S tart
Note Options To change the number format and other options, select a footnote or
endnote, right-click, and select Note Options. The Note Options dialog box also lets
you change the options for the current note or for the entire document.
TIP
7/22/2019 Easy Microsoft Office 2010
http://slidepdf.com/reader/full/easy-microsoft-office-2010 51/309
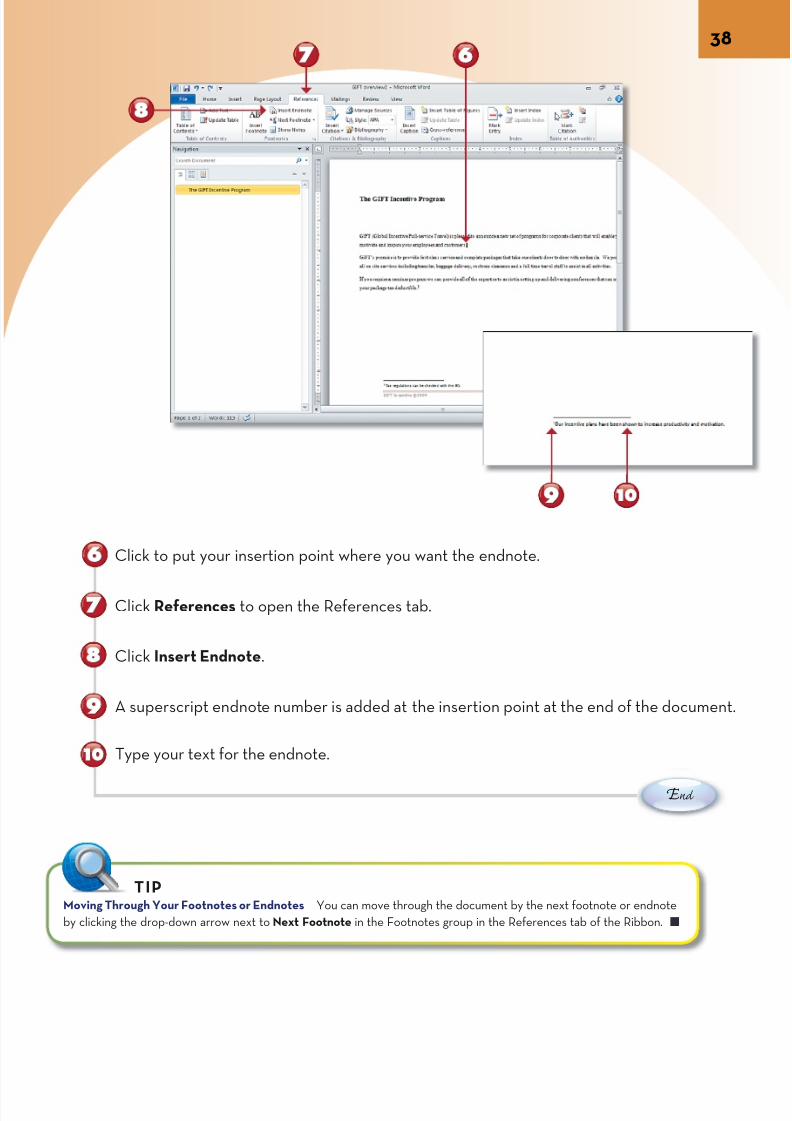
Click to put your insertion point where you want the endnote.
Click References to open the References tab.
Click Insert Endnote.
A superscript endnote number is added at the insertion point at the end of the docu
Type your text for the endnote.
E nd
Moving Through Your Footnotes or Endnotes You can move through the document by the next footnote or endnote
by clicking the drop-down arrow next to Next Footnote in the Footnotes group in the References tab of the Ribbon.
TIP

7/22/2019 Easy Microsoft Office 2010
http://slidepdf.com/reader/full/easy-microsoft-office-2010 52/309
39USING COPY AND PASTE PREVIEWWhen you select material in Word and copy or cut it and then click to paste it in anotlocation, a context menu appears. You can choose Keep Source Formatting, Merge Foting, Use the Destination Theme, or Keep Text Only. You can use Paste Preview by clicPaste in the Home tab of the Ribbon or pressing Ctrl+V on the keyboard.
Select the text you want to copy or cut.
Click Copy or click Cut on the Home tab of the Ribbon (or press Ctrl+C for Copy orCtrl+X for Cut).
C ontinue
Taking Advantage of Text If the preview options
shown in the Paste Preview don’t work, Keep Text
Only is the easiest way to use the formatting fea-
tures of Word for more changes.
TIP
S tart
7/22/2019 Easy Microsoft Office 2010
http://slidepdf.com/reader/full/easy-microsoft-office-2010 53/309
The Paste Options Are Contextual When you
click to reveal the Paste Preview options in the
Home tab or after pressing Ctrl+V, the options avail-
able depend on the material you cut or copied and
the formatting and theme of the destination file.
TIP
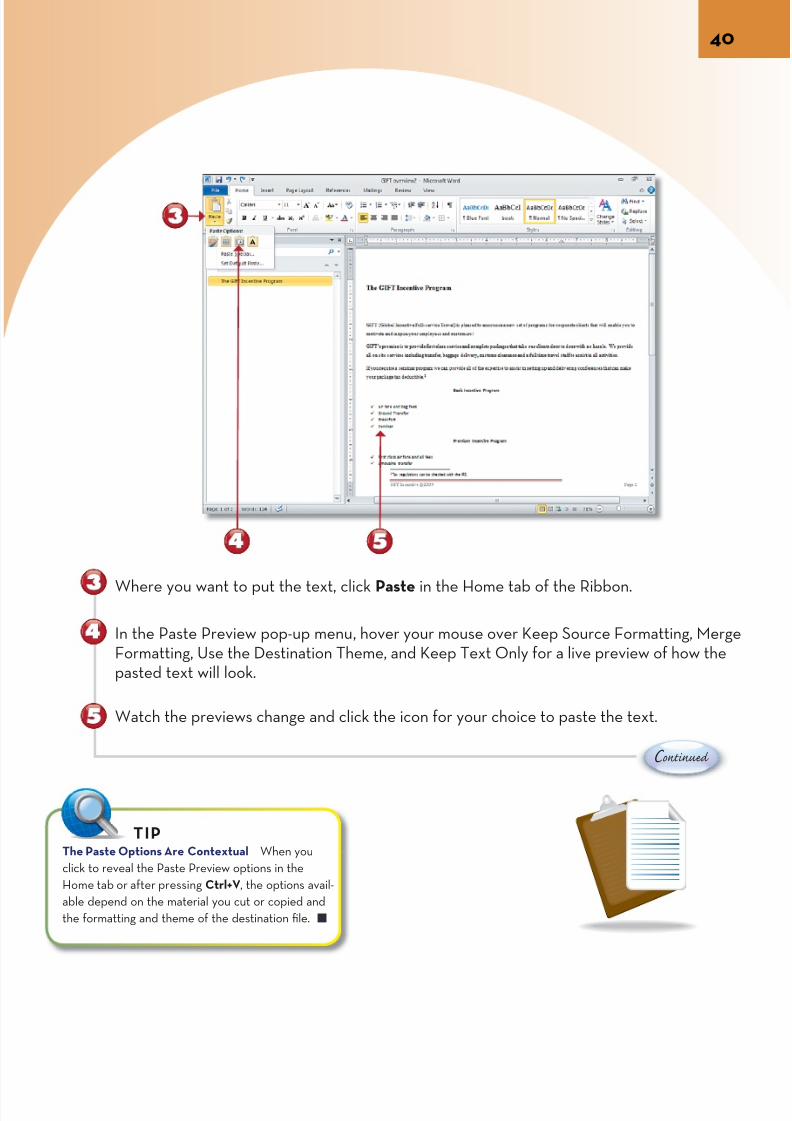
Where you want to put the text, click Paste in the Home tab of the Ribbon.
In the Paste Preview pop-up menu, hover your mouse over Keep Source Formatting, Formatting, Use the Destination Theme, and Keep Text Only for a live preview of howpasted text will look.
Watch the previews change and click the icon for your choice to paste the text.
C ontinue
7/22/2019 Easy Microsoft Office 2010
http://slidepdf.com/reader/full/easy-microsoft-office-2010 54/309
41
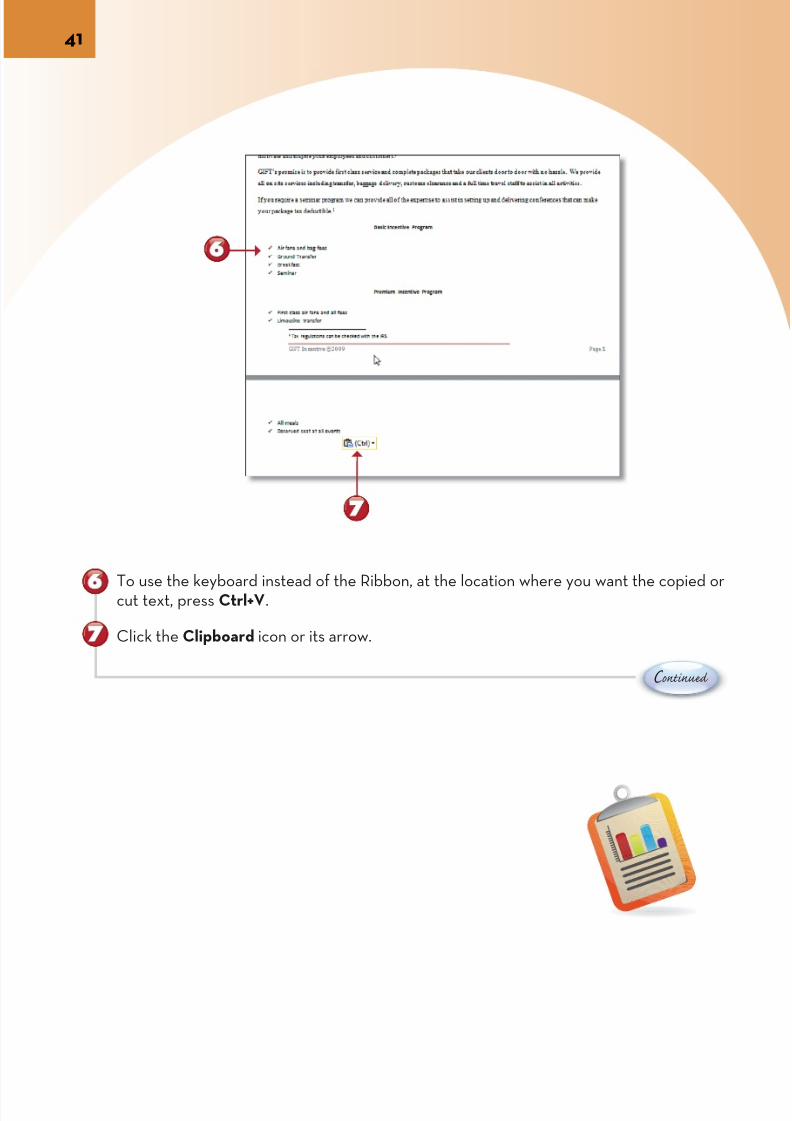
To use the keyboard instead of the Ribbon, at the location where you want the copiedcut text, press Ctrl+V.
Click the Clipboard icon or its arrow.
C ontinue
7/22/2019 Easy Microsoft Office 2010
http://slidepdf.com/reader/full/easy-microsoft-office-2010 55/309
E nd
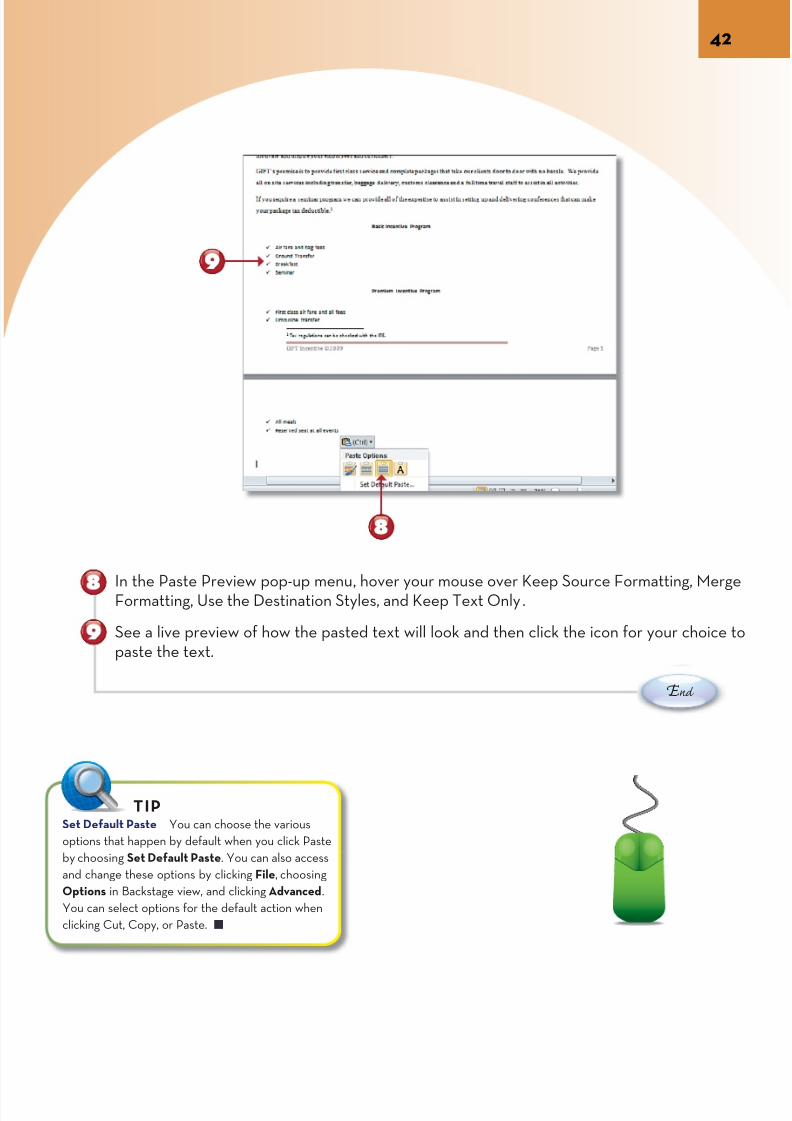
In the Paste Preview pop-up menu, hover your mouse over Keep Source Formatting, Formatting, Use the Destination Styles, and Keep Text Only.
See a live preview of how the pasted text will look and then click the icon for your chpaste the text.
Set Default Paste You can choose the various
options that happen by default when you click Paste
by choosing Set Default Paste. You can also access
and change these options by clicking File, choosing
Options in Backstage view, and clicking Advanced.
You can select options for the default action when
clicking Cut, Copy, or Paste.
TIP

7/22/2019 Easy Microsoft Office 2010
http://slidepdf.com/reader/full/easy-microsoft-office-2010 56/309
43CREATING COLUMNS IN A LONGER DOCUMENT
OR NEWSLETTER
To break up the text into columns for a newsletter or brochure, you can use the Columpresets in the Page Setup group of the Page Layout tab of the Ribbon or fine-tune theof your columns by using the options in More Columns.
Click Columns in the Page Layout tab of the Ribbon.
Select to apply one of the column presets.
The document is broken up into the columns you selected.
S tart
C ontinue
Adjusting Columns Manually When columns are
created in a document, you can drag to adjust their
widths manually in each of their individual segments
in the Ruler at the top of the page. (If the Ruler is
not open, click the View tab of the Ribbon and click
the Ruler check box.
TIP
7/22/2019 Easy Microsoft Office 2010
http://slidepdf.com/reader/full/easy-microsoft-office-2010 57/309
E nd
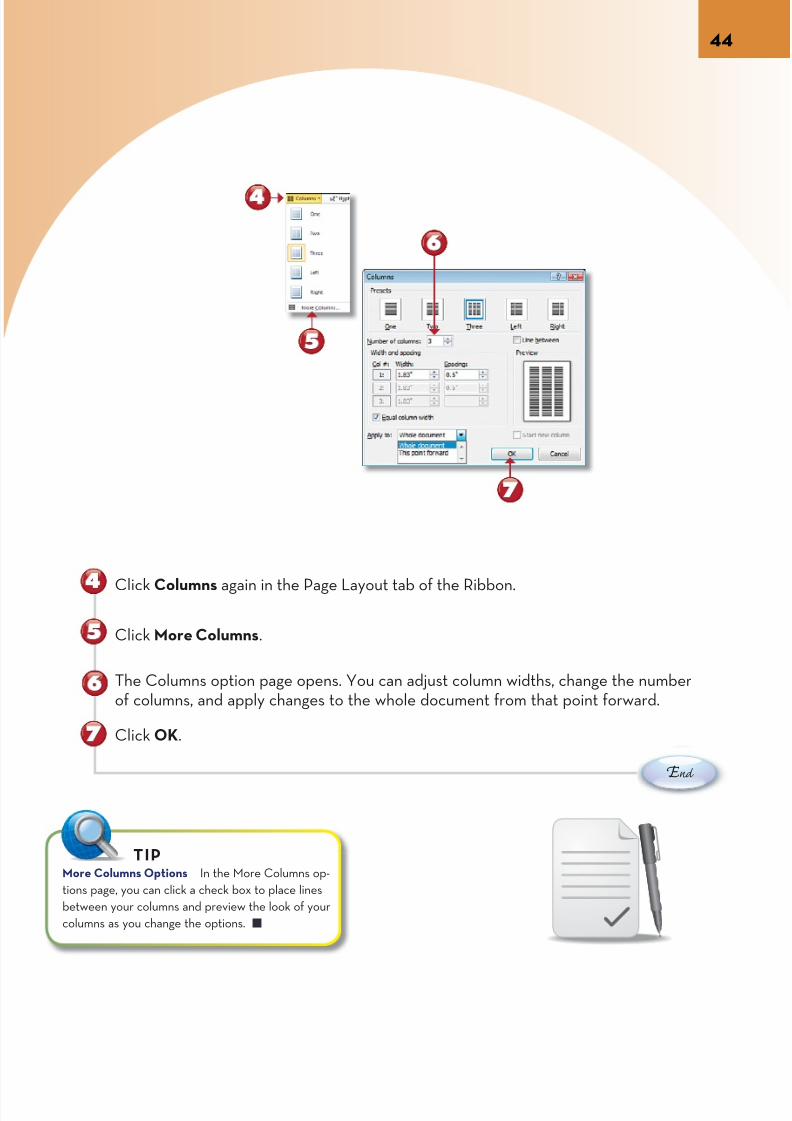
Click Columns again in the Page Layout tab of the Ribbon.
Click More Columns.
The Columns option page opens. You can adjust column widths, change the numberof columns, and apply changes to the whole document from that point forward.
Click OK.
More Columns Options In the More Columns op-
tions page, you can click a check box to place lines
between your columns and preview the look of your
columns as you change the options.
TIP
7/22/2019 Easy Microsoft Office 2010
http://slidepdf.com/reader/full/easy-microsoft-office-2010 58/309
Chapter 4
CHANGING PROJECT APPEARANCEMicrosoft Word can make your project look like much more than an ordinarydocument. Formatting options can be saved and reused as styles and quicklyapplied to selected text from the Quick Styles gallery.
You can create your own Quick Styles by formatting your own text and thensaving it as a style and adding it to the Quick Styles gallery. You can also selectcertain formatted text as a heading and use it in the Navigation pane to seemain topics or move through your document. Or you can generate a Table ofContents in the References tab of the Ribbon.
Formatting that you have applied in one area of the document can be copiedelsewhere by using the Format Painter, a very handy tool.
Portions of a document can also be added from the Quick Parts gallery, includ-ing AutoText selections and cover pages. After you’ve put a project together,you can apply a theme, which is composed of fonts, colors, and effects (moreabout effects in Chapter 6, “Working with Graphics and Effects”), to change thelook of the entire document from the Page Layout tab of the Ribbon.
Control Panel
7/22/2019 Easy Microsoft Office 2010
http://slidepdf.com/reader/full/easy-microsoft-office-2010 59/309
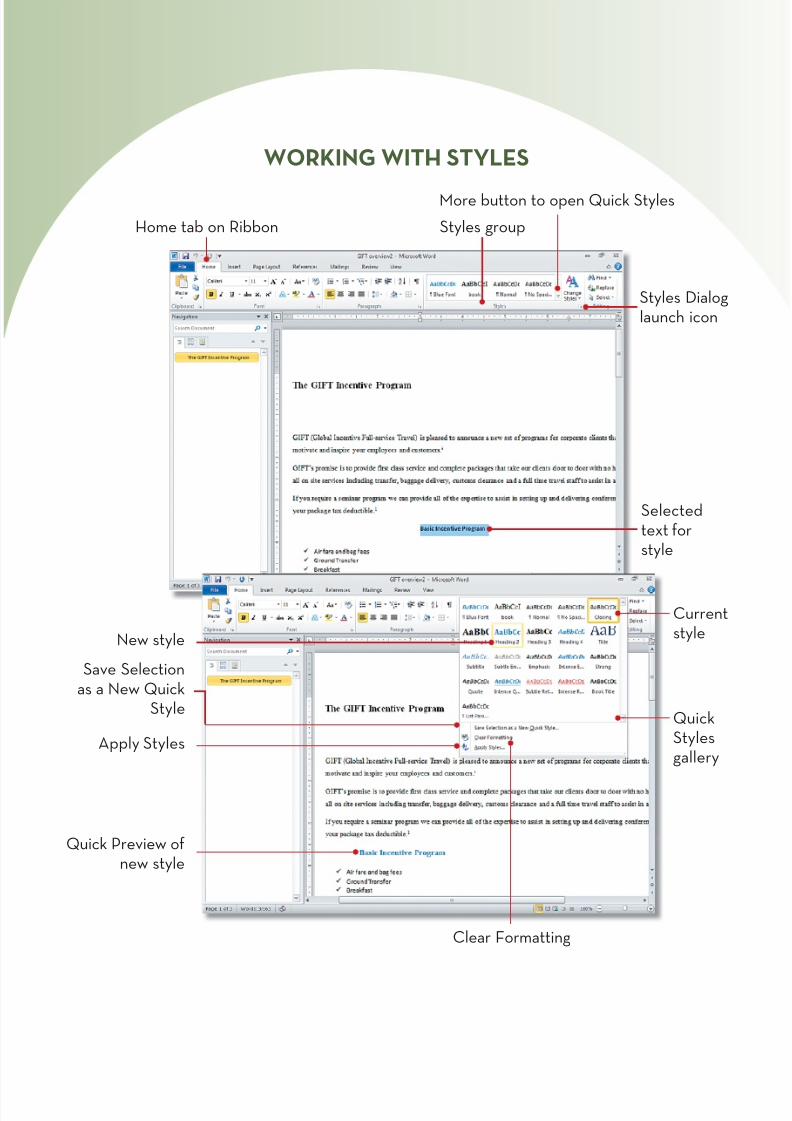
WORKING WITH STYLES
Home tab on Ribbon Styles group
More button to open Quick Styles
Styles Dilaunch ic
Selectedtext forstyle
Quick Preview ofnew style
Apply Styles
Save Selectionas a New Quick
Style
Curstyle
QuiStylgalle
Clear Formatting
New style

7/22/2019 Easy Microsoft Office 2010
http://slidepdf.com/reader/full/easy-microsoft-office-2010 60/309
47APPLYING A QUICK STYLEThe easiest way to apply a style is to select your text and choose a style from the QuStyles gallery. Before clicking to a apply a style, hover your mouse over the styles to sQuick Preview of how the selected text would look if the style is applied. You can alsothe Dialog Launch icon for the Styles Group to open all the styles available for the doment. Here you can apply a style or add or remove a style from the Quick Styles galle
With the Home tab active, select the text for the style.
Click the More button to open the Quick Styles gallery.
Hover your mouse over a style to see how it will look and then click to select it.
S tart
C ontinued
Change Styles You can click Change Styles in the Styles
group of the Home tab of the Ribbon to quickly preview
and apply a different style set (template or design), colors,
or fonts. You also can set the current styles as the default
for all new documents.
TIP
Manage Styles You can click Manage Styles
at the bottom of the Styles pane when you open
it with the Dialog Launch icon to edit, create, or
import and export styles from one document or
template to another.
TIP

7/22/2019 Easy Microsoft Office 2010
http://slidepdf.com/reader/full/easy-microsoft-office-2010 61/309
E nd
The Heading 2 text appears in the Navigation pane indented below Heading 1.
Click the Styles Dialog Launch icon.
All available styles are shown for the document in a manner similar to earlier versionsof Word.
Click the drop-down arrow for a style.
Options include adding or removing the style from the Quick Styles gallery and
modifying the style.
Style Pane Options To revise settings for how styles are displayed in the Styles pane, you can click Options at the bottom
the window. You can change the list from Recommended to All Styles to see a greater set of all possible styles.
TIP

7/22/2019 Easy Microsoft Office 2010
http://slidepdf.com/reader/full/easy-microsoft-office-2010 62/309
Remove Styles from the Quick Styles Gallery To quickly remove a style from the gallery, right-click it and click Remove
from Quick Styles Gallery. The new style will still be in the Styles pane if you click the Dialog Launch icon for Styles.
TIP
49CREATING A QUICK STYLESelect the text for the new style. You can create your own styles to include in the QuStyles gallery. To create your own style, select the text you want to be in the new stylemodify its font, font size, font color, or other attributes using the Font group of the Hoof the Ribbon. Then click Save Selection as a New Quick Style from the Quick Styles
Select the text for the new style.
In the Home tab, change the text format by using the features of the Font group.
The text reflects the changes for the new style.
S tart
C ontinued
Click the More button to open the Quick Styles gallery.
7/22/2019 Easy Microsoft Office 2010
http://slidepdf.com/reader/full/easy-microsoft-office-2010 63/309
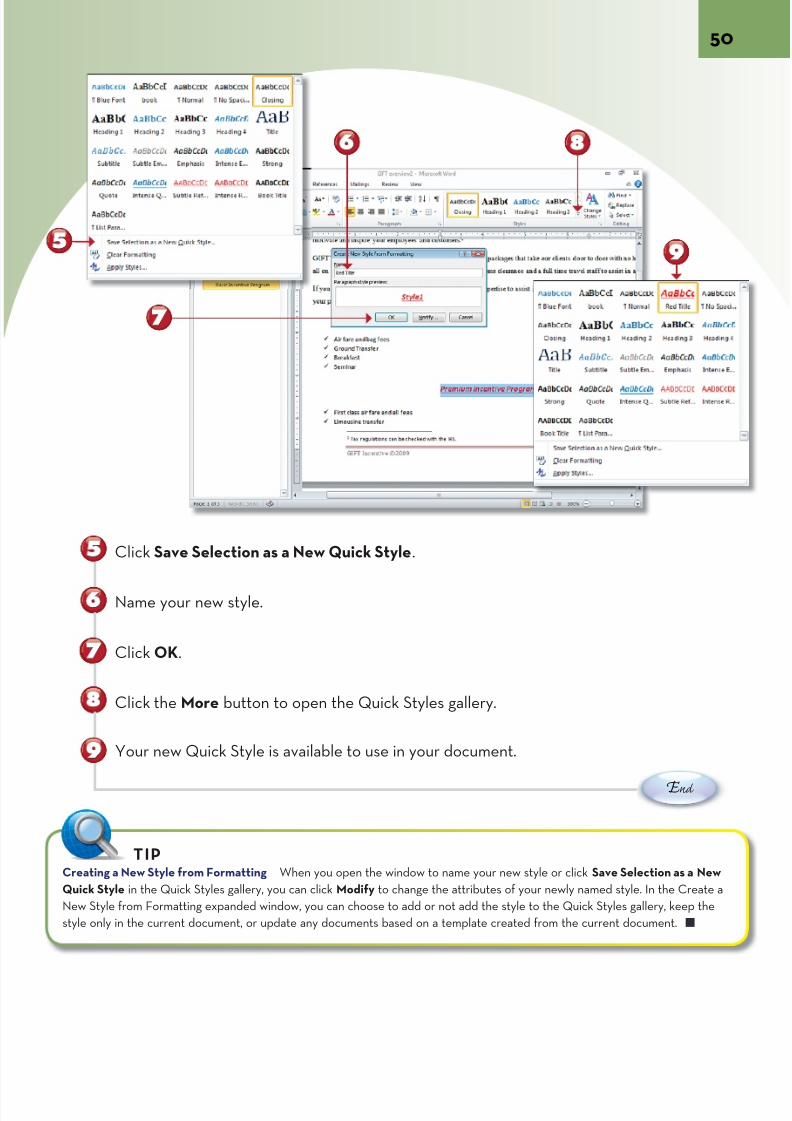
Click Save Selection as a New Quick Style.
Name your new style.
Click OK.
Click the More button to open the Quick Styles gallery.
Your new Quick Style is available to use in your document.
E nd
Creating a New Style from Formatting When you open the window to name your new style or click Save Selection as a N
Quick Style in the Quick Styles gallery, you can click Modify to change the attributes of your newly named style. In the Cre
New Style from Formatting expanded window, you can choose to add or not add the style to the Quick Styles gallery, keep
style only in the current document, or update any documents based on a template created from the current document.
TIP
7/22/2019 Easy Microsoft Office 2010
http://slidepdf.com/reader/full/easy-microsoft-office-2010 64/309
51MODIFYING A QUICK STYLE
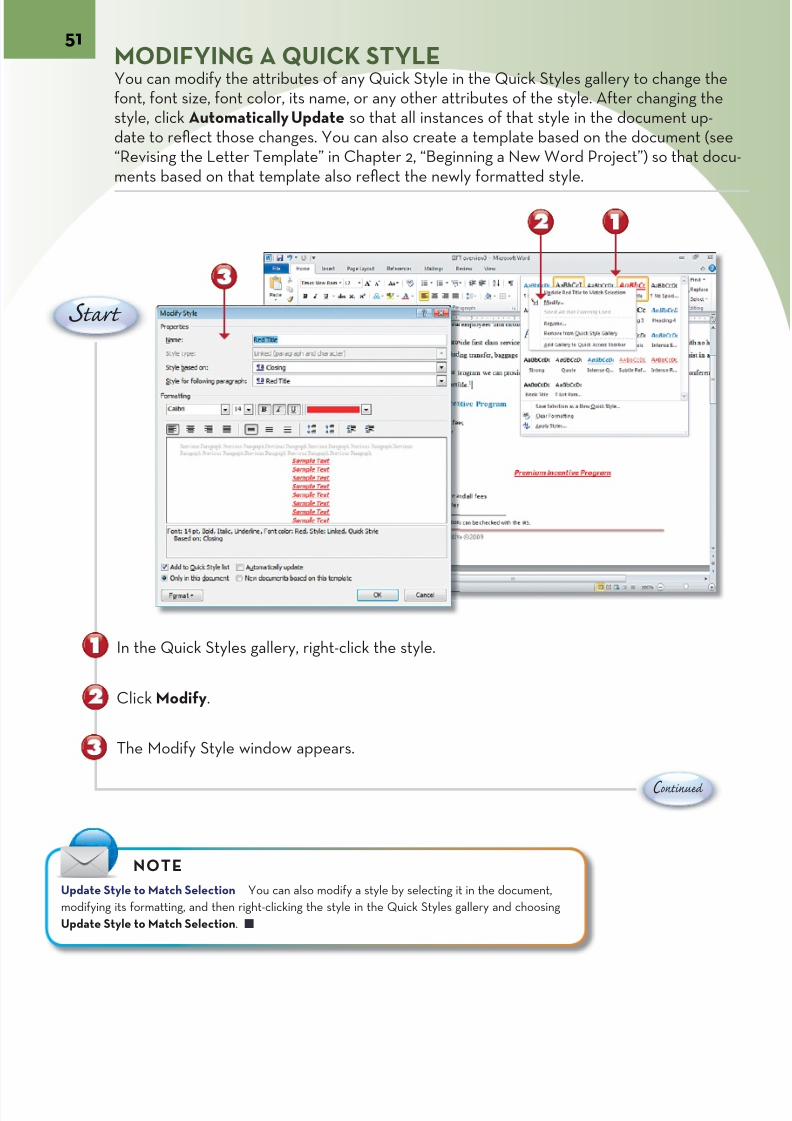
You can modify the attributes of any Quick Style in the Quick Styles gallery to changefont, font size, font color, its name, or any other attributes of the style. After changingstyle, click Automatically Update so that all instances of that style in the document udate to reflect those changes. You can also create a template based on the document“Revising the Letter Template” in Chapter 2, “Beginning a New Word Project”) so thatments based on that template also reflect the newly formatted style.
In the Quick Styles gallery, right-click the style.
Click Modify.
The Modify Style window appears.
S tart
Update Style to Match Selection You can also modify a style by selecting it in the document,
modifying its formatting, and then right-clicking the style in the Quick Styles gallery and choosing
Update Style to Match Selection.
NOTE
C ontinued

7/22/2019 Easy Microsoft Office 2010
http://slidepdf.com/reader/full/easy-microsoft-office-2010 65/309
E nd
Remove the underline and italic or change any other attributes of the Quick Style.
Click the drop-down arrow to change the color of the Quick Style. The Preview windoshows you how the new style will look.
Click Automatically update.
Click OK.
All instances of the Quick Style in the document reflect the changes.
Checking the Margins When you change the justification in the Modify Style window, the change
sometimes is not reflected in the document. Return to the document and check the Ruler for the
selected text; you may need to drag the margins for the text back to the left edge of the document.
TIP

7/22/2019 Easy Microsoft Office 2010
http://slidepdf.com/reader/full/easy-microsoft-office-2010 66/309
53UPDATING HEADINGS TO MATCH A SELECTION
The headings in a document have a special quality: They appear as topics in the Navigpane. To get your headings to appear the way you want, format them first and then sethe text. Another option is to select text that already reflects how they should look anthen right-click a heading in the Quick Styles gallery and click Update Heading to MaSelection. The heading’s format then becomes consistent with your other similar headand the topic appears in the Navigation pane.
Select the text that is formatted for the heading you want to update.
Locate Heading 2 in the Quick Styles gallery.
Right-click the heading in the Quick Styles gallery.
Click Update Heading 2 to Match Selection.
S tart
C ontinued
Getting More Headings If there are no headings in the Quick Styles gallery for your document, click the Dialog Launch
icon for Styles and locate the headings you want in the Styles pane. Click the drop-down arrow next to a heading and then
click Add to Quick Styles. For more headings, click Options in the Styles pane and choose All Styles from the Styles to Sho
drop-down list.
TIP

7/22/2019 Easy Microsoft Office 2010
http://slidepdf.com/reader/full/easy-microsoft-office-2010 67/309
E nd
The text previously set as Heading 2 now reflects the new chosen format.
Both topics set as Heading 2 appear in the Navigation pane.
Show Preview in Styles Pane To see how styles will
look in the document directly from the Styles pane,
click the check box to enable Show Preview.
TIP

7/22/2019 Easy Microsoft Office 2010
http://slidepdf.com/reader/full/easy-microsoft-office-2010 68/309
55COPYING STYLES AND/OR FORMATTING WITH
FORMAT PAINTERThe Format Painter in the Clipboard group of the Home tab of the Ribbon lets you “pup” the format from one part of your document and “paint,” or apply, it to another. Foexample, you can take a style and heading from one portion of your text and apply it tdifferently formatted portion, in the process adding a heading to your Navigation pan
C ontinue
Place your insertion point in (or select) the text with the Heading 2 style you want to
Click the Format Painter in the Clipboard group of the Home tab of the Ribbon.
Place your mouse cursor next to the text to which you want to copy the Heading 2 styturns into a little paintbrush.
S tart
Painting Other Formats Besides styles and headings, the Format Painter
can also pick up and apply formats and effects from one shape, picture,
or other object to another. You can experiment with the Format Painter
when you create tables in the next chapter or add graphics and pictures in
Chapter 6, “Working with Graphics and Effects.”
TIP

7/22/2019 Easy Microsoft Office 2010
http://slidepdf.com/reader/full/easy-microsoft-office-2010 69/309
E nd
Drag to apply your format through the destination text.
When you release the left mouse button, the new format is “painted” or applied.
The painted text is now a Heading 2, so it appears in the Navigation pane.
Quick Access Toolbar The Quick Access Toolbar is a drop-down menu that you can open and use next to the
Re-Do arrow at the top of the Word window. You can add the Format Painter to the Quick Access Toolbar by
right-clicking it and choosing that option. You can also right-click on the Format Painter to open Word Options
(directly in Backstage view) to customize the Quick Access Toolbar and add or remove commands.
TIP

7/22/2019 Easy Microsoft Office 2010
http://slidepdf.com/reader/full/easy-microsoft-office-2010 70/309
57
C ontinue
S tart
INSERTING A COVER PAGE
Inserting a cover page can make an ordinary document look more professional and stout. Word 2010 comes with preset cover pages that you can use and customize. You cdownload more cover pages from Office.com, or you can create your own cover page
Cover pages are Building Blocks that are saved blocks of preformatted content that cinserted into documents and customized. Another example of a Building Block is a heor footer, which are also stored in Word as Building Blocks.
In the Insert tab of the Ribbon, click Cover Page in the Pages group.
Click a cover page, such as Pinstripes, to insert it in the document.
Slide the zoom slider to zoom out to see the cover page as part of the document.
Select the title text from inside your document and copy the text to the Clipboard(press Ctrl+C).
Saving Your Own Cover Page You can save your own cover page as a Building Block and put it
into the Cover Page gallery by selecting it and then clicking Cover Page on the Insert tab of the
Ribbon. Click Save Selection to Cover Page Gallery, name the new cover page, and click OK.
TIP

7/22/2019 Easy Microsoft Office 2010
http://slidepdf.com/reader/full/easy-microsoft-office-2010 71/309
E nd
By using the Paste button on the Home tab of the Ribbon or pressing Ctrl+V on the kboard, paste the copied text onto the cover page’s title field.
In the Paste Options pop-up menu, click either Merge Formatting or Keep Text Only
The title is copied to the new cover page.
Click in the remaining Content Controls of the cover page to fill them in or delete the
Cover Pages as Organized Building Blocks If you
saved your own cover page, you saw a table in which
to name your cover page and save it as a Cover Page
Building Block. For more information, see “Using the
Building Blocks Organizer” later in this chapter.
TIPDelete a Content Control To delete a Content
Control from a cover page or other Building Block
content controls, click inside the control to select
prompt text, select the Content Control name tab
then press Delete on your keyboard.
TIP

7/22/2019 Easy Microsoft Office 2010
http://slidepdf.com/reader/full/easy-microsoft-office-2010 72/309
59CREATING A NEW QUICK PARTS ENTRYQuick Parts are blocks of formatted text that you can reuse and insert into a documeThey are Building Blocks and can also be found in the Building Blocks Organizer, whiccovered in the next section.
C ontinue
Select a block of text you want to reuse often.
On the Insert tab, click Quick Parts in the Text group.
Click Save Selection to Quick Parts Gallery.
In the Create New Building Block window, name your Quick Part in the Name field.
S tart
Click OK.
What About AutoText? When you open Quick Parts, you also see an option for AutoText and the option Save
Selection to AutoText. If you save the selected text to AutoText, it becomes a different kind of Building Block
(AutoText, not Quick Parts). You can insert it by clicking Quick Parts and then AutoText.
TIP
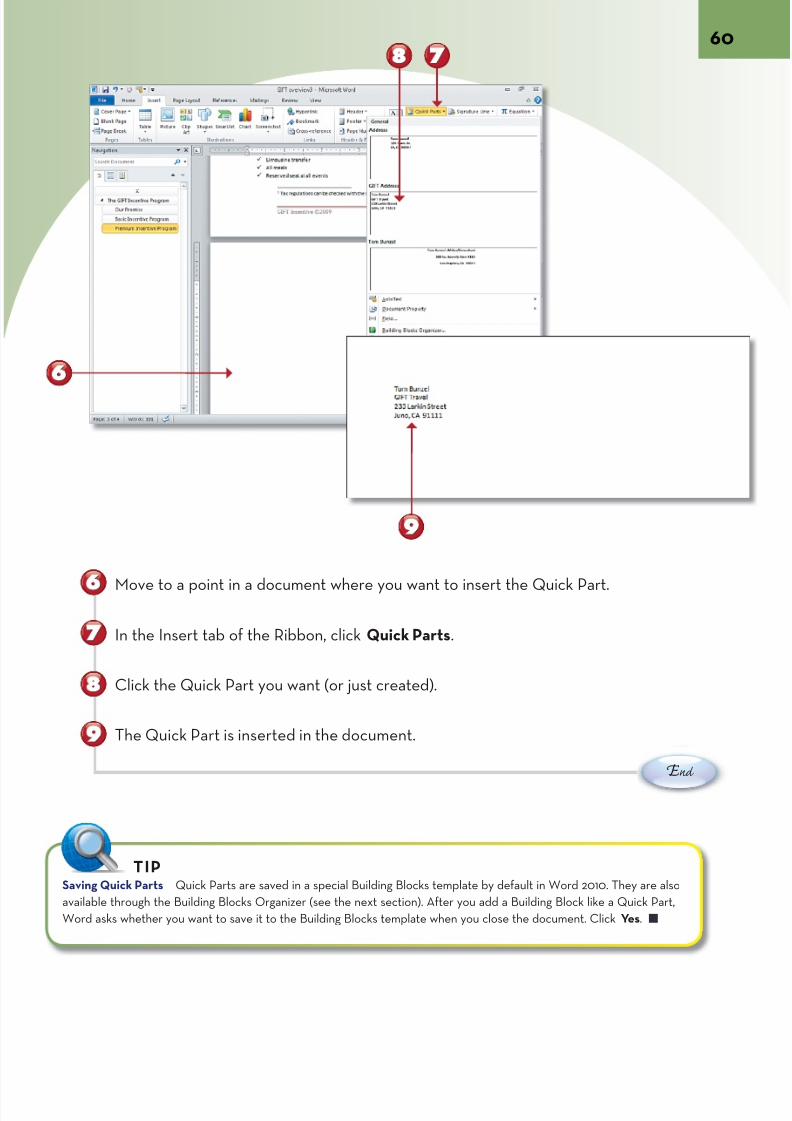
7/22/2019 Easy Microsoft Office 2010
http://slidepdf.com/reader/full/easy-microsoft-office-2010 73/309
E nd
Move to a point in a document where you want to insert the Quick Part.
In the Insert tab of the Ribbon, click Quick Parts.
Click the Quick Part you want (or just created).
The Quick Part is inserted in the document.
Saving Quick Parts Quick Parts are saved in a special Building Blocks template by default in Word 2010. They are also
available through the Building Blocks Organizer (see the next section). After you add a Building Block like a Quick Part,
Word asks whether you want to save it to the Building Blocks template when you close the document. Click Yes.
TIP

7/22/2019 Easy Microsoft Office 2010
http://slidepdf.com/reader/full/easy-microsoft-office-2010 74/309
61USING THE BUILDING BLOCKS ORGANIZERAll the Building Blocks are also located in the Building Blocks Organizer, which lets yomaintain and create new Building Blocks like headers, footers, Quick Parts, cover pagother types of Building Blocks. You can also locate and insert Building Blocks directlyyour document from the Building Blocks Organizer.
C ontinue
In the Insert tab of the Ribbon, click Quick Parts.
Click Building Blocks Organizer.
S tart
Building Blocks Organizer As you scroll through the
Building Blocks Organizer, you see all the various gal-
leries in Word 2010 and the preset and saved Building
Blocks available in the current document. They are
organized by Category, Gallery, and Template.
TIPMoving a Building Block If a Building Block is no
able in the current document, open the Building B
Organizer in the document where it is saved, click
Properties in the Organizer, and save it to the def
Normal Word template for all documents.
TIP
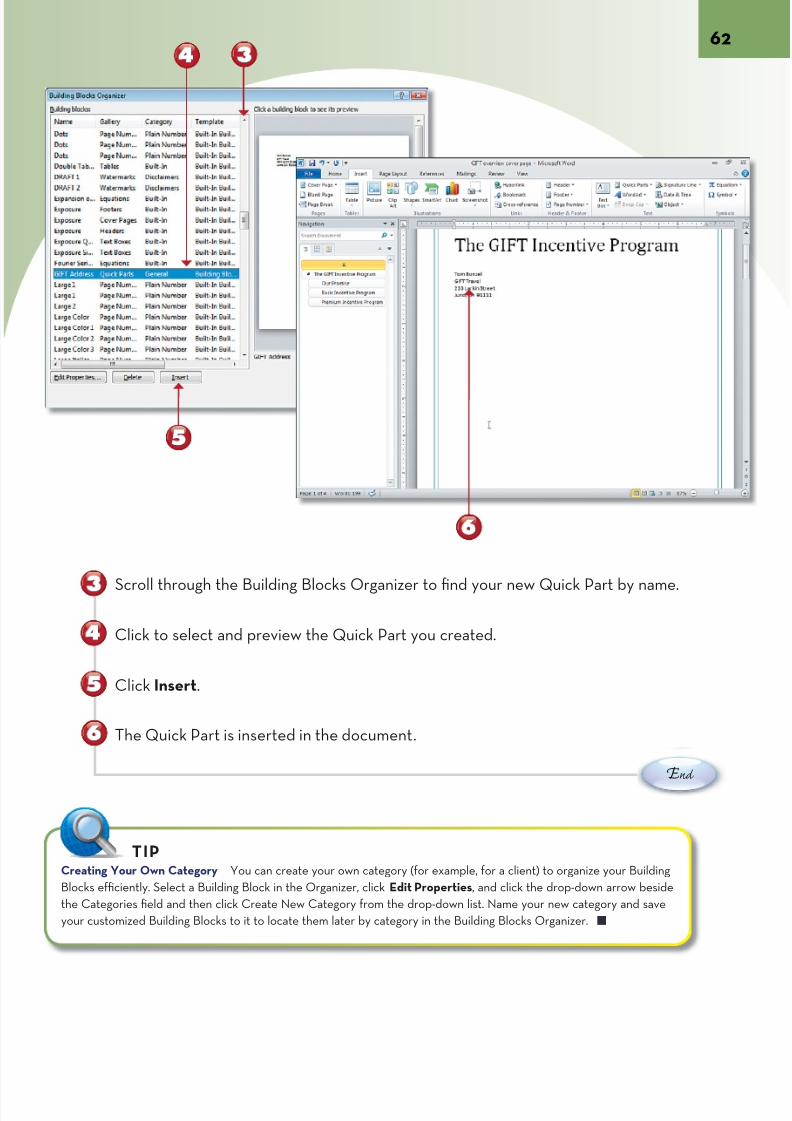
7/22/2019 Easy Microsoft Office 2010
http://slidepdf.com/reader/full/easy-microsoft-office-2010 75/309
E nd
Scroll through the Building Blocks Organizer to find your new Quick Part by name.
Click to select and preview the Quick Part you created.
Click Insert.
The Quick Part is inserted in the document.
Creating Your Own Category You can create your own category (for example, for a client) to organize your Building
Blocks efficiently. Select a Building Block in the Organizer, click Edit Properties, and click the drop-down arrow beside
the Categories field and then click Create New Category from the drop-down list. Name your new category and save
your customized Building Blocks to it to locate them later by category in the Building Blocks Organizer.
TIP
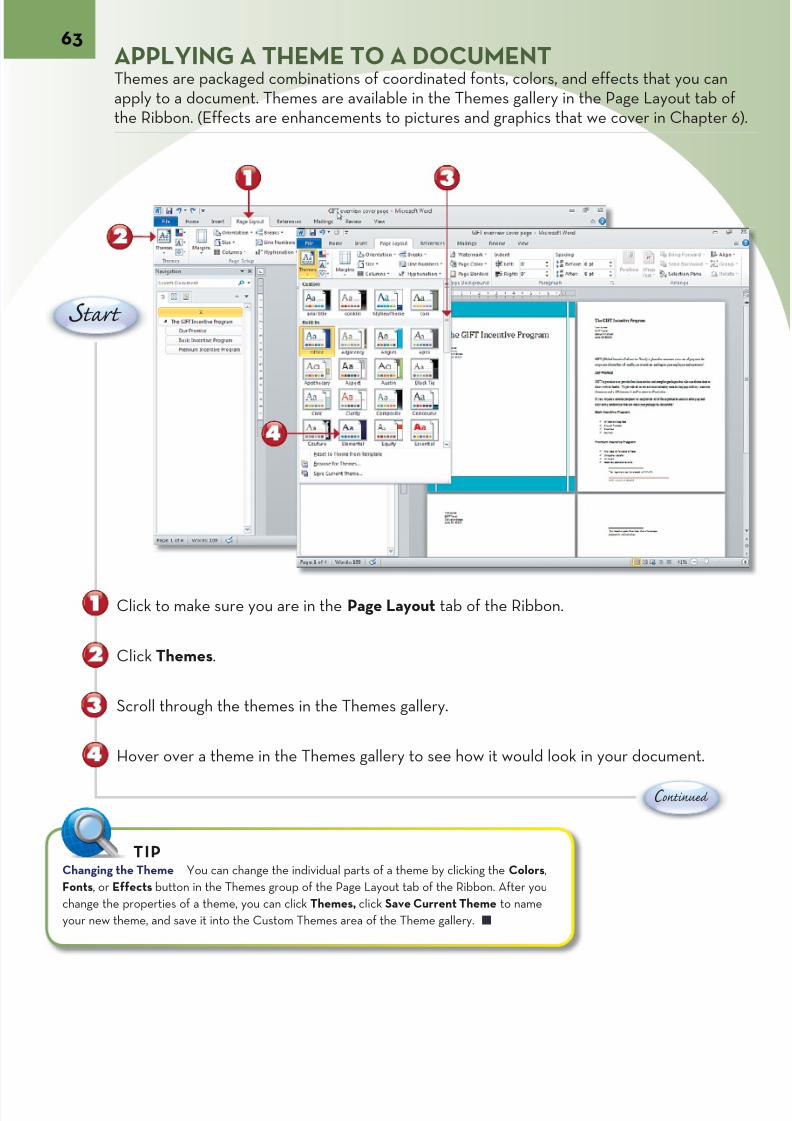
7/22/2019 Easy Microsoft Office 2010
http://slidepdf.com/reader/full/easy-microsoft-office-2010 76/309
63APPLYING A THEME TO A DOCUMENTThemes are packaged combinations of coordinated fonts, colors, and effects that youapply to a document. Themes are available in the Themes gallery in the Page Layout tthe Ribbon. (Effects are enhancements to pictures and graphics that we cover in Cha
C ontinue
Click to make sure you are in the Page Layout tab of the Ribbon.
Click Themes.
Scroll through the themes in the Themes gallery.
Hover over a theme in the Themes gallery to see how it would look in your document
S tart
Changing the Theme You can change the individual parts of a theme by clicking the Colors,
Fonts, or Effects button in the Themes group of the Page Layout tab of the Ribbon. After you
change the properties of a theme, you can click Themes, click Save Current Theme to name
your new theme, and save it into the Custom Themes area of the Theme gallery.
TIP
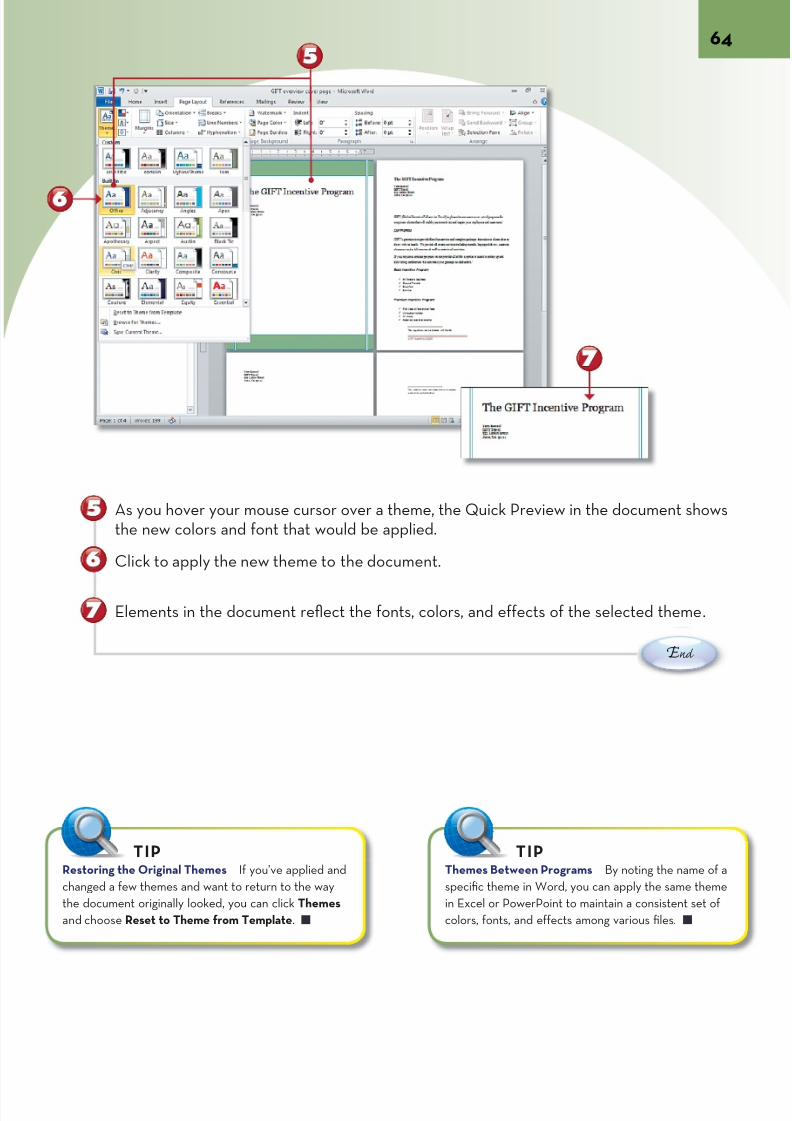
7/22/2019 Easy Microsoft Office 2010
http://slidepdf.com/reader/full/easy-microsoft-office-2010 77/309
E nd
As you hover your mouse cursor over a theme, the Quick Preview in the document shthe new colors and font that would be applied.
Click to apply the new theme to the document.
Elements in the document reflect the fonts, colors, and effects of the selected theme
Restoring the Original Themes If you’ve applied and
changed a few themes and want to return to the way
the document originally looked, you can click Themes
and choose Reset to Theme from Template.
TIP
Themes Between Programs By noting the nam
specific theme in Word, you can apply the same t
in Excel or PowerPoint to maintain a consistent se
colors, fonts, and effects among various files.
TIP
7/22/2019 Easy Microsoft Office 2010
http://slidepdf.com/reader/full/easy-microsoft-office-2010 78/309
Chapter 5
CREATING A TABLE FOR A SCHEDULEOne of the best ways to organize information in Word so that it can be easilyread and understood is to use a table. A table breaks up your content intoeasily digestible chunks of information.
You can use a table for many different types of content, from a calendar to atabular list. A table consists of a set of columns and rows meeting to form cellsthat contain the information in text or numeric format.
When you create and select a table, Word’s Table Tools tabs are available onthe Ribbon, with one tab for design and the other to change the layout of yourtable. By selecting individual cells, columns, and rows, you can reformat thelook of your table, or you can use the Table Styles gallery in the Design tab toquickly add a specific format to your table.
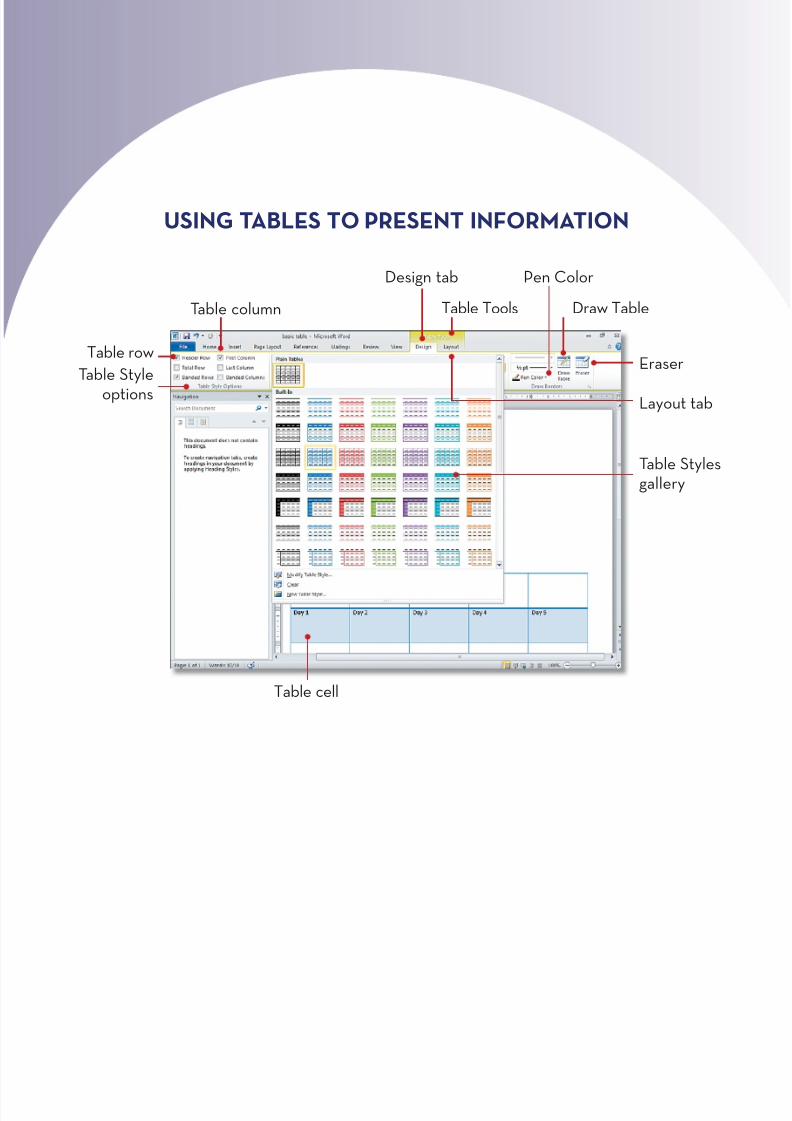
7/22/2019 Easy Microsoft Office 2010
http://slidepdf.com/reader/full/easy-microsoft-office-2010 79/309
USING TABLES TO PRESENT INFORMATION
Table row
Table column
Table cell
Table Tools
Design tab
Layout ta
Table Stygallery
Table Style
options
Pen Color
Eraser
Draw Table
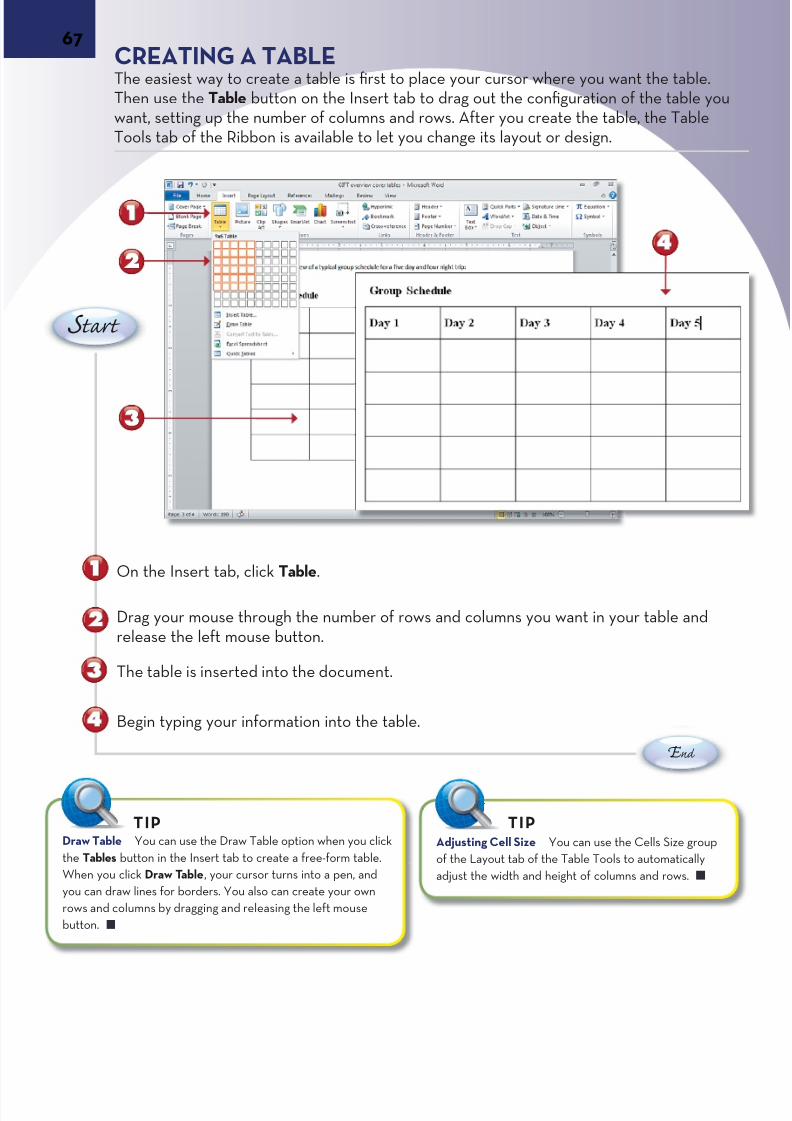
7/22/2019 Easy Microsoft Office 2010
http://slidepdf.com/reader/full/easy-microsoft-office-2010 80/309
67CREATING A TABLE
The easiest way to create a table is first to place your cursor where you want the tablThen use the Table button on the Insert tab to drag out the configuration of the tablewant, setting up the number of columns and rows. After you create the table, the TabTools tab of the Ribbon is available to let you change its layout or design.
E nd
On the Insert tab, click Table.
Drag your mouse through the number of rows and columns you want in your table anrelease the left mouse button.
The table is inserted into the document.
Begin typing your information into the table.
Adjusting Cell Size You can use the Cells Size gro
of the Layout tab of the Table Tools to automaticall
adjust the width and height of columns and rows.
Draw Table You can use the Draw Table option when you click
the Tables button in the Insert tab to create a free-form table.
When you click Draw Table, your cursor turns into a pen, and
you can draw lines for borders. You also can create your own
rows and columns by dragging and releasing the left mouse
button.
TIP
S tart
TIP
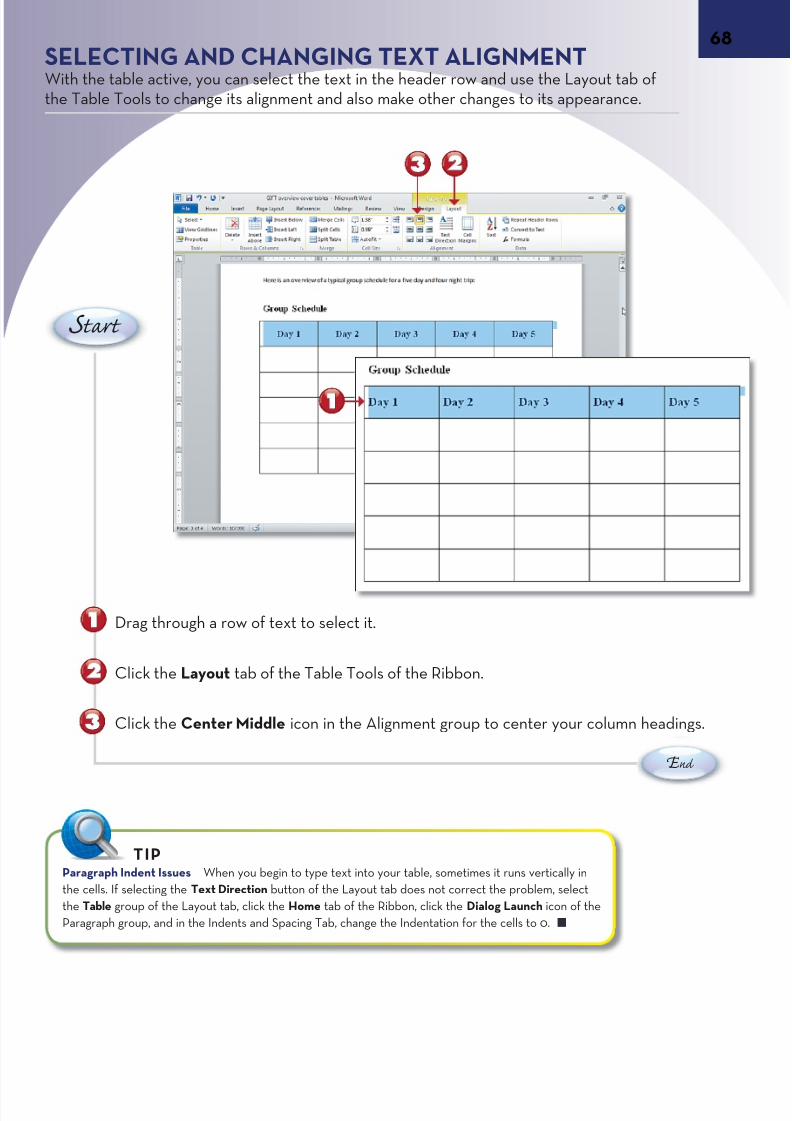
7/22/2019 Easy Microsoft Office 2010
http://slidepdf.com/reader/full/easy-microsoft-office-2010 81/309
SELECTING AND CHANGING TEXT ALIGNMENTWith the table active, you can select the text in the header row and use the Layout tab ofthe Table Tools to change its alignment and also make other changes to its appearance.
E nd
Drag through a row of text to select it.
Click the Layout tab of the Table Tools of the Ribbon.
Click the Center Middle icon in the Alignment group to center your column headings
S tart
Paragraph Indent Issues When you begin to type text into your table, sometimes it runs vertically in
the cells. If selecting the Text Direction button of the Layout tab does not correct the problem, select
the Table group of the Layout tab, click the Home tab of the Ribbon, click the Dialog Launch icon of the
Paragraph group, and in the Indents and Spacing Tab, change the Indentation for the cells to 0.
TIP
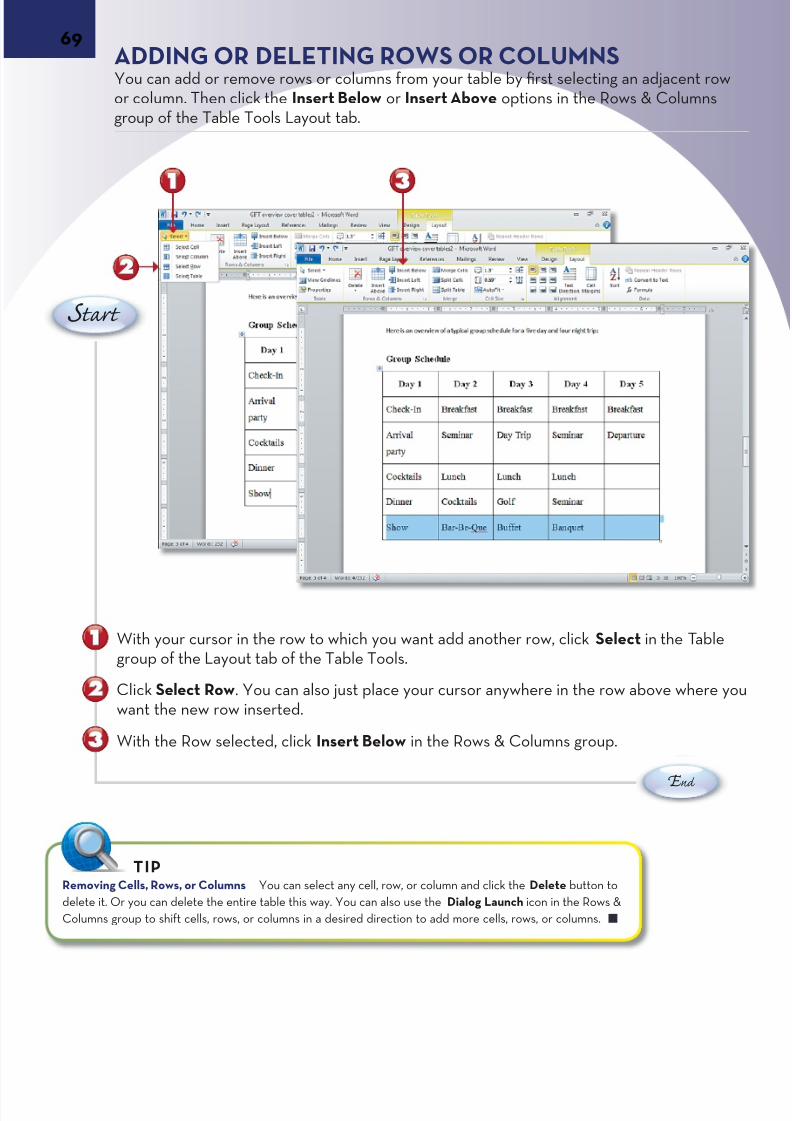
7/22/2019 Easy Microsoft Office 2010
http://slidepdf.com/reader/full/easy-microsoft-office-2010 82/309
69ADDING OR DELETING ROWS OR COLUMNS
You can add or remove rows or columns from your table by first selecting an adjacentor column. Then click the Insert Below or Insert Above options in the Rows & Columgroup of the Table Tools Layout tab.
E nd
With your cursor in the row to which you want add another row, click Select in the Tagroup of the Layout tab of the Table Tools.
Click Select Row. You can also just place your cursor anywhere in the row above whewant the new row inserted.
With the Row selected, click Insert Below in the Rows & Columns group.
Removing Cells, Rows, or Columns You can select any cell, row, or column and click the Delete button to
delete it. Or you can delete the entire table this way. You can also use the Dialog Launch icon in the Rows &
Columns group to shift cells, rows, or columns in a desired direction to add more cells, rows, or columns.
TIP
S tart

7/22/2019 Easy Microsoft Office 2010
http://slidepdf.com/reader/full/easy-microsoft-office-2010 83/309
S tart
MERGING CELLSYou can combine a group of formatted cells into one larger cell by using the Merge Cellsbutton in the Layout tab of the Table Tools. This gives you more room within the table formore text and possible summaries of information.
In the new row, drag through cells you want to combine to select them.
Click Merge Cells.
Type new information in the merged cells.
E nd
S tart
Splitting a Column or Row If you need to divide the information in a column or row, you can
select it and click the Split Cells button in the Merge group of the Layout tab of Table Tools.
TIP
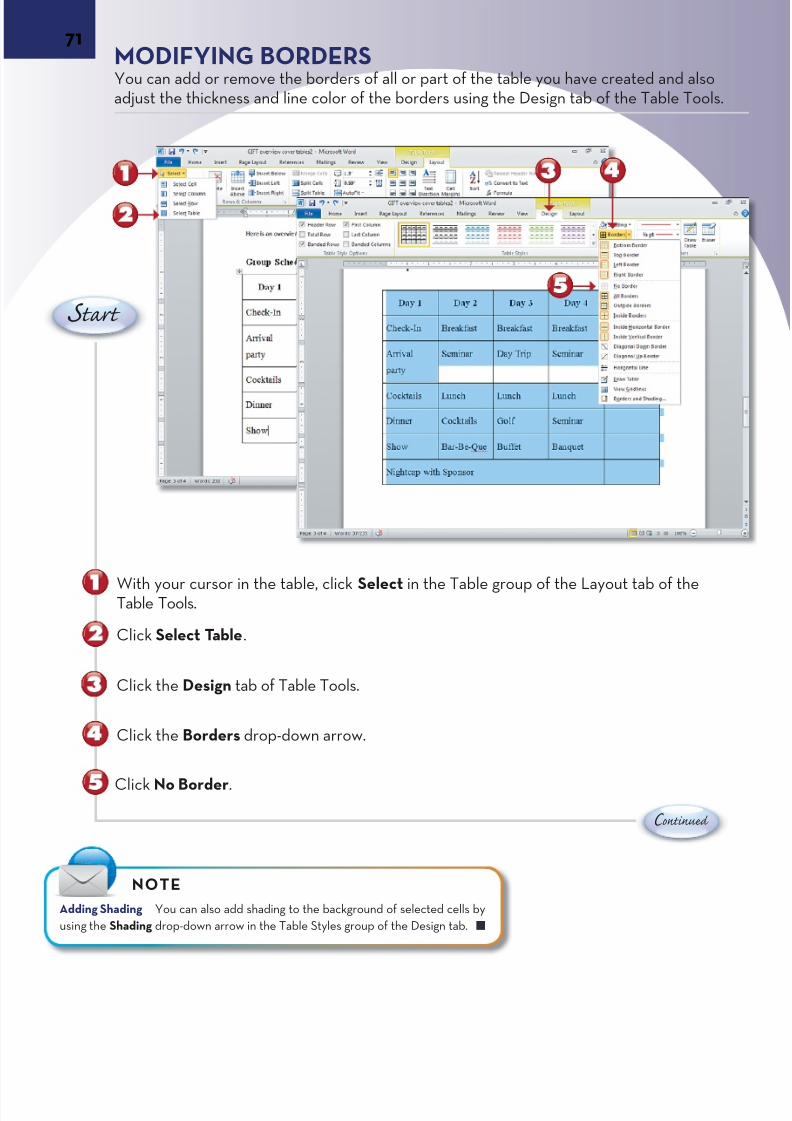
7/22/2019 Easy Microsoft Office 2010
http://slidepdf.com/reader/full/easy-microsoft-office-2010 84/309
71MODIFYING BORDERSYou can add or remove the borders of all or part of the table you have created and aladjust the thickness and line color of the borders using the Design tab of the Table To
C ontinue
With your cursor in the table, click Select in the Table group of the Layout tab of theTable Tools.
Click Select Table.
Click the Design tab of Table Tools.
Click the Borders drop-down arrow.
S tart
Click No Border.
Adding Shading You can also add shading to the background of selected cells by
using the Shading drop-down arrow in the Table Styles group of the Design tab.
NOTE
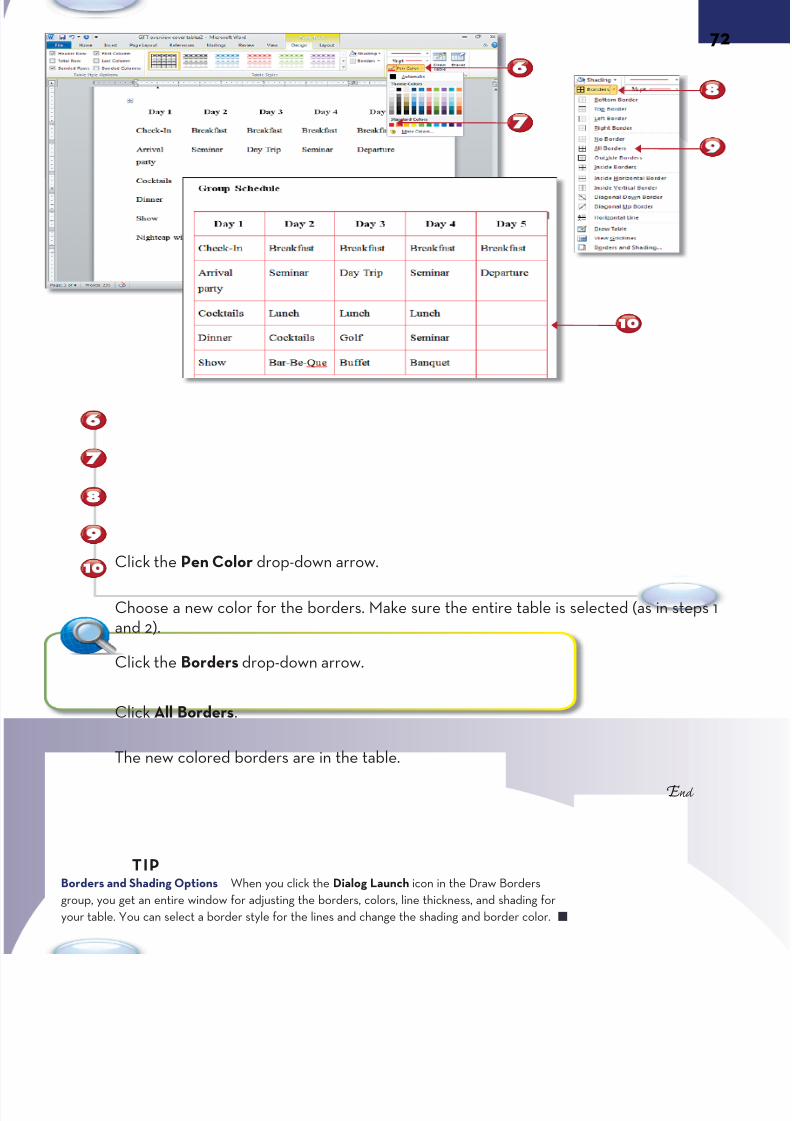
7/22/2019 Easy Microsoft Office 2010
http://slidepdf.com/reader/full/easy-microsoft-office-2010 85/309
S SS t tta aar rrt tt
E nd
Click the Pen Color drop-down arrow.
Choose a new color for the borders. Make sure the entire table is selected (as in stepand 2).
Click the Borders drop-down arrow.
Click All Borders.
The new colored borders are in the table.
Borders and Shading Options When you click the Dialog Launch icon in the Draw Borders
group, you get an entire window for adjusting the borders, colors, line thickness, and shading for
your table. You can select a border style for the lines and change the shading and border color.
TIP

7/22/2019 Easy Microsoft Office 2010
http://slidepdf.com/reader/full/easy-microsoft-office-2010 86/309
73USING THE TABLE STYLES GALLERYWord allows you to quickly change the appearance of a table using the Table Styles inDesign tab of the Table Tools on the Ribbon. Select the table and then see a Quick Prof one or more styles in the Table Styles Gallery and click to apply the style. You can further adjustments like using Banded Columns in the Table Style Options group of thDesign tab.
Saving a Formatted Table Style If you use the manual design tools or the Table Styles to
create a table with a style you want to save and reuse, you can click More in Table Styles
and save that style by clicking New Table Style. Then give it a name and click OK.
TIP
With your cursor in the table, click Design in Table Tools.
Click More in the Table Styles gallery.
Scroll through the table styles.
Hover over a table style to see a Quick Preview. Click it to apply the table style.
C ontinue
S tart

7/22/2019 Easy Microsoft Office 2010
http://slidepdf.com/reader/full/easy-microsoft-office-2010 87/309
S tart
E nd
The new style is applied to the table.
Click the Banded Columns check box in Table Style Options.
Column borders are added to the table.
Creating a New Table Style You can create an entirely new table style from
scratch by clicking More in Table Styles and setting up a new style from the
formatting options, naming the new style, and clicking OK.
TIP
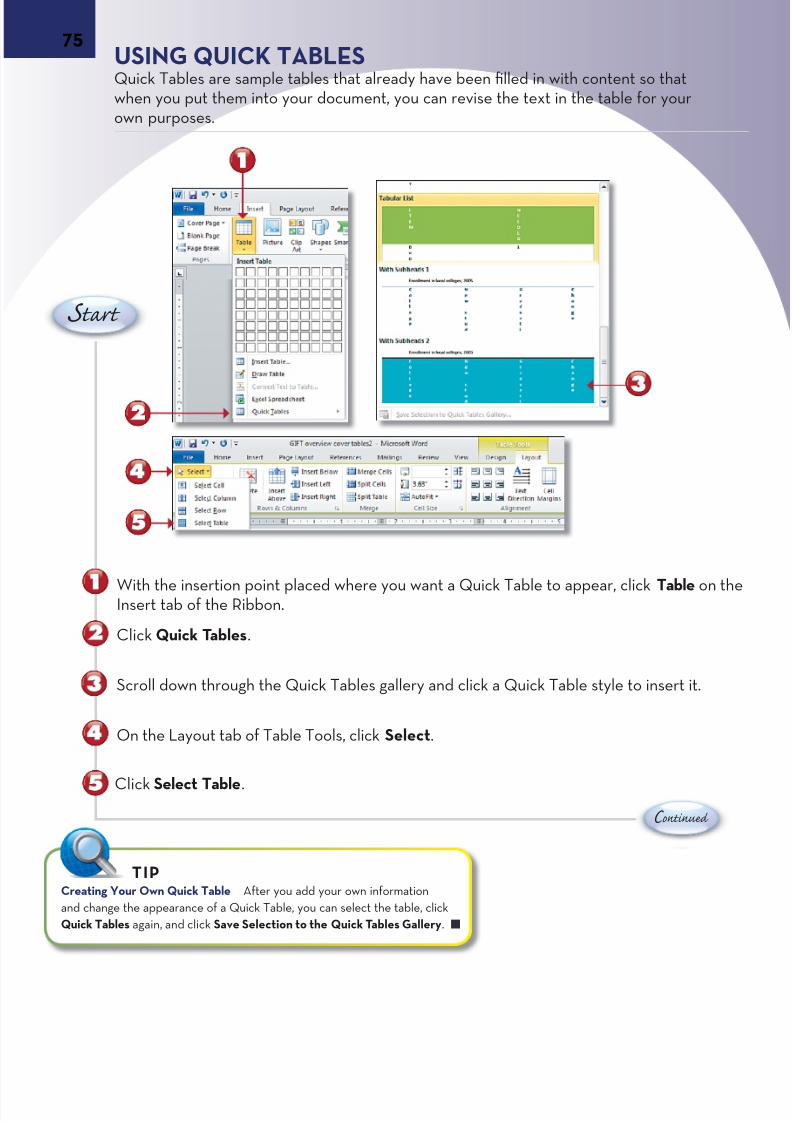
7/22/2019 Easy Microsoft Office 2010
http://slidepdf.com/reader/full/easy-microsoft-office-2010 88/309
75USING QUICK TABLES
Quick Tables are sample tables that already have been filled in with content so thatwhen you put them into your document, you can revise the text in the table for yourown purposes.
With the insertion point placed where you want a Quick Table to appear, click TableInsert tab of the Ribbon.
Click Quick Tables.
Scroll down through the Quick Tables gallery and click a Quick Table style to insert it
On the Layout tab of Table Tools, click Select.
S tart
Click Select Table.
C ontinue
Creating Your Own Quick Table After you add your own information
and change the appearance of a Quick Table, you can select the table, click
Quick Tables again, and click Save Selection to the Quick Tables Gallery.
TIP
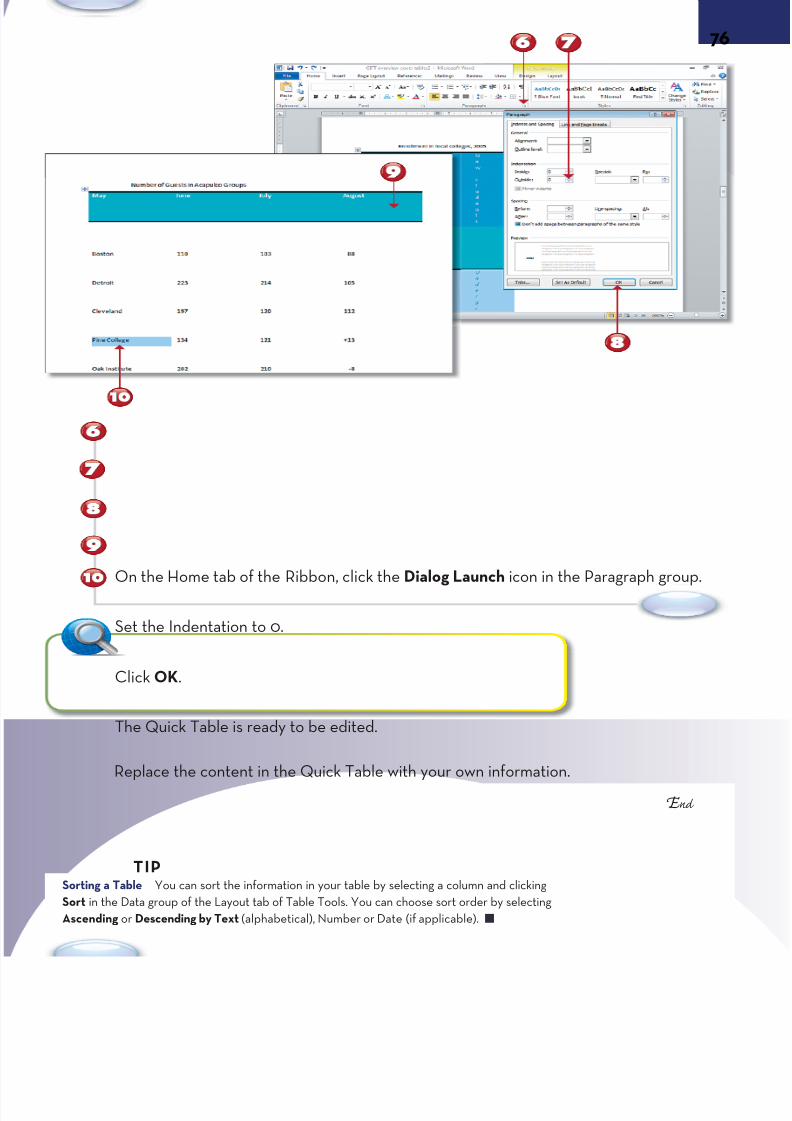
7/22/2019 Easy Microsoft Office 2010
http://slidepdf.com/reader/full/easy-microsoft-office-2010 89/309
S SS t tta aar rrt tt
E nd
On the Home tab of the Ribbon, click the Dialog Launch icon in the Paragraph group
Set the Indentation to 0.
Click OK.
The Quick Table is ready to be edited.
Replace the content in the Quick Table with your own information.
Sorting a Table You can sort the information in your table by selecting a column and clicking
Sort in the Data group of the Layout tab of Table Tools. You can choose sort order by selecting
Ascending or Descending by Text (alphabetical), Number or Date (if applicable).
TIP
7/22/2019 Easy Microsoft Office 2010
http://slidepdf.com/reader/full/easy-microsoft-office-2010 90/309
Chapter 6
WORKING WITH GRAPHICS AND EFFECTSWord comes with a wide array of graphics tools that let you put illustrations and diaginto your document to enhance its appearance and to communicate more clearly.
When you add a graphic, a Picture Tools tab becomes active on the Ribbon, letting yadd styles, borders, and effects to an image in the document. The Picture Styles gallallows you to instantly add preset looks to your image that include borders, shadowsrotation. You can also use the Picture Tools to crop the image, resize the graphic, or apicture layout that can include a caption.
Shapes and SmartArt graphics are a good way to make concepts more visual with diathat help you tell your story.
Word 2010 also has Advanced Typography and the capability to capture a screen frowindow in an open program and insert it into your document, which is a good way toate training materials.
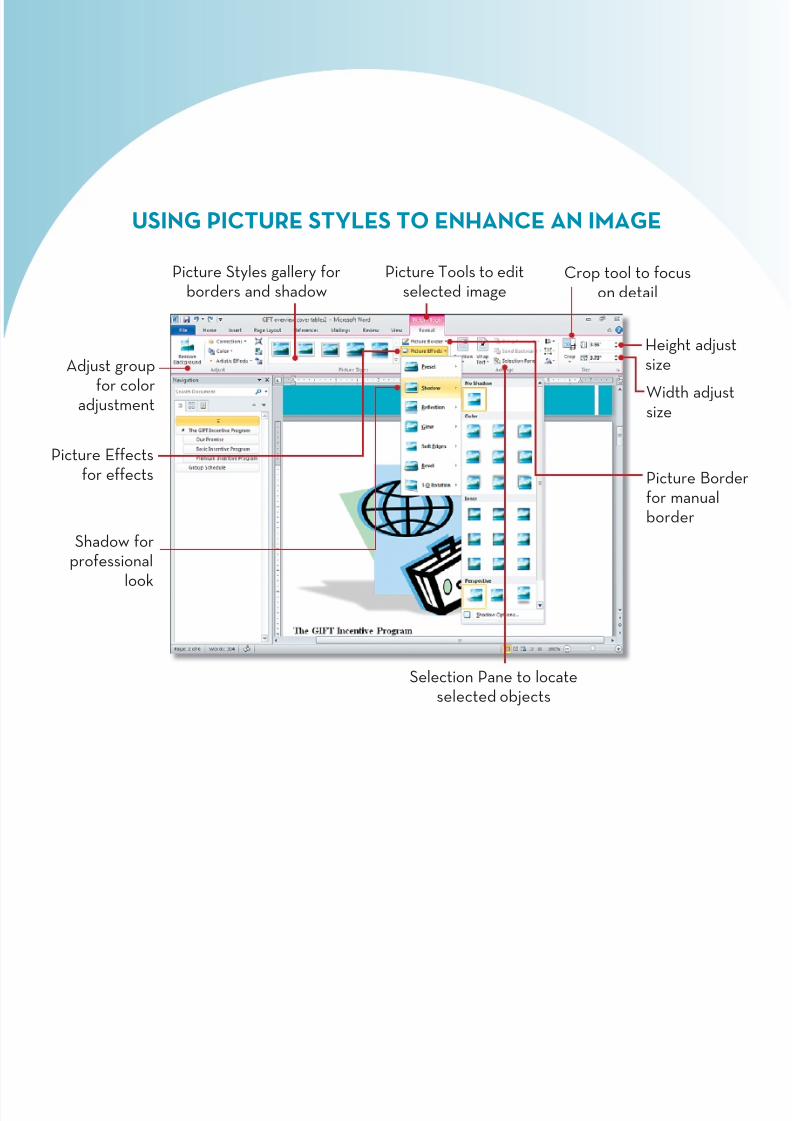
7/22/2019 Easy Microsoft Office 2010
http://slidepdf.com/reader/full/easy-microsoft-office-2010 91/309
USING PICTURE STYLES TO ENHANCE AN IMAGE
Adjust group
for coloradjustment Width asize
Picture Styles gallery forborders and shadow
Picture for manborder
Picture Tools to editselected image
Selection Pane to locateselected objects
Crop tool to focuson detail
Picture Effectsfor effects
Shadow forprofessional
look
Height asize
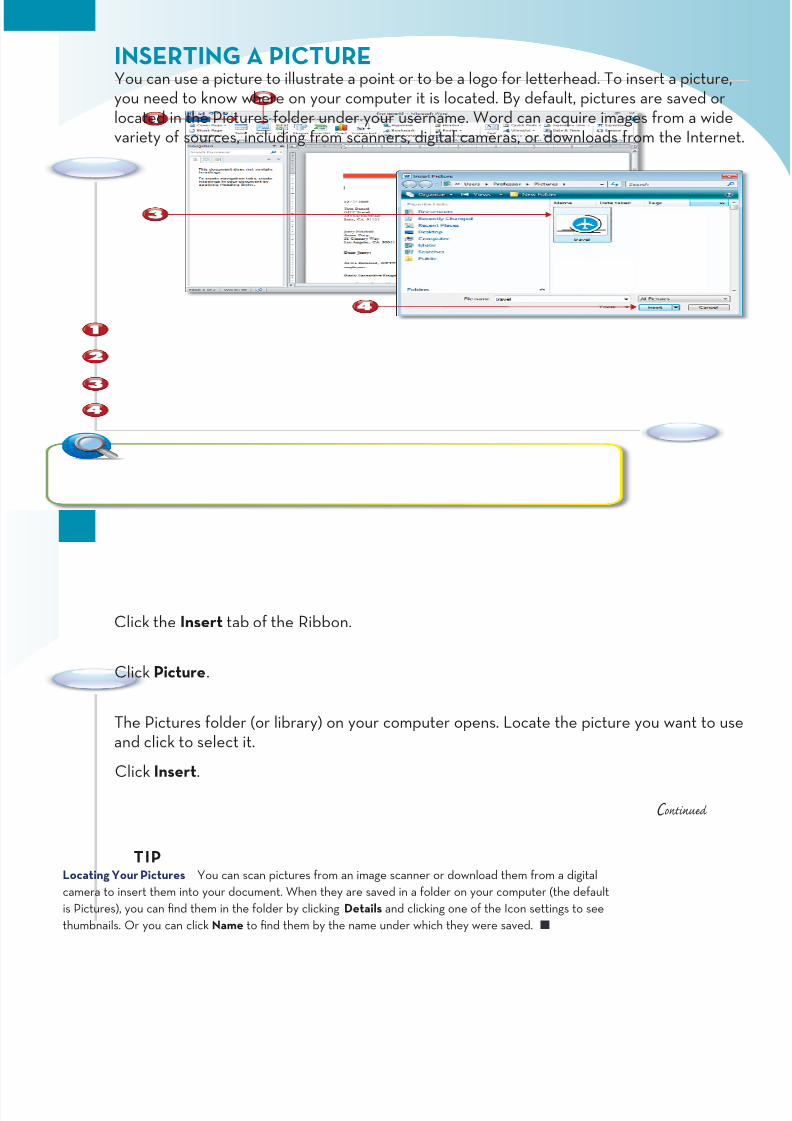
7/22/2019 Easy Microsoft Office 2010
http://slidepdf.com/reader/full/easy-microsoft-office-2010 92/309
777999
S SS t tta aar rrt tt
INSERTING A PICTUREYou can use a picture to illustrate a point or to be a logo for letterhead. To insert a picyou need to know where on your computer it is located. By default, pictures are savelocated in the Pictures folder under your username. Word can acquire images from a variety of sources, including from scanners, digital cameras, or downloads from the In
C ontinue
Click the Insert tab of the Ribbon.
Click Picture.
The Pictures folder (or library) on your computer opens. Locate the picture you want and click to select it.
Click Insert.
Locating Your Pictures You can scan pictures from an image scanner or download them from a digital
camera to insert them into your document. When they are saved in a folder on your computer (the default
is Pictures), you can find them in the folder by clicking Details and clicking one of the Icon settings to see
thumbnails. Or you can click Name to find them by the name under which they were saved.
TIP

7/22/2019 Easy Microsoft Office 2010
http://slidepdf.com/reader/full/easy-microsoft-office-2010 93/309
S SS t tta aar rrt tt
The picture is inserted into the document.
E nd
When a picture is selected in a document, the Picture Tools tab of the Ribbon is activ
Picture File Formats When you click All Pictures
in the Insert Picture window, you can review a list
of all the picture formats Word accepts. The most
common formats are JPEG (.JPG) for digital cam-
eras and the Web and Tagged Image File (.TIF) for
larger uncompressed images.
TIP
Organizing Pictures in Folders If you have several ima
for a particular project or client, you might want to keep
all in a specific folder, either in Pictures, in your Docume
folder, or on your Desktop. You can create a new folder
right-clicking in an existing folder or on your Desktop, cli
New, selecting Folder, and then naming your new folder
TIP
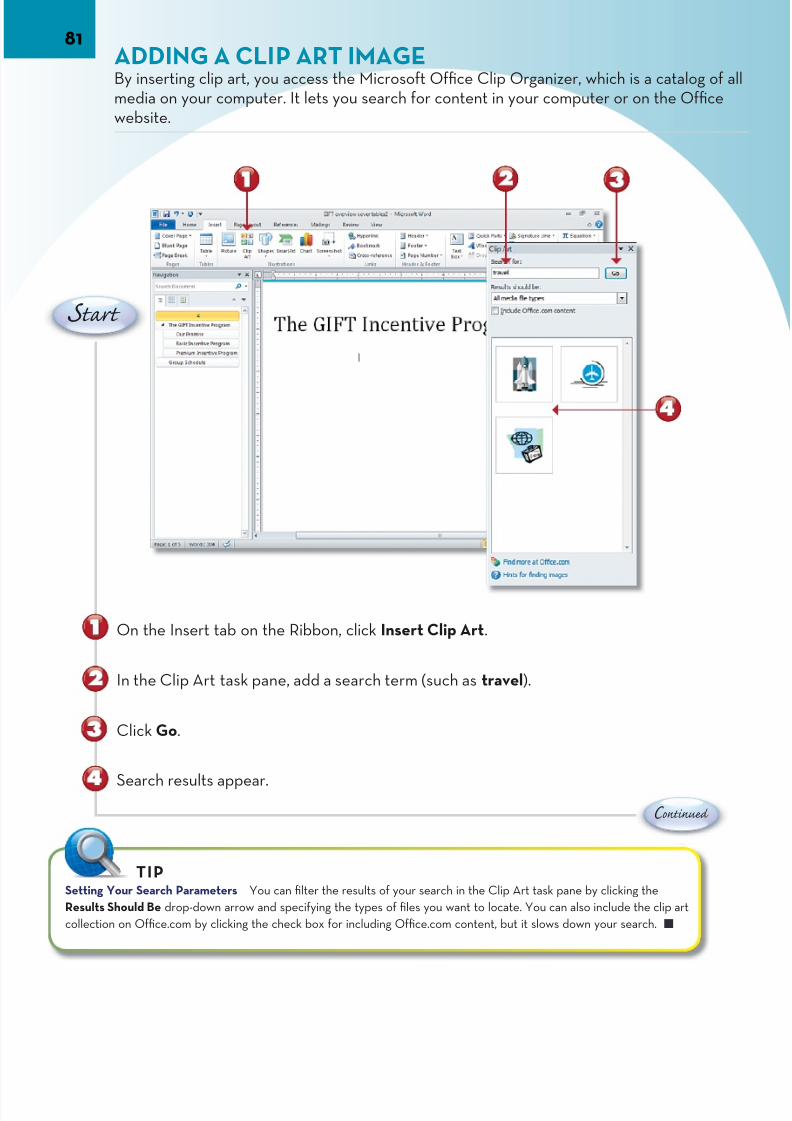
7/22/2019 Easy Microsoft Office 2010
http://slidepdf.com/reader/full/easy-microsoft-office-2010 94/309
81
C ontinue
ADDING A CLIP ART IMAGE By inserting clip art, you access the Microsoft Office Clip Organizer, which is a catalo
media on your computer. It lets you search for content in your computer or on the Ofwebsite.
On the Insert tab on the Ribbon, click Insert Clip Art.
In the Clip Art task pane, add a search term (such as travel).
Click Go.
Search results appear.
S tart
Setting Your Search Parameters You can filter the results of your search in the Clip Art task pane by clicking the
Results Should Be drop-down arrow and specifying the types of files you want to locate. You can also include the clip art
collection on Office.com by clicking the check box for including Office.com content, but it slows down your search.
TIP

7/22/2019 Easy Microsoft Office 2010
http://slidepdf.com/reader/full/easy-microsoft-office-2010 95/309
S tart
E nd
Place your cursor over the right side of the image you want to insert and click the drodown arrow.
Click Insert.
The image is placed into your document and selected, activating the Picture Tools onRibbon.
Adding Search Capabilities If you click the drop-
down arrow next to a clip art image in the Clip Art
task pane, you can choose Edit Keywords to tag
the image for future searches. You can click Copy
to Collection to add it to another part of the Clip
Organizer.
TIP
Using the Clip Organizer If you like the cata
features of the Clip Organizer, you can find it u
Microsoft Office Tools in your Windows Start
To add media to your Clip Organizer (and loca
later in the Clip Art task pane), click File in the
Organizer and click Add Clips to Organizer.
TIP

7/22/2019 Easy Microsoft Office 2010
http://slidepdf.com/reader/full/easy-microsoft-office-2010 96/309
83MOVING A GRAPHICWhen a graphic is inserted in a document and selected (click the graphic to select it anote the selection handles that appear around the graphic), you can grab a border anand drop it to a new location in the document.
E nd
With your graphic selected, click the left mouse button over a border until it turns intcrosshairs.
Drag the graphic to a new location (the mouse pointer pulls a small rectangle represethe graphic).
Release the left mouse button to put the graphic in a new location.
Using Paragraph Alignment You can select a
graphic and use the Paragraph Alignment options in
the Paragraph group of the Home tab to reposition
a graphic relative to the page and other text.
TIPWrapping Text To change the way text is wrapped around
a graphic, click the Wrap Text button in the Format tab of the
Picture Tools when the graphic is selected. Alternatively, righ
click the graphic and select Wrap Text. As you select the vari
options in Wrap Text, the graphic and text show you a previe
of what each option does if clicked.
TIP
S tart
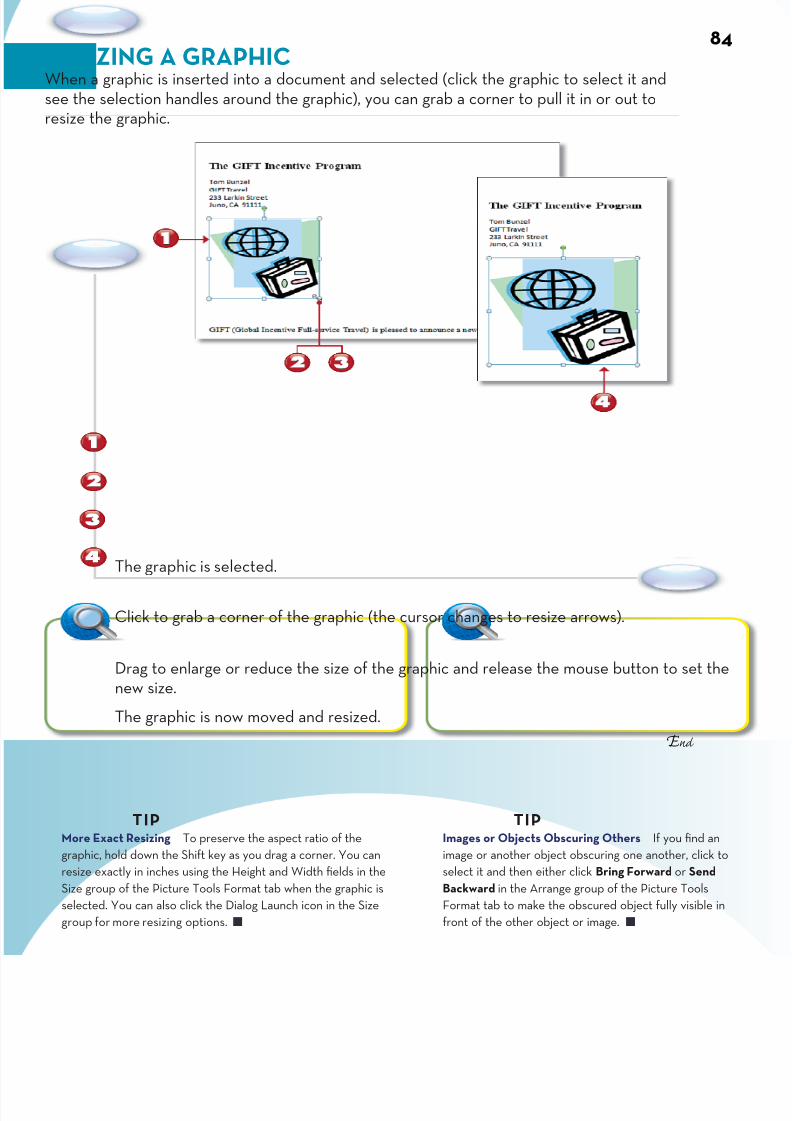
7/22/2019 Easy Microsoft Office 2010
http://slidepdf.com/reader/full/easy-microsoft-office-2010 97/309
S SS t tta aar rrt tt
RESIZING A GRAPHICWhen a graphic is inserted into a document and selected (click the graphic to select it andsee the selection handles around the graphic), you can grab a corner to pull it in or out toresize the graphic.
E nd
The graphic is selected.
Click to grab a corner of the graphic (the cursor changes to resize arrows).
Drag to enlarge or reduce the size of the graphic and release the mouse button to setnew size.
The graphic is now moved and resized.
More Exact Resizing To preserve the aspect ratio of the
graphic, hold down the Shift key as you drag a corner. You can
resize exactly in inches using the Height and Width fields in the
Size group of the Picture Tools Format tab when the graphic is
selected. You can also click the Dialog Launch icon in the Size
group for more resizing options.
TIP Images or Objects Obscuring Others If you find
image or another object obscuring one another, cl
select it and then either click Bring Forward or Se
Backward in the Arrange group of the Picture Too
Format tab to make the obscured object fully visib
front of the other object or image.
TIP
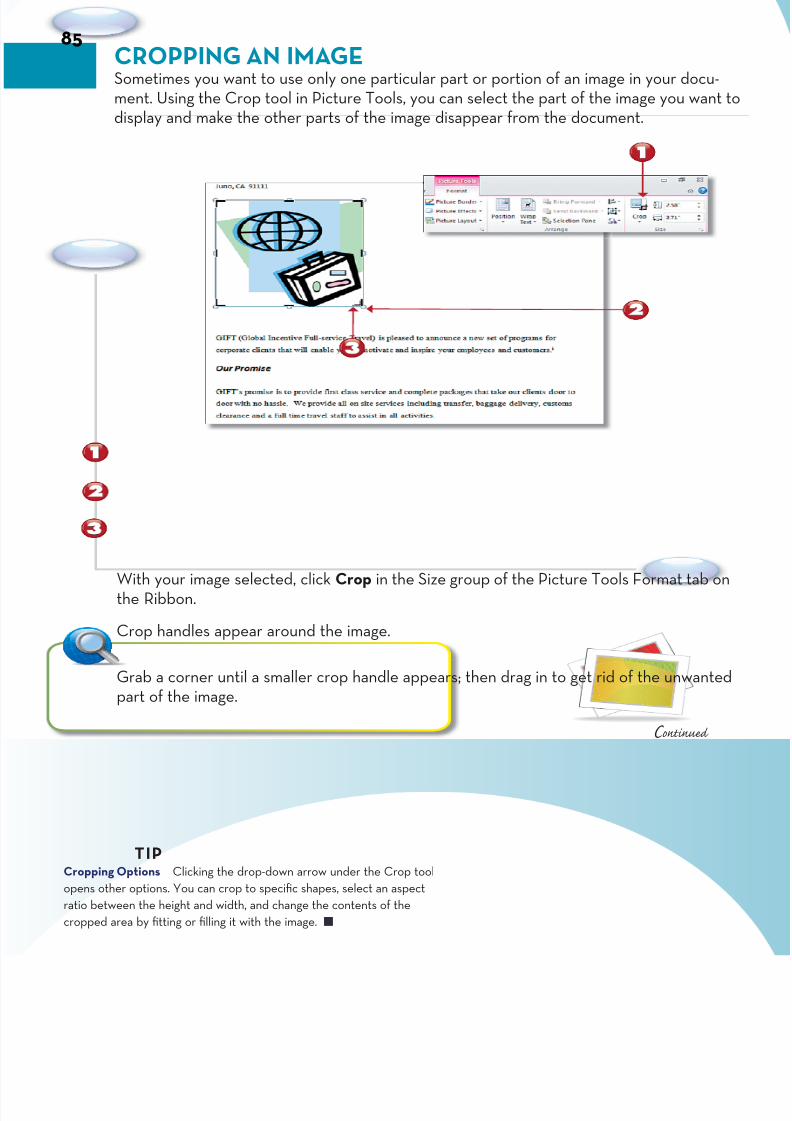
7/22/2019 Easy Microsoft Office 2010
http://slidepdf.com/reader/full/easy-microsoft-office-2010 98/309
S SS t tta aar rrt tt
85CROPPING AN IMAGESometimes you want to use only one particular part or portion of an image in your doment. Using the Crop tool in Picture Tools, you can select the part of the image you wdisplay and make the other parts of the image disappear from the document.
Grab a corner until a smaller crop handle appears; then drag in to get rid of the unwapart of the image.
C ontinue
With your image selected, click Crop in the Size group of the Picture Tools Format tathe Ribbon.
Crop handles appear around the image.
Cropping Options Clicking the drop-down arrow under the Crop tool
opens other options. You can crop to specific shapes, select an aspect
ratio between the height and width, and change the contents of the
cropped area by fitting or filling it with the image.
TIP

7/22/2019 Easy Microsoft Office 2010
http://slidepdf.com/reader/full/easy-microsoft-office-2010 99/309
S SS t tta aar rrt tt
E nd
E nd
The corner of the image turns into a cross shape as you drag. Release the mouse whethe part of the image you want to keep is showing.
Only the part of the image you want to show remains visible.
Click away from the image to deselect it in the document.
Files Sizes of Images and Documents When you crop a large image, its origi-
nal size is saved with the document, increasing its size. You can use an image
editor to reduce or compress an image before inserting it in Word. PowerPoint
has a Reduce the Size of Media Files feature in its Backstage view.
TIP
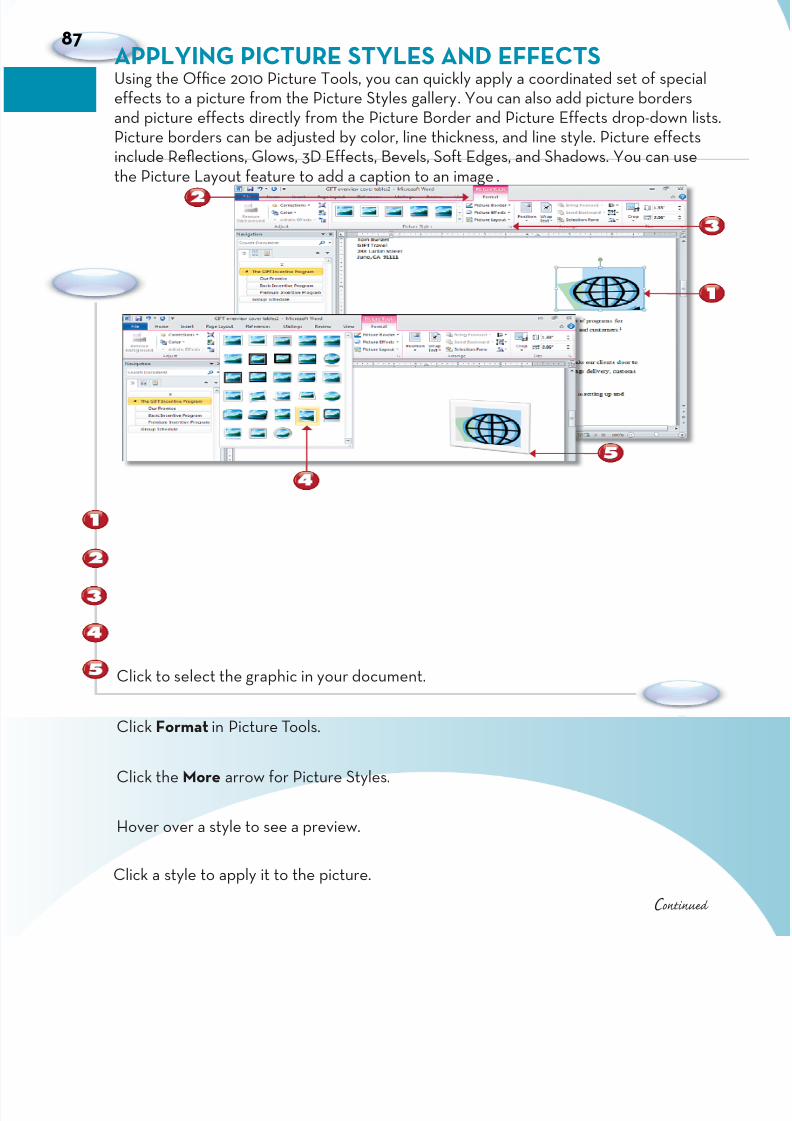
7/22/2019 Easy Microsoft Office 2010
http://slidepdf.com/reader/full/easy-microsoft-office-2010 100/309
S SS t tta aar rrt tt
87APPLYING PICTURE STYLES AND EFFECTS
Using the Office 2010 Picture Tools, you can quickly apply a coordinated set of speciaeffects to a picture from the Picture Styles gallery. You can also add picture bordersand picture effects directly from the Picture Border and Picture Effects drop-down liPicture borders can be adjusted by color, line thickness, and line style. Picture effectsinclude Reflections, Glows, 3D Effects, Bevels, Soft Edges, and Shadows. You can usethe Picture Layout feature to add a caption to an image.
C ontinue
Click to select the graphic in your document.
Click Format in Picture Tools.
Click the More arrow for Picture Styles.
Hover over a style to see a preview.
Click a style to apply it to the picture.
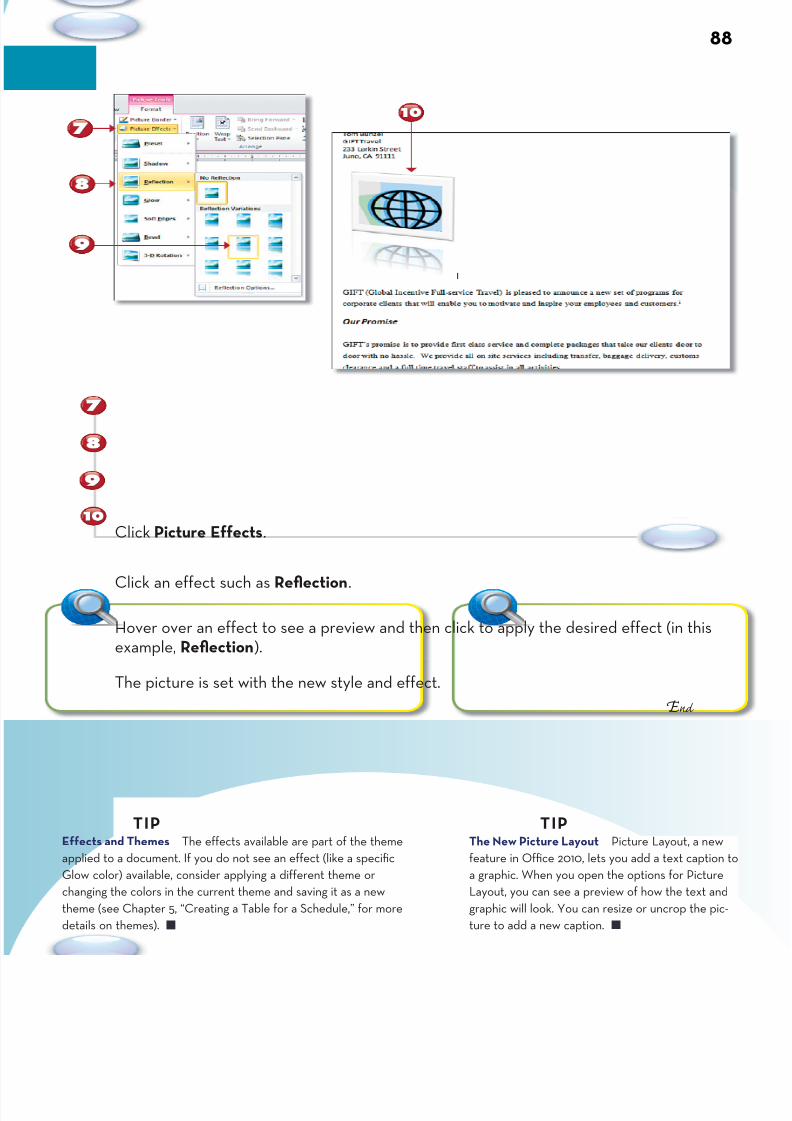
7/22/2019 Easy Microsoft Office 2010
http://slidepdf.com/reader/full/easy-microsoft-office-2010 101/309
S tart
S tart
E nd
Click Picture Effects.
Click an effect such as Reflection.
Hover over an effect to see a preview and then click to apply the desired effect (in thexample, Reflection).
The picture is set with the new style and effect.
Effects and Themes The effects available are part of the theme
applied to a document. If you do not see an effect (like a specific
Glow color) available, consider applying a different theme or
changing the colors in the current theme and saving it as a new
theme (see Chapter 5, “Creating a Table for a Schedule,” for more
details on themes).
TIP
The New Picture Layout Picture Layout, a
feature in Office 2010, lets you add a text cap
a graphic. When you open the options for Pic
Layout, you can see a preview of how the tex
graphic will look. You can resize or uncrop th
ture to add a new caption.
TIP

7/22/2019 Easy Microsoft Office 2010
http://slidepdf.com/reader/full/easy-microsoft-office-2010 102/309
89INSERTING A SMARTART DIAGRAMSmartArt graphics are preset diagrams that let you add text to depict a concept grapinstead of just with words. SmartArt diagrams include List, Process, Cycle, Hierarchy, tionship, Matrix, Pyramid, and Picture. You can change one SmartArt diagram into anoyou determine later a different type is preferable.
On the Insert tab, click SmartArt.
Select a category for SmartArt.
Click a diagram to see a preview.
Click OK to set it in your document.
C ontinue
S tart
Shape Effects The Shape Effects available in the Format
tab of SmartArt tools let you apply various special effects to
individual shapes or the entire SmartArt diagram.
TIP
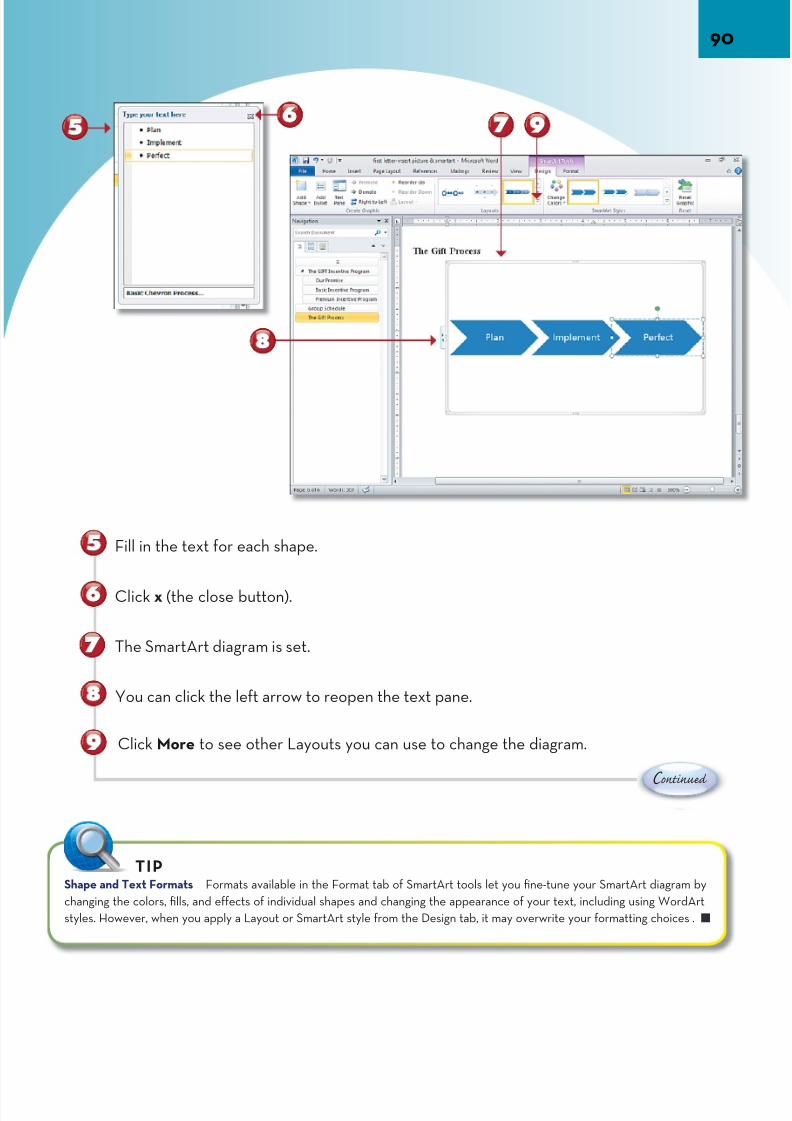
7/22/2019 Easy Microsoft Office 2010
http://slidepdf.com/reader/full/easy-microsoft-office-2010 103/309
C ontinue
Fill in the text for each shape.
Click x (the close button).
The SmartArt diagram is set.
You can click the left arrow to reopen the text pane.
Click More to see other Layouts you can use to change the diagram.
Shape and Text Formats Formats available in the Format tab of SmartArt tools let you fine-tune your SmartArt diagram b
changing the colors, fills, and effects of individual shapes and changing the appearance of your text, including using WordAr
styles. However, when you apply a Layout or SmartArt style from the Design tab, it may overwrite your formatting choices .
TIP

7/22/2019 Easy Microsoft Office 2010
http://slidepdf.com/reader/full/easy-microsoft-office-2010 104/309
91
S tart
Hover your mouse cursor to preview another layout and click the layout tochange the diagram.
Click Change Colors in the Design tab of SmartArt Tools.
Click to apply a Colorful color set.
Available Colors The Change Colors selections avail-
able are part of the theme applied to the document. If
you do not see the colors you want available, consider
applying a different theme or changing the colors in
the current theme and saving it as a new theme (see
Chapter 5 for more details on themes).
TIP
C ontinue

7/22/2019 Easy Microsoft Office 2010
http://slidepdf.com/reader/full/easy-microsoft-office-2010 105/309
S SS t tta aar rrt tt
The new colorful diagram represents your concept in the document.
E nd
SmartArt and PowerPoint Bullets In Office 2010,
you can convert PowerPoint bullets into SmartArt
diagrams by selecting the bullets, right-clicking, and
choosing Convert to SmartArt.
TIP
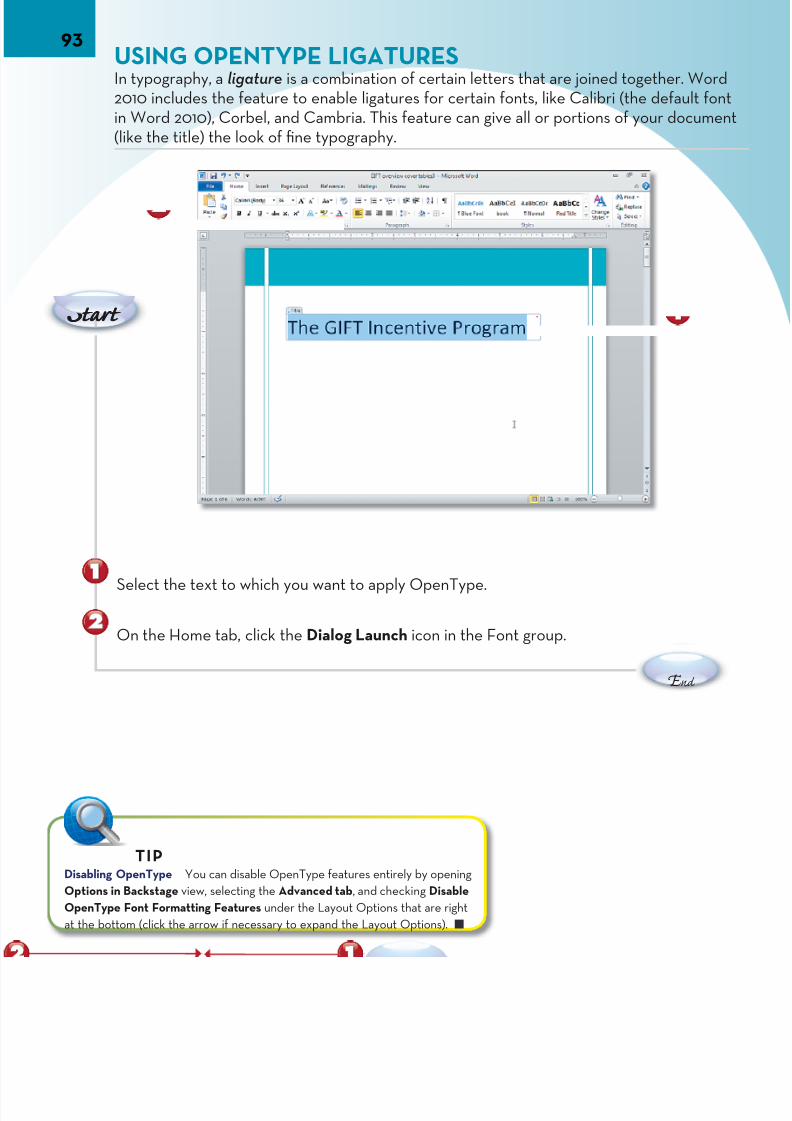
7/22/2019 Easy Microsoft Office 2010
http://slidepdf.com/reader/full/easy-microsoft-office-2010 106/309
93
S SS
E nd
USING OPENTYPE LIGATURES
In typography, a ligature is a combination of certain letters that are joined together. W2010 includes the feature to enable ligatures for certain fonts, like Calibri (the defaultin Word 2010), Corbel, and Cambria. This feature can give all or portions of your docu(like the title) the look of fine typography.
Select the text to which you want to apply OpenType.
On the Home tab, click the Dialog Launch icon in the Font group.
Disabling OpenType You can disable OpenType features entirely by opening
Options in Backstage view, selecting the Advanced tab, and checking Disable
OpenType Font Formatting Features under the Layout Options that are right
at the bottom (click the arrow if necessary to expand the Layout Options).
TIP
t tta aar rrt tt
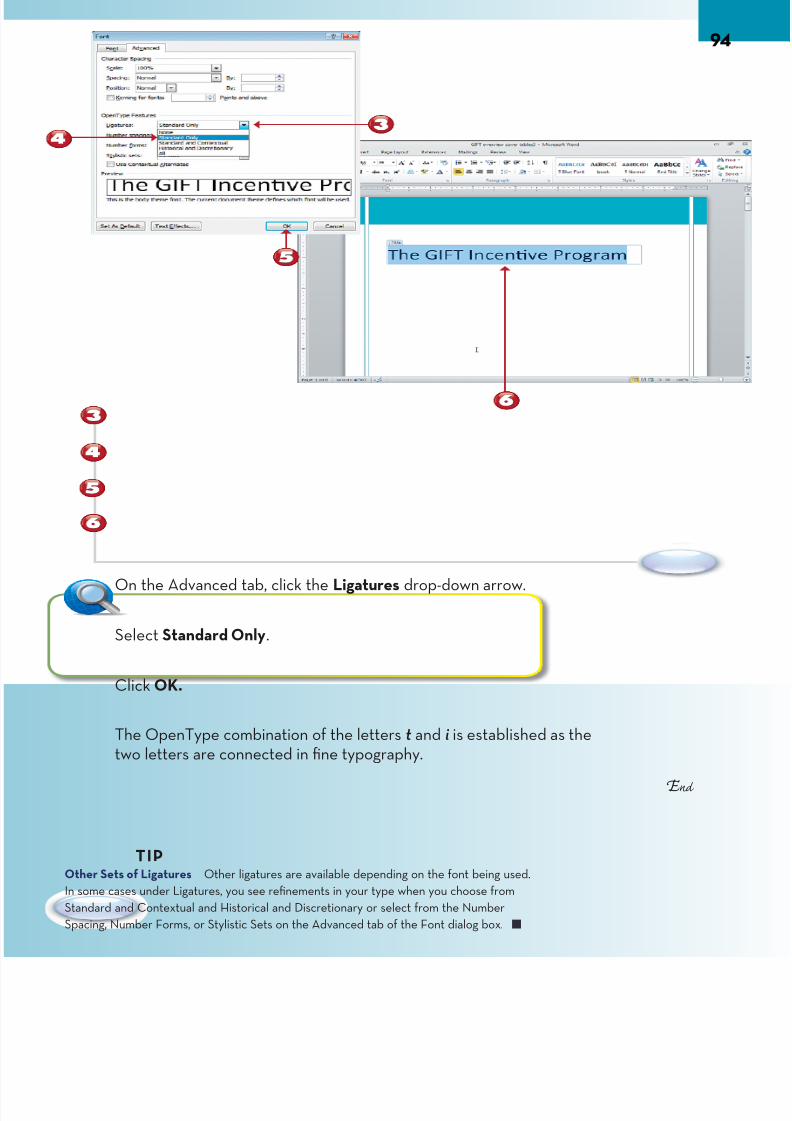
7/22/2019 Easy Microsoft Office 2010
http://slidepdf.com/reader/full/easy-microsoft-office-2010 107/309
S SS t tta aar rrt tt
On the Advanced tab, click the Ligatures drop-down arrow.
Select Standard Only.
Click OK.
The OpenType combination of the letters t and i is established as thetwo letters are connected in fine typography.
Other Sets of Ligatures Other ligatures are available depending on the font being used.
In some cases under Ligatures, you see refinements in your type when you choose from
Standard and Contextual and Historical and Discretionary or select from the Number
Spacing, Number Forms, or Stylistic Sets on the Advanced tab of the Font dialog box.
TIP
E nd
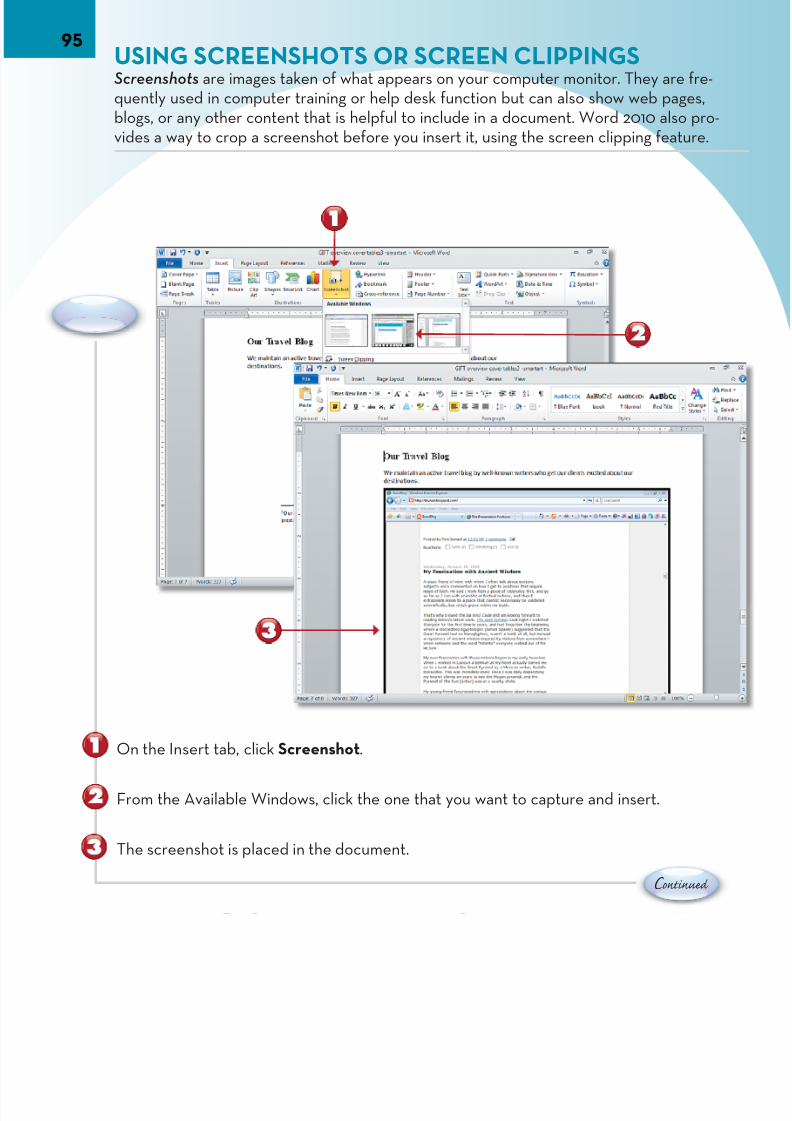
7/22/2019 Easy Microsoft Office 2010
http://slidepdf.com/reader/full/easy-microsoft-office-2010 108/309
95
S SS t tta aar rrt tt
USING SCREENSHOTS OR SCREEN CLIPPINGSScreenshots are images taken of what appears on your computer monitor. They are frquently used in computer training or help desk function but can also show web pagesblogs, or any other content that is helpful to include in a document. Word 2010 also pvides a way to crop a screenshot before you insert it, using the screen clipping featur
On the Insert tab, click Screenshot.
From the Available Windows, click the one that you want to capture and insert.
The screenshot is placed in the document.
C ontinue

7/22/2019 Easy Microsoft Office 2010
http://slidepdf.com/reader/full/easy-microsoft-office-2010 109/309
S SS t tta aar rrt tt
E nd
On the Insert tab, click Screenshot.
Click Screen Clipping.
The screen opens, and you can drag out the portion you want to clip.
The clipped portion of the captured screen is added to the document.
Editing Screenshots The Format tab of Picture Tools on the Ribbon lets you add effects or otherwise edit
your screenshots or screen clippings because they are pictures that have been placed into the document.
TIP

7/22/2019 Easy Microsoft Office 2010
http://slidepdf.com/reader/full/easy-microsoft-office-2010 110/309
REVIEWING DOCUMENTS AND WORKING ONLINEWhen you need to collaborate with others to get feedback or approval on a
document or other project, the Review tab of the Ribbon gives you the toolsto identify the changes suggested by other Word users. You also can accept orreject those changes and show the markup within the document.
You can also add comments to parts of the document that will appear in themarked-up version’s margin, allowing others to understand suggestions orcorrections that need to be implemented.
In Office 2010, online versions of Word, Excel, PowerPoint, and OneNote areavailable on Windows Live as web applications. When you sign in to a WindowsLive workspace (or if your company has a SharePoint site on a server), you
can maintain versions of your files in various folders in your workspace, allowothers to access the workspace and work with those files, and create or editdocuments using the new Office 2010 web applications.
Chapter 7
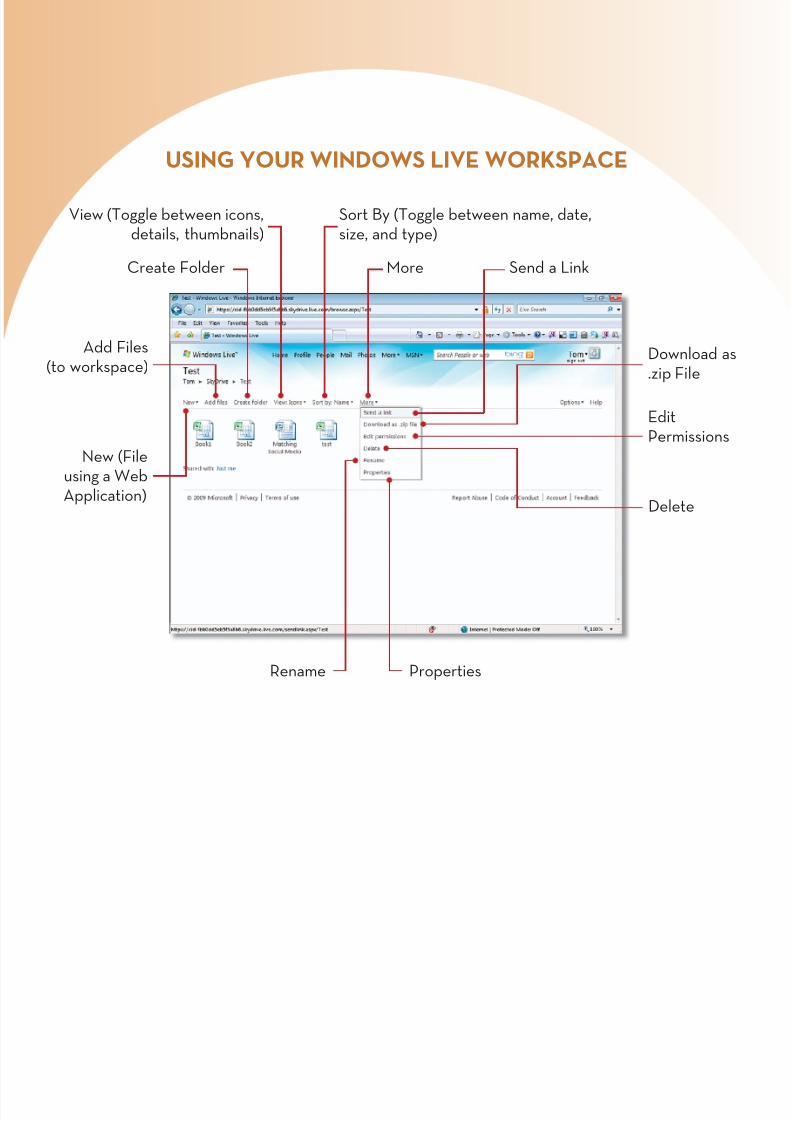
7/22/2019 Easy Microsoft Office 2010
http://slidepdf.com/reader/full/easy-microsoft-office-2010 111/309
USING YOUR WINDOWS LIVE WORKSPACE
New (Fileusing a WebApplication)
Add Files(to workspace)
Create Folder
View (Toggle between icons,details, thumbnails)
Sort By (Toggle between name, date,size, and type)
More Send a Link
Downlo.zip File
EditPermiss
Delete
Rename Properties
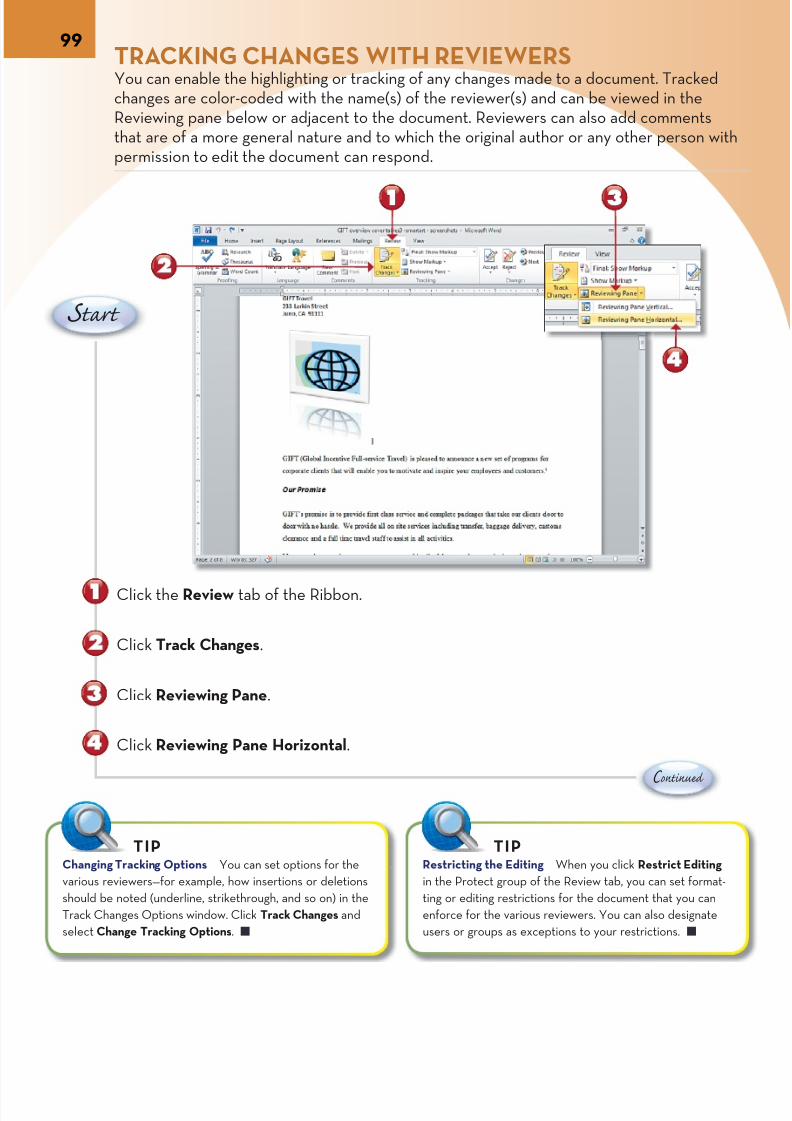
7/22/2019 Easy Microsoft Office 2010
http://slidepdf.com/reader/full/easy-microsoft-office-2010 112/309
99TRACKING CHANGES WITH REVIEWERSYou can enable the highlighting or tracking of any changes made to a document. Trackchanges are color-coded with the name(s) of the reviewer(s) and can be viewed in theReviewing pane below or adjacent to the document. Reviewers can also add commenthat are of a more general nature and to which the original author or any other persopermission to edit the document can respond.
Click the Review tab of the Ribbon.
Click Track Changes.
Click Reviewing Pane.
Click Reviewing Pane Horizontal.
S tart
Changing Tracking Options You can set options for the
various reviewers—for example, how insertions or deletions
should be noted (underline, strikethrough, and so on) in the
Track Changes Options window. Click Track Changes and
select Change Tracking Options.
TIP
Restricting the Editing When you click Restrict Edi
in the Protect group of the Review tab, you can set fo
ting or editing restrictions for the document that you
enforce for the various reviewers. You can also design
users or groups as exceptions to your restrictions.
TIP
C ontinued

7/22/2019 Easy Microsoft Office 2010
http://slidepdf.com/reader/full/easy-microsoft-office-2010 113/309
E nd
The Reviewing pane opens to show changes under the username associated withyour version of Word.
Select a word and replace it with another.
Changes are reflected in the Reviewing pane and in the document.
Click New Comment.
A Comment callout is opened in the margin. You can add a comment for the authoror other reviewers.
Comparing Documents If you have multiple documents that have been changed by different editors or reviewers,
you can click the Compare button in the Compare group on the Review tab to open the documents side-by-side
and choose the appropriate parts of either version to use in a final version.
TIP
7/22/2019 Easy Microsoft Office 2010
http://slidepdf.com/reader/full/easy-microsoft-office-2010 114/309
101ACCEPT AND REJECT REVIEWERS’ CHANGESWhen a document has gone through a set of reviews by other users, a user with permto accept or reject the changes can move through the document and address each coment or change individually, or accept or reject all changes in the document.
E nd
On the Review tab, to accept a change, click the Accept drop-down arrow.
Click Accept and Move to Next.
To reject a change, click the Reject drop-down arrow.
Click Reject and Move to Next.
S tart
Inspecting the Document After your reviewers have finished their work, you can use the Prepare for Sharing window und
Info in the Backstage view to select Check for Issues and then click Inspect Document. The Document Inspection can strip
reviewer’s comments, including documents and revisions, the document properties, and other extraneous data. Once this dat
removed, it is gone, so saving a version as a backup is advised.
TIP

7/22/2019 Easy Microsoft Office 2010
http://slidepdf.com/reader/full/easy-microsoft-office-2010 115/309
HIDING AND SHOWING MARKUPThe Tracking Group in the Review tab of the Ribbon lets you see various versions of thedocument: Final: Show Markup, Final, Original: Show Markup, and Original. You can changethe view of the document to hide or show the markup and display the Final or Originalversion of the document.
E nd
Click the Final: Show Markup drop-down arrow.
Click Final.
Click x (the close button) to close the Reviewing pane.
The document is displayed without markup.
S tart
Seeing All Reviewers If you click the Show Markup drop-
down arrow in the Tracking group of the Review tab and click
the arrow by Reviewers, you can see a list of the document’s
reviewers. If you check or uncheck these reviewers’ names,
you can show or hide their comments and changes.
TIP Returning to the Original If you need to get back
version of the document that was first sent out for r
without changes, click Final: Show Markup and then
Original. If desired, you can save this version to safe
what was created before the file was sent out for re
TIP
7/22/2019 Easy Microsoft Office 2010
http://slidepdf.com/reader/full/easy-microsoft-office-2010 116/309
103CREATING A FOLDER FOR WEB APPLICATIONS
Web applications of Word, Excel, PowerPoint, and OneNote 2010 are available onlinepart of SharePoint services if you use Windows Server or in Windows Live. In WindowLive, when you register with a username and password, you are provided a workspacefour folders: My Documents, for just your files; Public, for files to be shared with everFavorites, for accumulating web addresses; and Shared Favorites, for use by those usyou add to your personal network.
With your workspace open to the default folders, click Create Folder.
Name your new folder.
Click the Share with drop-down arrow
Select the option Select People.
S tart
C ontinued
Adding a Network You can add people to your
network and give permission to everyone in your
network for a given folder. In your main workspace
view, you can see recent activity for those in your
network. Just click Add People if necessary.
NOTE
All Folders When you start working online,
your main Recent Folders view shows the same
contents as All Folders. As you add folders, to
access those not showing under Recent Folders,
click All Folders.
TIP
7/22/2019 Easy Microsoft Office 2010
http://slidepdf.com/reader/full/easy-microsoft-office-2010 117/309
E nd
Add a name from your Contact list or a specific email address for a person to have acto the folder.
Click Next.
Click Cancel to proceed without uploading files to the folder (or click the Browse buselect files to upload files immediately and then click the Upload button).
Changing Folder Permission To let everyone in your network
download and access files in a folder, double-click to open the
folder; then click More and Edit Permissions. This returns you
to step 3, and you can change the permission for your folder to
share with people in your network.
TIP
Navigating the Workspace Because you ac
your workspace with a web browser, you can
the Back and Forward buttons to return to s
pages instead of the main Workspace menu.
TIP
7/22/2019 Easy Microsoft Office 2010
http://slidepdf.com/reader/full/easy-microsoft-office-2010 118/309
105
E nd
In the empty newly named folder, click the More drop-down arrow.
Click the name of your workspace (for example, SkyDrive). You can also click SkyDrivto your user name on the top left of the window.
You return to your main Workspace area.
Your new folder is available for use.
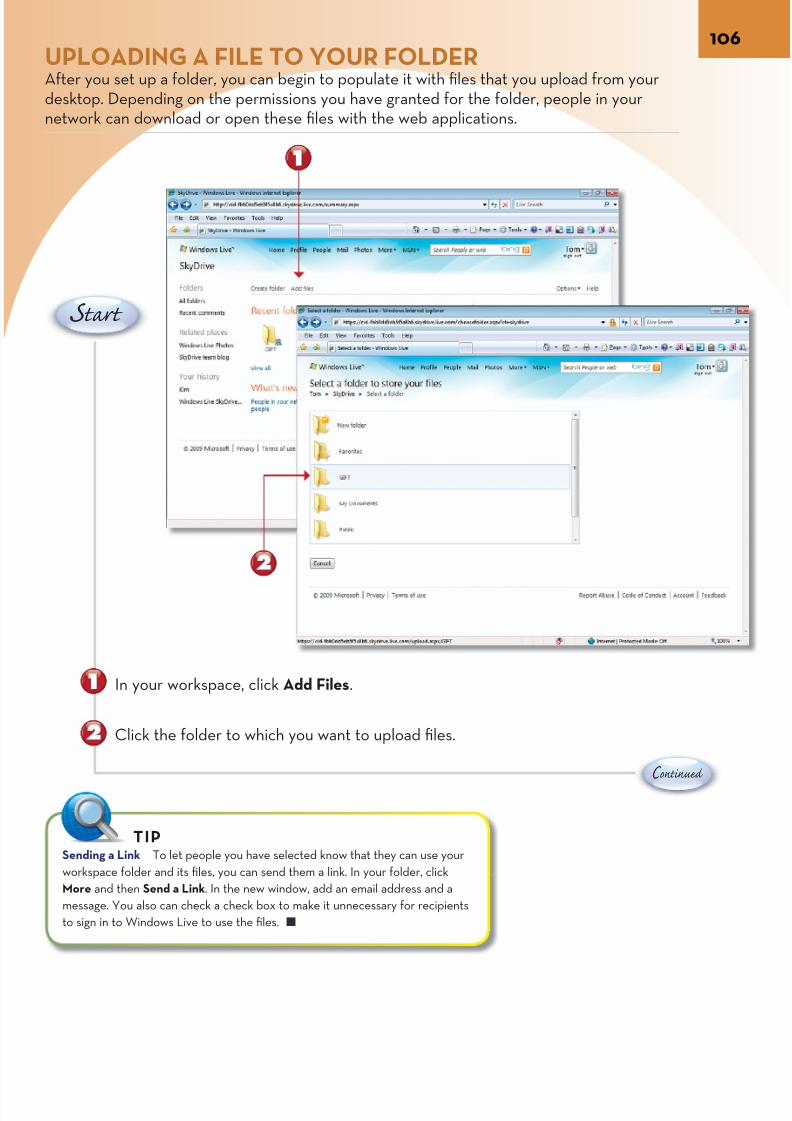
7/22/2019 Easy Microsoft Office 2010
http://slidepdf.com/reader/full/easy-microsoft-office-2010 119/309
UPLOADING A FILE TO YOUR FOLDER After you set up a folder, you can begin to populate it with files that you upload from your
desktop. Depending on the permissions you have granted for the folder, people in yournetwork can download or open these files with the web applications.
In your workspace, click Add Files.
Click the folder to which you want to upload files.
S tart
Sending a Link To let people you have selected know that they can use your
workspace folder and its files, you can send them a link. In your folder, click
More and then Send a Link. In the new window, add an email address and a
message. You also can check a check box to make it unnecessary for recipients
to sign in to Windows Live to use the files.
TIP
C ontinued
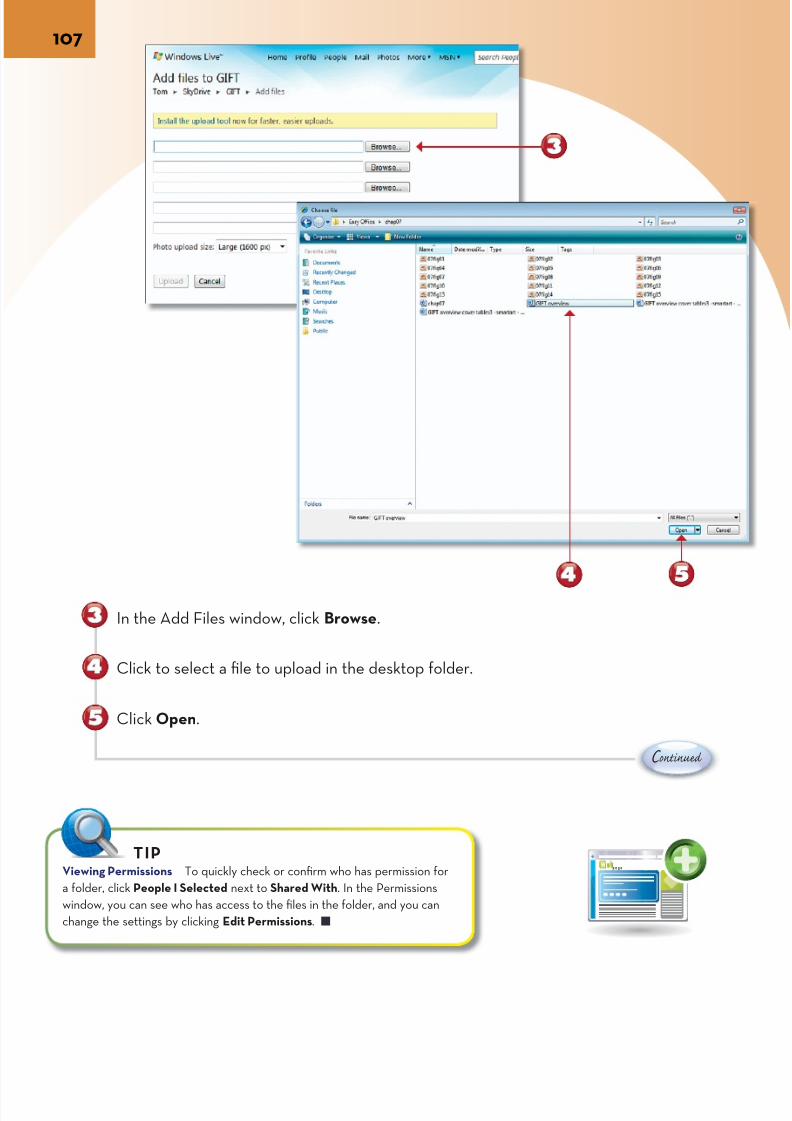
7/22/2019 Easy Microsoft Office 2010
http://slidepdf.com/reader/full/easy-microsoft-office-2010 120/309
107
In the Add Files window, click Browse.
Click to select a file to upload in the desktop folder.
Click Open.
Viewing Permissions To quickly check or confirm who has permission for
a folder, click People I Selected next to Shared With. In the Permissions
window, you can see who has access to the files in the folder, and you can
change the settings by clicking Edit Permissions.
TIP
C ontinued
p a g e
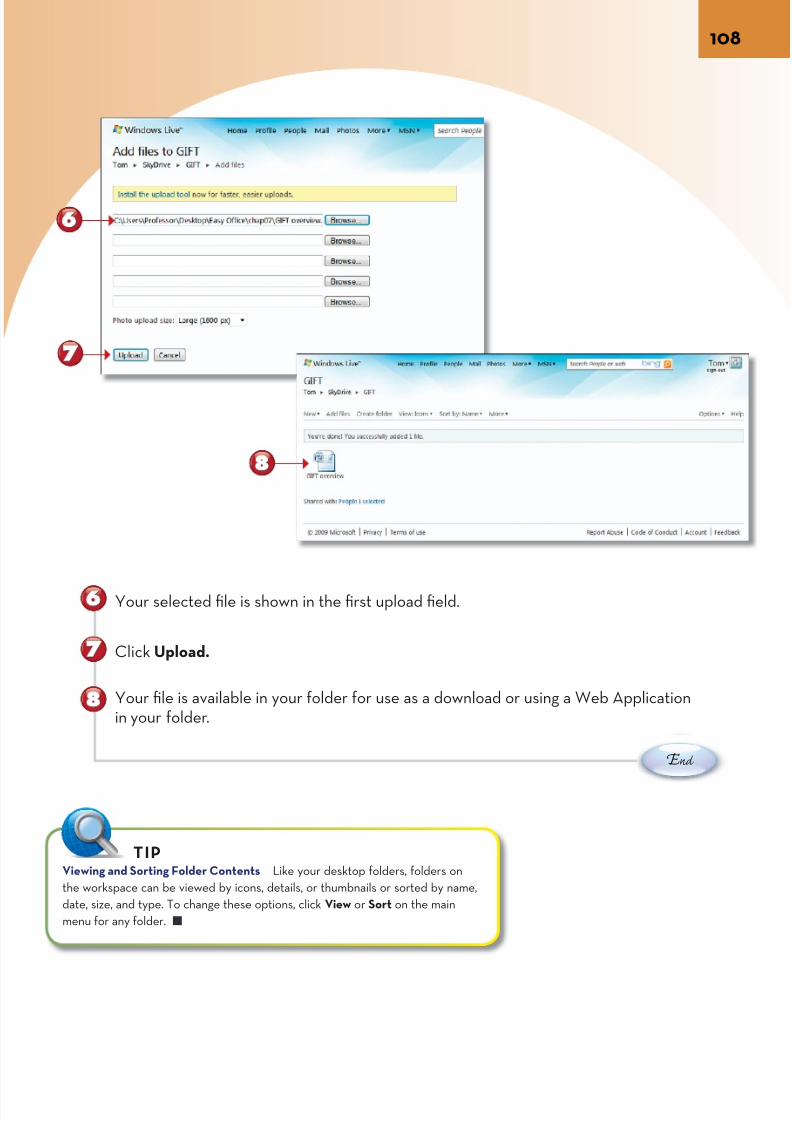
7/22/2019 Easy Microsoft Office 2010
http://slidepdf.com/reader/full/easy-microsoft-office-2010 121/309
E nd
Your selected file is shown in the first upload field.
Click Upload.
Your file is available in your folder for use as a download or using a Web Applicationin your folder.
Viewing and Sorting Folder Contents Like your desktop folders, folders on
the workspace can be viewed by icons, details, or thumbnails or sorted by name,
date, size, and type. To change these options, click View or Sort on the main
menu for any folder.
TIP
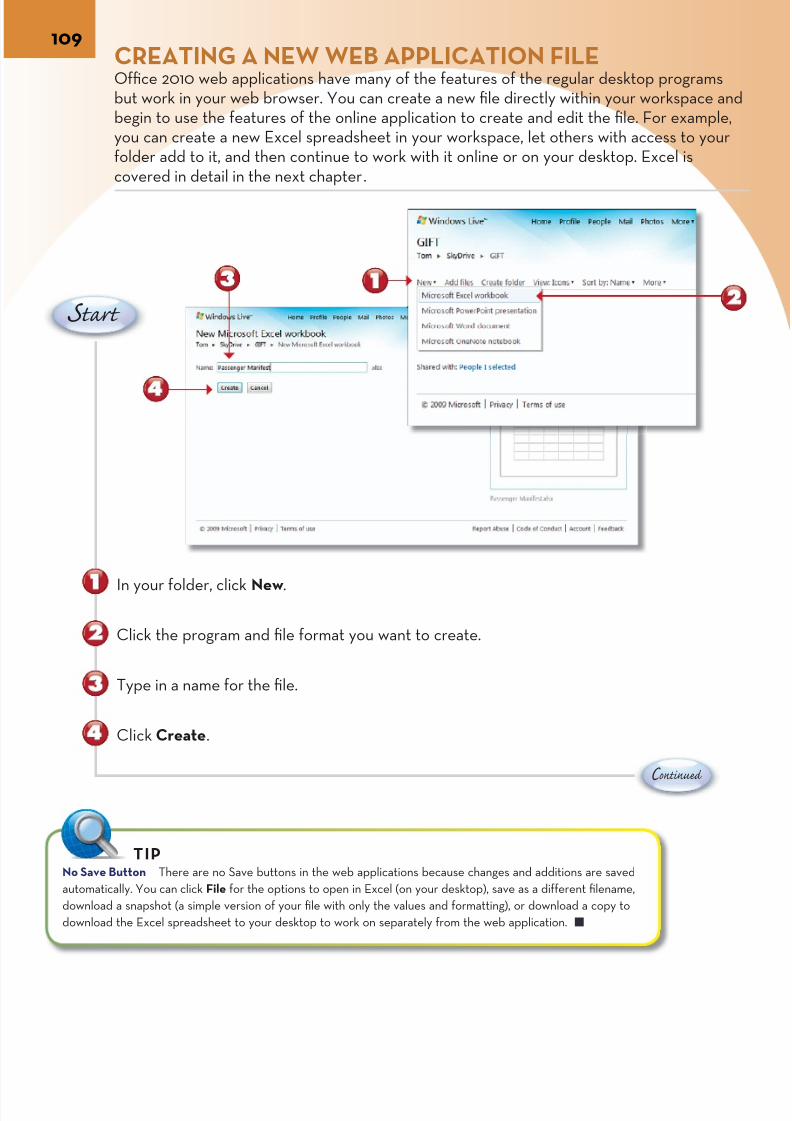
7/22/2019 Easy Microsoft Office 2010
http://slidepdf.com/reader/full/easy-microsoft-office-2010 122/309
109CREATING A NEW WEB APPLICATION FILE
Office 2010 web applications have many of the features of the regular desktop prograbut work in your web browser. You can create a new file directly within your workspabegin to use the features of the online application to create and edit the file. For examyou can create a new Excel spreadsheet in your workspace, let others with access to folder add to it, and then continue to work with it online or on your desktop. Excel iscovered in detail in the next chapter.
In your folder, click New.
Click the program and file format you want to create.
Type in a name for the file.
Click Create.
S tart
No Save Button There are no Save buttons in the web applications because changes and additions are saved
automatically. You can click File for the options to open in Excel (on your desktop), save as a different filename,
download a snapshot (a simple version of your file with only the values and formatting), or download a copy to
download the Excel spreadsheet to your desktop to work on separately from the web application.
TIP
C ontinued

7/22/2019 Easy Microsoft Office 2010
http://slidepdf.com/reader/full/easy-microsoft-office-2010 123/309
E nd
The web application (Excel) opens with a blank spreadsheet.
You can add information in the first cell.
Click the name of the folder (for example, GIFT).
Excel closes, and your new Excel spreadsheet is available in your folder, withthe changes you made.
Opening in Excel Although the web applications have a limited Ribbon with features specific to each pro-
gram, a button on the right of the Home tab enables you to open a file directly in the desktop program to use
its full features. Then you can save the file locally, click Save on the desktop to save changes directly back to
the web application, or save it locally and upload it back to your workspace.
TIP
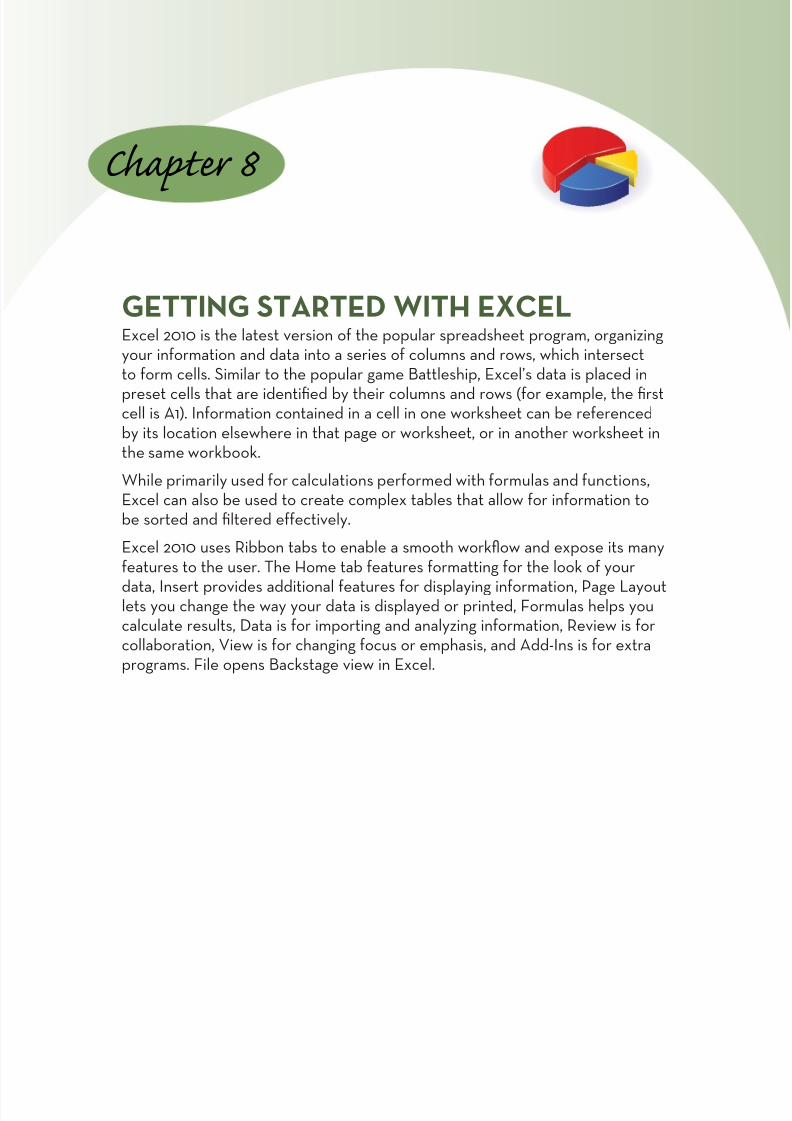
7/22/2019 Easy Microsoft Office 2010
http://slidepdf.com/reader/full/easy-microsoft-office-2010 124/309
GETTING STARTED WITH EXCELExcel 2010 is the latest version of the popular spreadsheet program, organizingyour information and data into a series of columns and rows, which intersectto form cells. Similar to the popular game Battleship, Excel’s data is placed in
preset cells that are identified by their columns and rows (for example, the firstcell is A1). Information contained in a cell in one worksheet can be referencedby its location elsewhere in that page or worksheet, or in another worksheet inthe same workbook.
While primarily used for calculations performed with formulas and functions,Excel can also be used to create complex tables that allow for information tobe sorted and filtered effectively.
Excel 2010 uses Ribbon tabs to enable a smooth workflow and expose its manyfeatures to the user. The Home tab features formatting for the look of your
data, Insert provides additional features for displaying information, Page Layoutlets you change the way your data is displayed or printed, Formulas helps youcalculate results, Data is for importing and analyzing information, Review is forcollaboration, View is for changing focus or emphasis, and Add-Ins is for extraprograms. File opens Backstage view in Excel.
Chapter 8
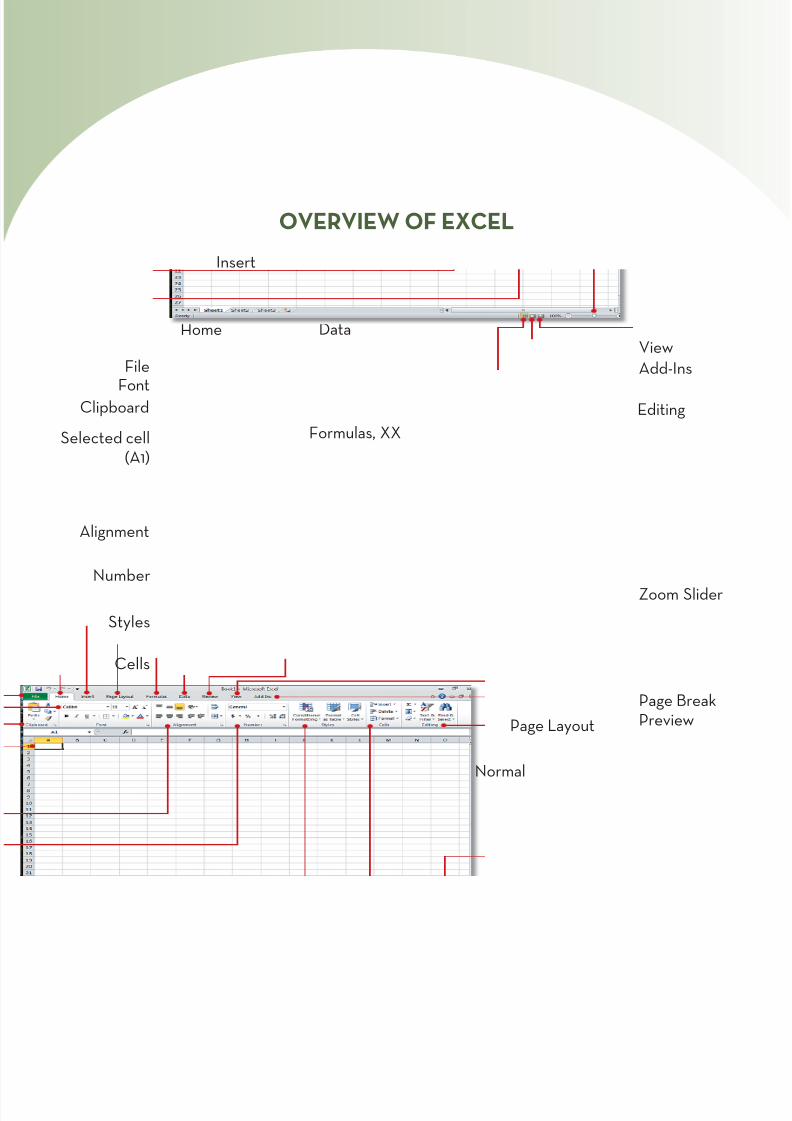
7/22/2019 Easy Microsoft Office 2010
http://slidepdf.com/reader/full/easy-microsoft-office-2010 125/309
Page Layout
Formulas, XX
DataHome
Review
View
Add-Ins
Normal
Page Layout
Editing
Page BrePreview
Insert
Zoom Sli
OVERVIEW OF EXCEL
Selected cell(A1)
File
ClipboardFont
Alignment
Number
Styles
Cells
Formulas

7/22/2019 Easy Microsoft Office 2010
http://slidepdf.com/reader/full/easy-microsoft-office-2010 126/309
113ALIGNING AND FORMATTING TEXTAs you begin to type text into cells in Excel, you might want to create a heading for yoworksheet or headings and content for your columns and rows. As you do this, you mthe content you enter overruns the preset borders of the cells or that it needs to be aed to display your information clearly and effectively.
C ontinue
With the Home tab selected, type a heading for the worksheet in the first cell (A1).
Drag through the cells that you want your heading to span.
Open the Merge and Center drop-down arrow and click Merge & Center.
With the cells still selected, click to change the alignment to also be
centered vertically within the merged cells.
S tart
TIPCorrecting Mistakes When you make an error in one or more cells, you can
click Undo at the top of the window to go back up to 99 consecutive steps. You
also can select the cell(s), right-click, and click Clear Contents.

7/22/2019 Easy Microsoft Office 2010
http://slidepdf.com/reader/full/easy-microsoft-office-2010 127/309
E nd
Select a cell with text and then drag through the text in the Formula Bar to select it.
In the Font group of the Home tab, change the text format to Bold.
Click the Font Size Increase button to increase font size.
Click the Font Color drop-down arrow to choose a different font color.
Click outside the merged cells to see the new alignment and format appliedto the selected cells.
Formatting Cells If you have selected an individual or group of merged cells, you can use Borders
drop-down options in the Font group in the Home tab to set an external or other border. Alternatively,
click the Fill Bucket drop-down arrow to change the background fill color of the selected cells.
TIP

7/22/2019 Easy Microsoft Office 2010
http://slidepdf.com/reader/full/easy-microsoft-office-2010 128/309
115INPUTTING AND FORMATTING NUMBERS
The initial steps for inputting numbers to cells are the same as for text: you simply selthe cell and begin typing the numbers. However, for the sake of appearance and also enable future calculations, you should format numbers correctly by selecting them firthen using the Number group in the Home tab of the Ribbon to apply the correct form
C ontinue
With the Ribbon’s Home tab selected, type a heading for a column of numbers.
Type a series of numbers into the cells beneath the heading.
Drag through the cells to select them.
Click $ in the Number group.
S tart
Number Formats Choosing the correct number format can be significant not just for
the appearance of the document, but also for future formulas, functions, and calculations.
Although the default General format permits calculation, more complex calculations may
require formatting such as Time, Percentage, Fraction, or other format for correct results.
TIP

7/22/2019 Easy Microsoft Office 2010
http://slidepdf.com/reader/full/easy-microsoft-office-2010 129/309
E nd
The number and two decimal places are applied by default.
Click the Decrease Decimal button twice to remove the decimals.
Click the drop-down arrow to display other number formats.
Select a format that suits your needs.
Using a Numeric Keypad For large amounts of numbers to be input
quickly, you may want to use the numeric keypad to input the numbers
calculator-style. To enable this, press the NumLock key on the keyboard
and then press it again to use the normal keyboard keys.
TIP Other Currencies If you need to us
currencies for your data, you can click
drop-down arrow under the $ button
other choices.
TIP
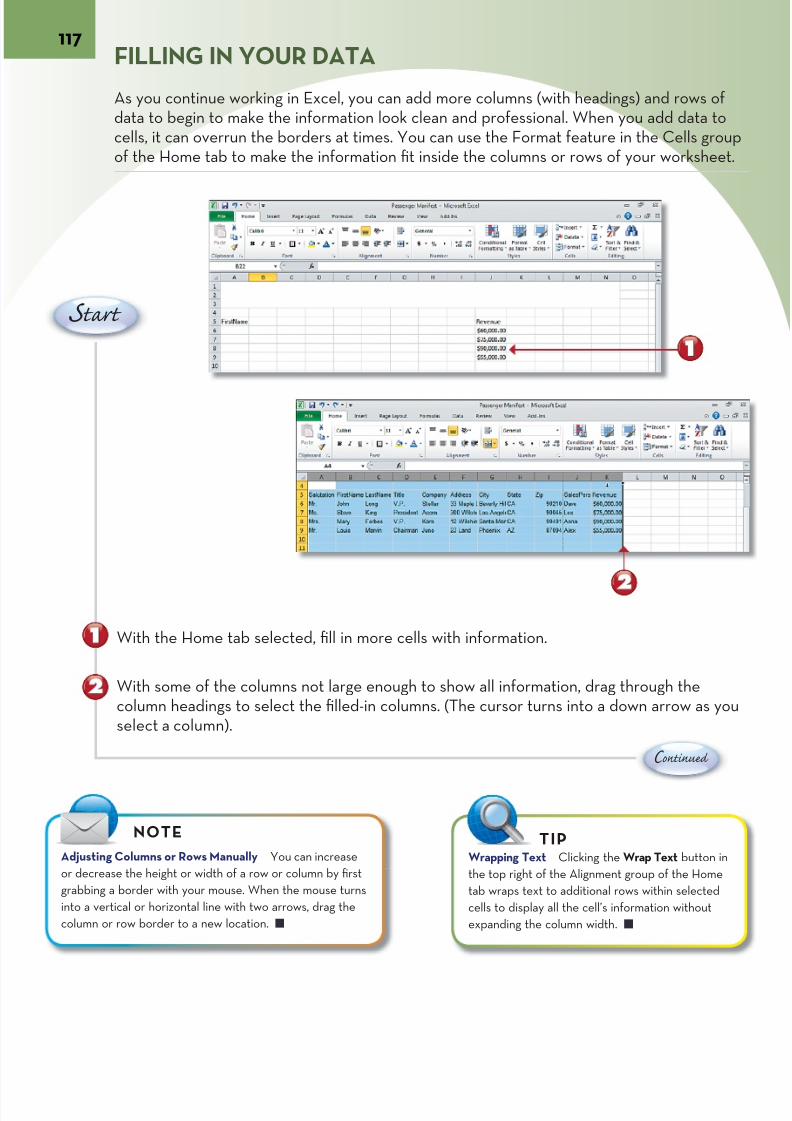
7/22/2019 Easy Microsoft Office 2010
http://slidepdf.com/reader/full/easy-microsoft-office-2010 130/309
117FILLING IN YOUR DATA
As you continue working in Excel, you can add more columns (with headings) and rowdata to begin to make the information look clean and professional. When you add datcells, it can overrun the borders at times. You can use the Format feature in the Cells of the Home tab to make the information fit inside the columns or rows of your works
C ontinue
With the Home tab selected, fill in more cells with information.
With some of the columns not large enough to show all information, drag through thecolumn headings to select the filled-in columns. (The cursor turns into a down arrow aselect a column).
S tart
Wrapping Text Clicking the Wrap Text but
the top right of the Alignment group of the H
tab wraps text to additional rows within selec
cells to display all the cell’s information witho
expanding the column width.
TIP
Adjusting Columns or Rows Manually You can increase
or decrease the height or width of a row or column by first
grabbing a border with your mouse. When the mouse turns
into a vertical or horizontal line with two arrows, drag the
column or row border to a new location.
NOTE
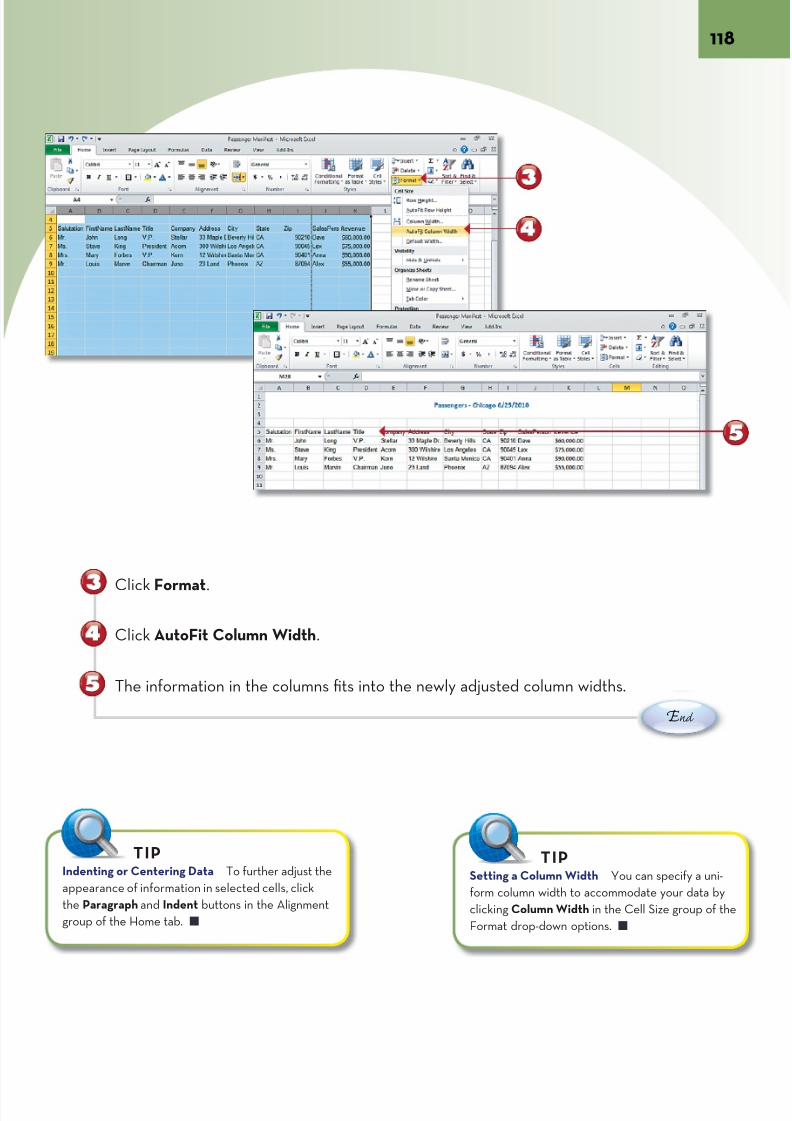
7/22/2019 Easy Microsoft Office 2010
http://slidepdf.com/reader/full/easy-microsoft-office-2010 131/309
E nd
Click Format.
Click AutoFit Column Width.
The information in the columns fits into the newly adjusted column widths.
Indenting or Centering Data To further adjust the
appearance of information in selected cells, click
the Paragraph and Indent buttons in the Alignment
group of the Home tab.
TIP
Setting a Column Width You can specify a
form column width to accommodate your da
clicking Column Width in the Cell Size group
Format drop-down options.
TIP
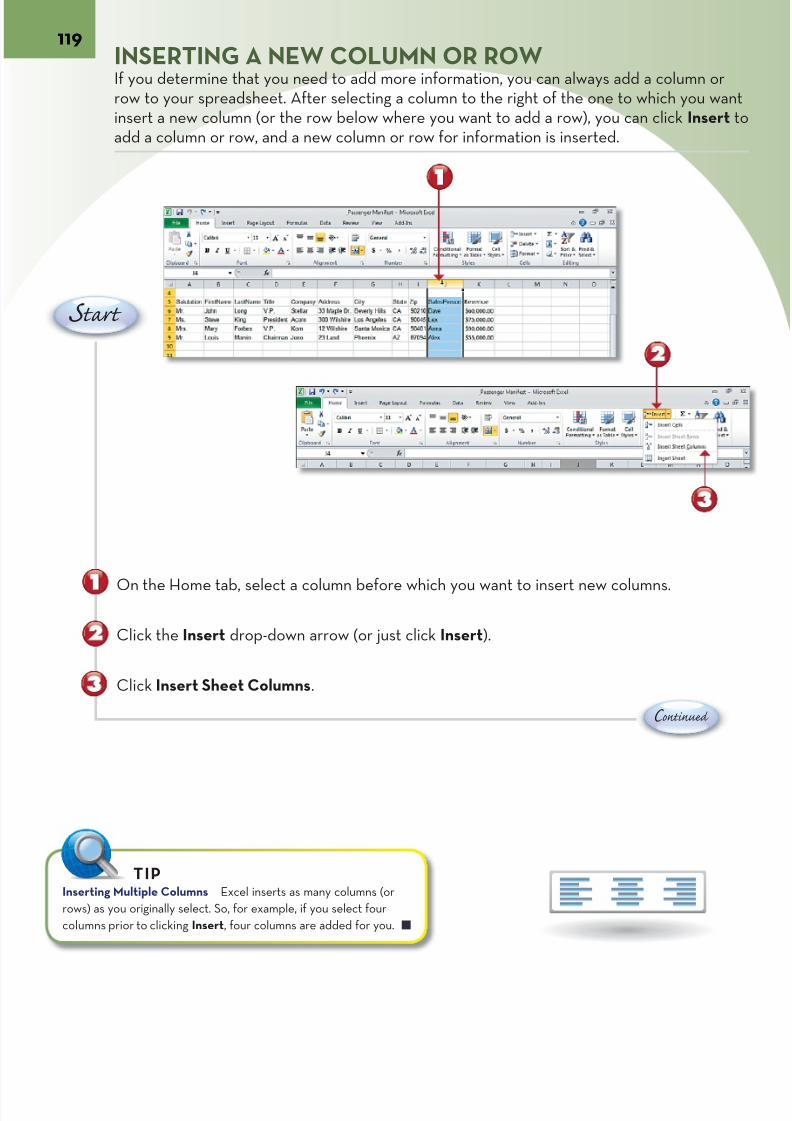
7/22/2019 Easy Microsoft Office 2010
http://slidepdf.com/reader/full/easy-microsoft-office-2010 132/309
119INSERTING A NEW COLUMN OR ROWIf you determine that you need to add more information, you can always add a columrow to your spreadsheet. After selecting a column to the right of the one to which yoinsert a new column (or the row below where you want to add a row), you can click Inadd a column or row, and a new column or row for information is inserted.
C ontinue
On the Home tab, select a column before which you want to insert new columns.
Click the Insert drop-down arrow (or just click Insert).
Click Insert Sheet Columns.
S tart
Inserting Multiple Columns Excel inserts as many columns (or
rows) as you originally select. So, for example, if you select four
columns prior to clicking Insert, four columns are added for you.
TIP

7/22/2019 Easy Microsoft Office 2010
http://slidepdf.com/reader/full/easy-microsoft-office-2010 133/309
E nd
A new selected column is inserted.
Click the Format Copy Paintbrush.
Select a formatting option from adjacent columns.
The new column is ready to fill in.
You can grab the column border (the cursor turns into wide arrows) to move the bordwiden the column.
Deleting Columns or Rows To delete one or more columns or rows,
select them and click Delete in the Cells group of the Home tab.
TIP
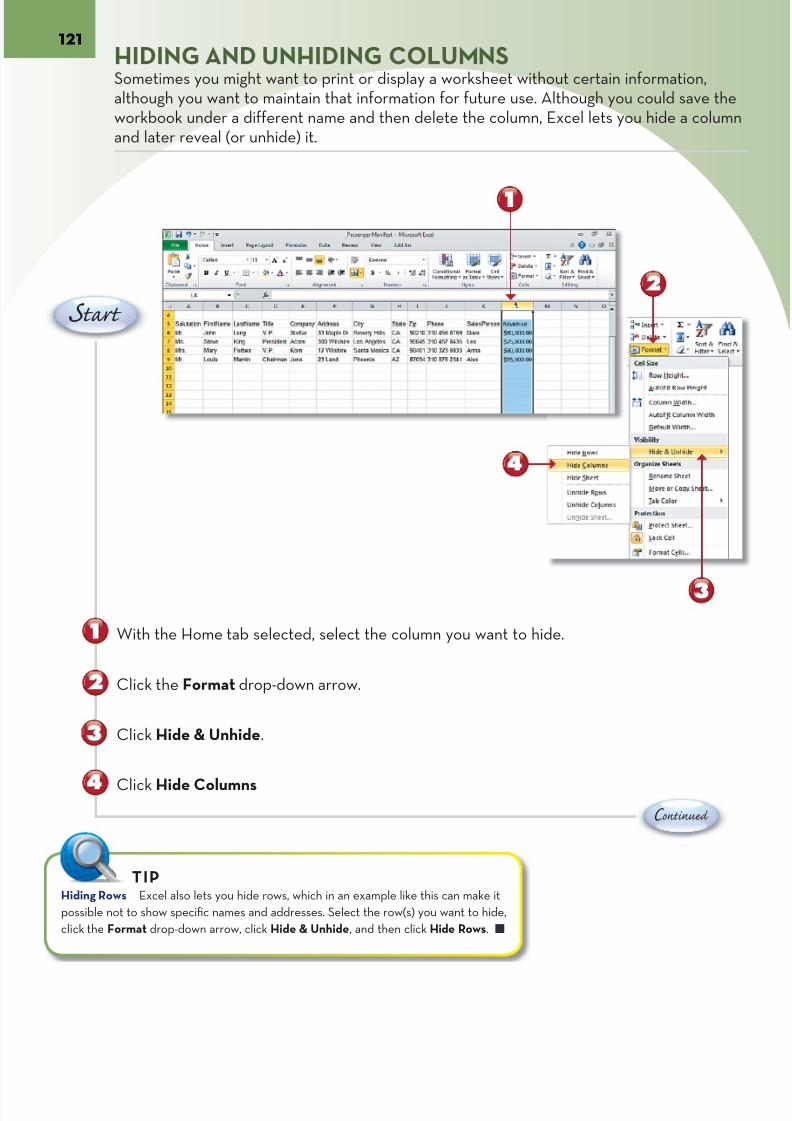
7/22/2019 Easy Microsoft Office 2010
http://slidepdf.com/reader/full/easy-microsoft-office-2010 134/309
121HIDING AND UNHIDING COLUMNSSometimes you might want to print or display a worksheet without certain informationalthough you want to maintain that information for future use. Although you could savworkbook under a different name and then delete the column, Excel lets you hide a cand later reveal (or unhide) it.
C ontinue
With the Home tab selected, select the column you want to hide.
Click the Format drop-down arrow.
Click Hide & Unhide.
Click Hide Columns
S tart
Hiding Rows Excel also lets you hide rows, which in an example like this can make it
possible not to show specific names and addresses. Select the row(s) you want to hide,
click the Format drop-down arrow, click Hide & Unhide, and then click Hide Rows.
TIP
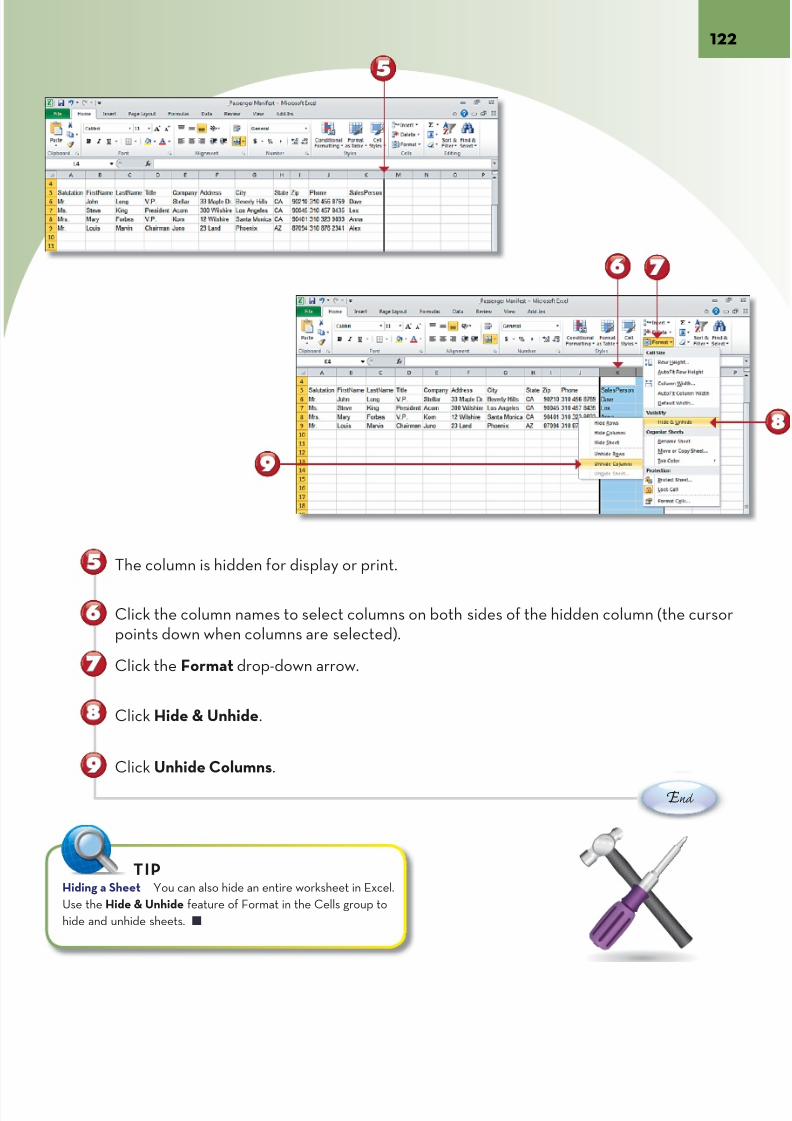
7/22/2019 Easy Microsoft Office 2010
http://slidepdf.com/reader/full/easy-microsoft-office-2010 135/309
E nd
The column is hidden for display or print.
Click the column names to select columns on both sides of the hidden column (the cupoints down when columns are selected).
Click the Format drop-down arrow.
Click Hide & Unhide.
Click Unhide Columns.
Hiding a Sheet You can also hide an entire worksheet in Excel.
Use the Hide & Unhide feature of Format in the Cells group to
hide and unhide sheets.
TIP
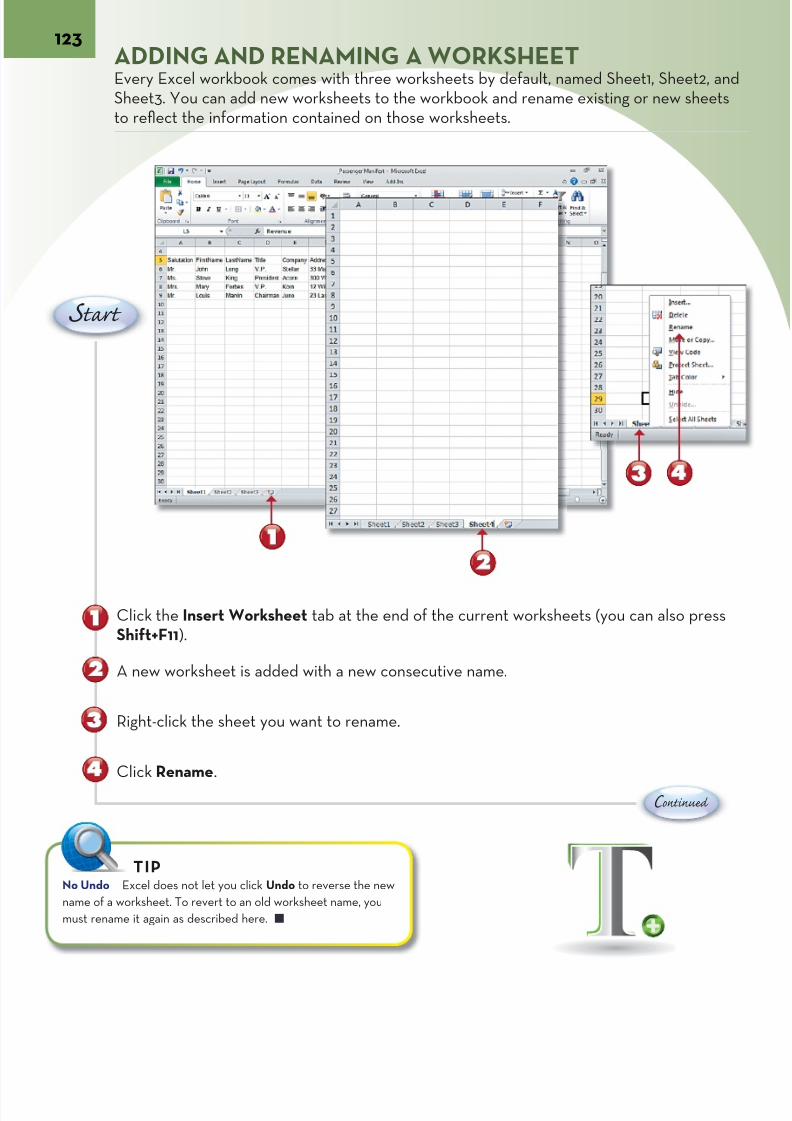
7/22/2019 Easy Microsoft Office 2010
http://slidepdf.com/reader/full/easy-microsoft-office-2010 136/309
123ADDING AND RENAMING A WORKSHEET
Every Excel workbook comes with three worksheets by default, named Sheet1, SheetSheet3. You can add new worksheets to the workbook and rename existing or new shto reflect the information contained on those worksheets.
C ontinue
Click the Insert Worksheet tab at the end of the current worksheets (you can also pShift+F11).
A new worksheet is added with a new consecutive name.
Right-click the sheet you want to rename.
Click Rename.
S tart
No Undo Excel does not let you click Undo to reverse the new
name of a worksheet. To revert to an old worksheet name, you
must rename it again as described here.
TIP
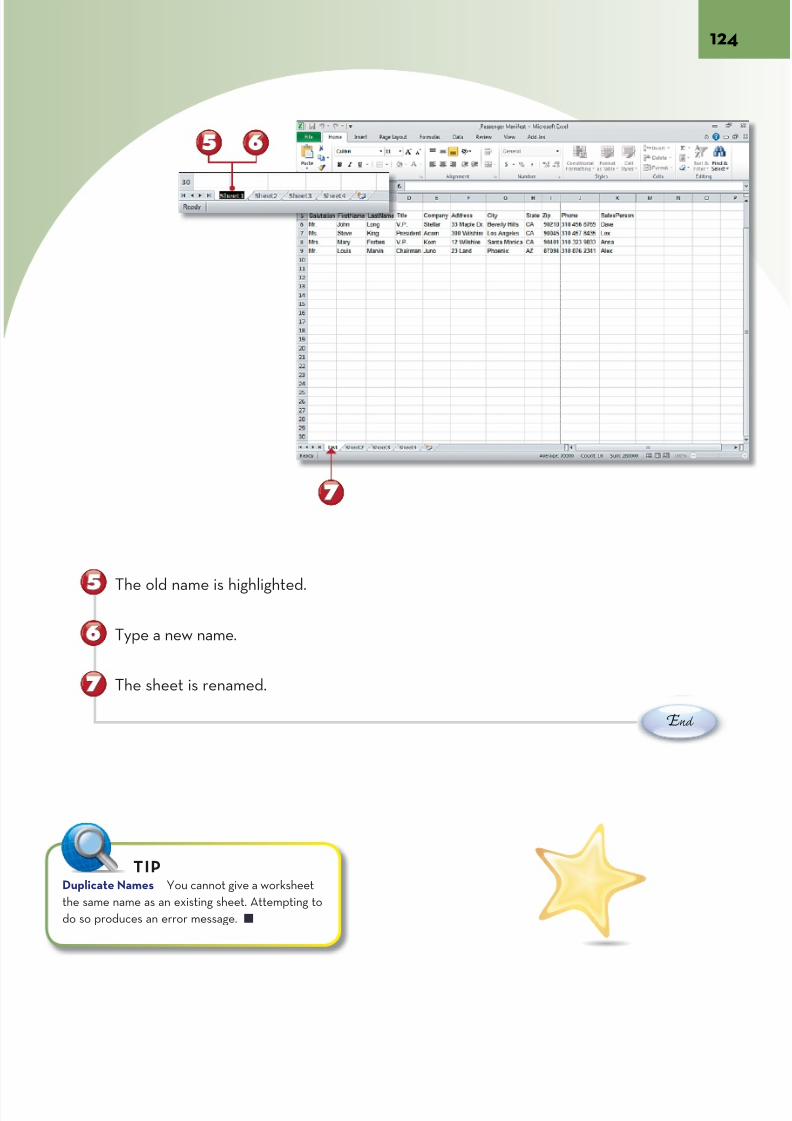
7/22/2019 Easy Microsoft Office 2010
http://slidepdf.com/reader/full/easy-microsoft-office-2010 137/309
E nd
The old name is highlighted.
Type a new name.
The sheet is renamed.
Duplicate Names You cannot give a worksheet
the same name as an existing sheet. Attempting to
do so produces an error message.
TIP

7/22/2019 Easy Microsoft Office 2010
http://slidepdf.com/reader/full/easy-microsoft-office-2010 138/309
125USING CELL STYLES
You can enhance the appearance of your worksheet by using Cell Styles to give certacells a background color and definitive font. You also can apply a different color and/oto other cells.
E nd
With the Home tab selected, drag through the cells of your data to select them.
Click Cell Styles.
The Cell Styles gallery opens.
Move your mouse cursor over a style to see a quick preview. Click a styleto apply it to the selected cells.
S tart
Adjusting Cells to Styles Some Cell Styles, require you to readjust your cells to display the data fully after the style is ap
Click the AutoFit Column Width option in the Format button of the Cells group and the Wrap to Cell feature in the Alignm
group to make all cell data visible.
TIP
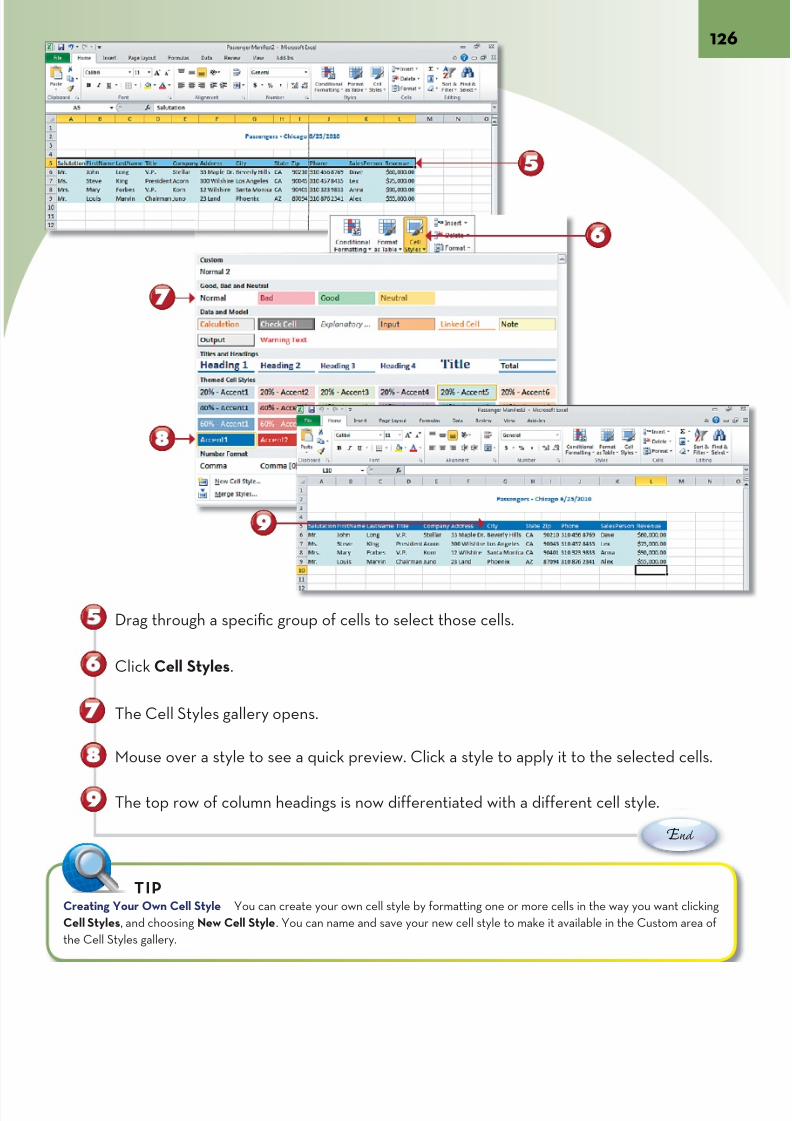
7/22/2019 Easy Microsoft Office 2010
http://slidepdf.com/reader/full/easy-microsoft-office-2010 139/309
E nd
Drag through a specific group of cells to select those cells.
Click Cell Styles.
The Cell Styles gallery opens.
Mouse over a style to see a quick preview. Click a style to apply it to the selected cel
The top row of column headings is now differentiated with a different cell style.
Creating Your Own Cell Style You can create your own cell style by formatting one or more cells in the way you want clic
Cell Styles, and choosing New Cell Style. You can name and save your new cell style to make it available in the Custom area
the Cell Styles gallery.
TIP

7/22/2019 Easy Microsoft Office 2010
http://slidepdf.com/reader/full/easy-microsoft-office-2010 140/309
WORKING WITH DATA, FUNCTIONS,AND FORMULASExcel 2010 is a very powerful spreadsheet program, which means that it can
be used to calculate values based on the figures entered into the cells, usingformulas, which are customized relationships that are placed into the FormulaBar, and functions, which are standard calculations, like the average of a set ofnumbers.
Excel provides numerous features to work with data effectively. In a largespreadsheet, you can use the Find feature to locate specific items in cells. Andas you construct a spreadsheet, you can use Excel’s artificial intelligence tofill in blank cells and complete a series of cells based on data that has alreadybeen entered.
The Formulas tab of the Excel 2010 Ribbon provides a wide array of functions,from very simple calculations like averages or maximum values, to complex andspecialized functions for financial and other types of applications. The ExcelFunction Library contains the many Excel function options, broken down bycategory.
Chapter 9

7/22/2019 Easy Microsoft Office 2010
http://slidepdf.com/reader/full/easy-microsoft-office-2010 141/309
THE FORMULA TAB OF THE RIBBON
Defined Names
AutoSum
InsertFunction
FunctionLibrary
Formulas tab forcalculationsRecently Used
Date & Time
MoreFunctions
Name Manager toname a Range
Formula Auditing tocheck precedents
CalculatiOptions
Watch Window tosee results
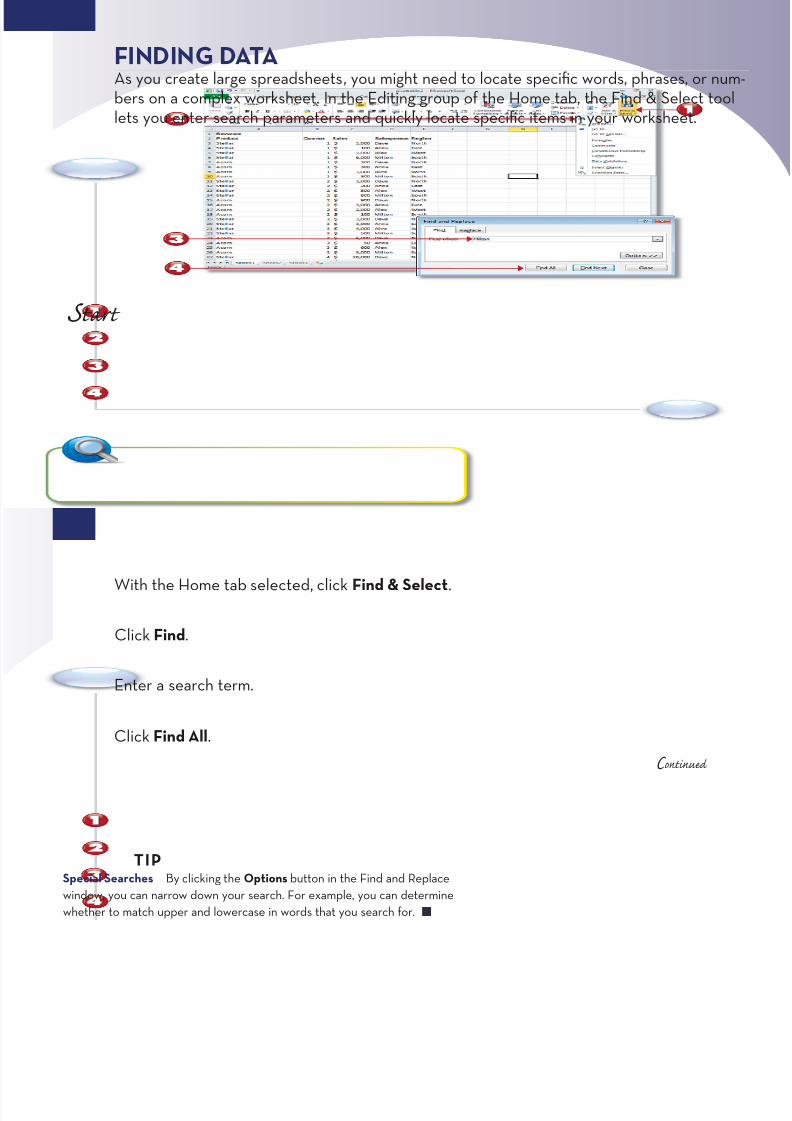
7/22/2019 Easy Microsoft Office 2010
http://slidepdf.com/reader/full/easy-microsoft-office-2010 142/309
111222999
S tart
FINDING DATA As you create large spreadsheets, you might need to locate specific words, phrases, o
bers on a complex worksheet. In the Editing group of the Home tab, the Find & Seleclets you enter search parameters and quickly locate specific items in your worksheet.
C ontinue
With the Home tab selected, click Find & Select.
Click Find.
Enter a search term.
Click Find All.
Special Searches By clicking the Options button in the Find and Replace
window, you can narrow down your search. For example, you can determine
whether to match upper and lowercase in words that you search for.
TIP
S tart

7/22/2019 Easy Microsoft Office 2010
http://slidepdf.com/reader/full/easy-microsoft-office-2010 143/309
S SS t tta aar rrt tt
Instances of the search term are listed in the Find and Replace window.
E nd
The first instance in a cell is selected in the worksheet.
Click Find Next.
The next instance of the search term is selected in the worksheet.
Replacing Entries You can use the Replace tab of the Find and Replace
window to search for specific terms in the worksheet and replace one or
all instances of those terms with a new word or phrase.
TIP
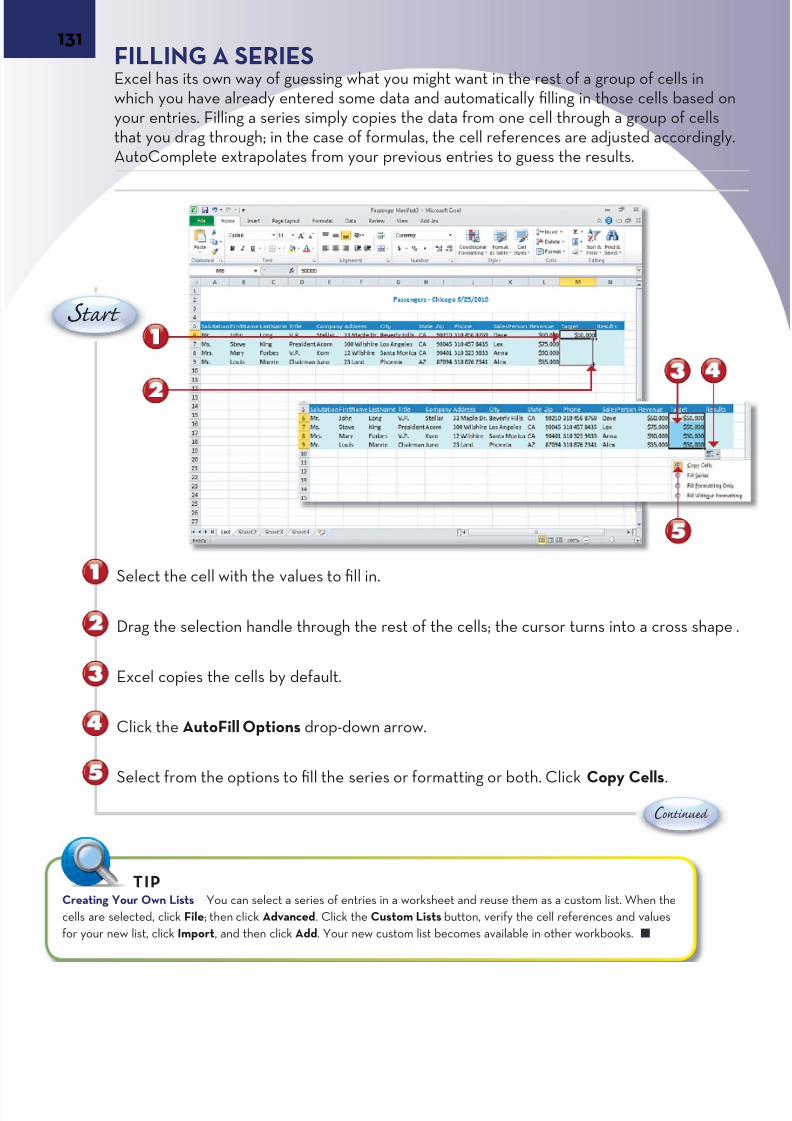
7/22/2019 Easy Microsoft Office 2010
http://slidepdf.com/reader/full/easy-microsoft-office-2010 144/309
131FILLING A SERIES
Excel has its own way of guessing what you might want in the rest of a group of cells inwhich you have already entered some data and automatically filling in those cells baseyour entries. Filling a series simply copies the data from one cell through a group of cthat you drag through; in the case of formulas, the cell references are adjusted accordAutoComplete extrapolates from your previous entries to guess the results.
C ontinue
Select the cell with the values to fill in.
Drag the selection handle through the rest of the cells; the cursor turns into a cross s
Excel copies the cells by default.
Click the AutoFill Options drop-down arrow.
Select from the options to fill the series or formatting or both. Click Copy Cells.
S tart
Creating Your Own Lists You can select a series of entries in a worksheet and reuse them as a custom list. When the
cells are selected, click File; then click Advanced. Click the Custom Lists button, verify the cell references and values
for your new list, click Import, and then click Add. Your new custom list becomes available in other workbooks.
TIP

7/22/2019 Easy Microsoft Office 2010
http://slidepdf.com/reader/full/easy-microsoft-office-2010 145/309
S tart
E nd
Enter the beginning of sequence of cells that have a probable order.
E nd
Grab the selection handle and begin dragging through the next set of cells.
Excel fills in the values of the cells based on the previous entries.
Click the AutoFill Options drop-down arrow.
Select from the options to fill the series or formatting or both. Click Fill Series.
Using AutoComplete As you type in cells directly after or below those in which you’ve typed data, Excel
fills in the remainder with possible entries based on what you have entered previously. You can accept by
pressing the down arrow or Tab key on your keyboard or simply type in your own new entry.
TIP
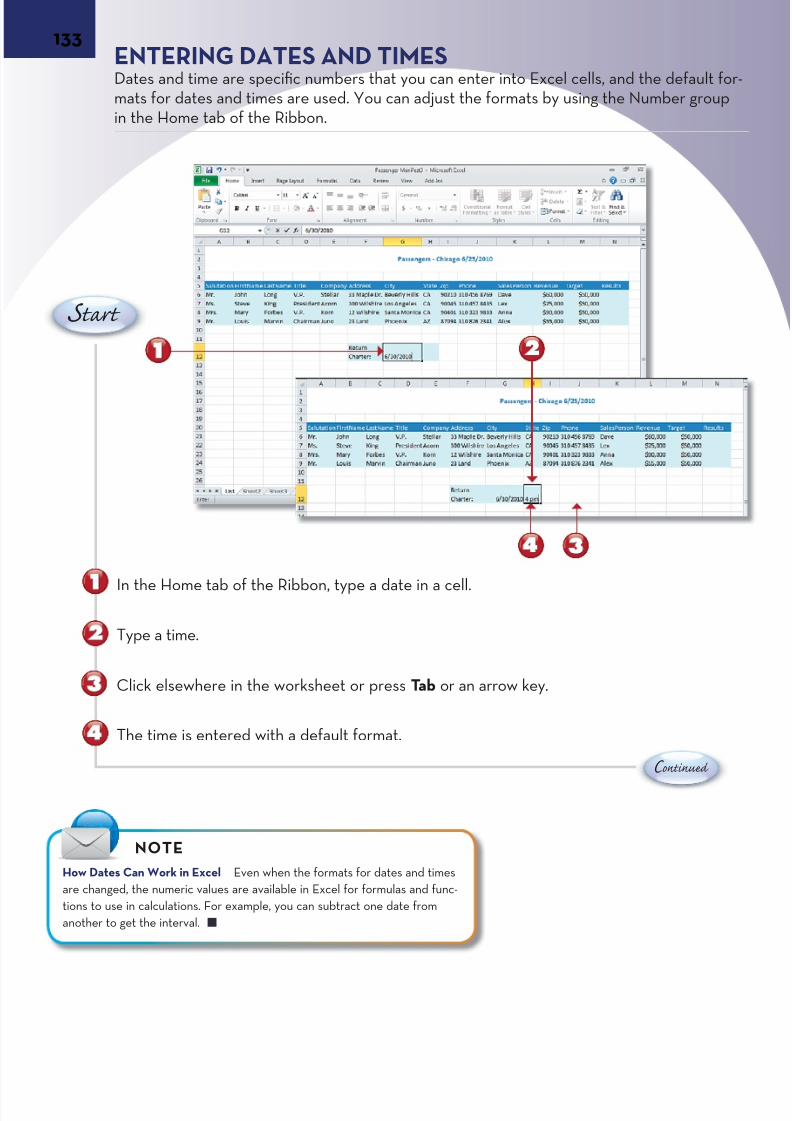
7/22/2019 Easy Microsoft Office 2010
http://slidepdf.com/reader/full/easy-microsoft-office-2010 146/309
133
C ontinue
S tart
ENTERING DATES AND TIMES Dates and time are specific numbers that you can enter into Excel cells, and the defau
mats for dates and times are used. You can adjust the formats by using the Number gin the Home tab of the Ribbon.
In the Home tab of the Ribbon, type a date in a cell.
Type a time.
Click elsewhere in the worksheet or press Tab or an arrow key.
The time is entered with a default format.
How Dates Can Work in Excel Even when the formats for dates and times
are changed, the numeric values are available in Excel for formulas and func-
tions to use in calculations. For example, you can subtract one date from
another to get the interval.
NOTE
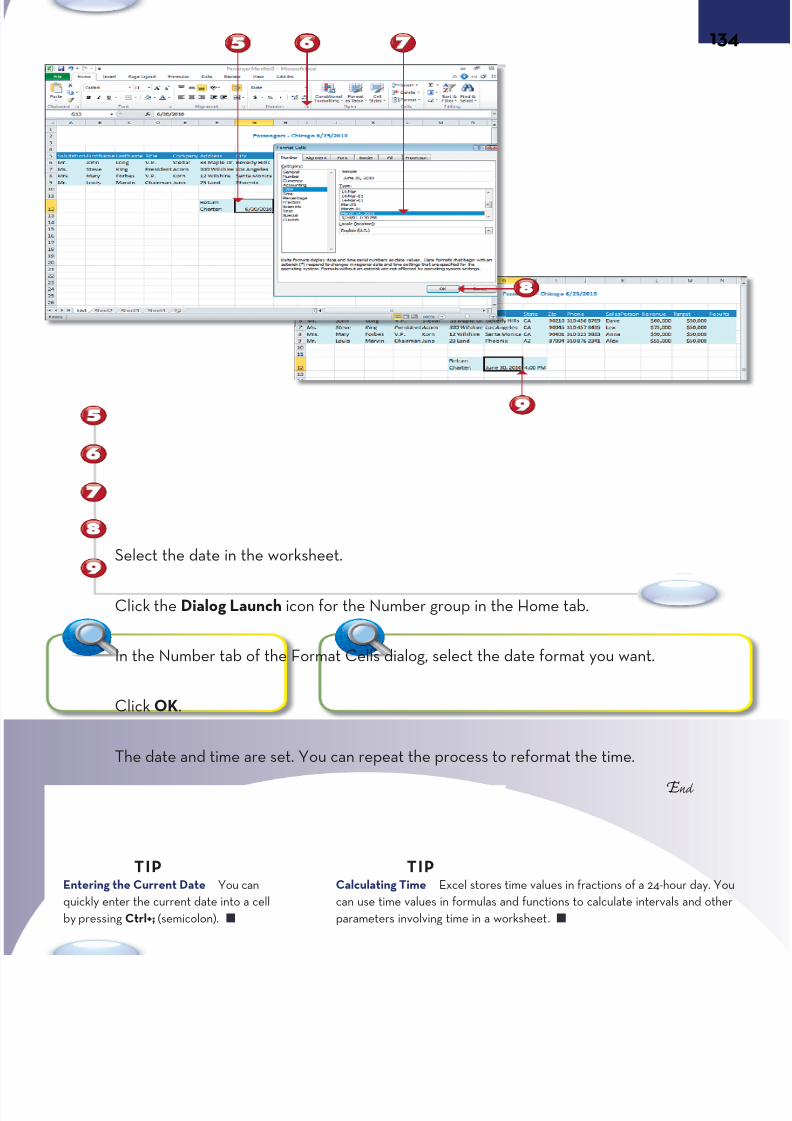
7/22/2019 Easy Microsoft Office 2010
http://slidepdf.com/reader/full/easy-microsoft-office-2010 147/309
S tart
E nd
Select the date in the worksheet.
Click the Dialog Launch icon for the Number group in the Home tab.
In the Number tab of the Format Cells dialog, select the date format you want.
Click OK.
The date and time are set. You can repeat the process to reformat the time.
Entering the Current Date You can
quickly enter the current date into a cell
by pressing Ctrl+; (semicolon).
TIPCalculating Time Excel stores time values in fractions of a 24-hour da
can use time values in formulas and functions to calculate intervals and
parameters involving time in a worksheet.
TIP
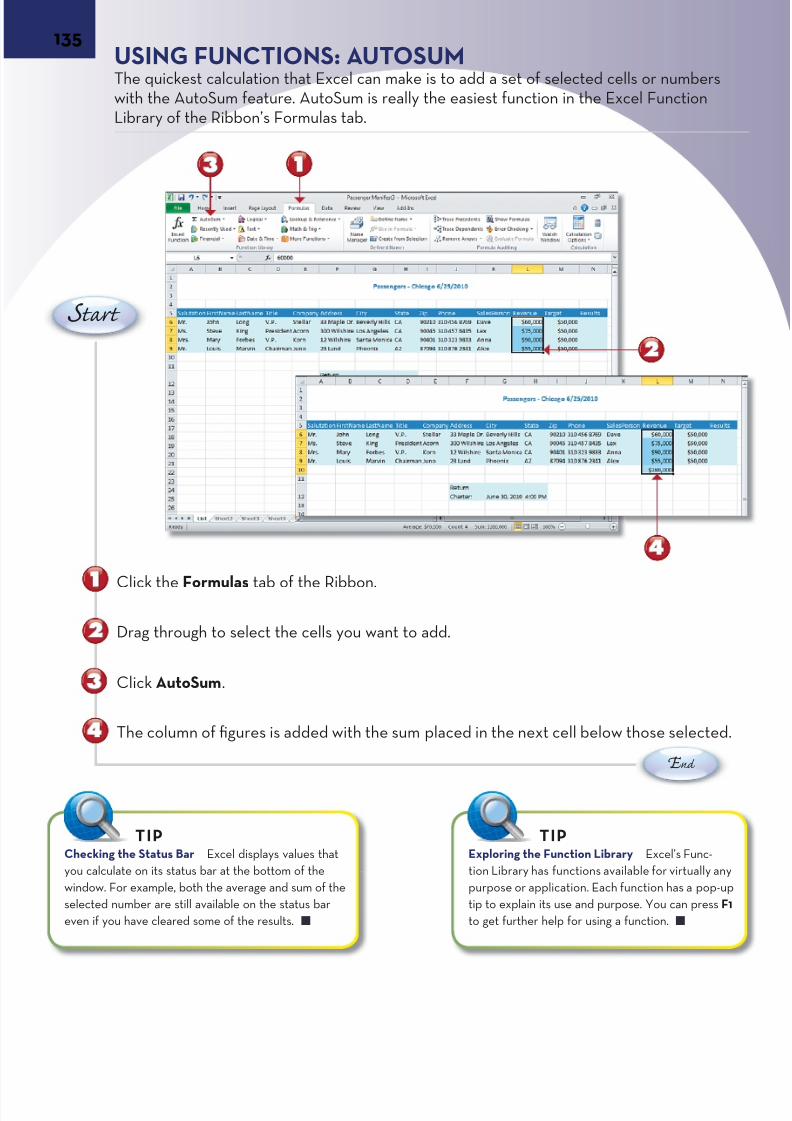
7/22/2019 Easy Microsoft Office 2010
http://slidepdf.com/reader/full/easy-microsoft-office-2010 148/309
135
E nd
USING FUNCTIONS: AUTOSUMThe quickest calculation that Excel can make is to add a set of selected cells or numbwith the AutoSum feature. AutoSum is really the easiest function in the Excel FunctioLibrary of the Ribbon’s Formulas tab.
Click the Formulas tab of the Ribbon.
Drag through to select the cells you want to add.
Click AutoSum.
The column of figures is added with the sum placed in the next cell below those selec
S tart
Checking the Status Bar Excel displays values that
you calculate on its status bar at the bottom of the
window. For example, both the average and sum of the
selected number are still available on the status bar
even if you have cleared some of the results.
TIP
Exploring the Function Library Excel’s Fun
tion Library has functions available for virtua
purpose or application. Each function has a p
tip to explain its use and purpose. You can pr
to get further help for using a function.
TIP
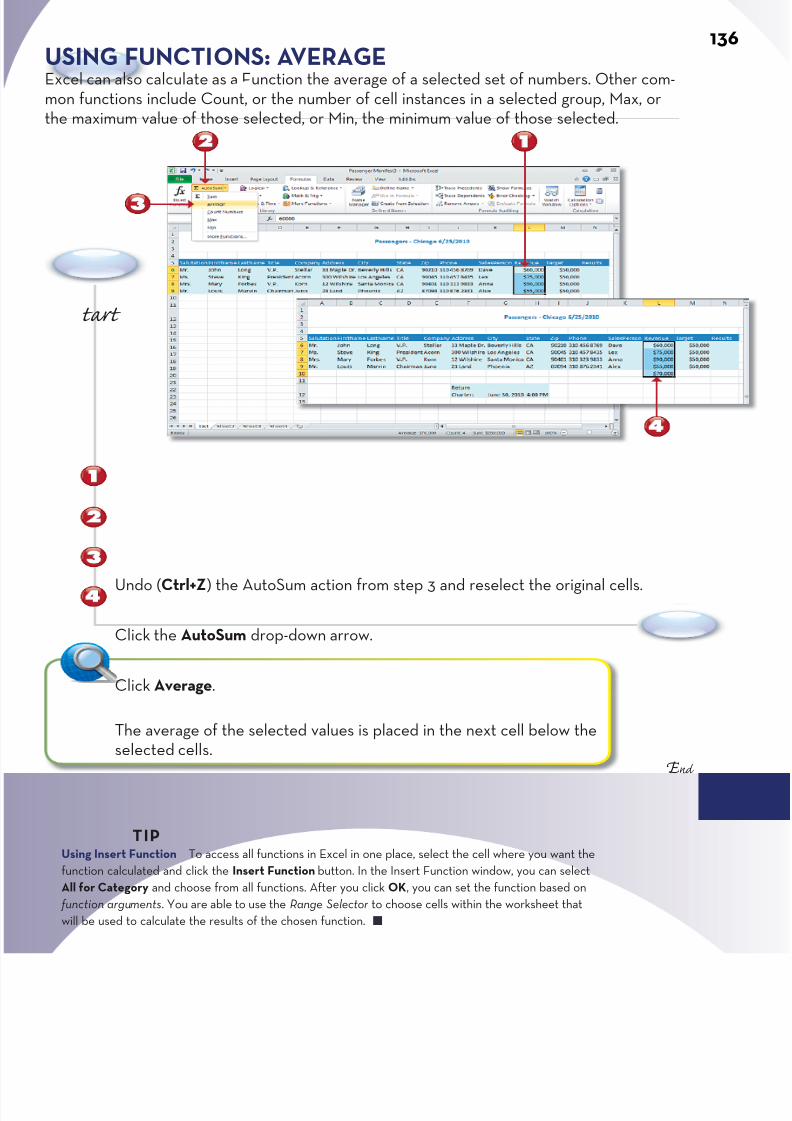
7/22/2019 Easy Microsoft Office 2010
http://slidepdf.com/reader/full/easy-microsoft-office-2010 149/309
S SS tart
USING FUNCTIONS: AVERAGEExcel can also calculate as a Function the average of a selected set of numbers. Other com-mon functions include Count, or the number of cell instances in a selected group, Max, orthe maximum value of those selected, or Min, the minimum value of those selected.
E nd
tart
Undo (Ctrl+Z) the AutoSum action from step 3 and reselect the original cells.
Click the AutoSum drop-down arrow.
Click Average.
The average of the selected values is placed in the next cell below theselected cells.
Using Insert Function To access all functions in Excel in one place, select the cell where you want the
function calculated and click the Insert Function button. In the Insert Function window, you can select
All for Category and choose from all functions. After you click OK, you can set the function based on
function arguments. You are able to use the Range Selector to choose cells within the worksheet that
will be used to calculate the results of the chosen function.
TIP
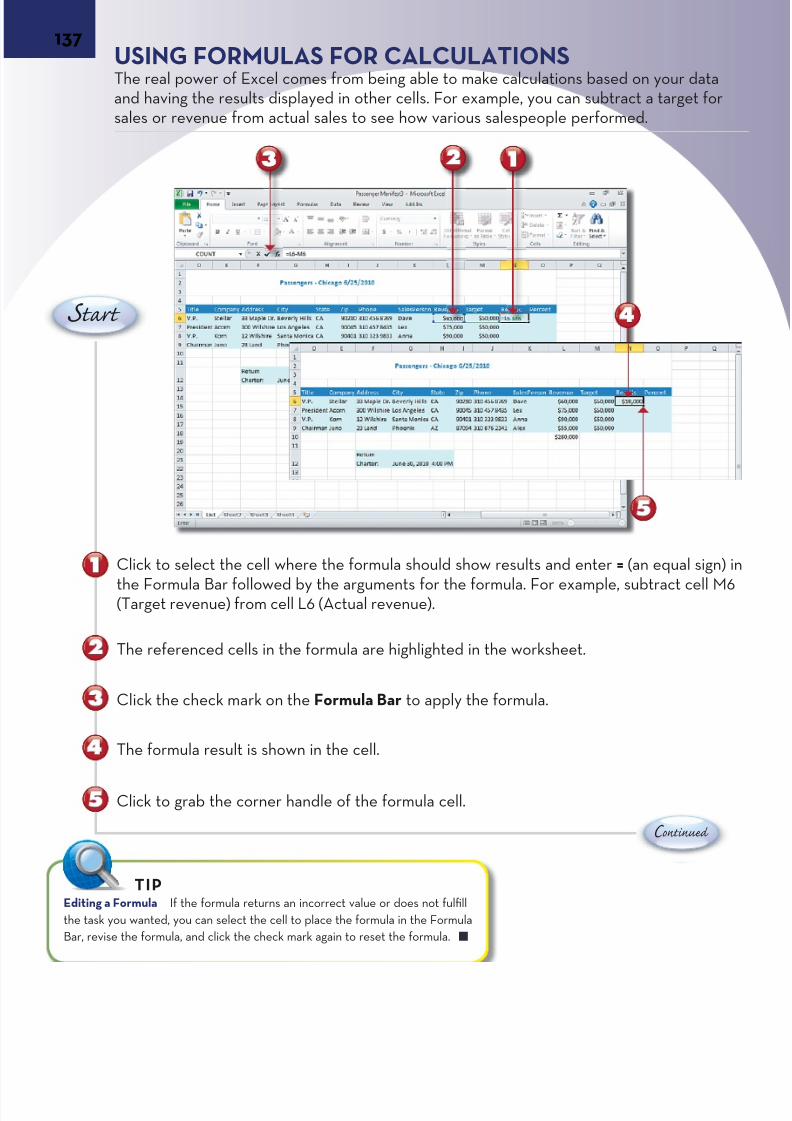
7/22/2019 Easy Microsoft Office 2010
http://slidepdf.com/reader/full/easy-microsoft-office-2010 150/309
137USING FORMULAS FOR CALCULATIONSThe real power of Excel comes from being able to make calculations based on your dand having the results displayed in other cells. For example, you can subtract a targetsales or revenue from actual sales to see how various salespeople performed.
Click to select the cell where the formula should show results and enter = (an equal s
the Formula Bar followed by the arguments for the formula. For example, subtract ce(Target revenue) from cell L6 (Actual revenue).
The referenced cells in the formula are highlighted in the worksheet.
Click the check mark on the Formula Bar to apply the formula.
The formula result is shown in the cell.
Click to grab the corner handle of the formula cell.
C ontinue
S tart
Editing a Formula If the formula returns an incorrect value or does not fulfill
the task you wanted, you can select the cell to place the formula in the Formula
Bar, revise the formula, and click the check mark again to reset the formula.
TIP
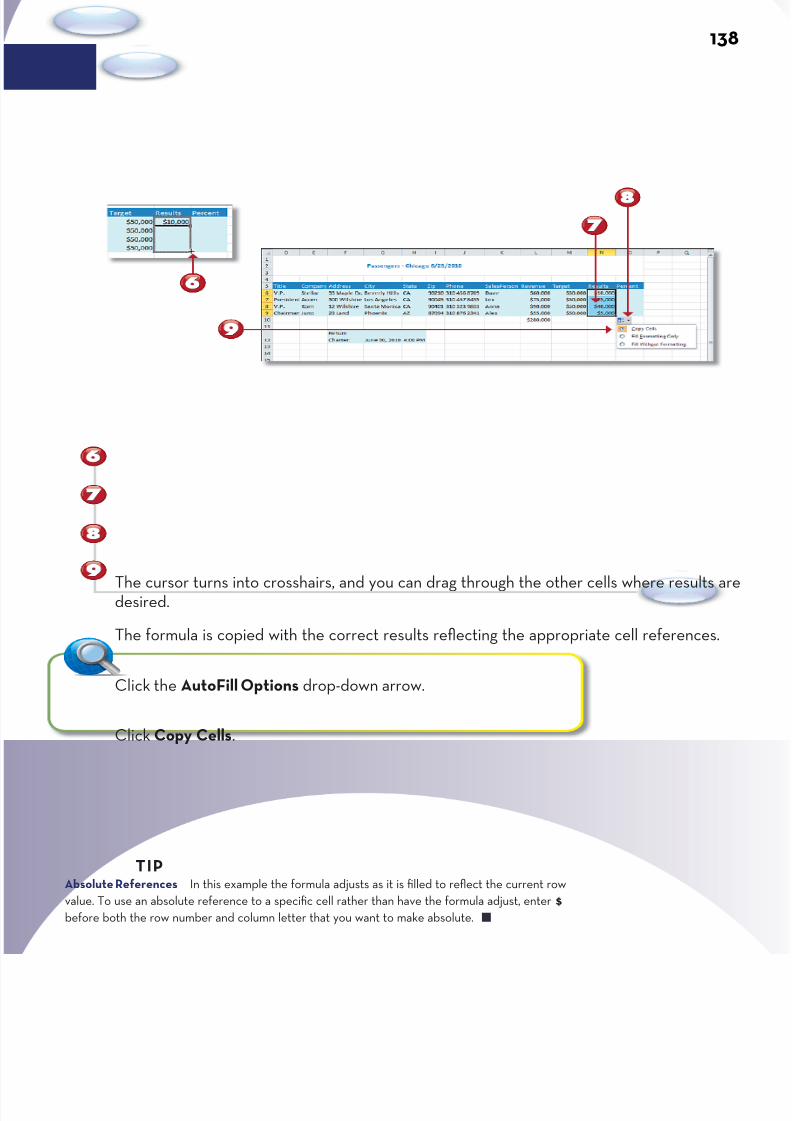
7/22/2019 Easy Microsoft Office 2010
http://slidepdf.com/reader/full/easy-microsoft-office-2010 151/309
S tart
E EE n nnd dd
The cursor turns into crosshairs, and you can drag through the other cells where resudesired.
The formula is copied with the correct results reflecting the appropriate cell referenc
Click the AutoFill Options drop-down arrow.
Click Copy Cells.
Absolute References In this example the formula adjusts as it is filled to reflect the current row
value. To use an absolute reference to a specific cell rather than have the formula adjust, enter $
before both the row number and column letter that you want to make absolute.
TIP

7/22/2019 Easy Microsoft Office 2010
http://slidepdf.com/reader/full/easy-microsoft-office-2010 152/309
139
C ontinue
FORMATTING AND TRACING FORMULA RESULTSAfter entering a formula, you can use the same formatting features of the Home tab’s ber group to show the values in the way you want. You can also use the features of thmula tab’s Formula Auditing group to trace the cells that lead to the results of your fo(Precedents) or to locate the formulas that result from values in those cells (Depende
Enter a formula that represents a percent or fraction in the Formula Bar (for examplepercentage of Results from the Target Revenue).
In the Home tab, set the Number format as General to see the fraction as a decimal.
Click the % button to set it as a percentage.
The cell formula result reflects the number formatted as a percentage.
Drag through the other cells to fill in the formula.
S tart
Referencing Other Worksheets Enter ! after a sheet name in the Formula Bar
reference. For example, List!A1 refers to the first cell in the worksheet called “List”
and can be used in other worksheets in the workbook.
TIP
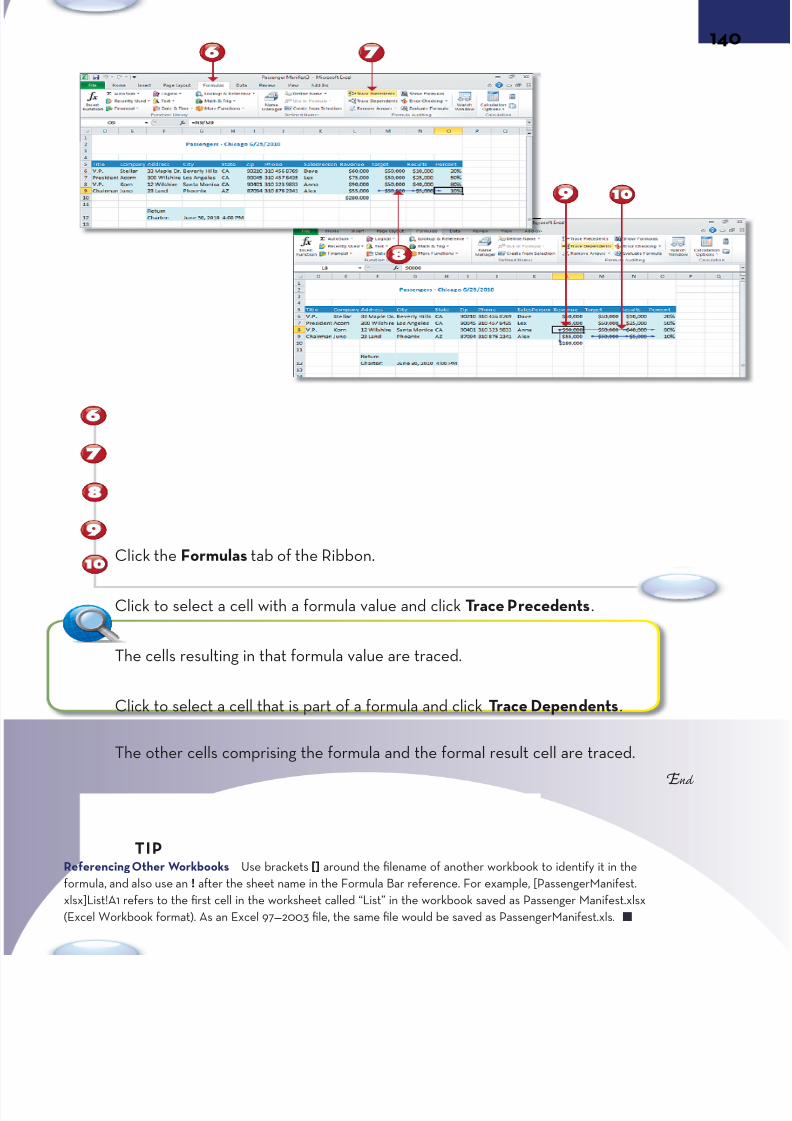
7/22/2019 Easy Microsoft Office 2010
http://slidepdf.com/reader/full/easy-microsoft-office-2010 153/309
S tart
E nd
Click the Formulas tab of the Ribbon.
Click to select a cell with a formula value and click Trace Precedents.
The cells resulting in that formula value are traced.
Click to select a cell that is part of a formula and click Trace Dependents.
The other cells comprising the formula and the formal result cell are traced.
Referencing Other Workbooks Use brackets [] around the filename of another workbook to identify it in the
formula, and also use an ! after the sheet name in the Formula Bar reference. For example, [PassengerManifest.
xlsx]List!A1 refers to the first cell in the worksheet called “List” in the workbook saved as Passenger Manifest.xlsx
(Excel Workbook format). As an Excel 97—2003 file, the same file would be saved as PassengerManifest.xls.
TIP
7/22/2019 Easy Microsoft Office 2010
http://slidepdf.com/reader/full/easy-microsoft-office-2010 154/309
CREATING CHARTS, DATA TABLES, ANDPIVOT TABLESExcel 2010 provides various ways that you can enter, view, analyze, and reorga-
nize your data when it is in a worksheet.The Insert tab on the Ribbon lets you create a visual representation of yourdata using a variety of preset chart types, including column, bar, pie, and more.The Chart Tools on the Ribbon let you modify the design, layout, and format ofthe various elements in your chart.
After selecting parts of your worksheet and converting those cells to a datatable, you can sort and filter the various columns. The Table Tools on theRibbon let you format your table with Table Styles and Table Style Options.
You can also reorganize your data in a pivot table to see relationships differ-
ently or use the Conditional Format feature to view results graphically oraccording to rules. New features in Excel 2010 include the capability to searchin tables for pivot tables, filter pivot tables with the Slicer, and add Sparklinesto visualize data in your worksheet.
Chapter 10

7/22/2019 Easy Microsoft Office 2010
http://slidepdf.com/reader/full/easy-microsoft-office-2010 155/309
THE DATA TABLE TOOLS
Chart (from Insert tab
of Ribbon)
Data Table with Sort Han-
dles to open Sort menu
Sort menu tosort columns
Table Tools torevise table
Design ta
Properties tochange data
range of table
Tools to convert orsummarize with
pivot table
External Data Tableto export data
Table StyOptions thighlightrows or
columns
Table Styfor quick changes

7/22/2019 Easy Microsoft Office 2010
http://slidepdf.com/reader/full/easy-microsoft-office-2010 156/309
143CREATING A CHART USING THE RIBBONA chart creates a visual representation of your data that you can use in a presentationanalyze results. Chart map your data along a set of coordinates to display values for aseries according to various categories, which can include a span of time. When a charcreated, the Chart Tools become available on the Ribbon to change the design, layouformat of chart elements.
C ontinue
Click the Insert tab on the Ribbon.
Drag through the cells that contain the information, headings, and data for the chart.
Click Column in the Charts group or select from among the other chart types.
With multiple categories to display, click the first option (Clustered) in the 3-D Colum
S tart
Adding and Modifying Elements By clicking the Layout tab in the Chart
Tools, you can add a chart title, add titles for the vertical or horizontal axis,
or move or delete the legend. You can also add labels for the data or a data
table to show the values for the chart elements as part of the chart.
TIP
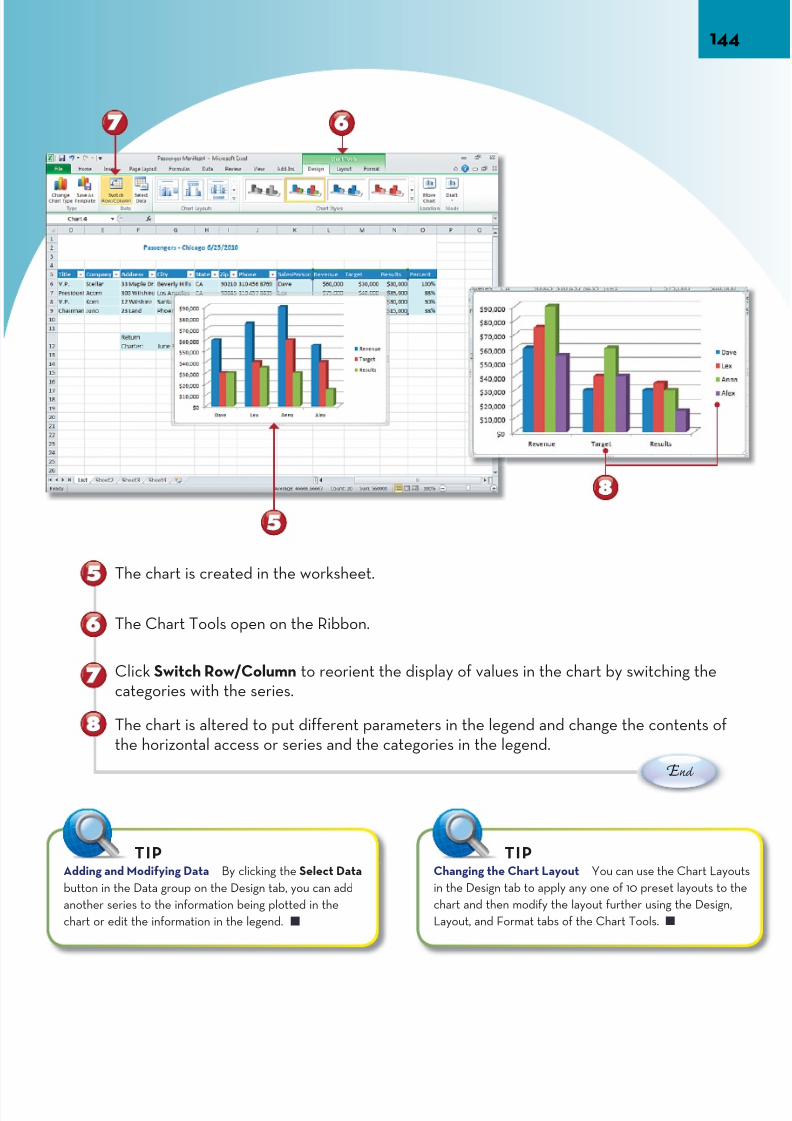
7/22/2019 Easy Microsoft Office 2010
http://slidepdf.com/reader/full/easy-microsoft-office-2010 157/309
The chart is created in the worksheet.
The Chart Tools open on the Ribbon.
Click Switch Row/Column to reorient the display of values in the chart by switching tcategories with the series.
The chart is altered to put different parameters in the legend and change the contentthe horizontal access or series and the categories in the legend.
E nd
Adding and Modifying Data By clicking the Select Data
button in the Data group on the Design tab, you can add
another series to the information being plotted in the
chart or edit the information in the legend.
TIPChanging the Chart Layout You can use the Cha
in the Design tab to apply any one of 10 preset layou
chart and then modify the layout further using the D
Layout, and Format tabs of the Chart Tools.
TIP
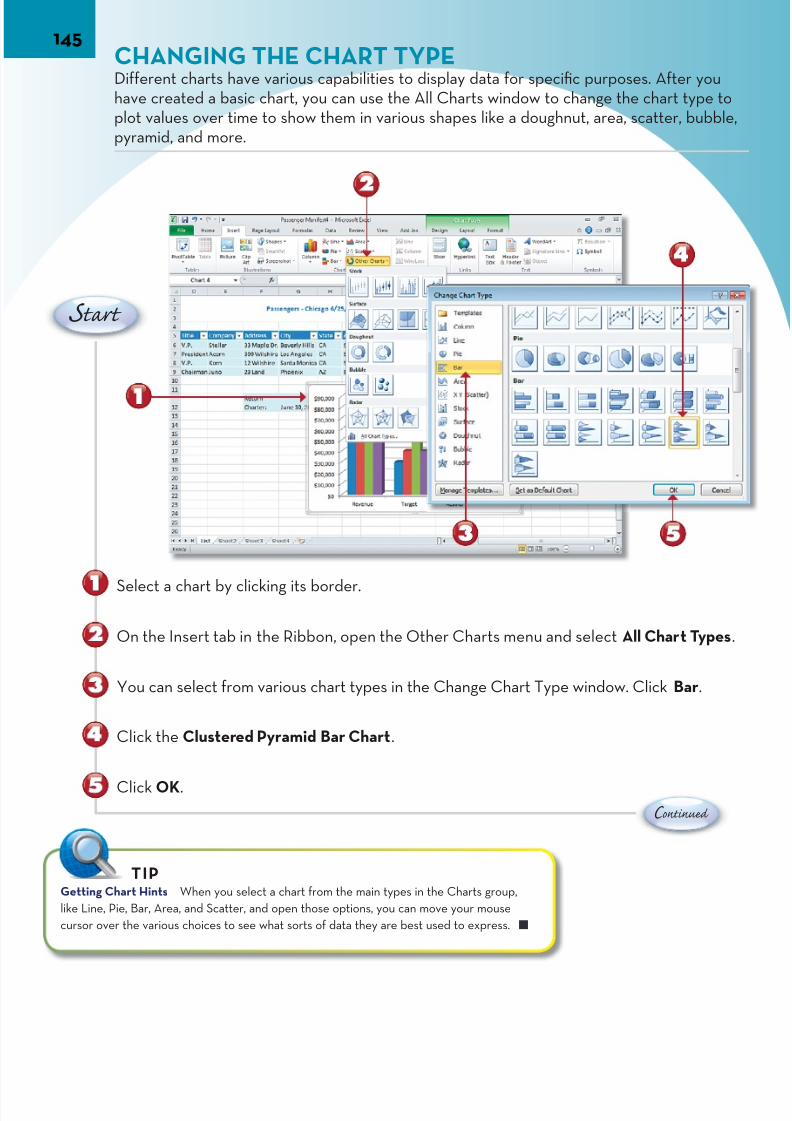
7/22/2019 Easy Microsoft Office 2010
http://slidepdf.com/reader/full/easy-microsoft-office-2010 158/309
145CHANGING THE CHART TYPE
Different charts have various capabilities to display data for specific purposes. After yhave created a basic chart, you can use the All Charts window to change the chart typplot values over time to show them in various shapes like a doughnut, area, scatter, bupyramid, and more.
C ontinue
Select a chart by clicking its border.
On the Insert tab in the Ribbon, open the Other Charts menu and select All Chart Ty
You can select from various chart types in the Change Chart Type window. Click Bar
Click the Clustered Pyramid Bar Chart.
Click OK.
Getting Chart Hints When you select a chart from the main types in the Charts group,
like Line, Pie, Bar, Area, and Scatter, and open those options, you can move your mouse
cursor over the various choices to see what sorts of data they are best used to express.
TIP
S tart

7/22/2019 Easy Microsoft Office 2010
http://slidepdf.com/reader/full/easy-microsoft-office-2010 159/309
E nd
The chart is transformed into the type you selected.
Click Undo if you don’t care for the results.
The chart reverts to your original selection.
Reusing Favorites When you use a specific chart
type frequently, you can make that the default chart by
clicking Set as Default Chart in the Change Chart Type
window. You can also save your worksheet with a chart
as an Excel template using Backstage view and then
select Manage Templates in the Change Chart Type
window to reuse such charts in a new project.
TIP
Using Pie Charts and Doughnut Charts A pie ch
is a very specific chart type used to express parts
whole, so you can display only one data series in a
chart, which is displayed by percentages. You can
a doughnut chart to display multiple such series, w
each forming one ring of the doughnut.
TIP
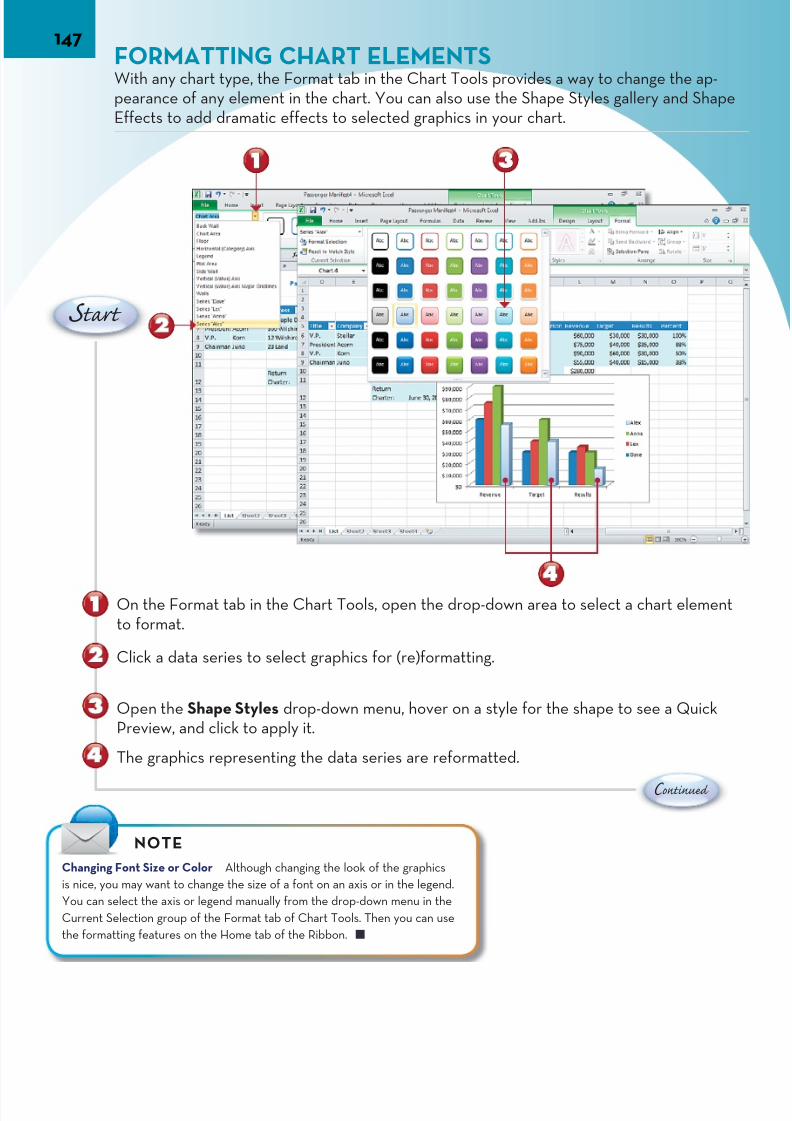
7/22/2019 Easy Microsoft Office 2010
http://slidepdf.com/reader/full/easy-microsoft-office-2010 160/309
147FORMATTING CHART ELEMENTSWith any chart type, the Format tab in the Chart Tools provides a way to change the apearance of any element in the chart. You can also use the Shape Styles gallery and SEffects to add dramatic effects to selected graphics in your chart.
C ontinue
On the Format tab in the Chart Tools, open the drop-down area to select a chart eleto format.
Click a data series to select graphics for (re)formatting.
Open the Shape Styles drop-down menu, hover on a style for the shape to see a QuPreview, and click to apply it.
The graphics representing the data series are reformatted.
S tart
Changing Font Size or Color Although changing the look of the graphics
is nice, you may want to change the size of a font on an axis or in the legend.
You can select the axis or legend manually from the drop-down menu in the
Current Selection group of the Format tab of Chart Tools. Then you can use
the formatting features on the Home tab of the Ribbon.
NOTE

7/22/2019 Easy Microsoft Office 2010
http://slidepdf.com/reader/full/easy-microsoft-office-2010 161/309
E nd
With the shape still selected, click the Shape Effects drop-down arrow.
Hover on an effect for the shape to see a Quick Preview and click to apply thatshape effect.
The style and effect are applied to all elements in the series.
You can also click to manually select another series to change its format, shape, or ef
Using WordArt Styles You can select text ele-
ments in the chart and use the Word Art Styles in
the Format tab to change the appearance of the
legend, title, axis text, or labels.
TIPChart Styles With the chart selected (click its border)
can use the Chart Style in the Design tab on the Chart T
to apply an entire design or look to your chart. (Applyin
Chart Styles removes individual element formatting you
applied to graphics in the chart).
TIP

7/22/2019 Easy Microsoft Office 2010
http://slidepdf.com/reader/full/easy-microsoft-office-2010 162/309
149MOVING A CHARTYou can move a chart within the current worksheet or to its own worksheet. Then youuse the zoom slider to change its relative size in the new worksheet and the formattinto change its appearance on the full page.
C ontinue
Click the border of a selected chart until your cursor turns to a cross shape.
Drag and drop the chart to a new place on the worksheet.
The chart is repositioned on the worksheet.
S tart
Resizing a Chart You can resize a chart by clicking on
the corner of the chart until your cursor changes into a
two-headed arrow. Then you can drag the corner out to
make the chart larger or in to reduce its size.
TIPMoving a Slice of a Pie Chart In a pie chart
can “break out” one of the pieces by selectin
and dragging it away from the rest of the pie.
TIP

7/22/2019 Easy Microsoft Office 2010
http://slidepdf.com/reader/full/easy-microsoft-office-2010 163/309
E nd
With the chart still selected, click Move Chart on the Design tab in Chart Tools.
Click New Sheet (with the sheet name selected, you can change it).
Click OK.
The chart is moved to its own sheet.
You can use the zoom slider to adjust its display size in the new sheet.
Reformatting the Chart Moving a chart to its own
sheet changes its appearance and makes the text appear
smaller. To change the font size select a chart element
and use the formatting tools of the Home tab.
TIP Copying a Chart You can select a chart and click
Copy in the Home tab of the Ribbon (or press Ctrl+
and then click Paste (Ctrl+V) to place the chart into
another worksheet.
TIP
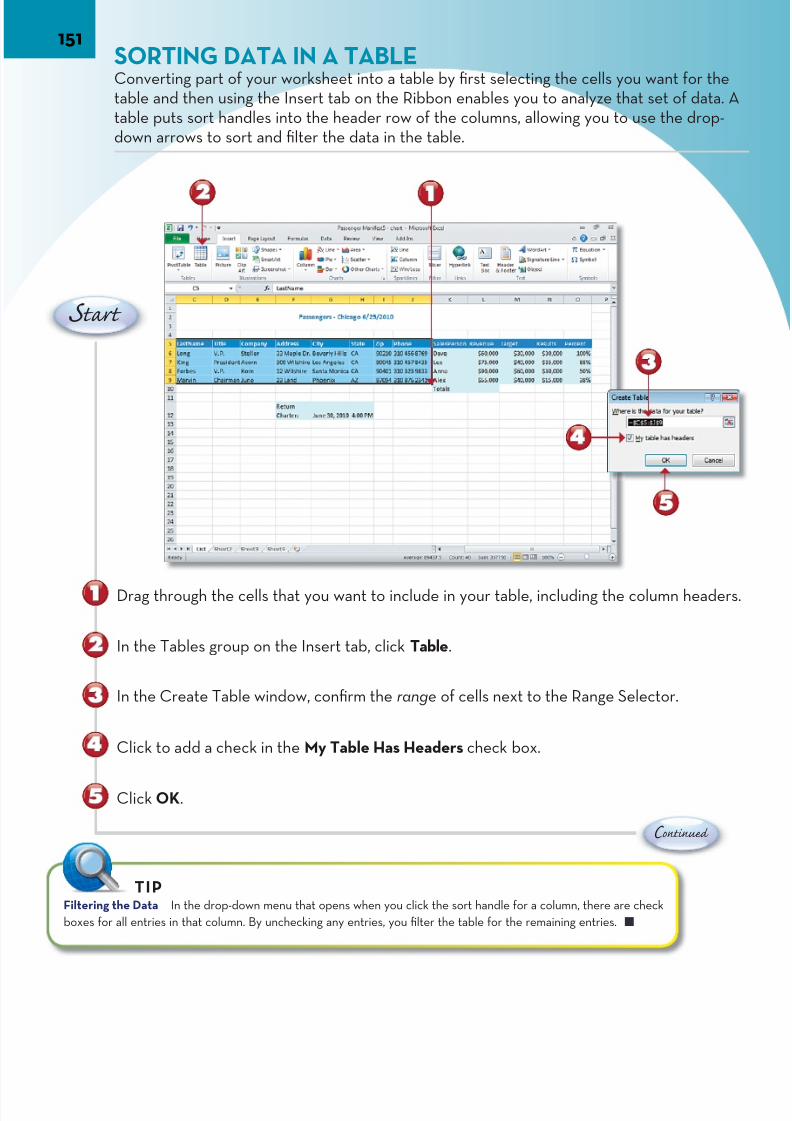
7/22/2019 Easy Microsoft Office 2010
http://slidepdf.com/reader/full/easy-microsoft-office-2010 164/309
151SORTING DATA IN A TABLE
Converting part of your worksheet into a table by first selecting the cells you want fotable and then using the Insert tab on the Ribbon enables you to analyze that set of dtable puts sort handles into the header row of the columns, allowing you to use the drdown arrows to sort and filter the data in the table.
Click OK.
C ontinue
Drag through the cells that you want to include in your table, including the column he
In the Tables group on the Insert tab, click Table.
In the Create Table window, confirm the range of cells next to the Range Selector.
Click to add a check in the My Table Has Headers check box.
S tart
Filtering the Data In the drop-down menu that opens when you click the sort handle for a column, there are check
boxes for all entries in that column. By unchecking any entries, you filter the table for the remaining entries.
TIP

7/22/2019 Easy Microsoft Office 2010
http://slidepdf.com/reader/full/easy-microsoft-office-2010 165/309
E nd
Sort handles are added to the header row.
Click one of the sort handles for a column heading.
Select a sorting method to sort table columns according to the option selected (Asceshown here) with an up arrow indicating the sort selection (Ascending).
Clearing Filter Handles To remove the filter
handles and deselect the cells in a table, click in the
table to open Table Tools and then click Convert to
Range in the Tools group of the Design tab.
TIP Using Text Filter Parameters Text filters in the d
down filter options let you fine-tune your filter usin
parameters such as Equals, Does Not Equal, Begin
Ends With, Contains, and Does Not Contain.
TIP
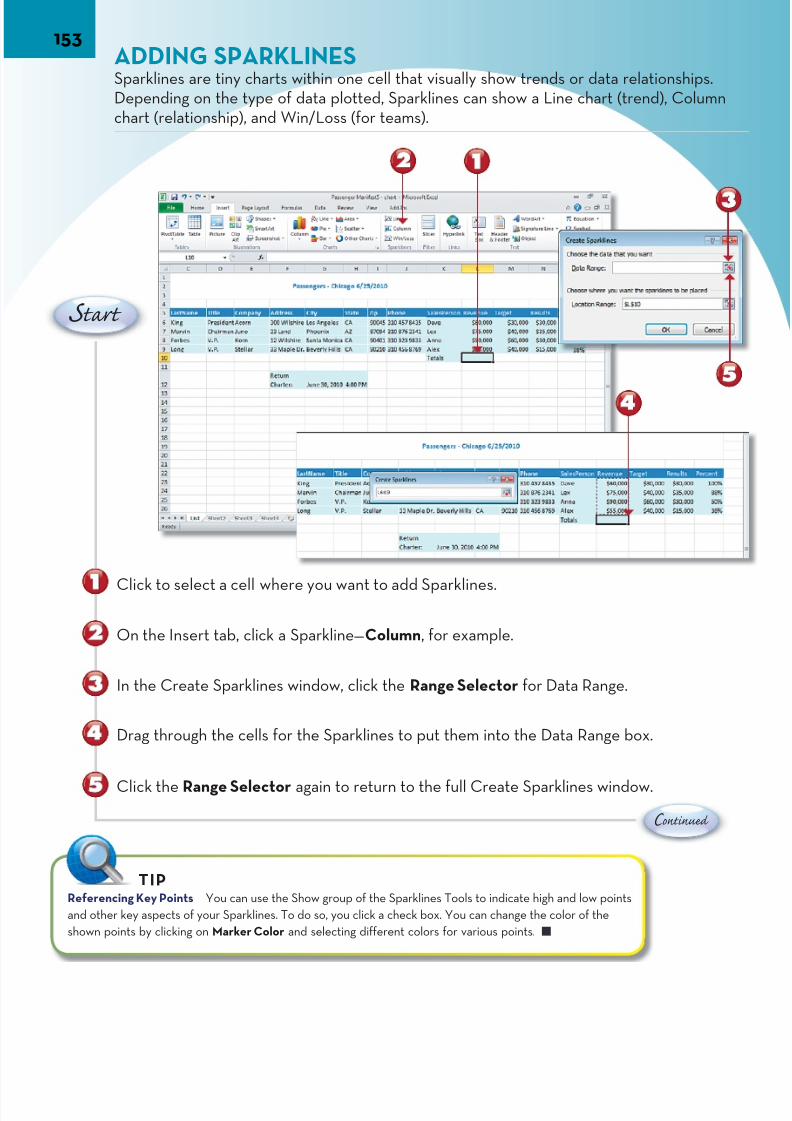
7/22/2019 Easy Microsoft Office 2010
http://slidepdf.com/reader/full/easy-microsoft-office-2010 166/309
153ADDING SPARKLINESSparklines are tiny charts within one cell that visually show trends or data relationshipDepending on the type of data plotted, Sparklines can show a Line chart (trend), Coluchart (relationship), and Win/Loss (for teams).
C ontinue
Click to select a cell where you want to add Sparklines.
On the Insert tab, click a Sparkline—Column, for example.
In the Create Sparklines window, click the Range Selector for Data Range.
Drag through the cells for the Sparklines to put them into the Data Range box.
S tart
Click the Range Selector again to return to the full Create Sparklines window.
Referencing Key Points You can use the Show group of the Sparklines Tools to indicate high and low points
and other key aspects of your Sparklines. To do so, you click a check box. You can change the color of the
shown points by clicking on Marker Color and selecting different colors for various points.
TIP
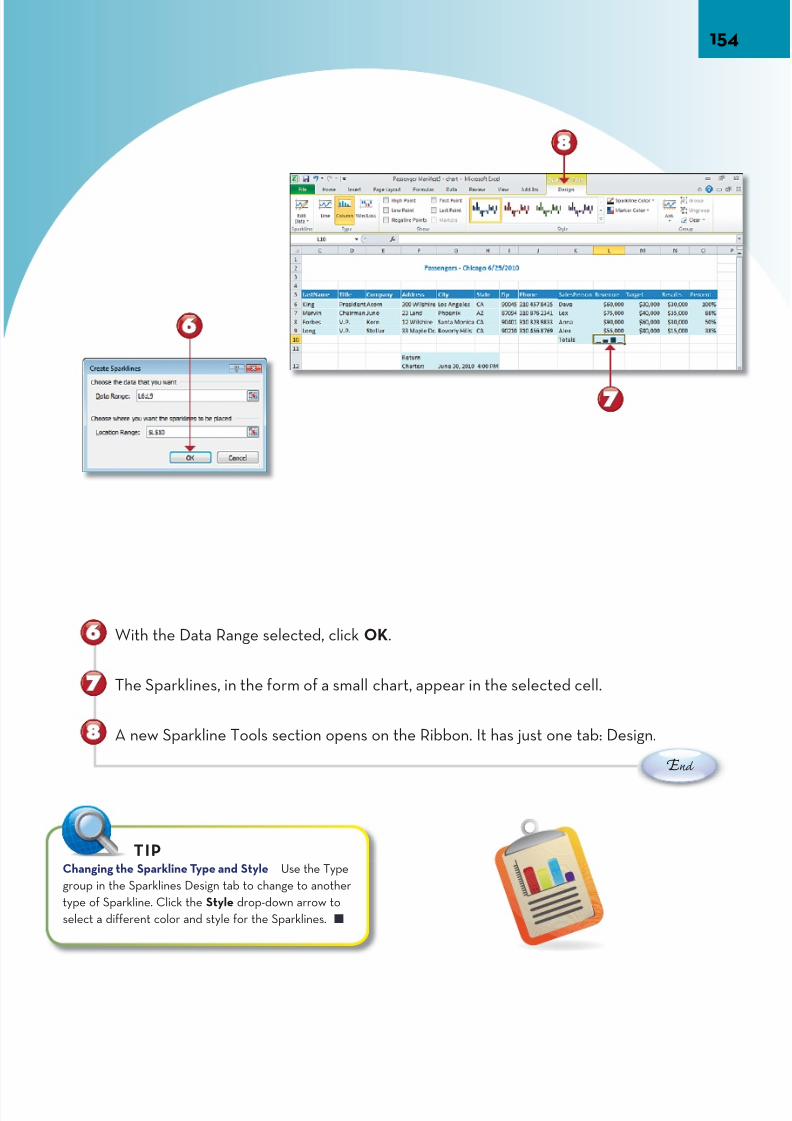
7/22/2019 Easy Microsoft Office 2010
http://slidepdf.com/reader/full/easy-microsoft-office-2010 167/309
E nd
With the Data Range selected, click OK.
The Sparklines, in the form of a small chart, appear in the selected cell.
A new Sparkline Tools section opens on the Ribbon. It has just one tab: Design.
Changing the Sparkline Type and Style Use the Type
group in the Sparklines Design tab to change to another
type of Sparkline. Click the Style drop-down arrow to
select a different color and style for the Sparklines.
TIP

7/22/2019 Easy Microsoft Office 2010
http://slidepdf.com/reader/full/easy-microsoft-office-2010 168/309
155USING A PIVOT TABLEYou can use a pivot table to reorganize your data to more clearly see various relationsFor example, with your sales data in ordinary columns or rows, with columns listing thous categories, it’s hard to see who sold what, when it was sold, or where. By putting ycategories into a pivot table, you can display all these relationships more clearly.
C ontinue
Click in the data that you want to make a pivot table.
Click Pivot Table on the Ribbon’s Insert tab.
In the Create Pivot Table window, check that the Table/Range shows all your data (usRange Selector to drag through the data again to modify it).
Accept the default setting for placing the pivot table into a new worksheet.
S tart
Click OK.
Choosing Your Fields Laying out your fields is usually just a matter of asking a question, such as how much of which produ
was sold where or by whom? Separating those categories into columns and rows is a good first step. Values answer the ques
“How much?” and generally go in the middle. Then you can decide what might be a helpful filter—for example, which produc
which area, by whom, or when. To adjust the pivot table, uncheck fields to remove them or drag and drop them to other are
TIP
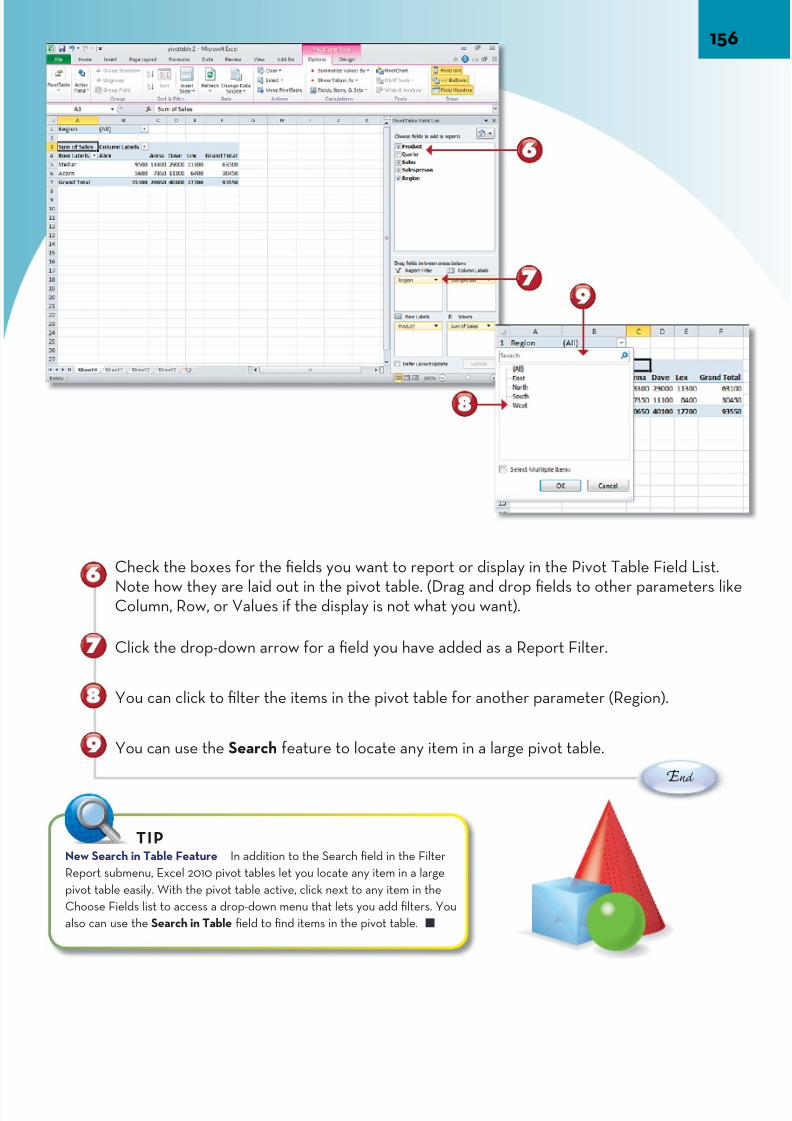
7/22/2019 Easy Microsoft Office 2010
http://slidepdf.com/reader/full/easy-microsoft-office-2010 169/309
E nd
Check the boxes for the fields you want to report or display in the Pivot Table Field L
Note how they are laid out in the pivot table. (Drag and drop fields to other parameteColumn, Row, or Values if the display is not what you want).
Click the drop-down arrow for a field you have added as a Report Filter.
You can click to filter the items in the pivot table for another parameter (Region).
You can use the Search feature to locate any item in a large pivot table.
New Search in Table Feature In addition to the Search field in the Filter
Report submenu, Excel 2010 pivot tables let you locate any item in a large
pivot table easily. With the pivot table active, click next to any item in the
Choose Fields list to access a drop-down menu that lets you add filters. You
also can use the Search in Table field to find items in the pivot table.
TIP

7/22/2019 Easy Microsoft Office 2010
http://slidepdf.com/reader/full/easy-microsoft-office-2010 170/309
157FILTERING A PIVOT TABLE WITH THE SLICER
In your pivot table, you can use the Slicer panel to quickly drill down or filter through data to see specific “slices” of information. For example, with a sales report, you can uSlicer to see how the sales played out by quarter for the fields and values you alreadyadded to the pivot table.
C ontinue
With the pivot table active (click in the pivot table), click Insert Slicer in the Option tthe PivotTable Tools.
Click to select a parameter to “slice” or filter in the Insert Slicers window.
Click OK.
S tart
Slicer Opens Data Connections If you click Slicer in the Ribbon’s Insert tab or outside a pivot table
from the PivotTable Tools, you open a window for selecting outside data connections. To use the Slicer
window as shown here, make sure you click in the pivot table to activate it before clicking Insert Slicer
in the Option tab of the PivotTable Tools.
TIP

7/22/2019 Easy Microsoft Office 2010
http://slidepdf.com/reader/full/easy-microsoft-office-2010 171/309
E nd
A graphic window opens with buttons for your Slicer, so you can quickly choose one oselections for a filter. The Slicer Tools Options tab also opens on the Ribbon.
Click one of the Slicer options to “slice,” or filter, your data for that selection.
The data reflects the selection you made.
You can remove the selected filter by clicking the X on the Filter icon.
Slicer Settings Using the Slicer Settings in the
Slicer group of the Options tab of the Slicer Tools,
you can change the caption and sort parameters as
well as other options for the Slicer window.
TIPRemoving a Slice You can remove the Slicer
by right-clicking its border and selecting Remove
[Name of Slicer].
TIP

7/22/2019 Easy Microsoft Office 2010
http://slidepdf.com/reader/full/easy-microsoft-office-2010 172/309
159HIGHLIGHTING DATA WITH CONDITIONAL FORMAT
Conditional formats are another way to display important aspects of your data. You cthe graphical capabilities of conditional formats to display the relative values of data as a bar, gradients, or icons, or you can create rules to highlight which cells represent tain relationships, such as those greater than a given value.
C ontinue
Click the Column Reference Letter to select it for Conditional Formatting.
Click Conditional Formatting on the Ribbon’s Home tab.
Click Data Bars and a Solid Fill color.
Solid color bars represent the data in the column selected.
S tart
Changing the Rules To change how Conditional Formatting rules reflect
in your data, click Conditional Formatting and Manage Rules.
TIP
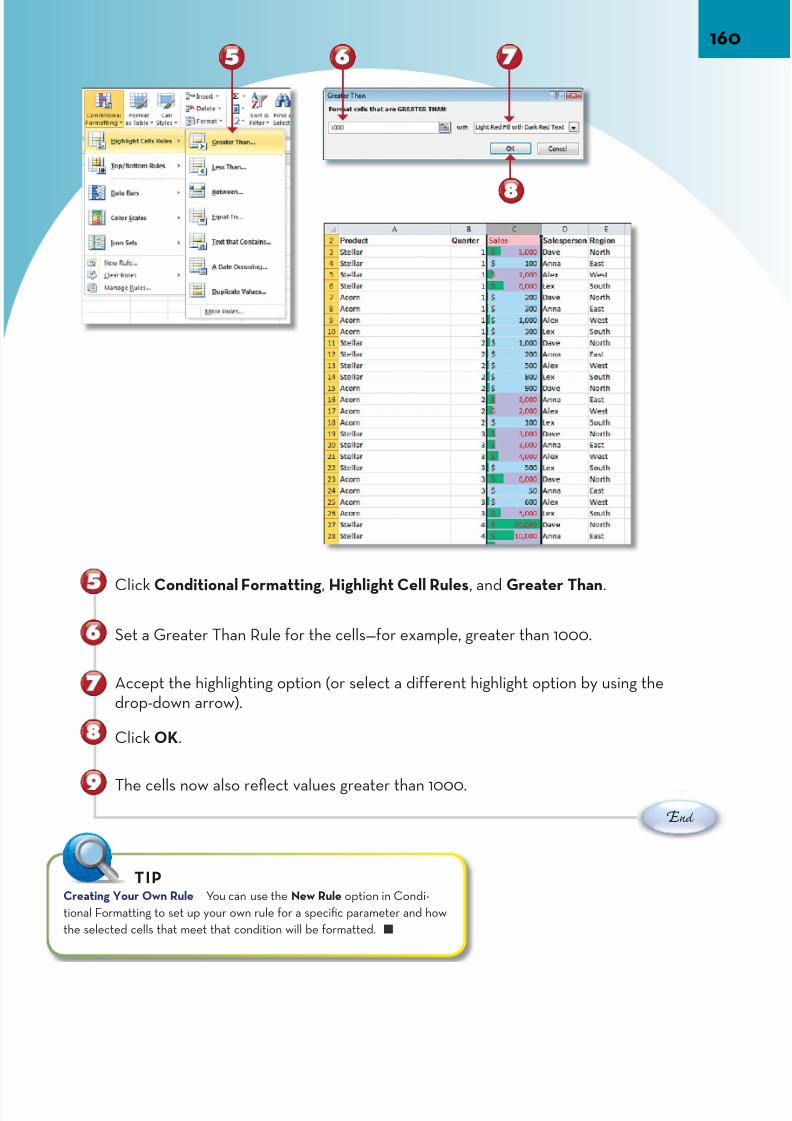
7/22/2019 Easy Microsoft Office 2010
http://slidepdf.com/reader/full/easy-microsoft-office-2010 173/309
E nd
Click Conditional Formatting, Highlight Cell Rules, and Greater Than.
Set a Greater Than Rule for the cells—for example, greater than 1000.
Accept the highlighting option (or select a different highlight option by using thedrop-down arrow).
Click OK.
The cells now also reflect values greater than 1000.
Creating Your Own Rule You can use the New Rule option in Condi-
tional Formatting to set up your own rule for a specific parameter and how
the selected cells that meet that condition will be formatted.
TIP

7/22/2019 Easy Microsoft Office 2010
http://slidepdf.com/reader/full/easy-microsoft-office-2010 174/309
SHARING YOUR PROJECT ONLINE WITH MICROSOFT OFFICE WEBAPPLICATIONSThe Microsoft web applications are scaled-down versions of the main programscreated to allow users to collaborate and share information online.
You can create an entire spreadsheet in Excel’s online application, or, forexample, you can upload the project that has been used as an example forExcel 2010 to the web workspace and view and modify it using the Excel webapplication. (See “Creating a Folder for Web Application” and “Uploading a Fileto Your Folder” at the end of Chapter 7, “Reviewing Documents and WorkingOnline”).
In the case of a data table, information can be modified and added to the web
application to supplement what was originally entered. For cells with formulas,functions, and other calculations, you can adjust figures so that they havedifferent results and affect the display of charts based on the information.
Working with the online web application means not having to save your work; itis automatically stored online. From the web application, you can return direct-ly to the desktop version of Excel 2010 to continue revising your work and useall the features of the Ribbon to complete your project.
Chapter 11 p a g e
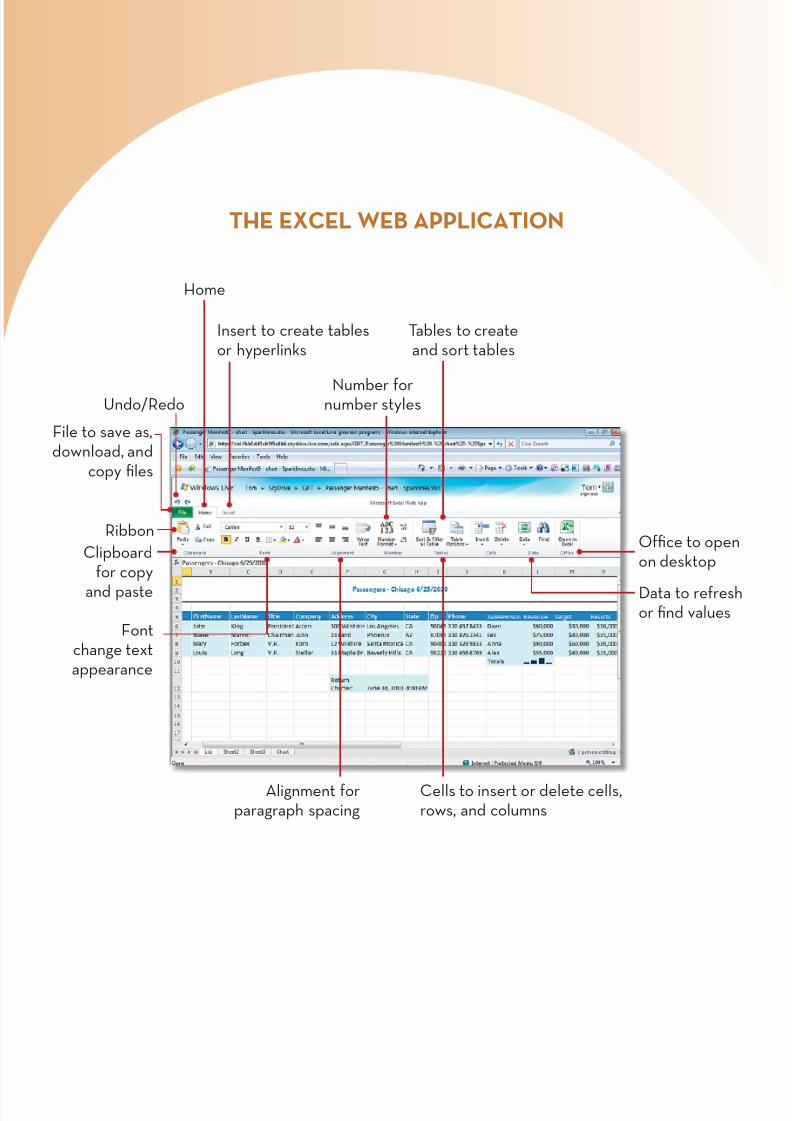
7/22/2019 Easy Microsoft Office 2010
http://slidepdf.com/reader/full/easy-microsoft-office-2010 175/309
THE EXCEL WEB APPLICATION
Ribbon
Home
Undo/Redo
File to save as,download, and
copy files
Number fornumber styles
Office toon deskt
Clipboardfor copy
and paste
Tables to createand sort tables
Insert to create tablesor hyperlinks
Fontchange textappearance
Cells to insert or delete cells,rows, and columns
Alignment forparagraph spacing
Data to ror find va
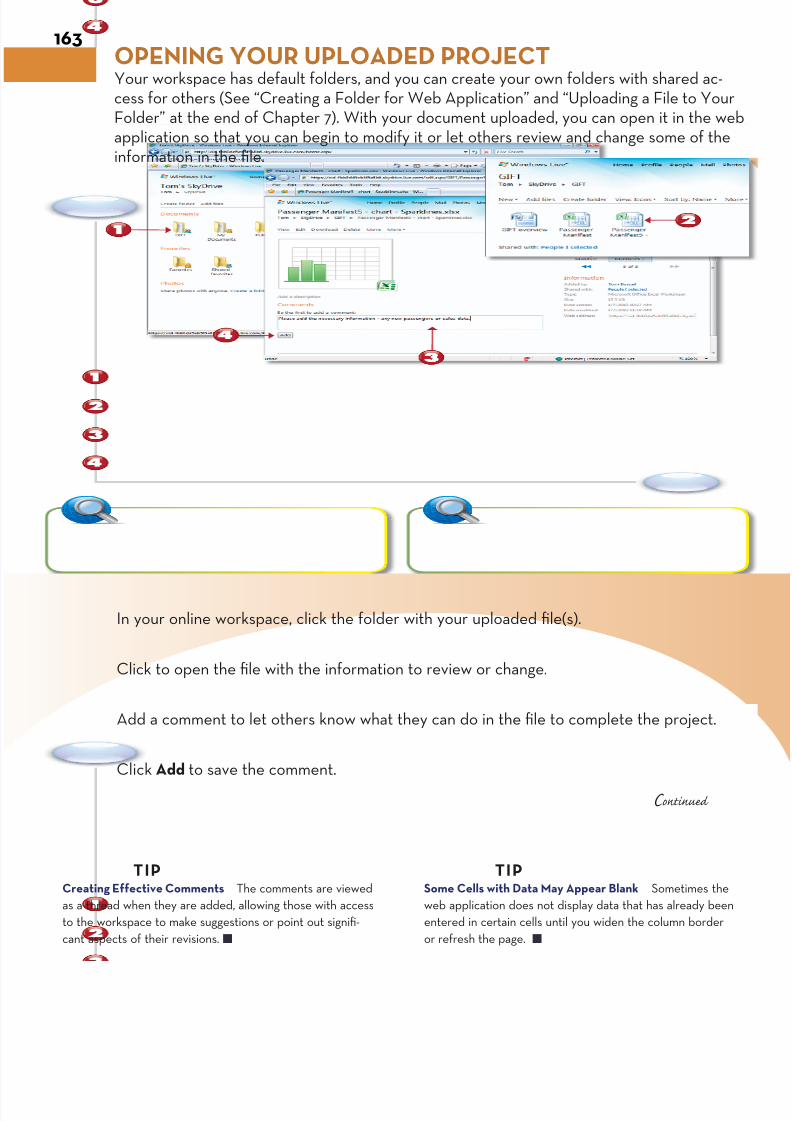
7/22/2019 Easy Microsoft Office 2010
http://slidepdf.com/reader/full/easy-microsoft-office-2010 176/309
S SS t tta aar rrt tt
163OPENING YOUR UPLOADED PROJECT
Your workspace has default folders, and you can create your own folders with sharedcess for others (See “Creating a Folder for Web Application” and “Uploading a File to Folder” at the end of Chapter 7). With your document uploaded, you can open it in thapplication so that you can begin to modify it or let others review and change some oinformation in the file.
In your online workspace, click the folder with your uploaded file(s).
Click to open the file with the information to review or change.
Add a comment to let others know what they can do in the file to complete the proje
Click Add to save the comment.
C ontinue
Creating Effective Comments The comments are viewed
as a thread when they are added, allowing those with access
to the workspace to make suggestions or point out signifi-
cant aspects of their revisions.
TIPSome Cells with Data May Appear Blank Sometime
web application does not display data that has already
entered in certain cells until you widen the column bo
or refresh the page.
TIP

7/22/2019 Easy Microsoft Office 2010
http://slidepdf.com/reader/full/easy-microsoft-office-2010 177/309
E nd
Your comment is added to the bottom of the page. Others with permission to access workspace can see your comment.
Any users with permission can create their own comment or click Edit to open thespreadsheet.
When the spreadsheet opens online, you can click a worksheet tab to get to the infortion you need.
In the worksheet with your data, you can begin to change information.
Chart Effects in the Web Application A chart may not retain all
its special effects (glows, bevels, and so on) when displayed within
the Excel web application.
TIP
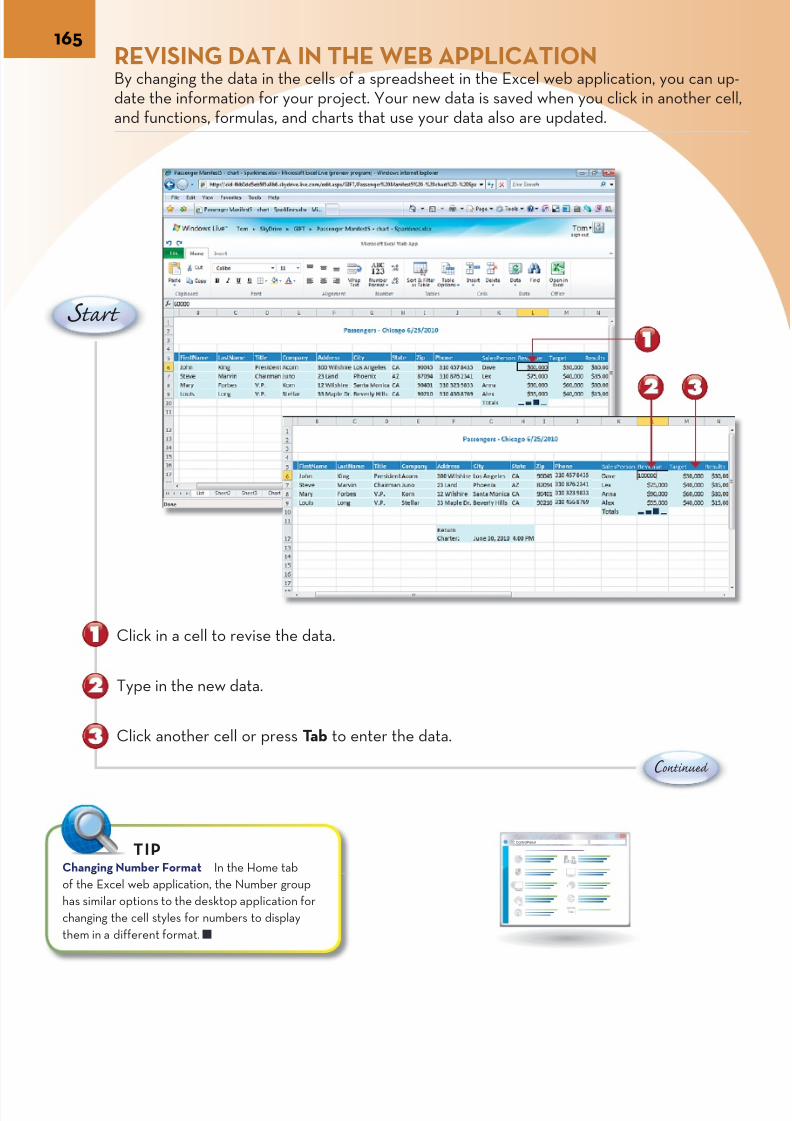
7/22/2019 Easy Microsoft Office 2010
http://slidepdf.com/reader/full/easy-microsoft-office-2010 178/309
165
S tart
C ontinue
Click another cell or press Tab to enter the data.
Type in the new data.
Click in a cell to revise the data.
REVISING DATA IN THE WEB APPLICATIONBy changing the data in the cells of a spreadsheet in the Excel web application, you cadate the information for your project. Your new data is saved when you click in anothand functions, formulas, and charts that use your data also are updated.
Changing Number Format In the Home tab
of the Excel web application, the Number group
has similar options to the desktop application for
changing the cell styles for numbers to display
them in a different format.
TIPControl Panel

7/22/2019 Easy Microsoft Office 2010
http://slidepdf.com/reader/full/easy-microsoft-office-2010 179/309
E nd
The new data is entered.
Any formulas or Sparklines reflecting your data are updated.
You can click another worksheet to view results in a chart.
A chart based on the data also reflects the new figures added.
New Sparklines Feature There is no Sparklines
feature directly in the web application for Excel
2010, but if you upload a file with Sparklines and
revise the data, the Sparklines reflect the
changes.
TIP
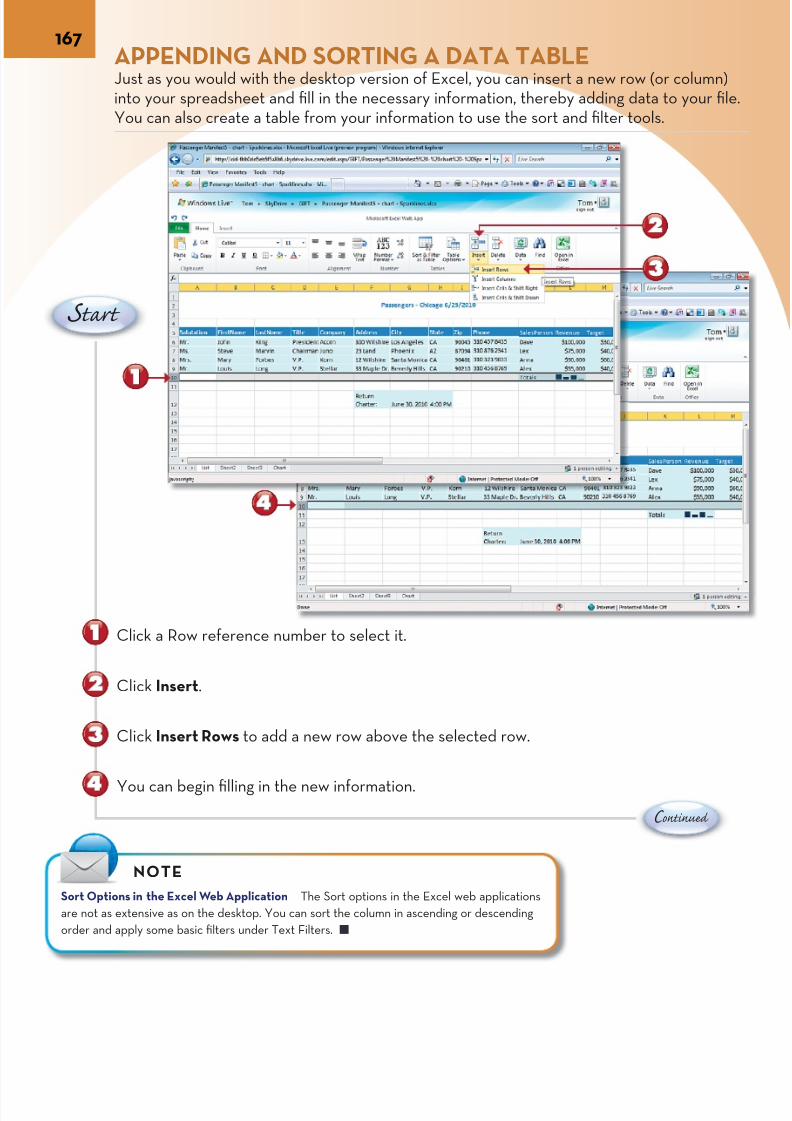
7/22/2019 Easy Microsoft Office 2010
http://slidepdf.com/reader/full/easy-microsoft-office-2010 180/309
167APPENDING AND SORTING A DATA TABLE
Just as you would with the desktop version of Excel, you can insert a new row (or coluinto your spreadsheet and fill in the necessary information, thereby adding data to yoYou can also create a table from your information to use the sort and filter tools.
Click a Row reference number to select it.
Click Insert.
Click Insert Rows to add a new row above the selected row.
You can begin filling in the new information.
S tart
C ontinue
Sort Options in the Excel Web Application The Sort options in the Excel web applications
are not as extensive as on the desktop. You can sort the column in ascending or descending
order and apply some basic filters under Text Filters.
NOTE

7/22/2019 Easy Microsoft Office 2010
http://slidepdf.com/reader/full/easy-microsoft-office-2010 181/309
E nd
Drag through the cells with the completed information.
Click Sort & Filter as Table.
Confirm the range of your table and whether or not it has headers.
Click OK.
Your table has sort handles that let you use the sort options for a table. (See “Sorting in a Table” in Chapter 10, “Creating Charts, Data Tables, and Pivot Tables.”)
Deleting Rows and Columns You can click the Delete button in the Cells group to delete
selected rows, columns, and cells and shift the remaining cells left (column) or up (row).
TIP

7/22/2019 Easy Microsoft Office 2010
http://slidepdf.com/reader/full/easy-microsoft-office-2010 182/309
169OPENING ONLINE FILES LOCALLY
You can open the web application version of an Office file using your Office 2010 desversion to take advantage of the full feature set of the program. For example, you canthe changed file and make more complex changes, save it directly back online (the deor you can save it under another name, or use other options like those in Backstage vi
Click Open in Excel.
Click OK to accept the warning about harmful files.
S tart
C ontinue
Resizing a Chart You can resize a chart by clicking
on a corner of the chart until your cursor changes
into a two-headed arrow and then dragging the
corner out to make the chart larger or in to reduce
its size.
TIP
Locked Files When a workbook is opened locally in Excel
Word or PowerPoint) from the web application, the online v
is locked for editing. The user who opened the file must save
local changes and close the file for it to be used again within
web application. Changes are saved directly to the web app
tion, so the user may want to also save a local version under
different name.
TIP

7/22/2019 Easy Microsoft Office 2010
http://slidepdf.com/reader/full/easy-microsoft-office-2010 183/309
E nd
The file opens in the desktop application with the name from the web application. Nothat any charts in the worksheet still retain their original effects.
You can click Options to clear the Security Warning about any external data connectother databases that the file might access.
You can click another worksheet to access its data.
You can work with the data that has been added or changed online by those with persion to access your workspace folder.
Saving in the Web App There is no Save button or
feature in the web applications. But you can choose
the Save As option under File to save the changes
made online into the workspace folder under a dif-
ferent name.
TIP
Downloading from the Web App Downloading a
web app version of the file keeps the web app file
available for editing and lets the user work with the
downloaded file locally using the full features of
Excel (or Word or PowerPoint).
TIP

7/22/2019 Easy Microsoft Office 2010
http://slidepdf.com/reader/full/easy-microsoft-office-2010 184/309
171PRINTING AN EXCEL WORKSHEET
Although you can print your web application worksheet as part of your web browser, the desktop application gives you more versatility in terms of previewing your printedand scaling the columns to fit into a printed page.
Click File to open Backstage view.
Click Print.
S tart
C ontinue
Page Break Preview If you want to adjust which
columns to print within the worksheet, you can use
the Page Break Preview view at the bottom right of
the Excel 2010 window. You can drag the break line
to extend or contract the portion of the worksheet
that will print on each page.
TIP
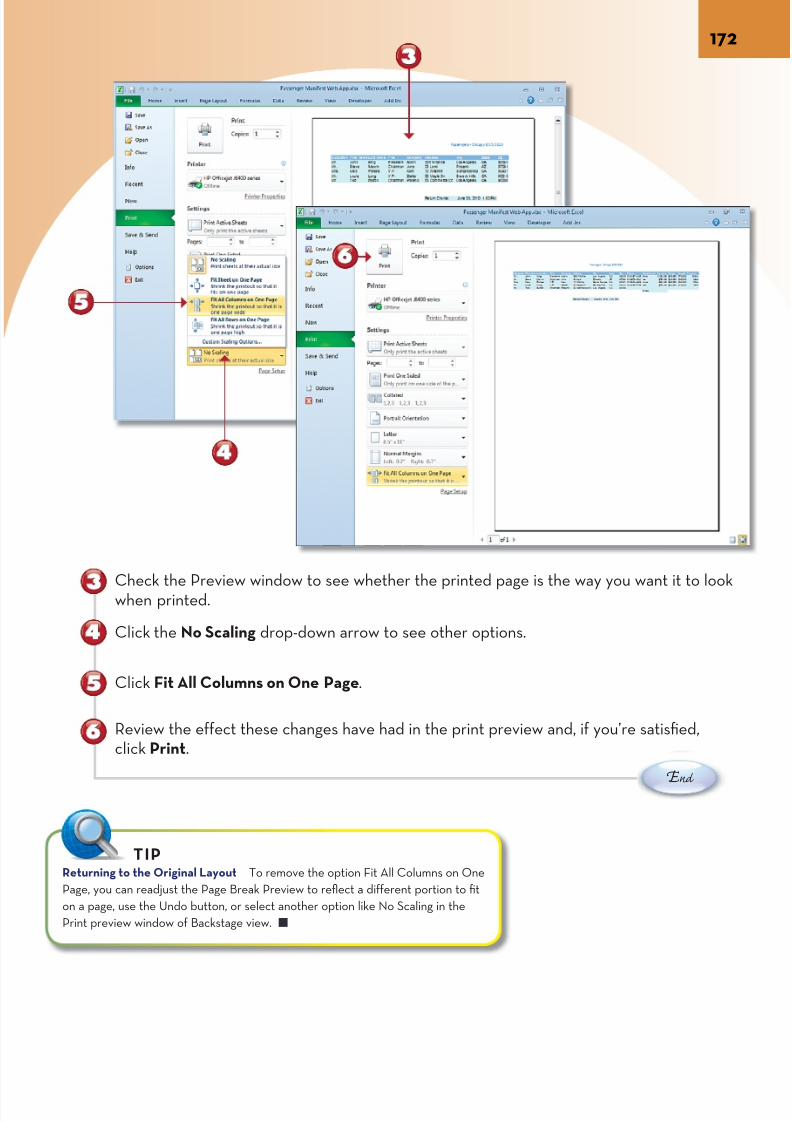
7/22/2019 Easy Microsoft Office 2010
http://slidepdf.com/reader/full/easy-microsoft-office-2010 185/309
E nd
Check the Preview window to see whether the printed page is the way you want it towhen printed.
Click the No Scaling drop-down arrow to see other options.
Click Fit All Columns on One Page.
Review the effect these changes have had in the print preview and, if you’re satisfied,click Print.
Returning to the Original Layout To remove the option Fit All Columns on One
Page, you can readjust the Page Break Preview to reflect a different portion to fit
on a page, use the Undo button, or select another option like No Scaling in the
Print preview window of Backstage view.
TIP
7/22/2019 Easy Microsoft Office 2010
http://slidepdf.com/reader/full/easy-microsoft-office-2010 186/309
GETTING STARTED WITH POWERPOINT 2010PowerPoint is a presentation program based on the concept of a slide projec-
tor; it projects a sequence of slides that tell a story to help you accomplish atask, such as selling, educating, motivating, or conveying a message.
You can begin a new presentation from the Backstage view, which has presettemplates in your Sample Templates folder, or from the Office.com online fold-ers of templates. (See “Creating a New Blank Document” in Chapter 1, “Intro-ducing the New Features in Office 2010.”)
Your new presentation begins with a cover page. From there, you can add newslides and change their layout using different placeholders that contain text,graphics, tables, charts, or other elements to communicate your message. You
can also add title and bullet text by typing directly into placeholders and canformat the text using the Font group in the Home tab on the Ribbon.
You can use slides from previous presentations or change the view of your pre-sentation to see the entire presentation in Slide Sorter view. Slide Sorter viewlets you see how a new theme affects your entire presentation, whereas SlideMaster view lets you control formatting of all your layouts.
Chapter 12
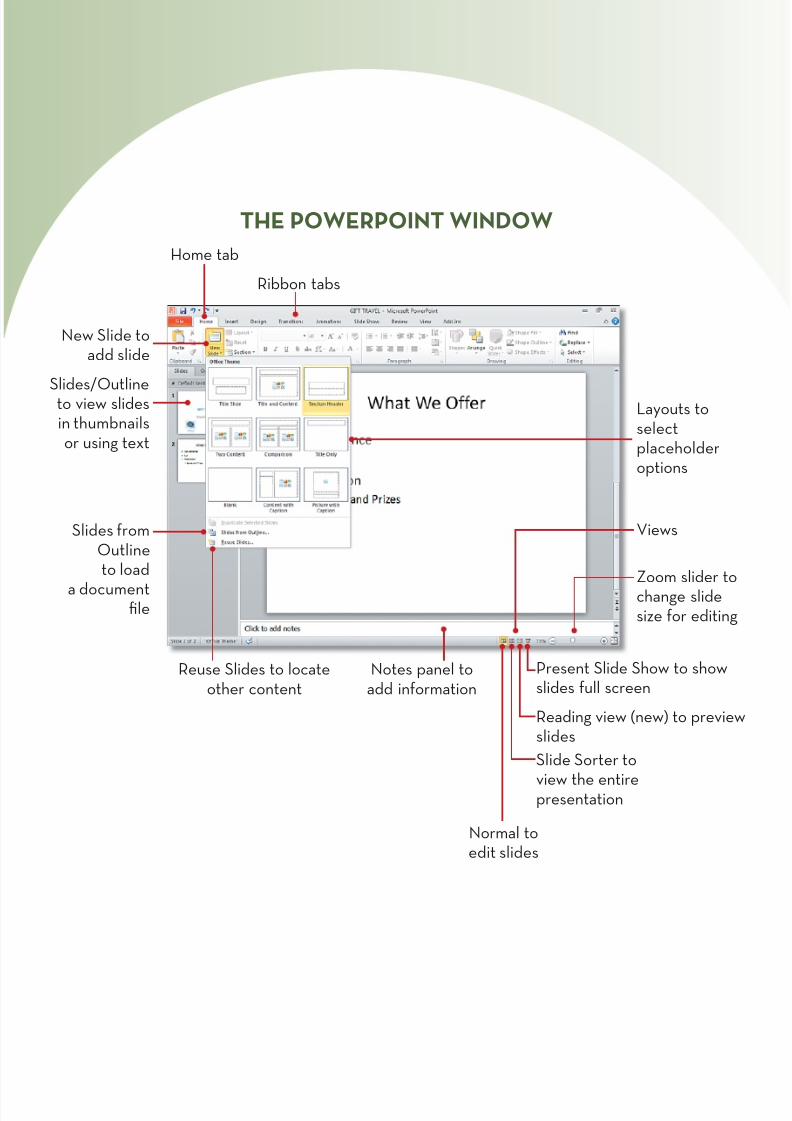
7/22/2019 Easy Microsoft Office 2010
http://slidepdf.com/reader/full/easy-microsoft-office-2010 187/309
THE POWERPOINT WINDOW
Ribbon tabs
Home tab
New Slide toadd slide
Layouts tselectplaceholdoptions
Slides fromOutlineto load
a documentfile
Reuse Slides to locateother content
Slides/Outlineto view slidesin thumbnailsor using text
Notes panel toadd information
Views
Present Slide Show to sslides full screen
Zoom slidchange slsize for e
Normal toedit slides
Slide Sorter to
view the entirepresentation
Reading view (new) to pslides
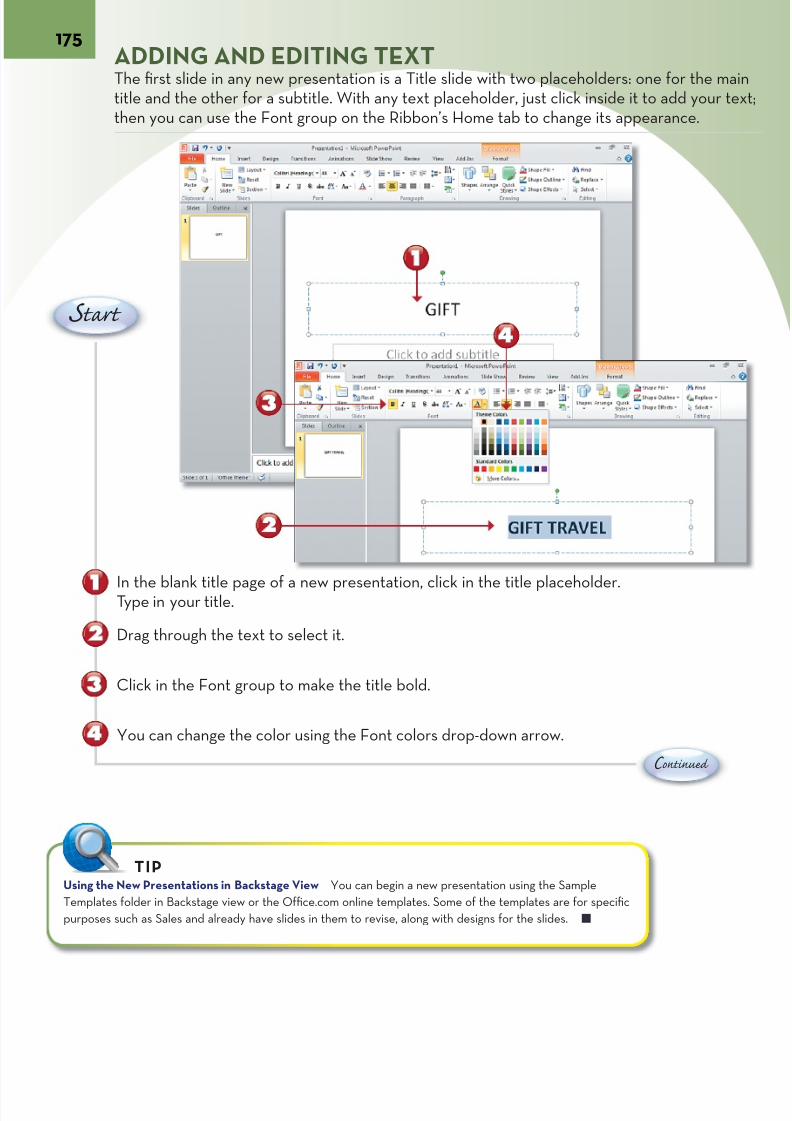
7/22/2019 Easy Microsoft Office 2010
http://slidepdf.com/reader/full/easy-microsoft-office-2010 188/309
175ADDING AND EDITING TEXT
The first slide in any new presentation is a Title slide with two placeholders: one for thtitle and the other for a subtitle. With any text placeholder, just click inside it to add ythen you can use the Font group on the Ribbon’s Home tab to change its appearance.
C ontinue
In the blank title page of a new presentation, click in the title placeholder.Type in your title.
Drag through the text to select it.
Click in the Font group to make the title bold.
You can change the color using the Font colors drop-down arrow.
S tart
Using the New Presentations in Backstage View You can begin a new presentation using the Sample
Templates folder in Backstage view or the Office.com online templates. Some of the templates are for specific
purposes such as Sales and already have slides in them to revise, along with designs for the slides.
TIP

7/22/2019 Easy Microsoft Office 2010
http://slidepdf.com/reader/full/easy-microsoft-office-2010 189/309
E nd
Click in the subtitle placeholder to type your subtitle.
The title text is set in the slide.
Finish adding text to the Title slide by filling in the subtitle placeholder.
Copying and Pasting Your Logo If you added a picture to a Word document to represent
a logo in previous chapters, you can copy and paste it from your Word document into a
PowerPoint slide, along with its picture effects, to add consistency to your project.
TIP

7/22/2019 Easy Microsoft Office 2010
http://slidepdf.com/reader/full/easy-microsoft-office-2010 190/309
177ADDING A SLIDE WITH BULLETSThe most basic layout for a slide is Title and Content, which lets you add bullet text toslide or use one of the content icons to add a different type of element, like Table, ChClip Art, Picture, SmartArt, and Media. You also can add and change bullets from theline tab next to the Slide tab in the left panel.
C ontinue
From the Home tab, click New Slide.
Click Title and Content Layout.
Type your title in the title placeholder.
Click the content placeholder to add bullet text or other elements. Note the contentfor Table, Chart, Clip Art, Picture, SmartArt, and Media. You can add any of these iteinstead of bullets.
S tart
Changing Bullet Styles You can change the bullet style in a slide by
selecting the bullets and using the Bullets drop-down arrow in the Para-
graph group of the Home tab to choose another style. You can also use
the Number List option next to Bullets in the Paragraph group.
TIPUsing the Keyboard to Add a Slide Yo
press Ctrl+M to add a new slide with the
layout as the previous slide.
TIP
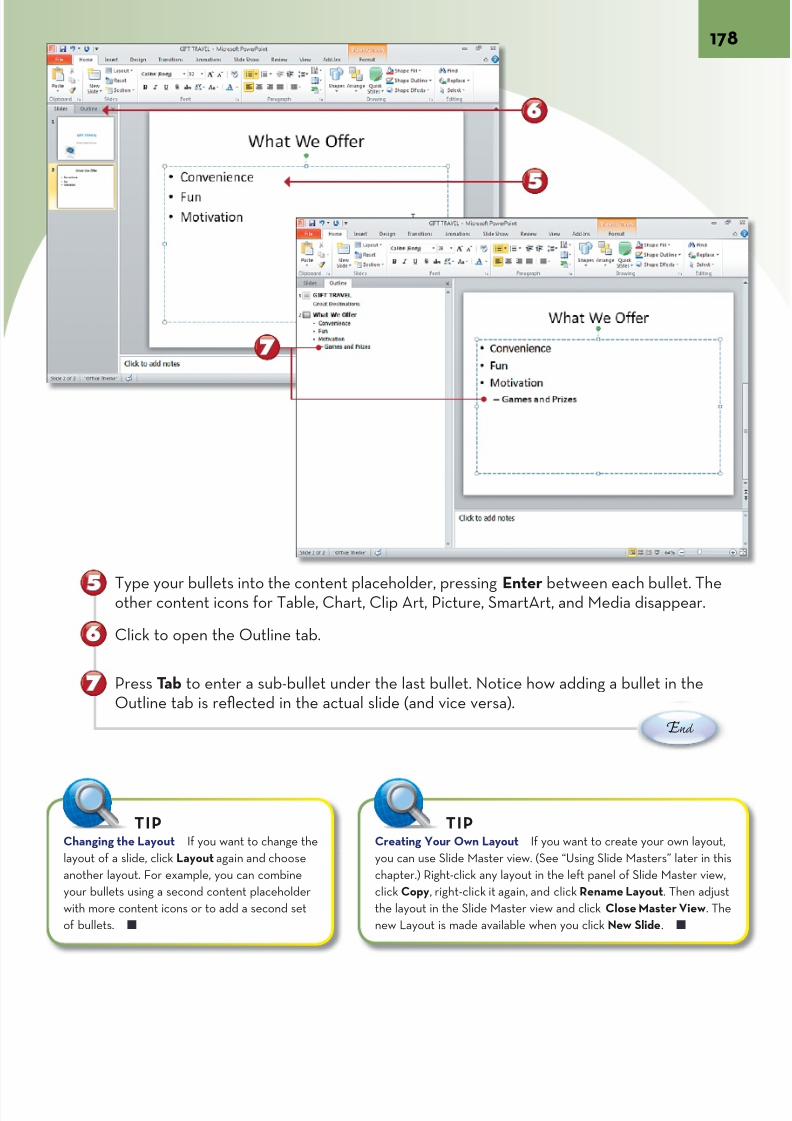
7/22/2019 Easy Microsoft Office 2010
http://slidepdf.com/reader/full/easy-microsoft-office-2010 191/309
E nd
Type your bullets into the content placeholder, pressing Enter between each bullet. Tother content icons for Table, Chart, Clip Art, Picture, SmartArt, and Media disappea
Click to open the Outline tab.
Press Tab to enter a sub-bullet under the last bullet. Notice how adding a bullet in theOutline tab is reflected in the actual slide (and vice versa).
Changing the Layout If you want to change the
layout of a slide, click Layout again and choose
another layout. For example, you can combine
your bullets using a second content placeholder
with more content icons or to add a second set
of bullets.
TIPCreating Your Own Layout If you want to create your own la
you can use Slide Master view. (See “Using Slide Masters” later
chapter.) Right-click any layout in the left panel of Slide Master
click Copy, right-click it again, and click Rename Layout. Then
the layout in the Slide Master view and click Close Master View
new Layout is made available when you click New Slide.
TIP
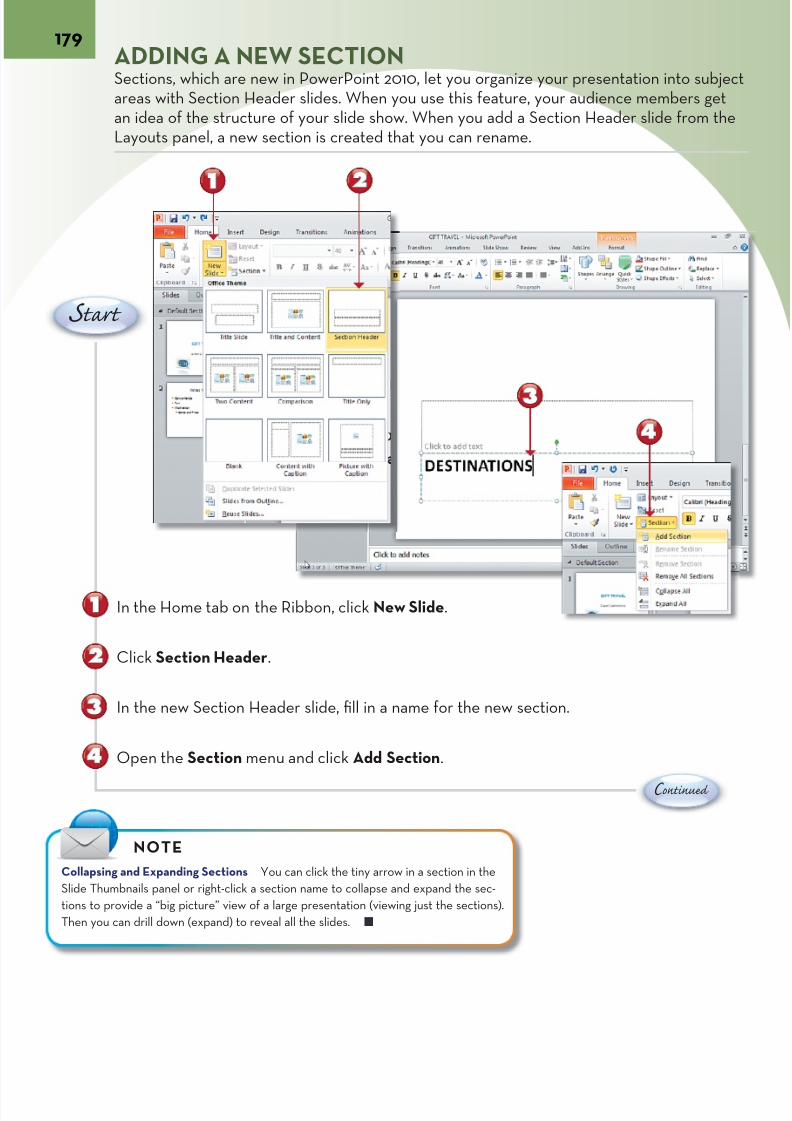
7/22/2019 Easy Microsoft Office 2010
http://slidepdf.com/reader/full/easy-microsoft-office-2010 192/309
179ADDING A NEW SECTIONSections, which are new in PowerPoint 2010, let you organize your presentation into sareas with Section Header slides. When you use this feature, your audience membersan idea of the structure of your slide show. When you add a Section Header slide fromLayouts panel, a new section is created that you can rename.
C ontinue
In the Home tab on the Ribbon, click New Slide.
Click Section Header.
In the new Section Header slide, fill in a name for the new section.
Open the Section menu and click Add Section.
S tart
Collapsing and Expanding Sections You can click the tiny arrow in a section in the
Slide Thumbnails panel or right-click a section name to collapse and expand the sec-
tions to provide a “big picture” view of a large presentation (viewing just the sections).
Then you can drill down (expand) to reveal all the slides.
NOTE

7/22/2019 Easy Microsoft Office 2010
http://slidepdf.com/reader/full/easy-microsoft-office-2010 193/309
E nd
A new untitled section is added, setting off a new section before the Section Header
Right-click Untitled Section and click Rename Section in the context menu that appe
Type a new name for the section.
Click Rename.
Moving Sections To move a section, right-click it and choose either
Move Section Up or Move Section Down. The sections are simply
markers, so you should generally also move the Section Header slides
with your sections to change where sections begin.
TIP

7/22/2019 Easy Microsoft Office 2010
http://slidepdf.com/reader/full/easy-microsoft-office-2010 194/309
181MOVING SLIDES (SLIDE SORTER VIEW)
Slide Sorter view provides a valuable overview of your entire presentation by showingslides as thumbnails and allowing you to view both their content and titles. This gives a good way to evaluate the flow of your message, and you can drag and drop your sliddifferent positions in the presentation in Slide Sorter view.
C ontinue
Click Slide Sorter View to open the Slide Sorter view, which also divides slides into tseparate sections.
Grab a slide using your left mouse button.
Drag and drop the slide onto a new location in the presentation. (While you’re draggivertical line shows where it will go based on the mouse pointer’s current location on t
screen.)
S tart
Slide Thumbnails You can drag and drop slides in the Slide
Thumbnails panel, and you can drag the border of the Slide
Thumbnails panel to make the Slide Thumbnails larger.
TIPReturning to Normal View From Slide Sort
view, you can return to Normal view by doub
clicking a slide.
TIP
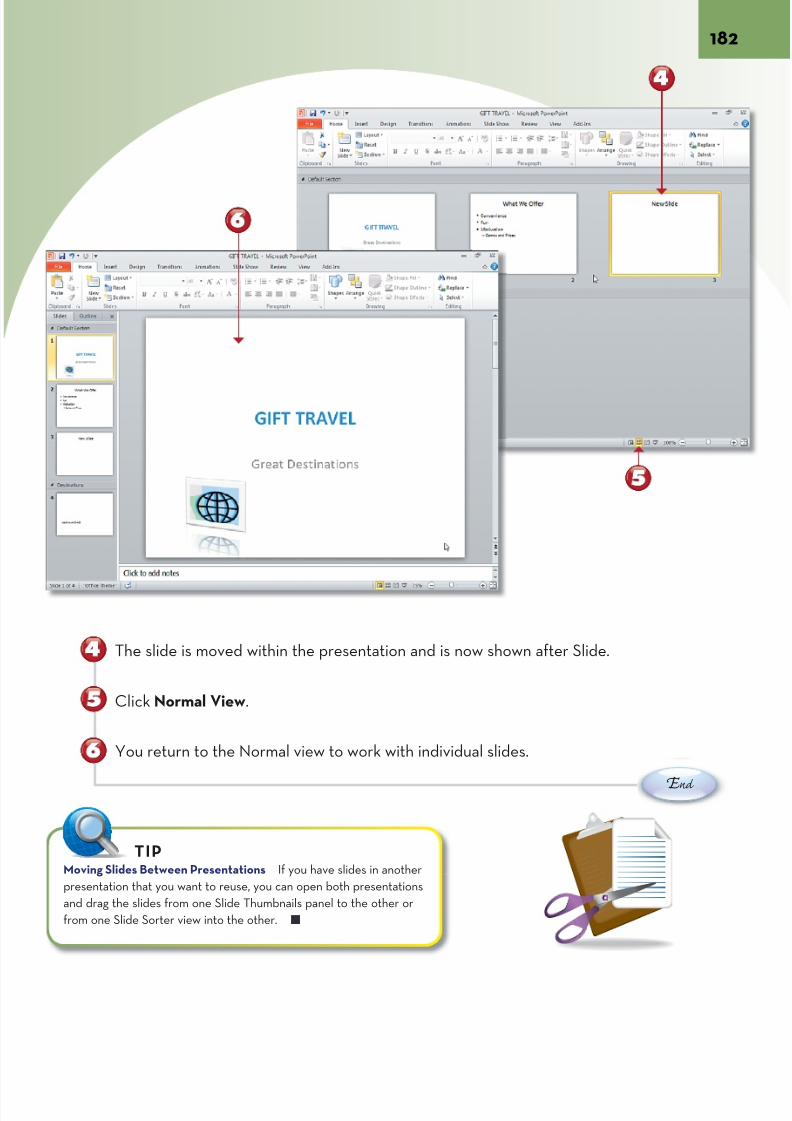
7/22/2019 Easy Microsoft Office 2010
http://slidepdf.com/reader/full/easy-microsoft-office-2010 195/309
E nd
The slide is moved within the presentation and is now shown after Slide.
Click Normal View.
You return to the Normal view to work with individual slides.
Moving Slides Between Presentations If you have slides in another
presentation that you want to reuse, you can open both presentations
and drag the slides from one Slide Thumbnails panel to the other or
from one Slide Sorter view into the other.
TIP

7/22/2019 Easy Microsoft Office 2010
http://slidepdf.com/reader/full/easy-microsoft-office-2010 196/309
183APPLYING A THEME FROM THE DESIGN TAB
To make your presentation stand out or give it more color, you can apply a theme fromRibbon’s Design tab. Each theme has its own coordinated set of fonts, colors, and effeFor more information on themes, see “Applying a Theme to a Document” in Chapter 4“Changing Project Appearance.”
C ontinue
Click the Design tab on the Ribbon.
Click the More drop-down arrow for Themes.
Scroll through the Themes Gallery, which shows This Presentation, Custom, and Builtthemes.
S tart
Different Themes for Different Slides If you want to apply different themes to
different slides, click Slide Sorter View and use your mouse to select individual
slides (Ctrl+click) or sequential slides (Shift+click). With the slides selected, you
can choose a different theme for them.
TIP

7/22/2019 Easy Microsoft Office 2010
http://slidepdf.com/reader/full/easy-microsoft-office-2010 197/309
E nd
Hover over a theme to see how it will look when applied to a presentation. Click a theapply it.
The theme is applied to the entire presentation. (Different masters control the appeaof different layouts, so the Title slide is different from the Title and Content slides wilighter background.)
Saving Your Own Custom Theme When you change any elements in your slide—for
example, the font for bullets; colors for a font or shape fill; or effects for a picture,
shape, or WordArt—you can save that coordinated combination to reuse in other
presentations by opening the Theme Gallery and choosing Save Current Theme.
TIP
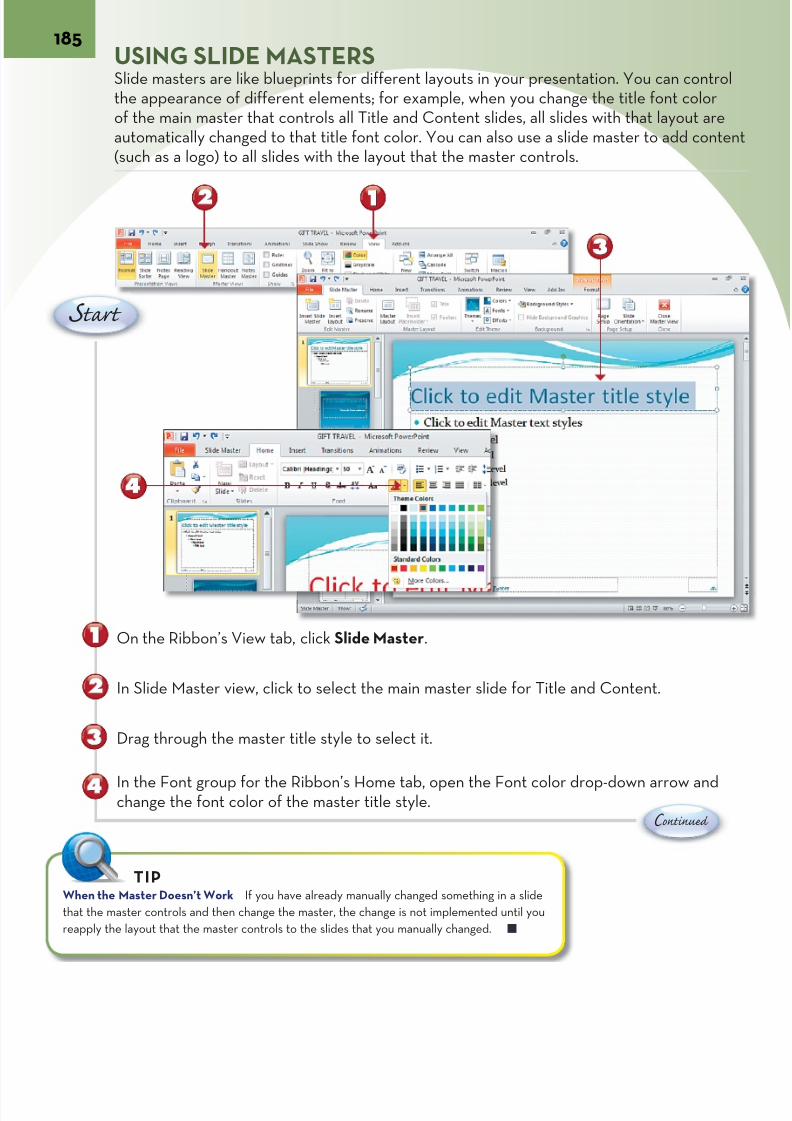
7/22/2019 Easy Microsoft Office 2010
http://slidepdf.com/reader/full/easy-microsoft-office-2010 198/309
185USING SLIDE MASTERSSlide masters are like blueprints for different layouts in your presentation. You can cothe appearance of different elements; for example, when you change the title font coof the main master that controls all Title and Content slides, all slides with that layoutautomatically changed to that title font color. You can also use a slide master to add c(such as a logo) to all slides with the layout that the master controls.
C ontinue
On the Ribbon’s View tab, click Slide Master.
In Slide Master view, click to select the main master slide for Title and Content.
Drag through the master title style to select it.
In the Font group for the Ribbon’s Home tab, open the Font color drop-down arrow achange the font color of the master title style.
S tart
When the Master Doesn’t Work If you have already manually changed something in a slide
that the master controls and then change the master, the change is not implemented until you
reapply the layout that the master controls to the slides that you manually changed.
TIP
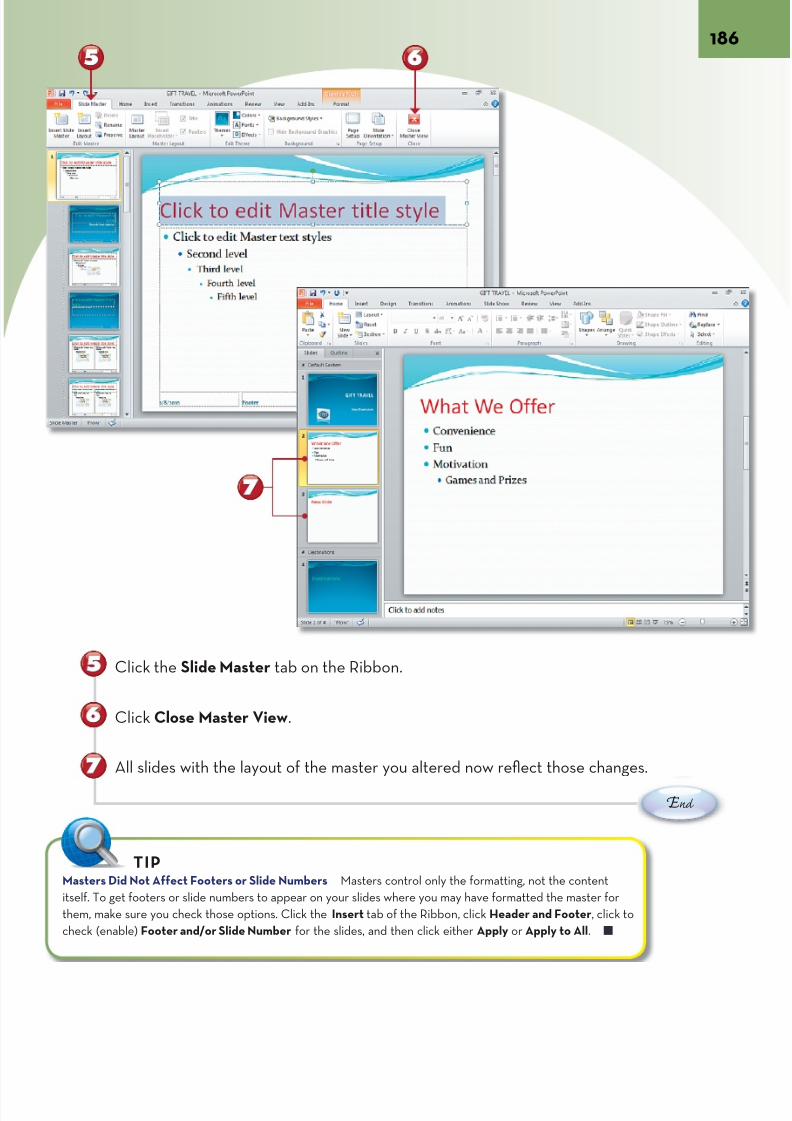
7/22/2019 Easy Microsoft Office 2010
http://slidepdf.com/reader/full/easy-microsoft-office-2010 199/309
E nd
Click the Slide Master tab on the Ribbon.
Click Close Master View.
All slides with the layout of the master you altered now reflect those changes.
Masters Did Not Affect Footers or Slide Numbers Masters control only the formatting, not the content
itself. To get footers or slide numbers to appear on your slides where you may have formatted the master for
them, make sure you check those options. Click the Insert tab of the Ribbon, click Header and Footer, click to
check (enable) Footer and/or Slide Number for the slides, and then click either Apply or Apply to All.
TIP
7/22/2019 Easy Microsoft Office 2010
http://slidepdf.com/reader/full/easy-microsoft-office-2010 200/309
TELLING YOUR STORY WITH EFFECTIVE SLIDESAfter you begin to create your presentation with a Title slide, putting text in
bullets and perhaps setting up sections of slides for topics, it’s time to createslides that tell your story effectively with the content and graphics features ofPowerPoint.
In Chapter 12, “Getting Started with PowerPoint 2010,” when you added theTitle and Content slide to enter bullets, you saw how PowerPoint providescontent icons to add specific elements to your slides. You can choose from theTable, Chart, SmartArt Diagram, Picture, ClipArt, and Media Clip icons.
Tables enable you to lay out information in a way that lets the audience quicklygrasp it. Charts, on the other hand, are for numerical information to be viewed
visually. SmartArt diagrams can help you visually present concepts (using bul-lets, for example). Pictures, clip art, and media clips can illustrate a point moredramatically.
All these graphical elements come with their own specific tabs on the Ribbonto provide more formatting options and enable you to add final touches andspecial effects.
Chapter 13

7/22/2019 Easy Microsoft Office 2010
http://slidepdf.com/reader/full/easy-microsoft-office-2010 201/309
SMARTART TOOLS
Add Shapefor another
concept
Text Pane to revisecaptions
Layouts to chooseanother diagram
Change Colors to alterappearance
SmartArt Toolsto edit diagrams
Design tab
Reset Graphic tooriginal
Convert to otherSmartArt diagram
Best Mafor Docby Them
3D for genhanc
SmartArtStyles

7/22/2019 Easy Microsoft Office 2010
http://slidepdf.com/reader/full/easy-microsoft-office-2010 202/309
111888999
S SS t tta aar rrt tt
CREATING A TABLE FOR INFORMATIONA table is a great way to lay out text information in a way that an audience can grasp and easily. A table is simply a grid with columns and rows that combine to form cells tyou can use to hold text. You can format it using the Table Tools on the Ribbon.
C ontinue
After creating a new slide using the Title and Content layout, instead of adding bulletclick the icon to create a table.
In the Insert Table window, enter the number of columns and rows you want in your ta
Click OK to create the table and gain access to the Table Tools section of the Ribbon
Fill in the table with the information you want to present.
To resize the table to fit the page, hover the mouse cursor over the corner of the tablit turns into a double arrow. Drag it out to the desired size.
Referring to Word Tables You can use the steps in Chapter 5, “Creating a Table for a Schedule,” to work with your
PowerPoint table. You can also create a table in Word and copy and paste it into your PowerPoint slide.
TIP

7/22/2019 Easy Microsoft Office 2010
http://slidepdf.com/reader/full/easy-microsoft-office-2010 203/309
S SS t tta aar rrt tt
In the Table Styles section of the Ribbon’s Table Tools Design tab, click More.
E nd
The table presents your information in an effective slide.
Hover over a table style for a Quick Preview. Click to apply the desired table style.
You can finish formatting the table using the Table Tools Design and Layout tabs.
Inserting a Table from the Ribbon Using the Ribbon’s
Insert tab (for example, on a title only or a blank slide),
you can click Table and then drag out a table with the
number of columns and rows that you want.
TIPDrawing a Table You can use the Ribbon’s Insert tab to
the pencil tool to manually draw a table in your slide. Wh
table is selected and the Table Tools are active, there is a
Draw Table pencil tool in the Design tab of Table Tools.
TIP

7/22/2019 Easy Microsoft Office 2010
http://slidepdf.com/reader/full/easy-microsoft-office-2010 204/309
191ADDING A CHARTA chart enables you to present numerical data in a graphic form that lets your audienrelationships quickly and easily. PowerPoint uses Excel as its data source, so you can cor use an Excel worksheet to hold the data for a chart that is created, edited, and disin PowerPoint.
C ontinue
After creating a new slide with the Title and Content layout, click the icon to create a
In the Insert Chart window that appears, click the chart type you want to create.
Click OK.
Excel opens to a worksheet with a default presentation (Sales) with dummy data for t
type of chart you selected. Enter your data into the worksheet.
S tart
Creating a Chart in Excel You can create a chart in Excel and copy and paste it into your PowerPoint slide. The Paste Pre
view feature lets you determine whether to keep the Word formatting options (Keep Source Formatting) or the PowerPoint
theme (Destination Styles). See “Using Copy and Paste Preview” in Chapter 3, “Adjusting the Structure of Your Document.”
TIP

7/22/2019 Easy Microsoft Office 2010
http://slidepdf.com/reader/full/easy-microsoft-office-2010 205/309
S tart
E nd
With the correct data in Excel, the chart in PowerPoint reflects the information. (The can be changed.) Save the chart in PowerPoint and save your Excel file with a new nakeep your data available.
Return to PowerPoint and click the Layout tab of the Chart Tools.
You can use the Chart Title button in the Layout tab to remove a redundant chart titfrom the chart (if the title is already part of the slide).
Changing the Chart Type If you want to change the type of chart
you are using to display data, select the Chart Tools Design tab on
the Ribbon and click Change Chart Type.
TIP

7/22/2019 Easy Microsoft Office 2010
http://slidepdf.com/reader/full/easy-microsoft-office-2010 206/309
193EDITING OR FORMATTING A CHART
With your chart set in your slide, you can use the Chart Tools on the Ribbon to make better and reflect your information more effectively. You can add labels to show datain the chart, select and format different parts of your chart by changing fonts and coloand further refine the appearance of your chart in your presentation with the Layout the Chart Tools.
C ontinue
With a chart selected, open Data Labels from the Chart Tools Layout tab on the Ribband select Outside End.
Click one of the data labels referencing the data in Excel to select it.
Click the Layout tab in the Chart Tools section of the Ribbon.
Click Format Selection.
S tart
Pie Charts Show Percentage In this example the pie chart is used to show percentage as part of a whole. In Chapter 10,
“Creating Charts, Data Tables, and Pivot Tables,” you learn to use and create different types of charts directly in Excel with
the Excel Chart Tools. You can create your chart entirely in Excel and then copy and paste it into PowerPoint.
NOTE
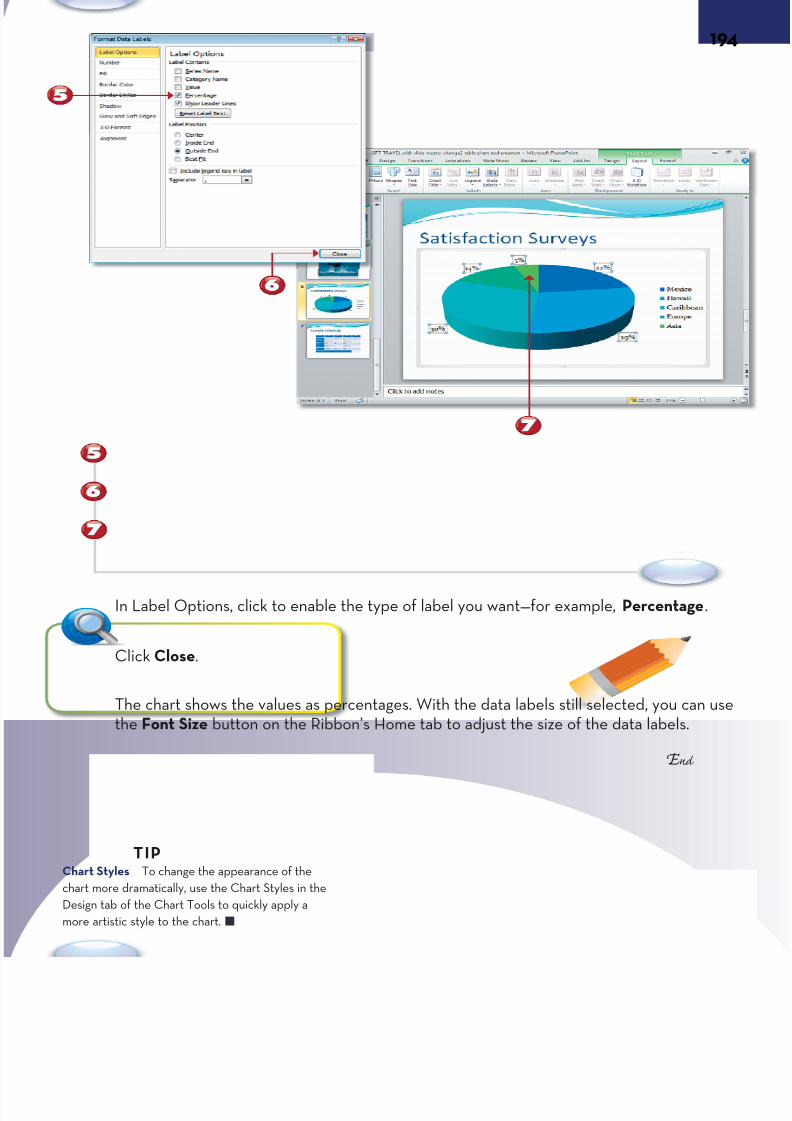
7/22/2019 Easy Microsoft Office 2010
http://slidepdf.com/reader/full/easy-microsoft-office-2010 207/309
S tart
E nd
In Label Options, click to enable the type of label you want—for example, Percentage
Click Close.
The chart shows the values as percentages. With the data labels still selected, you cathe Font Size button on the Ribbon’s Home tab to adjust the size of the data labels.
Chart Styles To change the appearance of the
chart more dramatically, use the Chart Styles in the
Design tab of the Chart Tools to quickly apply a
more artistic style to the chart.
TIP
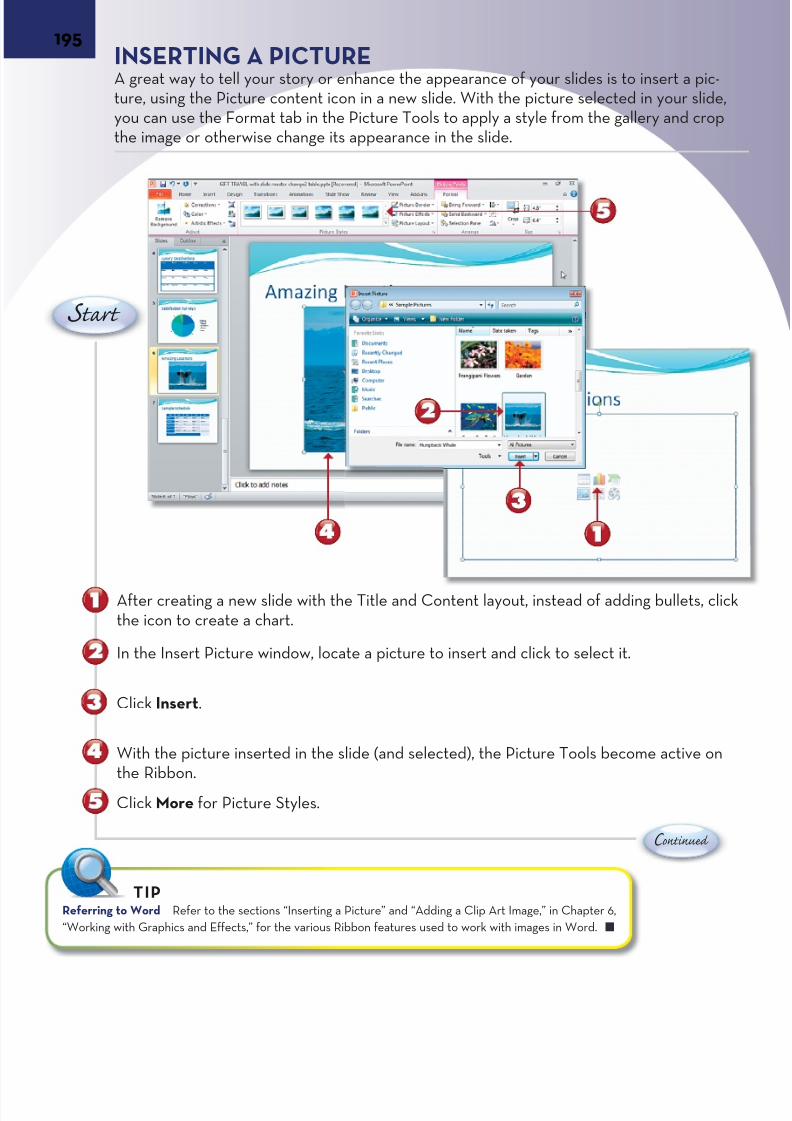
7/22/2019 Easy Microsoft Office 2010
http://slidepdf.com/reader/full/easy-microsoft-office-2010 208/309
195INSERTING A PICTUREA great way to tell your story or enhance the appearance of your slides is to insert a pture, using the Picture content icon in a new slide. With the picture selected in your syou can use the Format tab in the Picture Tools to apply a style from the gallery and cthe image or otherwise change its appearance in the slide.
C ontinue
After creating a new slide with the Title and Content layout, instead of adding bulletsthe icon to create a chart.
In the Insert Picture window, locate a picture to insert and click to select it.
Click Insert.
With the picture inserted in the slide (and selected), the Picture Tools become activethe Ribbon.
Click More for Picture Styles.
S tart
Referring to Word Refer to the sections “Inserting a Picture” and “Adding a Clip Art Image,” in Chapter 6,
“Working with Graphics and Effects,” for the various Ribbon features used to work with images in Word.
TIP
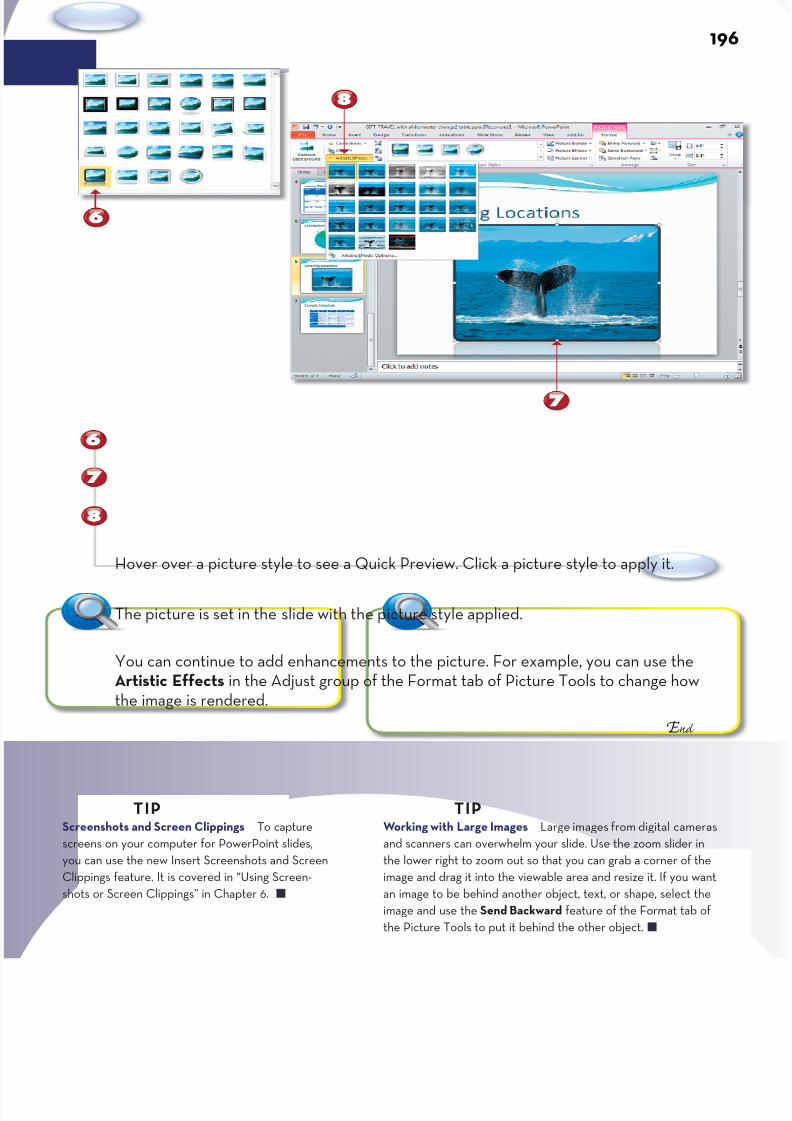
7/22/2019 Easy Microsoft Office 2010
http://slidepdf.com/reader/full/easy-microsoft-office-2010 209/309
S tart
E nd
Hover over a picture style to see a Quick Preview. Click a picture style to apply it.
The picture is set in the slide with the picture style applied.
You can continue to add enhancements to the picture. For example, you can use theArtistic Effects in the Adjust group of the Format tab of Picture Tools to change howthe image is rendered.
Working with Large Images Large images from digital came
and scanners can overwhelm your slide. Use the zoom slider i
the lower right to zoom out so that you can grab a corner of t
image and drag it into the viewable area and resize it. If you w
an image to be behind another object, text, or shape, select t
image and use the Send Backward feature of the Format tab
the Picture Tools to put it behind the other object.
TIPScreenshots and Screen Clippings To capture
screens on your computer for PowerPoint slides,
you can use the new Insert Screenshots and Screen
Clippings feature. It is covered in “Using Screen-
shots or Screen Clippings” in Chapter 6.
TIP

7/22/2019 Easy Microsoft Office 2010
http://slidepdf.com/reader/full/easy-microsoft-office-2010 210/309
197CONVERTING BULLETS TO SMARTARTBecause PowerPoint has been around for a long time, audiences have grown tired of lets in slides. Their overuse results in what some people refer to as “Death by PowerPTo avoid this problem, you can select a set of bullets and use a SmartArt diagram to qconvert them into a visual representation of your ideas.
C ontinue
Drag through your bullet text to select it.
Right-click the text and select Convert to SmartArt.
Click to apply a SmartArt diagram (or you can click More SmartArt Graphics to see options).
The SmartDiagram is selected, and the SmartArt Tools become active on the Ribbon.
S tart
On the SmartArt Tools Design tab on the Ribbon, click More in the SmartArt Styles s
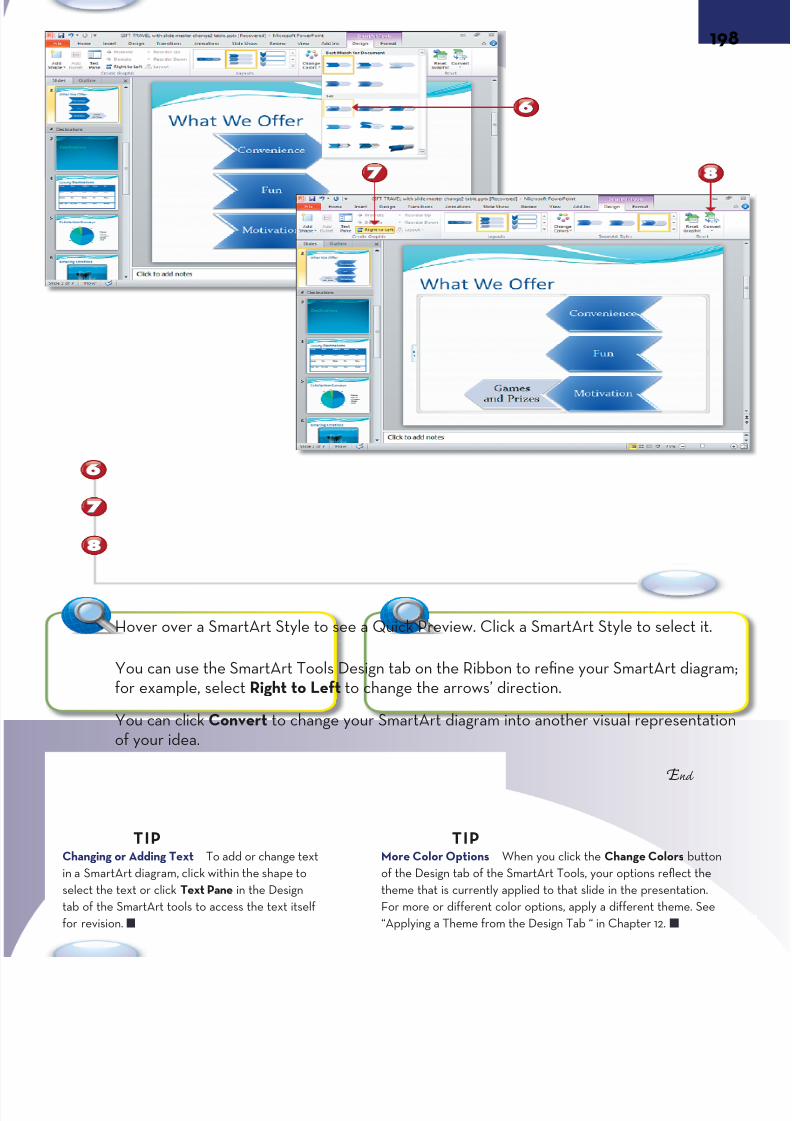
7/22/2019 Easy Microsoft Office 2010
http://slidepdf.com/reader/full/easy-microsoft-office-2010 211/309
S tart
E nd
Hover over a SmartArt Style to see a Quick Preview. Click a SmartArt Style to select
You can use the SmartArt Tools Design tab on the Ribbon to refine your SmartArt diafor example, select Right to Left to change the arrows’ direction.
You can click Convert to change your SmartArt diagram into another visual representof your idea.
Changing or Adding Text To add or change text
in a SmartArt diagram, click within the shape to
select the text or click Text Pane in the Design
tab of the SmartArt tools to access the text itself
for revision.
TIP
More Color Options When you click the Change Colors bu
of the Design tab of the SmartArt Tools, your options reflect t
theme that is currently applied to that slide in the presentatio
For more or different color options, apply a different theme. S
“Applying a Theme from the Design Tab “ in Chapter 12.
TIP
7/22/2019 Easy Microsoft Office 2010
http://slidepdf.com/reader/full/easy-microsoft-office-2010 212/309
ADDING TRANSITIONS, ANIMATION, AND VIDEONow that you have content in your slides to tell your story, you may want to add
some enhancements that add movement and activity to your slides.Animation can provide various parts of your slide with a separate “entrance”like an actor in a movie or play would use. Besides an entrance effect, youcan also give a selected object in your slide an Emphasis, Exit, or Motion Pathanimation. Using the Animation pane and new Animation Painter tool, you cancreate sophisticated movements within a slide to tell your story sequentially byshowing and hiding text, pictures, and shapes.
Transitions are eye-catching movements with special effects between slidesthat you can add from the Ribbon’s Transitions tab. For transitions as well as
animation, you can set the timing to happen when the presenter clicks themouse or to happen automatically at preset intervals.
You can also add movies from your local hard drive or directly from the Inter-net; plus, you can add recording narration for your slides.
Chapter 14

7/22/2019 Easy Microsoft Office 2010
http://slidepdf.com/reader/full/easy-microsoft-office-2010 213/309
THE ANIMATIONS TAB
Previewanimation
effects
Animations Galleryadds the most
common effects
Animations Tab on the Ribbon
Add Animation to add effect toselected object
(Open) Animation pane to (re)set
order of effectsTriggereffect a clickeobject
Timingsets whow ef
will ha
Animapane tset ordeffects
Reorder lets you change thesequence
Timings in Slide showseffect sequence in the
slide
Animation Painterto copy an effectfrom one object
to another
Effect Optionssets options forbullets, charts,
and SmartArt
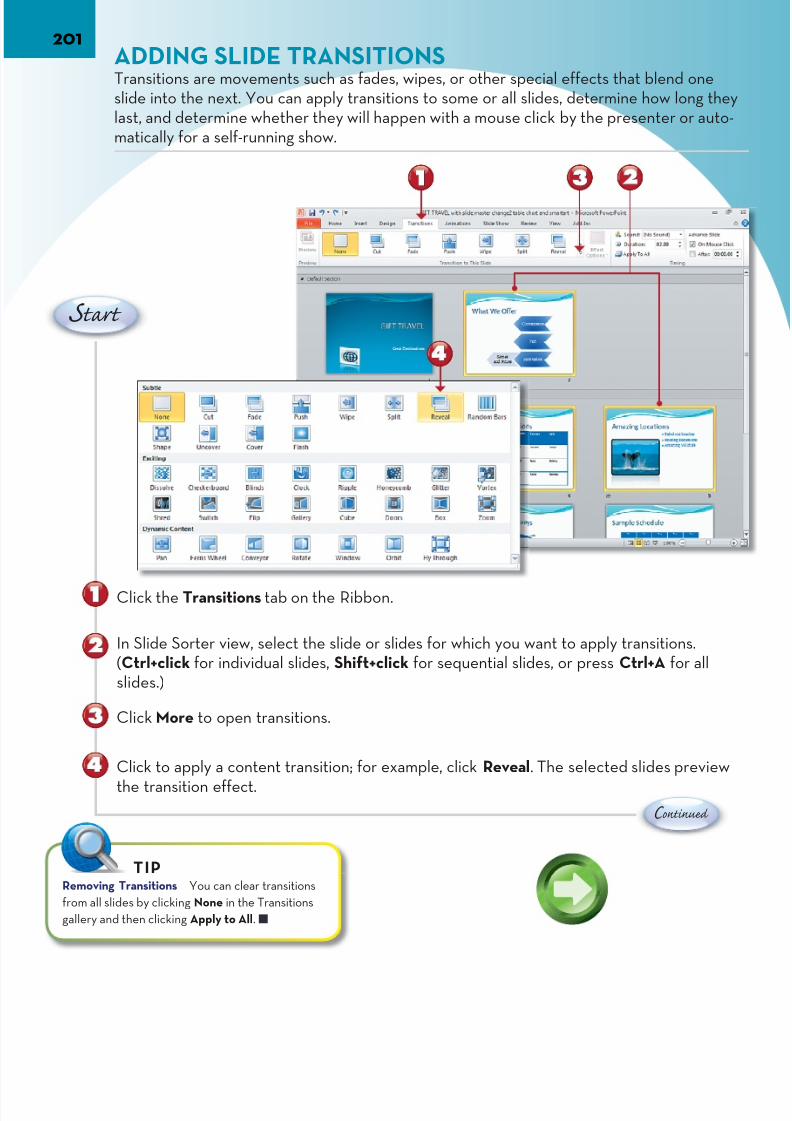
7/22/2019 Easy Microsoft Office 2010
http://slidepdf.com/reader/full/easy-microsoft-office-2010 214/309
201ADDING SLIDE TRANSITIONSTransitions are movements such as fades, wipes, or other special effects that blend oslide into the next. You can apply transitions to some or all slides, determine how longlast, and determine whether they will happen with a mouse click by the presenter or matically for a self-running show.
C ontinue
Click the Transitions tab on the Ribbon.
In Slide Sorter view, select the slide or slides for which you want to apply transitions.(Ctrl+click for individual slides, Shift+click for sequential slides, or press Ctrl+A for aslides.)
Click More to open transitions.
Click to apply a content transition; for example, click Reveal. The selected slides prev
the transition effect.
S tart
Removing Transitions You can clear transitions
from all slides by clicking None in the Transitions
gallery and then clicking Apply to All.
TIP

7/22/2019 Easy Microsoft Office 2010
http://slidepdf.com/reader/full/easy-microsoft-office-2010 215/309
E nd
Each slide with a transition has a small star icon.
Click Effect Options to fine-tune the movement of some transitions.
You can click Apply to All to make the transition you selected apply to all slides.
You can using the Timing group to change the length of the transition for the selectedslides.
You can using the Timing group to change whether the slides advance automatically
set time (rather than on a mouse click) for the selected slides.
Using Rehearse Timings to Save Timings for Your Show You can use the Rehearse Timings
feature in the Ribbon’s Slide Show tab to present your show to an imaginary audience. At the
end, you have the option to save those timings (as automatic) with the show.
TIP
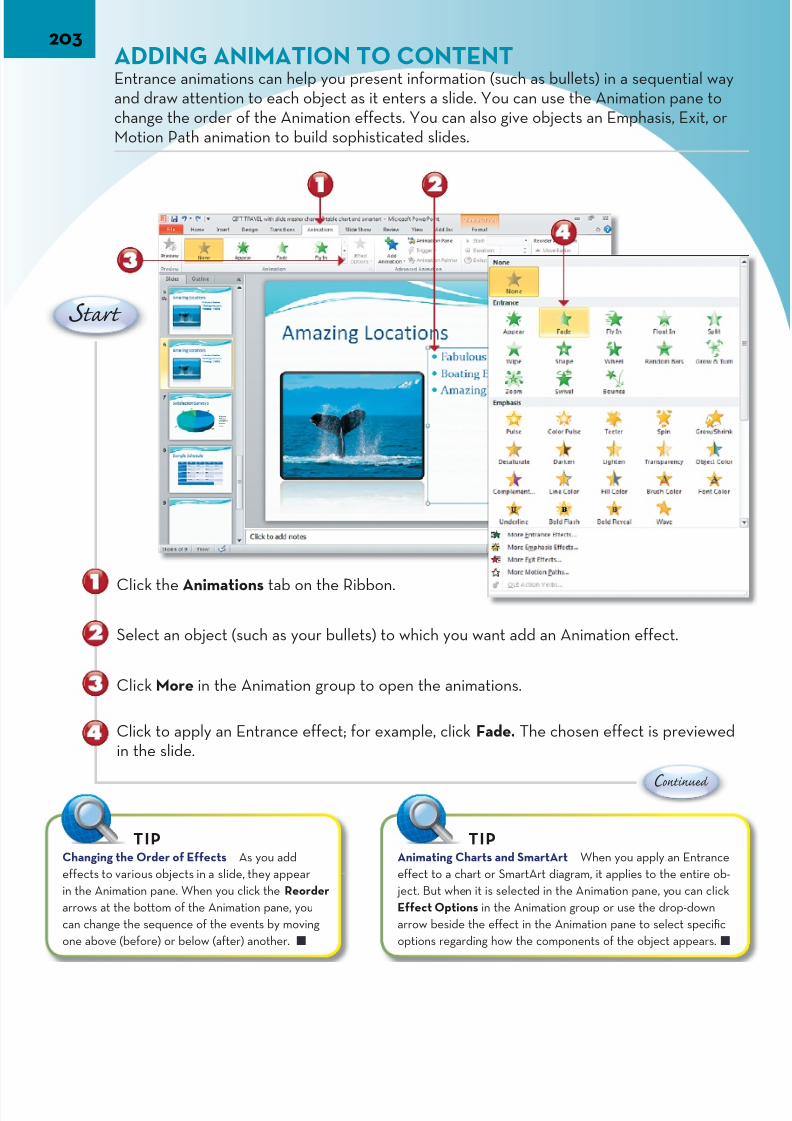
7/22/2019 Easy Microsoft Office 2010
http://slidepdf.com/reader/full/easy-microsoft-office-2010 216/309
203ADDING ANIMATION TO CONTENTEntrance animations can help you present information (such as bullets) in a sequentiaand draw attention to each object as it enters a slide. You can use the Animation panechange the order of the Animation effects. You can also give objects an Emphasis, ExiMotion Path animation to build sophisticated slides.
C ontinue
Click the Animations tab on the Ribbon.
Select an object (such as your bullets) to which you want add an Animation effect.
Click More in the Animation group to open the animations.
Click to apply an Entrance effect; for example, click Fade. The chosen effect is previein the slide.
S tart
Changing the Order of Effects As you add
effects to various objects in a slide, they appear
in the Animation pane. When you click the Reorder
arrows at the bottom of the Animation pane, you
can change the sequence of the events by moving
one above (before) or below (after) another.
TIPAnimating Charts and SmartArt When you apply an Ent
effect to a chart or SmartArt diagram, it applies to the enti
ject. But when it is selected in the Animation pane, you can
Effect Options in the Animation group or use the drop-do
arrow beside the effect in the Animation pane to select sp
options regarding how the components of the object appe
TIP
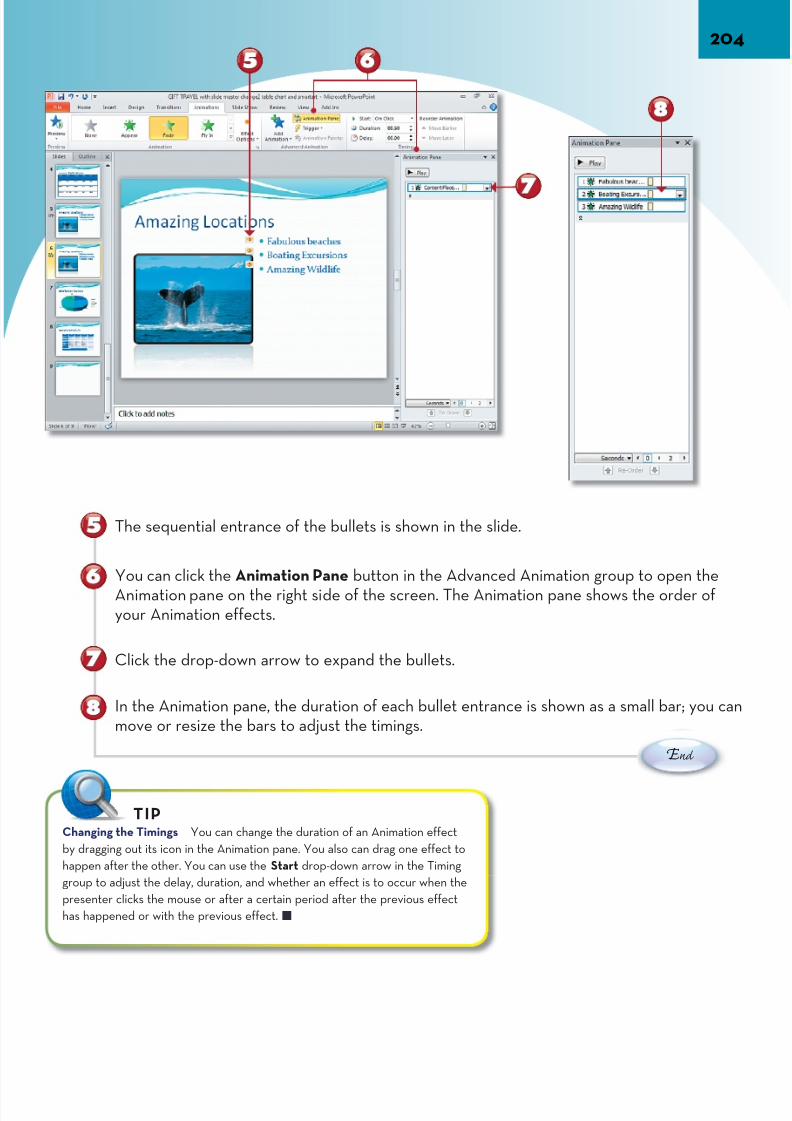
7/22/2019 Easy Microsoft Office 2010
http://slidepdf.com/reader/full/easy-microsoft-office-2010 217/309
E nd
The sequential entrance of the bullets is shown in the slide.
You can click the Animation Pane button in the Advanced Animation group to open tAnimation pane on the right side of the screen. The Animation pane shows the order your Animation effects.
Click the drop-down arrow to expand the bullets.
In the Animation pane, the duration of each bullet entrance is shown as a small bar; ymove or resize the bars to adjust the timings.
Changing the Timings You can change the duration of an Animation effect
by dragging out its icon in the Animation pane. You also can drag one effect to
happen after the other. You can use the Start drop-down arrow in the Timing
group to adjust the delay, duration, and whether an effect is to occur when the
presenter clicks the mouse or after a certain period after the previous effect
has happened or with the previous effect.
TIP

7/22/2019 Easy Microsoft Office 2010
http://slidepdf.com/reader/full/easy-microsoft-office-2010 218/309
205USING THE ANIMATION PAINTER TOOL
You can use the new Animation Painter feature to “pick up” an Animation effect fromobject and apply it to another. If you have adjusted specific timings to your favorite efthis can be a time-saving tool.
C ontinue
Select the object with the Animation effect you want to use.
Click Animation Painter in the Ribbon’s Animations tab.
After the mouse cursor turns into a small paintbrush, click the object to which you waapply the effect.
S tart
Using Preview You can click Preview any time to
see how the animations you’ve added will play in the
slide. You can also press Shift+F5 to play the cur-
rent slide full screen to see how the animations will
work in the actual presentation.
NOTE

7/22/2019 Easy Microsoft Office 2010
http://slidepdf.com/reader/full/easy-microsoft-office-2010 219/309
E nd
With the effect applied, it is added to the Animation pane.
You can expand its duration icon to make the animation take more time.
You can change its start from On Click to With Previous to have it appear in concert the bullet that describes it.
You can click the Re-Order up arrow to move it to appear before the last bullet.
Using Triggers After you add an effect to an object, you can
select that effect to be triggered by the click of another object. To
do so, click Trigger in the Advanced Animation group and select the
object you want to serve as the trigger for the effect.
TIP
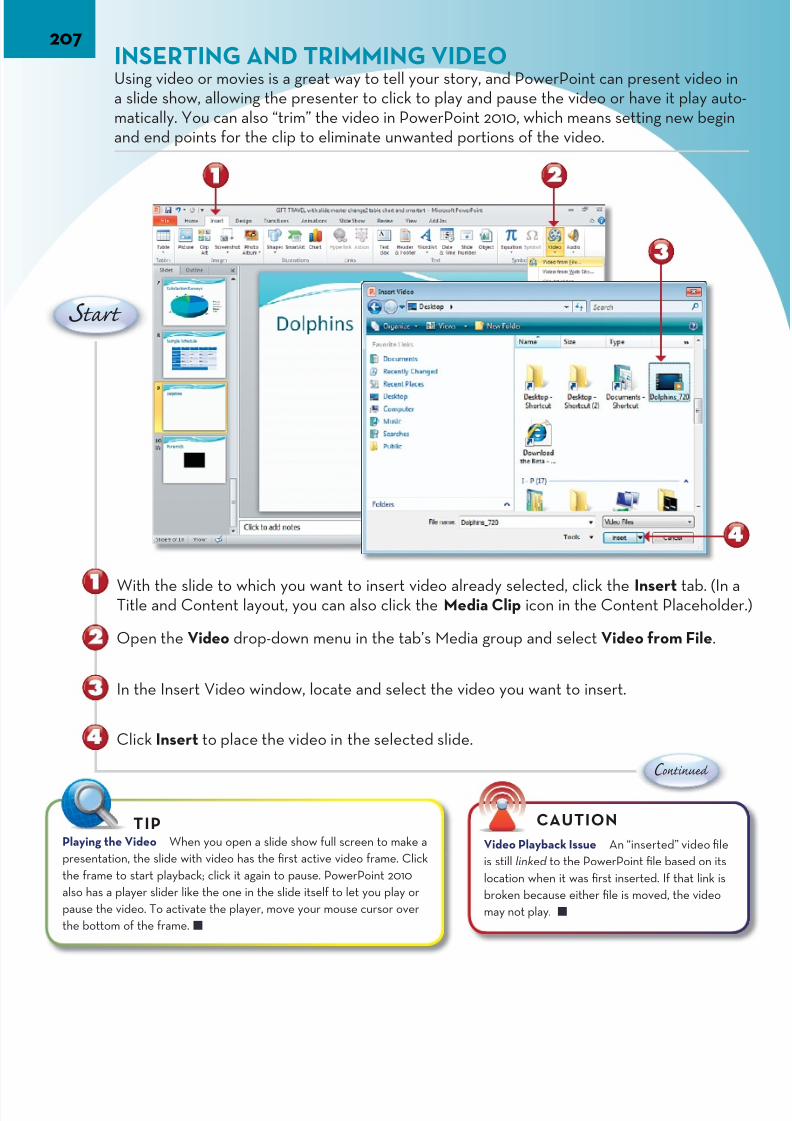
7/22/2019 Easy Microsoft Office 2010
http://slidepdf.com/reader/full/easy-microsoft-office-2010 220/309
207INSERTING AND TRIMMING VIDEOUsing video or movies is a great way to tell your story, and PowerPoint can present vida slide show, allowing the presenter to click to play and pause the video or have it plamatically. You can also “trim” the video in PowerPoint 2010, which means setting new and end points for the clip to eliminate unwanted portions of the video.
C ontinue
With the slide to which you want to insert video already selected, click the Insert tabTitle and Content layout, you can also click the Media Clip icon in the Content Place
Open the Video drop-down menu in the tab’s Media group and select Video from Fi
In the Insert Video window, locate and select the video you want to insert.
Click Insert to place the video in the selected slide.
S tart
Playing the Video When you open a slide show full screen to make a
presentation, the slide with video has the first active video frame. Click
the frame to start playback; click it again to pause. PowerPoint 2010
also has a player slider like the one in the slide itself to let you play or
pause the video. To activate the player, move your mouse cursor over
the bottom of the frame.
TIPVideo Playback Issue An “inserted” vide
is still linked to the PowerPoint file based
location when it was first inserted. If that l
broken because either file is moved, the v
may not play.
CAUTION

7/22/2019 Easy Microsoft Office 2010
http://slidepdf.com/reader/full/easy-microsoft-office-2010 221/309
E nd
The Video Tools tabs appear on the Ribbon. Click the Playback tab if it isn’t already s
Click Trim Video.
Drag the sliders to create new begin and end points for the clip. (You can use the Prewindow to help you find the right frames or set the start and end times.)
Click OK.
The video plays the selected segment when played in the slide. To play the video full
screen from that slide, press Shift+F5.
Video Enhancements You can use the Format tab
in the Ribbon’s Video Tools to add a border or styles
to the appearance of your video in the slide.
TIPVideo File Formats PowerPoint natively supports the *.WM
(Windows Media), *.AVI, and *.MPG video formats. It can also
*.MOV and *.SWF (Adobe Flash Media) formats under Insert
from File.
TIP
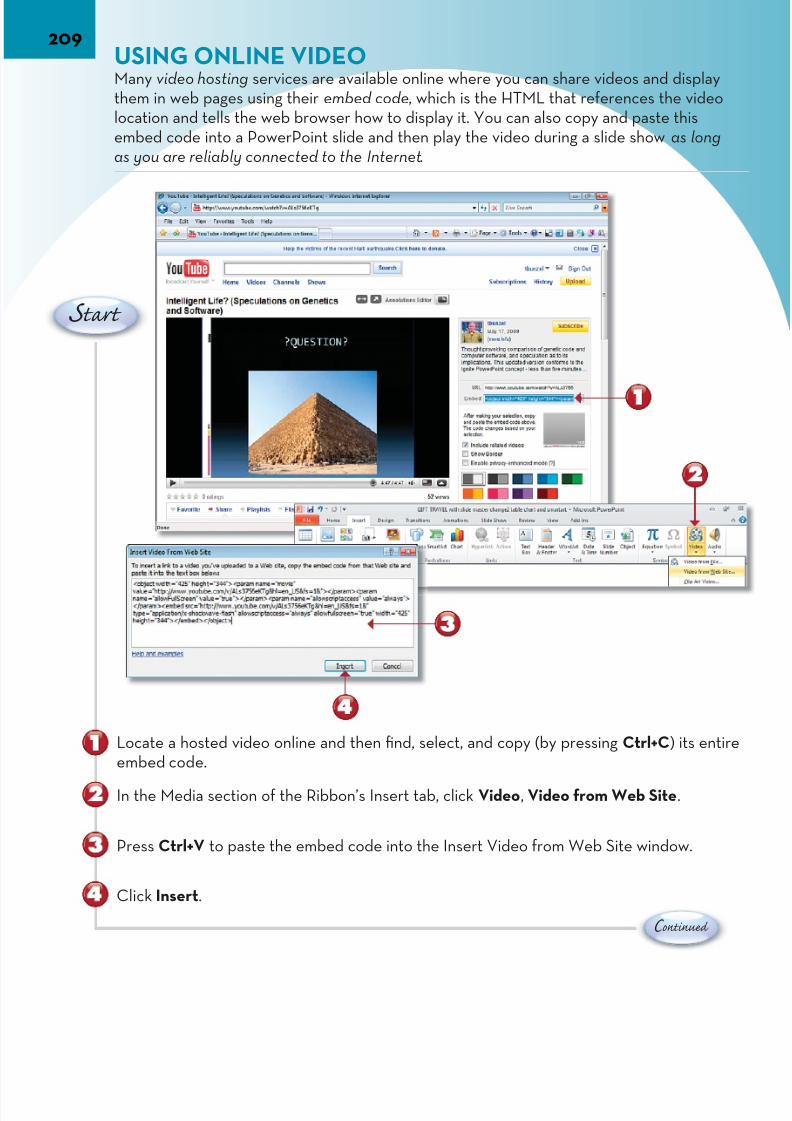
7/22/2019 Easy Microsoft Office 2010
http://slidepdf.com/reader/full/easy-microsoft-office-2010 222/309
209USING ONLINE VIDEOMany video hosting services are available online where you can share videos and dispthem in web pages using their embed code, which is the HTML that references the vidlocation and tells the web browser how to display it. You can also copy and paste thisembed code into a PowerPoint slide and then play the video during a slide show as loas you are reliably connected to the Internet.
C ontinue
Locate a hosted video online and then find, select, and copy (by pressing Ctrl+C) its embed code.
In the Media section of the Ribbon’s Insert tab, click Video, Video from Web Site.
Press Ctrl+V to paste the embed code into the Insert Video from Web Site window.
Click Insert.
S tart

7/22/2019 Easy Microsoft Office 2010
http://slidepdf.com/reader/full/easy-microsoft-office-2010 223/309
E nd
A black box represents the online video in your slide. Press Shift+F5 to play the slidescreen.
With your web connection active, the video will load into the slide and allow you to pduring a slide show.
Previewing in the Slide You can right-click an
online video within a slide and select Preview to see
it play within the slide in PowerPoint.
TIP
7/22/2019 Easy Microsoft Office 2010
http://slidepdf.com/reader/full/easy-microsoft-office-2010 224/309
COMPLETING THE PRESENTATIONThe focus in PowerPoint 2010 thus far has been on the program itself or the ed-iting mode where you can create slides to tell your story. But the actual impactof PowerPoint comes in delivering the presentation itself.
PowerPoint 2010 features a new Reading view, which lets you preview the pre-sentation while you are still in the editor. In addition to rehearsing your slides,you also can record a slide show with narration and timings so that you can saveand send that show to others and have them watch it as you deliver it. In addi-tion, you can use Backstage view to create a video of your show to upload tothe Web or send to others.
For your audience, you can print handouts or put supplemental information inyour notes to distribute as a booklet after a presentation or as follow-up. Whenyou make your presentation, you can use a dual monitor setup that lets you
(but not the audience) both see what’s coming next and refer to your notes.
With the PowerPoint web application, you can collaborate with your colleagueson a presentation and even deliver it online to those with a web browser.
Chapter 15
7/22/2019 Easy Microsoft Office 2010
http://slidepdf.com/reader/full/easy-microsoft-office-2010 225/309
THE SLIDE SHOW TAB
Start SlideShow
From
Beginning (fullscreen from
first slide)
From CurrentSlide played full
screen
BroadcastOnline with
a hostingservice
Create a CustomShow of selected
slides
Set UpSet Options forpresentation display
and effects
Hide Slide orthe current slide
show
Rehearse Timings –Preview slides andprepare your talk
Record Slide Show forautomatic playback and/
or videoShow O
for narratimings, media co
Presenteview fordual monto assistpresente
Set UpMonitors

7/22/2019 Easy Microsoft Office 2010
http://slidepdf.com/reader/full/easy-microsoft-office-2010 226/309
213PREVIEWING SLIDES IN READING VIEW
PowerPoint 2010 provides a Reading view, which lets you move through your slides, ining the animations and transitions, so that you can check any media without opening tshow full screen. Reading view has forward and back buttons for navigation, along witmenu that lets you move through the presentation to specific slides.
C ontinue
Click Reading View on the lower right of the screen. You also can open Reading viewthe View tab of the Ribbon.
Reading view opens to the current slide.
Use the Previous and Next arrows to navigate through the show.
S tart
Using Reading View Reading view is helpful if you are showing the
slides to colleagues for comments so that you can return to edit the
slides easily or for your own final review to see how the presentation
plays without toggling back and forth to full-screen view.
TIP

7/22/2019 Easy Microsoft Office 2010
http://slidepdf.com/reader/full/easy-microsoft-office-2010 227/309
E nd
Click the Forward arrow to play the next animation.
You can click Menu to navigate to a slide (by title) or section, along with other options
Click Normal View to return to the current slide (or press the Esc key).
Projecting Reading View With a simple projector setup, you
can show Reading view to your audience and use it to make your
presentation. Note that the filename of the presentation appears
on a small strip at the top of the screen.
TIP
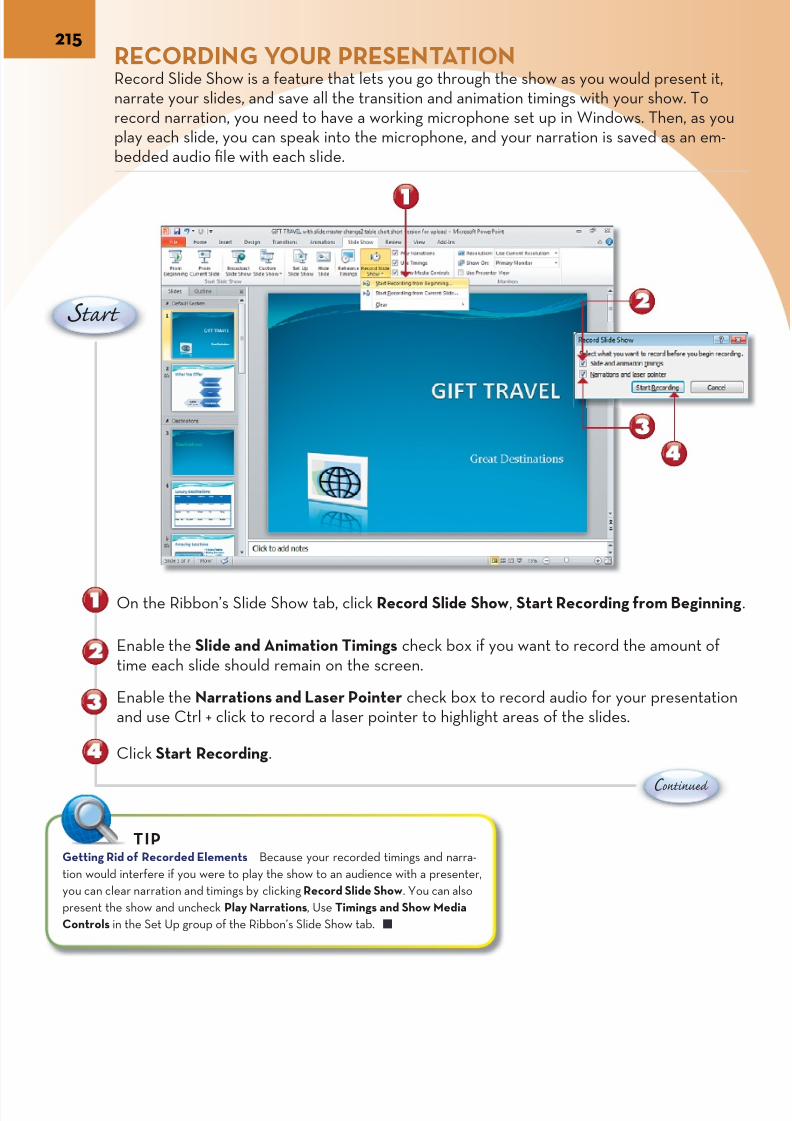
7/22/2019 Easy Microsoft Office 2010
http://slidepdf.com/reader/full/easy-microsoft-office-2010 228/309
215RECORDING YOUR PRESENTATION
Record Slide Show is a feature that lets you go through the show as you would presennarrate your slides, and save all the transition and animation timings with your show. Trecord narration, you need to have a working microphone set up in Windows. Then, aplay each slide, you can speak into the microphone, and your narration is saved as an bedded audio file with each slide.
C ontinue
On the Ribbon’s Slide Show tab, click Record Slide Show, Start Recording from Beg
Enable the Slide and Animation Timings check box if you want to record the amounttime each slide should remain on the screen.
Enable the Narrations and Laser Pointer check box to record audio for your presenand use Ctrl + click to record a laser pointer to highlight areas of the slides.
Click Start Recording.
S tart
Getting Rid of Recorded Elements Because your recorded timings and narra-
tion would interfere if you were to play the show to an audience with a presenter,
you can clear narration and timings by clicking Record Slide Show. You can also
present the show and uncheck Play Narrations, Use Timings and Show Media
Controls in the Set Up group of the Ribbon’s Slide Show tab.
TIP
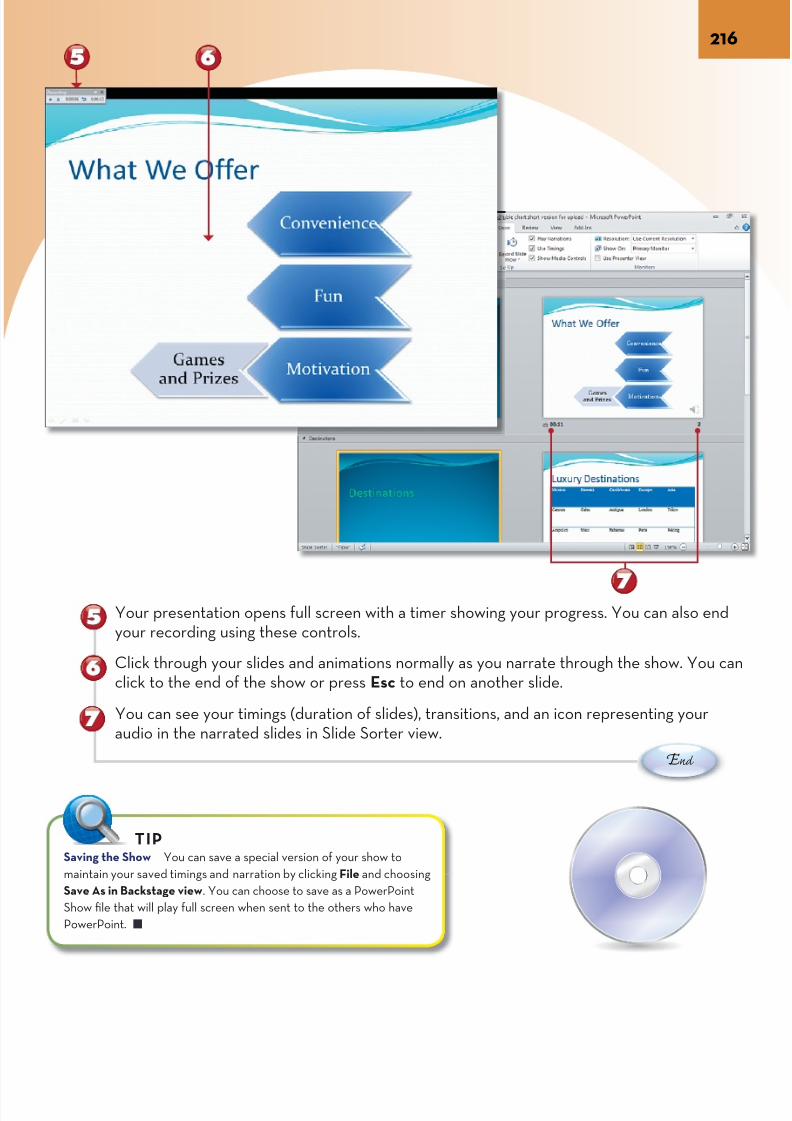
7/22/2019 Easy Microsoft Office 2010
http://slidepdf.com/reader/full/easy-microsoft-office-2010 229/309
E nd
Your presentation opens full screen with a timer showing your progress. You can alsoyour recording using these controls.
Click through your slides and animations normally as you narrate through the show. Yclick to the end of the show or press Esc to end on another slide.
You can see your timings (duration of slides), transitions, and an icon representing youaudio in the narrated slides in Slide Sorter view.
Saving the Show You can save a special version of your show to
maintain your saved timings and narration by clicking File and choosing
Save As in Backstage view. You can choose to save as a PowerPoint
Show file that will play full screen when sent to the others who have
PowerPoint.
TIP
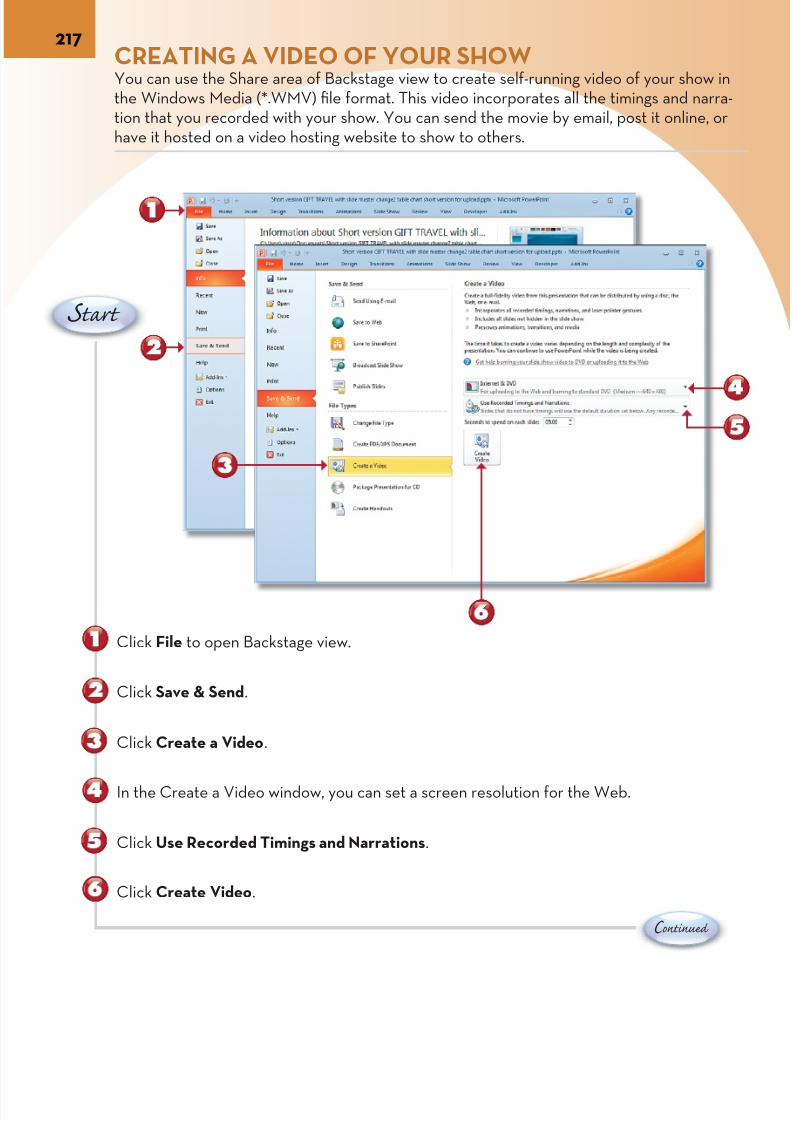
7/22/2019 Easy Microsoft Office 2010
http://slidepdf.com/reader/full/easy-microsoft-office-2010 230/309
217CREATING A VIDEO OF YOUR SHOW
You can use the Share area of Backstage view to create self-running video of your shothe Windows Media (*.WMV) file format. This video incorporates all the timings and ntion that you recorded with your show. You can send the movie by email, post it onlinhave it hosted on a video hosting website to show to others.
C ontinue
Click File to open Backstage view.
Click Save & Send.
Click Create a Video.
In the Create a Video window, you can set a screen resolution for the Web.
S tart
Click Use Recorded Timings and Narrations.
Click Create Video.
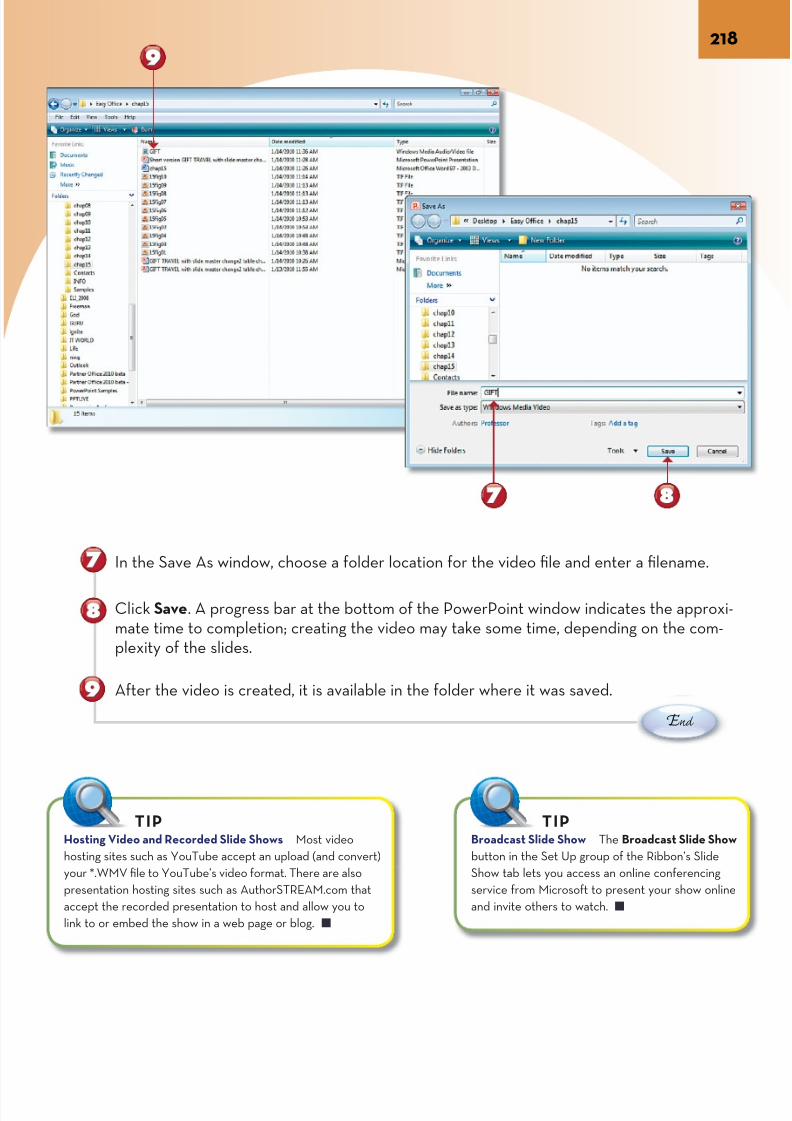
7/22/2019 Easy Microsoft Office 2010
http://slidepdf.com/reader/full/easy-microsoft-office-2010 231/309
E nd
In the Save As window, choose a folder location for the video file and enter a filenam
Click Save. A progress bar at the bottom of the PowerPoint window indicates the appmate time to completion; creating the video may take some time, depending on the cplexity of the slides.
After the video is created, it is available in the folder where it was saved.
Hosting Video and Recorded Slide Shows Most video
hosting sites such as YouTube accept an upload (and convert)
your *.WMV file to YouTube’s video format. There are also
presentation hosting sites such as AuthorSTREAM.com that
accept the recorded presentation to host and allow you to
link to or embed the show in a web page or blog.
TIPBroadcast Slide Show The Broadcast Slid
button in the Set Up group of the Ribbon’s S
Show tab lets you access an online conferen
service from Microsoft to present your show
and invite others to watch.
TIP
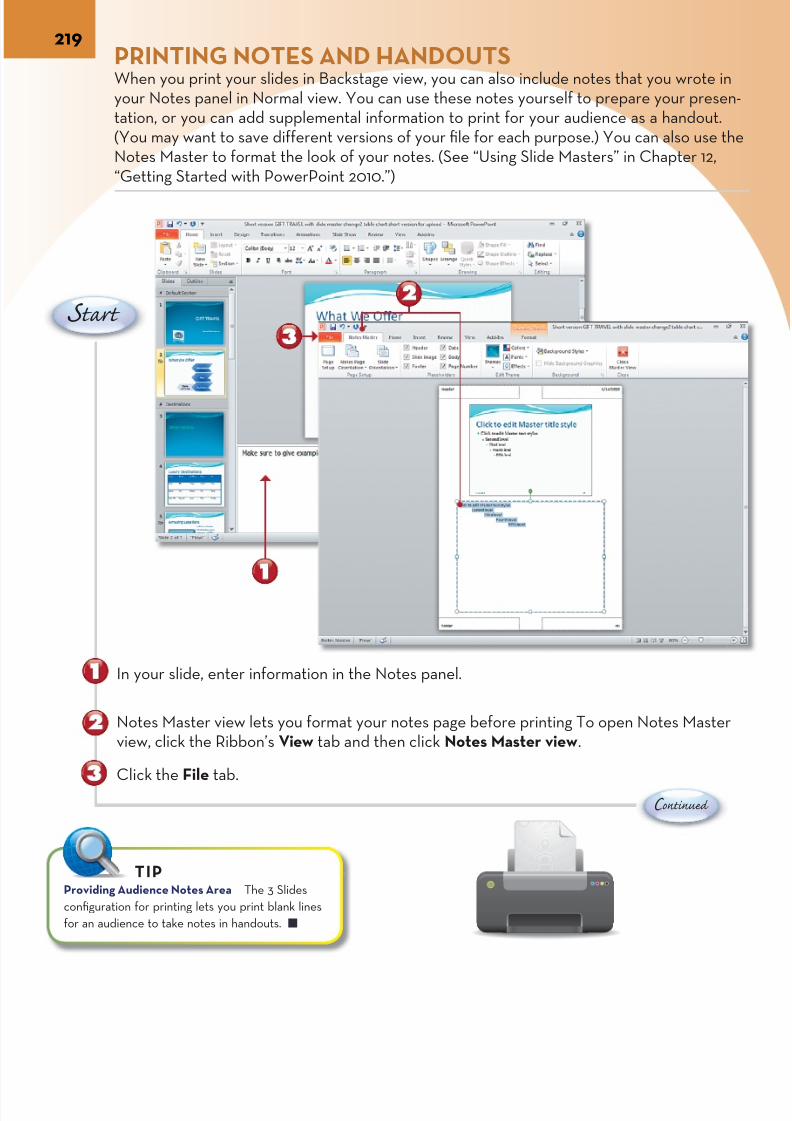
7/22/2019 Easy Microsoft Office 2010
http://slidepdf.com/reader/full/easy-microsoft-office-2010 232/309
219PRINTING NOTES AND HANDOUTS
When you print your slides in Backstage view, you can also include notes that you wroyour Notes panel in Normal view. You can use these notes yourself to prepare your ptation, or you can add supplemental information to print for your audience as a hando(You may want to save different versions of your file for each purpose.) You can also uNotes Master to format the look of your notes. (See “Using Slide Masters” in Chapter“Getting Started with PowerPoint 2010.”)
C ontinue
In your slide, enter information in the Notes panel.
Notes Master view lets you format your notes page before printing To open Notes Maview, click the Ribbon’s View tab and then click Notes Master view.
Click the File tab.
S tart
Providing Audience Notes Area The 3 Slides
configuration for printing lets you print blank lines
for an audience to take notes in handouts.
TIP

7/22/2019 Easy Microsoft Office 2010
http://slidepdf.com/reader/full/easy-microsoft-office-2010 233/309
E nd
In Backstage view, click Print.
Select Notes Pages from the drop-down menu.
Check the print preview on the right to ensure the overall look of your print job matcyour expectations.
Click Print.
Printing as PDF You can use the Save As button in Back-
stage view to save your presentation as a PDF file (click
the Save as Type drop-down arrow and select PDF). When
the PDF file is created, you can open it in a PDF reader
program and print it.
TIP
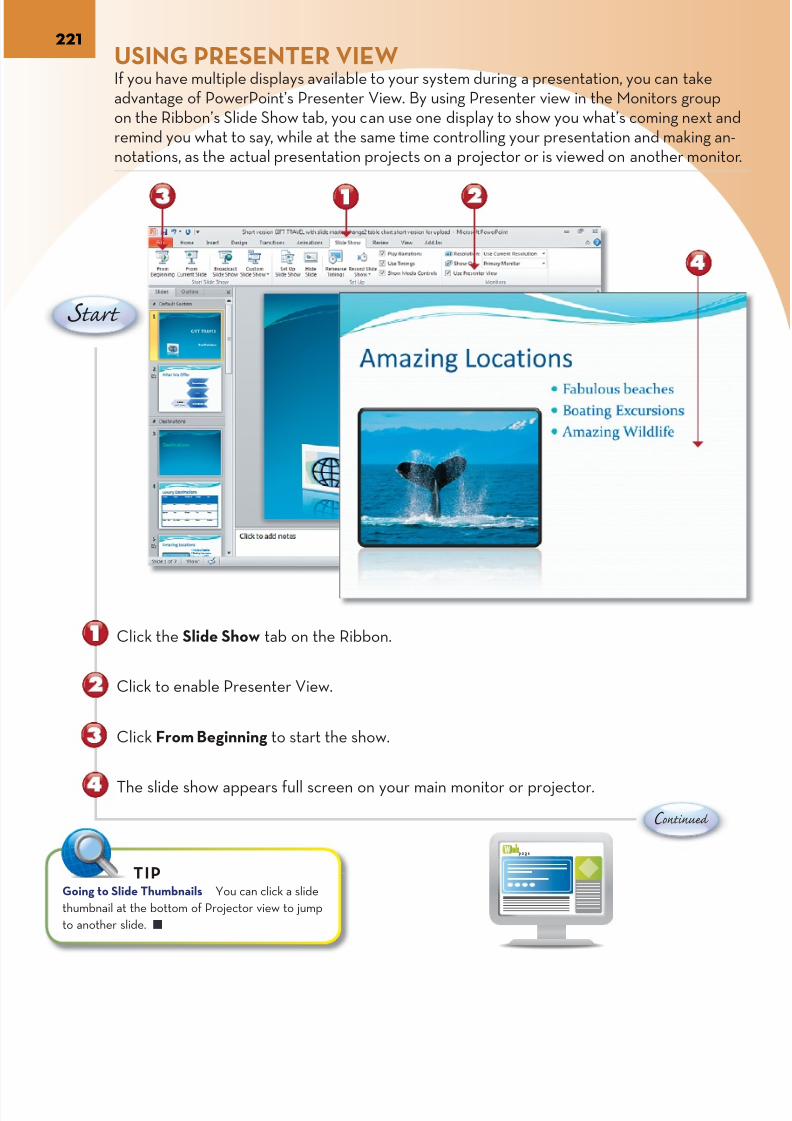
7/22/2019 Easy Microsoft Office 2010
http://slidepdf.com/reader/full/easy-microsoft-office-2010 234/309
221USING PRESENTER VIEWIf you have multiple displays available to your system during a presentation, you can taadvantage of PowerPoint’s Presenter View. By using Presenter view in the Monitors groon the Ribbon’s Slide Show tab, you can use one display to show you what’s coming neremind you what to say, while at the same time controlling your presentation and makinnotations, as the actual presentation projects on a projector or is viewed on another m
C ontinue
Click the Slide Show tab on the Ribbon.
Click to enable Presenter View.
Click From Beginning to start the show.
The slide show appears full screen on your main monitor or projector.
S tart
Going to Slide Thumbnails You can click a slide
thumbnail at the bottom of Projector view to jump
to another slide.
TIP
p a g e
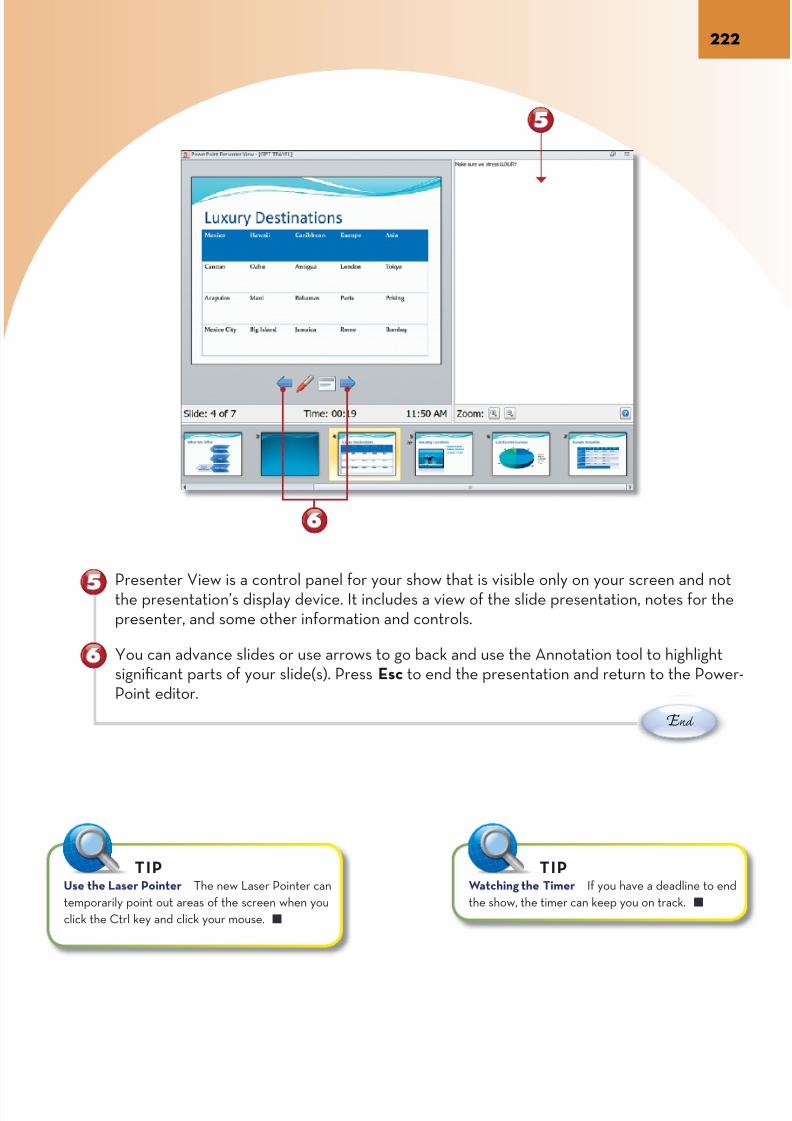
7/22/2019 Easy Microsoft Office 2010
http://slidepdf.com/reader/full/easy-microsoft-office-2010 235/309
E nd
Presenter View is a control panel for your show that is visible only on your screen andthe presentation’s display device. It includes a view of the slide presentation, notes fopresenter, and some other information and controls.
You can advance slides or use arrows to go back and use the Annotation tool to highlsignificant parts of your slide(s). Press Esc to end the presentation and return to the PPoint editor.
Use the Laser Pointer The new Laser Pointer can
temporarily point out areas of the screen when you
click the Ctrl key and click your mouse.
TIPWatching the Timer If you have a deadline
the show, the timer can keep you on track.
TIP

7/22/2019 Easy Microsoft Office 2010
http://slidepdf.com/reader/full/easy-microsoft-office-2010 236/309
223PRESENTING FROM THE POWERPOINT WEB APPPowerPoint 2010 has a light version that works as a web application, or web app. You do simple editing from the Home and Insert tabs on the web app’s Ribbon; add a pictSmartArt, or hyperlink from the Insert tab; and view notes, use the Reading view, or awatch the presentation from the View tab.
C ontinue
In your online workspace, click an uploaded PowerPoint file. (See “Uploading a File toFolder” in Chapter 7, “Reviewing Documents and Working Online.”)
Click Edit.
S tart
Saved Timings If you have saved a rehearsed or
recorded version of your presentation and uploaded
it to the web application, when it is played full
screen, it will use those automatic timings.
TIP
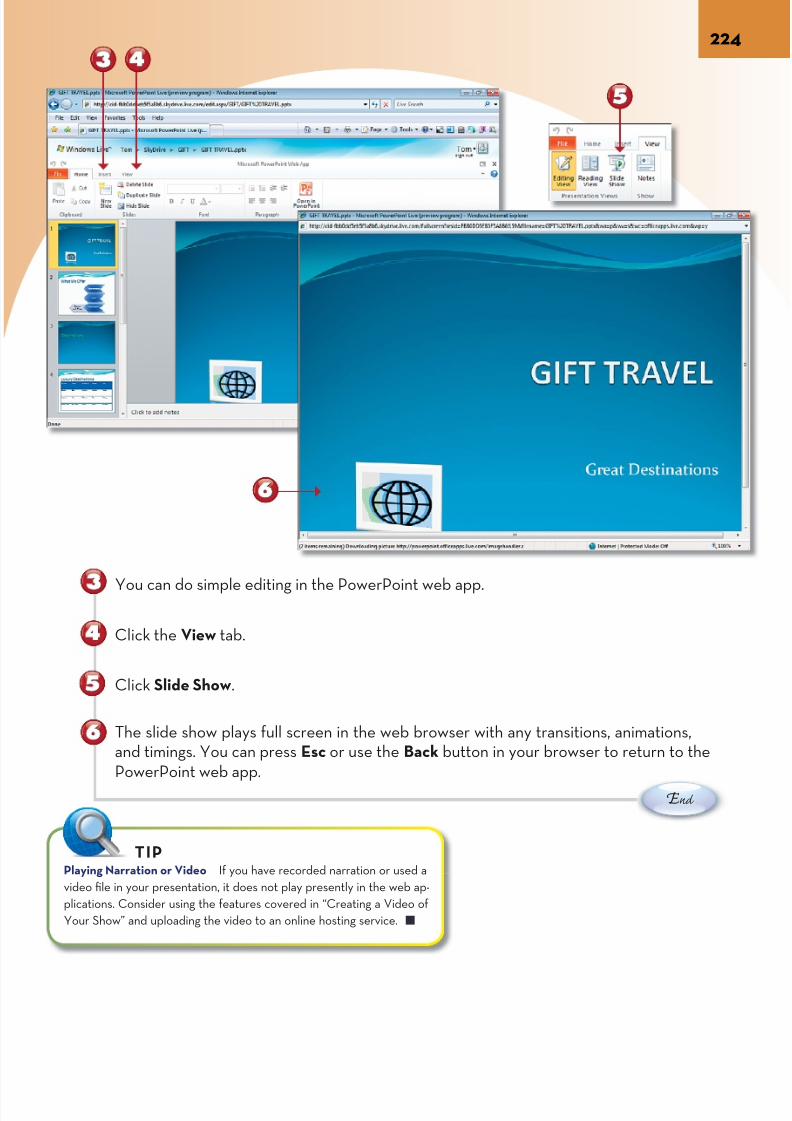
7/22/2019 Easy Microsoft Office 2010
http://slidepdf.com/reader/full/easy-microsoft-office-2010 237/309
E nd
You can do simple editing in the PowerPoint web app.
Click the View tab.
Click Slide Show.
The slide show plays full screen in the web browser with any transitions, animations,and timings. You can press Esc or use the Back button in your browser to return to thPowerPoint web app.
Playing Narration or Video If you have recorded narration or used a
video file in your presentation, it does not play presently in the web ap-
plications. Consider using the features covered in “Creating a Video of
Your Show” and uploading the video to an online hosting service.
TIP
7/22/2019 Easy Microsoft Office 2010
http://slidepdf.com/reader/full/easy-microsoft-office-2010 238/309
ORGANIZING YOUR PROJECT WITH ONENOTEOneNote is a note-taking program originally designed to read ink on tablet PCs,
but it is a remarkably efficient way to keep track of a wide variety of differentinformation and data and even share your information with others. The modelfor OneNote is the format of a day planner or loose-leaf notebook, with maintabs for separate notebooks on the left panel, tabs for sections within the cur-rently open notebook on the top of the window, and pages within each section,with named tabs for specific topics on the right panel.
Like the other Office applications, OneNote 2010 uses a Ribbon to access itsvarious features, and there is a OneNote web application available to shareyour notes directly online. OneNote also puts an icon on your taskbar that letsyou immediately open and create a note with formatting. Such Side Notes go
into an Unfiled Notes section of your notebook, but you can move them intoanother section to keep them organized.
One of the best ways to use OneNote is to collect information from the Webby copying and pasting material into named OneNote pages. OneNote pastesnot only the content itself, but also a reference URL, or web address, so thatyou can easily return to the source material.
OneNote also provides robust capability for searching through your notebooksusing a Search panel and Navigation pane. There are tags to help you organizeitems and quick links to send items to and from other Office programs; for ex-
ample, tasks can be sent and received from Outlook.
Chapter 16
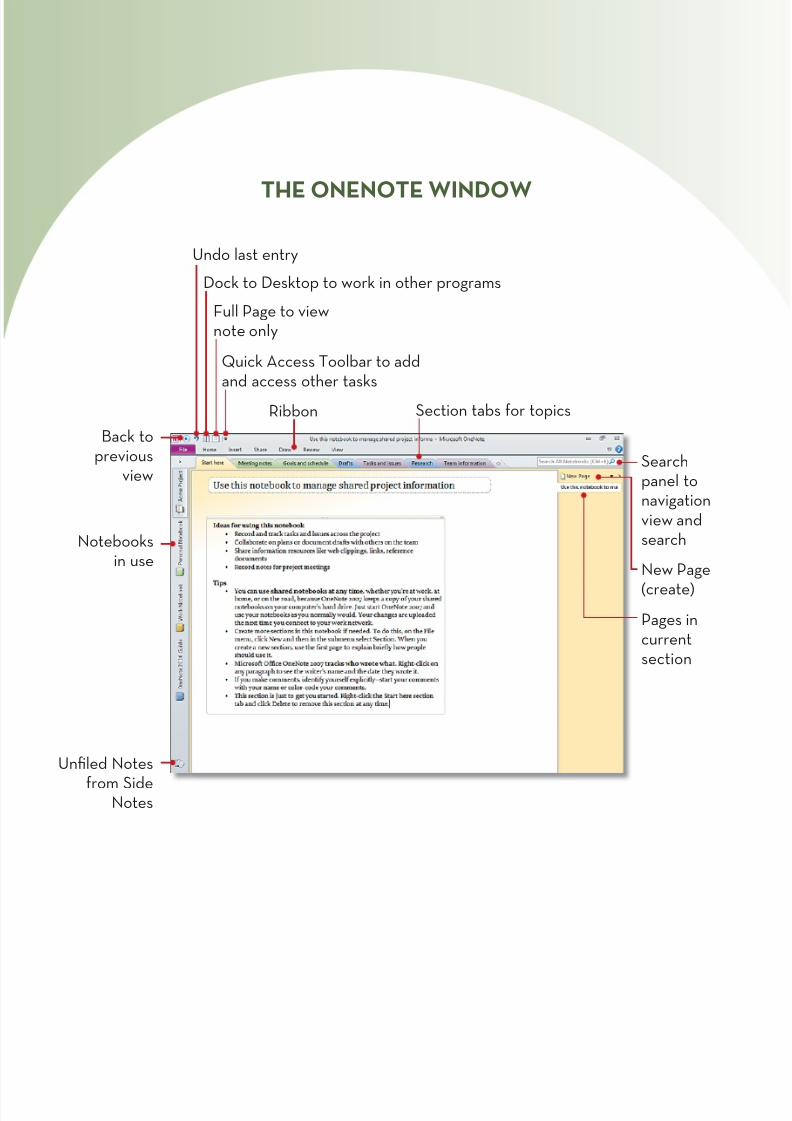
7/22/2019 Easy Microsoft Office 2010
http://slidepdf.com/reader/full/easy-microsoft-office-2010 239/309
THE ONENOTE WINDOW
Notebooksin use
Undo last entry
Unfiled Notes
from SideNotes
Ribbon
Back toprevious
view
Dock to Desktop to work in other programs
Full Page to viewnote only
Section tabs for topics
Quick Access Toolbar to addand access other tasks
Searchpanel tonavigatioview andsearch
Pages incurrentsection
New Pag
(create)
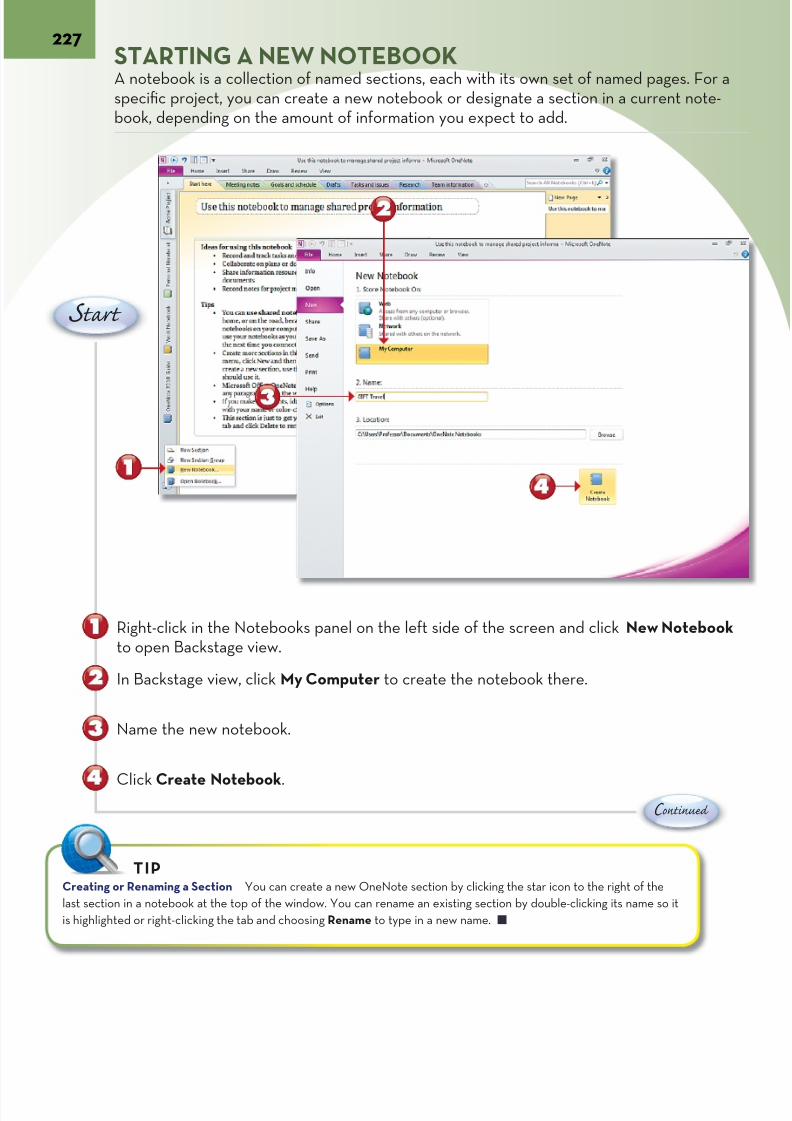
7/22/2019 Easy Microsoft Office 2010
http://slidepdf.com/reader/full/easy-microsoft-office-2010 240/309
227STARTING A NEW NOTEBOOK
A notebook is a collection of named sections, each with its own set of named pages. Fspecific project, you can create a new notebook or designate a section in a current nobook, depending on the amount of information you expect to add.
C ontinue
Right-click in the Notebooks panel on the left side of the screen and click New Notebto open Backstage view.
In Backstage view, click My Computer to create the notebook there.
Name the new notebook.
Click Create Notebook.
S tart
Creating or Renaming a Section You can create a new OneNote section by clicking the star icon to the right of the
last section in a notebook at the top of the window. You can rename an existing section by double-clicking its name so it
is highlighted or right-clicking the tab and choosing Rename to type in a new name.
TIP

7/22/2019 Easy Microsoft Office 2010
http://slidepdf.com/reader/full/easy-microsoft-office-2010 241/309
E nd
The new notebook is created with a tab in the left panel.
A New Section tab is available at the top, and a blank untitled page is open.
You can reorganize your notebooks by dragging and dropping the new notebook to thof the panel.
Unfiled Notes The Unfiled Notes icon at the
bottom of the Notebooks opens the Unfiled Notes,
which are created from Side Notes added by click-
ing the OneNote icon in your taskbar.
TIPReviewing the OneNote 2010 Guide The OneNote
2010 Guide is a default notebook available when you
start OneNote that has helpful examples and sugges-
tions on how to use OneNote effectively.
TIP
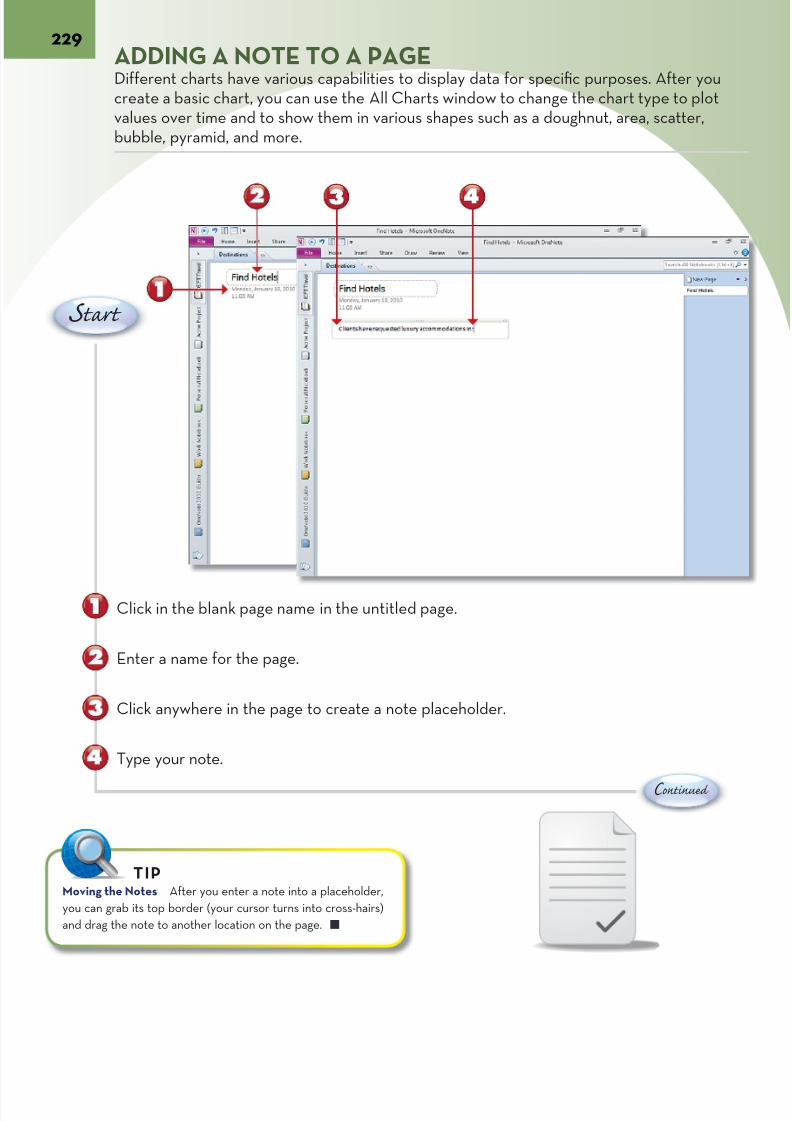
7/22/2019 Easy Microsoft Office 2010
http://slidepdf.com/reader/full/easy-microsoft-office-2010 242/309
229ADDING A NOTE TO A PAGE
Different charts have various capabilities to display data for specific purposes. After ycreate a basic chart, you can use the All Charts window to change the chart type to pvalues over time and to show them in various shapes such as a doughnut, area, scatterbubble, pyramid, and more.
C ontinue
Click in the blank page name in the untitled page.
Enter a name for the page.
Click anywhere in the page to create a note placeholder.
Type your note.
S tart
Moving the Notes After you enter a note into a placeholder,
you can grab its top border (your cursor turns into cross-hairs)
and drag the note to another location on the page.
TIP
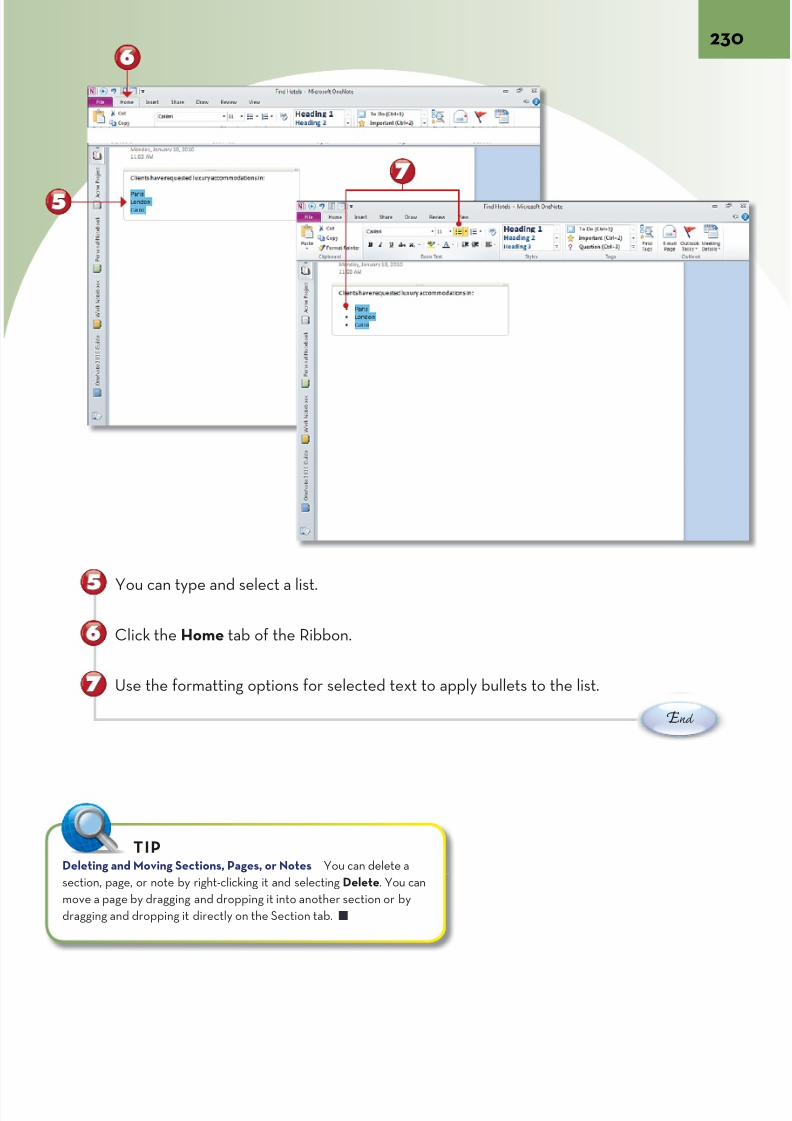
7/22/2019 Easy Microsoft Office 2010
http://slidepdf.com/reader/full/easy-microsoft-office-2010 243/309
E nd
You can type and select a list.
Click the Home tab of the Ribbon.
Use the formatting options for selected text to apply bullets to the list.
Deleting and Moving Sections, Pages, or Notes You can delete a
section, page, or note by right-clicking it and selecting Delete. You can
move a page by dragging and dropping it into another section or by
dragging and dropping it directly on the Section tab.
TIP

7/22/2019 Easy Microsoft Office 2010
http://slidepdf.com/reader/full/easy-microsoft-office-2010 244/309
231ADDING WEB CONTENT TO A NEW PAGEOneNote pages are a great place to copy and paste web content because you can refthe material when you are not online. The URL, or web address, is pasted with the coso you can go back to the original page again later.
C ontinue
Click New Page to open a blank new page in the current section.
Name the page. Doing so also names the tab for the page.
Drag through the material in the web page you want to copy.
Right-click the highlighted or selected material and click Copy.
S tart
New Linked Notes and Links in Pasted Material Clicking
an underlined link in pasted material also opens your default
web browser and takes you to a linked page.
NOTE

7/22/2019 Easy Microsoft Office 2010
http://slidepdf.com/reader/full/easy-microsoft-office-2010 245/309
E nd
Click the Home tab on the Ribbon.
Click Paste (or click in the placeholder for a new note and press Ctrl+V).
The material from the web page is inserted in your OneNote page.
You can click the URL from the web page to open your default web browser and retuthe web page.
Paste Preview Options When you click to paste material, OneNote gives you Paste
Preview Options for whether you want the pasted material formatted from the web page,
for the OneNote page, or as plain text. (For more details on Paste Preview, see “Using Copy
and Paste Preview” in Chapter 3, “Adjusting the Structure of Your Document.”)
TIP
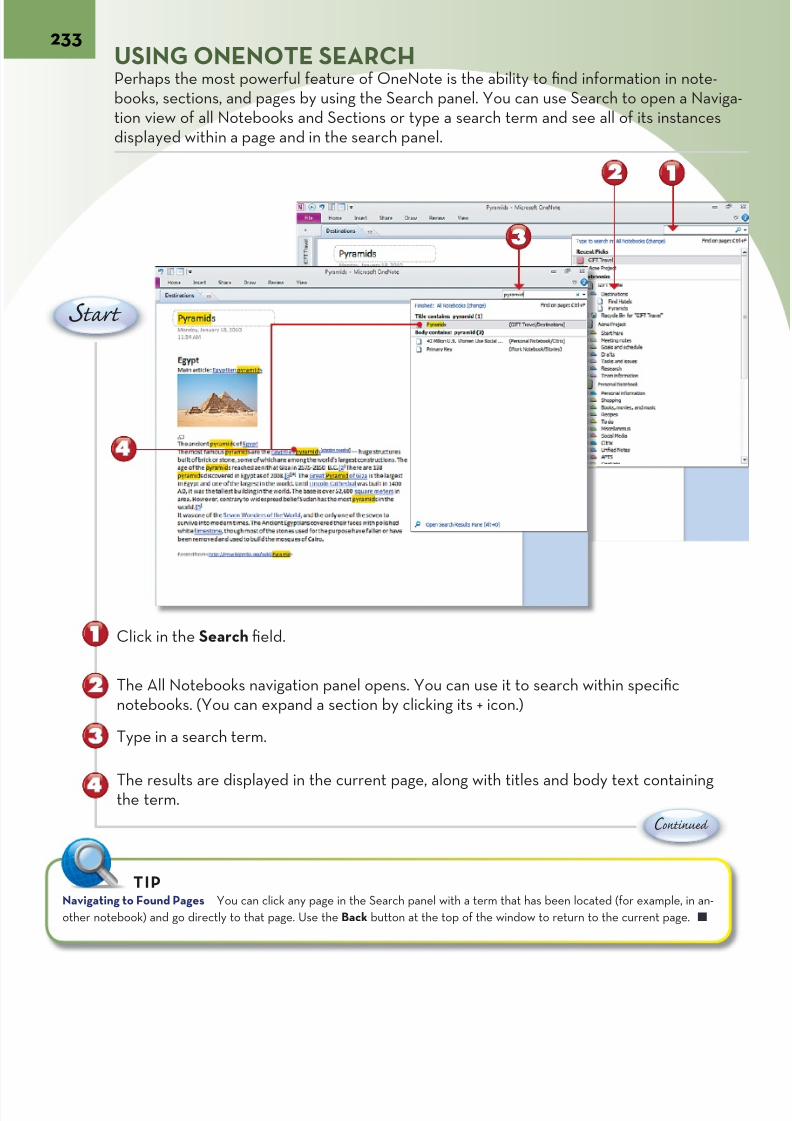
7/22/2019 Easy Microsoft Office 2010
http://slidepdf.com/reader/full/easy-microsoft-office-2010 246/309
233USING ONENOTE SEARCH
Perhaps the most powerful feature of OneNote is the ability to find information in nobooks, sections, and pages by using the Search panel. You can use Search to open a Ntion view of all Notebooks and Sections or type a search term and see all of its instandisplayed within a page and in the search panel.
C ontinue
Click in the Search field.
The All Notebooks navigation panel opens. You can use it to search within specificnotebooks. (You can expand a section by clicking its + icon.)
Type in a search term.
The results are displayed in the current page, along with titles and body text containithe term.
S tart
Navigating to Found Pages You can click any page in the Search panel with a term that has been located (for example, in a
other notebook) and go directly to that page. Use the Back button at the top of the window to return to the current page.
TIP

7/22/2019 Easy Microsoft Office 2010
http://slidepdf.com/reader/full/easy-microsoft-office-2010 247/309
E nd
Click the drop-down arrow to narrow the search.
Click This Section to limit search results to the current section.
Type another search term.
The page or pages are displayed with the search parameters for only the currently opsection.
Setting a Default Search Scope You can set OneNote to have a default scope for
your searches. For example, when working in a large section, set the scope to This
Section and then click Set This Scope as Default. All searches are limited to the
current section unless you change the scope again.
TIP
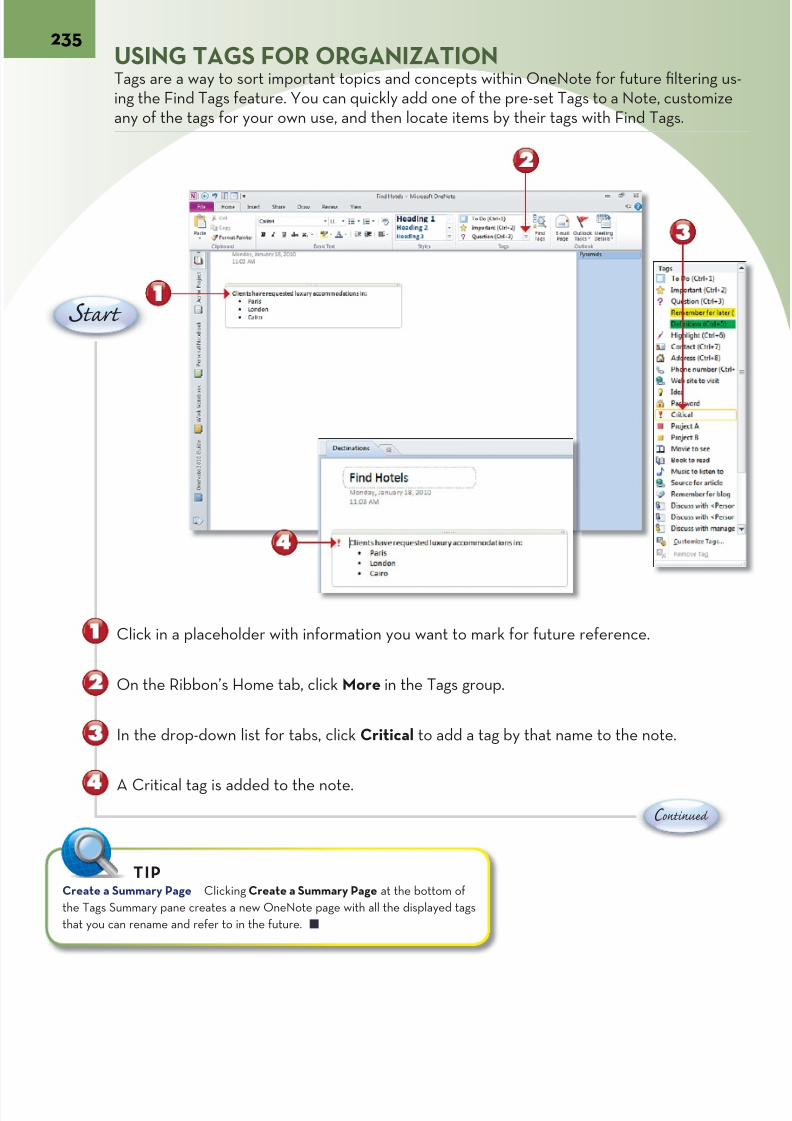
7/22/2019 Easy Microsoft Office 2010
http://slidepdf.com/reader/full/easy-microsoft-office-2010 248/309
235USING TAGS FOR ORGANIZATION
Tags are a way to sort important topics and concepts within OneNote for future filtering the Find Tags feature. You can quickly add one of the pre-set Tags to a Note, custoany of the tags for your own use, and then locate items by their tags with Find Tags.
C ontinue
Click in a placeholder with information you want to mark for future reference.
On the Ribbon’s Home tab, click More in the Tags group.
In the drop-down list for tabs, click Critical to add a tag by that name to the note.
A Critical tag is added to the note.
S tart
Create a Summary Page Clicking Create a Summary Page at the bottom of
the Tags Summary pane creates a new OneNote page with all the displayed tags
that you can rename and refer to in the future.
TIP
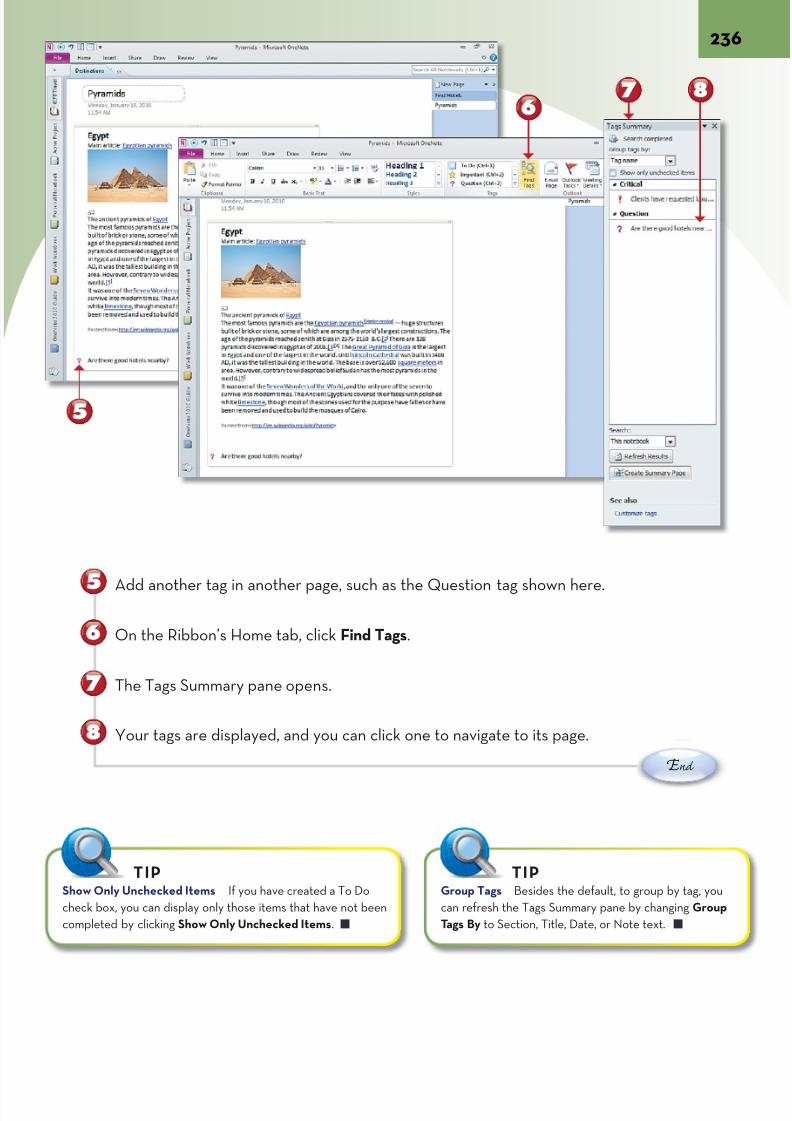
7/22/2019 Easy Microsoft Office 2010
http://slidepdf.com/reader/full/easy-microsoft-office-2010 249/309
E nd
Add another tag in another page, such as the Question tag shown here.
On the Ribbon’s Home tab, click Find Tags.
The Tags Summary pane opens.
Your tags are displayed, and you can click one to navigate to its page.
Show Only Unchecked Items If you have created a To Do
check box, you can display only those items that have not been
completed by clicking Show Only Unchecked Items.
TIPGroup Tags Besides the default, to group by tag
can refresh the Tags Summary pane by changing G
Tags By to Section, Title, Date, or Note text.
TIP
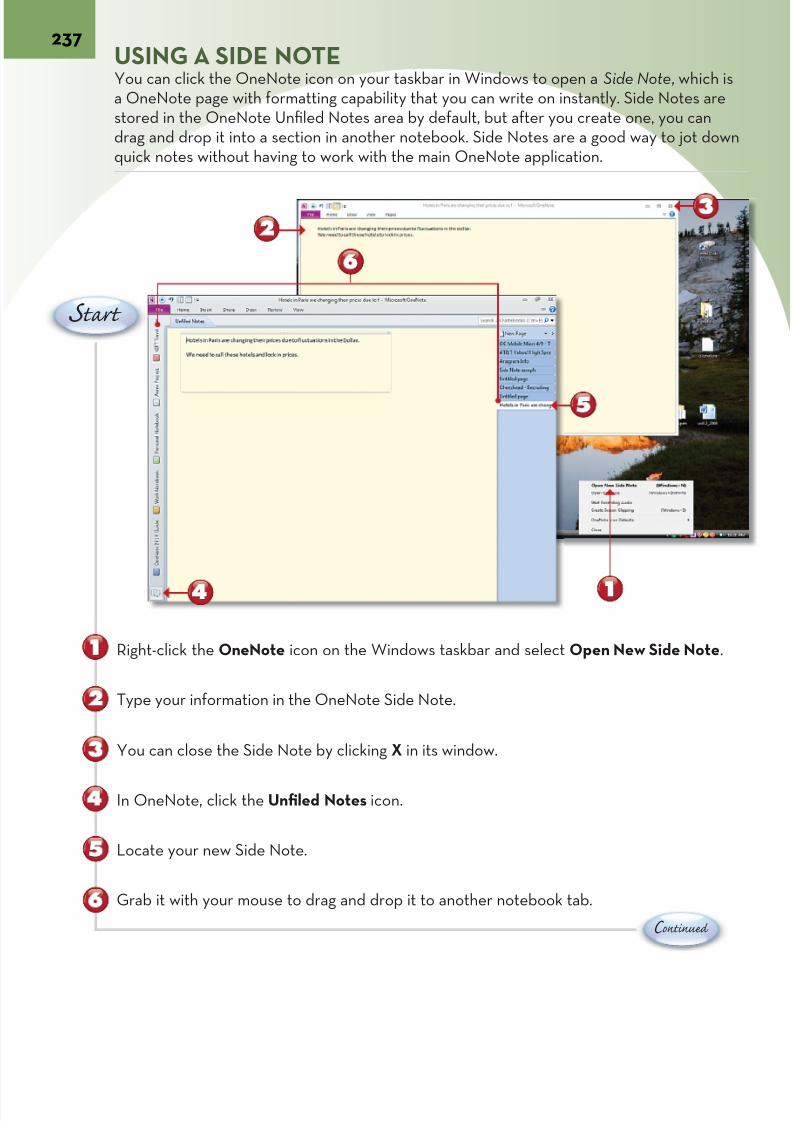
7/22/2019 Easy Microsoft Office 2010
http://slidepdf.com/reader/full/easy-microsoft-office-2010 250/309
237USING A SIDE NOTE
You can click the OneNote icon on your taskbar in Windows to open a Side Note, wha OneNote page with formatting capability that you can write on instantly. Side Notesstored in the OneNote Unfiled Notes area by default, but after you create one, you cadrag and drop it into a section in another notebook. Side Notes are a good way to jotquick notes without having to work with the main OneNote application.
C ontinue
Right-click the OneNote icon on the Windows taskbar and select Open New Side No
Type your information in the OneNote Side Note.
You can close the Side Note by clicking X in its window.
Locate your new Side Note.
In OneNote, click the Unfiled Notes icon.
Grab it with your mouse to drag and drop it to another notebook tab.
S tart

7/22/2019 Easy Microsoft Office 2010
http://slidepdf.com/reader/full/easy-microsoft-office-2010 251/309
E nd
As you hover over the notebook, locate the section into which you want to drop the SNote and drop it in.
The Side Note becomes a new page in the section where it is dropped.
Keep on Top You can make sure that a Side Note
is always accessible as you work by clicking View on
its Ribbon and selecting Keep on Top.
TIPDrawing in a Side Note or in OneNote Of particular
interest to pen or stylus users, the Draw tab on the Side
Note Ribbon lets you create diagrams in freehand. A more
extensive Draw tab on the main OneNote Ribbon lets you
add shapes for diagrams.
TIP
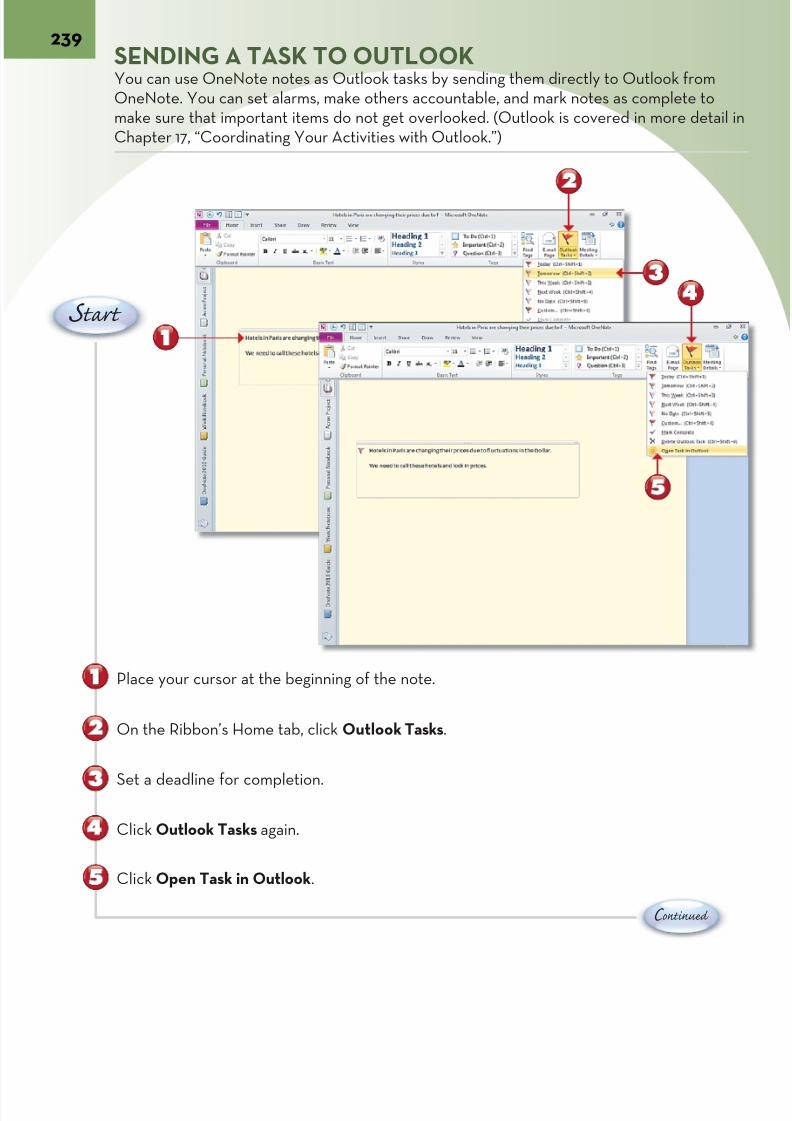
7/22/2019 Easy Microsoft Office 2010
http://slidepdf.com/reader/full/easy-microsoft-office-2010 252/309
239SENDING A TASK TO OUTLOOKYou can use OneNote notes as Outlook tasks by sending them directly to Outlook froOneNote. You can set alarms, make others accountable, and mark notes as complete make sure that important items do not get overlooked. (Outlook is covered in more dChapter 17, “Coordinating Your Activities with Outlook.”)
C ontinue
Place your cursor at the beginning of the note.
On the Ribbon’s Home tab, click Outlook Tasks.
Set a deadline for completion.
Click Outlook Tasks again.
S tart
Click Open Task in Outlook.
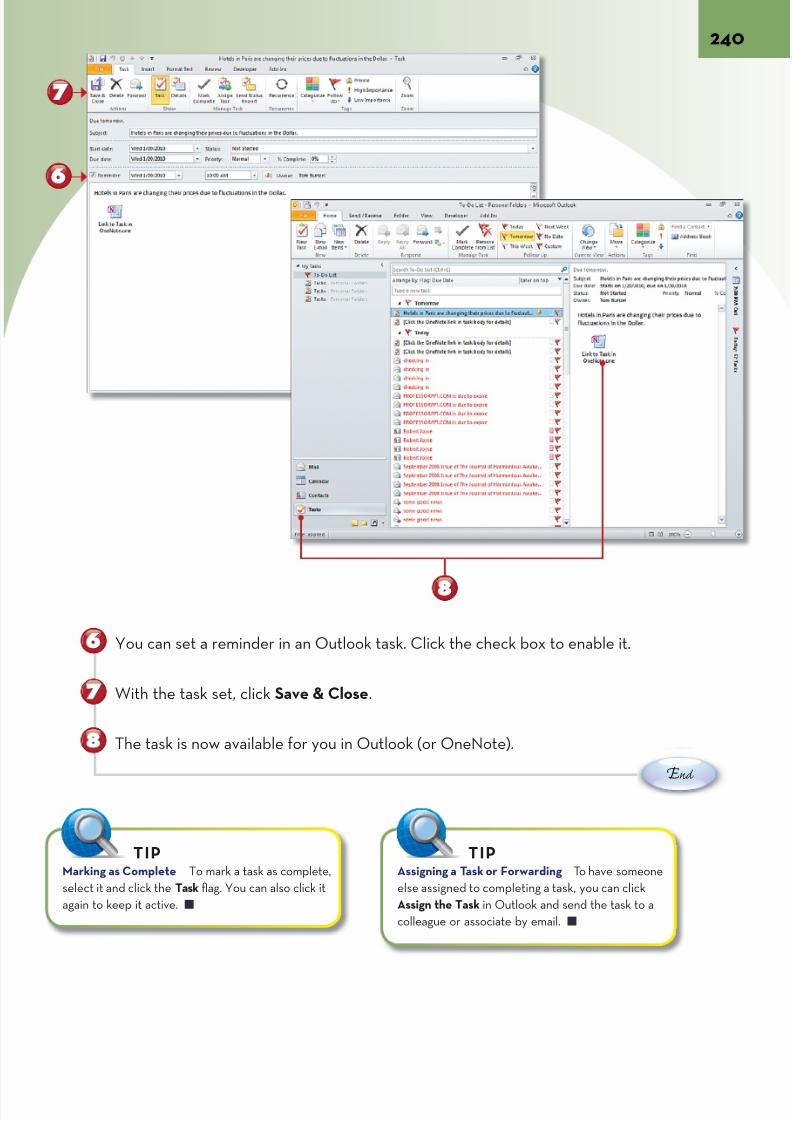
7/22/2019 Easy Microsoft Office 2010
http://slidepdf.com/reader/full/easy-microsoft-office-2010 253/309
E nd
You can set a reminder in an Outlook task. Click the check box to enable it.
With the task set, click Save & Close.
The task is now available for you in Outlook (or OneNote).
Assigning a Task or Forwarding To have someone
else assigned to completing a task, you can click
Assign the Task in Outlook and send the task to a
colleague or associate by email.
TIP
Marking as Complete To mark a task as complete,
select it and click the Task flag. You can also click it
again to keep it active.
TIP

7/22/2019 Easy Microsoft Office 2010
http://slidepdf.com/reader/full/easy-microsoft-office-2010 254/309
241SENDING A FILE TO ONENOTE
You can send a file—for example, a PowerPoint presentation on which you want commmade—to a specific OneNote page in a section of your notebook by printing the file aing the OneNote printer driver.
C ontinue
After creating a page for your file to go to in OneNote, in PowerPoint or another progclick File to open Backstage view.
Click Print.
Click the Printer drop-down arrow and select the Send to OneNote 2010.
Click Print.
S tart
Copying and Pasting to OneNote Using the OneNote printer driver is preferable to using copy
and paste because it lets you designate the destination and, for example, separates the slides from
PowerPoint. When you copy and paste, you must do individual slides; otherwise, you get one large
image for multiple slides if you copy more than one slide from Slide Sorter view in PowerPoint.
TIP

7/22/2019 Easy Microsoft Office 2010
http://slidepdf.com/reader/full/easy-microsoft-office-2010 255/309
E nd
Click to open the notebook, section, and page to which you want to print.
Click OK.
After the file is integrated into your OneNote page, you can adjust it further. For examyou can drag in a corner of a PowerPoint slide to reduce its size.
Work with the presentation within OneNote (for example, add tags to notes).
Recording Audio Notes To add commentary to files that you get
from other programs, such as a PowerPoint presentation, consider
using your microphone to dictate or narrate audio notes by clicking
Record Audio from the Insert tab on the Ribbon.
TIP
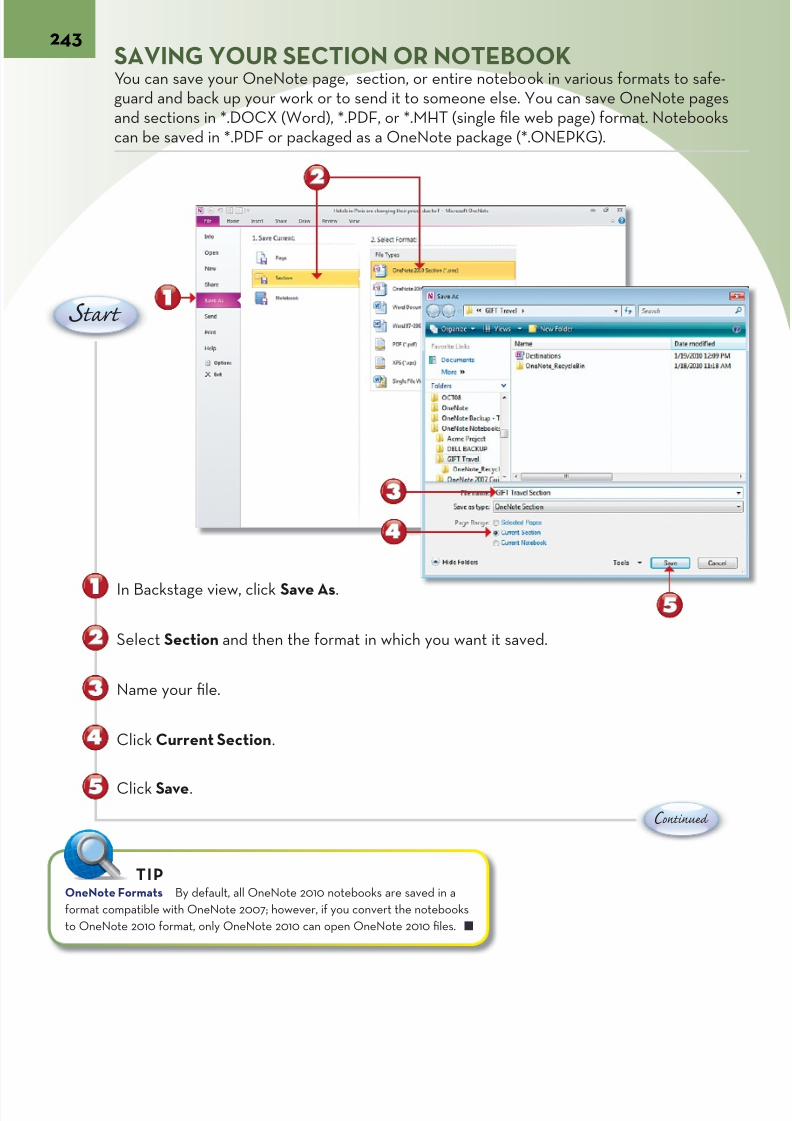
7/22/2019 Easy Microsoft Office 2010
http://slidepdf.com/reader/full/easy-microsoft-office-2010 256/309
243SAVING YOUR SECTION OR NOTEBOOK
You can save your OneNote page, section, or entire notebook in various formats to sguard and back up your work or to send it to someone else. You can save OneNote pand sections in *.DOCX (Word), *.PDF, or *.MHT (single file web page) format. Notebocan be saved in *.PDF or packaged as a OneNote package (*.ONEPKG).
C ontinue
In Backstage view, click Save As.
Select Section and then the format in which you want it saved.
Name your file.
Click Current Section.
S tart
Click Save.
OneNote Formats By default, all OneNote 2010 notebooks are saved in a
format compatible with OneNote 2007; however, if you convert the notebooks
to OneNote 2010 format, only OneNote 2010 can open OneNote 2010 files.
TIP
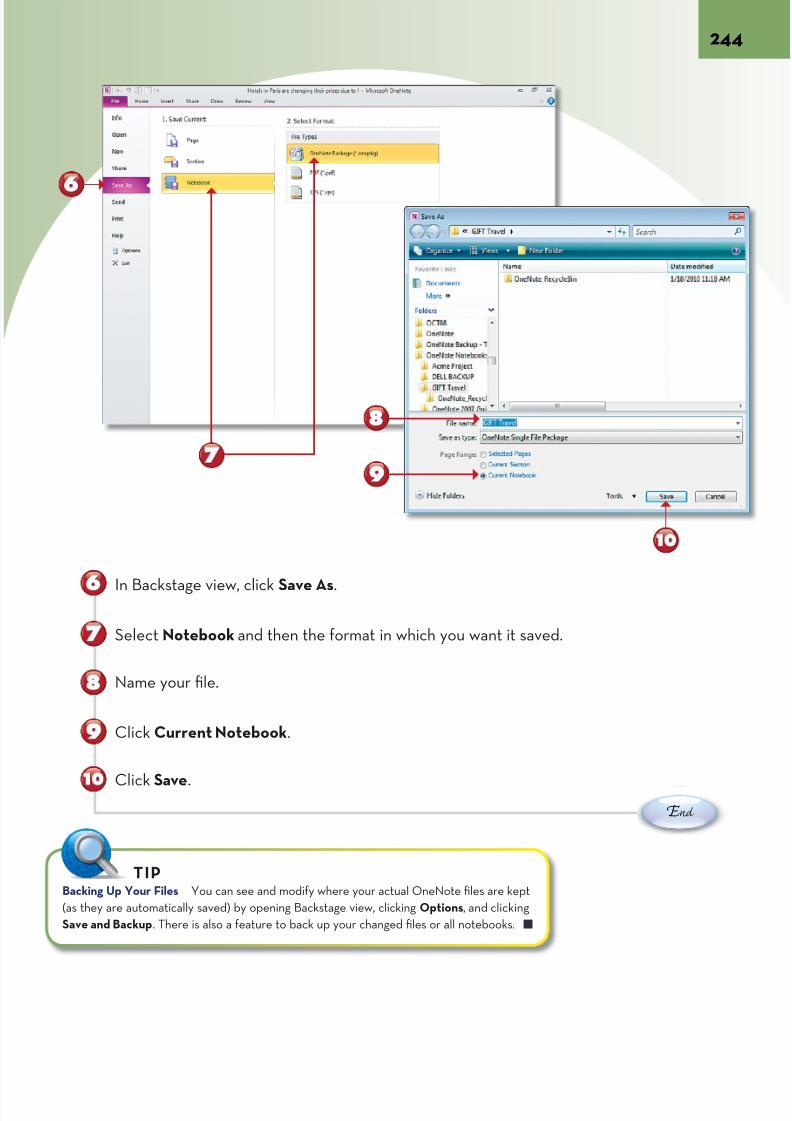
7/22/2019 Easy Microsoft Office 2010
http://slidepdf.com/reader/full/easy-microsoft-office-2010 257/309
E nd
In Backstage view, click Save As.
Select Notebook and then the format in which you want it saved.
Name your file.
Click Current Notebook.
Click Save.
Backing Up Your Files You can see and modify where your actual OneNote files are kept
(as they are automatically saved) by opening Backstage view, clicking Options, and clicking
Save and Backup. There is also a feature to back up your changed files or all notebooks.
TIP
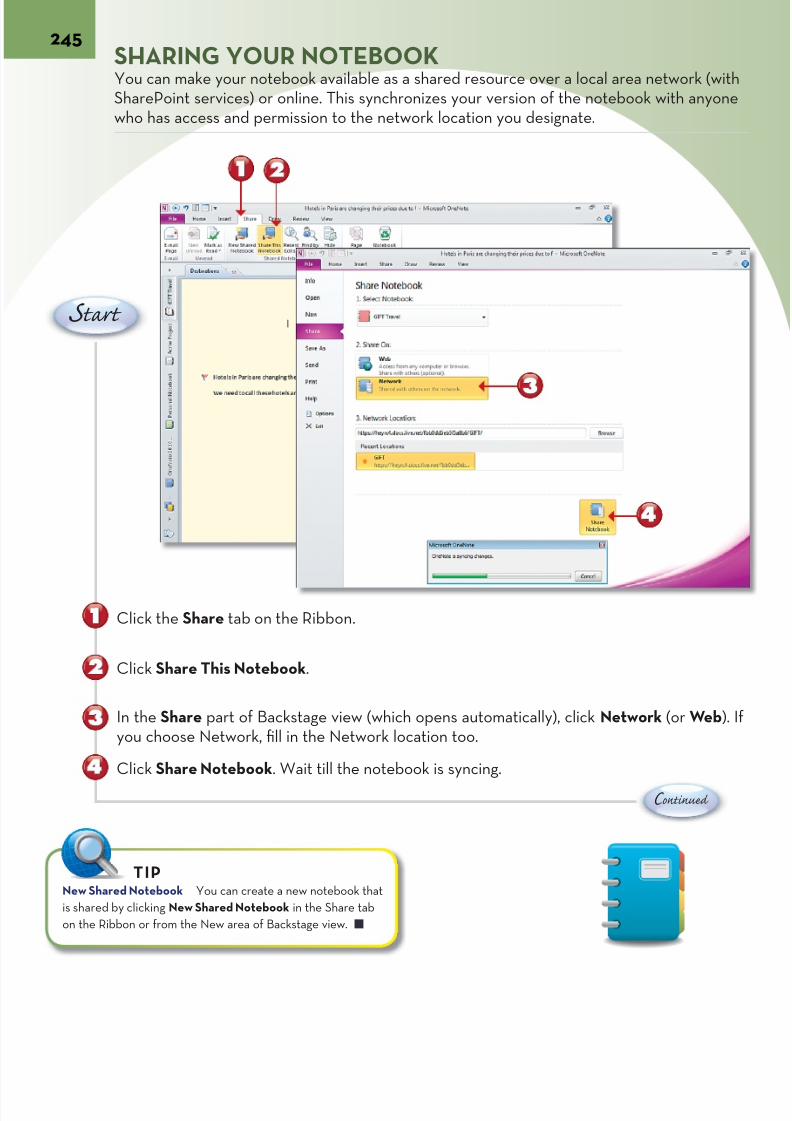
7/22/2019 Easy Microsoft Office 2010
http://slidepdf.com/reader/full/easy-microsoft-office-2010 258/309
245SHARING YOUR NOTEBOOKYou can make your notebook available as a shared resource over a local area networkSharePoint services) or online. This synchronizes your version of the notebook with awho has access and permission to the network location you designate.
C ontinue
Click the Share tab on the Ribbon.
Click Share This Notebook.
In the Share part of Backstage view (which opens automatically), click Network (or Wyou choose Network, fill in the Network location too.
Click Share Notebook. Wait till the notebook is syncing.
S tart
New Shared Notebook You can create a new notebook that
is shared by clicking New Shared Notebook in the Share tab
on the Ribbon or from the New area of Backstage view.
TIP
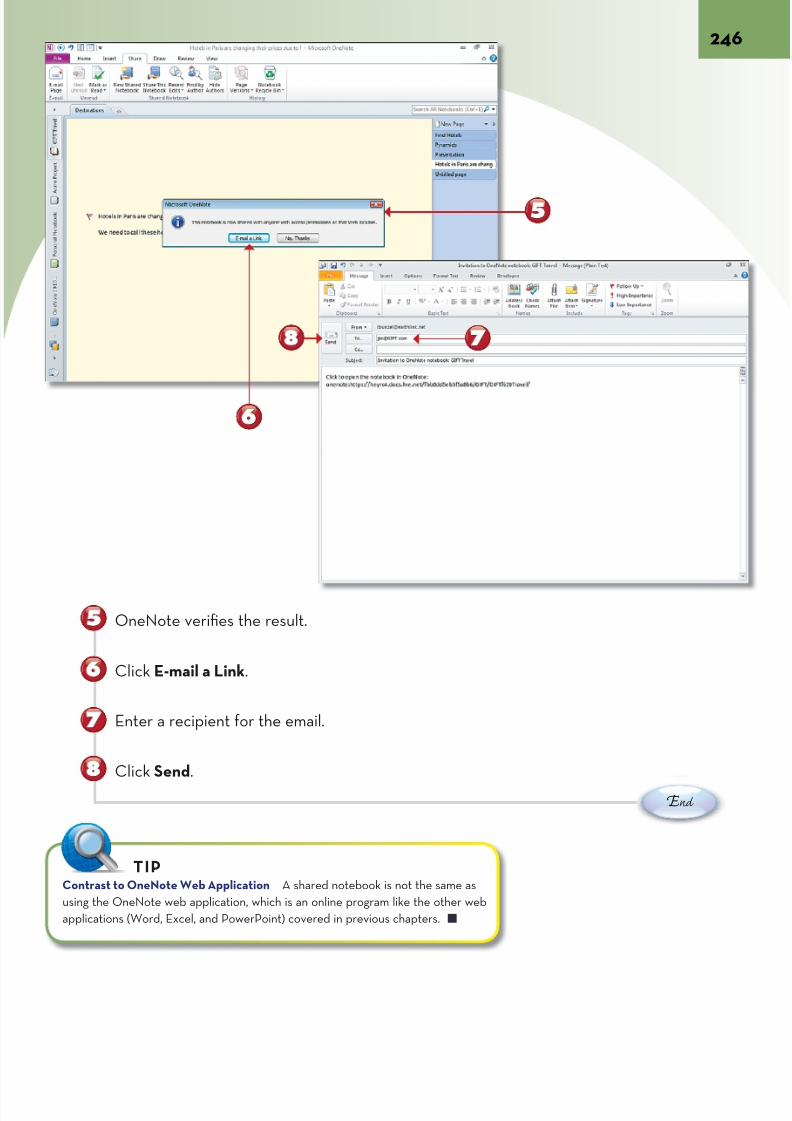
7/22/2019 Easy Microsoft Office 2010
http://slidepdf.com/reader/full/easy-microsoft-office-2010 259/309
E nd
OneNote verifies the result.
Click E-mail a Link.
Enter a recipient for the email.
Click Send.
Contrast to OneNote Web Application A shared notebook is not the same as
using the OneNote web application, which is an online program like the other web
applications (Word, Excel, and PowerPoint) covered in previous chapters.
TIP
7/22/2019 Easy Microsoft Office 2010
http://slidepdf.com/reader/full/easy-microsoft-office-2010 260/309
Chapter 17
COORDINATING YOUR ACTIVITIESWITH OUTLOOKOutlook is a communications center that serves you like an executive secretary
or assistant, sending and receiving email, maintaining your calendar with ap-pointments and events, and managing your contacts with categories and follow-up (flag) reminders.
Each Outlook component has its own folder in the main Personal Folders struc-ture, and you can add your own folders for sorting messages, handling contacts,or creating extra calendars. You can also use a folder for subscriptions to blogsand websites using Really Simple Syndication (RSS).
Like the other Office applications, Outlook 2010 has a Ribbon to provideaccess to the key features of your mail, contacts lists, calendars, and tasks.
A To-Do bar docked at the right of the window provides a quick look at yourcalendar and imminent tasks.
The key to Outlook is its integration between components and other programs;for example, you can send email from a Contact window and schedule a meet-ing that will be accessible in OneNote.
Each Outlook component also has various views; for example, you can sort andfilter email with rules; review your contacts as business cards or a phone list; orcheck you calendar by day, week, or month.
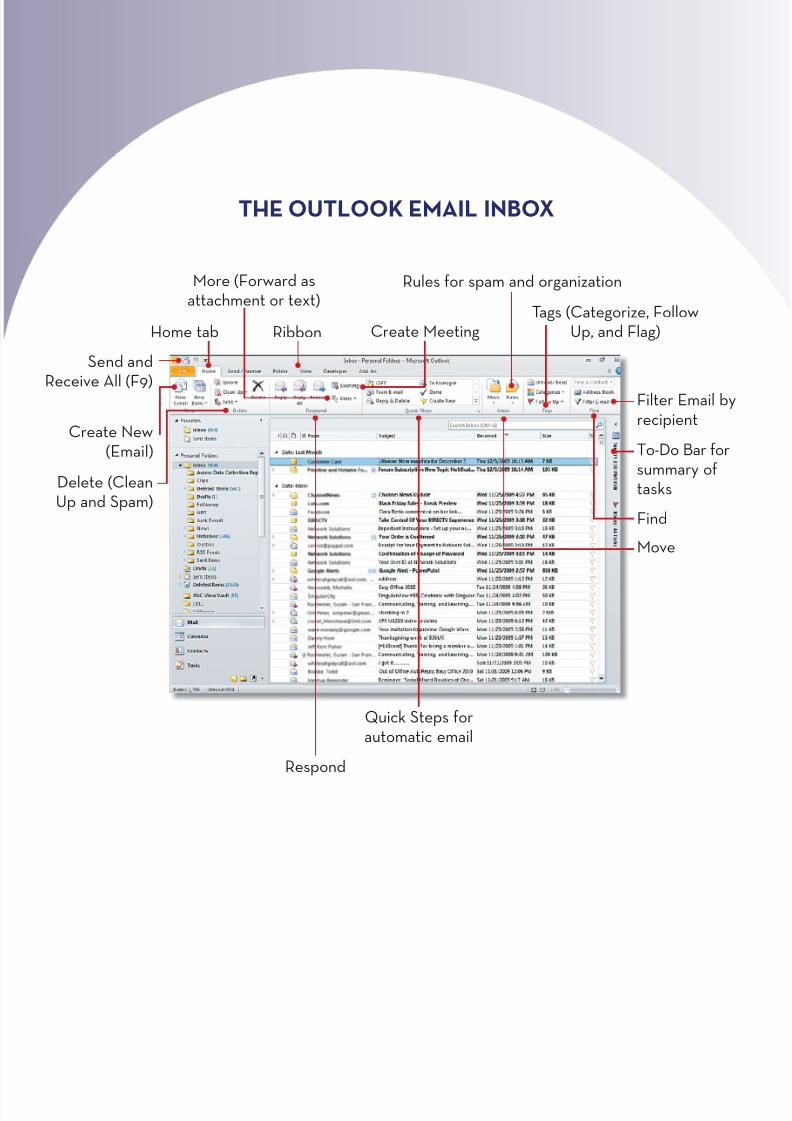
7/22/2019 Easy Microsoft Office 2010
http://slidepdf.com/reader/full/easy-microsoft-office-2010 261/309
THE OUTLOOK EMAIL INBOX
Send andReceive All (F9)
Create New(Email)
Delete (CleanUp and Spam)
More (Forward asattachment or text)
Create Meeting
Rules for spam and organization
Tags (Categorize, FollowUp, and Flag)
Filter Emrecipient
To-Do Basummary tasks
Quick Steps forautomatic email
Respond
Find
Home tab
Move
Ribbon
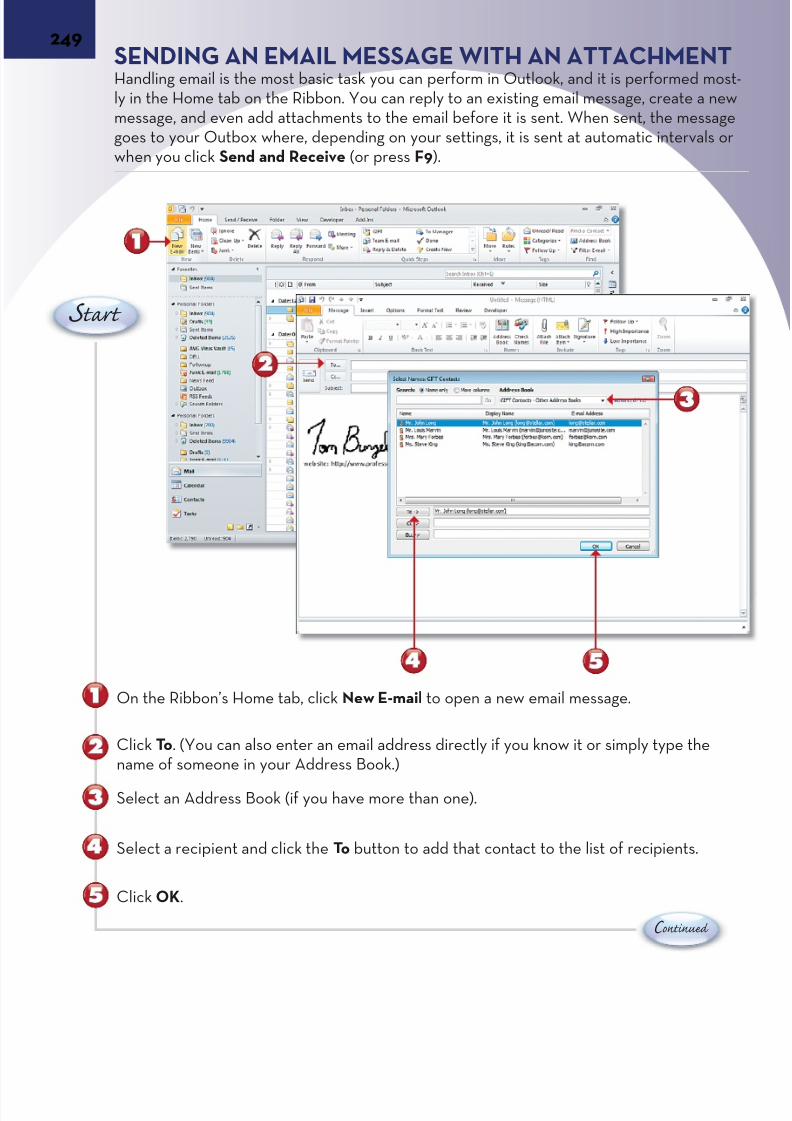
7/22/2019 Easy Microsoft Office 2010
http://slidepdf.com/reader/full/easy-microsoft-office-2010 262/309
249SENDING AN EMAIL MESSAGE WITH AN ATTACHMEHandling email is the most basic task you can perform in Outlook, and it is performedly in the Home tab on the Ribbon. You can reply to an existing email message, create message, and even add attachments to the email before it is sent. When sent, the megoes to your Outbox where, depending on your settings, it is sent at automatic intervwhen you click Send and Receive (or press F9).
C ontinue
On the Ribbon’s Home tab, click New E-mail to open a new email message.
Click To. (You can also enter an email address directly if you know it or simply type thname of someone in your Address Book.)
Select an Address Book (if you have more than one).
Select a recipient and click the To button to add that contact to the list of recipients.
Click OK.
S tart

7/22/2019 Easy Microsoft Office 2010
http://slidepdf.com/reader/full/easy-microsoft-office-2010 263/309
S tart
E nd
Click Attach File.
Locate and select the file in the Insert File window.
Click Insert.
Complete the email and click Send.
Sending from a Contact You can create a new email
message directly to a specific contact in your Contacts
folder. Just select the contact and click Email in the
Communicate group of the Ribbon’s Home tab.
TIPAdding an Address Book To make a contacts list into
Address Book for Outlook email, right-click the list in th
Folders panel, click Properties, and in the Outlook Add
tab, select Show This Folder as an E-mail Address Book
TIP
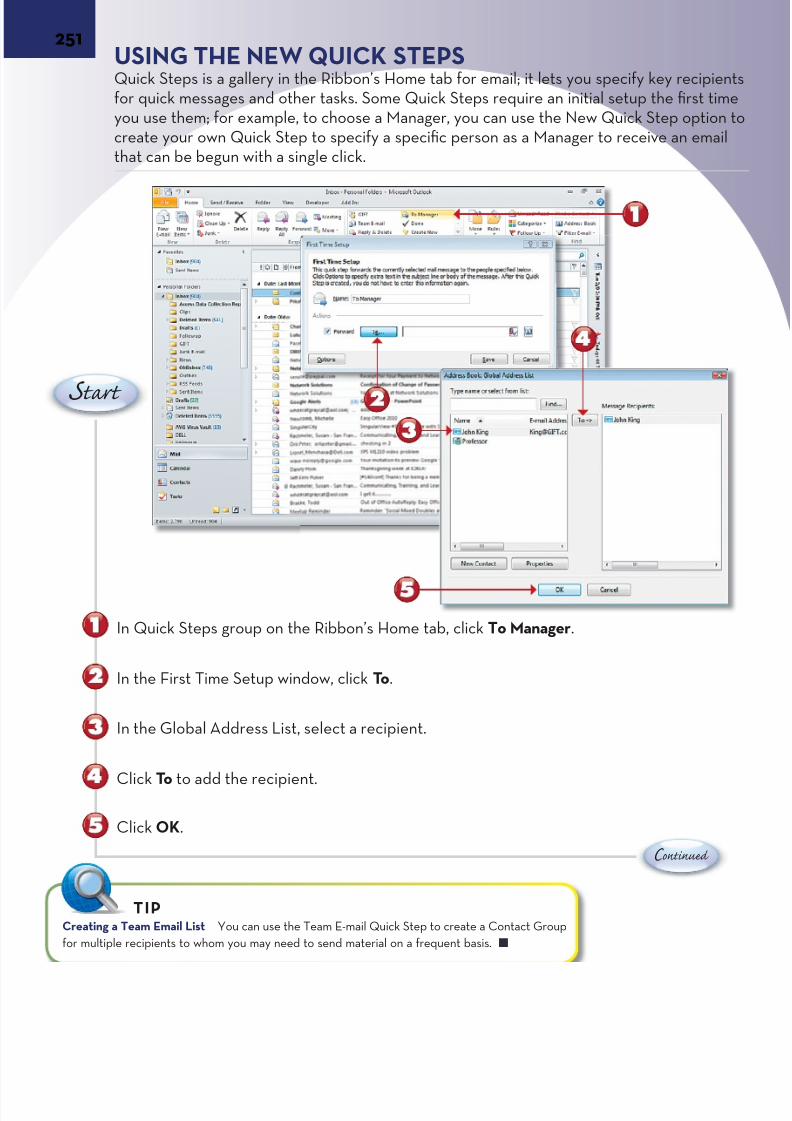
7/22/2019 Easy Microsoft Office 2010
http://slidepdf.com/reader/full/easy-microsoft-office-2010 264/309
251USING THE NEW QUICK STEPS
Quick Steps is a gallery in the Ribbon’s Home tab for email; it lets you specify key recfor quick messages and other tasks. Some Quick Steps require an initial setup the firsyou use them; for example, to choose a Manager, you can use the New Quick Step opcreate your own Quick Step to specify a specific person as a Manager to receive an ethat can be begun with a single click.
C ontinue
In Quick Steps group on the Ribbon’s Home tab, click To Manager.
In the First Time Setup window, click To.
In the Global Address List, select a recipient.
Click To to add the recipient.
S tart
Click OK.
Creating a Team Email List You can use the Team E-mail Quick Step to create a Contact Group
for multiple recipients to whom you may need to send material on a frequent basis.
TIP
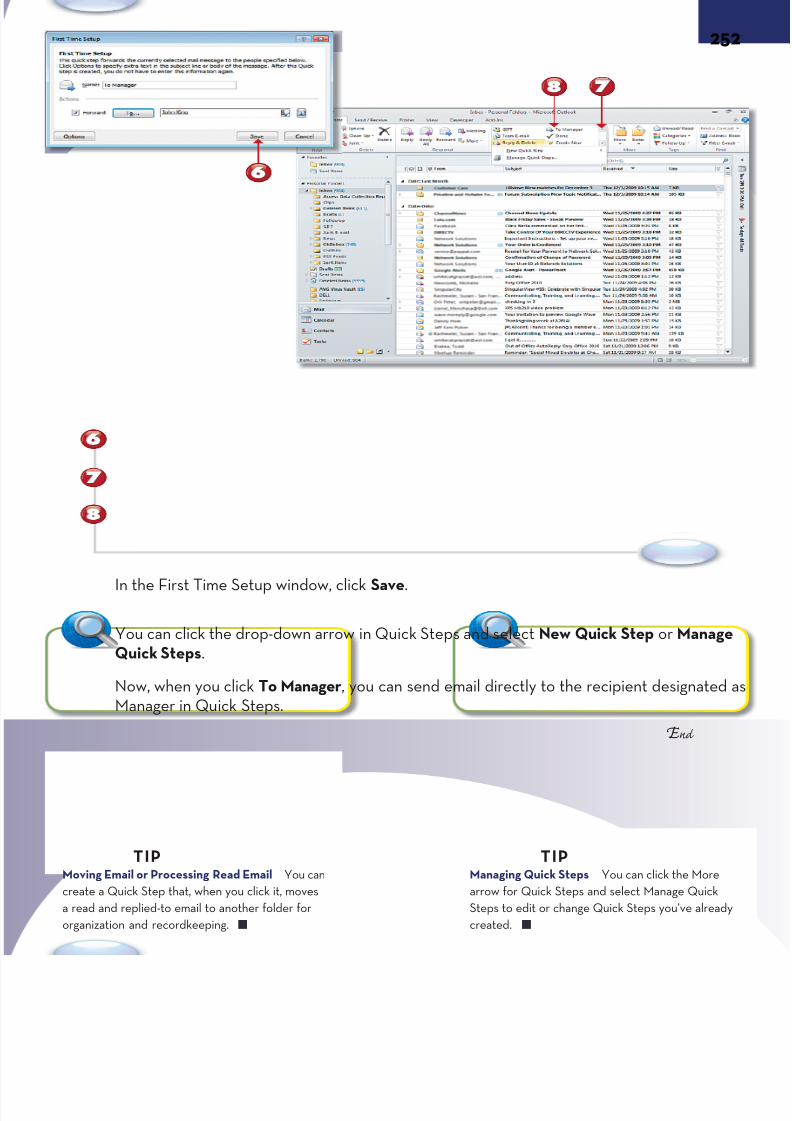
7/22/2019 Easy Microsoft Office 2010
http://slidepdf.com/reader/full/easy-microsoft-office-2010 265/309
S tart
E nd
In the First Time Setup window, click Save.
You can click the drop-down arrow in Quick Steps and select New Quick Step or MaQuick Steps.
Now, when you click To Manager, you can send email directly to the recipient designaManager in Quick Steps.
Moving Email or Processing Read Email You can
create a Quick Step that, when you click it, moves
a read and replied-to email to another folder for
organization and recordkeeping.
TIPManaging Quick Steps You can click the M
arrow for Quick Steps and select Manage Qu
Steps to edit or change Quick Steps you’ve a
created.
TIP
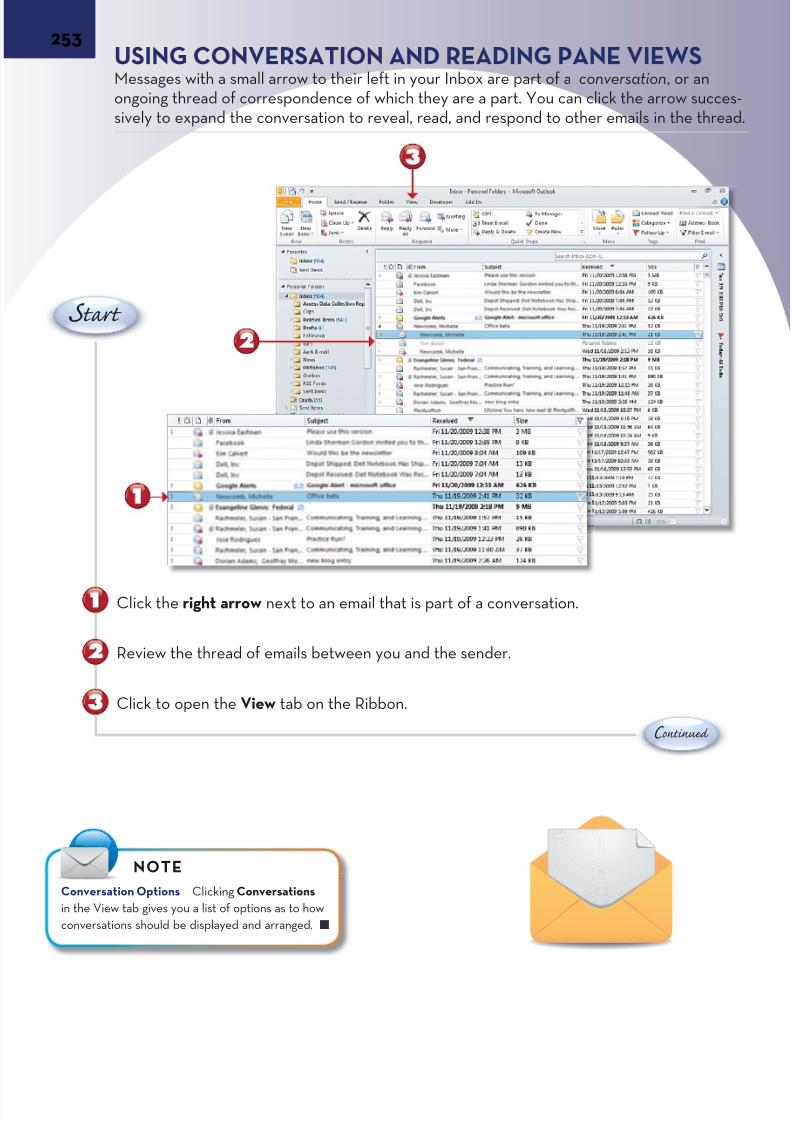
7/22/2019 Easy Microsoft Office 2010
http://slidepdf.com/reader/full/easy-microsoft-office-2010 266/309
253USING CONVERSATION AND READING PANE VIEWSMessages with a small arrow to their left in your Inbox are part of a conversation, or aongoing thread of correspondence of which they are a part. You can click the arrow ssively to expand the conversation to reveal, read, and respond to other emails in the t
C ontinue
Click the right arrow next to an email that is part of a conversation.
Review the thread of emails between you and the sender.
Click to open the View tab on the Ribbon.
S tart
Conversation Options Clicking Conversations
in the View tab gives you a list of options as to how
conversations should be displayed and arranged.
NOTE

7/22/2019 Easy Microsoft Office 2010
http://slidepdf.com/reader/full/easy-microsoft-office-2010 267/309
S tart
E nd
The View tab of the Ribbon is active with Date (Conversations) highlighted.
Open the Reading Pane in the Layout group and click Bottom.
Click one of the emails in the conversation.
You can read the email directly in the Inbox without opening it.
You can collapse the conversation by double-clicking the original email message.
Expand/Collapse Clicking Expand/Collapse in the
Ribbon’s View tab lets you expand or collapse the cur-
rently selected email conversation or select to expand
or collapse all conversations in your Inbox.
TIP
Changing Arrangement The Arrangement
in the Ribbon’s View tab provides different o
for sorting, filtering, and viewing your email in
Inbox.
TIP

7/22/2019 Easy Microsoft Office 2010
http://slidepdf.com/reader/full/easy-microsoft-office-2010 268/309
255SCHEDULING A MEETING WITH EMAIL
You can schedule an appointment or meeting with anyone from whom you’ve receiveemail directly from the email message itself. Alternatively, you can locate the person icontacts list, and the email meeting request will be opened with the email address in tfield.
C ontinue
Select an email message from the person with whom you want to schedule a meeting
Click Meeting to open a Meeting email message. (Note that the Meeting tab on the msage is active by default.)
Type in a message about the meeting.
Fill in the schedule for the date and time.
S tart
Click Send.

7/22/2019 Easy Microsoft Office 2010
http://slidepdf.com/reader/full/easy-microsoft-office-2010 269/309
S tart
E nd
The recipient of the meeting request email can click Respond and reply to it.
The recipient can enter a reply message.
After the recipient clicks Send, the response is received in your Inbox.
Canceling the Meeting To cancel a meeting, you
can click Cancel Invitation in the Meeting tab of
the Ribbon when you send a meeting request.
TIPChecking Availability You can click Scheduling in
the Ribbon’s Meeting tab to see your schedule for
the time period selected to be able to see the best
time to schedule a meeting. The recipient can do
the same in the reply message.
TIP
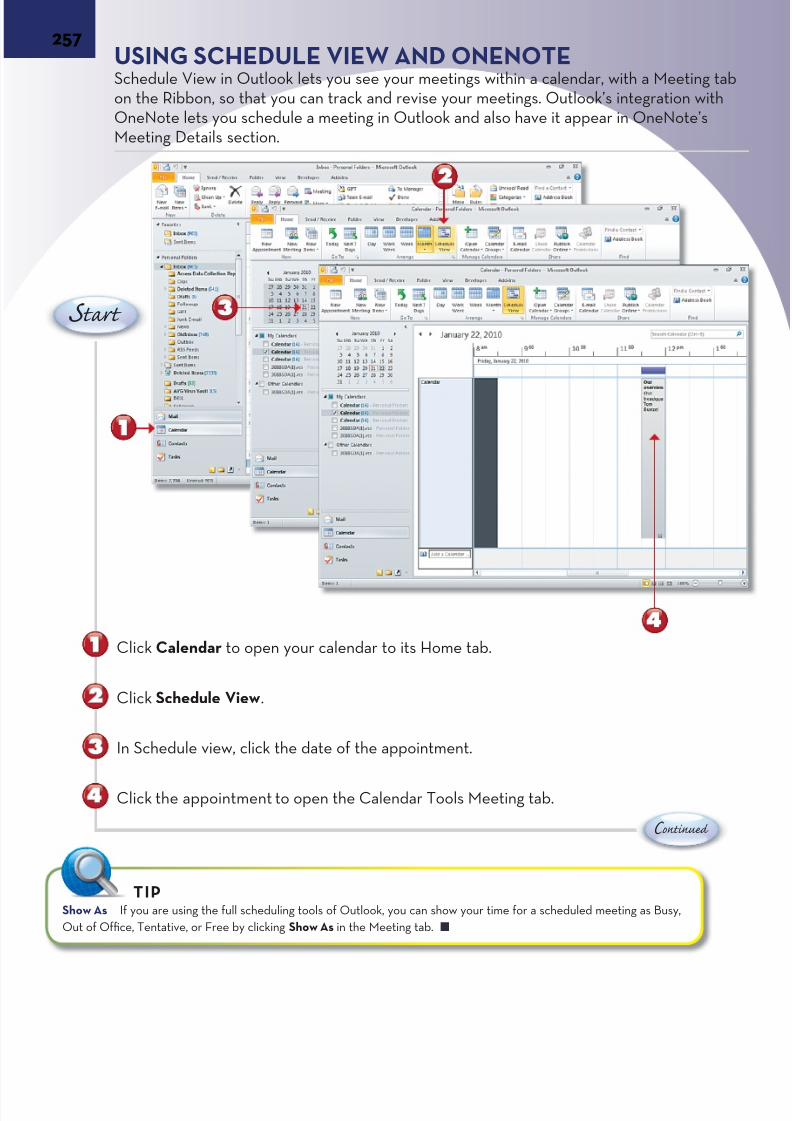
7/22/2019 Easy Microsoft Office 2010
http://slidepdf.com/reader/full/easy-microsoft-office-2010 270/309
257USING SCHEDULE VIEW AND ONENOTESchedule View in Outlook lets you see your meetings within a calendar, with a Meetinon the Ribbon, so that you can track and revise your meetings. Outlook’s integration wOneNote lets you schedule a meeting in Outlook and also have it appear in OneNoteMeeting Details section.
C ontinue
Click Calendar to open your calendar to its Home tab.
Click Schedule View.
In Schedule view, click the date of the appointment.
Click the appointment to open the Calendar Tools Meeting tab.
S tart
Show As If you are using the full scheduling tools of Outlook, you can show your time for a scheduled meeting as Busy,
Out of Office, Tentative, or Free by clicking Show As in the Meeting tab.
TIP

7/22/2019 Easy Microsoft Office 2010
http://slidepdf.com/reader/full/easy-microsoft-office-2010 271/309
S tart
E nd
You can click Tracking to see who has responded to the request.
You can also click Add or Remove Attendees.
To see meeting details in OneNote, open OneNote and click Meeting Details.
Your meeting information is also available in OneNote.
Tags To organize your meetings, you can apply
categories or set importance levels from the Tags
group of the Meeting tab.
TIP

7/22/2019 Easy Microsoft Office 2010
http://slidepdf.com/reader/full/easy-microsoft-office-2010 272/309
259USING THEMES AND COLORS IN EMAIL
You can use the Options tab on the Ribbon in an email to change the appearance of oin your message or its background color. You can even use the Ribbon tools to work wspecific elements (such as charts).
C ontinue
In a new email message, click the Options tab on the Ribbon.
Insert or copy and paste a graphic or chart that uses theme colors, fonts, or effects. (more details on themes, see “Applying a Theme to a Document” in Chapter 4, “ChangProject Appearance.”)
On the Ribbon’s Options tab, click Themes.
Hover over a theme for a Quick Preview or click to apply a theme.
S tart
Use Voting Buttons In a new email, you can click Use Voting Buttons in the Options tab on the Ribbon to add a survey
with voting buttons and then use the Tracking feature to tabulate results.
TIP

7/22/2019 Easy Microsoft Office 2010
http://slidepdf.com/reader/full/easy-microsoft-office-2010 273/309
S tart
E nd
Click Page Color to apply a color background to the email.
If you have inserted a chart or graphic, click it to have the [Chart] Tools become activthe Ribbon. (For more details on working with charts, see Chapter 10, “Creating CharData Tables, and Pivot Tables.”)
Inserting Objects The Insert tab for an email message provides the same fea-
tures for inserting content as we have covered for Word, Excel, and PowerPoint.
They include pictures, ClipArt, shapes, SmartArt, charts, and screenshots.
TIP
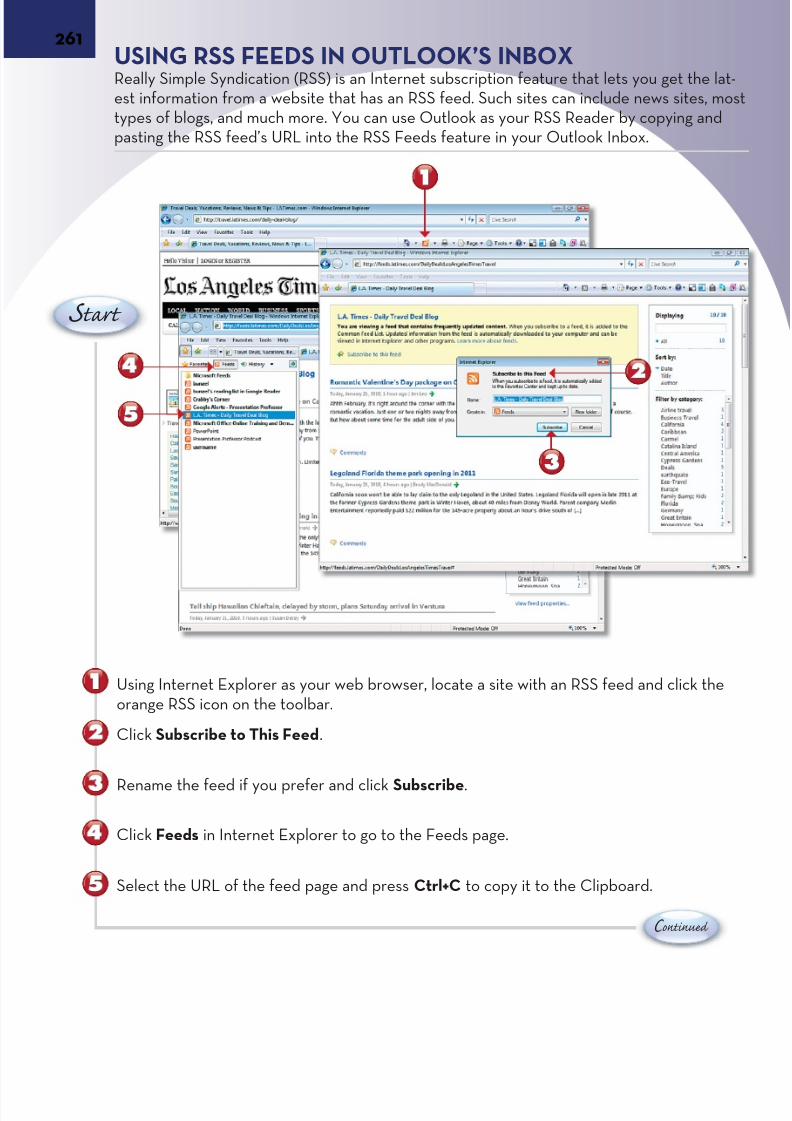
7/22/2019 Easy Microsoft Office 2010
http://slidepdf.com/reader/full/easy-microsoft-office-2010 274/309
261USING RSS FEEDS IN OUTLOOK’S INBOXReally Simple Syndication (RSS) is an Internet subscription feature that lets you get thest information from a website that has an RSS feed. Such sites can include news sitetypes of blogs, and much more. You can use Outlook as your RSS Reader by copying apasting the RSS feed’s URL into the RSS Feeds feature in your Outlook Inbox.
C ontinue
Using Internet Explorer as your web browser, locate a site with an RSS feed and clickorange RSS icon on the toolbar.
Click Subscribe to This Feed.
Rename the feed if you prefer and click Subscribe.
Click Feeds in Internet Explorer to go to the Feeds page.
S tart
Select the URL of the feed page and press Ctrl+C to copy it to the Clipboard.
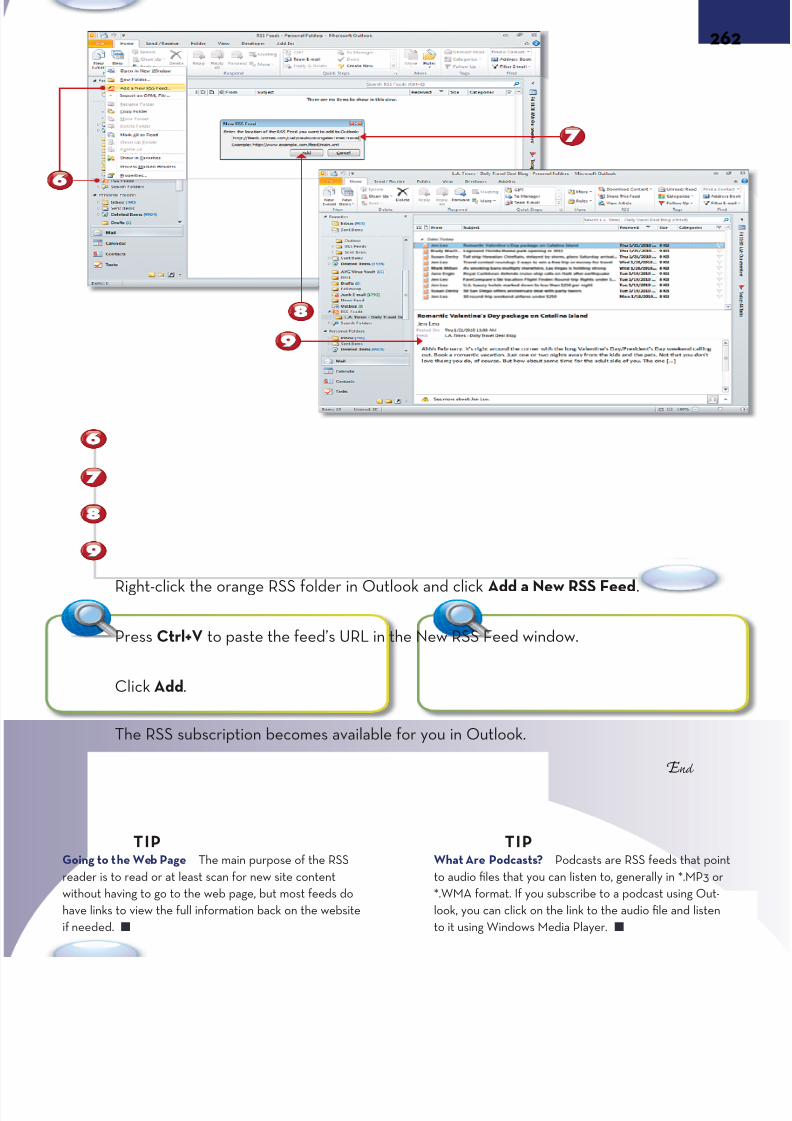
7/22/2019 Easy Microsoft Office 2010
http://slidepdf.com/reader/full/easy-microsoft-office-2010 275/309
S tart
E nd
Right-click the orange RSS folder in Outlook and click Add a New RSS Feed.
Press Ctrl+V to paste the feed’s URL in the New RSS Feed window.
Click Add.
Going to the Web Page The main purpose of the RSS
reader is to read or at least scan for new site content
without having to go to the web page, but most feeds do
have links to view the full information back on the website
if needed.
TIP
The RSS subscription becomes available for you in Outlook.
What Are Podcasts? Podcasts are RSS feeds that
to audio files that you can listen to, generally in *.MP
*.WMA format. If you subscribe to a podcast using O
look, you can click on the link to the audio file and li
to it using Windows Media Player.
TIP
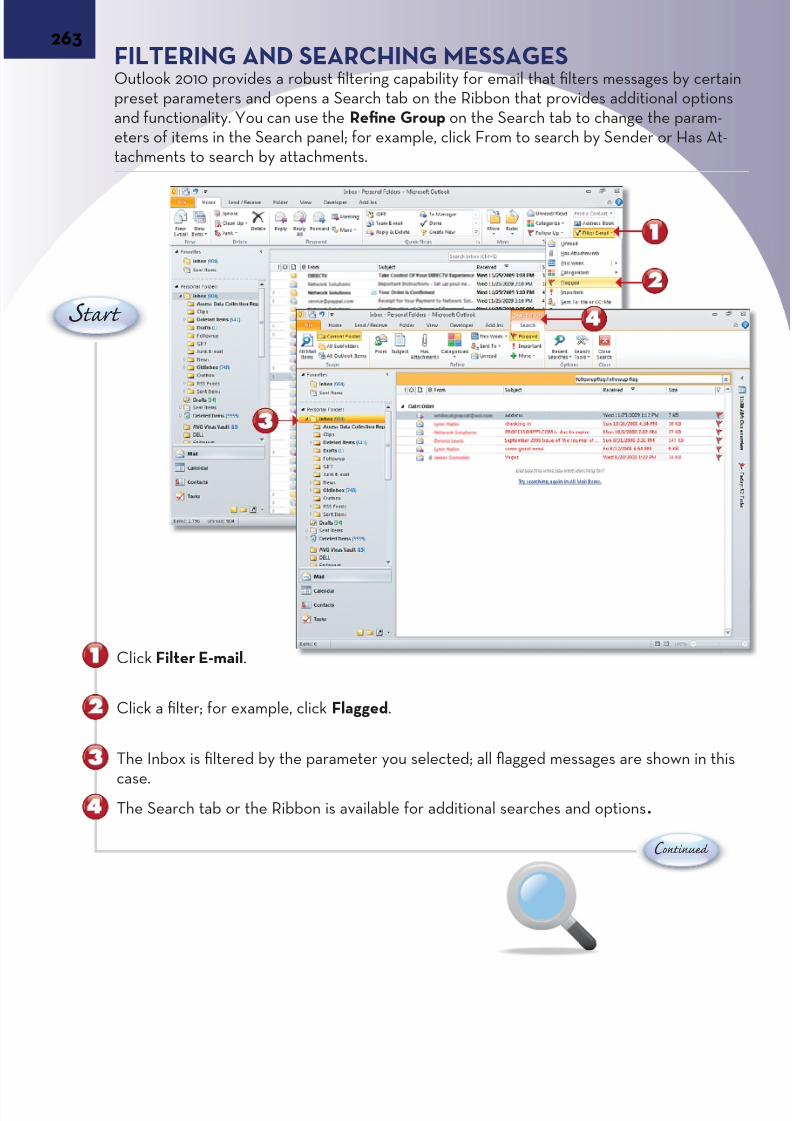
7/22/2019 Easy Microsoft Office 2010
http://slidepdf.com/reader/full/easy-microsoft-office-2010 276/309
263FILTERING AND SEARCHING MESSAGES
Outlook 2010 provides a robust filtering capability for email that filters messages by cpreset parameters and opens a Search tab on the Ribbon that provides additional opand functionality. You can use the Refine Group on the Search tab to change the paraeters of items in the Search panel; for example, click From to search by Sender or Hastachments to search by attachments.
C ontinue
Click Filter E-mail.
Click a filter; for example, click Flagged.
The Inbox is filtered by the parameter you selected; all flagged messages are shown i
case.The Search tab or the Ribbon is available for additional searches and options.
S tart
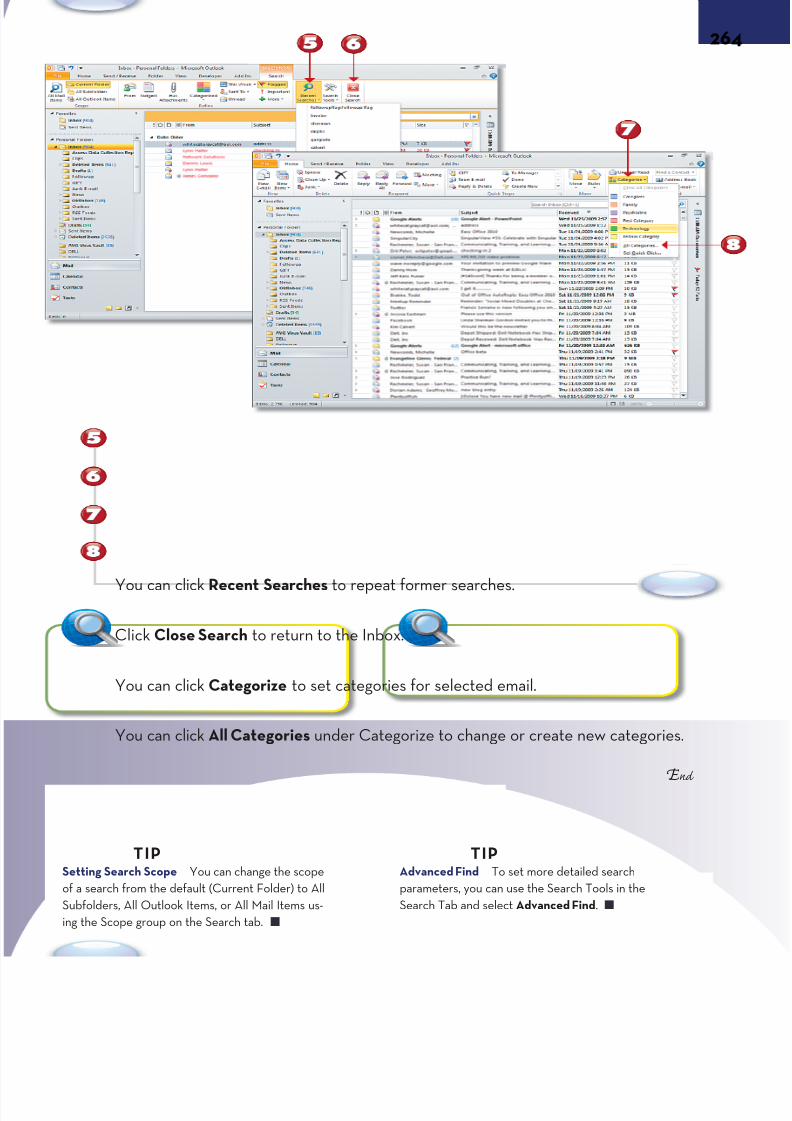
7/22/2019 Easy Microsoft Office 2010
http://slidepdf.com/reader/full/easy-microsoft-office-2010 277/309
S tart
E nd
You can click Recent Searches to repeat former searches.
Click Close Search to return to the Inbox.
You can click Categorize to set categories for selected email.
You can click All Categories under Categorize to change or create new categories.
Setting Search Scope You can change the scope
of a search from the default (Current Folder) to All
Subfolders, All Outlook Items, or All Mail Items us-
ing the Scope group on the Search tab.
TIPAdvanced Find To set more detailed search
parameters, you can use the Search Tools in the
Search Tab and select Advanced Find.
TIP
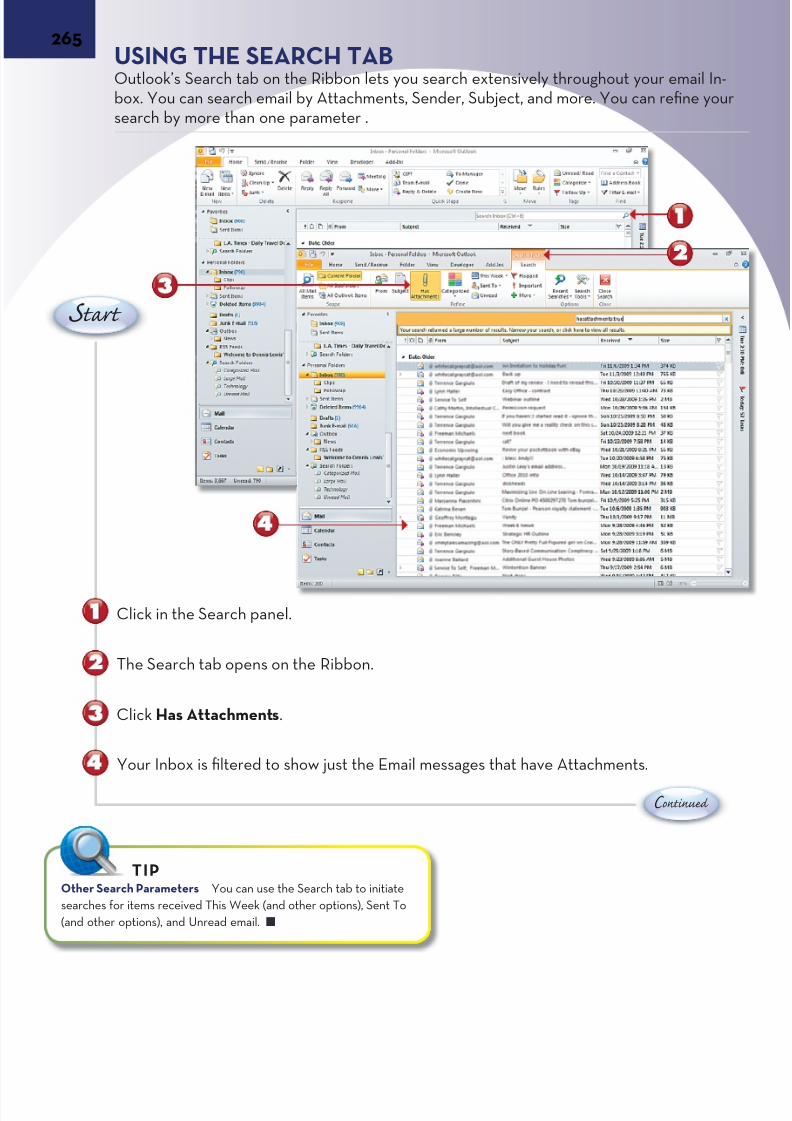
7/22/2019 Easy Microsoft Office 2010
http://slidepdf.com/reader/full/easy-microsoft-office-2010 278/309
265USING THE SEARCH TAB
Outlook’s Search tab on the Ribbon lets you search extensively throughout your emabox. You can search email by Attachments, Sender, Subject, and more. You can refinesearch by more than one parameter .
C ontinue
Click in the Search panel.
The Search tab opens on the Ribbon.
Click Has Attachments.
Your Inbox is filtered to show just the Email messages that have Attachments.
S tart
Other Search Parameters You can use the Search tab to initiate
searches for items received This Week (and other options), Sent To
(and other options), and Unread email.
TIP

7/22/2019 Easy Microsoft Office 2010
http://slidepdf.com/reader/full/easy-microsoft-office-2010 279/309
S tart
E nd
To search emails by subject, click Subject on the Ribbon’s Search tab.
Replace the highlighted term “keywords” with a search parameter (for subject).
The search parameter replaces “keywords.”
The relevant items are shown in the Inbox.
Click Close Search to end the search and return to the main Inbox.
Opening the Search Tab for all of Outlook You can quickly
access the Search tab of the Ribbon to do a comprehensive
search in any part of outlook by clicking Ctrl + E.
TIP
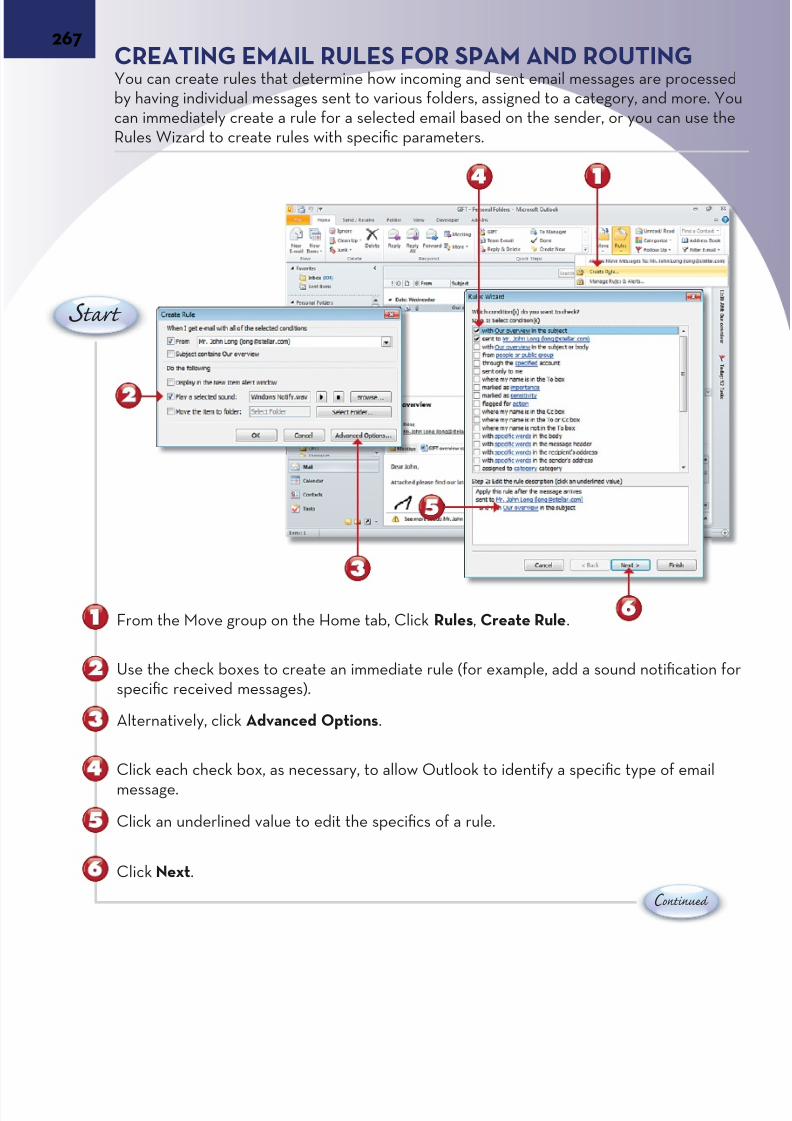
7/22/2019 Easy Microsoft Office 2010
http://slidepdf.com/reader/full/easy-microsoft-office-2010 280/309
267CREATING EMAIL RULES FOR SPAM AND ROUTING
You can create rules that determine how incoming and sent email messages are proceby having individual messages sent to various folders, assigned to a category, and morcan immediately create a rule for a selected email based on the sender, or you can usRules Wizard to create rules with specific parameters.
C ontinue
From the Move group on the Home tab, Click Rules, Create Rule.
Use the check boxes to create an immediate rule (for example, add a sound notificatispecific received messages).
Alternatively, click Advanced Options.
Click each check box, as necessary, to allow Outlook to identify a specific type of emmessage.
S tart
Click an underlined value to edit the specifics of a rule.
Click Next.
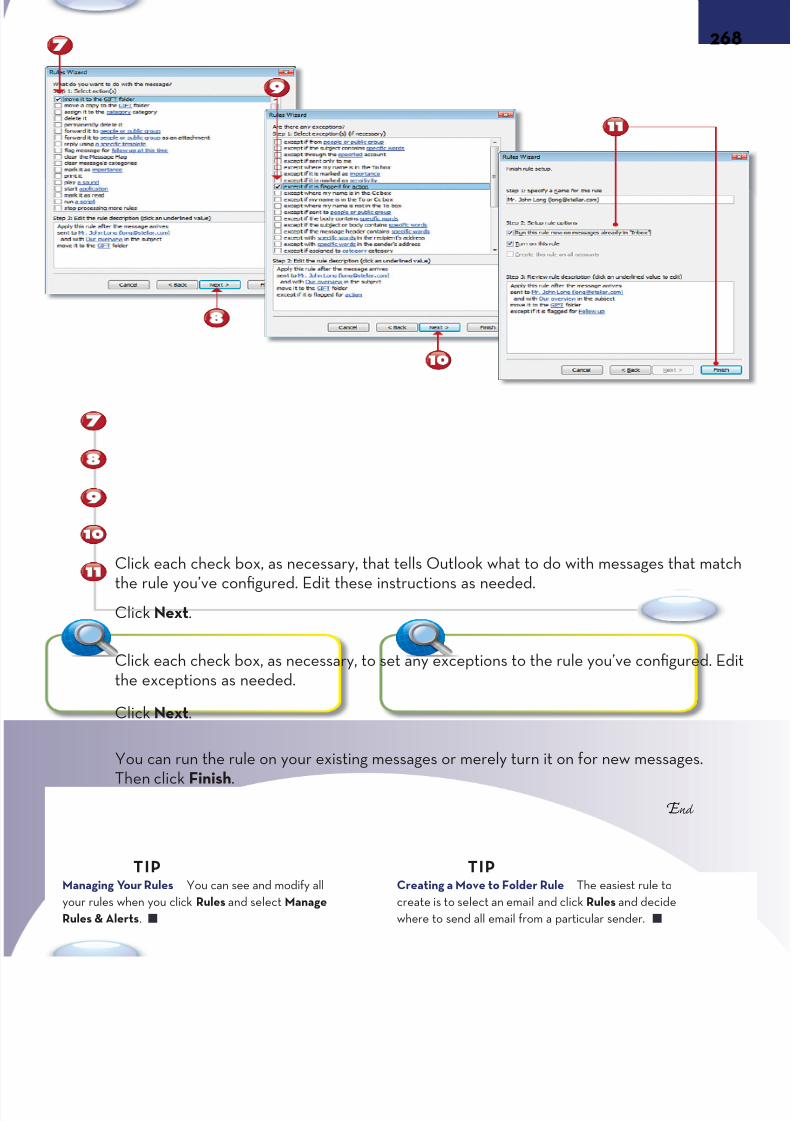
7/22/2019 Easy Microsoft Office 2010
http://slidepdf.com/reader/full/easy-microsoft-office-2010 281/309
S tart
E nd
Click each check box, as necessary, that tells Outlook what to do with messages that
the rule you’ve configured. Edit these instructions as needed.Click Next.
Click each check box, as necessary, to set any exceptions to the rule you’ve configurethe exceptions as needed.
Click Next.
You can run the rule on your existing messages or merely turn it on for new messages
Then click Finish.
Managing Your Rules You can see and modify all
your rules when you click Rules and select Manage
Rules & Alerts.
TIPCreating a Move to Folder Rule The easiest rule to
create is to select an email and click Rules and decide
where to send all email from a particular sender.
TIP
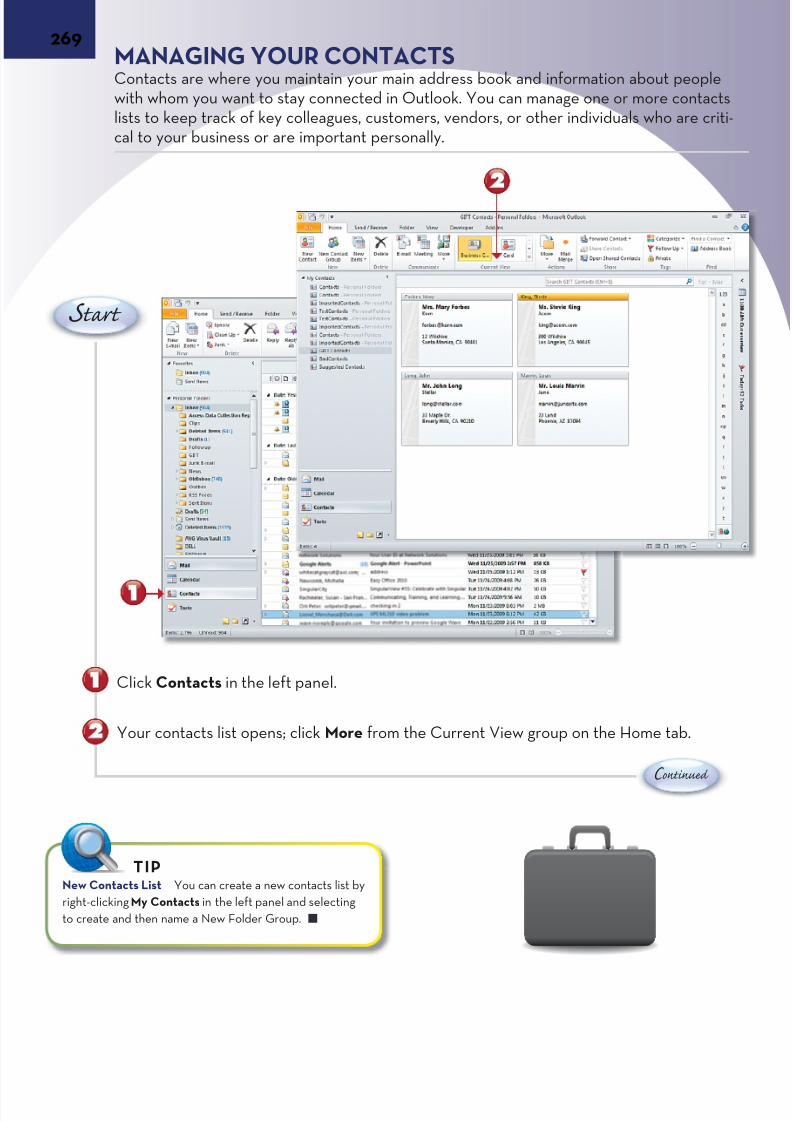
7/22/2019 Easy Microsoft Office 2010
http://slidepdf.com/reader/full/easy-microsoft-office-2010 282/309
269MANAGING YOUR CONTACTSContacts are where you maintain your main address book and information about peowith whom you want to stay connected in Outlook. You can manage one or more contlists to keep track of key colleagues, customers, vendors, or other individuals who arecal to your business or are important personally.
C ontinue
Click Contacts in the left panel.
Your contacts list opens; click More from the Current View group on the Home tab.
S tart
New Contacts List You can create a new contacts list by
right-clicking My Contacts in the left panel and selecting
to create and then name a New Folder Group.
TIP

7/22/2019 Easy Microsoft Office 2010
http://slidepdf.com/reader/full/easy-microsoft-office-2010 283/309
S tart
E nd
Click Phone.
The list of fields becomes visible.
Click the field name to sort ascending or descending; the up or down arrow lets you khow it’s sorted.
You can right-click the fields to open a Field Chooser to add more fields to the Phonview.
Creating and Editing Contacts For any contact list, you can click
New Contact to create a new contact, click Delete to remove a
contact, or double-click a contact to open and revise the contact
information and then click Save and Close.
TIPNew Items When you click New Items f
a selected contact, you are able to send t
person an email, assign a task, set up a me
and more.
TIP
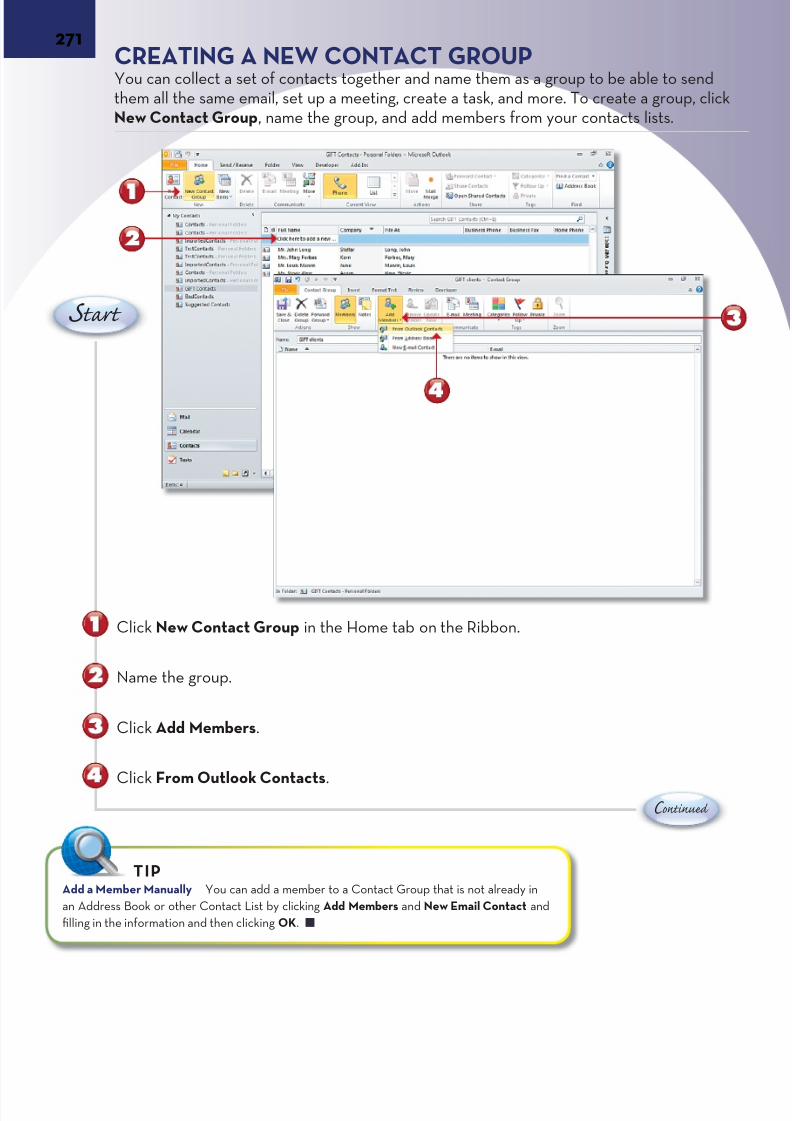
7/22/2019 Easy Microsoft Office 2010
http://slidepdf.com/reader/full/easy-microsoft-office-2010 284/309
271CREATING A NEW CONTACT GROUPYou can collect a set of contacts together and name them as a group to be able to senthem all the same email, set up a meeting, create a task, and more. To create a group, New Contact Group, name the group, and add members from your contacts lists.
C ontinue
Click New Contact Group in the Home tab on the Ribbon.
Name the group.
Click Add Members.
Click From Outlook Contacts.
S tart
Add a Member Manually You can add a member to a Contact Group that is not already in
an Address Book or other Contact List by clicking Add Members and New Email Contact and
filling in the information and then clicking OK.
TIP
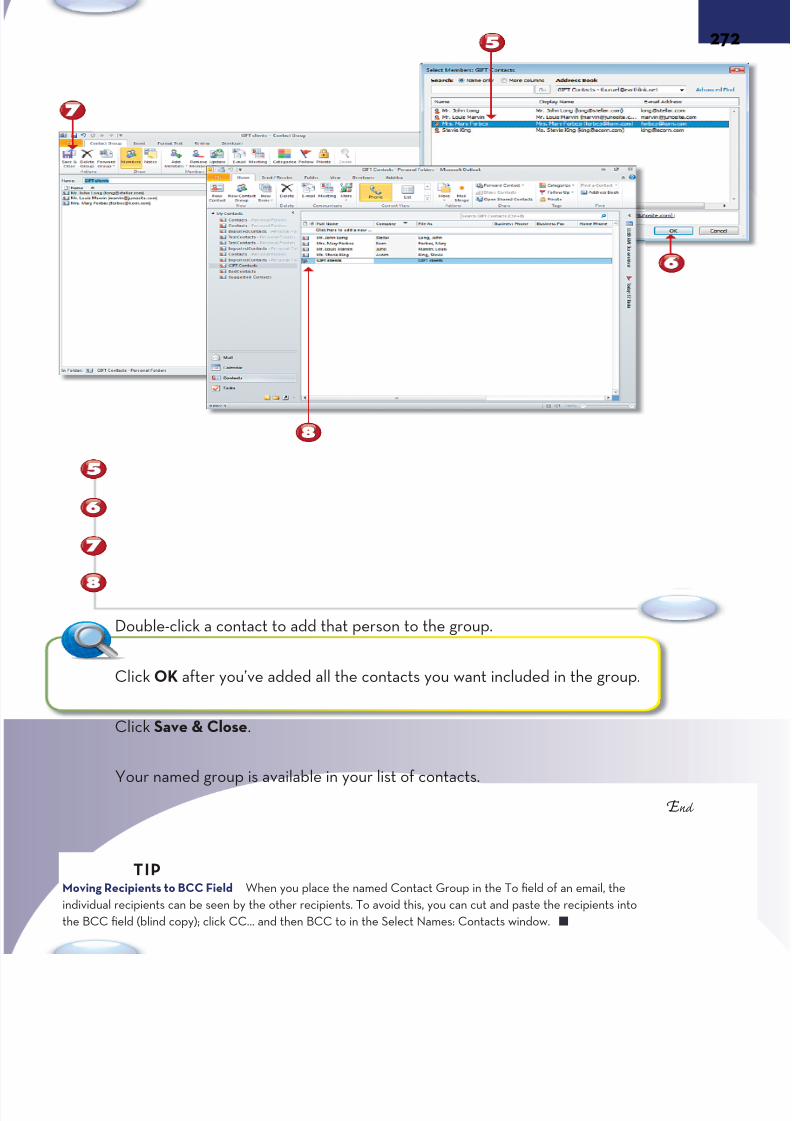
7/22/2019 Easy Microsoft Office 2010
http://slidepdf.com/reader/full/easy-microsoft-office-2010 285/309
S tart
E nd
Double-click a contact to add that person to the group.
Click OK after you’ve added all the contacts you want included in the group.
Click Save & Close.
Your named group is available in your list of contacts.
Moving Recipients to BCC Field When you place the named Contact Group in the To field of an email, the
individual recipients can be seen by the other recipients. To avoid this, you can cut and paste the recipients into
the BCC field (blind copy); click CC… and then BCC to in the Select Names: Contacts window.
TIP
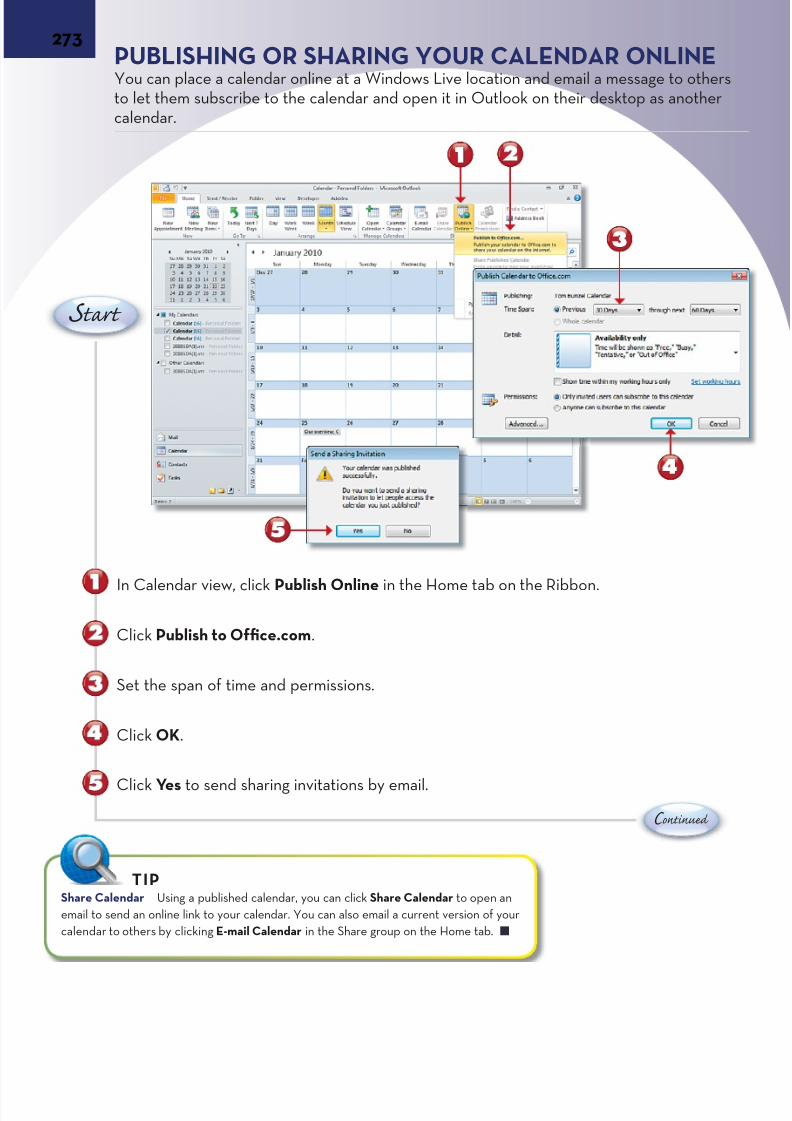
7/22/2019 Easy Microsoft Office 2010
http://slidepdf.com/reader/full/easy-microsoft-office-2010 286/309
273PUBLISHING OR SHARING YOUR CALENDAR ONLINYou can place a calendar online at a Windows Live location and email a message to otto let them subscribe to the calendar and open it in Outlook on their desktop as anotcalendar.
C ontinue
In Calendar view, click Publish Online in the Home tab on the Ribbon.
Click Publish to Office.com.
Set the span of time and permissions.
Click OK.
S tart
Click Yes to send sharing invitations by email.
Share Calendar Using a published calendar, you can click Share Calendar to open an
email to send an online link to your calendar. You can also email a current version of your
calendar to others by clicking E-mail Calendar in the Share group on the Home tab.
TIP
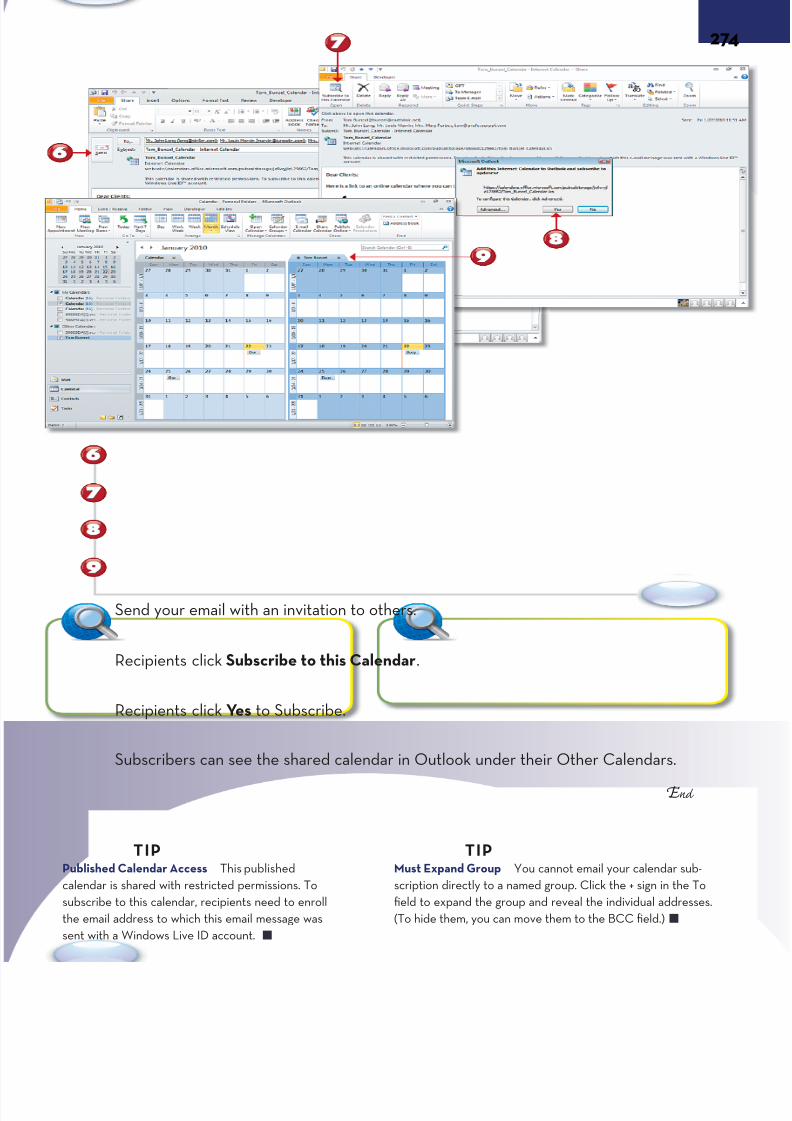
7/22/2019 Easy Microsoft Office 2010
http://slidepdf.com/reader/full/easy-microsoft-office-2010 287/309
S tart
E nd
Send your email with an invitation to others.
Recipients click Subscribe to this Calendar.
Recipients click Yes to Subscribe.
Subscribers can see the shared calendar in Outlook under their Other Calendars.
Published Calendar Access This published
calendar is shared with restricted permissions. To
subscribe to this calendar, recipients need to enroll
the email address to which this email message was
sent with a Windows Live ID account.
TIP
Must Expand Group You cannot email your calendar sub
scription directly to a named group. Click the + sign in the T
field to expand the group and reveal the individual address
(To hide them, you can move them to the BCC field.)
TIP
7/22/2019 Easy Microsoft Office 2010
http://slidepdf.com/reader/full/easy-microsoft-office-2010 288/309
xxxGlossary I IIn nnd dde ee
Aabsolute references (cells), 138
accepting/rejecting changes to documents, 101
adding
animations to slides, 203-204
attachments to email, 249-250
charts to presentations, 191-192
notes
to notebook pages, 229- 230
to slides, 219- 220
pictures to slides, 195-196
RSS feeds to Inbox, 261-262
Sparklines to cells, 153-154
tables to presentations, 189
tags to notebooks, 235-236
themes to email, 259-260
transitions to Slides, 201-202
video to slides, 207-210
web content to notebook pages, 231-232
Advanced Page Setup dialog, Apply To This Point For-
ward option, 29
aligning
images, 83
text
Excel spreadsheets, 113-114
tables, 68
Animation Painter tool, 205-206
animations, adding to slides, 203-204
Apply To This Point Forward option (Advanced Pa
Setup dialog), 29
attachments, adding to email, 249-250
AutoComplete feature, Excel spreadsheets, 131-13
AutoSum function, Excel spreadsheets, 135
Average function, Excel spreadsheets, 136
BBackstage view (PowerPoint), 1, 175
Cancel command, 3
Check for Updates option, 4
closing, 3
Exit command, 3
Info window, 3
new blank documents, creating, 5-6, 15-16
styling text, 6
templates, 5, 15-16

7/22/2019 Easy Microsoft Office 2010
http://slidepdf.com/reader/full/easy-microsoft-office-2010 289/309
New Document window
new documents, creating, 5-6 , 15-16
Recent Templates area, 16
Office templates, 5, 15-16
opening, 3
Options button, 4
printing in, 11
changing orientation, 12
keyboard shortcuts, 11
previewing printouts, 11
Recent button, 4
Recover Unsaved Documents option, 4
videos, creating from presentations, 217-218
blogs, Blog Post template (Backstage view, New Docu-
ment window), 6
borders, modifying in tables, 71-72
Breaks button (Page Setup group), 29
Building Blocks
Building Blocks Organizer, 61-62
moving, 61
Quick Parts, 59
bulleted lists, 23-24
Define New Bullet option, 24
Define Number Formats option, 24
removing, 23
bulleted text (PowerPoint), converting text to Smdiagrams, 92
bullets
adding to slides, 177-178
converting to SmartArt, 197-198
CCalendar (Outlook)
Schedule view, 257-258
sharing online, 273-274
Cancel command (Backstage view), 3
captioning images, 87
cells (tables)
absolute references, 138
AutoSum function, 135Average function, 136
Cell Styles gallery, 125-126
copying, 131
deleting, 69
formatting, 114
7/22/2019 Easy Microsoft Office 2010
http://slidepdf.com/reader/full/easy-microsoft-office-2010 290/309
277 cells (tables)
columns
manually adjusting, 43
More Columns options page (Columns option)
tables
adding, 69 , 119-120
deleting, 69, 120
hiding/showing, 121-122
sizing, 117 -118
splitting, 70
comments, adding to documents, 100
comparing documents, 100
conditional formats, 159
contact groups
creating, 271-272
members, adding, 271
contacts, managing in Outlook, 269-270
Content Controls, deleting, 18, 58
conversations, 253-254
converting
bullets to SmartArt, 197-198
documents to other formats, 10
copying
cells (tables), 131
charts, 150
Clipboard, 41
Copy command, 39
formatting, Format Painter, 45, 55-56
Paste command, 40-41
Set Default Paste option, 42
cover pages, 57-58
cropping images, 86
currencies (Excel spreadsheets), adding to, 116
Insert function, 136
merging, 70
Range Selector, 136
shading, 71
sizing, 67
wrapping text in, 117
centering text, Excel spreadsheets, 118
Change Styles option (Styles group), 47
charts
adding to presentations, 191-192
copying, 150
creating with Ribbon, 143-144
editing in presentations, 193-194
formatting, 147-148
moving, 149-150
pie charts, 146
slices, moving, 149
resizing, 149
type of, changing, 145-146
Chart Tools, 143
Check for Updates option (Backstage view), 4
Clear Formatting button (Fonts group), 20
clip art
adding to documents, 81-82
finding, 81-82
organizing, 82
Clipboard, 41
closing
Backstage view, 3
Navigation pane, 7
collapsing sections, 179
color, changing in SmartArt diagrams, 91

7/22/2019 Easy Microsoft Office 2010
http://slidepdf.com/reader/full/easy-microsoft-office-2010 291/309
documents
customizing
presentation themes, 184
Quick Styles, 51-52
templates
revising templates, 17
saving, 15
themes, 63
Cut command, 39
Ddata recovery, unsaved documents (Backstage view), 4
Data tab, Excel, 111
date/time
adding to documents, 18
Excel spreadsheets, 133-134
Define New Bullet option, 24
Define Number Formats option, 24
deleting
cells from tables, 69
columns
from Excel spreadsheets, 120
from tables, 69
Content Controls, 58
documents, 4
rows
from Excel spreadsheets, 120 from tables, 69
Design tab (Word), Table Styles gallery,65
Dialog Launch icon (Fonts group), 20
disabling OpenType ligatures, 93
Document Browser, navigating documents, 13
Document Map view. See Navigation pane
documents
Backstage view, creating in, 6
blog posts, 6
New Document window, 5 , 15-16
styling text, 6
templates, 5, 15-16
bulleted text, converting PowerPoint bullets to
Art diagrams, 92
comparing, 100
converting to other formats, 10
dates, adding to, 18
editing
accepting/rejecting changes, 101
adding comments to, 100
hiding/showing markup, 102
restricting, 99
reverting to original version, 102
tracking changes, 99-100
equations, inserting, 21
formatting
adding styles to Quick Styles gallery, 49
adjusting margins, 52
applying styles, 47- 48
Building Blocks Organizer, 61-62
bulleted lists, 23- 24
clearing, 20
columns, 43-44
copying formatting, 45, 55-56
cover pages, 57-58
creating styles, 49-50
footnotes/endnotes, 37 -38

7/22/2019 Easy Microsoft Office 2010
http://slidepdf.com/reader/full/easy-microsoft-office-2010 292/309
279 documents
navigating
Document Browser, 13
Find tool, 13
Navigation pane, 7
Word, 13
orientation, changing, 31
renaming, 17
reviewing
accepting/rejecting changes, 101
adding comments, 100
hiding/showing markup, 102
inspecting, 101
reverting to original version, 102
tracking changes, 99-100
saving, 17
different formats, 9-10
templates, 10
searches, Navigation pane, 8
searching/replacing text, 25
selecting text, quick selection keyboard shortc
sizing, 31
special characters, inserting, 22
symbols, inserting, 21-22
templates, 15
text
captioning images, 87
OpenType ligatures, 93
viewing multiple pages, 32
doughnut charts, 146
Draw Table option (Word), 67
Format Painter, 45 , 55-56
headers/footers, 35- 36
Home tab, 19
modifying styles, 51-52
numbered lists, 23- 24
page numbering, 33- 34
quick formatting, 19
Quick Parts gallery, 45, 59-60
Quick Styles gallery, 45-52
removing styles from Quick Styles gallery, 49
themes, 63-64
updating headings, 51, 54
images
aligning, 83
captioning, 87
clip art, 81-82
cropping, 85-86
documents, adding to, 79-80
effects, adding to, 87-88
moving, 83
Picture Layout, 88
Picture Styles gallery, 87
screenshots, 95-96
sizing, 84
SmartArt diagrams, 89-91
styles, adding to, 87-88
wrapping text around, 83
inspecting, 101
margins, adjusting, 29-30
naming, 17
7/22/2019 Easy Microsoft Office 2010
http://slidepdf.com/reader/full/easy-microsoft-office-2010 293/309
Excel
Eediting
documents
accepting/rejecting changes, 101
adding comments to, 100
hiding/showing markup, 102
restricting, 99
reverting to original version, 102
tracking changes, 99-100
formulas (Excel spreadsheets), 137
presentations
charts, 193-194
texts, 175-176
screenshots, 96
Editing group (Home tab), Find feature, 26
attachments, adding, 249-250
conversations, 253-254
filtering in Outlook, 263-264
meetings, scheduling, 255-256
rules, applying, 267-268
searching, 265-266
themes, applying, 259-260
endnotes/footnotes, 37-38
Entrance animations, adding to slides, 203-204
equations, inserting into documents, 21Excel
Add-ins tab (Ribbon), 111
cells, adding Sparklines, 153-154
charts
creating, 143-144
formatting, 147-148
moving, 149-150
type of, changing, 145-146
conditional formats, 159
Data tab (Ribbon), 111
Excel Function Library, 127
AutoSum function, 135
Average function, 136
Insert function, 136
File tab (Ribbon), 111
formulas
editing, 137
formatting results, 139-140
Formula Bar, 137 -138
tracing results, 139-140
Formulas tab (Ribbon), 111-127
function arguments, 136
Home tab (Ribbon), 111
Insert tab (Ribbon), 111
Page Break Preview, 171
Page Layout tab (Ribbon), 111
Pivot Tables, 155-156
fields, selecting, 155
filtering with Slicer, 157 -158
Range Selector, 136
Review tab (Ribbon), 111
slides, adding pictures, 195-196
spreadsheets
adding, 123
7/22/2019 Easy Microsoft Office 2010
http://slidepdf.com/reader/full/easy-microsoft-office-2010 294/309
281 Excel
aligning text, 113-114
AutoComplete feature, 131-132
AutoSum function, 135
Average function, 136
Cell Styles gallery, 125-126
centering text, 118
columns, adding, 119-120
columns, sizing, 117-118
copying cells, 131
currencies in, 116
custom lists, 131
date/time, 133-134
deleting columns, 120
deleting rows, 120
entering data, 117-118
filling series, 131-132
finding data, 129
formatting cells, 125-126
formatting numbers, 115
formatting text, 113-114
hiding/showing worksheets, 122
indenting text, 118
inputting numbers, 115
Insert function, 136
naming, 123
referencing other spreadsheets, 139
replacing data, 130
rows, adding, 119-120
rows, sizing, 117
undoing mistakes, 113
wrapping text in cells, 117
status bar, 135
tables, sorting data, 151-152
View tab (Ribbon), 111
workbooks, referencing other workbooks, 140
worksheets, printing, 171-172
Exit command (Backstage view), 3
exiting Backstage view, 3
expanding sections, 179
FFavorites folder (Windows Live), 103
fields, selecting in Pivot Tables, 155
files, sending to OneNote, 241-242
File tab (Ribbon), 1
filtering
email in Outlook, 263-264
Pivot Tables with Slicer, 157-158
table data, 151
finding
clip art, 81
data in Excel spreadsheets, 129
Find feature (Home tab, Editing group), 26
headings, 53
images
clip art, 81-82
on computer, 79
search parameters, changing, 26
text, 25Find tool, navigating documents, 13
folders, Windows Live
changing folder permissions, 104
creating folders in, 103-105
uploading files to, 106-107
Fonts group, 20

7/22/2019 Easy Microsoft Office 2010
http://slidepdf.com/reader/full/easy-microsoft-office-2010 295/309
graphics
footers/headers
Header & Footer tab (Ribbon, Insert tab), 35-36
removing, 36
footnotes/endnotes, 37-38
formatting
charts, 147-148
conditional formats, 159
documents, 20
adding styles to Quick Styles gallery, 49
adjusting margins, 52
applying styles, 47- 48
Building Blocks Organizer, 61-62
bulleted lists, 23- 24
clearing formatting, 20
columns, 43- 44
copying formatting, 45, 55-56
cover pages, 57-58
creating styles, 49-50
footnotes/endnotes, 37 -38
Format Painter, 45 , 55-56
headers/footers, 35-36
Home tab, 19
modifying styles, 51-52
numbered lists, 23- 24
page numbering, 33- 34
quick formatting, 19
Quick Parts gallery, 45, 59-60
Quick Styles gallery, 45-52
removing styles from Quick Styles gallery, 49
themes, 63-64
updating headings, 53-54
updating styles, 51
Excel spreadsheets
formula results, 139-140
numbers, 115
texts, 113-114
presentations, charts, 193-194
SmartArt diagrams, 90
Sparklines, 154
tables
creating styles, 74
Quick Tables gallery, 75
saving formatting, 73
Table Styles gallery, 73-74
text
bulleted lists, 23- 24
clearing formatting, 20
Home tab, 19
numbered lists, 23-24
quick formatting, 19
formulas (Excel spreadsheets)
editing, 137
formatting results, 139-140
Formula Bar, 137-138
tracing results, 139-140
Formulas tab (Ribbon), Excel, 111, 127
function arguments (Excel spreadsheets), 136
Ggraphics
aligning, 83
captioning, 87
clip art
adding to documents, 81-82

7/22/2019 Easy Microsoft Office 2010
http://slidepdf.com/reader/full/easy-microsoft-office-2010 296/309
283 graphics
finding, 81-82
organizing, 82
cropping, 85-86
effects, adding to, 87-88
file formats, 80
finding on computer, 79
moving, 83
organizing, 80
Picture Layout, 88
Picture Styles gallery, 87
Picture Tools tab (Ribbon), 77
screenshots, 95-96
sizing, 84
SmartArt diagrams, 89-91
styles, adding to, 87-88
Word documents, adding to, 79-80
wrapping text around, 83
HHeader & Footer tab (Ribbon, Insert tab), formatting
page numbering, 33-34
headers/footers
inserting, 35-36
removing, 36
headings
finding, 53
updating, 53-54
hiding
columns in Excel spreadsheets, 121-122
document markup, 102
rows in Excel spreadsheets, 121-122
Home tab (Ribbon)
Add-ins, 111
Copy command, 39
Cut command, 39
Editing group, Find feature, 26
formatting text via, 19
Excel, 111
Paragraph group, 23
Paste command, 40-41
Paste Preview menu, 40-42
Styles group
Change Styles option, 47
Manage Styles option, 47
Style Pane Options option, 48
hosting recorded slide shows, 218
Iimages
aligning, 83
captioning, 87
clip art
adding to documents, 81-82
finding, 81-82
organizing, 82
cropping, 85-86
effects, adding to, 87-88file formats, 80
finding on computer, 79
moving, 83
organizing, 80
Picture Layout, 88
7/22/2019 Easy Microsoft Office 2010
http://slidepdf.com/reader/full/easy-microsoft-office-2010 297/309
letters
Picture Styles gallery, 87
Picture Tools tab (Ribbon), 77
screenshots, 95-96
sizing, 84
SmartArt diagrams, 89-91
styles, adding to, 87-88
Word documents, adding to, 79-80
wrapping text around, 83
Inbox (Outlook)
filtering, 263- 264
searching, 265- 266
RSS feeds, adding, 261-262
indenting text
Excel spreadsheets, 118
tables, 68
Info window (Backstage view), 3
Insert function, Excel spreadsheets, 136
Insert tab (Ribbon), 21
Excel, 111
Header & Footer tab
formatting page numbering, 33- 34
inserting headers/footers, 35-36
inspecting documents, 101
J-K-Lkeyboard shortcuts
copy command, 39
cut command, 39
Paste command, 39
printing, Backstage view, 11
quick selection, 19
undoing actions, 17
layout of slides, changing, 178
letters
columns in, 43-44
copying/pasting in, 39-42
creating, 15-16
date/time, adding, 18
formatting, 19, 20
Building Blocks Organizer, 61-62
bulleted lists in, 23-24
Clear Formatting button (Fonts group), 20
copying, 55-56
cover pages, 57-58
creating styles, 49-50
equations in, 21
footnotes/endnotes, 37 -38
headers/footers, 35- 36
margins, 29- 30, 52
modifying styles, 51-52
numbered lists in, 23- 24
page numbering, 33- 34
page orientation, 31
Quick Formatting, 19
Quick Parts gallery, 45, 59-60
Quick Styles gallery, 45-52
searching/replacing text, 25
sizing, 31
special characters in, 22
symbols in, 21- 22
themes, 63-64
7/22/2019 Easy Microsoft Office 2010
http://slidepdf.com/reader/full/easy-microsoft-office-2010 298/309
285 letters
updating headings, 53-54
updating styles, 51
renaming, 17
saving, 17
viewing multiple pages, 32
ligatures (OpenType), 93
links (Windows Live workspace), sending availability via
links, 106
lists, creating in Excel spreadsheets, 131
locked files, 169
MManage Styles option (Styles group), 47
managing contacts in Outlook, 269-270
manually adjusting
columns, 43
margins, 29
margins, adjusting, 29-30, 52
markup (documents), hiding/showing, 102 meetings, scheduling with email, 255-256
members, adding to contact groups, 271
merging cells in tables, 70
Microsoft web applications. See web applications
modifying Quick Styles, 51-52
More Columns options page (Columns option), 44
movies
adding to slides, 207-208
online video, adding to slides, 209-210
moving
Building Blocks, 61
charts, 149-150
images, 83
Navigation pane, 7
My Documents folder (Windows Live), 103
Nnaming
documents, 17
Excel spreadsheets, 123
navigating
documents
Document Browser, 13
Find tool, 13
Word, 13
footnotes/endnotes, 38
Windows Live workspace, 104
Navigation pane, 1
closing, 7
moving, 7
searching documents via, 8
searching/replacing text, 25
sizing, 7
networks (Window Live), adding people to, 103
New Document window (Backstage view)
new documents, creating
styling text, 6
templates, 5, 15-16Recent Templates area,16
newsletters, columns in, 43-44
notebooks
notes, adding to pages, 229-230
saving, 243-244
7/22/2019 Easy Microsoft Office 2010
http://slidepdf.com/reader/full/easy-microsoft-office-2010 299/309
Outlook
tasks, sending to Outlook, 239-240
online files, opening locally, 169-170
online video, adding to slides, 209-210
opening
Backstage view, 3
online files locally, 169-170
uploaded projects, 163-164
web application files, 110
OpenType ligatures, 93
Options button (Backstage view), 4
organizing images, 80-82
orientation (documents), changing, 12, 31
Outlook
Calendar, sharing online, 273-274
contact groups
creating, 271- 272
members, adding, 271
contacts, managing, 269-270
attachments, adding, 249- 250
conversations, 253- 254
filtering, 263-264
Inbox
RSS feeds, 261- 262
searching, 265- 266
meetings, scheduling, 255-256
Quick Steps, 251-252
rules, applying to email, 267-268
Schedule view, 257-258
tasks, receiving from OneNote, 239-240
themes, adding to email, 259-260
searches, performing, 233-234
sections, 227
sharing, 245-246
starting in OneNote, 227-228
web content, adding to pages, 231-232
notes. See also OneNote
adding to notebook pages, 229-230
footnotes/endnotes, 37-38
Side Notes, 237-238
Notes Master view (PowerPoint), 219-220
numbered lists, 23-24
numbering document pages, 33-34
numbers (Excel spreadsheets), formatting, 115
numeric keypads, entering numbers into Excel spread-
sheets, 116
OOffice 2010, new features of, 1-2
Office.com templates, 15OneNote
files, sending to, 241-242
notebooks
notes, adding to pages, 229- 230
saving, 243- 244
sections, 227
sharing, 245- 246
starting, 227- 228
web content, adding to pages, 231- 232
searches, performing, 233-234
Side Notes, 237-238
tags, adding, 235-236
7/22/2019 Easy Microsoft Office 2010
http://slidepdf.com/reader/full/easy-microsoft-office-2010 300/309
287 Page Break Preview view (Excel)
sizing, 84
slides, adding to, 195-196
SmartArt diagrams, 89-91
styles, adding to, 87-88
Word documents, adding to, 79-80
wrapping text around, 83
pie charts, 146, 149
Pivot Tables, 155-156
fields, selecting, 155
filtering with Slicer, 157-158
podcasts, 262
posts (blogs), Blog Post template, 6
PowerPoint, 173
Animation Painter tool, 205-206
Backstage view, 175
bulleted text, converting to SmartArt diagrams
Notes Master view, 219-220
presentations
bullets, adding to slides, 177-178
charts, adding, 191-192
charts, editing, 193-194
recording, 215-216
sections, adding, 179-180
tables, adding, 189
text, adding, 175-176
themes, adding, 183-184
Presenter view, 221-222
Slide Masters, 185-186
slides
animations, adding, 203- 204
bullets, converting to SmartArt, 197-198
previewing in Reading view, 213-214
transitions, adding, 201- 202
PPage Break Preview view (Excel), 171
Page Layout tab (Ribbon)
Columns option, 43
Excel, 111
margins, adjusting, 29-30
orientation, changing, 31
sizing documents, 31
page numbering documents, 33-34
Page Setup group, Breaks button, 29
Page Setup tab (Ribbon), orientation, changing, 31
Paragraph group (Home tab), 23
paragraphs, indenting in tables, 68
Paste Preview menu (Ribbon, Home tab), 40-42
permissions, changing inWindows Live folders, 104, 107
pictures
aligning, 83
captioning, 87
clip art
adding to documents, 81-82
finding, 81, 82
organizing, 82
cropping, 85-86
effects, adding to, 87-88
file formats, 80
finding on computer, 79moving, 83
organizing, 80
Picture Layout, 88
Picture Styles gallery, 87
Picture Tools Tab (Ribbon), 77
screenshots, 95-96
7/22/2019 Easy Microsoft Office 2010
http://slidepdf.com/reader/full/easy-microsoft-office-2010 301/309
Recent Templates area
video, adding, 207 -210
Slide Sorter view, 181-182
SmartArt Tools, 188
videos, creating from presentations, 217-218
web application, 223-224
presentations
charts
adding, 191-192
editing, 193-194
hosting on websites, 218
recording, 215-216
sections, adding, 179-180
Slide Masters, 185-186
slides
bullets, adding, 177-178
notes, adding, 219- 220
pictures, adding, 195-196
previewing in Reading view, 214
video, adding, 207 -210
Slide Sorter view, 181-182
tables, adding, 189
text, adding, 175-176
themes, adding, 183-184
videos, creating from, 217-218
Presenter view (PowerPoint), 221-222
previewing
printing in Backstage view, 11
slides in Reading view, 214
styles in Styles pane, 54
printing
Backstage view, 11
changing orientation, 12
keyboard shortcuts, 11
previewing printouts, 11
Excel worksheets, 171-172
slides, notes, 219-220
projects, opening, 163-164
Public folder (Windows Live), 103
publishing
blog posts, 6
Outlook Calendar online, 273-274
QQuick Access Toolbar, 56
quick formatting text, 19
Quick Parts gallery, 45
new entries, creating, 59-60
saving Quick Parts, 60
quick selection keyboard shortcut, 19
Quick Steps (Outlook), 251-252
Quick Styles gallery, 45
adding styles to, 49
applying styles from, 47-48
creating styles in, 49-50
modifying styles in, 51-52
removing styles from, 49
updating styles in, 51
RRange Selector (Excel spreadsheets), 136
Reading view, previewing slides, 214
Recent button (Backstage view), 4
Recent Folders view (Windows Live), 103
Recent Templates area, 16, 30

7/22/2019 Easy Microsoft Office 2010
http://slidepdf.com/reader/full/easy-microsoft-office-2010 302/309
289 recording presentations
recording presentations, 215-216
Record Slide Show feature (PowerPoint), 215
Recover Unsaved Documents option (Backstage view), 4
redirecting spam, 267-268
References tab (Ribbon), footnotes/endnotes, 37-38
rejecting/accepting changes to documents, 101
removing
bulleted lists, 23
cells from tables, 69
columns from tables, 69
Content Controls (templates), 18
formatting from text, 20
headers/footers, 36
numbered lists, 23
page numbers, 34
rows from tables, 69
styles from Quick Styles gallery, 49
renaming
documents, 17
Excel spreadsheets, 123
resetting themes, 64
resizing
charts, 149
images, 84
restoring themes, 64
reviewing documents, 99-100
accepting/rejecting changes, 101
hiding/showing markup, 102
inspecting, 101
reverting to original version, 102
Review tab (Ribbon), 97, 111
revising templates, 17
revising data in web applications, 165-166
Ribbon
Add-ins tab, 111
charts
changing type of, 145-146
copying, 150
creating, 143-144
formatting, 147-148
moving, 149-150
pie charts, 146
resizing, 149
Data tab, 111
File tab, 1, 111
Formulas tab, 111, 127
Home tab
Copy command, 39
Cut command, 39
Excel, 111
Paste command, 40-41
Paste Preview menu, 40- 42
Styles group, Change Styles option, 47
Styles group, Manage Styles option, 47
Styles group, Style Pane Options option, 4
Insert tab, 21
Excel, 111
Header & Footer tab, 33-36
page numbering, 33
Page Layout tab
adjusting margins, 29- 30
changing orientation, 31
Columns option, 43
Excel, 111
sizing documents, 31
Page Setup tab, changing orientation, 31
7/22/2019 Easy Microsoft Office 2010
http://slidepdf.com/reader/full/easy-microsoft-office-2010 303/309
sizing
Find feature (Home tab, Editing group), 26
headings, 53
images
clip art, 81-82
on computer, 79
Navigation pane, 8
parameters, changing, 26
performing in OneNote, 233-234
sections
adding to presentations, 179-180
in notebooks, 227
OneNote, saving, 243-244
selecting, quick selection keyboard shortcut, 19
sending files to OneNote, 241-242
Set Default Paste option, 42
shading, adding to cells, 71
Shape Effects option (SmartArt tools), 89
Shared Favorites folder (Windows Live), 103
sharing
notebooks, 245-246
Outlook Calendar online, 273-274
shortcuts (keyboard)
copy command, 39
cut command, 39
Paste command, 39
printing, Backstage view, 11
quick selection, 19
undoing actions, 17
Side Notes, 237-238
sizing
cells, 67
columns (tables), 117-118
documents, 31
Picture Tools tab, 77
References tab, footnotes/endnotes, 37-38
Review tab, 97, 111
Table Tools tabs, 65
View tab, 27, 111
routing spam with rules, 267-268
rows (tables)
adding, 69, 119-120
deleting, 69, 120
hiding/showing, 121-122
sizing, 117
splitting, 70
RSS feeds, adding to Outlook Inbox, 261-262
rules, applying to email, 267-268
Ssaving
cover pages, 57
documents, 17
different formats, 9-10
templates, 10
notebooks, 243-244
Quick Parts, 60
templates, custom templates, 15
themes, 63
web application files in Windows Live, 109Schedule view (Outlook), 257-258
scheduling meetings with email, 255-256
screenshots, 95-96
searches
clip art, 81
data in Excel spreadsheets, 129

7/22/2019 Easy Microsoft Office 2010
http://slidepdf.com/reader/full/easy-microsoft-office-2010 304/309
291 sizing
formatting, 154
for web applications, 166
special characters, inserting into documents, 22
splitting columns/rows in tables, 70
spreadsheets (Excel)
adding, 123
AutoComplete feature, 131-132
AutoSum function, 135
Average function, 136
cells
Cell Styles gallery, 125-126
copying, 131
columns
adding, 119-120
deleting, 120
hiding/showing, 121-122
sizing, 117 -118
currencies in, 116
custom lists, creating, 131
data, entering, 117-118
date/time, 133-134
Excel Function Library, 127, 135
AutoSum function, 135
Average function, 136
Insert function, 136
filling series, 131-132
finding data, 129
formatting cells, 125-126
formulas
editing, 137
formatting results, 139-140
Formula Bar, 137 -138
tracing results, 139-140
images, 84
Navigation pane, 7
rows (tables), 117
Slicer (PivotTables), filtering, 157-158
Slide Masters (PowerPoint), 185-186
slides
animations, adding, 203-204
bullets, adding, 177-178
layout, changing, 178
notes, adding, 219-220
pictures, adding, 195-196
previewing in Reading view, 213-214
SmartArt, 197-198
themes, adding, 183-184
transitions, adding, 201-202
video
adding, 207- 208
online video, adding to slides, 209- 210
Slide Sorter view (PowerPoint), 181-182
SmartArt, 89, 188, 197-198
formatting
color, 91
shapes, 90
text, 90
PowerPoint bullets as, 92
text, adding, 198
sorting
contents of Windows Live folders, 108
table data, 151-152
tables, 76, 167-168
spam, redirecting, 267-268
Sparklines
adding to cells, 153-154

7/22/2019 Easy Microsoft Office 2010
http://slidepdf.com/reader/full/easy-microsoft-office-2010 305/309
tables
supported video formats (PowerPoint), 208
symbols, inserting into documents, 21-22
Ttables
adding to presentations, 189
adding to web applications, 167-168
borders, modifying, 71-72
cells
absolute references, 138
adding shading to, 71
AutoSum function, 135
Average function, 136
Cell Styles gallery, 125-126
copying, 131
deleting, 69
formatting, 114
Insert function, 136
merging, 70
Range Selector, 136
sizing, 67
columns
adding, 69, 119-120
deleting, 69 , 120
hiding/showing, 121-122
sizing, 117 -118 splitting, 70
creating, 67
data
filtering, 151
sorting, 151-152
Draw Table option, 67
function arguments, 136
hiding/showing, 122
Insert function, 136
naming, 123
numbers
formatting, 115
inputting, 115
Range Selector, 136
referencing other spreadsheets, 139
replacing data, 130
rows
adding, 119-120 deleting, 120
hiding/showing, 121-122
sizing, 117
status bar, 135
text
aligning, 113-114
centering, 118
formatting, 113-114
indenting, 118
wrapping in cells, 117
undoing mistakes, 113
status bar (Excel), 135
Style Pane Options option (Styles group), 48
Styles group (Ribbon, Home tab)
Change Styles option, 47
Manage Styles option, 47
Style Pane Options option, 48
Styles pane
finding headings, 53
previewing styles in, 54
styling text, New Document window (Backstage view), 6
7/22/2019 Easy Microsoft Office 2010
http://slidepdf.com/reader/full/easy-microsoft-office-2010 306/309
293 tables
text
adding
to presentations, 175-176
to SmartArt, 198
bulleted text, converting PowerPoint text to Smdiagrams, 92
equations, inserting into documents, 21
Excel spreadsheets
aligning, 113-114
centering text, 118
formatting, 113-114
indenting text, 118
formatting, 20
bulleted lists, 23- 24
clearing formatting, 20
Home tab, 19
numbered lists, 23- 24
quick formatting, 19
images, captioning, 87
OpenType ligatures,93
searching/replacing, 25
selecting, quick selection keyboard shortcut, 19
SmartArt diagrams, formatting, 90
special characters, inserting into documents, 2
styling, New Document window (Backstage vie
symbols, inserting into documents, 21-22
tables, aligning text in, 68
wrapping
around images, 83
within cells (Excel spreadsheets), 117
themes
adding
to email, 259- 260
formatting
creating styles, 74
Quick Tables gallery, 75
saving, 73
Table Styles gallery, 73-74
Pivot Tables, 155, 156
fields, selecting, 155
filtering with Slicer, 157 -158
rows
adding, 69 , 119-120
deleting, 69, 120
hiding/showing, 121-122
sizing, 117
splitting, 70
sorting, 76
Table Styles gallery (Word, Design tab), 65
Table Tools tabs (Ribbon), 65
text, aligning, 68
tags, adding to notebooks, 235-236
tasks, sending to Outlook, 239-240
Team Email lists, creating, 251-252
templates
Backstage view Office templates, 15-16
Blog Post template (Backstage view, New Document
window), 6
Content Controls, removing, 18
customizing, 17
Office.com templates, 15
Recent Templates area, 16, 30
revising, 17
saving
custom templates, 15
documents as, 10

7/22/2019 Easy Microsoft Office 2010
http://slidepdf.com/reader/full/easy-microsoft-office-2010 307/309
Windows Live
viewing
contents of Windows Live folders, 108
documents, multiple pages, 32
View tab (Ribbon), 27, 111
voting buttons, adding to email, 259
W-Zweb applications, 161-163
data, revising, 165-166
files
locked, 169
online files, opening locally, 169-170
opening, 110
Windows Live, 109
PowerPoint, 223-224
projects, opening, 163-164
Sparklines, 166
tables, adding, 167-168
web content, adding to notebook pages, 231-232
websites, hosting presentations, 218
Windows Live
folders
changing permissions, 104
creating, 103-105
Favorites folder, 103
My Documents folder, 103Public folder, 103
Recent Folders view, 103
Shared Favorites folder, 103
sorting contents, 108
uploading files to, 106-107
viewing contents of, 108
to presentations, 183-184
applying between programs, 64
changing, 63
customizing, 63, 184
resetting, 64
restoring, 64
saving, 63
time/date
adding to documents, 18
Excel spreadsheets, 133-134
tracking changes to documents, 99-100
transitions, adding to slides, 201-202triggering animations in PowerPoint, 206
typography, OpenType ligatures, 93
UUndo command, 17, 113
unsaved documents, recovering in Backstage view, 4
updating
headings, 53-54
Quick Styles, 51
uploaded projects, opening, 163-164
uploading files to Windows Live folders, 106-107
Vvideos
adding to slides, 207-208
creating from presentations, 217-218
online video, adding to slides, 209-210
supported formats (PowerPoint), 208
7/22/2019 Easy Microsoft Office 2010
http://slidepdf.com/reader/full/easy-microsoft-office-2010 308/309
295 Windows Live
inspecting, 101
margins, 29- 30, 52
navigating, 13
numbered lists in, 23- 24
OpenType ligatures, 93
page numbering, 33- 34
page orientation, 31
Picture Styles gallery, 87
Quick Parts gallery, 45, 59-60
Quick Styles gallery, 45-52
renaming, 17
reviewing, 99-102
saving, 17
screenshots, 95-96
searching/replacing text, 25
sizing, 31
SmartArt diagrams, 89-91
special characters in, 22
styles, adding to images, 87-88
styles, creating, 49-50
styles, modifying, 51-52
symbols in, 21- 22
themes, 63-64
tracking changes, 99-100
viewing multiple pages, 32
wrapping text around images, 83
images
adding to documents, 79-80
captioning, 87
clip art, 81-82
cropping, 85-86
effects, adding to, 87-88
finding on computer, 79
networks, adding, 103
web application files
creating, 109
opening, 110
saving, 109
workspace, 97
navigating, 104
sending availability notification links, 106
Word
Design tab, Table Styles gallery, 65
documents
accepting/rejecting changes, 101
Building Blocks Organizer, 61-62
bulleted lists in, 23- 24
captioning images, 87
clip art, 81-82
columns in, 43-44
comments, adding to, 100
comparing, 100
copying/pasting in, 39- 42
cover pages, 57-58
creating, 15-16
date/time, adding to, 18
effects, adding to images, 87-88
equations, 21
footnotes/endnotes, 37 -38
formatting, 19- 20
headers/footers, 35- 36
hiding/showing markup, 102
images, adding to, 79-80
images, aligning, 83
images, cropping, 85-86
images, moving, 83

7/22/2019 Easy Microsoft Office 2010
http://slidepdf.com/reader/full/easy-microsoft-office-2010 309/309
wrapping text


