1 Easy Ways to get SAS® Enterprise Guide to Send Tables and Graphs to Microsoft Office Suite, Without Writing Code! William E Benjamin Jr, Owl Computer Consultancy, LLC, Phoenix, AZ Abstract: This paper will demonstrate several ways to output tables, graphs, databases, and files that are in formats that Microsoft products are able to process. All of these methods require no programming, and just use little known or hidden techniques that are available directly from the SAS® Enterprise Guide user interface. The focus will be directly on how a new user to SAS® Enterprise Guide can prepare and deliver data to the Microsoft Office (MS Office) suite of tools. Introduction: At first glance, SAS® Enterprise Guide is – ALL BUSINESS – ALL SAS --, but dig a little deeper, peel back a layer or two, and you will find several portals into the Microsoft world of data processing. From the simple import/export commands hiding in plain sight on the “FILE” button on the command line to the hidden “Excel” and “Word” icons tucked away in the “customized” menu options. Plus the other methods that require real programming on the part of the user. This paper will focus upon the non-programming ways SAS® Enterprise Guide can prepare data for use by Microsoft Office products. This author uses SAS® Learning Edition Version 4.1 which is advertised by SAS as a tool to study for certification exams. SAS® Learning Edition Version 4.1 uses a nearly complete version of SAS® Enterprise Guide. The SAS ® Enterprise Guide Explorer is missing, the software is limited to 1500 input observations, and the EULA limits the use to non-commercial uses. But this software is a powerful teaching tool. Getting Started: After starting a new SAS® Enterprise Guide project, the first way a programmer usually finds to move data is to look at the “FILE” button on the main command bar that is usually at the top of the screen. I say usually because ALL of the windows and toolbars in SAS® Enterprise Guide can be moved or changed. So take care, a stray left click and mouse movement may produce unexpected results. Go ahead and try it sometime, because there is a way to recover, but that is a topic for later. The “FILE” button has an “EXPORT” sub-menu that expands to three items, but until there is a data file defined the options are inaccessible.
Transcript
1
Easy Ways to get SAS® Enterprise Guide to Send Tables and
Graphs to Microsoft Office Suite, Without Writing Code! William E Benjamin Jr, Owl Computer Consultancy, LLC, Phoenix, AZ
Abstract:
This paper will demonstrate several ways to output tables, graphs, databases, and files that are in
formats that Microsoft products are able to process. All of these methods require no programming, and
just use little known or hidden techniques that are available directly from the SAS® Enterprise Guide user
interface. The focus will be directly on how a new user to SAS® Enterprise Guide can prepare and deliver
data to the Microsoft Office (MS Office) suite of tools.
Introduction:
At first glance, SAS® Enterprise Guide is – ALL BUSINESS – ALL SAS --, but dig a little deeper, peel
back a layer or two, and you will find several portals into the Microsoft world of data processing. From the
simple import/export commands hiding in plain sight on the “FILE” button on the command line to the
hidden “Excel” and “Word” icons tucked away in the “customized” menu options. Plus the other methods
that require real programming on the part of the user. This paper will focus upon the non-programming
ways SAS® Enterprise Guide can prepare data for use by Microsoft Office products. This author uses
SAS® Learning Edition Version 4.1 which is advertised by SAS as a tool to study for certification exams.
SAS® Learning Edition Version 4.1 uses a nearly complete version of SAS® Enterprise Guide. The SAS
® Enterprise Guide Explorer is missing, the software is limited to 1500 input observations, and the EULA
limits the use to non-commercial uses. But this software is a powerful teaching tool.
Getting Started:
After starting a new SAS® Enterprise Guide project, the first way a programmer usually finds to move
data is to look at the “FILE” button on the main command bar that is usually at the top of the screen. I say
usually because ALL of the windows and toolbars in SAS® Enterprise Guide can be moved or changed.
So take care, a stray left click and mouse movement may produce unexpected results. Go ahead and try
it sometime, because there is a way to recover, but that is a topic for later. The “FILE” button has an
“EXPORT” sub-menu that expands to three items, but until there is a data file defined the options are
inaccessible.
2
This paper will use the SAS “SHOES” dataset from the SASHELP library, the file can be located by
choosing “FILE”>”OPEN”>”DATA” and a screen similar to the “Open Data Form” on the left will appear.
1 - Next select the SAS Servers icon, and
2 - Then double click on the local server icon.
3 – Select the Libraries icon.
5 – This screen shows the actual data from the
SASHELP.SHOES dataset.
4 - And finally access to the SASHELP files is
available
Now on to the meat of the
Paper:
3
The next question to answer is how many ways can we use SAS® Enterprise Guide to output data to a
MS Office tool. As was noted above, the first place to look is the “FILE” option on the main tool bar menu.
Now when the “FILE”>”EXPORT” buttons are selected the dialogue box offers to “Export Shoes” (the
currently visible dataset in the workspace) and when selected displays the following:
Which leads to the commonly seen interface shown below:
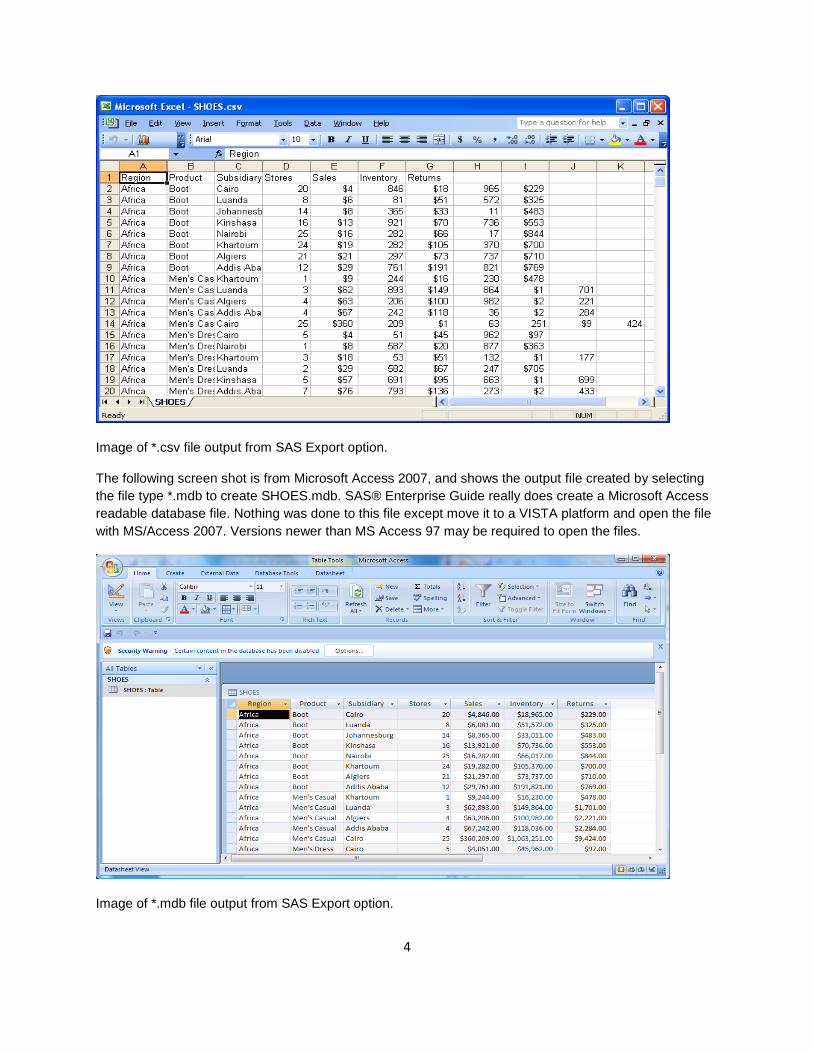
This screen shows as many as 8 different ways (*.xls, *.mdb, *.csv, *.tab, 2 forms of *.txt, *.htm, and
*.html formats) to produce files usable by MS Office tools. So depending upon how much work you are
willing to do after leaving SAS, these options may be enough to meet your needs. However, as shown
below(using *.csv format), some output file formats may need more work than others… depending upon
the source SAS data file. Below note that columns H, I, J, and K seem to have extra data values. These
come from the commas displayed in the formatted data values being propagated into the “CSV” file.
4
Image of *.csv file output from SAS Export option.
The following screen shot is from Microsoft Access 2007, and shows the output file created by selecting
the file type *.mdb to create SHOES.mdb. SAS® Enterprise Guide really does create a Microsoft Access
readable database file. Nothing was done to this file except move it to a VISTA platform and open the file
with MS/Access 2007. Versions newer than MS Access 97 may be required to open the files.
Image of *.mdb file output from SAS Export option.
5
Another option that is often used is moving data to text files. The Export option allows three different
formats of text file, (1) Raw data, (2) tab delimited, and (3) space delimited. Each of these produce slightly
different output files. Let’s take a look at each of them. These have uses in Microsoft files because the
tools will read the files, but these files can also go beyond the Windows world onto Mainframe and Unix
computer systems. So, let’s take a closer look. First the raw test file.
Image of *.txt file output from “Text Files (*.txt)” SAS Export option.
Note that the fields are output without any spacing between the fields. Alphabetic fields are in double
quotes, special characters and spaces are preserved in the quoted fields and the fields seem to be
separated by commas. Dollar signs also precede the numeric dollar fields. This is interesting because
SAS knows about character fields and numeric fields. As a programmer, if you have ever used a data
step and put commands to write a file of raw text data you needed to remember to use the dollarw.d
format to get the dollar signs to print. Also, the dollarw.d. format output a number with commas embedded
in the number. Look at the screen shot on this page. From this image can you tell how many fields should
be read using this file as an input file? Can you even tell if all of the fields have the same number of
columns? A close examination will reveal that this is the same format as *.csv, at least this author has
never seen a difference between *.csv and this method of creating text file in the *.txt format. But, a
double click on a *.csv file will open an Excel spreadsheet, as noted above.
Well let’s look at another text format, the “Text (Tab delimited) *.tab file format….
6
Image of *.txt file output from “Text Files (*.txt)” SAS Export option.
The data fields in this image show the data lined up on the tab boundaries, the character fields are
enclosed in double quotes and the numeric fields are now separated. The user can also determine how
many fields are in each record. This works well, but still requires a lot of effort on your part.
The final text format is the comma delimited format shown below.
Image of *.txt file output from “Text Files (*.txt)” SAS Export option.
7
This space delimited format is ok too, but you still need a way to recognize the spaces in the quoted
fields.
Here is a simple sample of the look of Microsoft Internet Explorer using the same data:
Image of *.htm file output from SAS Export option.
Since Simple does not always work best, let us dig a little deeper. The
“VIEW”>”TOOLBARS”>”CUSTOMIZE” option produces a screen similar to the following:
8
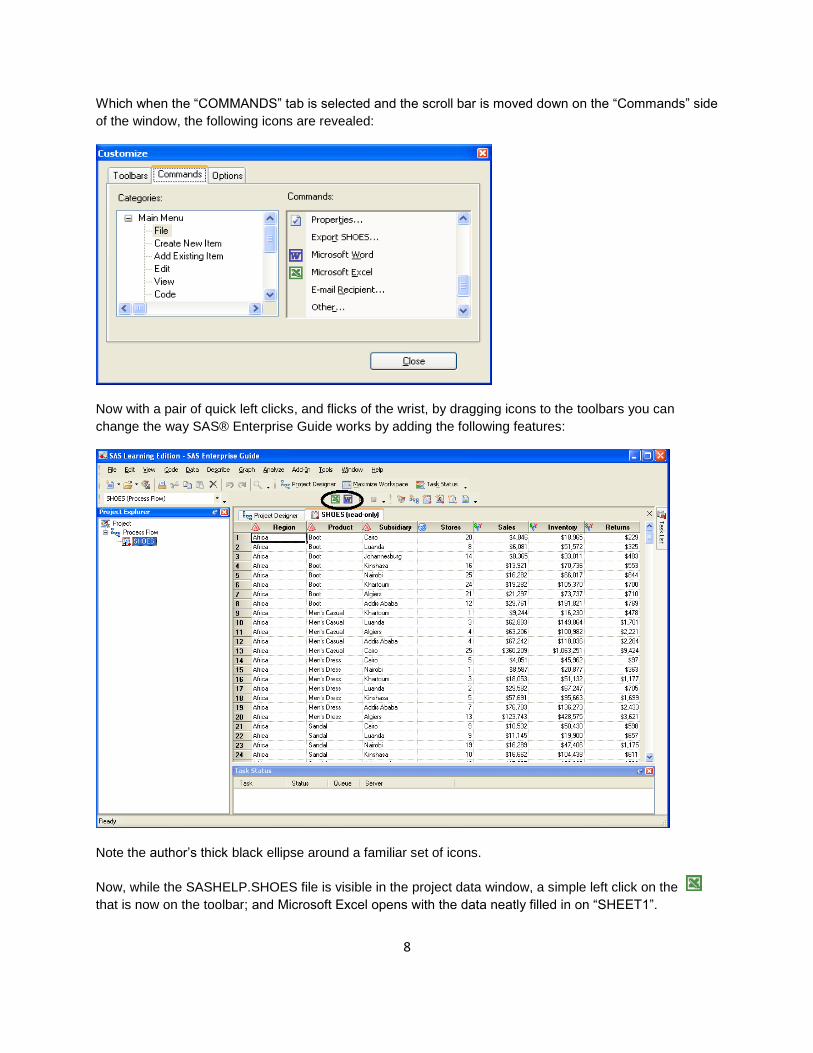
Which when the “COMMANDS” tab is selected and the scroll bar is moved down on the “Commands” side
of the window, the following icons are revealed:
Now with a pair of quick left clicks, and flicks of the wrist, by dragging icons to the toolbars you can
change the way SAS® Enterprise Guide works by adding the following features:
Note the author’s thick black ellipse around a familiar set of icons.
Now, while the SASHELP.SHOES file is visible in the project data window, a simple left click on the
that is now on the toolbar; and Microsoft Excel opens with the data neatly filled in on “SHEET1”.
9
Image of *.xls file created from pushing the button on the modified SAS toolbar.
While it is not quite as well formatted, the same thing happens when the icon is activated by a left
click.
10
Image of *.doc file created from pushing the button on the modified SAS toolbar.
Then when you want to hide these tools from the next user, just click on The “VIEW”> ”TOOLBARS”>
”CUSTOMIZE” option and choose the “OPTIONS” tab to reveal the following:
But does it do graphs?
One of the biggest advancements of SAS® Enterprise Guide (in this author’s opinion) the ability to help
visualize data. Nearly everyone has heard the phrase “A picture is worth a thousand words”. Well graphs
really… really… look like pictures. The largely unused SAS “Graph-N-Go” product from SAS Version 8
and 9 is a great little tool. But I always found it a little hard to use, because the user was given a blank
screen and drag-and-drop tools to build a graph, with limited instructions. This at least freed the
programmer from the coding. However, there was little help to guide the user. SAS® Enterprise Guide
provides “Wizards” to help the uninformed stumble through the process. Let us see what it takes to make
a pie chart. So, start with “GRAPH”>”WIZZARDS”>”PIE CHART” to display something like the following:
11
Click next to continue.
Step two – Pick the slice and size variables (Region and Sales):
Step Three – Choose 2D/3D and where to place the labels:
Finally – Add titles and footnotes.
12
When you are all done with the “Wizard” there appears a well formed pie chart with titles and labels. This
is something you could use in a report or word document… if only you could get it there.
Image of Pie Chart created by SAS® Enterprise Guide Graph Wizard.
Well – Remember the button? -- Push it…
13
Image of Pie Chart created by SAS® Enterprise Guide Graph Wizard after being exported to Microsoft
Word.
14
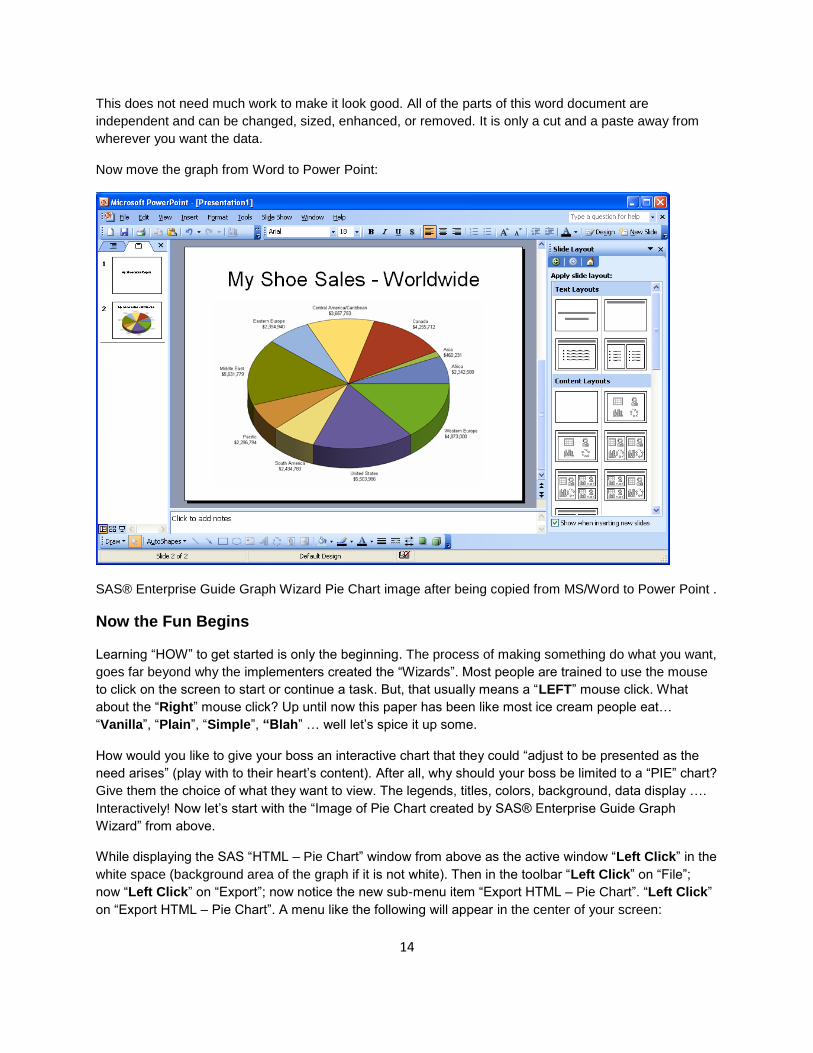
This does not need much work to make it look good. All of the parts of this word document are
independent and can be changed, sized, enhanced, or removed. It is only a cut and a paste away from
wherever you want the data.
Now move the graph from Word to Power Point:
SAS® Enterprise Guide Graph Wizard Pie Chart image after being copied from MS/Word to Power Point .
Now the Fun Begins
Learning “HOW” to get started is only the beginning. The process of making something do what you want,
goes far beyond why the implementers created the “Wizards”. Most people are trained to use the mouse
to click on the screen to start or continue a task. But, that usually means a “LEFT” mouse click. What
about the “Right” mouse click? Up until now this paper has been like most ice cream people eat…
“Vanilla”, “Plain”, “Simple”, “Blah” … well let’s spice it up some.
How would you like to give your boss an interactive chart that they could “adjust to be presented as the
need arises” (play with to their heart’s content). After all, why should your boss be limited to a “PIE” chart?
Give them the choice of what they want to view. The legends, titles, colors, background, data display ….
Interactively! Now let’s start with the “Image of Pie Chart created by SAS® Enterprise Guide Graph
Wizard” from above.
While displaying the SAS “HTML – Pie Chart” window from above as the active window “Left Click” in the
white space (background area of the graph if it is not white). Then in the toolbar “Left Click” on “File”;
now “Left Click” on “Export”; now notice the new sub-menu item “Export HTML – Pie Chart”. “Left Click”
on “Export HTML – Pie Chart”. A menu like the following will appear in the center of your screen:
15
SAS® Enterprise Guide Graph Wizard Pie Chart image with export menu visible.
With the Export menu visible save the new file wherever you choose, and then open the file by double
clicking on it. The first time this author opened a file created this way, the Internet Explorer loaded the
SAS®/Graph Activex Control application onto the computer (admin privileges needed, this takes a few
minutes and you need to follow on-screen instructions, your boss will need this too to view the output
graphs). The OS was Windows Vista Ultimate – 64 bit. The “Export” process creates a file with the
extension of *.HTML and a directory with a file name that contains a *.css (Cascading Style Sheet output
file). Find and double click on the file just created by the export process, you will see something like the
following graph, in Windows Internet Explorer.
16
Image of graph viewed in Windows Internet explorer.
“Right Click” on the graph, and a menu will appear, it should have several options like:
Pie Properties
Graph Properties
Graph toolbar
Chart Type With a sub-menu of chart types like Horizontal bars, vertical bars, Pie Plot, and Area
Data options
Style editor
Titles With a sub-menu of Title and Footnote
Save as
Copy
Print
View 2D Chart, Chart tips, Legend, and Reset view
17
Let’s first turn on the Graph toolbar, it is shown below:
Image of graph toolbar as viewed in Windows Internet explorer, it is also available in SAS® Enterprise
Guide.
The buttons (from the left) are Select, Rotate, Move, Zoom, Subset Data, Position light, and Reset view.
Now it is time for me (the author) to play, and you (the student) to guess what I did. Let’s adjust the graph
type, size, legend, titles, and view using Windows Internet Explorer and the free SAS®/Graph Activex
Control application. But, make sure to save both the *HTML file and the *.css style sheet directory.
Ready, Set, Go….
18
Image of graph after it was adjusted in multiple steps using “right Clicks” and menus found in BOTH
Windows Internet Explorer and SAS® Enterprise Guide.
Conclusion
This graph is nearly “Production Ready” without writing a line of code, or writing a call to ODS directly.
Furthermore, it is interactive, and in a set of files ready to be used by Internet Explorer (or possibly other
web browsers). The note on the bottom about showing sales amounts is active, making the graph
interactive. The image can still be changed by interacting with the browser, but moving the output to a
PDF can probably freeze that from happening. This is a simple graph, and no time was spent trying to
add drill down fields to the graph. This could be left as a student exercise.
Admittedly, nearly anyone could do this, there are no programming tricks and no code written to produce
these results. These are simple examples, but the hardest part about programming is getting started, and
learning where to find the tools needed to do the job. If this paper has shown you one thing you did not
19
know about SAS® Enterprise Guide, then it was worth your time to read it and my time to write it. None of
the screen shots in this document (except for the Power Point image) have been edited, they are exactly
the way SAS Enterprise Guide produced them. Since SAS® Enterprise Guide does not write directly to
MS Power Point the title was added, but the graph was only a cut, and a paste, away from MS Word. The
Internet Explorer screen shots were not modified, and the files were created with the simple export
command directly from the file menu (when the graph was the active window).
Contact information: Author: William E Benjamin Jr
SAS and all other SAS Institute Inc. product or service names are registered trademarks or trademarks of SAS Institute Inc. in the USA and other countries. ® indicates USA registration. Other brand and product names are trademarks of their respective companies.