79
eBilling User Guide

eBilling User Guide

Copyright 2017 Benefitfocus.com, Inc. | Confidential and Proprietary 2
Table of Contents
About This Guide Chapter 1 eBilling Basics ......................................................................................................................................... 6
Getting Started with eBilling .................................................................................................................... 6
Logging into eBilling .......................................................................................................................... 6
Working with the eBilling Home Page ................................................................................................ 8
Updating Your Account Settings ...................................................................................................... 12
Logging out of eBilling ..................................................................................................................... 13
Going Paperless............................................................................................................................... 13
Chapter 2 Billing .................................................................................................................................................... 16
Viewing Invoices .................................................................................................................................... 16
Conducting an Invoice Level Search ................................................................................................. 16
Viewing Consolidated and Sub-group Invoices ................................................................................. 18
Modifying the Invoice List View ....................................................................................................... 18
Viewing Invoice Details.................................................................................................................... 19
Sorting Invoices ............................................................................................................................... 28
Advanced Sorting ............................................................................................................................ 30
Searching for Invoices ............................................................................................................................ 33
Viewing Invoice Adjustments ................................................................................................................. 34
Viewing Payment History ....................................................................................................................... 36
Managing and Printing Invoice Transactions .......................................................................................... 37
Making Online Invoice Payments ..................................................................................................... 38
Editing Payment Accounts on Invoice Payments .............................................................................. 43
Editing an Existing Account on an Invoice Payment ................................................................................. 43
Creating a New Account on an Invoice Payment ...................................................................................... 47
Enabling Auto-Draft Payments ........................................................................................................ 49
Printing Payment Stubs for Mailing Payments ................................................................................. 50
Printing Invoices .............................................................................................................................. 52
Requesting a Rebill .......................................................................................................................... 56
Making Invoice Adjustments ........................................................................................................... 59
Chapter 3 Reports ................................................................................................................................................. 65
Managing Reports ................................................................................................................................. 65

Copyright 2017 Benefitfocus.com, Inc. | Confidential and Proprietary 3
Creating a Report ............................................................................................................................ 65
Viewing Reports .............................................................................................................................. 68
Scheduling a Report ........................................................................................................................ 70
Chapter 4 Setup .................................................................................................................................................... 73
Creating and Editing Payment Accounts ................................................................................................ 73
Creating a Payment Account ........................................................................................................... 73
Editing a Payment Account .............................................................................................................. 75
Reviewing Payment Account History ............................................................................................... 77
Copyright 2017 Benefitfocus.com, Inc. | Confidential and Proprietary 4
Benefitfocus University 100 Benefitfocus Way Charleston, SC 29492 www.benefitfocus.com ©2017. Benefitfocus.com, Inc. All Rights Reserved. Words and logos identified by “®” or “™” and listed at https://www.benefitfocus.com/legal/trademarks are trademarks of Benefitfocus.com, Inc. Disclaimer This resource includes images containing sample data to better illustrate the functionality of our software within the context of this course. All sample data displayed in the figures throughout this document is simulated, non-personal data.

Copyright 2017 Benefitfocus.com, Inc. | Confidential and Proprietary 5
About This Guide
This guide provides information on how to use Aetna eBilling (eBilling). eBilling is an electronic invoice presentment and payment solution, securely hosted for you to efficiently manage and pay your invoices online.
The chapters in this guide correspond to each of the tabs that appear on the Home page of the eBilling application. See Working with the eBilling Home Page for additional information.
This document may include the following icons to highlight additional information, warnings and suggestions:
The document icon references external documentation that is useful to further understand the information being presented.
The note icon provides additional or important information about special conditions, suggestions or actions that should be taken.
The risk icon is a warning, often cautioning against taking certain actions.
The tip icon provides additional, more efficient instructions when completing a task.

Copyright 2017 Benefitfocus.com, Inc. | Confidential and Proprietary 6
Chapter 1
eBilling Basics
This chapter provides information on the basics of working with the eBilling application and includes information on logging into the application, working with the eBilling user interface and managing your account information.
Getting Started with eBilling
After receiving your eBilling user credentials, you can refer to the information in this section to familiarize yourself with the eBilling user interface and basic system features.
Logging into eBilling
Follow the steps below to log into eBilling.
1. Go to https://www.aetna.com/employers-organizations.html
2. Click Manage Your Plan.
3. Enter your User Name and Password.
4. Click Log In.

Copyright 2017 Benefitfocus.com, Inc. | Confidential and Proprietary 7
If you forget your Username or Password, you can request to have your credentials reset using the links on the login page.
The Welcome to eBusiness page displays.
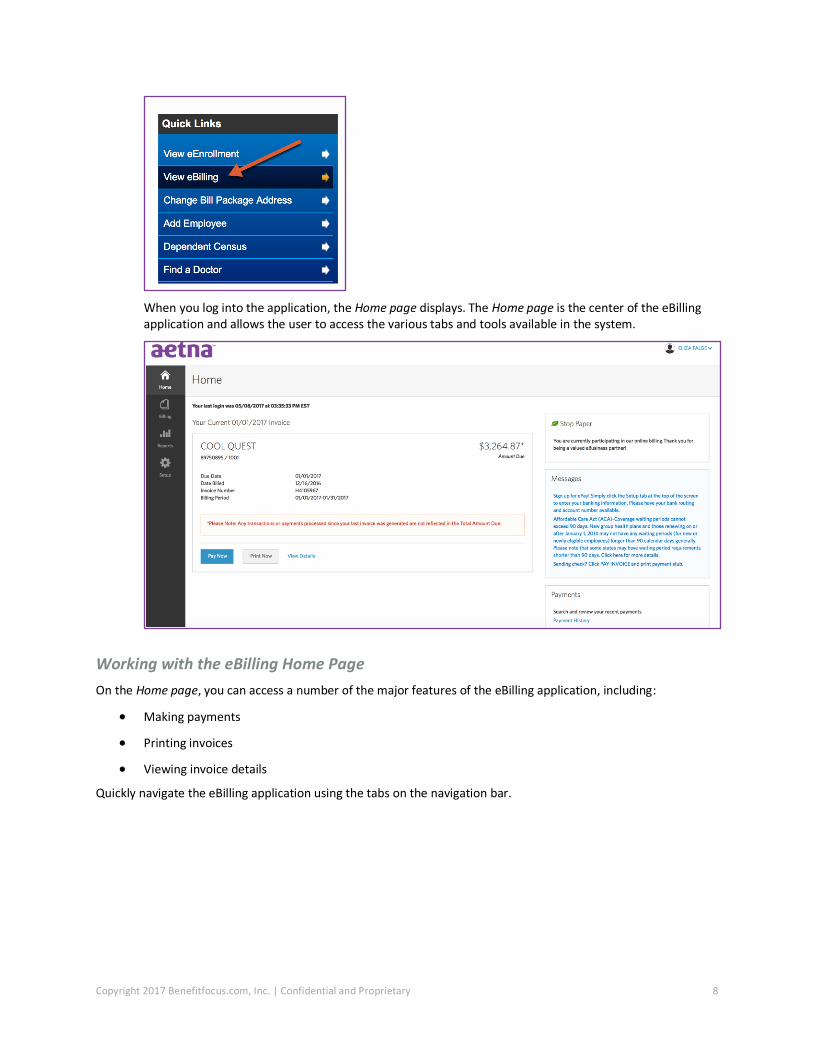
5. Click View eBilling in the Quick Links section.
Copyright 2017 Benefitfocus.com, Inc. | Confidential and Proprietary 8
When you log into the application, the Home page displays. The Home page is the center of the eBilling application and allows the user to access the various tabs and tools available in the system.
Working with the eBilling Home Page
On the Home page, you can access a number of the major features of the eBilling application, including:
Making payments
Printing invoices
Viewing invoice details
Quickly navigate the eBilling application using the tabs on the navigation bar.

Copyright 2017 Benefitfocus.com, Inc. | Confidential and Proprietary 9
Search for and view current invoices, adjustments and payment history on the Billing tab.
Create, view and schedule reports on the Reports tab.

Copyright 2017 Benefitfocus.com, Inc. | Confidential and Proprietary 10
Set up payment accounts on the Setup tab.
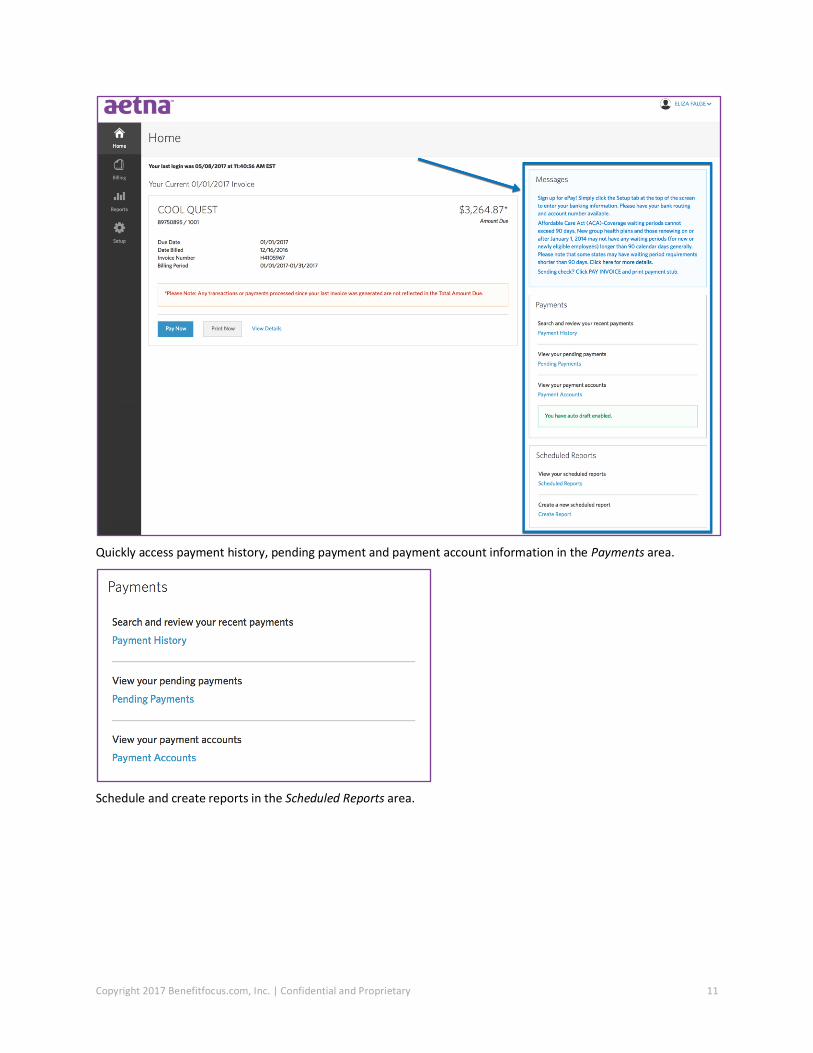
The Home Page also includes additional sections for quick access to messages, training, payments, scheduled reports and users. The Messages area displays important information and instructions for clients.
Copyright 2017 Benefitfocus.com, Inc. | Confidential and Proprietary 11
Quickly access payment history, pending payment and payment account information in the Payments area.
Schedule and create reports in the Scheduled Reports area.

Copyright 2017 Benefitfocus.com, Inc. | Confidential and Proprietary 12
Create and manage eBilling user accounts in the Users area.
Updating Your Account Settings
Update your user account settings to change your notification preferences, password and security questions. To update your user account, click the user profile menu in the upper right corner then select My Account.
The My Account Settings page displays.

Copyright 2017 Benefitfocus.com, Inc. | Confidential and Proprietary 13
Update your preferred email address, password and/or security questions as desired, then click Save.
Logging out of eBilling
To log out of eBilling, click the user profile menu in the upper right corner, then select Logout.
Going Paperless
If you prefer, you can choose stop receiving paper invoices. After electing to go paperless, you must contact Aetna to re-establish paper billing.
Follow the steps below to go paperless.
1. On the Home page, click the Go Paperless link in the Stop Paper section.

Copyright 2017 Benefitfocus.com, Inc. | Confidential and Proprietary 14
The Stop Paper Invoices page displays.
2. Select Turn off paper invoices for all invoice levels to disable paper invoices for all accounts. Select Turn off paper invoices for the following invoice levels to disable paper invoices for specific accounts. If you select this option, you must select the specific account(s) from the account listing as shown in the figure below.

Copyright 2017 Benefitfocus.com, Inc. | Confidential and Proprietary 15
3. Click Save.
The Home page displays a message indicating that you are participating in online billing.

Copyright 2017 Benefitfocus.com, Inc. | Confidential and Proprietary 16
Chapter 2
Billing
By default, your current invoices are displayed on the Home page. You can view additional invoices and invoice information on the Billing tab, however, which also enables you to search for invoices, adjustments and view your payment history.
Viewing Invoices
The View Invoices page provides you with at-a-glance visibility into your invoices. On this page, you can search for invoices at the invoice level by specifying a bill package and/or an invoice status.
The list below provides a brief description of each invoice status:
Current invoices belong to the current coverage period
Prior invoices belong to a previous coverage period
Paid status is applied to all invoices to which payments have been applied
Obsolete status applies to all invoices that have been replaced with a re-billed invoice
Conducting an Invoice Level Search
Follow the steps below to conduct an invoice level search.
1. Click the Billing tab on the navigation bar.
The View Invoices page displays. The default display mode in the Invoice Level Search section is Current invoices.

Copyright 2017 Benefitfocus.com, Inc. | Confidential and Proprietary 17
2. If there are multiple groups under one account, you can locate a specific group by entering the group number in the Bill Package field. For example, 1002.
3. Select the display view type from the View drop-down box. For example, Prior. See Modifying the Invoice List View for additional information.
4. Click Submit.
The search results display.
Scroll on the page to view the invoices in the search list. By default, the search results display 20 records per page. You can use the navigation control at the bottom of the page to easily navigate between pages in the search results.

Copyright 2017 Benefitfocus.com, Inc. | Confidential and Proprietary 18
Viewing Consolidated and Sub-group Invoices
Consolidated invoices contain multiple sub-group invoices rolled into an overall group invoice. Invoices are consolidated for convenience to display a summary of all the invoices for a particular billing period. Consolidated invoice records are identified by a plus symbol (+) adjacent to the invoice level name or number, as shown in the figure below.
Click the (+) symbol to view the consolidated/sub-group invoice information. In the figure below, the sub-group1002 is displayed in the Invoice Level identifier (87510604 / 1002).
Modifying the Invoice List View
The default view on the View Invoices page displays Your Current Invoices. You can easily modify the invoice list view on the View Invoices page by selecting to view a different period or category from the View drop-down box.

Copyright 2017 Benefitfocus.com, Inc. | Confidential and Proprietary 19
You can display Current, Prior, Obsolete or Paid invoices.
Click Submit. The modified view displays.
Viewing Invoice Details
View the details of an invoice to access invoice summary information, including financial totals, charges, retroactivity, adjustments and additional fees or charges. You can view the details of a regular invoice or consolidate/sub-group invoices.

Copyright 2017 Benefitfocus.com, Inc. | Confidential and Proprietary 20
To view the invoice details, click Options and select View Invoice.
The Invoice Details page displays the Summary of Account tab.
The buttons on the header of the Invoice Details page enable you to quickly jump to the pages from which you can pay invoices, make invoice adjustments, print invoices and add members to invoices.
See Managing and Printing Invoice Transactions for additional information.
The Financial Totals section displays the Original Totals for the invoice balance and charges.
Copyright 2017 Benefitfocus.com, Inc. | Confidential and Proprietary 21
The table below provides a description of each of the Original Totals.
Item Description
Opening Balance The balance from the prior month.
Total Payments Received Since Last Invoice A listing of each payment received since the last invoice and the total of these payments.
Current Inforce Charges The current charges based on the active membership as of the prepared date.
Retroactivity Charges Charges and credits for activity not previously billed or credited.
Current Admin/Other Adjustment Charges Administrative charges for the current period and/or adjustments to previously billed amounts.
Current Net Charges Total of current effective charges plus retroactivity and other adjustments.
AMOUNT DUE Total amount to remit as payment based on the opening balance, payments received and current net charges.
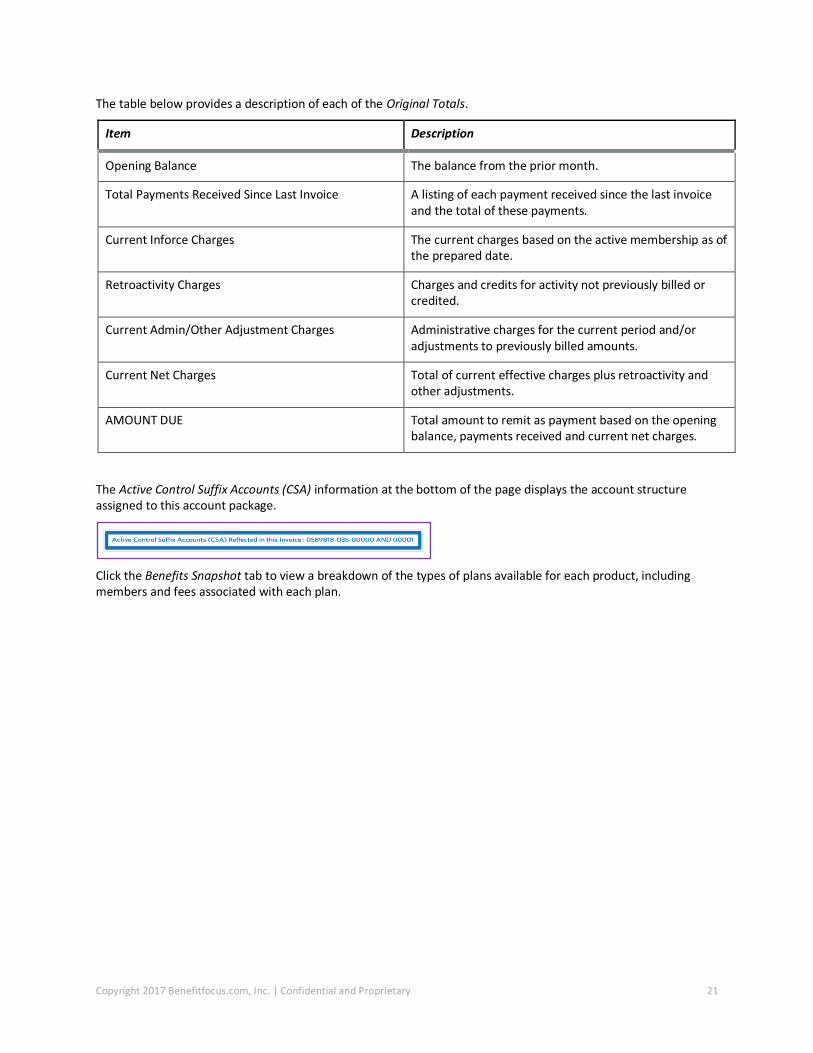
The Active Control Suffix Accounts (CSA) information at the bottom of the page displays the account structure assigned to this account package.
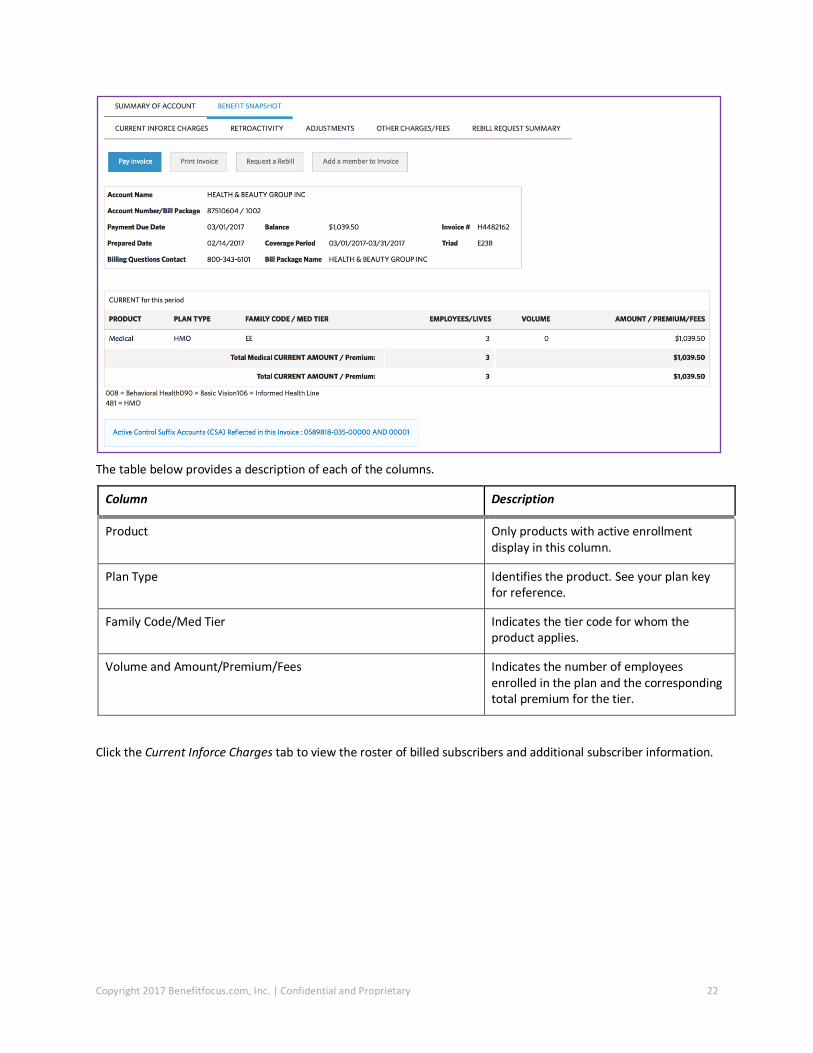
Click the Benefits Snapshot tab to view a breakdown of the types of plans available for each product, including members and fees associated with each plan.
Copyright 2017 Benefitfocus.com, Inc. | Confidential and Proprietary 22
The table below provides a description of each of the columns.
Column Description
Product Only products with active enrollment display in this column.
Plan Type Identifies the product. See your plan key for reference.
Family Code/Med Tier Indicates the tier code for whom the product applies.
Volume and Amount/Premium/Fees Indicates the number of employees enrolled in the plan and the corresponding total premium for the tier.
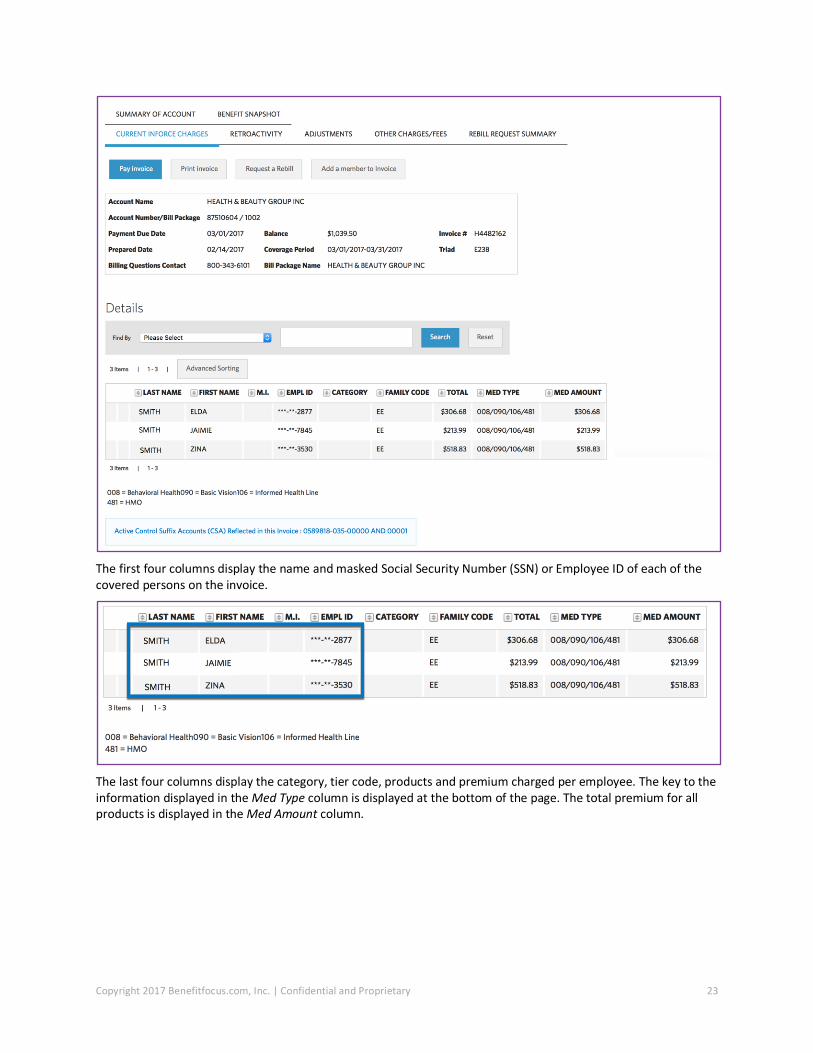
Click the Current Inforce Charges tab to view the roster of billed subscribers and additional subscriber information.
Copyright 2017 Benefitfocus.com, Inc. | Confidential and Proprietary 23
The first four columns display the name and masked Social Security Number (SSN) or Employee ID of each of the covered persons on the invoice.
The last four columns display the category, tier code, products and premium charged per employee. The key to the information displayed in the Med Type column is displayed at the bottom of the page. The total premium for all products is displayed in the Med Amount column.

Copyright 2017 Benefitfocus.com, Inc. | Confidential and Proprietary 24
If an employee is enrolled in multiple products, each product displays separately.
Click the Retroactivity tab to view subscriber adjustments that apply to the current invoice.
The first four columns display the name and masked Social Security Number (SSN) or Employee ID of each of the covered persons on the invoice.

Copyright 2017 Benefitfocus.com, Inc. | Confidential and Proprietary 25
The key to the information displayed in the Med Type column is displayed at the bottom of the page. The total premium for all products is displayed in the Med Amount column.
The table below provides a description of each of the remaining columns.
Column Description
Trans The transaction type code. Valid values are New, Termination or Change.
Eff. Date The effective date of the transaction.
Mos. Imp. The number of months impacted.
Total The total amount of retroactive premium per employee for all products.
Med Type Identifies the product type. For example, HMO.
Med Amount The total adjusted premium per employee.
Click the Adjustments tab to view both new and old subscriber premium amounts, as well as the reasons for differences. This information only displays if a user has selected to make adjustments or add a member to the invoice.

Copyright 2017 Benefitfocus.com, Inc. | Confidential and Proprietary 26
To view the detailed information about an adjustment, click Options and select View Adjustment Details.
A page is displayed enabling you to review the adjustment transaction details.

Copyright 2017 Benefitfocus.com, Inc. | Confidential and Proprietary 27
Click Cancel to return to the Adjustments tab.
If you need to delete an invoice adjustment, click Options and select Delete Adjustment.
A confirmation message displays asking you to confirm the deletion.
Click OK to delete the invoice adjustment. The Adjustment tab displays.
Click the Other Charges/Fees tab to view the details of other adjustment activities to an invoice, such as manual accounts receivable adjustments, credits, etc.

Copyright 2017 Benefitfocus.com, Inc. | Confidential and Proprietary 28
Click the Rebill Request Summary tab to view the summary details of any invoices for which a re-billing requests generated for the invoice.
Sorting Invoices
You can sort the invoice list and some invoice details using the sort function on any column to display the records in ascending or descending order.

Copyright 2017 Benefitfocus.com, Inc. | Confidential and Proprietary 29
When selected the sort column is highlighted to easily identify the data on which you are sorting. Clicking on the top arrow sorts the invoice records in ascending order by the column content.
Clicking on the bottom arrow sorts the invoice records in descending order by the column content.
Click the column header name to remove the sort and display the default view.
Copyright 2017 Benefitfocus.com, Inc. | Confidential and Proprietary 30
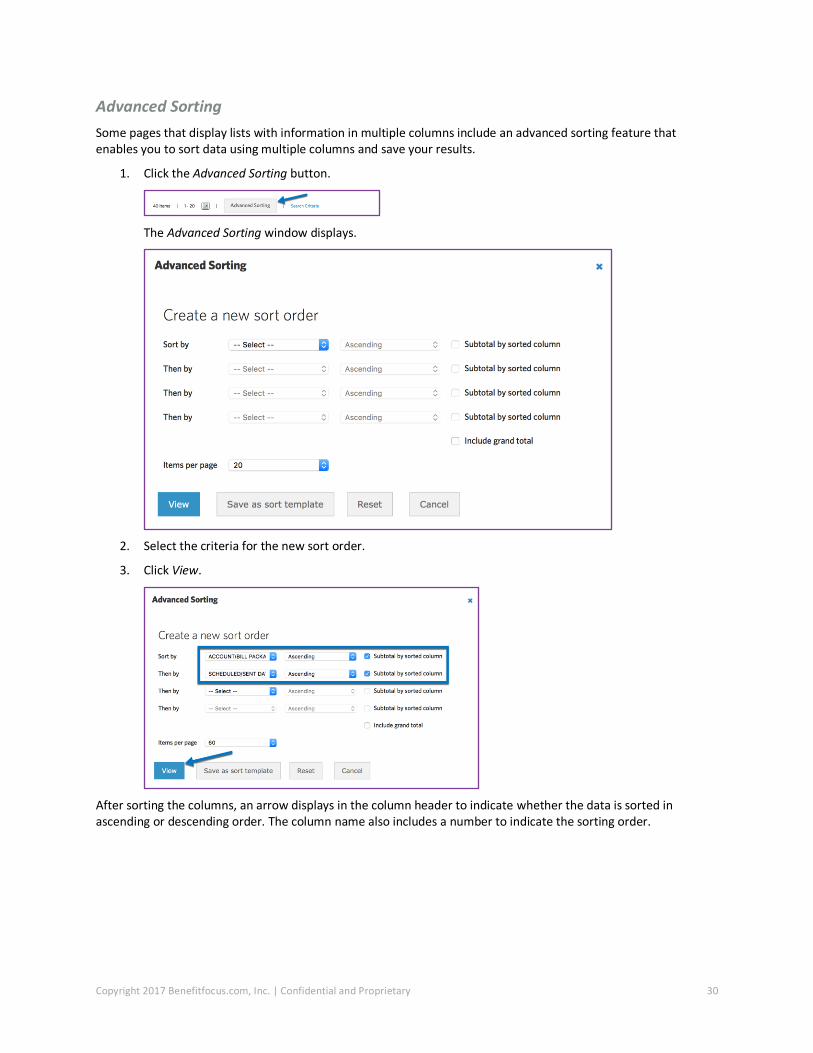
Advanced Sorting
Some pages that display lists with information in multiple columns include an advanced sorting feature that enables you to sort data using multiple columns and save your results.
1. Click the Advanced Sorting button.
The Advanced Sorting window displays.
2. Select the criteria for the new sort order.
3. Click View.
After sorting the columns, an arrow displays in the column header to indicate whether the data is sorted in ascending or descending order. The column name also includes a number to indicate the sorting order.

Copyright 2017 Benefitfocus.com, Inc. | Confidential and Proprietary 31
If you selected to subtotal the columns or include the grand total, the subtotal information will display within the results set. The grand total will display at the end of the results set.
Depending on your search results, the data may display on multiple pages. You can use the navigation control at the bottom of the page to navigate to additional pages to see the total amounts.

Copyright 2017 Benefitfocus.com, Inc. | Confidential and Proprietary 32
When selecting your sort criteria, you can also click Save as sort template to create a template of a frequent sorting order to reuse in the future.
Enter a name for the template and click Save.
Your sort templates will then display in the Advanced Sorting window. To apply the sort criteria, click View for the applicable template.
You can also click to Edit or Delete a sort template as necessary.
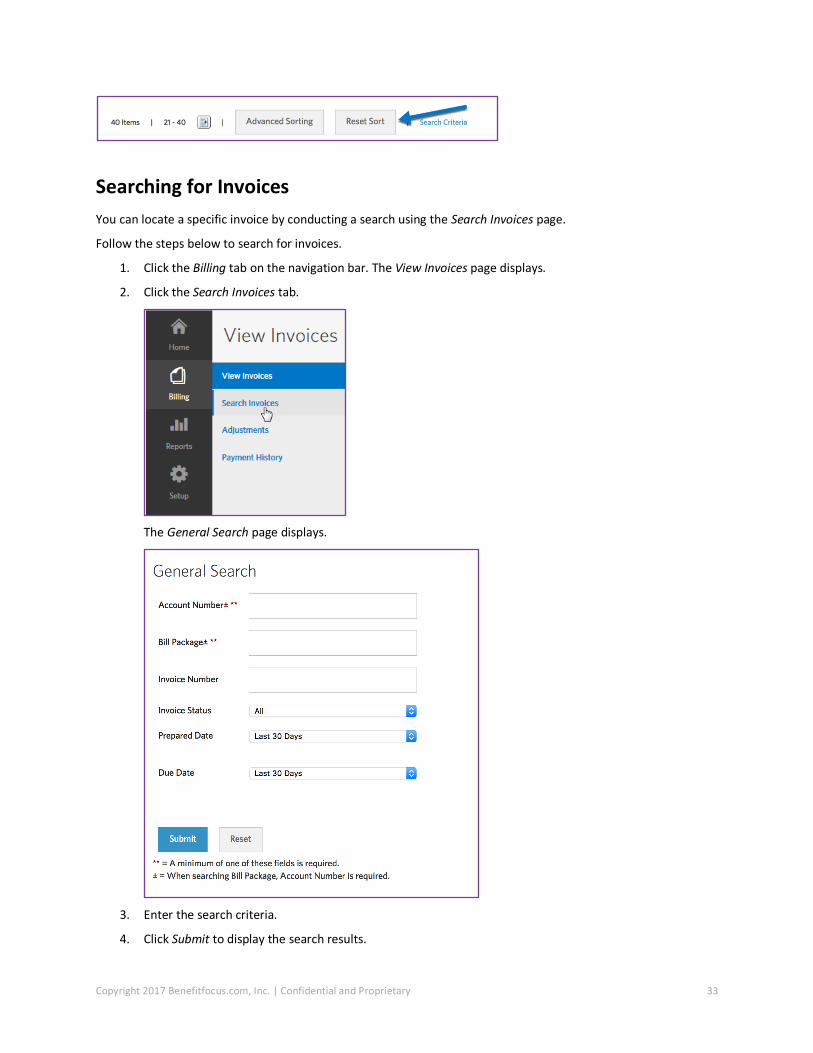
After applying an advanced sort to a page, you can click the Reset Sort button on the page header to clear the selected criteria.
Copyright 2017 Benefitfocus.com, Inc. | Confidential and Proprietary 33
Searching for Invoices
You can locate a specific invoice by conducting a search using the Search Invoices page.
Follow the steps below to search for invoices.
1. Click the Billing tab on the navigation bar. The View Invoices page displays.
2. Click the Search Invoices tab.
The General Search page displays.
3. Enter the search criteria.
4. Click Submit to display the search results.

Copyright 2017 Benefitfocus.com, Inc. | Confidential and Proprietary 34
5. To view the invoice details, click Options and select View Invoice.
The Invoice Details page displays for the selected invoice. See Viewing Invoice Details for additional information.
Viewing Invoice Adjustments
Follow the steps below to view invoice adjustments.
1. Click the Billing tab on the navigation bar. The View Invoices page displays.
2. Click the Adjustments tab.
The General Search page for Adjustments displays.

Copyright 2017 Benefitfocus.com, Inc. | Confidential and Proprietary 35
3. Enter the search criteria for the adjustment.
4. Click Submit to display the search results.
5. To view the adjustment details, click Options and select View Adjustments.
The Adjustment Details page displays for the selected invoice. See Viewing Invoice Details for additional information.

Copyright 2017 Benefitfocus.com, Inc. | Confidential and Proprietary 36
Viewing Payment History
Search for and view payment history to review specific information about payments made to invoices.
A received payment is only tied to an invoice in eBilling if the payment was submitted electronically.
Follow the steps below to view payment history.
1. Click the Billing tab on the navigation bar. The View Invoices page displays.
2. Click the Payment History tab.
The General Search page for payments displays.

Copyright 2017 Benefitfocus.com, Inc. | Confidential and Proprietary 37
3. Enter the search criteria.
4. Click Submit to display the search results.
If necessary, you can use the Advanced Sorting feature to sort to the data using multiple columns. See Advanced Sorting for additional information.
Managing and Printing Invoice Transactions
From any tab of the Invoice Details page, you can manage invoice transactions including:

Copyright 2017 Benefitfocus.com, Inc. | Confidential and Proprietary 38
Paying invoices
Making invoice adjustments
Printing invoices
Adding members to invoices
Making Online Invoice Payments
Follow the steps below to make an online invoice payment.
1. Initiate the invoice payment.
eBilling provides three ways to initiate an invoice payment:
Click the Pay Now button on the current invoice displayed on the Home page.
Click Options and select Pay Invoice on the invoice displayed on the View Invoices page (for both consolidated and non-consolidated invoices).
Click the Pay invoice button on the Invoice Details page.

Copyright 2017 Benefitfocus.com, Inc. | Confidential and Proprietary 39
A message displays asking if you wish to continue.
2. Review the notice and click Next.
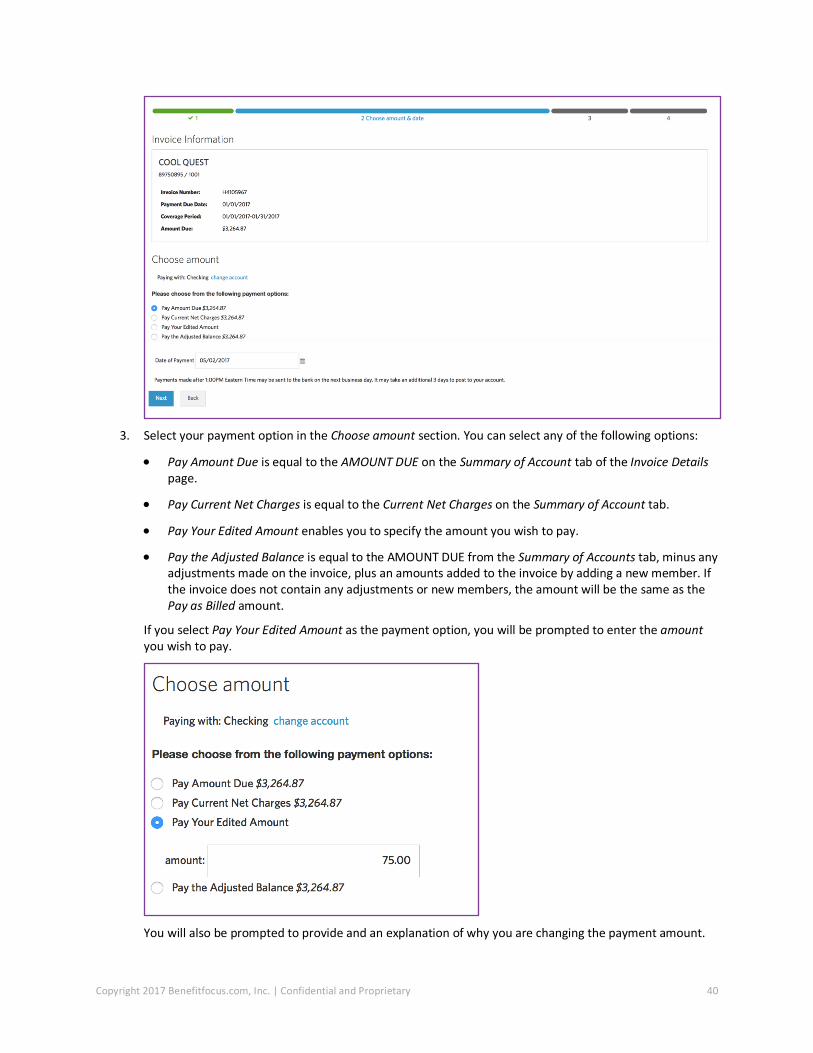
The Choose amount and Date of Payment options display.
Copyright 2017 Benefitfocus.com, Inc. | Confidential and Proprietary 40
3. Select your payment option in the Choose amount section. You can select any of the following options:
Pay Amount Due is equal to the AMOUNT DUE on the Summary of Account tab of the Invoice Details page.
Pay Current Net Charges is equal to the Current Net Charges on the Summary of Account tab.
Pay Your Edited Amount enables you to specify the amount you wish to pay.
Pay the Adjusted Balance is equal to the AMOUNT DUE from the Summary of Accounts tab, minus any adjustments made on the invoice, plus an amounts added to the invoice by adding a new member. If the invoice does not contain any adjustments or new members, the amount will be the same as the Pay as Billed amount.
If you select Pay Your Edited Amount as the payment option, you will be prompted to enter the amount you wish to pay.
You will also be prompted to provide and an explanation of why you are changing the payment amount.

Copyright 2017 Benefitfocus.com, Inc. | Confidential and Proprietary 41
4. Enter a payment date and click Next. The Confirm information page displays.
5. Review the payment information. If applicable, you can modify the payment in the Confirm Information section.
Click the change account link to modify the payment account.
See Editing Payment Accounts for additional details.
Click the edit payment amount or change payment links to return to the Choose amount & date page from which you can modify the payment amount or date.

Copyright 2017 Benefitfocus.com, Inc. | Confidential and Proprietary 42
Click the Review invoice payment information details link to display a summary of the current payment information.
6. Click Submit Payment.
The Payment Results page displays.
The Payment Results section also provides several additional features.

Copyright 2017 Benefitfocus.com, Inc. | Confidential and Proprietary 43
You can print this screen to generate a hard copy or save a PDF of the payment for your records.
Click Review invoice payment information details to display a summary of the current invoice details.
Click Enable Auto Draft to edit your payment account.
See Editing Payment Accounts for more information.
7. Click Return to Home.
Editing Payment Accounts on Invoice Payments
When editing payment accounts on invoices, you can update the existing account or create a new account.
Editing an Existing Account on an Invoice Payment
Follow these steps to edit an existing account on an invoice payment.
1. Initiate an invoice payment.
See Making Online Invoice Payments for additional information.
2. Click change account on the Choose amount & date page.
The Choose payment account page displays.

Copyright 2017 Benefitfocus.com, Inc. | Confidential and Proprietary 44
In the Choose payment account section, the existing payment account is selected by default. For example, Checking.
3. Click edit account info.
The Edit Payment Account page displays.

Copyright 2017 Benefitfocus.com, Inc. | Confidential and Proprietary 45
4. Edit the account information as necessary. You can modify the Account Type and Account Options if applicable.
In the Account Options section, the Make this my default payment account checkbox is selected by default. Deselect this option if you no longer want this account to be the default payment account. Select Only I can view/edit/use this account for payment option if you want to limit the access and use of this payment account to only you.

Copyright 2017 Benefitfocus.com, Inc. | Confidential and Proprietary 46
Click the History button to view the account history of this payment account.
The Account History window displays.
Click View to see the Account History Details.
You can also click view changes resulting from this update to see a history of account changes.
Click Advanced Search on the Account History window to search for specific groups or bill packages.

Copyright 2017 Benefitfocus.com, Inc. | Confidential and Proprietary 47
5. Click Save. The system verifies the routing number and account information and displays a confirmation.
Creating a New Account on an Invoice Payment
Follow the steps below to create a new account on an invoice payment.
1. Initiate an invoice payment.
See Making Online Invoice Payments for additional information.
2. Click change account on the Choose amount & date page.
The Choose payment account page displays.
In the Choose payment account section, the existing payment account is selected by default. For example, Checking.
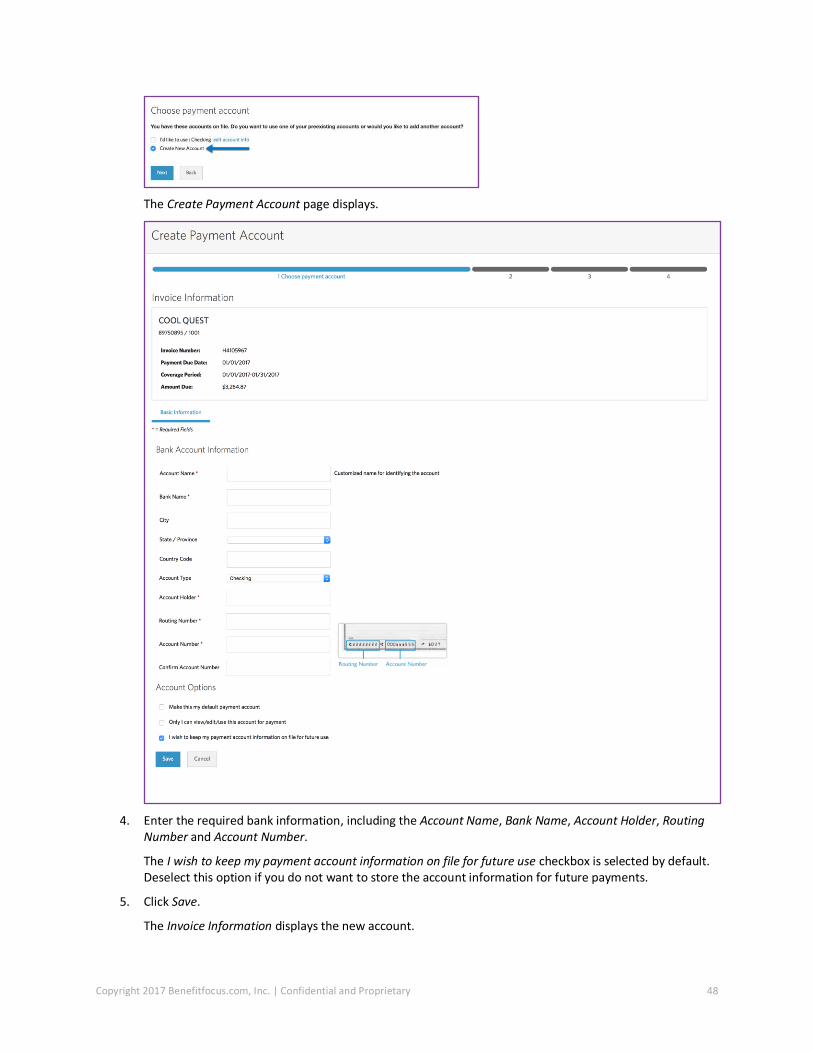
3. Select Create New Account and click Next.
Copyright 2017 Benefitfocus.com, Inc. | Confidential and Proprietary 48
The Create Payment Account page displays.
4. Enter the required bank information, including the Account Name, Bank Name, Account Holder, Routing Number and Account Number.
The I wish to keep my payment account information on file for future use checkbox is selected by default. Deselect this option if you do not want to store the account information for future payments.
5. Click Save.
The Invoice Information displays the new account.

Copyright 2017 Benefitfocus.com, Inc. | Confidential and Proprietary 49
Enabling Auto-Draft Payments
After completing an online payment, you can set up the payment account to automatically draft the invoice amount for each due date. When you complete a payment, the Payment Results display a confirmation message from which you can enable auto-drafts. See Making Online Invoice Payments for additional information.
Follow the steps below to enable auto-draft payments.
1. Click Enable Auto Draft in the Payment Results section.
The Edit Payment Account page displays.

Copyright 2017 Benefitfocus.com, Inc. | Confidential and Proprietary 50
2. Select the checkbox in the Auto-Draft section of the page.
When you select to enable the auto-draft, an Auto-Draft Authorization Date displays.
3. Specify the Effective Date of the auto-draft by specifying the Start on date and the date of the month on which to make the draft. You can select any date between 1 and 10 for Select Date for Monthly Draft.
4. If applicable, modify the Account Options.
5. Click Save. A confirmation message displays.
Printing Payment Stubs for Mailing Payments
Follow the steps below to print payment stubs for mailing payments.
1. Initiate the invoice payment. See Making Online Invoice Payments for additional information.
2. (If applicable) Select Print payment stub to send in the mail on the Choose payment method page and click Next.

Copyright 2017 Benefitfocus.com, Inc. | Confidential and Proprietary 51
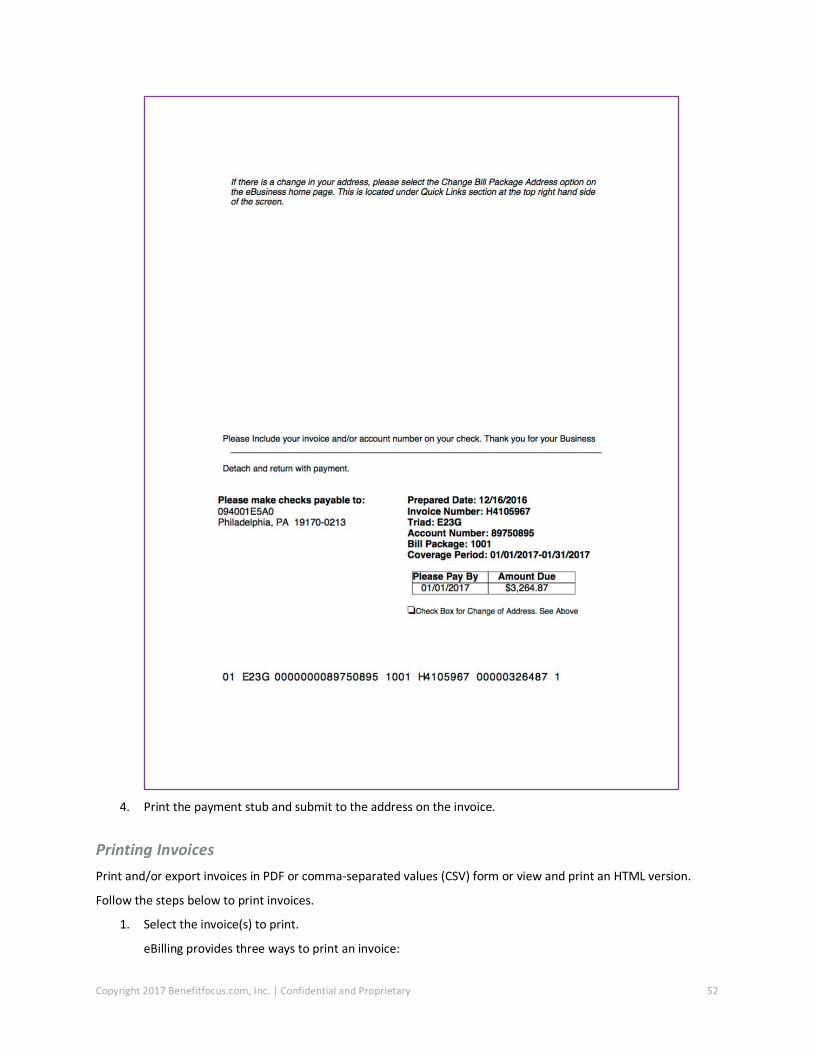
The Print the payment stub page is displayed. If you are paying a consolidated bill, you may select the individual invoices to be included in the payment.
3. Click Next. A PDF of the payment stub is generated.
Copyright 2017 Benefitfocus.com, Inc. | Confidential and Proprietary 52
4. Print the payment stub and submit to the address on the invoice.
Printing Invoices
Print and/or export invoices in PDF or comma-separated values (CSV) form or view and print an HTML version.
Follow the steps below to print invoices.
1. Select the invoice(s) to print.
eBilling provides three ways to print an invoice:

Copyright 2017 Benefitfocus.com, Inc. | Confidential and Proprietary 53
Click the Print Now button on the current invoice displayed on the Home page.
Click Options and select Print Invoice on the invoice displayed on the View Invoices page (for both consolidated and non-consolidated invoices).
Click the Print invoice button on the Invoice Details page.

Copyright 2017 Benefitfocus.com, Inc. | Confidential and Proprietary 54
The Print Invoice page displays.
2. Select the format in which you want to generate and print the report.
3. Select the invoice sections to print and the sorting order for each section in the Print Options.

Copyright 2017 Benefitfocus.com, Inc. | Confidential and Proprietary 55
If you selected to print invoices in the consolidated view, you can click select invoices to choose which invoices you want to print.
Select the invoice(s) to print and then click Done.
4. Click Print.
The Completed Reports page displays.
The report Status will display as PENDING or RUNNING while generating the results. Depending on the size and complexity of the report, it may take a few minutes to generate the results. You can click Refresh Reports to refresh the page and display the current status.
When the report is complete the Status will display as COMPLETE.

Copyright 2017 Benefitfocus.com, Inc. | Confidential and Proprietary 56
5. Click Options and select Download to download a copy of the invoice.
Requesting a Rebill
Customer initiated re-billing enables a primary contact to view and generate an updated invoice (rebill) that captures Benefitfocus eEnrollment™ changes processed after the original prepared date of the invoice.
To be eligible for re-billing, customer invoices must meet the following criteria:
Invoice(s) do not include HMO plans
The customer must have an active eEnrollment account
The primary contact must have access and permission to request re-bills
The customer must have an active status
Rebills for the current month can only occur up to five days prior to the next invoice month. The rebill will be completed within four business days of the request.
Follow the steps below to request a rebill.
1. View an invoice. See Viewing Invoices for additional information.
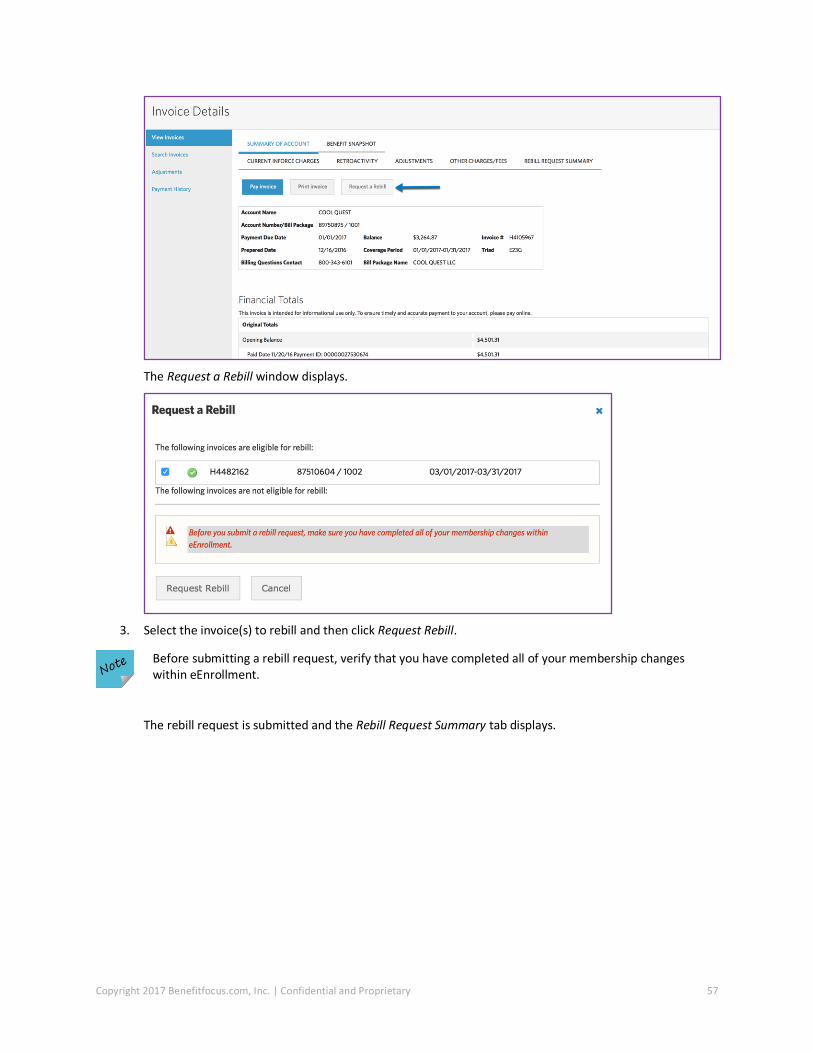
2. On the Invoice Details page, click Request a Rebill.
Copyright 2017 Benefitfocus.com, Inc. | Confidential and Proprietary 57
The Request a Rebill window displays.
3. Select the invoice(s) to rebill and then click Request Rebill.
Before submitting a rebill request, verify that you have completed all of your membership changes within eEnrollment.
The rebill request is submitted and the Rebill Request Summary tab displays.
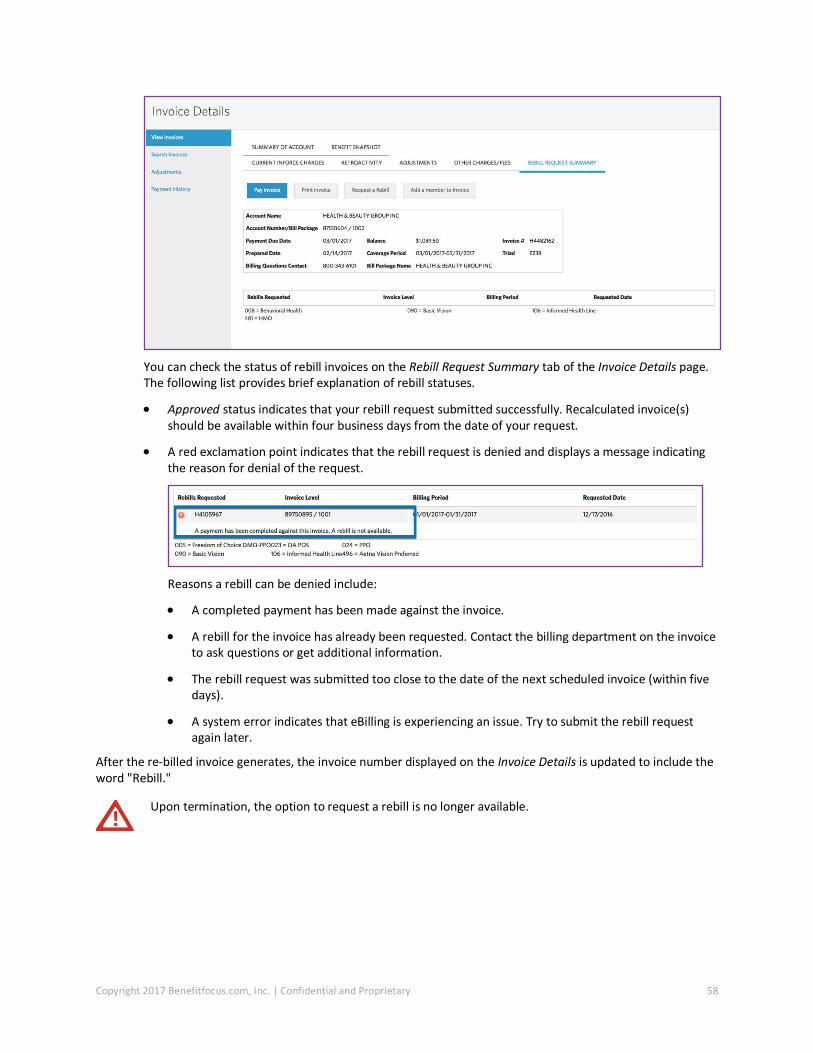
Copyright 2017 Benefitfocus.com, Inc. | Confidential and Proprietary 58
You can check the status of rebill invoices on the Rebill Request Summary tab of the Invoice Details page. The following list provides brief explanation of rebill statuses.
Approved status indicates that your rebill request submitted successfully. Recalculated invoice(s) should be available within four business days from the date of your request.
A red exclamation point indicates that the rebill request is denied and displays a message indicating the reason for denial of the request.
Reasons a rebill can be denied include:
A completed payment has been made against the invoice.
A rebill for the invoice has already been requested. Contact the billing department on the invoice to ask questions or get additional information.
The rebill request was submitted too close to the date of the next scheduled invoice (within five days).
A system error indicates that eBilling is experiencing an issue. Try to submit the rebill request again later.
After the re-billed invoice generates, the invoice number displayed on the Invoice Details is updated to include the word "Rebill."
Upon termination, the option to request a rebill is no longer available.

Copyright 2017 Benefitfocus.com, Inc. | Confidential and Proprietary 59
Making Invoice Adjustments
You may be able to make adjustments to your invoice to reflect changes since your last billing cycle. You can access adjustments from the Invoice Details page. Adjustments typically display on the following month's invoice as either a credit or a debit.
Follow the steps below to make an invoice adjustment.
1. View an invoice.
See Viewing Invoices for additional information.
2. On the Invoice Details page, click Make Adjustments.
You can also click Make Adjustments on the current invoice displayed on the Home page.
A message displays describing the adjustment process.

Copyright 2017 Benefitfocus.com, Inc. | Confidential and Proprietary 60
If you do not wish to receive this message in the future, select Do not show me this again and click Continue.
The Current Inforce Charges tab displays.
3. Select a record in the Details section, click Options and select Make Adjustment.
The Roster Adjustments page displays.
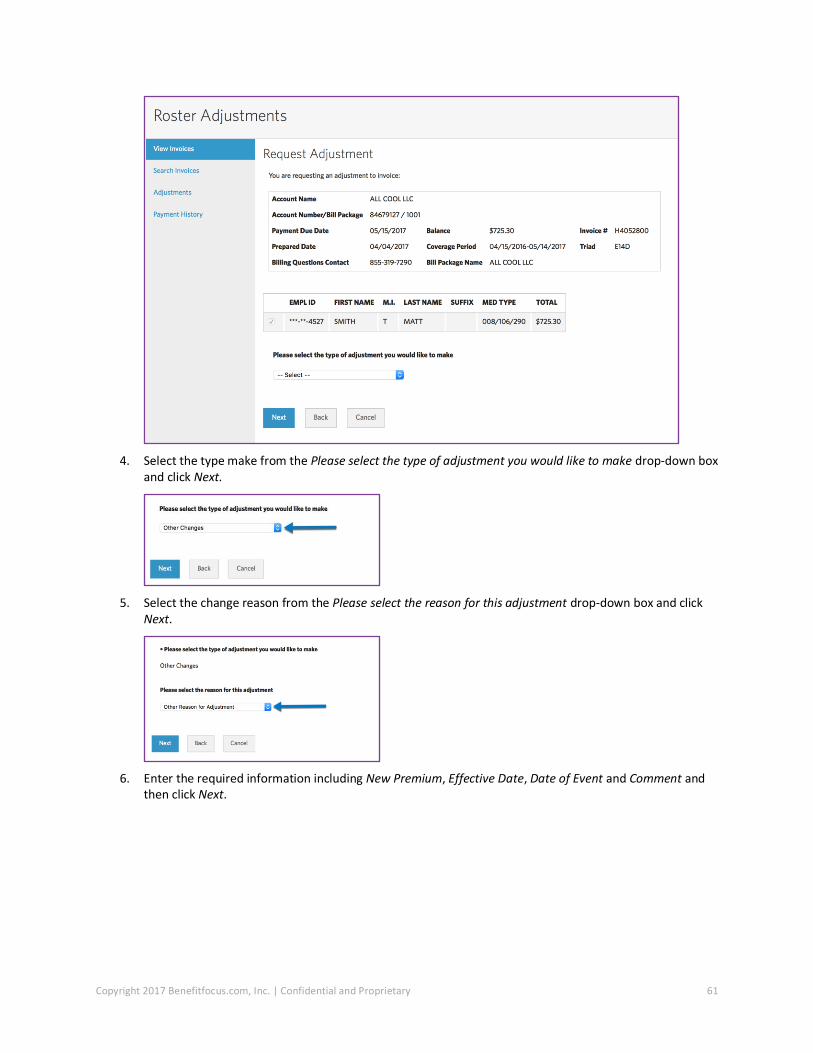
Copyright 2017 Benefitfocus.com, Inc. | Confidential and Proprietary 61
4. Select the type make from the Please select the type of adjustment you would like to make drop-down box and click Next.
5. Select the change reason from the Please select the reason for this adjustment drop-down box and click Next.
6. Enter the required information including New Premium, Effective Date, Date of Event and Comment and then click Next.

Copyright 2017 Benefitfocus.com, Inc. | Confidential and Proprietary 62
If applicable, click Note Dependent to include all dependents in the adjustments and enter the required dependent information.
The Request Adjustment summary displays.
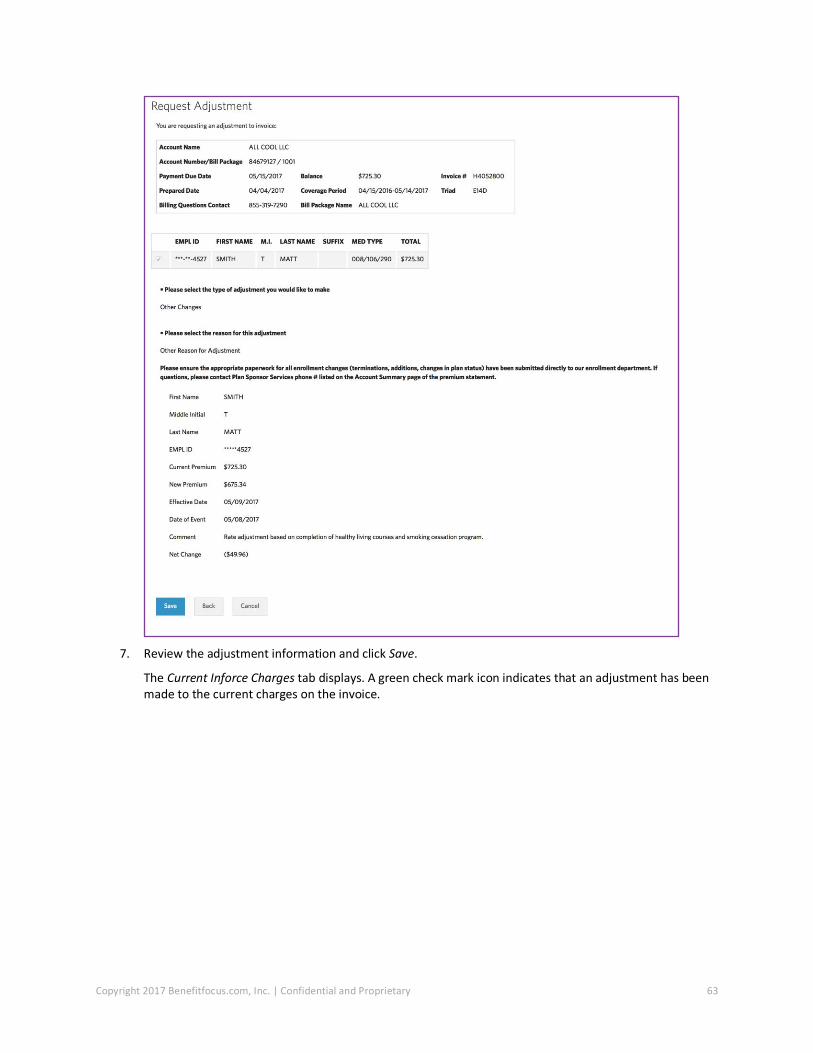
Copyright 2017 Benefitfocus.com, Inc. | Confidential and Proprietary 63
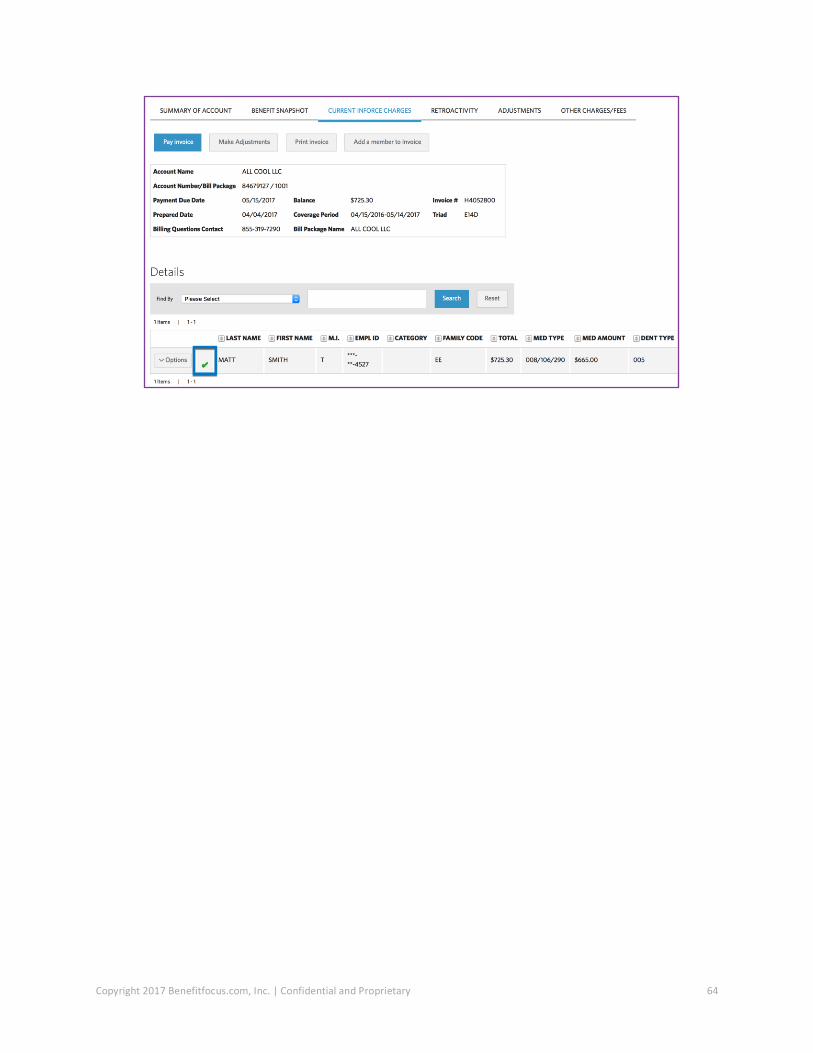
7. Review the adjustment information and click Save.
The Current Inforce Charges tab displays. A green check mark icon indicates that an adjustment has been made to the current charges on the invoice.
Copyright 2017 Benefitfocus.com, Inc. | Confidential and Proprietary 64

Copyright 2017 Benefitfocus.com, Inc. | Confidential and Proprietary 65
Chapter 3
Reports
You can generate invoice and payment reports on the Reports tab. The Reports tab includes three sub tabs:
The Create Reports tab displays all available reports. Selecting Create for a report will present filter criteria and format options for the report. You can create a one-time report or schedule reports to run at specific time intervals.
The Completed Reports tab displays all the reports generated during the past seven days.
The Scheduled Reports tab displays all reports scheduled to run on a specific start and end date. You can edit or delete reports from the schedule as necessary.
Managing Reports
You can create and schedule invoice and payment reports on the Create Reports tab.
Creating a Report
Follow these steps to create a report.
1. Click the Reports tab on the navigation bar. The Create Reports page displays. Reports are categorized as Invoice Reports or Payment Reports.
2. Click Options and select Create for the report to be generated.
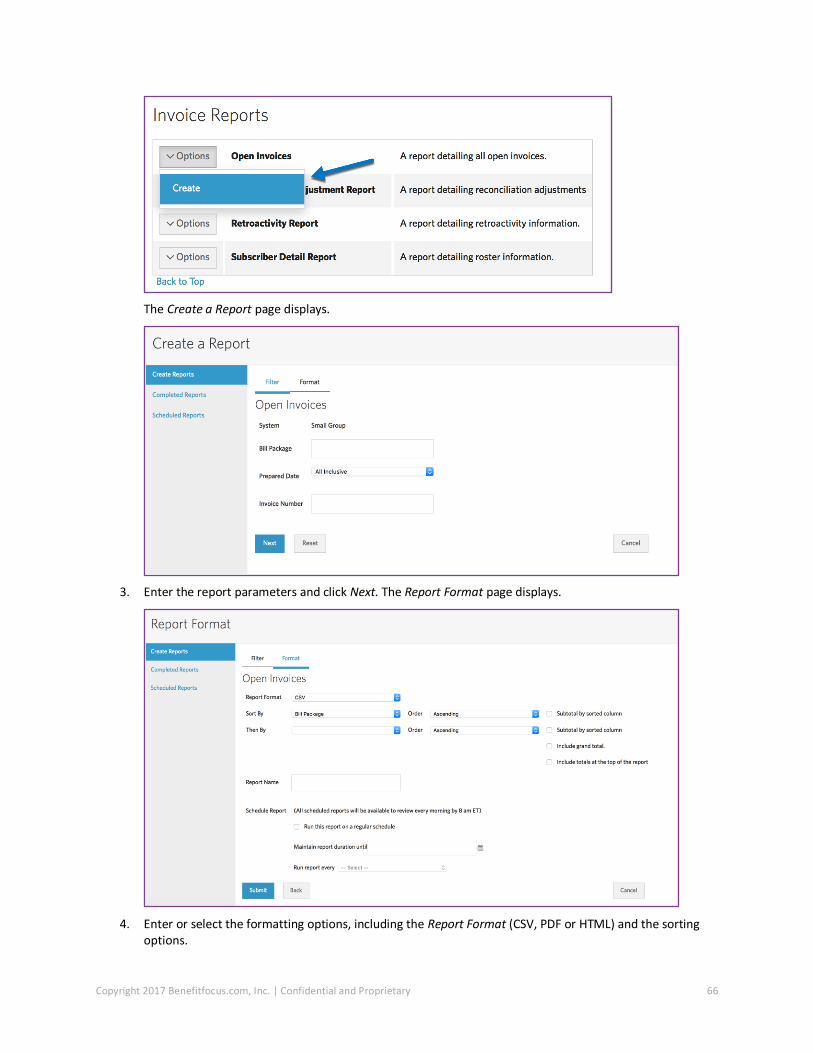
Copyright 2017 Benefitfocus.com, Inc. | Confidential and Proprietary 66
The Create a Report page displays.
3. Enter the report parameters and click Next. The Report Format page displays.
4. Enter or select the formatting options, including the Report Format (CSV, PDF or HTML) and the sorting options.

Copyright 2017 Benefitfocus.com, Inc. | Confidential and Proprietary 67
Because this scenario describes the on-demand report generation process, do not select the Run this report on a regular schedule option. See Scheduling Reports for additional information.
5. Click Submit. The Completed Reports page displays.
The report Status will display as PENDING or RUNNING while generating the results. Depending on the size and complexity of the report, it may take a few minutes to generate the results. You can click Refresh Reports to refresh the page and display the current status. When the report is complete the Status will display as COMPLETE.
6. Click Options and select Download to download a copy of the report.

Copyright 2017 Benefitfocus.com, Inc. | Confidential and Proprietary 68
The report output downloads and displays.
Viewing Reports
View the status of reports for up to seven days after the report is generated. Reports are automatically deleted after seven days.
To view reports, complete the following steps. 1. Click the Reports tab in the main navigation bar. 2. Click the Completed Reports tab.

Copyright 2017 Benefitfocus.com, Inc. | Confidential and Proprietary 69
The Completed Reports page displays.
3. View the status of your reports. 4. Click Options, then select Download.
Copyright 2017 Benefitfocus.com, Inc. | Confidential and Proprietary 70
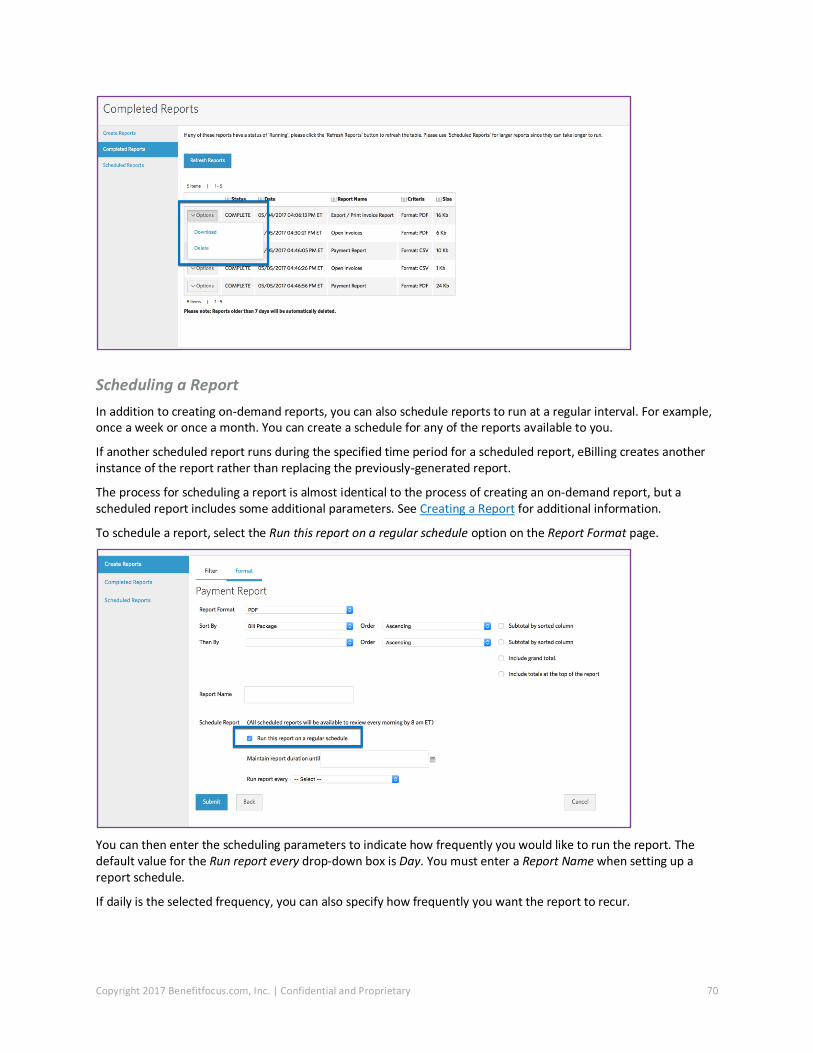
Scheduling a Report
In addition to creating on-demand reports, you can also schedule reports to run at a regular interval. For example, once a week or once a month. You can create a schedule for any of the reports available to you.
If another scheduled report runs during the specified time period for a scheduled report, eBilling creates another instance of the report rather than replacing the previously-generated report.
The process for scheduling a report is almost identical to the process of creating an on-demand report, but a scheduled report includes some additional parameters. See Creating a Report for additional information.
To schedule a report, select the Run this report on a regular schedule option on the Report Format page.
You can then enter the scheduling parameters to indicate how frequently you would like to run the report. The default value for the Run report every drop-down box is Day. You must enter a Report Name when setting up a report schedule.
If daily is the selected frequency, you can also specify how frequently you want the report to recur.

Copyright 2017 Benefitfocus.com, Inc. | Confidential and Proprietary 71
When scheduling the report weekly, you can specify which days of the week the report generates.
When scheduling the report monthly, you can specify which day of the month the report generates.
Click Submit. The Create Reports page displays a confirmation.
To view scheduled reports, click the Scheduled Reports tab.
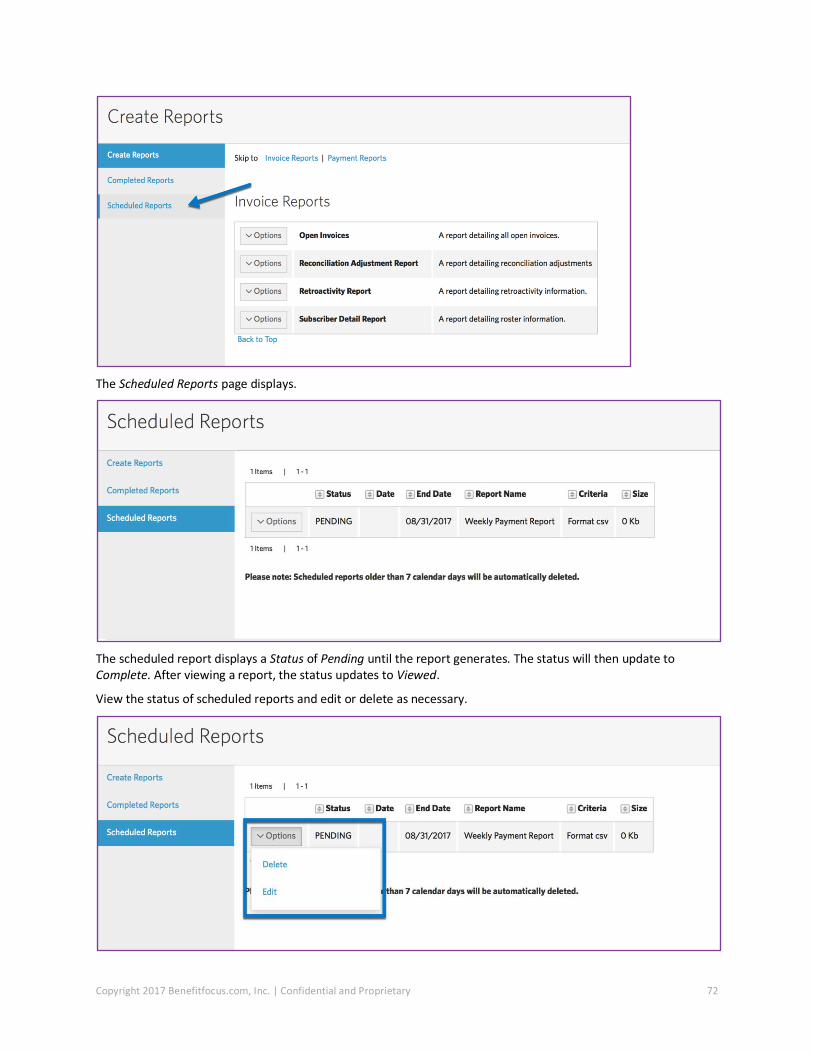
Copyright 2017 Benefitfocus.com, Inc. | Confidential and Proprietary 72
The Scheduled Reports page displays.
The scheduled report displays a Status of Pending until the report generates. The status will then update to Complete. After viewing a report, the status updates to Viewed.
View the status of scheduled reports and edit or delete as necessary.

Copyright 2017 Benefitfocus.com, Inc. | Confidential and Proprietary 73
Chapter 4
Setup
You can create and edit bank account data, review payment accounts and audit billing type history data on the Setup tab.
Creating and Editing Payment Accounts
Creating a Payment Account
Payment accounts store banking account information for making invoice payments. You can create multiple payment accounts as needed and select different accounts when making invoice payments. See Editing Payment Accounts on Invoices for additional information.
Follow the steps below to create a payment account.
1. Click the Setup tab on the navigation bar. The Payment Accounts page displays.
2. Click the Create Payment Account button.
The Create Payment Account page displays.

Copyright 2017 Benefitfocus.com, Inc. | Confidential and Proprietary 74
3. Enter the required bank information, including the Account Name, Bank Name, Account Holder, Routing Number and Account Number.
If applicable, select the checkbox in the Auto-Draft section of the page.
When you select to enable the auto-draft , an Auto-Draft Authorization Date displays.

Copyright 2017 Benefitfocus.com, Inc. | Confidential and Proprietary 75
Specify the Effective Date of the auto-draft by specifying the Start on date and the date of the month on which to make the draft. You can select any date between 1 and 10 for Select Date for Monthly Draft.
4. In the Account Options section, select the Make this my default payment account option if you want this account to be the default payment account. Select Only I can view/edit/use this account for payment option if you want to limit the access and use of this payment account to only you.
5. Click Save. The account information is saved and a confirmation displays.
Click Return to Payment Accounts or Return Home to continue.
Editing a Payment Account
Follow the steps below to edit a payment account.
1. Click the Setup tab in the main navigation bar.
2. Click Options and select View/Edit Account for the account to be edited on the Payment Accounts page.

Copyright 2017 Benefitfocus.com, Inc. | Confidential and Proprietary 76
The Edit Payment Account page displays.
3. Edit the account information as necessary. See Creating a Payment Account for additional information.
If this account is already being used to process payments, you can only change certain information, such as account type and auto-draft options.
4. Click Save. A confirmation displays.
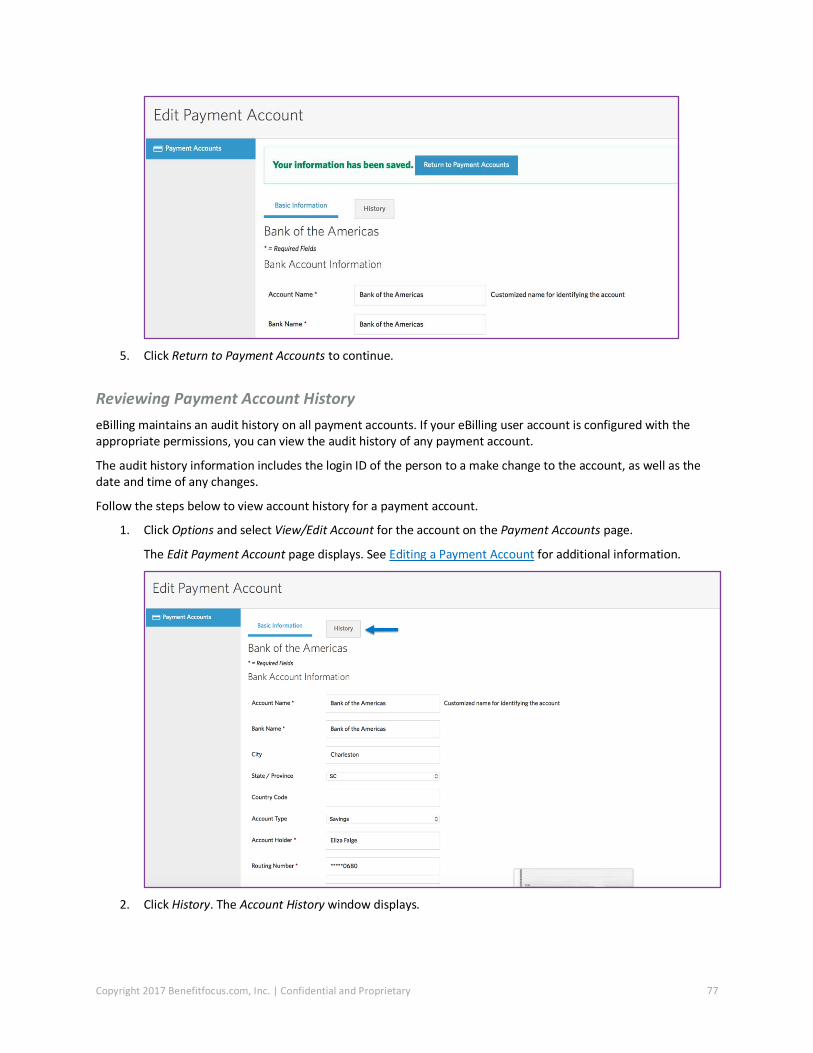
Copyright 2017 Benefitfocus.com, Inc. | Confidential and Proprietary 77
5. Click Return to Payment Accounts to continue.
Reviewing Payment Account History
eBilling maintains an audit history on all payment accounts. If your eBilling user account is configured with the appropriate permissions, you can view the audit history of any payment account.
The audit history information includes the login ID of the person to a make change to the account, as well as the date and time of any changes.
Follow the steps below to view account history for a payment account.
1. Click Options and select View/Edit Account for the account on the Payment Accounts page.
The Edit Payment Account page displays. See Editing a Payment Account for additional information.
2. Click History. The Account History window displays.

Copyright 2017 Benefitfocus.com, Inc. | Confidential and Proprietary 78
If applicable, click Advanced Search to search for a specific transaction. Click Reset Search to remove the search criteria.
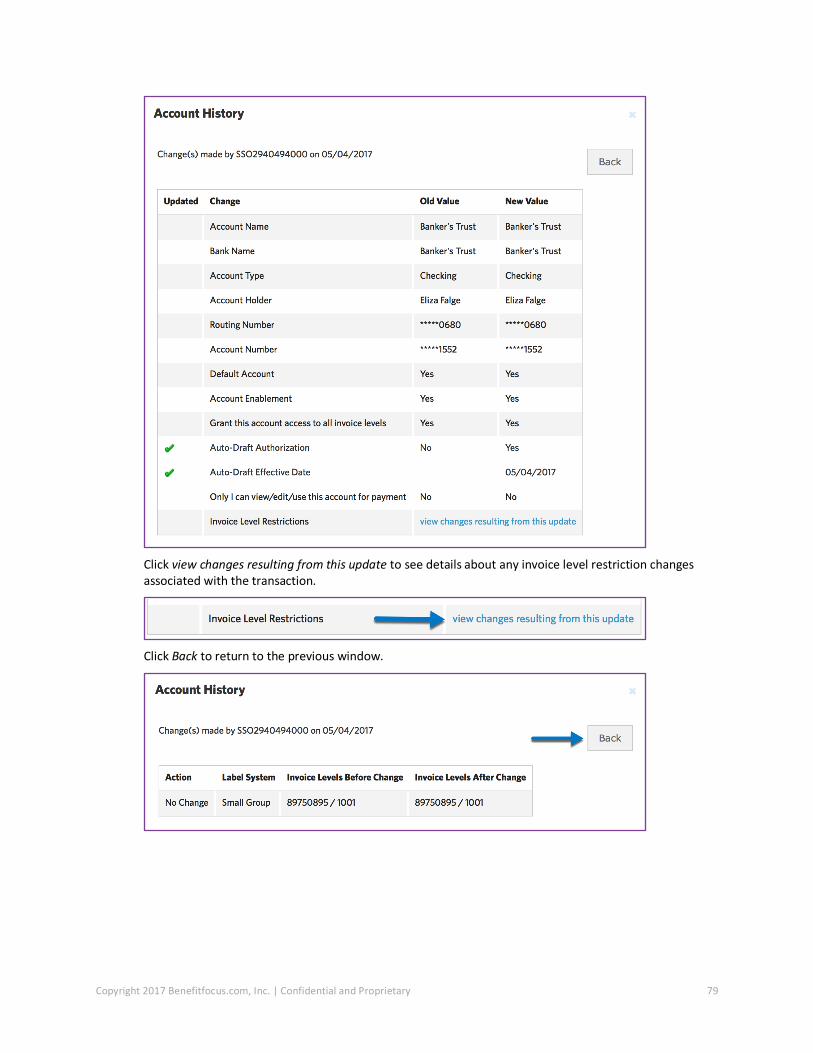
3. Click View for a transaction to view the details.
The Account History details display. A green check mark indicates items that were updated for the transaction.
Copyright 2017 Benefitfocus.com, Inc. | Confidential and Proprietary 79
Click view changes resulting from this update to see details about any invoice level restriction changes associated with the transaction.
Click Back to return to the previous window.


