16
English Elcometer 456 Duct Deposit Measuring System Operating Instructions
| Date post: | 07-Jun-2018 |
| Category: |
Documents |
| Upload: | truongkiet |
| View: | 222 times |
| Download: | 0 times |
Engl
ish
ystem
s
456_Ductkit_TMA_0490_00_01_ A6_22604.fm Page -1 Wednesday, March 23, 2011 3:46 PM
Elcometer 456
Duct Deposit Measuring S
Operating Instruction

Engl
ish
Equipment Directive. The Model E meetsipment according to CISPR 11. Class Bnnected to a low voltage power supply
A product in which there is intentionallysary for the internal functioning of the
ns: (1) this device may not cause harmfuly cause undesired operation.
e, pursuant to Part 15 of the FCC Rules.al installation. This equipment generates,ructions, may cause harmful interference installation. If this equipment does causeent off and on, the user is encouraged to
ected.
the equipment under FCC rules.
ted Kingdom SIG QDID = B014393
batteries.; GB2342450A, DE10131827
mitted, transcribed, stored (in a retrievalechanical, magnetic, optical, manual or
490 Issue 01 Text with Cover No: 22604
456_Ductkit_TMA_0490_00_01_ A6_22604.fm Page 0 Wednesday, March 23, 2011 3:46 PM
R
The Elcometer 456 Models B, S & T meet the Radio and Telecommunications Terminal the Electromagnetic Compatibility Directive. This product is Class B, Group 1 ISM equproduct: Suitable for use in domestic establishments and in establishments directly conetwork which supplies buildings used for domestic purposes. Group 1 ISM product: generated and/or used conductively coupled radio-frequency energy which is necesequipment itself.
This device complies with Part 15 of the FCC Rules. Operation is subject to the following two conditiointerference, and (2) this device must accept any interference received, including interference that maNote: This equipment has been tested and found to comply with the limits for a Class B digital devicThese limits are designed to provide reasonable protection against harmful interference in a residentiuses and can radiate radio frequency energy and, if not installed and used in accordance with the instto radio communications. However, there is no guarantee that interference will not occur in a particularharmful interference to radio or television reception, which can be determined by turning the equipmtry to correct the interference by one or more of the following measures:• Reorient or relocate the receiving antenna.• Increase the separation between the equipment and receiver.• Connect the equipment into an outlet on a circuit different from that to which the receiver is conn• Consult the dealer or an experienced radio/TV technician for help.Modifications not expressly approved by Elcometer Limited could void the user’s authority to operateThis Class B digital apparatus complies with Canadian ICES-003
is a registered trademark of Elcometer Limited, Edge Lane, Manchester, M43 6BU. Uniare trademarks owned by Bluetooth SIG Inc and licensed to Elcometer Limited. Bluetooth
All other trademarks acknowledged.Gauge dimensions: 140 x 720 x 450mm (5.51 x 2.83 x 1.77"). Gauge Weight: 154g (5.43oz) includingApplicable patents: US6243661; US5886522; US676203; US760667B2; GB2306009B; GB2367135B© Elcometer Limited 2011. All rights reserved. No part of this document may be reproduced, transsystem or otherwise) or translated into any language, in any form or by any means (electronic, motherwise) without the prior written permission of Elcometer Limited
Doc.No. TMA-0

R
1
Page
. . . . . . . . . . . . . . . . . . . . . . . . 3
. . . . . . . . . . . . . . . . . . . . . . . . 5
. . . . . . . . . . . . . . . . . . . . . . . . 5
. . . . . . . . . . . . . . . . . . . . . . . . 6
. . . . . . . . . . . . . . . . . . . . . . . . 7
. . . . . . . . . . . . . . . . . . . . . . . . 9
. . . . . . . . . . . . . . . . . . . . . . . . 9
. . . . . . . . . . . . . . . . . . . . . . . 10
. . . . . . . . . . . . . . . . . . . . . . . 14
. . . . . . . . . . . . . . . . . . . . . . . 15
. . . . . . . . . . . . . . . . . . . . . . . 15
456_Ductkit_TMA_0490_00_01_ A6_22604.fm Page 1 Wednesday, March 23, 2011 3:46 PM
CONTENTS
Section
1 About this equipment . . . . . . . . . . . . . . . . . . . . . . . . . . . . . . . . . . . . . 2 Getting started. . . . . . . . . . . . . . . . . . . . . . . . . . . . . . . . . . . . . . . . . . . 3 Connecting your probe. . . . . . . . . . . . . . . . . . . . . . . . . . . . . . . . . . . . 4 Taking a reading . . . . . . . . . . . . . . . . . . . . . . . . . . . . . . . . . . . . . . . . . 5 Using the duct cleaning template . . . . . . . . . . . . . . . . . . . . . . . . . . . 6 Calibrating the gauge . . . . . . . . . . . . . . . . . . . . . . . . . . . . . . . . . . . . . 7 Transferring readings to a computer . . . . . . . . . . . . . . . . . . . . . . . . 8 Producing reports using ElcoMaster™ 2.0. . . . . . . . . . . . . . . . . . . . 9 Probe technical data . . . . . . . . . . . . . . . . . . . . . . . . . . . . . . . . . . . . . . 10 Spares and accessories . . . . . . . . . . . . . . . . . . . . . . . . . . . . . . . . . . . 11 Related equipment . . . . . . . . . . . . . . . . . . . . . . . . . . . . . . . . . . . . . . .

asuring System. Welcome to
tings inspection equipment. Ourh application to post application
duct. With the purchase of thistwork of Elcometer. For more
rement of the thickness of dustferrous metals.ver the test area and then save, download your measurements report using the pre-designedest) in HVCA guide TR/19.
easuring System, please take instruction manual for thelcometer supplier if you have
456_Ductkit_TMA_0490_00_01_ A6_22604.fm Page 2 Wednesday, March 23, 2011 3:46 PM
R
2
Thank you for your purchase of this Elcometer 456 Duct Deposit MeElcometer.Elcometer are world leaders in the design, manufacture and supply of coaproducts cover all aspects of coating inspection, from development througinspection.The Elcometer 456 Duct Deposit Measuring System is a world beating proproduct you now have access to the worldwide service and support neinformation visit our website at www.elcometer.com.
1 ABOUT THIS EQUIPMENT
The Elcometer 456 Duct Deposit Measuring System is designed for measuand grease deposits within ventilation systems and kitchen ducts made of Use the template supplied to help you take readings of deposit thickness oyour measurements in the gauge memory. When you have finished testingto a PC via Bluetooth® or cable and then produce a professional surveyreports in ElcoMaster™ 2.0 software. This is the DTT (Deposit Thickness T
To maximise the benefits of your new Elcometer 456 Duct Deposit Msome time to read these Operating Instructions and the separateElcometer 456 gauge. Do not hesitate to contact Elcometer or your Eany questions.
R
3
that this packaging is disposedal Authority for further guidance.
456_Ductkit_TMA_0490_00_01_ A6_22604.fm Page 3 Wednesday, March 23, 2011 3:46 PM
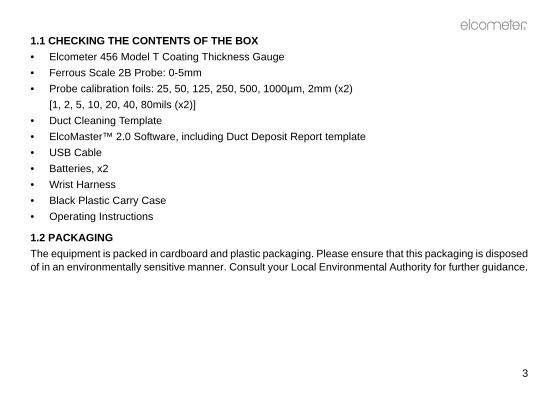
1.1 CHECKING THE CONTENTS OF THE BOX• Elcometer 456 Model T Coating Thickness Gauge • Ferrous Scale 2B Probe: 0-5mm• Probe calibration foils: 25, 50, 125, 250, 500, 1000µm, 2mm (x2)
[1, 2, 5, 10, 20, 40, 80mils (x2)]• Duct Cleaning Template• ElcoMaster™ 2.0 Software, including Duct Deposit Report template• USB Cable• Batteries, x2• Wrist Harness• Black Plastic Carry Case• Operating Instructions
1.2 PACKAGINGThe equipment is packed in cardboard and plastic packaging. Please ensureof in an environmentally sensitive manner. Consult your Local Environment

d
g Bluetooth® for quick and easyo a computer” on page 8.B convertor (see “Spares andcated on the end of your gauge
2
456_Ductkit_TMA_0490_00_01_ A6_22604.fm Page 4 Wednesday, March 23, 2011 3:46 PM
R
4
2 GETTING STARTED
1. Press and hold the ON/OFF button until the Elcometer logo is displaye2. Select your language using the softkeys3. Follow the on screen menusTo access the language menu when in a foreign language:1. Switch the gauge OFF2. Press and hold the left softkey and switch the gauge ON3. Select your language using the softkeys
2.1 INTERFACING WITH A PCYour gauge has a Bluetooth® interface. Connect your gauge to your PC usindata transfer and welcome screen download - see “Transferring readings tIf your PC does not have a Bluetooth® interface, use a Bluetooth® to USaccessories” on page 14) or connect your gauge using the USB interface lowith the optional USB connection cable supplied.
3 CONNECTING YOUR PROBE
1. Rotate the probe socket to align the pins2. Screw in the collar - clockwise
1

R
5
8
it perpendicularated surface
’ if inactive for the period defined
e over the coated surfacee down hard onto the surfacee to hover over the surface aslt in a false reading
456_Ductkit_TMA_0490_00_01_ A6_22604.fm Page 5 Wednesday, March 23, 2011 3:46 PM
4 TAKING A READING
4.1 BEFORE YOU STARTHave you calibrated the gauge?........ see Cal and follow the steps on pageDo you require statistics? .................. press Stats.Do you want to save readings? ......... press Batch.Have you selected units (µm, etc)? ... press Menu/Setup/Units1. Hold the probe by the sleeve2. To take a reading, bring the probe down onto the surface whilst holding3. For subsequent readings, lift the probe off and then replace onto the co
The display will dim if inactive for more than 15 seconds and will go ‘blackin Menu/Setup/Display/Screen Timeout.The gauge will switch off automatically after 5 minutes of inactivity- - - indicates reading outside range of probe
DO DO NOT
• Hold the probe by the probe sleeve • Drag the prob• Gently place the probe onto the surface • Bang the prob• Allow the sleeve to make contact with the
surface - to improve accuracy• Allow the prob
this could resu

thod of measurement.low to help you take a group of
r readings to ElcoMaster™ 2.0.
, Cleanliness of Ventilation Systems
(2)
(4)
456_Ductkit_TMA_0490_00_01_ A6_22604.fm Page 6 Wednesday, March 23, 2011 3:46 PM
R
6
5 USING THE DUCT CLEANING TEMPLATE
Take readings (see page 5) in accordance with the appropriate HVCAa meUse the Duct Cleaning Template supplied and the procedure described be20 readings before and after cleaning in the test location. Then output you1. Place the Duct Cleaning Template
in the duct.2. Mark the position of each corner.
3. Use your gauge to take a reading ineach of the holes in the templateand save all these readings in abatch.
4. Remove the template and cleanthe surface of the duct within theboundaries of the corner marks.
a. Heating and Ventilating Contractors’ Association, Guide to Good Practice TR/19(www.hvca.org.uk).
(1)
R
(3)

R
7
(6)
R
456_Ductkit_TMA_0490_00_01_ A6_22604.fm Page 7 Wednesday, March 23, 2011 3:46 PM
5. Replace the Duct CleaningTemplate in the duct ensuring that itis in the same position as before -use the corner marks aspositioning guides.
6. Use your gauge to take a secondset of readings in the same orderas the first set and save yourreadings in the same batch.
7. Connect your gauge to a PC anduse the Duct Deposit Reporttemplate in ElcoMaster™ 2.0 toproduce a professional report ofyour readings - see “Producingreports using ElcoMaster™ 2.0” onpage 9.
(5)

rchiving, analysis and reporting.
red to a PC using Bluetooth® ordes the ElcoMaster™ 2.0.eposit measurements. Data cancan also be transferred as themay need together with a reportMaster™ 2.0 can also be used
90°
456_Ductkit_TMA_0490_00_01_ A6_22604.fm Page 8 Wednesday, March 23, 2011 3:46 PM
R
8
6 CALIBRATING THE GAUGE
1. Press the Cal softkey2. For alternative calibration methods, select Cal/Cal Method3. Select Calibrate and follow the on-screen instructions4. When prompted place the probe on the centre of the foil(s)Note: Foils can be stackedYou have now finished calibrating your gauge and it is ready foruse. You may wish to test the gauge again using the stackedshims.
7 TRANSFERRING READINGS TO A COMPUTERTransfer the readings you take from the memory of the gauge to a PC for a
7.1 SOFTWAREYour gauge comes complete with software which allows data to be transferthe optional USB connection cable. The CD supplied with your gauge incluElcoMaster™ 2.0 software contains a report designed specifically for duct dbe transferred from the batch memory of the Elcometer 456 gauge and measurements are taken. ElcoMaster™ 2.0 includes all the charts that you designer to let you design your reports the way you wish to see them. Elcoto create personalised welcome screens and upload them to your gauge.

R
9
ble. Connect the cable between
tware.
download data are included in
ge includes a report designed to download readings from theo email. Further information canained within ElcoMaster™ 2.0.
to the instructions included with
l key to select multiple batches).
d.
456_Ductkit_TMA_0490_00_01_ A6_22604.fm Page 9 Wednesday, March 23, 2011 3:46 PM
7.2 CABLE CONNECTION1. Connect your gauge to your PC using the optional USB connection ca
the interface on the end of the gauge and an USB port on your PC.2. Switch on your gauge and ensure the Reading Screen is displayed.3. Start ElcoMaster™ 2.0 and follow the instructions included with the sof
7.3 BLUETOOTH® CONNECTIONFull instructions on how to interface your gauge with ElcoMaster™ 2.0 andthe ElcoMaster™ 2.0 help file supplied with the software.
8 PRODUCING REPORTS USING ELCOMASTER™ 2.0The ElcoMaster™ 2.0 software included with your Elcometer 456 gauspecifically for duct deposit measurements. Follow the steps listed belowgauge to ElcoMaster™ 2.0 and then output the report to a printer, a file or tbe found in the instructions provided with your gauge and the help file cont
8.1 DOWNLOAD READINGS DATA FROM GAUGE MEMORYBefore you start, interface and add your gauge to ElcoMaster™ 2.0 - refer ElcoMaster™ 2.0 software.1. Ensure your gauge is connected - refer to the following screenshot.2. Click on the batch or batches you want to download (hold down the Ctr3. Click on the Download button.4. Select which folder to download to and then press OK to start downloa
were saved.
456_Ductkit_TMA_0490_00_01_ A6_22604.fm Page 10 Wednesday, March 23, 2011 3:46 PM
R
10
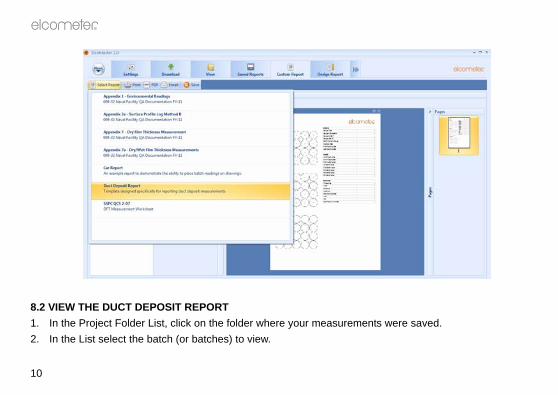
8.2 VIEW THE DUCT DEPOSIT REPORT1. In the Project Folder List, click on the folder where your measurements2. In the List select the batch (or batches) to view.

R
11
sit Report’ from the ‘Batches’lick the batch or drag and drop to pdf or emailed - refer to theion.
456_Ductkit_TMA_0490_00_01_ A6_22604.fm Page 11 Wednesday, March 23, 2011 3:46 PM
3. In ‘Custom Reports’ choose ‘Select Report’ and select ‘Duct Depowindow, select the Project/Folder/Batch for the Report. Either double cto the Report. The report will be shown and can be printed, convertedinstructions included with ElcoMaster™ 2.0 software for more informat

456_Ductkit_TMA_0490_00_01_ A6_22604.fm Page 12 Wednesday, March 23, 2011 3:46 PM
R
12
8.3 EXAMPLE DUCT DEPOSIT REPORT

R
13
)
456_Ductkit_TMA_0490_00_01_ A6_22604.fm Page 13 Wednesday, March 23, 2011 3:46 PM
9 PROBE TECHNICAL DATA
RANGE0 µm to 1500 µm (0 mil to 60 mils)and 0 to 5 mm (0 to 200 mils) user selectable
ACCURACY±1% to ±3% or ±2.5 µmb (±0.1 mil) for 0 µm to 1500 µm±1% to ±3% or ±20 µm (±1.0 mil) for 0 to 5 mm
RESOLUTION0.1 µm in the range 0 - 99.9 µm, 1.0 µm 100 - 1500 µm (Scale 1)0.01 mil in the range 0 - 4.99 mils, 0.1mil in the range 5 to 60 mils (Scale 11.0 µm in the range 0 to 1.0 mm, 10 µm in the range 1-5 mm (Scale 2)0.1 mil in the range 0 to 50 mils, 1 mil in the range 50 to 200 mils (Scale 2)
b. Whichever is the greater.

Elcometer, or your Elcometerws the description of each part:
T99920130T99913939T99022255-8T99913969
r associated coating inspectiony also benefit from the following
visit www.elcometer.com
456_Ductkit_TMA_0490_00_01_ A6_22604.fm Page 14 Wednesday, March 23, 2011 3:46 PM
R
14
10 SPARES AND ACCESSORIESThe following spare parts and optional accessories are available fromsupplier. To place an order please quote the sales part number which folloUSB to Bluetooth® Interface Duct cleaning template:Precision Foil Set: Scale 2BFerrous zero plate:
11 RELATED EQUIPMENT
Elcometer produces a wide range of surface testing equipment and otheequipment. Users of the Elcometer 456 Duct Deposit Measuring System maElcometer products:• Elcometer Duct Grease Thickness CombFor further information contact Elcometer, your local Elcometer supplier or


