30
EMC ® Avamar ® Virtual Edition 7.2 for VMware Installation Guide 302-001-816 REV 01 EMC CONFIDENTIAL

EMC® Avamar® Virtual Edition 7.2for VMware
Installation Guide302-001-816
REV 01
EMC CONFIDENTIAL

Copyright © 2015 EMC Corporation. All rights reserved. Published in USA.
Published June, 2015
EMC believes the information in this publication is accurate as of its publication date. The information is subject to changewithout notice.
The information in this publication is provided as is. EMC Corporation makes no representations or warranties of any kind withrespect to the information in this publication, and specifically disclaims implied warranties of merchantability or fitness for aparticular purpose. Use, copying, and distribution of any EMC software described in this publication requires an applicablesoftware license.
EMC², EMC, and the EMC logo are registered trademarks or trademarks of EMC Corporation in the United States and othercountries. All other trademarks used herein are the property of their respective owners.
For the most up-to-date regulatory document for your product line, go to EMC Online Support (https://support.emc.com).
EMC CorporationHopkinton, Massachusetts 01748-91031-508-435-1000 In North America 1-866-464-7381www.EMC.com
EMC CONFIDENTIAL
2 EMC Avamar Virtual Edition 7.2 for VMware Installation Guide
5
7
Introduction 11
Overview of Avamar Virtual Edition for VMware..............................................12Appropriate environments for AVE.................................................................12Pre-sales performance analysis..................................................................... 13
Installation 15
Preinstallation requirements and best practices............................................16System requirements....................................................................... 16Verifying the DNS configuration........................................................16AVE virtual disk requirements...........................................................17Software requirements.....................................................................17Network requirements......................................................................17Virtual disk configuration best practices...........................................18
Installation....................................................................................................18Preparing the virtual machine...........................................................18Configuring network settings............................................................20Installing and configuring Avamar software...................................... 22
Benchmark Testing 25
Running ave-part.pl.......................................................................................26Running benchmark testing...........................................................................26Starting benchmark testing........................................................................... 26Manually ending benchmark testing..............................................................27Analyzing benchmark results.........................................................................27Benchmark removal...................................................................................... 29Benchmark failure.........................................................................................29
Tables
Preface
Chapter 1
Chapter 2
Appendix A
CONTENTS
EMC CONFIDENTIAL
EMC Avamar Virtual Edition 7.2 for VMware Installation Guide 3

CONTENTS
EMC CONFIDENTIAL
4 EMC Avamar Virtual Edition 7.2 for VMware Installation Guide

Maximum change rates AVE supports for file server and mixed environments................ 12Minimum requirements for AVE......................................................................................16AVE virtual disk requirements........................................................................................ 17Additional AVE software installation requirements.........................................................170.5 TB AVE minimum benchmark test results................................................................. 271 TB AVE minimum benchmark test results.................................................................... 282 TB AVE minimum benchmark test results.................................................................... 284 TB AVE minimum benchmark test results.................................................................... 28
12345678
TABLES
EMC CONFIDENTIAL
EMC Avamar Virtual Edition 7.2 for VMware Installation Guide 5

TABLES
EMC CONFIDENTIAL
6 EMC Avamar Virtual Edition 7.2 for VMware Installation Guide

PREFACE
As part of an effort to improve its product lines, EMC periodically releases revisions of itssoftware and hardware. Therefore, some functions described in this document might notbe supported by all versions of the software or hardware currently in use. The productrelease notes provide the most up-to-date information on product features.
Contact your EMC technical support professional if a product does not function properlyor does not function as described in this document.
Note
This document was accurate at publication time. Go to EMC Online Support (https://support.emc.com) to ensure that you are using the latest version of this document.
PurposeThis guide describes how to install the Avamar Virtual Edition solution, a single-node,non-RAIN Avamar server that runs as a virtual machine in a VMware ESX Serverenvironment.
AudienceThis document is intended for EMC Professional Services employees and EMC authorizedchannel partners who install AVE.
Revision historyThe following table presents the revision history of this document.
Revision Date Description
01 June, 2015 Release of Avamar Virtual Edition for VMware7.2.
Related documentationThe following EMC publications provide additional information:
l EMC Avamar Release Notes
l EMC Avamar Administration Guide
l EMC Avamar Operational Best Practices Guide
l EMC Avamar Product Security Guide
l EMC Avamar Backup Clients User Guide
Special notice conventions used in this documentEMC uses the following conventions for special notices:
NOTICE
Addresses practices not related to personal injury.
Note
Presents information that is important, but not hazard-related.
Typographical conventionsEMC uses the following type style conventions in this document:
EMC CONFIDENTIAL
EMC Avamar Virtual Edition 7.2 for VMware Installation Guide 7

Bold Use for names of interface elements, such as names of windows, dialogboxes, buttons, fields, tab names, key names, and menu paths (whatthe user specifically selects or clicks)
Italic Use for full titles of publications referenced in text
Monospace Use for:
l System code
l System output, such as an error message or script
l Pathnames, file names, prompts, and syntax
l Commands and options
Monospace italic Use for variables
Monospace bold Use for user input
[ ] Square brackets enclose optional values
| Vertical bar indicates alternate selections - the bar means “or”
{ } Braces enclose content that the user must specify, such as x or y or z
... Ellipses indicate nonessential information omitted from the example
Where to get helpThe Avamar support page provides access to licensing information, productdocumentation, advisories, and downloads, as well as how-to and troubleshootinginformation. This information may enable you to resolve a product issue before youcontact EMC Customer Support.
To access the Avamar support page:
1. Go to https://support.EMC.com/products.
2. Type a product name in the Find a Product box.
3. Select the product from the list that appears.
4. Click the arrow next to the Find a Product box.
5. (Optional) Add the product to the My Products list by clicking Add to my products inthe top right corner of the Support by Product page.
DocumentationThe Avamar product documentation provides a comprehensive set of featureoverview, operational task, and technical reference information. Review thefollowing documents in addition to product administration and user guides:
l Release notes provide an overview of new features and known limitations for arelease.
l Technical notes provide technical details about specific product features,including step-by-step tasks, where necessary.
l White papers provide an in-depth technical perspective of a product or productsas applied to critical business issues or requirements.
PREFACE
EMC CONFIDENTIAL
8 EMC Avamar Virtual Edition 7.2 for VMware Installation Guide

KnowledgebaseThe EMC Knowledgebase contains applicable solutions that you can search for eitherby solution number (for example, esgxxxxxx) or by keyword.
To search the EMC Knowledgebase:
1. Click the Search link at the top of the page.
2. Type either the solution number or keywords in the search box.
3. (Optional) Limit the search to specific products by typing a product name in theScope by product box and then selecting the product from the list that appears.
4. Select Knowledgebase from the Scope by resource list.
5. (Optional) Specify advanced options by clicking Advanced options andspecifying values in the available fields.
6. Click the search button.
Online communitiesVisit EMC Community Network at http://community.EMC.com for peer contacts,conversations, and content on product support and solutions. Interactively engageonline with customers, partners and certified professionals for all EMC products.
Live chatTo engage EMC Customer Support by using live interactive chat, click Join Live Chaton the Service Center panel of the Avamar support page.
Service RequestsFor in-depth help from EMC Customer Support, submit a service request by clickingCreate Service Requests on the Service Center panel of the Avamar support page.
Note
To open a service request, you must have a valid support agreement. Contact yourEMC sales representative for details about obtaining a valid support agreement orwith questions about your account.
To review an open service request, click the Service Center link on the ServiceCenter panel, and then click View and manage service requests.
Facilitating supportEMC recommends that you enable ConnectEMC and Email Home on all Avamarsystems:
l ConnectEMC automatically generates service requests for high priority events.
l Email Home emails configuration, capacity, and general system information toEMC Customer Support.
Your commentsYour suggestions will help us continue to improve the accuracy, organization, and overallquality of the user publications. Send your opinions of this document to [email protected].
Please include the following information:
l Product name and version
l Document name, part number, and revision (for example, 01)
l Page numbers
PREFACE
EMC CONFIDENTIAL
EMC Avamar Virtual Edition 7.2 for VMware Installation Guide 9

l Other details that will help us address the documentation issue
PREFACE
EMC CONFIDENTIAL
10 EMC Avamar Virtual Edition 7.2 for VMware Installation Guide

CHAPTER 1
Introduction
This chapter includes the following topics:
l Overview of Avamar Virtual Edition for VMware......................................................12l Appropriate environments for AVE.........................................................................12l Pre-sales performance analysis............................................................................. 13
EMC CONFIDENTIAL
Introduction 11

Overview of Avamar Virtual Edition for VMwareEMC® Avamar® Virtual Edition (AVE) is a single-node non-RAIN (Redundant Array ofIndependent Nodes) Avamar server that runs as a virtual machine in a VMware® ESXi5.1/5.5/5.5u2/6.0 environment. AVE integrates the latest version of Avamar softwarewith SUSE Linux as a VMware virtual machine.
AVE is similar to single-node Avamar servers in the following ways:
l Runs autonomously as a target for all Avamar client backups
l Performs replication to a physical Avamar system or another AVE
AVE is available in four configurations: 0.5 TB, 1 TB, 2 TB, and 4 TB licensed capacity. AVEis not scalable to a multi-node Avamar server and resizing the virtual machine is notsupported. You can increase storage capacity by deploying additional AVE virtualmachines, and then divide backups among them. Or you can replicate the data toanother Avamar server, delete the smaller virtual machine, create a larger virtualmachine, and replicate the data back to the larger virtual machine.
AVE supports backup of physical and virtual clients:
l For physical clients, install Avamar client software on each client.
l For virtual clients, there are two options for backups. Virtual clients can be backed upthrough guest OS backups (requires installing Avamar client software on each virtualmachine) or through host-based backups (requires a proxy server).
Appropriate environments for AVEThe following factors have the most direct impact on the long-term reliability, availability,and supportability of the AVE virtual machine:
l I/O performance capability of the AVE storage subsystem
l Amount of data added daily to the AVE virtual machine (change rate)
l Capacity utilized within the AVE virtual machine
Specifications in this section and AVE virtual disk requirements on page 17 describeminimum or maximum requirements for these factors. AVE generally performs betterwhen I/O performance is higher, and change rate and utilized capacity are lower. Tomaximize the capacity the AVE virtual machine can use, the daily change rate of the dataAVE protects must be balanced with adequate I/O performance.
The first step in determining the proper implementation of AVE is to establish which kindof customer environment AVE will be used to protect, file server or mixed environment.File server environments include file system data and mixed environments include filesystem data and structured data (for example, database data).
The following table describes the maximum change rates that AVE supports for file serverand mixed environments.
Table 1 Maximum change rates AVE supports for file server and mixed environments
Configuration File server data Mixed data
0.5 TB AVE Less than 2 GB per day Less than 5 GB per day
1 TB AVE Less than 4 GB per day Less than 10 GB per day
Introduction
EMC CONFIDENTIAL
12 EMC Avamar Virtual Edition 7.2 for VMware Installation Guide
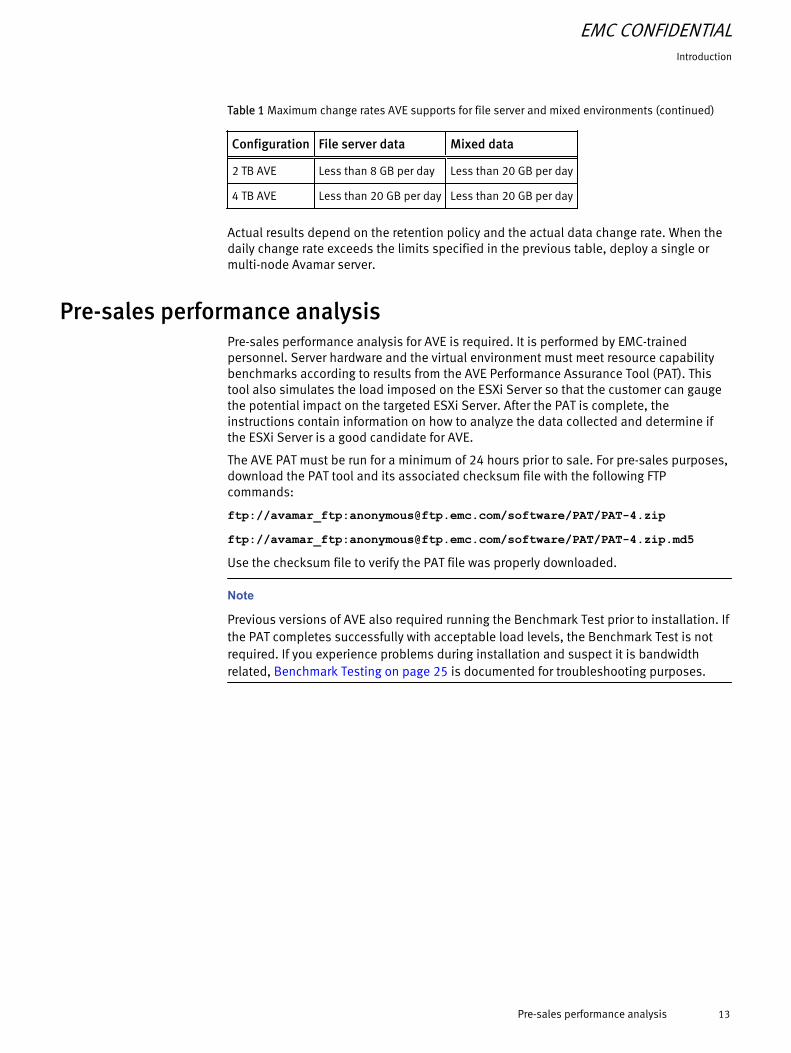
Table 1 Maximum change rates AVE supports for file server and mixed environments (continued)
Configuration File server data Mixed data
2 TB AVE Less than 8 GB per day Less than 20 GB per day
4 TB AVE Less than 20 GB per day Less than 20 GB per day
Actual results depend on the retention policy and the actual data change rate. When thedaily change rate exceeds the limits specified in the previous table, deploy a single ormulti-node Avamar server.
Pre-sales performance analysisPre-sales performance analysis for AVE is required. It is performed by EMC-trainedpersonnel. Server hardware and the virtual environment must meet resource capabilitybenchmarks according to results from the AVE Performance Assurance Tool (PAT). Thistool also simulates the load imposed on the ESXi Server so that the customer can gaugethe potential impact on the targeted ESXi Server. After the PAT is complete, theinstructions contain information on how to analyze the data collected and determine ifthe ESXi Server is a good candidate for AVE.
The AVE PAT must be run for a minimum of 24 hours prior to sale. For pre-sales purposes,download the PAT tool and its associated checksum file with the following FTPcommands:
ftp://avamar_ftp:[email protected]/software/PAT/PAT-4.zipftp://avamar_ftp:[email protected]/software/PAT/PAT-4.zip.md5Use the checksum file to verify the PAT file was properly downloaded.
Note
Previous versions of AVE also required running the Benchmark Test prior to installation. Ifthe PAT completes successfully with acceptable load levels, the Benchmark Test is notrequired. If you experience problems during installation and suspect it is bandwidthrelated, Benchmark Testing on page 25 is documented for troubleshooting purposes.
Introduction
EMC CONFIDENTIAL
Pre-sales performance analysis 13

Introduction
EMC CONFIDENTIAL
14 EMC Avamar Virtual Edition 7.2 for VMware Installation Guide

CHAPTER 2
Installation
This chapter includes the following topics:
l Preinstallation requirements and best practices....................................................16l Installation............................................................................................................18
EMC CONFIDENTIAL
Installation 15

Preinstallation requirements and best practicesBefore you install an AVE virtual machine, follow the preinstallation requirements andreview the best practices in the following sections.
Note
Using third party tools to create clones or exact copies of deployed Avamar Virtual Editionsystems is known to cause issues. Cloning of Avamar Virtual Edition systems is notsupported.
System requirementsAvamar Virtual Edition (AVE) is supported on VMware ESXi 5.1/5.5/5.5u2/6.0.
The following table defines the minimum system requirements for each size of AVE.
Table 2 Minimum requirements for AVE
0.5 TB AVE 1 TB AVE 2TB AVE 4 TB AVE
Processors Minimum two 2GHz processors
Minimum two 2GHz processors
Minimum two 2GHz processors
Minimum four 2GHz processors
Memory 6 GB 8 GB 16 GB 36 GB
Disk space 900 GB 1,650 GB 3,150 GB 6,150 GB
Networkconnection
1 GbE connection 1 GbE connection 1 GbE connection 1 GbE connection
Note
If you are usingVMFS3 datastores, for 250 GB virtual disks, use at least 1 MB block sizefor your VMFS datastore filesystem. For 1000 GB disks, use at least a 4 MB block size foryour VMFS3 datastore file system. For VMFS5 the block size is automatically defined.
Verifying the DNS configurationPrior to installing AVE, DNS must be properly configured. Failure to have DNS set upproperly can cause runtime or configuration issues.
Procedure
1. Open a command prompt on the vCenter Server and type the following command:
nslookup AVE_IP_address DNS_Server_IP_address
The nslookup command will return the FQDN for AVE.
2. Type the following command:
nslookup AVE_FQDN DNS_Server_IP_address
The nslookup command will return the IP address for AVE.
3. Type the following command:
nslookup FQDN_of_vCenter DNS_Server_IP_address
Installation
EMC CONFIDENTIAL
16 EMC Avamar Virtual Edition 7.2 for VMware Installation Guide

The nslookup command returns the IP address of the vCenter Server.
4. If the nslookup commands returned the proper information, close the commandprompt. If the nslookup commands do not return proper information, resolve theDNS configuration before you install AVE.
AVE virtual disk requirementsThe AVE disk layout comprises one operating system disk (126 GB) and several storagepartitions (250 GB or 1000 GB depending on the AVE configuration).
The OS disk stores the operating system, Avamar application and log files.
The storage partitions store the backup data. Backup data is evenly distributed acrossthe storage partitions. The primary amount of the disk read, write, and seek usage occurson the storage partitions. To improve performance in the storage configuration, distributestorage partitions across high performance LUNs.
In addition to the OS partition, the following table defines the number and size of virtualdisks required for each AVE configuration.
Table 3 AVE virtual disk requirements
AVE configuration Number of virtual disks
0.5 TB 3 storage partitions (250 GB each)
1 TB 6 storage partitions (250 GB each)
2 TB 3 storage partitions (1000 GB each)
4 TB 6 storage partitions (1000 GB each)
Note
For 250 GB virtual disks, use at least 1 MB block size for your VMFS datastore file system.For 1000 GB disks, use at least a 4 MB block size for your VMFS datastore file system.
Software requirementsBefore you install AVE, ensure you have the software listed in the following table.
Table 4 Additional AVE software installation requirements
Requirement Description
Applications PuTTY and WinSCP
Files AVE Package, operating system security patches (if applicable)
Network requirementsBefore you install AVE, gather the following information:
l Hostnames and IP addresses for the AVE virtual machine and the DNS Server
l Gateway, netmask, and domain of the AVE virtual machine
l Firewall openings, if applicable
Installation
EMC CONFIDENTIAL
AVE virtual disk requirements 17

Note
The EMC Avamar Product Security Guide provides client-server data port usage and firewallrequirements.
Virtual disk configuration best practicesESXi supports multiple disk formats. For AVE virtual machines, the initial configuration isThick Provision Lazy Zeroed.
Note
AVE does not support thin provisioning.
After the initial installation, if you configure the virtual disks for the Thick Provision EagerZeroed, the customer will get better initial performance because the first write to the diskwill require less operations.
Note
See the VMware documentation for information on converting Lazy zeroed virtual disks toEager zeroed virtual disks. Converting a disk from Thick Provisioned Lazy Zeroed to ThickProvisioned Eager Zeroed is time consuming and can consume a significant number ofstorage I/O processes.
A virtual machine running AVE aggressively uses disk I/O and is almost never idle.VMware's recommendations for appropriate resources for high-performance databasevirtual machines are generally applicable to an AVE virtual machine. In particular, astorage pool allocated from a group of dedicated physical disks in a RAID 1 (mirror) orRAID 10 (combines RAID 0 with RAID 1) configuration provides the best performance.
InstallationThe following sections are describe how to install an AVE virtual machine.
Preparing the virtual machineThe following instructions use vCenter Server 5.5. Other versions of vCenter Server mighthave different options.
Procedure
1. Download the AVE virtual appliance file for the appropriate version of AVE you areinstalling.
2. Extract the compressed .7z file.
3. Start a VMware vSphere Client and connect to the vCenter Server or to the ESXi hostthat will host the AVE virtual machine.
4. Log in with administrative rights.
5. If you logged into vCenter, select the ESXi server that will host the AVE virtualmachine.
6. Select File > Deploy OVF Template.
The Source page appears.
7. Select Deploy from a file or URL and browse to the AVE virtual machine file (OVFextension) and click Next.
Installation
EMC CONFIDENTIAL
18 EMC Avamar Virtual Edition 7.2 for VMware Installation Guide
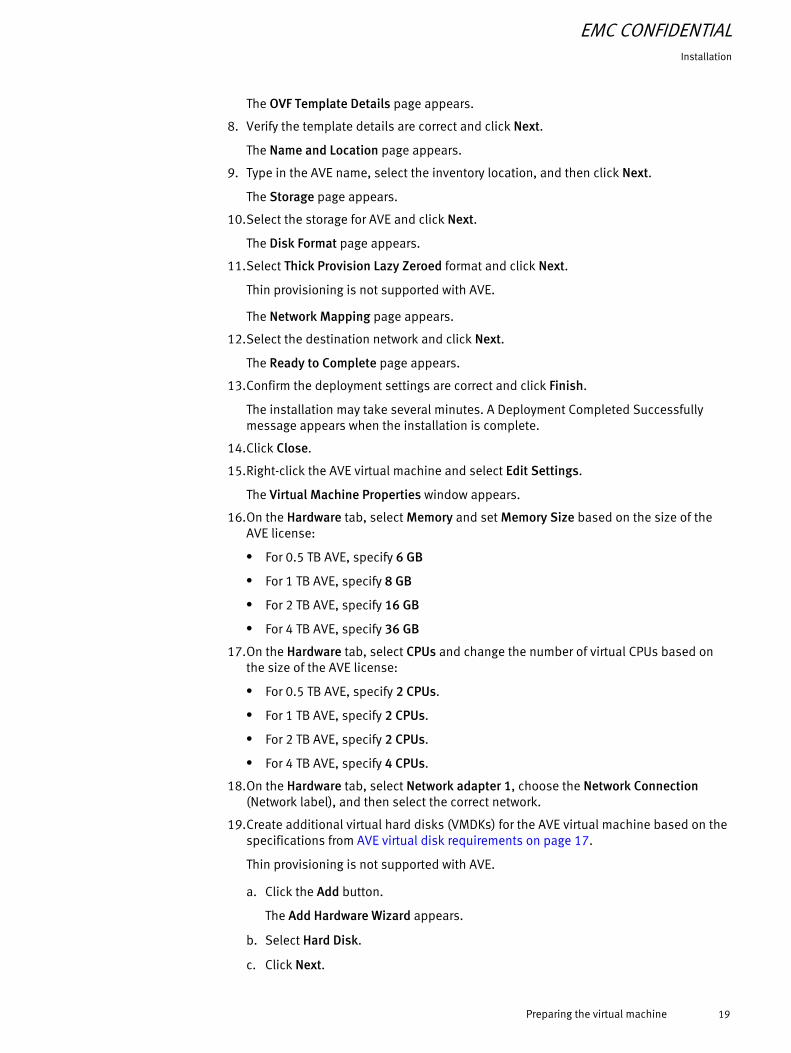
The OVF Template Details page appears.
8. Verify the template details are correct and click Next.
The Name and Location page appears.
9. Type in the AVE name, select the inventory location, and then click Next.
The Storage page appears.
10.Select the storage for AVE and click Next.
The Disk Format page appears.
11.Select Thick Provision Lazy Zeroed format and click Next.
Thin provisioning is not supported with AVE.
The Network Mapping page appears.
12.Select the destination network and click Next.
The Ready to Complete page appears.
13.Confirm the deployment settings are correct and click Finish.
The installation may take several minutes. A Deployment Completed Successfullymessage appears when the installation is complete.
14.Click Close.
15.Right-click the AVE virtual machine and select Edit Settings.
The Virtual Machine Properties window appears.
16.On the Hardware tab, select Memory and set Memory Size based on the size of theAVE license:
l For 0.5 TB AVE, specify 6 GB
l For 1 TB AVE, specify 8 GB
l For 2 TB AVE, specify 16 GB
l For 4 TB AVE, specify 36 GB
17.On the Hardware tab, select CPUs and change the number of virtual CPUs based onthe size of the AVE license:
l For 0.5 TB AVE, specify 2 CPUs.
l For 1 TB AVE, specify 2 CPUs.
l For 2 TB AVE, specify 2 CPUs.
l For 4 TB AVE, specify 4 CPUs.
18.On the Hardware tab, select Network adapter 1, choose the Network Connection(Network label), and then select the correct network.
19.Create additional virtual hard disks (VMDKs) for the AVE virtual machine based on thespecifications from AVE virtual disk requirements on page 17.
Thin provisioning is not supported with AVE.
a. Click the Add button.
The Add Hardware Wizard appears.
b. Select Hard Disk.
c. Click Next.
Installation
EMC CONFIDENTIAL
Preparing the virtual machine 19

d. Select Create a new virtual disk.
e. Click Next.
f. For Disk Size, type 250 GB (or 1000 GB if you are implementing a 2 or 4 TB AVE).
g. For Disk Provisioning select Thick Provision Lazy Zeroed format.
If you select Thick Provision Eager Zeroed during the installation, the installationcould take several hours. Time-out errors could also occur. See AVE virtual diskrequirements on page 17 for information about disk formatting after theinstallation process is complete.
h. For Location, select either Store with virtual machine or Specify a datastore.
i. Click Next.
j. For Mode select Independent. Use the default setting for Persistent.
k. Click Next.
l. Verify the configuration and select Finish.
m. Repeat these steps based on your AVE configuration:
l For 0.5 TB AVE, repeat two more times (for a total of three 250 GB hard drives).
l For 1 TB AVE, repeat five more times (for a total of six 250 GB hard drives).
l For 2 TB AVE, repeat two more times (for a total of three 1000 GB hard drives).
l For 4 TB AVE repeat five more times (for a total of six 1000 GB hard drives).
20.Finalize virtual machine configuration by completing the following steps:
a. Click OK.
b. In the Recent Tasks status area (bottom of screen), observe the progress of thehard drive creation.
When the status of the reconfigured Virtual Machine is complete, a Completedmessage appears.
21.Right-click the virtual machine and select Power > Power On. This command boots thevirtual machine.
22.Open the Virtual Console to monitor installation progress.
An insufficient licensing message at this point might indicate either a shortage of ESXiServer licenses or an inability to connect to a license server. Resolve this problem withthe network administrator.
23.On the Summary tab, verify the status for VMware Tools changes to Running orUnmanaged.
Configuring network settingsThe following procedure is used to configure AVE network configuration for a single IPaddress.
Note
If you need to run the Benchmark Test, skip this section and proceed to GUID-0DDEB048-16D4-40D1-B581-8862ADDA54CC.
Installation
EMC CONFIDENTIAL
20 EMC Avamar Virtual Edition 7.2 for VMware Installation Guide

Note
If you require dual-mode stack configuration (to support IPv4 and IPv6) refer to the SLESUnix YAST2 documentation.
Procedure
1. At the command prompt, type the following command:
yast2
2. Press Enter.
In YaST2, pressing Ctrl-H backspaces over data to delete existing data.
The YaST2 Control Center dialog box appears.
3. Select Network Devices and press Enter.
The Network Devices dialog box appears.
4. From Network Devices, select Network Settings and press Enter.
5. From Network Settings use the Tab key to access the Edit option and press Enter.
6. From the Network Card Setup use the Tab key to access and select Statically assignedIP Address (select using the spacebar). Tab to IP Address and type in the IPAddress, the Subnet Mask, and the Hostname of the AVE virtual machine.
7. Use the Tab key to select Next and press Enter.
8. FromNetwork Settings, use the Tab key to select Overview. Use the right-arrow key toselect Hostname/DNS. Use the Tab key to specify the following fields:
a. Hostname
b. Domain Name
c. Name Server 1
d. Name Server 2
e. Domain Search9. Use the Tab key to select Hostname/DNS. Use the right-arrow key to select Routing.
Type in the Default Gateway IP address for the AVE virtual machine. Use the Tabkey to select OK, and then press Enter.
10.From the YaST Control Center, use the Tab key to select Quit and press Enter.
Before proceeding, it is critical to confirm the network settings configured throughYAST2 are correct. Verify that all of the configuration files edited through YAST2 areproperly configured. Refer to the SLES Unix YAST2 documentation for additionalinformation.
11.Wait a couple of minutes and verify the preceding data by typing the followingcommand:
ifconfig
12.Verify basic network configuration of eth0 typing the following command:
ping Static-IP-Address
13.Verify basic network configuration by typing the following commands:
pinggateway_IP_Address
pingDNS_IP Address
Installation
EMC CONFIDENTIAL
Configuring network settings 21

nslookup FQDN
Installing and configuring Avamar softwareTo install Avamar software on a new AVE virtual machine, complete the followingprocedure:
Procedure
1. Log in to the Avamar Installation Manager user interface as root.
2. Open a web browser and type the following URL:
https://Avamar-Server:7543/avi/avigui.html
where Avamar-Server is the hostname or the IP address of the Avamar virtual machine.
The EMC Avamar Installation Manager login page appears.
3. If any security messages appear, click Continue.
The EMC Avamar Installation Manager dialog box appears.
4. In the User field type root.
5. In the Password field type changeme.
6. Click Login.
7. Click the SW Updates tab and click the Unlock icon in the upper right corner of thedialog page.
The Passcode dialog box appears.
8. Type in the support password Supp0rtHarV1 and click OK.
The EMC Avamar Installation Manager dialog box appears. This screen can take a fewminutes to populate.
9. After a few minutes, click the Refresh icon on your web browser to see the installationpackage.
10.Click the Install button.
The installation initialization begins. The initialization extracts files from the packageand prepares the environment for the installation. The process can take a fewminutes.
11.Once the initialization completes, the Installation Setup page appears. Note that thetabs with a red exclamation mark (!) are required for the installation.
By default, the Network Config tab is open.
12.Type a value of 0 and click Save.
13.Click the ConnectEMC tab and specify the following:
a. For Email sender address type sender email address for email notification
b. For Email server type Hostname of email server for notification emails to EMC
c. For Site name type Description of Avamar server location
d. For Email Server IP Protocol select IP Protocol used by the email server
e. Click Save
14.Click the Install Patches tab. Install available patches, and then click Save.
15.Click the Passwords tab, and then specify and confirm passwords. Make sure younote these for the customer. Click Save.
Installation
EMC CONFIDENTIAL
22 EMC Avamar Virtual Edition 7.2 for VMware Installation Guide

16.Click the Customer Contact Info tab, and then specify the customer contactinformation and click Save.
17.(Optional) To set Security Settings, click the Security Settings tab and then configureapplicable security settings. Click Save.
18.Click the Server Settings tab. Leave the Avamar Server Address field blank. Select theapplicable System time zone name and click Save. Click Continue.
The Avamar configuration begins. Wait until the process completes.
Note
Please check for the latest available security rollup released and install if applicable
Note
Once AVE is installed, see the EMC Avamar Administration Guide for additionalinformation on setting up and configuring Avamar.
Installation
EMC CONFIDENTIAL
Installing and configuring Avamar software 23

Installation
EMC CONFIDENTIAL
24 EMC Avamar Virtual Edition 7.2 for VMware Installation Guide

APPENDIX A
Benchmark Testing
This appendix includes the following topics:
l Running ave-part.pl...............................................................................................26l Running benchmark testing...................................................................................26l Starting benchmark testing................................................................................... 26l Manually ending benchmark testing......................................................................27l Analyzing benchmark results.................................................................................27l Benchmark removal.............................................................................................. 29l Benchmark failure.................................................................................................29
EMC CONFIDENTIAL
Benchmark Testing 25

Running ave-part.plThe ave-part.pl command is used to create AVE partitions before the Benchmark Testis run.
Procedure
1. In the vSphere Client, select the AVE virtual machine and click the Console tab.
2. Click in the middle of the Console to put it into command mode and press Enter.
Press Ctrl-Alt to regain mouse control.
3. Log in to the guest as root.
4. When prompted for a password, type changeme and press Enter.
5. Configure the virtual hard drives by typing the following command and pressing Enter:
/usr/local/avamar/bin/ave-part.pl
When all actions are completed and a Script Complete! message appears in thecommand shell. This script can take several minutes to complete.
Running benchmark testingThe benchmark test is essentially the same as the Performance Analysis Tool (PAT). If thePAT passes, you should not need to use the benchmark test. However, if theconfiguration changes or additional load is added to the ESXi host between the PAT andthe AVE deployment, I/O performance might change to unacceptable levels.
There are two purposes for this test:
l To ensure the AVE virtual machine runs in an environment with acceptable I/Operformance.
l To stress virtual machine resources to determine whether the impact of running anAVE virtual machine is acceptable to other applications on the ESXi host.
Note
Before running the benchmark test, warn the customer that the test will induce a highload on the ESXi host. Monitor the ESXi host performance while the tool is running todetermine whether the stress on resources is acceptable. If not, end the test by followingthe instructions in Manually ending benchmark testing on page 27.
Starting benchmark testingThe following steps are used to start the benchmark test:
Procedure
1. On the vSphere Client Console tab, log in to the guest as root.
2. When prompted for a password, type changeme and press Enter.
All remaining instructions in this procedure assume that you are logged in to theguest, and not into the ESXi Server.
3. Run the benchmark test by typing the following command:
/usr/local/avamar/bin/24hr-benchmark.sh &
Benchmark Testing
EMC CONFIDENTIAL
26 EMC Avamar Virtual Edition 7.2 for VMware Installation Guide

While the test is running, monitor the host ESXi Server’s performance. If the stress onresources is unacceptable, end the test with the instructions. See Manually endingbenchmark testing on page 27 for more detail.
The test runs for 24 hours unless it is manually ended (see next section). Thiscommand also copies operational status data to a log file.
4. After 24 hours, confirm the test has successfully ended by typing the followingcommand:
ps -ax | grep benchmark
Blank output indicates the test is complete.
5. Save test results by typing the following commands:
cd /root
tar –cvf CUSTOMERNAME_benchmark-results.tar YYYYMMDD_benchmark
where YYYYMMDD_benchmark is the directory automatically created by the start ofthe test.
Manually ending benchmark testingBy default, the benchmark test runs for 24 hours and does not need to be manuallyended. If the stress on resources is unacceptable, the following steps can be used tomanually end benchmark testing.
Procedure
1. Type the following command on the vCenter Client Console tab:
/usr/local/avamar/bin/kill-benchmark.sh
2. Wait at least 30 seconds, and then type the following command:
ps ax | grep benchmark
Blank output indicates the test has been stopped.
3. Delete data from the following directory:
/usr/local/avamar/bin/
Blank output indicates the test is complete.
Analyzing benchmark resultsTest results are written to:
/DIRECTORY/dt_std_HOSTNAME_summary/DIRECTORY/seektest_only_summary_1 filesThe following table lists minimal acceptable benchmark test results for 0.5 TB AVE:
Table 5 0.5 TB AVE minimum benchmark test results
Conditions File server data Mixed data
Total Minimal Read Throughput 60 MB/sec 75 MB/sec
Benchmark Testing
EMC CONFIDENTIAL
Manually ending benchmark testing 27

Table 5 0.5 TB AVE minimum benchmark test results (continued)
Conditions File server data Mixed data
Total Read Throughput 60 MB/sec 75 MB/sec
Total Minimal Write Throughput 30 MB/sec 60 MB/sec
Total Write Throughput 30 MB/sec 60 MB/sec
Total Seek Minimal Throughput for 4 Threads 320 seeks/sec 320 seeks/sec
Total Seek Throughput for 4 Threads 400 seeks/sec 400 seeks/sec
The following table lists minimal acceptable benchmark test results for 1 TB AVE:
Table 6 1 TB AVE minimum benchmark test results
Conditions File server data Mixed data
Total Minimal Read Throughput 80 MB/sec 100 MB/sec
Total Read Throughput 80 MB/sec 100 MB/sec
Total Minimal Write Throughput 40 MB/sec 80 MB/sec
Total Write Throughput 40 MB/sec 80 MB/sec
Total Seek Minimal Throughput for 4 Threads 400 seeks/sec 400 seeks/sec
Total Seek Throughput for 4 Threads 500 seeks/sec 500 seeks/sec
The following table lists minimal acceptable benchmark test results for 2 TB AVE:
Table 7 2 TB AVE minimum benchmark test results
Conditions File server data Mixed data
Total Minimal Read Throughput 150 MB/sec 150 MB/sec
Total Read Throughput 150 MB/sec 150 MB/sec
Total Minimal Write Throughput 120 MB/sec 120 MB/sec
Total Write Throughput 120 MB/sec 120 MB/sec
Total Seek Minimal Throughput for 4 Threads 400 seeks/sec 400 seeks/sec
Total Seek Throughput for 4 Threads 500 seeks/sec 500 seeks/sec
The following table lists minimal acceptable benchmark test results for 4 TB AVE:
Table 8 4 TB AVE minimum benchmark test results
Conditions File server data Mixed data
Total Minimal Read Throughput 260 MB/sec 260 MB/sec
Total Read Throughput 270 MB/sec 270 MB/sec
Total Minimal Write Throughput 270 MB/sec 270 MB/sec
Total Write Throughput 280 MB/sec 280 MB/sec
Benchmark Testing
EMC CONFIDENTIAL
28 EMC Avamar Virtual Edition 7.2 for VMware Installation Guide

Table 8 4 TB AVE minimum benchmark test results (continued)
Conditions File server data Mixed data
Total Seek Minimal Throughput for 4 Threads 500 seeks/sec 500 seeks/sec
Total Seek Throughput for 4 Threads 500 seeks/sec 500 seeks/sec
Benchmark removalOnce the benchmark test is complete, it can be removed by typing the followingcommand in the vSphere Client Console tab as root user:
Procedure
l /usr/local/avamar/bin/dtsh --cleanup
Benchmark failureIf minimum acceptable benchmark results cannot be achieved, delete the virtual machineby performing the following:
Note
Do not perform the following procedure if benchmark results are satisfactory. In thatcase, continue installing AVE.
Procedure
1. Log in as root.
When prompted for a password, type changeme and press Enter.
2. On the vSphere Client Console tab, type the following command:
poweroff
3. In left pane, right-click the virtual machine you want to remove.
4. Select Delete from Disk.
Benchmark Testing
EMC CONFIDENTIAL
Benchmark removal 29

Benchmark Testing
EMC CONFIDENTIAL
30 EMC Avamar Virtual Edition 7.2 for VMware Installation Guide


