32
ACS800 Application Guide ACS800 Single Drive Common DC Configurations

ACS800
Application GuideACS800 Single Drive Common DC Configurations

ACS800 Single Drive Common DC Configurations
Application Guide
3AFE64786555 REV EEN
EFFECTIVE: 03.12.2004
2004 ABB Oy. All Rights Reserved.


5
Table of contents
Introduction
Possible main supply connections
Step by step guide
Design
Power limit . . . . . . . . . . . . . . . . . . . . . . . . . . . . . . . . . . . . . . . . . . . . . . . . . . . . . . . . . . . . . . . . . . . . 11Fuses . . . . . . . . . . . . . . . . . . . . . . . . . . . . . . . . . . . . . . . . . . . . . . . . . . . . . . . . . . . . . . . . . . . . . . . . 13Cables . . . . . . . . . . . . . . . . . . . . . . . . . . . . . . . . . . . . . . . . . . . . . . . . . . . . . . . . . . . . . . . . . . . . . . . 14Allowed braking power and need for a brake resistor . . . . . . . . . . . . . . . . . . . . . . . . . . . . . . . . . . . 15
Calculation of the allowed braking power . . . . . . . . . . . . . . . . . . . . . . . . . . . . . . . . . . . . . . . . . . 16Internal brake chopper . . . . . . . . . . . . . . . . . . . . . . . . . . . . . . . . . . . . . . . . . . . . . . . . . . . . . . . . . . 18External brake chopper . . . . . . . . . . . . . . . . . . . . . . . . . . . . . . . . . . . . . . . . . . . . . . . . . . . . . . . . . . 18Contactors, DC bus and brake circuit . . . . . . . . . . . . . . . . . . . . . . . . . . . . . . . . . . . . . . . . . . . . . . . 18
Wiring
Supply . . . . . . . . . . . . . . . . . . . . . . . . . . . . . . . . . . . . . . . . . . . . . . . . . . . . . . . . . . . . . . . . . . . . . . . 20Powering the AC fans in R7 and R8 . . . . . . . . . . . . . . . . . . . . . . . . . . . . . . . . . . . . . . . . . . . . . . . . 20Brake resistor circuit . . . . . . . . . . . . . . . . . . . . . . . . . . . . . . . . . . . . . . . . . . . . . . . . . . . . . . . . . . . . 20
Connecting the contactor of the resistor circuit . . . . . . . . . . . . . . . . . . . . . . . . . . . . . . . . . . . . . 20Phase loss guard . . . . . . . . . . . . . . . . . . . . . . . . . . . . . . . . . . . . . . . . . . . . . . . . . . . . . . . . . . . . . . . 22READY signals . . . . . . . . . . . . . . . . . . . . . . . . . . . . . . . . . . . . . . . . . . . . . . . . . . . . . . . . . . . . . . . . 22
Wiring the READY signals . . . . . . . . . . . . . . . . . . . . . . . . . . . . . . . . . . . . . . . . . . . . . . . . . . . . . 22
Start-up
Appendix A Charging circuit capacity
Frame sizes R...R4 . . . . . . . . . . . . . . . . . . . . . . . . . . . . . . . . . . . . . . . . . . . . . . . . . . . . . . . . . . . 25Frame sizes R5...R8 . . . . . . . . . . . . . . . . . . . . . . . . . . . . . . . . . . . . . . . . . . . . . . . . . . . . . . . . . . 25
Appendix B Powering the AC fans of R7 and R8

6

7
Introduction
Connecting the DC buses of frequency converters together results in energy savings and in some cases simplifies the connection to the main supply. With common DC the braking energy of one converter can be used for the other converters and motors.
Unequal current distribution and different charging methods cause difficulties to common DC systems:
• Unequal current distribution is influenced by input cables, AC or DC chokes and input bridges’ forward characteristics. If the voltage reduction over the supply components mentioned is not the same with all converters, more current will flow through the converter which has a lower voltage reduction. Factors which influence the current distribution include temperature, tolerances of components and in DC choke cases the input cable’s cross-sectional area and length.
• Charging methods vary depending on the converter size. Because of this in some installations, the supplies of the frame sizes R2-R4 should be disconnected when they are connected parallel with frame sizes R5-R8.
Note: The drive compliance with the EMC Directive on low voltage networks is specified in the appropriate Hardware Manual. However, please notice that different common DC configurations have not been tested according to the EMC requirements of conducted and radiated emissions.
Introduction

8
Possible main supply connections
Figure 1. Common DC connections. Cases a and b.
Figure 2. Common DC connections. Cases c, d1 and d2.
Cases b, c and d can be used when the total power taken from the main supply, Pout.tot, is smaller than the drive power rating, Pcont.max, of the biggest converter.
+- +- +-
R8 R7 R6
F8 F7 F6
M3~
M3~
M3~
+- +- +-
F8
R8 R8 R8
F8
M3~
M3~
M3~
+- +- +-
R6 R8 R7
F8F6 F7
M3~
M3~
M3~
+- +- +-
R7 / R6 R7 R7 / R5
F7
M3~
M3~
M3~
Possible main supply connections

9
Case a)
The most common set-up, where all converters are connected to the main supply. When the charging circuits of the converters are different, this connection is not always allowed. Table 1 shows when the connection cannot be used.
Case b)
Converters are identical and only one converter is connected directly to the main supply.
Case c)
Converters are not identical and only the biggest converter is connected directly to the main supply. The AC cables to the other converters are protected by drive-specific fuses.
Case d1)
Converters are identical and only one converter is connected directly to the main supply. The charging circuit of the connected converter is capable of charging the whole DC bus.
Case d2)
Converters are not identical and only the biggest converter is connected to the main supply. Charging circuit of the connected converter is capable of charging the whole DC bus.
Note: If the charging circuit in case d1/d2 is not capable of charging the DC bus, connection presented in case b/c must be used.
Note: With frame sizes R5...R8 the charging circuit in case d1/d2 might not be able to withstand the three times larger charging energies. In this case the main supply cable is wired to all of the input rectifiers as presented in case b/c.
Note: With ACS800-11 only connection presented in case d1/d2 is allowed.
Note: With ACS800-11 220 V units, the voltage drop over the charging resistor during charging can generate a permanent undervoltage fault. Contact your local ABB representative for help on designing the common DC configuration!
To determine whether it is possible to leave some converters unconnected to the main supply see Appendix A Charging circuit capacity.
Possible main supply connections

10
Step by step guide
1) Select the converters and preselect the main supply connection. See Possible main supply connections and Appendix A Charging circuit capacity.
2) Check from Table 1 that the connection is possible.
3) Check by using equation 1 that the load does not exceed the total power limit Pout.tot of the system. See Power limit.
4) Select the fuses, cables and possible contactors for the DC side. See Fuses, Cables and Contactors, DC bus and brake circuit.
5) Calculate the braking power and determine whether the braking cycle can be performed and whether an internal or an external brake chopper is needed. See Allowed braking power and need for a brake resistor.
6) If resistor braking is needed, select the internal or external brake chopper, the resistor and the contactor. See Internal brake chopper, External brake chopper and Contactors, DC bus and brake circuit.
7) Set up the common DC system according to the wiring instructions. See Wiring.
8) If the input terminals of frame sizes R7 and R8 are left unconnected, make sure that the AC fans are powered separately. See Appendix B Powering the AC fans of R7 and R8.
9) Set the common DC system related parameter values. See Start-up.
Step by step guide

11
Design
Power limitTotal output power limit of the common DC system can be calculated with equation 1.
Pout.tot is the instantaneous power limit of the installation. P1cont.max is the lowest and Pn.cont.max the highest drive power rating of the converters.
Only converters, which are connected to the main supply, are used for the power limit calculations.
The power correction factor, k, for each combination can be found from Table 1. When several converters are connected to the main supply, the least efficient power correction factor is chosen from table 1, i.e. the smallest factor. See Example1 and Example2.
Table 1 Power correction factors
Explanations of Table 1:
NO: The supply of the smaller converter MUST NOT be connected, because the converters have different input chokes. Frame sizes R2...R3 have DC chokes and frame sizes R4...R8 AC chokes.
C: If both converters are connected to the main supply, the DC links MUST be connected together via contactor because the converters have different charging circuits. In R2...R4 the charging resistors are in series with the DC capacitors and in R5...R8 the charging resistor is in parallel with the input bridge. The DC contactors are switched on after all of the DC links are charged and the converters are in the READY state.
Note: The Pout.tot value is higher if the smallest converter is not connected to the main supply.
ACS800
R2-R3 R4 R5-R6 R7-R8
R2-R3 k=0.5 NO NO NO
R4 NO k=0.7 k=0.7 C k=0.7 C
R5-R6 NO k=0.7 C k=0.7 k=0.6
R7-R8 NO k=0.7 C k=0.6 k=0.7
Pout.tot P1cont.max k P2cont.max⋅ k Pn.cont.max⋅+ += (equation 1)
Design

12
Example1
The DC buses of three converters ACS800-0004-5, 2.2 kW, R2; ACS800-0025-5, 18.5 kW, R3 and ACS800-0025-5, 18.5 kW, R3 are connected together. The input terminals of the 2.2 kW converter are left unconnected. According to Table 1, k = 0.5 when two R3´s are connected to the main supply, therefore Pout.tot is
Example2
The DC buses of three converters ACS800-0050-5, 37 kW, R5; ACS800-0140-5, 110 kW, R6 and ACS800-0320-5, 250 kW, R8 are connected together. All three converters are connected to the main supply. According to Table 1, k = 0.7 when R5 and R6 are connected to the main supply and k = 0.6 when R6 and R8 are connected to the main supply. The worst case is chosen for the calculations, i.e. k = 0.6, therefore Pout.tot is
Pout.tot 18.5kW 0.5 18.5kW⋅+ 27.75kW= =
Pout.tot 37kW 0.6 110kW⋅ 0.6 250kW⋅+ + 253kW= =
Design

13
FusesUse fuses listed in the appropriate drive Hardware Manual for input cable protection.
The recommendations for obligatory DC side semiconductor fuses, aR fuses, are listed in Table 2. Use 690 VAC rated fuses for 230...500 V converters and 1250 VAC rated fuses for 690 V converters. The aR fuses protect the converter against short circuits in other converters. Because of the complicated fault current paths the selectivity of the fuses cannot be guaranteed in all conditions.
aR fuses must be installed on both DC wires.
Table 2 Recommended DC side aR fuses.ACS800-01/04/11
Frame size 230 V 400 V 500 V 690 V I / AR2 0001-2, 0002-2, 0003-2 0003-3, 0004-3, 0005-3 0004-5, 0005-5, 0006-5 20R2 0004-2 0006-3 0009-5 25R2 0005-2 0009-3 0011-5 40R3 0006-2, 0009-2 0011-3, 0016-3 0016-5, 0020-5 50R3 0011-2 0020-3, 0023-3 0025-5 63R4 0011-7 25R4 0016-7 32R4 0020-7 40R4 0016-2, 0020-2 0025-3, 0030-3 0028-5, 0030-5, 0040-5 0025-7 63R4 0035-3 0045-5 0040-7 80R5 0025-2 0040-3 0050-5 0050-7, 0060-7 100R5 0030-2 0050-3 0060-5, 0070-5 125R5 0040-2 0060-3 160R6 0070-7 125R6 0100-7 160R6 0120-7 200R6 0050-2, 0060-2 0070-3, 0100-3 0100-5, 0120-5 315R6 0070-2 0120-3, 0130-3 0140-5, 0150-5 400R6 0140-7, 0170-7 350
ACS800-0xFrame size 230 V 400 V 500 V 690 V I / AR7 0080-2 0140-3 0170-5 0210-7, 0260-7 400R7 0100-2 0170-3 0210-5 500R7 0120-2 0210-3 0260-5 550R8 0320-7, 0400-7 700R8 0140-2, 0170-2 0260-3 0270-5, 0300-5, 0320-5 0440-7 800R8 0490-7, 0550-7 900R8 0210-2 0320-3 0400-5 0610-7 1000R8 0230-2 0400-3 0440-5, 0490-5 1250R8 0260-2, 0300-2 0440-3, 0490-3 0550-5, 0610-5 1600
Design

14
Cables• Select the input power cables as described in the appropriate drive Hardware
Manual. The cross-sectional area of the DC cables must be the same as the cross-sectional area of the AC side cables.
• If screened DC cables are used, ground the screen at the other end only.
• The lengths of the supply cables must not differ more than 15%. This applies especially to converters equipped with DC chokes.
• Maximum length of the DC cables between two converters is 50 m.
• If the system consists of more than two converters, the DC links must be connected in an external terminal box. Do not use the terminals of one of the converters for this purpose.
Design

15
Allowed braking power and need for a brake resistor1. For each drive check that the braking power does not exceed the allowed braking power. See Calculation of the allowed braking power below.
2. For the common DC system check whether it needs to be equipped with an additional brake chopper and resistor. This is the case if the total power of the common DC system is negative at any point of the duty cycle [i.e. braking motor(s) regenerate more power to DC link that can be consumed by other motors]. See the figure below which shows the duty cycles of three drives and the sum, the common DC duty cycle. A brake chopper and a resistor is needed to dissipate the surplus braking energy (the shaded areas).
Common DCduty cycle
Drive Cduty cycle
Drive Bduty cycle
Drive Aduty cycle
P
t
P
t
P
t
P
t
Design
16
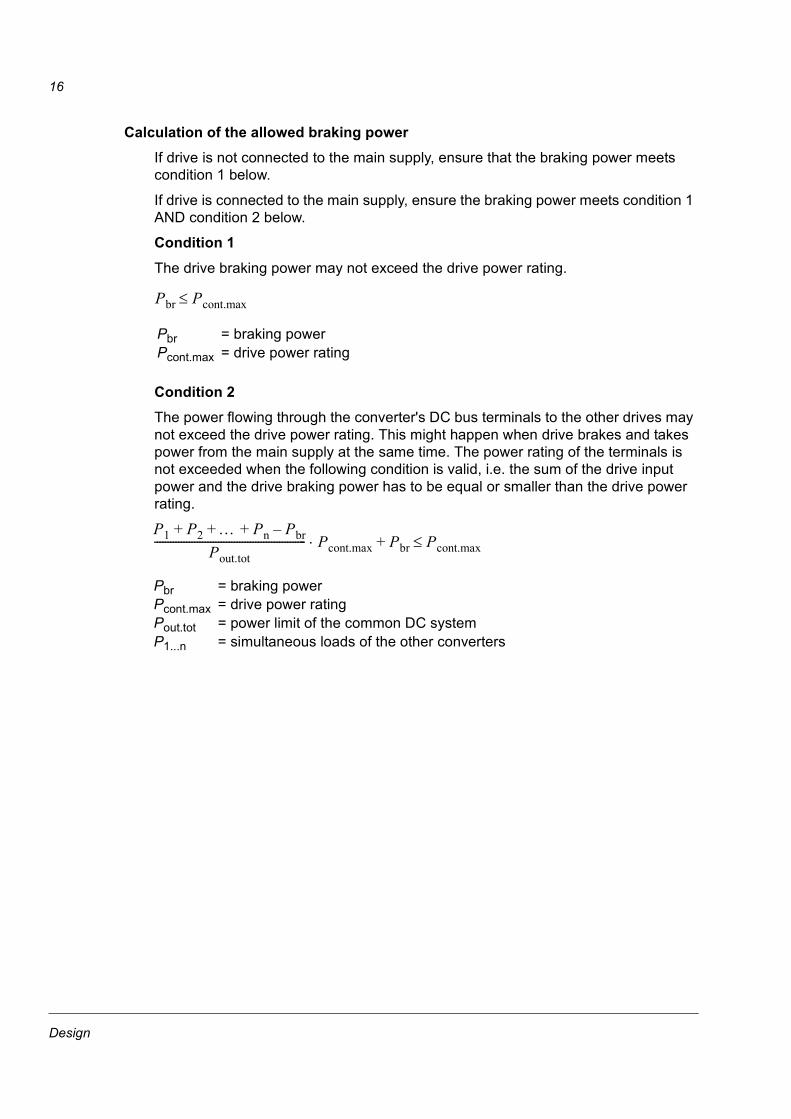
Calculation of the allowed braking power If drive is not connected to the main supply, ensure that the braking power meets condition 1 below.
If drive is connected to the main supply, ensure the braking power meets condition 1 AND condition 2 below.
Condition 1The drive braking power may not exceed the drive power rating.
Condition 2
The power flowing through the converter's DC bus terminals to the other drives may not exceed the drive power rating. This might happen when drive brakes and takes power from the main supply at the same time. The power rating of the terminals is not exceeded when the following condition is valid, i.e. the sum of the drive input power and the drive braking power has to be equal or smaller than the drive power rating.
Pbr Pcont.max≤
Pbr = braking powerPcont.max = drive power rating
P1 P2 … Pn Pbr–+ + +Pout.tot
--------------------------------------------------------- Pcont.max⋅ Pbr Pcont.max≤+
Pbr = braking powerPcont.max = drive power ratingPout.tot = power limit of the common DC systemP1...n = simultaneous loads of the other converters
Design

17
Example 3
The DC buses of three converters ACS800-0140-5, 110 kW, R6; ACS800-0140-5, 110 kW, R6, and ACS800-0070-5, 55 kW, R5 are connected together. Only one 110 kW converter is connected to the main supply. The duty cycle is shown in the table below.
Allowed braking powersR6 connected to main supply:
Condition 1: 70 kW < 110 kW OK
Condition 2:
Pout.tot of the system is 110 kW.
R6 not connected to main supply:Condition 1: 30 kW < 110 kW OK
R5 not connected to main supply:Condition 1: 30 kW < 55 kW OK
Need for a brake resistorThe total power of the common DC system is negative during phase interval t3...t4, therefore a brake chopper and a brake resistor are needed.
Phase Converter powers (kW) Common DC duty cycle (kW)
R6 (AC supplied) R6 R5
0…t1 110 -30 30 110
t1…t2 60 0 30 90
t2…t3 -70 70 30 30
t3...t4 -50 70 -30 -10
t4…t5 0 -30 30 0
70kW 70kW– 30kW+110kW
--------------------------------------------------------- 110kW⋅ 70kW+ 100kW 110kW≤=
70kW 50kW–( ) 30–( )kW+110kW
-------------------------------------------------------------------- 110kW⋅ 50kW+ 40kW 110kW≤=
Design

18
Internal brake chopper• Only one internal brake chopper is allowed to be active.
• If an internal chopper is used, it must be in the biggest converter.
• The maximum braking power of the brake chopper or the inverter must not be exceeded.
• A contactor must be used in the resistor circuit for protection against brake chopper faults and against the overtemperature of the resistor.
External brake chopper• An external brake chopper can be used but not at the same time with an internal
brake chopper.
• The external chopper must be installed close, < 5 m, to the biggest braking converter.
• The external chopper can be selected according to the braking power demand. For more information, see the appropriate drive Hardware Manual.
• A contactor must be used for protection against brake chopper faults.
Contactors, DC bus and brake circuitIf converters with different charging circuits are connected directly to the main supply, the DC links must be connected together via contactors. See Table 1.
With an external or an internal brake chopper a contactor must be used for protection against brake chopper faults.
• Contactors must be capable of cutting off the DC current. The maximum operational voltage over the contactor is the DC voltage during the braking, i.e. 1.21 · 1.35 · U1.
• DC current rating for the DC contactor can be calculated by using equation 4.
Pcont.max is the drive power rating of the biggest converter and U1 is the supply voltage of the converter.
IDCPDC UDC-----------=
PDC Pcont.max≈ (equation 4)
UDC 1.35 U1⋅=
Design

19
Peak current through the contactor in brake resistor circuit can be calculated with equation 5.
The rms current during the braking can be calculated with equation 6.
Rbrake is the brake resistor‘s resistance. Pbr is the applied braking power.
I1.21 UDC⋅Rbrake
-------------------------= (equation 5)
IrmsPbr Rbrake-------------= (equation 6)
Design
20
Wiring
SupplyUse the same supply connection point. All converters must be fed from the same transformer. The supply impedance is an important parameter, which influences the current distribution. All converters must have equal supply impedance.
Powering the AC fans in R7 and R8See Appendix B Powering the AC fans of R7 and R8 for more information.
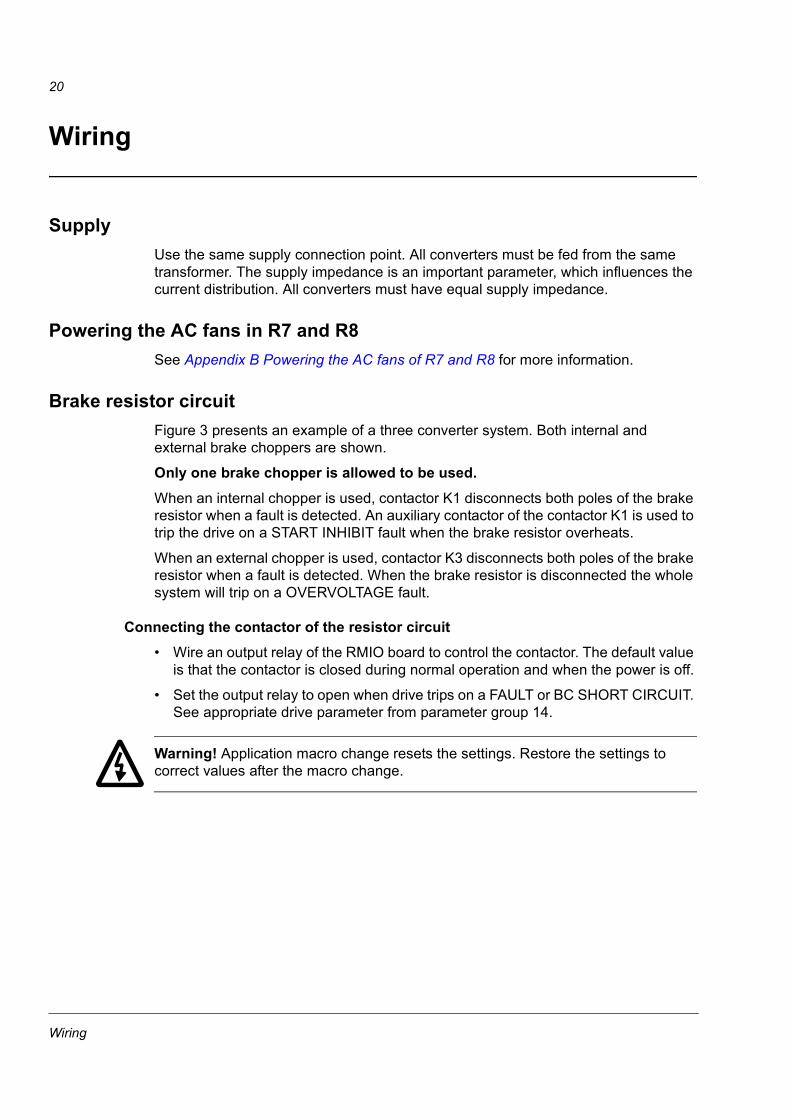
Brake resistor circuitFigure 3 presents an example of a three converter system. Both internal and external brake choppers are shown.
Only one brake chopper is allowed to be used.When an internal chopper is used, contactor K1 disconnects both poles of the brake resistor when a fault is detected. An auxiliary contactor of the contactor K1 is used to trip the drive on a START INHIBIT fault when the brake resistor overheats.
When an external chopper is used, contactor K3 disconnects both poles of the brake resistor when a fault is detected. When the brake resistor is disconnected the whole system will trip on a OVERVOLTAGE fault.
Connecting the contactor of the resistor circuit• Wire an output relay of the RMIO board to control the contactor. The default value
is that the contactor is closed during normal operation and when the power is off.
• Set the output relay to open when drive trips on a FAULT or BC SHORT CIRCUIT. See appropriate drive parameter from parameter group 14.
Warning! Application macro change resets the settings. Restore the settings to correct values after the macro change.
Wiring

21
Figure 3. Common DC connection with brake choppers. IC = internal chopper, EC = external chopper, K2 = DC contactors based on table 1. Note! Only one chopper may be used at a time.
+-
R8
F8
K2
M3~
+-
R7
F7
M3~
-
R4
F4
M3~
+ - + - + -IC
K1
θ
22R-
22R+
228229
2211
X22
2210
+24V
DIIL
221222223
230 V~
X27
RO3
ACS 800
n
IC EC
θ
EC
+-
K3221222223
230 V~
X27
RO3
DC+ DC+ DC+DC- DC- DC-
Wiring

22
Phase loss guardIt is recommended to use phase loss guard in the input supplies of all of the converters. If phase loss guard is not used and the fuse of one of the input supply phases blows, the semiconductors of the converters may be overloaded and damaged.
READY signalsTo ensure that all of the DC links have been charged before the system is started, the READY signals of the converters must be wired together. If this is neglected, the charging resistor can be damaged.
Wiring the READY signals• Wire together the READY signals of all the converters connected to the main
supply and the START INTERLOCK signals of all of the converters not connected to the main supply. An example is presented in figure 4 below.
Wiring

23
Figure 4. READY signal wiring example.
Wiring

24
Start-up
• It is recommended to set parameter 99.04 MOTOR CTRL MODE to DTC and to adjust parameters 20.11 P MOTORING LIM and 20.12 P GENERATING LIM to limit the maximum power. The braking power given by equation 3 can also be used as the parameter value of 20.12 P GENERATING LIM.
• When brake chopper is used, set parameter 27.08 BC CTRL MODE to COMMON DC. This activates the chopper when the DC voltage is high. Also the parameter 20.05 OVERVOLTAGE CONTROL must be disabled from all of the converters separately.
• All converters must be in the READY state before starting. See section READY signals for instuctions on how to connect the READY signals.
• Switch on the possible DC contactors based on Table 1 after all of the DC links are charged and the converters are in the READY state, i.e. when the power is on and no faults appear.
Note: The parameter settings mentioned above apply to ACS800 Standard Application Program.
Note: With ACS800-11, line-side converter parameter 16.15 I/O START MODE must be set to DI2 LEVEL (= IGBT supply unit starts modulating always when the RMIO control board is powered). If parameter 16.15 setting is other than DI2 LEVEL, the charging resistor can be damaged.
Always check the setting of parameter 16.15 I/O START MODE after software update, macro change or control board replacement!
See ACS800-11 Hardware Manual for information on how to change the line-side converter parameters with control panel.
Start-up
25
Appendix A Charging circuit capacity
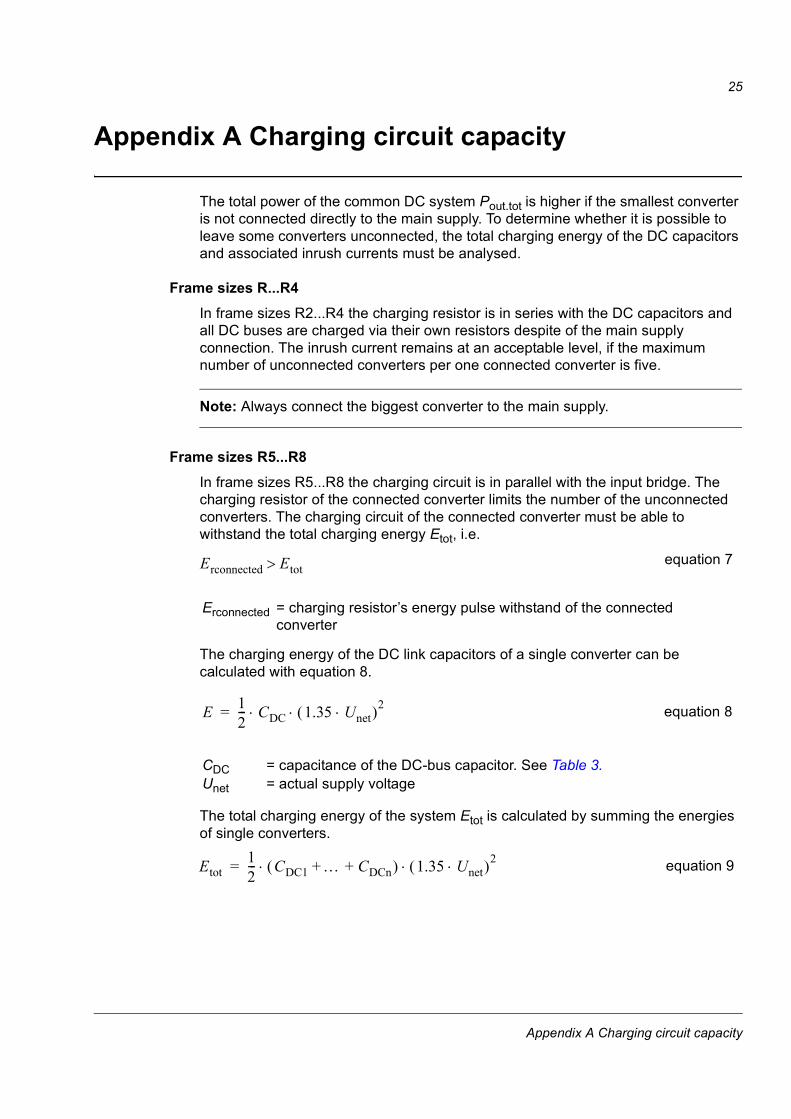
The total power of the common DC system Pout.tot is higher if the smallest converter is not connected directly to the main supply. To determine whether it is possible to leave some converters unconnected, the total charging energy of the DC capacitors and associated inrush currents must be analysed.
Frame sizes R...R4In frame sizes R2...R4 the charging resistor is in series with the DC capacitors and all DC buses are charged via their own resistors despite of the main supply connection. The inrush current remains at an acceptable level, if the maximum number of unconnected converters per one connected converter is five.
Note: Always connect the biggest converter to the main supply.
Frame sizes R5...R8In frame sizes R5...R8 the charging circuit is in parallel with the input bridge. The charging resistor of the connected converter limits the number of the unconnected converters. The charging circuit of the connected converter must be able to withstand the total charging energy Etot, i.e.
The charging energy of the DC link capacitors of a single converter can be calculated with equation 8.
The total charging energy of the system Etot is calculated by summing the energies of single converters.
Erconnected Etot> equation 7
Erconnected = charging resistor’s energy pulse withstand of the connected converter
E 12--- CDC 1.35 Unet⋅( )2⋅ ⋅= equation 8
CDC = capacitance of the DC-bus capacitor. See Table 3.Unet = actual supply voltage
Etot12--- CDC1 … CDCn+ +( ) 1.35 Unet⋅( )2⋅ ⋅= equation 9
Appendix A Charging circuit capacity

26
The energy pulse withstands Er of the charging circuits are listed in the following table:
Note: Always connect the biggest converter to the main supply. If the charging circuit of the biggest converter is not capable of delivering the demanded charging energy, connect also the next biggest converter to the main supply.
Example 4
The DC buses of three converters ACS800-0060-3 (R5), ACS800-0120-3 (R6) and ACS800-0170-3 (R7) are connected together. The main supply voltage is 400 V. The total charging energy of the capacitors is
The charging resistor of the ACS800-0170-3 (R7) is able to withstand the whole charging energy, Etot = 1866 J < Er = 5600 J.
Example 5
The DC buses of converters ACS800-0120-5 (R6), ACS800-0260-5 (R7) and ACS800-0400-5 (R8) are connected together. The main supply voltage is 500 V. The total charging energy of the capacitors is
Even if the charging resistor of the ACS800-0260-5 (R7) is able to withstand the whole charging energy, Etot = 4829 J < Er = 5600 J, the biggest converter ACS800-0400-5 (R8) is connected to the main supply.
Frame size: Er / J
R5 1000
R6 2000
R7 (230...500 V) 5600
R7 (690 V) 2800
R8 5600
Etot12--- 2400uF 4700uF 5700uF+ +( ) 1.35 400V⋅( )2 10 6–⋅ ⋅ ⋅ 1866J= =
Etot12--- 4700uF 5700uF 10800uF+ +( ) 1.35 500V⋅( )2 10 6–⋅ ⋅ ⋅ 4829J= =
Appendix A Charging circuit capacity

27
Example 6
The DC buses of two ACS800-0120-5 (R6) and four ACS800-0260-5 (R7) are connected together. The main supply voltage is 500 V. The total charging energy of the DC link capacitors is
Etot exceeds the energy pulse withstand of the ACS800-0260-5 (R7) charging circuit. Charging resistors of two ACS800-0260-5 (R7) are able to withstand the charging energy, Etot = 7335 J < Er = 2 ⋅ 5600 J.
Etot12--- 2 4700uF 4 5700uF⋅+⋅( ) 1.35 500V⋅( )2 10 6–⋅ ⋅ ⋅ 7335J= =
Appendix A Charging circuit capacity

28
Table 3 Capacitances of the DC link capacitor.Frame size ACS800-x1 ACS800-x1 ACS800-x1 CDC / uFR2 0001-2 0003-3 0004-5 350R2 0002-2 0004-3 0005-5 350R2 0003-2 0005-3 0006-5 350R2 0004-2 0006-3 0009-5 350R2 0005-2 0009-3 0011-5 350R3 0006-2 0011-3 0016-5 820R3 0009-2 0016-3 0020-5 820R3 0011-2 0020-3 0025-5 820R3 0023-3 0028-5 820R4 0016-2 0025-3 0030-5 1200R4 0020-2 0030-3 0040-5 1200R4 0035-3 0045-5 1200R5 0025-2 0040-3 0050-5 2000R5 0030-2 0050-3 0060-5 2000R5 0040-2 0060-3 0070-5 2400R6 0050-2 0070-3 0100-5 3300R6 0060-2 0100-3 0120-5 4700R6 0070-2 0120-3 0140-5 4700R6 0130-3 0150-5 7050R4 0011-7 667R4 0016-7 667R4 0020-7 667R4 0025-7 667R4 0030-7 667R4 0040-7 667R5 0050-7 1333R5 0060-7 1333R6 0070-7 2200R6 0100-7 3133R6 0120-7 3133
Appendix A Charging circuit capacity

29
Frame size ACS800-x2/x4 ACS800-x2/x4 ACS800-x2/x4 CDC / uFR7 0080-2 0140-3 0170-5 5700R7 0100-2 0170-3 0210-5 5700R7 0120-2 0210-3 0260-5 5700R8 0140-2 0260-3 0270-5 8600R8 0170-2 0300-5 8600R8 0320-5 8600R8 0210-2 0320-3 0400-5 10800R8 0230-2 0400-3 0440-5 12900R8 0490-5 12900R8 0260-2 0440-3 0550-5 15100R8 0300-2 0490-3 0610-5 15100R7 0140-7 2900R7 0170-7 2900R7 0210-7 2900R7 0260-7 3300R8 0320-7 4600R8 0400-7 6100R8 0440-7 6100R8 0490-7 7700R8 0550-7 7700R8 0610-7 7700
Appendix A Charging circuit capacity

30
Appendix B Powering the AC fans of R7 and R8
If the supply of frame size R7 or R8 is not connected to the main supply, the AC fan must be powered separately.
Feed the primary of the fan circuit transformer with the converter’s nominal main supply voltage, V- and W-phases, via the built-in fan circuit. The original cables between the busbars and the fuses have to be removed. The feeding cable must be protected against short circuits despite of the used built-in fuses.
The fuse locations are shown in the following picture.
500 V 690 V
R7
R8
Appendix B Powering the AC fans of R7 and R8


ABB OyAC DrivesP.O. Box 184FI-00381 HELSINKIFINLANDTelephone+358 10 22 11Telefax +358 10 22 22681Internet http://www.abb.com
ABB Inc.Automation TechnologiesDrives & Motors16250 West Glendale DriveNew Berlin, WI 53151USATelephone262 785-3200
800-HELP-365Telefax 262 780-5135
3AFE
6478
6555
REV
E E
NEF
FEC
TIVE
: 03.
12.2
004


