TM TM TM TM PoolComPak TM (PCP) RoofPak (AWH/ HCDH only) POOLCOMPAK R-410A AW/HCD SERIES ROOFPAK SERIES HCD (High Capacity Dehumidifier) AW (Air and Water) Horizontal (H) and Vertical (V) Configurations Engineering Guide EGW06-PCPEG-20150514 Packaged Natatorium Environment Control System
Transcript
TMTM
TMTM
PoolComPakTM (PCP)
RoofPak (AWH HCDH only)
POOLCOMPAK R-410AAWHCD SERIES
ROOFPAK SERIESHCD (High Capacity Dehumidifier)
AW (Air and Water)
Horizontal (H) and Vertical (V) Configurations
Engineering GuideEGW06-PCPEG-20150514
Packaged Natatorium Environment Control System
TMTM
3491 Industrial Drive York PA 17402 USA 800-959-7725 Fax 717-757-5085for more information wwwpoolpakcom
The Leader in Indoor Pool Dehumidification
TMTM
IEGW06-PCPEG-20150514
TMTM
TABLE OF CONTENTSSECTION I INDOOR POOL DESIGN 1
Introduction 1Creating an ideal environment for indoor pool facilities1Operating Cost 1
Application 1Moisture Loads 1Effects of Moisture 1Indoor Air Quality 1Occupant Comfort 2Pool Water Chemistry 2
Equipment Choices 3Overview 3Ventilation with Heating 3Ventilation with Heating and Energy Recovery 3Mechanical Dehumidification3Hybrids 4Other Technologies 4
Room Air Distribution 4Airside Design 4
Supply Air4Return Air 6Ductwork Design6Air Distribution 6Other Airside Considerations 7
SECTION II PRINCIPLES FUNCTIONS AND FEATURES 8The Mechanical Dehumidification System 8
Principles of Operation 8Automatic Control of Air Temperature and Humidity 8Room Dew Point Control 9PoolComPak Operation9
ECC-PCP Control System 10Overview 10Humidity Control 10Cold Surface Temperature Humidity Reset 10Space Heating 10Networking Multiple Units 11Space Cooling (Optional) 11Water Heating (Models AWV and AWH only) 11
Features and Options 11Standard Items Factory Mounted 11Standard Items factory Supplied for Field Installation 11System Options 11RoofPak System12PoolComPaktrade Dehumidification Systems Selection12
Overview 12Available Configurations 12Typical AW Series Applications 12Typical Non-Pool HCD Series Applications 12Unit Selection software program12
RoofPak Series (HCDHAWH) 13Design Features 13
Durable Construction 13Rooftop Installation 13Microprocessor Controller13Heating Packages13Self-Contained Air-Cooled Condensing Section 13Evaporator Coil Options13Totally Enclosed Fan Cooled (TEFC) Motors 14Unique Outside Air System 14
II EGW06-PCPEG-20150514
TMTM
Housed Blower 14Cupronickel Water Heat Exchanger 14
Technical Summary 15Dimensional Data 15RoofPak Weights 15
SECTION III PERFORMANCE AND SIZING 16PoolComPaktrade Performance 16
PoolComPak Unit Dimensions 18PoolComPaktrade Horizontal Dimensions 18PoolComPaktrade Vertical Dimensions19
Hot Water Coil Capacities 20PoolComPak Outside Air Damper Size 21Refrigerant22Remote Air-Cooled Condenser (ACC) 23Electric Duct Heater 25
SECTION IV INSTALLATION 26PCP Installation 26
Introduction26UnitFacility Interface 26Handling 27Clearance 27Mounting of PoolComPak Units 27Inspection 27Power Supply 27Control Wiring 27Condensate Piping 27Curb Mounting 28Integral Gas Furnace Option (RoofPak Only) 28
ECC-PCP Controls Field Wiring 30Overview 30Remote Interface Unit (1) 30Cold Surface Temperature Sensor (2) 31Economizer System (Optional) (3) 31Outside Air Temperature Sensor (Economizer Option Only) (4) 32Air Cooled Condenser (Optional) (5) 32Auxiliary Pool Water Heating System (AWH Model only) (6) 33Auxiliary Air Heating System (7) 33External Alarm System (8)33Building Fire Control System (9) 34Return Air Sensor (10)34Purge Mode Input (11) 34AC Proof Input (12) 34Pool Water Temperature Sensor (13) 34
Pool Water Piping (AWH and AWV models only) 35Salt Water Pools 36
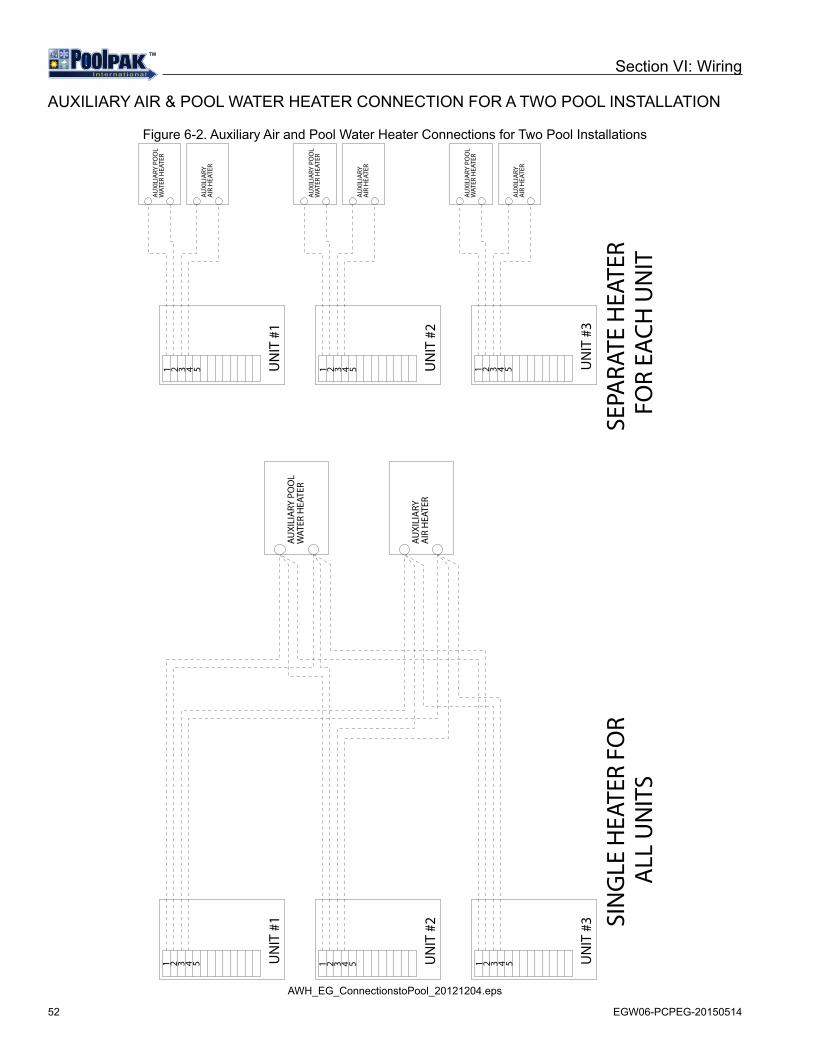
SECTION VI WIRING 51Auxiliary Air amp Pool Water Heater Connections for Multiple Unit Installation 51Auxiliary Air amp Pool Water Heater Connection for a Two Pool Installation 52Field Wiring 53Fire Control System Connection 54
IV EGW06-PCPEG-20150514
TMTM
LIST OF FIGURESFigure 1-1 Perimeter Air Distribution 5Figure 1-2 Overhead Air Distribution5Figure 1-3 Below Grade Air Distribution5Figure 1-4 Supply Air Proportions 6Figure 2-1 PoolComPaktrade AW and HCD Typical Refrigerant System Schematic 9Figure 2-2 PCP RoofPak Dimensions 15Figure 3-1 AWHCD Horizontal Unit Elevation and End Views 18Figure 3-2 AWHCD Vertical Unit Elevation and Plan Views19Figure 3-3 Air-Cooled Condenser (PoolPaktrade) - Isometric Views 24Figure 3-4 Air-Cooled Condenser (Bohn) - Elevation Views 24Figure 3-5 Duct Heater 25Figure 4-1 Typical PoolComPaktrade AWH Series System Layout 26Figure 4-2 PoolComPaktrade Curb Assembly 29Figure 4-3 Remote Interface Mounting Plate 30Figure 4-4 Economizer Operation 31Figure 4-5 Outside Air Sensor32Figure 4-6 PAC Unit Field Wiring 32Figure 4-7 Installation of a Hot Water Coil 3-Way Valve 33Figure 4-8 Typical Pool Water Piping Diagram (AWH and AWV Model Only) 36Figure 4-9 AWH and HCDH Condensate Trap 37Figure 4-10 Remote ACC Installation Around Walls or Obstructions 38Figure 4-11 Remote ACC Installation When Installing Multiple Units 38Figure 4-12 Remote ACC Installation When Installing Units in Pits 39Figure 4-13 Remote ACC Installation When Installing Units Near Decorative Fences 39Figure 4-14 ACC Refrigerant Piping 41Figure 5-1 RIU Keypad 43Figure 5-2 Status Screen 1 43Figure 6-1 Auxiliary Air and Pool Water Heater Connections for Multiple Units 51Figure 6-2 Auxiliary Air and Pool Water Heater Connections for Two Pool Installations 52Figure 6-3 Field Wiring Diagram 53Figure 6-4 Fire Control System Connection54
LIST OF TABLESTable 1-1 Typical Pool Water amp Air Temperature Set-Points 2Table 1-2 Recommended Pool Water Chemistry 3Table 2-1 RoofPak Technical Data 15Table 2-2 RoofPak Weights 15Table 3-1 PoolComPaktrade AW Performance Summary 16Table 3-2 PoolComPaktrade HCD Performance Summary 17Table 3-3 AWHCD Horizontal Unit Overall Dimensions 18Table 3-4 AWHCD Vertical Unit Overall Dimensions 19Table 3-5 Hot Water Coil Capacities 20Table 3-6 PoolComPaktrade Outside Air Damper Size 21Table 3-7 Factory Refrigerant R410A Charge 22Table 3-8 Remote ACC Performance Chart 23Table 3-9 Duct Sizes 25Table 4-1 Horizontal PoolComPaktrade Curb Dimensions 29Table 4-2 R410A Charge for Air Cooled Condensers (lb) 41Table 4-3 Refrigerant (R410A) Charge for Different Line Size 42Table 5-1 Pool Water Chemistry 50
1EGW06-PCPEG-20150514
TMTM
SECTION I INDOOR POOL DESIGN
INTRODUCTIONCREATING AN IDEAL ENVIRONMENT FOR INDOOR POOL FACILITIES
Indoor pool facilities are unlike any other structure in design construction and maintenance requirements Humidity air and water temperatures are especially difficult to control and improper management usually results in an uncomfortable environment excessive operating costs and possibly serious structural damage Effectively controlling these special conditions require control hardware and control sequences specially engineered for large commercial indoor pool applications The PoolPaktrade System utilizes an environmental control package designed to meet all special needs of the indoor pool environment while reducing energy usage and building maintenance costs
OPERATING COST
Energy consumption is a direct function of the variables necessary to satisfy the occupant and protect the facility These variables include space heating and cooling water heating humidity removal and ventilation Maintaining ideal and precise environmental conditions has a fairly high cost of operation And for a majority of the indoor pools regardless of geographic location require water and space heating 70 to 90 of the year
APPLICATIONMOISTURE LOADS
An indoor swimming pool produces large quantities of water vapor through evaporation which accounts for roughly 95 of the pool water heat loss making the water colder This excessive humidity will form damaging condensation unless removed from the building In the past the method of removing this water vapor was by ventilating an otherwise energy efficient building exhausting the humid air and the energy it contained Additional energy was used to bring in and heat the make-up air and to heat the pool water
More cost effective technologies offer an alternative method adding heat exchangers and mechanical heat recovery systems with many useful options The ideal solution to removing the water vapor from the pool area is to convert the latent (wet) heat contained in the moist air back into sensible (dry) heat placing it back into the pool water and air
EFFECTS OF MOISTURE
Excess humidity in natatorium structures may be readily apparent as condensation on cool surfaces such as windows and outside doors the growth of mildew or mold and when coupled with poor pool chemistry the accelerated corrosion of metals In its less obvious forms moisture may penetrate walls and ceilings and cause rot that becomes noticeable only when large scale structural failure occurs Humidity levels are also a major factor in the comfort of pool users
INDOOR AIR QUALITY
Pools and water parks with water features have a higher evaporation rate than a standard pool because of the increased water surface area Chloramines (See Pool Water Chemistry below) which are present in the water become more concentrated in the air as the ldquowater to airrdquo interactions increase affecting the indoor air quality A strong ldquochlorinerdquo odor is an indicator of poor pool water chemistry and is generally offensive to the occupants Higher levels of chloramines can cause skineye irritation and respiratory problems commonly known as ldquolifeguard lungrdquo
Most poolrooms are designed with a minimum ventilation rate to dilute the airborne pollutants generated from the chemical interactions in the pool water Typically these rates are based on ASHRAE standard 621 and dictated by local codes at about 05 CFM per square foot of pool and deck area but depending on the pool water chemistry the ventilation rate may not always be adequate for good poolroom indoor air quality
2 EGW06-PCPEG-20150514
TMTM
However increasing ventilation rates can significantly add to the cost of operation Including energy conservation strategies such as heat recovery airflow measurement and CO2 based control help control costs while improving indoor air quality
Depending on the geographic location and season of the year treating the outside air has a direct effect on energy consumption Some facilities prefer higher than minimum ventilation rates up to 100 of OA to maximize indoor air quality but the cost of treating this air can be significant
OCCUPANT COMFORT
Occupant comfort in a natatorium is easy to understand If you ever swam in an outdoor pool on a cold windy day or exited a pool in a dry desert location--you will probably notice an immediate chill The opposite is true where high humidity is not adequately controlled either through ventilation or by mechanical means The moisture level can reach such a state where it is oppressive or stuffy Common complaints are difficulty in breathing and the room being perceived to be warmer than the actual dry bulb temperature would suggest
Regardless of the source of discomfort users will not enjoy the facility if waterair temperatures and humidity levels are not within a narrow range Ideal water temperature is around 82deg with the air temperature about 2 degrees F higher to prevent chilling when exiting the pool and to minimize evaporation from the pool surface Here are some recommended temperatures for poolrooms which can be adjusted to meet specific needs of bathers In general ldquoactiverdquo poolrooms are maintained at lower temperature ranges so the users donrsquot overheat warmer temperatures are more common for seniors or children or less active pools
The desirable humidity range is generally between 50 and 60--greater than 60 creates a sticky feeling andor difficult breathing and low humidity results in evaporative cooling on the batherrsquos skin resulting in a chill
Poor air movement caused by improper duct placement within the poolroom will also lead to occupant discomfort Excessive supply air blowing on bathers can create drafts while uneven air distribution may create stagnant zones within the space
Table 1-1 Typical Pool Water amp Air Temperature Set-Points
POOL WATER CHEMISTRY
Water chemistry in swimming pools is critical for the health of the bathers and the condition of the enclosure and components An enclosure with poor water chemistry has a noticeable ldquochlorinerdquo smell which is an indication of high chloramines in the air Not only does this have an effect on the water but it affects the bathers and the air they breathe
Dehumidification systems are not designed to remove the effects of incorrect pool water chemistry Dehumidificationventilation equipment is not designed to remedy the effects of poor pool chemistry but is designed to deliver prescribed ventilation to manage smaller amounts of pollutants generated from normal pool activity Pool water chemistry is a part of daily maintenance and it is recommended that the users follow the current National Spa and Pool Institute standards
For more information review the Controling Chloramines with Proper Chlorine Management chapter in the Indoor Pool Water Chemistry publication in the online PoolPaktrade Educational Library
Section I Indoor Pool Design
Typical Pool Water amp Air Temperature Set-PointsPool Type Water Temp degF Air Temp degF Room RH
1 Normally max 86degF to minimize overheating of occupants
3EGW06-PCPEG-20150514
TMTM
Table 1-2 Recommended Pool Water Chemistry
EQUIPMENT CHOICESOVERVIEW
There are several methods for controlling humidity temperature and ventilation in poolrooms Each method offers some level of control but there can be significant differences in first cost and operating cost of each method Geographic location degree of comfort unit cost and operational cost must be evaluated in the selection of the correct system
VENTILATION WITH HEATING
bull Moisture removal is accomplished through the dilution with dryer outside air bull High cost of operation (air reheating)bull Lowest first costbull No opportunity to recover energy in the exhaust airstreambull No opportunity to recover energy into the pool waterbull No integral cooling capabilitybull Summer space conditions can be unbearably hot and humid
VENTILATION WITH HEATING AND ENERGY RECOVERY
bull Moisture removal is accomplished through the dilution with dryer outside air bull Significant heat recovery from exhaust air streambull Cost-effective method but with modest operating costbull Performance limitations in humid areas or during summer peaksbull No opportunity to recover energy into the pool waterbull No integral cooling capability
MECHANICAL DEHUMIDIFICATION
bull Moisture removal is accomplished through mechanical refrigerationbull Significant heat recovery using ldquoheat pumprdquo technologybull Recovers the most energy from the exhaust airstreambull Offers an opportunity to recover energy into the supply airstreambull Offers an opportunity to recover energy into the pool waterbull Higher first cost with lower operating costbull No performance limitations based on locationbull Tightest control of setpoint conditionsbull Integral cooling capabilitybull Can be integrated to include appropriate ventilation strategies
HYBRIDS bull Combines various technologies to increase efficiency and capabilitybull Utilizes ventilation as primary dehumidification methodbull Switches to heat pump method when conditions require better environmental control
OTHER TECHNOLOGIES
Desiccant technology can be adapted to provide super dry air which is injected into the poolroom to dilute the moisture load The regeneration phase of the desiccant is typically driven by waste heat from refrigeration cycle or other fossil fuel
Wheels are sometimes considered because of their wide acceptance as heat recovery devices Latent or Enthalpy wheels are not suitable for pools but sensible wheels may have application
ROOM AIR DISTRIBUTIONAll PoolPaktrade models provide continuous air recirculation and with a good air distribution system will promote uniform space conditions To remove the required moisture and maintain controlled conditions it is essential that there be adequate air movement and distribution in the natatorium The unit must remove the humid air from the pool area and discharge the dehumidified air back into it The supply air should be distributed over areas subject to condensation (windows outside walls support trusses skylights etc)
AIRSIDE DESIGN
The supply air volume and external static pressure capability of the fan is given for each model in the Performance Section It is recommended that an experienced engineering or mechanical contracting firm do the design sizing and layout of the duct system
The recommended volume of supply air should provide three to eight air changes an hour However in larger waterparks or spaces with high sensible heat gain higher airflows may be appropriate Lower air volumes require more care to avoid short cycling the air between the return and supply air stratification and pockets of high humidity
The most even control of space conditions occurs with proper air distribution and a proper air flow rate This provides space control without excessive loading and unloading of refrigerant-based dehumidification equipment
Supply Air
After dehumidification dry air is supplied back to the room Supply air should be distributed from ducting around the perimeter (see Figure 1-1) of the space The two options for perimeter supply air distribution are overhead (see Figure1-2) or below grade (see Figure 1-3)
Section I Indoor Pool Design
5EGW06-PCPEG-20150514
TMTM
Figure 1-1 Perimeter Air Distribution
ALL_AirDistributionPerimeter_20131220eps
The warm dry air should be directed over outside walls windows and other surfaces susceptible to condensation or it can be directed down the center of the room blowing air toward the surfaces prone to have condensation Supply ducts should be as short and with as few turns as possible Use turning vanes to minimize air noise and static pressure drop
Recommended maximum supply duct air velocity is 1000 FPM The recommended velocity from diffusers is 300 to 500 FPM Air velocities in ducts should be kept as low as is reasonable to avoid excessive noise in the ducts In multiple unit installations supply air from each unit may go into a common supply duct or into a plenum A supply air duct collar is provided at the fan outlet The duct should be attached to this with a flexible connection to minimize vibration transmission
SUPPLY AIR BLOWINGDOWN FROM SOFFIT DUCTSCOVERING WINDOWS ANDMOISTURE-EXPOSED AREAS
SUPPLY AIRTO SKYLIGHTS
POOLPAKDEHUMIDIFICATIONSYSTEM
RETURN AIR
Figure 1-3 Below Grade Air Distribution
Section I Indoor Pool Design
BELOW GRADE DUCTING CEILING DUCTING
RETURN AIR
SUPPLY AIRTO SKYLIGHTS
POOLPAKDEHUMIDIFICATIONSYSTEM
SUPPLY AIR BLOWING UPFROM BELOW-GRADEDUCTS COVERING WINDOWSAND MOISTURE-EXPOSEDAREAS
SUPPLY AIR BLOWINGDOWN FROM SOFFIT DUCTSCOVERING WINDOWS ANDMOISTURE-EXPOSED AREAS
SUPPLY AIRTO SKYLIGHTS
POOLPAKDEHUMIDIFICATIONSYSTEM
RETURN AIR
6 EGW06-PCPEG-20150514
TMTM
Return Air
The unit will operate most efficiently in a natatorium where the supply and return openings are placed diagonally opposite each other All ducting should be done in accordance with acceptable practices Return air ducts in the section just prior to entering the unit return air opening and elbows in both the return and supply air ducts must comply with the guidelines set forth in SMACNA HVAC Duct Construction Standards Metal and Flexible ndash Third Edition Chapter 4
Ductwork Design
All supply and return duct work to the unit should be installed such that no condensate occurs in the duct work Duct turns and transitions must be made carefully to keep friction losses to a minimum Duct elbows should contain splitters or turning vanes and avoid short radius fittings
Duct work that is connected to the fan discharge should run in a straight line with proper transitions and minimum distances to elbows as recommended by SMACNA and should not be reduced in cross-sectional area Duct turns should be in the same direction as fan rotation Never deadhead the fan discharge into the flat side of a plenum
Duct work attached to the PoolPaktrade unit return air connection must be done in accordance with SMACNA recommended standards and or generally accepted industry practice
Supply and return duct work should have all seams sealed before applying insulation to the exterior of the duct work The insulationrsquos seams must be sealed wrapped and mastic coated Use of pre-insulated duct work (interior) is acceptable if it meets local codes however all seams must be sealed prior to startup
Air Distribution
Supply outlets and return grilles should be carefully placed to avoid short-circuiting in the space Short-circuiting creates stagnant areas where humidity and temperatures may build up to undesirable levels reducing the effectiveness of the PoolPaktrade System Return grilles can be placed high in the space to reduce return ductwork however removal of Chloramines from the occupied area has become much more of a design consideration and so low returns are favored by poolroom designers
Supply air should be directed 45 degrees up and down (most of the air will be directed downward) toward exterior walls windows skylights and other areas where stagnant conditions could cause humidity buildup and condensation problems or drafts The end result of the supply air ducts is to wash the surfaces of the pool room that are prone to condensation with the warm dry supply air
Figure 1-4 Supply Air Proportions
20 OF SUPPLYAIR DIRECTEDALONG CEILING
80 OF SUPPLYAIR DIRECTEDDOWN WALLS
WINDOWSURFACE
12rdquo
ALL_AirDistribution45DegProportions_20131220eps
Section I Indoor Pool Design
7EGW06-PCPEG-20150514
TMTM
Diffusers for supply ducts located overhead (as opposed to under the deck) must be sized such that the supply air will be thrown all the way to the deck and wash the entire wall surface from supply duct to the floor
As a rule directing the supply air at or across the pool surface increases the evaporation rate To control the buildup of chloramines at the surface of the pool some air may be directed at the pool surface Supply outlets should not discharge directly onto surfaces where drafts may be created that will blow on swimmers walking along the edges of the pool Spectators should have supply air directed toward their faces
The outside air intake and exhaust may have rain hoods if the unit is mounted outdoors Rain hood locations are illustrated on the unit arrangement drawings The intake and exhaust should be screened to prevent the entrance of foreign matter and arranged to avoid recirculation of exhaust and outside air Also when auxiliary gas heat is selected (in an outside installation) a combustion air louver or rain hood is provided
Ductwork connections over 5 feet long must be supported to avoid damage to unit Short Flexible connections of rubber or canvas can be made between the return duct and the unit to eliminate vibration transmission through the duct
PoolPaktrade International does not recommend the use of equipment rooms or locker rooms as return or supply air plenums due to the potential of corrosion for components installed in the room The return air duct should always connect the pool enclosure to the return air plenum collar of the PoolPaktrade unit(s)
Other Airside Considerations
A hot water electric or gas duct heater may be installed in the supply duct to provide auxiliary space heating Be sure that the additional air pressure drop across the heater is accounted for in the unit fan selection These heating components must be designed for use in swimming pool environments
Maintain the poolroom at a slightly negative pressure This will minimize moisture and chemical odor migration to other spaces The exhaust fan should be sized for about 5-10 greater CFM than the amount of outside air being introduced into the space Ducts can be fabric aluminum PVC or galvanized steel Even though ldquodry airrdquo is being supplied back to the pool do not use duct board or similar materials If the PoolPaktrade unit is installed in an area that is below the natatoriumrsquos dew point temperature the ducts may require insulation pitching and drainage
Continuous vapor barriers are required between the poolroom and all other interior and exterior spaces because of the high dewpoint in the poolroom all the time Care must be taken during design and installation to avoid gaps in the vapor barriers or building damage may result
Windows and exterior doors must be selected with adequate thermal insulation (including thermal breaks) to minimize condensation on their interior surfaces even if the supply air is directed across these components Doors and windows must also have as low an air leakage as possible Although the space will be maintained at a slightly negative pressure cold air leaking into the space from poorly sealed openings will negate all of the effects of good thermal insulation
Section I Indoor Pool Design
8 EGW06-PCPEG-20150514
TMTM
SECTION II PRINCIPLES FUNCTIONS AND FEATURES
THE MECHANICAL DEHUMIDIFICATION SYSTEM
PRINCIPLES OF OPERATION
The PoolPaktrade System is a complete environmental control system designed expressly for indoor swimming pool enclosures It takes into account two important factors the swimming pool occupant (personal comfort) and the swimming pool environment (the physical structure and surrounding furnishings)
The swimming pool enclosure can be a hostile environment for equipment decor and building structures A PoolPaktrade Systemrsquos major function is to dehumidify the pool enclosure air through a vapor compression cycle During this cycle the PoolPaktrade System recycles the sensible and latent heat and places it back into the pool water and air as needed This recycling process saves money and keeps your pool environment efficient and safe
Solid state microprocessor technology working in conjunction with sensors continually monitors water and air conditions provide superior occupant comfort Unlike typical outside air ventilation systems a PoolPaktrade System recycles energy and blankets the walls and windows with warm dry air
PoolPaktrade dehumidification systems reduce the energy input required to maintain pool water and air temperatures By dehumidifying the air and recycling the latent energy back into the pool air and water the unit will reduce operating costs when compared to conventional heating and ventilating systems Pool water and enclosure heating are still required but with greatly reduced requirements
A PoolPaktrade unit when matched correctly to the evaporation rate of the pool water and overall dehumidification requirements will efficiently maintain the pool air at relative humidity levels between 50 and 60 It should be noted that a lower evaporation rate occurs when the pool enclosurersquos air temperature is maintained above the pool water temperature Evaporation losses and the energy required to maintain desired room conditions will dramatically increase if the air temperature is allowed to fall below the pool water temperature It is recommended that the continuous dry bulb temperature entering the evaporator of the PoolPaktrade unit not fall below 75degF
PoolPaktrade International recommends that backup heating equipment for both pool water and pool enclosure air is capable of carrying the full system heating requirements This makes for a well-designed system that will provide the least amount of pool down time if unforeseen system problems occur Building conductive loads and other losses must be taken into consideration
AUTOMATIC CONTROL OF AIR TEMPERATURE AND HUMIDITY
An integral part of any PoolPaktrade System is a proven microprocessor control system which automatically senses and maintains comfort conditions Sensors detect changes in humidity and air temperature in the indoor pool environment and quickly regulate supply air conditions to meet set point comfort levels even during periods of unusually heavy pool use
To prevent condensation on walls and windows The PoolPaktrade System automatically adjusts humidity in response to changes in wall or window surface temperatures As the seasons and weather conditions change the PoolPaktrade System changes its own mode of operation Throughout the year PoolPaktrade thinks ldquoefficiencyrdquo and automatically selects the least expensive energy source for the poolroom conditions
PoolPaktrade models include a factory mounted and wired space temperature and humidity sensor at the return air opening of the unit Refer to the installation section for mounting location Caution should be exercised When the outside air is to be introduced into the space for ventilation adequate exhaust capacity via an integral (or a separate external fan) must be specified to ensure the poolroom remains slightly negative An inadequately sized exhaust system may result in damage to the structure and pool odors may be forced into other areas of the building
9EGW06-PCPEG-20150514
TMTM
ROOM DEW POINT CONTROL
PoolPaktrade units with the ECC-PCP controller operate using an advanced type of control called dew point temperature control This method of control is more accurate than conventional relative humidity control The main purpose of a dehumidification system is to maintain the amount of moisture in the pool area below a level that would cause damage to the building Relative humidity is a measurement of the percentage of moisture which is in the air at a given dry bulb temperature in proportion to the maximum amount of moisture that could be contained at this particular dry bulb temperature Warmer air can hold more moisture than colder air and therefore changes in dry bulb temperature will change the relative humidity reading without any change in the actual amount of moisture in the air The amount of moisture in the air is expressed as ldquograins of moisture per pound of dry airrdquo and is directly related to the dew point temperature
The ECC-PCP uses dew point control to operate the PoolPaktrade unit and maintain the moisture level below the setpoint The space dry bulb temperature and relative humidity determine the dew point temperature By varying the space temperature and space relative humidity set points the dew point set point is changed When the space dew point temperature rises more than 12 degree Fahrenheit above the space dew point temperature set point the ECC-PCP controller energizes the compressor for dehumidification As the dew point temperature drops more than 12 degree Fahrenheit below the dew point temperature set point the controller de-energizes the compressor
POOLCOMPAK OPERATION
The PoolComPaktrade fan draws in warm moist air from the pool enclosure This air passes through the evaporator (dehumidification) coil and gives up heat energy to the refrigerant which is in a cool liquid state This exchange of energy causes the air temperature to fall below its dew point resulting in moisture condensation on the evaporator coil The moisture formed falls into the unitrsquos condensate drain pan After passing through the evaporator coil the refrigerant becomes a cool gas
The refrigerant enters the unitrsquos compressor where it is compressed into a hot gas While in the compressor the refrigerant absorbs the energy used to operate the compressor This hot gas refrigerant then travels either through an air reheat coil the pool water condenser or to an optional auxiliary air conditioning condenser which may be either air or water cooled If air heating is called for the air reheat coil is used The hot refrigerant exchanges energy with the cooler dehumidified air coming from the evaporator coil This causes the temperature of the air to rise for heating
Figure 2-1 PoolComPaktrade AW and HCD Typical Refrigerant System Schematic
PCP_EG_Schematic3D_20121204tif
Section II Principles Functions and Features
10 EGW06-PCPEG-20150514
TMTM
If pool water heating is required (AWH models only) the hot gas flows into a pool water condenser where it adds energy to the incoming pool water This heats the pool water while the refrigerant is condensed into a warm liquid If space cooling is called for the refrigerant flows to the auxiliary air conditioning condenser bypassing the air reheat coil and pool water condenser and allowing cool air from the evaporator coil to provide space
ECC-PCP CONTROL SYSTEMOVERVIEW
The ECC-PCP controller is a micro-processor based system that maintains pool enclosure humidity and air and water temperatures at optimum levels automatically It is also possible to monitor this critical data via the Internet using the optional Remote Access Package (RAP) This also allows the controller to be accessed from the factory via the internet or a telephone line (AWH and HCDH only)
The ECC-PCP is designed to work with the PoolComPaktrade dehumidification system to provide an environment that is both comfortable and cost effective It controls unwanted humidity in the pool enclosure and helps to prevent unsightly condensation from forming on surfaces
The ECC-PCP provides accurate control and allows the user to monitor system parameters and change setpoints easily For this purpose a remote interface unit with a text display and keypad is provided The remote panel should be mounted outside the pool space in an office or in the equipment room (The ECC-PCP remote interface unit contains no sensors) All setpoints are saved in the memory of the ECC-PCP and are not erased in the event of a power failure Critical operating data can be easily accessed by a service technician for the purpose of system operation and evaluation
HUMIDITY CONTROL
As the dewpoint temperature within the pool enclosure rises above the desired setpoint the ECC-PCP activates the compressor within the PoolComPaktrade to begin the dehumidification process If the space temperature is below the desired setpoint the heat recovered during dehumidification is directed to the air reheat coil for space heating If the pool water temperature is also below the setpoint some of the recovered heat is directed to the pool water condenser (model AW only) for pool water heating If neither air heating nor pool water heating is required the recovered heat can be directed to an auxiliary air conditioning condenser if the system is so equipped If the system does not include an auxiliary air conditioning condenser the ECC-PCP will direct the recovered heat to the air reheat coil until the need for dehumidification is satisfied
COLD SURFACE TEMPERATURE HUMIDITY RESET
The ECC-PCP control system includes a sensor that measures the temperature of the coldest surface in the pool enclosure usually an exterior window or door frame When the temperature of this surface approaches the dewpoint temperature of the space the controller lowers the humidity setpoint to activate dehumidification This function helps to prevent condensation on the cold surface
SPACE HEATING
When the compressor is running the ECC-PCP directs the recovered heat to the air reheat coil Space heating will continue until the space temperature reaches the setpoint The ECC-PCP will activate the auxiliary space heating system if the PoolComPaktrade unit is unable to satisfy the heating need with heat recovered during dehumidification The ECC-PCP will activate the auxiliary pool water heating system if the water temperature cannot be satisfied with recovered heat An auxiliary pool water heater must be supplied as part of the pool water pump and filter system
Section II Principles Functions and Features
11EGW06-PCPEG-20150514
TMTM
Section II Principles Functions and Features
NETWORKING MULTIPLE UNITS
ECC-PCP networking allows up to four PoolComPaktrade units to be connected together The units will work with eachother to control water temperature air temperature and relative humidity Networked PoolComPaktrade units have all thefeatures of standard PoolComPaktrade plus the ability to control water temperature in multiple pools They also allow system dehumidification capacity to be staged All units on the network are accessible from a single remote interface unit for convenience
SPACE COOLING (OPTIONAL)
If space cooling is required and the unit is equipped with an auxiliary air conditioning condenser (air-cooled or water-cooled) the ECC-PCP will activate the space cooling mode of operation In this mode the heat removed from the space air will be directed to the auxiliary air conditioning condenser The air cooling mode of operation is independent of the need for dehumidification
When the PoolComPaktrade unit is equipped with a field supplied economizer the ECC-PCP will automatically select the most economical method for space cooling An economizer utilizes outside air rather than the refrigeration system to achieve space cooling A sensor connected to the ECC-PCP monitors the outside air temperature When appropriate the controller will disable the compressor and bring in cool outside air for economical operation A separate exhaust system must be installed to ensure negative room pressure during the economizer mode
WATER HEATING (MODELS AWV AND AWH ONLY)
If the pool water temperature is also below the set point some of the recovered heat is directed to the pool water condenser for pool water heating Heating can only take place during the dehumidification when heat is captured in the refrigeration circuit This is only available on the Model AW which is equipped with a pool water condenser
FEATURES AND OPTIONSSTANDARD ITEMS FACTORY MOUNTED
bull Evaporator (dehumidification) coil bull Air reheat coil (hot gas reheat coil)bull Bottom top (for indoor installations) or horizontal supply air configuration bull Filters and filter rackbull Air temperature and relative humidity sensorbull Compressor suction and Discharge pressure transducersbull Compressor suction temperature
STANDARD ITEMS FACTORY SUPPLIED FOR FIELD INSTALLATION
bull ECC-PCP control interface devicebull Cold surface temperature sensorbull Outside air temperature sensor (with economizer control kit option only)bull Pool water temperature sensor (AW models only)
SYSTEM OPTIONS
bull Remote air-cooled condenser for space air conditioningbull Capability of introducing up to 30 outside airbull Economizer controlbull Network multiple unitsbull Remote monitoring via Internet (AWH and HCDH only)bull Weatherproofing for outdoor installation (AWH and HCDH only)
12 EGW06-PCPEG-20150514
TMTM
bull A factory-mounted water-cooled condenser with a refrigerant head-pressure controlled water regulating valve for space air conditioning Chilled water and closed loop cooling tower water may be used for the water-cooled condenser loop Never use ground water for the water-cooled condenser Consult the factory for cooling tower applications
ROOFPAK SYSTEM
The RoofPak product line is comprised of the most popular PoolComPaktrade configuration and repacked as a self-contained all-in one dehumidification system This offering merges a highly reliable PoolComPaktrade AWH or HCDH base system with an integral air-cooled condenser and either an integral gas furnace or an electric heater The RoofPak Series is only available in horizontal configuations which can be utilized over a wide range of popular applications See the RoofPak section of this manual for more information
POOLCOMPAKtrade DEHUMIDIFICATION SYSTEMS SELECTION
Overview
The PoolComPaktrade is a compact unitary pool dehumidification system designed for commercial and residential applications It is available in the AW Series with a pool water condenser for water heating or in the HCD Series without the pool water condenser
Available Configurations
Indoor Installation The PoolComPaktrade fits easily into a standard utility room (vertical and horizontal configurations) Outdoor Installation The horizontal configuration only can be pad roof or curb mounted depending on the application
For detailed information for your specific model please refer to General Arrangement DrawingsThe PoolComPaktrade can be configured with an internal hot water coil or duct-mounted electric heater and adapted for economizer operation The horizontal model can have either a top bottom or end supply duct connection
Typical AW Series Applications
bull Hot Tubs Spas and Whirlpoolsbull Residential Pools bull Hotel and Motel Pools bull School Natatoriums bull YMCA and Club Pools
PoolPaktrade International LLC maintains a computerized software selection program Information required for the program can be found in the PoolComPak Selection Input Data form found in the online PoolPaktrade Engineering Library Please contact your exclusive PoolPaktrade Sales representative for a selection
Section II Principles Functions and Features
13EGW06-PCPEG-20150514
TMTM
Section II Principles Functions and Features
ROOFPAK SERIES (HCDHAWH)PoolPaktrade has taken their most popular PoolComPaktrade configuration and repacked it as a self-contained all-in-one dehumidification system This product comprises the RoofPak Series This offering merges a highly reliable PoolComPaktrade AWH or HCDH base system with an integral air-cooled condenser and either an integral gas furnace or an electric heater The RoofPak Series is only available in horizontal configuations which can be utilized over a wide range of popular applications The ten and twelve ton models are ideally suited for applications having a surface area between 1200 sq ft and 2500 sq ft
DESIGN FEATURES
The RookPak Series is designed with features that provide cost savings and greater reliability over traditional systems Key features are
bull Single self-contained unit can be installed with one crane liftbull Enclosed refrigerant system reduces refrigerant chargebull Factory assembly ensures wiring and brazing are accomplished under ideal situationsbull Single power connection to minimize field wiring (Separate power connection required for integral electric heat)
Durable Construction
bull Heavy duty construction designed for outside installation to withstand the elementsbull Double-wall construction enhances product longevitybull Designed for quiet operation
Rooftop Installation
bull Requires only one mounting curbbull Bottom return airbull Bottom supply airbull Side outside air Microprocessor Controller
bull Utilizes the PoolPaktrade proven ECC-PCP microprocessor based contol technologybull Incorporates Remote Access Package (RAP) to allow system access via the ethernetinternetbull RAP is easily adaptable to BAS systems including BACnet (MSTP amp IP) LonWorks and Modbus
Heating Packages
bull 200 MBH or 240 MBH indirect gas furnace for consistent temperature controlbull 20kW or 30kW electric heater (requires separate power connection) bull Hot water coil using PoolPaktrade standard Hycorreg Blue coil or optional Electro-Guardtrade coils
Self-Contained Air-Cooled Condensing Section
bull Built-in Air Cooled Condenser (ACC) reduces cost and eliminates field pipingbull Utilizes efficient dual rotary blade fansbull Efficient to 105degF ambient outside air temperaturebull Choice of coil coatings for specific applications
Evaporator Coil Options
bull Hycorreg Blue (standard)bull Electro-Guardtrade Plusbull All copper
14 EGW06-PCPEG-20150514
TMTM
Totally Enclosed Fan Cooled (TEFC) Motors
bull Protects fan motors from corrosive air streambull Extends motor lifeprevents premature failurebull Reduces system maintenance
Unique Outside Air System
bull Houses adjustable louvers and filterbull Convenient external filter accessbull Swing-out door-mount design for easy service access to fan motor and belts
Housed Blower
bull Heavy pillow-block bearings provide durabilitybull Rugged cast-steel housing provides longevitybull Provides greater reliability
Cupronickel Water Heat Exchanger
bull Supplies 100 of available recycled energy to the pool waterbull Reaches water temperature set-point conditions fasterbull Efficiently maintains the water temperature set-pointbull Redirects heat only after space temperature is satisfied
AWHHCDH 35004000 With Integral Gas or Electric Heat and With Remote ACC 2900AWHHCDH 35004000 With Integral Gas or Electric Heat and With Integral ACC 3700AWHHCDH 35004000 With No Integral Auxiliary Heat and With Integral ACC 2700
RoofPak weights are also included with the RoofPak Generic Product Drawings found in the Engineering Library section of the PoolPaktrade website
Model Number AWH HCDH 3500 - 10 Ton AWH HCDH 4000 - 12 TonPool Size (Sq Ft) 1200 - 2000 1400 - 2500Reheat Capacity (MBH) 170 200Moisture Removal (LbHr82degF60RH) 63 70Pool Water Flow (GPM) 26 28Pool Water Condenser PD (FT WC) 20 30Pool Water Condenser Capacity (MBH) 170 200Outside Air (CFM)(Nominal) 0 - 2000 0 - 2000Total Supply Airflow CFM (Maximum) 3500 - 7000 4000 - 7000Refrigerant Charge (lbs) 81 83Dimensions (in inches) with integral air-cooled condenser and gas furnaceLength 264 264Width 574 575Height 525 522
OA
453
152
134 440
FRONT VIEW
525
SA1200 CG
Side return air available horizontal return air available without integral air-cooled condenser
LEFT VIEW
RA
2640
16 EGW06-PCPEG-20150514
TMTM
SECTION III PERFORMANCE AND SIZING
POOLCOMPAKtrade PERFORMANCE
Detailed performance and dimensional information are provided in the PoolPaktrade Selection Software
PoolComPaktrade AW (AWV AWH) Performance
Table 3-1 PoolComPaktrade AW Performance Summary
Performance at 82degF Air and 80degF Water Pool water Condenser (Vented)
Model AW Return Air CFM
Return Air RH ()
Moisture removal (lbshr)
Sensible Cooling Capacity (MBH)
ACC Max Heat Rejection (MBH) GPM Pressure Drop
FT water
0550 90060 111 136 312
4 650 85 156 301
0800 160060 157 221 475
6 1050 117 249 457
1200 170060 208 269 579
10 2450 155 305 555
1400 230060 260 384 766
10 850 188 434 736
1800 250060 309 418 891
12 1250 229 478 861
2600 330060 451 546 1209
13 650 350 606 1156
3500 430060 597 789 1700
24 1750 442 898 1634
4000 450060 704 876 1975
28 2450 524 1001 1893
17EGW06-PCPEG-20150514
TMTM
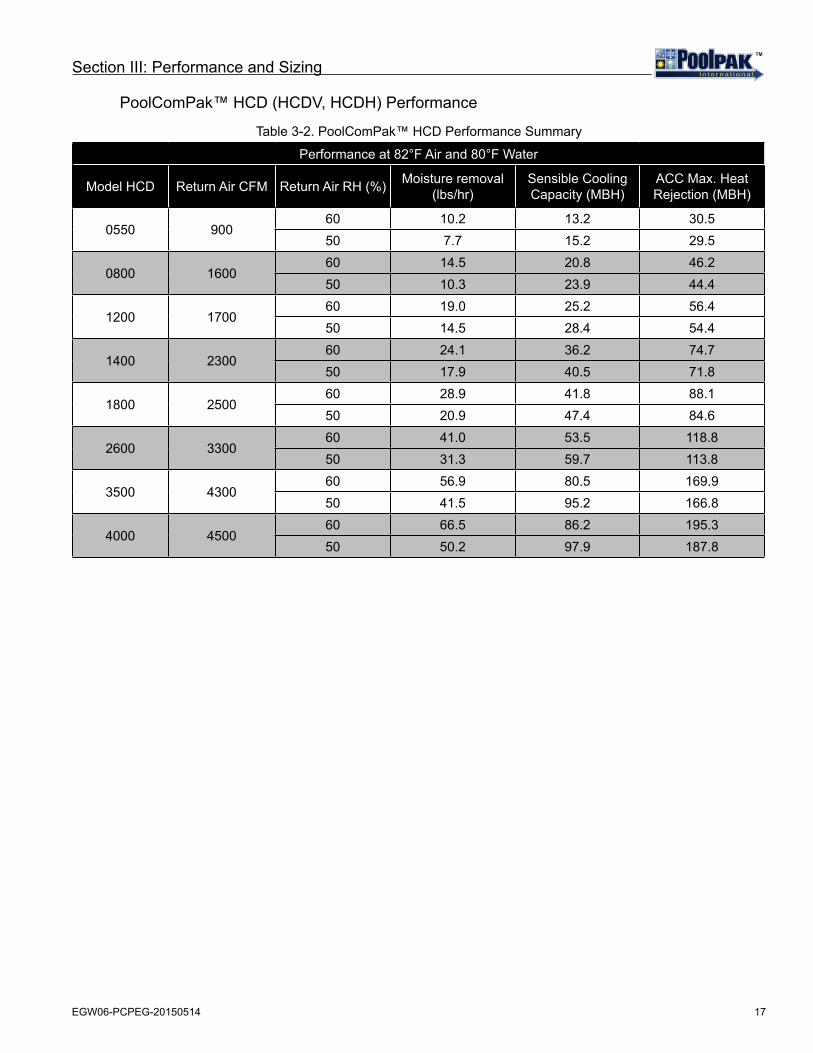
Performance at 82degF Air and 80degF Water
Model HCD Return Air CFM Return Air RH () Moisture removal (lbshr)
Sensible Cooling Capacity (MBH)
ACC Max Heat Rejection (MBH)
0550 90060 102 132 30550 77 152 295
0800 160060 145 208 46250 103 239 444
1200 170060 190 252 56450 145 284 544
1400 230060 241 362 74750 179 405 718
1800 250060 289 418 88150 209 474 846
2600 330060 410 535 118850 313 597 1138
3500 430060 569 805 169950 415 952 1668
4000 450060 665 862 195350 502 979 1878
PoolComPaktrade HCD (HCDV HCDH) Performance
Table 3-2 PoolComPaktrade HCD Performance Summary
Section III Performance and Sizing
18 EGW06-PCPEG-20150514
TMTM
POOLCOMPAK UNIT DIMENSIONS
The latest detailed unit dimensional data may be found in the PoolComPaktrade Series AWHHCDH AWVHCDV All Models R-410A Dimensional Drawings publication (EG6_Dim_All) which can be downloaded from in the PoolPaktrade Engineering Library (wwwpoolpakcom)
PoolComPaktrade Horizontal Dimensions
Table 3-3 AWHCD Horizontal Unit Overall Dimensions
NOTECoils add 01rdquoWC to ESPEntering Air Temperature - 80degFEntering Water Temperature - 180degFMax Working Pressure - 125 psiCapacity is a function of Return Airflow and is independent of Supply Airflow
21EGW06-PCPEG-20150514
TMTM
POOLCOMPAK OUTSIDE AIR DAMPER SIZE
Table 3-6 PoolComPaktrade Outside Air Damper Size
Section III Performance and Sizing
Model Outside Air (OA) Location
Opening Size1 (in) Damper Code OA CFM Range2
PoolComPak Vertical AWVHCDVV5508001200 Top A 14 x 10 OA-TR 0-800Left OA-LT
V14001800
Top A 14 x 10 OA-TR 0-800Left OA-LTTop B 14 x 22 OA-TR 800-2000Left OA-LT
V2600
Top A 14 x 10 OA-TR 0-800Left OA-LTTop C 14 x 30 OA-TR 800-2500Left OA-LT
V35004000
Top A 14 x 10 OA-TR 0-800Left OA-LTTop C 14 x 30 OA-TR 800-2800Left OA-LT
PoolComPak Horizontal AWHHCDH
H5508001200
Top A 12 x 12 OA-TC 0-450Front OA-FCTop B 12 x 24 OA-TC 450-800Front OA-FC
H14001800
Top C 16 x 20 OA-TC 0-1000Front OA-FCTop D 16 x 40 OA-TC 1000-2000Front OA-FC
H260035004000
Top E 20 x 20 OA-TC 0-1400Front OA-FCTop F 20 x 40 OA-TC 1400-2800Front OA-FC
1Size may change depending on RA CFM and ESP See product dwg requestpulley request from section software for exact damper size
2Operating these units at OA quantities different from which the unit was selected will be detrimental to the unitrsquos operation
22 EGW06-PCPEG-20150514
TMTM
REFRIGERANT
Table 3-7 Factory Refrigerant R410A Charge
NOTEFactory charge for remote ACC option does not include refrigerant nor oil charge for either ACC or connecting refrigerant line between unit and ACC
For ACC and lineset charging see Table 4-2 and Table 4-3 in the Installation section
1Factory charge for remote ACC option does not include refrigerant for either ACC or lineset
2Factory charge for RoofPak with Integral ACC in parentheses
Section III Performance and Sizing
23EGW06-PCPEG-20150514
TMTM
Section III Performance and Sizing
REMOTE AIR-COOLED CONDENSER (ACC)
Table 3-8 Remote ACC Performance ChartNote Below table contains the piping sizes of the remote ACC stub-outs Additional field piping may be needed to make the transition from the connections to correct refrigeration lineset sizing (See Table 4-3)
Unit Size ACC Model
Ambient Temp (degF)
Unit Height
(inches)
Vapor OD
(inches)
Liquid OD
(inches)Unit
WeightMotor FLA Min Circuit
Ampacity
A B C 208230V 460V 208230V 460V0550 ACC0041 95100105115 393 58 12 120 3 15 38 19
Power wiring should incorporate properly sized fuses or motor rated circuit breakers A disconnect must be fitted within easy access and sight of the unit Supply voltage must be maintained within +- 10 of design voltage on both single and three phase units Cycles must be within +- 5 of design Failure to operate within these ranges can adversely affect performance cause failure of the equipment and may void warranty terms
Figure 3-5 Duct Heaterbull Tubular sheathed elementsbull Galvanized steel cabinetbull Duct-mounted flanged typebull Airflow in either directionbull UL and CSA approved heaterbull Airflow proving switchbull Auto and manual reset high temperature limitsbull Magnetic contactorsbull 24 volt control circuit and transformerbull Standard heater for indoor installation in non-insulated duct
Duct Heater Sizes
Table 3-9 Duct Sizes
Duct Heater Installation
1 Flange both ends of the ducts outwards on three sides to match heater flanges as shown2 Fasten heater to duct using sheet metal screws for smaller heaters or bolts for larger ones3 Seal opening with suitable sealing compound4 If needed use additional hangers to support heater5 Electrical power connections must be made within NEC standards and local electrical codes6 Refer to the Field Wiring Diagram at the back of this manual for controls connection
Reference Dimensions Fan Outlet
AWHHCDH 5508001200 9-14 x 10-38 inchesAWHHCDH 140018002600 12-12 x 13-12 inchesAWHHCDH 260035004000 17 x 19 inchesDuct heater width = 8 10 or 12 inches depending on heater kW Flange width = 1 inch
VOLTSHZPHDuct Size
12rdquo X 12rdquo 15rdquo X 15rdquo 20rdquo X 20rdquo 28rdquo X 28rdquo
Installation requires the unit to be placed on a roof mounted curb the mechanical room floor an appropriate location in the pool room or outside on an equipment housekeeping pad Isolation pads should be placed under the unit to minimize transmission of noise due to unit operation Then pool water is piped to the unit Electrical power from a properly sized fused disconnect is connected to the unit The supply and return air ducts are connected to their respective locations on the unit The condensate is piped back to the pool or to the sewer
If an optional remote air-cooled condenser is used place the condenser in a proper outdoor location Refrigerant piping is then run from the air cooled condenser to the PoolComPaktrade unit Refrigerant lines must be leak checked and evacuated through installer provided Schrader valves Control and power wiring are run to complete the installation If a field-furnished auxiliary space heating coil is installed the control for this heater must be field wired to the PoolComPaktrade controls shown in Section V1 - Wiring (Figure 6-3 Field Wiring Diagram)
Outside air can be ducted into the unit through the optional outside air duct connection The unit can draw up to 30 of its supply air from the outside When ventilating the natatorium in this way an exhaust fan must be furnished in the natatorium to exhaust to the outside an air volume slightly greater than the air volume introduced into the natatorium from the outside This will maintain a negative pressure in the space preventing odor and moisture migration Outside air filters are provided for Horizontal PoolComPaktrade units For Vertical PoolComPaktrade units outside air must be filtered before entering the unit
UNITFACILITY INTERFACE
A typical PoolComPaktrade system layout and its connection to the natatorium and pool water piping systems is shown in the figure below
Figure 4-1 Typical PoolComPaktrade AWH Series System Layout
PCP_EG_LayoutSchematic_AW_3D_20121204eps
Cold SurfaceTemperature Sensor
POOL
Recommended WaterPressure Taps
Return Air
ECC-PCP RemoteInterface Unit (should not
be mounted insidepool enclosure)
FusedDisconnect (Able to be seen
from the unit)
RemoteAir-CooledCondenser(optional)
PoolComPakHorizontal
Unit
Pool Heater
Pool HeaterPump (optional)
Pool Water Circulation Pumpfor PoolComPak (Optional - By Others)
Flo
Pool WaterTemp Sensor
wBalancing Valve
Pool Filter
Pool Pump
IsolationValves
AirVent
Supply Air DuctSupply Air
ExteriorWindow
27EGW06-PCPEG-20150514
TMTM
HANDLING
All units are shipped completely assembled Care should be taken to avoid damage due to rough handling If the unit is not to be immediately installed it must be protected from weather and site hazards
CLEARANCE
For proper operation and service PoolComPaktrade Vertical PoolComPaktrade Horizontal and RoofPak units require 36rdquoclearance on all sides
MOUNTING OF POOLCOMPAK UNITS
Locate the PoolComPaktrade unit on a firm level base If floor mounting ensure that the floor is capable of supporting the operating weight If wall mounting or hanging a unit provide a support structure that is capable of supporting the unit while protecting pool patrons and employees from injury Ensure that the support structure will not interfere with the operation of the unit Provision must be made for servicing units suspended above floor level Install isolation pads under the unit to minimize unit transmitted vibration noise
INSPECTION
Upon receipt of the PoolComPaktrade unit(s) immediately inspect for damage In particular inspect the housing and the evaporator coil face Minor indentations of the fins will not affect performance However if there is substantial damage immediately notify shipping company of unseen damage at delivery with a detailed letter outlining the damage Retain copies of all shipping damage claim documentation as well as photographs of the observed damage
NOTEPoolPaktrade International does not ship damaged units from its facility nor is it responsible for damage incurred during transit
POWER SUPPLY
A separate fused disconnect switch must be provided per local codes and be within easy accessibility of the PoolComPaktrade unit Use the minimum circuit capacity listed on the unitrsquos data plate to determine the minimum wire size for incoming electrical power The ground connection for the unit is located in the unit control panel The power supply to the unit must be adequate for the compressor starting amperage (LRA) If it is not a compressor rotor stall will occur during start-up due to an excessive voltage drop All field wiring must be done according to the wiring diagram provided with the unit and in conformance to the National Electrical Code (NEC) and any other applicable local electrical code(s)
For Vertical and Horizontal PoolComPaktrade units installing contractor must punch a hole into the electrical compartment to run power wires The hole is to be properly finished with a rubber grommet and weather sealing
CONTROL WIRING
All control wiring field connections are described in the wiring diagram furnished with the PoolComPaktrade unit as well as in the Field Wiring section of this manual All control wiring is low voltage
CONDENSATE PIPING
The condensate may be piped to a drain or returned to the pool if local codes allow If returned to the pool the condensate should be piped to the skimmer PoolPaktrade International recommends neither for nor against the practice of returning condensate to the pool The overflow drain should be piped in a similar fashion The installer should review the local codes prior to making the decision of where to dispose of the condensate The amount of condensate produced in a year is about equal to the volume of the pool
Section IV Installation
28 EGW06-PCPEG-20150514
TMTM
Section IV Installation
CURB MOUNTING
Illustrated in Figure 4-2 is a curb that has been designed specifically for the PoolComPaktrade product line The outside dimensions of the curb are such that the base of PoolComPaktrade extends over the edge of the curb all the way around This aids in preventing rainwater from getting between the base of the PoolComPaktrade and the curb It is the installing contractorrsquos responsibility to complete the following
bull Flash the curb into the roofbull Insulate the curbbull Connect the supply and return duct to the curbrsquos duct support railsbull Connect condensate drain line with appropriate trap bull Seal the curb to the bottom of the PoolComPaktrade using the gasket supplied with the curbbull Provide counter flashing between curb and PoolComPaktrade unitbull Seal the pool water pipes where they go through the curb
If specified when ordering all water piping connections can be made through the curb These water connections include pool water condensate auxiliary hot water coil (optional)
If the PoolComPaktrade is to be mounted on a curb the unit must be ordered with the ldquooutdoorrdquo option PoolComPaktrade Units produced for curb mounting receive special weatherizing and insulation that non-curb mounted PoolComPaktrade Units do not receive
NOTEIf the factory is not notified that a PoolComPaktrade is to mounted outdoors the unit will not be weather tight it will leak and it will not be properly insulated
INTEGRAL GAS FURNACE OPTION (ROOFPAK ONLY)
When using a gas furnace power venting is provided for all unit sizes External vent piping andor cap is required Please refer to the furnace manufacturerrsquos manual for piping and venting instructions Install leak-test and properly regulate piping for the gas-fired heater Pressures should be regulated to the entering pressures as shown on the furnace manufacturerrsquos data plate or manual
The ECC-PCP is the Electronic Control Center programmable controller designed specifically for the PoolComPaktrade dehumidification system It is a robust system capable of a variety of functions The following text describes the field wiring required for for proper operation of the ECC-PCP dehumidification system in a typical PoolComPaktrade unit installationThe field wiring diagram (see Section VI - Wiring) shows the location of the connections for the sensors and other required devicesThe numbers following the text identify the location on the field wiring diagram where each device is connected to the PoolComPaktrade unit electrical panel
REMOTE INTERFACE UNIT (1)
The remote interface unit allows the user to view space temperature pool water temperature and relative humidity change set points and receive fault notifications It should be mounted in a convenient location that is outside the pool area The ambient temperature of the mounting location must always be above 32 F
NOTEThe maximum distance from the Remote Interface Unit to the PoolComPaktrade unit is 1000 feet For distances greater than 1000 feet contact the factory
The control panel does not contain any sensors and should be mounted outside the pool enclosure A factory supplied 6 ft cable RJ25 (6 conductor) must be installed between the PoolComPaktrade unit and the control panel
For distances greater than 6 feet use 6 conductor 22 AWG shielded twisted-pair cable along with the supplied RJ25 jack and second 6 foot cable shipped loose with the unit
The wall mounting of the terminal first requires the back piece (A) of the RIU assembly The RIU is designed to fit a single gang extra-deep electrical box mounted horizontally in the wall The RJ25 jack and most of the black cable should be placed inside the box before installing the mounting bracket A frac34rdquo hole must be drilled for the 6-conductor cable which connects the remote interface unit to the PoolPaktrade unit The below is specific mounting instructions that correspond to the mounting schematic below
1 Fasten the back piece (A) to the gang box using the rounded-head screws supplied in the packaging Use the screws that come with the box to secure the bracket
2 Thread the 6-conductor cable through the back piece (A) and connect to the back of front panel (B)3 Rest the front panel (B) on the back piece A and fasten the parts together using the flush-head screws supplied in the
packaging4 Finally fit the click-on frame (C)
Figure 4-3 Remote Interface Mounting Plate
ALL_EG_RIUMounting_20131219eps
A
B
C
31EGW06-PCPEG-20150514
TMTMSection IV Installation
COLD SURFACE TEMPERATURE SENSOR (2)
This sensor is used to measure the temperature of the coldest surface in the pool enclosure The sensor is an aluminum bar 1rdquo long by frac14rdquo square with a clearance hole for a number 8 screw and two 6rdquo wires on one end
When the temperature of the surface drops to within 5 F of the space air dew point the humidity set point will be automatically reset downward to help prevent condensation on the cold surface It should be noted that resetting the humidity set point will not compensate for lower quality building materials such as single pane glass or non-thermally broken frames
The sensor should be mounted on an exterior window or door frame that is not in direct sunlight In cases where there are no exterior windows or doors the sensor should be mounted on the inside surface of an exterior wall The sensor must be in contact with the cold surface Electrical connection should be made with 22 AWG copper two-conductor shielded twisted-pair cable Connect the shield drain wire to ground at the PoolComPaktrade unit end only
ECONOMIZER SYSTEM (OPTIONAL) (3)
An economizer system cools the space with outside air instead of the compressor The ECC-PCP provides a dry contact closure to activate the economizer The contacts of the ECC-PCP may be connected directly to the economizer control circuit provided the circuit is 24 VAC maximum and the current does not exceed 1 amp inductive The other components of the system must be provided by others (See figure below for an illustration of a typical economizer system)
Units equipped with an economizer require relocation of the factory mounted return air sensor It must be located in a duct that will always contain air that represents the space temperature and humidity
The economizer will operate only when space cooling is required and there is no dehumidification requirement When the outside air temperature is greater than 50degF and more than 5degF below the space temperature set point and the space temperature rises above the set point the compressor is disabled and a dry contact closure between T216 and T217 is made to activate the economizer
When the ECC-PCP contacts close relay R1 is energized causing the outside and exhaust air dampers (by others) to open and the return air damper (by others) to close At the same time relay R2 is energized causing the exhaust fan to run If the space temperature continues to rise and exceeds the space temperature set point by more than two degrees the economizer contact is opened reversing the damper positions The compressor is energized in the space cooling mode (if so equipped) The compressor will then continue to run until the call for space cooling is satisfied The economizer will also be activated in the space cooling mode if the auxiliary air conditioning condenser option is not installed or if the compressor is locked out by a fault condition
Figure 4-4 Economizer Operation
PCP_EG_EconomizerOperation2_20121204eps
32 EGW06-PCPEG-20150514
TMTM Section IV Installation
WARNINGWhen economizer option is selected adequate exhaust capacity via a separate fan must be specified to ensure the natatorium pressure remains slightly negative Failure to specify adequately sized exhaust system may result in damage to structure and pool odors may be forced into other areas of the building
OUTSIDE AIR TEMPERATURE SENSOR (ECONOMIZER OPTION ONLY) (4)
The outside air temperature sensor is installed only when the outside air economizer option is included The sensor is mounted inside a 12rdquo PVC conduit pull elbow It can be mounted to the outside of the building using standard PVC conduit fittings The sensor should be mounted near the outside air intake vent for the economizer system It is very important to mount the sensor so that it does not receive direct sunlight The exposure to sunlight will cause the sensor housing to warm resulting in temperature readings that are higher than the actual air temperature This condition may prevent the ECC-PCP from selecting the economizer mode of operation If possible mount the sensor under an overhang or on a surface with a northern exposure
Electrical connection should be made with 22 AWG copper 2-conductor shielded twisted-pair cable Connect the shield drain wire to ground at the PoolComPaktrade end only See figure below for an illustration of the outside air temperature sensor Seal the conduit leading to the sensor with silicone caulk to prevent moisture from migrating out to the sensor and condensing inside the sensor
Figure 4-5 Outside Air Sensor
PCP_EG_OutsideAirSensorInstallation_20121204eps
AIR COOLED CONDENSER (OPTIONAL) (5)
The air-cooled condenser is used to reject heat recovered during the space cooling mode of operation Only PoolComPaktrade brand air-cooled condensers (PAC Units) should be used with a PoolComPaktrade Unit The ECC-PCP provides 24 VAC control signal to the speed control located in the PAC unit control panel The speed control then runs the condenser fan motor at the appropriate speed See figure below for an illustration of a PAC unit field wiring
Figure 4-6 PAC Unit Field Wiring
PCP_EG_RemoteACCFieldConnection_20121204eps
24 VAC CONTROL SIGNAL FROM
USE COPPER SUPPLY WIRES
POOLCOMPAKTERMINALS 12AND 13
POWER SUPPLY
21 L1 L2
GR
33EGW06-PCPEG-20150514
TMTMSection IV Installation
AUXILIARY POOL WATER HEATING SYSTEM (AWH MODEL ONLY) (6)
The auxiliary pool water heating system is provided by others Typically a gas fired or electric pool water heater is used The ECC-PCP provides a dry contact closure that signals a need for auxiliary water heating The contacts of the ECC-PCP may be connected directly to the heaterrsquos control circuit provided the circuit is 24 VAC maximum and the current does not exceed 1 amp inductive Any other applications will require an additional relay (by others) to be installed between the ECC-PCP and the pool water heating system
AUXILIARY AIR HEATING SYSTEM (7)
Typically a duct mounted electric heater hot water coil or a factory installed unit mounted hot water coil is used to provide air heating The ECC-PCP provides a form ldquoCrdquo (NO and NC) dry contact closure that signals a need for auxiliary air heating The ECC-PCP contacts may be directly connected to an electric duct heater control circuit provided the circuit is 24 VAC maximum and the current through the contacts does not exceed 1 amp inductive The figure below shows a typical installation that utilizes a 3-way hot water control valve and a unit or duct mounted hot water coil
Figure 4-7 Installation of a Hot Water Coil 3-Way Valve
The ECC-PCP provides a normally open contact closure for connection to a building management system If a fault occurs the controller will energize this output to indicate that there is a problem with the dehumidification system The remote interface unit will display the cause of the fault and provide a suggested course of action This output may also be used to energize an external alarm light or buzzer It may also be directly connected to an external circuit as long as the circuit is 24 VAC maximum and the current through the contacts does not exceed 1 amp inductive
HO
T W
ATER
CO
IL
FIELD SUPPLIEDACTUATOR
AB SWITCH INB POSITION
2
1
W
BK
W 3
A
B
VALVE IN BYPASS POSITION
HOT WATER IN
HOT WATER OUT
THREE WAY VALVE WITHACTUATOR
HO
T W
ATER
CO
IL
VALVE IN HEATING POSITION
HOT WATER IN
HOT WATER OUT
THREE WAY VALVE WITHACTUATOR
ALL WIRING BY CONTRACTOR
T23
T25
T24
POOLCOMPAK
120 VAC24 VAC
FIELD SUPPLIED 40 VATRANSFORMER
WIRING DETAIL
PIPING DETAIL
34 EGW06-PCPEG-20150514
TMTM
Section IV Installation
BUILDING FIRE CONTROL SYSTEM (9)
The ECC-PCP can receive a contact closure signal from a building fire control system This input of the controller must be connected to dry (voltage free) contacts only When this input receives a contact closure the PoolComPaktrade unit compressor and fan will be shut down and the remote interface unit will show an alarm condition When the contact closure opens The PoolComPaktrade unit will resume normal operations It is possible to change the operation of the fire trip input to be active on open instead of close See ECC-PCP Service in the Operation section for further explanation
RETURN AIR SENSOR (10)
The return air sensor measures air temperature and relative humidity The sensor is normally factory mounted in the PoolComPaktrade unit return air section However with the optional economizer it is necessary to field mount this sensor in the duct work The sensor must be located in the return duct upstream of the exhaust duct connection (See Figure 4-4 Economizer Operation for a typical location of the sensor in the economizer system)
When field mounting is necessary the sensor will be provided from the factory and must be field wired using 22 AWG copper 4-conductor shielded twisted-pair cable
PURGE MODE INPUT (11)
The ECC-PCP can receive a contact closure signal from an external source to activate purge mode operation During purge mode the compressor is disabled and the economizer output is activated to bring in 100 outside air
AC PROOF INPUT (12)
An optional interlock used with certain types of heat rejection condensers Dry contact closure indicates a problem and prevents compressor operation in air cooling mode
POOL WATER TEMPERATURE SENSOR (13)
Units equipped with a pool water heating condenser require installation of factory supplied pool water temperature sensor It must be mounted upstream of the PoolComPaktrade and the auxiliary water heater The sensor can be threaded directly into a 1frasl4rdquo FPT fitting Electrical connection should be made with 22 AWG copper 2 conductor shielded twisted-pair cable Connect the shield drain wire to ground at the PoolComPaktrade end only
35EGW06-PCPEG-20150514
TMTM
Section IV Installation
POOL WATER PIPING (AWH AND AWV MODELS ONLY)
CAUTIONDo not run piping across service panels evaporator coil face or air discharge outlet
If a new or existing pool water heater is piped within the same circuit the PoolComPaktrade unit should be connected in a parallel loop between the filter and the other heater This allows the PoolComPaktrade unit to act as the primary water heating source and the other heater as a backup or supplemental water heater
All pool purification and chemical feed systems MUST be installed downstream of the unit This includes the practice of adding chemicals directly to the skimmer which results in highly concentrated corrosive chemicals passing over and through the PoolComPaktrade water condenser Water chemistry must be maintained at a pH level between 72 and 76 with a free chlorine level not exceeding 30 PPM and a combined chlorine level less than 03 PPM
If possible install the PoolComPaktrade unit above the pool water level If it is installed below the pool level isolation valves must be added Breakable couplings should be located near the unit on both the water inlet and outlet lines When installing piping connect the piping to these couplings last so as not to place stress on the other connection in the plumbing systemA constant flow of water is required through the PoolComPaktrade unitsrsquo condenser The circuit to and from the unit must be capable of maintaining the flow rate as specified for the installed unit (see PoolComPaktrade Performance data in Table 3-1) To ensure correct water flow the filter pump usually operates at the same time as the PoolComPaktrade unit However to reduce energy consumption during filter off cycle times a two-speed or small auxiliary water pump which bypasses the filter may be used
CAUTIONCAUTION Excessive water flow can cause premature erosion and pitting of the pool water condenser Adjust valve so that the water flow does not exceed the GPM or pressure drop listed in the table PoolPaktrade recommends a fixed flow control or adjustable flow circuit setter
PoolPaktrade International recommends installing water pressure tap ports to check influent and effluent water pressure See PoolComPaktrade Performance data in Table 3-1 for the particular unit model in question for the proper flow rate and pressure drop across the pool water condenser The pressure tap ports should be installed in a straight length of the water piping exterior to the PoolComPaktrade unit Install the port before any 90-degree turns and approximately 6 inches from the corner-post of the unit
In some instances piping from the PoolComPaktrade unit to the filter return line may not be feasible or economical The unit may be installed on its own supply and return line using a properly sized water pump and appropriate strainer Ensure that auxiliary water heating systems are staged to supplement the PoolComPaktrade unit water heating
If the PoolComPaktrade unit is installed above the pool surface and the main circulating pump cannot provide the proper water flow to it at the specified pressure an auxiliary booster pump is required
Condensate may be returned to the pool (if local codes allow) but PoolPaktrade International neither recommends nor disapproves this practice The installer should check local codes prior to making this decision Condensate must be filtered prior to being returned to the pool
If multiple PoolComPaktrade units are installed on the pool water piping circuit pipe them (and any auxiliary water heater) in parallel Piping PoolComPaktrade units in series may result in the downstream unit(s) sensing the pool water temperature as satisfied and not reject heat to the water to its full capacity The actual pool water temperature should be sensed by each PoolComPaktrade unit and auxiliary water heater
36 EGW06-PCPEG-20150514
TMTM
Section IV Installation
Figure 4-8 Typical Pool Water Piping Diagram (AWH and AWV Model Only)
PCP_EG_PoolWaterConnectSchematic_20140305eps
SALT WATER POOLS
For units (AW models only) installed serving a salt water pool wire the pool bonding system to the bonding lug on the unit copper pool water piping This connection is required to prevent corrosion of the internal PoolComPaktrade water piping
For more information on salt water pools see the article ldquoSalt Water Poolsrdquo in the Pool Water Chemistry section of the PoolPak educational library
POOLCHEMICAL
FEEDER
CHECKVALUE
OPTIONALBOOSTERPUMP IF
MAIN FILTERPUMP IS A
2-SPEED OR UNDERSIZED
BALLVALVES
POOLWATERFILTER MAIN
FILTERPUMP
DRAIN
UNIONS
EXTERNALPRESSURETAP PORTS
UNIONS
AUXILIARYPOOL WATER
HEATER
DRAIN
BALLVALVES
LOCKINGGLOBEVALVE
LOCKINGGLOBEVALVE
POOL WATERTEMP SENSOR
FC
FlowControl
37EGW06-PCPEG-20150514
TMTM
Section IV Installation
CONDENSATE DRAINSDrain pans are connected to a common drain system and must be trapped for proper operation For AWH and HCDH units a trap and piping must be supplied and installed by the customer The trap depth must be a minimum of 6 inches (See figure 4-9) For AWV and HCDV units a condensate trap is located inside the unit and the field condensate piping and overflow drain must not have an additional trap
Provisions MUST be made for disposal of condensate Condensate from the dehumidifier coil will have nearly the same properties as the pool water itself It is recommended that building materials subjected to the condensate and systems used for its disposal are checked for compatibility For drain piping use PVC plastic pipe minimum Schedule 40 The drain line must be sloped to provide proper drainage
Drain line exposed to outdoor ambient temperatures must be protected against freezing Wrap lines with electric heat tape (follow manufacturerrsquos instructions) controlled by an automatic thermostat set at a minimum of 35degF to protect against freezing Insulate all piping Insulation must be sealed at all seams Power for heat tape must be supplied external to the PoolComPaktrade
Figure 4-9 AWH and HCDH Condensate Trap
PCP_EG_NegPressCondPiping_20140122eps
WATER COOLED CONDENSERA standard option for PoolComPaktrade units is an integral water-cooled condenser For this option all valves and refrigerant piping is internal to the unit No additional field wiring is required No additional refrigerant or oil charge is required Water piping connections are 1-14rdquo MPT and labeled on the unit
UNIT BASE
MINIMUM SCHEDULE 40 PVC
REMOVABLECLEANOUT
OPEN TEEFOR VENT
AWH OR HCDH UNIT
PLUG THEUNUSEDCONNECTIONWITH SUITABLEPVC PLUG
1
2
4 INCHES MINIMUM OR MAX NEGATIVE STATICPRESSURE (INCHES WC) + 1 INCH
2 INCHES MINIMUM OR 12
1
12
TMTM
38 EGW06-PCPEG-20150514
TMTM
Section IV Installation
REMOTE AIR-COOLED CONDENSERSPACE AND LOCATION REQUIREMENTS
The most important consideration which must be taken into account when deciding upon the locations of air-cooled equipment is the provision for a supply of ambient air to the condenser and removal of heated air from the condenser area Where this essential requirement is not adhered to it will result in higher head pressures which cause poor operation and possible eventual failure of equipment Units must not be located in the vicinity of steam hot air or fume exhausts
Another consideration which must be taken is that the unit should be mounted away from noise sensitive spaces and must have adequate support to avoid vibration and noise transmission into the building Units should be mounted over corridors utility areas rest rooms and other auxiliary areas where high levels of sound are not an important factor Sound and structural consultants should be retained for recommendations
Walls or Obstructions
The unit should be located so that air may circulate freely and not be re-circulated For proper air flow and access all sides of the units should be a minimum of ldquoWrdquo away from any wall or obstruction It is preferred that this distance be increased whenever possible Care should be taken to see that ample room is left for maintenance work through access doors and panels Overhead obstructions are not permitted When the unit is in an area where it is enclosed by three walls the unit must be installed as indicated for units in a pit
Figure 4-10 Remote ACC Installation Around Walls or Obstructions
ALL_WallsorObstructions_20131111eps
Multiple Units
For units placed side by side the minimum distance between units is the width of the largest unit If units are placed end to end the minimum distance between the units is 4 feet
Figure 4-11 Remote ACC Installation When Installing Multiple Units
ALL_MultipleUnits_20131111eps
MINW
AIR FLOW
Wrdquo=Total width of the condenser
MIN
Wrdquo=Total width of the condenserrdquo
W
AIR FLOWAIR FLOW
39EGW06-PCPEG-20150514
TMTM
Section IV Installation
Units in Pits
The top of the unit should be level with the top of the pit and side distances increased to ldquo2Wrdquo If the top of the units is not level with the top of the pit discharge cones or stacks must be used to raise discharge air to the top of the pit This is a minimum requirement
Figure 4-12 Remote ACC Installation When Installing Units in Pits
ALL_UnitsinPits_20131111eps
Decorative Fences
Fences must have 50 free area with 1 foot undercut a ldquoWrdquo minimum clearance and must not exceed the tops of the unit If these requirements are not met the unit must be installed as indicated for ldquoUnits in Pitsrdquo
Figure 4-13 Remote ACC Installation When Installing Units Near Decorative Fences
ALL_DecorativeFences_20131111eps
Wrdquo=Total width of the condenserrdquo
MIN MIN
AIRFLOW
2W2W
STACK(BY OTHERSIF SUPPLIED) 10rsquo MAX
Wrdquo=Total width of the condenserrdquo
MIN1rdquo MIN MIN
AIR FLOWW W
40 EGW06-PCPEG-20150514
TMTM
Section IV Installation
FIELD INSTALLED PIPING
Installation of the outdoor air-cooled condenser should only be done by a qualified refrigeration mechanic familiar with this type of work Many service problems can be avoided by taking adequate precautions to provide an internally clean and dry system and by using procedures and materials that conform to established procedural standards
Piping Guidelines
The following piping recommendations are intended for use as a general guide For more complete information refer to the latest ASHRAE Handbook
Materialsbull Use clean dehydrated refrigeration-grade copper tubing for all refrigerant lines Hard drawn tubing should be used
where no appreciable amount of bending around pipes or obstructions is necessary If soft copper tubing must be used care should be taken to avoid sharp bends which may cause restrictions and excessive refrigerant pressure drops
bull Use long radius elbows wherever possible with one exception - short radius elbows should be used for any traps in the hot gas riser
bull Braze all copper to copper joints with a phosphorus-copper alloy material such as Silfos 5 or equivalent Do not use soft solder
bull During brazing operations flow an inert gas such as nitrogen through the lines to prevent internal oxidation scaling and contamination
bull Support refrigeration lines at intervals with suitable hangers brackets or clampsbull Pack glass fiber insulation and a sealing material around refrigerant lines where they penetrate a wall to reduce
vibration and to retain some flexibilitybull The liquid line and discharge line should not be in contact with one another If the installing contractor must tie these
lines together because of an installation requirement the contractor must insulate them from each other to prevent heat transfer Because the discharge line is hot during system operation precautions should be taken to avoid personnel injury
bull PoolComPaktrade units do not utilize compressors with unloading stages Consequently double hot gas risers are not needed for reduced load conditions as refrigerant flow rates will not fall below minimum velocities necessary to carry oil up through the discharge line
bull A field provided field installed liquid line filter-drier is recommended in the field piping to the PoolComPaktrade unit
Sizingbull The lines must be sized and routed so that oil is carried through the system Using smaller lines than recommended
will give excessive pressure drops resulting in reduced capacity and increased power consumption Oversized lines could result in an oil flow problem within the system and possible compressor damage
bull Excessive pressure drops in the liquid line may cause flashing of the refrigerant and a loss of a liquid seal at the expansion valve inlet A reduction in capacity may then occur because the presence of gaseous refrigerant will partially block the expansion valve Using hot gas and liquid line sizes recommended in the Air Cooled Condenser section for these units and the proper system refrigerant charge will prevent this problem
bull Discharge lines should be designed to prevent condensed refrigerant and oil from draining back to the compressor during OFF cycles Use the following guidelines The highest point in the discharge line should be above the highest point in the condenser coil The hot gas line should loop toward the floor if the condenser is located above the PoolComPaktrade unit especially
if the hot gas riser is longbull For refrigerant line sizing for an Air Cooled Condenser (ACC) where the lineset length is less than 100 feet or the
ACC location is less than 50 feet higher or 20 feet lower than the unit use the below Table 4-3bull ACC line lengths beyond the above limits will void warranty unless written approval is obtained from the
factory PRIOR to installation and startup
PCP_EG_ACCPiping_20140122eps
41EGW06-PCPEG-20150514
TMTM
Section IV Installation
Figure 4-14 ACC Refrigerant Piping
Refrigerant and Oil Chargingbull PoolPaktrade units are shipped with the required charge for self contained operation only The remote ACC option does
NOT provide the refrigerant charge or oil required for the ACC and line setsbull Refer to Table 4-2 for the additional ACC condenser chargebull Refer to Table 4-3 for the required additional oil and refrigerant charge Use the calculation method shown to calculate
the additional refrigerant and oilbull For the additional oil required multiply 2 of additional refrigerant charge of both ACC and refrigerant line length
Use the correct oil type of POE oil depending on the compressor installed For Alliance models SXA SPA SSA compressors use Copeland Ultra PN 998-E022-00 For Trane models CSHD compressors use Trane PN OIL00080
Sample Charging CalculationFor an AWV2600 with 73 feet line length and ACC0121 located 30 feet above the unit
Table 4-3 indicates 34rdquo discharge line and 58rdquo liquid line piping sizes Using R410A ozft additional charge for the lineset is 73 feet x 025 ozft + 73 feet x 148 ozft = 1260 oz Table 4-2 indicates additional charge for ACC0121 (allow 30 F Operation) is 39 lb x 16 ozlb = 6240 oz Total additional R410A charge for both ACC and refrigerant line is 1260 + 6240 oz = 750 oz or 46 lbs 14 oz Total additional oil charge is 750 oz x 2 = 15 oz
Table 4-2 R410A Charge for Air Cooled Condensers (lb)
DISCHARGE LINE
Pitch inDirection ofrefrigerant flow
LIQUID LINE
AIR-COOLEDCONDENSER
DISCHARGE LINE Pitch inDirection ofrefrigerant flow
Table 4-3 Refrigerant (R410A) Charge for Different Line Size
WARNINGAbove chart is for lineset length less than 100 ft and ACC located less than 50ft above unit or 20ft below unit Failures due to a piping layout not within these limits nor receiving prior PoolPaktrade
Factory approval will not be covered under PoolPaktrade warranty
Refrigerant Line Size (ACC) Refrigerant Charge for Units with Air Cooled Condensers (ACC)
Discharge Liquid Line Length (ft) vs R410A Charge (lbs)
Model OD R410A ozft OD R410A
ozft25 ft 50 ft 75 ft 100 ft
Lbs Oz Lbs Oz Lbs Oz Lbs Oz
0550 12 010 38 049 0 15 1 14 2 13 3 12
58 016 12 092 1 11 3 6 5 1 6 13
0800 58 016 38 049 1 0 2 1 3 1 4 2
58 016 12 092 1 11 3 6 5 1 6 13
1200 58 016 12 092 1 11 3 6 5 1 6 13
34 025 58 148 2 11 5 6 8 1 10 13
1400 58 016 12 092 1 11 3 6 5 1 6 13
34 025 58 148 2 11 5 6 8 1 10 13
1800 34 025 12 092 1 13 3 10 5 8 7 5
78 034 58 148 2 14 5 11 8 9 11 6
2600 34 025 58 148 2 11 5 6 8 1 10 13
1 18 058 34 221 4 6 8 12 13 1 17 7
3500 78 034 58 148 2 14 5 11 8 9 11 6
1 18 058 78 307 5 11 11 7 17 2 22 13
4000 78 034 34 221 3 16 7 16 11 15 15 15
1 18 058 78 307 5 11 11 7 17 2 22 13
Note1 This table applies to ACC line length less than 100 ft only Contact factory if ACC line length is more than 100 ft
2 Line size should be used for ACC at the same level or located up to 20ft below the unit
3 Line size should be used for ACC located up to 50 ft above the unit
43EGW06-PCPEG-20150514
TMTM
SECTION V OPERATION
ECC-PCP REMOTE INTERFACE UNITFigure 5-1 RIU Keypad
PCP_EG_StraightOnKeypadAnnotated_20121204eps
The ECC-PCP Remote Interface Unit (RIU) is designed around the Carel pGD0 4-line x 20 character backlit LCD display module The RIU displays are accessed through six backlit selection buttons They consist of a Return Enter Key Up Key Down Key Program Key Alarm Key and Escape Key as shown above
After approximately 5 minutes the RIU will display the status screen rotation Press the Escape key to bypass the five minute delay and move directly to the status display
STATUS DISPLAY
The status screens contain basic information about operation of the PoolComPaktrade system Press the up or down arrow keys to move from screen to screen The screens will also rotate automatically every 10 seconds
Figure 5-2 Status Screen 1S P A C E T E M P _ _ o FS P A C E R H _ _ S P A C E D E W P O I N T _ _ o F(O U T S I D E T E M P) _ _ o F
Status Screen 1 displaysbull Space Temperature in degF or degCbull Space Relative Humidity in bull Space Dew Point in degF or degCbull Outside Air Temperature in degF or degC (with Economizer Option Only)
Status Screen 2 displaysbull Water Heating - YES indicates that the unit is returning recovered heat back to the pool waterbull Aux Water Heat - YES indicates that the controller has closed the relay contact requesting auxiliary pool water heater
operationbull Water Temperature in degF or degC
Status Screen 3 displaysbull SPACE temperature control requirement bull TEMPERATURE- OK Indicates the space temperature is at setpointbull HEATING- YES Indicates the space requires heatingbull COOLING- YES Indicates the space requires coolingbull AUX AIR HEAT Indicates the space requires additional heating The auxiliary air heating relay contacts close to
activate the external heating system
44 EGW06-PCPEG-20150514
TMTM
bull DEHUMID (SURFACE) Indicates the space requires dehumidification The word SURFACE indicates that the unit is temporarily lowering the dew point set point to minimize condensation at the cold surface temperature sensor
bull ECONOMIZER MODE Indicates the unit is cooling the space with outside air ECONOMIZER MODE is only shown if the optional economizer system is present
Status Screen 4 displaysbull The first line displays the current system status bull The second line displays compressor status
SET POINT CHANGE MENU
bull Press the PRG key to access the main menubull Use the arrow keys to scroll to the menu selection for Set Points and then press the Enter keybull Use the arrow keys to select the set point to be changed and then press Enter Available set points are
Air Temperature
The allowable range for the air temperature set point is 70 to 95degF Use the arrow keys to change the set point and then press Enter The new dew point set point is shown immediately as DPT The set point change screen will remain visible for a short time to allow verification of the new dew point set point After about five seconds the RIU will return to the status screen display
Relative Humidity
The allowable range for the relative humidity set point is 40 to 65degF Use the arrow keys to change the set point and then press Enter The new dew point set point is shown immediately as DPT The set point change screen will remain visible for a short time to allow verification of the new dew point set point After about five seconds the RIU will automatically return to the status screen display
Pool Temperature
The allowable range for the water temperature set point is 70 to 104degF Use the arrow keys to change the set point and then press Enter The RIU will automatically return to the status screen display
Recommendations
bull Air Temperature (Range 70degF to 95degF) The air temperature should normally be set about 2degF above the pool water temperature to minimize the pool water evaporation rate (high temperature spas are an exception)
bull Relative Humidity (Range 40 to 65) The normal range for the humidity set point is 50 to 60 Lower set points will require more energy (electricity) to satisfy the dehumidification requirement and increase pool water evaporation
bull Pool Temperature (Range 70degF to 104degF) The pool temperature set point is normally set between 80degF and 88degF for a typical swimming pool and higher for a spa depending on user preference
CAUTIONThe dehumidifier should be configured to operate at the set points designed for the facility These set points are shown on the yellow label on the door of the RIU Set points other than those shown may not be attainable with this dehumidifier
Section V Operation
45EGW06-PCPEG-20150514
TMTM
Section V Operation
PURGE MODE CONTROL MENU
CAUTIONIt is the userrsquos responsibility to use this feature properly to prevent freeze damage to downstream equip-ment 100 outside air at below freezing conditions has the potential to cause serious damage
Purge Mode causes the unit to force the optional field-provided economizer dampers and fan to full open introducing large quantities of outside air to the space This is typically used when ldquoshockingrdquo the pool Compressor operation is disabled during purge but the auxiliary air and water heating systems remain active
If the unit is not equipped with the economizer option a flashing ldquoCAUTION NO FREEZE PROTECTIONrdquo warning will be displayed This warning indicates that operation of purge mode without regard for outside air temperatures below freezing can result in damage to hot water coils or other equipment in the pool area
DETAILED STATUS MENU
To access the detailed status menubull Press the PRG key to access the main menubull Use the arrow keys to scroll to the menu selection for Detailed Status and then press the Enter key
Detailed Status Screen 1 displays Temperaturesbull Surface ndash The temperature measured at the cold surface sensorbull Dew Point ndash The calculated dew point of the spacebull Dewpt Setpoint ndash The dew point set point calculated from the temperature and relative humidity set points
Detailed Status Screen 2 displaysbull Disch Press ndash The measured refrigerant pressure in the discharge line at the compressorbull Suct Press ndash The measured refrigerant pressure in the suction line at the compressorbull Suct Temp ndash The refrigerant temperature measured on the surface of the suction line at the compressorbull Suct SH ndash The calculated superheat at the suction of the compressor
Detailed Status Screen 3 displays the number of hours the following device or system has been active since power was last applied to the unitbull Cmpr - Compressorbull Fan ndash Supply Fanbull AC ndash Mechanical Air Cooling (Economizer Cooling Not Included)bull Aux ndash Air ndash Auxiliary Air Heatingbull Aux - Wtr ndash Auxiliary Water Heating
Detailed Status Screen 4 displaysbull Fault Count ndash The total number of high pressure low pressure and defrost trips that have occurred since power was
last applied to the unit When this number reaches 10 the compressor is locked outbull AC Proof ndash Indicates a status of ldquoProvenrdquo if AC mode operation is allowed ldquoNot Provenrdquo indicates that AC mode
operation is not allowed
Detailed Status Screen 5 (only present in units configured for multi-unit networking) displaysbull Network Role ndash Indicates if the unit currently being displayed by the RIU is the master or a slavebull Net Status ndash Indicates ldquoCONNECTEDrdquo if the unit is properly connected to the multi-unit network ldquoNO LINKrdquo
indicates the unit is not connectedbull Unit ID Number ndash Indicates the unit address on the multi-unit network
Detailed Status Screen 6 (only present in units configured for multi-unit networking) displaysbull Unit 1 Present ndash Indicates if the unit currently being displayed by the RIU can communicate with unit 1 on the multi-
unit networkbull Unit 2 3 4 ndash Same as for unit 1 but for the other 3 possible units on the network
46 EGW06-PCPEG-20150514
TMTM
Section V Operation
ECC-PCP NETWORK OPERATIONNetworked ECC-PCP units operate in a MASTERSLAVE environment This means that one unit (master) determines heating cooling and dehumidification requirements and broadcasts them on the network to the other units (slaves) This ensures that all units work together instead of against other Each networked unit contains all sensor and controls necessary for independent operation and is capable of acting in the master role Units on the network are identified by a number between one and four The unit with the lowest identification number having no uncleared alarms will be the master unit
If an alarm condition occurs in the master unit it will give up the role of master The unit with the next lowest identification number and no unclear alarms will take over the master role The unit that experienced the alarm condition will operate in the slave role until the alarm is cleared at the control panel
The control panel provides two network status screens These can be accessed in the detailed status menu The figure above shows the first screen that displays the status of units one through four as present or not Use this screen to verify that all units on the network are connected and communicating with each other The figure below shows the second screen that displays network information for the unit that is being displayed by the remote interface unit including network role connection status and network identification number
NETWORK CONFIGURATION
Using the following four parameters it is possible to configure the ECC-PCP network to accommodate a wide variety of installation options Network configuration can be accessed in the service menu These parameters must be set in each unit individually
Pool Water Temperature Control
Determines whether the unit will control water temperature based on the masterrsquos command (NETWORK) or its own temperature sensor and set point (LOCAL) If a unit set to LOCAL becomes the master other units in the network will not use the masterrsquos command for water heating They will look to the next line that is not set to LOCAL This parameter is only set to LOCAL if the unit is connected to a different pool than the rest of the units on the network Because the unit is controlling water temperature on its own it is necessary to select the correct unit with the control panel before changing the water temperature set point
Staged Dehumidification Control
Determines whether the unit will run in dehumidification when there is a need for 1 stage or 2 stages of dehumidification The master unit will start on any need for dehumidification independent of this parameter Slave units with this parameter set to YES will dehumidify only if the master is asking for 2 stages of dehumidification Setting this parameter to NO will cause the unit to dehumidify when the master calls for at least 1 stage of dehumidification Using this parameter it is possible to configure the number of units in each dehumidification stage
Dehumidification Stage 2 Offset
Determines how far the dewpoint (relative humidity) of the space has to rise above the set points before the unit will request 2 stages of dehumidification on the network This parameter is normally the same in all units on the network Making this parameter smaller will bring on the second stage of dehumidification sooner
Enable Network Control
Determines whether the unit will participate in the masterslave environment Setting this parameter to NO will cause the unit to act like a standard ECC-PCP single unit The unit will never become the master on the network and will not listen to the demands broadcast by the master on the network Although units with this parameter set to NO do not participate in the masterslave environment they are still accessible through the network control panel Like the LOCAL pool
47EGW06-PCPEG-20150514
TMTM
Section V Operation
water temperature setting this parameter when set to NO requires this unit to be displayed on the control panel before changing any of the set points The other screens for Pool Water Temperature Control Staged Dehumidification and Stage 2 Offset are not available when this parameter is set to NO
Changing Set Points
Each unit on the network maintains two groups of set points network and local If a unit has the Enable Network Control parameter set to YES and the Water Temperature Control parameter set to NETWORK it will control to the network set points Set points changed when the remote interface unit is displaying this unit will be changed in every unit on the network with the same NETWORK and Water Temperature Control parameters Units that are configured for Network Control and LOCAL water temperature control will control using local water temperature set point the network air temperature and relative humidity set points When the air temperature and relative humidity set points are changed when the remote interface unit is displaying the unit they will be changed in all units configured for Network control The water temperature set point will only be changed in the unit currently being displayed by the remote interface unit Units that are not configured for Network Control will use all local set points Therefore any set points changed while the remote interface unit is displaying this unit will only be changed in this unit
ECC-PCP SERVICE
SERVICE MENU
To access the service menubull Press the PRG key to access the main menubull Use the arrow keys to scroll to the menu selection for Service and then press the Enter keybull A password is required to access the service menu
The following sub-menus are available in the service menu
IO CONFIGURATION
Digital Inputs
This menu contains a screen for each digital input Each screen contains the following parametersbull Status of the data point linked to the inputbull Status of the raw digital inputbull Input type
The following parameter list shows the available digital input screensbull Defrost Switchbull Cpr High Tempbull Water Flow bull Fire Tripbull AC Proofbull Cpr High Prsbull Fan Overloadbull Low Pressurebull Purge Input
Digital Outputs
This menu contains a screen for each digital output Each screen contains the following parametersbull Current output status bull Requested output status bull Override
48 EGW06-PCPEG-20150514
TMTM
Section V Operation
The following digital output screens are availablebull Supply Fanbull Compressorbull Bypass Solenoidbull Water Heating Solenoidbull Reheat Solenoidbull AC Solenoidbull Aux Water Heatbull Alarm Outputbull ACC Run Signalbull Economizerbull Aux Air Heat Stage 1bull Aux Air Heat Stage 2
Analog Inputs
This menu contains a screen for each analog input Each screen contains the following parametersbull Current read-only value from the inputbull Fail bull Tol bull Offs bull Ovrd bull Min bull Max
The following analog input screens are availablebull Discharge Pressure bull Suction Pressure bull Return Relative Humidity bull Suction Temperature bull Return Air Temperature bull Pool Water Temperature bull Surface Temperature bull Outside Air Temperature
UNIT CONFIGURATION
Installed Options
This menu contains parameters that indicate the hardware options installed in the dehumidifier The parameters are set by the factory and do not typically require modification
Aux Air Heating
This menu contains parameters that configure the auxiliary air heating system
Aux Water Heating
This menu contains parameters that configure the auxiliary water heating system
Temperature Ctrl
This menu contains parameters that configure the air temperature control routines of the dehumidifier
49EGW06-PCPEG-20150514
TMTM
Section V Operation
Humidity Control
This menu contains parameters that configure the humidity control routines of the dehumidifier Water Temp CtrlThis menu contains parameters that configure the compressor based water heating system of the dehumidifier bull Water Heat First This parameter indicates whether the control routine will use the compressor for water heating when
there is no dehumidification requirement bull Deadband This parameter is the deadband used by the compressor based pool water heating control routine
BAS INTERFACE
This menu contains parameters that configure the building automation system interface of the dehumidifier
MULTI-UNIT NETWORK
This menu contains parameters that configure the operation of dehumidifier in a multiple unit installation
COMPRESSOR
This menu contains parameters that configure the operation of the dehumidifier compressor
ECONOMIZER
This menu contains parameters that configure the operation of the optional field provided and field installed economizer damper system
HISTORY
The history screen provides information on the last 50 faults that have occurred in the dehumidifier It can be used for troubleshooting by an experienced HVAC technician The faults are recorded with a sequence number from 1 to 50 Sequence number 1 is always the most recent fault The following information is stored and displayed for each fault in non-volatile memorybull Hour at which the fault occurred bull Fault Code Number bull Return Air Temperaturebull Return Air Humiditybull Discharge Pressurebull Suction Pressurebull Suction Temperaturebull Pool Water Temperaturebull AC Solenoid Statusbull Bypass Solenoid Statusbull Compressor Statusbull Reheat Solenoid Status
MANUAL MODE
The Manual Mode menu for use by qualified service personnel provides two options Demand Control and Digital Output Control
UTILITIES
The Utilities menu provides sub menus for configuring units of measure and passwords for set point and service access control
50 EGW06-PCPEG-20150514
TMTM
Section V Operation
MAINTENANCEOVERVIEW
Periodic routine maintenance will promote extended equipment life While PoolComPaktrade units use components that are usually maintenance free and do not require service a simple check could result in noticing possible problems before they develop into major problems
DAILY MAINTENANCE
bull Pool water chemistry is a part of daily maintenance and it is recommended to follow National Spa and Pool Institute standards PoolPaktrade International strongly recommends following the National Spa and Pool Institute values
Table 5-1 Pool Water Chemistry
bull PoolPaktrade International recommends daily logging of your pool water chemistry MAINTENANCE AND YOUR POOL WATER CHEMISTRY IS IMPORTANT TO PROTECT YOUR WARRANTY RIGHTS
MONTHLY MAINTENANCE
bull Air Filters inspect and replace or clean as applicable Dirty filters restrict air flow and can cause improper unit operation
bull Ensure that the condensate collection pan is draining properly and the condensate is not overflowing or being drawn into the supply air stream Check the condensate and overflow lines to ensure that neither are clogged
bull Check the operation of the blower motor and scroll Ensure that the scroll does not rub the housing Check for proper belt tension Worn or cracked belts should be replaced Check fan and mounting brackets for tightness
bull Ensure that the ALARM light is not illuminated
ANNUAL MAINTENANCE
bull Inspect the refrigeration and water circuits for leaks wear or corrosion Corrosion on the water piping or condenser may indicate poor pool chemical maintenance and improper chlorine and pH levels
bull Check electrical components for loose wiringbull Although the exterior of the PoolComPaktrade units are powder coated wipe down unit particularly if installed in an
area subject to dirt or chemical concentrationbull Wash brush or vacuum the evaporator and air condenser coils This will ensure proper heat transfer and reduce static
pressure losses Caution should be taken not to wet electrical components inside the unit
NOTEIf service and inspections are not performed by a competent and experienced service firm the manufacturer warranty may be voided
AUXILIARY AIR amp POOL WATER HEATER CONNECTIONS FOR MULTIPLE UNIT INSTALLATION
Figure 6-1 Auxiliary Air and Pool Water Heater Connections for Multiple Units
AWH_EG_Connections_20121204eps
52 EGW06-PCPEG-20150514
TMTM
AUXILIARY AIR amp POOL WATER HEATER CONNECTION FOR A TWO POOL INSTALLATION
Figure 6-2 Auxiliary Air and Pool Water Heater Connections for Two Pool Installations
AWH_EG_ConnectionstoPool_20121204eps
Section VI Wiring
53EGW06-PCPEG-20150514
TMTM
Section VI Wiring
FIELD WIRING
Figure 6-3 Field Wiring Diagram
PCP_EG_FieldWiringDiagram_20121204eps
54 EGW06-PCPEG-20150514
TMTM
Section VI Wiring
FIRE CONTROL SYSTEM CONNECTION
Figure 6-4 Fire Control System Connection
PCP_EG_FirecontrolSysConnection_20121204eps
55EGW06-PCPEG-20150514
TMTM
Section VI Wiring
This page intentionally left blank
EGW06-PCPEG-20150514
TMTM
56
TMTM
3491 Industrial Drive York PA 17402 USA 800-959-7725 Fax 717-757-5085for more information wwwpoolpakcom
The Leader in Indoor Pool Dehumidification
TMTM
3491 Industrial Drive York PA 17402 USA 800-959-7725 Fax 717-757-5085for more information wwwpoolpakcom
The Leader in Indoor Pool Dehumidification
TMTM
IEGW06-PCPEG-20150514
TMTM
TABLE OF CONTENTSSECTION I INDOOR POOL DESIGN 1
Introduction 1Creating an ideal environment for indoor pool facilities1Operating Cost 1
Application 1Moisture Loads 1Effects of Moisture 1Indoor Air Quality 1Occupant Comfort 2Pool Water Chemistry 2
Equipment Choices 3Overview 3Ventilation with Heating 3Ventilation with Heating and Energy Recovery 3Mechanical Dehumidification3Hybrids 4Other Technologies 4
Room Air Distribution 4Airside Design 4
Supply Air4Return Air 6Ductwork Design6Air Distribution 6Other Airside Considerations 7
SECTION II PRINCIPLES FUNCTIONS AND FEATURES 8The Mechanical Dehumidification System 8
Principles of Operation 8Automatic Control of Air Temperature and Humidity 8Room Dew Point Control 9PoolComPak Operation9
ECC-PCP Control System 10Overview 10Humidity Control 10Cold Surface Temperature Humidity Reset 10Space Heating 10Networking Multiple Units 11Space Cooling (Optional) 11Water Heating (Models AWV and AWH only) 11
Features and Options 11Standard Items Factory Mounted 11Standard Items factory Supplied for Field Installation 11System Options 11RoofPak System12PoolComPaktrade Dehumidification Systems Selection12
Overview 12Available Configurations 12Typical AW Series Applications 12Typical Non-Pool HCD Series Applications 12Unit Selection software program12
RoofPak Series (HCDHAWH) 13Design Features 13
Durable Construction 13Rooftop Installation 13Microprocessor Controller13Heating Packages13Self-Contained Air-Cooled Condensing Section 13Evaporator Coil Options13Totally Enclosed Fan Cooled (TEFC) Motors 14Unique Outside Air System 14
II EGW06-PCPEG-20150514
TMTM
Housed Blower 14Cupronickel Water Heat Exchanger 14
Technical Summary 15Dimensional Data 15RoofPak Weights 15
SECTION III PERFORMANCE AND SIZING 16PoolComPaktrade Performance 16
PoolComPak Unit Dimensions 18PoolComPaktrade Horizontal Dimensions 18PoolComPaktrade Vertical Dimensions19
Hot Water Coil Capacities 20PoolComPak Outside Air Damper Size 21Refrigerant22Remote Air-Cooled Condenser (ACC) 23Electric Duct Heater 25
SECTION IV INSTALLATION 26PCP Installation 26
Introduction26UnitFacility Interface 26Handling 27Clearance 27Mounting of PoolComPak Units 27Inspection 27Power Supply 27Control Wiring 27Condensate Piping 27Curb Mounting 28Integral Gas Furnace Option (RoofPak Only) 28
ECC-PCP Controls Field Wiring 30Overview 30Remote Interface Unit (1) 30Cold Surface Temperature Sensor (2) 31Economizer System (Optional) (3) 31Outside Air Temperature Sensor (Economizer Option Only) (4) 32Air Cooled Condenser (Optional) (5) 32Auxiliary Pool Water Heating System (AWH Model only) (6) 33Auxiliary Air Heating System (7) 33External Alarm System (8)33Building Fire Control System (9) 34Return Air Sensor (10)34Purge Mode Input (11) 34AC Proof Input (12) 34Pool Water Temperature Sensor (13) 34
Pool Water Piping (AWH and AWV models only) 35Salt Water Pools 36
SECTION VI WIRING 51Auxiliary Air amp Pool Water Heater Connections for Multiple Unit Installation 51Auxiliary Air amp Pool Water Heater Connection for a Two Pool Installation 52Field Wiring 53Fire Control System Connection 54
IV EGW06-PCPEG-20150514
TMTM
LIST OF FIGURESFigure 1-1 Perimeter Air Distribution 5Figure 1-2 Overhead Air Distribution5Figure 1-3 Below Grade Air Distribution5Figure 1-4 Supply Air Proportions 6Figure 2-1 PoolComPaktrade AW and HCD Typical Refrigerant System Schematic 9Figure 2-2 PCP RoofPak Dimensions 15Figure 3-1 AWHCD Horizontal Unit Elevation and End Views 18Figure 3-2 AWHCD Vertical Unit Elevation and Plan Views19Figure 3-3 Air-Cooled Condenser (PoolPaktrade) - Isometric Views 24Figure 3-4 Air-Cooled Condenser (Bohn) - Elevation Views 24Figure 3-5 Duct Heater 25Figure 4-1 Typical PoolComPaktrade AWH Series System Layout 26Figure 4-2 PoolComPaktrade Curb Assembly 29Figure 4-3 Remote Interface Mounting Plate 30Figure 4-4 Economizer Operation 31Figure 4-5 Outside Air Sensor32Figure 4-6 PAC Unit Field Wiring 32Figure 4-7 Installation of a Hot Water Coil 3-Way Valve 33Figure 4-8 Typical Pool Water Piping Diagram (AWH and AWV Model Only) 36Figure 4-9 AWH and HCDH Condensate Trap 37Figure 4-10 Remote ACC Installation Around Walls or Obstructions 38Figure 4-11 Remote ACC Installation When Installing Multiple Units 38Figure 4-12 Remote ACC Installation When Installing Units in Pits 39Figure 4-13 Remote ACC Installation When Installing Units Near Decorative Fences 39Figure 4-14 ACC Refrigerant Piping 41Figure 5-1 RIU Keypad 43Figure 5-2 Status Screen 1 43Figure 6-1 Auxiliary Air and Pool Water Heater Connections for Multiple Units 51Figure 6-2 Auxiliary Air and Pool Water Heater Connections for Two Pool Installations 52Figure 6-3 Field Wiring Diagram 53Figure 6-4 Fire Control System Connection54
LIST OF TABLESTable 1-1 Typical Pool Water amp Air Temperature Set-Points 2Table 1-2 Recommended Pool Water Chemistry 3Table 2-1 RoofPak Technical Data 15Table 2-2 RoofPak Weights 15Table 3-1 PoolComPaktrade AW Performance Summary 16Table 3-2 PoolComPaktrade HCD Performance Summary 17Table 3-3 AWHCD Horizontal Unit Overall Dimensions 18Table 3-4 AWHCD Vertical Unit Overall Dimensions 19Table 3-5 Hot Water Coil Capacities 20Table 3-6 PoolComPaktrade Outside Air Damper Size 21Table 3-7 Factory Refrigerant R410A Charge 22Table 3-8 Remote ACC Performance Chart 23Table 3-9 Duct Sizes 25Table 4-1 Horizontal PoolComPaktrade Curb Dimensions 29Table 4-2 R410A Charge for Air Cooled Condensers (lb) 41Table 4-3 Refrigerant (R410A) Charge for Different Line Size 42Table 5-1 Pool Water Chemistry 50
1EGW06-PCPEG-20150514
TMTM
SECTION I INDOOR POOL DESIGN
INTRODUCTIONCREATING AN IDEAL ENVIRONMENT FOR INDOOR POOL FACILITIES
Indoor pool facilities are unlike any other structure in design construction and maintenance requirements Humidity air and water temperatures are especially difficult to control and improper management usually results in an uncomfortable environment excessive operating costs and possibly serious structural damage Effectively controlling these special conditions require control hardware and control sequences specially engineered for large commercial indoor pool applications The PoolPaktrade System utilizes an environmental control package designed to meet all special needs of the indoor pool environment while reducing energy usage and building maintenance costs
OPERATING COST
Energy consumption is a direct function of the variables necessary to satisfy the occupant and protect the facility These variables include space heating and cooling water heating humidity removal and ventilation Maintaining ideal and precise environmental conditions has a fairly high cost of operation And for a majority of the indoor pools regardless of geographic location require water and space heating 70 to 90 of the year
APPLICATIONMOISTURE LOADS
An indoor swimming pool produces large quantities of water vapor through evaporation which accounts for roughly 95 of the pool water heat loss making the water colder This excessive humidity will form damaging condensation unless removed from the building In the past the method of removing this water vapor was by ventilating an otherwise energy efficient building exhausting the humid air and the energy it contained Additional energy was used to bring in and heat the make-up air and to heat the pool water
More cost effective technologies offer an alternative method adding heat exchangers and mechanical heat recovery systems with many useful options The ideal solution to removing the water vapor from the pool area is to convert the latent (wet) heat contained in the moist air back into sensible (dry) heat placing it back into the pool water and air
EFFECTS OF MOISTURE
Excess humidity in natatorium structures may be readily apparent as condensation on cool surfaces such as windows and outside doors the growth of mildew or mold and when coupled with poor pool chemistry the accelerated corrosion of metals In its less obvious forms moisture may penetrate walls and ceilings and cause rot that becomes noticeable only when large scale structural failure occurs Humidity levels are also a major factor in the comfort of pool users
INDOOR AIR QUALITY
Pools and water parks with water features have a higher evaporation rate than a standard pool because of the increased water surface area Chloramines (See Pool Water Chemistry below) which are present in the water become more concentrated in the air as the ldquowater to airrdquo interactions increase affecting the indoor air quality A strong ldquochlorinerdquo odor is an indicator of poor pool water chemistry and is generally offensive to the occupants Higher levels of chloramines can cause skineye irritation and respiratory problems commonly known as ldquolifeguard lungrdquo
Most poolrooms are designed with a minimum ventilation rate to dilute the airborne pollutants generated from the chemical interactions in the pool water Typically these rates are based on ASHRAE standard 621 and dictated by local codes at about 05 CFM per square foot of pool and deck area but depending on the pool water chemistry the ventilation rate may not always be adequate for good poolroom indoor air quality
2 EGW06-PCPEG-20150514
TMTM
However increasing ventilation rates can significantly add to the cost of operation Including energy conservation strategies such as heat recovery airflow measurement and CO2 based control help control costs while improving indoor air quality
Depending on the geographic location and season of the year treating the outside air has a direct effect on energy consumption Some facilities prefer higher than minimum ventilation rates up to 100 of OA to maximize indoor air quality but the cost of treating this air can be significant
OCCUPANT COMFORT
Occupant comfort in a natatorium is easy to understand If you ever swam in an outdoor pool on a cold windy day or exited a pool in a dry desert location--you will probably notice an immediate chill The opposite is true where high humidity is not adequately controlled either through ventilation or by mechanical means The moisture level can reach such a state where it is oppressive or stuffy Common complaints are difficulty in breathing and the room being perceived to be warmer than the actual dry bulb temperature would suggest
Regardless of the source of discomfort users will not enjoy the facility if waterair temperatures and humidity levels are not within a narrow range Ideal water temperature is around 82deg with the air temperature about 2 degrees F higher to prevent chilling when exiting the pool and to minimize evaporation from the pool surface Here are some recommended temperatures for poolrooms which can be adjusted to meet specific needs of bathers In general ldquoactiverdquo poolrooms are maintained at lower temperature ranges so the users donrsquot overheat warmer temperatures are more common for seniors or children or less active pools
The desirable humidity range is generally between 50 and 60--greater than 60 creates a sticky feeling andor difficult breathing and low humidity results in evaporative cooling on the batherrsquos skin resulting in a chill
Poor air movement caused by improper duct placement within the poolroom will also lead to occupant discomfort Excessive supply air blowing on bathers can create drafts while uneven air distribution may create stagnant zones within the space
Table 1-1 Typical Pool Water amp Air Temperature Set-Points
POOL WATER CHEMISTRY
Water chemistry in swimming pools is critical for the health of the bathers and the condition of the enclosure and components An enclosure with poor water chemistry has a noticeable ldquochlorinerdquo smell which is an indication of high chloramines in the air Not only does this have an effect on the water but it affects the bathers and the air they breathe
Dehumidification systems are not designed to remove the effects of incorrect pool water chemistry Dehumidificationventilation equipment is not designed to remedy the effects of poor pool chemistry but is designed to deliver prescribed ventilation to manage smaller amounts of pollutants generated from normal pool activity Pool water chemistry is a part of daily maintenance and it is recommended that the users follow the current National Spa and Pool Institute standards
For more information review the Controling Chloramines with Proper Chlorine Management chapter in the Indoor Pool Water Chemistry publication in the online PoolPaktrade Educational Library
Section I Indoor Pool Design
Typical Pool Water amp Air Temperature Set-PointsPool Type Water Temp degF Air Temp degF Room RH
1 Normally max 86degF to minimize overheating of occupants
3EGW06-PCPEG-20150514
TMTM
Table 1-2 Recommended Pool Water Chemistry
EQUIPMENT CHOICESOVERVIEW
There are several methods for controlling humidity temperature and ventilation in poolrooms Each method offers some level of control but there can be significant differences in first cost and operating cost of each method Geographic location degree of comfort unit cost and operational cost must be evaluated in the selection of the correct system
VENTILATION WITH HEATING
bull Moisture removal is accomplished through the dilution with dryer outside air bull High cost of operation (air reheating)bull Lowest first costbull No opportunity to recover energy in the exhaust airstreambull No opportunity to recover energy into the pool waterbull No integral cooling capabilitybull Summer space conditions can be unbearably hot and humid
VENTILATION WITH HEATING AND ENERGY RECOVERY
bull Moisture removal is accomplished through the dilution with dryer outside air bull Significant heat recovery from exhaust air streambull Cost-effective method but with modest operating costbull Performance limitations in humid areas or during summer peaksbull No opportunity to recover energy into the pool waterbull No integral cooling capability
MECHANICAL DEHUMIDIFICATION
bull Moisture removal is accomplished through mechanical refrigerationbull Significant heat recovery using ldquoheat pumprdquo technologybull Recovers the most energy from the exhaust airstreambull Offers an opportunity to recover energy into the supply airstreambull Offers an opportunity to recover energy into the pool waterbull Higher first cost with lower operating costbull No performance limitations based on locationbull Tightest control of setpoint conditionsbull Integral cooling capabilitybull Can be integrated to include appropriate ventilation strategies
HYBRIDS bull Combines various technologies to increase efficiency and capabilitybull Utilizes ventilation as primary dehumidification methodbull Switches to heat pump method when conditions require better environmental control
OTHER TECHNOLOGIES
Desiccant technology can be adapted to provide super dry air which is injected into the poolroom to dilute the moisture load The regeneration phase of the desiccant is typically driven by waste heat from refrigeration cycle or other fossil fuel
Wheels are sometimes considered because of their wide acceptance as heat recovery devices Latent or Enthalpy wheels are not suitable for pools but sensible wheels may have application
ROOM AIR DISTRIBUTIONAll PoolPaktrade models provide continuous air recirculation and with a good air distribution system will promote uniform space conditions To remove the required moisture and maintain controlled conditions it is essential that there be adequate air movement and distribution in the natatorium The unit must remove the humid air from the pool area and discharge the dehumidified air back into it The supply air should be distributed over areas subject to condensation (windows outside walls support trusses skylights etc)
AIRSIDE DESIGN
The supply air volume and external static pressure capability of the fan is given for each model in the Performance Section It is recommended that an experienced engineering or mechanical contracting firm do the design sizing and layout of the duct system
The recommended volume of supply air should provide three to eight air changes an hour However in larger waterparks or spaces with high sensible heat gain higher airflows may be appropriate Lower air volumes require more care to avoid short cycling the air between the return and supply air stratification and pockets of high humidity
The most even control of space conditions occurs with proper air distribution and a proper air flow rate This provides space control without excessive loading and unloading of refrigerant-based dehumidification equipment
Supply Air
After dehumidification dry air is supplied back to the room Supply air should be distributed from ducting around the perimeter (see Figure 1-1) of the space The two options for perimeter supply air distribution are overhead (see Figure1-2) or below grade (see Figure 1-3)
Section I Indoor Pool Design
5EGW06-PCPEG-20150514
TMTM
Figure 1-1 Perimeter Air Distribution
ALL_AirDistributionPerimeter_20131220eps
The warm dry air should be directed over outside walls windows and other surfaces susceptible to condensation or it can be directed down the center of the room blowing air toward the surfaces prone to have condensation Supply ducts should be as short and with as few turns as possible Use turning vanes to minimize air noise and static pressure drop
Recommended maximum supply duct air velocity is 1000 FPM The recommended velocity from diffusers is 300 to 500 FPM Air velocities in ducts should be kept as low as is reasonable to avoid excessive noise in the ducts In multiple unit installations supply air from each unit may go into a common supply duct or into a plenum A supply air duct collar is provided at the fan outlet The duct should be attached to this with a flexible connection to minimize vibration transmission
SUPPLY AIR BLOWINGDOWN FROM SOFFIT DUCTSCOVERING WINDOWS ANDMOISTURE-EXPOSED AREAS
SUPPLY AIRTO SKYLIGHTS
POOLPAKDEHUMIDIFICATIONSYSTEM
RETURN AIR
Figure 1-3 Below Grade Air Distribution
Section I Indoor Pool Design
BELOW GRADE DUCTING CEILING DUCTING
RETURN AIR
SUPPLY AIRTO SKYLIGHTS
POOLPAKDEHUMIDIFICATIONSYSTEM
SUPPLY AIR BLOWING UPFROM BELOW-GRADEDUCTS COVERING WINDOWSAND MOISTURE-EXPOSEDAREAS
SUPPLY AIR BLOWINGDOWN FROM SOFFIT DUCTSCOVERING WINDOWS ANDMOISTURE-EXPOSED AREAS
SUPPLY AIRTO SKYLIGHTS
POOLPAKDEHUMIDIFICATIONSYSTEM
RETURN AIR
6 EGW06-PCPEG-20150514
TMTM
Return Air
The unit will operate most efficiently in a natatorium where the supply and return openings are placed diagonally opposite each other All ducting should be done in accordance with acceptable practices Return air ducts in the section just prior to entering the unit return air opening and elbows in both the return and supply air ducts must comply with the guidelines set forth in SMACNA HVAC Duct Construction Standards Metal and Flexible ndash Third Edition Chapter 4
Ductwork Design
All supply and return duct work to the unit should be installed such that no condensate occurs in the duct work Duct turns and transitions must be made carefully to keep friction losses to a minimum Duct elbows should contain splitters or turning vanes and avoid short radius fittings
Duct work that is connected to the fan discharge should run in a straight line with proper transitions and minimum distances to elbows as recommended by SMACNA and should not be reduced in cross-sectional area Duct turns should be in the same direction as fan rotation Never deadhead the fan discharge into the flat side of a plenum
Duct work attached to the PoolPaktrade unit return air connection must be done in accordance with SMACNA recommended standards and or generally accepted industry practice
Supply and return duct work should have all seams sealed before applying insulation to the exterior of the duct work The insulationrsquos seams must be sealed wrapped and mastic coated Use of pre-insulated duct work (interior) is acceptable if it meets local codes however all seams must be sealed prior to startup
Air Distribution
Supply outlets and return grilles should be carefully placed to avoid short-circuiting in the space Short-circuiting creates stagnant areas where humidity and temperatures may build up to undesirable levels reducing the effectiveness of the PoolPaktrade System Return grilles can be placed high in the space to reduce return ductwork however removal of Chloramines from the occupied area has become much more of a design consideration and so low returns are favored by poolroom designers
Supply air should be directed 45 degrees up and down (most of the air will be directed downward) toward exterior walls windows skylights and other areas where stagnant conditions could cause humidity buildup and condensation problems or drafts The end result of the supply air ducts is to wash the surfaces of the pool room that are prone to condensation with the warm dry supply air
Figure 1-4 Supply Air Proportions
20 OF SUPPLYAIR DIRECTEDALONG CEILING
80 OF SUPPLYAIR DIRECTEDDOWN WALLS
WINDOWSURFACE
12rdquo
ALL_AirDistribution45DegProportions_20131220eps
Section I Indoor Pool Design
7EGW06-PCPEG-20150514
TMTM
Diffusers for supply ducts located overhead (as opposed to under the deck) must be sized such that the supply air will be thrown all the way to the deck and wash the entire wall surface from supply duct to the floor
As a rule directing the supply air at or across the pool surface increases the evaporation rate To control the buildup of chloramines at the surface of the pool some air may be directed at the pool surface Supply outlets should not discharge directly onto surfaces where drafts may be created that will blow on swimmers walking along the edges of the pool Spectators should have supply air directed toward their faces
The outside air intake and exhaust may have rain hoods if the unit is mounted outdoors Rain hood locations are illustrated on the unit arrangement drawings The intake and exhaust should be screened to prevent the entrance of foreign matter and arranged to avoid recirculation of exhaust and outside air Also when auxiliary gas heat is selected (in an outside installation) a combustion air louver or rain hood is provided
Ductwork connections over 5 feet long must be supported to avoid damage to unit Short Flexible connections of rubber or canvas can be made between the return duct and the unit to eliminate vibration transmission through the duct
PoolPaktrade International does not recommend the use of equipment rooms or locker rooms as return or supply air plenums due to the potential of corrosion for components installed in the room The return air duct should always connect the pool enclosure to the return air plenum collar of the PoolPaktrade unit(s)
Other Airside Considerations
A hot water electric or gas duct heater may be installed in the supply duct to provide auxiliary space heating Be sure that the additional air pressure drop across the heater is accounted for in the unit fan selection These heating components must be designed for use in swimming pool environments
Maintain the poolroom at a slightly negative pressure This will minimize moisture and chemical odor migration to other spaces The exhaust fan should be sized for about 5-10 greater CFM than the amount of outside air being introduced into the space Ducts can be fabric aluminum PVC or galvanized steel Even though ldquodry airrdquo is being supplied back to the pool do not use duct board or similar materials If the PoolPaktrade unit is installed in an area that is below the natatoriumrsquos dew point temperature the ducts may require insulation pitching and drainage
Continuous vapor barriers are required between the poolroom and all other interior and exterior spaces because of the high dewpoint in the poolroom all the time Care must be taken during design and installation to avoid gaps in the vapor barriers or building damage may result
Windows and exterior doors must be selected with adequate thermal insulation (including thermal breaks) to minimize condensation on their interior surfaces even if the supply air is directed across these components Doors and windows must also have as low an air leakage as possible Although the space will be maintained at a slightly negative pressure cold air leaking into the space from poorly sealed openings will negate all of the effects of good thermal insulation
Section I Indoor Pool Design
8 EGW06-PCPEG-20150514
TMTM
SECTION II PRINCIPLES FUNCTIONS AND FEATURES
THE MECHANICAL DEHUMIDIFICATION SYSTEM
PRINCIPLES OF OPERATION
The PoolPaktrade System is a complete environmental control system designed expressly for indoor swimming pool enclosures It takes into account two important factors the swimming pool occupant (personal comfort) and the swimming pool environment (the physical structure and surrounding furnishings)
The swimming pool enclosure can be a hostile environment for equipment decor and building structures A PoolPaktrade Systemrsquos major function is to dehumidify the pool enclosure air through a vapor compression cycle During this cycle the PoolPaktrade System recycles the sensible and latent heat and places it back into the pool water and air as needed This recycling process saves money and keeps your pool environment efficient and safe
Solid state microprocessor technology working in conjunction with sensors continually monitors water and air conditions provide superior occupant comfort Unlike typical outside air ventilation systems a PoolPaktrade System recycles energy and blankets the walls and windows with warm dry air
PoolPaktrade dehumidification systems reduce the energy input required to maintain pool water and air temperatures By dehumidifying the air and recycling the latent energy back into the pool air and water the unit will reduce operating costs when compared to conventional heating and ventilating systems Pool water and enclosure heating are still required but with greatly reduced requirements
A PoolPaktrade unit when matched correctly to the evaporation rate of the pool water and overall dehumidification requirements will efficiently maintain the pool air at relative humidity levels between 50 and 60 It should be noted that a lower evaporation rate occurs when the pool enclosurersquos air temperature is maintained above the pool water temperature Evaporation losses and the energy required to maintain desired room conditions will dramatically increase if the air temperature is allowed to fall below the pool water temperature It is recommended that the continuous dry bulb temperature entering the evaporator of the PoolPaktrade unit not fall below 75degF
PoolPaktrade International recommends that backup heating equipment for both pool water and pool enclosure air is capable of carrying the full system heating requirements This makes for a well-designed system that will provide the least amount of pool down time if unforeseen system problems occur Building conductive loads and other losses must be taken into consideration
AUTOMATIC CONTROL OF AIR TEMPERATURE AND HUMIDITY
An integral part of any PoolPaktrade System is a proven microprocessor control system which automatically senses and maintains comfort conditions Sensors detect changes in humidity and air temperature in the indoor pool environment and quickly regulate supply air conditions to meet set point comfort levels even during periods of unusually heavy pool use
To prevent condensation on walls and windows The PoolPaktrade System automatically adjusts humidity in response to changes in wall or window surface temperatures As the seasons and weather conditions change the PoolPaktrade System changes its own mode of operation Throughout the year PoolPaktrade thinks ldquoefficiencyrdquo and automatically selects the least expensive energy source for the poolroom conditions
PoolPaktrade models include a factory mounted and wired space temperature and humidity sensor at the return air opening of the unit Refer to the installation section for mounting location Caution should be exercised When the outside air is to be introduced into the space for ventilation adequate exhaust capacity via an integral (or a separate external fan) must be specified to ensure the poolroom remains slightly negative An inadequately sized exhaust system may result in damage to the structure and pool odors may be forced into other areas of the building
9EGW06-PCPEG-20150514
TMTM
ROOM DEW POINT CONTROL
PoolPaktrade units with the ECC-PCP controller operate using an advanced type of control called dew point temperature control This method of control is more accurate than conventional relative humidity control The main purpose of a dehumidification system is to maintain the amount of moisture in the pool area below a level that would cause damage to the building Relative humidity is a measurement of the percentage of moisture which is in the air at a given dry bulb temperature in proportion to the maximum amount of moisture that could be contained at this particular dry bulb temperature Warmer air can hold more moisture than colder air and therefore changes in dry bulb temperature will change the relative humidity reading without any change in the actual amount of moisture in the air The amount of moisture in the air is expressed as ldquograins of moisture per pound of dry airrdquo and is directly related to the dew point temperature
The ECC-PCP uses dew point control to operate the PoolPaktrade unit and maintain the moisture level below the setpoint The space dry bulb temperature and relative humidity determine the dew point temperature By varying the space temperature and space relative humidity set points the dew point set point is changed When the space dew point temperature rises more than 12 degree Fahrenheit above the space dew point temperature set point the ECC-PCP controller energizes the compressor for dehumidification As the dew point temperature drops more than 12 degree Fahrenheit below the dew point temperature set point the controller de-energizes the compressor
POOLCOMPAK OPERATION
The PoolComPaktrade fan draws in warm moist air from the pool enclosure This air passes through the evaporator (dehumidification) coil and gives up heat energy to the refrigerant which is in a cool liquid state This exchange of energy causes the air temperature to fall below its dew point resulting in moisture condensation on the evaporator coil The moisture formed falls into the unitrsquos condensate drain pan After passing through the evaporator coil the refrigerant becomes a cool gas
The refrigerant enters the unitrsquos compressor where it is compressed into a hot gas While in the compressor the refrigerant absorbs the energy used to operate the compressor This hot gas refrigerant then travels either through an air reheat coil the pool water condenser or to an optional auxiliary air conditioning condenser which may be either air or water cooled If air heating is called for the air reheat coil is used The hot refrigerant exchanges energy with the cooler dehumidified air coming from the evaporator coil This causes the temperature of the air to rise for heating
Figure 2-1 PoolComPaktrade AW and HCD Typical Refrigerant System Schematic
PCP_EG_Schematic3D_20121204tif
Section II Principles Functions and Features
10 EGW06-PCPEG-20150514
TMTM
If pool water heating is required (AWH models only) the hot gas flows into a pool water condenser where it adds energy to the incoming pool water This heats the pool water while the refrigerant is condensed into a warm liquid If space cooling is called for the refrigerant flows to the auxiliary air conditioning condenser bypassing the air reheat coil and pool water condenser and allowing cool air from the evaporator coil to provide space
ECC-PCP CONTROL SYSTEMOVERVIEW
The ECC-PCP controller is a micro-processor based system that maintains pool enclosure humidity and air and water temperatures at optimum levels automatically It is also possible to monitor this critical data via the Internet using the optional Remote Access Package (RAP) This also allows the controller to be accessed from the factory via the internet or a telephone line (AWH and HCDH only)
The ECC-PCP is designed to work with the PoolComPaktrade dehumidification system to provide an environment that is both comfortable and cost effective It controls unwanted humidity in the pool enclosure and helps to prevent unsightly condensation from forming on surfaces
The ECC-PCP provides accurate control and allows the user to monitor system parameters and change setpoints easily For this purpose a remote interface unit with a text display and keypad is provided The remote panel should be mounted outside the pool space in an office or in the equipment room (The ECC-PCP remote interface unit contains no sensors) All setpoints are saved in the memory of the ECC-PCP and are not erased in the event of a power failure Critical operating data can be easily accessed by a service technician for the purpose of system operation and evaluation
HUMIDITY CONTROL
As the dewpoint temperature within the pool enclosure rises above the desired setpoint the ECC-PCP activates the compressor within the PoolComPaktrade to begin the dehumidification process If the space temperature is below the desired setpoint the heat recovered during dehumidification is directed to the air reheat coil for space heating If the pool water temperature is also below the setpoint some of the recovered heat is directed to the pool water condenser (model AW only) for pool water heating If neither air heating nor pool water heating is required the recovered heat can be directed to an auxiliary air conditioning condenser if the system is so equipped If the system does not include an auxiliary air conditioning condenser the ECC-PCP will direct the recovered heat to the air reheat coil until the need for dehumidification is satisfied
COLD SURFACE TEMPERATURE HUMIDITY RESET
The ECC-PCP control system includes a sensor that measures the temperature of the coldest surface in the pool enclosure usually an exterior window or door frame When the temperature of this surface approaches the dewpoint temperature of the space the controller lowers the humidity setpoint to activate dehumidification This function helps to prevent condensation on the cold surface
SPACE HEATING
When the compressor is running the ECC-PCP directs the recovered heat to the air reheat coil Space heating will continue until the space temperature reaches the setpoint The ECC-PCP will activate the auxiliary space heating system if the PoolComPaktrade unit is unable to satisfy the heating need with heat recovered during dehumidification The ECC-PCP will activate the auxiliary pool water heating system if the water temperature cannot be satisfied with recovered heat An auxiliary pool water heater must be supplied as part of the pool water pump and filter system
Section II Principles Functions and Features
11EGW06-PCPEG-20150514
TMTM
Section II Principles Functions and Features
NETWORKING MULTIPLE UNITS
ECC-PCP networking allows up to four PoolComPaktrade units to be connected together The units will work with eachother to control water temperature air temperature and relative humidity Networked PoolComPaktrade units have all thefeatures of standard PoolComPaktrade plus the ability to control water temperature in multiple pools They also allow system dehumidification capacity to be staged All units on the network are accessible from a single remote interface unit for convenience
SPACE COOLING (OPTIONAL)
If space cooling is required and the unit is equipped with an auxiliary air conditioning condenser (air-cooled or water-cooled) the ECC-PCP will activate the space cooling mode of operation In this mode the heat removed from the space air will be directed to the auxiliary air conditioning condenser The air cooling mode of operation is independent of the need for dehumidification
When the PoolComPaktrade unit is equipped with a field supplied economizer the ECC-PCP will automatically select the most economical method for space cooling An economizer utilizes outside air rather than the refrigeration system to achieve space cooling A sensor connected to the ECC-PCP monitors the outside air temperature When appropriate the controller will disable the compressor and bring in cool outside air for economical operation A separate exhaust system must be installed to ensure negative room pressure during the economizer mode
WATER HEATING (MODELS AWV AND AWH ONLY)
If the pool water temperature is also below the set point some of the recovered heat is directed to the pool water condenser for pool water heating Heating can only take place during the dehumidification when heat is captured in the refrigeration circuit This is only available on the Model AW which is equipped with a pool water condenser
FEATURES AND OPTIONSSTANDARD ITEMS FACTORY MOUNTED
bull Evaporator (dehumidification) coil bull Air reheat coil (hot gas reheat coil)bull Bottom top (for indoor installations) or horizontal supply air configuration bull Filters and filter rackbull Air temperature and relative humidity sensorbull Compressor suction and Discharge pressure transducersbull Compressor suction temperature
STANDARD ITEMS FACTORY SUPPLIED FOR FIELD INSTALLATION
bull ECC-PCP control interface devicebull Cold surface temperature sensorbull Outside air temperature sensor (with economizer control kit option only)bull Pool water temperature sensor (AW models only)
SYSTEM OPTIONS
bull Remote air-cooled condenser for space air conditioningbull Capability of introducing up to 30 outside airbull Economizer controlbull Network multiple unitsbull Remote monitoring via Internet (AWH and HCDH only)bull Weatherproofing for outdoor installation (AWH and HCDH only)
12 EGW06-PCPEG-20150514
TMTM
bull A factory-mounted water-cooled condenser with a refrigerant head-pressure controlled water regulating valve for space air conditioning Chilled water and closed loop cooling tower water may be used for the water-cooled condenser loop Never use ground water for the water-cooled condenser Consult the factory for cooling tower applications
ROOFPAK SYSTEM
The RoofPak product line is comprised of the most popular PoolComPaktrade configuration and repacked as a self-contained all-in one dehumidification system This offering merges a highly reliable PoolComPaktrade AWH or HCDH base system with an integral air-cooled condenser and either an integral gas furnace or an electric heater The RoofPak Series is only available in horizontal configuations which can be utilized over a wide range of popular applications See the RoofPak section of this manual for more information
POOLCOMPAKtrade DEHUMIDIFICATION SYSTEMS SELECTION
Overview
The PoolComPaktrade is a compact unitary pool dehumidification system designed for commercial and residential applications It is available in the AW Series with a pool water condenser for water heating or in the HCD Series without the pool water condenser
Available Configurations
Indoor Installation The PoolComPaktrade fits easily into a standard utility room (vertical and horizontal configurations) Outdoor Installation The horizontal configuration only can be pad roof or curb mounted depending on the application
For detailed information for your specific model please refer to General Arrangement DrawingsThe PoolComPaktrade can be configured with an internal hot water coil or duct-mounted electric heater and adapted for economizer operation The horizontal model can have either a top bottom or end supply duct connection
Typical AW Series Applications
bull Hot Tubs Spas and Whirlpoolsbull Residential Pools bull Hotel and Motel Pools bull School Natatoriums bull YMCA and Club Pools
PoolPaktrade International LLC maintains a computerized software selection program Information required for the program can be found in the PoolComPak Selection Input Data form found in the online PoolPaktrade Engineering Library Please contact your exclusive PoolPaktrade Sales representative for a selection
Section II Principles Functions and Features
13EGW06-PCPEG-20150514
TMTM
Section II Principles Functions and Features
ROOFPAK SERIES (HCDHAWH)PoolPaktrade has taken their most popular PoolComPaktrade configuration and repacked it as a self-contained all-in-one dehumidification system This product comprises the RoofPak Series This offering merges a highly reliable PoolComPaktrade AWH or HCDH base system with an integral air-cooled condenser and either an integral gas furnace or an electric heater The RoofPak Series is only available in horizontal configuations which can be utilized over a wide range of popular applications The ten and twelve ton models are ideally suited for applications having a surface area between 1200 sq ft and 2500 sq ft
DESIGN FEATURES
The RookPak Series is designed with features that provide cost savings and greater reliability over traditional systems Key features are
bull Single self-contained unit can be installed with one crane liftbull Enclosed refrigerant system reduces refrigerant chargebull Factory assembly ensures wiring and brazing are accomplished under ideal situationsbull Single power connection to minimize field wiring (Separate power connection required for integral electric heat)
Durable Construction
bull Heavy duty construction designed for outside installation to withstand the elementsbull Double-wall construction enhances product longevitybull Designed for quiet operation
Rooftop Installation
bull Requires only one mounting curbbull Bottom return airbull Bottom supply airbull Side outside air Microprocessor Controller
bull Utilizes the PoolPaktrade proven ECC-PCP microprocessor based contol technologybull Incorporates Remote Access Package (RAP) to allow system access via the ethernetinternetbull RAP is easily adaptable to BAS systems including BACnet (MSTP amp IP) LonWorks and Modbus
Heating Packages
bull 200 MBH or 240 MBH indirect gas furnace for consistent temperature controlbull 20kW or 30kW electric heater (requires separate power connection) bull Hot water coil using PoolPaktrade standard Hycorreg Blue coil or optional Electro-Guardtrade coils
Self-Contained Air-Cooled Condensing Section
bull Built-in Air Cooled Condenser (ACC) reduces cost and eliminates field pipingbull Utilizes efficient dual rotary blade fansbull Efficient to 105degF ambient outside air temperaturebull Choice of coil coatings for specific applications
Evaporator Coil Options
bull Hycorreg Blue (standard)bull Electro-Guardtrade Plusbull All copper
14 EGW06-PCPEG-20150514
TMTM
Totally Enclosed Fan Cooled (TEFC) Motors
bull Protects fan motors from corrosive air streambull Extends motor lifeprevents premature failurebull Reduces system maintenance
Unique Outside Air System
bull Houses adjustable louvers and filterbull Convenient external filter accessbull Swing-out door-mount design for easy service access to fan motor and belts
Housed Blower
bull Heavy pillow-block bearings provide durabilitybull Rugged cast-steel housing provides longevitybull Provides greater reliability
Cupronickel Water Heat Exchanger
bull Supplies 100 of available recycled energy to the pool waterbull Reaches water temperature set-point conditions fasterbull Efficiently maintains the water temperature set-pointbull Redirects heat only after space temperature is satisfied
AWHHCDH 35004000 With Integral Gas or Electric Heat and With Remote ACC 2900AWHHCDH 35004000 With Integral Gas or Electric Heat and With Integral ACC 3700AWHHCDH 35004000 With No Integral Auxiliary Heat and With Integral ACC 2700
RoofPak weights are also included with the RoofPak Generic Product Drawings found in the Engineering Library section of the PoolPaktrade website
Model Number AWH HCDH 3500 - 10 Ton AWH HCDH 4000 - 12 TonPool Size (Sq Ft) 1200 - 2000 1400 - 2500Reheat Capacity (MBH) 170 200Moisture Removal (LbHr82degF60RH) 63 70Pool Water Flow (GPM) 26 28Pool Water Condenser PD (FT WC) 20 30Pool Water Condenser Capacity (MBH) 170 200Outside Air (CFM)(Nominal) 0 - 2000 0 - 2000Total Supply Airflow CFM (Maximum) 3500 - 7000 4000 - 7000Refrigerant Charge (lbs) 81 83Dimensions (in inches) with integral air-cooled condenser and gas furnaceLength 264 264Width 574 575Height 525 522
OA
453
152
134 440
FRONT VIEW
525
SA1200 CG
Side return air available horizontal return air available without integral air-cooled condenser
LEFT VIEW
RA
2640
16 EGW06-PCPEG-20150514
TMTM
SECTION III PERFORMANCE AND SIZING
POOLCOMPAKtrade PERFORMANCE
Detailed performance and dimensional information are provided in the PoolPaktrade Selection Software
PoolComPaktrade AW (AWV AWH) Performance
Table 3-1 PoolComPaktrade AW Performance Summary
Performance at 82degF Air and 80degF Water Pool water Condenser (Vented)
Model AW Return Air CFM
Return Air RH ()
Moisture removal (lbshr)
Sensible Cooling Capacity (MBH)
ACC Max Heat Rejection (MBH) GPM Pressure Drop
FT water
0550 90060 111 136 312
4 650 85 156 301
0800 160060 157 221 475
6 1050 117 249 457
1200 170060 208 269 579
10 2450 155 305 555
1400 230060 260 384 766
10 850 188 434 736
1800 250060 309 418 891
12 1250 229 478 861
2600 330060 451 546 1209
13 650 350 606 1156
3500 430060 597 789 1700
24 1750 442 898 1634
4000 450060 704 876 1975
28 2450 524 1001 1893
17EGW06-PCPEG-20150514
TMTM
Performance at 82degF Air and 80degF Water
Model HCD Return Air CFM Return Air RH () Moisture removal (lbshr)
Sensible Cooling Capacity (MBH)
ACC Max Heat Rejection (MBH)
0550 90060 102 132 30550 77 152 295
0800 160060 145 208 46250 103 239 444
1200 170060 190 252 56450 145 284 544
1400 230060 241 362 74750 179 405 718
1800 250060 289 418 88150 209 474 846
2600 330060 410 535 118850 313 597 1138
3500 430060 569 805 169950 415 952 1668
4000 450060 665 862 195350 502 979 1878
PoolComPaktrade HCD (HCDV HCDH) Performance
Table 3-2 PoolComPaktrade HCD Performance Summary
Section III Performance and Sizing
18 EGW06-PCPEG-20150514
TMTM
POOLCOMPAK UNIT DIMENSIONS
The latest detailed unit dimensional data may be found in the PoolComPaktrade Series AWHHCDH AWVHCDV All Models R-410A Dimensional Drawings publication (EG6_Dim_All) which can be downloaded from in the PoolPaktrade Engineering Library (wwwpoolpakcom)
PoolComPaktrade Horizontal Dimensions
Table 3-3 AWHCD Horizontal Unit Overall Dimensions
NOTECoils add 01rdquoWC to ESPEntering Air Temperature - 80degFEntering Water Temperature - 180degFMax Working Pressure - 125 psiCapacity is a function of Return Airflow and is independent of Supply Airflow
21EGW06-PCPEG-20150514
TMTM
POOLCOMPAK OUTSIDE AIR DAMPER SIZE
Table 3-6 PoolComPaktrade Outside Air Damper Size
Section III Performance and Sizing
Model Outside Air (OA) Location
Opening Size1 (in) Damper Code OA CFM Range2
PoolComPak Vertical AWVHCDVV5508001200 Top A 14 x 10 OA-TR 0-800Left OA-LT
V14001800
Top A 14 x 10 OA-TR 0-800Left OA-LTTop B 14 x 22 OA-TR 800-2000Left OA-LT
V2600
Top A 14 x 10 OA-TR 0-800Left OA-LTTop C 14 x 30 OA-TR 800-2500Left OA-LT
V35004000
Top A 14 x 10 OA-TR 0-800Left OA-LTTop C 14 x 30 OA-TR 800-2800Left OA-LT
PoolComPak Horizontal AWHHCDH
H5508001200
Top A 12 x 12 OA-TC 0-450Front OA-FCTop B 12 x 24 OA-TC 450-800Front OA-FC
H14001800
Top C 16 x 20 OA-TC 0-1000Front OA-FCTop D 16 x 40 OA-TC 1000-2000Front OA-FC
H260035004000
Top E 20 x 20 OA-TC 0-1400Front OA-FCTop F 20 x 40 OA-TC 1400-2800Front OA-FC
1Size may change depending on RA CFM and ESP See product dwg requestpulley request from section software for exact damper size
2Operating these units at OA quantities different from which the unit was selected will be detrimental to the unitrsquos operation
22 EGW06-PCPEG-20150514
TMTM
REFRIGERANT
Table 3-7 Factory Refrigerant R410A Charge
NOTEFactory charge for remote ACC option does not include refrigerant nor oil charge for either ACC or connecting refrigerant line between unit and ACC
For ACC and lineset charging see Table 4-2 and Table 4-3 in the Installation section
1Factory charge for remote ACC option does not include refrigerant for either ACC or lineset
2Factory charge for RoofPak with Integral ACC in parentheses
Section III Performance and Sizing
23EGW06-PCPEG-20150514
TMTM
Section III Performance and Sizing
REMOTE AIR-COOLED CONDENSER (ACC)
Table 3-8 Remote ACC Performance ChartNote Below table contains the piping sizes of the remote ACC stub-outs Additional field piping may be needed to make the transition from the connections to correct refrigeration lineset sizing (See Table 4-3)
Unit Size ACC Model
Ambient Temp (degF)
Unit Height
(inches)
Vapor OD
(inches)
Liquid OD
(inches)Unit
WeightMotor FLA Min Circuit
Ampacity
A B C 208230V 460V 208230V 460V0550 ACC0041 95100105115 393 58 12 120 3 15 38 19
Power wiring should incorporate properly sized fuses or motor rated circuit breakers A disconnect must be fitted within easy access and sight of the unit Supply voltage must be maintained within +- 10 of design voltage on both single and three phase units Cycles must be within +- 5 of design Failure to operate within these ranges can adversely affect performance cause failure of the equipment and may void warranty terms
Figure 3-5 Duct Heaterbull Tubular sheathed elementsbull Galvanized steel cabinetbull Duct-mounted flanged typebull Airflow in either directionbull UL and CSA approved heaterbull Airflow proving switchbull Auto and manual reset high temperature limitsbull Magnetic contactorsbull 24 volt control circuit and transformerbull Standard heater for indoor installation in non-insulated duct
Duct Heater Sizes
Table 3-9 Duct Sizes
Duct Heater Installation
1 Flange both ends of the ducts outwards on three sides to match heater flanges as shown2 Fasten heater to duct using sheet metal screws for smaller heaters or bolts for larger ones3 Seal opening with suitable sealing compound4 If needed use additional hangers to support heater5 Electrical power connections must be made within NEC standards and local electrical codes6 Refer to the Field Wiring Diagram at the back of this manual for controls connection
Reference Dimensions Fan Outlet
AWHHCDH 5508001200 9-14 x 10-38 inchesAWHHCDH 140018002600 12-12 x 13-12 inchesAWHHCDH 260035004000 17 x 19 inchesDuct heater width = 8 10 or 12 inches depending on heater kW Flange width = 1 inch
VOLTSHZPHDuct Size
12rdquo X 12rdquo 15rdquo X 15rdquo 20rdquo X 20rdquo 28rdquo X 28rdquo
Installation requires the unit to be placed on a roof mounted curb the mechanical room floor an appropriate location in the pool room or outside on an equipment housekeeping pad Isolation pads should be placed under the unit to minimize transmission of noise due to unit operation Then pool water is piped to the unit Electrical power from a properly sized fused disconnect is connected to the unit The supply and return air ducts are connected to their respective locations on the unit The condensate is piped back to the pool or to the sewer
If an optional remote air-cooled condenser is used place the condenser in a proper outdoor location Refrigerant piping is then run from the air cooled condenser to the PoolComPaktrade unit Refrigerant lines must be leak checked and evacuated through installer provided Schrader valves Control and power wiring are run to complete the installation If a field-furnished auxiliary space heating coil is installed the control for this heater must be field wired to the PoolComPaktrade controls shown in Section V1 - Wiring (Figure 6-3 Field Wiring Diagram)
Outside air can be ducted into the unit through the optional outside air duct connection The unit can draw up to 30 of its supply air from the outside When ventilating the natatorium in this way an exhaust fan must be furnished in the natatorium to exhaust to the outside an air volume slightly greater than the air volume introduced into the natatorium from the outside This will maintain a negative pressure in the space preventing odor and moisture migration Outside air filters are provided for Horizontal PoolComPaktrade units For Vertical PoolComPaktrade units outside air must be filtered before entering the unit
UNITFACILITY INTERFACE
A typical PoolComPaktrade system layout and its connection to the natatorium and pool water piping systems is shown in the figure below
Figure 4-1 Typical PoolComPaktrade AWH Series System Layout
PCP_EG_LayoutSchematic_AW_3D_20121204eps
Cold SurfaceTemperature Sensor
POOL
Recommended WaterPressure Taps
Return Air
ECC-PCP RemoteInterface Unit (should not
be mounted insidepool enclosure)
FusedDisconnect (Able to be seen
from the unit)
RemoteAir-CooledCondenser(optional)
PoolComPakHorizontal
Unit
Pool Heater
Pool HeaterPump (optional)
Pool Water Circulation Pumpfor PoolComPak (Optional - By Others)
Flo
Pool WaterTemp Sensor
wBalancing Valve
Pool Filter
Pool Pump
IsolationValves
AirVent
Supply Air DuctSupply Air
ExteriorWindow
27EGW06-PCPEG-20150514
TMTM
HANDLING
All units are shipped completely assembled Care should be taken to avoid damage due to rough handling If the unit is not to be immediately installed it must be protected from weather and site hazards
CLEARANCE
For proper operation and service PoolComPaktrade Vertical PoolComPaktrade Horizontal and RoofPak units require 36rdquoclearance on all sides
MOUNTING OF POOLCOMPAK UNITS
Locate the PoolComPaktrade unit on a firm level base If floor mounting ensure that the floor is capable of supporting the operating weight If wall mounting or hanging a unit provide a support structure that is capable of supporting the unit while protecting pool patrons and employees from injury Ensure that the support structure will not interfere with the operation of the unit Provision must be made for servicing units suspended above floor level Install isolation pads under the unit to minimize unit transmitted vibration noise
INSPECTION
Upon receipt of the PoolComPaktrade unit(s) immediately inspect for damage In particular inspect the housing and the evaporator coil face Minor indentations of the fins will not affect performance However if there is substantial damage immediately notify shipping company of unseen damage at delivery with a detailed letter outlining the damage Retain copies of all shipping damage claim documentation as well as photographs of the observed damage
NOTEPoolPaktrade International does not ship damaged units from its facility nor is it responsible for damage incurred during transit
POWER SUPPLY
A separate fused disconnect switch must be provided per local codes and be within easy accessibility of the PoolComPaktrade unit Use the minimum circuit capacity listed on the unitrsquos data plate to determine the minimum wire size for incoming electrical power The ground connection for the unit is located in the unit control panel The power supply to the unit must be adequate for the compressor starting amperage (LRA) If it is not a compressor rotor stall will occur during start-up due to an excessive voltage drop All field wiring must be done according to the wiring diagram provided with the unit and in conformance to the National Electrical Code (NEC) and any other applicable local electrical code(s)
For Vertical and Horizontal PoolComPaktrade units installing contractor must punch a hole into the electrical compartment to run power wires The hole is to be properly finished with a rubber grommet and weather sealing
CONTROL WIRING
All control wiring field connections are described in the wiring diagram furnished with the PoolComPaktrade unit as well as in the Field Wiring section of this manual All control wiring is low voltage
CONDENSATE PIPING
The condensate may be piped to a drain or returned to the pool if local codes allow If returned to the pool the condensate should be piped to the skimmer PoolPaktrade International recommends neither for nor against the practice of returning condensate to the pool The overflow drain should be piped in a similar fashion The installer should review the local codes prior to making the decision of where to dispose of the condensate The amount of condensate produced in a year is about equal to the volume of the pool
Section IV Installation
28 EGW06-PCPEG-20150514
TMTM
Section IV Installation
CURB MOUNTING
Illustrated in Figure 4-2 is a curb that has been designed specifically for the PoolComPaktrade product line The outside dimensions of the curb are such that the base of PoolComPaktrade extends over the edge of the curb all the way around This aids in preventing rainwater from getting between the base of the PoolComPaktrade and the curb It is the installing contractorrsquos responsibility to complete the following
bull Flash the curb into the roofbull Insulate the curbbull Connect the supply and return duct to the curbrsquos duct support railsbull Connect condensate drain line with appropriate trap bull Seal the curb to the bottom of the PoolComPaktrade using the gasket supplied with the curbbull Provide counter flashing between curb and PoolComPaktrade unitbull Seal the pool water pipes where they go through the curb
If specified when ordering all water piping connections can be made through the curb These water connections include pool water condensate auxiliary hot water coil (optional)
If the PoolComPaktrade is to be mounted on a curb the unit must be ordered with the ldquooutdoorrdquo option PoolComPaktrade Units produced for curb mounting receive special weatherizing and insulation that non-curb mounted PoolComPaktrade Units do not receive
NOTEIf the factory is not notified that a PoolComPaktrade is to mounted outdoors the unit will not be weather tight it will leak and it will not be properly insulated
INTEGRAL GAS FURNACE OPTION (ROOFPAK ONLY)
When using a gas furnace power venting is provided for all unit sizes External vent piping andor cap is required Please refer to the furnace manufacturerrsquos manual for piping and venting instructions Install leak-test and properly regulate piping for the gas-fired heater Pressures should be regulated to the entering pressures as shown on the furnace manufacturerrsquos data plate or manual
The ECC-PCP is the Electronic Control Center programmable controller designed specifically for the PoolComPaktrade dehumidification system It is a robust system capable of a variety of functions The following text describes the field wiring required for for proper operation of the ECC-PCP dehumidification system in a typical PoolComPaktrade unit installationThe field wiring diagram (see Section VI - Wiring) shows the location of the connections for the sensors and other required devicesThe numbers following the text identify the location on the field wiring diagram where each device is connected to the PoolComPaktrade unit electrical panel
REMOTE INTERFACE UNIT (1)
The remote interface unit allows the user to view space temperature pool water temperature and relative humidity change set points and receive fault notifications It should be mounted in a convenient location that is outside the pool area The ambient temperature of the mounting location must always be above 32 F
NOTEThe maximum distance from the Remote Interface Unit to the PoolComPaktrade unit is 1000 feet For distances greater than 1000 feet contact the factory
The control panel does not contain any sensors and should be mounted outside the pool enclosure A factory supplied 6 ft cable RJ25 (6 conductor) must be installed between the PoolComPaktrade unit and the control panel
For distances greater than 6 feet use 6 conductor 22 AWG shielded twisted-pair cable along with the supplied RJ25 jack and second 6 foot cable shipped loose with the unit
The wall mounting of the terminal first requires the back piece (A) of the RIU assembly The RIU is designed to fit a single gang extra-deep electrical box mounted horizontally in the wall The RJ25 jack and most of the black cable should be placed inside the box before installing the mounting bracket A frac34rdquo hole must be drilled for the 6-conductor cable which connects the remote interface unit to the PoolPaktrade unit The below is specific mounting instructions that correspond to the mounting schematic below
1 Fasten the back piece (A) to the gang box using the rounded-head screws supplied in the packaging Use the screws that come with the box to secure the bracket
2 Thread the 6-conductor cable through the back piece (A) and connect to the back of front panel (B)3 Rest the front panel (B) on the back piece A and fasten the parts together using the flush-head screws supplied in the
packaging4 Finally fit the click-on frame (C)
Figure 4-3 Remote Interface Mounting Plate
ALL_EG_RIUMounting_20131219eps
A
B
C
31EGW06-PCPEG-20150514
TMTMSection IV Installation
COLD SURFACE TEMPERATURE SENSOR (2)
This sensor is used to measure the temperature of the coldest surface in the pool enclosure The sensor is an aluminum bar 1rdquo long by frac14rdquo square with a clearance hole for a number 8 screw and two 6rdquo wires on one end
When the temperature of the surface drops to within 5 F of the space air dew point the humidity set point will be automatically reset downward to help prevent condensation on the cold surface It should be noted that resetting the humidity set point will not compensate for lower quality building materials such as single pane glass or non-thermally broken frames
The sensor should be mounted on an exterior window or door frame that is not in direct sunlight In cases where there are no exterior windows or doors the sensor should be mounted on the inside surface of an exterior wall The sensor must be in contact with the cold surface Electrical connection should be made with 22 AWG copper two-conductor shielded twisted-pair cable Connect the shield drain wire to ground at the PoolComPaktrade unit end only
ECONOMIZER SYSTEM (OPTIONAL) (3)
An economizer system cools the space with outside air instead of the compressor The ECC-PCP provides a dry contact closure to activate the economizer The contacts of the ECC-PCP may be connected directly to the economizer control circuit provided the circuit is 24 VAC maximum and the current does not exceed 1 amp inductive The other components of the system must be provided by others (See figure below for an illustration of a typical economizer system)
Units equipped with an economizer require relocation of the factory mounted return air sensor It must be located in a duct that will always contain air that represents the space temperature and humidity
The economizer will operate only when space cooling is required and there is no dehumidification requirement When the outside air temperature is greater than 50degF and more than 5degF below the space temperature set point and the space temperature rises above the set point the compressor is disabled and a dry contact closure between T216 and T217 is made to activate the economizer
When the ECC-PCP contacts close relay R1 is energized causing the outside and exhaust air dampers (by others) to open and the return air damper (by others) to close At the same time relay R2 is energized causing the exhaust fan to run If the space temperature continues to rise and exceeds the space temperature set point by more than two degrees the economizer contact is opened reversing the damper positions The compressor is energized in the space cooling mode (if so equipped) The compressor will then continue to run until the call for space cooling is satisfied The economizer will also be activated in the space cooling mode if the auxiliary air conditioning condenser option is not installed or if the compressor is locked out by a fault condition
Figure 4-4 Economizer Operation
PCP_EG_EconomizerOperation2_20121204eps
32 EGW06-PCPEG-20150514
TMTM Section IV Installation
WARNINGWhen economizer option is selected adequate exhaust capacity via a separate fan must be specified to ensure the natatorium pressure remains slightly negative Failure to specify adequately sized exhaust system may result in damage to structure and pool odors may be forced into other areas of the building
OUTSIDE AIR TEMPERATURE SENSOR (ECONOMIZER OPTION ONLY) (4)
The outside air temperature sensor is installed only when the outside air economizer option is included The sensor is mounted inside a 12rdquo PVC conduit pull elbow It can be mounted to the outside of the building using standard PVC conduit fittings The sensor should be mounted near the outside air intake vent for the economizer system It is very important to mount the sensor so that it does not receive direct sunlight The exposure to sunlight will cause the sensor housing to warm resulting in temperature readings that are higher than the actual air temperature This condition may prevent the ECC-PCP from selecting the economizer mode of operation If possible mount the sensor under an overhang or on a surface with a northern exposure
Electrical connection should be made with 22 AWG copper 2-conductor shielded twisted-pair cable Connect the shield drain wire to ground at the PoolComPaktrade end only See figure below for an illustration of the outside air temperature sensor Seal the conduit leading to the sensor with silicone caulk to prevent moisture from migrating out to the sensor and condensing inside the sensor
Figure 4-5 Outside Air Sensor
PCP_EG_OutsideAirSensorInstallation_20121204eps
AIR COOLED CONDENSER (OPTIONAL) (5)
The air-cooled condenser is used to reject heat recovered during the space cooling mode of operation Only PoolComPaktrade brand air-cooled condensers (PAC Units) should be used with a PoolComPaktrade Unit The ECC-PCP provides 24 VAC control signal to the speed control located in the PAC unit control panel The speed control then runs the condenser fan motor at the appropriate speed See figure below for an illustration of a PAC unit field wiring
Figure 4-6 PAC Unit Field Wiring
PCP_EG_RemoteACCFieldConnection_20121204eps
24 VAC CONTROL SIGNAL FROM
USE COPPER SUPPLY WIRES
POOLCOMPAKTERMINALS 12AND 13
POWER SUPPLY
21 L1 L2
GR
33EGW06-PCPEG-20150514
TMTMSection IV Installation
AUXILIARY POOL WATER HEATING SYSTEM (AWH MODEL ONLY) (6)
The auxiliary pool water heating system is provided by others Typically a gas fired or electric pool water heater is used The ECC-PCP provides a dry contact closure that signals a need for auxiliary water heating The contacts of the ECC-PCP may be connected directly to the heaterrsquos control circuit provided the circuit is 24 VAC maximum and the current does not exceed 1 amp inductive Any other applications will require an additional relay (by others) to be installed between the ECC-PCP and the pool water heating system
AUXILIARY AIR HEATING SYSTEM (7)
Typically a duct mounted electric heater hot water coil or a factory installed unit mounted hot water coil is used to provide air heating The ECC-PCP provides a form ldquoCrdquo (NO and NC) dry contact closure that signals a need for auxiliary air heating The ECC-PCP contacts may be directly connected to an electric duct heater control circuit provided the circuit is 24 VAC maximum and the current through the contacts does not exceed 1 amp inductive The figure below shows a typical installation that utilizes a 3-way hot water control valve and a unit or duct mounted hot water coil
Figure 4-7 Installation of a Hot Water Coil 3-Way Valve
The ECC-PCP provides a normally open contact closure for connection to a building management system If a fault occurs the controller will energize this output to indicate that there is a problem with the dehumidification system The remote interface unit will display the cause of the fault and provide a suggested course of action This output may also be used to energize an external alarm light or buzzer It may also be directly connected to an external circuit as long as the circuit is 24 VAC maximum and the current through the contacts does not exceed 1 amp inductive
HO
T W
ATER
CO
IL
FIELD SUPPLIEDACTUATOR
AB SWITCH INB POSITION
2
1
W
BK
W 3
A
B
VALVE IN BYPASS POSITION
HOT WATER IN
HOT WATER OUT
THREE WAY VALVE WITHACTUATOR
HO
T W
ATER
CO
IL
VALVE IN HEATING POSITION
HOT WATER IN
HOT WATER OUT
THREE WAY VALVE WITHACTUATOR
ALL WIRING BY CONTRACTOR
T23
T25
T24
POOLCOMPAK
120 VAC24 VAC
FIELD SUPPLIED 40 VATRANSFORMER
WIRING DETAIL
PIPING DETAIL
34 EGW06-PCPEG-20150514
TMTM
Section IV Installation
BUILDING FIRE CONTROL SYSTEM (9)
The ECC-PCP can receive a contact closure signal from a building fire control system This input of the controller must be connected to dry (voltage free) contacts only When this input receives a contact closure the PoolComPaktrade unit compressor and fan will be shut down and the remote interface unit will show an alarm condition When the contact closure opens The PoolComPaktrade unit will resume normal operations It is possible to change the operation of the fire trip input to be active on open instead of close See ECC-PCP Service in the Operation section for further explanation
RETURN AIR SENSOR (10)
The return air sensor measures air temperature and relative humidity The sensor is normally factory mounted in the PoolComPaktrade unit return air section However with the optional economizer it is necessary to field mount this sensor in the duct work The sensor must be located in the return duct upstream of the exhaust duct connection (See Figure 4-4 Economizer Operation for a typical location of the sensor in the economizer system)
When field mounting is necessary the sensor will be provided from the factory and must be field wired using 22 AWG copper 4-conductor shielded twisted-pair cable
PURGE MODE INPUT (11)
The ECC-PCP can receive a contact closure signal from an external source to activate purge mode operation During purge mode the compressor is disabled and the economizer output is activated to bring in 100 outside air
AC PROOF INPUT (12)
An optional interlock used with certain types of heat rejection condensers Dry contact closure indicates a problem and prevents compressor operation in air cooling mode
POOL WATER TEMPERATURE SENSOR (13)
Units equipped with a pool water heating condenser require installation of factory supplied pool water temperature sensor It must be mounted upstream of the PoolComPaktrade and the auxiliary water heater The sensor can be threaded directly into a 1frasl4rdquo FPT fitting Electrical connection should be made with 22 AWG copper 2 conductor shielded twisted-pair cable Connect the shield drain wire to ground at the PoolComPaktrade end only
35EGW06-PCPEG-20150514
TMTM
Section IV Installation
POOL WATER PIPING (AWH AND AWV MODELS ONLY)
CAUTIONDo not run piping across service panels evaporator coil face or air discharge outlet
If a new or existing pool water heater is piped within the same circuit the PoolComPaktrade unit should be connected in a parallel loop between the filter and the other heater This allows the PoolComPaktrade unit to act as the primary water heating source and the other heater as a backup or supplemental water heater
All pool purification and chemical feed systems MUST be installed downstream of the unit This includes the practice of adding chemicals directly to the skimmer which results in highly concentrated corrosive chemicals passing over and through the PoolComPaktrade water condenser Water chemistry must be maintained at a pH level between 72 and 76 with a free chlorine level not exceeding 30 PPM and a combined chlorine level less than 03 PPM
If possible install the PoolComPaktrade unit above the pool water level If it is installed below the pool level isolation valves must be added Breakable couplings should be located near the unit on both the water inlet and outlet lines When installing piping connect the piping to these couplings last so as not to place stress on the other connection in the plumbing systemA constant flow of water is required through the PoolComPaktrade unitsrsquo condenser The circuit to and from the unit must be capable of maintaining the flow rate as specified for the installed unit (see PoolComPaktrade Performance data in Table 3-1) To ensure correct water flow the filter pump usually operates at the same time as the PoolComPaktrade unit However to reduce energy consumption during filter off cycle times a two-speed or small auxiliary water pump which bypasses the filter may be used
CAUTIONCAUTION Excessive water flow can cause premature erosion and pitting of the pool water condenser Adjust valve so that the water flow does not exceed the GPM or pressure drop listed in the table PoolPaktrade recommends a fixed flow control or adjustable flow circuit setter
PoolPaktrade International recommends installing water pressure tap ports to check influent and effluent water pressure See PoolComPaktrade Performance data in Table 3-1 for the particular unit model in question for the proper flow rate and pressure drop across the pool water condenser The pressure tap ports should be installed in a straight length of the water piping exterior to the PoolComPaktrade unit Install the port before any 90-degree turns and approximately 6 inches from the corner-post of the unit
In some instances piping from the PoolComPaktrade unit to the filter return line may not be feasible or economical The unit may be installed on its own supply and return line using a properly sized water pump and appropriate strainer Ensure that auxiliary water heating systems are staged to supplement the PoolComPaktrade unit water heating
If the PoolComPaktrade unit is installed above the pool surface and the main circulating pump cannot provide the proper water flow to it at the specified pressure an auxiliary booster pump is required
Condensate may be returned to the pool (if local codes allow) but PoolPaktrade International neither recommends nor disapproves this practice The installer should check local codes prior to making this decision Condensate must be filtered prior to being returned to the pool
If multiple PoolComPaktrade units are installed on the pool water piping circuit pipe them (and any auxiliary water heater) in parallel Piping PoolComPaktrade units in series may result in the downstream unit(s) sensing the pool water temperature as satisfied and not reject heat to the water to its full capacity The actual pool water temperature should be sensed by each PoolComPaktrade unit and auxiliary water heater
36 EGW06-PCPEG-20150514
TMTM
Section IV Installation
Figure 4-8 Typical Pool Water Piping Diagram (AWH and AWV Model Only)
PCP_EG_PoolWaterConnectSchematic_20140305eps
SALT WATER POOLS
For units (AW models only) installed serving a salt water pool wire the pool bonding system to the bonding lug on the unit copper pool water piping This connection is required to prevent corrosion of the internal PoolComPaktrade water piping
For more information on salt water pools see the article ldquoSalt Water Poolsrdquo in the Pool Water Chemistry section of the PoolPak educational library
POOLCHEMICAL
FEEDER
CHECKVALUE
OPTIONALBOOSTERPUMP IF
MAIN FILTERPUMP IS A
2-SPEED OR UNDERSIZED
BALLVALVES
POOLWATERFILTER MAIN
FILTERPUMP
DRAIN
UNIONS
EXTERNALPRESSURETAP PORTS
UNIONS
AUXILIARYPOOL WATER
HEATER
DRAIN
BALLVALVES
LOCKINGGLOBEVALVE
LOCKINGGLOBEVALVE
POOL WATERTEMP SENSOR
FC
FlowControl
37EGW06-PCPEG-20150514
TMTM
Section IV Installation
CONDENSATE DRAINSDrain pans are connected to a common drain system and must be trapped for proper operation For AWH and HCDH units a trap and piping must be supplied and installed by the customer The trap depth must be a minimum of 6 inches (See figure 4-9) For AWV and HCDV units a condensate trap is located inside the unit and the field condensate piping and overflow drain must not have an additional trap
Provisions MUST be made for disposal of condensate Condensate from the dehumidifier coil will have nearly the same properties as the pool water itself It is recommended that building materials subjected to the condensate and systems used for its disposal are checked for compatibility For drain piping use PVC plastic pipe minimum Schedule 40 The drain line must be sloped to provide proper drainage
Drain line exposed to outdoor ambient temperatures must be protected against freezing Wrap lines with electric heat tape (follow manufacturerrsquos instructions) controlled by an automatic thermostat set at a minimum of 35degF to protect against freezing Insulate all piping Insulation must be sealed at all seams Power for heat tape must be supplied external to the PoolComPaktrade
Figure 4-9 AWH and HCDH Condensate Trap
PCP_EG_NegPressCondPiping_20140122eps
WATER COOLED CONDENSERA standard option for PoolComPaktrade units is an integral water-cooled condenser For this option all valves and refrigerant piping is internal to the unit No additional field wiring is required No additional refrigerant or oil charge is required Water piping connections are 1-14rdquo MPT and labeled on the unit
UNIT BASE
MINIMUM SCHEDULE 40 PVC
REMOVABLECLEANOUT
OPEN TEEFOR VENT
AWH OR HCDH UNIT
PLUG THEUNUSEDCONNECTIONWITH SUITABLEPVC PLUG
1
2
4 INCHES MINIMUM OR MAX NEGATIVE STATICPRESSURE (INCHES WC) + 1 INCH
2 INCHES MINIMUM OR 12
1
12
TMTM
38 EGW06-PCPEG-20150514
TMTM
Section IV Installation
REMOTE AIR-COOLED CONDENSERSPACE AND LOCATION REQUIREMENTS
The most important consideration which must be taken into account when deciding upon the locations of air-cooled equipment is the provision for a supply of ambient air to the condenser and removal of heated air from the condenser area Where this essential requirement is not adhered to it will result in higher head pressures which cause poor operation and possible eventual failure of equipment Units must not be located in the vicinity of steam hot air or fume exhausts
Another consideration which must be taken is that the unit should be mounted away from noise sensitive spaces and must have adequate support to avoid vibration and noise transmission into the building Units should be mounted over corridors utility areas rest rooms and other auxiliary areas where high levels of sound are not an important factor Sound and structural consultants should be retained for recommendations
Walls or Obstructions
The unit should be located so that air may circulate freely and not be re-circulated For proper air flow and access all sides of the units should be a minimum of ldquoWrdquo away from any wall or obstruction It is preferred that this distance be increased whenever possible Care should be taken to see that ample room is left for maintenance work through access doors and panels Overhead obstructions are not permitted When the unit is in an area where it is enclosed by three walls the unit must be installed as indicated for units in a pit
Figure 4-10 Remote ACC Installation Around Walls or Obstructions
ALL_WallsorObstructions_20131111eps
Multiple Units
For units placed side by side the minimum distance between units is the width of the largest unit If units are placed end to end the minimum distance between the units is 4 feet
Figure 4-11 Remote ACC Installation When Installing Multiple Units
ALL_MultipleUnits_20131111eps
MINW
AIR FLOW
Wrdquo=Total width of the condenser
MIN
Wrdquo=Total width of the condenserrdquo
W
AIR FLOWAIR FLOW
39EGW06-PCPEG-20150514
TMTM
Section IV Installation
Units in Pits
The top of the unit should be level with the top of the pit and side distances increased to ldquo2Wrdquo If the top of the units is not level with the top of the pit discharge cones or stacks must be used to raise discharge air to the top of the pit This is a minimum requirement
Figure 4-12 Remote ACC Installation When Installing Units in Pits
ALL_UnitsinPits_20131111eps
Decorative Fences
Fences must have 50 free area with 1 foot undercut a ldquoWrdquo minimum clearance and must not exceed the tops of the unit If these requirements are not met the unit must be installed as indicated for ldquoUnits in Pitsrdquo
Figure 4-13 Remote ACC Installation When Installing Units Near Decorative Fences
ALL_DecorativeFences_20131111eps
Wrdquo=Total width of the condenserrdquo
MIN MIN
AIRFLOW
2W2W
STACK(BY OTHERSIF SUPPLIED) 10rsquo MAX
Wrdquo=Total width of the condenserrdquo
MIN1rdquo MIN MIN
AIR FLOWW W
40 EGW06-PCPEG-20150514
TMTM
Section IV Installation
FIELD INSTALLED PIPING
Installation of the outdoor air-cooled condenser should only be done by a qualified refrigeration mechanic familiar with this type of work Many service problems can be avoided by taking adequate precautions to provide an internally clean and dry system and by using procedures and materials that conform to established procedural standards
Piping Guidelines
The following piping recommendations are intended for use as a general guide For more complete information refer to the latest ASHRAE Handbook
Materialsbull Use clean dehydrated refrigeration-grade copper tubing for all refrigerant lines Hard drawn tubing should be used
where no appreciable amount of bending around pipes or obstructions is necessary If soft copper tubing must be used care should be taken to avoid sharp bends which may cause restrictions and excessive refrigerant pressure drops
bull Use long radius elbows wherever possible with one exception - short radius elbows should be used for any traps in the hot gas riser
bull Braze all copper to copper joints with a phosphorus-copper alloy material such as Silfos 5 or equivalent Do not use soft solder
bull During brazing operations flow an inert gas such as nitrogen through the lines to prevent internal oxidation scaling and contamination
bull Support refrigeration lines at intervals with suitable hangers brackets or clampsbull Pack glass fiber insulation and a sealing material around refrigerant lines where they penetrate a wall to reduce
vibration and to retain some flexibilitybull The liquid line and discharge line should not be in contact with one another If the installing contractor must tie these
lines together because of an installation requirement the contractor must insulate them from each other to prevent heat transfer Because the discharge line is hot during system operation precautions should be taken to avoid personnel injury
bull PoolComPaktrade units do not utilize compressors with unloading stages Consequently double hot gas risers are not needed for reduced load conditions as refrigerant flow rates will not fall below minimum velocities necessary to carry oil up through the discharge line
bull A field provided field installed liquid line filter-drier is recommended in the field piping to the PoolComPaktrade unit
Sizingbull The lines must be sized and routed so that oil is carried through the system Using smaller lines than recommended
will give excessive pressure drops resulting in reduced capacity and increased power consumption Oversized lines could result in an oil flow problem within the system and possible compressor damage
bull Excessive pressure drops in the liquid line may cause flashing of the refrigerant and a loss of a liquid seal at the expansion valve inlet A reduction in capacity may then occur because the presence of gaseous refrigerant will partially block the expansion valve Using hot gas and liquid line sizes recommended in the Air Cooled Condenser section for these units and the proper system refrigerant charge will prevent this problem
bull Discharge lines should be designed to prevent condensed refrigerant and oil from draining back to the compressor during OFF cycles Use the following guidelines The highest point in the discharge line should be above the highest point in the condenser coil The hot gas line should loop toward the floor if the condenser is located above the PoolComPaktrade unit especially
if the hot gas riser is longbull For refrigerant line sizing for an Air Cooled Condenser (ACC) where the lineset length is less than 100 feet or the
ACC location is less than 50 feet higher or 20 feet lower than the unit use the below Table 4-3bull ACC line lengths beyond the above limits will void warranty unless written approval is obtained from the
factory PRIOR to installation and startup
PCP_EG_ACCPiping_20140122eps
41EGW06-PCPEG-20150514
TMTM
Section IV Installation
Figure 4-14 ACC Refrigerant Piping
Refrigerant and Oil Chargingbull PoolPaktrade units are shipped with the required charge for self contained operation only The remote ACC option does
NOT provide the refrigerant charge or oil required for the ACC and line setsbull Refer to Table 4-2 for the additional ACC condenser chargebull Refer to Table 4-3 for the required additional oil and refrigerant charge Use the calculation method shown to calculate
the additional refrigerant and oilbull For the additional oil required multiply 2 of additional refrigerant charge of both ACC and refrigerant line length
Use the correct oil type of POE oil depending on the compressor installed For Alliance models SXA SPA SSA compressors use Copeland Ultra PN 998-E022-00 For Trane models CSHD compressors use Trane PN OIL00080
Sample Charging CalculationFor an AWV2600 with 73 feet line length and ACC0121 located 30 feet above the unit
Table 4-3 indicates 34rdquo discharge line and 58rdquo liquid line piping sizes Using R410A ozft additional charge for the lineset is 73 feet x 025 ozft + 73 feet x 148 ozft = 1260 oz Table 4-2 indicates additional charge for ACC0121 (allow 30 F Operation) is 39 lb x 16 ozlb = 6240 oz Total additional R410A charge for both ACC and refrigerant line is 1260 + 6240 oz = 750 oz or 46 lbs 14 oz Total additional oil charge is 750 oz x 2 = 15 oz
Table 4-2 R410A Charge for Air Cooled Condensers (lb)
DISCHARGE LINE
Pitch inDirection ofrefrigerant flow
LIQUID LINE
AIR-COOLEDCONDENSER
DISCHARGE LINE Pitch inDirection ofrefrigerant flow
Table 4-3 Refrigerant (R410A) Charge for Different Line Size
WARNINGAbove chart is for lineset length less than 100 ft and ACC located less than 50ft above unit or 20ft below unit Failures due to a piping layout not within these limits nor receiving prior PoolPaktrade
Factory approval will not be covered under PoolPaktrade warranty
Refrigerant Line Size (ACC) Refrigerant Charge for Units with Air Cooled Condensers (ACC)
Discharge Liquid Line Length (ft) vs R410A Charge (lbs)
Model OD R410A ozft OD R410A
ozft25 ft 50 ft 75 ft 100 ft
Lbs Oz Lbs Oz Lbs Oz Lbs Oz
0550 12 010 38 049 0 15 1 14 2 13 3 12
58 016 12 092 1 11 3 6 5 1 6 13
0800 58 016 38 049 1 0 2 1 3 1 4 2
58 016 12 092 1 11 3 6 5 1 6 13
1200 58 016 12 092 1 11 3 6 5 1 6 13
34 025 58 148 2 11 5 6 8 1 10 13
1400 58 016 12 092 1 11 3 6 5 1 6 13
34 025 58 148 2 11 5 6 8 1 10 13
1800 34 025 12 092 1 13 3 10 5 8 7 5
78 034 58 148 2 14 5 11 8 9 11 6
2600 34 025 58 148 2 11 5 6 8 1 10 13
1 18 058 34 221 4 6 8 12 13 1 17 7
3500 78 034 58 148 2 14 5 11 8 9 11 6
1 18 058 78 307 5 11 11 7 17 2 22 13
4000 78 034 34 221 3 16 7 16 11 15 15 15
1 18 058 78 307 5 11 11 7 17 2 22 13
Note1 This table applies to ACC line length less than 100 ft only Contact factory if ACC line length is more than 100 ft
2 Line size should be used for ACC at the same level or located up to 20ft below the unit
3 Line size should be used for ACC located up to 50 ft above the unit
43EGW06-PCPEG-20150514
TMTM
SECTION V OPERATION
ECC-PCP REMOTE INTERFACE UNITFigure 5-1 RIU Keypad
PCP_EG_StraightOnKeypadAnnotated_20121204eps
The ECC-PCP Remote Interface Unit (RIU) is designed around the Carel pGD0 4-line x 20 character backlit LCD display module The RIU displays are accessed through six backlit selection buttons They consist of a Return Enter Key Up Key Down Key Program Key Alarm Key and Escape Key as shown above
After approximately 5 minutes the RIU will display the status screen rotation Press the Escape key to bypass the five minute delay and move directly to the status display
STATUS DISPLAY
The status screens contain basic information about operation of the PoolComPaktrade system Press the up or down arrow keys to move from screen to screen The screens will also rotate automatically every 10 seconds
Figure 5-2 Status Screen 1S P A C E T E M P _ _ o FS P A C E R H _ _ S P A C E D E W P O I N T _ _ o F(O U T S I D E T E M P) _ _ o F
Status Screen 1 displaysbull Space Temperature in degF or degCbull Space Relative Humidity in bull Space Dew Point in degF or degCbull Outside Air Temperature in degF or degC (with Economizer Option Only)
Status Screen 2 displaysbull Water Heating - YES indicates that the unit is returning recovered heat back to the pool waterbull Aux Water Heat - YES indicates that the controller has closed the relay contact requesting auxiliary pool water heater
operationbull Water Temperature in degF or degC
Status Screen 3 displaysbull SPACE temperature control requirement bull TEMPERATURE- OK Indicates the space temperature is at setpointbull HEATING- YES Indicates the space requires heatingbull COOLING- YES Indicates the space requires coolingbull AUX AIR HEAT Indicates the space requires additional heating The auxiliary air heating relay contacts close to
activate the external heating system
44 EGW06-PCPEG-20150514
TMTM
bull DEHUMID (SURFACE) Indicates the space requires dehumidification The word SURFACE indicates that the unit is temporarily lowering the dew point set point to minimize condensation at the cold surface temperature sensor
bull ECONOMIZER MODE Indicates the unit is cooling the space with outside air ECONOMIZER MODE is only shown if the optional economizer system is present
Status Screen 4 displaysbull The first line displays the current system status bull The second line displays compressor status
SET POINT CHANGE MENU
bull Press the PRG key to access the main menubull Use the arrow keys to scroll to the menu selection for Set Points and then press the Enter keybull Use the arrow keys to select the set point to be changed and then press Enter Available set points are
Air Temperature
The allowable range for the air temperature set point is 70 to 95degF Use the arrow keys to change the set point and then press Enter The new dew point set point is shown immediately as DPT The set point change screen will remain visible for a short time to allow verification of the new dew point set point After about five seconds the RIU will return to the status screen display
Relative Humidity
The allowable range for the relative humidity set point is 40 to 65degF Use the arrow keys to change the set point and then press Enter The new dew point set point is shown immediately as DPT The set point change screen will remain visible for a short time to allow verification of the new dew point set point After about five seconds the RIU will automatically return to the status screen display
Pool Temperature
The allowable range for the water temperature set point is 70 to 104degF Use the arrow keys to change the set point and then press Enter The RIU will automatically return to the status screen display
Recommendations
bull Air Temperature (Range 70degF to 95degF) The air temperature should normally be set about 2degF above the pool water temperature to minimize the pool water evaporation rate (high temperature spas are an exception)
bull Relative Humidity (Range 40 to 65) The normal range for the humidity set point is 50 to 60 Lower set points will require more energy (electricity) to satisfy the dehumidification requirement and increase pool water evaporation
bull Pool Temperature (Range 70degF to 104degF) The pool temperature set point is normally set between 80degF and 88degF for a typical swimming pool and higher for a spa depending on user preference
CAUTIONThe dehumidifier should be configured to operate at the set points designed for the facility These set points are shown on the yellow label on the door of the RIU Set points other than those shown may not be attainable with this dehumidifier
Section V Operation
45EGW06-PCPEG-20150514
TMTM
Section V Operation
PURGE MODE CONTROL MENU
CAUTIONIt is the userrsquos responsibility to use this feature properly to prevent freeze damage to downstream equip-ment 100 outside air at below freezing conditions has the potential to cause serious damage
Purge Mode causes the unit to force the optional field-provided economizer dampers and fan to full open introducing large quantities of outside air to the space This is typically used when ldquoshockingrdquo the pool Compressor operation is disabled during purge but the auxiliary air and water heating systems remain active
If the unit is not equipped with the economizer option a flashing ldquoCAUTION NO FREEZE PROTECTIONrdquo warning will be displayed This warning indicates that operation of purge mode without regard for outside air temperatures below freezing can result in damage to hot water coils or other equipment in the pool area
DETAILED STATUS MENU
To access the detailed status menubull Press the PRG key to access the main menubull Use the arrow keys to scroll to the menu selection for Detailed Status and then press the Enter key
Detailed Status Screen 1 displays Temperaturesbull Surface ndash The temperature measured at the cold surface sensorbull Dew Point ndash The calculated dew point of the spacebull Dewpt Setpoint ndash The dew point set point calculated from the temperature and relative humidity set points
Detailed Status Screen 2 displaysbull Disch Press ndash The measured refrigerant pressure in the discharge line at the compressorbull Suct Press ndash The measured refrigerant pressure in the suction line at the compressorbull Suct Temp ndash The refrigerant temperature measured on the surface of the suction line at the compressorbull Suct SH ndash The calculated superheat at the suction of the compressor
Detailed Status Screen 3 displays the number of hours the following device or system has been active since power was last applied to the unitbull Cmpr - Compressorbull Fan ndash Supply Fanbull AC ndash Mechanical Air Cooling (Economizer Cooling Not Included)bull Aux ndash Air ndash Auxiliary Air Heatingbull Aux - Wtr ndash Auxiliary Water Heating
Detailed Status Screen 4 displaysbull Fault Count ndash The total number of high pressure low pressure and defrost trips that have occurred since power was
last applied to the unit When this number reaches 10 the compressor is locked outbull AC Proof ndash Indicates a status of ldquoProvenrdquo if AC mode operation is allowed ldquoNot Provenrdquo indicates that AC mode
operation is not allowed
Detailed Status Screen 5 (only present in units configured for multi-unit networking) displaysbull Network Role ndash Indicates if the unit currently being displayed by the RIU is the master or a slavebull Net Status ndash Indicates ldquoCONNECTEDrdquo if the unit is properly connected to the multi-unit network ldquoNO LINKrdquo
indicates the unit is not connectedbull Unit ID Number ndash Indicates the unit address on the multi-unit network
Detailed Status Screen 6 (only present in units configured for multi-unit networking) displaysbull Unit 1 Present ndash Indicates if the unit currently being displayed by the RIU can communicate with unit 1 on the multi-
unit networkbull Unit 2 3 4 ndash Same as for unit 1 but for the other 3 possible units on the network
46 EGW06-PCPEG-20150514
TMTM
Section V Operation
ECC-PCP NETWORK OPERATIONNetworked ECC-PCP units operate in a MASTERSLAVE environment This means that one unit (master) determines heating cooling and dehumidification requirements and broadcasts them on the network to the other units (slaves) This ensures that all units work together instead of against other Each networked unit contains all sensor and controls necessary for independent operation and is capable of acting in the master role Units on the network are identified by a number between one and four The unit with the lowest identification number having no uncleared alarms will be the master unit
If an alarm condition occurs in the master unit it will give up the role of master The unit with the next lowest identification number and no unclear alarms will take over the master role The unit that experienced the alarm condition will operate in the slave role until the alarm is cleared at the control panel
The control panel provides two network status screens These can be accessed in the detailed status menu The figure above shows the first screen that displays the status of units one through four as present or not Use this screen to verify that all units on the network are connected and communicating with each other The figure below shows the second screen that displays network information for the unit that is being displayed by the remote interface unit including network role connection status and network identification number
NETWORK CONFIGURATION
Using the following four parameters it is possible to configure the ECC-PCP network to accommodate a wide variety of installation options Network configuration can be accessed in the service menu These parameters must be set in each unit individually
Pool Water Temperature Control
Determines whether the unit will control water temperature based on the masterrsquos command (NETWORK) or its own temperature sensor and set point (LOCAL) If a unit set to LOCAL becomes the master other units in the network will not use the masterrsquos command for water heating They will look to the next line that is not set to LOCAL This parameter is only set to LOCAL if the unit is connected to a different pool than the rest of the units on the network Because the unit is controlling water temperature on its own it is necessary to select the correct unit with the control panel before changing the water temperature set point
Staged Dehumidification Control
Determines whether the unit will run in dehumidification when there is a need for 1 stage or 2 stages of dehumidification The master unit will start on any need for dehumidification independent of this parameter Slave units with this parameter set to YES will dehumidify only if the master is asking for 2 stages of dehumidification Setting this parameter to NO will cause the unit to dehumidify when the master calls for at least 1 stage of dehumidification Using this parameter it is possible to configure the number of units in each dehumidification stage
Dehumidification Stage 2 Offset
Determines how far the dewpoint (relative humidity) of the space has to rise above the set points before the unit will request 2 stages of dehumidification on the network This parameter is normally the same in all units on the network Making this parameter smaller will bring on the second stage of dehumidification sooner
Enable Network Control
Determines whether the unit will participate in the masterslave environment Setting this parameter to NO will cause the unit to act like a standard ECC-PCP single unit The unit will never become the master on the network and will not listen to the demands broadcast by the master on the network Although units with this parameter set to NO do not participate in the masterslave environment they are still accessible through the network control panel Like the LOCAL pool
47EGW06-PCPEG-20150514
TMTM
Section V Operation
water temperature setting this parameter when set to NO requires this unit to be displayed on the control panel before changing any of the set points The other screens for Pool Water Temperature Control Staged Dehumidification and Stage 2 Offset are not available when this parameter is set to NO
Changing Set Points
Each unit on the network maintains two groups of set points network and local If a unit has the Enable Network Control parameter set to YES and the Water Temperature Control parameter set to NETWORK it will control to the network set points Set points changed when the remote interface unit is displaying this unit will be changed in every unit on the network with the same NETWORK and Water Temperature Control parameters Units that are configured for Network Control and LOCAL water temperature control will control using local water temperature set point the network air temperature and relative humidity set points When the air temperature and relative humidity set points are changed when the remote interface unit is displaying the unit they will be changed in all units configured for Network control The water temperature set point will only be changed in the unit currently being displayed by the remote interface unit Units that are not configured for Network Control will use all local set points Therefore any set points changed while the remote interface unit is displaying this unit will only be changed in this unit
ECC-PCP SERVICE
SERVICE MENU
To access the service menubull Press the PRG key to access the main menubull Use the arrow keys to scroll to the menu selection for Service and then press the Enter keybull A password is required to access the service menu
The following sub-menus are available in the service menu
IO CONFIGURATION
Digital Inputs
This menu contains a screen for each digital input Each screen contains the following parametersbull Status of the data point linked to the inputbull Status of the raw digital inputbull Input type
The following parameter list shows the available digital input screensbull Defrost Switchbull Cpr High Tempbull Water Flow bull Fire Tripbull AC Proofbull Cpr High Prsbull Fan Overloadbull Low Pressurebull Purge Input
Digital Outputs
This menu contains a screen for each digital output Each screen contains the following parametersbull Current output status bull Requested output status bull Override
48 EGW06-PCPEG-20150514
TMTM
Section V Operation
The following digital output screens are availablebull Supply Fanbull Compressorbull Bypass Solenoidbull Water Heating Solenoidbull Reheat Solenoidbull AC Solenoidbull Aux Water Heatbull Alarm Outputbull ACC Run Signalbull Economizerbull Aux Air Heat Stage 1bull Aux Air Heat Stage 2
Analog Inputs
This menu contains a screen for each analog input Each screen contains the following parametersbull Current read-only value from the inputbull Fail bull Tol bull Offs bull Ovrd bull Min bull Max
The following analog input screens are availablebull Discharge Pressure bull Suction Pressure bull Return Relative Humidity bull Suction Temperature bull Return Air Temperature bull Pool Water Temperature bull Surface Temperature bull Outside Air Temperature
UNIT CONFIGURATION
Installed Options
This menu contains parameters that indicate the hardware options installed in the dehumidifier The parameters are set by the factory and do not typically require modification
Aux Air Heating
This menu contains parameters that configure the auxiliary air heating system
Aux Water Heating
This menu contains parameters that configure the auxiliary water heating system
Temperature Ctrl
This menu contains parameters that configure the air temperature control routines of the dehumidifier
49EGW06-PCPEG-20150514
TMTM
Section V Operation
Humidity Control
This menu contains parameters that configure the humidity control routines of the dehumidifier Water Temp CtrlThis menu contains parameters that configure the compressor based water heating system of the dehumidifier bull Water Heat First This parameter indicates whether the control routine will use the compressor for water heating when
there is no dehumidification requirement bull Deadband This parameter is the deadband used by the compressor based pool water heating control routine
BAS INTERFACE
This menu contains parameters that configure the building automation system interface of the dehumidifier
MULTI-UNIT NETWORK
This menu contains parameters that configure the operation of dehumidifier in a multiple unit installation
COMPRESSOR
This menu contains parameters that configure the operation of the dehumidifier compressor
ECONOMIZER
This menu contains parameters that configure the operation of the optional field provided and field installed economizer damper system
HISTORY
The history screen provides information on the last 50 faults that have occurred in the dehumidifier It can be used for troubleshooting by an experienced HVAC technician The faults are recorded with a sequence number from 1 to 50 Sequence number 1 is always the most recent fault The following information is stored and displayed for each fault in non-volatile memorybull Hour at which the fault occurred bull Fault Code Number bull Return Air Temperaturebull Return Air Humiditybull Discharge Pressurebull Suction Pressurebull Suction Temperaturebull Pool Water Temperaturebull AC Solenoid Statusbull Bypass Solenoid Statusbull Compressor Statusbull Reheat Solenoid Status
MANUAL MODE
The Manual Mode menu for use by qualified service personnel provides two options Demand Control and Digital Output Control
UTILITIES
The Utilities menu provides sub menus for configuring units of measure and passwords for set point and service access control
50 EGW06-PCPEG-20150514
TMTM
Section V Operation
MAINTENANCEOVERVIEW
Periodic routine maintenance will promote extended equipment life While PoolComPaktrade units use components that are usually maintenance free and do not require service a simple check could result in noticing possible problems before they develop into major problems
DAILY MAINTENANCE
bull Pool water chemistry is a part of daily maintenance and it is recommended to follow National Spa and Pool Institute standards PoolPaktrade International strongly recommends following the National Spa and Pool Institute values
Table 5-1 Pool Water Chemistry
bull PoolPaktrade International recommends daily logging of your pool water chemistry MAINTENANCE AND YOUR POOL WATER CHEMISTRY IS IMPORTANT TO PROTECT YOUR WARRANTY RIGHTS
MONTHLY MAINTENANCE
bull Air Filters inspect and replace or clean as applicable Dirty filters restrict air flow and can cause improper unit operation
bull Ensure that the condensate collection pan is draining properly and the condensate is not overflowing or being drawn into the supply air stream Check the condensate and overflow lines to ensure that neither are clogged
bull Check the operation of the blower motor and scroll Ensure that the scroll does not rub the housing Check for proper belt tension Worn or cracked belts should be replaced Check fan and mounting brackets for tightness
bull Ensure that the ALARM light is not illuminated
ANNUAL MAINTENANCE
bull Inspect the refrigeration and water circuits for leaks wear or corrosion Corrosion on the water piping or condenser may indicate poor pool chemical maintenance and improper chlorine and pH levels
bull Check electrical components for loose wiringbull Although the exterior of the PoolComPaktrade units are powder coated wipe down unit particularly if installed in an
area subject to dirt or chemical concentrationbull Wash brush or vacuum the evaporator and air condenser coils This will ensure proper heat transfer and reduce static
pressure losses Caution should be taken not to wet electrical components inside the unit
NOTEIf service and inspections are not performed by a competent and experienced service firm the manufacturer warranty may be voided
AUXILIARY AIR amp POOL WATER HEATER CONNECTIONS FOR MULTIPLE UNIT INSTALLATION
Figure 6-1 Auxiliary Air and Pool Water Heater Connections for Multiple Units
AWH_EG_Connections_20121204eps
52 EGW06-PCPEG-20150514
TMTM
AUXILIARY AIR amp POOL WATER HEATER CONNECTION FOR A TWO POOL INSTALLATION
Figure 6-2 Auxiliary Air and Pool Water Heater Connections for Two Pool Installations
AWH_EG_ConnectionstoPool_20121204eps
Section VI Wiring
53EGW06-PCPEG-20150514
TMTM
Section VI Wiring
FIELD WIRING
Figure 6-3 Field Wiring Diagram
PCP_EG_FieldWiringDiagram_20121204eps
54 EGW06-PCPEG-20150514
TMTM
Section VI Wiring
FIRE CONTROL SYSTEM CONNECTION
Figure 6-4 Fire Control System Connection
PCP_EG_FirecontrolSysConnection_20121204eps
55EGW06-PCPEG-20150514
TMTM
Section VI Wiring
This page intentionally left blank
EGW06-PCPEG-20150514
TMTM
56
TMTM
3491 Industrial Drive York PA 17402 USA 800-959-7725 Fax 717-757-5085for more information wwwpoolpakcom
The Leader in Indoor Pool Dehumidification
IEGW06-PCPEG-20150514
TMTM
TABLE OF CONTENTSSECTION I INDOOR POOL DESIGN 1
Introduction 1Creating an ideal environment for indoor pool facilities1Operating Cost 1
Application 1Moisture Loads 1Effects of Moisture 1Indoor Air Quality 1Occupant Comfort 2Pool Water Chemistry 2
Equipment Choices 3Overview 3Ventilation with Heating 3Ventilation with Heating and Energy Recovery 3Mechanical Dehumidification3Hybrids 4Other Technologies 4
Room Air Distribution 4Airside Design 4
Supply Air4Return Air 6Ductwork Design6Air Distribution 6Other Airside Considerations 7
SECTION II PRINCIPLES FUNCTIONS AND FEATURES 8The Mechanical Dehumidification System 8
Principles of Operation 8Automatic Control of Air Temperature and Humidity 8Room Dew Point Control 9PoolComPak Operation9
ECC-PCP Control System 10Overview 10Humidity Control 10Cold Surface Temperature Humidity Reset 10Space Heating 10Networking Multiple Units 11Space Cooling (Optional) 11Water Heating (Models AWV and AWH only) 11
Features and Options 11Standard Items Factory Mounted 11Standard Items factory Supplied for Field Installation 11System Options 11RoofPak System12PoolComPaktrade Dehumidification Systems Selection12
Overview 12Available Configurations 12Typical AW Series Applications 12Typical Non-Pool HCD Series Applications 12Unit Selection software program12
RoofPak Series (HCDHAWH) 13Design Features 13
Durable Construction 13Rooftop Installation 13Microprocessor Controller13Heating Packages13Self-Contained Air-Cooled Condensing Section 13Evaporator Coil Options13Totally Enclosed Fan Cooled (TEFC) Motors 14Unique Outside Air System 14
II EGW06-PCPEG-20150514
TMTM
Housed Blower 14Cupronickel Water Heat Exchanger 14
Technical Summary 15Dimensional Data 15RoofPak Weights 15
SECTION III PERFORMANCE AND SIZING 16PoolComPaktrade Performance 16
PoolComPak Unit Dimensions 18PoolComPaktrade Horizontal Dimensions 18PoolComPaktrade Vertical Dimensions19
Hot Water Coil Capacities 20PoolComPak Outside Air Damper Size 21Refrigerant22Remote Air-Cooled Condenser (ACC) 23Electric Duct Heater 25
SECTION IV INSTALLATION 26PCP Installation 26
Introduction26UnitFacility Interface 26Handling 27Clearance 27Mounting of PoolComPak Units 27Inspection 27Power Supply 27Control Wiring 27Condensate Piping 27Curb Mounting 28Integral Gas Furnace Option (RoofPak Only) 28
ECC-PCP Controls Field Wiring 30Overview 30Remote Interface Unit (1) 30Cold Surface Temperature Sensor (2) 31Economizer System (Optional) (3) 31Outside Air Temperature Sensor (Economizer Option Only) (4) 32Air Cooled Condenser (Optional) (5) 32Auxiliary Pool Water Heating System (AWH Model only) (6) 33Auxiliary Air Heating System (7) 33External Alarm System (8)33Building Fire Control System (9) 34Return Air Sensor (10)34Purge Mode Input (11) 34AC Proof Input (12) 34Pool Water Temperature Sensor (13) 34
Pool Water Piping (AWH and AWV models only) 35Salt Water Pools 36
SECTION VI WIRING 51Auxiliary Air amp Pool Water Heater Connections for Multiple Unit Installation 51Auxiliary Air amp Pool Water Heater Connection for a Two Pool Installation 52Field Wiring 53Fire Control System Connection 54
IV EGW06-PCPEG-20150514
TMTM
LIST OF FIGURESFigure 1-1 Perimeter Air Distribution 5Figure 1-2 Overhead Air Distribution5Figure 1-3 Below Grade Air Distribution5Figure 1-4 Supply Air Proportions 6Figure 2-1 PoolComPaktrade AW and HCD Typical Refrigerant System Schematic 9Figure 2-2 PCP RoofPak Dimensions 15Figure 3-1 AWHCD Horizontal Unit Elevation and End Views 18Figure 3-2 AWHCD Vertical Unit Elevation and Plan Views19Figure 3-3 Air-Cooled Condenser (PoolPaktrade) - Isometric Views 24Figure 3-4 Air-Cooled Condenser (Bohn) - Elevation Views 24Figure 3-5 Duct Heater 25Figure 4-1 Typical PoolComPaktrade AWH Series System Layout 26Figure 4-2 PoolComPaktrade Curb Assembly 29Figure 4-3 Remote Interface Mounting Plate 30Figure 4-4 Economizer Operation 31Figure 4-5 Outside Air Sensor32Figure 4-6 PAC Unit Field Wiring 32Figure 4-7 Installation of a Hot Water Coil 3-Way Valve 33Figure 4-8 Typical Pool Water Piping Diagram (AWH and AWV Model Only) 36Figure 4-9 AWH and HCDH Condensate Trap 37Figure 4-10 Remote ACC Installation Around Walls or Obstructions 38Figure 4-11 Remote ACC Installation When Installing Multiple Units 38Figure 4-12 Remote ACC Installation When Installing Units in Pits 39Figure 4-13 Remote ACC Installation When Installing Units Near Decorative Fences 39Figure 4-14 ACC Refrigerant Piping 41Figure 5-1 RIU Keypad 43Figure 5-2 Status Screen 1 43Figure 6-1 Auxiliary Air and Pool Water Heater Connections for Multiple Units 51Figure 6-2 Auxiliary Air and Pool Water Heater Connections for Two Pool Installations 52Figure 6-3 Field Wiring Diagram 53Figure 6-4 Fire Control System Connection54
LIST OF TABLESTable 1-1 Typical Pool Water amp Air Temperature Set-Points 2Table 1-2 Recommended Pool Water Chemistry 3Table 2-1 RoofPak Technical Data 15Table 2-2 RoofPak Weights 15Table 3-1 PoolComPaktrade AW Performance Summary 16Table 3-2 PoolComPaktrade HCD Performance Summary 17Table 3-3 AWHCD Horizontal Unit Overall Dimensions 18Table 3-4 AWHCD Vertical Unit Overall Dimensions 19Table 3-5 Hot Water Coil Capacities 20Table 3-6 PoolComPaktrade Outside Air Damper Size 21Table 3-7 Factory Refrigerant R410A Charge 22Table 3-8 Remote ACC Performance Chart 23Table 3-9 Duct Sizes 25Table 4-1 Horizontal PoolComPaktrade Curb Dimensions 29Table 4-2 R410A Charge for Air Cooled Condensers (lb) 41Table 4-3 Refrigerant (R410A) Charge for Different Line Size 42Table 5-1 Pool Water Chemistry 50
1EGW06-PCPEG-20150514
TMTM
SECTION I INDOOR POOL DESIGN
INTRODUCTIONCREATING AN IDEAL ENVIRONMENT FOR INDOOR POOL FACILITIES
Indoor pool facilities are unlike any other structure in design construction and maintenance requirements Humidity air and water temperatures are especially difficult to control and improper management usually results in an uncomfortable environment excessive operating costs and possibly serious structural damage Effectively controlling these special conditions require control hardware and control sequences specially engineered for large commercial indoor pool applications The PoolPaktrade System utilizes an environmental control package designed to meet all special needs of the indoor pool environment while reducing energy usage and building maintenance costs
OPERATING COST
Energy consumption is a direct function of the variables necessary to satisfy the occupant and protect the facility These variables include space heating and cooling water heating humidity removal and ventilation Maintaining ideal and precise environmental conditions has a fairly high cost of operation And for a majority of the indoor pools regardless of geographic location require water and space heating 70 to 90 of the year
APPLICATIONMOISTURE LOADS
An indoor swimming pool produces large quantities of water vapor through evaporation which accounts for roughly 95 of the pool water heat loss making the water colder This excessive humidity will form damaging condensation unless removed from the building In the past the method of removing this water vapor was by ventilating an otherwise energy efficient building exhausting the humid air and the energy it contained Additional energy was used to bring in and heat the make-up air and to heat the pool water
More cost effective technologies offer an alternative method adding heat exchangers and mechanical heat recovery systems with many useful options The ideal solution to removing the water vapor from the pool area is to convert the latent (wet) heat contained in the moist air back into sensible (dry) heat placing it back into the pool water and air
EFFECTS OF MOISTURE
Excess humidity in natatorium structures may be readily apparent as condensation on cool surfaces such as windows and outside doors the growth of mildew or mold and when coupled with poor pool chemistry the accelerated corrosion of metals In its less obvious forms moisture may penetrate walls and ceilings and cause rot that becomes noticeable only when large scale structural failure occurs Humidity levels are also a major factor in the comfort of pool users
INDOOR AIR QUALITY
Pools and water parks with water features have a higher evaporation rate than a standard pool because of the increased water surface area Chloramines (See Pool Water Chemistry below) which are present in the water become more concentrated in the air as the ldquowater to airrdquo interactions increase affecting the indoor air quality A strong ldquochlorinerdquo odor is an indicator of poor pool water chemistry and is generally offensive to the occupants Higher levels of chloramines can cause skineye irritation and respiratory problems commonly known as ldquolifeguard lungrdquo
Most poolrooms are designed with a minimum ventilation rate to dilute the airborne pollutants generated from the chemical interactions in the pool water Typically these rates are based on ASHRAE standard 621 and dictated by local codes at about 05 CFM per square foot of pool and deck area but depending on the pool water chemistry the ventilation rate may not always be adequate for good poolroom indoor air quality
2 EGW06-PCPEG-20150514
TMTM
However increasing ventilation rates can significantly add to the cost of operation Including energy conservation strategies such as heat recovery airflow measurement and CO2 based control help control costs while improving indoor air quality
Depending on the geographic location and season of the year treating the outside air has a direct effect on energy consumption Some facilities prefer higher than minimum ventilation rates up to 100 of OA to maximize indoor air quality but the cost of treating this air can be significant
OCCUPANT COMFORT
Occupant comfort in a natatorium is easy to understand If you ever swam in an outdoor pool on a cold windy day or exited a pool in a dry desert location--you will probably notice an immediate chill The opposite is true where high humidity is not adequately controlled either through ventilation or by mechanical means The moisture level can reach such a state where it is oppressive or stuffy Common complaints are difficulty in breathing and the room being perceived to be warmer than the actual dry bulb temperature would suggest
Regardless of the source of discomfort users will not enjoy the facility if waterair temperatures and humidity levels are not within a narrow range Ideal water temperature is around 82deg with the air temperature about 2 degrees F higher to prevent chilling when exiting the pool and to minimize evaporation from the pool surface Here are some recommended temperatures for poolrooms which can be adjusted to meet specific needs of bathers In general ldquoactiverdquo poolrooms are maintained at lower temperature ranges so the users donrsquot overheat warmer temperatures are more common for seniors or children or less active pools
The desirable humidity range is generally between 50 and 60--greater than 60 creates a sticky feeling andor difficult breathing and low humidity results in evaporative cooling on the batherrsquos skin resulting in a chill
Poor air movement caused by improper duct placement within the poolroom will also lead to occupant discomfort Excessive supply air blowing on bathers can create drafts while uneven air distribution may create stagnant zones within the space
Table 1-1 Typical Pool Water amp Air Temperature Set-Points
POOL WATER CHEMISTRY
Water chemistry in swimming pools is critical for the health of the bathers and the condition of the enclosure and components An enclosure with poor water chemistry has a noticeable ldquochlorinerdquo smell which is an indication of high chloramines in the air Not only does this have an effect on the water but it affects the bathers and the air they breathe
Dehumidification systems are not designed to remove the effects of incorrect pool water chemistry Dehumidificationventilation equipment is not designed to remedy the effects of poor pool chemistry but is designed to deliver prescribed ventilation to manage smaller amounts of pollutants generated from normal pool activity Pool water chemistry is a part of daily maintenance and it is recommended that the users follow the current National Spa and Pool Institute standards
For more information review the Controling Chloramines with Proper Chlorine Management chapter in the Indoor Pool Water Chemistry publication in the online PoolPaktrade Educational Library
Section I Indoor Pool Design
Typical Pool Water amp Air Temperature Set-PointsPool Type Water Temp degF Air Temp degF Room RH
1 Normally max 86degF to minimize overheating of occupants
3EGW06-PCPEG-20150514
TMTM
Table 1-2 Recommended Pool Water Chemistry
EQUIPMENT CHOICESOVERVIEW
There are several methods for controlling humidity temperature and ventilation in poolrooms Each method offers some level of control but there can be significant differences in first cost and operating cost of each method Geographic location degree of comfort unit cost and operational cost must be evaluated in the selection of the correct system
VENTILATION WITH HEATING
bull Moisture removal is accomplished through the dilution with dryer outside air bull High cost of operation (air reheating)bull Lowest first costbull No opportunity to recover energy in the exhaust airstreambull No opportunity to recover energy into the pool waterbull No integral cooling capabilitybull Summer space conditions can be unbearably hot and humid
VENTILATION WITH HEATING AND ENERGY RECOVERY
bull Moisture removal is accomplished through the dilution with dryer outside air bull Significant heat recovery from exhaust air streambull Cost-effective method but with modest operating costbull Performance limitations in humid areas or during summer peaksbull No opportunity to recover energy into the pool waterbull No integral cooling capability
MECHANICAL DEHUMIDIFICATION
bull Moisture removal is accomplished through mechanical refrigerationbull Significant heat recovery using ldquoheat pumprdquo technologybull Recovers the most energy from the exhaust airstreambull Offers an opportunity to recover energy into the supply airstreambull Offers an opportunity to recover energy into the pool waterbull Higher first cost with lower operating costbull No performance limitations based on locationbull Tightest control of setpoint conditionsbull Integral cooling capabilitybull Can be integrated to include appropriate ventilation strategies
HYBRIDS bull Combines various technologies to increase efficiency and capabilitybull Utilizes ventilation as primary dehumidification methodbull Switches to heat pump method when conditions require better environmental control
OTHER TECHNOLOGIES
Desiccant technology can be adapted to provide super dry air which is injected into the poolroom to dilute the moisture load The regeneration phase of the desiccant is typically driven by waste heat from refrigeration cycle or other fossil fuel
Wheels are sometimes considered because of their wide acceptance as heat recovery devices Latent or Enthalpy wheels are not suitable for pools but sensible wheels may have application
ROOM AIR DISTRIBUTIONAll PoolPaktrade models provide continuous air recirculation and with a good air distribution system will promote uniform space conditions To remove the required moisture and maintain controlled conditions it is essential that there be adequate air movement and distribution in the natatorium The unit must remove the humid air from the pool area and discharge the dehumidified air back into it The supply air should be distributed over areas subject to condensation (windows outside walls support trusses skylights etc)
AIRSIDE DESIGN
The supply air volume and external static pressure capability of the fan is given for each model in the Performance Section It is recommended that an experienced engineering or mechanical contracting firm do the design sizing and layout of the duct system
The recommended volume of supply air should provide three to eight air changes an hour However in larger waterparks or spaces with high sensible heat gain higher airflows may be appropriate Lower air volumes require more care to avoid short cycling the air between the return and supply air stratification and pockets of high humidity
The most even control of space conditions occurs with proper air distribution and a proper air flow rate This provides space control without excessive loading and unloading of refrigerant-based dehumidification equipment
Supply Air
After dehumidification dry air is supplied back to the room Supply air should be distributed from ducting around the perimeter (see Figure 1-1) of the space The two options for perimeter supply air distribution are overhead (see Figure1-2) or below grade (see Figure 1-3)
Section I Indoor Pool Design
5EGW06-PCPEG-20150514
TMTM
Figure 1-1 Perimeter Air Distribution
ALL_AirDistributionPerimeter_20131220eps
The warm dry air should be directed over outside walls windows and other surfaces susceptible to condensation or it can be directed down the center of the room blowing air toward the surfaces prone to have condensation Supply ducts should be as short and with as few turns as possible Use turning vanes to minimize air noise and static pressure drop
Recommended maximum supply duct air velocity is 1000 FPM The recommended velocity from diffusers is 300 to 500 FPM Air velocities in ducts should be kept as low as is reasonable to avoid excessive noise in the ducts In multiple unit installations supply air from each unit may go into a common supply duct or into a plenum A supply air duct collar is provided at the fan outlet The duct should be attached to this with a flexible connection to minimize vibration transmission
SUPPLY AIR BLOWINGDOWN FROM SOFFIT DUCTSCOVERING WINDOWS ANDMOISTURE-EXPOSED AREAS
SUPPLY AIRTO SKYLIGHTS
POOLPAKDEHUMIDIFICATIONSYSTEM
RETURN AIR
Figure 1-3 Below Grade Air Distribution
Section I Indoor Pool Design
BELOW GRADE DUCTING CEILING DUCTING
RETURN AIR
SUPPLY AIRTO SKYLIGHTS
POOLPAKDEHUMIDIFICATIONSYSTEM
SUPPLY AIR BLOWING UPFROM BELOW-GRADEDUCTS COVERING WINDOWSAND MOISTURE-EXPOSEDAREAS
SUPPLY AIR BLOWINGDOWN FROM SOFFIT DUCTSCOVERING WINDOWS ANDMOISTURE-EXPOSED AREAS
SUPPLY AIRTO SKYLIGHTS
POOLPAKDEHUMIDIFICATIONSYSTEM
RETURN AIR
6 EGW06-PCPEG-20150514
TMTM
Return Air
The unit will operate most efficiently in a natatorium where the supply and return openings are placed diagonally opposite each other All ducting should be done in accordance with acceptable practices Return air ducts in the section just prior to entering the unit return air opening and elbows in both the return and supply air ducts must comply with the guidelines set forth in SMACNA HVAC Duct Construction Standards Metal and Flexible ndash Third Edition Chapter 4
Ductwork Design
All supply and return duct work to the unit should be installed such that no condensate occurs in the duct work Duct turns and transitions must be made carefully to keep friction losses to a minimum Duct elbows should contain splitters or turning vanes and avoid short radius fittings
Duct work that is connected to the fan discharge should run in a straight line with proper transitions and minimum distances to elbows as recommended by SMACNA and should not be reduced in cross-sectional area Duct turns should be in the same direction as fan rotation Never deadhead the fan discharge into the flat side of a plenum
Duct work attached to the PoolPaktrade unit return air connection must be done in accordance with SMACNA recommended standards and or generally accepted industry practice
Supply and return duct work should have all seams sealed before applying insulation to the exterior of the duct work The insulationrsquos seams must be sealed wrapped and mastic coated Use of pre-insulated duct work (interior) is acceptable if it meets local codes however all seams must be sealed prior to startup
Air Distribution
Supply outlets and return grilles should be carefully placed to avoid short-circuiting in the space Short-circuiting creates stagnant areas where humidity and temperatures may build up to undesirable levels reducing the effectiveness of the PoolPaktrade System Return grilles can be placed high in the space to reduce return ductwork however removal of Chloramines from the occupied area has become much more of a design consideration and so low returns are favored by poolroom designers
Supply air should be directed 45 degrees up and down (most of the air will be directed downward) toward exterior walls windows skylights and other areas where stagnant conditions could cause humidity buildup and condensation problems or drafts The end result of the supply air ducts is to wash the surfaces of the pool room that are prone to condensation with the warm dry supply air
Figure 1-4 Supply Air Proportions
20 OF SUPPLYAIR DIRECTEDALONG CEILING
80 OF SUPPLYAIR DIRECTEDDOWN WALLS
WINDOWSURFACE
12rdquo
ALL_AirDistribution45DegProportions_20131220eps
Section I Indoor Pool Design
7EGW06-PCPEG-20150514
TMTM
Diffusers for supply ducts located overhead (as opposed to under the deck) must be sized such that the supply air will be thrown all the way to the deck and wash the entire wall surface from supply duct to the floor
As a rule directing the supply air at or across the pool surface increases the evaporation rate To control the buildup of chloramines at the surface of the pool some air may be directed at the pool surface Supply outlets should not discharge directly onto surfaces where drafts may be created that will blow on swimmers walking along the edges of the pool Spectators should have supply air directed toward their faces
The outside air intake and exhaust may have rain hoods if the unit is mounted outdoors Rain hood locations are illustrated on the unit arrangement drawings The intake and exhaust should be screened to prevent the entrance of foreign matter and arranged to avoid recirculation of exhaust and outside air Also when auxiliary gas heat is selected (in an outside installation) a combustion air louver or rain hood is provided
Ductwork connections over 5 feet long must be supported to avoid damage to unit Short Flexible connections of rubber or canvas can be made between the return duct and the unit to eliminate vibration transmission through the duct
PoolPaktrade International does not recommend the use of equipment rooms or locker rooms as return or supply air plenums due to the potential of corrosion for components installed in the room The return air duct should always connect the pool enclosure to the return air plenum collar of the PoolPaktrade unit(s)
Other Airside Considerations
A hot water electric or gas duct heater may be installed in the supply duct to provide auxiliary space heating Be sure that the additional air pressure drop across the heater is accounted for in the unit fan selection These heating components must be designed for use in swimming pool environments
Maintain the poolroom at a slightly negative pressure This will minimize moisture and chemical odor migration to other spaces The exhaust fan should be sized for about 5-10 greater CFM than the amount of outside air being introduced into the space Ducts can be fabric aluminum PVC or galvanized steel Even though ldquodry airrdquo is being supplied back to the pool do not use duct board or similar materials If the PoolPaktrade unit is installed in an area that is below the natatoriumrsquos dew point temperature the ducts may require insulation pitching and drainage
Continuous vapor barriers are required between the poolroom and all other interior and exterior spaces because of the high dewpoint in the poolroom all the time Care must be taken during design and installation to avoid gaps in the vapor barriers or building damage may result
Windows and exterior doors must be selected with adequate thermal insulation (including thermal breaks) to minimize condensation on their interior surfaces even if the supply air is directed across these components Doors and windows must also have as low an air leakage as possible Although the space will be maintained at a slightly negative pressure cold air leaking into the space from poorly sealed openings will negate all of the effects of good thermal insulation
Section I Indoor Pool Design
8 EGW06-PCPEG-20150514
TMTM
SECTION II PRINCIPLES FUNCTIONS AND FEATURES
THE MECHANICAL DEHUMIDIFICATION SYSTEM
PRINCIPLES OF OPERATION
The PoolPaktrade System is a complete environmental control system designed expressly for indoor swimming pool enclosures It takes into account two important factors the swimming pool occupant (personal comfort) and the swimming pool environment (the physical structure and surrounding furnishings)
The swimming pool enclosure can be a hostile environment for equipment decor and building structures A PoolPaktrade Systemrsquos major function is to dehumidify the pool enclosure air through a vapor compression cycle During this cycle the PoolPaktrade System recycles the sensible and latent heat and places it back into the pool water and air as needed This recycling process saves money and keeps your pool environment efficient and safe
Solid state microprocessor technology working in conjunction with sensors continually monitors water and air conditions provide superior occupant comfort Unlike typical outside air ventilation systems a PoolPaktrade System recycles energy and blankets the walls and windows with warm dry air
PoolPaktrade dehumidification systems reduce the energy input required to maintain pool water and air temperatures By dehumidifying the air and recycling the latent energy back into the pool air and water the unit will reduce operating costs when compared to conventional heating and ventilating systems Pool water and enclosure heating are still required but with greatly reduced requirements
A PoolPaktrade unit when matched correctly to the evaporation rate of the pool water and overall dehumidification requirements will efficiently maintain the pool air at relative humidity levels between 50 and 60 It should be noted that a lower evaporation rate occurs when the pool enclosurersquos air temperature is maintained above the pool water temperature Evaporation losses and the energy required to maintain desired room conditions will dramatically increase if the air temperature is allowed to fall below the pool water temperature It is recommended that the continuous dry bulb temperature entering the evaporator of the PoolPaktrade unit not fall below 75degF
PoolPaktrade International recommends that backup heating equipment for both pool water and pool enclosure air is capable of carrying the full system heating requirements This makes for a well-designed system that will provide the least amount of pool down time if unforeseen system problems occur Building conductive loads and other losses must be taken into consideration
AUTOMATIC CONTROL OF AIR TEMPERATURE AND HUMIDITY
An integral part of any PoolPaktrade System is a proven microprocessor control system which automatically senses and maintains comfort conditions Sensors detect changes in humidity and air temperature in the indoor pool environment and quickly regulate supply air conditions to meet set point comfort levels even during periods of unusually heavy pool use
To prevent condensation on walls and windows The PoolPaktrade System automatically adjusts humidity in response to changes in wall or window surface temperatures As the seasons and weather conditions change the PoolPaktrade System changes its own mode of operation Throughout the year PoolPaktrade thinks ldquoefficiencyrdquo and automatically selects the least expensive energy source for the poolroom conditions
PoolPaktrade models include a factory mounted and wired space temperature and humidity sensor at the return air opening of the unit Refer to the installation section for mounting location Caution should be exercised When the outside air is to be introduced into the space for ventilation adequate exhaust capacity via an integral (or a separate external fan) must be specified to ensure the poolroom remains slightly negative An inadequately sized exhaust system may result in damage to the structure and pool odors may be forced into other areas of the building
9EGW06-PCPEG-20150514
TMTM
ROOM DEW POINT CONTROL
PoolPaktrade units with the ECC-PCP controller operate using an advanced type of control called dew point temperature control This method of control is more accurate than conventional relative humidity control The main purpose of a dehumidification system is to maintain the amount of moisture in the pool area below a level that would cause damage to the building Relative humidity is a measurement of the percentage of moisture which is in the air at a given dry bulb temperature in proportion to the maximum amount of moisture that could be contained at this particular dry bulb temperature Warmer air can hold more moisture than colder air and therefore changes in dry bulb temperature will change the relative humidity reading without any change in the actual amount of moisture in the air The amount of moisture in the air is expressed as ldquograins of moisture per pound of dry airrdquo and is directly related to the dew point temperature
The ECC-PCP uses dew point control to operate the PoolPaktrade unit and maintain the moisture level below the setpoint The space dry bulb temperature and relative humidity determine the dew point temperature By varying the space temperature and space relative humidity set points the dew point set point is changed When the space dew point temperature rises more than 12 degree Fahrenheit above the space dew point temperature set point the ECC-PCP controller energizes the compressor for dehumidification As the dew point temperature drops more than 12 degree Fahrenheit below the dew point temperature set point the controller de-energizes the compressor
POOLCOMPAK OPERATION
The PoolComPaktrade fan draws in warm moist air from the pool enclosure This air passes through the evaporator (dehumidification) coil and gives up heat energy to the refrigerant which is in a cool liquid state This exchange of energy causes the air temperature to fall below its dew point resulting in moisture condensation on the evaporator coil The moisture formed falls into the unitrsquos condensate drain pan After passing through the evaporator coil the refrigerant becomes a cool gas
The refrigerant enters the unitrsquos compressor where it is compressed into a hot gas While in the compressor the refrigerant absorbs the energy used to operate the compressor This hot gas refrigerant then travels either through an air reheat coil the pool water condenser or to an optional auxiliary air conditioning condenser which may be either air or water cooled If air heating is called for the air reheat coil is used The hot refrigerant exchanges energy with the cooler dehumidified air coming from the evaporator coil This causes the temperature of the air to rise for heating
Figure 2-1 PoolComPaktrade AW and HCD Typical Refrigerant System Schematic
PCP_EG_Schematic3D_20121204tif
Section II Principles Functions and Features
10 EGW06-PCPEG-20150514
TMTM
If pool water heating is required (AWH models only) the hot gas flows into a pool water condenser where it adds energy to the incoming pool water This heats the pool water while the refrigerant is condensed into a warm liquid If space cooling is called for the refrigerant flows to the auxiliary air conditioning condenser bypassing the air reheat coil and pool water condenser and allowing cool air from the evaporator coil to provide space
ECC-PCP CONTROL SYSTEMOVERVIEW
The ECC-PCP controller is a micro-processor based system that maintains pool enclosure humidity and air and water temperatures at optimum levels automatically It is also possible to monitor this critical data via the Internet using the optional Remote Access Package (RAP) This also allows the controller to be accessed from the factory via the internet or a telephone line (AWH and HCDH only)
The ECC-PCP is designed to work with the PoolComPaktrade dehumidification system to provide an environment that is both comfortable and cost effective It controls unwanted humidity in the pool enclosure and helps to prevent unsightly condensation from forming on surfaces
The ECC-PCP provides accurate control and allows the user to monitor system parameters and change setpoints easily For this purpose a remote interface unit with a text display and keypad is provided The remote panel should be mounted outside the pool space in an office or in the equipment room (The ECC-PCP remote interface unit contains no sensors) All setpoints are saved in the memory of the ECC-PCP and are not erased in the event of a power failure Critical operating data can be easily accessed by a service technician for the purpose of system operation and evaluation
HUMIDITY CONTROL
As the dewpoint temperature within the pool enclosure rises above the desired setpoint the ECC-PCP activates the compressor within the PoolComPaktrade to begin the dehumidification process If the space temperature is below the desired setpoint the heat recovered during dehumidification is directed to the air reheat coil for space heating If the pool water temperature is also below the setpoint some of the recovered heat is directed to the pool water condenser (model AW only) for pool water heating If neither air heating nor pool water heating is required the recovered heat can be directed to an auxiliary air conditioning condenser if the system is so equipped If the system does not include an auxiliary air conditioning condenser the ECC-PCP will direct the recovered heat to the air reheat coil until the need for dehumidification is satisfied
COLD SURFACE TEMPERATURE HUMIDITY RESET
The ECC-PCP control system includes a sensor that measures the temperature of the coldest surface in the pool enclosure usually an exterior window or door frame When the temperature of this surface approaches the dewpoint temperature of the space the controller lowers the humidity setpoint to activate dehumidification This function helps to prevent condensation on the cold surface
SPACE HEATING
When the compressor is running the ECC-PCP directs the recovered heat to the air reheat coil Space heating will continue until the space temperature reaches the setpoint The ECC-PCP will activate the auxiliary space heating system if the PoolComPaktrade unit is unable to satisfy the heating need with heat recovered during dehumidification The ECC-PCP will activate the auxiliary pool water heating system if the water temperature cannot be satisfied with recovered heat An auxiliary pool water heater must be supplied as part of the pool water pump and filter system
Section II Principles Functions and Features
11EGW06-PCPEG-20150514
TMTM
Section II Principles Functions and Features
NETWORKING MULTIPLE UNITS
ECC-PCP networking allows up to four PoolComPaktrade units to be connected together The units will work with eachother to control water temperature air temperature and relative humidity Networked PoolComPaktrade units have all thefeatures of standard PoolComPaktrade plus the ability to control water temperature in multiple pools They also allow system dehumidification capacity to be staged All units on the network are accessible from a single remote interface unit for convenience
SPACE COOLING (OPTIONAL)
If space cooling is required and the unit is equipped with an auxiliary air conditioning condenser (air-cooled or water-cooled) the ECC-PCP will activate the space cooling mode of operation In this mode the heat removed from the space air will be directed to the auxiliary air conditioning condenser The air cooling mode of operation is independent of the need for dehumidification
When the PoolComPaktrade unit is equipped with a field supplied economizer the ECC-PCP will automatically select the most economical method for space cooling An economizer utilizes outside air rather than the refrigeration system to achieve space cooling A sensor connected to the ECC-PCP monitors the outside air temperature When appropriate the controller will disable the compressor and bring in cool outside air for economical operation A separate exhaust system must be installed to ensure negative room pressure during the economizer mode
WATER HEATING (MODELS AWV AND AWH ONLY)
If the pool water temperature is also below the set point some of the recovered heat is directed to the pool water condenser for pool water heating Heating can only take place during the dehumidification when heat is captured in the refrigeration circuit This is only available on the Model AW which is equipped with a pool water condenser
FEATURES AND OPTIONSSTANDARD ITEMS FACTORY MOUNTED
bull Evaporator (dehumidification) coil bull Air reheat coil (hot gas reheat coil)bull Bottom top (for indoor installations) or horizontal supply air configuration bull Filters and filter rackbull Air temperature and relative humidity sensorbull Compressor suction and Discharge pressure transducersbull Compressor suction temperature
STANDARD ITEMS FACTORY SUPPLIED FOR FIELD INSTALLATION
bull ECC-PCP control interface devicebull Cold surface temperature sensorbull Outside air temperature sensor (with economizer control kit option only)bull Pool water temperature sensor (AW models only)
SYSTEM OPTIONS
bull Remote air-cooled condenser for space air conditioningbull Capability of introducing up to 30 outside airbull Economizer controlbull Network multiple unitsbull Remote monitoring via Internet (AWH and HCDH only)bull Weatherproofing for outdoor installation (AWH and HCDH only)
12 EGW06-PCPEG-20150514
TMTM
bull A factory-mounted water-cooled condenser with a refrigerant head-pressure controlled water regulating valve for space air conditioning Chilled water and closed loop cooling tower water may be used for the water-cooled condenser loop Never use ground water for the water-cooled condenser Consult the factory for cooling tower applications
ROOFPAK SYSTEM
The RoofPak product line is comprised of the most popular PoolComPaktrade configuration and repacked as a self-contained all-in one dehumidification system This offering merges a highly reliable PoolComPaktrade AWH or HCDH base system with an integral air-cooled condenser and either an integral gas furnace or an electric heater The RoofPak Series is only available in horizontal configuations which can be utilized over a wide range of popular applications See the RoofPak section of this manual for more information
POOLCOMPAKtrade DEHUMIDIFICATION SYSTEMS SELECTION
Overview
The PoolComPaktrade is a compact unitary pool dehumidification system designed for commercial and residential applications It is available in the AW Series with a pool water condenser for water heating or in the HCD Series without the pool water condenser
Available Configurations
Indoor Installation The PoolComPaktrade fits easily into a standard utility room (vertical and horizontal configurations) Outdoor Installation The horizontal configuration only can be pad roof or curb mounted depending on the application
For detailed information for your specific model please refer to General Arrangement DrawingsThe PoolComPaktrade can be configured with an internal hot water coil or duct-mounted electric heater and adapted for economizer operation The horizontal model can have either a top bottom or end supply duct connection
Typical AW Series Applications
bull Hot Tubs Spas and Whirlpoolsbull Residential Pools bull Hotel and Motel Pools bull School Natatoriums bull YMCA and Club Pools
PoolPaktrade International LLC maintains a computerized software selection program Information required for the program can be found in the PoolComPak Selection Input Data form found in the online PoolPaktrade Engineering Library Please contact your exclusive PoolPaktrade Sales representative for a selection
Section II Principles Functions and Features
13EGW06-PCPEG-20150514
TMTM
Section II Principles Functions and Features
ROOFPAK SERIES (HCDHAWH)PoolPaktrade has taken their most popular PoolComPaktrade configuration and repacked it as a self-contained all-in-one dehumidification system This product comprises the RoofPak Series This offering merges a highly reliable PoolComPaktrade AWH or HCDH base system with an integral air-cooled condenser and either an integral gas furnace or an electric heater The RoofPak Series is only available in horizontal configuations which can be utilized over a wide range of popular applications The ten and twelve ton models are ideally suited for applications having a surface area between 1200 sq ft and 2500 sq ft
DESIGN FEATURES
The RookPak Series is designed with features that provide cost savings and greater reliability over traditional systems Key features are
bull Single self-contained unit can be installed with one crane liftbull Enclosed refrigerant system reduces refrigerant chargebull Factory assembly ensures wiring and brazing are accomplished under ideal situationsbull Single power connection to minimize field wiring (Separate power connection required for integral electric heat)
Durable Construction
bull Heavy duty construction designed for outside installation to withstand the elementsbull Double-wall construction enhances product longevitybull Designed for quiet operation
Rooftop Installation
bull Requires only one mounting curbbull Bottom return airbull Bottom supply airbull Side outside air Microprocessor Controller
bull Utilizes the PoolPaktrade proven ECC-PCP microprocessor based contol technologybull Incorporates Remote Access Package (RAP) to allow system access via the ethernetinternetbull RAP is easily adaptable to BAS systems including BACnet (MSTP amp IP) LonWorks and Modbus
Heating Packages
bull 200 MBH or 240 MBH indirect gas furnace for consistent temperature controlbull 20kW or 30kW electric heater (requires separate power connection) bull Hot water coil using PoolPaktrade standard Hycorreg Blue coil or optional Electro-Guardtrade coils
Self-Contained Air-Cooled Condensing Section
bull Built-in Air Cooled Condenser (ACC) reduces cost and eliminates field pipingbull Utilizes efficient dual rotary blade fansbull Efficient to 105degF ambient outside air temperaturebull Choice of coil coatings for specific applications
Evaporator Coil Options
bull Hycorreg Blue (standard)bull Electro-Guardtrade Plusbull All copper
14 EGW06-PCPEG-20150514
TMTM
Totally Enclosed Fan Cooled (TEFC) Motors
bull Protects fan motors from corrosive air streambull Extends motor lifeprevents premature failurebull Reduces system maintenance
Unique Outside Air System
bull Houses adjustable louvers and filterbull Convenient external filter accessbull Swing-out door-mount design for easy service access to fan motor and belts
Housed Blower
bull Heavy pillow-block bearings provide durabilitybull Rugged cast-steel housing provides longevitybull Provides greater reliability
Cupronickel Water Heat Exchanger
bull Supplies 100 of available recycled energy to the pool waterbull Reaches water temperature set-point conditions fasterbull Efficiently maintains the water temperature set-pointbull Redirects heat only after space temperature is satisfied
AWHHCDH 35004000 With Integral Gas or Electric Heat and With Remote ACC 2900AWHHCDH 35004000 With Integral Gas or Electric Heat and With Integral ACC 3700AWHHCDH 35004000 With No Integral Auxiliary Heat and With Integral ACC 2700
RoofPak weights are also included with the RoofPak Generic Product Drawings found in the Engineering Library section of the PoolPaktrade website
Model Number AWH HCDH 3500 - 10 Ton AWH HCDH 4000 - 12 TonPool Size (Sq Ft) 1200 - 2000 1400 - 2500Reheat Capacity (MBH) 170 200Moisture Removal (LbHr82degF60RH) 63 70Pool Water Flow (GPM) 26 28Pool Water Condenser PD (FT WC) 20 30Pool Water Condenser Capacity (MBH) 170 200Outside Air (CFM)(Nominal) 0 - 2000 0 - 2000Total Supply Airflow CFM (Maximum) 3500 - 7000 4000 - 7000Refrigerant Charge (lbs) 81 83Dimensions (in inches) with integral air-cooled condenser and gas furnaceLength 264 264Width 574 575Height 525 522
OA
453
152
134 440
FRONT VIEW
525
SA1200 CG
Side return air available horizontal return air available without integral air-cooled condenser
LEFT VIEW
RA
2640
16 EGW06-PCPEG-20150514
TMTM
SECTION III PERFORMANCE AND SIZING
POOLCOMPAKtrade PERFORMANCE
Detailed performance and dimensional information are provided in the PoolPaktrade Selection Software
PoolComPaktrade AW (AWV AWH) Performance
Table 3-1 PoolComPaktrade AW Performance Summary
Performance at 82degF Air and 80degF Water Pool water Condenser (Vented)
Model AW Return Air CFM
Return Air RH ()
Moisture removal (lbshr)
Sensible Cooling Capacity (MBH)
ACC Max Heat Rejection (MBH) GPM Pressure Drop
FT water
0550 90060 111 136 312
4 650 85 156 301
0800 160060 157 221 475
6 1050 117 249 457
1200 170060 208 269 579
10 2450 155 305 555
1400 230060 260 384 766
10 850 188 434 736
1800 250060 309 418 891
12 1250 229 478 861
2600 330060 451 546 1209
13 650 350 606 1156
3500 430060 597 789 1700
24 1750 442 898 1634
4000 450060 704 876 1975
28 2450 524 1001 1893
17EGW06-PCPEG-20150514
TMTM
Performance at 82degF Air and 80degF Water
Model HCD Return Air CFM Return Air RH () Moisture removal (lbshr)
Sensible Cooling Capacity (MBH)
ACC Max Heat Rejection (MBH)
0550 90060 102 132 30550 77 152 295
0800 160060 145 208 46250 103 239 444
1200 170060 190 252 56450 145 284 544
1400 230060 241 362 74750 179 405 718
1800 250060 289 418 88150 209 474 846
2600 330060 410 535 118850 313 597 1138
3500 430060 569 805 169950 415 952 1668
4000 450060 665 862 195350 502 979 1878
PoolComPaktrade HCD (HCDV HCDH) Performance
Table 3-2 PoolComPaktrade HCD Performance Summary
Section III Performance and Sizing
18 EGW06-PCPEG-20150514
TMTM
POOLCOMPAK UNIT DIMENSIONS
The latest detailed unit dimensional data may be found in the PoolComPaktrade Series AWHHCDH AWVHCDV All Models R-410A Dimensional Drawings publication (EG6_Dim_All) which can be downloaded from in the PoolPaktrade Engineering Library (wwwpoolpakcom)
PoolComPaktrade Horizontal Dimensions
Table 3-3 AWHCD Horizontal Unit Overall Dimensions
NOTECoils add 01rdquoWC to ESPEntering Air Temperature - 80degFEntering Water Temperature - 180degFMax Working Pressure - 125 psiCapacity is a function of Return Airflow and is independent of Supply Airflow
21EGW06-PCPEG-20150514
TMTM
POOLCOMPAK OUTSIDE AIR DAMPER SIZE
Table 3-6 PoolComPaktrade Outside Air Damper Size
Section III Performance and Sizing
Model Outside Air (OA) Location
Opening Size1 (in) Damper Code OA CFM Range2
PoolComPak Vertical AWVHCDVV5508001200 Top A 14 x 10 OA-TR 0-800Left OA-LT
V14001800
Top A 14 x 10 OA-TR 0-800Left OA-LTTop B 14 x 22 OA-TR 800-2000Left OA-LT
V2600
Top A 14 x 10 OA-TR 0-800Left OA-LTTop C 14 x 30 OA-TR 800-2500Left OA-LT
V35004000
Top A 14 x 10 OA-TR 0-800Left OA-LTTop C 14 x 30 OA-TR 800-2800Left OA-LT
PoolComPak Horizontal AWHHCDH
H5508001200
Top A 12 x 12 OA-TC 0-450Front OA-FCTop B 12 x 24 OA-TC 450-800Front OA-FC
H14001800
Top C 16 x 20 OA-TC 0-1000Front OA-FCTop D 16 x 40 OA-TC 1000-2000Front OA-FC
H260035004000
Top E 20 x 20 OA-TC 0-1400Front OA-FCTop F 20 x 40 OA-TC 1400-2800Front OA-FC
1Size may change depending on RA CFM and ESP See product dwg requestpulley request from section software for exact damper size
2Operating these units at OA quantities different from which the unit was selected will be detrimental to the unitrsquos operation
22 EGW06-PCPEG-20150514
TMTM
REFRIGERANT
Table 3-7 Factory Refrigerant R410A Charge
NOTEFactory charge for remote ACC option does not include refrigerant nor oil charge for either ACC or connecting refrigerant line between unit and ACC
For ACC and lineset charging see Table 4-2 and Table 4-3 in the Installation section
1Factory charge for remote ACC option does not include refrigerant for either ACC or lineset
2Factory charge for RoofPak with Integral ACC in parentheses
Section III Performance and Sizing
23EGW06-PCPEG-20150514
TMTM
Section III Performance and Sizing
REMOTE AIR-COOLED CONDENSER (ACC)
Table 3-8 Remote ACC Performance ChartNote Below table contains the piping sizes of the remote ACC stub-outs Additional field piping may be needed to make the transition from the connections to correct refrigeration lineset sizing (See Table 4-3)
Unit Size ACC Model
Ambient Temp (degF)
Unit Height
(inches)
Vapor OD
(inches)
Liquid OD
(inches)Unit
WeightMotor FLA Min Circuit
Ampacity
A B C 208230V 460V 208230V 460V0550 ACC0041 95100105115 393 58 12 120 3 15 38 19
Power wiring should incorporate properly sized fuses or motor rated circuit breakers A disconnect must be fitted within easy access and sight of the unit Supply voltage must be maintained within +- 10 of design voltage on both single and three phase units Cycles must be within +- 5 of design Failure to operate within these ranges can adversely affect performance cause failure of the equipment and may void warranty terms
Figure 3-5 Duct Heaterbull Tubular sheathed elementsbull Galvanized steel cabinetbull Duct-mounted flanged typebull Airflow in either directionbull UL and CSA approved heaterbull Airflow proving switchbull Auto and manual reset high temperature limitsbull Magnetic contactorsbull 24 volt control circuit and transformerbull Standard heater for indoor installation in non-insulated duct
Duct Heater Sizes
Table 3-9 Duct Sizes
Duct Heater Installation
1 Flange both ends of the ducts outwards on three sides to match heater flanges as shown2 Fasten heater to duct using sheet metal screws for smaller heaters or bolts for larger ones3 Seal opening with suitable sealing compound4 If needed use additional hangers to support heater5 Electrical power connections must be made within NEC standards and local electrical codes6 Refer to the Field Wiring Diagram at the back of this manual for controls connection
Reference Dimensions Fan Outlet
AWHHCDH 5508001200 9-14 x 10-38 inchesAWHHCDH 140018002600 12-12 x 13-12 inchesAWHHCDH 260035004000 17 x 19 inchesDuct heater width = 8 10 or 12 inches depending on heater kW Flange width = 1 inch
VOLTSHZPHDuct Size
12rdquo X 12rdquo 15rdquo X 15rdquo 20rdquo X 20rdquo 28rdquo X 28rdquo
Installation requires the unit to be placed on a roof mounted curb the mechanical room floor an appropriate location in the pool room or outside on an equipment housekeeping pad Isolation pads should be placed under the unit to minimize transmission of noise due to unit operation Then pool water is piped to the unit Electrical power from a properly sized fused disconnect is connected to the unit The supply and return air ducts are connected to their respective locations on the unit The condensate is piped back to the pool or to the sewer
If an optional remote air-cooled condenser is used place the condenser in a proper outdoor location Refrigerant piping is then run from the air cooled condenser to the PoolComPaktrade unit Refrigerant lines must be leak checked and evacuated through installer provided Schrader valves Control and power wiring are run to complete the installation If a field-furnished auxiliary space heating coil is installed the control for this heater must be field wired to the PoolComPaktrade controls shown in Section V1 - Wiring (Figure 6-3 Field Wiring Diagram)
Outside air can be ducted into the unit through the optional outside air duct connection The unit can draw up to 30 of its supply air from the outside When ventilating the natatorium in this way an exhaust fan must be furnished in the natatorium to exhaust to the outside an air volume slightly greater than the air volume introduced into the natatorium from the outside This will maintain a negative pressure in the space preventing odor and moisture migration Outside air filters are provided for Horizontal PoolComPaktrade units For Vertical PoolComPaktrade units outside air must be filtered before entering the unit
UNITFACILITY INTERFACE
A typical PoolComPaktrade system layout and its connection to the natatorium and pool water piping systems is shown in the figure below
Figure 4-1 Typical PoolComPaktrade AWH Series System Layout
PCP_EG_LayoutSchematic_AW_3D_20121204eps
Cold SurfaceTemperature Sensor
POOL
Recommended WaterPressure Taps
Return Air
ECC-PCP RemoteInterface Unit (should not
be mounted insidepool enclosure)
FusedDisconnect (Able to be seen
from the unit)
RemoteAir-CooledCondenser(optional)
PoolComPakHorizontal
Unit
Pool Heater
Pool HeaterPump (optional)
Pool Water Circulation Pumpfor PoolComPak (Optional - By Others)
Flo
Pool WaterTemp Sensor
wBalancing Valve
Pool Filter
Pool Pump
IsolationValves
AirVent
Supply Air DuctSupply Air
ExteriorWindow
27EGW06-PCPEG-20150514
TMTM
HANDLING
All units are shipped completely assembled Care should be taken to avoid damage due to rough handling If the unit is not to be immediately installed it must be protected from weather and site hazards
CLEARANCE
For proper operation and service PoolComPaktrade Vertical PoolComPaktrade Horizontal and RoofPak units require 36rdquoclearance on all sides
MOUNTING OF POOLCOMPAK UNITS
Locate the PoolComPaktrade unit on a firm level base If floor mounting ensure that the floor is capable of supporting the operating weight If wall mounting or hanging a unit provide a support structure that is capable of supporting the unit while protecting pool patrons and employees from injury Ensure that the support structure will not interfere with the operation of the unit Provision must be made for servicing units suspended above floor level Install isolation pads under the unit to minimize unit transmitted vibration noise
INSPECTION
Upon receipt of the PoolComPaktrade unit(s) immediately inspect for damage In particular inspect the housing and the evaporator coil face Minor indentations of the fins will not affect performance However if there is substantial damage immediately notify shipping company of unseen damage at delivery with a detailed letter outlining the damage Retain copies of all shipping damage claim documentation as well as photographs of the observed damage
NOTEPoolPaktrade International does not ship damaged units from its facility nor is it responsible for damage incurred during transit
POWER SUPPLY
A separate fused disconnect switch must be provided per local codes and be within easy accessibility of the PoolComPaktrade unit Use the minimum circuit capacity listed on the unitrsquos data plate to determine the minimum wire size for incoming electrical power The ground connection for the unit is located in the unit control panel The power supply to the unit must be adequate for the compressor starting amperage (LRA) If it is not a compressor rotor stall will occur during start-up due to an excessive voltage drop All field wiring must be done according to the wiring diagram provided with the unit and in conformance to the National Electrical Code (NEC) and any other applicable local electrical code(s)
For Vertical and Horizontal PoolComPaktrade units installing contractor must punch a hole into the electrical compartment to run power wires The hole is to be properly finished with a rubber grommet and weather sealing
CONTROL WIRING
All control wiring field connections are described in the wiring diagram furnished with the PoolComPaktrade unit as well as in the Field Wiring section of this manual All control wiring is low voltage
CONDENSATE PIPING
The condensate may be piped to a drain or returned to the pool if local codes allow If returned to the pool the condensate should be piped to the skimmer PoolPaktrade International recommends neither for nor against the practice of returning condensate to the pool The overflow drain should be piped in a similar fashion The installer should review the local codes prior to making the decision of where to dispose of the condensate The amount of condensate produced in a year is about equal to the volume of the pool
Section IV Installation
28 EGW06-PCPEG-20150514
TMTM
Section IV Installation
CURB MOUNTING
Illustrated in Figure 4-2 is a curb that has been designed specifically for the PoolComPaktrade product line The outside dimensions of the curb are such that the base of PoolComPaktrade extends over the edge of the curb all the way around This aids in preventing rainwater from getting between the base of the PoolComPaktrade and the curb It is the installing contractorrsquos responsibility to complete the following
bull Flash the curb into the roofbull Insulate the curbbull Connect the supply and return duct to the curbrsquos duct support railsbull Connect condensate drain line with appropriate trap bull Seal the curb to the bottom of the PoolComPaktrade using the gasket supplied with the curbbull Provide counter flashing between curb and PoolComPaktrade unitbull Seal the pool water pipes where they go through the curb
If specified when ordering all water piping connections can be made through the curb These water connections include pool water condensate auxiliary hot water coil (optional)
If the PoolComPaktrade is to be mounted on a curb the unit must be ordered with the ldquooutdoorrdquo option PoolComPaktrade Units produced for curb mounting receive special weatherizing and insulation that non-curb mounted PoolComPaktrade Units do not receive
NOTEIf the factory is not notified that a PoolComPaktrade is to mounted outdoors the unit will not be weather tight it will leak and it will not be properly insulated
INTEGRAL GAS FURNACE OPTION (ROOFPAK ONLY)
When using a gas furnace power venting is provided for all unit sizes External vent piping andor cap is required Please refer to the furnace manufacturerrsquos manual for piping and venting instructions Install leak-test and properly regulate piping for the gas-fired heater Pressures should be regulated to the entering pressures as shown on the furnace manufacturerrsquos data plate or manual
The ECC-PCP is the Electronic Control Center programmable controller designed specifically for the PoolComPaktrade dehumidification system It is a robust system capable of a variety of functions The following text describes the field wiring required for for proper operation of the ECC-PCP dehumidification system in a typical PoolComPaktrade unit installationThe field wiring diagram (see Section VI - Wiring) shows the location of the connections for the sensors and other required devicesThe numbers following the text identify the location on the field wiring diagram where each device is connected to the PoolComPaktrade unit electrical panel
REMOTE INTERFACE UNIT (1)
The remote interface unit allows the user to view space temperature pool water temperature and relative humidity change set points and receive fault notifications It should be mounted in a convenient location that is outside the pool area The ambient temperature of the mounting location must always be above 32 F
NOTEThe maximum distance from the Remote Interface Unit to the PoolComPaktrade unit is 1000 feet For distances greater than 1000 feet contact the factory
The control panel does not contain any sensors and should be mounted outside the pool enclosure A factory supplied 6 ft cable RJ25 (6 conductor) must be installed between the PoolComPaktrade unit and the control panel
For distances greater than 6 feet use 6 conductor 22 AWG shielded twisted-pair cable along with the supplied RJ25 jack and second 6 foot cable shipped loose with the unit
The wall mounting of the terminal first requires the back piece (A) of the RIU assembly The RIU is designed to fit a single gang extra-deep electrical box mounted horizontally in the wall The RJ25 jack and most of the black cable should be placed inside the box before installing the mounting bracket A frac34rdquo hole must be drilled for the 6-conductor cable which connects the remote interface unit to the PoolPaktrade unit The below is specific mounting instructions that correspond to the mounting schematic below
1 Fasten the back piece (A) to the gang box using the rounded-head screws supplied in the packaging Use the screws that come with the box to secure the bracket
2 Thread the 6-conductor cable through the back piece (A) and connect to the back of front panel (B)3 Rest the front panel (B) on the back piece A and fasten the parts together using the flush-head screws supplied in the
packaging4 Finally fit the click-on frame (C)
Figure 4-3 Remote Interface Mounting Plate
ALL_EG_RIUMounting_20131219eps
A
B
C
31EGW06-PCPEG-20150514
TMTMSection IV Installation
COLD SURFACE TEMPERATURE SENSOR (2)
This sensor is used to measure the temperature of the coldest surface in the pool enclosure The sensor is an aluminum bar 1rdquo long by frac14rdquo square with a clearance hole for a number 8 screw and two 6rdquo wires on one end
When the temperature of the surface drops to within 5 F of the space air dew point the humidity set point will be automatically reset downward to help prevent condensation on the cold surface It should be noted that resetting the humidity set point will not compensate for lower quality building materials such as single pane glass or non-thermally broken frames
The sensor should be mounted on an exterior window or door frame that is not in direct sunlight In cases where there are no exterior windows or doors the sensor should be mounted on the inside surface of an exterior wall The sensor must be in contact with the cold surface Electrical connection should be made with 22 AWG copper two-conductor shielded twisted-pair cable Connect the shield drain wire to ground at the PoolComPaktrade unit end only
ECONOMIZER SYSTEM (OPTIONAL) (3)
An economizer system cools the space with outside air instead of the compressor The ECC-PCP provides a dry contact closure to activate the economizer The contacts of the ECC-PCP may be connected directly to the economizer control circuit provided the circuit is 24 VAC maximum and the current does not exceed 1 amp inductive The other components of the system must be provided by others (See figure below for an illustration of a typical economizer system)
Units equipped with an economizer require relocation of the factory mounted return air sensor It must be located in a duct that will always contain air that represents the space temperature and humidity
The economizer will operate only when space cooling is required and there is no dehumidification requirement When the outside air temperature is greater than 50degF and more than 5degF below the space temperature set point and the space temperature rises above the set point the compressor is disabled and a dry contact closure between T216 and T217 is made to activate the economizer
When the ECC-PCP contacts close relay R1 is energized causing the outside and exhaust air dampers (by others) to open and the return air damper (by others) to close At the same time relay R2 is energized causing the exhaust fan to run If the space temperature continues to rise and exceeds the space temperature set point by more than two degrees the economizer contact is opened reversing the damper positions The compressor is energized in the space cooling mode (if so equipped) The compressor will then continue to run until the call for space cooling is satisfied The economizer will also be activated in the space cooling mode if the auxiliary air conditioning condenser option is not installed or if the compressor is locked out by a fault condition
Figure 4-4 Economizer Operation
PCP_EG_EconomizerOperation2_20121204eps
32 EGW06-PCPEG-20150514
TMTM Section IV Installation
WARNINGWhen economizer option is selected adequate exhaust capacity via a separate fan must be specified to ensure the natatorium pressure remains slightly negative Failure to specify adequately sized exhaust system may result in damage to structure and pool odors may be forced into other areas of the building
OUTSIDE AIR TEMPERATURE SENSOR (ECONOMIZER OPTION ONLY) (4)
The outside air temperature sensor is installed only when the outside air economizer option is included The sensor is mounted inside a 12rdquo PVC conduit pull elbow It can be mounted to the outside of the building using standard PVC conduit fittings The sensor should be mounted near the outside air intake vent for the economizer system It is very important to mount the sensor so that it does not receive direct sunlight The exposure to sunlight will cause the sensor housing to warm resulting in temperature readings that are higher than the actual air temperature This condition may prevent the ECC-PCP from selecting the economizer mode of operation If possible mount the sensor under an overhang or on a surface with a northern exposure
Electrical connection should be made with 22 AWG copper 2-conductor shielded twisted-pair cable Connect the shield drain wire to ground at the PoolComPaktrade end only See figure below for an illustration of the outside air temperature sensor Seal the conduit leading to the sensor with silicone caulk to prevent moisture from migrating out to the sensor and condensing inside the sensor
Figure 4-5 Outside Air Sensor
PCP_EG_OutsideAirSensorInstallation_20121204eps
AIR COOLED CONDENSER (OPTIONAL) (5)
The air-cooled condenser is used to reject heat recovered during the space cooling mode of operation Only PoolComPaktrade brand air-cooled condensers (PAC Units) should be used with a PoolComPaktrade Unit The ECC-PCP provides 24 VAC control signal to the speed control located in the PAC unit control panel The speed control then runs the condenser fan motor at the appropriate speed See figure below for an illustration of a PAC unit field wiring
Figure 4-6 PAC Unit Field Wiring
PCP_EG_RemoteACCFieldConnection_20121204eps
24 VAC CONTROL SIGNAL FROM
USE COPPER SUPPLY WIRES
POOLCOMPAKTERMINALS 12AND 13
POWER SUPPLY
21 L1 L2
GR
33EGW06-PCPEG-20150514
TMTMSection IV Installation
AUXILIARY POOL WATER HEATING SYSTEM (AWH MODEL ONLY) (6)
The auxiliary pool water heating system is provided by others Typically a gas fired or electric pool water heater is used The ECC-PCP provides a dry contact closure that signals a need for auxiliary water heating The contacts of the ECC-PCP may be connected directly to the heaterrsquos control circuit provided the circuit is 24 VAC maximum and the current does not exceed 1 amp inductive Any other applications will require an additional relay (by others) to be installed between the ECC-PCP and the pool water heating system
AUXILIARY AIR HEATING SYSTEM (7)
Typically a duct mounted electric heater hot water coil or a factory installed unit mounted hot water coil is used to provide air heating The ECC-PCP provides a form ldquoCrdquo (NO and NC) dry contact closure that signals a need for auxiliary air heating The ECC-PCP contacts may be directly connected to an electric duct heater control circuit provided the circuit is 24 VAC maximum and the current through the contacts does not exceed 1 amp inductive The figure below shows a typical installation that utilizes a 3-way hot water control valve and a unit or duct mounted hot water coil
Figure 4-7 Installation of a Hot Water Coil 3-Way Valve
The ECC-PCP provides a normally open contact closure for connection to a building management system If a fault occurs the controller will energize this output to indicate that there is a problem with the dehumidification system The remote interface unit will display the cause of the fault and provide a suggested course of action This output may also be used to energize an external alarm light or buzzer It may also be directly connected to an external circuit as long as the circuit is 24 VAC maximum and the current through the contacts does not exceed 1 amp inductive
HO
T W
ATER
CO
IL
FIELD SUPPLIEDACTUATOR
AB SWITCH INB POSITION
2
1
W
BK
W 3
A
B
VALVE IN BYPASS POSITION
HOT WATER IN
HOT WATER OUT
THREE WAY VALVE WITHACTUATOR
HO
T W
ATER
CO
IL
VALVE IN HEATING POSITION
HOT WATER IN
HOT WATER OUT
THREE WAY VALVE WITHACTUATOR
ALL WIRING BY CONTRACTOR
T23
T25
T24
POOLCOMPAK
120 VAC24 VAC
FIELD SUPPLIED 40 VATRANSFORMER
WIRING DETAIL
PIPING DETAIL
34 EGW06-PCPEG-20150514
TMTM
Section IV Installation
BUILDING FIRE CONTROL SYSTEM (9)
The ECC-PCP can receive a contact closure signal from a building fire control system This input of the controller must be connected to dry (voltage free) contacts only When this input receives a contact closure the PoolComPaktrade unit compressor and fan will be shut down and the remote interface unit will show an alarm condition When the contact closure opens The PoolComPaktrade unit will resume normal operations It is possible to change the operation of the fire trip input to be active on open instead of close See ECC-PCP Service in the Operation section for further explanation
RETURN AIR SENSOR (10)
The return air sensor measures air temperature and relative humidity The sensor is normally factory mounted in the PoolComPaktrade unit return air section However with the optional economizer it is necessary to field mount this sensor in the duct work The sensor must be located in the return duct upstream of the exhaust duct connection (See Figure 4-4 Economizer Operation for a typical location of the sensor in the economizer system)
When field mounting is necessary the sensor will be provided from the factory and must be field wired using 22 AWG copper 4-conductor shielded twisted-pair cable
PURGE MODE INPUT (11)
The ECC-PCP can receive a contact closure signal from an external source to activate purge mode operation During purge mode the compressor is disabled and the economizer output is activated to bring in 100 outside air
AC PROOF INPUT (12)
An optional interlock used with certain types of heat rejection condensers Dry contact closure indicates a problem and prevents compressor operation in air cooling mode
POOL WATER TEMPERATURE SENSOR (13)
Units equipped with a pool water heating condenser require installation of factory supplied pool water temperature sensor It must be mounted upstream of the PoolComPaktrade and the auxiliary water heater The sensor can be threaded directly into a 1frasl4rdquo FPT fitting Electrical connection should be made with 22 AWG copper 2 conductor shielded twisted-pair cable Connect the shield drain wire to ground at the PoolComPaktrade end only
35EGW06-PCPEG-20150514
TMTM
Section IV Installation
POOL WATER PIPING (AWH AND AWV MODELS ONLY)
CAUTIONDo not run piping across service panels evaporator coil face or air discharge outlet
If a new or existing pool water heater is piped within the same circuit the PoolComPaktrade unit should be connected in a parallel loop between the filter and the other heater This allows the PoolComPaktrade unit to act as the primary water heating source and the other heater as a backup or supplemental water heater
All pool purification and chemical feed systems MUST be installed downstream of the unit This includes the practice of adding chemicals directly to the skimmer which results in highly concentrated corrosive chemicals passing over and through the PoolComPaktrade water condenser Water chemistry must be maintained at a pH level between 72 and 76 with a free chlorine level not exceeding 30 PPM and a combined chlorine level less than 03 PPM
If possible install the PoolComPaktrade unit above the pool water level If it is installed below the pool level isolation valves must be added Breakable couplings should be located near the unit on both the water inlet and outlet lines When installing piping connect the piping to these couplings last so as not to place stress on the other connection in the plumbing systemA constant flow of water is required through the PoolComPaktrade unitsrsquo condenser The circuit to and from the unit must be capable of maintaining the flow rate as specified for the installed unit (see PoolComPaktrade Performance data in Table 3-1) To ensure correct water flow the filter pump usually operates at the same time as the PoolComPaktrade unit However to reduce energy consumption during filter off cycle times a two-speed or small auxiliary water pump which bypasses the filter may be used
CAUTIONCAUTION Excessive water flow can cause premature erosion and pitting of the pool water condenser Adjust valve so that the water flow does not exceed the GPM or pressure drop listed in the table PoolPaktrade recommends a fixed flow control or adjustable flow circuit setter
PoolPaktrade International recommends installing water pressure tap ports to check influent and effluent water pressure See PoolComPaktrade Performance data in Table 3-1 for the particular unit model in question for the proper flow rate and pressure drop across the pool water condenser The pressure tap ports should be installed in a straight length of the water piping exterior to the PoolComPaktrade unit Install the port before any 90-degree turns and approximately 6 inches from the corner-post of the unit
In some instances piping from the PoolComPaktrade unit to the filter return line may not be feasible or economical The unit may be installed on its own supply and return line using a properly sized water pump and appropriate strainer Ensure that auxiliary water heating systems are staged to supplement the PoolComPaktrade unit water heating
If the PoolComPaktrade unit is installed above the pool surface and the main circulating pump cannot provide the proper water flow to it at the specified pressure an auxiliary booster pump is required
Condensate may be returned to the pool (if local codes allow) but PoolPaktrade International neither recommends nor disapproves this practice The installer should check local codes prior to making this decision Condensate must be filtered prior to being returned to the pool
If multiple PoolComPaktrade units are installed on the pool water piping circuit pipe them (and any auxiliary water heater) in parallel Piping PoolComPaktrade units in series may result in the downstream unit(s) sensing the pool water temperature as satisfied and not reject heat to the water to its full capacity The actual pool water temperature should be sensed by each PoolComPaktrade unit and auxiliary water heater
36 EGW06-PCPEG-20150514
TMTM
Section IV Installation
Figure 4-8 Typical Pool Water Piping Diagram (AWH and AWV Model Only)
PCP_EG_PoolWaterConnectSchematic_20140305eps
SALT WATER POOLS
For units (AW models only) installed serving a salt water pool wire the pool bonding system to the bonding lug on the unit copper pool water piping This connection is required to prevent corrosion of the internal PoolComPaktrade water piping
For more information on salt water pools see the article ldquoSalt Water Poolsrdquo in the Pool Water Chemistry section of the PoolPak educational library
POOLCHEMICAL
FEEDER
CHECKVALUE
OPTIONALBOOSTERPUMP IF
MAIN FILTERPUMP IS A
2-SPEED OR UNDERSIZED
BALLVALVES
POOLWATERFILTER MAIN
FILTERPUMP
DRAIN
UNIONS
EXTERNALPRESSURETAP PORTS
UNIONS
AUXILIARYPOOL WATER
HEATER
DRAIN
BALLVALVES
LOCKINGGLOBEVALVE
LOCKINGGLOBEVALVE
POOL WATERTEMP SENSOR
FC
FlowControl
37EGW06-PCPEG-20150514
TMTM
Section IV Installation
CONDENSATE DRAINSDrain pans are connected to a common drain system and must be trapped for proper operation For AWH and HCDH units a trap and piping must be supplied and installed by the customer The trap depth must be a minimum of 6 inches (See figure 4-9) For AWV and HCDV units a condensate trap is located inside the unit and the field condensate piping and overflow drain must not have an additional trap
Provisions MUST be made for disposal of condensate Condensate from the dehumidifier coil will have nearly the same properties as the pool water itself It is recommended that building materials subjected to the condensate and systems used for its disposal are checked for compatibility For drain piping use PVC plastic pipe minimum Schedule 40 The drain line must be sloped to provide proper drainage
Drain line exposed to outdoor ambient temperatures must be protected against freezing Wrap lines with electric heat tape (follow manufacturerrsquos instructions) controlled by an automatic thermostat set at a minimum of 35degF to protect against freezing Insulate all piping Insulation must be sealed at all seams Power for heat tape must be supplied external to the PoolComPaktrade
Figure 4-9 AWH and HCDH Condensate Trap
PCP_EG_NegPressCondPiping_20140122eps
WATER COOLED CONDENSERA standard option for PoolComPaktrade units is an integral water-cooled condenser For this option all valves and refrigerant piping is internal to the unit No additional field wiring is required No additional refrigerant or oil charge is required Water piping connections are 1-14rdquo MPT and labeled on the unit
UNIT BASE
MINIMUM SCHEDULE 40 PVC
REMOVABLECLEANOUT
OPEN TEEFOR VENT
AWH OR HCDH UNIT
PLUG THEUNUSEDCONNECTIONWITH SUITABLEPVC PLUG
1
2
4 INCHES MINIMUM OR MAX NEGATIVE STATICPRESSURE (INCHES WC) + 1 INCH
2 INCHES MINIMUM OR 12
1
12
TMTM
38 EGW06-PCPEG-20150514
TMTM
Section IV Installation
REMOTE AIR-COOLED CONDENSERSPACE AND LOCATION REQUIREMENTS
The most important consideration which must be taken into account when deciding upon the locations of air-cooled equipment is the provision for a supply of ambient air to the condenser and removal of heated air from the condenser area Where this essential requirement is not adhered to it will result in higher head pressures which cause poor operation and possible eventual failure of equipment Units must not be located in the vicinity of steam hot air or fume exhausts
Another consideration which must be taken is that the unit should be mounted away from noise sensitive spaces and must have adequate support to avoid vibration and noise transmission into the building Units should be mounted over corridors utility areas rest rooms and other auxiliary areas where high levels of sound are not an important factor Sound and structural consultants should be retained for recommendations
Walls or Obstructions
The unit should be located so that air may circulate freely and not be re-circulated For proper air flow and access all sides of the units should be a minimum of ldquoWrdquo away from any wall or obstruction It is preferred that this distance be increased whenever possible Care should be taken to see that ample room is left for maintenance work through access doors and panels Overhead obstructions are not permitted When the unit is in an area where it is enclosed by three walls the unit must be installed as indicated for units in a pit
Figure 4-10 Remote ACC Installation Around Walls or Obstructions
ALL_WallsorObstructions_20131111eps
Multiple Units
For units placed side by side the minimum distance between units is the width of the largest unit If units are placed end to end the minimum distance between the units is 4 feet
Figure 4-11 Remote ACC Installation When Installing Multiple Units
ALL_MultipleUnits_20131111eps
MINW
AIR FLOW
Wrdquo=Total width of the condenser
MIN
Wrdquo=Total width of the condenserrdquo
W
AIR FLOWAIR FLOW
39EGW06-PCPEG-20150514
TMTM
Section IV Installation
Units in Pits
The top of the unit should be level with the top of the pit and side distances increased to ldquo2Wrdquo If the top of the units is not level with the top of the pit discharge cones or stacks must be used to raise discharge air to the top of the pit This is a minimum requirement
Figure 4-12 Remote ACC Installation When Installing Units in Pits
ALL_UnitsinPits_20131111eps
Decorative Fences
Fences must have 50 free area with 1 foot undercut a ldquoWrdquo minimum clearance and must not exceed the tops of the unit If these requirements are not met the unit must be installed as indicated for ldquoUnits in Pitsrdquo
Figure 4-13 Remote ACC Installation When Installing Units Near Decorative Fences
ALL_DecorativeFences_20131111eps
Wrdquo=Total width of the condenserrdquo
MIN MIN
AIRFLOW
2W2W
STACK(BY OTHERSIF SUPPLIED) 10rsquo MAX
Wrdquo=Total width of the condenserrdquo
MIN1rdquo MIN MIN
AIR FLOWW W
40 EGW06-PCPEG-20150514
TMTM
Section IV Installation
FIELD INSTALLED PIPING
Installation of the outdoor air-cooled condenser should only be done by a qualified refrigeration mechanic familiar with this type of work Many service problems can be avoided by taking adequate precautions to provide an internally clean and dry system and by using procedures and materials that conform to established procedural standards
Piping Guidelines
The following piping recommendations are intended for use as a general guide For more complete information refer to the latest ASHRAE Handbook
Materialsbull Use clean dehydrated refrigeration-grade copper tubing for all refrigerant lines Hard drawn tubing should be used
where no appreciable amount of bending around pipes or obstructions is necessary If soft copper tubing must be used care should be taken to avoid sharp bends which may cause restrictions and excessive refrigerant pressure drops
bull Use long radius elbows wherever possible with one exception - short radius elbows should be used for any traps in the hot gas riser
bull Braze all copper to copper joints with a phosphorus-copper alloy material such as Silfos 5 or equivalent Do not use soft solder
bull During brazing operations flow an inert gas such as nitrogen through the lines to prevent internal oxidation scaling and contamination
bull Support refrigeration lines at intervals with suitable hangers brackets or clampsbull Pack glass fiber insulation and a sealing material around refrigerant lines where they penetrate a wall to reduce
vibration and to retain some flexibilitybull The liquid line and discharge line should not be in contact with one another If the installing contractor must tie these
lines together because of an installation requirement the contractor must insulate them from each other to prevent heat transfer Because the discharge line is hot during system operation precautions should be taken to avoid personnel injury
bull PoolComPaktrade units do not utilize compressors with unloading stages Consequently double hot gas risers are not needed for reduced load conditions as refrigerant flow rates will not fall below minimum velocities necessary to carry oil up through the discharge line
bull A field provided field installed liquid line filter-drier is recommended in the field piping to the PoolComPaktrade unit
Sizingbull The lines must be sized and routed so that oil is carried through the system Using smaller lines than recommended
will give excessive pressure drops resulting in reduced capacity and increased power consumption Oversized lines could result in an oil flow problem within the system and possible compressor damage
bull Excessive pressure drops in the liquid line may cause flashing of the refrigerant and a loss of a liquid seal at the expansion valve inlet A reduction in capacity may then occur because the presence of gaseous refrigerant will partially block the expansion valve Using hot gas and liquid line sizes recommended in the Air Cooled Condenser section for these units and the proper system refrigerant charge will prevent this problem
bull Discharge lines should be designed to prevent condensed refrigerant and oil from draining back to the compressor during OFF cycles Use the following guidelines The highest point in the discharge line should be above the highest point in the condenser coil The hot gas line should loop toward the floor if the condenser is located above the PoolComPaktrade unit especially
if the hot gas riser is longbull For refrigerant line sizing for an Air Cooled Condenser (ACC) where the lineset length is less than 100 feet or the
ACC location is less than 50 feet higher or 20 feet lower than the unit use the below Table 4-3bull ACC line lengths beyond the above limits will void warranty unless written approval is obtained from the
factory PRIOR to installation and startup
PCP_EG_ACCPiping_20140122eps
41EGW06-PCPEG-20150514
TMTM
Section IV Installation
Figure 4-14 ACC Refrigerant Piping
Refrigerant and Oil Chargingbull PoolPaktrade units are shipped with the required charge for self contained operation only The remote ACC option does
NOT provide the refrigerant charge or oil required for the ACC and line setsbull Refer to Table 4-2 for the additional ACC condenser chargebull Refer to Table 4-3 for the required additional oil and refrigerant charge Use the calculation method shown to calculate
the additional refrigerant and oilbull For the additional oil required multiply 2 of additional refrigerant charge of both ACC and refrigerant line length
Use the correct oil type of POE oil depending on the compressor installed For Alliance models SXA SPA SSA compressors use Copeland Ultra PN 998-E022-00 For Trane models CSHD compressors use Trane PN OIL00080
Sample Charging CalculationFor an AWV2600 with 73 feet line length and ACC0121 located 30 feet above the unit
Table 4-3 indicates 34rdquo discharge line and 58rdquo liquid line piping sizes Using R410A ozft additional charge for the lineset is 73 feet x 025 ozft + 73 feet x 148 ozft = 1260 oz Table 4-2 indicates additional charge for ACC0121 (allow 30 F Operation) is 39 lb x 16 ozlb = 6240 oz Total additional R410A charge for both ACC and refrigerant line is 1260 + 6240 oz = 750 oz or 46 lbs 14 oz Total additional oil charge is 750 oz x 2 = 15 oz
Table 4-2 R410A Charge for Air Cooled Condensers (lb)
DISCHARGE LINE
Pitch inDirection ofrefrigerant flow
LIQUID LINE
AIR-COOLEDCONDENSER
DISCHARGE LINE Pitch inDirection ofrefrigerant flow
Table 4-3 Refrigerant (R410A) Charge for Different Line Size
WARNINGAbove chart is for lineset length less than 100 ft and ACC located less than 50ft above unit or 20ft below unit Failures due to a piping layout not within these limits nor receiving prior PoolPaktrade
Factory approval will not be covered under PoolPaktrade warranty
Refrigerant Line Size (ACC) Refrigerant Charge for Units with Air Cooled Condensers (ACC)
Discharge Liquid Line Length (ft) vs R410A Charge (lbs)
Model OD R410A ozft OD R410A
ozft25 ft 50 ft 75 ft 100 ft
Lbs Oz Lbs Oz Lbs Oz Lbs Oz
0550 12 010 38 049 0 15 1 14 2 13 3 12
58 016 12 092 1 11 3 6 5 1 6 13
0800 58 016 38 049 1 0 2 1 3 1 4 2
58 016 12 092 1 11 3 6 5 1 6 13
1200 58 016 12 092 1 11 3 6 5 1 6 13
34 025 58 148 2 11 5 6 8 1 10 13
1400 58 016 12 092 1 11 3 6 5 1 6 13
34 025 58 148 2 11 5 6 8 1 10 13
1800 34 025 12 092 1 13 3 10 5 8 7 5
78 034 58 148 2 14 5 11 8 9 11 6
2600 34 025 58 148 2 11 5 6 8 1 10 13
1 18 058 34 221 4 6 8 12 13 1 17 7
3500 78 034 58 148 2 14 5 11 8 9 11 6
1 18 058 78 307 5 11 11 7 17 2 22 13
4000 78 034 34 221 3 16 7 16 11 15 15 15
1 18 058 78 307 5 11 11 7 17 2 22 13
Note1 This table applies to ACC line length less than 100 ft only Contact factory if ACC line length is more than 100 ft
2 Line size should be used for ACC at the same level or located up to 20ft below the unit
3 Line size should be used for ACC located up to 50 ft above the unit
43EGW06-PCPEG-20150514
TMTM
SECTION V OPERATION
ECC-PCP REMOTE INTERFACE UNITFigure 5-1 RIU Keypad
PCP_EG_StraightOnKeypadAnnotated_20121204eps
The ECC-PCP Remote Interface Unit (RIU) is designed around the Carel pGD0 4-line x 20 character backlit LCD display module The RIU displays are accessed through six backlit selection buttons They consist of a Return Enter Key Up Key Down Key Program Key Alarm Key and Escape Key as shown above
After approximately 5 minutes the RIU will display the status screen rotation Press the Escape key to bypass the five minute delay and move directly to the status display
STATUS DISPLAY
The status screens contain basic information about operation of the PoolComPaktrade system Press the up or down arrow keys to move from screen to screen The screens will also rotate automatically every 10 seconds
Figure 5-2 Status Screen 1S P A C E T E M P _ _ o FS P A C E R H _ _ S P A C E D E W P O I N T _ _ o F(O U T S I D E T E M P) _ _ o F
Status Screen 1 displaysbull Space Temperature in degF or degCbull Space Relative Humidity in bull Space Dew Point in degF or degCbull Outside Air Temperature in degF or degC (with Economizer Option Only)
Status Screen 2 displaysbull Water Heating - YES indicates that the unit is returning recovered heat back to the pool waterbull Aux Water Heat - YES indicates that the controller has closed the relay contact requesting auxiliary pool water heater
operationbull Water Temperature in degF or degC
Status Screen 3 displaysbull SPACE temperature control requirement bull TEMPERATURE- OK Indicates the space temperature is at setpointbull HEATING- YES Indicates the space requires heatingbull COOLING- YES Indicates the space requires coolingbull AUX AIR HEAT Indicates the space requires additional heating The auxiliary air heating relay contacts close to
activate the external heating system
44 EGW06-PCPEG-20150514
TMTM
bull DEHUMID (SURFACE) Indicates the space requires dehumidification The word SURFACE indicates that the unit is temporarily lowering the dew point set point to minimize condensation at the cold surface temperature sensor
bull ECONOMIZER MODE Indicates the unit is cooling the space with outside air ECONOMIZER MODE is only shown if the optional economizer system is present
Status Screen 4 displaysbull The first line displays the current system status bull The second line displays compressor status
SET POINT CHANGE MENU
bull Press the PRG key to access the main menubull Use the arrow keys to scroll to the menu selection for Set Points and then press the Enter keybull Use the arrow keys to select the set point to be changed and then press Enter Available set points are
Air Temperature
The allowable range for the air temperature set point is 70 to 95degF Use the arrow keys to change the set point and then press Enter The new dew point set point is shown immediately as DPT The set point change screen will remain visible for a short time to allow verification of the new dew point set point After about five seconds the RIU will return to the status screen display
Relative Humidity
The allowable range for the relative humidity set point is 40 to 65degF Use the arrow keys to change the set point and then press Enter The new dew point set point is shown immediately as DPT The set point change screen will remain visible for a short time to allow verification of the new dew point set point After about five seconds the RIU will automatically return to the status screen display
Pool Temperature
The allowable range for the water temperature set point is 70 to 104degF Use the arrow keys to change the set point and then press Enter The RIU will automatically return to the status screen display
Recommendations
bull Air Temperature (Range 70degF to 95degF) The air temperature should normally be set about 2degF above the pool water temperature to minimize the pool water evaporation rate (high temperature spas are an exception)
bull Relative Humidity (Range 40 to 65) The normal range for the humidity set point is 50 to 60 Lower set points will require more energy (electricity) to satisfy the dehumidification requirement and increase pool water evaporation
bull Pool Temperature (Range 70degF to 104degF) The pool temperature set point is normally set between 80degF and 88degF for a typical swimming pool and higher for a spa depending on user preference
CAUTIONThe dehumidifier should be configured to operate at the set points designed for the facility These set points are shown on the yellow label on the door of the RIU Set points other than those shown may not be attainable with this dehumidifier
Section V Operation
45EGW06-PCPEG-20150514
TMTM
Section V Operation
PURGE MODE CONTROL MENU
CAUTIONIt is the userrsquos responsibility to use this feature properly to prevent freeze damage to downstream equip-ment 100 outside air at below freezing conditions has the potential to cause serious damage
Purge Mode causes the unit to force the optional field-provided economizer dampers and fan to full open introducing large quantities of outside air to the space This is typically used when ldquoshockingrdquo the pool Compressor operation is disabled during purge but the auxiliary air and water heating systems remain active
If the unit is not equipped with the economizer option a flashing ldquoCAUTION NO FREEZE PROTECTIONrdquo warning will be displayed This warning indicates that operation of purge mode without regard for outside air temperatures below freezing can result in damage to hot water coils or other equipment in the pool area
DETAILED STATUS MENU
To access the detailed status menubull Press the PRG key to access the main menubull Use the arrow keys to scroll to the menu selection for Detailed Status and then press the Enter key
Detailed Status Screen 1 displays Temperaturesbull Surface ndash The temperature measured at the cold surface sensorbull Dew Point ndash The calculated dew point of the spacebull Dewpt Setpoint ndash The dew point set point calculated from the temperature and relative humidity set points
Detailed Status Screen 2 displaysbull Disch Press ndash The measured refrigerant pressure in the discharge line at the compressorbull Suct Press ndash The measured refrigerant pressure in the suction line at the compressorbull Suct Temp ndash The refrigerant temperature measured on the surface of the suction line at the compressorbull Suct SH ndash The calculated superheat at the suction of the compressor
Detailed Status Screen 3 displays the number of hours the following device or system has been active since power was last applied to the unitbull Cmpr - Compressorbull Fan ndash Supply Fanbull AC ndash Mechanical Air Cooling (Economizer Cooling Not Included)bull Aux ndash Air ndash Auxiliary Air Heatingbull Aux - Wtr ndash Auxiliary Water Heating
Detailed Status Screen 4 displaysbull Fault Count ndash The total number of high pressure low pressure and defrost trips that have occurred since power was
last applied to the unit When this number reaches 10 the compressor is locked outbull AC Proof ndash Indicates a status of ldquoProvenrdquo if AC mode operation is allowed ldquoNot Provenrdquo indicates that AC mode
operation is not allowed
Detailed Status Screen 5 (only present in units configured for multi-unit networking) displaysbull Network Role ndash Indicates if the unit currently being displayed by the RIU is the master or a slavebull Net Status ndash Indicates ldquoCONNECTEDrdquo if the unit is properly connected to the multi-unit network ldquoNO LINKrdquo
indicates the unit is not connectedbull Unit ID Number ndash Indicates the unit address on the multi-unit network
Detailed Status Screen 6 (only present in units configured for multi-unit networking) displaysbull Unit 1 Present ndash Indicates if the unit currently being displayed by the RIU can communicate with unit 1 on the multi-
unit networkbull Unit 2 3 4 ndash Same as for unit 1 but for the other 3 possible units on the network
46 EGW06-PCPEG-20150514
TMTM
Section V Operation
ECC-PCP NETWORK OPERATIONNetworked ECC-PCP units operate in a MASTERSLAVE environment This means that one unit (master) determines heating cooling and dehumidification requirements and broadcasts them on the network to the other units (slaves) This ensures that all units work together instead of against other Each networked unit contains all sensor and controls necessary for independent operation and is capable of acting in the master role Units on the network are identified by a number between one and four The unit with the lowest identification number having no uncleared alarms will be the master unit
If an alarm condition occurs in the master unit it will give up the role of master The unit with the next lowest identification number and no unclear alarms will take over the master role The unit that experienced the alarm condition will operate in the slave role until the alarm is cleared at the control panel
The control panel provides two network status screens These can be accessed in the detailed status menu The figure above shows the first screen that displays the status of units one through four as present or not Use this screen to verify that all units on the network are connected and communicating with each other The figure below shows the second screen that displays network information for the unit that is being displayed by the remote interface unit including network role connection status and network identification number
NETWORK CONFIGURATION
Using the following four parameters it is possible to configure the ECC-PCP network to accommodate a wide variety of installation options Network configuration can be accessed in the service menu These parameters must be set in each unit individually
Pool Water Temperature Control
Determines whether the unit will control water temperature based on the masterrsquos command (NETWORK) or its own temperature sensor and set point (LOCAL) If a unit set to LOCAL becomes the master other units in the network will not use the masterrsquos command for water heating They will look to the next line that is not set to LOCAL This parameter is only set to LOCAL if the unit is connected to a different pool than the rest of the units on the network Because the unit is controlling water temperature on its own it is necessary to select the correct unit with the control panel before changing the water temperature set point
Staged Dehumidification Control
Determines whether the unit will run in dehumidification when there is a need for 1 stage or 2 stages of dehumidification The master unit will start on any need for dehumidification independent of this parameter Slave units with this parameter set to YES will dehumidify only if the master is asking for 2 stages of dehumidification Setting this parameter to NO will cause the unit to dehumidify when the master calls for at least 1 stage of dehumidification Using this parameter it is possible to configure the number of units in each dehumidification stage
Dehumidification Stage 2 Offset
Determines how far the dewpoint (relative humidity) of the space has to rise above the set points before the unit will request 2 stages of dehumidification on the network This parameter is normally the same in all units on the network Making this parameter smaller will bring on the second stage of dehumidification sooner
Enable Network Control
Determines whether the unit will participate in the masterslave environment Setting this parameter to NO will cause the unit to act like a standard ECC-PCP single unit The unit will never become the master on the network and will not listen to the demands broadcast by the master on the network Although units with this parameter set to NO do not participate in the masterslave environment they are still accessible through the network control panel Like the LOCAL pool
47EGW06-PCPEG-20150514
TMTM
Section V Operation
water temperature setting this parameter when set to NO requires this unit to be displayed on the control panel before changing any of the set points The other screens for Pool Water Temperature Control Staged Dehumidification and Stage 2 Offset are not available when this parameter is set to NO
Changing Set Points
Each unit on the network maintains two groups of set points network and local If a unit has the Enable Network Control parameter set to YES and the Water Temperature Control parameter set to NETWORK it will control to the network set points Set points changed when the remote interface unit is displaying this unit will be changed in every unit on the network with the same NETWORK and Water Temperature Control parameters Units that are configured for Network Control and LOCAL water temperature control will control using local water temperature set point the network air temperature and relative humidity set points When the air temperature and relative humidity set points are changed when the remote interface unit is displaying the unit they will be changed in all units configured for Network control The water temperature set point will only be changed in the unit currently being displayed by the remote interface unit Units that are not configured for Network Control will use all local set points Therefore any set points changed while the remote interface unit is displaying this unit will only be changed in this unit
ECC-PCP SERVICE
SERVICE MENU
To access the service menubull Press the PRG key to access the main menubull Use the arrow keys to scroll to the menu selection for Service and then press the Enter keybull A password is required to access the service menu
The following sub-menus are available in the service menu
IO CONFIGURATION
Digital Inputs
This menu contains a screen for each digital input Each screen contains the following parametersbull Status of the data point linked to the inputbull Status of the raw digital inputbull Input type
The following parameter list shows the available digital input screensbull Defrost Switchbull Cpr High Tempbull Water Flow bull Fire Tripbull AC Proofbull Cpr High Prsbull Fan Overloadbull Low Pressurebull Purge Input
Digital Outputs
This menu contains a screen for each digital output Each screen contains the following parametersbull Current output status bull Requested output status bull Override
48 EGW06-PCPEG-20150514
TMTM
Section V Operation
The following digital output screens are availablebull Supply Fanbull Compressorbull Bypass Solenoidbull Water Heating Solenoidbull Reheat Solenoidbull AC Solenoidbull Aux Water Heatbull Alarm Outputbull ACC Run Signalbull Economizerbull Aux Air Heat Stage 1bull Aux Air Heat Stage 2
Analog Inputs
This menu contains a screen for each analog input Each screen contains the following parametersbull Current read-only value from the inputbull Fail bull Tol bull Offs bull Ovrd bull Min bull Max
The following analog input screens are availablebull Discharge Pressure bull Suction Pressure bull Return Relative Humidity bull Suction Temperature bull Return Air Temperature bull Pool Water Temperature bull Surface Temperature bull Outside Air Temperature
UNIT CONFIGURATION
Installed Options
This menu contains parameters that indicate the hardware options installed in the dehumidifier The parameters are set by the factory and do not typically require modification
Aux Air Heating
This menu contains parameters that configure the auxiliary air heating system
Aux Water Heating
This menu contains parameters that configure the auxiliary water heating system
Temperature Ctrl
This menu contains parameters that configure the air temperature control routines of the dehumidifier
49EGW06-PCPEG-20150514
TMTM
Section V Operation
Humidity Control
This menu contains parameters that configure the humidity control routines of the dehumidifier Water Temp CtrlThis menu contains parameters that configure the compressor based water heating system of the dehumidifier bull Water Heat First This parameter indicates whether the control routine will use the compressor for water heating when
there is no dehumidification requirement bull Deadband This parameter is the deadband used by the compressor based pool water heating control routine
BAS INTERFACE
This menu contains parameters that configure the building automation system interface of the dehumidifier
MULTI-UNIT NETWORK
This menu contains parameters that configure the operation of dehumidifier in a multiple unit installation
COMPRESSOR
This menu contains parameters that configure the operation of the dehumidifier compressor
ECONOMIZER
This menu contains parameters that configure the operation of the optional field provided and field installed economizer damper system
HISTORY
The history screen provides information on the last 50 faults that have occurred in the dehumidifier It can be used for troubleshooting by an experienced HVAC technician The faults are recorded with a sequence number from 1 to 50 Sequence number 1 is always the most recent fault The following information is stored and displayed for each fault in non-volatile memorybull Hour at which the fault occurred bull Fault Code Number bull Return Air Temperaturebull Return Air Humiditybull Discharge Pressurebull Suction Pressurebull Suction Temperaturebull Pool Water Temperaturebull AC Solenoid Statusbull Bypass Solenoid Statusbull Compressor Statusbull Reheat Solenoid Status
MANUAL MODE
The Manual Mode menu for use by qualified service personnel provides two options Demand Control and Digital Output Control
UTILITIES
The Utilities menu provides sub menus for configuring units of measure and passwords for set point and service access control
50 EGW06-PCPEG-20150514
TMTM
Section V Operation
MAINTENANCEOVERVIEW
Periodic routine maintenance will promote extended equipment life While PoolComPaktrade units use components that are usually maintenance free and do not require service a simple check could result in noticing possible problems before they develop into major problems
DAILY MAINTENANCE
bull Pool water chemistry is a part of daily maintenance and it is recommended to follow National Spa and Pool Institute standards PoolPaktrade International strongly recommends following the National Spa and Pool Institute values
Table 5-1 Pool Water Chemistry
bull PoolPaktrade International recommends daily logging of your pool water chemistry MAINTENANCE AND YOUR POOL WATER CHEMISTRY IS IMPORTANT TO PROTECT YOUR WARRANTY RIGHTS
MONTHLY MAINTENANCE
bull Air Filters inspect and replace or clean as applicable Dirty filters restrict air flow and can cause improper unit operation
bull Ensure that the condensate collection pan is draining properly and the condensate is not overflowing or being drawn into the supply air stream Check the condensate and overflow lines to ensure that neither are clogged
bull Check the operation of the blower motor and scroll Ensure that the scroll does not rub the housing Check for proper belt tension Worn or cracked belts should be replaced Check fan and mounting brackets for tightness
bull Ensure that the ALARM light is not illuminated
ANNUAL MAINTENANCE
bull Inspect the refrigeration and water circuits for leaks wear or corrosion Corrosion on the water piping or condenser may indicate poor pool chemical maintenance and improper chlorine and pH levels
bull Check electrical components for loose wiringbull Although the exterior of the PoolComPaktrade units are powder coated wipe down unit particularly if installed in an
area subject to dirt or chemical concentrationbull Wash brush or vacuum the evaporator and air condenser coils This will ensure proper heat transfer and reduce static
pressure losses Caution should be taken not to wet electrical components inside the unit
NOTEIf service and inspections are not performed by a competent and experienced service firm the manufacturer warranty may be voided
AUXILIARY AIR amp POOL WATER HEATER CONNECTIONS FOR MULTIPLE UNIT INSTALLATION
Figure 6-1 Auxiliary Air and Pool Water Heater Connections for Multiple Units
AWH_EG_Connections_20121204eps
52 EGW06-PCPEG-20150514
TMTM
AUXILIARY AIR amp POOL WATER HEATER CONNECTION FOR A TWO POOL INSTALLATION
Figure 6-2 Auxiliary Air and Pool Water Heater Connections for Two Pool Installations
AWH_EG_ConnectionstoPool_20121204eps
Section VI Wiring
53EGW06-PCPEG-20150514
TMTM
Section VI Wiring
FIELD WIRING
Figure 6-3 Field Wiring Diagram
PCP_EG_FieldWiringDiagram_20121204eps
54 EGW06-PCPEG-20150514
TMTM
Section VI Wiring
FIRE CONTROL SYSTEM CONNECTION
Figure 6-4 Fire Control System Connection
PCP_EG_FirecontrolSysConnection_20121204eps
55EGW06-PCPEG-20150514
TMTM
Section VI Wiring
This page intentionally left blank
EGW06-PCPEG-20150514
TMTM
56
TMTM
3491 Industrial Drive York PA 17402 USA 800-959-7725 Fax 717-757-5085for more information wwwpoolpakcom
The Leader in Indoor Pool Dehumidification
4 EGW06-PCPEG-20150514
TMTM
HYBRIDS bull Combines various technologies to increase efficiency and capabilitybull Utilizes ventilation as primary dehumidification methodbull Switches to heat pump method when conditions require better environmental control
OTHER TECHNOLOGIES
Desiccant technology can be adapted to provide super dry air which is injected into the poolroom to dilute the moisture load The regeneration phase of the desiccant is typically driven by waste heat from refrigeration cycle or other fossil fuel
Wheels are sometimes considered because of their wide acceptance as heat recovery devices Latent or Enthalpy wheels are not suitable for pools but sensible wheels may have application
ROOM AIR DISTRIBUTIONAll PoolPaktrade models provide continuous air recirculation and with a good air distribution system will promote uniform space conditions To remove the required moisture and maintain controlled conditions it is essential that there be adequate air movement and distribution in the natatorium The unit must remove the humid air from the pool area and discharge the dehumidified air back into it The supply air should be distributed over areas subject to condensation (windows outside walls support trusses skylights etc)
AIRSIDE DESIGN
The supply air volume and external static pressure capability of the fan is given for each model in the Performance Section It is recommended that an experienced engineering or mechanical contracting firm do the design sizing and layout of the duct system
The recommended volume of supply air should provide three to eight air changes an hour However in larger waterparks or spaces with high sensible heat gain higher airflows may be appropriate Lower air volumes require more care to avoid short cycling the air between the return and supply air stratification and pockets of high humidity
The most even control of space conditions occurs with proper air distribution and a proper air flow rate This provides space control without excessive loading and unloading of refrigerant-based dehumidification equipment
Supply Air
After dehumidification dry air is supplied back to the room Supply air should be distributed from ducting around the perimeter (see Figure 1-1) of the space The two options for perimeter supply air distribution are overhead (see Figure1-2) or below grade (see Figure 1-3)
Section I Indoor Pool Design
5EGW06-PCPEG-20150514
TMTM
Figure 1-1 Perimeter Air Distribution
ALL_AirDistributionPerimeter_20131220eps
The warm dry air should be directed over outside walls windows and other surfaces susceptible to condensation or it can be directed down the center of the room blowing air toward the surfaces prone to have condensation Supply ducts should be as short and with as few turns as possible Use turning vanes to minimize air noise and static pressure drop
Recommended maximum supply duct air velocity is 1000 FPM The recommended velocity from diffusers is 300 to 500 FPM Air velocities in ducts should be kept as low as is reasonable to avoid excessive noise in the ducts In multiple unit installations supply air from each unit may go into a common supply duct or into a plenum A supply air duct collar is provided at the fan outlet The duct should be attached to this with a flexible connection to minimize vibration transmission
SUPPLY AIR BLOWINGDOWN FROM SOFFIT DUCTSCOVERING WINDOWS ANDMOISTURE-EXPOSED AREAS
SUPPLY AIRTO SKYLIGHTS
POOLPAKDEHUMIDIFICATIONSYSTEM
RETURN AIR
Figure 1-3 Below Grade Air Distribution
Section I Indoor Pool Design
BELOW GRADE DUCTING CEILING DUCTING
RETURN AIR
SUPPLY AIRTO SKYLIGHTS
POOLPAKDEHUMIDIFICATIONSYSTEM
SUPPLY AIR BLOWING UPFROM BELOW-GRADEDUCTS COVERING WINDOWSAND MOISTURE-EXPOSEDAREAS
SUPPLY AIR BLOWINGDOWN FROM SOFFIT DUCTSCOVERING WINDOWS ANDMOISTURE-EXPOSED AREAS
SUPPLY AIRTO SKYLIGHTS
POOLPAKDEHUMIDIFICATIONSYSTEM
RETURN AIR
6 EGW06-PCPEG-20150514
TMTM
Return Air
The unit will operate most efficiently in a natatorium where the supply and return openings are placed diagonally opposite each other All ducting should be done in accordance with acceptable practices Return air ducts in the section just prior to entering the unit return air opening and elbows in both the return and supply air ducts must comply with the guidelines set forth in SMACNA HVAC Duct Construction Standards Metal and Flexible ndash Third Edition Chapter 4
Ductwork Design
All supply and return duct work to the unit should be installed such that no condensate occurs in the duct work Duct turns and transitions must be made carefully to keep friction losses to a minimum Duct elbows should contain splitters or turning vanes and avoid short radius fittings
Duct work that is connected to the fan discharge should run in a straight line with proper transitions and minimum distances to elbows as recommended by SMACNA and should not be reduced in cross-sectional area Duct turns should be in the same direction as fan rotation Never deadhead the fan discharge into the flat side of a plenum
Duct work attached to the PoolPaktrade unit return air connection must be done in accordance with SMACNA recommended standards and or generally accepted industry practice
Supply and return duct work should have all seams sealed before applying insulation to the exterior of the duct work The insulationrsquos seams must be sealed wrapped and mastic coated Use of pre-insulated duct work (interior) is acceptable if it meets local codes however all seams must be sealed prior to startup
Air Distribution
Supply outlets and return grilles should be carefully placed to avoid short-circuiting in the space Short-circuiting creates stagnant areas where humidity and temperatures may build up to undesirable levels reducing the effectiveness of the PoolPaktrade System Return grilles can be placed high in the space to reduce return ductwork however removal of Chloramines from the occupied area has become much more of a design consideration and so low returns are favored by poolroom designers
Supply air should be directed 45 degrees up and down (most of the air will be directed downward) toward exterior walls windows skylights and other areas where stagnant conditions could cause humidity buildup and condensation problems or drafts The end result of the supply air ducts is to wash the surfaces of the pool room that are prone to condensation with the warm dry supply air
Figure 1-4 Supply Air Proportions
20 OF SUPPLYAIR DIRECTEDALONG CEILING
80 OF SUPPLYAIR DIRECTEDDOWN WALLS
WINDOWSURFACE
12rdquo
ALL_AirDistribution45DegProportions_20131220eps
Section I Indoor Pool Design
7EGW06-PCPEG-20150514
TMTM
Diffusers for supply ducts located overhead (as opposed to under the deck) must be sized such that the supply air will be thrown all the way to the deck and wash the entire wall surface from supply duct to the floor
As a rule directing the supply air at or across the pool surface increases the evaporation rate To control the buildup of chloramines at the surface of the pool some air may be directed at the pool surface Supply outlets should not discharge directly onto surfaces where drafts may be created that will blow on swimmers walking along the edges of the pool Spectators should have supply air directed toward their faces
The outside air intake and exhaust may have rain hoods if the unit is mounted outdoors Rain hood locations are illustrated on the unit arrangement drawings The intake and exhaust should be screened to prevent the entrance of foreign matter and arranged to avoid recirculation of exhaust and outside air Also when auxiliary gas heat is selected (in an outside installation) a combustion air louver or rain hood is provided
Ductwork connections over 5 feet long must be supported to avoid damage to unit Short Flexible connections of rubber or canvas can be made between the return duct and the unit to eliminate vibration transmission through the duct
PoolPaktrade International does not recommend the use of equipment rooms or locker rooms as return or supply air plenums due to the potential of corrosion for components installed in the room The return air duct should always connect the pool enclosure to the return air plenum collar of the PoolPaktrade unit(s)
Other Airside Considerations
A hot water electric or gas duct heater may be installed in the supply duct to provide auxiliary space heating Be sure that the additional air pressure drop across the heater is accounted for in the unit fan selection These heating components must be designed for use in swimming pool environments
Maintain the poolroom at a slightly negative pressure This will minimize moisture and chemical odor migration to other spaces The exhaust fan should be sized for about 5-10 greater CFM than the amount of outside air being introduced into the space Ducts can be fabric aluminum PVC or galvanized steel Even though ldquodry airrdquo is being supplied back to the pool do not use duct board or similar materials If the PoolPaktrade unit is installed in an area that is below the natatoriumrsquos dew point temperature the ducts may require insulation pitching and drainage
Continuous vapor barriers are required between the poolroom and all other interior and exterior spaces because of the high dewpoint in the poolroom all the time Care must be taken during design and installation to avoid gaps in the vapor barriers or building damage may result
Windows and exterior doors must be selected with adequate thermal insulation (including thermal breaks) to minimize condensation on their interior surfaces even if the supply air is directed across these components Doors and windows must also have as low an air leakage as possible Although the space will be maintained at a slightly negative pressure cold air leaking into the space from poorly sealed openings will negate all of the effects of good thermal insulation
Section I Indoor Pool Design
8 EGW06-PCPEG-20150514
TMTM
SECTION II PRINCIPLES FUNCTIONS AND FEATURES
THE MECHANICAL DEHUMIDIFICATION SYSTEM
PRINCIPLES OF OPERATION
The PoolPaktrade System is a complete environmental control system designed expressly for indoor swimming pool enclosures It takes into account two important factors the swimming pool occupant (personal comfort) and the swimming pool environment (the physical structure and surrounding furnishings)
The swimming pool enclosure can be a hostile environment for equipment decor and building structures A PoolPaktrade Systemrsquos major function is to dehumidify the pool enclosure air through a vapor compression cycle During this cycle the PoolPaktrade System recycles the sensible and latent heat and places it back into the pool water and air as needed This recycling process saves money and keeps your pool environment efficient and safe
Solid state microprocessor technology working in conjunction with sensors continually monitors water and air conditions provide superior occupant comfort Unlike typical outside air ventilation systems a PoolPaktrade System recycles energy and blankets the walls and windows with warm dry air
PoolPaktrade dehumidification systems reduce the energy input required to maintain pool water and air temperatures By dehumidifying the air and recycling the latent energy back into the pool air and water the unit will reduce operating costs when compared to conventional heating and ventilating systems Pool water and enclosure heating are still required but with greatly reduced requirements
A PoolPaktrade unit when matched correctly to the evaporation rate of the pool water and overall dehumidification requirements will efficiently maintain the pool air at relative humidity levels between 50 and 60 It should be noted that a lower evaporation rate occurs when the pool enclosurersquos air temperature is maintained above the pool water temperature Evaporation losses and the energy required to maintain desired room conditions will dramatically increase if the air temperature is allowed to fall below the pool water temperature It is recommended that the continuous dry bulb temperature entering the evaporator of the PoolPaktrade unit not fall below 75degF
PoolPaktrade International recommends that backup heating equipment for both pool water and pool enclosure air is capable of carrying the full system heating requirements This makes for a well-designed system that will provide the least amount of pool down time if unforeseen system problems occur Building conductive loads and other losses must be taken into consideration
AUTOMATIC CONTROL OF AIR TEMPERATURE AND HUMIDITY
An integral part of any PoolPaktrade System is a proven microprocessor control system which automatically senses and maintains comfort conditions Sensors detect changes in humidity and air temperature in the indoor pool environment and quickly regulate supply air conditions to meet set point comfort levels even during periods of unusually heavy pool use
To prevent condensation on walls and windows The PoolPaktrade System automatically adjusts humidity in response to changes in wall or window surface temperatures As the seasons and weather conditions change the PoolPaktrade System changes its own mode of operation Throughout the year PoolPaktrade thinks ldquoefficiencyrdquo and automatically selects the least expensive energy source for the poolroom conditions
PoolPaktrade models include a factory mounted and wired space temperature and humidity sensor at the return air opening of the unit Refer to the installation section for mounting location Caution should be exercised When the outside air is to be introduced into the space for ventilation adequate exhaust capacity via an integral (or a separate external fan) must be specified to ensure the poolroom remains slightly negative An inadequately sized exhaust system may result in damage to the structure and pool odors may be forced into other areas of the building
9EGW06-PCPEG-20150514
TMTM
ROOM DEW POINT CONTROL
PoolPaktrade units with the ECC-PCP controller operate using an advanced type of control called dew point temperature control This method of control is more accurate than conventional relative humidity control The main purpose of a dehumidification system is to maintain the amount of moisture in the pool area below a level that would cause damage to the building Relative humidity is a measurement of the percentage of moisture which is in the air at a given dry bulb temperature in proportion to the maximum amount of moisture that could be contained at this particular dry bulb temperature Warmer air can hold more moisture than colder air and therefore changes in dry bulb temperature will change the relative humidity reading without any change in the actual amount of moisture in the air The amount of moisture in the air is expressed as ldquograins of moisture per pound of dry airrdquo and is directly related to the dew point temperature
The ECC-PCP uses dew point control to operate the PoolPaktrade unit and maintain the moisture level below the setpoint The space dry bulb temperature and relative humidity determine the dew point temperature By varying the space temperature and space relative humidity set points the dew point set point is changed When the space dew point temperature rises more than 12 degree Fahrenheit above the space dew point temperature set point the ECC-PCP controller energizes the compressor for dehumidification As the dew point temperature drops more than 12 degree Fahrenheit below the dew point temperature set point the controller de-energizes the compressor
POOLCOMPAK OPERATION
The PoolComPaktrade fan draws in warm moist air from the pool enclosure This air passes through the evaporator (dehumidification) coil and gives up heat energy to the refrigerant which is in a cool liquid state This exchange of energy causes the air temperature to fall below its dew point resulting in moisture condensation on the evaporator coil The moisture formed falls into the unitrsquos condensate drain pan After passing through the evaporator coil the refrigerant becomes a cool gas
The refrigerant enters the unitrsquos compressor where it is compressed into a hot gas While in the compressor the refrigerant absorbs the energy used to operate the compressor This hot gas refrigerant then travels either through an air reheat coil the pool water condenser or to an optional auxiliary air conditioning condenser which may be either air or water cooled If air heating is called for the air reheat coil is used The hot refrigerant exchanges energy with the cooler dehumidified air coming from the evaporator coil This causes the temperature of the air to rise for heating
Figure 2-1 PoolComPaktrade AW and HCD Typical Refrigerant System Schematic
PCP_EG_Schematic3D_20121204tif
Section II Principles Functions and Features
10 EGW06-PCPEG-20150514
TMTM
If pool water heating is required (AWH models only) the hot gas flows into a pool water condenser where it adds energy to the incoming pool water This heats the pool water while the refrigerant is condensed into a warm liquid If space cooling is called for the refrigerant flows to the auxiliary air conditioning condenser bypassing the air reheat coil and pool water condenser and allowing cool air from the evaporator coil to provide space
ECC-PCP CONTROL SYSTEMOVERVIEW
The ECC-PCP controller is a micro-processor based system that maintains pool enclosure humidity and air and water temperatures at optimum levels automatically It is also possible to monitor this critical data via the Internet using the optional Remote Access Package (RAP) This also allows the controller to be accessed from the factory via the internet or a telephone line (AWH and HCDH only)
The ECC-PCP is designed to work with the PoolComPaktrade dehumidification system to provide an environment that is both comfortable and cost effective It controls unwanted humidity in the pool enclosure and helps to prevent unsightly condensation from forming on surfaces
The ECC-PCP provides accurate control and allows the user to monitor system parameters and change setpoints easily For this purpose a remote interface unit with a text display and keypad is provided The remote panel should be mounted outside the pool space in an office or in the equipment room (The ECC-PCP remote interface unit contains no sensors) All setpoints are saved in the memory of the ECC-PCP and are not erased in the event of a power failure Critical operating data can be easily accessed by a service technician for the purpose of system operation and evaluation
HUMIDITY CONTROL
As the dewpoint temperature within the pool enclosure rises above the desired setpoint the ECC-PCP activates the compressor within the PoolComPaktrade to begin the dehumidification process If the space temperature is below the desired setpoint the heat recovered during dehumidification is directed to the air reheat coil for space heating If the pool water temperature is also below the setpoint some of the recovered heat is directed to the pool water condenser (model AW only) for pool water heating If neither air heating nor pool water heating is required the recovered heat can be directed to an auxiliary air conditioning condenser if the system is so equipped If the system does not include an auxiliary air conditioning condenser the ECC-PCP will direct the recovered heat to the air reheat coil until the need for dehumidification is satisfied
COLD SURFACE TEMPERATURE HUMIDITY RESET
The ECC-PCP control system includes a sensor that measures the temperature of the coldest surface in the pool enclosure usually an exterior window or door frame When the temperature of this surface approaches the dewpoint temperature of the space the controller lowers the humidity setpoint to activate dehumidification This function helps to prevent condensation on the cold surface
SPACE HEATING
When the compressor is running the ECC-PCP directs the recovered heat to the air reheat coil Space heating will continue until the space temperature reaches the setpoint The ECC-PCP will activate the auxiliary space heating system if the PoolComPaktrade unit is unable to satisfy the heating need with heat recovered during dehumidification The ECC-PCP will activate the auxiliary pool water heating system if the water temperature cannot be satisfied with recovered heat An auxiliary pool water heater must be supplied as part of the pool water pump and filter system
Section II Principles Functions and Features
11EGW06-PCPEG-20150514
TMTM
Section II Principles Functions and Features
NETWORKING MULTIPLE UNITS
ECC-PCP networking allows up to four PoolComPaktrade units to be connected together The units will work with eachother to control water temperature air temperature and relative humidity Networked PoolComPaktrade units have all thefeatures of standard PoolComPaktrade plus the ability to control water temperature in multiple pools They also allow system dehumidification capacity to be staged All units on the network are accessible from a single remote interface unit for convenience
SPACE COOLING (OPTIONAL)
If space cooling is required and the unit is equipped with an auxiliary air conditioning condenser (air-cooled or water-cooled) the ECC-PCP will activate the space cooling mode of operation In this mode the heat removed from the space air will be directed to the auxiliary air conditioning condenser The air cooling mode of operation is independent of the need for dehumidification
When the PoolComPaktrade unit is equipped with a field supplied economizer the ECC-PCP will automatically select the most economical method for space cooling An economizer utilizes outside air rather than the refrigeration system to achieve space cooling A sensor connected to the ECC-PCP monitors the outside air temperature When appropriate the controller will disable the compressor and bring in cool outside air for economical operation A separate exhaust system must be installed to ensure negative room pressure during the economizer mode
WATER HEATING (MODELS AWV AND AWH ONLY)
If the pool water temperature is also below the set point some of the recovered heat is directed to the pool water condenser for pool water heating Heating can only take place during the dehumidification when heat is captured in the refrigeration circuit This is only available on the Model AW which is equipped with a pool water condenser
FEATURES AND OPTIONSSTANDARD ITEMS FACTORY MOUNTED
bull Evaporator (dehumidification) coil bull Air reheat coil (hot gas reheat coil)bull Bottom top (for indoor installations) or horizontal supply air configuration bull Filters and filter rackbull Air temperature and relative humidity sensorbull Compressor suction and Discharge pressure transducersbull Compressor suction temperature
STANDARD ITEMS FACTORY SUPPLIED FOR FIELD INSTALLATION
bull ECC-PCP control interface devicebull Cold surface temperature sensorbull Outside air temperature sensor (with economizer control kit option only)bull Pool water temperature sensor (AW models only)
SYSTEM OPTIONS
bull Remote air-cooled condenser for space air conditioningbull Capability of introducing up to 30 outside airbull Economizer controlbull Network multiple unitsbull Remote monitoring via Internet (AWH and HCDH only)bull Weatherproofing for outdoor installation (AWH and HCDH only)
12 EGW06-PCPEG-20150514
TMTM
bull A factory-mounted water-cooled condenser with a refrigerant head-pressure controlled water regulating valve for space air conditioning Chilled water and closed loop cooling tower water may be used for the water-cooled condenser loop Never use ground water for the water-cooled condenser Consult the factory for cooling tower applications
ROOFPAK SYSTEM
The RoofPak product line is comprised of the most popular PoolComPaktrade configuration and repacked as a self-contained all-in one dehumidification system This offering merges a highly reliable PoolComPaktrade AWH or HCDH base system with an integral air-cooled condenser and either an integral gas furnace or an electric heater The RoofPak Series is only available in horizontal configuations which can be utilized over a wide range of popular applications See the RoofPak section of this manual for more information
POOLCOMPAKtrade DEHUMIDIFICATION SYSTEMS SELECTION
Overview
The PoolComPaktrade is a compact unitary pool dehumidification system designed for commercial and residential applications It is available in the AW Series with a pool water condenser for water heating or in the HCD Series without the pool water condenser
Available Configurations
Indoor Installation The PoolComPaktrade fits easily into a standard utility room (vertical and horizontal configurations) Outdoor Installation The horizontal configuration only can be pad roof or curb mounted depending on the application
For detailed information for your specific model please refer to General Arrangement DrawingsThe PoolComPaktrade can be configured with an internal hot water coil or duct-mounted electric heater and adapted for economizer operation The horizontal model can have either a top bottom or end supply duct connection
Typical AW Series Applications
bull Hot Tubs Spas and Whirlpoolsbull Residential Pools bull Hotel and Motel Pools bull School Natatoriums bull YMCA and Club Pools
PoolPaktrade International LLC maintains a computerized software selection program Information required for the program can be found in the PoolComPak Selection Input Data form found in the online PoolPaktrade Engineering Library Please contact your exclusive PoolPaktrade Sales representative for a selection
Section II Principles Functions and Features
13EGW06-PCPEG-20150514
TMTM
Section II Principles Functions and Features
ROOFPAK SERIES (HCDHAWH)PoolPaktrade has taken their most popular PoolComPaktrade configuration and repacked it as a self-contained all-in-one dehumidification system This product comprises the RoofPak Series This offering merges a highly reliable PoolComPaktrade AWH or HCDH base system with an integral air-cooled condenser and either an integral gas furnace or an electric heater The RoofPak Series is only available in horizontal configuations which can be utilized over a wide range of popular applications The ten and twelve ton models are ideally suited for applications having a surface area between 1200 sq ft and 2500 sq ft
DESIGN FEATURES
The RookPak Series is designed with features that provide cost savings and greater reliability over traditional systems Key features are
bull Single self-contained unit can be installed with one crane liftbull Enclosed refrigerant system reduces refrigerant chargebull Factory assembly ensures wiring and brazing are accomplished under ideal situationsbull Single power connection to minimize field wiring (Separate power connection required for integral electric heat)
Durable Construction
bull Heavy duty construction designed for outside installation to withstand the elementsbull Double-wall construction enhances product longevitybull Designed for quiet operation
Rooftop Installation
bull Requires only one mounting curbbull Bottom return airbull Bottom supply airbull Side outside air Microprocessor Controller
bull Utilizes the PoolPaktrade proven ECC-PCP microprocessor based contol technologybull Incorporates Remote Access Package (RAP) to allow system access via the ethernetinternetbull RAP is easily adaptable to BAS systems including BACnet (MSTP amp IP) LonWorks and Modbus
Heating Packages
bull 200 MBH or 240 MBH indirect gas furnace for consistent temperature controlbull 20kW or 30kW electric heater (requires separate power connection) bull Hot water coil using PoolPaktrade standard Hycorreg Blue coil or optional Electro-Guardtrade coils
Self-Contained Air-Cooled Condensing Section
bull Built-in Air Cooled Condenser (ACC) reduces cost and eliminates field pipingbull Utilizes efficient dual rotary blade fansbull Efficient to 105degF ambient outside air temperaturebull Choice of coil coatings for specific applications
Evaporator Coil Options
bull Hycorreg Blue (standard)bull Electro-Guardtrade Plusbull All copper
14 EGW06-PCPEG-20150514
TMTM
Totally Enclosed Fan Cooled (TEFC) Motors
bull Protects fan motors from corrosive air streambull Extends motor lifeprevents premature failurebull Reduces system maintenance
Unique Outside Air System
bull Houses adjustable louvers and filterbull Convenient external filter accessbull Swing-out door-mount design for easy service access to fan motor and belts
Housed Blower
bull Heavy pillow-block bearings provide durabilitybull Rugged cast-steel housing provides longevitybull Provides greater reliability
Cupronickel Water Heat Exchanger
bull Supplies 100 of available recycled energy to the pool waterbull Reaches water temperature set-point conditions fasterbull Efficiently maintains the water temperature set-pointbull Redirects heat only after space temperature is satisfied
AWHHCDH 35004000 With Integral Gas or Electric Heat and With Remote ACC 2900AWHHCDH 35004000 With Integral Gas or Electric Heat and With Integral ACC 3700AWHHCDH 35004000 With No Integral Auxiliary Heat and With Integral ACC 2700
RoofPak weights are also included with the RoofPak Generic Product Drawings found in the Engineering Library section of the PoolPaktrade website
Model Number AWH HCDH 3500 - 10 Ton AWH HCDH 4000 - 12 TonPool Size (Sq Ft) 1200 - 2000 1400 - 2500Reheat Capacity (MBH) 170 200Moisture Removal (LbHr82degF60RH) 63 70Pool Water Flow (GPM) 26 28Pool Water Condenser PD (FT WC) 20 30Pool Water Condenser Capacity (MBH) 170 200Outside Air (CFM)(Nominal) 0 - 2000 0 - 2000Total Supply Airflow CFM (Maximum) 3500 - 7000 4000 - 7000Refrigerant Charge (lbs) 81 83Dimensions (in inches) with integral air-cooled condenser and gas furnaceLength 264 264Width 574 575Height 525 522
OA
453
152
134 440
FRONT VIEW
525
SA1200 CG
Side return air available horizontal return air available without integral air-cooled condenser
LEFT VIEW
RA
2640
16 EGW06-PCPEG-20150514
TMTM
SECTION III PERFORMANCE AND SIZING
POOLCOMPAKtrade PERFORMANCE
Detailed performance and dimensional information are provided in the PoolPaktrade Selection Software
PoolComPaktrade AW (AWV AWH) Performance
Table 3-1 PoolComPaktrade AW Performance Summary
Performance at 82degF Air and 80degF Water Pool water Condenser (Vented)
Model AW Return Air CFM
Return Air RH ()
Moisture removal (lbshr)
Sensible Cooling Capacity (MBH)
ACC Max Heat Rejection (MBH) GPM Pressure Drop
FT water
0550 90060 111 136 312
4 650 85 156 301
0800 160060 157 221 475
6 1050 117 249 457
1200 170060 208 269 579
10 2450 155 305 555
1400 230060 260 384 766
10 850 188 434 736
1800 250060 309 418 891
12 1250 229 478 861
2600 330060 451 546 1209
13 650 350 606 1156
3500 430060 597 789 1700
24 1750 442 898 1634
4000 450060 704 876 1975
28 2450 524 1001 1893
17EGW06-PCPEG-20150514
TMTM
Performance at 82degF Air and 80degF Water
Model HCD Return Air CFM Return Air RH () Moisture removal (lbshr)
Sensible Cooling Capacity (MBH)
ACC Max Heat Rejection (MBH)
0550 90060 102 132 30550 77 152 295
0800 160060 145 208 46250 103 239 444
1200 170060 190 252 56450 145 284 544
1400 230060 241 362 74750 179 405 718
1800 250060 289 418 88150 209 474 846
2600 330060 410 535 118850 313 597 1138
3500 430060 569 805 169950 415 952 1668
4000 450060 665 862 195350 502 979 1878
PoolComPaktrade HCD (HCDV HCDH) Performance
Table 3-2 PoolComPaktrade HCD Performance Summary
Section III Performance and Sizing
18 EGW06-PCPEG-20150514
TMTM
POOLCOMPAK UNIT DIMENSIONS
The latest detailed unit dimensional data may be found in the PoolComPaktrade Series AWHHCDH AWVHCDV All Models R-410A Dimensional Drawings publication (EG6_Dim_All) which can be downloaded from in the PoolPaktrade Engineering Library (wwwpoolpakcom)
PoolComPaktrade Horizontal Dimensions
Table 3-3 AWHCD Horizontal Unit Overall Dimensions
NOTECoils add 01rdquoWC to ESPEntering Air Temperature - 80degFEntering Water Temperature - 180degFMax Working Pressure - 125 psiCapacity is a function of Return Airflow and is independent of Supply Airflow
21EGW06-PCPEG-20150514
TMTM
POOLCOMPAK OUTSIDE AIR DAMPER SIZE
Table 3-6 PoolComPaktrade Outside Air Damper Size
Section III Performance and Sizing
Model Outside Air (OA) Location
Opening Size1 (in) Damper Code OA CFM Range2
PoolComPak Vertical AWVHCDVV5508001200 Top A 14 x 10 OA-TR 0-800Left OA-LT
V14001800
Top A 14 x 10 OA-TR 0-800Left OA-LTTop B 14 x 22 OA-TR 800-2000Left OA-LT
V2600
Top A 14 x 10 OA-TR 0-800Left OA-LTTop C 14 x 30 OA-TR 800-2500Left OA-LT
V35004000
Top A 14 x 10 OA-TR 0-800Left OA-LTTop C 14 x 30 OA-TR 800-2800Left OA-LT
PoolComPak Horizontal AWHHCDH
H5508001200
Top A 12 x 12 OA-TC 0-450Front OA-FCTop B 12 x 24 OA-TC 450-800Front OA-FC
H14001800
Top C 16 x 20 OA-TC 0-1000Front OA-FCTop D 16 x 40 OA-TC 1000-2000Front OA-FC
H260035004000
Top E 20 x 20 OA-TC 0-1400Front OA-FCTop F 20 x 40 OA-TC 1400-2800Front OA-FC
1Size may change depending on RA CFM and ESP See product dwg requestpulley request from section software for exact damper size
2Operating these units at OA quantities different from which the unit was selected will be detrimental to the unitrsquos operation
22 EGW06-PCPEG-20150514
TMTM
REFRIGERANT
Table 3-7 Factory Refrigerant R410A Charge
NOTEFactory charge for remote ACC option does not include refrigerant nor oil charge for either ACC or connecting refrigerant line between unit and ACC
For ACC and lineset charging see Table 4-2 and Table 4-3 in the Installation section
1Factory charge for remote ACC option does not include refrigerant for either ACC or lineset
2Factory charge for RoofPak with Integral ACC in parentheses
Section III Performance and Sizing
23EGW06-PCPEG-20150514
TMTM
Section III Performance and Sizing
REMOTE AIR-COOLED CONDENSER (ACC)
Table 3-8 Remote ACC Performance ChartNote Below table contains the piping sizes of the remote ACC stub-outs Additional field piping may be needed to make the transition from the connections to correct refrigeration lineset sizing (See Table 4-3)
Unit Size ACC Model
Ambient Temp (degF)
Unit Height
(inches)
Vapor OD
(inches)
Liquid OD
(inches)Unit
WeightMotor FLA Min Circuit
Ampacity
A B C 208230V 460V 208230V 460V0550 ACC0041 95100105115 393 58 12 120 3 15 38 19
Power wiring should incorporate properly sized fuses or motor rated circuit breakers A disconnect must be fitted within easy access and sight of the unit Supply voltage must be maintained within +- 10 of design voltage on both single and three phase units Cycles must be within +- 5 of design Failure to operate within these ranges can adversely affect performance cause failure of the equipment and may void warranty terms
Figure 3-5 Duct Heaterbull Tubular sheathed elementsbull Galvanized steel cabinetbull Duct-mounted flanged typebull Airflow in either directionbull UL and CSA approved heaterbull Airflow proving switchbull Auto and manual reset high temperature limitsbull Magnetic contactorsbull 24 volt control circuit and transformerbull Standard heater for indoor installation in non-insulated duct
Duct Heater Sizes
Table 3-9 Duct Sizes
Duct Heater Installation
1 Flange both ends of the ducts outwards on three sides to match heater flanges as shown2 Fasten heater to duct using sheet metal screws for smaller heaters or bolts for larger ones3 Seal opening with suitable sealing compound4 If needed use additional hangers to support heater5 Electrical power connections must be made within NEC standards and local electrical codes6 Refer to the Field Wiring Diagram at the back of this manual for controls connection
Reference Dimensions Fan Outlet
AWHHCDH 5508001200 9-14 x 10-38 inchesAWHHCDH 140018002600 12-12 x 13-12 inchesAWHHCDH 260035004000 17 x 19 inchesDuct heater width = 8 10 or 12 inches depending on heater kW Flange width = 1 inch
VOLTSHZPHDuct Size
12rdquo X 12rdquo 15rdquo X 15rdquo 20rdquo X 20rdquo 28rdquo X 28rdquo
Installation requires the unit to be placed on a roof mounted curb the mechanical room floor an appropriate location in the pool room or outside on an equipment housekeeping pad Isolation pads should be placed under the unit to minimize transmission of noise due to unit operation Then pool water is piped to the unit Electrical power from a properly sized fused disconnect is connected to the unit The supply and return air ducts are connected to their respective locations on the unit The condensate is piped back to the pool or to the sewer
If an optional remote air-cooled condenser is used place the condenser in a proper outdoor location Refrigerant piping is then run from the air cooled condenser to the PoolComPaktrade unit Refrigerant lines must be leak checked and evacuated through installer provided Schrader valves Control and power wiring are run to complete the installation If a field-furnished auxiliary space heating coil is installed the control for this heater must be field wired to the PoolComPaktrade controls shown in Section V1 - Wiring (Figure 6-3 Field Wiring Diagram)
Outside air can be ducted into the unit through the optional outside air duct connection The unit can draw up to 30 of its supply air from the outside When ventilating the natatorium in this way an exhaust fan must be furnished in the natatorium to exhaust to the outside an air volume slightly greater than the air volume introduced into the natatorium from the outside This will maintain a negative pressure in the space preventing odor and moisture migration Outside air filters are provided for Horizontal PoolComPaktrade units For Vertical PoolComPaktrade units outside air must be filtered before entering the unit
UNITFACILITY INTERFACE
A typical PoolComPaktrade system layout and its connection to the natatorium and pool water piping systems is shown in the figure below
Figure 4-1 Typical PoolComPaktrade AWH Series System Layout
PCP_EG_LayoutSchematic_AW_3D_20121204eps
Cold SurfaceTemperature Sensor
POOL
Recommended WaterPressure Taps
Return Air
ECC-PCP RemoteInterface Unit (should not
be mounted insidepool enclosure)
FusedDisconnect (Able to be seen
from the unit)
RemoteAir-CooledCondenser(optional)
PoolComPakHorizontal
Unit
Pool Heater
Pool HeaterPump (optional)
Pool Water Circulation Pumpfor PoolComPak (Optional - By Others)
Flo
Pool WaterTemp Sensor
wBalancing Valve
Pool Filter
Pool Pump
IsolationValves
AirVent
Supply Air DuctSupply Air
ExteriorWindow
27EGW06-PCPEG-20150514
TMTM
HANDLING
All units are shipped completely assembled Care should be taken to avoid damage due to rough handling If the unit is not to be immediately installed it must be protected from weather and site hazards
CLEARANCE
For proper operation and service PoolComPaktrade Vertical PoolComPaktrade Horizontal and RoofPak units require 36rdquoclearance on all sides
MOUNTING OF POOLCOMPAK UNITS
Locate the PoolComPaktrade unit on a firm level base If floor mounting ensure that the floor is capable of supporting the operating weight If wall mounting or hanging a unit provide a support structure that is capable of supporting the unit while protecting pool patrons and employees from injury Ensure that the support structure will not interfere with the operation of the unit Provision must be made for servicing units suspended above floor level Install isolation pads under the unit to minimize unit transmitted vibration noise
INSPECTION
Upon receipt of the PoolComPaktrade unit(s) immediately inspect for damage In particular inspect the housing and the evaporator coil face Minor indentations of the fins will not affect performance However if there is substantial damage immediately notify shipping company of unseen damage at delivery with a detailed letter outlining the damage Retain copies of all shipping damage claim documentation as well as photographs of the observed damage
NOTEPoolPaktrade International does not ship damaged units from its facility nor is it responsible for damage incurred during transit
POWER SUPPLY
A separate fused disconnect switch must be provided per local codes and be within easy accessibility of the PoolComPaktrade unit Use the minimum circuit capacity listed on the unitrsquos data plate to determine the minimum wire size for incoming electrical power The ground connection for the unit is located in the unit control panel The power supply to the unit must be adequate for the compressor starting amperage (LRA) If it is not a compressor rotor stall will occur during start-up due to an excessive voltage drop All field wiring must be done according to the wiring diagram provided with the unit and in conformance to the National Electrical Code (NEC) and any other applicable local electrical code(s)
For Vertical and Horizontal PoolComPaktrade units installing contractor must punch a hole into the electrical compartment to run power wires The hole is to be properly finished with a rubber grommet and weather sealing
CONTROL WIRING
All control wiring field connections are described in the wiring diagram furnished with the PoolComPaktrade unit as well as in the Field Wiring section of this manual All control wiring is low voltage
CONDENSATE PIPING
The condensate may be piped to a drain or returned to the pool if local codes allow If returned to the pool the condensate should be piped to the skimmer PoolPaktrade International recommends neither for nor against the practice of returning condensate to the pool The overflow drain should be piped in a similar fashion The installer should review the local codes prior to making the decision of where to dispose of the condensate The amount of condensate produced in a year is about equal to the volume of the pool
Section IV Installation
28 EGW06-PCPEG-20150514
TMTM
Section IV Installation
CURB MOUNTING
Illustrated in Figure 4-2 is a curb that has been designed specifically for the PoolComPaktrade product line The outside dimensions of the curb are such that the base of PoolComPaktrade extends over the edge of the curb all the way around This aids in preventing rainwater from getting between the base of the PoolComPaktrade and the curb It is the installing contractorrsquos responsibility to complete the following
bull Flash the curb into the roofbull Insulate the curbbull Connect the supply and return duct to the curbrsquos duct support railsbull Connect condensate drain line with appropriate trap bull Seal the curb to the bottom of the PoolComPaktrade using the gasket supplied with the curbbull Provide counter flashing between curb and PoolComPaktrade unitbull Seal the pool water pipes where they go through the curb
If specified when ordering all water piping connections can be made through the curb These water connections include pool water condensate auxiliary hot water coil (optional)
If the PoolComPaktrade is to be mounted on a curb the unit must be ordered with the ldquooutdoorrdquo option PoolComPaktrade Units produced for curb mounting receive special weatherizing and insulation that non-curb mounted PoolComPaktrade Units do not receive
NOTEIf the factory is not notified that a PoolComPaktrade is to mounted outdoors the unit will not be weather tight it will leak and it will not be properly insulated
INTEGRAL GAS FURNACE OPTION (ROOFPAK ONLY)
When using a gas furnace power venting is provided for all unit sizes External vent piping andor cap is required Please refer to the furnace manufacturerrsquos manual for piping and venting instructions Install leak-test and properly regulate piping for the gas-fired heater Pressures should be regulated to the entering pressures as shown on the furnace manufacturerrsquos data plate or manual
The ECC-PCP is the Electronic Control Center programmable controller designed specifically for the PoolComPaktrade dehumidification system It is a robust system capable of a variety of functions The following text describes the field wiring required for for proper operation of the ECC-PCP dehumidification system in a typical PoolComPaktrade unit installationThe field wiring diagram (see Section VI - Wiring) shows the location of the connections for the sensors and other required devicesThe numbers following the text identify the location on the field wiring diagram where each device is connected to the PoolComPaktrade unit electrical panel
REMOTE INTERFACE UNIT (1)
The remote interface unit allows the user to view space temperature pool water temperature and relative humidity change set points and receive fault notifications It should be mounted in a convenient location that is outside the pool area The ambient temperature of the mounting location must always be above 32 F
NOTEThe maximum distance from the Remote Interface Unit to the PoolComPaktrade unit is 1000 feet For distances greater than 1000 feet contact the factory
The control panel does not contain any sensors and should be mounted outside the pool enclosure A factory supplied 6 ft cable RJ25 (6 conductor) must be installed between the PoolComPaktrade unit and the control panel
For distances greater than 6 feet use 6 conductor 22 AWG shielded twisted-pair cable along with the supplied RJ25 jack and second 6 foot cable shipped loose with the unit
The wall mounting of the terminal first requires the back piece (A) of the RIU assembly The RIU is designed to fit a single gang extra-deep electrical box mounted horizontally in the wall The RJ25 jack and most of the black cable should be placed inside the box before installing the mounting bracket A frac34rdquo hole must be drilled for the 6-conductor cable which connects the remote interface unit to the PoolPaktrade unit The below is specific mounting instructions that correspond to the mounting schematic below
1 Fasten the back piece (A) to the gang box using the rounded-head screws supplied in the packaging Use the screws that come with the box to secure the bracket
2 Thread the 6-conductor cable through the back piece (A) and connect to the back of front panel (B)3 Rest the front panel (B) on the back piece A and fasten the parts together using the flush-head screws supplied in the
packaging4 Finally fit the click-on frame (C)
Figure 4-3 Remote Interface Mounting Plate
ALL_EG_RIUMounting_20131219eps
A
B
C
31EGW06-PCPEG-20150514
TMTMSection IV Installation
COLD SURFACE TEMPERATURE SENSOR (2)
This sensor is used to measure the temperature of the coldest surface in the pool enclosure The sensor is an aluminum bar 1rdquo long by frac14rdquo square with a clearance hole for a number 8 screw and two 6rdquo wires on one end
When the temperature of the surface drops to within 5 F of the space air dew point the humidity set point will be automatically reset downward to help prevent condensation on the cold surface It should be noted that resetting the humidity set point will not compensate for lower quality building materials such as single pane glass or non-thermally broken frames
The sensor should be mounted on an exterior window or door frame that is not in direct sunlight In cases where there are no exterior windows or doors the sensor should be mounted on the inside surface of an exterior wall The sensor must be in contact with the cold surface Electrical connection should be made with 22 AWG copper two-conductor shielded twisted-pair cable Connect the shield drain wire to ground at the PoolComPaktrade unit end only
ECONOMIZER SYSTEM (OPTIONAL) (3)
An economizer system cools the space with outside air instead of the compressor The ECC-PCP provides a dry contact closure to activate the economizer The contacts of the ECC-PCP may be connected directly to the economizer control circuit provided the circuit is 24 VAC maximum and the current does not exceed 1 amp inductive The other components of the system must be provided by others (See figure below for an illustration of a typical economizer system)
Units equipped with an economizer require relocation of the factory mounted return air sensor It must be located in a duct that will always contain air that represents the space temperature and humidity
The economizer will operate only when space cooling is required and there is no dehumidification requirement When the outside air temperature is greater than 50degF and more than 5degF below the space temperature set point and the space temperature rises above the set point the compressor is disabled and a dry contact closure between T216 and T217 is made to activate the economizer
When the ECC-PCP contacts close relay R1 is energized causing the outside and exhaust air dampers (by others) to open and the return air damper (by others) to close At the same time relay R2 is energized causing the exhaust fan to run If the space temperature continues to rise and exceeds the space temperature set point by more than two degrees the economizer contact is opened reversing the damper positions The compressor is energized in the space cooling mode (if so equipped) The compressor will then continue to run until the call for space cooling is satisfied The economizer will also be activated in the space cooling mode if the auxiliary air conditioning condenser option is not installed or if the compressor is locked out by a fault condition
Figure 4-4 Economizer Operation
PCP_EG_EconomizerOperation2_20121204eps
32 EGW06-PCPEG-20150514
TMTM Section IV Installation
WARNINGWhen economizer option is selected adequate exhaust capacity via a separate fan must be specified to ensure the natatorium pressure remains slightly negative Failure to specify adequately sized exhaust system may result in damage to structure and pool odors may be forced into other areas of the building
OUTSIDE AIR TEMPERATURE SENSOR (ECONOMIZER OPTION ONLY) (4)
The outside air temperature sensor is installed only when the outside air economizer option is included The sensor is mounted inside a 12rdquo PVC conduit pull elbow It can be mounted to the outside of the building using standard PVC conduit fittings The sensor should be mounted near the outside air intake vent for the economizer system It is very important to mount the sensor so that it does not receive direct sunlight The exposure to sunlight will cause the sensor housing to warm resulting in temperature readings that are higher than the actual air temperature This condition may prevent the ECC-PCP from selecting the economizer mode of operation If possible mount the sensor under an overhang or on a surface with a northern exposure
Electrical connection should be made with 22 AWG copper 2-conductor shielded twisted-pair cable Connect the shield drain wire to ground at the PoolComPaktrade end only See figure below for an illustration of the outside air temperature sensor Seal the conduit leading to the sensor with silicone caulk to prevent moisture from migrating out to the sensor and condensing inside the sensor
Figure 4-5 Outside Air Sensor
PCP_EG_OutsideAirSensorInstallation_20121204eps
AIR COOLED CONDENSER (OPTIONAL) (5)
The air-cooled condenser is used to reject heat recovered during the space cooling mode of operation Only PoolComPaktrade brand air-cooled condensers (PAC Units) should be used with a PoolComPaktrade Unit The ECC-PCP provides 24 VAC control signal to the speed control located in the PAC unit control panel The speed control then runs the condenser fan motor at the appropriate speed See figure below for an illustration of a PAC unit field wiring
Figure 4-6 PAC Unit Field Wiring
PCP_EG_RemoteACCFieldConnection_20121204eps
24 VAC CONTROL SIGNAL FROM
USE COPPER SUPPLY WIRES
POOLCOMPAKTERMINALS 12AND 13
POWER SUPPLY
21 L1 L2
GR
33EGW06-PCPEG-20150514
TMTMSection IV Installation
AUXILIARY POOL WATER HEATING SYSTEM (AWH MODEL ONLY) (6)
The auxiliary pool water heating system is provided by others Typically a gas fired or electric pool water heater is used The ECC-PCP provides a dry contact closure that signals a need for auxiliary water heating The contacts of the ECC-PCP may be connected directly to the heaterrsquos control circuit provided the circuit is 24 VAC maximum and the current does not exceed 1 amp inductive Any other applications will require an additional relay (by others) to be installed between the ECC-PCP and the pool water heating system
AUXILIARY AIR HEATING SYSTEM (7)
Typically a duct mounted electric heater hot water coil or a factory installed unit mounted hot water coil is used to provide air heating The ECC-PCP provides a form ldquoCrdquo (NO and NC) dry contact closure that signals a need for auxiliary air heating The ECC-PCP contacts may be directly connected to an electric duct heater control circuit provided the circuit is 24 VAC maximum and the current through the contacts does not exceed 1 amp inductive The figure below shows a typical installation that utilizes a 3-way hot water control valve and a unit or duct mounted hot water coil
Figure 4-7 Installation of a Hot Water Coil 3-Way Valve
The ECC-PCP provides a normally open contact closure for connection to a building management system If a fault occurs the controller will energize this output to indicate that there is a problem with the dehumidification system The remote interface unit will display the cause of the fault and provide a suggested course of action This output may also be used to energize an external alarm light or buzzer It may also be directly connected to an external circuit as long as the circuit is 24 VAC maximum and the current through the contacts does not exceed 1 amp inductive
HO
T W
ATER
CO
IL
FIELD SUPPLIEDACTUATOR
AB SWITCH INB POSITION
2
1
W
BK
W 3
A
B
VALVE IN BYPASS POSITION
HOT WATER IN
HOT WATER OUT
THREE WAY VALVE WITHACTUATOR
HO
T W
ATER
CO
IL
VALVE IN HEATING POSITION
HOT WATER IN
HOT WATER OUT
THREE WAY VALVE WITHACTUATOR
ALL WIRING BY CONTRACTOR
T23
T25
T24
POOLCOMPAK
120 VAC24 VAC
FIELD SUPPLIED 40 VATRANSFORMER
WIRING DETAIL
PIPING DETAIL
34 EGW06-PCPEG-20150514
TMTM
Section IV Installation
BUILDING FIRE CONTROL SYSTEM (9)
The ECC-PCP can receive a contact closure signal from a building fire control system This input of the controller must be connected to dry (voltage free) contacts only When this input receives a contact closure the PoolComPaktrade unit compressor and fan will be shut down and the remote interface unit will show an alarm condition When the contact closure opens The PoolComPaktrade unit will resume normal operations It is possible to change the operation of the fire trip input to be active on open instead of close See ECC-PCP Service in the Operation section for further explanation
RETURN AIR SENSOR (10)
The return air sensor measures air temperature and relative humidity The sensor is normally factory mounted in the PoolComPaktrade unit return air section However with the optional economizer it is necessary to field mount this sensor in the duct work The sensor must be located in the return duct upstream of the exhaust duct connection (See Figure 4-4 Economizer Operation for a typical location of the sensor in the economizer system)
When field mounting is necessary the sensor will be provided from the factory and must be field wired using 22 AWG copper 4-conductor shielded twisted-pair cable
PURGE MODE INPUT (11)
The ECC-PCP can receive a contact closure signal from an external source to activate purge mode operation During purge mode the compressor is disabled and the economizer output is activated to bring in 100 outside air
AC PROOF INPUT (12)
An optional interlock used with certain types of heat rejection condensers Dry contact closure indicates a problem and prevents compressor operation in air cooling mode
POOL WATER TEMPERATURE SENSOR (13)
Units equipped with a pool water heating condenser require installation of factory supplied pool water temperature sensor It must be mounted upstream of the PoolComPaktrade and the auxiliary water heater The sensor can be threaded directly into a 1frasl4rdquo FPT fitting Electrical connection should be made with 22 AWG copper 2 conductor shielded twisted-pair cable Connect the shield drain wire to ground at the PoolComPaktrade end only
35EGW06-PCPEG-20150514
TMTM
Section IV Installation
POOL WATER PIPING (AWH AND AWV MODELS ONLY)
CAUTIONDo not run piping across service panels evaporator coil face or air discharge outlet
If a new or existing pool water heater is piped within the same circuit the PoolComPaktrade unit should be connected in a parallel loop between the filter and the other heater This allows the PoolComPaktrade unit to act as the primary water heating source and the other heater as a backup or supplemental water heater
All pool purification and chemical feed systems MUST be installed downstream of the unit This includes the practice of adding chemicals directly to the skimmer which results in highly concentrated corrosive chemicals passing over and through the PoolComPaktrade water condenser Water chemistry must be maintained at a pH level between 72 and 76 with a free chlorine level not exceeding 30 PPM and a combined chlorine level less than 03 PPM
If possible install the PoolComPaktrade unit above the pool water level If it is installed below the pool level isolation valves must be added Breakable couplings should be located near the unit on both the water inlet and outlet lines When installing piping connect the piping to these couplings last so as not to place stress on the other connection in the plumbing systemA constant flow of water is required through the PoolComPaktrade unitsrsquo condenser The circuit to and from the unit must be capable of maintaining the flow rate as specified for the installed unit (see PoolComPaktrade Performance data in Table 3-1) To ensure correct water flow the filter pump usually operates at the same time as the PoolComPaktrade unit However to reduce energy consumption during filter off cycle times a two-speed or small auxiliary water pump which bypasses the filter may be used
CAUTIONCAUTION Excessive water flow can cause premature erosion and pitting of the pool water condenser Adjust valve so that the water flow does not exceed the GPM or pressure drop listed in the table PoolPaktrade recommends a fixed flow control or adjustable flow circuit setter
PoolPaktrade International recommends installing water pressure tap ports to check influent and effluent water pressure See PoolComPaktrade Performance data in Table 3-1 for the particular unit model in question for the proper flow rate and pressure drop across the pool water condenser The pressure tap ports should be installed in a straight length of the water piping exterior to the PoolComPaktrade unit Install the port before any 90-degree turns and approximately 6 inches from the corner-post of the unit
In some instances piping from the PoolComPaktrade unit to the filter return line may not be feasible or economical The unit may be installed on its own supply and return line using a properly sized water pump and appropriate strainer Ensure that auxiliary water heating systems are staged to supplement the PoolComPaktrade unit water heating
If the PoolComPaktrade unit is installed above the pool surface and the main circulating pump cannot provide the proper water flow to it at the specified pressure an auxiliary booster pump is required
Condensate may be returned to the pool (if local codes allow) but PoolPaktrade International neither recommends nor disapproves this practice The installer should check local codes prior to making this decision Condensate must be filtered prior to being returned to the pool
If multiple PoolComPaktrade units are installed on the pool water piping circuit pipe them (and any auxiliary water heater) in parallel Piping PoolComPaktrade units in series may result in the downstream unit(s) sensing the pool water temperature as satisfied and not reject heat to the water to its full capacity The actual pool water temperature should be sensed by each PoolComPaktrade unit and auxiliary water heater
36 EGW06-PCPEG-20150514
TMTM
Section IV Installation
Figure 4-8 Typical Pool Water Piping Diagram (AWH and AWV Model Only)
PCP_EG_PoolWaterConnectSchematic_20140305eps
SALT WATER POOLS
For units (AW models only) installed serving a salt water pool wire the pool bonding system to the bonding lug on the unit copper pool water piping This connection is required to prevent corrosion of the internal PoolComPaktrade water piping
For more information on salt water pools see the article ldquoSalt Water Poolsrdquo in the Pool Water Chemistry section of the PoolPak educational library
POOLCHEMICAL
FEEDER
CHECKVALUE
OPTIONALBOOSTERPUMP IF
MAIN FILTERPUMP IS A
2-SPEED OR UNDERSIZED
BALLVALVES
POOLWATERFILTER MAIN
FILTERPUMP
DRAIN
UNIONS
EXTERNALPRESSURETAP PORTS
UNIONS
AUXILIARYPOOL WATER
HEATER
DRAIN
BALLVALVES
LOCKINGGLOBEVALVE
LOCKINGGLOBEVALVE
POOL WATERTEMP SENSOR
FC
FlowControl
37EGW06-PCPEG-20150514
TMTM
Section IV Installation
CONDENSATE DRAINSDrain pans are connected to a common drain system and must be trapped for proper operation For AWH and HCDH units a trap and piping must be supplied and installed by the customer The trap depth must be a minimum of 6 inches (See figure 4-9) For AWV and HCDV units a condensate trap is located inside the unit and the field condensate piping and overflow drain must not have an additional trap
Provisions MUST be made for disposal of condensate Condensate from the dehumidifier coil will have nearly the same properties as the pool water itself It is recommended that building materials subjected to the condensate and systems used for its disposal are checked for compatibility For drain piping use PVC plastic pipe minimum Schedule 40 The drain line must be sloped to provide proper drainage
Drain line exposed to outdoor ambient temperatures must be protected against freezing Wrap lines with electric heat tape (follow manufacturerrsquos instructions) controlled by an automatic thermostat set at a minimum of 35degF to protect against freezing Insulate all piping Insulation must be sealed at all seams Power for heat tape must be supplied external to the PoolComPaktrade
Figure 4-9 AWH and HCDH Condensate Trap
PCP_EG_NegPressCondPiping_20140122eps
WATER COOLED CONDENSERA standard option for PoolComPaktrade units is an integral water-cooled condenser For this option all valves and refrigerant piping is internal to the unit No additional field wiring is required No additional refrigerant or oil charge is required Water piping connections are 1-14rdquo MPT and labeled on the unit
UNIT BASE
MINIMUM SCHEDULE 40 PVC
REMOVABLECLEANOUT
OPEN TEEFOR VENT
AWH OR HCDH UNIT
PLUG THEUNUSEDCONNECTIONWITH SUITABLEPVC PLUG
1
2
4 INCHES MINIMUM OR MAX NEGATIVE STATICPRESSURE (INCHES WC) + 1 INCH
2 INCHES MINIMUM OR 12
1
12
TMTM
38 EGW06-PCPEG-20150514
TMTM
Section IV Installation
REMOTE AIR-COOLED CONDENSERSPACE AND LOCATION REQUIREMENTS
The most important consideration which must be taken into account when deciding upon the locations of air-cooled equipment is the provision for a supply of ambient air to the condenser and removal of heated air from the condenser area Where this essential requirement is not adhered to it will result in higher head pressures which cause poor operation and possible eventual failure of equipment Units must not be located in the vicinity of steam hot air or fume exhausts
Another consideration which must be taken is that the unit should be mounted away from noise sensitive spaces and must have adequate support to avoid vibration and noise transmission into the building Units should be mounted over corridors utility areas rest rooms and other auxiliary areas where high levels of sound are not an important factor Sound and structural consultants should be retained for recommendations
Walls or Obstructions
The unit should be located so that air may circulate freely and not be re-circulated For proper air flow and access all sides of the units should be a minimum of ldquoWrdquo away from any wall or obstruction It is preferred that this distance be increased whenever possible Care should be taken to see that ample room is left for maintenance work through access doors and panels Overhead obstructions are not permitted When the unit is in an area where it is enclosed by three walls the unit must be installed as indicated for units in a pit
Figure 4-10 Remote ACC Installation Around Walls or Obstructions
ALL_WallsorObstructions_20131111eps
Multiple Units
For units placed side by side the minimum distance between units is the width of the largest unit If units are placed end to end the minimum distance between the units is 4 feet
Figure 4-11 Remote ACC Installation When Installing Multiple Units
ALL_MultipleUnits_20131111eps
MINW
AIR FLOW
Wrdquo=Total width of the condenser
MIN
Wrdquo=Total width of the condenserrdquo
W
AIR FLOWAIR FLOW
39EGW06-PCPEG-20150514
TMTM
Section IV Installation
Units in Pits
The top of the unit should be level with the top of the pit and side distances increased to ldquo2Wrdquo If the top of the units is not level with the top of the pit discharge cones or stacks must be used to raise discharge air to the top of the pit This is a minimum requirement
Figure 4-12 Remote ACC Installation When Installing Units in Pits
ALL_UnitsinPits_20131111eps
Decorative Fences
Fences must have 50 free area with 1 foot undercut a ldquoWrdquo minimum clearance and must not exceed the tops of the unit If these requirements are not met the unit must be installed as indicated for ldquoUnits in Pitsrdquo
Figure 4-13 Remote ACC Installation When Installing Units Near Decorative Fences
ALL_DecorativeFences_20131111eps
Wrdquo=Total width of the condenserrdquo
MIN MIN
AIRFLOW
2W2W
STACK(BY OTHERSIF SUPPLIED) 10rsquo MAX
Wrdquo=Total width of the condenserrdquo
MIN1rdquo MIN MIN
AIR FLOWW W
40 EGW06-PCPEG-20150514
TMTM
Section IV Installation
FIELD INSTALLED PIPING
Installation of the outdoor air-cooled condenser should only be done by a qualified refrigeration mechanic familiar with this type of work Many service problems can be avoided by taking adequate precautions to provide an internally clean and dry system and by using procedures and materials that conform to established procedural standards
Piping Guidelines
The following piping recommendations are intended for use as a general guide For more complete information refer to the latest ASHRAE Handbook
Materialsbull Use clean dehydrated refrigeration-grade copper tubing for all refrigerant lines Hard drawn tubing should be used
where no appreciable amount of bending around pipes or obstructions is necessary If soft copper tubing must be used care should be taken to avoid sharp bends which may cause restrictions and excessive refrigerant pressure drops
bull Use long radius elbows wherever possible with one exception - short radius elbows should be used for any traps in the hot gas riser
bull Braze all copper to copper joints with a phosphorus-copper alloy material such as Silfos 5 or equivalent Do not use soft solder
bull During brazing operations flow an inert gas such as nitrogen through the lines to prevent internal oxidation scaling and contamination
bull Support refrigeration lines at intervals with suitable hangers brackets or clampsbull Pack glass fiber insulation and a sealing material around refrigerant lines where they penetrate a wall to reduce
vibration and to retain some flexibilitybull The liquid line and discharge line should not be in contact with one another If the installing contractor must tie these
lines together because of an installation requirement the contractor must insulate them from each other to prevent heat transfer Because the discharge line is hot during system operation precautions should be taken to avoid personnel injury
bull PoolComPaktrade units do not utilize compressors with unloading stages Consequently double hot gas risers are not needed for reduced load conditions as refrigerant flow rates will not fall below minimum velocities necessary to carry oil up through the discharge line
bull A field provided field installed liquid line filter-drier is recommended in the field piping to the PoolComPaktrade unit
Sizingbull The lines must be sized and routed so that oil is carried through the system Using smaller lines than recommended
will give excessive pressure drops resulting in reduced capacity and increased power consumption Oversized lines could result in an oil flow problem within the system and possible compressor damage
bull Excessive pressure drops in the liquid line may cause flashing of the refrigerant and a loss of a liquid seal at the expansion valve inlet A reduction in capacity may then occur because the presence of gaseous refrigerant will partially block the expansion valve Using hot gas and liquid line sizes recommended in the Air Cooled Condenser section for these units and the proper system refrigerant charge will prevent this problem
bull Discharge lines should be designed to prevent condensed refrigerant and oil from draining back to the compressor during OFF cycles Use the following guidelines The highest point in the discharge line should be above the highest point in the condenser coil The hot gas line should loop toward the floor if the condenser is located above the PoolComPaktrade unit especially
if the hot gas riser is longbull For refrigerant line sizing for an Air Cooled Condenser (ACC) where the lineset length is less than 100 feet or the
ACC location is less than 50 feet higher or 20 feet lower than the unit use the below Table 4-3bull ACC line lengths beyond the above limits will void warranty unless written approval is obtained from the
factory PRIOR to installation and startup
PCP_EG_ACCPiping_20140122eps
41EGW06-PCPEG-20150514
TMTM
Section IV Installation
Figure 4-14 ACC Refrigerant Piping
Refrigerant and Oil Chargingbull PoolPaktrade units are shipped with the required charge for self contained operation only The remote ACC option does
NOT provide the refrigerant charge or oil required for the ACC and line setsbull Refer to Table 4-2 for the additional ACC condenser chargebull Refer to Table 4-3 for the required additional oil and refrigerant charge Use the calculation method shown to calculate
the additional refrigerant and oilbull For the additional oil required multiply 2 of additional refrigerant charge of both ACC and refrigerant line length
Use the correct oil type of POE oil depending on the compressor installed For Alliance models SXA SPA SSA compressors use Copeland Ultra PN 998-E022-00 For Trane models CSHD compressors use Trane PN OIL00080
Sample Charging CalculationFor an AWV2600 with 73 feet line length and ACC0121 located 30 feet above the unit
Table 4-3 indicates 34rdquo discharge line and 58rdquo liquid line piping sizes Using R410A ozft additional charge for the lineset is 73 feet x 025 ozft + 73 feet x 148 ozft = 1260 oz Table 4-2 indicates additional charge for ACC0121 (allow 30 F Operation) is 39 lb x 16 ozlb = 6240 oz Total additional R410A charge for both ACC and refrigerant line is 1260 + 6240 oz = 750 oz or 46 lbs 14 oz Total additional oil charge is 750 oz x 2 = 15 oz
Table 4-2 R410A Charge for Air Cooled Condensers (lb)
DISCHARGE LINE
Pitch inDirection ofrefrigerant flow
LIQUID LINE
AIR-COOLEDCONDENSER
DISCHARGE LINE Pitch inDirection ofrefrigerant flow
Table 4-3 Refrigerant (R410A) Charge for Different Line Size
WARNINGAbove chart is for lineset length less than 100 ft and ACC located less than 50ft above unit or 20ft below unit Failures due to a piping layout not within these limits nor receiving prior PoolPaktrade
Factory approval will not be covered under PoolPaktrade warranty
Refrigerant Line Size (ACC) Refrigerant Charge for Units with Air Cooled Condensers (ACC)
Discharge Liquid Line Length (ft) vs R410A Charge (lbs)
Model OD R410A ozft OD R410A
ozft25 ft 50 ft 75 ft 100 ft
Lbs Oz Lbs Oz Lbs Oz Lbs Oz
0550 12 010 38 049 0 15 1 14 2 13 3 12
58 016 12 092 1 11 3 6 5 1 6 13
0800 58 016 38 049 1 0 2 1 3 1 4 2
58 016 12 092 1 11 3 6 5 1 6 13
1200 58 016 12 092 1 11 3 6 5 1 6 13
34 025 58 148 2 11 5 6 8 1 10 13
1400 58 016 12 092 1 11 3 6 5 1 6 13
34 025 58 148 2 11 5 6 8 1 10 13
1800 34 025 12 092 1 13 3 10 5 8 7 5
78 034 58 148 2 14 5 11 8 9 11 6
2600 34 025 58 148 2 11 5 6 8 1 10 13
1 18 058 34 221 4 6 8 12 13 1 17 7
3500 78 034 58 148 2 14 5 11 8 9 11 6
1 18 058 78 307 5 11 11 7 17 2 22 13
4000 78 034 34 221 3 16 7 16 11 15 15 15
1 18 058 78 307 5 11 11 7 17 2 22 13
Note1 This table applies to ACC line length less than 100 ft only Contact factory if ACC line length is more than 100 ft
2 Line size should be used for ACC at the same level or located up to 20ft below the unit
3 Line size should be used for ACC located up to 50 ft above the unit
43EGW06-PCPEG-20150514
TMTM
SECTION V OPERATION
ECC-PCP REMOTE INTERFACE UNITFigure 5-1 RIU Keypad
PCP_EG_StraightOnKeypadAnnotated_20121204eps
The ECC-PCP Remote Interface Unit (RIU) is designed around the Carel pGD0 4-line x 20 character backlit LCD display module The RIU displays are accessed through six backlit selection buttons They consist of a Return Enter Key Up Key Down Key Program Key Alarm Key and Escape Key as shown above
After approximately 5 minutes the RIU will display the status screen rotation Press the Escape key to bypass the five minute delay and move directly to the status display
STATUS DISPLAY
The status screens contain basic information about operation of the PoolComPaktrade system Press the up or down arrow keys to move from screen to screen The screens will also rotate automatically every 10 seconds
Figure 5-2 Status Screen 1S P A C E T E M P _ _ o FS P A C E R H _ _ S P A C E D E W P O I N T _ _ o F(O U T S I D E T E M P) _ _ o F
Status Screen 1 displaysbull Space Temperature in degF or degCbull Space Relative Humidity in bull Space Dew Point in degF or degCbull Outside Air Temperature in degF or degC (with Economizer Option Only)
Status Screen 2 displaysbull Water Heating - YES indicates that the unit is returning recovered heat back to the pool waterbull Aux Water Heat - YES indicates that the controller has closed the relay contact requesting auxiliary pool water heater
operationbull Water Temperature in degF or degC
Status Screen 3 displaysbull SPACE temperature control requirement bull TEMPERATURE- OK Indicates the space temperature is at setpointbull HEATING- YES Indicates the space requires heatingbull COOLING- YES Indicates the space requires coolingbull AUX AIR HEAT Indicates the space requires additional heating The auxiliary air heating relay contacts close to
activate the external heating system
44 EGW06-PCPEG-20150514
TMTM
bull DEHUMID (SURFACE) Indicates the space requires dehumidification The word SURFACE indicates that the unit is temporarily lowering the dew point set point to minimize condensation at the cold surface temperature sensor
bull ECONOMIZER MODE Indicates the unit is cooling the space with outside air ECONOMIZER MODE is only shown if the optional economizer system is present
Status Screen 4 displaysbull The first line displays the current system status bull The second line displays compressor status
SET POINT CHANGE MENU
bull Press the PRG key to access the main menubull Use the arrow keys to scroll to the menu selection for Set Points and then press the Enter keybull Use the arrow keys to select the set point to be changed and then press Enter Available set points are
Air Temperature
The allowable range for the air temperature set point is 70 to 95degF Use the arrow keys to change the set point and then press Enter The new dew point set point is shown immediately as DPT The set point change screen will remain visible for a short time to allow verification of the new dew point set point After about five seconds the RIU will return to the status screen display
Relative Humidity
The allowable range for the relative humidity set point is 40 to 65degF Use the arrow keys to change the set point and then press Enter The new dew point set point is shown immediately as DPT The set point change screen will remain visible for a short time to allow verification of the new dew point set point After about five seconds the RIU will automatically return to the status screen display
Pool Temperature
The allowable range for the water temperature set point is 70 to 104degF Use the arrow keys to change the set point and then press Enter The RIU will automatically return to the status screen display
Recommendations
bull Air Temperature (Range 70degF to 95degF) The air temperature should normally be set about 2degF above the pool water temperature to minimize the pool water evaporation rate (high temperature spas are an exception)
bull Relative Humidity (Range 40 to 65) The normal range for the humidity set point is 50 to 60 Lower set points will require more energy (electricity) to satisfy the dehumidification requirement and increase pool water evaporation
bull Pool Temperature (Range 70degF to 104degF) The pool temperature set point is normally set between 80degF and 88degF for a typical swimming pool and higher for a spa depending on user preference
CAUTIONThe dehumidifier should be configured to operate at the set points designed for the facility These set points are shown on the yellow label on the door of the RIU Set points other than those shown may not be attainable with this dehumidifier
Section V Operation
45EGW06-PCPEG-20150514
TMTM
Section V Operation
PURGE MODE CONTROL MENU
CAUTIONIt is the userrsquos responsibility to use this feature properly to prevent freeze damage to downstream equip-ment 100 outside air at below freezing conditions has the potential to cause serious damage
Purge Mode causes the unit to force the optional field-provided economizer dampers and fan to full open introducing large quantities of outside air to the space This is typically used when ldquoshockingrdquo the pool Compressor operation is disabled during purge but the auxiliary air and water heating systems remain active
If the unit is not equipped with the economizer option a flashing ldquoCAUTION NO FREEZE PROTECTIONrdquo warning will be displayed This warning indicates that operation of purge mode without regard for outside air temperatures below freezing can result in damage to hot water coils or other equipment in the pool area
DETAILED STATUS MENU
To access the detailed status menubull Press the PRG key to access the main menubull Use the arrow keys to scroll to the menu selection for Detailed Status and then press the Enter key
Detailed Status Screen 1 displays Temperaturesbull Surface ndash The temperature measured at the cold surface sensorbull Dew Point ndash The calculated dew point of the spacebull Dewpt Setpoint ndash The dew point set point calculated from the temperature and relative humidity set points
Detailed Status Screen 2 displaysbull Disch Press ndash The measured refrigerant pressure in the discharge line at the compressorbull Suct Press ndash The measured refrigerant pressure in the suction line at the compressorbull Suct Temp ndash The refrigerant temperature measured on the surface of the suction line at the compressorbull Suct SH ndash The calculated superheat at the suction of the compressor
Detailed Status Screen 3 displays the number of hours the following device or system has been active since power was last applied to the unitbull Cmpr - Compressorbull Fan ndash Supply Fanbull AC ndash Mechanical Air Cooling (Economizer Cooling Not Included)bull Aux ndash Air ndash Auxiliary Air Heatingbull Aux - Wtr ndash Auxiliary Water Heating
Detailed Status Screen 4 displaysbull Fault Count ndash The total number of high pressure low pressure and defrost trips that have occurred since power was
last applied to the unit When this number reaches 10 the compressor is locked outbull AC Proof ndash Indicates a status of ldquoProvenrdquo if AC mode operation is allowed ldquoNot Provenrdquo indicates that AC mode
operation is not allowed
Detailed Status Screen 5 (only present in units configured for multi-unit networking) displaysbull Network Role ndash Indicates if the unit currently being displayed by the RIU is the master or a slavebull Net Status ndash Indicates ldquoCONNECTEDrdquo if the unit is properly connected to the multi-unit network ldquoNO LINKrdquo
indicates the unit is not connectedbull Unit ID Number ndash Indicates the unit address on the multi-unit network
Detailed Status Screen 6 (only present in units configured for multi-unit networking) displaysbull Unit 1 Present ndash Indicates if the unit currently being displayed by the RIU can communicate with unit 1 on the multi-
unit networkbull Unit 2 3 4 ndash Same as for unit 1 but for the other 3 possible units on the network
46 EGW06-PCPEG-20150514
TMTM
Section V Operation
ECC-PCP NETWORK OPERATIONNetworked ECC-PCP units operate in a MASTERSLAVE environment This means that one unit (master) determines heating cooling and dehumidification requirements and broadcasts them on the network to the other units (slaves) This ensures that all units work together instead of against other Each networked unit contains all sensor and controls necessary for independent operation and is capable of acting in the master role Units on the network are identified by a number between one and four The unit with the lowest identification number having no uncleared alarms will be the master unit
If an alarm condition occurs in the master unit it will give up the role of master The unit with the next lowest identification number and no unclear alarms will take over the master role The unit that experienced the alarm condition will operate in the slave role until the alarm is cleared at the control panel
The control panel provides two network status screens These can be accessed in the detailed status menu The figure above shows the first screen that displays the status of units one through four as present or not Use this screen to verify that all units on the network are connected and communicating with each other The figure below shows the second screen that displays network information for the unit that is being displayed by the remote interface unit including network role connection status and network identification number
NETWORK CONFIGURATION
Using the following four parameters it is possible to configure the ECC-PCP network to accommodate a wide variety of installation options Network configuration can be accessed in the service menu These parameters must be set in each unit individually
Pool Water Temperature Control
Determines whether the unit will control water temperature based on the masterrsquos command (NETWORK) or its own temperature sensor and set point (LOCAL) If a unit set to LOCAL becomes the master other units in the network will not use the masterrsquos command for water heating They will look to the next line that is not set to LOCAL This parameter is only set to LOCAL if the unit is connected to a different pool than the rest of the units on the network Because the unit is controlling water temperature on its own it is necessary to select the correct unit with the control panel before changing the water temperature set point
Staged Dehumidification Control
Determines whether the unit will run in dehumidification when there is a need for 1 stage or 2 stages of dehumidification The master unit will start on any need for dehumidification independent of this parameter Slave units with this parameter set to YES will dehumidify only if the master is asking for 2 stages of dehumidification Setting this parameter to NO will cause the unit to dehumidify when the master calls for at least 1 stage of dehumidification Using this parameter it is possible to configure the number of units in each dehumidification stage
Dehumidification Stage 2 Offset
Determines how far the dewpoint (relative humidity) of the space has to rise above the set points before the unit will request 2 stages of dehumidification on the network This parameter is normally the same in all units on the network Making this parameter smaller will bring on the second stage of dehumidification sooner
Enable Network Control
Determines whether the unit will participate in the masterslave environment Setting this parameter to NO will cause the unit to act like a standard ECC-PCP single unit The unit will never become the master on the network and will not listen to the demands broadcast by the master on the network Although units with this parameter set to NO do not participate in the masterslave environment they are still accessible through the network control panel Like the LOCAL pool
47EGW06-PCPEG-20150514
TMTM
Section V Operation
water temperature setting this parameter when set to NO requires this unit to be displayed on the control panel before changing any of the set points The other screens for Pool Water Temperature Control Staged Dehumidification and Stage 2 Offset are not available when this parameter is set to NO
Changing Set Points
Each unit on the network maintains two groups of set points network and local If a unit has the Enable Network Control parameter set to YES and the Water Temperature Control parameter set to NETWORK it will control to the network set points Set points changed when the remote interface unit is displaying this unit will be changed in every unit on the network with the same NETWORK and Water Temperature Control parameters Units that are configured for Network Control and LOCAL water temperature control will control using local water temperature set point the network air temperature and relative humidity set points When the air temperature and relative humidity set points are changed when the remote interface unit is displaying the unit they will be changed in all units configured for Network control The water temperature set point will only be changed in the unit currently being displayed by the remote interface unit Units that are not configured for Network Control will use all local set points Therefore any set points changed while the remote interface unit is displaying this unit will only be changed in this unit
ECC-PCP SERVICE
SERVICE MENU
To access the service menubull Press the PRG key to access the main menubull Use the arrow keys to scroll to the menu selection for Service and then press the Enter keybull A password is required to access the service menu
The following sub-menus are available in the service menu
IO CONFIGURATION
Digital Inputs
This menu contains a screen for each digital input Each screen contains the following parametersbull Status of the data point linked to the inputbull Status of the raw digital inputbull Input type
The following parameter list shows the available digital input screensbull Defrost Switchbull Cpr High Tempbull Water Flow bull Fire Tripbull AC Proofbull Cpr High Prsbull Fan Overloadbull Low Pressurebull Purge Input
Digital Outputs
This menu contains a screen for each digital output Each screen contains the following parametersbull Current output status bull Requested output status bull Override
48 EGW06-PCPEG-20150514
TMTM
Section V Operation
The following digital output screens are availablebull Supply Fanbull Compressorbull Bypass Solenoidbull Water Heating Solenoidbull Reheat Solenoidbull AC Solenoidbull Aux Water Heatbull Alarm Outputbull ACC Run Signalbull Economizerbull Aux Air Heat Stage 1bull Aux Air Heat Stage 2
Analog Inputs
This menu contains a screen for each analog input Each screen contains the following parametersbull Current read-only value from the inputbull Fail bull Tol bull Offs bull Ovrd bull Min bull Max
The following analog input screens are availablebull Discharge Pressure bull Suction Pressure bull Return Relative Humidity bull Suction Temperature bull Return Air Temperature bull Pool Water Temperature bull Surface Temperature bull Outside Air Temperature
UNIT CONFIGURATION
Installed Options
This menu contains parameters that indicate the hardware options installed in the dehumidifier The parameters are set by the factory and do not typically require modification
Aux Air Heating
This menu contains parameters that configure the auxiliary air heating system
Aux Water Heating
This menu contains parameters that configure the auxiliary water heating system
Temperature Ctrl
This menu contains parameters that configure the air temperature control routines of the dehumidifier
49EGW06-PCPEG-20150514
TMTM
Section V Operation
Humidity Control
This menu contains parameters that configure the humidity control routines of the dehumidifier Water Temp CtrlThis menu contains parameters that configure the compressor based water heating system of the dehumidifier bull Water Heat First This parameter indicates whether the control routine will use the compressor for water heating when
there is no dehumidification requirement bull Deadband This parameter is the deadband used by the compressor based pool water heating control routine
BAS INTERFACE
This menu contains parameters that configure the building automation system interface of the dehumidifier
MULTI-UNIT NETWORK
This menu contains parameters that configure the operation of dehumidifier in a multiple unit installation
COMPRESSOR
This menu contains parameters that configure the operation of the dehumidifier compressor
ECONOMIZER
This menu contains parameters that configure the operation of the optional field provided and field installed economizer damper system
HISTORY
The history screen provides information on the last 50 faults that have occurred in the dehumidifier It can be used for troubleshooting by an experienced HVAC technician The faults are recorded with a sequence number from 1 to 50 Sequence number 1 is always the most recent fault The following information is stored and displayed for each fault in non-volatile memorybull Hour at which the fault occurred bull Fault Code Number bull Return Air Temperaturebull Return Air Humiditybull Discharge Pressurebull Suction Pressurebull Suction Temperaturebull Pool Water Temperaturebull AC Solenoid Statusbull Bypass Solenoid Statusbull Compressor Statusbull Reheat Solenoid Status
MANUAL MODE
The Manual Mode menu for use by qualified service personnel provides two options Demand Control and Digital Output Control
UTILITIES
The Utilities menu provides sub menus for configuring units of measure and passwords for set point and service access control
50 EGW06-PCPEG-20150514
TMTM
Section V Operation
MAINTENANCEOVERVIEW
Periodic routine maintenance will promote extended equipment life While PoolComPaktrade units use components that are usually maintenance free and do not require service a simple check could result in noticing possible problems before they develop into major problems
DAILY MAINTENANCE
bull Pool water chemistry is a part of daily maintenance and it is recommended to follow National Spa and Pool Institute standards PoolPaktrade International strongly recommends following the National Spa and Pool Institute values
Table 5-1 Pool Water Chemistry
bull PoolPaktrade International recommends daily logging of your pool water chemistry MAINTENANCE AND YOUR POOL WATER CHEMISTRY IS IMPORTANT TO PROTECT YOUR WARRANTY RIGHTS
MONTHLY MAINTENANCE
bull Air Filters inspect and replace or clean as applicable Dirty filters restrict air flow and can cause improper unit operation
bull Ensure that the condensate collection pan is draining properly and the condensate is not overflowing or being drawn into the supply air stream Check the condensate and overflow lines to ensure that neither are clogged
bull Check the operation of the blower motor and scroll Ensure that the scroll does not rub the housing Check for proper belt tension Worn or cracked belts should be replaced Check fan and mounting brackets for tightness
bull Ensure that the ALARM light is not illuminated
ANNUAL MAINTENANCE
bull Inspect the refrigeration and water circuits for leaks wear or corrosion Corrosion on the water piping or condenser may indicate poor pool chemical maintenance and improper chlorine and pH levels
bull Check electrical components for loose wiringbull Although the exterior of the PoolComPaktrade units are powder coated wipe down unit particularly if installed in an
area subject to dirt or chemical concentrationbull Wash brush or vacuum the evaporator and air condenser coils This will ensure proper heat transfer and reduce static
pressure losses Caution should be taken not to wet electrical components inside the unit
NOTEIf service and inspections are not performed by a competent and experienced service firm the manufacturer warranty may be voided
AUXILIARY AIR amp POOL WATER HEATER CONNECTIONS FOR MULTIPLE UNIT INSTALLATION
Figure 6-1 Auxiliary Air and Pool Water Heater Connections for Multiple Units
AWH_EG_Connections_20121204eps
52 EGW06-PCPEG-20150514
TMTM
AUXILIARY AIR amp POOL WATER HEATER CONNECTION FOR A TWO POOL INSTALLATION
Figure 6-2 Auxiliary Air and Pool Water Heater Connections for Two Pool Installations
AWH_EG_ConnectionstoPool_20121204eps
Section VI Wiring
53EGW06-PCPEG-20150514
TMTM
Section VI Wiring
FIELD WIRING
Figure 6-3 Field Wiring Diagram
PCP_EG_FieldWiringDiagram_20121204eps
54 EGW06-PCPEG-20150514
TMTM
Section VI Wiring
FIRE CONTROL SYSTEM CONNECTION
Figure 6-4 Fire Control System Connection
PCP_EG_FirecontrolSysConnection_20121204eps
55EGW06-PCPEG-20150514
TMTM
Section VI Wiring
This page intentionally left blank
EGW06-PCPEG-20150514
TMTM
56
TMTM
3491 Industrial Drive York PA 17402 USA 800-959-7725 Fax 717-757-5085for more information wwwpoolpakcom
The Leader in Indoor Pool Dehumidification
14 EGW06-PCPEG-20150514
TMTM
Totally Enclosed Fan Cooled (TEFC) Motors
bull Protects fan motors from corrosive air streambull Extends motor lifeprevents premature failurebull Reduces system maintenance
Unique Outside Air System
bull Houses adjustable louvers and filterbull Convenient external filter accessbull Swing-out door-mount design for easy service access to fan motor and belts
Housed Blower
bull Heavy pillow-block bearings provide durabilitybull Rugged cast-steel housing provides longevitybull Provides greater reliability
Cupronickel Water Heat Exchanger
bull Supplies 100 of available recycled energy to the pool waterbull Reaches water temperature set-point conditions fasterbull Efficiently maintains the water temperature set-pointbull Redirects heat only after space temperature is satisfied
AWHHCDH 35004000 With Integral Gas or Electric Heat and With Remote ACC 2900AWHHCDH 35004000 With Integral Gas or Electric Heat and With Integral ACC 3700AWHHCDH 35004000 With No Integral Auxiliary Heat and With Integral ACC 2700
RoofPak weights are also included with the RoofPak Generic Product Drawings found in the Engineering Library section of the PoolPaktrade website
Model Number AWH HCDH 3500 - 10 Ton AWH HCDH 4000 - 12 TonPool Size (Sq Ft) 1200 - 2000 1400 - 2500Reheat Capacity (MBH) 170 200Moisture Removal (LbHr82degF60RH) 63 70Pool Water Flow (GPM) 26 28Pool Water Condenser PD (FT WC) 20 30Pool Water Condenser Capacity (MBH) 170 200Outside Air (CFM)(Nominal) 0 - 2000 0 - 2000Total Supply Airflow CFM (Maximum) 3500 - 7000 4000 - 7000Refrigerant Charge (lbs) 81 83Dimensions (in inches) with integral air-cooled condenser and gas furnaceLength 264 264Width 574 575Height 525 522
OA
453
152
134 440
FRONT VIEW
525
SA1200 CG
Side return air available horizontal return air available without integral air-cooled condenser
LEFT VIEW
RA
2640
16 EGW06-PCPEG-20150514
TMTM
SECTION III PERFORMANCE AND SIZING
POOLCOMPAKtrade PERFORMANCE
Detailed performance and dimensional information are provided in the PoolPaktrade Selection Software
PoolComPaktrade AW (AWV AWH) Performance
Table 3-1 PoolComPaktrade AW Performance Summary
Performance at 82degF Air and 80degF Water Pool water Condenser (Vented)
Model AW Return Air CFM
Return Air RH ()
Moisture removal (lbshr)
Sensible Cooling Capacity (MBH)
ACC Max Heat Rejection (MBH) GPM Pressure Drop
FT water
0550 90060 111 136 312
4 650 85 156 301
0800 160060 157 221 475
6 1050 117 249 457
1200 170060 208 269 579
10 2450 155 305 555
1400 230060 260 384 766
10 850 188 434 736
1800 250060 309 418 891
12 1250 229 478 861
2600 330060 451 546 1209
13 650 350 606 1156
3500 430060 597 789 1700
24 1750 442 898 1634
4000 450060 704 876 1975
28 2450 524 1001 1893
17EGW06-PCPEG-20150514
TMTM
Performance at 82degF Air and 80degF Water
Model HCD Return Air CFM Return Air RH () Moisture removal (lbshr)
Sensible Cooling Capacity (MBH)
ACC Max Heat Rejection (MBH)
0550 90060 102 132 30550 77 152 295
0800 160060 145 208 46250 103 239 444
1200 170060 190 252 56450 145 284 544
1400 230060 241 362 74750 179 405 718
1800 250060 289 418 88150 209 474 846
2600 330060 410 535 118850 313 597 1138
3500 430060 569 805 169950 415 952 1668
4000 450060 665 862 195350 502 979 1878
PoolComPaktrade HCD (HCDV HCDH) Performance
Table 3-2 PoolComPaktrade HCD Performance Summary
Section III Performance and Sizing
18 EGW06-PCPEG-20150514
TMTM
POOLCOMPAK UNIT DIMENSIONS
The latest detailed unit dimensional data may be found in the PoolComPaktrade Series AWHHCDH AWVHCDV All Models R-410A Dimensional Drawings publication (EG6_Dim_All) which can be downloaded from in the PoolPaktrade Engineering Library (wwwpoolpakcom)
PoolComPaktrade Horizontal Dimensions
Table 3-3 AWHCD Horizontal Unit Overall Dimensions
NOTECoils add 01rdquoWC to ESPEntering Air Temperature - 80degFEntering Water Temperature - 180degFMax Working Pressure - 125 psiCapacity is a function of Return Airflow and is independent of Supply Airflow
21EGW06-PCPEG-20150514
TMTM
POOLCOMPAK OUTSIDE AIR DAMPER SIZE
Table 3-6 PoolComPaktrade Outside Air Damper Size
Section III Performance and Sizing
Model Outside Air (OA) Location
Opening Size1 (in) Damper Code OA CFM Range2
PoolComPak Vertical AWVHCDVV5508001200 Top A 14 x 10 OA-TR 0-800Left OA-LT
V14001800
Top A 14 x 10 OA-TR 0-800Left OA-LTTop B 14 x 22 OA-TR 800-2000Left OA-LT
V2600
Top A 14 x 10 OA-TR 0-800Left OA-LTTop C 14 x 30 OA-TR 800-2500Left OA-LT
V35004000
Top A 14 x 10 OA-TR 0-800Left OA-LTTop C 14 x 30 OA-TR 800-2800Left OA-LT
PoolComPak Horizontal AWHHCDH
H5508001200
Top A 12 x 12 OA-TC 0-450Front OA-FCTop B 12 x 24 OA-TC 450-800Front OA-FC
H14001800
Top C 16 x 20 OA-TC 0-1000Front OA-FCTop D 16 x 40 OA-TC 1000-2000Front OA-FC
H260035004000
Top E 20 x 20 OA-TC 0-1400Front OA-FCTop F 20 x 40 OA-TC 1400-2800Front OA-FC
1Size may change depending on RA CFM and ESP See product dwg requestpulley request from section software for exact damper size
2Operating these units at OA quantities different from which the unit was selected will be detrimental to the unitrsquos operation
22 EGW06-PCPEG-20150514
TMTM
REFRIGERANT
Table 3-7 Factory Refrigerant R410A Charge
NOTEFactory charge for remote ACC option does not include refrigerant nor oil charge for either ACC or connecting refrigerant line between unit and ACC
For ACC and lineset charging see Table 4-2 and Table 4-3 in the Installation section
1Factory charge for remote ACC option does not include refrigerant for either ACC or lineset
2Factory charge for RoofPak with Integral ACC in parentheses
Section III Performance and Sizing
23EGW06-PCPEG-20150514
TMTM
Section III Performance and Sizing
REMOTE AIR-COOLED CONDENSER (ACC)
Table 3-8 Remote ACC Performance ChartNote Below table contains the piping sizes of the remote ACC stub-outs Additional field piping may be needed to make the transition from the connections to correct refrigeration lineset sizing (See Table 4-3)
Unit Size ACC Model
Ambient Temp (degF)
Unit Height
(inches)
Vapor OD
(inches)
Liquid OD
(inches)Unit
WeightMotor FLA Min Circuit
Ampacity
A B C 208230V 460V 208230V 460V0550 ACC0041 95100105115 393 58 12 120 3 15 38 19
Power wiring should incorporate properly sized fuses or motor rated circuit breakers A disconnect must be fitted within easy access and sight of the unit Supply voltage must be maintained within +- 10 of design voltage on both single and three phase units Cycles must be within +- 5 of design Failure to operate within these ranges can adversely affect performance cause failure of the equipment and may void warranty terms
Figure 3-5 Duct Heaterbull Tubular sheathed elementsbull Galvanized steel cabinetbull Duct-mounted flanged typebull Airflow in either directionbull UL and CSA approved heaterbull Airflow proving switchbull Auto and manual reset high temperature limitsbull Magnetic contactorsbull 24 volt control circuit and transformerbull Standard heater for indoor installation in non-insulated duct
Duct Heater Sizes
Table 3-9 Duct Sizes
Duct Heater Installation
1 Flange both ends of the ducts outwards on three sides to match heater flanges as shown2 Fasten heater to duct using sheet metal screws for smaller heaters or bolts for larger ones3 Seal opening with suitable sealing compound4 If needed use additional hangers to support heater5 Electrical power connections must be made within NEC standards and local electrical codes6 Refer to the Field Wiring Diagram at the back of this manual for controls connection
Reference Dimensions Fan Outlet
AWHHCDH 5508001200 9-14 x 10-38 inchesAWHHCDH 140018002600 12-12 x 13-12 inchesAWHHCDH 260035004000 17 x 19 inchesDuct heater width = 8 10 or 12 inches depending on heater kW Flange width = 1 inch
VOLTSHZPHDuct Size
12rdquo X 12rdquo 15rdquo X 15rdquo 20rdquo X 20rdquo 28rdquo X 28rdquo
Installation requires the unit to be placed on a roof mounted curb the mechanical room floor an appropriate location in the pool room or outside on an equipment housekeeping pad Isolation pads should be placed under the unit to minimize transmission of noise due to unit operation Then pool water is piped to the unit Electrical power from a properly sized fused disconnect is connected to the unit The supply and return air ducts are connected to their respective locations on the unit The condensate is piped back to the pool or to the sewer
If an optional remote air-cooled condenser is used place the condenser in a proper outdoor location Refrigerant piping is then run from the air cooled condenser to the PoolComPaktrade unit Refrigerant lines must be leak checked and evacuated through installer provided Schrader valves Control and power wiring are run to complete the installation If a field-furnished auxiliary space heating coil is installed the control for this heater must be field wired to the PoolComPaktrade controls shown in Section V1 - Wiring (Figure 6-3 Field Wiring Diagram)
Outside air can be ducted into the unit through the optional outside air duct connection The unit can draw up to 30 of its supply air from the outside When ventilating the natatorium in this way an exhaust fan must be furnished in the natatorium to exhaust to the outside an air volume slightly greater than the air volume introduced into the natatorium from the outside This will maintain a negative pressure in the space preventing odor and moisture migration Outside air filters are provided for Horizontal PoolComPaktrade units For Vertical PoolComPaktrade units outside air must be filtered before entering the unit
UNITFACILITY INTERFACE
A typical PoolComPaktrade system layout and its connection to the natatorium and pool water piping systems is shown in the figure below
Figure 4-1 Typical PoolComPaktrade AWH Series System Layout
PCP_EG_LayoutSchematic_AW_3D_20121204eps
Cold SurfaceTemperature Sensor
POOL
Recommended WaterPressure Taps
Return Air
ECC-PCP RemoteInterface Unit (should not
be mounted insidepool enclosure)
FusedDisconnect (Able to be seen
from the unit)
RemoteAir-CooledCondenser(optional)
PoolComPakHorizontal
Unit
Pool Heater
Pool HeaterPump (optional)
Pool Water Circulation Pumpfor PoolComPak (Optional - By Others)
Flo
Pool WaterTemp Sensor
wBalancing Valve
Pool Filter
Pool Pump
IsolationValves
AirVent
Supply Air DuctSupply Air
ExteriorWindow
27EGW06-PCPEG-20150514
TMTM
HANDLING
All units are shipped completely assembled Care should be taken to avoid damage due to rough handling If the unit is not to be immediately installed it must be protected from weather and site hazards
CLEARANCE
For proper operation and service PoolComPaktrade Vertical PoolComPaktrade Horizontal and RoofPak units require 36rdquoclearance on all sides
MOUNTING OF POOLCOMPAK UNITS
Locate the PoolComPaktrade unit on a firm level base If floor mounting ensure that the floor is capable of supporting the operating weight If wall mounting or hanging a unit provide a support structure that is capable of supporting the unit while protecting pool patrons and employees from injury Ensure that the support structure will not interfere with the operation of the unit Provision must be made for servicing units suspended above floor level Install isolation pads under the unit to minimize unit transmitted vibration noise
INSPECTION
Upon receipt of the PoolComPaktrade unit(s) immediately inspect for damage In particular inspect the housing and the evaporator coil face Minor indentations of the fins will not affect performance However if there is substantial damage immediately notify shipping company of unseen damage at delivery with a detailed letter outlining the damage Retain copies of all shipping damage claim documentation as well as photographs of the observed damage
NOTEPoolPaktrade International does not ship damaged units from its facility nor is it responsible for damage incurred during transit
POWER SUPPLY
A separate fused disconnect switch must be provided per local codes and be within easy accessibility of the PoolComPaktrade unit Use the minimum circuit capacity listed on the unitrsquos data plate to determine the minimum wire size for incoming electrical power The ground connection for the unit is located in the unit control panel The power supply to the unit must be adequate for the compressor starting amperage (LRA) If it is not a compressor rotor stall will occur during start-up due to an excessive voltage drop All field wiring must be done according to the wiring diagram provided with the unit and in conformance to the National Electrical Code (NEC) and any other applicable local electrical code(s)
For Vertical and Horizontal PoolComPaktrade units installing contractor must punch a hole into the electrical compartment to run power wires The hole is to be properly finished with a rubber grommet and weather sealing
CONTROL WIRING
All control wiring field connections are described in the wiring diagram furnished with the PoolComPaktrade unit as well as in the Field Wiring section of this manual All control wiring is low voltage
CONDENSATE PIPING
The condensate may be piped to a drain or returned to the pool if local codes allow If returned to the pool the condensate should be piped to the skimmer PoolPaktrade International recommends neither for nor against the practice of returning condensate to the pool The overflow drain should be piped in a similar fashion The installer should review the local codes prior to making the decision of where to dispose of the condensate The amount of condensate produced in a year is about equal to the volume of the pool
Section IV Installation
28 EGW06-PCPEG-20150514
TMTM
Section IV Installation
CURB MOUNTING
Illustrated in Figure 4-2 is a curb that has been designed specifically for the PoolComPaktrade product line The outside dimensions of the curb are such that the base of PoolComPaktrade extends over the edge of the curb all the way around This aids in preventing rainwater from getting between the base of the PoolComPaktrade and the curb It is the installing contractorrsquos responsibility to complete the following
bull Flash the curb into the roofbull Insulate the curbbull Connect the supply and return duct to the curbrsquos duct support railsbull Connect condensate drain line with appropriate trap bull Seal the curb to the bottom of the PoolComPaktrade using the gasket supplied with the curbbull Provide counter flashing between curb and PoolComPaktrade unitbull Seal the pool water pipes where they go through the curb
If specified when ordering all water piping connections can be made through the curb These water connections include pool water condensate auxiliary hot water coil (optional)
If the PoolComPaktrade is to be mounted on a curb the unit must be ordered with the ldquooutdoorrdquo option PoolComPaktrade Units produced for curb mounting receive special weatherizing and insulation that non-curb mounted PoolComPaktrade Units do not receive
NOTEIf the factory is not notified that a PoolComPaktrade is to mounted outdoors the unit will not be weather tight it will leak and it will not be properly insulated
INTEGRAL GAS FURNACE OPTION (ROOFPAK ONLY)
When using a gas furnace power venting is provided for all unit sizes External vent piping andor cap is required Please refer to the furnace manufacturerrsquos manual for piping and venting instructions Install leak-test and properly regulate piping for the gas-fired heater Pressures should be regulated to the entering pressures as shown on the furnace manufacturerrsquos data plate or manual
The ECC-PCP is the Electronic Control Center programmable controller designed specifically for the PoolComPaktrade dehumidification system It is a robust system capable of a variety of functions The following text describes the field wiring required for for proper operation of the ECC-PCP dehumidification system in a typical PoolComPaktrade unit installationThe field wiring diagram (see Section VI - Wiring) shows the location of the connections for the sensors and other required devicesThe numbers following the text identify the location on the field wiring diagram where each device is connected to the PoolComPaktrade unit electrical panel
REMOTE INTERFACE UNIT (1)
The remote interface unit allows the user to view space temperature pool water temperature and relative humidity change set points and receive fault notifications It should be mounted in a convenient location that is outside the pool area The ambient temperature of the mounting location must always be above 32 F
NOTEThe maximum distance from the Remote Interface Unit to the PoolComPaktrade unit is 1000 feet For distances greater than 1000 feet contact the factory
The control panel does not contain any sensors and should be mounted outside the pool enclosure A factory supplied 6 ft cable RJ25 (6 conductor) must be installed between the PoolComPaktrade unit and the control panel
For distances greater than 6 feet use 6 conductor 22 AWG shielded twisted-pair cable along with the supplied RJ25 jack and second 6 foot cable shipped loose with the unit
The wall mounting of the terminal first requires the back piece (A) of the RIU assembly The RIU is designed to fit a single gang extra-deep electrical box mounted horizontally in the wall The RJ25 jack and most of the black cable should be placed inside the box before installing the mounting bracket A frac34rdquo hole must be drilled for the 6-conductor cable which connects the remote interface unit to the PoolPaktrade unit The below is specific mounting instructions that correspond to the mounting schematic below
1 Fasten the back piece (A) to the gang box using the rounded-head screws supplied in the packaging Use the screws that come with the box to secure the bracket
2 Thread the 6-conductor cable through the back piece (A) and connect to the back of front panel (B)3 Rest the front panel (B) on the back piece A and fasten the parts together using the flush-head screws supplied in the
packaging4 Finally fit the click-on frame (C)
Figure 4-3 Remote Interface Mounting Plate
ALL_EG_RIUMounting_20131219eps
A
B
C
31EGW06-PCPEG-20150514
TMTMSection IV Installation
COLD SURFACE TEMPERATURE SENSOR (2)
This sensor is used to measure the temperature of the coldest surface in the pool enclosure The sensor is an aluminum bar 1rdquo long by frac14rdquo square with a clearance hole for a number 8 screw and two 6rdquo wires on one end
When the temperature of the surface drops to within 5 F of the space air dew point the humidity set point will be automatically reset downward to help prevent condensation on the cold surface It should be noted that resetting the humidity set point will not compensate for lower quality building materials such as single pane glass or non-thermally broken frames
The sensor should be mounted on an exterior window or door frame that is not in direct sunlight In cases where there are no exterior windows or doors the sensor should be mounted on the inside surface of an exterior wall The sensor must be in contact with the cold surface Electrical connection should be made with 22 AWG copper two-conductor shielded twisted-pair cable Connect the shield drain wire to ground at the PoolComPaktrade unit end only
ECONOMIZER SYSTEM (OPTIONAL) (3)
An economizer system cools the space with outside air instead of the compressor The ECC-PCP provides a dry contact closure to activate the economizer The contacts of the ECC-PCP may be connected directly to the economizer control circuit provided the circuit is 24 VAC maximum and the current does not exceed 1 amp inductive The other components of the system must be provided by others (See figure below for an illustration of a typical economizer system)
Units equipped with an economizer require relocation of the factory mounted return air sensor It must be located in a duct that will always contain air that represents the space temperature and humidity
The economizer will operate only when space cooling is required and there is no dehumidification requirement When the outside air temperature is greater than 50degF and more than 5degF below the space temperature set point and the space temperature rises above the set point the compressor is disabled and a dry contact closure between T216 and T217 is made to activate the economizer
When the ECC-PCP contacts close relay R1 is energized causing the outside and exhaust air dampers (by others) to open and the return air damper (by others) to close At the same time relay R2 is energized causing the exhaust fan to run If the space temperature continues to rise and exceeds the space temperature set point by more than two degrees the economizer contact is opened reversing the damper positions The compressor is energized in the space cooling mode (if so equipped) The compressor will then continue to run until the call for space cooling is satisfied The economizer will also be activated in the space cooling mode if the auxiliary air conditioning condenser option is not installed or if the compressor is locked out by a fault condition
Figure 4-4 Economizer Operation
PCP_EG_EconomizerOperation2_20121204eps
32 EGW06-PCPEG-20150514
TMTM Section IV Installation
WARNINGWhen economizer option is selected adequate exhaust capacity via a separate fan must be specified to ensure the natatorium pressure remains slightly negative Failure to specify adequately sized exhaust system may result in damage to structure and pool odors may be forced into other areas of the building
OUTSIDE AIR TEMPERATURE SENSOR (ECONOMIZER OPTION ONLY) (4)
The outside air temperature sensor is installed only when the outside air economizer option is included The sensor is mounted inside a 12rdquo PVC conduit pull elbow It can be mounted to the outside of the building using standard PVC conduit fittings The sensor should be mounted near the outside air intake vent for the economizer system It is very important to mount the sensor so that it does not receive direct sunlight The exposure to sunlight will cause the sensor housing to warm resulting in temperature readings that are higher than the actual air temperature This condition may prevent the ECC-PCP from selecting the economizer mode of operation If possible mount the sensor under an overhang or on a surface with a northern exposure
Electrical connection should be made with 22 AWG copper 2-conductor shielded twisted-pair cable Connect the shield drain wire to ground at the PoolComPaktrade end only See figure below for an illustration of the outside air temperature sensor Seal the conduit leading to the sensor with silicone caulk to prevent moisture from migrating out to the sensor and condensing inside the sensor
Figure 4-5 Outside Air Sensor
PCP_EG_OutsideAirSensorInstallation_20121204eps
AIR COOLED CONDENSER (OPTIONAL) (5)
The air-cooled condenser is used to reject heat recovered during the space cooling mode of operation Only PoolComPaktrade brand air-cooled condensers (PAC Units) should be used with a PoolComPaktrade Unit The ECC-PCP provides 24 VAC control signal to the speed control located in the PAC unit control panel The speed control then runs the condenser fan motor at the appropriate speed See figure below for an illustration of a PAC unit field wiring
Figure 4-6 PAC Unit Field Wiring
PCP_EG_RemoteACCFieldConnection_20121204eps
24 VAC CONTROL SIGNAL FROM
USE COPPER SUPPLY WIRES
POOLCOMPAKTERMINALS 12AND 13
POWER SUPPLY
21 L1 L2
GR
33EGW06-PCPEG-20150514
TMTMSection IV Installation
AUXILIARY POOL WATER HEATING SYSTEM (AWH MODEL ONLY) (6)
The auxiliary pool water heating system is provided by others Typically a gas fired or electric pool water heater is used The ECC-PCP provides a dry contact closure that signals a need for auxiliary water heating The contacts of the ECC-PCP may be connected directly to the heaterrsquos control circuit provided the circuit is 24 VAC maximum and the current does not exceed 1 amp inductive Any other applications will require an additional relay (by others) to be installed between the ECC-PCP and the pool water heating system
AUXILIARY AIR HEATING SYSTEM (7)
Typically a duct mounted electric heater hot water coil or a factory installed unit mounted hot water coil is used to provide air heating The ECC-PCP provides a form ldquoCrdquo (NO and NC) dry contact closure that signals a need for auxiliary air heating The ECC-PCP contacts may be directly connected to an electric duct heater control circuit provided the circuit is 24 VAC maximum and the current through the contacts does not exceed 1 amp inductive The figure below shows a typical installation that utilizes a 3-way hot water control valve and a unit or duct mounted hot water coil
Figure 4-7 Installation of a Hot Water Coil 3-Way Valve
The ECC-PCP provides a normally open contact closure for connection to a building management system If a fault occurs the controller will energize this output to indicate that there is a problem with the dehumidification system The remote interface unit will display the cause of the fault and provide a suggested course of action This output may also be used to energize an external alarm light or buzzer It may also be directly connected to an external circuit as long as the circuit is 24 VAC maximum and the current through the contacts does not exceed 1 amp inductive
HO
T W
ATER
CO
IL
FIELD SUPPLIEDACTUATOR
AB SWITCH INB POSITION
2
1
W
BK
W 3
A
B
VALVE IN BYPASS POSITION
HOT WATER IN
HOT WATER OUT
THREE WAY VALVE WITHACTUATOR
HO
T W
ATER
CO
IL
VALVE IN HEATING POSITION
HOT WATER IN
HOT WATER OUT
THREE WAY VALVE WITHACTUATOR
ALL WIRING BY CONTRACTOR
T23
T25
T24
POOLCOMPAK
120 VAC24 VAC
FIELD SUPPLIED 40 VATRANSFORMER
WIRING DETAIL
PIPING DETAIL
34 EGW06-PCPEG-20150514
TMTM
Section IV Installation
BUILDING FIRE CONTROL SYSTEM (9)
The ECC-PCP can receive a contact closure signal from a building fire control system This input of the controller must be connected to dry (voltage free) contacts only When this input receives a contact closure the PoolComPaktrade unit compressor and fan will be shut down and the remote interface unit will show an alarm condition When the contact closure opens The PoolComPaktrade unit will resume normal operations It is possible to change the operation of the fire trip input to be active on open instead of close See ECC-PCP Service in the Operation section for further explanation
RETURN AIR SENSOR (10)
The return air sensor measures air temperature and relative humidity The sensor is normally factory mounted in the PoolComPaktrade unit return air section However with the optional economizer it is necessary to field mount this sensor in the duct work The sensor must be located in the return duct upstream of the exhaust duct connection (See Figure 4-4 Economizer Operation for a typical location of the sensor in the economizer system)
When field mounting is necessary the sensor will be provided from the factory and must be field wired using 22 AWG copper 4-conductor shielded twisted-pair cable
PURGE MODE INPUT (11)
The ECC-PCP can receive a contact closure signal from an external source to activate purge mode operation During purge mode the compressor is disabled and the economizer output is activated to bring in 100 outside air
AC PROOF INPUT (12)
An optional interlock used with certain types of heat rejection condensers Dry contact closure indicates a problem and prevents compressor operation in air cooling mode
POOL WATER TEMPERATURE SENSOR (13)
Units equipped with a pool water heating condenser require installation of factory supplied pool water temperature sensor It must be mounted upstream of the PoolComPaktrade and the auxiliary water heater The sensor can be threaded directly into a 1frasl4rdquo FPT fitting Electrical connection should be made with 22 AWG copper 2 conductor shielded twisted-pair cable Connect the shield drain wire to ground at the PoolComPaktrade end only
35EGW06-PCPEG-20150514
TMTM
Section IV Installation
POOL WATER PIPING (AWH AND AWV MODELS ONLY)
CAUTIONDo not run piping across service panels evaporator coil face or air discharge outlet
If a new or existing pool water heater is piped within the same circuit the PoolComPaktrade unit should be connected in a parallel loop between the filter and the other heater This allows the PoolComPaktrade unit to act as the primary water heating source and the other heater as a backup or supplemental water heater
All pool purification and chemical feed systems MUST be installed downstream of the unit This includes the practice of adding chemicals directly to the skimmer which results in highly concentrated corrosive chemicals passing over and through the PoolComPaktrade water condenser Water chemistry must be maintained at a pH level between 72 and 76 with a free chlorine level not exceeding 30 PPM and a combined chlorine level less than 03 PPM
If possible install the PoolComPaktrade unit above the pool water level If it is installed below the pool level isolation valves must be added Breakable couplings should be located near the unit on both the water inlet and outlet lines When installing piping connect the piping to these couplings last so as not to place stress on the other connection in the plumbing systemA constant flow of water is required through the PoolComPaktrade unitsrsquo condenser The circuit to and from the unit must be capable of maintaining the flow rate as specified for the installed unit (see PoolComPaktrade Performance data in Table 3-1) To ensure correct water flow the filter pump usually operates at the same time as the PoolComPaktrade unit However to reduce energy consumption during filter off cycle times a two-speed or small auxiliary water pump which bypasses the filter may be used
CAUTIONCAUTION Excessive water flow can cause premature erosion and pitting of the pool water condenser Adjust valve so that the water flow does not exceed the GPM or pressure drop listed in the table PoolPaktrade recommends a fixed flow control or adjustable flow circuit setter
PoolPaktrade International recommends installing water pressure tap ports to check influent and effluent water pressure See PoolComPaktrade Performance data in Table 3-1 for the particular unit model in question for the proper flow rate and pressure drop across the pool water condenser The pressure tap ports should be installed in a straight length of the water piping exterior to the PoolComPaktrade unit Install the port before any 90-degree turns and approximately 6 inches from the corner-post of the unit
In some instances piping from the PoolComPaktrade unit to the filter return line may not be feasible or economical The unit may be installed on its own supply and return line using a properly sized water pump and appropriate strainer Ensure that auxiliary water heating systems are staged to supplement the PoolComPaktrade unit water heating
If the PoolComPaktrade unit is installed above the pool surface and the main circulating pump cannot provide the proper water flow to it at the specified pressure an auxiliary booster pump is required
Condensate may be returned to the pool (if local codes allow) but PoolPaktrade International neither recommends nor disapproves this practice The installer should check local codes prior to making this decision Condensate must be filtered prior to being returned to the pool
If multiple PoolComPaktrade units are installed on the pool water piping circuit pipe them (and any auxiliary water heater) in parallel Piping PoolComPaktrade units in series may result in the downstream unit(s) sensing the pool water temperature as satisfied and not reject heat to the water to its full capacity The actual pool water temperature should be sensed by each PoolComPaktrade unit and auxiliary water heater
36 EGW06-PCPEG-20150514
TMTM
Section IV Installation
Figure 4-8 Typical Pool Water Piping Diagram (AWH and AWV Model Only)
PCP_EG_PoolWaterConnectSchematic_20140305eps
SALT WATER POOLS
For units (AW models only) installed serving a salt water pool wire the pool bonding system to the bonding lug on the unit copper pool water piping This connection is required to prevent corrosion of the internal PoolComPaktrade water piping
For more information on salt water pools see the article ldquoSalt Water Poolsrdquo in the Pool Water Chemistry section of the PoolPak educational library
POOLCHEMICAL
FEEDER
CHECKVALUE
OPTIONALBOOSTERPUMP IF
MAIN FILTERPUMP IS A
2-SPEED OR UNDERSIZED
BALLVALVES
POOLWATERFILTER MAIN
FILTERPUMP
DRAIN
UNIONS
EXTERNALPRESSURETAP PORTS
UNIONS
AUXILIARYPOOL WATER
HEATER
DRAIN
BALLVALVES
LOCKINGGLOBEVALVE
LOCKINGGLOBEVALVE
POOL WATERTEMP SENSOR
FC
FlowControl
37EGW06-PCPEG-20150514
TMTM
Section IV Installation
CONDENSATE DRAINSDrain pans are connected to a common drain system and must be trapped for proper operation For AWH and HCDH units a trap and piping must be supplied and installed by the customer The trap depth must be a minimum of 6 inches (See figure 4-9) For AWV and HCDV units a condensate trap is located inside the unit and the field condensate piping and overflow drain must not have an additional trap
Provisions MUST be made for disposal of condensate Condensate from the dehumidifier coil will have nearly the same properties as the pool water itself It is recommended that building materials subjected to the condensate and systems used for its disposal are checked for compatibility For drain piping use PVC plastic pipe minimum Schedule 40 The drain line must be sloped to provide proper drainage
Drain line exposed to outdoor ambient temperatures must be protected against freezing Wrap lines with electric heat tape (follow manufacturerrsquos instructions) controlled by an automatic thermostat set at a minimum of 35degF to protect against freezing Insulate all piping Insulation must be sealed at all seams Power for heat tape must be supplied external to the PoolComPaktrade
Figure 4-9 AWH and HCDH Condensate Trap
PCP_EG_NegPressCondPiping_20140122eps
WATER COOLED CONDENSERA standard option for PoolComPaktrade units is an integral water-cooled condenser For this option all valves and refrigerant piping is internal to the unit No additional field wiring is required No additional refrigerant or oil charge is required Water piping connections are 1-14rdquo MPT and labeled on the unit
UNIT BASE
MINIMUM SCHEDULE 40 PVC
REMOVABLECLEANOUT
OPEN TEEFOR VENT
AWH OR HCDH UNIT
PLUG THEUNUSEDCONNECTIONWITH SUITABLEPVC PLUG
1
2
4 INCHES MINIMUM OR MAX NEGATIVE STATICPRESSURE (INCHES WC) + 1 INCH
2 INCHES MINIMUM OR 12
1
12
TMTM
38 EGW06-PCPEG-20150514
TMTM
Section IV Installation
REMOTE AIR-COOLED CONDENSERSPACE AND LOCATION REQUIREMENTS
The most important consideration which must be taken into account when deciding upon the locations of air-cooled equipment is the provision for a supply of ambient air to the condenser and removal of heated air from the condenser area Where this essential requirement is not adhered to it will result in higher head pressures which cause poor operation and possible eventual failure of equipment Units must not be located in the vicinity of steam hot air or fume exhausts
Another consideration which must be taken is that the unit should be mounted away from noise sensitive spaces and must have adequate support to avoid vibration and noise transmission into the building Units should be mounted over corridors utility areas rest rooms and other auxiliary areas where high levels of sound are not an important factor Sound and structural consultants should be retained for recommendations
Walls or Obstructions
The unit should be located so that air may circulate freely and not be re-circulated For proper air flow and access all sides of the units should be a minimum of ldquoWrdquo away from any wall or obstruction It is preferred that this distance be increased whenever possible Care should be taken to see that ample room is left for maintenance work through access doors and panels Overhead obstructions are not permitted When the unit is in an area where it is enclosed by three walls the unit must be installed as indicated for units in a pit
Figure 4-10 Remote ACC Installation Around Walls or Obstructions
ALL_WallsorObstructions_20131111eps
Multiple Units
For units placed side by side the minimum distance between units is the width of the largest unit If units are placed end to end the minimum distance between the units is 4 feet
Figure 4-11 Remote ACC Installation When Installing Multiple Units
ALL_MultipleUnits_20131111eps
MINW
AIR FLOW
Wrdquo=Total width of the condenser
MIN
Wrdquo=Total width of the condenserrdquo
W
AIR FLOWAIR FLOW
39EGW06-PCPEG-20150514
TMTM
Section IV Installation
Units in Pits
The top of the unit should be level with the top of the pit and side distances increased to ldquo2Wrdquo If the top of the units is not level with the top of the pit discharge cones or stacks must be used to raise discharge air to the top of the pit This is a minimum requirement
Figure 4-12 Remote ACC Installation When Installing Units in Pits
ALL_UnitsinPits_20131111eps
Decorative Fences
Fences must have 50 free area with 1 foot undercut a ldquoWrdquo minimum clearance and must not exceed the tops of the unit If these requirements are not met the unit must be installed as indicated for ldquoUnits in Pitsrdquo
Figure 4-13 Remote ACC Installation When Installing Units Near Decorative Fences
ALL_DecorativeFences_20131111eps
Wrdquo=Total width of the condenserrdquo
MIN MIN
AIRFLOW
2W2W
STACK(BY OTHERSIF SUPPLIED) 10rsquo MAX
Wrdquo=Total width of the condenserrdquo
MIN1rdquo MIN MIN
AIR FLOWW W
40 EGW06-PCPEG-20150514
TMTM
Section IV Installation
FIELD INSTALLED PIPING
Installation of the outdoor air-cooled condenser should only be done by a qualified refrigeration mechanic familiar with this type of work Many service problems can be avoided by taking adequate precautions to provide an internally clean and dry system and by using procedures and materials that conform to established procedural standards
Piping Guidelines
The following piping recommendations are intended for use as a general guide For more complete information refer to the latest ASHRAE Handbook
Materialsbull Use clean dehydrated refrigeration-grade copper tubing for all refrigerant lines Hard drawn tubing should be used
where no appreciable amount of bending around pipes or obstructions is necessary If soft copper tubing must be used care should be taken to avoid sharp bends which may cause restrictions and excessive refrigerant pressure drops
bull Use long radius elbows wherever possible with one exception - short radius elbows should be used for any traps in the hot gas riser
bull Braze all copper to copper joints with a phosphorus-copper alloy material such as Silfos 5 or equivalent Do not use soft solder
bull During brazing operations flow an inert gas such as nitrogen through the lines to prevent internal oxidation scaling and contamination
bull Support refrigeration lines at intervals with suitable hangers brackets or clampsbull Pack glass fiber insulation and a sealing material around refrigerant lines where they penetrate a wall to reduce
vibration and to retain some flexibilitybull The liquid line and discharge line should not be in contact with one another If the installing contractor must tie these
lines together because of an installation requirement the contractor must insulate them from each other to prevent heat transfer Because the discharge line is hot during system operation precautions should be taken to avoid personnel injury
bull PoolComPaktrade units do not utilize compressors with unloading stages Consequently double hot gas risers are not needed for reduced load conditions as refrigerant flow rates will not fall below minimum velocities necessary to carry oil up through the discharge line
bull A field provided field installed liquid line filter-drier is recommended in the field piping to the PoolComPaktrade unit
Sizingbull The lines must be sized and routed so that oil is carried through the system Using smaller lines than recommended
will give excessive pressure drops resulting in reduced capacity and increased power consumption Oversized lines could result in an oil flow problem within the system and possible compressor damage
bull Excessive pressure drops in the liquid line may cause flashing of the refrigerant and a loss of a liquid seal at the expansion valve inlet A reduction in capacity may then occur because the presence of gaseous refrigerant will partially block the expansion valve Using hot gas and liquid line sizes recommended in the Air Cooled Condenser section for these units and the proper system refrigerant charge will prevent this problem
bull Discharge lines should be designed to prevent condensed refrigerant and oil from draining back to the compressor during OFF cycles Use the following guidelines The highest point in the discharge line should be above the highest point in the condenser coil The hot gas line should loop toward the floor if the condenser is located above the PoolComPaktrade unit especially
if the hot gas riser is longbull For refrigerant line sizing for an Air Cooled Condenser (ACC) where the lineset length is less than 100 feet or the
ACC location is less than 50 feet higher or 20 feet lower than the unit use the below Table 4-3bull ACC line lengths beyond the above limits will void warranty unless written approval is obtained from the
factory PRIOR to installation and startup
PCP_EG_ACCPiping_20140122eps
41EGW06-PCPEG-20150514
TMTM
Section IV Installation
Figure 4-14 ACC Refrigerant Piping
Refrigerant and Oil Chargingbull PoolPaktrade units are shipped with the required charge for self contained operation only The remote ACC option does
NOT provide the refrigerant charge or oil required for the ACC and line setsbull Refer to Table 4-2 for the additional ACC condenser chargebull Refer to Table 4-3 for the required additional oil and refrigerant charge Use the calculation method shown to calculate
the additional refrigerant and oilbull For the additional oil required multiply 2 of additional refrigerant charge of both ACC and refrigerant line length
Use the correct oil type of POE oil depending on the compressor installed For Alliance models SXA SPA SSA compressors use Copeland Ultra PN 998-E022-00 For Trane models CSHD compressors use Trane PN OIL00080
Sample Charging CalculationFor an AWV2600 with 73 feet line length and ACC0121 located 30 feet above the unit
Table 4-3 indicates 34rdquo discharge line and 58rdquo liquid line piping sizes Using R410A ozft additional charge for the lineset is 73 feet x 025 ozft + 73 feet x 148 ozft = 1260 oz Table 4-2 indicates additional charge for ACC0121 (allow 30 F Operation) is 39 lb x 16 ozlb = 6240 oz Total additional R410A charge for both ACC and refrigerant line is 1260 + 6240 oz = 750 oz or 46 lbs 14 oz Total additional oil charge is 750 oz x 2 = 15 oz
Table 4-2 R410A Charge for Air Cooled Condensers (lb)
DISCHARGE LINE
Pitch inDirection ofrefrigerant flow
LIQUID LINE
AIR-COOLEDCONDENSER
DISCHARGE LINE Pitch inDirection ofrefrigerant flow
Table 4-3 Refrigerant (R410A) Charge for Different Line Size
WARNINGAbove chart is for lineset length less than 100 ft and ACC located less than 50ft above unit or 20ft below unit Failures due to a piping layout not within these limits nor receiving prior PoolPaktrade
Factory approval will not be covered under PoolPaktrade warranty
Refrigerant Line Size (ACC) Refrigerant Charge for Units with Air Cooled Condensers (ACC)
Discharge Liquid Line Length (ft) vs R410A Charge (lbs)
Model OD R410A ozft OD R410A
ozft25 ft 50 ft 75 ft 100 ft
Lbs Oz Lbs Oz Lbs Oz Lbs Oz
0550 12 010 38 049 0 15 1 14 2 13 3 12
58 016 12 092 1 11 3 6 5 1 6 13
0800 58 016 38 049 1 0 2 1 3 1 4 2
58 016 12 092 1 11 3 6 5 1 6 13
1200 58 016 12 092 1 11 3 6 5 1 6 13
34 025 58 148 2 11 5 6 8 1 10 13
1400 58 016 12 092 1 11 3 6 5 1 6 13
34 025 58 148 2 11 5 6 8 1 10 13
1800 34 025 12 092 1 13 3 10 5 8 7 5
78 034 58 148 2 14 5 11 8 9 11 6
2600 34 025 58 148 2 11 5 6 8 1 10 13
1 18 058 34 221 4 6 8 12 13 1 17 7
3500 78 034 58 148 2 14 5 11 8 9 11 6
1 18 058 78 307 5 11 11 7 17 2 22 13
4000 78 034 34 221 3 16 7 16 11 15 15 15
1 18 058 78 307 5 11 11 7 17 2 22 13
Note1 This table applies to ACC line length less than 100 ft only Contact factory if ACC line length is more than 100 ft
2 Line size should be used for ACC at the same level or located up to 20ft below the unit
3 Line size should be used for ACC located up to 50 ft above the unit
43EGW06-PCPEG-20150514
TMTM
SECTION V OPERATION
ECC-PCP REMOTE INTERFACE UNITFigure 5-1 RIU Keypad
PCP_EG_StraightOnKeypadAnnotated_20121204eps
The ECC-PCP Remote Interface Unit (RIU) is designed around the Carel pGD0 4-line x 20 character backlit LCD display module The RIU displays are accessed through six backlit selection buttons They consist of a Return Enter Key Up Key Down Key Program Key Alarm Key and Escape Key as shown above
After approximately 5 minutes the RIU will display the status screen rotation Press the Escape key to bypass the five minute delay and move directly to the status display
STATUS DISPLAY
The status screens contain basic information about operation of the PoolComPaktrade system Press the up or down arrow keys to move from screen to screen The screens will also rotate automatically every 10 seconds
Figure 5-2 Status Screen 1S P A C E T E M P _ _ o FS P A C E R H _ _ S P A C E D E W P O I N T _ _ o F(O U T S I D E T E M P) _ _ o F
Status Screen 1 displaysbull Space Temperature in degF or degCbull Space Relative Humidity in bull Space Dew Point in degF or degCbull Outside Air Temperature in degF or degC (with Economizer Option Only)
Status Screen 2 displaysbull Water Heating - YES indicates that the unit is returning recovered heat back to the pool waterbull Aux Water Heat - YES indicates that the controller has closed the relay contact requesting auxiliary pool water heater
operationbull Water Temperature in degF or degC
Status Screen 3 displaysbull SPACE temperature control requirement bull TEMPERATURE- OK Indicates the space temperature is at setpointbull HEATING- YES Indicates the space requires heatingbull COOLING- YES Indicates the space requires coolingbull AUX AIR HEAT Indicates the space requires additional heating The auxiliary air heating relay contacts close to
activate the external heating system
44 EGW06-PCPEG-20150514
TMTM
bull DEHUMID (SURFACE) Indicates the space requires dehumidification The word SURFACE indicates that the unit is temporarily lowering the dew point set point to minimize condensation at the cold surface temperature sensor
bull ECONOMIZER MODE Indicates the unit is cooling the space with outside air ECONOMIZER MODE is only shown if the optional economizer system is present
Status Screen 4 displaysbull The first line displays the current system status bull The second line displays compressor status
SET POINT CHANGE MENU
bull Press the PRG key to access the main menubull Use the arrow keys to scroll to the menu selection for Set Points and then press the Enter keybull Use the arrow keys to select the set point to be changed and then press Enter Available set points are
Air Temperature
The allowable range for the air temperature set point is 70 to 95degF Use the arrow keys to change the set point and then press Enter The new dew point set point is shown immediately as DPT The set point change screen will remain visible for a short time to allow verification of the new dew point set point After about five seconds the RIU will return to the status screen display
Relative Humidity
The allowable range for the relative humidity set point is 40 to 65degF Use the arrow keys to change the set point and then press Enter The new dew point set point is shown immediately as DPT The set point change screen will remain visible for a short time to allow verification of the new dew point set point After about five seconds the RIU will automatically return to the status screen display
Pool Temperature
The allowable range for the water temperature set point is 70 to 104degF Use the arrow keys to change the set point and then press Enter The RIU will automatically return to the status screen display
Recommendations
bull Air Temperature (Range 70degF to 95degF) The air temperature should normally be set about 2degF above the pool water temperature to minimize the pool water evaporation rate (high temperature spas are an exception)
bull Relative Humidity (Range 40 to 65) The normal range for the humidity set point is 50 to 60 Lower set points will require more energy (electricity) to satisfy the dehumidification requirement and increase pool water evaporation
bull Pool Temperature (Range 70degF to 104degF) The pool temperature set point is normally set between 80degF and 88degF for a typical swimming pool and higher for a spa depending on user preference
CAUTIONThe dehumidifier should be configured to operate at the set points designed for the facility These set points are shown on the yellow label on the door of the RIU Set points other than those shown may not be attainable with this dehumidifier
Section V Operation
45EGW06-PCPEG-20150514
TMTM
Section V Operation
PURGE MODE CONTROL MENU
CAUTIONIt is the userrsquos responsibility to use this feature properly to prevent freeze damage to downstream equip-ment 100 outside air at below freezing conditions has the potential to cause serious damage
Purge Mode causes the unit to force the optional field-provided economizer dampers and fan to full open introducing large quantities of outside air to the space This is typically used when ldquoshockingrdquo the pool Compressor operation is disabled during purge but the auxiliary air and water heating systems remain active
If the unit is not equipped with the economizer option a flashing ldquoCAUTION NO FREEZE PROTECTIONrdquo warning will be displayed This warning indicates that operation of purge mode without regard for outside air temperatures below freezing can result in damage to hot water coils or other equipment in the pool area
DETAILED STATUS MENU
To access the detailed status menubull Press the PRG key to access the main menubull Use the arrow keys to scroll to the menu selection for Detailed Status and then press the Enter key
Detailed Status Screen 1 displays Temperaturesbull Surface ndash The temperature measured at the cold surface sensorbull Dew Point ndash The calculated dew point of the spacebull Dewpt Setpoint ndash The dew point set point calculated from the temperature and relative humidity set points
Detailed Status Screen 2 displaysbull Disch Press ndash The measured refrigerant pressure in the discharge line at the compressorbull Suct Press ndash The measured refrigerant pressure in the suction line at the compressorbull Suct Temp ndash The refrigerant temperature measured on the surface of the suction line at the compressorbull Suct SH ndash The calculated superheat at the suction of the compressor
Detailed Status Screen 3 displays the number of hours the following device or system has been active since power was last applied to the unitbull Cmpr - Compressorbull Fan ndash Supply Fanbull AC ndash Mechanical Air Cooling (Economizer Cooling Not Included)bull Aux ndash Air ndash Auxiliary Air Heatingbull Aux - Wtr ndash Auxiliary Water Heating
Detailed Status Screen 4 displaysbull Fault Count ndash The total number of high pressure low pressure and defrost trips that have occurred since power was
last applied to the unit When this number reaches 10 the compressor is locked outbull AC Proof ndash Indicates a status of ldquoProvenrdquo if AC mode operation is allowed ldquoNot Provenrdquo indicates that AC mode
operation is not allowed
Detailed Status Screen 5 (only present in units configured for multi-unit networking) displaysbull Network Role ndash Indicates if the unit currently being displayed by the RIU is the master or a slavebull Net Status ndash Indicates ldquoCONNECTEDrdquo if the unit is properly connected to the multi-unit network ldquoNO LINKrdquo
indicates the unit is not connectedbull Unit ID Number ndash Indicates the unit address on the multi-unit network
Detailed Status Screen 6 (only present in units configured for multi-unit networking) displaysbull Unit 1 Present ndash Indicates if the unit currently being displayed by the RIU can communicate with unit 1 on the multi-
unit networkbull Unit 2 3 4 ndash Same as for unit 1 but for the other 3 possible units on the network
46 EGW06-PCPEG-20150514
TMTM
Section V Operation
ECC-PCP NETWORK OPERATIONNetworked ECC-PCP units operate in a MASTERSLAVE environment This means that one unit (master) determines heating cooling and dehumidification requirements and broadcasts them on the network to the other units (slaves) This ensures that all units work together instead of against other Each networked unit contains all sensor and controls necessary for independent operation and is capable of acting in the master role Units on the network are identified by a number between one and four The unit with the lowest identification number having no uncleared alarms will be the master unit
If an alarm condition occurs in the master unit it will give up the role of master The unit with the next lowest identification number and no unclear alarms will take over the master role The unit that experienced the alarm condition will operate in the slave role until the alarm is cleared at the control panel
The control panel provides two network status screens These can be accessed in the detailed status menu The figure above shows the first screen that displays the status of units one through four as present or not Use this screen to verify that all units on the network are connected and communicating with each other The figure below shows the second screen that displays network information for the unit that is being displayed by the remote interface unit including network role connection status and network identification number
NETWORK CONFIGURATION
Using the following four parameters it is possible to configure the ECC-PCP network to accommodate a wide variety of installation options Network configuration can be accessed in the service menu These parameters must be set in each unit individually
Pool Water Temperature Control
Determines whether the unit will control water temperature based on the masterrsquos command (NETWORK) or its own temperature sensor and set point (LOCAL) If a unit set to LOCAL becomes the master other units in the network will not use the masterrsquos command for water heating They will look to the next line that is not set to LOCAL This parameter is only set to LOCAL if the unit is connected to a different pool than the rest of the units on the network Because the unit is controlling water temperature on its own it is necessary to select the correct unit with the control panel before changing the water temperature set point
Staged Dehumidification Control
Determines whether the unit will run in dehumidification when there is a need for 1 stage or 2 stages of dehumidification The master unit will start on any need for dehumidification independent of this parameter Slave units with this parameter set to YES will dehumidify only if the master is asking for 2 stages of dehumidification Setting this parameter to NO will cause the unit to dehumidify when the master calls for at least 1 stage of dehumidification Using this parameter it is possible to configure the number of units in each dehumidification stage
Dehumidification Stage 2 Offset
Determines how far the dewpoint (relative humidity) of the space has to rise above the set points before the unit will request 2 stages of dehumidification on the network This parameter is normally the same in all units on the network Making this parameter smaller will bring on the second stage of dehumidification sooner
Enable Network Control
Determines whether the unit will participate in the masterslave environment Setting this parameter to NO will cause the unit to act like a standard ECC-PCP single unit The unit will never become the master on the network and will not listen to the demands broadcast by the master on the network Although units with this parameter set to NO do not participate in the masterslave environment they are still accessible through the network control panel Like the LOCAL pool
47EGW06-PCPEG-20150514
TMTM
Section V Operation
water temperature setting this parameter when set to NO requires this unit to be displayed on the control panel before changing any of the set points The other screens for Pool Water Temperature Control Staged Dehumidification and Stage 2 Offset are not available when this parameter is set to NO
Changing Set Points
Each unit on the network maintains two groups of set points network and local If a unit has the Enable Network Control parameter set to YES and the Water Temperature Control parameter set to NETWORK it will control to the network set points Set points changed when the remote interface unit is displaying this unit will be changed in every unit on the network with the same NETWORK and Water Temperature Control parameters Units that are configured for Network Control and LOCAL water temperature control will control using local water temperature set point the network air temperature and relative humidity set points When the air temperature and relative humidity set points are changed when the remote interface unit is displaying the unit they will be changed in all units configured for Network control The water temperature set point will only be changed in the unit currently being displayed by the remote interface unit Units that are not configured for Network Control will use all local set points Therefore any set points changed while the remote interface unit is displaying this unit will only be changed in this unit
ECC-PCP SERVICE
SERVICE MENU
To access the service menubull Press the PRG key to access the main menubull Use the arrow keys to scroll to the menu selection for Service and then press the Enter keybull A password is required to access the service menu
The following sub-menus are available in the service menu
IO CONFIGURATION
Digital Inputs
This menu contains a screen for each digital input Each screen contains the following parametersbull Status of the data point linked to the inputbull Status of the raw digital inputbull Input type
The following parameter list shows the available digital input screensbull Defrost Switchbull Cpr High Tempbull Water Flow bull Fire Tripbull AC Proofbull Cpr High Prsbull Fan Overloadbull Low Pressurebull Purge Input
Digital Outputs
This menu contains a screen for each digital output Each screen contains the following parametersbull Current output status bull Requested output status bull Override
48 EGW06-PCPEG-20150514
TMTM
Section V Operation
The following digital output screens are availablebull Supply Fanbull Compressorbull Bypass Solenoidbull Water Heating Solenoidbull Reheat Solenoidbull AC Solenoidbull Aux Water Heatbull Alarm Outputbull ACC Run Signalbull Economizerbull Aux Air Heat Stage 1bull Aux Air Heat Stage 2
Analog Inputs
This menu contains a screen for each analog input Each screen contains the following parametersbull Current read-only value from the inputbull Fail bull Tol bull Offs bull Ovrd bull Min bull Max
The following analog input screens are availablebull Discharge Pressure bull Suction Pressure bull Return Relative Humidity bull Suction Temperature bull Return Air Temperature bull Pool Water Temperature bull Surface Temperature bull Outside Air Temperature
UNIT CONFIGURATION
Installed Options
This menu contains parameters that indicate the hardware options installed in the dehumidifier The parameters are set by the factory and do not typically require modification
Aux Air Heating
This menu contains parameters that configure the auxiliary air heating system
Aux Water Heating
This menu contains parameters that configure the auxiliary water heating system
Temperature Ctrl
This menu contains parameters that configure the air temperature control routines of the dehumidifier
49EGW06-PCPEG-20150514
TMTM
Section V Operation
Humidity Control
This menu contains parameters that configure the humidity control routines of the dehumidifier Water Temp CtrlThis menu contains parameters that configure the compressor based water heating system of the dehumidifier bull Water Heat First This parameter indicates whether the control routine will use the compressor for water heating when
there is no dehumidification requirement bull Deadband This parameter is the deadband used by the compressor based pool water heating control routine
BAS INTERFACE
This menu contains parameters that configure the building automation system interface of the dehumidifier
MULTI-UNIT NETWORK
This menu contains parameters that configure the operation of dehumidifier in a multiple unit installation
COMPRESSOR
This menu contains parameters that configure the operation of the dehumidifier compressor
ECONOMIZER
This menu contains parameters that configure the operation of the optional field provided and field installed economizer damper system
HISTORY
The history screen provides information on the last 50 faults that have occurred in the dehumidifier It can be used for troubleshooting by an experienced HVAC technician The faults are recorded with a sequence number from 1 to 50 Sequence number 1 is always the most recent fault The following information is stored and displayed for each fault in non-volatile memorybull Hour at which the fault occurred bull Fault Code Number bull Return Air Temperaturebull Return Air Humiditybull Discharge Pressurebull Suction Pressurebull Suction Temperaturebull Pool Water Temperaturebull AC Solenoid Statusbull Bypass Solenoid Statusbull Compressor Statusbull Reheat Solenoid Status
MANUAL MODE
The Manual Mode menu for use by qualified service personnel provides two options Demand Control and Digital Output Control
UTILITIES
The Utilities menu provides sub menus for configuring units of measure and passwords for set point and service access control
50 EGW06-PCPEG-20150514
TMTM
Section V Operation
MAINTENANCEOVERVIEW
Periodic routine maintenance will promote extended equipment life While PoolComPaktrade units use components that are usually maintenance free and do not require service a simple check could result in noticing possible problems before they develop into major problems
DAILY MAINTENANCE
bull Pool water chemistry is a part of daily maintenance and it is recommended to follow National Spa and Pool Institute standards PoolPaktrade International strongly recommends following the National Spa and Pool Institute values
Table 5-1 Pool Water Chemistry
bull PoolPaktrade International recommends daily logging of your pool water chemistry MAINTENANCE AND YOUR POOL WATER CHEMISTRY IS IMPORTANT TO PROTECT YOUR WARRANTY RIGHTS
MONTHLY MAINTENANCE
bull Air Filters inspect and replace or clean as applicable Dirty filters restrict air flow and can cause improper unit operation
bull Ensure that the condensate collection pan is draining properly and the condensate is not overflowing or being drawn into the supply air stream Check the condensate and overflow lines to ensure that neither are clogged
bull Check the operation of the blower motor and scroll Ensure that the scroll does not rub the housing Check for proper belt tension Worn or cracked belts should be replaced Check fan and mounting brackets for tightness
bull Ensure that the ALARM light is not illuminated
ANNUAL MAINTENANCE
bull Inspect the refrigeration and water circuits for leaks wear or corrosion Corrosion on the water piping or condenser may indicate poor pool chemical maintenance and improper chlorine and pH levels
bull Check electrical components for loose wiringbull Although the exterior of the PoolComPaktrade units are powder coated wipe down unit particularly if installed in an
area subject to dirt or chemical concentrationbull Wash brush or vacuum the evaporator and air condenser coils This will ensure proper heat transfer and reduce static
pressure losses Caution should be taken not to wet electrical components inside the unit
NOTEIf service and inspections are not performed by a competent and experienced service firm the manufacturer warranty may be voided
AUXILIARY AIR amp POOL WATER HEATER CONNECTIONS FOR MULTIPLE UNIT INSTALLATION
Figure 6-1 Auxiliary Air and Pool Water Heater Connections for Multiple Units
AWH_EG_Connections_20121204eps
52 EGW06-PCPEG-20150514
TMTM
AUXILIARY AIR amp POOL WATER HEATER CONNECTION FOR A TWO POOL INSTALLATION
Figure 6-2 Auxiliary Air and Pool Water Heater Connections for Two Pool Installations
AWH_EG_ConnectionstoPool_20121204eps
Section VI Wiring
53EGW06-PCPEG-20150514
TMTM
Section VI Wiring
FIELD WIRING
Figure 6-3 Field Wiring Diagram
PCP_EG_FieldWiringDiagram_20121204eps
54 EGW06-PCPEG-20150514
TMTM
Section VI Wiring
FIRE CONTROL SYSTEM CONNECTION
Figure 6-4 Fire Control System Connection
PCP_EG_FirecontrolSysConnection_20121204eps
55EGW06-PCPEG-20150514
TMTM
Section VI Wiring
This page intentionally left blank
EGW06-PCPEG-20150514
TMTM
56
TMTM
3491 Industrial Drive York PA 17402 USA 800-959-7725 Fax 717-757-5085for more information wwwpoolpakcom
The Leader in Indoor Pool Dehumidification
18 EGW06-PCPEG-20150514
TMTM
POOLCOMPAK UNIT DIMENSIONS
The latest detailed unit dimensional data may be found in the PoolComPaktrade Series AWHHCDH AWVHCDV All Models R-410A Dimensional Drawings publication (EG6_Dim_All) which can be downloaded from in the PoolPaktrade Engineering Library (wwwpoolpakcom)
PoolComPaktrade Horizontal Dimensions
Table 3-3 AWHCD Horizontal Unit Overall Dimensions
NOTECoils add 01rdquoWC to ESPEntering Air Temperature - 80degFEntering Water Temperature - 180degFMax Working Pressure - 125 psiCapacity is a function of Return Airflow and is independent of Supply Airflow
21EGW06-PCPEG-20150514
TMTM
POOLCOMPAK OUTSIDE AIR DAMPER SIZE
Table 3-6 PoolComPaktrade Outside Air Damper Size
Section III Performance and Sizing
Model Outside Air (OA) Location
Opening Size1 (in) Damper Code OA CFM Range2
PoolComPak Vertical AWVHCDVV5508001200 Top A 14 x 10 OA-TR 0-800Left OA-LT
V14001800
Top A 14 x 10 OA-TR 0-800Left OA-LTTop B 14 x 22 OA-TR 800-2000Left OA-LT
V2600
Top A 14 x 10 OA-TR 0-800Left OA-LTTop C 14 x 30 OA-TR 800-2500Left OA-LT
V35004000
Top A 14 x 10 OA-TR 0-800Left OA-LTTop C 14 x 30 OA-TR 800-2800Left OA-LT
PoolComPak Horizontal AWHHCDH
H5508001200
Top A 12 x 12 OA-TC 0-450Front OA-FCTop B 12 x 24 OA-TC 450-800Front OA-FC
H14001800
Top C 16 x 20 OA-TC 0-1000Front OA-FCTop D 16 x 40 OA-TC 1000-2000Front OA-FC
H260035004000
Top E 20 x 20 OA-TC 0-1400Front OA-FCTop F 20 x 40 OA-TC 1400-2800Front OA-FC
1Size may change depending on RA CFM and ESP See product dwg requestpulley request from section software for exact damper size
2Operating these units at OA quantities different from which the unit was selected will be detrimental to the unitrsquos operation
22 EGW06-PCPEG-20150514
TMTM
REFRIGERANT
Table 3-7 Factory Refrigerant R410A Charge
NOTEFactory charge for remote ACC option does not include refrigerant nor oil charge for either ACC or connecting refrigerant line between unit and ACC
For ACC and lineset charging see Table 4-2 and Table 4-3 in the Installation section
1Factory charge for remote ACC option does not include refrigerant for either ACC or lineset
2Factory charge for RoofPak with Integral ACC in parentheses
Section III Performance and Sizing
23EGW06-PCPEG-20150514
TMTM
Section III Performance and Sizing
REMOTE AIR-COOLED CONDENSER (ACC)
Table 3-8 Remote ACC Performance ChartNote Below table contains the piping sizes of the remote ACC stub-outs Additional field piping may be needed to make the transition from the connections to correct refrigeration lineset sizing (See Table 4-3)
Unit Size ACC Model
Ambient Temp (degF)
Unit Height
(inches)
Vapor OD
(inches)
Liquid OD
(inches)Unit
WeightMotor FLA Min Circuit
Ampacity
A B C 208230V 460V 208230V 460V0550 ACC0041 95100105115 393 58 12 120 3 15 38 19
Power wiring should incorporate properly sized fuses or motor rated circuit breakers A disconnect must be fitted within easy access and sight of the unit Supply voltage must be maintained within +- 10 of design voltage on both single and three phase units Cycles must be within +- 5 of design Failure to operate within these ranges can adversely affect performance cause failure of the equipment and may void warranty terms
Figure 3-5 Duct Heaterbull Tubular sheathed elementsbull Galvanized steel cabinetbull Duct-mounted flanged typebull Airflow in either directionbull UL and CSA approved heaterbull Airflow proving switchbull Auto and manual reset high temperature limitsbull Magnetic contactorsbull 24 volt control circuit and transformerbull Standard heater for indoor installation in non-insulated duct
Duct Heater Sizes
Table 3-9 Duct Sizes
Duct Heater Installation
1 Flange both ends of the ducts outwards on three sides to match heater flanges as shown2 Fasten heater to duct using sheet metal screws for smaller heaters or bolts for larger ones3 Seal opening with suitable sealing compound4 If needed use additional hangers to support heater5 Electrical power connections must be made within NEC standards and local electrical codes6 Refer to the Field Wiring Diagram at the back of this manual for controls connection
Reference Dimensions Fan Outlet
AWHHCDH 5508001200 9-14 x 10-38 inchesAWHHCDH 140018002600 12-12 x 13-12 inchesAWHHCDH 260035004000 17 x 19 inchesDuct heater width = 8 10 or 12 inches depending on heater kW Flange width = 1 inch
VOLTSHZPHDuct Size
12rdquo X 12rdquo 15rdquo X 15rdquo 20rdquo X 20rdquo 28rdquo X 28rdquo
Installation requires the unit to be placed on a roof mounted curb the mechanical room floor an appropriate location in the pool room or outside on an equipment housekeeping pad Isolation pads should be placed under the unit to minimize transmission of noise due to unit operation Then pool water is piped to the unit Electrical power from a properly sized fused disconnect is connected to the unit The supply and return air ducts are connected to their respective locations on the unit The condensate is piped back to the pool or to the sewer
If an optional remote air-cooled condenser is used place the condenser in a proper outdoor location Refrigerant piping is then run from the air cooled condenser to the PoolComPaktrade unit Refrigerant lines must be leak checked and evacuated through installer provided Schrader valves Control and power wiring are run to complete the installation If a field-furnished auxiliary space heating coil is installed the control for this heater must be field wired to the PoolComPaktrade controls shown in Section V1 - Wiring (Figure 6-3 Field Wiring Diagram)
Outside air can be ducted into the unit through the optional outside air duct connection The unit can draw up to 30 of its supply air from the outside When ventilating the natatorium in this way an exhaust fan must be furnished in the natatorium to exhaust to the outside an air volume slightly greater than the air volume introduced into the natatorium from the outside This will maintain a negative pressure in the space preventing odor and moisture migration Outside air filters are provided for Horizontal PoolComPaktrade units For Vertical PoolComPaktrade units outside air must be filtered before entering the unit
UNITFACILITY INTERFACE
A typical PoolComPaktrade system layout and its connection to the natatorium and pool water piping systems is shown in the figure below
Figure 4-1 Typical PoolComPaktrade AWH Series System Layout
PCP_EG_LayoutSchematic_AW_3D_20121204eps
Cold SurfaceTemperature Sensor
POOL
Recommended WaterPressure Taps
Return Air
ECC-PCP RemoteInterface Unit (should not
be mounted insidepool enclosure)
FusedDisconnect (Able to be seen
from the unit)
RemoteAir-CooledCondenser(optional)
PoolComPakHorizontal
Unit
Pool Heater
Pool HeaterPump (optional)
Pool Water Circulation Pumpfor PoolComPak (Optional - By Others)
Flo
Pool WaterTemp Sensor
wBalancing Valve
Pool Filter
Pool Pump
IsolationValves
AirVent
Supply Air DuctSupply Air
ExteriorWindow
27EGW06-PCPEG-20150514
TMTM
HANDLING
All units are shipped completely assembled Care should be taken to avoid damage due to rough handling If the unit is not to be immediately installed it must be protected from weather and site hazards
CLEARANCE
For proper operation and service PoolComPaktrade Vertical PoolComPaktrade Horizontal and RoofPak units require 36rdquoclearance on all sides
MOUNTING OF POOLCOMPAK UNITS
Locate the PoolComPaktrade unit on a firm level base If floor mounting ensure that the floor is capable of supporting the operating weight If wall mounting or hanging a unit provide a support structure that is capable of supporting the unit while protecting pool patrons and employees from injury Ensure that the support structure will not interfere with the operation of the unit Provision must be made for servicing units suspended above floor level Install isolation pads under the unit to minimize unit transmitted vibration noise
INSPECTION
Upon receipt of the PoolComPaktrade unit(s) immediately inspect for damage In particular inspect the housing and the evaporator coil face Minor indentations of the fins will not affect performance However if there is substantial damage immediately notify shipping company of unseen damage at delivery with a detailed letter outlining the damage Retain copies of all shipping damage claim documentation as well as photographs of the observed damage
NOTEPoolPaktrade International does not ship damaged units from its facility nor is it responsible for damage incurred during transit
POWER SUPPLY
A separate fused disconnect switch must be provided per local codes and be within easy accessibility of the PoolComPaktrade unit Use the minimum circuit capacity listed on the unitrsquos data plate to determine the minimum wire size for incoming electrical power The ground connection for the unit is located in the unit control panel The power supply to the unit must be adequate for the compressor starting amperage (LRA) If it is not a compressor rotor stall will occur during start-up due to an excessive voltage drop All field wiring must be done according to the wiring diagram provided with the unit and in conformance to the National Electrical Code (NEC) and any other applicable local electrical code(s)
For Vertical and Horizontal PoolComPaktrade units installing contractor must punch a hole into the electrical compartment to run power wires The hole is to be properly finished with a rubber grommet and weather sealing
CONTROL WIRING
All control wiring field connections are described in the wiring diagram furnished with the PoolComPaktrade unit as well as in the Field Wiring section of this manual All control wiring is low voltage
CONDENSATE PIPING
The condensate may be piped to a drain or returned to the pool if local codes allow If returned to the pool the condensate should be piped to the skimmer PoolPaktrade International recommends neither for nor against the practice of returning condensate to the pool The overflow drain should be piped in a similar fashion The installer should review the local codes prior to making the decision of where to dispose of the condensate The amount of condensate produced in a year is about equal to the volume of the pool
Section IV Installation
28 EGW06-PCPEG-20150514
TMTM
Section IV Installation
CURB MOUNTING
Illustrated in Figure 4-2 is a curb that has been designed specifically for the PoolComPaktrade product line The outside dimensions of the curb are such that the base of PoolComPaktrade extends over the edge of the curb all the way around This aids in preventing rainwater from getting between the base of the PoolComPaktrade and the curb It is the installing contractorrsquos responsibility to complete the following
bull Flash the curb into the roofbull Insulate the curbbull Connect the supply and return duct to the curbrsquos duct support railsbull Connect condensate drain line with appropriate trap bull Seal the curb to the bottom of the PoolComPaktrade using the gasket supplied with the curbbull Provide counter flashing between curb and PoolComPaktrade unitbull Seal the pool water pipes where they go through the curb
If specified when ordering all water piping connections can be made through the curb These water connections include pool water condensate auxiliary hot water coil (optional)
If the PoolComPaktrade is to be mounted on a curb the unit must be ordered with the ldquooutdoorrdquo option PoolComPaktrade Units produced for curb mounting receive special weatherizing and insulation that non-curb mounted PoolComPaktrade Units do not receive
NOTEIf the factory is not notified that a PoolComPaktrade is to mounted outdoors the unit will not be weather tight it will leak and it will not be properly insulated
INTEGRAL GAS FURNACE OPTION (ROOFPAK ONLY)
When using a gas furnace power venting is provided for all unit sizes External vent piping andor cap is required Please refer to the furnace manufacturerrsquos manual for piping and venting instructions Install leak-test and properly regulate piping for the gas-fired heater Pressures should be regulated to the entering pressures as shown on the furnace manufacturerrsquos data plate or manual
The ECC-PCP is the Electronic Control Center programmable controller designed specifically for the PoolComPaktrade dehumidification system It is a robust system capable of a variety of functions The following text describes the field wiring required for for proper operation of the ECC-PCP dehumidification system in a typical PoolComPaktrade unit installationThe field wiring diagram (see Section VI - Wiring) shows the location of the connections for the sensors and other required devicesThe numbers following the text identify the location on the field wiring diagram where each device is connected to the PoolComPaktrade unit electrical panel
REMOTE INTERFACE UNIT (1)
The remote interface unit allows the user to view space temperature pool water temperature and relative humidity change set points and receive fault notifications It should be mounted in a convenient location that is outside the pool area The ambient temperature of the mounting location must always be above 32 F
NOTEThe maximum distance from the Remote Interface Unit to the PoolComPaktrade unit is 1000 feet For distances greater than 1000 feet contact the factory
The control panel does not contain any sensors and should be mounted outside the pool enclosure A factory supplied 6 ft cable RJ25 (6 conductor) must be installed between the PoolComPaktrade unit and the control panel
For distances greater than 6 feet use 6 conductor 22 AWG shielded twisted-pair cable along with the supplied RJ25 jack and second 6 foot cable shipped loose with the unit
The wall mounting of the terminal first requires the back piece (A) of the RIU assembly The RIU is designed to fit a single gang extra-deep electrical box mounted horizontally in the wall The RJ25 jack and most of the black cable should be placed inside the box before installing the mounting bracket A frac34rdquo hole must be drilled for the 6-conductor cable which connects the remote interface unit to the PoolPaktrade unit The below is specific mounting instructions that correspond to the mounting schematic below
1 Fasten the back piece (A) to the gang box using the rounded-head screws supplied in the packaging Use the screws that come with the box to secure the bracket
2 Thread the 6-conductor cable through the back piece (A) and connect to the back of front panel (B)3 Rest the front panel (B) on the back piece A and fasten the parts together using the flush-head screws supplied in the
packaging4 Finally fit the click-on frame (C)
Figure 4-3 Remote Interface Mounting Plate
ALL_EG_RIUMounting_20131219eps
A
B
C
31EGW06-PCPEG-20150514
TMTMSection IV Installation
COLD SURFACE TEMPERATURE SENSOR (2)
This sensor is used to measure the temperature of the coldest surface in the pool enclosure The sensor is an aluminum bar 1rdquo long by frac14rdquo square with a clearance hole for a number 8 screw and two 6rdquo wires on one end
When the temperature of the surface drops to within 5 F of the space air dew point the humidity set point will be automatically reset downward to help prevent condensation on the cold surface It should be noted that resetting the humidity set point will not compensate for lower quality building materials such as single pane glass or non-thermally broken frames
The sensor should be mounted on an exterior window or door frame that is not in direct sunlight In cases where there are no exterior windows or doors the sensor should be mounted on the inside surface of an exterior wall The sensor must be in contact with the cold surface Electrical connection should be made with 22 AWG copper two-conductor shielded twisted-pair cable Connect the shield drain wire to ground at the PoolComPaktrade unit end only
ECONOMIZER SYSTEM (OPTIONAL) (3)
An economizer system cools the space with outside air instead of the compressor The ECC-PCP provides a dry contact closure to activate the economizer The contacts of the ECC-PCP may be connected directly to the economizer control circuit provided the circuit is 24 VAC maximum and the current does not exceed 1 amp inductive The other components of the system must be provided by others (See figure below for an illustration of a typical economizer system)
Units equipped with an economizer require relocation of the factory mounted return air sensor It must be located in a duct that will always contain air that represents the space temperature and humidity
The economizer will operate only when space cooling is required and there is no dehumidification requirement When the outside air temperature is greater than 50degF and more than 5degF below the space temperature set point and the space temperature rises above the set point the compressor is disabled and a dry contact closure between T216 and T217 is made to activate the economizer
When the ECC-PCP contacts close relay R1 is energized causing the outside and exhaust air dampers (by others) to open and the return air damper (by others) to close At the same time relay R2 is energized causing the exhaust fan to run If the space temperature continues to rise and exceeds the space temperature set point by more than two degrees the economizer contact is opened reversing the damper positions The compressor is energized in the space cooling mode (if so equipped) The compressor will then continue to run until the call for space cooling is satisfied The economizer will also be activated in the space cooling mode if the auxiliary air conditioning condenser option is not installed or if the compressor is locked out by a fault condition
Figure 4-4 Economizer Operation
PCP_EG_EconomizerOperation2_20121204eps
32 EGW06-PCPEG-20150514
TMTM Section IV Installation
WARNINGWhen economizer option is selected adequate exhaust capacity via a separate fan must be specified to ensure the natatorium pressure remains slightly negative Failure to specify adequately sized exhaust system may result in damage to structure and pool odors may be forced into other areas of the building
OUTSIDE AIR TEMPERATURE SENSOR (ECONOMIZER OPTION ONLY) (4)
The outside air temperature sensor is installed only when the outside air economizer option is included The sensor is mounted inside a 12rdquo PVC conduit pull elbow It can be mounted to the outside of the building using standard PVC conduit fittings The sensor should be mounted near the outside air intake vent for the economizer system It is very important to mount the sensor so that it does not receive direct sunlight The exposure to sunlight will cause the sensor housing to warm resulting in temperature readings that are higher than the actual air temperature This condition may prevent the ECC-PCP from selecting the economizer mode of operation If possible mount the sensor under an overhang or on a surface with a northern exposure
Electrical connection should be made with 22 AWG copper 2-conductor shielded twisted-pair cable Connect the shield drain wire to ground at the PoolComPaktrade end only See figure below for an illustration of the outside air temperature sensor Seal the conduit leading to the sensor with silicone caulk to prevent moisture from migrating out to the sensor and condensing inside the sensor
Figure 4-5 Outside Air Sensor
PCP_EG_OutsideAirSensorInstallation_20121204eps
AIR COOLED CONDENSER (OPTIONAL) (5)
The air-cooled condenser is used to reject heat recovered during the space cooling mode of operation Only PoolComPaktrade brand air-cooled condensers (PAC Units) should be used with a PoolComPaktrade Unit The ECC-PCP provides 24 VAC control signal to the speed control located in the PAC unit control panel The speed control then runs the condenser fan motor at the appropriate speed See figure below for an illustration of a PAC unit field wiring
Figure 4-6 PAC Unit Field Wiring
PCP_EG_RemoteACCFieldConnection_20121204eps
24 VAC CONTROL SIGNAL FROM
USE COPPER SUPPLY WIRES
POOLCOMPAKTERMINALS 12AND 13
POWER SUPPLY
21 L1 L2
GR
33EGW06-PCPEG-20150514
TMTMSection IV Installation
AUXILIARY POOL WATER HEATING SYSTEM (AWH MODEL ONLY) (6)
The auxiliary pool water heating system is provided by others Typically a gas fired or electric pool water heater is used The ECC-PCP provides a dry contact closure that signals a need for auxiliary water heating The contacts of the ECC-PCP may be connected directly to the heaterrsquos control circuit provided the circuit is 24 VAC maximum and the current does not exceed 1 amp inductive Any other applications will require an additional relay (by others) to be installed between the ECC-PCP and the pool water heating system
AUXILIARY AIR HEATING SYSTEM (7)
Typically a duct mounted electric heater hot water coil or a factory installed unit mounted hot water coil is used to provide air heating The ECC-PCP provides a form ldquoCrdquo (NO and NC) dry contact closure that signals a need for auxiliary air heating The ECC-PCP contacts may be directly connected to an electric duct heater control circuit provided the circuit is 24 VAC maximum and the current through the contacts does not exceed 1 amp inductive The figure below shows a typical installation that utilizes a 3-way hot water control valve and a unit or duct mounted hot water coil
Figure 4-7 Installation of a Hot Water Coil 3-Way Valve
The ECC-PCP provides a normally open contact closure for connection to a building management system If a fault occurs the controller will energize this output to indicate that there is a problem with the dehumidification system The remote interface unit will display the cause of the fault and provide a suggested course of action This output may also be used to energize an external alarm light or buzzer It may also be directly connected to an external circuit as long as the circuit is 24 VAC maximum and the current through the contacts does not exceed 1 amp inductive
HO
T W
ATER
CO
IL
FIELD SUPPLIEDACTUATOR
AB SWITCH INB POSITION
2
1
W
BK
W 3
A
B
VALVE IN BYPASS POSITION
HOT WATER IN
HOT WATER OUT
THREE WAY VALVE WITHACTUATOR
HO
T W
ATER
CO
IL
VALVE IN HEATING POSITION
HOT WATER IN
HOT WATER OUT
THREE WAY VALVE WITHACTUATOR
ALL WIRING BY CONTRACTOR
T23
T25
T24
POOLCOMPAK
120 VAC24 VAC
FIELD SUPPLIED 40 VATRANSFORMER
WIRING DETAIL
PIPING DETAIL
34 EGW06-PCPEG-20150514
TMTM
Section IV Installation
BUILDING FIRE CONTROL SYSTEM (9)
The ECC-PCP can receive a contact closure signal from a building fire control system This input of the controller must be connected to dry (voltage free) contacts only When this input receives a contact closure the PoolComPaktrade unit compressor and fan will be shut down and the remote interface unit will show an alarm condition When the contact closure opens The PoolComPaktrade unit will resume normal operations It is possible to change the operation of the fire trip input to be active on open instead of close See ECC-PCP Service in the Operation section for further explanation
RETURN AIR SENSOR (10)
The return air sensor measures air temperature and relative humidity The sensor is normally factory mounted in the PoolComPaktrade unit return air section However with the optional economizer it is necessary to field mount this sensor in the duct work The sensor must be located in the return duct upstream of the exhaust duct connection (See Figure 4-4 Economizer Operation for a typical location of the sensor in the economizer system)
When field mounting is necessary the sensor will be provided from the factory and must be field wired using 22 AWG copper 4-conductor shielded twisted-pair cable
PURGE MODE INPUT (11)
The ECC-PCP can receive a contact closure signal from an external source to activate purge mode operation During purge mode the compressor is disabled and the economizer output is activated to bring in 100 outside air
AC PROOF INPUT (12)
An optional interlock used with certain types of heat rejection condensers Dry contact closure indicates a problem and prevents compressor operation in air cooling mode
POOL WATER TEMPERATURE SENSOR (13)
Units equipped with a pool water heating condenser require installation of factory supplied pool water temperature sensor It must be mounted upstream of the PoolComPaktrade and the auxiliary water heater The sensor can be threaded directly into a 1frasl4rdquo FPT fitting Electrical connection should be made with 22 AWG copper 2 conductor shielded twisted-pair cable Connect the shield drain wire to ground at the PoolComPaktrade end only
35EGW06-PCPEG-20150514
TMTM
Section IV Installation
POOL WATER PIPING (AWH AND AWV MODELS ONLY)
CAUTIONDo not run piping across service panels evaporator coil face or air discharge outlet
If a new or existing pool water heater is piped within the same circuit the PoolComPaktrade unit should be connected in a parallel loop between the filter and the other heater This allows the PoolComPaktrade unit to act as the primary water heating source and the other heater as a backup or supplemental water heater
All pool purification and chemical feed systems MUST be installed downstream of the unit This includes the practice of adding chemicals directly to the skimmer which results in highly concentrated corrosive chemicals passing over and through the PoolComPaktrade water condenser Water chemistry must be maintained at a pH level between 72 and 76 with a free chlorine level not exceeding 30 PPM and a combined chlorine level less than 03 PPM
If possible install the PoolComPaktrade unit above the pool water level If it is installed below the pool level isolation valves must be added Breakable couplings should be located near the unit on both the water inlet and outlet lines When installing piping connect the piping to these couplings last so as not to place stress on the other connection in the plumbing systemA constant flow of water is required through the PoolComPaktrade unitsrsquo condenser The circuit to and from the unit must be capable of maintaining the flow rate as specified for the installed unit (see PoolComPaktrade Performance data in Table 3-1) To ensure correct water flow the filter pump usually operates at the same time as the PoolComPaktrade unit However to reduce energy consumption during filter off cycle times a two-speed or small auxiliary water pump which bypasses the filter may be used
CAUTIONCAUTION Excessive water flow can cause premature erosion and pitting of the pool water condenser Adjust valve so that the water flow does not exceed the GPM or pressure drop listed in the table PoolPaktrade recommends a fixed flow control or adjustable flow circuit setter
PoolPaktrade International recommends installing water pressure tap ports to check influent and effluent water pressure See PoolComPaktrade Performance data in Table 3-1 for the particular unit model in question for the proper flow rate and pressure drop across the pool water condenser The pressure tap ports should be installed in a straight length of the water piping exterior to the PoolComPaktrade unit Install the port before any 90-degree turns and approximately 6 inches from the corner-post of the unit
In some instances piping from the PoolComPaktrade unit to the filter return line may not be feasible or economical The unit may be installed on its own supply and return line using a properly sized water pump and appropriate strainer Ensure that auxiliary water heating systems are staged to supplement the PoolComPaktrade unit water heating
If the PoolComPaktrade unit is installed above the pool surface and the main circulating pump cannot provide the proper water flow to it at the specified pressure an auxiliary booster pump is required
Condensate may be returned to the pool (if local codes allow) but PoolPaktrade International neither recommends nor disapproves this practice The installer should check local codes prior to making this decision Condensate must be filtered prior to being returned to the pool
If multiple PoolComPaktrade units are installed on the pool water piping circuit pipe them (and any auxiliary water heater) in parallel Piping PoolComPaktrade units in series may result in the downstream unit(s) sensing the pool water temperature as satisfied and not reject heat to the water to its full capacity The actual pool water temperature should be sensed by each PoolComPaktrade unit and auxiliary water heater
36 EGW06-PCPEG-20150514
TMTM
Section IV Installation
Figure 4-8 Typical Pool Water Piping Diagram (AWH and AWV Model Only)
PCP_EG_PoolWaterConnectSchematic_20140305eps
SALT WATER POOLS
For units (AW models only) installed serving a salt water pool wire the pool bonding system to the bonding lug on the unit copper pool water piping This connection is required to prevent corrosion of the internal PoolComPaktrade water piping
For more information on salt water pools see the article ldquoSalt Water Poolsrdquo in the Pool Water Chemistry section of the PoolPak educational library
POOLCHEMICAL
FEEDER
CHECKVALUE
OPTIONALBOOSTERPUMP IF
MAIN FILTERPUMP IS A
2-SPEED OR UNDERSIZED
BALLVALVES
POOLWATERFILTER MAIN
FILTERPUMP
DRAIN
UNIONS
EXTERNALPRESSURETAP PORTS
UNIONS
AUXILIARYPOOL WATER
HEATER
DRAIN
BALLVALVES
LOCKINGGLOBEVALVE
LOCKINGGLOBEVALVE
POOL WATERTEMP SENSOR
FC
FlowControl
37EGW06-PCPEG-20150514
TMTM
Section IV Installation
CONDENSATE DRAINSDrain pans are connected to a common drain system and must be trapped for proper operation For AWH and HCDH units a trap and piping must be supplied and installed by the customer The trap depth must be a minimum of 6 inches (See figure 4-9) For AWV and HCDV units a condensate trap is located inside the unit and the field condensate piping and overflow drain must not have an additional trap
Provisions MUST be made for disposal of condensate Condensate from the dehumidifier coil will have nearly the same properties as the pool water itself It is recommended that building materials subjected to the condensate and systems used for its disposal are checked for compatibility For drain piping use PVC plastic pipe minimum Schedule 40 The drain line must be sloped to provide proper drainage
Drain line exposed to outdoor ambient temperatures must be protected against freezing Wrap lines with electric heat tape (follow manufacturerrsquos instructions) controlled by an automatic thermostat set at a minimum of 35degF to protect against freezing Insulate all piping Insulation must be sealed at all seams Power for heat tape must be supplied external to the PoolComPaktrade
Figure 4-9 AWH and HCDH Condensate Trap
PCP_EG_NegPressCondPiping_20140122eps
WATER COOLED CONDENSERA standard option for PoolComPaktrade units is an integral water-cooled condenser For this option all valves and refrigerant piping is internal to the unit No additional field wiring is required No additional refrigerant or oil charge is required Water piping connections are 1-14rdquo MPT and labeled on the unit
UNIT BASE
MINIMUM SCHEDULE 40 PVC
REMOVABLECLEANOUT
OPEN TEEFOR VENT
AWH OR HCDH UNIT
PLUG THEUNUSEDCONNECTIONWITH SUITABLEPVC PLUG
1
2
4 INCHES MINIMUM OR MAX NEGATIVE STATICPRESSURE (INCHES WC) + 1 INCH
2 INCHES MINIMUM OR 12
1
12
TMTM
38 EGW06-PCPEG-20150514
TMTM
Section IV Installation
REMOTE AIR-COOLED CONDENSERSPACE AND LOCATION REQUIREMENTS
The most important consideration which must be taken into account when deciding upon the locations of air-cooled equipment is the provision for a supply of ambient air to the condenser and removal of heated air from the condenser area Where this essential requirement is not adhered to it will result in higher head pressures which cause poor operation and possible eventual failure of equipment Units must not be located in the vicinity of steam hot air or fume exhausts
Another consideration which must be taken is that the unit should be mounted away from noise sensitive spaces and must have adequate support to avoid vibration and noise transmission into the building Units should be mounted over corridors utility areas rest rooms and other auxiliary areas where high levels of sound are not an important factor Sound and structural consultants should be retained for recommendations
Walls or Obstructions
The unit should be located so that air may circulate freely and not be re-circulated For proper air flow and access all sides of the units should be a minimum of ldquoWrdquo away from any wall or obstruction It is preferred that this distance be increased whenever possible Care should be taken to see that ample room is left for maintenance work through access doors and panels Overhead obstructions are not permitted When the unit is in an area where it is enclosed by three walls the unit must be installed as indicated for units in a pit
Figure 4-10 Remote ACC Installation Around Walls or Obstructions
ALL_WallsorObstructions_20131111eps
Multiple Units
For units placed side by side the minimum distance between units is the width of the largest unit If units are placed end to end the minimum distance between the units is 4 feet
Figure 4-11 Remote ACC Installation When Installing Multiple Units
ALL_MultipleUnits_20131111eps
MINW
AIR FLOW
Wrdquo=Total width of the condenser
MIN
Wrdquo=Total width of the condenserrdquo
W
AIR FLOWAIR FLOW
39EGW06-PCPEG-20150514
TMTM
Section IV Installation
Units in Pits
The top of the unit should be level with the top of the pit and side distances increased to ldquo2Wrdquo If the top of the units is not level with the top of the pit discharge cones or stacks must be used to raise discharge air to the top of the pit This is a minimum requirement
Figure 4-12 Remote ACC Installation When Installing Units in Pits
ALL_UnitsinPits_20131111eps
Decorative Fences
Fences must have 50 free area with 1 foot undercut a ldquoWrdquo minimum clearance and must not exceed the tops of the unit If these requirements are not met the unit must be installed as indicated for ldquoUnits in Pitsrdquo
Figure 4-13 Remote ACC Installation When Installing Units Near Decorative Fences
ALL_DecorativeFences_20131111eps
Wrdquo=Total width of the condenserrdquo
MIN MIN
AIRFLOW
2W2W
STACK(BY OTHERSIF SUPPLIED) 10rsquo MAX
Wrdquo=Total width of the condenserrdquo
MIN1rdquo MIN MIN
AIR FLOWW W
40 EGW06-PCPEG-20150514
TMTM
Section IV Installation
FIELD INSTALLED PIPING
Installation of the outdoor air-cooled condenser should only be done by a qualified refrigeration mechanic familiar with this type of work Many service problems can be avoided by taking adequate precautions to provide an internally clean and dry system and by using procedures and materials that conform to established procedural standards
Piping Guidelines
The following piping recommendations are intended for use as a general guide For more complete information refer to the latest ASHRAE Handbook
Materialsbull Use clean dehydrated refrigeration-grade copper tubing for all refrigerant lines Hard drawn tubing should be used
where no appreciable amount of bending around pipes or obstructions is necessary If soft copper tubing must be used care should be taken to avoid sharp bends which may cause restrictions and excessive refrigerant pressure drops
bull Use long radius elbows wherever possible with one exception - short radius elbows should be used for any traps in the hot gas riser
bull Braze all copper to copper joints with a phosphorus-copper alloy material such as Silfos 5 or equivalent Do not use soft solder
bull During brazing operations flow an inert gas such as nitrogen through the lines to prevent internal oxidation scaling and contamination
bull Support refrigeration lines at intervals with suitable hangers brackets or clampsbull Pack glass fiber insulation and a sealing material around refrigerant lines where they penetrate a wall to reduce
vibration and to retain some flexibilitybull The liquid line and discharge line should not be in contact with one another If the installing contractor must tie these
lines together because of an installation requirement the contractor must insulate them from each other to prevent heat transfer Because the discharge line is hot during system operation precautions should be taken to avoid personnel injury
bull PoolComPaktrade units do not utilize compressors with unloading stages Consequently double hot gas risers are not needed for reduced load conditions as refrigerant flow rates will not fall below minimum velocities necessary to carry oil up through the discharge line
bull A field provided field installed liquid line filter-drier is recommended in the field piping to the PoolComPaktrade unit
Sizingbull The lines must be sized and routed so that oil is carried through the system Using smaller lines than recommended
will give excessive pressure drops resulting in reduced capacity and increased power consumption Oversized lines could result in an oil flow problem within the system and possible compressor damage
bull Excessive pressure drops in the liquid line may cause flashing of the refrigerant and a loss of a liquid seal at the expansion valve inlet A reduction in capacity may then occur because the presence of gaseous refrigerant will partially block the expansion valve Using hot gas and liquid line sizes recommended in the Air Cooled Condenser section for these units and the proper system refrigerant charge will prevent this problem
bull Discharge lines should be designed to prevent condensed refrigerant and oil from draining back to the compressor during OFF cycles Use the following guidelines The highest point in the discharge line should be above the highest point in the condenser coil The hot gas line should loop toward the floor if the condenser is located above the PoolComPaktrade unit especially
if the hot gas riser is longbull For refrigerant line sizing for an Air Cooled Condenser (ACC) where the lineset length is less than 100 feet or the
ACC location is less than 50 feet higher or 20 feet lower than the unit use the below Table 4-3bull ACC line lengths beyond the above limits will void warranty unless written approval is obtained from the
factory PRIOR to installation and startup
PCP_EG_ACCPiping_20140122eps
41EGW06-PCPEG-20150514
TMTM
Section IV Installation
Figure 4-14 ACC Refrigerant Piping
Refrigerant and Oil Chargingbull PoolPaktrade units are shipped with the required charge for self contained operation only The remote ACC option does
NOT provide the refrigerant charge or oil required for the ACC and line setsbull Refer to Table 4-2 for the additional ACC condenser chargebull Refer to Table 4-3 for the required additional oil and refrigerant charge Use the calculation method shown to calculate
the additional refrigerant and oilbull For the additional oil required multiply 2 of additional refrigerant charge of both ACC and refrigerant line length
Use the correct oil type of POE oil depending on the compressor installed For Alliance models SXA SPA SSA compressors use Copeland Ultra PN 998-E022-00 For Trane models CSHD compressors use Trane PN OIL00080
Sample Charging CalculationFor an AWV2600 with 73 feet line length and ACC0121 located 30 feet above the unit
Table 4-3 indicates 34rdquo discharge line and 58rdquo liquid line piping sizes Using R410A ozft additional charge for the lineset is 73 feet x 025 ozft + 73 feet x 148 ozft = 1260 oz Table 4-2 indicates additional charge for ACC0121 (allow 30 F Operation) is 39 lb x 16 ozlb = 6240 oz Total additional R410A charge for both ACC and refrigerant line is 1260 + 6240 oz = 750 oz or 46 lbs 14 oz Total additional oil charge is 750 oz x 2 = 15 oz
Table 4-2 R410A Charge for Air Cooled Condensers (lb)
DISCHARGE LINE
Pitch inDirection ofrefrigerant flow
LIQUID LINE
AIR-COOLEDCONDENSER
DISCHARGE LINE Pitch inDirection ofrefrigerant flow
Table 4-3 Refrigerant (R410A) Charge for Different Line Size
WARNINGAbove chart is for lineset length less than 100 ft and ACC located less than 50ft above unit or 20ft below unit Failures due to a piping layout not within these limits nor receiving prior PoolPaktrade
Factory approval will not be covered under PoolPaktrade warranty
Refrigerant Line Size (ACC) Refrigerant Charge for Units with Air Cooled Condensers (ACC)
Discharge Liquid Line Length (ft) vs R410A Charge (lbs)
Model OD R410A ozft OD R410A
ozft25 ft 50 ft 75 ft 100 ft
Lbs Oz Lbs Oz Lbs Oz Lbs Oz
0550 12 010 38 049 0 15 1 14 2 13 3 12
58 016 12 092 1 11 3 6 5 1 6 13
0800 58 016 38 049 1 0 2 1 3 1 4 2
58 016 12 092 1 11 3 6 5 1 6 13
1200 58 016 12 092 1 11 3 6 5 1 6 13
34 025 58 148 2 11 5 6 8 1 10 13
1400 58 016 12 092 1 11 3 6 5 1 6 13
34 025 58 148 2 11 5 6 8 1 10 13
1800 34 025 12 092 1 13 3 10 5 8 7 5
78 034 58 148 2 14 5 11 8 9 11 6
2600 34 025 58 148 2 11 5 6 8 1 10 13
1 18 058 34 221 4 6 8 12 13 1 17 7
3500 78 034 58 148 2 14 5 11 8 9 11 6
1 18 058 78 307 5 11 11 7 17 2 22 13
4000 78 034 34 221 3 16 7 16 11 15 15 15
1 18 058 78 307 5 11 11 7 17 2 22 13
Note1 This table applies to ACC line length less than 100 ft only Contact factory if ACC line length is more than 100 ft
2 Line size should be used for ACC at the same level or located up to 20ft below the unit
3 Line size should be used for ACC located up to 50 ft above the unit
43EGW06-PCPEG-20150514
TMTM
SECTION V OPERATION
ECC-PCP REMOTE INTERFACE UNITFigure 5-1 RIU Keypad
PCP_EG_StraightOnKeypadAnnotated_20121204eps
The ECC-PCP Remote Interface Unit (RIU) is designed around the Carel pGD0 4-line x 20 character backlit LCD display module The RIU displays are accessed through six backlit selection buttons They consist of a Return Enter Key Up Key Down Key Program Key Alarm Key and Escape Key as shown above
After approximately 5 minutes the RIU will display the status screen rotation Press the Escape key to bypass the five minute delay and move directly to the status display
STATUS DISPLAY
The status screens contain basic information about operation of the PoolComPaktrade system Press the up or down arrow keys to move from screen to screen The screens will also rotate automatically every 10 seconds
Figure 5-2 Status Screen 1S P A C E T E M P _ _ o FS P A C E R H _ _ S P A C E D E W P O I N T _ _ o F(O U T S I D E T E M P) _ _ o F
Status Screen 1 displaysbull Space Temperature in degF or degCbull Space Relative Humidity in bull Space Dew Point in degF or degCbull Outside Air Temperature in degF or degC (with Economizer Option Only)
Status Screen 2 displaysbull Water Heating - YES indicates that the unit is returning recovered heat back to the pool waterbull Aux Water Heat - YES indicates that the controller has closed the relay contact requesting auxiliary pool water heater
operationbull Water Temperature in degF or degC
Status Screen 3 displaysbull SPACE temperature control requirement bull TEMPERATURE- OK Indicates the space temperature is at setpointbull HEATING- YES Indicates the space requires heatingbull COOLING- YES Indicates the space requires coolingbull AUX AIR HEAT Indicates the space requires additional heating The auxiliary air heating relay contacts close to
activate the external heating system
44 EGW06-PCPEG-20150514
TMTM
bull DEHUMID (SURFACE) Indicates the space requires dehumidification The word SURFACE indicates that the unit is temporarily lowering the dew point set point to minimize condensation at the cold surface temperature sensor
bull ECONOMIZER MODE Indicates the unit is cooling the space with outside air ECONOMIZER MODE is only shown if the optional economizer system is present
Status Screen 4 displaysbull The first line displays the current system status bull The second line displays compressor status
SET POINT CHANGE MENU
bull Press the PRG key to access the main menubull Use the arrow keys to scroll to the menu selection for Set Points and then press the Enter keybull Use the arrow keys to select the set point to be changed and then press Enter Available set points are
Air Temperature
The allowable range for the air temperature set point is 70 to 95degF Use the arrow keys to change the set point and then press Enter The new dew point set point is shown immediately as DPT The set point change screen will remain visible for a short time to allow verification of the new dew point set point After about five seconds the RIU will return to the status screen display
Relative Humidity
The allowable range for the relative humidity set point is 40 to 65degF Use the arrow keys to change the set point and then press Enter The new dew point set point is shown immediately as DPT The set point change screen will remain visible for a short time to allow verification of the new dew point set point After about five seconds the RIU will automatically return to the status screen display
Pool Temperature
The allowable range for the water temperature set point is 70 to 104degF Use the arrow keys to change the set point and then press Enter The RIU will automatically return to the status screen display
Recommendations
bull Air Temperature (Range 70degF to 95degF) The air temperature should normally be set about 2degF above the pool water temperature to minimize the pool water evaporation rate (high temperature spas are an exception)
bull Relative Humidity (Range 40 to 65) The normal range for the humidity set point is 50 to 60 Lower set points will require more energy (electricity) to satisfy the dehumidification requirement and increase pool water evaporation
bull Pool Temperature (Range 70degF to 104degF) The pool temperature set point is normally set between 80degF and 88degF for a typical swimming pool and higher for a spa depending on user preference
CAUTIONThe dehumidifier should be configured to operate at the set points designed for the facility These set points are shown on the yellow label on the door of the RIU Set points other than those shown may not be attainable with this dehumidifier
Section V Operation
45EGW06-PCPEG-20150514
TMTM
Section V Operation
PURGE MODE CONTROL MENU
CAUTIONIt is the userrsquos responsibility to use this feature properly to prevent freeze damage to downstream equip-ment 100 outside air at below freezing conditions has the potential to cause serious damage
Purge Mode causes the unit to force the optional field-provided economizer dampers and fan to full open introducing large quantities of outside air to the space This is typically used when ldquoshockingrdquo the pool Compressor operation is disabled during purge but the auxiliary air and water heating systems remain active
If the unit is not equipped with the economizer option a flashing ldquoCAUTION NO FREEZE PROTECTIONrdquo warning will be displayed This warning indicates that operation of purge mode without regard for outside air temperatures below freezing can result in damage to hot water coils or other equipment in the pool area
DETAILED STATUS MENU
To access the detailed status menubull Press the PRG key to access the main menubull Use the arrow keys to scroll to the menu selection for Detailed Status and then press the Enter key
Detailed Status Screen 1 displays Temperaturesbull Surface ndash The temperature measured at the cold surface sensorbull Dew Point ndash The calculated dew point of the spacebull Dewpt Setpoint ndash The dew point set point calculated from the temperature and relative humidity set points
Detailed Status Screen 2 displaysbull Disch Press ndash The measured refrigerant pressure in the discharge line at the compressorbull Suct Press ndash The measured refrigerant pressure in the suction line at the compressorbull Suct Temp ndash The refrigerant temperature measured on the surface of the suction line at the compressorbull Suct SH ndash The calculated superheat at the suction of the compressor
Detailed Status Screen 3 displays the number of hours the following device or system has been active since power was last applied to the unitbull Cmpr - Compressorbull Fan ndash Supply Fanbull AC ndash Mechanical Air Cooling (Economizer Cooling Not Included)bull Aux ndash Air ndash Auxiliary Air Heatingbull Aux - Wtr ndash Auxiliary Water Heating
Detailed Status Screen 4 displaysbull Fault Count ndash The total number of high pressure low pressure and defrost trips that have occurred since power was
last applied to the unit When this number reaches 10 the compressor is locked outbull AC Proof ndash Indicates a status of ldquoProvenrdquo if AC mode operation is allowed ldquoNot Provenrdquo indicates that AC mode
operation is not allowed
Detailed Status Screen 5 (only present in units configured for multi-unit networking) displaysbull Network Role ndash Indicates if the unit currently being displayed by the RIU is the master or a slavebull Net Status ndash Indicates ldquoCONNECTEDrdquo if the unit is properly connected to the multi-unit network ldquoNO LINKrdquo
indicates the unit is not connectedbull Unit ID Number ndash Indicates the unit address on the multi-unit network
Detailed Status Screen 6 (only present in units configured for multi-unit networking) displaysbull Unit 1 Present ndash Indicates if the unit currently being displayed by the RIU can communicate with unit 1 on the multi-
unit networkbull Unit 2 3 4 ndash Same as for unit 1 but for the other 3 possible units on the network
46 EGW06-PCPEG-20150514
TMTM
Section V Operation
ECC-PCP NETWORK OPERATIONNetworked ECC-PCP units operate in a MASTERSLAVE environment This means that one unit (master) determines heating cooling and dehumidification requirements and broadcasts them on the network to the other units (slaves) This ensures that all units work together instead of against other Each networked unit contains all sensor and controls necessary for independent operation and is capable of acting in the master role Units on the network are identified by a number between one and four The unit with the lowest identification number having no uncleared alarms will be the master unit
If an alarm condition occurs in the master unit it will give up the role of master The unit with the next lowest identification number and no unclear alarms will take over the master role The unit that experienced the alarm condition will operate in the slave role until the alarm is cleared at the control panel
The control panel provides two network status screens These can be accessed in the detailed status menu The figure above shows the first screen that displays the status of units one through four as present or not Use this screen to verify that all units on the network are connected and communicating with each other The figure below shows the second screen that displays network information for the unit that is being displayed by the remote interface unit including network role connection status and network identification number
NETWORK CONFIGURATION
Using the following four parameters it is possible to configure the ECC-PCP network to accommodate a wide variety of installation options Network configuration can be accessed in the service menu These parameters must be set in each unit individually
Pool Water Temperature Control
Determines whether the unit will control water temperature based on the masterrsquos command (NETWORK) or its own temperature sensor and set point (LOCAL) If a unit set to LOCAL becomes the master other units in the network will not use the masterrsquos command for water heating They will look to the next line that is not set to LOCAL This parameter is only set to LOCAL if the unit is connected to a different pool than the rest of the units on the network Because the unit is controlling water temperature on its own it is necessary to select the correct unit with the control panel before changing the water temperature set point
Staged Dehumidification Control
Determines whether the unit will run in dehumidification when there is a need for 1 stage or 2 stages of dehumidification The master unit will start on any need for dehumidification independent of this parameter Slave units with this parameter set to YES will dehumidify only if the master is asking for 2 stages of dehumidification Setting this parameter to NO will cause the unit to dehumidify when the master calls for at least 1 stage of dehumidification Using this parameter it is possible to configure the number of units in each dehumidification stage
Dehumidification Stage 2 Offset
Determines how far the dewpoint (relative humidity) of the space has to rise above the set points before the unit will request 2 stages of dehumidification on the network This parameter is normally the same in all units on the network Making this parameter smaller will bring on the second stage of dehumidification sooner
Enable Network Control
Determines whether the unit will participate in the masterslave environment Setting this parameter to NO will cause the unit to act like a standard ECC-PCP single unit The unit will never become the master on the network and will not listen to the demands broadcast by the master on the network Although units with this parameter set to NO do not participate in the masterslave environment they are still accessible through the network control panel Like the LOCAL pool
47EGW06-PCPEG-20150514
TMTM
Section V Operation
water temperature setting this parameter when set to NO requires this unit to be displayed on the control panel before changing any of the set points The other screens for Pool Water Temperature Control Staged Dehumidification and Stage 2 Offset are not available when this parameter is set to NO
Changing Set Points
Each unit on the network maintains two groups of set points network and local If a unit has the Enable Network Control parameter set to YES and the Water Temperature Control parameter set to NETWORK it will control to the network set points Set points changed when the remote interface unit is displaying this unit will be changed in every unit on the network with the same NETWORK and Water Temperature Control parameters Units that are configured for Network Control and LOCAL water temperature control will control using local water temperature set point the network air temperature and relative humidity set points When the air temperature and relative humidity set points are changed when the remote interface unit is displaying the unit they will be changed in all units configured for Network control The water temperature set point will only be changed in the unit currently being displayed by the remote interface unit Units that are not configured for Network Control will use all local set points Therefore any set points changed while the remote interface unit is displaying this unit will only be changed in this unit
ECC-PCP SERVICE
SERVICE MENU
To access the service menubull Press the PRG key to access the main menubull Use the arrow keys to scroll to the menu selection for Service and then press the Enter keybull A password is required to access the service menu
The following sub-menus are available in the service menu
IO CONFIGURATION
Digital Inputs
This menu contains a screen for each digital input Each screen contains the following parametersbull Status of the data point linked to the inputbull Status of the raw digital inputbull Input type
The following parameter list shows the available digital input screensbull Defrost Switchbull Cpr High Tempbull Water Flow bull Fire Tripbull AC Proofbull Cpr High Prsbull Fan Overloadbull Low Pressurebull Purge Input
Digital Outputs
This menu contains a screen for each digital output Each screen contains the following parametersbull Current output status bull Requested output status bull Override
48 EGW06-PCPEG-20150514
TMTM
Section V Operation
The following digital output screens are availablebull Supply Fanbull Compressorbull Bypass Solenoidbull Water Heating Solenoidbull Reheat Solenoidbull AC Solenoidbull Aux Water Heatbull Alarm Outputbull ACC Run Signalbull Economizerbull Aux Air Heat Stage 1bull Aux Air Heat Stage 2
Analog Inputs
This menu contains a screen for each analog input Each screen contains the following parametersbull Current read-only value from the inputbull Fail bull Tol bull Offs bull Ovrd bull Min bull Max
The following analog input screens are availablebull Discharge Pressure bull Suction Pressure bull Return Relative Humidity bull Suction Temperature bull Return Air Temperature bull Pool Water Temperature bull Surface Temperature bull Outside Air Temperature
UNIT CONFIGURATION
Installed Options
This menu contains parameters that indicate the hardware options installed in the dehumidifier The parameters are set by the factory and do not typically require modification
Aux Air Heating
This menu contains parameters that configure the auxiliary air heating system
Aux Water Heating
This menu contains parameters that configure the auxiliary water heating system
Temperature Ctrl
This menu contains parameters that configure the air temperature control routines of the dehumidifier
49EGW06-PCPEG-20150514
TMTM
Section V Operation
Humidity Control
This menu contains parameters that configure the humidity control routines of the dehumidifier Water Temp CtrlThis menu contains parameters that configure the compressor based water heating system of the dehumidifier bull Water Heat First This parameter indicates whether the control routine will use the compressor for water heating when
there is no dehumidification requirement bull Deadband This parameter is the deadband used by the compressor based pool water heating control routine
BAS INTERFACE
This menu contains parameters that configure the building automation system interface of the dehumidifier
MULTI-UNIT NETWORK
This menu contains parameters that configure the operation of dehumidifier in a multiple unit installation
COMPRESSOR
This menu contains parameters that configure the operation of the dehumidifier compressor
ECONOMIZER
This menu contains parameters that configure the operation of the optional field provided and field installed economizer damper system
HISTORY
The history screen provides information on the last 50 faults that have occurred in the dehumidifier It can be used for troubleshooting by an experienced HVAC technician The faults are recorded with a sequence number from 1 to 50 Sequence number 1 is always the most recent fault The following information is stored and displayed for each fault in non-volatile memorybull Hour at which the fault occurred bull Fault Code Number bull Return Air Temperaturebull Return Air Humiditybull Discharge Pressurebull Suction Pressurebull Suction Temperaturebull Pool Water Temperaturebull AC Solenoid Statusbull Bypass Solenoid Statusbull Compressor Statusbull Reheat Solenoid Status
MANUAL MODE
The Manual Mode menu for use by qualified service personnel provides two options Demand Control and Digital Output Control
UTILITIES
The Utilities menu provides sub menus for configuring units of measure and passwords for set point and service access control
50 EGW06-PCPEG-20150514
TMTM
Section V Operation
MAINTENANCEOVERVIEW
Periodic routine maintenance will promote extended equipment life While PoolComPaktrade units use components that are usually maintenance free and do not require service a simple check could result in noticing possible problems before they develop into major problems
DAILY MAINTENANCE
bull Pool water chemistry is a part of daily maintenance and it is recommended to follow National Spa and Pool Institute standards PoolPaktrade International strongly recommends following the National Spa and Pool Institute values
Table 5-1 Pool Water Chemistry
bull PoolPaktrade International recommends daily logging of your pool water chemistry MAINTENANCE AND YOUR POOL WATER CHEMISTRY IS IMPORTANT TO PROTECT YOUR WARRANTY RIGHTS
MONTHLY MAINTENANCE
bull Air Filters inspect and replace or clean as applicable Dirty filters restrict air flow and can cause improper unit operation
bull Ensure that the condensate collection pan is draining properly and the condensate is not overflowing or being drawn into the supply air stream Check the condensate and overflow lines to ensure that neither are clogged
bull Check the operation of the blower motor and scroll Ensure that the scroll does not rub the housing Check for proper belt tension Worn or cracked belts should be replaced Check fan and mounting brackets for tightness
bull Ensure that the ALARM light is not illuminated
ANNUAL MAINTENANCE
bull Inspect the refrigeration and water circuits for leaks wear or corrosion Corrosion on the water piping or condenser may indicate poor pool chemical maintenance and improper chlorine and pH levels
bull Check electrical components for loose wiringbull Although the exterior of the PoolComPaktrade units are powder coated wipe down unit particularly if installed in an
area subject to dirt or chemical concentrationbull Wash brush or vacuum the evaporator and air condenser coils This will ensure proper heat transfer and reduce static
pressure losses Caution should be taken not to wet electrical components inside the unit
NOTEIf service and inspections are not performed by a competent and experienced service firm the manufacturer warranty may be voided
AUXILIARY AIR amp POOL WATER HEATER CONNECTIONS FOR MULTIPLE UNIT INSTALLATION
Figure 6-1 Auxiliary Air and Pool Water Heater Connections for Multiple Units
AWH_EG_Connections_20121204eps
52 EGW06-PCPEG-20150514
TMTM
AUXILIARY AIR amp POOL WATER HEATER CONNECTION FOR A TWO POOL INSTALLATION
Figure 6-2 Auxiliary Air and Pool Water Heater Connections for Two Pool Installations
AWH_EG_ConnectionstoPool_20121204eps
Section VI Wiring
53EGW06-PCPEG-20150514
TMTM
Section VI Wiring
FIELD WIRING
Figure 6-3 Field Wiring Diagram
PCP_EG_FieldWiringDiagram_20121204eps
54 EGW06-PCPEG-20150514
TMTM
Section VI Wiring
FIRE CONTROL SYSTEM CONNECTION
Figure 6-4 Fire Control System Connection
PCP_EG_FirecontrolSysConnection_20121204eps
55EGW06-PCPEG-20150514
TMTM
Section VI Wiring
This page intentionally left blank
EGW06-PCPEG-20150514
TMTM
56
TMTM
3491 Industrial Drive York PA 17402 USA 800-959-7725 Fax 717-757-5085for more information wwwpoolpakcom
The Leader in Indoor Pool Dehumidification
23EGW06-PCPEG-20150514
TMTM
Section III Performance and Sizing
REMOTE AIR-COOLED CONDENSER (ACC)
Table 3-8 Remote ACC Performance ChartNote Below table contains the piping sizes of the remote ACC stub-outs Additional field piping may be needed to make the transition from the connections to correct refrigeration lineset sizing (See Table 4-3)
Unit Size ACC Model
Ambient Temp (degF)
Unit Height
(inches)
Vapor OD
(inches)
Liquid OD
(inches)Unit
WeightMotor FLA Min Circuit
Ampacity
A B C 208230V 460V 208230V 460V0550 ACC0041 95100105115 393 58 12 120 3 15 38 19
Power wiring should incorporate properly sized fuses or motor rated circuit breakers A disconnect must be fitted within easy access and sight of the unit Supply voltage must be maintained within +- 10 of design voltage on both single and three phase units Cycles must be within +- 5 of design Failure to operate within these ranges can adversely affect performance cause failure of the equipment and may void warranty terms
Figure 3-5 Duct Heaterbull Tubular sheathed elementsbull Galvanized steel cabinetbull Duct-mounted flanged typebull Airflow in either directionbull UL and CSA approved heaterbull Airflow proving switchbull Auto and manual reset high temperature limitsbull Magnetic contactorsbull 24 volt control circuit and transformerbull Standard heater for indoor installation in non-insulated duct
Duct Heater Sizes
Table 3-9 Duct Sizes
Duct Heater Installation
1 Flange both ends of the ducts outwards on three sides to match heater flanges as shown2 Fasten heater to duct using sheet metal screws for smaller heaters or bolts for larger ones3 Seal opening with suitable sealing compound4 If needed use additional hangers to support heater5 Electrical power connections must be made within NEC standards and local electrical codes6 Refer to the Field Wiring Diagram at the back of this manual for controls connection
Reference Dimensions Fan Outlet
AWHHCDH 5508001200 9-14 x 10-38 inchesAWHHCDH 140018002600 12-12 x 13-12 inchesAWHHCDH 260035004000 17 x 19 inchesDuct heater width = 8 10 or 12 inches depending on heater kW Flange width = 1 inch
VOLTSHZPHDuct Size
12rdquo X 12rdquo 15rdquo X 15rdquo 20rdquo X 20rdquo 28rdquo X 28rdquo
Installation requires the unit to be placed on a roof mounted curb the mechanical room floor an appropriate location in the pool room or outside on an equipment housekeeping pad Isolation pads should be placed under the unit to minimize transmission of noise due to unit operation Then pool water is piped to the unit Electrical power from a properly sized fused disconnect is connected to the unit The supply and return air ducts are connected to their respective locations on the unit The condensate is piped back to the pool or to the sewer
If an optional remote air-cooled condenser is used place the condenser in a proper outdoor location Refrigerant piping is then run from the air cooled condenser to the PoolComPaktrade unit Refrigerant lines must be leak checked and evacuated through installer provided Schrader valves Control and power wiring are run to complete the installation If a field-furnished auxiliary space heating coil is installed the control for this heater must be field wired to the PoolComPaktrade controls shown in Section V1 - Wiring (Figure 6-3 Field Wiring Diagram)
Outside air can be ducted into the unit through the optional outside air duct connection The unit can draw up to 30 of its supply air from the outside When ventilating the natatorium in this way an exhaust fan must be furnished in the natatorium to exhaust to the outside an air volume slightly greater than the air volume introduced into the natatorium from the outside This will maintain a negative pressure in the space preventing odor and moisture migration Outside air filters are provided for Horizontal PoolComPaktrade units For Vertical PoolComPaktrade units outside air must be filtered before entering the unit
UNITFACILITY INTERFACE
A typical PoolComPaktrade system layout and its connection to the natatorium and pool water piping systems is shown in the figure below
Figure 4-1 Typical PoolComPaktrade AWH Series System Layout
PCP_EG_LayoutSchematic_AW_3D_20121204eps
Cold SurfaceTemperature Sensor
POOL
Recommended WaterPressure Taps
Return Air
ECC-PCP RemoteInterface Unit (should not
be mounted insidepool enclosure)
FusedDisconnect (Able to be seen
from the unit)
RemoteAir-CooledCondenser(optional)
PoolComPakHorizontal
Unit
Pool Heater
Pool HeaterPump (optional)
Pool Water Circulation Pumpfor PoolComPak (Optional - By Others)
Flo
Pool WaterTemp Sensor
wBalancing Valve
Pool Filter
Pool Pump
IsolationValves
AirVent
Supply Air DuctSupply Air
ExteriorWindow
27EGW06-PCPEG-20150514
TMTM
HANDLING
All units are shipped completely assembled Care should be taken to avoid damage due to rough handling If the unit is not to be immediately installed it must be protected from weather and site hazards
CLEARANCE
For proper operation and service PoolComPaktrade Vertical PoolComPaktrade Horizontal and RoofPak units require 36rdquoclearance on all sides
MOUNTING OF POOLCOMPAK UNITS
Locate the PoolComPaktrade unit on a firm level base If floor mounting ensure that the floor is capable of supporting the operating weight If wall mounting or hanging a unit provide a support structure that is capable of supporting the unit while protecting pool patrons and employees from injury Ensure that the support structure will not interfere with the operation of the unit Provision must be made for servicing units suspended above floor level Install isolation pads under the unit to minimize unit transmitted vibration noise
INSPECTION
Upon receipt of the PoolComPaktrade unit(s) immediately inspect for damage In particular inspect the housing and the evaporator coil face Minor indentations of the fins will not affect performance However if there is substantial damage immediately notify shipping company of unseen damage at delivery with a detailed letter outlining the damage Retain copies of all shipping damage claim documentation as well as photographs of the observed damage
NOTEPoolPaktrade International does not ship damaged units from its facility nor is it responsible for damage incurred during transit
POWER SUPPLY
A separate fused disconnect switch must be provided per local codes and be within easy accessibility of the PoolComPaktrade unit Use the minimum circuit capacity listed on the unitrsquos data plate to determine the minimum wire size for incoming electrical power The ground connection for the unit is located in the unit control panel The power supply to the unit must be adequate for the compressor starting amperage (LRA) If it is not a compressor rotor stall will occur during start-up due to an excessive voltage drop All field wiring must be done according to the wiring diagram provided with the unit and in conformance to the National Electrical Code (NEC) and any other applicable local electrical code(s)
For Vertical and Horizontal PoolComPaktrade units installing contractor must punch a hole into the electrical compartment to run power wires The hole is to be properly finished with a rubber grommet and weather sealing
CONTROL WIRING
All control wiring field connections are described in the wiring diagram furnished with the PoolComPaktrade unit as well as in the Field Wiring section of this manual All control wiring is low voltage
CONDENSATE PIPING
The condensate may be piped to a drain or returned to the pool if local codes allow If returned to the pool the condensate should be piped to the skimmer PoolPaktrade International recommends neither for nor against the practice of returning condensate to the pool The overflow drain should be piped in a similar fashion The installer should review the local codes prior to making the decision of where to dispose of the condensate The amount of condensate produced in a year is about equal to the volume of the pool
Section IV Installation
28 EGW06-PCPEG-20150514
TMTM
Section IV Installation
CURB MOUNTING
Illustrated in Figure 4-2 is a curb that has been designed specifically for the PoolComPaktrade product line The outside dimensions of the curb are such that the base of PoolComPaktrade extends over the edge of the curb all the way around This aids in preventing rainwater from getting between the base of the PoolComPaktrade and the curb It is the installing contractorrsquos responsibility to complete the following
bull Flash the curb into the roofbull Insulate the curbbull Connect the supply and return duct to the curbrsquos duct support railsbull Connect condensate drain line with appropriate trap bull Seal the curb to the bottom of the PoolComPaktrade using the gasket supplied with the curbbull Provide counter flashing between curb and PoolComPaktrade unitbull Seal the pool water pipes where they go through the curb
If specified when ordering all water piping connections can be made through the curb These water connections include pool water condensate auxiliary hot water coil (optional)
If the PoolComPaktrade is to be mounted on a curb the unit must be ordered with the ldquooutdoorrdquo option PoolComPaktrade Units produced for curb mounting receive special weatherizing and insulation that non-curb mounted PoolComPaktrade Units do not receive
NOTEIf the factory is not notified that a PoolComPaktrade is to mounted outdoors the unit will not be weather tight it will leak and it will not be properly insulated
INTEGRAL GAS FURNACE OPTION (ROOFPAK ONLY)
When using a gas furnace power venting is provided for all unit sizes External vent piping andor cap is required Please refer to the furnace manufacturerrsquos manual for piping and venting instructions Install leak-test and properly regulate piping for the gas-fired heater Pressures should be regulated to the entering pressures as shown on the furnace manufacturerrsquos data plate or manual
The ECC-PCP is the Electronic Control Center programmable controller designed specifically for the PoolComPaktrade dehumidification system It is a robust system capable of a variety of functions The following text describes the field wiring required for for proper operation of the ECC-PCP dehumidification system in a typical PoolComPaktrade unit installationThe field wiring diagram (see Section VI - Wiring) shows the location of the connections for the sensors and other required devicesThe numbers following the text identify the location on the field wiring diagram where each device is connected to the PoolComPaktrade unit electrical panel
REMOTE INTERFACE UNIT (1)
The remote interface unit allows the user to view space temperature pool water temperature and relative humidity change set points and receive fault notifications It should be mounted in a convenient location that is outside the pool area The ambient temperature of the mounting location must always be above 32 F
NOTEThe maximum distance from the Remote Interface Unit to the PoolComPaktrade unit is 1000 feet For distances greater than 1000 feet contact the factory
The control panel does not contain any sensors and should be mounted outside the pool enclosure A factory supplied 6 ft cable RJ25 (6 conductor) must be installed between the PoolComPaktrade unit and the control panel
For distances greater than 6 feet use 6 conductor 22 AWG shielded twisted-pair cable along with the supplied RJ25 jack and second 6 foot cable shipped loose with the unit
The wall mounting of the terminal first requires the back piece (A) of the RIU assembly The RIU is designed to fit a single gang extra-deep electrical box mounted horizontally in the wall The RJ25 jack and most of the black cable should be placed inside the box before installing the mounting bracket A frac34rdquo hole must be drilled for the 6-conductor cable which connects the remote interface unit to the PoolPaktrade unit The below is specific mounting instructions that correspond to the mounting schematic below
1 Fasten the back piece (A) to the gang box using the rounded-head screws supplied in the packaging Use the screws that come with the box to secure the bracket
2 Thread the 6-conductor cable through the back piece (A) and connect to the back of front panel (B)3 Rest the front panel (B) on the back piece A and fasten the parts together using the flush-head screws supplied in the
packaging4 Finally fit the click-on frame (C)
Figure 4-3 Remote Interface Mounting Plate
ALL_EG_RIUMounting_20131219eps
A
B
C
31EGW06-PCPEG-20150514
TMTMSection IV Installation
COLD SURFACE TEMPERATURE SENSOR (2)
This sensor is used to measure the temperature of the coldest surface in the pool enclosure The sensor is an aluminum bar 1rdquo long by frac14rdquo square with a clearance hole for a number 8 screw and two 6rdquo wires on one end
When the temperature of the surface drops to within 5 F of the space air dew point the humidity set point will be automatically reset downward to help prevent condensation on the cold surface It should be noted that resetting the humidity set point will not compensate for lower quality building materials such as single pane glass or non-thermally broken frames
The sensor should be mounted on an exterior window or door frame that is not in direct sunlight In cases where there are no exterior windows or doors the sensor should be mounted on the inside surface of an exterior wall The sensor must be in contact with the cold surface Electrical connection should be made with 22 AWG copper two-conductor shielded twisted-pair cable Connect the shield drain wire to ground at the PoolComPaktrade unit end only
ECONOMIZER SYSTEM (OPTIONAL) (3)
An economizer system cools the space with outside air instead of the compressor The ECC-PCP provides a dry contact closure to activate the economizer The contacts of the ECC-PCP may be connected directly to the economizer control circuit provided the circuit is 24 VAC maximum and the current does not exceed 1 amp inductive The other components of the system must be provided by others (See figure below for an illustration of a typical economizer system)
Units equipped with an economizer require relocation of the factory mounted return air sensor It must be located in a duct that will always contain air that represents the space temperature and humidity
The economizer will operate only when space cooling is required and there is no dehumidification requirement When the outside air temperature is greater than 50degF and more than 5degF below the space temperature set point and the space temperature rises above the set point the compressor is disabled and a dry contact closure between T216 and T217 is made to activate the economizer
When the ECC-PCP contacts close relay R1 is energized causing the outside and exhaust air dampers (by others) to open and the return air damper (by others) to close At the same time relay R2 is energized causing the exhaust fan to run If the space temperature continues to rise and exceeds the space temperature set point by more than two degrees the economizer contact is opened reversing the damper positions The compressor is energized in the space cooling mode (if so equipped) The compressor will then continue to run until the call for space cooling is satisfied The economizer will also be activated in the space cooling mode if the auxiliary air conditioning condenser option is not installed or if the compressor is locked out by a fault condition
Figure 4-4 Economizer Operation
PCP_EG_EconomizerOperation2_20121204eps
32 EGW06-PCPEG-20150514
TMTM Section IV Installation
WARNINGWhen economizer option is selected adequate exhaust capacity via a separate fan must be specified to ensure the natatorium pressure remains slightly negative Failure to specify adequately sized exhaust system may result in damage to structure and pool odors may be forced into other areas of the building
OUTSIDE AIR TEMPERATURE SENSOR (ECONOMIZER OPTION ONLY) (4)
The outside air temperature sensor is installed only when the outside air economizer option is included The sensor is mounted inside a 12rdquo PVC conduit pull elbow It can be mounted to the outside of the building using standard PVC conduit fittings The sensor should be mounted near the outside air intake vent for the economizer system It is very important to mount the sensor so that it does not receive direct sunlight The exposure to sunlight will cause the sensor housing to warm resulting in temperature readings that are higher than the actual air temperature This condition may prevent the ECC-PCP from selecting the economizer mode of operation If possible mount the sensor under an overhang or on a surface with a northern exposure
Electrical connection should be made with 22 AWG copper 2-conductor shielded twisted-pair cable Connect the shield drain wire to ground at the PoolComPaktrade end only See figure below for an illustration of the outside air temperature sensor Seal the conduit leading to the sensor with silicone caulk to prevent moisture from migrating out to the sensor and condensing inside the sensor
Figure 4-5 Outside Air Sensor
PCP_EG_OutsideAirSensorInstallation_20121204eps
AIR COOLED CONDENSER (OPTIONAL) (5)
The air-cooled condenser is used to reject heat recovered during the space cooling mode of operation Only PoolComPaktrade brand air-cooled condensers (PAC Units) should be used with a PoolComPaktrade Unit The ECC-PCP provides 24 VAC control signal to the speed control located in the PAC unit control panel The speed control then runs the condenser fan motor at the appropriate speed See figure below for an illustration of a PAC unit field wiring
Figure 4-6 PAC Unit Field Wiring
PCP_EG_RemoteACCFieldConnection_20121204eps
24 VAC CONTROL SIGNAL FROM
USE COPPER SUPPLY WIRES
POOLCOMPAKTERMINALS 12AND 13
POWER SUPPLY
21 L1 L2
GR
33EGW06-PCPEG-20150514
TMTMSection IV Installation
AUXILIARY POOL WATER HEATING SYSTEM (AWH MODEL ONLY) (6)
The auxiliary pool water heating system is provided by others Typically a gas fired or electric pool water heater is used The ECC-PCP provides a dry contact closure that signals a need for auxiliary water heating The contacts of the ECC-PCP may be connected directly to the heaterrsquos control circuit provided the circuit is 24 VAC maximum and the current does not exceed 1 amp inductive Any other applications will require an additional relay (by others) to be installed between the ECC-PCP and the pool water heating system
AUXILIARY AIR HEATING SYSTEM (7)
Typically a duct mounted electric heater hot water coil or a factory installed unit mounted hot water coil is used to provide air heating The ECC-PCP provides a form ldquoCrdquo (NO and NC) dry contact closure that signals a need for auxiliary air heating The ECC-PCP contacts may be directly connected to an electric duct heater control circuit provided the circuit is 24 VAC maximum and the current through the contacts does not exceed 1 amp inductive The figure below shows a typical installation that utilizes a 3-way hot water control valve and a unit or duct mounted hot water coil
Figure 4-7 Installation of a Hot Water Coil 3-Way Valve
The ECC-PCP provides a normally open contact closure for connection to a building management system If a fault occurs the controller will energize this output to indicate that there is a problem with the dehumidification system The remote interface unit will display the cause of the fault and provide a suggested course of action This output may also be used to energize an external alarm light or buzzer It may also be directly connected to an external circuit as long as the circuit is 24 VAC maximum and the current through the contacts does not exceed 1 amp inductive
HO
T W
ATER
CO
IL
FIELD SUPPLIEDACTUATOR
AB SWITCH INB POSITION
2
1
W
BK
W 3
A
B
VALVE IN BYPASS POSITION
HOT WATER IN
HOT WATER OUT
THREE WAY VALVE WITHACTUATOR
HO
T W
ATER
CO
IL
VALVE IN HEATING POSITION
HOT WATER IN
HOT WATER OUT
THREE WAY VALVE WITHACTUATOR
ALL WIRING BY CONTRACTOR
T23
T25
T24
POOLCOMPAK
120 VAC24 VAC
FIELD SUPPLIED 40 VATRANSFORMER
WIRING DETAIL
PIPING DETAIL
34 EGW06-PCPEG-20150514
TMTM
Section IV Installation
BUILDING FIRE CONTROL SYSTEM (9)
The ECC-PCP can receive a contact closure signal from a building fire control system This input of the controller must be connected to dry (voltage free) contacts only When this input receives a contact closure the PoolComPaktrade unit compressor and fan will be shut down and the remote interface unit will show an alarm condition When the contact closure opens The PoolComPaktrade unit will resume normal operations It is possible to change the operation of the fire trip input to be active on open instead of close See ECC-PCP Service in the Operation section for further explanation
RETURN AIR SENSOR (10)
The return air sensor measures air temperature and relative humidity The sensor is normally factory mounted in the PoolComPaktrade unit return air section However with the optional economizer it is necessary to field mount this sensor in the duct work The sensor must be located in the return duct upstream of the exhaust duct connection (See Figure 4-4 Economizer Operation for a typical location of the sensor in the economizer system)
When field mounting is necessary the sensor will be provided from the factory and must be field wired using 22 AWG copper 4-conductor shielded twisted-pair cable
PURGE MODE INPUT (11)
The ECC-PCP can receive a contact closure signal from an external source to activate purge mode operation During purge mode the compressor is disabled and the economizer output is activated to bring in 100 outside air
AC PROOF INPUT (12)
An optional interlock used with certain types of heat rejection condensers Dry contact closure indicates a problem and prevents compressor operation in air cooling mode
POOL WATER TEMPERATURE SENSOR (13)
Units equipped with a pool water heating condenser require installation of factory supplied pool water temperature sensor It must be mounted upstream of the PoolComPaktrade and the auxiliary water heater The sensor can be threaded directly into a 1frasl4rdquo FPT fitting Electrical connection should be made with 22 AWG copper 2 conductor shielded twisted-pair cable Connect the shield drain wire to ground at the PoolComPaktrade end only
35EGW06-PCPEG-20150514
TMTM
Section IV Installation
POOL WATER PIPING (AWH AND AWV MODELS ONLY)
CAUTIONDo not run piping across service panels evaporator coil face or air discharge outlet
If a new or existing pool water heater is piped within the same circuit the PoolComPaktrade unit should be connected in a parallel loop between the filter and the other heater This allows the PoolComPaktrade unit to act as the primary water heating source and the other heater as a backup or supplemental water heater
All pool purification and chemical feed systems MUST be installed downstream of the unit This includes the practice of adding chemicals directly to the skimmer which results in highly concentrated corrosive chemicals passing over and through the PoolComPaktrade water condenser Water chemistry must be maintained at a pH level between 72 and 76 with a free chlorine level not exceeding 30 PPM and a combined chlorine level less than 03 PPM
If possible install the PoolComPaktrade unit above the pool water level If it is installed below the pool level isolation valves must be added Breakable couplings should be located near the unit on both the water inlet and outlet lines When installing piping connect the piping to these couplings last so as not to place stress on the other connection in the plumbing systemA constant flow of water is required through the PoolComPaktrade unitsrsquo condenser The circuit to and from the unit must be capable of maintaining the flow rate as specified for the installed unit (see PoolComPaktrade Performance data in Table 3-1) To ensure correct water flow the filter pump usually operates at the same time as the PoolComPaktrade unit However to reduce energy consumption during filter off cycle times a two-speed or small auxiliary water pump which bypasses the filter may be used
CAUTIONCAUTION Excessive water flow can cause premature erosion and pitting of the pool water condenser Adjust valve so that the water flow does not exceed the GPM or pressure drop listed in the table PoolPaktrade recommends a fixed flow control or adjustable flow circuit setter
PoolPaktrade International recommends installing water pressure tap ports to check influent and effluent water pressure See PoolComPaktrade Performance data in Table 3-1 for the particular unit model in question for the proper flow rate and pressure drop across the pool water condenser The pressure tap ports should be installed in a straight length of the water piping exterior to the PoolComPaktrade unit Install the port before any 90-degree turns and approximately 6 inches from the corner-post of the unit
In some instances piping from the PoolComPaktrade unit to the filter return line may not be feasible or economical The unit may be installed on its own supply and return line using a properly sized water pump and appropriate strainer Ensure that auxiliary water heating systems are staged to supplement the PoolComPaktrade unit water heating
If the PoolComPaktrade unit is installed above the pool surface and the main circulating pump cannot provide the proper water flow to it at the specified pressure an auxiliary booster pump is required
Condensate may be returned to the pool (if local codes allow) but PoolPaktrade International neither recommends nor disapproves this practice The installer should check local codes prior to making this decision Condensate must be filtered prior to being returned to the pool
If multiple PoolComPaktrade units are installed on the pool water piping circuit pipe them (and any auxiliary water heater) in parallel Piping PoolComPaktrade units in series may result in the downstream unit(s) sensing the pool water temperature as satisfied and not reject heat to the water to its full capacity The actual pool water temperature should be sensed by each PoolComPaktrade unit and auxiliary water heater
36 EGW06-PCPEG-20150514
TMTM
Section IV Installation
Figure 4-8 Typical Pool Water Piping Diagram (AWH and AWV Model Only)
PCP_EG_PoolWaterConnectSchematic_20140305eps
SALT WATER POOLS
For units (AW models only) installed serving a salt water pool wire the pool bonding system to the bonding lug on the unit copper pool water piping This connection is required to prevent corrosion of the internal PoolComPaktrade water piping
For more information on salt water pools see the article ldquoSalt Water Poolsrdquo in the Pool Water Chemistry section of the PoolPak educational library
POOLCHEMICAL
FEEDER
CHECKVALUE
OPTIONALBOOSTERPUMP IF
MAIN FILTERPUMP IS A
2-SPEED OR UNDERSIZED
BALLVALVES
POOLWATERFILTER MAIN
FILTERPUMP
DRAIN
UNIONS
EXTERNALPRESSURETAP PORTS
UNIONS
AUXILIARYPOOL WATER
HEATER
DRAIN
BALLVALVES
LOCKINGGLOBEVALVE
LOCKINGGLOBEVALVE
POOL WATERTEMP SENSOR
FC
FlowControl
37EGW06-PCPEG-20150514
TMTM
Section IV Installation
CONDENSATE DRAINSDrain pans are connected to a common drain system and must be trapped for proper operation For AWH and HCDH units a trap and piping must be supplied and installed by the customer The trap depth must be a minimum of 6 inches (See figure 4-9) For AWV and HCDV units a condensate trap is located inside the unit and the field condensate piping and overflow drain must not have an additional trap
Provisions MUST be made for disposal of condensate Condensate from the dehumidifier coil will have nearly the same properties as the pool water itself It is recommended that building materials subjected to the condensate and systems used for its disposal are checked for compatibility For drain piping use PVC plastic pipe minimum Schedule 40 The drain line must be sloped to provide proper drainage
Drain line exposed to outdoor ambient temperatures must be protected against freezing Wrap lines with electric heat tape (follow manufacturerrsquos instructions) controlled by an automatic thermostat set at a minimum of 35degF to protect against freezing Insulate all piping Insulation must be sealed at all seams Power for heat tape must be supplied external to the PoolComPaktrade
Figure 4-9 AWH and HCDH Condensate Trap
PCP_EG_NegPressCondPiping_20140122eps
WATER COOLED CONDENSERA standard option for PoolComPaktrade units is an integral water-cooled condenser For this option all valves and refrigerant piping is internal to the unit No additional field wiring is required No additional refrigerant or oil charge is required Water piping connections are 1-14rdquo MPT and labeled on the unit
UNIT BASE
MINIMUM SCHEDULE 40 PVC
REMOVABLECLEANOUT
OPEN TEEFOR VENT
AWH OR HCDH UNIT
PLUG THEUNUSEDCONNECTIONWITH SUITABLEPVC PLUG
1
2
4 INCHES MINIMUM OR MAX NEGATIVE STATICPRESSURE (INCHES WC) + 1 INCH
2 INCHES MINIMUM OR 12
1
12
TMTM
38 EGW06-PCPEG-20150514
TMTM
Section IV Installation
REMOTE AIR-COOLED CONDENSERSPACE AND LOCATION REQUIREMENTS
The most important consideration which must be taken into account when deciding upon the locations of air-cooled equipment is the provision for a supply of ambient air to the condenser and removal of heated air from the condenser area Where this essential requirement is not adhered to it will result in higher head pressures which cause poor operation and possible eventual failure of equipment Units must not be located in the vicinity of steam hot air or fume exhausts
Another consideration which must be taken is that the unit should be mounted away from noise sensitive spaces and must have adequate support to avoid vibration and noise transmission into the building Units should be mounted over corridors utility areas rest rooms and other auxiliary areas where high levels of sound are not an important factor Sound and structural consultants should be retained for recommendations
Walls or Obstructions
The unit should be located so that air may circulate freely and not be re-circulated For proper air flow and access all sides of the units should be a minimum of ldquoWrdquo away from any wall or obstruction It is preferred that this distance be increased whenever possible Care should be taken to see that ample room is left for maintenance work through access doors and panels Overhead obstructions are not permitted When the unit is in an area where it is enclosed by three walls the unit must be installed as indicated for units in a pit
Figure 4-10 Remote ACC Installation Around Walls or Obstructions
ALL_WallsorObstructions_20131111eps
Multiple Units
For units placed side by side the minimum distance between units is the width of the largest unit If units are placed end to end the minimum distance between the units is 4 feet
Figure 4-11 Remote ACC Installation When Installing Multiple Units
ALL_MultipleUnits_20131111eps
MINW
AIR FLOW
Wrdquo=Total width of the condenser
MIN
Wrdquo=Total width of the condenserrdquo
W
AIR FLOWAIR FLOW
39EGW06-PCPEG-20150514
TMTM
Section IV Installation
Units in Pits
The top of the unit should be level with the top of the pit and side distances increased to ldquo2Wrdquo If the top of the units is not level with the top of the pit discharge cones or stacks must be used to raise discharge air to the top of the pit This is a minimum requirement
Figure 4-12 Remote ACC Installation When Installing Units in Pits
ALL_UnitsinPits_20131111eps
Decorative Fences
Fences must have 50 free area with 1 foot undercut a ldquoWrdquo minimum clearance and must not exceed the tops of the unit If these requirements are not met the unit must be installed as indicated for ldquoUnits in Pitsrdquo
Figure 4-13 Remote ACC Installation When Installing Units Near Decorative Fences
ALL_DecorativeFences_20131111eps
Wrdquo=Total width of the condenserrdquo
MIN MIN
AIRFLOW
2W2W
STACK(BY OTHERSIF SUPPLIED) 10rsquo MAX
Wrdquo=Total width of the condenserrdquo
MIN1rdquo MIN MIN
AIR FLOWW W
40 EGW06-PCPEG-20150514
TMTM
Section IV Installation
FIELD INSTALLED PIPING
Installation of the outdoor air-cooled condenser should only be done by a qualified refrigeration mechanic familiar with this type of work Many service problems can be avoided by taking adequate precautions to provide an internally clean and dry system and by using procedures and materials that conform to established procedural standards
Piping Guidelines
The following piping recommendations are intended for use as a general guide For more complete information refer to the latest ASHRAE Handbook
Materialsbull Use clean dehydrated refrigeration-grade copper tubing for all refrigerant lines Hard drawn tubing should be used
where no appreciable amount of bending around pipes or obstructions is necessary If soft copper tubing must be used care should be taken to avoid sharp bends which may cause restrictions and excessive refrigerant pressure drops
bull Use long radius elbows wherever possible with one exception - short radius elbows should be used for any traps in the hot gas riser
bull Braze all copper to copper joints with a phosphorus-copper alloy material such as Silfos 5 or equivalent Do not use soft solder
bull During brazing operations flow an inert gas such as nitrogen through the lines to prevent internal oxidation scaling and contamination
bull Support refrigeration lines at intervals with suitable hangers brackets or clampsbull Pack glass fiber insulation and a sealing material around refrigerant lines where they penetrate a wall to reduce
vibration and to retain some flexibilitybull The liquid line and discharge line should not be in contact with one another If the installing contractor must tie these
lines together because of an installation requirement the contractor must insulate them from each other to prevent heat transfer Because the discharge line is hot during system operation precautions should be taken to avoid personnel injury
bull PoolComPaktrade units do not utilize compressors with unloading stages Consequently double hot gas risers are not needed for reduced load conditions as refrigerant flow rates will not fall below minimum velocities necessary to carry oil up through the discharge line
bull A field provided field installed liquid line filter-drier is recommended in the field piping to the PoolComPaktrade unit
Sizingbull The lines must be sized and routed so that oil is carried through the system Using smaller lines than recommended
will give excessive pressure drops resulting in reduced capacity and increased power consumption Oversized lines could result in an oil flow problem within the system and possible compressor damage
bull Excessive pressure drops in the liquid line may cause flashing of the refrigerant and a loss of a liquid seal at the expansion valve inlet A reduction in capacity may then occur because the presence of gaseous refrigerant will partially block the expansion valve Using hot gas and liquid line sizes recommended in the Air Cooled Condenser section for these units and the proper system refrigerant charge will prevent this problem
bull Discharge lines should be designed to prevent condensed refrigerant and oil from draining back to the compressor during OFF cycles Use the following guidelines The highest point in the discharge line should be above the highest point in the condenser coil The hot gas line should loop toward the floor if the condenser is located above the PoolComPaktrade unit especially
if the hot gas riser is longbull For refrigerant line sizing for an Air Cooled Condenser (ACC) where the lineset length is less than 100 feet or the
ACC location is less than 50 feet higher or 20 feet lower than the unit use the below Table 4-3bull ACC line lengths beyond the above limits will void warranty unless written approval is obtained from the
factory PRIOR to installation and startup
PCP_EG_ACCPiping_20140122eps
41EGW06-PCPEG-20150514
TMTM
Section IV Installation
Figure 4-14 ACC Refrigerant Piping
Refrigerant and Oil Chargingbull PoolPaktrade units are shipped with the required charge for self contained operation only The remote ACC option does
NOT provide the refrigerant charge or oil required for the ACC and line setsbull Refer to Table 4-2 for the additional ACC condenser chargebull Refer to Table 4-3 for the required additional oil and refrigerant charge Use the calculation method shown to calculate
the additional refrigerant and oilbull For the additional oil required multiply 2 of additional refrigerant charge of both ACC and refrigerant line length
Use the correct oil type of POE oil depending on the compressor installed For Alliance models SXA SPA SSA compressors use Copeland Ultra PN 998-E022-00 For Trane models CSHD compressors use Trane PN OIL00080
Sample Charging CalculationFor an AWV2600 with 73 feet line length and ACC0121 located 30 feet above the unit
Table 4-3 indicates 34rdquo discharge line and 58rdquo liquid line piping sizes Using R410A ozft additional charge for the lineset is 73 feet x 025 ozft + 73 feet x 148 ozft = 1260 oz Table 4-2 indicates additional charge for ACC0121 (allow 30 F Operation) is 39 lb x 16 ozlb = 6240 oz Total additional R410A charge for both ACC and refrigerant line is 1260 + 6240 oz = 750 oz or 46 lbs 14 oz Total additional oil charge is 750 oz x 2 = 15 oz
Table 4-2 R410A Charge for Air Cooled Condensers (lb)
DISCHARGE LINE
Pitch inDirection ofrefrigerant flow
LIQUID LINE
AIR-COOLEDCONDENSER
DISCHARGE LINE Pitch inDirection ofrefrigerant flow
Table 4-3 Refrigerant (R410A) Charge for Different Line Size
WARNINGAbove chart is for lineset length less than 100 ft and ACC located less than 50ft above unit or 20ft below unit Failures due to a piping layout not within these limits nor receiving prior PoolPaktrade
Factory approval will not be covered under PoolPaktrade warranty
Refrigerant Line Size (ACC) Refrigerant Charge for Units with Air Cooled Condensers (ACC)
Discharge Liquid Line Length (ft) vs R410A Charge (lbs)
Model OD R410A ozft OD R410A
ozft25 ft 50 ft 75 ft 100 ft
Lbs Oz Lbs Oz Lbs Oz Lbs Oz
0550 12 010 38 049 0 15 1 14 2 13 3 12
58 016 12 092 1 11 3 6 5 1 6 13
0800 58 016 38 049 1 0 2 1 3 1 4 2
58 016 12 092 1 11 3 6 5 1 6 13
1200 58 016 12 092 1 11 3 6 5 1 6 13
34 025 58 148 2 11 5 6 8 1 10 13
1400 58 016 12 092 1 11 3 6 5 1 6 13
34 025 58 148 2 11 5 6 8 1 10 13
1800 34 025 12 092 1 13 3 10 5 8 7 5
78 034 58 148 2 14 5 11 8 9 11 6
2600 34 025 58 148 2 11 5 6 8 1 10 13
1 18 058 34 221 4 6 8 12 13 1 17 7
3500 78 034 58 148 2 14 5 11 8 9 11 6
1 18 058 78 307 5 11 11 7 17 2 22 13
4000 78 034 34 221 3 16 7 16 11 15 15 15
1 18 058 78 307 5 11 11 7 17 2 22 13
Note1 This table applies to ACC line length less than 100 ft only Contact factory if ACC line length is more than 100 ft
2 Line size should be used for ACC at the same level or located up to 20ft below the unit
3 Line size should be used for ACC located up to 50 ft above the unit
43EGW06-PCPEG-20150514
TMTM
SECTION V OPERATION
ECC-PCP REMOTE INTERFACE UNITFigure 5-1 RIU Keypad
PCP_EG_StraightOnKeypadAnnotated_20121204eps
The ECC-PCP Remote Interface Unit (RIU) is designed around the Carel pGD0 4-line x 20 character backlit LCD display module The RIU displays are accessed through six backlit selection buttons They consist of a Return Enter Key Up Key Down Key Program Key Alarm Key and Escape Key as shown above
After approximately 5 minutes the RIU will display the status screen rotation Press the Escape key to bypass the five minute delay and move directly to the status display
STATUS DISPLAY
The status screens contain basic information about operation of the PoolComPaktrade system Press the up or down arrow keys to move from screen to screen The screens will also rotate automatically every 10 seconds
Figure 5-2 Status Screen 1S P A C E T E M P _ _ o FS P A C E R H _ _ S P A C E D E W P O I N T _ _ o F(O U T S I D E T E M P) _ _ o F
Status Screen 1 displaysbull Space Temperature in degF or degCbull Space Relative Humidity in bull Space Dew Point in degF or degCbull Outside Air Temperature in degF or degC (with Economizer Option Only)
Status Screen 2 displaysbull Water Heating - YES indicates that the unit is returning recovered heat back to the pool waterbull Aux Water Heat - YES indicates that the controller has closed the relay contact requesting auxiliary pool water heater
operationbull Water Temperature in degF or degC
Status Screen 3 displaysbull SPACE temperature control requirement bull TEMPERATURE- OK Indicates the space temperature is at setpointbull HEATING- YES Indicates the space requires heatingbull COOLING- YES Indicates the space requires coolingbull AUX AIR HEAT Indicates the space requires additional heating The auxiliary air heating relay contacts close to
activate the external heating system
44 EGW06-PCPEG-20150514
TMTM
bull DEHUMID (SURFACE) Indicates the space requires dehumidification The word SURFACE indicates that the unit is temporarily lowering the dew point set point to minimize condensation at the cold surface temperature sensor
bull ECONOMIZER MODE Indicates the unit is cooling the space with outside air ECONOMIZER MODE is only shown if the optional economizer system is present
Status Screen 4 displaysbull The first line displays the current system status bull The second line displays compressor status
SET POINT CHANGE MENU
bull Press the PRG key to access the main menubull Use the arrow keys to scroll to the menu selection for Set Points and then press the Enter keybull Use the arrow keys to select the set point to be changed and then press Enter Available set points are
Air Temperature
The allowable range for the air temperature set point is 70 to 95degF Use the arrow keys to change the set point and then press Enter The new dew point set point is shown immediately as DPT The set point change screen will remain visible for a short time to allow verification of the new dew point set point After about five seconds the RIU will return to the status screen display
Relative Humidity
The allowable range for the relative humidity set point is 40 to 65degF Use the arrow keys to change the set point and then press Enter The new dew point set point is shown immediately as DPT The set point change screen will remain visible for a short time to allow verification of the new dew point set point After about five seconds the RIU will automatically return to the status screen display
Pool Temperature
The allowable range for the water temperature set point is 70 to 104degF Use the arrow keys to change the set point and then press Enter The RIU will automatically return to the status screen display
Recommendations
bull Air Temperature (Range 70degF to 95degF) The air temperature should normally be set about 2degF above the pool water temperature to minimize the pool water evaporation rate (high temperature spas are an exception)
bull Relative Humidity (Range 40 to 65) The normal range for the humidity set point is 50 to 60 Lower set points will require more energy (electricity) to satisfy the dehumidification requirement and increase pool water evaporation
bull Pool Temperature (Range 70degF to 104degF) The pool temperature set point is normally set between 80degF and 88degF for a typical swimming pool and higher for a spa depending on user preference
CAUTIONThe dehumidifier should be configured to operate at the set points designed for the facility These set points are shown on the yellow label on the door of the RIU Set points other than those shown may not be attainable with this dehumidifier
Section V Operation
45EGW06-PCPEG-20150514
TMTM
Section V Operation
PURGE MODE CONTROL MENU
CAUTIONIt is the userrsquos responsibility to use this feature properly to prevent freeze damage to downstream equip-ment 100 outside air at below freezing conditions has the potential to cause serious damage
Purge Mode causes the unit to force the optional field-provided economizer dampers and fan to full open introducing large quantities of outside air to the space This is typically used when ldquoshockingrdquo the pool Compressor operation is disabled during purge but the auxiliary air and water heating systems remain active
If the unit is not equipped with the economizer option a flashing ldquoCAUTION NO FREEZE PROTECTIONrdquo warning will be displayed This warning indicates that operation of purge mode without regard for outside air temperatures below freezing can result in damage to hot water coils or other equipment in the pool area
DETAILED STATUS MENU
To access the detailed status menubull Press the PRG key to access the main menubull Use the arrow keys to scroll to the menu selection for Detailed Status and then press the Enter key
Detailed Status Screen 1 displays Temperaturesbull Surface ndash The temperature measured at the cold surface sensorbull Dew Point ndash The calculated dew point of the spacebull Dewpt Setpoint ndash The dew point set point calculated from the temperature and relative humidity set points
Detailed Status Screen 2 displaysbull Disch Press ndash The measured refrigerant pressure in the discharge line at the compressorbull Suct Press ndash The measured refrigerant pressure in the suction line at the compressorbull Suct Temp ndash The refrigerant temperature measured on the surface of the suction line at the compressorbull Suct SH ndash The calculated superheat at the suction of the compressor
Detailed Status Screen 3 displays the number of hours the following device or system has been active since power was last applied to the unitbull Cmpr - Compressorbull Fan ndash Supply Fanbull AC ndash Mechanical Air Cooling (Economizer Cooling Not Included)bull Aux ndash Air ndash Auxiliary Air Heatingbull Aux - Wtr ndash Auxiliary Water Heating
Detailed Status Screen 4 displaysbull Fault Count ndash The total number of high pressure low pressure and defrost trips that have occurred since power was
last applied to the unit When this number reaches 10 the compressor is locked outbull AC Proof ndash Indicates a status of ldquoProvenrdquo if AC mode operation is allowed ldquoNot Provenrdquo indicates that AC mode
operation is not allowed
Detailed Status Screen 5 (only present in units configured for multi-unit networking) displaysbull Network Role ndash Indicates if the unit currently being displayed by the RIU is the master or a slavebull Net Status ndash Indicates ldquoCONNECTEDrdquo if the unit is properly connected to the multi-unit network ldquoNO LINKrdquo
indicates the unit is not connectedbull Unit ID Number ndash Indicates the unit address on the multi-unit network
Detailed Status Screen 6 (only present in units configured for multi-unit networking) displaysbull Unit 1 Present ndash Indicates if the unit currently being displayed by the RIU can communicate with unit 1 on the multi-
unit networkbull Unit 2 3 4 ndash Same as for unit 1 but for the other 3 possible units on the network
46 EGW06-PCPEG-20150514
TMTM
Section V Operation
ECC-PCP NETWORK OPERATIONNetworked ECC-PCP units operate in a MASTERSLAVE environment This means that one unit (master) determines heating cooling and dehumidification requirements and broadcasts them on the network to the other units (slaves) This ensures that all units work together instead of against other Each networked unit contains all sensor and controls necessary for independent operation and is capable of acting in the master role Units on the network are identified by a number between one and four The unit with the lowest identification number having no uncleared alarms will be the master unit
If an alarm condition occurs in the master unit it will give up the role of master The unit with the next lowest identification number and no unclear alarms will take over the master role The unit that experienced the alarm condition will operate in the slave role until the alarm is cleared at the control panel
The control panel provides two network status screens These can be accessed in the detailed status menu The figure above shows the first screen that displays the status of units one through four as present or not Use this screen to verify that all units on the network are connected and communicating with each other The figure below shows the second screen that displays network information for the unit that is being displayed by the remote interface unit including network role connection status and network identification number
NETWORK CONFIGURATION
Using the following four parameters it is possible to configure the ECC-PCP network to accommodate a wide variety of installation options Network configuration can be accessed in the service menu These parameters must be set in each unit individually
Pool Water Temperature Control
Determines whether the unit will control water temperature based on the masterrsquos command (NETWORK) or its own temperature sensor and set point (LOCAL) If a unit set to LOCAL becomes the master other units in the network will not use the masterrsquos command for water heating They will look to the next line that is not set to LOCAL This parameter is only set to LOCAL if the unit is connected to a different pool than the rest of the units on the network Because the unit is controlling water temperature on its own it is necessary to select the correct unit with the control panel before changing the water temperature set point
Staged Dehumidification Control
Determines whether the unit will run in dehumidification when there is a need for 1 stage or 2 stages of dehumidification The master unit will start on any need for dehumidification independent of this parameter Slave units with this parameter set to YES will dehumidify only if the master is asking for 2 stages of dehumidification Setting this parameter to NO will cause the unit to dehumidify when the master calls for at least 1 stage of dehumidification Using this parameter it is possible to configure the number of units in each dehumidification stage
Dehumidification Stage 2 Offset
Determines how far the dewpoint (relative humidity) of the space has to rise above the set points before the unit will request 2 stages of dehumidification on the network This parameter is normally the same in all units on the network Making this parameter smaller will bring on the second stage of dehumidification sooner
Enable Network Control
Determines whether the unit will participate in the masterslave environment Setting this parameter to NO will cause the unit to act like a standard ECC-PCP single unit The unit will never become the master on the network and will not listen to the demands broadcast by the master on the network Although units with this parameter set to NO do not participate in the masterslave environment they are still accessible through the network control panel Like the LOCAL pool
47EGW06-PCPEG-20150514
TMTM
Section V Operation
water temperature setting this parameter when set to NO requires this unit to be displayed on the control panel before changing any of the set points The other screens for Pool Water Temperature Control Staged Dehumidification and Stage 2 Offset are not available when this parameter is set to NO
Changing Set Points
Each unit on the network maintains two groups of set points network and local If a unit has the Enable Network Control parameter set to YES and the Water Temperature Control parameter set to NETWORK it will control to the network set points Set points changed when the remote interface unit is displaying this unit will be changed in every unit on the network with the same NETWORK and Water Temperature Control parameters Units that are configured for Network Control and LOCAL water temperature control will control using local water temperature set point the network air temperature and relative humidity set points When the air temperature and relative humidity set points are changed when the remote interface unit is displaying the unit they will be changed in all units configured for Network control The water temperature set point will only be changed in the unit currently being displayed by the remote interface unit Units that are not configured for Network Control will use all local set points Therefore any set points changed while the remote interface unit is displaying this unit will only be changed in this unit
ECC-PCP SERVICE
SERVICE MENU
To access the service menubull Press the PRG key to access the main menubull Use the arrow keys to scroll to the menu selection for Service and then press the Enter keybull A password is required to access the service menu
The following sub-menus are available in the service menu
IO CONFIGURATION
Digital Inputs
This menu contains a screen for each digital input Each screen contains the following parametersbull Status of the data point linked to the inputbull Status of the raw digital inputbull Input type
The following parameter list shows the available digital input screensbull Defrost Switchbull Cpr High Tempbull Water Flow bull Fire Tripbull AC Proofbull Cpr High Prsbull Fan Overloadbull Low Pressurebull Purge Input
Digital Outputs
This menu contains a screen for each digital output Each screen contains the following parametersbull Current output status bull Requested output status bull Override
48 EGW06-PCPEG-20150514
TMTM
Section V Operation
The following digital output screens are availablebull Supply Fanbull Compressorbull Bypass Solenoidbull Water Heating Solenoidbull Reheat Solenoidbull AC Solenoidbull Aux Water Heatbull Alarm Outputbull ACC Run Signalbull Economizerbull Aux Air Heat Stage 1bull Aux Air Heat Stage 2
Analog Inputs
This menu contains a screen for each analog input Each screen contains the following parametersbull Current read-only value from the inputbull Fail bull Tol bull Offs bull Ovrd bull Min bull Max
The following analog input screens are availablebull Discharge Pressure bull Suction Pressure bull Return Relative Humidity bull Suction Temperature bull Return Air Temperature bull Pool Water Temperature bull Surface Temperature bull Outside Air Temperature
UNIT CONFIGURATION
Installed Options
This menu contains parameters that indicate the hardware options installed in the dehumidifier The parameters are set by the factory and do not typically require modification
Aux Air Heating
This menu contains parameters that configure the auxiliary air heating system
Aux Water Heating
This menu contains parameters that configure the auxiliary water heating system
Temperature Ctrl
This menu contains parameters that configure the air temperature control routines of the dehumidifier
49EGW06-PCPEG-20150514
TMTM
Section V Operation
Humidity Control
This menu contains parameters that configure the humidity control routines of the dehumidifier Water Temp CtrlThis menu contains parameters that configure the compressor based water heating system of the dehumidifier bull Water Heat First This parameter indicates whether the control routine will use the compressor for water heating when
there is no dehumidification requirement bull Deadband This parameter is the deadband used by the compressor based pool water heating control routine
BAS INTERFACE
This menu contains parameters that configure the building automation system interface of the dehumidifier
MULTI-UNIT NETWORK
This menu contains parameters that configure the operation of dehumidifier in a multiple unit installation
COMPRESSOR
This menu contains parameters that configure the operation of the dehumidifier compressor
ECONOMIZER
This menu contains parameters that configure the operation of the optional field provided and field installed economizer damper system
HISTORY
The history screen provides information on the last 50 faults that have occurred in the dehumidifier It can be used for troubleshooting by an experienced HVAC technician The faults are recorded with a sequence number from 1 to 50 Sequence number 1 is always the most recent fault The following information is stored and displayed for each fault in non-volatile memorybull Hour at which the fault occurred bull Fault Code Number bull Return Air Temperaturebull Return Air Humiditybull Discharge Pressurebull Suction Pressurebull Suction Temperaturebull Pool Water Temperaturebull AC Solenoid Statusbull Bypass Solenoid Statusbull Compressor Statusbull Reheat Solenoid Status
MANUAL MODE
The Manual Mode menu for use by qualified service personnel provides two options Demand Control and Digital Output Control
UTILITIES
The Utilities menu provides sub menus for configuring units of measure and passwords for set point and service access control
50 EGW06-PCPEG-20150514
TMTM
Section V Operation
MAINTENANCEOVERVIEW
Periodic routine maintenance will promote extended equipment life While PoolComPaktrade units use components that are usually maintenance free and do not require service a simple check could result in noticing possible problems before they develop into major problems
DAILY MAINTENANCE
bull Pool water chemistry is a part of daily maintenance and it is recommended to follow National Spa and Pool Institute standards PoolPaktrade International strongly recommends following the National Spa and Pool Institute values
Table 5-1 Pool Water Chemistry
bull PoolPaktrade International recommends daily logging of your pool water chemistry MAINTENANCE AND YOUR POOL WATER CHEMISTRY IS IMPORTANT TO PROTECT YOUR WARRANTY RIGHTS
MONTHLY MAINTENANCE
bull Air Filters inspect and replace or clean as applicable Dirty filters restrict air flow and can cause improper unit operation
bull Ensure that the condensate collection pan is draining properly and the condensate is not overflowing or being drawn into the supply air stream Check the condensate and overflow lines to ensure that neither are clogged
bull Check the operation of the blower motor and scroll Ensure that the scroll does not rub the housing Check for proper belt tension Worn or cracked belts should be replaced Check fan and mounting brackets for tightness
bull Ensure that the ALARM light is not illuminated
ANNUAL MAINTENANCE
bull Inspect the refrigeration and water circuits for leaks wear or corrosion Corrosion on the water piping or condenser may indicate poor pool chemical maintenance and improper chlorine and pH levels
bull Check electrical components for loose wiringbull Although the exterior of the PoolComPaktrade units are powder coated wipe down unit particularly if installed in an
area subject to dirt or chemical concentrationbull Wash brush or vacuum the evaporator and air condenser coils This will ensure proper heat transfer and reduce static
pressure losses Caution should be taken not to wet electrical components inside the unit
NOTEIf service and inspections are not performed by a competent and experienced service firm the manufacturer warranty may be voided
AUXILIARY AIR amp POOL WATER HEATER CONNECTIONS FOR MULTIPLE UNIT INSTALLATION
Figure 6-1 Auxiliary Air and Pool Water Heater Connections for Multiple Units
AWH_EG_Connections_20121204eps
52 EGW06-PCPEG-20150514
TMTM
AUXILIARY AIR amp POOL WATER HEATER CONNECTION FOR A TWO POOL INSTALLATION
Figure 6-2 Auxiliary Air and Pool Water Heater Connections for Two Pool Installations
AWH_EG_ConnectionstoPool_20121204eps
Section VI Wiring
53EGW06-PCPEG-20150514
TMTM
Section VI Wiring
FIELD WIRING
Figure 6-3 Field Wiring Diagram
PCP_EG_FieldWiringDiagram_20121204eps
54 EGW06-PCPEG-20150514
TMTM
Section VI Wiring
FIRE CONTROL SYSTEM CONNECTION
Figure 6-4 Fire Control System Connection
PCP_EG_FirecontrolSysConnection_20121204eps
55EGW06-PCPEG-20150514
TMTM
Section VI Wiring
This page intentionally left blank
EGW06-PCPEG-20150514
TMTM
56
TMTM
3491 Industrial Drive York PA 17402 USA 800-959-7725 Fax 717-757-5085for more information wwwpoolpakcom
The Leader in Indoor Pool Dehumidification
25EGW06-PCPEG-20150514
TMTM
Section III Performance and Sizing
ELECTRIC DUCT HEATER
General Duct Heater Information
Power wiring should incorporate properly sized fuses or motor rated circuit breakers A disconnect must be fitted within easy access and sight of the unit Supply voltage must be maintained within +- 10 of design voltage on both single and three phase units Cycles must be within +- 5 of design Failure to operate within these ranges can adversely affect performance cause failure of the equipment and may void warranty terms
Figure 3-5 Duct Heaterbull Tubular sheathed elementsbull Galvanized steel cabinetbull Duct-mounted flanged typebull Airflow in either directionbull UL and CSA approved heaterbull Airflow proving switchbull Auto and manual reset high temperature limitsbull Magnetic contactorsbull 24 volt control circuit and transformerbull Standard heater for indoor installation in non-insulated duct
Duct Heater Sizes
Table 3-9 Duct Sizes
Duct Heater Installation
1 Flange both ends of the ducts outwards on three sides to match heater flanges as shown2 Fasten heater to duct using sheet metal screws for smaller heaters or bolts for larger ones3 Seal opening with suitable sealing compound4 If needed use additional hangers to support heater5 Electrical power connections must be made within NEC standards and local electrical codes6 Refer to the Field Wiring Diagram at the back of this manual for controls connection
Reference Dimensions Fan Outlet
AWHHCDH 5508001200 9-14 x 10-38 inchesAWHHCDH 140018002600 12-12 x 13-12 inchesAWHHCDH 260035004000 17 x 19 inchesDuct heater width = 8 10 or 12 inches depending on heater kW Flange width = 1 inch
VOLTSHZPHDuct Size
12rdquo X 12rdquo 15rdquo X 15rdquo 20rdquo X 20rdquo 28rdquo X 28rdquo
Installation requires the unit to be placed on a roof mounted curb the mechanical room floor an appropriate location in the pool room or outside on an equipment housekeeping pad Isolation pads should be placed under the unit to minimize transmission of noise due to unit operation Then pool water is piped to the unit Electrical power from a properly sized fused disconnect is connected to the unit The supply and return air ducts are connected to their respective locations on the unit The condensate is piped back to the pool or to the sewer
If an optional remote air-cooled condenser is used place the condenser in a proper outdoor location Refrigerant piping is then run from the air cooled condenser to the PoolComPaktrade unit Refrigerant lines must be leak checked and evacuated through installer provided Schrader valves Control and power wiring are run to complete the installation If a field-furnished auxiliary space heating coil is installed the control for this heater must be field wired to the PoolComPaktrade controls shown in Section V1 - Wiring (Figure 6-3 Field Wiring Diagram)
Outside air can be ducted into the unit through the optional outside air duct connection The unit can draw up to 30 of its supply air from the outside When ventilating the natatorium in this way an exhaust fan must be furnished in the natatorium to exhaust to the outside an air volume slightly greater than the air volume introduced into the natatorium from the outside This will maintain a negative pressure in the space preventing odor and moisture migration Outside air filters are provided for Horizontal PoolComPaktrade units For Vertical PoolComPaktrade units outside air must be filtered before entering the unit
UNITFACILITY INTERFACE
A typical PoolComPaktrade system layout and its connection to the natatorium and pool water piping systems is shown in the figure below
Figure 4-1 Typical PoolComPaktrade AWH Series System Layout
PCP_EG_LayoutSchematic_AW_3D_20121204eps
Cold SurfaceTemperature Sensor
POOL
Recommended WaterPressure Taps
Return Air
ECC-PCP RemoteInterface Unit (should not
be mounted insidepool enclosure)
FusedDisconnect (Able to be seen
from the unit)
RemoteAir-CooledCondenser(optional)
PoolComPakHorizontal
Unit
Pool Heater
Pool HeaterPump (optional)
Pool Water Circulation Pumpfor PoolComPak (Optional - By Others)
Flo
Pool WaterTemp Sensor
wBalancing Valve
Pool Filter
Pool Pump
IsolationValves
AirVent
Supply Air DuctSupply Air
ExteriorWindow
27EGW06-PCPEG-20150514
TMTM
HANDLING
All units are shipped completely assembled Care should be taken to avoid damage due to rough handling If the unit is not to be immediately installed it must be protected from weather and site hazards
CLEARANCE
For proper operation and service PoolComPaktrade Vertical PoolComPaktrade Horizontal and RoofPak units require 36rdquoclearance on all sides
MOUNTING OF POOLCOMPAK UNITS
Locate the PoolComPaktrade unit on a firm level base If floor mounting ensure that the floor is capable of supporting the operating weight If wall mounting or hanging a unit provide a support structure that is capable of supporting the unit while protecting pool patrons and employees from injury Ensure that the support structure will not interfere with the operation of the unit Provision must be made for servicing units suspended above floor level Install isolation pads under the unit to minimize unit transmitted vibration noise
INSPECTION
Upon receipt of the PoolComPaktrade unit(s) immediately inspect for damage In particular inspect the housing and the evaporator coil face Minor indentations of the fins will not affect performance However if there is substantial damage immediately notify shipping company of unseen damage at delivery with a detailed letter outlining the damage Retain copies of all shipping damage claim documentation as well as photographs of the observed damage
NOTEPoolPaktrade International does not ship damaged units from its facility nor is it responsible for damage incurred during transit
POWER SUPPLY
A separate fused disconnect switch must be provided per local codes and be within easy accessibility of the PoolComPaktrade unit Use the minimum circuit capacity listed on the unitrsquos data plate to determine the minimum wire size for incoming electrical power The ground connection for the unit is located in the unit control panel The power supply to the unit must be adequate for the compressor starting amperage (LRA) If it is not a compressor rotor stall will occur during start-up due to an excessive voltage drop All field wiring must be done according to the wiring diagram provided with the unit and in conformance to the National Electrical Code (NEC) and any other applicable local electrical code(s)
For Vertical and Horizontal PoolComPaktrade units installing contractor must punch a hole into the electrical compartment to run power wires The hole is to be properly finished with a rubber grommet and weather sealing
CONTROL WIRING
All control wiring field connections are described in the wiring diagram furnished with the PoolComPaktrade unit as well as in the Field Wiring section of this manual All control wiring is low voltage
CONDENSATE PIPING
The condensate may be piped to a drain or returned to the pool if local codes allow If returned to the pool the condensate should be piped to the skimmer PoolPaktrade International recommends neither for nor against the practice of returning condensate to the pool The overflow drain should be piped in a similar fashion The installer should review the local codes prior to making the decision of where to dispose of the condensate The amount of condensate produced in a year is about equal to the volume of the pool
Section IV Installation
28 EGW06-PCPEG-20150514
TMTM
Section IV Installation
CURB MOUNTING
Illustrated in Figure 4-2 is a curb that has been designed specifically for the PoolComPaktrade product line The outside dimensions of the curb are such that the base of PoolComPaktrade extends over the edge of the curb all the way around This aids in preventing rainwater from getting between the base of the PoolComPaktrade and the curb It is the installing contractorrsquos responsibility to complete the following
bull Flash the curb into the roofbull Insulate the curbbull Connect the supply and return duct to the curbrsquos duct support railsbull Connect condensate drain line with appropriate trap bull Seal the curb to the bottom of the PoolComPaktrade using the gasket supplied with the curbbull Provide counter flashing between curb and PoolComPaktrade unitbull Seal the pool water pipes where they go through the curb
If specified when ordering all water piping connections can be made through the curb These water connections include pool water condensate auxiliary hot water coil (optional)
If the PoolComPaktrade is to be mounted on a curb the unit must be ordered with the ldquooutdoorrdquo option PoolComPaktrade Units produced for curb mounting receive special weatherizing and insulation that non-curb mounted PoolComPaktrade Units do not receive
NOTEIf the factory is not notified that a PoolComPaktrade is to mounted outdoors the unit will not be weather tight it will leak and it will not be properly insulated
INTEGRAL GAS FURNACE OPTION (ROOFPAK ONLY)
When using a gas furnace power venting is provided for all unit sizes External vent piping andor cap is required Please refer to the furnace manufacturerrsquos manual for piping and venting instructions Install leak-test and properly regulate piping for the gas-fired heater Pressures should be regulated to the entering pressures as shown on the furnace manufacturerrsquos data plate or manual
The ECC-PCP is the Electronic Control Center programmable controller designed specifically for the PoolComPaktrade dehumidification system It is a robust system capable of a variety of functions The following text describes the field wiring required for for proper operation of the ECC-PCP dehumidification system in a typical PoolComPaktrade unit installationThe field wiring diagram (see Section VI - Wiring) shows the location of the connections for the sensors and other required devicesThe numbers following the text identify the location on the field wiring diagram where each device is connected to the PoolComPaktrade unit electrical panel
REMOTE INTERFACE UNIT (1)
The remote interface unit allows the user to view space temperature pool water temperature and relative humidity change set points and receive fault notifications It should be mounted in a convenient location that is outside the pool area The ambient temperature of the mounting location must always be above 32 F
NOTEThe maximum distance from the Remote Interface Unit to the PoolComPaktrade unit is 1000 feet For distances greater than 1000 feet contact the factory
The control panel does not contain any sensors and should be mounted outside the pool enclosure A factory supplied 6 ft cable RJ25 (6 conductor) must be installed between the PoolComPaktrade unit and the control panel
For distances greater than 6 feet use 6 conductor 22 AWG shielded twisted-pair cable along with the supplied RJ25 jack and second 6 foot cable shipped loose with the unit
The wall mounting of the terminal first requires the back piece (A) of the RIU assembly The RIU is designed to fit a single gang extra-deep electrical box mounted horizontally in the wall The RJ25 jack and most of the black cable should be placed inside the box before installing the mounting bracket A frac34rdquo hole must be drilled for the 6-conductor cable which connects the remote interface unit to the PoolPaktrade unit The below is specific mounting instructions that correspond to the mounting schematic below
1 Fasten the back piece (A) to the gang box using the rounded-head screws supplied in the packaging Use the screws that come with the box to secure the bracket
2 Thread the 6-conductor cable through the back piece (A) and connect to the back of front panel (B)3 Rest the front panel (B) on the back piece A and fasten the parts together using the flush-head screws supplied in the
packaging4 Finally fit the click-on frame (C)
Figure 4-3 Remote Interface Mounting Plate
ALL_EG_RIUMounting_20131219eps
A
B
C
31EGW06-PCPEG-20150514
TMTMSection IV Installation
COLD SURFACE TEMPERATURE SENSOR (2)
This sensor is used to measure the temperature of the coldest surface in the pool enclosure The sensor is an aluminum bar 1rdquo long by frac14rdquo square with a clearance hole for a number 8 screw and two 6rdquo wires on one end
When the temperature of the surface drops to within 5 F of the space air dew point the humidity set point will be automatically reset downward to help prevent condensation on the cold surface It should be noted that resetting the humidity set point will not compensate for lower quality building materials such as single pane glass or non-thermally broken frames
The sensor should be mounted on an exterior window or door frame that is not in direct sunlight In cases where there are no exterior windows or doors the sensor should be mounted on the inside surface of an exterior wall The sensor must be in contact with the cold surface Electrical connection should be made with 22 AWG copper two-conductor shielded twisted-pair cable Connect the shield drain wire to ground at the PoolComPaktrade unit end only
ECONOMIZER SYSTEM (OPTIONAL) (3)
An economizer system cools the space with outside air instead of the compressor The ECC-PCP provides a dry contact closure to activate the economizer The contacts of the ECC-PCP may be connected directly to the economizer control circuit provided the circuit is 24 VAC maximum and the current does not exceed 1 amp inductive The other components of the system must be provided by others (See figure below for an illustration of a typical economizer system)
Units equipped with an economizer require relocation of the factory mounted return air sensor It must be located in a duct that will always contain air that represents the space temperature and humidity
The economizer will operate only when space cooling is required and there is no dehumidification requirement When the outside air temperature is greater than 50degF and more than 5degF below the space temperature set point and the space temperature rises above the set point the compressor is disabled and a dry contact closure between T216 and T217 is made to activate the economizer
When the ECC-PCP contacts close relay R1 is energized causing the outside and exhaust air dampers (by others) to open and the return air damper (by others) to close At the same time relay R2 is energized causing the exhaust fan to run If the space temperature continues to rise and exceeds the space temperature set point by more than two degrees the economizer contact is opened reversing the damper positions The compressor is energized in the space cooling mode (if so equipped) The compressor will then continue to run until the call for space cooling is satisfied The economizer will also be activated in the space cooling mode if the auxiliary air conditioning condenser option is not installed or if the compressor is locked out by a fault condition
Figure 4-4 Economizer Operation
PCP_EG_EconomizerOperation2_20121204eps
32 EGW06-PCPEG-20150514
TMTM Section IV Installation
WARNINGWhen economizer option is selected adequate exhaust capacity via a separate fan must be specified to ensure the natatorium pressure remains slightly negative Failure to specify adequately sized exhaust system may result in damage to structure and pool odors may be forced into other areas of the building
OUTSIDE AIR TEMPERATURE SENSOR (ECONOMIZER OPTION ONLY) (4)
The outside air temperature sensor is installed only when the outside air economizer option is included The sensor is mounted inside a 12rdquo PVC conduit pull elbow It can be mounted to the outside of the building using standard PVC conduit fittings The sensor should be mounted near the outside air intake vent for the economizer system It is very important to mount the sensor so that it does not receive direct sunlight The exposure to sunlight will cause the sensor housing to warm resulting in temperature readings that are higher than the actual air temperature This condition may prevent the ECC-PCP from selecting the economizer mode of operation If possible mount the sensor under an overhang or on a surface with a northern exposure
Electrical connection should be made with 22 AWG copper 2-conductor shielded twisted-pair cable Connect the shield drain wire to ground at the PoolComPaktrade end only See figure below for an illustration of the outside air temperature sensor Seal the conduit leading to the sensor with silicone caulk to prevent moisture from migrating out to the sensor and condensing inside the sensor
Figure 4-5 Outside Air Sensor
PCP_EG_OutsideAirSensorInstallation_20121204eps
AIR COOLED CONDENSER (OPTIONAL) (5)
The air-cooled condenser is used to reject heat recovered during the space cooling mode of operation Only PoolComPaktrade brand air-cooled condensers (PAC Units) should be used with a PoolComPaktrade Unit The ECC-PCP provides 24 VAC control signal to the speed control located in the PAC unit control panel The speed control then runs the condenser fan motor at the appropriate speed See figure below for an illustration of a PAC unit field wiring
Figure 4-6 PAC Unit Field Wiring
PCP_EG_RemoteACCFieldConnection_20121204eps
24 VAC CONTROL SIGNAL FROM
USE COPPER SUPPLY WIRES
POOLCOMPAKTERMINALS 12AND 13
POWER SUPPLY
21 L1 L2
GR
33EGW06-PCPEG-20150514
TMTMSection IV Installation
AUXILIARY POOL WATER HEATING SYSTEM (AWH MODEL ONLY) (6)
The auxiliary pool water heating system is provided by others Typically a gas fired or electric pool water heater is used The ECC-PCP provides a dry contact closure that signals a need for auxiliary water heating The contacts of the ECC-PCP may be connected directly to the heaterrsquos control circuit provided the circuit is 24 VAC maximum and the current does not exceed 1 amp inductive Any other applications will require an additional relay (by others) to be installed between the ECC-PCP and the pool water heating system
AUXILIARY AIR HEATING SYSTEM (7)
Typically a duct mounted electric heater hot water coil or a factory installed unit mounted hot water coil is used to provide air heating The ECC-PCP provides a form ldquoCrdquo (NO and NC) dry contact closure that signals a need for auxiliary air heating The ECC-PCP contacts may be directly connected to an electric duct heater control circuit provided the circuit is 24 VAC maximum and the current through the contacts does not exceed 1 amp inductive The figure below shows a typical installation that utilizes a 3-way hot water control valve and a unit or duct mounted hot water coil
Figure 4-7 Installation of a Hot Water Coil 3-Way Valve
The ECC-PCP provides a normally open contact closure for connection to a building management system If a fault occurs the controller will energize this output to indicate that there is a problem with the dehumidification system The remote interface unit will display the cause of the fault and provide a suggested course of action This output may also be used to energize an external alarm light or buzzer It may also be directly connected to an external circuit as long as the circuit is 24 VAC maximum and the current through the contacts does not exceed 1 amp inductive
HO
T W
ATER
CO
IL
FIELD SUPPLIEDACTUATOR
AB SWITCH INB POSITION
2
1
W
BK
W 3
A
B
VALVE IN BYPASS POSITION
HOT WATER IN
HOT WATER OUT
THREE WAY VALVE WITHACTUATOR
HO
T W
ATER
CO
IL
VALVE IN HEATING POSITION
HOT WATER IN
HOT WATER OUT
THREE WAY VALVE WITHACTUATOR
ALL WIRING BY CONTRACTOR
T23
T25
T24
POOLCOMPAK
120 VAC24 VAC
FIELD SUPPLIED 40 VATRANSFORMER
WIRING DETAIL
PIPING DETAIL
34 EGW06-PCPEG-20150514
TMTM
Section IV Installation
BUILDING FIRE CONTROL SYSTEM (9)
The ECC-PCP can receive a contact closure signal from a building fire control system This input of the controller must be connected to dry (voltage free) contacts only When this input receives a contact closure the PoolComPaktrade unit compressor and fan will be shut down and the remote interface unit will show an alarm condition When the contact closure opens The PoolComPaktrade unit will resume normal operations It is possible to change the operation of the fire trip input to be active on open instead of close See ECC-PCP Service in the Operation section for further explanation
RETURN AIR SENSOR (10)
The return air sensor measures air temperature and relative humidity The sensor is normally factory mounted in the PoolComPaktrade unit return air section However with the optional economizer it is necessary to field mount this sensor in the duct work The sensor must be located in the return duct upstream of the exhaust duct connection (See Figure 4-4 Economizer Operation for a typical location of the sensor in the economizer system)
When field mounting is necessary the sensor will be provided from the factory and must be field wired using 22 AWG copper 4-conductor shielded twisted-pair cable
PURGE MODE INPUT (11)
The ECC-PCP can receive a contact closure signal from an external source to activate purge mode operation During purge mode the compressor is disabled and the economizer output is activated to bring in 100 outside air
AC PROOF INPUT (12)
An optional interlock used with certain types of heat rejection condensers Dry contact closure indicates a problem and prevents compressor operation in air cooling mode
POOL WATER TEMPERATURE SENSOR (13)
Units equipped with a pool water heating condenser require installation of factory supplied pool water temperature sensor It must be mounted upstream of the PoolComPaktrade and the auxiliary water heater The sensor can be threaded directly into a 1frasl4rdquo FPT fitting Electrical connection should be made with 22 AWG copper 2 conductor shielded twisted-pair cable Connect the shield drain wire to ground at the PoolComPaktrade end only
35EGW06-PCPEG-20150514
TMTM
Section IV Installation
POOL WATER PIPING (AWH AND AWV MODELS ONLY)
CAUTIONDo not run piping across service panels evaporator coil face or air discharge outlet
If a new or existing pool water heater is piped within the same circuit the PoolComPaktrade unit should be connected in a parallel loop between the filter and the other heater This allows the PoolComPaktrade unit to act as the primary water heating source and the other heater as a backup or supplemental water heater
All pool purification and chemical feed systems MUST be installed downstream of the unit This includes the practice of adding chemicals directly to the skimmer which results in highly concentrated corrosive chemicals passing over and through the PoolComPaktrade water condenser Water chemistry must be maintained at a pH level between 72 and 76 with a free chlorine level not exceeding 30 PPM and a combined chlorine level less than 03 PPM
If possible install the PoolComPaktrade unit above the pool water level If it is installed below the pool level isolation valves must be added Breakable couplings should be located near the unit on both the water inlet and outlet lines When installing piping connect the piping to these couplings last so as not to place stress on the other connection in the plumbing systemA constant flow of water is required through the PoolComPaktrade unitsrsquo condenser The circuit to and from the unit must be capable of maintaining the flow rate as specified for the installed unit (see PoolComPaktrade Performance data in Table 3-1) To ensure correct water flow the filter pump usually operates at the same time as the PoolComPaktrade unit However to reduce energy consumption during filter off cycle times a two-speed or small auxiliary water pump which bypasses the filter may be used
CAUTIONCAUTION Excessive water flow can cause premature erosion and pitting of the pool water condenser Adjust valve so that the water flow does not exceed the GPM or pressure drop listed in the table PoolPaktrade recommends a fixed flow control or adjustable flow circuit setter
PoolPaktrade International recommends installing water pressure tap ports to check influent and effluent water pressure See PoolComPaktrade Performance data in Table 3-1 for the particular unit model in question for the proper flow rate and pressure drop across the pool water condenser The pressure tap ports should be installed in a straight length of the water piping exterior to the PoolComPaktrade unit Install the port before any 90-degree turns and approximately 6 inches from the corner-post of the unit
In some instances piping from the PoolComPaktrade unit to the filter return line may not be feasible or economical The unit may be installed on its own supply and return line using a properly sized water pump and appropriate strainer Ensure that auxiliary water heating systems are staged to supplement the PoolComPaktrade unit water heating
If the PoolComPaktrade unit is installed above the pool surface and the main circulating pump cannot provide the proper water flow to it at the specified pressure an auxiliary booster pump is required
Condensate may be returned to the pool (if local codes allow) but PoolPaktrade International neither recommends nor disapproves this practice The installer should check local codes prior to making this decision Condensate must be filtered prior to being returned to the pool
If multiple PoolComPaktrade units are installed on the pool water piping circuit pipe them (and any auxiliary water heater) in parallel Piping PoolComPaktrade units in series may result in the downstream unit(s) sensing the pool water temperature as satisfied and not reject heat to the water to its full capacity The actual pool water temperature should be sensed by each PoolComPaktrade unit and auxiliary water heater
36 EGW06-PCPEG-20150514
TMTM
Section IV Installation
Figure 4-8 Typical Pool Water Piping Diagram (AWH and AWV Model Only)
PCP_EG_PoolWaterConnectSchematic_20140305eps
SALT WATER POOLS
For units (AW models only) installed serving a salt water pool wire the pool bonding system to the bonding lug on the unit copper pool water piping This connection is required to prevent corrosion of the internal PoolComPaktrade water piping
For more information on salt water pools see the article ldquoSalt Water Poolsrdquo in the Pool Water Chemistry section of the PoolPak educational library
POOLCHEMICAL
FEEDER
CHECKVALUE
OPTIONALBOOSTERPUMP IF
MAIN FILTERPUMP IS A
2-SPEED OR UNDERSIZED
BALLVALVES
POOLWATERFILTER MAIN
FILTERPUMP
DRAIN
UNIONS
EXTERNALPRESSURETAP PORTS
UNIONS
AUXILIARYPOOL WATER
HEATER
DRAIN
BALLVALVES
LOCKINGGLOBEVALVE
LOCKINGGLOBEVALVE
POOL WATERTEMP SENSOR
FC
FlowControl
37EGW06-PCPEG-20150514
TMTM
Section IV Installation
CONDENSATE DRAINSDrain pans are connected to a common drain system and must be trapped for proper operation For AWH and HCDH units a trap and piping must be supplied and installed by the customer The trap depth must be a minimum of 6 inches (See figure 4-9) For AWV and HCDV units a condensate trap is located inside the unit and the field condensate piping and overflow drain must not have an additional trap
Provisions MUST be made for disposal of condensate Condensate from the dehumidifier coil will have nearly the same properties as the pool water itself It is recommended that building materials subjected to the condensate and systems used for its disposal are checked for compatibility For drain piping use PVC plastic pipe minimum Schedule 40 The drain line must be sloped to provide proper drainage
Drain line exposed to outdoor ambient temperatures must be protected against freezing Wrap lines with electric heat tape (follow manufacturerrsquos instructions) controlled by an automatic thermostat set at a minimum of 35degF to protect against freezing Insulate all piping Insulation must be sealed at all seams Power for heat tape must be supplied external to the PoolComPaktrade
Figure 4-9 AWH and HCDH Condensate Trap
PCP_EG_NegPressCondPiping_20140122eps
WATER COOLED CONDENSERA standard option for PoolComPaktrade units is an integral water-cooled condenser For this option all valves and refrigerant piping is internal to the unit No additional field wiring is required No additional refrigerant or oil charge is required Water piping connections are 1-14rdquo MPT and labeled on the unit
UNIT BASE
MINIMUM SCHEDULE 40 PVC
REMOVABLECLEANOUT
OPEN TEEFOR VENT
AWH OR HCDH UNIT
PLUG THEUNUSEDCONNECTIONWITH SUITABLEPVC PLUG
1
2
4 INCHES MINIMUM OR MAX NEGATIVE STATICPRESSURE (INCHES WC) + 1 INCH
2 INCHES MINIMUM OR 12
1
12
TMTM
38 EGW06-PCPEG-20150514
TMTM
Section IV Installation
REMOTE AIR-COOLED CONDENSERSPACE AND LOCATION REQUIREMENTS
The most important consideration which must be taken into account when deciding upon the locations of air-cooled equipment is the provision for a supply of ambient air to the condenser and removal of heated air from the condenser area Where this essential requirement is not adhered to it will result in higher head pressures which cause poor operation and possible eventual failure of equipment Units must not be located in the vicinity of steam hot air or fume exhausts
Another consideration which must be taken is that the unit should be mounted away from noise sensitive spaces and must have adequate support to avoid vibration and noise transmission into the building Units should be mounted over corridors utility areas rest rooms and other auxiliary areas where high levels of sound are not an important factor Sound and structural consultants should be retained for recommendations
Walls or Obstructions
The unit should be located so that air may circulate freely and not be re-circulated For proper air flow and access all sides of the units should be a minimum of ldquoWrdquo away from any wall or obstruction It is preferred that this distance be increased whenever possible Care should be taken to see that ample room is left for maintenance work through access doors and panels Overhead obstructions are not permitted When the unit is in an area where it is enclosed by three walls the unit must be installed as indicated for units in a pit
Figure 4-10 Remote ACC Installation Around Walls or Obstructions
ALL_WallsorObstructions_20131111eps
Multiple Units
For units placed side by side the minimum distance between units is the width of the largest unit If units are placed end to end the minimum distance between the units is 4 feet
Figure 4-11 Remote ACC Installation When Installing Multiple Units
ALL_MultipleUnits_20131111eps
MINW
AIR FLOW
Wrdquo=Total width of the condenser
MIN
Wrdquo=Total width of the condenserrdquo
W
AIR FLOWAIR FLOW
39EGW06-PCPEG-20150514
TMTM
Section IV Installation
Units in Pits
The top of the unit should be level with the top of the pit and side distances increased to ldquo2Wrdquo If the top of the units is not level with the top of the pit discharge cones or stacks must be used to raise discharge air to the top of the pit This is a minimum requirement
Figure 4-12 Remote ACC Installation When Installing Units in Pits
ALL_UnitsinPits_20131111eps
Decorative Fences
Fences must have 50 free area with 1 foot undercut a ldquoWrdquo minimum clearance and must not exceed the tops of the unit If these requirements are not met the unit must be installed as indicated for ldquoUnits in Pitsrdquo
Figure 4-13 Remote ACC Installation When Installing Units Near Decorative Fences
ALL_DecorativeFences_20131111eps
Wrdquo=Total width of the condenserrdquo
MIN MIN
AIRFLOW
2W2W
STACK(BY OTHERSIF SUPPLIED) 10rsquo MAX
Wrdquo=Total width of the condenserrdquo
MIN1rdquo MIN MIN
AIR FLOWW W
40 EGW06-PCPEG-20150514
TMTM
Section IV Installation
FIELD INSTALLED PIPING
Installation of the outdoor air-cooled condenser should only be done by a qualified refrigeration mechanic familiar with this type of work Many service problems can be avoided by taking adequate precautions to provide an internally clean and dry system and by using procedures and materials that conform to established procedural standards
Piping Guidelines
The following piping recommendations are intended for use as a general guide For more complete information refer to the latest ASHRAE Handbook
Materialsbull Use clean dehydrated refrigeration-grade copper tubing for all refrigerant lines Hard drawn tubing should be used
where no appreciable amount of bending around pipes or obstructions is necessary If soft copper tubing must be used care should be taken to avoid sharp bends which may cause restrictions and excessive refrigerant pressure drops
bull Use long radius elbows wherever possible with one exception - short radius elbows should be used for any traps in the hot gas riser
bull Braze all copper to copper joints with a phosphorus-copper alloy material such as Silfos 5 or equivalent Do not use soft solder
bull During brazing operations flow an inert gas such as nitrogen through the lines to prevent internal oxidation scaling and contamination
bull Support refrigeration lines at intervals with suitable hangers brackets or clampsbull Pack glass fiber insulation and a sealing material around refrigerant lines where they penetrate a wall to reduce
vibration and to retain some flexibilitybull The liquid line and discharge line should not be in contact with one another If the installing contractor must tie these
lines together because of an installation requirement the contractor must insulate them from each other to prevent heat transfer Because the discharge line is hot during system operation precautions should be taken to avoid personnel injury
bull PoolComPaktrade units do not utilize compressors with unloading stages Consequently double hot gas risers are not needed for reduced load conditions as refrigerant flow rates will not fall below minimum velocities necessary to carry oil up through the discharge line
bull A field provided field installed liquid line filter-drier is recommended in the field piping to the PoolComPaktrade unit
Sizingbull The lines must be sized and routed so that oil is carried through the system Using smaller lines than recommended
will give excessive pressure drops resulting in reduced capacity and increased power consumption Oversized lines could result in an oil flow problem within the system and possible compressor damage
bull Excessive pressure drops in the liquid line may cause flashing of the refrigerant and a loss of a liquid seal at the expansion valve inlet A reduction in capacity may then occur because the presence of gaseous refrigerant will partially block the expansion valve Using hot gas and liquid line sizes recommended in the Air Cooled Condenser section for these units and the proper system refrigerant charge will prevent this problem
bull Discharge lines should be designed to prevent condensed refrigerant and oil from draining back to the compressor during OFF cycles Use the following guidelines The highest point in the discharge line should be above the highest point in the condenser coil The hot gas line should loop toward the floor if the condenser is located above the PoolComPaktrade unit especially
if the hot gas riser is longbull For refrigerant line sizing for an Air Cooled Condenser (ACC) where the lineset length is less than 100 feet or the
ACC location is less than 50 feet higher or 20 feet lower than the unit use the below Table 4-3bull ACC line lengths beyond the above limits will void warranty unless written approval is obtained from the
factory PRIOR to installation and startup
PCP_EG_ACCPiping_20140122eps
41EGW06-PCPEG-20150514
TMTM
Section IV Installation
Figure 4-14 ACC Refrigerant Piping
Refrigerant and Oil Chargingbull PoolPaktrade units are shipped with the required charge for self contained operation only The remote ACC option does
NOT provide the refrigerant charge or oil required for the ACC and line setsbull Refer to Table 4-2 for the additional ACC condenser chargebull Refer to Table 4-3 for the required additional oil and refrigerant charge Use the calculation method shown to calculate
the additional refrigerant and oilbull For the additional oil required multiply 2 of additional refrigerant charge of both ACC and refrigerant line length
Use the correct oil type of POE oil depending on the compressor installed For Alliance models SXA SPA SSA compressors use Copeland Ultra PN 998-E022-00 For Trane models CSHD compressors use Trane PN OIL00080
Sample Charging CalculationFor an AWV2600 with 73 feet line length and ACC0121 located 30 feet above the unit
Table 4-3 indicates 34rdquo discharge line and 58rdquo liquid line piping sizes Using R410A ozft additional charge for the lineset is 73 feet x 025 ozft + 73 feet x 148 ozft = 1260 oz Table 4-2 indicates additional charge for ACC0121 (allow 30 F Operation) is 39 lb x 16 ozlb = 6240 oz Total additional R410A charge for both ACC and refrigerant line is 1260 + 6240 oz = 750 oz or 46 lbs 14 oz Total additional oil charge is 750 oz x 2 = 15 oz
Table 4-2 R410A Charge for Air Cooled Condensers (lb)
DISCHARGE LINE
Pitch inDirection ofrefrigerant flow
LIQUID LINE
AIR-COOLEDCONDENSER
DISCHARGE LINE Pitch inDirection ofrefrigerant flow
Table 4-3 Refrigerant (R410A) Charge for Different Line Size
WARNINGAbove chart is for lineset length less than 100 ft and ACC located less than 50ft above unit or 20ft below unit Failures due to a piping layout not within these limits nor receiving prior PoolPaktrade
Factory approval will not be covered under PoolPaktrade warranty
Refrigerant Line Size (ACC) Refrigerant Charge for Units with Air Cooled Condensers (ACC)
Discharge Liquid Line Length (ft) vs R410A Charge (lbs)
Model OD R410A ozft OD R410A
ozft25 ft 50 ft 75 ft 100 ft
Lbs Oz Lbs Oz Lbs Oz Lbs Oz
0550 12 010 38 049 0 15 1 14 2 13 3 12
58 016 12 092 1 11 3 6 5 1 6 13
0800 58 016 38 049 1 0 2 1 3 1 4 2
58 016 12 092 1 11 3 6 5 1 6 13
1200 58 016 12 092 1 11 3 6 5 1 6 13
34 025 58 148 2 11 5 6 8 1 10 13
1400 58 016 12 092 1 11 3 6 5 1 6 13
34 025 58 148 2 11 5 6 8 1 10 13
1800 34 025 12 092 1 13 3 10 5 8 7 5
78 034 58 148 2 14 5 11 8 9 11 6
2600 34 025 58 148 2 11 5 6 8 1 10 13
1 18 058 34 221 4 6 8 12 13 1 17 7
3500 78 034 58 148 2 14 5 11 8 9 11 6
1 18 058 78 307 5 11 11 7 17 2 22 13
4000 78 034 34 221 3 16 7 16 11 15 15 15
1 18 058 78 307 5 11 11 7 17 2 22 13
Note1 This table applies to ACC line length less than 100 ft only Contact factory if ACC line length is more than 100 ft
2 Line size should be used for ACC at the same level or located up to 20ft below the unit
3 Line size should be used for ACC located up to 50 ft above the unit
43EGW06-PCPEG-20150514
TMTM
SECTION V OPERATION
ECC-PCP REMOTE INTERFACE UNITFigure 5-1 RIU Keypad
PCP_EG_StraightOnKeypadAnnotated_20121204eps
The ECC-PCP Remote Interface Unit (RIU) is designed around the Carel pGD0 4-line x 20 character backlit LCD display module The RIU displays are accessed through six backlit selection buttons They consist of a Return Enter Key Up Key Down Key Program Key Alarm Key and Escape Key as shown above
After approximately 5 minutes the RIU will display the status screen rotation Press the Escape key to bypass the five minute delay and move directly to the status display
STATUS DISPLAY
The status screens contain basic information about operation of the PoolComPaktrade system Press the up or down arrow keys to move from screen to screen The screens will also rotate automatically every 10 seconds
Figure 5-2 Status Screen 1S P A C E T E M P _ _ o FS P A C E R H _ _ S P A C E D E W P O I N T _ _ o F(O U T S I D E T E M P) _ _ o F
Status Screen 1 displaysbull Space Temperature in degF or degCbull Space Relative Humidity in bull Space Dew Point in degF or degCbull Outside Air Temperature in degF or degC (with Economizer Option Only)
Status Screen 2 displaysbull Water Heating - YES indicates that the unit is returning recovered heat back to the pool waterbull Aux Water Heat - YES indicates that the controller has closed the relay contact requesting auxiliary pool water heater
operationbull Water Temperature in degF or degC
Status Screen 3 displaysbull SPACE temperature control requirement bull TEMPERATURE- OK Indicates the space temperature is at setpointbull HEATING- YES Indicates the space requires heatingbull COOLING- YES Indicates the space requires coolingbull AUX AIR HEAT Indicates the space requires additional heating The auxiliary air heating relay contacts close to
activate the external heating system
44 EGW06-PCPEG-20150514
TMTM
bull DEHUMID (SURFACE) Indicates the space requires dehumidification The word SURFACE indicates that the unit is temporarily lowering the dew point set point to minimize condensation at the cold surface temperature sensor
bull ECONOMIZER MODE Indicates the unit is cooling the space with outside air ECONOMIZER MODE is only shown if the optional economizer system is present
Status Screen 4 displaysbull The first line displays the current system status bull The second line displays compressor status
SET POINT CHANGE MENU
bull Press the PRG key to access the main menubull Use the arrow keys to scroll to the menu selection for Set Points and then press the Enter keybull Use the arrow keys to select the set point to be changed and then press Enter Available set points are
Air Temperature
The allowable range for the air temperature set point is 70 to 95degF Use the arrow keys to change the set point and then press Enter The new dew point set point is shown immediately as DPT The set point change screen will remain visible for a short time to allow verification of the new dew point set point After about five seconds the RIU will return to the status screen display
Relative Humidity
The allowable range for the relative humidity set point is 40 to 65degF Use the arrow keys to change the set point and then press Enter The new dew point set point is shown immediately as DPT The set point change screen will remain visible for a short time to allow verification of the new dew point set point After about five seconds the RIU will automatically return to the status screen display
Pool Temperature
The allowable range for the water temperature set point is 70 to 104degF Use the arrow keys to change the set point and then press Enter The RIU will automatically return to the status screen display
Recommendations
bull Air Temperature (Range 70degF to 95degF) The air temperature should normally be set about 2degF above the pool water temperature to minimize the pool water evaporation rate (high temperature spas are an exception)
bull Relative Humidity (Range 40 to 65) The normal range for the humidity set point is 50 to 60 Lower set points will require more energy (electricity) to satisfy the dehumidification requirement and increase pool water evaporation
bull Pool Temperature (Range 70degF to 104degF) The pool temperature set point is normally set between 80degF and 88degF for a typical swimming pool and higher for a spa depending on user preference
CAUTIONThe dehumidifier should be configured to operate at the set points designed for the facility These set points are shown on the yellow label on the door of the RIU Set points other than those shown may not be attainable with this dehumidifier
Section V Operation
45EGW06-PCPEG-20150514
TMTM
Section V Operation
PURGE MODE CONTROL MENU
CAUTIONIt is the userrsquos responsibility to use this feature properly to prevent freeze damage to downstream equip-ment 100 outside air at below freezing conditions has the potential to cause serious damage
Purge Mode causes the unit to force the optional field-provided economizer dampers and fan to full open introducing large quantities of outside air to the space This is typically used when ldquoshockingrdquo the pool Compressor operation is disabled during purge but the auxiliary air and water heating systems remain active
If the unit is not equipped with the economizer option a flashing ldquoCAUTION NO FREEZE PROTECTIONrdquo warning will be displayed This warning indicates that operation of purge mode without regard for outside air temperatures below freezing can result in damage to hot water coils or other equipment in the pool area
DETAILED STATUS MENU
To access the detailed status menubull Press the PRG key to access the main menubull Use the arrow keys to scroll to the menu selection for Detailed Status and then press the Enter key
Detailed Status Screen 1 displays Temperaturesbull Surface ndash The temperature measured at the cold surface sensorbull Dew Point ndash The calculated dew point of the spacebull Dewpt Setpoint ndash The dew point set point calculated from the temperature and relative humidity set points
Detailed Status Screen 2 displaysbull Disch Press ndash The measured refrigerant pressure in the discharge line at the compressorbull Suct Press ndash The measured refrigerant pressure in the suction line at the compressorbull Suct Temp ndash The refrigerant temperature measured on the surface of the suction line at the compressorbull Suct SH ndash The calculated superheat at the suction of the compressor
Detailed Status Screen 3 displays the number of hours the following device or system has been active since power was last applied to the unitbull Cmpr - Compressorbull Fan ndash Supply Fanbull AC ndash Mechanical Air Cooling (Economizer Cooling Not Included)bull Aux ndash Air ndash Auxiliary Air Heatingbull Aux - Wtr ndash Auxiliary Water Heating
Detailed Status Screen 4 displaysbull Fault Count ndash The total number of high pressure low pressure and defrost trips that have occurred since power was
last applied to the unit When this number reaches 10 the compressor is locked outbull AC Proof ndash Indicates a status of ldquoProvenrdquo if AC mode operation is allowed ldquoNot Provenrdquo indicates that AC mode
operation is not allowed
Detailed Status Screen 5 (only present in units configured for multi-unit networking) displaysbull Network Role ndash Indicates if the unit currently being displayed by the RIU is the master or a slavebull Net Status ndash Indicates ldquoCONNECTEDrdquo if the unit is properly connected to the multi-unit network ldquoNO LINKrdquo
indicates the unit is not connectedbull Unit ID Number ndash Indicates the unit address on the multi-unit network
Detailed Status Screen 6 (only present in units configured for multi-unit networking) displaysbull Unit 1 Present ndash Indicates if the unit currently being displayed by the RIU can communicate with unit 1 on the multi-
unit networkbull Unit 2 3 4 ndash Same as for unit 1 but for the other 3 possible units on the network
46 EGW06-PCPEG-20150514
TMTM
Section V Operation
ECC-PCP NETWORK OPERATIONNetworked ECC-PCP units operate in a MASTERSLAVE environment This means that one unit (master) determines heating cooling and dehumidification requirements and broadcasts them on the network to the other units (slaves) This ensures that all units work together instead of against other Each networked unit contains all sensor and controls necessary for independent operation and is capable of acting in the master role Units on the network are identified by a number between one and four The unit with the lowest identification number having no uncleared alarms will be the master unit
If an alarm condition occurs in the master unit it will give up the role of master The unit with the next lowest identification number and no unclear alarms will take over the master role The unit that experienced the alarm condition will operate in the slave role until the alarm is cleared at the control panel
The control panel provides two network status screens These can be accessed in the detailed status menu The figure above shows the first screen that displays the status of units one through four as present or not Use this screen to verify that all units on the network are connected and communicating with each other The figure below shows the second screen that displays network information for the unit that is being displayed by the remote interface unit including network role connection status and network identification number
NETWORK CONFIGURATION
Using the following four parameters it is possible to configure the ECC-PCP network to accommodate a wide variety of installation options Network configuration can be accessed in the service menu These parameters must be set in each unit individually
Pool Water Temperature Control
Determines whether the unit will control water temperature based on the masterrsquos command (NETWORK) or its own temperature sensor and set point (LOCAL) If a unit set to LOCAL becomes the master other units in the network will not use the masterrsquos command for water heating They will look to the next line that is not set to LOCAL This parameter is only set to LOCAL if the unit is connected to a different pool than the rest of the units on the network Because the unit is controlling water temperature on its own it is necessary to select the correct unit with the control panel before changing the water temperature set point
Staged Dehumidification Control
Determines whether the unit will run in dehumidification when there is a need for 1 stage or 2 stages of dehumidification The master unit will start on any need for dehumidification independent of this parameter Slave units with this parameter set to YES will dehumidify only if the master is asking for 2 stages of dehumidification Setting this parameter to NO will cause the unit to dehumidify when the master calls for at least 1 stage of dehumidification Using this parameter it is possible to configure the number of units in each dehumidification stage
Dehumidification Stage 2 Offset
Determines how far the dewpoint (relative humidity) of the space has to rise above the set points before the unit will request 2 stages of dehumidification on the network This parameter is normally the same in all units on the network Making this parameter smaller will bring on the second stage of dehumidification sooner
Enable Network Control
Determines whether the unit will participate in the masterslave environment Setting this parameter to NO will cause the unit to act like a standard ECC-PCP single unit The unit will never become the master on the network and will not listen to the demands broadcast by the master on the network Although units with this parameter set to NO do not participate in the masterslave environment they are still accessible through the network control panel Like the LOCAL pool
47EGW06-PCPEG-20150514
TMTM
Section V Operation
water temperature setting this parameter when set to NO requires this unit to be displayed on the control panel before changing any of the set points The other screens for Pool Water Temperature Control Staged Dehumidification and Stage 2 Offset are not available when this parameter is set to NO
Changing Set Points
Each unit on the network maintains two groups of set points network and local If a unit has the Enable Network Control parameter set to YES and the Water Temperature Control parameter set to NETWORK it will control to the network set points Set points changed when the remote interface unit is displaying this unit will be changed in every unit on the network with the same NETWORK and Water Temperature Control parameters Units that are configured for Network Control and LOCAL water temperature control will control using local water temperature set point the network air temperature and relative humidity set points When the air temperature and relative humidity set points are changed when the remote interface unit is displaying the unit they will be changed in all units configured for Network control The water temperature set point will only be changed in the unit currently being displayed by the remote interface unit Units that are not configured for Network Control will use all local set points Therefore any set points changed while the remote interface unit is displaying this unit will only be changed in this unit
ECC-PCP SERVICE
SERVICE MENU
To access the service menubull Press the PRG key to access the main menubull Use the arrow keys to scroll to the menu selection for Service and then press the Enter keybull A password is required to access the service menu
The following sub-menus are available in the service menu
IO CONFIGURATION
Digital Inputs
This menu contains a screen for each digital input Each screen contains the following parametersbull Status of the data point linked to the inputbull Status of the raw digital inputbull Input type
The following parameter list shows the available digital input screensbull Defrost Switchbull Cpr High Tempbull Water Flow bull Fire Tripbull AC Proofbull Cpr High Prsbull Fan Overloadbull Low Pressurebull Purge Input
Digital Outputs
This menu contains a screen for each digital output Each screen contains the following parametersbull Current output status bull Requested output status bull Override
48 EGW06-PCPEG-20150514
TMTM
Section V Operation
The following digital output screens are availablebull Supply Fanbull Compressorbull Bypass Solenoidbull Water Heating Solenoidbull Reheat Solenoidbull AC Solenoidbull Aux Water Heatbull Alarm Outputbull ACC Run Signalbull Economizerbull Aux Air Heat Stage 1bull Aux Air Heat Stage 2
Analog Inputs
This menu contains a screen for each analog input Each screen contains the following parametersbull Current read-only value from the inputbull Fail bull Tol bull Offs bull Ovrd bull Min bull Max
The following analog input screens are availablebull Discharge Pressure bull Suction Pressure bull Return Relative Humidity bull Suction Temperature bull Return Air Temperature bull Pool Water Temperature bull Surface Temperature bull Outside Air Temperature
UNIT CONFIGURATION
Installed Options
This menu contains parameters that indicate the hardware options installed in the dehumidifier The parameters are set by the factory and do not typically require modification
Aux Air Heating
This menu contains parameters that configure the auxiliary air heating system
Aux Water Heating
This menu contains parameters that configure the auxiliary water heating system
Temperature Ctrl
This menu contains parameters that configure the air temperature control routines of the dehumidifier
49EGW06-PCPEG-20150514
TMTM
Section V Operation
Humidity Control
This menu contains parameters that configure the humidity control routines of the dehumidifier Water Temp CtrlThis menu contains parameters that configure the compressor based water heating system of the dehumidifier bull Water Heat First This parameter indicates whether the control routine will use the compressor for water heating when
there is no dehumidification requirement bull Deadband This parameter is the deadband used by the compressor based pool water heating control routine
BAS INTERFACE
This menu contains parameters that configure the building automation system interface of the dehumidifier
MULTI-UNIT NETWORK
This menu contains parameters that configure the operation of dehumidifier in a multiple unit installation
COMPRESSOR
This menu contains parameters that configure the operation of the dehumidifier compressor
ECONOMIZER
This menu contains parameters that configure the operation of the optional field provided and field installed economizer damper system
HISTORY
The history screen provides information on the last 50 faults that have occurred in the dehumidifier It can be used for troubleshooting by an experienced HVAC technician The faults are recorded with a sequence number from 1 to 50 Sequence number 1 is always the most recent fault The following information is stored and displayed for each fault in non-volatile memorybull Hour at which the fault occurred bull Fault Code Number bull Return Air Temperaturebull Return Air Humiditybull Discharge Pressurebull Suction Pressurebull Suction Temperaturebull Pool Water Temperaturebull AC Solenoid Statusbull Bypass Solenoid Statusbull Compressor Statusbull Reheat Solenoid Status
MANUAL MODE
The Manual Mode menu for use by qualified service personnel provides two options Demand Control and Digital Output Control
UTILITIES
The Utilities menu provides sub menus for configuring units of measure and passwords for set point and service access control
50 EGW06-PCPEG-20150514
TMTM
Section V Operation
MAINTENANCEOVERVIEW
Periodic routine maintenance will promote extended equipment life While PoolComPaktrade units use components that are usually maintenance free and do not require service a simple check could result in noticing possible problems before they develop into major problems
DAILY MAINTENANCE
bull Pool water chemistry is a part of daily maintenance and it is recommended to follow National Spa and Pool Institute standards PoolPaktrade International strongly recommends following the National Spa and Pool Institute values
Table 5-1 Pool Water Chemistry
bull PoolPaktrade International recommends daily logging of your pool water chemistry MAINTENANCE AND YOUR POOL WATER CHEMISTRY IS IMPORTANT TO PROTECT YOUR WARRANTY RIGHTS
MONTHLY MAINTENANCE
bull Air Filters inspect and replace or clean as applicable Dirty filters restrict air flow and can cause improper unit operation
bull Ensure that the condensate collection pan is draining properly and the condensate is not overflowing or being drawn into the supply air stream Check the condensate and overflow lines to ensure that neither are clogged
bull Check the operation of the blower motor and scroll Ensure that the scroll does not rub the housing Check for proper belt tension Worn or cracked belts should be replaced Check fan and mounting brackets for tightness
bull Ensure that the ALARM light is not illuminated
ANNUAL MAINTENANCE
bull Inspect the refrigeration and water circuits for leaks wear or corrosion Corrosion on the water piping or condenser may indicate poor pool chemical maintenance and improper chlorine and pH levels
bull Check electrical components for loose wiringbull Although the exterior of the PoolComPaktrade units are powder coated wipe down unit particularly if installed in an
area subject to dirt or chemical concentrationbull Wash brush or vacuum the evaporator and air condenser coils This will ensure proper heat transfer and reduce static
pressure losses Caution should be taken not to wet electrical components inside the unit
NOTEIf service and inspections are not performed by a competent and experienced service firm the manufacturer warranty may be voided
AUXILIARY AIR amp POOL WATER HEATER CONNECTIONS FOR MULTIPLE UNIT INSTALLATION
Figure 6-1 Auxiliary Air and Pool Water Heater Connections for Multiple Units
AWH_EG_Connections_20121204eps
52 EGW06-PCPEG-20150514
TMTM
AUXILIARY AIR amp POOL WATER HEATER CONNECTION FOR A TWO POOL INSTALLATION
Figure 6-2 Auxiliary Air and Pool Water Heater Connections for Two Pool Installations
AWH_EG_ConnectionstoPool_20121204eps
Section VI Wiring
53EGW06-PCPEG-20150514
TMTM
Section VI Wiring
FIELD WIRING
Figure 6-3 Field Wiring Diagram
PCP_EG_FieldWiringDiagram_20121204eps
54 EGW06-PCPEG-20150514
TMTM
Section VI Wiring
FIRE CONTROL SYSTEM CONNECTION
Figure 6-4 Fire Control System Connection
PCP_EG_FirecontrolSysConnection_20121204eps
55EGW06-PCPEG-20150514
TMTM
Section VI Wiring
This page intentionally left blank
EGW06-PCPEG-20150514
TMTM
56
TMTM
3491 Industrial Drive York PA 17402 USA 800-959-7725 Fax 717-757-5085for more information wwwpoolpakcom
The Leader in Indoor Pool Dehumidification
26 EGW06-PCPEG-20150514
TMTM
SECTION IV INSTALLATION
PCP INSTALLATIONINTRODUCTION
Installation requires the unit to be placed on a roof mounted curb the mechanical room floor an appropriate location in the pool room or outside on an equipment housekeeping pad Isolation pads should be placed under the unit to minimize transmission of noise due to unit operation Then pool water is piped to the unit Electrical power from a properly sized fused disconnect is connected to the unit The supply and return air ducts are connected to their respective locations on the unit The condensate is piped back to the pool or to the sewer
If an optional remote air-cooled condenser is used place the condenser in a proper outdoor location Refrigerant piping is then run from the air cooled condenser to the PoolComPaktrade unit Refrigerant lines must be leak checked and evacuated through installer provided Schrader valves Control and power wiring are run to complete the installation If a field-furnished auxiliary space heating coil is installed the control for this heater must be field wired to the PoolComPaktrade controls shown in Section V1 - Wiring (Figure 6-3 Field Wiring Diagram)
Outside air can be ducted into the unit through the optional outside air duct connection The unit can draw up to 30 of its supply air from the outside When ventilating the natatorium in this way an exhaust fan must be furnished in the natatorium to exhaust to the outside an air volume slightly greater than the air volume introduced into the natatorium from the outside This will maintain a negative pressure in the space preventing odor and moisture migration Outside air filters are provided for Horizontal PoolComPaktrade units For Vertical PoolComPaktrade units outside air must be filtered before entering the unit
UNITFACILITY INTERFACE
A typical PoolComPaktrade system layout and its connection to the natatorium and pool water piping systems is shown in the figure below
Figure 4-1 Typical PoolComPaktrade AWH Series System Layout
PCP_EG_LayoutSchematic_AW_3D_20121204eps
Cold SurfaceTemperature Sensor
POOL
Recommended WaterPressure Taps
Return Air
ECC-PCP RemoteInterface Unit (should not
be mounted insidepool enclosure)
FusedDisconnect (Able to be seen
from the unit)
RemoteAir-CooledCondenser(optional)
PoolComPakHorizontal
Unit
Pool Heater
Pool HeaterPump (optional)
Pool Water Circulation Pumpfor PoolComPak (Optional - By Others)
Flo
Pool WaterTemp Sensor
wBalancing Valve
Pool Filter
Pool Pump
IsolationValves
AirVent
Supply Air DuctSupply Air
ExteriorWindow
27EGW06-PCPEG-20150514
TMTM
HANDLING
All units are shipped completely assembled Care should be taken to avoid damage due to rough handling If the unit is not to be immediately installed it must be protected from weather and site hazards
CLEARANCE
For proper operation and service PoolComPaktrade Vertical PoolComPaktrade Horizontal and RoofPak units require 36rdquoclearance on all sides
MOUNTING OF POOLCOMPAK UNITS
Locate the PoolComPaktrade unit on a firm level base If floor mounting ensure that the floor is capable of supporting the operating weight If wall mounting or hanging a unit provide a support structure that is capable of supporting the unit while protecting pool patrons and employees from injury Ensure that the support structure will not interfere with the operation of the unit Provision must be made for servicing units suspended above floor level Install isolation pads under the unit to minimize unit transmitted vibration noise
INSPECTION
Upon receipt of the PoolComPaktrade unit(s) immediately inspect for damage In particular inspect the housing and the evaporator coil face Minor indentations of the fins will not affect performance However if there is substantial damage immediately notify shipping company of unseen damage at delivery with a detailed letter outlining the damage Retain copies of all shipping damage claim documentation as well as photographs of the observed damage
NOTEPoolPaktrade International does not ship damaged units from its facility nor is it responsible for damage incurred during transit
POWER SUPPLY
A separate fused disconnect switch must be provided per local codes and be within easy accessibility of the PoolComPaktrade unit Use the minimum circuit capacity listed on the unitrsquos data plate to determine the minimum wire size for incoming electrical power The ground connection for the unit is located in the unit control panel The power supply to the unit must be adequate for the compressor starting amperage (LRA) If it is not a compressor rotor stall will occur during start-up due to an excessive voltage drop All field wiring must be done according to the wiring diagram provided with the unit and in conformance to the National Electrical Code (NEC) and any other applicable local electrical code(s)
For Vertical and Horizontal PoolComPaktrade units installing contractor must punch a hole into the electrical compartment to run power wires The hole is to be properly finished with a rubber grommet and weather sealing
CONTROL WIRING
All control wiring field connections are described in the wiring diagram furnished with the PoolComPaktrade unit as well as in the Field Wiring section of this manual All control wiring is low voltage
CONDENSATE PIPING
The condensate may be piped to a drain or returned to the pool if local codes allow If returned to the pool the condensate should be piped to the skimmer PoolPaktrade International recommends neither for nor against the practice of returning condensate to the pool The overflow drain should be piped in a similar fashion The installer should review the local codes prior to making the decision of where to dispose of the condensate The amount of condensate produced in a year is about equal to the volume of the pool
Section IV Installation
28 EGW06-PCPEG-20150514
TMTM
Section IV Installation
CURB MOUNTING
Illustrated in Figure 4-2 is a curb that has been designed specifically for the PoolComPaktrade product line The outside dimensions of the curb are such that the base of PoolComPaktrade extends over the edge of the curb all the way around This aids in preventing rainwater from getting between the base of the PoolComPaktrade and the curb It is the installing contractorrsquos responsibility to complete the following
bull Flash the curb into the roofbull Insulate the curbbull Connect the supply and return duct to the curbrsquos duct support railsbull Connect condensate drain line with appropriate trap bull Seal the curb to the bottom of the PoolComPaktrade using the gasket supplied with the curbbull Provide counter flashing between curb and PoolComPaktrade unitbull Seal the pool water pipes where they go through the curb
If specified when ordering all water piping connections can be made through the curb These water connections include pool water condensate auxiliary hot water coil (optional)
If the PoolComPaktrade is to be mounted on a curb the unit must be ordered with the ldquooutdoorrdquo option PoolComPaktrade Units produced for curb mounting receive special weatherizing and insulation that non-curb mounted PoolComPaktrade Units do not receive
NOTEIf the factory is not notified that a PoolComPaktrade is to mounted outdoors the unit will not be weather tight it will leak and it will not be properly insulated
INTEGRAL GAS FURNACE OPTION (ROOFPAK ONLY)
When using a gas furnace power venting is provided for all unit sizes External vent piping andor cap is required Please refer to the furnace manufacturerrsquos manual for piping and venting instructions Install leak-test and properly regulate piping for the gas-fired heater Pressures should be regulated to the entering pressures as shown on the furnace manufacturerrsquos data plate or manual
The ECC-PCP is the Electronic Control Center programmable controller designed specifically for the PoolComPaktrade dehumidification system It is a robust system capable of a variety of functions The following text describes the field wiring required for for proper operation of the ECC-PCP dehumidification system in a typical PoolComPaktrade unit installationThe field wiring diagram (see Section VI - Wiring) shows the location of the connections for the sensors and other required devicesThe numbers following the text identify the location on the field wiring diagram where each device is connected to the PoolComPaktrade unit electrical panel
REMOTE INTERFACE UNIT (1)
The remote interface unit allows the user to view space temperature pool water temperature and relative humidity change set points and receive fault notifications It should be mounted in a convenient location that is outside the pool area The ambient temperature of the mounting location must always be above 32 F
NOTEThe maximum distance from the Remote Interface Unit to the PoolComPaktrade unit is 1000 feet For distances greater than 1000 feet contact the factory
The control panel does not contain any sensors and should be mounted outside the pool enclosure A factory supplied 6 ft cable RJ25 (6 conductor) must be installed between the PoolComPaktrade unit and the control panel
For distances greater than 6 feet use 6 conductor 22 AWG shielded twisted-pair cable along with the supplied RJ25 jack and second 6 foot cable shipped loose with the unit
The wall mounting of the terminal first requires the back piece (A) of the RIU assembly The RIU is designed to fit a single gang extra-deep electrical box mounted horizontally in the wall The RJ25 jack and most of the black cable should be placed inside the box before installing the mounting bracket A frac34rdquo hole must be drilled for the 6-conductor cable which connects the remote interface unit to the PoolPaktrade unit The below is specific mounting instructions that correspond to the mounting schematic below
1 Fasten the back piece (A) to the gang box using the rounded-head screws supplied in the packaging Use the screws that come with the box to secure the bracket
2 Thread the 6-conductor cable through the back piece (A) and connect to the back of front panel (B)3 Rest the front panel (B) on the back piece A and fasten the parts together using the flush-head screws supplied in the
packaging4 Finally fit the click-on frame (C)
Figure 4-3 Remote Interface Mounting Plate
ALL_EG_RIUMounting_20131219eps
A
B
C
31EGW06-PCPEG-20150514
TMTMSection IV Installation
COLD SURFACE TEMPERATURE SENSOR (2)
This sensor is used to measure the temperature of the coldest surface in the pool enclosure The sensor is an aluminum bar 1rdquo long by frac14rdquo square with a clearance hole for a number 8 screw and two 6rdquo wires on one end
When the temperature of the surface drops to within 5 F of the space air dew point the humidity set point will be automatically reset downward to help prevent condensation on the cold surface It should be noted that resetting the humidity set point will not compensate for lower quality building materials such as single pane glass or non-thermally broken frames
The sensor should be mounted on an exterior window or door frame that is not in direct sunlight In cases where there are no exterior windows or doors the sensor should be mounted on the inside surface of an exterior wall The sensor must be in contact with the cold surface Electrical connection should be made with 22 AWG copper two-conductor shielded twisted-pair cable Connect the shield drain wire to ground at the PoolComPaktrade unit end only
ECONOMIZER SYSTEM (OPTIONAL) (3)
An economizer system cools the space with outside air instead of the compressor The ECC-PCP provides a dry contact closure to activate the economizer The contacts of the ECC-PCP may be connected directly to the economizer control circuit provided the circuit is 24 VAC maximum and the current does not exceed 1 amp inductive The other components of the system must be provided by others (See figure below for an illustration of a typical economizer system)
Units equipped with an economizer require relocation of the factory mounted return air sensor It must be located in a duct that will always contain air that represents the space temperature and humidity
The economizer will operate only when space cooling is required and there is no dehumidification requirement When the outside air temperature is greater than 50degF and more than 5degF below the space temperature set point and the space temperature rises above the set point the compressor is disabled and a dry contact closure between T216 and T217 is made to activate the economizer
When the ECC-PCP contacts close relay R1 is energized causing the outside and exhaust air dampers (by others) to open and the return air damper (by others) to close At the same time relay R2 is energized causing the exhaust fan to run If the space temperature continues to rise and exceeds the space temperature set point by more than two degrees the economizer contact is opened reversing the damper positions The compressor is energized in the space cooling mode (if so equipped) The compressor will then continue to run until the call for space cooling is satisfied The economizer will also be activated in the space cooling mode if the auxiliary air conditioning condenser option is not installed or if the compressor is locked out by a fault condition
Figure 4-4 Economizer Operation
PCP_EG_EconomizerOperation2_20121204eps
32 EGW06-PCPEG-20150514
TMTM Section IV Installation
WARNINGWhen economizer option is selected adequate exhaust capacity via a separate fan must be specified to ensure the natatorium pressure remains slightly negative Failure to specify adequately sized exhaust system may result in damage to structure and pool odors may be forced into other areas of the building
OUTSIDE AIR TEMPERATURE SENSOR (ECONOMIZER OPTION ONLY) (4)
The outside air temperature sensor is installed only when the outside air economizer option is included The sensor is mounted inside a 12rdquo PVC conduit pull elbow It can be mounted to the outside of the building using standard PVC conduit fittings The sensor should be mounted near the outside air intake vent for the economizer system It is very important to mount the sensor so that it does not receive direct sunlight The exposure to sunlight will cause the sensor housing to warm resulting in temperature readings that are higher than the actual air temperature This condition may prevent the ECC-PCP from selecting the economizer mode of operation If possible mount the sensor under an overhang or on a surface with a northern exposure
Electrical connection should be made with 22 AWG copper 2-conductor shielded twisted-pair cable Connect the shield drain wire to ground at the PoolComPaktrade end only See figure below for an illustration of the outside air temperature sensor Seal the conduit leading to the sensor with silicone caulk to prevent moisture from migrating out to the sensor and condensing inside the sensor
Figure 4-5 Outside Air Sensor
PCP_EG_OutsideAirSensorInstallation_20121204eps
AIR COOLED CONDENSER (OPTIONAL) (5)
The air-cooled condenser is used to reject heat recovered during the space cooling mode of operation Only PoolComPaktrade brand air-cooled condensers (PAC Units) should be used with a PoolComPaktrade Unit The ECC-PCP provides 24 VAC control signal to the speed control located in the PAC unit control panel The speed control then runs the condenser fan motor at the appropriate speed See figure below for an illustration of a PAC unit field wiring
Figure 4-6 PAC Unit Field Wiring
PCP_EG_RemoteACCFieldConnection_20121204eps
24 VAC CONTROL SIGNAL FROM
USE COPPER SUPPLY WIRES
POOLCOMPAKTERMINALS 12AND 13
POWER SUPPLY
21 L1 L2
GR
33EGW06-PCPEG-20150514
TMTMSection IV Installation
AUXILIARY POOL WATER HEATING SYSTEM (AWH MODEL ONLY) (6)
The auxiliary pool water heating system is provided by others Typically a gas fired or electric pool water heater is used The ECC-PCP provides a dry contact closure that signals a need for auxiliary water heating The contacts of the ECC-PCP may be connected directly to the heaterrsquos control circuit provided the circuit is 24 VAC maximum and the current does not exceed 1 amp inductive Any other applications will require an additional relay (by others) to be installed between the ECC-PCP and the pool water heating system
AUXILIARY AIR HEATING SYSTEM (7)
Typically a duct mounted electric heater hot water coil or a factory installed unit mounted hot water coil is used to provide air heating The ECC-PCP provides a form ldquoCrdquo (NO and NC) dry contact closure that signals a need for auxiliary air heating The ECC-PCP contacts may be directly connected to an electric duct heater control circuit provided the circuit is 24 VAC maximum and the current through the contacts does not exceed 1 amp inductive The figure below shows a typical installation that utilizes a 3-way hot water control valve and a unit or duct mounted hot water coil
Figure 4-7 Installation of a Hot Water Coil 3-Way Valve
The ECC-PCP provides a normally open contact closure for connection to a building management system If a fault occurs the controller will energize this output to indicate that there is a problem with the dehumidification system The remote interface unit will display the cause of the fault and provide a suggested course of action This output may also be used to energize an external alarm light or buzzer It may also be directly connected to an external circuit as long as the circuit is 24 VAC maximum and the current through the contacts does not exceed 1 amp inductive
HO
T W
ATER
CO
IL
FIELD SUPPLIEDACTUATOR
AB SWITCH INB POSITION
2
1
W
BK
W 3
A
B
VALVE IN BYPASS POSITION
HOT WATER IN
HOT WATER OUT
THREE WAY VALVE WITHACTUATOR
HO
T W
ATER
CO
IL
VALVE IN HEATING POSITION
HOT WATER IN
HOT WATER OUT
THREE WAY VALVE WITHACTUATOR
ALL WIRING BY CONTRACTOR
T23
T25
T24
POOLCOMPAK
120 VAC24 VAC
FIELD SUPPLIED 40 VATRANSFORMER
WIRING DETAIL
PIPING DETAIL
34 EGW06-PCPEG-20150514
TMTM
Section IV Installation
BUILDING FIRE CONTROL SYSTEM (9)
The ECC-PCP can receive a contact closure signal from a building fire control system This input of the controller must be connected to dry (voltage free) contacts only When this input receives a contact closure the PoolComPaktrade unit compressor and fan will be shut down and the remote interface unit will show an alarm condition When the contact closure opens The PoolComPaktrade unit will resume normal operations It is possible to change the operation of the fire trip input to be active on open instead of close See ECC-PCP Service in the Operation section for further explanation
RETURN AIR SENSOR (10)
The return air sensor measures air temperature and relative humidity The sensor is normally factory mounted in the PoolComPaktrade unit return air section However with the optional economizer it is necessary to field mount this sensor in the duct work The sensor must be located in the return duct upstream of the exhaust duct connection (See Figure 4-4 Economizer Operation for a typical location of the sensor in the economizer system)
When field mounting is necessary the sensor will be provided from the factory and must be field wired using 22 AWG copper 4-conductor shielded twisted-pair cable
PURGE MODE INPUT (11)
The ECC-PCP can receive a contact closure signal from an external source to activate purge mode operation During purge mode the compressor is disabled and the economizer output is activated to bring in 100 outside air
AC PROOF INPUT (12)
An optional interlock used with certain types of heat rejection condensers Dry contact closure indicates a problem and prevents compressor operation in air cooling mode
POOL WATER TEMPERATURE SENSOR (13)
Units equipped with a pool water heating condenser require installation of factory supplied pool water temperature sensor It must be mounted upstream of the PoolComPaktrade and the auxiliary water heater The sensor can be threaded directly into a 1frasl4rdquo FPT fitting Electrical connection should be made with 22 AWG copper 2 conductor shielded twisted-pair cable Connect the shield drain wire to ground at the PoolComPaktrade end only
35EGW06-PCPEG-20150514
TMTM
Section IV Installation
POOL WATER PIPING (AWH AND AWV MODELS ONLY)
CAUTIONDo not run piping across service panels evaporator coil face or air discharge outlet
If a new or existing pool water heater is piped within the same circuit the PoolComPaktrade unit should be connected in a parallel loop between the filter and the other heater This allows the PoolComPaktrade unit to act as the primary water heating source and the other heater as a backup or supplemental water heater
All pool purification and chemical feed systems MUST be installed downstream of the unit This includes the practice of adding chemicals directly to the skimmer which results in highly concentrated corrosive chemicals passing over and through the PoolComPaktrade water condenser Water chemistry must be maintained at a pH level between 72 and 76 with a free chlorine level not exceeding 30 PPM and a combined chlorine level less than 03 PPM
If possible install the PoolComPaktrade unit above the pool water level If it is installed below the pool level isolation valves must be added Breakable couplings should be located near the unit on both the water inlet and outlet lines When installing piping connect the piping to these couplings last so as not to place stress on the other connection in the plumbing systemA constant flow of water is required through the PoolComPaktrade unitsrsquo condenser The circuit to and from the unit must be capable of maintaining the flow rate as specified for the installed unit (see PoolComPaktrade Performance data in Table 3-1) To ensure correct water flow the filter pump usually operates at the same time as the PoolComPaktrade unit However to reduce energy consumption during filter off cycle times a two-speed or small auxiliary water pump which bypasses the filter may be used
CAUTIONCAUTION Excessive water flow can cause premature erosion and pitting of the pool water condenser Adjust valve so that the water flow does not exceed the GPM or pressure drop listed in the table PoolPaktrade recommends a fixed flow control or adjustable flow circuit setter
PoolPaktrade International recommends installing water pressure tap ports to check influent and effluent water pressure See PoolComPaktrade Performance data in Table 3-1 for the particular unit model in question for the proper flow rate and pressure drop across the pool water condenser The pressure tap ports should be installed in a straight length of the water piping exterior to the PoolComPaktrade unit Install the port before any 90-degree turns and approximately 6 inches from the corner-post of the unit
In some instances piping from the PoolComPaktrade unit to the filter return line may not be feasible or economical The unit may be installed on its own supply and return line using a properly sized water pump and appropriate strainer Ensure that auxiliary water heating systems are staged to supplement the PoolComPaktrade unit water heating
If the PoolComPaktrade unit is installed above the pool surface and the main circulating pump cannot provide the proper water flow to it at the specified pressure an auxiliary booster pump is required
Condensate may be returned to the pool (if local codes allow) but PoolPaktrade International neither recommends nor disapproves this practice The installer should check local codes prior to making this decision Condensate must be filtered prior to being returned to the pool
If multiple PoolComPaktrade units are installed on the pool water piping circuit pipe them (and any auxiliary water heater) in parallel Piping PoolComPaktrade units in series may result in the downstream unit(s) sensing the pool water temperature as satisfied and not reject heat to the water to its full capacity The actual pool water temperature should be sensed by each PoolComPaktrade unit and auxiliary water heater
36 EGW06-PCPEG-20150514
TMTM
Section IV Installation
Figure 4-8 Typical Pool Water Piping Diagram (AWH and AWV Model Only)
PCP_EG_PoolWaterConnectSchematic_20140305eps
SALT WATER POOLS
For units (AW models only) installed serving a salt water pool wire the pool bonding system to the bonding lug on the unit copper pool water piping This connection is required to prevent corrosion of the internal PoolComPaktrade water piping
For more information on salt water pools see the article ldquoSalt Water Poolsrdquo in the Pool Water Chemistry section of the PoolPak educational library
POOLCHEMICAL
FEEDER
CHECKVALUE
OPTIONALBOOSTERPUMP IF
MAIN FILTERPUMP IS A
2-SPEED OR UNDERSIZED
BALLVALVES
POOLWATERFILTER MAIN
FILTERPUMP
DRAIN
UNIONS
EXTERNALPRESSURETAP PORTS
UNIONS
AUXILIARYPOOL WATER
HEATER
DRAIN
BALLVALVES
LOCKINGGLOBEVALVE
LOCKINGGLOBEVALVE
POOL WATERTEMP SENSOR
FC
FlowControl
37EGW06-PCPEG-20150514
TMTM
Section IV Installation
CONDENSATE DRAINSDrain pans are connected to a common drain system and must be trapped for proper operation For AWH and HCDH units a trap and piping must be supplied and installed by the customer The trap depth must be a minimum of 6 inches (See figure 4-9) For AWV and HCDV units a condensate trap is located inside the unit and the field condensate piping and overflow drain must not have an additional trap
Provisions MUST be made for disposal of condensate Condensate from the dehumidifier coil will have nearly the same properties as the pool water itself It is recommended that building materials subjected to the condensate and systems used for its disposal are checked for compatibility For drain piping use PVC plastic pipe minimum Schedule 40 The drain line must be sloped to provide proper drainage
Drain line exposed to outdoor ambient temperatures must be protected against freezing Wrap lines with electric heat tape (follow manufacturerrsquos instructions) controlled by an automatic thermostat set at a minimum of 35degF to protect against freezing Insulate all piping Insulation must be sealed at all seams Power for heat tape must be supplied external to the PoolComPaktrade
Figure 4-9 AWH and HCDH Condensate Trap
PCP_EG_NegPressCondPiping_20140122eps
WATER COOLED CONDENSERA standard option for PoolComPaktrade units is an integral water-cooled condenser For this option all valves and refrigerant piping is internal to the unit No additional field wiring is required No additional refrigerant or oil charge is required Water piping connections are 1-14rdquo MPT and labeled on the unit
UNIT BASE
MINIMUM SCHEDULE 40 PVC
REMOVABLECLEANOUT
OPEN TEEFOR VENT
AWH OR HCDH UNIT
PLUG THEUNUSEDCONNECTIONWITH SUITABLEPVC PLUG
1
2
4 INCHES MINIMUM OR MAX NEGATIVE STATICPRESSURE (INCHES WC) + 1 INCH
2 INCHES MINIMUM OR 12
1
12
TMTM
38 EGW06-PCPEG-20150514
TMTM
Section IV Installation
REMOTE AIR-COOLED CONDENSERSPACE AND LOCATION REQUIREMENTS
The most important consideration which must be taken into account when deciding upon the locations of air-cooled equipment is the provision for a supply of ambient air to the condenser and removal of heated air from the condenser area Where this essential requirement is not adhered to it will result in higher head pressures which cause poor operation and possible eventual failure of equipment Units must not be located in the vicinity of steam hot air or fume exhausts
Another consideration which must be taken is that the unit should be mounted away from noise sensitive spaces and must have adequate support to avoid vibration and noise transmission into the building Units should be mounted over corridors utility areas rest rooms and other auxiliary areas where high levels of sound are not an important factor Sound and structural consultants should be retained for recommendations
Walls or Obstructions
The unit should be located so that air may circulate freely and not be re-circulated For proper air flow and access all sides of the units should be a minimum of ldquoWrdquo away from any wall or obstruction It is preferred that this distance be increased whenever possible Care should be taken to see that ample room is left for maintenance work through access doors and panels Overhead obstructions are not permitted When the unit is in an area where it is enclosed by three walls the unit must be installed as indicated for units in a pit
Figure 4-10 Remote ACC Installation Around Walls or Obstructions
ALL_WallsorObstructions_20131111eps
Multiple Units
For units placed side by side the minimum distance between units is the width of the largest unit If units are placed end to end the minimum distance between the units is 4 feet
Figure 4-11 Remote ACC Installation When Installing Multiple Units
ALL_MultipleUnits_20131111eps
MINW
AIR FLOW
Wrdquo=Total width of the condenser
MIN
Wrdquo=Total width of the condenserrdquo
W
AIR FLOWAIR FLOW
39EGW06-PCPEG-20150514
TMTM
Section IV Installation
Units in Pits
The top of the unit should be level with the top of the pit and side distances increased to ldquo2Wrdquo If the top of the units is not level with the top of the pit discharge cones or stacks must be used to raise discharge air to the top of the pit This is a minimum requirement
Figure 4-12 Remote ACC Installation When Installing Units in Pits
ALL_UnitsinPits_20131111eps
Decorative Fences
Fences must have 50 free area with 1 foot undercut a ldquoWrdquo minimum clearance and must not exceed the tops of the unit If these requirements are not met the unit must be installed as indicated for ldquoUnits in Pitsrdquo
Figure 4-13 Remote ACC Installation When Installing Units Near Decorative Fences
ALL_DecorativeFences_20131111eps
Wrdquo=Total width of the condenserrdquo
MIN MIN
AIRFLOW
2W2W
STACK(BY OTHERSIF SUPPLIED) 10rsquo MAX
Wrdquo=Total width of the condenserrdquo
MIN1rdquo MIN MIN
AIR FLOWW W
40 EGW06-PCPEG-20150514
TMTM
Section IV Installation
FIELD INSTALLED PIPING
Installation of the outdoor air-cooled condenser should only be done by a qualified refrigeration mechanic familiar with this type of work Many service problems can be avoided by taking adequate precautions to provide an internally clean and dry system and by using procedures and materials that conform to established procedural standards
Piping Guidelines
The following piping recommendations are intended for use as a general guide For more complete information refer to the latest ASHRAE Handbook
Materialsbull Use clean dehydrated refrigeration-grade copper tubing for all refrigerant lines Hard drawn tubing should be used
where no appreciable amount of bending around pipes or obstructions is necessary If soft copper tubing must be used care should be taken to avoid sharp bends which may cause restrictions and excessive refrigerant pressure drops
bull Use long radius elbows wherever possible with one exception - short radius elbows should be used for any traps in the hot gas riser
bull Braze all copper to copper joints with a phosphorus-copper alloy material such as Silfos 5 or equivalent Do not use soft solder
bull During brazing operations flow an inert gas such as nitrogen through the lines to prevent internal oxidation scaling and contamination
bull Support refrigeration lines at intervals with suitable hangers brackets or clampsbull Pack glass fiber insulation and a sealing material around refrigerant lines where they penetrate a wall to reduce
vibration and to retain some flexibilitybull The liquid line and discharge line should not be in contact with one another If the installing contractor must tie these
lines together because of an installation requirement the contractor must insulate them from each other to prevent heat transfer Because the discharge line is hot during system operation precautions should be taken to avoid personnel injury
bull PoolComPaktrade units do not utilize compressors with unloading stages Consequently double hot gas risers are not needed for reduced load conditions as refrigerant flow rates will not fall below minimum velocities necessary to carry oil up through the discharge line
bull A field provided field installed liquid line filter-drier is recommended in the field piping to the PoolComPaktrade unit
Sizingbull The lines must be sized and routed so that oil is carried through the system Using smaller lines than recommended
will give excessive pressure drops resulting in reduced capacity and increased power consumption Oversized lines could result in an oil flow problem within the system and possible compressor damage
bull Excessive pressure drops in the liquid line may cause flashing of the refrigerant and a loss of a liquid seal at the expansion valve inlet A reduction in capacity may then occur because the presence of gaseous refrigerant will partially block the expansion valve Using hot gas and liquid line sizes recommended in the Air Cooled Condenser section for these units and the proper system refrigerant charge will prevent this problem
bull Discharge lines should be designed to prevent condensed refrigerant and oil from draining back to the compressor during OFF cycles Use the following guidelines The highest point in the discharge line should be above the highest point in the condenser coil The hot gas line should loop toward the floor if the condenser is located above the PoolComPaktrade unit especially
if the hot gas riser is longbull For refrigerant line sizing for an Air Cooled Condenser (ACC) where the lineset length is less than 100 feet or the
ACC location is less than 50 feet higher or 20 feet lower than the unit use the below Table 4-3bull ACC line lengths beyond the above limits will void warranty unless written approval is obtained from the
factory PRIOR to installation and startup
PCP_EG_ACCPiping_20140122eps
41EGW06-PCPEG-20150514
TMTM
Section IV Installation
Figure 4-14 ACC Refrigerant Piping
Refrigerant and Oil Chargingbull PoolPaktrade units are shipped with the required charge for self contained operation only The remote ACC option does
NOT provide the refrigerant charge or oil required for the ACC and line setsbull Refer to Table 4-2 for the additional ACC condenser chargebull Refer to Table 4-3 for the required additional oil and refrigerant charge Use the calculation method shown to calculate
the additional refrigerant and oilbull For the additional oil required multiply 2 of additional refrigerant charge of both ACC and refrigerant line length
Use the correct oil type of POE oil depending on the compressor installed For Alliance models SXA SPA SSA compressors use Copeland Ultra PN 998-E022-00 For Trane models CSHD compressors use Trane PN OIL00080
Sample Charging CalculationFor an AWV2600 with 73 feet line length and ACC0121 located 30 feet above the unit
Table 4-3 indicates 34rdquo discharge line and 58rdquo liquid line piping sizes Using R410A ozft additional charge for the lineset is 73 feet x 025 ozft + 73 feet x 148 ozft = 1260 oz Table 4-2 indicates additional charge for ACC0121 (allow 30 F Operation) is 39 lb x 16 ozlb = 6240 oz Total additional R410A charge for both ACC and refrigerant line is 1260 + 6240 oz = 750 oz or 46 lbs 14 oz Total additional oil charge is 750 oz x 2 = 15 oz
Table 4-2 R410A Charge for Air Cooled Condensers (lb)
DISCHARGE LINE
Pitch inDirection ofrefrigerant flow
LIQUID LINE
AIR-COOLEDCONDENSER
DISCHARGE LINE Pitch inDirection ofrefrigerant flow
Table 4-3 Refrigerant (R410A) Charge for Different Line Size
WARNINGAbove chart is for lineset length less than 100 ft and ACC located less than 50ft above unit or 20ft below unit Failures due to a piping layout not within these limits nor receiving prior PoolPaktrade
Factory approval will not be covered under PoolPaktrade warranty
Refrigerant Line Size (ACC) Refrigerant Charge for Units with Air Cooled Condensers (ACC)
Discharge Liquid Line Length (ft) vs R410A Charge (lbs)
Model OD R410A ozft OD R410A
ozft25 ft 50 ft 75 ft 100 ft
Lbs Oz Lbs Oz Lbs Oz Lbs Oz
0550 12 010 38 049 0 15 1 14 2 13 3 12
58 016 12 092 1 11 3 6 5 1 6 13
0800 58 016 38 049 1 0 2 1 3 1 4 2
58 016 12 092 1 11 3 6 5 1 6 13
1200 58 016 12 092 1 11 3 6 5 1 6 13
34 025 58 148 2 11 5 6 8 1 10 13
1400 58 016 12 092 1 11 3 6 5 1 6 13
34 025 58 148 2 11 5 6 8 1 10 13
1800 34 025 12 092 1 13 3 10 5 8 7 5
78 034 58 148 2 14 5 11 8 9 11 6
2600 34 025 58 148 2 11 5 6 8 1 10 13
1 18 058 34 221 4 6 8 12 13 1 17 7
3500 78 034 58 148 2 14 5 11 8 9 11 6
1 18 058 78 307 5 11 11 7 17 2 22 13
4000 78 034 34 221 3 16 7 16 11 15 15 15
1 18 058 78 307 5 11 11 7 17 2 22 13
Note1 This table applies to ACC line length less than 100 ft only Contact factory if ACC line length is more than 100 ft
2 Line size should be used for ACC at the same level or located up to 20ft below the unit
3 Line size should be used for ACC located up to 50 ft above the unit
43EGW06-PCPEG-20150514
TMTM
SECTION V OPERATION
ECC-PCP REMOTE INTERFACE UNITFigure 5-1 RIU Keypad
PCP_EG_StraightOnKeypadAnnotated_20121204eps
The ECC-PCP Remote Interface Unit (RIU) is designed around the Carel pGD0 4-line x 20 character backlit LCD display module The RIU displays are accessed through six backlit selection buttons They consist of a Return Enter Key Up Key Down Key Program Key Alarm Key and Escape Key as shown above
After approximately 5 minutes the RIU will display the status screen rotation Press the Escape key to bypass the five minute delay and move directly to the status display
STATUS DISPLAY
The status screens contain basic information about operation of the PoolComPaktrade system Press the up or down arrow keys to move from screen to screen The screens will also rotate automatically every 10 seconds
Figure 5-2 Status Screen 1S P A C E T E M P _ _ o FS P A C E R H _ _ S P A C E D E W P O I N T _ _ o F(O U T S I D E T E M P) _ _ o F
Status Screen 1 displaysbull Space Temperature in degF or degCbull Space Relative Humidity in bull Space Dew Point in degF or degCbull Outside Air Temperature in degF or degC (with Economizer Option Only)
Status Screen 2 displaysbull Water Heating - YES indicates that the unit is returning recovered heat back to the pool waterbull Aux Water Heat - YES indicates that the controller has closed the relay contact requesting auxiliary pool water heater
operationbull Water Temperature in degF or degC
Status Screen 3 displaysbull SPACE temperature control requirement bull TEMPERATURE- OK Indicates the space temperature is at setpointbull HEATING- YES Indicates the space requires heatingbull COOLING- YES Indicates the space requires coolingbull AUX AIR HEAT Indicates the space requires additional heating The auxiliary air heating relay contacts close to
activate the external heating system
44 EGW06-PCPEG-20150514
TMTM
bull DEHUMID (SURFACE) Indicates the space requires dehumidification The word SURFACE indicates that the unit is temporarily lowering the dew point set point to minimize condensation at the cold surface temperature sensor
bull ECONOMIZER MODE Indicates the unit is cooling the space with outside air ECONOMIZER MODE is only shown if the optional economizer system is present
Status Screen 4 displaysbull The first line displays the current system status bull The second line displays compressor status
SET POINT CHANGE MENU
bull Press the PRG key to access the main menubull Use the arrow keys to scroll to the menu selection for Set Points and then press the Enter keybull Use the arrow keys to select the set point to be changed and then press Enter Available set points are
Air Temperature
The allowable range for the air temperature set point is 70 to 95degF Use the arrow keys to change the set point and then press Enter The new dew point set point is shown immediately as DPT The set point change screen will remain visible for a short time to allow verification of the new dew point set point After about five seconds the RIU will return to the status screen display
Relative Humidity
The allowable range for the relative humidity set point is 40 to 65degF Use the arrow keys to change the set point and then press Enter The new dew point set point is shown immediately as DPT The set point change screen will remain visible for a short time to allow verification of the new dew point set point After about five seconds the RIU will automatically return to the status screen display
Pool Temperature
The allowable range for the water temperature set point is 70 to 104degF Use the arrow keys to change the set point and then press Enter The RIU will automatically return to the status screen display
Recommendations
bull Air Temperature (Range 70degF to 95degF) The air temperature should normally be set about 2degF above the pool water temperature to minimize the pool water evaporation rate (high temperature spas are an exception)
bull Relative Humidity (Range 40 to 65) The normal range for the humidity set point is 50 to 60 Lower set points will require more energy (electricity) to satisfy the dehumidification requirement and increase pool water evaporation
bull Pool Temperature (Range 70degF to 104degF) The pool temperature set point is normally set between 80degF and 88degF for a typical swimming pool and higher for a spa depending on user preference
CAUTIONThe dehumidifier should be configured to operate at the set points designed for the facility These set points are shown on the yellow label on the door of the RIU Set points other than those shown may not be attainable with this dehumidifier
Section V Operation
45EGW06-PCPEG-20150514
TMTM
Section V Operation
PURGE MODE CONTROL MENU
CAUTIONIt is the userrsquos responsibility to use this feature properly to prevent freeze damage to downstream equip-ment 100 outside air at below freezing conditions has the potential to cause serious damage
Purge Mode causes the unit to force the optional field-provided economizer dampers and fan to full open introducing large quantities of outside air to the space This is typically used when ldquoshockingrdquo the pool Compressor operation is disabled during purge but the auxiliary air and water heating systems remain active
If the unit is not equipped with the economizer option a flashing ldquoCAUTION NO FREEZE PROTECTIONrdquo warning will be displayed This warning indicates that operation of purge mode without regard for outside air temperatures below freezing can result in damage to hot water coils or other equipment in the pool area
DETAILED STATUS MENU
To access the detailed status menubull Press the PRG key to access the main menubull Use the arrow keys to scroll to the menu selection for Detailed Status and then press the Enter key
Detailed Status Screen 1 displays Temperaturesbull Surface ndash The temperature measured at the cold surface sensorbull Dew Point ndash The calculated dew point of the spacebull Dewpt Setpoint ndash The dew point set point calculated from the temperature and relative humidity set points
Detailed Status Screen 2 displaysbull Disch Press ndash The measured refrigerant pressure in the discharge line at the compressorbull Suct Press ndash The measured refrigerant pressure in the suction line at the compressorbull Suct Temp ndash The refrigerant temperature measured on the surface of the suction line at the compressorbull Suct SH ndash The calculated superheat at the suction of the compressor
Detailed Status Screen 3 displays the number of hours the following device or system has been active since power was last applied to the unitbull Cmpr - Compressorbull Fan ndash Supply Fanbull AC ndash Mechanical Air Cooling (Economizer Cooling Not Included)bull Aux ndash Air ndash Auxiliary Air Heatingbull Aux - Wtr ndash Auxiliary Water Heating
Detailed Status Screen 4 displaysbull Fault Count ndash The total number of high pressure low pressure and defrost trips that have occurred since power was
last applied to the unit When this number reaches 10 the compressor is locked outbull AC Proof ndash Indicates a status of ldquoProvenrdquo if AC mode operation is allowed ldquoNot Provenrdquo indicates that AC mode
operation is not allowed
Detailed Status Screen 5 (only present in units configured for multi-unit networking) displaysbull Network Role ndash Indicates if the unit currently being displayed by the RIU is the master or a slavebull Net Status ndash Indicates ldquoCONNECTEDrdquo if the unit is properly connected to the multi-unit network ldquoNO LINKrdquo
indicates the unit is not connectedbull Unit ID Number ndash Indicates the unit address on the multi-unit network
Detailed Status Screen 6 (only present in units configured for multi-unit networking) displaysbull Unit 1 Present ndash Indicates if the unit currently being displayed by the RIU can communicate with unit 1 on the multi-
unit networkbull Unit 2 3 4 ndash Same as for unit 1 but for the other 3 possible units on the network
46 EGW06-PCPEG-20150514
TMTM
Section V Operation
ECC-PCP NETWORK OPERATIONNetworked ECC-PCP units operate in a MASTERSLAVE environment This means that one unit (master) determines heating cooling and dehumidification requirements and broadcasts them on the network to the other units (slaves) This ensures that all units work together instead of against other Each networked unit contains all sensor and controls necessary for independent operation and is capable of acting in the master role Units on the network are identified by a number between one and four The unit with the lowest identification number having no uncleared alarms will be the master unit
If an alarm condition occurs in the master unit it will give up the role of master The unit with the next lowest identification number and no unclear alarms will take over the master role The unit that experienced the alarm condition will operate in the slave role until the alarm is cleared at the control panel
The control panel provides two network status screens These can be accessed in the detailed status menu The figure above shows the first screen that displays the status of units one through four as present or not Use this screen to verify that all units on the network are connected and communicating with each other The figure below shows the second screen that displays network information for the unit that is being displayed by the remote interface unit including network role connection status and network identification number
NETWORK CONFIGURATION
Using the following four parameters it is possible to configure the ECC-PCP network to accommodate a wide variety of installation options Network configuration can be accessed in the service menu These parameters must be set in each unit individually
Pool Water Temperature Control
Determines whether the unit will control water temperature based on the masterrsquos command (NETWORK) or its own temperature sensor and set point (LOCAL) If a unit set to LOCAL becomes the master other units in the network will not use the masterrsquos command for water heating They will look to the next line that is not set to LOCAL This parameter is only set to LOCAL if the unit is connected to a different pool than the rest of the units on the network Because the unit is controlling water temperature on its own it is necessary to select the correct unit with the control panel before changing the water temperature set point
Staged Dehumidification Control
Determines whether the unit will run in dehumidification when there is a need for 1 stage or 2 stages of dehumidification The master unit will start on any need for dehumidification independent of this parameter Slave units with this parameter set to YES will dehumidify only if the master is asking for 2 stages of dehumidification Setting this parameter to NO will cause the unit to dehumidify when the master calls for at least 1 stage of dehumidification Using this parameter it is possible to configure the number of units in each dehumidification stage
Dehumidification Stage 2 Offset
Determines how far the dewpoint (relative humidity) of the space has to rise above the set points before the unit will request 2 stages of dehumidification on the network This parameter is normally the same in all units on the network Making this parameter smaller will bring on the second stage of dehumidification sooner
Enable Network Control
Determines whether the unit will participate in the masterslave environment Setting this parameter to NO will cause the unit to act like a standard ECC-PCP single unit The unit will never become the master on the network and will not listen to the demands broadcast by the master on the network Although units with this parameter set to NO do not participate in the masterslave environment they are still accessible through the network control panel Like the LOCAL pool
47EGW06-PCPEG-20150514
TMTM
Section V Operation
water temperature setting this parameter when set to NO requires this unit to be displayed on the control panel before changing any of the set points The other screens for Pool Water Temperature Control Staged Dehumidification and Stage 2 Offset are not available when this parameter is set to NO
Changing Set Points
Each unit on the network maintains two groups of set points network and local If a unit has the Enable Network Control parameter set to YES and the Water Temperature Control parameter set to NETWORK it will control to the network set points Set points changed when the remote interface unit is displaying this unit will be changed in every unit on the network with the same NETWORK and Water Temperature Control parameters Units that are configured for Network Control and LOCAL water temperature control will control using local water temperature set point the network air temperature and relative humidity set points When the air temperature and relative humidity set points are changed when the remote interface unit is displaying the unit they will be changed in all units configured for Network control The water temperature set point will only be changed in the unit currently being displayed by the remote interface unit Units that are not configured for Network Control will use all local set points Therefore any set points changed while the remote interface unit is displaying this unit will only be changed in this unit
ECC-PCP SERVICE
SERVICE MENU
To access the service menubull Press the PRG key to access the main menubull Use the arrow keys to scroll to the menu selection for Service and then press the Enter keybull A password is required to access the service menu
The following sub-menus are available in the service menu
IO CONFIGURATION
Digital Inputs
This menu contains a screen for each digital input Each screen contains the following parametersbull Status of the data point linked to the inputbull Status of the raw digital inputbull Input type
The following parameter list shows the available digital input screensbull Defrost Switchbull Cpr High Tempbull Water Flow bull Fire Tripbull AC Proofbull Cpr High Prsbull Fan Overloadbull Low Pressurebull Purge Input
Digital Outputs
This menu contains a screen for each digital output Each screen contains the following parametersbull Current output status bull Requested output status bull Override
48 EGW06-PCPEG-20150514
TMTM
Section V Operation
The following digital output screens are availablebull Supply Fanbull Compressorbull Bypass Solenoidbull Water Heating Solenoidbull Reheat Solenoidbull AC Solenoidbull Aux Water Heatbull Alarm Outputbull ACC Run Signalbull Economizerbull Aux Air Heat Stage 1bull Aux Air Heat Stage 2
Analog Inputs
This menu contains a screen for each analog input Each screen contains the following parametersbull Current read-only value from the inputbull Fail bull Tol bull Offs bull Ovrd bull Min bull Max
The following analog input screens are availablebull Discharge Pressure bull Suction Pressure bull Return Relative Humidity bull Suction Temperature bull Return Air Temperature bull Pool Water Temperature bull Surface Temperature bull Outside Air Temperature
UNIT CONFIGURATION
Installed Options
This menu contains parameters that indicate the hardware options installed in the dehumidifier The parameters are set by the factory and do not typically require modification
Aux Air Heating
This menu contains parameters that configure the auxiliary air heating system
Aux Water Heating
This menu contains parameters that configure the auxiliary water heating system
Temperature Ctrl
This menu contains parameters that configure the air temperature control routines of the dehumidifier
49EGW06-PCPEG-20150514
TMTM
Section V Operation
Humidity Control
This menu contains parameters that configure the humidity control routines of the dehumidifier Water Temp CtrlThis menu contains parameters that configure the compressor based water heating system of the dehumidifier bull Water Heat First This parameter indicates whether the control routine will use the compressor for water heating when
there is no dehumidification requirement bull Deadband This parameter is the deadband used by the compressor based pool water heating control routine
BAS INTERFACE
This menu contains parameters that configure the building automation system interface of the dehumidifier
MULTI-UNIT NETWORK
This menu contains parameters that configure the operation of dehumidifier in a multiple unit installation
COMPRESSOR
This menu contains parameters that configure the operation of the dehumidifier compressor
ECONOMIZER
This menu contains parameters that configure the operation of the optional field provided and field installed economizer damper system
HISTORY
The history screen provides information on the last 50 faults that have occurred in the dehumidifier It can be used for troubleshooting by an experienced HVAC technician The faults are recorded with a sequence number from 1 to 50 Sequence number 1 is always the most recent fault The following information is stored and displayed for each fault in non-volatile memorybull Hour at which the fault occurred bull Fault Code Number bull Return Air Temperaturebull Return Air Humiditybull Discharge Pressurebull Suction Pressurebull Suction Temperaturebull Pool Water Temperaturebull AC Solenoid Statusbull Bypass Solenoid Statusbull Compressor Statusbull Reheat Solenoid Status
MANUAL MODE
The Manual Mode menu for use by qualified service personnel provides two options Demand Control and Digital Output Control
UTILITIES
The Utilities menu provides sub menus for configuring units of measure and passwords for set point and service access control
50 EGW06-PCPEG-20150514
TMTM
Section V Operation
MAINTENANCEOVERVIEW
Periodic routine maintenance will promote extended equipment life While PoolComPaktrade units use components that are usually maintenance free and do not require service a simple check could result in noticing possible problems before they develop into major problems
DAILY MAINTENANCE
bull Pool water chemistry is a part of daily maintenance and it is recommended to follow National Spa and Pool Institute standards PoolPaktrade International strongly recommends following the National Spa and Pool Institute values
Table 5-1 Pool Water Chemistry
bull PoolPaktrade International recommends daily logging of your pool water chemistry MAINTENANCE AND YOUR POOL WATER CHEMISTRY IS IMPORTANT TO PROTECT YOUR WARRANTY RIGHTS
MONTHLY MAINTENANCE
bull Air Filters inspect and replace or clean as applicable Dirty filters restrict air flow and can cause improper unit operation
bull Ensure that the condensate collection pan is draining properly and the condensate is not overflowing or being drawn into the supply air stream Check the condensate and overflow lines to ensure that neither are clogged
bull Check the operation of the blower motor and scroll Ensure that the scroll does not rub the housing Check for proper belt tension Worn or cracked belts should be replaced Check fan and mounting brackets for tightness
bull Ensure that the ALARM light is not illuminated
ANNUAL MAINTENANCE
bull Inspect the refrigeration and water circuits for leaks wear or corrosion Corrosion on the water piping or condenser may indicate poor pool chemical maintenance and improper chlorine and pH levels
bull Check electrical components for loose wiringbull Although the exterior of the PoolComPaktrade units are powder coated wipe down unit particularly if installed in an
area subject to dirt or chemical concentrationbull Wash brush or vacuum the evaporator and air condenser coils This will ensure proper heat transfer and reduce static
pressure losses Caution should be taken not to wet electrical components inside the unit
NOTEIf service and inspections are not performed by a competent and experienced service firm the manufacturer warranty may be voided
AUXILIARY AIR amp POOL WATER HEATER CONNECTIONS FOR MULTIPLE UNIT INSTALLATION
Figure 6-1 Auxiliary Air and Pool Water Heater Connections for Multiple Units
AWH_EG_Connections_20121204eps
52 EGW06-PCPEG-20150514
TMTM
AUXILIARY AIR amp POOL WATER HEATER CONNECTION FOR A TWO POOL INSTALLATION
Figure 6-2 Auxiliary Air and Pool Water Heater Connections for Two Pool Installations
AWH_EG_ConnectionstoPool_20121204eps
Section VI Wiring
53EGW06-PCPEG-20150514
TMTM
Section VI Wiring
FIELD WIRING
Figure 6-3 Field Wiring Diagram
PCP_EG_FieldWiringDiagram_20121204eps
54 EGW06-PCPEG-20150514
TMTM
Section VI Wiring
FIRE CONTROL SYSTEM CONNECTION
Figure 6-4 Fire Control System Connection
PCP_EG_FirecontrolSysConnection_20121204eps
55EGW06-PCPEG-20150514
TMTM
Section VI Wiring
This page intentionally left blank
EGW06-PCPEG-20150514
TMTM
56
TMTM
3491 Industrial Drive York PA 17402 USA 800-959-7725 Fax 717-757-5085for more information wwwpoolpakcom
The Leader in Indoor Pool Dehumidification
28 EGW06-PCPEG-20150514
TMTM
Section IV Installation
CURB MOUNTING
Illustrated in Figure 4-2 is a curb that has been designed specifically for the PoolComPaktrade product line The outside dimensions of the curb are such that the base of PoolComPaktrade extends over the edge of the curb all the way around This aids in preventing rainwater from getting between the base of the PoolComPaktrade and the curb It is the installing contractorrsquos responsibility to complete the following
bull Flash the curb into the roofbull Insulate the curbbull Connect the supply and return duct to the curbrsquos duct support railsbull Connect condensate drain line with appropriate trap bull Seal the curb to the bottom of the PoolComPaktrade using the gasket supplied with the curbbull Provide counter flashing between curb and PoolComPaktrade unitbull Seal the pool water pipes where they go through the curb
If specified when ordering all water piping connections can be made through the curb These water connections include pool water condensate auxiliary hot water coil (optional)
If the PoolComPaktrade is to be mounted on a curb the unit must be ordered with the ldquooutdoorrdquo option PoolComPaktrade Units produced for curb mounting receive special weatherizing and insulation that non-curb mounted PoolComPaktrade Units do not receive
NOTEIf the factory is not notified that a PoolComPaktrade is to mounted outdoors the unit will not be weather tight it will leak and it will not be properly insulated
INTEGRAL GAS FURNACE OPTION (ROOFPAK ONLY)
When using a gas furnace power venting is provided for all unit sizes External vent piping andor cap is required Please refer to the furnace manufacturerrsquos manual for piping and venting instructions Install leak-test and properly regulate piping for the gas-fired heater Pressures should be regulated to the entering pressures as shown on the furnace manufacturerrsquos data plate or manual
The ECC-PCP is the Electronic Control Center programmable controller designed specifically for the PoolComPaktrade dehumidification system It is a robust system capable of a variety of functions The following text describes the field wiring required for for proper operation of the ECC-PCP dehumidification system in a typical PoolComPaktrade unit installationThe field wiring diagram (see Section VI - Wiring) shows the location of the connections for the sensors and other required devicesThe numbers following the text identify the location on the field wiring diagram where each device is connected to the PoolComPaktrade unit electrical panel
REMOTE INTERFACE UNIT (1)
The remote interface unit allows the user to view space temperature pool water temperature and relative humidity change set points and receive fault notifications It should be mounted in a convenient location that is outside the pool area The ambient temperature of the mounting location must always be above 32 F
NOTEThe maximum distance from the Remote Interface Unit to the PoolComPaktrade unit is 1000 feet For distances greater than 1000 feet contact the factory
The control panel does not contain any sensors and should be mounted outside the pool enclosure A factory supplied 6 ft cable RJ25 (6 conductor) must be installed between the PoolComPaktrade unit and the control panel
For distances greater than 6 feet use 6 conductor 22 AWG shielded twisted-pair cable along with the supplied RJ25 jack and second 6 foot cable shipped loose with the unit
The wall mounting of the terminal first requires the back piece (A) of the RIU assembly The RIU is designed to fit a single gang extra-deep electrical box mounted horizontally in the wall The RJ25 jack and most of the black cable should be placed inside the box before installing the mounting bracket A frac34rdquo hole must be drilled for the 6-conductor cable which connects the remote interface unit to the PoolPaktrade unit The below is specific mounting instructions that correspond to the mounting schematic below
1 Fasten the back piece (A) to the gang box using the rounded-head screws supplied in the packaging Use the screws that come with the box to secure the bracket
2 Thread the 6-conductor cable through the back piece (A) and connect to the back of front panel (B)3 Rest the front panel (B) on the back piece A and fasten the parts together using the flush-head screws supplied in the
packaging4 Finally fit the click-on frame (C)
Figure 4-3 Remote Interface Mounting Plate
ALL_EG_RIUMounting_20131219eps
A
B
C
31EGW06-PCPEG-20150514
TMTMSection IV Installation
COLD SURFACE TEMPERATURE SENSOR (2)
This sensor is used to measure the temperature of the coldest surface in the pool enclosure The sensor is an aluminum bar 1rdquo long by frac14rdquo square with a clearance hole for a number 8 screw and two 6rdquo wires on one end
When the temperature of the surface drops to within 5 F of the space air dew point the humidity set point will be automatically reset downward to help prevent condensation on the cold surface It should be noted that resetting the humidity set point will not compensate for lower quality building materials such as single pane glass or non-thermally broken frames
The sensor should be mounted on an exterior window or door frame that is not in direct sunlight In cases where there are no exterior windows or doors the sensor should be mounted on the inside surface of an exterior wall The sensor must be in contact with the cold surface Electrical connection should be made with 22 AWG copper two-conductor shielded twisted-pair cable Connect the shield drain wire to ground at the PoolComPaktrade unit end only
ECONOMIZER SYSTEM (OPTIONAL) (3)
An economizer system cools the space with outside air instead of the compressor The ECC-PCP provides a dry contact closure to activate the economizer The contacts of the ECC-PCP may be connected directly to the economizer control circuit provided the circuit is 24 VAC maximum and the current does not exceed 1 amp inductive The other components of the system must be provided by others (See figure below for an illustration of a typical economizer system)
Units equipped with an economizer require relocation of the factory mounted return air sensor It must be located in a duct that will always contain air that represents the space temperature and humidity
The economizer will operate only when space cooling is required and there is no dehumidification requirement When the outside air temperature is greater than 50degF and more than 5degF below the space temperature set point and the space temperature rises above the set point the compressor is disabled and a dry contact closure between T216 and T217 is made to activate the economizer
When the ECC-PCP contacts close relay R1 is energized causing the outside and exhaust air dampers (by others) to open and the return air damper (by others) to close At the same time relay R2 is energized causing the exhaust fan to run If the space temperature continues to rise and exceeds the space temperature set point by more than two degrees the economizer contact is opened reversing the damper positions The compressor is energized in the space cooling mode (if so equipped) The compressor will then continue to run until the call for space cooling is satisfied The economizer will also be activated in the space cooling mode if the auxiliary air conditioning condenser option is not installed or if the compressor is locked out by a fault condition
Figure 4-4 Economizer Operation
PCP_EG_EconomizerOperation2_20121204eps
32 EGW06-PCPEG-20150514
TMTM Section IV Installation
WARNINGWhen economizer option is selected adequate exhaust capacity via a separate fan must be specified to ensure the natatorium pressure remains slightly negative Failure to specify adequately sized exhaust system may result in damage to structure and pool odors may be forced into other areas of the building
OUTSIDE AIR TEMPERATURE SENSOR (ECONOMIZER OPTION ONLY) (4)
The outside air temperature sensor is installed only when the outside air economizer option is included The sensor is mounted inside a 12rdquo PVC conduit pull elbow It can be mounted to the outside of the building using standard PVC conduit fittings The sensor should be mounted near the outside air intake vent for the economizer system It is very important to mount the sensor so that it does not receive direct sunlight The exposure to sunlight will cause the sensor housing to warm resulting in temperature readings that are higher than the actual air temperature This condition may prevent the ECC-PCP from selecting the economizer mode of operation If possible mount the sensor under an overhang or on a surface with a northern exposure
Electrical connection should be made with 22 AWG copper 2-conductor shielded twisted-pair cable Connect the shield drain wire to ground at the PoolComPaktrade end only See figure below for an illustration of the outside air temperature sensor Seal the conduit leading to the sensor with silicone caulk to prevent moisture from migrating out to the sensor and condensing inside the sensor
Figure 4-5 Outside Air Sensor
PCP_EG_OutsideAirSensorInstallation_20121204eps
AIR COOLED CONDENSER (OPTIONAL) (5)
The air-cooled condenser is used to reject heat recovered during the space cooling mode of operation Only PoolComPaktrade brand air-cooled condensers (PAC Units) should be used with a PoolComPaktrade Unit The ECC-PCP provides 24 VAC control signal to the speed control located in the PAC unit control panel The speed control then runs the condenser fan motor at the appropriate speed See figure below for an illustration of a PAC unit field wiring
Figure 4-6 PAC Unit Field Wiring
PCP_EG_RemoteACCFieldConnection_20121204eps
24 VAC CONTROL SIGNAL FROM
USE COPPER SUPPLY WIRES
POOLCOMPAKTERMINALS 12AND 13
POWER SUPPLY
21 L1 L2
GR
33EGW06-PCPEG-20150514
TMTMSection IV Installation
AUXILIARY POOL WATER HEATING SYSTEM (AWH MODEL ONLY) (6)
The auxiliary pool water heating system is provided by others Typically a gas fired or electric pool water heater is used The ECC-PCP provides a dry contact closure that signals a need for auxiliary water heating The contacts of the ECC-PCP may be connected directly to the heaterrsquos control circuit provided the circuit is 24 VAC maximum and the current does not exceed 1 amp inductive Any other applications will require an additional relay (by others) to be installed between the ECC-PCP and the pool water heating system
AUXILIARY AIR HEATING SYSTEM (7)
Typically a duct mounted electric heater hot water coil or a factory installed unit mounted hot water coil is used to provide air heating The ECC-PCP provides a form ldquoCrdquo (NO and NC) dry contact closure that signals a need for auxiliary air heating The ECC-PCP contacts may be directly connected to an electric duct heater control circuit provided the circuit is 24 VAC maximum and the current through the contacts does not exceed 1 amp inductive The figure below shows a typical installation that utilizes a 3-way hot water control valve and a unit or duct mounted hot water coil
Figure 4-7 Installation of a Hot Water Coil 3-Way Valve
The ECC-PCP provides a normally open contact closure for connection to a building management system If a fault occurs the controller will energize this output to indicate that there is a problem with the dehumidification system The remote interface unit will display the cause of the fault and provide a suggested course of action This output may also be used to energize an external alarm light or buzzer It may also be directly connected to an external circuit as long as the circuit is 24 VAC maximum and the current through the contacts does not exceed 1 amp inductive
HO
T W
ATER
CO
IL
FIELD SUPPLIEDACTUATOR
AB SWITCH INB POSITION
2
1
W
BK
W 3
A
B
VALVE IN BYPASS POSITION
HOT WATER IN
HOT WATER OUT
THREE WAY VALVE WITHACTUATOR
HO
T W
ATER
CO
IL
VALVE IN HEATING POSITION
HOT WATER IN
HOT WATER OUT
THREE WAY VALVE WITHACTUATOR
ALL WIRING BY CONTRACTOR
T23
T25
T24
POOLCOMPAK
120 VAC24 VAC
FIELD SUPPLIED 40 VATRANSFORMER
WIRING DETAIL
PIPING DETAIL
34 EGW06-PCPEG-20150514
TMTM
Section IV Installation
BUILDING FIRE CONTROL SYSTEM (9)
The ECC-PCP can receive a contact closure signal from a building fire control system This input of the controller must be connected to dry (voltage free) contacts only When this input receives a contact closure the PoolComPaktrade unit compressor and fan will be shut down and the remote interface unit will show an alarm condition When the contact closure opens The PoolComPaktrade unit will resume normal operations It is possible to change the operation of the fire trip input to be active on open instead of close See ECC-PCP Service in the Operation section for further explanation
RETURN AIR SENSOR (10)
The return air sensor measures air temperature and relative humidity The sensor is normally factory mounted in the PoolComPaktrade unit return air section However with the optional economizer it is necessary to field mount this sensor in the duct work The sensor must be located in the return duct upstream of the exhaust duct connection (See Figure 4-4 Economizer Operation for a typical location of the sensor in the economizer system)
When field mounting is necessary the sensor will be provided from the factory and must be field wired using 22 AWG copper 4-conductor shielded twisted-pair cable
PURGE MODE INPUT (11)
The ECC-PCP can receive a contact closure signal from an external source to activate purge mode operation During purge mode the compressor is disabled and the economizer output is activated to bring in 100 outside air
AC PROOF INPUT (12)
An optional interlock used with certain types of heat rejection condensers Dry contact closure indicates a problem and prevents compressor operation in air cooling mode
POOL WATER TEMPERATURE SENSOR (13)
Units equipped with a pool water heating condenser require installation of factory supplied pool water temperature sensor It must be mounted upstream of the PoolComPaktrade and the auxiliary water heater The sensor can be threaded directly into a 1frasl4rdquo FPT fitting Electrical connection should be made with 22 AWG copper 2 conductor shielded twisted-pair cable Connect the shield drain wire to ground at the PoolComPaktrade end only
35EGW06-PCPEG-20150514
TMTM
Section IV Installation
POOL WATER PIPING (AWH AND AWV MODELS ONLY)
CAUTIONDo not run piping across service panels evaporator coil face or air discharge outlet
If a new or existing pool water heater is piped within the same circuit the PoolComPaktrade unit should be connected in a parallel loop between the filter and the other heater This allows the PoolComPaktrade unit to act as the primary water heating source and the other heater as a backup or supplemental water heater
All pool purification and chemical feed systems MUST be installed downstream of the unit This includes the practice of adding chemicals directly to the skimmer which results in highly concentrated corrosive chemicals passing over and through the PoolComPaktrade water condenser Water chemistry must be maintained at a pH level between 72 and 76 with a free chlorine level not exceeding 30 PPM and a combined chlorine level less than 03 PPM
If possible install the PoolComPaktrade unit above the pool water level If it is installed below the pool level isolation valves must be added Breakable couplings should be located near the unit on both the water inlet and outlet lines When installing piping connect the piping to these couplings last so as not to place stress on the other connection in the plumbing systemA constant flow of water is required through the PoolComPaktrade unitsrsquo condenser The circuit to and from the unit must be capable of maintaining the flow rate as specified for the installed unit (see PoolComPaktrade Performance data in Table 3-1) To ensure correct water flow the filter pump usually operates at the same time as the PoolComPaktrade unit However to reduce energy consumption during filter off cycle times a two-speed or small auxiliary water pump which bypasses the filter may be used
CAUTIONCAUTION Excessive water flow can cause premature erosion and pitting of the pool water condenser Adjust valve so that the water flow does not exceed the GPM or pressure drop listed in the table PoolPaktrade recommends a fixed flow control or adjustable flow circuit setter
PoolPaktrade International recommends installing water pressure tap ports to check influent and effluent water pressure See PoolComPaktrade Performance data in Table 3-1 for the particular unit model in question for the proper flow rate and pressure drop across the pool water condenser The pressure tap ports should be installed in a straight length of the water piping exterior to the PoolComPaktrade unit Install the port before any 90-degree turns and approximately 6 inches from the corner-post of the unit
In some instances piping from the PoolComPaktrade unit to the filter return line may not be feasible or economical The unit may be installed on its own supply and return line using a properly sized water pump and appropriate strainer Ensure that auxiliary water heating systems are staged to supplement the PoolComPaktrade unit water heating
If the PoolComPaktrade unit is installed above the pool surface and the main circulating pump cannot provide the proper water flow to it at the specified pressure an auxiliary booster pump is required
Condensate may be returned to the pool (if local codes allow) but PoolPaktrade International neither recommends nor disapproves this practice The installer should check local codes prior to making this decision Condensate must be filtered prior to being returned to the pool
If multiple PoolComPaktrade units are installed on the pool water piping circuit pipe them (and any auxiliary water heater) in parallel Piping PoolComPaktrade units in series may result in the downstream unit(s) sensing the pool water temperature as satisfied and not reject heat to the water to its full capacity The actual pool water temperature should be sensed by each PoolComPaktrade unit and auxiliary water heater
36 EGW06-PCPEG-20150514
TMTM
Section IV Installation
Figure 4-8 Typical Pool Water Piping Diagram (AWH and AWV Model Only)
PCP_EG_PoolWaterConnectSchematic_20140305eps
SALT WATER POOLS
For units (AW models only) installed serving a salt water pool wire the pool bonding system to the bonding lug on the unit copper pool water piping This connection is required to prevent corrosion of the internal PoolComPaktrade water piping
For more information on salt water pools see the article ldquoSalt Water Poolsrdquo in the Pool Water Chemistry section of the PoolPak educational library
POOLCHEMICAL
FEEDER
CHECKVALUE
OPTIONALBOOSTERPUMP IF
MAIN FILTERPUMP IS A
2-SPEED OR UNDERSIZED
BALLVALVES
POOLWATERFILTER MAIN
FILTERPUMP
DRAIN
UNIONS
EXTERNALPRESSURETAP PORTS
UNIONS
AUXILIARYPOOL WATER
HEATER
DRAIN
BALLVALVES
LOCKINGGLOBEVALVE
LOCKINGGLOBEVALVE
POOL WATERTEMP SENSOR
FC
FlowControl
37EGW06-PCPEG-20150514
TMTM
Section IV Installation
CONDENSATE DRAINSDrain pans are connected to a common drain system and must be trapped for proper operation For AWH and HCDH units a trap and piping must be supplied and installed by the customer The trap depth must be a minimum of 6 inches (See figure 4-9) For AWV and HCDV units a condensate trap is located inside the unit and the field condensate piping and overflow drain must not have an additional trap
Provisions MUST be made for disposal of condensate Condensate from the dehumidifier coil will have nearly the same properties as the pool water itself It is recommended that building materials subjected to the condensate and systems used for its disposal are checked for compatibility For drain piping use PVC plastic pipe minimum Schedule 40 The drain line must be sloped to provide proper drainage
Drain line exposed to outdoor ambient temperatures must be protected against freezing Wrap lines with electric heat tape (follow manufacturerrsquos instructions) controlled by an automatic thermostat set at a minimum of 35degF to protect against freezing Insulate all piping Insulation must be sealed at all seams Power for heat tape must be supplied external to the PoolComPaktrade
Figure 4-9 AWH and HCDH Condensate Trap
PCP_EG_NegPressCondPiping_20140122eps
WATER COOLED CONDENSERA standard option for PoolComPaktrade units is an integral water-cooled condenser For this option all valves and refrigerant piping is internal to the unit No additional field wiring is required No additional refrigerant or oil charge is required Water piping connections are 1-14rdquo MPT and labeled on the unit
UNIT BASE
MINIMUM SCHEDULE 40 PVC
REMOVABLECLEANOUT
OPEN TEEFOR VENT
AWH OR HCDH UNIT
PLUG THEUNUSEDCONNECTIONWITH SUITABLEPVC PLUG
1
2
4 INCHES MINIMUM OR MAX NEGATIVE STATICPRESSURE (INCHES WC) + 1 INCH
2 INCHES MINIMUM OR 12
1
12
TMTM
38 EGW06-PCPEG-20150514
TMTM
Section IV Installation
REMOTE AIR-COOLED CONDENSERSPACE AND LOCATION REQUIREMENTS
The most important consideration which must be taken into account when deciding upon the locations of air-cooled equipment is the provision for a supply of ambient air to the condenser and removal of heated air from the condenser area Where this essential requirement is not adhered to it will result in higher head pressures which cause poor operation and possible eventual failure of equipment Units must not be located in the vicinity of steam hot air or fume exhausts
Another consideration which must be taken is that the unit should be mounted away from noise sensitive spaces and must have adequate support to avoid vibration and noise transmission into the building Units should be mounted over corridors utility areas rest rooms and other auxiliary areas where high levels of sound are not an important factor Sound and structural consultants should be retained for recommendations
Walls or Obstructions
The unit should be located so that air may circulate freely and not be re-circulated For proper air flow and access all sides of the units should be a minimum of ldquoWrdquo away from any wall or obstruction It is preferred that this distance be increased whenever possible Care should be taken to see that ample room is left for maintenance work through access doors and panels Overhead obstructions are not permitted When the unit is in an area where it is enclosed by three walls the unit must be installed as indicated for units in a pit
Figure 4-10 Remote ACC Installation Around Walls or Obstructions
ALL_WallsorObstructions_20131111eps
Multiple Units
For units placed side by side the minimum distance between units is the width of the largest unit If units are placed end to end the minimum distance between the units is 4 feet
Figure 4-11 Remote ACC Installation When Installing Multiple Units
ALL_MultipleUnits_20131111eps
MINW
AIR FLOW
Wrdquo=Total width of the condenser
MIN
Wrdquo=Total width of the condenserrdquo
W
AIR FLOWAIR FLOW
39EGW06-PCPEG-20150514
TMTM
Section IV Installation
Units in Pits
The top of the unit should be level with the top of the pit and side distances increased to ldquo2Wrdquo If the top of the units is not level with the top of the pit discharge cones or stacks must be used to raise discharge air to the top of the pit This is a minimum requirement
Figure 4-12 Remote ACC Installation When Installing Units in Pits
ALL_UnitsinPits_20131111eps
Decorative Fences
Fences must have 50 free area with 1 foot undercut a ldquoWrdquo minimum clearance and must not exceed the tops of the unit If these requirements are not met the unit must be installed as indicated for ldquoUnits in Pitsrdquo
Figure 4-13 Remote ACC Installation When Installing Units Near Decorative Fences
ALL_DecorativeFences_20131111eps
Wrdquo=Total width of the condenserrdquo
MIN MIN
AIRFLOW
2W2W
STACK(BY OTHERSIF SUPPLIED) 10rsquo MAX
Wrdquo=Total width of the condenserrdquo
MIN1rdquo MIN MIN
AIR FLOWW W
40 EGW06-PCPEG-20150514
TMTM
Section IV Installation
FIELD INSTALLED PIPING
Installation of the outdoor air-cooled condenser should only be done by a qualified refrigeration mechanic familiar with this type of work Many service problems can be avoided by taking adequate precautions to provide an internally clean and dry system and by using procedures and materials that conform to established procedural standards
Piping Guidelines
The following piping recommendations are intended for use as a general guide For more complete information refer to the latest ASHRAE Handbook
Materialsbull Use clean dehydrated refrigeration-grade copper tubing for all refrigerant lines Hard drawn tubing should be used
where no appreciable amount of bending around pipes or obstructions is necessary If soft copper tubing must be used care should be taken to avoid sharp bends which may cause restrictions and excessive refrigerant pressure drops
bull Use long radius elbows wherever possible with one exception - short radius elbows should be used for any traps in the hot gas riser
bull Braze all copper to copper joints with a phosphorus-copper alloy material such as Silfos 5 or equivalent Do not use soft solder
bull During brazing operations flow an inert gas such as nitrogen through the lines to prevent internal oxidation scaling and contamination
bull Support refrigeration lines at intervals with suitable hangers brackets or clampsbull Pack glass fiber insulation and a sealing material around refrigerant lines where they penetrate a wall to reduce
vibration and to retain some flexibilitybull The liquid line and discharge line should not be in contact with one another If the installing contractor must tie these
lines together because of an installation requirement the contractor must insulate them from each other to prevent heat transfer Because the discharge line is hot during system operation precautions should be taken to avoid personnel injury
bull PoolComPaktrade units do not utilize compressors with unloading stages Consequently double hot gas risers are not needed for reduced load conditions as refrigerant flow rates will not fall below minimum velocities necessary to carry oil up through the discharge line
bull A field provided field installed liquid line filter-drier is recommended in the field piping to the PoolComPaktrade unit
Sizingbull The lines must be sized and routed so that oil is carried through the system Using smaller lines than recommended
will give excessive pressure drops resulting in reduced capacity and increased power consumption Oversized lines could result in an oil flow problem within the system and possible compressor damage
bull Excessive pressure drops in the liquid line may cause flashing of the refrigerant and a loss of a liquid seal at the expansion valve inlet A reduction in capacity may then occur because the presence of gaseous refrigerant will partially block the expansion valve Using hot gas and liquid line sizes recommended in the Air Cooled Condenser section for these units and the proper system refrigerant charge will prevent this problem
bull Discharge lines should be designed to prevent condensed refrigerant and oil from draining back to the compressor during OFF cycles Use the following guidelines The highest point in the discharge line should be above the highest point in the condenser coil The hot gas line should loop toward the floor if the condenser is located above the PoolComPaktrade unit especially
if the hot gas riser is longbull For refrigerant line sizing for an Air Cooled Condenser (ACC) where the lineset length is less than 100 feet or the
ACC location is less than 50 feet higher or 20 feet lower than the unit use the below Table 4-3bull ACC line lengths beyond the above limits will void warranty unless written approval is obtained from the
factory PRIOR to installation and startup
PCP_EG_ACCPiping_20140122eps
41EGW06-PCPEG-20150514
TMTM
Section IV Installation
Figure 4-14 ACC Refrigerant Piping
Refrigerant and Oil Chargingbull PoolPaktrade units are shipped with the required charge for self contained operation only The remote ACC option does
NOT provide the refrigerant charge or oil required for the ACC and line setsbull Refer to Table 4-2 for the additional ACC condenser chargebull Refer to Table 4-3 for the required additional oil and refrigerant charge Use the calculation method shown to calculate
the additional refrigerant and oilbull For the additional oil required multiply 2 of additional refrigerant charge of both ACC and refrigerant line length
Use the correct oil type of POE oil depending on the compressor installed For Alliance models SXA SPA SSA compressors use Copeland Ultra PN 998-E022-00 For Trane models CSHD compressors use Trane PN OIL00080
Sample Charging CalculationFor an AWV2600 with 73 feet line length and ACC0121 located 30 feet above the unit
Table 4-3 indicates 34rdquo discharge line and 58rdquo liquid line piping sizes Using R410A ozft additional charge for the lineset is 73 feet x 025 ozft + 73 feet x 148 ozft = 1260 oz Table 4-2 indicates additional charge for ACC0121 (allow 30 F Operation) is 39 lb x 16 ozlb = 6240 oz Total additional R410A charge for both ACC and refrigerant line is 1260 + 6240 oz = 750 oz or 46 lbs 14 oz Total additional oil charge is 750 oz x 2 = 15 oz
Table 4-2 R410A Charge for Air Cooled Condensers (lb)
DISCHARGE LINE
Pitch inDirection ofrefrigerant flow
LIQUID LINE
AIR-COOLEDCONDENSER
DISCHARGE LINE Pitch inDirection ofrefrigerant flow
Table 4-3 Refrigerant (R410A) Charge for Different Line Size
WARNINGAbove chart is for lineset length less than 100 ft and ACC located less than 50ft above unit or 20ft below unit Failures due to a piping layout not within these limits nor receiving prior PoolPaktrade
Factory approval will not be covered under PoolPaktrade warranty
Refrigerant Line Size (ACC) Refrigerant Charge for Units with Air Cooled Condensers (ACC)
Discharge Liquid Line Length (ft) vs R410A Charge (lbs)
Model OD R410A ozft OD R410A
ozft25 ft 50 ft 75 ft 100 ft
Lbs Oz Lbs Oz Lbs Oz Lbs Oz
0550 12 010 38 049 0 15 1 14 2 13 3 12
58 016 12 092 1 11 3 6 5 1 6 13
0800 58 016 38 049 1 0 2 1 3 1 4 2
58 016 12 092 1 11 3 6 5 1 6 13
1200 58 016 12 092 1 11 3 6 5 1 6 13
34 025 58 148 2 11 5 6 8 1 10 13
1400 58 016 12 092 1 11 3 6 5 1 6 13
34 025 58 148 2 11 5 6 8 1 10 13
1800 34 025 12 092 1 13 3 10 5 8 7 5
78 034 58 148 2 14 5 11 8 9 11 6
2600 34 025 58 148 2 11 5 6 8 1 10 13
1 18 058 34 221 4 6 8 12 13 1 17 7
3500 78 034 58 148 2 14 5 11 8 9 11 6
1 18 058 78 307 5 11 11 7 17 2 22 13
4000 78 034 34 221 3 16 7 16 11 15 15 15
1 18 058 78 307 5 11 11 7 17 2 22 13
Note1 This table applies to ACC line length less than 100 ft only Contact factory if ACC line length is more than 100 ft
2 Line size should be used for ACC at the same level or located up to 20ft below the unit
3 Line size should be used for ACC located up to 50 ft above the unit
43EGW06-PCPEG-20150514
TMTM
SECTION V OPERATION
ECC-PCP REMOTE INTERFACE UNITFigure 5-1 RIU Keypad
PCP_EG_StraightOnKeypadAnnotated_20121204eps
The ECC-PCP Remote Interface Unit (RIU) is designed around the Carel pGD0 4-line x 20 character backlit LCD display module The RIU displays are accessed through six backlit selection buttons They consist of a Return Enter Key Up Key Down Key Program Key Alarm Key and Escape Key as shown above
After approximately 5 minutes the RIU will display the status screen rotation Press the Escape key to bypass the five minute delay and move directly to the status display
STATUS DISPLAY
The status screens contain basic information about operation of the PoolComPaktrade system Press the up or down arrow keys to move from screen to screen The screens will also rotate automatically every 10 seconds
Figure 5-2 Status Screen 1S P A C E T E M P _ _ o FS P A C E R H _ _ S P A C E D E W P O I N T _ _ o F(O U T S I D E T E M P) _ _ o F
Status Screen 1 displaysbull Space Temperature in degF or degCbull Space Relative Humidity in bull Space Dew Point in degF or degCbull Outside Air Temperature in degF or degC (with Economizer Option Only)
Status Screen 2 displaysbull Water Heating - YES indicates that the unit is returning recovered heat back to the pool waterbull Aux Water Heat - YES indicates that the controller has closed the relay contact requesting auxiliary pool water heater
operationbull Water Temperature in degF or degC
Status Screen 3 displaysbull SPACE temperature control requirement bull TEMPERATURE- OK Indicates the space temperature is at setpointbull HEATING- YES Indicates the space requires heatingbull COOLING- YES Indicates the space requires coolingbull AUX AIR HEAT Indicates the space requires additional heating The auxiliary air heating relay contacts close to
activate the external heating system
44 EGW06-PCPEG-20150514
TMTM
bull DEHUMID (SURFACE) Indicates the space requires dehumidification The word SURFACE indicates that the unit is temporarily lowering the dew point set point to minimize condensation at the cold surface temperature sensor
bull ECONOMIZER MODE Indicates the unit is cooling the space with outside air ECONOMIZER MODE is only shown if the optional economizer system is present
Status Screen 4 displaysbull The first line displays the current system status bull The second line displays compressor status
SET POINT CHANGE MENU
bull Press the PRG key to access the main menubull Use the arrow keys to scroll to the menu selection for Set Points and then press the Enter keybull Use the arrow keys to select the set point to be changed and then press Enter Available set points are
Air Temperature
The allowable range for the air temperature set point is 70 to 95degF Use the arrow keys to change the set point and then press Enter The new dew point set point is shown immediately as DPT The set point change screen will remain visible for a short time to allow verification of the new dew point set point After about five seconds the RIU will return to the status screen display
Relative Humidity
The allowable range for the relative humidity set point is 40 to 65degF Use the arrow keys to change the set point and then press Enter The new dew point set point is shown immediately as DPT The set point change screen will remain visible for a short time to allow verification of the new dew point set point After about five seconds the RIU will automatically return to the status screen display
Pool Temperature
The allowable range for the water temperature set point is 70 to 104degF Use the arrow keys to change the set point and then press Enter The RIU will automatically return to the status screen display
Recommendations
bull Air Temperature (Range 70degF to 95degF) The air temperature should normally be set about 2degF above the pool water temperature to minimize the pool water evaporation rate (high temperature spas are an exception)
bull Relative Humidity (Range 40 to 65) The normal range for the humidity set point is 50 to 60 Lower set points will require more energy (electricity) to satisfy the dehumidification requirement and increase pool water evaporation
bull Pool Temperature (Range 70degF to 104degF) The pool temperature set point is normally set between 80degF and 88degF for a typical swimming pool and higher for a spa depending on user preference
CAUTIONThe dehumidifier should be configured to operate at the set points designed for the facility These set points are shown on the yellow label on the door of the RIU Set points other than those shown may not be attainable with this dehumidifier
Section V Operation
45EGW06-PCPEG-20150514
TMTM
Section V Operation
PURGE MODE CONTROL MENU
CAUTIONIt is the userrsquos responsibility to use this feature properly to prevent freeze damage to downstream equip-ment 100 outside air at below freezing conditions has the potential to cause serious damage
Purge Mode causes the unit to force the optional field-provided economizer dampers and fan to full open introducing large quantities of outside air to the space This is typically used when ldquoshockingrdquo the pool Compressor operation is disabled during purge but the auxiliary air and water heating systems remain active
If the unit is not equipped with the economizer option a flashing ldquoCAUTION NO FREEZE PROTECTIONrdquo warning will be displayed This warning indicates that operation of purge mode without regard for outside air temperatures below freezing can result in damage to hot water coils or other equipment in the pool area
DETAILED STATUS MENU
To access the detailed status menubull Press the PRG key to access the main menubull Use the arrow keys to scroll to the menu selection for Detailed Status and then press the Enter key
Detailed Status Screen 1 displays Temperaturesbull Surface ndash The temperature measured at the cold surface sensorbull Dew Point ndash The calculated dew point of the spacebull Dewpt Setpoint ndash The dew point set point calculated from the temperature and relative humidity set points
Detailed Status Screen 2 displaysbull Disch Press ndash The measured refrigerant pressure in the discharge line at the compressorbull Suct Press ndash The measured refrigerant pressure in the suction line at the compressorbull Suct Temp ndash The refrigerant temperature measured on the surface of the suction line at the compressorbull Suct SH ndash The calculated superheat at the suction of the compressor
Detailed Status Screen 3 displays the number of hours the following device or system has been active since power was last applied to the unitbull Cmpr - Compressorbull Fan ndash Supply Fanbull AC ndash Mechanical Air Cooling (Economizer Cooling Not Included)bull Aux ndash Air ndash Auxiliary Air Heatingbull Aux - Wtr ndash Auxiliary Water Heating
Detailed Status Screen 4 displaysbull Fault Count ndash The total number of high pressure low pressure and defrost trips that have occurred since power was
last applied to the unit When this number reaches 10 the compressor is locked outbull AC Proof ndash Indicates a status of ldquoProvenrdquo if AC mode operation is allowed ldquoNot Provenrdquo indicates that AC mode
operation is not allowed
Detailed Status Screen 5 (only present in units configured for multi-unit networking) displaysbull Network Role ndash Indicates if the unit currently being displayed by the RIU is the master or a slavebull Net Status ndash Indicates ldquoCONNECTEDrdquo if the unit is properly connected to the multi-unit network ldquoNO LINKrdquo
indicates the unit is not connectedbull Unit ID Number ndash Indicates the unit address on the multi-unit network
Detailed Status Screen 6 (only present in units configured for multi-unit networking) displaysbull Unit 1 Present ndash Indicates if the unit currently being displayed by the RIU can communicate with unit 1 on the multi-
unit networkbull Unit 2 3 4 ndash Same as for unit 1 but for the other 3 possible units on the network
46 EGW06-PCPEG-20150514
TMTM
Section V Operation
ECC-PCP NETWORK OPERATIONNetworked ECC-PCP units operate in a MASTERSLAVE environment This means that one unit (master) determines heating cooling and dehumidification requirements and broadcasts them on the network to the other units (slaves) This ensures that all units work together instead of against other Each networked unit contains all sensor and controls necessary for independent operation and is capable of acting in the master role Units on the network are identified by a number between one and four The unit with the lowest identification number having no uncleared alarms will be the master unit
If an alarm condition occurs in the master unit it will give up the role of master The unit with the next lowest identification number and no unclear alarms will take over the master role The unit that experienced the alarm condition will operate in the slave role until the alarm is cleared at the control panel
The control panel provides two network status screens These can be accessed in the detailed status menu The figure above shows the first screen that displays the status of units one through four as present or not Use this screen to verify that all units on the network are connected and communicating with each other The figure below shows the second screen that displays network information for the unit that is being displayed by the remote interface unit including network role connection status and network identification number
NETWORK CONFIGURATION
Using the following four parameters it is possible to configure the ECC-PCP network to accommodate a wide variety of installation options Network configuration can be accessed in the service menu These parameters must be set in each unit individually
Pool Water Temperature Control
Determines whether the unit will control water temperature based on the masterrsquos command (NETWORK) or its own temperature sensor and set point (LOCAL) If a unit set to LOCAL becomes the master other units in the network will not use the masterrsquos command for water heating They will look to the next line that is not set to LOCAL This parameter is only set to LOCAL if the unit is connected to a different pool than the rest of the units on the network Because the unit is controlling water temperature on its own it is necessary to select the correct unit with the control panel before changing the water temperature set point
Staged Dehumidification Control
Determines whether the unit will run in dehumidification when there is a need for 1 stage or 2 stages of dehumidification The master unit will start on any need for dehumidification independent of this parameter Slave units with this parameter set to YES will dehumidify only if the master is asking for 2 stages of dehumidification Setting this parameter to NO will cause the unit to dehumidify when the master calls for at least 1 stage of dehumidification Using this parameter it is possible to configure the number of units in each dehumidification stage
Dehumidification Stage 2 Offset
Determines how far the dewpoint (relative humidity) of the space has to rise above the set points before the unit will request 2 stages of dehumidification on the network This parameter is normally the same in all units on the network Making this parameter smaller will bring on the second stage of dehumidification sooner
Enable Network Control
Determines whether the unit will participate in the masterslave environment Setting this parameter to NO will cause the unit to act like a standard ECC-PCP single unit The unit will never become the master on the network and will not listen to the demands broadcast by the master on the network Although units with this parameter set to NO do not participate in the masterslave environment they are still accessible through the network control panel Like the LOCAL pool
47EGW06-PCPEG-20150514
TMTM
Section V Operation
water temperature setting this parameter when set to NO requires this unit to be displayed on the control panel before changing any of the set points The other screens for Pool Water Temperature Control Staged Dehumidification and Stage 2 Offset are not available when this parameter is set to NO
Changing Set Points
Each unit on the network maintains two groups of set points network and local If a unit has the Enable Network Control parameter set to YES and the Water Temperature Control parameter set to NETWORK it will control to the network set points Set points changed when the remote interface unit is displaying this unit will be changed in every unit on the network with the same NETWORK and Water Temperature Control parameters Units that are configured for Network Control and LOCAL water temperature control will control using local water temperature set point the network air temperature and relative humidity set points When the air temperature and relative humidity set points are changed when the remote interface unit is displaying the unit they will be changed in all units configured for Network control The water temperature set point will only be changed in the unit currently being displayed by the remote interface unit Units that are not configured for Network Control will use all local set points Therefore any set points changed while the remote interface unit is displaying this unit will only be changed in this unit
ECC-PCP SERVICE
SERVICE MENU
To access the service menubull Press the PRG key to access the main menubull Use the arrow keys to scroll to the menu selection for Service and then press the Enter keybull A password is required to access the service menu
The following sub-menus are available in the service menu
IO CONFIGURATION
Digital Inputs
This menu contains a screen for each digital input Each screen contains the following parametersbull Status of the data point linked to the inputbull Status of the raw digital inputbull Input type
The following parameter list shows the available digital input screensbull Defrost Switchbull Cpr High Tempbull Water Flow bull Fire Tripbull AC Proofbull Cpr High Prsbull Fan Overloadbull Low Pressurebull Purge Input
Digital Outputs
This menu contains a screen for each digital output Each screen contains the following parametersbull Current output status bull Requested output status bull Override
48 EGW06-PCPEG-20150514
TMTM
Section V Operation
The following digital output screens are availablebull Supply Fanbull Compressorbull Bypass Solenoidbull Water Heating Solenoidbull Reheat Solenoidbull AC Solenoidbull Aux Water Heatbull Alarm Outputbull ACC Run Signalbull Economizerbull Aux Air Heat Stage 1bull Aux Air Heat Stage 2
Analog Inputs
This menu contains a screen for each analog input Each screen contains the following parametersbull Current read-only value from the inputbull Fail bull Tol bull Offs bull Ovrd bull Min bull Max
The following analog input screens are availablebull Discharge Pressure bull Suction Pressure bull Return Relative Humidity bull Suction Temperature bull Return Air Temperature bull Pool Water Temperature bull Surface Temperature bull Outside Air Temperature
UNIT CONFIGURATION
Installed Options
This menu contains parameters that indicate the hardware options installed in the dehumidifier The parameters are set by the factory and do not typically require modification
Aux Air Heating
This menu contains parameters that configure the auxiliary air heating system
Aux Water Heating
This menu contains parameters that configure the auxiliary water heating system
Temperature Ctrl
This menu contains parameters that configure the air temperature control routines of the dehumidifier
49EGW06-PCPEG-20150514
TMTM
Section V Operation
Humidity Control
This menu contains parameters that configure the humidity control routines of the dehumidifier Water Temp CtrlThis menu contains parameters that configure the compressor based water heating system of the dehumidifier bull Water Heat First This parameter indicates whether the control routine will use the compressor for water heating when
there is no dehumidification requirement bull Deadband This parameter is the deadband used by the compressor based pool water heating control routine
BAS INTERFACE
This menu contains parameters that configure the building automation system interface of the dehumidifier
MULTI-UNIT NETWORK
This menu contains parameters that configure the operation of dehumidifier in a multiple unit installation
COMPRESSOR
This menu contains parameters that configure the operation of the dehumidifier compressor
ECONOMIZER
This menu contains parameters that configure the operation of the optional field provided and field installed economizer damper system
HISTORY
The history screen provides information on the last 50 faults that have occurred in the dehumidifier It can be used for troubleshooting by an experienced HVAC technician The faults are recorded with a sequence number from 1 to 50 Sequence number 1 is always the most recent fault The following information is stored and displayed for each fault in non-volatile memorybull Hour at which the fault occurred bull Fault Code Number bull Return Air Temperaturebull Return Air Humiditybull Discharge Pressurebull Suction Pressurebull Suction Temperaturebull Pool Water Temperaturebull AC Solenoid Statusbull Bypass Solenoid Statusbull Compressor Statusbull Reheat Solenoid Status
MANUAL MODE
The Manual Mode menu for use by qualified service personnel provides two options Demand Control and Digital Output Control
UTILITIES
The Utilities menu provides sub menus for configuring units of measure and passwords for set point and service access control
50 EGW06-PCPEG-20150514
TMTM
Section V Operation
MAINTENANCEOVERVIEW
Periodic routine maintenance will promote extended equipment life While PoolComPaktrade units use components that are usually maintenance free and do not require service a simple check could result in noticing possible problems before they develop into major problems
DAILY MAINTENANCE
bull Pool water chemistry is a part of daily maintenance and it is recommended to follow National Spa and Pool Institute standards PoolPaktrade International strongly recommends following the National Spa and Pool Institute values
Table 5-1 Pool Water Chemistry
bull PoolPaktrade International recommends daily logging of your pool water chemistry MAINTENANCE AND YOUR POOL WATER CHEMISTRY IS IMPORTANT TO PROTECT YOUR WARRANTY RIGHTS
MONTHLY MAINTENANCE
bull Air Filters inspect and replace or clean as applicable Dirty filters restrict air flow and can cause improper unit operation
bull Ensure that the condensate collection pan is draining properly and the condensate is not overflowing or being drawn into the supply air stream Check the condensate and overflow lines to ensure that neither are clogged
bull Check the operation of the blower motor and scroll Ensure that the scroll does not rub the housing Check for proper belt tension Worn or cracked belts should be replaced Check fan and mounting brackets for tightness
bull Ensure that the ALARM light is not illuminated
ANNUAL MAINTENANCE
bull Inspect the refrigeration and water circuits for leaks wear or corrosion Corrosion on the water piping or condenser may indicate poor pool chemical maintenance and improper chlorine and pH levels
bull Check electrical components for loose wiringbull Although the exterior of the PoolComPaktrade units are powder coated wipe down unit particularly if installed in an
area subject to dirt or chemical concentrationbull Wash brush or vacuum the evaporator and air condenser coils This will ensure proper heat transfer and reduce static
pressure losses Caution should be taken not to wet electrical components inside the unit
NOTEIf service and inspections are not performed by a competent and experienced service firm the manufacturer warranty may be voided
AUXILIARY AIR amp POOL WATER HEATER CONNECTIONS FOR MULTIPLE UNIT INSTALLATION
Figure 6-1 Auxiliary Air and Pool Water Heater Connections for Multiple Units
AWH_EG_Connections_20121204eps
52 EGW06-PCPEG-20150514
TMTM
AUXILIARY AIR amp POOL WATER HEATER CONNECTION FOR A TWO POOL INSTALLATION
Figure 6-2 Auxiliary Air and Pool Water Heater Connections for Two Pool Installations
AWH_EG_ConnectionstoPool_20121204eps
Section VI Wiring
53EGW06-PCPEG-20150514
TMTM
Section VI Wiring
FIELD WIRING
Figure 6-3 Field Wiring Diagram
PCP_EG_FieldWiringDiagram_20121204eps
54 EGW06-PCPEG-20150514
TMTM
Section VI Wiring
FIRE CONTROL SYSTEM CONNECTION
Figure 6-4 Fire Control System Connection
PCP_EG_FirecontrolSysConnection_20121204eps
55EGW06-PCPEG-20150514
TMTM
Section VI Wiring
This page intentionally left blank
EGW06-PCPEG-20150514
TMTM
56
TMTM
3491 Industrial Drive York PA 17402 USA 800-959-7725 Fax 717-757-5085for more information wwwpoolpakcom
The Leader in Indoor Pool Dehumidification
30 EGW06-PCPEG-20150514
TMTM Section IV Installation
ECC-PCP CONTROLS FIELD WIRINGOVERVIEW
The ECC-PCP is the Electronic Control Center programmable controller designed specifically for the PoolComPaktrade dehumidification system It is a robust system capable of a variety of functions The following text describes the field wiring required for for proper operation of the ECC-PCP dehumidification system in a typical PoolComPaktrade unit installationThe field wiring diagram (see Section VI - Wiring) shows the location of the connections for the sensors and other required devicesThe numbers following the text identify the location on the field wiring diagram where each device is connected to the PoolComPaktrade unit electrical panel
REMOTE INTERFACE UNIT (1)
The remote interface unit allows the user to view space temperature pool water temperature and relative humidity change set points and receive fault notifications It should be mounted in a convenient location that is outside the pool area The ambient temperature of the mounting location must always be above 32 F
NOTEThe maximum distance from the Remote Interface Unit to the PoolComPaktrade unit is 1000 feet For distances greater than 1000 feet contact the factory
The control panel does not contain any sensors and should be mounted outside the pool enclosure A factory supplied 6 ft cable RJ25 (6 conductor) must be installed between the PoolComPaktrade unit and the control panel
For distances greater than 6 feet use 6 conductor 22 AWG shielded twisted-pair cable along with the supplied RJ25 jack and second 6 foot cable shipped loose with the unit
The wall mounting of the terminal first requires the back piece (A) of the RIU assembly The RIU is designed to fit a single gang extra-deep electrical box mounted horizontally in the wall The RJ25 jack and most of the black cable should be placed inside the box before installing the mounting bracket A frac34rdquo hole must be drilled for the 6-conductor cable which connects the remote interface unit to the PoolPaktrade unit The below is specific mounting instructions that correspond to the mounting schematic below
1 Fasten the back piece (A) to the gang box using the rounded-head screws supplied in the packaging Use the screws that come with the box to secure the bracket
2 Thread the 6-conductor cable through the back piece (A) and connect to the back of front panel (B)3 Rest the front panel (B) on the back piece A and fasten the parts together using the flush-head screws supplied in the
packaging4 Finally fit the click-on frame (C)
Figure 4-3 Remote Interface Mounting Plate
ALL_EG_RIUMounting_20131219eps
A
B
C
31EGW06-PCPEG-20150514
TMTMSection IV Installation
COLD SURFACE TEMPERATURE SENSOR (2)
This sensor is used to measure the temperature of the coldest surface in the pool enclosure The sensor is an aluminum bar 1rdquo long by frac14rdquo square with a clearance hole for a number 8 screw and two 6rdquo wires on one end
When the temperature of the surface drops to within 5 F of the space air dew point the humidity set point will be automatically reset downward to help prevent condensation on the cold surface It should be noted that resetting the humidity set point will not compensate for lower quality building materials such as single pane glass or non-thermally broken frames
The sensor should be mounted on an exterior window or door frame that is not in direct sunlight In cases where there are no exterior windows or doors the sensor should be mounted on the inside surface of an exterior wall The sensor must be in contact with the cold surface Electrical connection should be made with 22 AWG copper two-conductor shielded twisted-pair cable Connect the shield drain wire to ground at the PoolComPaktrade unit end only
ECONOMIZER SYSTEM (OPTIONAL) (3)
An economizer system cools the space with outside air instead of the compressor The ECC-PCP provides a dry contact closure to activate the economizer The contacts of the ECC-PCP may be connected directly to the economizer control circuit provided the circuit is 24 VAC maximum and the current does not exceed 1 amp inductive The other components of the system must be provided by others (See figure below for an illustration of a typical economizer system)
Units equipped with an economizer require relocation of the factory mounted return air sensor It must be located in a duct that will always contain air that represents the space temperature and humidity
The economizer will operate only when space cooling is required and there is no dehumidification requirement When the outside air temperature is greater than 50degF and more than 5degF below the space temperature set point and the space temperature rises above the set point the compressor is disabled and a dry contact closure between T216 and T217 is made to activate the economizer
When the ECC-PCP contacts close relay R1 is energized causing the outside and exhaust air dampers (by others) to open and the return air damper (by others) to close At the same time relay R2 is energized causing the exhaust fan to run If the space temperature continues to rise and exceeds the space temperature set point by more than two degrees the economizer contact is opened reversing the damper positions The compressor is energized in the space cooling mode (if so equipped) The compressor will then continue to run until the call for space cooling is satisfied The economizer will also be activated in the space cooling mode if the auxiliary air conditioning condenser option is not installed or if the compressor is locked out by a fault condition
Figure 4-4 Economizer Operation
PCP_EG_EconomizerOperation2_20121204eps
32 EGW06-PCPEG-20150514
TMTM Section IV Installation
WARNINGWhen economizer option is selected adequate exhaust capacity via a separate fan must be specified to ensure the natatorium pressure remains slightly negative Failure to specify adequately sized exhaust system may result in damage to structure and pool odors may be forced into other areas of the building
OUTSIDE AIR TEMPERATURE SENSOR (ECONOMIZER OPTION ONLY) (4)
The outside air temperature sensor is installed only when the outside air economizer option is included The sensor is mounted inside a 12rdquo PVC conduit pull elbow It can be mounted to the outside of the building using standard PVC conduit fittings The sensor should be mounted near the outside air intake vent for the economizer system It is very important to mount the sensor so that it does not receive direct sunlight The exposure to sunlight will cause the sensor housing to warm resulting in temperature readings that are higher than the actual air temperature This condition may prevent the ECC-PCP from selecting the economizer mode of operation If possible mount the sensor under an overhang or on a surface with a northern exposure
Electrical connection should be made with 22 AWG copper 2-conductor shielded twisted-pair cable Connect the shield drain wire to ground at the PoolComPaktrade end only See figure below for an illustration of the outside air temperature sensor Seal the conduit leading to the sensor with silicone caulk to prevent moisture from migrating out to the sensor and condensing inside the sensor
Figure 4-5 Outside Air Sensor
PCP_EG_OutsideAirSensorInstallation_20121204eps
AIR COOLED CONDENSER (OPTIONAL) (5)
The air-cooled condenser is used to reject heat recovered during the space cooling mode of operation Only PoolComPaktrade brand air-cooled condensers (PAC Units) should be used with a PoolComPaktrade Unit The ECC-PCP provides 24 VAC control signal to the speed control located in the PAC unit control panel The speed control then runs the condenser fan motor at the appropriate speed See figure below for an illustration of a PAC unit field wiring
Figure 4-6 PAC Unit Field Wiring
PCP_EG_RemoteACCFieldConnection_20121204eps
24 VAC CONTROL SIGNAL FROM
USE COPPER SUPPLY WIRES
POOLCOMPAKTERMINALS 12AND 13
POWER SUPPLY
21 L1 L2
GR
33EGW06-PCPEG-20150514
TMTMSection IV Installation
AUXILIARY POOL WATER HEATING SYSTEM (AWH MODEL ONLY) (6)
The auxiliary pool water heating system is provided by others Typically a gas fired or electric pool water heater is used The ECC-PCP provides a dry contact closure that signals a need for auxiliary water heating The contacts of the ECC-PCP may be connected directly to the heaterrsquos control circuit provided the circuit is 24 VAC maximum and the current does not exceed 1 amp inductive Any other applications will require an additional relay (by others) to be installed between the ECC-PCP and the pool water heating system
AUXILIARY AIR HEATING SYSTEM (7)
Typically a duct mounted electric heater hot water coil or a factory installed unit mounted hot water coil is used to provide air heating The ECC-PCP provides a form ldquoCrdquo (NO and NC) dry contact closure that signals a need for auxiliary air heating The ECC-PCP contacts may be directly connected to an electric duct heater control circuit provided the circuit is 24 VAC maximum and the current through the contacts does not exceed 1 amp inductive The figure below shows a typical installation that utilizes a 3-way hot water control valve and a unit or duct mounted hot water coil
Figure 4-7 Installation of a Hot Water Coil 3-Way Valve
The ECC-PCP provides a normally open contact closure for connection to a building management system If a fault occurs the controller will energize this output to indicate that there is a problem with the dehumidification system The remote interface unit will display the cause of the fault and provide a suggested course of action This output may also be used to energize an external alarm light or buzzer It may also be directly connected to an external circuit as long as the circuit is 24 VAC maximum and the current through the contacts does not exceed 1 amp inductive
HO
T W
ATER
CO
IL
FIELD SUPPLIEDACTUATOR
AB SWITCH INB POSITION
2
1
W
BK
W 3
A
B
VALVE IN BYPASS POSITION
HOT WATER IN
HOT WATER OUT
THREE WAY VALVE WITHACTUATOR
HO
T W
ATER
CO
IL
VALVE IN HEATING POSITION
HOT WATER IN
HOT WATER OUT
THREE WAY VALVE WITHACTUATOR
ALL WIRING BY CONTRACTOR
T23
T25
T24
POOLCOMPAK
120 VAC24 VAC
FIELD SUPPLIED 40 VATRANSFORMER
WIRING DETAIL
PIPING DETAIL
34 EGW06-PCPEG-20150514
TMTM
Section IV Installation
BUILDING FIRE CONTROL SYSTEM (9)
The ECC-PCP can receive a contact closure signal from a building fire control system This input of the controller must be connected to dry (voltage free) contacts only When this input receives a contact closure the PoolComPaktrade unit compressor and fan will be shut down and the remote interface unit will show an alarm condition When the contact closure opens The PoolComPaktrade unit will resume normal operations It is possible to change the operation of the fire trip input to be active on open instead of close See ECC-PCP Service in the Operation section for further explanation
RETURN AIR SENSOR (10)
The return air sensor measures air temperature and relative humidity The sensor is normally factory mounted in the PoolComPaktrade unit return air section However with the optional economizer it is necessary to field mount this sensor in the duct work The sensor must be located in the return duct upstream of the exhaust duct connection (See Figure 4-4 Economizer Operation for a typical location of the sensor in the economizer system)
When field mounting is necessary the sensor will be provided from the factory and must be field wired using 22 AWG copper 4-conductor shielded twisted-pair cable
PURGE MODE INPUT (11)
The ECC-PCP can receive a contact closure signal from an external source to activate purge mode operation During purge mode the compressor is disabled and the economizer output is activated to bring in 100 outside air
AC PROOF INPUT (12)
An optional interlock used with certain types of heat rejection condensers Dry contact closure indicates a problem and prevents compressor operation in air cooling mode
POOL WATER TEMPERATURE SENSOR (13)
Units equipped with a pool water heating condenser require installation of factory supplied pool water temperature sensor It must be mounted upstream of the PoolComPaktrade and the auxiliary water heater The sensor can be threaded directly into a 1frasl4rdquo FPT fitting Electrical connection should be made with 22 AWG copper 2 conductor shielded twisted-pair cable Connect the shield drain wire to ground at the PoolComPaktrade end only
35EGW06-PCPEG-20150514
TMTM
Section IV Installation
POOL WATER PIPING (AWH AND AWV MODELS ONLY)
CAUTIONDo not run piping across service panels evaporator coil face or air discharge outlet
If a new or existing pool water heater is piped within the same circuit the PoolComPaktrade unit should be connected in a parallel loop between the filter and the other heater This allows the PoolComPaktrade unit to act as the primary water heating source and the other heater as a backup or supplemental water heater
All pool purification and chemical feed systems MUST be installed downstream of the unit This includes the practice of adding chemicals directly to the skimmer which results in highly concentrated corrosive chemicals passing over and through the PoolComPaktrade water condenser Water chemistry must be maintained at a pH level between 72 and 76 with a free chlorine level not exceeding 30 PPM and a combined chlorine level less than 03 PPM
If possible install the PoolComPaktrade unit above the pool water level If it is installed below the pool level isolation valves must be added Breakable couplings should be located near the unit on both the water inlet and outlet lines When installing piping connect the piping to these couplings last so as not to place stress on the other connection in the plumbing systemA constant flow of water is required through the PoolComPaktrade unitsrsquo condenser The circuit to and from the unit must be capable of maintaining the flow rate as specified for the installed unit (see PoolComPaktrade Performance data in Table 3-1) To ensure correct water flow the filter pump usually operates at the same time as the PoolComPaktrade unit However to reduce energy consumption during filter off cycle times a two-speed or small auxiliary water pump which bypasses the filter may be used
CAUTIONCAUTION Excessive water flow can cause premature erosion and pitting of the pool water condenser Adjust valve so that the water flow does not exceed the GPM or pressure drop listed in the table PoolPaktrade recommends a fixed flow control or adjustable flow circuit setter
PoolPaktrade International recommends installing water pressure tap ports to check influent and effluent water pressure See PoolComPaktrade Performance data in Table 3-1 for the particular unit model in question for the proper flow rate and pressure drop across the pool water condenser The pressure tap ports should be installed in a straight length of the water piping exterior to the PoolComPaktrade unit Install the port before any 90-degree turns and approximately 6 inches from the corner-post of the unit
In some instances piping from the PoolComPaktrade unit to the filter return line may not be feasible or economical The unit may be installed on its own supply and return line using a properly sized water pump and appropriate strainer Ensure that auxiliary water heating systems are staged to supplement the PoolComPaktrade unit water heating
If the PoolComPaktrade unit is installed above the pool surface and the main circulating pump cannot provide the proper water flow to it at the specified pressure an auxiliary booster pump is required
Condensate may be returned to the pool (if local codes allow) but PoolPaktrade International neither recommends nor disapproves this practice The installer should check local codes prior to making this decision Condensate must be filtered prior to being returned to the pool
If multiple PoolComPaktrade units are installed on the pool water piping circuit pipe them (and any auxiliary water heater) in parallel Piping PoolComPaktrade units in series may result in the downstream unit(s) sensing the pool water temperature as satisfied and not reject heat to the water to its full capacity The actual pool water temperature should be sensed by each PoolComPaktrade unit and auxiliary water heater
36 EGW06-PCPEG-20150514
TMTM
Section IV Installation
Figure 4-8 Typical Pool Water Piping Diagram (AWH and AWV Model Only)
PCP_EG_PoolWaterConnectSchematic_20140305eps
SALT WATER POOLS
For units (AW models only) installed serving a salt water pool wire the pool bonding system to the bonding lug on the unit copper pool water piping This connection is required to prevent corrosion of the internal PoolComPaktrade water piping
For more information on salt water pools see the article ldquoSalt Water Poolsrdquo in the Pool Water Chemistry section of the PoolPak educational library
POOLCHEMICAL
FEEDER
CHECKVALUE
OPTIONALBOOSTERPUMP IF
MAIN FILTERPUMP IS A
2-SPEED OR UNDERSIZED
BALLVALVES
POOLWATERFILTER MAIN
FILTERPUMP
DRAIN
UNIONS
EXTERNALPRESSURETAP PORTS
UNIONS
AUXILIARYPOOL WATER
HEATER
DRAIN
BALLVALVES
LOCKINGGLOBEVALVE
LOCKINGGLOBEVALVE
POOL WATERTEMP SENSOR
FC
FlowControl
37EGW06-PCPEG-20150514
TMTM
Section IV Installation
CONDENSATE DRAINSDrain pans are connected to a common drain system and must be trapped for proper operation For AWH and HCDH units a trap and piping must be supplied and installed by the customer The trap depth must be a minimum of 6 inches (See figure 4-9) For AWV and HCDV units a condensate trap is located inside the unit and the field condensate piping and overflow drain must not have an additional trap
Provisions MUST be made for disposal of condensate Condensate from the dehumidifier coil will have nearly the same properties as the pool water itself It is recommended that building materials subjected to the condensate and systems used for its disposal are checked for compatibility For drain piping use PVC plastic pipe minimum Schedule 40 The drain line must be sloped to provide proper drainage
Drain line exposed to outdoor ambient temperatures must be protected against freezing Wrap lines with electric heat tape (follow manufacturerrsquos instructions) controlled by an automatic thermostat set at a minimum of 35degF to protect against freezing Insulate all piping Insulation must be sealed at all seams Power for heat tape must be supplied external to the PoolComPaktrade
Figure 4-9 AWH and HCDH Condensate Trap
PCP_EG_NegPressCondPiping_20140122eps
WATER COOLED CONDENSERA standard option for PoolComPaktrade units is an integral water-cooled condenser For this option all valves and refrigerant piping is internal to the unit No additional field wiring is required No additional refrigerant or oil charge is required Water piping connections are 1-14rdquo MPT and labeled on the unit
UNIT BASE
MINIMUM SCHEDULE 40 PVC
REMOVABLECLEANOUT
OPEN TEEFOR VENT
AWH OR HCDH UNIT
PLUG THEUNUSEDCONNECTIONWITH SUITABLEPVC PLUG
1
2
4 INCHES MINIMUM OR MAX NEGATIVE STATICPRESSURE (INCHES WC) + 1 INCH
2 INCHES MINIMUM OR 12
1
12
TMTM
38 EGW06-PCPEG-20150514
TMTM
Section IV Installation
REMOTE AIR-COOLED CONDENSERSPACE AND LOCATION REQUIREMENTS
The most important consideration which must be taken into account when deciding upon the locations of air-cooled equipment is the provision for a supply of ambient air to the condenser and removal of heated air from the condenser area Where this essential requirement is not adhered to it will result in higher head pressures which cause poor operation and possible eventual failure of equipment Units must not be located in the vicinity of steam hot air or fume exhausts
Another consideration which must be taken is that the unit should be mounted away from noise sensitive spaces and must have adequate support to avoid vibration and noise transmission into the building Units should be mounted over corridors utility areas rest rooms and other auxiliary areas where high levels of sound are not an important factor Sound and structural consultants should be retained for recommendations
Walls or Obstructions
The unit should be located so that air may circulate freely and not be re-circulated For proper air flow and access all sides of the units should be a minimum of ldquoWrdquo away from any wall or obstruction It is preferred that this distance be increased whenever possible Care should be taken to see that ample room is left for maintenance work through access doors and panels Overhead obstructions are not permitted When the unit is in an area where it is enclosed by three walls the unit must be installed as indicated for units in a pit
Figure 4-10 Remote ACC Installation Around Walls or Obstructions
ALL_WallsorObstructions_20131111eps
Multiple Units
For units placed side by side the minimum distance between units is the width of the largest unit If units are placed end to end the minimum distance between the units is 4 feet
Figure 4-11 Remote ACC Installation When Installing Multiple Units
ALL_MultipleUnits_20131111eps
MINW
AIR FLOW
Wrdquo=Total width of the condenser
MIN
Wrdquo=Total width of the condenserrdquo
W
AIR FLOWAIR FLOW
39EGW06-PCPEG-20150514
TMTM
Section IV Installation
Units in Pits
The top of the unit should be level with the top of the pit and side distances increased to ldquo2Wrdquo If the top of the units is not level with the top of the pit discharge cones or stacks must be used to raise discharge air to the top of the pit This is a minimum requirement
Figure 4-12 Remote ACC Installation When Installing Units in Pits
ALL_UnitsinPits_20131111eps
Decorative Fences
Fences must have 50 free area with 1 foot undercut a ldquoWrdquo minimum clearance and must not exceed the tops of the unit If these requirements are not met the unit must be installed as indicated for ldquoUnits in Pitsrdquo
Figure 4-13 Remote ACC Installation When Installing Units Near Decorative Fences
ALL_DecorativeFences_20131111eps
Wrdquo=Total width of the condenserrdquo
MIN MIN
AIRFLOW
2W2W
STACK(BY OTHERSIF SUPPLIED) 10rsquo MAX
Wrdquo=Total width of the condenserrdquo
MIN1rdquo MIN MIN
AIR FLOWW W
40 EGW06-PCPEG-20150514
TMTM
Section IV Installation
FIELD INSTALLED PIPING
Installation of the outdoor air-cooled condenser should only be done by a qualified refrigeration mechanic familiar with this type of work Many service problems can be avoided by taking adequate precautions to provide an internally clean and dry system and by using procedures and materials that conform to established procedural standards
Piping Guidelines
The following piping recommendations are intended for use as a general guide For more complete information refer to the latest ASHRAE Handbook
Materialsbull Use clean dehydrated refrigeration-grade copper tubing for all refrigerant lines Hard drawn tubing should be used
where no appreciable amount of bending around pipes or obstructions is necessary If soft copper tubing must be used care should be taken to avoid sharp bends which may cause restrictions and excessive refrigerant pressure drops
bull Use long radius elbows wherever possible with one exception - short radius elbows should be used for any traps in the hot gas riser
bull Braze all copper to copper joints with a phosphorus-copper alloy material such as Silfos 5 or equivalent Do not use soft solder
bull During brazing operations flow an inert gas such as nitrogen through the lines to prevent internal oxidation scaling and contamination
bull Support refrigeration lines at intervals with suitable hangers brackets or clampsbull Pack glass fiber insulation and a sealing material around refrigerant lines where they penetrate a wall to reduce
vibration and to retain some flexibilitybull The liquid line and discharge line should not be in contact with one another If the installing contractor must tie these
lines together because of an installation requirement the contractor must insulate them from each other to prevent heat transfer Because the discharge line is hot during system operation precautions should be taken to avoid personnel injury
bull PoolComPaktrade units do not utilize compressors with unloading stages Consequently double hot gas risers are not needed for reduced load conditions as refrigerant flow rates will not fall below minimum velocities necessary to carry oil up through the discharge line
bull A field provided field installed liquid line filter-drier is recommended in the field piping to the PoolComPaktrade unit
Sizingbull The lines must be sized and routed so that oil is carried through the system Using smaller lines than recommended
will give excessive pressure drops resulting in reduced capacity and increased power consumption Oversized lines could result in an oil flow problem within the system and possible compressor damage
bull Excessive pressure drops in the liquid line may cause flashing of the refrigerant and a loss of a liquid seal at the expansion valve inlet A reduction in capacity may then occur because the presence of gaseous refrigerant will partially block the expansion valve Using hot gas and liquid line sizes recommended in the Air Cooled Condenser section for these units and the proper system refrigerant charge will prevent this problem
bull Discharge lines should be designed to prevent condensed refrigerant and oil from draining back to the compressor during OFF cycles Use the following guidelines The highest point in the discharge line should be above the highest point in the condenser coil The hot gas line should loop toward the floor if the condenser is located above the PoolComPaktrade unit especially
if the hot gas riser is longbull For refrigerant line sizing for an Air Cooled Condenser (ACC) where the lineset length is less than 100 feet or the
ACC location is less than 50 feet higher or 20 feet lower than the unit use the below Table 4-3bull ACC line lengths beyond the above limits will void warranty unless written approval is obtained from the
factory PRIOR to installation and startup
PCP_EG_ACCPiping_20140122eps
41EGW06-PCPEG-20150514
TMTM
Section IV Installation
Figure 4-14 ACC Refrigerant Piping
Refrigerant and Oil Chargingbull PoolPaktrade units are shipped with the required charge for self contained operation only The remote ACC option does
NOT provide the refrigerant charge or oil required for the ACC and line setsbull Refer to Table 4-2 for the additional ACC condenser chargebull Refer to Table 4-3 for the required additional oil and refrigerant charge Use the calculation method shown to calculate
the additional refrigerant and oilbull For the additional oil required multiply 2 of additional refrigerant charge of both ACC and refrigerant line length
Use the correct oil type of POE oil depending on the compressor installed For Alliance models SXA SPA SSA compressors use Copeland Ultra PN 998-E022-00 For Trane models CSHD compressors use Trane PN OIL00080
Sample Charging CalculationFor an AWV2600 with 73 feet line length and ACC0121 located 30 feet above the unit
Table 4-3 indicates 34rdquo discharge line and 58rdquo liquid line piping sizes Using R410A ozft additional charge for the lineset is 73 feet x 025 ozft + 73 feet x 148 ozft = 1260 oz Table 4-2 indicates additional charge for ACC0121 (allow 30 F Operation) is 39 lb x 16 ozlb = 6240 oz Total additional R410A charge for both ACC and refrigerant line is 1260 + 6240 oz = 750 oz or 46 lbs 14 oz Total additional oil charge is 750 oz x 2 = 15 oz
Table 4-2 R410A Charge for Air Cooled Condensers (lb)
DISCHARGE LINE
Pitch inDirection ofrefrigerant flow
LIQUID LINE
AIR-COOLEDCONDENSER
DISCHARGE LINE Pitch inDirection ofrefrigerant flow
Table 4-3 Refrigerant (R410A) Charge for Different Line Size
WARNINGAbove chart is for lineset length less than 100 ft and ACC located less than 50ft above unit or 20ft below unit Failures due to a piping layout not within these limits nor receiving prior PoolPaktrade
Factory approval will not be covered under PoolPaktrade warranty
Refrigerant Line Size (ACC) Refrigerant Charge for Units with Air Cooled Condensers (ACC)
Discharge Liquid Line Length (ft) vs R410A Charge (lbs)
Model OD R410A ozft OD R410A
ozft25 ft 50 ft 75 ft 100 ft
Lbs Oz Lbs Oz Lbs Oz Lbs Oz
0550 12 010 38 049 0 15 1 14 2 13 3 12
58 016 12 092 1 11 3 6 5 1 6 13
0800 58 016 38 049 1 0 2 1 3 1 4 2
58 016 12 092 1 11 3 6 5 1 6 13
1200 58 016 12 092 1 11 3 6 5 1 6 13
34 025 58 148 2 11 5 6 8 1 10 13
1400 58 016 12 092 1 11 3 6 5 1 6 13
34 025 58 148 2 11 5 6 8 1 10 13
1800 34 025 12 092 1 13 3 10 5 8 7 5
78 034 58 148 2 14 5 11 8 9 11 6
2600 34 025 58 148 2 11 5 6 8 1 10 13
1 18 058 34 221 4 6 8 12 13 1 17 7
3500 78 034 58 148 2 14 5 11 8 9 11 6
1 18 058 78 307 5 11 11 7 17 2 22 13
4000 78 034 34 221 3 16 7 16 11 15 15 15
1 18 058 78 307 5 11 11 7 17 2 22 13
Note1 This table applies to ACC line length less than 100 ft only Contact factory if ACC line length is more than 100 ft
2 Line size should be used for ACC at the same level or located up to 20ft below the unit
3 Line size should be used for ACC located up to 50 ft above the unit
43EGW06-PCPEG-20150514
TMTM
SECTION V OPERATION
ECC-PCP REMOTE INTERFACE UNITFigure 5-1 RIU Keypad
PCP_EG_StraightOnKeypadAnnotated_20121204eps
The ECC-PCP Remote Interface Unit (RIU) is designed around the Carel pGD0 4-line x 20 character backlit LCD display module The RIU displays are accessed through six backlit selection buttons They consist of a Return Enter Key Up Key Down Key Program Key Alarm Key and Escape Key as shown above
After approximately 5 minutes the RIU will display the status screen rotation Press the Escape key to bypass the five minute delay and move directly to the status display
STATUS DISPLAY
The status screens contain basic information about operation of the PoolComPaktrade system Press the up or down arrow keys to move from screen to screen The screens will also rotate automatically every 10 seconds
Figure 5-2 Status Screen 1S P A C E T E M P _ _ o FS P A C E R H _ _ S P A C E D E W P O I N T _ _ o F(O U T S I D E T E M P) _ _ o F
Status Screen 1 displaysbull Space Temperature in degF or degCbull Space Relative Humidity in bull Space Dew Point in degF or degCbull Outside Air Temperature in degF or degC (with Economizer Option Only)
Status Screen 2 displaysbull Water Heating - YES indicates that the unit is returning recovered heat back to the pool waterbull Aux Water Heat - YES indicates that the controller has closed the relay contact requesting auxiliary pool water heater
operationbull Water Temperature in degF or degC
Status Screen 3 displaysbull SPACE temperature control requirement bull TEMPERATURE- OK Indicates the space temperature is at setpointbull HEATING- YES Indicates the space requires heatingbull COOLING- YES Indicates the space requires coolingbull AUX AIR HEAT Indicates the space requires additional heating The auxiliary air heating relay contacts close to
activate the external heating system
44 EGW06-PCPEG-20150514
TMTM
bull DEHUMID (SURFACE) Indicates the space requires dehumidification The word SURFACE indicates that the unit is temporarily lowering the dew point set point to minimize condensation at the cold surface temperature sensor
bull ECONOMIZER MODE Indicates the unit is cooling the space with outside air ECONOMIZER MODE is only shown if the optional economizer system is present
Status Screen 4 displaysbull The first line displays the current system status bull The second line displays compressor status
SET POINT CHANGE MENU
bull Press the PRG key to access the main menubull Use the arrow keys to scroll to the menu selection for Set Points and then press the Enter keybull Use the arrow keys to select the set point to be changed and then press Enter Available set points are
Air Temperature
The allowable range for the air temperature set point is 70 to 95degF Use the arrow keys to change the set point and then press Enter The new dew point set point is shown immediately as DPT The set point change screen will remain visible for a short time to allow verification of the new dew point set point After about five seconds the RIU will return to the status screen display
Relative Humidity
The allowable range for the relative humidity set point is 40 to 65degF Use the arrow keys to change the set point and then press Enter The new dew point set point is shown immediately as DPT The set point change screen will remain visible for a short time to allow verification of the new dew point set point After about five seconds the RIU will automatically return to the status screen display
Pool Temperature
The allowable range for the water temperature set point is 70 to 104degF Use the arrow keys to change the set point and then press Enter The RIU will automatically return to the status screen display
Recommendations
bull Air Temperature (Range 70degF to 95degF) The air temperature should normally be set about 2degF above the pool water temperature to minimize the pool water evaporation rate (high temperature spas are an exception)
bull Relative Humidity (Range 40 to 65) The normal range for the humidity set point is 50 to 60 Lower set points will require more energy (electricity) to satisfy the dehumidification requirement and increase pool water evaporation
bull Pool Temperature (Range 70degF to 104degF) The pool temperature set point is normally set between 80degF and 88degF for a typical swimming pool and higher for a spa depending on user preference
CAUTIONThe dehumidifier should be configured to operate at the set points designed for the facility These set points are shown on the yellow label on the door of the RIU Set points other than those shown may not be attainable with this dehumidifier
Section V Operation
45EGW06-PCPEG-20150514
TMTM
Section V Operation
PURGE MODE CONTROL MENU
CAUTIONIt is the userrsquos responsibility to use this feature properly to prevent freeze damage to downstream equip-ment 100 outside air at below freezing conditions has the potential to cause serious damage
Purge Mode causes the unit to force the optional field-provided economizer dampers and fan to full open introducing large quantities of outside air to the space This is typically used when ldquoshockingrdquo the pool Compressor operation is disabled during purge but the auxiliary air and water heating systems remain active
If the unit is not equipped with the economizer option a flashing ldquoCAUTION NO FREEZE PROTECTIONrdquo warning will be displayed This warning indicates that operation of purge mode without regard for outside air temperatures below freezing can result in damage to hot water coils or other equipment in the pool area
DETAILED STATUS MENU
To access the detailed status menubull Press the PRG key to access the main menubull Use the arrow keys to scroll to the menu selection for Detailed Status and then press the Enter key
Detailed Status Screen 1 displays Temperaturesbull Surface ndash The temperature measured at the cold surface sensorbull Dew Point ndash The calculated dew point of the spacebull Dewpt Setpoint ndash The dew point set point calculated from the temperature and relative humidity set points
Detailed Status Screen 2 displaysbull Disch Press ndash The measured refrigerant pressure in the discharge line at the compressorbull Suct Press ndash The measured refrigerant pressure in the suction line at the compressorbull Suct Temp ndash The refrigerant temperature measured on the surface of the suction line at the compressorbull Suct SH ndash The calculated superheat at the suction of the compressor
Detailed Status Screen 3 displays the number of hours the following device or system has been active since power was last applied to the unitbull Cmpr - Compressorbull Fan ndash Supply Fanbull AC ndash Mechanical Air Cooling (Economizer Cooling Not Included)bull Aux ndash Air ndash Auxiliary Air Heatingbull Aux - Wtr ndash Auxiliary Water Heating
Detailed Status Screen 4 displaysbull Fault Count ndash The total number of high pressure low pressure and defrost trips that have occurred since power was
last applied to the unit When this number reaches 10 the compressor is locked outbull AC Proof ndash Indicates a status of ldquoProvenrdquo if AC mode operation is allowed ldquoNot Provenrdquo indicates that AC mode
operation is not allowed
Detailed Status Screen 5 (only present in units configured for multi-unit networking) displaysbull Network Role ndash Indicates if the unit currently being displayed by the RIU is the master or a slavebull Net Status ndash Indicates ldquoCONNECTEDrdquo if the unit is properly connected to the multi-unit network ldquoNO LINKrdquo
indicates the unit is not connectedbull Unit ID Number ndash Indicates the unit address on the multi-unit network
Detailed Status Screen 6 (only present in units configured for multi-unit networking) displaysbull Unit 1 Present ndash Indicates if the unit currently being displayed by the RIU can communicate with unit 1 on the multi-
unit networkbull Unit 2 3 4 ndash Same as for unit 1 but for the other 3 possible units on the network
46 EGW06-PCPEG-20150514
TMTM
Section V Operation
ECC-PCP NETWORK OPERATIONNetworked ECC-PCP units operate in a MASTERSLAVE environment This means that one unit (master) determines heating cooling and dehumidification requirements and broadcasts them on the network to the other units (slaves) This ensures that all units work together instead of against other Each networked unit contains all sensor and controls necessary for independent operation and is capable of acting in the master role Units on the network are identified by a number between one and four The unit with the lowest identification number having no uncleared alarms will be the master unit
If an alarm condition occurs in the master unit it will give up the role of master The unit with the next lowest identification number and no unclear alarms will take over the master role The unit that experienced the alarm condition will operate in the slave role until the alarm is cleared at the control panel
The control panel provides two network status screens These can be accessed in the detailed status menu The figure above shows the first screen that displays the status of units one through four as present or not Use this screen to verify that all units on the network are connected and communicating with each other The figure below shows the second screen that displays network information for the unit that is being displayed by the remote interface unit including network role connection status and network identification number
NETWORK CONFIGURATION
Using the following four parameters it is possible to configure the ECC-PCP network to accommodate a wide variety of installation options Network configuration can be accessed in the service menu These parameters must be set in each unit individually
Pool Water Temperature Control
Determines whether the unit will control water temperature based on the masterrsquos command (NETWORK) or its own temperature sensor and set point (LOCAL) If a unit set to LOCAL becomes the master other units in the network will not use the masterrsquos command for water heating They will look to the next line that is not set to LOCAL This parameter is only set to LOCAL if the unit is connected to a different pool than the rest of the units on the network Because the unit is controlling water temperature on its own it is necessary to select the correct unit with the control panel before changing the water temperature set point
Staged Dehumidification Control
Determines whether the unit will run in dehumidification when there is a need for 1 stage or 2 stages of dehumidification The master unit will start on any need for dehumidification independent of this parameter Slave units with this parameter set to YES will dehumidify only if the master is asking for 2 stages of dehumidification Setting this parameter to NO will cause the unit to dehumidify when the master calls for at least 1 stage of dehumidification Using this parameter it is possible to configure the number of units in each dehumidification stage
Dehumidification Stage 2 Offset
Determines how far the dewpoint (relative humidity) of the space has to rise above the set points before the unit will request 2 stages of dehumidification on the network This parameter is normally the same in all units on the network Making this parameter smaller will bring on the second stage of dehumidification sooner
Enable Network Control
Determines whether the unit will participate in the masterslave environment Setting this parameter to NO will cause the unit to act like a standard ECC-PCP single unit The unit will never become the master on the network and will not listen to the demands broadcast by the master on the network Although units with this parameter set to NO do not participate in the masterslave environment they are still accessible through the network control panel Like the LOCAL pool
47EGW06-PCPEG-20150514
TMTM
Section V Operation
water temperature setting this parameter when set to NO requires this unit to be displayed on the control panel before changing any of the set points The other screens for Pool Water Temperature Control Staged Dehumidification and Stage 2 Offset are not available when this parameter is set to NO
Changing Set Points
Each unit on the network maintains two groups of set points network and local If a unit has the Enable Network Control parameter set to YES and the Water Temperature Control parameter set to NETWORK it will control to the network set points Set points changed when the remote interface unit is displaying this unit will be changed in every unit on the network with the same NETWORK and Water Temperature Control parameters Units that are configured for Network Control and LOCAL water temperature control will control using local water temperature set point the network air temperature and relative humidity set points When the air temperature and relative humidity set points are changed when the remote interface unit is displaying the unit they will be changed in all units configured for Network control The water temperature set point will only be changed in the unit currently being displayed by the remote interface unit Units that are not configured for Network Control will use all local set points Therefore any set points changed while the remote interface unit is displaying this unit will only be changed in this unit
ECC-PCP SERVICE
SERVICE MENU
To access the service menubull Press the PRG key to access the main menubull Use the arrow keys to scroll to the menu selection for Service and then press the Enter keybull A password is required to access the service menu
The following sub-menus are available in the service menu
IO CONFIGURATION
Digital Inputs
This menu contains a screen for each digital input Each screen contains the following parametersbull Status of the data point linked to the inputbull Status of the raw digital inputbull Input type
The following parameter list shows the available digital input screensbull Defrost Switchbull Cpr High Tempbull Water Flow bull Fire Tripbull AC Proofbull Cpr High Prsbull Fan Overloadbull Low Pressurebull Purge Input
Digital Outputs
This menu contains a screen for each digital output Each screen contains the following parametersbull Current output status bull Requested output status bull Override
48 EGW06-PCPEG-20150514
TMTM
Section V Operation
The following digital output screens are availablebull Supply Fanbull Compressorbull Bypass Solenoidbull Water Heating Solenoidbull Reheat Solenoidbull AC Solenoidbull Aux Water Heatbull Alarm Outputbull ACC Run Signalbull Economizerbull Aux Air Heat Stage 1bull Aux Air Heat Stage 2
Analog Inputs
This menu contains a screen for each analog input Each screen contains the following parametersbull Current read-only value from the inputbull Fail bull Tol bull Offs bull Ovrd bull Min bull Max
The following analog input screens are availablebull Discharge Pressure bull Suction Pressure bull Return Relative Humidity bull Suction Temperature bull Return Air Temperature bull Pool Water Temperature bull Surface Temperature bull Outside Air Temperature
UNIT CONFIGURATION
Installed Options
This menu contains parameters that indicate the hardware options installed in the dehumidifier The parameters are set by the factory and do not typically require modification
Aux Air Heating
This menu contains parameters that configure the auxiliary air heating system
Aux Water Heating
This menu contains parameters that configure the auxiliary water heating system
Temperature Ctrl
This menu contains parameters that configure the air temperature control routines of the dehumidifier
49EGW06-PCPEG-20150514
TMTM
Section V Operation
Humidity Control
This menu contains parameters that configure the humidity control routines of the dehumidifier Water Temp CtrlThis menu contains parameters that configure the compressor based water heating system of the dehumidifier bull Water Heat First This parameter indicates whether the control routine will use the compressor for water heating when
there is no dehumidification requirement bull Deadband This parameter is the deadband used by the compressor based pool water heating control routine
BAS INTERFACE
This menu contains parameters that configure the building automation system interface of the dehumidifier
MULTI-UNIT NETWORK
This menu contains parameters that configure the operation of dehumidifier in a multiple unit installation
COMPRESSOR
This menu contains parameters that configure the operation of the dehumidifier compressor
ECONOMIZER
This menu contains parameters that configure the operation of the optional field provided and field installed economizer damper system
HISTORY
The history screen provides information on the last 50 faults that have occurred in the dehumidifier It can be used for troubleshooting by an experienced HVAC technician The faults are recorded with a sequence number from 1 to 50 Sequence number 1 is always the most recent fault The following information is stored and displayed for each fault in non-volatile memorybull Hour at which the fault occurred bull Fault Code Number bull Return Air Temperaturebull Return Air Humiditybull Discharge Pressurebull Suction Pressurebull Suction Temperaturebull Pool Water Temperaturebull AC Solenoid Statusbull Bypass Solenoid Statusbull Compressor Statusbull Reheat Solenoid Status
MANUAL MODE
The Manual Mode menu for use by qualified service personnel provides two options Demand Control and Digital Output Control
UTILITIES
The Utilities menu provides sub menus for configuring units of measure and passwords for set point and service access control
50 EGW06-PCPEG-20150514
TMTM
Section V Operation
MAINTENANCEOVERVIEW
Periodic routine maintenance will promote extended equipment life While PoolComPaktrade units use components that are usually maintenance free and do not require service a simple check could result in noticing possible problems before they develop into major problems
DAILY MAINTENANCE
bull Pool water chemistry is a part of daily maintenance and it is recommended to follow National Spa and Pool Institute standards PoolPaktrade International strongly recommends following the National Spa and Pool Institute values
Table 5-1 Pool Water Chemistry
bull PoolPaktrade International recommends daily logging of your pool water chemistry MAINTENANCE AND YOUR POOL WATER CHEMISTRY IS IMPORTANT TO PROTECT YOUR WARRANTY RIGHTS
MONTHLY MAINTENANCE
bull Air Filters inspect and replace or clean as applicable Dirty filters restrict air flow and can cause improper unit operation
bull Ensure that the condensate collection pan is draining properly and the condensate is not overflowing or being drawn into the supply air stream Check the condensate and overflow lines to ensure that neither are clogged
bull Check the operation of the blower motor and scroll Ensure that the scroll does not rub the housing Check for proper belt tension Worn or cracked belts should be replaced Check fan and mounting brackets for tightness
bull Ensure that the ALARM light is not illuminated
ANNUAL MAINTENANCE
bull Inspect the refrigeration and water circuits for leaks wear or corrosion Corrosion on the water piping or condenser may indicate poor pool chemical maintenance and improper chlorine and pH levels
bull Check electrical components for loose wiringbull Although the exterior of the PoolComPaktrade units are powder coated wipe down unit particularly if installed in an
area subject to dirt or chemical concentrationbull Wash brush or vacuum the evaporator and air condenser coils This will ensure proper heat transfer and reduce static
pressure losses Caution should be taken not to wet electrical components inside the unit
NOTEIf service and inspections are not performed by a competent and experienced service firm the manufacturer warranty may be voided
AUXILIARY AIR amp POOL WATER HEATER CONNECTIONS FOR MULTIPLE UNIT INSTALLATION
Figure 6-1 Auxiliary Air and Pool Water Heater Connections for Multiple Units
AWH_EG_Connections_20121204eps
52 EGW06-PCPEG-20150514
TMTM
AUXILIARY AIR amp POOL WATER HEATER CONNECTION FOR A TWO POOL INSTALLATION
Figure 6-2 Auxiliary Air and Pool Water Heater Connections for Two Pool Installations
AWH_EG_ConnectionstoPool_20121204eps
Section VI Wiring
53EGW06-PCPEG-20150514
TMTM
Section VI Wiring
FIELD WIRING
Figure 6-3 Field Wiring Diagram
PCP_EG_FieldWiringDiagram_20121204eps
54 EGW06-PCPEG-20150514
TMTM
Section VI Wiring
FIRE CONTROL SYSTEM CONNECTION
Figure 6-4 Fire Control System Connection
PCP_EG_FirecontrolSysConnection_20121204eps
55EGW06-PCPEG-20150514
TMTM
Section VI Wiring
This page intentionally left blank
EGW06-PCPEG-20150514
TMTM
56
TMTM
3491 Industrial Drive York PA 17402 USA 800-959-7725 Fax 717-757-5085for more information wwwpoolpakcom
The Leader in Indoor Pool Dehumidification
42 EGW06-PCPEG-20150514
TMTM
Section IV Installation
Table 4-3 Refrigerant (R410A) Charge for Different Line Size
WARNINGAbove chart is for lineset length less than 100 ft and ACC located less than 50ft above unit or 20ft below unit Failures due to a piping layout not within these limits nor receiving prior PoolPaktrade
Factory approval will not be covered under PoolPaktrade warranty
Refrigerant Line Size (ACC) Refrigerant Charge for Units with Air Cooled Condensers (ACC)
Discharge Liquid Line Length (ft) vs R410A Charge (lbs)
Model OD R410A ozft OD R410A
ozft25 ft 50 ft 75 ft 100 ft
Lbs Oz Lbs Oz Lbs Oz Lbs Oz
0550 12 010 38 049 0 15 1 14 2 13 3 12
58 016 12 092 1 11 3 6 5 1 6 13
0800 58 016 38 049 1 0 2 1 3 1 4 2
58 016 12 092 1 11 3 6 5 1 6 13
1200 58 016 12 092 1 11 3 6 5 1 6 13
34 025 58 148 2 11 5 6 8 1 10 13
1400 58 016 12 092 1 11 3 6 5 1 6 13
34 025 58 148 2 11 5 6 8 1 10 13
1800 34 025 12 092 1 13 3 10 5 8 7 5
78 034 58 148 2 14 5 11 8 9 11 6
2600 34 025 58 148 2 11 5 6 8 1 10 13
1 18 058 34 221 4 6 8 12 13 1 17 7
3500 78 034 58 148 2 14 5 11 8 9 11 6
1 18 058 78 307 5 11 11 7 17 2 22 13
4000 78 034 34 221 3 16 7 16 11 15 15 15
1 18 058 78 307 5 11 11 7 17 2 22 13
Note1 This table applies to ACC line length less than 100 ft only Contact factory if ACC line length is more than 100 ft
2 Line size should be used for ACC at the same level or located up to 20ft below the unit
3 Line size should be used for ACC located up to 50 ft above the unit
43EGW06-PCPEG-20150514
TMTM
SECTION V OPERATION
ECC-PCP REMOTE INTERFACE UNITFigure 5-1 RIU Keypad
PCP_EG_StraightOnKeypadAnnotated_20121204eps
The ECC-PCP Remote Interface Unit (RIU) is designed around the Carel pGD0 4-line x 20 character backlit LCD display module The RIU displays are accessed through six backlit selection buttons They consist of a Return Enter Key Up Key Down Key Program Key Alarm Key and Escape Key as shown above
After approximately 5 minutes the RIU will display the status screen rotation Press the Escape key to bypass the five minute delay and move directly to the status display
STATUS DISPLAY
The status screens contain basic information about operation of the PoolComPaktrade system Press the up or down arrow keys to move from screen to screen The screens will also rotate automatically every 10 seconds
Figure 5-2 Status Screen 1S P A C E T E M P _ _ o FS P A C E R H _ _ S P A C E D E W P O I N T _ _ o F(O U T S I D E T E M P) _ _ o F
Status Screen 1 displaysbull Space Temperature in degF or degCbull Space Relative Humidity in bull Space Dew Point in degF or degCbull Outside Air Temperature in degF or degC (with Economizer Option Only)
Status Screen 2 displaysbull Water Heating - YES indicates that the unit is returning recovered heat back to the pool waterbull Aux Water Heat - YES indicates that the controller has closed the relay contact requesting auxiliary pool water heater
operationbull Water Temperature in degF or degC
Status Screen 3 displaysbull SPACE temperature control requirement bull TEMPERATURE- OK Indicates the space temperature is at setpointbull HEATING- YES Indicates the space requires heatingbull COOLING- YES Indicates the space requires coolingbull AUX AIR HEAT Indicates the space requires additional heating The auxiliary air heating relay contacts close to
activate the external heating system
44 EGW06-PCPEG-20150514
TMTM
bull DEHUMID (SURFACE) Indicates the space requires dehumidification The word SURFACE indicates that the unit is temporarily lowering the dew point set point to minimize condensation at the cold surface temperature sensor
bull ECONOMIZER MODE Indicates the unit is cooling the space with outside air ECONOMIZER MODE is only shown if the optional economizer system is present
Status Screen 4 displaysbull The first line displays the current system status bull The second line displays compressor status
SET POINT CHANGE MENU
bull Press the PRG key to access the main menubull Use the arrow keys to scroll to the menu selection for Set Points and then press the Enter keybull Use the arrow keys to select the set point to be changed and then press Enter Available set points are
Air Temperature
The allowable range for the air temperature set point is 70 to 95degF Use the arrow keys to change the set point and then press Enter The new dew point set point is shown immediately as DPT The set point change screen will remain visible for a short time to allow verification of the new dew point set point After about five seconds the RIU will return to the status screen display
Relative Humidity
The allowable range for the relative humidity set point is 40 to 65degF Use the arrow keys to change the set point and then press Enter The new dew point set point is shown immediately as DPT The set point change screen will remain visible for a short time to allow verification of the new dew point set point After about five seconds the RIU will automatically return to the status screen display
Pool Temperature
The allowable range for the water temperature set point is 70 to 104degF Use the arrow keys to change the set point and then press Enter The RIU will automatically return to the status screen display
Recommendations
bull Air Temperature (Range 70degF to 95degF) The air temperature should normally be set about 2degF above the pool water temperature to minimize the pool water evaporation rate (high temperature spas are an exception)
bull Relative Humidity (Range 40 to 65) The normal range for the humidity set point is 50 to 60 Lower set points will require more energy (electricity) to satisfy the dehumidification requirement and increase pool water evaporation
bull Pool Temperature (Range 70degF to 104degF) The pool temperature set point is normally set between 80degF and 88degF for a typical swimming pool and higher for a spa depending on user preference
CAUTIONThe dehumidifier should be configured to operate at the set points designed for the facility These set points are shown on the yellow label on the door of the RIU Set points other than those shown may not be attainable with this dehumidifier
Section V Operation
45EGW06-PCPEG-20150514
TMTM
Section V Operation
PURGE MODE CONTROL MENU
CAUTIONIt is the userrsquos responsibility to use this feature properly to prevent freeze damage to downstream equip-ment 100 outside air at below freezing conditions has the potential to cause serious damage
Purge Mode causes the unit to force the optional field-provided economizer dampers and fan to full open introducing large quantities of outside air to the space This is typically used when ldquoshockingrdquo the pool Compressor operation is disabled during purge but the auxiliary air and water heating systems remain active
If the unit is not equipped with the economizer option a flashing ldquoCAUTION NO FREEZE PROTECTIONrdquo warning will be displayed This warning indicates that operation of purge mode without regard for outside air temperatures below freezing can result in damage to hot water coils or other equipment in the pool area
DETAILED STATUS MENU
To access the detailed status menubull Press the PRG key to access the main menubull Use the arrow keys to scroll to the menu selection for Detailed Status and then press the Enter key
Detailed Status Screen 1 displays Temperaturesbull Surface ndash The temperature measured at the cold surface sensorbull Dew Point ndash The calculated dew point of the spacebull Dewpt Setpoint ndash The dew point set point calculated from the temperature and relative humidity set points
Detailed Status Screen 2 displaysbull Disch Press ndash The measured refrigerant pressure in the discharge line at the compressorbull Suct Press ndash The measured refrigerant pressure in the suction line at the compressorbull Suct Temp ndash The refrigerant temperature measured on the surface of the suction line at the compressorbull Suct SH ndash The calculated superheat at the suction of the compressor
Detailed Status Screen 3 displays the number of hours the following device or system has been active since power was last applied to the unitbull Cmpr - Compressorbull Fan ndash Supply Fanbull AC ndash Mechanical Air Cooling (Economizer Cooling Not Included)bull Aux ndash Air ndash Auxiliary Air Heatingbull Aux - Wtr ndash Auxiliary Water Heating
Detailed Status Screen 4 displaysbull Fault Count ndash The total number of high pressure low pressure and defrost trips that have occurred since power was
last applied to the unit When this number reaches 10 the compressor is locked outbull AC Proof ndash Indicates a status of ldquoProvenrdquo if AC mode operation is allowed ldquoNot Provenrdquo indicates that AC mode
operation is not allowed
Detailed Status Screen 5 (only present in units configured for multi-unit networking) displaysbull Network Role ndash Indicates if the unit currently being displayed by the RIU is the master or a slavebull Net Status ndash Indicates ldquoCONNECTEDrdquo if the unit is properly connected to the multi-unit network ldquoNO LINKrdquo
indicates the unit is not connectedbull Unit ID Number ndash Indicates the unit address on the multi-unit network
Detailed Status Screen 6 (only present in units configured for multi-unit networking) displaysbull Unit 1 Present ndash Indicates if the unit currently being displayed by the RIU can communicate with unit 1 on the multi-
unit networkbull Unit 2 3 4 ndash Same as for unit 1 but for the other 3 possible units on the network
46 EGW06-PCPEG-20150514
TMTM
Section V Operation
ECC-PCP NETWORK OPERATIONNetworked ECC-PCP units operate in a MASTERSLAVE environment This means that one unit (master) determines heating cooling and dehumidification requirements and broadcasts them on the network to the other units (slaves) This ensures that all units work together instead of against other Each networked unit contains all sensor and controls necessary for independent operation and is capable of acting in the master role Units on the network are identified by a number between one and four The unit with the lowest identification number having no uncleared alarms will be the master unit
If an alarm condition occurs in the master unit it will give up the role of master The unit with the next lowest identification number and no unclear alarms will take over the master role The unit that experienced the alarm condition will operate in the slave role until the alarm is cleared at the control panel
The control panel provides two network status screens These can be accessed in the detailed status menu The figure above shows the first screen that displays the status of units one through four as present or not Use this screen to verify that all units on the network are connected and communicating with each other The figure below shows the second screen that displays network information for the unit that is being displayed by the remote interface unit including network role connection status and network identification number
NETWORK CONFIGURATION
Using the following four parameters it is possible to configure the ECC-PCP network to accommodate a wide variety of installation options Network configuration can be accessed in the service menu These parameters must be set in each unit individually
Pool Water Temperature Control
Determines whether the unit will control water temperature based on the masterrsquos command (NETWORK) or its own temperature sensor and set point (LOCAL) If a unit set to LOCAL becomes the master other units in the network will not use the masterrsquos command for water heating They will look to the next line that is not set to LOCAL This parameter is only set to LOCAL if the unit is connected to a different pool than the rest of the units on the network Because the unit is controlling water temperature on its own it is necessary to select the correct unit with the control panel before changing the water temperature set point
Staged Dehumidification Control
Determines whether the unit will run in dehumidification when there is a need for 1 stage or 2 stages of dehumidification The master unit will start on any need for dehumidification independent of this parameter Slave units with this parameter set to YES will dehumidify only if the master is asking for 2 stages of dehumidification Setting this parameter to NO will cause the unit to dehumidify when the master calls for at least 1 stage of dehumidification Using this parameter it is possible to configure the number of units in each dehumidification stage
Dehumidification Stage 2 Offset
Determines how far the dewpoint (relative humidity) of the space has to rise above the set points before the unit will request 2 stages of dehumidification on the network This parameter is normally the same in all units on the network Making this parameter smaller will bring on the second stage of dehumidification sooner
Enable Network Control
Determines whether the unit will participate in the masterslave environment Setting this parameter to NO will cause the unit to act like a standard ECC-PCP single unit The unit will never become the master on the network and will not listen to the demands broadcast by the master on the network Although units with this parameter set to NO do not participate in the masterslave environment they are still accessible through the network control panel Like the LOCAL pool
47EGW06-PCPEG-20150514
TMTM
Section V Operation
water temperature setting this parameter when set to NO requires this unit to be displayed on the control panel before changing any of the set points The other screens for Pool Water Temperature Control Staged Dehumidification and Stage 2 Offset are not available when this parameter is set to NO
Changing Set Points
Each unit on the network maintains two groups of set points network and local If a unit has the Enable Network Control parameter set to YES and the Water Temperature Control parameter set to NETWORK it will control to the network set points Set points changed when the remote interface unit is displaying this unit will be changed in every unit on the network with the same NETWORK and Water Temperature Control parameters Units that are configured for Network Control and LOCAL water temperature control will control using local water temperature set point the network air temperature and relative humidity set points When the air temperature and relative humidity set points are changed when the remote interface unit is displaying the unit they will be changed in all units configured for Network control The water temperature set point will only be changed in the unit currently being displayed by the remote interface unit Units that are not configured for Network Control will use all local set points Therefore any set points changed while the remote interface unit is displaying this unit will only be changed in this unit
ECC-PCP SERVICE
SERVICE MENU
To access the service menubull Press the PRG key to access the main menubull Use the arrow keys to scroll to the menu selection for Service and then press the Enter keybull A password is required to access the service menu
The following sub-menus are available in the service menu
IO CONFIGURATION
Digital Inputs
This menu contains a screen for each digital input Each screen contains the following parametersbull Status of the data point linked to the inputbull Status of the raw digital inputbull Input type
The following parameter list shows the available digital input screensbull Defrost Switchbull Cpr High Tempbull Water Flow bull Fire Tripbull AC Proofbull Cpr High Prsbull Fan Overloadbull Low Pressurebull Purge Input
Digital Outputs
This menu contains a screen for each digital output Each screen contains the following parametersbull Current output status bull Requested output status bull Override
48 EGW06-PCPEG-20150514
TMTM
Section V Operation
The following digital output screens are availablebull Supply Fanbull Compressorbull Bypass Solenoidbull Water Heating Solenoidbull Reheat Solenoidbull AC Solenoidbull Aux Water Heatbull Alarm Outputbull ACC Run Signalbull Economizerbull Aux Air Heat Stage 1bull Aux Air Heat Stage 2
Analog Inputs
This menu contains a screen for each analog input Each screen contains the following parametersbull Current read-only value from the inputbull Fail bull Tol bull Offs bull Ovrd bull Min bull Max
The following analog input screens are availablebull Discharge Pressure bull Suction Pressure bull Return Relative Humidity bull Suction Temperature bull Return Air Temperature bull Pool Water Temperature bull Surface Temperature bull Outside Air Temperature
UNIT CONFIGURATION
Installed Options
This menu contains parameters that indicate the hardware options installed in the dehumidifier The parameters are set by the factory and do not typically require modification
Aux Air Heating
This menu contains parameters that configure the auxiliary air heating system
Aux Water Heating
This menu contains parameters that configure the auxiliary water heating system
Temperature Ctrl
This menu contains parameters that configure the air temperature control routines of the dehumidifier
49EGW06-PCPEG-20150514
TMTM
Section V Operation
Humidity Control
This menu contains parameters that configure the humidity control routines of the dehumidifier Water Temp CtrlThis menu contains parameters that configure the compressor based water heating system of the dehumidifier bull Water Heat First This parameter indicates whether the control routine will use the compressor for water heating when
there is no dehumidification requirement bull Deadband This parameter is the deadband used by the compressor based pool water heating control routine
BAS INTERFACE
This menu contains parameters that configure the building automation system interface of the dehumidifier
MULTI-UNIT NETWORK
This menu contains parameters that configure the operation of dehumidifier in a multiple unit installation
COMPRESSOR
This menu contains parameters that configure the operation of the dehumidifier compressor
ECONOMIZER
This menu contains parameters that configure the operation of the optional field provided and field installed economizer damper system
HISTORY
The history screen provides information on the last 50 faults that have occurred in the dehumidifier It can be used for troubleshooting by an experienced HVAC technician The faults are recorded with a sequence number from 1 to 50 Sequence number 1 is always the most recent fault The following information is stored and displayed for each fault in non-volatile memorybull Hour at which the fault occurred bull Fault Code Number bull Return Air Temperaturebull Return Air Humiditybull Discharge Pressurebull Suction Pressurebull Suction Temperaturebull Pool Water Temperaturebull AC Solenoid Statusbull Bypass Solenoid Statusbull Compressor Statusbull Reheat Solenoid Status
MANUAL MODE
The Manual Mode menu for use by qualified service personnel provides two options Demand Control and Digital Output Control
UTILITIES
The Utilities menu provides sub menus for configuring units of measure and passwords for set point and service access control
50 EGW06-PCPEG-20150514
TMTM
Section V Operation
MAINTENANCEOVERVIEW
Periodic routine maintenance will promote extended equipment life While PoolComPaktrade units use components that are usually maintenance free and do not require service a simple check could result in noticing possible problems before they develop into major problems
DAILY MAINTENANCE
bull Pool water chemistry is a part of daily maintenance and it is recommended to follow National Spa and Pool Institute standards PoolPaktrade International strongly recommends following the National Spa and Pool Institute values
Table 5-1 Pool Water Chemistry
bull PoolPaktrade International recommends daily logging of your pool water chemistry MAINTENANCE AND YOUR POOL WATER CHEMISTRY IS IMPORTANT TO PROTECT YOUR WARRANTY RIGHTS
MONTHLY MAINTENANCE
bull Air Filters inspect and replace or clean as applicable Dirty filters restrict air flow and can cause improper unit operation
bull Ensure that the condensate collection pan is draining properly and the condensate is not overflowing or being drawn into the supply air stream Check the condensate and overflow lines to ensure that neither are clogged
bull Check the operation of the blower motor and scroll Ensure that the scroll does not rub the housing Check for proper belt tension Worn or cracked belts should be replaced Check fan and mounting brackets for tightness
bull Ensure that the ALARM light is not illuminated
ANNUAL MAINTENANCE
bull Inspect the refrigeration and water circuits for leaks wear or corrosion Corrosion on the water piping or condenser may indicate poor pool chemical maintenance and improper chlorine and pH levels
bull Check electrical components for loose wiringbull Although the exterior of the PoolComPaktrade units are powder coated wipe down unit particularly if installed in an
area subject to dirt or chemical concentrationbull Wash brush or vacuum the evaporator and air condenser coils This will ensure proper heat transfer and reduce static
pressure losses Caution should be taken not to wet electrical components inside the unit
NOTEIf service and inspections are not performed by a competent and experienced service firm the manufacturer warranty may be voided
AUXILIARY AIR amp POOL WATER HEATER CONNECTIONS FOR MULTIPLE UNIT INSTALLATION
Figure 6-1 Auxiliary Air and Pool Water Heater Connections for Multiple Units
AWH_EG_Connections_20121204eps
52 EGW06-PCPEG-20150514
TMTM
AUXILIARY AIR amp POOL WATER HEATER CONNECTION FOR A TWO POOL INSTALLATION
Figure 6-2 Auxiliary Air and Pool Water Heater Connections for Two Pool Installations
AWH_EG_ConnectionstoPool_20121204eps
Section VI Wiring
53EGW06-PCPEG-20150514
TMTM
Section VI Wiring
FIELD WIRING
Figure 6-3 Field Wiring Diagram
PCP_EG_FieldWiringDiagram_20121204eps
54 EGW06-PCPEG-20150514
TMTM
Section VI Wiring
FIRE CONTROL SYSTEM CONNECTION
Figure 6-4 Fire Control System Connection
PCP_EG_FirecontrolSysConnection_20121204eps
55EGW06-PCPEG-20150514
TMTM
Section VI Wiring
This page intentionally left blank
EGW06-PCPEG-20150514
TMTM
56
TMTM
3491 Industrial Drive York PA 17402 USA 800-959-7725 Fax 717-757-5085for more information wwwpoolpakcom
The Leader in Indoor Pool Dehumidification
50 EGW06-PCPEG-20150514
TMTM
Section V Operation
MAINTENANCEOVERVIEW
Periodic routine maintenance will promote extended equipment life While PoolComPaktrade units use components that are usually maintenance free and do not require service a simple check could result in noticing possible problems before they develop into major problems
DAILY MAINTENANCE
bull Pool water chemistry is a part of daily maintenance and it is recommended to follow National Spa and Pool Institute standards PoolPaktrade International strongly recommends following the National Spa and Pool Institute values
Table 5-1 Pool Water Chemistry
bull PoolPaktrade International recommends daily logging of your pool water chemistry MAINTENANCE AND YOUR POOL WATER CHEMISTRY IS IMPORTANT TO PROTECT YOUR WARRANTY RIGHTS
MONTHLY MAINTENANCE
bull Air Filters inspect and replace or clean as applicable Dirty filters restrict air flow and can cause improper unit operation
bull Ensure that the condensate collection pan is draining properly and the condensate is not overflowing or being drawn into the supply air stream Check the condensate and overflow lines to ensure that neither are clogged
bull Check the operation of the blower motor and scroll Ensure that the scroll does not rub the housing Check for proper belt tension Worn or cracked belts should be replaced Check fan and mounting brackets for tightness
bull Ensure that the ALARM light is not illuminated
ANNUAL MAINTENANCE
bull Inspect the refrigeration and water circuits for leaks wear or corrosion Corrosion on the water piping or condenser may indicate poor pool chemical maintenance and improper chlorine and pH levels
bull Check electrical components for loose wiringbull Although the exterior of the PoolComPaktrade units are powder coated wipe down unit particularly if installed in an
area subject to dirt or chemical concentrationbull Wash brush or vacuum the evaporator and air condenser coils This will ensure proper heat transfer and reduce static
pressure losses Caution should be taken not to wet electrical components inside the unit
NOTEIf service and inspections are not performed by a competent and experienced service firm the manufacturer warranty may be voided