24
Enhanced Atlas Project Management Module Atlas Project Management Module User's Guide Release 1.1 2012 Copyright © 2012 UNDP. All rights reserved

Enhanced Atlas
Project Management Module
Atlas Project Management Module User's Guide
Release 1.1 2012
Copyright © 2012 UNDP. All rights reserved

Title Atlas Project Management Module User's Guide Document Language English
Responsible Unit Bureau of Management – Office of Information Systems and Technology
Creator (individual) Yazan Musharbash [email protected]
Subject (Taxonomy) Project Management User’s Guide
Date created July 2012
Audience All country offices. Primarily intended for staff involved in programming, project
formulation, project management, monitoring and evaluation.
Applicability This user guide is applicable to all UNDP projects.
Replaces N/A
Related documents UNDP POPP - Project Management
Document Location
Version 1.1 Reviewed December 2012
Reviewed By Lina Fernandez [email protected] - Sam De La Cruz [email protected]
– Vesna Nikolic [email protected]
Table of contents I. Introduction – Enhanced Atlas Project Management Module .................................................................... 3
II. Entering New Proposal ...................................................................................................................................... 4
A. Project Proposal Basic Information ............................................................................................................. 5
B. Entering Proposal Budgets ........................................................................................................................... 7
C. Adding Proposal Attachments ................................................................................................................... 10
III. Submit Proposal for Approval ........................................................................................................................ 11
IV. Approval of Project Proposal .......................................................................................................................... 12
V. Setting up Approved Project .......................................................................................................................... 13
1. Output and Activity Details ........................................................................................................................ 13
2. Setting up Output Targets and Results ..................................................................................................... 15
3. Setting up Project Budget ........................................................................................................................... 16
4. Setting up Activity Plan Results and Assessment .................................................................................... 18
5. Monitoring of Project .................................................................................................................................. 19
6. Risks of Project ............................................................................................................................................. 20
7. Setting up Outputs Attributes (Gender Marker) ..................................................................................... 21
8. Uploading Attachments .............................................................................................................................. 22
9. User Fields .................................................................................................................................................... 22
10. Setting Project GMS .................................................................................................................................... 23
3
I. Introduction – Enhanced Atlas Project Management Module
With the new enhanced Project Management Module the following benefits are expected from the changes introduced in the module:
Improved user experience from simplified navigation and consistent use of programme terminology
Simplified results data entry screens for outputs and activities (optional)
Improved data quality of GMS rates and distribution
Searchable document repository in SharePoint
Data capture of Total Approved Budget
Ability to enter pipeline budgets and link to programme focus areas
Simplified project approval process replacing “Generate Award”
The new module will allow you to:
Enter new Proposal to Atlas (Including Outputs, Budgets and Attachments)
Link the new Outputs directly to the CO Atlas Project Tree (Related Development Outcome)
Approve the Proposal (Generate the Project)
Set the GMS cost recovery method, Rate and Income Distribution
Establish and update the Output Targets and Results based on the Result and Resource Framework
(RRF)
Establish and update the Activities plan results and assessment based on the Monitoring Framework
and Evaluation
Enter and update/follow-up the Project Monitoring and Communication Plan
Enter, update and track the risks elements (Risks Log)
Enter and Update the Output Gender Marker Attribute
Upload attachments
Perform budget revisions in a simplified process.

4
In this user guide, we will use one scenario to walk through the new enhanced Project Management Module using the below information:
Scenario: UNDP Jordan Country office prepared a new project document with the below basic details:
Project Title: Youth Employment Programme
Description: This multi-country programme has been developed to respond to escalating need to
provide tool addressing the unemployment challenge in number of Arab Countries including Jordan.
Expected Outcome: Increased communities (esp. women and youth) productivity, empowerment and
participation in local development initiative
Start Date 01-Aug-2012 and End Date 31-Dec-2013
Implementing Partner: UNDP Country Office in Jordan
Donor: Government of Japan
Total Resources: US$100,000
GMS: Earn-as-you-go (7%)
Project Result and Planning Framework:
Output Activity Responsible Party Budget Year 1 Budget Year 2 Youth Employment Promotion
National Implementation Plan
Ministry of Youth $30,100 $50,825
Youth Employment Policies
Ministry of Youth $9,844 $9,231
Please note the following:
The Project in Atlas should mirror the Results and Planning Framework
The outputs are not the same as the project, and there can be more than one output per project.
II. Entering New Proposal
Navigation: Atlas Main Menu > Grants > Project Management > Project Proposals

5
A. Entering the Project Proposal basic information:

6
Once you save the Project Proposal the page will be updated as per below:
Two new tabs will become available: 1. Budgets 2. Attachments
The proposal ID and Output ID will be generated
Proposal Status will be changed to Draft
Budget Periods will be automatically derived and scheduled
Submit button will become available at the bottom of the page
NOTE: After saving the Project Proposal, proceed to the Budgets tab to enter the proposal budget.
Entering proposal budgets to be captured as pipeline is critical for resource management.

7
B. Entering Proposal Budgets
Entering the Project Proposal budget can be done only if the Project Proposal Status is still draft. (Click
on the Budgets Tab to review the below page):
Once the Proposal is submitted the Page will be updated as per below:
Once you click on the Budget Period hyperlink the below screen is presented where you can enter the
proposed budget (Note: Make sure to enter the GMS line to the budget since it is part of the total cost of
the project)

8
Once the Budget Period is entered and you click on Save and Return you will be able to see the entries
on the main page as per below.
Please note that the same steps should be followed to enter the budget for each and every Budget
Period.
Once all periods are entered the budgets page will look as per the below; make sure that the total
budgets entered matches the Total Resources Required.

9

10
C. Adding Proposal Attachments
UNDP is starting to move to SharePoint for document management. Accordingly; we have integrated
SharePoint into Atlas to facilitate the uploading of all Project Documents.
When clicking on the Attachment Tab the SharePoint - Programme Document Center will be available to
upload all the supporting documents under the respective country office.

11
III. Submit Proposal for Approval
Important Note: Before submitting the proposal for approval, please make sure that budgets have
been entered for the proposal.
12
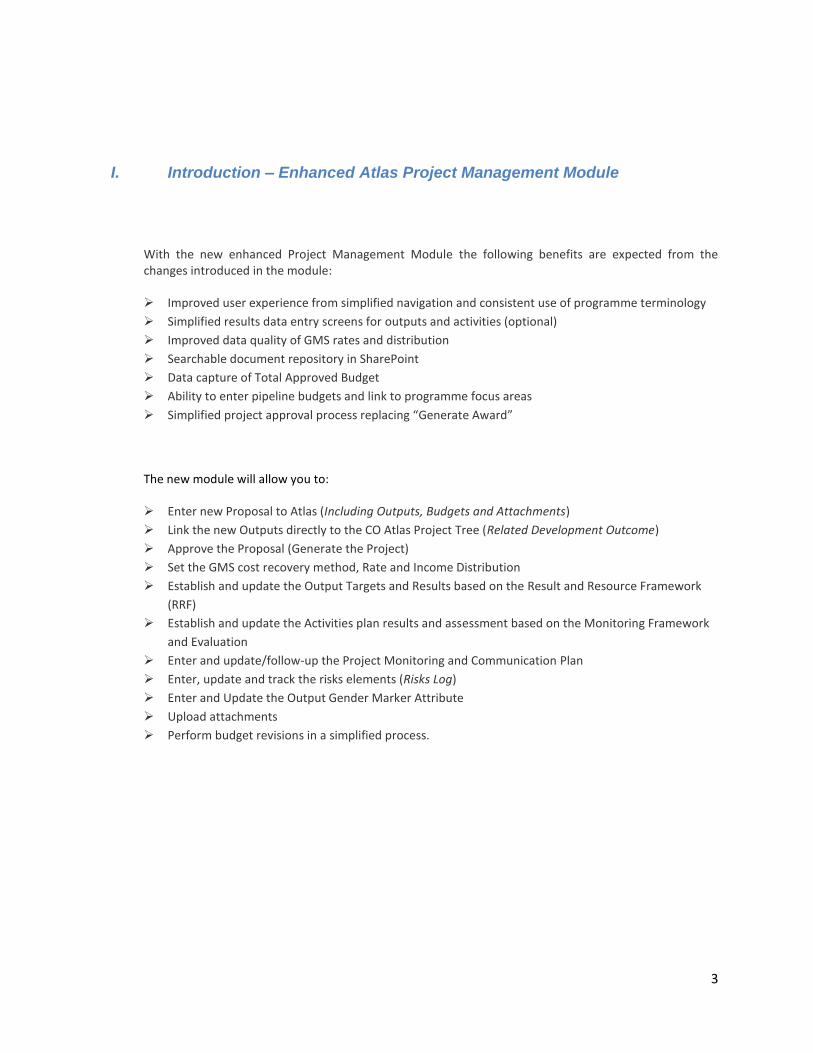
IV. Approval of Project Proposal
Once the Approving Officer receives the Workflow Notification, the link will take him to the below page
to Approve the Proposal or Return for Review if there is any missing information or if changes are
required.
Note: Return for Review will change back the Proposal Status to Draft and allow project staff to make
required modification and update, once Approved no further changed to the Proposal can be made.

13
V. Setting up Approved Projects
Navigation: Atlas Main Menu > Grants > Project Management > Approved Projects

14
1. Setting up Output and Activity Details: Based on approved PRODOC

15
2. Setting up Output Targets and Results:
Based on PRODOC Result and Resources Framework (RRF)

16
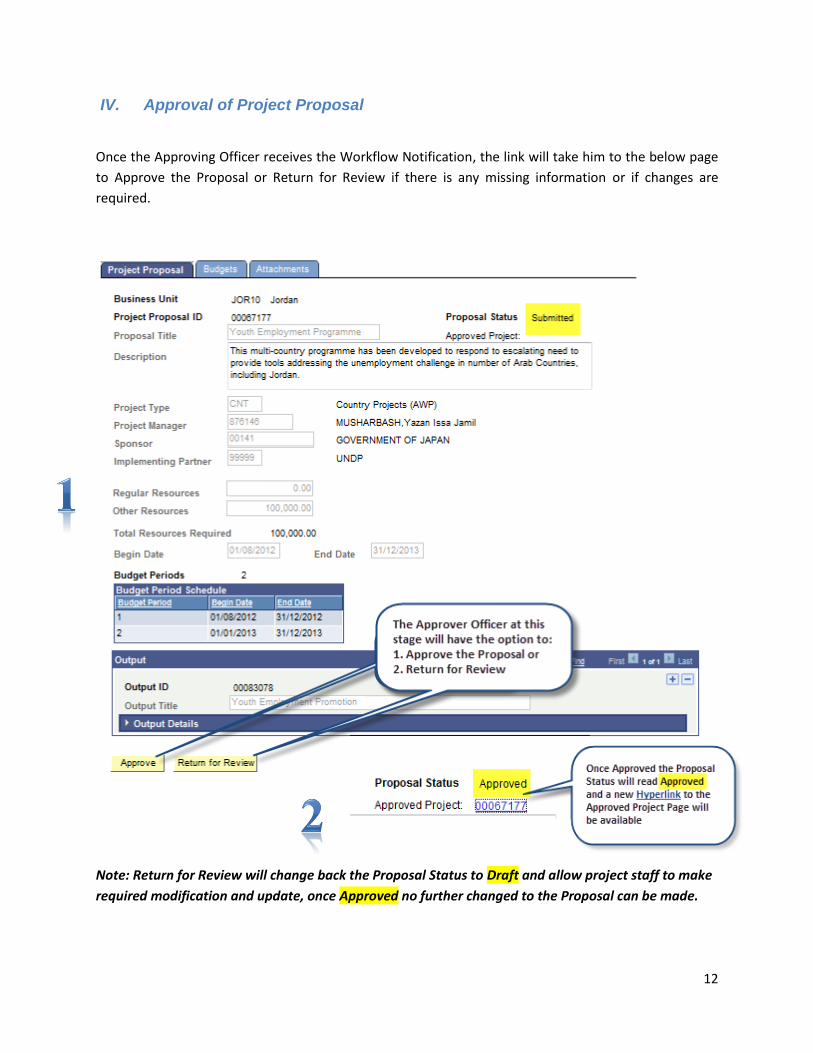
3. Setting up Project Budget:
Note that this page will reflect only Finalized (KKed) budget; that’s why at the initial creation of the
project the budget will read Zero.
The Project Revision page will open in a new window
17
The Project Revision page will open in a new window
Once the full COA is completed and saved the budget in details will be reflected in the project revision
page.
Note: The same steps should be followed for all Project Budget Periods. Make sure to Finalize all
the budgets once the Gender Attribute is assigned (Step 7 below) to update the Commitment Control.

18
4. Setting up Activity Plan Results and Assessment:
On this page you will be able to set the Planned Results, Assessment method and Progress of each
Activity under the Project. (The Activity Plan Results and Assessment is OPTIONAL)
19
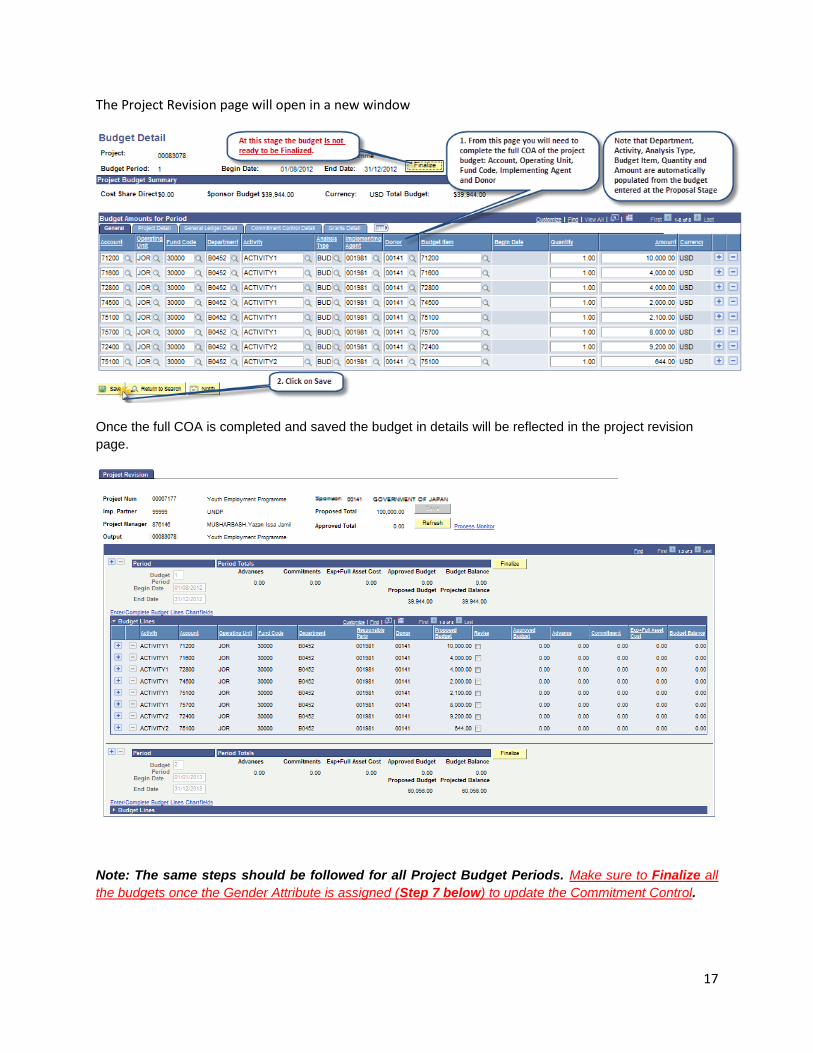
5. Project Monitoring:
On this page you will be able capture monitoring actions, corresponding due dates or milestones, and description of the milestone.
Once the Monitoring Action is completed; you will need to check the Completed box which will open
new fields to enter the Completion Date and person responsible for completing the action.
Note: Make sure to click on after changing the status of Monitoring Action or
adding a new Action.

20
6. Project Risks:
On this page you will be able to update, follow-up and track the Project Risks (Risks Log). Project Issues may be raised at any time during the project, by anyone with an interest in the project. Managing Project Risks will involve:
Capturing and formally logging the Project Risk Determining the type of risk and indicating whether it is critical or not Capture Management Response
In case the identified Risk is Critical; you will need to check the Critical box which will open new fields to
enter the Review Date and Risk Monitor (Whom has been appointed to address this issue).
Note: Make sure to click on after updating a Risk or adding a new Risk.
21
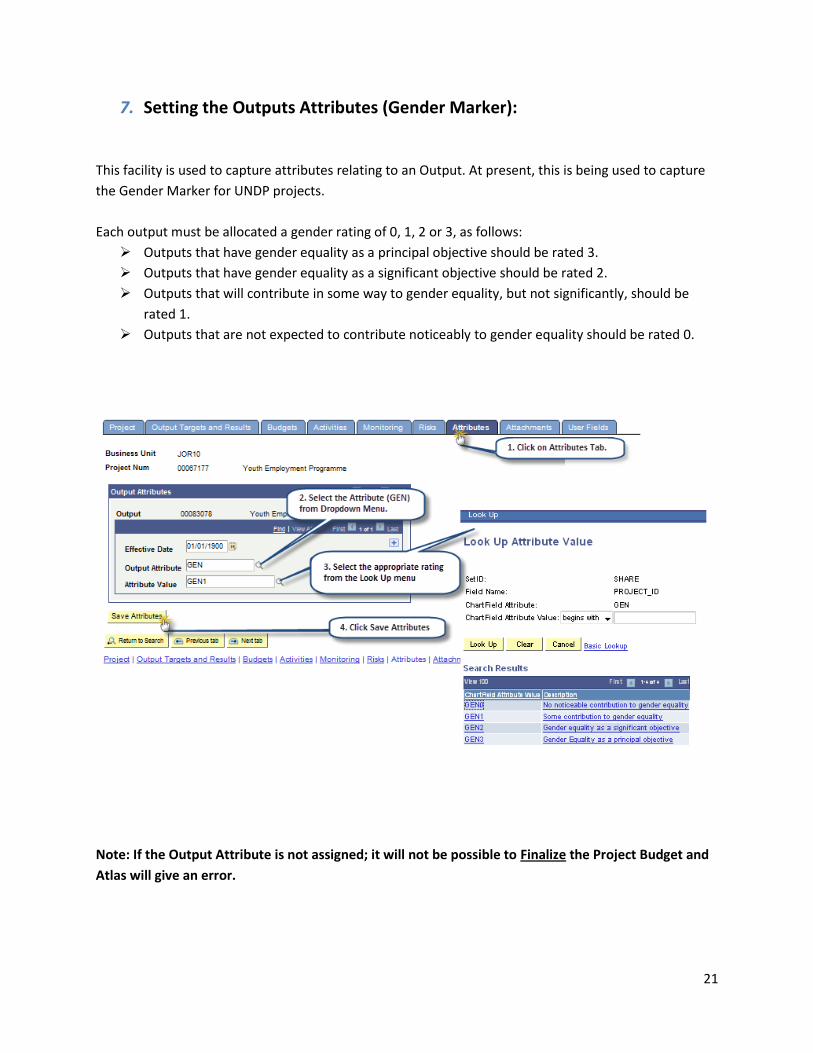
7. Setting the Outputs Attributes (Gender Marker):
This facility is used to capture attributes relating to an Output. At present, this is being used to capture
the Gender Marker for UNDP projects.
Each output must be allocated a gender rating of 0, 1, 2 or 3, as follows:
Outputs that have gender equality as a principal objective should be rated 3.
Outputs that have gender equality as a significant objective should be rated 2.
Outputs that will contribute in some way to gender equality, but not significantly, should be
rated 1.
Outputs that are not expected to contribute noticeably to gender equality should be rated 0.
Note: If the Output Attribute is not assigned; it will not be possible to Finalize the Project Budget and
Atlas will give an error.

22
8. Uploading Attachments:
On this page you will be able to upload all the Project documents such as PRODOC, Financial Reports, Progress Reports, Lessons Learned, Project Extension and any project related document.
9. User Fields:
On this page you will be able to enter User Fields; this is optional and some offices are using it as identification data to filter specific queries that reflect those fields.

23
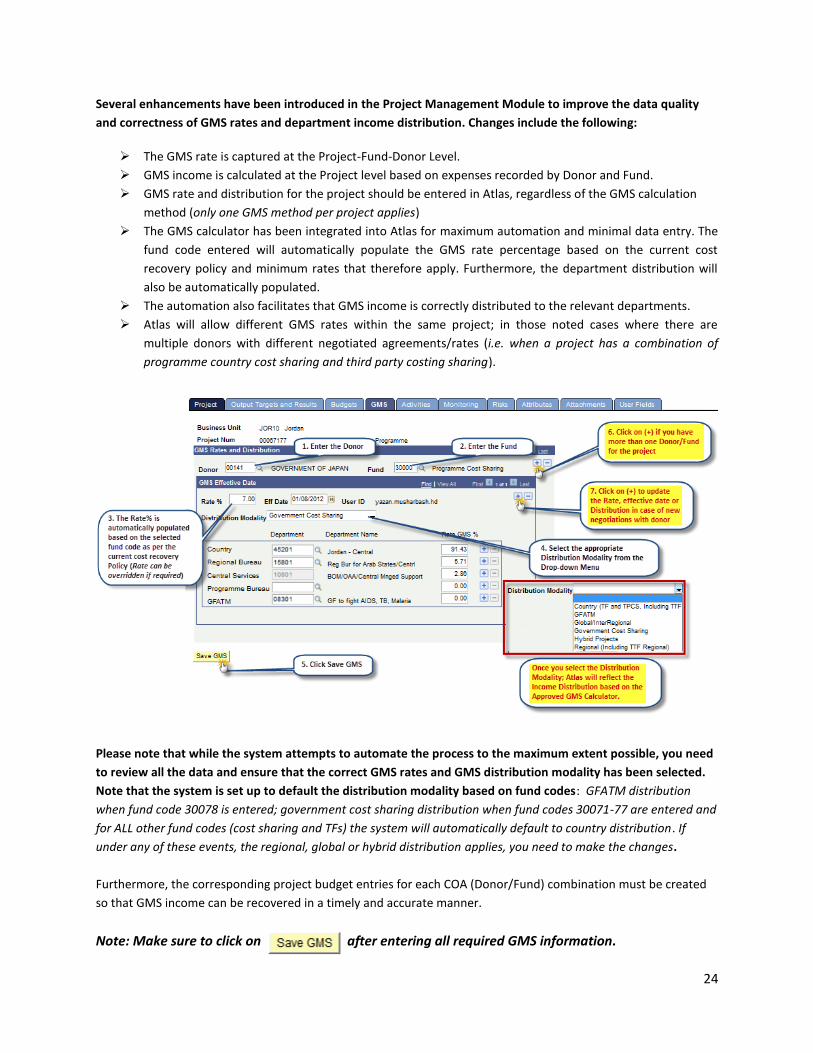
10. Setting-Up Project General Management Support (GMS):
24
Several enhancements have been introduced in the Project Management Module to improve the data quality
and correctness of GMS rates and department income distribution. Changes include the following:
The GMS rate is captured at the Project-Fund-Donor Level.
GMS income is calculated at the Project level based on expenses recorded by Donor and Fund.
GMS rate and distribution for the project should be entered in Atlas, regardless of the GMS calculation
method (only one GMS method per project applies)
The GMS calculator has been integrated into Atlas for maximum automation and minimal data entry. The
fund code entered will automatically populate the GMS rate percentage based on the current cost
recovery policy and minimum rates that therefore apply. Furthermore, the department distribution will
also be automatically populated.
The automation also facilitates that GMS income is correctly distributed to the relevant departments.
Atlas will allow different GMS rates within the same project; in those noted cases where there are
multiple donors with different negotiated agreements/rates (i.e. when a project has a combination of
programme country cost sharing and third party costing sharing).
Please note that while the system attempts to automate the process to the maximum extent possible, you need
to review all the data and ensure that the correct GMS rates and GMS distribution modality has been selected.
Note that the system is set up to default the distribution modality based on fund codes: GFATM distribution
when fund code 30078 is entered; government cost sharing distribution when fund codes 30071-77 are entered and
for ALL other fund codes (cost sharing and TFs) the system will automatically default to country distribution. If
under any of these events, the regional, global or hybrid distribution applies, you need to make the changes.
Furthermore, the corresponding project budget entries for each COA (Donor/Fund) combination must be created
so that GMS income can be recovered in a timely and accurate manner.
Note: Make sure to click on after entering all required GMS information.


