131
Database Management Guide
Database Management Guide

06/07/2018 eTapestry 7.22.0 Database Management US
©2016 Blackbaud, Inc. This publication, or any part thereof, may not be reproduced or transmitted in any form orby anymeans, electronic, or mechanical, including photocopying, recording, storage in an information retrievalsystem, or otherwise, without the prior written permission of Blackbaud, Inc.
The information in this manual has been carefully checked and is believed to be accurate. Blackbaud, Inc., assumesno responsibility for any inaccuracies, errors, or omissions in this manual. In no event will Blackbaud, Inc., be liablefor direct, indirect, special, incidental, or consequential damages resulting from any defect or omission in thismanual, even if advised of the possibility of damages.
In the interest of continuing product development, Blackbaud, Inc., reserves the right to make improvements inthis manual and the products it describes at any time, without notice or obligation.
All Blackbaud product names appearing herein are trademarks or registered trademarks of Blackbaud, Inc.
All other products and company names mentioned herein are trademarks of their respective holder.
DbMgmt-2016

ContentsManagement 7
My Organization Settings 8Persona 9Journal 10Subscriptions 10Preferences 11
Preferences 11SEPA Preferences 12Password Preferences 12My Mission 13
Data Entry Rules 13Phone Number Rules 13Required Persona Rules 13Address Rules 13Configure Auto-Generated Field Rules based on Name Format 14
Phone Auto-format 15eCommerce 15My User Preferences 17User Preferences 18Security Preferences 18Interface Preferences 19Navigation Preferences 19Search Preferences 20Journal Preferences 20WealthPoint Preferences 20User Customizations 20Custom Home Page 21Custom Account Home Page and Header 22Custom Journal Page 23Custom Save And Options 24User Activity Report 24Defined Fields 25System-Defined Fields 25

List of System-Defined Fields 26User-Defined Fields 28Edit a User-Defined Field 31Defined Field Sets 34Consent 34Capture Consent preferences 38Query and view Consent preferences 43Consent: Forget Constituent 45Create UDFs to Track Volunteers 46Create UDFs to Track Grants and Foundations 46Defined Fields Reports 47Campaigns, Funds, and Approaches 47Funds 48Campaigns 48Approaches 49Import 50Import Types 50General Import Setup 63Exports 67Standard Exports 68Account Exports 69
iCal Export 71Banking Exports 72Accounting Exports 73
The Financial Edge Export 74Account Numbers for The Financial Edge 75The Financial Edge Export File Format 76
FundWare Export 77Fundware Export Definition File 78
MIP Export 79MIP Definition File 80
QuickBooks Desktop Export 82Funds for QuickBooks Desktop 82User-Defined Fields for QuickBooks Desktop 83Run QuickBooks Desktop Export 83Export Deposits into QuickBooks Desktop 86

Export Items on Sales Receipts into QuickBooks Desktop 88Export Payments into QuickBooks Desktop as Payments 90Export Pledges into QuickBooks Desktop as Invoices 91Optional Customer Section for QuickBooks Desktop 92Transaction Section for QuickBooks Desktop 93Undeposited Funds Option for QuickBooks Desktop 94
MYOB AccountRight 2015 and Later Export 95Colleague Export 95Intacct Export 96Funds for Intacct Exports 96
NBA Export 97ForFUND Export 98General Ledger Codes 99
Export Options 100Mass Updates 101Security 103Basic Security 104Advanced Security 104Advanced Security Queries 105Advanced Security Codes 106Security Groups 108Getting Started Wizard 110Social Media Finder Service 112Social Media Finder Use Cases 114Wealth Rating 116eTapestry and everydayhero Integration 118Sign up for everydayhero 118Access the API token for the everydayhero integration 118Enter basic settings 119Map campaigns 120Import historical data 121Finish your integration setup 122Edit the everydayhero import settings 123Field mapping between everydayhero and eTapestry 123Account Fields 123Fundraiser Fields 125
Journal Fields 125Offline Transactions 127
Personal Fundraising 127Multiple Participation Journal Entries 130Relationship Types 130
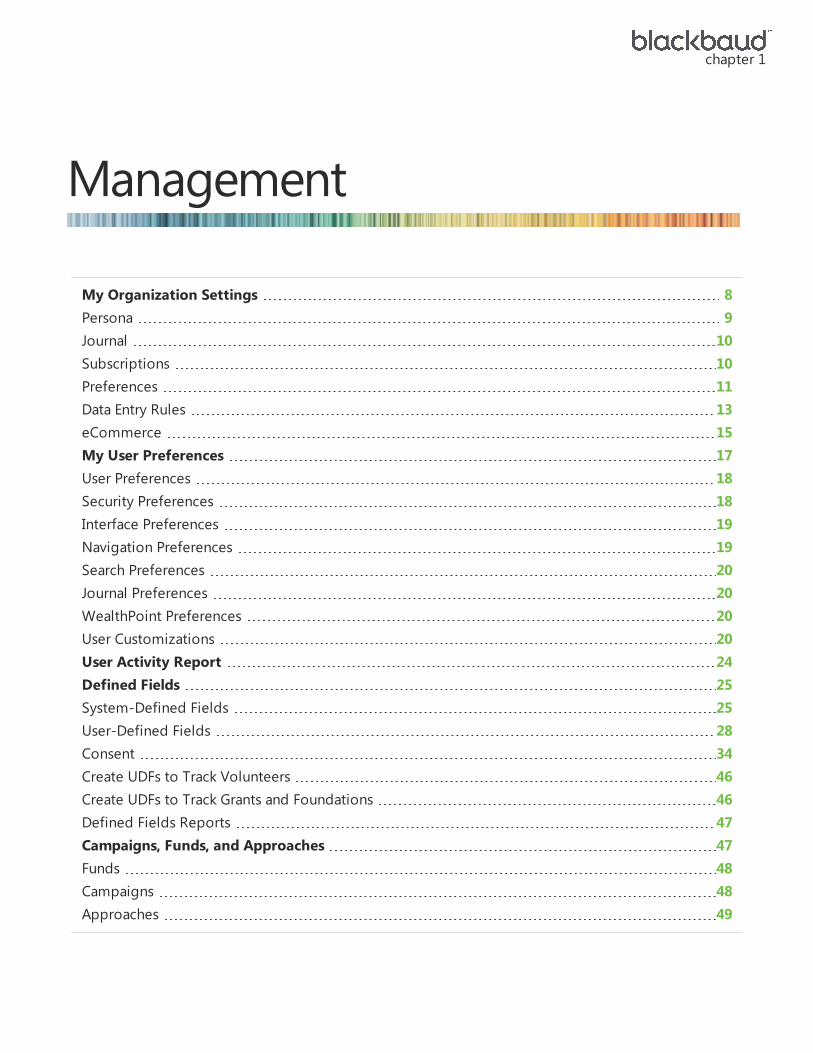
Management
My Organization Settings 8Persona 9Journal 10Subscriptions 10Preferences 11Data Entry Rules 13eCommerce 15My User Preferences 17User Preferences 18Security Preferences 18Interface Preferences 19Navigation Preferences 19Search Preferences 20Journal Preferences 20WealthPoint Preferences 20User Customizations 20User Activity Report 24Defined Fields 25System-Defined Fields 25User-Defined Fields 28Consent 34Create UDFs to Track Volunteers 46Create UDFs to Track Grants and Foundations 46Defined Fields Reports 47Campaigns, Funds, and Approaches 47Funds 48Campaigns 48Approaches 49
chapter 1
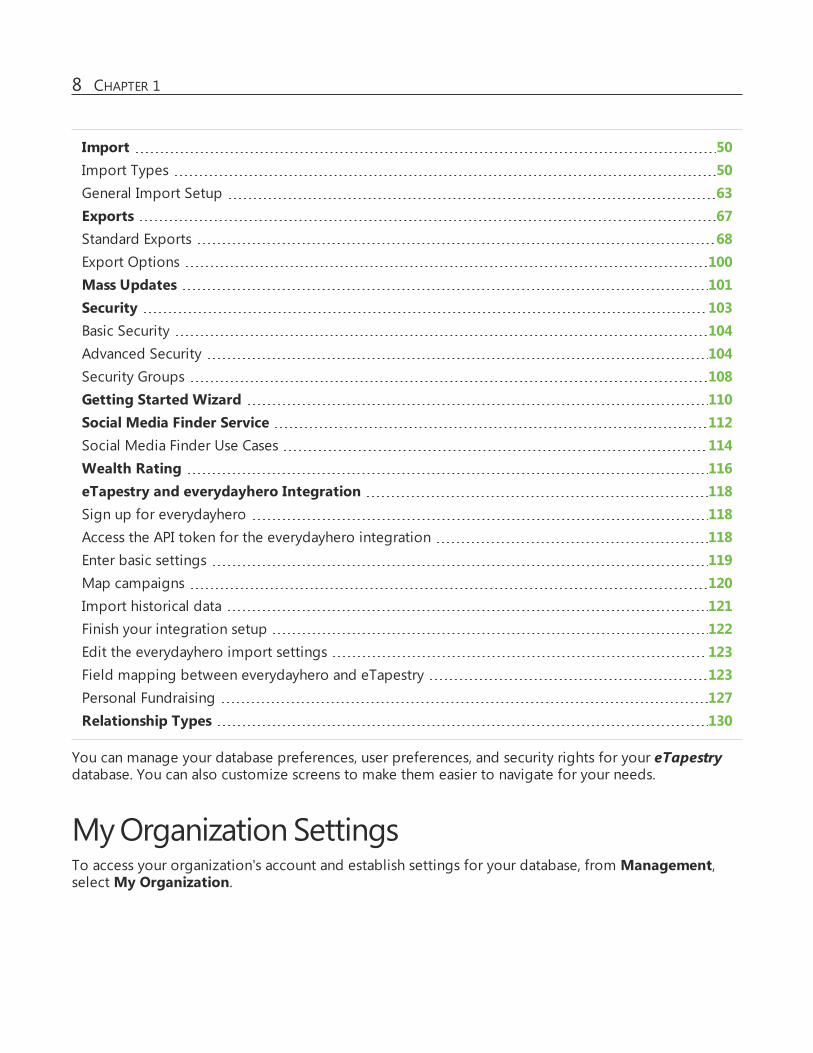
Import 50Import Types 50General Import Setup 63Exports 67Standard Exports 68Export Options 100Mass Updates 101Security 103Basic Security 104Advanced Security 104Security Groups 108Getting Started Wizard 110Social Media Finder Service 112Social Media Finder Use Cases 114Wealth Rating 116eTapestry and everydayhero Integration 118Sign up for everydayhero 118Access the API token for the everydayhero integration 118Enter basic settings 119Map campaigns 120Import historical data 121Finish your integration setup 122Edit the everydayhero import settings 123Field mapping between everydayhero and eTapestry 123Personal Fundraising 127Relationship Types 130
You can manage your database preferences, user preferences, and security rights for your eTapestrydatabase. You can also customize screens to make them easier to navigate for your needs.
MyOrganization SettingsTo access your organization's account and establish settings for your database, from Management,selectMy Organization.
8 CHAPTER 1
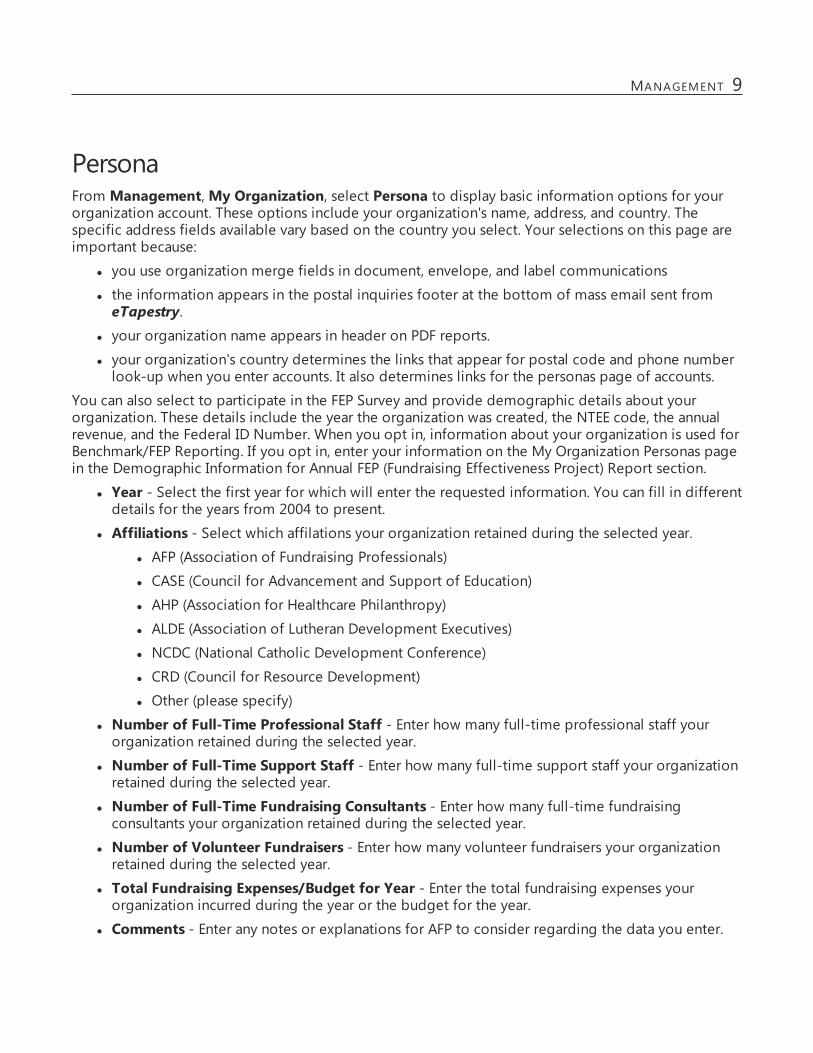
PersonaFrom Management,My Organization, select Persona to display basic information options for yourorganization account. These options include your organization's name, address, and country. Thespecific address fields available vary based on the country you select. Your selections on this page areimportant because:
l you use organization merge fields in document, envelope, and label communications
l the information appears in the postal inquiries footer at the bottom of mass email sent fromeTapestry.
l your organization name appears in header on PDF reports.
l your organization's country determines the links that appear for postal code and phone numberlook-up when you enter accounts. It also determines links for the personas page of accounts.
You can also select to participate in the FEP Survey and provide demographic details about yourorganization. These details include the year the organization was created, the NTEE code, the annualrevenue, and the Federal ID Number. When you opt in, information about your organization is used forBenchmark/FEP Reporting. If you opt in, enter your information on the My Organization Personas pagein the Demographic Information for Annual FEP (Fundraising Effectiveness Project) Report section.
l Year - Select the first year for which will enter the requested information. You can fill in differentdetails for the years from 2004 to present.
l Affiliations - Select which affilations your organization retained during the selected year.l AFP (Association of Fundraising Professionals)
l CASE (Council for Advancement and Support of Education)
l AHP (Association for Healthcare Philanthropy)
l ALDE (Association of Lutheran Development Executives)
l NCDC (National Catholic Development Conference)
l CRD (Council for Resource Development)
l Other (please specify)
l Number of Full-Time Professional Staff - Enter how many full-time professional staff yourorganization retained during the selected year.
l Number of Full-Time Support Staff - Enter how many full-time support staff your organizationretained during the selected year.
l Number of Full-Time Fundraising Consultants - Enter how many full-time fundraisingconsultants your organization retained during the selected year.
l Number of Volunteer Fundraisers - Enter how many volunteer fundraisers your organizationretained during the selected year.
l Total Fundraising Expenses/Budget for Year - Enter the total fundraising expenses yourorganization incurred during the year or the budget for the year.
l Comments - Enter any notes or explanations for AFP to consider regarding the data you enter.
MANAGEMENT 9
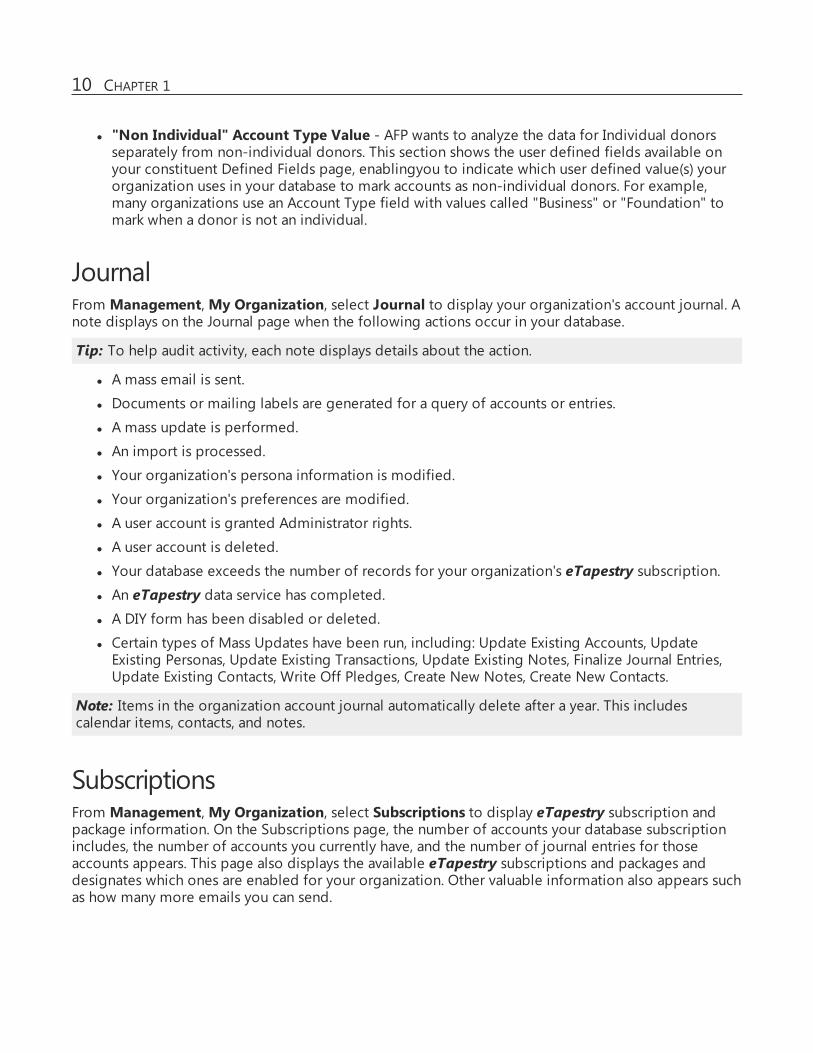
l "Non Individual" Account Type Value - AFP wants to analyze the data for Individual donorsseparately from non-individual donors. This section shows the user defined fields available onyour constituent Defined Fields page, enablingyou to indicate which user defined value(s) yourorganization uses in your database to mark accounts as non-individual donors. For example,many organizations use an Account Type field with values called "Business" or "Foundation" tomark when a donor is not an individual.
JournalFrom Management,My Organization, select Journal to display your organization's account journal. Anote displays on the Journal page when the following actions occur in your database.
Tip: To help audit activity, each note displays details about the action.
l A mass email is sent.
l Documents or mailing labels are generated for a query of accounts or entries.
l A mass update is performed.
l An import is processed.
l Your organization's persona information is modified.
l Your organization's preferences are modified.
l A user account is granted Administrator rights.
l A user account is deleted.
l Your database exceeds the number of records for your organization's eTapestry subscription.l An eTapestry data service has completed.l A DIY form has been disabled or deleted.
l Certain types of Mass Updates have been run, including: Update Existing Accounts, UpdateExisting Personas, Update Existing Transactions, Update Existing Notes, Finalize Journal Entries,Update Existing Contacts, Write Off Pledges, Create New Notes, Create New Contacts.
Note: Items in the organization account journal automatically delete after a year. This includescalendar items, contacts, and notes.
SubscriptionsFrom Management,My Organization, select Subscriptions to display eTapestry subscription andpackage information. On the Subscriptions page, the number of accounts your database subscriptionincludes, the number of accounts you currently have, and the number of journal entries for thoseaccounts appears. This page also displays the available eTapestry subscriptions and packages anddesignates which ones are enabled for your organization. Other valuable information also appears suchas how many more emails you can send.
10 CHAPTER 1

PreferencesFrom Management,My Organization, select Preferences to establish database-wide preferences foryour organization. These include currency, time zone, fiscal year, and password preferences. Theoptions you select on this page impact the whole database; they are not based on your logincredentials.
Preferences
Field Details
Currency Select the currency and symbol to be used throughout the database. Changes incurrency do not update values in the database, they only update the currencysymbol displayed for those values.
Time Zone Select the time zone for the location where your organization is based. eTapestryuses this time zone to determine when auto-processing should begin. Each usercan select a different time zone on the Preferences page of their user account ifthey are located in a different time zone.
Auto Process Report Email Enter the email address where you want the auto process report to be sent.
Last month of the fiscalyear
Select the last month of your organization's fiscal year. This setting is used tocalculate fiscal year information for queries, reports, and in the tiles on the accounthome page.
Non-Deductible Fields Select if you want to enable or disable theNon-Deductible field in the gift entryscreen. If your organization does not intend to use this field, you can disable it. Ifthere is historical data on this field, that history is preserved even if you disable thefield.
Pledge Fields Select if you want to enable or disable the Pledged Amount field in the gift entryscreen. If your organization does not intend to use this field, you can disable it. Ifthere is historical data on this field, that history is preserved even if you disable thefield.
Soft Credits Select if you want to enable or disable the Soft Credit fields on the gift entryscreen. If your organization does not intend to use this field, you can disable it. Ifthere is historical data on this field, that history is preserved even if you disable thefield. (You can manually delete the historical instances of soft credit.)
Mobile Query Category Select the query category you want your users to be able to access througheTapestry Mobile.
BBPS UserName If you use BBPS for transaction processing, enter your user name.
BBPS Password If you use BBPS for transaction processing, enter your password.
MANAGEMENT 11
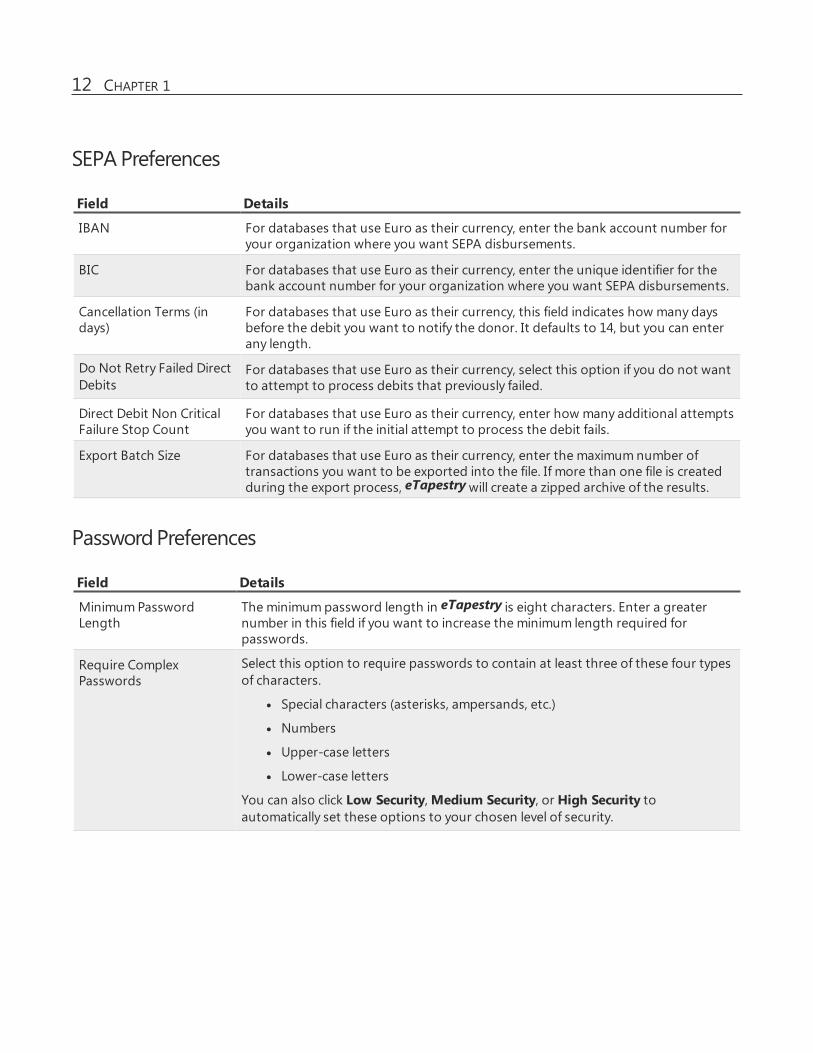
SEPAPreferences
Field Details
IBAN For databases that use Euro as their currency, enter the bank account number foryour organization where you want SEPA disbursements.
BIC For databases that use Euro as their currency, enter the unique identifier for thebank account number for your organization where you want SEPA disbursements.
Cancellation Terms (indays)
For databases that use Euro as their currency, this field indicates how many daysbefore the debit you want to notify the donor. It defaults to 14, but you can enterany length.
Do Not Retry Failed DirectDebits
For databases that use Euro as their currency, select this option if you do not wantto attempt to process debits that previously failed.
Direct Debit Non CriticalFailure Stop Count
For databases that use Euro as their currency, enter how many additional attemptsyou want to run if the initial attempt to process the debit fails.
Export Batch Size For databases that use Euro as their currency, enter the maximumnumber oftransactions you want to be exported into the file. If more than one file is createdduring the export process, eTapestrywill create a zipped archive of the results.
PasswordPreferences
Field Details
MinimumPasswordLength
The minimumpassword length in eTapestry is eight characters. Enter a greaternumber in this field if you want to increase the minimum length required forpasswords.
Require ComplexPasswords
Select this option to require passwords to contain at least three of these four typesof characters.
l Special characters (asterisks, ampersands, etc.)
l Numbers
l Upper-case letters
l Lower-case letters
You can also click Low Security,Medium Security, or High Security toautomatically set these options to your chosen level of security.
12 CHAPTER 1

MyMission
Field Details
Upload a New Logo To upload an image to display on the Home dashboard for all users, click ChooseFile.
Logo Name This read only field displays the file name of the image you upload in the Upload aNew Logo field.
Mission Statement To display a tagline with your logo in theMy Mission tile on the Home dashboard,enter it in the box.
Data EntryRulesFrom Management,My Organization, select Data Entry Rules to select rules for phone numbers,required persona fields, address preferences, and salutations.
PhoneNumberRules
Field Details
Autoformat US andCanadian Phone Numbers
Select this option if you want US and Canadian phone numbers to be autoformatted. For more information, see Phone Auto-format on page 15.
RequiredPersona Rules
Field Details
Persona fields Select any persona fields you want to make required when users enter data on thePersona screen of accounts. The address fields available are based on yourorganization's country.
AddressRules
Field Details
Omit [your domesticcountry] for addresses in[your domestic country]when you use thesemerge fields
To use the same template and reports for domestic and international mail, butremove your country from the address block when you send mail, select thischeckbox. This provides a way for you to combine domestic and international mail,but remove your country from the address block for domestic mail.Note: This onlyapplies when you use the Full Address with Country (Multi Line) and FullAddress with Country (Single Line)merge fields.
MANAGEMENT 13

Field Details
Enable users to reformataddresses on an account'spersona page
To allow users to manually reformat an address on an account's Persona page,select this checkbox.Note: You should only enable this option when you usePersonal Fundraising, Custom eCommerce, Cart, or API Activity.
To update address in bulk so that they adhere to the standard format for acountry, export existing addresses and then map the fields to the new formatwhen you import themback into eTapestry. You may need to manually reformataddresses when fields cannot be mapped on a one-to-one basis.
ConfigureAuto-GeneratedField Rulesbased onNameFormatUse these settings to establish the name configurations that eTapestry uses as you create an account.For example, when you select Individual for the Name Format on an account, eTapestry configuresname values based on these settings in the Sort Name, Account Name, Short Salutation, LongSalutation, and Envelope Salutation fields as you enter name information in the First Name,MiddleName, and Last name fields. When you select "Family" or "Business," the program configures namevalues based on these settings in the Sort Name, Short Salutation, Long Salutation, and EnvelopeSalutation fields as you enter it in the Account Name field. This data entry process helps you enterdata faster and provides name consistency.
Tip: When you change formats for account names, be aware there is no change to existing accountnames. Your changes only apply to account names for new accounts.
Field Details
Individual The default name configuration to use when an Individual account is createdappears as a link. To change the default configuration for a field, select the link. TheEdit Rules screen appears. Select the configuration you want to use for that fieldand click Continue to return to the Data Entry Rules page.
The Salutation fields include options for Friends, Blank, and Custom. To addressrecipients as "Friends," select Friends. To leave salutation fields empty, select Blank.When you do this, eTapestry does not populate the field with name values and youcan enter any salutation in the field. To use another general term (for example, onethat is similar to Friends) as a salutation, select Custom and enter your customsalutation to use for all Individual accounts.
Note:When you select Blank for an Individual salutation, your selection onlyapplies to manual data entry. When an account is created from an online formwithBlank selected, salutations generate based on eTapestry's auto-generatedformats.
14 CHAPTER 1
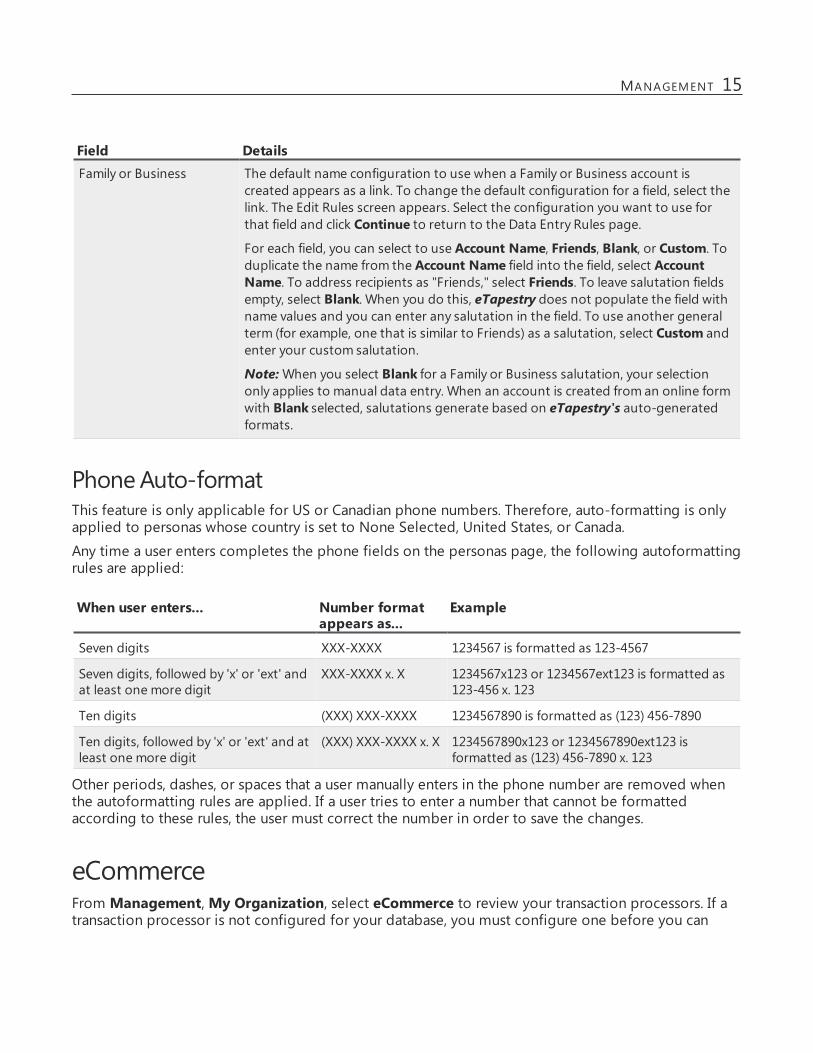
Field DetailsFamily or Business The default name configuration to use when a Family or Business account is
created appears as a link. To change the default configuration for a field, select thelink. The Edit Rules screen appears. Select the configuration you want to use forthat field and click Continue to return to the Data Entry Rules page.
For each field, you can select to use Account Name, Friends, Blank, or Custom. Toduplicate the name from the Account Name field into the field, select AccountName. To address recipients as "Friends," select Friends. To leave salutation fieldsempty, select Blank. When you do this, eTapestry does not populate the field withname values and you can enter any salutation in the field. To use another generalterm (for example, one that is similar to Friends) as a salutation, select Custom andenter your custom salutation.
Note:When you select Blank for a Family or Business salutation, your selectiononly applies to manual data entry. When an account is created from an online formwith Blank selected, salutations generate based on eTapestry's auto-generatedformats.
PhoneAuto-formatThis feature is only applicable for US or Canadian phone numbers. Therefore, auto-formatting is onlyapplied to personas whose country is set to None Selected, United States, or Canada.
Any time a user enters completes the phone fields on the personas page, the following autoformattingrules are applied:
When user enters... Number formatappears as...
Example
Seven digits XXX-XXXX 1234567 is formatted as 123-4567
Seven digits, followed by 'x' or 'ext' andat least one more digit
XXX-XXXX x. X 1234567x123 or 1234567ext123 is formatted as123-456 x. 123
Ten digits (XXX) XXX-XXXX 1234567890 is formatted as (123) 456-7890
Ten digits, followed by 'x' or 'ext' and atleast one more digit
(XXX) XXX-XXXX x. X 1234567890x123 or 1234567890ext123 isformatted as (123) 456-7890 x. 123
Other periods, dashes, or spaces that a user manually enters in the phone number are removed whenthe autoformatting rules are applied. If a user tries to enter a number that cannot be formattedaccording to these rules, the user must correct the number in order to save the changes.
eCommerceFrom Management,My Organization, select eCommerce to review your transaction processors. If atransaction processor is not configured for your database, you must configure one before you can
MANAGEMENT 15

create online forms and accept online donations. When more than one processor exists, eTapestryuses your default processor unless you select a different one in preferences for the online form.
Under Tasks, select the processor to enable for your organization. Options appear on the right for youto enter applicable information for the processor.
Tip: For information about adding the Blackbaud Merchant Services (BBMS) processor, refer toLink your BBMS Account to your eTapestry Database on page 1.
eCommerce: Migrate iATS Transactions to BBPS
Note: This functionality is not available to all users. Only Admin users can run this migration.
To migrate iATS transactions to your Blackbaud Payment Services (BBPS) processor, you can uploadcredit card numbers to those transactions to eTapestry through an Customer List CSV file provided toyou by iATS.
To obtain the Customer List CSV file, you will need to contact iATS Payments and ask them totemporarily unmask credit card numbers in your Virtual Terminal. While the credit card numbers areunmasked, log into the iATS Payments Customer Portal. Under Virtual Terminal, select CustomerDatabase.Once the Customer List loads, click Export Customer List and wait for the CSV file to download.
From Management,My Organization select the eCommerce tab. On the eCommerce page, underLinks, selectMigrate iATS transactions to BBPS.Select Browse and choose the file you wish to upload.
16 CHAPTER 1

If you have more than one BBPS processor, select the processor that you will use under Select BBPStransaction processor.
Note: This option is only available for organization with an iATS processor.
To migrate credit card numbers from iATS, select Run under the Tasksmenu. This process will uploadcredit card numbers from the file to any active iATS auto processing transactions in eTapestry and re-assign them to the BBPS processor you selected.
When this process is complete, you will receive a notification with details on the number of linesprocessed, active transactions updated, inactive transactions skipped, and number of transactions notfound.
Once the migration finishes, eTapestry will also create a note on the My Organization Journal statingthe process was run and its details.
Manage IP Address RestrictionsUnder Links, clickManage IP Address Restrictions to help prevent credit card fraud by selecting IPaddress restrictions. When the Manage IP Address Restrictions page appears, under Settings, makesure the IP checkbox is selected. We recommend you do this so that eTapestry monitors all of youronline web pages for possible fraudulent activity. When an IP address submits six failed transactionswithin the previous hour, eTapestry blocks the IP address from submitting again for the next hour. Toview restricted IP addresses, under Tasks, click Show Disabled Restrictions. To manually enable arestricted IP address, click Disabled under the applicable IP address.
Note: On the Manage IP Address Restrictions page, click Tasks, New Restriction to manually restrictan IP address. When the Create Restriction page appears, enter the IP address, comments to provideadditional information, and select how long the restriction applies.
MyUser PreferencesUser preferences allow you to customize the database according to your needs. The User Preferencespage includes user name and password, locale and time zone, and interface, navigation, and searchpreferences.
From Management, clickMy User to access your user preferences account. Next, click Preferencesand the User Preferences page appears.
MANAGEMENT 17

UserPreferences
Field Details
Locale Set the locale to the language where the user is located. This affects the dateformatting for the database. For users in English, Dutch, French, Italian, andSpanish speaking countries, the locale also determines the language used in theprogram. To apply changes to this field, log out and log back into the databaseafter you save them.
Time Zone The time zone affects the time and date stamps throughout the program anddetermines how calendar items are displayed. To apply changes to this field, logout and log back into the database after you save them.
Duplicate Check on save When this option is selected, eTapestry checks for duplicate accounts when youadd an account or modify an existing account's Persona page. Potential duplicatesare displayed when the user saves changes.
Default Report Delivery Select the default report format. By default, eTapestry displays report results onscreen, but you can choose to default to PDF or Excel format. Regardless of yourdefault, you can change this setting when you run individual reports.
Default Letter Delivery Select the default format for communication. When you create a mailing, eTapestrydefaults to PDF format, but you can change the default to Word format. Regardlessof your default, you can change this setting when you create individual mailings.
Default Query Persona Select the default persona to check for matches when you query on fields from anaccount's persona. This option allows you to further filter the criteria by personatype. Regardless of your default, you can change this setting when you createindividual queries. As a reminder, the query results automatically display thePrimary persona.
Security Preferences
Field Details
Login ID This field displays the user's login ID. You can change the ID here.
Password and ConfirmPassword
Enter and confirm the user's password.
Security Question To select your own security question, click Reset your security question. TheSecurity Question and Answer fields appear.
Security Question andAnswer
Select the question you want to answer and enter your answer.
Remove Lock on UserAccount
After five unsuccessful log in attempts, users are locked out of eTapestry. The lockremoves automatically after 60 minutes, but the Administrator can also remove itmanually. To remove a user's lock, click this button.
18 CHAPTER 1

InterfacePreferences
Field Details
Use Animations This option allows moving features in eTapestry to have a visual effect. Forexample, when you scroll down a page with a moving task pane and this option isenabled, you see the task pane move around the screen to the new location. Whenyou disable this option, the task pane jumps to the new location when you finishscrolling.
Task Pane Location You can select whether you want the Tasks menu on pages to be on the left orright side of the screen.
Use Floating Task Pane When this option is enabled, the task pane moves down the page as you scroll.
Use Floating AccountMenu
When this option is enabled, the account header moves down the page as youscroll.
Show Defined-FieldDetails By Default
This option indicates if the defined-field details display when a page loads. If youselect "Yes," all defined-field details automatically display. If you select "No," alldetails are hidden. If you select "Auto," eTapestry shows the details in some pagesand hides them in others, according to the recommended workflow.
Hide Empty Defined Fieldsby Default
This option indicates if empty defined fields display when a page loads. If you select"Yes," all empty defined fields automatically display. If you select "No," all definedfields are hidden. If you select "Auto," eTapestry shows empty fields in some pagesand hides them in others, according to the recommended workflow.
Default ApplicationTransaction Processor
Select the payment processor you want to use in transactions by default.
Show Country in AddressBlocks
When you enable this option, the country code is included in the address block onthe Find Account search results screen, the Personas tile on the Home dashboard,and in the account header.
NavigationPreferences
Field Details
Use an External Programfor Email
When you enable this option, you can send one-off emails from a program outsideeTapestry such as Microsoft Outlook.
Pressing Alt+N OpensFast Navigation
When this option is enabled, you can open the Fast Navigation window when youpress Alt+N.
MANAGEMENT 19
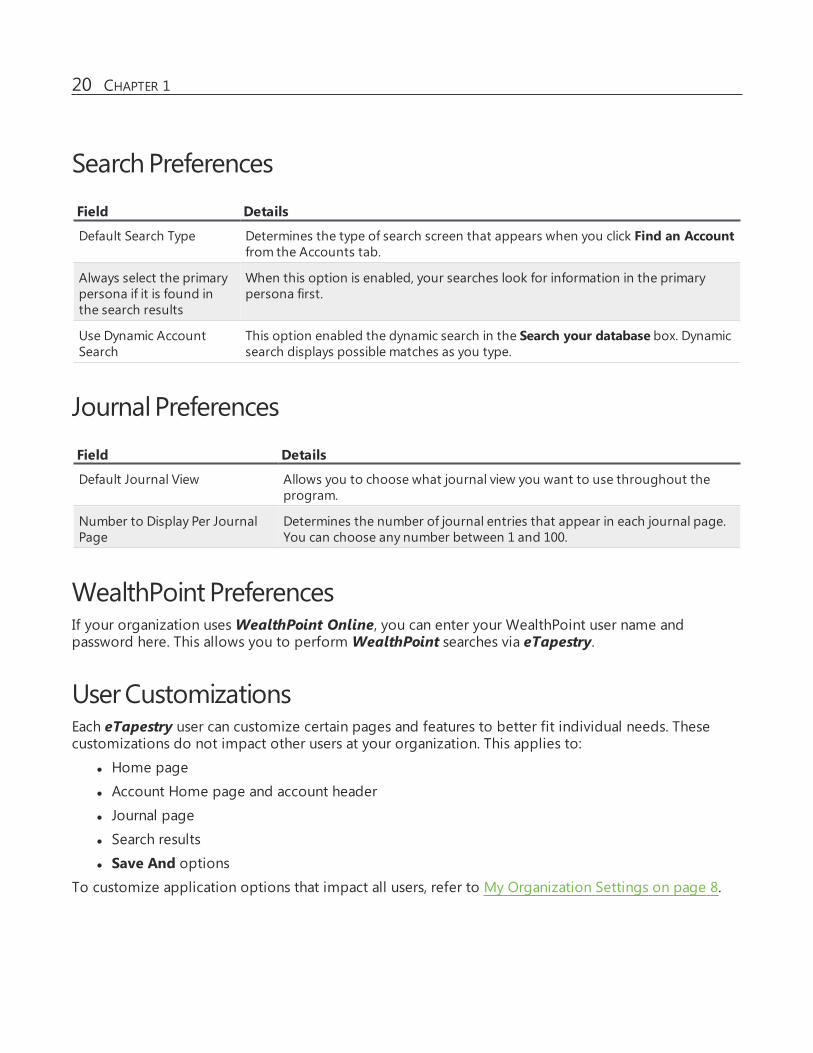
SearchPreferences
Field Details
Default Search Type Determines the type of search screen that appears when you click Find an Accountfrom the Accounts tab.
Always select the primarypersona if it is found inthe search results
When this option is enabled, your searches look for information in the primarypersona first.
Use Dynamic AccountSearch
This option enabled the dynamic search in the Search your database box. Dynamicsearch displays possible matches as you type.
JournalPreferences
Field Details
Default Journal View Allows you to choose what journal view you want to use throughout theprogram.
Number to Display Per JournalPage
Determines the number of journal entries that appear in each journal page.You can choose any number between 1 and 100.
WealthPoint PreferencesIf your organization usesWealthPoint Online, you can enter your WealthPoint user name andpassword here. This allows you to performWealthPoint searches via eTapestry.
UserCustomizationsEach eTapestry user can customize certain pages and features to better fit individual needs. Thesecustomizations do not impact other users at your organization. This applies to:
l Home page
l Account Home page and account header
l Journal page
l Search results
l Save And optionsTo customize application options that impact all users, refer to My Organization Settings on page 8.
20 CHAPTER 1
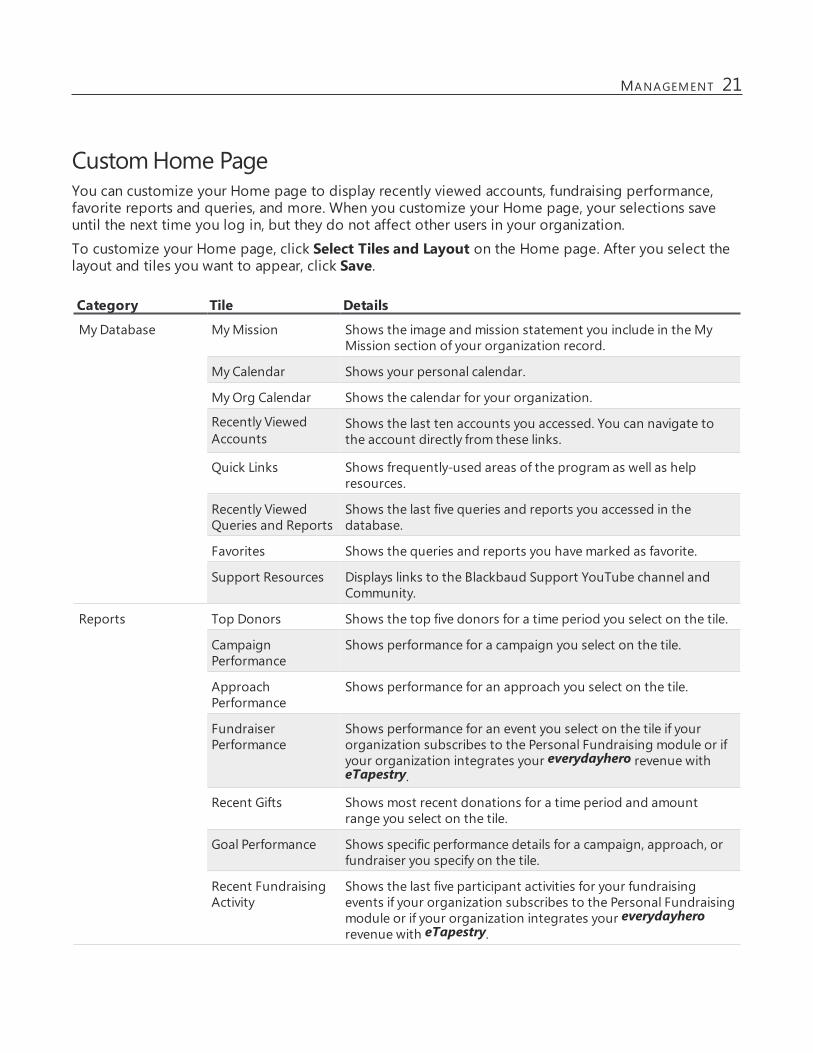
CustomHome PageYou can customize your Home page to display recently viewed accounts, fundraising performance,favorite reports and queries, and more. When you customize your Home page, your selections saveuntil the next time you log in, but they do not affect other users in your organization.
To customize your Home page, click Select Tiles and Layout on the Home page. After you select thelayout and tiles you want to appear, click Save.
Category Tile Details
MyDatabase MyMission Shows the image and mission statement you include in the MyMission section of your organization record.
My Calendar Shows your personal calendar.
MyOrg Calendar Shows the calendar for your organization.
Recently ViewedAccounts
Shows the last ten accounts you accessed. You can navigate tothe account directly from these links.
Quick Links Shows frequently-used areas of the program as well as helpresources.
Recently ViewedQueries and Reports
Shows the last five queries and reports you accessed in thedatabase.
Favorites Shows the queries and reports you have marked as favorite.
Support Resources Displays links to the Blackbaud Support YouTube channel andCommunity.
Reports Top Donors Shows the top five donors for a time period you select on the tile.
CampaignPerformance
Shows performance for a campaign you select on the tile.
ApproachPerformance
Shows performance for an approach you select on the tile.
FundraiserPerformance
Shows performance for an event you select on the tile if yourorganization subscribes to the Personal Fundraising module or ifyour organization integrates your everydayhero revenue witheTapestry.
Recent Gifts Shows most recent donations for a time period and amountrange you select on the tile.
Goal Performance Shows specific performance details for a campaign, approach, orfundraiser you specify on the tile.
Recent FundraisingActivity
Shows the last five participant activities for your fundraisingevents if your organization subscribes to the Personal Fundraisingmodule or if your organization integrates your everydayherorevenue with eTapestry.
MANAGEMENT 21
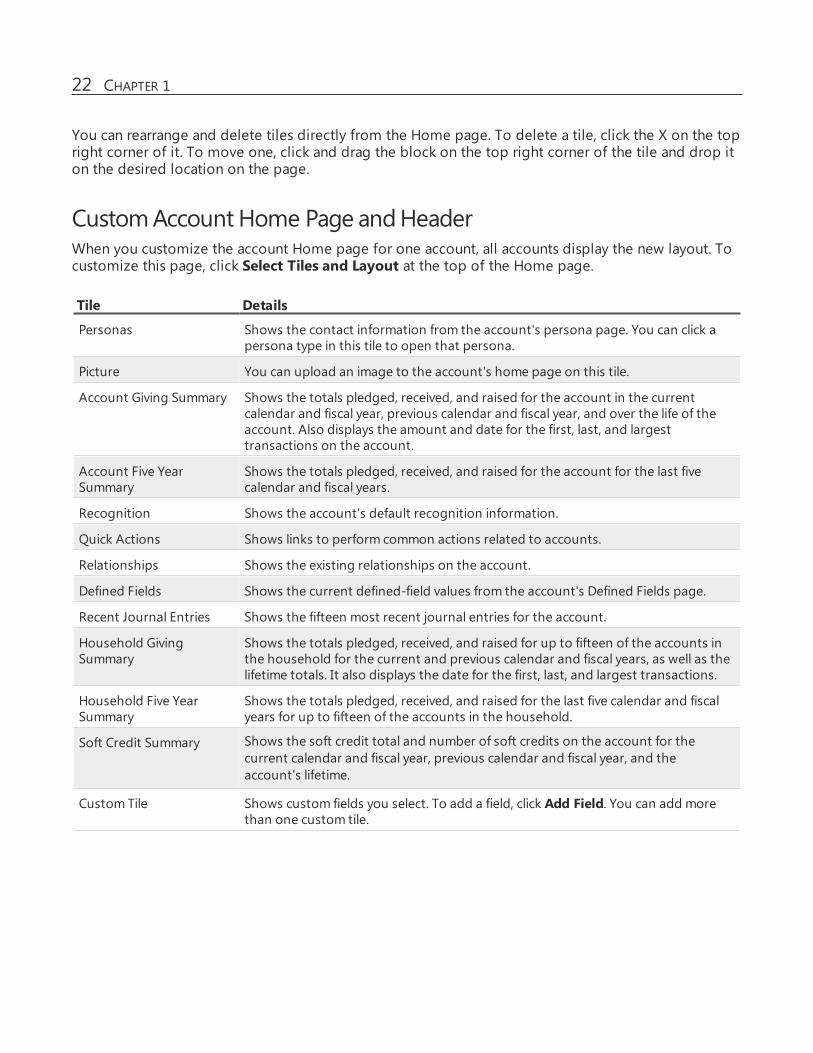
You can rearrange and delete tiles directly from the Home page. To delete a tile, click the X on the topright corner of it. To move one, click and drag the block on the top right corner of the tile and drop iton the desired location on the page.
CustomAccount Home Page andHeaderWhen you customize the account Home page for one account, all accounts display the new layout. Tocustomize this page, click Select Tiles and Layout at the top of the Home page.
Tile Details
Personas Shows the contact information from the account's persona page. You can click apersona type in this tile to open that persona.
Picture You can upload an image to the account's home page on this tile.
Account Giving Summary Shows the totals pledged, received, and raised for the account in the currentcalendar and fiscal year, previous calendar and fiscal year, and over the life of theaccount. Also displays the amount and date for the first, last, and largesttransactions on the account.
Account Five YearSummary
Shows the totals pledged, received, and raised for the account for the last fivecalendar and fiscal years.
Recognition Shows the account's default recognition information.
Quick Actions Shows links to perform common actions related to accounts.
Relationships Shows the existing relationships on the account.
Defined Fields Shows the current defined-field values from the account's Defined Fields page.
Recent Journal Entries Shows the fifteen most recent journal entries for the account.
Household GivingSummary
Shows the totals pledged, received, and raised for up to fifteen of the accounts inthe household for the current and previous calendar and fiscal years, as well as thelifetime totals. It also displays the date for the first, last, and largest transactions.
Household Five YearSummary
Shows the totals pledged, received, and raised for the last five calendar and fiscalyears for up to fifteen of the accounts in the household.
Soft Credit Summary Shows the soft credit total and number of soft credits on the account for thecurrent calendar and fiscal year, previous calendar and fiscal year, and theaccount's lifetime.
Custom Tile Shows custom fields you select. To add a field, click Add Field. You can add morethan one custom tile.
22 CHAPTER 1

Tile Details
Social Media Finder When you use the Pro package of eTapestry in the United States and Canada, youcan select to include this tile to display the account's social network results andrelated email addresses.
Wealth Rating When you use the Pro or Essentials package of eTapestry in the United States, youcan select to include this tile to show the overall wealth rating for an account fromTarget Analytics, a division of Blackbaud Inc and the date the service was last run.
Note: If Target Analytics cannot accurately identify a constituent or screen theirwealth, they appear with No rating.
Recent FundraisingActivity
Shows the last five participant activities for your fundraising events and includesthe Fundraiser, Goal, Raised, Remaining, and Transactions columns. You can sortinformation in the tile by clicking the header of the column you wish to sort.
You can also customize the header that appears on the top left of each account. By default, it displaysthe primary persona's address, phone number, email address, and website.
1. To customize the header, click Edit Header.2. To select the columns to display, click a drop down link.
3. To change the order of the fields, click and drag the field names under Select Field Order.4. To add another row to the header, click Add Row.5. To remove a field, click X next to the field name.6. To save the header display, click Save And.
Custom Journal PageYou can customize the data that appears on the Journal page.
1. To customize the columns that appear, click Choose columns.2. To select the columns to display, select the checkbox next to the column name on the Choose
columns to show in the list screen.
3. To remove a column, clear the checkbox next to the column name on the Choose columns toshow in the list screen.
4. To save your selections, click Apply changes. The Journal page uses the new column displayoptions.
5. To change the order of the columns, click and drag the column names on the Journal page.
To view journal entry details, click the available link in the corresponding column. When you addcolumns, the new columns do not create a link to the journal entry details. The default columns includethe following information.
l Date - Displays the journal entry create date.l Name - When you view the journal as a household or split household, this displays the name of
MANAGEMENT 23

the household member.
l Type - Displays type of journal entry.l Description - For gifts, pledges, payments, recurring gifts, split transactions, upgraded pledges,and disbursements, this displays the fund for the entry. For soft credits, it shows the soft creditamount. For recurring gift schedules, the installment amount displays. For notes, the first line oftext appears. For contacts, the subject appears. For calendar items, the title appears.
l Received - Displays the received amount for any transaction entries. When the amount isnegative, it appears in parentheses. The column is blank for notes, contacts, and calendar items.
l Pledged - Displays the pledged amount for any transaction entries. When the amount isnegative, it appears in parentheses. The column is blank for notes, contacts, and calendar items.
l Attachments - Displays attachments to the journal entry. Journal entries that allow attachmentsinclude gifts, pledges, pledge payments, disbursements, recurring gifts, contacts and notes.
CustomSave AndOptionsThroughout eTapestry, the option to save your work displays with an option to navigate to anotherarea in the application when you click Save And. You can customize the navigation options that appearin the menu beside the Save And button. You can also select the option to appear first so it is yourdefault.
1. To edit the navigation options for a specific screen, click the wrench icon next to the Save Anddrop down field. A warning message appears.
2. Click OK to confirm that you want to leave the current page without saving. The Add/RemoveOptions page appears.
3. Select the options to add to the specific Save And menu.4. To change the order of the options, you can drag and drop them. Place the option you use most
frequently first.
5. To remove an option, click X next to the name.
Note: You must include at least one option.
6. To save the options for the specific page, click Save.
User Activity ReportWhen you use the advanced administration module, you can access user activity information, includingdate and length of logins and activity performed by each user.
See All UsersYou can see a list of all active users in your database. From Management, click All Users. A completelist of users appears, and you can drill down to each user by clicking their user name.
24 CHAPTER 1

Run User Activity ReportThe User Activity Report shows login activity as well as accounts and journal entries created andmodified by each user during each login session. The report shows activity for the past 30 days foreach user.
1. From Management, click User Activity. The Launch User Activity screen appears.2. Select a query of users to include. To see all users, select Base - All users in the Query section.3. Select the delivery format and click Submit.
Defined FieldsDefined Fields are fields that your organization can create or edit in the database. These fields arecustomizable, and they can be set up to appear on every account screen, allowing you to track all ofthe data that is important to you in each area of an account. After data has been entered in these fields,you can use that data to group accounts together in queries, and then use those queries to run reportsor send mass communications.
System-Defined FieldsSystem-defined fields are used to record data that the application needs in order to function properly,and as such, they are only partially customizable by users. Unlike user-defined fields, you cannot definewhere in the database system-defined fields are located, the name or display type for the fields, orwhat kind of data they can track. However, for most system-defined fields, you can customize whatvalues are available in the field and, for the Phone Types field, you can customize the names and addmore fields.
Edit System-Defined Field ValuesWhile you cannot add or edit system-defined fields, you can add and edit the individual valuesassociated with most fields.
1. From Management, click System-Defined Fields. The System-Defined Fields screen appears.2. Click a field to edit it.
l To add a value, in the Name field enter the new value and click Add Value.l To disable a value, click Enabled under the value you want to disable.l To enable a previously-disabled value, click Disabled under the value you want to enable.To see all disabled values, click Show Disabled Values under Values.
3. Click Save and Finish to save your changes.
Add and Rename System-Defined Field ValuesWe recommend that you review, add, and edit system-defined field values when you first begin using
MANAGEMENT 25

eTapestry.
Note: You can never delete a value once you save it on a system-defined field. You can, however,add, edit, and disable values.
1. From Management, click System Defined Fields.The System Defined Fields screen appears.
2. Click the field you want to add a value to or edit.
l To add a new value, enter the value in the Name field and click Add Value.l To edit an existing value, click the value and edit it in the Name field. Click Update tosave.
3. Click Save and Finish to save your changes.
Disable/Enable System-Defined Field ValuesWhile you cannot delete system-defined fields, you can disable system-defined values as needed. Forexample, if your organization decides to temporarily stop accepting a specific credit/debit card, youcan disable the value for that credit/debit card. After a value is disabled, it no longer appears in theCredit/Debit Card Type menu for users to select on new transactions. If you later begin accepting thatcredit/debit card type again, you can enable the value to allow users to select that card type again.
1. From Management, click System-Defined Fields.2. Click the field for which you want to disable or enable values.
3. To see values that are currently disabled, click Show Disabled Values under Values.4. To disable a value, click Enabled underneath the value.5. To enable a value that has previously been disabled, click Disabled underneath the value.6. Click Save and Finish to save your changes.
List of System-Defined FieldsThe following are all the system-defined fields available in eTapestry.
System-Defined Field Details
26 CHAPTER 1
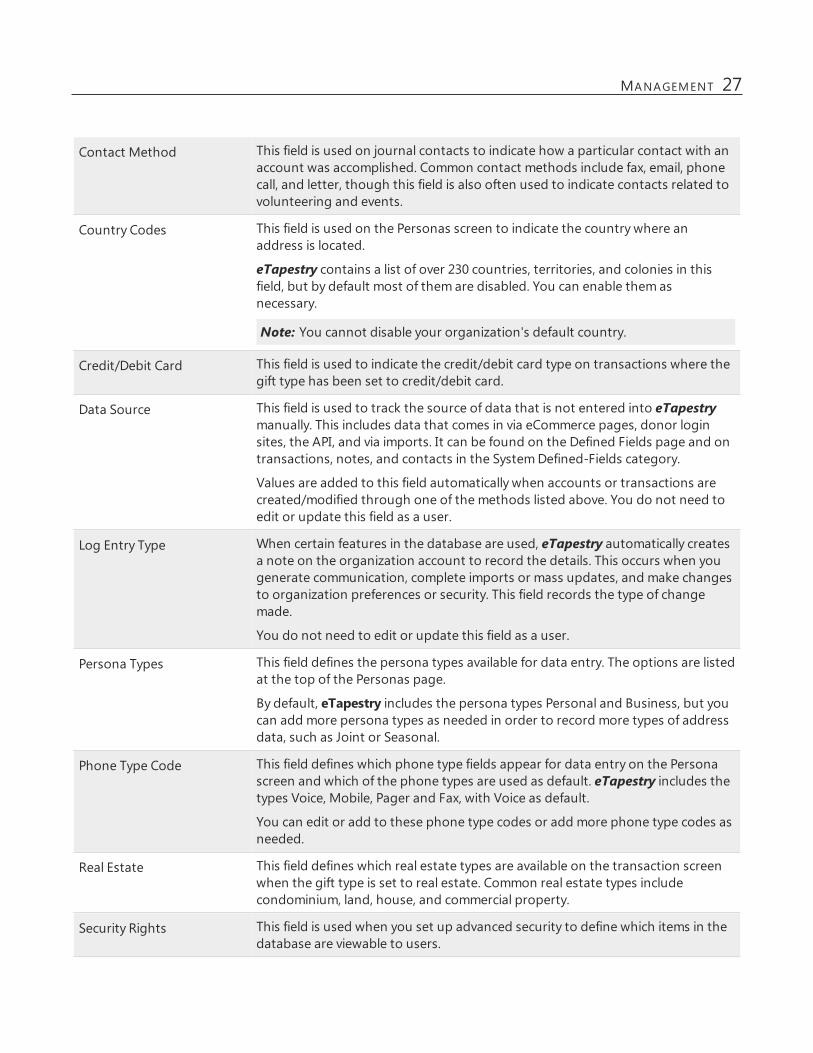
Contact Method This field is used on journal contacts to indicate how a particular contact with anaccount was accomplished. Common contact methods include fax, email, phonecall, and letter, though this field is also often used to indicate contacts related tovolunteering and events.
Country Codes This field is used on the Personas screen to indicate the country where anaddress is located.
eTapestry contains a list of over 230 countries, territories, and colonies in thisfield, but by default most of them are disabled. You can enable them asnecessary.
Note: You cannot disable your organization's default country.
Credit/Debit Card This field is used to indicate the credit/debit card type on transactions where thegift type has been set to credit/debit card.
Data Source This field is used to track the source of data that is not entered into eTapestrymanually. This includes data that comes in via eCommerce pages, donor loginsites, the API, and via imports. It can be found on the Defined Fields page and ontransactions, notes, and contacts in the SystemDefined-Fields category.
Values are added to this field automatically when accounts or transactions arecreated/modified through one of the methods listed above. You do not need toedit or update this field as a user.
Log Entry Type When certain features in the database are used, eTapestry automatically createsa note on the organization account to record the details. This occurs when yougenerate communication, complete imports or mass updates, and make changesto organization preferences or security. This field records the type of changemade.
You do not need to edit or update this field as a user.
Persona Types This field defines the persona types available for data entry. The options are listedat the top of the Personas page.
By default, eTapestry includes the persona types Personal and Business, but youcan add more persona types as needed in order to record more types of addressdata, such as Joint or Seasonal.
Phone Type Code This field defines which phone type fields appear for data entry on the Personascreen and which of the phone types are used as default. eTapestry includes thetypes Voice, Mobile, Pager and Fax, with Voice as default.
You can edit or add to these phone type codes or add more phone type codes asneeded.
Real Estate This field defines which real estate types are available on the transaction screenwhen the gift type is set to real estate. Common real estate types includecondominium, land, house, and commercial property.
Security Rights This field is used when you set up advanced security to define which items in thedatabase are viewable to users.
MANAGEMENT 27

User-Defined FieldsUser-defined fields are fields that are not included by default in your database but that yourorganization needs to track additional information not captured in standard fields. You can create asmany user-defined fields as you need. User-defined fields can apply to accounts, or to specifictransactions like gifts or notes.
Tip: For best practice information about user-defined fields, refer to eTapestry Best Practices: User-Defined Fields.
Add a user-defined field1. From Management, click User-Defined Fields.2. Like queries, reports, and communication templates, defined fields must be placed into
categories to help keep your database organized in a meaningful way. eTapestry includes onlyone defined-field category called Base by default. However, you can create as many defined-field categories as you need. You can also move fields from one category to another. To create anew category, click New Category from the Tasks menu.
3. Once you have chosen the category for your new field, click the category to select it. Click NewDefined Field under Tasks.
4. On Step 1, complete the following information.
l On the Name field, enter a unique and descriptive name for the field. You can edit thename of the field after you create it.
l On the Description field, it can be helpful to enter a longer description of the field tohelp other users in your organization when they use the field.
l On the Data Type field, select the type of data you want to track in this field.l Text: Use this type for fields that will contain letters and numbers. For example, thisdata type is well-suited for an Account Type field.
l Date: Use this type for fields that contain full dates. Fields with this data type canonly accept dates in the mm/dd/yyyy or dd/mm/yyyy (European locales) format. Acommon field of this type is Membership Expiration Date.
l Month, Day (mm/dd): Use this type for fields that will contain only month and day.Fields with this data type can only accept dates in the mm/dd or dd/mm (Europeanlocales) format. Common examples are birthday or other calendar dates wherecapturing the specific year is not necessary.
l Number: Use number for fields that will contain only numbers. Fields with this datatype can accept decimal or whole numbers, which can be positive or negative.Number fields cannot accept text. Common examples include Volunteer Hours orNumber of Tickets for ticket purchases. You can query on number fields to find all
28 CHAPTER 1
items with numbers within a certain range, and number fields can be totaled inreports and communication.
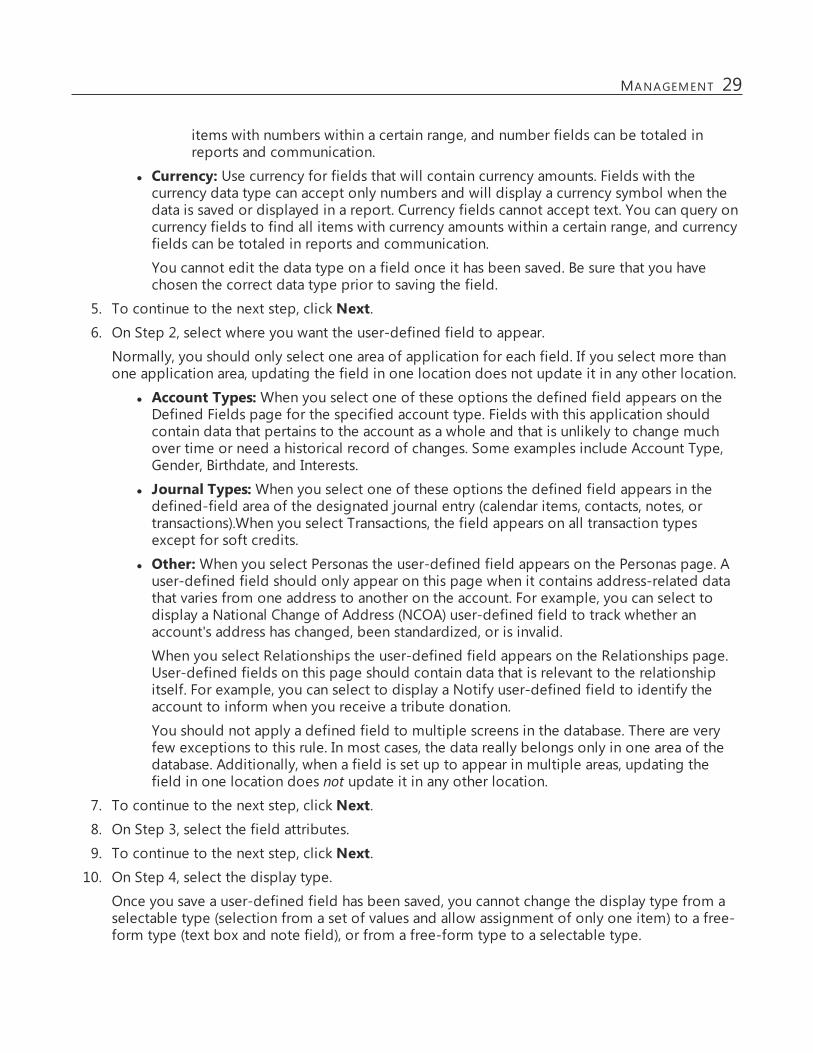
l Currency: Use currency for fields that will contain currency amounts. Fields with thecurrency data type can accept only numbers and will display a currency symbol when thedata is saved or displayed in a report. Currency fields cannot accept text. You can query oncurrency fields to find all items with currency amounts within a certain range, and currencyfields can be totaled in reports and communication.
You cannot edit the data type on a field once it has been saved. Be sure that you havechosen the correct data type prior to saving the field.
5. To continue to the next step, click Next.6. On Step 2, select where you want the user-defined field to appear.
Normally, you should only select one area of application for each field. If you select more thanone application area, updating the field in one location does not update it in any other location.
l Account Types:When you select one of these options the defined field appears on theDefined Fields page for the specified account type. Fields with this application shouldcontain data that pertains to the account as a whole and that is unlikely to change muchover time or need a historical record of changes. Some examples include Account Type,Gender, Birthdate, and Interests.
l Journal Types:When you select one of these options the defined field appears in thedefined-field area of the designated journal entry (calendar items, contacts, notes, ortransactions).When you select Transactions, the field appears on all transaction typesexcept for soft credits.
l Other:When you select Personas the user-defined field appears on the Personas page. Auser-defined field should only appear on this page when it contains address-related datathat varies from one address to another on the account. For example, you can select todisplay a National Change of Address (NCOA) user-defined field to track whether anaccount's address has changed, been standardized, or is invalid.
When you select Relationships the user-defined field appears on the Relationships page.User-defined fields on this page should contain data that is relevant to the relationshipitself. For example, you can select to display a Notify user-defined field to identify theaccount to inform when you receive a tribute donation.
You should not apply a defined field to multiple screens in the database. There are veryfew exceptions to this rule. In most cases, the data really belongs only in one area of thedatabase. Additionally, when a field is set up to appear in multiple areas, updating thefield in one location does not update it in any other location.
7. To continue to the next step, click Next.8. On Step 3, select the field attributes.
9. To continue to the next step, click Next.10. On Step 4, select the display type.
Once you save a user-defined field has been saved, you cannot change the display type from aselectable type (selection from a set of values and allow assignment of only one item) to a free-form type (text box and note field), or from a free-form type to a selectable type.
MANAGEMENT 29

l Selection from a set of values: Also referred to as a multi-select field, this type of fieldappears as a set of checkboxes and allows users to select multiple values on the field. Forexample, you might create a Volunteer Availability field with the values Day, Evening, andWeekend so a volunteer can indicate that they are available at more than one of thosetimes.
l Allow assignment of only one item: Also referred to as a single-select field, this type offield appears as a drop-down menu and allows users to select only one value in the field.For example, you might create an Account Type field with the values Individual, Business,and Foundation. An account can only be one of those three choices, so a single-select fieldworks well.
l Text Box: A text box allows the user to type in a single line of data. For example, youmight create a field on the Journal Contact screen for Volunteer Hours, where the usercould type how much time a volunteer worked during a session. Text box fields must obeythe data type. For example, if the data type is set to date, only dates in mm/dd/yyyyformat can be entered.
l Note Field: A note field allows the user to enter large amounts of data with multiple lines.For example, you might create a field on the constituent's Defined Fields page used torecord how the constituent came to be involved with your organization. Because thiscould have several lines of text, you might use a note box display type for that field. Notefields must obey the data type. For example, if the data type is set to date, only dates inmm/dd/yyyy format can be entered.
11. To continue to the next step, click Next.12. If you use advanced security, in step 5 make any necessary security selections to control which
users can see the field.
13. To continue to the next step, click Next.14. On Step 6, you add values to fields of selectable types (selection from a set of values and allow
assignment of only one item). If you set the display type to one of the free-form displays, youdo not need to create values and can proceed to the Finish step.
A selectable field must have some values listed in it in order to appear on screen for data entry.If you create a selectable field and do not create any values for it, the field will not appearanywhere in the database.
To create a value, type the value name into the Name field, enter a Description if you like, andclick Add Value. Continue adding values following those steps until you have all the values youneed for the field. If you make a mistake on a value, click Delete underneath the value. Once yousave this field, you will not be able to delete any values, although you will be able to renamethem or mark them as inactive if needed. To change the order of the values, drag and drop thevalues from the list to your desired order.
15. To create the field, click Save and Finish.
Create a tribute type UDF for transactionsFor general information about how to add a user-defined field, refer to Add a user-defined field onpage 28.
30 CHAPTER 1

1. From Management, click User-Defined Fields.2. Select the Base category.3. Click New Defined Field under Tasks.4. On Step 1, complete the following information.
l On the Name field, enter the name "Tribute Type."l On the Description field, enter a longer description of the field to help other users in yourorganization when they use the field.
l On the Data Type field, select Text.5. Click Next.6. On Step 2, select Transactions. This applies the field to journal types that are transactions, so that
the field appears on all transaction types except for soft credits.
7. Click Next.8. On Step 3, select the field attributes.
9. Click Next.10. On Step 4, select Allow assignment of only one item as the display type.
11. Click Next.12. If you use advanced security, in step 5 make any necessary security selections to control which
users can see the field.
13. Click Next.14. Add values such as "In honor of," "In memory of," and "In celebration of."
To create a value, type the value name into the Name field, enter a Description if you like, andclick Add Value. Continue adding values following those steps until you have all the values youneed for the field. If you make a mistake on a value, click Delete underneath the value. Once yousave this field, you will not be able to delete any values, although you will be able to renamethem or mark them as inactive if needed. To change the order of the values, drag and drop thevalues from the list to your desired order.
15. To create the field, click Save and Finish.
Edit aUser-Defined FieldYou cannot delete user-defined fields, and you cannot edit some aspects of the field after the field iscreated. However, you can disable defined fields and values, rename defined fields and values, addmore values to a field, and move defined-field values from one field to another.
Tip: For best practice information about user-defined fields, refer eTapestry Best Practices: User-Defined Fields.
MANAGEMENT 31

Disable/Enable User-Defined Fields and ValuesWhen you disable a defined field or value, it no longer appears on any screens in the database. Youcannot create new queries on a field a value that is currently disabled, nor can you add a disabled fieldor value to a custom report. You can still view disabled fields and values on screens where they alreadyhave data stored in them, and queries and reports that had the field or value added to them while itwas enabled still use/display the existing data in the field or value. You can also re-enable a field thathas been disabled.
1. From Management, click User-Defined Fields. The Edit User-Defined Field Categories pageappears.
2. Click a category to select it. The Edit User-Defined Field Category page appears.
3. On the list of fields in this category, you can see if the field is enabled or disabled. To disable afield, click Enabled under the field. The label changes to Disabled, and the field appears grayedout.
4. To enable a disabled field, click Disabled. To see all disabled fields, click Show Disabled Fieldsunder Tasks.
You can also disable and enable values on a multi-select or single-select defined field.
1. From Management, click User-Defined Fields. The Edit User-Defined Field Categories pageappears.
2. Click a category to select it. The Edit User-Defined Field Category page appears.
3. Click the field for which you want to edit values. The Field screen appears.
4. The selection options for the field appear on the list. Under each option, you can see if a value isenabled or disabled. To see disabled values, click Show Disabled Values under Values.
5. To disable a value, click Enabled under the value. To enable a disabled value, click Disabledunder the value.
6. Click Save and Finish to save your changes.
Rename User-Defined Fields and ValuesYou can rename a user-defined field or any of its values. Renaming a field or value will rename it onevery screen - including those screens that already have data in the field or have the value selected.
1. From Management, click User-Defined Fields. The Edit User-Defined Field Categories pageappears.
2. Click on a category to select it. The Edit User-Defined Field Category page appears.
3. Click the field to open it.
4. Navigate to Step 1 in the wizard.
5. In the Name field, enter the new name.6. Click Save and Finish to save the new name.
You can also rename values on multi- or single-select fields.
32 CHAPTER 1

1. From Management, click User-Defined Fields. The Edit User-Defined Field Categories pageappears.
2. Click on a category to select it. The Edit User-Defined Field Category page appears.
3. Click the field to open it. Step 6 on the wizard appears.
4. Click the value you want to open. The value appears on the Edit Value section at the top of thescreen.
5. In the Name field, enter the new value.6. Click Save and Finish to save the new name.
Add Values to an Existing User-Defined FieldYou can add more values to a multi- or single-select user defined field at any time.
1. From Management, click User-Defined Fields. The Edit User-Defined Field Categories pageappears.
2. Click on a category to select it. The Edit User-Defined Field Category page appears.
3. Click the field to open it.
4. On the Name field, enter the new value.5. Click Add Value.6. Click Save and Finish to save the new value.
Move User-Defined Field ValuesYou can move values from one user-defined field to another. For example, if you have two similarfields, you might decide that you want to consolidate them into one field and move the existingvalues.
1. From Management, click User-Defined Fields. The Edit User-Defined Field Categories pageappears.
2. Click a category to select it. The Edit User-Defined Field Category page appears.
3. Click the field you want to edit. The Values screen appears.
4. ClickMove Values under Values. The Move Items screen appears.5. Under Select Values to Move, check the values you want to move. You can select any number of
values you want. Under Move Them to Which Field?, select the existing user-defined field whereyou want these values to move.
6. ClickMove to save your changes.
Note: If you move all of the values from a selectable field, that field no longer appears on screen fordata entry.
MANAGEMENT 33

DefinedField SetsDefined field sets allow you to create groups of user-defined fields without the need to manually setup each field. Defined field sets are pre-populated according to database management best practices.You can use these sets as they are, or personalize them to better fit the needs of your organization.
Add Defined Field Sets1. From Management, click User-Defined Fields. The Edit User-Defined Field Categories page
appears.
2. Under Defined Field Sets, click Add Defined-Field Sets. The Defined Field Sets screen appears.3. To select a defined field set, click the name of it. A list all defined fields for that set appears.
4. By default, all fields and options are selected for you to import. To exclude a field you do notneed, clear its checkbox. When you exclude all options for a field, the field does not create.
You can cannot exclude fields from all sets. For example, you cannot exclude fields from theVolunteer Fields or For Impact Fields defined sets.
5. To add the defined field set, click Create under Tasks or click Import.
ConsentThe General Data Protection Regulation (GDPR) is an EU law that will be enforceable from 25th May2018, and in the UK will replace the ageing Data Protection Act. It is designed to both strengthen andharmonise data protection across EU member states, and is directly applicable to all organisations‘established’ in the EU, irrespective of whether the actual data processing takes place in the EU or not.
Note: Even if not established in an EU country, certain organisations with substantial activities in theEU will need to comply with GDPR. Please refer to our infographic Could You Be Subject to GDPR?for further guidance on whether or not GDPR may apply to your organisation.
Such organisations that are subject to GDPR and collect, store or process personal data must complywith GDPR’s Data Protection Principles and other conditions of processing. New obligations on datacontrollers include expanded data subject rights, mandatory data breach notification, an enhancedfocus on accountability and the appointment of Data Protection Officers. Personal data must still beprocessed fairly and lawfully, justified by one of six legal bases that have remained substantially similarbetween the Data Protection Act and GDPR, including with the data subject’s consent.
Arguably the most significant change, however, is the requirement that a data subject’s consent toprocess their data must now be "unambiguous" and given via a "clear, affirmative action". Thepenalties are also set to change, standing at a maximum of €20,000,000 or 4% of global revenue;whichever is higher.
For a more in depth discussion of GDPR’s operational effects, please read Blackbaud’s datasheetImportant Impacts of GDPR. GDPR requires organisations processing personal data to implementsignificant operational reform. Blackbaud has designed the following solution functionality to assistour customers in achieving this reform.
34 CHAPTER 1

For more information about GDPR, see Blackbaud GDPR.
In order to capture a constituent’s consent to your organization’s processing activities in eTapestry, werecommend the use of user defined fields to track communication preferences for different channels.
These fields should reflect the current status of a constituent's consent. The constituent's Journal can beused to track historical consent. Additionally, though perhaps not required for compliance withexisting privacy laws, you may wish to collect further preferences from constituents, such as specificcommunication pieces they want to receive, frequency of communication, or preferred channel.
The consent and communication preferences can then be used in eTapestry queries to select whichconstituents to send communications to.
Import Consent Fields Defined Field SetDefined field sets allow you to create groups of user-defined fields without the need to manually setup each field. Defined field sets are pre-populated according to database management best practices.You can use these sets as they are, or personalize them to better fit the needs of your organization.
MANAGEMENT 35

UnderManagement, User Defined Fields, select Add Defined Field Sets. On the Defined Field Setsscreen, select Consent Fields under Advanced. A list of all the defined fields and queries for theConsent Field set appears.
To add the defined field set, click Import Consent Set.
Create User Defined Fields that comply with Consent settings1. From Management, select User Defined Fields. The Edit User Defined Field Categories page
appears.
36 CHAPTER 1

2. Once you have chosen or created the category for the new field, click New Defined Fields underTasks.
Note: You cannot edit an existing field and apply Consent settings. You must create a new userdefined field.
3. Complete the information on the Basic Information step. For more information, see Add a user-defined field.
4. On the Field Application step, select the checkbox on the Consent tile.5. Once you select the Consent checkbox, the areas of application for this field will be limited to
Constituents, Contacts, Notes, and Transactions, as well as Participations for organizations withPersonal Fundraising enabled. You will not be able to change this option once the field is saved.
6. Click Next. On this step, select the attributes you would like your field to have.A Consent field cannot be marked as a required field. Consent fields should only be populatedwhen a constituent expressly communicates consent preferences.
7. SelectWould you like to display this field's name when included in the Account Header ifyou would like to view the name of the Consent field if you select to include the value in theheader.
8. Click Next. On the Display Types step, if you have selected the Consent checkbox, then theAllow assignment of only one item option is automatically selected, and you will not be ableto select another display type. Fields marked as Consent fields are setup to only allow you toselect one value from your field. The field displays a drop down and allows you to select from alist of values that you add to the database.
9. To continue to the next step, click Next.10. If you use advanced security, in Step 5 make any necessary security selections to control which
users can see the field.
11. To continue to the next step, click Next.12. On Step 6, you add values to fields of selectable types (selection from a set of values and allow
assignment of only one item). A selectable field must have some values listed in it in order toappear on screen for data entry.
To create a value, type the value name into the Name field. For example, you may way to enter"Yes" and "No" if you create this field to gather a user's consent to send communication to them.Enter a description if you like, and click Add Value.Continue adding values following those steps until you have all the values you need for the field.If you make a mistake on a value, click Delete underneath the value. Once you save this field, youwill not be able to delete any values, although you will be able to rename them or disable themif needed. To change the order of the values, drag and drop the values from the list to yourdesired order.
13. To create the field, click Save and Finish.
MANAGEMENT 37

CaptureConsent preferencesA constituent's consent preferences can be captured in eTapestry in the following areas:
l Account recordl Importl DIY Formsl Cartl Personal Fundraisingl everydayhero integration
Update Consent fields on constituent records from a Note or Contact
Note: You cannot update Consent fields on a constituent level. You can only update Consent fieldsthrough new Notes, Contacts, Transactions, or Participations. This is to maintain the history of aconstituent's communication preferences on their Journal page.
If you need to update a constituent’s Consent fields, you can add a Note or Contact with the Consentfields completed so that constituent's current communication preferences appear on their record.
You cannot edit Consent fields on existing Notes, Contacts, Transactions, or Participations. To update aconstituent's communication preferences, you will need to add new Notes or Contacts to their Journal.eTapestry suggests that you do not delete Notes, Contacts, Transactions, or Participations withpopulated Consent fields, so that historical consent information will not be impacted.
Once you have added a Note or Contact with Consent fields populated, this information will appear atthe account level on the Defined Fields tab of the constituent's account.If you add Consent fields to a DIY form, constituents can enter their communication preferences at thetime a Gift or Contact is submitted. This information will be recorded on the Gift or Contact created intheir Journal and will update their Consent fields on the constituent level.
Add a Note with Consent fields1. From a constituent’s record, click Journal.2. Click Add. The Add Journal Entry screen appears.3. Select Note. The New Note screen appears.
Tip: You can also access this screen from the quick add menu on the search results screen.
4. Select Final if you only want your database administrator to have access to edit or delete thenote.
5. In the Date field, enter the date for the note. This is normally the date you enter the note, whichdefaults to the current date.
6. Under the user defined field category where you have added your Consent fields, select thename of the Consent field. In the drop down menu, select the value. Multiple Consent fields canbe populated at the same time.
7. Click Save And to save the note to the constituent's account.
38 CHAPTER 1
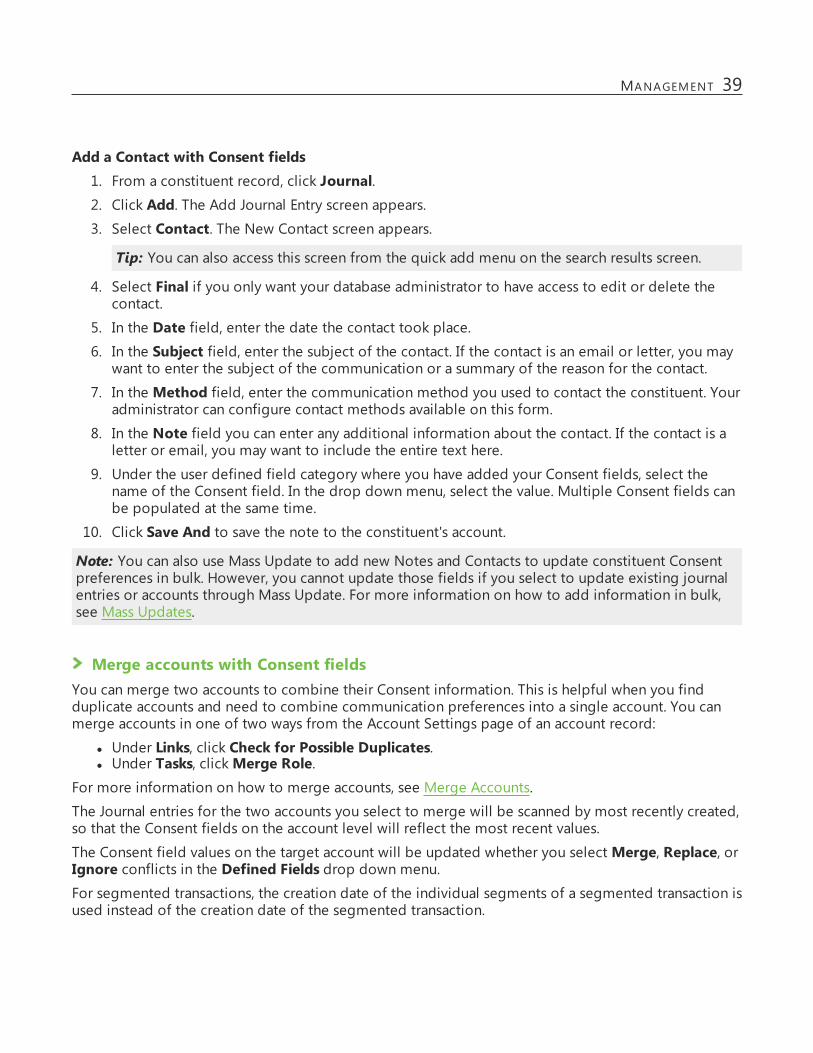
Add a Contact with Consent fields1. From a constituent record, click Journal.2. Click Add. The Add Journal Entry screen appears.3. Select Contact. The New Contact screen appears.
Tip: You can also access this screen from the quick add menu on the search results screen.
4. Select Final if you only want your database administrator to have access to edit or delete thecontact.
5. In the Date field, enter the date the contact took place.6. In the Subject field, enter the subject of the contact. If the contact is an email or letter, you may
want to enter the subject of the communication or a summary of the reason for the contact.
7. In the Method field, enter the communication method you used to contact the constituent. Youradministrator can configure contact methods available on this form.
8. In the Note field you can enter any additional information about the contact. If the contact is aletter or email, you may want to include the entire text here.
9. Under the user defined field category where you have added your Consent fields, select thename of the Consent field. In the drop down menu, select the value. Multiple Consent fields canbe populated at the same time.
10. Click Save And to save the note to the constituent's account.
Note: You can also use Mass Update to add new Notes and Contacts to update constituent Consentpreferences in bulk. However, you cannot update those fields if you select to update existing journalentries or accounts through Mass Update. For more information on how to add information in bulk,see Mass Updates.
Merge accounts with Consent fieldsYou can merge two accounts to combine their Consent information. This is helpful when you findduplicate accounts and need to combine communication preferences into a single account. You canmerge accounts in one of two ways from the Account Settings page of an account record:
l Under Links, click Check for Possible Duplicates.l Under Tasks, clickMerge Role.
For more information on how to merge accounts, see Merge Accounts.
The Journal entries for the two accounts you select to merge will be scanned by most recently created,so that the Consent fields on the account level will reflect the most recent values.
The Consent field values on the target account will be updated whether you selectMerge, Replace, orIgnore conflicts in the Defined Fields drop down menu.For segmented transactions, the creation date of the individual segments of a segmented transaction isused instead of the creation date of the segmented transaction.
MANAGEMENT 39
Also, Consent field values on journal entries for Constituents with a linked soft credit to a hardtransaction will be ignored. The Consent field values apply to the hard transaction account.
User security rights will not impact a user's ability to merge Consent field values. Even if a user doesnot have rights to view Consent fields, the Consent field values will still be updated if they mergeaccounts.
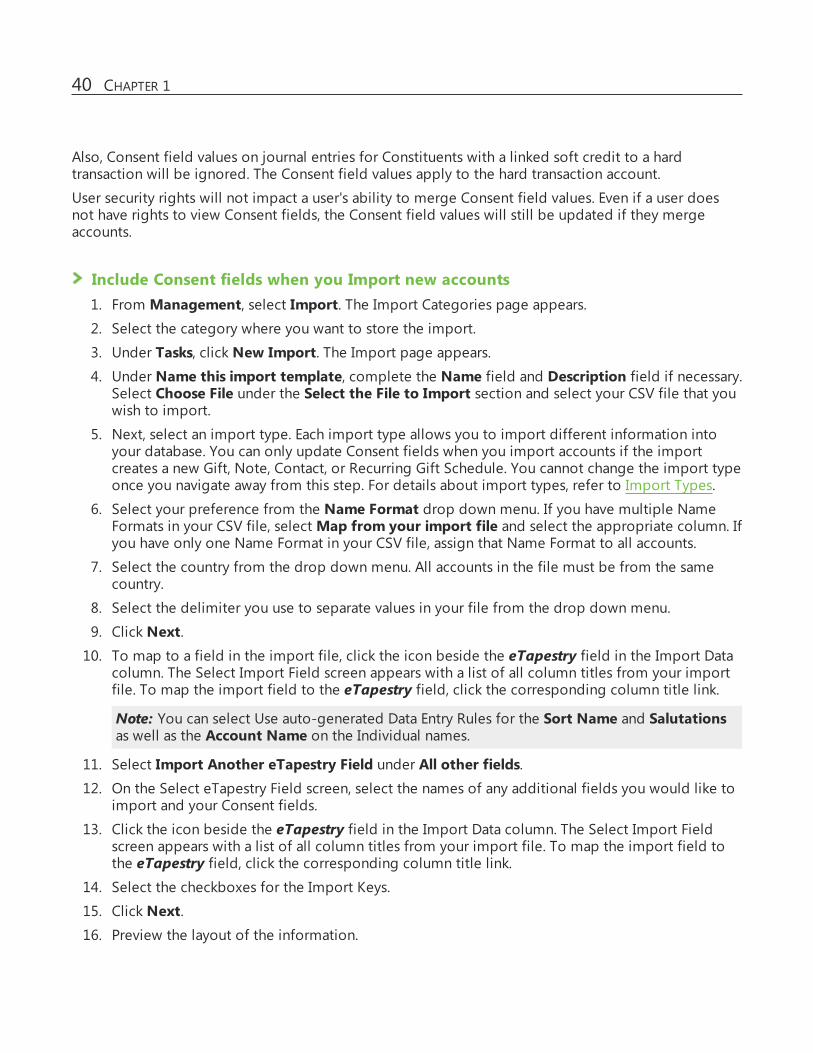
Include Consent fields when you Import new accounts1. From Management, select Import. The Import Categories page appears.2. Select the category where you want to store the import.
3. Under Tasks, click New Import. The Import page appears.4. Under Name this import template, complete the Name field and Description field if necessary.
Select Choose File under the Select the File to Import section and select your CSV file that youwish to import.
5. Next, select an import type. Each import type allows you to import different information intoyour database. You can only update Consent fields when you import accounts if the importcreates a new Gift, Note, Contact, or Recurring Gift Schedule. You cannot change the import typeonce you navigate away from this step. For details about import types, refer to Import Types.
6. Select your preference from the Name Format drop down menu. If you have multiple NameFormats in your CSV file, selectMap from your import file and select the appropriate column. Ifyou have only one Name Format in your CSV file, assign that Name Format to all accounts.
7. Select the country from the drop down menu. All accounts in the file must be from the samecountry.
8. Select the delimiter you use to separate values in your file from the drop down menu.
9. Click Next.10. To map to a field in the import file, click the icon beside the eTapestry field in the Import Data
column. The Select Import Field screen appears with a list of all column titles from your importfile. To map the import field to the eTapestry field, click the corresponding column title link.
Note: You can select Use auto-generated Data Entry Rules for the Sort Name and Salutationsas well as the Account Name on the Individual names.
11. Select Import Another eTapestry Field under All other fields.12. On the Select eTapestry Field screen, select the names of any additional fields you would like to
import and your Consent fields.
13. Click the icon beside the eTapestry field in the Import Data column. The Select Import Fieldscreen appears with a list of all column titles from your import file. To map the import field tothe eTapestry field, click the corresponding column title link.
14. Select the checkboxes for the Import Keys.
15. Click Next.16. Preview the layout of the information.
40 CHAPTER 1
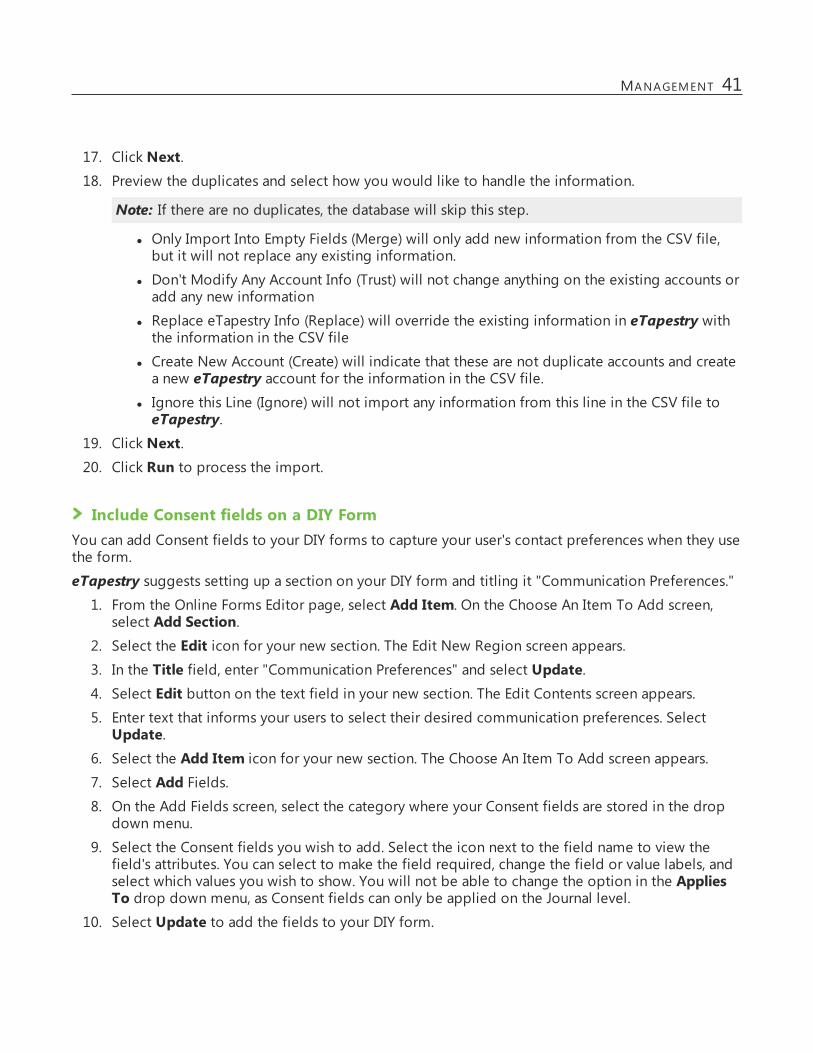
17. Click Next.18. Preview the duplicates and select how you would like to handle the information.
Note: If there are no duplicates, the database will skip this step.
l Only Import Into Empty Fields (Merge) will only add new information from the CSV file,but it will not replace any existing information.
l Don't Modify Any Account Info (Trust) will not change anything on the existing accounts oradd any new information
l Replace eTapestry Info (Replace) will override the existing information in eTapestry withthe information in the CSV file
l Create New Account (Create) will indicate that these are not duplicate accounts and createa new eTapestry account for the information in the CSV file.
l Ignore this Line (Ignore) will not import any information from this line in the CSV file toeTapestry.
19. Click Next.20. Click Run to process the import.
Include Consent fields on a DIY FormYou can add Consent fields to your DIY forms to capture your user's contact preferences when they usethe form.
eTapestry suggests setting up a section on your DIY form and titling it "Communication Preferences."
1. From the Online Forms Editor page, select Add Item. On the Choose An Item To Add screen,select Add Section.
2. Select the Edit icon for your new section. The Edit New Region screen appears.3. In the Title field, enter "Communication Preferences" and select Update.4. Select Edit button on the text field in your new section. The Edit Contents screen appears.5. Enter text that informs your users to select their desired communication preferences. Select
Update.6. Select the Add Item icon for your new section. The Choose An Item To Add screen appears.
7. Select Add Fields.8. On the Add Fields screen, select the category where your Consent fields are stored in the drop
down menu.
9. Select the Consent fields you wish to add. Select the icon next to the field name to view thefield's attributes. You can select to make the field required, change the field or value labels, andselect which values you wish to show. You will not be able to change the option in the AppliesTo drop down menu, as Consent fields can only be applied on the Journal level.
10. Select Update to add the fields to your DIY form.
MANAGEMENT 41
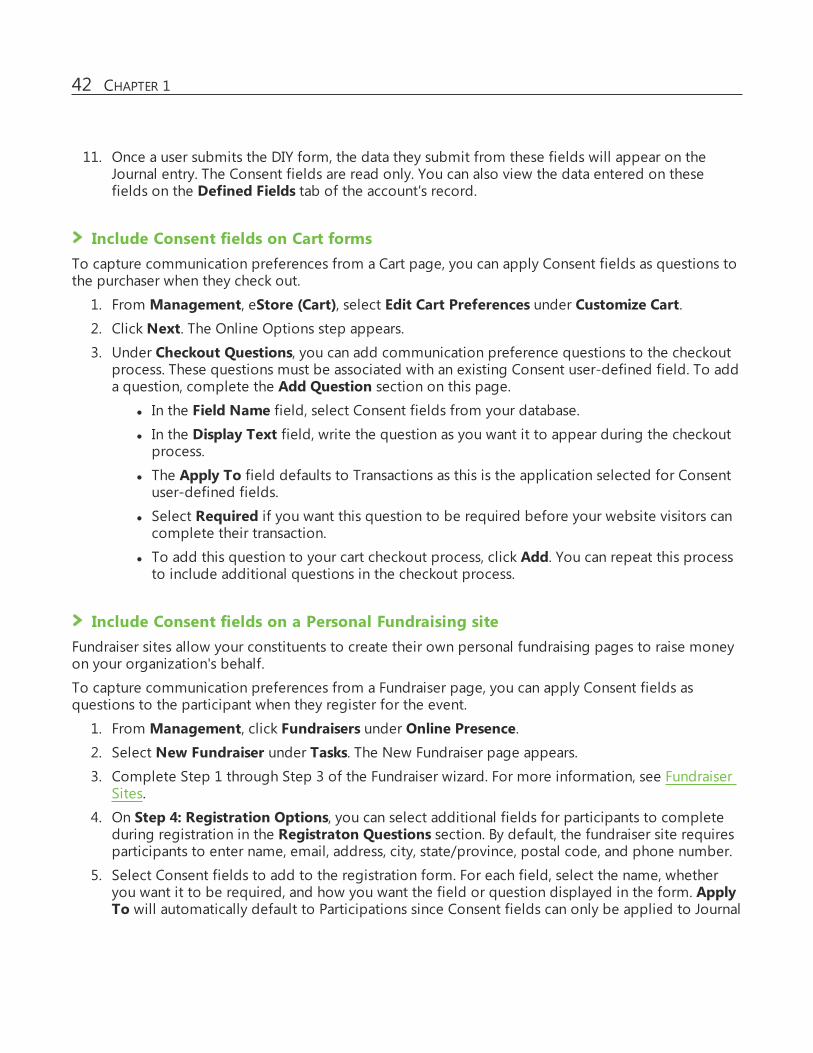
11. Once a user submits the DIY form, the data they submit from these fields will appear on theJournal entry. The Consent fields are read only. You can also view the data entered on thesefields on the Defined Fields tab of the account's record.
Include Consent fields on Cart formsTo capture communication preferences from a Cart page, you can apply Consent fields as questions tothe purchaser when they check out.
1. From Management, eStore (Cart), select Edit Cart Preferences under Customize Cart.2. Click Next. The Online Options step appears.3. Under Checkout Questions, you can add communication preference questions to the checkout
process. These questions must be associated with an existing Consent user-defined field. To adda question, complete the Add Question section on this page.
l In the Field Name field, select Consent fields from your database.
l In the Display Text field, write the question as you want it to appear during the checkoutprocess.
l The Apply To field defaults to Transactions as this is the application selected for Consentuser-defined fields.
l Select Required if you want this question to be required before your website visitors cancomplete their transaction.
l To add this question to your cart checkout process, click Add. You can repeat this processto include additional questions in the checkout process.
Include Consent fields on a Personal Fundraising siteFundraiser sites allow your constituents to create their own personal fundraising pages to raise moneyon your organization's behalf.
To capture communication preferences from a Fundraiser page, you can apply Consent fields asquestions to the participant when they register for the event.
1. From Management, click Fundraisers under Online Presence.2. Select New Fundraiser under Tasks. The New Fundraiser page appears.3. Complete Step 1 through Step 3 of the Fundraiser wizard. For more information, see Fundraiser
Sites.
4. On Step 4: Registration Options, you can select additional fields for participants to completeduring registration in the Registraton Questions section. By default, the fundraiser site requiresparticipants to enter name, email, address, city, state/province, postal code, and phone number.
5. Select Consent fields to add to the registration form. For each field, select the name, whetheryou want it to be required, and how you want the field or question displayed in the form. ApplyTo will automatically default to Participations since Consent fields can only be applied to Journal
42 CHAPTER 1
entries.
6. Click Add to add the fields to the form. You can add as many fields as you want.
Collect consent through everydayhero integrationNew accounts are created in eTapestry when everydayhero ID and standard duplicate checks returnno matches. The EDH Communication Preference user defined field on the user’s Defined Fields tabwill be updated with the consent preferences chosen in everydayhero. If an existing constituentcomes through everydayhero and does not select to opt-in, there will be no change to theirpreferences. If they do opt-in, then the user defined field will be populated with the value “Opt-In”.
Query andviewConsent preferencesConsent and communication preferences can be used in eTapestry queries to select whichconstituents to send communications to and track historical consent preferences. You can also viewthese preferences from a user's Home page and Journal page.
Query on active consent for a specific communication channelConsent fields will appear in multiple field categories, as you can capture Consent field values indifferent locations across eTapestry, but you should query on Consent fields under the UDFs -Constituent category when you want to search on the most current communication preferences. If youneed to look for historic Consent information from journal entries, you can query on Consent fields inother categories.
This query can be used for sending communications such as a mass email. You can always addadditional criteria to further segment.
1. From Queries, select Click Manage Queries. The Query Categories page appears.2. Select the category where you want to store this query.
3. Under the Tasksmenu, select New Query. The Create a New Query page appears.4. Under Query Basics, name the query and complete any other information.5. Set the Starting Query to Base/All Constituents – A.6. Under Results, select Accounts as the Data Return Type.7. Under Criteria Options, selectMatch each criteria.8. Under Browse Fields, select UDFs – Constituent from the drop down menu.
9. Select the name of the Consent field.
10. Select the value you added to reflect that consent has been given or assumed.
11. Click Save and Preview.
MANAGEMENT 43
View Consent fields in Query Preview1. From Queries, clickManage Queries. The Query Categories page appears.2. Select a query category. The Edit Query Category page appears.
3. Under the query you wish to preview, select Preview. The Query Preview page appears.4. To select which columns appear in the preview grid, select Choose columns.5. Browse or search for your Consent fields. Select the checkbox next to the fields you wish to add.
6. Select Apply changes to add these fields to your query preview results.
View Consent fields in ReportsWhen you create a custom report, Consent fields appear as available fields you can report on under theUser Defined Fields: Account and User Defined Fields: Journal field categories.
To view information about custom reports, see Custom Reports.
When you create or edit a custom report, under Report Columns, select a field category in the dropdown menu. To view current consent preferences, you will need to select fields available under theUser Defined Fields: Account field category. To view historical consent preferences, you will need toselect fields under User Defined Fields: Journal.
Customizing the account's Home page to show consent information at a glance1. From Accounts, select Find an Account.2. Search for and select the account name.
3. Select Tiles and Layout.4. Select Custom Tile.5. Click Save.6. On the account’s Home page, find the custom tile.
7. In the Tile Title field, enter “Current Consent Information."8. Select Add Field.9. Select User Defined Fields: Account in the drop down menu.
10. Select all Consent user defined fields.
11. Select the close icon to exit the screen.
12. Select Save.
View Consent preferences on the Journal page1. From Accounts, select Find an Account.2. Search for and select the account name.
3. Select the Journal tab.
44 CHAPTER 1
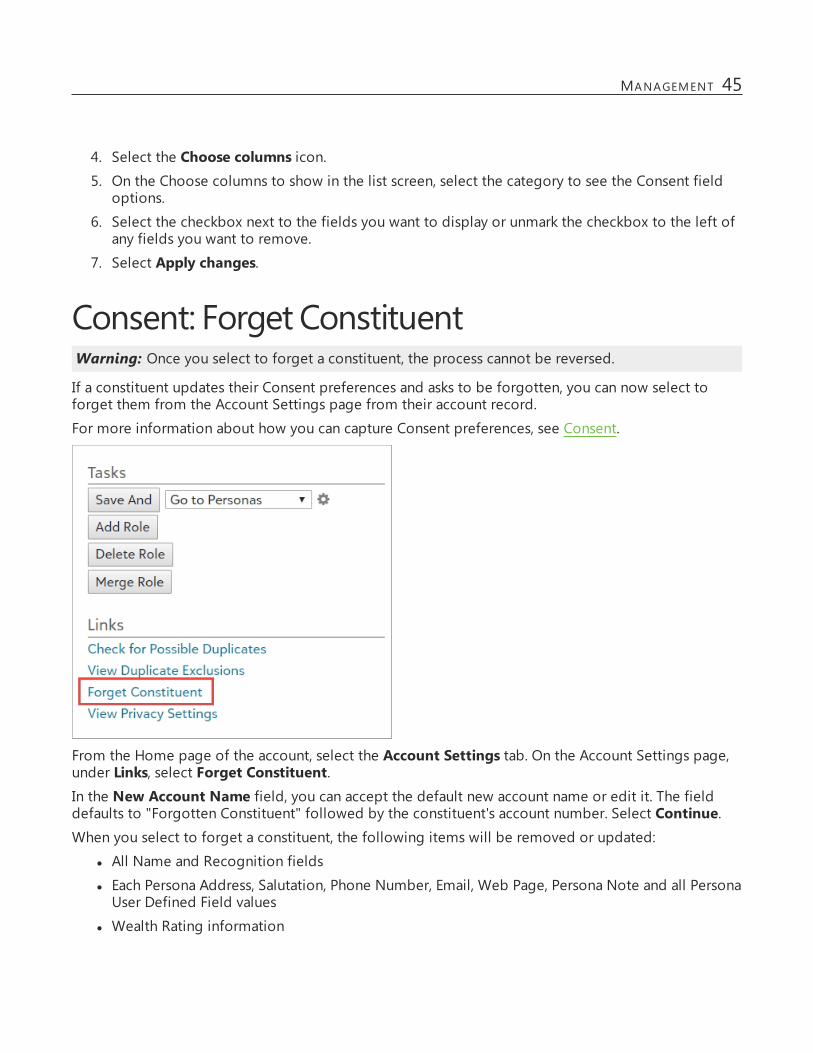
4. Select the Choose columns icon.5. On the Choose columns to show in the list screen, select the category to see the Consent field
options.
6. Select the checkbox next to the fields you want to display or unmark the checkbox to the left ofany fields you want to remove.
7. Select Apply changes.
Consent: Forget ConstituentWarning: Once you select to forget a constituent, the process cannot be reversed.
If a constituent updates their Consent preferences and asks to be forgotten, you can now select toforget them from the Account Settings page from their account record.
For more information about how you can capture Consent preferences, see Consent.
From the Home page of the account, select the Account Settings tab. On the Account Settings page,under Links, select Forget Constituent.In the New Account Name field, you can accept the default new account name or edit it. The fielddefaults to "Forgotten Constituent" followed by the constituent's account number. Select Continue.When you select to forget a constituent, the following items will be removed or updated:
l All Name and Recognition fields
l Each Persona Address, Salutation, Phone Number, Email, Web Page, Persona Note and all PersonaUser Defined Field values
l Wealth Rating information
MANAGEMENT 45

l Social Media Finder information
l All Relationships
l Billing and Shipping information on eStore (Cart) transactions
l eTapestry-generated Journal Notes that contain a name or address information
Note: Personally identifiable information found elsewhere on this account (like the Defined Fieldspage or within journal entries and Gift Aid Declarations) will need to be removed manually.
CreateUDFs to TrackVolunteersWhen you track information about your volunteers, you learn more about them and can use thisknowledge to build stronger relationships.
Tip: We recommend you use the volunteer user-defined field set. For information about how to adda defined field set, refer to Add Defined Field Sets.
Alternatively, you could manually create the recommended fields. If you manually create fields, werecommend you first create a "Volunteer Information" field. Then, add the following fields based onyour organization's needs.
l Volunteer Interest- - Add this as a multi-select field and apply it to the Defined Fields page ofa constituent account. For values, enter areas for which your organization has volunteeropportunities, such as music, children, deliveries, etc.
l Volunteer Skill Level- Add this as multi or single select field. Its values apply to the DefinedFields page of a constituent account. For values, some organizations use numbers and others usedescriptions, such as good or average.
l Volunteer Availability- Add this multi-select field and apply it to the Defined Fields page of aconstituent account. For values, consider times of day such as afternoon and morning. You maywant a second field to for days, such as M-F and weekend.
l Volunteer Job/Project/Event- Add this single select field and apply it to the Defined Fieldspage of a constituent account. For values, enter the specific events and projects.
l Volunteer Team- If your organization use teams, add this single select field and apply it to theDefined Fields page of a constituent account.
l Volunteer Hours- - Add this numeric text field and apply it Journal contacts. When you create areport, you can calculate the total hours.
l Volunteer Contact Method - Create a contact method to use for volunteer-related journalcontact entries. With it, you can create a query to view your volunteer information.
CreateUDFs to TrackGrantsand FoundationsTip: We recommend you use user-defined field sets to help track grant information. Enable theGeneral Fields and Grant Tracking Fields sets. For information about how to add a defined field set,refer to Add Defined Field Sets.
46 CHAPTER 1

Alternatively, you can manually create the recommended user-defined fields.
l Account Type - Use this to indicate whether an account is an individual, foundation, business,etc.
l Grant Priority - Add this field to the Base category. Use this to indicate how important the grantis. Values may include high, low, medium, and other.
l Grant Status - Add this field to the Base category. Use this to indicate the status of your grantrequest. Values may include pending, accepted, or declined.
l Requested Amount - Add this currency field to the Base category. For Journal Types, selectContacts. This field should be a text box.
l Amount Awarded - Add this currency field to the Base category. For Journal Types, selectContacts. This field should be a text box.
l Due Date, Proposal Due Date, Date Report Sent, Date Grant Awarded, Grant ProjectedBegin, and Grant Projected End. - Add date fields to the Base category.
You'll also need to set up a system defined field to track the contact method. Add "Grant" as a valuefor the Contact Method Field. For details, refer to Add and Rename System-Defined Field Values.
Defined FieldsReportseTapestry includes a User-Defined Fields Report and a System-Defined Fields Report, which allow youto see all the defined fields you currently have enabled.
To run the report user-defined field report, from Reports, click eTapestry Standard Reports. Underthe Defined Fields Reports category, click User-Defined Fields Report.To run the report system-defined field report, from Reports, click eTapestry Standard Reports.Under the Defined Fields Reports category, click System-Defined Fields Report.
Campaigns, Funds, andApproachesWhen you add transactions such as donations, pledged, or recurring gifts to the database, you mustspecify how you plan to use the revenue received. For example, a constituent may request you use adonation for a specific purpose or perhaps the gift is in response to a solicitation used to raise fundsfor a specific cause.
Campaigns, funds, and approaches are the way you organize transactions and activity with yourconstituents to better analyze information in reports and queries and track your success towardsspecific goals. Before you begin adding transactions to your database, we recommend that you set upa campaign, funds, and approaches structure.
To update designations and goals for your donations, from Management, click a donation strategy.
Tip: You can also use tiles on your Home dashboard to monitor campaigns, funds and approaches.
MANAGEMENT 47
FundsFunds designate what the purpose of the donation is. A Fund is always a required field when you entera gift. Many organizations create a general fund where unrestricted donations are recorded, andseveral other funds with specific designations, such as a fund for each event and funds for differentprojects that you undertake. Each fund may be associated with multiple campaigns and approaches.
If you plan to export your donations to your accounting software, the fund is where you associate a giftwith the credit and debit accounts recognized by your accounting package. For each fund that you setup, you can associate only one bank account, one income or revenue account, and one receivablesaccount. So if your accountant needs to allocate some donations to an unrestricted income accountand others to a restricted income account, you must create two separate funds.
Add a fund1. From the Management, click Funds. The Funds page appears.2. Under Tasks, click New Fund.The New Fund screen appears.3. In the Name field, enter a descriptive name for the fund.4. In the Description field, you can enter a description to better identify the campaign fund.5. If you intend to export transactions from this fund to your accounting software, enter the
appropriate account numbers for this fund in the Cash Account, Receivables Account, andRevenue Account fields.
6. If you intend to use the Financial Edge export, enter the project ID In the Financial EdgeProject ID field.
7. To create the fund, click Save And.
Disable a FundWhen you no longer need a fund, you can disable it. When you disable a fund it does not appear onthe menu when you enter a gift, but you retain the gift history to that fund. You cannot delete a fund.
To disable a fund, from Management, click Funds. Under the name of the fund, click the Enabled link.The fund disables for your database.
CampaignsCampaigns are the overall goal of a fundraising project. They have a defined start and end date, andusually have a monetary goal. Typical campaigns include annual campaigns and capital campaigns.Most organizations do not have many campaigns, and not all gifts have to be tied to a campaign.
The Campaign field is not required when you add a gift, although your organization can choose tomake it required.
48 CHAPTER 1
Add a Campaign1. From Management, click Campaigns. The Campaigns page appears.2. Under Tasks, click New Campaign.The New Campaign screen appears.3. In the Name field, enter a descriptive name for the campaign.4. In the Description field, you can enter a description to better identify the campaign internally.5. In the Goal field, enter the monetary goal for the campaign.6. In the Quantity field, enter the total number of gifts you have set as a goal for this campaign.7. To create the campaign, click Save And.
Disable a CampaignWhen you no longer need a campaign, you can disable it. When you disable a campaign it does notappear on the menu when you enter a gift, but you retain the gift history to that campaign. You cannotdelete a campaign.
To disable a campaign, from Management, click Campaigns. Under the name of the campaign, clickthe Enabled link. The campaign disables for your database.
Require CampaignsYou can make campaigns required so that when your organization enters gifts a campaign must belinked to each gift. To make the Campaign field required in gift entry screens, from Management,click Campaigns. On the Campaigns page, under Settings, select Require Campaign on Transactions.
ApproachesApproaches are the means you use to raise money for your organization. They normally track thesources your organization uses to generate gifts and the expenses associated with these sources. Theycan include any activity, such as a direct mailing, a phonathon, or a special event. Approaches can helpyou analyze how different types of asks perform with your constituents.
The Approach field is not required when you add a gift, although your organization can choose tomake it required. When you know what specific approach generated a gift, we recommend that youtrack it when you enter that gift.
Add an approach1. From Management, click Approaches. The Approaches page appears.2. Under Tasks, click New Approach. The New Approach screen appears.3. In the Name field, enter a descriptive name for the approach.4. In the Description field, you can enter a description to better identify the approach internally.5. In the Goal field, enter the monetary goal for the approach.
MANAGEMENT 49

6. In the Quantity field, enter the total number of gifts you have set as a goal for this approach.7. To create the approach, click Save And.
Disable an ApproachWhen you no longer need an approach, you can disable it. When you disable an approach it does notappear on the menu when you enter a gift, but you retain the gift history to that approach. You cannotdelete an approach.
To disable or re-enable an approach, from Management, click Approaches. There is an indicatorunder the approach name to indicate if it is enabled or disabled. Click it to switch the status of theapproach.
Require ApproachesYou can make approaches required so that when your organization enters gifts an approach must belinked to each gift. To make the Approach field required in gift entry screens, from Management,click Approaches. On the Approaches page, select Require Approach on Transactions.
ImportImport allows you to add a group of records to your database from a file that you prepare to matchcertain format requirements. You can use import to update contact information for existing accountsor add new accounts with a single gift, recurring gift schedule, note, contact, or declaration. You canalso add a gift, contact, or note to existing accounts by account number. For more information aboutthe types of import available, refer to Import Types on page 50.
Import TypesDuring the import process, you select the type of information you want to import. The import typedetermines what information you can load into your database and what fields are required. You cannotchange the import type for an existing import, so you must start a new import if you select the wrongimport type.
Note: You cannot update existing data on gifts with any import type. To update existing informationin your database, you must perform a mass update. For more information, refer to Mass Updates onpage 101.
Account informationThis basic import allows you to import new constituent accounts or update information for existingaccounts in your database.
50 CHAPTER 1

When you import accounts, make sure you key on Account Name and Persona Type to check forduplicate accounts. You should also key on either the Address or Postal Code field to make sureupdates import to the correct existing accounts.
Required Fields Details
Account Name This field is required for all name formats. For Individuals, you can select to useauto-generated Data Entry Rules or map this field from your import file.
Country Select Country on Step 1 of the import process. Country does not need to be acolumn in your import file, but you should only include addresses from onecountry in your file.
If you need to import addresses from other countries, create a separate importfile and definition for each country.
Last Name (Individuals Only) When you import accounts with Individual set as the name format, include LastName as a column in your import file.
Name Format If you import accounts with the same name format, select a name format onStep 1 of the import process, so you do not have to include it in your importfile.
If you import accounts with different name formats, include theName Formatfield as a column in your import file and specify Individual, Family, or Businessfor each account.
Persona Type If you import accounts with the same persona type, you can enter the personatype on Step 2 of the import process.
If you leave the Persona Type field blank, the default persona type will beapplied to all newly created accounts.
If you import accounts with different persona types, include the Persona Typecolumn in your import file and designate the appropriate type for eachaccount.
Sort Name This field is required for all name formats. For each Sort Name option, you canselect to use auto-generated Data Entry Rules or map this field from yourimport file.
Account information by account numberUse this import to update existing accounts using the account number. You must know and include theaccount number on the source file.
Note: To update or edit Name or Salutation fields for existing accounts, you will need to useanother Account Information template since the Account information by account number templatedoes not include these fields.
To see account numbers for a group of accounts, you can add the Account Number column to yourquery preview and export the results or create a custom report for a query of those accounts.
MANAGEMENT 51

Required Fields Details
Account Number The Account Number column is required in your import file.
Country Select Country on Step 1 of the import process. Country does not need to be acolumn in your import file, but you should only include addresses from onecountry in your file.
If you need to import addresses from other countries, create a separate importfile and definition for each country.
Account information with single giftUse this import to create one-time gifts for new or existing accounts.
When you import gifts for existing accounts, make sure you key on Account Name to check forduplicate accounts by name. You should also key on either the Address or Postal Code field to makesure gifts import to the correct existing accounts.
Do not use this import to update existing gifts or to import recurring gifts or pledges.
Required Fields Details
Account Name This field is required for all name formats. For Individuals, you can select to useauto-generated Data Entry Rules or map this field from your import file.
Country Select Country on Step 1 of the import process. Country does not need to be acolumn in your import file, but you should only include addresses from onecountry in your file.
If you need to import addresses from other countries, create a separate importfile and definition for each country.
Date If you import single gifts with the same date, you can enter it in the Date fieldon Step 2 of the import process.
If you import single gifts with different dates, you will need to include a Datecolumn in your import file.
Fund If you import single gifts with the same fund, you can enter it in the Fund fieldon Step 2 of the import process.
If you import single gifts with different funds, you will need to include the Fundcolumn in your import file.
Last Name (Individuals Only) When importing Individual accounts, include Last Name as a column in yourimport file.
52 CHAPTER 1
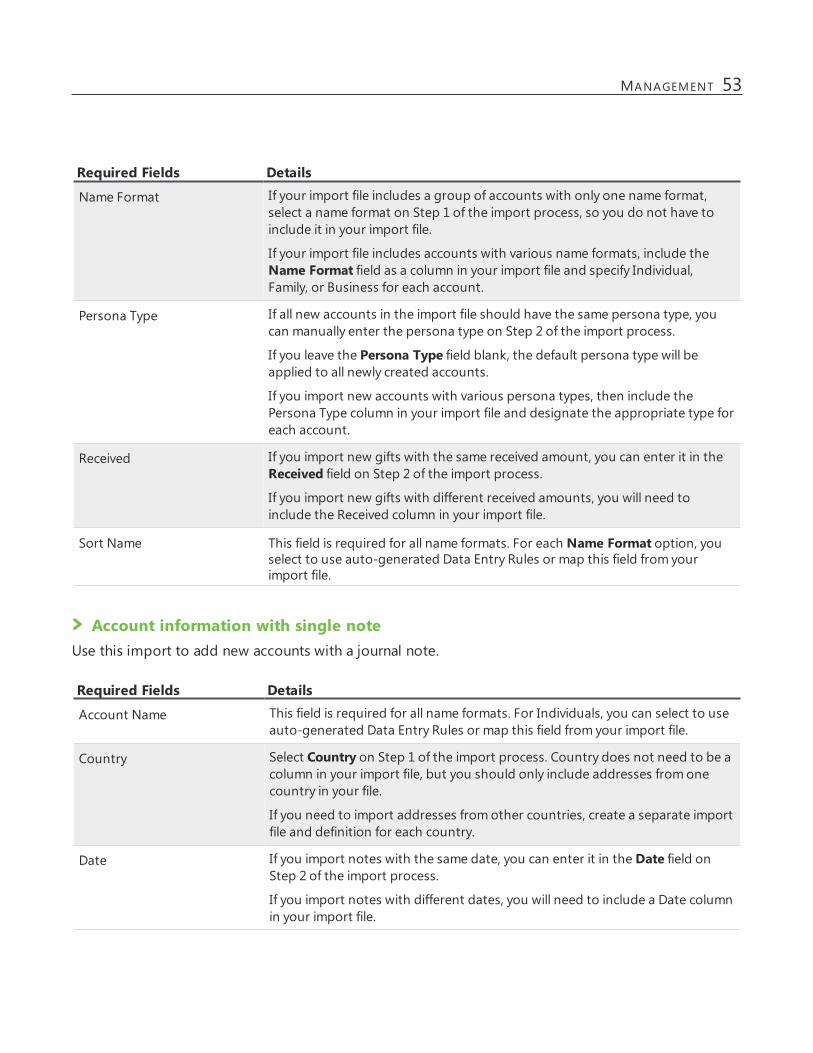
Required Fields Details
Name Format If your import file includes a group of accounts with only one name format,select a name format on Step 1 of the import process, so you do not have toinclude it in your import file.
If your import file includes accounts with various name formats, include theName Format field as a column in your import file and specify Individual,Family, or Business for each account.
Persona Type If all new accounts in the import file should have the same persona type, youcan manually enter the persona type on Step 2 of the import process.
If you leave the Persona Type field blank, the default persona type will beapplied to all newly created accounts.
If you import new accounts with various persona types, then include thePersona Type column in your import file and designate the appropriate type foreach account.
Received If you import new gifts with the same received amount, you can enter it in theReceived field on Step 2 of the import process.
If you import new gifts with different received amounts, you will need toinclude the Received column in your import file.
Sort Name This field is required for all name formats. For each Name Format option, youselect to use auto-generated Data Entry Rules or map this field from yourimport file.
Account information with single noteUse this import to add new accounts with a journal note.
Required Fields Details
Account Name This field is required for all name formats. For Individuals, you can select to useauto-generated Data Entry Rules or map this field from your import file.
Country Select Country on Step 1 of the import process. Country does not need to be acolumn in your import file, but you should only include addresses from onecountry in your file.
If you need to import addresses from other countries, create a separate importfile and definition for each country.
Date If you import notes with the same date, you can enter it in the Date field onStep 2 of the import process.
If you import notes with different dates, you will need to include a Date columnin your import file.
MANAGEMENT 53

Required Fields Details
Last Name (Individuals Only) When importing Individual accounts, include Last Name as a column in yourimport file.
Name Format If you import accounts with only one name format, select a name format onStep 1 of the import process, so you do not have to include it in your importfile.
If you import accounts with various name formats, include theName Formatfield as a column in your import file and specify Individual, Family, or Businessfor each account.
Note If you import accounts with the same note, you can enter it in theNote field onStep 2 of the import process.
If you import accounts with different notes, you will need to include a Notecolumn in your import file.
Persona Type If you import accounts with the same persona type, you can enter the personatype on Step 2 of the import process.
If you leave the Persona Type field blank, the default persona type will beapplied to all newly created accounts.
If you import accounts with various persona types, then include the PersonaType column in your import file and designate the appropriate type for eachaccount.
Sort Name This field is required for all name formats. For each Name Format option, youselect to use auto-generated Data Entry Rules or map this field from yourimport file.
Account information with single contactUse this import to add new accounts with a journal contact item.
Required Fields Details
Account Name This field is required for all name formats. For Individuals, you can select to useauto-generated Data Entry Rules or map this field from your import file.
54 CHAPTER 1
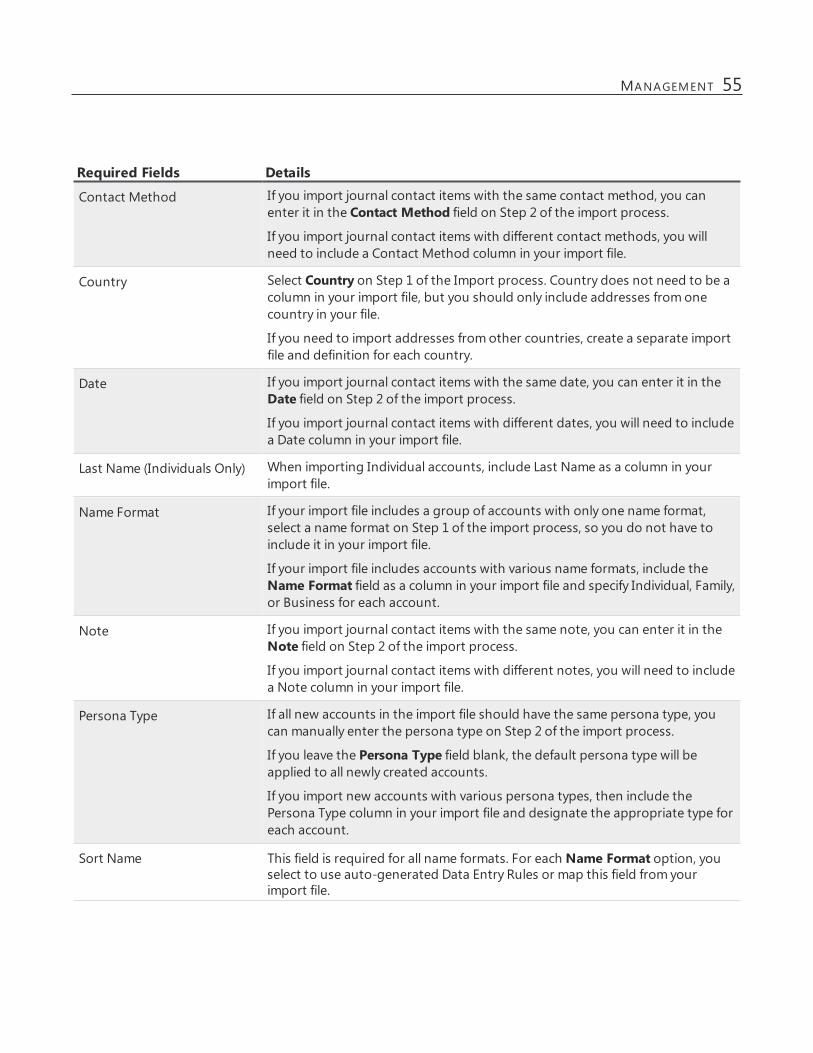
Required Fields Details
Contact Method If you import journal contact items with the same contact method, you canenter it in the Contact Method field on Step 2 of the import process.
If you import journal contact items with different contact methods, you willneed to include a Contact Method column in your import file.
Country Select Country on Step 1 of the Import process. Country does not need to be acolumn in your import file, but you should only include addresses from onecountry in your file.
If you need to import addresses from other countries, create a separate importfile and definition for each country.
Date If you import journal contact items with the same date, you can enter it in theDate field on Step 2 of the import process.
If you import journal contact items with different dates, you will need to includea Date column in your import file.
Last Name (Individuals Only) When importing Individual accounts, include Last Name as a column in yourimport file.
Name Format If your import file includes a group of accounts with only one name format,select a name format on Step 1 of the import process, so you do not have toinclude it in your import file.
If your import file includes accounts with various name formats, include theName Format field as a column in your import file and specify Individual, Family,or Business for each account.
Note If you import journal contact items with the same note, you can enter it in theNote field on Step 2 of the import process.
If you import journal contact items with different notes, you will need to includea Note column in your import file.
Persona Type If all new accounts in the import file should have the same persona type, youcan manually enter the persona type on Step 2 of the import process.
If you leave the Persona Type field blank, the default persona type will beapplied to all newly created accounts.
If you import new accounts with various persona types, then include thePersona Type column in your import file and designate the appropriate type foreach account.
Sort Name This field is required for all name formats. For each Name Format option, youselect to use auto-generated Data Entry Rules or map this field from yourimport file.
MANAGEMENT 55

Required Fields Details
Subject If all new accounts in the import file contain the same subject, you can enterthe subject on Step 2 of the import process.
If you import new accounts with Can be manually typed in on Step 2 of theimport process if all new contacts should be set to the same Subject otherwiseinclude this column in your import file.
Account information with a single Mass Interaction
Use this import type to add or update accounts with a Mass Interaction. When you select to importaccounts with a mass interaction, an account is updated for each row in your import file. All theaccounts you import will then be associated with the single Mass Interaction created by the import.
On the Map Your Import File step, in the Mass Interaction values tile, you can complete the Date,Method, Subject and Note fields. The values you enter in these fields will be the same for allimported accounts. Select Next to preview your import.From the Mass Interaction values tile, you can also select to copy over the values previously used bythe import to create the Mass Interaction.
Note: If you are reusing an import template, you will be prompted with the option to link theaccounts in your current import file to the previously created Mass Interaction. This option will notappear if the previously created Mass Interaction has been deleted.
Account information with single declarationUse this import type to enter new accounts with a Gift Aid declaration. For more information about theUnited Kingdom's Gift Aid program, see Gift Aid on page 1.
This import type is only available for customers in the United Kingdom who need to import Gift Aiddeclaration. You must select the United Kingdom as your locale under user preferences in order to seethis import option. For more information about user preferences, see User Preferences Page on page1.
Required Fields Details
Account Name This field is required for all name formats. For Individuals, you can select to useauto-generated Data Entry Rules or map this field from your import file.
56 CHAPTER 1
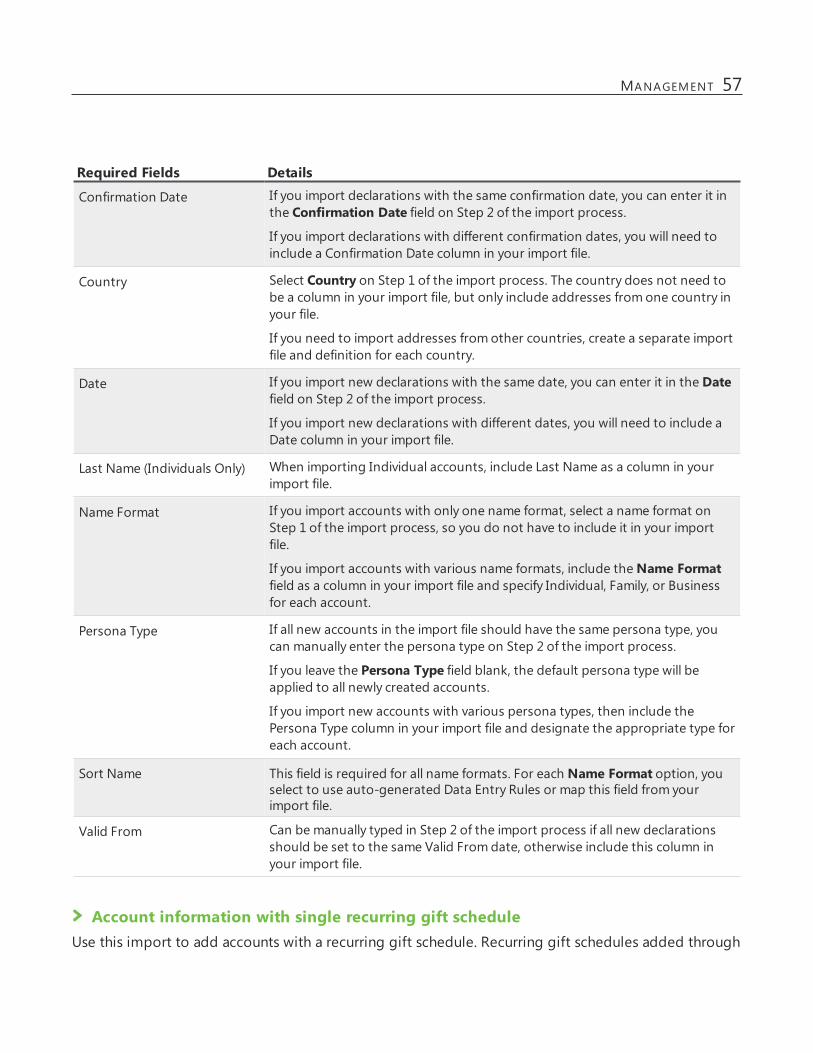
Required Fields Details
Confirmation Date If you import declarations with the same confirmation date, you can enter it inthe Confirmation Date field on Step 2 of the import process.
If you import declarations with different confirmation dates, you will need toinclude a Confirmation Date column in your import file.
Country Select Country on Step 1 of the import process. The country does not need tobe a column in your import file, but only include addresses from one country inyour file.
If you need to import addresses from other countries, create a separate importfile and definition for each country.
Date If you import new declarations with the same date, you can enter it in the Datefield on Step 2 of the import process.
If you import new declarations with different dates, you will need to include aDate column in your import file.
Last Name (Individuals Only) When importing Individual accounts, include Last Name as a column in yourimport file.
Name Format If you import accounts with only one name format, select a name format onStep 1 of the import process, so you do not have to include it in your importfile.
If you import accounts with various name formats, include theName Formatfield as a column in your import file and specify Individual, Family, or Businessfor each account.
Persona Type If all new accounts in the import file should have the same persona type, youcan manually enter the persona type on Step 2 of the import process.
If you leave the Persona Type field blank, the default persona type will beapplied to all newly created accounts.
If you import new accounts with various persona types, then include thePersona Type column in your import file and designate the appropriate type foreach account.
Sort Name This field is required for all name formats. For each Name Format option, youselect to use auto-generated Data Entry Rules or map this field from yourimport file.
Valid From Can be manually typed in Step 2 of the import process if all new declarationsshould be set to the same Valid Fromdate, otherwise include this column inyour import file.
Account information with single recurring gift scheduleUse this import to add accounts with a recurring gift schedule. Recurring gift schedules added through
MANAGEMENT 57

this import default to manual processing, and the first payment is not applied through the import.
Required Fields Details
Account Name This field is required for all name formats. For Individuals, you can select to useauto-generated Data Entry Rules or map this field from your import file.
Country Select Country on Step 1 of the import process. Country does not need to be acolumn in your import file, but you should only include addresses from onecountry in your file.
If you need to import addresses from other countries, create a separate importfile and definition for each country.
Date If you import recurring gift schedules with the same date, you can enter it inthe Date field on Step 2 of the import process.
If you import recurring gift schedules with different dates, you will need toinclude a Date column in your import file.
First Installment Date If you import recurring gift schedules with the same first intsallment date, youcan enter it in the First Installment Date field on Step 2 of the import process.
If you import reccuring gift schedules with various first installment dates, youwill need to include a First Installment Date column in your import file.
Frequency If you import recurring gift schedules with the same frequency, you can enter itin the Frequency field on Step 2 of the import process.
If you import reccuring gift schedules with different frequencies, you will needto include a Frequency column in your import file.
Fund If you import recurring gift schedules with the same fund, you can enter it inthe Fund field on Step 2 of the import process.
If you import recurring gift schedules with different funds, you will need toinclude the Fund column in your import file.
Installment Amount If you import recurring gift schedules with the same installment amount, youcan enter it in the Installment Amount field on Step 2 of the import process.
If you import recurring gift schedules with different installment amounts, youwill need to include the Installment Amount column in your import file.
Last Name (Individuals Only) When importing Individual accounts, include Last Name as a column in yourimport file.
Name Format If your import file includes a group of accounts with only one name format,select a name format on Step 1 of the import process, so you do not have toinclude it in your import file.
If your import file includes accounts with various name formats, include theName Format field as a column in your import file and specify Individual,Family, or Business for each account.
58 CHAPTER 1
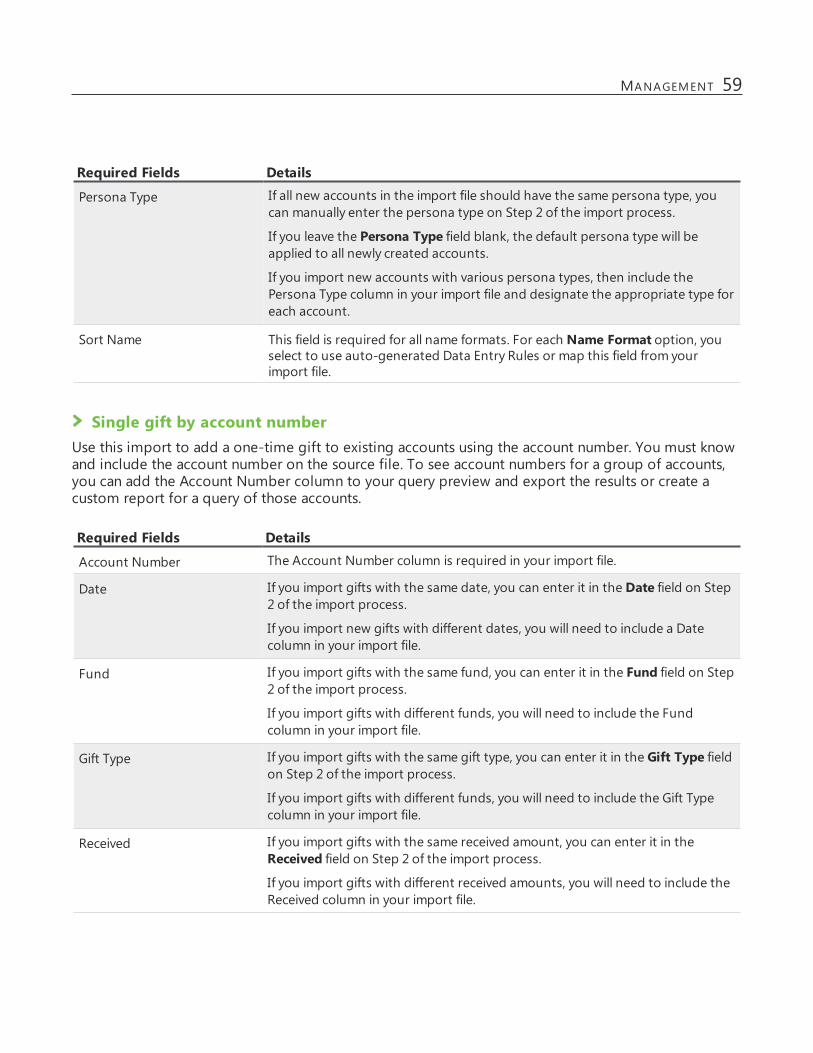
Required Fields Details
Persona Type If all new accounts in the import file should have the same persona type, youcan manually enter the persona type on Step 2 of the import process.
If you leave the Persona Type field blank, the default persona type will beapplied to all newly created accounts.
If you import new accounts with various persona types, then include thePersona Type column in your import file and designate the appropriate type foreach account.
Sort Name This field is required for all name formats. For each Name Format option, youselect to use auto-generated Data Entry Rules or map this field from yourimport file.
Single gift by account numberUse this import to add a one-time gift to existing accounts using the account number. You must knowand include the account number on the source file. To see account numbers for a group of accounts,you can add the Account Number column to your query preview and export the results or create acustom report for a query of those accounts.
Required Fields Details
Account Number The Account Number column is required in your import file.
Date If you import gifts with the same date, you can enter it in the Date field on Step2 of the import process.
If you import new gifts with different dates, you will need to include a Datecolumn in your import file.
Fund If you import gifts with the same fund, you can enter it in the Fund field on Step2 of the import process.
If you import gifts with different funds, you will need to include the Fundcolumn in your import file.
Gift Type If you import gifts with the same gift type, you can enter it in the Gift Type fieldon Step 2 of the import process.
If you import gifts with different funds, you will need to include the Gift Typecolumn in your import file.
Received If you import gifts with the same received amount, you can enter it in theReceived field on Step 2 of the import process.
If you import gifts with different received amounts, you will need to include theReceived column in your import file.
MANAGEMENT 59
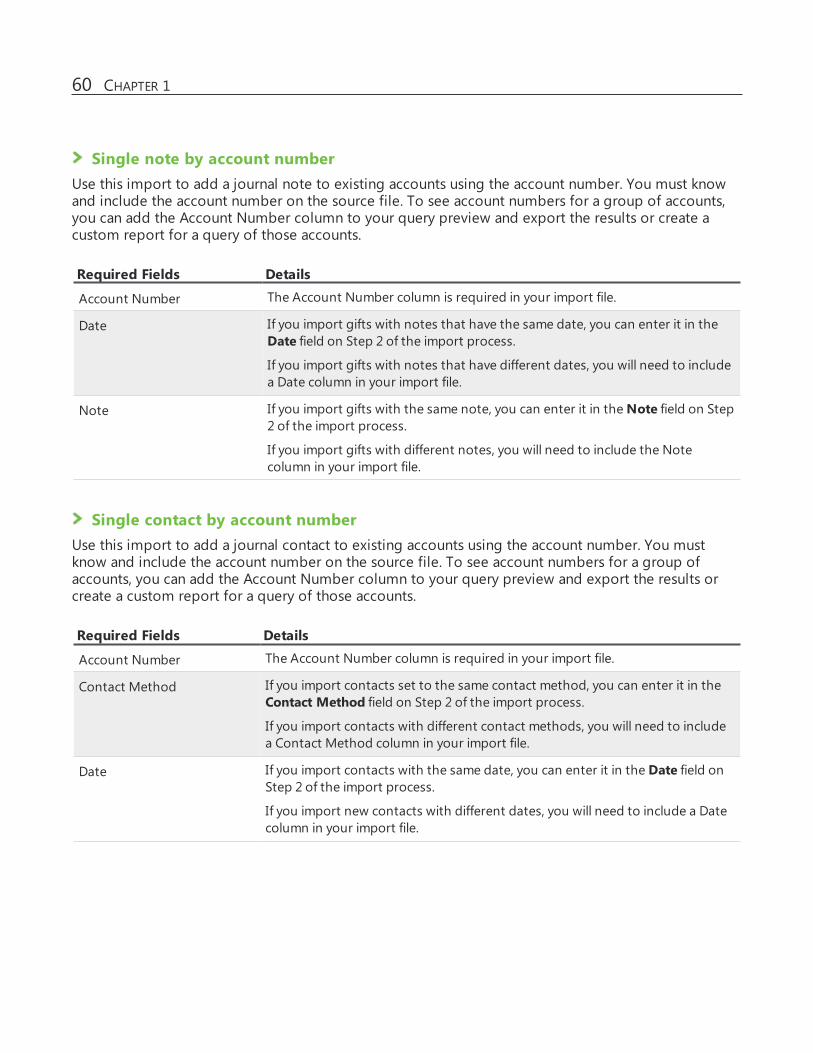
Single note by account numberUse this import to add a journal note to existing accounts using the account number. You must knowand include the account number on the source file. To see account numbers for a group of accounts,you can add the Account Number column to your query preview and export the results or create acustom report for a query of those accounts.
Required Fields Details
Account Number The Account Number column is required in your import file.
Date If you import gifts with notes that have the same date, you can enter it in theDate field on Step 2 of the import process.
If you import gifts with notes that have different dates, you will need to includea Date column in your import file.
Note If you import gifts with the same note, you can enter it in theNote field on Step2 of the import process.
If you import gifts with different notes, you will need to include the Notecolumn in your import file.
Single contact by account numberUse this import to add a journal contact to existing accounts using the account number. You mustknow and include the account number on the source file. To see account numbers for a group ofaccounts, you can add the Account Number column to your query preview and export the results orcreate a custom report for a query of those accounts.
Required Fields Details
Account Number The Account Number column is required in your import file.
Contact Method If you import contacts set to the same contact method, you can enter it in theContact Method field on Step 2 of the import process.
If you import contacts with different contact methods, you will need to includea Contact Method column in your import file.
Date If you import contacts with the same date, you can enter it in the Date field onStep 2 of the import process.
If you import new contacts with different dates, you will need to include a Datecolumn in your import file.
60 CHAPTER 1
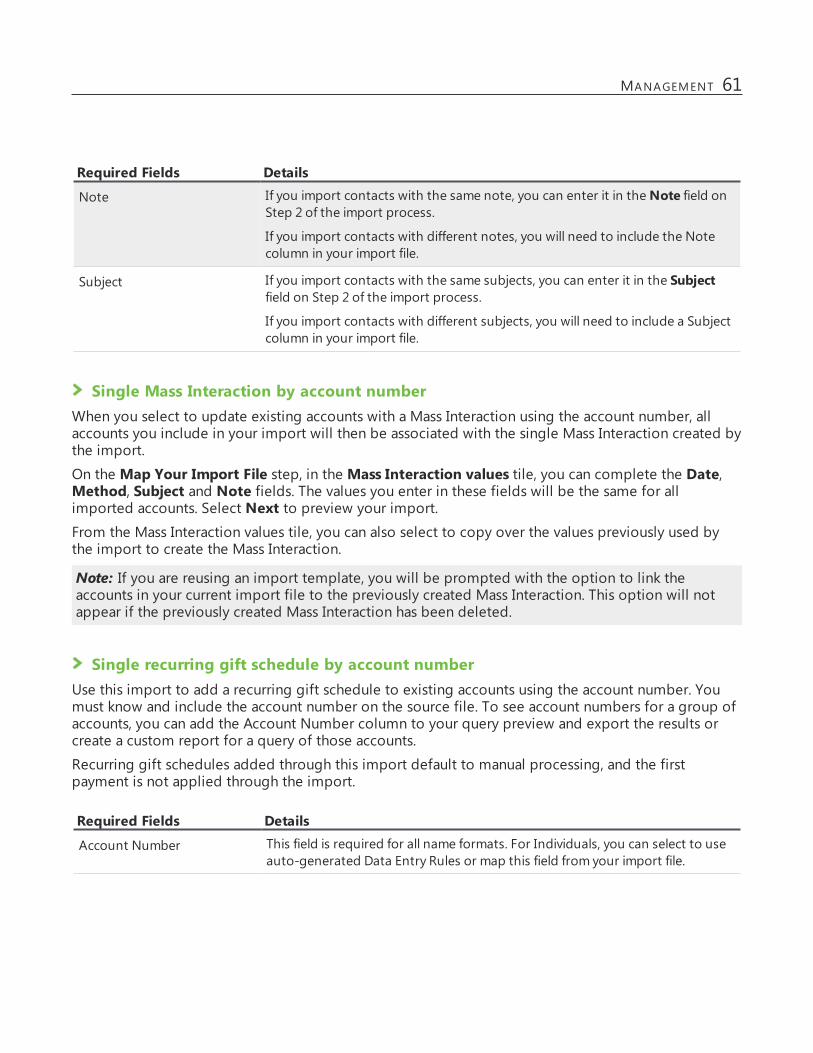
Required Fields Details
Note If you import contacts with the same note, you can enter it in theNote field onStep 2 of the import process.
If you import contacts with different notes, you will need to include the Notecolumn in your import file.
Subject If you import contacts with the same subjects, you can enter it in the Subjectfield on Step 2 of the import process.
If you import contacts with different subjects, you will need to include a Subjectcolumn in your import file.
Single Mass Interaction by account numberWhen you select to update existing accounts with a Mass Interaction using the account number, allaccounts you include in your import will then be associated with the single Mass Interaction created bythe import.
On the Map Your Import File step, in the Mass Interaction values tile, you can complete the Date,Method, Subject and Note fields. The values you enter in these fields will be the same for allimported accounts. Select Next to preview your import.From the Mass Interaction values tile, you can also select to copy over the values previously used bythe import to create the Mass Interaction.
Note: If you are reusing an import template, you will be prompted with the option to link theaccounts in your current import file to the previously created Mass Interaction. This option will notappear if the previously created Mass Interaction has been deleted.
Single recurring gift schedule by account numberUse this import to add a recurring gift schedule to existing accounts using the account number. Youmust know and include the account number on the source file. To see account numbers for a group ofaccounts, you can add the Account Number column to your query preview and export the results orcreate a custom report for a query of those accounts.
Recurring gift schedules added through this import default to manual processing, and the firstpayment is not applied through the import.
Required Fields Details
Account Number This field is required for all name formats. For Individuals, you can select to useauto-generated Data Entry Rules or map this field from your import file.
MANAGEMENT 61
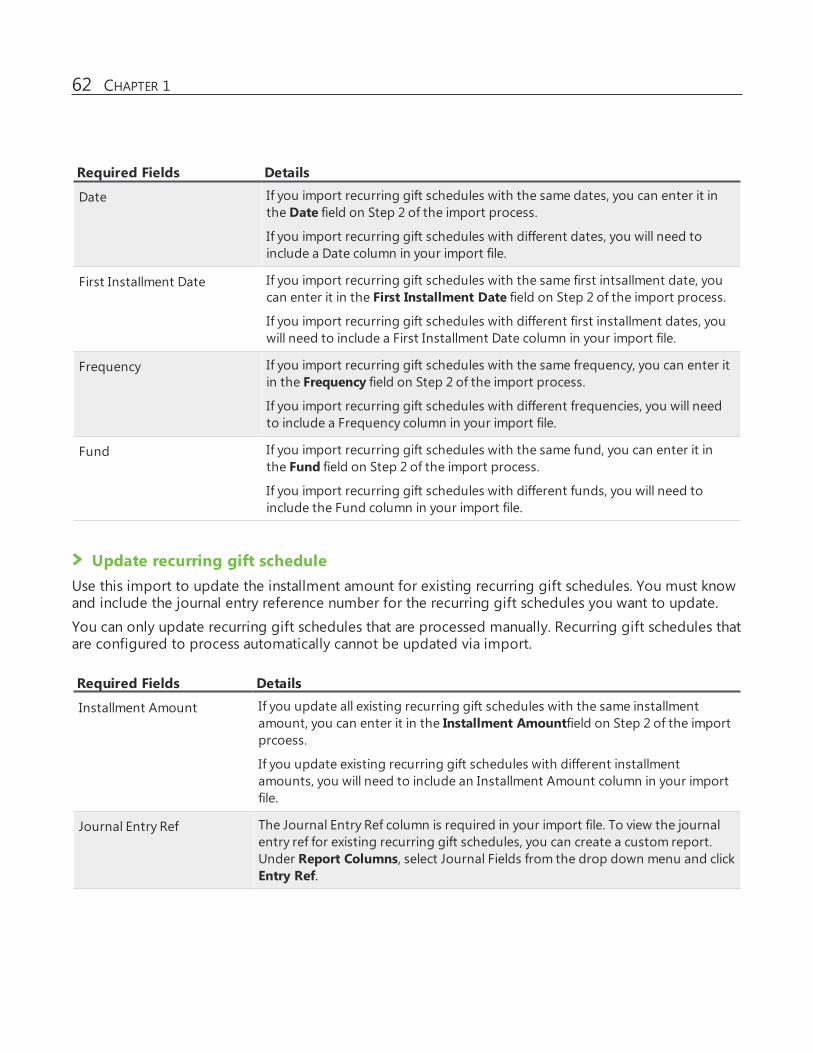
Required Fields Details
Date If you import recurring gift schedules with the same dates, you can enter it inthe Date field on Step 2 of the import process.
If you import recurring gift schedules with different dates, you will need toinclude a Date column in your import file.
First Installment Date If you import recurring gift schedules with the same first intsallment date, youcan enter it in the First Installment Date field on Step 2 of the import process.
If you import recurring gift schedules with different first installment dates, youwill need to include a First Installment Date column in your import file.
Frequency If you import recurring gift schedules with the same frequency, you can enter itin the Frequency field on Step 2 of the import process.
If you import recurring gift schedules with different frequencies, you will needto include a Frequency column in your import file.
Fund If you import recurring gift schedules with the same fund, you can enter it inthe Fund field on Step 2 of the import process.
If you import recurring gift schedules with different funds, you will need toinclude the Fund column in your import file.
Update recurring gift scheduleUse this import to update the installment amount for existing recurring gift schedules. You must knowand include the journal entry reference number for the recurring gift schedules you want to update.
You can only update recurring gift schedules that are processed manually. Recurring gift schedules thatare configured to process automatically cannot be updated via import.
Required Fields Details
Installment Amount If you update all existing recurring gift schedules with the same installmentamount, you can enter it in the Installment Amountfield on Step 2 of the importprcoess.
If you update existing recurring gift schedules with different installmentamounts, you will need to include an Installment Amount column in your importfile.
Journal Entry Ref The Journal Entry Ref column is required in your import file. To view the journalentry ref for existing recurring gift schedules, you can create a custom report.Under Report Columns, select Journal Fields from the drop down menu and clickEntry Ref.
62 CHAPTER 1

General Import SetupBefore you begin an import, you must set up your import source file. Refer to this information to setup your file correctly.
Import Guidelinesl To import successfully, select a comma separated file (.csv) file. If you have a Microsoft Excel file,you can save it as a .csv file in Excel.
eTapestry does not support the following file types for import.l DOC
l DOCX
l Files created by Google Docs
l Files created by Mac Sheets
l ODF
l ODS
l PDF
l XLS - To convert this file type to .csv, open it in Excel, and select to save it as a .csv file.
l XLSX - To convert this file type to .csv, open it in Excel, and select to save it as a .csv file.
l The file must have no more than 2,000 lines. If you need to import more records, use separatefiles of 2,000 lines or less and perform separate imports for each file.
l The file must have column headers. eTapestry uses the column headers to map columns tofields in the database. Use descriptive column headers to make mapping easier. Never put datathat you want to import on the first line of the import source file.
l The file cannot contain blank lines. Any blank lines create an error in the import process.
l To avoid import difficulty, make sure you remove line breaks within the fields or any fields thatcontain quotes.
l Each import type has a number of required fields and your source file must contain informationyou can map to required fields. For example, Account Information types require the Countryfield. For more information required fields for import types, refer to Import Types on page 50.
l If you plan to import addresses, make sure that your import file only includes addresses fromone country. If you need to import addresses from other countries, create a separate import fileand import definition for each country.
l If you plan to import values into fields with fixed values (such as drop down menus orcheckboxes), the values in the import source file must match the values in the database exactly.For example, if you import a fund value, the value in your file must match an existing fund inyour database. These values are case-sensitive, and it must be spelled exactly the same.
l If you plan to import user-defined values into a multiple selection field, you must delimit themin the import source file. In this case, use a single field for all the values, and separate them with
MANAGEMENT 63

on of the available characters. You must use the same delimiter throughout your import sourcefile.
l asterisk (*)
l pipe (|)
l comma (,)
l semicolon (;)
l tilde (~)
Step One - Name and Import Type with Name Formats
Note: Customer Support is available to troubleshoot and answer specific import questions. To learnthe how-to process for imports, it is best to review the Account Information Import Tutorial and referto these import procedure steps.
1. From Management, click Import. The Import Categories page appears.2. Click a category to select it, or create a new category.
3. Under Tasks, click New Import. The Import page appears.4. In the Name field, enter a unique name for your import.5. In the Description field, you can enter a description for your import to make it easy to identify.6. Under Select the File to Import, click Choose File. To successfully import your data, select a .csv
file. Any leading or trailing spaces included in field values in your import file will be excludedonce you import the file and will not appear on Step 2 of the import wizard.
Tip: You must select a new file or select the same file again each time you run this import.
7. Next, select an import type. Each import type allows you to import different information intoyour database. You cannot change the import type once you navigate away from this step. Fordetails about import types, refer to Import Types on page 50
8. When you select an Account Information import type, the Name Format section appears. In theName Format field, select whether the file is for individuals, families, or businesses in the fieldwhen your import file includes a group of accounts for one Name Format. If your import fileincludes a combination of accounts, select "Map from your import file." The Map Name Formatscreen appears for you to map the Name Format field from your import file to the eTapestryName Format field.
Tip: To successfully map your Name Format field to an eTapestry Name Format, make sureyour .csv file includes a name format column. In this column, identify each row as Individual,Family, or Business. These Name Formats correspond to the eTapestry Name Formats.
9. When you select an Account Information import type, the Country section appears. In this field,you must select the country for Account Information import types. This selection controls theaddress fields available to you when you map fields on Step Two - Map Your Import File withName Formats on page 65.
64 CHAPTER 1

Tip: Remember, your import file can only include addresses from one country. When you needto import addresses from other countries, create a separate import file and import definitionfor each country.
10. UnderMulti select delimiter, select a delimiter type to separate values in your import file. Youuse delimiters for multiple values in a single field. For example, a user-defined field for InterestAreas can have more than one value for a single constituent, such as"Environment*Animals*Conservation".
You must use the delimiter you select consistently in your source file. The available delimiteroptions to select are asterisk (*), pipe (|), comma (,), semicolon (;), and tilde (~).
11. Click Next to continue to the next step.
Step Two -Map Your Import File with Name Formats
Show Me: Review the Account Information Import Tutorial
1. On Step 2 of the import wizard, the Map your Import File page appears with multiple sections tohelp you identify groups of eTapestry fields for a particular area in the application.The fields that appear on the page are determined by the import type you select on Step 1. Forexample, when you select the Single Gift by Account Number type, gift fields appear. When youselect an Account Information type, additional sections appear for individual, family, andbusiness account fields, in addition to the All other account fields section.
2. To search for potential duplicates based on an eTapestry field, select the checkbox for at leastone key. For example, to search for duplicates by name, select the checkbox in the Key columnbeside the Account Name field. You should also select to key on the Persona Type field tomake sure future imports for persona information are successful for existing accounts.
Tip: You should only map to Account Number to select its Key checkbox to identify duplicateaccounts. You cannot import data into the eTapestry Account Number field because theimport does not overwrite existing account number IDs and it automatically assigns an IDnumber for each new account.
On Step 4, you review potential duplicates and indicate how to handle them in the import.
3. To map to a field in the import file, click the icon beside the eTapestry field in the Import Datacolumn. The Select Import Field screen appears with a list of all column titles from your importfile. To map the import field to the eTapestry field, click the corresponding column title link.The Select Import Field screen closes and you return to the Step 2 page.
Tip: As you map fields, you can view a sample of your data to import beside the field. Use thisto confirm you are mapping fields correctly. You also review all mapped data on Step 3 of theimport wizard.
l You may need to map more than one field from your import file to the same field ineTapestry. For example, if you have a column for First Name and a column for Last nameon your source file, you may want to map both columns to the eTapestry Account Namefield. To do this, click the icon beside the field in the Import Data column and select theFirst Name field, enter a space, and select the last name field. You can also do this for the
MANAGEMENT 65
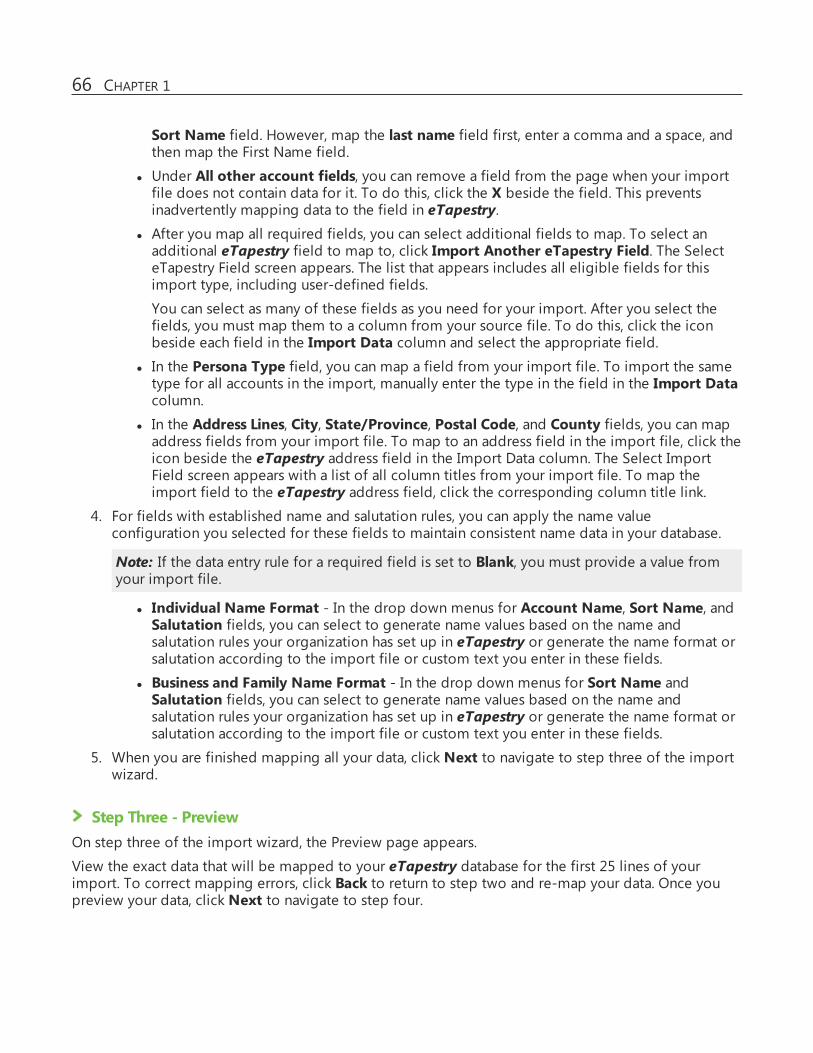
Sort Name field. However, map the last name field first, enter a comma and a space, andthen map the First Name field.
l Under All other account fields, you can remove a field from the page when your importfile does not contain data for it. To do this, click the X beside the field. This preventsinadvertently mapping data to the field in eTapestry.
l After you map all required fields, you can select additional fields to map. To select anadditional eTapestry field to map to, click Import Another eTapestry Field. The SelecteTapestry Field screen appears. The list that appears includes all eligible fields for thisimport type, including user-defined fields.
You can select as many of these fields as you need for your import. After you select thefields, you must map them to a column from your source file. To do this, click the iconbeside each field in the Import Data column and select the appropriate field.
l In the Persona Type field, you can map a field from your import file. To import the sametype for all accounts in the import, manually enter the type in the field in the Import Datacolumn.
l In the Address Lines, City, State/Province, Postal Code, and County fields, you can mapaddress fields from your import file. To map to an address field in the import file, click theicon beside the eTapestry address field in the Import Data column. The Select ImportField screen appears with a list of all column titles from your import file. To map theimport field to the eTapestry address field, click the corresponding column title link.
4. For fields with established name and salutation rules, you can apply the name valueconfiguration you selected for these fields to maintain consistent name data in your database.
Note: If the data entry rule for a required field is set to Blank, you must provide a value fromyour import file.
l Individual Name Format - In the drop down menus for Account Name, Sort Name, andSalutation fields, you can select to generate name values based on the name andsalutation rules your organization has set up in eTapestry or generate the name format orsalutation according to the import file or custom text you enter in these fields.
l Business and Family Name Format - In the drop down menus for Sort Name andSalutation fields, you can select to generate name values based on the name andsalutation rules your organization has set up in eTapestry or generate the name format orsalutation according to the import file or custom text you enter in these fields.
5. When you are finished mapping all your data, click Next to navigate to step three of the importwizard.
Step Three - PreviewOn step three of the import wizard, the Preview page appears.
View the exact data that will be mapped to your eTapestry database for the first 25 lines of yourimport. To correct mapping errors, click Back to return to step two and re-map your data. Once youpreview your data, click Next to navigate to step four.
66 CHAPTER 1
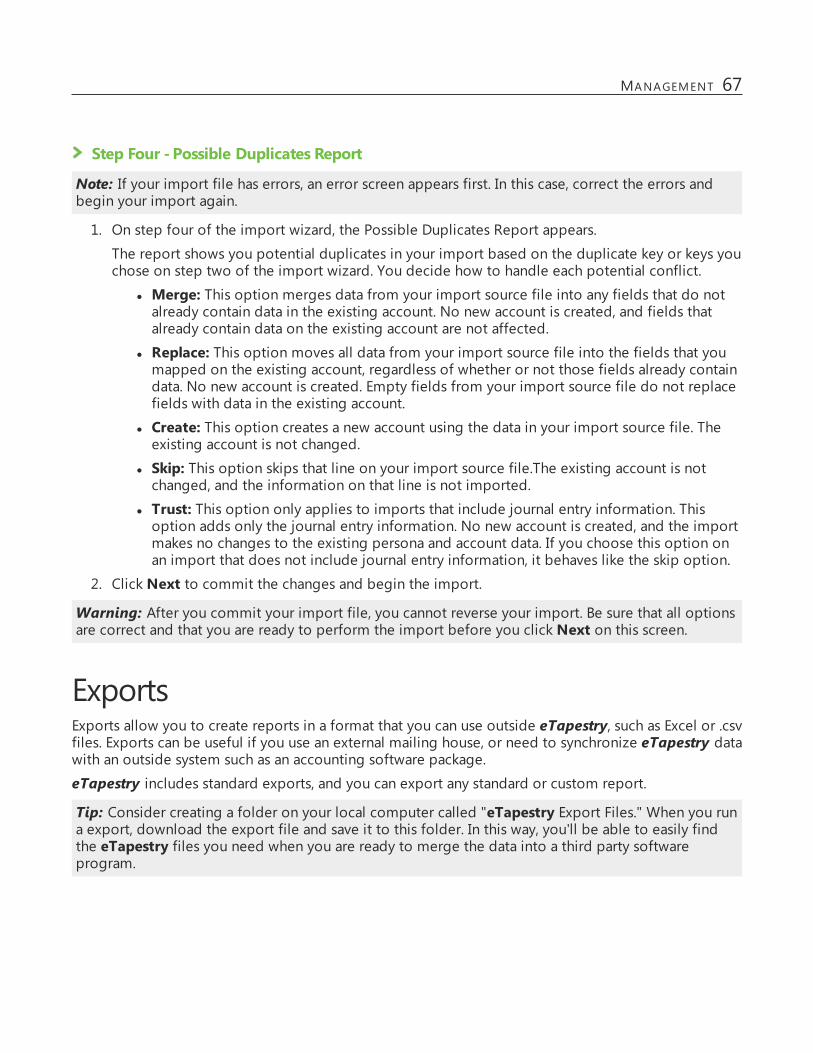
Step Four -Possible Duplicates Report
Note: If your import file has errors, an error screen appears first. In this case, correct the errors andbegin your import again.
1. On step four of the import wizard, the Possible Duplicates Report appears.
The report shows you potential duplicates in your import based on the duplicate key or keys youchose on step two of the import wizard. You decide how to handle each potential conflict.
l Merge: This option merges data from your import source file into any fields that do notalready contain data in the existing account. No new account is created, and fields thatalready contain data on the existing account are not affected.
l Replace: This option moves all data from your import source file into the fields that youmapped on the existing account, regardless of whether or not those fields already containdata. No new account is created. Empty fields from your import source file do not replacefields with data in the existing account.
l Create: This option creates a new account using the data in your import source file. Theexisting account is not changed.
l Skip: This option skips that line on your import source file.The existing account is notchanged, and the information on that line is not imported.
l Trust: This option only applies to imports that include journal entry information. Thisoption adds only the journal entry information. No new account is created, and the importmakes no changes to the existing persona and account data. If you choose this option onan import that does not include journal entry information, it behaves like the skip option.
2. Click Next to commit the changes and begin the import.
Warning: After you commit your import file, you cannot reverse your import. Be sure that all optionsare correct and that you are ready to perform the import before you click Next on this screen.
ExportsExports allow you to create reports in a format that you can use outside eTapestry, such as Excel or .csvfiles. Exports can be useful if you use an external mailing house, or need to synchronize eTapestry datawith an outside system such as an accounting software package.
eTapestry includes standard exports, and you can export any standard or custom report.
Tip: Consider creating a folder on your local computer called "eTapestry Export Files." When you runa export, download the export file and save it to this folder. In this way, you'll be able to easily findthe eTapestry files you need when you are ready to merge the data into a third party softwareprogram.
MANAGEMENT 67
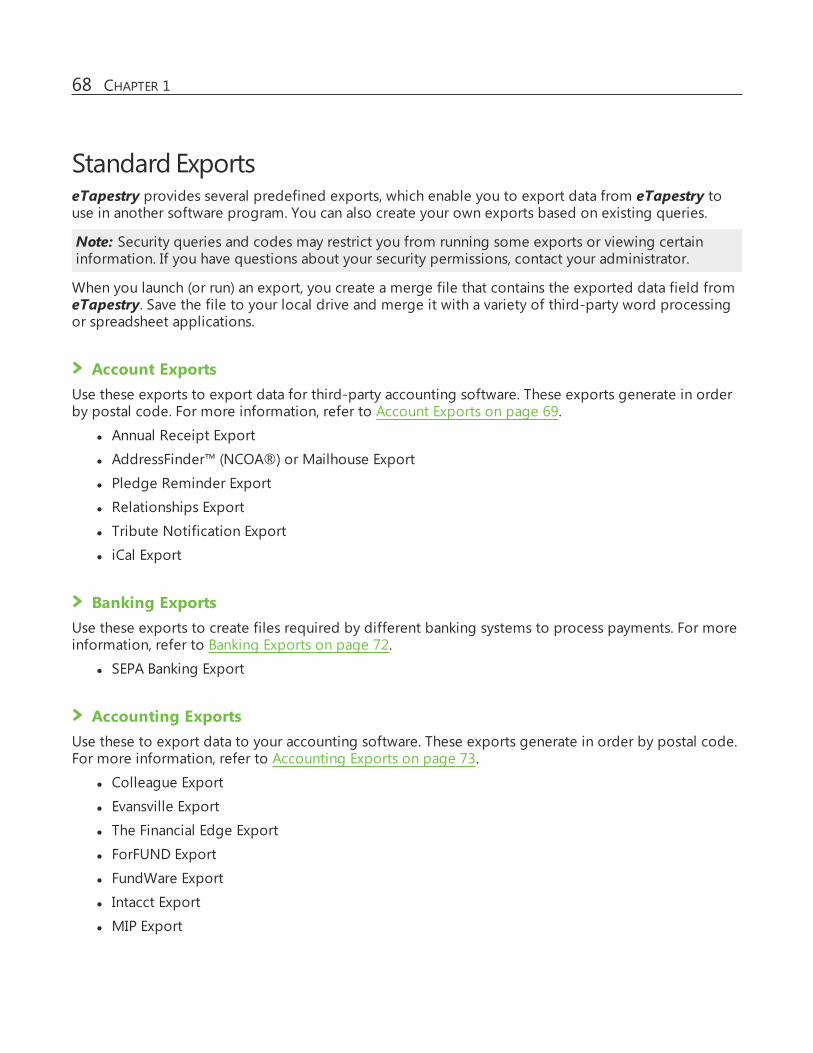
Standard ExportseTapestry provides several predefined exports, which enable you to export data from eTapestry touse in another software program. You can also create your own exports based on existing queries.
Note: Security queries and codes may restrict you from running some exports or viewing certaininformation. If you have questions about your security permissions, contact your administrator.
When you launch (or run) an export, you create a merge file that contains the exported data field fromeTapestry. Save the file to your local drive and merge it with a variety of third-party word processingor spreadsheet applications.
Account ExportsUse these exports to export data for third-party accounting software. These exports generate in orderby postal code. For more information, refer to Account Exports on page 69.
l Annual Receipt Export
l AddressFinder™ (NCOA®) or Mailhouse Export
l Pledge Reminder Export
l Relationships Export
l Tribute Notification Export
l iCal Export
Banking ExportsUse these exports to create files required by different banking systems to process payments. For moreinformation, refer to Banking Exports on page 72.
l SEPA Banking Export
Accounting ExportsUse these to export data to your accounting software. These exports generate in order by postal code.For more information, refer to Accounting Exports on page 73.
l Colleague Export
l Evansville Export
l The Financial Edge Export
l ForFUND Export
l FundWare Export
l Intacct Export
l MIP Export
68 CHAPTER 1
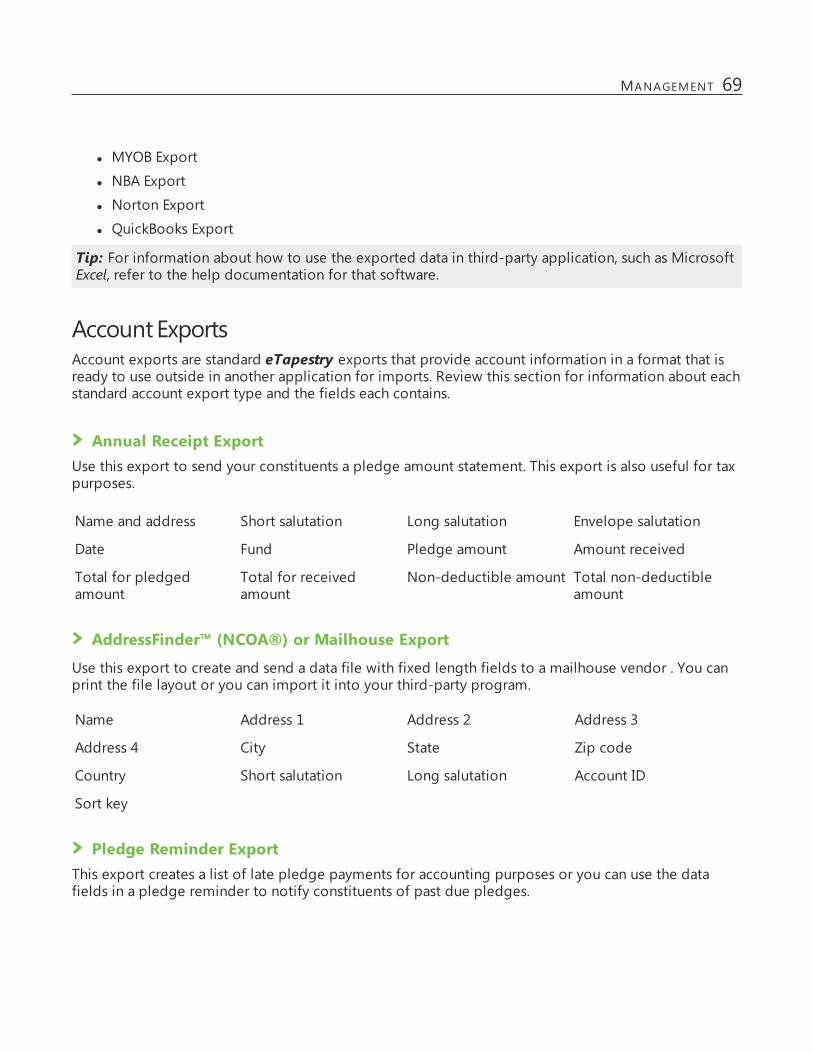
l MYOB Export
l NBA Export
l Norton Export
l QuickBooks Export
Tip: For information about how to use the exported data in third-party application, such as MicrosoftExcel, refer to the help documentation for that software.
AccountExportsAccount exports are standard eTapestry exports that provide account information in a format that isready to use outside in another application for imports. Review this section for information about eachstandard account export type and the fields each contains.
Annual Receipt ExportUse this export to send your constituents a pledge amount statement. This export is also useful for taxpurposes.
Name and address Short salutation Long salutation Envelope salutation
Date Fund Pledge amount Amount received
Total for pledgedamount
Total for receivedamount
Non-deductible amount Total non-deductibleamount
AddressFinder™ (NCOA®) or Mailhouse Export
Use this export to create and send a data file with fixed length fields to a mailhouse vendor . You canprint the file layout or you can import it into your third-party program.
Name Address 1 Address 2 Address 3
Address 4 City State Zip code
Country Short salutation Long salutation Account ID
Sort key
Pledge Reminder ExportThis export creates a list of late pledge payments for accounting purposes or you can use the datafields in a pledge reminder to notify constituents of past due pledges.
MANAGEMENT 69

Pledge Date Pledge Amount
Pledge Balance Date of next payment Amount of next payment
Fund Long salutation
Relationship ExportUse this export to view relationships between accounts.
Account ID Account name Account address block Account short salutation
Account long salutation Account phone Account email Account note
Account contact name Account job title Account envelopesalutation
Account sort name
Related name Related address block Related short salutation Related long salutation
Related phone Related email Related note Related contact name
Related job title Related envelopesalutation
Related sort name Account relationshiptype
Related relationship type Relationship start date Relationship end date Relationship notes
Relationship matchingaccount
Relationship matchingaccount text
Tribute Notification ExportUse this export to track or print a letter that identifies who gave gifts for a tribute account.
Tribute name Notificant name Address block for donor Address block fornotificant
Short salutation Long salutation Donor name Pledge date
Fund Pledged amount Received amount Total amount pledged
Total amount received
AddressFinder™ (NCOA®) orMailhouse Export1. From Management, click Standard Exports.2. Under Account Exports, click NCOA Export. The Launch NCOA Export screen appears.3. Select the category and query you want to use to run the export.
4. Enter the export criteria based on your NCOA or mailhouse setup.
70 CHAPTER 1

5. Select whether to export all personas or set up a hierarchy that determines which to export.
6. Under Delivery Options, select how you want to receive the export file. You can download itdirectly to your computer, put it in your eTapestry drop box, or receive it by email.
7. When you download the export, save it locally to your computer.
8. Click Submit.
Relationship Export1. From Management, click Standard Exports.2. Under Account Exports, click Relationship Export. The Launch Relationship Export screen
appears.
3. Select the category and query you want to use to run the export.
4. Select the relationship type.
5. Under Delivery Options, select how you want to receive the export file. You can download itdirectly to your computer, put it in your eTapestry drop box, or receive it by email.
6. When you download the export, save it locally to your computer.
7. Click Submit.
iCal ExportYou can export iCal items so you can then import them to your calendar management software, such asMicrosoft Outlook. In order to run the iCal export, you must first query the calendar items that youwould like to export.
Query iCal Items1. From Queries, clickManage Queries. The Query Categories page appears.2. Click on a category to select it, or create a new category.
3. Under Tasks, click New Query.4. In the Name field, enter a unique name for your query.5. Under Starting Criteria, select the "Base" category and the query "All Journal Entries - JE."6. In the Data Return Type field, select "Journal Entries."7. Under Available Fields, select "Journal."8. Click Journal Entry Types from the list of available fields.
9. Select the Calendar Item checkbox.
10. Under Available Fields, select "Journal Created By."11. Select theWhoever Runs This Query checkbox.12. If you want to limit the dates of the calendar items, under Available Fields, select the "Dates"
MANAGEMENT 71
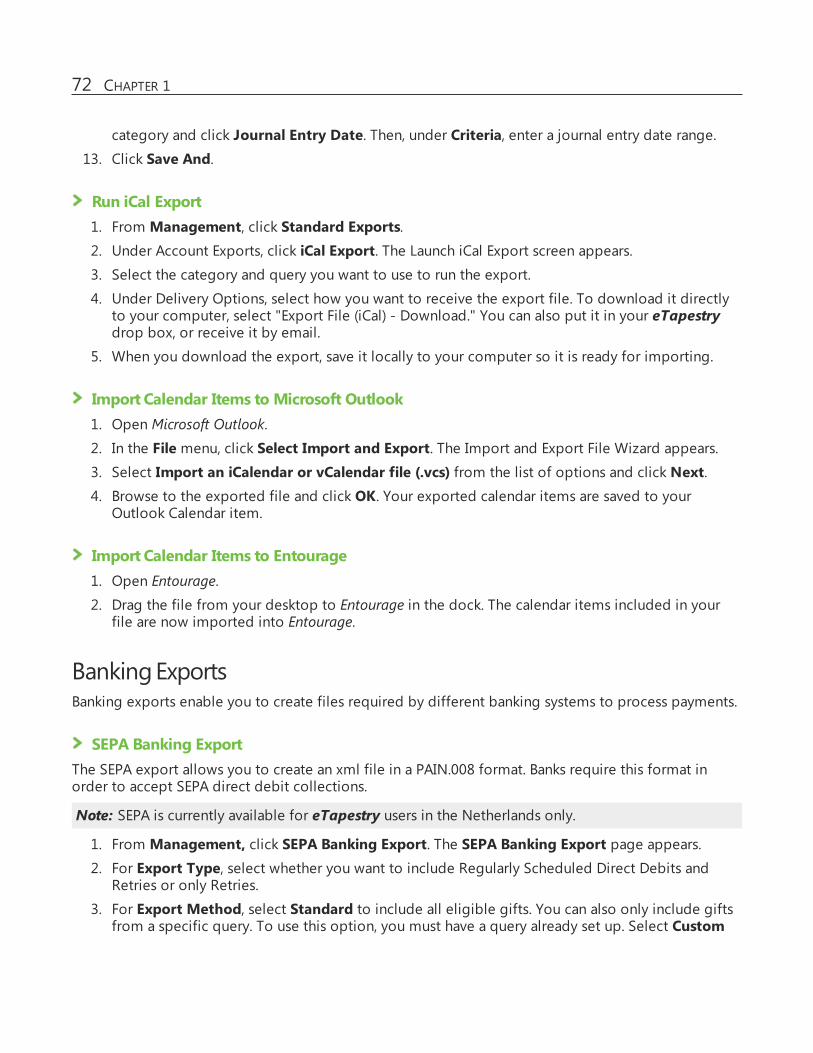
category and click Journal Entry Date. Then, under Criteria, enter a journal entry date range.13. Click Save And.
Run iCal Export1. From Management, click Standard Exports.2. Under Account Exports, click iCal Export. The Launch iCal Export screen appears.3. Select the category and query you want to use to run the export.
4. Under Delivery Options, select how you want to receive the export file. To download it directlyto your computer, select "Export File (iCal) - Download." You can also put it in your eTapestrydrop box, or receive it by email.
5. When you download the export, save it locally to your computer so it is ready for importing.
Import Calendar Items to Microsoft Outlook1. Open Microsoft Outlook.
2. In the File menu, click Select Import and Export. The Import and Export File Wizard appears.3. Select Import an iCalendar or vCalendar file (.vcs) from the list of options and click Next.4. Browse to the exported file and click OK. Your exported calendar items are saved to your
Outlook Calendar item.
Import Calendar Items to Entourage1. Open Entourage.
2. Drag the file from your desktop to Entourage in the dock. The calendar items included in yourfile are now imported into Entourage.
BankingExportsBanking exports enable you to create files required by different banking systems to process payments.
SEPA Banking ExportThe SEPA export allows you to create an xml file in a PAIN.008 format. Banks require this format inorder to accept SEPA direct debit collections.
Note: SEPA is currently available for eTapestry users in the Netherlands only.
1. From Management, click SEPA Banking Export. The SEPA Banking Export page appears.2. For Export Type, select whether you want to include Regularly Scheduled Direct Debits and
Retries or only Retries.
3. For Export Method, select Standard to include all eligible gifts. You can also only include giftsfrom a specific query. To use this option, you must have a query already set up. Select Custom
72 CHAPTER 1

and then select a query category and query.
4. Select a Date Range. If you select This Month, only gifts made in this calendar month areincluded. If you select Next Month, only gifts made in the next calendar month are included.You can also select a custom date range. To use this option, select Custom and enter a start andend date.
5. Select one or more Gift Status types. To include recurring gifts with no associated payments,select First and One Off. To include recurring gifts that have one or more associated payments,select Recurring.
6. To generate a final export, under Export Mode select Live. To generate a test export first, selectTest.
7. For a live export, enter a Process Date. This is the date, in the future, when you expect the bankto process gifts.
8. Click Nextto preview the report. If the number of gifts and their total value are not what youexpect, click Back to update the SEPA Export Criteria.
9. Click Next. The XML file is created.
Accounting ExportsIf you need to export your data from eTapestry to your accounting software, use an eTapestry export.For your convenience, eTapestry includes predefined exports for some common software programs,including The Financial Edge, FundWare, and others. For other programs, use eTapestry's CustomReport Writer to create your own export definition. If you create your own export definition, be sureto review the user manual for your accounting software to ensure the import file has the necessaryformat and content.
Before you set up an accounting export, ensure your eTapestry database is set up correctly.
l Set up funds in eTapestry. These indicate how a donation will be used. Most funds in eTapestrytrack income, including gifts, pledges, and pledge payments. Based on a fund, donations arecredited to specific General Ledger (GL) accounts in your accounting software. Therefore, youenter the appropriate GLaccount numbers when you set up each fund. Your accountantdetermines which account numbers to use.
l To track expenses in eTapestry, your organization may use disbursements. If you want to exportdisbursements to your accounting software, they cannot be associated with funds that you set upto track income. Instead, set up a set up separate funds for each expense account that willreceive exported data. For information about funds, refer to Funds on page 48.
l You may need to set up user-defined fields for exports to some accounting software programs.Because these fields vary, be sure to review the help topics for your specific accounting export.
Identify at least one query to use to select transactions to include in the export file. If you import yourdata at the end of each work day, consider using the Today query in the Constituent Journal Entry Datecategory. If you import more frequently, create a query that excludes items that have already beenexported. To do this, for exported transactions, mark the Journal Entry Status as "Pending." If you wantto use different export options for gifts than for pledges, use different queries for each.
MANAGEMENT 73

After you create the export file, save it to your computer on your network so you can import it intoyour accounting system. You can also email the export file to your accountant. To import thetransactions, follow the instructions your accounting software provides.
After a transaction is exported, you should mark it as Final. This prevents anyone other than anadministrator from modifying it and helps to keep your accounting system and eTapestry in sync. Toquickly finalize exported transactions, you can run a mass update using the same query that you usedto create the export file.
TheFinancial EdgeExportYou can export transactions from your eTapestry database so you can then import them into TheFinancial Edge. For each transaction, the export file includes a credit and debit record. For moreinformation about what the export contains, refer toThe Financial Edge Export File Format on page 76.
Before you create an export for The Financial Edge, set up funds with the appropriate accountnumbers and project IDs from your Financial Edge system. If you want to associate eTapestrytransactions with a particular project in The Financial Edge, enter a project ID when you set up thefund. For more information about funds, refer to Funds on page 48.
When you are ready to import transactions into the GL, refer to The Financial Edge's Import Guide.
Run the The Financial Edge exportBefore you run the Financial Edge Export, you must set up funds to include appropriate cash, revenue,receivables account, and project ID values. Then enter transactions into eTapestry.1. From Management, click Standard Exports.2. Under Accounting Exports, click Financial Edge Export. The Launch Financial Edge Export
screen appears.
Note: If you create a new query, remember that some eTapestry transactions should not beimported into your Financial Edge database. For example, if you have entered disbursementsin eTapestry to track expenses, they might not need to be imported into The Financial Edge.You can exclude those disbursements from your query.
3. Select the category and query you want to use to run the export.
Tip: After you import transactions into The Financial Edge, use this same query to finalizejournal entries by mass update.
4. Enter a batch number.
5. In the Journal field, enter a note, such as "eTapestry."6. Under Delivery Options, decide what type of file you want and how you want to receive it. You
can receive the file as aMicrosoft Excel (.xls), Comma separated value (.csv), or a Merge (.mrg) file.You download it directly to your computer, put it in your eTapestry drop box, or receive it byemail.
7. When you download the export, save it locally to your computer so it is ready for importing.
Sample:
74 CHAPTER 1

AccountNumber
Date R D orC
Debit/CreditAmount
OrganizationNumber
CustomerName
Commas
01-40201 6/4/2014 R D 100 01 Emily Black ...
Note: When you are ready to import transactions into the GL, refer to The Financial Edge'sImport Guide.
Finalize transactions that export to The Financial EdgeAfter you export transactions from eTapestry and import them into The Financial Edge, mark themas final in eTapestry. This helps you track which transactions have been exported. It also prevents userswho are not admins from modifying the transactions, which keeps the data in your databasesconsistent.
1. From Management, clickMass Updates.2. Click Finalize Journal Entries.3. Select the category and query that you used for the export.
4. Click Next under Steps.5. Under Action, select Finalize.6. Click Next.7. Review the query, number of entries to update, and finalize information. To make changes, click
Back.8. To run this process, click Next.
Tip: We recommend that you run this process at the end of the day, when other users are notaccessing eTapestry. Other users cannot access the records affected by this update until afterthe process is complete. You can log out of eTapestry while the process continues.
AccountNumbers forThe Financial EdgeWhen you create a Financial Edge export, the account numbers are based on the fund for thattransaction. When you set up a fund in eTapestry, you enter account numbers for the Cash Account,Receivables Account, and Revenue Account fields.The table below shows which account numbers are used for each transaction type in the FinancialEdge Export.
Transaction Type Credit to this account Debit to this account
Gift Revenue Cash
Reversed Gift Cash Revenue
Pledge Revenue Receivables
MANAGEMENT 75
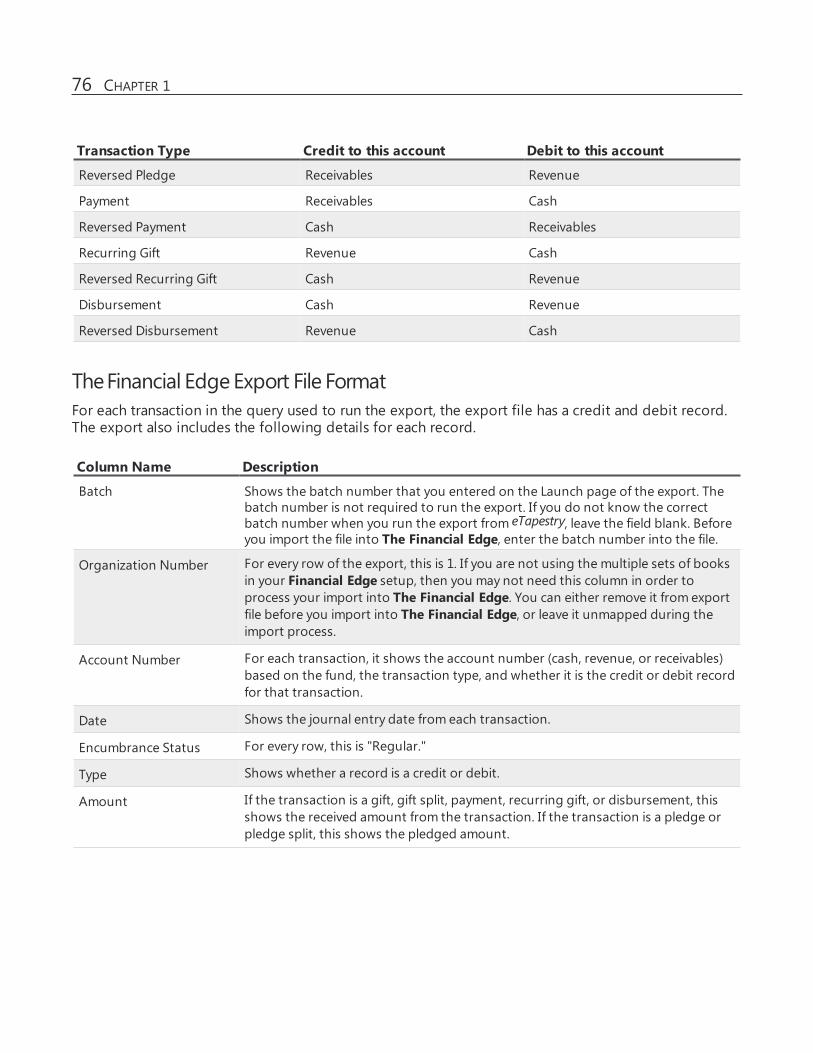
Transaction Type Credit to this account Debit to this account
Reversed Pledge Receivables Revenue
Payment Receivables Cash
Reversed Payment Cash Receivables
Recurring Gift Revenue Cash
Reversed Recurring Gift Cash Revenue
Disbursement Cash Revenue
Reversed Disbursement Revenue Cash
TheFinancial EdgeExport File FormatFor each transaction in the query used to run the export, the export file has a credit and debit record.The export also includes the following details for each record.
Column Name Description
Batch Shows the batch number that you entered on the Launch page of the export. Thebatch number is not required to run the export. If you do not know the correctbatch number when you run the export from eTapestry, leave the field blank. Beforeyou import the file into The Financial Edge, enter the batch number into the file.
Organization Number For every row of the export, this is 1. If you are not using the multiple sets of booksin your Financial Edge setup, then you may not need this column in order toprocess your import into The Financial Edge. You can either remove it from exportfile before you import into The Financial Edge, or leave it unmapped during theimport process.
Account Number For each transaction, it shows the account number (cash, revenue, or receivables)based on the fund, the transaction type, and whether it is the credit or debit recordfor that transaction.
Date Shows the journal entry date from each transaction.
Encumbrance Status For every row, this is "Regular."
Type Shows whether a record is a credit or debit.
Amount If the transaction is a gift, gift split, payment, recurring gift, or disbursement, thisshows the received amount from the transaction. If the transaction is a pledge orpledge split, this shows the pledged amount.
76 CHAPTER 1

Column Name Description
Journal Shows what you entered for the journal field when you created the export. Thisfield is not required. If you do not know the correct journal entry when you exportfrom eTapestry, leave the field blank. Before you import the file into The FinancialEdge, enter the Journal entry to the file.
Journal Reference Shows the name of the constituent account, followed by the transaction type. Forexample, if the account for Melissa Jordan contained a gift, the Journal Referencefor that transaction would be Melissa Jordan-Gift.
Project ID For each transaction, it shows the project ID based on the Fund.
Project Amount If the transaction is a gift, gift split, payment, recurring gift, or disbursement, thisshows the received amount from the transaction. If the transaction is a pledge orpledge split, this shows the pledged amount.
FundWareExportYou can export transactions from your eTapestry, so you can them import them into FundWare. Inorder to run the FundWare export, you must first set up funds with the appropriate account numbersfor your GL. For information about funds, refer to Funds on page 48.
Run FundWare export1. From the Management tab, click Standard Exports.2. Under Accounting Exports, click FundWare Export. The Launch FundWare Export screen
appears.
3. Select the category and query you want to use to run the export.
4. Enter the export criteria based on your FundWare setup.l In the Division field, enter the two digit number for the division.l In the Journal Name field, enter the five character name of the Journal to which theentries will be posted.
l In the Date field, enter when transactions are posted. Use MMDDYYYYY format. Do not usehyphens or slashes.
l In the File Name field, enter the five character name of the batch. This appears on thesecond line of the export.
l In the Description field, enter a description for the batch.l If your organization uses reference fields, either enter the values or select to exportconstituent account names, check names, and transaction dates.
Alternatively, select to export account names, check numbers, or transaction dates.
5. Under Delivery Options, decide what type of file you want and how you want to receive it. Youcan receive the file as aMicrosoft Excel (.xls), Comma separated value (.csv), or a Merge (.mrg) file.
MANAGEMENT 77
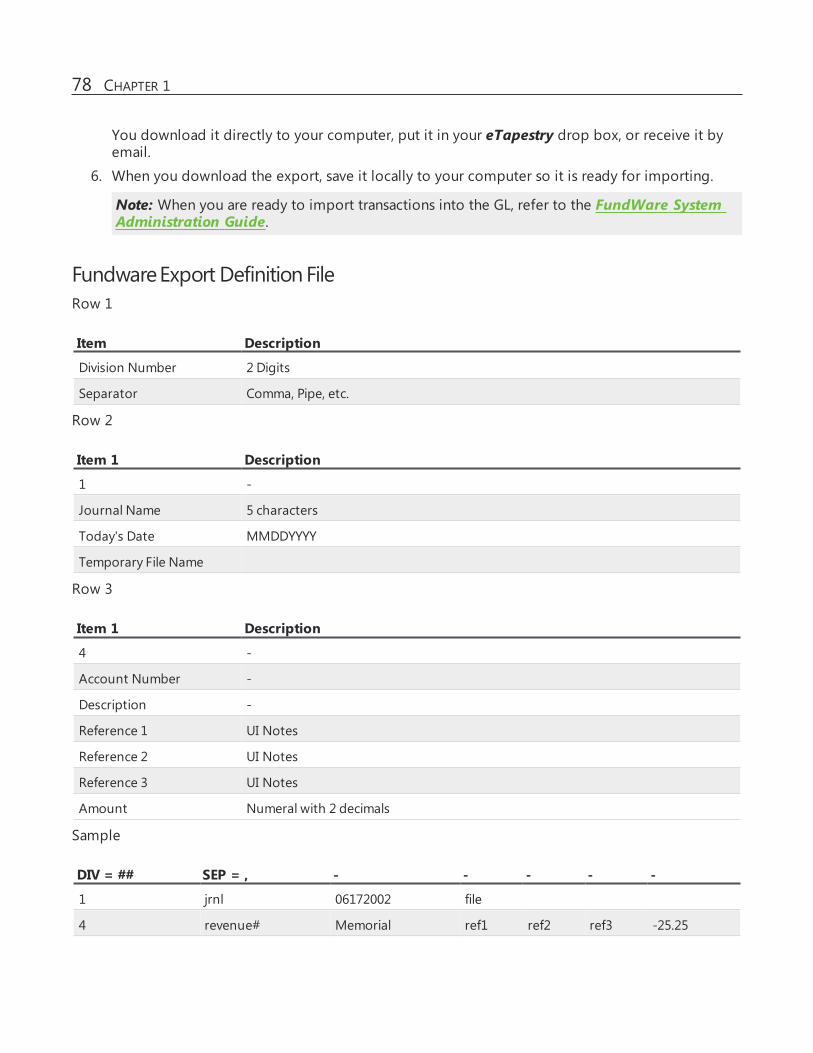
You download it directly to your computer, put it in your eTapestry drop box, or receive it byemail.
6. When you download the export, save it locally to your computer so it is ready for importing.
Note: When you are ready to import transactions into the GL, refer to the FundWare SystemAdministration Guide.
FundwareExport DefinitionFileRow 1
Item Description
Division Number 2 Digits
Separator Comma, Pipe, etc.
Row 2
Item 1 Description
1 -
Journal Name 5 characters
Today's Date MMDDYYYY
Temporary File Name
Row 3
Item 1 Description
4 -
Account Number -
Description -
Reference 1 UI Notes
Reference 2 UI Notes
Reference 3 UI Notes
Amount Numeral with 2 decimals
Sample
DIV = ## SEP = , - - - - -
1 jrnl 06172002 file
4 revenue# Memorial ref1 ref2 ref3 -25.25
78 CHAPTER 1
MIPExportYou can export transactions from your eTapestry, so you can them import them into MIP. For eachtransaction, the export file includes a credit and debit record. In order to run the MIP export, you mustfirst set up funds with the appropriate account numbers.
In eTapestry, a fund designates the purpose of a donation. MIP uses several splits to categorize eachtransaction. Your accountant selects the number and types of splits that your organization uses. Yourorganization may have a MIP split called Fund, but it is not the same as an eTapestry fund. Othercommon names for splits are Project, Cost Center, General Ledger Account, Subaccount, Restrictionand Department. For information about eTapestry funds, refer to Funds on page 48.If there are only a few combinations of splits that you use to represent Gifts, Pledges and Payments inMIP, you may want to create separate eTapestry funds for each combination. If your data entrypersonnel have limited accounting knowledge, and you want to minimizes the number of fields thatmust be entered for each donation, consider this approach.
For some organizations, creating a fund for every combination of splits would result in too manyfunds. In this situation, consider using a user-defined field for one or more splits. For each donation,you enter the fund and user-defined field.
For example, your organization may have a split called Program Code, which it uses to designate whichmissionary group collected the donation. The donation can be made to one of several Generalaccounts, regardless of which missionary group collected it. Since your organization may work withhundreds of missionary groups, there would be too many combinations of Program Codes andGeneral accounts to create separate funds. For this example, it is better to use a user-defined field forthe Program Code and separate funds for each General account.
eTapestry provides four user-defined fields which the MIP Export also recognizes: Location, Program,Department and Grant. To simplify data entry, create dropdown list for each feild, so your data entryperson can quickly select the appropriate value. The values store in an eTapestry user-defined fieldmust be identical to the value for the MIP split. Because the MIP values are usually codes, instead ofnames, it can be difficult for your eTapestry data entry person to identify the appropriate value. Tohelp, consider use the code followed by the name or description for the user-defined field; forexample, 60-Kenya, or U-Unrestricted. In order for the MIP Definition File to separate the code fromthe name or description, the code must be first.
Note: You cannot rename these four user-defined fields to match the names of your MIP splits.However, you should set up your MIP Definition File to ensure the data is imported to the correctsplit. For example, data in the Location field can be imported to a Cost Center split in MIP.
RunMIP export1. From the Management tab, click Standard Exports.2. Under Accounting Exports, clickMIP Export. The Launch MIP Export screen appears.3. Select the category and query you want to use to run the export.
4. Enter the export criteria based on your MIP setup
MANAGEMENT 79
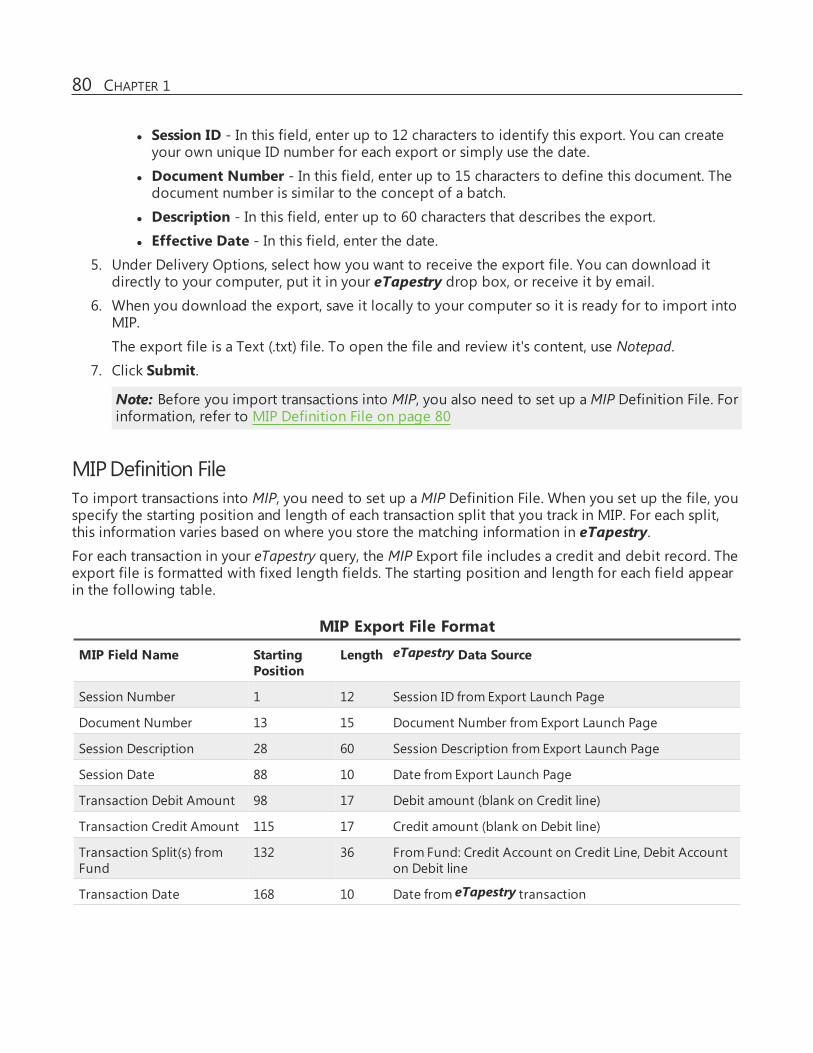
l Session ID - In this field, enter up to 12 characters to identify this export. You can createyour own unique ID number for each export or simply use the date.
l Document Number - In this field, enter up to 15 characters to define this document. Thedocument number is similar to the concept of a batch.
l Description - In this field, enter up to 60 characters that describes the export.l Effective Date - In this field, enter the date.
5. Under Delivery Options, select how you want to receive the export file. You can download itdirectly to your computer, put it in your eTapestry drop box, or receive it by email.
6. When you download the export, save it locally to your computer so it is ready for to import intoMIP.
The export file is a Text (.txt) file. To open the file and review it's content, use Notepad.
7. Click Submit.
Note: Before you import transactions into MIP, you also need to set up aMIP Definition File. Forinformation, refer to MIP Definition File on page 80
MIPDefinition FileTo import transactions into MIP, you need to set up aMIP Definition File. When you set up the file, youspecify the starting position and length of each transaction split that you track in MIP. For each split,this information varies based on where you store the matching information in eTapestry.For each transaction in your eTapestry query, the MIP Export file includes a credit and debit record. Theexport file is formatted with fixed length fields. The starting position and length for each field appearin the following table.
MIP Export File Format
MIP Field Name StartingPosition
Length eTapestry Data Source
Session Number 1 12 Session ID from Export Launch Page
Document Number 13 15 Document Number from Export Launch Page
Session Description 28 60 Session Description from Export Launch Page
Session Date 88 10 Date from Export Launch Page
Transaction Debit Amount 98 17 Debit amount (blank on Credit line)
Transaction Credit Amount 115 17 Credit amount (blank on Debit line)
Transaction Split(s) fromFund
132 36 From Fund: Credit Account on Credit Line, Debit Accounton Debit line
Transaction Date 168 10 Date from eTapestry transaction
80 CHAPTER 1

MIP Export File Format
Transaction Split(s) fromLocation
178 10 Location user-defined field
Transaction Split(s) fromProgram
188 10 Program user-defined field
Transaction Split(s) fromDepartment
198 10 Department user-defined field
Transaction Split(s) fromGrant
208 10 Grant user-defined field
Donor Name 218 45 Donor Name
Transaction ID 263 3 Generated during export to mark each donation as aseparate MIP transaction
For example, you may have stored three splits in the Account fields on the Fund. The first split is the GLcode, which is 6 digits long. The second split is the Cost Center, which is 4 digits long. Third split is theRestriction, which is one digit long. You separated the splits using a dash (-), so that the accounts onthe Fund have values such as: 156430-5299-1. The export file will include this entire value starting inposition 132. Your MIP Definition file would specify that the GL Code starts in position 132 and is 6characters long, the Cost Center split starts in position 139 and is 4 characters long, and the Restrictionsplit starts in position 144 and is one character long.
Sample:
SessionID
DocumentNumber
Description SessionDate
Amount GLNumber
Location Program Department Grant
session# session# description 06172002 25.25 revenue#
UDF UDF UDF UDF
Finalize transactions that export to MIPAfter you export transactions from eTapestry and import them into MIP, mark them as final ineTapestry. This helps you track which transactions have been exported so that you can avoid creatingduplicates in MIP. It also prevents users who are not admins from modifying the transactions, whichkeeps the data in your databases consistent.
1. From Management, clickMass Updates.2. Click Finalize Journal Entries.3. Select the category and query that you used for the export.
4. Click Next under Steps.5. Under Action, select Finalize.6. Click Next.7. Review the query, number of entries to update, and finalize information. To make changes, click
MANAGEMENT 81

Back.8. To run this process, click Next.
Tip: We recommend that you run this process at the end of the day, when other users are notaccessing eTapestry. Other users cannot access the records affected by this update until afterthe process is complete. You can log out of eTapestry while the process continues.
To remove transactions that have already been exported from your export query, specify that JournalEntry Status should be "Pending." After you finalize a transaction, you'll have the option to reverse itinstead of deleting it. When you create a reversal transaction for a constituent, you can then export itto MIP to keep eTapestry and MIP in sync.
QuickBooksDesktopExportTo take advantage of the QuickBooks desktop export, you must first set up your eTapestry database totrack the information QuickBooks requires.
First, set up funds in eTapestry to indicate how each gift is used. Refer to Funds for QuickBooksDesktop on page 82.
Then, based on how your QuickBooks desktop database is set up, you may need to create one or moreuser-defined fields. Refer to User-Defined Fields for QuickBooks Desktop on page 83.
Funds forQuickBooksDesktopAs a general rule, if you do not export items out of eTapestry, then you create a fund for each incomeaccount that could be associated with transactions tracked in eTapestry. If you export items and butdo note use eTapestry Cart, create a fund for each item. If you track items in the eTapestry Cart, youmust associate the item with a fund that has the correct income account associated with that item inQuickBooks desktop.
Donations made to a fund are credited to specific General Ledger (GL) accounts in QuickBooks desktop.Enter the appropriate GL account codes for each of the funds that you have in eTapestry. The GLaccount codes must be spelled identically in eTapestry and QuickBooks desktop. For informationabout what GL numbers to include, consult your accountant.
Before you export from etapestry, ensure that your eTapestry database is set up with correct funds.Different types of donations require different types of accounts on the fund. Your funds ineTapestrymust match the QuickBooks® income accounts that you want to import.
l The fund name must be identical to the income account name from your chart of accounts.
l The cash account for each fund, must be the same as your bank account GL account number foryour deposited funds account.
l If you track invoices and payments in QuickBooks® desktop, the receivable account must be thesame as the accounts receivable account GL account number in QuickBooks® in order to exportpledges and payments.
l The revenue account must be the same as the income account GL account number inQuickBooks® desktop.
82 CHAPTER 1
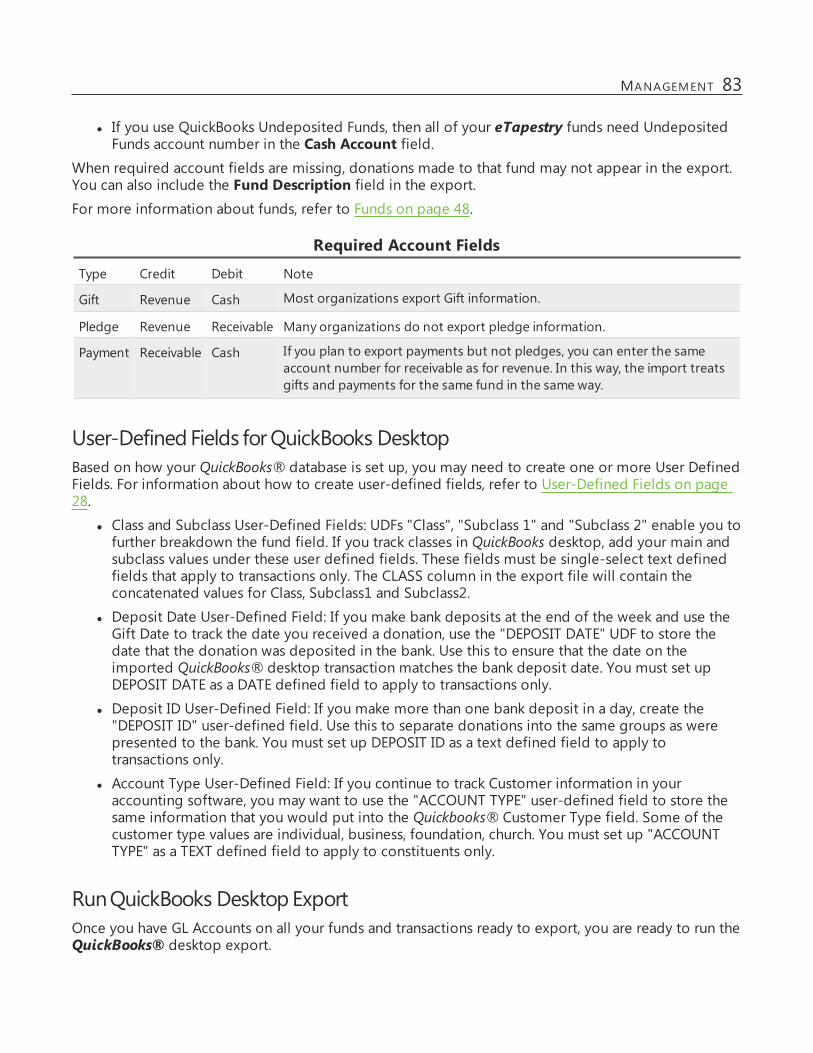
l If you use QuickBooks Undeposited Funds, then all of your eTapestry funds need UndepositedFunds account number in the Cash Account field.
When required account fields are missing, donations made to that fund may not appear in the export.You can also include the Fund Description field in the export.For more information about funds, refer to Funds on page 48.
Required Account Fields
Type Credit Debit Note
Gift Revenue Cash Most organizations export Gift information.
Pledge Revenue Receivable Many organizations do not export pledge information.
Payment Receivable Cash If you plan to export payments but not pledges, you can enter the sameaccount number for receivable as for revenue. In this way, the import treatsgifts and payments for the same fund in the same way.
User-DefinedFields forQuickBooks DesktopBased on how your QuickBooks® database is set up, you may need to create one or more User DefinedFields. For information about how to create user-defined fields, refer to User-Defined Fields on page28.
l Class and Subclass User-Defined Fields: UDFs "Class", "Subclass 1" and "Subclass 2" enable you tofurther breakdown the fund field. If you track classes in QuickBooks desktop, add your main andsubclass values under these user defined fields. These fields must be single-select text definedfields that apply to transactions only. The CLASS column in the export file will contain theconcatenated values for Class, Subclass1 and Subclass2.
l Deposit Date User-Defined Field: If you make bank deposits at the end of the week and use theGift Date to track the date you received a donation, use the "DEPOSIT DATE" UDF to store thedate that the donation was deposited in the bank. Use this to ensure that the date on theimported QuickBooks® desktop transaction matches the bank deposit date. You must set upDEPOSIT DATE as a DATE defined field to apply to transactions only.
l Deposit ID User-Defined Field: If you make more than one bank deposit in a day, create the"DEPOSIT ID" user-defined field. Use this to separate donations into the same groups as werepresented to the bank. You must set up DEPOSIT ID as a text defined field to apply totransactions only.
l Account Type User-Defined Field: If you continue to track Customer information in youraccounting software, you may want to use the "ACCOUNT TYPE" user-defined field to store thesame information that you would put into the Quickbooks® Customer Type field. Some of thecustomer type values are individual, business, foundation, church. You must set up "ACCOUNTTYPE" as a TEXT defined field to apply to constituents only.
RunQuickBooks DesktopExportOnce you have GL Accounts on all your funds and transactions ready to export, you are ready to run theQuickBooks® desktop export.
MANAGEMENT 83

Run the export1. From Management, click Standard Exports. On the eTapestry Standard Exports screen, click
QuickBooks Desktop Export under Accounting Exports. On the launch page, select a query.You can use one of the standard queries like one of the Constituent Journal Entry Date queries, oryou can create your own Journal Entry query.
Note: If you are tracking donations with gift types other than cash and check, you shouldspecify the gift type to be exported in the query. Cash and check donations should be exportedtogether.
2. On the Customer Information tile, select your customer options.
l Select whether QuickBooks desktop should identify constituents by their name or their sortname.
l Indicate if you want QuickBooks desktop to create customer records. If you select "No,"QuickBooks desktopwill put constituents in either the Vendor or the Other Name list,depending on our QuickBooksdesktop setup.
Note: The QuickBooks desktop import will register an error if you attempt to add to theCustomer list any donor names that are currently stored in your QuickBooks desktopdatabase on the Other Names or Vendor lists. The error message will indicate that theimport cannot be used to change the type of a name. To correct the problem, you canmanually change the name record in your QuickBooks desktop database to have the typeCustomer.
l If you choose to create customer records, indicate whether you want to include optionalcustomer fields. export names and whether you want to create customer records inQuickBooks desktop and export optional customer fields. Optional fields include accountnumber, address, voice and mobile numbers, email address, and customer type.
3. In the Transaction Information tile, enter details about how to handle transactions in QuickBooksdesktop.
l QuickBooks Desktop Transaction Type determines whether donations are stored in yourQuickBooks database as deposits or cash sales.
l Select Yes on the Export Individual Transactions field to export each individualeTapestry transaction to a separate QuickBooks desktop transaction. To group transactionstogether, select No. It is common to import all donations from a single bank deposittogether into a single entry in the Cash account, while keeping the detail of each gift inthe Income accounts. This option is not available for cash sales, because each donationmust be tied to a specific QuickBooks desktop customer.
l If you do not choose to export individual transactions, select the grouping criteria in theTransaction Grouping field. The deposit date grouping can be useful to save transactionsto deposit once a week. The deposit ID grouping is usefulto make more than one depositon a single day. The credit/debit card type grouping combines donations with the samecredit/debit card type and gift date into one QuickBooks desktop transaction.
l To combine all donations associated with the same credit account and CLASS value into a
84 CHAPTER 1
single distribution within a transaction, select Yes on the Subtotal by GL Account# field.This option is only available when the Export Individual Transaction option is set to No.Export files created with this option do not include donor information on the transaction.
1. On the Credit/Debit Card Payment Method field, select "Credit/Debit Card" or"Credit/Debit Card Type." When you select "Credit/Debit Card," the words "Credit/DebitCard" appear as the payment method on the QuickBooks desktop transaction for a gift orpayment that has a "Credit/Debit card" gift type in eTapestry. When you select"Credit/Debit Card Type," the credit/debit card type that you select on the gift page isplaced in the QuickBooksPayment Method field.
2. In the Track Sales Tax field, select whether you want to include sales tax information onthe import.
4. You can customize three fields in your export.
l Transaction Name: Select the value to be used to identify transactions in the export.l Transaction Memo: Select the value to be displayed in the Memo field for the transactionline in the input file.
l Distribution Memo: Select the value to be displayed in the Memo field on each detailline of the import file.
5. Select your delivery options. The Report Format field defaults to a .iif file, which is the fileformat needed to import the data into QuickBooks desktop.
6. Click Submit to run the export or Schedule for Off-Hours to run it later or to set up a recurringexport.
Import data to QuickBooks1. Backup your database. Before you run the QuickBooks® Import function, it is a good idea to back
up your QuickBooks® desktop database. That way, if there is any problem with the import, youcan easily restore from the backup to get your accounting system back to the way it was beforethe import.
2. Import your transactions. After you have run the backup, select the IIF File import option in in theQuickBooks® File menu. Select the name of the IIF file to be imported from the displayed list.The import starts immediately after you select the name of the IIF file from the list.
3. Check your work. When the import is complete, check the results to make sure that the importeddata matches your expectations. If it does not, you can restore the QuickBooks® desktopdatabase to the backup.
Warning: To make sure that donations are only recorded once in your accounting package, do notimport transactions more than once. To keep track of the donations that have been exported, markeach eTapestry record as Final after it has successfully imported into your QuickBooks® desktopdatabase. You can do this globally for all donations in your export query. From the Management tab,clickMass Update. On the Mass Updates page, click Finalize Journal Entries under Update ExistingItems and select the same query you used for your export. To remove transactions that have alreadybeen exported from your export query, specify that Journal Entry Status should be "Pending."
MANAGEMENT 85
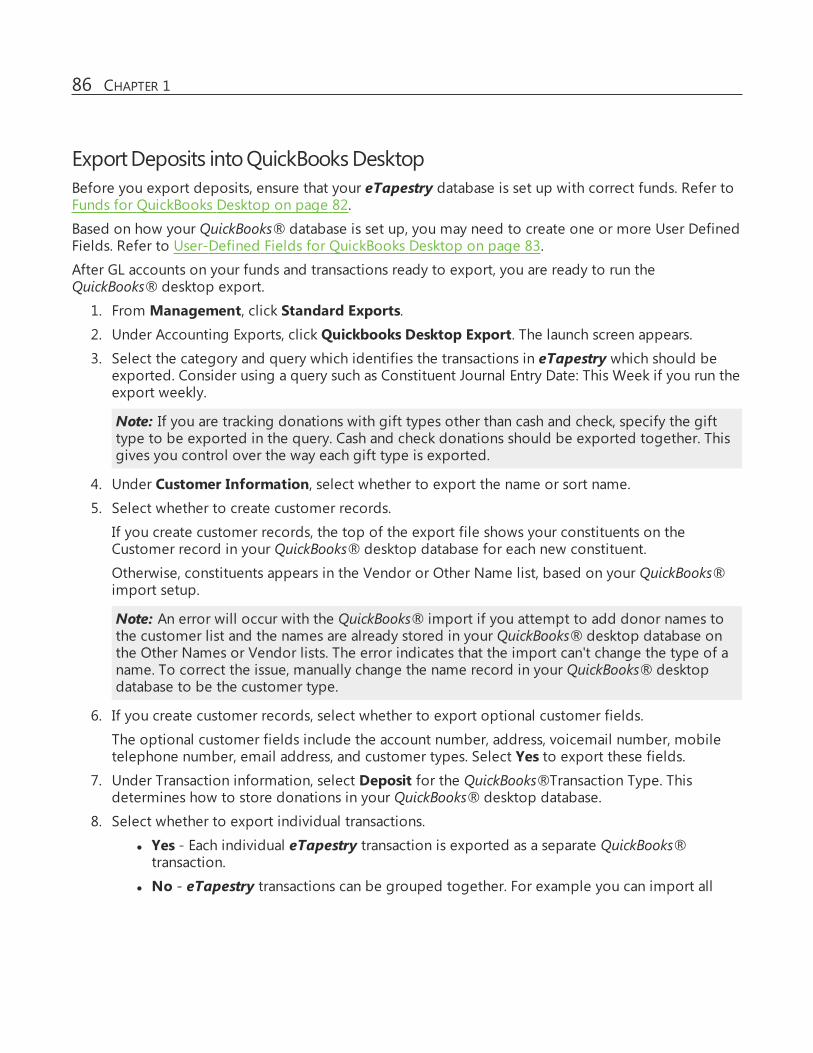
ExportDeposits intoQuickBooksDesktopBefore you export deposits, ensure that your eTapestry database is set up with correct funds. Refer toFunds for QuickBooks Desktop on page 82.
Based on how your QuickBooks® database is set up, you may need to create one or more User DefinedFields. Refer to User-Defined Fields for QuickBooks Desktop on page 83.
After GL accounts on your funds and transactions ready to export, you are ready to run theQuickBooks® desktop export.
1. From Management, click Standard Exports.2. Under Accounting Exports, click Quickbooks Desktop Export. The launch screen appears.3. Select the category and query which identifies the transactions in eTapestry which should be
exported. Consider using a query such as Constituent Journal Entry Date: This Week if you run theexport weekly.
Note: If you are tracking donations with gift types other than cash and check, specify the gifttype to be exported in the query. Cash and check donations should be exported together. Thisgives you control over the way each gift type is exported.
4. Under Customer Information, select whether to export the name or sort name.5. Select whether to create customer records.
If you create customer records, the top of the export file shows your constituents on theCustomer record in your QuickBooks® desktop database for each new constituent.
Otherwise, constituents appears in the Vendor or Other Name list, based on your QuickBooks®import setup.
Note: An error will occur with the QuickBooks® import if you attempt to add donor names tothe customer list and the names are already stored in your QuickBooks® desktop database onthe Other Names or Vendor lists. The error indicates that the import can't change the type of aname. To correct the issue, manually change the name record in your QuickBooks® desktopdatabase to be the customer type.
6. If you create customer records, select whether to export optional customer fields.
The optional customer fields include the account number, address, voicemail number, mobiletelephone number, email address, and customer types. Select Yes to export these fields.
7. Under Transaction information, select Deposit for the QuickBooks®Transaction Type. Thisdetermines how to store donations in your QuickBooks® desktop database.
8. Select whether to export individual transactions.
l Yes - Each individual eTapestry transaction is exported as a separate QuickBooks®transaction.
l No - eTapestry transactions can be grouped together. For example you can import all
86 CHAPTER 1
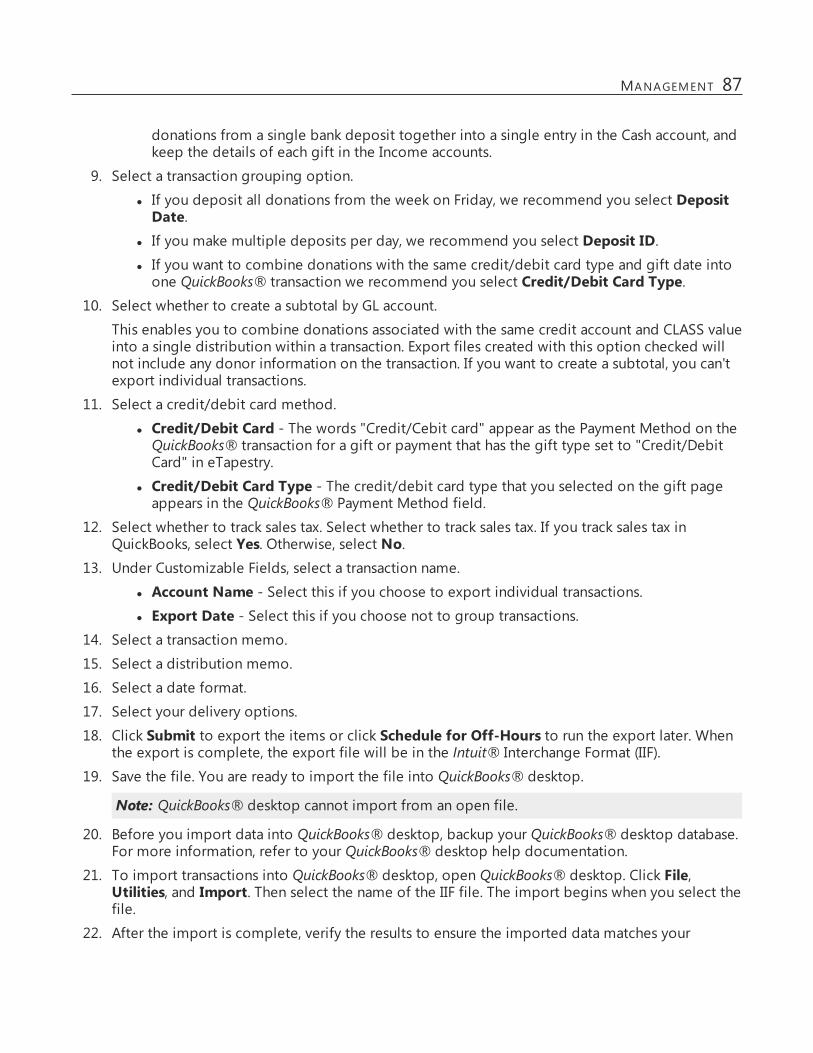
donations from a single bank deposit together into a single entry in the Cash account, andkeep the details of each gift in the Income accounts.
9. Select a transaction grouping option.
l If you deposit all donations from the week on Friday, we recommend you select DepositDate.
l If you make multiple deposits per day, we recommend you select Deposit ID.l If you want to combine donations with the same credit/debit card type and gift date intoone QuickBooks® transaction we recommend you select Credit/Debit Card Type.
10. Select whether to create a subtotal by GL account.
This enables you to combine donations associated with the same credit account and CLASS valueinto a single distribution within a transaction. Export files created with this option checked willnot include any donor information on the transaction. If you want to create a subtotal, you can'texport individual transactions.
11. Select a credit/debit card method.
l Credit/Debit Card - The words "Credit/Cebit card" appear as the Payment Method on theQuickBooks® transaction for a gift or payment that has the gift type set to "Credit/DebitCard" in eTapestry.
l Credit/Debit Card Type - The credit/debit card type that you selected on the gift pageappears in the QuickBooks® Payment Method field.
12. Select whether to track sales tax. Select whether to track sales tax. If you track sales tax inQuickBooks, select Yes. Otherwise, select No.
13. Under Customizable Fields, select a transaction name.
l Account Name - Select this if you choose to export individual transactions.l Export Date - Select this if you choose not to group transactions.
14. Select a transaction memo.
15. Select a distribution memo.
16. Select a date format.
17. Select your delivery options.
18. Click Submit to export the items or click Schedule for Off-Hours to run the export later. Whenthe export is complete, the export file will be in the Intuit® Interchange Format (IIF).
19. Save the file. You are ready to import the file into QuickBooks® desktop.
Note: QuickBooks® desktop cannot import from an open file.
20. Before you import data into QuickBooks® desktop, backup your QuickBooks® desktop database.For more information, refer to your QuickBooks® desktop help documentation.
21. To import transactions into QuickBooks® desktop, open QuickBooks® desktop. Click File,Utilities, and Import. Then select the name of the IIF file. The import begins when you select thefile.
22. After the import is complete, verify the results to ensure the imported data matches your
MANAGEMENT 87
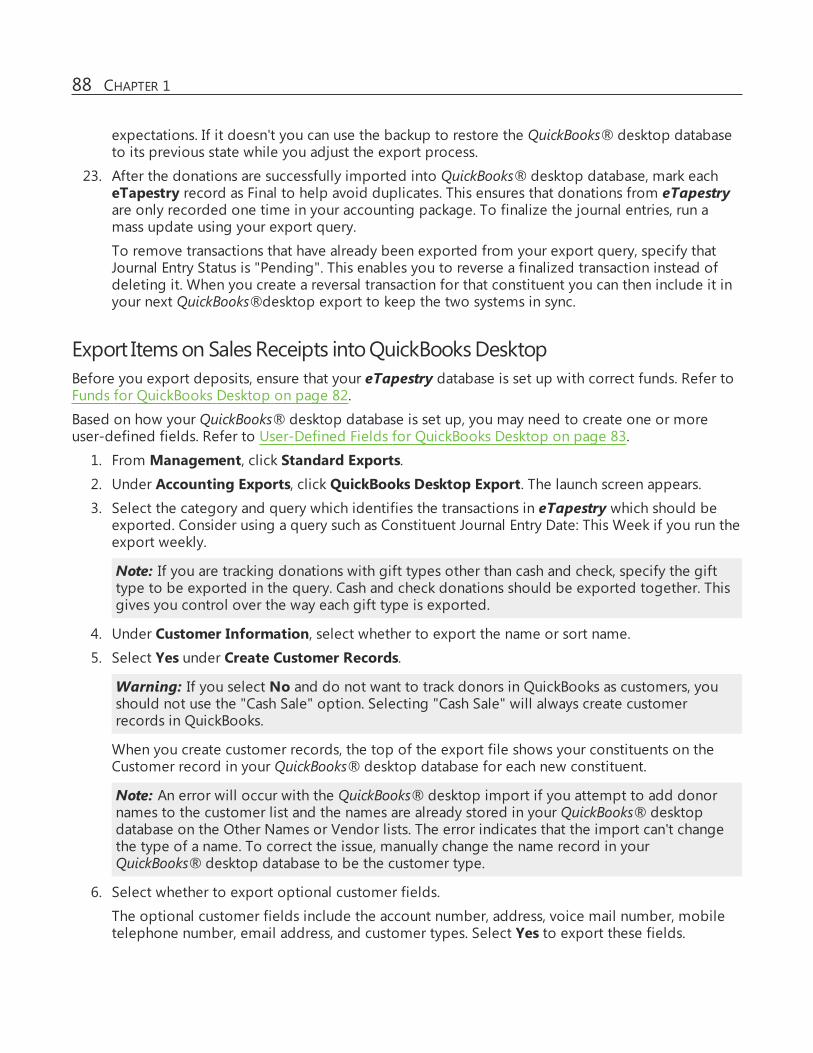
expectations. If it doesn't you can use the backup to restore the QuickBooks® desktop databaseto its previous state while you adjust the export process.
23. After the donations are successfully imported into QuickBooks® desktop database, mark eacheTapestry record as Final to help avoid duplicates. This ensures that donations from eTapestryare only recorded one time in your accounting package. To finalize the journal entries, run amass update using your export query.
To remove transactions that have already been exported from your export query, specify thatJournal Entry Status is "Pending". This enables you to reverse a finalized transaction instead ofdeleting it. When you create a reversal transaction for that constituent you can then include it inyour next QuickBooks®desktop export to keep the two systems in sync.
Export Itemson SalesReceipts intoQuickBooksDesktopBefore you export deposits, ensure that your eTapestry database is set up with correct funds. Refer toFunds for QuickBooks Desktop on page 82.
Based on how your QuickBooks® desktop database is set up, you may need to create one or moreuser-defined fields. Refer to User-Defined Fields for QuickBooks Desktop on page 83.
1. From Management, click Standard Exports.2. Under Accounting Exports, click QuickBooks Desktop Export. The launch screen appears.3. Select the category and query which identifies the transactions in eTapestry which should be
exported. Consider using a query such as Constituent Journal Entry Date: This Week if you run theexport weekly.
Note: If you are tracking donations with gift types other than cash and check, specify the gifttype to be exported in the query. Cash and check donations should be exported together. Thisgives you control over the way each gift type is exported.
4. Under Customer Information, select whether to export the name or sort name.5. Select Yes under Create Customer Records.
Warning: If you select No and do not want to track donors in QuickBooks as customers, youshould not use the "Cash Sale" option. Selecting "Cash Sale" will always create customerrecords in QuickBooks.
When you create customer records, the top of the export file shows your constituents on theCustomer record in your QuickBooks® desktop database for each new constituent.
Note: An error will occur with the QuickBooks® desktop import if you attempt to add donornames to the customer list and the names are already stored in your QuickBooks® desktopdatabase on the Other Names or Vendor lists. The error indicates that the import can't changethe type of a name. To correct the issue, manually change the name record in yourQuickBooks® desktop database to be the customer type.
6. Select whether to export optional customer fields.
The optional customer fields include the account number, address, voice mail number, mobiletelephone number, email address, and customer types. Select Yes to export these fields.
88 CHAPTER 1

7. Under Transaction information, select Cash Sale for the QuickBooks®Transaction Type. Thisdetermines how to store donations in your QuickBooks® desktop database.
Note: Many of the other transaction information fields will be complete for you when youchoose select Cash Sale.
8. Select to export individual transactions.
9. Select a transaction grouping option.
l If you deposit all donations from the week on Friday, we recommend you select DepositDate.
l If you make multiple deposits per day, we recommend you select Deposit ID.l If you want to combine donations with the same credit/debit card type and gift date intoone QuickBooks® transaction we recommend you select Credit/Debit Card Type.
10. Select whether to create a subtotal by GL account.
This enables you to combine donations associated with the same credit account and CLASS valueinto a single distribution within a transaction. Export files created with this option checked willnot include any donor information on the transaction. If you want to create a subtotal, you can'texport individual transactions.
11. Select a credit/debit card method.
l Credit/Debit Card - The words "Credit/Debit Card" appear as the Payment Method on theQuickBooks® transaction for a gift or payment that has the gift type set to "Credit/Debitcard" in eTapestry.
l Credit/Debit Card Type - The credit/debit card type that you selected on the gift pageappears in the QuickBooks® Payment Method field.
12. Select whether to track sales tax. If you track sales tax in QuickBooks, select Yes. Otherwise, selectNo.
13. For Export General Journal Items to Undeposited funds, select No.14. Do not track sales tax.
15. Under Customizable Fields, select a Account Name as the transaction name.16. Select a transaction memo.
17. Select a distribution memo.
18. Select a date format.
19. Select your delivery options.
20. Click Submit to export the items or click Schedule for Off-Hours to run the export later. Whenthe export is complete, the export file will be in the Intuit® Interchange Format (IIF).
21. Save the file. You are ready to import the file into QuickBooks® desktop.
Note: QuickBooks® cannot import from an open file.
22. To modify the export file, use spreadsheet software (such as Microsoft Excel) to open the IIF file.Save the file. For Save as type, select Text type and ensure that the file name ends with suffix"IIF" (for example: eTapestryExport2-18-14.iif). Confirm that you want to keep the file in the
MANAGEMENT 89

same format. Close the file. You are ready to import the file into QuickBooks® desktop.
23. Before you import data into QuickBooks® desktop, backup your QuickBooks® desktop database.For more information, refer to your QuickBooks® help documentation.
24. To import transactions into QuickBooks® desktop, open QuickBooks® desktop. Click File,Utilities, and Import. Then select the name of the IIF file. The import begins when you select thefile.
25. After the import is complete, verify the results to ensure the imported data matches yourexpectations. If it doesn't you can use the backup to restore the QuickBooks® desktop databaseto its previous state while you adjust the export process.
26. After the donations are successfully imported into QuickBooks® desktop database, mark eacheTapestry record as Final to help avoid duplicates. This ensures that donations from eTapestryare only recorded one time in your accounting package. To finalize the journal entries, run amass update using your export query.
27. To remove transactions that have already been exported from your export query, specify thatJournal Entry Status is "Pending". This enables you to reverse a finalized transaction instead ofdeleting it. When you create a reversal transaction for that constituent you can then include it inyour next QuickBooks® desktop export to keep the two systems in sync.
ExportPayments intoQuickBooksDesktop asPaymentsBefore you export deposits, ensure that your eTapestry database is set up with correct funds. Refer toFunds for QuickBooks Desktop on page 82.
Then create a query to identify the transactions in eTapestry which should be exported. Limit thetransactions to Journal Entry Type Pledge. For example, you may want to only export pledgetransactions for the previous week which were not finalized.
1. From the Management, click eTapestry Standard Exports.2. Under Accounting Exports, select Quickbooks Desktop Export. The Launch Quickbooks
Desktop Export page appears.
3. Select the category and query which identifies the transactions in eTapestry which should beexported.
4. Under Customer Information, select whether to export the name or sort name.5. Select to create customer records.
6. Select whether to export optional customer fields.
7. Under Transaction information, select Cash Sale for the QuickBooks® Transaction Type.
8. Select whether to export individual transactions.
9. Select a transaction grouping option.
10. Select whether to create a subtotal by GL account.
11. Select a credit/debit card method.
12. Select whether to track sales tax. If you track sales tax in QuickBooks, select Yes. Otherwise, selectNo.
90 CHAPTER 1
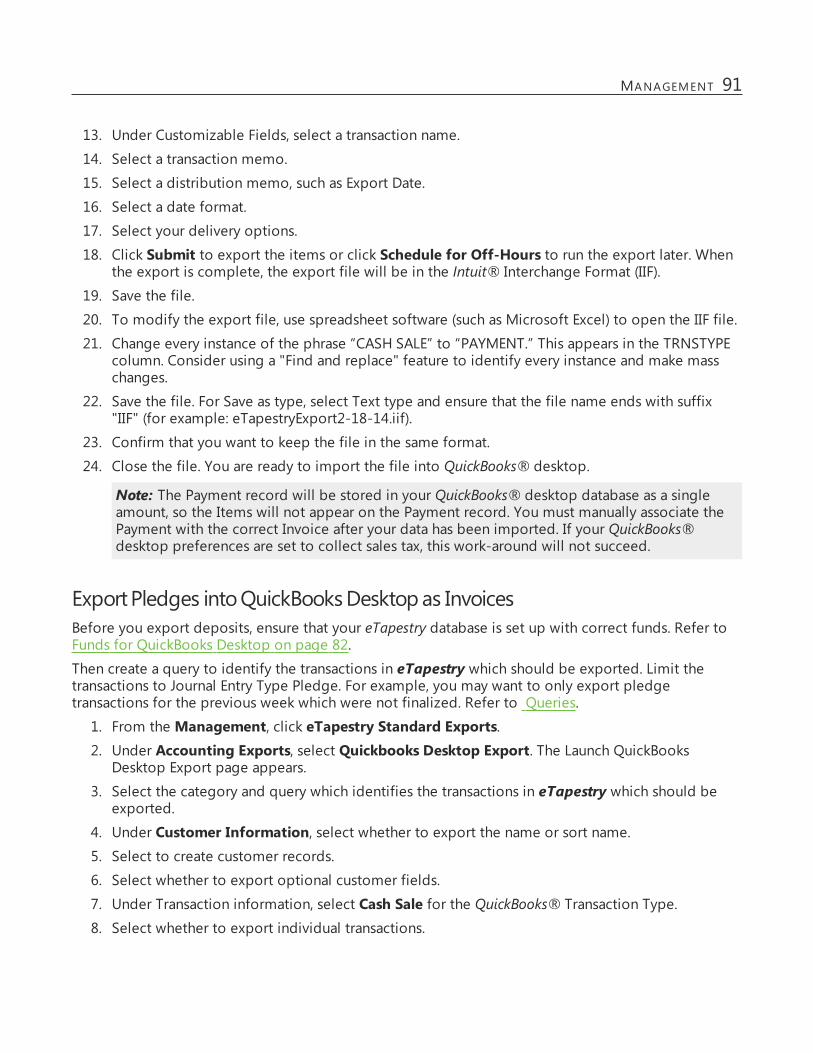
13. Under Customizable Fields, select a transaction name.
14. Select a transaction memo.
15. Select a distribution memo, such as Export Date.
16. Select a date format.
17. Select your delivery options.
18. Click Submit to export the items or click Schedule for Off-Hours to run the export later. Whenthe export is complete, the export file will be in the Intuit® Interchange Format (IIF).
19. Save the file.
20. To modify the export file, use spreadsheet software (such as Microsoft Excel) to open the IIF file.
21. Change every instance of the phrase “CASH SALE” to “PAYMENT.” This appears in the TRNSTYPEcolumn. Consider using a "Find and replace" feature to identify every instance and make masschanges.
22. Save the file. For Save as type, select Text type and ensure that the file name ends with suffix"IIF" (for example: eTapestryExport2-18-14.iif).
23. Confirm that you want to keep the file in the same format.
24. Close the file. You are ready to import the file into QuickBooks® desktop.
Note: The Payment record will be stored in your QuickBooks® desktop database as a singleamount, so the Items will not appear on the Payment record. You must manually associate thePayment with the correct Invoice after your data has been imported. If your QuickBooks®desktop preferences are set to collect sales tax, this work-around will not succeed.
ExportPledges intoQuickBooksDesktopas InvoicesBefore you export deposits, ensure that your eTapestry database is set up with correct funds. Refer toFunds for QuickBooks Desktop on page 82.
Then create a query to identify the transactions in eTapestry which should be exported. Limit thetransactions to Journal Entry Type Pledge. For example, you may want to only export pledgetransactions for the previous week which were not finalized. Refer to Queries.
1. From the Management, click eTapestry Standard Exports.2. Under Accounting Exports, select Quickbooks Desktop Export. The Launch QuickBooks
Desktop Export page appears.
3. Select the category and query which identifies the transactions in eTapestry which should beexported.
4. Under Customer Information, select whether to export the name or sort name.5. Select to create customer records.
6. Select whether to export optional customer fields.
7. Under Transaction information, select Cash Sale for the QuickBooks® Transaction Type.
8. Select whether to export individual transactions.
MANAGEMENT 91

9. Select a transaction grouping option.
10. Select whether to create a subtotal by GL account.
11. Select a credit/debit card method.
12. Select whether to track sales tax. If you track sales tax in QuickBooks, select Yes. Otherwise, selectNo.
13. Under Customizable Fields, select a transaction name.
14. Select a transaction memo.
15. Select a distribution memo.
16. Select a date format.
17. Select your delivery options.
18. Click Submit to export the items or click Schedule for Off-Hours to run the export later. Whenthe export is complete, the export file will be in the Intuit® Interchange Format (IIF).
19. Save the file.
20. To modify the export file, use spreadsheet software (such as Microsoft Excel) to open the IIF file.
21. Change every instance of the phrase “CASH SALE” to “INVOICE.” This appears in the TRNSTYPEcolumn. Consider using a "Find and replace" feature to identify every instance and make masschanges.
22. Save the file. For Save as type, select Text type and ensure that the file name ends with suffix"IIF" (for example: eTapestryExport2-18-14.iif).
23. Confirm that you want to keep the file in the same format.
24. Close the file. You are ready to import the file into QuickBooks® desktop.
OptionalCustomerSection forQuickBooksDesktopThis is indicated by the record staring with “!CUST” and listing Customer keyword headings.
QuickBooks Keyword eTapestry Source
NAME Account Name or Sort Name (client selected)
NOTE Account number (optional)
BADDR1 Account Address (line 1) (optional)
BADDR2 Account Address (line 2) (optional)
BADDR3 Account City (optional)
BADDR4 Account State / Provence (optional)
BADDR5 Account Postal Code (optional)
PHONE1 Voice (optional)
PHONE2 Mobile (optional)
EMAIL Email (optional)
92 CHAPTER 1

TransactionSection forQuickBooks DesktopTransaction Heading:
Line 1: “!TRNS” record containing transaction keyword headings
Line 3: “!ENDTRNS” record
Transaction Line:
QuickBooks Keyword eTapestry Source
TRNSTYPE QuickBooks® Transaction Type value selected on export launch page.
DATE If Transaction Grouping is set to Deposit Date or Deposit ID, Transaction Date is setto Deposit Date. Otherwise, the Transaction Date is set to Gift Date. If Deposit Dateis missing, Transaction Date defaults to Gift Date.
NAME Transaction Name value selected on export launch page.
AMOUNT Journal Entry amount – see table below for sign based on Journal Entry Type
ACCNT TRNS account associated with Fund: determined by transaction type as described intable above. Since this is required, items must be grouped by TRNS account.
CLASS Appears on TRNS record only when exporting individual transactions.
MEMO Transaction Memo value selected on export launch page.
Distribution Line:
QuickBooks Keyword eTapestry Source
TRNSTYPE QuickBooks® Transaction Type value selected on export launch page.
If Transaction Grouping isset to Deposit Date orDeposit ID, TransactionDate is set to DepositDate. Otherwise, theTransaction Date is set toGift Date. If Deposit Date ismissing, Transaction Datedefaults to Gift Date.
NAME Account name
AMOUNT Journal Entry amount – see table below for sign based on Journal Entry Type
ACCNT SPL account associated with Fund: determined by transaction type as described intable above.
MANAGEMENT 93

QuickBooks Keyword eTapestry Source
CLASS Class. Subclass1 and Subclass2 UDFs, concatenated as
Class:Subclass1:Subclass2.
MEMO Distribution Memo value selected on export launch page.
PAYMETH Depends on Gift Type – see table above.
DOCNUM When Gift Type = ‘Check”, Check Number. When Gift Type = ‘Credit/Debit Card’,credit/debit card type. Else blank
SPLID Required in header – value will be blank.
Undeposited FundsOption forQuickBooks DesktopColumn headings for transactions
Quickbooks Name eTapestry Name
TRNSTYPE Transaction Type
GENERAL JOURNAL Gift, Pledge, Payment, Disbursement
ACCNT General Ledger Number From Fund
AMOUNT Amount of Transaction (Debits are +, Credits are -)
Column headings for distribution lines
Quickbooks Name eTapestry Name
SPLID Distribution Line Identification Number
TRNSTYPE Transaction Type
DATE Transaction Date in mm/dd/yyyy Format
ACCNT Income or Expense Account
NAME Account Name
AMOUNT Distribution Amount
DOCNUM Transaction Number
MEMO Journal Note
Optional fields
Quickbooks Name eTapestry Name
ADDR1 Account Address 1
94 CHAPTER 1
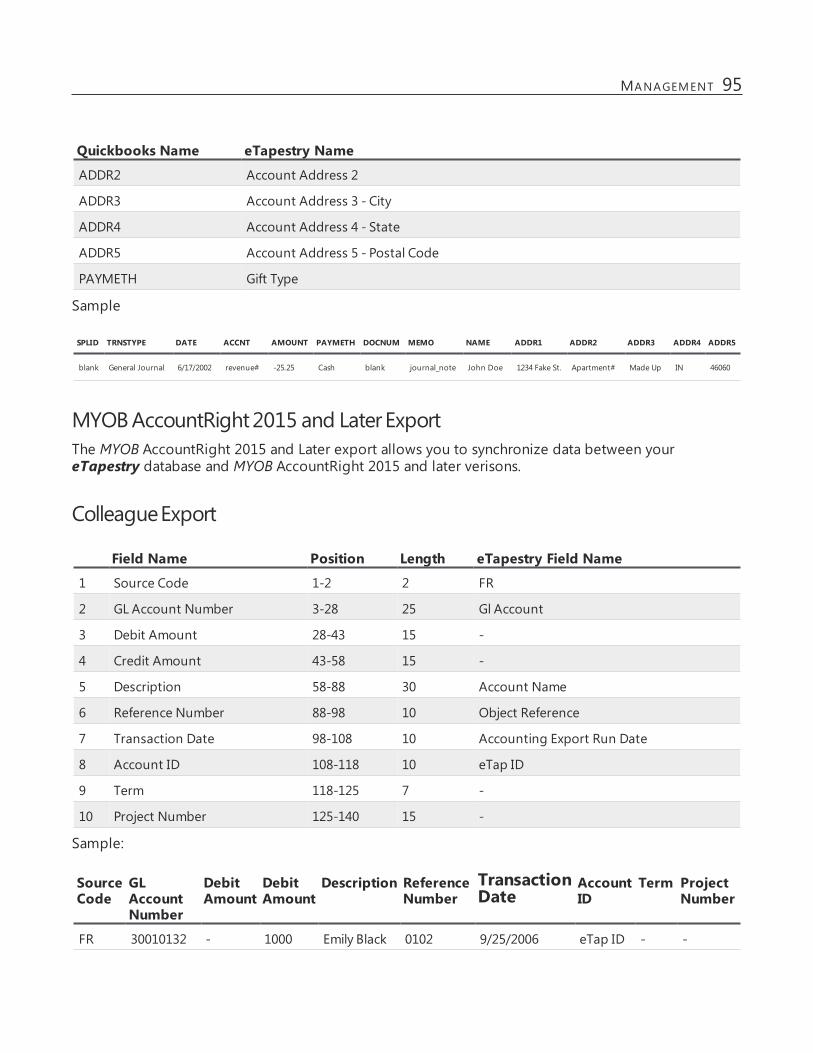
Quickbooks Name eTapestry Name
ADDR2 Account Address 2
ADDR3 Account Address 3 - City
ADDR4 Account Address 4 - State
ADDR5 Account Address 5 - Postal Code
PAYMETH Gift Type
Sample
SPLID TRNSTYPE DATE ACCNT AMOUNT PAYMETH DOCNUM MEMO NAME ADDR1 ADDR2 ADDR3 ADDR4 ADDR5
blank General Journal 6/17/2002 revenue# -25.25 Cash blank journal_note John Doe 1234 Fake St. Apartment# Made Up IN 46060
MYOBAccountRight2015 and LaterExportThe MYOB AccountRight 2015 and Later export allows you to synchronize data between youreTapestry database and MYOB AccountRight 2015 and later verisons.
ColleagueExport
Field Name Position Length eTapestry Field Name
1 Source Code 1-2 2 FR
2 GL Account Number 3-28 25 Gl Account
3 Debit Amount 28-43 15 -
4 Credit Amount 43-58 15 -
5 Description 58-88 30 Account Name
6 Reference Number 88-98 10 Object Reference
7 Transaction Date 98-108 10 Accounting Export Run Date
8 Account ID 108-118 10 eTap ID
9 Term 118-125 7 -
10 Project Number 125-140 15 -
Sample:
SourceCode
GLAccountNumber
DebitAmount
DebitAmount
Description ReferenceNumber
Transaction Date
AccountID
Term ProjectNumber
FR 30010132 - 1000 Emily Black 0102 9/25/2006 eTap ID - -
MANAGEMENT 95

IntacctExportTip: Data from eTapestry fields must match fields in Intacct. For information about importing data into Intacct, refer to Intacct documentation.
Definition File:
Description Field Length eTapestry Field Name
1 Description 80 User Defined At Run Time
2 Journal 4 User Defined At Run Time
3 Date - User Defined At Run Time
4 Line_no - Starts At One And Increments By One
5 Acct_no - General Ledger Number
6 Location_id - Location (Transaction user-defined field)
7 Dept_id - Department (Transaction user-defined field)
8 Document - Check Number
9 Memo 500 Journal Note
10 Debit - Debit Amount (Blank if a Credit Line)
11 Credit - Credit Amount (Blank if a Debit Line)
12 None - Transaction Date
Sample:
Description Journal 2 Date Line Number Account Number Location_ID Dept_ID Document Memo Debit Credit Etap-Date
description 1234 01/01/2002 1 Cash101 Cambridge Business 5678 note 200.00 - 12/31/2001
Funds for IntacctExportsAs a general rule, if you do not export items out of eTapestry, then you create a fund for each incomeaccount that you can associate with transactions tracked in eTapestry. Donations made to a fund arecredited to specific General Ledger (GL) accounts and you must enter the appropriate GL accountcodes for each fund in eTapestry. For information about what GL numbers to include, consult youraccountant.
Before you export from etapestry, make sure that your eTapestry database is set up with correctfunds. Different types of donations require different types of accounts on the fund. Your funds ineTapestry must match the income accounts that you want to import.
l The fund name must be identical to the income account name from your chart of accounts.
l The cash account for each fund, must be the same as your bank account GL account number for
96 CHAPTER 1
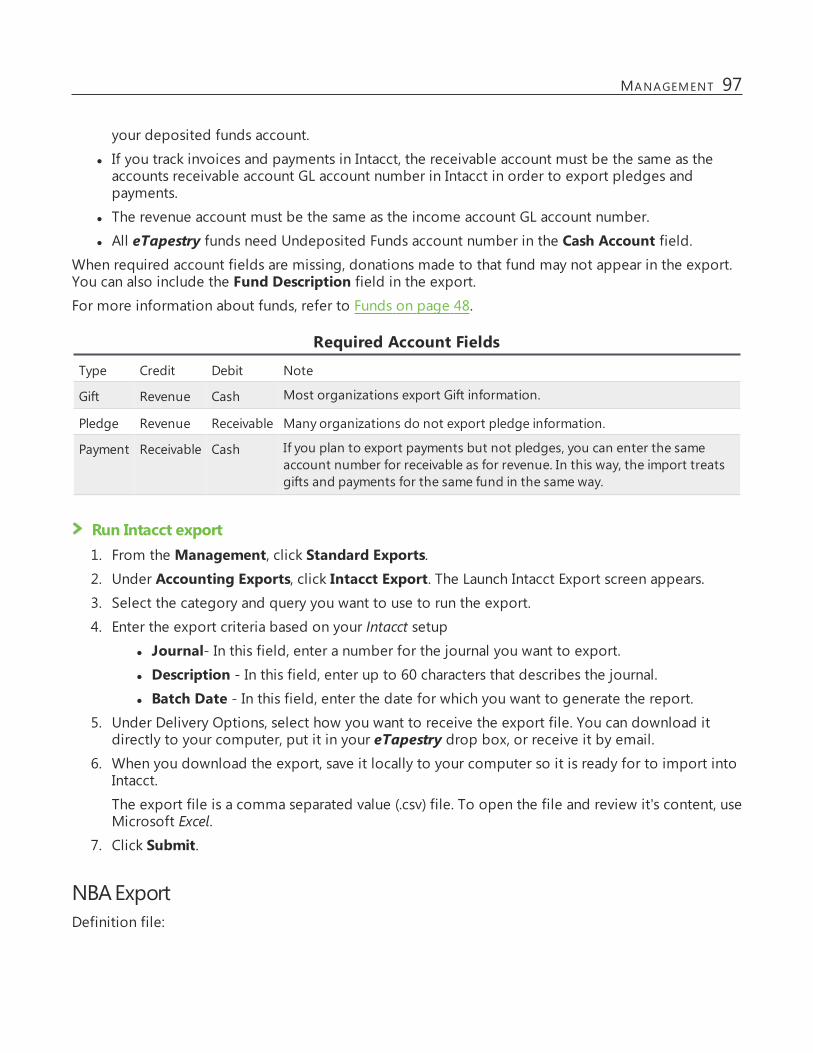
your deposited funds account.
l If you track invoices and payments in Intacct, the receivable account must be the same as theaccounts receivable account GL account number in Intacct in order to export pledges andpayments.
l The revenue account must be the same as the income account GL account number.
l All eTapestry funds need Undeposited Funds account number in the Cash Account field.When required account fields are missing, donations made to that fund may not appear in the export.You can also include the Fund Description field in the export.For more information about funds, refer to Funds on page 48.
Required Account Fields
Type Credit Debit Note
Gift Revenue Cash Most organizations export Gift information.
Pledge Revenue Receivable Many organizations do not export pledge information.
Payment Receivable Cash If you plan to export payments but not pledges, you can enter the sameaccount number for receivable as for revenue. In this way, the import treatsgifts and payments for the same fund in the same way.
Run Intacct export1. From the Management, click Standard Exports.2. Under Accounting Exports, click Intacct Export. The Launch Intacct Export screen appears.3. Select the category and query you want to use to run the export.
4. Enter the export criteria based on your Intacct setup
l Journal- In this field, enter a number for the journal you want to export.l Description - In this field, enter up to 60 characters that describes the journal.l Batch Date - In this field, enter the date for which you want to generate the report.
5. Under Delivery Options, select how you want to receive the export file. You can download itdirectly to your computer, put it in your eTapestry drop box, or receive it by email.
6. When you download the export, save it locally to your computer so it is ready for to import intoIntacct.
The export file is a comma separated value (.csv) file. To open the file and review it's content, useMicrosoft Excel.
7. Click Submit.
NBAExportDefinition file:
MANAGEMENT 97

NBA Field Name Field Length Field Description
Transaction Type 2 Gift Type
Organization Number 3 UI Option
Date 10 Date (mm/dd/yyyy)
Receipt Number 12 Receipt Number
Gift Type 2 Journal UDF
Tribute Code 2 Journal UDF
General Ledger Account Code 27 -
Amount Debited/Credited 16 -
Account Name 42 -
City 30 From Primary Persona
State 2 From Primary Persona
Postal Code 10 From Primary Persona
Transaction - User Login Name
ForFUNDExportDefinition file:
Field Name Type Length eTapestry Field
1 TR_ACCT Char 19 GL Number, 16 characters
2 TR_JVNO Char 7 Journal Entry Number
3 TR_JVDATE Numeric 8 Journal Transaction Date
4 TR_MO Numeric 2 Fiscal Period (1-13)
5 TR_YR Numeric 4 Fiscal Year
6 TR_MAMT Numeric 12 - 2 decimals Transaction Amount (+ are debits, - are credits)
7 TR_JVTOTAL Numeric 14 - 2 decimals Sumof All JE Transaction (Must Equal Zero to Post)
8 TR_REF2 Char 10 Reference Field (Misc.)
9 TR_DESC Char 30 User Description of Transaction
Sample:
TR_ACCT TR_JVNO TR_JVDATE TR_MO TR_YR TR_MAMT TR_JVTOTAL TR_REF2 TR_DESC
revenue# blank 06172002 blank blank -2525 000 ref description
98 CHAPTER 1
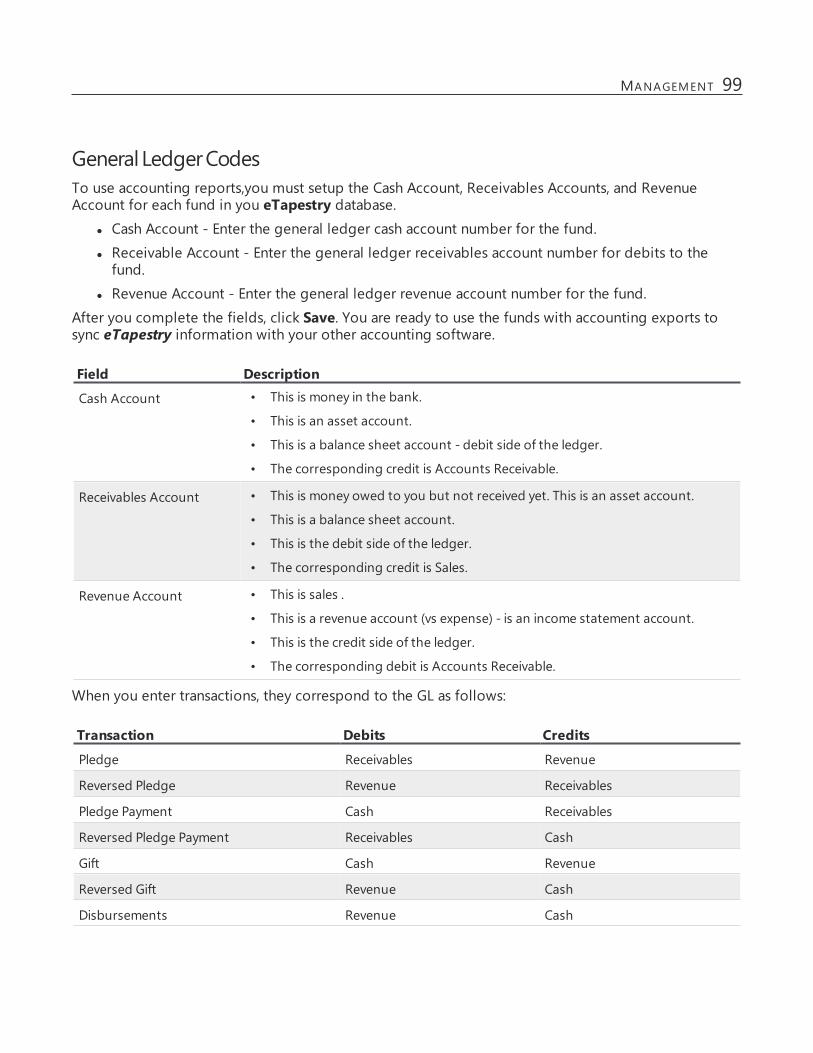
GeneralLedgerCodesTo use accounting reports,you must setup the Cash Account, Receivables Accounts, and RevenueAccount for each fund in you eTapestry database.
l Cash Account - Enter the general ledger cash account number for the fund.
l Receivable Account - Enter the general ledger receivables account number for debits to thefund.
l Revenue Account - Enter the general ledger revenue account number for the fund.
After you complete the fields, click Save. You are ready to use the funds with accounting exports tosync eTapestry information with your other accounting software.
Field Description
Cash Account • This is money in the bank.
• This is an asset account.
• This is a balance sheet account - debit side of the ledger.
• The corresponding credit is Accounts Receivable.
Receivables Account • This is money owed to you but not received yet. This is an asset account.
• This is a balance sheet account.
• This is the debit side of the ledger.
• The corresponding credit is Sales.
Revenue Account • This is sales .
• This is a revenue account (vs expense) - is an income statement account.
• This is the credit side of the ledger.
• The corresponding debit is Accounts Receivable.
When you enter transactions, they correspond to the GL as follows:
Transaction Debits Credits
Pledge Receivables Revenue
Reversed Pledge Revenue Receivables
Pledge Payment Cash Receivables
Reversed Pledge Payment Receivables Cash
Gift Cash Revenue
Reversed Gift Revenue Cash
Disbursements Revenue Cash
MANAGEMENT 99
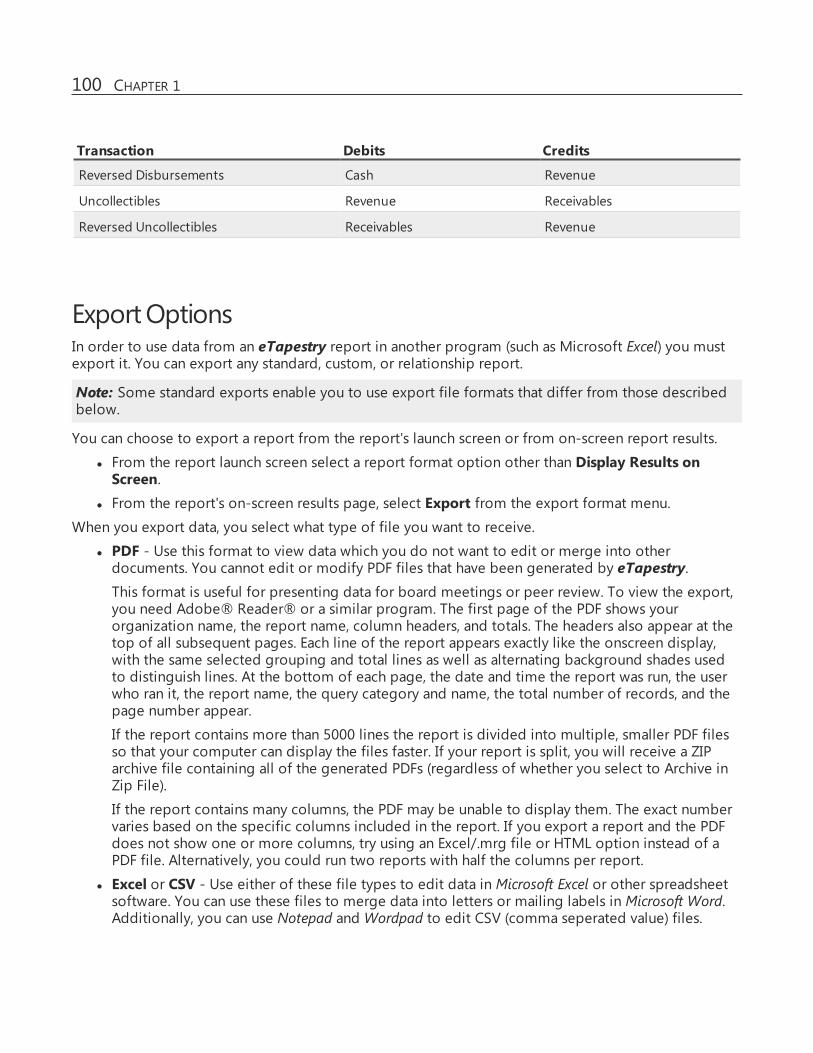
Transaction Debits Credits
Reversed Disbursements Cash Revenue
Uncollectibles Revenue Receivables
Reversed Uncollectibles Receivables Revenue
ExportOptionsIn order to use data from an eTapestry report in another program (such as Microsoft Excel) you mustexport it. You can export any standard, custom, or relationship report.
Note: Some standard exports enable you to use export file formats that differ from those describedbelow.
You can choose to export a report from the report's launch screen or from on-screen report results.
l From the report launch screen select a report format option other than Display Results onScreen.
l From the report's on-screen results page, select Export from the export format menu.
When you export data, you select what type of file you want to receive.
l PDF - Use this format to view data which you do not want to edit or merge into otherdocuments. You cannot edit or modify PDF files that have been generated by eTapestry.This format is useful for presenting data for board meetings or peer review. To view the export,you need Adobe® Reader® or a similar program. The first page of the PDF shows yourorganization name, the report name, column headers, and totals. The headers also appear at thetop of all subsequent pages. Each line of the report appears exactly like the onscreen display,with the same selected grouping and total lines as well as alternating background shades usedto distinguish lines. At the bottom of each page, the date and time the report was run, the userwho ran it, the report name, the query category and name, the total number of records, and thepage number appear.
If the report contains more than 5000 lines the report is divided into multiple, smaller PDF filesso that your computer can display the files faster. If your report is split, you will receive a ZIParchive file containing all of the generated PDFs (regardless of whether you select to Archive inZip File).
If the report contains many columns, the PDF may be unable to display them. The exact numbervaries based on the specific columns included in the report. If you export a report and the PDFdoes not show one or more columns, try using an Excel/.mrg file or HTML option instead of aPDF file. Alternatively, you could run two reports with half the columns per report.
l Excel or CSV - Use either of these file types to edit data in Microsoft Excel or other spreadsheetsoftware. You can use these files to merge data into letters or mailing labels in Microsoft Word.Additionally, you can use Notepad and Wordpad to edit CSV (comma seperated value) files.
100 CHAPTER 1

From your User Preferences page, you can select to use one of these file types as your defaultexport extension. Some users find the .xlsx export extension enables Microsoft Excel software tomore easily recognize and open the file. Other users prefer the .csv export extension because itmay enable Microsoft Word to more easily recognize the file for merging purposes.
l HTML - Consider using this option if your report contains too many columns for a PDF, but youstill want an easy-to-read format. The report information appears in a separate browser window.To save the HTML to your local computer, click File and then click Save Page As. For Save asType, selectWeb Page - Complete. The HTML is saved to your computer and you can use aninternet browser to open it.
When you export data, you select to receive a PDF or .xlsx/.csv file, you also choose how you want toreceive the file.
l Download - The report is generated and downloaded from the browser screen. If you navigateaway before the download is complete, you will not receive the file and you'll need toregenerate the report. We do not recommend this option for large reports because you wouldhave to wait longer for the report to generate and download.
l Email - The report is generated. When the report is complete, you receive an email whichincludes the file as an attachment. While the report is generating, you can navigate to otherpages, enter data, or even log out of eTapestry. When you receive the email, open the attachedfile and save it to your local computer.
When you select to receive the file by email, you then enter one or more email addresses and asubject for the email. If your accounts primary persona has an email address, you can also selectto receive the file by email when you export a report from the report display screen.
Tip: For faster downloads, we recommend you use the Archive in Zip File option for largereports. This compresses the report and saves it inside a zipped file, to decrease the file size.To open the file, use a program like WinZip to extract the report from the zipped file.
l Drop Box - The report is generated. When the report is complete, the file is placed in youreTapestry drop box. While the report is generating, you can navigate to other pages, enter data,or even log out of eTapestry. We recommend this option for large reports, especially if youremail server does not accept large attachments.
Mass UpdatesFrom Management, use Mass Updates to add or update the same information to accounts in bulk. Onthe Mass Updates page, two groups of Mass Updates appear for Update Existing Items and CreateNew Items.Use the types under Update Existing Items to update data in fields for existing accounts, personas,transactions, notes, contacts, journal entries, and write off pledges. For example, you can add assign orremove a mailing status from a query of accounts.
Use the types under Create New Items to add new items to your database for relationships, notes,contacts, pledge payments, and gifts in recurring schedules For example, you can add multiplerelationships for a single account.
MANAGEMENT 101

Mass Update for Existing ItemsYou can use mass update to update existing items. This includes accounts, personas, transactions,notes, contacts, finalized journal entries, and write-off pledges.
1. From Management, clickMass Update. The Mass Update page appears.2. Under Update Existing Items, select an item to update. The Mass Assign Values page appears.
3. Under Select Query, select the category and query that groups the items to update. For moreinformation about queries, refer to Query .
Note: When you update existing personas, transactions, notes, or contacts; finalize journalentries; or write off pledges through mass update, Account Return Type queries do not appearin the Query drop down menu in order to help you avoid updating all journal entries if youaccidentally select an Account Return Type query.
4. If Update Type appears for your mass update, select whether to assign a value to all items in thequery or to remove a specific value from the items.
When you select to remove information, the value removes from the items in the query.However the item remains in the database.
5. If Action appears for your mass update, select whether or not to finalize journal entries or toallow future edits to them. For .write off pledges, select whether to write off the pledge andinclude a date or remove write offs from the pledges.
6. Select values for user-defined fields that correspond to the type of mass update.
7. Click Next. A preview appears.8. Verify the changes. You can also view a report of the items that will be updated.
9. Click Next. A confirmation message appears.10. To confirm, click Yes. When the mass update completes, a message appears to inform you the
items have been updated. If you navigate away from the screen or log out before the updatecompletes, the items update but the message does not appear.
Mass Update for Create New ItemsUse mass update to add new items to your database for relationships, notes, contacts, pledgepayments, and gifts in recurring schedules.
1. From Management, clickMass Update. The Mass Updates page appears.2. Under Create New Items, select an item to create. The Mass Add page appears.
3. If you select Create New Contacts or Mass Interactions, select whether you want to create anew journal contact or a new mass interactions under Type.
4. Under Select Query, select the category and query that groups the items to create.5. After you select a query, the options that appear on this page vary depending on mass update
type you are creating.
102 CHAPTER 1
Create New Relationships - Use this type to add multiple relationships for a single account. Onthis page, click the Select Related Account link beside the Related Account field. The Find anAccount screen appears for you to select the account you want to relate all accounts to in thequery. Under Navigation, click Next. On Step 2: Details, enter the relationship information, suchas the type, roles, and household information.
Create New Notes - Use this type to add the same journal note information to multipleaccounts. On this page, select whether the note is final, enter the date and note text, and selectuser-defined fields.
Create New Contacts - Use this type to add the same journal contact information to multipleaccounts. For example, add contacts after you send mail to track accounts included in themailing. On this page, select whether the journal contact is final, enter a date, contact method,subject, note, and select user-defined fields.
Create New Scheduled Payments - Use this type to add pledge payments to multiple pledgeschedules with payments on the same date. For example, if your organization's pledge schedulesare always set up on a monthly frequency with payments scheduled on the first of the month,use this mass update to update the pledge schedules with a payment. On this page, enter thescheduled payment date, select whether the payment is final, the actual payment date, whetherto copy the pledge letter, enter a note, and select user-defined fields.
Create New Scheduled Recurring Gifts - Use this type to add recurring gifts to multiplerecurring gift schedules with gifts on the same date. For example, if your organization acceptspayroll deductions and sets them up as recurring gift schedules, use this mass update to updatepayroll deduction schedules after each pay period. On this page, enter the scheduled gift date,select whether the gift is final, enter the actual gift date and a note, and select user-definedfields.
6. Under Navigation, click Next. A preview appears.7. Verify the changes. You can also view a report of the items to create.
8. Click Next. A confirmation message appears.9. To confirm, click Yes. When the mass update completes, a message appears to inform you the
items have been updated. If you navigate away from the screen or log out before the updatecompletes, the items update but the message does not appear.
SecurityIt is important that your organization establishes a consistent and thorough approach to securitythroughout eTapestry. Based on your security needs, you need to restrict who can perform specifictasks and optionally, decide whether you want to restrict access to account and gift information.
In eTapestry, you can set up basic security or advanced security. Basic security is available to alleTapestry customers and provides a way for you to limit who has access to areas of the applicationand who can perform specific tasks, such as view, create, and run a mass update. If you use theAdvanced Security module, you can limit constituent and journal data that users view. For example, youcan keep your major donor's contact information and gift information private from a group ofeTapestry users.Other examples of basic and advanced security include the following.
MANAGEMENT 103

• Use basic security to enable data entry for a group of volunteers. To prevent them from viewingpast donations, you must apply advanced security.
• Use basic security to grant account record access to users at your chapter offices. To prevent themfrom viewing records outside of their area, you must apply advanced security.
For more information about basic security, refer to Basic Security on page 104. For more informationabout advanced security, refer to Advanced Security on page 104.
Tip: We recommend you create a document to address your organization's security policy and save itfrom the Help, User Manual shared location in eTapestry.
BasicSecurityBasic security in eTapestry is assigned by accounts and security groups.1. Create an account.
2. When you create the account, assign the User role to it. To apply security in eTapestry, users musthave this role to include them in a security group.
3. From Management, create security groups. These groups assign permissions for the users in thegroup.
For example, you create a new account for a new employee, Mark Smith. Mark is going to completedata entry tasks in eTapestry. As you create the account, you select the User role for his record. TheDefault security group, which appears automatically in your database, grants data entry permissions foraccounts, gift entry, and other general data entry areas to records with the User role. When you saveMark's record, the application automatically includes him in the Default security group. If Mark's jobresponsibilities change to include additional tasks and processes in eTapestry, you can include him inanother security group that grants additional permissions to more areas in the application.
Basic security is available to all eTapestry customers. When you first begin to define security for theapplication, we recommend you keep it simple. For example, create a security group to assignvolunteers data entry rights. You can add additional groups as you identify a need for them.
Note: Basic security does not limit access to account or gift data. For example, you cannot use basicsecurity to prevent access to a major donor's contact and gift information. To do this, you must usethe Advanced Security module. For more information, refer to Advanced Security on page 104.
AdvancedSecurityUse the Advanced Security module when your organization needs additional control over the data thatusers can view, add, edit, and delete. This module provides the following additional security features.
l Restrict contact and gift information.
l Limit access to certain accounts or journal entries.
l Restrict chapter offices so users in each office only view their local data.
l Prevent users from viewing, querying, or reporting on certain accounts or gift information.
104 CHAPTER 1

l Prevent users from updating certain accounts or gift information.
l Prevent users from viewing and updating certain defined fields and their values.
To establish advanced security, use security queries or security codes. For most organizations, it is bestto use security queries. Like basic security, you then use security groups to grant or deny data to usersin the group.
Tip: When you use advanced security, the permissions also apply to data in outputs for reports andexports. eTapestry applies permissions before running queries to generate the correct report andexport information.
AdvancedSecurity QueriesYou can create security queries to limit user access by granting or denying rights to accounts andjournal entries for a security group. For example, you want to restrict a certain group of users fromviewing, editing, or deleting any transactions. You can create a security query that returns alltransactions and then use that query to deny users in the security group the ability to read or updatetransactions in the query. Later, if you decide to also deny rights to contacts from journal entries, youcan update the query to include all contacts.
You can also use advanced security to limit account access to records in certain states. After you createthe query that returns these accounts, you use it in a security group to apply the permission to users inthe group.
Create a security query
Tip: We recommend creating security queries to apply advanced security. For best practiceinformation about queries, refer to eTapestry Best Practices: Query 101.
1. From Queries, select the eTapestry Security category. The Edit Query Category screen appears.2. Under Tasks, select New Query.3. Enter a name, such as Financial Information.
4. To hide this query from other users in your organization, select Private.5. To prevent other users in your organization from editing this query, but allow them to view and
select it, select Read Only.6. In the Query Type field, select Change Query Type to change the query to be dynamic or static.
Dynamic queries reflect updated data every time you run them or use them to sendcommunications or run reports. Results for static queries are not updated when data changes inthe database.
7. Under Starting Criteria, select the eTapestry Security query category and the All Entries query.
Note: You must base a query you create in the eTapestry Security category on an existing queryfrom this same category. You cannot select a query from another category as the starting point.
8. Under Results, select the appropriate option depending on the type of results you want in theData Return Type field. To see results related to accounts, such as if you are querying on
MANAGEMENT 105

individuals, select Accounts. If your query is looking for gifts, select Journal Entries. For moreinformation about data return types, see Data Return Types.
9. Under Criteria Matching, select whether you want all criteria to be matched in the results or ifyou want to include every result in the query that matches at least one of your criteria.
10. TheWhich persona should be checked for matches field is relevant if your criteria is related topersona fields such as address information. Select whether you want to look for matches to yourcriteria in all persona types, only the primary persona, or only one persona type.
Note: As a reminder, the query results automatically display the primary persona.
11. Select the criteria for your query. For example, select Journal in the drop down field, and thenselect Journal Entry Types. Continue to select all data entry types that apply for the permissionyou want to grant or deny. For more information, see Query Criteria.
12. Click Save And to save the query and navigate to the page selected in the drop down field.After you create the security group, you need to assign permissions to users in the query. First, openthe applicable security group from Management, Security Groups. When you use the AdvancedSecurity module, a section appears on the Security Group page with the columns Permission, Query,Grant, and Deny. Under Permission, four rows appear to apply the security query to the advancedsecurity right. These rows are Account Read Query, Account Update Query, Journal Entry ReadQuery, and Journal Entry Update Query. For the applicable data permission row, select the securityquery in the drop down field and then select whether you want to grant or deny the permission tousers in the group.
For example, to deny volunteers access to your Board Member account information, create a securityquery to group the Board Member accounts. Next, open the applicable security group for volunteers.For the Account Read Query and Account Update Query rows, select the security query and thenselect Deny for both rows. This prevents each user in the group from viewing Board Member accountdata on records and in query and report outputs.
AdvancedSecurity CodesWhen security queries do not segment your data enough to apply advanced security, you can usesecurity codes to limit users access. You can apply these individually to an account record or journalentry after you add the code as a system defined Security Rights field value. You can also use securitycodes to limit users access to specific funds, campaigns, approaches, relationships, and user-definedfields.
To apply security codes so that only authorized users view the data, make sure to add the security codeas you enter the data on the account record. When a user, who is in a security group with security codepermissions, enters data, eTapestry automatically defaults the security code for the data. For example,when a user is part of the volunteer security group, the selected security codes from the security groupdefault automatically for new funds, campaigns, approaches, relationships, and user-defined fields.
Tip: You can use security codes to grant or deny account and journal information. However, werecommend you use security queries to limit this data. Use security codes only when you need tolimit data funds, campaigns, approaches, relationships, and user-defined fields.
106 CHAPTER 1

Create a security code1. From Management, click System Defined Fields. The System Defined Fields page appears.
2. Click Security Rights. The Field: Security Rights page appears.3. To add a new value, enter the name and then click Add Value.
To edit an existing value, click the security code name. Under Edit Value, update the informationand click Update.
4. To save the security code, click Save and Finish.
Note: After you save the security code, it appears as checkbox under System Defined Fields,Security Rights where it appears throughout eTapestry. For example, if your organization haschapters, and you enter "Chapter A" in the Name field when you create the code, a Chapter Acheckbox appears as you enter data for accounts, journal entries, relationships, funds,campaigns, approaches, and user-defined fields. In addition, the checkbox also appears insecurity groups.
5. To save the security code, click Save and Finish.Like other defined field values, you cannot delete a security rights field after you save it.However, you can disable it.
After you create security codes, you individually assign the code to data on account records that needit. When you select the checkbox for the security code in a security group, users in that group can view,query, or report on the data.
Note: A user can also view, query, or report on the data when there are no assigned security codes. Toprevent a user from viewing the information, make sure you select the checkbox for a differentsecurity code.
l To assign a security code to an account, open the account record and click Defined Fields.Under System Defined Fields, click Security Rights and select the code to apply.
l To assign a security code to a relationship, open the relationship. Under System Defined Fields,Security Rights and select the code to apply.
l You can also assign a security code to funds, campaigns, and approaches. From Management,select Funds, Campaigns, or Approaches. On the page that appears, click the fund, campaign, orapproach to apply the security code. Under System Defined Fields, click Security Rights toselect the code. To save your changes, click Save and Finish.
l To assign a security code to user-defined fields, selectManagement, User Defined Fields. Clickthe category where the field is stored and then click the field name. On Step 5 Security, underSecurity Rights, select the code to apply. Next, click Save and Finish.
After you create security codes, select the codes in a security group to grant access to this data forusers in the group. To do this, go to Management, Security Groups. After you open the applicablesecurity group, select the security code checkboxes under System Defined Fields, Security Rights. Tosave your changes, click Save and Finish. For more information about how to edit a security group,refer to Create a security group on page 108.
MANAGEMENT 107
SecurityGroupsTip: For best practice information about users and security groups, refer to eTapestry Best Practices:Users and Security Groups 101.
eTapestry allows Administrator users to set up various security groups with rights to perform certainactions in the database. Once a security group has been created, the Administrator can assign users tothe group to grant specific rights to each assigned user. For example, the Administrator creates agroup with limited data entry and reporting rights, and then assigns all volunteers to that group.Likewise, the Administrator can create a group that has data entry and reporting rights, but does nothave rights to update the database's defined field structure, and then assigns all users who enter giftsto that group.
When you create a security group, you select security options to specify what users can view, create,edit, and delete in eTapestry. For example, you can set up rights so that a user can view information,but cannot change it. You can also determine the days and times the users can access eTapestry, andgrant access to tiles for the Home and account home pages. When you use the Advanced Securitymodule, you can also select a query to assign account and journal data permissions to filter the recordsand gift data that users can access.
By default, two security groups appear for you automatically in eTapestry. The Admin group providesfull rights to access any area of the application. This group must always contain at least one user tomake sure at least one has full Administrator rights. The Default group provides data entry rights.However, it does not provide rights to advanced features, such asMass Email and User Rights Admin.You cannot edit or delete the Admin and Default security groups, but you can copy them to use as astarting point for a new group.
Tip: New users are automatically in the Default security group. When a user is cloned from anotheruser , the cloned user is automatically in the same security group as the original user.
Create a security group1. From Management, select Security Groups.2. Under Tasks, click New Security Group.3. In the Name and Description fields, enter information that uniquely identifies the security group
to other users.
4. Under Allowed Access Time, establish the times during the day when users can accesseTapestry. After you select the correct time zone for the users, select the checkbox under eachhour of the day when they can log into the application.
5. Under Permission Types, select the checkbox in the row for each field to allow users to read,update, create, or delete the information in the database.
l Read: Users can view the existing information.l Create: Users can add new the information.l Update: Users can change the existing information. If the Read checkbox is clear when
108 CHAPTER 1
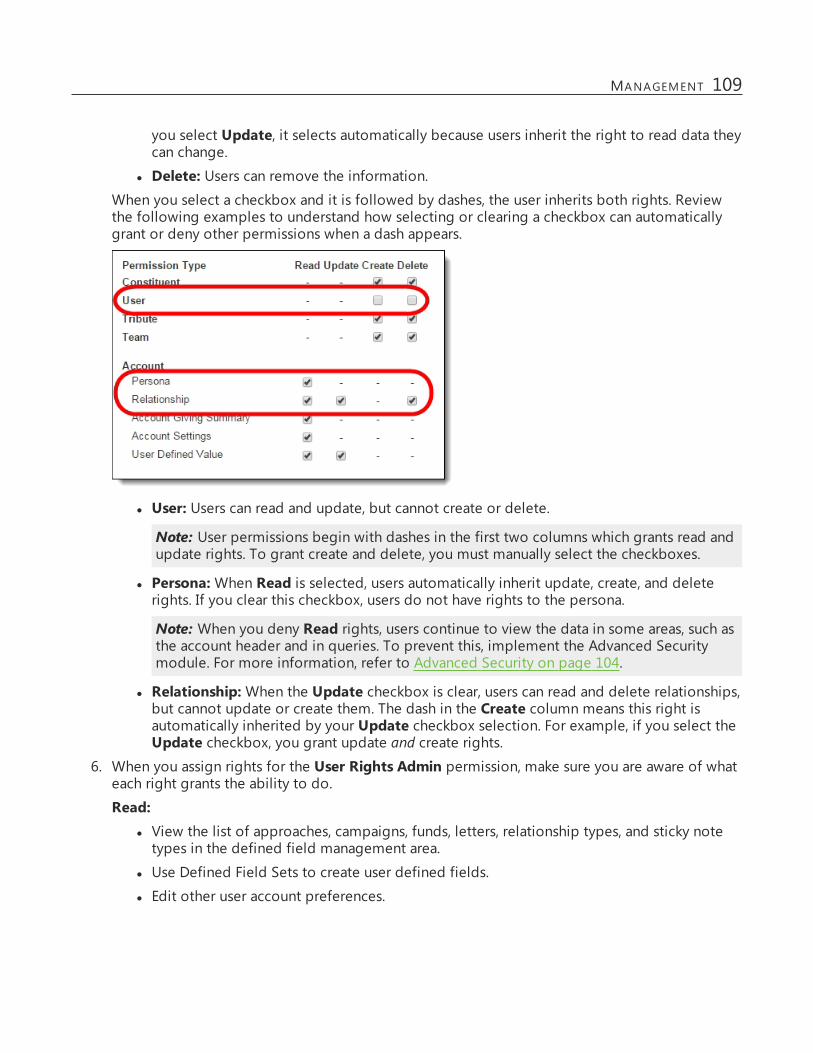
you select Update, it selects automatically because users inherit the right to read data theycan change.
l Delete: Users can remove the information.When you select a checkbox and it is followed by dashes, the user inherits both rights. Reviewthe following examples to understand how selecting or clearing a checkbox can automaticallygrant or deny other permissions when a dash appears.
l User: Users can read and update, but cannot create or delete.
Note: User permissions begin with dashes in the first two columns which grants read andupdate rights. To grant create and delete, you must manually select the checkboxes.
l Persona:When Read is selected, users automatically inherit update, create, and deleterights. If you clear this checkbox, users do not have rights to the persona.
Note: When you deny Read rights, users continue to view the data in some areas, such asthe account header and in queries. To prevent this, implement the Advanced Securitymodule. For more information, refer to Advanced Security on page 104.
l Relationship:When the Update checkbox is clear, users can read and delete relationships,but cannot update or create them. The dash in the Create column means this right isautomatically inherited by your Update checkbox selection. For example, if you select theUpdate checkbox, you grant update and create rights.
6. When you assign rights for the User Rights Admin permission, make sure you are aware of whateach right grants the ability to do.
Read:l View the list of approaches, campaigns, funds, letters, relationship types, and sticky notetypes in the defined field management area.
l Use Defined Field Sets to create user defined fields.
l Edit other user account preferences.
MANAGEMENT 109

l View the Rights page of other user accounts.
l View security groups.
Update:l Add and edit approaches, campaigns, funds, letters, relationship types, and sticky notetypes.
l Use the Getting Started Wizard.
l Edit or delete read only items.
l Use Defined Field Sets to create user-defined fields.
l Clone users.
l Edit security queries.
Read and Update:l Edit other user's Rights.
l Update security groups.
Note: If you select Read or Read and Update rights for the User Rights Adminpermission and apply advanced security to security queries, the Read and Update rightsare granted instead of the security query permissions.
l Use the User Activity Report from Management, User Activity.7. If you use the Advanced Security module, a section appears with Permission, Query, Grant, and
Deny columns. To apply a security query to one of the account or journal permissions, click thedrop down in the field to select the query. Next, select Grant to provide access to the data inthe query or Deny to prevent access to it. For more information about security queries, refer toAdvanced Security Queries on page 105.
When you enable security codes, System Defined Fields, Security Rights also appears if you usethe Advanced Security module. To provide users in the security group with access to data thatuses the security code, select its checkbox. For more information about security codes, refer toAdvanced Security Codes on page 106.
8. Under Home Tiles, you can grant access to any Home page tiles.9. Under Home Page Tiles, you can grant access to any tile for account home pages.10. To save the security group, under Tasks, click Save.
Getting StartedWizardThe Getting Started Wizard help you set up your eTapestry database when you first begin to use theprogram. If you contract consulting services to help you set up your database or used Import, many ofthe steps in the wizard may already be completed. You can still use this tool to help you understandthe basic database setup.
To access the Getting Started Wizard, from Management, click Getting Started Wizard. On the pagethat appears, underWizard Preference, the Show Wizard every time I login option allows you to
110 CHAPTER 1
view the Wizard each time you log in. To prevent the Wizard from appearing every time you log in,clear the checkbox.
Getting Started Wizard steps1. The Welcome step provides information about the Getting Started Wizard. To continue, click
Next.2. For the My Organization step, enter information about your organization.
l Information - This shows your organization's name, address, web page, and other contactinformation based on your online form. You can update this information as necessary. Tocontinue, click Next.
l Settings -This page enables you to opt in to the FEP Report, identify your initiation year,NTEE code, last month of your fiscal year, time zone, and type of currency used. Tocontinue, click Next.
l Mission - Personalize your database. Upload your logo and enter a mission statement toappear on your welcome page. To continue, click Next.
To continue, click Next.3. For the Transaction Fields step, enter funds, campaigns, approaches, or letters that are specific to
your organization and view the current ones. To add additional fields, click Add Additional Line.To receive a weekly email about your funds, campaigns, and approaches, select Send Reportend enter your email address.
To continue, click Next.4. For the Other Fields step, add other necessary fields, including persona types, country codes,
phone types, contact methods, credit/debit card types, and relationship types.
l Persona Types - View current persona types. To add one, enter a name under Add NewPersona Types. To add another, click Add Additional Line.
l Country Codes - View your enabled and disabled country codes. To add or removecountries, click Enable or Disable.
l Phone Types - View current phone types. To add one, enter a name under Add NewPhone Types. To add another, click Add Additional Line.
l Contact Methods - View current contact methods. To add one, enter a name under AddNew Contact Methods. To add another, click Add Additional Line.
l Credit/Debit Card Types - View current credit/debit card types. To add one, enter a nameunder Add New Credit/Debit Card Types. To add another, click Add Additional Line.
l Relationship Types - You'll use relationship types to track how constituent accounts areconnected. To add one, such as employer/employee or parent/child, enter the role foreach constituent. To add another relationship type, click Add Additional Line.
To continue, click Next.5. The Summary steps displays the wizard pages you visited. Pages you skipped appear in red. To
go back to a previous page, click a summary link. When you are done, click Save And.
MANAGEMENT 111

SocialMedia Finder ServiceShow Me: Watch a video about the Social Media Finder Service and review the graphical overview tolearn more.
Use the Social Media Finder service to find and track social media network accounts associated withyour eTapestry accounts. This information helps determine how to provide the most impact for yoursocial marketing efforts.
Tip: System Administrators that use the Pro package of eTapestry in the United States and Canadacan take advantage of this service two times per year. For all other countries, you must obtain asubscription so System Administrators can use the Social Media Finder service two times per year. Forquestions about the Pro package of eTapestry and eTapestry subscriptions, please contact yourAccount Manager or send an email to [email protected].
Social Media Finder uses email addresses to find social media data. This data appears under SocialMedia Finder on the account Home page.
112 CHAPTER 1
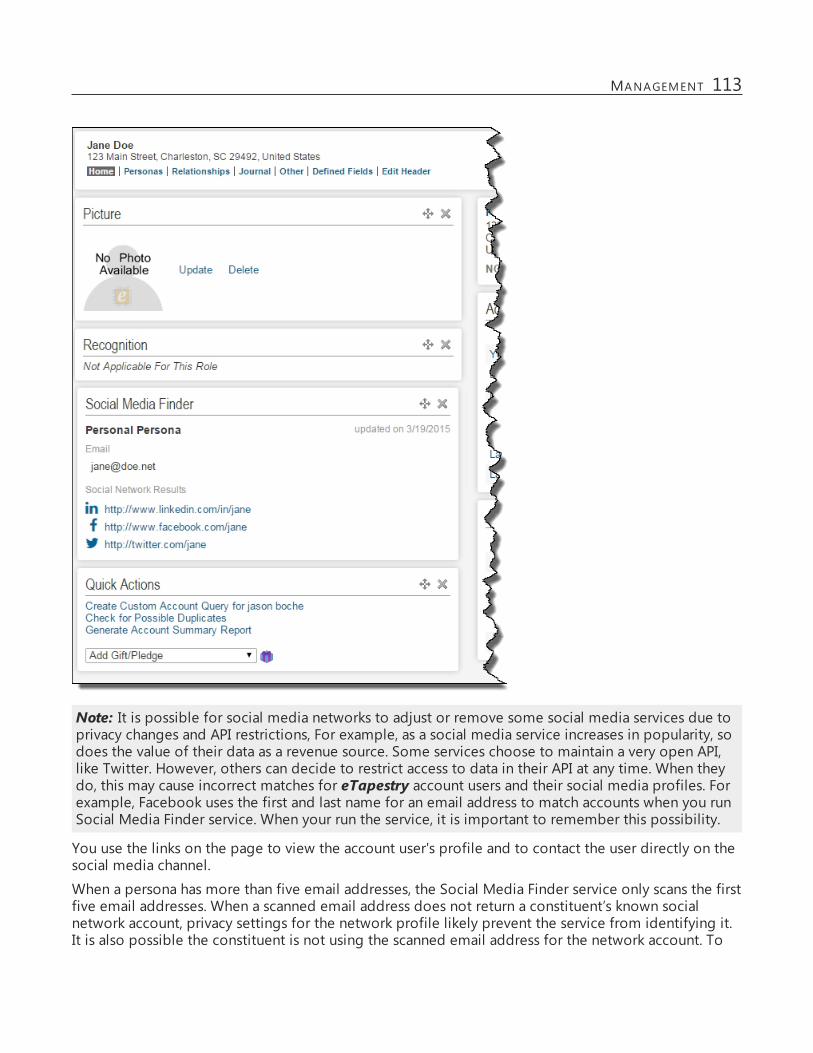
Note: It is possible for social media networks to adjust or remove some social media services due toprivacy changes and API restrictions, For example, as a social media service increases in popularity, sodoes the value of their data as a revenue source. Some services choose to maintain a very open API,like Twitter. However, others can decide to restrict access to data in their API at any time. When theydo, this may cause incorrect matches for eTapestry account users and their social media profiles. Forexample, Facebook uses the first and last name for an email address to match accounts when you runSocial Media Finder service. When your run the service, it is important to remember this possibility.
You use the links on the page to view the account user's profile and to contact the user directly on thesocial media channel.
When a persona has more than five email addresses, the Social Media Finder service only scans the firstfive email addresses. When a scanned email address does not return a constituent’s known socialnetwork account, privacy settings for the network profile likely prevent the service from identifying it.It is also possible the constituent is not using the scanned email address for the network account. To
MANAGEMENT 113

access a constituent’s social network profile, click the link on their Account page. You may need to login to the social network to view the profile.
The Social Media Finder service scans the email addresses in your database for the follow socialnetworks.
l Facebook
l Google Plus
l Instagram
l LinkedIn
l Pinterest
l Quora
l Slideshare
l Twitter
l YouTube
SocialMedia FinderUseCasesWhile social media is a newer field of information, there is a lot you can do with the data that theSocial Media Finder service returns. Use these ideas to leverage social media information to thebenefit of your organization.
l Use the social media accounts to get to know and connect with your constituents.
l Use social media links to open profiles and verify information about your accounts includingoccupation, employer, interests, and affiliations.
l Use social media data to determine the social media networks you should invest your time indeveloping a strong message and network for your organization. You can identify people onsocial media to promote your cause. For example, when you are having an event, you canresearch and provide your event coordinator a list of accounts so he or she can invite them tothe event. Well connected individuals can help promote the event and increase awareness.
Schedule and run the Social Media Finder service
Tip: System Administrators that use the Essentials or Pro package of eTapestry in the United Statesand Canada can take advantage of this service two times per year. For questions about the Essentialsand Pro packages of eTapestry and eTapestry subscriptions, please contact your Account Manager orsend an email to [email protected].
1. From Management, click Social Media Finder. The Scheduling your service page appears.2. In the Category and Query fields, select the query of accounts for the service to run and return
social media account networks for your accounts based on email addresses.
3. Select whether to run the process for Primary personas only or All personas in your database.
Note: The Social Media Finder service does not analyze accounts without an email address.
4. Enter a date to run the process. The service begins at the earliest time possible on that date. For
114 CHAPTER 1
example, if you schedule it for June 26, 2014 it starts at 12:00AM that day.
5. In the last field on the page, enter each recipient email address at your organization who shouldreceive a summary of the results when the Social Media Finder service completes. If you entermultiple email addresses, use commas to separate them.
6. To save the schedule and run it on the designated date, click Schedule.l When the process is complete, the email recipients receive a summary email message thatincludes the number of emails scanned and the number of identified social profiles.eTapestry also creates a journal note for your organization's account that includes asummary of the service run.
l The social media network data for each account appears under Social Media Finder onthe Home page of the account. To access a social network profile, click the link on thepage. You may need to log in to the social network to view the profile. Based on privacysettings, you may also need permission from the account user to view personal content.
l When a persona has more than five email addresses, the Social Media Finder service onlyscans the first five email addresses. When a scanned email address does not return aconstituent’s known social network account, privacy settings for the network profile likelyprevent the service from identifying it. It is also possible the constituent is not using thescanned email address for the network account.
l You can query on social media data to analyze relevant social media information for yourorganization. eTapestry generates a query for each social network type identified duringyour Social Media Finder service run. For example, if your account users only useFacebook, LinkedIn, and YouTube, a query generates for each social network. A query for asocial network type does not generate until it is linked to an email address in yourdatabase during the run. Also, each query contains its corresponding social network field.For example, the Facebook query contains the Facebook field. To view the social networkqueries in your database, view the new Social Media Finder query category from Queries,Manage Queries.
l You can create a custom report to analyze relevant social media information for yourorganization. The social network types identified during your Social Media Finder servicerun appear as available fields you can report on under the Account Fields category. Forexample, if your account users only use Facebook and LinkedIn, the Social Media -Facebook and Social Media - LinkedIn fields now appear. The field for a social networktype does not appear until it is linked to an email address in your database during the run.
l Social Media Finder information appears on the Social tab of the Data Health Scorecard.The data on this tab includes the number of email accounts analyzed when the SocialMedia Finder service last ran and the number of email addresses from personas that link tosocial media network accounts. It also includes a graph of the four most popular socialnetworks your accounts use and helpful links to queries for social media data.
Note: To edit schedule information, return to this page and click Edit. To prevent the schedule fromrunning the service, you can also return to this page and click Cancel.
MANAGEMENT 115

WealthRatingShow Me: Watch a video about the Wealth Rating service to learn more.
Use the wealth rating service to view wealth information for an account—including their overall wealthrating and the date the service was last run—from Target Analytics, a division of Blackbaud Inc.
Tip: System Administrator users can limit or give rights to users to view wealth ratings data. FromManagement, Security Groups, select the security group of the user whose rights you want to edit.UnderWealth Ratings, select or clear the Read checkbox.
Target Analytics screens your individuals and prospects located in the United States based on publicassets, including:
l High-confidence real estate ownership, based on their name and address
l Private company information, based on their reported ownership percentage
l High-confidence public company insider holdings and options
Then, Target Analytics ranks your individuals and prospects on their wealth data up to five stars. Thehigher the wealth rating, the higher the stars. With this information, you can determine where to focusyour fundraising energies and who to ask for larger gifts. For example, we recommend you assign yourfour- and five-star constituents to an attentive fundraiser with more care and interaction than otherdonors.
l — A five-star constituent has public assets greater than $25,000,000 USD.l — A four-star constituent has public assets between $10,000,000 and $25,000,000USD.
l — A three-star constituent has public assets between $1,000,000 and $10,000,000USD.
l — A two-star constituent has public assets between $500,000 and $1,000,000USD.
l — A one-star constituent has public assets up to $500,000 USD.If Target Analytics cannot accurately identify a constituent or screen their wealth, they appear with Norating.
This data appears on the Data Health Scorecard as well as theWealth Rating tile on the account Homepage. You can also query and report on wealth data to analyze relevant information for yourorganization.
Schedule and run the wealth rating service
Warning: Only System Administrator users can schedule the Wealth Rating service.
1. From Management, clickWealth Rating. The Scheduling your service page appears.2. In the Query Category and Query Name fields, select the query of accounts for the service to
116 CHAPTER 1

run and return wealth rating information for your accounts.
Note: System Administrators who use the Essentials or Pro package of eTapestry in the UnitedStates can take advantage of this new service two times per year. For questions about theEssentials and Pro packages of eTapestry and eTapestry subscriptions, please contact yourAccount Manager or send an email to [email protected].
3. Enter a date to run the process. The service begins at the earliest possible time on that date. Forexample, if you schedule it for June 26, the process starts at 12:00AM that day.
4. In the last field on the page, enter each recipient email address at your organization who shouldreceive a summary of the results when the wealth rating service completes. If you enter multipleemail addresses, use commas to separate them.
5. To save the schedule and run it on the designated date, click Schedule.l Only accounts with the role of Constituent will be included during the wealth ratingservice run.
l The wealth rating service processes only the primary persona on all accounts in the query.
l When the process is complete, the email recipients receive a summary email message thatincludes the date the service was run, the query you selected, the number of accounts thatcorrespond to each overall wealth rating score, and the number of accounts processed.eTapestry also creates a journal note for your organization's account that includes asummary of the service run.
When an extended period of time has passed since you last ran the service, informationappears to remind you to run the service again. To schedule your next service, click the Goto Wealth Ratings link on the page.After you run the service, the information updates, and the scorecard includes the accountsanalyzed by the service and their overall wealth rating. It also includes helpful links toqueries for wealth rating data.
l The Wealth Rating Data Health Score displays on the Home page when you openeTapestry. The information that appears in this section varies depending on your wealthrating data's current state. For example, basic wealth rating information displays with a linkto learn more details about the service before you run it for the first time.
l To group eTapestry accounts together with the same overall wealth rating, eTapestrygenerates a query for each ratings level. For example, if the wealth rating service returnsaccounts with a three-star rating, you can generate a query to find accounts with an overallrating of three stars.
To view the wealth rating queries in your database, view the Wealth Ratings querycategory from Queries,Manage Queries.When you create a query for wealth ratings, under Available Fields, select Wealth RatingStars under the Account category. Under Criteria, a checkbox appears next to each overallwealth rating, No rating, and Unprocessed. Select which criteria you want to apply to yourquery.
l You can create a custom report to analyze relevant wealth rating information for yourorganization. The wealth rating scores identified during your wealth rating service runappear as available fields you can report on under the Account Fields category.
MANAGEMENT 117
l Wealth rating information appears on the Wealth tab of the Data Health Scorecard. On thethis tab, you can view wealth information for an account—including their overall wealthrating and the date the service was last run—from Target Analytics, a division ofBlackbaud Inc.
For more information about the Data Health Scorecard, refer to Data Health Scorecard.
Tip: To edit schedule information, return to this page and click Edit. To prevent this schedule fromrunning the service, you can also return to this page and click Cancel.
eTapestry andeverydayhero IntegrationNote: For users in non-US regions, refer to the everydayhero Integration guide for the UK, Ireland,Australia, and New Zealand
everydayhero is a peer-to-peer online giving solution that allows your organization to build onlinefundraising campaigns as part of your existing websites or as a stand-alone fundraising site.
Show Me: Watch a video about the everydayhero integration with eTapestry to learn more
With the everydayhero integration with eTapestry, you can import constituent, participation, and giftinformation from everydayhero to update your database. Constituent records are updated with theinformation that comes from everydayhero, and new accounts are created if necessary. When youimport gifts from everydayhero, you can create queries and reports of the information imported.
Signup for everydayheroBefore you can begin to transfer information from everydayhero into eTapestry, you must sign upwith everydayhero.
Sign up for everydayhero1. Visit everydayhero.com to sign up for your account.
2. In the top navigation, select FOR NONPROFITS.3. On the everydayhero for nonprofits page, select to join everydayhero.
Access theAPI token for the everydayherointegrationWhen you sign up with everydayhero, you receive an eTapestry API key. You can then use the API keyto establish a connection between everydayhero and eTapestry.
118 CHAPTER 1

Access the API token for the everydayhero integration1. After you have created your everydayhero account, sign in to your account.2. From your everydayhero dashboard, select the Settings tab and click Integrations. The
Integrations page appears.
3. On the Integrations page, under eTapestry, select Copy to copy the API token to your clipboard.For more information about where to enter your API token, see Enter basic settings on page 119.
Enterbasic settingsOn the Basic Settings tab of the everydayhero integration wizard, enter your API key to set up aconnection between everydayhero and your eTapestry database.
Enter basic settings1. From Management, select Integrations.2. On the Integrations page, in the everydayhero integration tile, select Set Up. The Set up
everydayhero integration screen appears.
3. On the Basic settings tab, enter your API Key in the field. For more information about how toretrieve your API key, see Sign up for everydayhero on page 118.
4. In the last field, enter each recipient email address at your organization who should receive anotification when the import completes. If you enter multiple email addresses, use commas orsemi-colons to separate them.
5. Click Next to go to the next step or Save and Close to save your choices and come back to thepage later. To return to the previous step, click Previous.
MANAGEMENT 119

Mapcampaignseverydayhero campaigns are brought into your eTapestry database as eTapestry Fundraisers with theSource of everydayhero. Once you enter basic settings, you will need to map revenue fromeverydayhero campaigns to an eTapestry fund, campaign, and approach.In eTapestry, funds, campaigns, and approaches are the way you organize transactions and activity withyour constituents to better analyze information in reports and queries and track your success towardsspecific goals.
On the Map Campaigns step, if you want to select default funds, campaigns, and approaches for alleverydayhero campaigns, you can select them from the drop down menus.
For customers in Ireland, direct donations imported from everydayhero, or donations that are not partof specific everydayhero campaigns, will also inherit the default Campaign, Fund, and Approach youselect.
If you do not already have everydayhero campaigns, select default mapping options. Once you addeverydayhero campaigns, you can edit the default options in the table.
120 CHAPTER 1

Note: For campaigns to appear, it must have an associated donation or hero in your everydayheroaccount
If you want to select default funds, campaigns and approaches for individual everydayherocampaigns, in the campaign mappings table, select them from the drop down menus.
Note: Default eTapestry Fund is a required field. A fund is always a required field when you enter agift. If your organization makes campaigns and approaches required when you enter a gift ineTapestry, then campaigns and approaches will be required when you map revenue fromeverydayhero.
If you do not select a campaign or approach for an individual fundraiser when your organizationrequires campaigns and approaches, then the default campaign and approach will apply. For moreinformation about how to require campaigns and approaches, see Campaigns and Approaches.
To filter which campaigns appear in the table, you can search for campaigns by name. Select Includeinactive everydayhero campaigns to include inactive campaigns in your results.Click Next to go to the next step or Save and Close to save your choices and come back to the pagelater. To return to the previous step, click Previous.After a new eTapestry Fundraiser is created when you import an everydayhero campaign, any emailaddresses entered on the Basic Settings step of the integration set up will receive a notification so thatthe eTapestry Fundraiser can then be mapped to the appropriate campaign, fund, and approach. Toreturn to the Map Campaigns step of the integration wizard after you have begun the nightly import,underManagement, Integrations, select Edit Mappings.
Importhistorical dataOn the Select historical data tab of the Set up everydayhero integration screen, select how you wantto import previous everydayhero data into eTapestry. This data will be imported during the firstnightly import you schedule.
MANAGEMENT 121

Select historical data to import
Note: Once your import begins, these settings cannot be edited.
1. If you do not want to import data from previous everydayhero campaigns, select No historicaldata.
Note: The day you set up the integration is considered part of this historical time frame. Forexample, if you choose this option during the integration setup on Monday, only informationadded to everydayhero the following Tuesday and onward will be imported.
2. To import all data from previous everydayhero campaigns, select All historical data.3. To import data from previous everydayhero campaigns starting with a specific date, select
Historical data created since and select the date.4. Click Next to go to the next step or Save and Close to save your choices and come back to the
page later. To return to the previous step, click Previous.
Finishyour integration setupOn the Finish tab of the Set up everydayhero integration screen, select when you want to import youreverydayhero data into eTapestry.If you select to schedule your imports now, your everydayhero data will import nightly beginning onthe date shown.
If you select to schedule your import at a future date, you can return to this step after you finalize yourimport settings.
122 CHAPTER 1

Click Finish or Save and Close to begin to the import or to save your choices and come back to thepage later. To return to the previous step, click Previous.
Edit the everydayhero import settings
Once you have completed the steps to set up your everydayhero integration with eTapestry, theeverydayhero integration tile now displays details about the import, such as the date and time yourimport is scheduled for and who will be sent notifications when your import is complete.
To edit the settings of your integration, click Edit settings from the everydayhero integration tile. Topause the integration until a later time, click Pause integration.If you want to import your everydayhero data outside of scheduled runs, you can select import nownext to the date of your next scheduled import. A warning screen appears to notify you that the importis an intensive process. Select Confirm to begin importing your everydayhero data.
Fieldmappingbetween everydayhero andeTapestryAfter you complete the integration set up, information from everydayhero is imported into youreTapestry database.
Account FieldsWhen you import account data from everydayhero into your eTapestry database, accounts can becreated or participation and transaction information updated if the account already exists in your
MANAGEMENT 123
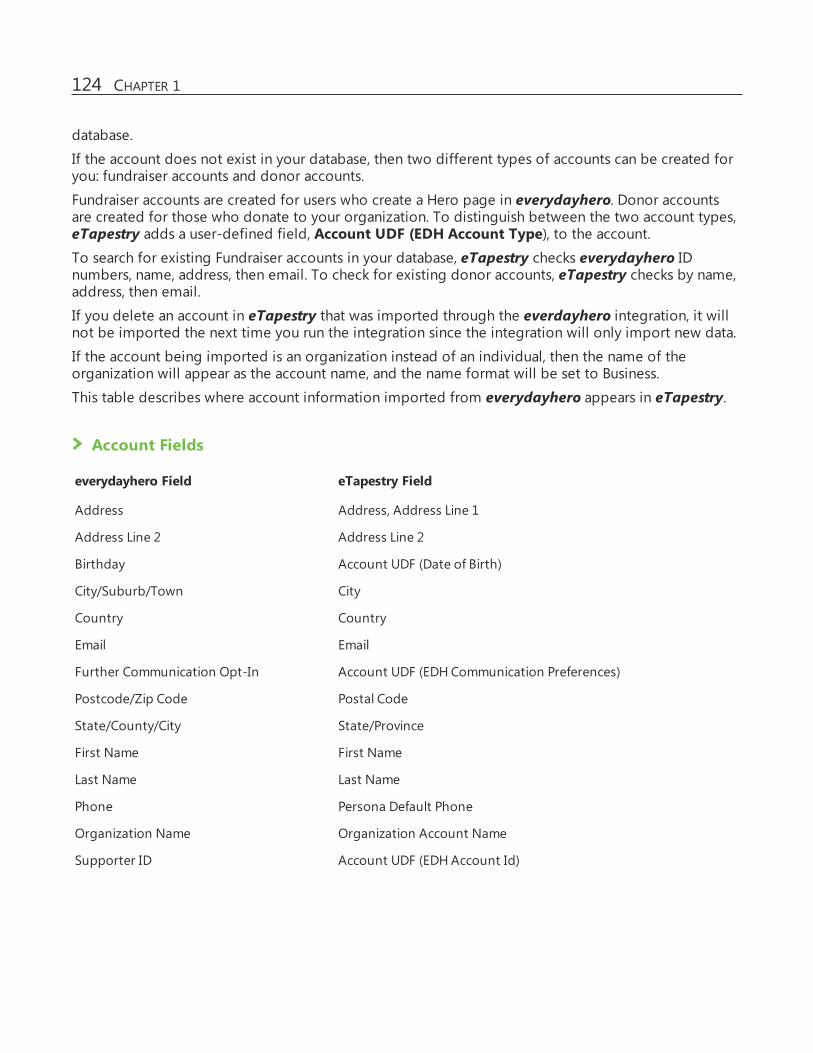
database.
If the account does not exist in your database, then two different types of accounts can be created foryou: fundraiser accounts and donor accounts.
Fundraiser accounts are created for users who create a Hero page in everydayhero. Donor accountsare created for those who donate to your organization. To distinguish between the two account types,eTapestry adds a user-defined field, Account UDF (EDH Account Type), to the account.To search for existing Fundraiser accounts in your database, eTapestry checks everydayhero IDnumbers, name, address, then email. To check for existing donor accounts, eTapestry checks by name,address, then email.
If you delete an account in eTapestry that was imported through the everdayhero integration, it willnot be imported the next time you run the integration since the integration will only import new data.
If the account being imported is an organization instead of an individual, then the name of theorganization will appear as the account name, and the name format will be set to Business.
This table describes where account information imported from everydayhero appears in eTapestry.
Account Fields
everydayhero Field eTapestry Field
Address Address, Address Line 1
Address Line 2 Address Line 2
Birthday Account UDF (Date of Birth)
City/Suburb/Town City
Country Country
Email Email
Further Communication Opt-In Account UDF (EDH Communication Preferences)
Postcode/Zip Code Postal Code
State/County/City State/Province
First Name First Name
Last Name Last Name
Phone Persona Default Phone
Organization Name Organization Account Name
Supporter ID Account UDF (EDH Account Id)
124 CHAPTER 1
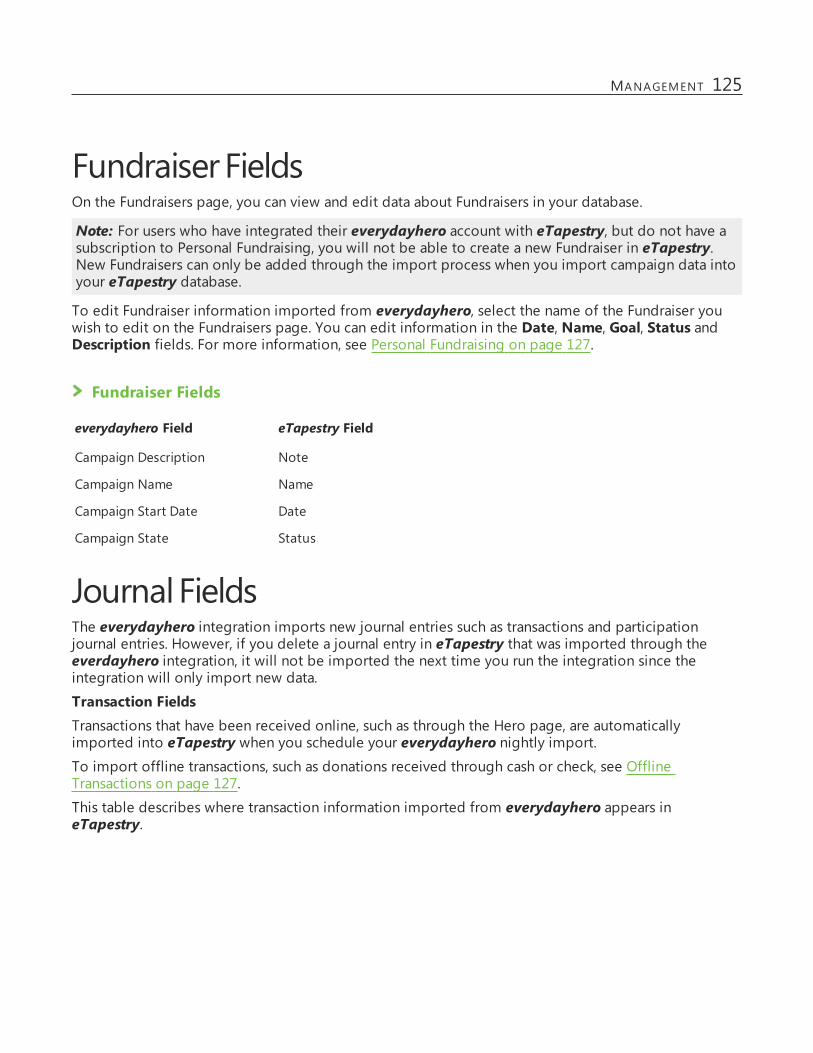
Fundraiser FieldsOn the Fundraisers page, you can view and edit data about Fundraisers in your database.
Note: For users who have integrated their everydayhero account with eTapestry, but do not have asubscription to Personal Fundraising, you will not be able to create a new Fundraiser in eTapestry.New Fundraisers can only be added through the import process when you import campaign data intoyour eTapestry database.
To edit Fundraiser information imported from everydayhero, select the name of the Fundraiser youwish to edit on the Fundraisers page. You can edit information in the Date, Name, Goal, Status andDescription fields. For more information, see Personal Fundraising on page 127.
Fundraiser Fields
everydayhero Field eTapestry Field
Campaign Description Note
Campaign Name Name
Campaign Start Date Date
Campaign State Status
JournalFieldsThe everydayhero integration imports new journal entries such as transactions and participationjournal entries. However, if you delete a journal entry in eTapestry that was imported through theeverdayhero integration, it will not be imported the next time you run the integration since theintegration will only import new data.
Transaction FieldsTransactions that have been received online, such as through the Hero page, are automaticallyimported into eTapestry when you schedule your everydayhero nightly import.To import offline transactions, such as donations received through cash or check, see OfflineTransactions on page 127.
This table describes where transaction information imported from everydayhero appears ineTapestry.
MANAGEMENT 125

Transaction Fields
everydayhero Field eTapestry Field
Donation Amount, Uplift/Cover Transaction Received Amount
Donation ID Transaction UDF (EDH Transaction ID)
Donor Message Transaction Fundraiser Donation Message
Donation Payment Instrument Gift Type
Donation Received at (Date) Transaction Date, Transaction UDF (EDH Date Gift Received)
Donation Receipt Number Transaction Receipt Number
Donation Type Transaction UDF (EDH Transaction Type)
Is Recurring Gift? Transaction UDF (EDH Recurring Gift)
Net Amount Transaction UDF (EDH Net Amount)
Supporter Soft Credit
Participation Journal Entry FieldsYou can use participation journal entries to track information about which accounts participate in yourFundraisers. A participation journal entry is automatically created for each Hero constituent importedfrom everydayhero into your database. You can also manually add participation entries to theaccount's journal.
This table describes where participation information imported from everydayhero appears ineTapestry.
Participation Journal Entry Fields
everydayhero Field eTapestry Field
Page Id Participation UDF (EDH Page Id)
Page Created Date Date
Page Name Display Name
Page Goal Participant Goal
Page URL Participation UDF (EDH Page URL)
Campaign Fundraiser
Team Position Participation UDF (EDH Team Position)
TeamName Participation UDF (EDH Team Name)
Team Page URL Participation UDF (EDH TeamURL)
126 CHAPTER 1

OfflineTransactionsInformation about offline donations, such as cash and chheck transactions, does not automaticallyimport along with your online donations. However, you can manually add these gifts directly to youreTapestry database.
Add offline everydayhero transactions to eTapestry1. From the donor's account Home page, click Journal. The Journal page appears.2. Click Add. The Add Journal Entry screen appears.3. Select Gift/Pledge. The New Gift/Pledge screen appears.4. Under Gift Types, select Check or Cash for your offline donation. Enter applicable details about
the gift.
5. If the donation was given in sponsorship of a participant or everydayhero Hero, under Tribute,Soft Credit, Matching Gift Receipts, click the magnifying glass under Soft Credit. The Find anAccount page appears. Search for the account of the participant or Hero. When you locate thecorrect account in your search results, click the account to select it.
If the account for the soft credit recipient does not exist in your database, you can click AddAccount to add a new account. Click Save to save the new account or select the existing accountin the search results.
6. Complete the gift details. For more information about the items on this screen, refer to Add aGift Screen.
7. Click Save And to save the gift to the Fundraiser's account.
Personal FundraisingAfter you run the everydayhero integration to import your data, you will now have access to a limitedversion of the Personal Fundraising module in eTapestry in order to view, query, and report onFundraiser data imported from everydayhero.
Warning: If you do not have a Personal Fundraising subscription, or if your subscription has lapsed,you will not be able to create or edit Fundraiser information with the Source of eTapestry. You willonly be able to edit Fundraiser information imported from everydayhero.
Fundraisers PageFrom Management, Fundraisers, you can view data about Fundraisers in your database on theFundraisers page.
For users who have integrated their everydayhero account with eTapestry, but do not have asubscription to Personal Fundraising, you will not be able to create a new Fundraiser in eTapestry.
MANAGEMENT 127

New Fundraisers can only be added through the import process when you import campaign data intoyour eTapestry database.To edit Fundraiser information imported from everydayhero, select the name of the Fundraiser youwish to edit on the Fundraisers page. You can edit information in the Date, Name, Goal , Status andDescription fields.The date of your Fundraiser is determined by the date you enter in the Start On field for the campaignin everydayhero. Dates for ongoing campaigns without start dates will be determined by the date thecampaign was created in everydayhero.If the name of a campaign from everydayhero imported into your database matches an existingeTapestry Fundraiser, the date of the campaign will be added to the Fundraiser name. If that namingcombination is not unique, a number will be added to the end of the name until a unique name isfound.
When you import a campaign with the status of Expired or Deactivated from everydayhero, eTapestrysets the status of the Fundraiser to Disabled. All other campaigns will be imported as Fundraisersmarked as Active. After the initial import, eTapestry cannot change the status of Fundraiser, even if youedit the campaign status in everydayhero. However, you can manually edit the status of a Fundraiseron its Fundraiser page.
To set a goal for a Fundraiser, you must edit the Goal field in eTapestry. You cannot import goalamounts from everydayhero. Goals allow you to track the progress of a Fundraiser if you utilize thestandard fundraising reports in eTapestry.
Participation Journal EntriesYou can use participation journal entries to track information about which accounts participate in yourFundraisers. A participation entry is automatically created for each constituent and team accountimported from everydayhero into your database. You can also manually add participation entries tothe account's journal. For more information, see Participation Journal Entries.
Query and Query PreviewFrom the drop menu under Browse Fields, select Defined Fields. You can query on fundraising datausing the Fundraisers field to locate either transactions or participation entries for a specificFundraiser.
You can select User Defined Fields - Participation from the drop down menu to select Participationuser-defined fields for query.
Under Journal Fields in the drop down menu, you can also select Participation within the Journal EntryTypes category to query for Participation journal entry types.
When previewing a query, select the Fundraiser column to include the name of the Fundraiser in yourpreview results.
Standard ReportsThree standard reports can help you monitor personal fundraisers that constituents do on behalf of
128 CHAPTER 1
your organization.
l Fundraiser Activity Summary
l Fundraiser Summary
l Fundraiser Analysis
Communications FieldsData merge tags enable you to merge data from specific fields in accounts or journal entries intodocuments or emails. When you generate letters or emails, the tag is replaced with the specific datafrom each entry in your query. The following Personal Fundraising fields now appear as data merge tagoptions for Communcations layouts:
l Fundraiserl Fundraiser Donation Messagel Fundraiser Total Raisedl Fundraiser Total Receivedl Fundraiser Total Pledgedl Goall Participant Display Name
These fields are also available when you build a custom report to group data. To add these fields to acustom report, select Journal Fields from the Browse Fields drop down menu under Report Columns.For more information about adding merge tags to Communications layouts, see TinyMCE HTML Editor.
Transaction PagesWhen you integrate everydayhero with your database, the Fundraiser drop down menu appears onthe Transaction page so you can indicate which Fundraiser is associated with your transaction. The dropdown menu will not appear on transactions where a soft credit has been selected.
User Defined FieldsTo track additional information not captured in standard fields, you can use everydayhero user-defined fields. These fields can apply to accounts or to specific transactions.
From Management, select User Defined Fields under Database Management. Select theeverydayhero category.
Warning: You can use these fields as they are, or personalize them to better fit the needs of yourorganization. However, we suggest that you do not re-name any user-defined fields created duringthe everydayhero import process. When you re-name the user-defined field, eTapestry creates anew field to store the information which can duplicate data and complicate your data tracking.
Mass UpdatesAfter you integrate everydayhero with your databse, the Fundraiser drop down will appear under
MANAGEMENT 129
Transaction Values when running a mass update to Transaction Values.
MultipleParticipation JournalEntriesWhen you import everydayhero data, you may have Heroes that have created multiple Hero pagesthat are linked to a single campaign.
Only one participation journal entry per account can be created for each Fundraiser when theFundraiser is created in eTapestry. You will not be able to select a Fundraiser on a participation journalentry if you have already selected that Fundraiser on another participation journal entry for the sameaccount.
However, if you have integrated everydayhero with your database, then Fundraisers created throughthe everydayhero import can support multiple participation journal entries for each account.
Participation Journal Entry PageOn the Participation Journal Entry page, the Fundraiser drop down shows all active Fundraisers, even ifthe account already has a participation journal entry linked to the Fundraiser imported fromeverydayhero.You can also save a participation journal entry for an account that already has a participation journalentry for the same Fundraiser if the Fundraiser originated from everydayhero.
Participation Summary ReportWhen you run the Participation Summary Report, accounts with multiple participation journal entrieson a single everydayhero Fundraiser will be listed for each participation journal entry in the report.The Display Name field is included in this report so you can distinguish between accounts withmultiple fundraisers.
If the gift associated with the Fundraiser imported from everydayhero is an offline gift, or a gift ofcash or chheck, then "(Offline)" will appear in the Role column. For more information about offlinegifts, see Offline Transactions on page 127.
To see donation information for individuals, click on the account name when the Account role isParticipation. For Team accounts, click on the account name to view team participation summaryinformation. On the detail report, click on the individual names to view their information.
Relationship TypesYou can manage the relationship types used with your accounts. For example, your organization cantrack familial pairs such as "parent" and "child." You may want to be specific, such as "husband" and"wife," or generic, such as "spouse" and "spouse." The more you know about your supporters and their
130 CHAPTER 1
personal networks, the more information you'll have to strengthen their relationship with yourorganization. Therefore, track any relationship that has value to you. This may include "friend," as wellas "employer" and "employee" relationships. For example, a friend could help you secure a major giftand an employer might match gifts.
To set up relationship types, clickManagement, Relationship Types.l To add a relationship type, click New Relationship Type under Tasks. Enter a role for each sideof the relationship, such as "Employer" and "Employee." Click Save And.
l To reorder the relationship types, select a pair and drag and drop it to the preferred location.
l If you no longer use a relationship type, you can disable it. If you need it later, just enable itagain.
When you learn about an individual's relationships, add the information to the account. For details,refer to Add a Relationship.
MANAGEMENT 131


