104
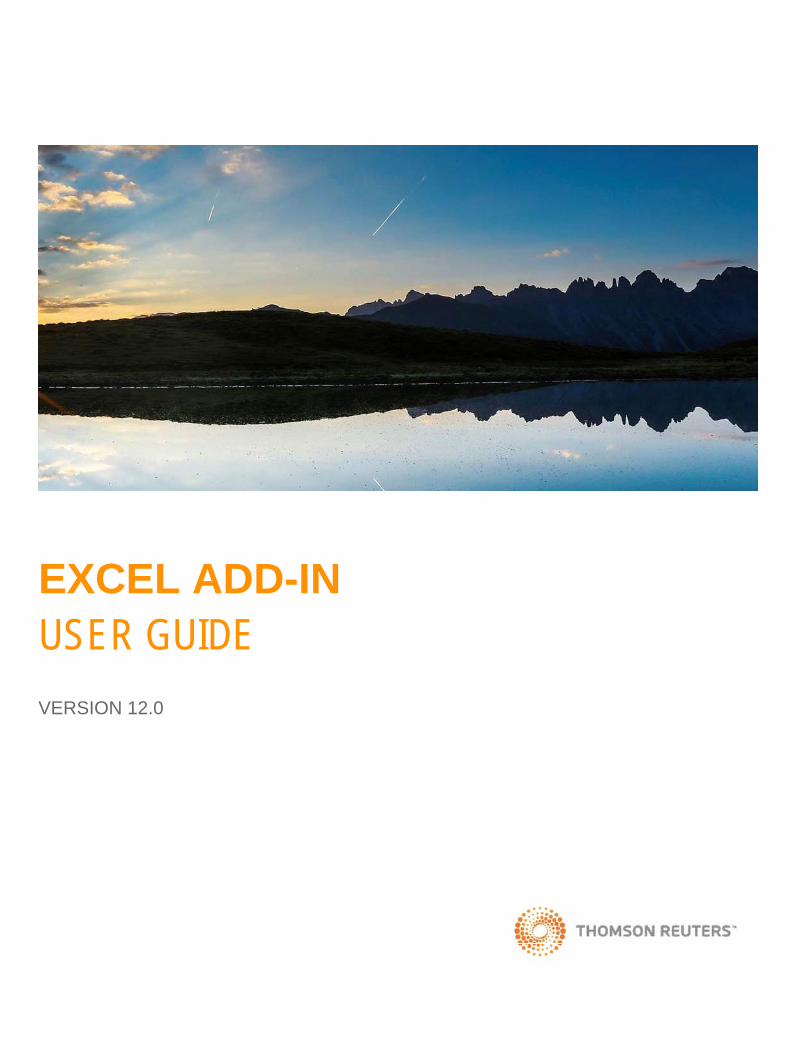
EXCEL ADD-IN USER GUIDE VERSION 12.0
| Date post: | 09-Apr-2018 |
| Category: |
Documents |
| Upload: | nguyendien |
| View: | 269 times |
| Download: | 0 times |
EXCEL ADD-INUSER GUIDE
VERSION 12.0

Copyright © 2017 Thomson Reuters. All Rights Reserved.
Thomson Reuters disclaims any and all liability arising from the use of this document and does not guarantee that any information contained herein is accurate or complete. This document contains information proprietary to Thomson Reuters and may not be reproduced, transmitted, or distributed in whole or part without the express written permission of Thomson Reuters.
Acknowledgement is made to all other brand or product names referred to in the text that are registered trademarks, trademarks, or trade names of their respective owners.
CO
NT
EN
TS
EXCEL ADD-IN FOR ONESOURCE INCOME TAX . . . . . . . . . . . . . . . 1
GETTING STARTED . . . . . . . . . . . . . . . . . . . . . . . . . . . . . . . . . . . . . . . 2ACCESS. . . . . . . . . . . . . . . . . . . . . . . . . . . . . . . . . . . . . . . . . . . . . . . . . . . . . . 2DOWNLOADING THE EXCEL ADD-IN . . . . . . . . . . . . . . . . . . . . . . . . . . . . . . 2REGISTERING THE EXCEL ADD-IN . . . . . . . . . . . . . . . . . . . . . . . . . . . . . . . 9ACCESSING DATA IMPORT FROM A SPREADSHEET . . . . . . . . . . . . . . . 11
DATA IMPORT FUNCTIONS . . . . . . . . . . . . . . . . . . . . . . . . . . . . . . . 12ADD-IN INFO . . . . . . . . . . . . . . . . . . . . . . . . . . . . . . . . . . . . . . . . . . . . . . . . . 12
SETTINGS..............................................................................................................12PROXY ...................................................................................................................13CLIENT MANAGER SETUP (USER WITH MULTI-CLIENT ACCESS)..................14DEBUG ...................................................................................................................15
BINDER GROUPS. . . . . . . . . . . . . . . . . . . . . . . . . . . . . . . . . . . . . . . . 16BINDER GROUPS REQUIRED FOR DATA IMPORT FUNCTIONS . . . . . . . 16USING PREVIOUSLY MAPPED IMPORT FILES DATA IMPORT. . . . . . . . . 16CREATING A NEW BINDER GROUP TO USE WITH DATA IMPORT . . . . . 17NEW MAPPING IMPORT FILE TYPE . . . . . . . . . . . . . . . . . . . . . . . . . . . . . . 17
NEW MAPPING. . . . . . . . . . . . . . . . . . . . . . . . . . . . . . . . . . . . . . . . . . 18MAPPING DATA ON AN EXISTING WORKSHEET . . . . . . . . . . . . . . . . . . . 18NAMING NEW MAPPING . . . . . . . . . . . . . . . . . . . . . . . . . . . . . . . . . . . . . . . 24MAPPING A NEW WORKSHEET . . . . . . . . . . . . . . . . . . . . . . . . . . . . . . . . . 26DELETING AN EXISTING XML MAP IN A SPREADSHEET. . . . . . . . . . . . . 26USING THE DEPTH ELEMENT. . . . . . . . . . . . . . . . . . . . . . . . . . . . . . . . . . . 27MORE ABOUT ELEMENT HEADINGS . . . . . . . . . . . . . . . . . . . . . . . . . . . . . 27
ADDING HEADINGS ..............................................................................................27RETAINING EXISTING HEADINGS.......................................................................30
INDENTIFYING MAPPED ELEMENTS . . . . . . . . . . . . . . . . . . . . . . . . . . . . . 30GLOBAL IDENTIFIERS MAP . . . . . . . . . . . . . . . . . . . . . . . . . . . . . . . . . . . . . 30
COPYING MAPPING. . . . . . . . . . . . . . . . . . . . . . . . . . . . . . . . . . . . . . 32
ROLLING OVER EXCEL ADD-IN MAPPING . . . . . . . . . . . . . . . . . . . 36
COPYING MAPPED ELEMENTS TO WORKBOOKS . . . . . . . . . . . . 39
TEMPLATES . . . . . . . . . . . . . . . . . . . . . . . . . . . . . . . . . . . . . . . . . . . . 41DOWNLOADING THE TEMPLATES . . . . . . . . . . . . . . . . . . . . . . . . . . . . . . . 41
VALIDATING WORKSHEETS . . . . . . . . . . . . . . . . . . . . . . . . . . . . . . 43VERIFYING WORKSHEET INPUT FOR EXPORT . . . . . . . . . . . . . . . . . . . . 43SAMPLE EXPORT ERRORS. . . . . . . . . . . . . . . . . . . . . . . . . . . . . . . . . . . . . 43
EXPORTING MAPPED DATA TO ONESOURCE INCOME TAX. . . . 45TRANSFERING DATA TO ONESOURCE INCOME TAX . . . . . . . . . . . . . . . 45
UNSUCCESSFUL IMPORTS .................................................................................47SUCCESSFUL IMPORTS ......................................................................................47
VERIFYING TRANSFERS IN ONESOURCE INCOME TAX . . . . . . . . . . . . . 47IMPORT LOG STATUS . . . . . . . . . . . . . . . . . . . . . . . . . . . . . . . . . . . . . . . . . 48TIPS FOR MAPPING DATA. . . . . . . . . . . . . . . . . . . . . . . . . . . . . . . . . . . . . . 48
IDENTIFIERS .........................................................................................................49JOURNAL ENTRIES ..............................................................................................49DATA FORMAT ......................................................................................................49EXPAND NUMERICAL COLUMNS........................................................................50
1

CO
NT
EN
TS
IMPORT LOG . . . . . . . . . . . . . . . . . . . . . . . . . . . . . . . . . . . . . . . . . . . 51FILTER CRITERIA FOR IMPORT REPORTS . . . . . . . . . . . . . . . . . . . . . . . . 52DOWNLOADING THE IMPORT LOG . . . . . . . . . . . . . . . . . . . . . . . . . . . . . . 53DELETING THE IMPORT LOG . . . . . . . . . . . . . . . . . . . . . . . . . . . . . . . . . . . 54
AUTO UPDATE FEATURE FOR EXISTING MAPS . . . . . . . . . . . . . . 55
ADDITIONAL ONESOURCE MENU OPTIONS . . . . . . . . . . . . . . . . . 57SAVE AS . . . . . . . . . . . . . . . . . . . . . . . . . . . . . . . . . . . . . . . . . . . . . . . . . . . . 57VIEWING THE SOURCE PANE. . . . . . . . . . . . . . . . . . . . . . . . . . . . . . . . . . . 58CHECKING FOR UPDATES . . . . . . . . . . . . . . . . . . . . . . . . . . . . . . . . . . . . . 59ABOUT ONESOURCE EXCEL ADD-IN / ACCESS REGISTRATION . . . . . . 59UPDATING REGISTRATION . . . . . . . . . . . . . . . . . . . . . . . . . . . . . . . . . . . . . 60
TIPS AND TRICKS . . . . . . . . . . . . . . . . . . . . . . . . . . . . . . . . . . . . . . . 62GROUP DATA FORMAT . . . . . . . . . . . . . . . . . . . . . . . . . . . . . . . . . . . . . . . . 62MULTI-LEVEL GROUP DATA FORMAT . . . . . . . . . . . . . . . . . . . . . . . . . . . . 62MULTI-COMPANY/GROUP DATA FORMAT FOR TAX ACCOUNTING SYSTEM TARGETS . . . . . . . . . . . . . . . . . . . . . . . . . . . . . . . 63MULTI-COMPANY/GROUP DATA FORMAT FOR TAX RETURN TARGETS. . . . . . . . . . . . . . . . . . . . . . . . . . . . . . . . . . . . . . . . . . . . . . . . . . . . 64TAX ACCOUNTING SYSTEM (TAS) INTERCOMPANY TARGETS . . . . . . . 641065/1120 TAX RETURN TARGETS. . . . . . . . . . . . . . . . . . . . . . . . . . . . . . . 65
APPENDIX 1 - AVAILABLE IMPORT TARGETS. . . . . . . . . . . . . . . . 66
APPENDIX 2 - DATA SPECIFICATIONS . . . . . . . . . . . . . . . . . . . . . . 76
APPENDIX 3 - COUNTRY CODES. . . . . . . . . . . . . . . . . . . . . . . . . . . 78
APPENDIX 4 - OFFICER TITLE CODES . . . . . . . . . . . . . . . . . . . . . . 94
APPENDIX 5 - LATE FILING REASON CODES . . . . . . . . . . . . . . . . 95
APPENDIX 6 - TROUBLESHOOTING EXCEL ADD-IN INSTALLATION ISSUES . . . . . . . . . . . . . . . . . . . . . . . . . . . . . . . . . . 96OFFICE 2007: . . . . . . . . . . . . . . . . . . . . . . . . . . . . . . . . . . . . . . . . . . . . . . . . 96
APPENDIX 7 - FAQS . . . . . . . . . . . . . . . . . . . . . . . . . . . . . . . . . . . . . 99
2
EXCEL ADD-IN FOR ONESOURCE INCOME TAX
1
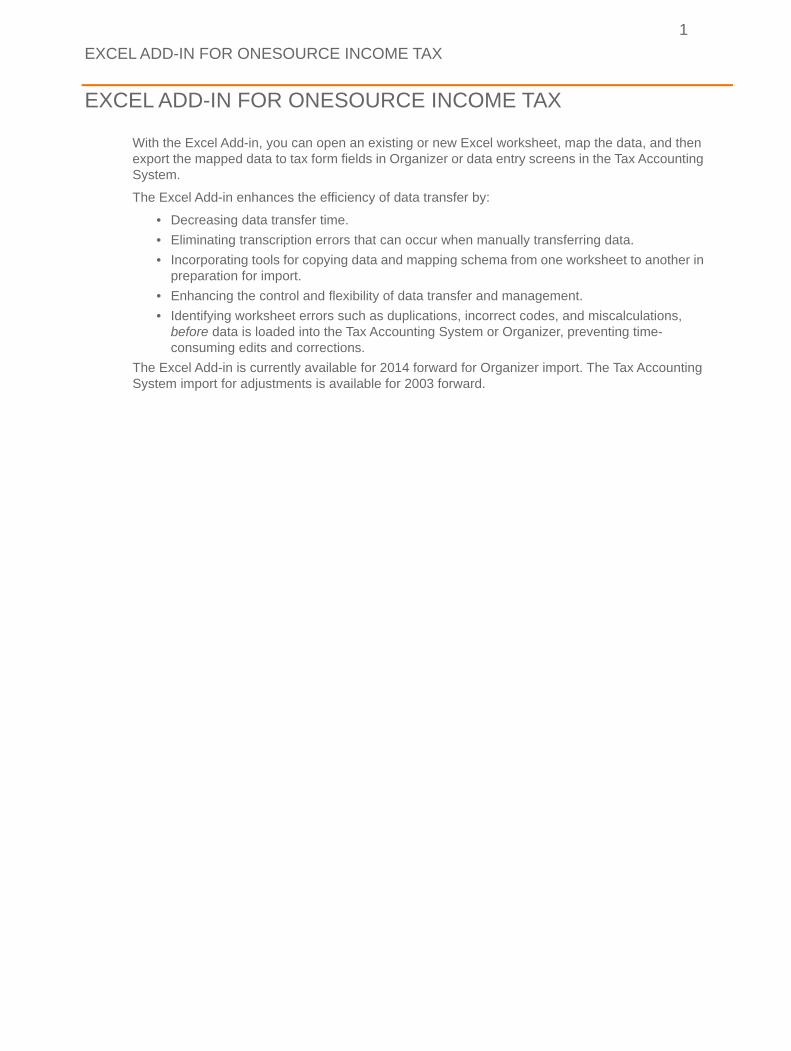
EXCEL ADD-IN FOR ONESOURCE INCOME TAX
With the Excel Add-in, you can open an existing or new Excel worksheet, map the data, and then export the mapped data to tax form fields in Organizer or data entry screens in the Tax Accounting System.
The Excel Add-in enhances the efficiency of data transfer by:
• Decreasing data transfer time.
• Eliminating transcription errors that can occur when manually transferring data.
• Incorporating tools for copying data and mapping schema from one worksheet to another in preparation for import.
• Enhancing the control and flexibility of data transfer and management.
• Identifying worksheet errors such as duplications, incorrect codes, and miscalculations, before data is loaded into the Tax Accounting System or Organizer, preventing time-consuming edits and corrections.
The Excel Add-in is currently available for 2014 forward for Organizer import. The Tax Accounting System import for adjustments is available for 2003 forward.
GETTING STARTED
2
GETTING STARTED
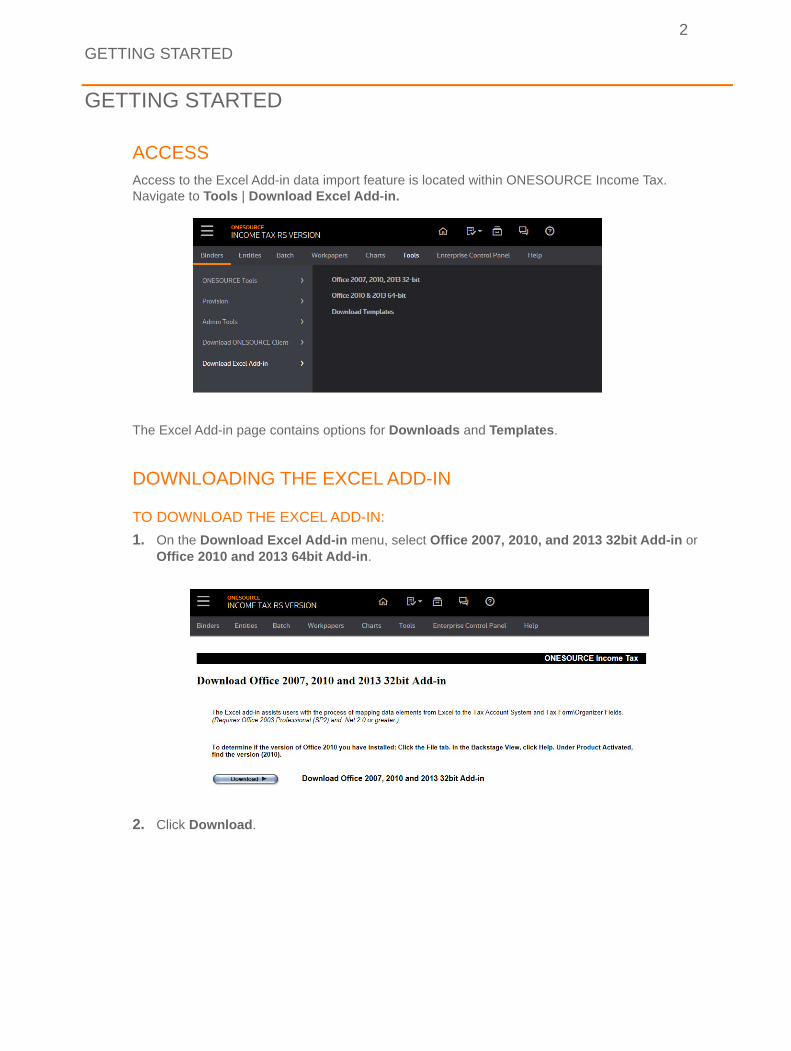
ACCESS Access to the Excel Add-in data import feature is located within ONESOURCE Income Tax. Navigate to Tools | Download Excel Add-in.
The Excel Add-in page contains options for Downloads and Templates.
DOWNLOADING THE EXCEL ADD-IN
TO DOWNLOAD THE EXCEL ADD-IN:
1. On the Download Excel Add-in menu, select Office 2007, 2010, and 2013 32bit Add-in or Office 2010 and 2013 64bit Add-in.
2. Click Download.
DOWNLOADING THE EXCEL ADD-IN
3
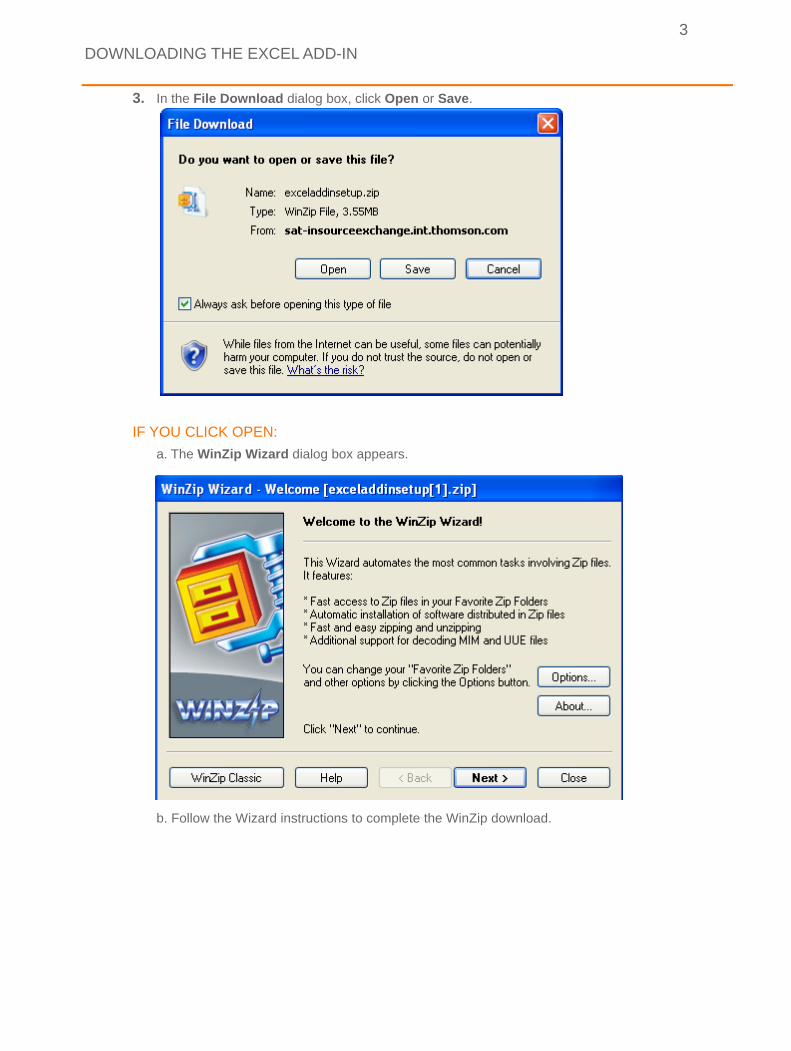
3. In the File Download dialog box, click Open or Save.
IF YOU CLICK OPEN:
a. The WinZip Wizard dialog box appears.
b. Follow the Wizard instructions to complete the WinZip download.
DOWNLOADING THE EXCEL ADD-IN
4
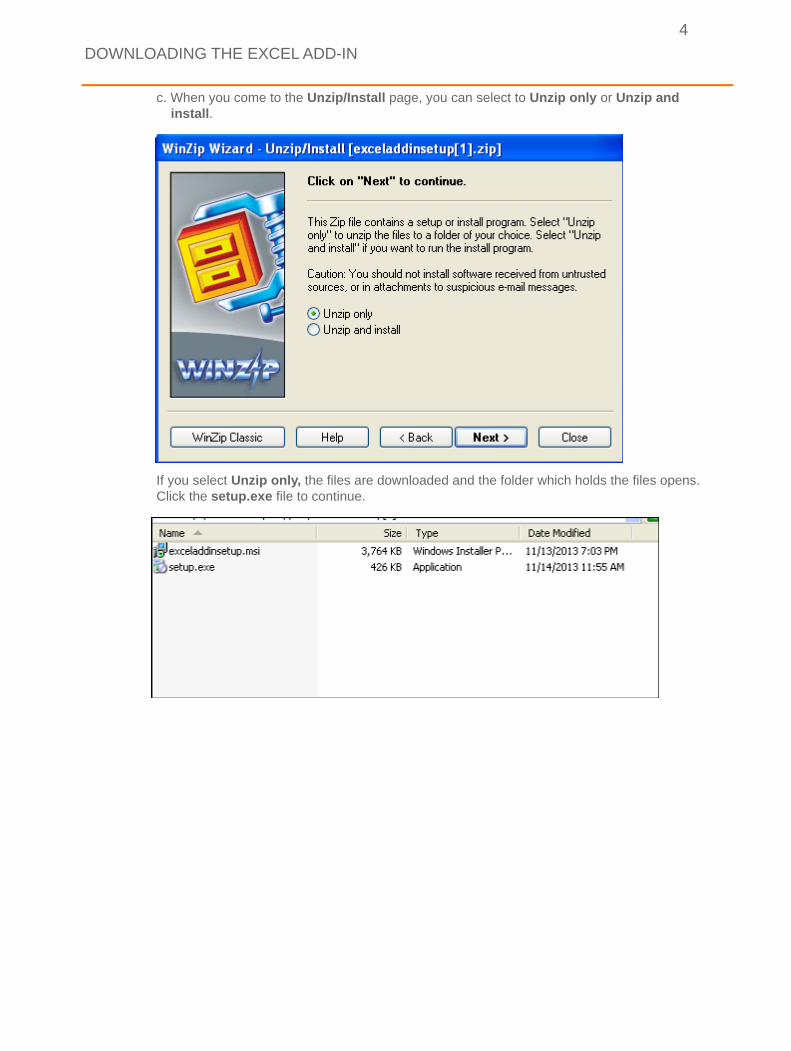
c. When you come to the Unzip/Install page, you can select to Unzip only or Unzip and install.
If you select Unzip only, the files are downloaded and the folder which holds the files opens. Click the setup.exe file to continue.
DOWNLOADING THE EXCEL ADD-IN
5
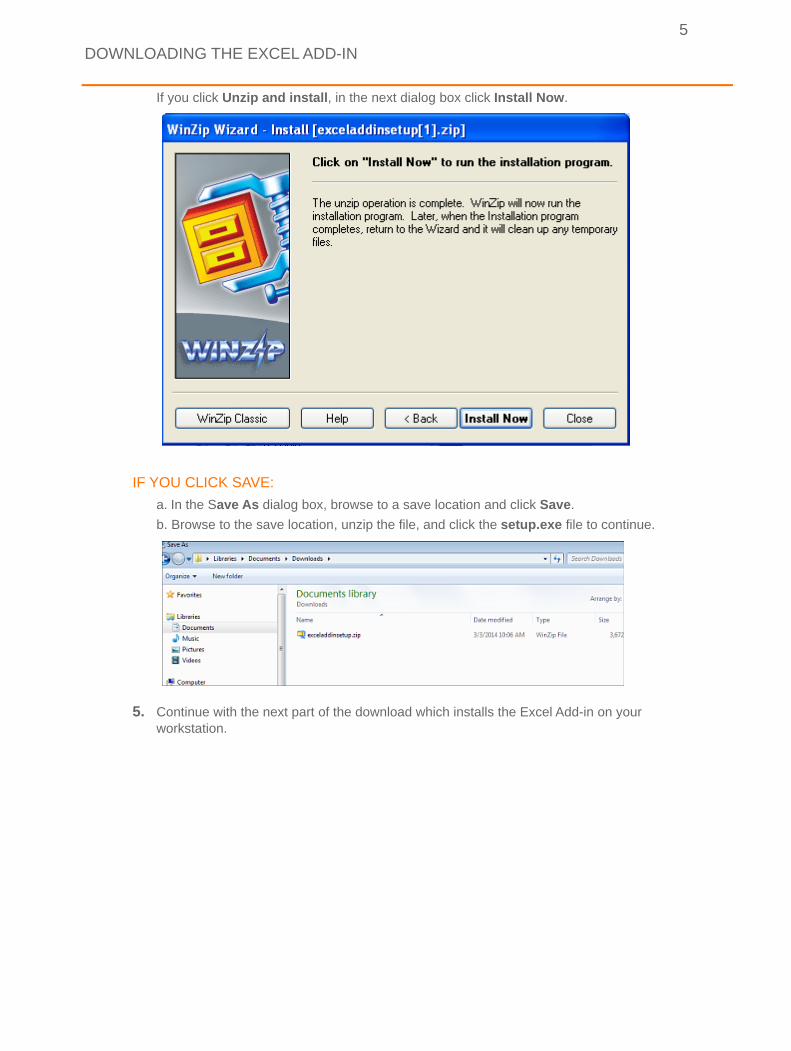
If you click Unzip and install, in the next dialog box click Install Now.
IF YOU CLICK SAVE:
a. In the Save As dialog box, browse to a save location and click Save.
b. Browse to the save location, unzip the file, and click the setup.exe file to continue.
5. Continue with the next part of the download which installs the Excel Add-in on your workstation.
DOWNLOADING THE EXCEL ADD-IN
6
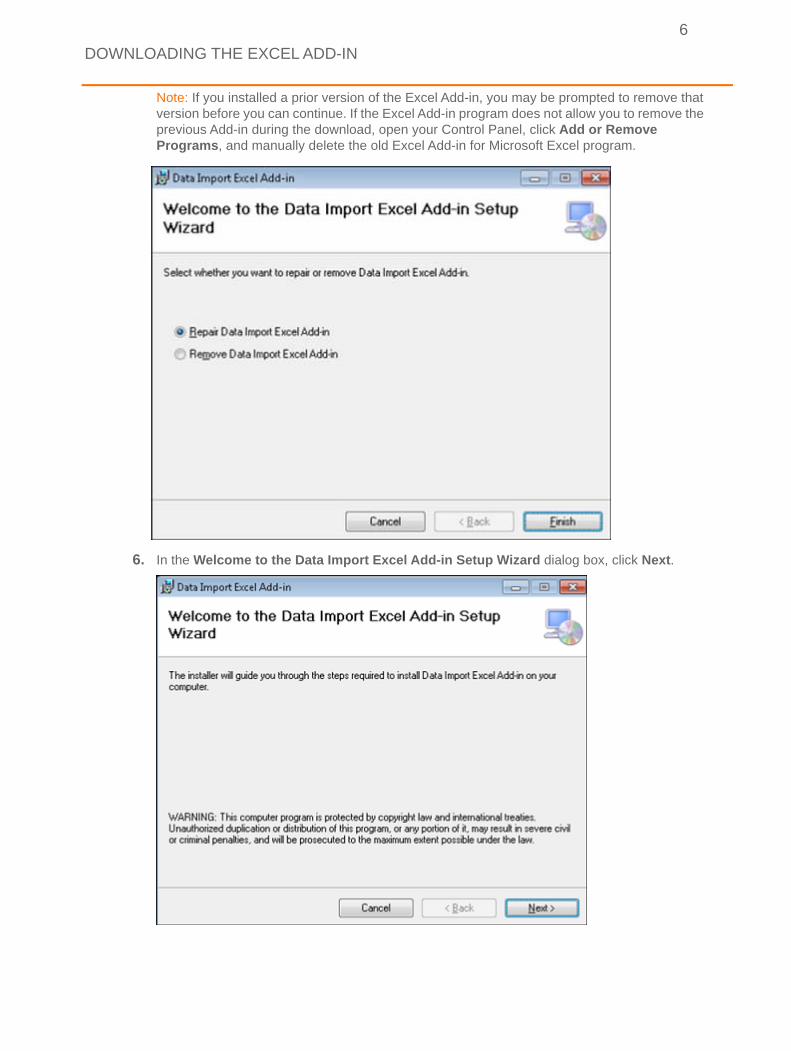
Note: If you installed a prior version of the Excel Add-in, you may be prompted to remove that version before you can continue. If the Excel Add-in program does not allow you to remove the previous Add-in during the download, open your Control Panel, click Add or Remove Programs, and manually delete the old Excel Add-in for Microsoft Excel program.
6. In the Welcome to the Data Import Excel Add-in Setup Wizard dialog box, click Next.
DOWNLOADING THE EXCEL ADD-IN
7
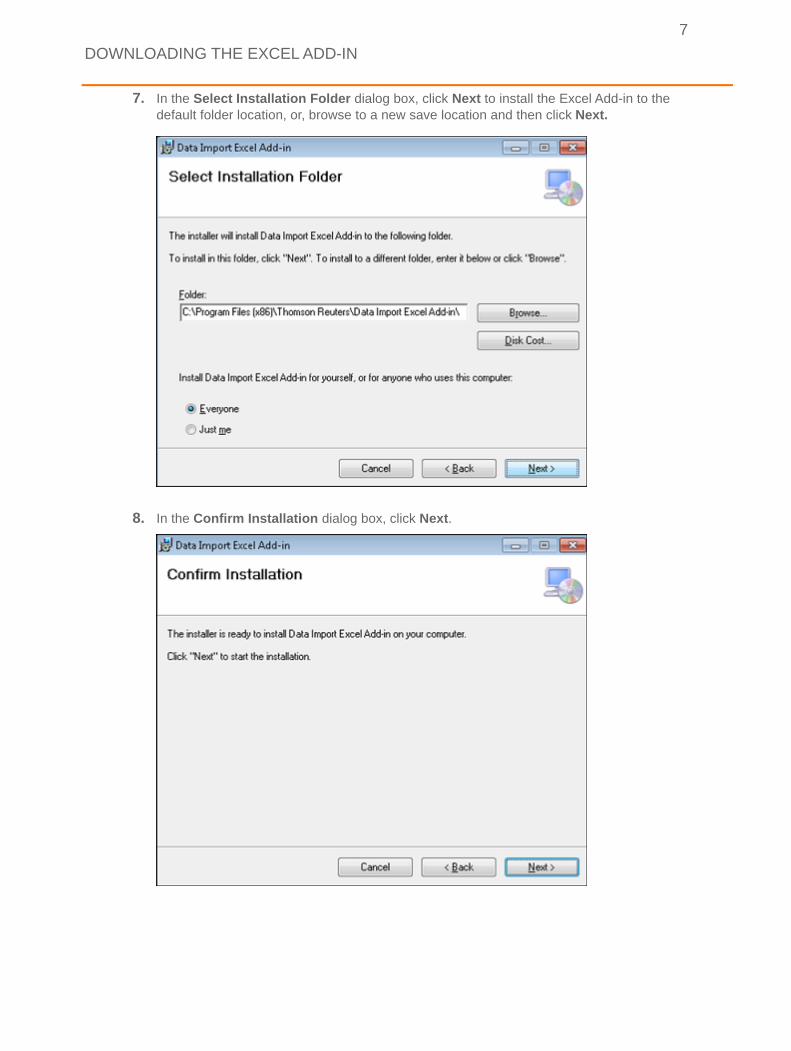
7. In the Select Installation Folder dialog box, click Next to install the Excel Add-in to the default folder location, or, browse to a new save location and then click Next.
8. In the Confirm Installation dialog box, click Next.
DOWNLOADING THE EXCEL ADD-IN
8
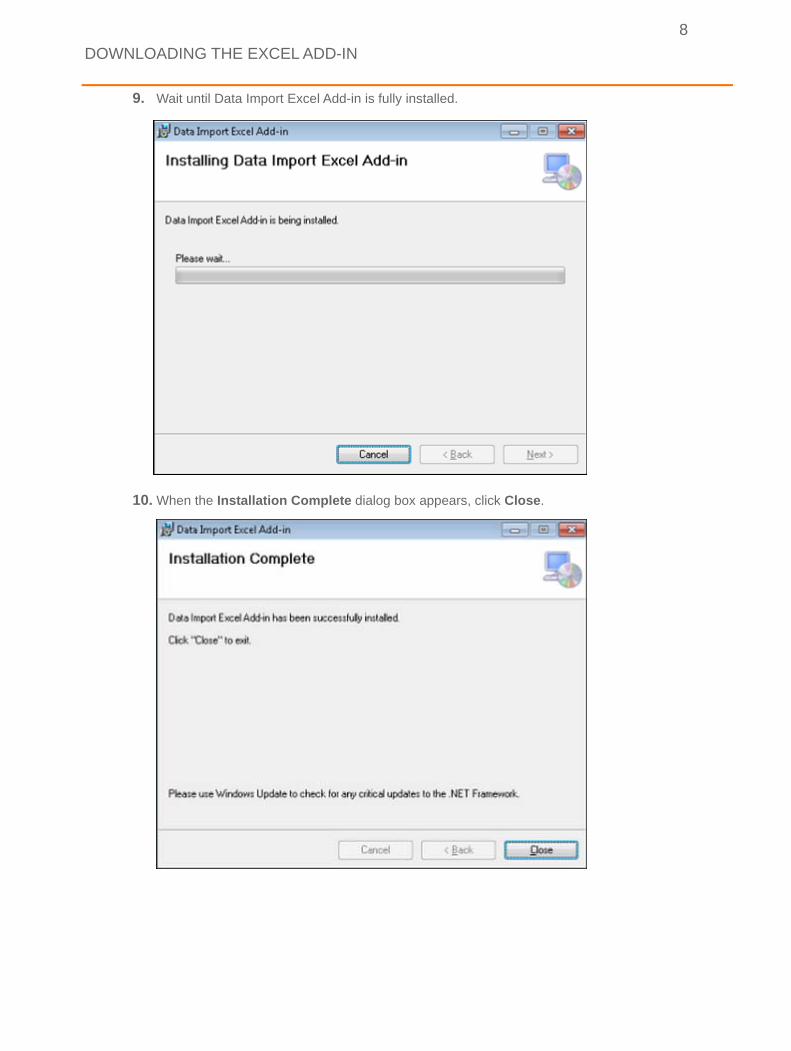
9. Wait until Data Import Excel Add-in is fully installed.
10. When the Installation Complete dialog box appears, click Close.

REGISTERING THE EXCEL ADD-IN
9
REGISTERING THE EXCEL ADD-IN After installation is completed, you must register the Excel Add-in before you can access Add-in mapping and import functions.
Note: When you open an Excel spreadsheet after successfully installing the Excel Add-in, a prompt or message about registering the Excel Add-in does not automatically appear. You must click the Register button to activate the dialog boxes which will lead you through the registration process.
1. Open an Excel spreadsheet.
2. Click the Data Import tab and then click the Register button.
3. The Registration dialog box appears. Type your ONESOURCE Universal ID and Password, and then click Register.
4. The Registering dialog box appears while the registration process takes place.
REGISTERING THE EXCEL ADD-IN
10
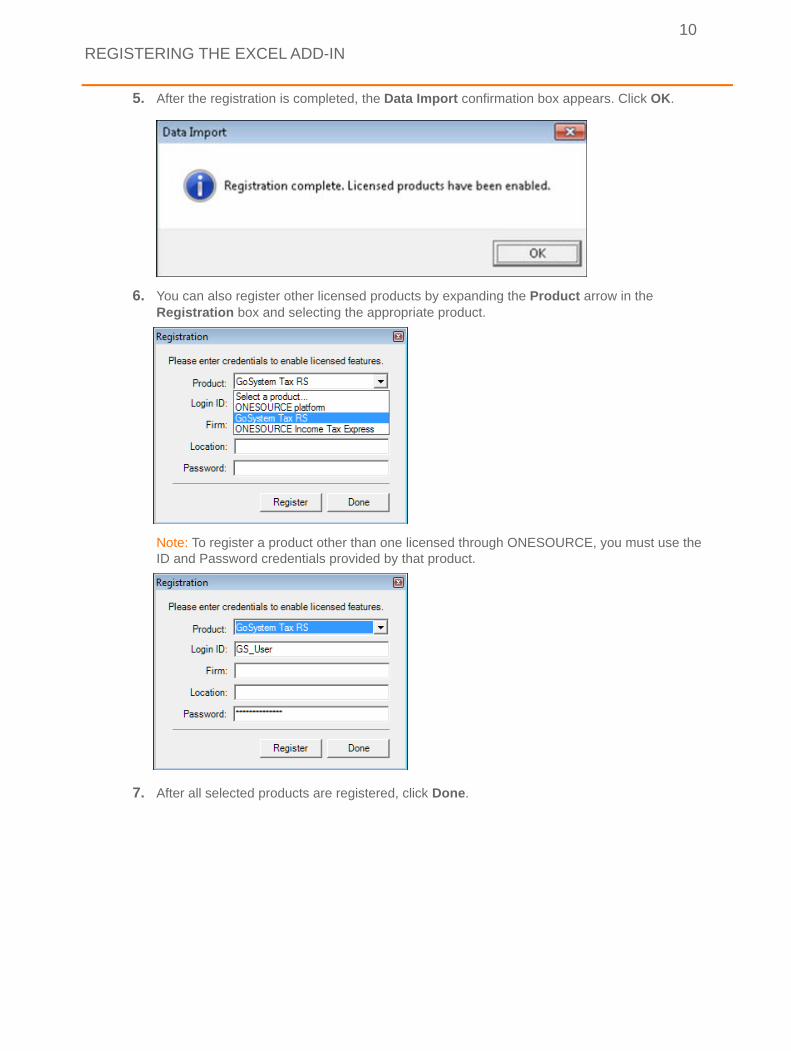
5. After the registration is completed, the Data Import confirmation box appears. Click OK.
6. You can also register other licensed products by expanding the Product arrow in the Registration box and selecting the appropriate product.
Note: To register a product other than one licensed through ONESOURCE, you must use the ID and Password credentials provided by that product.
7. After all selected products are registered, click Done.
ACCESSING DATA IMPORT FROM A SPREADSHEET
11
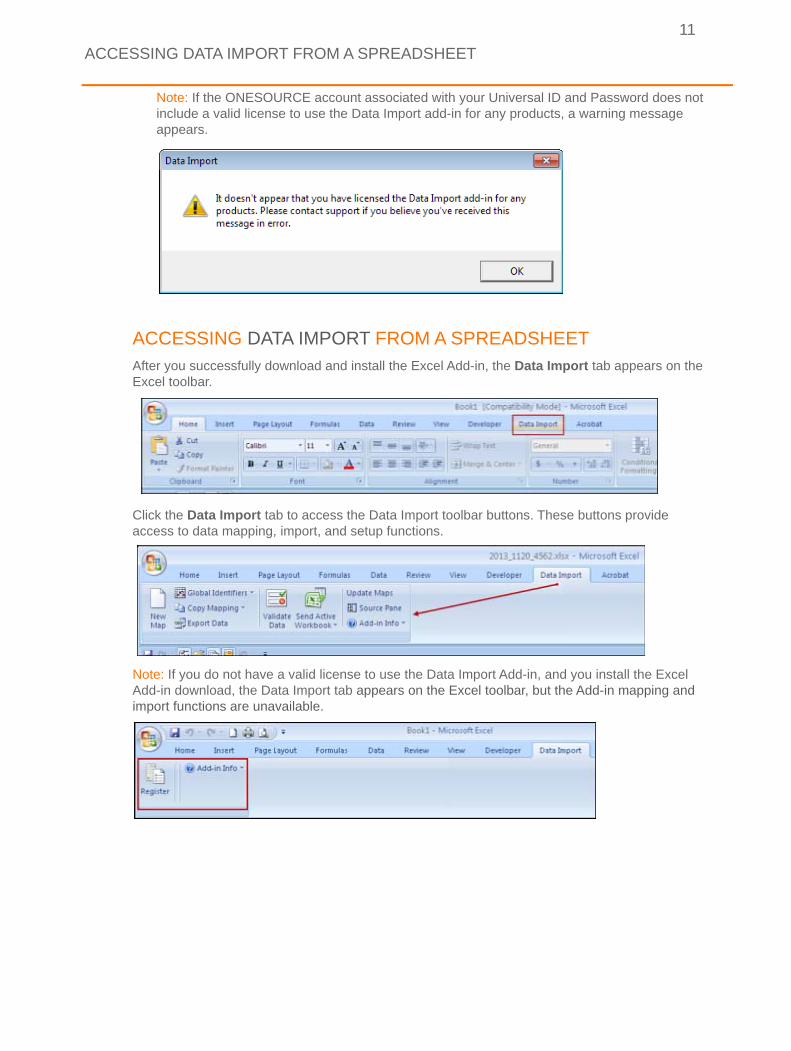
Note: If the ONESOURCE account associated with your Universal ID and Password does not include a valid license to use the Data Import add-in for any products, a warning message appears.
ACCESSING DATA IMPORT FROM A SPREADSHEETAfter you successfully download and install the Excel Add-in, the Data Import tab appears on the Excel toolbar.
Click the Data Import tab to access the Data Import toolbar buttons. These buttons provide access to data mapping, import, and setup functions.
Note: If you do not have a valid license to use the Data Import Add-in, and you install the Excel Add-in download, the Data Import tab appears on the Excel toolbar, but the Add-in mapping and import functions are unavailable.
DATA IMPORT FUNCTIONS
12
DATA IMPORT FUNCTIONS
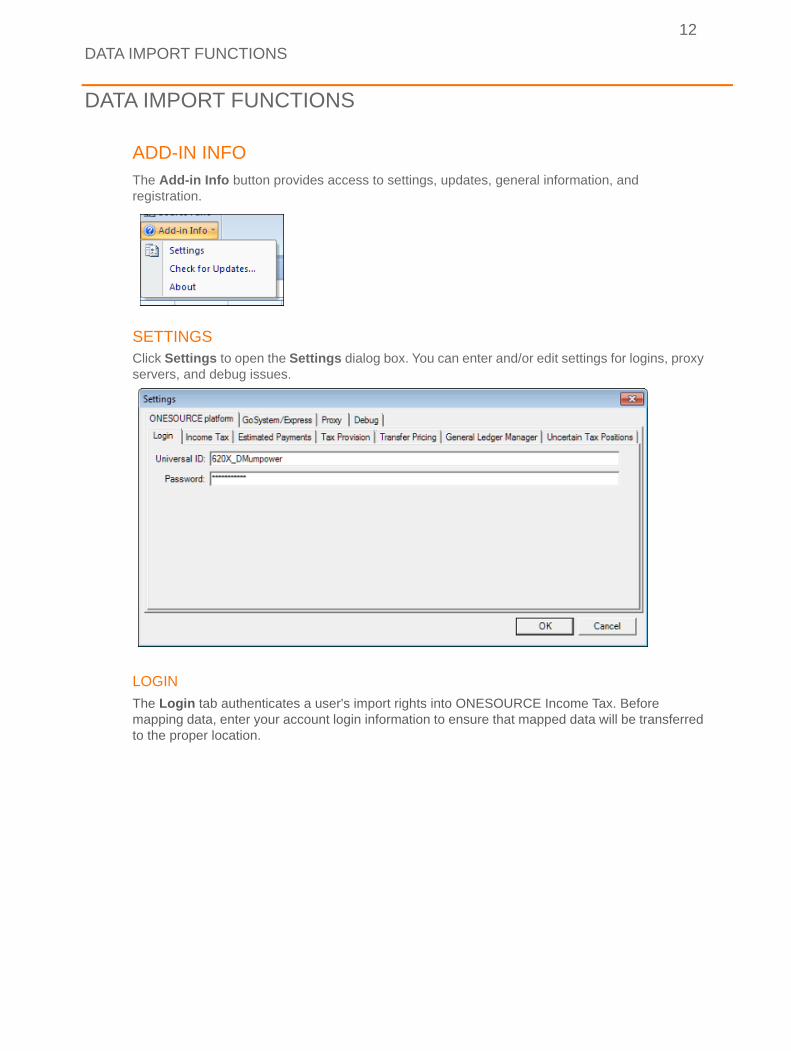
ADD-IN INFOThe Add-in Info button provides access to settings, updates, general information, and registration.
SETTINGS Click Settings to open the Settings dialog box. You can enter and/or edit settings for logins, proxy servers, and debug issues.
LOGIN
The Login tab authenticates a user's import rights into ONESOURCE Income Tax. Before mapping data, enter your account login information to ensure that mapped data will be transferred to the proper location.

PROXY
13
1. In the Settings dialog box, click the ONESOURCE platform tab, and then click the Login tab. Type your User ID and Password.
2. Click OK.
Note: During the Registration or Update Registration process, you must register the Excel Add-in for all applicable ONESOURCE products within your account if you plan to perform Data Import functions with those products. If you fail to register a licensed product, and then try to login, a message appears.
PROXYIf your company utilizes a proxy server to access the internet, and your company does not use Proxy Auto Config or “PAC”, you must enter proxy settings to successfully transfer data to ONESOURCE Income Tax.
1. In the Settings dialog box, click the Proxy tab.
2. Click Enabled.
3. Add your company’s proxy server URL Address and Port.

CLIENT MANAGER SETUP (USER WITH MULTI-CLIENT ACCESS)
14
4. Type your user’s domain Username and Password.
5. Click OK.
CLIENT MANAGER SETUP (USER WITH MULTI-CLIENT ACCESS)If you are a user with multi-client access, and want to import into another account, you must change the Account number in Settings
1. Click the Add-in Info button and then click Settings.
2. In the Settings dialog box, click the Income Tax tab.

DEBUG
15
3. In the Account box, type the four digit child account number and then click OK.
Note: The default account is set to the Parent account. All accounts must be authorized to use Excel Add-in.
DEBUGThe Debug log is used for troubleshooting issues when using the Excel Add-in. To access the debug tool, click the Debug tab in the Settings dialog box. Unless instructed by a support representative, the Debug Log setting should remain on Off.
BINDER GROUPS
16
BINDER GROUPS
Before using Data Import mapping or import functions, please review the following information about Binder Groups.
BINDER GROUPS REQUIRED FOR DATA IMPORT FUNCTIONSIf you previously accessed mapping and import functions through Quick Launch groups, you must map to Binder Groups to access Data Import functions.
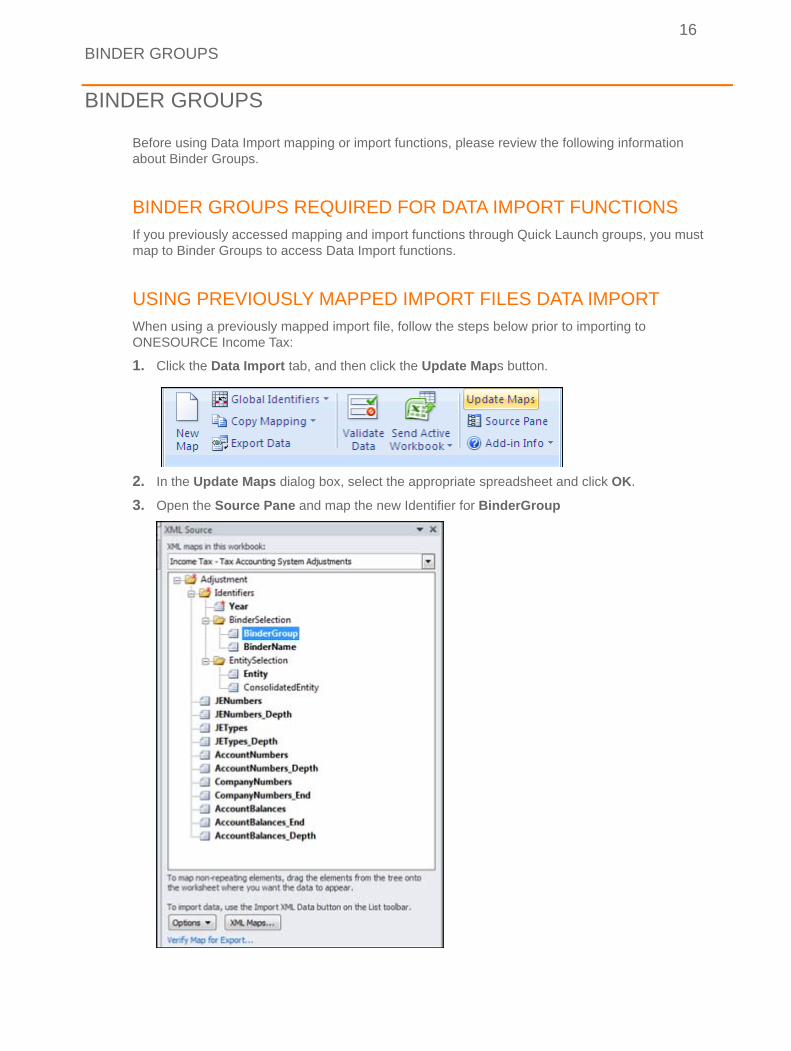
USING PREVIOUSLY MAPPED IMPORT FILES DATA IMPORTWhen using a previously mapped import file, follow the steps below prior to importing to ONESOURCE Income Tax:
1. Click the Data Import tab, and then click the Update Maps button.
2. In the Update Maps dialog box, select the appropriate spreadsheet and click OK.
3. Open the Source Pane and map the new Identifier for BinderGroup

CREATING A NEW BINDER GROUP TO USE WITH DATA IMPORT
17
4. Validate and send.
CREATING A NEW BINDER GROUP TO USE WITH DATA IMPORTWhen creating a new Binder Group to use with Data Import:
• Do not include multiple binders for an entity in the same Binder Group
The Add-in cannot differentiate various binders within an entity in a Binder Group. After the Add-in sends import data (containing targeted Binders within the same Entity) to ONESOURCE Income Tax, the Import Log will return an Error with the following explanation:Unable to determine binder because Binder Group contains multiple binders with the same targeted Company / Entity number.
• Do not include multiple return types in the same Binder Group
The Add-in has different maps for different return types (for example, 1120, 1065). Therefore, if there are different return types within the import file, the Add-in sends data into only one return type.
NEW MAPPING IMPORT FILE TYPEWhen you export out of ONESOURCE Income Tax, files are saved as CSV. When you create mapping files to import, you must save the files as XLS or XLSX in order to import them successfully. Mapping will not save to a CSV file.

NEW MAPPING
18
NEW MAPPING
MAPPING DATA ON AN EXISTING WORKSHEETYou can open an existing Excel worksheet, map the data, and then export the mapped data to ONESOURCE Income Tax.
TO MAP DATA ON AN EXISTING WORKSHEET:
1. Open an existing Excel worksheet.
2. Click the New Map button.
MAPPING DATA ON AN EXISTING WORKSHEET
19
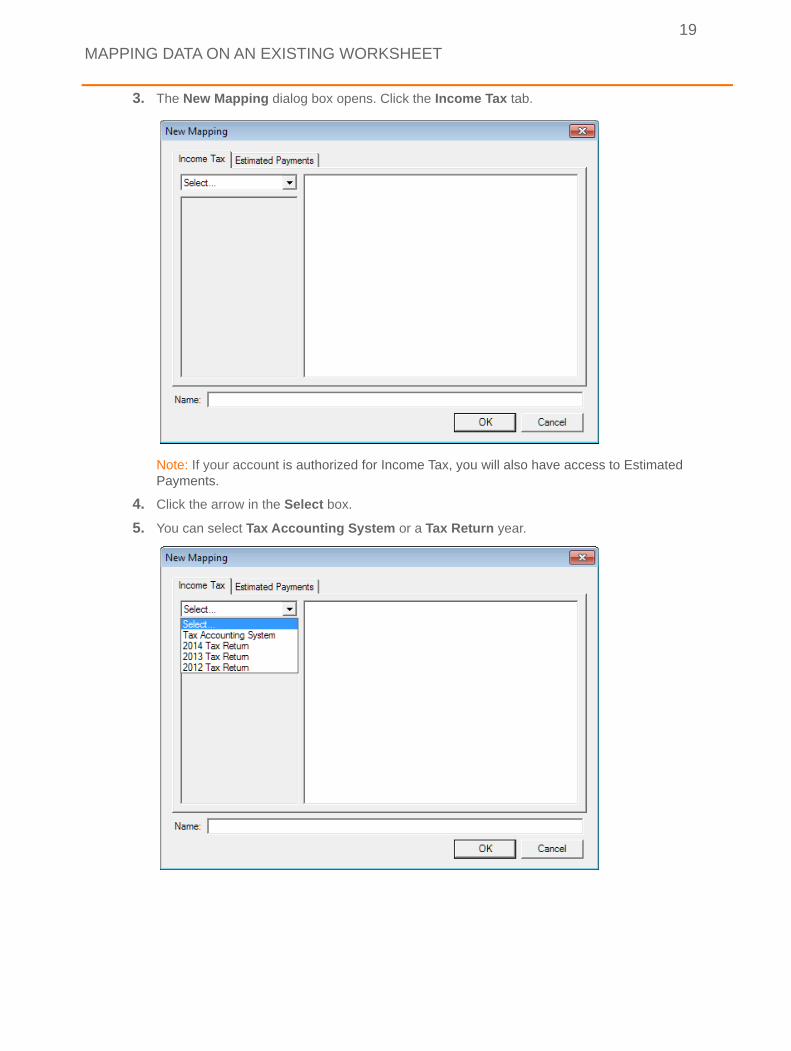
3. The New Mapping dialog box opens. Click the Income Tax tab.
Note: If your account is authorized for Income Tax, you will also have access to Estimated Payments.
4. Click the arrow in the Select box.
5. You can select Tax Accounting System or a Tax Return year.
MAPPING DATA ON AN EXISTING WORKSHEET
20
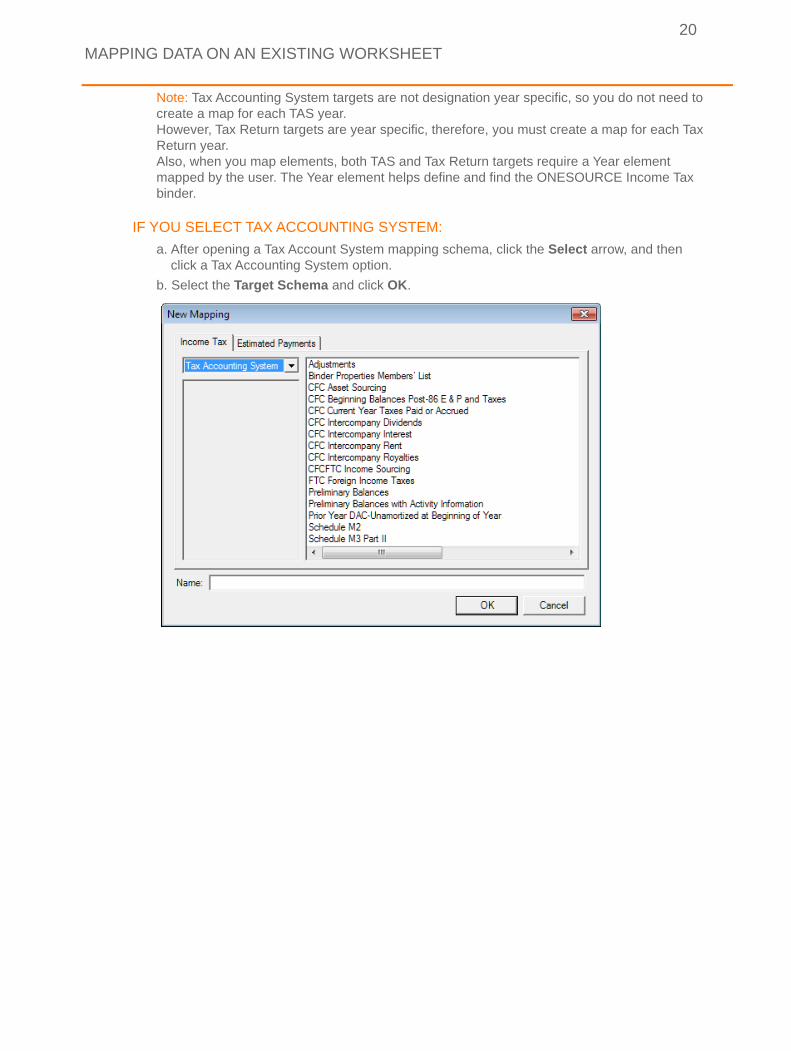
Note: Tax Accounting System targets are not designation year specific, so you do not need to create a map for each TAS year. However, Tax Return targets are year specific, therefore, you must create a map for each Tax Return year.Also, when you map elements, both TAS and Tax Return targets require a Year element mapped by the user. The Year element helps define and find the ONESOURCE Income Tax binder.
IF YOU SELECT TAX ACCOUNTING SYSTEM:
a. After opening a Tax Account System mapping schema, click the Select arrow, and then click a Tax Accounting System option.
b. Select the Target Schema and click OK.
MAPPING DATA ON AN EXISTING WORKSHEET
21
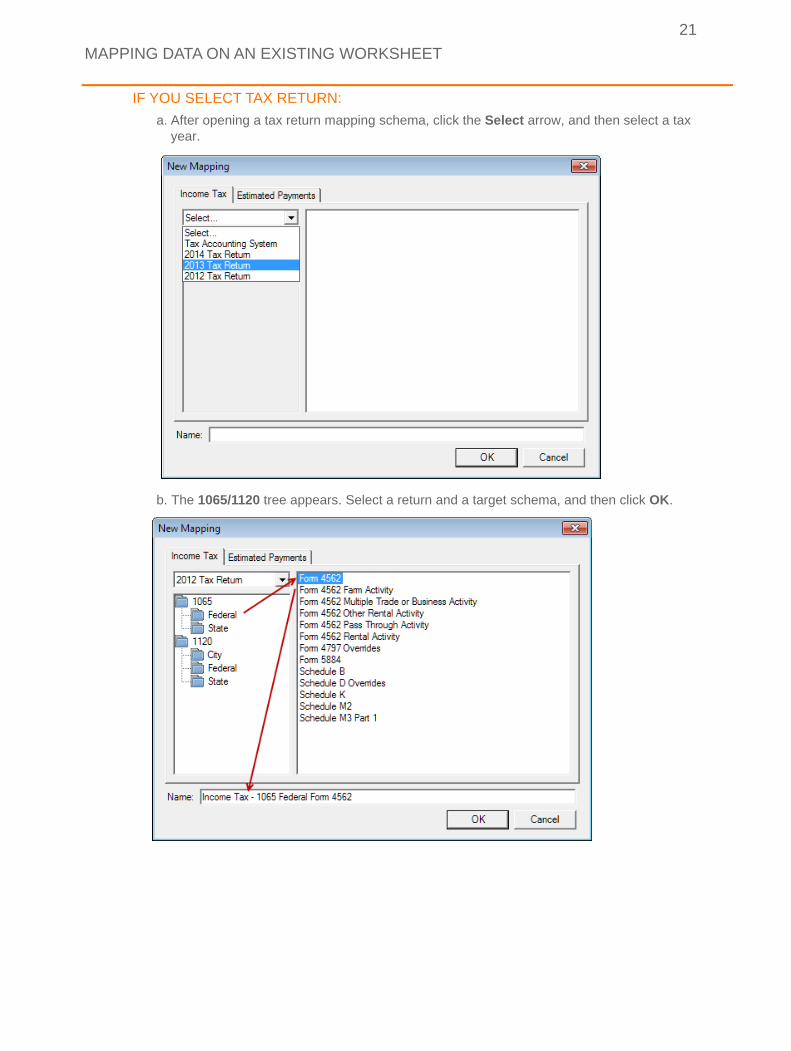
IF YOU SELECT TAX RETURN:
a. After opening a tax return mapping schema, click the Select arrow, and then select a tax year.
b. The 1065/1120 tree appears. Select a return and a target schema, and then click OK.
MAPPING DATA ON AN EXISTING WORKSHEET
22
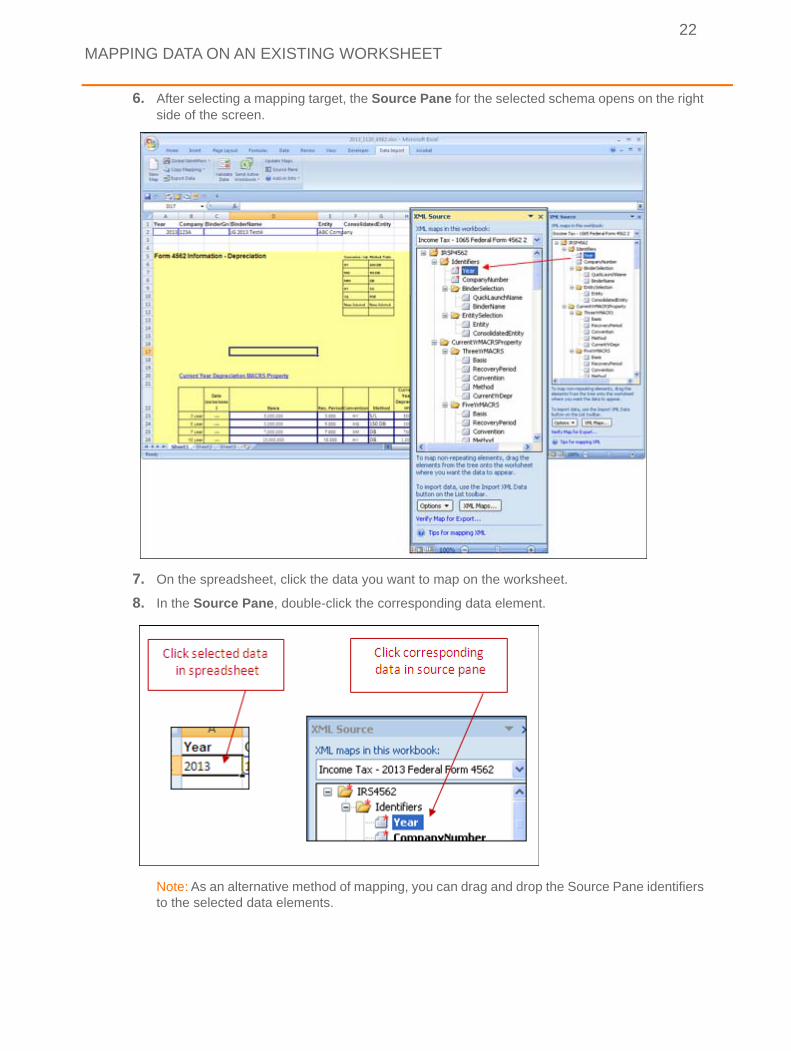
6. After selecting a mapping target, the Source Pane for the selected schema opens on the right side of the screen.
7. On the spreadsheet, click the data you want to map on the worksheet.
8. In the Source Pane, double-click the corresponding data element.
Note: As an alternative method of mapping, you can drag and drop the Source Pane identifiers to the selected data elements.
MAPPING DATA ON AN EXISTING WORKSHEET
23
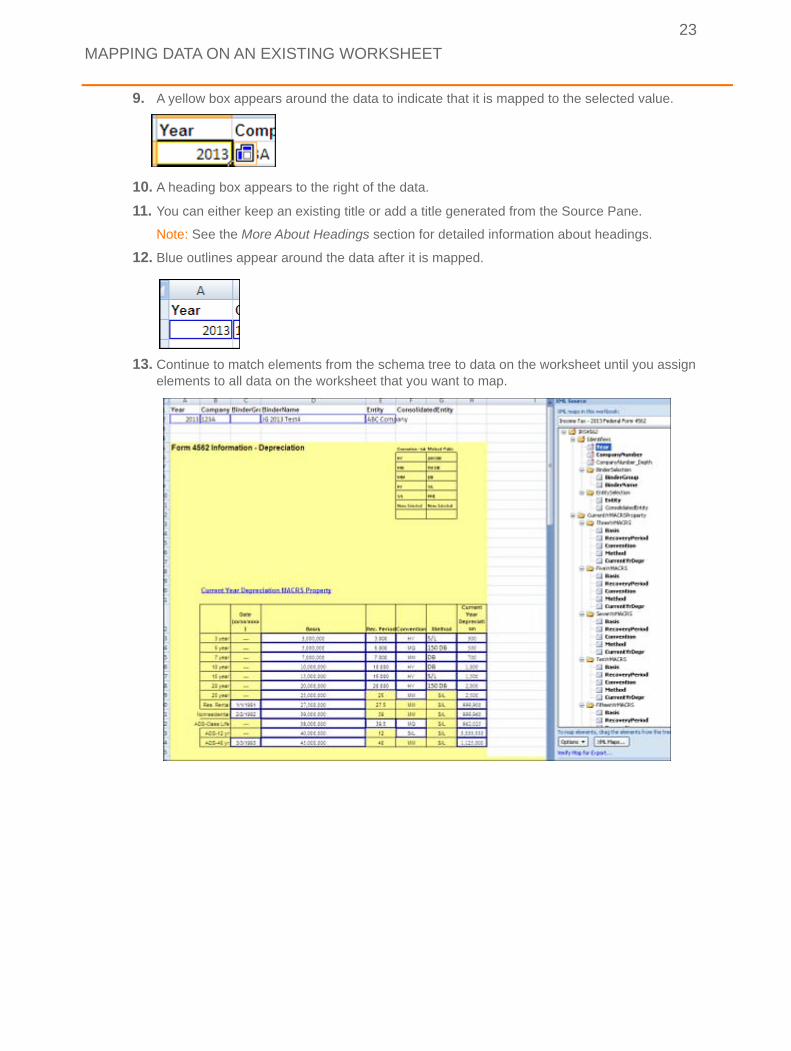
9. A yellow box appears around the data to indicate that it is mapped to the selected value.
10. A heading box appears to the right of the data.
11. You can either keep an existing title or add a title generated from the Source Pane.
Note: See the More About Headings section for detailed information about headings.
12. Blue outlines appear around the data after it is mapped.
13. Continue to match elements from the schema tree to data on the worksheet until you assign elements to all data on the worksheet that you want to map.
NAMING NEW MAPPING
24
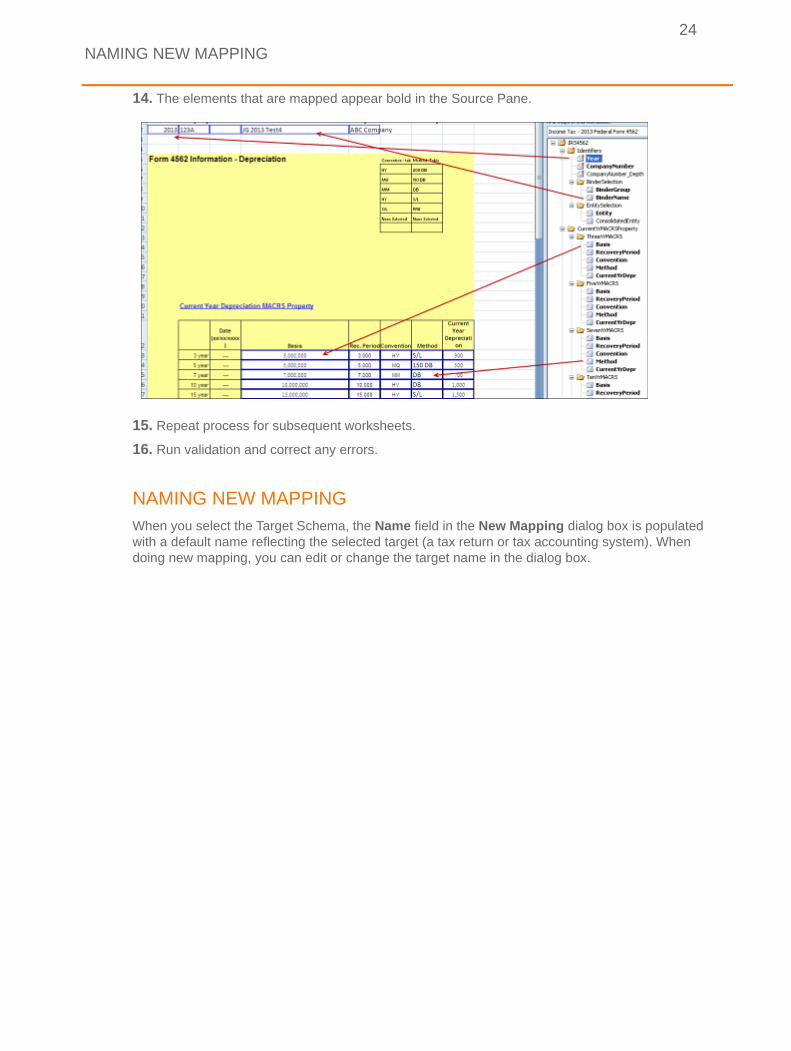
14. The elements that are mapped appear bold in the Source Pane.
15. Repeat process for subsequent worksheets.
16. Run validation and correct any errors.
NAMING NEW MAPPINGWhen you select the Target Schema, the Name field in the New Mapping dialog box is populated with a default name reflecting the selected target (a tax return or tax accounting system). When doing new mapping, you can edit or change the target name in the dialog box.
NAMING NEW MAPPING
25
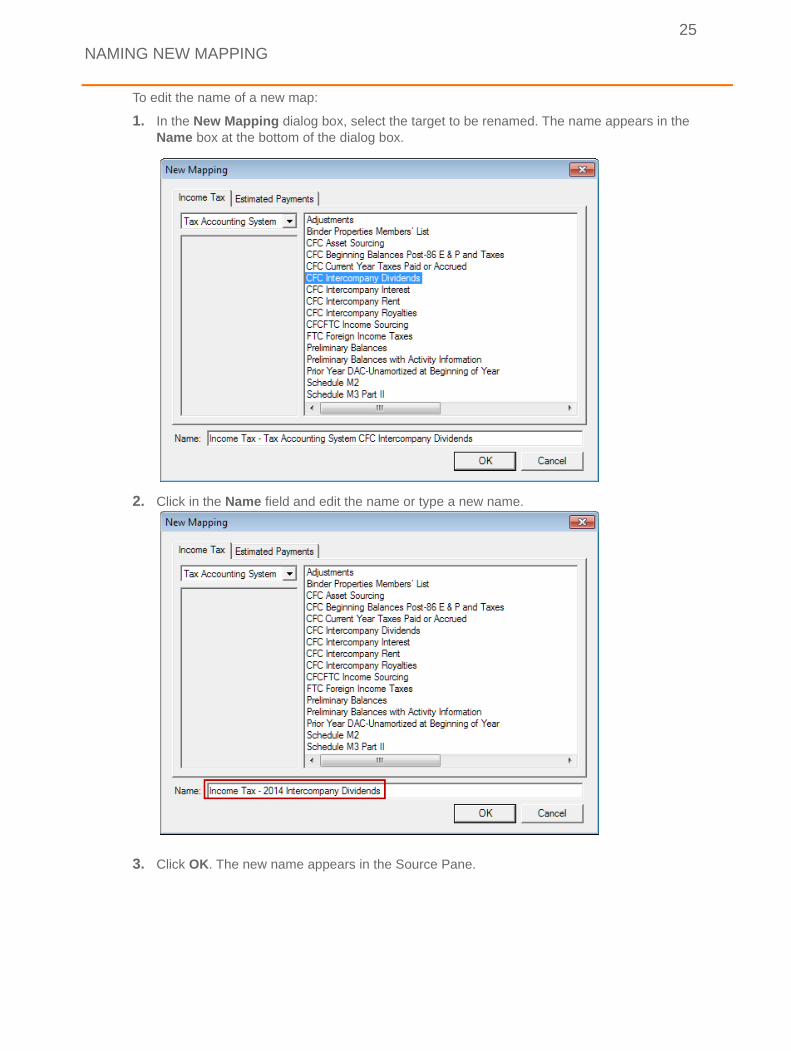
To edit the name of a new map:
1. In the New Mapping dialog box, select the target to be renamed. The name appears in the Name box at the bottom of the dialog box.
2. Click in the Name field and edit the name or type a new name.
3. Click OK. The new name appears in the Source Pane.

MAPPING A NEW WORKSHEET
26
MAPPING A NEW WORKSHEET
TO MAP A NEW WORKSHEET:
1. Open a new Excel spreadsheet.
2. Enter the new data.
3. Click the New Map button.
4. The New Mapping dialog box opens. Click the Income Tax tab.
5. Follow Steps 4 through 16 in the Mapping Data on an Existing Worksheet section above.
DELETING AN EXISTING XML MAP IN A SPREADSHEET
TO DELETE AN EXISTING XML MAP:
1. In the Source Pane, click XML Maps.
2. The XML dialog box opens with a list of XML maps in the workbook. Select the map to be deleted and then click Delete.
3. A warning box appears. Click OK to continue with the deletion.
USING THE DEPTH ELEMENT
27
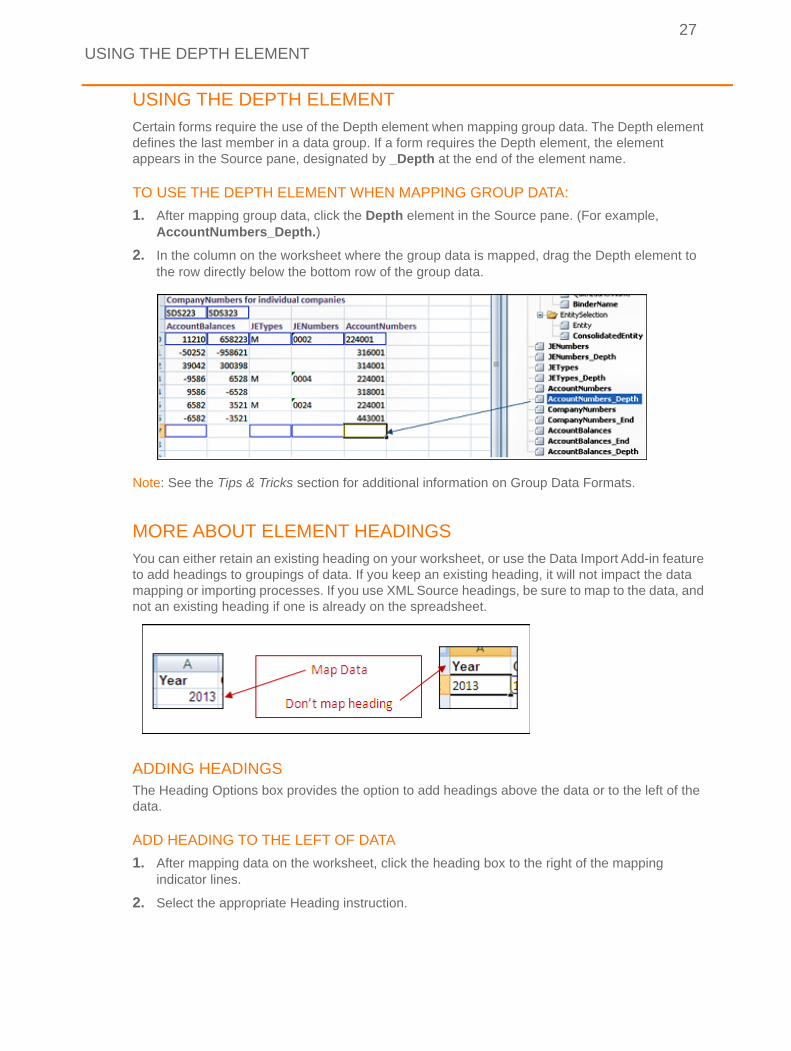
USING THE DEPTH ELEMENTCertain forms require the use of the Depth element when mapping group data. The Depth element defines the last member in a data group. If a form requires the Depth element, the element appears in the Source pane, designated by _Depth at the end of the element name.
TO USE THE DEPTH ELEMENT WHEN MAPPING GROUP DATA:
1. After mapping group data, click the Depth element in the Source pane. (For example, AccountNumbers_Depth.)
2. In the column on the worksheet where the group data is mapped, drag the Depth element to the row directly below the bottom row of the group data.
Note: See the Tips & Tricks section for additional information on Group Data Formats.
MORE ABOUT ELEMENT HEADINGSYou can either retain an existing heading on your worksheet, or use the Data Import Add-in feature to add headings to groupings of data. If you keep an existing heading, it will not impact the data mapping or importing processes. If you use XML Source headings, be sure to map to the data, and not an existing heading if one is already on the spreadsheet.
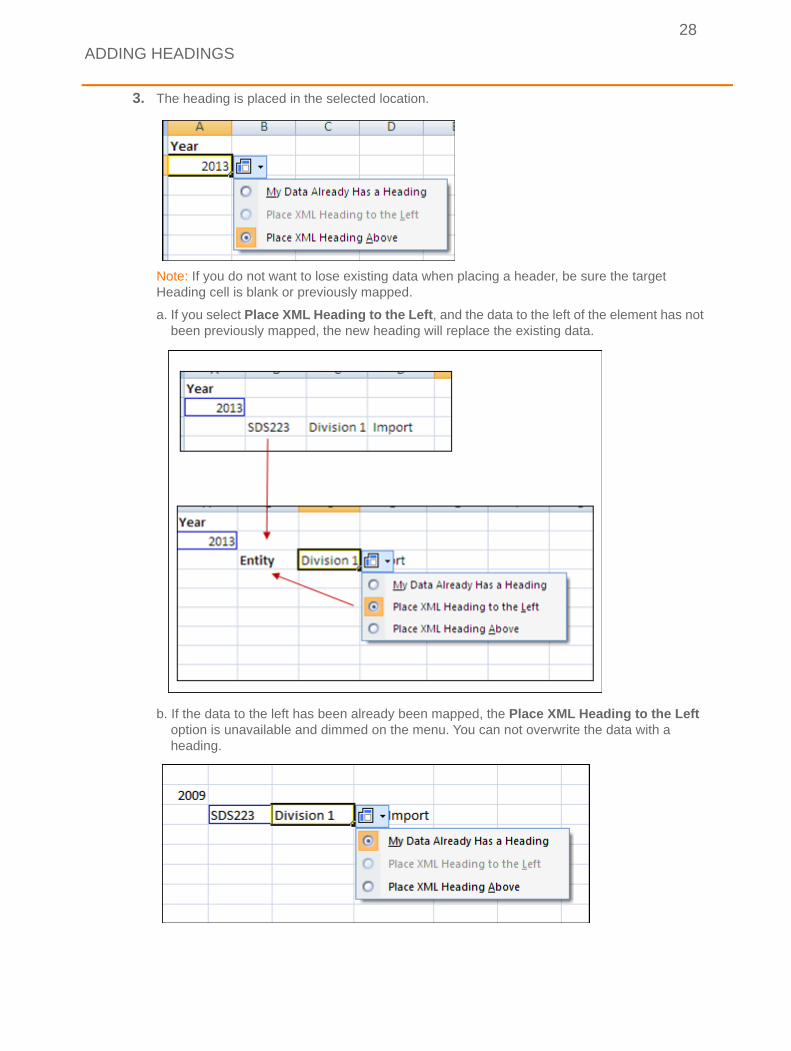
ADDING HEADINGSThe Heading Options box provides the option to add headings above the data or to the left of the data.
ADD HEADING TO THE LEFT OF DATA
1. After mapping data on the worksheet, click the heading box to the right of the mapping indicator lines.
2. Select the appropriate Heading instruction.
ADDING HEADINGS
28
3. The heading is placed in the selected location.
Note: If you do not want to lose existing data when placing a header, be sure the target Heading cell is blank or previously mapped.
a. If you select Place XML Heading to the Left, and the data to the left of the element has not been previously mapped, the new heading will replace the existing data.
b. If the data to the left has been already been mapped, the Place XML Heading to the Left option is unavailable and dimmed on the menu. You can not overwrite the data with a heading.
ADDING HEADINGS
29
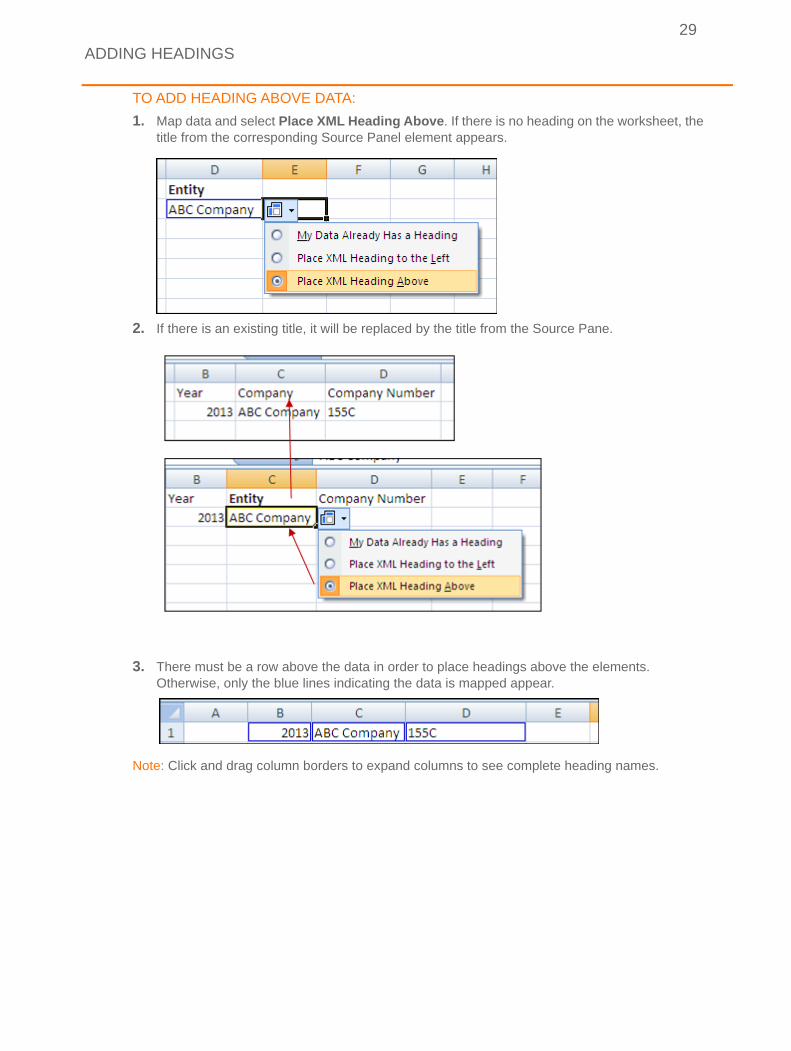
TO ADD HEADING ABOVE DATA:
1. Map data and select Place XML Heading Above. If there is no heading on the worksheet, the title from the corresponding Source Panel element appears.
2. If there is an existing title, it will be replaced by the title from the Source Pane.
3. There must be a row above the data in order to place headings above the elements. Otherwise, only the blue lines indicating the data is mapped appear.
Note: Click and drag column borders to expand columns to see complete heading names.
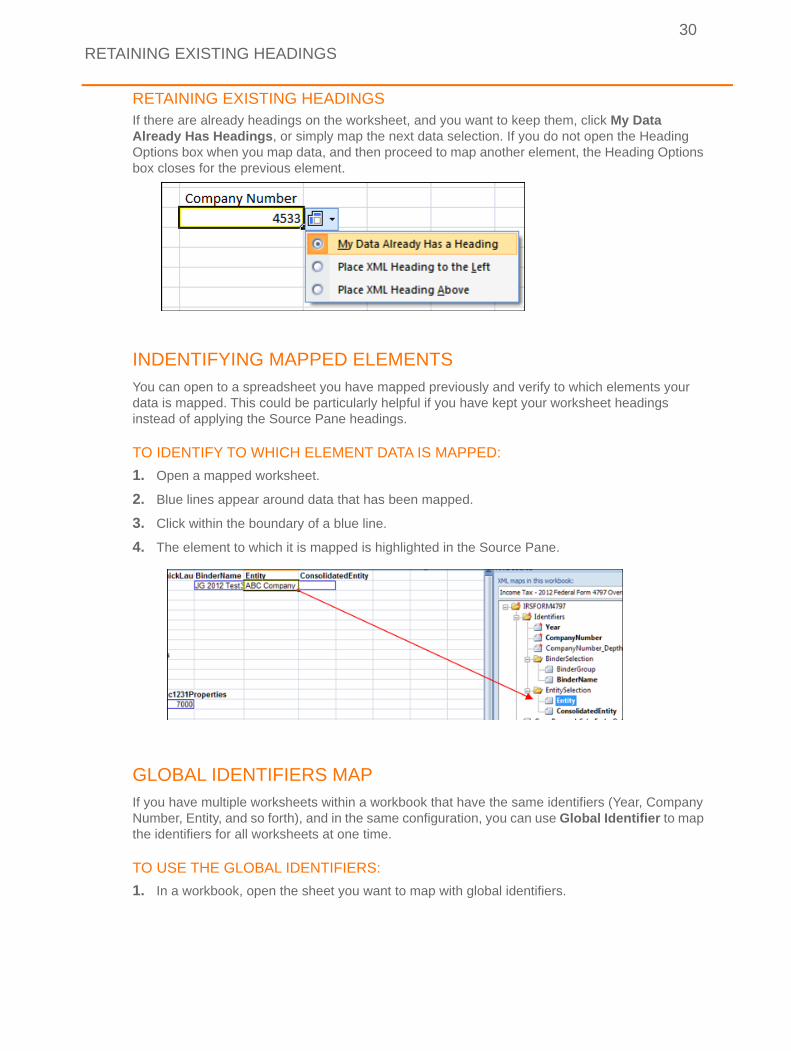
RETAINING EXISTING HEADINGS
30
RETAINING EXISTING HEADINGSIf there are already headings on the worksheet, and you want to keep them, click My Data Already Has Headings, or simply map the next data selection. If you do not open the Heading Options box when you map data, and then proceed to map another element, the Heading Options box closes for the previous element.
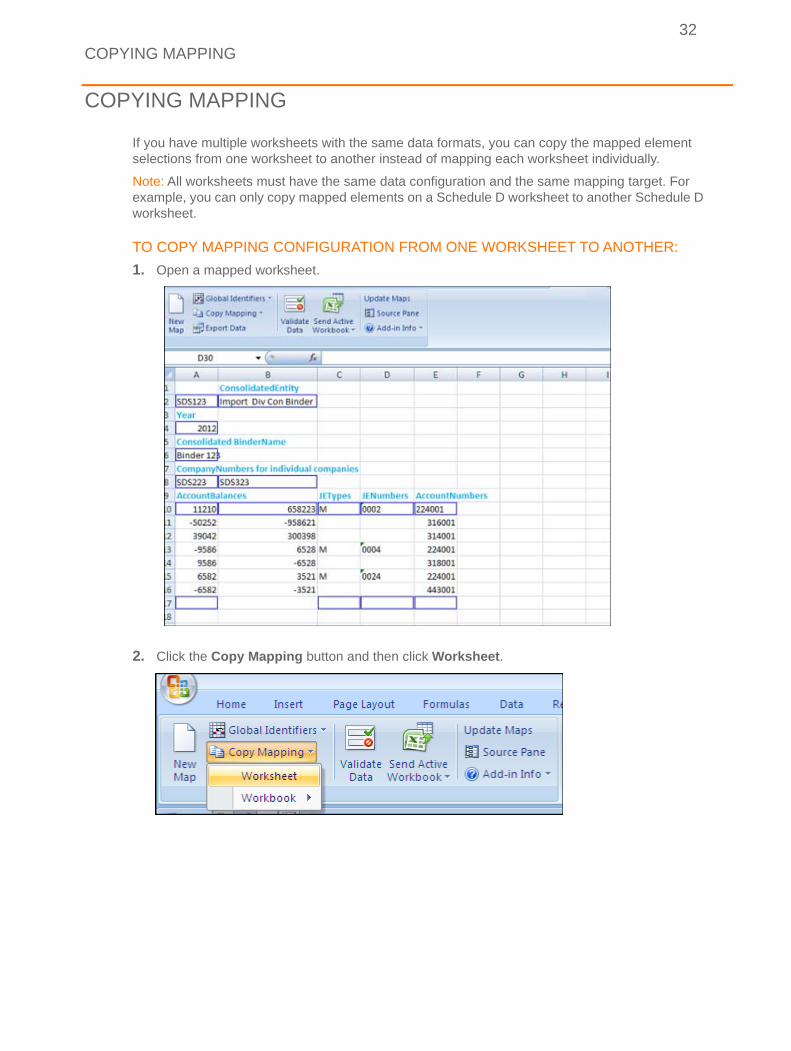
INDENTIFYING MAPPED ELEMENTSYou can open to a spreadsheet you have mapped previously and verify to which elements your data is mapped. This could be particularly helpful if you have kept your worksheet headings instead of applying the Source Pane headings.
TO IDENTIFY TO WHICH ELEMENT DATA IS MAPPED:
1. Open a mapped worksheet.
2. Blue lines appear around data that has been mapped.
3. Click within the boundary of a blue line.
4. The element to which it is mapped is highlighted in the Source Pane.
GLOBAL IDENTIFIERS MAPIf you have multiple worksheets within a workbook that have the same identifiers (Year, Company Number, Entity, and so forth), and in the same configuration, you can use Global Identifier to map the identifiers for all worksheets at one time.
TO USE THE GLOBAL IDENTIFIERS:
1. In a workbook, open the sheet you want to map with global identifiers.

GLOBAL IDENTIFIERS MAP
31
2. Click the Global Identifiers button, and then click Income Tax.
3. The Income Tax - Global Identity source pane opens.
4. Map the identifier elements. All worksheets in the workbook are mapped to the same global identifiers.
Note: If an individual worksheet within a workbook is already mapped with other identifiers, the global identifiers will not overwrite the elements already mapped. That worksheet retains the initial mapping schema.
COPYING MAPPING
32
COPYING MAPPING
If you have multiple worksheets with the same data formats, you can copy the mapped element selections from one worksheet to another instead of mapping each worksheet individually.
Note: All worksheets must have the same data configuration and the same mapping target. For example, you can only copy mapped elements on a Schedule D worksheet to another Schedule D worksheet.
TO COPY MAPPING CONFIGURATION FROM ONE WORKSHEET TO ANOTHER:
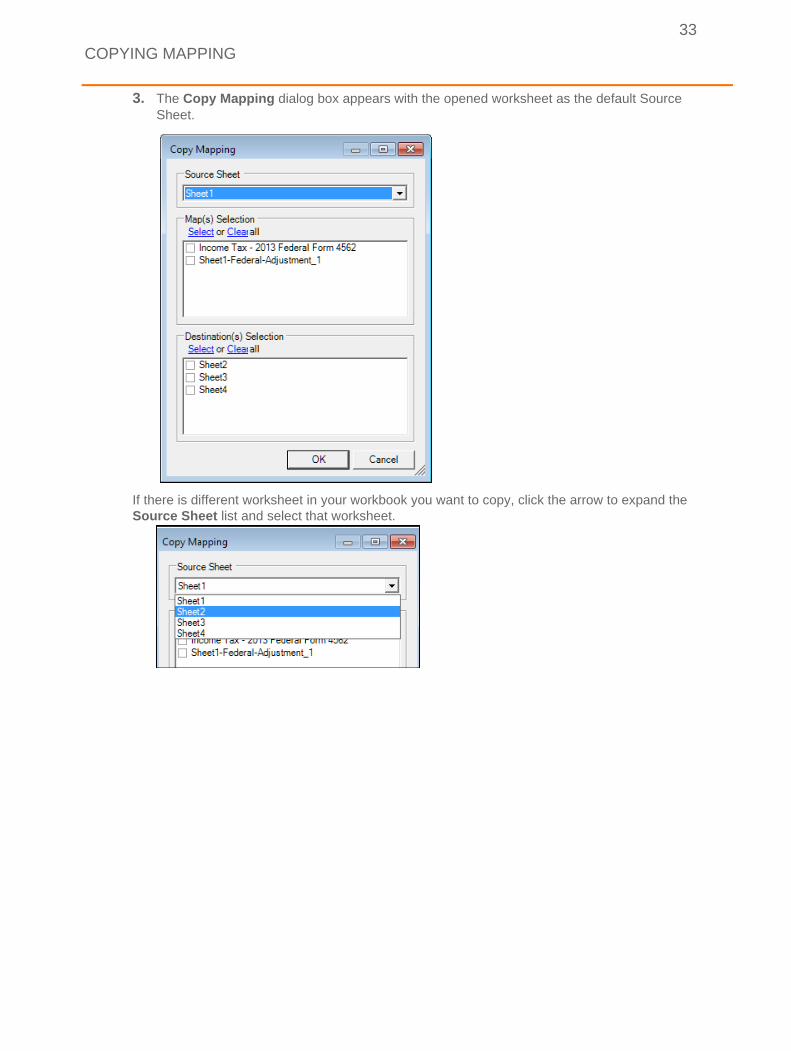
1. Open a mapped worksheet.
2. Click the Copy Mapping button and then click Worksheet.
COPYING MAPPING
33
3. The Copy Mapping dialog box appears with the opened worksheet as the default Source Sheet.
If there is different worksheet in your workbook you want to copy, click the arrow to expand the Source Sheet list and select that worksheet.
COPYING MAPPING
34
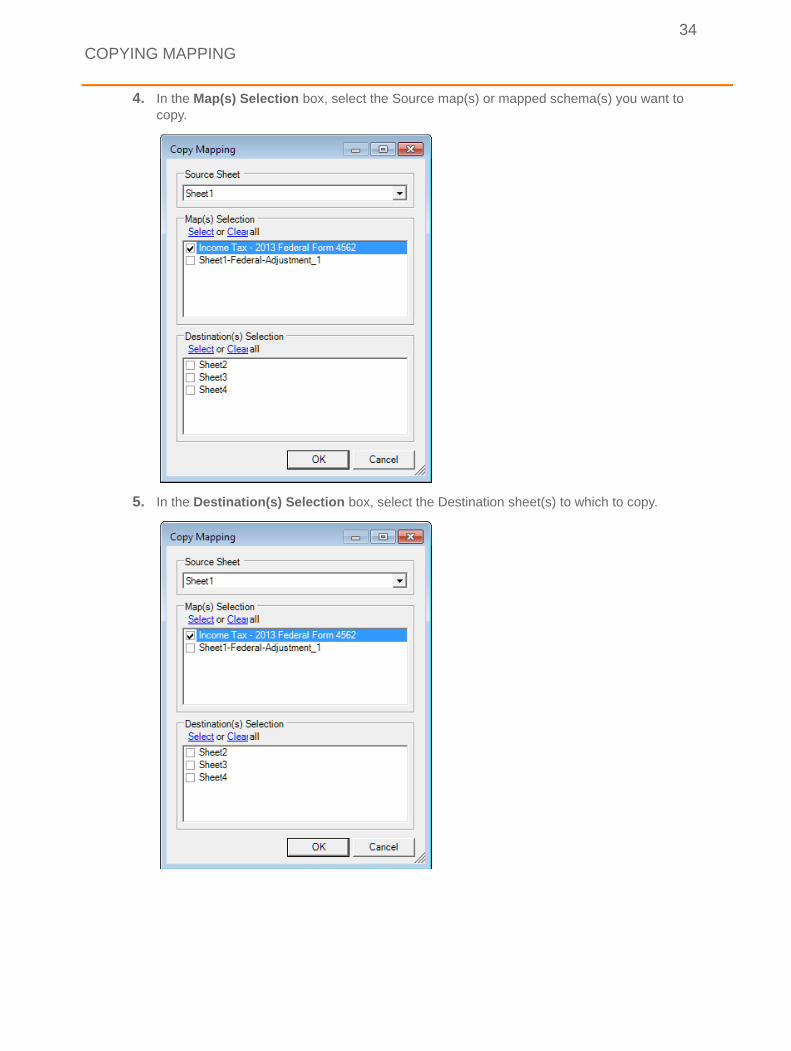
4. In the Map(s) Selection box, select the Source map(s) or mapped schema(s) you want to copy.
5. In the Destination(s) Selection box, select the Destination sheet(s) to which to copy.
COPYING MAPPING
35
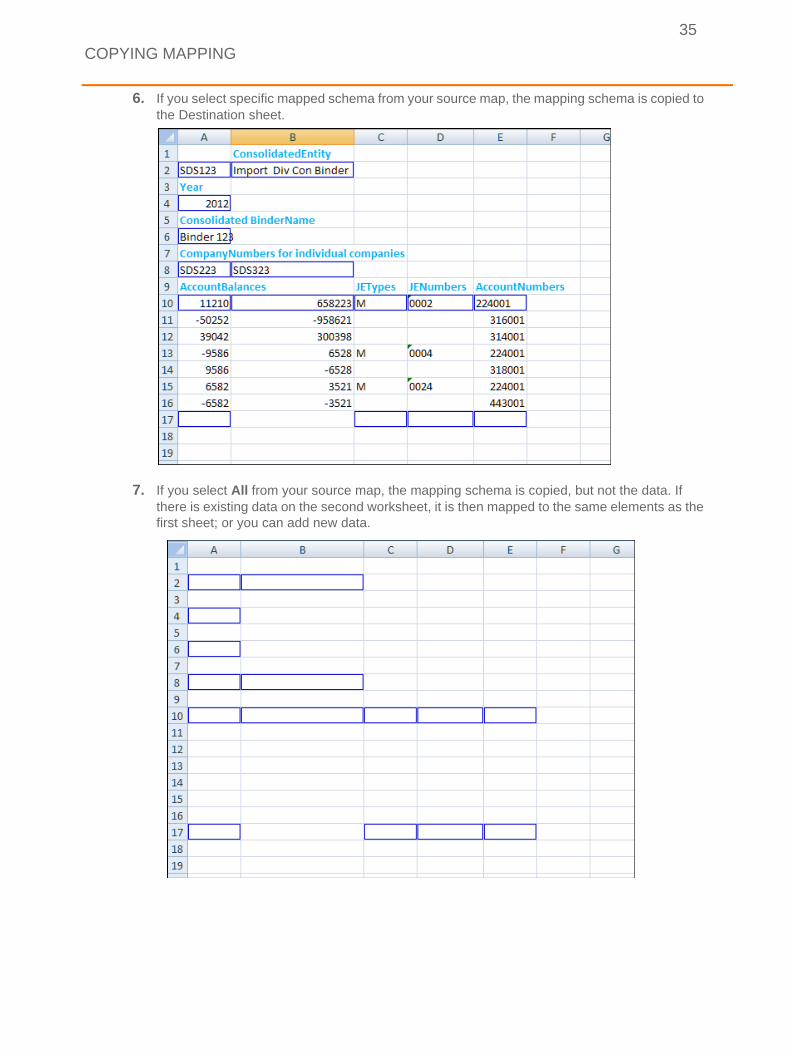
6. If you select specific mapped schema from your source map, the mapping schema is copied to the Destination sheet.
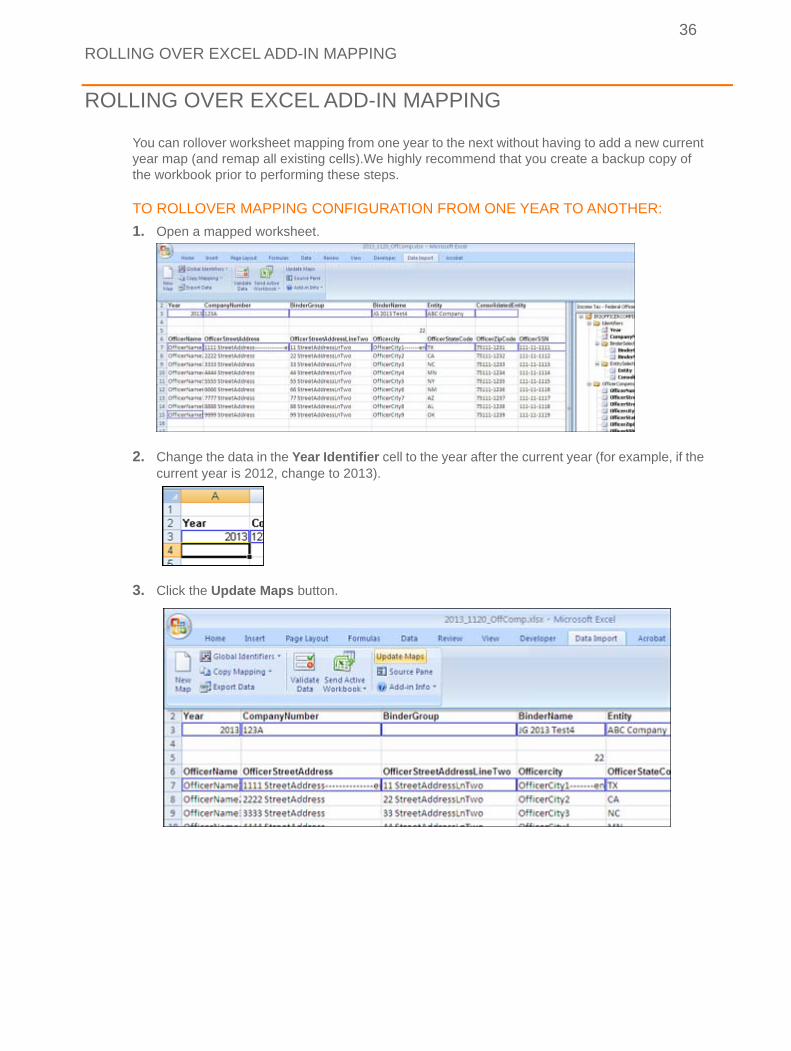
7. If you select All from your source map, the mapping schema is copied, but not the data. If there is existing data on the second worksheet, it is then mapped to the same elements as the first sheet; or you can add new data.
ROLLING OVER EXCEL ADD-IN MAPPING
36
ROLLING OVER EXCEL ADD-IN MAPPING
You can rollover worksheet mapping from one year to the next without having to add a new current year map (and remap all existing cells).We highly recommend that you create a backup copy of the workbook prior to performing these steps.
TO ROLLOVER MAPPING CONFIGURATION FROM ONE YEAR TO ANOTHER:
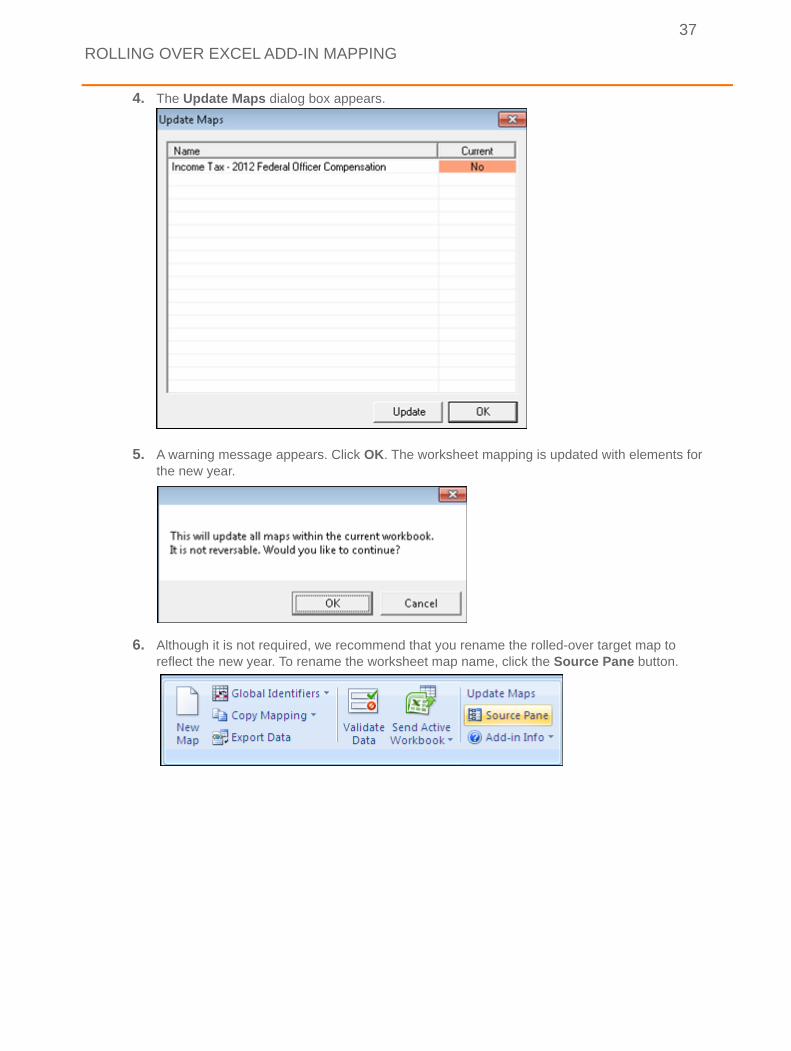
1. Open a mapped worksheet.
2. Change the data in the Year Identifier cell to the year after the current year (for example, if the current year is 2012, change to 2013).
3. Click the Update Maps button.
ROLLING OVER EXCEL ADD-IN MAPPING
37
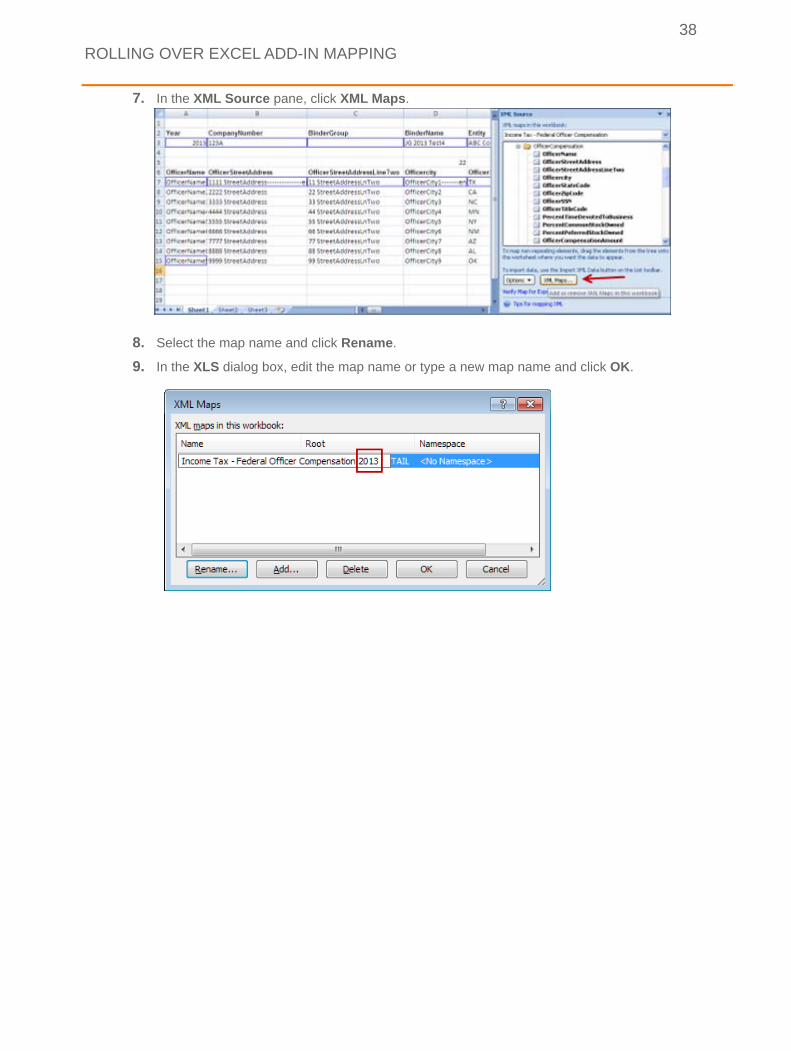
4. The Update Maps dialog box appears.
5. A warning message appears. Click OK. The worksheet mapping is updated with elements for the new year.
6. Although it is not required, we recommend that you rename the rolled-over target map to reflect the new year. To rename the worksheet map name, click the Source Pane button.
ROLLING OVER EXCEL ADD-IN MAPPING
38
7. In the XML Source pane, click XML Maps.
8. Select the map name and click Rename.
9. In the XLS dialog box, edit the map name or type a new map name and click OK.
COPYING MAPPED ELEMENTS TO WORKBOOKS
39
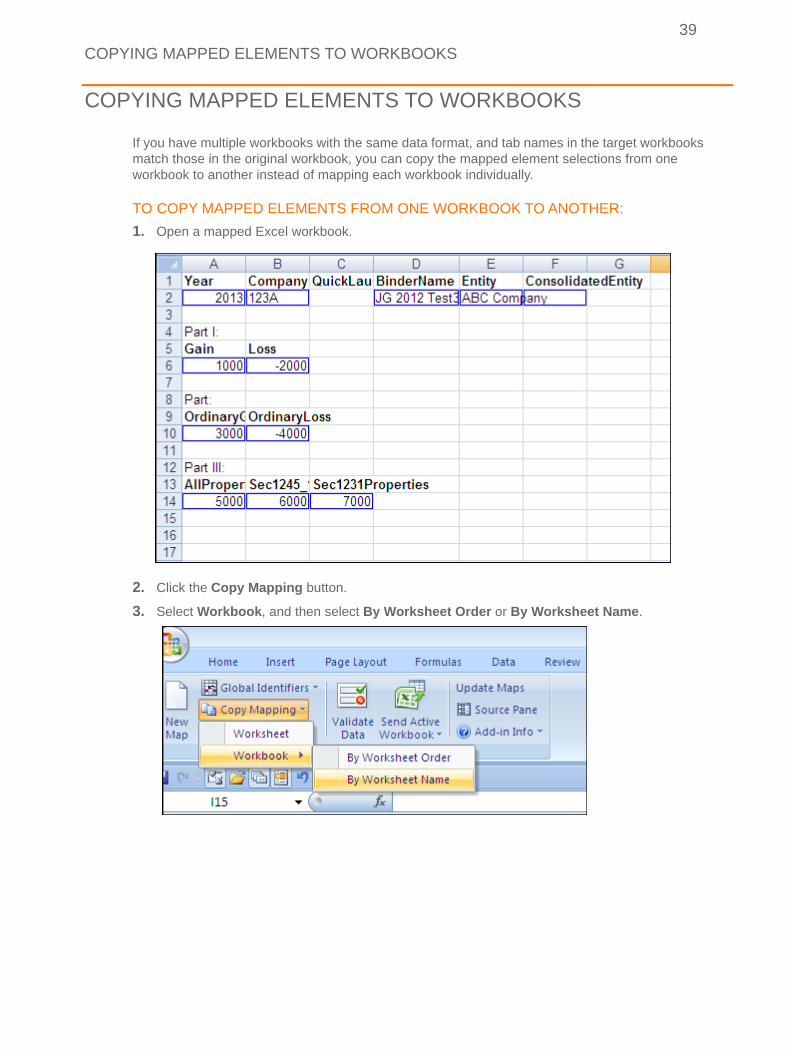
COPYING MAPPED ELEMENTS TO WORKBOOKS
If you have multiple workbooks with the same data format, and tab names in the target workbooks match those in the original workbook, you can copy the mapped element selections from one workbook to another instead of mapping each workbook individually.
TO COPY MAPPED ELEMENTS FROM ONE WORKBOOK TO ANOTHER:
1. Open a mapped Excel workbook.
2. Click the Copy Mapping button.
3. Select Workbook, and then select By Worksheet Order or By Worksheet Name.

COPYING MAPPED ELEMENTS TO WORKBOOKS
40
4. In the Select target workbooks dialog box, browse to and select the workbook to which you want to copy the data.
5. Click Open.
6. The selected workbook opens and its existing data elements are mapped with the same schema as the first workbook.
TEMPLATES
41
TEMPLATES
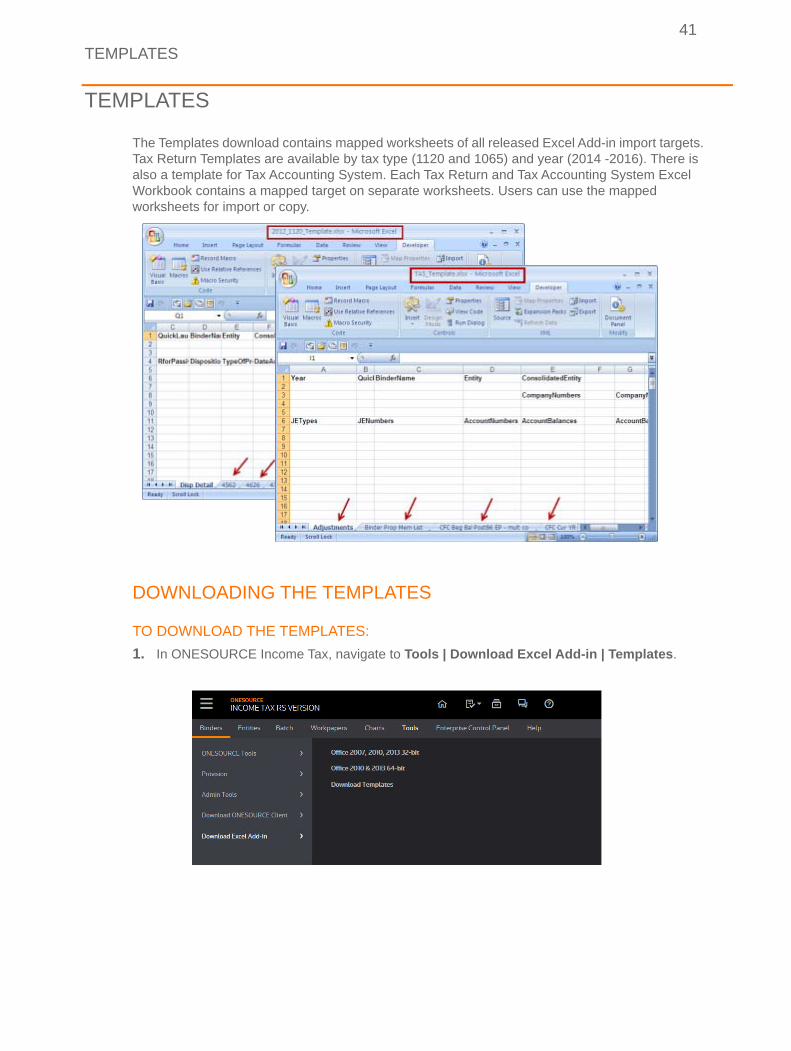
The Templates download contains mapped worksheets of all released Excel Add-in import targets. Tax Return Templates are available by tax type (1120 and 1065) and year (2014 -2016). There is also a template for Tax Accounting System. Each Tax Return and Tax Accounting System Excel Workbook contains a mapped target on separate worksheets. Users can use the mapped worksheets for import or copy.
DOWNLOADING THE TEMPLATES
TO DOWNLOAD THE TEMPLATES:
1. In ONESOURCE Income Tax, navigate to Tools | Download Excel Add-in | Templates.
DOWNLOADING THE TEMPLATES
42
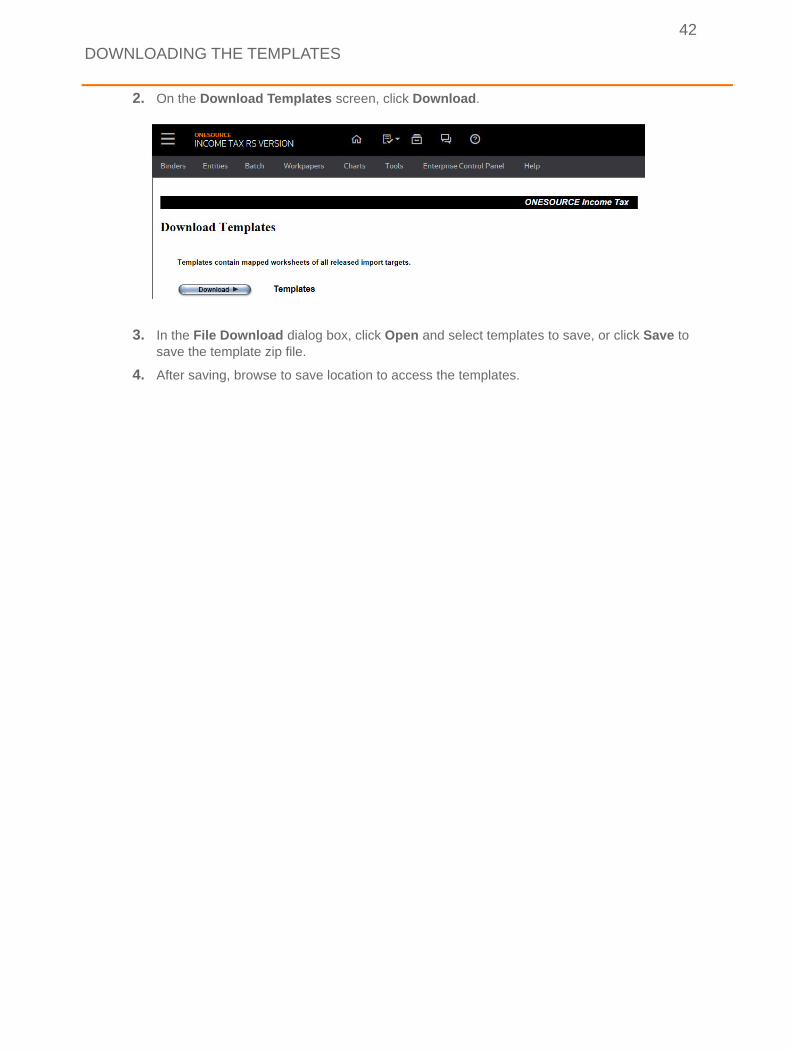
2. On the Download Templates screen, click Download.
3. In the File Download dialog box, click Open and select templates to save, or click Save to save the template zip file.
4. After saving, browse to save location to access the templates.
VALIDATING WORKSHEETS
43
VALIDATING WORKSHEETS
VERIFYING WORKSHEET INPUT FOR EXPORT
TO VALIDATE A WORKSHEET BEFORE EXPORTING IT TO ONESOURCE INCOME TAX:
1. Open the a mapped worksheet.
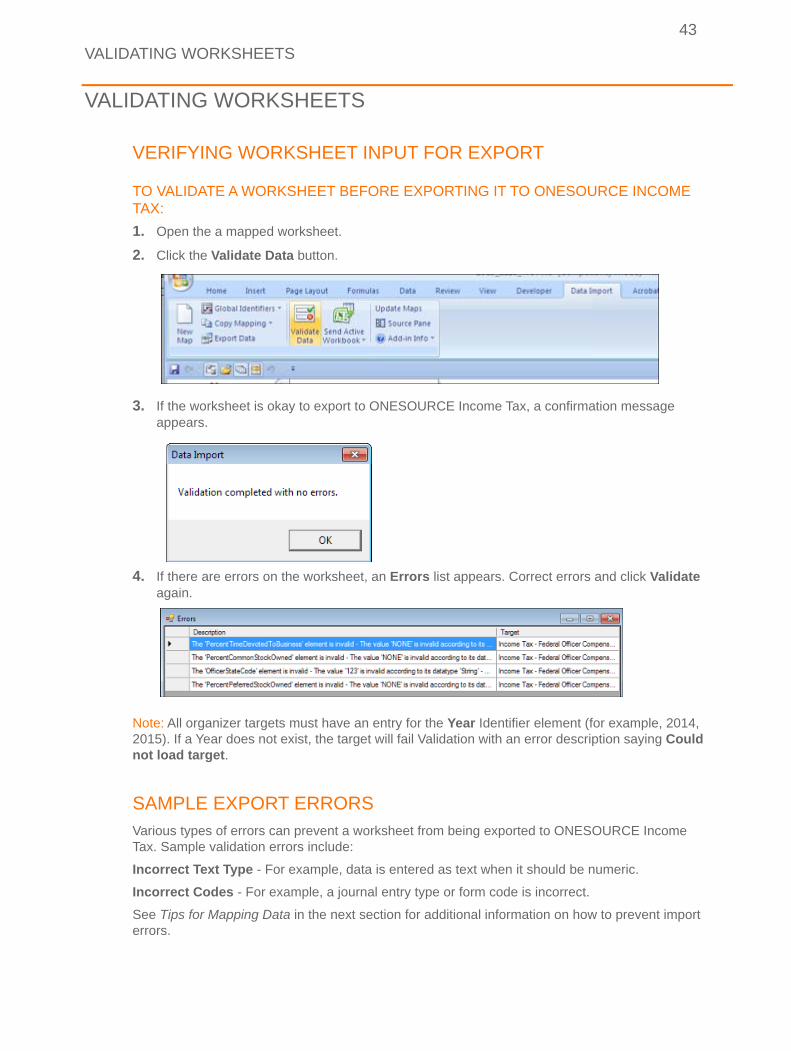
2. Click the Validate Data button.
3. If the worksheet is okay to export to ONESOURCE Income Tax, a confirmation message appears.
4. If there are errors on the worksheet, an Errors list appears. Correct errors and click Validate again.
Note: All organizer targets must have an entry for the Year Identifier element (for example, 2014, 2015). If a Year does not exist, the target will fail Validation with an error description saying Could not load target.
SAMPLE EXPORT ERRORSVarious types of errors can prevent a worksheet from being exported to ONESOURCE Income Tax. Sample validation errors include:
Incorrect Text Type - For example, data is entered as text when it should be numeric.
Incorrect Codes - For example, a journal entry type or form code is incorrect.
See Tips for Mapping Data in the next section for additional information on how to prevent import errors.

SAMPLE EXPORT ERRORS
44
Note: The Validation feature might not catch all import errors. After transferring data to ONESOURCE Income Tax, always check the Import Log for Status to verify the import was completed. Also, open the ONESOURCE Income Tax target area and verify data was imported properly.
EXPORTING MAPPED DATA TO ONESOURCE INCOME TAX
45
EXPORTING MAPPED DATA TO ONESOURCE INCOME TAX
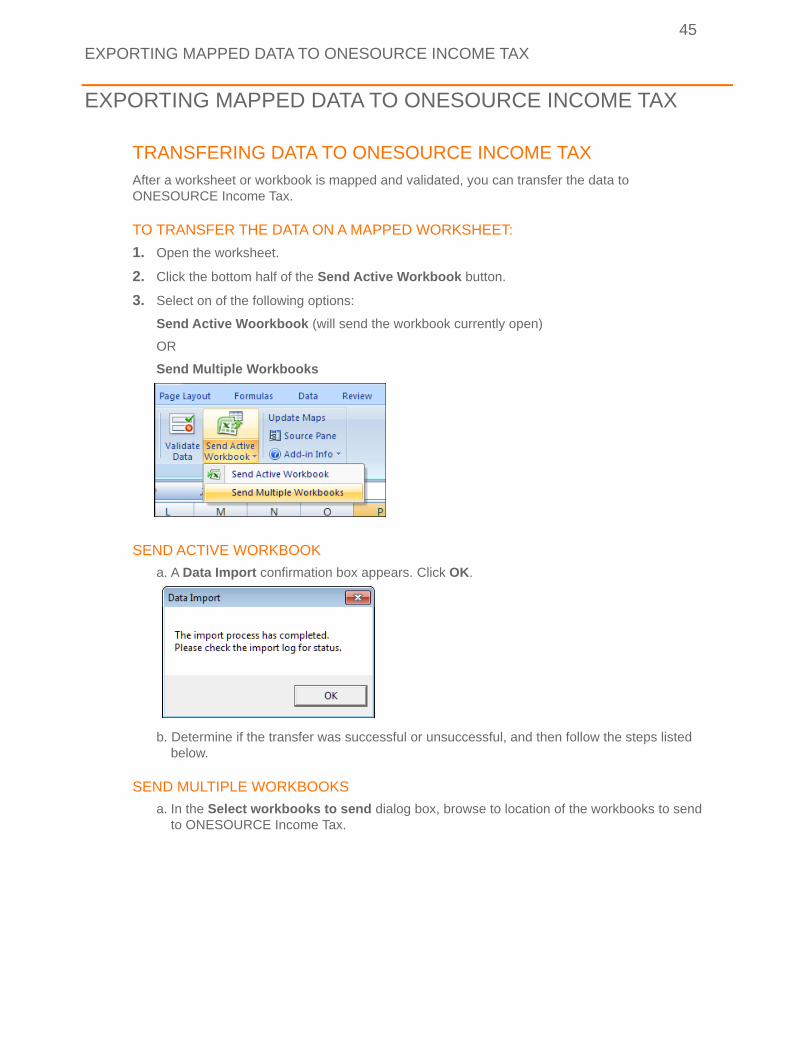
TRANSFERING DATA TO ONESOURCE INCOME TAXAfter a worksheet or workbook is mapped and validated, you can transfer the data to ONESOURCE Income Tax.
TO TRANSFER THE DATA ON A MAPPED WORKSHEET:
1. Open the worksheet.
2. Click the bottom half of the Send Active Workbook button.
3. Select on of the following options:
Send Active Woorkbook (will send the workbook currently open)
OR
Send Multiple Workbooks
SEND ACTIVE WORKBOOK
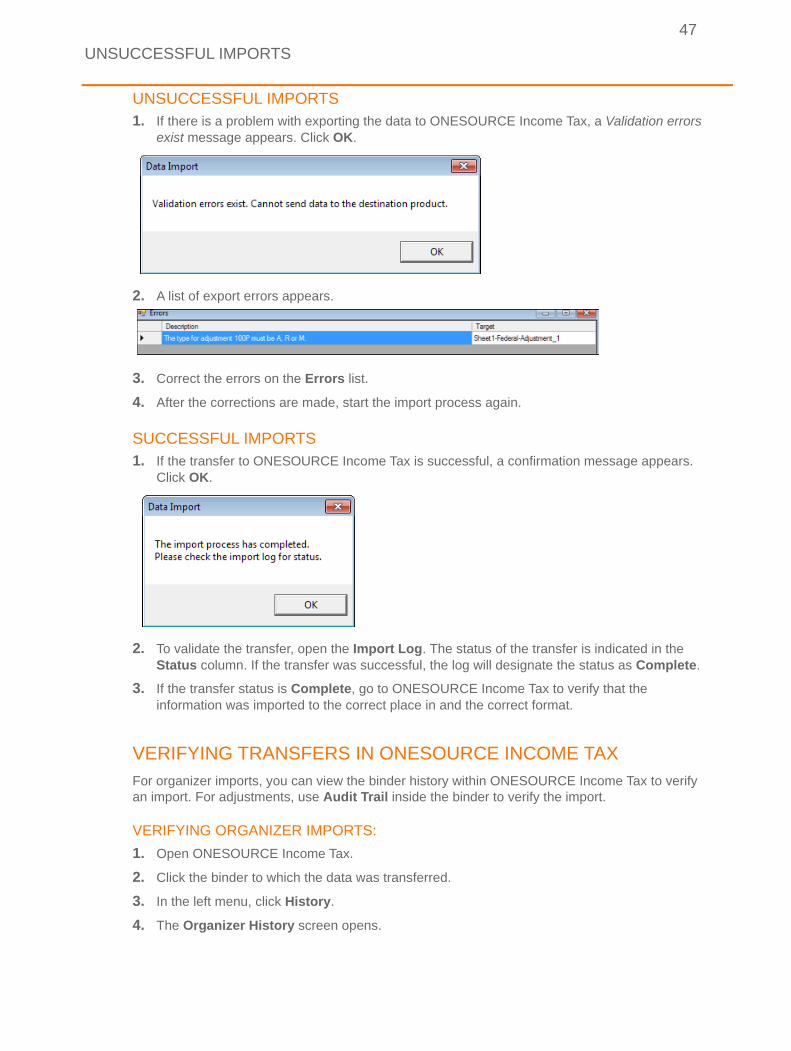
a. A Data Import confirmation box appears. Click OK.
b. Determine if the transfer was successful or unsuccessful, and then follow the steps listed below.
SEND MULTIPLE WORKBOOKS
a. In the Select workbooks to send dialog box, browse to location of the workbooks to send to ONESOURCE Income Tax.

TRANSFERING DATA TO ONESOURCE INCOME TAX
46
b. Select workbooks to and click Open.
c. Determine if the transfer was successful or unsuccessful, and then follow the steps listed below.
Note: To access previous versions of workbooks, click the Open arrow and then click Show previous versions.
A list of previous version Workbooks and modification dates open in the Select workbooks to send dialog box.
UNSUCCESSFUL IMPORTS
47
UNSUCCESSFUL IMPORTS1. If there is a problem with exporting the data to ONESOURCE Income Tax, a Validation errors
exist message appears. Click OK.
2. A list of export errors appears.
3. Correct the errors on the Errors list.
4. After the corrections are made, start the import process again.
SUCCESSFUL IMPORTS1. If the transfer to ONESOURCE Income Tax is successful, a confirmation message appears.
Click OK.
2. To validate the transfer, open the Import Log. The status of the transfer is indicated in the Status column. If the transfer was successful, the log will designate the status as Complete.
3. If the transfer status is Complete, go to ONESOURCE Income Tax to verify that the information was imported to the correct place in and the correct format.
VERIFYING TRANSFERS IN ONESOURCE INCOME TAXFor organizer imports, you can view the binder history within ONESOURCE Income Tax to verify an import. For adjustments, use Audit Trail inside the binder to verify the import.
VERIFYING ORGANIZER IMPORTS:
1. Open ONESOURCE Income Tax.
2. Click the binder to which the data was transferred.
3. In the left menu, click History.
4. The Organizer History screen opens.
IMPORT LOG STATUS
48
VERIFYING ADJUSTMENT IMPORTS:
1. Open ONESOURCE Income Tax.
2. Open the binder to which the data was transferred.
3. On the Tax Accounting System tree, click Audit Trail. The Audit Trail screen opens.
4. For Data Type, select Adjustments.
5. Select the various adjustment types to be verified.
6. Clear the Show only records where the amount changed box.
7. Click Run Query.
Note: You can filter queries by using dates, user names, and adjustment types.
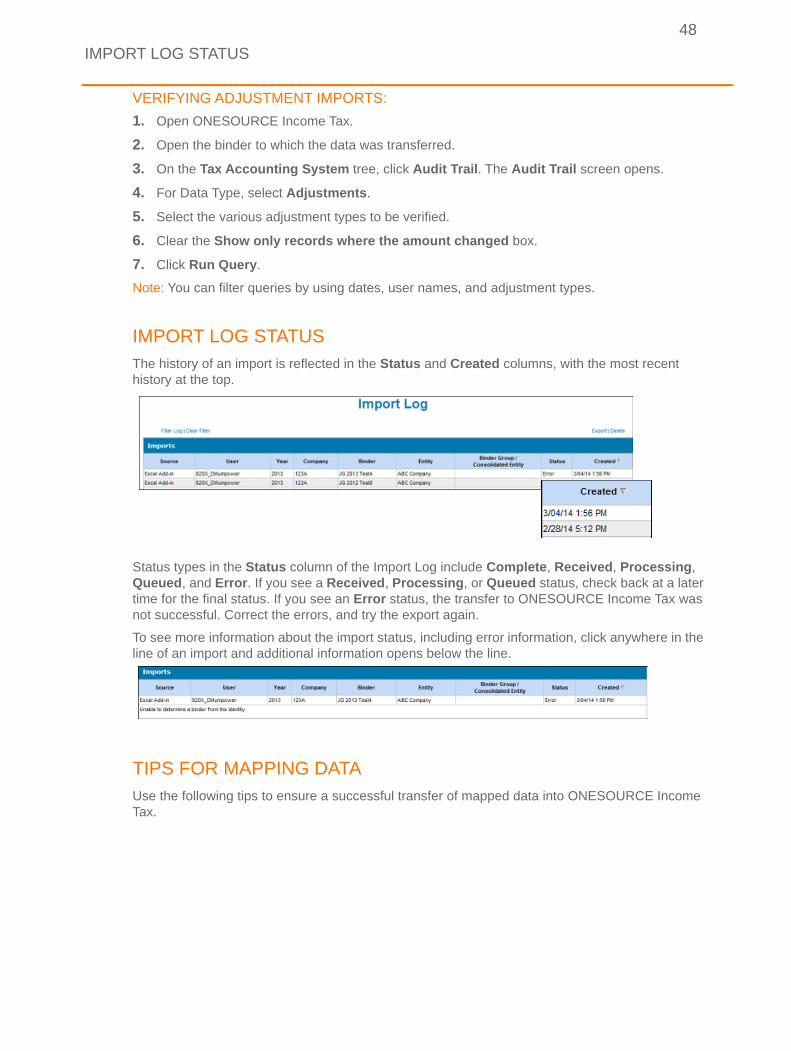
IMPORT LOG STATUSThe history of an import is reflected in the Status and Created columns, with the most recent history at the top.
Status types in the Status column of the Import Log include Complete, Received, Processing, Queued, and Error. If you see a Received, Processing, or Queued status, check back at a later time for the final status. If you see an Error status, the transfer to ONESOURCE Income Tax was not successful. Correct the errors, and try the export again.
To see more information about the import status, including error information, click anywhere in the line of an import and additional information opens below the line.
TIPS FOR MAPPING DATAUse the following tips to ensure a successful transfer of mapped data into ONESOURCE Income Tax.
IDENTIFIERS
49
IDENTIFIERSIt is extremely important that you include identifiers with the data being mapped on a worksheet. These identifiers are required for successful data exportation into ONESOURCE Income Tax. Identifiers are marked with red asterisk in the schema XML source pane.
• If Binder Group is used as an identifier, you must include a CompanyNumber and Year, and they must be mapped. You can include more than one entity, but there can be only one binder per entity.
• If the Binder Name is used as an identifier, the Consolidated Entity or Entity name must be included, and they must be mapped. You can include multiple binders per entity, however, additional identifiers could be required.
JOURNAL ENTRIESJournal entries must balance. Journal entries must match exactly on the worksheet(s), and match to the input criteria designated by the import location in ONESOURCE Income Tax. The following are examples of journal entry errors that could prevent the transfer of data from a worksheet to ONESOURCE Income Tax.
Incorrect Text Type: For example, data is entered as text when it should be numeric.
Incorrect Codes: For example, a journal entry type or form code is incorrect.
Matches Not Found: For example, within a Binder Group in Excel, a company number is not found in the corresponding Binder Group in ONESOURCE Income tax.
Duplicate Numbers: For example, company numbers are found in more than one binder.
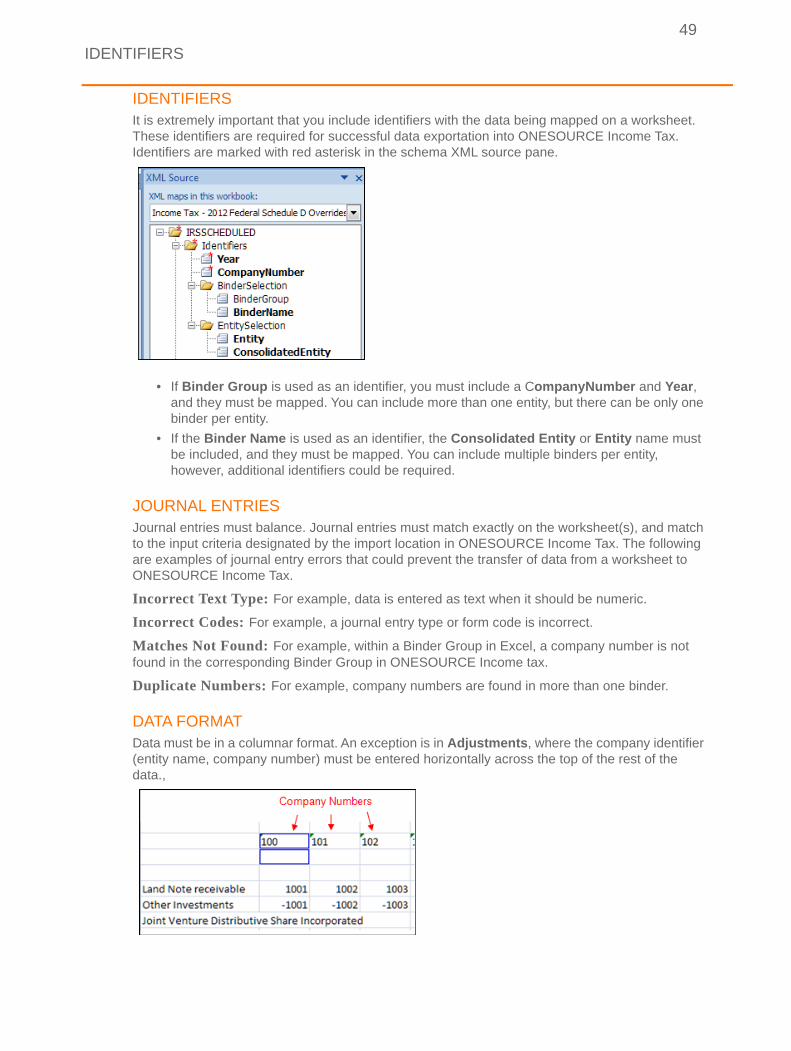
DATA FORMATData must be in a columnar format. An exception is in Adjustments, where the company identifier (entity name, company number) must be entered horizontally across the top of the rest of the data.,
EXPAND NUMERICAL COLUMNS
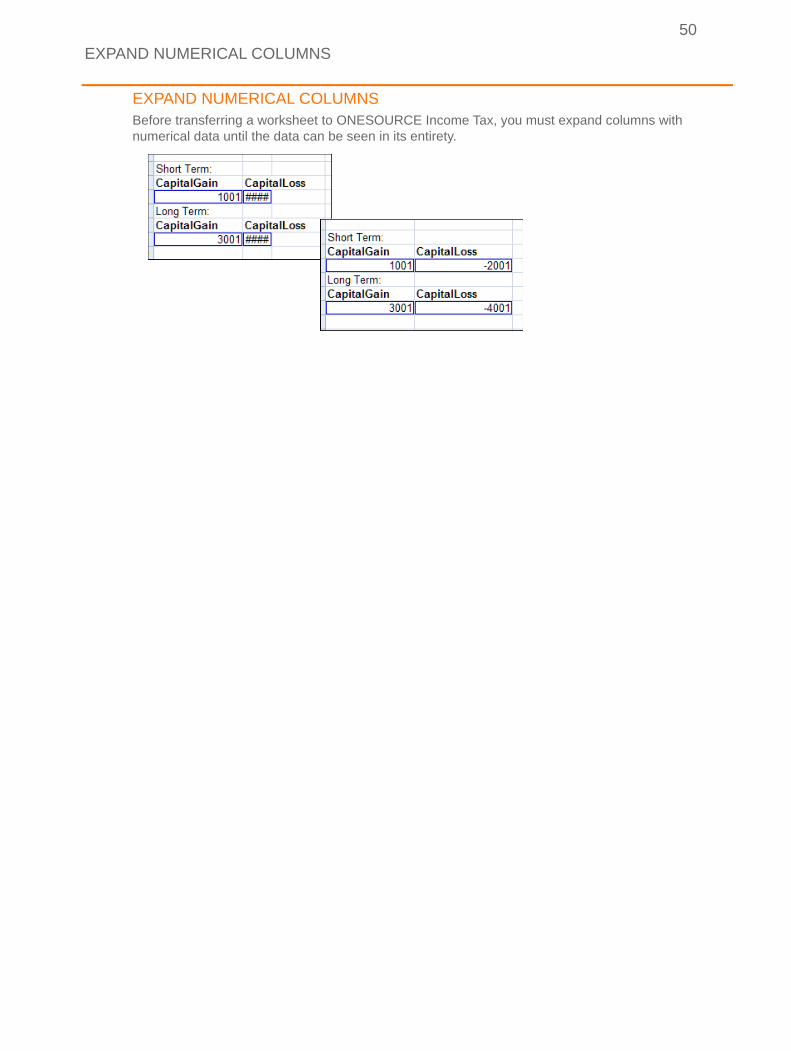
50
EXPAND NUMERICAL COLUMNSBefore transferring a worksheet to ONESOURCE Income Tax, you must expand columns with numerical data until the data can be seen in its entirety.
IMPORT LOG
51
IMPORT LOG
The Import Log provides information on the status and history of imports.
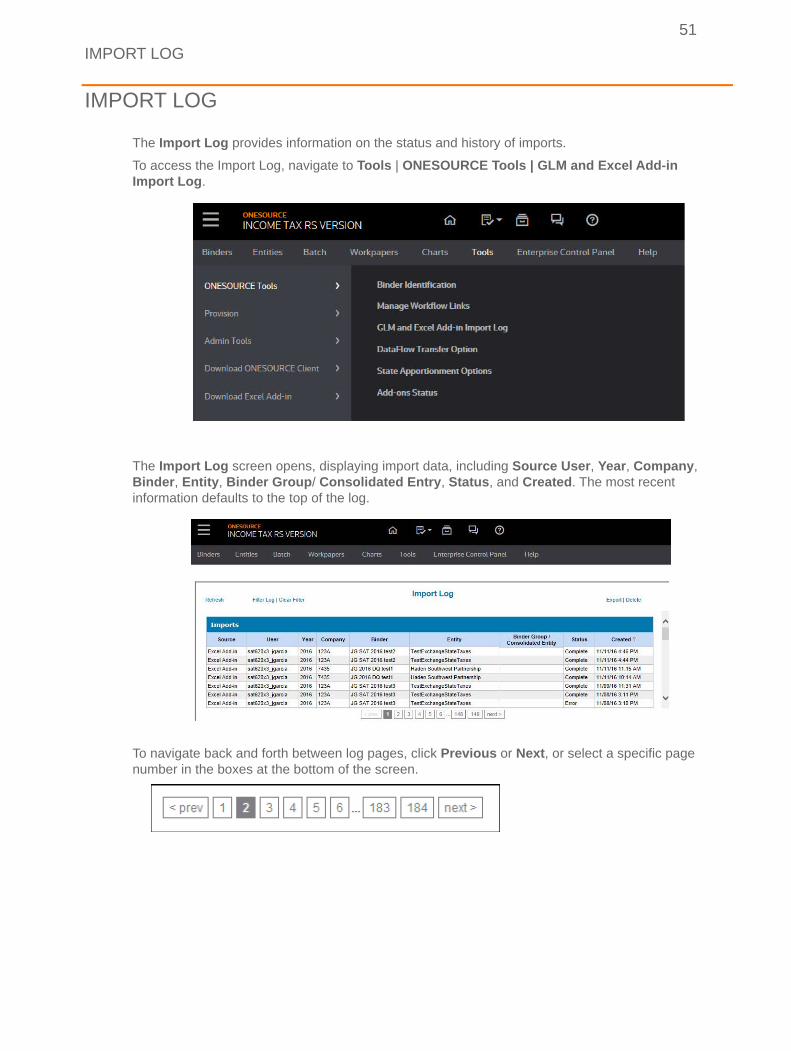
To access the Import Log, navigate to Tools | ONESOURCE Tools | GLM and Excel Add-in Import Log.
The Import Log screen opens, displaying import data, including Source User, Year, Company, Binder, Entity, Binder Group/ Consolidated Entry, Status, and Created. The most recent information defaults to the top of the log.
To navigate back and forth between log pages, click Previous or Next, or select a specific page number in the boxes at the bottom of the screen.
FILTER CRITERIA FOR IMPORT REPORTS
52
FILTER CRITERIA FOR IMPORT REPORTSYou can filter the import criteria to produce a more data-specific report.
To filter data in the Import Log:
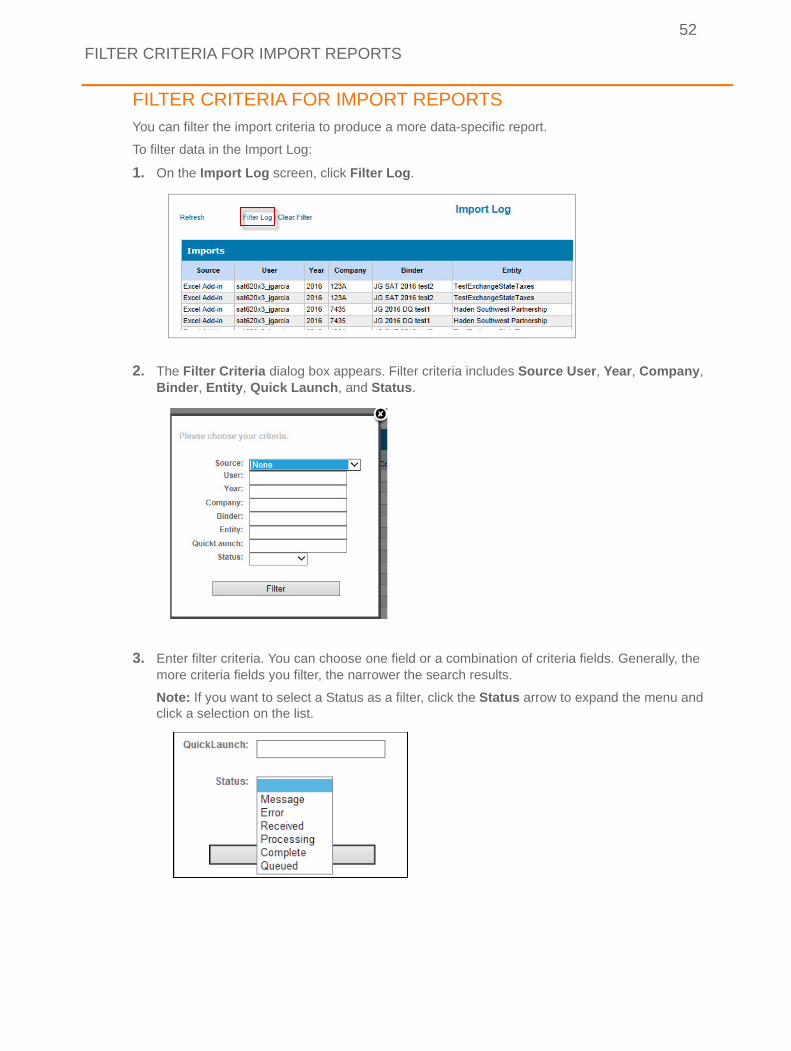
1. On the Import Log screen, click Filter Log.
2. The Filter Criteria dialog box appears. Filter criteria includes Source User, Year, Company, Binder, Entity, Quick Launch, and Status.
3. Enter filter criteria. You can choose one field or a combination of criteria fields. Generally, the more criteria fields you filter, the narrower the search results.
Note: If you want to select a Status as a filter, click the Status arrow to expand the menu and click a selection on the list.
DOWNLOADING THE IMPORT LOG
53
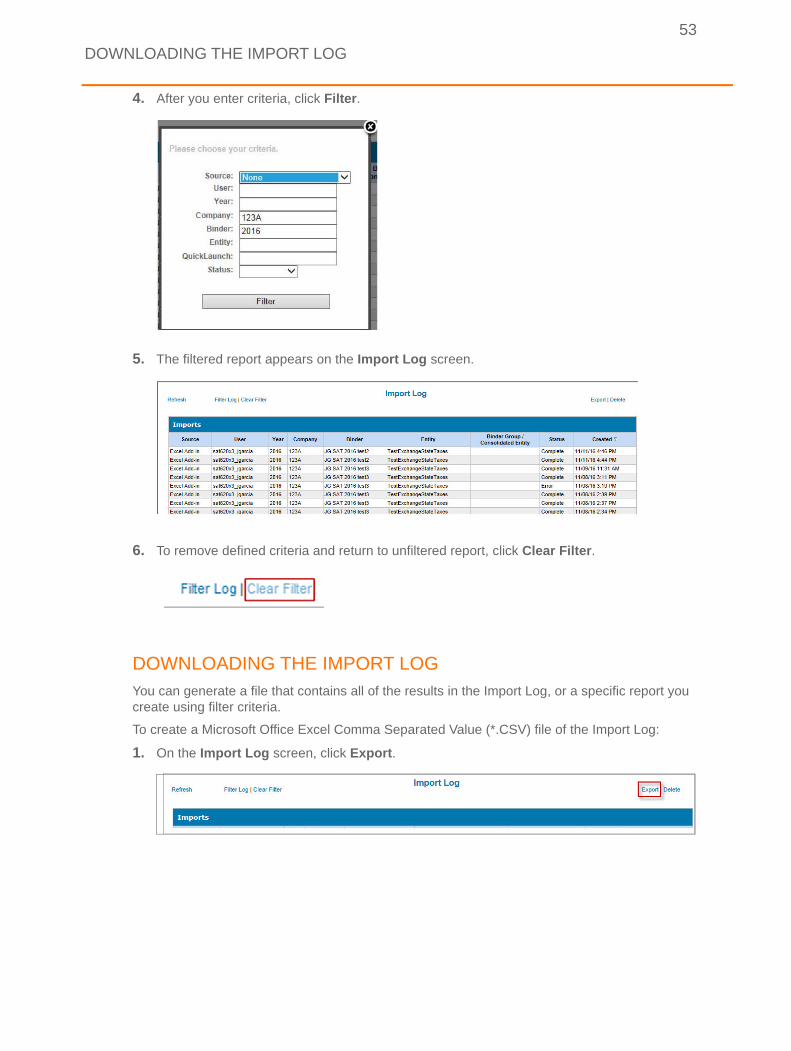
4. After you enter criteria, click Filter.
5. The filtered report appears on the Import Log screen.
6. To remove defined criteria and return to unfiltered report, click Clear Filter.
DOWNLOADING THE IMPORT LOGYou can generate a file that contains all of the results in the Import Log, or a specific report you create using filter criteria.
To create a Microsoft Office Excel Comma Separated Value (*.CSV) file of the Import Log:
1. On the Import Log screen, click Export.
DELETING THE IMPORT LOG
54
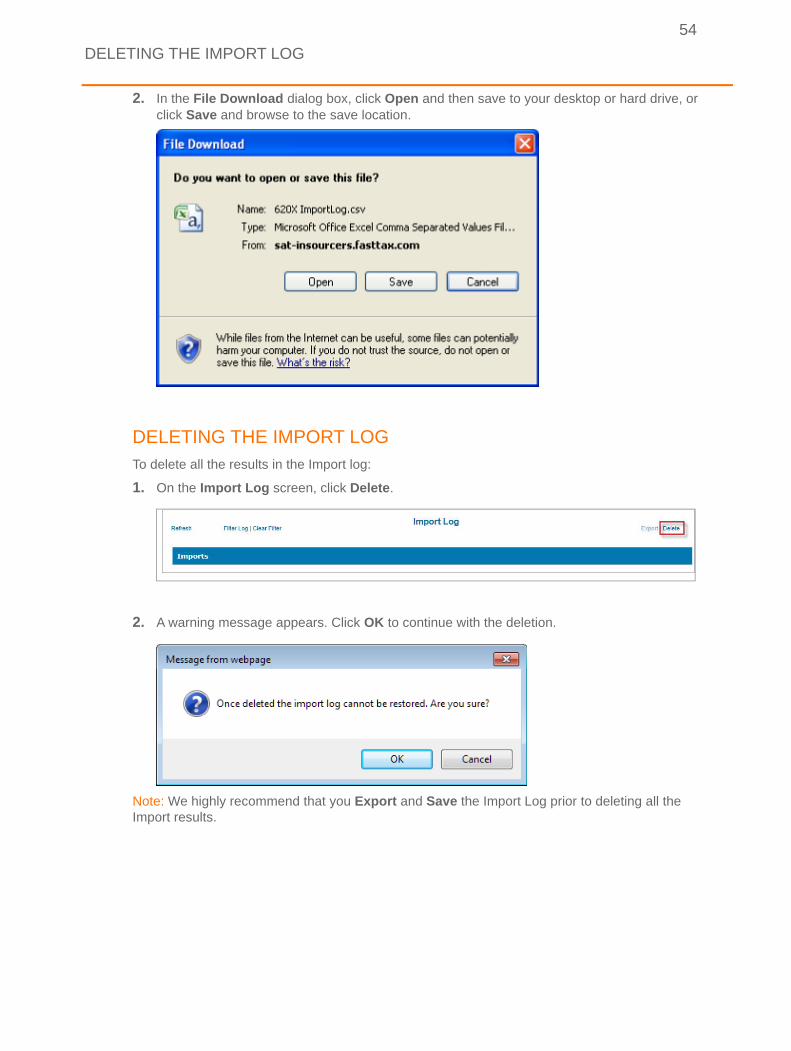
2. In the File Download dialog box, click Open and then save to your desktop or hard drive, or click Save and browse to the save location.
DELETING THE IMPORT LOGTo delete all the results in the Import log:
1. On the Import Log screen, click Delete.
2. A warning message appears. Click OK to continue with the deletion.
Note: We highly recommend that you Export and Save the Import Log prior to deleting all the Import results.
AUTO UPDATE FEATURE FOR EXISTING MAPS
55
AUTO UPDATE FEATURE FOR EXISTING MAPS
If you have a workbook containing targets from a previous release that have had new fields exposed, you can use the Map Version feature to automatically update the targets, eliminating the need to re-map the workbooks to reflect those changes.
There are two ways to trigger the update.
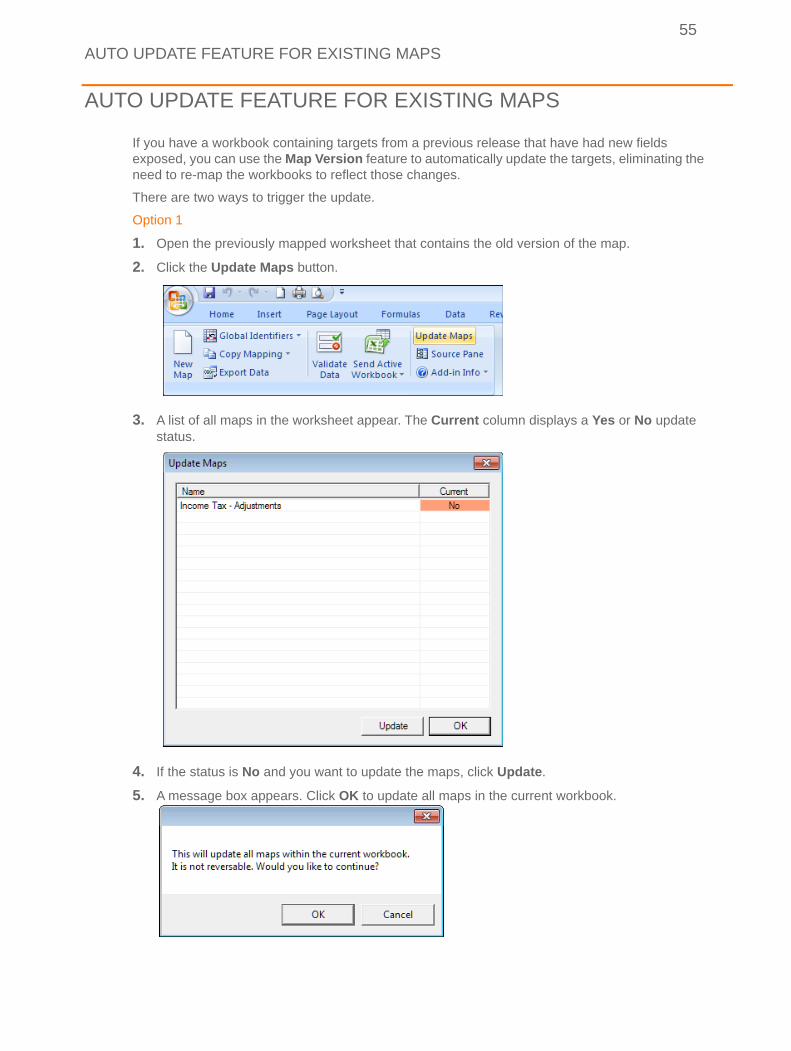
Option 1
1. Open the previously mapped worksheet that contains the old version of the map.
2. Click the Update Maps button.
3. A list of all maps in the worksheet appear. The Current column displays a Yes or No update status.
4. If the status is No and you want to update the maps, click Update.
5. A message box appears. Click OK to update all maps in the current workbook.
AUTO UPDATE FEATURE FOR EXISTING MAPS
56
6. The maps for all sheets in the workbook are updated and the new fields appear in the Source Pane.
Note: You can select the Up date Maps option at any time to review or select versions of a mapped file.
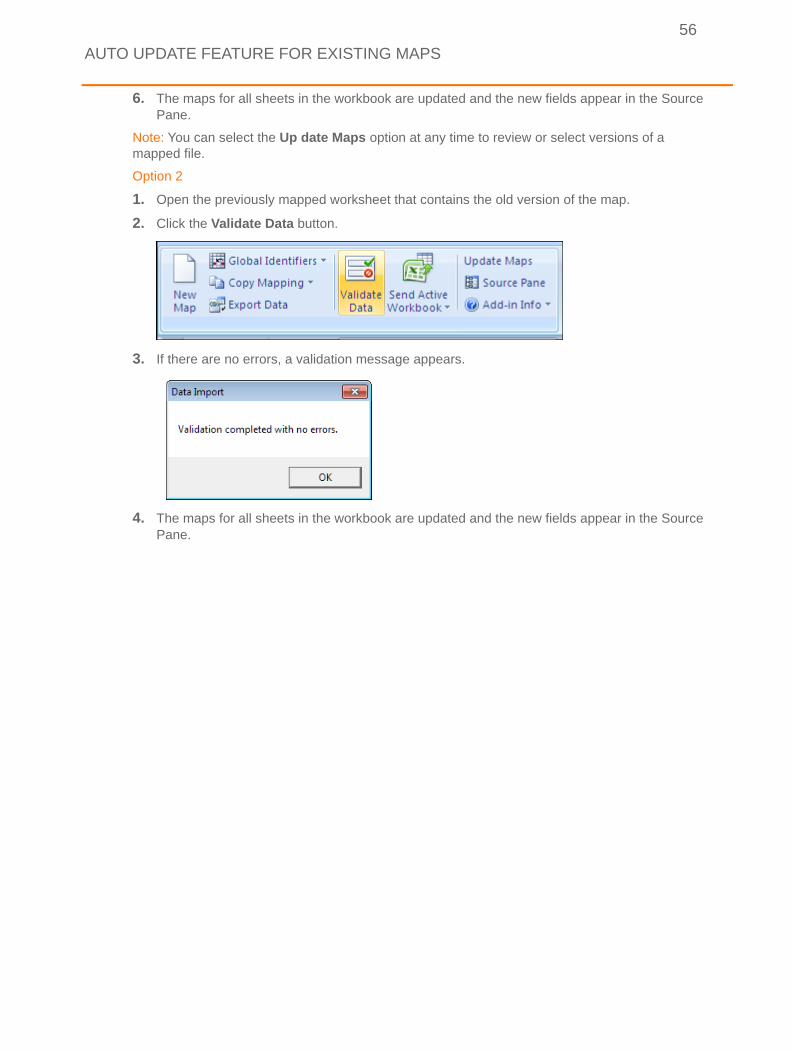
Option 2
1. Open the previously mapped worksheet that contains the old version of the map.
2. Click the Validate Data button.
3. If there are no errors, a validation message appears.
4. The maps for all sheets in the workbook are updated and the new fields appear in the Source Pane.
ADDITIONAL ONESOURCE MENU OPTIONS
57
ADDITIONAL ONESOURCE MENU OPTIONS
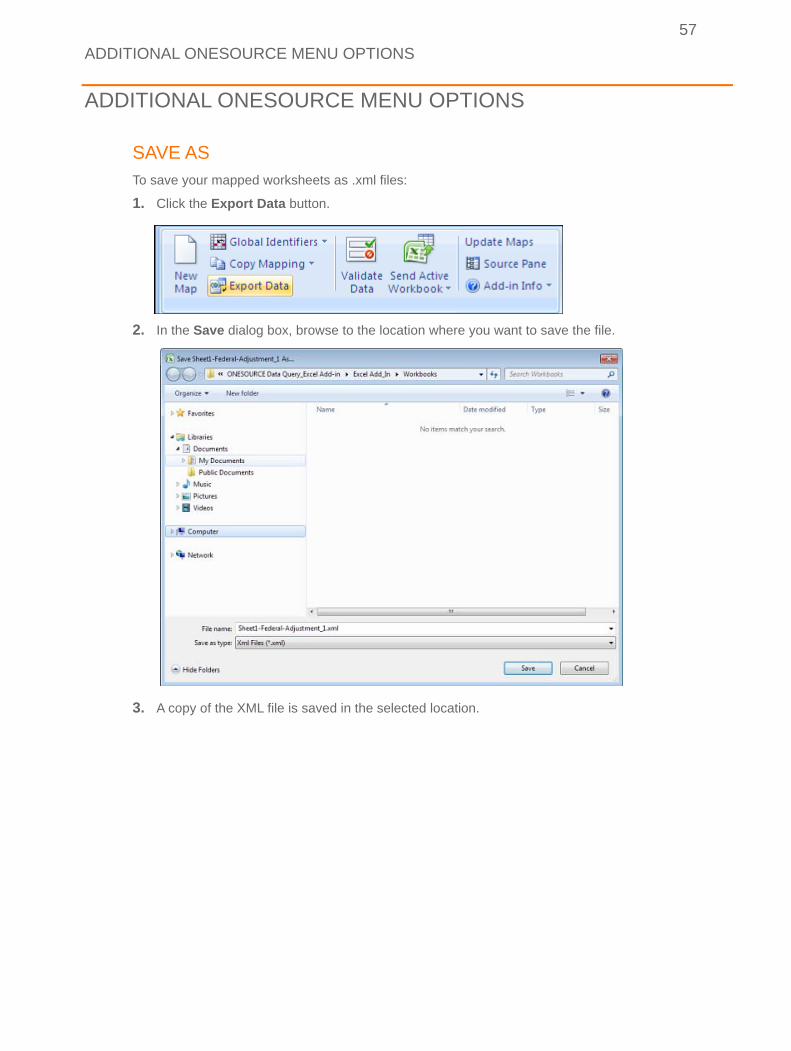
SAVE ASTo save your mapped worksheets as .xml files:
1. Click the Export Data button.
2. In the Save dialog box, browse to the location where you want to save the file.
3. A copy of the XML file is saved in the selected location.
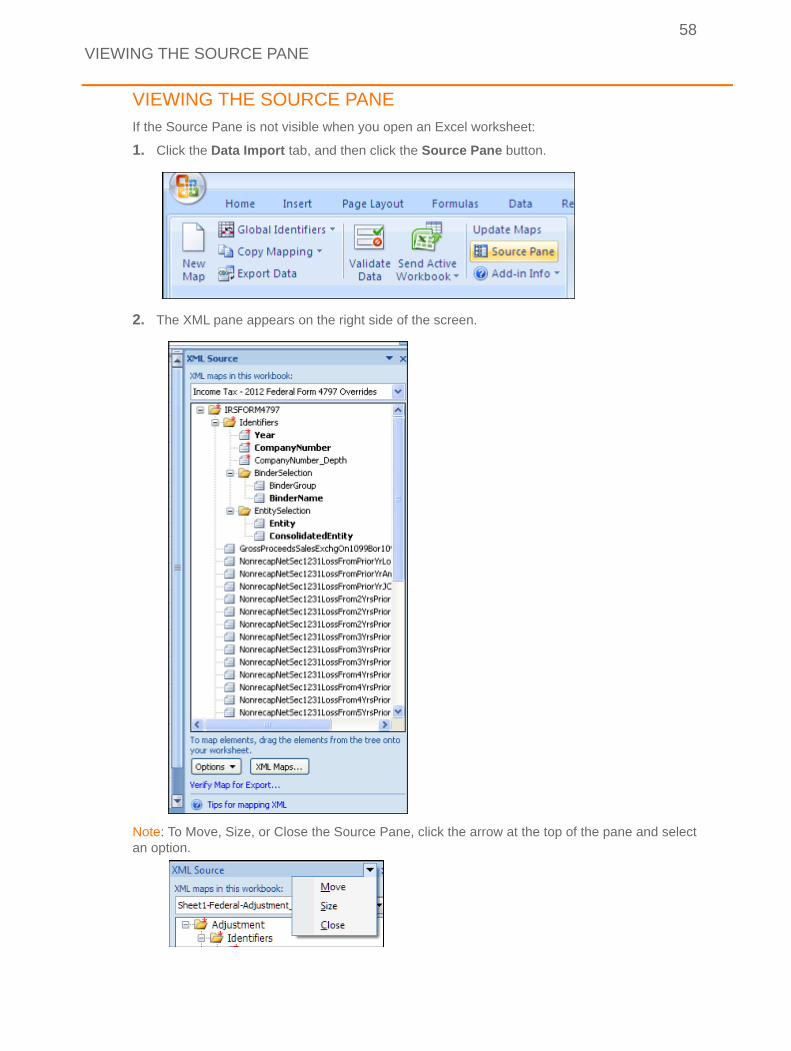
VIEWING THE SOURCE PANE
58
VIEWING THE SOURCE PANEIf the Source Pane is not visible when you open an Excel worksheet:
1. Click the Data Import tab, and then click the Source Pane button.
2. The XML pane appears on the right side of the screen.
Note: To Move, Size, or Close the Source Pane, click the arrow at the top of the pane and select an option.
CHECKING FOR UPDATES
59
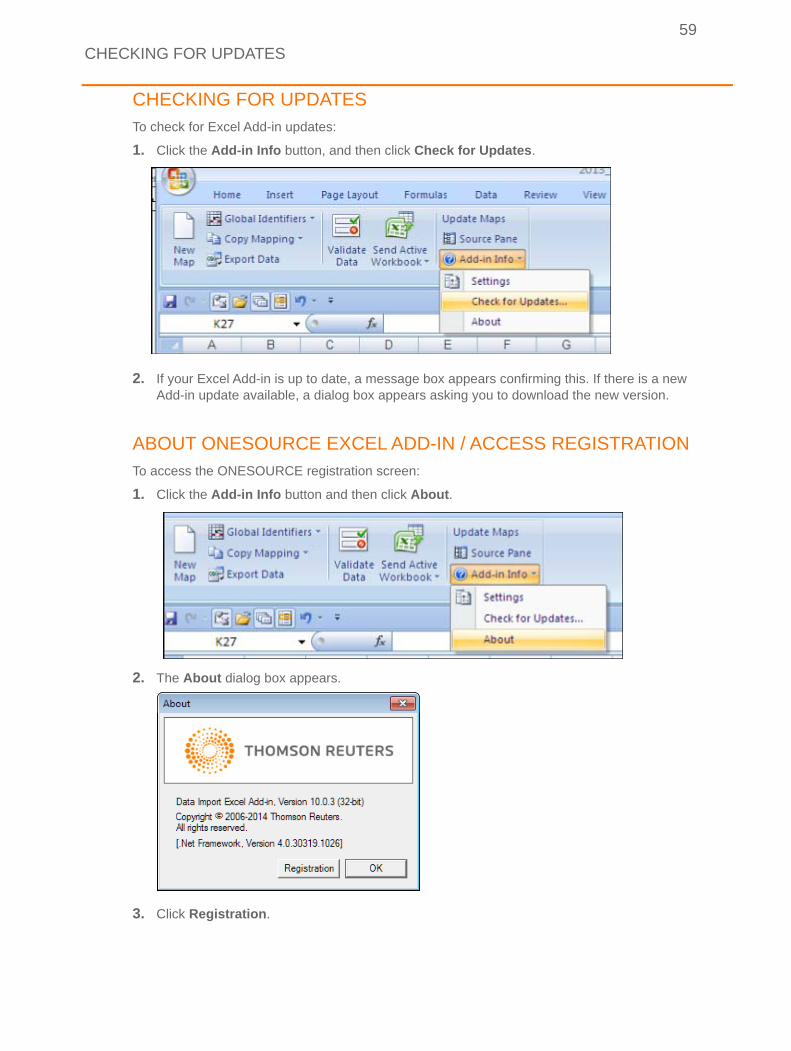
CHECKING FOR UPDATESTo check for Excel Add-in updates:
1. Click the Add-in Info button, and then click Check for Updates.
2. If your Excel Add-in is up to date, a message box appears confirming this. If there is a new Add-in update available, a dialog box appears asking you to download the new version.
ABOUT ONESOURCE EXCEL ADD-IN / ACCESS REGISTRATIONTo access the ONESOURCE registration screen:
1. Click the Add-in Info button and then click About.
2. The About dialog box appears.
3. Click Registration.
UPDATING REGISTRATION
60
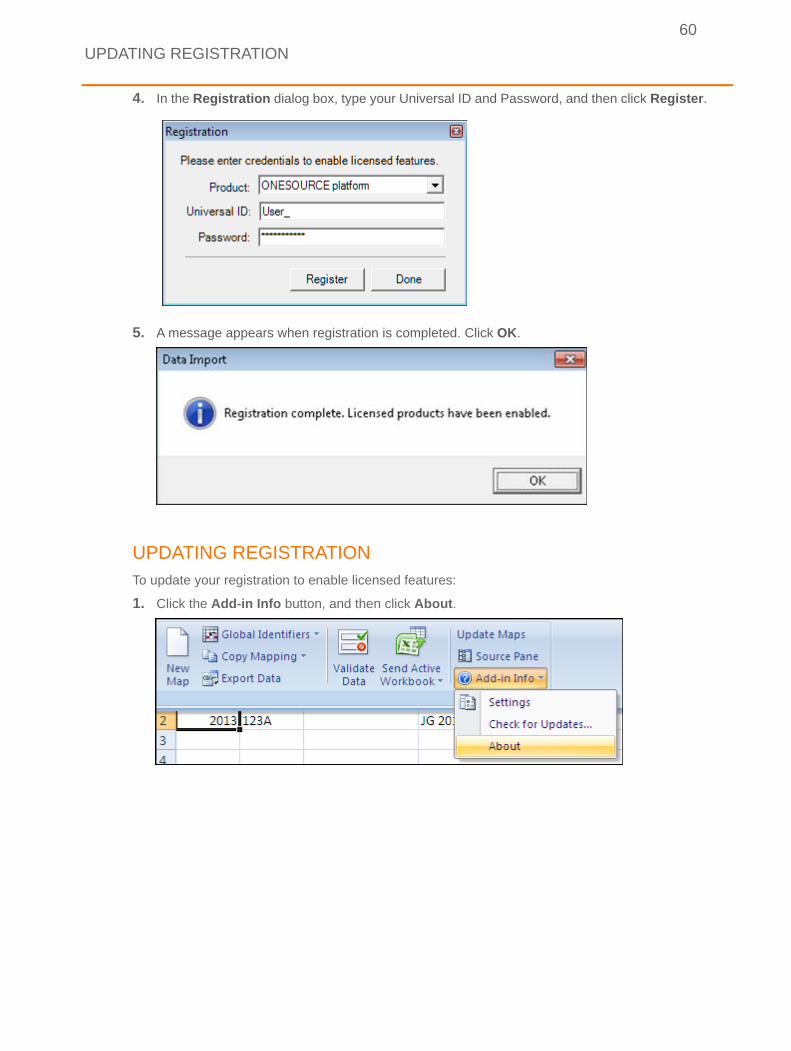
4. In the Registration dialog box, type your Universal ID and Password, and then click Register.
5. A message appears when registration is completed. Click OK.
UPDATING REGISTRATION To update your registration to enable licensed features:
1. Click the Add-in Info button, and then click About.
UPDATING REGISTRATION
61
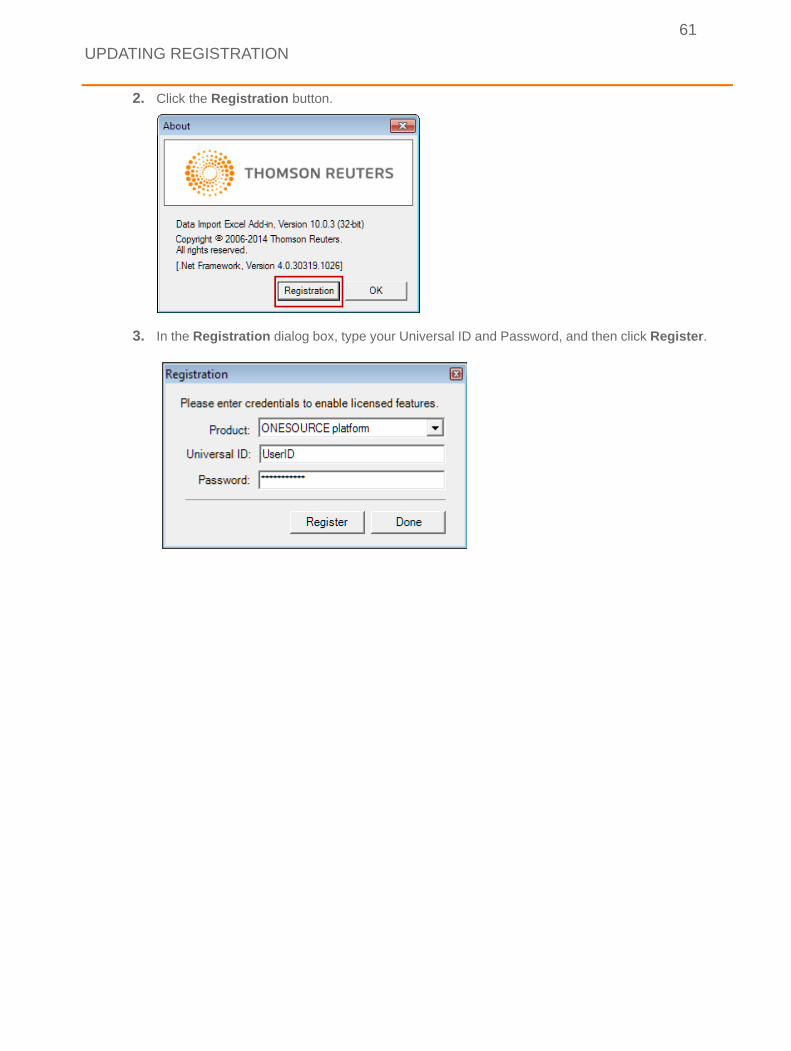
2. Click the Registration button.
3. In the Registration dialog box, type your Universal ID and Password, and then click Register.
TIPS AND TRICKS
62
TIPS AND TRICKS
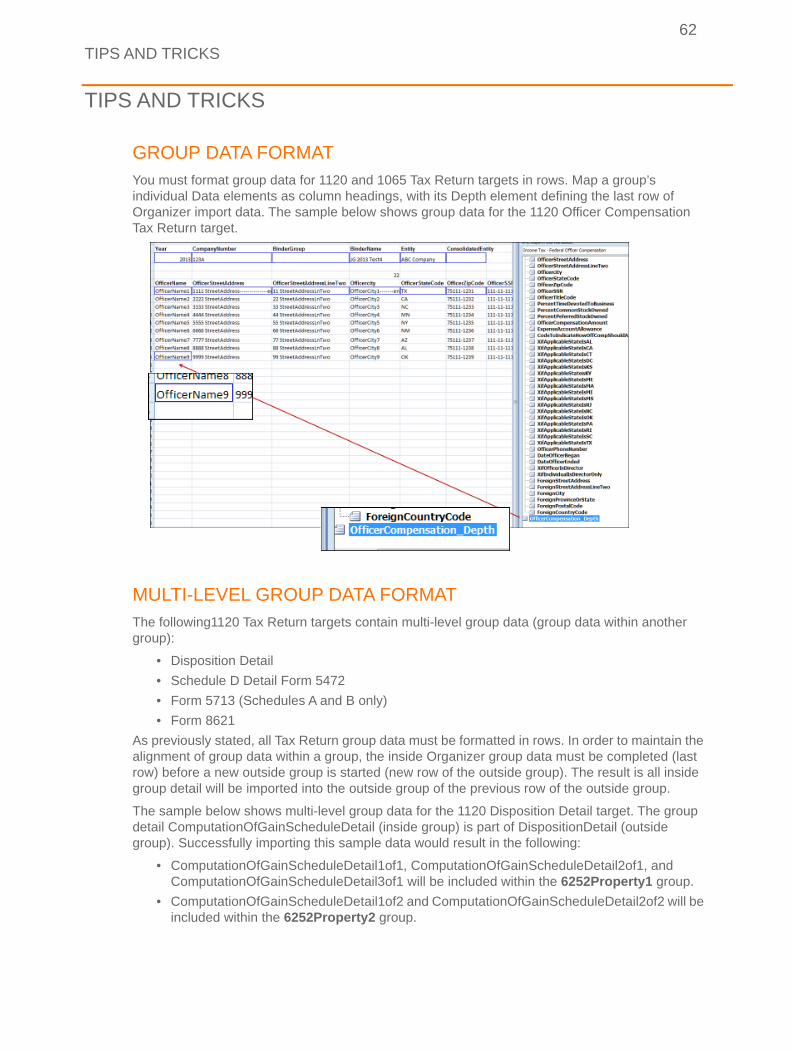
GROUP DATA FORMATYou must format group data for 1120 and 1065 Tax Return targets in rows. Map a group’s individual Data elements as column headings, with its Depth element defining the last row of Organizer import data. The sample below shows group data for the 1120 Officer Compensation Tax Return target.
MULTI-LEVEL GROUP DATA FORMATThe following1120 Tax Return targets contain multi-level group data (group data within another group):
• Disposition Detail
• Schedule D Detail Form 5472
• Form 5713 (Schedules A and B only)
• Form 8621
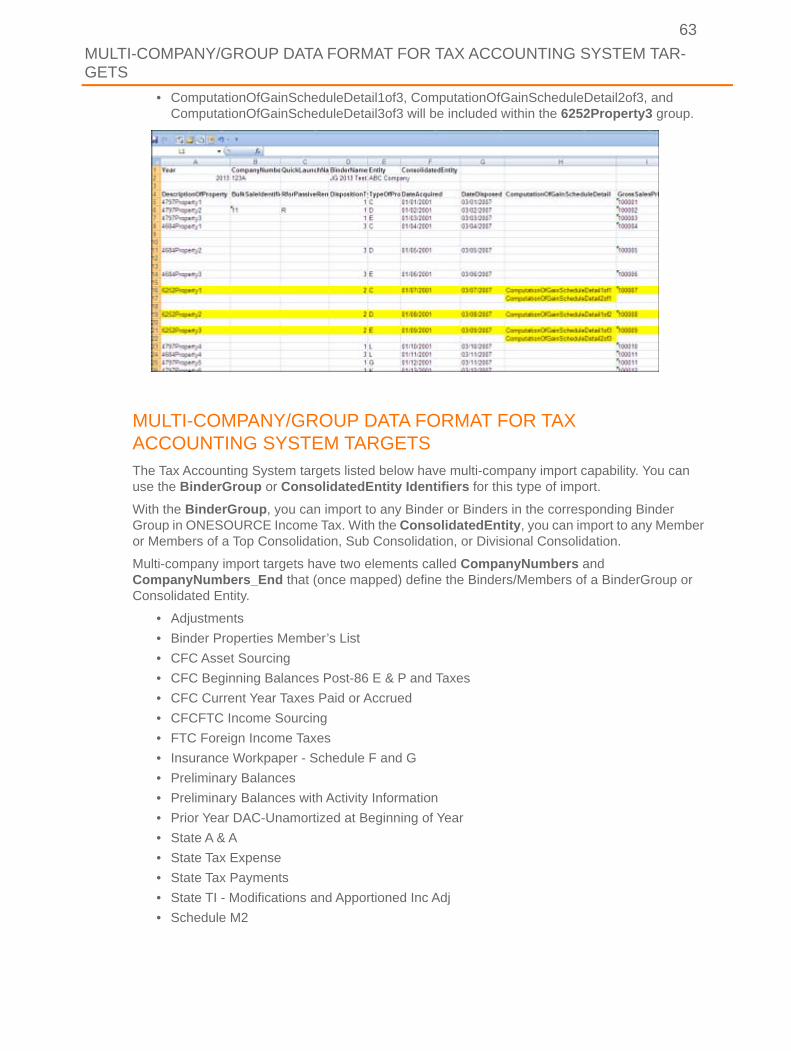
As previously stated, all Tax Return group data must be formatted in rows. In order to maintain the alignment of group data within a group, the inside Organizer group data must be completed (last row) before a new outside group is started (new row of the outside group). The result is all inside group detail will be imported into the outside group of the previous row of the outside group.
The sample below shows multi-level group data for the 1120 Disposition Detail target. The group detail ComputationOfGainScheduleDetail (inside group) is part of DispositionDetail (outside group). Successfully importing this sample data would result in the following:
• ComputationOfGainScheduleDetail1of1, ComputationOfGainScheduleDetail2of1, and ComputationOfGainScheduleDetail3of1 will be included within the 6252Property1 group.
• ComputationOfGainScheduleDetail1of2 and ComputationOfGainScheduleDetail2of2 will be included within the 6252Property2 group.
MULTI-COMPANY/GROUP DATA FORMAT FOR TAX ACCOUNTING SYSTEM TAR-GETS
63
• ComputationOfGainScheduleDetail1of3, ComputationOfGainScheduleDetail2of3, and ComputationOfGainScheduleDetail3of3 will be included within the 6252Property3 group.
MULTI-COMPANY/GROUP DATA FORMAT FOR TAX ACCOUNTING SYSTEM TARGETSThe Tax Accounting System targets listed below have multi-company import capability. You can use the BinderGroup or ConsolidatedEntity Identifiers for this type of import.
With the BinderGroup, you can import to any Binder or Binders in the corresponding Binder Group in ONESOURCE Income Tax. With the ConsolidatedEntity, you can import to any Member or Members of a Top Consolidation, Sub Consolidation, or Divisional Consolidation.
Multi-company import targets have two elements called CompanyNumbers and CompanyNumbers_End that (once mapped) define the Binders/Members of a BinderGroup or Consolidated Entity.
• Adjustments
• Binder Properties Member’s List
• CFC Asset Sourcing
• CFC Beginning Balances Post-86 E & P and Taxes
• CFC Current Year Taxes Paid or Accrued
• CFCFTC Income Sourcing
• FTC Foreign Income Taxes
• Insurance Workpaper - Schedule F and G
• Preliminary Balances
• Preliminary Balances with Activity Information
• Prior Year DAC-Unamortized at Beginning of Year
• State A & A
• State Tax Expense
• State Tax Payments
• State TI - Modifications and Apportioned Inc Adj
• Schedule M2
MULTI-COMPANY/GROUP DATA FORMAT FOR TAX RETURN TARGETS
64
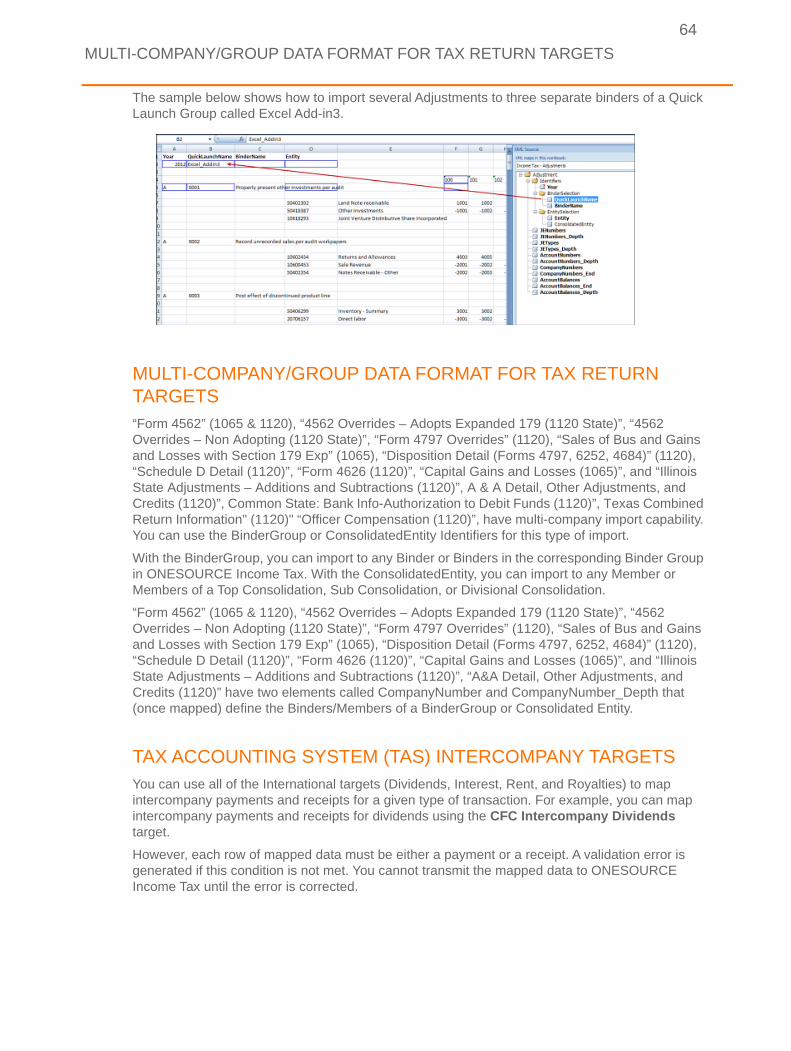
The sample below shows how to import several Adjustments to three separate binders of a Quick Launch Group called Excel Add-in3.
MULTI-COMPANY/GROUP DATA FORMAT FOR TAX RETURN TARGETS“Form 4562” (1065 & 1120), “4562 Overrides – Adopts Expanded 179 (1120 State)”, “4562 Overrides – Non Adopting (1120 State)”, “Form 4797 Overrides” (1120), “Sales of Bus and Gains and Losses with Section 179 Exp” (1065), “Disposition Detail (Forms 4797, 6252, 4684)” (1120), “Schedule D Detail (1120)”, “Form 4626 (1120)”, “Capital Gains and Losses (1065)”, and “Illinois State Adjustments – Additions and Subtractions (1120)”, A & A Detail, Other Adjustments, and Credits (1120)”, Common State: Bank Info-Authorization to Debit Funds (1120)”, Texas Combined Return Information" (1120)" “Officer Compensation (1120)”, have multi-company import capability. You can use the BinderGroup or ConsolidatedEntity Identifiers for this type of import.
With the BinderGroup, you can import to any Binder or Binders in the corresponding Binder Group in ONESOURCE Income Tax. With the ConsolidatedEntity, you can import to any Member or Members of a Top Consolidation, Sub Consolidation, or Divisional Consolidation.
“Form 4562” (1065 & 1120), “4562 Overrides – Adopts Expanded 179 (1120 State)”, “4562 Overrides – Non Adopting (1120 State)”, “Form 4797 Overrides” (1120), “Sales of Bus and Gains and Losses with Section 179 Exp” (1065), “Disposition Detail (Forms 4797, 6252, 4684)” (1120), “Schedule D Detail (1120)”, “Form 4626 (1120)”, “Capital Gains and Losses (1065)”, and “Illinois State Adjustments – Additions and Subtractions (1120)”, “A&A Detail, Other Adjustments, and Credits (1120)” have two elements called CompanyNumber and CompanyNumber_Depth that (once mapped) define the Binders/Members of a BinderGroup or Consolidated Entity.
TAX ACCOUNTING SYSTEM (TAS) INTERCOMPANY TARGETSYou can use all of the International targets (Dividends, Interest, Rent, and Royalties) to map intercompany payments and receipts for a given type of transaction. For example, you can map intercompany payments and receipts for dividends using the CFC Intercompany Dividends target.
However, each row of mapped data must be either a payment or a receipt. A validation error is generated if this condition is not met. You cannot transmit the mapped data to ONESOURCE Income Tax until the error is corrected.
1065/1120 TAX RETURN TARGETS
65
The import target entity company number is determined programmatically. If a RecipientAmount is entered, the RecipientEntityCompanyNumber is used to determine the import target entity. If a PayorAmount is entered, the PayorEntityCompanyNumber is used to determine the import target entity.
If you use BinderGroup or ConsolidatedEntity and BinderName in the Identifiers section, you can include intercompany payments or receipts for multiple binders on one Excel worksheet.
Worksheets can contain data for intercompany payments or intercompany receipts, or both, for a single company or multiple companies. An entire row must be valid for the row to import (no partial import permitted). Invalid recipient entities (where entity type equals “Division” or “Eliminations”) will be logged as error.
Delete any existing data for the selected binder for the transaction and look-through type being imported. Attempting to send an import without valid rows will delete any existing data for that transaction and look-through type.
XML submitted to Web Service does not need to contain data designated as “default”; for example, the “Related Other Expenses” for an “Intercompany Receipts – Interest” import, or the “Spot Rate to US$ for Pre ’87 DPC or PTI Exchange G/L” for “Intercompany Payments – Dividends” import.
Duplicate entries between a payor-recipient pair are allowed. For example, if you are importing to Company A, you can have multiple receipts of the same transaction and look-through type from Company B.
Valid rows of data will import. Invalid rows of data will not import. For example, if you have two interest intercompany payments from two different companies, and the data from the first company validates but the data from the second company does not, the data from the first company will import. The data from the second company will not. Send comprehensive, user-friendly messaging to the second company about the errors. Provide feedback for each of the items within the row being rejected, not just the first error encountered.
1065/1120 TAX RETURN TARGETSA worksheet previously mapped with a 1120 Tax Return target (i.e. Form 4562, Schedule D Overrides) cannot be used for a 1065 Tax Return target (and vice versa). For example, individually mapped cells of a worksheet (that is, “New Mapping” defined as Tax Return | 2015 | 1120 | Federal | Form 1120) only correspond to Organizer fields in the 1120 Tax Application. You cannot simply change the Identifiers data to that of a 1065 binder and successfully import to fields in the 1065 Tax Application. A new 1065 Tax Return Target must be defined and mapped.
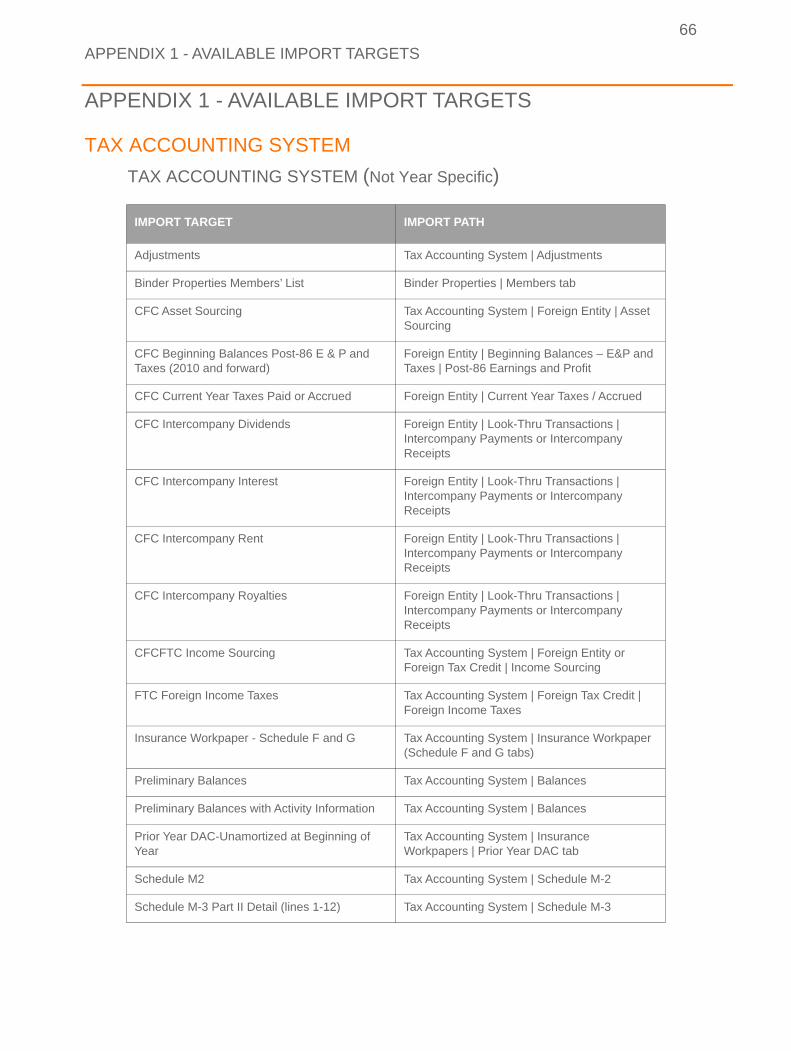
APPENDIX 1 - AVAILABLE IMPORT TARGETS
66
APPENDIX 1 - AVAILABLE IMPORT TARGETS
TAX ACCOUNTING SYSTEM
TAX ACCOUNTING SYSTEM (Not Year Specific)
IMPORT TARGET IMPORT PATH
Adjustments Tax Accounting System | Adjustments
Binder Properties Members’ List Binder Properties | Members tab
CFC Asset Sourcing Tax Accounting System | Foreign Entity | Asset Sourcing
CFC Beginning Balances Post-86 E & P and Taxes (2010 and forward)
Foreign Entity | Beginning Balances – E&P and Taxes | Post-86 Earnings and Profit
CFC Current Year Taxes Paid or Accrued Foreign Entity | Current Year Taxes / Accrued
CFC Intercompany Dividends Foreign Entity | Look-Thru Transactions | Intercompany Payments or Intercompany Receipts
CFC Intercompany Interest Foreign Entity | Look-Thru Transactions | Intercompany Payments or Intercompany Receipts
CFC Intercompany Rent Foreign Entity | Look-Thru Transactions | Intercompany Payments or Intercompany Receipts
CFC Intercompany Royalties Foreign Entity | Look-Thru Transactions | Intercompany Payments or Intercompany Receipts
CFCFTC Income Sourcing Tax Accounting System | Foreign Entity or Foreign Tax Credit | Income Sourcing
FTC Foreign Income Taxes Tax Accounting System | Foreign Tax Credit | Foreign Income Taxes
Insurance Workpaper - Schedule F and G Tax Accounting System | Insurance Workpaper (Schedule F and G tabs)
Preliminary Balances Tax Accounting System | Balances
Preliminary Balances with Activity Information Tax Accounting System | Balances
Prior Year DAC-Unamortized at Beginning of Year
Tax Accounting System | InsuranceWorkpapers | Prior Year DAC tab
Schedule M2 Tax Accounting System | Schedule M-2
Schedule M-3 Part II Detail (lines 1-12) Tax Accounting System | Schedule M-3

APPENDIX 1 - AVAILABLE IMPORT TARGETS
67
State A & A Tax Account System | State Workpapers | Data Entry | State A&A | Corporate Entity (excluding Partnerships) | Property, Payroll, Sales, Allocation, or All State A&A
State Tax Expense Tax Accounting System | State Workpapers | Data Entry | Taxable Income and Taxes | Tax Expense
State Tax Payments Tax Accounting System | Tax Payments
State TI – Modifications and Apportioned Inc Adj Tax Accounting System | State Workpapers | Data Entry | Taxable Income and Taxes | Modifications and Apportioned Income Adjustments
IMPORT TARGET IMPORT PATH
APPENDIX 1 - AVAILABLE IMPORT TARGETS
68
s
t/
t/
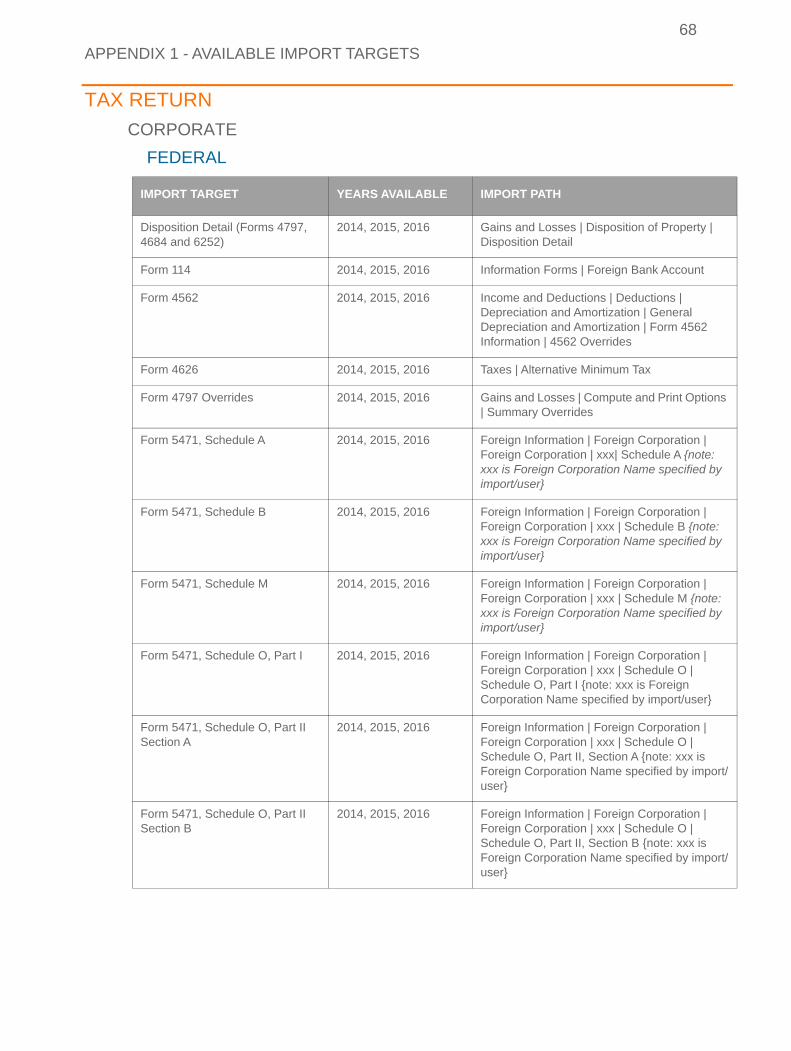
TAX RETURN
CORPORATE
FEDERAL
IMPORT TARGET YEARS AVAILABLE IMPORT PATH
Disposition Detail (Forms 4797, 4684 and 6252)
2014, 2015, 2016 Gains and Losses | Disposition of Property | Disposition Detail
Form 114 2014, 2015, 2016 Information Forms | Foreign Bank Account
Form 4562 2014, 2015, 2016 Income and Deductions | Deductions | Depreciation and Amortization | General Depreciation and Amortization | Form 4562 Information | 4562 Overrides
Form 4626 2014, 2015, 2016 Taxes | Alternative Minimum Tax
Form 4797 Overrides 2014, 2015, 2016 Gains and Losses | Compute and Print Option| Summary Overrides
Form 5471, Schedule A 2014, 2015, 2016 Foreign Information | Foreign Corporation | Foreign Corporation | xxx| Schedule A {note: xxx is Foreign Corporation Name specified byimport/user}
Form 5471, Schedule B 2014, 2015, 2016 Foreign Information | Foreign Corporation | Foreign Corporation | xxx | Schedule B {note: xxx is Foreign Corporation Name specified byimport/user}
Form 5471, Schedule M 2014, 2015, 2016 Foreign Information | Foreign Corporation | Foreign Corporation | xxx | Schedule M {note:xxx is Foreign Corporation Name specified byimport/user}
Form 5471, Schedule O, Part I 2014, 2015, 2016 Foreign Information | Foreign Corporation | Foreign Corporation | xxx | Schedule O | Schedule O, Part I {note: xxx is Foreign Corporation Name specified by import/user}
Form 5471, Schedule O, Part II Section A
2014, 2015, 2016 Foreign Information | Foreign Corporation | Foreign Corporation | xxx | Schedule O | Schedule O, Part II, Section A {note: xxx is Foreign Corporation Name specified by imporuser}
Form 5471, Schedule O, Part II Section B
2014, 2015, 2016 Foreign Information | Foreign Corporation | Foreign Corporation | xxx | Schedule O | Schedule O, Part II, Section B {note: xxx is Foreign Corporation Name specified by imporuser}
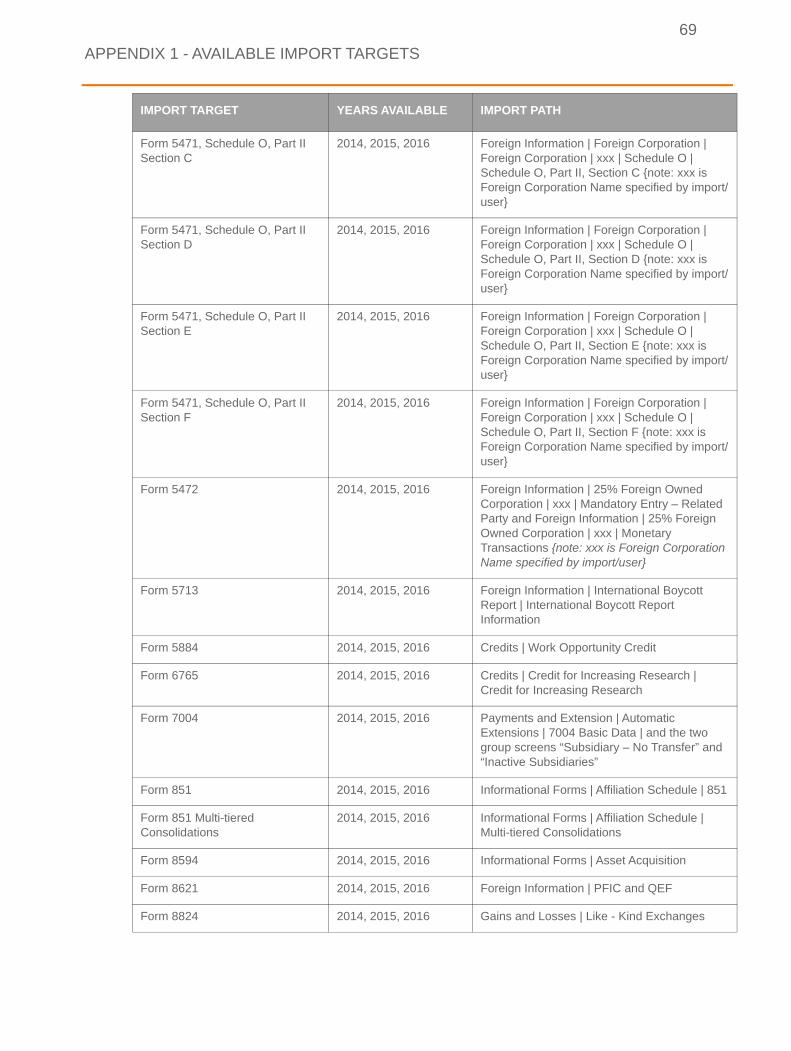
APPENDIX 1 - AVAILABLE IMPORT TARGETS
69
t/
t/
t/
t/
1
Form 5471, Schedule O, Part II Section C
2014, 2015, 2016 Foreign Information | Foreign Corporation | Foreign Corporation | xxx | Schedule O | Schedule O, Part II, Section C {note: xxx is Foreign Corporation Name specified by imporuser}
Form 5471, Schedule O, Part II Section D
2014, 2015, 2016 Foreign Information | Foreign Corporation | Foreign Corporation | xxx | Schedule O | Schedule O, Part II, Section D {note: xxx is Foreign Corporation Name specified by imporuser}
Form 5471, Schedule O, Part II Section E
2014, 2015, 2016 Foreign Information | Foreign Corporation | Foreign Corporation | xxx | Schedule O | Schedule O, Part II, Section E {note: xxx is Foreign Corporation Name specified by imporuser}
Form 5471, Schedule O, Part II Section F
2014, 2015, 2016 Foreign Information | Foreign Corporation | Foreign Corporation | xxx | Schedule O | Schedule O, Part II, Section F {note: xxx is Foreign Corporation Name specified by imporuser}
Form 5472 2014, 2015, 2016 Foreign Information | 25% Foreign Owned Corporation | xxx | Mandatory Entry – RelatedParty and Foreign Information | 25% Foreign Owned Corporation | xxx | Monetary Transactions {note: xxx is Foreign CorporationName specified by import/user}
Form 5713 2014, 2015, 2016 Foreign Information | International Boycott Report | International Boycott Report Information
Form 5884 2014, 2015, 2016 Credits | Work Opportunity Credit
Form 6765 2014, 2015, 2016 Credits | Credit for Increasing Research | Credit for Increasing Research
Form 7004 2014, 2015, 2016 Payments and Extension | Automatic Extensions | 7004 Basic Data | and the two group screens “Subsidiary – No Transfer” and“Inactive Subsidiaries”
Form 851 2014, 2015, 2016 Informational Forms | Affiliation Schedule | 85
Form 851 Multi-tiered Consolidations
2014, 2015, 2016 Informational Forms | Affiliation Schedule | Multi-tiered Consolidations
Form 8594 2014, 2015, 2016 Informational Forms | Asset Acquisition
Form 8621 2014, 2015, 2016 Foreign Information | PFIC and QEF
Form 8824 2014, 2015, 2016 Gains and Losses | Like - Kind Exchanges
IMPORT TARGET YEARS AVAILABLE IMPORT PATH
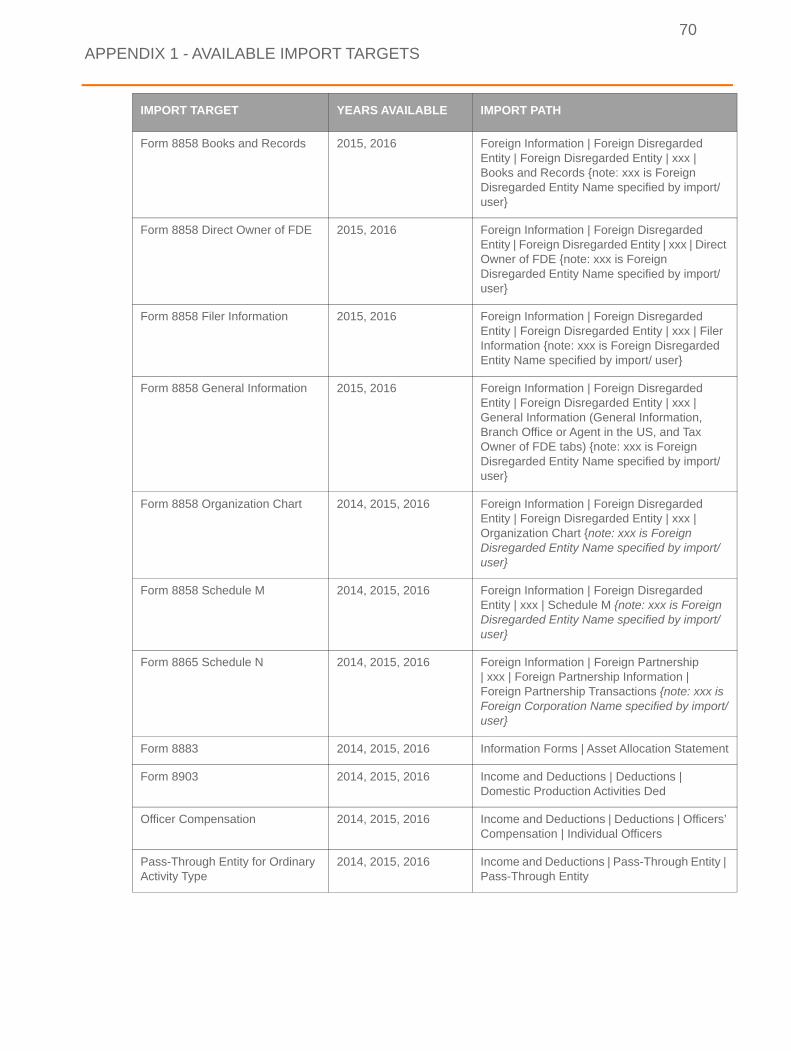
APPENDIX 1 - AVAILABLE IMPORT TARGETS
70
t
t/
t
’
|
Form 8858 Books and Records 2015, 2016 Foreign Information | Foreign Disregarded Entity | Foreign Disregarded Entity | xxx | Books and Records {note: xxx is Foreign Disregarded Entity Name specified by import/user}
Form 8858 Direct Owner of FDE 2015, 2016 Foreign Information | Foreign Disregarded Entity | Foreign Disregarded Entity | xxx | DirecOwner of FDE {note: xxx is Foreign Disregarded Entity Name specified by import/user}
Form 8858 Filer Information 2015, 2016 Foreign Information | Foreign Disregarded Entity | Foreign Disregarded Entity | xxx | FilerInformation {note: xxx is Foreign DisregardedEntity Name specified by import/ user}
Form 8858 General Information 2015, 2016 Foreign Information | Foreign Disregarded Entity | Foreign Disregarded Entity | xxx | General Information (General Information, Branch Office or Agent in the US, and Tax Owner of FDE tabs) {note: xxx is Foreign Disregarded Entity Name specified by import/user}
Form 8858 Organization Chart 2014, 2015, 2016 Foreign Information | Foreign Disregarded Entity | Foreign Disregarded Entity | xxx | Organization Chart {note: xxx is Foreign Disregarded Entity Name specified by import/user}
Form 8858 Schedule M 2014, 2015, 2016 Foreign Information | Foreign Disregarded Entity | xxx | Schedule M {note: xxx is ForeignDisregarded Entity Name specified by import/user}
Form 8865 Schedule N 2014, 2015, 2016 Foreign Information | Foreign Partnership | xxx | Foreign Partnership Information | Foreign Partnership Transactions {note: xxx isForeign Corporation Name specified by imporuser}
Form 8883 2014, 2015, 2016 Information Forms | Asset Allocation Statemen
Form 8903 2014, 2015, 2016 Income and Deductions | Deductions | Domestic Production Activities Ded
Officer Compensation 2014, 2015, 2016 Income and Deductions | Deductions | OfficersCompensation | Individual Officers
Pass-Through Entity for Ordinary Activity Type
2014, 2015, 2016 Income and Deductions | Pass-Through EntityPass-Through Entity
IMPORT TARGET YEARS AVAILABLE IMPORT PATH
APPENDIX 1 - AVAILABLE IMPORT TARGETS
71
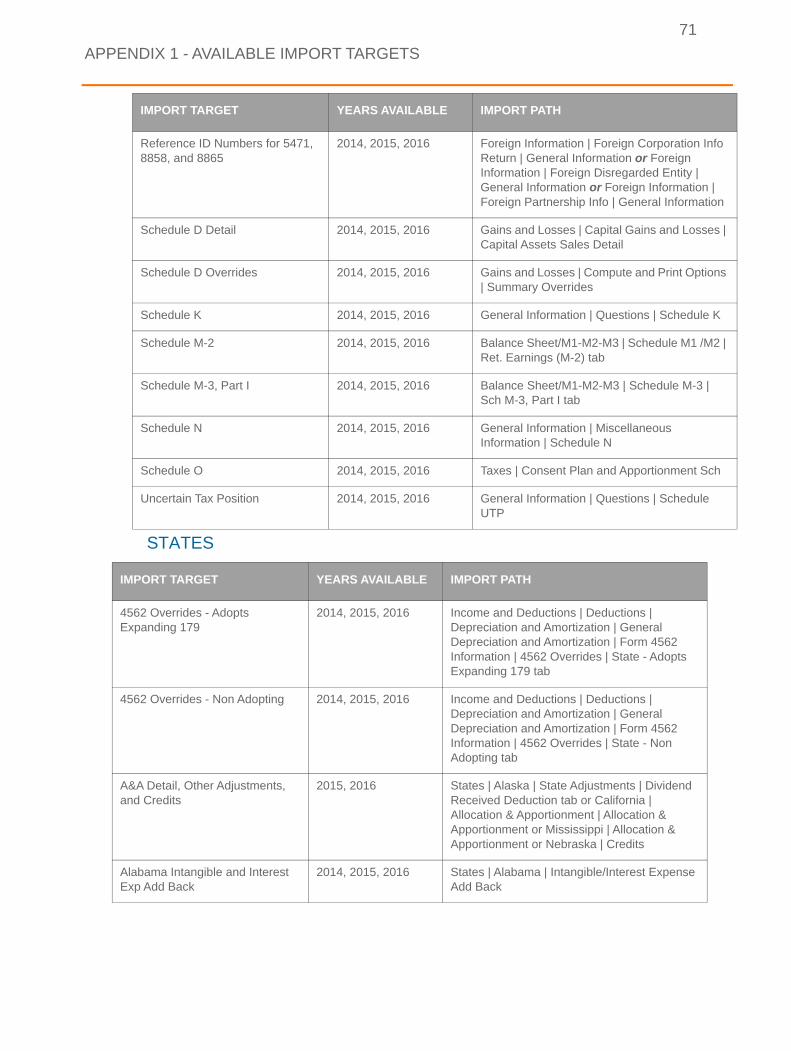
|
s
|
STATES
Reference ID Numbers for 5471, 8858, and 8865
2014, 2015, 2016 Foreign Information | Foreign Corporation InfoReturn | General Information or Foreign Information | Foreign Disregarded Entity | General Information or Foreign Information | Foreign Partnership Info | General Information
Schedule D Detail 2014, 2015, 2016 Gains and Losses | Capital Gains and LossesCapital Assets Sales Detail
Schedule D Overrides 2014, 2015, 2016 Gains and Losses | Compute and Print Option| Summary Overrides
Schedule K 2014, 2015, 2016 General Information | Questions | Schedule K
Schedule M-2 2014, 2015, 2016 Balance Sheet/M1-M2-M3 | Schedule M1 /M2Ret. Earnings (M-2) tab
Schedule M-3, Part I 2014, 2015, 2016 Balance Sheet/M1-M2-M3 | Schedule M-3 | Sch M-3, Part I tab
Schedule N 2014, 2015, 2016 General Information | Miscellaneous Information | Schedule N
Schedule O 2014, 2015, 2016 Taxes | Consent Plan and Apportionment Sch
Uncertain Tax Position 2014, 2015, 2016 General Information | Questions | Schedule UTP
IMPORT TARGET YEARS AVAILABLE IMPORT PATH
4562 Overrides - Adopts Expanding 179
2014, 2015, 2016 Income and Deductions | Deductions | Depreciation and Amortization | General Depreciation and Amortization | Form 4562 Information | 4562 Overrides | State - Adopts Expanding 179 tab
4562 Overrides - Non Adopting 2014, 2015, 2016 Income and Deductions | Deductions | Depreciation and Amortization | General Depreciation and Amortization | Form 4562 Information | 4562 Overrides | State - Non Adopting tab
A&A Detail, Other Adjustments, and Credits
2015, 2016 States | Alaska | State Adjustments | Dividend Received Deduction tab or California | Allocation & Apportionment | Allocation & Apportionment or Mississippi | Allocation & Apportionment or Nebraska | Credits
Alabama Intangible and Interest Exp Add Back
2014, 2015, 2016 States | Alabama | Intangible/Interest Expense Add Back
IMPORT TARGET YEARS AVAILABLE IMPORT PATH
APPENDIX 1 - AVAILABLE IMPORT TARGETS
72
CITY
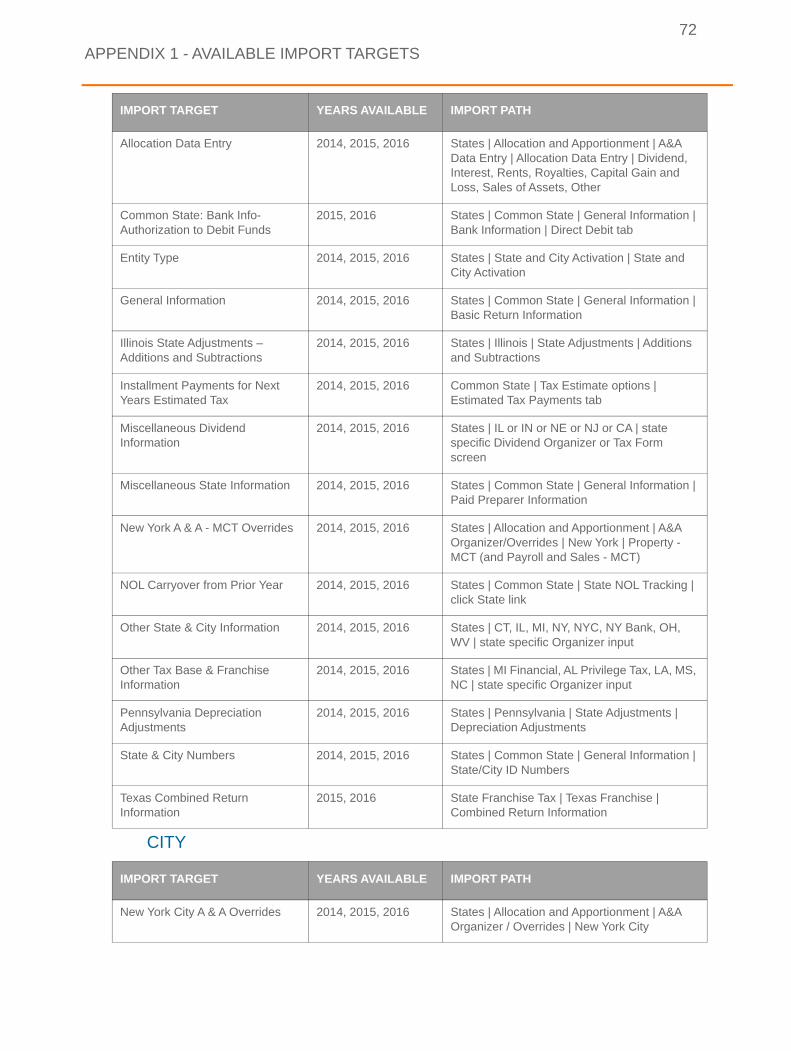
IMPORT TARGET YEARS AVAILABLE IMPORT PATH
New York City A & A Overrides 2014, 2015, 2016 States | Allocation and Apportionment | A&A Organizer / Overrides | New York City
Allocation Data Entry 2014, 2015, 2016 States | Allocation and Apportionment | A&A Data Entry | Allocation Data Entry | Dividend, Interest, Rents, Royalties, Capital Gain and Loss, Sales of Assets, Other
Common State: Bank Info-Authorization to Debit Funds
2015, 2016 States | Common State | General Information | Bank Information | Direct Debit tab
Entity Type 2014, 2015, 2016 States | State and City Activation | State and City Activation
General Information 2014, 2015, 2016 States | Common State | General Information | Basic Return Information
Illinois State Adjustments – Additions and Subtractions
2014, 2015, 2016 States | Illinois | State Adjustments | Additions and Subtractions
Installment Payments for Next Years Estimated Tax
2014, 2015, 2016 Common State | Tax Estimate options | Estimated Tax Payments tab
Miscellaneous Dividend Information
2014, 2015, 2016 States | IL or IN or NE or NJ or CA | state specific Dividend Organizer or Tax Form screen
Miscellaneous State Information 2014, 2015, 2016 States | Common State | General Information | Paid Preparer Information
New York A & A - MCT Overrides 2014, 2015, 2016 States | Allocation and Apportionment | A&A Organizer/Overrides | New York | Property - MCT (and Payroll and Sales - MCT)
NOL Carryover from Prior Year 2014, 2015, 2016 States | Common State | State NOL Tracking | click State link
Other State & City Information 2014, 2015, 2016 States | CT, IL, MI, NY, NYC, NY Bank, OH, WV | state specific Organizer input
Other Tax Base & Franchise Information
2014, 2015, 2016 States | MI Financial, AL Privilege Tax, LA, MS, NC | state specific Organizer input
Pennsylvania Depreciation Adjustments
2014, 2015, 2016 States | Pennsylvania | State Adjustments | Depreciation Adjustments
State & City Numbers 2014, 2015, 2016 States | Common State | General Information | State/City ID Numbers
Texas Combined Return Information
2015, 2016 State Franchise Tax | Texas Franchise | Combined Return Information
IMPORT TARGET YEARS AVAILABLE IMPORT PATH

APPENDIX 1 - AVAILABLE IMPORT TARGETS
73
CORPORATE - HOMEOWNERS ASSOCIATION (1120H)
FEDERAL
IMPORT TARGET YEARS AVAILABLE IMPORT PATH
Other Info – Homeowners Assoc 2014, 2015, 2016 Income and Deductions | Other Info – Homeowners Associations
APPENDIX 1 - AVAILABLE IMPORT TARGETS
74
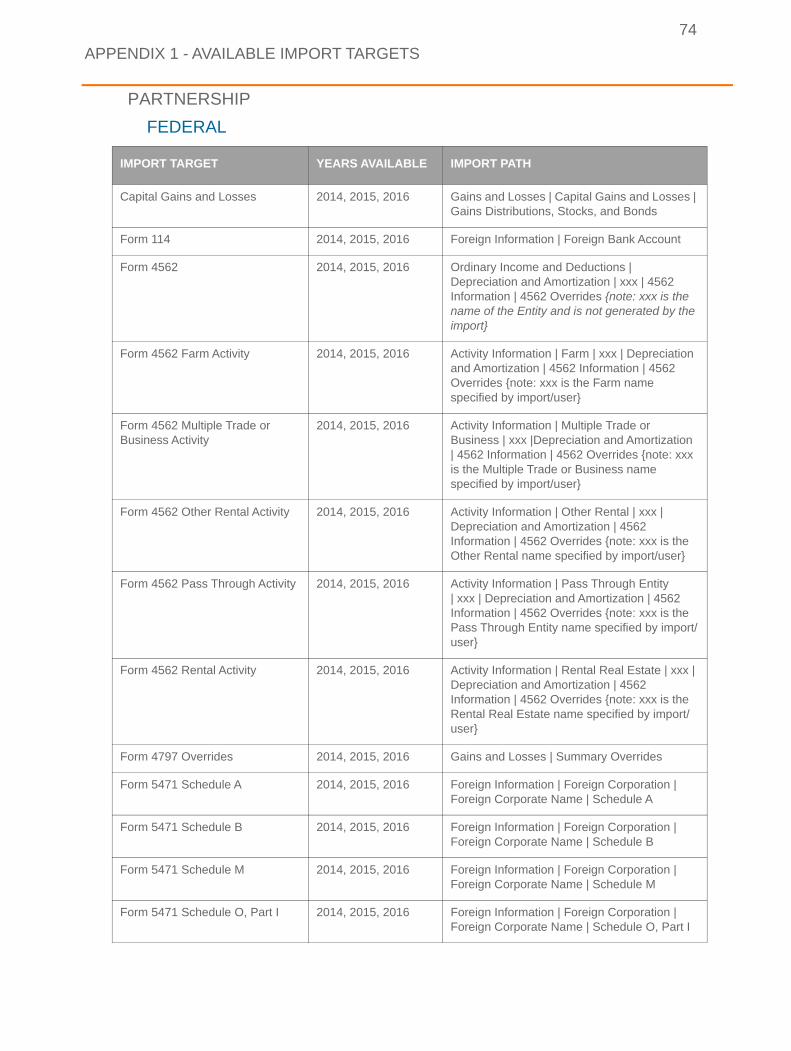
PARTNERSHIP
FEDERAL
IMPORT TARGET YEARS AVAILABLE IMPORT PATH
Capital Gains and Losses 2014, 2015, 2016 Gains and Losses | Capital Gains and Losses | Gains Distributions, Stocks, and Bonds
Form 114 2014, 2015, 2016 Foreign Information | Foreign Bank Account
Form 4562 2014, 2015, 2016 Ordinary Income and Deductions | Depreciation and Amortization | xxx | 4562 Information | 4562 Overrides {note: xxx is the name of the Entity and is not generated by the import}
Form 4562 Farm Activity 2014, 2015, 2016 Activity Information | Farm | xxx | Depreciation and Amortization | 4562 Information | 4562 Overrides {note: xxx is the Farm name specified by import/user}
Form 4562 Multiple Trade or Business Activity
2014, 2015, 2016 Activity Information | Multiple Trade or Business | xxx |Depreciation and Amortization | 4562 Information | 4562 Overrides {note: xxx is the Multiple Trade or Business name specified by import/user}
Form 4562 Other Rental Activity 2014, 2015, 2016 Activity Information | Other Rental | xxx | Depreciation and Amortization | 4562 Information | 4562 Overrides {note: xxx is the Other Rental name specified by import/user}
Form 4562 Pass Through Activity 2014, 2015, 2016 Activity Information | Pass Through Entity | xxx | Depreciation and Amortization | 4562 Information | 4562 Overrides {note: xxx is the Pass Through Entity name specified by import/user}
Form 4562 Rental Activity 2014, 2015, 2016 Activity Information | Rental Real Estate | xxx | Depreciation and Amortization | 4562 Information | 4562 Overrides {note: xxx is the Rental Real Estate name specified by import/user}
Form 4797 Overrides 2014, 2015, 2016 Gains and Losses | Summary Overrides
Form 5471 Schedule A 2014, 2015, 2016 Foreign Information | Foreign Corporation | Foreign Corporate Name | Schedule A
Form 5471 Schedule B 2014, 2015, 2016 Foreign Information | Foreign Corporation | Foreign Corporate Name | Schedule B
Form 5471 Schedule M 2014, 2015, 2016 Foreign Information | Foreign Corporation | Foreign Corporate Name | Schedule M
Form 5471 Schedule O, Part I 2014, 2015, 2016 Foreign Information | Foreign Corporation | Foreign Corporate Name | Schedule O, Part I
APPENDIX 1 - AVAILABLE IMPORT TARGETS
75
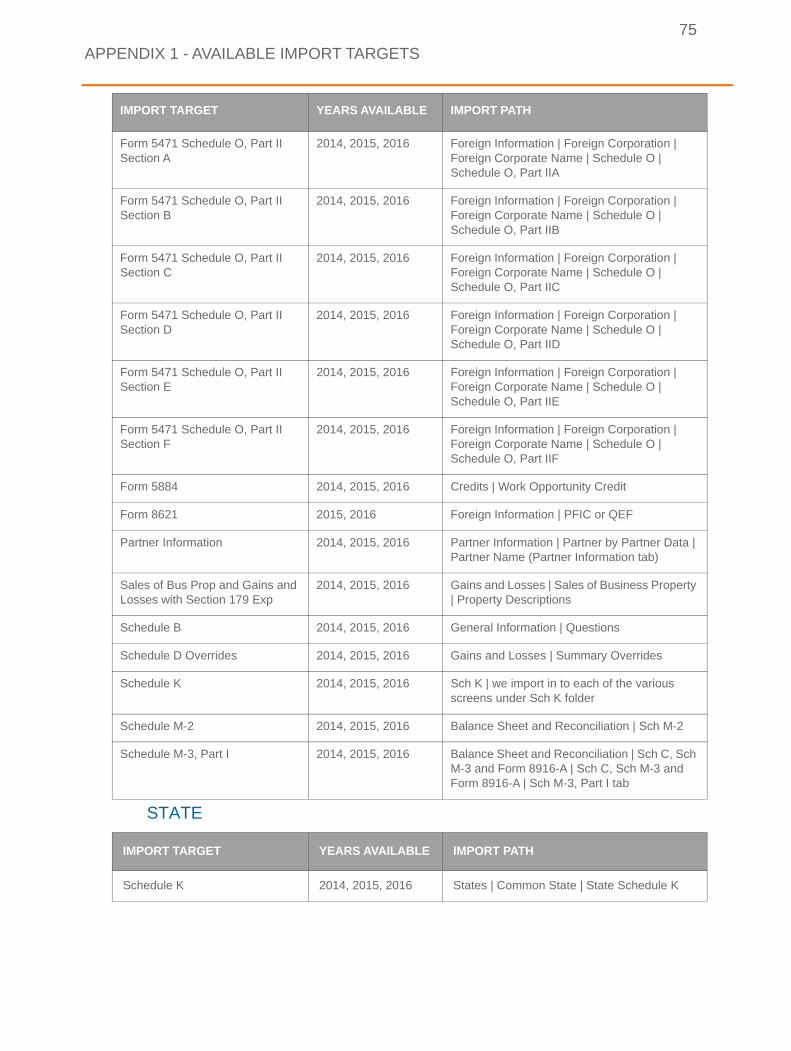
STATE
IMPORT TARGET YEARS AVAILABLE IMPORT PATH
Schedule K 2014, 2015, 2016 States | Common State | State Schedule K
Form 5471 Schedule O, Part II Section A
2014, 2015, 2016 Foreign Information | Foreign Corporation | Foreign Corporate Name | Schedule O | Schedule O, Part IIA
Form 5471 Schedule O, Part II Section B
2014, 2015, 2016 Foreign Information | Foreign Corporation | Foreign Corporate Name | Schedule O | Schedule O, Part IIB
Form 5471 Schedule O, Part II Section C
2014, 2015, 2016 Foreign Information | Foreign Corporation | Foreign Corporate Name | Schedule O | Schedule O, Part IIC
Form 5471 Schedule O, Part II Section D
2014, 2015, 2016 Foreign Information | Foreign Corporation | Foreign Corporate Name | Schedule O | Schedule O, Part IID
Form 5471 Schedule O, Part II Section E
2014, 2015, 2016 Foreign Information | Foreign Corporation | Foreign Corporate Name | Schedule O | Schedule O, Part IIE
Form 5471 Schedule O, Part II Section F
2014, 2015, 2016 Foreign Information | Foreign Corporation | Foreign Corporate Name | Schedule O | Schedule O, Part IIF
Form 5884 2014, 2015, 2016 Credits | Work Opportunity Credit
Form 8621 2015, 2016 Foreign Information | PFIC or QEF
Partner Information 2014, 2015, 2016 Partner Information | Partner by Partner Data | Partner Name (Partner Information tab)
Sales of Bus Prop and Gains and Losses with Section 179 Exp
2014, 2015, 2016 Gains and Losses | Sales of Business Property | Property Descriptions
Schedule B 2014, 2015, 2016 General Information | Questions
Schedule D Overrides 2014, 2015, 2016 Gains and Losses | Summary Overrides
Schedule K 2014, 2015, 2016 Sch K | we import in to each of the various screens under Sch K folder
Schedule M-2 2014, 2015, 2016 Balance Sheet and Reconciliation | Sch M-2
Schedule M-3, Part I 2014, 2015, 2016 Balance Sheet and Reconciliation | Sch C, Sch M-3 and Form 8916-A | Sch C, Sch M-3 and Form 8916-A | Sch M-3, Part I tab
IMPORT TARGET YEARS AVAILABLE IMPORT PATH

APPENDIX 2 - DATA SPECIFICATIONS
76
APPENDIX 2 - DATA SPECIFICATIONS
To access the Excel Add-in Input Data Specifications for Worksheets Imported into ONESOURCE spreadsheet, please go to our Product Assistance site at: https://support2.riahome.com
You can access this spreadsheet as a separate Excel document.
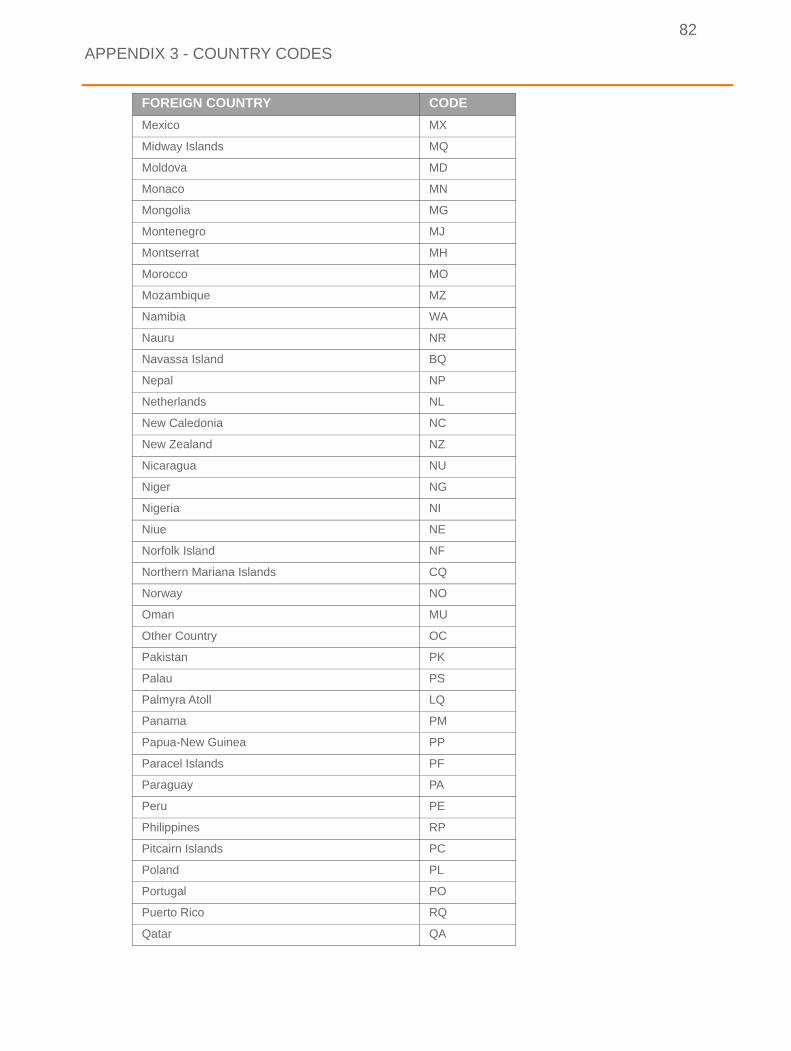
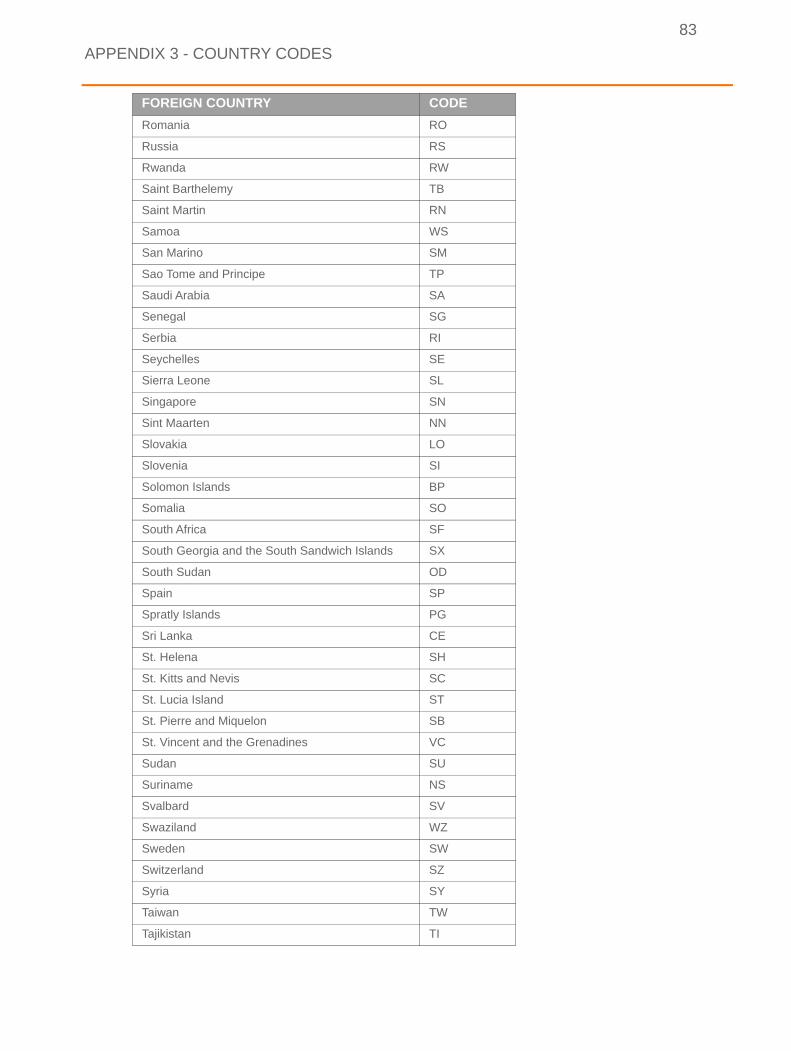
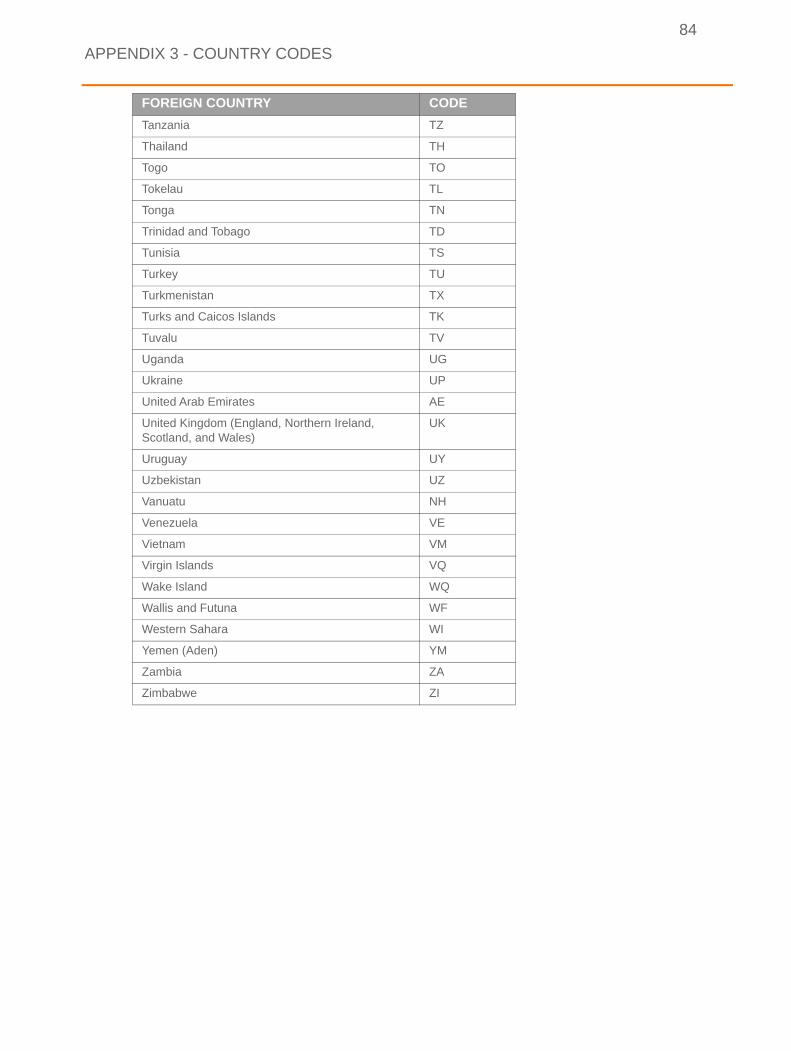
APPENDIX 3 - COUNTRY CODES
78
APPENDIX 3 - COUNTRY CODES
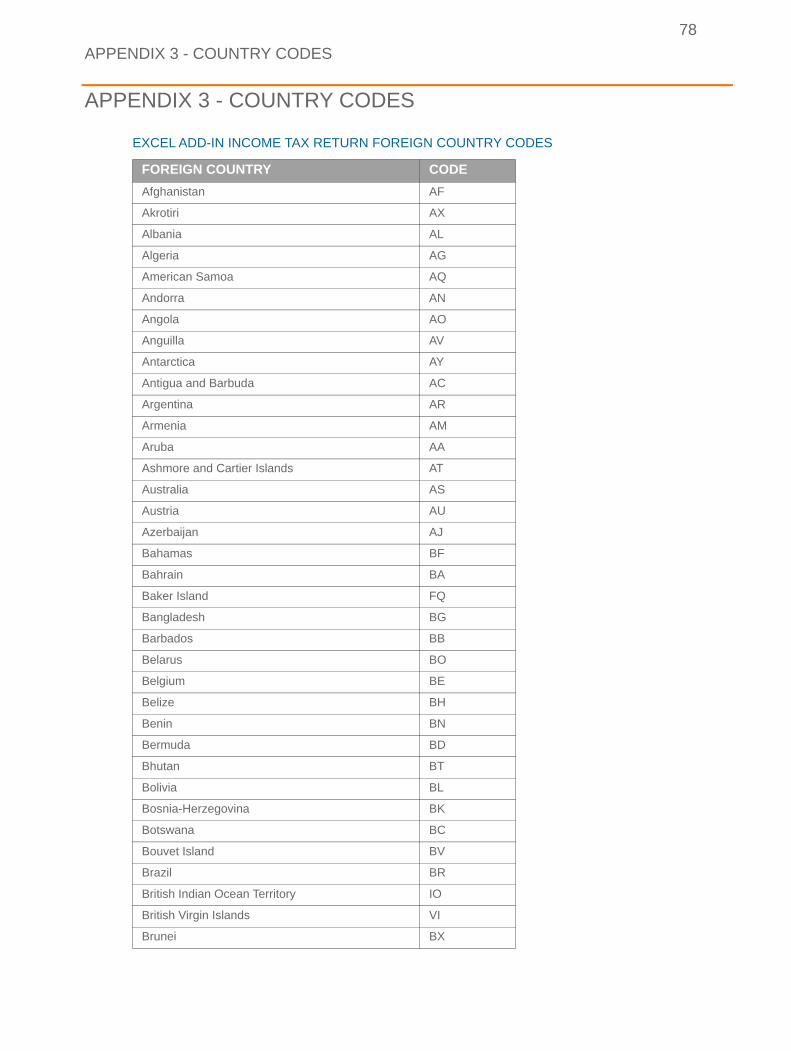
EXCEL ADD-IN INCOME TAX RETURN FOREIGN COUNTRY CODES
FOREIGN COUNTRY CODE
Afghanistan AF
Akrotiri AX
Albania AL
Algeria AG
American Samoa AQ
Andorra AN
Angola AO
Anguilla AV
Antarctica AY
Antigua and Barbuda AC
Argentina AR
Armenia AM
Aruba AA
Ashmore and Cartier Islands AT
Australia AS
Austria AU
Azerbaijan AJ
Bahamas BF
Bahrain BA
Baker Island FQ
Bangladesh BG
Barbados BB
Belarus BO
Belgium BE
Belize BH
Benin BN
Bermuda BD
Bhutan BT
Bolivia BL
Bosnia-Herzegovina BK
Botswana BC
Bouvet Island BV
Brazil BR
British Indian Ocean Territory IO
British Virgin Islands VI
Brunei BX
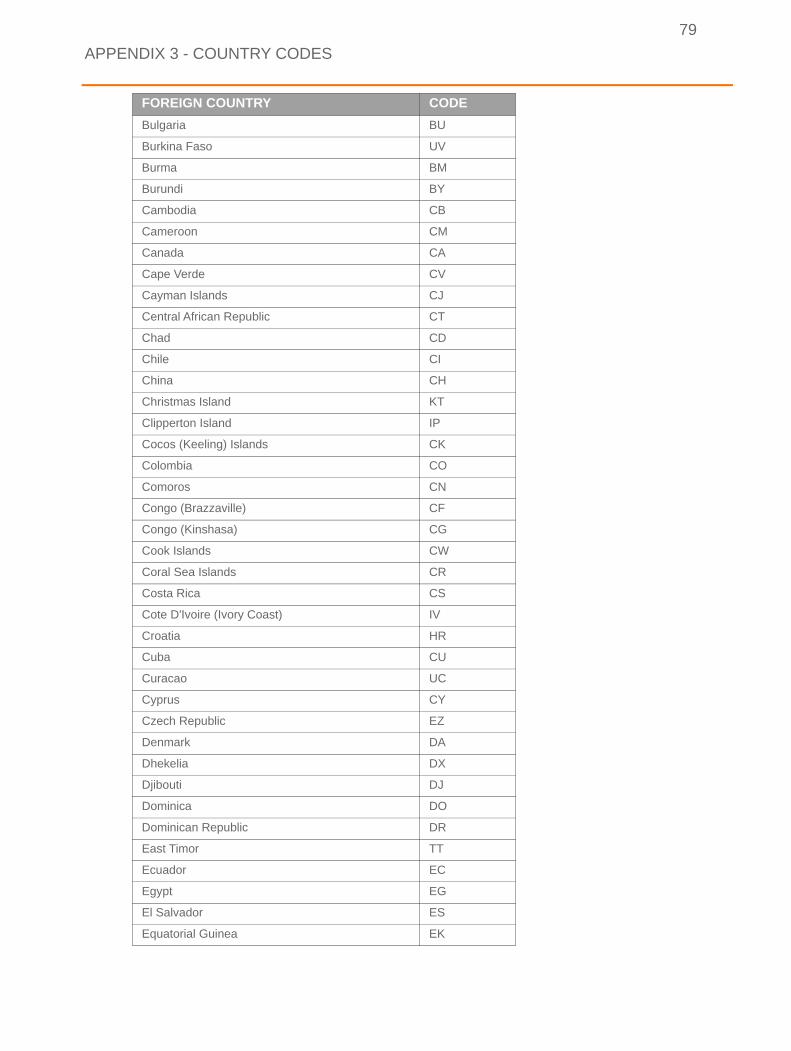
APPENDIX 3 - COUNTRY CODES
79
Bulgaria BU
Burkina Faso UV
Burma BM
Burundi BY
Cambodia CB
Cameroon CM
Canada CA
Cape Verde CV
Cayman Islands CJ
Central African Republic CT
Chad CD
Chile CI
China CH
Christmas Island KT
Clipperton Island IP
Cocos (Keeling) Islands CK
Colombia CO
Comoros CN
Congo (Brazzaville) CF
Congo (Kinshasa) CG
Cook Islands CW
Coral Sea Islands CR
Costa Rica CS
Cote D'Ivoire (Ivory Coast) IV
Croatia HR
Cuba CU
Curacao UC
Cyprus CY
Czech Republic EZ
Denmark DA
Dhekelia DX
Djibouti DJ
Dominica DO
Dominican Republic DR
East Timor TT
Ecuador EC
Egypt EG
El Salvador ES
Equatorial Guinea EK
FOREIGN COUNTRY CODE
APPENDIX 3 - COUNTRY CODES
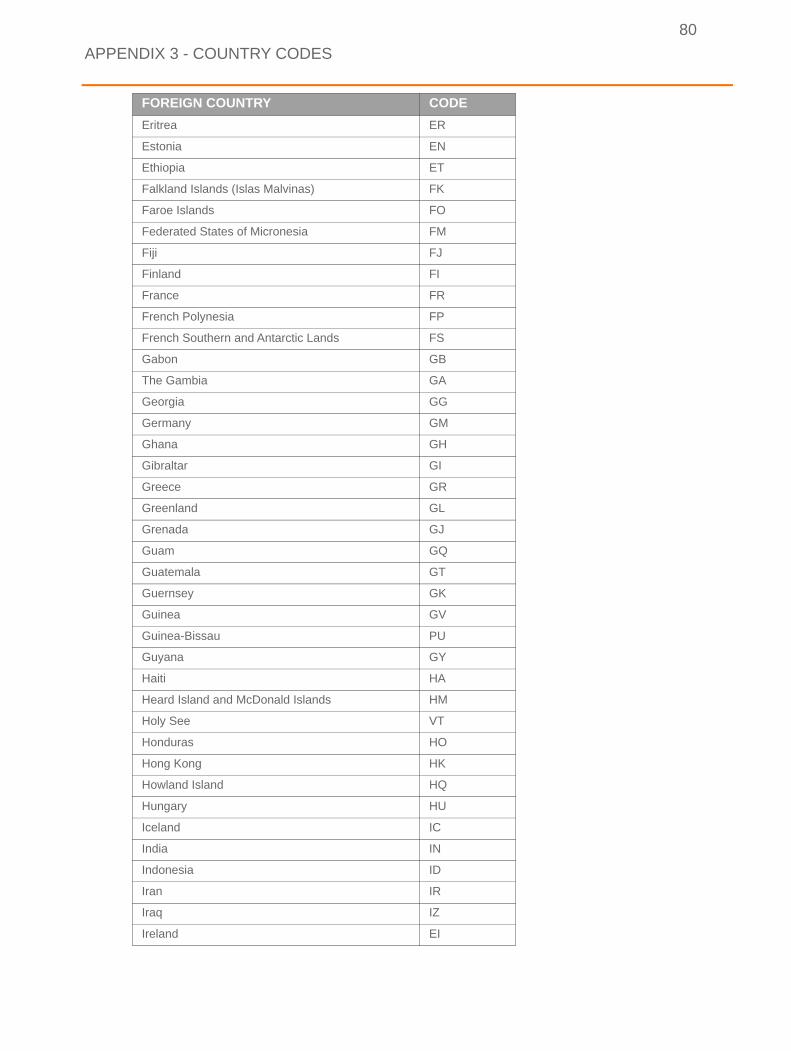
80
Eritrea ER
Estonia EN
Ethiopia ET
Falkland Islands (Islas Malvinas) FK
Faroe Islands FO
Federated States of Micronesia FM
Fiji FJ
Finland FI
France FR
French Polynesia FP
French Southern and Antarctic Lands FS
Gabon GB
The Gambia GA
Georgia GG
Germany GM
Ghana GH
Gibraltar GI
Greece GR
Greenland GL
Grenada GJ
Guam GQ
Guatemala GT
Guernsey GK
Guinea GV
Guinea-Bissau PU
Guyana GY
Haiti HA
Heard Island and McDonald Islands HM
Holy See VT
Honduras HO
Hong Kong HK
Howland Island HQ
Hungary HU
Iceland IC
India IN
Indonesia ID
Iran IR
Iraq IZ
Ireland EI
FOREIGN COUNTRY CODE
APPENDIX 3 - COUNTRY CODES
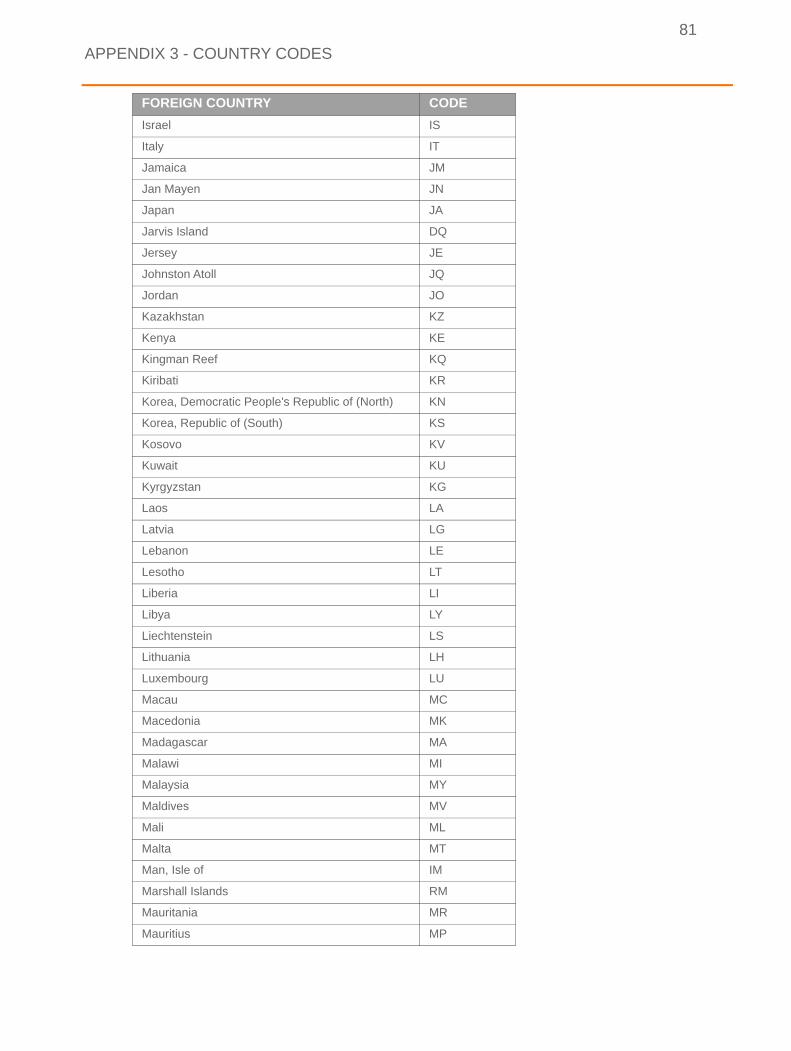
81
Israel IS
Italy IT
Jamaica JM
Jan Mayen JN
Japan JA
Jarvis Island DQ
Jersey JE
Johnston Atoll JQ
Jordan JO
Kazakhstan KZ
Kenya KE
Kingman Reef KQ
Kiribati KR
Korea, Democratic People's Republic of (North) KN
Korea, Republic of (South) KS
Kosovo KV
Kuwait KU
Kyrgyzstan KG
Laos LA
Latvia LG
Lebanon LE
Lesotho LT
Liberia LI
Libya LY
Liechtenstein LS
Lithuania LH
Luxembourg LU
Macau MC
Macedonia MK
Madagascar MA
Malawi MI
Malaysia MY
Maldives MV
Mali ML
Malta MT
Man, Isle of IM
Marshall Islands RM
Mauritania MR
Mauritius MP
FOREIGN COUNTRY CODE
APPENDIX 3 - COUNTRY CODES
82
Mexico MX
Midway Islands MQ
Moldova MD
Monaco MN
Mongolia MG
Montenegro MJ
Montserrat MH
Morocco MO
Mozambique MZ
Namibia WA
Nauru NR
Navassa Island BQ
Nepal NP
Netherlands NL
New Caledonia NC
New Zealand NZ
Nicaragua NU
Niger NG
Nigeria NI
Niue NE
Norfolk Island NF
Northern Mariana Islands CQ
Norway NO
Oman MU
Other Country OC
Pakistan PK
Palau PS
Palmyra Atoll LQ
Panama PM
Papua-New Guinea PP
Paracel Islands PF
Paraguay PA
Peru PE
Philippines RP
Pitcairn Islands PC
Poland PL
Portugal PO
Puerto Rico RQ
Qatar QA
FOREIGN COUNTRY CODE
APPENDIX 3 - COUNTRY CODES
83
Romania RO
Russia RS
Rwanda RW
Saint Barthelemy TB
Saint Martin RN
Samoa WS
San Marino SM
Sao Tome and Principe TP
Saudi Arabia SA
Senegal SG
Serbia RI
Seychelles SE
Sierra Leone SL
Singapore SN
Sint Maarten NN
Slovakia LO
Slovenia SI
Solomon Islands BP
Somalia SO
South Africa SF
South Georgia and the South Sandwich Islands SX
South Sudan OD
Spain SP
Spratly Islands PG
Sri Lanka CE
St. Helena SH
St. Kitts and Nevis SC
St. Lucia Island ST
St. Pierre and Miquelon SB
St. Vincent and the Grenadines VC
Sudan SU
Suriname NS
Svalbard SV
Swaziland WZ
Sweden SW
Switzerland SZ
Syria SY
Taiwan TW
Tajikistan TI
FOREIGN COUNTRY CODE
APPENDIX 3 - COUNTRY CODES
84
Tanzania TZ
Thailand TH
Togo TO
Tokelau TL
Tonga TN
Trinidad and Tobago TD
Tunisia TS
Turkey TU
Turkmenistan TX
Turks and Caicos Islands TK
Tuvalu TV
Uganda UG
Ukraine UP
United Arab Emirates AE
United Kingdom (England, Northern Ireland, Scotland, and Wales)
UK
Uruguay UY
Uzbekistan UZ
Vanuatu NH
Venezuela VE
Vietnam VM
Virgin Islands VQ
Wake Island WQ
Wallis and Futuna WF
Western Sahara WI
Yemen (Aden) YM
Zambia ZA
Zimbabwe ZI
FOREIGN COUNTRY CODE
APPENDIX 3 - COUNTRY CODES
85
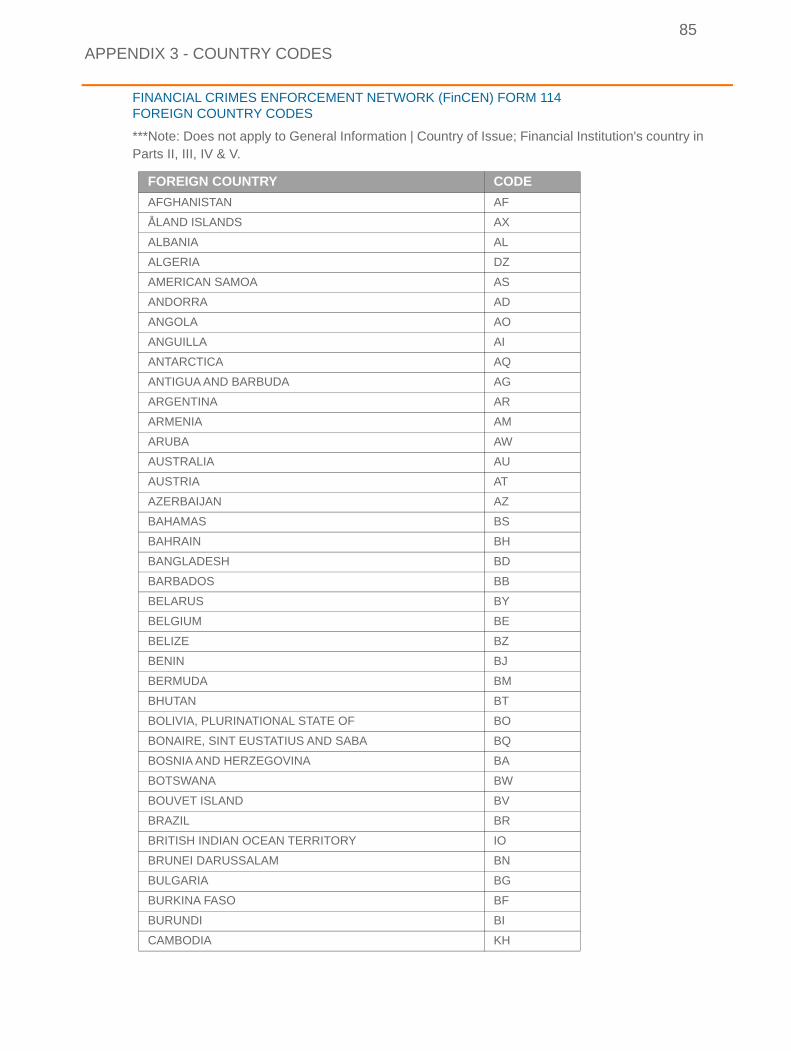
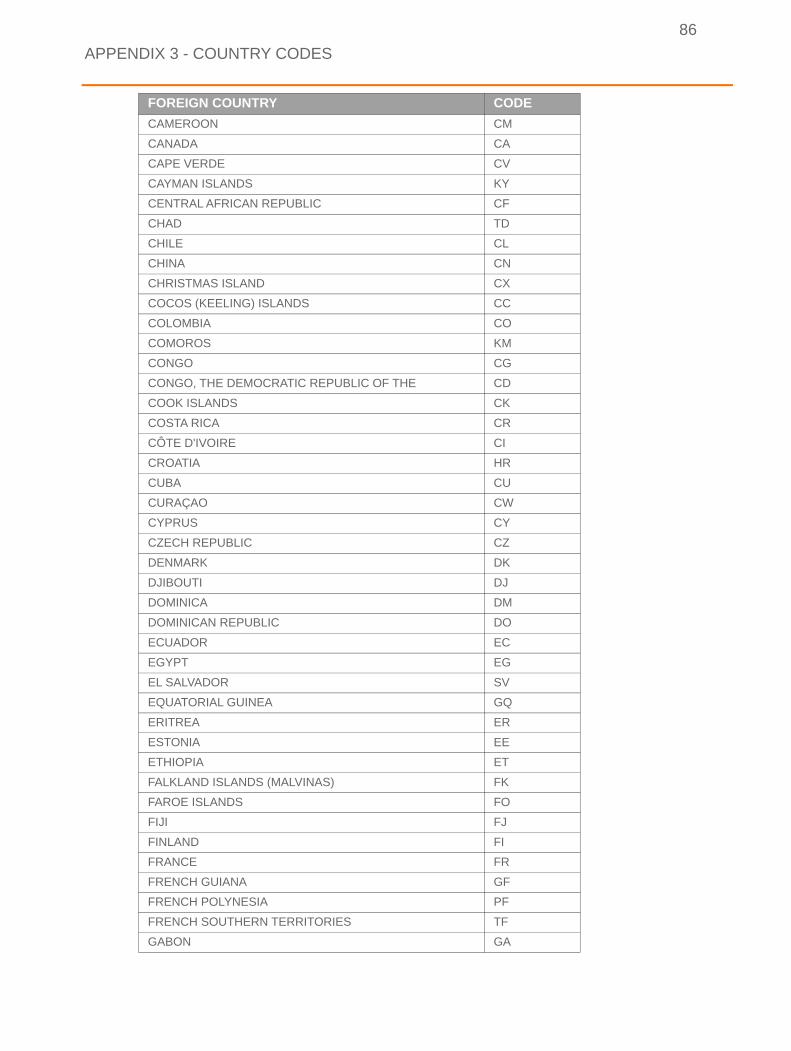
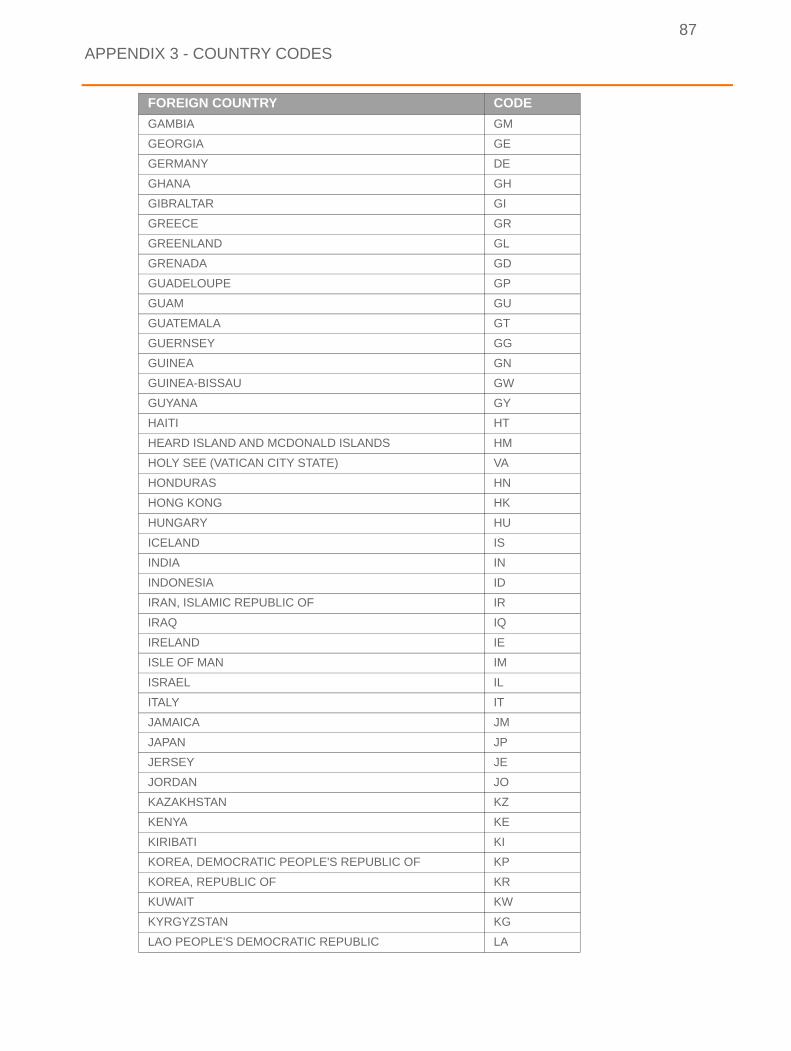
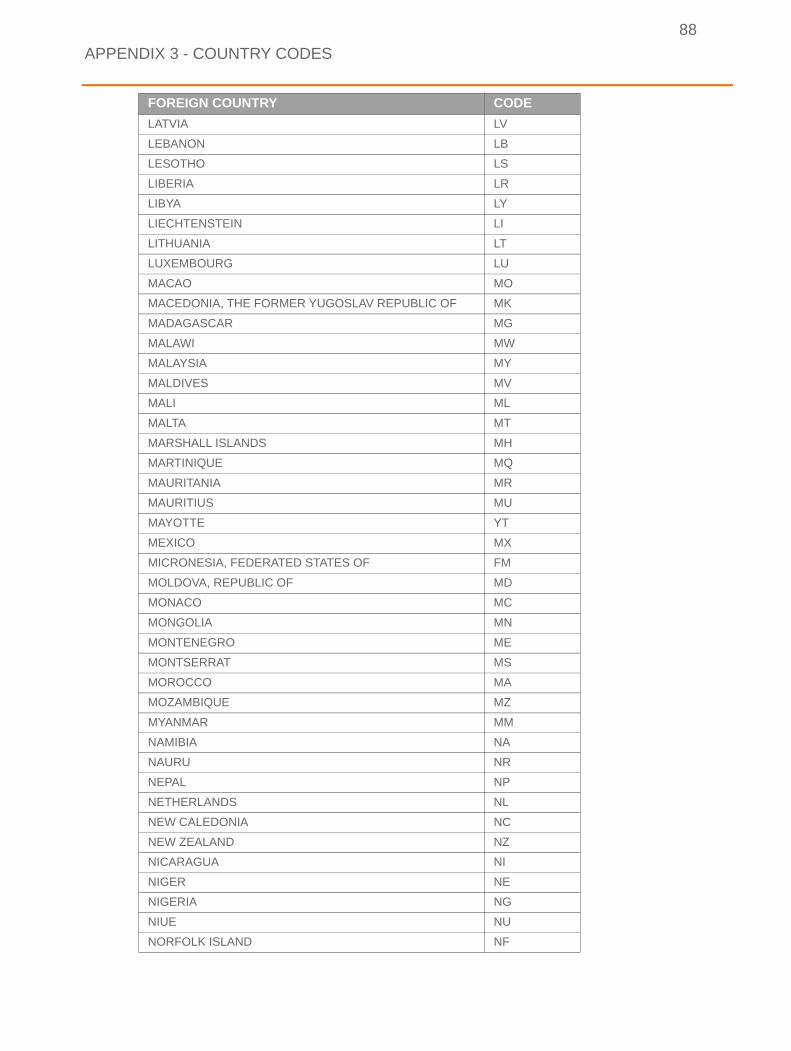
FINANCIAL CRIMES ENFORCEMENT NETWORK (FinCEN) FORM 114 FOREIGN COUNTRY CODES
***Note: Does not apply to General Information | Country of Issue; Financial Institution's country in Parts II, III, IV & V.
FOREIGN COUNTRY CODE
AFGHANISTAN AF
ÅLAND ISLANDS AX
ALBANIA AL
ALGERIA DZ
AMERICAN SAMOA AS
ANDORRA AD
ANGOLA AO
ANGUILLA AI
ANTARCTICA AQ
ANTIGUA AND BARBUDA AG
ARGENTINA AR
ARMENIA AM
ARUBA AW
AUSTRALIA AU
AUSTRIA AT
AZERBAIJAN AZ
BAHAMAS BS
BAHRAIN BH
BANGLADESH BD
BARBADOS BB
BELARUS BY
BELGIUM BE
BELIZE BZ
BENIN BJ
BERMUDA BM
BHUTAN BT
BOLIVIA, PLURINATIONAL STATE OF BO
BONAIRE, SINT EUSTATIUS AND SABA BQ
BOSNIA AND HERZEGOVINA BA
BOTSWANA BW
BOUVET ISLAND BV
BRAZIL BR
BRITISH INDIAN OCEAN TERRITORY IO
BRUNEI DARUSSALAM BN
BULGARIA BG
BURKINA FASO BF
BURUNDI BI
CAMBODIA KH
APPENDIX 3 - COUNTRY CODES
86
CAMEROON CM
CANADA CA
CAPE VERDE CV
CAYMAN ISLANDS KY
CENTRAL AFRICAN REPUBLIC CF
CHAD TD
CHILE CL
CHINA CN
CHRISTMAS ISLAND CX
COCOS (KEELING) ISLANDS CC
COLOMBIA CO
COMOROS KM
CONGO CG
CONGO, THE DEMOCRATIC REPUBLIC OF THE CD
COOK ISLANDS CK
COSTA RICA CR
CÔTE D'IVOIRE CI
CROATIA HR
CUBA CU
CURAÇAO CW
CYPRUS CY
CZECH REPUBLIC CZ
DENMARK DK
DJIBOUTI DJ
DOMINICA DM
DOMINICAN REPUBLIC DO
ECUADOR EC
EGYPT EG
EL SALVADOR SV
EQUATORIAL GUINEA GQ
ERITREA ER
ESTONIA EE
ETHIOPIA ET
FALKLAND ISLANDS (MALVINAS) FK
FAROE ISLANDS FO
FIJI FJ
FINLAND FI
FRANCE FR
FRENCH GUIANA GF
FRENCH POLYNESIA PF
FRENCH SOUTHERN TERRITORIES TF
GABON GA
FOREIGN COUNTRY CODE
APPENDIX 3 - COUNTRY CODES
87
GAMBIA GM
GEORGIA GE
GERMANY DE
GHANA GH
GIBRALTAR GI
GREECE GR
GREENLAND GL
GRENADA GD
GUADELOUPE GP
GUAM GU
GUATEMALA GT
GUERNSEY GG
GUINEA GN
GUINEA-BISSAU GW
GUYANA GY
HAITI HT
HEARD ISLAND AND MCDONALD ISLANDS HM
HOLY SEE (VATICAN CITY STATE) VA
HONDURAS HN
HONG KONG HK
HUNGARY HU
ICELAND IS
INDIA IN
INDONESIA ID
IRAN, ISLAMIC REPUBLIC OF IR
IRAQ IQ
IRELAND IE
ISLE OF MAN IM
ISRAEL IL
ITALY IT
JAMAICA JM
JAPAN JP
JERSEY JE
JORDAN JO
KAZAKHSTAN KZ
KENYA KE
KIRIBATI KI
KOREA, DEMOCRATIC PEOPLE'S REPUBLIC OF KP
KOREA, REPUBLIC OF KR
KUWAIT KW
KYRGYZSTAN KG
LAO PEOPLE'S DEMOCRATIC REPUBLIC LA
FOREIGN COUNTRY CODE
APPENDIX 3 - COUNTRY CODES
88
LATVIA LV
LEBANON LB
LESOTHO LS
LIBERIA LR
LIBYA LY
LIECHTENSTEIN LI
LITHUANIA LT
LUXEMBOURG LU
MACAO MO
MACEDONIA, THE FORMER YUGOSLAV REPUBLIC OF MK
MADAGASCAR MG
MALAWI MW
MALAYSIA MY
MALDIVES MV
MALI ML
MALTA MT
MARSHALL ISLANDS MH
MARTINIQUE MQ
MAURITANIA MR
MAURITIUS MU
MAYOTTE YT
MEXICO MX
MICRONESIA, FEDERATED STATES OF FM
MOLDOVA, REPUBLIC OF MD
MONACO MC
MONGOLIA MN
MONTENEGRO ME
MONTSERRAT MS
MOROCCO MA
MOZAMBIQUE MZ
MYANMAR MM
NAMIBIA NA
NAURU NR
NEPAL NP
NETHERLANDS NL
NEW CALEDONIA NC
NEW ZEALAND NZ
NICARAGUA NI
NIGER NE
NIGERIA NG
NIUE NU
NORFOLK ISLAND NF
FOREIGN COUNTRY CODE
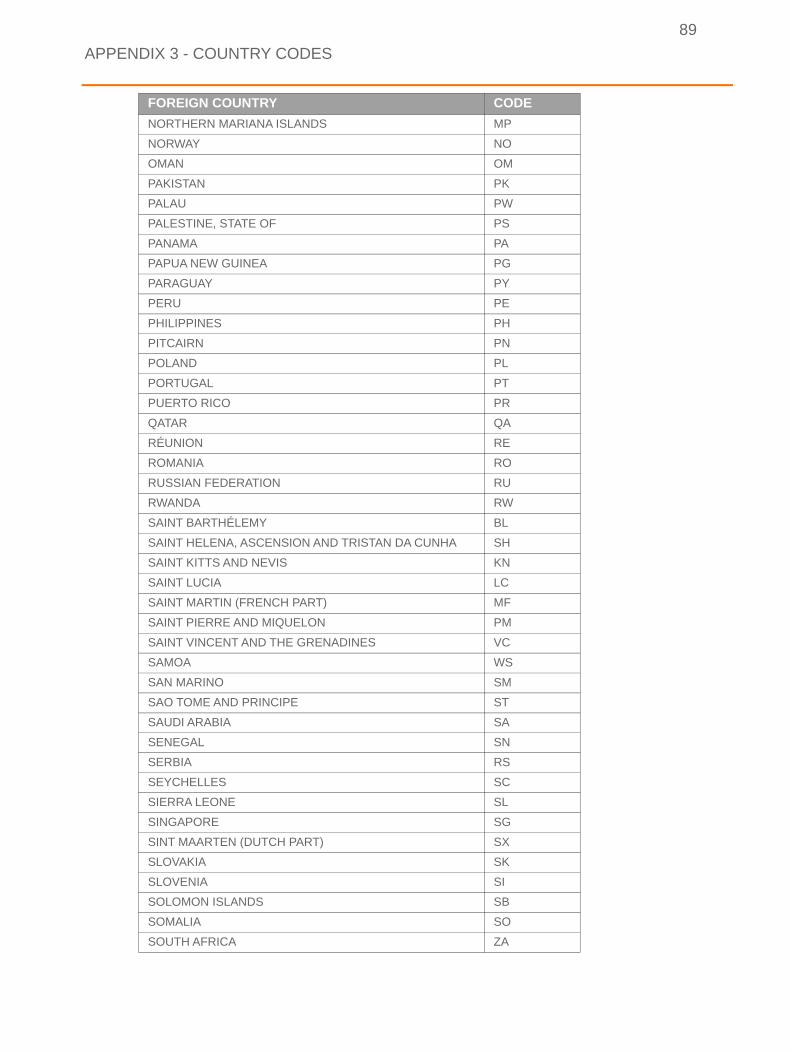
APPENDIX 3 - COUNTRY CODES
89
NORTHERN MARIANA ISLANDS MP
NORWAY NO
OMAN OM
PAKISTAN PK
PALAU PW
PALESTINE, STATE OF PS
PANAMA PA
PAPUA NEW GUINEA PG
PARAGUAY PY
PERU PE
PHILIPPINES PH
PITCAIRN PN
POLAND PL
PORTUGAL PT
PUERTO RICO PR
QATAR QA
RÉUNION RE
ROMANIA RO
RUSSIAN FEDERATION RU
RWANDA RW
SAINT BARTHÉLEMY BL
SAINT HELENA, ASCENSION AND TRISTAN DA CUNHA SH
SAINT KITTS AND NEVIS KN
SAINT LUCIA LC
SAINT MARTIN (FRENCH PART) MF
SAINT PIERRE AND MIQUELON PM
SAINT VINCENT AND THE GRENADINES VC
SAMOA WS
SAN MARINO SM
SAO TOME AND PRINCIPE ST
SAUDI ARABIA SA
SENEGAL SN
SERBIA RS
SEYCHELLES SC
SIERRA LEONE SL
SINGAPORE SG
SINT MAARTEN (DUTCH PART) SX
SLOVAKIA SK
SLOVENIA SI
SOLOMON ISLANDS SB
SOMALIA SO
SOUTH AFRICA ZA
FOREIGN COUNTRY CODE
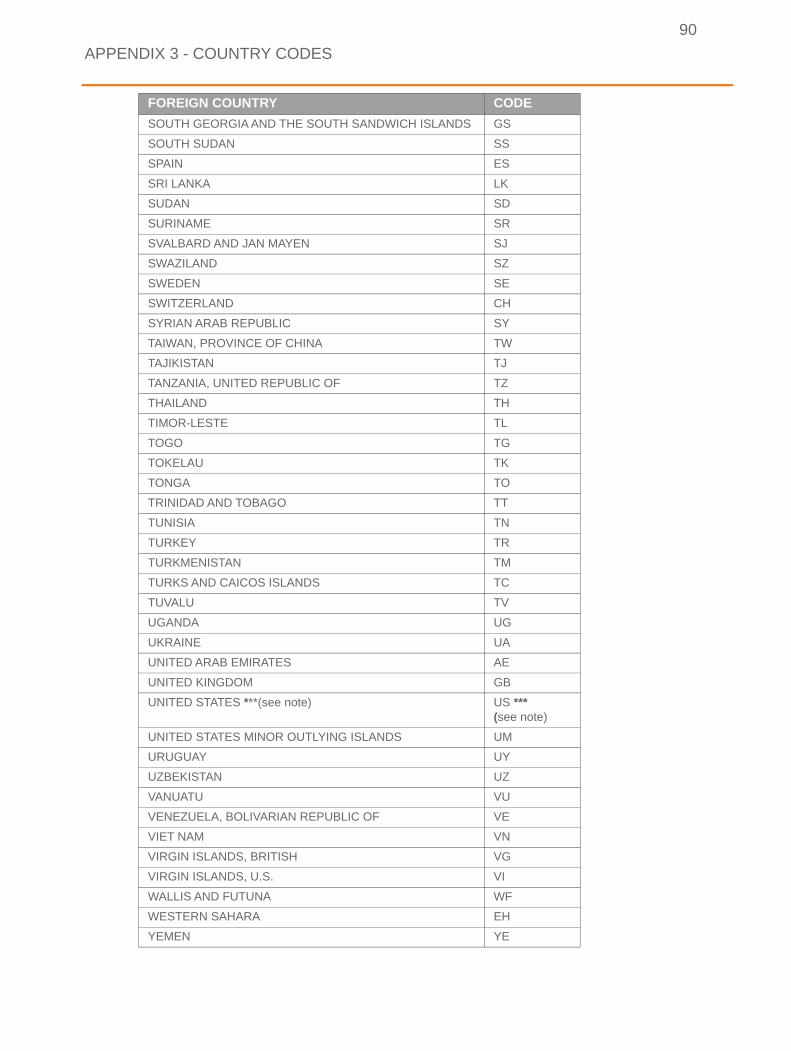
APPENDIX 3 - COUNTRY CODES
90
SOUTH GEORGIA AND THE SOUTH SANDWICH ISLANDS GS
SOUTH SUDAN SS
SPAIN ES
SRI LANKA LK
SUDAN SD
SURINAME SR
SVALBARD AND JAN MAYEN SJ
SWAZILAND SZ
SWEDEN SE
SWITZERLAND CH
SYRIAN ARAB REPUBLIC SY
TAIWAN, PROVINCE OF CHINA TW
TAJIKISTAN TJ
TANZANIA, UNITED REPUBLIC OF TZ
THAILAND TH
TIMOR-LESTE TL
TOGO TG
TOKELAU TK
TONGA TO
TRINIDAD AND TOBAGO TT
TUNISIA TN
TURKEY TR
TURKMENISTAN TM
TURKS AND CAICOS ISLANDS TC
TUVALU TV
UGANDA UG
UKRAINE UA
UNITED ARAB EMIRATES AE
UNITED KINGDOM GB
UNITED STATES ***(see note) US ***(see note)
UNITED STATES MINOR OUTLYING ISLANDS UM
URUGUAY UY
UZBEKISTAN UZ
VANUATU VU
VENEZUELA, BOLIVARIAN REPUBLIC OF VE
VIET NAM VN
VIRGIN ISLANDS, BRITISH VG
VIRGIN ISLANDS, U.S. VI
WALLIS AND FUTUNA WF
WESTERN SAHARA EH
YEMEN YE
FOREIGN COUNTRY CODE

APPENDIX 3 - COUNTRY CODES
91
ZAMBIA ZM
ZIMBABWE ZW
FOREIGN COUNTRY CODE
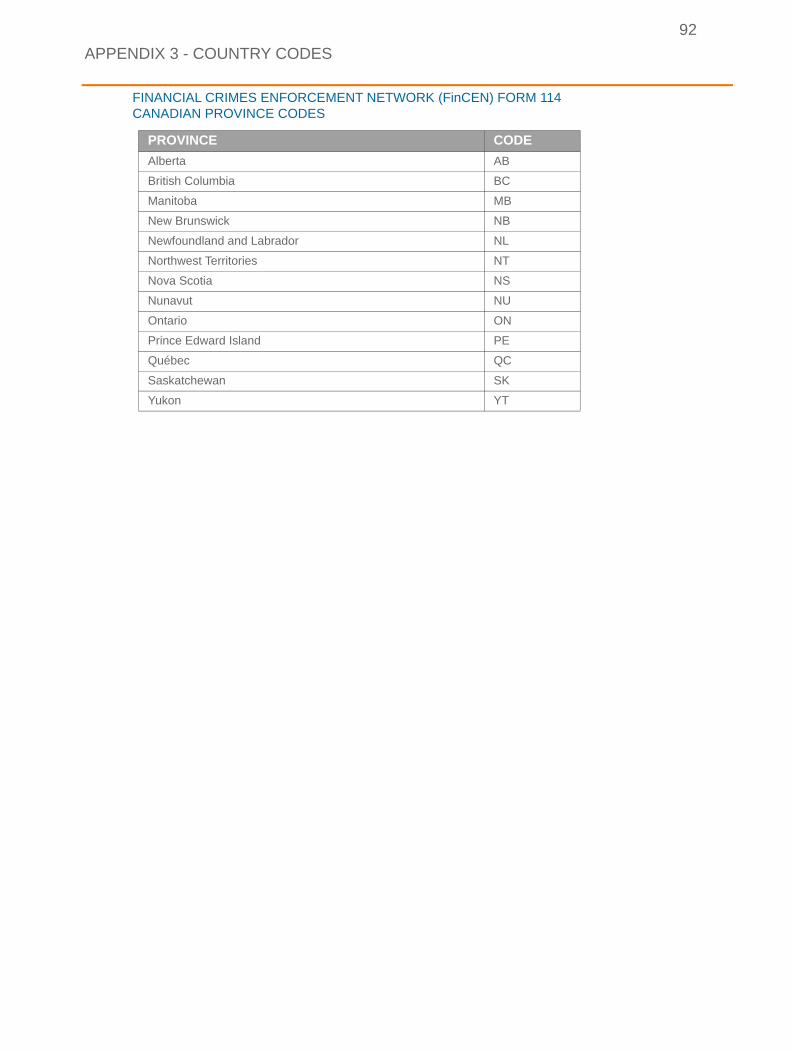
APPENDIX 3 - COUNTRY CODES
92
FINANCIAL CRIMES ENFORCEMENT NETWORK (FinCEN) FORM 114 CANADIAN PROVINCE CODES
PROVINCE CODE
Alberta AB
British Columbia BC
Manitoba MB
New Brunswick NB
Newfoundland and Labrador NL
Northwest Territories NT
Nova Scotia NS
Nunavut NU
Ontario ON
Prince Edward Island PE
Québec QC
Saskatchewan SK
Yukon YT
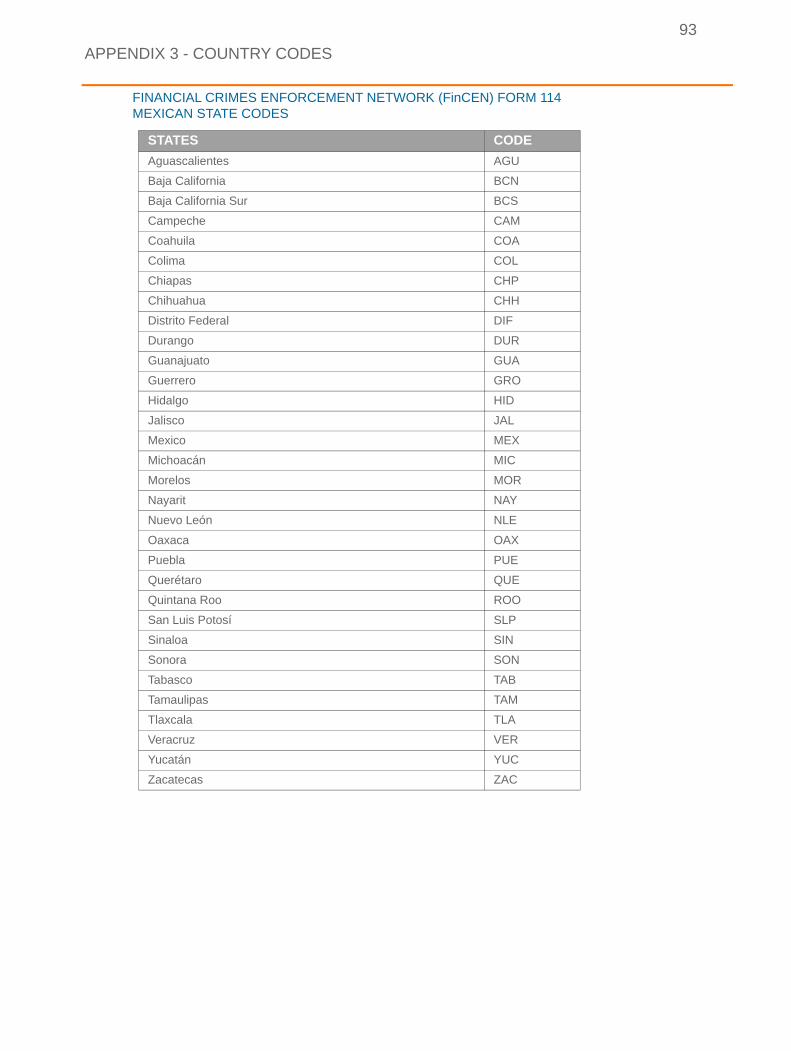
APPENDIX 3 - COUNTRY CODES
93
FINANCIAL CRIMES ENFORCEMENT NETWORK (FinCEN) FORM 114 MEXICAN STATE CODES
STATES CODE
Aguascalientes AGU
Baja California BCN
Baja California Sur BCS
Campeche CAM
Coahuila COA
Colima COL
Chiapas CHP
Chihuahua CHH
Distrito Federal DIF
Durango DUR
Guanajuato GUA
Guerrero GRO
Hidalgo HID
Jalisco JAL
Mexico MEX
Michoacán MIC
Morelos MOR
Nayarit NAY
Nuevo León NLE
Oaxaca OAX
Puebla PUE
Querétaro QUE
Quintana Roo ROO
San Luis Potosí SLP
Sinaloa SIN
Sonora SON
Tabasco TAB
Tamaulipas TAM
Tlaxcala TLA
Veracruz VER
Yucatán YUC
Zacatecas ZAC
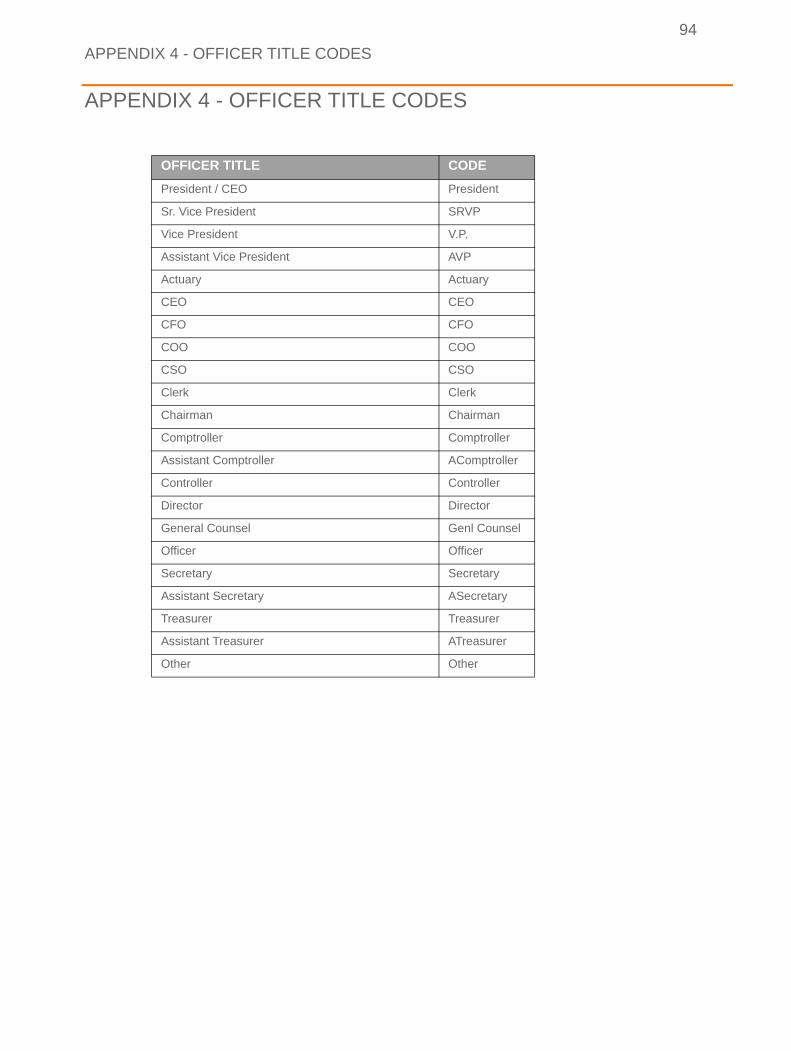
APPENDIX 4 - OFFICER TITLE CODES
94
APPENDIX 4 - OFFICER TITLE CODES
OFFICER TITLE CODE
President / CEO President
Sr. Vice President SRVP
Vice President V.P.
Assistant Vice President AVP
Actuary Actuary
CEO CEO
CFO CFO
COO COO
CSO CSO
Clerk Clerk
Chairman Chairman
Comptroller Comptroller
Assistant Comptroller AComptroller
Controller Controller
Director Director
General Counsel Genl Counsel
Officer Officer
Secretary Secretary
Assistant Secretary ASecretary
Treasurer Treasurer
Assistant Treasurer ATreasurer
Other Other

APPENDIX 5 - LATE FILING REASON CODES
95
APPENDIX 5 - LATE FILING REASON CODES
LATE FILING REASON CODE
Forgot to file A
Did not know I had to file B
Thought account balance was below reporting threshold
C
Did not know my account qualified as foreign D
Account statement not received in time E
Account statement lost (replacement requested) F
Late receiving missing required account information
G
Unable to obtain joint spouse signature in time H
Unable to access BSA E-Filing System I
Other Z
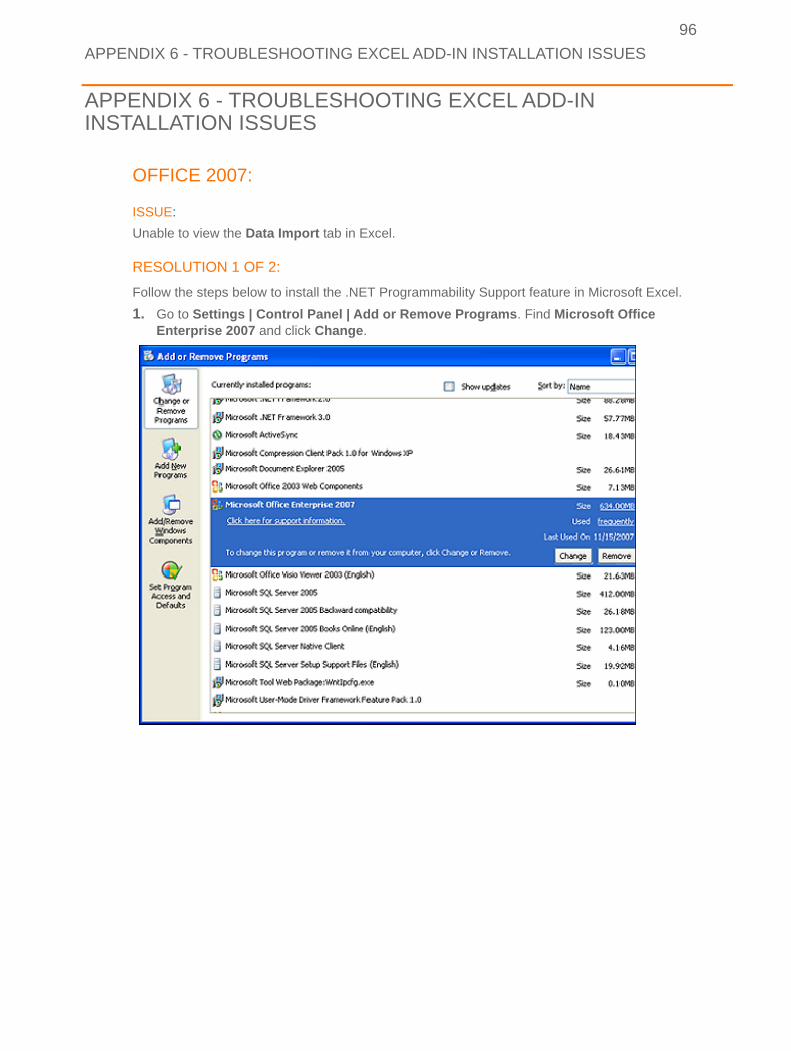
APPENDIX 6 - TROUBLESHOOTING EXCEL ADD-IN INSTALLATION ISSUES
96
APPENDIX 6 - TROUBLESHOOTING EXCEL ADD-IN INSTALLATION ISSUES
OFFICE 2007:
ISSUE:
Unable to view the Data Import tab in Excel.
RESOLUTION 1 OF 2:
Follow the steps below to install the .NET Programmability Support feature in Microsoft Excel.
1. Go to Settings | Control Panel | Add or Remove Programs. Find Microsoft Office Enterprise 2007 and click Change.
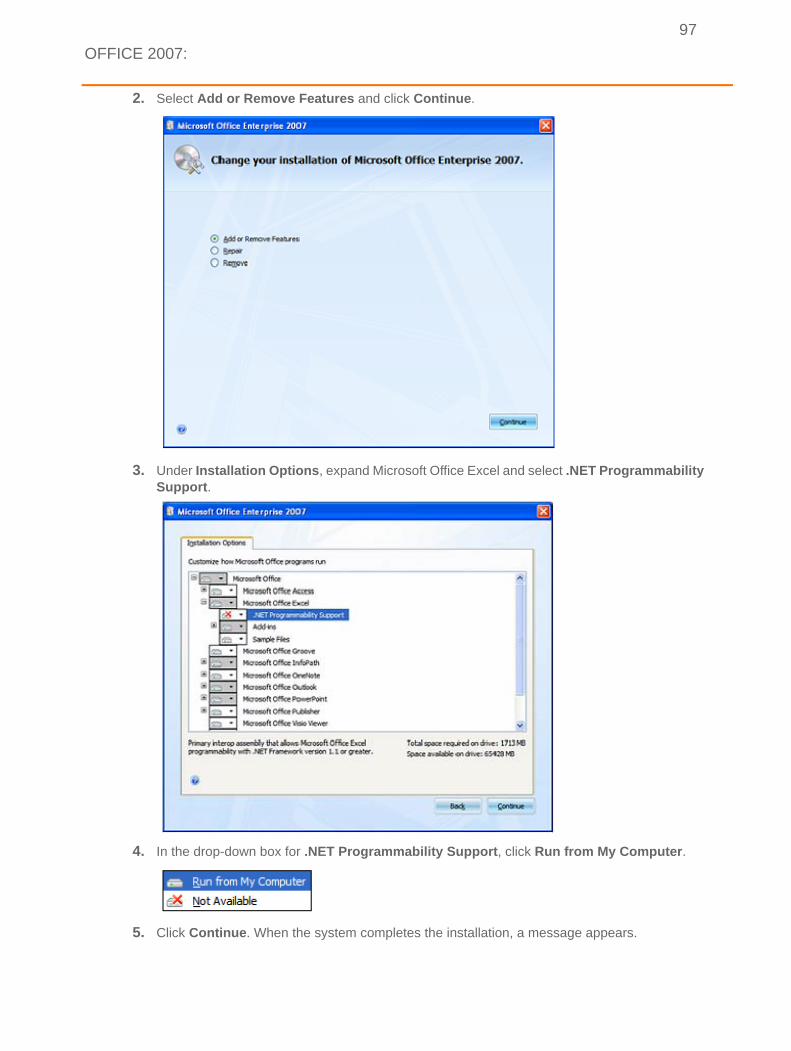
OFFICE 2007:
97
2. Select Add or Remove Features and click Continue.
3. Under Installation Options, expand Microsoft Office Excel and select .NET Programmability Support.
4. In the drop-down box for .NET Programmability Support, click Run from My Computer.
5. Click Continue. When the system completes the installation, a message appears.
OFFICE 2007:
98
6. Click Close and then close the Add/Remove Programs screen.
Note: These steps may differ slightly depending on your operating system.
RESOLUTION 2 OF 2:
Enable the Data Import Excel Add-in
1. Open a blank Excel worksheet.
2. Click the Microsoft Office button.
3. Click Excel Options.
4. Click Add-Ins.
5. On the Add-ins drop-down list, select Disabled Items and then click Go.
6. Select Data Import Excel Add-in and click Enable.
ISSUE:
Unable to see any elements of a target in the View Source Pane.
RESOLUTION
Data Import Excel Add-in requires Microsoft Office Professional. Follow the steps below to view the installed version of Excel.
1. On a blank Excel spreadsheet, click the Microsoft Office button.
2. Click Excel Options.
3. Click Resources.
4. Click About to see full version of Microsoft Office installed.
APPENDIX 7 - FAQS
99
APPENDIX 7 - FAQS
QUESTION:
I GET A LOGIN FAILED MESSAGE WHEN I ATTEMPT TO SEND A FILE TO ONESOURCE INCOME TAX.
ANSWER:
Verify the following:
• In Add-In Settings, the account number, user name, and password entered match the ONESOURCE Income Tax credentials you use to log in.
• The ONESOURCE Income Tax credentials you have supplied has rights to import into the binder to which you are sending data.
• If your company has a proxy in place, and your company does not use Proxy Auto Config or “PAC”, verify the proxy settings on the Add-In Info Settings dialog box are correct (this information comes from your IT department).
QUESTION:
I GET A COULD NOT LOAD TARGET MESSAGE WHEN I TRY TO VALIDATE.
ANSWER:
Verify there are no extra/blank maps in your workbook. If there are:
1. Click the XML Maps button in the XML Source Pane.
2. Click to highlight the extra/blank map.
3. Click Delete and OK.
4. Click OK to close the window.
QUESTION:
THE MESSAGE IN EXCEL SAYS MY IMPORT WAS SENT, BUT I DON’T SEE THE DATA IN MY ONESOURCE INCOME TAX BINDER.
ANSWER:
Check the following:
• Import Log: In ONESOURCE Income Tax, go to Tools tab | ONESOURCE Tools | Import Log to look for any errors.
Note: You can filter on Type for “Error” and see all errors. Expand the error line to get details of the error encountered
• Verify the map you are using is for the correct return type.
Examples:
• Form 4562 maps exist for both 1120 and 1065 returns, but are not interchangeable. The 1120 Form 4562 map will only import in to 1120 return types and the 1065 Form 4562 will
APPENDIX 7 - FAQS
100
only import in to 1065 return types.
• Partnership maps contain the letter P in the name. Form 4562 for 1065 return types is called IRSP4562 and for 1120 return types it is IRS4562.
Partnership/1065 return type
Corporate/1120 return type
QUESTION:
I GET AN ERROR ON IMPORT, BUT I DON’T UNDERSTAND WHAT “UNABLE TO DETERMINE A BINDER FROM THE IDENTITY” MEANS.
ANSWER:
• The year, company number, entity name, or binder name is incorrect or does not exist in ONESOURCE Income Tax.
• The binder has been created in ONESOURCE Income Tax but it has not been opened or computed.
• The binder is not part of the BinderGroup or the Consolidated Entity in batch import.
QUESTION:
I DOWNLOADED AND INSTALLED THE EXCEL ADD-IN. WHY DOES THE DATA IMPORT TAB NOT APPEAR ON MY SPREADSHEET?
ANSWER:
If the Data Import tab does not display in Excel, follow the steps below:
1. Close Excel and all Excel files.
2. Go to Task Manager and find/ end process for Excel.EXE.
3. Reopen Excel.
4. In Excel go to:
APPENDIX 7 - FAQS
101
• 2007 - Navigate to Microsoft Excel Office 2007 | Browse to the Workbook containing Add-in maps.
• 2010 - Navigate to: File | Open | Browse to the Workbook containing Add-in maps.
• 2013 - Navigate to: File | Open | Browse to the Workbook containing Add-in maps.
Question:
HOW DO I IMPORT INTO MY CHILD ACCOUNT INSTEAD OF THE PARENT ACCOUNT?
ANSWER
See the CLIENT MANAGER SETUP (user with multi-client access) section in this guide.
Question
WHY DO I GET AN ERROR MESSAGE WHEN I TRY TO SHARE A WORKBOOK THAT HAS PREVIOUSLY BEEN MAPPED?
ANSWER
Due to Microsoft Office Excel limitations, the Share Workbook capability is disabled once the workbook has been mapped.
• This limitation applies to existing workbooks that have been shared.
• To enable the Share Workbook functionality, you must delete the XML map.
Navigate to: XML Source | XML Maps button | highlight map | click Delete button.


