page 1 FAQ & compendium Water parameters within reef aquariums (FAQ: Frequently Asked Questions) Tanks with tropical seawater fish, corals, anemones and other invertebrates are fascinating people worldwide. Anybody undertaking this hobby with enthusiasm will sooner or later also have to touch on the complex topic of water parameters. The target of this FAQ is to combine and publish all relevant information in an easy and understandable way, but still with a high level of detail. A clear arrangement of the topics will help you finding the things of interest to you. Visit our homepage for more FAQs/compendiums and AquaCalculator … the reference software tool for enthusiastic reefers. Last Updated: 2017-08-09
Transcript
page 1
FAQ & compendium
Water parameters within reef aquariums (FAQ: Frequently Asked Questions)
Tanks with tropical seawater fish, corals, anemones and other invertebrates are fascinating
people worldwide. Anybody undertaking this hobby with enthusiasm will sooner or later
also have to touch on the complex topic of water parameters.
The target of this FAQ is to combine and publish all relevant information in an easy and
understandable way, but still with a high level of detail.
A clear arrangement of the topics will help you finding the things of interest to you.
Visit our homepage for more FAQs/compendiums and
AquaCalculator … the reference software tool for enthusiastic reefers.
Last Updated: 2017-08-09
page 2
Content
PART 1 – Water values, test kits and measuring processes ............................................................................................... 5 1.1) Which water parameters are worth measuring in my reef tank and how often should I measure them? 5
1.2) Which water parameters are less important? ............................................................................................. 6
1.3) Which are the optimal water parameters? .................................................................................................. 6
1.5) What can I do to be sure to measure correctly? .......................................................................................... 9
1.6) Which methods that measure my tank’s salt concentration are available? .............................................. 10
1.8 How can I know if my spindle/hydrometer is displaying “density” or “relative density/specific gravity“? 12
1.9 Which tool should I trust most? .................................................................................................................. 12
1.10) Can I use tap water for my reef tank? Does a water purification unit make sense? ........................... 14
1.11) Tips for measuring your water parameters accurately ............................................................................ 18
1.12) Tips for measuring with syringes, cuvettes and hydrometers ................................................................. 19
1.14 Which test kits or tools should I buy? ....................................................................................................... 23
PART 2 – Important processes in reef tanks ..................................................................................................................... 24 2.1 Current flow................................................................................................................................................. 24
2.2 The circle of nitrogens ................................................................................................................................. 27
CHAPTER 3 – Which effects are caused by the single water parameters? What happens if parameters are off the
3.8) Salt concentration ...................................................................................................................................... 36
3.10) Temperature ............................................................................................................................................ 36
4.10) Salt concentration/Salinity ....................................................................................................................... 45
4.12) Water changes: The all-in-one solution? ................................................................................................. 46
4.13) Which salt mixture is best for my tank? ................................................................................................... 49
4.14) Sea-salt mixture data for nearly all available salt mixtures (my privately measured results) ................. 51
4.15) Adaptations within the natural proportion of calcium vs alkalinity (Four-zone system) ........................ 53
CHAPTER 5 – Adapting your water parameters in real life (Ca, alkalinity and Mg) ................................................. 57 5.1) How should I add chemicals to my tank? ................................................................................................... 57
5.2 How to calculate a specific dosage? ............................................................................................................ 58
5.3 Mixing liquid solutions for Ca/Alk/Mg......................................................................................................... 60
5.4 Which amounts of chemicals can be soluted in water? .............................................................................. 61
5.5) The Balling method .................................................................................................................................... 62
5.6) Balling recipe for a stoichiometric-balanced adaptation of Ca-concentration and alkalinity ................... 63
5.7) Adaptation of Ca-concentration only ......................................................................................................... 65
5.8 Adaptation of alkalinity only (2 options) ..................................................................................................... 65
5.9) Adaptation of Mg-concentration only (2 options) ..................................................................................... 66
5.10 Frequently asked questions about the Balling method ............................................................................ 67
5.11 A recommended recipe for liquid dosage of Ca/Alk/Mg .......................................................................... 71
5.12 How do calcium reactors work? ................................................................................................................ 73
PART 6 –Filters & methods to redcue nutrients (nitrates, phosphates) ......................................................................... 81 6.1) Advantages and risks of reducing your tank’s nutrients ............................................................................ 81
6.2 Wet-dry filters, bio balls, mechanical filters – just a relic from former times? ........................................... 83
6.4 The “Berlin system” ..................................................................................................................................... 86
6.5 Jaubert System ............................................................................................................................................ 87
PART 7 – Some more tips & tricks .................................................................................................................................. 110 7.1 Dosing iodine ............................................................................................................................................. 110
7.4 Evaluate CO2 concentration within rooms ................................................................................................ 111
page 4
Salinity Table 1: Density vs. Salinity ................................................................................................................ 113
Salinity Table 2: Relative density (Specific gravity) vs. Salinity Relative Dichte ............................................. 114
Salinity Table 3: Conductivity vs. Salinity Leitwert ......................................................................................... 115
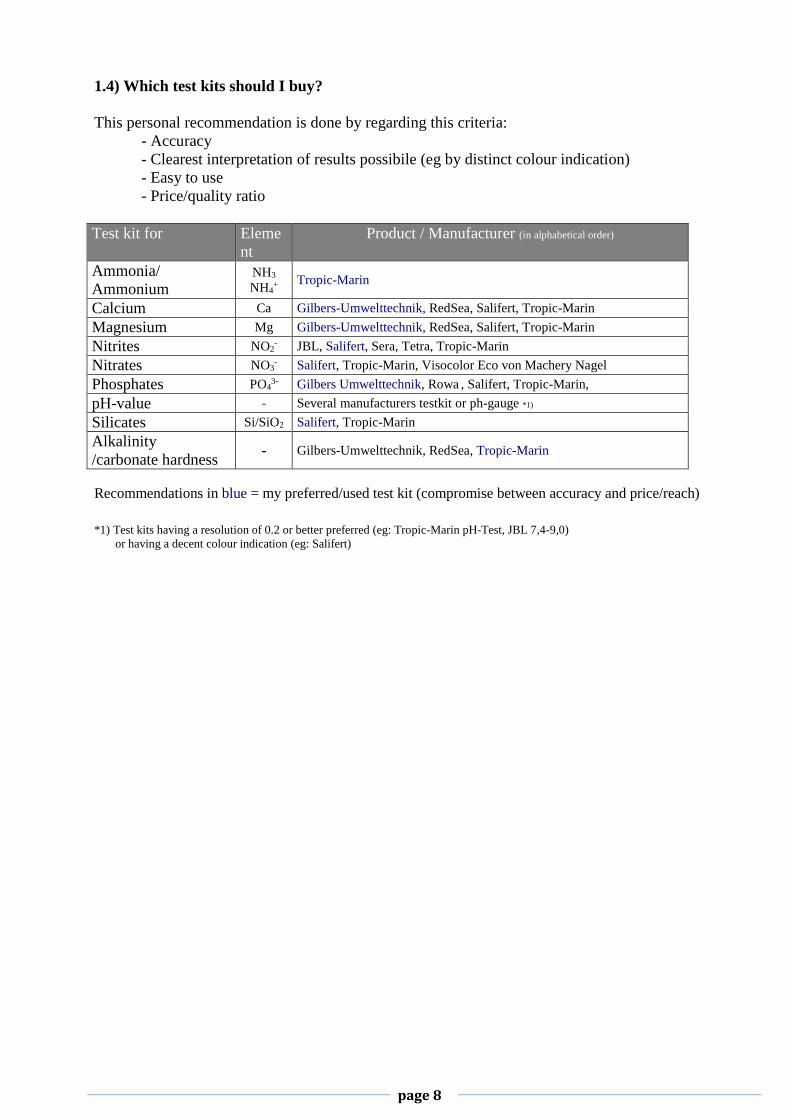
Recommendations in blue = my preferred/used test kit (compromise between accuracy and price/reach)
*1) Test kits having a resolution of 0.2 or better preferred (eg: Tropic-Marin pH-Test, JBL 7,4-9,0)
or having a decent colour indication (eg: Salifert)
page 9
1.5) What can I do to be sure to measure correctly?
Unfortunately, it happens that results from test kits show too low or too high results. This can be
fatal for your tank, because you might make some corrections to your parameters based on wrong
information, or you just miss seeing some deviant values.
These are only some of the reasons for wrongly interpreted or wrongly measured water parameters:
- Poor quality test kit used or faulty production lot
- Test kit not stored as recommended in instructions for use
- Test is over its shelflife
- You made an error while reading the results
I recommend calibrating EACH new test kit PRIOR to its first use with a standard solution.
After using the test kit for a longer time, you should repeat this process.
A standard solution (also called reference solution or multi-reference) is a seawater sample which
is adjusted to a certain concentration level. This level should be close to the optimum parameters
you are looking for.
Procedure:
1. Use your test kit to measure a sample of the reference solution (the amount of standard solution you need depends on the test kit you want to test)
2. a) Value you measured is identical or very close to the values the manufacturer of the
standard solutions guarantees * Very good, you should trust the results of the test kit.
b) Value you measured is different to the values the manufacturer of the standard solution *
Evaluate the difference between standard solution and value measured
ex: guaranteed value of standard solution 1350 mg/l
measured value of standard solution 1300 mg/l
Δ = 1350mg/l – 1300 mg/L = 50 mg/L
* test kit showing 50 mg/l too little.
You should write this down directly on the packaging or instruction of the test kit.
Regard this data for future measurements.
ex: measured value of your tank’s water 1180 mg/l
test kits Δ (as above) Δ = 50 mg/L
realistic value of your tank’s water 1230 mg/l (1180+50)
Annotation: This process works only if the test kit is genereally able to measure but only inaccurate, meaning it has a
certain offset. Rule of thumb: if Δ is bigger than the test result you should not use this test kit (use your guarantee). THIS
NEEDS DOUBLE CHECKING MARTIN******END OF EDITED COPY****
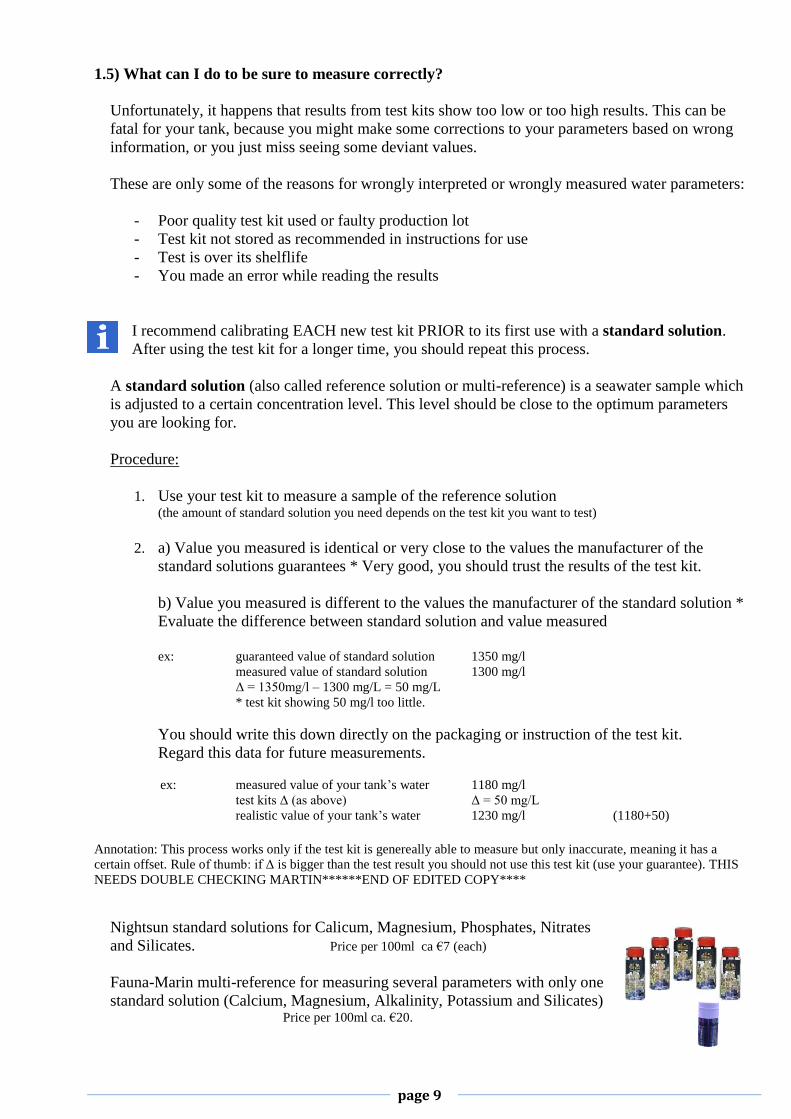
Nightsun standard solutions for Calicum, Magnesium, Phosphates, Nitrates
and Silicates. Price per 100ml ca €7 (each)
Fauna-Marin multi-reference for measuring several parameters with only one
standard solution (Calcium, Magnesium, Alkalinity, Potassium and Silicates) Price per 100ml ca. €20.
page 10
1.6) Which methods that measure my tank’s salt concentration are available?
There are several options to measure salt concentration:
- Refractometer
- Spindle / hydrometer
- conductivity sensor and display unit
These tools will measure salt concentration by three totally different methods (optical refraction,
buoyancy, electrical conductivity) and will also result in different measurement values. Later on you
will see how values coming from one measurement system can be converted into results from
another one.
Basically all three methods are OK, but there is a clear difference between usability and accuracy of
the results measured. You have to decide which method you prefer.
Method of measurement Refractometer Spindle (hydrometer) Conductivity
Price €50-100 €15-50 €250-1000
Measured quantity and
unit
Difference in refraction
between sea/salt water (thus without unit, first)
will result in [psu] or [‰]
most tools will also
display spec. gravity [-]
Two different types of
tools are available.
a) showing density
[g/cm³]
b) showing relative
density /specific gravity
[-]
Electric conductivity
(= el. resistance-1)
[ms/cm]
Temperature-
compensation
Yes No,
you have to know the
measured water’s
temperature
Yes or No
(depending on your tool)
For non-temperature
compensated tools you
have to know the measured
water’s temperature
Steadily measurement
possible
No No Yes
Time needed for
measuring
Little Needs some time Very little
Miscellaneous
- Disadvantage
+ Advantage
- Beware of low-quality
tools (eg from China)
- Needs to be calibrated
before use (best with
referenced salt water of
exactly known salinity)
- sensitive to breaking
- Needs another container
where you can measure
the water (Don’t measure
directly in your tank)
- Sensor must be calibrated
again and again
- Only expensive tools
measure accurately
+ Can be attached to
aquarium computers
page 11
1.7 What are the differences between the tools for measuring salt concentration?
For reef tanks, a salt concentration (salinity) of 34,8 is optimal. This would be reached by adding
exactly 34,8 gramm of salt into one litre of reverse osmosis water.
Salinity, specified in [psu] (practical salinity unit) is independent from the measuring temperature,
which means that water measured eg at 20°C with a saility of 34,8 [psu], has the same at 30°C.
Some tools CANNOT measure salinity, but density, relative density/specific gravity or
conductivity. These measured quantities are dependent on the temperature.
Reason is the so-called anomaly of water, meaning that there is a steadily expension of water once
above >3,98°C. This expansion means an increase of volume going together with reduction of density
(and also spec. density and conductivity)
Temperature Density of water at
temperature specified
[g/cm³]
3,98°C 1,0000
10°C 0,9997
15°C 0,9992
20°C 0,9983
25°C 0,9971
30°C 0,9957
For better understanding:
a.) Density
= mass
volume=
m
V in [g/cm³] or [dm³/kg]
ρ: density
b.) Relative density / specific gravity
d = ρ
ρ0 without unit [/]
ρ: Measured value for density
ρ0: Density at a specific temperature (related temperture)
c.) Conductivity
G = 1
R[ms/cm]
G = electrical conductivity
R = electrical resistance
page 12
This means that because of the anomaly of water, water with identical salinity, measured at different
temperatures will give you different values for density, relative density/spec. gravity and conductivity.
example:
Measured value Unit at 20°C at 25°C (normal temperature rteef tank)
at 30°C
Salinity [psu] oder [‰] 34,8 34,8 34,8
Density [g/cm³] 1,0246 1,0232 1,0216
Relative density [/] 1,0276 1,0262 1,0246
Conductivity [ms/cm] 47,67 52,80 58,05
So, always talking about salinity (in [psu]) would be best.
(no room for interpretation or need to add, “measured at xx °C/F”)
On the other hand there are several very accurate and inexpensive measurement tools available which
do not directly show us salinity in [psu] but values in other units.
It is decisive to know WHICH value the tool used for measuring salt concentrations is
displaying.
1.8 How can I know if my spindle/hydrometer is displaying “density” or “relative density/specific
gravity“?
Displaying in
Density
Displaying in
relative density/spec. gravity
Designation Dichte
Density
Spezifisches Gewicht
oder relative Dichte
Specific Gravity / SG
Unit [g/cm³] [-] without unit !
Misc Designation of related
temperature 25/4°C
or only 25°C
(typical if bought in Europe)
Designation of related temperature
25/25°C
(typical if bought in USA/UK)
1.9 Which tool should I trust most?
I recommend not believing blindly in a new tool. As referencing source (calibration), it is best to check
values measured against values which have measured with a big spindle (eg from Tropic marin, Aqua
Medic, JBL,..), also measuring temperature in parallel.
Once you have calibrated your source of measurement, you can use this for your weekly measurements
if more comfortable than measuring with the spindle each time.
I do not recommend using any
- hydrometers from platics
- cheap refraks from China
page 13
Tips for using refractometers:
1.) Calibrate your refractometer regularly, but at the very minimum before the first use. One way is to
adjust it to “0 [psu]“ by using purified water. Even better would be calibrating it in the area of
measurement with salt water that has a defined salinity (multi-reference).
2.) Clean your refractometer measuring area before each measurement.
3.) Reading the measured value, DO NOT take the value of (spec.) gravity which is also displayed,
but use only the value given in [psu] /[‰] which is the salinity.
3.) Buy only recfractometers calibrated to “seawater“ not others which might be for example calibrated
to NaCl.The difference in values displayed is ~ 1 [psu].
4.) Use only refractometers with ATC (automatice temperature conversion).
Tips for using spindles:
1.) Buy a big spindle, which allows for a much more accurate reading of the value for density.
Organise a separate, transparent, long ad tall vessel where you can perform your measurement
(never measure directly within your tank). A 500ml big, tall measuring cylinder (as available in
chemical stores) or a tall beer glass is fine.
Ensure you also have an accurate thermometer available.
2.) I recommend buying a spindle, measuring in “density“ not “relative density/spec.gravity“ because
they are more common.
3.) Clean your spindle from salt and dry the upper part before each use to get accurate measurements.
Tables for converting salinity see appendix of this FAQ
- Density Salinity
- Rel.density/spec. gravity Salinity
- Conductivity Salinity
page 14
1.10) Can I use tap water for my reef tank?
Does a water purification unit make sense?
You should use tap water ONLY if you are sure that it is free of any harmful substances AND
that it will be the case all times of the year. Spending money for a good puryfing unit is well
invested.
Several waterworks have seasonal deviations of water quality. Having good water in summer must not
mean also having good water in winter and vice versa.
If you want to rely on tap water, check its quality carefully.
Harmful:
- Raised values for nutrients and other trace elements (Nitrate, Phosphate, Silicates...)
- Availability of heavy metalls (iron, copper, lead…) even in small doses
- Chlorine (typically in summer months)
Acceptable:
- Calcium
- Sulphate
- Chloride (converted from Chlorine)
- Sodium
- Carbonates (Carbonate hardness)
.. because being part also of natural seawater.
Most other water parameters published by your waterworks are not too important for reef
tanks.
Nearly all seawater mixes available are designed to bring optimal water parameters if using
purified water. Using tap will mean that you raise the concentrations coming by the salt
mixture by the concentrations being already within your tap water. This might result in getting
concentrations above the recommended ones.
In a lot of cases the water quality of tap water is not sufficient for running reef tanks.
I recommend a water-purifying unit as one of the basic items for a reef tank.
For smaller tanks, buying purified water might be a better idea than buying such a unit, because costs
(including maintenance) and the required space are not available. Check that the water you buy is OK
for use in reef tanks (distilled water is fine and should be done according DIN 57 510/VDE 0510 or
DIN 45530, EN 285).
page 15
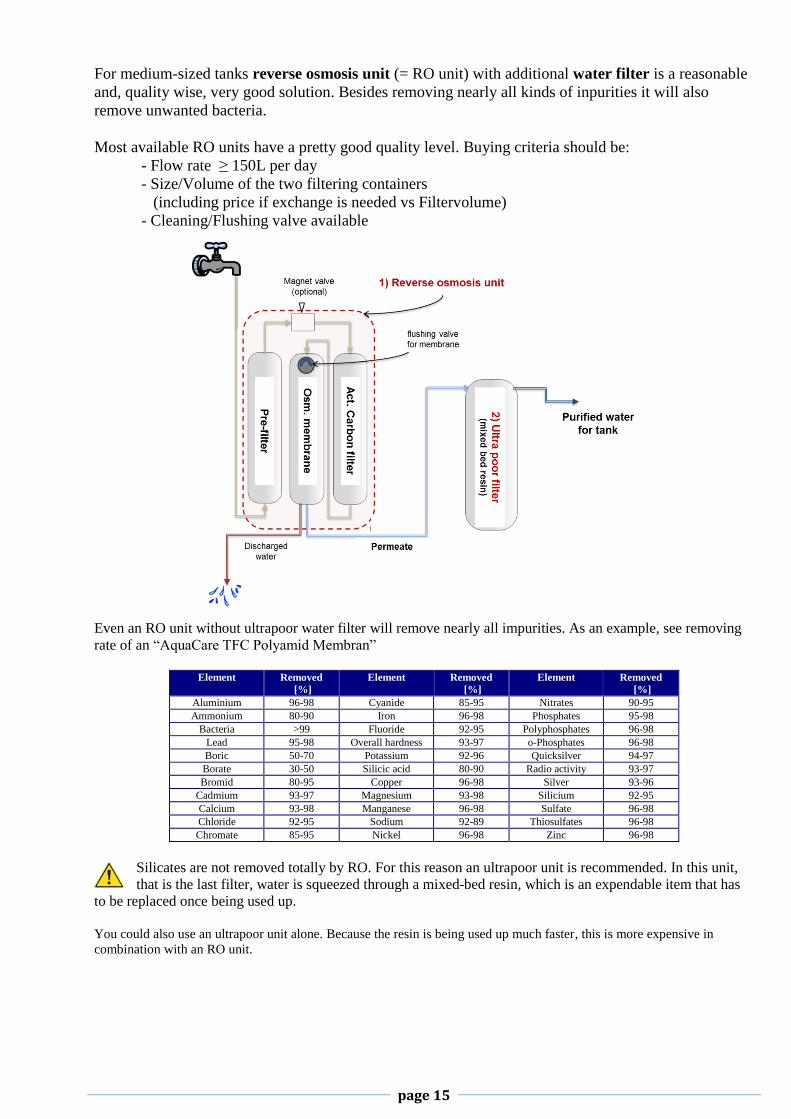
For medium-sized tanks reverse osmosis unit (= RO unit) with additional water filter is a reasonable
and, quality wise, very good solution. Besides removing nearly all kinds of inpurities it will also
remove unwanted bacteria.
Most available RO units have a pretty good quality level. Buying criteria should be:
- Flow rate ≥ 150L per day
- Size/Volume of the two filtering containers
(including price if exchange is needed vs Filtervolume)
- Cleaning/Flushing valve available
Even an RO unit without ultrapoor water filter will remove nearly all impurities. As an example, see removing
rate of an “AquaCare TFC Polyamid Membran”
Element Removed
[%]
Element Removed
[%]
Element Removed
[%]
Aluminium 96-98 Cyanide 85-95 Nitrates 90-95
Ammonium 80-90 Iron 96-98 Phosphates 95-98
Bacteria >99 Fluoride 92-95 Polyphosphates 96-98
Lead 95-98 Overall hardness 93-97 o-Phosphates 96-98
Boric 50-70 Potassium 92-96 Quicksilver 94-97
Borate 30-50 Silicic acid 80-90 Radio activity 93-97
Bromid 80-95 Copper 96-98 Silver 93-96
Cadmium 93-97 Magnesium 93-98 Silicium 92-95
Calcium 93-98 Manganese 96-98 Sulfate 96-98
Chloride 92-95 Sodium 92-89 Thiosulfates 96-98
Chromate 85-95 Nickel 96-98 Zinc 96-98
Silicates are not removed totally by RO. For this reason an ultrapoor unit is recommended. In this unit,
that is the last filter, water is squeezed through a mixed-bed resin, which is an expendable item that has
to be replaced once being used up.
You could also use an ultrapoor unit alone. Because the resin is being used up much faster, this is more expensive in
combination with an RO unit.
page 16
The following sketch explains the functioning principle of a reverse osmosis
membrane. To get the maxium possible surface, these membranes are rolled up in
most avalaible units to have an even bigger surface and thus better efficiency.
- An RO membrane is different to strainers or particle filters which would not work with particles soluted in water.
- Unpurified water entering the membrane from the left side (water intake) has to be under pressure. The higher the
pressure, the more effective the membrane will work: 3-4bar coming from your pipings is sufficient. Even better
would be higher pressure eg. coming form a booster pump. The right chamber operates without any pressure.
- Part of the water, because of the so-called osmotic pressure (between the left and right chamber), will move
through the membrane into the pressureless right chamber. Water molecules will penetrate through the membrane
easily, but the differently loaded ions will not. This is the cause for the filtering effect of an RO membrane.
Only “purified water“ will leave the membrane (presureless) as so called permeate (Outlet-1).
- The other part of the water will remain in the left chamber first. This water will enrich itself more and more with
soluted impurities. To remove this water there is a valve where a certain amount of water can “escape“ the
membrane, without reducing the pressure of the left chamber too much.
Water running out from this chamber (Outlet-2) will have an even higher concentration of impurities than the
water from the intake and is thus named concentrate (I will call it discharged water within this FAQ) and can
either be disposed or used for non-aquaritic purposes like watering your flowers.
page 17
RO Units need being maintained regularly. If you miss this, rate of permeate will drop and you will get
more and more discharged water.
You will notice this because the time needed to get a certain amount of purified water will get longer.
Recommendations for maintenance intervals can only be rule of thumb, because of being strongly
dependent on how much purifed water you need and also from the quality of your intake water.
Finefilter/Pre-filter: is holding back mechanical impurities and thus can get stuck.
Typical maintenance interval: 2 years.
Activated carbon filter: Although there is no typical wearout for this filter, it should be exchanged together with
the pre-filter.
Chlorine can be within tapwater. This filter converts chlorine to chloride but only for a
limited amount before it is used up.
Chlorine can damage the RO mebrane and is also toxic for fishes
Maintenance interval: 2 years or more often if your tap water contains lot of chlorine
RO membrane: There is typically no wearout.
It is recommended to flush it for 5 minutes every 2 weeks. I personally never did and
had no problems.
In case you had problems with the pre-filter or activated carbon filter, the RO
membrane can be stuck or damaged and thus must be replaced.
Ultrapoor filter: Replace mixed-bed resin once being chemically used up.
(brown algae in the tank is a good indicator)
How can I check if my RO unit still works properly?
Conductivity of permeate ≤ 5% of conductivity of tap water
KH-Test should have a result betwen (0 .. 2 °dH)
Concentration of silicates can be ≥ 0 mg/l
pH value of water is not influenced by RO unit and thus cannot be used to check
(it will be raised by adding a salt mixture)
page 18
1.11) Tips for measuring your water parameters accurately
- Do not use no-name test kits (see list of recommended test kits)
- Do not use test kits designed for seawater only
- Regard manufacturers recommendations and instructions for use (some test kits need to be stored cool)
- Measure at the same time of the day each time and, if possible, at identical water temperature and before
(not after) feeding your animals.
- Remove water to be tested always from same position within tank or sump.
Tested water should be clean and free from any visible impurities.
- Measuring concentration of elements soluted in salt water (Ca, Alk, Mg...) are only comparable if
measured at identical salt concentration. Lower salinity, lower concentration and vice versa.
- Get the required amount of water to be measured with a syringe (don’t trust in markings on
glasses/cuvettes)
- Carefully clean and dry syringes, cuvetttes, spoons and caps after each use.
Do not exchange between different test kits (you might impurify with chemicals used). Very good test
kits have differently coloured syringes
- Measure you use water and chemicals without air bubbles
- Test kits determining concentrations by measuring the amounts of chemicals needed until a colour
change is seen: Take care that no chemicals get stuck on housing of cuvettes. Shake well during testing
- To prevent unwanted dropping of chemicals from flasks, either:
a) turn around flasks besides the measuring flask and allow dropping out or
b) Give some pressure on the flask with opening rising to the top, then turn around and dose
- Work with clean fingers only and take regard to safety aspects from manufacturer
- Compare colours under strong and natural light if possible. Use identical sources of light each time.
- Also test your tap water from time to time, to detect possible problems of the water purifiying unit.
- No iron in your tank. Measuring sensors should not be from iron or, even worse, from brass or copper.
One option istto cover sensors with a diaphragm.
It is recommended to record your measured parameters, helping you to detect creeping deteriorations
in your tank with my Software-tool AquaCalculator.
page 19
1.12) Tips for measuring with syringes, cuvettes and hydrometers
Surface tension of liquids is causing a rise or even a drop of surface level within
small vessels or tubes. This has to be regarded to measure correctly. Capillarity: Plunging in a thin tube with both sides open (capillary) the water level will rise or sink. The
thinner the capillary is, the stronger the effect.
For normal liquids which are wetting the vessel walls (water on glass or plastics)
the water level in the tube is rising and forms a concave surface.
Liquids which are not wetting the vessel walls (water on greased glass, quicksilver on glass)
the water level is dropping, forming a convex surface.
Reversed Capillarity: Plungin an item into a liquid, you are getting the reversed effect. Water surface is
arching around the item, which is exactly what happens using a spindle/hydrometer.
F: How do i read a spindle/hydrometer?
A: Read the value at the water surface, not the meniscus (arching).
Start moving your eyes coming from the bottom and move upwards. Once
you see the first elliptical shaped area as a line, this is the correct value to
read.
Don‘t forget: measuring salt concentration with a hydrometer needs
parallel measurement of the water’s temperature.
F: How to read the filling amount of a syringe?
A: If the syringes piston is not just flat but like an arrow, you have to read the value at the side of the
piston, not top of the arrow (see sketch).
Only a very few syringes are different to this recommendation.
In case the syringe’s piston is flat, this is a no-brainer.
page 20
F: My test kits instructions tell me to attach a small top part. Once I draw up the syringe there is an air
bubble. Is there something wrong? For what reason do I need that top part?
A: Everything is OK.
The top part is for emptying the syringe more easily. Because it is filled with air in the beginning, this
air is also sucked into the syringe. Once emptying the syringe, the air bubble will be pressed out first.
What you should do is keep the syringe in vertical position all the time, so that the air buble does not
change its position.
F: What is better to read: syringe or curvette?
A: A syringe is easier to fill and also more accurate.
F: How do you read a cuvette?
A: Don’t read the “meniscus“, but below instead
page 21
1.13) What about the shortcuts and units?
Can I convert form on unit into another one?
a) Concentrations (e.g. Ammonia, Nitrite, Nitrate, Calcium, Magnesium, Silicates)
The commonly used unit is [mg/l] (1/1000g per litre or 1 milligramm per litre)
This is not 100% identical with [ppm] (parts per million, equaling mg/kg entspricht).
Cause: 1 litre saltwater weighs ~ 1.023 kg, which means a difference of 2.3%.
100% vs 102.3%) is quite acceptable for aquarists. There is no need for a conversion.
[mg/l] ~ [ppm]
b) Volume
SI/metrical unit [l] (litre) equailing 1 cube-decimeter [dm³]
GB/USA [g] (gallons)
VolLiter = VolGalleons * 3,78
VolGalleons = VolLiter / 3,78
c) Weight
SI/metrical unit [g] (Gramm)
GB/USA [oz] (“ounces”)
WeightGramm = WeightOunces * 28.349
WeightOunces = WeightGramm / 28.349
d) Carbonate hardness / Alkalinity
Either [°dH] (German carbonate hardness/”deutsche KarbonatHärte”)
or [mEq/l] (milli equivalents per litre)
mEq = °dH / 2,78
°dH = mEq x 2,78
Seawater: Carbonate hardness ~ Alkalinity
Annotation: Carbonate hardness test kits are displaying the buffering capability of water which is its alkalinity.
They will add acid until pH 4.3 is reached. In sea water, alkalinity is 95% dependent on buffering ions carbonates ,
hydrogencarbonates and pH-value. Thus, we can equal carbonate hardness and alkalinity
page 22
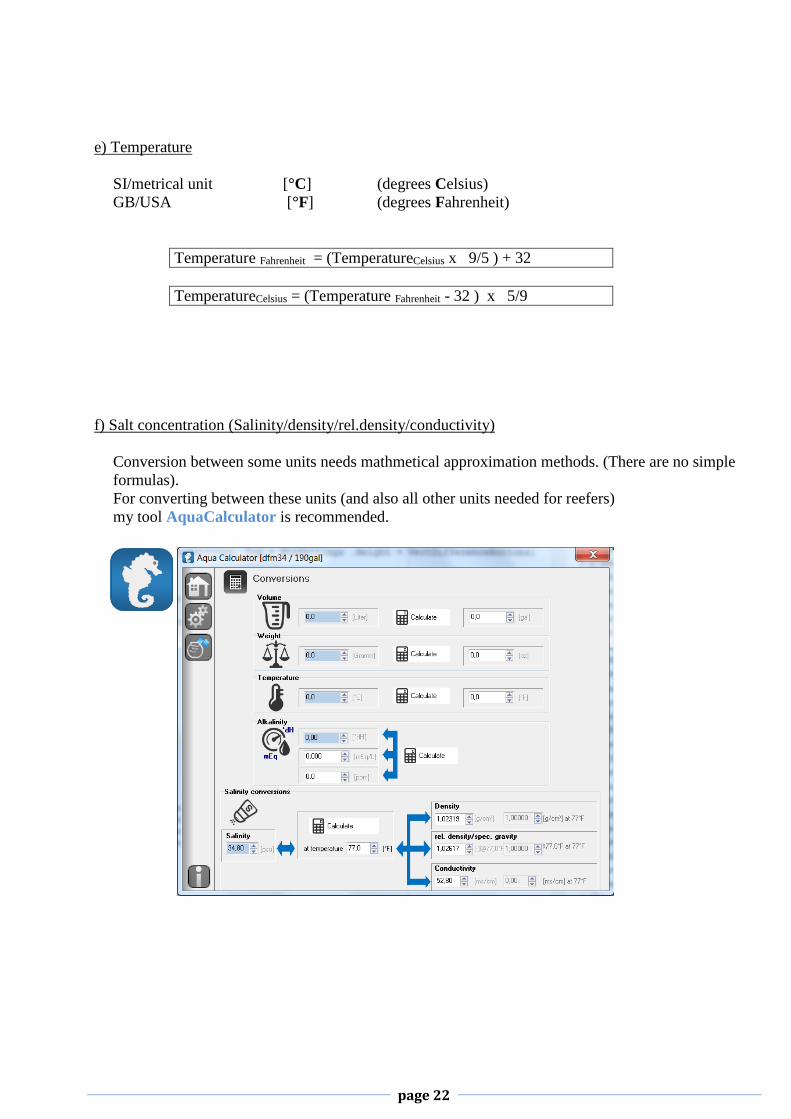
e) Temperature
SI/metrical unit [°C] (degrees Celsius)
GB/USA [°F] (degrees Fahrenheit)
Temperature Fahrenheit = (TemperatureCelsius x 9/5 ) + 32
TemperatureCelsius = (Temperature Fahrenheit - 32 ) x 5/9
f) Salt concentration (Salinity/density/rel.density/conductivity)
Conversion between some units needs mathmetical approximation methods. (There are no simple
formulas).
For converting between these units (and also all other units needed for reefers)
my tool AquaCalculator is recommended.
page 23
1.14 Which test kits or tools should I buy?
I don’t recommend buying complete measuring sets as offered for example by JBL or Tetra,
but buying a mix of high-quality test kits, matched perfectly for reef aquariums:
test kit for Manufacturer Ca.-Preis
Nitrite / Nitrate (Kombitest) Tropic Marin €15
Phosphate Umwelttechnik Gilbers €33
Alcalinity/Carbonate hardness Tropic Marin €8
Calcium Umwelttechnik Gilbers €19
Magnesium Umwelttechnik Gilbers €19
pH-value Salifert €7
Total price ca. €100
To check each test kit prior to use and after a certain time,
Reference solutions for Alkalinity, Calcium and Magnesium (eg FaunaMarin’s Multi-reference €20 or Nightsun, €7/each)
Big and thus perfectly readable spindle/hydrometer (eg Tropic Marine’s - Precision Aräometer for €35)
Long and tall vessel for measuring without current flow influence of your tank (best is a 500ml plastic-measuring cylinder with 35cm height, €20 or glass measuring cylinder).
This is often underestimated but maybe the most important factor for well-established reef tanks:
Current is adapted to the tank’s properties and size and also
the tank’s arrangement is adapted for good flow.
Obviously, the flow in our tanks has no influence on salt concentration or concentrations of nutrients
and trace elements. BUT: the better the current flow of a tank, the less debris and settlements of any
rooting/fouly material. Put another way:
The more areas with insufficient flow, the higher the risk for rotten material or rotten live rock.
Rotten areas in your tank or sump are not only ugly, but often the cause for rising or continually high
nutrients (N3 and PO4 levels). Seen over several months, this can even develop as a ticking
(phosphate)-timebomb.
Tanks with long lasting nitrate and/or phosphate concentrations very often have insufficient or
wrong flow as initial reason.
This is also valid for areas which you do not even see, like drains and especially areas behind
and within your reef construction (eg behind live rocks).
Looking for more arguments why you should carefully plan and optimise your tank’s flow?
• Adapted flow is vital in caring for invertebrates and corals - Current flow not strongh enough, or areas within “current shadow”
Insufficient supply of micro-creatures/food
Cleaning effect of filigree coral branches
- Current is too strong
can lead to mechanical damage of your life stock (especially LPS corals)
• Adapted flow will provide good circulation of your water surface. Exchange of oxygen
Improves removal of high tank temperatures
Optically attractive (curling effect on sand while light goes through wavy surface)
• Adapted current flow is a prerequisite for clean gravel. - Current flow not strongh enough, or areas within “current shadow”
Sediments assemble.
gravel being compressed, leads to unfavourable accumulation of bacteria and algae
- Current is too strong
fine gravel might “fly away” and build piles
page 25
Now, as you know how important good flow is for your tank, you should learn which are your major
influencing criteria to get there:
Geometry of the tank
Geometry of your reef structure or other static tank arrangement
(this is also your corals.)
Arrangement, strength and number of pumps
You will achive the best flow if you are aiming for a “Ring-flow” where flowing water reaches
ALL areas of your tank (see sketch, light green).
These are examples of limited flow
Two areas with limited flow (red) “Blind alley” despite ring-flow (red)
Because of disruption of flow
Limited flow (red)
Caused by 2 streams eliminating themselves
page 26
Above are only some examples. The situation generated by tank size, reef construction *1) and flow
pumps can be quite complex.
*1) including also other static elements of your tank like corals
Carefully plan the size/geometry of your tank including reef construction and current flow
BEFORE planning any other aspects of your tank.
I suggest making a sketch of your planned tank equipment and pumps
enabling you to estimate whether your flow will work or not.
You can select from several options to optimize your tank’s flow:
Select between pumps with punctual or broad flow
Adjustable pumps make it easier to optimise your flow in the tank (not too strong, not too
weak)
Pump heads adjustable in several axis (eg ball joimted ones) ease the adjustment
Pumps can be adjusted in several layers of your tank (top/middle/bottom areas)
You don’t like the look of visible flow pumps?
Then you can hide pumps within reef ceramics or life rock
Use of invisible flow for “problem areas” (eg flow behind rocks close to the tank walls)
Use moving pump heads (eg Osci-motion) or wave simulators ( eg wave boxes) to reach a
realistic flow, streaming/cleaning animals from different sides and intensity.
Some more tips:
Take care about the current consumption of your flow pumps, because they run 24h/day
365days/year. High-quality pumps with a good degree of efficiency pay off pretty soon, taking
power consumption and lifetime into regard.
Pure “flow pumps” have a lower current consumption than “feed pumps”.
If you want some additional experience or advice for optimising your flow, ask advanced
aquarists or good aquaristic dealers.
Saving money while designing your tank’s flow is a BAD idea and might take its revenge some
time later.
page 27
2.2 The circle of nitrogens
…describes the most basic process of all salt-water tanks.
Through digestion and fouling processes, there will be harmful substances stressing your tank’s
inhabitants. The less effective this process is working the more stress you will have for your animals
because nutrients will steadily enrich within your tank.
This is the reason why you have to have this process established BEFORE you add sensitive animals
to your salt-water tank.
1.) At the beginning of the cycle – and clearly most critical for toxicity – is Ammonia/Ammonium.
It comes from transformation of excrement and fouling processes (eg from dead animals).
2.) Ammonia is converted by ammonifying bacteria into less harmful Nitrite. Effect: Ammonia-concentration is reduced, Nitrite-concentration is rising
3.) Nitrite is converted by nitrificating bacteria into the even-less harmful Nitrate. Effect: Nitrite-concentration is reduced, Nitrate-concentration is rising
4.) a) Nitrate can be converted into nitrogen in areas with deficits in oxygen
(=anaerobic areas, eg your gravel, also the porous reef rocks)
Gaseous nitrogen will then escape your tank.
b) Nitrate (and also ammonia) is assimliated into algae growth. Effect: Nitrate-concentration is reduced
This process is going on all the time.
In “well-started up tanks” the amount of harmful substances which are removed (circle of nitrogens) is equal or
even higher than the amount of harmful substances which comes to your tank (feeding, excrements, etc)
If this is not the case, your tank might become unstable (crash) after a certain time.
Algae Fungus &
bacteria Rests of food, algae
2.) Nitrite
Nitrosomas (Bacteria)
Nitrobacter (Bacteria)
3.) Nitrate
excrement Food
4.a) Denitrification by
anaerobic Bacteria
Circle of
nitrogenes 4.b) Denitrification by
Algae-growth 1.) Ammonia
By gills fish
Reef
rocks
page 28
More detailed description
Ammonia/Ammonium is reduced/removed in two steps to nitrogen
(Nitrification/DeNitrification).
A) Nitrification
Nitrification means converting Ammonia to Nitrites first, then from Nitrites to Nitrates.
Oxidation Ammonia to Nitrites 2NH4+ + 3O2 → 2NO2
− + 4H+ + 2H2O
(ph is lowered by 4 release of H+-Iones)
Oxidation Nitrite to Nitrate 2NO2− + O2 → 2NO3
−
Ammonia/Ammoniium is (bio)chemical-wise oxidised by waters O2 into the more-stable Nitrate.
This normally happens without any action from our side by bacteria.
It is also the case that we normally find any Ammonia/Ammonium in our tanks if large animals have died or
during the tank’s start-up phase.
Nitrate is not able for another reaction with oxygen, because it is already oxidised and thus stable.
This is the reason why we sometimes have too high nitrate levels,
even having a zero concentration of Ammonia/Ammonium and also Nitrite.
B) DeNitrification
Nitrate can be further converted, but only in areas free of oxygen.
To find out the best water-changing strategy for your tank, you should know the answers to these
questions:
The actual water parameters are?
What do you add/replace in your tank by the planned water change, depending on your fresh
water and salt mixture used?
Which parameters are the best for your animals?
How much Ca, Alk and Mg does my tank consume and is it even possible to adapt this by
doing water changes only?
page 47
Water changes for reducing the amount of harmful substances
Sometimes we add toxins or other unwanted substances to our tanks by accident. It is very clear that
we want to remove them fast, as complete as possible and without causing too much additional stress
on our animals.
Depending on risk, but also costs, you should decide to remove it by filters, adsorbers or water
changes.
Diagram below showing:
Harmful substance added at a single time (no further bringing in of this substance).
This substance has its own concentration 100% at the beginning.
Situation after changing water with only little (red: 1%/day or 7% week), average (blue: 2%/day
or 14% week) and large amount of water change (green: 4%/day or 28% week)
Solid lines: “weekly” water change; dashed lines: “daily” water changes.
Result:
As expected, the bigger the amount of water change, the faster the harmful substance is removed by
replacement (redbluegreen)
Concentration is reduced faster at the beginning then slowing down.
Cause effect: Starting with the second water change, you also remove part of the “good salt water”
Doing water changes less frequent (here weekly) is a bit more effective. Cause effect as before
0,0
20,0
40,0
60,0
80,0
100,0
120,0
0 10 20 30 40 50 60 70 80 90 100co
nc
en
tra
ion
of
ha
rmfu
l s
ub
sta
nc
e [%
]
time [days]
reduction of harmful substances by water change(dependency of volume and frequence of water change)
1% wc each day
2% wc each day
4% wc each day
7% wc each week
14% wc each week
28% wc each week
page 48
Water changes for a steadily reduction of harmful substances (harmful substances added steadily)
In some cases, harmful substances are built up steadily and cannot be reduced enough by
the tank’s biology or filtering mechanisms. A typical example would be a tank with lots of fish,
thus also intense feeding but inefficient filtering.
These sytems are producing more harmful substances than they are able to remove. The logical result is a steady
rise of unwanted/harmfull substances, which can even lead to dying animals.
In general, you should identify causes and try to eliminate or improve your filtering mechanisms, but there is
also a chance to get to grips with it by doing regular water changes. A big advantage of doing water changes in
this case is the ability to act fast. If you plan doing this for a longer time, you should balance time and costs.
Diagram below showing: Steadily bringing in of a harmful/unwanted substance/element
No3 concentration is raised by 0.3 mg/l each day
Black line: - no water changes
red, blue, green lines: water changes with 3%, 10% and 30% a week
Result: Depending on the amount of a harmful substance added each day, this can or cannot be
adapted by water changes
- green: ok, is levelling off at ~ 5mg/l
- blue: is levelling off at maybe already too high a concentration
- red: not leveling off! Concentration of harmful substance rising slower than without water changes
page 49
Water changes to raise concentrations of mass/trace elements
Again, being totally different is the desired increase of concentrations of
elements such as Ca, Mg and alkalinity (KH) as also of further trace
elements (all of this has to be brought in for well-running tanks).
Depending on your corals and other animals, your tank’s consumption is STRONGLY different and
unique for each tank. Fish-only tanks have a much lower demand than SPS-filled reef tanks. Also,
consumption can alter over time.
These are the main influencing parameters telling you if water changes will be a good way to keep these
concentrations up:
Concentrations of mass elements (Ca, Alk, Mg) within the salt mixture
Desired concentration of mass elements (Ca, Alk, Mg) in your tank
Actual concentration within your tank (Ca, Alk, Mg) (primarily to see how long an adaption might take)
Consumption of your tank (Ca, Alk, Mg)
In case your salt mixture’s concentration of Ca, Alk, Mg is lower than your desired values,
water changes can even be counterproductive, reducing your concentration.
Diagram: Adaptation of steadily consumption of mass elements by water changes. example: Ca, starting point: 400 mg/l & Ca-consumption (10 mg/l per day)
Result: Adaptation of Ca, alkalinity by water change is only possible in tanks with little
consumption. Tanks with lots of stony corals (SPS) need a separate/alternative way of adding
Ca/alkalinity.
Hint: Curves shown are purely hypothetical.
In reality, Ca will never drop to 0, because Ca consuming animals would either die or stop their growth.
page 50
4.13) Which salt mixture is best for my tank?
Even if that is very clear for most of us, you should only use special sea-salt mixtures developed and
produced for aquariums. NEVER use table salts, thawing salts or other non-aquaristic salts.
I recommend using one or more salt mixtures which fit best to your tank’s demands. It is not necessary
to buy only the most expensive products, but buying high-quality products in general gives you less
risk of adding unwanted impurities.
a) For fish-only tanks or tanks without stony corals normal sea-salt types are fine.
b) For tanks with lots of SPS and other sensitive animals, I recommend using special “reef-salt types”
which have higher and more nature-like concentrations of calcium, alkalinity, magnesium and also
trace elements. It is also possible, but more time consuming, to buy cheaper sea salt mixtures and
bolster it with Ca, Alk, Mg and trace elements separately
Amount of salt needed
Wanting to know how much salt is needed, you need to know:
a) Volume of fresh water that should be used
(you get a bit higher volume than that as salt water later, because adding salt ?MARTIN NOT
SURE WHAT YOU MEAN HERE?)
b) Amount of salt needed per litre to reach targeted salinity (if used with purified fresh water)
for the salt mixture you are using
c) Your tank’s actual salt concentration
I recommend aiming a (norm) salinity of 34.8 [psu].
The amount of salt to be added to one litre of fresh water to reach an aimed salinity (eg 34.8
psu) is different for each manufacturer and salt type used.
In general, you need between 38 and 41 grams per litre to reach a salinity of 34.8 psu.
This is more than you might have expected. The reason is that salt mixtures have not only pure salts
but also other elements and trace elements which do not raise salinity 1:1.
In several cases, manufacturers do not publish the required amount of salts, or even publish
unrealisticly (low) values. I expect they are doing this for competitive reasons.
Aqua Calculator supports you with comfortable water-change
calculations and includes data of nearly all avalibale salt mixtures.
measured data normalised to 34,8 psu [gr/1Liter] needed to reach [psu]
page 53
4.15) Adaptations within the natural proportion of calcium vs alkalinity (Four-zone system)
Adapatations to the calcification system are kind of complex. The following graphic explains the
correlation of calcium-concentration dependent from carbonate hardness/alkalinity.
a) The light-green area in the middle shows concentrations we should strive for in reef tanks
optimal range
b) The two black lines show a balanced consumption of calcium vs alkalinity, which is especially
important if being outside the light-green area
This will give us four zones with sub-optimal relation between Ca vs alkalinity.
c) Areas marked blue (I, II, III and IV) are the different zones where the relation Ca vs alkalinity is
sub-optimal. The more you are “off” the green area, the more harmful/stressing for our tank’s
inhabitants, especially stony corals
Following chapters will explain:
- Possible reasons for being out of the optimal range
- How to get back into the optimal range
page 54
Calcium/alkalinity is within Zone 1
Description: Calcium and alkalinity are too high
Correcting measure: Easy
This happens if dosing too many chemicals to raise CA and alkalinity (eg Balling salts),
or if you have elements in your tank adding Ca/alkalinity steadily (incompatible rocks, reef ceramics)
Ca and alkalinity will automatically be reduced by tank’s consumption. This might be by stony corals
building new calcium skeletons, growth of coralline algae.
Ca/alkalinity will most likely drop parallel to both black lines (direction bottom left).
Hint: If there is no dosing of chemicals going through the optimal range, your tank will get into Zone 2
sooner or later.
page 55
Calcium/alkalinity is within Zone 2
Description: Calcium and alkalinity are too low
correcting measure: easy
Reef tanks have a steady consumption of Ca/alkalinity. You will get into this zone automatically if you don’t
take care of your tank’s Ca/alkalinity consumption by adding this two mass elements separately.
Adding chemicals in a so-called stoichiometric balanced way (which is called Balling method) or adding them
based on your tank’s specific consumption is a very good option to control this consumption. Holding your ph
between 7.9 and 8.5, even slight over-dosing shouldn’t be critical for your animals.
Another option is having a calcium reactor or using Kalkwasser (see later)
Regular water changes with salt mixtures supporting optimum concentrations are recommended to reduce any
risks of wrong dosing and adding other trace elements
If you don’t react to being in Zone 2, you might end up in Zone 3.
Hint: If you don‘t succeed in raising your tank’s Ca/alkalinity, this might be because of magnesium being too
low. Not having enough magnesium means preventing the abiotic precipitation of calcium carbonates.
Chemicals added will precipitate within the water and are thus not available in a soluted state. Even overdosing
of Ca/alkalinity does not help, but furthermore generates precipitations.
* Raise magnesium first to a proper level, then adapt Ca/alkalinity.
page 56
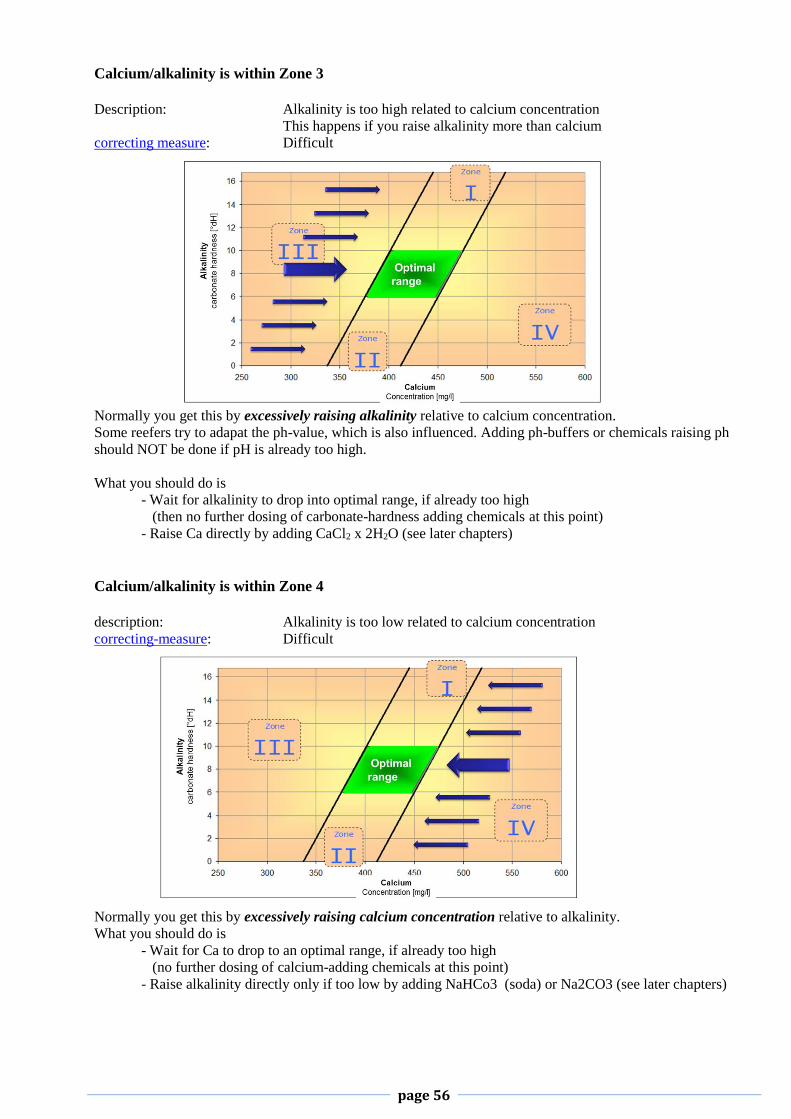
Calcium/alkalinity is within Zone 3
Description: Alkalinity is too high related to calcium concentration
This happens if you raise alkalinity more than calcium
correcting measure: Difficult
Normally you get this by excessively raising alkalinity relative to calcium concentration.
Some reefers try to adapat the ph-value, which is also influenced. Adding ph-buffers or chemicals raising ph
should NOT be done if pH is already too high.
What you should do is
- Wait for alkalinity to drop into optimal range, if already too high
(then no further dosing of carbonate-hardness adding chemicals at this point)
- Raise Ca directly by adding CaCl2 x 2H2O (see later chapters)
Calcium/alkalinity is within Zone 4
description: Alkalinity is too low related to calcium concentration
correcting-measure: Difficult
Normally you get this by excessively raising calcium concentration relative to alkalinity.
What you should do is
- Wait for Ca to drop to an optimal range, if already too high
(no further dosing of calcium-adding chemicals at this point)
- Raise alkalinity directly only if too low by adding NaHCo3 (soda) or Na2CO3 (see later chapters)
page 57
CHAPTER 5 – Adapting your water parameters in real life (Ca, alkalinity and
Mg)
5.1) How should I add chemicals to my tank?
Starting with manually dosing (pouring powders or liquids into your tank) and ending with fully
automated dosing, everything is possible. You should select your favourite way regarding the
following parameters:
- Which and how much different chemicals do you want to add?
- Dosing frequency (only seldom or several times a day?)
- Available space for containers and dosing units
- Budget
5.1.1 You should take care of the following aspects:
- Correctly evaluated water parameters are basic for any dosing Use only high-quality test kits and tools. Learn how to measure correctly.
Measure concentrations like Ca, Alk, Mg only at correct salinity (~34.8 psu).
- Weighing-in of chemicals has to be done with an accurate set of scales Don’t rely only on the number of digits your scale is displaying, but its measuring accuracy
(I’ve seen scales which display 1/100 gramm , but show an incorrect result by 50 grams)
In general: the smaller your tank is (meaning the smaller the amount you have to dose),
the more accurate your scales should be.
- Check if there are any timely limitations where you should add a dose of chemicals (eg in the morning, in the evening…)
- Take care of incompatibilities of some chemicals or possible precipitations (eg: you shouldn’t add CalciumChlorid-DiHydrate and NatriumHydrogencarbonate at the same time and
place in your tank)
- The smoother you add chemicals to your tank, the less stress on your animals You should not directly pour chemcials directly over animals or raise certain levels too fast
- Pour chemicals into positions with good flow to prevent areas with assembly of high concentrations
- Containers used for storing should be food-safe. Some solutions should be mixed after some
time of storage.
5.1a Manual dosing
Manual dosing is easy to do and needs no further explanation. Be sure to consider 5.1.1.
5.1b Automatical dosing
Can be done either: - as liquid (eg: pre-mixed trace elements, pre-mixed Balling liquids..)
- as powder
In case you want to dose powder-like chemicals by dosing pumps, you have to solute them before use
in RO water. Most common dosing is dosing of Balling liquid solutions.
page 58
5.2 How to calculate a specific dosage?
I strongly recommend using Aqua Calculator
to calculate your tank’s specific dosage.
There are even specific FAQs about how to use Aqua Calculator for this job
Interested in how to calculate manually? Here you go….
Step 1:
How much of a chemical substance is to be added to reach a defined concentration?
Assuming a dry substance, the weight of this substance is the only thing we can measure easily.
Before starting an adaptation we need the following information:
a) Which concentrations should be raised (calicium, alkalinity and/or magnesium)
b) By how much [mg/l] should the level(s) be raised * Concentration deficit
c) Water volume*1) that has to be adapted
*1) Overall water volume (Volume of water in tank, sump, pipings, etc)
example: Tank with 100 litre water volume
Magnesium should be raised from 1280 mg/l to 1320 mg/l
- Concentration deficit 1320 – 1280 = 40 mg/l
- Overall deficit 40mg/l x 100l /1000 = 4 g
Result: You have to add four grams of magnesium to your tank
Step 2:
It would be too easy if we could just add exactly the calculated amount (overall deficit) of “100%
magnesium” right now.
Instead, we use available salts (Balling salts), which are a chemically associated and thus having not
only “Mg” but also other ions. Thus we have to add more of the Balling salts than just the calculated
The name of the Balling method is due to Hans-Werner Balling, who published
it several years ago. His idea was to add a so-called
“NaCl-free” salt mixture to make the tank’s water more nature-like.
Hans-Werner is a very experienced and advanced aquarist and biologist,
working several years for the well-known company Tropic-Marin.
Balling ≠ Balling!
You will find tons of information about the Balling method on the internet, books, or even aquatic
stores. Only some of them recommend the initial recipe suggested by Hans-Werner Balling but using
the name “Balling”. Recipes as well as dosing suggestions for liquid solutions differ a lot, but all of
them following one target: Raising your tank’s water concentration for Ca, Alk and also Mg by an
easy to use and cost effective way.
Follwing advantages made the Balling method widely known and the best way to control your Ca, Alk
and Mg concentration:
- Very accurate dosing and also able to adapt single parameters
(not only all together)
- Can be started with nearly no needed technique, up to a fully automated solution
- Cost effective
The initial Balling recipe is adapting calcium & alkalinity. Most users also apply and call also the
adaptation of magnesium doing the Balling method (Adaptation of Mg was not initially suggested by
H.W. Balling).
Dosing of trace elements in a pretty complicated and not commonly spreaded composition, together with the other chemicals for adapting Ca, Alk, Mg was also suggested by H.W. Balling. This is not described in this FAQ.
You need chemical substances that we call Balling salts in good aquatic stores, chemical stores
or even drugstores. Definition of Balling salts needed * later, see recipes.
Several manufacturers sell ready packed versions of standard Balling salts under more common
names like BioCalicium, Magnesium Plus etc. Most of them are nothing more than pimped up
Balling salts sold more expensively. This might be a good choice for smaller tanks or for your
first Balling attempts. For bigger tanks this might get too expensive.
Also, readly mixed Balling salts in purified water (liquid solutions) are sold.
You can easily and much cheaper mix yourself.
H.W. Balling (Dez.2009)
page 63
0
2
4
6
8
10
12
14
16
250 300 350 400 450 500 550 600Calcium
Konzentration [mg/l]
Alk
alin
itä
t
Ka
rbo
na
thä
rte
[d
KH
]
optimaler
Bereich
Zone
III
Zone
I
Zone
II
Zone
IV
5.6) Balling recipe for a stoichiometric-balanced adaptation of Ca-concentration and alkalinity
In well-running reef tanks, calcium and alkalinity will steadily and quickly drop by coral’s
consumption. They will drift into Zone-II (red arrow) and have to be raised again (green
arrow).
H.W. Balling‘s recipe suggests raising both
values (by adding 2 different Balling salts) in
a stoichiometricly balanced way. That means
the amount of salts is calculated in a way
where there are the least possible unrequired
ions available in the water NOT adapting Ca
and alkalinity.
Relation between Ca concentration and
alkalinity will be raised always in the same
way. For most tanks this is OK.
Raising Ca-concentration by 10 mg/l corresponds with
Raising Alkalinity/Carbonate hardness by 1.38 °dH
Recipe suggestion works like this: Ca-concentration is the input parameter; Alkalinity raise will follow with the above factor
H.W. Balling’s stoichiometric-balanced recipe is calculated according to this formula
There is also another risk, which is unbalanced levels of nitrates vs phosphates. This can also lead
to degeneration of corals and should be avoided.
Redfield-relation: N3 versus PO4-concentration should be ~10:1.
For most tanks this is automatically taking place and thus OK.
Adjusting unabalanced levels of nitrates vs phosphates
Case-A: Nitrates OK/too many phosphates
Use phosphate absorber
Case-B: phosphates OK/too many nitrates (rare)
Adding of phosphates artificially
page 83
6.2 Wet-dry filters, bio balls, mechanical filters – just a relic from former times?
These were state of the art in saltwater tanks only a few years ago, but things have changed and
improved. The idea of these type of mechanical filters is to generate additional aerobic settling
area for bacteria to convert toxic ammonia nitrites nitrates. Unfortunately the process ends
here (generating nitrates) – and having too high nutrients/nitrate concentrations within our tanks
is not what we want.
Modern reef tanks do not need any filtering mats, filtering sponges etc. If you need to have them
for special/emergency reasons, you should clean them often with saltwater to avoid generating
unwanted nitrates.
In general, you shoud avoid any mechanical filters within reef tanks.
In the next chapters you learn about several improved methods that will help you get your tank
“crystal clear” and without many nutrients.
page 84
6.3 Skimmers (protein skimmers)
Skimmers are a basic element of nearly every saltwater tank.
Advantages of using a skimmer:
Particles/substances/toxins are removed immediately from the tank’s water circuit
Water is strongly enriched with oxygen
Different to skimmers, mechancial filters just “keep back” particles, excrement, etc. They assemble
them over a certain time and still pollute your water before they are finally removed.
Working principle of skimmers: Starting point of each skimmer is forming a huge number of bubbles from air plus tank’s
water. Nearly all modern skimmers have a pump with an air-injector doing that job. Water used for forming the bubbles
can contain inpurities, toxins, particles etc. (Intake with “dirty” water), which attaches directly to the air bubbles, forming
a more or less liquid and “dirty foam”. Within the skimmer’s reactor tube, air bubbles are then wandering upside down.
Efficient skimmers use a micro injector grid to canalise the chaotic stream of air bubbles even better. Bubbles coming again
and again from the bottom of the skimmer are pressing the other bubbles towards the upper end of the skimmer.
Superfluous water is rinsing downwards by gravity. Dirty foam is then being pushed over the edge of the foam collector,
where it assembles in the foam pot/skimmer cup. Here bubbles are bursting, leaving a dirty liquid. Efficient skimmers
allow the user to adjust the height of the water column in the main chamber. The higher the water column, the more liquid
is generated. Skimmer shown for this reason uses an adjustable shut-off valve
page 85
Skimmers are skimming:
- undissolved surface-active and partially also not surface-active particles
- substances oxidised and soluted in water
Criteria for selection of an effective skimmer:
- Construction and size must fit systems requirements several systems available. Choose between a sump or hang-on types
- Skimmer strong enough for tank size/amount of fish
positive: High amount of air bubbles produced, bubbles as small as possible
- Low power consumption together with high amount of air bubbles skimmers are running 24h/day! More expensive models can pay off fast.
- Quiet, no vibrations
- Foam pot should be easy to remove and easy to clean
Even better: adsorbate can be removed by an extra valve without removing the foam pot
- Good adjustability of adsorbate (liquid or dry)
- No bubbles within water running out of the outlet
- Quality and sustainability of plastic parts and pump
page 86
6.4 The “Berlin system”
This is a starting point for all following featured systems for reducing nutrients in your reef tank.
Biological filtering is done exclusively by live rock. Coming by high porosity within the stones,
already packed with millions of useful bacteria, denitrification is taking place. Different types of
bacteria convert ammonianitritesnitrates (later also to escaping nitrogen) and also
phosphates. Together with a skimmer, particles and even some toxins are removed from your
tank.
Good quality of live rock is decisive: - The more space for settlement and the more living bacteria stones have, the better
reduction of nutrients is working.
- Good quality stones are light weighted and porous
- Best is to get your live rock on the day when it is imported by your dealer (before it might bum around in absence of light and bad current flow situations)
- Good live rock has a healthy appearance
To save some money you can use partially non-live rock. But it is important here to use material
from reefs which are very porous. Doing this, the start-up phase of your tank (establishment of
bacterial population) will take longer.
What do you need for running a “Berlin system“?
- Top quality live rock
- Skimmer
- No mechanical filters
Running a Berlin system, you can also use in parallel:
- Activated carbon or ozone for filtering out or oxidizing harmful bacteria,
toxins and pathogenic germs.
- Your preferred method to supply your tank with Ca, Alk, Mg
(eg Balling method, calcium reactors, etc.) and eventually trace elements
because these are partially filtered out by your skimmer
page 87
6.5 Jaubert System
Target is an improved reduction of nitrates and also phosphates.
The Jaubert System (acc. Prof. Jean Jaubert University Nizza/Monaco) is not very widely
spread and just mentioned for completeness. It has a thicker layer of sand and only limited
reduction of phosphates.
Functioning principle: A thick layer (>10cm) of a specially constructed sand layer leads to de-
nitrification in its anaerobic zones.
Foto: Sabine Mülder
Construction of sand layer (described bottom up):
- Bottom glass plate should have a valve for withdrawal of water
- sheets of plastic that can be streamed through (Plenum) (sand-free area with water low on oxygen, 2-3 cm high)
- net with small holes, preventing sand from entering the plenum (use non-rotting material!) - Thick layer of crude coral sand with yet another net in the middle to prevent animals from
digging up too much (anaerobic zone, thickness ≥ 10cm, grain size 3.5 mm)
- You should not use too much of the sand area to place your live rock for better
de-nitrification
Jaubert systems can run even without skimmers. Take care that enough oxygen can enter your tank.
page 88
6.6 Sandbed filters (DSB)
Target: - Improved reduction of nutrients nitrate and phosphate
- Creation of optimal conditions for plankton and small critters
(additional source of food for your animals and also LPS corals)
- A smaller amount of calciumcarbonate is added automatically
(partial adaptation only)
Core of each sand bed filter (DSB = Deep Sand Bed) is a sand layer being 8-15cm thick from a
mixture of very fine white coral or aragonite sand. Very small granular size especially in bottom zone
is generating an optimal area for bacteria and small critters. Nitrate is converted to N3 gas, which
escapes the tank especially in the bottom, anerobous zone. Generating good conditions for heterotroph
bacteria phosphate is digested and partially converted to biomass, which is removed by the skimmer.
Detail shot of a deep sand bed/DSB (photo: Markus Emge)
What do I need to run a DSB / sand bed filter?
- Special sand mixture (very fine at the bottom, normal sand at the top)
incl. denitrifiying bacteria cultures and population of small critters
- Good current flow (best would be an alternating current, 30-40 x tank volumnia)
- Skimmer
page 89
How to set up a DSB (from bottom up)
1.) Form a 6cm layer from very fine white aragonite sand (eg Acro Tropic Aragonitsand)
Clean sand with existing saltwater before inserting.
2.) Place a 2-4cm thick layer of fine live sand to add bacteria and small critters (eg CaribSea AragAlive or Ecoystems Livesand, particle size 0.5 – 1.7mm)
Gently mix part of the live sand with aragonite sand with your fingers.
3.) Form the top layer by more crude “real live sand”. (eg Ecoystems Livesand, granular size 1.0 – 3.5mm)
It is very important to have a slight current flow at the top layer. Current should steadily clean
the top grains, but not totally whirl through or even blow away the sand.
A DSB needs a start-up phase before reducing nutrients in an effcient way. The more real live
sand is used the faster the bacteria and critter population will emerge
- ca. 2-6 weeks for full population of bacteria
- up to 12 weeks for small critter to emerge
In most cases, reduction of nitrates starts before reduction of phosphate.
Especially in the DSB’s start-up phase, but also later, you should avoid animals trenching your
sand too heavily and also eating your DSB critters. (digging gobies, digging starfish, sanddollars and spotted mandarin fish are not ideal in DSB tanks)
The inner layer of a DSB should be in very slight but steady movement. This comes
automatically by bristle worms, small seastars, snails etc digging themselves small caverns.
Running a DSB you should avoid “cleaning your sand” with mull bells or similar.
page 90
Risks of using a sand bed filter (DSB)
1.) Rarely DSB users report dying of fish.
High population depth of bacteria and crittera use up lots of oxygen. Especially at night
where no photosynthesis can take place, the oxygen supply must be secured. If not,
bacteria/critters will use up all oxygen available and fish can suffocate.
A powerful skimmer running at minimum all night long is a must wthin DSB tanks.
2.) Providing a very efficient reduction of nutrients, there is a chance that, even if plankton is
provided by the DSB (small critters), corals can suffer from too little feeding.
In case of any deficiency symptoms of corals, you should provide additional coral food. (Amino acid like AutraAmino, UltraMin S/Aminoacid concentrate, or powder food like CyclopEeze, etc.)
3.) In some cases, DSB reduce nitrates very well, but PO4 levels are still high. This might not be
only a DSB problem but can also be caused by PO4 enrichment within your reef. Due to being
suboptimal for your corals, you should avoid this by either
using PO4 absorbers
stronger skimming
Frequently asked Questions about sand bed filters/DSB
F: Doesn’t a skimmer reduce my DSB source of food, detritus etc?
A: No. Even with skimming a DSB will have plenty of food available.
F: My DSB is reducing phosphates less than nitrates. What should I do?
A: This is not untypical for DSBs. You can correct by stronger skimming and/or using PO4
adsorbers.
F: Which nutrient levels will I get with a DSB?
A: Stabile, eingelaufene DSB-Systemen liegen meist bei: ***IN GERMAN***
- Nitrate 0.1 .. 5 mg/l
- Phosphate 0.05 .. 0.1 mg/l
F: When is the best starting point for a DSB?
A: In general: As early as possible to allow critter to reproduce without the presence of fish who
can decimate a fresh population pretty fast.
Anyway, the start-up phase of your tank should be already over before adding a new DSBs top
layer of live sand.
page 91
F: The very fine sand is dulling my water. What can I improve?
A: - Add live stones/reef structure before sand
- Use a PVC-tube to let the sand carefully glide through it to the ground.
- Switch of flow pumps when bringing in the sand.
F: Detritus is assembling on my gravel . What can I do?
A: You have to optimise your flow conditions. If you don’t, the DSB cannot work.
F: There are collections of detritus within my middle layer of DSB/sand. What can I do?
A: Most likely you used sand with a granular size that was too big.
Replace sand. Use smaller granular size.
I do not recommend changing more than one third of sand’s volume at one time.
F: Within my DSB/sand there are black, fouly smelling areas. What should I do?
A: Exploitation of detritus by critter is not working well enough.
Possible reasons:
- Not enough critters within your DSB (poor quality real live sand?)
- Remove black, fouly sand by sucking up with water
- Reduce stress by too many/big fish
- Add fresh lining of sand to stimulate critter population
F: Do I have to refill sand?
A: Yes. The very fine sand of the bottom layer has to be refilled each 1½ .. 2 years in normal
cases. This is required because the sand is from CaCO3 and soluted slowly within the acid milieu
within the DSB. This also has the (positive) effect that you might not even need Balling method,
calcium reactor etc. (depending on your tank’s consumption).
F: I want to remove my old sand. How should I do that?
A: By no means you should remove all sand in one go. Remove old sand in amounts not bigger
than one third of the total amount to avoid crashing your
bacteria poupluation!
page 92
6.7 Algae and mud filters (eg miracle mud)
Targets: - Improved reduction of nutrients nitrate and phosphate
- Creation of optimal conditions for plankton/small critter
(additonal source of food for your animals and also LPS corals)
- Smaller amounts of CalciumCarbonates (within algae filters mud)
is added to the tank
- Algae parts can get flushed to the tank and taken up as food
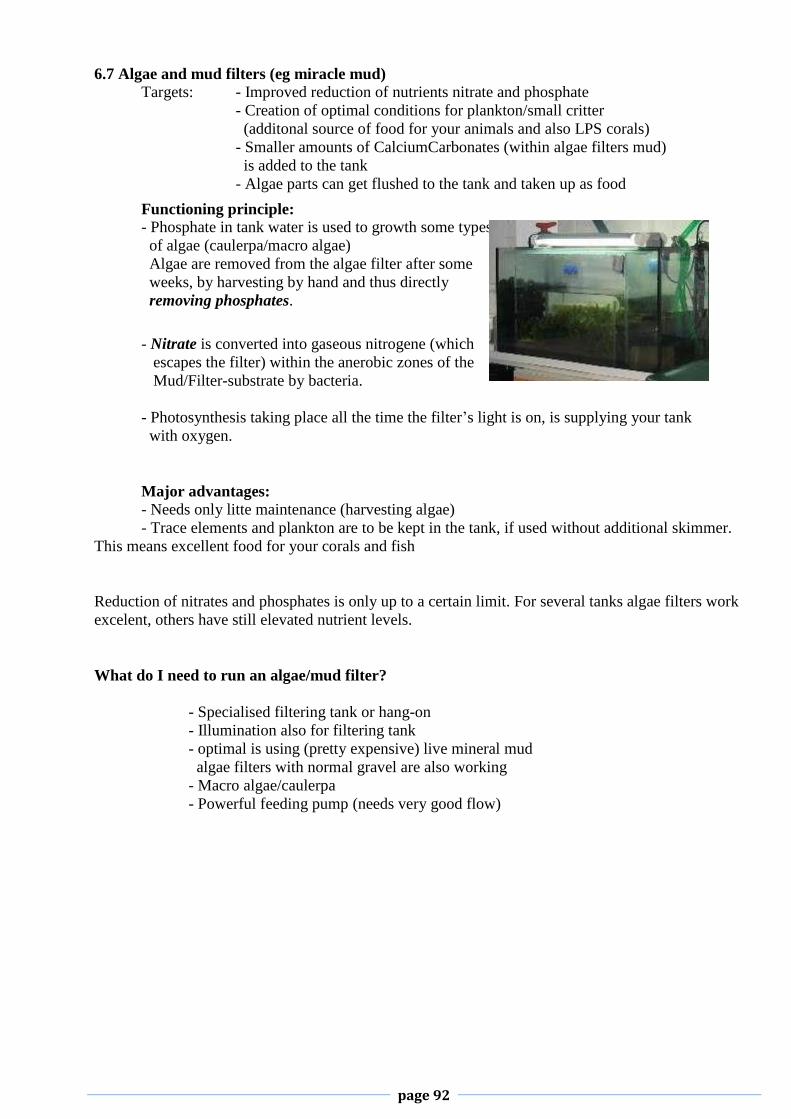
Functioning principle: - Phosphate in tank water is used to growth some types
of algae (caulerpa/macro algae)
Algae are removed from the algae filter after some
weeks, by harvesting by hand and thus directly
removing phosphates.
- Nitrate is converted into gaseous nitrogene (which
escapes the filter) within the anerobic zones of the
Mud/Filter-substrate by bacteria.
- Photosynthesis taking place all the time the filter’s light is on, is supplying your tank
with oxygen.
Major advantages: - Needs only litte maintenance (harvesting algae)
- Trace elements and plankton are to be kept in the tank, if used without additional skimmer.
This means excellent food for your corals and fish
Reduction of nitrates and phosphates is only up to a certain limit. For several tanks algae filters work
excelent, others have still elevated nutrient levels.
What do I need to run an algae/mud filter?
- Specialised filtering tank or hang-on
- Illumination also for filtering tank
- optimal is using (pretty expensive) live mineral mud
algae filters with normal gravel are also working
- Macro algae/caulerpa
- Powerful feeding pump (needs very good flow)
page 93
- Chambers of the algae filter are streamed in direction 1→2→3 by strong flow
rule of thumb for flow: 6 x tank volume/h
(hint: means pump’s actual flow rate, not the maximum value)
- Chamber-1: Pre chamber
a) Water intake from main tank
b) Can also hold Bio balls being an area for settlement of aerobe bacteria to
convert ammonia to nitrite to nitrate if not done elsewhere within tank itself
- Chamber -2: Main chamber
a) Anaerobe bacteria within mud or gravel convert nitrate into gaseous nitrogen
which will escape the tank
b) Mud/gravel is a perfect area for settlement for critters.
Absence of fish allows very good growth.
c) Caulerpa/macro algae are growing and taking up phosphates from the water.
Chamber should have an 24h/365 day UV illumination
Photosynthesis enriches water with oxygen
d) Spezialised mud (eg miracle mud) contains several minerals/trace elements
which are emitted to the wate steadily
- Chamber -3: Pump chamber
for adding a pump which has to transport water back to the main tank
Illumination (24h/day)
pump
Chamber 2 Chamber 3 Chamber 1
Mud / gravel
page 94
Miscellaneous
Harvesting of caulerpa/algae ~ each 1-2 wesks
Harvesting improves algae grwoth and thus also PO4 reduction
Renewal of mineral mud is recommended each 1-2 years by 50% of its amount
Following macro algae are especially recommended
I recommend adding a grid between chamber 2 and 3 to prevent algae from coming into the
pump/main tank
Chamber 2 is a perfect settlement area for all types of small critters which are very positive and
are also additional food for your animals/fish once they reach the main tank.
page 95
Frequently asked questions about algae/mud refugium
F: Do I need a skimmer parallel to an algae/mud refugium?
A: This type of filter also works without skimming.
Tanks with a high fish load should also have a skimmer to prevent fish suffocating, especially
during night hours.
F: How do I add mud to a new refugium or if I have to exchange it?
A: - Fill refugium with salt water
- shut down refugium’s pump
- Insert mud slowly/carefully and allow ≥ 1h for settling
(no panic, water is extremely misted during this time)
- Remove any particles swimming on the surface (net)
- Switch on pump
F: Which type of algae are recommended most?
A: Caulerpa/macro algae such as Profilera, Taxifolia and Racemosa.
F: How should I add algae/caulerpa?
A: 2 possibilities:
- Make a small hole into the mud/gravel → insert algae → close hole
- Insert caulerpa and roughly fix by adding a stone above it. Hint: in case of established tanks, you should use gloves to prevent contact with bristle worms.
F: How can I remove algae/caulerpa?
A: You can leave your pump switched on.
Simply tear off algae above its root and throw away (trash bin, compost, etc) Hint: in case of established tanks, you should use gloves to prevent contact with bristle worms.
F: How often should I harvest my algae filter?
A: A typical cycle is each 1-2 weeks. The more often algae is harvested, the faster they will grow
and thus remove nutrients.
But you should not harvest algae until they have built up several ramifications.
F: My algae/caulerpa are getting transparent. What should I do?
A: Remove any transparent caulerpa. They might release nutrients/toxins.
F: Can I feed harvested corals to my fish?
A: In general yes. Due to having taken up phospahtes this might be counterproductive
F: Help, my algae refugium is alive! What should I do?
A: Don’t panic. This is totally normal and positive for your refugium, tank and especially your
animals, which like this source of plankton/food.
F: I have red/green cyano on my caulerpa. What can I do?
A: Remove cyano bacteria from your refugium once you see it. It is best to place a piece of
wadding between chamber-2 and chamber-3, then remove cyno, which are cought in the
wadding. After that, simply throw away the wadding.
Hint: Cyno bacteria is a problem if flow rate is too low
page 96
F: Reduction of nutrients is not working good enough.
Can I use a skimmer together with my refugium?
A: Yes, a high percentage of refugium is used together with a skimmer.
Using a skimmer also reduces the risk of getting low on oxygen.
F: How long do I have to wait for my refugium until it really works?
A: Algae in refugia need some time until caulerpa starts a strong growth and also
mud/gravel population with small critters needs some time to establish.
Allow 2-4 weeks for a reduction in nutrients and 1-2 months for full efficiency.
F: Do I have to light my refugium 24h/day?
A: Yes, that is strongly recommended, especially if run without a skimmer.
But it is a must that the refugium’s light is on at hours where the tanks lights are off.
a) 24h lightning means more algae growth and thus reduction of nutrients.
b) Photosynthesis at night hours reduces risk of insufficient oxygen supply.
F: Do I need a special lightning?
A: UV lightning is fine.
page 97
6.8 Vodka method
Target: Improved reduction of nitrate and phosphate
This method works by feeding the bacteria population, which will make up most of your tank’s
nitrogen cycle. The growth and cell division rate of bacteria is boosted by adding a source of organic
carbon, ie vodka/ethanol.
Vodka method uses 2 parallel running processes:
- Optimised denitrification from nitrate to gaseous nitrogen
(which escapes your tank as gas)
- Consumption of nitrate/phosphate by building up biomass
by generating layers of heterotroph bacteria which:
- are removed partly by skimming
- are used partly as food for corals
Once there is no sufficient (heterotroph) bacteria population available, you have to accumulate with
bacteria cultures first.
Using the vodka method means only little work and is very reasonable.
But there is a certain risk if bacteria grows too fast, which then generates problems for your fish.
What do i need?
- Skimmer (as an absolute must)
- Any source of Ethanol being uncoloured and free of harmful substances eg. vodka
- Test kits to determine concentrations of nitrate and phosphate
Risks of the vodka method
1.) Some users report massive loss of fish. Most of the time this happened over night.
Reason is overproportional growth of bacteria population by vodka method ONLY if coming
TOGETHER with an insufficient oxygen supply. High population depth of aerobe bacteria is
using up lots of oxygen, especially at night where photosynthesis is not taking place. Fish have
died by suffocation.
A powerful skimmer running 24h/day is a must if the vodka method is used.
2.) The vodka method reduces nutrients efficiently. Doing this either too fast or until you reach
0 concentrations of N3 / PO4 can lead to problems for your corals by starvation. You should be
especially careful not to reduce too fast (see dosing recommendations later on).
Remember, you should target “low nutrients”, but not “nutrient-free conditions”
In case of 0 concentrations you have to feed corals separately (Amino acids like UltraAmin, UltraMin S/Amino acid concentrate, powder food like CyclopEeze, usw.)
page 98
3.) In rare cases, users report that the vodka method reduces only one of both nutrients (nitrate
OR phosphate). Although I see other reasons within your tank being responsible for this
(which you should try to resolve in this situation).
Case-A: Nitrate concentration good/low but phosphate concentration too high
Use phosphate absorbers parallel to vodka method
Case-B: Phosphate concentration good/low but nitrate concentration too high (happens only very rarely
Dosing of Phosphate
4.) In very rare cases, users report a higher sensitivity of fish against pathogenic germs.
Increased population depth especially of aerobe bacteria within the water is seen as a possible
reason that may have led to a stronger stress for the defence mechansim of fish and thus to an
outbreak of illness (starting with dulling of skin, followed by secondary infection with non-
bacterial parasites.
But it is not proven that this would not also have happened without dosing vodka.
page 99
Dosing recommendation
There is not an exact doing recommendation valid for all tanks, because the biology of tanks are
different (amount/assembly of nutrients, available amount for settling of bacteria, type and amount of
bacteria being present, etc).
The following recommendation was used by several aquarists in Germany with very positive feedback.
It is more on the conservative side (meaning that it starts with moderate dosages) (Source: Riffaquaristikforum; Thomas Geisel)
Time Dosing [per 100 litre tank volume]
comment
day 1-4 0.5ml vodka /100L
day 5-6 0.75ml vodka /100L
day 7-14 1.0ml vodka /100L After ~7 days:
you should notice more skimmate
After ~10-14 days:
Reduction of nitrate/phosphate should be
measurable with your test kits
day 15 – xx Evaluate the amount of vodka
your tank needs to hold low on
nutrient levels for N3/PO4
rule of thumb: it should not be
much higher than 1.0ml/100L
Problem tanks can consume up to 4ml
vodka /100L per day
(high fish population, not too good flow,
not enough settling space for bacteria)
Furthermore
(steadily
dosing)
Try to reduce amount of vodka
used to 20-50% of the amount
you evaluated before, based on
measuring N3/PO4
concentration more often during
this time.
Target: low on nutrients
(but not N3/PO4 = 0)
24h/day oxygen supply (eg by skimmer) is an absolute must.
In no way should your tank should stay without additonal oxygen supply overnight.
Especially within the first 3 weeks using vodka you should measure nitrate/phosphate
pretty often (2-3 times a week). Your specific dosage has to be evaluated according your
tank’s biological demands.
Dosing recommendation above is for normal vodka available in super markets
(uncoloured, sugarfree, ~40 Vol-% alcolhol).
In case you recognise smeary surface layers within your tank/glass, this is bacteria films. *
reduce amount of vodka dosed
page 100
Frequently asked questions about the vodka method
F: Should I pour the vodka directly into my tank?
A: Yes, best if you maesure the amount of vodka you need with a syringe
and inject into a position of your tank with good flow
F: Does it matter which vodka I’m using?
A: In general yes. The brand doesn’t matter. Should be ~40 Vol%, uncoloured and sugarfree. You
could even dose a pure ethanol (dosing recommendation would be different)
F: How can I see that the vodka method is functioning??
A: You will notice a stronger skimming first
Some days later reduced concentrations of nutrients can be measured
F: Slimy white/brownish layers are assembling on my glass, rocks and/or sump. What’s that?
A: Most likely this is layers from bacteria. This is indicating that you use too much vodka for
feeding → reduce amount of vodka. You can remove this with a toothbrush. Your skimmer
will remove them later on.
F: Water surface is getting milky since i use vodka. Is that a problem? A: Most likely this is died off bacteria (normal). You should improve water movement. F: My tank’s water is getting milky. What’s that?
A: Maybe you dosed too much vodka and bacteria are multiplying excessively (bacteria bleed).
Reduce vodka dosage and ensure a good oxygen supply/skimming.
Attention: A sub-optimal oxgen supply can be dangerous for your animals/fish
F: Can I use vodka without running a skimmer?
A: No Using vodka without having a secure and strong oxygen back up like a skimmer is not
recommended. F: Can I use a PO4 absorber running the vodka method?
A: Yes. In case of low nitrate concentrations but still eleavted PO4 this is recommended.
F: Can I run UV and ozone generators running the vodka method?
A: Yes.
F: Can I run the vodka method parallel to a sandbed filter (DSB)?
A: Normally you won’t need 2 systems reducing nutrients. This might even lead to an
unfavourable zero-nutrient situation.
F: Can I run the vodka method parallel to an algae/mud refugium?
A: Normally you won’t need 2 systems reducing nutrients, but you can reduce more nutrients if
running parallel in problematic tanks. Don’t forget to use a skimmer if you dose vodka.
page 101
F: Can I run vodka method parallel to zeolite?
A: Tanks using zeolite method normally are extremely low on nutrient concentrations. In very
problematic tanks you can combine both methods to further reduce nutrients.
6.9 Bio pellets, pellet filters
Functioning principle:
Starting point is small pellets being a mixture of several natural polymers that are biodegradable.
They offer a perfect surface for bacteria and also a carbon source for corals, sponges and filtering
lifeforms. Thus they are efficient for reducing nutrients.
Allthough you could also place the pellets somewhere in your sump, it is more effective to have
them in a filter where they are streamed steadily and from all sides.
Photo: Fauna Marin’s NPO redu pellets (NPO redu = reduce N3/PO4))
within Fauna Marin’s pellet filter
page 102
6.10 Reducing nutrients by zeolites
This method requires a bunch of measures to be done. The benefit if acting according this labour-
intensive and somehow expensive method is, getting very nature like conditions in your tank. Used
correctly this will give you very good growth and excellent colours especially for sensitive stony
corals.
Colours reached are very distinct and bright (red, pink, blue and green tones). This is the visible effect
of reduced building up of lots of brownish zooxanthelle.
You can also use this method for tanks with a very high fish load or strong feeding as common in axo-
coral tanks.
Market is offering several systems eg UltraLith (Fauna Marin – Claude Schumacher), ZEOvit
(Korallenzucht - Pohl). For the following pages I use the wording Zeolite-method to be as product