BL00140-200 (1) Getting Ready Basic Photography Advanced Photography Settings Connection Advanced Features Playback OWNER’S MANUAL This manual will show you how to use your FUJIFILM DIGITAL CAMERA FinePix S2 Pro correctly. Please follow the instructions carefully.
Transcript
BL00140-200(1)
Gettin
g R
eady
Basic
Ph
oto
grap
hy
Ad
vanced
P
ho
tog
raph
yS
etting
sC
on
nectio
nA
dvan
ced
Featu
resP
layback
OWNER’S MANUALThis manual will show you how to use your FUJIFILM DIGITAL CAMERA FinePix S2 Pro correctly. Please follow the instructions carefully.
32
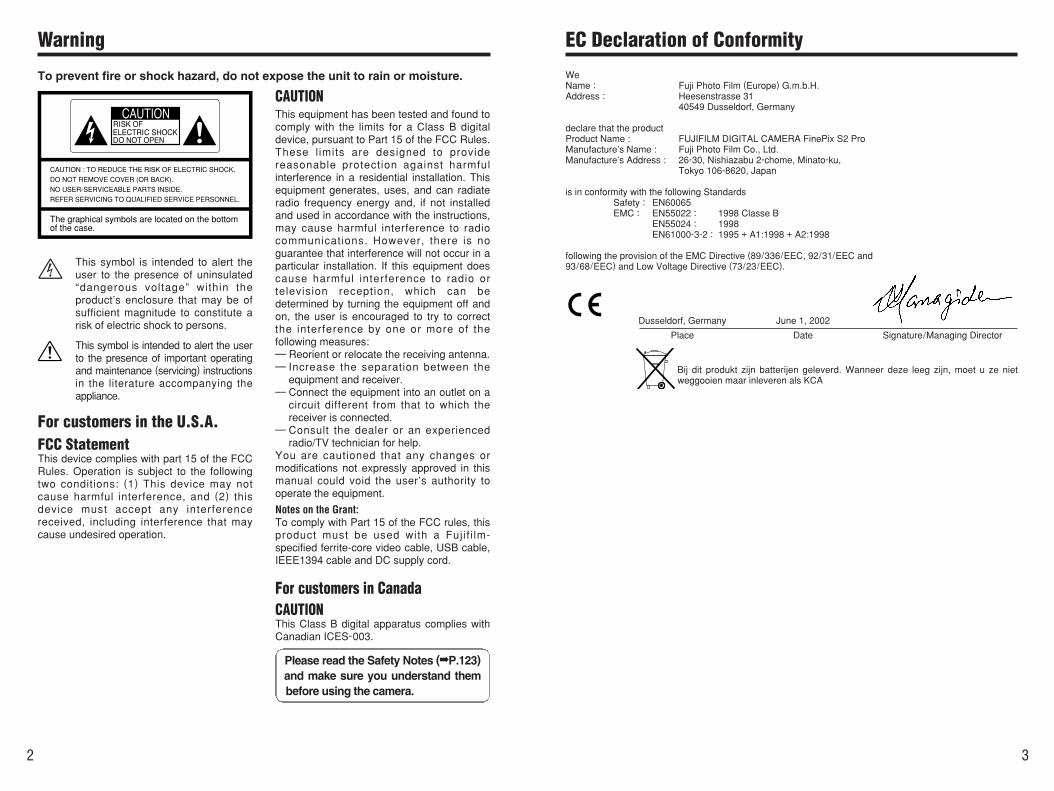
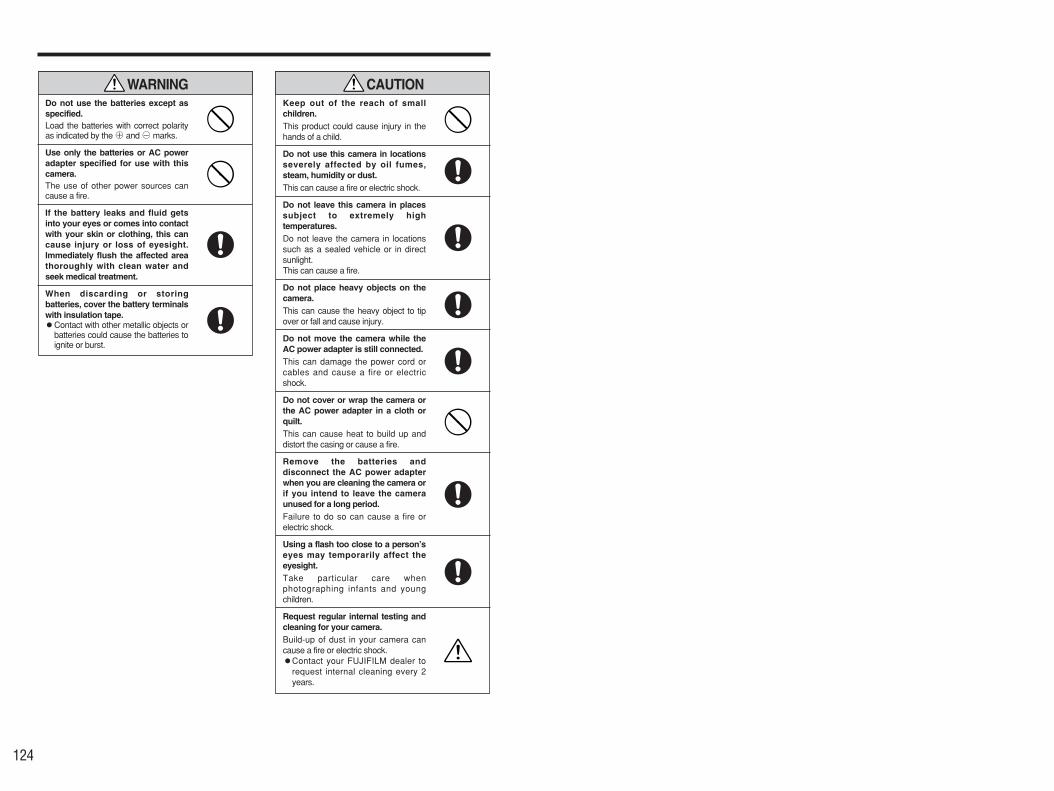
Warning
This symbol is intended to alert theuser to the presence of uninsulated“dangerous voltage” within theproduct’s enclosure that may be ofsufficient magnitude to constitute arisk of electric shock to persons.
This symbol is intended to alert the userto the presence of important operatingand maintenance (servicing) instructionsin the literature accompanying theappliance.
For customers in the U.S.A.FCC StatementThis device complies with part 15 of the FCCRules. Operation is subject to the followingtwo conditions: (1) This device may notcause harmful interference, and (2) thisdevice must accept any interferencereceived, including interference that maycause undesired operation.
CAUTION : TO REDUCE THE RISK OF ELECTRIC SHOCK.
DO NOT REMOVE COVER (OR BACK).
NO USER-SERVICEABLE PARTS INSIDE.
REFER SERVICING TO QUALIFIED SERVICE PERSONNEL.
The graphical symbols are located on the bottom of the case.
To prevent fire or shock hazard, do not expose the unit to rain or moisture.
CAUTIONThis equipment has been tested and found tocomply with the limits for a Class B digitaldevice, pursuant to Part 15 of the FCC Rules.These l imits are designed to providereasonable protection against harmfulinterference in a residential installation. Thisequipment generates, uses, and can radiateradio frequency energy and, if not installedand used in accordance with the instructions,may cause harmful interference to radiocommunications. However, there is noguarantee that interference will not occur in aparticular installation. If this equipment doescause harmful interference to radio ortelevision reception, which can bedetermined by turning the equipment off andon, the user is encouraged to try to correctthe interference by one or more of thefollowing measures:— Reorient or relocate the receiving antenna.— Increase the separation between the
equipment and receiver.— Connect the equipment into an outlet on a
circuit different from that to which thereceiver is connected.
— Consult the dealer or an experiencedradio/TV technician for help.
You are cautioned that any changes ormodifications not expressly approved in thismanual could void the user’s authority tooperate the equipment.
Notes on the Grant:To comply with Part 15 of the FCC rules, thisproduct must be used with a Fujif i lm-specified ferrite-core video cable, USB cable,IEEE1394 cable and DC supply cord.
For customers in CanadaCAUTIONThis Class B digital apparatus complies withCanadian ICES-003.
Please read the Safety Notes (P.123)and make sure you understand thembefore using the camera.
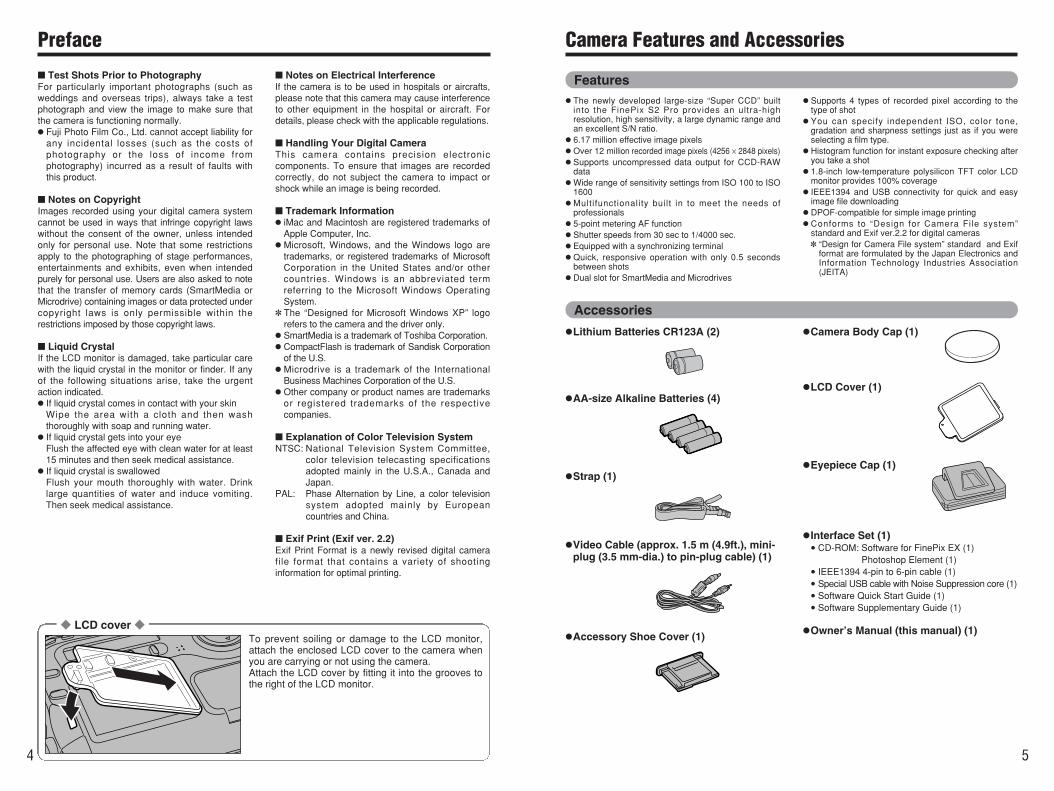
EC Declaration of Conformity
WeName : Fuji Photo Film (Europe) G.m.b.H.Address : Heesenstrasse 31
40549 Dusseldorf, Germany
declare that the productProduct Name : FUJIFILM DIGITAL CAMERA FinePix S2 ProManufacture’s Name : Fuji Photo Film Co., Ltd.Manufacture’s Address : 26-30, Nishiazabu 2-chome, Minato-ku,
Tokyo 106-8620, Japan
is in conformity with the following StandardsSafety : EN60065EMC : EN55022 : 1998 Classe B
following the provision of the EMC Directive (89/336/EEC, 92/31/EEC and 93/68/EEC) and Low Voltage Directive (73/23/EEC).
Dusseldorf, Germany June 1, 2002
Place Date Signature/Managing Director
Bij dit produkt zijn batterijen geleverd. Wanneer deze leeg zijn, moet u ze nietweggooien maar inleveren als KCA
54
Camera Features and Accessories
h The newly developed large-size “Super CCD” builtinto the FinePix S2 Pro provides an ultra-highresolution, high sensitivity, a large dynamic range andan excellent S/N ratio.h 6.17 million effective image pixelsh Over 12 million recorded image pixels (4256 × 2848 pixels)h Supports uncompressed data output for CCD-RAW
datahWide range of sensitivity settings from ISO 100 to ISO
1600h Multifunctionality built in to meet the needs of
professionalsh 5-point metering AF functionh Shutter speeds from 30 sec to 1/4000 sec.h Equipped with a synchronizing terminalh Quick, responsive operation with only 0.5 seconds
between shotsh Dual slot for SmartMedia and Microdrives
h Supports 4 types of recorded pixel according to thetype of shoth You can specify independent ISO, color tone,
gradation and sharpness settings just as if you wereselecting a film type.h Histogram function for instant exposure checking after
you take a shoth 1.8-inch low-temperature polysilicon TFT color LCD
monitor provides 100% coverageh IEEE1394 and USB connectivity for quick and easy
image file downloadingh DPOF-compatible for simple image printingh Conforms to “Design for Camera File system”
standard and Exif ver.2.2 for digital cameras “Design for Camera File system” standard and Exif
format are formulated by the Japan Electronics andInformation Technology Industries Association(JEITA)
hLithium Batteries CR123A (2)
hAA-size Alkaline Batteries (4)
hStrap (1)
hVideo Cable (approx. 1.5 m (4.9ft.), mini-plug (3.5 mm-dia.) to pin-plug cable) (1)
hAccessory Shoe Cover (1)
hCamera Body Cap (1)
hLCD Cover (1)
hEyepiece Cap (1)
hInterface Set (1)i CD-ROM: Software for FinePix EX (1)
Photoshop Element (1)i IEEE1394 4-pin to 6-pin cable (1)i Special USB cable with Noise Suppression core (1)i Software Quick Start Guide (1)i Software Supplementary Guide (1)
hOwner’s Manual (this manual) (1) LCD cover To prevent soiling or damage to the LCD monitor,attach the enclosed LCD cover to the camera whenyou are carrying or not using the camera.Attach the LCD cover by fitting it into the grooves tothe right of the LCD monitor.
Preface
Test Shots Prior to PhotographyFor particularly important photographs (such asweddings and overseas trips), always take a testphotograph and view the image to make sure thatthe camera is functioning normally.h Fuji Photo Film Co., Ltd. cannot accept liability for
any incidental losses (such as the costs ofphotography or the loss of income fromphotography) incurred as a result of faults withthis product.
Notes on CopyrightImages recorded using your digital camera systemcannot be used in ways that infringe copyright lawswithout the consent of the owner, unless intendedonly for personal use. Note that some restrictionsapply to the photographing of stage performances,entertainments and exhibits, even when intendedpurely for personal use. Users are also asked to notethat the transfer of memory cards (SmartMedia orMicrodrive) containing images or data protected undercopyright laws is only permissible within therestrictions imposed by those copyright laws.
Liquid CrystalIf the LCD monitor is damaged, take particular carewith the liquid crystal in the monitor or finder. If anyof the following situations arise, take the urgentaction indicated.h If liquid crystal comes in contact with your skin
Wipe the area with a cloth and then washthoroughly with soap and running water.h If liquid crystal gets into your eye
Flush the affected eye with clean water for at least15 minutes and then seek medical assistance.h If liquid crystal is swallowed
Flush your mouth thoroughly with water. Drinklarge quantities of water and induce vomiting.Then seek medical assistance.
Notes on Electrical InterferenceIf the camera is to be used in hospitals or aircrafts,please note that this camera may cause interferenceto other equipment in the hospital or aircraft. Fordetails, please check with the applicable regulations.
Handling Your Digital CameraThis camera contains precision electroniccomponents. To ensure that images are recordedcorrectly, do not subject the camera to impact orshock while an image is being recorded.
Trademark Informationh iMac and Macintosh are registered trademarks of
Apple Computer, Inc.h Microsoft, Windows, and the Windows logo are
trademarks, or registered trademarks of MicrosoftCorporation in the United States and/or othercountries. Windows is an abbreviated termreferring to the Microsoft Windows OperatingSystem.
The “Designed for Microsoft Windows XP” logorefers to the camera and the driver only.h SmartMedia is a trademark of Toshiba Corporation.h CompactFlash is trademark of Sandisk Corporation
of the U.S.h Microdrive is a trademark of the International
Business Machines Corporation of the U.S.h Other company or product names are trademarks
or registered trademarks of the respectivecompanies.
Explanation of Color Television SystemNTSC: National Television System Committee,
color television telecasting specificationsadopted mainly in the U.S.A., Canada andJapan.
PAL: Phase Alternation by Line, a color televisionsystem adopted mainly by Europeancountries and China.
Exif Print (Exif ver. 2.2)Exif Print Format is a newly revised digital camerafile format that contains a variety of shootinginformation for optimal printing.
ISO SENSITIVITY/EXPOSURE MODES P ................................................................. 46Program chart .......................................................................................................... 47
EXPOSURE MODES S ............................................................................................... 48S SHUTTER-PRIORITY AUTO ............................................................................... 48
EXPOSURE MODES A ............................................................................................... 49A APERTURE-PRIORITY AUTO ............................................................................ 49
SETTINGS FOR FLASH PHOTOGRAPHY ............................................................ 60BUILT-IN FLASH ......................................................................................................... 61
Flash control modes that can be used with the built-in flash ............................... 61SYNCHRO MODES AND THEIR FEATURES ............................................................ 62
TAKING PICTURES USING THE BUILT-IN FLASH ................................................... 64 Effective Range of the Built-in Flash .................................................................... 65
LENSES THAT CAN BE USED WITH THE BUILT-IN FLASH .................................... 66FLASH EXPOSURE COMPENSATION ...................................................................... 67
To check the amount of compensation .................................................................... 67To cancel exposure compensation .......................................................................... 67
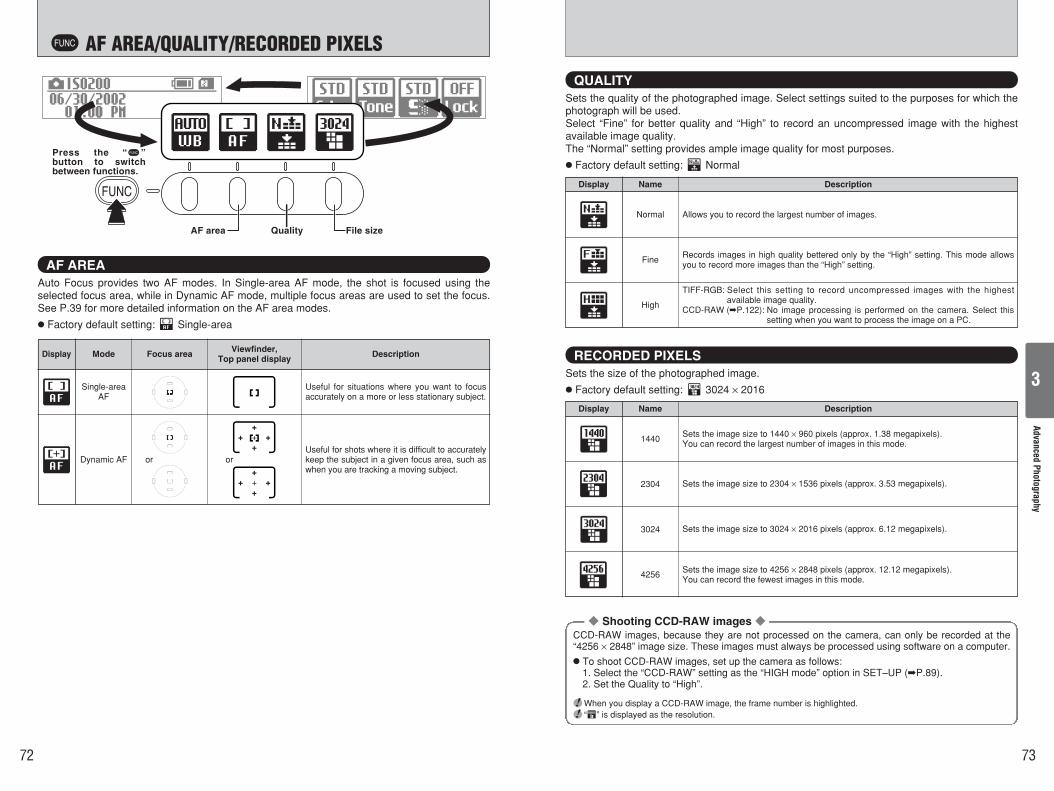
NIKON FLASH UNITS THAT CAN BE USED ............................................................. 68USING THE FUNCTION MENU WHEN TAKING PICTURES .................................... 70w WHITE BALANCE ................................................................................................. 71w AF AREA/QUALITY/RECORDED PIXELS ........................................................... 72
AF AREA ................................................................................................................. 72QUALITY ................................................................................................................. 73RECORDED PIXELS .............................................................................................. 73
ATTACHING THE STRAP ........................................................................................... 15MOUNTING THE CAMERA LENS .............................................................................. 16
Using Nikkor lenses with built-in CPUs other than G-type lenses ........................... 17Lens Compatibility ................................................................................................... 18
LOADING THE MEDIA ................................................................................................ 20SmartMedia™ (optional) .......................................................................................... 20Microdrive (optional: supplied by another manufacturers) ....................................... 20
LOADING THE BATTERIES ....................................................................................... 22Compatible Batteries ............................................................................................... 22Loading the lithium batteries .................................................................................... 22Loading the AA-size batteries .................................................................................. 23
SWITCHING ON AND OFF • SETTING THE DATE AND TIME ................................. 24CHECKING THE BATTERY LEVEL ............................................................................ 25
When you have difficulty obtaining lithium batteries ............................................ 25 Batteries Uses and Symptoms When Batteries are Depleted ............................. 25
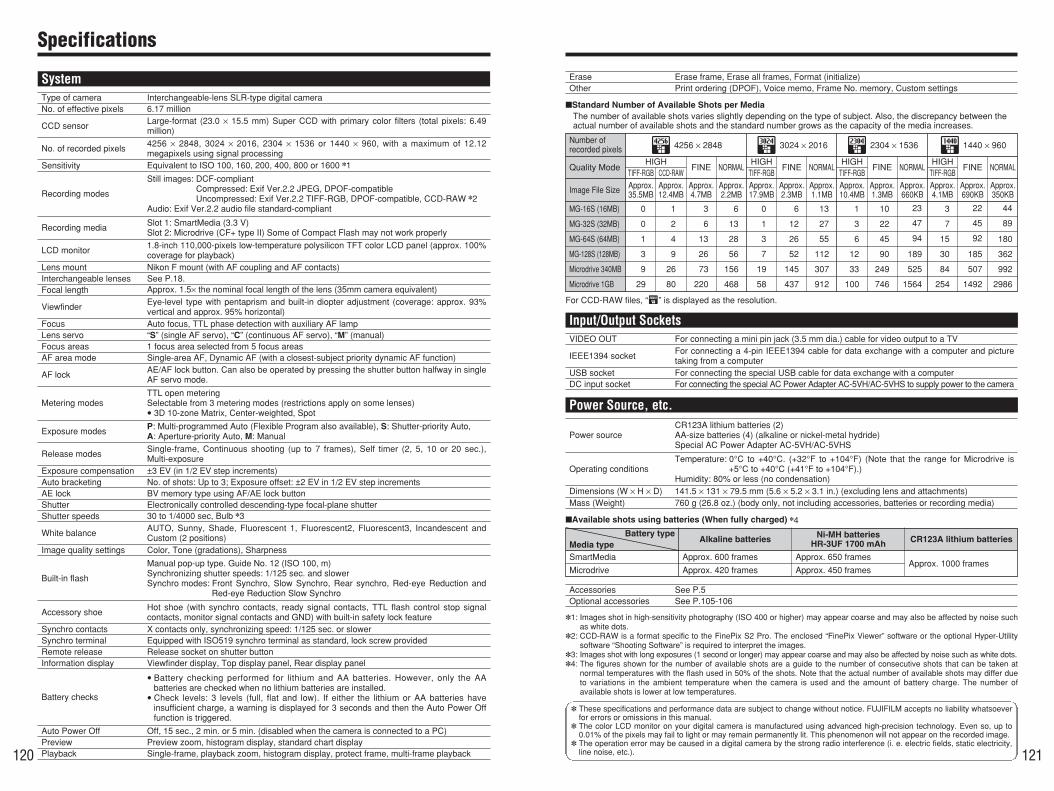
TAKING PICTURES .................................................................................................... 30NUMBER OF AVAILABLE SHOTS ......................................................................... 32
Standard Number of Shots for the Media ...................................................... 32USING AF LOCK ..................................................................................................... 33
PLAYING BACK IMAGES ........................................................................................... 34DIOPTRE ADJUSTMENT/LCD ILLUMINATOR .......................................................... 35DEPTH OF FIELD CHECK BUTTON/CCD PLANE INDICATOR ............................... 36
Focus modes ................................................................................................. 38SELECTING THE AF AREA MODE ........................................................................ 39
Selecting the focus area .................................................................................... 40AF-ASSIST ILLUMINATOR ......................................................................................... 41SITUATIONS WHERE AUTOFOCUS MAY NOT WORK AS EXPECTED ................. 42MANUAL FOCUS ........................................................................................................ 43
Focus can be set manually when the focus mode selector is set to M. ................... 43Focus Aid ................................................................................................................. 43
RELEASE MODES/e (SINGLE-FRAME) AND r (CONTINUOUS SHOOTING) . 44e (Single frame) .................................................................................................... 44r (Continuous Shooting) ....................................................................................... 44
GettingReady
BasicPhotographyAdvanced
Photography
Warning .................................................................................................................................. 2EC Declaration of Conformity ................................................................................................. 3Preface ................................................................................................................................... 4Camera Features and Accessories ........................................................................................ 5Nomenclature ......................................................................................................................... 9
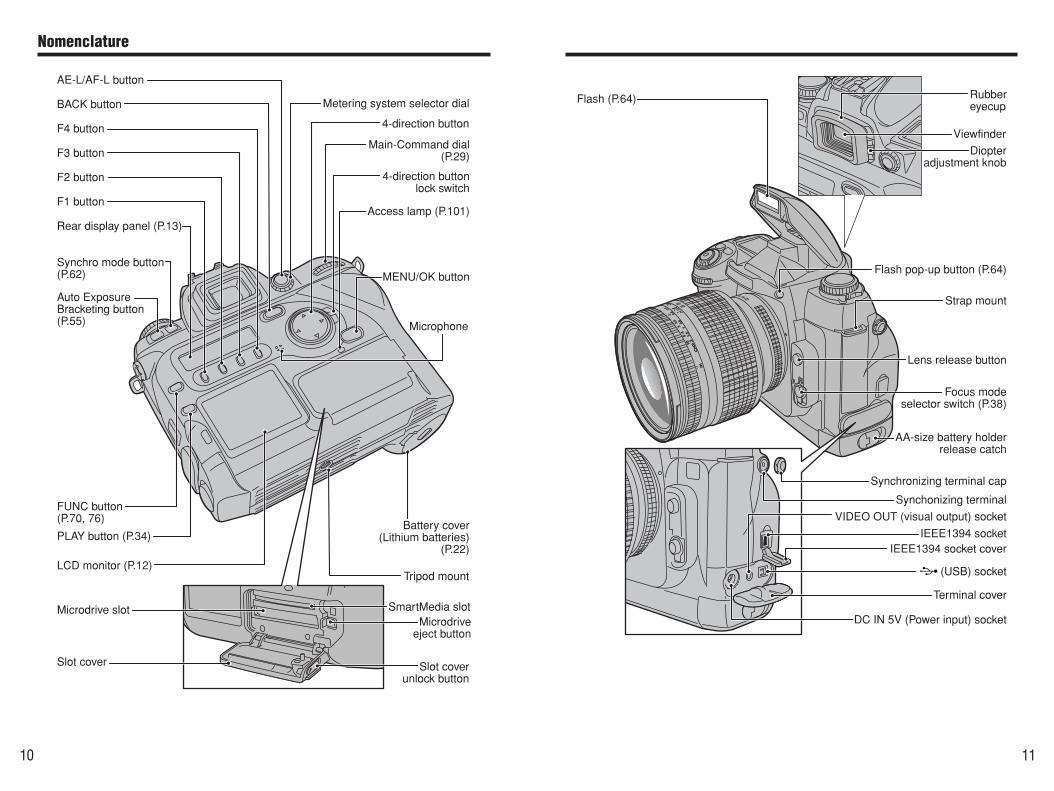
Nomenclature Refer to the pages in parentheses for information on using the camera features.
AF assist illuminator (P.41)Self-timer lamp (P.59)
Red-eye reduction lamp (P.63)
Release mode switchunlock button
Exposure mode dial
Release modeswitch
Accessory shoe(P.69)
Accessory shoe cover
Power switch(P.24)
Sub-Command dial (P.29)
Depth of field check button (P.36)
Strap mount(P.15)
Flash exposurecompensation button(P.67)
Exposure compensationbutton (P.54)
Top display panel(P.12)
LCD illuminatorbutton (P.35)
Shutter button(P.32)
Contents
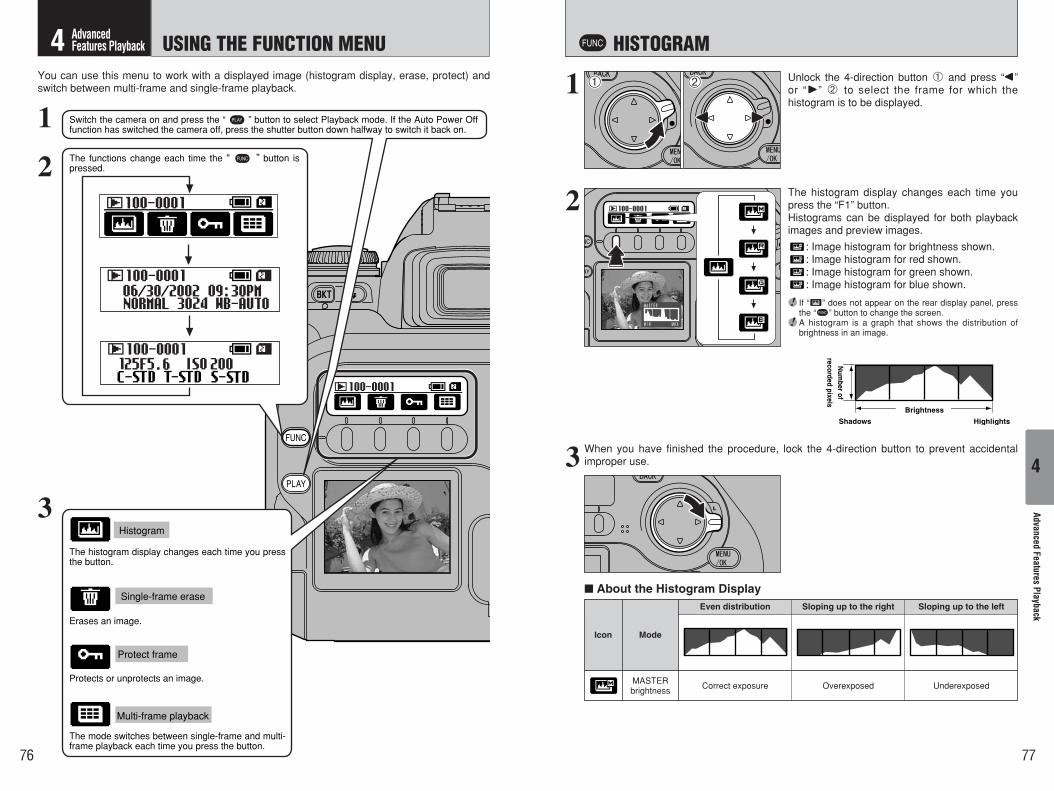
USING THE FUNCTION MENU .................................................................................. 76w HISTOGRAM ........................................................................................................ 77
About the Histogram Display ............................................................................... 77w ERASING SINGLE-FRAME .................................................................................. 78w SINGLE-FRAME PROTECT ................................................................................. 79
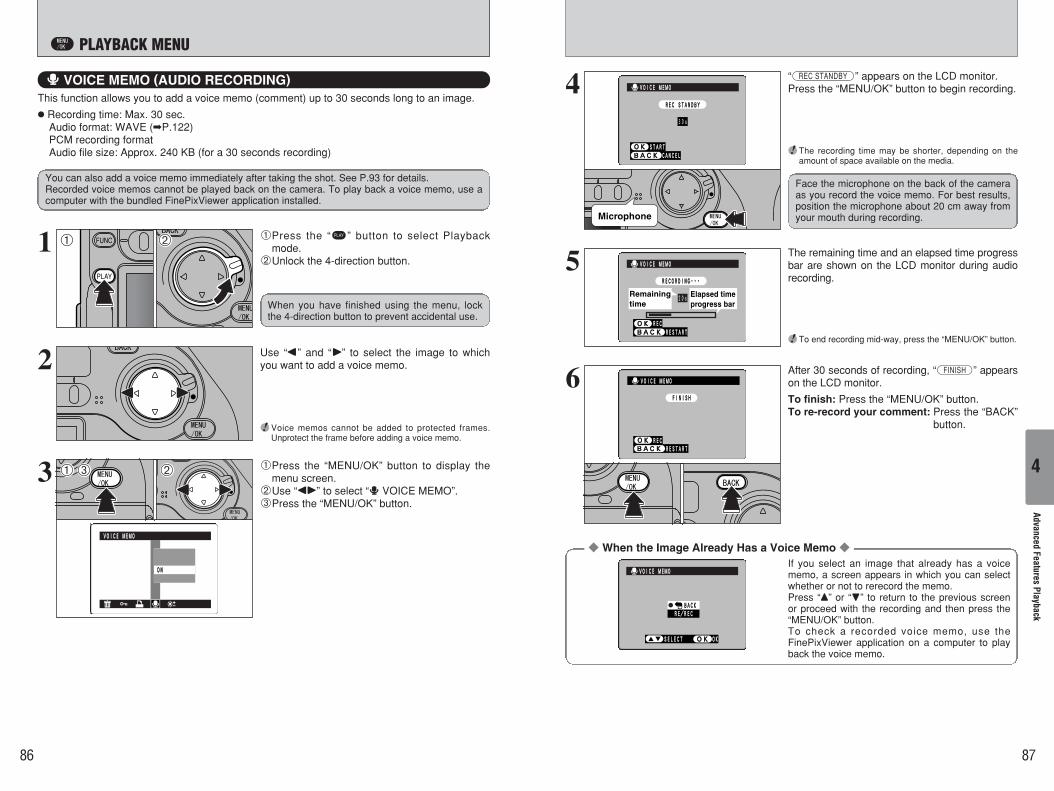
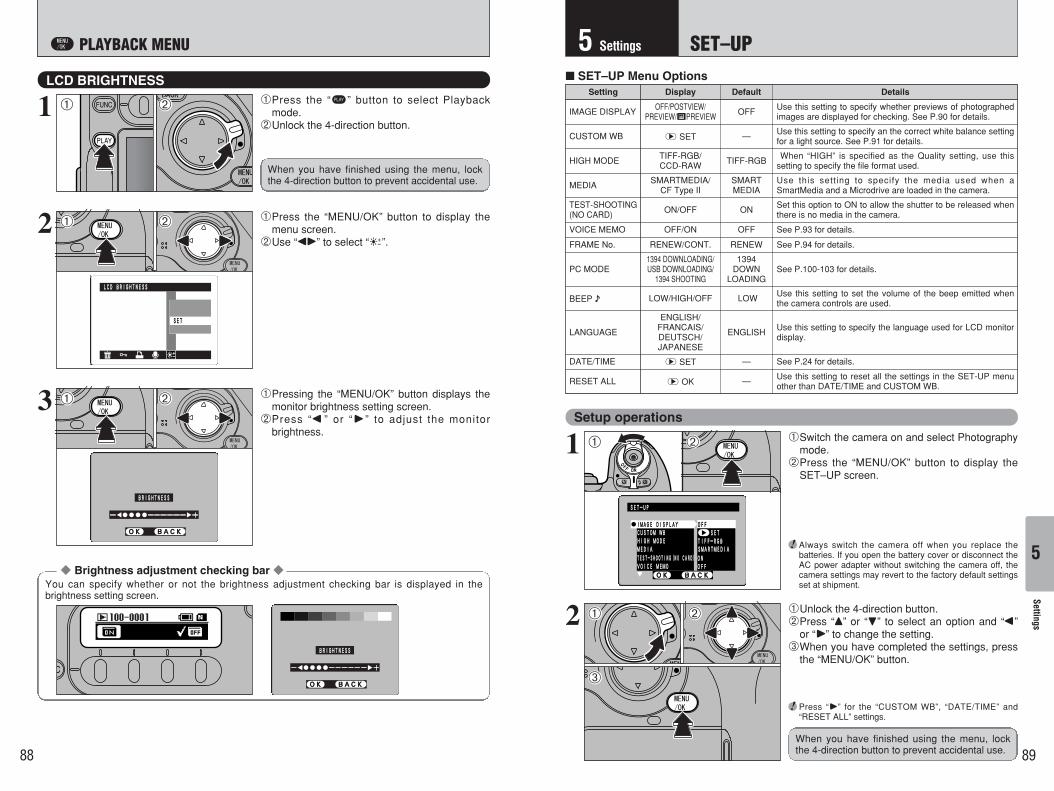
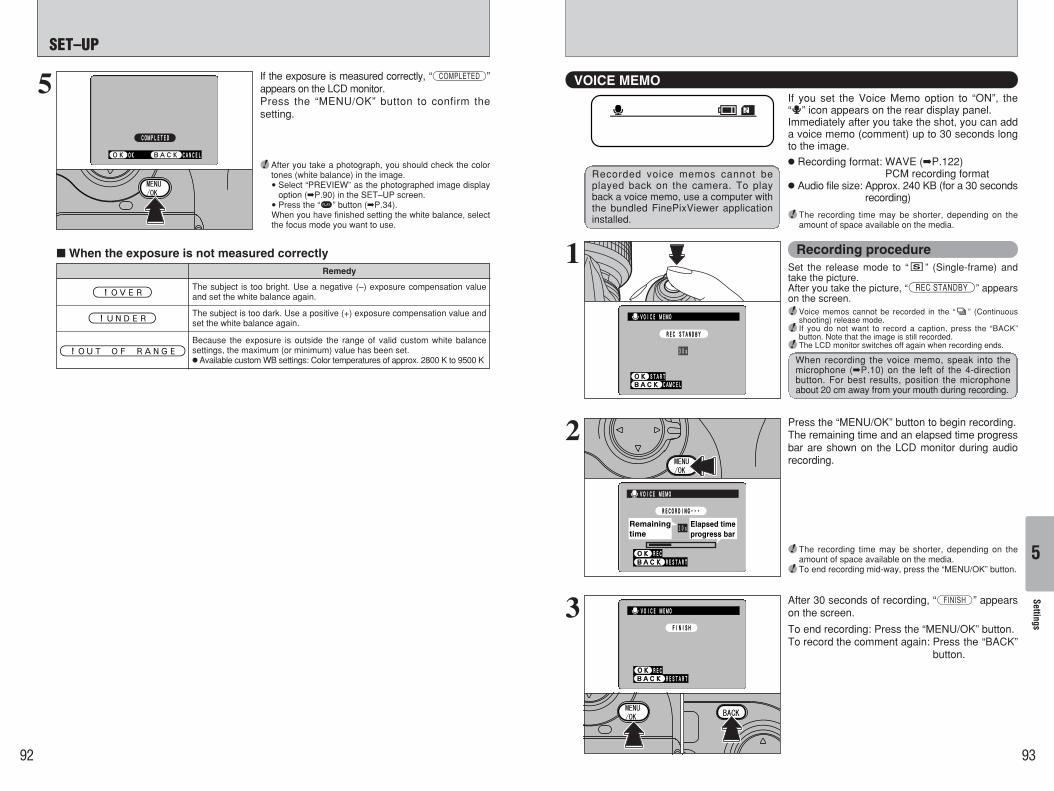
To check protected frames .................................................................................. 79w MULTI-FRAME PLAYBACK ................................................................................. 80b PLAYBACK MENU ............................................................................................... 81K ERASE .............................................................................................................. 81J SETTING AND REMOVING PROTECTION FOR ALL FRAMES ..................... 83HOW TO SPECIFY PRINT OPTIONS (DPOF) ....................................................... 84H VOICE MEMO (AUDIO RECORDING) ............................................................. 86LCD BRIGHTNESS ................................................................................................. 88
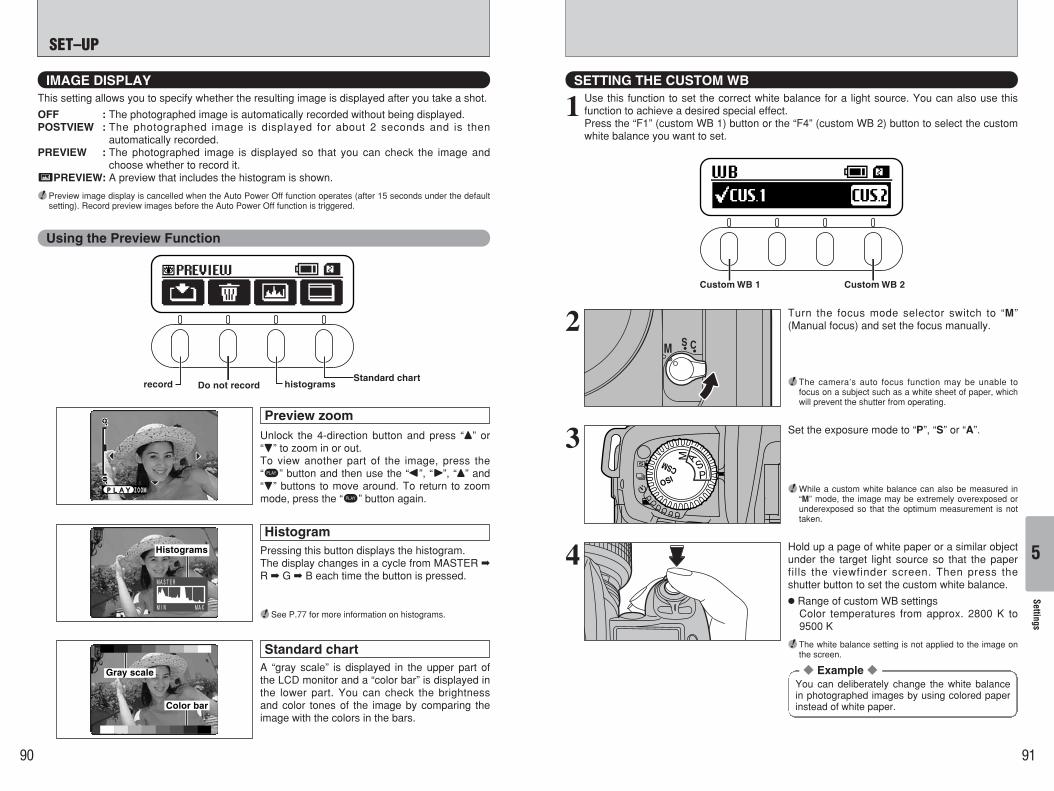
Using the Preview Function ............................................................................... 90SETTING THE CUSTOM WB ................................................................................. 91
When the exposure is not measured correctly .............................................. 92VOICE MEMO ......................................................................................................... 93FRAME No. MEMORY ............................................................................................ 94
Cancelling custom settings ...................................................................................... 96 Custom Settings List ...................................................................................... 97
CONNECTING TO A TV/USING THE AC POWER ADAPTER (OPTIONAL) ............. 99CONNECTING TO A COMPUTER ........................................................................... 100CONNECTING TO A COMPUTER VIA IEEE 1394 .................................................. 101CONNECTING TO A COMPUTER VIA USB ............................................................ 102DISCONNECTING FROM THE PC (Important — always use this procedure.) ........ 103
AdvancedFeatures
PlaybackSettings
Connection
4
5
6
System Expansion Options ................................................................................................ 104Accessories Guide ............................................................................................................. 105Notes on Using Your Camera Correctly ............................................................................. 107Cleaning the CCD .............................................................................................................. 108Notes on the Power Supply ................................................................................................ 112
Applicable Batteries ........................................................................................................ 112Notes on the Batteries .................................................................................................... 112Notes on Using the AC Power Adapter .......................................................................... 112
Notes on the Media (SmartMedia™ and Microdrives) ....................................................... 113Warning Displays ............................................................................................................... 114Troubleshooting .................................................................................................................. 118Specifications ..................................................................................................................... 120Explanation of Terms ......................................................................................................... 122Safety Notes ....................................................................................................................... 123
1110
Nomenclature
Flash pop-up button (P.64)
Diopteradjustment knob
Rubbereyecup
Viewfinder
Focus modeselector switch (P.38)
AA-size battery holderrelease catch
Lens release button
Strap mount
Flash (P.64)
(USB) socket
IEEE1394 socketIEEE1394 socket cover
VIDEO OUT (visual output) socket
Synchronizing terminal cap
Synchonizing terminal
Terminal cover
DC IN 5V (Power input) socket
Battery cover(Lithium batteries)
(P.22)
Tripod mount
Microdriveeject button
SmartMedia slot
Slot coverunlock button
Microdrive slot
Slot cover
MENU/OK button
Main-Command dial(P.29)
Access lamp (P.101)
4-direction buttonlock switch
BACK button
4-direction button
AE-L/AF-L button
Metering system selector dial
PLAY button (P.34)
FUNC button(P.70, 76)
F1 button
F2 button
F3 button
F4 button
LCD monitor (P.12)
Microphone
Rear display panel (P.13)
Synchro mode button(P.62)
Auto ExposureBracketing button(P.55)
1312
Top display panel Rear display panel
LCD monitor
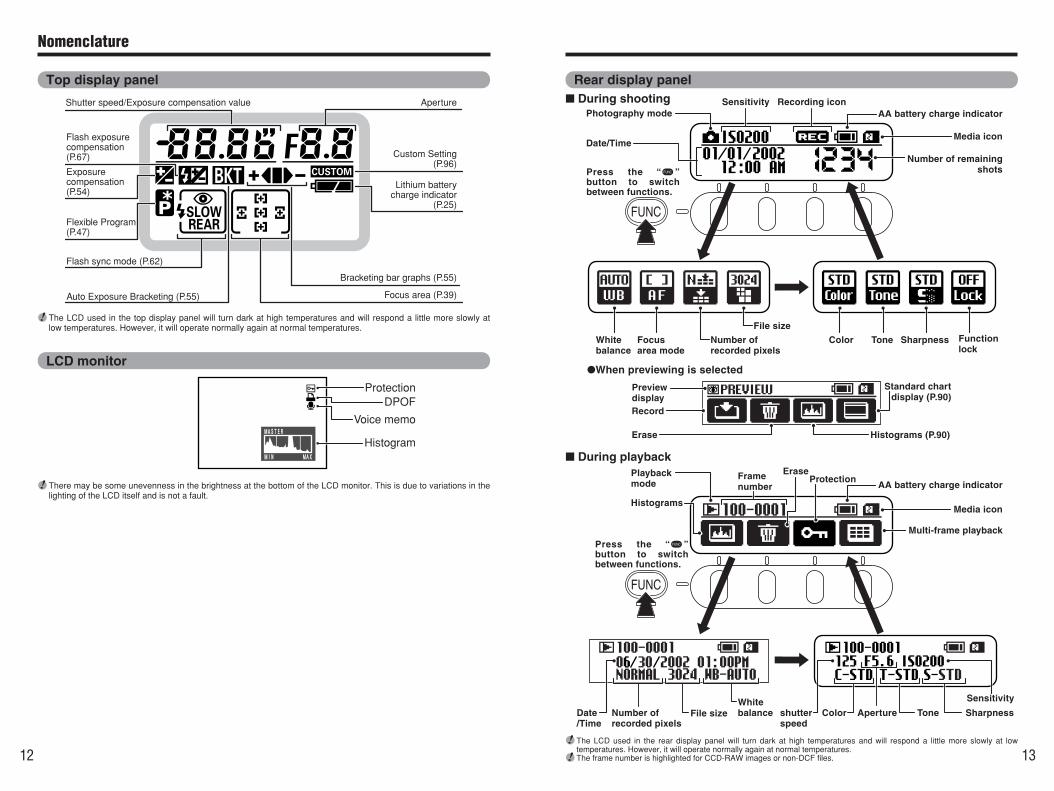
! The LCD used in the top display panel will turn dark at high temperatures and will respond a little more slowly atlow temperatures. However, it will operate normally again at normal temperatures.
! There may be some unevenness in the brightness at the bottom of the LCD monitor. This is due to variations in thelighting of the LCD itself and is not a fault.
! The LCD used in the rear display panel will turn dark at high temperatures and will respond a little more slowly at lowtemperatures. However, it will operate normally again at normal temperatures.
! The frame number is highlighted for CCD-RAW images or non-DCF files.
Nomenclature
MINMIN
MASTERMASTER
MAXMAX
ProtectionDPOF
Voice memo
Histogram
Shutter speed/Exposure compensation value Aperture
Flash exposurecompensation(P.67) Custom Setting
(P.96)
Lithium batterycharge indicator
(P.25)
Exposurecompensation(P.54)
Flash sync mode (P.62)
Bracketing bar graphs (P.55)
Auto Exposure Bracketing (P.55) Focus area (P.39)
Flexible Program(P.47)
Number of remainingshots
Media icon
Photography modeSensitivity Recording icon
AA battery charge indicator
Date/Time
Multi-frame playback
Media icon
Playbackmode
Framenumber
EraseProtection
AA battery charge indicator
Histograms
When previewing is selected
PreviewdisplayRecord
Standard chartdisplay (P.90)
Erase Histograms (P.90)
File size
Number ofrecorded pixels
Sharpness Functionlock
Focusarea mode
Whitebalance
ToneColor
Sharpness
Sensitivity
ToneNumber ofrecorded pixels
File sizeWhitebalance Colorshutter
speedDate/Time
Aperture
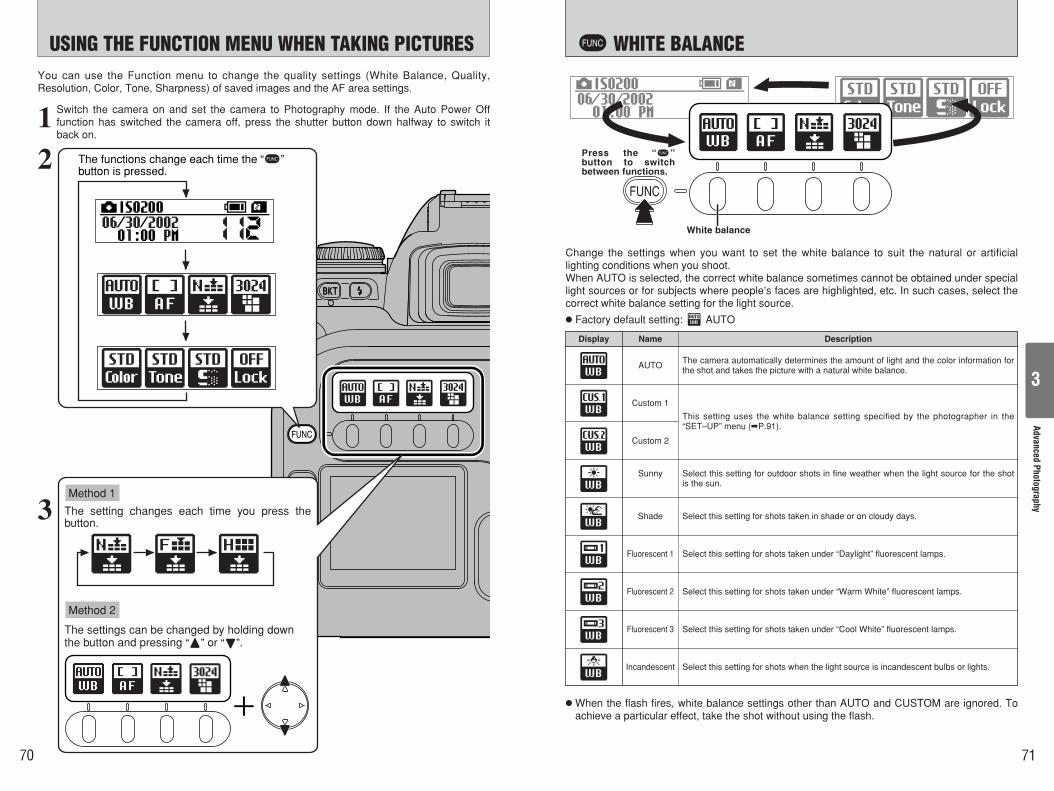
Press the “w” button to switch between functions.
Press the “w” button to switch between functions.
During playback
During shooting
15
GettingReady
1
14
Nomenclature
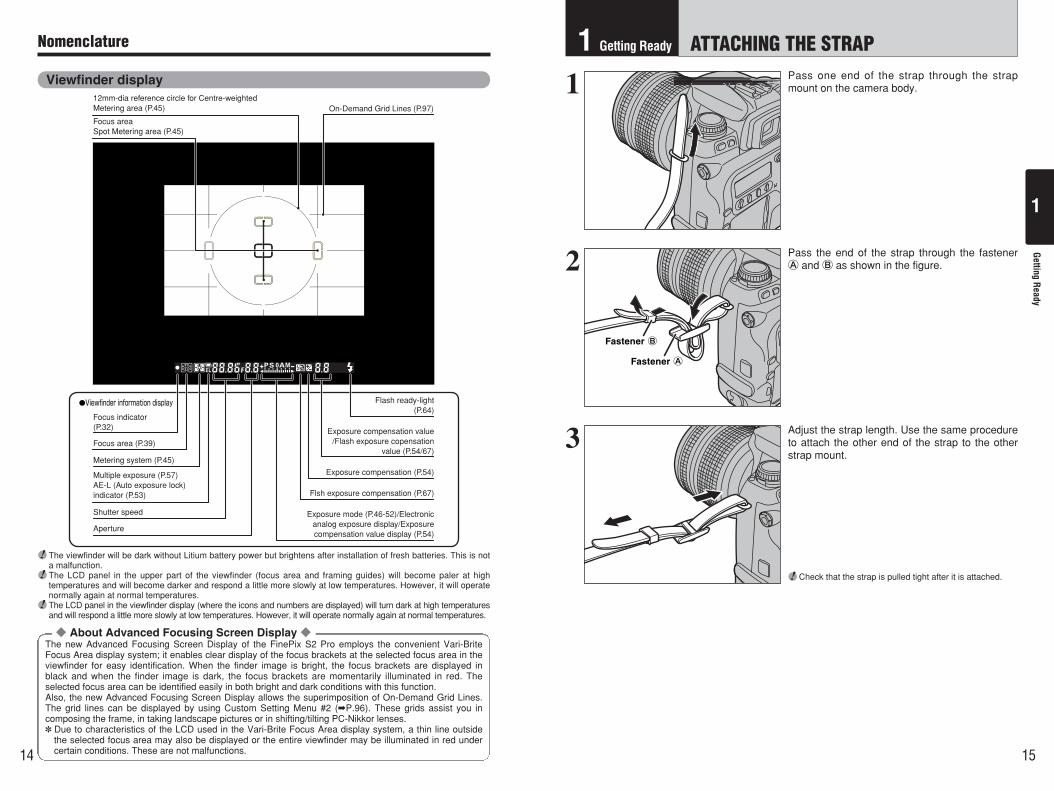
Viewfinder display
! The viewfinder will be dark without Litium battery power but brightens after installation of fresh batteries. This is nota malfunction.
! The LCD panel in the upper part of the viewfinder (focus area and framing guides) will become paler at hightemperatures and will become darker and respond a little more slowly at low temperatures. However, it will operatenormally again at normal temperatures.
! The LCD panel in the viewfinder display (where the icons and numbers are displayed) will turn dark at high temperaturesand will respond a little more slowly at low temperatures. However, it will operate normally again at normal temperatures.
About Advanced Focusing Screen Display The new Advanced Focusing Screen Display of the FinePix S2 Pro employs the convenient Vari-BriteFocus Area display system; it enables clear display of the focus brackets at the selected focus area in theviewfinder for easy identification. When the finder image is bright, the focus brackets are displayed inblack and when the finder image is dark, the focus brackets are momentarily illuminated in red. Theselected focus area can be identified easily in both bright and dark conditions with this function.Also, the new Advanced Focusing Screen Display allows the superimposition of On-Demand Grid Lines.The grid lines can be displayed by using Custom Setting Menu #2 (P.96). These grids assist you incomposing the frame, in taking landscape pictures or in shifting/tilting PC-Nikkor lenses. Due to characteristics of the LCD used in the Vari-Brite Focus Area display system, a thin line outside
the selected focus area may also be displayed or the entire viewfinder may be illuminated in red undercertain conditions. These are not malfunctions.
1
Fastener A
Fastener B
2
3
Pass one end of the strap through the strapmount on the camera body.
Pass the end of the strap through the fastenerA and B as shown in the figure.
Adjust the strap length. Use the same procedureto attach the other end of the strap to the otherstrap mount.
! Check that the strap is pulled tight after it is attached.
12mm-dia reference circle for Centre-weightedMetering area (P.45)
Focus indicator(P.32)
Flash ready-light(P.64)
Exposure compensation value /Flash exposure copensation
Exposure mode (P.46-52)/Electronicanalog exposure display/Exposurecompensation value display (P.54)
Viewfinder information display
On-Demand Grid Lines (P.97)
Focus areaSpot Metering area (P.45)
1 Getting Ready ATTACHING THE STRAP
16 17
MOUNTING THE CAMERA LENSGetting
Ready
1
1
2
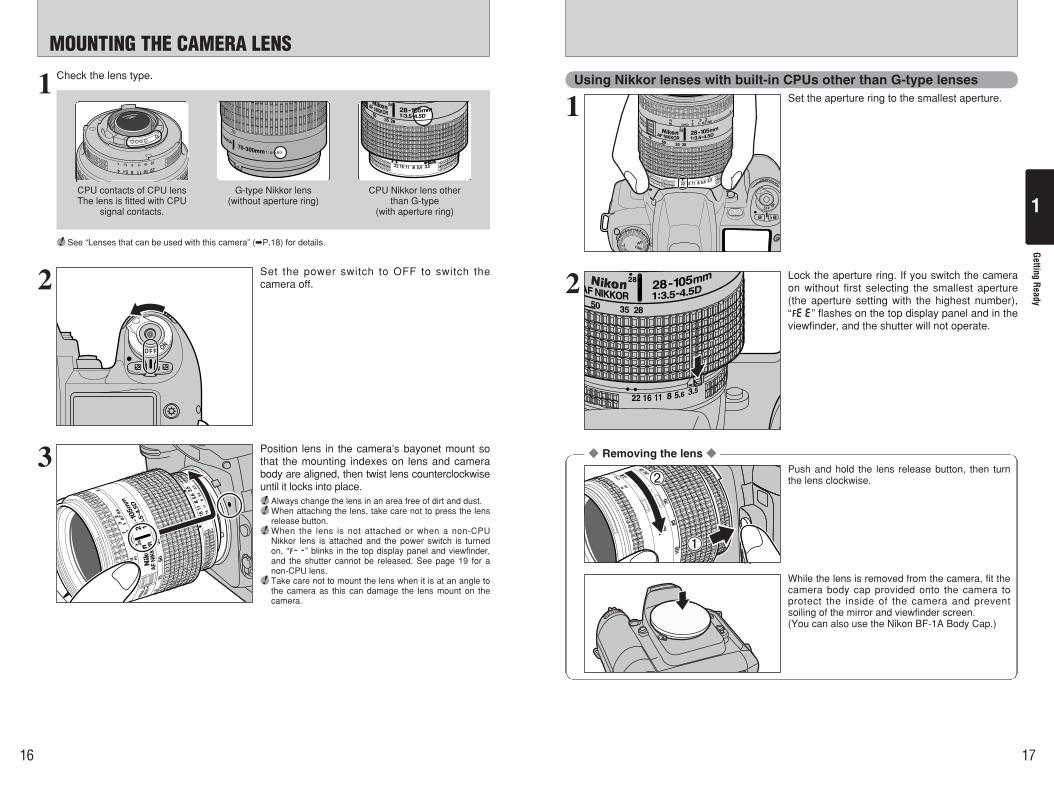
Check the lens type.
Set the power switch to OFF to switch thecamera off.
CPU contacts of CPU lensThe lens is fitted with CPU
signal contacts.
CPU Nikkor lens otherthan G-type
(with aperture ring)
G-type Nikkor lens (without aperture ring)
3 Position lens in the camera’s bayonet mount sothat the mounting indexes on lens and camerabody are aligned, then twist lens counterclockwiseuntil it locks into place.! Always change the lens in an area free of dirt and dust.! When attaching the lens, take care not to press the lens
release button.! When the lens is not attached or when a non-CPU
Nikkor lens is attached and the power switch is turnedon, “`” blinks in the top display panel and viewfinder,and the shutter cannot be released. See page 19 for anon-CPU lens.
! Take care not to mount the lens when it is at an angle tothe camera as this can damage the lens mount on thecamera.
! See “Lenses that can be used with this camera” (P.18) for details.
Using Nikkor lenses with built-in CPUs other than G-type lenses
1 Set the aperture ring to the smallest aperture.
2 Lock the aperture ring. If you switch the cameraon without first selecting the smallest aperture(the aperture setting with the highest number),“¡” flashes on the top display panel and in theviewfinder, and the shutter will not operate.
Removing the lens Push and hold the lens release button, then turnthe lens clockwise.
22
ftft m
2828
70
5050
35352828
858510
510
5
2222
ftft m
2828
70
5050
35352828
858510
510
5
2222
ftft m
2828
70
5050
35352828
858510
510
5
22
ft m
28
70
50
3528
8510
5 1
2
While the lens is removed from the camera, fit thecamera body cap provided onto the camera toprotect the inside of the camera and preventsoiling of the mirror and viewfinder screen.(You can also use the Nikon BF-1A Body Cap.)
19
GettingReady
1
18
MOUNTING THE CAMERA LENS
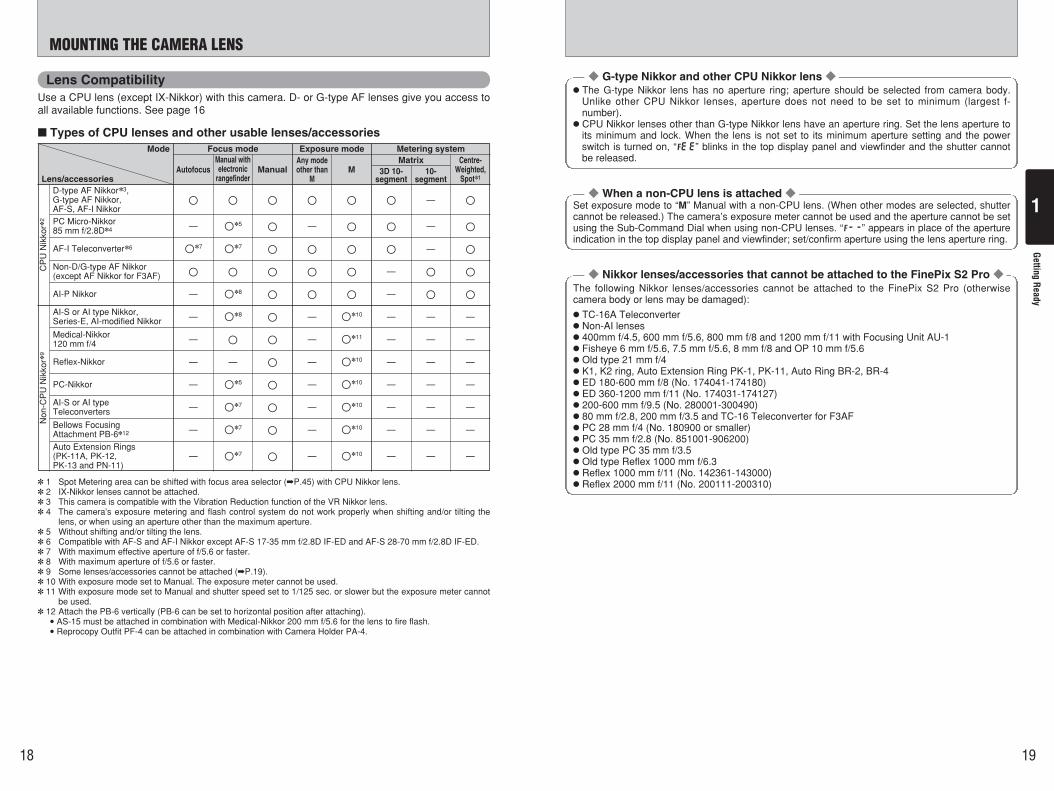
Lens CompatibilityUse a CPU lens (except IX-Nikkor) with this camera. D- or G-type AF lenses give you access toall available functions. See page 16
G-type Nikkor and other CPU Nikkor lens
When a non-CPU lens is attached
Nikkor lenses/accessories that cannot be attached to the FinePix S2 Pro
h The G-type Nikkor lens has no aperture ring; aperture should be selected from camera body.Unlike other CPU Nikkor lenses, aperture does not need to be set to minimum (largest f-number).h CPU Nikkor lenses other than G-type Nikkor lens have an aperture ring. Set the lens aperture to
its minimum and lock. When the lens is not set to its minimum aperture setting and the powerswitch is turned on, “¡” blinks in the top display panel and viewfinder and the shutter cannotbe released.
Set exposure mode to “M” Manual with a non-CPU lens. (When other modes are selected, shuttercannot be released.) The camera’s exposure meter cannot be used and the aperture cannot be setusing the Sub-Command Dial when using non-CPU lenses. “`” appears in place of the apertureindication in the top display panel and viewfinder; set/confirm aperture using the lens aperture ring.
The following Nikkor lenses/accessories cannot be attached to the FinePix S2 Pro (otherwisecamera body or lens may be damaged):
h TC-16A Teleconverterh Non-AI lensesh 400mm f/4.5, 600 mm f/5.6, 800 mm f/8 and 1200 mm f/11 with Focusing Unit AU-1h Fisheye 6 mm f/5.6, 7.5 mm f/5.6, 8 mm f/8 and OP 10 mm f/5.6h Old type 21 mm f/4h K1, K2 ring, Auto Extension Ring PK-1, PK-11, Auto Ring BR-2, BR-4h ED 180-600 mm f/8 (No. 174041-174180)h ED 360-1200 mm f/11 (No. 174031-174127)h 200-600 mm f/9.5 (No. 280001-300490)h 80 mm f/2.8, 200 mm f/3.5 and TC-16 Teleconverter for F3AFh PC 28 mm f/4 (No. 180900 or smaller)h PC 35 mm f/2.8 (No. 851001-906200)h Old type PC 35 mm f/3.5h Old type Reflex 1000 mm f/6.3h Reflex 1000 mm f/11 (No. 142361-143000)h Reflex 2000 mm f/11 (No. 200111-200310)
Types of CPU lenses and other usable lenses/accessories
1 Spot Metering area can be shifted with focus area selector (P.45) with CPU Nikkor lens. 2 IX-Nikkor lenses cannot be attached. 3 This camera is compatible with the Vibration Reduction function of the VR Nikkor lens. 4 The camera’s exposure metering and flash control system do not work properly when shifting and/or tilting the
lens, or when using an aperture other than the maximum aperture. 5 Without shifting and/or tilting the lens. 6 Compatible with AF-S and AF-I Nikkor except AF-S 17-35 mm f/2.8D IF-ED and AF-S 28-70 mm f/2.8D IF-ED. 7 With maximum effective aperture of f/5.6 or faster. 8 With maximum aperture of f/5.6 or faster. 9 Some lenses/accessories cannot be attached (P.19). 10 With exposure mode set to Manual. The exposure meter cannot be used. 11 With exposure mode set to Manual and shutter speed set to 1/125 sec. or slower but the exposure meter cannot
be used. 12 Attach the PB-6 vertically (PB-6 can be set to horizontal position after attaching).i AS-15 must be attached in combination with Medical-Nikkor 200 mm f/5.6 for the lens to fire flash.i Reprocopy Outfit PF-4 can be attached in combination with Camera Holder PA-4.
Focus modeMode
Lens/accessoriesAutofocus
u u u u u u — u
— u5 u — u u — u
u7 u7 u u u u — u
u u u u u — u u
— u8 u u u — u u
— u8 u — u10 — — —
— u u — u11 — — —
— — u — u10 — — —
— u5 u — u10 — — —
— u7 u — u10 — — —
— u7 u — u10 — — —
— u7 u — u10 — — —
Manual withelectronic
rangefinderManual
Exposure modeAny modeother than
MM
Metering systemMatrix
3D 10-segment
10-segment
Centre-Weighted,
Spot1
CP
UN
ikko
r2
Non
-CP
UN
ikko
r9
D-type AF Nikkor3,G-type AF Nikkor,AF-S, AF-I NikkorPC Micro-Nikkor 85 mm f/2.8D4
AF-I Teleconverter6
Non-D/G-type AF Nikkor(except AF Nikkor for F3AF)
AI-P Nikkor
AI-S or AI type Nikkor,Series-E, AI-modified Nikkor
Medical-Nikkor 120 mm f/4
Reflex-Nikkor
PC-Nikkor
AI-S or AI typeTeleconverters
Bellows Focusing Attachment PB-612
Auto Extension Rings (PK-11A, PK-12, PK-13 and PN-11)
20 21
LOADING THE MEDIAGetting
Ready
1
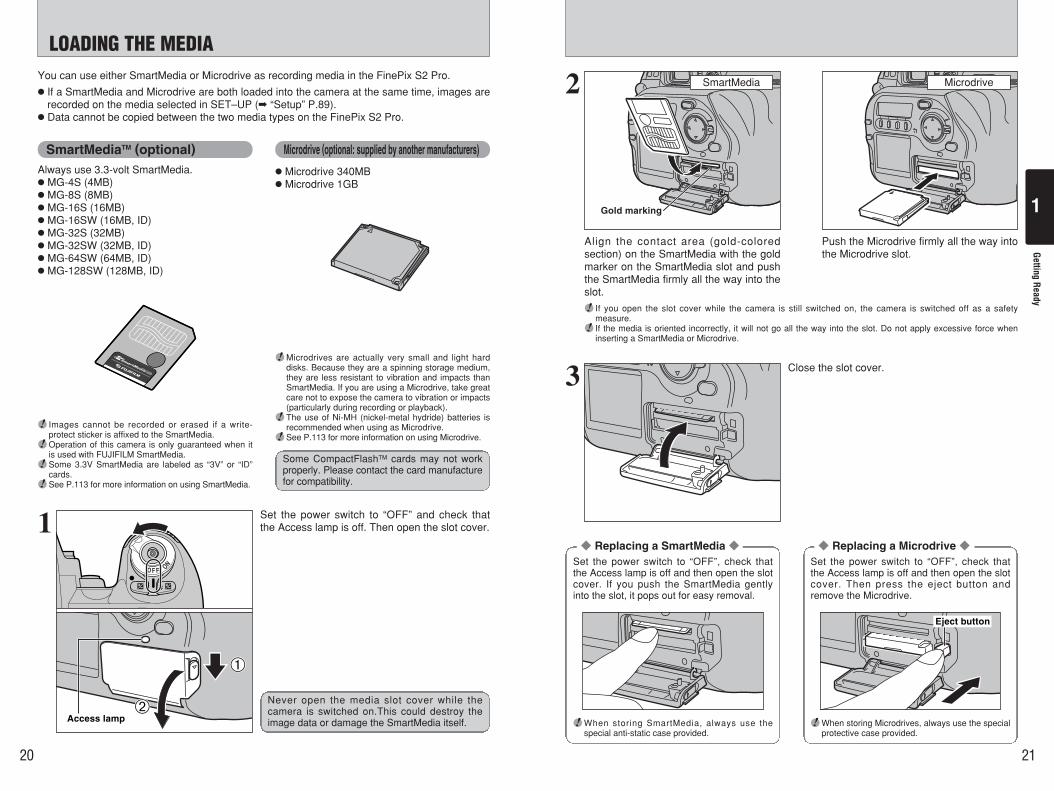
You can use either SmartMedia or Microdrive as recording media in the FinePix S2 Pro.
h If a SmartMedia and Microdrive are both loaded into the camera at the same time, images arerecorded on the media selected in SET–UP ( “Setup” P.89).h Data cannot be copied between the two media types on the FinePix S2 Pro.
2
Gold marking
Align the contact area (gold-coloredsection) on the SmartMedia with the goldmarker on the SmartMedia slot and pushthe SmartMedia firmly all the way into theslot.
Push the Microdrive firmly all the way intothe Microdrive slot.
SmartMedia Microdrive
! If you open the slot cover while the camera is still switched on, the camera is switched off as a safetymeasure.
! If the media is oriented incorrectly, it will not go all the way into the slot. Do not apply excessive force wheninserting a SmartMedia or Microdrive.
Replacing a SmartMedia Set the power switch to “OFF”, check thatthe Access lamp is off and then open the slotcover. If you push the SmartMedia gentlyinto the slot, it pops out for easy removal.
Replacing a Microdrive Set the power switch to “OFF”, check thatthe Access lamp is off and then open the slotcover. Then press the eject button andremove the Microdrive.
Eject button
! When storing SmartMedia, always use thespecial anti-static case provided.
! When storing Microdrives, always use the specialprotective case provided.
3 Close the slot cover.
1 Set the power switch to “OFF” and check thatthe Access lamp is off. Then open the slot cover.
Access lamp2
1
SmartMediaTM (optional)
! Images cannot be recorded or erased if a write-protect sticker is affixed to the SmartMedia.
! Operation of this camera is only guaranteed when itis used with FUJIFILM SmartMedia.
! Some 3.3V SmartMedia are labeled as “3V” or “ID”cards.
! See P.113 for more information on using SmartMedia.
Microdrive (optional: supplied by another manufacturers)
! Microdrives are actually very small and light harddisks. Because they are a spinning storage medium,they are less resistant to vibration and impacts thanSmartMedia. If you are using a Microdrive, take greatcare not to expose the camera to vibration or impacts(particularly during recording or playback).
! The use of Ni-MH (nickel-metal hydride) batteries isrecommended when using as Microdrive.
! See P.113 for more information on using Microdrive.
h Microdrive 340MBh Microdrive 1GB
Some CompactFlashTM cards may not workproperly. Please contact the card manufacturefor compatibility.
Never open the media slot cover while thecamera is switched on.This could destroy theimage data or damage the SmartMedia itself.
22 23
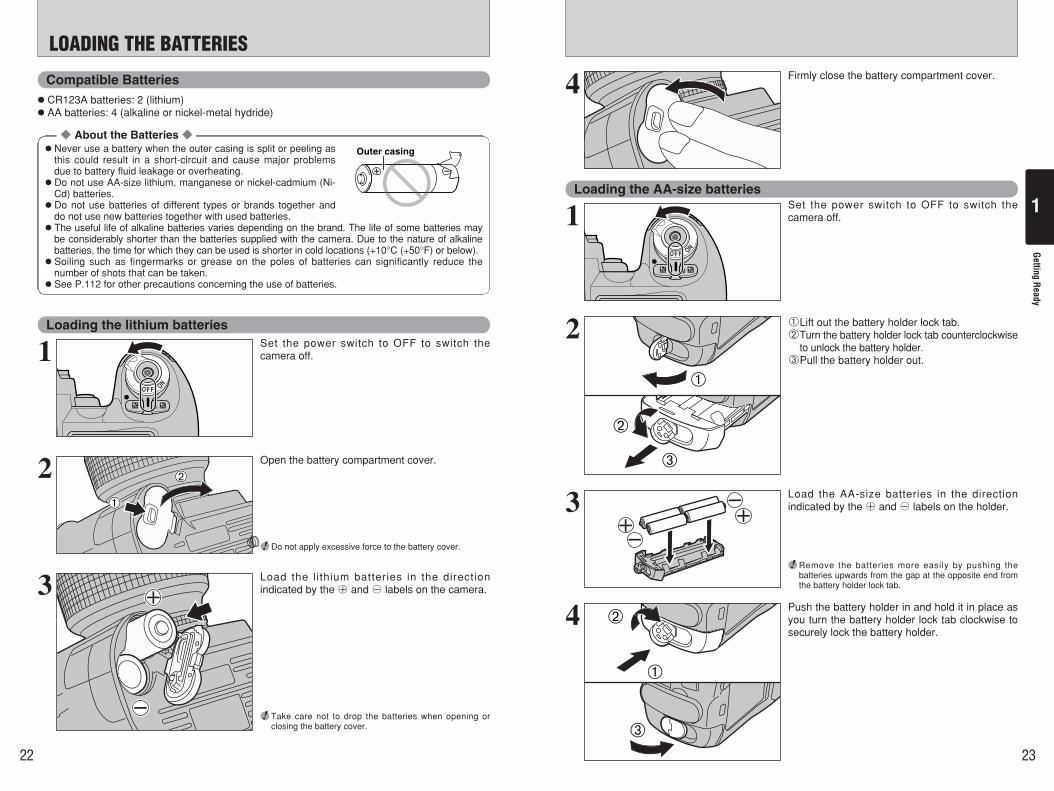
LOADING THE BATTERIESGetting
Ready
1
Set the power switch to OFF to switch thecamera off.1
Loading the AA-size batteriesSet the power switch to OFF to switch thecamera off.1
1Lift out the battery holder lock tab.2Turn the battery holder lock tab counterclockwise
to unlock the battery holder.3Pull the battery holder out.
2
Load the AA-size batteries in the directionindicated by the Ω and ≈ labels on the holder.3
Push the battery holder in and hold it in place asyou turn the battery holder lock tab clockwise tosecurely lock the battery holder.
4
Open the battery compartment cover.
Load the lithium batteries in the directionindicated by the Ω and ≈ labels on the camera.
21
2
! Do not apply excessive force to the battery cover.
! Remove the batteries more easily by pushing thebatteries upwards from the gap at the opposite end fromthe battery holder lock tab.
! Take care not to drop the batteries when opening orclosing the battery cover.
3
Firmly close the battery compartment cover.4
2
3
1
3
2
1
h CR123A batteries: 2 (lithium)h AA batteries: 4 (alkaline or nickel-metal hydride)
Compatible Batteries
Loading the lithium batteries
About the Batteries h Never use a battery when the outer casing is split or peeling as
this could result in a short-circuit and cause major problemsdue to battery fluid leakage or overheating.h Do not use AA-size lithium, manganese or nickel-cadmium (Ni-
Cd) batteries.h Do not use batteries of different types or brands together and
do not use new batteries together with used batteries.h The useful life of alkaline batteries varies depending on the brand. The life of some batteries may
be considerably shorter than the batteries supplied with the camera. Due to the nature of alkalinebatteries, the time for which they can be used is shorter in cold locations (+10°C (+50°F) or below).h Soiling such as fingermarks or grease on the poles of batteries can significantly reduce the
number of shots that can be taken.h See P.112 for other precautions concerning the use of batteries.
Outer casing
24 25
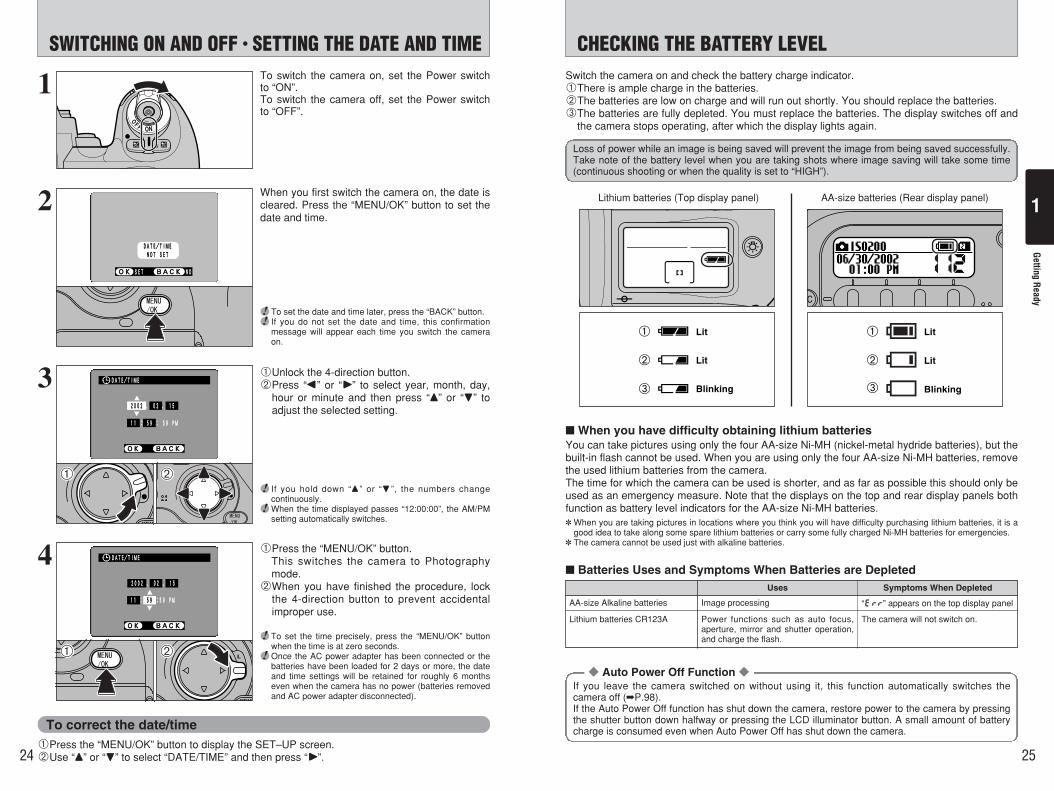
SWITCHING ON AND OFF • SETTING THE DATE AND TIME CHECKING THE BATTERY LEVEL Getting
Ready
1
To switch the camera on, set the Power switchto “ON”.To switch the camera off, set the Power switchto “OFF”.
1
2DATE/TIMEDATE/TIMENOT SETNOT SET
SETSET NONOOKOK BACKBACK
! To set the date and time later, press the “BACK” button.! If you do not set the date and time, this confirmation
message will appear each time you switch the cameraon.
When you first switch the camera on, the date iscleared. Press the “MENU/OK” button to set thedate and time.
3
4
1Unlock the 4-direction button.2Press “d” or “c” to select year, month, day,
hour or minute and then press “a” or “b” toadjust the selected setting.
1Press the “MENU/OK” button.This switches the camera to Photographymode.
2When you have finished the procedure, lockthe 4-direction button to prevent accidentalimproper use.
! To set the time precisely, press the “MENU/OK” buttonwhen the time is at zero seconds.
! Once the AC power adapter has been connected or thebatteries have been loaded for 2 days or more, the dateand time settings will be retained for roughly 6 monthseven when the camera has no power (batteries removedand AC power adapter disconnected).
! If you hold down “a ” or “b ”, the numbers changecontinuously.
! When the time displayed passes “12:00:00”, the AM/PMsetting automatically switches.
01 02
DATE/TIMEDATE/TIME
2002 2002 . 02 . 15. 02 . 15
11 : 59 : 59 PM 11 : 59 : 59 PM
OKOK BACKBACK
01 02
DATE/TIMEDATE/TIME
2002 . 02 . 152002 . 02 . 15
11 : 11 : 59 59 :59 PM:59 PM
OKOK BACKBACK
Switch the camera on and check the battery charge indicator.1There is ample charge in the batteries.2The batteries are low on charge and will run out shortly. You should replace the batteries.3The batteries are fully depleted. You must replace the batteries. The display switches off and
the camera stops operating, after which the display lights again.
Loss of power while an image is being saved will prevent the image from being saved successfully.Take note of the battery level when you are taking shots where image saving will take some time(continuous shooting or when the quality is set to “HIGH”).
Lithium batteries (Top display panel)
Auto Power Off Function
AA-size batteries (Rear display panel)
3 Blinking
Lit
Lit1
2
3 Blinking
Lit
Lit1
2
Batteries Uses and Symptoms When Batteries are Depleted
When you have difficulty obtaining lithium batteries
Uses Symptoms When Depleted
AA-size Alkaline batteries Image processing “∞” appears on the top display panel
Lithium batteries CR123A Power functions such as auto focus,aperture, mirror and shutter operation,and charge the flash.
The camera will not switch on.
You can take pictures using only the four AA-size Ni-MH (nickel-metal hydride batteries), but thebuilt-in flash cannot be used. When you are using only the four AA-size Ni-MH batteries, removethe used lithium batteries from the camera.The time for which the camera can be used is shorter, and as far as possible this should only beused as an emergency measure. Note that the displays on the top and rear display panels bothfunction as battery level indicators for the AA-size Ni-MH batteries. When you are taking pictures in locations where you think you will have difficulty purchasing lithium batteries, it is a
good idea to take along some spare lithium batteries or carry some fully charged Ni-MH batteries for emergencies. The camera cannot be used just with alkaline batteries.
If you leave the camera switched on without using it, this function automatically switches thecamera off (P.98).If the Auto Power Off function has shut down the camera, restore power to the camera by pressingthe shutter button down halfway or pressing the LCD illuminator button. A small amount of batterycharge is consumed even when Auto Power Off has shut down the camera.
1Press the “MENU/OK” button to display the SET–UP screen.2Use “a” or “b” to select “DATE/TIME” and then press “c”.
To correct the date/time
26 27
BasicPhotography
2
35
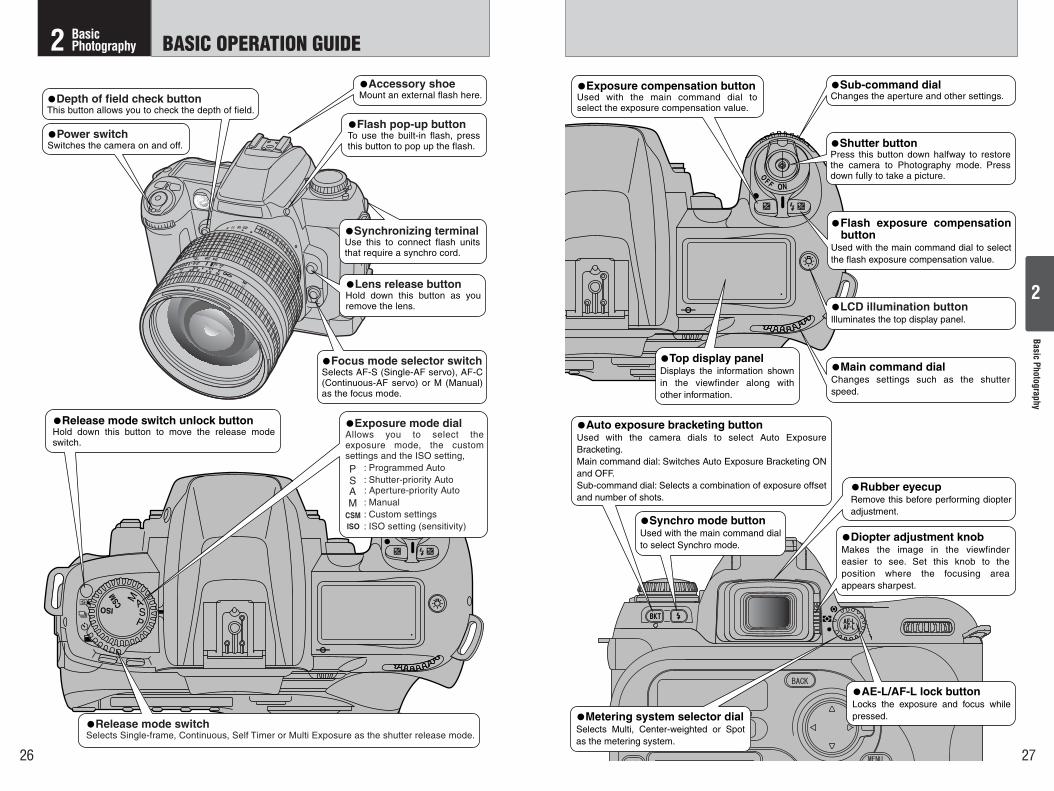
xAccessory shoeMount an external flash here.
xRelease mode switch unlock buttonHold down this button to move the release mode switch.
xExposure mode dialAllows you to select the exposure mode, the custom settings and the ISO setting, : Programmed Auto : Shutter-priority Auto : Aperture-priority Auto : Manual : Custom settings : ISO setting (sensitivity)
xRelease mode switchSelects Single-frame, Continuous, Self Timer or Multi Exposure as the shutter release mode.
xLens release buttonHold down this button as you remove the lens.
xPower switchSwitches the camera on and off.
xFocus mode selector switchSelects AF-S (Single-AF servo), AF-C (Continuous-AF servo) or M (Manual) as the focus mode.
xFlash pop-up buttonTo use the built-in flash, press this button to pop up the flash.
xSynchronizing terminalUse this to connect flash units that require a synchro cord.
xDepth of field check buttonThis button allows you to check the depth of field.
xShutter buttonPress this button down halfway to restore the camera to Photography mode. Press down fully to take a picture.
xSub-command dialChanges the aperture and other settings.
xLCD illumination buttonIlluminates the top display panel.
xDiopter adjustment knobMakes the image in the viewfinder easier to see. Set this knob to the position where the focusing area appears sharpest.
xExposure compensation buttonUsed with the main command dial to select the exposure compensation value.
xFlash exposure compensation button
Used with the main command dial to select the flash exposure compensation value.
xTop display panelDisplays the information shown in the viewfinder along with other information.
xMain command dialChanges settings such as the shutter speed.
xAuto exposure bracketing buttonUsed with the camera dials to select Auto Exposure Bracketing.Main command dial: Switches Auto Exposure Bracketing ON and OFF.Sub-command dial: Selects a combination of exposure offset and number of shots.
xSynchro mode buttonUsed with the main command dial to select Synchro mode.
xRubber eyecupRemove this before performing diopter adjustment.
xMetering system selector dialSelects Multi, Center-weighted or Spot as the metering system.
xAE-L/AF-L lock buttonLocks the exposure and focus while pressed.
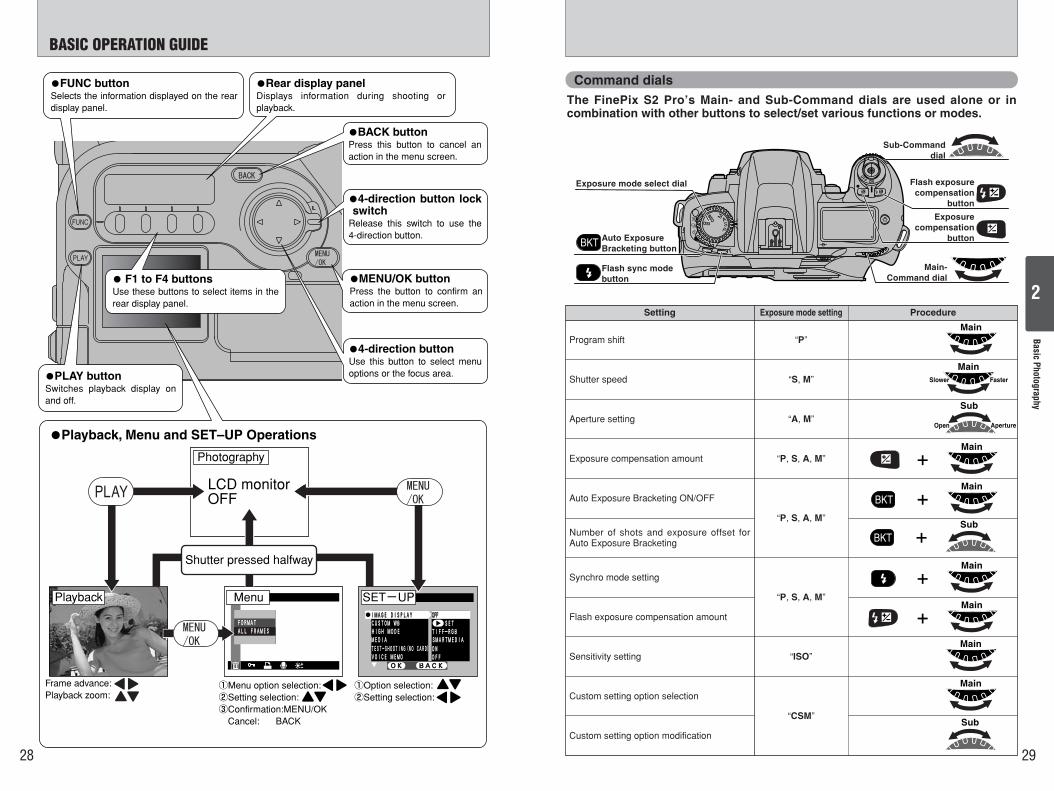
2 Basic Photography BASIC OPERATION GUIDE
Sub
Main
Main
Main
+
Main
+
28 29
BASIC OPERATION GUIDE
BasicPhotography
2
Main
+
Command dialsThe FinePix S2 Pro’s Main- and Sub-Command dials are used alone or incombination with other buttons to select/set various functions or modes.
Main
xFUNC buttonSelects the information displayed on the rear display panel.
xRear display panelDisplays information during shooting or playback.
xPLAY buttonSwitches playback display on and off.
x F1 to F4 buttonsUse these buttons to select items in the rear display panel.
xMENU/OK buttonPress the button to confirm an action in the menu screen.
x4-direction button lock switch
Release this switch to use the 4-direction button.
xBACK buttonPress this button to cancel an action in the menu screen.
x4-direction buttonUse this button to select menu options or the focus area.
Number of shots and exposure offset forAuto Exposure Bracketing
Sensitivity setting “ISO”
Custom setting option selection
“CSM”
Custom setting option modification
Synchro mode setting
“P, S, A, M”
Sub
+
Main
+
Flash exposure compensation amount
Open Aperture
Sub
30 31
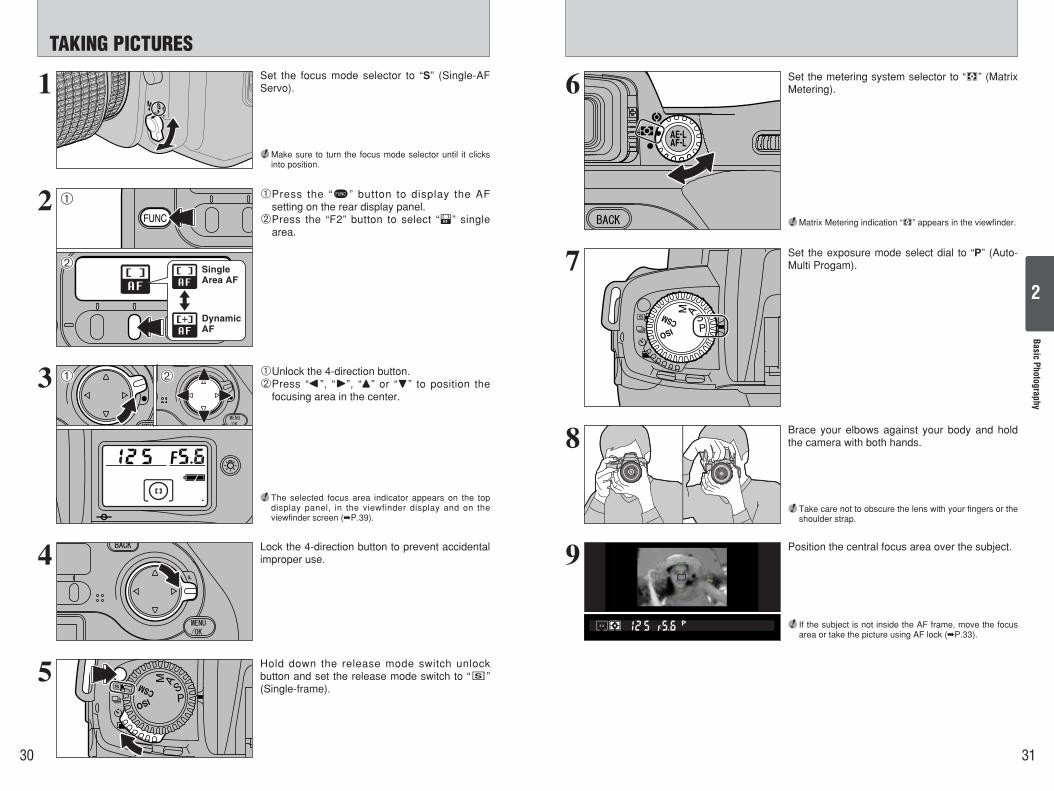
TAKING PICTURESBasic
Photography
2SingleArea AF
DynamicAF
6 Set the metering system selector to “'” (MatrixMetering).
! Matrix Metering indication “'” appears in the viewfinder.
! Take care not to obscure the lens with your fingers or theshoulder strap.
7 Set the exposure mode select dial to “P” (Auto-Multi Progam).
8 Brace your elbows against your body and holdthe camera with both hands.
9 Position the central focus area over the subject.
! If the subject is not inside the AF frame, move the focusarea or take the picture using AF lock (P.33).
1 Set the focus mode selector to “S” (Single-AFServo).
2 1Press the “w” button to display the AFsetting on the rear display panel.
2Press the “F2” button to select “z” singlearea.
! Make sure to turn the focus mode selector until it clicksinto position.
3 1Unlock the 4-direction button.2Press “d”, “c”, “a” or “b” to position the
focusing area in the center.
4 Lock the 4-direction button to prevent accidentalimproper use.
5 Hold down the release mode switch unlockbutton and set the release mode switch to “e”(Single-frame).
! The selected focus area indicator appears on the topdisplay panel, in the viewfinder display and on theviewfinder screen (P.39).
01
02
01 02
32 33
TAKING PICTURES
BasicPhotography
2
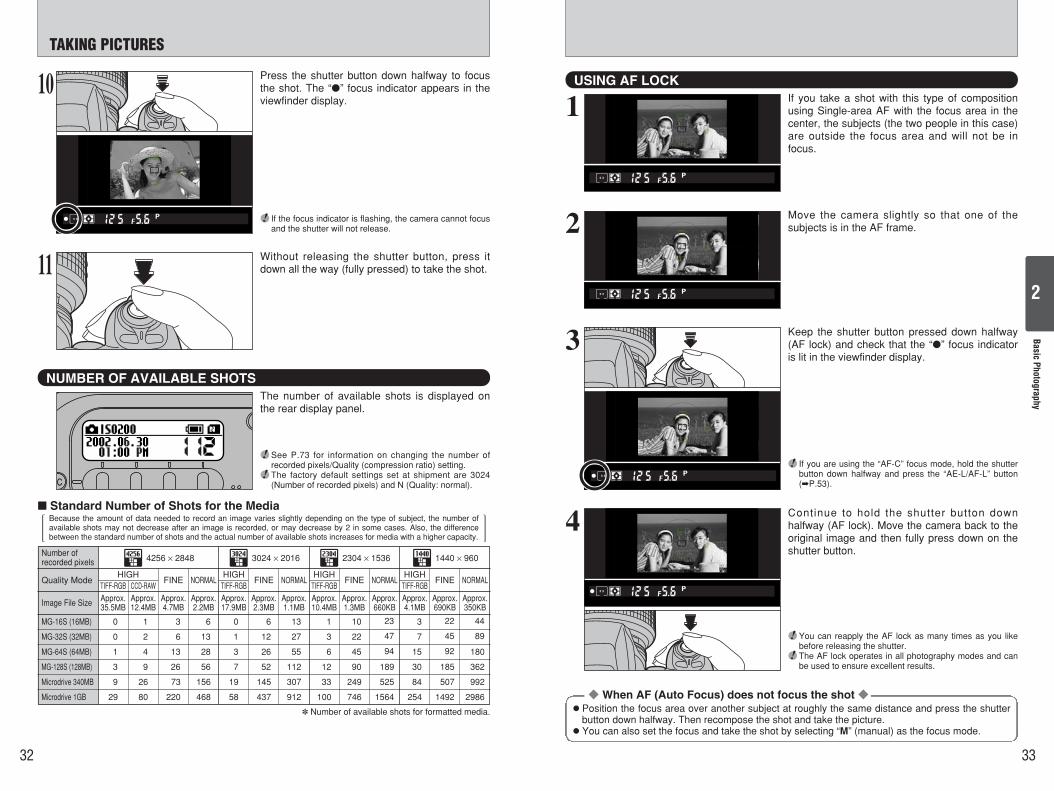
If you take a shot with this type of compositionusing Single-area AF with the focus area in thecenter, the subjects (the two people in this case)are outside the focus area and will not be infocus.
Move the camera slightly so that one of thesubjects is in the AF frame.
1
4
3
2
When AF (Auto Focus) does not focus the shot h Position the focus area over another subject at roughly the same distance and press the shutter
button down halfway. Then recompose the shot and take the picture.h You can also set the focus and take the shot by selecting “M” (manual) as the focus mode.
Keep the shutter button pressed down halfway(AF lock) and check that the “” focus indicatoris lit in the viewfinder display.
Continue to hold the shutter button downhalfway (AF lock). Move the camera back to theoriginal image and then fully press down on theshutter button.
! You can reapply the AF lock as many times as you likebefore releasing the shutter.
! The AF lock operates in all photography modes and canbe used to ensure excellent results.
! If you are using the “AF-C” focus mode, hold the shutterbutton down halfway and press the “AE-L/AF-L” button(P.53).
USING AF LOCK10 Press the shutter button down halfway to focusthe shot. The “” focus indicator appears in theviewfinder display.
! If the focus indicator is flashing, the camera cannot focusand the shutter will not release.
11 Without releasing the shutter button, press itdown all the way (fully pressed) to take the shot.
NUMBER OF AVAILABLE SHOTSThe number of available shots is displayed onthe rear display panel.
! See P.73 for information on changing the number ofrecorded pixels/Quality (compression ratio) setting.
! The factory default settings set at shipment are 3024(Number of recorded pixels) and N (Quality: normal).
Standard Number of Shots for the MediaBecause the amount of data needed to record an image varies slightly depending on the type of subject, the number ofavailable shots may not decrease after an image is recorded, or may decrease by 2 in some cases. Also, the differencebetween the standard number of shots and the actual number of available shots increases for media with a higher capacity.
PLAYING BACK IMAGES DIOPTRE ADJUSTMENT/LCD ILLUMINATORBasic
Photography
2
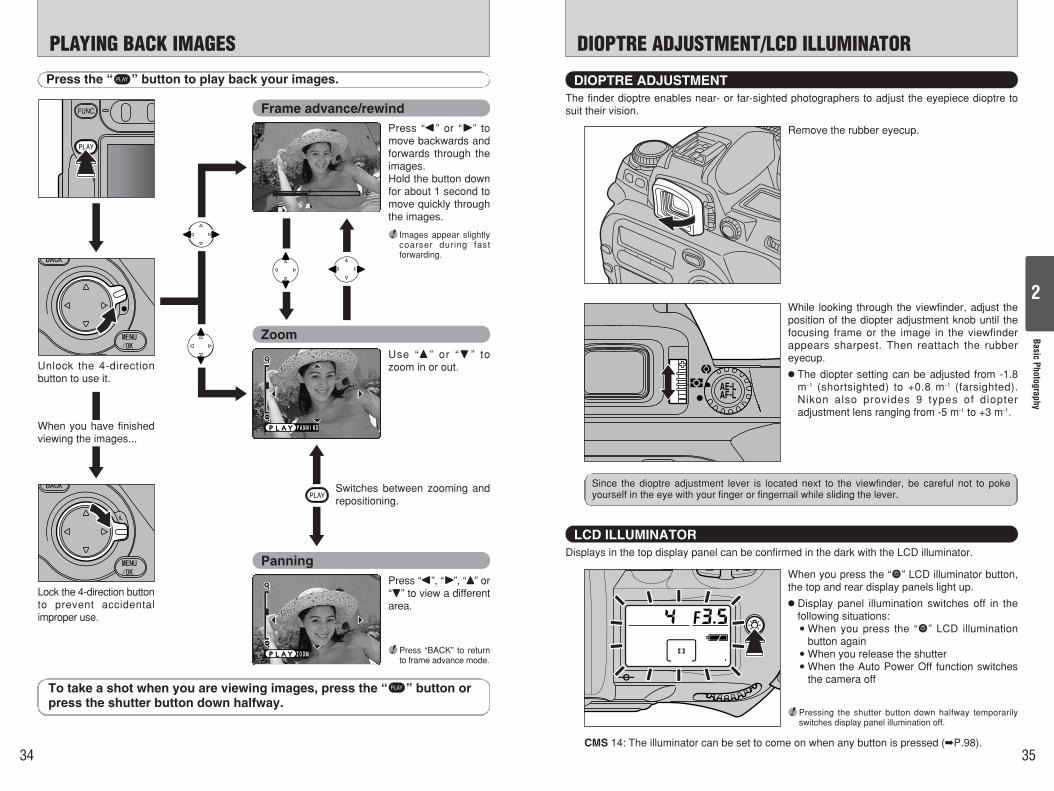
The finder dioptre enables near- or far-sighted photographers to adjust the eyepiece dioptre tosuit their vision.
Remove the rubber eyecup.
Displays in the top display panel can be confirmed in the dark with the LCD illuminator.
When you press the “y” LCD illuminator button,the top and rear display panels light up.
h Display panel illumination switches off in thefollowing situations:iWhen you press the “y” LCD illumination
button againiWhen you release the shutteriWhen the Auto Power Off function switches
the camera off
While looking through the viewfinder, adjust theposition of the diopter adjustment knob until thefocusing frame or the image in the viewfinderappears sharpest. Then reattach the rubbereyecup.
h The diopter setting can be adjusted from -1.8m-1 (shortsighted) to +0.8 m-1 (farsighted).Nikon also provides 9 types of diopteradjustment lens ranging from -5 m-1 to +3 m-1.
DIOPTRE ADJUSTMENT
LCD ILLUMINATOR
Since the dioptre adjustment lever is located next to the viewfinder, be careful not to pokeyourself in the eye with your finger or fingernail while sliding the lever.
CMS 14: The illuminator can be set to come on when any button is pressed (P.98).
Press the “d” button to play back your images.
To take a shot when you are viewing images, press the “d” button orpress the shutter button down halfway.
Frame advance/rewind
Unlock the 4-directionbutton to use it.
Press “d” or “c” tomove backwards andforwards through theimages.Hold the button downfor about 1 second tomove quickly throughthe images.
! Images appear slightlycoarser during fastforwarding.
Zoom
PANNINGPANNINGPLAYPLAY
Use “a ” or “b ” tozoom in or out.
Switches between zooming andrepositioning.
Panning
ZOOMZOOMPLAYPLAY
Press “d”, “c”, “a” or“b” to view a differentarea.
When you have finishedviewing the images...
Lock the 4-direction buttonto prevent accidentalimproper use.
! Press “BACK” to returnto frame advance mode.
! Pressing the shutter button down halfway temporarilyswitches display panel illumination off.
36
DEPTH OF FIELD CHECK BUTTON/CCD PLANE INDICATOR
37
AdvancedPhotography
3
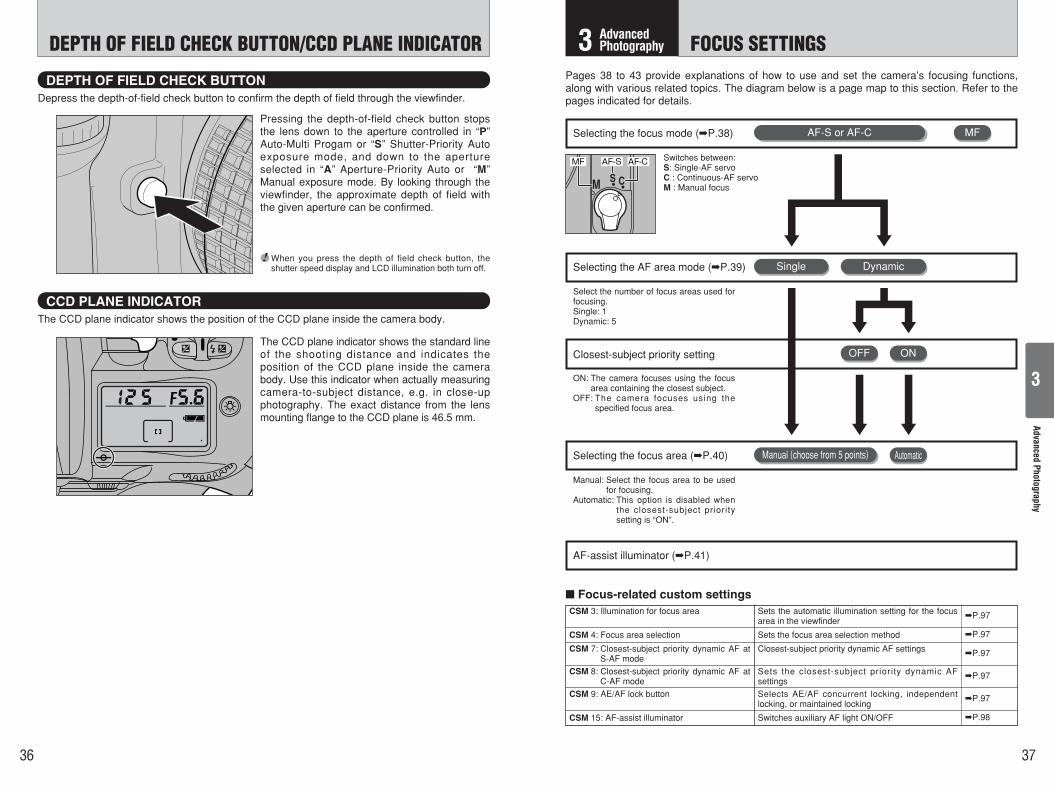
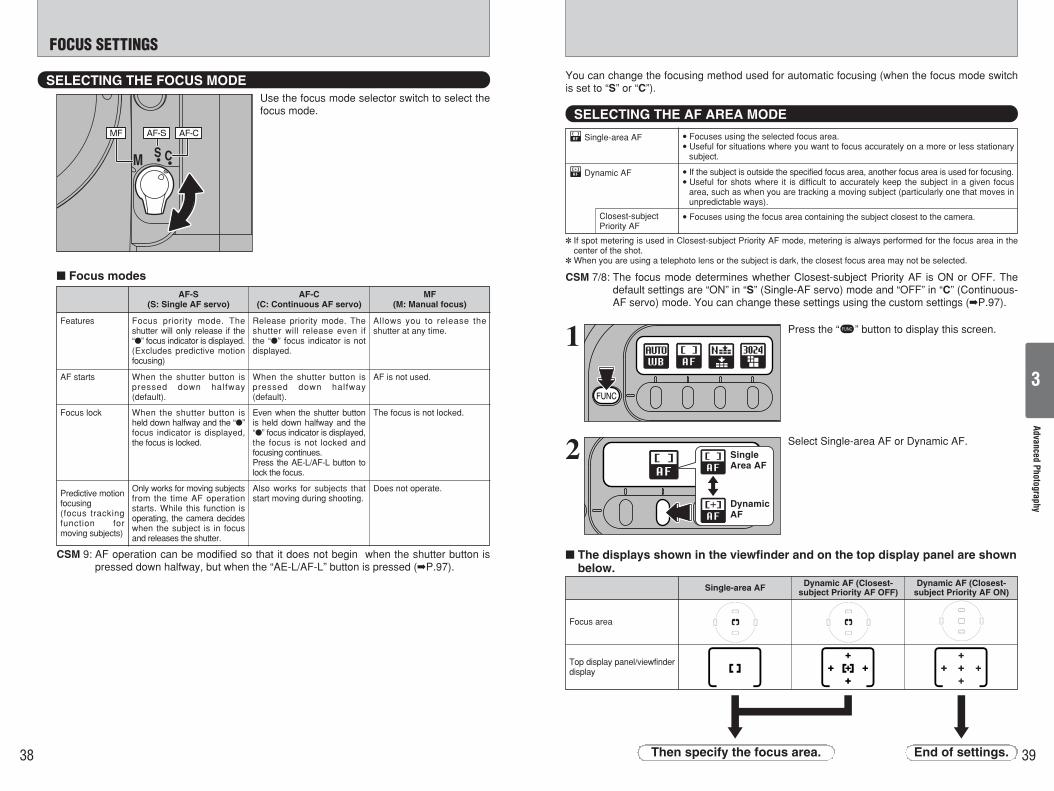
Pages 38 to 43 provide explanations of how to use and set the camera’s focusing functions,along with various related topics. The diagram below is a page map to this section. Refer to thepages indicated for details.Depress the depth-of-field check button to confirm the depth of field through the viewfinder.
Pressing the depth-of-field check button stopsthe lens down to the aperture controlled in “P”Auto-Multi Progam or “S” Shutter-Priority Autoexposure mode, and down to the apertureselected in “A” Aperture-Priority Auto or “M”Manual exposure mode. By looking through theviewfinder, the approximate depth of field withthe given aperture can be confirmed.
The CCD plane indicator shows the position of the CCD plane inside the camera body.
The CCD plane indicator shows the standard lineof the shooting distance and indicates theposition of the CCD plane inside the camerabody. Use this indicator when actually measuringcamera-to-subject distance, e.g. in close-upphotography. The exact distance from the lensmounting flange to the CCD plane is 46.5 mm.
CSM 15: AF-assist illuminator Switches auxiliary AF light ON/OFF
AF-CAF-SMF
3 Advanced Photography FOCUS SETTINGS
! When you press the depth of field check button, theshutter speed display and LCD illumination both turn off.
38 39
FOCUS SETTINGS
AdvancedPhotography
3
You can change the focusing method used for automatic focusing (when the focus mode switchis set to “S” or “C”).
SELECTING THE AF AREA MODE
z Single-area AF i Focuses using the selected focus area.i Useful for situations where you want to focus accurately on a more or less stationary
subject.
Z Dynamic AF i If the subject is outside the specified focus area, another focus area is used for focusing.i Useful for shots where it is difficult to accurately keep the subject in a given focus
area, such as when you are tracking a moving subject (particularly one that moves inunpredictable ways).
Closest-subjectPriority AF
i Focuses using the focus area containing the subject closest to the camera.
If spot metering is used in Closest-subject Priority AF mode, metering is always performed for the focus area in thecenter of the shot.
When you are using a telephoto lens or the subject is dark, the closest focus area may not be selected.
1 Press the “w” button to display this screen.
2 SingleArea AF
DynamicAF
Select Single-area AF or Dynamic AF.
The displays shown in the viewfinder and on the top display panel are shownbelow.
Focus area
Single-area AF Dynamic AF (Closest-subject Priority AF OFF)
Dynamic AF (Closest-subject Priority AF ON)
Top display panel/viewfinderdisplay
Then specify the focus area. End of settings.
SELECTING THE FOCUS MODE
AF-CAF-SMF
Use the focus mode selector switch to select thefocus mode.
Focus modesAF-S
(S: Single AF servo)AF-C
(C: Continuous AF servo)MF
(M: Manual focus)
Features Focus priority mode. Theshutter will only release if the“” focus indicator is displayed.(Excludes predictive motionfocusing)
Release priority mode. Theshutter will release even ifthe “” focus indicator is notdisplayed.
Allows you to release theshutter at any time.
AF starts When the shutter button ispressed down halfway(default).
When the shutter button ispressed down halfway(default).
AF is not used.
Focus lock When the shutter button isheld down halfway and the “”focus indicator is displayed,the focus is locked.
Even when the shutter buttonis held down halfway and the“” focus indicator is displayed,the focus is not locked andfocusing continues.Press the AE-L/AF-L button tolock the focus.
Only works for moving subjectsfrom the time AF operationstarts. While this function isoperating, the camera decideswhen the subject is in focusand releases the shutter.
Also works for subjects thatstart moving during shooting.
Does not operate.
CSM 9: AF operation can be modified so that it does not begin when the shutter button ispressed down halfway, but when the “AE-L/AF-L” button is pressed (P.97).
CSM 7/8: The focus mode determines whether Closest-subject Priority AF is ON or OFF. Thedefault settings are “ON” in “S” (Single-AF servo) mode and “OFF” in “C” (Continuous-AF servo) mode. You can change these settings using the custom settings (P.97).
40 41
FOCUS SETTINGS AF-ASSIST ILLUMINATORAdvanced
Photography
3
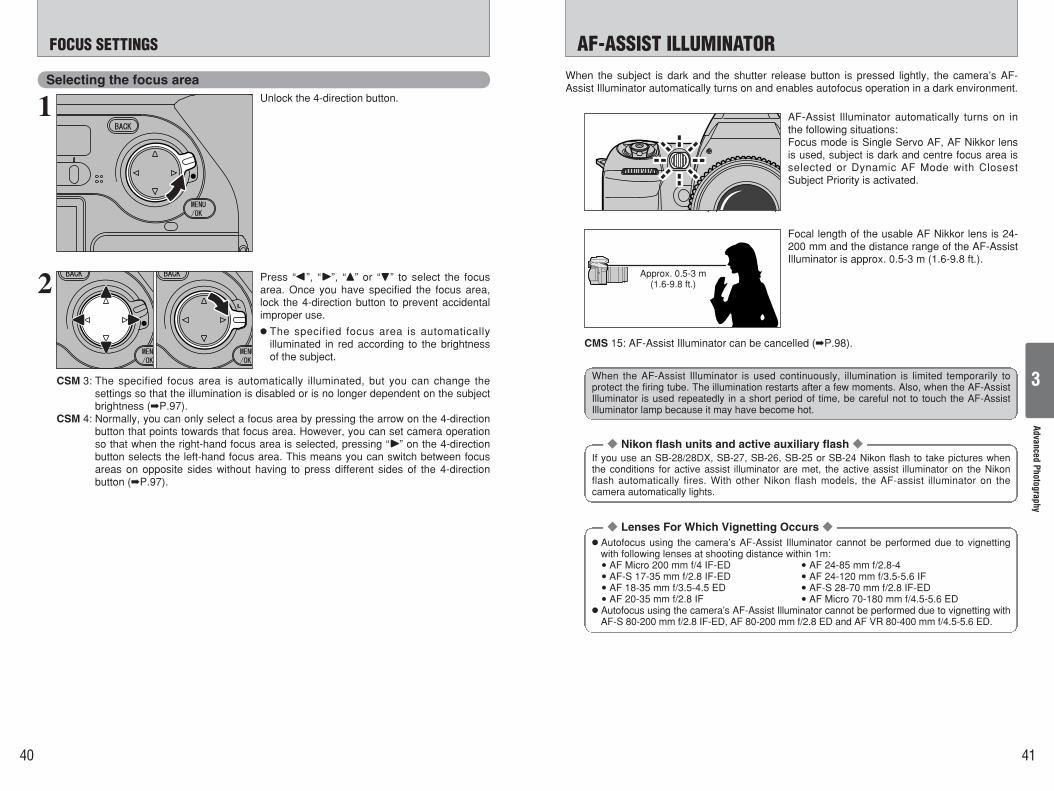
When the subject is dark and the shutter release button is pressed lightly, the camera’s AF-Assist Illuminator automatically turns on and enables autofocus operation in a dark environment.
AF-Assist Illuminator automatically turns on inthe following situations:Focus mode is Single Servo AF, AF Nikkor lensis used, subject is dark and centre focus area isselected or Dynamic AF Mode with ClosestSubject Priority is activated.
Focal length of the usable AF Nikkor lens is 24-200 mm and the distance range of the AF-AssistIlluminator is approx. 0.5-3 m (1.6-9.8 ft.).
CMS 15: AF-Assist Illuminator can be cancelled (P.98).
Approx. 0.5-3 m(1.6-9.8 ft.)
Selecting the focus area
1 Unlock the 4-direction button.
2 Press “d”, “c”, “a” or “b” to select the focusarea. Once you have specified the focus area,lock the 4-direction button to prevent accidentalimproper use.
h The specified focus area is automaticallyilluminated in red according to the brightnessof the subject.
CSM 3: The specified focus area is automatically illuminated, but you can change thesettings so that the illumination is disabled or is no longer dependent on the subjectbrightness (P.97).
CSM 4: Normally, you can only select a focus area by pressing the arrow on the 4-directionbutton that points towards that focus area. However, you can set camera operationso that when the right-hand focus area is selected, pressing “c” on the 4-directionbutton selects the left-hand focus area. This means you can switch between focusareas on opposite sides without having to press different sides of the 4-directionbutton (P.97).
When the AF-Assist Illuminator is used continuously, illumination is limited temporarily toprotect the firing tube. The illumination restarts after a few moments. Also, when the AF-AssistIlluminator is used repeatedly in a short period of time, be careful not to touch the AF-AssistIlluminator lamp because it may have become hot.
Nikon flash units and active auxiliary flash
Lenses For Which Vignetting Occurs
If you use an SB-28/28DX, SB-27, SB-26, SB-25 or SB-24 Nikon flash to take pictures whenthe conditions for active assist illuminator are met, the active assist illuminator on the Nikonflash automatically fires. With other Nikon flash models, the AF-assist illuminator on thecamera automatically lights.
h Autofocus using the camera’s AF-Assist Illuminator cannot be performed due to vignettingwith following lenses at shooting distance within 1m:i AF Micro 200 mm f/4 IF-ED i AF 24-85 mm f/2.8-4i AF-S 17-35 mm f/2.8 IF-ED i AF 24-120 mm f/3.5-5.6 IFi AF 18-35 mm f/3.5-4.5 ED i AF-S 28-70 mm f/2.8 IF-EDi AF 20-35 mm f/2.8 IF i AF Micro 70-180 mm f/4.5-5.6 EDh Autofocus using the camera’s AF-Assist Illuminator cannot be performed due to vignetting with
AF-S 80-200 mm f/2.8 IF-ED, AF 80-200 mm f/2.8 ED and AF VR 80-400 mm f/4.5-5.6 ED.
42 43
SITUATIONS WHERE AUTOFOCUS MAY NOT WORK AS EXPECTED MANUAL FOCUSAdvanced
Photography
3
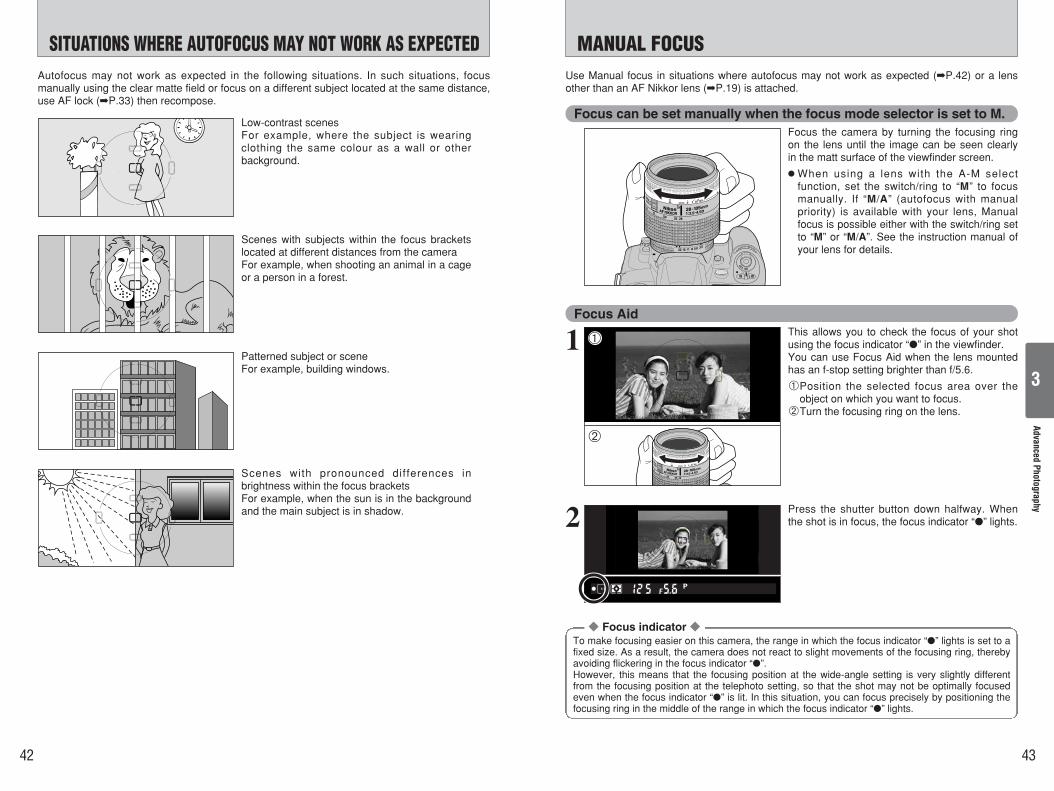
Use Manual focus in situations where autofocus may not work as expected (P.42) or a lensother than an AF Nikkor lens (P.19) is attached.
Focus can be set manually when the focus mode selector is set to M.Focus the camera by turning the focusing ringon the lens until the image can be seen clearlyin the matt surface of the viewfinder screen.
hWhen using a lens with the A-M selectfunction, set the switch/ring to “M” to focusmanually. If “M/A” (autofocus with manualpriority) is available with your lens, Manualfocus is possible either with the switch/ring setto “M” or “M/A”. See the instruction manual ofyour lens for details.
Autofocus may not work as expected in the following situations. In such situations, focusmanually using the clear matte field or focus on a different subject located at the same distance,use AF lock (P.33) then recompose.
Low-contrast scenesFor example, where the subject is wearingclothing the same colour as a wall or otherbackground.
Scenes with subjects within the focus bracketslocated at different distances from the cameraFor example, when shooting an animal in a cageor a person in a forest.
Patterned subject or sceneFor example, building windows.
Scenes with pronounced differences inbrightness within the focus bracketsFor example, when the sun is in the backgroundand the main subject is in shadow.
Focus AidThis allows you to check the focus of your shotusing the focus indicator “” in the viewfinder.You can use Focus Aid when the lens mountedhas an f-stop setting brighter than f/5.6.
1Position the selected focus area over theobject on which you want to focus.
2Turn the focusing ring on the lens.
Press the shutter button down halfway. Whenthe shot is in focus, the focus indicator “” lights.
01
02
1
2
Focus indicator To make focusing easier on this camera, the range in which the focus indicator “” lights is set to afixed size. As a result, the camera does not react to slight movements of the focusing ring, therebyavoiding flickering in the focus indicator “”.However, this means that the focusing position at the wide-angle setting is very slightly differentfrom the focusing position at the telephoto setting, so that the shot may not be optimally focusedeven when the focus indicator “” is lit. In this situation, you can focus precisely by positioning thefocusing ring in the middle of the range in which the focus indicator “” lights.
44 45
METERING SYSTEMSAdvanced
Photography
3
Normally, the Matrix Metering system will provide the optimum exposure for your shot. However,you can choose from 3 metering modes for shots where you want to select a different exposurelevel (AE lock or exposure compensation) or for particular scenes (such as backlit shots orshots with very strong contrast).
The release mode is normally set to Single-frame. Set the release mode to Continuous Shootingto take sequential shots of moving subjects or to take a series of shots using Auto ExposureBracketing.
In this mode, one shot is taken each time you press the shutter button. Use this mode to take asingle clearly defined shot in each frame.
! If you take a number of single-frame shots in rapid succession, the number of available shots is highlighted in thesame way as in continuous shooting. Once this happens, no further shots can be taken. Wait until the number ofavailable shots is no longer highlighted.
e (Single frame)
This mode allows you to take up to 7 consecutive shots at intervals as short as 0.5 seconds byholding down the shutter button.
h Once you have shot the maximum number of continuous frames (7), the number of availableshots shown on the rear display panel is highlighted. No further continuous shots can betaken at that point. Wait until the number of available shots is no longer highlighted.
r (Continuous Shooting)
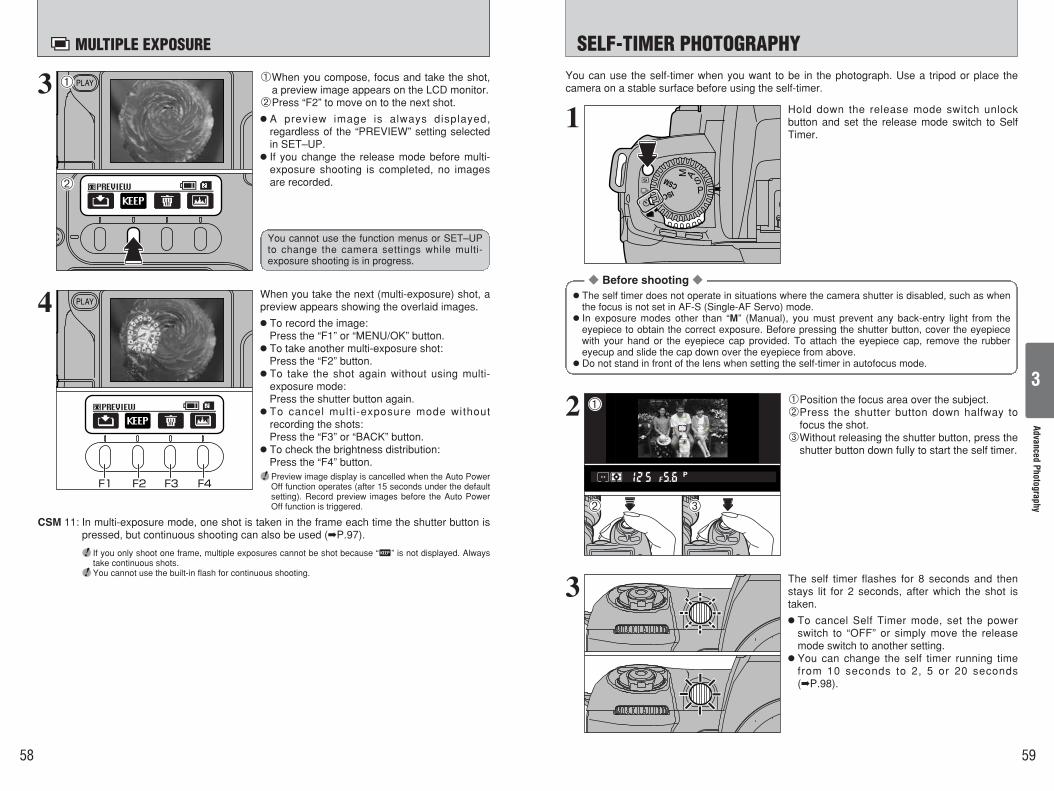
Hold down the release mode switch unlockbutton and set the release mode switch to “e”(Single frame) or “r” (Continuous Shooting).
! The continuous shooting speed is fixed and does not vary according to the resolution or quality settings.! You cannot use continuous shooting with the built-in flash.! If previewing is selected for photographed images (P.90) when continuous shooting is used, only the
photographed image for the final frame is displayed and automatically recorded.! If you use continuous shooting when the number of available shots is low, the number of available shots may
temporarily change to 0.
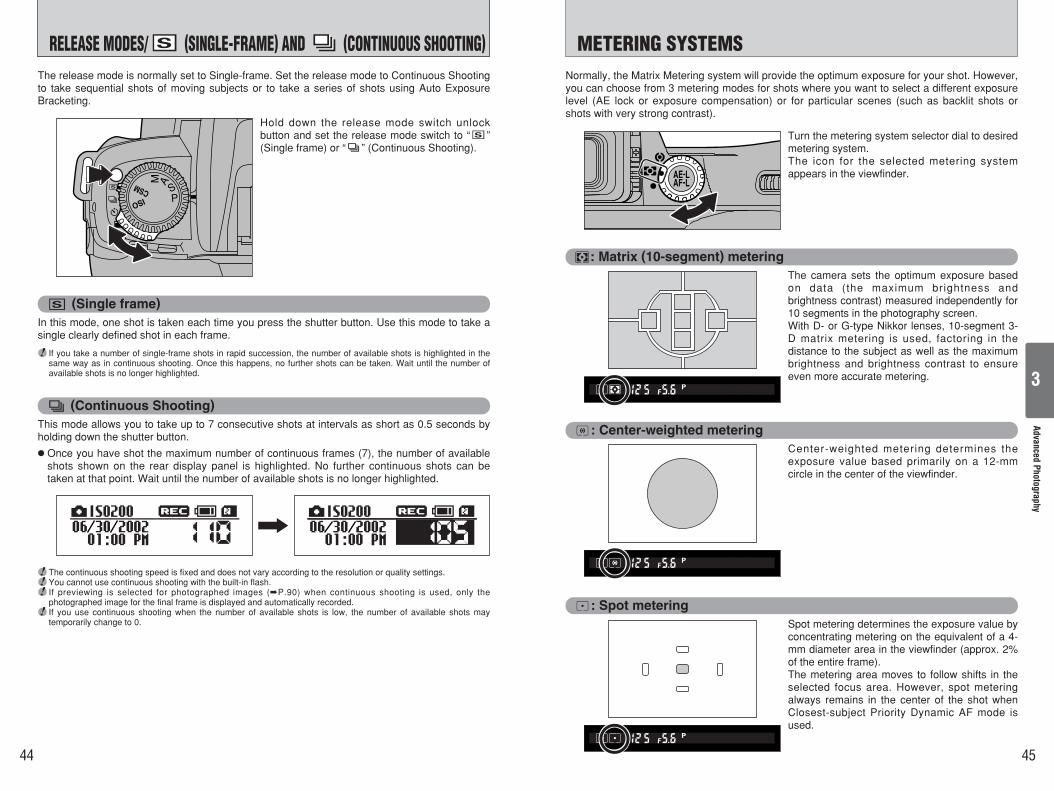
Turn the metering system selector dial to desiredmetering system.The icon for the selected metering systemappears in the viewfinder.
The camera sets the optimum exposure basedon data (the maximum brightness andbrightness contrast) measured independently for10 segments in the photography screen.With D- or G-type Nikkor lenses, 10-segment 3-D matrix metering is used, factoring in thedistance to the subject as well as the maximumbrightness and brightness contrast to ensureeven more accurate metering.
': Matrix (10-segment) metering
Center-weighted metering determines theexposure value based primarily on a 12-mmcircle in the center of the viewfinder.
;: Center-weighted metering
Spot metering determines the exposure value byconcentrating metering on the equivalent of a 4-mm diameter area in the viewfinder (approx. 2%of the entire frame).The metering area moves to follow shifts in theselected focus area. However, spot meteringalways remains in the center of the shot whenClosest-subject Priority Dynamic AF mode isused.
l: Spot metering
RELEASE MODES/e (SINGLE-FRAME) AND r (CONTINUOUS SHOOTING)
46 47
ISO SENSITIVITY/EXPOSURE MODES PAdvanced
Photography
3
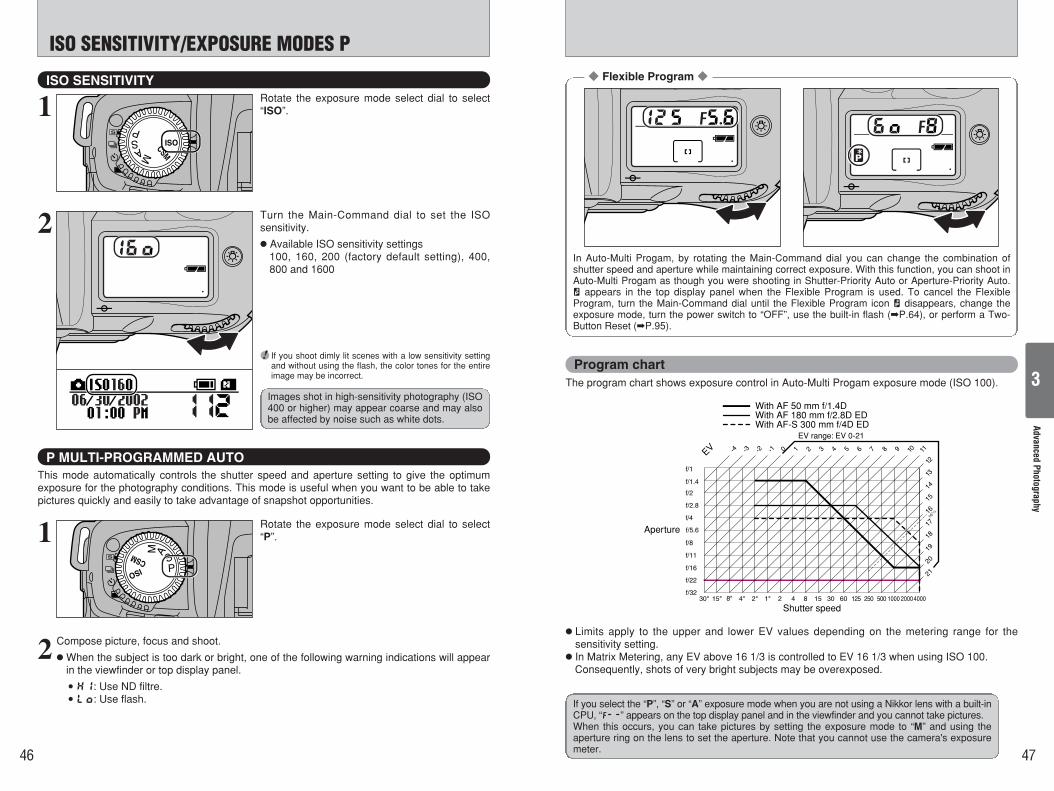
Flexible Program
In Auto-Multi Progam, by rotating the Main-Command dial you can change the combination ofshutter speed and aperture while maintaining correct exposure. With this function, you can shoot inAuto-Multi Progam as though you were shooting in Shutter-Priority Auto or Aperture-Priority Auto.W appears in the top display panel when the Flexible Program is used. To cancel the FlexibleProgram, turn the Main-Command dial until the Flexible Program icon W disappears, change theexposure mode, turn the power switch to “OFF”, use the built-in flash (P.64), or perform a Two-Button Reset (P.95).
Program chartThe program chart shows exposure control in Auto-Multi Progam exposure mode (ISO 100).
h Limits apply to the upper and lower EV values depending on the metering range for thesensitivity setting.h In Matrix Metering, any EV above 16 1/3 is controlled to EV 16 1/3 when using ISO 100.
Consequently, shots of very bright subjects may be overexposed.
With AF 50 mm f/1.4DWith AF 180 mm f/2.8D EDWith AF-S 300 mm f/4D ED
EV range: EV 0-21
EV
Shutter speed
Aperture
If you select the “P”, “S” or “A” exposure mode when you are not using a Nikkor lens with a built-inCPU, “`” appears on the top display panel and in the viewfinder and you cannot take pictures.When this occurs, you can take pictures by setting the exposure mode to “M” and using theaperture ring on the lens to set the aperture. Note that you cannot use the camera's exposuremeter.
P MULTI-PROGRAMMED AUTOThis mode automatically controls the shutter speed and aperture setting to give the optimumexposure for the photography conditions. This mode is useful when you want to be able to takepictures quickly and easily to take advantage of snapshot opportunities.
ISO SENSITIVITY
1 Rotate the exposure mode select dial to select“P”.
1 Rotate the exposure mode select dial to select“ISO”.
2 Turn the Main-Command dial to set the ISOsensitivity.
h Available ISO sensitivity settings100, 160, 200 (factory default setting), 400,800 and 1600
! If you shoot dimly lit scenes with a low sensitivity settingand without using the flash, the color tones for the entireimage may be incorrect.
2 Compose picture, focus and shoot.
hWhen the subject is too dark or bright, one of the following warning indications will appearin the viewfinder or top display panel.
i£: Use ND filtre.i¢: Use flash.
Images shot in high-sensitivity photography (ISO400 or higher) may appear coarse and may alsobe affected by noise such as white dots.
48 49
EXPOSURE MODES S EXPOSURE MODES AAdvanced
Photography
3
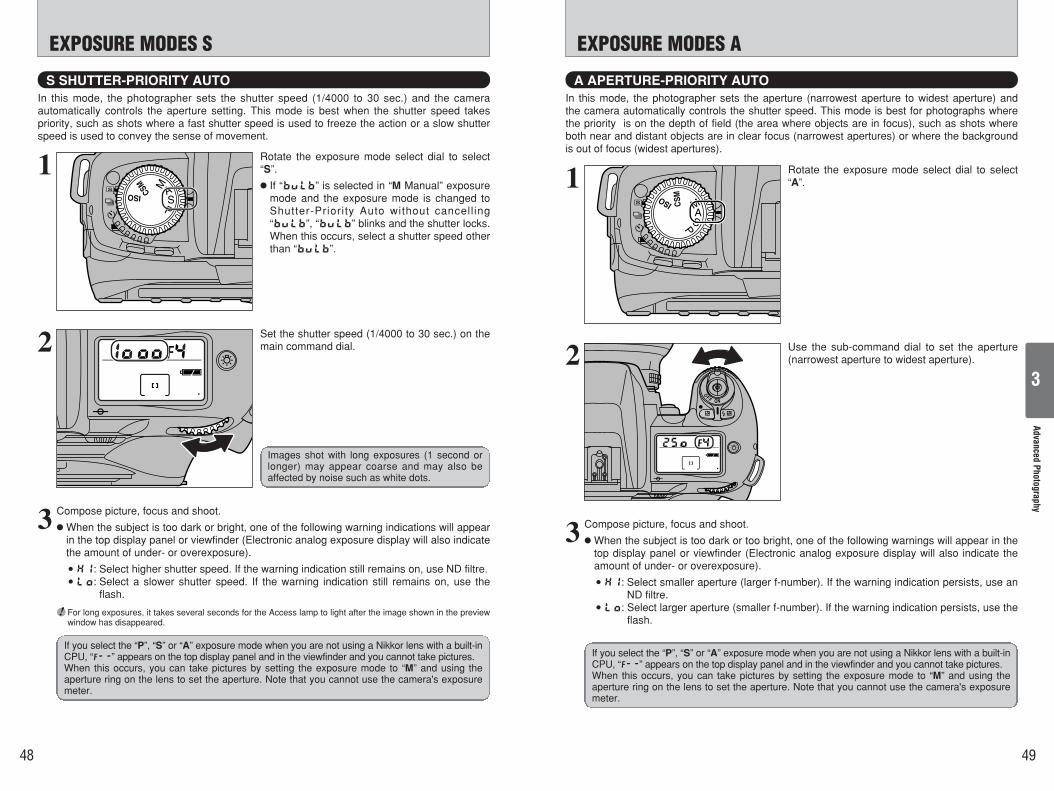
A APERTURE-PRIORITY AUTOIn this mode, the photographer sets the aperture (narrowest aperture to widest aperture) andthe camera automatically controls the shutter speed. This mode is best for photographs wherethe priority is on the depth of field (the area where objects are in focus), such as shots whereboth near and distant objects are in clear focus (narrowest apertures) or where the backgroundis out of focus (widest apertures).
S SHUTTER-PRIORITY AUTOIn this mode, the photographer sets the shutter speed (1/4000 to 30 sec.) and the cameraautomatically controls the aperture setting. This mode is best when the shutter speed takespriority, such as shots where a fast shutter speed is used to freeze the action or a slow shutterspeed is used to convey the sense of movement.
1 Rotate the exposure mode select dial to select“S”.
h If “™” is selected in “M Manual” exposuremode and the exposure mode is changed toShutter-Priority Auto without cancell ing“™”, “™” blinks and the shutter locks.When this occurs, select a shutter speed otherthan “™”.
2 Set the shutter speed (1/4000 to 30 sec.) on themain command dial.
3 Compose picture, focus and shoot.
hWhen the subject is too dark or bright, one of the following warning indications will appearin the top display panel or viewfinder (Electronic analog exposure display will also indicatethe amount of under- or overexposure).
i£: Select higher shutter speed. If the warning indication still remains on, use ND filtre.i¢: Select a slower shutter speed. If the warning indication still remains on, use the
flash.
! For long exposures, it takes several seconds for the Access lamp to light after the image shown in the previewwindow has disappeared.
Images shot with long exposures (1 second orlonger) may appear coarse and may also beaffected by noise such as white dots.
If you select the “P”, “S” or “A” exposure mode when you are not using a Nikkor lens with a built-inCPU, “`” appears on the top display panel and in the viewfinder and you cannot take pictures.When this occurs, you can take pictures by setting the exposure mode to “M” and using theaperture ring on the lens to set the aperture. Note that you cannot use the camera's exposuremeter.
1 Rotate the exposure mode select dial to select“A”.
2
3
Use the sub-command dial to set the aperture(narrowest aperture to widest aperture).
Compose picture, focus and shoot.
hWhen the subject is too dark or too bright, one of the following warnings will appear in thetop display panel or viewfinder (Electronic analog exposure display will also indicate theamount of under- or overexposure).
i£: Select smaller aperture (larger f-number). If the warning indication persists, use anND filtre.
i¢: Select larger aperture (smaller f-number). If the warning indication persists, use theflash.
If you select the “P”, “S” or “A” exposure mode when you are not using a Nikkor lens with a built-inCPU, “`” appears on the top display panel and in the viewfinder and you cannot take pictures.When this occurs, you can take pictures by setting the exposure mode to “M” and using theaperture ring on the lens to set the aperture. Note that you cannot use the camera's exposuremeter.
50 51
EXPOSURE MODES MAdvanced
Photography
3
Electronic analog exposure display The electronic analog display in the viewfinder indicates the difference between the selectedexposure (shutter speed and aperture) and the correct exposure. Not available with Long TimeExposure.The electronic analog exposure display blinks when the subject brightness is beyond the camera’sexposure range.The following examples show electronic analog exposure display indications:
Correct exposure –1/2 EV Over +3 EV
3 Compose picture, focus and shoot.
If you are not using a Nikkor lens with a built-in CPU, you can take pictures by using the aperturering on the lens to set the aperture. However, you cannot use the camera’s exposure meter. “`”also appears on the top display panel and in the viewfinder.
M MANUALIn this mode, the photographer is free to set any shutter speed (1/4000 to 30 sec. or “™”) oraperture setting (narrowest aperture to widest aperture). This allows the photographer todetermine the exposure to suit the conditions and the desired effect while watching theexposure indicator in the viewfinder.
CSM 6: To use the “™” shutter speed (for long exposures), the custom settings must bemodified (P.97).
While watching the exposure indicator in the viewfinder, use the main command dial to setthe shutter speed (1/4000 to 30 sec. or “™”) and the sub-command dial to set theaperture setting (narrowest aperture to widest aperture).
hWhen the exposure compensation (P.54) is set, only the electronic analog displaychanges—selected shutter speed and aperture do not change.
1 Rotate the exposure mode select dial to select“M”.
2
Images shot with long exposures (1 second or longer) may appear coarse and may also beaffected by noise such as white dots.
52 53
EXPOSURE MODES M TAKING PICTURES WITH AE LOCKAdvanced
Photography
3
AE lock allows you to set the exposure for a specific subject in your shot. This technique isuseful when brightness of your subject differs greatly from its surroundings.
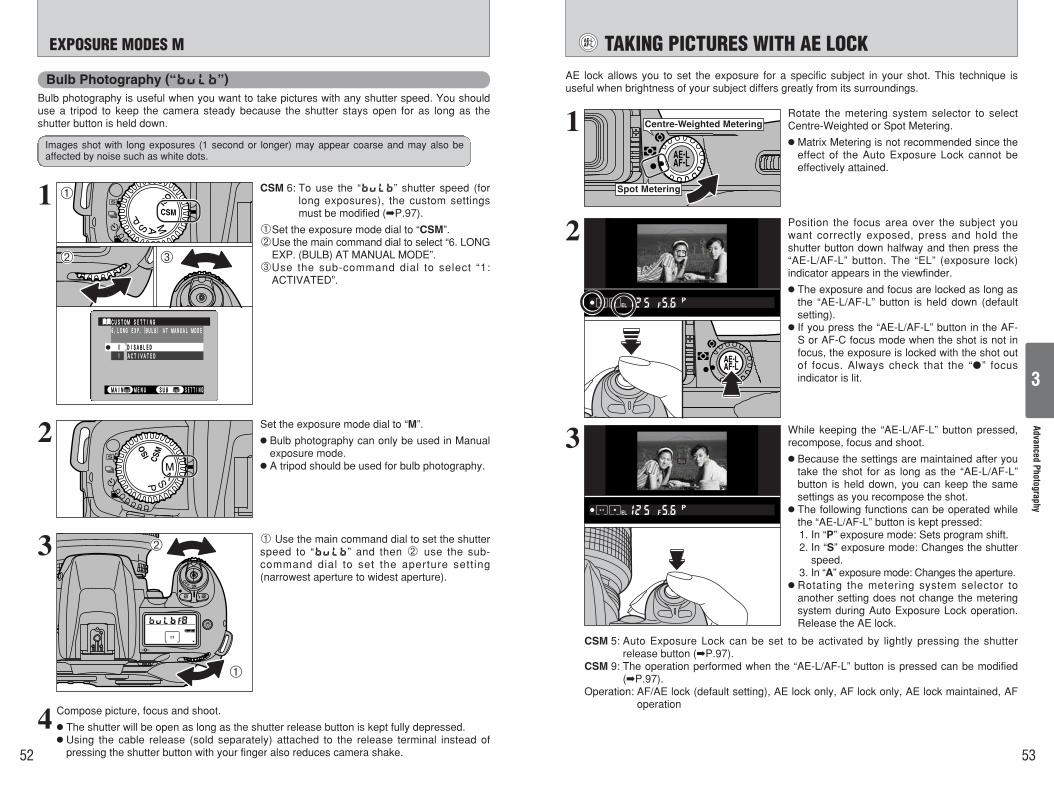
1 Centre-Weighted Metering
Spot Metering
Rotate the metering system selector to selectCentre-Weighted or Spot Metering.
h Matrix Metering is not recommended since theeffect of the Auto Exposure Lock cannot beeffectively attained.
2 Position the focus area over the subject youwant correctly exposed, press and hold theshutter button down halfway and then press the“AE-L/AF-L” button. The “EL” (exposure lock)indicator appears in the viewfinder.
h The exposure and focus are locked as long asthe “AE-L/AF-L” button is held down (defaultsetting).h If you press the “AE-L/AF-L” button in the AF-
S or AF-C focus mode when the shot is not infocus, the exposure is locked with the shot outof focus. Always check that the “” focusindicator is lit.
3 While keeping the “AE-L/AF-L” button pressed,recompose, focus and shoot.
h Because the settings are maintained after youtake the shot for as long as the “AE-L/AF-L”button is held down, you can keep the samesettings as you recompose the shot.h The following functions can be operated while
the “AE-L/AF-L” button is kept pressed:1. In “P” exposure mode: Sets program shift.2. In “S” exposure mode: Changes the shutter
speed.3. In “A” exposure mode: Changes the aperture.
h Rotating the metering system selector toanother setting does not change the meteringsystem during Auto Exposure Lock operation.Release the AE lock.
CSM 5: Auto Exposure Lock can be set to be activated by lightly pressing the shutterrelease button (P.97).
CSM 9: The operation performed when the “AE-L/AF-L” button is pressed can be modified(P.97).
Bulb Photography (“™”)Bulb photography is useful when you want to take pictures with any shutter speed. You shoulduse a tripod to keep the camera steady because the shutter stays open for as long as theshutter button is held down.
1 CSM 6: To use the “™” shutter speed (forlong exposures), the custom settingsmust be modified (P.97).
1Set the exposure mode dial to “CSM”.2Use the main command dial to select “6. LONG
EXP. (BULB) AT MANUAL MODE”.3Use the sub-command dial to select “1:
ACTIVATED”.
2 Set the exposure mode dial to “M”.
h Bulb photography can only be used in Manualexposure mode.h A tripod should be used for bulb photography.
3 1 Use the main command dial to set the shutterspeed to “™” and then 2 use the sub-command dial to set the aperture sett ing(narrowest aperture to widest aperture).
4 Compose picture, focus and shoot.
h The shutter will be open as long as the shutter release button is kept fully depressed.h Using the cable release (sold separately) attached to the release terminal instead of
pressing the shutter button with your finger also reduces camera shake.
02
01
Images shot with long exposures (1 second or longer) may appear coarse and may also beaffected by noise such as white dots.
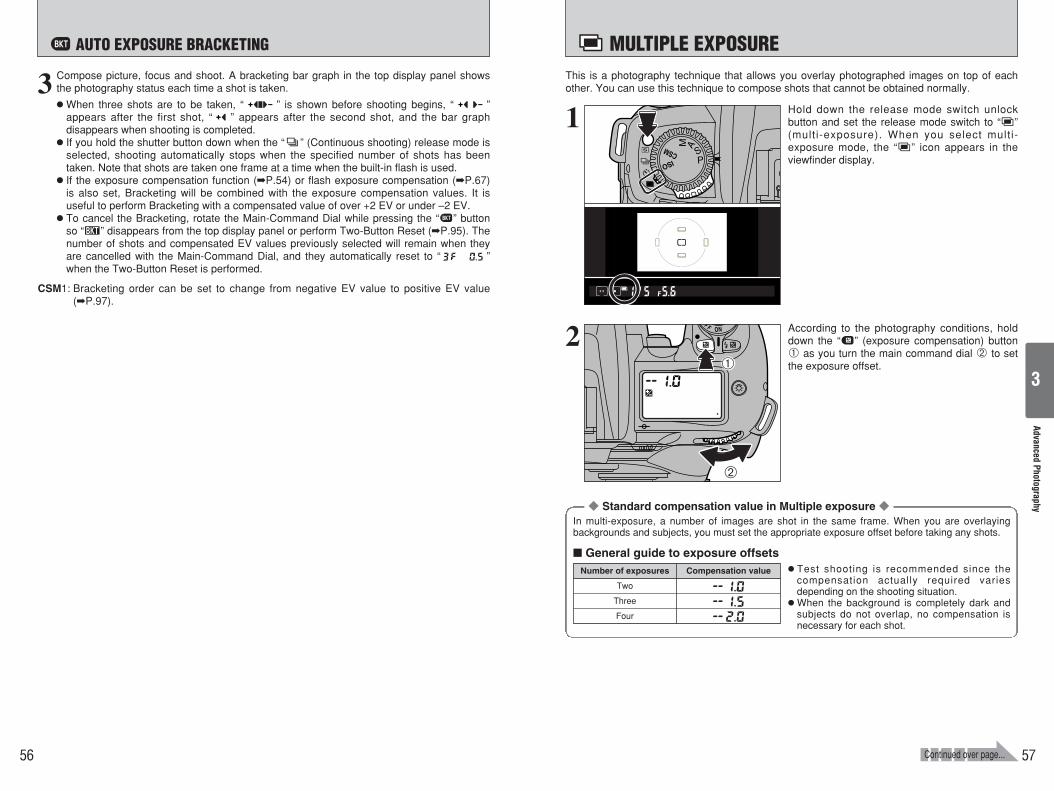
Use Auto Exposure Bracketing when you want to take the same shot with different exposuresettings. Using the correct exposure setting displayed by the camera (the value set in “M”exposure mode) as a reference, the camera can automatically offset the exposure by a setvalue (up to ±2 EV steps without exposure compensation) in either direction.
Exposure compensation allows you to intentionally vary the optimum exposure value controlledby the camera. This can be useful when intentionally achieving under- or overexposure. UseCentre-Weighted or Spot Metering. Exposure compensation can be performed in any exposuremode (However in “M” exposure mode, only the electronic analog display changes—selectedshutter speed and aperture do not change).
1
2
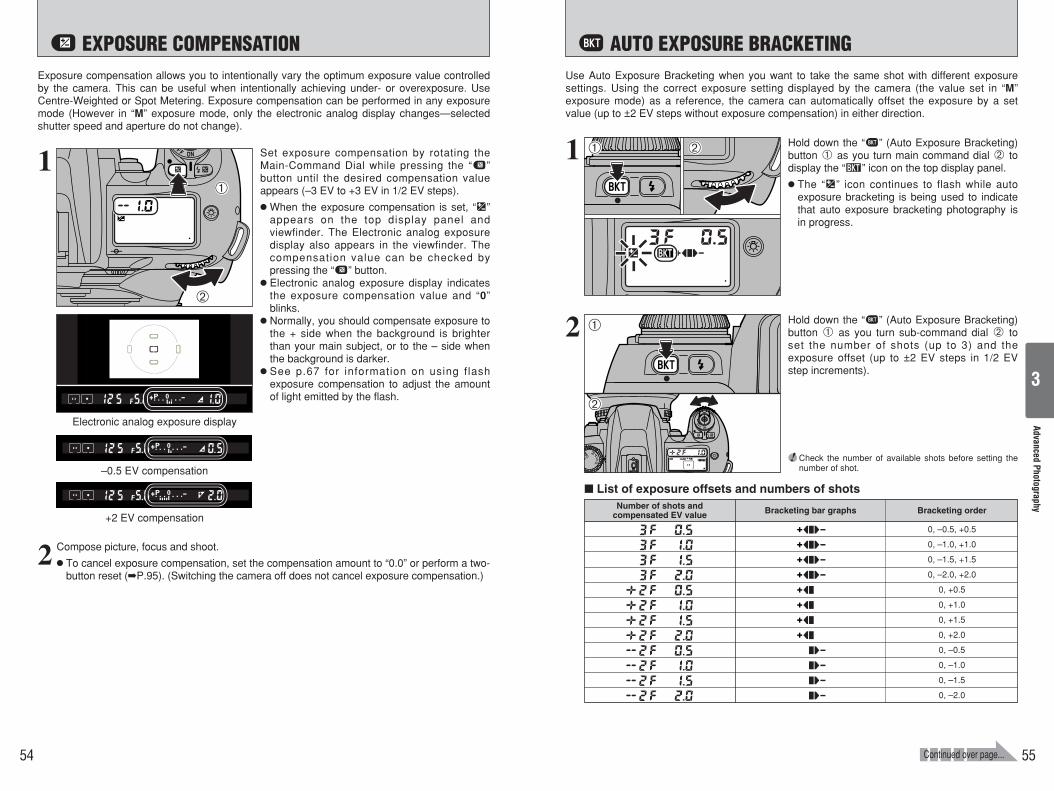
Set exposure compensation by rotating theMain-Command Dial while pressing the “u”button until the desired compensation valueappears (–3 EV to +3 EV in 1/2 EV steps).
hWhen the exposure compensation is set, “U”appears on the top display panel andviewfinder. The Electronic analog exposuredisplay also appears in the viewfinder. Thecompensation value can be checked bypressing the “u” button.h Electronic analog exposure display indicates
the exposure compensation value and “0”blinks.h Normally, you should compensate exposure to
the + side when the background is brighterthan your main subject, or to the – side whenthe background is darker.h See p.67 for information on using flash
exposure compensation to adjust the amountof light emitted by the flash.
Compose picture, focus and shoot.
h To cancel exposure compensation, set the compensation amount to “0.0” or perform a two-button reset (P.95). (Switching the camera off does not cancel exposure compensation.)
–0.5 EV compensation
Electronic analog exposure display
+2 EV compensation
01
02
1 Hold down the “q” (Auto Exposure Bracketing)button 1 as you turn main command dial 2 todisplay the “Q” icon on the top display panel.
h The “U” icon continues to flash while autoexposure bracketing is being used to indicatethat auto exposure bracketing photography isin progress.
01
02
2 Hold down the “q” (Auto Exposure Bracketing)button 1 as you turn sub-command dial 2 toset the number of shots (up to 3) and theexposure offset (up to ±2 EV steps in 1/2 EVstep increments).
List of exposure offsets and numbers of shotsNumber of shots and
compensated EV value Bracketing bar graphs Bracketing order
0, –0.5, +0.5
0, –1.0, +1.0
0, –1.5, +1.5
0, –2.0, +2.0
0, +0.5
0, +1.0
0, +1.5
0, +2.0
0, –0.5
0, –1.0
0, –1.5
0, –2.0
01 02
! Check the number of available shots before setting thenumber of shot.
u EXPOSURE COMPENSATION q AUTO EXPOSURE BRACKETING
Continued over page...
56 57
AdvancedPhotography
3
This is a photography technique that allows you overlay photographed images on top of eachother. You can use this technique to compose shots that cannot be obtained normally.3 Compose picture, focus and shoot. A bracketing bar graph in the top display panel shows
the photography status each time a shot is taken.
hWhen three shots are to be taken, “ ” is shown before shooting begins, “ ”appears after the first shot, “ ” appears after the second shot, and the bar graphdisappears when shooting is completed.h If you hold the shutter button down when the “r” (Continuous shooting) release mode is
selected, shooting automatically stops when the specified number of shots has beentaken. Note that shots are taken one frame at a time when the built-in flash is used.h If the exposure compensation function (P.54) or flash exposure compensation (P.67)
is also set, Bracketing will be combined with the exposure compensation values. It isuseful to perform Bracketing with a compensated value of over +2 EV or under –2 EV.h To cancel the Bracketing, rotate the Main-Command Dial while pressing the “q” button
so “Q” disappears from the top display panel or perform Two-Button Reset (P.95). Thenumber of shots and compensated EV values previously selected will remain when theyare cancelled with the Main-Command Dial, and they automatically reset to “ ”when the Two-Button Reset is performed.
CSM1: Bracketing order can be set to change from negative EV value to positive EV value(P.97).
1 Hold down the release mode switch unlockbutton and set the release mode switch to “i”(multi-exposure). When you select multi-exposure mode, the “i” icon appears in theviewfinder display.
2 According to the photography conditions, holddown the “u” (exposure compensation) button1 as you turn the main command dial 2 to setthe exposure offset.
Standard compensation value in Multiple exposure
01
02
q AUTO EXPOSURE BRACKETING i MULTIPLE EXPOSURE
Continued over page...
In multi-exposure, a number of images are shot in the same frame. When you are overlayingbackgrounds and subjects, you must set the appropriate exposure offset before taking any shots.
h Test shooting is recommended since thecompensation actually required variesdepending on the shooting situation.hWhen the background is completely dark and
subjects do not overlap, no compensation isnecessary for each shot.
General guide to exposure offsetsNumber of exposures Compensation value
Two
Three
Four
58 59
SELF-TIMER PHOTOGRAPHYAdvanced
Photography
3
F1 F2 F3 F4
You can use the self-timer when you want to be in the photograph. Use a tripod or place thecamera on a stable surface before using the self-timer.
1 Hold down the release mode switch unlockbutton and set the release mode switch to SelfTimer.
2 1Position the focus area over the subject.2Press the shutter button down halfway to
focus the shot.3Without releasing the shutter button, press the
shutter button down fully to start the self timer.
3 The self timer flashes for 8 seconds and thenstays lit for 2 seconds, after which the shot istaken.
h To cancel Self Timer mode, set the powerswitch to “OFF” or simply move the releasemode switch to another setting.h You can change the self timer running time
from 10 seconds to 2, 5 or 20 seconds(P.98).
Before shooting
02
01
03
3 1When you compose, focus and take the shot,a preview image appears on the LCD monitor.
2Press “F2” to move on to the next shot.
h A preview image is always displayed,regardless of the “PREVIEW” setting selectedin SET–UP.h If you change the release mode before multi-
exposure shooting is completed, no imagesare recorded.
4 When you take the next (multi-exposure) shot, apreview appears showing the overlaid images.
h To record the image: Press the “F1” or “MENU/OK” button.h To take another multi-exposure shot:
Press the “F2” button.h To take the shot again without using multi-
exposure mode:Press the shutter button again.h To cancel multi-exposure mode without
recording the shots:Press the “F3” or “BACK” button.h To check the brightness distribution:
Press the “F4” button.! Preview image display is cancelled when the Auto Power
Off function operates (after 15 seconds under the defaultsetting). Record preview images before the Auto PowerOff function is triggered.
CSM 11: In multi-exposure mode, one shot is taken in the frame each time the shutter button ispressed, but continuous shooting can also be used (P.97).
! If you only shoot one frame, multiple exposures cannot be shot because “S” is not displayed. Alwaystake continuous shots.
! You cannot use the built-in flash for continuous shooting.
You cannot use the function menus or SET–UPto change the camera settings while multi-exposure shooting is in progress.
i MULTIPLE EXPOSURE
h The self timer does not operate in situations where the camera shutter is disabled, such as whenthe focus is not set in AF-S (Single-AF Servo) mode.h In exposure modes other than “M” (Manual), you must prevent any back-entry light from the
eyepiece to obtain the correct exposure. Before pressing the shutter button, cover the eyepiecewith your hand or the eyepiece cap provided. To attach the eyepiece cap, remove the rubbereyecup and slide the cap down over the eyepiece from above.h Do not stand in front of the lens when setting the self-timer in autofocus mode.
01
02
60 61
FLASH PHOTOGRAPHY BUILT-IN FLASHAdvanced
Photography
3TTL3D-Multi BL Multi BL
3D Multi-Sensor Balanced Fill-Flash together with Multi-Sensor Balanced Fill-Flash is calledAutomatic Balanced Fill-Flash with TTL Multi Sensor
Some flash settings can be set directly:
Other settings are:
Synchro mode (the flash timing and shutter speed)Flash exposure compensation (flash brightness adjustment)
The basic settings for flash photography are explained on pages 61 to 67. If necessary, referalso to “Nikon Flash Units That Can Be Used” (P.68).
Flash control mode (the system for measuring and adjusting the flash brightness)Flash control range (the effective range of the flash)
SETTINGS FOR FLASH PHOTOGRAPHY This camera is equipped with a built-in Speedlight that provides an angle of coverage for a28mm lens with a guide number of 12 (ISO100, m). TTL Auto Flash modes such as 3D Multi-Sensor Balanced Fill-Flash and Multi-Sensor Balanced Fill-Flash are available and ensureproper exposure of the main subject and background, while providing adequate flash output tocreate natural-looking flash photography. In addition to shooting in dim light, the flash can beused in daylight to reduce shadows on the main subject or to put catchlights in your subject’seyes. Five flash sync modes—Front-Curtain Sync (Normal Sync), Slow Sync, Rear-CurtainSync, Red-Eye Reduction and Red-Eye Reduction with Slow Sync—are available with thiscamera.
3D Multi-Sensor Balanced Fill-Flash can be performed with a combination of the FinePix S2 Procamera and D- or G-type Nikkor lens. In this flash mode, just after you press the shutter releasebutton and before the shutter is activated, the built-in flash will fire a series of imperceptible pre-flashes that are detected by the FinePix S2 Pro’s five-segment TTL Multi Sensor, then analysedfor brightness and contrast. Furthermore, it integrates Distance Information from the lens withother exposure control information, automatically compensating the flash output level so thatflash output and ambient light are balanced.3D Multi-Sensor Balanced Fill-Flash enables flash photography in very difficult situations, suchas a scene that includes an object with extremely high reflectivity or a subject against an“infinite” background (empty sky, clouds, etc.).
1 When built-in flash is used and the exposure mode is set to Manual or Spot metering is selected, TTL Auto Flashmode automatically changes to Standard TTL Flash.
2 To cancel Monitor Pre-Flash, select Manual exposure mode or Spot metering.3 Monitor-Pre Flash is not fired in Standard TTL Flash.
Flash control modes that can be used with the built-in flashLens TTL Auto Flash mode
D- or G-type Nikkor lens 3D Multi-Sensor Balanced Fill-Flash1
(with Distance Information and Monitor Pre-Flash2)
CPU Nikkor lens other than D/G- type(except AF Nikkor for F3AF)
Multi-Sensor Balanced Fill-Flash1
(with Monitor Pre-Flash2)
Non-CPU Nikkor lens Standard TTL3
Item Measure
Lens brightness Use a brighter lens.
Guide No. Use a higher number.
Aperture Widen the aperture.
ISO setting Increase the ISO setting.
How the flash control mode is set The three flash modes are 3D-Multi BL, Multi BL and TTL. One of these is selected based on theexposure mode, the metering system and the lens-flash combination.
Multi-Sensor Balanced Fill-Flash, without the Distance Information added to the 3D Multi-SensorBalanced Fill-Flash, can be performed with a combination of the FinePix S2 Pro camera andCPU Nikkor lens other than D/G-type.
Multi-Sensor Balanced Fill-Flash
Standard TTL Flash can be performed with non-CPU Nikkor lens. (Can only be used withexposure mode set to “M” P.50) With CPU Nikkor lens, Standard TTL Flash is automaticallyset when the camera is set to “M” exposure mode or Spot metering when using built-in flash. InStandard TTL Flash, automatic flash output level compensation is not available. This meansthat, even though the main subject is correctly exposed, the background may not be. StandardTTL Flash is useful when you want to highlight the main subject or perform flash exposurecompensation. Monitor Pre-Flash is cancelled in Standard TTL Flash.
Standard TTL Flash
62 63
SYNCHRO MODES AND THEIR FEATURESAdvanced
Photography
3
Can be used in all exposure modes. In the “P”and “A” exposure modes, a slow shutter speedis used. The flash fires just before the shuttercloses. This mode is effective in capturing thesubject's movement as a flow of light in a waythat looks natural.
! Rear-Synchro cannot be used with a studio flash systemsince the correct synchronisation cannot be obtained.
p> REAR SYNCHRO MODEYou can select any of 5 modes to suit the type of shot and the desired effect.
Front Synchro Red-eye Reduction
Red-eye Reduction
Slow Synchro
Slow Synchro Rear Synchro
! When some exposure mode and synchro mode combinations are selected, the synchro mode may beautomatically changed subsequently.
Exposuremode
P or A
Synchro mode Display duringselection
Display afterselection Operation
Rear Synchro Automatically set to SlowSynchro.
S or M
Red-eye Reduction SlowSynchro
Slow Synchro
Slow Synchro is cancelled(shutter speed not changed.)
Can be used in all exposure modes.Select this mode for normal flash photography.
p FRONT SYNCHRO MODE
Can be used in the “P” and “A” exposure modes.Because this mode uses a slow shutter speed, itcaptures the background while at the same timefiring the flash to produce a shot that capturesthe atmosphere of a twilight or nighttime scene.
p< SLOW SYNCHRO MODE
Can be used in all exposure modes.The Red-Eye Reduction lamp lights for approx. 1sec. before the flash fires in order to reduce thered-eye effect in photos of people or animals.
p? RED-EYE REDUCTION MODE
Can be used in the “P” and “A” exposure modes.This mode combines red-eye reduction with aslow shutter speed.
! When a Nikon SB-28/28DX, SB-27 or SB-26 flash unit isused, the red-eye reduction lamp on the external flashfires.
! Take care to ensure that the camera and the subjects(people) in the shot do not move until the shutter isreleased.
! Depending on the type of lens mounted, the light from thered-eye reduction lamp may not reach the person, inwhich case the effect of the red-eye reduction lamp is lost.
p?< RED-EYE REDUCTION SLOW SYNCHRO MODE
Shutter Speeds
Exposure mode
Synchro mode
nFront Synchro
P or A S M
1/125 to 1/60 sec. (automatically set by the camera1) 1/125 to 30 sec. 1/125 to 30 sec.
and ™
mSlow Synchro1/125 to 30 sec. (automatically set by the camera2) — —
,Rear SynchroAutomatically set to Slow Synchro.1/125 to 30 sec. (automatically set by the camera1, 2)
1/125 to 30 sec. 1/125 to 30 sec.and ™
.Red-eye Reduction1/125 to 1/60 sec. (automatically set by the camera) 1/125 to 30 sec. 1/125 to 30 sec.
and ™
/Red-eye ReductionSlow Synchro
1/125 to 30 sec. (automatically set by the camera2) — —
1 When a Nikon SB-26, SB-25 or SB-24 flash unit is used, the synchro selector on the external flash unit setsthe shutter speed.
2 Because a slow shutter speed is used, a tripod should be used to prevent camera shake.
The synchronized shutter speed is 1/125 sec.The shutter speeds that can be set vary depending on the combination of synchro modeand exposure mode, as shown below.
1Press the flash pop-up button to pop up theflash.
2Hold down the “a” button and,3Turn the main command dial to select the
synchro mode. The icon shown on the topdisplay panel changes as shown below.
! When you are not using the flash, always keep it stowedaway to prevent battery depletion.
02
01
03
64 65
TAKING PICTURES USING THE BUILT-IN FLASHAdvanced
Photography
3
4 Check that the “p” (ready light) is displayed inthe viewfinder.
5 Bear in mind the composition, focus and effective flash range when taking pictures.
! If the “p” (ready light) flashes for about 3 seconds after the shutter is released, this is a warning that the flashfired at full power and the shot may be underexposed. Play the image back to check it. If you decide to retakethe shot, check the shooting distance, aperture, flash control range, etc. again before shooting.
! If the subject is dark, the auxiliary AF-Assist illuminator fires to set the focus. See P.41 for details.! When you use the flash, shots are not taken continuously when the release mode is set to Continuous
Shooting.! If the built-in flash is charging, camera-shake correction is not performed on a VR lens while the shutter button
is pressed down halfway.
! If you take a number of continuous shots with the built-inflash, the “p” (ready light) may take a few moments tolight.
! The shutter cannot be released unless “p” appearswithout blinking in the viewfinder.
Effective Range of the Built-in Flash
Operation described in this section applies when the built-in flash and D- or G-type AF Nikkorare attached.
1 Centre-Weighted Metering
Matrix Metering
Set the metering system selector dial to “MatrixMetering” or “Center-weighted Metering”.
2
3 Set exposure mode and confirm shutter speedand aperture.
The effective range of the built-in flash varies depending on the ISO sensitivity and aperturesettings used. Refer to the table below.
Shutter speeds faster than the synchronized speed (1/125 sec.) cannot be set. When “125” appears in theviewfinder display and the specified shutter speed flashes on the display panel, the actual shutter speed is1/125 sec.
The shooting distance is determined by the ISO setting and the aperture. For the “A” and “M” exposure modes,see the table below.
For the “P” exposure mode, the widest aperture that can be set by the camera varies depending on the ISOsetting. See P.69.
! If you select “l” (Spot Metering), the flash control modeis switched to “TTL”.
Exposure mode
P
S
A
M
Shutter speed Aperture Flash control mode
Synchronized shutter speed: 1/125sec. See P.63 for details.
Automatically set by thecamera
Any aperture
3D Multi BL
TTL
1Press the flash pop-up button to pop up theflash.
2Hold down the “a” button and,3Turn the main command dial to select the
synchro mode.
! When you are not using the flash, always keep it stowedaway to prevent battery depletion.
02
01
03
ISO setting
Widest aperture (built-in flash) 2.8 3.3 4
100
3.3
160 200 400
ISO setting Guide Nos shown in < >
Aperture
1.4 2.5-5.0 — —
100<12>
—
2 1.5-4.5 2.5-5.3 —2.5-5.0
2.8 1.0-3.3 2.2-5.0 3.0-6.01.5-4.7
4 0.7-2.5 1.0-3.5 2.3-5.01.0-3.3
5.6 0.6-1.7 0.8-2.5 2.0-3.50.8-2.2
8 0.6-1.0 0.6-1.6 0.8-2.30.6-1.5
11 — 0.6-1.0 0.6-1.6—
16 — — 0.6-1.0—
160<15>
200<17>
400<24>
The effective flash range can be calculated by dividing the guide number (12 for the built-in flash in thiscamera) by the specified aperture.
! When the sensitivity is set to ISO 800 or 1600, the built-in flash will fire but the correct exposure may not beobtained. Use one of the following methods to check the results:h Select “PREVIEW” as the photographed image display option in the SET–UP screen.h Press the “d” button to play back the image.
Flash control range (m)
66 67
LENSES THAT CAN BE USED WITH THE BUILT-IN FLASH FLASH EXPOSURE COMPENSATIONAdvanced
Photography
3
Flash exposure compensation lets you intentionally change the correct exposure computed by theflash and the camera. For example, you can highlight the main subject by increasing the flashoutput or prevent the main subject from becoming too bright by decreasing the flash output.
1 1Hold down the “s” button (Flash ExposureCompensation) button and,
2Turn the main-command dial to set theamount of compensation.The “I” icon appears on the top displaypanel and on the viewfinder.
Compensation range: –3 EV to 1 EV in 1/2 EVincrements
Compensation guide: Select + settings when thebackground is brighterthan the subject and –settings when backgroundis darker.
2 The remainder of the procedure is the same as for normal flash photography (P.64).
Press the “s” (Flash Exposure Compensation) button.
To check the amount of compensation
01
02
Usable lenses with built-in flash
h 28 mm to 300 mm CPU lenses can be used with the built-in flash.h Make sure to remove the lens hood.h The built-in flash cannot be used at shooting distance less than 0.6 m.h Vignetting occurs at the edges of the frame resulting in underexposure with the following
zoom lenses, which have limitations in usable focal length or shooting distance:
Lens
AF-S 17-35 mm f/2.8 ED 35 mm focal length at 1.5 m or longer shooting distance
AF 18-35 mm f/3.5-4.5 IF-ED 28 mm or longer focal length; and at 28 mm, at 1 m or longer shooting distance
AF 20-35 mm f/2.8 28 mm focal length at 2 m or longer shooting distance or 35 mm focal length at0.7 m or longer shooting distance
AF 24-85 mm f/2.8-4 28 mm or longer focal length; and at 28 mm, at 1 m or longer shooting distance
AF 24-120 mm f/3.5-5.6 28 mm or longer focal length; and at 28 mm, at 0.8 m or longer shooting distance
AF-S 28-70 mm f/2.8 ED 50 mm or longer focal length; and at 50 mm, at 0.8 m or longer shooting distance
AF 28-85 mm f/3.5-4.5 28 mm or longer focal length; and at 28 mm, at 2 m or longer shooting distance
AF 35-70 mm f/2.8 35 mm or longer focal length; and at 35 mm, at 0.8 m or longer shooting distance
AF Micro 70-180 mm f/4.5-5.6 ED 70 mm or longer focal length; and at 70 mm, at 0.7 m or longer shooting distance
Limitations
28 mm to 200 mm non-CPU Nikkor lenses (AI-S, AI, AI-modified Nikkor) and Series-E lenses except 200 mm f/2lens can be used with the built-in Flash. However following lenses have limitations in usable focal length or shootingdistance:i AI-S/AI 25-50 mm f/4 (40 mm or longer focal length; and at 40 mm, at 0.8 m or longer shooting distance)i AI-S 28-85 mm f/3.5-4.5 (35 mm or longer focal length)i AI 35-70 mm f/3.5 (35 mm or longer focal length; and at 35 mm, at 1m or longer shooting distance)i AI 28-45 mm f/4.5 (28 mm or longer focal length; and at 28 mm, at 1m or longer shooting distance)i AI-modified 50-300 mm f/4.5 (200 mm or longer focal length)i AI-S/AI 50-300 mm f/4.5 (135 mm or longer focal length)i AI-S 80-200 mm f/2.8 (105 mm or longer focal length)i AI-modified 80-250 mm f/4 (135 mm or longer focal length)
h Set the compensation amount back to “0.0”.
! Switching the camera off does not cancel Flash Exposure Compensation.
h Even when the optional flash with the AF-Assist Illuminator is attached, AF-Assist Illuminatordoes not emit light unless the conditions for AF-Assist Illumination are met.hWith SK-6 and SB-24 are attached, AF-Assist Illuminators of the camera body and the flash
do not emit light.hWhen the exposure mode is “P” Multi-Programmed Auto, the widest aperture that can be
automatically set by the camera is governed by the ISO setting used, as shown in the tablebelow.
The Nikon flash models listed in the table below can be used with this camera. In the table, 1indicates D- or G-type Nikkor lenses (except IX-Nikkor), 2 indicates CPU Nikkor lens otherthan D- or G-type (except AF Nikkor for F3AF) and 3 indicates non-CPU Nikkor lenses.
Notes on using Nikon flash units
h Refer to the instructions supplied with the flash unit for details.If your flash unit supports TTL mode and comes with instructions that include a table ofcamera types, refer to the section for group I cameras.
h The synchronized shutter speed when a flash is used is a slow speed of 1/125 sec. or slower.h In TTL mode, the ISO sensitivity linked settings are ISO 100-400.hWith the SB-26, 25 or 24, flash sync mode set on the Speedlight overrides the setting on the
camera body.h If you set the camera’s synchro mode to “Red-eye Reduction” or “Red-eye Reduction Slow
Synchro” and then use a Nikon external flash unit that has its own red-eye reduction function,the red-eye reduction lamp on the external flash unit fires.
1 metering system other than Spot.2 Standard TTL is performed with Spot Metering. Also, selecting Manual exposure mode automatically changes the
TTL Auto Flash mode to Standard TTL with flash other than SB-28/28DX, 27, 26, 25 and 24 that are equipped withTTL Auto Flash.
3 When Spot metering is selected, Monitor Pre-Flash will not be fired.4 Wireless Slave Flash can be performed with the SB-26. Shutter speed is automatically controlled to slower than
1/90 sec. when the Wireless Slave Flash selector is set to D.5 With the SB-29 and SB-21B, autofocus can only be used when an AF Micro-Nikkor (60 mm, 105 mm, 200 mm and
70-180 mm) is attached.6 Select exposure mode other than Manual or metering system other than Spot.7 If TTL mode is used with the SB-11 or SB-14, the SC-23 TTL flash control cord is required for the connection, To
use “A” or “M” mode, connect the SB-11 or SB-14 with the SC-13 and SU-2. The SC-11 or SC-15 can also beused to connect the SB-11 or SB-14, but in that case the Ready light in the camera’s viewfinder display cannot beused and the shutter speed is not selected automatically.
SB-28, SB-28DX(Cordless)
Flash
1
Lens
Flash mode
2
3
SB-27 (Cordless)
1
2
3
SB-264 (Cordless)
1
2
3
SB-25 (Cordless)
1
2
3
SB-24 (Cordless)
SB-23, SB-295
SB-21B5
(Cordless)
12
3
12
3
SB-22s, SB-22, SB-20, SB-16B, SB-15 (Cordless)
12
3
SB-117, SB-1412
3
u u u u u u u u
u1 u u u u u u u
u u u u u u
u u u u u u u
u1 u u u u u u
u u u u u
u u u u u u u
u1 u u u u u u
u u u
u
u
u u u
u u u u u u u
u1 u u u u u u
u u u
u
u
u u u
u1 u u u u u u
u u u u u u
u6 u u u u
u u u u
u6 u u u u u
u u u u u
u6 u u u u u
u u u u u
TTL3D Multi- Sensor
Balanced Fill-Flash1
Multi- SensorBalanced Fill-
Flash
StandardTTL
flash2
Non-TTLAuto Manual Repeating
Flash
Rear-CurtainSync
Red-EyeReduction
MonitorPre-
Falsh3
A M
ISO setting
Widest aperture (built-in flash) 2.8 3.3 4
Widest aperture (optional flash) 4 4.8 5.6
100
3.3
4.8
160 200 400
If an aperture that is wider than the controlled aperture is still too dark, the aperture is determined by widest apertureon the mounted lens.
Accessory shoe (with cover)
Synchronizing terminal (with cap)
hWhen flash exposure compensation is set, “I” appears in the viewfinder without thecompensation value.h “¡” in the top display panel and “P” in the viewfinder blink and the shutter cannot be
released when the exposure mode is set to “P” and attached flash is not set to TTL AutoFlash. Set the flash mode to TTL, or set the camera’s exposure mode to “S”, “A” or “M”.h To cancel Monitor Pre-Flash when using the SB-28/28DX, 27, 26 or 25, select Spot metering.
Flash attachments made by manufacturers other than Nikon
An optional flash, i.e. SB-28/28DX, SB-27, SB-26, SB-25, SB-24, SB-23 or SB-22s can be attached directly to the accessory shoe of the FinePix S2 Pro without a cord.This accessory shoe is equipped with a safetylock which prevents accidental drop when a flashwith a safety-lock pin (i.e. SB-28/ 28DX, SB-27, SB-26, SB-25 or SB-22s) is attached.
To use an external flash unit that requires a synchro cord, connect the synchro cord to thesynchro cord terminal (with JIS-B locking screw). However, if you mount a Nikon SB-28/28DX,SB-50DX, SB-28, SB-27, SB-26, SB-25, SB-24, SB-23, SB-22S or SB-29 on the accessoryshoe and then select Rear Synchro mode, do not connect other external flash units to thesynchronizing terminal to provide additional flash for the shot.
Use only Nikon flash models. Other units may damage the camera’s electrical circuit due toincompatible voltage requirements (not compatible with 250V or higher), electric contact alignmentor switch phase.
Always install the accessory shoe cover when you are not using an external flash unit.
70 71
USING THE FUNCTION MENU WHEN TAKING PICTURESAdvanced
Photography
3
Change the settings when you want to set the white balance to suit the natural or artificiallighting conditions when you shoot.When AUTO is selected, the correct white balance sometimes cannot be obtained under speciallight sources or for subjects where people’s faces are highlighted, etc. In such cases, select thecorrect white balance setting for the light source.
h Factory default setting: AUTO
hWhen the flash fires, white balance settings other than AUTO and CUSTOM are ignored. Toachieve a particular effect, take the shot without using the flash.
Display Name Description
AUTO The camera automatically determines the amount of light and the color information forthe shot and takes the picture with a natural white balance.
Sunny Select this setting for outdoor shots in fine weather when the light source for the shotis the sun.
Shade Select this setting for shots taken in shade or on cloudy days.
Fluorescent 1 Select this setting for shots taken under “Daylight” fluorescent lamps.
Fluorescent 2 Select this setting for shots taken under “Warm White” fluorescent lamps.
Fluorescent 3 Select this setting for shots taken under “Cool White” fluorescent lamps.
Incandescent Select this setting for shots when the light source is incandescent bulbs or lights.
Custom 1
This setting uses the white balance setting specified by the photographer in the“SET–UP” menu (P.91).
Custom 2
White balance
Press the “w” button to switch between functions.
You can use the Function menu to change the quality settings (White Balance, Quality,Resolution, Color, Tone, Sharpness) of saved images and the AF area settings.
1
The setting changes each time you press the button.
The settings can be changed by holding down the button and pressing “ ” or “ ”.
+
The functions change each time the “w” button is pressed.
Method 1
Method 2
2
3
Switch the camera on and set the camera to Photography mode. If the Auto Power Offfunction has switched the camera off, press the shutter button down halfway to switch itback on.
w WHITE BALANCE
72 73
AdvancedPhotography
3
QUALITYSets the quality of the photographed image. Select settings suited to the purposes for which thephotograph will be used.Select “Fine” for better quality and “High” to record an uncompressed image with the highestavailable image quality.The “Normal” setting provides ample image quality for most purposes.
h Factory default setting: Normal
Display Name Description
Normal Allows you to record the largest number of images.
Fine Records images in high quality bettered only by the “High” setting. This mode allowsyou to record more images than the “High” setting.
High
TIFF-RGB: Select this setting to record uncompressed images with the highestavailable image quality.
CCD-RAW (P.122): No image processing is performed on the camera. Select thissetting when you want to process the image on a PC.
RECORDED PIXELSSets the size of the photographed image.
h Factory default setting: 3024 × 2016
Display Name Description
1440 Sets the image size to 1440 × 960 pixels (approx. 1.38 megapixels).You can record the largest number of images in this mode.
2304 Sets the image size to 2304 × 1536 pixels (approx. 3.53 megapixels).
3024 Sets the image size to 3024 × 2016 pixels (approx. 6.12 megapixels).
4256 Sets the image size to 4256 × 2848 pixels (approx. 12.12 megapixels).You can record the fewest images in this mode.
AF AREAAuto Focus provides two AF modes. In Single-area AF mode, the shot is focused using theselected focus area, while in Dynamic AF mode, multiple focus areas are used to set the focus.See P.39 for more detailed information on the AF area modes.
h Factory default setting: Single-area
Display Mode Focus area Viewfinder, Top panel display Description
Single-areaAF
Useful for situations where you want to focusaccurately on a more or less stationary subject.
Dynamic AF or orUseful for shots where it is difficult to accuratelykeep the subject in a given focus area, such aswhen you are tracking a moving subject.
File sizeQualityAF area
Press the “w” button to switch between functions.
Shooting CCD-RAW images
w AF AREA/QUALITY/RECORDED PIXELS
CCD-RAW images, because they are not processed on the camera, can only be recorded at the“4256 × 2848” image size. These images must always be processed using software on a computer.
h To shoot CCD-RAW images, set up the camera as follows:1. Select the “CCD-RAW” setting as the “HIGH mode” option in SET–UP (P.89).2. Set the Quality to “High”.
! When you display a CCD-RAW image, the frame number is highlighted.! “5” is displayed as the resolution.
74 75
AdvancedPhotography
3
h If you want to view or print the image data directly, do not select “OFF”.
SHARPNESSUse this setting to soften or sharpen the outlines in an image and to adjust the quality of thephotographed image.
h Factory default setting: STANDARD
Display Name Description
STD This setting applies the optimum level of sharpness for normal shots.
HARD This setting sharpens the outlines in an image and is best for images of subjects suchas buildings or text where clarity is important.
OFF Sharpness processing is not applied in this setting. Use this setting for images that willundergo image processing for use in commercial printing.
FUNCTION LOCKThis feature allows you to lock the function menu settings so that they cannot be changed (toprevent accidental misuse).
h Factory default setting: OFF
Display Name Description
OFF Releases the function lock.
ON
Sets the function lock.The settings cannot be changed once thefunction lock is applied. To change the settings,first press the “F4” button to cancel function lock.
COLORUse the procedure below to set the density of the color used when images are shot.
h Factory default setting: STANDARD
Display Name Description
STD This setting sets the standard color density.
HIGH This setting provides a higher color density than the “STD” setting.
ORG This setting specifies a lower color density than the “STD” setting. Use this setting forimages that will undergo image processing for use in commercial printing.
B/W This setting converts the colors in the photographed image to black and white.
h If you want to view or print the image data directly, do not select “ORG”.
h If you want to view or print the image data directly, do not select “ORG”.
TONEUse the procedure below to set the contrast when images are shot.
h Factory default setting: STANDARD
Display Name Description
STD This setting sets the contrast for photographed images to the standard level.
HARD Use this setting for images that will undergo image processing for use in commercialprinting. This setting provides a higher level of contrast than the “STD” setting.
ORGThis setting specifies a lower contrast than the “STD” setting. Use this setting for images that will undergo image processing for use in commercialprinting.
Color Tone shapness Function lock
Press the “w” button to switch between functions.
w COLOR/TONE/SHARPNESS/FUNCTION LOCK
76 77
AdvancedFeatures
Playback
4
Shadows Highlights
Brightness
Num
ber ofrecorded pixels
Icon Mode
Even distribution Sloping up to the right Sloping up to the left
Switch the camera on and press the “ d ” button to select Playback mode. If the Auto Power Off function has switched the camera off, press the shutter button down halfway to switch it back on.
The functions change each time the “ w ” button is pressed.
The histogram display changes each time you press the button.
The mode switches between single-frame and multi-frame playback each time you press the button.
Erases an image.
Protects or unprotects an image.
You can use this menu to work with a displayed image (histogram display, erase, protect) andswitch between multi-frame and single-frame playback.
1
2
3
MINMIN
MASTERMASTER
MAXMAX
01 021 Unlock the 4-direction button 1 and press “d”or “c ” 2 to select the frame for which thehistogram is to be displayed.
2 The histogram display changes each time youpress the “F1” button.Histograms can be displayed for both playbackimages and preview images.
: Image histogram for brightness shown.: Image histogram for red shown.: Image histogram for green shown.: Image histogram for blue shown.
! If “x” does not appear on the rear display panel, pressthe “w” button to change the screen.
! A histogram is a graph that shows the distribution ofbrightness in an image.
3 When you have finished the procedure, lock the 4-direction button to prevent accidentalimproper use.
About the Histogram Display
4 Advanced Features Playback USING THE FUNCTION MENU w HISTOGRAM
78 79
AdvancedFeatures
Playback
4
Unlock the 4-direction button.1
Press the “F2” button to display the eraseconfirmation screen.2
back delete last frame
next frame
The following operations can be used in theerase confirmation screen:To select the frame: “d” or “c”To erase the displayed frame: “f” (“F4” button)To return to the previous frame: “g” (“F1” button) or “BACK” button
3
When you have finished the procedure, lock the4-direction button to prevent accidental improperuse.
4
Use this function to erase an image you have photographed.
! If “k” does not appear on the rear display panel, pressthe “w” button to change the screen.
! If the currently displayed frame is protected, “C” appearsinstead of “k” and the “j” icon is displayed in the top-right corner of the LCD monitor.
! “Å” displayed for a frame indicates thatthe frame is protected. Unprotect the frame beforeerasing it.
Unlock the 4-direction button.1
Press the “F3” button to display the protectionscreen.
The following operations can be used in theprotection screen:To select the frame: “d” or “c”To protect the frame: “c” (“F1” button)To unprotect the frame: “v” (“F4” button)To return to the previous frame: “BACK” button
2
Protect
last frame
back
next frame
unprotect
3
When you have finished the procedure, lock the4-direction button to prevent accidental improperuse.
4
The “Protect” setting prevents an image from being accidentally erased.Protected images cannot be erased by the “Erasing single-frame” or “Erase all” function.However, the “Format” function erases all files.
! If “j” does not appear on the rear display panel, pressthe “w” button to change the screen.
! If the currently displayed frame is protected, “j” isdisplayed instead of “X”.
To check protected frames
If the “† ” messageappears, press the “MENU/OK” button again toerase the files.
! This may take some time if there is a large number ofrecorded frames. To interrupt the procedure, press“BACK” button.
01
02
01
02
b PLAYBACK MENU
Formatting erases all images, includingprotected images (P.82).
When you have finished using the menu, lockthe 4-direction button to prevent accidental use.
85
AdvancedFeatures
Playback
4
84
1Use “a ” and “b ” to select “DATE ON” or“DATE OFF”.
2Press the “MENU/OK” button.
The selected setting is then valid for all frameswith DPOF settings.
1Use “d” or “c” to display the frame for whichyou want to specify DPOF settings.
2Use “a” or “b” to select the setting for theframe to be printed.
To specify more DPOF settings, repeat steps 1and 2.Do not press the “MENU/OK” button until youhave finished specifying all the DPOF settingsfor your images.
! DPOF settings cannot be specified for CCD-RAW filesbecause they cannot be printed without first beingprocessed.
! “TOTAL” shows the total number of frames for whichprints have been ordered.
3 DPOFDPOF
DATE OFFDATE OFFDATE ONDATE ON
0201
SETSETFRAMEFRAME
CANCELCANCEL
TOTAL/TOTAL/000000
SETSETRESETRESET
123-9999123-9999DPOFDPOF
OKOK BACKBACK
02014
When you have finished specifying the DPOFsettings, always press the “MENU/OK” button toconfirm the settings.If you press the “BACK” button, no DPOFsettings are specified.
! You can only specify one print per frame in the DPOFsettings. Note also that you can specify prints for up to999 frames on the same SmartMedia.
Pressing the “MENU/OK” button confirms all thesettings. Note that you cannot change thesettings later.
5
Additional DPOF settings cannot be specified If you select a frame for which DPOF settings havealready been specified, the “¨ ”message appears.Pressing the “MENU/OK” button erases all theDPOF settings already specified. You must thenspecify the DPOF settings again.
! Press the “BACK” button to leave the previous settingsunchanged.
! During playback, check that the “F” icon is displayedfor the previous settings.
RESET DPOF OK?RESET DPOF OK?
OKOK BACKBACK
123-9999123-9999
b PLAYBACK MENU
HOW TO SPECIFY PRINT OPTIONS (DPOF)DPOF stands for Digital Print Order Format and refers to a format that is used forrecording printing specifications for images shot using a digital camera on mediasuch as SmartMedia. The recorded specifications include information on whichframes are to be printed.This section gives a detailed description of how to order your prints with the FinePixS2 Pro.On the FinePix S2 Pro, you can specify only one print per image in the DPOFsettings. Note that some printers do not support date and time imprinting or specification of
the number of prints. Note that the warnings shown below may be displayed while you are specifying
the prints.
¥† (P.116)When you erase the image, the DPOF setting for that image is deleted at thesame time.
¨ (P.117)If you load a media that contains frames specified for printing on anothercamera, those print specifications are all reset and replaced by the new printspecifications.
ˆ (P.117)Up to 999 frames can be specified on the same media.
Use “g” to select “FDPOF”.
1Press the “d” button to select Playbackmode.
2Unlock the 4-direction button.3Press the “MENU/OK” button to display the
menu screen.
1
2
01 02
03
DPOFDPOF
DATE OFFDATE OFFDATE ONDATE ON
When you have finished using the menu, lockthe 4-direction button to prevent accidental use.
87
AdvancedFeatures
Playback
4
The remaining time and an elapsed time progressbar are shown on the LCD monitor during audiorecording.
! To end recording mid-way, press the “MENU/OK” button.
! Voice memos cannot be added to protected frames.Unprotect the frame before adding a voice memo.
RECORDING・・・RECORDING・・・
RECRECRESTARTRESTART
20s20s
VOICE MEMOVOICE MEMO
OKOKBACKBACK
Elapsed timeprogress bar
Remainingtime
5
After 30 seconds of recording, “∑” appearson the LCD monitor.
To finish: Press the “MENU/OK” button.To re-record your comment: Press the “BACK”
button.
FINISHFINISH
RESTARTRESTART
VOICE MEMOVOICE MEMO
RECRECOKOKBACKBACK
6
When the Image Already Has a Voice Memo If you select an image that already has a voicememo, a screen appears in which you can selectwhether or not to rerecord the memo.Press “a” or “b” to return to the previous screenor proceed with the recording and then press the“MENU/OK” button.To check a recorded voice memo, use theFinePixViewer application on a computer to playback the voice memo.
VOICE MEMOVOICE MEMO
BACKBACKRE/RECRE/REC
SELECTSELECT OKOKOKOK
Microphone
“®” appears on the LCD monitor.Press the “MENU/OK” button to begin recording.
REC STANDBYREC STANDBY
30s30s
CANCELCANCEL
VOICE MEMOVOICE MEMO
STARTSTARTOKOKBACKBACK
4
! The recording time may be shorter, depending on theamount of space available on the media.
Face the microphone on the back of the cameraas you record the voice memo. For best results,position the microphone about 20 cm away fromyour mouth during recording.
86
2
H VOICE MEMO (AUDIO RECORDING)
Use “d” and “c” to select the image to whichyou want to add a voice memo.
This function allows you to add a voice memo (comment) up to 30 seconds long to an image.
1Press the “MENU/OK” button to display themenu screen.
2Use “g” to select “H VOICE MEMO”.3Press the “MENU/OK” button.
ONON
VOICE MEMOVOICE MEMO
02013 03
1 01 02 1Press the “d” button to select Playbackmode.
2Unlock the 4-direction button.
You can also add a voice memo immediately after taking the shot. See P.93 for details.Recorded voice memos cannot be played back on the camera. To play back a voice memo, use acomputer with the bundled FinePixViewer application installed.
b PLAYBACK MENU
When you have finished using the menu, lockthe 4-direction button to prevent accidental use.
89
Settings
5
88
FRAME No. RENEW/CONT. See P.94 for details.RENEW
PC MODE1394 DOWNLOADING/USB DOWNLOADING/
1394 SHOOTINGSee P.100-103 for details.
1394DOWN
LOADING
BEEP ≤ LOW/HIGH/OFF Use this setting to set the volume of the beep emitted whenthe camera controls are used.LOW
LANGUAGE
ENGLISH/FRANCAIS/DEUTSCH/JAPANESE
Use this setting to specify the language used for LCD monitordisplay.ENGLISH
DATE/TIME [ SET See P.24 for details.—
RESET ALL [ OKUse this setting to reset all the settings in the SET-UP menuother than DATE/TIME and CUSTOM WB.—
SET–UP Menu OptionsSetting Display Details
IMAGE DISPLAY OFF/POSTVIEW/PREVIEW/xPREVIEW
Use this setting to specify whether previews of photographedimages are displayed for checking. See P.90 for details.
Default
OFF
CUSTOM WB [ SETUse this setting to specify an the correct white balance settingfor a light source. See P.91 for details.—
HIGH MODE TIFF-RGB/CCD-RAW
When “HIGH” is specified as the Quality setting, use thissetting to specify the file format used.TIFF-RGB
MEDIA SMARTMEDIA/CF Type II
Use this sett ing to specify the media used when aSmartMedia and a Microdrive are loaded in the camera.
SMARTMEDIA
TEST-SHOOTING(NO CARD) ON/OFF Set this option to ON to allow the shutter to be released when
0201 1Switch the camera on and select Photographymode.
2Press the “MENU/OK” button to display theSET–UP screen.
! Always switch the camera off when you replace thebatteries. If you open the battery cover or disconnect theAC power adapter without switching the camera off, thecamera settings may revert to the factory default settingsset at shipment.
2 1Unlock the 4-direction button.2Press “a” or “b” to select an option and “d”
or “c” to change the setting.3When you have completed the settings, press
the “MENU/OK” button.
! Press “c” for the “CUSTOM WB”, “DATE/TIME” and“RESET ALL” settings.
01 02
03
5 Settings SET–UP
LCD BRIGHTNESS
1 01 02 1Press the “d” button to select Playbackmode.
2Unlock the 4-direction button.
2 1Press the “MENU/OK” button to display themenu screen.
2Use “g” to select “G”.
0201
3 1Pressing the “MENU/OK” button displays themonitor brightness setting screen.
2Press “d ” or “c ” to adjust the monitorbrightness.
Brightness adjustment checking bar You can specify whether or not the brightness adjustment checking bar is displayed in thebrightness setting screen.
BRIGHTNESSBRIGHTNESS
OKOK BACKBACK
BRIGHTNESSBRIGHTNESS
OKOK BACKBACK
0201
b PLAYBACK MENU
LCD BRIGHTNESSLCD BRIGHTNESS
SETSET
When you have finished using the menu, lockthe 4-direction button to prevent accidental use.
When you have finished using the menu, lockthe 4-direction button to prevent accidental use.
91
Settings
5
90
SETTING THE CUSTOM WBUse this function to set the correct white balance for a light source. You can also use thisfunction to achieve a desired special effect.Press the “F1” (custom WB 1) button or the “F4” (custom WB 2) button to select the customwhite balance you want to set.
Example
1
2
2
Custom WB 1 Custom WB 2
Turn the focus mode selector switch to “M”(Manual focus) and set the focus manually.
3
4
Set the exposure mode to “P”, “S” or “A”.
! The camera’s auto focus function may be unable tofocus on a subject such as a white sheet of paper, whichwill prevent the shutter from operating.
! While a custom white balance can also be measured in“M” mode, the image may be extremely overexposed orunderexposed so that the optimum measurement is nottaken.
Hold up a page of white paper or a similar objectunder the target light source so that the paperfills the viewfinder screen. Then press theshutter button to set the custom white balance.
h Range of custom WB settingsColor temperatures from approx. 2800 K to9500 K
! The white balance setting is not applied to the image onthe screen.
You can deliberately change the white balancein photographed images by using colored paperinstead of white paper.
SET–UP
IMAGE DISPLAYThis setting allows you to specify whether the resulting image is displayed after you take a shot.
OFF : The photographed image is automatically recorded without being displayed.POSTVIEW : The photographed image is displayed for about 2 seconds and is then
automatically recorded.PREVIEW : The photographed image is displayed so that you can check the image and
choose whether to record it.xPREVIEW: A preview that includes the histogram is shown.
! Preview image display is cancelled when the Auto Power Off function operates (after 15 seconds under the defaultsetting). Record preview images before the Auto Power Off function is triggered.
Using the Preview Function
record Do not record histograms Standard chart
ZOOMZOOMPLAYPLAY
Preview zoomUnlock the 4-direction button and press “a” or“b” to zoom in or out.To view another part of the image, press the“d” button and then use the “d”, “c”, “a” and“b” buttons to move around. To return to zoommode, press the “d” button again.
Histograms
MINMIN
MASTERMASTER
MAXMAX
HistogramPressing this button displays the histogram.The display changes in a cycle from MASTER R G B each time the button is pressed.
! See P.77 for more information on histograms.
Color bar
Gray scale
Standard chartA “gray scale” is displayed in the upper part ofthe LCD monitor and a “color bar” is displayed inthe lower part. You can check the brightnessand color tones of the image by comparing theimage with the colors in the bars.
93
Settings
5
92
VOICE MEMOIf you set the Voice Memo option to “ON”, the“H” icon appears on the rear display panel.Immediately after you take the shot, you can adda voice memo (comment) up to 30 seconds longto the image.
h Recording format: WAVE (P.122)PCM recording format
h Audio file size: Approx. 240 KB (for a 30 secondsrecording)
! The recording time may be shorter, depending on theamount of space available on the media.
Set the release mode to “e” (Single-frame) andtake the picture.After you take the picture, “®” appearson the screen.
After 30 seconds of recording, “∑” appearson the screen.
To end recording: Press the “MENU/OK” button.To record the comment again: Press the “BACK”
button.
Recorded voice memos cannot beplayed back on the camera. To playback a voice memo, use a computer withthe bundled FinePixViewer applicationinstalled.
REC STANDBYREC STANDBY
30s30s
CAMCELCAMCEL
VOICE MEMOVOICE MEMO
STARTSTARTOKOKBACKBACK
1
2 Press the “MENU/OK” button to begin recording.The remaining time and an elapsed time progressbar are shown on the LCD monitor during audiorecording.
3
Recording procedure
! Voice memos cannot be recorded in the “r” (Continuousshooting) release mode.
! If you do not want to record a caption, press the “BACK”button. Note that the image is still recorded.
! The LCD monitor switches off again when recording ends.
When recording the voice memo, speak into themicrophone (P.10) on the left of the 4-directionbutton. For best results, position the microphoneabout 20 cm away from your mouth during recording.
RECORDING・・・RECORDING・・・
RECRECRESTARTRESTART
20s20s
VOICE MEMOVOICE MEMO
OKOKBACKBACK
Elapsed timeprogress bar
Remainingtime
FINISHFINISH
RESTARTRESTART
VOICE MEMOVOICE MEMO
RECRECOKOKBACKBACK
! The recording time may be shorter, depending on theamount of space available on the media.
! To end recording mid-way, press the “MENU/OK” button.
SET–UP
5
OKOK CANCELCANCEL
COMPLETEDCOMPLETED
OKOK BACKBACK
If the exposure is measured correctly, “ø”appears on the LCD monitor.Press the “MENU/OK” button to confirm thesetting.
! After you take a photograph, you should check the colortones (white balance) in the image.i Select “PREVIEW” as the photographed image display
option (P.90) in the SET–UP screen.i Press the “d” button (P.34).When you have finished setting the white balance, selectthe focus mode you want to use.
When the exposure is not measured correctlyRemedy
The subject is too bright. Use a negative (–) exposure compensation valueand set the white balance again.
The subject is too dark. Use a positive (+) exposure compensation value andset the white balance again.
Because the exposure is outside the range of valid custom white balancesettings, the maximum (or minimum) value has been set.hAvailable custom WB settings: Color temperatures of approx. 2800 K to 9500 K
95
Settings
5
94
TWO-BUTTON RESETTwo-Button Reset lets you instantly reset specified settings to their original initial settings.
1 Set the exposure mode dial to “P”, “S”, “A”, “M”or “CSM” and select the settings to be reset.
2 Hold down the “q” and “u” buttons togetherfor at least 2 seconds (green markings arepositioned alongside).The top display panel flashes briefly and thesettings are reset.
Exposure mode dial Reset Settings
“P”, “S”, “A”, “M” The photography functions are reset as shown below.
“CSM” h All the custom settings are reset.h The ISO sensitivity is reset to 200.
Function Condition
Focus area Centre
Flexible Program Cancelled
Exposure compensation Cancelled
Auto Exposure Bracketing Cancelled
Auto Exposure Lock Cancelled
Flash Sync mode Front-curtain sync
Flash exposure compensation Cancelled
3 When the reset is finished, set the exposure mode dial to a setting other than “CSM”.
SET–UP
Use this feature to manage the file numbers for frames you have shot. Setting this function to“CONT.” is useful as a way of ensuring that the file names for images recorded on a computerare not duplicated.
FRAME No. MEMORY
RENEW: Pictures are stored on each mediabeginning with a file number “0001”.
CONT. : Pictures are stored beginning from thehighest file number stored on the lastmedia used.
You can check the file number by viewing theimage. The last 4 digits of the 7-digit number inthe top right corner of the screen are the filenumbers, while the first 3 digits show thedirectory number.
! When you change the media, always switch the cameraoff before you open the media slot cover. If you open theslot cover without switching the camera off, the framenumber memory will not function.
! File numbers run from 0001 to 9999. Once 9999 isexceeded, the directory number changes from 100 to101. The maximum number is 999–9999.
! If you switch the Frame No. Memory function off, thehighest file number stored by the function is reset.
! The displayed frame number may differ for imagesphotographed on other cameras.
! The frame number is reset if the camera is left for a longperiod with the batteries removed (Settings are retainedfor roughly 6 months once the batteries have beenloaded for 2 days or more).
AA
BB
RENEW CONT.
Formatted SmartMedia used for both A and B. ! If the media already contains image files with filenumbers higher than the highest file number on the lastmedia, images are stored beginning from the highest filenumber on the current media.
Directory number
Frame number
File number
97
Settings
5
96
Custom Settings ListSettingNo. Display Details
0: METERED VALUE UNDER OVER (default)
1: UNDER METEREDVALUE OVER
BRACKETING ORDER
1
2
3
4
5
6
7
8
9
10
11
Allows you to change the compensation sequencewhen auto exposure bracketing is used.
0: OFF (default)1: ON
ON-DEMAND GRID LINESDISPLAY
If you display the framing guides, you can use theintersections of the horizontal and vertical lines toposition your main subject in the shot or align one of thehorizontal lines with the horizon. This allows you tocompose the desired shot while monitoring the subject'ssize and the balance.
0: AUTO (default)1: OFF2: ON
ILLUMINATION FORFOCUS AREA
Specifies the illumination used for the focus area in theviewfinder.
0: NORMAL (default)1: ENABLES
ROTATION
FOCUS AREA SELECTION Selecting cyclic focus area selection allows you toselect the opposite focus area without changing whichpart of the 4-direction button you have to press.
0: DISABLED (default)1: ACTIVATED
AE-LOCK This setting lets you apply AE lock by pressing theshutter button down halfway.
0: DISABLED (default)1: ACTIVATED
LONG EXP. (BULB) ATMANUAL MODE
Select “1” to take bulb flash shots in the “M” exposuremode.
0: ENABLED (default)1: DISABLED
CLOSEST-SUBJECT-PRIORITY DYNAMIC AFAT S-AF MODE
If you select “1”, Closest-subject Priority Dynamic AF isnot used in AF-S mode.
0: DISABLED (default)1: ENABLED
CLOSEST-SUBJECT-PRIORITY DYNAMIC AFAT C-AF MODE
If you select “1”, Closest-subject Priority Dynamic AF isused in AF-C mode.
0: AE/AF LOCK(default)
1: AE LOCK ONLY2: AF LOCK ONLY3: AE REMAINS
LOCKED4: AF OPERATION
AE/AF LOCK BUTTON Normally, AE lock (exposure recording) and AF lock(focus lock) are both applied concurrently when youpress the “AE-L/AF-L” button. However, this can bechanged so that only AE lock or only AF lock is applied,or so that that the AE lock status is maintained. If theAE/AF lock is used with the “Maintain AE lock” setting,pressing the “AE-L/AF-L” button again or releasing theshutter cancels the lock.In addition, though the auto focus (AF) normallyoperates when the shutter button is pressed downhalfway, you can change this so that AF operates whenthe “AE-L/AF-L” button is pressed. (In this case, AFdoes not operate when the shutter button is presseddown halfway.)
0: DISABLED (default)1: ENABLED
COMMAND DIALFUNCTIONS
Use this setting to change the main command dial andsub-command dial operation during photography.0: Main: Changes the shutter speed.
Sub: Changes the aperture.1: Main: Changes the aperture.
Sub: Changes the shutter speed.
0: SINGLE SHUTTERRELEASE (default)
1: CONTINUOUSSHUTTERRELEASE
MULTIPLE EXPOSURE Changing this setting allows you to use continuousshooting for multi-exposure shots.
CUSTOM SETTING (CSM)The custom settings allow to modify camera functions such as how information is displayed inthe viewfinder and which functions are assigned to which buttons.
1 Set the exposure mode dial to “CSM”.
2 1Turn the main-command dial to select anoption.
2Turn the sub-command dial to change thesetting.
3“R” appears on the top display panel.
3 When you have finished the settings, set the exposure mode dial to a setting other than“CSM”.! The custom settings are retained when the camera is switched off.
Cancelling custom settings1Set the exposure mode dial to “CSM”.2Hold down the “q” and “u” buttons together
for at least 2 seconds (green markings arepositioned alongside).
The top display panel flashes briefly and thesettings are reset.
h All the custom settings are reset to theirdefault values.h The ISO sensitivity is reset to 200.02
The AC Power Adapter is useful since it allows you to take pictures, play back images(connected to a TV, etc.) and connect to a computer without worrying about using up the batterycharge.
h Compatible AC power adaptersModel: AC-5VH/AC-5VHS (optional)
DC IN 5VSocket
01 02Check that the camera is switched off and thenremove the lithium batteries. Open the terminalcover and plug the AC power adapter connectorinto the “DC IN 5V” socket. Then plug the ACpower adapter into a power outlet.
! Use only the FUJIFILM products listed above.! See P.112 for notes on using the AC power adapter.! The shape of the plug and socket-outlet depends on the
country of use.! The lithium batteries are still used when the AC power
adapter is connected.! The built-in flash will not operate if the lithium batteries
are removed.
Switch off the camera and TV. Open theterminal cover and plug the bundled video cableinto the camera’s “VIDEO OUT” socket.
1VIDEO OUTsocket
! If there is a power outlet available, connect the AC-5VH/AC-5VHS AC Power Adapter.
Plug the other end of the cable into the videoinput socket on the TV. Then switch the cameraand TV on and take pictures or play backimages as you would normally.
2
! Refer to the instructions provided with your TV for moreinformation on video input for your TV.
To the videoinput socket
6 Connection
CONNECTING TO A TV/USING THE AC POWER ADAPTER (OPTIONAL)CUSTOM SETTING
SettingNo. Display Details
0: OFF (default)5: 5 SEC.
15: 15 SEC.
LCD ILLUMINATION Allows you to change the settings so that the LCDillumination lights when buttons are used.
0: ON (default)1: OFF
AF-ASSIST ILLUMINATOR Allows you to prevent the built-in auxiliary AF light fromoperating. Note that this may prevent the auto focusfrom successfully setting the focus in some cases.
0: OFF15: 15 SEC. (default)2: 2 MIN.5: 5 MIN.
AUTO POWER OFF12
13
14
15
Sets the delay time until the Auto Power Off functionoperates.Preview image display is also cancelled after thespecified time.
2: 2 SEC.5: 5 SEC.
10: 10 SEC. (default)20: 20 20 SEC.
SELF-TIMER DURATION Sets the running time for the self timer.
101
Connection
6
100
CONNECTING TO A COMPUTER VIA IEEE 1394
IEEE1394 socket
Camera
1 1Load the media containing your shots into thecamera.
2Switch the camera on.3Select “1394 DOWNLOADING” as the “PC
MODE” setting in SET–UP (P.89).4Set the power switch to “OFF” to switch the
camera off.
! Refer to the operating system compatibility charts onP.100 and check that your operating system supports theIEEE1394 interface.
! Use of the AC power adapter (sold separately) isrecommended when connecting the camera to acomputer.
! If a SmartMedia and Microdrive are both loaded into thecamera at the same time, the media selected in the“MEDIA” setting in SET–UP is used (“Setup”, P.89).
2 1Switch your PC on.2Connect the camera to the computer using
the bundled IEEE1394 cable.3Switch the camera on.
IEEE1394 socketIEEE1394 socket
PC
01 02
Always use the prescribed procedure whendisconnecting or switching off the camera(P.103).
! In Windows XP and Mac OS X, automatic startup must be set up the first time you connect.! The first time you connect, the media may take a few moments to mount.! Take care to ensure that the cable is connected the right way round and that the plugs are firmly inserted all
the way into the sockets.
Camera Operations PC Operations
h The Access lamp blinks when the cameraand computer are exchanging data.h “1394 DOWNLOADING” is displayed on
rear display panel.h The Auto Power Off function is disabled
while the camera is connected to acomputer.
! When replacing the media, always switch the cameraand computer off first using the procedure describedon P.103.
! Do not disconnect the USB cable when the camera iscommunicating with the PC. See P.103 for informationon the disconnection procedure.
h If FinePixViewer is installed, it starts upautomatically.
h A removable disk icon appears and youcan use your PC to transfer files to andfrom the camera.
Screen forWindows 98 SE
If the above operations do not occur, you donot have the required software programs ordrivers installed on your PC. Refer to theSoftware Quick Start Guide booklet andcomplete the required PC setup procedures.Then reconnect the camera to your PC.
Windows Macintosh
CONNECTING TO A COMPUTERInstall the software before connecting the camera to a computer.The available functions differ depending on the camera’s PC mode settings, as shown below.
xAllows the camera to be controlled and shots to be taken from a computer.
xImages photographed with the camera can be automatically saved on the computer.
Special USB cable
USB driver Shooting driver
IEEE 1394 cable
FinePixViewer Shooting Software
xAllows photographed images to be saved on a computer xCCD-RAW files can be played back and converted to other
formats.xVoice memos can be played back.
h Refer to the User’s Guide for the optional Hyper-Utility Software HS-S2 for more informationon the photography modes.h This description covers the downloading modes.
Connecting to a ComputerTo connect the camera to a computer via a USB port, the computer must be equipped with aUSB port as a standard feature. (Operation is not guaranteed for USB ports added later.) Toconnect via an IEEE1394 port, check that the interface is OHCI compliant and then refer to thetable below to check whether it is supported by your operating system.
Operating System Compatibility Chart (Windows) u: Can be connected : Cannot be connected
OS
Connection typeWindows 98
Windows 98 SE(Second Edition)
u2
Windows Me(Millennium Edition)
u
Windows 2000
u
Windows XP
uIEEE1394
u u u u uUSB1
1 Can be used by installing the driver from the bundled CD-ROM.2 Select Windows Update from the Start button menu and update the 1394 device driver (Your system must be
capable of connecting to the Internet).
Operating System Compatibility Chart (Macintosh) u: Can be connected : Cannot be connected
1 Can be used by installing the driver from the bundled CD-ROM.2 Cannot be used even when installed as a standard feature, but can be used by downloading and installing the free
update to Mac OS 9.1. Contact Apple Computers (http://www.apple.com) for information on software updates.
DISCONNECTING FROM THE PC (Important — always use this procedure.)
Off
1Quit all applications (FinePixViewer, etc.) thatare using the camera.
2Check that the Access lamp is off (that thecamera and computer are no longerexchanging data).
Perform the steps shown below before you switch the camera off. This procedure differsdepending on the operating system software (or PC) you are using.
! In some cases, the camera and computer may still be communicating even after the “Copying” messagedisappears from the computer screen. Always check that the Access lamp is off.
For a USB connection, no action is needed on the computer.If you are connecting via an IEEE1394 interface, use the disconnection procedure describedbelow.1Left-click the Eject icon in the taskbar and eject “USB Disk”.2The “Eject” menu option is displayed. Click this menu option.3The “Eject hardware” dialog box appears. Click the [OK] button or the close button.
Windows 98/98 SE
1
2
Windows Me/2000 Professional/XP1Right-click the removable disk icon in the
“My Computer” window and select Eject.
3The “Eject” menu option is displayed.Click this menu option.
4The “Eject hardware” dialog box appears.Click the [OK] button or the close button.
2Left-click the Eject icon in the taskbarand eject “USB Disk”.
Drag the “Removable drive” icon on the desktop to the Trash.
Macintosh
! When you drag the icon to the Trash, “REMOVEOK” appears on the camera’s screen.
Switch the camera off and disconnect the IEEE1394 or USB cable.
3
This step is only required inWindows Me. Windows Me screen
CONNECTING TO A COMPUTER VIA USB
USB socket
Camera
1Load a media containing photographedimages into the camera.
2Switch the camera on.3Select “USB DOWNLOADING” as the “PC
MODE” setting in SET–UP (P.89).4Set the power switch to “OFF” to switch the
camera off.
! Before connecting, you must install software on thebundled CD-ROM on your computer.
! Use of the AC power adapter (sold separately) isrecommended when connecting the camera to acomputer.
! If a SmartMedia and Microdrive are both loaded into thecamera at the same time, the media selected in the“MEDIA” setting in SET–UP is used (“Setup”, P.89).
2 1Switch your PC on.2Connect the special USB cable to the camera
and the computer.3Switch the camera on.
! In Windows XP and Mac OS X, automatic startup must be set up the first time you connect.! Take care to ensure that the cable is connected the right way round and that the plugs are firmly inserted all
the way into the sockets.
Camera Operations
hWhen the camera and the computer areexchanging data, the Access lamp blinksorange.h “USB DOWNLOADING” is displayed on the
rear display panel.h The Auto Power Off function is disabled
while the camera is connected to acomputer.
! When replacing the SmartMedia, always disconnectthe camera and computer first using the proceduredescribed on P.103.
! Do not disconnect the USB cable duringcommunication. See P.103 for the disconnectioninstructions.
USBsocket PC
01 02
PC Operationsh If FinePixViewer is installed, it starts up
automatically.h A removable disk icon appears and you
can use your PC to transfer files to andfrom the camera.
Always use the prescribed procedure whendisconnecting or switching off the camera(P.103).
If you are using a Windows PC, the driver settings are automatically specified when installationends. Simply wait a few moments. If your computer does not recognize the camera, refer to the Software Quick Start Guide.
If the above operations do not occur, you donot have the required software programs ordrivers installed on your PC. Refer to theSoftware Quick Start Guide booklet andcomplete the required PC setup procedures.Then reconnect the camera to your PC.
Windows Macintosh
104 105
Accessories Guide
e The optional accessories (sold separately) can make taking pictures with the FinePix S2 Pro even easier.For information on how to attach and use the accessories, refer to the instructions provided with theaccessory used.Visit the FUJIFILM web site for the latest information on camera accessories. http://home.fujifilm.com/products/digital/index.html
h SmartMedia™These are SmartMedia cards sold separately. Use the 9 types listed below.h MG-4S : 4MB, 3.3V h MG-8S : 8MB, 3.3V h MG-16S : 16MB, 3.3Vh MG-32S : 32MB, 3.3V h MG-64S : 64MB, 3.3V Some 3.3V SmartMedia are labelled as “3V” cards.h MG-16SW : 16MB, 3.3V, ID h MG-32SW : 32MB, 3.3V, IDh MG-64SW : 64MB, 3.3V, ID h MG-128SW : 128MB, 3.3V, ID SmartMedia with ID are labelled as “ID” cards.
h AC-5VH/AC-5VHS AC Power AdapterUse the AC-5VH/AC-5VHS when you want to take pictures or play back imagesfor long periods or when the FinePix S2 Pro is connected to a personal computer. The shape of the AC power adapter, the plug and socket outlet depend on the
country.
h PC-AD3 PC Card AdapterThe PC Card Adapter allows the SmartMedia to be used as a PC Card StandardATA-compliant (PCMCIA 2.1) PC card (Type II).h Compatible with SmartMedia of 5V/3.3V, 2MB to 128MB.
h SM-R2 Image Memory Card ReaderThe SM-R2 allows images to very easily be read and written from an imagememory card (SmartMedia) to a personal computer. Its USB interface provideshigh-speed data transmission.h Compatible with Windows 98/98 SE, Windows Me, Windows 2000 Professional
or iMac or Power Macintosh and models that support USB as standard.
PC CARDADAPTER
h DM-R1 Image Memory Card ReaderThis device provides a simple way to transfer image data in either directionbetween your PC and an image memory card (SmartMedia or CompactFlashType II (Microdrive-compatible)).The IEEE 1394 interface provides high-speed data transfer.h Compatible with Windows 98 SE, Windows 2000 Professional (read-only), iMac DV
and Power Macintosh PCs with FireWire as a standard feature. Mac OS 8.5.1 to 9.1
h Fujifilm Rechargeable Battery 2HR-3UFThe 2HR-3UF includes high-capacity AA-size Nickel-Metal Hydride batteries.
h Fujifilm Battery Charger with Battery BK-NH (Not Available inU.S.A. / Canada)The BK-NH includes the quick battery charger BCH-NH and 2 AA Ni-MH batteries.The BCH-NH can charge 4 AA Ni-MH batteries in approx. 180 minutes.Up to 4 Ni-MH or Ni-Cd batteries can be charged simultaneously.
System Expansion Options
FinePix S2 ProDigital Camera
Video output
SmartMedia
Personal Computer (commercially available)
(Floppy disk drive)
Image Memory Card Reader
Digital Photo Printer
TV monitor (commercially available)
(PC card slot)PC Card Adapter
Floppy Disk Adapter(FlashPath)
(USB)
(USB)
(IEEE1394)
(USB)
Image Memory Card Reader(IEEE1394)
Microdrive(commercially available)
Card adapter(PC card slot)
PC CARDADAPTER
eBy using the FinePix S2 Pro together with other optional FUJIFILM products, your system canbe expanded to fill a wide range of uses.
107
Notes on Using Your Camera CorrectlyAccessories Guide
eBe sure to read this information in conjunction with “Safety Notes” (P.123), to ensure thatyou use your camera correctly.
Places to AvoidDo not store or use the camera in the following types of locations:h In the rain or in very humid, dirty or dusty places.h In direct sunlight or in places subject to extreme temperature rises, such as in a closed car in summer.h Extremely cold places.h Places subject to strong vibration.h Places affected by smoke or steam.h Places subject to strong magnetic fields (such as near motors, transformers or magnets).h In contact with chemicals such as pesticides or next to rubber or vinyl products for long periods of time.
Notes on Immersion in Water or SandThe FinePix S2 Pro is particularly adversely affected by water and sand. When you are at the beach or close towater, ensure that the camera is not exposed to water or sand. Take care also not to place the camera on a wetsurface. Water or sand inside the camera can cause faults that may be irreparable.
Notes on CondensationIf the camera is carried suddenly from a cold location into a warm place, water droplets (condensation) may formon the inside of the camera or on the lens. When this occurs, switch the camera off and wait an hour beforeusing the camera. Condensation may also form on the media. In this event, remove the media and wait a shorttime before using it again.
When the Camera is Unused for Long PeriodsIf you do not intend to use the camera for a long period of time, remove the battery and the media card beforestoring the camera.
Cleaning Your Camerah Use a blower brush to brush away any dust on the lens, LCD monitor surface, viewfinder or external AF
sensor and then gently wipe the camera with a soft, dry cloth. If any soiling remains, apply a small amountof lens cleaning liquid to a piece of FUJIFILM lens cleaning paper and wipe gently.h Do not scratch hard objects against the lens, LCD monitor screen or viewfinder as these surfaces are easily
damaged.h Clean the body of the camera with a soft, dry cloth. Do not use volatile substances such as thinners,
benzine or insecticide, as these may react with camera body and cause deformation or remove the coating.h This camera is equipped with a CCD photosensitive element. This CCD is located behind the shutter
screen. If dust or other soiling attaches to the surface of the CCD and pictures are then taken, this soilingmay appear as spots in the image, depending on the camera settings and the type of subject. If this occurs,the CCD must be cleaned. Because the surface of the CCD is extremely fragile, wherever possible thecamera should be returned to an authorized FUJIFILM dealer for cleaning (for a charge).Any repairs carried out by an authorized FUJIFILM service facility to CCDs that were scratched or damagedduring cleaning by the customer will be charged to the customer. Note that such repairs will probablyinvolve replacing the CCD and will be expensive.
Take the following precautions to ensure that no dirt or dust gets onto the CCD:iBefore a FUJIFILM digital camera is shipped from the factory, it is carefully checked for dust insidethe camera and on the surface of the CCD to ensure that it conforms to FUJIFILM standards.iBear in mind also that some types of soiling on the CCD surface cannot be removed even by anauthorized FUJIFILM service facility.Should this occur, you can use features such as the despeckling function provided in the imageprocessing software to remedy the problem.
Using the Camera OverseasWhen travelling overseas, do not place your camera in the check-in baggage. Baggage handling at airportsmay subject baggage to violent shocks, and the camera may be damaged internally even when no externaldamage is visible.
106
h Hyper-Utility Software HS-S2 (IEEE1394 Interface)h This software allows you to convert CCD-RAW files shot on the FinePix S2 Pro to 16-bit TIFF files by
specifying the conversion settings (tone curve, white balance, sharpness and color) and the output imagesize.h This software also makes it possible for you to connect the camera to a computer via an IEEE1394 interface
and download the images shot on the camera directly to the computer without first storing them on a media.You can also use this software to control the camera and take pictures from your computer.h This software allows images shot on the Digital Camera FinePix S2 Pro to be used on a computer.
System Requirements
Windows® Mac OS
IBM PC/AT compatible PCCompatiblemachine
Macintosh with an IEEE1394 interface as astandard feature
Equipped with an IEEE1394 (OHCI-compliant)PCI board or IEEE1394 (OHCI-compliant)CardBus card
Pentium III, 4 or Celeron or higherCPU PowerPC G3, G4, iBook (Dual USB)
RAM of 256 MB or more (512 MB recommended)RAM RAM of 256 MB or more (512 MB recommended)
Minimum 1 GB available spaceHard disk Minimum 1 GB available space
1024 × 768 pixels or higher, High Color (16-bit)or higher
DisplayMonitor
1024 × 768 pixels or higher, approx. 32,000color or higher
Drive capable of reading CD-ROM disksDisk drives Drive capable of reading CD-ROM disks
109108
6 Hold down the release mode switch unlockbutton and set the release mode switch to “e”(single-frame).
7 Hold down both the Synchro mode button andthe LCD illumination button and switch thecamera on.
8 When you press the shutter button, the mirrorflips up and the shutter opens and stays open.
! When you release the shutter button, the mirror stays up.
5 Set the exposure mode dial to “M”.
Cleaning the CCD
This camera is equipped with a CCD photosensitive element. This CCD is located behind theshutter screen.If dust or other soiling attaches to the surface of the CCD and pictures are then taken, this soiling mayappear as spots in the image, depending on the camera settings and the type of subject. If this occurs,the CCD must be cleaned. Because the surface of the CCD is extremely fragile, wherever possible thecamera should be returned to an authorized FUJIFILM dealer for cleaning (for a charge).Any repairs carried out by an authorized FUJIFILM service facility to CCDs that were scratchedor damaged during cleaning by the customer will be charged to the customer. Note that suchrepairs will probably involve replacing the CCD and will be expensive.
2 Open the terminal cover and fully insert theconnector plug from the AC power adapter (soldseparately) into the “DC IN 5V” socket. Thenplug the AC power adapter into the power outlet.
! When cleaning the camera, always use the AC poweradapter (sold separately) to prevent camera damage duethe mirror dropping down or the shutter closing.
! See P.112 for more information on using the AC poweradapter.
422
ftft m
2828
70
5050
35352828
858510
510
5
2222
ftft m
2828
70
5050
35352828
858510
510
5
2222
ftft m
2828
70
5050
35352828
858510
510
5
22
ft m
28
70
50
3528
8510
5 1
2Hold down the lens release button and turn thelens in the direction of the arrow.
Check that the camera is switched off and thenremove the lithium batteries.1
1
2
! Do not apply excessive force to the battery cover.
DC IN 5VSocket
3 Press the built-in flash down to stow it away.
Dust inside the camera and on the surface of the CCD i Before a FUJIFILM digital camera is shipped from the factory, it is carefully checked for dust
inside the camera and on the surface of the CCD to ensure that it conforms to FUJIFILMstandards.i Bear in mind also that some types of soiling on the CCD surface cannot be removed even by an
authorized FUJIFILM service facility.Should this occur, you can use features such as the despeckling function provided in the imageprocessing software to remedy the problem.
Checking the Condition of the CCD Surface
Continued over page...
111110
9 Hold the camera so that the sun shines on the CCD and check the surface for dust.
Surface clean Surface soiled
Contact a FUJIFILMservice center andrequest CCD cleaning.
Clean the CCD yourself.
Switch the camera off and attach a lensor body cap to the camera.
! When you switch the camera off, the mirrordrops down and the shutter closes at the sametime. Ensure that your fingers are not caughtinside the camera.
Cleaning the CCD
! When you switch the camera off, the mirror drops downand the shutter closes at the same time. Take care toensure that your fingers are not caught inside thecamera.
! Do not use the swab when it is dry or not moistened withcleaning fluid.
Starting CCD Cleaning
Take great care to avoid scratching or damaging the CCD during cleaning, as you will be responsiblefor the possibly high cost of repairs (or replacement) by an authorized FUJIFILM service facility.
1 Use a blower (without a brush attached) toremove any soiling on the CCD surface.
! Use a blower that does not have a brush attached. Usinga blower brush to clean soiling from the CCD can scratchthe CCD surface.
2 Check whether the dust has been removed from the CCD surface.
The blower has removed the dust (Thereare no oily marks or fingerprints).
There are oily marks or fingerprints left on theCCD that cannot be removed with the blower.
Proceed to step 3.
Switch the camera off and mount thelens or body cap on the camera.
! When you switch the camera off, the mirrordrops down and the shutter closes at the sametime. Ensure that your fingers are not caughtinside the camera.
Ensure that you have the cleaning equipment ready i Cleaning swabs
Sensor Swab (Photographic Solutions, Inc.) For information on suppliers outside Japan, visit the web site listed below
Ethanol (95% solution or better), EE Cleaner (Olympus)
3 Moisten the bottom 5 mm of the Sensor swabevenly with cleaning fluid.
4 Slowly and gently wipe one side of the swab justonce across the full width of the CCD from left toright.
6 Switch the camera off and mount the lens orbody cap on the camera.
5 Then wipe the other side of the Sensor swab across the full width of the CCD from left toright once more. Do not reuse Sensor swabs.
If this does not remove the soiling, repeat steps 3 to 5 with a new Sensor swab or contact anauthorized FUJIFILM service facility.
113112
Notes on the Media (SmartMedia™ and Microdrives) SmartMediaThe SmartMedia card is a new image recording mediumdeveloped especially for use in digital cameras. EachSmartMedia card contains a built-in semiconductor memorychip (NAND flash memory) which is used for storing imagedata files in digital form.Because the data is stored electronically, the stored imagedata can be erased from the card and new data recorded.
SmartMedia with IDA SmartMedia with ID is a SmartMedia that has anindividually assigned identification number. SmartMedia IDcards can be used with devices that use ID numbers forcopyright protection or other purposes. This camera acceptsSmartMedia ID cards in the same way as conventionalSmartMedia cards.
MicrodrivesMicrodrives are compact, lightweight hard disk drives thatconform to the CF+ Type II standard. Due to their amplecapacity for large image data files and their low per-megabyte recording cost, Microdrives provide a moreeconomical way to save high-resolution image files.
Storing DataIn the situations listed below, recorded data may be erased(destroyed). Please note that FUJIFILM accepts noresponsibility whatsoever for the loss (destruction) ofrecorded data. When the media is used incorrectly by the owner or a third
party When the media is exposed to static electricity or electrical
noise When the media is removed or the camera is switched off
during data recording or erasing (media formatting) When the media is bent, dropped or otherwise subjected
to a strong force or impact
Important data should be backed up onto another medium.(MO disk, floppy disk, hard disk, etc.)
General Notes on Handling Media (all types)hWhen inserting the media into the camera, hold the media
straight as you push it in.h Never remove the media or switch the camera off during
data recording or erasing (media formatting) as this couldresult in damage to the media.h Data storage media are precision electronic devices. Do
not bend, drop or otherwise subject the media to strongforce or shocks.h Do not use or store these media in environments likely to
be affected by strong static electricity or electrical noise.h Do not use or store media in locations subject to high
temperatures and humidity or in environments where theyare exposed to corrosive substances.
Notes on Handling SmartMediah Use only the SmartMedia specified for use with the
camera. The use of other SmartMedia could damage thecamera.h Take care not to touch the SmartMedia’s contact area (the
gold-colored area) or allow the area to become soiled. Usea soft, dry cloth to wipe off any soiling that does occur.h To avoid damage caused by static electricity, always use
the special static-free case provided when carrying orstoring the media. Alternatively, keep the SmartMedia in astorage case if available.h Inserting a SmartMedia that is charged with static
electricity into your camera may result in a cameramalfunction. If this occurs, switch the camera off and thenon again.h Do not carry SmartMedia in locations such as a trouser
pocket. This could subject the SmartMedia to excessiveforce when you sit down, thereby damaging the
SmartMedia.h The SmartMedia may feel warm when it is removed from
the camera after extended periods of use. This is normaland does not indicate a fault.h SmartMedia have a limited life and it may become
impossible to record or erase data on a SmartMedia thathas been used for a long time. When this happens,purchase a new SmartMedia.h Affix the index labels supplied with the SmartMedia onto
the designated area of the card. Do not use third-partylabels as this can lead to problems when the card isinserted or removed.hWhen you attach the index label to a SmartMedia, take
care that it does not cover any part of the write-protectarea.
Notes on using Microdriveh Do not write on the Microdrive label.h Do not peel off the Microdrive label.h Do not stick additional labels onto a Microdrive.hWhen carrying or storing a Microdrive, keep it in the
protective case provided.h Do not use Microdrive in CF+ Type II slots that do not
have an eject function.h Take care when handling Microdrive that have been used
for long periods as they may become hot.h Do not place Microdrive close to strong magnetic fields.h Keep Microdrive dry.h Do not apply strong pressure to the Microdrive cover.
Notes on using media with a computerh If you intend to take photos using a media that has been
used on a personal computer, first format the media onyour camera.hWhen you format a media in the camera and then
photograph and record images, a folder is automaticallycreated on the media. Image data is then recorded in thisfolder.h Do not change or delete the folder names or file names on
the media from your computer as this wil l make itimpossible to use the media in your camera.h Always use the camera to erase image data on a media.h To edit image data, copy the image data to the computer's
hard disk and then edit the copied data.
SmartMedia SpecificationsType Image memory card for digital cameras
(SmartMedia)Operating voltage 3.3VConditions for use Temperature:
0°C to +40°C (+32°F to +104°F)Humidity: 80% or less (no condensation)
Dimensions 37 mm × 45 mm × 0.76 mm(1.45 in. × 1.77 in. × 0.03 in.) (W × H × D)
Notes on the Power Supply
h Use AA-size alkaline or nickel-metal hydride (Ni-MH)batteries, and 3-volt lithium batteries with this camera. AA-size manganese or lithium batteries cannot be used.
h The operating lives of alkaline batteries vary betweenbrands and the life of batteries you purchase may beshorter than the alkaline batteries provided with thecamera.
Applicable Batteries
Incorrect use of the batteries could cause them to leak, becomehot, ignite or burst. Always observe the precautions given below.h Do not heat the batteries or throw them into a fire.h Do not carry or store the batteries with metal objects such
as necklaces or hairpins that could come into contact withthe metal positive Ω and negative ≈ poles of the battery.h Do not expose the batteries to fresh or sea water, and take
particular care to keep the terminals dry.h Do not attempt to deform, disassemble or modify the batteries.h Do not attempt to peel off or cut the battery casing.h Do not drop, strike or otherwise subject the batteries to
strong impacts.h Do not use the batteries that are leaking, deformed,
discolored or exhibit any other obvious abnormality.h Do not store the batteries in very warm or moist locations.h Keep the batteries out of reach of infant and young children.hWhen loading the batteries into the camera, ensure that the
battery polarity (Ω and ≈ ) is as indicated on the camera.h Do not use new batteries together with used batteries. In
the case of rechargeable batteries, do not use chargedand discharged batteries together. Do not use batteries ofdifferent types or brands together.h If you do not intend to use the camera for a long period of
time, remove the batteries from the camera (Note that ifthe camera is left with the batteries removed, the time anddate settings are cleared).h The batteries may feel warm immediately after being used.
Before removing the batteries, switch the camera off andwait until the batteries cool down.hWhen replacing the batteries, always fit 4 new batteries.
Here, ‘new batteries’ refers to either recently purchasedunused alkaline batteries, or Ni-MH (nickel metal hydride)batteries that have recently been fully recharged together.h In cold locations (at temperatures of +10°C/+50°F or below),
battery performance deteriorates and the time for which theycan be used shortens markedly. This is particularly true ofalkaline batteries. In cold conditions, put the batteries in yourpocket or a similar place to warm them before loading them intothe camera. If you use a body warmer to warm the batteries,ensure that they are not in direct contact with the warmer.h Soil (such as fingerprints) on the battery terminals can markedly
reduce the number of available shots. Carefully wipe the batteryterminals clean with a soft dry cloth before loading the batteries.
If any liquid at all leaks from the batteries, wipe the batterycompartment thoroughly and then load new batteries.If any battery fluid comes into contact with your hands orclothing, flush the area thoroughly with water. Note thatbattery fluid can cause loss of eyesight if it gets into youreyes. If this occurs, do not rub your eyes. Flush the fluid outwith clean water and contact your physician for treatment.
Disposing of BatteriesWhen disposing of batteries, do so in accordance with yourlocal waste disposal regulations.
Notes on Small Rechargeable Batteries (Ni-MHbatteries)
h Always use the special battery charger to charge AA-sizeNi-MH batteries. Charge the batteries as described in theinstructions provided with the battery charger.h Do not use the battery charger to charge batteries other
than those specified for use with the charger.h Note that the batteries may feel warm immediately after
being charged.h Ni-MH batteries are not charged at shipment. Be sure to
charge the batteries before using them.h The camera mechanism is such that it draws a minute amount
of current even when the camera is switched off. Takeparticular care not to leave Ni-MH batteries in the camera for along period of time as they can become excessivelydischarged and may no longer be usable even when charged.h Ni-MH batteries self-discharge even when not used. Always
charge Ni-MH batteries before using them. If the time forwhich a battery provides power shortens markedly when ithas been correctly charged, this indicates that the battery hasreached the end of its effective life and should be replaced.h Soiling (fingerprints, etc) on the terminals of Ni-MH
batteries can greatly reduce the number of available shots.When this occurs, clean the terminals carefully with a softdry cloth. Then use up the remaining charge in thebatteries and recharge them.h Newly purchased batteries or batteries that have been left
unused for an extended period may not be fully charged.(This is indicated by the immediate display of the batterylow warning or a low number of available shots.) This is anormal characteristic of the batteries and does not indicatea fault. Repeatedly charging and using the batteries 3 or 4times will restore them to a normal condition.h If you repeatedly charge a Ni-MH batteries before it is fully
discharged, it will suffer from the “memory effect”,causing the battery low warning to appear while there isstill ample charge remaining in the battery. To restore thebatteries to their normal condition, use up all the charge inthe batteries before recharging them.
Memory effect: A phenomenon affecting the batterycharacteristics such that the apparentbattery capacity decreases.
Notes on the Batteries
Notes on Using the AC Power AdapterAlways use the AC-5VH/AC-5VHS AC Power Adapter withthe camera.The use of an AC Power adapter other than AC-5VH/AC-5VHScould result in damage to your digital camera.h This AC power adapter is designed exclusively for indoor
use.h Plug the connection cord plug securely into the DC input
terminal of the FUJIFILM Digital camera.h Turn off the power switch of the FUJIFILM Digital camera
before disconnecting the connection cord from theFUJIFILM Digital camera ’s DC input terminal. Todisconnect, take hold of the plug and pull it out (do notdisconnect it by pulling on the cord).
h Do not use this AC power adapter with any device exceptthe specified device.h During use, this AC power adapter will become hot to
touch, but this is normal.h Do not disassemble the AC power adapter. Doing so could
be dangerous.h Do not use this device in a place with high temperature
and high humidity.h Do not drop or subject this device to strong shocks.h This device may emit a humming noise, but this is normal.h If used near a radio, this device may cause static, so play
the radio in a distant place.
115114
—
i Switch the camera off and replace the lithiumbatteries. Then switch the camera back onand try again.If this does not resolve the problem, set thefocusing mode to “M”, release the shutter andbriefly switch the camera off.
i The lithium batteries are low oncharge or the camera mechanismhas stopped due to cold andcannot take pictures.(blinking)
Warning Displayed
Top display panel View finderExplanation Remedy
i Switch the camera off, close the slot cover,switch the camera back on and try again.i Switch the camera off and replace the AA-
size batteries or load new AA-size batteries.Then switch the camera back on and tryagain.
—
i Release shutter again. If the warningindication remains, or this warning appearsfrequently, contact you FUJIFILM dealer.
i Malfunction detected.
(blinking) (blinking)
i The slot cover was opened duringcard operation.i The AA-size batteries are low on
charge or flat.i No AA-size batteries are loaded.
(lit)
(lit)
(blinking)
(blinking)
Warning Displays eThe table below lists the warning messages displayed on thetop display panel or in the viewfinder.
Warning Displayed
Top display panel View finderExplanation Remedy
i CPU Nikkor lens other than G-typeis not set to its minimum aperture.i Attached flash is not set at TTL
Auto Flash in “P” mode.
i Set lens to minimum aperture.
i Set the external flash mode to TTL, or set thecamera’s exposure mode to “S”, “A” or “M”.
(blinking) (blinking)
i Lithium Batteries are low on charge. i Have new ones ready.—
i Lithium Batteries have no remainingcharge.
i Turn the power off and replace l ithiumbatteries with new ones.
i Attach CPU lens (except IX-Nikkor). With anon-CPU lens, set the exposure mode to “M”and set the aperture with lens’ aperture ring.
—
i Non-CPU lens is attached or lens isnot attached.
(blinking) (blinking)
i Focus manually.i Autofocus is not possible.—(blinking)
i In “P” mode, use ND filtre (If the warningindication remains after performing aboveremedies in “S” or “A” mode, use ND filtre aswell).i In “S” mode, select faster shutter speed.i In “A” mode, select smaller aperture (larger f-
number).
i Overexposure warning (subject istoo bright).
(lit) (lit)
i In “P” mode, use flash (If the warningindication remains after performing aboveremedies in “S” or “A” mode, use flash aswell).i In “S” mode, select slower shutter speed.i In “A” mode, select larger aperture (smaller f-
number).
i Underexposure warning (subject istoo dark.).
(lit) (lit)
iWhen the subject is too bright, use ND filtreand when the subject is too dark, use flashtoo the electronic analog exposure displayremains blinking when the flash is used.
i Subject brightness is beyondcamera’s exposure range.
—
Electronicanalog
exposuredisplay
(blinking)
i Release the shutter as it is to take a flashpicture (Shutter speed automatically shifts to1/125 sec.).
i Shutter speed faster than syncspeed is selected in “S” or “M”mode.
Shutter speed indication(blinking) (lit)
i Cancel the “™” or select “M” mode.i Shutter speed is set to “™” in“S” mode.(blinking)
i Shoot again after confirming focus distance,aperture or flash shooting distance range.
i Flash has fired at full output andunderexposure may have occurred.
—(blinking)
In certain cases, due to static electricity or poorly loaded batteries, the FinePix S2 Promicrocomputer may turn the camera off, even with fresh, properly installed batteries. For the samereason, the operation of camera may not advance properly during either “USB mode” or “IEEE1394mode”. In each of these cases, to resume operation, simply turn the power off, then turn it onagain. Or, remove and reinstall the batteries.
117116
(lit)
The AA-size batteries are flat. Replace the AA-size batteries.(blinking)
Warning Displayed
LCD monitorExplanation Remedy
The built-in flash was popped upeven though the battery adapter isused.
The built-in flash cannot be used if thelithium batteries are not installed.
The AA-size batteries are low oncharge.
Have replacement AA-size batteriesready.
1000 or more prints were specified inthe DPOF frame settings.
See P.92 for details.
The maximum number of frames for whichprinting can be specified on the sameSmartMedia is 999. Set no more than 999frames.
DPOF FILE ERROR
i DPOF settings are already specified.i The DPOF file contains an error or
was specified on another device.
To create a new DPOF file and reset allthe DPOF settings, press the “MENU/OK”button.
RESET DPOF OK?
Warning Displays
Warning Displayed
LCD monitorExplanation Remedy
No media is inserted. i Load a SmartMedia (3.3V) in the correctdirection.i Load a Microdrive in the correct
direction.
i The media is not formatted(initialized).i The SmartMedia contact area
(gold-colored area) is soiled.
i The camera is faulty.
i Format the media.
iWipe the SmartMedia contact area witha soft, dry cloth. It may also benecessary to format the SmartMedia. Ifan error message still appears, replacethe SmartMedia.i Contact your FUJIFILM dealer.
i The SmartMedia is not loadedcorrectly.
i The SmartMedia contact area(gold-colored area) is soiled.
i The media is damaged.i The media format is incorrect.i The camera is faulty.
i Push the SmartMedia all the way intothe slot and check that it is locked intoplace.iWipe the SmartMedia contact area with
a soft, dry cloth. It may also benecessary to format the SmartMedia. Ifan error message still appears, replacethe SmartMedia.i Contact your FUJIFILM dealer.
The media is full and no further datacan be recorded.
Erase some images or use a media thathas some available space.
The SmartMedia is write-protected. Use a SmartMedia that is not write-protected.
i You attempted to play back file thatwas not recorded correctly.i The SmartMedia contact area
(gold-colored area) is soiled.
i The camera is faulty.
i That data cannot be played back.
iWipe the SmartMedia contact area witha soft, dry cloth. It may also benecessary to format the SmartMedia. Ifan error message still appears, replacethe SmartMedia.i Contact your FUJIFILM dealer.
Frame number 999-9999 has beenreached.
Use a formatted SmartMedia to takepictures.FILE NO.FULL
i Data cannot be recorded due to amedia fault or a problem with theconnection between the media andthe camera.i The image you just shot is too large
to fit in the space available on themedia.
i Reload the media or switch the cameraoff and then on again. If this does notremedy the problem, contact yourFUJIFILM dealer.i Use a new media.
You attempted to erase a protectedframe.
Protected frames cannot be erased.Remove the protection using the cameraon which the protection was applied.
PROTECTED FRAME
You attempted to erase an image forwhich DPOF settings have beenspecified.
Erasing the image deletes the setting fromthe DPOF specifications at the same time.
DPOF SPECIFIED.ERASE OK?
DPOF SPECIFIED.ERASE ALL OK?
Warning Displayed
Rear display panelExplanation Remedy
eThe table below lists the warning messages displayed on thetop display panel or in the viewfinder.
eThe table below lists the warnings that are displayed on the rear display panel.
119118
The playback image isblurred.
i The lens is dirty.i The camera is not focused.
i Clean the lens.i Focus the camera correctly (P.30).
I cannot format theSmartMedia or Microdrive.
i The SmartMedia or Microdrive is write-protected.i The media is damaged.
i Remove the write-protection (Peel off thewrite-protect sticker).i Use a new media.
I cannot erase all theframes.
i The frame is protected. i Remove the frame protection.
Nothing happens when Iuse the camera switchesand dials.
i Camera malfunction.
i The batteries are flat.
i Remove the power supply (the batteries)and then reload them and try again.i Fit new batteries.
No image appears onthe color LCD monitorwhen I press the “d”button.
i There is no media loaded.
i There is no photography data recordedon the media.
i Insert a media that contains somephotography data.
There is no image on theTV screen.
i The camera and TV are not connectedcorrectly.i “TV” is selected as the TV input.
i Connect the camera and TV correctly.
i Set the TV input to “VIDEO”.
Troubleshooting Possible causes Solutions
The camera won’t switchon.
i The batteries are exhausted.i The batteries are loaded the wrong way
round.i The AC power adapter is not connected
correctly.
i Load new or fully charged batteries.i Reload the batteries correctly
i Reconnect the adapter correctly and plugthe adapter plug into the mains power outlet.
Batteries run out quickly. i You are using the camera in extremelycold conditions.
i The battery terminals are soiled.
i The battery terminals were soiled whenthe batteries were charged.i The batteries were charged after having
not been used for a long period.
i The rechargeable batteries have reachedthe end of their operating lives.
i Put the batteries in your pocket or anotherwarm place to heat them and then loadthem into the camera just before you takea picture. Note that alkaline batteriescannot be used at very low temperatures.i Remove the batteries from the camera and
wipe the battery terminals with a clean, drycloth before reloading the batteries.iWipe the battery terminals with a clean,
dry cloth before charging.i Due to their nature, the batteries may not
be fully charged. Charge and use thebatteries several times to restore them tonormal operation.i Load new fully charged batteries.
No photograph is takenwhen the shutter buttonis pressed.
i The focus is not set in AF-S mode (“”focus indicator not lit).
i No media is loaded.i The media is full and no further data can
be recorded.i The SmartMedia is write-protected.i The media is not formatted.i The SmartMedia contact surface (the
gold-colored area) is soiled.
i The media is damaged.i The Auto Power Off function has
switched the camera off.i The batteries are flat.i The camera will not focus.
i You are trying to take pictures using thebuilt-in flash when there are no lithiumbatteries loaded in the camera.i An error occurred.
i Use AF lock to set the focus and checkthat the “” focus indicator is lit beforetaking the shot.i Load a media.i Load a new media or erase some frames.
i Remove the write-protection.i Format the media.i Clean the SmartMedia contact surface
(the gold-colored area) with a clean drycloth.i Load a new media.i Switch the camera on.
i Fit new batteries.i Set the focusing mode to manual (M),
focus on the subject manually and takethe picture.i Close the built-in flash and then take the
picture.
i Refer to the warning displays on P.114-117 and take the appropriate action.
I can’t use the flash totake pictures.
i The flash is set to Suppressed Flashmode. (The flash is closed.)i You pressed the shutter button while the
flash was charging.i You are trying to take pictures using the
built-in flash when there are no lithiumbatteries loaded in the camera.
i The flash pops up.
iWait until charging is completed beforepressing the shutter button.i Use lithium batteries.
Power cuts out duringoperation.
i The batteries are exhausted. i Load new or fully charged batteries.
Troubleshooting eIf you think the camera is faulty, check the following once more
Troubleshooting Possible causes Solutions
The playback image istoo dark even though Iused the flash.
i The subject is too far away.i Something is obstructing the flash.
i Move closer to the subject.i Remove the lens hood.
121120
Specifications
Type of camera Interchangeable-lens SLR-type digital cameraNo. of effective pixels 6.17 million
CCD sensor Large-format (23.0 × 15.5 mm) Super CCD with primary color filters (total pixels: 6.49million)
No. of recorded pixels 4256 × 2848, 3024 × 2016, 2304 × 1536 or 1440 × 960, with a maximum of 12.12megapixels using signal processing
Sensitivity Equivalent to ISO 100, 160, 200, 400, 800 or 1600 1
Recording media Slot 1: SmartMedia (3.3 V)Slot 2: Microdrive (CF+ type II) Some of Compact Flash may not work properly
LCD monitor 1.8-inch 110,000-pixels low-temperature polysilicon TFT color LCD panel (approx. 100%coverage for playback)
Lens mount Nikon F mount (with AF coupling and AF contacts)Interchangeable lenses See P.18.Focal length Approx. 1.5× the nominal focal length of the lens (35mm camera equivalent)
Viewfinder Eye-level type with pentaprism and built-in diopter adjustment (coverage: approx. 93%vertical and approx. 95% horizontal)
Focus Auto focus, TTL phase detection with auxiliary AF lampLens servo “S” (single AF servo), “C” (continuous AF servo), “M” (manual)Focus areas 1 focus area selected from 5 focus areasAF area mode Single-area AF, Dynamic AF (with a closest-subject priority dynamic AF function)
AF lock AE/AF lock button. Can also be operated by pressing the shutter button halfway in singleAF servo mode.
Metering modesTTL open meteringSelectable from 3 metering modes (restrictions apply on some lenses)i 3D 10-zone Matrix, Center-weighted, Spot
Exposure modes P: Multi-programmed Auto (Flexible Program also available), S: Shutter-priority Auto, A: Aperture-priority Auto, M: Manual
Release modes Single-frame, Continuous shooting (up to 7 frames), Self timer (2, 5, 10 or 20 sec.),Multi-exposure
Exposure compensation ±3 EV (in 1/2 EV step increments)Auto bracketing No. of shots: Up to 3; Exposure offset: ±2 EV in 1/2 EV step incrementsAE lock BV memory type using AF/AE lock buttonShutter Electronically controlled descending-type focal-plane shutterShutter speeds 30 to 1/4000 sec, Bulb 3
Image quality settings Color, Tone (gradations), Sharpness
Built-in flash
Manual pop-up type. Guide No. 12 (ISO 100, m)Synchronizing shutter speeds: 1/125 sec. and slowerSynchro modes: Front Synchro, Slow Synchro, Rear synchro, Red-eye Reduction and
Red-eye Reduction Slow Synchro
Accessory shoe Hot shoe (with synchro contacts, ready signal contacts, TTL flash control stop signalcontacts, monitor signal contacts and GND) with built-in safety lock feature
Synchro contacts X contacts only, synchronizing speed: 1/125 sec. or slowerSynchro terminal Equipped with ISO519 synchro terminal as standard, lock screw providedRemote release Release socket on shutter buttonInformation display Viewfinder display, Top display panel, Rear display panel
Battery checks
i Battery checking performed for lithium and AA batteries. However, only the AAbatteries are checked when no lithium batteries are installed.i Check levels: 3 levels (full, flat and low). If either the lithium or AA batteries have
insufficient charge, a warning is displayed for 3 seconds and then the Auto Power Offfunction is triggered.
Auto Power Off Off, 15 sec., 2 min. or 5 min. (disabled when the camera is connected to a PC)Preview Preview zoom, histogram display, standard chart displayPlayback Single-frame, playback zoom, histogram display, protect frame, multi-frame playback
System Erase Erase frame, Erase all frames, Format (initialize)Other Print ordering (DPOF), Voice memo, Frame No. memory, Custom settings
Standard Number of Available Shots per MediaThe number of available shots varies slightly depending on the type of subject. Also, the discrepancy between theactual number of available shots and the standard number grows as the capacity of the media increases.
VIDEO OUT For connecting a mini pin jack (3.5 mm dia.) cable for video output to a TV
IEEE1394 socket For connecting a 4-pin IEEE1394 cable for data exchange with a computer and picturetaking from a computer
USB socket For connecting the special USB cable for data exchange with a computerDC input socket For connecting the special AC Power Adapter AC-5VH/AC-5VHS to supply power to the camera
Input/Output Sockets
Power sourceCR123A lithium batteries (2)AA-size batteries (4) (alkaline or nickel-metal hydride)Special AC Power Adapter AC-5VH/AC-5VHS
Operating conditionsTemperature: 0°C to +40°C. (+32°F to +104°F) (Note that the range for Microdrive is
+5°C to +40°C (+41°F to +104°F).)Humidity: 80% or less (no condensation)
Dimensions (W × H × D) 141.5 × 131 × 79.5 mm (5.6 × 5.2 × 3.1 in.) (excluding lens and attachments)Mass (Weight) 760 g (26.8 oz.) (body only, not including accessories, batteries or recording media)
Power Source, etc.
Accessories See P.5Optional accessories See P.105-106
1: Images shot in high-sensitivity photography (ISO 400 or higher) may appear coarse and may also be affected by noise suchas white dots.
2: CCD-RAW is a format specific to the FinePix S2 Pro. The enclosed “FinePix Viewer” software or the optional Hyper-Utilitysoftware “Shooting Software” is required to interpret the images.
3: Images shot with long exposures (1 second or longer) may appear coarse and may also be affected by noise such as white dots.4: The figures shown for the number of available shots are a guide to the number of consecutive shots that can be taken at
normal temperatures with the flash used in 50% of the shots. Note that the actual number of available shots may differ dueto variations in the ambient temperature when the camera is used and the amount of battery charge. The number ofavailable shots is lower at low temperatures.
These specifications and performance data are subject to change without notice. FUJIFILM accepts no liability whatsoeverfor errors or omissions in this manual.
The color LCD monitor on your digital camera is manufactured using advanced high-precision technology. Even so, up to0.01% of the pixels may fail to light or may remain permanently lit. This phenomenon will not appear on the recorded image.
The operation error may be caused in a digital camera by the strong radio interference (i. e. electric fields, static electricity,line noise, etc.).
For CCD-RAW files, “5” is displayed as the resolution.
Battery typeMedia typeSmartMedia
Microdrive
Approx. 600 frames
Approx. 420 frames
Approx. 650 frames
Approx. 450 framesApprox. 1000 frames
Alkaline batteries Ni-MH batteries HR-3UF 1700 mAh CR123A lithium batteries
Available shots using batteries (When fully charged) 4
123122
Safety Notes
h To ensure that you use your FinePix S2 Pro cameracorrectly, read these Safety Notes and your Owner’sManual carefully beforehand.hAfter reading these Safety Notes, store them in a
safe place.
About the IconsThe icons shown below are used in this document toindicate the severity of the injury or damage that canresult if the information indicated by the icon is ignoredand the product is used incorrectly as a result.
WARNINGThis icon indicates that deathor serious injury can result ifthe information is ignored.
CAUTIONThis icon indicates thatpersonal injury or materialdamage can result if theinformation is ignored.
The icons shown below are used to indicate the natureof the information which is to be observed.
Triangular icons notify the user ofinformation requiring attention (“Important”).
Circular icons with a diagonal bar notify theuser that the action indicated is prohibited(“Prohibited”).
Filled circles with an exclamation mark notifythe user of an action that must be performed(“Required”).
When a fault arises, switch thecamera off and then remove thebatteries and disconnect the ACpower adapter.Continued use of the camera when it isemitting smoke, is emitting any unusualodor, or is in any other abnormal statecan cause a fire or electric shock.hContact your FUJIFILM dealer.
Do not allow water or foreign objectsto enter the camera.If water or foreign objects get inside thecamera, switch the camera off, removethe battery and disconnect and unplugthe AC power adapter.Continued use of the camera cancause a fire or electric shock.h Contact your FUJIFILM dealer.
Do not place the camera on anunstable surface.This can cause the camera to fall or tipover and cause injury.
Do not use the camera in thebathroom or shower.This can cause a fire or electric shock.
Never attempt to modify ordisassemble the camera. (Neveropen the casing.)Do not use the camera when it hasbeen dropped or the casing is damaged.
This can cause a fire or electric shock. Contact your FUJIFILM dealer.
Never attempt to take pictures whilein motion.Do not use the camera while you arewalking or operating a moving car orother vehicle.
This can result in you falling down orbeing involved in a traffic accident.
Do not heat, modify or attempt todisassemble the batteries.Do not drop or subject the batteriesto impacts.Do not attempt to recharge lithiumor alkaline batteries.Do not store the batteries withmetallic products.Any of these actions can cause thebatteries to burst or leak and cause fireor injury as a result.
Do not touch any metal parts of thecamera during a thunderstorm.This can cause an electric shock due toinduced current from the lightningdischarge.
WARNING
Unplug from power socket.
Do not use in thebathroom or shower.
Do notdisassemble.
Explanation of Terms
Auto Power Off Function:If the camera is not used in any way for a set period, the Auto Power Off function switches thecamera off to prevent battery depletion and to avoid wasting power when the camera isconnected to the AC power adapter. Preview image display is also cancelled when this functionoperates.h The Auto Power Off function does not operate, when a USB connection is being used, or
when the Auto Power Off function is switched off during setup.
CCD-RAWThis is the image data prior to signal processing (the reconstruction of the data read in from theCCD as an image). Because the signal processing is performed on the computer, high levels ofcontrol are possible. To reconstruct images, FinePixViewer (on the enclosed CD-ROM) or the Hyper Utility
(optional) must be installed on your computer.
Color Temperature:Low-temperature light sources, such as a candle flame, are strongly red, while high-temperaturelight sources, such as a gas burner flame, are strongly blue. The color of the light for thesetemperatures is expressed as a color temperature (K = Kelvin). The light of the sun at midday ina completely clear sky is taken to be 5500K.
EV:A number that denotes Exposure Value. The EV is determined by the brightness of the subjectand sensitivity (speed) of the film or CCD. The number is larger for bright subjects and smallerfor dark subjects. As the brightness of the subject changes, a digital camera maintains theamount of light hitting the CCD at a constant level by adjusting the aperture and shutter speed.When the amount of light striking the CCD doubles, the EV increases by 1. Likewise, when thelight is halved, the EV decreases by 1.
JPEG:Joint Photographics Experts GroupA file format used for compressing and saving color images. The compression ratio can beselected, but the higher the compression ratio, the poorer the quality of the expanded image.
TIFF-RGB:A format for saving image data in which a tag indicating the file format is attached to each itemof data. Files stored in this format can be opened on a personal computer.
WAVE:A standard format used on Windows systems for saving audio data. WAVE files have the“.WAV” file extension and the data can be saved in either compressed or uncompressed format.This camera use PCM recording.WAVE files can be played back on a personal computer using the following software:Windows: MediaPlayerMacintosh: QuickTime Player
QuickTime 3.0 or later
White Balance:Whatever the kind of the light, the human eye adapts to it so that a white object still looks white.On the other hand, devices such as digital cameras see a white subject as white by firstadjusting the color balance to suit the color of the ambient light around the subject. Thisadjustment is called matching the white balance. A function that automatically matches thewhite balance is called an Automatic White Balance function.
Exif Print Format is a newly revised digital camera file format that contains a variety of shootinginformation for optimal printing.
124
Keep out of the reach of smallchildren.This product could cause injury in thehands of a child.
Do not use this camera in locationsseverely affected by oil fumes,steam, humidity or dust.This can cause a fire or electric shock.
Do not leave this camera in placessubject to extremely hightemperatures.Do not leave the camera in locationssuch as a sealed vehicle or in directsunlight.This can cause a fire.
Do not place heavy objects on thecamera.This can cause the heavy object to tipover or fall and cause injury.
Do not move the camera while theAC power adapter is still connected.This can damage the power cord orcables and cause a fire or electricshock.
Do not cover or wrap the camera orthe AC power adapter in a cloth orquilt.This can cause heat to build up anddistort the casing or cause a fire.
Remove the batteries anddisconnect the AC power adapterwhen you are cleaning the camera orif you intend to leave the cameraunused for a long period.Failure to do so can cause a fire orelectric shock.
Using a flash too close to a person’seyes may temporarily affect theeyesight.Take particular care whenphotographing infants and youngchildren.
Request regular internal testing andcleaning for your camera.Build-up of dust in your camera cancause a fire or electric shock.hContact your FUJIFILM dealer to
request internal cleaning every 2years.
CAUTIONDo not use the batteries except asspecified.Load the batteries with correct polarityas indicated by the Ω and ≈marks.
Use only the batteries or AC poweradapter specified for use with thiscamera.The use of other power sources cancause a fire.
If the battery leaks and fluid getsinto your eyes or comes into contactwith your skin or clothing, this cancause injury or loss of eyesight.Immediately flush the affected areathoroughly with clean water andseek medical treatment.
When discarding or storingbatteries, cover the battery terminalswith insulation tape.h Contact with other metallic objects or
batteries could cause the batteries toignite or burst.
WARNING
Printed in Japan FGS-204104-FG
Printed on recycled paper.26-30, Nishiazabu 2-chome, Minato-ku, Tokyo 106-8620, Japan