The Flightcell DZM ............................................................................................................................................ 6
Getting Started ................................................................................................................................................. 7
Turning the Flightcell On and Off ......................................................................................................................... 7 What’s on the Display ......................................................................................................................................... 7
The Flightcell DZM Keypad ............................................................................................................................... 8
Main Screen Functions ................................................................................................................................... 10
Entering the Menu System ................................................................................................................................ 10 Turning the Flightcell DZM Off ........................................................................................................................... 10 Sending Current GPS Position ............................................................................................................................ 10 Activating / Terminating Flight Tracking ............................................................................................................. 11 Isolating the Phones ......................................................................................................................................... 11 Auxiliary Mute .................................................................................................................................................. 12
Making and answering calls ........................................................................................................................... 13
The Menu System ........................................................................................................................................... 19
Navigating the Menu System ............................................................................................................................. 19 The Menu Structure ......................................................................................................................................... 20 How to Configure the Important Settings ........................................................................................................... 21
Extended Menus .......................................................................................................................................... 21 Menu Structure when Extended Menus are hidden .......................................................................................... 22 Factory Reset .............................................................................................................................................. 22 Firmware Version and Serial Number ............................................................................................................. 22
Main Menu ...................................................................................................................................................... 24 Custom Info Menu ........................................................................................................................................... 24 Custom Info Menu ........................................................................................................................................... 25 Power Off ........................................................................................................................................................ 26 Auxiliary Volume .............................................................................................................................................. 26 Sat Phone Power ............................................................................................................................................. 27 GPS Menu ....................................................................................................................................................... 27
Audio Menu ..................................................................................................................................................... 33 Audio Paths within the DZM .......................................................................................................................... 34
Flightcell DZM Operating Manual with Flight Tracking and Custom Info Options - Issue 9 4
Sat Phone Volume........................................................................................................................................ 34 Sat Phone MIC Gain ..................................................................................................................................... 35 Cell Phone Volume ....................................................................................................................................... 35 Cell Phone MIC Gain..................................................................................................................................... 35 ICS Transmit Level ....................................................................................................................................... 36 ICS Receive Level ........................................................................................................................................ 36 ICS Sidetone ............................................................................................................................................... 36
Setup Menu ..................................................................................................................................................... 37 Extended Menus .......................................................................................................................................... 38 Auto Power On ............................................................................................................................................ 38 Sat Phone Type ........................................................................................................................................... 39 Sat SMS Destination ..................................................................................................................................... 39 Cell Phone Type ........................................................................................................................................... 40 Cell SMS Destination .................................................................................................................................... 40 Preferred SMS Device ................................................................................................................................... 41 Backlight Mode ............................................................................................................................................ 41 Backlight Brightness ..................................................................................................................................... 42 LCD Contrast ............................................................................................................................................... 42 Keypad Tones .............................................................................................................................................. 43 GPS/SMS Confirm Tones ............................................................................................................................... 43 Factory Reset .............................................................................................................................................. 43 Firmware Version and Serial Number ............................................................................................................. 44 GPS Diagnostics ........................................................................................................................................... 44
Receiving SMS Messages .................................................................................................................................. 46 Processing Data ............................................................................................................................................... 46 Transmitted Information ................................................................................................................................... 46
AT Commands ................................................................................................................................................. 47
User Notes ...................................................................................................................................................... 48
Flightcell DZM Operating Manual with Flight Tracking and Custom Info Options - Issue 9 5
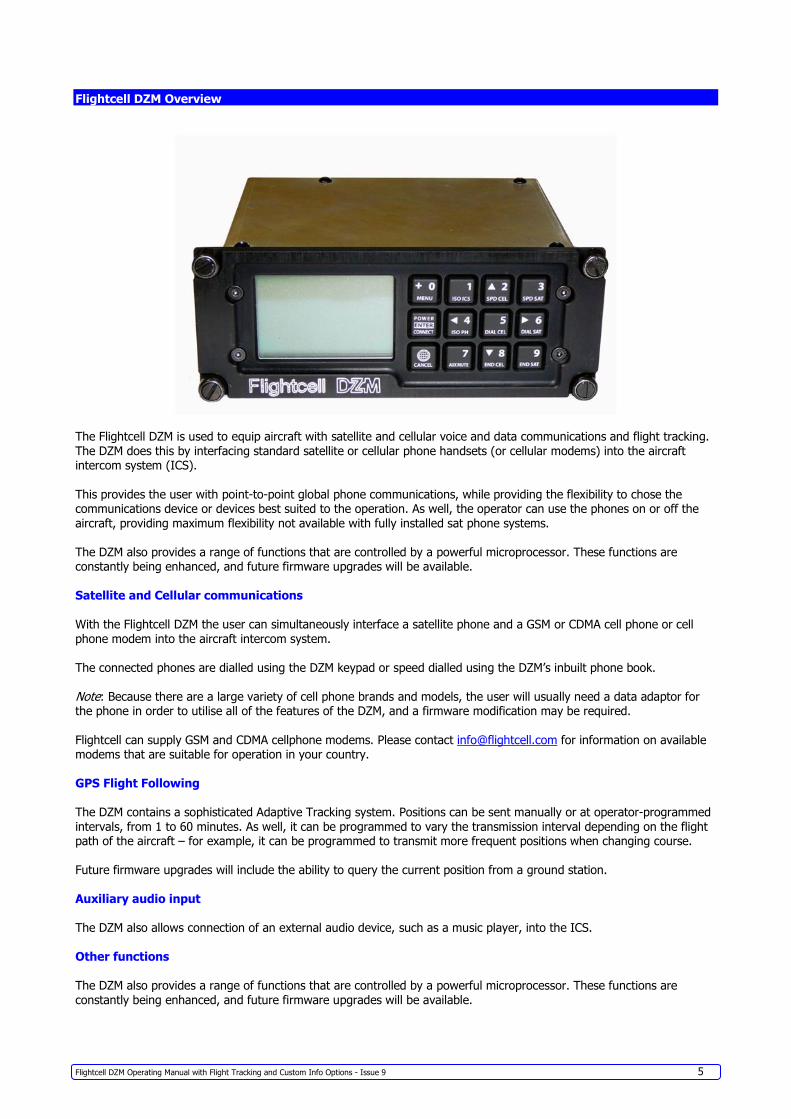
Flightcell DZM Overview
The Flightcell DZM is used to equip aircraft with satellite and cellular voice and data communications and flight tracking.
The DZM does this by interfacing standard satellite or cellular phone handsets (or cellular modems) into the aircraft intercom system (ICS).
This provides the user with point-to-point global phone communications, while providing the flexibility to chose the communications device or devices best suited to the operation. As well, the operator can use the phones on or off the
aircraft, providing maximum flexibility not available with fully installed sat phone systems.
The DZM also provides a range of functions that are controlled by a powerful microprocessor. These functions are constantly being enhanced, and future firmware upgrades will be available.
Satellite and Cellular communications
With the Flightcell DZM the user can simultaneously interface a satellite phone and a GSM or CDMA cell phone or cell
phone modem into the aircraft intercom system.
The connected phones are dialled using the DZM keypad or speed dialled using the DZM’s inbuilt phone book.
Note: Because there are a large variety of cell phone brands and models, the user will usually need a data adaptor for the phone in order to utilise all of the features of the DZM, and a firmware modification may be required.
Flightcell can supply GSM and CDMA cellphone modems. Please contact [email protected] for information on available modems that are suitable for operation in your country.
GPS Flight Following
The DZM contains a sophisticated Adaptive Tracking system. Positions can be sent manually or at operator-programmed
intervals, from 1 to 60 minutes. As well, it can be programmed to vary the transmission interval depending on the flight path of the aircraft – for example, it can be programmed to transmit more frequent positions when changing course.
Future firmware upgrades will include the ability to query the current position from a ground station.
Auxiliary audio input
The DZM also allows connection of an external audio device, such as a music player, into the ICS.
Other functions
The DZM also provides a range of functions that are controlled by a powerful microprocessor. These functions are
constantly being enhanced, and future firmware upgrades will be available.
Flightcell DZM Operating Manual with Flight Tracking and Custom Info Options - Issue 9 6
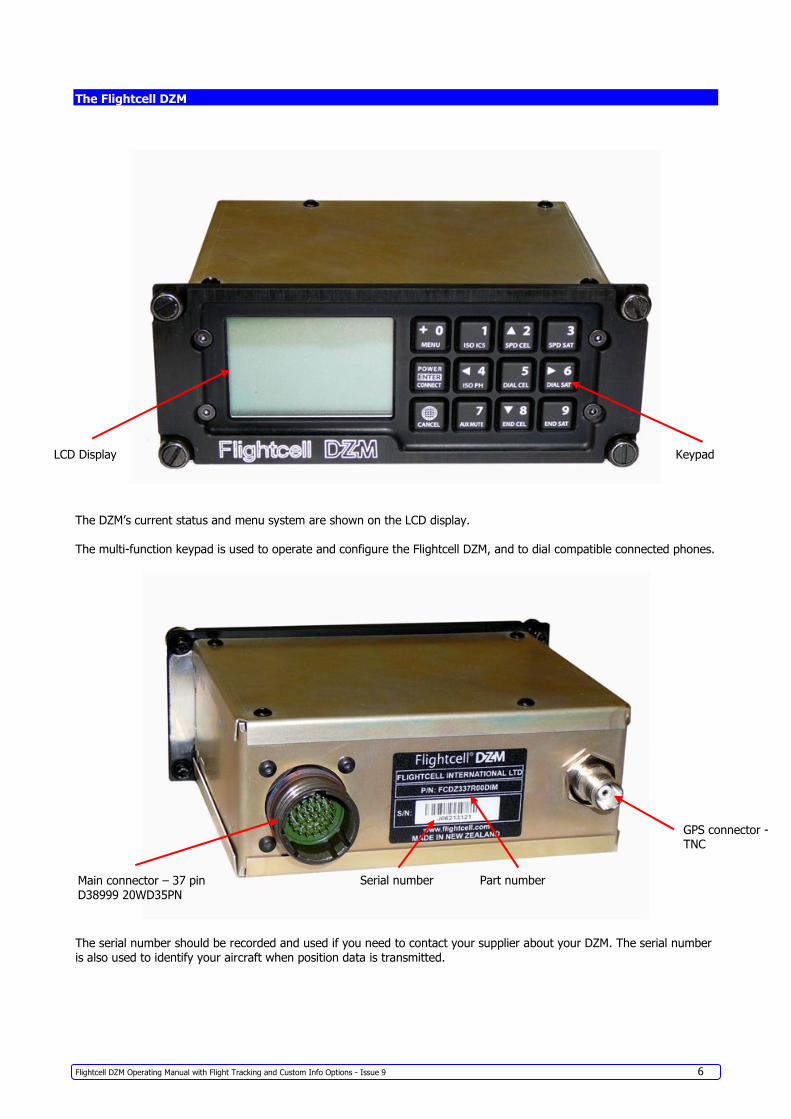
The Flightcell DZM
The DZM’s current status and menu system are shown on the LCD display.
The multi-function keypad is used to operate and configure the Flightcell DZM, and to dial compatible connected phones.
The serial number should be recorded and used if you need to contact your supplier about your DZM. The serial number
is also used to identify your aircraft when position data is transmitted.
GPS connector - TNC
Serial number Part number
LCD Display Keypad
Main connector – 37 pin
D38999 20WD35PN
Flightcell DZM Operating Manual with Flight Tracking and Custom Info Options - Issue 9 7
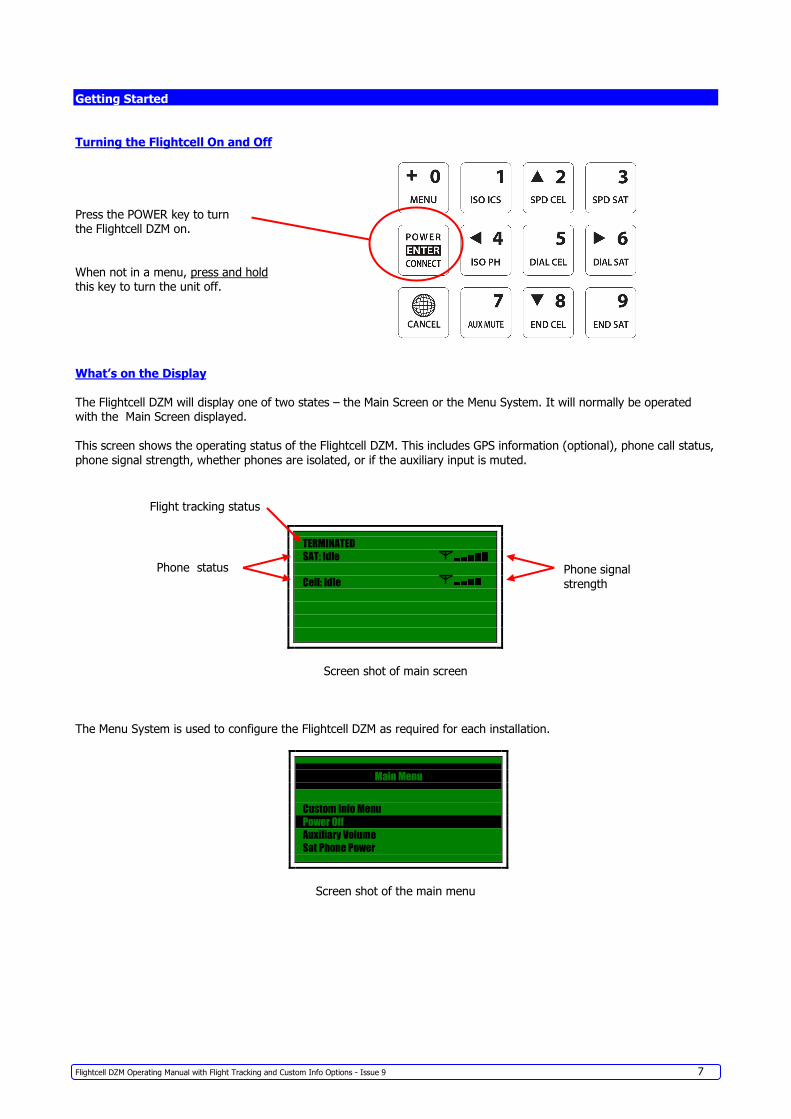
Getting Started
Turning the Flightcell On and Off
Press the POWER key to turn the Flightcell DZM on.
When not in a menu, press and hold this key to turn the unit off.
What’s on the Display
The Flightcell DZM will display one of two states – the Main Screen or the Menu System. It will normally be operated with the Main Screen displayed.
This screen shows the operating status of the Flightcell DZM. This includes GPS information (optional), phone call status,
phone signal strength, whether phones are isolated, or if the auxiliary input is muted.
TERMINATED
SAT: Idle
Cell: Idle
Screen shot of main screen
The Menu System is used to configure the Flightcell DZM as required for each installation.
Main Menu
Custom Info Menu
Power Off
Auxiliary Volume
Sat Phone Power
Screen shot of the main menu
Flight tracking status
Phone status
Phone signal
strength
Flightcell DZM Operating Manual with Flight Tracking and Custom Info Options - Issue 9 8
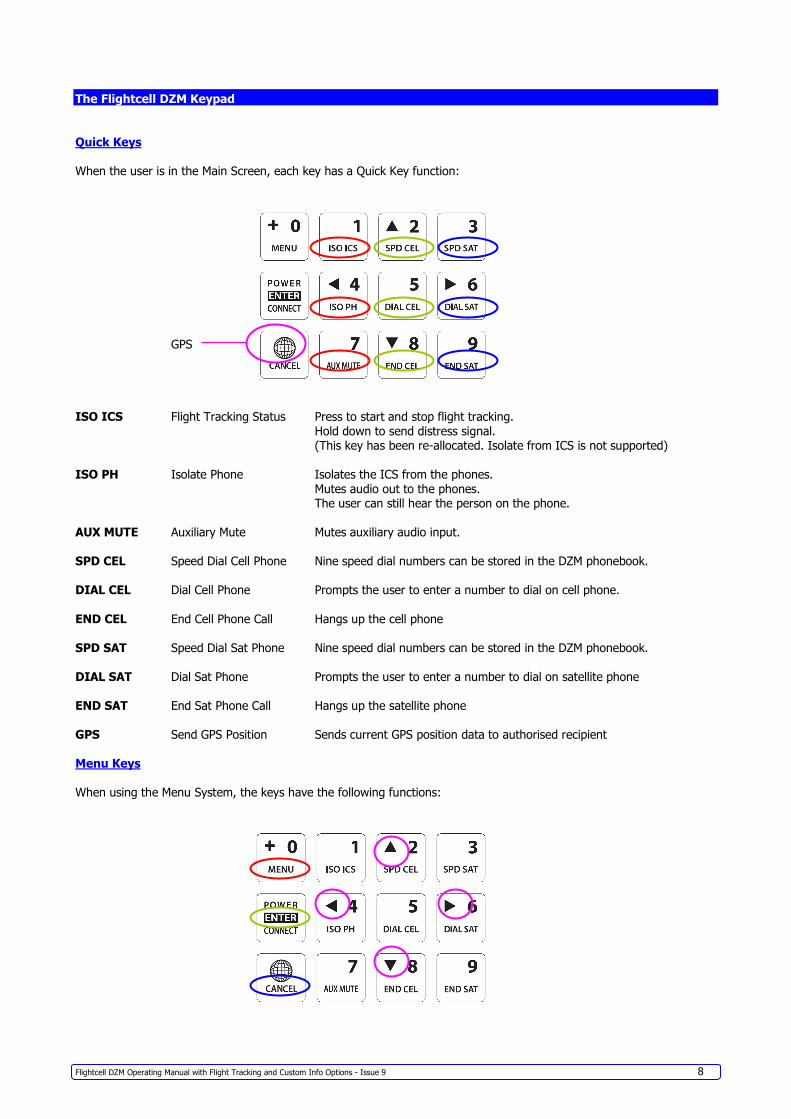
The Flightcell DZM Keypad
Quick Keys
When the user is in the Main Screen, each key has a Quick Key function:
GPS
ISO ICS Flight Tracking Status Press to start and stop flight tracking.
Hold down to send distress signal. (This key has been re-allocated. Isolate from ICS is not supported)
ISO PH Isolate Phone Isolates the ICS from the phones.
Mutes audio out to the phones. The user can still hear the person on the phone.
AUX MUTE Auxiliary Mute Mutes auxiliary audio input.
SPD CEL Speed Dial Cell Phone Nine speed dial numbers can be stored in the DZM phonebook.
DIAL CEL Dial Cell Phone Prompts the user to enter a number to dial on cell phone.
END CEL End Cell Phone Call Hangs up the cell phone
SPD SAT Speed Dial Sat Phone Nine speed dial numbers can be stored in the DZM phonebook.
DIAL SAT Dial Sat Phone Prompts the user to enter a number to dial on satellite phone
END SAT End Sat Phone Call Hangs up the satellite phone
GPS Send GPS Position Sends current GPS position data to authorised recipient
Menu Keys
When using the Menu System, the keys have the following functions:
Flightcell DZM Operating Manual with Flight Tracking and Custom Info Options - Issue 9 9
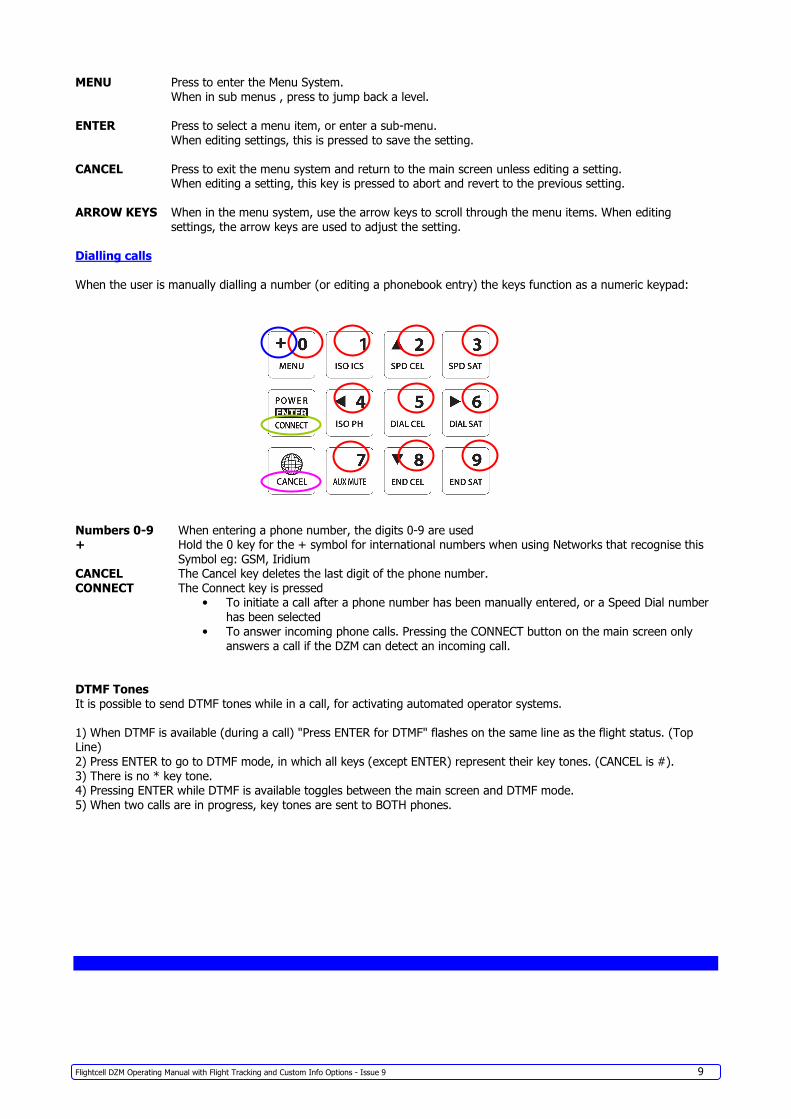
MENU Press to enter the Menu System.
When in sub menus , press to jump back a level.
ENTER Press to select a menu item, or enter a sub-menu.
When editing settings, this is pressed to save the setting.
CANCEL Press to exit the menu system and return to the main screen unless editing a setting. When editing a setting, this key is pressed to abort and revert to the previous setting.
ARROW KEYS When in the menu system, use the arrow keys to scroll through the menu items. When editing
settings, the arrow keys are used to adjust the setting.
Dialling calls
When the user is manually dialling a number (or editing a phonebook entry) the keys function as a numeric keypad:
Numbers 0-9 When entering a phone number, the digits 0-9 are used + Hold the 0 key for the + symbol for international numbers when using Networks that recognise this
Symbol eg: GSM, Iridium CANCEL The Cancel key deletes the last digit of the phone number.
CONNECT The Connect key is pressed • To initiate a call after a phone number has been manually entered, or a Speed Dial number
has been selected
• To answer incoming phone calls. Pressing the CONNECT button on the main screen only
answers a call if the DZM can detect an incoming call.
DTMF Tones
It is possible to send DTMF tones while in a call, for activating automated operator systems.
1) When DTMF is available (during a call) "Press ENTER for DTMF" flashes on the same line as the flight status. (Top Line)
2) Press ENTER to go to DTMF mode, in which all keys (except ENTER) represent their key tones. (CANCEL is #).
3) There is no * key tone. 4) Pressing ENTER while DTMF is available toggles between the main screen and DTMF mode.
5) When two calls are in progress, key tones are sent to BOTH phones.
Flightcell DZM Operating Manual with Flight Tracking and Custom Info Options - Issue 9 10
Main Screen Functions
This section details the use of the Flightcell DZM in its main operating state.
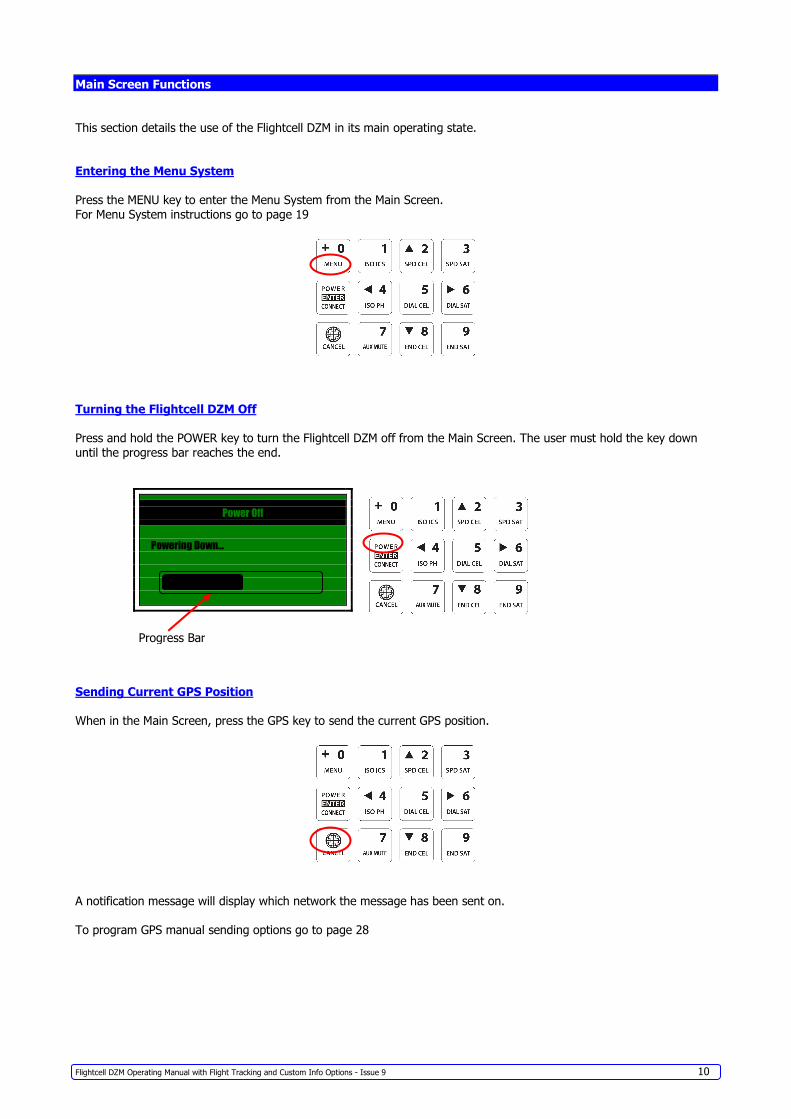
Entering the Menu System
Press the MENU key to enter the Menu System from the Main Screen.
For Menu System instructions go to page 19
Turning the Flightcell DZM Off
Press and hold the POWER key to turn the Flightcell DZM off from the Main Screen. The user must hold the key down
until the progress bar reaches the end.
Power Off
Powering Down...
Sending Current GPS Position
When in the Main Screen, press the GPS key to send the current GPS position.
A notification message will display which network the message has been sent on.
To program GPS manual sending options go to page 28
Progress Bar
Flightcell DZM Operating Manual with Flight Tracking and Custom Info Options - Issue 9 11
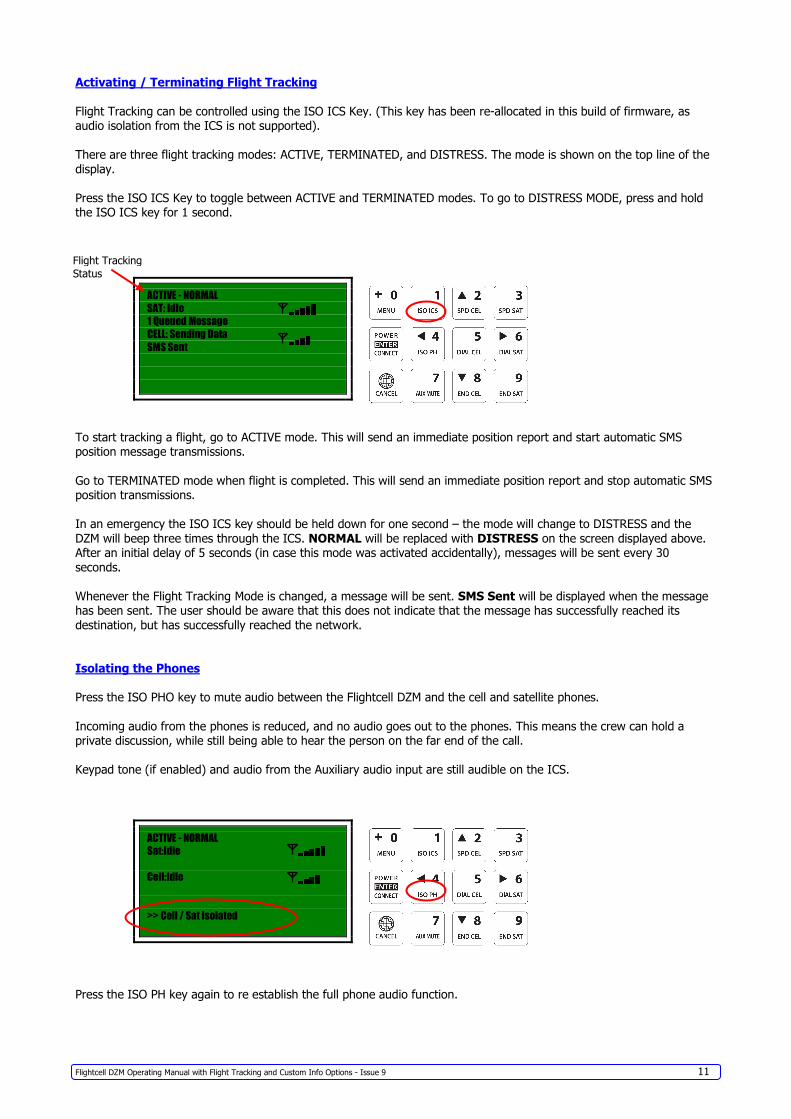
Activating / Terminating Flight Tracking
Flight Tracking can be controlled using the ISO ICS Key. (This key has been re-allocated in this build of firmware, as audio isolation from the ICS is not supported).
There are three flight tracking modes: ACTIVE, TERMINATED, and DISTRESS. The mode is shown on the top line of the
display.
Press the ISO ICS Key to toggle between ACTIVE and TERMINATED modes. To go to DISTRESS MODE, press and hold the ISO ICS key for 1 second.
ACTIVE - NORMAL
SAT: Idle
1 Queued Message
CELL: Sending Data
SMS Sent
To start tracking a flight, go to ACTIVE mode. This will send an immediate position report and start automatic SMS position message transmissions.
Go to TERMINATED mode when flight is completed. This will send an immediate position report and stop automatic SMS position transmissions.
In an emergency the ISO ICS key should be held down for one second – the mode will change to DISTRESS and the
DZM will beep three times through the ICS. NORMAL will be replaced with DISTRESS on the screen displayed above. After an initial delay of 5 seconds (in case this mode was activated accidentally), messages will be sent every 30
seconds.
Whenever the Flight Tracking Mode is changed, a message will be sent. SMS Sent will be displayed when the message has been sent. The user should be aware that this does not indicate that the message has successfully reached its
destination, but has successfully reached the network.
Isolating the Phones
Press the ISO PHO key to mute audio between the Flightcell DZM and the cell and satellite phones.
Incoming audio from the phones is reduced, and no audio goes out to the phones. This means the crew can hold a private discussion, while still being able to hear the person on the far end of the call.
Keypad tone (if enabled) and audio from the Auxiliary audio input are still audible on the ICS.
ACTIVE - NORMAL
Sat:Idle
Cell:Idle
>> Cell / Sat Isolated
Press the ISO PH key again to re establish the full phone audio function.
Flight Tracking
Status
Flightcell DZM Operating Manual with Flight Tracking and Custom Info Options - Issue 9 12
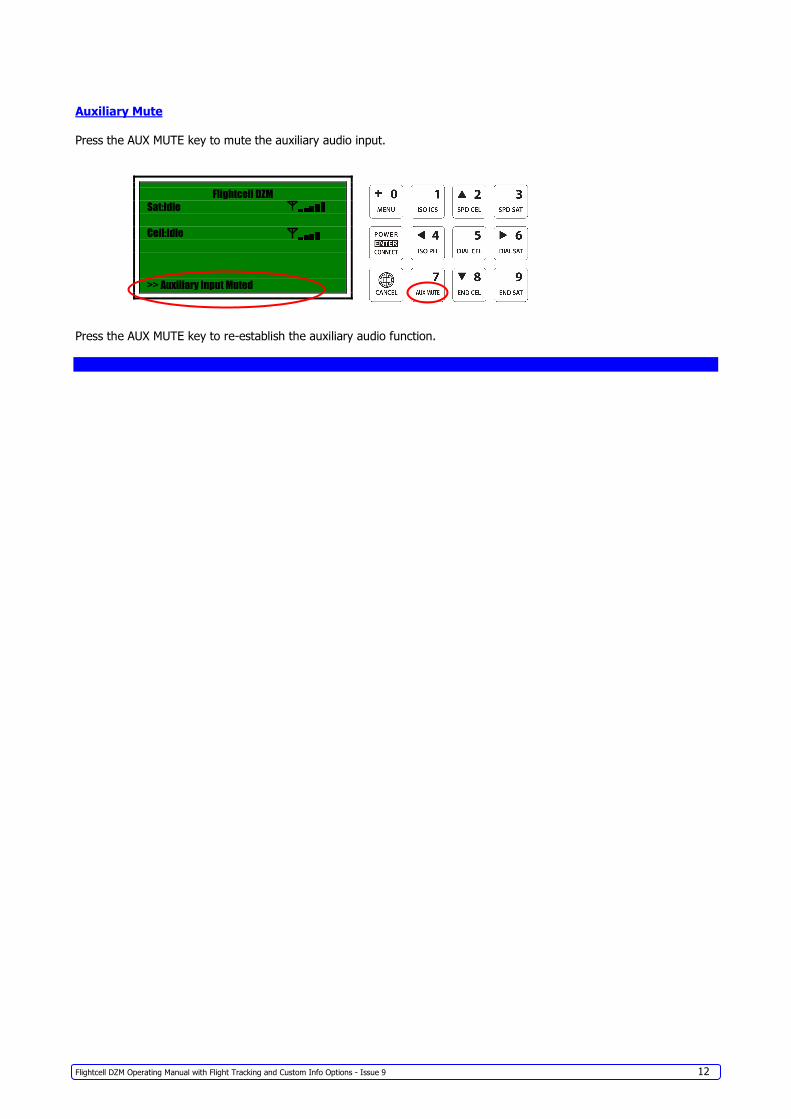
Auxiliary Mute
Press the AUX MUTE key to mute the auxiliary audio input.
Flightcell DZM
Sat:Idle
Cell:Idle
>> Auxiliary Input Muted
Press the AUX MUTE key to re-establish the auxiliary audio function.
Flightcell DZM Operating Manual with Flight Tracking and Custom Info Options - Issue 9 13
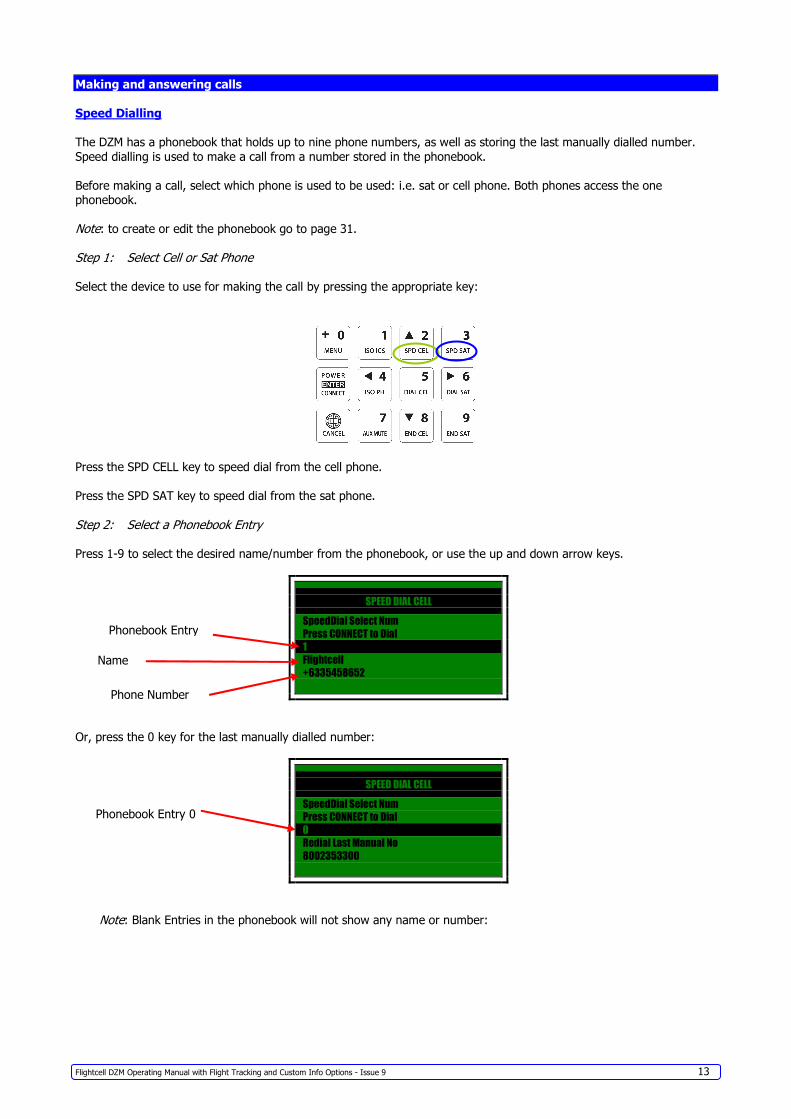
Making and answering calls
Speed Dialling
The DZM has a phonebook that holds up to nine phone numbers, as well as storing the last manually dialled number.
Speed dialling is used to make a call from a number stored in the phonebook.
Before making a call, select which phone is used to be used: i.e. sat or cell phone. Both phones access the one phonebook.
Note: to create or edit the phonebook go to page 31. Step 1: Select Cell or Sat Phone Select the device to use for making the call by pressing the appropriate key:
Press the SPD CELL key to speed dial from the cell phone.
Press the SPD SAT key to speed dial from the sat phone.
Step 2: Select a Phonebook Entry
Press 1-9 to select the desired name/number from the phonebook, or use the up and down arrow keys.
SPEED DIAL CELL
SpeedDial Select Num
Press CONNECT to Dial
1
Flightcell
+6335458652
Or, press the 0 key for the last manually dialled number:
SPEED DIAL CELL
SpeedDial Select Num
Press CONNECT to Dial
0
Redial Last Manual No
8002353300
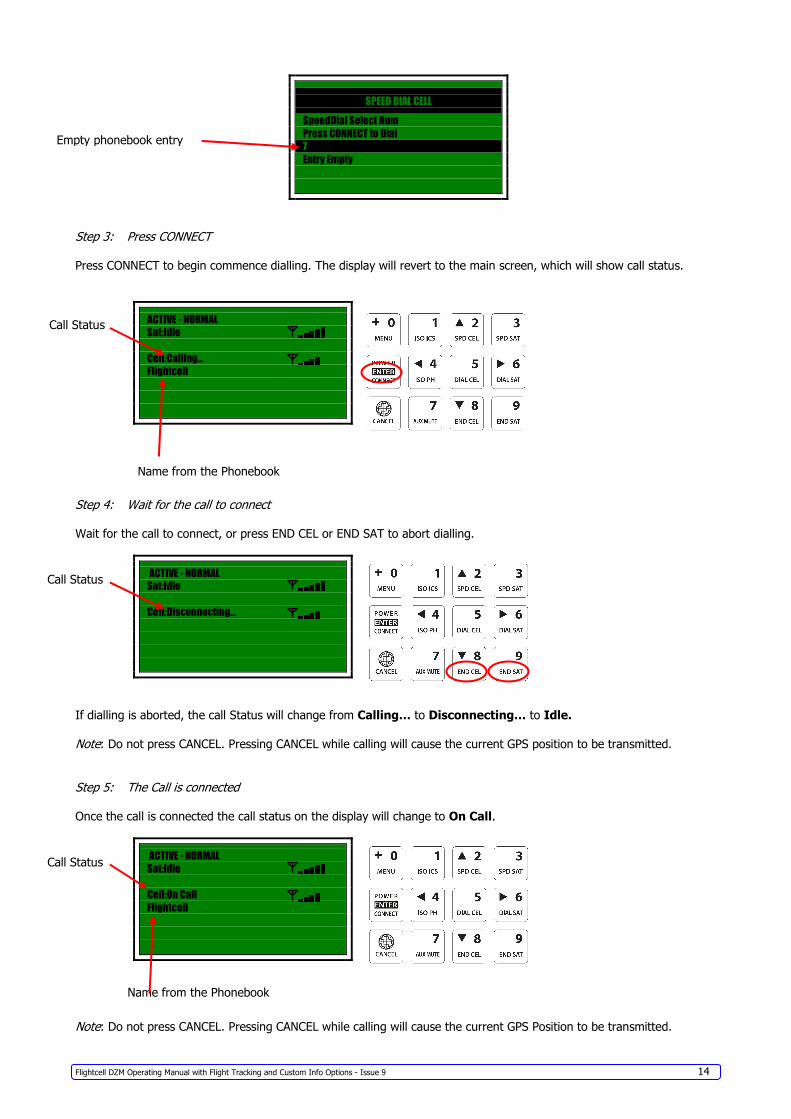
Note: Blank Entries in the phonebook will not show any name or number:
Phonebook Entry
Name
Phone Number
Phonebook Entry 0
Flightcell DZM Operating Manual with Flight Tracking and Custom Info Options - Issue 9 14
SPEED DIAL CELL
SpeedDial Select Num
Press CONNECT to Dial
7
Entry Empty
Step 3: Press CONNECT
Press CONNECT to begin commence dialling. The display will revert to the main screen, which will show call status.
ACTIVE - NORMAL
Sat:Idle
Cell:Calling...
Flightcell
Step 4: Wait for the call to connect Wait for the call to connect, or press END CEL or END SAT to abort dialling.
ACTIVE - NORMAL
Sat:Idle
Cell:Disconnecting...
If dialling is aborted, the call Status will change from Calling… to Disconnecting… to Idle.
Note: Do not press CANCEL. Pressing CANCEL while calling will cause the current GPS position to be transmitted.
Step 5: The Call is connected
Once the call is connected the call status on the display will change to On Call.
ACTIVE - NORMAL
Sat:Idle
Cell:On Call
Flightcell
Note: Do not press CANCEL. Pressing CANCEL while calling will cause the current GPS Position to be transmitted.
Empty phonebook entry
Call Status
Call Status
Call Status
Name from the Phonebook
Name from the Phonebook
Flightcell DZM Operating Manual with Flight Tracking and Custom Info Options - Issue 9 15
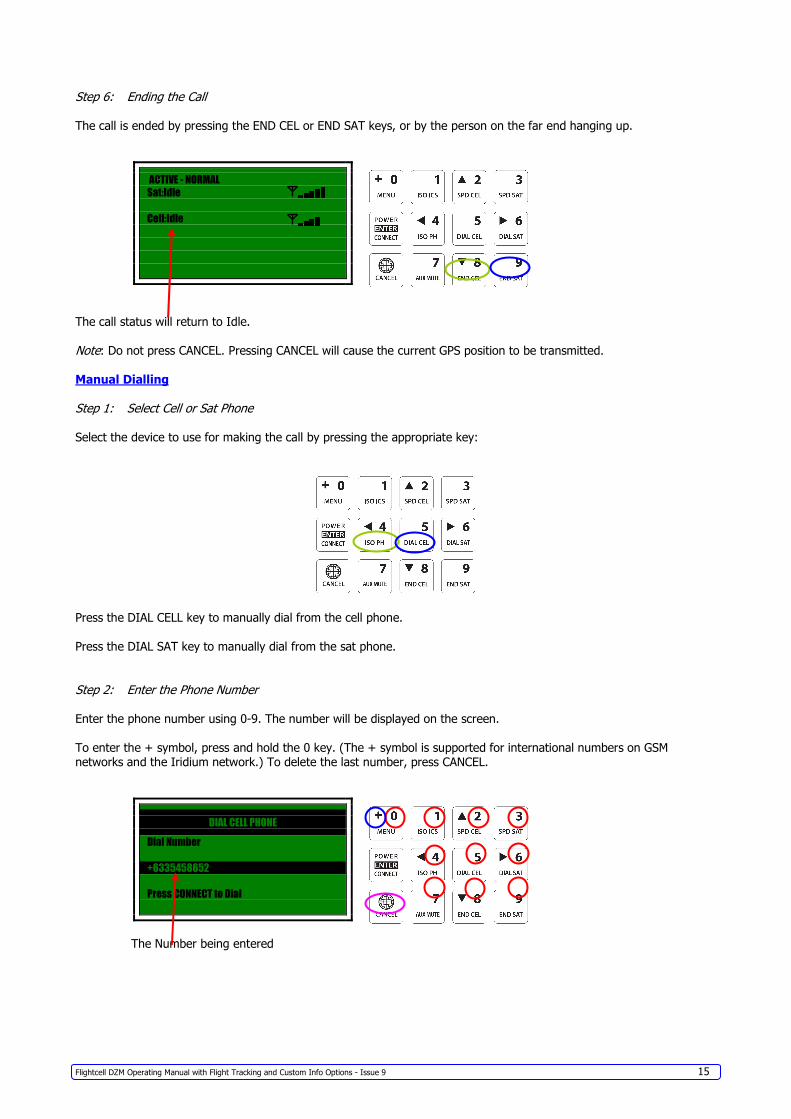
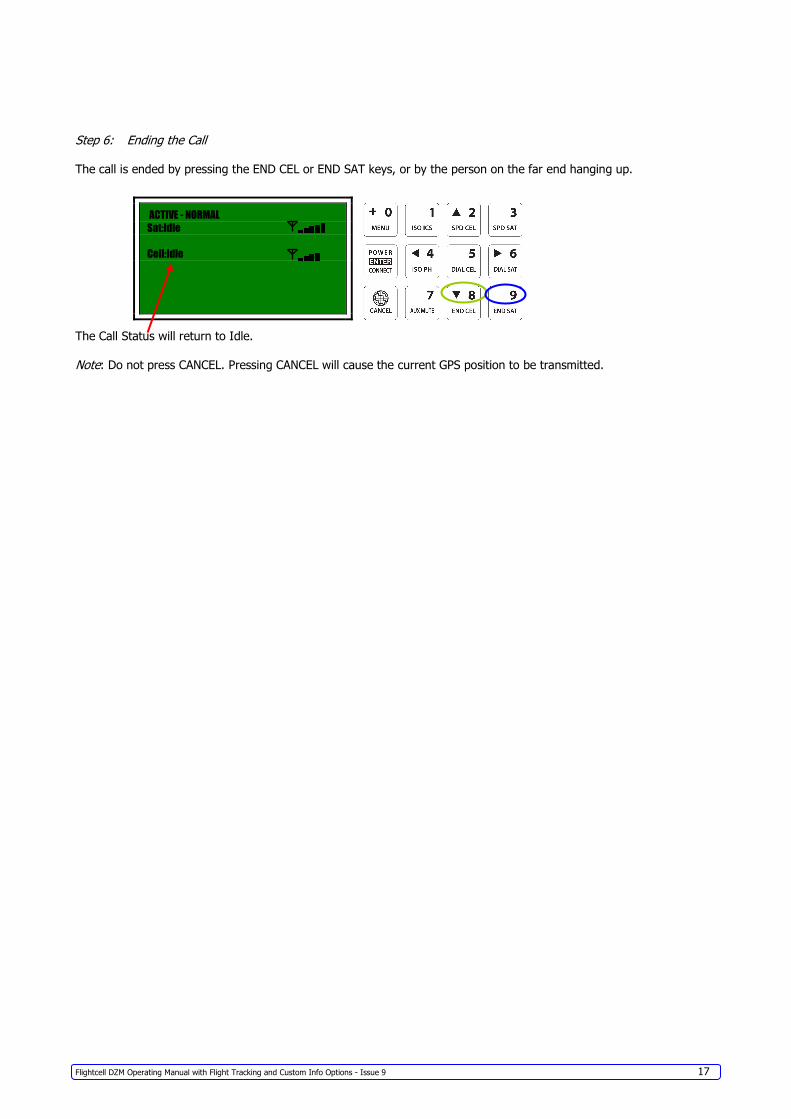
Step 6: Ending the Call The call is ended by pressing the END CEL or END SAT keys, or by the person on the far end hanging up.
ACTIVE - NORMAL
Sat:Idle
Cell:Idle
The call status will return to Idle.
Note: Do not press CANCEL. Pressing CANCEL will cause the current GPS position to be transmitted.
Manual Dialling
Step 1: Select Cell or Sat Phone
Select the device to use for making the call by pressing the appropriate key:
Press the DIAL CELL key to manually dial from the cell phone.
Press the DIAL SAT key to manually dial from the sat phone.
Step 2: Enter the Phone Number
Enter the phone number using 0-9. The number will be displayed on the screen.
To enter the + symbol, press and hold the 0 key. (The + symbol is supported for international numbers on GSM networks and the Iridium network.) To delete the last number, press CANCEL.
DIAL CELL PHONE
Dial Number
+6335458652
Press CONNECT to Dial
The Number being entered
Flightcell DZM Operating Manual with Flight Tracking and Custom Info Options - Issue 9 16
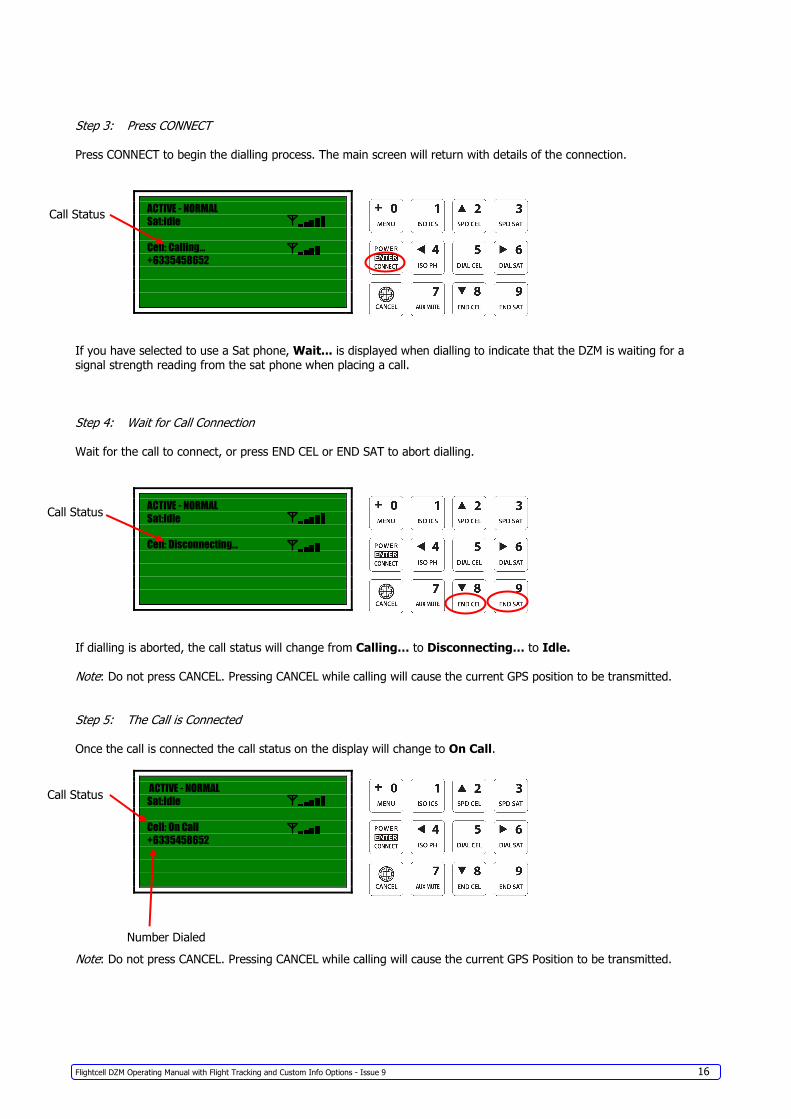
Step 3: Press CONNECT Press CONNECT to begin the dialling process. The main screen will return with details of the connection.
ACTIVE - NORMAL
Sat:Idle
Cell: Calling...
+6335458652
If you have selected to use a Sat phone, Wait... is displayed when dialling to indicate that the DZM is waiting for a signal strength reading from the sat phone when placing a call.
Step 4: Wait for Call Connection Wait for the call to connect, or press END CEL or END SAT to abort dialling.
ACTIVE - NORMAL
Sat:Idle
Cell: Disconnecting...
If dialling is aborted, the call status will change from Calling… to Disconnecting… to Idle.
Note: Do not press CANCEL. Pressing CANCEL while calling will cause the current GPS position to be transmitted.
Step 5: The Call is Connected
Once the call is connected the call status on the display will change to On Call.
ACTIVE - NORMAL
Sat:Idle
Cell: On Call
+6335458652
Note: Do not press CANCEL. Pressing CANCEL while calling will cause the current GPS Position to be transmitted.
Call Status
Call Status
Call Status
Number Dialed
Flightcell DZM Operating Manual with Flight Tracking and Custom Info Options - Issue 9 17
Step 6: Ending the Call
The call is ended by pressing the END CEL or END SAT keys, or by the person on the far end hanging up.
ACTIVE - NORMAL
Sat:Idle
Cell:Idle
The Call Status will return to Idle.
Note: Do not press CANCEL. Pressing CANCEL will cause the current GPS position to be transmitted.
Flightcell DZM Operating Manual with Flight Tracking and Custom Info Options - Issue 9 18
Answering Incoming Calls
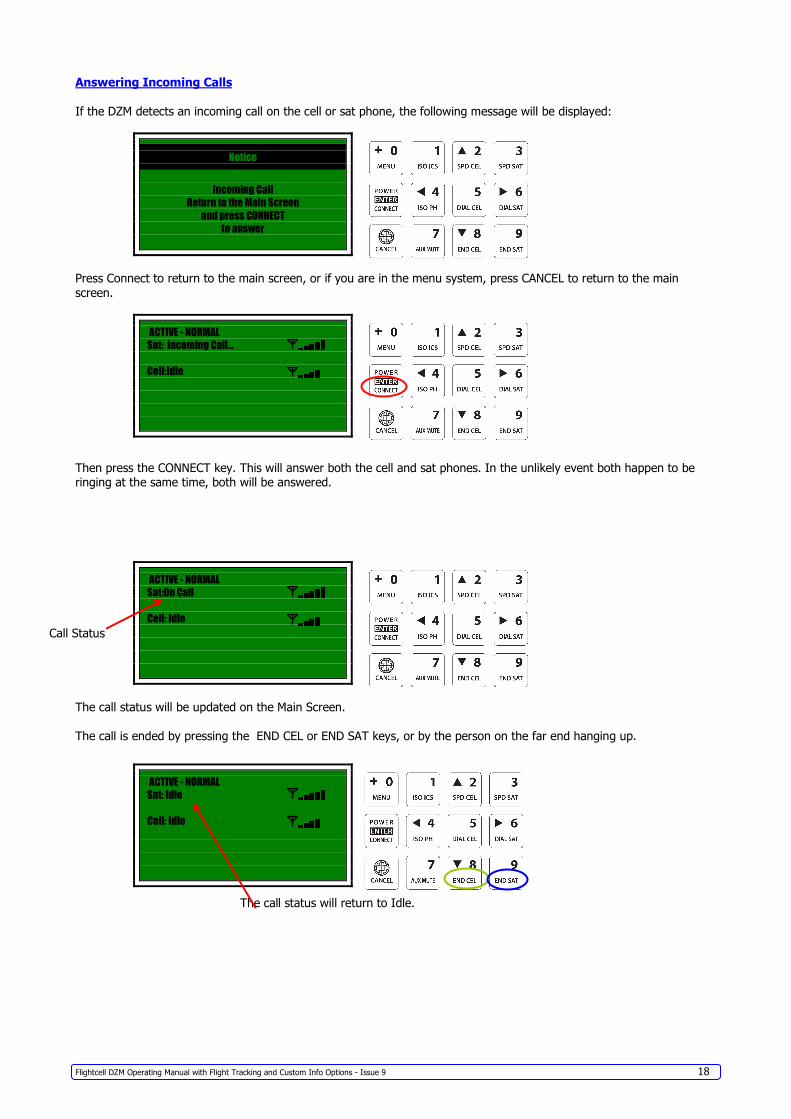
If the DZM detects an incoming call on the cell or sat phone, the following message will be displayed:
Notice
Incoming Call
Return to the Main Screen
and press CONNECT
to answer
Press Connect to return to the main screen, or if you are in the menu system, press CANCEL to return to the main
screen.
ACTIVE - NORMAL
Sat: Incoming Call...
Cell:Idle
Then press the CONNECT key. This will answer both the cell and sat phones. In the unlikely event both happen to be ringing at the same time, both will be answered.
ACTIVE - NORMAL
Sat:On Call
Cell: Idle
The call status will be updated on the Main Screen.
The call is ended by pressing the END CEL or END SAT keys, or by the person on the far end hanging up.
ACTIVE - NORMAL
Sat: Idle
Cell: Idle
The call status will return to Idle.
Call Status
Flightcell DZM Operating Manual with Flight Tracking and Custom Info Options - Issue 9 19
The Menu System
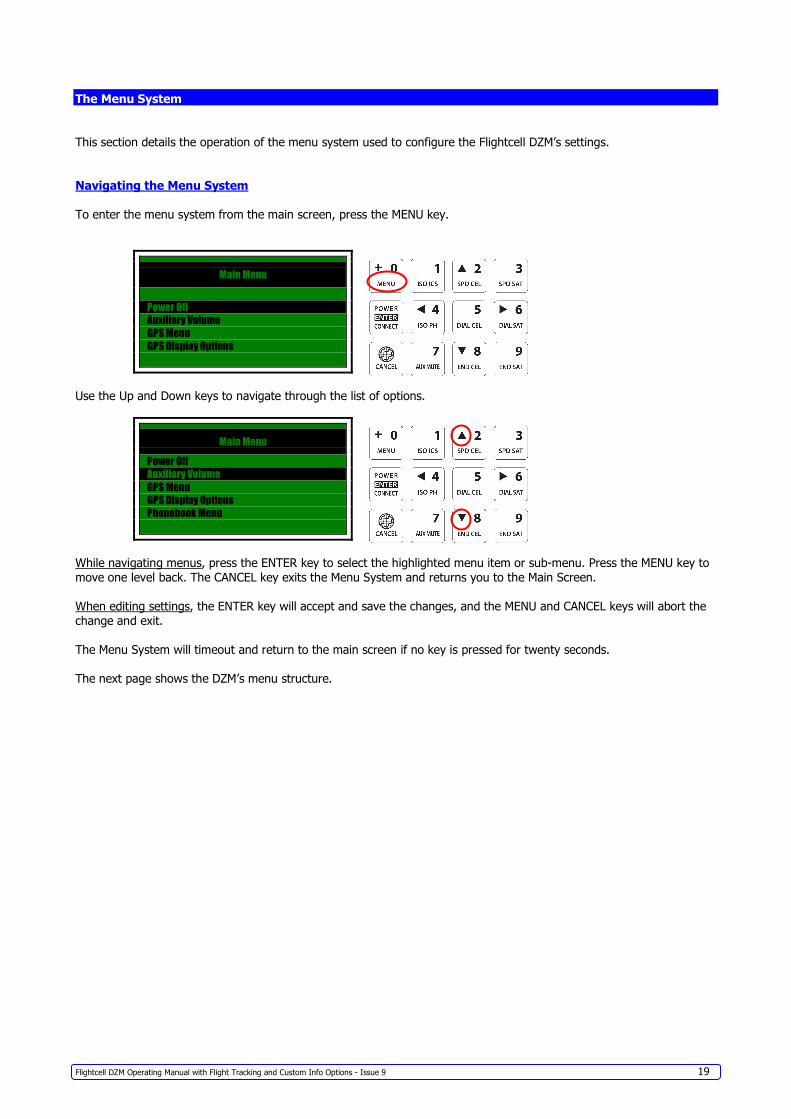
This section details the operation of the menu system used to configure the Flightcell DZM’s settings.
Navigating the Menu System
To enter the menu system from the main screen, press the MENU key.
Main Menu
Power Off
Auxiliary Volume
GPS Menu
GPS Display Options
Use the Up and Down keys to navigate through the list of options.
Main Menu
Power Off
Auxiliary Volume
GPS Menu
GPS Display Options Phonebook Menu
While navigating menus, press the ENTER key to select the highlighted menu item or sub-menu. Press the MENU key to
move one level back. The CANCEL key exits the Menu System and returns you to the Main Screen.
When editing settings, the ENTER key will accept and save the changes, and the MENU and CANCEL keys will abort the
change and exit.
The Menu System will timeout and return to the main screen if no key is pressed for twenty seconds.
The next page shows the DZM’s menu structure.
Flightcell DZM Operating Manual with Flight Tracking and Custom Info Options - Issue 9 20
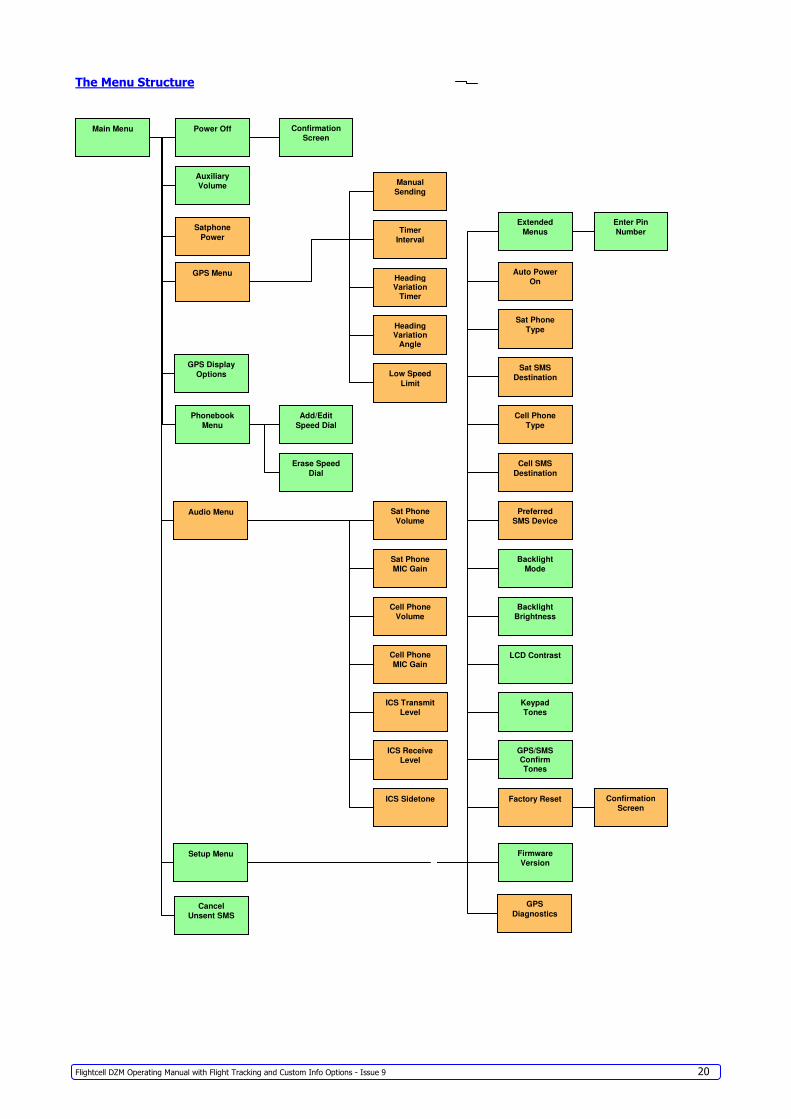
The Menu Structure
Main Menu
Manual Sending
Auxiliary Volume
Audio Menu Sat Phone Volume
Cell Phone Volume
Sat Phone MIC Gain
Cell Phone MIC Gain
ICS Transmit Level Keypad
Tones
Setup Menu
Factory Reset
Phonebook
Menu
Erase Speed
Dial
Add/Edit
Speed Dial
Timer Interval
Sat SMS
Destination
Cell SMS
Destination
Sat Phone
Type
Cell Phone
Type
Backlight Mode
Backlight Brightness
Firmware Version
Power Off
LCD Contrast
Preferred SMS Device
GPS Menu Heading Variation
Timer
Heading Variation
Angle
Low Speed
Limit
ICS Receive Level
Auto Power On
GPS/SMS Confirm Tones
ConfirmationScreen
ConfirmationScreen
Extended
Menus Enter Pin
Number
GPS Display
Options
ICS Sidetone
Cancel Unsent SMS
Satphone
Power
GPS
Diagnostics
Flightcell DZM Operating Manual with Flight Tracking and Custom Info Options - Issue 9 21
Important Note:
In normal operation it is important that some DZM settings are protected from adjustment. These settings may have been optimised by approved technicians or set as standard for a fleet of aircraft. For this reason some settings are
hidden until unlocked by a password.
How to Configure the Important Settings
It is recommended that first time users familiarise themselves with the following settings of the Flightcell DZM.
These items are repeated elsewhere in the manual.
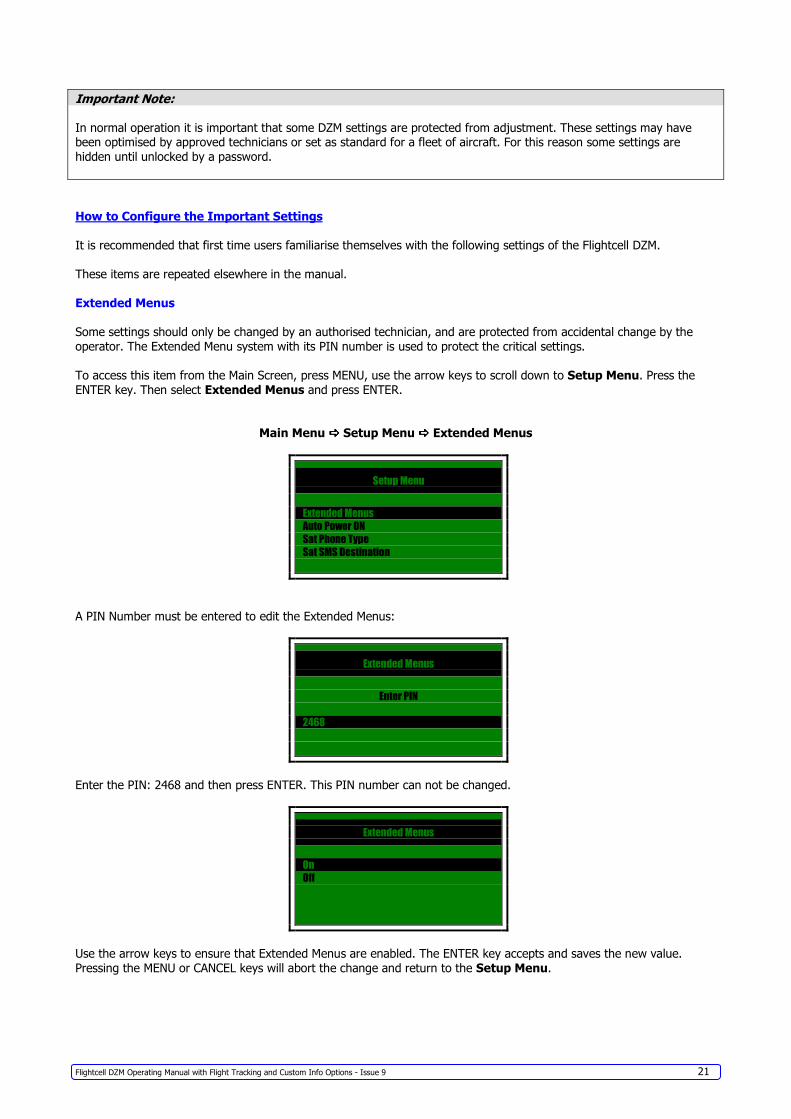
Extended Menus
Some settings should only be changed by an authorised technician, and are protected from accidental change by the
operator. The Extended Menu system with its PIN number is used to protect the critical settings.
To access this item from the Main Screen, press MENU, use the arrow keys to scroll down to Setup Menu. Press the
ENTER key. Then select Extended Menus and press ENTER.
Main Menu ���� Setup Menu ���� Extended Menus
Setup Menu
Extended Menus
Auto Power ON
Sat Phone Type
Sat SMS Destination
A PIN Number must be entered to edit the Extended Menus:
Extended Menus
Enter PIN
2468
Enter the PIN: 2468 and then press ENTER. This PIN number can not be changed.
Extended Menus
On
Off
Use the arrow keys to ensure that Extended Menus are enabled. The ENTER key accepts and saves the new value.
Pressing the MENU or CANCEL keys will abort the change and return to the Setup Menu.
Flightcell DZM Operating Manual with Flight Tracking and Custom Info Options - Issue 9 22
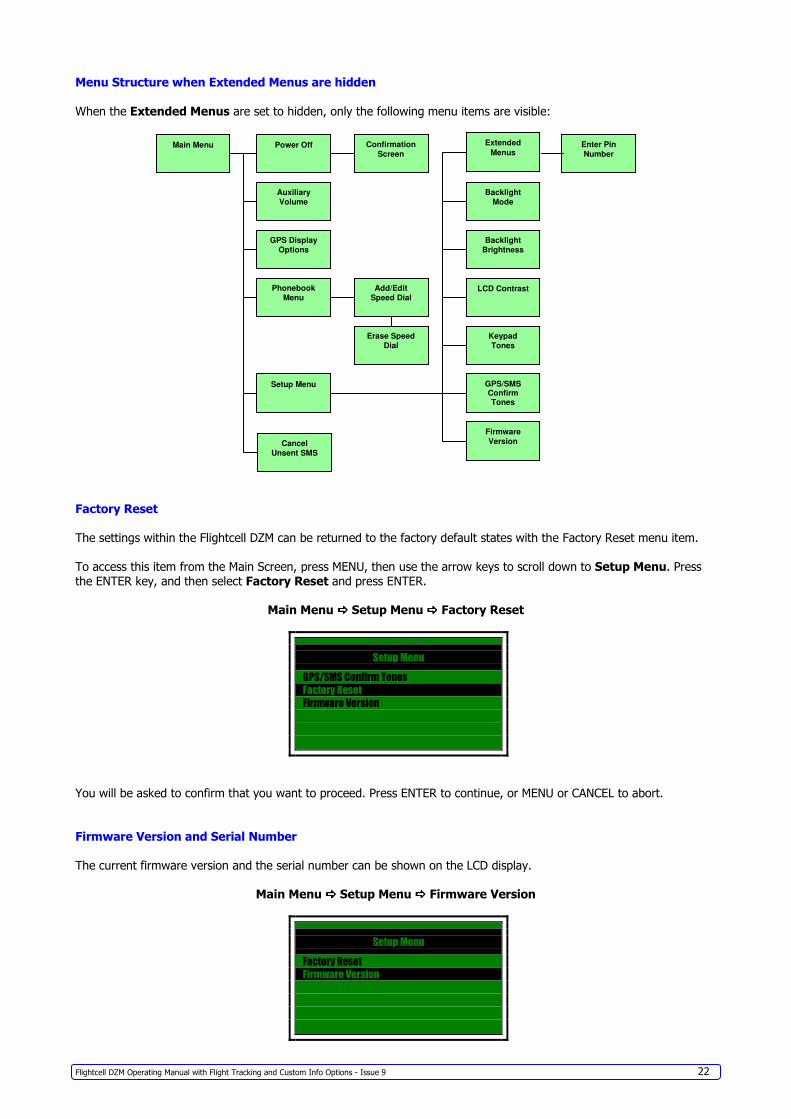
Menu Structure when Extended Menus are hidden
When the Extended Menus are set to hidden, only the following menu items are visible:
Factory Reset
The settings within the Flightcell DZM can be returned to the factory default states with the Factory Reset menu item.
To access this item from the Main Screen, press MENU, then use the arrow keys to scroll down to Setup Menu. Press
the ENTER key, and then select Factory Reset and press ENTER.
Main Menu ���� Setup Menu ���� Factory Reset
Setup Menu
GPS/SMS Confirm Tones
Factory Reset
Firmware Version
You will be asked to confirm that you want to proceed. Press ENTER to continue, or MENU or CANCEL to abort.
Firmware Version and Serial Number
The current firmware version and the serial number can be shown on the LCD display.
Main Menu ���� Setup Menu ���� Firmware Version
Setup Menu
Factory Reset
Firmware Version
Main Menu
Auxiliary Volume
Keypad Tones
Setup Menu
Phonebook Menu
Erase Speed Dial
Add/Edit Speed Dial
Backlight Mode
Backlight Brightness
Firmware Version
Power Off Extended
Menus
LCD Contrast
GPS/SMS Confirm Tones
ConfirmationScreen Enter Pin
Number
GPS Display Options
Cancel Unsent SMS
Flightcell DZM Operating Manual with Flight Tracking and Custom Info Options - Issue 9 23
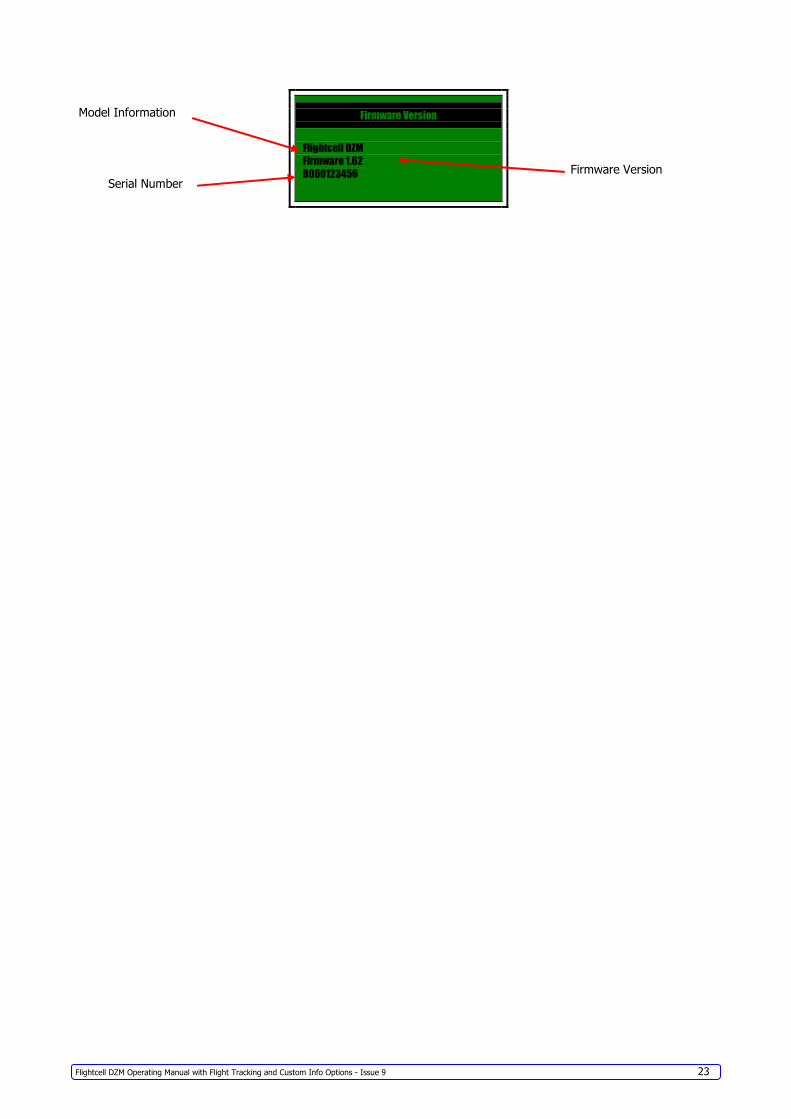
Firmware Version
Flightcell DZM
Firmware 1.62
B060123456
Serial Number Firmware Version
Model Information
Flightcell DZM Operating Manual with Flight Tracking and Custom Info Options - Issue 9 24
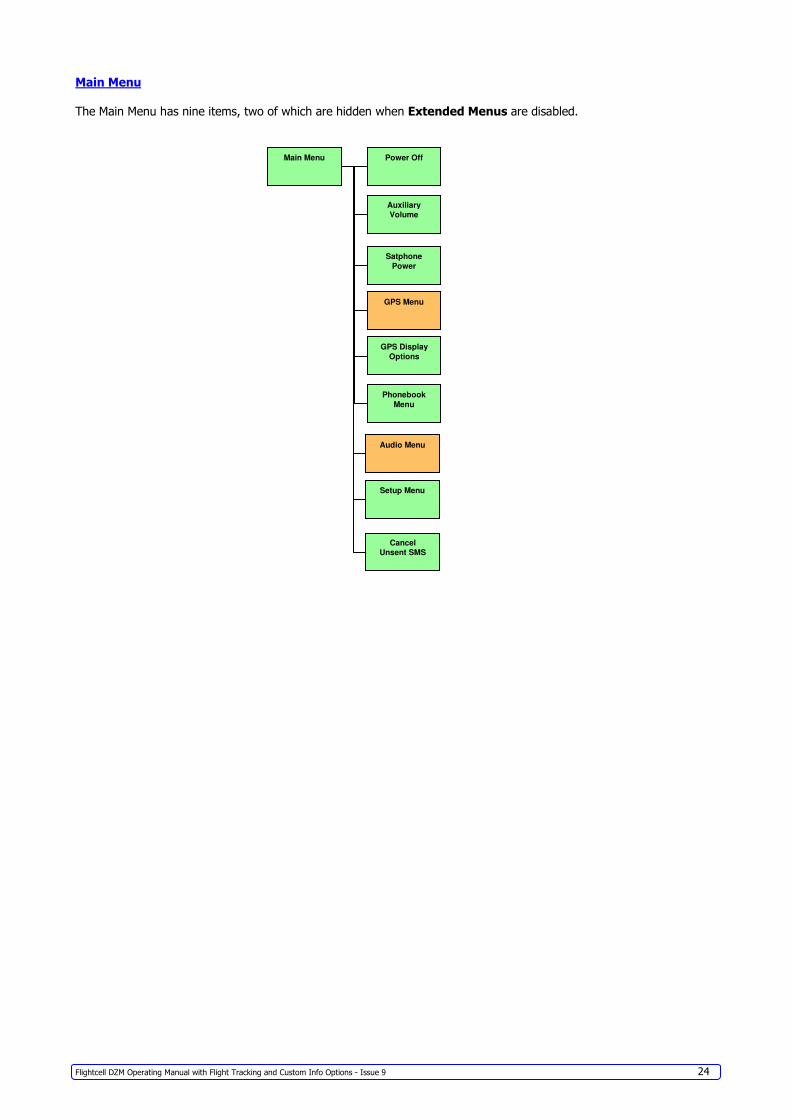
Main Menu
The Main Menu has nine items, two of which are hidden when Extended Menus are disabled.
Main Menu
Auxiliary Volume
Audio Menu
Setup Menu
Phonebook
Menu
Power Off
GPS Menu
GPS Display
Options
Cancel Unsent SMS
Satphone
Power
Flightcell DZM Operating Manual with Flight Tracking and Custom Info Options - Issue 9 25
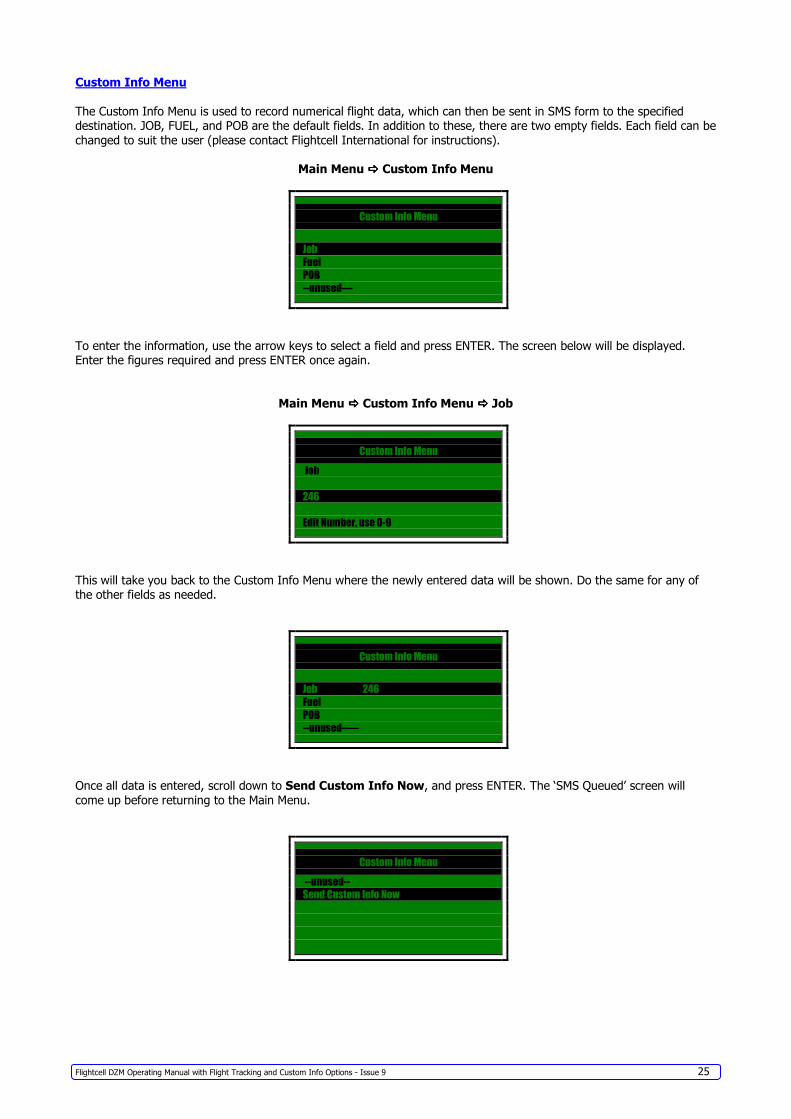
Custom Info Menu
The Custom Info Menu is used to record numerical flight data, which can then be sent in SMS form to the specified destination. JOB, FUEL, and POB are the default fields. In addition to these, there are two empty fields. Each field can be
changed to suit the user (please contact Flightcell International for instructions).
Main Menu ���� Custom Info Menu
Custom Info Menu
Job
Fuel
POB
--unused—
To enter the information, use the arrow keys to select a field and press ENTER. The screen below will be displayed. Enter the figures required and press ENTER once again.
Main Menu ���� Custom Info Menu ���� Job
Custom Info Menu
Job
246
Edit Number, use 0-9
This will take you back to the Custom Info Menu where the newly entered data will be shown. Do the same for any of the other fields as needed.
Custom Info Menu
Job 246
Fuel
POB
--unused--—
Once all data is entered, scroll down to Send Custom Info Now, and press ENTER. The ‘SMS Queued’ screen will
come up before returning to the Main Menu.
Custom Info Menu
--unused--
Send Custom Info Now
Flightcell DZM Operating Manual with Flight Tracking and Custom Info Options - Issue 9 26
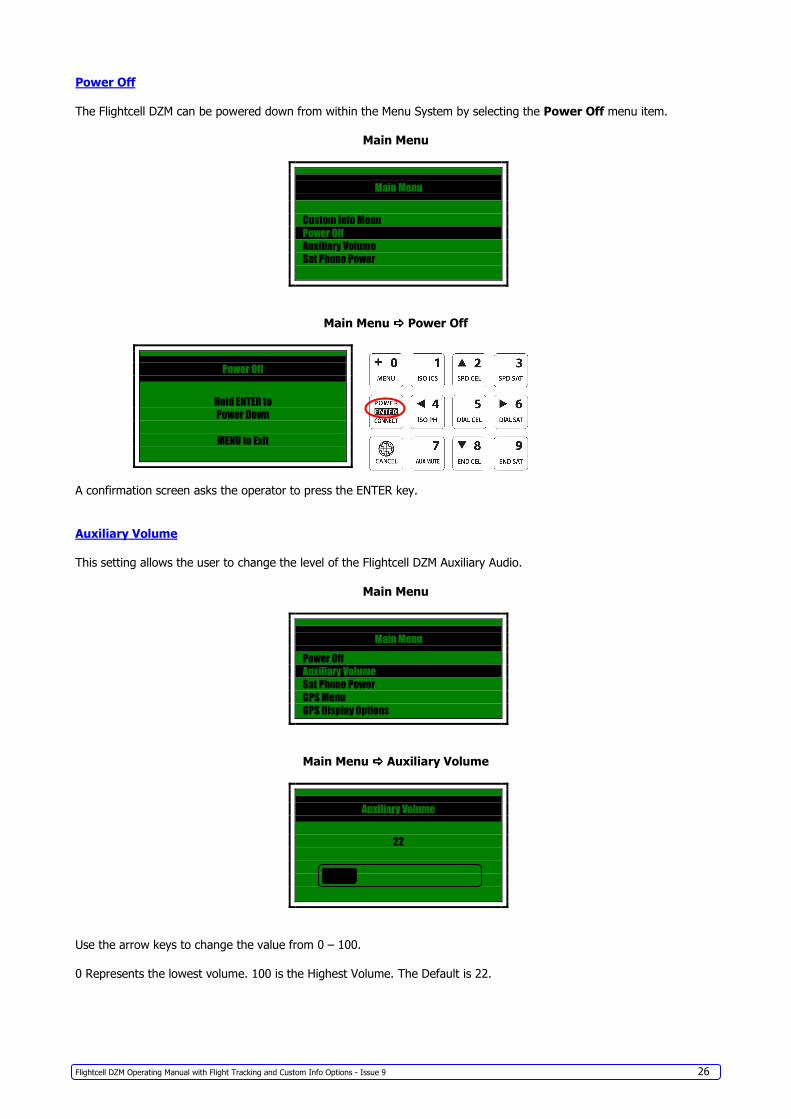
Power Off
The Flightcell DZM can be powered down from within the Menu System by selecting the Power Off menu item.
Main Menu
Main Menu
Custom Info Menu
Power Off
Auxiliary Volume
Sat Phone Power
Main Menu ���� Power Off
Power Off
Hold ENTER to
Power Down
MENU to Exit
A confirmation screen asks the operator to press the ENTER key.
Auxiliary Volume
This setting allows the user to change the level of the Flightcell DZM Auxiliary Audio.
Main Menu
Main Menu
Power Off
Auxiliary Volume
Sat Phone Power
GPS Menu
GPS Display Options
Main Menu ���� Auxiliary Volume
Auxiliary Volume
22
Use the arrow keys to change the value from 0 – 100.
0 Represents the lowest volume. 100 is the Highest Volume. The Default is 22.
Flightcell DZM Operating Manual with Flight Tracking and Custom Info Options - Issue 9 27
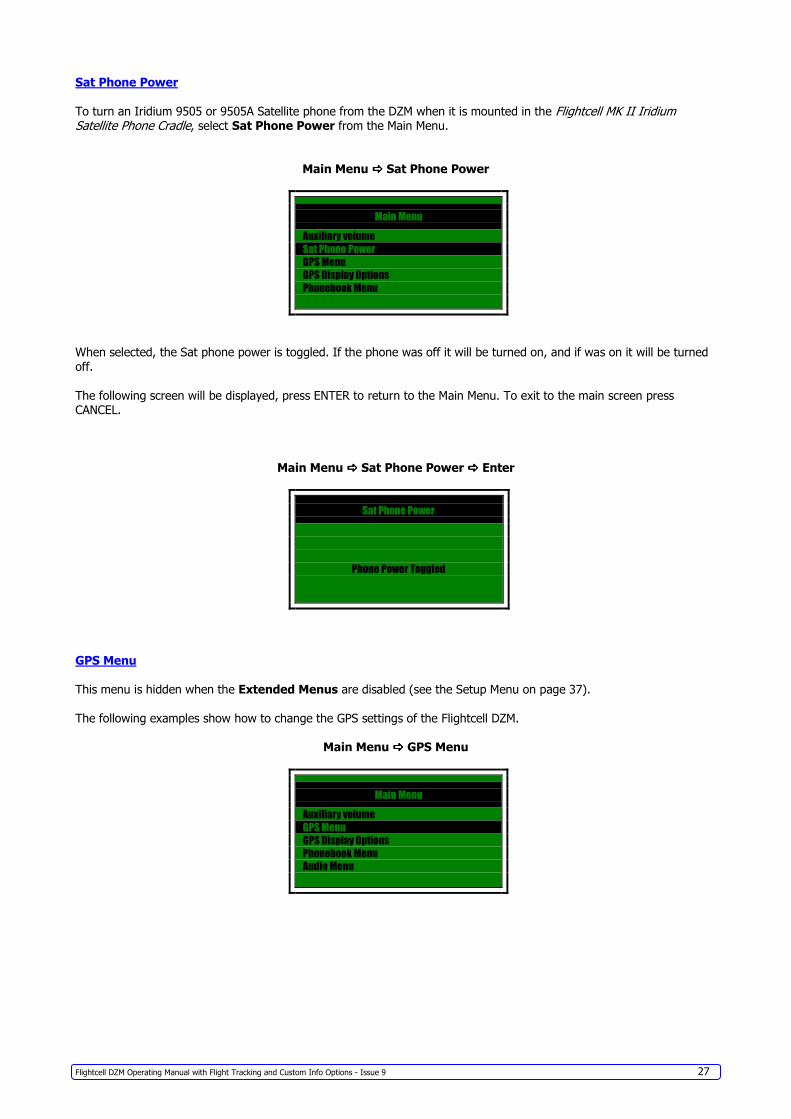
Sat Phone Power
To turn an Iridium 9505 or 9505A Satellite phone from the DZM when it is mounted in the Flightcell MK II Iridium Satellite Phone Cradle, select Sat Phone Power from the Main Menu.
Main Menu ���� Sat Phone Power
Main Menu
Auxiliary volume
Sat Phone Power
GPS Menu
GPS Display Options
Phonebook Menu
When selected, the Sat phone power is toggled. If the phone was off it will be turned on, and if was on it will be turned
off.
The following screen will be displayed, press ENTER to return to the Main Menu. To exit to the main screen press CANCEL.
Main Menu ���� Sat Phone Power ���� Enter
Sat Phone Power
Phone Power Toggled
GPS Menu
This menu is hidden when the Extended Menus are disabled (see the Setup Menu on page 37).
The following examples show how to change the GPS settings of the Flightcell DZM.
Main Menu ���� GPS Menu
Main Menu
Auxiliary volume
GPS Menu
GPS Display Options
Phonebook Menu
Audio Menu
Flightcell DZM Operating Manual with Flight Tracking and Custom Info Options - Issue 9 28
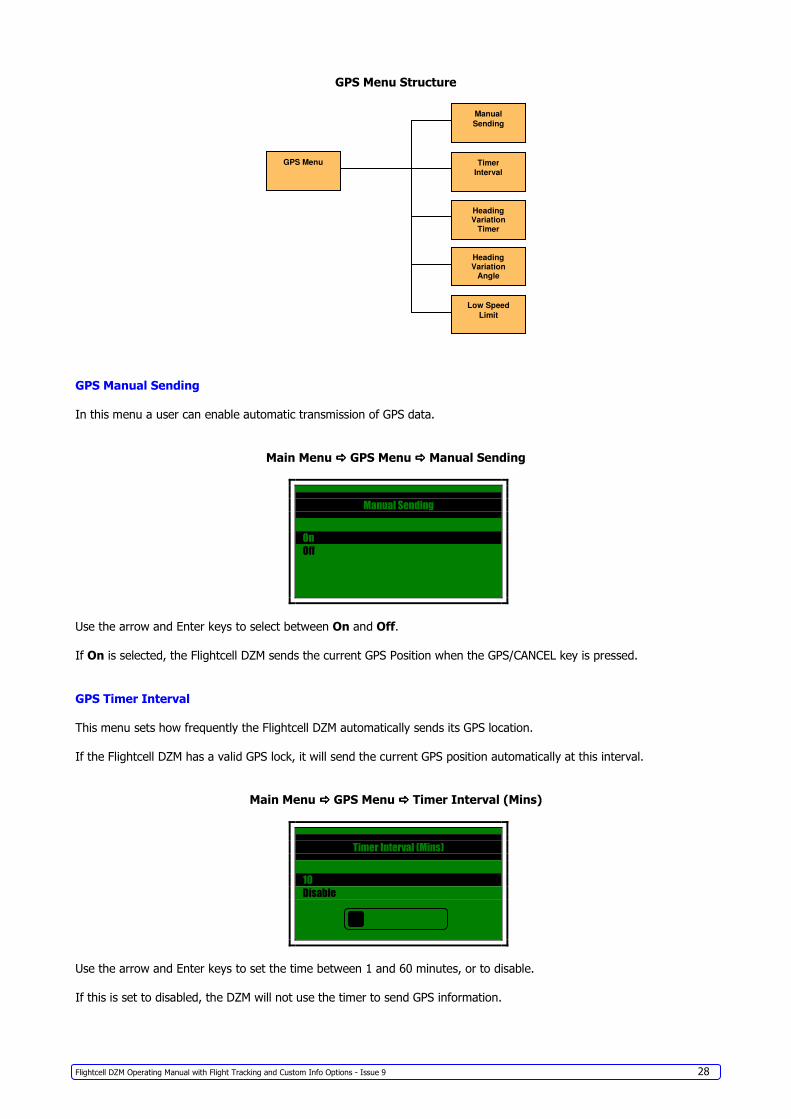
GPS Menu Structure
GPS Manual Sending
In this menu a user can enable automatic transmission of GPS data.
Main Menu ���� GPS Menu ���� Manual Sending
Manual Sending
On
Off
Use the arrow and Enter keys to select between On and Off.
If On is selected, the Flightcell DZM sends the current GPS Position when the GPS/CANCEL key is pressed.
GPS Timer Interval
This menu sets how frequently the Flightcell DZM automatically sends its GPS location.
If the Flightcell DZM has a valid GPS lock, it will send the current GPS position automatically at this interval.
Main Menu ���� GPS Menu ���� Timer Interval (Mins)
Timer Interval (Mins)
10
Disable
Use the arrow and Enter keys to set the time between 1 and 60 minutes, or to disable.
If this is set to disabled, the DZM will not use the timer to send GPS information.
Manual
Sending
Timer Interval
GPS Menu
Heading Variation
Timer
Heading Variation
Angle
Low Speed
Limit
Flightcell DZM Operating Manual with Flight Tracking and Custom Info Options - Issue 9 29
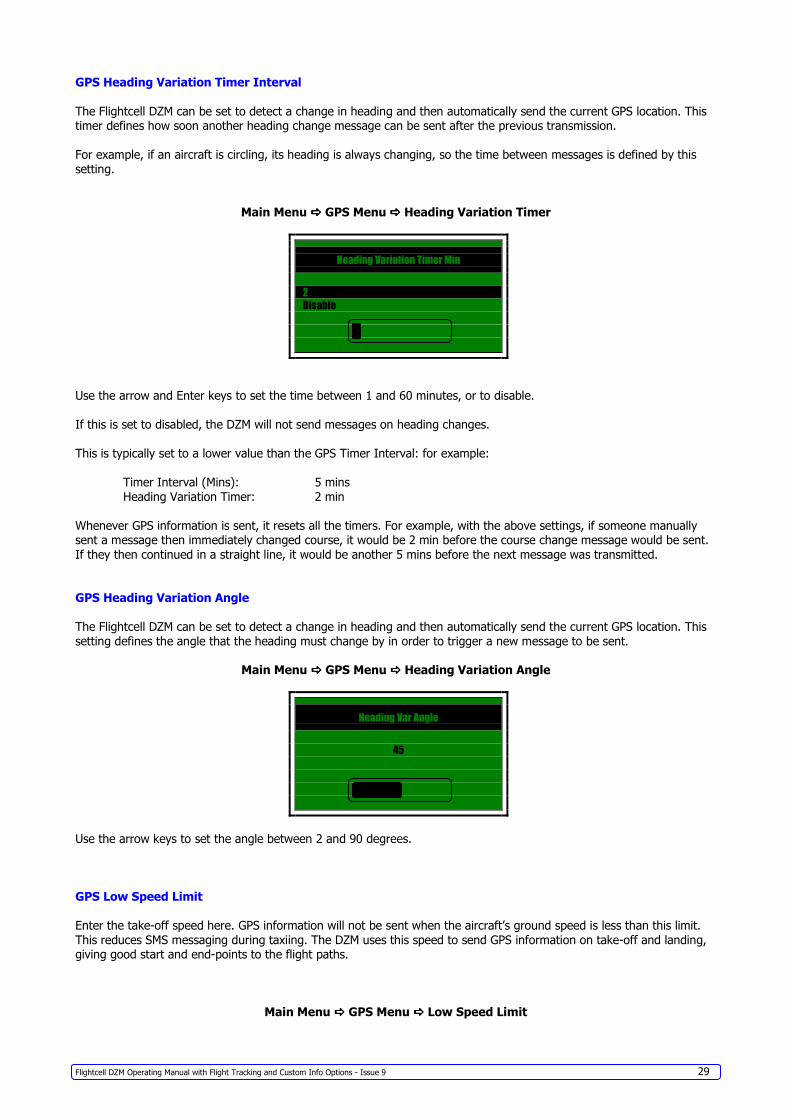
GPS Heading Variation Timer Interval
The Flightcell DZM can be set to detect a change in heading and then automatically send the current GPS location. This timer defines how soon another heading change message can be sent after the previous transmission.
For example, if an aircraft is circling, its heading is always changing, so the time between messages is defined by this
setting.
Main Menu ���� GPS Menu ���� Heading Variation Timer
Heading Variation Timer Min
2
Disable
Use the arrow and Enter keys to set the time between 1 and 60 minutes, or to disable.
If this is set to disabled, the DZM will not send messages on heading changes.
This is typically set to a lower value than the GPS Timer Interval: for example:
Timer Interval (Mins): 5 mins
Heading Variation Timer: 2 min
Whenever GPS information is sent, it resets all the timers. For example, with the above settings, if someone manually sent a message then immediately changed course, it would be 2 min before the course change message would be sent.
If they then continued in a straight line, it would be another 5 mins before the next message was transmitted.
GPS Heading Variation Angle
The Flightcell DZM can be set to detect a change in heading and then automatically send the current GPS location. This
setting defines the angle that the heading must change by in order to trigger a new message to be sent.
Main Menu ���� GPS Menu ���� Heading Variation Angle
Heading Var Angle
45
Use the arrow keys to set the angle between 2 and 90 degrees.
GPS Low Speed Limit
Enter the take-off speed here. GPS information will not be sent when the aircraft’s ground speed is less than this limit.
This reduces SMS messaging during taxiing. The DZM uses this speed to send GPS information on take-off and landing, giving good start and end-points to the flight paths.
Main Menu ���� GPS Menu ���� Low Speed Limit
Flightcell DZM Operating Manual with Flight Tracking and Custom Info Options - Issue 9 30
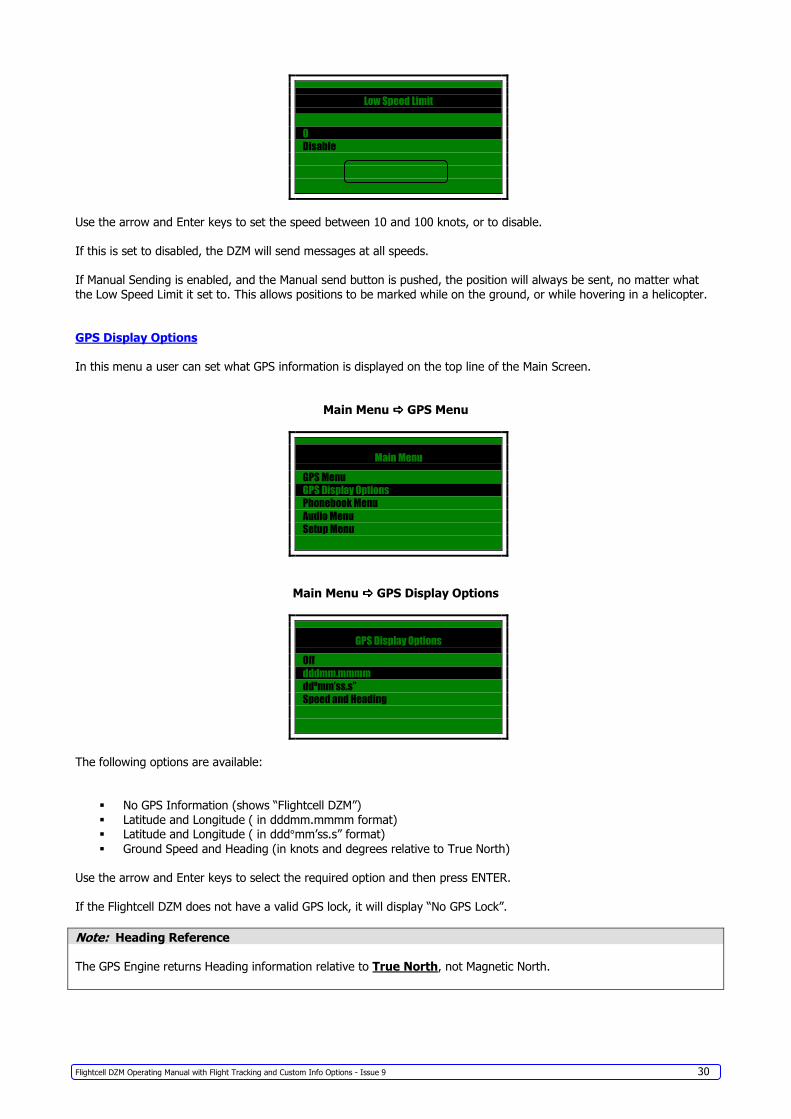
Low Speed Limit
0
Disable
Use the arrow and Enter keys to set the speed between 10 and 100 knots, or to disable.
If this is set to disabled, the DZM will send messages at all speeds.
If Manual Sending is enabled, and the Manual send button is pushed, the position will always be sent, no matter what
the Low Speed Limit it set to. This allows positions to be marked while on the ground, or while hovering in a helicopter.
GPS Display Options
In this menu a user can set what GPS information is displayed on the top line of the Main Screen.
Main Menu ���� GPS Menu
Main Menu
GPS Menu
GPS Display Options
Phonebook Menu
Audio Menu
Setup Menu
Main Menu ���� GPS Display Options
GPS Display Options
Off
dddmm.mmmm
ddºmm’ss.s”
Speed and Heading
The following options are available:
� No GPS Information (shows “Flightcell DZM”)
� Latitude and Longitude ( in dddmm.mmmm format) � Latitude and Longitude ( in ddd°mm’ss.s” format)
� Ground Speed and Heading (in knots and degrees relative to True North)
Use the arrow and Enter keys to select the required option and then press ENTER.
If the Flightcell DZM does not have a valid GPS lock, it will display “No GPS Lock”.
Note: Heading Reference
The GPS Engine returns Heading information relative to True North, not Magnetic North.
Flightcell DZM Operating Manual with Flight Tracking and Custom Info Options - Issue 9 31
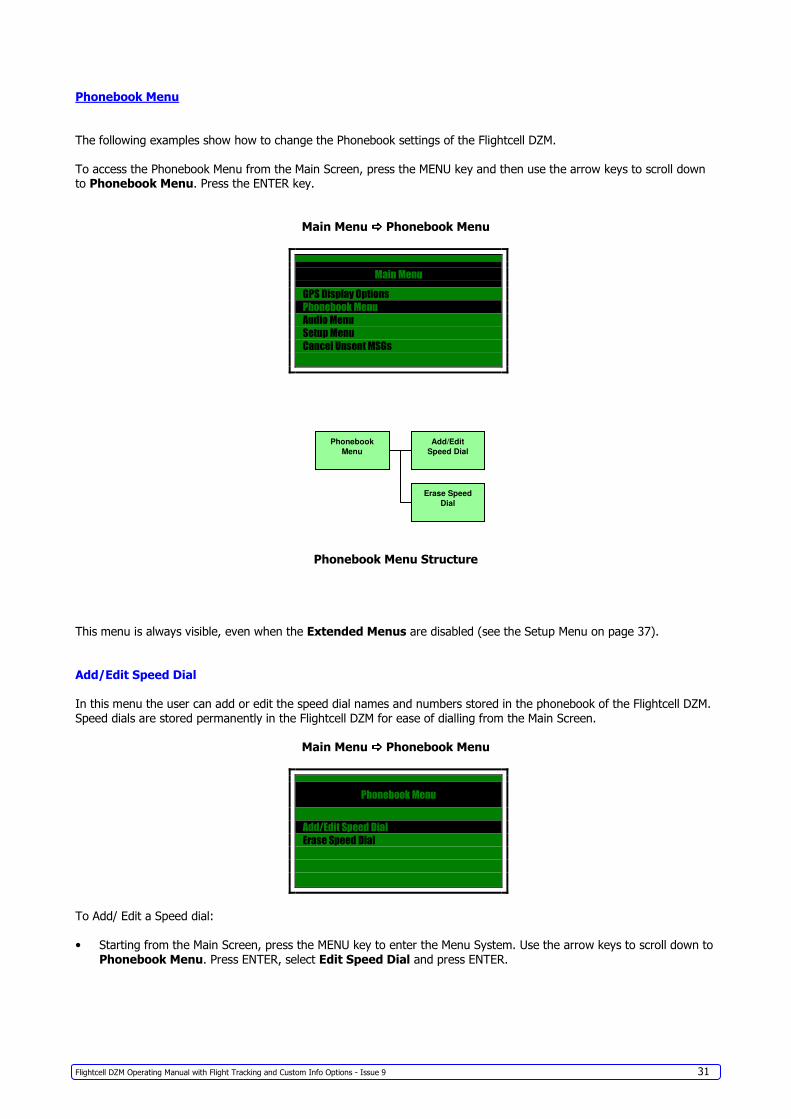
Phonebook Menu
The following examples show how to change the Phonebook settings of the Flightcell DZM.
To access the Phonebook Menu from the Main Screen, press the MENU key and then use the arrow keys to scroll down to Phonebook Menu. Press the ENTER key.
Main Menu ���� Phonebook Menu
Main Menu
GPS Display Options
Phonebook Menu
Audio Menu
Setup Menu
Cancel Unsent MSGs
Phonebook Menu Structure
This menu is always visible, even when the Extended Menus are disabled (see the Setup Menu on page 37).
Add/Edit Speed Dial
In this menu the user can add or edit the speed dial names and numbers stored in the phonebook of the Flightcell DZM.
Speed dials are stored permanently in the Flightcell DZM for ease of dialling from the Main Screen.
Main Menu ���� Phonebook Menu
Phonebook Menu
Add/Edit Speed Dial
Erase Speed Dial
To Add/ Edit a Speed dial:
• Starting from the Main Screen, press the MENU key to enter the Menu System. Use the arrow keys to scroll down to
Flightcell DZM Operating Manual with Flight Tracking and Custom Info Options - Issue 9 32
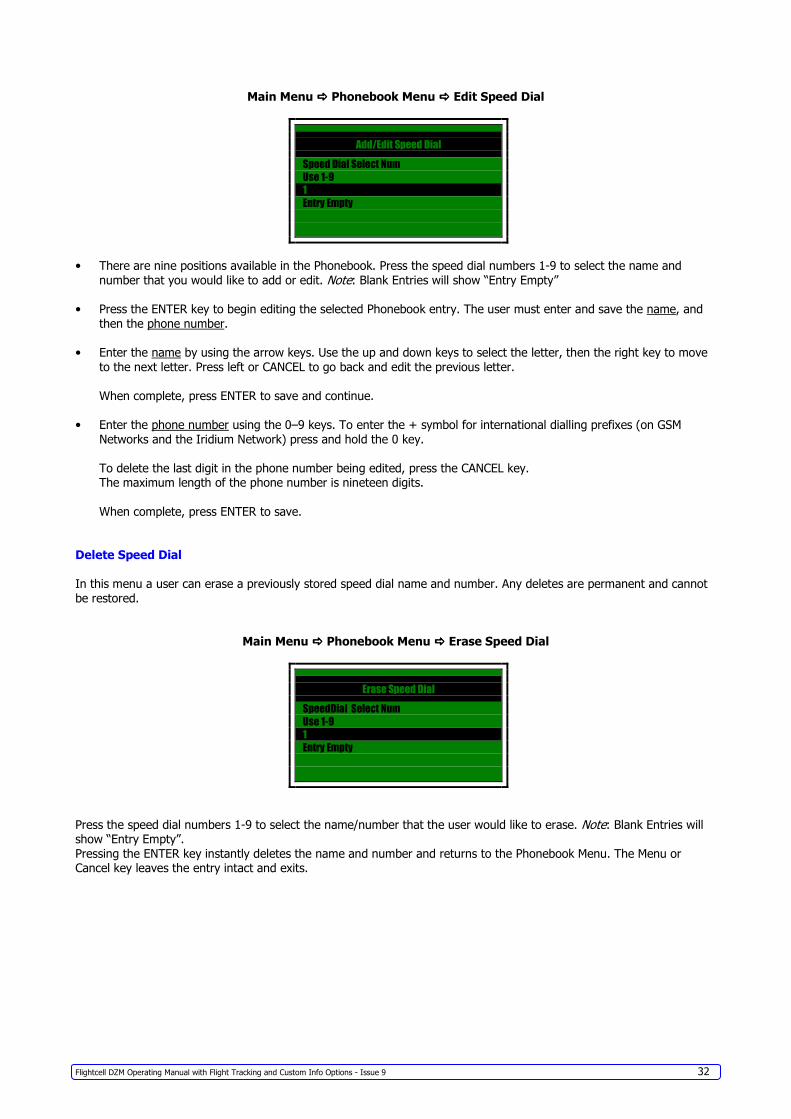
Main Menu ���� Phonebook Menu ���� Edit Speed Dial
Add/Edit Speed Dial
Speed Dial Select Num
Use 1-9
1
Entry Empty
• There are nine positions available in the Phonebook. Press the speed dial numbers 1-9 to select the name and
number that you would like to add or edit. Note: Blank Entries will show “Entry Empty”
• Press the ENTER key to begin editing the selected Phonebook entry. The user must enter and save the name, and
then the phone number.
• Enter the name by using the arrow keys. Use the up and down keys to select the letter, then the right key to move
to the next letter. Press left or CANCEL to go back and edit the previous letter.
When complete, press ENTER to save and continue.
• Enter the phone number using the 0–9 keys. To enter the + symbol for international dialling prefixes (on GSM
Networks and the Iridium Network) press and hold the 0 key.
To delete the last digit in the phone number being edited, press the CANCEL key. The maximum length of the phone number is nineteen digits.
When complete, press ENTER to save.
Delete Speed Dial
In this menu a user can erase a previously stored speed dial name and number. Any deletes are permanent and cannot
be restored.
Main Menu ���� Phonebook Menu ���� Erase Speed Dial
Erase Speed Dial
SpeedDial Select Num
Use 1-9
1
Entry Empty
Press the speed dial numbers 1-9 to select the name/number that the user would like to erase. Note: Blank Entries will show “Entry Empty”.
Pressing the ENTER key instantly deletes the name and number and returns to the Phonebook Menu. The Menu or Cancel key leaves the entry intact and exits.
Flightcell DZM Operating Manual with Flight Tracking and Custom Info Options - Issue 9 33
Audio Menu
This menu is hidden when the Extended Menus are disabled (see the Setup Menu on page 37).
The following examples show how to change the Audio settings of the Flightcell DZM.
Where stated, the Factory Default settings are the most commonly used or considered the optimum settings in most instances.
To access the Audio Menu from the Main Screen, press MENU then use the arrow keys to scroll down to Audio Menu.
Press the ENTER key.
Main Menu ���� Audio Menu
Main Menu
Phonebook Menu
Audio Menu
Setup Menu
Cancel Unsent MSGs
Audio MenuSat Phone
Volume
Cell Phone
Volume
Sat Phone
MIC Gain
Cell Phone MIC Gain
ICS Transmit
Level
ICS Receive
Level
ICS Sidetone
Audio Menu Structure
Flightcell DZM Operating Manual with Flight Tracking and Custom Info Options - Issue 9 34
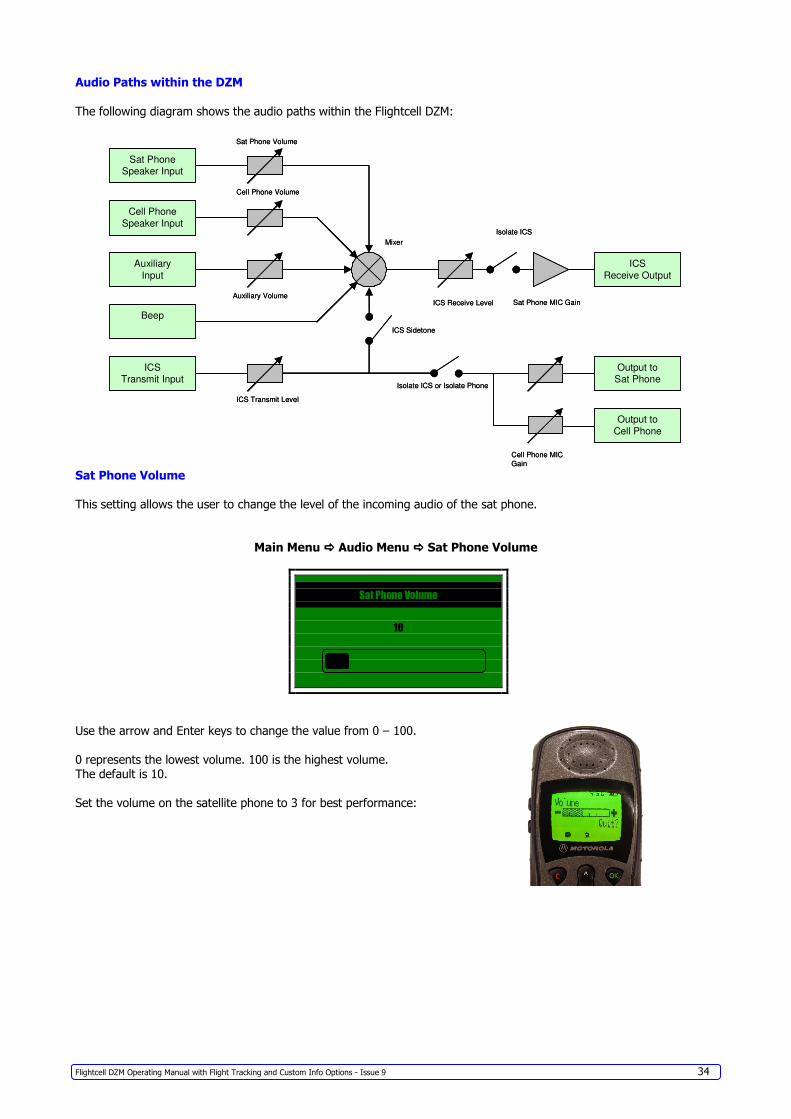
Audio Paths within the DZM
The following diagram shows the audio paths within the Flightcell DZM:
Sat PhoneSpeaker Input
Cell Phone
Speaker Input
Auxiliary
Input
Beep
ICSTransmit Input
ICS
Receive Output
Output toSat Phone
Output to
Cell Phone
Sat Phone Volume
ICS Transmit Level
Sat Phone MIC Gain
Mixer
Auxiliary Volume
Cell Phone Volume
Cell Phone MIC
Gain
ICS Sidetone
Isolate ICS or Isolate Phone
ICS Receive Level
Isolate ICS
Sat Phone Volume
This setting allows the user to change the level of the incoming audio of the sat phone.
Main Menu ���� Audio Menu ���� Sat Phone Volume
Sat Phone Volume
10
Use the arrow and Enter keys to change the value from 0 – 100.
0 represents the lowest volume. 100 is the highest volume. The default is 10.
Set the volume on the satellite phone to 3 for best performance:
Flightcell DZM Operating Manual with Flight Tracking and Custom Info Options - Issue 9 35
Sat Phone MIC Gain
This setting allows the user to change the gain of the audio going out to the sat phone.
Main Menu ���� Audio Menu ���� Sat Phone MIC Gain
Sat Phone MIC Gain
80
Use the arrow and Enter keys to change the value from 0 – 100.
0 represents the lowest gain. 100 is the highest gain. The Default is 80.
Cell Phone Volume
This setting allows the user to change the level of the incoming audio of the cell phone.
Main Menu ���� Audio Menu ���� Cell Phone Volume
Cell Phone Volume
16
Use the arrow and Enter keys to change the value from 0 – 100.
0 Represents the lowest volume. 100 is the highest volume. The default is 16.
Cell Phone MIC Gain
This setting allows the user to change the gain of the audio going out to the Cell Phone.
Main Menu ���� Audio Menu ���� Cell Phone MIC Gain
Cell Phone MIC Gain
80
Use the arrow and Enter keys to change the value from 0 – 100.
0 represents the lowest gain. 100 is the lowest gain. The default is 80.
Flightcell DZM Operating Manual with Flight Tracking and Custom Info Options - Issue 9 36
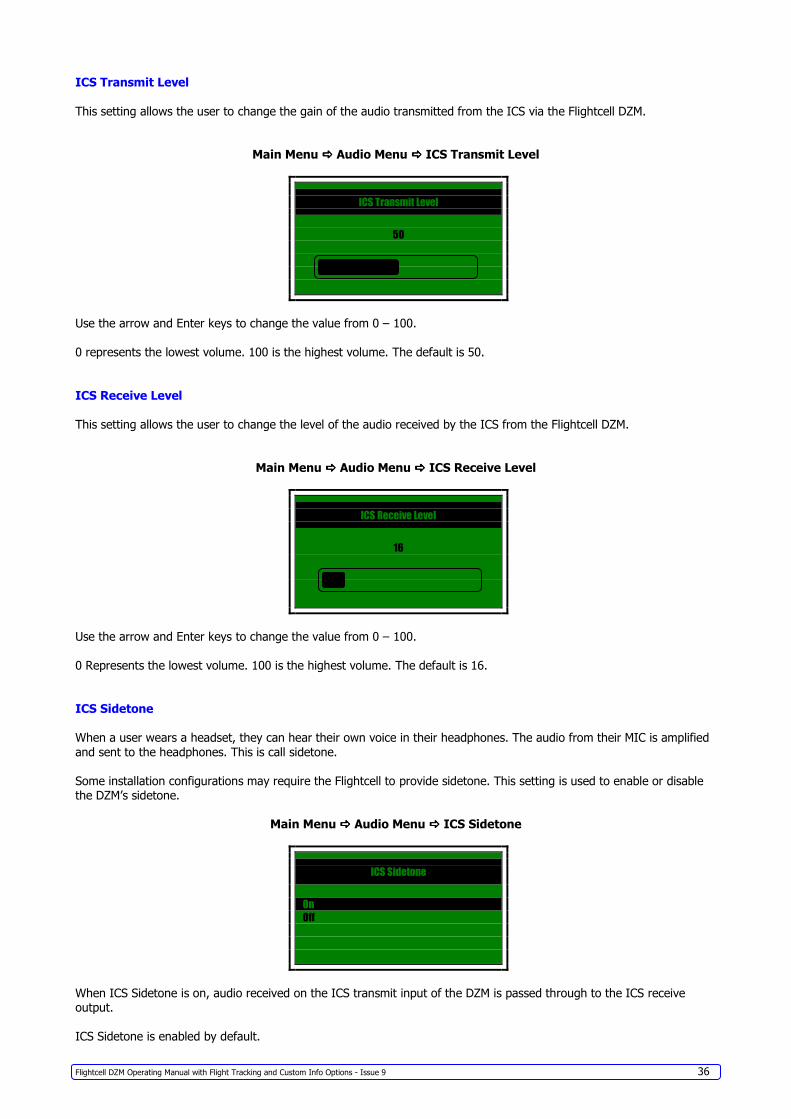
ICS Transmit Level
This setting allows the user to change the gain of the audio transmitted from the ICS via the Flightcell DZM.
Main Menu ���� Audio Menu ���� ICS Transmit Level
ICS Transmit Level
50
Use the arrow and Enter keys to change the value from 0 – 100.
0 represents the lowest volume. 100 is the highest volume. The default is 50.
ICS Receive Level
This setting allows the user to change the level of the audio received by the ICS from the Flightcell DZM.
Main Menu ���� Audio Menu ���� ICS Receive Level
ICS Receive Level
16
Use the arrow and Enter keys to change the value from 0 – 100.
0 Represents the lowest volume. 100 is the highest volume. The default is 16.
ICS Sidetone
When a user wears a headset, they can hear their own voice in their headphones. The audio from their MIC is amplified
and sent to the headphones. This is call sidetone.
Some installation configurations may require the Flightcell to provide sidetone. This setting is used to enable or disable the DZM’s sidetone.
Main Menu ���� Audio Menu ���� ICS Sidetone
ICS Sidetone
On
Off
When ICS Sidetone is on, audio received on the ICS transmit input of the DZM is passed through to the ICS receive output.
ICS Sidetone is enabled by default.
Flightcell DZM Operating Manual with Flight Tracking and Custom Info Options - Issue 9 37
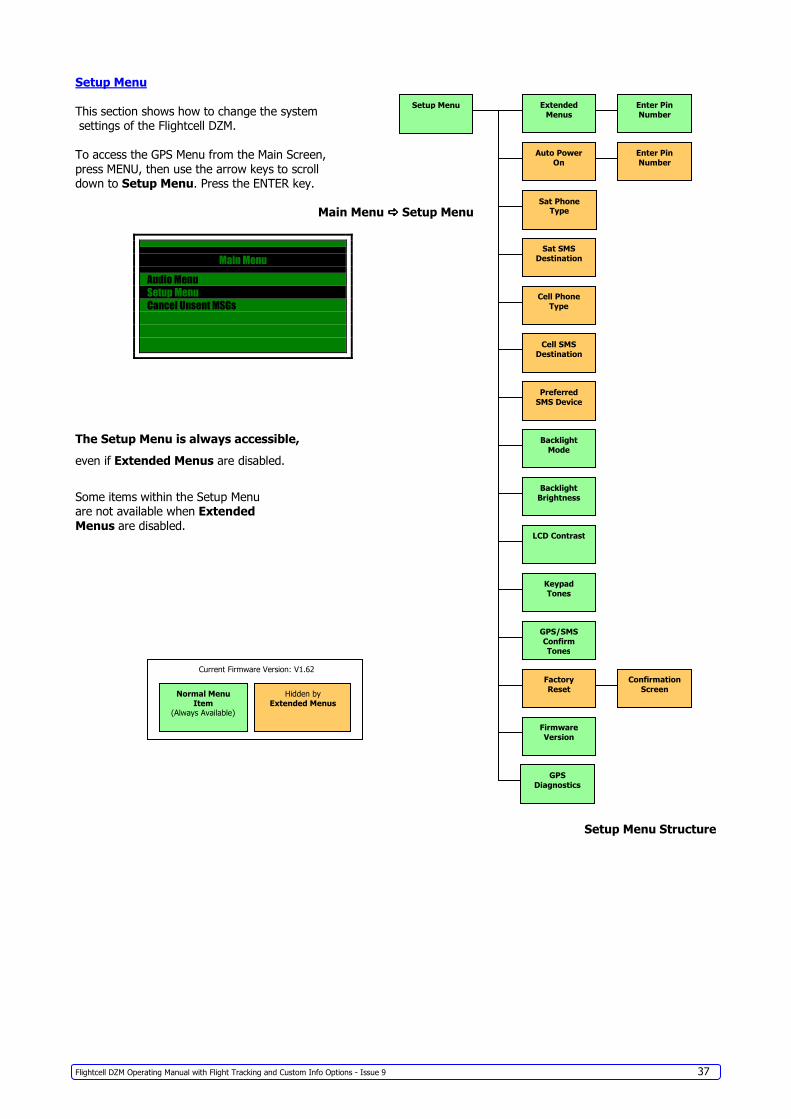
Setup Menu
This section shows how to change the system settings of the Flightcell DZM.
To access the GPS Menu from the Main Screen,
press MENU, then use the arrow keys to scroll down to Setup Menu. Press the ENTER key.
Main Menu ���� Setup Menu
Main Menu
Audio Menu
Setup Menu
Cancel Unsent MSGs
The Setup Menu is always accessible,
even if Extended Menus are disabled.
Some items within the Setup Menu are not available when Extended
Menus are disabled.
Setup Menu Structure
Hidden by Extended Menus
Normal Menu Item
(Always Available)
Current Firmware Version: V1.62
Keypad
Tones
Factory
Reset
Sat SMS
Destination
Cell SMS
Destination
Sat Phone Type
Cell Phone
Type
Backlight
Mode
Backlight
Brightness
Firmware
Version
LCD Contrast
Preferred
SMS Device
GPS
Diagnostics
GPS/SMS
Confirm Tones
Confirmation
Screen
Enter Pin
Number
Auto Power
On
Enter Pin
Number
Setup Menu Extended
Menus
Flightcell DZM Operating Manual with Flight Tracking and Custom Info Options - Issue 9 38
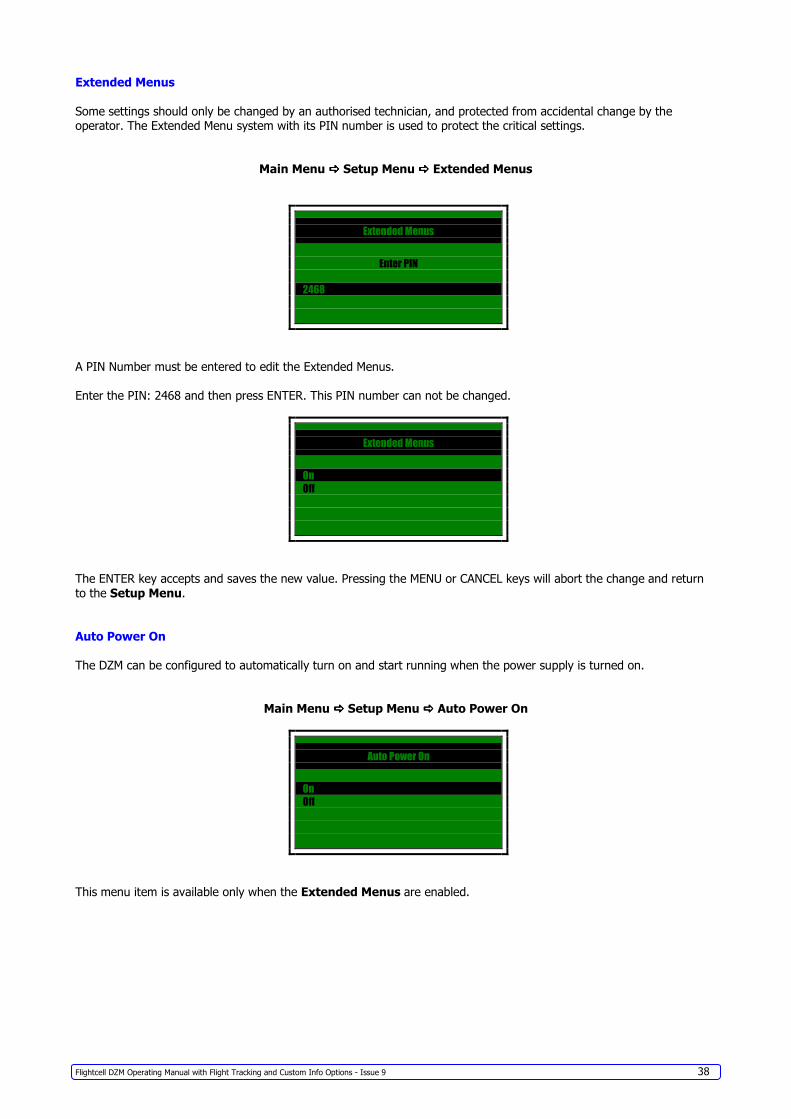
Extended Menus
Some settings should only be changed by an authorised technician, and protected from accidental change by the operator. The Extended Menu system with its PIN number is used to protect the critical settings.
Main Menu ���� Setup Menu ���� Extended Menus
Extended Menus
Enter PIN
2468
A PIN Number must be entered to edit the Extended Menus.
Enter the PIN: 2468 and then press ENTER. This PIN number can not be changed.
Extended Menus
On
Off
The ENTER key accepts and saves the new value. Pressing the MENU or CANCEL keys will abort the change and return
to the Setup Menu.
Auto Power On
The DZM can be configured to automatically turn on and start running when the power supply is turned on.
Main Menu ���� Setup Menu ���� Auto Power On
Auto Power On
On
Off
This menu item is available only when the Extended Menus are enabled.
Flightcell DZM Operating Manual with Flight Tracking and Custom Info Options - Issue 9 39
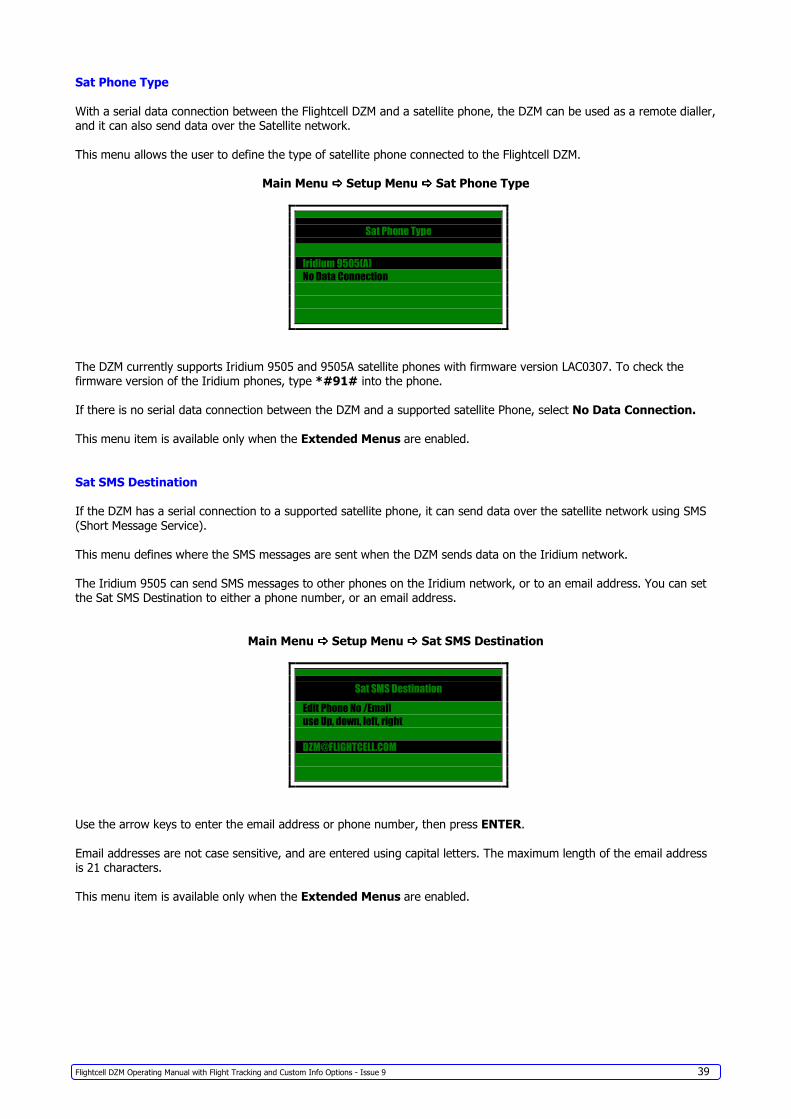
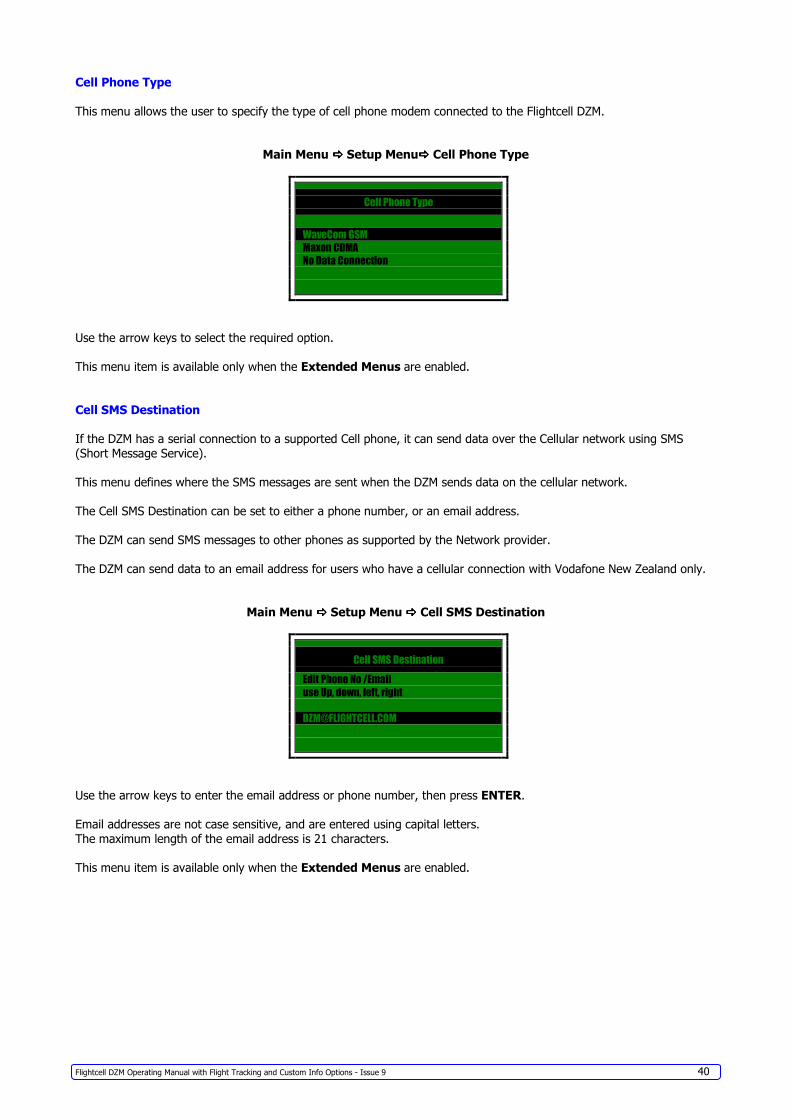
Sat Phone Type
With a serial data connection between the Flightcell DZM and a satellite phone, the DZM can be used as a remote dialler, and it can also send data over the Satellite network.
This menu allows the user to define the type of satellite phone connected to the Flightcell DZM.
Main Menu ���� Setup Menu ���� Sat Phone Type
Sat Phone Type
Iridium 9505(A)
No Data Connection
The DZM currently supports Iridium 9505 and 9505A satellite phones with firmware version LAC0307. To check the firmware version of the Iridium phones, type *#91# into the phone.
If there is no serial data connection between the DZM and a supported satellite Phone, select No Data Connection.
This menu item is available only when the Extended Menus are enabled.
Sat SMS Destination
If the DZM has a serial connection to a supported satellite phone, it can send data over the satellite network using SMS
(Short Message Service).
This menu defines where the SMS messages are sent when the DZM sends data on the Iridium network.
The Iridium 9505 can send SMS messages to other phones on the Iridium network, or to an email address. You can set the Sat SMS Destination to either a phone number, or an email address.
Main Menu ���� Setup Menu ���� Sat SMS Destination
Use the arrow keys to enter the email address or phone number, then press ENTER.
Email addresses are not case sensitive, and are entered using capital letters.
The maximum length of the email address is 21 characters.
This menu item is available only when the Extended Menus are enabled.
Flightcell DZM Operating Manual with Flight Tracking and Custom Info Options - Issue 9 41
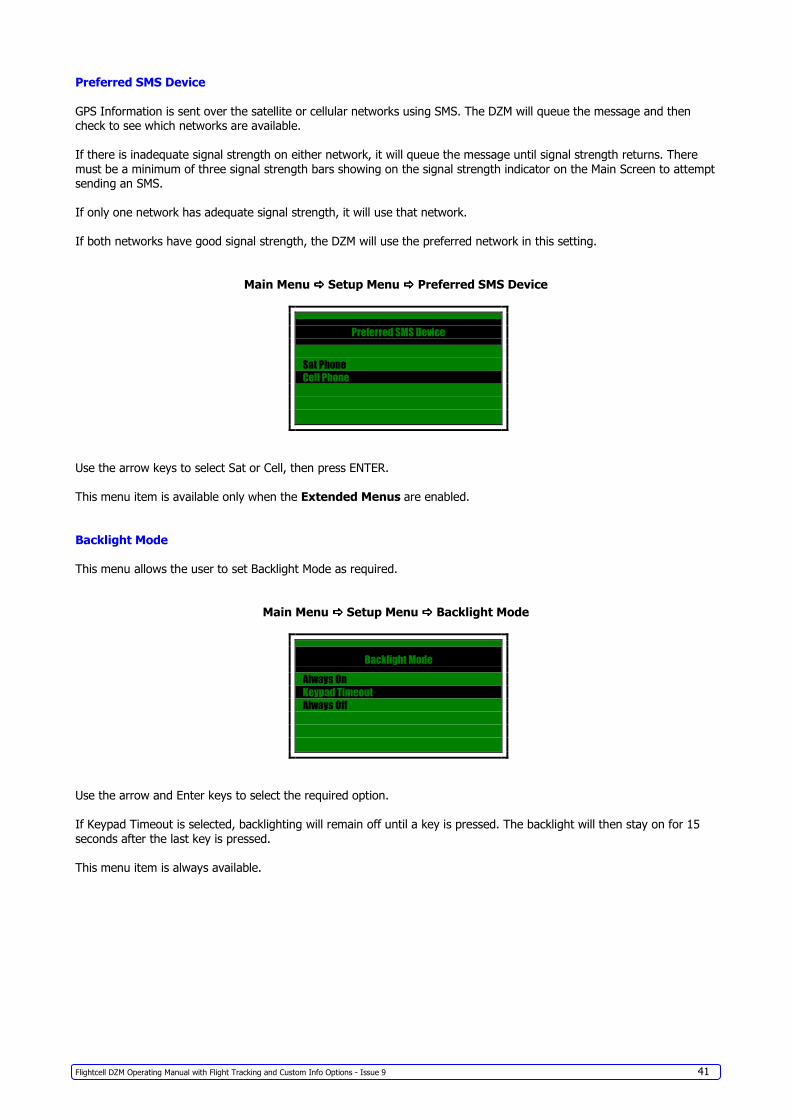
Preferred SMS Device
GPS Information is sent over the satellite or cellular networks using SMS. The DZM will queue the message and then check to see which networks are available.
If there is inadequate signal strength on either network, it will queue the message until signal strength returns. There
must be a minimum of three signal strength bars showing on the signal strength indicator on the Main Screen to attempt sending an SMS.
If only one network has adequate signal strength, it will use that network.
If both networks have good signal strength, the DZM will use the preferred network in this setting.
Main Menu ���� Setup Menu ���� Preferred SMS Device
Preferred SMS Device
Sat Phone
Cell Phone
Use the arrow keys to select Sat or Cell, then press ENTER.
This menu item is available only when the Extended Menus are enabled.
Backlight Mode
This menu allows the user to set Backlight Mode as required.
Main Menu ���� Setup Menu ���� Backlight Mode
Backlight Mode
Always On
Keypad Timeout
Always Off
Use the arrow and Enter keys to select the required option.
If Keypad Timeout is selected, backlighting will remain off until a key is pressed. The backlight will then stay on for 15
seconds after the last key is pressed.
This menu item is always available.
Flightcell DZM Operating Manual with Flight Tracking and Custom Info Options - Issue 9 42
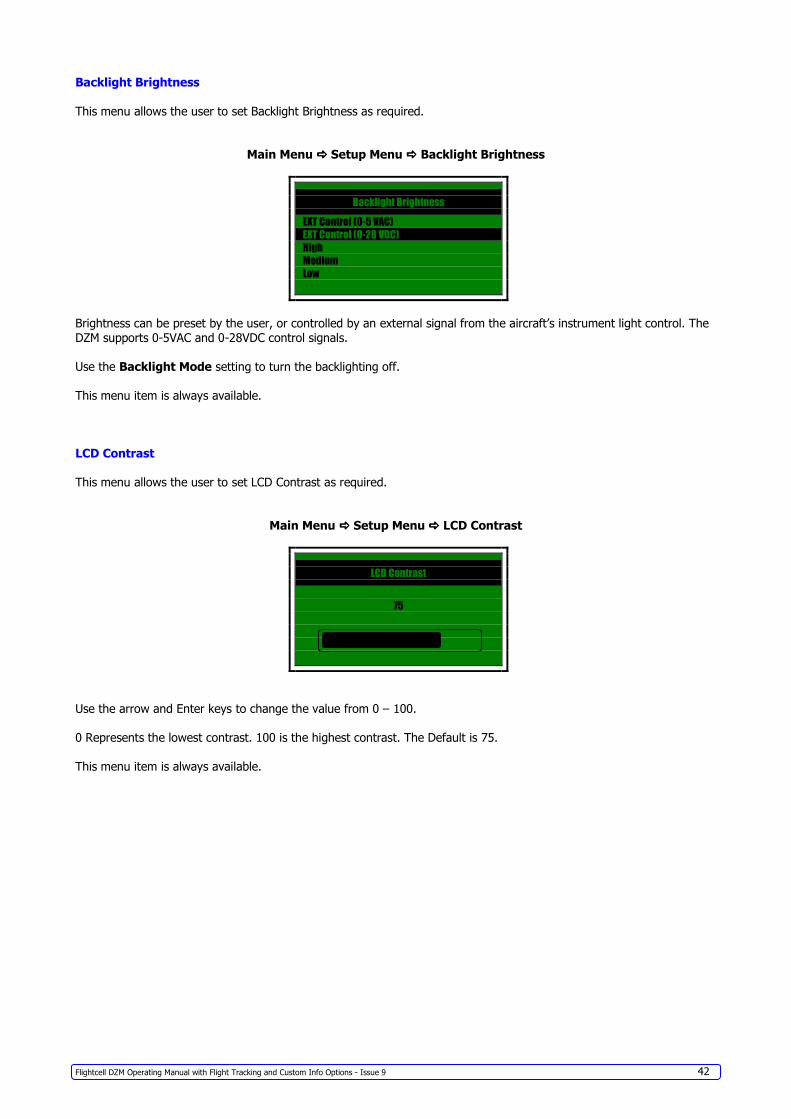
Backlight Brightness
This menu allows the user to set Backlight Brightness as required.
Main Menu ���� Setup Menu ���� Backlight Brightness
Backlight Brightness
EXT Control (0-5 VAC)
EXT Control (0-28 VDC)
High
Medium
Low
Brightness can be preset by the user, or controlled by an external signal from the aircraft’s instrument light control. The
DZM supports 0-5VAC and 0-28VDC control signals.
Use the Backlight Mode setting to turn the backlighting off.
This menu item is always available.
LCD Contrast
This menu allows the user to set LCD Contrast as required.
Main Menu ���� Setup Menu ���� LCD Contrast
LCD Contrast
75
Use the arrow and Enter keys to change the value from 0 – 100.
0 Represents the lowest contrast. 100 is the highest contrast. The Default is 75.
This menu item is always available.
Flightcell DZM Operating Manual with Flight Tracking and Custom Info Options - Issue 9 43
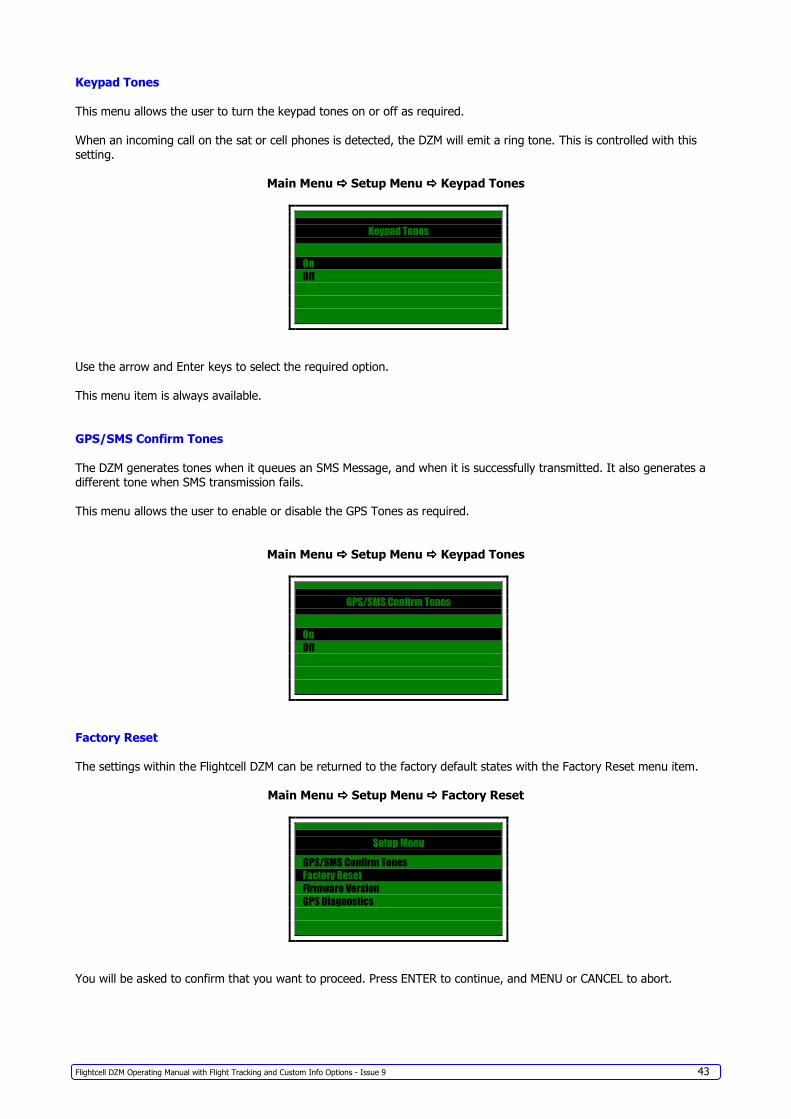
Keypad Tones
This menu allows the user to turn the keypad tones on or off as required.
When an incoming call on the sat or cell phones is detected, the DZM will emit a ring tone. This is controlled with this setting.
Main Menu ���� Setup Menu ���� Keypad Tones
Keypad Tones
On
Off
Use the arrow and Enter keys to select the required option.
This menu item is always available.
GPS/SMS Confirm Tones
The DZM generates tones when it queues an SMS Message, and when it is successfully transmitted. It also generates a different tone when SMS transmission fails.
This menu allows the user to enable or disable the GPS Tones as required.
Main Menu ���� Setup Menu ���� Keypad Tones
GPS/SMS Confirm Tones
On
Off
Factory Reset
The settings within the Flightcell DZM can be returned to the factory default states with the Factory Reset menu item.
Main Menu ���� Setup Menu ���� Factory Reset
Setup Menu
GPS/SMS Confirm Tones
Factory Reset
Firmware Version
GPS Diagnostics
You will be asked to confirm that you want to proceed. Press ENTER to continue, and MENU or CANCEL to abort.
Flightcell DZM Operating Manual with Flight Tracking and Custom Info Options - Issue 9 44
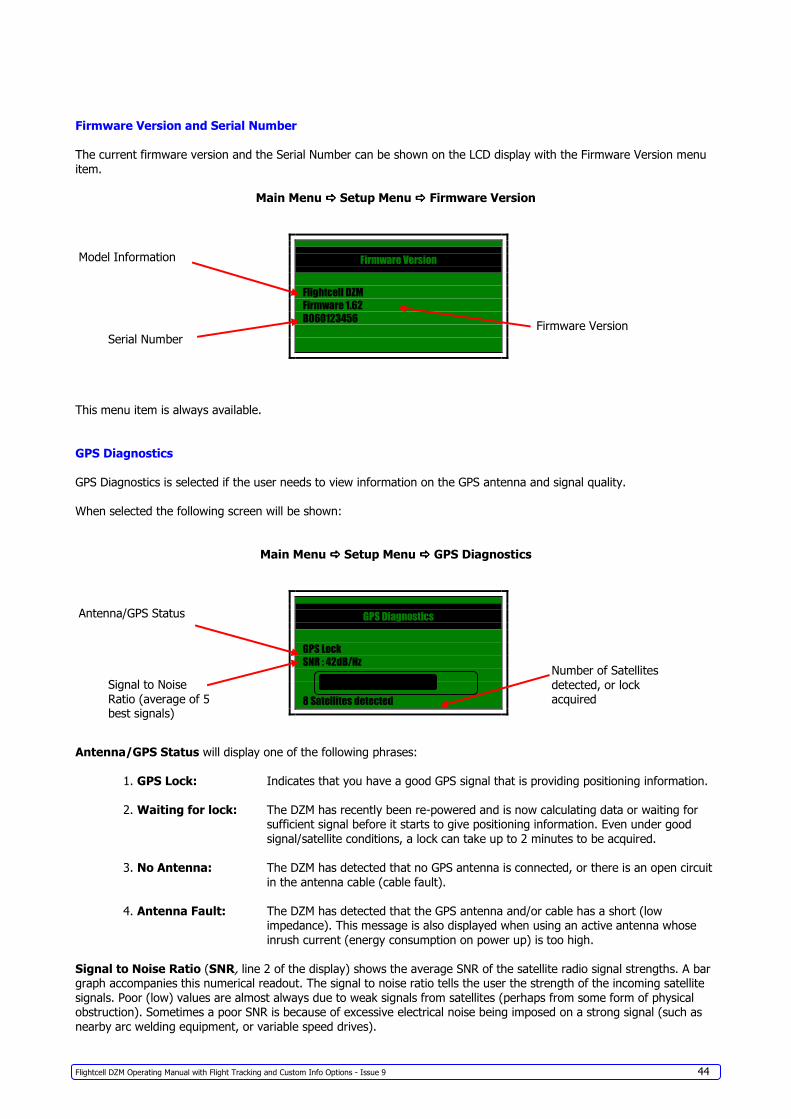
Firmware Version and Serial Number
The current firmware version and the Serial Number can be shown on the LCD display with the Firmware Version menu
item.
Main Menu ���� Setup Menu ���� Firmware Version
Firmware Version
Flightcell DZM
Firmware 1.62
B060123456
This menu item is always available.
GPS Diagnostics
GPS Diagnostics is selected if the user needs to view information on the GPS antenna and signal quality.
When selected the following screen will be shown:
Main Menu ���� Setup Menu ���� GPS Diagnostics
GPS Diagnostics
GPS Lock
SNR : 42dB/Hz
8 Satellites detected
Antenna/GPS Status will display one of the following phrases:
1. GPS Lock: Indicates that you have a good GPS signal that is providing positioning information.
2. Waiting for lock: The DZM has recently been re-powered and is now calculating data or waiting for sufficient signal before it starts to give positioning information. Even under good
signal/satellite conditions, a lock can take up to 2 minutes to be acquired.
3. No Antenna: The DZM has detected that no GPS antenna is connected, or there is an open circuit
in the antenna cable (cable fault).
4. Antenna Fault: The DZM has detected that the GPS antenna and/or cable has a short (low impedance). This message is also displayed when using an active antenna whose
inrush current (energy consumption on power up) is too high.
Signal to Noise Ratio (SNR, line 2 of the display) shows the average SNR of the satellite radio signal strengths. A bar graph accompanies this numerical readout. The signal to noise ratio tells the user the strength of the incoming satellite
signals. Poor (low) values are almost always due to weak signals from satellites (perhaps from some form of physical obstruction). Sometimes a poor SNR is because of excessive electrical noise being imposed on a strong signal (such as
nearby arc welding equipment, or variable speed drives).
Serial Number Firmware Version
Model Information
Signal to Noise
Ratio (average of 5 best signals)
Number of Satellites
detected, or lock acquired
Antenna/GPS Status
Flightcell DZM Operating Manual with Flight Tracking and Custom Info Options - Issue 9 45
A normal SNR value is around 40db/Hz, a GPS lock is not normally obtainable until this value is above 30db/Hz.
The SNR displayed here is the average of the SNR from the top 5 best signals (or average of all visible satellites if there
are 5 or fewer visible satellites). It is possible that this number can be high and the DZM is unable to get a GPS lock because there are not enough visible satellites (4 is the minimum). You also may not get a lock if the visible satellites
have a good signal, but are not in suitably strategic locations in order to acquire a lock (ie they are sitting close the horizon).
Line 3 of this menu shows you how many satellites are currently visible to the DZM, or if a GPS lock has been acquired,
and how many GPS satellites are being used to calculate your position (in either case, the more satellites the better). There are two possibilities that will be displayed here:
1. x Satellites Used: This is display when you already have a lock. The greater the number of
satellites being used to calculate your position the more accurate a position you get. The minimum is 4 satellites.
2. x Satellites Detected: During the time when the DZM is trying to acquire a GPS lock it will show
you how many satellites signal’s are being picked up by the DZM. The DZM
requires a minimum of 4 satellites with good signal (at least 30db/Hz each) to get a lock.
Note: It is unlikely that you will get a GPS lock with the antenna indoors. Ensure the antenna has a good
view of the sky.
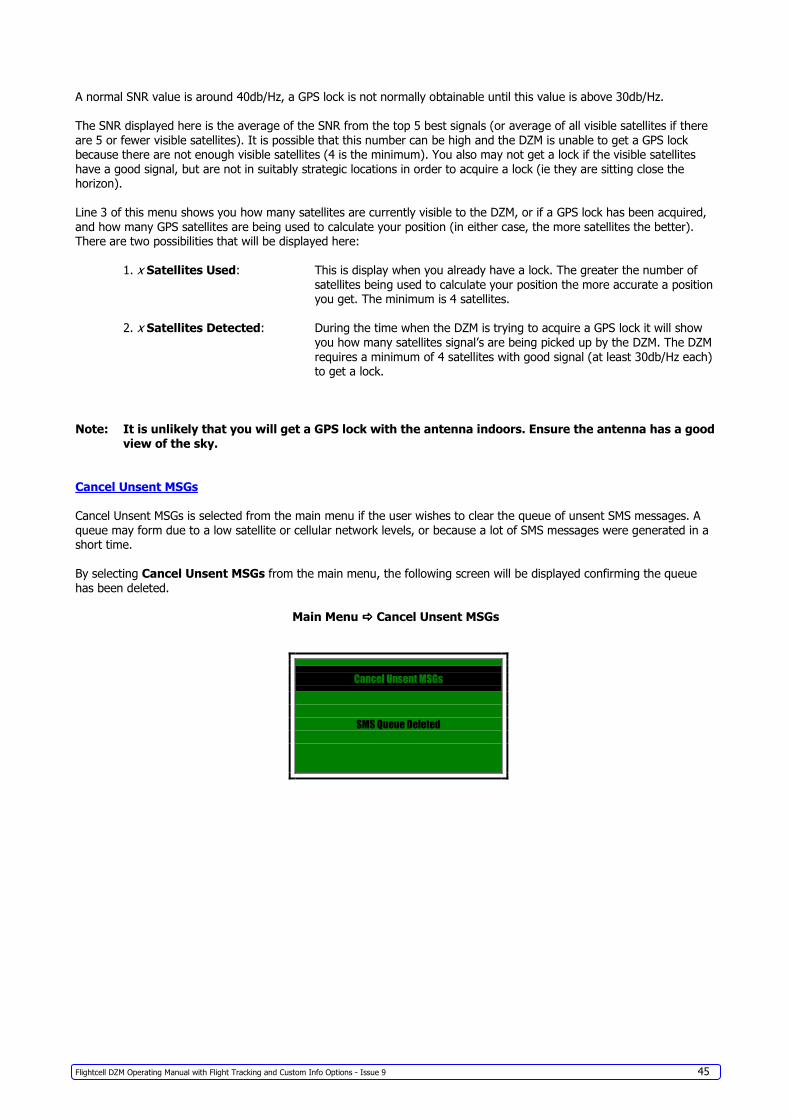
Cancel Unsent MSGs
Cancel Unsent MSGs is selected from the main menu if the user wishes to clear the queue of unsent SMS messages. A
queue may form due to a low satellite or cellular network levels, or because a lot of SMS messages were generated in a short time.
By selecting Cancel Unsent MSGs from the main menu, the following screen will be displayed confirming the queue
has been deleted.
Main Menu ���� Cancel Unsent MSGs
Cancel Unsent MSGs
SMS Queue Deleted
Flightcell DZM Operating Manual with Flight Tracking and Custom Info Options - Issue 9 46
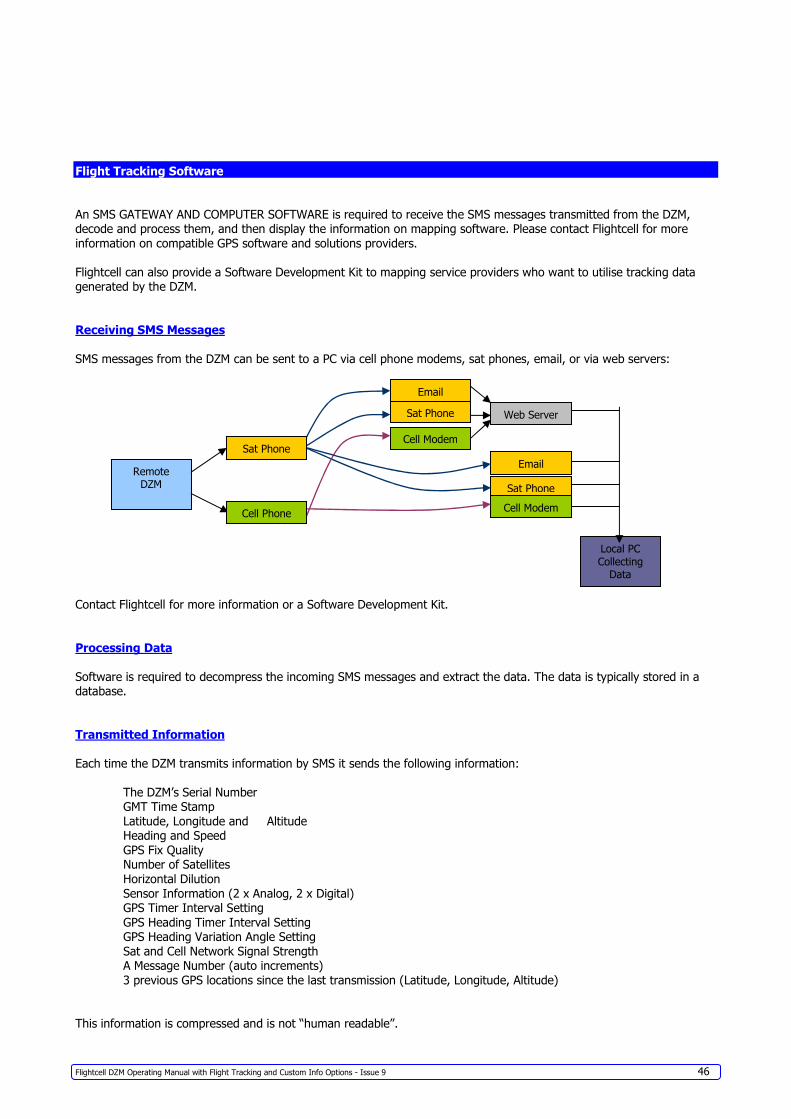
Flight Tracking Software
An SMS GATEWAY AND COMPUTER SOFTWARE is required to receive the SMS messages transmitted from the DZM, decode and process them, and then display the information on mapping software. Please contact Flightcell for more
information on compatible GPS software and solutions providers.
Flightcell can also provide a Software Development Kit to mapping service providers who want to utilise tracking data generated by the DZM.
Receiving SMS Messages
SMS messages from the DZM can be sent to a PC via cell phone modems, sat phones, email, or via web servers:
Contact Flightcell for more information or a Software Development Kit.
Processing Data
Software is required to decompress the incoming SMS messages and extract the data. The data is typically stored in a database.
Transmitted Information
Each time the DZM transmits information by SMS it sends the following information:
The DZM’s Serial Number GMT Time Stamp
Latitude, Longitude and Altitude Heading and Speed
GPS Fix Quality Number of Satellites
Horizontal Dilution
Sensor Information (2 x Analog, 2 x Digital) GPS Timer Interval Setting
Sat and Cell Network Signal Strength A Message Number (auto increments)
3 previous GPS locations since the last transmission (Latitude, Longitude, Altitude)
This information is compressed and is not “human readable”.
Local PC Collecting Data
Remote DZM
Email
Web Server Sat Phone
Cell Modem
Email
Sat Phone
Cell Modem Cell Phone
Sat Phone
Flightcell DZM Operating Manual with Flight Tracking and Custom Info Options - Issue 9 47
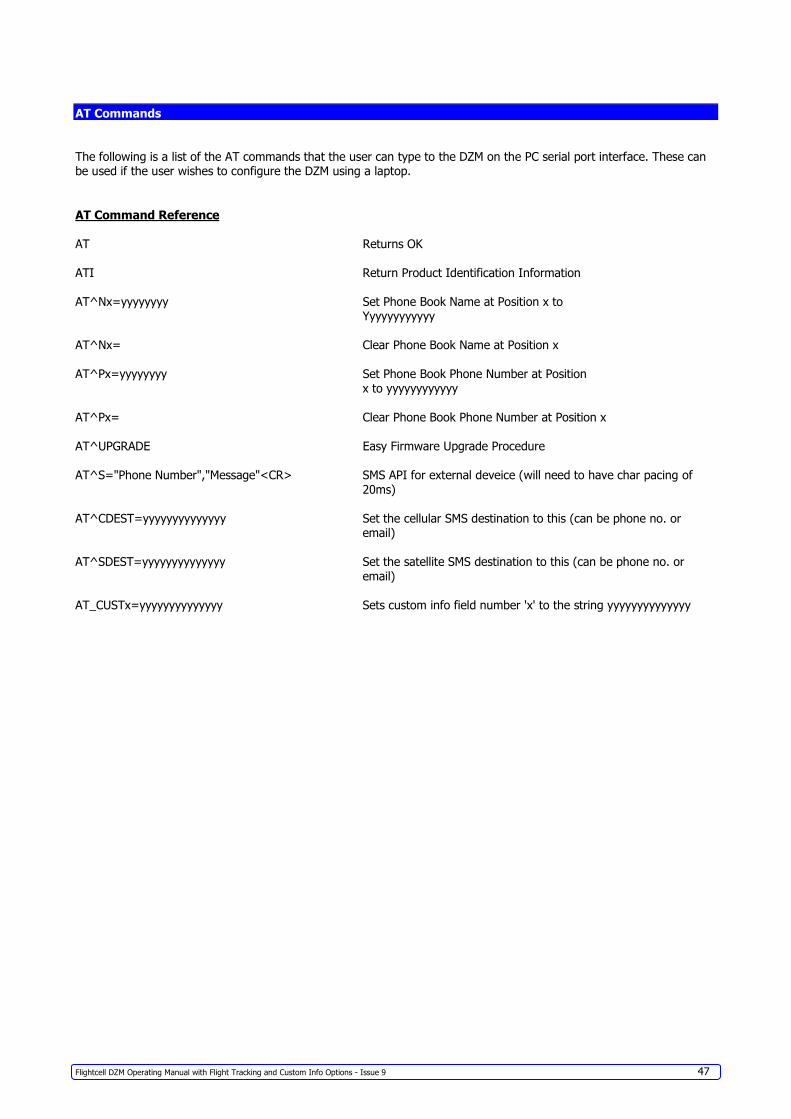
AT Commands
The following is a list of the AT commands that the user can type to the DZM on the PC serial port interface. These can be used if the user wishes to configure the DZM using a laptop.
AT Command Reference
AT Returns OK
ATI Return Product Identification Information
AT^Nx=yyyyyyyy Set Phone Book Name at Position x to Yyyyyyyyyyyy
AT^Nx= Clear Phone Book Name at Position x
AT^Px=yyyyyyyy Set Phone Book Phone Number at Position
x to yyyyyyyyyyyy
AT^Px= Clear Phone Book Phone Number at Position x
AT^UPGRADE Easy Firmware Upgrade Procedure
AT^S="Phone Number","Message"<CR> SMS API for external deveice (will need to have char pacing of
20ms)
AT^CDEST=yyyyyyyyyyyyyy Set the cellular SMS destination to this (can be phone no. or email)
AT^SDEST=yyyyyyyyyyyyyy Set the satellite SMS destination to this (can be phone no. or
email)
AT_CUSTx=yyyyyyyyyyyyyy Sets custom info field number 'x' to the string yyyyyyyyyyyyyy
Flightcell DZM Operating Manual with Flight Tracking and Custom Info Options - Issue 9 48
User Notes
Satphone Power Cancel Unsent SMS GPS Display
Options GPS Menu Power Off Phonebook Menu Setup Menu Audio Menu Auxiliary Volume Main Menu


![ON DIFFERENTIAL OPERATORS AND AUTOMORPHIC FORMS · 1966] ON DIFFERENTIAL OPERATORS AND AUTOMORPHIC FORMS 337 3. Hereafter the operator dm/dzm will be denoted by Lmz, or Lm when it](https://static.documents.pub/doc/80x56/5f94df6bad608d49e25b364f/on-differential-operators-and-automorphic-1966-on-differential-operators-and-automorphic.jpg)


