Claris Corporation5201 Patrick Henry DriveSanta Clara, California 95054
http://www.claris.com
Claris, ClarisWorks, and FileMaker are trademarks of Claris Corporation, registered in the U.S. and other countries, and Claris Home Page is a trademark of Claris Corporation.
Apple, AppleTalk, Mac, Macintosh, and MacTCP are trademarks of Apple Computer, Inc., registered in the U.S. and other countries. All other trademarks are the property of their respective owners.
This software is based in part on the work of the Independent JPEG group.
Mention of third party companies and products is for informational purposes only and constitutes neither an endorsement nor a recommendation.
All persons and companies listed in the examples are purely fictitious and any resemblance to existing persons and companies is purely coincidental.
III
Contents
Chapter 1: Installing FileMaker Pro
About this guide 1-1Registration and customer support 1-1What you need to install FileMaker Pro 1-2
Minimum hardware and software requirements 1-2Networking requirements 1-2Web publishing requirements 1-3Requirements for advanced features 1-3
Before you begin 1-4Installing with Windows 95 or Windows NT 4.0 1-4
Typical installation 1-6Compact installation or Custom installation 1-8Uninstalling FileMaker Pro for Windows 95 or Windows NT 4.0 1-11
Installing with Windows 3.1, Windows for Workgroups, or Windows NT 3.51 1-11
Typical installation 1-11Compact installation or Custom installation 1-11Uninstalling FileMaker Pro for Windows 3.1, Windows for Workgroups, or Windows NT 3.51 1-12
Updating your User Dictionary 1-12Where files are stored on your hard disk 1-12
FileMaker Pro 4.0 folder 1-13Windows System Directory folder 1-16
Adjusting the FileMaker Pro cache 1-16Changing the cache size 1-17
Adjusting network software 1-17Changing the network protocol 1-18Changing the frame type 1-19
Opening files from previous versions 1-21Where to go from here 1-22
Chapter 2: New features in FileMaker Pro
Web publishing capabilities 2-1Instant Web Publishing 2-1Custom Web Publishing 2-2
IV
FileMaker Pro Installation and New Features Guide
New Internet features 2-2GIF and JPEG support 2-2Export to an HTML table 2-2Send Mail script step 2-2URL support 2-2Open URL script step 2-2
Expanded Sort and Find options 2-3New calculation functions 2-3Layout and interface enhancements 2-3Excel import 2-3IntelliMouse support for Windows 95 and Windows NT 2-3
Appendix A: Installing Win32s
Removing earlier versions of Win32s A-1Installing Win32s 1.30c A-2
ing
of ro.
u
.S.
Chapter 1: Installing FileMaker Pro
Welcome to the FileMaker Pro application from Claris Corporation. FileMaker Pro is designed to help you manage information easily and effectively.
About this guideThis FileMaker Pro Installation and New Features Guide includes instructions for installing the application on your hard disk.
1 Chapter 1, “Installing FileMaker Pro,” gives instructions for installing the application, registering your ownership, and everythelse you need to do before you can use FileMaker Pro.
1 Chapter 2, “New features in FileMaker Pro,” provides an overviewthe new features in FileMaker Pro 4.0. This chapter is especiallyhelpful for users upgrading from previous versions of FileMaker P
1 Appendix A, “Installing Win32s,” provides information on installingand removing Win32s.
This installation guide, the FileMaker Pro User’s Guide, and the onscreen Help system work together to give you the information yoneed to know as you learn about FileMaker Pro.
Registration and customer supportPlease take the time to complete and mail the product registration card that is included in this package. Refer to our Web site at http://www.claris.com for information about customer support.
U.S. and Canadian retail customers can also refer to the Claris Service Directory included with the software. For customers outside of the Uor Canada, refer to the Technical Support brochure included with the software.
1-2
FileMaker Pro Installation and New Features Guide
ing,
our
r, ing
s
n
ing
,
What you need to install FileMaker ProThis guide gives instructions for installing the FileMaker Pro application and associated files on your PC. Before you begin installyou must know how you plan to use FileMaker Pro.
1 On a stand-alone computer—you want to use FileMaker Pro on ycomputer, and you don’t plan to share files with other users overa network.
1 With networking—you want to use FileMaker Pro on your computeand you plan to share FileMaker Pro files with other computers useither TCP/IP or IPX/SPX networking software.
If you’re on a network You need to know which type of network you’re using. If you’re not sure which network option to choose, check withyour network administrator before you begin installation.
Minimum hardware and software requirementsTo install and use FileMaker Pro, you need the CD-ROM disc in the FileMaker Pro package and the following minimum equipment and software:
1 an Intel compatible 486/33 PC or higher with 8 MB of RAM
1 a hard disk
1 a CD-ROM drive
1 Windows 95, Windows NT 3.51 or later, Windows for Workgroup3.11, or Windows 3.1
You also need your FileMaker Pro Installation Code to install and ruthe application. Look for it in the product package.
Networking requirementsTo share files among users on a network, you need to have the followadditional software and hardware installed on your PC:
1 a Windows-compatible network card
1 the software driver for your network card
1 the appropriate TCP/IP network protocol or IPX/SPX network protocol for Windows 95, Windows NT, Windows for Workgroupsor Windows 3.1
Installing FileMaker Pro
1-3
r an g
r.
e
re.
You can use one of the following solutions to share files on a PC orcross-platform network. See the documentation that came with Windows or your network card for more information.
Web publishing requirementsTo publish a database on the Web using the FileMaker Pro Web Companion, you need a host computer with access to the Internet ointranet via TCP/IP. The host computer must be either a PC runninWindows 95 or Windows NT 3.51 or later, or a Mac OS computer.
Note Web publishing in FileMaker Pro 4.0 is not supported under Windows 3.1 or Windows for Workgroups.
Important Access to the Internet requires an Internet service provideFileMaker Pro does not provide an Internet account for you.
Requirements for advanced featuresSome of the advanced features of FileMaker Pro 4.0 require additional software.
The DLL and the API files are normally installed with a Typical installation of Windows 95 and Windows NT 3.51 and 4.0.
Windows 95 Windows NTWindows for Workgroups Windows 3.1 Mac OS
TCP/IP(recommended for Mac OS)
Microsoft TCP/IP Microsoft TCP/IP Microsoft TCP/IP-32 version 3.11b
Network TeleSystems TCP Pro 3.0 or later
MacTCP 2.0.6 or later or Open Transport 1.1 or later
Phone dialing Phone dialer or other TAPI (Telephony API) compliant softwar
Instant Web Publishing URL.DLL
Custom Web Publishing HTML editing software, such as Claris Home Page 3.0 softwaWeb browser software is suggested to view your work.
IntelliMouse support IntelliPoint software (included with the IntelliMouse)
1-4
FileMaker Pro Installation and New Features Guide
ms
d
Before you beginBefore you begin the installation process, exit all other open prograand save your work. Use Alt + Tab to switch between programs.
Installing with Windows 95 or Windows NT 4.0You must use the installation program to install FileMaker Pro—youcan’t install FileMaker Pro by dragging files to your hard disk.
To install FileMaker Pro on your hard disk:
1. Insert the CD-ROM disc into your CD-ROM drive.
You see the FileMaker Pro screen.
2. For late-breaking information about FileMaker Pro, view the ReaMe file. You can also browse the contents of the CD, if you wish.
3. Click the Install FileMaker Pro 4.0 button.
You see the software license agreement.
4. Click Accept to accept the license agreement.
You see the Welcome screen.
5. Click Next.
Installing FileMaker Pro
1-5
You see the FileMaker Pro Installation dialog box.
Follow the steps described in one of the following sections:
1 If you want to install all the available files, continue with Typical installation.
1 If you want to install a subset of the FileMaker Pro files, skip to “Compact installation or Custom installation” on page 1-8.
With a Compact installation, the following files are not installed:
1 Networking files
1 Web Companion and Web publishing files
1 Tutorial and example files
1 Translator and import files
1 Dictionary files
With a Custom installation, you can install just the files you want.
1-6
FileMaker Pro Installation and New Features Guide
n
r
and
ge lp
ace
Typical installationFollow these steps to install the complete FileMaker Pro package oyour Windows 95 or Windows NT 4.0 system.
To install all the FileMaker Pro files on your hard disk:
1. If you have not already done so, insert the CD-ROM disc.
Follow the instructions on page 1-4.
2. In the FileMaker Pro Installation dialog box, choose Typical.
If you want to install FileMaker Pro in another folder or on anothedrive, click the Browse button. If the selected disk doesn’t have enough space for the files you select, you can leave the installerdelete existing files to make more room on the disk. If the disk islocked, or isn’t a hard disk, you can choose another drive.
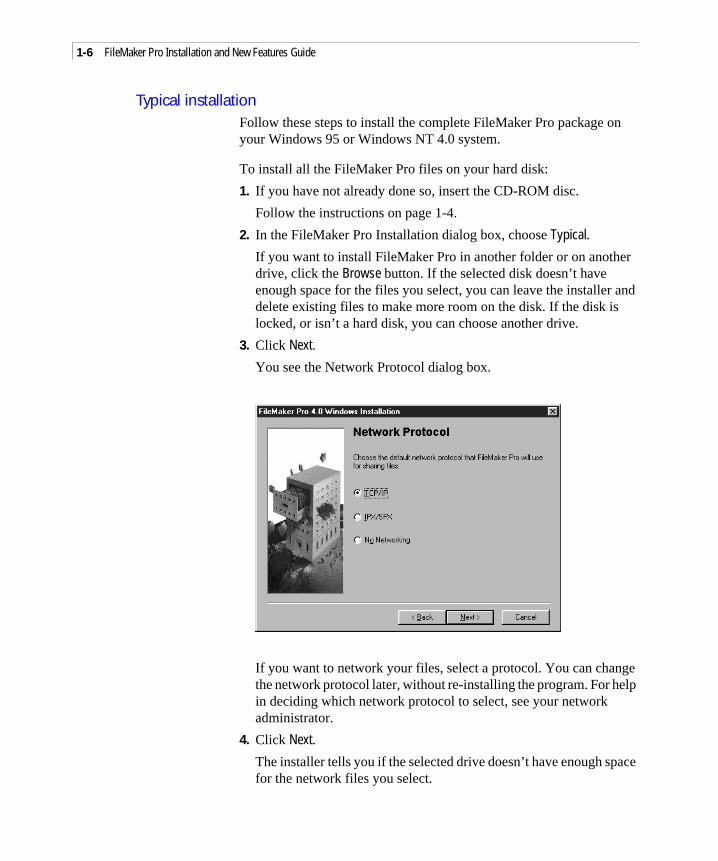
3. Click Next.
You see the Network Protocol dialog box.
If you want to network your files, select a protocol. You can chanthe network protocol later, without re-installing the program. For hein deciding which network protocol to select, see your network administrator.
4. Click Next.
The installer tells you if the selected drive doesn’t have enough spfor the network files you select.
Installing FileMaker Pro 1-7
.
Otherwise, you see the Personalization dialog box.
5. In the Name box, type your name and press the Tab key.
6. Type your company name, if applicable, and press Tab.
If you don’t have a company name, you can put other information(like your address) in the box or leave it blank.
7. In the Installation Code box, type your FileMaker Pro Installation Code
The Installation Code number is not optional. Look for your Installation Code in the product package.
8. Click Next.
If you’ve made an error typing your name or company, follow theinstructions provided on the screen.
9. Click Next.
The Installer begins copying files. A dialog box tells you what theInstaller is doing.
After all the files are installed, a final dialog box tells you the installation on your hard disk was successful.
Type your name here
Type your Installation Code here
1-8 FileMaker Pro Installation and New Features Guide
em
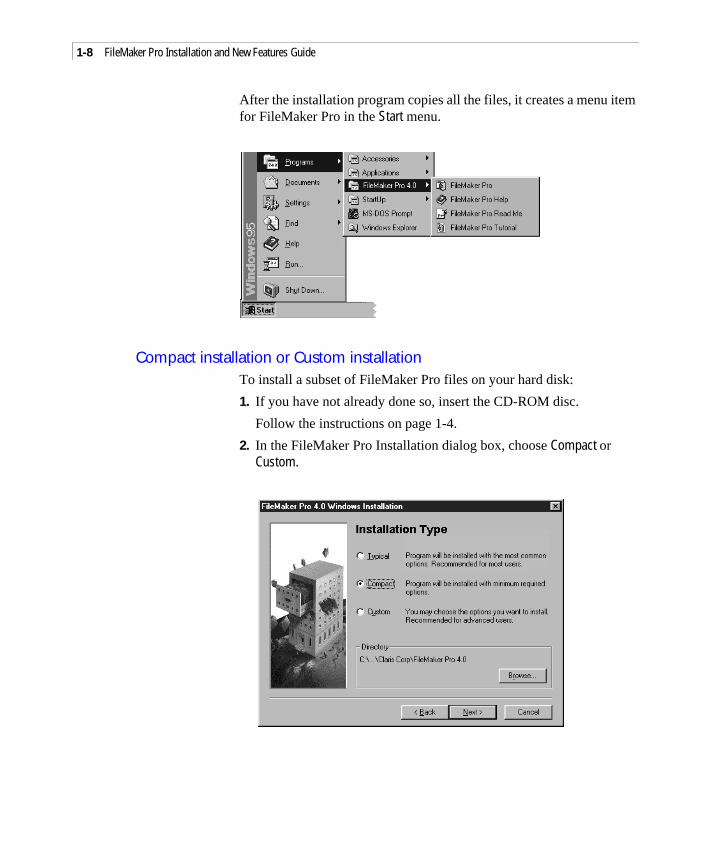
After the installation program copies all the files, it creates a menu itfor FileMaker Pro in the Start menu.
Compact installation or Custom installationTo install a subset of FileMaker Pro files on your hard disk:
1. If you have not already done so, insert the CD-ROM disc.
Follow the instructions on page 1-4.
2. In the FileMaker Pro Installation dialog box, choose Compact or Custom.
Installing FileMaker Pro 1-9
r
e If rive.
l.
ou
If you want to install FileMaker Pro in another folder or on anothedrive, click the Browse button. If the selected disk doesn’t have enough space for the files you select, is locked, you can leave thinstaller and delete existing files to make more room on the disk.the disk is locked, or isn’t a hard disk, you can choose another d
3. Click Next.
If you’ve selected Custom, the dialog box lists the files you can instal
4. For a Custom installation, click next to a filename to select files ywant to install.
Any file with a checkmark will be installed.
5. Click Next.
Files you can install
1-10 FileMaker Pro Installation and New Features Guide
.
e
If you are installing the FileMaker Pro application, you see the Personalization dialog box.
6. In the Name box, type your name and press the Tab key.
7. Type your company name, if applicable, and press Tab.
If you don’t have a company name, you can put other information(like your address) in the box or leave it blank.
8. In the Installation Code box, type your FileMaker Pro Installation Code
The Installation Code number is not optional. Look for your Installation Code in the product package.
9. Click Next.
If you’ve made an error typing your name or company, follow theinstructions provided on the screen.
10. Click Next.
The Installer begins copying files. A dialog box tells you what theInstaller is doing.
After the selected files are installed, a final dialog box tells you thinstallation on your hard drive was successful.
If you’ve installed the FileMaker Pro application, the installation program creates a menu item for FileMaker Pro in the Start menu.
Type your name here
Type your Installation Code here
Installing FileMaker Pro 1-11
ion ix A,
s
tup
Uninstalling FileMaker Pro for Windows 95 or Windows NT 4.01. Open the Add/Remove Programs control panel.
2. Click the Install/Uninstall tab and select FileMaker Pro 4.0 from the list.
3. Click Add/Remove.
Earlier versions of FileMaker Pro can be removed the same way.
Note Uninstalling doesn’t delete files that you’ve created, as long asthey are named differently than the files that are installed with FileMaker Pro.
Installing with Windows 3.1, Windows for Workgroups, or Windows NT 3.51
If you are using Windows 3.1 or Windows for Workgroups 3.11, youneed to install Win32s 1.30c before installing FileMaker Pro. If an earlier version of Win32s is installed on your system, the older versmust be removed and Win32s 1.30c must be installed. See append“Installing Win32s” for further information.
Typical installationTo install FileMaker Pro with Windows 3.1, Windows for Workgroup3.11, or Windows NT 3.51:
1. Start Windows.
2. Insert the CD-ROM disc into the CD-ROM drive.
3. Choose Run from the Program Manager’s File menu.
4. Type the drive letter for the CD-ROM drive and the path for the secommand in the Command Line box (for example, d:\setup ) and click OK.
5. Follow the installation instructions provided on the screen.
Compact installation or Custom installationFor information on installing a subset of the FileMaker Pro files, see“Compact installation or Custom installation” on page 1-8.
1-12 FileMaker Pro Installation and New Features Guide
s
r
in
p
Uninstalling FileMaker Pro for Windows 3.1, Windows for Workgroups, or Windows NT 3.51
1. Open the FileMaker Pro program group.
2. Double-click Uninstall FileMaker Pro.
Note Uninstalling doesn’t delete files that you’ve created, as long asthey are named differently than the files that are installed with FileMaker Pro.
Updating your User DictionaryIf you have added words to your User Dictionary in either a previouversion of FileMaker Pro or another Claris product, then you must export that User Dictionary to a text file, then import it into FileMaker Pro 4.0.
1. Export your User Dictionary using your other Claris product.
2. In FileMaker Pro 4.0, choose Spelling from the Edit menu, then choose Edit User Dictionary.
3. Click Text File to show the Import and Export buttons.
4. Click Import and import the text file containing the words from youprevious User Dictionary.
Where files are stored on your hard diskThe following tables show the files and folders you can install, and the preferred location for them on your hard disk. With a Typical installation, the FileMaker Pro Installer installs all the files you needtheir preferred locations.
Location of the FileMaker Pro 4.0 folder In Windows 95 and Windows NT 4.0, the FileMaker Pro folder is installed by default in the Claris Corfolder in the Program Files folder. In Windows 3.1, Windows for Workgroups, or Windows NT 3.51, the FileMaker Pro directory is installed by default in the root directory.
Installing FileMaker Pro 1-13
r.
FileMaker Pro 4.0 folderThis table shows the files and folders in the FileMaker Pro 4.0 folde
Folder location in Windows 95 and Windows NT 4.0
Folder location in Windows 3.1, Windows for Workgroups, and Windows NT 3.51 File or folder Description
FileMaker Pro 4.0 folder
\fmpro40 FILEMAKER PRO.EXE (FMPRO.EXE in Windows 3.1, and Windows for Workgroups)
Application file
README.WRI Text document about FileMaker Pro
CLLNGENU.DLL Claris Spelling engine module
FMENGINE.DLL FileMaker application module
FMOLE.DLL FileMaker application module
FMRSRC.DLL FileMaker application module
FMATM16.DLL Support for Adobe Type Manager (Windows 95 and Windows NT 4.0 only)
FMATM32.DLL Support for Adobe Type Manager (Windows 95 and Windows NT 4.0 only)
FMTOOLS.DLL FileMaker application module
FMPRO40.HLPFMPRO40.CNT
FileMaker Pro online help documents
FMPRO40.FTS A file generated by the Help system
FMPRO40.GID A file generated by the Help system
CLPROOF.DLL Spelling engine
Template folder \template TEMPLATE Folder containing predesigned templates that helpyou use FileMaker Pro right away
Examples folder \examples EXAMPLES Folder containing database examples that use therelational capabilities of FileMaker Pro 4.0
Tutorial folder \tutorial TUTORIAL.FP3 A FileMaker Pro tutorial database
Web folder(for Web publishing, do not move or rename this folder)
\web(Windows NT 3.51 only)
Employee Database filesGuest Book filesShopping Cart files
Example databases and HTML files that you can useto learn about Custom Web Publishing
1-14 FileMaker Pro Installation and New Features Guide
Web Tools folder \web tools(Windows NT 3.51 only)
CDML Reference For Custom Web Publishing, a FileMaker databasethat documents how to use the Claris Dynamic Markup Language (CDML) to create HTML format files for Custom Web Publishing; contains a Developer’s Guide
CDML Tool For Custom Web Publishing, a FileMaker database that helps you create HTML files that contain CDML tags, using Copy and Paste
CDML Template folder For Custom Web Publishing, HTML files containing CDML tags for the standard actions (Add Record, Search, and so on), to be used as building blocks foryour Custom Web Publishing files
Web Security folder \web security (Windows NT 3.51 only)
Databases folder
Security folder
A folder containing the FileMaker databases and HTML files required to use Web Security Database safeguards
Claris folder windows\claris USENGLSH.MPR
UKENGLSH.MPR
The primary dictionaries that FileMaker Pro uses to spell check your files. You can select either U.S. or British spellings for your main dictionary. Each dictionary contains over 100,000 words.
USER.UPR The dictionary that stores your customized list of spelling exceptions and additions to the primary dictionaries
CLADDON.CLR An additional dictionary that contains computer terminology
Folder location in Windows 95 and Windows NT 4.0
Folder location in Windows 3.1, Windows for Workgroups, and Windows NT 3.51 File or folder Description
Installing FileMaker Pro 1-15
System folder \fmpro\system DELSL1.ISU A log file, used by the uninstaller
CTL3D32.DLL Windows 3-D interface (Windows 3.1, Windows for Workgroups, and Windows NT 3.51 only)
DOCICON.ICO Contains icons for the application
FMHOSTS.TXT Stores your lists of hosts which appear in the TCP/IPnetwork dialog box
WEBCOMPN.FMX The Web Companion plug-in that enables Web publishing from FileMaker Pro (Windows 95, Windows NT 3.51, and Windows NT 4.0 only)
Folder location in Windows 95 and Windows NT 4.0
Folder location in Windows 3.1, Windows for Workgroups, and Windows NT 3.51 File or folder Description
1-16 FileMaker Pro Installation and New Features Guide
ws
se. t to
that
Windows System Directory folderThe following table shows the files and folders installed in the WindoSystem Directory folder.
Adjusting the FileMaker Pro cacheFileMaker Pro maintains an internal cache of portions of your databaDepending on your computer’s memory configuration, you may wanadjust the cache size to improve performance.
You may want to consider increasing the cache size if you plan to:
1 work on a large database file
1 work on several database files at once
1 host database files
1 use a database file that contains many graphics
1 insert a large graphic into a database file
Consider decreasing the cache size if you plan to run several applications at the same time and you have a limited amount of memory (RAM) installed.
Note By changing the FileMaker Pro cache size, you also affect theamount of memory needed to run FileMaker Pro.
For more information on managing memory, see the documentationcame with your computer.
Folder location in Windows 95 and Windows NT 4.0
Folder location in Windows 3.1, Windows for Workgroups, and Windows NT 3.51 File or folder Description
Windows System Directory
\windows\system(Windows 3.1 and Windows for Workgroups),\winnt35\system32\(Windows NT 3.51)
NWIPXSPX.DLL Networking file
NWNETAPI.DLL Networking file
Installing FileMaker Pro 1-17
to
ns ns to
NT.
Changing the cache sizeTo change the cache size that FileMaker Pro uses:
1. In FileMaker Pro, choose Preferences from the Edit menu and then choose Application.
You see the Application Preferences dialog box.
2. Click the Memory tab at the top of the dialog box.
3. Type a number in the Attempt cache size of box.
4. Click Done.
The next time you start FileMaker Pro, the new cache size is used.
Adjusting network softwareDepending on the networking protocol you’re using, you may have modify settings on the host and/or guest computers.
If you are using the IPX/SPX protocol with Windows 95 or Windows NT To allow the maximum number of guests (25), your IPX/SPX connectiomust be set to 60 or greater. Consider increasing the SPX connectio60 in the Network control panel if you cannot connect the desired number of guests. You do not need to modify settings on Windows
1-18 FileMaker Pro Installation and New Features Guide
ge e
riate
n ns.
Pro tion r.
ck
If you are using the IPX/SPX network with Windows 3.1 or Windows for Workgroups 3.11 You should use the Novell NetWare Client Shell version 3.26 or later to share FileMaker Pro files. You’ll need to chanNovell NetWare settings in order to network FileMaker Pro. To sharFileMaker Pro files over the network, your machine must be a fully configured NetWare client.
To share FileMaker Pro database files:
1 Use the Windows Setup program to set the network to the appropNetWare option (usually NetWare 3.26 or later).
1 Add the following entries to your NET.CFG (or SHELL.CFG) file:
GET LOCAL TARGET STACKS=10
SPX CONNECTIONS=40
Get local target stacks needs to be set on all guest machines. SPX connections should be set on the host machine if it will host more thatwelve guests, or on guest machines using additional SPX applicatioConsider increasing the SPX connections if you cannot connect the desired number of guests.
Changing the network protocolDuring installation, you select a network protocol (or No Networking) for FileMaker Pro. You can change the network protocol at any time.
You must choose a network protocol if you want to share FileMaker files over a network, either as a guest or as a host. For more informaabout your network configuration, consult your network administrato
Important The network protocol setting in FileMaker Pro must be thesame on the host and guest computers.
To change the network protocol:
1. Start FileMaker Pro 4.0.
2. Choose Preferences from the Edit menu, and then choose Application.
You see the Application Preferences dialog box. If necessary, clithe General tab to bring the General preferences to the front.
Installing FileMaker Pro 1-19
list.
nd
at. to ter
e to
3. Choose a network protocol from the Network Protocol drop-down
Note In Windows 3.1, FMIPX32.NET and FMTCP32.NET appear in the drop-down list.
Changes to this setting don’t take effect until you exit FileMaker Pro athen start it again.
Changing the frame typeA frame encapsulates packets of information in a recognizable formEach packet on the network must conform to a specific frame type successfully communicate with other computers on the network. Afyou select the network protocol, you must select a frame type.
Note All computers communicating with each other on the network must use the same frame type. For help in deciding which frame typselect, see your network administrator.
1-20 FileMaker Pro Installation and New Features Guide
me
Changing the frame type in Windows 95If you are using TCP/IP networking, you do not need to change theframe type. To change the frame type with IPX/SPX networking:
1. Open the Network control panel and click the Configuration tab.
2. Open IPX/SPX Compatible Protocol and click Properties.
3. Click the Advanced tab.
4. Click the frame type in the Property dialog box.
5. Make a selection from the Value drop-down list.
6. Click OK.
Windows 95 prompts you to restart your computer for these new changes to take effect.
Changing the frame type in Windows NTIf you are using TCP/IP networking, you do not need to change theframe type. To change the frame type with IPX/SPX networking:
1. Right-click Network Neighborhood.
2. Select Properties from the menu.
You see the Network dialog box.
3. Click the Protocols tab.
4. Click NWLink IPX/SPX.
5. Click Properties.
6. Select a frame type from the drop-down list.
7. Click OK to apply the frame type.
8. Click OK to close the Network dialog box.
Windows NT prompts you to restart your computer for these new changes to take effect.
Changing the frame type in Windows 3.1 and Windows for WorkgroupsFor information on changing the frame type in Windows 3.1 and Windows for Workgroups, please refer to the documentation that cawith your networking software.
Installing FileMaker Pro 1-21
ro or
at.
e not 3.0.
Opening files from previous versions FileMaker Pro 4.0 can open both Windows and Mac OS-compatiblefiles created by FileMaker Pro 2.0 or later.
Important You do not need to convert 3.x files. In FileMaker Pro 4.0, you can open files created with FileMaker Pro 3.x; in FileMaker 3.x, you can open files created with FileMaker Pro 4.0. However, new 4.0 features aren’t supported when you open files in 3.x. For example, rotated fields will appear as horizontal (left to right) fields in 3.x.
FileMaker Pro 1.0 databases To use a database created by FileMaker P1.0, you must first convert it on a Mac OS computer with version 2.0later and then open it in FileMaker Pro for Windows.
To use files created with FileMaker Pro 2.x, you must convert them to FileMaker Pro 4.0.
To convert and open a FileMaker Pro 2.x file:
1. Start FileMaker Pro 4.0.
2. Choose Open from the File menu and select the file you want to convert in the Open dialog box.
You see the Conversion dialog box.
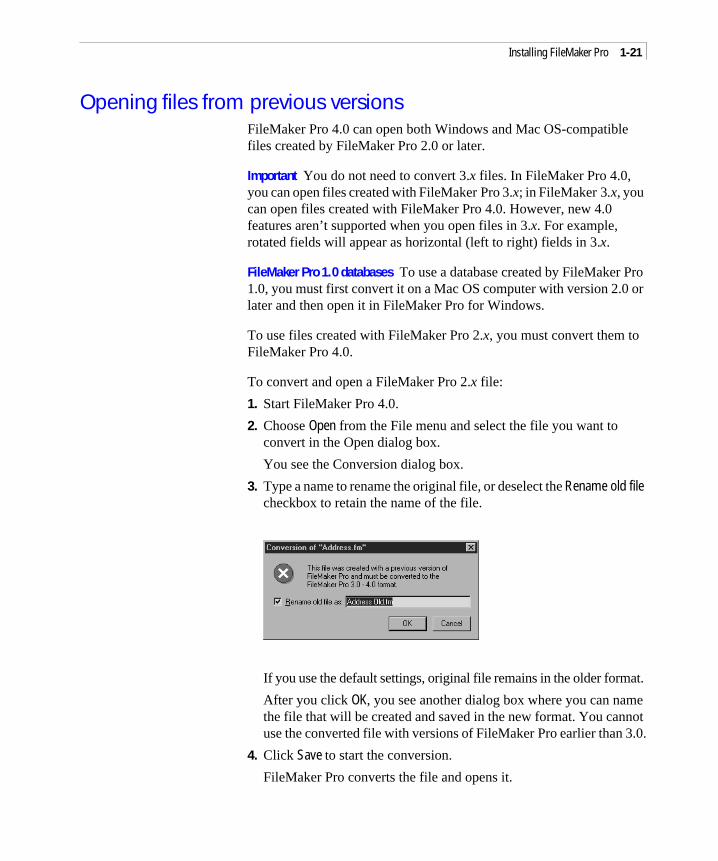
3. Type a name to rename the original file, or deselect the Rename old file checkbox to retain the name of the file.
If you use the default settings, original file remains in the older form
After you click OK, you see another dialog box where you can namthe file that will be created and saved in the new format. You canuse the converted file with versions of FileMaker Pro earlier than
4. Click Save to start the conversion.
FileMaker Pro converts the file and opens it.
1-22 FileMaker Pro Installation and New Features Guide
the
,” in
cal
to
Where to go from hereAfter you install FileMaker Pro, you can immediately begin workingwith the application. Here are some suggestions on where to go in documentation to get started:
1 If you’re new to databases, read chapter 1, “FileMaker Pro basicsthe FileMaker Pro User’s Guide to learn basic database concepts.
1 If you’re new to FileMaker Pro, work through the online tutorial, which is automatically copied to your hard disk when you do a Typiinstallation.
1 If you’ve used FileMaker Pro before, read chapter 2 of this guidefind out about the new features available in FileMaker Pro 4.0.
4.0.
st t or sers
he .
re
Chapter 2: New features in FileMaker Pro
This chapter introduces the new features available in FileMaker Pro
Web publishing capabilitiesUsing FileMaker Pro 4.0, you can access your database from almoanywhere in the world. Your file can be viewed, edited, sorted, andsearched with just Web browser software and access to the Interneyour intranet. You can also choose how much or how little access uhave to your file.
Note Access to the Internet requires an Internet service provider. FileMaker Pro does not provide an Internet account for you.
Instant Web PublishingWith FileMaker Pro 4.0, you can quickly publish your database on tInternet or on an intranet, using the FileMaker Pro Web Companion
This functionality is built in—no additional CGI or Web server softwais required for either Windows 95, Windows NT, or the Mac OS. However, access to the Internet requires an Internet account.
2-2 FileMaker Pro Installation and New Features Guide
nd or
ML
ts, nds e. If EG
ur
ress e.
Custom Web PublishingYou can create a complete, custom, interactive Web solution usingFileMaker Pro 4.0 Web Companion and dynamic HTML files. FileMaker Pro now can publish HTML documents containing GIF aJPEG graphics, animated GIF files, QuickTime movies, AIFF files, Java applets.
For step-by-step instructions on Custom Web Publishing, see the CDReference database in the Web Tools folder.
New Internet featuresNote Some of these features require additional software. See “Requirements for advanced features” on page 1-3.
GIF and JPEG supportFileMaker Pro 4.0 supports GIF and JPEG graphic formats in layoucontainer fields, and published Web pages. When FileMaker Pro sean image to a Web browser, it can send either a GIF or JPEG imagone is not available, the stored graphic is converted on-the-fly to JPfor display, even if it is not stored in JPEG format in the database.
Export to an HTML tableYou can now export all or part of your database formatted as an HTML table.
Send Mail script stepWith email client software, you can send email via the Internet or yointranet directly from your FileMaker Pro database.
URL supportWhen you right-click a URL in a field and choose Open <URL> from the context menu that appears, FileMaker Pro opens that URL. If the addis for a Web page, FileMaker Pro opens your Web browser softwar
Open URL script stepYou can write a script that opens a URL.
New features in FileMaker Pro 2-3
d list.
wing ped t.
be
)
ith
ts g,
Expanded Sort and Find optionsRelated records can now be sorted within a portal or as part of a relate
With the addition of exact field matches, Find requests can be even more specific.
New calculation functionsNew functions help you determine:
1 the current group that a password belongs to
1 the modifier key being pressed by the user
1 the network protocol that is loaded and in use
1 the ID of the current record
1 the number and kinds of objects in a layout
Layout and interface enhancementsFields and objects can be now rotated in 90-degree increments, allogreater flexibility in your layouts. Text can also be dragged and dropinto a rotated text block. You can zoom in or out on a rotated objec
To make creating and managing your files easier, value lists can nowdefined from the File menu.
Excel importFileMaker Pro now supports direct import of worksheets (.XLS filesfrom Microsoft Excel, including version 4.0 and 5.0 for Mac OS, andversions 4.0 through Excel 97 for Windows. Additionally, you can import a specific worksheet from an Excel workbook.
IntelliMouse support for Windows 95 and Windows NTIf you have an IntelliMouse, then you can use it to scroll or zoom wFileMaker Pro 4.0.
Note FileMaker Pro 4.0 supports IntelliMouse scrolling through layouor lists of records, not scrolling in fields or portals. Autoscroll, panninand DataZoom are also not supported.
m,
r:
e
Appendix A: Installing Win32s
If you are using Windows 3.1 or Windows for Workgroups 3.11, youneed to install Win32s 1.30c before installing FileMaker Pro. After installing Win32s, you will still be able to run all the applications youcurrently use. If an earlier version of Win32s is installed on your systeyou must first remove the older version.
To determine the version of Win32 that’s installed on your compute
1. In the File Manager, click WIN32S16.DLL , located in the \WINDOWS\SYSTEM directory.
The file is highlighted.
2. Select Properties from the File menu of the File Manager.
You see the version.
Removing earlier versions of Win32sTo completely remove an earlier version of Win32s:
1. Modify the following line from the [BOOT] section in the SYSTEM.INI.
Change DRIVERS=MMSYSTEM.DLL WINMM16.DLL
to the following: DRIVERS=MMSYSTEM.DLL
2. Remove the following line from the 386 Enhanced [386Enh ] section of the SYSTEM.INI file:
DEVICE=<WINDOWS>\<SYSTEM>\WIN32S\W32S.386
where <WINDOWS> and <SYSTEM> are the locations of your WINDOWS and SYSTEM directories. In a normal Windows configuration the linwill read DEVICE=C:\WINDOWS\SYSTEM\WIN32S\W32S.386
3. Exit and restart Windows.
4. Delete the following files from the <WINDOWS>\<SYSTEM> subdirectory or from the SYSTEM directory in network installations:
W32SYS.DLL
WIN32S16.DLL
WIN32S.INI
WINMM16.DLL
A-2 FileMaker Pro Installation and New Features Guide
d our
e
ory
5. Delete all the files in the <WINDOWS>\<SYSTEM>\WIN32S subdirectory or the <SYSTEM>\WIN32S subdirectory in network installations. Then delete the WIN32S directory itself.
The above changes take effect the next time you run Windows.
Note <WINDOWS> refers to the Windows installation directory. On a networked Windows installation, the system directory may be locateon a shared remote volume. If you are removing only WIN32s from ymachine, then you do not need to remove the shared files in <SYSTEM> and <SYSTEM>\WIN32S. Before removing these files from the sharednetwork, make sure that all users that use Win32s have removed threferences to Win32s from the SYSTEM.INI file.
Installing Win32s 1.30cTo install or update Win32s:
1. In the Program Manager, click the Main group.
2. Open the 386 Enhanced control panel and change the virtual memtype to Permanent.
3. Make sure the swap file size is at least 20480 KB.
4. Select Use 32-Bit Disk Access and Use 32-Bit File Access, if available.
Enable 32-BitFile Access
Set swap file size toat least 20480 KB
Change virtual memory type to Permanent
Enable 32-Bit Disk Access
Installing Win32s A-3
ing
s
log
.
5. Click OK.
If you made changes, you need to restart Windows before installWin32s.
6. In the File Manager, open the Disk 1 directory that’s in the Win32directory on the FileMaker Pro CD-ROM disc.
7. Double-click the SETUP.EXE program and follow the Win32s setupinstructions.
8. When the Win32s installation is complete, the FreeCell Setup diabox appears.
9. Claris recommends that you install and run the game FreeCell, because it can help verify your Win32s software installation.
10. Restart the machine, then install FileMaker Pro.
See “Installing with Windows 3.1, Windows for Workgroups, or Windows NT 3.51” on page 1-11, for step-by-step instructions