84
Fourth Edition Discovering the Internet Discovering the Internet: Brief Concepts and Techniques, Second Edition •Chapter 2 Browsing the Web
| Date post: | 31-Dec-2015 |
| Category: |
Documents |
| Upload: | marylou-chapman |
| View: | 220 times |
| Download: | 1 times |

Fourth Edition
Discovering the Internet
Discovering the Internet: Brief Concepts and Techniques, Second Edition
• Chapter 2Browsing the Web

Objectives
• Describe a Web site, common Web page characteristics, and Web servers
• Explain the role IP addresses, domain names, and URLs play in locating Web pages
• Start a Web browser and view Web pages• Visit Web pages using browser shortcuts
Chapter 2: Browsing the Web 2

Objectives
• Save online information for later use• Change Web browser options• Discuss the risks and safeguards related to using
the Web
Chapter 2: Browsing the Web 3

Web Sites, Web Pages, and Web Servers
• Web Sites– Number of pages varies depending on site’s purpose
and type of content and services it provides– FAQ page lists frequently asked questions and their
answers– A Web portal, or simply a portal, is a special type of
Web site that offers a doorway to a vast range of content and services
Chapter 2: Browsing the Web 4

Web Sites
Chapter 2: Browsing the Web 5

Web Sites, Web Pages, and Web Servers
• Web Pages– Designed to attract visitors and hold their attention– Common characteristics
• Logo and/or name• Images• Links• Advertisements• Search tool• Connectivity links or icons• Copyright statement• Link to a privacy and security policy statement
Chapter 2: Browsing the Web 6

Web Pages
Chapter 2: Browsing the Web 7
Web Sites, Web Pages, and Web Servers
• Web Servers– Web browser is a client that requests resources from a
Web server– Server “serves up” resources upon request
• Web browsing is example of client/server computing
Chapter 2: Browsing the Web 8

Web Sites, Web Pages, and Web Servers
• Web Servers– Single Web server can host multiple Web sites– Large Web sites may span multiple Web servers
Chapter 2: Browsing the Web 9

IP Addresses, Domain Names, and URLs
• IP Address– A number that uniquely identifies each computer or
device connected to the Internet– A series of four numbers separated by a period or dot
• 69.32.133.79• Static IP addresses seldom change• Dynamic IP addresses are temporary
Chapter 2: Browsing the Web 10

IP Addresses, Domain Names, and URLs
Chapter 2: Browsing the Web 11
IP Addresses, Domain Names, and URLs
• Domain Name– A text alias for one or more IP addresses
• cengage.com is domain name for 69.32.133.79
– Domain Name System (DNS) uses name servers to resolve domain name to IP address
• Managed by ICANN• TLD (.com, .biz, and so forth)• ccTLD (.us, .uk, and so forth)
Chapter 2: Browsing the Web 12
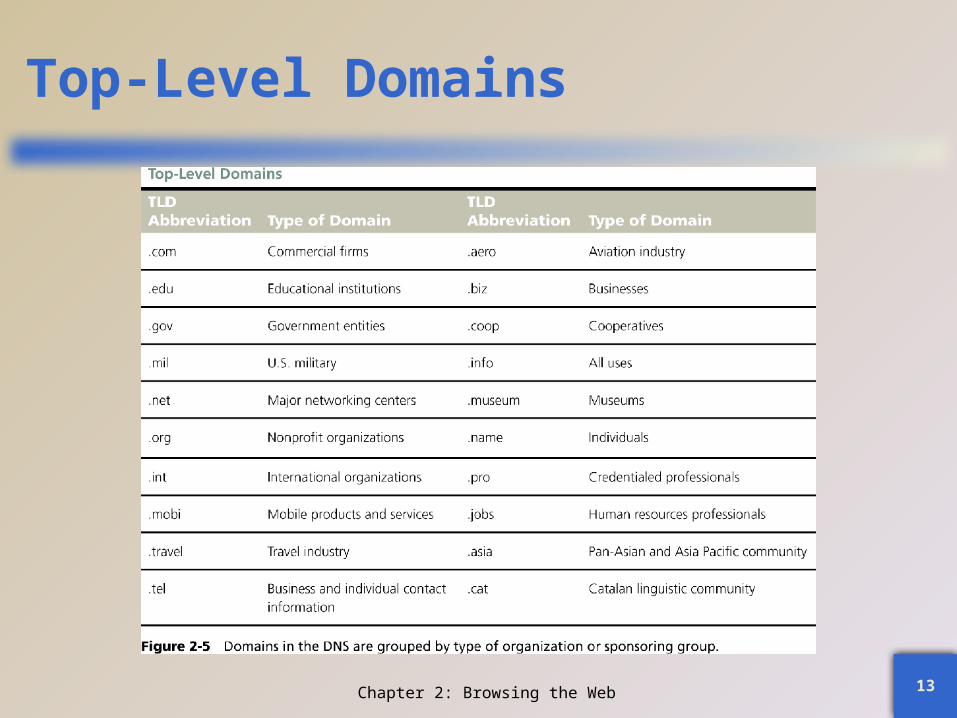
Top-Level Domains
Chapter 2: Browsing the Web 13

IP Addresses, Domain Names, and URLs
• Uniform Resource Locators (URLs)– A unique Web address
• http:// protocol• Domain name• Path• File name
Chapter 2: Browsing the Web 14

Web Browsers
• Software program used to view Web pages• Most commonly used Web browser is Windows
Internet Explorer, others include– Firefox– Opera– Google Chrome– Safari
Chapter 2: Browsing the Web 15

Internet Explorer 9
Chapter 2: Browsing the Web 16

Opening Your Browser and Loading a Web Page
• Click the Start button on the Windows taskbar• Click the Internet Explorer icon on the Start menu,
or click All Programs, and then click the Internet Explorer icon if it is not pinned to the Start menu to open Internet Explorer
• Click the Address box on the Address bar
Chapter 2: Browsing the Web 17

Opening Your Browser and Loading a Web Page
• Type www.cengage.com as the URL• Press the ENTER key to open the Cengage home
page• Click the Buy, Rent, Access CengageBrain.com link
to open the CengageBrain Web site in your browser
Chapter 2: Browsing the Web 18

Opening Your Browser and Loading a Web Page
Chapter 2: Browsing the Web 19

Using a Search Box to Find Information
• Type Discovering the Internet in the Find your Textbook or Materials text box
• Press the ENTER key to search for the Book Companion Site Web page for this text
• Click the link for this text to open a new page• Click the Access Now button to open the Book
Companion Site Web page
Chapter 2: Browsing the Web 20

Using a Search Box to Find Information
Chapter 2: Browsing the Web 21

Viewing a Web Page by Clicking a Link
• Click the Select a chapter list arrow, and then click 2. Browsing the Web to open the resources for Chapter 2
• Click the Steps text link to view the links for the text• Right-click the The Weather Channel link, and then click
‘Open in new window’ to open www.weather.com in a new browser window. Maximize the window if necessary
• Drag the scroll box on the vertical scroll bar down to view the content at the bottom of the Web page, and then drag the scroll box on the vertical scroll bar up to view the top of the Web page
Chapter 2: Browsing the Web 22

Viewing a Web Page by Clicking a Link
Chapter 2: Browsing the Web 23

Web Browsers
• Navigating Recently Viewed Web Pages– Use the Back, Forward, Stop, Refresh, and Home
Buttons• Back and Forward buttons – revisit recently viewed pages• Stop and Refresh buttons – stops opening a page or opens
an updated copy of the current page• Home – refreshes the home page(s)
Chapter 2: Browsing the Web 24

Navigating Through Recently Viewed Pages
• Verify that Internet Explorer is open with The Weather Channel home page open
• Click any link on The Weather Channel home page to open a new Web page in the same browser window and tab
• Click the Back button to return to The Weather Channel home page
• Click the Forward button to return to the Web page you were viewing before you clicked the Back button
Chapter 2: Browsing the Web 25

Navigating Through Recently Viewed Pages
• Click the Refresh button to open a fresh copy of the Web page to view any updated temperature or other new information on the Web page
• Click the Home button to open the browser’s default home page
• Click the browser Close button to close Internet Explorer; close all tabs, if asked
• If necessary, close any other open Internet Explorer windows
Chapter 2: Browsing the Web 26

Navigating Through Recently Viewed Pages
Chapter 2: Browsing the Web 27

Web Browsers
• Using Tabbed Browsing– Allows you to open multiple Web pages in a single
browser window
Chapter 2: Browsing the Web 28
Web Browsers
• Using Tabbed Browsing– Each page can be opened in its own tab on the tab row– Clicking a tab brings the Web page and tab from the
tab row background to the foreground– Click the New Tab button to open a blank tab then
enter URL in the Address box to open a Web page in the new tab
Chapter 2: Browsing the Web 29

Web Browsers
• Using Tabbed Browsing– Press ALT+ENTER keys after you type a URL to open
the Web page in a new tab– Press the CTRL key as you click a link to open the
linked page in a new tab– To open the linked page in the background, press
CTRL+SHIFT as you click the link– To close a tab, click the Close Tab button
Chapter 2: Browsing the Web 30

Opening and Closing Multiple Web Page Tabs
• Click the Internet Explorer Browser icon on the Start menu to open Internet Explorer
• Click the New Tab button on the tab row to open a New Tab page
• Type espn.com in the Address box• Press the ENTER key to open the ESPN home page in the
new tab• Type nfl.com in the Address box.• Press ALT+ENTER to open the NFL.com home page in a
new tab in the tab row foregroundChapter 2: Browsing the Web 31

Opening and Closing Multiple Web Page Tabs
• Press CTRL and click the News link to open the NFL News page in a new tab in the tab row background
• Click the NFL News tab to display the tab in the foreground
• Click the Close Tab button on the NFL News Web page tab to close the Web page
• Click the New Tab button on the tab row to open a New Tab page
• Click the ‘Reopen closed tabs’ link on the New Tab page, if necessary, to see a list of closed tabs
Chapter 2: Browsing the Web 32

Opening and Closing Multiple Web Page Tabs
• Click the NFL News link to reopen the Web page in a new tab
• Close Internet Explorer and close all tabs, if asked• Click the Internet Explorer Browser icon on the Start
menu to start Internet Explorer• Click the New Tab button on the tab row to open a
New Tab page• Click the ‘Reopen last session’ link to reopen the tabs
that were open when you closed Internet ExplorerChapter 2: Browsing the Web 33

Opening and Closing Multiple Web Page Tabs
Chapter 2: Browsing the Web 34

Viewing Open Web Pages Using the New Tab Page• Click the New Tab button to open the New Tab page• Click the NFL News button to open the NFL News Web
page• Close Internet Explorer and all tabs
Chapter 2: Browsing the Web 35

Using Browser Shortcuts to Visit Web Pages
• The Internet Explorer browser provides several shortcuts for accessing Web page content and revisiting Web pages, such as:– Favorites– History– Accelerators– RSS feeds and Web Slices– Address bar dropdown list– Suggested Sites
Chapter 2: Browsing the Web 36

Creating a Favorite Subfolder and Adding a Favorite• Start Internet Explorer and open the Student Online
Companion Web page at www.cengagebrain.com by following the same set of steps as you did earlier in the chapter
• Click the Select a chapter list arrow, and then click 2. Browsing the Web to open the resources for Chapter 2
• Click the Steps link in the left navigation bar to open the Steps Web page.
• Click Dell to open the Dell home page in the current tab• Click the Favorites button to open the Favorites Center pane
Chapter 2: Browsing the Web 37

Creating a Favorite Subfolder and Adding a Favorite
• Click the Favorites tab, if necessary, to view your list of favorites and subfolders
• Click the ‘Add to favorites’ button to display the Add a Favorite dialog box
• Type Dell in the Name text box• Click the New folder button to display the Create a
Folder dialog box• Type Technology Sites
Chapter 2: Browsing the Web 38

Creating a Favorite Subfolder and Adding a Favorite• Click the Create button to create the new Technology
Sites subfolder inside the Favorites folder• Click the Add button in the Add a Favorite dialog box to
add the Dell favorite to the new Technology Sites folder• Click the New Tab button to display the New Tab page• Click the Favorites button to open the Favorites Center• Click the Technology Sites folder to view its contents• Click the Dell favorite link to open the Dell home page in
the current tab
Chapter 2: Browsing the Web 39

Creating a Favorite Subfolder and Adding a Favorite
Chapter 2: Browsing the Web 40

Deleting a Favorites Subfolder and Its Contents• Click the Favorites button to open the Favorites
Center• Click the Favorites tab, if necessary, to display your
list of favorites and subfolders• Right-click the Technology Sites subfolder to display
the shortcut menu• Click Delete to display the Delete Folder confirmation
dialog box• Click the Yes button to confirm the deletion• Close Internet Explorer
Chapter 2: Browsing the Web 41

Deleting a Favorites Subfolder and Its Contents
Chapter 2: Browsing the Web 42

Revisiting a Web Page Using the History List
• Start Internet Explorer• Click the Favorites button to open the Favorites
Center• Click the History tab to view the History list• Click the Today icon, if necessary, to expand the
list of Web pages visited today
Chapter 2: Browsing the Web 43

Revisiting a Web Page Using the History List
• Click the nfl (www.nfl.com) folder link in the History list to view links to individual pages visited at the NFL Web site
• Click the NFL News link to close the Favorites Center and open the NFL News Web page in the current tab
• Close Internet Explorer
Chapter 2: Browsing the Web 44

Revisiting a Web Page Using the History List
Chapter 2: Browsing the Web 45

Web Slices
• Allows you to quickly preview frequently updated Web page content, such as weather reports or sports scores
Chapter 2: Browsing the Web 46

Accelerators
• Add-ons to Internet Explorer that allow you to access Web content or take some action based on selected Web page text
Chapter 2: Browsing the Web 47

Subscribing to an RSS Feed
• Navigate to the page containing an RSS feed• Click the Feeds button arrow to view the available feeds on the
selected Web site• Click the feed of your choice• Scroll the Web page to view the stories available through the feed• Click the ‘Subscribe to this feed’ link to display the Subscribe to this
Feed dialog box• Click the Subscribe button to display the confirmation Web page• Click the Close Tab button to close the confirmation Web page
Chapter 2: Browsing the Web 48

Subscribing to an RSS Feed
Chapter 2: Browsing the Web 49
Viewing and Deleting an RSS Feed
• Open the Favorites Center• Click the Feeds tab to view the list of RSS feeds to which
you have subscribed• Open the Favorites Center• Click the Feeds tab, if necessary, to view the Feeds list• Right-click the desired feed to delete• Click the Delete button to display the confirmation dialog
box• Click the Yes button to confirm the deletion• Close Internet Explorer
Chapter 2: Browsing the Web 50

Viewing and Deleting an RSS Feed
Chapter 2: Browsing the Web 51

Address Bar Drop-Down List
• The AutoComplete feature looks at the first few characters you type in the Address box and then suggests Web sites and search keywords based on the stored URLs
• The Address bar dropdown list organizes suggestions by:– AutoComplete suggestions– History– Favorites
Chapter 2: Browsing the Web 52

Address Bar Drop-Down List
Chapter 2: Browsing the Web 53

Suggested Sites
• The Suggested Sites feature allows Internet Explorer to use your Web browsing habits to present suggestions for additional browsing
Chapter 2: Browsing the Web 54
Pinning a Web Site to the Taskbar
• Open Internet Explorer and navigate to www.msn.com if it is not your home page
• Click the favicon• Drag the favicon to the taskbar to pin it• Close the browser• Click the icon on the taskbar to open the Web site• Right-click the icon on the taskbar to open a shortcut
menu• Click ‘Unpin this program from taskbar’ to remove the
taskbar iconChapter 2: Browsing the Web 55

Pinning a Web Site to the Taskbar
Chapter 2: Browsing the Web 56

Saving Online Information
• Printing a Web Page– Preview the page to see how it will look before
printing it– Print selected information– Print the entire page
Chapter 2: Browsing the Web 57

Saving Online Information
• Saving a Web Page– Webpage, complete (HTML page and all related files)– Web Archive, single file (snapshot of page)– Webpage, HTML only (no related files are saved)– Text file (page text is saved in plain text format)
Chapter 2: Browsing the Web 58

Saving a Web Page
• Start Internet Explorer• Click the Page button on the Command bar to
view the Page button menu• Click Save as to open the Save Webpage dialog
box• Navigate to the folder specified by your instructor• Click the ‘Save as type’ box arrow to view the
available file types
Chapter 2: Browsing the Web 59

Saving a Web Page
• Click Web Archive, single file (*.mht), if necessary, to select the desired file type
• Click the Save button• Close Internet Explorer
Chapter 2: Browsing the Web 60

Saving a Web Page
Chapter 2: Browsing the Web 61
Saving Online Information
• E-mailing a Web Page– Send a page or a link to a page using commands on the
Page button on the Command bar• Saving a Web Page Image
– Use a shortcut menu– Most Web page images are the property of their
owners and are protected by U.S. copyright law.
Chapter 2: Browsing the Web 62

Changing Browser Options
• Showing and Hiding the Menu Bar and Toolbars– Turn on or off toolbars using the Tools button on the
Command bar– Press ALT key to toggle on/off the menu bar
Chapter 2: Browsing the Web 63

Showing and Hiding the Menu Bar and the Favorites Bar
• Start Internet Explorer• Press ALT to display the menu bar below the
Address bar• Press ALT to hide the menu bar• Click the Tools button on the Command bar• Point to Toolbars to display the Toolbars submenu
Chapter 2: Browsing the Web 64

Showing and Hiding the Menu Bar and the Favorites Bar
• Click Favorites bar on the Toolbars submenu to display the Favorites bar below the Address bar
• Right-click a blank area at the end of the Favorites bar to display the Toolbars shortcut menu
• Click Favorites bar on the shortcut menu to hide the Favorites bar
• Close Internet Explorer
Chapter 2: Browsing the Web 65

Showing and Hiding the Menu Bar and the Favorites Bar
Chapter 2: Browsing the Web 66

Changing Browser Options
• Customizing the Command Bar– Use the Tools button on the Command bar – Add or remove buttons or modify text labels
Chapter 2: Browsing the Web 67

Adding a Browser Home Page
• Start Internet Explorer• Type weather.com in the Address bar and press the
ENTER key• Click the Home button arrow on the Command bar to
display the Home button menu• Click ‘Add or change home page’ to display the Add or
Change Home Page dialog box• Click the “Add this webpage to your home page tabs”
option button to add the current Web page as a home page tab
Chapter 2: Browsing the Web 68

Adding a Browser Home Page
• Click the Yes button to add the Web page to your home page tabs
• Close Internet Explorer• Start Internet Explorer to view two home page
tabs• Click the Home button arrow on the Command
bar to view the menu• Point to the Remove command to view the
submenuChapter 2: Browsing the Web 69

Adding a Browser Home Page
• Click National and Local Weather Forecast… to open the Delete Home Page dialog box
• Click the Yes button in the Delete Home Page dialog box to confirm the removal of the second home page
• Close Internet Explorer• Start Internet Explorer to confirm that The Weather
Channel’s home page is no longer part of the home page tabs
• Close Internet Explorer
Chapter 2: Browsing the Web 70

Adding a Browser Home Page
Chapter 2: Browsing the Web 71

Changing Browser Options
• Viewing a Web Page in Compatibility View– Click the Tools button on the Command bar and click
Compatibility View to turn on the feature• Zooming a Web Page
– Change the "zoom" percentage using the ‘Change zoom level’ button arrow on the status bar
Chapter 2: Browsing the Web 72

Changing Browser Options
• Setting Other Browser Options– Use the Internet Options dialog box to set browser
options• Number of days browsing history is maintained• Temporary Internet files• Overall appearance
Chapter 2: Browsing the Web 73

Using the Web: Risks and Safeguards
• Protecting Your Computer from Hackers– A hacker is an individual who uses his or her computer
skills to access a network and the computers on that network without authorization
– A firewall is hardware and/or software that blocks outside intruders
• Home computers: install a personal firewall to protect against hackers
– Windows Firewall– ZoneAlarm– PCTools
Chapter 2: Browsing the Web 74

Using the Web: Risks and Safeguards
Chapter 2: Browsing the Web 75

Using the Web: Risks and Safeguards
• Protecting Your Computer from Viruses– A computer virus is a small, potentially damaging
computer program that can infect a computer and then spread to other computers through:
• Sending/receiving e-mail• Downloading files• Exchanging word processing or spreadsheet files
– Install virus protection software to protect against infection
Chapter 2: Browsing the Web 76

Using the Web: Risks and Safeguards
• Shopping Safely Online– Use reputable online vendors– Pay with a credit card over a secure (SSL) connection– Use a third-party payment service if participating in
consumer-to-consumer transactions
Chapter 2: Browsing the Web 77

Using the Web: Risks and Safeguards
• Filtering Web Content– Web is a largely unregulated environment
• Tracking Protection Lists (TPLs)• Use Web content filters (Internet filters)
Chapter 2: Browsing the Web 78

Using the Web: Risks and Safeguards
• Protecting Against Malicious Web Sites– A malicious Web site is a phony site designed to look
like a legitimate site– Used by thieves to collect personal information
• Name• Password
– Internet Explorer has built-in SmartScreen Filter that evaluates sites
Chapter 2: Browsing the Web 79
Using the Web: Risks and Safeguards
• Keeping Your Personal Information Private– Entities that might be collecting and using your private
information• Employers• Internet Service Providers• Government agencies• Privacy advocates• E-Business Web sites• Cookies• Spyware and adware
Chapter 2: Browsing the Web 80

Using the Web: Risks and Safeguards
• Keeping Your Personal Information Private– Privacy advocates are dedicated to informing
government agencies and consumers about privacy issues and maintaining information about privacy issues at their Web sites
– InPrivate Browsing allows you to browse the Web privately without storing information about the Web sites you visit
– InPrivate Filtering protects against parties collecting information about your browsing habits
Chapter 2: Browsing the Web 81

Chapter Summary
• Describe a Web site, common Web page characteristics, and Web servers
• Explain the role IP addresses, domain names, and URLs play in locating Web pages
• Start a Web browser and view Web pages• Visit Web pages using browser shortcuts
Chapter 2: Browsing the Web 82

Chapter Summary
• Save online information for later use• Change Web browser options• Discuss the risks and safeguards related to using
the Web
Chapter 2: Browsing the Web 83
Fourth Edition
Discovering the Internet
Chapter 2Complete


