Fratelli d'Italia A supplement for converting Polemos Commandant de Bataille FPW rules for the Italian Wars of Unification Peter Riley Fratelli d'Italia A supplement for converting Polemos Commandant de Bataille FPW rules for the Italian Wars of Unification Peter Riley
Transcript
Fratelli d'ItaliaA supplement for converting Polemos Commandant de Bataille FPW rules for the Italian Wars of Unification
Peter Riley
Fratelli d'ItaliaA supplement for converting Polemos Commandant de Bataille FPW rules for the Italian Wars of Unification
Peter Riley
Fratelli d'ItaliaA supplement for converting Polemos Commandant de Bataille FPW rules for the Italian Wars of Unification
Published in pdf format by: Baccus 6mm Ltd, 2009.
Text Copyright: Peter Riley
Layout and Design: Baccus 6mm Ltd
Photography: Peter Berry
Maps: Sven Lugar
Buildings and Scenics: Timecast
Baccus 6mm figures painted by Peter Berry
All rights reserved. No part of this work may be reproduced or used in any form or by any means without the express written consent of the authors.
For more information about the figures and models used in this catalogue, extra sections and add-ons to
these rules, as well as the other rules sets in the Polemos series, visit: www.baccus6mm.com
A Yahoo group has been set up to allow for discussion of all aspects of playing games using Polemos rules. If you have any questions, are looking for tips and advice or just want to talk to other gamers, you can join by logging on to http://games.groups.yahoo.com/group/polemos
Fratelli d'ItaliaA supplement for converting Polemos Commandant de Bataille FPW rules for the Italian Wars of Unification
Introduction
i Polemos Risorgimento — Fratelli d'Italia
Introduction ii
Part One – Setting up the Game Troop Types 4 Part Two – Playing the Game Tempo Bidding 5 Bombardment Tables 5 Move Distance Table 6 Firing Range Table 6 Firing Procedure Modifiers Table 6 Close Combat Attacks Table 7 Pursuit Modifiers Table 7 Army Morale 7 Part Three – Orders of Battle Piedmont & French Army Commands 8 Austrian Army Commands 9 French Army of Italy - OOB 10 Piedmont Army - OOB 13 Austrian Second Army - OOB 14 Part Four – Army Generators Army Generators 19 French Army 20 Piedmont Army 21 Austrian Army 22 Part Five – Scenario The Battle of Palestro - 1859 23
Fratelli d’Italia
The Risorgimento of 1859 actually began a year earlier, in July 1858, during a conference held at Plombières in France. At the conference it was agreed, between Emperor Napoleon III and Camillo Benso, Conte di Cavour, the Prime Min-ister that the French would aid Piedmont in the face of any Austrian moves against them.
So in 1859, the Italians, having secured the sup-port of Napoleon III of France, began provoking Austria into war it was not prepared for. The Austrians reacted as planned the Emperor Fran-cis Joseph declared war. By April 23rd 1859 an ultimatum was delivered wanting the complete demobilization of Piedmontese troops. This was rejected and Austria declared war three days later, and as a result France, as a part of the secret agreement, was asked to come to the aid of the Piedmontese army, this small request led to the War of Italian Unification.
Although in terms of numbers and time it is con-sidered a small war, the battle of Solferino was at the time the largest single battle ever fought in Europe. The campaign is interesting as it was quite fluid and led to a number of battles of vary sizes and types, the encounter battle of Magenta is particularly interesting one.
The protagonists were also interesting in the fact that France committed a large number of veteran troops in its Imperial Guard and its experienced African foreign service troops totalling to about 28% of it army. For the Austrians with their poor officer corps, using smoothbore artillery and lots of inexperienced troops was always in for a hard fight. And of the fledgling Piedmon-tese army with it compact size, belief and smoothbore muskets adding to a healthy mix of type and experience for some interesting games.
Introduction
ii Polemos Risorgimento — Fratelli d'Italia
Polemos Risorgimento
Fratelli d'Italia
Troop types Infantry units in this era formed in increasingly more open formations with a skirmish line in advance and a formed reserve deeper in the rear of the formation. In attack however, columns were often used to de-liver fast moving assaults. Infantry: Most infantry, known as Regulars, Garde Nationale, Imperial Guard, Imperial Infantry, Grena-diers, Foreign Legion or Turco’s or any other name, are formed units and are armed with Muzzle Loading Smoothbores or Rifles and bayonet. They can deliver their fire by command or individual shots to break up attacks or rely on the charge to break the target.
Skirmishers: Jaegers, Kaiser Jaegers, Bersaglieri, Ti-railleurs and Chasseurs etc. These are not generally depicted by distinct bases of their own, but by a skir-mish capability factor which is assigned to standard infantry bases. This represents the infantry base’s abil-ity to skirmish. However they can also be represented as individual Infantry bases as well.
Cavalry units did not generally fare well against the increased rate of Infantry and Artillery fire during the war and to compound matters was badly handled by both sides’ generals. The cavalry arm was mainly used in pre-battle scouting, harassing a retreating enemy or providing rearguard actions to delay the enemy. In some cases, shock action was employed by cavalry, such as the Piedmontese Aosta Light Horse at Montebello.
Light cavalry: Hussars, Lancers, Chasseur d’Afrique, Light Horse and Uhlans etc. Cavalry trained to scout, skirmish and screen in front of the army, but also capable of charging.
Heavy cavalry: Dragoons, Cuirassiers, Heavy Horse & Carabiniers etc. These are cavalry trained to charge but, are also capable of scouting and screening.
Artillery and Rockets units were mainly used to sup-port defensive lines by breaking up attacking move-ments. They would also be used in suppressing enemy lines, counter battery fire and closely supporting at-tacks. The French with a mix of Smoothbore and Muzzle Loading Rifled artillery were used to engage targets at a mixture of ranges, where the fire of the Austrian and Piedmontese Smoothbores had expose themselves to move in closer to support attacking formations.
Setting up the game
4 Polemos Risorgimento — Fratelli d'Italia
Tempo & Bombardment
Polemos Risorgimento — Fratelli d'Italia 5
Tempo bidding (CDB p.10) At the start of each move the CinC throws 1D6 and gets this number of tempo points (TPs) plus:
French & Piedmontese CinC’s: • 4 TPs for an Energetic CinC. • 3 TPs for an Experienced CinC. • 1 TPs for a Listless CinC. French Subordinates: • 4 TPs for each Imposing officer. • 3 TPs for each Competent officer. • 1 TP for each Confused officer. Piedmontese Subordinates: • 3 TPs for each Imposing officer. • 2 TPs for each Competent officer. • 0 TP for each Confused officer. Austrian CinC’s: • 3 TPs for an Energetic CinC. • 2 TPs for an Experienced CinC. • 1 TPs for a Listless CinC. Austrian Subordinates: • 3 TPs for each Imposing officer. • 2 TPs for each Competent officer. • 0 TP for each Confused officer. Bombardment phase (CDB p.10) If an unmodified dice roll of 2 occurs for any artillery firing this result is an automatic BS result and it is im-mediately applied to the firers.
Otherwise add or subtract the following Bombardment Modifiers: Firer behind target’s flank +2 Each further base in line of sight and in base con-tact behind target (up 2 additional bases) +1
For each additional base firing +1 12pdr, 18pdr or 16pdr bases firing or in firing group +1
Bombardment Definitions BS = Bombarding Shaken (BS) - bombarding base(s) take one level of shaken. Bombarding bases will not fire in next bombardment phase or give support in this turn. All units must limber up and move back one full move. BCF = Bombarding Cease Firing (BCF) - bombard-ing base(s) will not fire in next bombardment phase or give support in this turn. BNE = Bombardment No Effect (BNE).
TBS = Target Base Shaken (TBS) - target base takes one shaken level. TSF = Target Shaken & Fall Back (TSF) - target base, plus any base behind and in contact with it, take one shaken level and fall back 1BW.
Bombardment Results read resulting total off following table:
Score 2 or less 3-4 5-7 8-10 Over
10 Result BS BCF BNE TBS TSF
6 Polemos Risorgimento — Fratelli d'Italia
Movement and Firing Move Distances (CdB - Page 14)
Note: Rocket Bases are treated as Artillery in all re-spects. Firing (CdB - Page 16) Range Table
* Piedmontese Bersaglieri units were armed with the minie rifle the same as the French units.
Heavy cavalry 3 BW 4 BW All Artillery & Rockets 3 BW -
Units Point Blank
Close Range
Long Range
French and Ber-saglieri*
Contact to 1BW
Over 1BW to 3BW
Over 3BW to 4BW
Austrian Contact to 1BW
Over 1BW to 2BW
Over 2BW to 3BW
Piedmon-tese Contact
Over ‘Contact’ to 1BW
Over 1BW to 2BW
Firing Modifiers Point blank range +2 to firer
Firer behind target’s flank +2
First time firing +1 to firer
Veteran troops +1
Supporting artillery (if 12pdr, 18pdr or 16pdr) +1
Raw troops -1
Each shaken level -1
Long range -1 (-2 if Smoothbore Musket)
Target behind/in level 1 obstacle -1
Target behind/in level 2 or 3 obstacle
-2 (Infantry Fire Only)
Firing Procedure
Close Combat Attacks (CdB - Page 19)
Tempo, Bombardment & Morale
Polemos Risorgimento — Fratelli d'Italia 7
Attack Modifiers
Both Sides
Veteran Unit +2 Supporting Units (up to +2) +1
Cavalry Heavier than Opposing Cavalry +2 One or Both Secure Flanks +1
Uphill of Enemy +2 Austrian or Piedmontese Grenadiers +1
CinC in base contact with unit +2 All Austrian Units -1
General in base contact with unit +1 Attacking Units have Gone to ground -1
Supported by Cavalry and Infantry +1 Shaken -2
Elite Unit +1 Cavalry Attacking Infantry -2
Any French Guard, Foreign Service or Light Units +1 Raw Unit -2
Defender Only Attacker Only
Supported by Unlimbered Artillery +2 Cavalry Pursuing +2
Cavalry within 1BW of at start of move -1 Supported by Unlimbered Artillery +1
Defender intends to fire at close range -1 Cavalry Charging +1 Defender intends to fire at point blank range -2 Defender behind level 1 linear obstacle -1
French Foreign Service Troops +2 Unbroken enemy within 2BW -1
Cavalry +1 Unbroken enemy within 2BW -2
Shaken Troops +1 Gone to ground -2
First Melee +1 following modifier is at the player’s discretion
Veteran Troops -1 General or CinC with unit +/-2
Army Morale (CdB - Page 23) At the start of the game, multiply the number of subordinate officers under the direct command of the CinC by: • 2 - For Austrian and Piedmontese army’s critical morale factor. • 2.5 - For the French army’s critical morale Factor. The result is the army’s critical morale factor. Each time a subordinate officer’s force becomes spent, throw a D6 and deduct the result from the army’s critical morale. Once the factor falls below 0, the army is broken in defeat.
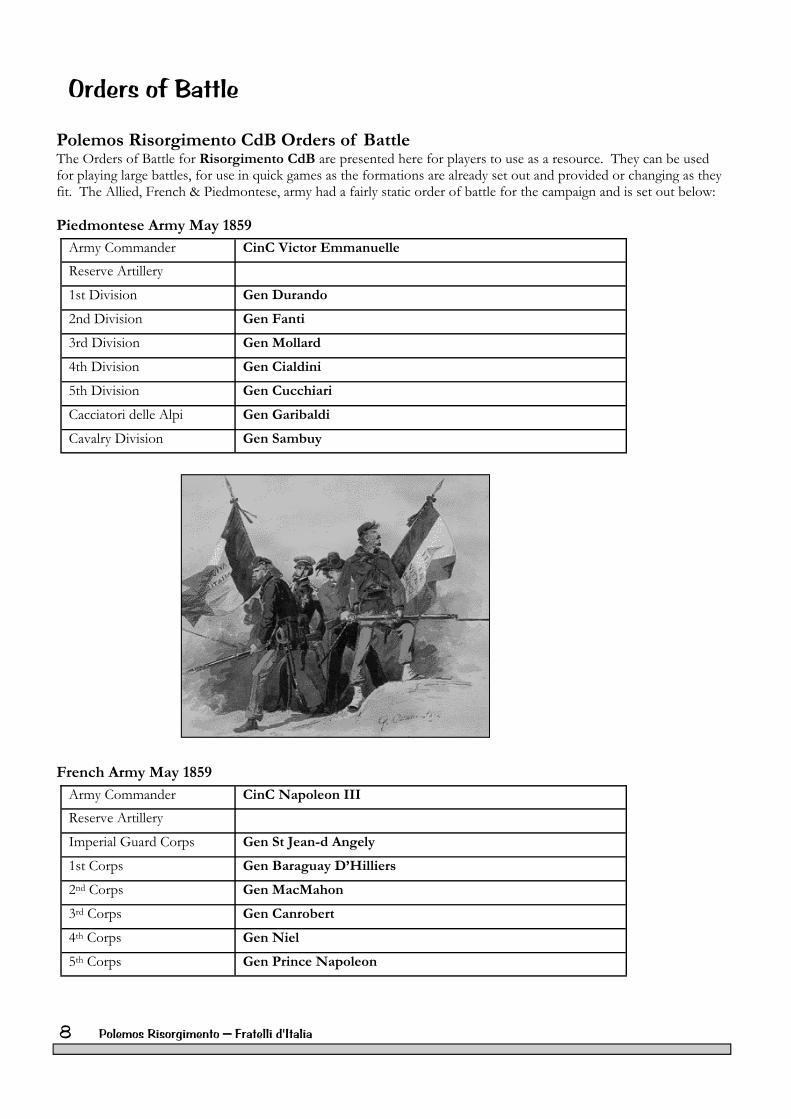
Polemos Risorgimento CdB Orders of Battle The Orders of Battle for Risorgimento CdB are presented here for players to use as a resource. They can be used for playing large battles, for use in quick games as the formations are already set out and provided or changing as they fit. The Allied, French & Piedmontese, army had a fairly static order of battle for the campaign and is set out below: Piedmontese Army May 1859
French Army May 1859
Army Commander CinC Victor Emmanuelle Reserve Artillery
1st Division Gen Durando
2nd Division Gen Fanti
3rd Division Gen Mollard
4th Division Gen Cialdini
5th Division Gen Cucchiari
Cacciatori delle Alpi Gen Garibaldi
Cavalry Division Gen Sambuy
Army Commander CinC Napoleon III Reserve Artillery
Imperial Guard Corps Gen St Jean-d Angely
1st Corps Gen Baraguay D’Hilliers
2nd Corps Gen MacMahon
3rd Corps Gen Canrobert
4th Corps Gen Niel
5th Corps Gen Prince Napoleon
8 Polemos Risorgimento — Fratelli d'Italia
Orders of Battle
The Austrian Army had quite a few additions and changes over May and June. I have only really detailed any quite substantial changes to the OOB’s, due to the scale. I have not detailed all of minute changes that occurred throughout the army and movements between organisations. Austrian 1st Army June 1859 - CinC Kaiser Franz Josef
Austrian 2nd Army June 1859
Mid/Late of June: 1st Army Army Commander CinC Wimpffen
2nd Corps Gen Liechtenstein
3rd Corps Gen Schwarzenberg
9th Corps Gen Schaffgotsche
10th Corps Gen Wernhardt
11th Corps Gen Veigl
Reserve Artillery
Cavalry Division Gen Zedtwitz
Mid/Late of June: 1st Army Army Commander CinC Schlick
1st Corps Gen Clam-Gallas
5th Corps Gen Stadion
7th Corps Gen Zobel
8th Corps Gen Benedek
Reserve Artillery
Cavalry Division Gen Mensdorff
Polemos Risorgimento — Fratelli d'Italia 9
Orders of Battle
Reserve Artillery 2 Base 12pdr SB - Veteran 1 Base 12pdr MLR - Veteran Guard Corps - Gen St Jean-d Angely 1st Division - Gen Mellinet 1st Brigade 2 Bases Guard Zouaves - Veteran Elite, SK2 3 Bases 1st Grenadiers - Veteran, Sk1 2nd Brigade 3 Bases 2nd Grenadiers - Veteran, SK1 3 Bases 3rd Grenadiers - Veteran, Sk1 Divisional Artillery 1 Base, 4pdr MLR - Veteran 2nd Division - Gen Camou 1st Brigade 1 Base Chasseurs a Pied - Veteran Elite, SK2 3 Bases 1st Voltigeurs - Veteran, SK1 3 Bases 2nd Voltigeurs - Veteran, Sk1 2nd Brigade 3 Bases 3rd Voltigeurs - Veteran, SK1 3 Bases 4th Voltigeurs - Veteran, SK1 Divisional Artillery 1 Base 4pdr MLR - Veteran Guard Cavalry Division - Gen Morris 1st Brigade 1 Base 1st Cuirassiers - Veteran, Elt, Hvy Cav 1 Base 2nd Cuirassiers - Veteran, Elt, Hvy Cav 2nd Brigade 1 Base Empress Dragoons - Veteran, Hvy Cav 1 Base Lancers - Veteran, Light Cavalry 3rd Brigade 1 Base Chasseurs a Cheval, Veteran, Lt Cav 1 Base Guides, Veteran, Light Cavalry Divisional Artillery 1 Base 4pdr MLR - Veteran Guard Corps Artillery 1 Base 4pdr MLR- Veteran 1st Corps - Gen Baraguay D’Hilliers
4th Division - Gen Cialdini 1st Brigade (Regina) 1 Base 7th Bersaglieri - Trained, SK2 4 Bases 9th Infantry - Trained, SK1 4 Bases 10th Infantry - Trained, SK0 2nd Brigade (Savona) 1 Base 6th Bersaglieri - Trained, SK2 4 Bases 15th Infantry - Trained, SK1 4 Bases 16th Infantry - Raw, SK0 Novara Cavalry 1 Base Light Horse - Trained Divisional Artillery 1 Base 8pdr - Trained 1b 16pdr - Trained 5th Division - Gen Cucchiari 1st Brigade (Casale) 1 Base 8th Bersaglieri - Trained, SK2 4 Bases 11th Infantry - Trained, SK1 4 Bases 12th Infantry - Trained, SK0 2nd Brigade (Acqui) 1 Base 5th Bersaglieri - Trained, SK2 4 Bases 17th Infantry - Trained, SK1 4 Bases 18th Infantry - Trained, SK1 Saluzzo Cavalry 1 Base Light Horse - Trained Divisional Artillery 1 Base 8pdr- Trained Caccadori delle Alpi - Gen Garibaldi 2 Bases 1st Infantry - Trained, SK2 2 Bases 2nd Infantry - Trained, SK1 2 Bases 3rd Infantry - Raw, SK1 Cavalry Division - Gen Sambuy 1st Brigade 1 Base Nizza Heavy Horse - Trained 1 Base Savioa Heavy Horse - Trained 2nd Brigade 1 Base Piedmont Heavy Horse - Trained 1 Base Genova Heavy Horse - Trained Divisional Artillery 1 Base 8pdr SB - Trained
Polemos Risorgimento — Fratelli d'Italia 13
Orders of Battle The Piedmontese Army CinC - Victor Emmanuel II
Reserve Artillery 1 Base 12pdr SB - Veteran 1 Base 6pdr SB - Trained 1 Base Rocket - Veteran 1 Base 18pdr - Trained 2nd Corps - Gen Leichtenstein 1st Division - Gen Jellavcic 1st Brigade 1 Base 7th Jager Battalion - Veteran, SK2 4 Bases 12th Infantry Regiment - 3 of Infantry - Raw, SK1 - 1 of Grenadiers - Veteran, SK1 2nd Brigade 1 Base 21st Jager Battalion - Veteran, SK2 4 Bases 46th Infantry Regiment - 3 of Infantry - Trained, SK1 - 1 of Grenadiers - Veteran, SK1 Artillery 1 Base 6pdr SB - Trained 2nd Division - Gen Herdy 1st Brigade 1 Base 10th Jager Battalion - Veteran, SK2 4 Bases 9th Infantry Regiment - 3 of Infantry - Trained, SK1 - 1 of Grenadiers - Trained, SK1 2nd Brigade 3 Base 9th Jager Battalion - Trained, SK2 4 Bases 59th Infantry Regiment - 3 of Infantry - Raw, SK1 - 1 of Grenadiers - Trained, SK1 Artillery 1 Base 12pdr SB - Trained Corps Artillery 1 Base Rocket - Veteran
3rd Corps - Gen Schwarzenberg 1st Division - Gen Schoenberger 1st Brigade 1 Base 15th Jager Battalion - Veteran, SK2 4 Bases 58th Infantry Regiment - 3 of Infantry - Trained, SK1 - 1 of Grenadiers - Trained, Elite SK1 2nd Brigade 1 Base 13th Jager Battalion - Veteran, SK2 4 Bases 27th Infantry Regiment - 3 of Infantry - Trained, SK1 - 1 of Grenadiers - Trained, Elite SK1 Artillery 1 Base, 6pdr SB - Trained 2nd Division - Gen Martini 1st Brigade 1 Base Otto Grenze Battalion - Veteran, SK1 4 Bases 5th Infantry Regiment - 3 of Infantry - Trained, SK1 - 1 of Grenadiers - Trained, Elite SK1 2nd Brigade 1 Base 23rd Jager Battalion - Veteran, SK2 4 Baseb 14th Infantry Regiment - 3 of Infantry - Trained, SK1 - 1 of Grenadiers - Trained, Elite SK1 Artillery 1 Base 6pdr SB - Trained Corps Cavalry 2 Bases 10th Hussar - Trained, Light Cavalry Corps Artillery 1 Base 12pdr SB - Trained 1 Base Rocket - Trained
14 Polemos Risorgimento — Fratelli d'Italia
Orders of Battle Austrian Second Army CinC - FZM Gyuali
5th Corps - Gen Stadion 1st Division - Gen Paumgartten 1st Brigade 1 Base Liccaner Grenze - Trained, SK1 4 Bases 3rd Infantry Regiment - 3 of Infantry - Trained, SK1 - 1 of Grenadiers - Trained, Elite SK1 2nd Brigade 1 Base 4th Kaiser Jager - Trained, Elite, SK1 4 Bases 31st Infantry Regiment - 3 of Infantry - Trained, SK1 - 1 of Grenadiers - Trained, Elite SK1 3rd Brigade 1 Base Ogul Grenze - Trained, SK1 4 Bases 47th Infantry Regiment - 3 of Infantry - Trained, SK1 - 1 of Grenadiers - Trained, Elite SK1 Artillery 2 Bases 6pdr SB - Trained 2nd Division - Gen Sternberg 1st Brigade 1 Base Ogul Grenze - Trained, SK1 4 Bases 32nd Infantry Regiment - 3 of Infantry - Raw, SK1 - 1 of Grenadiers - Trained, Elite SK1 2nd Brigade 1 Base 6th Kaiser Jager - Trained, Elite, SK1 4 Bases 21st Infantry Regiment - 3 of Infantry - Trained, SK1 - 1 of Grenadiers - Trained, Elite SK1 Artillery 1 Base 6pdr SB - Trained Corps Cavalry 1 Base 12th Uhlans - Trained, Light Cavalry Corps Artillery 1 Base 12pdr SB - Trained 1 Base 6pdr SB - Trained
7th Corps - Gen Zobel 1st Division - Gen Reischach 1st Brigade 4 Bases 1st Infantry Regiment - 3 of Infantry - Trained, SK1 - 1 of Grenadiers - Trained, Elite SK1 2nd Brigade 1 Base 3rd Kaiser Jager - Trained, Elite, SK1 4 Bases 54th Infantry Regiment - 3 of Infantry - Trained, SK1 - 1 of Grenadiers - Trained, Elite SK1 Artillery 1 Base 12pdr SB - Trained 2nd Division - Gen Chevalier de Lilia 1st Brigade 4 Bases 53rd Infantry Regiment - 3 of Infantry - Raw, SK1 - 1 of Grenadiers - Trained, Elite SK1 2nd Brigade 1 Base Otto Grenze - Trained, SK1 4 Bases 22nd Infantry Regiment - 3 of Infantry - Trained, SK1 - 1 of Grenadiers - Trained, Elite SK1 Artillery 1 Base 6pdr - Trained Corps Cavalry 1 Base 1st Hussars - Trained, Light Cavalry Corps Artillery 1 Base 6pdr SB - Trained 1 Base Rocket - Trained
Polemos Risorgimento — Fratelli d'Italia 15
Orders of Battle Austrian Second Army CinC - FZM Gyuali
8th Corps - Gen Benedek 1st Division - Gen Berger 1st Brigade 1 Base 2nd Kaiser Jager - Trained, Elite, SK1 4 Bases 7th Infantry Regiment - 3 of Infantry - Trained, SK1 - 1 of Grenadiers - Trained, Elite SK1 2nd Brigade 1 Base Szluiner Grenze - Trained, SK1 4 Bases 11th Infantry Regiment - 3 of Infantry - Raw, SK0 - 1 of Grenadiers - Trained, Elite SK1 Artillery 1 Base 6pdr SB - Trained 2nd Division - Gen Lang 1st Brigade 1 Base 5th Kaiser Jager - Trained, Elite, SK1 4 Bases 17th Infantry Regiment - 3 of Infantry - Trained, SK1 - 1 of Grenadiers - Trained, Elite SK1 2nd Brigade 1 Base 3rd Jager - Trained, Elite, SK1 4 Bases 39th Infantry Regiment - 3 of Infantry - Trained, SK1 - 1 of Grenadiers - Trained, Elite SK1 Artillery 1 Base 6pdr SB - Trained Corps Cavalry 1 Base 1st Hussars - Trained Corps Artillery 1 Base 6pdr - Trained 1 Base 12 pdr - Trained
Reserve Division - Gen Urban 1st Brigade 1 Base 19th Jager - Trained, Elite, SK1 4 Bases 33rd Infantry Regiment - 3 of Infantry - Trained, SK1 - 1 of Grenadiers - Trained, Elite SK1 2nd Brigade 1b 1b Szluiner Grenze - Trained, SK1 4b 41st Infantry Regiment - 3 of Infantry - Trained, SK1 - 1 of Grenadiers - Trained, Elite SK1 3rd Brigade 2 Bases 59th/49th Infantry - Trained, SK1 1 Base 12th Hussars - Trained, Light Cav 1 Base 6pdr SB - Trained Cavalry Division - Gen Mensdorff 1st Brigade 1 Base 12th Hussars - Trained, Light Cav 1 Base 1st Uhlans - Trained, Light Cav 2nd Brigade 1 Base 5th Dragoons - Trained, Heavy Cav 1 Base 6th Dragoons - Trained, Heavy Cav Cavalry Artillery 1 Base 6pdr SB - Trained
16 Polemos Risorgimento — Fratelli d'Italia
Orders of Battle Austrian Second Army CinC - FZM Gyuali
Orders of Battle
May end - Additional Corps to 2nd Army: 9th Corps - Gen Schaffgotsche 1st Division - Gen Handel 1st Brigade 1 Base Gradiskaner Grenze - Trained, SK1 4 Bases 19th Infantry Regiment - 3 of Infantry - Trained, SK1 - 1 of Grenadiers - Trained, Elite SK1 2nd Brigade 1 Base Gradiskaner Grenze - Trained, SK1 4 Bases 40th Infantry Regiment - 3 of Infantry - Raw, SK0 - 1 of Grenadiers - Trained, Elite SK1 3rd Brigade 1 Base 16th Jager - Trained, Elite, SK1 4 Bases 34th Infantry Regiment - 3 of Infantry - Raw, SK0 - 1 of Grenadiers - Trained, SK0 Artillery 2 Bases 6pdr SB - Trained 2nd Division - Gen Crenneville 1st Brigade 1 Base 4th Jager - Trained, SK1 4 Bases 52nd Infantry Regiment - 3 of Infantry - Trained, SK1 - 1 of Grenadiers - Trained, Elite SK1 2nd Brigade 1 Base Tittler Grenze - Trained, Elite, SK1 4 Bases 8th Infantry Regiment - 3 of Infantry - Trained, SK1 - 1 of Grenadiers - Trained, Elite SK1 Artillery 1 Base 6pdr SB - Trained Corps Cavalry 1 Base 12th Hussars - Trained Corps Artillery 1 Base Rocket - Trained 1 Base 12 pdr - Trained May end - Changes to: 8th Corps 2nd Division - Gen Lang 2nd Brigade from Herdys Division, II corps 2nd Brigade 1 Base 9th Jager - Trained, SK1 4 Bases 59th Infantry Regiment - 3 of Infantry - Trained, SK1 - 1 of Grenadiers - Trained, Elite SK1 May end - Changes to: 8th Corps
2nd Division - Gen Lang 2nd Brigade from Herdys Division, II corps 2nd Brigade 1 Base 9th Jager - Trained, SK1 4 Bases 59th Infantry Regiment - 3 of Infantry - Trained, SK1 - 1 of Grenadiers - Trained, Elite SK1 2nd Corps - Gen Leichtenstein 2nd Division - Gen Herdy 1st Brigade joins Herdys Division, II corps in place of the above 2nd Brigade 1st Brigade 4 Bases 45th Infantry Regiment - 3 of Infantry - Trained, SK1 - 1 of Grenadiers - Trained, SK1 Beginning June - Additional Corps to 2nd Army: 1st Corps - Gen Clam-Gallas 1st Division - Gen Montenouvo 1st Brigade 1 Base 2nd Jager - Trained, Elite, SK1 4 Bases 60th Infantry Regiment - 3 of Infantry - Trained, SK1 - 1 of Grenadiers - Trained, Elite SK1 2nd Brigade 1 Base 24th Jager - Trained, SK1 4 Bases 16th Infantry Regiment - 3 of Infantry - Raw, SK0 - 1 of Grenadiers - Trained, Elite SK1 3rd Brigade 1 Base Banal Grenze - Trained, SK1 4 Bases 29th Infantry Regiment - 3 of Infantry - Raw, SK0 - 1 of Grenadiers - Trained, SK0 Artillery 2 Bases 6pdr SB - Trained 2nd Division - Gen Cordon 1st Brigade 1 Base 14th Jager - Trained, SK1 4 Bases 48th Infantry Regiment - 3 of Infantry - Trained, SK0 - 1 of Grenadiers - Trained, SK2 2nd Brigade 1 Base Banal Grenze - Trained, Elite, SK1 4 Bases 37th Infantry Regiment - 3 of Infantry - Trained, SK1 - 1 of Grenadiers – Veteran, SK1 Artillery 1 Base 6pdr SB - Trained Corps Cavalry 1 Base 12th Hussars - Trained
Austrian Second Army CinC - FZM Gyuali
Polemos Risorgimento — Fratelli d'Italia 17
At this point the Austrians became 2 forces: 1st Army under Wimpffen 2nd Army under Schlick Additional Corps/Units to the 1st Army above: Reserve Artillery 2 Bases 12pdr SB - Veteran 10th Corps - Gen Wernhardt 1st Division - Gen Marziani 1st Brigade 1 Base 12th Jager - Trained, SK1 4 Bases 15th Infantry Regiment - 3 of Infantry - Trained, SK1 - 1 of Grenadiers - Trained, Elite SK1 2nd Brigade 1 Base Illyrian Grenze - Trained, SK0 4 Bases 4th Infantry Regiment - 3 of Infantry - Raw, SK0 - 1 of Grenadiers - Trained, Elite SK1 3rd Brigade 1 Base 20th Jager - Trained, Elite, SK1 4 Bases 33rd Infantry Regiment - 3 of Infantry - Raw, SK0 - 1 of Grenadiers - Trained, SK0 Artillery 2 Bases 6pdr SB - Trained 2nd Division - Gen Wallemare 1st Brigade 1 Base 5th Jager - Trained, SK1 4 Bases 6th Infantry Regiment - 3 of Infantry - Trained, SK1 - 1 of Grenadiers - Trained, Elite SK1 2nd Brigade 1 Base Romanian Grenze - Trained, SK1 4 Bases 56th Infantry Regiment - 3 of Infantry - Trained, SK0 - 1 of Grenadiers - Trained, Elite SK1 Artillery 1 Base 6pdr SB - Trained Corps Cavalry 1 Base 4th Uhlans - Trained Corps Artillery 1 Base Rocket - Trained 1 Base 12 pdr - Trained Additional Corps to 1st Army above:
11th Corps - Gen Veigl 1st Division - Gen Schwarzel 1st Brigade 1 Base 10th Jager - Trained, SK1 4 Bases 37th Infantry Regiment - 3 of Infantry - Trained, SK0 - 1 of Grenadiers - Trained, Elite SK1 2nd Brigade 4 Bases 35th Infantry Regiment - 3 of Infantry - Raw, SK1 - 1 of Grenadiers - Trained, Elite SK1 Artillery 1 Bases 6pdr SB - Trained 1 Base Rocket - Trained 2nd Division - Gen Blomberg 1st Brigade 1 Base Warasdiner Grenze - Trained, SK1 4 Bases 9th Infantry Regiment - 3 of Infantry - Raw, SK0 - 1 of Grenadiers - Trained, SK0 2nd Brigade 1 Base 21st Jager - Trained, Elite, SK1 4 Bases 42nd Infantry Regiment - 3 of Infantry - Trained, SK1 - 1 of Grenadiers - Trained, Elite SK1 3rd Brigade 1 Base Peterwardeiner Grenze - Trained, SK1 4 Bases 57th Infantry Regiment - 3 of Infantry - Raw, SK0 - 1 of Grenadiers - Trained, SK0 Artillery 1 Base 6pdr SB - Trained Corps Cavalry 1 Base 12th Hussars - Trained Corps Artillery 1 Base Rocket - Trained 1 Base 12 pdr - Trained Cavalry Division - Gen Zedtwitz 1st Brigade 1 Base 3rd Hussars - Trained, Light Cav 1 Base 11th Hussars - Trained, Light Cav 2nd Brigade 1 Base 1st Dragoons - Trained, Heavy Cav 1 Base 3rd Dragoons - Trained, Heavy Cav
18 Polemos Risorgimento — Fratelli d'Italia
Orders of Battle Austrian Army
Firstly decide on a Minimum number of bases in your army. You will keep generating formations until this minimum is reached or exceeded. Roll for the Grading of the CinC and any attached Corps assets detailed in the army list. The first formation to be generated in each army list is an Infantry Division. Dice as directed to decide the number of Brigades in the Division, Battalions or Regiments in the Brigade and their type and class. Then Dice for the grading of the commanding General and the number of and type of the Divi-sional Artillery units. Once the first line Infantry Division is complete, dice at random for what the next formation will be; this may be a Cavalry Formation, Guards Bri-gade, Reserve Division or even specialist units like the Cacciatori delle Alpi for instance, or even another Infantry Division. Continue to dice again for the composition, type and class until this forma-tion too is complete.
Once any other type of formation has been gener-ated, the formation which follows will always be a line Infantry Division; therefore line Infantry for-mations will always equal or outnumber all other type of formations within your army. When the minimum number of bases you decided to start with is reached, continue to dice for the formation you are currently generating until it is complete. Do not stop generating part of the way through a formation, only when it is complete. You may therefore exceed your minimum by some margin.
Polemos Risorgimento—Fratelli d’Italia 19
Army Generators
CinC Grade of CinC (D6) 1-2 Listless 3-5 Experienced 6 Energetic Corps Artillery (D6) for each Corps 1 1 x 12pdr SB Base 2-3 1 x 12pdr SB & 1 x 4pdr MLR Base 4-5 2 x 4pdr MLR Bases 6 2 x 12pdr SB Bases Corps (D6) for Engineers/Sappers 5 or 6 1 Base Infantry Division (D6) for Brigades 1 1 Brigade 3-5 2 Brigades 6 3 Brigades Battalions (units) per Brigade (D6) 1 3 Battalions 2-3 4 Battalions 4-5 5 Battalions 6 6 Battalions Battalion Experience (D10)
*If a “Leger” unit has been already rolled for the Divi-sion, any following “Leger” units are treated as Infantry. Throw (D6) for each Brigade if 4 or 6 add Elite status to one base Throw (D6) for each Division if 4 to 6 make 1 Base Veteran, Elite, SK2 After an Infantry Division (D6) Divisions/ Brigades in Corps 1-4 Another Infantry Division 5 Cavalry Formation 6 Guard Brigade If Guard Brigade Throw (D6) 1-4 Infantry 5-6 Cavalry
Cavalry Formation (D6) for Type 1-4 Cavalry Brigade 5-6 Cavalry Division Cavalry Brigade (D6) 1-2 1 Trained Light Cavalry Base 3-6 2 Trained Light Cavalry Bases Cavalry Division (D6) for Brigades 1-2 1 Brigade 3-5 2 Brigades Cavalry Division Brigades Type (D6) 1-3 Light cavalry 4-6 Heavy cavalry Cavalry Division Regiments (Bases) per Brigade (D6) 1-3 1 Regiment (Base) 4-6 2 Regiments (Base) Class of Regiment (D6) 1-2 Raw 3-5 Trained 6 Veteran Throw (D6) for each Brigade if 5 or 6 add Elite status to one base Grades of General (D6) 1-2 Confused 4-6 Confident Divisional Artillery (D6) for each Division 1-4 1 x 4pdr MLR Base 5-6 2 x 4pdr MLR Base Guard Cavalry Brigade (D6) 1-2 1 Veteran Light Cavalry Base 3 2 Veteran Light Cavalry Bases 4 1 Veteran Heavy Cavalry Base 5-6 2 Veteran Heavy Cavalry Bases Guard Infantry Brigade (D6) 1-2 3 Veteran (SK1) Bases 3-4 3 Veteran Elite (SK2) Bases 5 4 Veteran (SK1) Bases 6 4 Veteran Elite (SK2) Bases Reserve Artillery (D6) for each CinC if 4 to 6 roll (D6) for Artillery. 1-2 1 x 12pdr SB Base 3-4 1 x 12pdr SB & 1 x 4pdr MLR Base 5-6 2 x 12pdr MLR Bases
1 2 3 4 5
Raw SK0
Raw SK1
Trained SK0
Trained SK1
Trained SK1
6 7 8 9 0
Trained SK2
Trained Leger SK2
Veteran SK1
Veteran SK1
Veteran Leger SK2
20 Polemos Risorgimento — Fratelli d'Italia
Army Generators The French Imperial Army of Italy 1859
CinC Grade of CinC (D6) 1-2 Listless 3-5 Experienced 6 Energetic Reserve Artillery (D6) for each CinC if 4 to 6 then roll (D6) for Artillery. 1 1 x 16pdr Base 2-5 1 x 16pdr Base & 1 x 150mm 6 2 x 16pdr Base & 1 x 150mm Army (D6) for Engineers/Sappers 5 or 6 1 Base Infantry Division (D6) for Brigades 1-2 1 Brigade 3-6 2 Brigades Battalions (units) per Brigade (D6) 1-2 4 Battalions 3-4 5 Battalions 5-6 6 Battalions Battalion Experience (D10)
*If a Bersaglieri unit has been already rolled for the Brigade, any following Bersaglieri units are treated as Infantry. Throw (D6) for each Division if 3 to 6 add one Trained Light Cavalry Base Throw (D6) only for the 1st Division rolled, if 3 to 6 make 1 Brigade Veteran, Elite, SK2 Throw (D6) for each Brigade if 5 or 6 add Elite status to one base
After an Infantry Division (D6) 1-4 Another Infantry Division 5 Cacciatori delle Alpi 6 Cavalry Division *Once a the Cacciatori delle Alpi and the Cavalry Division have been rolled all other Divisions are infantry divisions. Cacciatori delle Alpi (D6) 1-2 4 Battalions 3-4 5 Battalions 5-6 6 Battalions *for experience use the “Battalion Experience” table with a +2 modifier to the dice. Cavalry Division (D6) for Brigades 1-2 1 Brigades 3-6 2 Brigades Cavalry Brigade Type (D6) 1-2 1 Heavy Cavalry Base 3-6 2 Heavy Cavalry Bases Throw D6 for class of Regiment (Base) 1-2 Raw 3-5 Trained 6 Veteran Throw (D6) for each Brigade if 5 or 6 add Elite status to one base Divisional Artillery (D6) for each Infantry Division 1-4 1 x 8pdr Base 5-6 1 x 8pdr & 1x 16pdr Bases *Once a 5 or 6 is thrown (D6) all following Divi-sions have 1 x 8pdr Base Cavalry Divisional Artillery Throw (D6) for the Cavalry Division if 3 to 6 add 1 x 8pdr Base Grades of General (D6) 1-2 Confused 3-4 Confident 5-6 Imposing *For the Cacciatori delle Alpi add +2 to the dice roll.
Polemos Risorgimento—Fratelli d’Italia 21
Army Generators
1 2 3 4 5
Raw SK0
Raw SK0
Raw SK1
Trained SK1
Trained Bersaglieri
SK2 6 7 8 9 0
Trained Bersaglieri
SK2
Veteran SK1
Veteran SK2
Veteran Bersaglieri
SK2
Veteran SK2
The Piedmontese Army 1859
CinC Grade of CinC (D6) 1-3 Listless 4-5 Experienced Corps Artillery (D6) for each Corps 1 1 x 12pdr SB Base 2-3 1 x 6pdr SB Base 4 1 x Rocket Base 5 1 x 6pdr SB & 1 x 12pdr SB Bases 6 1 x 6pdr SB & 1 x Rocket Bases Corps Cavalry 1-4 1 Light Cavalry Base 5-6 2 Light Cavalry Bases Corps (D6) for Engineers/Sappers 5 or 6 1 Base Infantry Division (D6) for Brigades 1-5 2 Brigades 6 3 Brigades Battalions (units) per Brigade (D6) 1 4 Battalions 2-5 5 Battalions 6 6 Battalions Battalion Experience (D10)
*If a “Jager/Grenzer” unit has been rolled for the Bri-gade, any other “Jager/Grenzer” units are treated as In-fantry. Throw (D6) for each Brigade if 6 add Elite status to one base Throw (D6) for each Brigade with no Veteran unit. If 3 to 6 make one base a Veteran unit. After an Infantry Division (D6) Divisions in Corps (D6) 1-3 Another Infantry Division 4-5 Reserve Infantry Division 6 Cavalry Division
Cavalry Division Type (D6) 1-2 1 Brigade Light Cavalry 3-4 1 Brigade Heavy Cavalry 5-6 1 Brigade Heavy & 1 Light Cavalry Heavy Cavalry Brigade Type (D6) 1-3 2 Light Cavalry Bases 4-6 1 Light Base Light Cavalry Brigade Type (D6) 1-3 2 Light Cavalry Bases 4-6 1 Light Base Throw D6 for class of Cavalry (Base) 1 Raw 2-4 Trained 5-6 Veteran Throw (D6) for each Brigade if 6 add Elite status to one base Throw (D6) for each Cavalry Brigade if 5-6 add 1 x 6pdr SB Base Divisional Artillery (D6) for each Infantry Division 1-2 1 x 12pdr SB Base 3-6 1 x 6pdr Base Reserve Infantry Division 3 Brigades roll (D6) for each Brigade *for experience use the “Battalion Experience” table with a +2 modifier to the dice. Treat Jager/Grenz rolls as Infantry. 1st & 2nd Brigades Table Battalions (units) per Brigade (D6) 1 1 Jager & 2 Infantry Battalions 2-5 1 Jager & 3 Infantry Battalions 6 1 Jager & 4 Infantry Battalions 3rd Brigade Table Bases for the Brigade (D6) 1 1 Infantry & 1 Trained Lt Cav 2-5 2 Inf, 1 Tr Lt Cav & 1x Tr 6pdr SB 6 1 Trained Lt Cav & 1x Tr 6pdr SB Reserve Artillery (D6) for each CinC if 3 to 6 then roll (D6) for Artillery. 1 1 x 12pdr SB Base 2-3 1 x 6pdr SB Base 4-5 1 x 6pdr SB & 1 x Rocket Base 6 1 x 18pdr SB, 1 x pdr SB & 1 x Rocket Base Grades of General (D6) 1-2 Confused 3-5 Confident 6 Imposing
22 Polemos Risorgimento — Fratelli d'Italia
Orders of Battle
1 2 3 4 5
Raw SK0
Raw SK1
Raw Jgr/Grz
SK1
Trained SK0
Trained SK1
6 7 8 9 0
Trained
SK1
Trained
SK2
Trained Jgr/Grz
SK2
Veteran SK1
Veteran Jgr/Grz
SK2
The Austrian Army May 1859
Historical Situation The allies began the planned to move to Novara and threaten Milan after winning the battle of Montebello on the 20th of May using a grand flanking manoeuvre. The Piedmontese army units moved into position to cover the right flank of the allied forces. By the 30th of May, the Piedmontese had taken control of Palestro and a few surrounding villages’. The Austrians ordered FMZ Zobel to attack the village of Palestro using two infantry divi-sions for the purpose. The 3rd Zouaves, attached to the Piedmontese, were hidden on an island called Sesietta. Cialdini’s Savona Brigade of the 4th Division, was in position to cover the road between Palestro and Robbio. The Regina Brigade was placed to defend San Pietro. Terrain The terrain is very flat and open with the area being cov-ered by grasslands and cornfields with a few rice fields as well. The villages are on small hill shown by the contours as that kept them from flooding and the woods and tree lined canals causing some problems for the troops. Terrain Effects Gentle Slope: +1 No Effects. Towns & Villages May only be negotiated by columns 1BW wide, moving at 1BW per turn. • Counts as level 2 obstacle to units in combat.
Obstacle level 2 to fire. Wetlands (scenario only terrain) • Cavalry may not advance to contact. • All troops half speed except infantry with skirmish capability 2. • Counts as level 1 obstacle to units in combat. Obstacle level 1 to fire.
Canals and Streams (Irrigation Ditches) • Passable by all troops, costing 1BW of movement. Obstacle level 1 to combat units attacking across them. River Impassable except by bridge or ford. One unit per game turn may negotiate a bridge or ford. Palestro is 2 town bases in size and San Pietro is 1 town base. Objectives The Austrian objective is to take and hold Palestro. The Piedmontese objective is to prevent the Austrians taking and holding Palestro and ensuring the protection of the Bridge. The game starts at 8:00am and has turns of approx 20minutes and ends at 1:30pm.
Polemos Risorgimento—Fratelli d’Italia 23
Scenario — The Battle of Palestro, 1859
The map represents an approximate area of 4km by 4km and is about 16BW’s across by 16BW’s in depth.
Elements of Austrian Second Army - CinC Zobel Center Column - Gen Dondorf 7th Corps, 2nd Division - 2nd Brigade 1 Base Otto Grenze - Trained, SK1 4 Bases 22nd Infantry Regiment 3 of Infantry - Trained, SK1 1 of Grenadiers - Trained, Elite SK1 Center Column Artillery 1 Base 6pdr - Trained 1 Base 12pdr SB - Trained Left Column - Gen Jellavcic 2nd Corps, 1st Division - 2nd Brigade 1 Base 21st Jager Battalion - Veteran, SK2 4 Bases 46th Infantry Regiment 3 of Infantry - Trained, SK1 1 of Grenadiers - Veteran, SK1 Left Column Artillery 1 Base 6pdr – Trained 1 Base 12pdr SB – Trained 2nd Corps, 1st Division - 1st Brigade 1 Base 7th Jager Battalion - Veteran, SK2 4 Bases 12th Infantry Regiment 3 of Infantry - Raw, SK1 1 of Grenadiers - Veteran, SK1 Cavalry 1 Base 1st Hussars - Trained, Light Cavalry Right Column - Gen Weigl 7th Corps, 1st Division - 1st Brigade 3 Bases 53rd Infantry Regiment 3 of Infantry - Raw, SK1
General Reserve 1 Base 53rd Infantry Regiment 1 of Grenadiers - Trained, Elite SK1 The Piedmontese Army CinC - Victor Emmanuel II 3 Bases 3rd Zouaves - Veteran, SK2 4th Division - Gen Cialdini 1st Brigade (Regina) 1 Base 7th Bersaglieri - Trained, SK2 4 Bases 9th Infantry - Trained, SK1 Bases 10th Infantry - Raw, SK0 Divisional Artillery 1 Base 8pdr - Trained 1 Base 16pdr - Trained 1 Base (attached) 12pdr MLR - Trained Novara Cavalry 1 Base Light Horse - Trained 2nd Brigade (Savona) 1 Base 6th Bersaglieri - Trained, SK2 4 Bases 15th Infantry - Trained, SK1 4 Bases 16th Infantry - Raw, SK0 2nd Division - Gen Fanti 1st Brigade (Piemonte) 1 Base 9th Bersaglieri - Trained Elt, SK2 1 Base 1st Bersaglieri - Trained Elt, SK2
24 Polemos Risorgimento — Fratelli d'Italia
Scenario — The Battle of Palestro, 1859
Arrivals The French 3rd Zouaves appear in line of Battle at point B on a roll of 1-2 on a D6 or when the Austrians attack San Pietro. The Austrian Center Column, 2nd Corps, 1st Division - 1st Brigade will appear at Point A on a roll of 1-3 on a D6, begin rolling after the second turn. All other units start on the map as marked.
Historical Outcome When the Austrians attacked Palestro they were driven back towards Robbio where they had come from. The Austrians were to suffer similar setbacks at San Pietro, which was also being attacked by Austrian units coming from the direction of Rosacco. At San Pietro Vittorio Emmanuel II led the French Zouaves from the Sesietta against the Austrians taking them by surprise and flanking them. The Austrians were forced back across the La Brida bridge, where many were drowned in the headlong flight. Also another Austrian attack towards Confienza, held by Fanti’s Piedmontese division was sent back in retreat and closed the days fighting. Allied Casualties were about 700 casualties, against almost 1400 Austrian losses. Vittorio Emanuele II was given the rank of honorary corporal of the Zouaves in recognition of his courage in during the battle at San Pietro.
FeldzeugmeisterA supplement for converting Polemos Kommandant der Armee FPW rules to the Italian Wars of Unification
Peter Riley
FeldzeugmeisterA supplement for converting Polemos Kommandant der Armee FPW rules to the Italian Wars of Unification
Peter Riley
FeldzeugmeisterA supplement for converting Polemos Kommandant der Armee FPW rules for use in the Italian Wars of Unification
Published in pdf format by: Baccus 6mm Ltd, 2009.
Text Copyright: Peter Riley
Layout and Design: Baccus 6mm Ltd
Photography: Peter Berry
Maps: Sven Lugar
Buildings and Scenics: Timecast
Baccus 6mm figures painted by Peter Berry
All rights reserved. No part of this work may be reproduced or used in any form or by any means without the express written consent of the authors.
For more information about the figures and models used in this catalogue, extra sections and add-ons to
these rules, as well as the other rules sets in the Polemos series visit: www.baccus6mm.com
A Yahoo group has been set up to allow for discussion of all aspects of playing games using Polemos rules. If you have any questions, are looking for tips and advice or just want to talk to other gamers, you can join by logging on to http://games.groups.yahoo.com/group/polemos
FeldzeugmeisterA supplement for converting Polemos Kommandant der Armee FPW rules for use in the Italian Wars of Unification
Introduction
i Polemos Risorgimento — Feldzeugmeister
Fedlzeugmeister
Introduction ii
Part One – Setting up the Game Troop Types 4 Part Two – Playing the Game Tempo Bidding 5 Bombardment Tables 5 Tempo Point Cost 6 Ranged Attacks 6 Combat 7 Army Morale 8 Part Three – Orders of Battle Piedmont & French Army Commands 9 Austrian Army Commands 10 French Army of Italy - OOB 11 Piedmont Army - OOB 12 Austrian Second Army - OOB 13,14 Part Four – Army Generators Army Generators 15 French Army 16,17 Piedmont Army 18 Austrian Army 19 Part Five – Scenario The Battle of Magenta - 1859 20,21
The Risorgimento of 1859 began a year earlier, in July 1858, during a conference held at Plombières in France. At the conference it was agreed, between Emperor Napoleon III and Camillo Benso, Conte di Cavour, that the French would aid Piedmont in the face of any Austrian moves against them. So in 1859, the Italians, having secured the support of Napoleon III of France, began provoking Austria into war it was not prepared for. The Austrians re-acted as planned the Emperor Francis Joseph de-clared war. By April 23rd 1859 an ultimatum was de-livered wanting the complete demobilization of Pied-montese troops. This was rejected and Austria de-clared war three days later, and as a result France, as a part of the secret agreement, was asked to come to the aid of the Piedmontese army, this small request led to the War of Italian Unification. Although in terms of numbers and time it is consid-ered a small war, the battle of Solferino was at the time the largest single battle ever fought in Europe.
The campaign is interesting as it was quite fluid and led to a number of battles of vary sizes and types, the encounter battle of Magenta is particularly interesting one. The protagonists were also interesting in the fact that France committed a large number of veteran troops in it Imperial Guard and its Experienced African For-eign Service Troops totaling to about 28% of it army. For the Austrians with their poor officer corps, using smoothbore artillery and lots of inexperienced troops was always in for a hard fight. And of the fledgling Piedmontese army with it compact size, belief and smoothbore muskets adding to a healthy mix of type and experience for some interesting games. Risorgiamento KDA allows players to fight the larger battle of the period. The three multi-corps armies that sprawled across the fields and hills of Solferino are modelled here, allowing the Battle of Solferino to be gamed very easily by using these additional rules.
Introduction
ii Polemos Risorgimento — Feldzeugmeister
Polemos Risorgimento
Feldzeugmeister
Troop types (FPW KDA - Page 4) Infantry units in this era formed in increasingly more open formations with a skirmish line in advance and a formed reserve deeper in the rear of the formation. In attack however, columns were often used to de-liver fast moving assaults. Infantry: Most infantry, known as Regulars, Garde Nationale, Imperial Guard, Imperial Infantry, Grena-diers, Foreign Legion or Turco’s or any other name, are formed units and are armed with Muzzle Loading Smoothbores or Rifles and bayonet. They can deliver their fire by command or individual shots to break up attacks or rely on the charge to break the target.
Skirmishers: Jaegers, Kaiser Jaegers, Bersaglieri, Ti-railleurs and Chasseurs etc. These are not generally depicted by distinct bases of their own, but by a skir-mish capability factor which is assigned to standard infantry bases. This represents the infantry base’s abil-ity to skirmish. However they can also be represented as individual Infantry bases as well. Cavalry: The mounted arm did not generally fare well against the increased rate of Infantry and Artillery fire during the war and to compound matters was badly handled by both sides’ generals. The cavalry arm was mainly used in pre-battle scouting, harassing a retreat-ing enemy or providing rearguard actions to delay the enemy. In some cases, shock action was employed by cavalry, such as the Piedmontese Aosta Light Horse at Montebello. Light cavalry: Hussars, Lancers, Chasseur d’Afrique, Light Horse and Uhlans etc. Cavalry trained to scout, skirmish and screen in front of the army, but also capable of charging. Heavy cavalry: Dragoons, Cuirassiers, Heavy Horse & Carabiniers etc. These are cavalry trained to charge but, are also capable of scouting and screening.
Artillery and Rockets units were mainly used to sup-port defensive lines by breaking up attacking move-ments. They would also be used in suppressing enemy lines, counter battery fire and closely supporting at-tacks. The French with a mix of Smoothbore and Muzzle Loading Rifled artillery were used to engage targets at a mixture of ranges, where the fire of the Austrian and Piedmontese Smoothbores had expose themselves to move in closer to support attacking formations.
Artillery: Divisional or “Field” Batteries were able to closely support infantry or cavalry attacks and unlim-ber close to the enemy line. The Heavier ‘Corps’ or ‘Reserve’ guns were usually placed in support of troops in defense, however they could also be de-ployed forward on the gun line..
Troop Types
4 Polemos Risorgimento—Feldzeugmeister
Tempo bidding (CDB p.10) At the start of each move the CinC throws 1D6 and gets this number of tempo points (TPs) plus:
French & Piedmontese CinC’s: • 4 TPs for an Energetic CinC. • 3 TPs for an Experienced CinC. • 1 TPs for a Listless CinC. French Subordinates: • 4 TPs for each Imposing officer. • 3 TPs for each Competent officer. • 1 TP for each Confused officer. Piedmontese Subordinates: • 3 TPs for each Imposing officer. • 2 TPs for each Competent officer. • 0 TP for each Confused officer. Austrian CinC’s: • 3 TPs for an Energetic CinC. • 2 TPs for an Experienced CinC. • 1 TPs for a Listless CinC. Austrian Subordinates: • 3 TPs for each Imposing officer. • 2 TPs for each Competent officer. • 0 TP for each Confused officer.
Bombardment Phase (FPW KDA - Page 13) • For Field Artillery, the maximum range is 4BW. • For Reserve Artillery, the maximum range is 6BW. Bombardment Phase (FPW KDA - Page 14) If an unmodified dice roll of, 1 occurs for any artillery firing the artillery must recoil immediately.
Tempo & Bombardment
Polemos Risorgimento—Feldzeugmeister5
Each further base in line of sight and in base con-tact behind target (up to 2) +1
Artillery Firing into Flank +1
Firer is French Field or Reserve Artillery +1
Firer is Austrian or Piedmontese Field or Reserve Artillery -1
Artillery standing on rough ground or marsh -1
Otherwise add or subtract the following factors:
Outcome of Bombardment Table
If the bombarding base’s modified result exceeds that of the target by 3 or more, target is shaken and goes to ground. If the bombarding base’s modified result exceeds that of the target by 4 or more, target recoils and is shaken. If the target base’s score exceeds the artillery’s by 3 or more, the artillery recoils. If the target base’s score exceeds the artillery’s by 5 or more, the artillery recoils and becomes shaken Any other score has no effect.
Tempo Point Cost (FPW KDA - Page 15)
Ranges (FPW KDA - Page 16) Note: Austrian & Piedmontese troops do not have a ‘close range,. The majority are armed with smoothbore muskets and anything from 1BW up to 1.5BW is classed as long range fire.
Ranged Attack Procedure (FPW KDA - Page 17)
Ranged Attack Outcome (FPW KDA - Page 17) (There is no change to this chart I have included it for completeness.)
Action TPs re-quired
To instigate a movement for a single unit 2
To instigate a movement for a corps or formation
4
To instigate a movement for a corps or formation for Austrian Armies only
5
To instigate a movement for a single unit, corps or formation that maintains a 7BW or over distance from any enemy forma-tions during its whole move.
2
To redeploy formation or corps 2
To have a force continue a movement once started
1
For each extra unit within a formation after the first
1
To rally shaken or tired unit 1
To steal tempo with one unit, corps or formation
5
To steal tempo with a corps or formation for Austrian Armies only
6
To instigate any non-bombardment ranged attack for a single unit, corps or formation
2
To commence engineer task 3
6 Polemos Risorgimento—Feldzeugmeister
Tempo and Ranged Attacks
Units Contact Close Range
Long Range
French
Under 1BW must go to Contact Phase
From 1BW up to 1.5BW
Over 1.5BW up to 2BW
Austrian & Piedmon-tese
Under 1BW must go to Contact Phase
- From 1BW up to 1.5BW
Ranged Attack Modifiers
Firer behind target’s flank +2
Veteran troops +1
Close Range +1 to firer
Supporting Bases +1
Gone to Ground -1
Raw troops -1
Each shaken level -1
Long range -1 (-2 if Austrian & Piedmon-tese)
Relevant Terrain Modifiers See Terrain chart
Outcome of Ranged Attacks
If the attacking base’s modified result exceeds that of the target by 5 or more, target recoils and is shaken. If the attacking base’s score exceeds that of the tar-get by 3 or more, target recoils and goes to ground. Differences of less than 3 mean that neither side is winning the fire-fight. Both sides go to ground. They are not driving off the enemy and all bases stay in position. If the target base’s score exceeds that of the attacker by 3 or more, the attacker recoils and goes to ground. If the target base’s score exceeds that of the attacker by 5 or more, the attacker recoils and becomes shaken.
Combat Modifiers (FPW KDA - Page 20)
Combat results (FPW KDA - Page 20) (There is no change to this chart I have included it for completeness.)
Following up (FPW KDA - Page 21)
Difference in scores
Result
0-1 No effect, both units remain in posi-tion and go to ground.
2-4 Loser recoils
5 Loser recoils and is shaken
6 Loser breaks
Combat
Polemos Risorgimento—Feldzeugmeister 7
Modifiers + / -
If two infantry bases in combat with each other, each side add skirmish capa-bility.
+0,1 or 2
Uphill of enemy if steep slope +2
Attacking or following up recoiling en-emy
+1
Each Artillery, Infantry or Cavalry base giving support
+1
Elite +1
Veteran +1
Imposing or Competent General leading the attack
+1
Heavier cavalry attacking lighter cavalry +1
Uphill of enemy if gentle slope +1
Shaken troops in combat -1
Enemy unit following up friendly base and is within 1BW
-1
Each supporting base that is shaken -1
Raw troops -1
Cavalry attacking shaken infantry -1
Cavalry on soft ground -2
Contacted by, or contacting, previously unseen enemy
-2
Cavalry attacking unshaken infantry -3
Terrain modifiers where applicable See table P.18
Following up Modifiers:
Elite Troops +2 2nd Round or more of pur-suit
-1
Light Cavalry +2 Tired -2
Heavy Cavalry +1 Cavalry fol-lowing up un-shaken infan-try
-2
French Infantry +1 following modifiers are at the player’s discretion
Shaken Troops -1 Veteran Troops
+ or -1
Raw Troops -1 Imposing or Competent General within 1BW
+ or -1
Austrian Infantry -1 Energetic or Experienced CinC within 1BW
+ or -1
Force Morale (FPW KDA - Page 23) Morale is taken per force, i.e. corps or formation, un-der the direct command of the CinC and may be diced for after every game turn in which they have been in contact with the enemy. Add: • 1 point per base which is shaken • 2 points per base which has broken • 1 For Forces with a Listless Corps commander
If the result is equal or greater than the number of bases in the force at the start of the game, the whole force is adjudged to be spent and returns immediately to their army’s base line. It will take no further part in the fighting.
Army Morale (FPW KDA - Page 23) At the start of the game, multiply the number of sub-ordinate officers under the direct command of the CinC by: • 2 - For Austrian and Piedmontese army’s critical morale factor. • 2.5 - For the French army’s critical morale Factor. Add the CinC’s grade level: • Energetic +2 • Experienced +1 • Listless +0 The result is the army’s critical morale factor. Round up any fractions in the final total. Each time a subordinate officer’s force becomes spent, throw a D6 and deduct the result from the army’s critical morale. Once the factor falls below 0, the army is broken in defeat.
8 Polemos Risorgimento—Feldzeugmeister
Morale
Plus D6 scoring: Allied Modifiers Austrian Modifiers
1 -2 -3
2 -1 -2
3 or 4 0 -1
5 +1 0
6 +2 +1
Polemos Risorgimento KDA Orders of Battle The Orders of Battle for Risorgimento KDA are presented here for players to use as a resource. They can be used for playing large battles, for use in quick games as the formations are already set out and provided or changing as they fit. The Allied, French & Piedmontese, army had a fairly static order of battle for the campaign and is set out below: Piedmontese Army May 1859
French Army May 1859
Army Commander CinC Victor Emmanuelle Reserve Artillery
1st Division Gen Durando
2nd Division Gen Fanti
3rd Division Gen Mollard
4th Division Gen Cialdini
5th Division Gen Cucchiari
Cacciatori delle Alpi Gen Garibaldi
Cavalry Division Gen Sambuy
Army Commander CinC Napoleon III Reserve Artillery
Imperial Guard Corps Gen St Jean-d Angely
1st Corps Gen Baraguay D’Hilliers
2nd Corps Gen MacMahon
3rd Corps Gen Canrobert
4th Corps Gen Niel
5th Corps Gen Prince Napoleon
Polemos Risorgimento—Feldzeugmeister9
Orders of Battle
The Austrian Army had quite a few additions and changes over May and June. I have only really detailed any quite substantial changes to the OOB’s, due to the scale. I have not detailed all of minute changes that occurred throughout the army and movements between organisations. Austrian 1st Army June 1859 - CinC Kaiser Franz Josef
Austrian 2nd Army June 1859
Mid/Late of June: 1st Army Army Commander CinC Wimpffen
2nd Corps Gen Liechtenstein
3rd Corps Gen Schwarzenberg
9th Corps Gen Schaffgotsche
10th Corps Gen Wernhardt
11th Corps Gen Veigl
Reserve Artillery
Cavalry Division Gen Zedtwitz
Mid/Late of June: 1st Army Army Commander CinC Schlick
1st Corps Gen Clam-Gallas
5th Corps Gen Stadion
7th Corps Gen Zobel
8th Corps Gen Benedek
Reserve Artillery
Cavalry Division Gen Mensdorff
10 Polemos Risorgimento—Feldzeugmeister
Orders of Battle
Army of Italy - CinC Napoleon III Reserve Artillery 1 Base Reserve Artillery - Veteran Guard Corps - Gen St Jean-d Angely 1st Division 1st Brigade - 1 Base Veteran, SK2 2nd Brigade - 2 Bases Veteran, SK1 2nd Division 1st Brigade - 2 Bases Veteran, SK2 2nd Brigade - 2 Bases Veteran, SK2 Guard Corps Cavalry Division 1st Brigade - 1 Base Veteran, Elite, Heavy Cav 2nd Brigade - 1 Base Veteran, Heavy Cav 3rd Brigade - 1 Base Veteran, Light Cavalry Corps Assets Divisional Artillery - 1 Base Field Artillery Corps Artillery - 1 Base Reserve Artillery 1st Corps - Gen Baraguay D’Hilliers 1st Division 1st Brigade - 2 Bases - Trained, SK1 2nd Brigade - 2 Bases Trained, SK0 2nd Division 1st Brigade - 2 Bases Trained, SK1 2nd Brigade - 2 Bases Trained, SK0 3rd Division 1st Brigade - 2 Bases Trained, SK1 2nd Brigade - 2 Bases Trained, SK0 Corps Cavalry Division 1st Brigade - 1 Base Veteran, Light Cavalry 2nd Brigade - 1 Base Veteran, Light Cavalry Corps Assets Divisional Artillery - 2 Bases Field Artillery Corps Artillery - 1 Base Reserve Artillery 2nd Corps - Gen MacMahon 1st Division 1st Brigade - 2 Bases Veteran, SK1 2nd Brigade - 2 Bases Trained, SK1 2nd Division 1st Brigade - 2 Bases Trained, SK1 2nd Brigade - 3 Bases Veteran, SK1 Corps Cavalry Brigade 1st Brigade - 1 Base Trained, Light Cavalry Corps Assets Divisional Artillery - 1 Base Field Artillery Corps Artillery - 1 Base Reserve Artillery
3rd Corps - Gen Canrobert 1st Division 1st Brigade - 2 Bases Trained, SK1 2nd Brigade - 2 Bases Raw, SK1 2nd Division 1st Brigade - 2 Bases Trained, SK1 2nd Brigade - 2 Bases Raw, SK0 3rd Division 1st Brigade - 2 Bases Trained, SK2 2nd Brigade - 2 Bases Raw, SK1 Corps Cavalry Division 1st Brigade - 1 Base Trained, Light Cavalry 2nd Brigade - 1 Base Trained, Light Cavalry Corps Assets Divisional Artillery - 2 Bases Field Artillery Corps Artillery - 1 Base Reserve Artillery 5th Corps - Gen Prince Napoleon 1st Division 1st Brigade - 1 Base Veteran, SK2 - 2 Bases Trained, SK1 2nd Brigade - 2 Bases Raw, SK0 2nd Division 1st Brigade - 2 Bases Trained, SK2 2nd Brigade - 2 Bases Trained, SK0 Corps Cavalry Brigade 1st Brigade - 1 Base Trained, Light Cavalry Corps Assets Divisional Artillery - 1 Base Field Artillery Corps Artillery - 1 Base Reserve Artillery 4th Corps - Gen Niel 1st Division 1st Brigade - 2 Bases Trained, SK2 2nd Brigade - 2 Bases Trained, SK1 2nd Division 1st Brigade - 2 Bases Trained, SK2 2nd Brigade - 2 Bases Trained, SK1 3rd Division 1st Brigade - 2 Bases Trained, SK2 2nd Brigade - 2 Bases Trained, SK0 Corps Cavalry Brigade 1st Brigade - 1 Base Trained, Light Cavalry Corps Assets Divisional Artillery - 2 Bases Field Artillery Corps Artillery - 1 Base Reserve Artillery
Polemos Risorgimento—Feldzeugmeister 11
Orders of Battle French Army of Italy CinC - Napoleon III
5th Division - Gen Cucchiari 1st Brigade (Casale) - 2 Bases Trained, SK0 2nd Brigade (Acqui) - 2 Bases Trained, SK1 Cacciatori delle Alpi - Gen Garibaldi 1 Base Trained, SK2 1 Base Trained, SK0 1 Base Raw, SK0 Cavalry Division - Gen Sambuy Combined Light Brigade - 2 Bases Light Horse - Trained 1st Brigade - 1 Base Heavy Horse - Trained 2nd Brigade - 1 Base Heavy Horse - Trained Artillery Assets 3 Bases Field Artillery 2 Bases Reserve Artillery Note: Each Piedmontese army will have a CinC and One nominated General. If more than 2 divisions are present it will be Two nominated Generals
12 Polemos Risorgimento—Feldzeugmeister
Orders of Battle
The Piedmontese Army CinC - Victor Emmanuel II
Austrian 2nd Army - CinC FZM Gyuali Reserve Artillery 2 Bases Reserve Artillery 2nd Corps - Gen Leichtenstein 1st Division 1st Brigade - 2 Bases Veteran, SK1 2nd Brigade - 2 Bases Trained, SK0 2nd Division 1st Brigade - 1 Base Veteran, SK1 - 1 Base Trained, SK0 2nd Brigade - 1 Base Trained, SK2 - 1 Base Raw, SK0 Corps Assets Divisional Artillery - 1 Base Field Artillery Corps Artillery - 1 Base Reserve Artillery 3rd Corps - Gen Schwarzenberg 1st Division 1st Brigade - 1 Base Veteran, SK2 - 1 Base Trained, SK0 2nd Brigade - 2 Bases Trained, SK1 2nd Division 1st Brigade - 2 Bases Trained, SK2 2nd Brigade - 2 Bases Trained, SK0 Corps Assets Corp Cavalry - 1 Base Trained, Light Cavalry Divisional Artillery - 1 Base Field Artillery Corps Artillery - 1 Base Reserve Artillery 5th Corps - Gen Stadion 1st Division 1st Brigade - 2 Bases Trained, SK0 2nd Brigade - 1 Base Trained, SK2 - 1 Base Trained, SK0 3rd Brigade - 2 Bases Trained, SK1 2nd Division 1st Brigade - 2 Bases Trained, SK0 2nd Brigade - 1 Base Trained, SK2 - 1 Base Raw, SK0 Corps Assets Corp Cavalry - 1 Base Trained, Light Cavalry Divisional Artillery - 2 Base Field Artillery Corps Artillery - 1 Base Reserve Artillery
7th Corps - Gen Zobel 1st Division 1st Brigade - 2 Bases Trained, SK0 2nd Brigade - 2 Bases Trained, SK1 2nd Division 1st Brigade - 2 Bases Trained, SK0 2nd Brigade - 2 Bases Trained, Elite, SK1 Corps Assets Corp Cavalry - 1 Base Trained, Light Cavalry Divisional Artillery - 1 Base Field Artillery Corps Artillery - 1 Base Reserve Artillery 8th Corps - Gen Benedek 1st Division 1st Brigade - 2 Bases Trained, SK0 2nd Brigade - 1 Base Trained, SK2 - 1 Base Raw, SK0 2nd Division - Gen Lang 1st Brigade - 2 Bases Trained, SK2 2nd Brigade - 2 Bases Trained, Elite, SK1 Corps Assets Corp Cavalry - 1 Base Trained, Light Cavalry Divisional Artillery - 1 Base Field Artillery Corps Artillery - 1 Base Reserve Artillery Reserve Division - Gen Urban 1st Brigade - 2 Bases Trained, SK0 2nd Brigade - 2 Bases Trained, Elite, SK1 3rd Brigade - 1 Base Trained, SK1 - 1 Base Trained, Light Cav - 1 Base Field Artillery Cavalry Division - Gen Mensdorff 1st Brigade - 1 Base Trained, Light Cav 2nd Brigade - 1 Base Trained, Heavy Cav Cavalry Artillery - 1 Base Field Artillery
Polemos Risorgimento—Feldzeugmeister 13
Orders of Battle Austrian Second Army CinC - FZM Gyuali
Changes to the Order of Battle from the end of May 1859 May end - Additional Corps to 2nd Army: 9th Corps - Gen Schaffgotsche 1st Division 1st Brigade - 2 Bases Trained, SK1 2nd Brigade - 1 Base Trained, Elite, SK2 - 1 Base Trained, SK1 3rd Brigade - 2 Bases Trained, SK0 2nd Division 1st Brigade - 2 Bases Trained, SK1 2nd Brigade - 1 Base Trained, Elite, SK2 - 1 Base Trained, SK1 Corps Assets Corp Cavalry - 1 Base Trained, Light Cavalry Divisional Artillery - 2 Base Field Artillery Corps Artillery - 1 Base Reserve Artillery Beginning June - Additional Corps to 2nd Army: 1st Corps - Gen Clam-Gallas 1st Division 1st Brigade - 2 Bases Trained, Elite, SK1 2nd Brigade - 1 Base Trained, Elite, SK2 - 1 Base Raw, SK0 3rd Brigade - 2 Bases Trained, SK1 2nd Division 1st Brigade - 2 Bases Trained, SK1 2nd Brigade - 1 Base Trained, SK0 - 1 Base Raw, SK0 Corps Assets Corp Cavalry - 1 Base Trained, Light Cavalry Divisional Artillery - 2 Base Field Artillery Corps Artillery - 1 Base Reserve Artillery
Changes to the Order of Battle from June 1859 At this point the Austrians became 2 forces: 1st Army under Wimpffen 2nd Army under Schlick Additional Corps/Units to the 1st Army above: Reserve Artillery 2 Bases Reserve Artillery 10th Corps - Gen Wernhardt 1st Division 1st Brigade - 2 Bases Trained, Elite, SK1 2nd Brigade - 1 Base Trained, SK2 - 1 Base Trained, SK1 3rd Brigade - 2 Bases Raw, SK0 2nd Division 1st Brigade - 2 Bases Trained, SK1 2nd Brigade - 1 Base Trained, SK1 - 1 Base Trained, SK0 Corps Assets Corp Cavalry - 1 Base Trained, Light Cavalry Divisional Artillery - 2 Base Field Artillery Corps Artillery - 1 Base Reserve Artillery Additional Corps to 1st Army above: 11th Corps 1st Division - Gen Schwarzel 1st Brigade - 2 Bases Trained, SK1 2nd Brigade - 1 Base Trained, SK1 - 1 Base Raw, SK0 2nd Division 1st Brigade - 2 Bases Trained, SK2 2nd Brigade - 1 Base Trained, SK1 - 1 Base Raw, SK1 3rd Brigade - 2 Bases Raw, SK0 Corps Assets Corp Cavalry - 1 Base Trained, Light Cavalry Divisional Artillery - 2 Base Field Artillery Corps Artillery - 1 Base Reserve Artillery Cavalry Division 1st Brigade - 1 Base Trained, Light Cav 2nd Brigade - 1 Base Trained, Heavy Cav Cavalry Artillery - 1 Base Field Artillery
14 Polemos Risorgimento—Feldzeugmeister
Orders of Battle Austrian Second Army CinC - FZM Gyuali
When generating your army you must decide on the rough size of the forces that will be involved in the battle. First decide on the number of subordinate com-manders you will have, the number must be within the range given at the start of each list. As a very rough guide the lower number will give you an army of about twenty four bases the higher number in excess of fifty.
Roll for the Grading of the CinC and any attached Generals as detailed in the army list. For the Austrian Army you may treat the two army commanders under the CinC as wing commanders (Generals) with other Generals reporting to them. Once you have rolled for your subordinates, roll again on the tables below, following the sequence outlined to determine the composition of your Army.
Polemos Risorgimento—Feldzeugmeister 15
Army Generators
Austrian Forces
Allied Forces
Die Score Results
1 or 2 One of your Generals has decided to take a short cut using an unfamiliar map. Getting hopelessly lost, his command will not reach the battlefield.
Deduct One Subordinate officer
3 or 4
Orders are muddled and two of your General’s forces end up marching through each other. They will be late to the Battle.
They will arrive at the battle when each rolls a 4, 5 or 6
5
One of your Generals gets a report of an intact wine cellar and diverts his force to investigate.
He will arrive at the battle when a 3, 4, 5 or 6 is rolled
6 Your army arrives intact. No effect
Die Score Results
1 One of your Generals has decided to take a short cut using an un-familiar map. Getting hopelessly lost, his command will not reach the battlefield.
Deduct One Subordinate officer
2 or 3
Orders are muddled and two of your General’s forces end up marching through each other. They will be late to the Battle.
They will arrive at the battle when each rolls a 4, 5 or 6
4
One of your Generals gets a report of an intact wine cellar and diverts his force to investigate.
He will arrive at the battle when a 3, 4, 5 or 6 is rolled
5 Your army arrives intact. No effect.
6 Reinforcements arrive! A General has arrived after getting sepa-rated form his army.
You get an allied General added to your army. If you are playing French use the Piedmontese table, if you are playing Piedmontese use the French table to gen-erate this force.
Grade of CinC (D6) 1-3 Listless 4-5 Experienced 6 Energetic Generals - Choose - 2 to 5 Grades of General (D6) 1-2 Confused 3-5 Competent 6 Imposing For Each CinC (D6) for Engineers/Sappers 5 or 6 1 Base Their Commands (D10)
Note: each option may only be assigned once. If the same number is rolled more than once roll again. Line Corps - Divisions in Corps (D6) 1 1 Infantry Division 2 2 Infantry Divisions 3 3 Infantry Divisions 4 1 Infantry & Corps Cavalry Division 5 2 Infantry & Corps Cavalry Division 6 3 Infantry & Corps Cavalry Division For each Line Infantry Division (D6) 1-2 1 Brigade 3-5 2 Brigades 6 3 Brigades For each Infantry Brigade (D6) 1-2 1 Base 3-6 2 Bases For each Infantry Brigade (D6) 1-2 SK 0 3-5 SK 1 6 SK 2
For Each Brigade Class (D6) 1-2 Raw 3-4 Trained 5-6 Veteran Throw (D6) for each Division if 5 or 6 add Elite status to one brigade. For each Infantry Corps, roll (D6) for Corps As-sets (for Guard Corps Artillery +1 to roll) 1-2 1 Reserve Artillery Base 3-5 1 Reserve & 1 Field Artillery Base 6 1 Reserve & 2 Field Artillery Base
Cavalry Division For each Division (D6) 1-2 1 Brigade 3-6 2 Brigades Each Brigade is 1 Base Light cavalry For Class (D6) 1 Raw 3-4 Trained 5-6 Veteran Throw (D6) for each Brigade if 6 add Elite status to one base.
1 2 3 4 5
Cavalry Div
Line Inf Div
Line Corps
Line Corps
Line Corps
6 7 8 9 10
Line Corps
Line Corps
Line Corps
Imp Guard Corps
Re-serve Artil-lery
16 Polemos Risorgimento—Feldzeugmeister
Army Generators The French Imperial Army of Italy 1859
Imperial Guard Corps Divisions in Guard Corps (D6) 1-2 1 Divisions 3-6 2 Divisions For Each Guard Infantry Division (D6) 1-2 1 Brigade 3-6 2 Brigades For Each Guard Infantry Brigade (D6) 1 Base 3-6 2 Bases (All Guard Bases are, Veteran SK2) Throw (D6) for each Division if 5 or 6 add Elite status to one brigade. Throw (D6) for each Division if 5 to 6 downgrade one brigade to SK1. Guard Cavalry (D6) if 4-6 Guard Cavalry Division is present
For the Guard Cavalry Division Roll (D6) 1-2 1 Light Brigade 3-4 1 Light & 1 Heavy Brigade 5-6 2 Light & 1 Heavy Brigade Each Guard Cavalry Brigade is 1 Base of Cavalry and is Veteran Throw (D6) For each Guard Cavalry Division if 4-6 add Elite status to one brigade Reserve Artillery (D6) for each CinC if a 3 to 6 is rolled, roll (D6) for Artillery Bases. 1-2 1 x Field Artillery 3-4 1 x Reserve Artillery 5-6 1 x Reserve & 1 x Field Artillery
The French Imperial Army of Italy 1859
Polemos Risorgimento—Feldzeugmeister 17
Army Generators
Grade of CinC (D6) 1-3 Listless 4-5 Experienced 6 Energetic Generals - Choose 2 or 4 Grades of General (D6) 1-3 Confused 4-5 Competent 6 Imposing For Each CinC (D6) for Engineers/Sappers 5 or 6 1 Base Their Commands (D6)
Note: each option may only be assigned once. If the same number is rolled more than once roll again.
Throw (D6) for each Division if 3 to 6 make one division the Cacciatori delle Alpi and roll as per line div. Once successfully rolled this option may not be rolled for again. For Each Line Division (D6) 1-2 1 Brigade 3-6 2 Brigades For Infantry per Brigade (D6) 1-2 1 Base 3-5 2 Bases For each Infantry Brigade (D6) (For the Cacciatori delle Alpi +2 to dice) 1-2 SK 0 3-4 SK 1 5-6 SK 2 For each Brigade Class (D6) (For the Grenadier Div +2 to dice, for the Caccia-tori delle Alpi +1 to dice) 1-2 Raw 3-4 Trained 5-6 Veteran
Throw (D6) for each Division if 5 or 6 add Elite status to one brigade. Throw (D6) for each Division if 4 to 6 add one Trained Light Cavalry Base Cavalry Division (D6) for Brigades 1-2 1 Brigades 3-6 2 Brigades Cavalry Brigade Type (D6) 1-2 1 Light Cavalry Base 3-4 1 Heavy Cavalry Bases 5-6 1 Heavy & 1 Light Cavalry Base Throw D6 for class of Base 1-2 Raw 3-5 Trained 6 Veteran Throw (D6) for each Cavalry Division if 5 or 6 add Elite status to one Brigade Divisional Artillery (D6) for all Divisions 1-3 1 x Field Artillery Base Reserve Artillery (D6) for Artillery. 1-2 1 x Field Artillery 3-5 1 x Field & 1 x Reserve Artillery 6 2 x Reserve Artillery
1 2 3 4 5 6
Cavalry Div
Line Div
Line Div
Line Div
Grenadier Div
Re-serve Art
18 Polemos Risorgimento—Feldzeugmeister
Army Generators The Piedmontese Army 1859
CinC Grade of CinC (D6) 1-3 Listless 4-6 Experienced Generals - Choose - 3 to 5 Grades of General (D6) 1-3 Confused 4-5 Confident 6 Imposing For CinC (D6) for Engineers/Sappers 5 or 6 1 Base Their Commands (D10)
Note: each option may only be assigned once. If the same number is rolled more than once roll again. Line Corps - Divisions in Corps (D6) 1-2 1 Infantry Division 3-5 2 Infantry Divisions 6 3 Infantry Divisions For each Line Infantry Division (D6) 1 1 Brigade 3-5 2 Brigades 6 3 Brigades For each Infantry Brigade (D6) 1 1 Base 2-6 2 Bases For each Infantry Brigade (D6) 1-2 SK 0 3-5 SK 1 6 SK 2 For Each Brigade Class (D6) 1-2 Raw 3-5 Trained 6 Veteran
Throw (D6) for each Division if 5 or 6 add Elite status to one brigade. Throw (D6) for each Division if 4 or 6 add 1 Field Artillery Base Corps Assets (D6) for each Corps 1 No Corps Assets 2-3 1 x Field Artillery Base 4-5 1 x Reserve Artillery Base 6 1 x Reserve & 1 Field Artillery Bases Throw (D6) for each Corps if 4 to 6 add 1 Trained Light Cavalry Base to the Corps Assets Cavalry Division Type (D6) 1 1 Brigade Light Cavalry 2-3 1 Brigade Heavy Cavalry 4-6 1 Brigade Heavy & 1 Light Cavalry Cavalry Brigades Class All are bases are Trained Throw (D6) for each Cavalry Brigade if 6 add Elite status to one base Throw (D6) for each Cavalry Brigade if 5 or 6 add 1 x Field Artillery Base Reserve Division (D6) 1 2 Infantry Base 2 3 Infantry Bases 3 4 Infantry Bases 4 4 Inf & 1 Trained Lt Cav Base 5 3 Inf, 1 TrLt Cav & 1 Field Art Base 6 2 Inf, 1 TrLt Cav & 1 Field Art Base Reserve Artillery (D6) for each CinC if a 3 to 6 is rolled, roll (D6) for Artillery Bases. 1 1 x Field Artillery 2-3 1 x Reserve Artillery 4-6 2 x Reserve Artillery
1 2 3 4 5
Cavalry Div
Reserve Div
Line Corps
Line Corps
Line Corps
6 7 8 9 0
Line Corps
Line Corps
Line Corps
Line Corps
Reserve Artillery
Polemos Risorgimento—Feldzeugmeister 19
Army Generators The Austrian Army May 1859
The Flank March Continues - The Battle of Magenta 4th June, 1859. Historical Situation Neither commander, Napoleon the III or FZM Graf Gyulai, expected a battle to be fought on the day. Napoleon thought that the Austrians would not have sufficient troops in place to stop any Allied advance, so the Allies sole aim was to get troops across the Ticino by June 4th and move closer to Milan. The French Imperial Guard, II and III corps with the Piedmontese following up closely positioned them-selves on the east bank of the river facing south. This would be facing the direction the Austrians were ex-pected to come from, if any. The two others, I and IV French corps were on the west bank facing south pro-tecting the allies’ lines of communication. The Austrians were expecting a rest day to redeploy their forces and the allies were to settle into their new positions. Magenta therefore proved to be a battle of encounter; it was, as a matter of fact, a complete sur-prise to both commanders and only a small portion of each force took actually part. The Austrians faced the Allies with the II Corps, a large portion of the I Corps, part of VII Corps and a cavalry division. Other Austrian units were within the sound of the guns how-ever FMZ Gyulai’s army was so disorganised, that they just could not respond quickly enough. The Allies needed to take Magenta by the evening or face over-whelming odds the following day. Terrain The terrain is very flat and open with the area being covered by grassland, vineyards, crops and fruit trees. The woods were light with the main obstacle being the Naviglio Grande Canal that is deep and wide with steep overgrown banks and is impassable except at bridges. Terrain Effects Road
• Reduces very steep slope to steep. Steep slope to gentle.
• Ignore terrain effect of marsh, woods, en-closures if in formation 1BW wide.
Towns & Villages:
• May only be negotiated by columns 1BW wide, moving at 1BW per turn.
• Counts as level 2 obstacle to units in com-bat.
• Obstacle level 2 to fire.
Woods
• All movement reduced to 1BW. • Infantry ignore +1 for attacking. • Cavalry may not attack.
Rivers, Lakes and Canals
• Impassable except by bridge or ford. • One unit per game turn may negotiate a
bridge or ford. • All Troops count shaken if attacking
across a bridge or ford. Magenta is 4 bases in size all others are 1 base in size. The map represents an approximate area of 7km by 9km and is about 14BW’s across by 18BW’s in depth Objectives
• The Allies have the tempo in the first turn this means that there will be no tempo bidding. The Allied, Piedmontese & French objective is to take and hold Ma-genta.
• The Austrian objective is to prevent the taking and holding Magenta.
• The game starts at 1:00pm and has turns of approx 20minutes and ends at 8:00pm.
Arrivals All units not marked as “on board” arrive as stated. Historical Outcome During the battle the Austrians suffered over 5,000 killed or wounded in action, with the captured total reaching 4,500. The Allied total reached almost 5000 casualties in achieving the battle. The Battle of Ma-genta was being claimed as a great victory in France, so much so it even had a colour named after it. General MacMahon was made the Duke of Magenta and both he de Saint-Jean-d’Angély of the Imperial Guard were both made marshals of France. Winning the Battle of Magenta had cleared road to Milan where the allies entered the city on the 8th of June.
20 Polemos Risorgimento—Feldzeugmeister
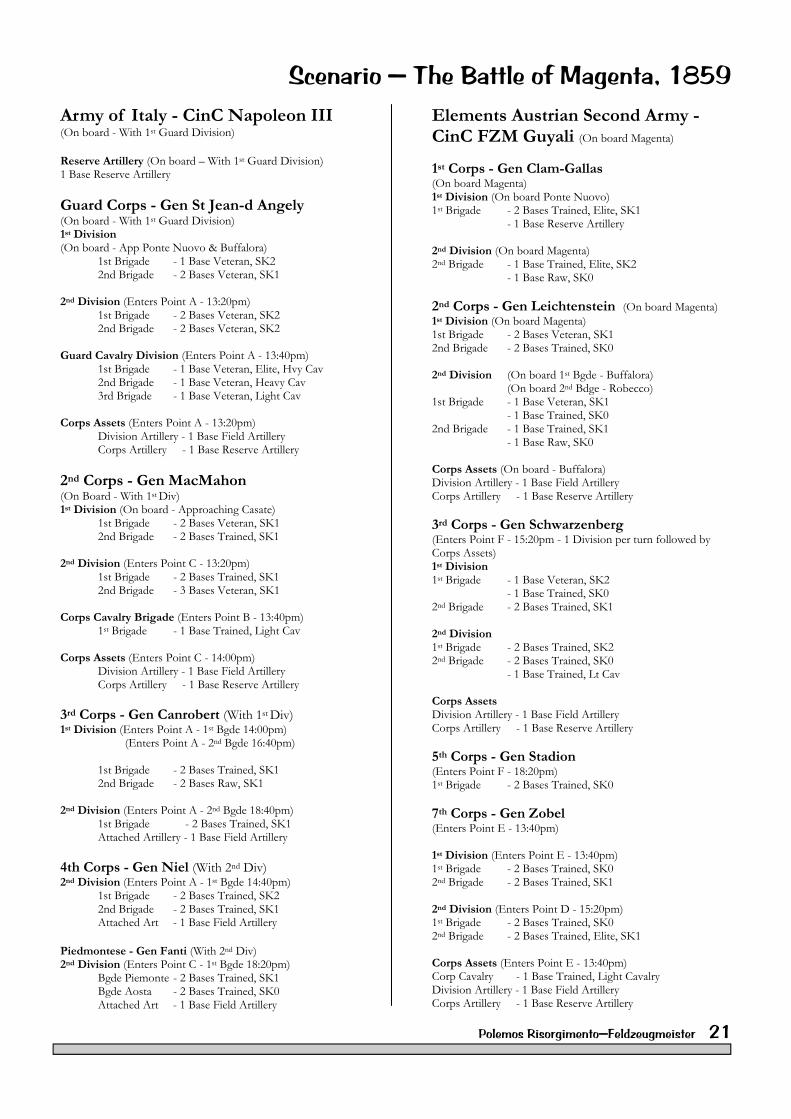
Scenario — The Battle of Magenta, 1859
Army of Italy - CinC Napoleon III (On board - With 1st Guard Division) Reserve Artillery (On board – With 1st Guard Division) 1 Base Reserve Artillery Guard Corps - Gen St Jean-d Angely (On board - With 1st Guard Division) 1st Division (On board - App Ponte Nuovo & Buffalora)
1st Brigade - 1 Base Veteran, Elite, Hvy Cav 2nd Brigade - 1 Base Veteran, Heavy Cav 3rd Brigade - 1 Base Veteran, Light Cav
Corps Assets (Enters Point A - 13:20pm) Division Artillery - 1 Base Field Artillery Corps Artillery - 1 Base Reserve Artillery 2nd Corps - Gen MacMahon (On Board - With 1st Div) 1st Division (On board - Approaching Casate)
1st Brigade - 1 Base Trained, Light Cav Corps Assets (Enters Point C - 14:00pm) Division Artillery - 1 Base Field Artillery Corps Artillery - 1 Base Reserve Artillery 3rd Corps - Gen Canrobert (With 1st Div) 1st Division (Enters Point A - 1st Bgde 14:00pm) (Enters Point A - 2nd Bgde 16:40pm)
1st Brigade - 2 Bases Trained, SK1 Attached Artillery - 1 Base Field Artillery
4th Corps - Gen Niel (With 2nd Div) 2nd Division (Enters Point A - 1st Bgde 14:40pm)
1st Brigade - 2 Bases Trained, SK2 2nd Brigade - 2 Bases Trained, SK1 Attached Art - 1 Base Field Artillery
Piedmontese - Gen Fanti (With 2nd Div) 2nd Division (Enters Point C - 1st Bgde 18:20pm)
Bgde Piemonte - 2 Bases Trained, SK1 Bgde Aosta - 2 Bases Trained, SK0 Attached Art - 1 Base Field Artillery
Elements Austrian Second Army - CinC FZM Guyali (On board Magenta) 1st Corps - Gen Clam-Gallas (On board Magenta) 1st Division (On board Ponte Nuovo) 1st Brigade - 2 Bases Trained, Elite, SK1 - 1 Base Reserve Artillery 2nd Division (On board Magenta) 2nd Brigade - 1 Base Trained, Elite, SK2 - 1 Base Raw, SK0 2nd Corps - Gen Leichtenstein (On board Magenta) 1st Division (On board Magenta) 1st Brigade - 2 Bases Veteran, SK1 2nd Brigade - 2 Bases Trained, SK0 2nd Division (On board 1st Bgde - Buffalora) (On board 2nd Bdge - Robecco) 1st Brigade - 1 Base Veteran, SK1 - 1 Base Trained, SK0 2nd Brigade - 1 Base Trained, SK1 - 1 Base Raw, SK0 Corps Assets (On board - Buffalora) Division Artillery - 1 Base Field Artillery Corps Artillery - 1 Base Reserve Artillery 3rd Corps - Gen Schwarzenberg (Enters Point F - 15:20pm - 1 Division per turn followed by Corps Assets) 1st Division 1st Brigade - 1 Base Veteran, SK2 - 1 Base Trained, SK0 2nd Brigade - 2 Bases Trained, SK1 2nd Division 1st Brigade - 2 Bases Trained, SK2 2nd Brigade - 2 Bases Trained, SK0 - 1 Base Trained, Lt Cav Corps Assets Division Artillery - 1 Base Field Artillery Corps Artillery - 1 Base Reserve Artillery 5th Corps - Gen Stadion (Enters Point F - 18:20pm) 1st Brigade - 2 Bases Trained, SK0 7th Corps - Gen Zobel (Enters Point E - 13:40pm) 1st Division (Enters Point E - 13:40pm) 1st Brigade - 2 Bases Trained, SK0 2nd Brigade - 2 Bases Trained, SK1 2nd Division (Enters Point D - 15:20pm) 1st Brigade - 2 Bases Trained, SK0 2nd Brigade - 2 Bases Trained, Elite, SK1 Corps Assets (Enters Point E - 13:40pm) Corp Cavalry - 1 Base Trained, Light Cavalry Division Artillery - 1 Base Field Artillery Corps Artillery - 1 Base Reserve Artillery