56
FTS: The Perils and Promise of Computing Cascading Style Sheets (CSS) Gustavus Adolphus College Fall 2012
| Date post: | 30-Dec-2015 |
| Category: |
Documents |
| Upload: | elvin-arnold |
| View: | 214 times |
| Download: | 0 times |
FTS: The Perils and Promise of Computing
Cascading Style Sheets (CSS)
Gustavus Adolphus CollegeFall 2012

HTML and CSS
• In the beginning – web pages were pure HTML • Old Style HTML was used for
– Content and Meaning (what is on the page)
– Formatting and Layout (how page looks)

HTML and CSS
1995
2007
Designers wanted more complex formatting on pages,Pure HTML was not enough

HTML and CSS
• Over time, it became apparent that we needed to split web design into two areas:
– Content and Meaning in HTML
– Formatting and Layout in another technology (language) called CSS
(Cascading Style Sheets)

CSS
• Style Sheets are quite different than HTML code.
• Style sheets have no content, only style specifications
• Style sheets allow one to design a style for all web pages on a developer’s web site
• Provide a uniform “look and feel” for a site• Don’t need to style every page!

CSS Example
• Before we get to the CSS commands, let’s see how a page can change under style commands.
• Download the file “basic.html” from the course Moodle site for today’s date.
• Open the file in Notepad (Windows) or TextWrangler (Mac)

CSS Example <html> <head> <title>A basic page</title> </head> <body> <!-- Site navigation menu --> <ul class="navbar"> <li><a href="index.html">Home page</a></li> <li><a href="background.html">Background</a></li> <li><a href="links.html">Links</a></li> </ul>
(continued on next slide)

CSS Example (cont’d) <!-- Main content --> <h1>A styled page</h1> <p>This is an example of a basic web page that we will style.</p> <p>It has links that we will not want to position on the page. </p> <!-- Author section --> <address>Updated October 2012<br> <br> by Linus Torvalds.</address> </body></html>

CSS Example

CSS Example
• Now, let’s add a style file for the page: • Create a new text file and save it as
myStyle.css in the same directory as the web page.
• Add the following to the file myStyle.css: body { color: purple; background-color: #d8da3d }
• Add the following to the web page (after title): <link rel="stylesheet" href="myStyle.css">

CSS Example

Revised Style Sheet
body { padding-left: 11em; font-family: Times, serif; color: purple; background-color: #d8da3d }ul.navbar { list-style-type: none; padding: 0; margin: 0; position: absolute; top: 2em; left: 1em; width: 9em }h1 { font-family: Helvetica, sans-serif }
ul.navbar li { background: white; margin: 0.5em 0; padding: 0.3em; border-right: 1em solid black }ul.navbar a { text-decoration: none }a:link { color: blue }a:visited { color: purple }address { margin-top: 1em; padding-top: 1em; border-top: thin dotted }

CSS Example
• Go to the class Moodle site for today’s lecture and copy the text for this new CSS style file and paste it into your myStyle.css file
• Then, re-load your basic html file – you should see quite a difference!

CSS Example

CSS Basics - Rules
• The style characteristics for an HTML element are expressed by Style Rules Style Rules .
• A set of style rules is called a Style SheetStyle Sheet.• Style rules are contained in the <STYLE>
element in the document’s <HEAD> section.• Alternatively, they can be put in a single HTML
tag or in a separate file, as we showed above.

Three ways to add style rules
• Inline Style - Add style information to a tag• Embedded Style - Add style information to
the document at the beginning• External Style Sheet - Put all of your style in
an external file– Preferred because style parameters can be used by
many pages

Inline Style
• Add styles to each tag within the HTML file• Use it when you need to format just a single
section in a web page• Example:
<h1 style=“color:red; font-family: sans-sarif”>A Big Heading </h1>

Embedded Style
• Embedded or internal styles– A style is applied to the entire HTML file– Usually defined in <head> section – Use it when you need to modify all instances of a
particular element (e.g., h1) in a web page• Example
<style>h1 {color:red; font-family:sans-serif}
</style>

External Style Sheet
• External style sheets– An external style sheet is a text file containing
the style definition (declaration)– Use it when you need to control the style for an
entire web site
• Exampleh1, h2, h3, h4, h5, h6 {color:red; font-family:sans-
serif}Save this in a new document using a .css extension

body { font-family: Tahoma, Arial, sans-serif; color: black; background: white; margin: 8px;}
Selector: The element of the document to which rule applies
Declaration Block: The style values that are being set for the element
Attribute Name: which styleaspect we are setting
Value: The value of that styleparameter
Anatomy of a CSS Rule

CSS <-> HTML
body { font-family: Tahoma, Arial, sans-serif; font-size: 13px; color: black; background: white; margin: 8px;}h1 { font-size: 19px; margin-top: 15px; margin-bottom: 5px; border-bottom: 1px solid black}.shaded { background: #d0d0ff;}
<body><h1>First Section Heading</h1><p>
Here is the first paragraph, containingtext that really doesn't have any useor meaning; it just prattles on and on,with no end whatsoever, no point tomake, really no purpose for existenceat all.
</p><div class="shaded">
<h1>Another Section Heading</h1><p>
Another paragraph.</p>
</div></body>
CSS: HTML:

• Predefined names:white black red …
• 8-bit hexadecimal intensities for red, green, blue:
• 0-255 decimal intensities:
• Percentage intensities:
CSS Color Specifiers
#ff0000
R G B
rgb(255,255,0)
R G B
rgb(80%,80%,100%)
R G B

1. Change the background color for the body of our basic web page to one of your favorite colors
2. Change the font for a paragraph tag <p> to the font family of Helvetica, sans-serif
3. Change the color of the font in a paragraph to another of your favorite colors (not black)
4. Consult your cheat sheet and make the text in the address blink on and off (set the text-decoration property to blink)
5. Experiment with setting other font, text, and background properties for elements on your page.
CSS Practice

CSS for Page Layout
• CSS can be used for more than just colors and font display – we can manipulate the size and position of block-level elements
• Block-level elements in HTML are elements that are formatted in boxes:– Heading tags, e.g., <H1>, <H2>– <p>, <blockquote> and <address> tags– List tags, e.g., <ul>, <ol>, <dl>– <div>– <body>– <hr>– <img>

Block Level Elements
• Start on their own line, end justification and start a new block • Can be a container for other elements• Blocks can contain other blocks
<div id=”content”> <p>One </p> <p>Two</p></div>

CSS Default Layout Order
• By default, CSS boxes for block elements are stacked, one above the other, so that they’re read from top to bottom.
• In CSS, this is said to be the “normal flow”.
• (Note that CSS boxes for inline elements are placed next to each other, within boxes for block elements, and will normally wrap according to the width of the containing block.)

Simple Example – simple-divs.html
<html> <head> <title>The box model</title> </head> <body> <div id="box1"> This is box 1.
</div> <div id="box2"> This is box 2.
</div> <div id="box3"> This is box 3.
</div> </body></html>

Working With Ids
• To create an ID for a specific tag, use the property:– <tag ID=id_name>
• To apply a style to a specific ID, use:– #id_name {style attributes and values}

Simple Example- with style file
<html> <head> <title>The box model</title> <link rel="stylesheet"
href="myStyleDivs.css"> </head> <body> <div id="box1"> This is box 1. </div> <div id="box2"> This is box 2. </div> <div id="box3"> This is box 3. </div> </body></html>
#box1 {width: 200px;height: 200px;background-color: #ABC;
}#box2 {
width: 100%;height: 100px;background-color: #007BAD;
}#box3 {
width: 10em;height: 5em;background-color: red;
}
Simple-divs.html myStyleDivs.css

Simple Example – with style file

CSS Measurement Units

What’s a Div??
• The div element is used for layout purposes. • A div is like an invisible box that is used to
group elements together. • The default width of a div is "as wide as
possible," while the default height of a div is "as tall as necessary“ to enclose the content inside the div section.

CSS Box Model
Content
Padding
Border
Margin
The margin, border and padding properties, can be specified independently for each side
The margin, border and padding properties, can be specified independently for each side

Simple Example – Box Model
#box1 {width: 200px;height: 200px;background-color: #ABC;
margin: 10px 20px; padding: 10px;}#box2 {
width: 100%;height: 100px;background-color: #007BAD;
myStyleDivs.css
border-style: solid;border-color: black;
border-width: 4px;margin: 2em
}#box3 {
width: 10em;height: 5em;background-color: red;margin: 25px 50px 75px 100px;
}

Simple Example – Box Model

Floats: Positioning CSS Boxes
• …we can position block element boxes side-by-side in CSS using floats.
• Setting the float property to left or right causes a box to be taken out of its position in the normal flow and moved as far left or right as possible.
text text text text text text text text text text
text text text text text text text text text text
text text text text text text text text text text text text text text text text text text text text
text text text text text text text text text text
text text text text text text text text text text text text text text text text text text text text
text text text text text text text text text text
text text text text text text text text text text text text text text text text text text text text
text text text text text text text text text text
text text text text text text text text text text text text text text text text text text text text
text text text text text text text text text text
text text text text text text text text text text text text text text text text text text text text
text text text text text text text text text text
inline
inline
inlineblock

Simple Example – Float left
#box1 {width: 200px;height: 200px;background-color: #ABC;
margin: 10px 20px; padding: 10px;
float:left}#box2 {
width: 100%;height: 100px;background-color: #007BAD;
myStyleDivs.css
border-style: solid;border-color: black;
border-width: 4px;margin: 2emfloat:left
}#box3 {
width: 10em;height: 5em;background-color: red;margin: 25px 50px 75px 100px;float:left
}

Simple Example – Float left
• Is this what you expected?
• How can we get red box to float to right of blue box?

Simple Example – Float left
#box1 {width: 200px;height: 200px;background-color: #ABC;
margin: 10px 20px; padding: 10px;
float:left}#box2 {
width: 100%;height: 100px;background-color: #007BAD;
myStyleDivs.css
border-style: solid;border-color: black;
border-width: 4px;margin: 2emfloat:left
}#box3 {
width: 10em;height: 5em;background-color: red;margin: 10px 5px 7px 10px;float:left
}

Simple Example – Float left

Float Values
• The Float property has three value options:– float: left;– float: right;– float: none;
• To restore the “normal flow”, we can use the clear property.• The clear property has three value options:
– clear: left;– clear: right;– clear: both;
• These specify which side of the element’s box may not have a float next to it.

Simple Example – Clear left
#box1 {width: 200px;height: 200px;background-color: #ABC;
margin: 10px 20px; padding: 10px;
float:left}#box2 {
width: 100%;height: 100px;background-color: #007BAD;
myStyleDivs.css
border-style: solid;border-color: black;
border-width: 4px;margin: 2emfloat:left
}#box3 {
width: 10em;height: 5em;background-color: red;margin: 10px 5px 7px 10px;clear: left
}

Simple Example – Clear left

CSS Positioning
• The third core concept to understand in CSS layout (after the ‘box model’ and ‘floats’), is positioning.
• There are two types of positioning that can be applied to CSS boxes:• Relative Positioning• Absolute Positioning

CSS Positioning: Relative Positioning
• A relatively positioned element will stay exactly where it is, in relation to the normal flow.
• You can then offset its position “relative” to its starting point in the normal flow:
Box 1 Box 2 Box 3
Containing box

CSS Positioning: Relative Positioning
• In this example, box 2 is offset 20px, top and left. The result is the box is offset 20px from its original position in the normal flow. Box 2 may overlap other boxes in the flow, but other boxes still recognise its original position in the flow.
Left: 20px
top: 20px
Position: relativeBox 1
Box 2
Box 3
Containing box
#myBox {position: relative;left: 20px;top: 20px;
}

CSS Positioning: Absolute Positioning
• An absolutely positioned box is taken out of the normal flow, and positioned in relation to its nearest positioned ancestor (i.e. its containing box).
• If there is no ancestor box, it will be positioned in relation to the initial containing block, usually the browser window.
Left: 20px
top: 20px
Position: absoluteBox 1
Box 2
Box 3
Containing box (relatively positioned ancestor)

CSS Positioning: Absolute Positioning
• An absolutely positioned box can be offset from its initial position inside the containing block, but other boxes within the block (and still within the normal flow) act as if the box wasn’t there.
Left: 20px
top: 20px
Position: absoluteBox 1
Box 2
Box 3
Containing box (relatively positioned ancestor)
#myBox {position: absolute;left: 20px;top: 20px;
}
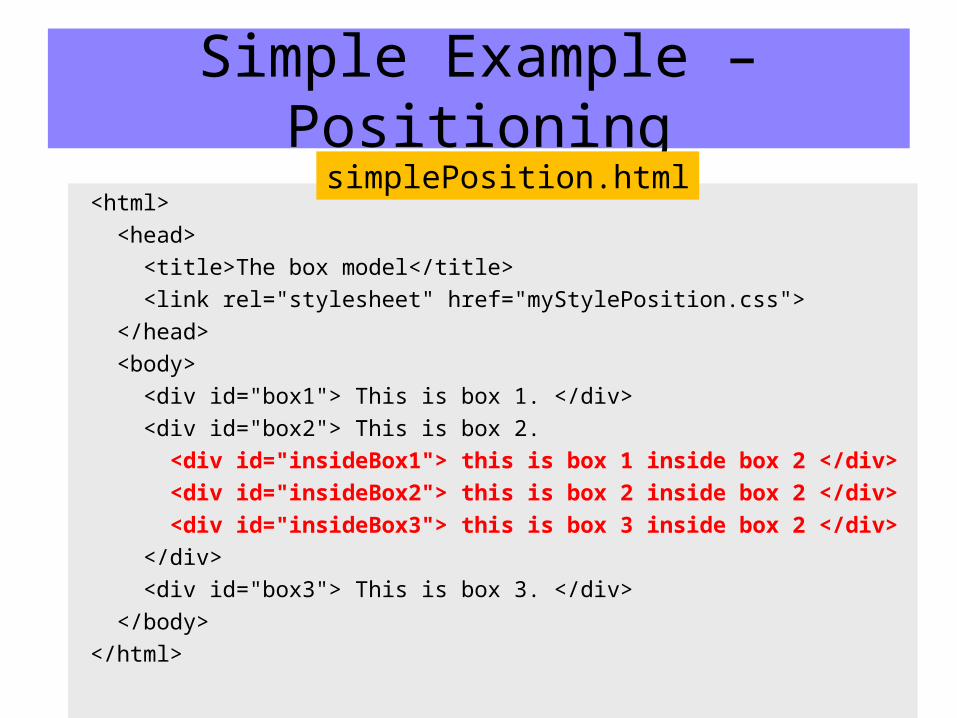
Simple Example – Positioning
<html> <head> <title>The box model</title> <link rel="stylesheet" href="myStylePosition.css"> </head> <body> <div id="box1"> This is box 1. </div> <div id="box2"> This is box 2. <div id="insideBox1"> this is box 1 inside box 2 </div> <div id="insideBox2"> this is box 2 inside box 2 </div> <div id="insideBox3"> this is box 3 inside box 2 </div> </div> <div id="box3"> This is box 3. </div> </body></html>
simplePosition.html

Simple Example – Positioning
#box1 {width: 200px;height: 200px;background-color: #ABC;
margin: 10px 20px; padding: 10px;}#box2 {
width: 100%;height: 100px;background-color: #007BAD;border-style: solid;border-color: black;
border-width: 4px;margin: 2em;
}
myStylePosition.css
#box3 {width: 10em;height: 5em;background-color: red;margin: 10px 5px 7px 10px;position:absolute;left: 150px;top:40px;
}#insideBox1, #insideBox3 {
background-color: purple;float:right
}#insideBox2 {
background-color: gray;position:relative;left: 25px;top:10px;
}

Simple Example – Positioning

CSS Page Layout Example
Except for the image, all elements on this page follow normal flow

Two Column Page Layout
• wrapper contains the two columns – sets default background color
• Left-column navigation– float: left;– width:100px;
• Right-column content– margin-left: 100px;
• Float (flower photo)– float: right;
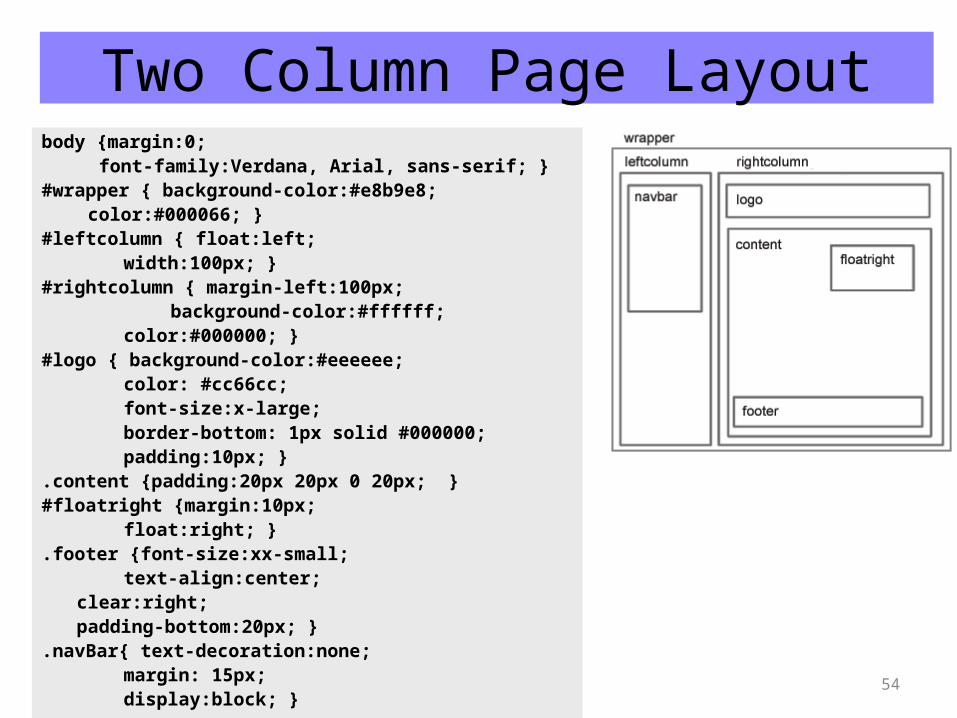
54
body {margin:0; font-family:Verdana, Arial, sans-serif; }#wrapper { background-color:#e8b9e8;
color:#000066; } #leftcolumn { float:left;
width:100px; } #rightcolumn { margin-left:100px; background-color:#ffffff; color:#000000; } #logo { background-color:#eeeeee; color: #cc66cc; font-size:x-large; border-bottom: 1px solid #000000; padding:10px; }.content {padding:20px 20px 0 20px; } #floatright {margin:10px; float:right; }.footer {font-size:xx-small; text-align:center;
clear:right;padding-bottom:20px; }
.navBar{ text-decoration:none; margin: 15px; display:block; }
Two Column Page Layout

55
Configure a class vs id• Define and Configure a class:
– If the style may apply to more than one element on a page– Use the . (dot) notation in the style sheet. – Use the class attribute in the XHTML.
• Define and Configure an id:– If the style is specific to only one element on a page– Use the # notation in the style sheet. – Use the id attribute in the XHTML.
Style Sheet: .content {padding:20px 20px 0 20px; } HTML file: <div id = “box1” class = “content”> Some stuff </div> <div id = “box2” class = “content”> More stuff </div>

1. Design a basic 3-column page with a header section, three columns (left, center, right) and a footer that always is below the 3 columns)
2. Design the CSS file that will layout the page correctly
CSS Practice


