black and white wagon wheels 170g unsalted butter, softened 1 cup (160g) icing (confectioner's) sugar, sifted 1 teaspoon vanilla extract 2 teaspoons honey 1 egg 2¼ cups (335g) plain (all-purpose) flour, sifted 1 teaspoon baking powder ½ teaspoon bicarbonate of (baking) soda 1¼ cups (115g) store-bought marshmallow fluff+ 1/3 cup (120g) blackberry jam 400g dark (70%) chocolate, finely chopped 2 tablespoons vegetable oil 375g white chocolate buttons 1/3 cup (80ml) vegetable oil, extra Place the butter, sugar and vanilla in an electric mixer and beat for 5–7 minutes or until pale and creamy. Scrape down the sides of the bowl, add the honey and egg and beat until well combined. Add the flour, baking powder and bicarbonate of soda and beat on low speed until combined. Flatten the dough into a disc and wrap with plastic wrap. Refrigerate for 1 hour or until firm. Preheat oven to 180°C (325°F). Roll the dough out between two sheets of non-stick baking paper to 5mm thick. Using a 5cm-round cookie cutter, cut out 45 rounds from the dough and place on baking trays lined with non-stick baking paper. Bake for 4–5 minutes or until just golden around the edges. Using a palette knife, transfer immediately to wire racks to cool completely. Spread 30 of the cookies with 1 teaspoon marshmallow fluff each. Top with ½ teaspoon jam each. Sandwich two filled cookies and top with remaining plain cookies. (You will have 3 cookies for each wagon wheel). Place in the freezer for 20 minutes or until firm. Place the dark chocolate and oil in a heatproof bowl over a saucepan of simmering water and stir occasionally until smooth. Repeat in a separate bowl with the white chocolate buttons and extra oil. Dip half of the cookies into the dark chocolate and half into the white chocolate to coat and place on trays lined with non-stick baking paper. Refrigerate until set. Makes 15.
Transcript
black and white wagon wheels
170g unsalted butter, softened 1 cup (160g) icing (confectioner's) sugar, sifted 1 teaspoon vanilla extract 2 teaspoons honey 1 egg 2¼ cups (335g) plain (all-purpose) flour, sifted 1 teaspoon baking powder ½ teaspoon bicarbonate of (baking) soda 1¼ cups (115g) store-bought marshmallow fluff+ 1/3 cup (120g) blackberry jam 400g dark (70%) chocolate, finely chopped 2 tablespoons vegetable oil 375g white chocolate buttons 1/3 cup (80ml) vegetable oil, extra
Place the butter, sugar and vanilla in an electric mixer and beat for 5–7 minutes or until pale and creamy. Scrape down the sides of the bowl, add the honey and egg and beat until well combined. Add the flour, baking powder and bicarbonate of soda and beat on low speed until combined. Flatten the dough into a disc and wrap with plastic wrap. Refrigerate for 1 hour or until firm.Preheat oven to 180°C (325°F). Roll the dough out between two sheets of non-stick baking paper to 5mm thick. Using a 5cm-round cookie cutter, cut out 45 rounds from the dough and place on baking trays lined with non-stick baking paper. Bake for 4–5 minutes or until just golden around the edges. Using a palette knife, transfer immediately to wire racks to cool completely. Spread 30 of the cookies with 1 teaspoon marshmallow fluff each. Top with ½ teaspoon jam each. Sandwich two filled cookies and top with remaining plain cookies. (You will have 3 cookies for each wagon wheel). Place in the freezer for 20 minutes or until firm. Place the dark chocolate and oil in a heatproof bowl over a saucepan of simmering water and stir occasionally until smooth. Repeat in a separate bowl with the white chocolate buttons and extra oil. Dip half of the cookies into the dark chocolate and half into the white chocolate to coat and place on trays lined with non-stick baking paper. Refrigerate until set. Makes 15. + Marshmallow fluff is a US product available from some specialty food stores, supermarkets and online.
anzac biscuits
2 cups (180g) rolled oats 1 cup (150g) plain (all-purpose) flour ⅔ cup (150g) caster (superfine) sugar ¾ cup (60g) desiccated coconut ⅓ cup (115g) golden syrup 125g unsalted butter 1 teaspoon bicarbonate of (baking) soda 2 tablespoons hot water
Preheat oven to 160°C (325°F). Place the oats, flour, sugar and coconut in a bowl and mix to combine. Place the golden syrup and butter in a saucepan over low heat and cook, stirring, until melted. Combine the bicarbonate of soda with the water and add to the butter mixture. Pour into the oat mixture and mix well to combine. Place tablespoonfuls of the mixture onto baking trays lined with non-stick baking paper and flatten to 7cm rounds, allowing room to spread. Bake for 8–10 minutes or until deep golden. Allow to cool on baking trays for 5 minutes before transferring to wire racks to cool completely. Makes 35.
chocolate-caramel slice
1 cup (150g) plain (all-purpose) flour ½ cup (60g) almond meal (ground almonds) 125g butter, melted ¾ cup (165g) caster (superfine) sugar
filling
½ cup (125ml) golden syrup 125g butter, melted 2 x 400g cans sweetened condensed milk
topping
200g dark cooking chocolate 2 teaspoons vegetable oil
Preheat oven to 180°C (355ºF). Place the flour, almond meal, butter and sugar in a bowl and mix to combine. Press the mixture into a 20cm x 30cm tin lined with non-stick baking paper and bake for 15 minutes or until golden. Allow to cool.
To make the filling, place the golden syrup, butter and condensed milk in a saucepan over low heat and stir for 6-8 minutes or until thickened slightly. Pour over the base and bake for 20 minutes or until golden. Refrigerate until cooled completely.
To make the topping, place the chocolate and oil in a heatproof bowl over a saucepan of simmering water and stir until melted. Spread the chocolate mixture over the caramel and refrigerate for 2 hours or until set. Slice to serve. Serves 6-8.
basic crème caramel
⅔ cups (150g) caster (superfine) sugar ⅓ cup (80ml) water ¾ cup (180ml) milk ¾ cup (180ml) single (pouring) cream 2 eggs 4 egg yolks, extra ⅓ cup (75g) caster (superfine) sugar, extra 2 teaspoons vanilla extract
Preheat oven to 150°C (300°F). Place the sugar and water in a saucepan over high heat and stir until the sugar is dissolved. Bring to the boil and cook for 8–10 minutes or until the mixture is dark golden. Pour into 4 x ¾ cup-capacity (180ml) ovenproof dishes. Set aside for 5 minutes or until the caramel is set. Place the milk and cream in a saucepan over medium heat until it just comes to the boil. Remove from heat. Place the eggs, extra yolks, extra sugar and vanilla in a bowl and whisk until well combined. Gradually add the milk mixture, whisking to combine. Strain the mixture and pour into the dishes. Place dishes in a water bath+. Bake for 35 minutes or until set. Remove from the dish and refrigerate for 2 hours or until cold. Remove the crème caramels from the fridge 30 minutes before serving. Turn out onto plates to serve. Serves 4.+ Make a water bath by placing dishes in a baking dish lined with a folded tea towel and pour in enough boiling water to come halfway up the sides of the dishes. A folded tea towel in the base of the baking dish stops the dishes from sliding around and ensures the crème caramel cooks evenly as the dishes don’t touch the baking dish directly.
basic chocolate truffles
¾ cup (180ml) single (pouring) cream 600g dark chocolate, finely chopped cocoa, for dusting
Place the cream in a small saucepan over high heat and bring to the boil. Place the chocolate in a medium bowl and pour the creamover. Place the bowl over a saucepan of simmering water, and using a metal spoon, stir until the mixture is smooth. Pour into a lightly greased 20cmx 20cm metal tin lined with non-stick baking paper and tap the tin to even the mixture (see tips + tricks, below). Refrigerate for 2–3 hours or until firm. Remove the truffle from the tin and bring to room temperature. Cut into 36 squares to serve. Dust with cocoa, if desired. Makes 36.
Tips + tricks:+ It’s to finely chop the chocolate first so it melts evenly and important quickly, without being on the heat for too long.+ You tap the tin to even out the mixture, but you can also smooth the surface of the with a chocolate with a palette knife before refrigerating.+ Use a knife thin blade to cut the truffles. After every cut, clean the blade with a damp tea towel and dry it with a clean tea towel to make sure the your truffles in other crushed slices are clean and tidy.+ Try coating and toasted nuts, such as pistachios and hazelnuts. You could even coat truffles, separated by non-stick them in biscuit crumbs.+ store the baking paper, in an airtight container in the refrigerator for up to 1 week. Simply coat the truffles in the praline, almonds, or dust with cocoa or salt just before serving.
brownie cookies with peanut butter frosting
350g dark chocolate, chopped 40g butter 2 eggs ⅔ cup (150g) caster (superfine) sugar 1 teaspoon vanilla extract ¼ cup (35g) plain (all-purpose) flour, sifted ¼ teaspoon baking powder, sifted
peanut butter frosting
1 cup (160g) icing (confectioner’s) sugar mixture 1 cup (280g) smooth peanut butter 80g butter 1 teaspoon vanilla extract ⅓ cup (80ml) single (pouring) cream
Preheat oven to 180°C (350°F). Place 200g of the chocolate and the butter in a small saucepan over low heat and stir until melted and smooth. Set aside. Place the eggs, sugar and vanilla in the bowl of an electric mixer and whisk for 15 minutes or until pale and creamy. Stir through the flour, baking powder, chocolate mixture and remaining chocolate and allow to stand for 10 minutes. Spoon tablespoonfuls of the mixture, at a time, onto baking trays lined with non-stick baking paper. Bake for 8–10 minutes or until puffed and cracked. Allow to cool completely on trays.To make the peanut butter frosting, place the sugar, peanut butter, butter and vanilla in an electric mixer and beat for 6 minutes or until light and fluffy. Add the cream and beat for a further 2 minutes. Spread half the cookies with the peanut butter frosting and sandwich with the remaining cookies. Makes 12.
The zing of ginger and the sweetness of molasses combine in perfect proportions in this cookie, sent to us by Jane Booth Vollers of Chester, Connecticut. Her grandmother, Helen Dougherty, made batches and batches of them every holiday season.
Ingredients
2 1/4 cups all-purpose flour 2 teaspoons baking soda 1 teaspoon ground cinnamon 3/4 teaspoon ground ginger 1/2 teaspoon ground allspice 1/2 teaspoon ground cloves 1/2 teaspoon salt 1/2 cup vegetable shortening at room temperature 1/2 stick (1/4 cup) unsalted butter, softened 1 cup packed dark brown sugar 1 large egg 1/2 cup molasses (not robust or blackstrap) About 1/3 cup sanding or granulated sugar* for tops of cookies
Preparation
Whisk together flour, baking soda, cinnamon, ginger, allspice, cloves, and salt in a bowl until combined.
Beat together shortening, butter, and brown sugar in a large bowl with an electric mixer at medium-high speed until pale and fluffy, about 3 minutes in a stand mixer (preferably fitted with paddle attachment) or 6 minutes with a handheld. Add egg and molasses, beating until combined. Reduce speed to low, then mix in flour mixture until combined.
Put oven racks in upper and lower thirds of oven and preheat oven to 375°F.
Roll 1 heaping teaspoon of dough into a 1-inch ball with wet hands, then dip 1 end of ball in sanding sugar. Make more cookies in same manner, arranging them, sugared side up, 2 inches apart on 2 ungreased baking sheets.
Bake cookies, switching position of sheets halfway through baking, until undersides are golden brown, 10 to 12 minutes total, then cool on sheets 1 minute. Transfer to racks to cool completely. Make more cookies with remaining dough on cooled baking sheets.
*Available at Sweet Celebrations (800328-6722).
Cooks' note: Cookies keep, layered between sheets of wax paper or parchment, in an airtight container at room temperature 2 weeks.
Swig Sugar CookiesAuthor: AlyssaPrep time: 15 mins Cook time: 10 mins Total time: 25 mins Serves: 24 The famous Swig Cookie Copycat recipe. Soft sugar cookie with amazing frosting!Ingredients
1 Cup Butter, softened ¾ C Vegetable Oil 1¼ C Sugar (plus ¼ cup reserved) ¾ C Powdered Sugar 2 T Water 2 Eggs ½ t Baking Soda ½ t Cream of Tarter 1 t Salt 5½ C Flour Frosting: ½ cup butter, softened ¾ C Sour Cream 5 Cups powdered Sugar 1 t salt ¼ C Milk Red Food Coloring
Instructions
1. Preheat oven to 350 degrees. In a medium sized mixing bowl, combine flour, baking soda, cream of tarter, and salt. Set aside.
2. In a large mixing bowl, cream together butter, vegetable oil, sugar (1¼ C), powdered sugar, and water. Add in eggs.
3. Slowly add in flour mixture until combined. Roll the dough into golf sized balls and place onto a non stick cookie sheet.
4. To give the cookies their signature rough edge, dip the bottom of a glass into the reserved ¼ cup sugar and press onto the cookie ball to flatten the cookie. You still want the cookie to be thicker so don’t press them to thin.
5. Bake for 8-10 minutes or until the bottom is lightly brown. The cookies stay soft so do not over bake.
6. To make the frosting: Cream together butter, sour cream, and salt. Add the powdered sugar. Add in the milk to the desired consistency. Spread over cooled cookies and store in an airtight container.
Recipe Source Vintage Revivals
Ingredientes
2 tazas de harina multiuso 1 cucharadita de polvo para hornear 1/2 cucharadita de sal 1 taza de azúcar granulada 1/2 taza de mantequilla blanda (1 barra) 1 huevo grande 2 cucharaditas de extracto de vainilla
OpcionalAzúcar granulada adicional, azúcar moreno, azúcar de colores o chispas para decorar las galletas.
¿qué es esto?
Instruccionespaso 1Coloca la rejilla para hornear en el centro del horno y precaliéntalo a 350 grados F.paso 2En un tazón mediano, tamiza (o bate con un batidor de mano para mezclar) los ingredientes secos: harina, polvo para hornear y sal. Reserva.paso 3En un tazón grande, agrega el azúcar y la mantequilla. Con una batidora eléctrica a velocidad media, bate por unos 2 a 3 minutos el azúcar y la mantequilla hasta que la mezcla esté esponjosa y raspa los costados del tazón con una espátula de goma cuando sea necesario. La mezcla debe parecerse a arena húmeda y gruesa.paso 4Agrega el huevo y el extracto de vainilla a la mezcla de azúcar y mantequilla del paso 3. Con la batidora a baja velocidad, bate por 1 minuto hasta lograr una pasta homogénea. Raspa los costados del tazón.paso 5Agrega los ingredientes secos del paso 2 a los ingredientes húmedos y bate con una batidora eléctrica a baja velocidad por 1 minuto hasta que la mezcla se integre. No batas de más. Para hacer galletas cortadas en rodajas y al horno, ve al paso 6. Para hacer galletas cortadas con molde ve al paso 7.paso 6Para las galletas en rebanadas y al horno, con la masa forma un cilindro de 2" por 12". Envuelve bien con Saran™ Premium Wrap y déjala reposar durante al menos 1 hora. Cuando la masa esté lista, retira la envoltura y corta en rebanadas de 1/4". Colócalas con una separación de 2" en una bandeja para hornear galletas, sin enmantecar. Espolvorea las galletas con más azúcar, azúcar moreno o azúcar para decorar si lo deseas.
Hornea de 12 a 14 minutos, hasta que los bordes de las galletas adquieran un leve dorado. Si estás horneando dos bandejas al mismo tiempo, intercambia la bandeja de arriba y la de abajo en medio de la cocción.
Retira las bandejas del horno y colócalas en una rejilla para enfriar durante 1 minuto. Con una espátula plana, coloca las galletas en esta rejilla y deja que se enfríen antes de guardarlas.
Las galletas horneadas se pueden guardar en recipiente Ziploc® Brand Container with the Smart Snap® Seal grandes a temperatura ambiente hasta por una semana, o se pueden colocar en Bolsas Ziploc® Brand Freezer Bags y congelarlas hasta por 1 mes.paso 7Para hacer galletas cortadas con molde, divide la masa por la mitad. Envuelve cada mitad con Saran™ Premium Wrap, presiona formando discos planos y redondos de 6" y deja
descansar durante al menos 1 hora. Cuando la masa esté lista, retira la envoltura, colócala en una superficie lisa apenas enharinada y usa un rodillo de amasar para que se estire y llegue a un espesor de 1/8". Corta con moldes de galletas y utiliza una espátula plana para colocarlas en una bandeja para hornear galletas, sin enmantecar y a una distancia de 2" entre sí. Mezcla y estira el resto de la masa, luego continúa cortando galletas con el molde y colócalas en bandejas para hornear sin enmantecar. Luego, sigue las instrucciones del paso 6 para la decoración y el horneado.
notas del chefPara mejorar el sabor y crear una textura aún mejor, prueba sellar al vacío la masa de galletas y dejarla reposar por 24 a 36 horas.
Se puede sustituir la mantequilla con las mismas cantidades de margarina, mantequilla vegetal o mantequilla vegetal con sabor a mantequilla.
La masa cruda de galletas, envuelta en Saran™ Premium Wrap, se puede congelar hasta por 1 mes o mantener en el refrigerador hasta por 1 semana.
También se pueden formar bolas con las galletas de azúcar en rebanadas y hornear por unos 14 a 16 minutos. Cuando estén en su punto medio de horneado, aplánalas con una espátula. Cuando las galletas estén completamente frías, espolvorea con azúcar impalpable.
Cuando hornees varias tandas de galletas, enfría completamente la bandeja para hornear con agua fría y sécala antes de colocar la próxima tanda de galletas.
Estira la masa de galletas sobre una bandeja fría para evitar que se ablande demasiado mientras cortas las galletas. Si la masa se ablanda mucho, envuélvela en Saran™ Premium Wrap y colócala en el congelador durante 5 minutos para que se vuelva a enfriar y adquiera consistencia.
Bueno a mi me encanta ésta receta...y a mi familia másIngredientes1 taza (2 barritas) de mantequilla sin sal, ablandada1 1/2 taza de azúcar granulada1 huevo1 1/2 cdta de extracto de vainilla transparente1/2 cdta de extracto de almendras (opcional)2 3/4 tazas de harina de uso universal2 dtas de polvo de hornear1 cdta de salPrecalentar el horno a 400 F. En un recipiente hondo grande, con batidora eléctrica, batir la mantequilla con el azúcar hasta que esté cremosa y obtenga una consitencia ligera y esponjosa. Agregar el huevo y los extractos; mezclar bien.Combinar la harina, el polvo de hornear y la sal; agregar a la mezcla de mantequilla 1 taza a la vez, mezclando después de cada adición. No refrigerar la masa. Dividirla en 2 bolas. En una superficie enharinada, extiende cada bola hasta formar un círculo de apoximadamente 12 pulgadas de ancho y 1/8 pulg. de grosor. Sumerjir los cortadores de galletas en harina antes de cada uso. Hornear las galletas en una plancha para galletas sin engrasar de 6 a 7 minutos o hasta que las galletas estén ligeramente doradas. Rinde alrededor de 3 docenas de galletas...
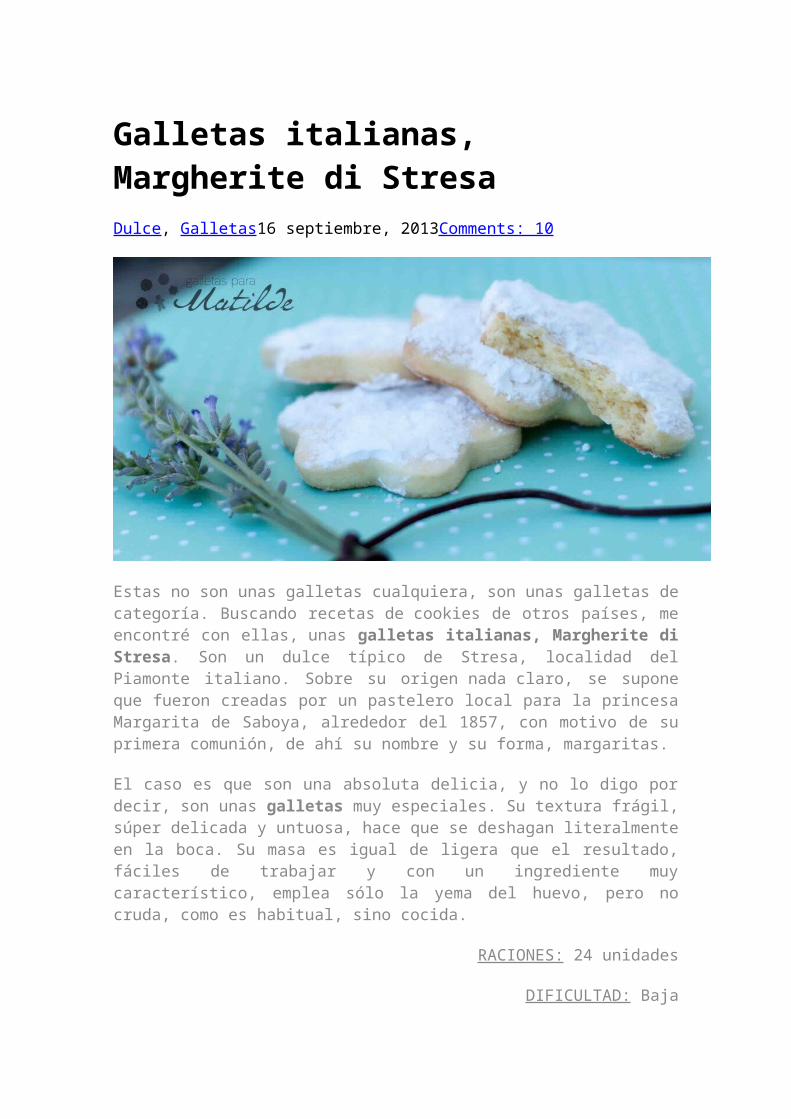
Galletas italianas, Margherite di StresaDulce, Galletas16 septiembre, 2013Comments: 10
Estas no son unas galletas cualquiera, son unas galletas de categoría. Buscando recetas de cookies de otros países, me encontré con ellas, unas galletas italianas, Margherite di Stresa. Son un dulce típico de Stresa, localidad del Piamonte italiano. Sobre su origen nada claro, se supone que fueron creadas por un pastelero local para la princesa Margarita de Saboya, alrededor del 1857, con motivo de su primera comunión, de ahí su nombre y su forma, margaritas.
El caso es que son una absoluta delicia, y no lo digo por decir, son unas galletas muy especiales. Su textura frágil, súper delicada y untuosa, hace que se deshagan literalmente en la boca. Su masa es igual de ligera que el resultado, fáciles de trabajar y con un ingrediente muy característico, emplea sólo la yema del huevo, pero no cruda, como es habitual, sino cocida.
RACIONES: 24 unidades
DIFICULTAD: Baja
TIEMPO: 15 minutos de preparación + 2 horas de reposo y frío
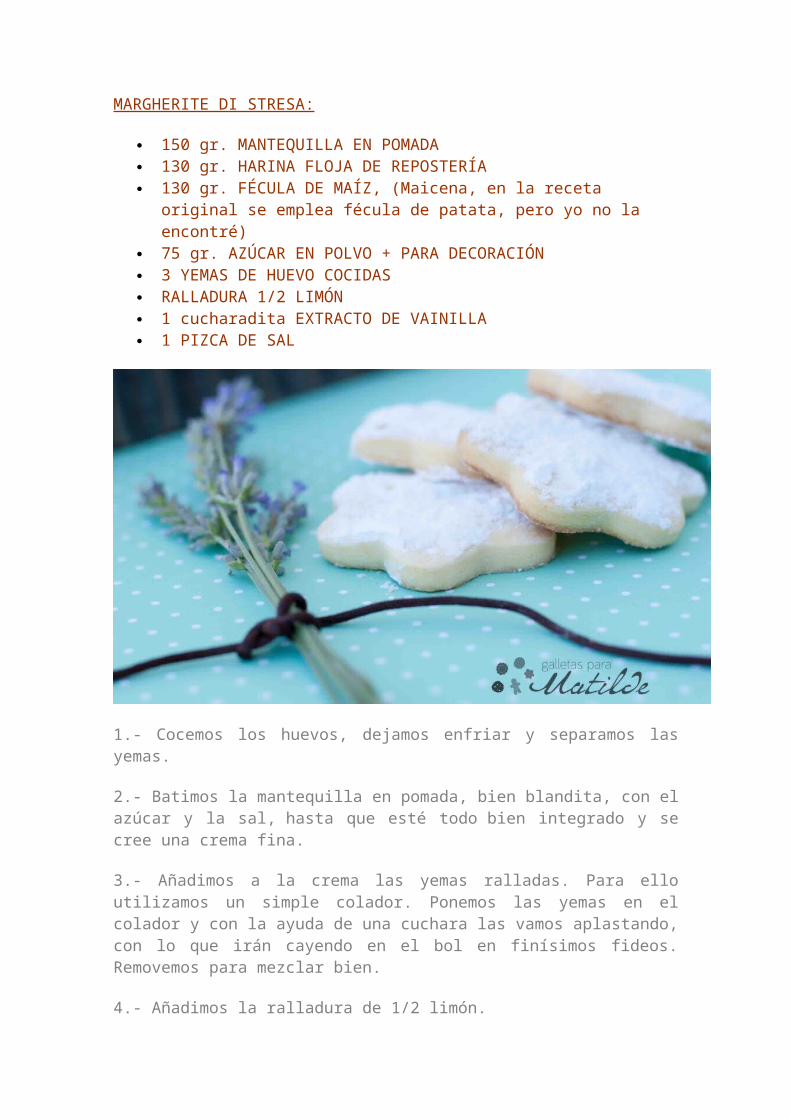
150 gr. MANTEQUILLA EN POMADA 130 gr. HARINA FLOJA DE REPOSTERÍA 130 gr. FÉCULA DE MAÍZ, (Maicena, en la receta original se emplea fécula de
patata, pero yo no la encontré) 75 gr. AZÚCAR EN POLVO + PARA DECORACIÓN 3 YEMAS DE HUEVO COCIDAS RALLADURA 1/2 LIMÓN 1 cucharadita EXTRACTO DE VAINILLA 1 PIZCA DE SAL
1.- Cocemos los huevos, dejamos enfriar y separamos las yemas.
2.- Batimos la mantequilla en pomada, bien blandita, con el azúcar y la sal, hasta que esté todo bien integrado y se cree una crema fina.
3.- Añadimos a la crema las yemas ralladas. Para ello utilizamos un simple colador. Ponemos las yemas en el colador y con la ayuda de una cuchara las vamos aplastando, con lo que irán cayendo en el bol en finísimos fideos. Removemos para mezclar bien.
4.- Añadimos la ralladura de 1/2 limón.
5.- Incorporamos la harina y la Maicena y removemos para que se integren bien todos los ingredientes. Nos va a quedar una masa muy blandita y fina. Hacemos una bola achatada y la envolvemos en papel film. La dejamos reposar y enfriar en el frigo hasta que endurezca lo justo para poder trabajar con el rodillo.
6.- Cuando la masa esté lista para trabajar la dividimos en dos partes para facilitar el manejo y empezamos a trabajar una de las porciones colocándolas entre dos papeles de horno. Estiramos la masa con un rodillo hasta que tenga un grosor de más o menos 1
cm. Para que todas las galletas salgan iguales, lo ideal es que nos ayudemos de dos palitos largos de ese espesor que nos sirvan de guía sobre los que apoyar el rodillo. Recortamos las galletas con la forma elegida, suelen ser con forma de flor, y las colocamos directamente en la bandeja del horno.
7.- Con el horno previamente caliente las horneamos durante 10-12 minutos a 175º. Procuraremos que nos queden más bien blanquitas, que no se doren prácticamente. Tenéis que tener especial cuidado a la hora de retirarlas de la bandeja de horno y pasarlas a la rejilla de enfriado. Son súper delicadas y es muy fácil que se rompan.
Las espolvoreamos con azúcar molido y las dejamos enfriar totalmente. Podemos conservarlas perfectamente en un bote hermético durante bastante tiempo.
Dicen que estas galletas llegan a su apogeo con el paso de los días, que están mucho más buenas al cabo de un mes que en el momento de hacerlas, no puedo deciros porque nunca he conseguido que nos duraran tanto, pero si lo dicen… por algo será.
Espero que os haya gustado la receta y os animéis a probarlas.
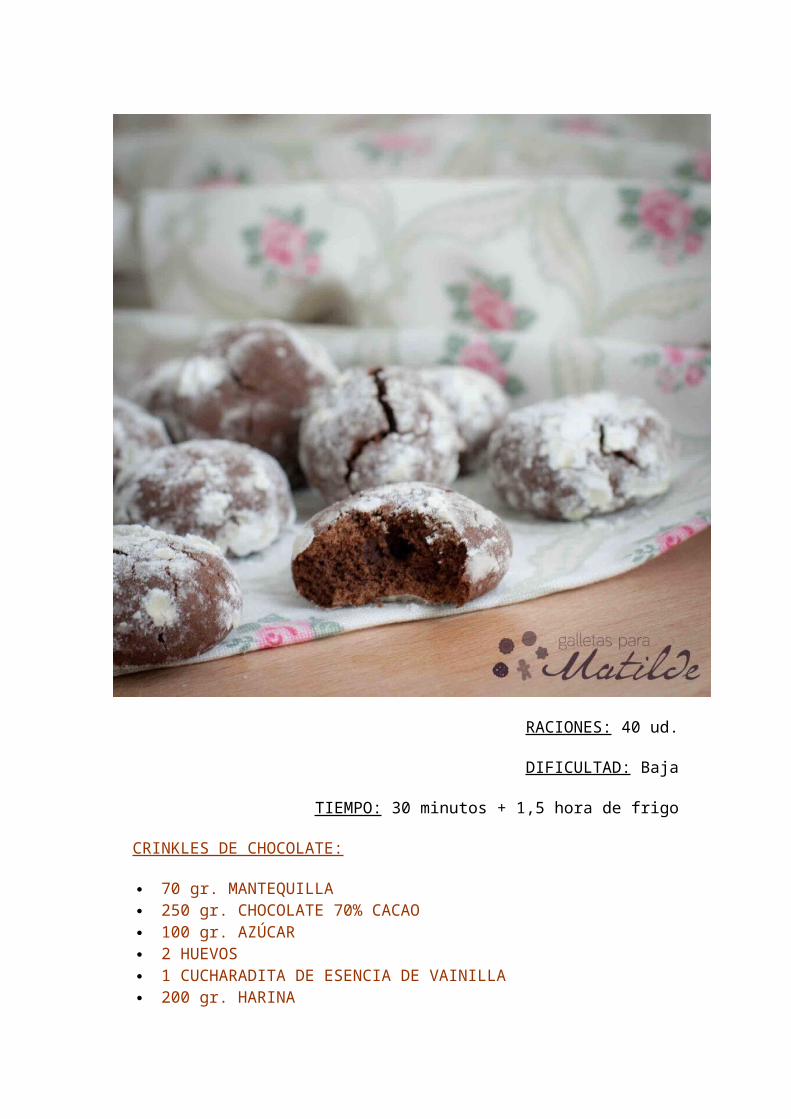
Galletas crinkles de chocolateDulce, Galletas15 mayo, 2014Comments: 6
Las galletas crinkles de chocolate son un tipo de bocaditos de delicioso e intenso sabor a puro chocolate. Su nombre significa agrietado/arrugado en inglés, y de ahí el uso del vocablo para denominarlas, las galletas quedan como agrietadas una vez horneadas.
Las descubrí navegando por la red y, además de originales, me parecieron un recurso ideal para hacer en un momento, quieres preparar algo y no tienes mucho tiempo o pocas ganas de gastarlo.
Han sido para mi todo un descubrimiento, crujientes por fuera y súper melosas por dentro, a medio camino entre una galleta y un bocadito de brownie de intenso sabor a chocolate, una delicia.
70 gr. MANTEQUILLA 250 gr. CHOCOLATE 70% CACAO 100 gr. AZÚCAR 2 HUEVOS 1 CUCHARADITA DE ESENCIA DE VAINILLA 200 gr. HARINA 1 PIZCA DE SAL 1/2 CUCHARADITA DE LEVADURA (Tipo Royal)
AZÚCAR GLASS PARA REBOZAR PAPEL DE HORNO PAPEL TRANSPARENTE
1.- Derretimos el chocolate con la mantequilla a baño maría removiendo constantemente. Si no tenéis un cazo específico para ello podéis utilizar dos cazuelas de diferentes tamaños, una dentro de la otra. Reservamos a temperatura ambiente hasta que el chocolate se haya enfriado.
2.- En un bol mezclamos los ingredientes secos, la harina, la levadura y la pizca de sal. Reservamos.
3.- Cuando veamos que el chocolate está frío reanudamos la tarea. En un bol batimos el azúcar con los huevos hasta que la mezcla se vuelva blanquecina y espume.
4.- Agregamos el chocolate derretido y mezclamos bien.
5.- Incorporamos los ingredientes secos y mezclamos hasta que queden integrados.
6.- Tapamos el bol con papel film transparente y lo dejamos durante 2 horas en el frigo. Otra posibilidad sería dejarlo de un día para otro.
7.- Retiramos del frigo y con la ayuda de una cuchara vamos cogiendo porciones de la masa y formando bolitas con las manos. Guardamos las bolitas en el frigo durante 15 minutos antes de hornear.
8.- Mientras el horno se calienta a 170º rebozamos cada bolita en azúcar glass y las colocamos en la bandeja del horno sobre un papel vegetal.
9.- Horneamos a 170º durante 10 minutos. Si las dejamos demasiado tiempo quedarán secas en su interior y la intención es que queden jugosas.
Galletas de limón rellenas de lemon curd tostadoDulce, Galletas26 abril, 2013Comments: 6
A pesar de que soy más de chocolate que de cremas, hay una que me tiene enganchada, que aprovecho para “colocar” en cualquier postre que puedo siempre que tengo ocasión, el lemon curd.
Para los que no la conozcáis, es una crema inglesa de limón que tiene como ingredientes básicos yema de huevo, mantequilla, azúcar y zumo. Es muy suave y con un intenso sabor a limón, dulce y ácida a la vez, una maravilla, os lo aseguro.
A finales del siglo XIX y principios del XX, era tradicional en Inglaterra servir esta crema con pan o los típicos scones (panecillos ingleses) para acompañar el té, como alternativa a la mermelada. Sirve, además como relleno para tartas, pasteles y tartaletas.
Se podrían hacer variantes de esta crema con otras frutas, como mandarina, fruta de la pasión, moras, mango o arándanos.
En esta ocasión he preparado unas galletas de limón rellenas de lemon curd tostado, llevan lemon curd en su masa y están rellenas de lemon curd. La variante es que la crema de relleno, en lugar de aplicarla una vez que las galletas ya están horneadas y frías, la he cocinado junto con la masa, con lo que queda un poco tostada en color y en sabor.
El resultado ha sido genial, una galletas de limón con un relleno de lujo. Las cantidades que os indico son para hacer la masa y el relleno de unas 20 galletas, y seguramente os sobrará un poco, pero seguro que no tendréis problemas con eso cuando la probéis, siempre habrá quien se la coma a cucharadas.
LEMON CURD:
2 HUEVOS 145 gr. AZÚCAR 65 gr. MANTEQUILLA 100 ml. ZUMO DE LIMÓN RALLADURA DE 1 LIMÓN
1.- Lo primero que hacemos es batir los huevos y añadimos el resto de ingredientes, la mantequilla derretida, el azúcar, el zumo de los limones y la ralladura. Batimos la mezcla hasta incorporar.
2.- Ponemos un recipiente de cristal a baño maría y vertemos en él la mezcla. Tenemos que cocinar la mezcla a fuego lento, sin que hierva en ningún momento, sin para de revolver. Irá adquiriendo cremosidad poco a poco, cuanto más tiempo lo trabajemos más se solidificará. Este proceso puede durar unos 30 minutos.
GALLETAS DE LIMÓN (20 galletas dobles):
325gr. HARINA 125 gr. MANTEQUILLA A TEMPERATURA AMBIENTE 100 gr. AZÚCAR 1 CUCHARADITA ESENCIA DE VAINILLA 2 CUCHARADAS DE ZUMO DE LIMÓN 100 gr. LEMON CURD
1.- En un bol tamizamos la harina y la sal y reservamos.
2.- En otro bol batimos la mantequilla a temperatura ambiente con el azúcar durante 5 minutos, hasta que tenga consistencia cremosa. Añadimos la esencia de vainilla y el zumo de limón y continuamos batiendo hasta que esté todo integrado.
3.- Agregamos el lemon curd y batimos.
4.- Añadimos la harina y revolvemos hasta integrar la mezcla, primero con la ayuda de una cuchara de madera y luego con las manos hasta formar una bola. Quedará una masa manejable aunque un poco blandita.
5.- La envolvemos con papel transparente de cocina y la dejamos en el frigo no menos de 1 hora, hasta que esté lo más duro posible.
6.- Colocamos la masa entre dos papeles de horno para poder estirarla con facilidad con un rodillo, evitando así que se nos quede pegada a la encimera. La estiraremos hasta que quede de más o menos 4 mm. de espesor, no muy gordita, ya que al ser estas unas galletas dobles y rellenas, quedarían demasiado gruesas.
Por un lado cortaremos las galletas destinadas a la base con el cortante que más nos guste. Por otro cortamos la misma cantidad de unidades con el mismo cortante más otro pequeñito si queremos dejarles un hueco por el que se vea el relleno.
7.- Vamos colocando las bases en la bandeja de horneado. Como estas galletas no van a crecer podremos colocarlas más o menos juntitas. Aplicamos una cucharadita de lemon curd encima de cada base y colocamos encima las tapas ya cortadas con el agujero. Si es necesario podéis rellenar el hueco que quede con un poco más de lemon curd, algo que yo no hice pero debería haber hecho.
8.- Horneamos con el horno previamente precaliente a 170º unos 12 minutos, dependiendo del tamaño que tengas las galletas. Es importante poner en una misma bandeja de horneado galletas del mismo tamaño, para que se horneen de forma homogénea. Una vez horneadas las pasamos a una rejilla y dejamos enfriar.
Espero que os animéis a hacer estas galletas, estoy segura de que os gustarán. Ya me contaréis.