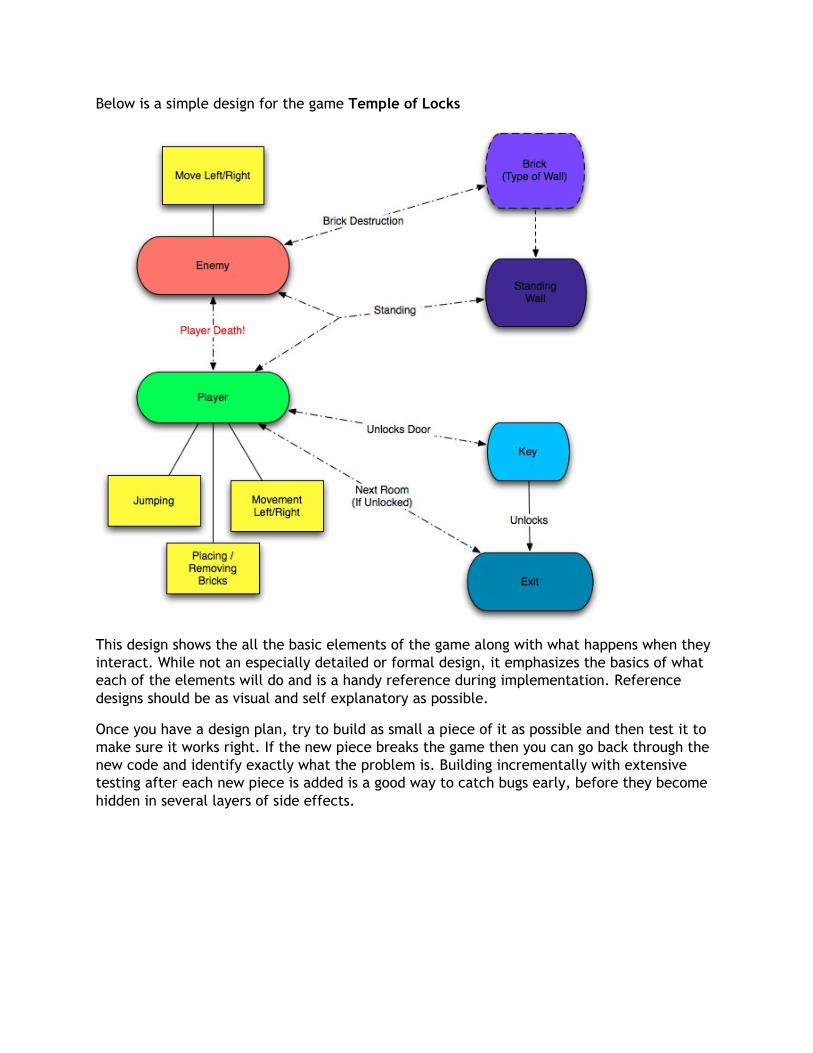
Below is a simple design for the game Temple of Locks
This design shows the all the basic elements of the game along with what happens when they
interact. While not an especially detailed or formal design, it emphasizes the basics of what
each of the elements will do and is a handy reference during implementation. Reference
designs should be as visual and self explanatory as possible.
Once you have a design plan, try to build as small a piece of it as possible and then test it to
make sure it works right. If the new piece breaks the game then you can go back through the
new code and identify exactly what the problem is. Building incrementally with extensive
testing after each new piece is added is a good way to catch bugs early, before they become
hidden in several layers of side effects.
GAME MAKER ERROR MESSAGES
Game Maker does a lot for us to make developing games easy, but one thing it can’t do is
read the programmers mind and correct their mistakes. When the programmer does
something that doesn’t make sense to Game Maker, Game Maker will stop everything and
throw an error. An error is an alert that comes up during the program’s execution that tells
the user that the program has been given a command it can’t understand. Game Maker will
also tell you exactly where and what this problem is.
Below is an example of a Game Maker error message from a broken version of Temple of
Locks (coloring has been added):
The error should be read from bottom to top and gives us 4 very important pieces of
information:
1. The reason for the error: Unknown variable “Timer” 2. The object where the error occurred: object_exit
3. The event inside the object where the error occurred: collision with object_player
4. The number of the action (numbered from the top) which caused the error: Action
number 3
The error will also give us the ability to ignore or abort; abort will quit the game while the
ignore function will just skip the offending action. Error messages are signs of something
fundamentally wrong with the program and should never be simply ignored. Choosing ignore
may also cause strange behavior in the rest of your game as the action skipped may have been
something that set the stage for a set of other actions.
The error message takes a lot of the trouble out of debugging because it shows exactly where
the error is in our program. All we need to do is figure out what we did wrong and fix it. In
the example error we know that our problem is in the 3rd action of the collision event of
“object_exit”:
In this case the 3rd action is a Set Score ( ) action because the start and end blocks ( )
are counted as actions. If we look at the Set Score we see:
The error tells us that the problem with this action is that the variable “Timer” is unknown.
This is a common error that tells us that we are trying to use a variable we haven’t assigned a
value yet using a Set Variable ( ) action. Because the variable doesn’t exist yet we can’t
use it to add to the score. Something must be wrong with the “Timer” variable in
“object_controler”.
If we look in “object_controler” at the place where we assigned the initial value of the timer
we see the problem:
Here we set the variable “timer” not “Timer”. Game Maker is case sensitive so “timer” and
“Timer” are 2 different words. If we change our original Set Score to use
“object_controler.timer” everything should be fixed.
ISOLATING AND DIAGNOSING BUGS
A lot of bugs are not as obvious as when Game Maker gives an error, they instead are visible
only through the effect they have on the game. While it is fairly easy to see a bug in your
game, it can be very hard to figure out exactly where the problem is. Most bugs come down
to minor typing errors, but these errors can produce bizarre side effects. A lot of the time
and effort of debugging is discovering where the error is in the first place.
The first step in debugging is isolating the problem. Isolating the problem requires an in-
depth understanding of what the bug actually is; the effect on screen may only be a symptom
of a much larger problem. First identify:
1. What object the bug affects? (e.g. The player, the enemy, …)
2. What action triggers the bug? (e.g. Moving, colliding with another object, …)
3. What is unwanted behavior? (e.g. Destruction of the player, objects appearing in the
wrong place, …)
4. When the bug occurs? (e.g. Start of the game, when the mini-boss shows up, …)
All these give you clues as to where the bug is inside the game. Take for example a bug in the
game “Vacuum Marauders”. In this bug the boss is trivially easy to defeat because the missiles
appear to cause a lot more damage than they are supposed to:
Let’s diagnose exactly what is going on:
1. What object the bug affects? – The bug affects the boss object, specifically the
health of the boss object.
2. What action triggers the bug? - The collision of the missile with the boss object
triggers the bug.
3. What is unwanted behavior? – The boss object dies too early, apparently from
excessive damage from the missiles.
4. When the bug occurs? – The bug occurs when the timeline launches the boss.
Here is where the debug process goes into the realm of art, or at the very least “soft
science”. Like a medical mystery, once all the symptoms are collected we have to use our
knowledge about how the system works to figure out the most probable culprits by order of
likelihood. An effective way to do this is to first narrow down all the possible causes of the
boss dying early:
• Missile is taking too much health
• Health is being taken away from the boss by some other object
• Boss object is destroyed before all the health is gone
• Some other object is destroying the boss
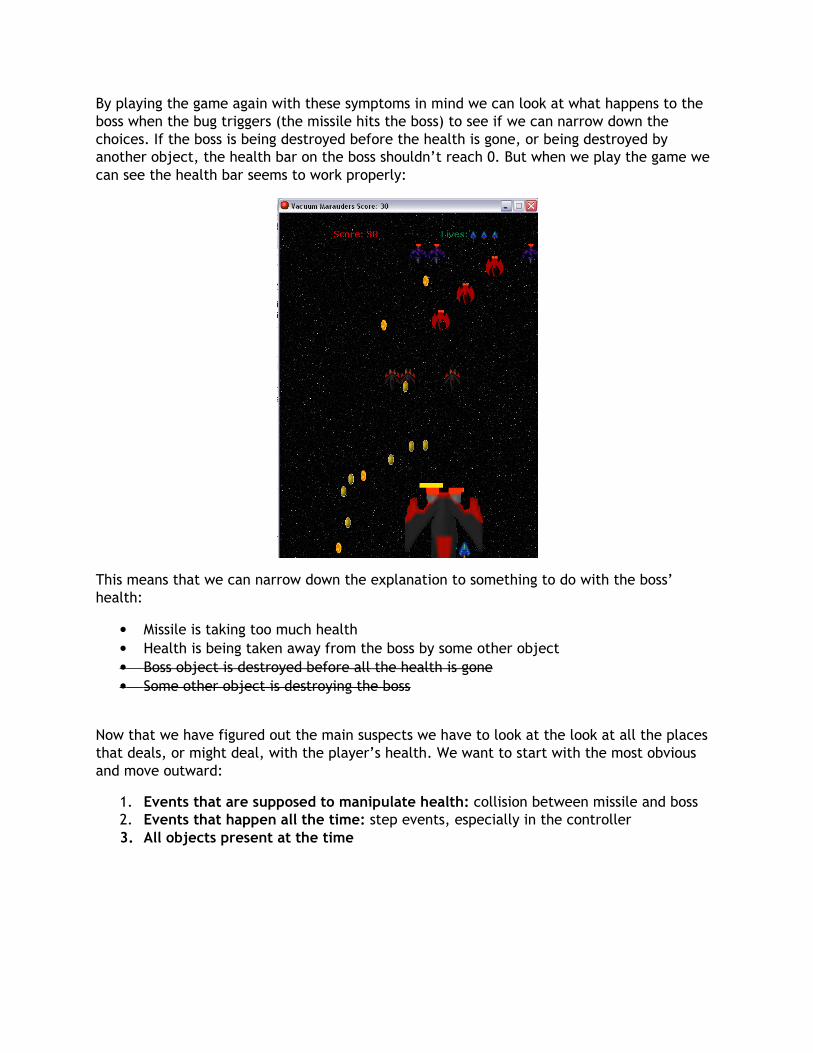
By playing the game again with these symptoms in mind we can look at what happens to the
boss when the bug triggers (the missile hits the boss) to see if we can narrow down the
choices. If the boss is being destroyed before the health is gone, or being destroyed by
another object, the health bar on the boss shouldn’t reach 0. But when we play the game we
can see the health bar seems to work properly:
This means that we can narrow down the explanation to something to do with the boss’
health:
• Missile is taking too much health
• Health is being taken away from the boss by some other object
• Boss object is destroyed before all the health is gone
• Some other object is destroying the boss
Now that we have figured out the main suspects we have to look at the look at all the places
that deals, or might deal, with the player’s health. We want to start with the most obvious
and move outward:
1. Events that are supposed to manipulate health: collision between missile and boss
2. Events that happen all the time: step events, especially in the controller
3. All objects present at the time
Visually we can use a dart board type of system to see where to start searching:
If we look in the Collision event and reconstruct what it does, we see the order of actions is:
• Take away 5 health from the score
• Check to see if Health = 0
o Add 5000 to the score
o Create Explosions
o Destroy the boss
Reconstructing what the event does, in sequence, is vital to understanding what went wrong.
In this case we see that the missile only takes off 5, that the destroy sequence is correct for
the boss and that it only fires when Health = 0.
This error is one of the harder ones to diagnose, because the problem is not something in the
program that is wrong but something that is left out! Errors of omission are almost as
common as errors in the code that was put in.
In this case we forgot to destroy the missile that did the collision, as a result it keeps moving
at its current speed through the boss, and at each step that it is still in collision with the boss
it takes another 5 points off the health. In this case all our code was working fine, we just
forgot to get rid of the missile causing the damage.
GAME MAKER DEBUG TOOLS
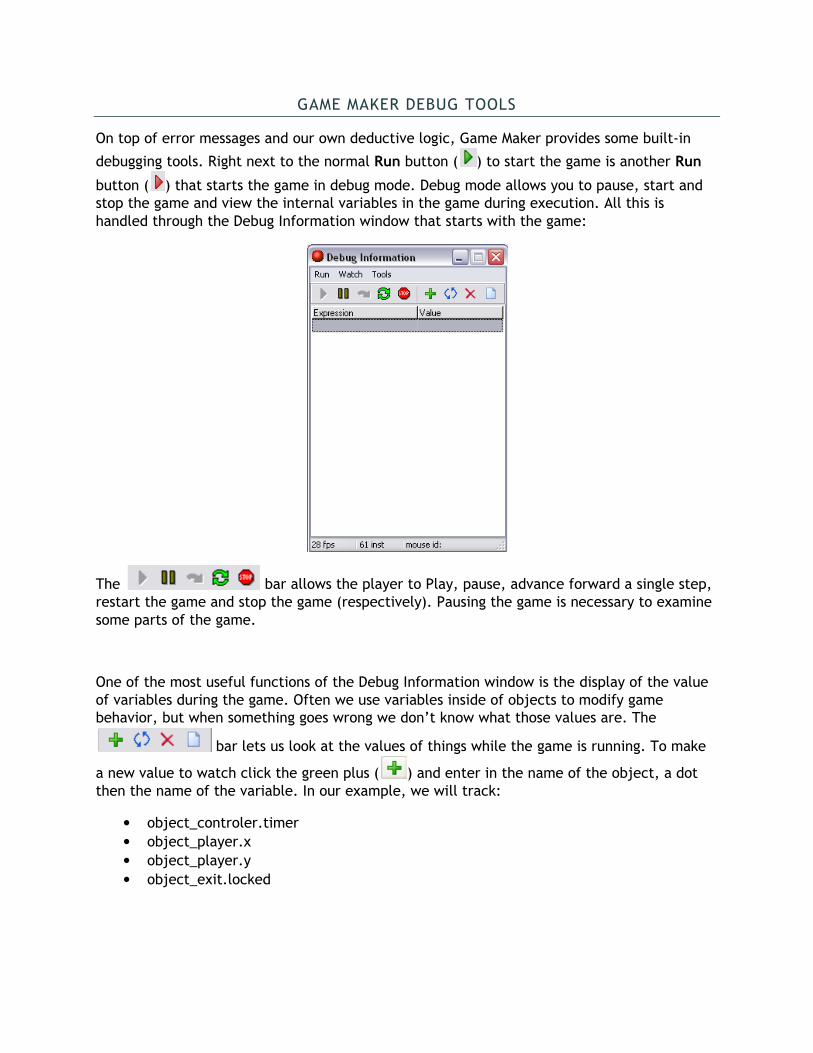
On top of error messages and our own deductive logic, Game Maker provides some built-in
debugging tools. Right next to the normal Run button ( ) to start the game is another Run
button ( ) that starts the game in debug mode. Debug mode allows you to pause, start and
stop the game and view the internal variables in the game during execution. All this is
handled through the Debug Information window that starts with the game:
The bar allows the player to Play, pause, advance forward a single step,
restart the game and stop the game (respectively). Pausing the game is necessary to examine
some parts of the game.
One of the most useful functions of the Debug Information window is the display of the value
of variables during the game. Often we use variables inside of objects to modify game
behavior, but when something goes wrong we don’t know what those values are. The
bar lets us look at the values of things while the game is running. To make
a new value to watch click the green plus ( ) and enter in the name of the object, a dot
then the name of the variable. In our example, we will track:
• object_controler.timer
• object_player.x
• object_player.y
• object_exit.locked
Now we can see in real time how variables change and better diagnose problems related to
them. This only works when there is only one of the object type in the game, otherwise the
game doesn’t know which instance to track. You can track any sort of expression in the box
and it will take single lines of code from the scripting language built into Game Maker,
(discussed in a later tutorial).
The Debug screen also allows the player to pause the game ( ) during gameplay and
examine the state of the game. Once paused, the Tools menu will allow you to look at the
state of all the Global Variables (variables relating to the game as a whole, tracked by Game
Maker):
Also all the local variables (variables bound to an object) relating to individual objects
(custom variables are at the very bottom):
Show Instances will give a long list of ID numbers that correspond with the individual objects
on screen that can be used when looking at Local Variables (instead of putting in the name of
the object, put in the ID number):
All this information can be invaluable when tracking down the source of individual bugs.
COMMON BUGS
Relative Problems:
The most common and easiest bug to detect is forgetting to click the Relative box when
placing objects on the screen. This is easy to forget when placing multiple actions and usually
has a very tell tale effect – things happening in the upper left hand corner. For example, with
Relative turned off for the placement of bricks in Temple of Locks we get this behavior:
When I create a brick, instead of placing in front of me at (45,0) relative, it goes to (0, 45) in
the room. Things appearing magically in the top left corner are almost always a problem with
Relative. These problems can be hard to spot when they involve actions like Check Object
( ) and Check Free ( ) that don’t create anything visual, but checking Relative is a good place to start when these actions don’t work as intended. Accidentally clicking the
Relative box when placing things on the screen can also cause objects to show up on top of
other objects.
Relative can also cause havoc when used to assign values like in the Set Variable ( ).
Accidentally clicking, or unclicking the box will cause event related to the variable to happen
at unintended times. The best way to spot these problems is to run the program in Debug
mode and watch the value of the variable over time.
Case Sensitive:
Game Maker (like almost all programming languages) is “case sensitive”. This means that it
counts uppercase letters, like “E”, as completely different from their lowercase cousins, like
“e”. This means that if you define a variable like “lock” and later try to refer to it as “Lock”,
you will get an error. If you get an “Unknown variable” error, one of the first things to check
is whether or not you have the capitalization right.
One of the techniques used by programmers to avoid these problems is to always use lower
case letters when defining their variables.
Action Order:
Even though it appears that everything that happens in a single step of the game is all
executed at once, we must be aware that only one action happens at a time and that the
order in which things happen can be very important.
Take these two collision events from Vacuum Marauders:
When “object_fireball” and “object_shot” hit each other, both these events will fire.
“object_shot” adds to the score and “object_fireball” creates an explosion and destroys both
the objects.
Which one will go first?
If the “object_shot” goes first then everything is fine, the score is assigned and then the
fireball does the rest. If the fireball goes first then “object_shot” is destroyed before it gets a
chance to add to the score, which creates a bug. A good way to fix this is to do all the actions
in just the fireball, or to have each object destroy itself.
When doing things in separate objects during the same step, make sure that they work the
same no matter what order they are performed.
Collision problems:
Collision events are usually very important events in the games made with Game Maker, often
touching off a lot of other actions in separate objects. Given the important nature of collision
events, we want to make sure that it only happens when we want it to. Collision events will
fire whenever the two objects overlap, but stopping the collision is up to the programmer.
Unless one of the objects that collide is destroyed or moved, the collision will continue to
occur. There may also be very different behaviors that you want depending on where on the
object the collision occurs.
When collision events go wrong, make sure that it is not because you have not included a way