41
General Ledger Setup

General Ledger Setup


i
Table of Contents General Ledger Setup ..................................................................................................................... 1
Objectives ............................................................................................................................... 1
General Ledger/Accounting ........................................................................................................ 1
SuccessWare21 as an Accounting Program ............................................................................ 1
Basic Accounting Terminology .............................................................................................. 1
Accrual vs. Cash Basis Accounting ........................................................................................ 2
Types of Accounts .................................................................................................................. 2
Debits & Credits ..................................................................................................................... 3
Chart of Accounts ................................................................................................................... 4
Printing the Chart of Accounts ............................................................................................... 5
Reconciliation and Financial Reports ..................................................................................... 6
How does SuccessWare21 Know Where to Put "IT" in the General Ledger? ....................... 7
General Ledger/Accounting Key Items to Remember............................................................ 8
General Ledger Setup ................................................................................................................. 8
General Ledger Setup ............................................................................................................. 8
Accounts ................................................................................................................................. 9
Adding New Accounts ............................................................................................................ 9
Editing an Account ............................................................................................................... 10
Deleting Accounts ................................................................................................................. 11
Activating and Deactivating Accounts ................................................................................. 12
Sub-Accounts ........................................................................................................................ 12
Adding Sub-Accounts ........................................................................................................... 13
Default Accounts .................................................................................................................. 14
Defining the Default Types ................................................................................................... 15
Changing a Default Account ................................................................................................. 18
How Does SuccessWare21 Departmentalize? ...................................................................... 18
Departments .......................................................................................................................... 19
Deleting a Department .......................................................................................................... 19
Deactivating a Department ................................................................................................... 20
Changing or Editing a Department Description .................................................................... 21
Adding a New Department ................................................................................................... 21
General Ledger Setup Key Items to Remember ................................................................... 22
Fiscal Periods ............................................................................................................................ 22
Fiscal Periods ........................................................................................................................ 22
Creating a Fiscal Period ........................................................................................................ 22
Changing the End Date of a Period....................................................................................... 23
Adding Another Fiscal Year ................................................................................................. 23
Opening a Fiscal Period ........................................................................................................ 24
Fiscal Periods Key Items to Remember ................................................................................ 25
General Ledger Activation ........................................................................................................ 25
Activating the General Ledger .............................................................................................. 25
General Ledger Activation Key Items to Remember ........................................................... 27
Expense Groups ........................................................................................................................ 27
Expense Groups .................................................................................................................... 27
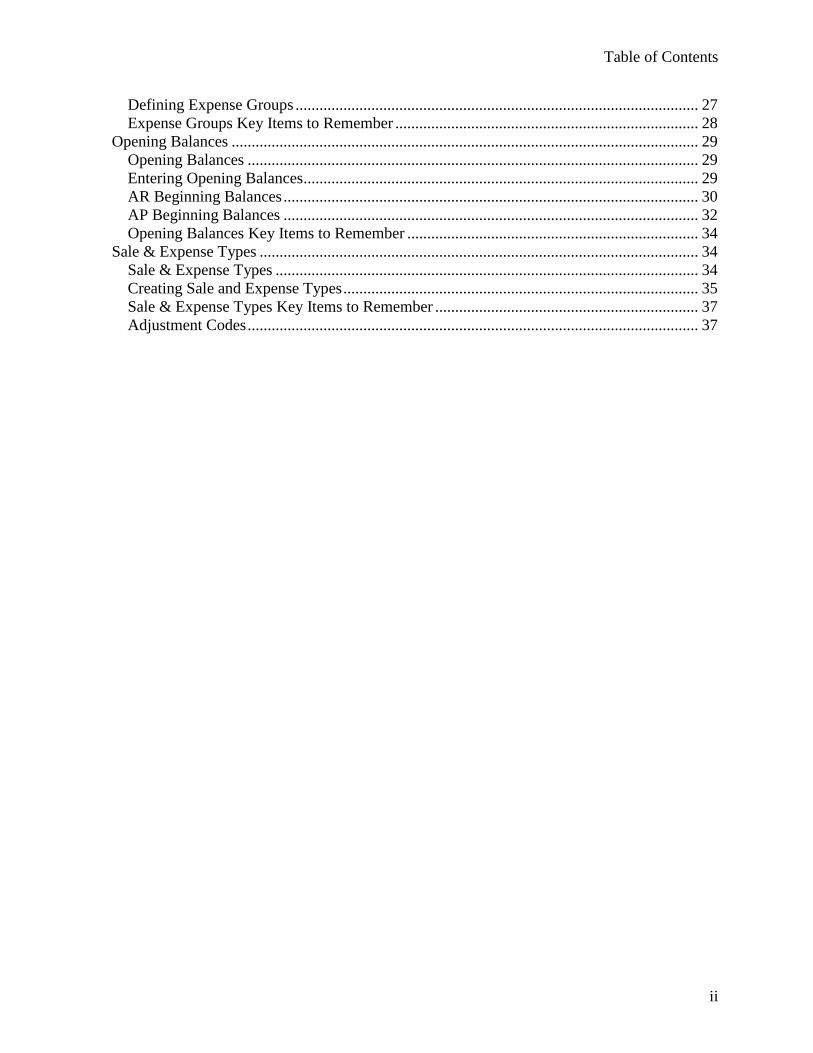
Table of Contents
ii
Defining Expense Groups ..................................................................................................... 27
Expense Groups Key Items to Remember ............................................................................ 28
Opening Balances ..................................................................................................................... 29
Opening Balances ................................................................................................................. 29
Entering Opening Balances ................................................................................................... 29
AR Beginning Balances ........................................................................................................ 30
AP Beginning Balances ........................................................................................................ 32
Opening Balances Key Items to Remember ......................................................................... 34
Sale & Expense Types .............................................................................................................. 34
Sale & Expense Types .......................................................................................................... 34
Creating Sale and Expense Types ......................................................................................... 35
Sale & Expense Types Key Items to Remember .................................................................. 37
Adjustment Codes ................................................................................................................. 37
1
General Ledger Setup
Objectives
After completing this unit, the student will be able to:
Understand the accounting functionality of SuccessWare21.
Understand basic accounting terminology.
Understand how SuccessWare21 posts to the General Ledger.
View and print the SuccessWare21 Chart of Accounts.
Effectively set-up the General Ledger in SuccessWare21.
Enter the beginning balance for General Ledger Accounts.
Enter General Ledger periods and activation dates.
Create and open fiscal periods.
Understand and set up Adjustment Codes.
Create Sale and Expense Types.
GENERAL LEDGER/ACCOUNTING
SuccessWare21 as an Accounting Program
At its heart, SuccessWare21 is an accounting program, but, one of the strengths of
SuccessWare21 is that it isn't JUST an accounting program. It does the accounting, but as a
result of the normal day-to-day call taking, dispatching completion of work tickets and
purchasing that is carried out by a user. The goal of SuccessWare21 is to make the
complicated process of entering information into a ledger sheet and balancing the books as
effortless and invisible to the end-user as possible. To accomplish this, SuccessWare21
requires that all of your accounting information be properly setup before you begin to fully
use the application.
Accounting entails keeping track of where money is moving in your business. For example,
keeping track of how much is spent on parts, how much is owed in Sales Tax, and how much
money you made for performing an installation are all functions that are carried out
automatically by SuccessWare21, thereby making it easy for you to generate reports detailing
the information you need.
Basic Accounting Terminology
In order to understand the accounting functions of SuccessWare21, it is important that you
understand some basic accounting terminology.

General Ledger Setup
2
Accrual vs. Cash Basis Accounting
SuccessWare21 operates based upon Accrual Basis Accounting. This means that revenues
are recognized on the books when it is earned, i.e., when you send create and post the
invoice, not when the customer pays the bill. Expenses are recognized when they are
incurred, i.e., when you become liable for a payment, not when you actually pay the bill.
SuccessWare21 cannot be set up to run as a cash basis accounting system (meaning that
expenses and revenue are recognized when bills are paid or payments from customers are
received).
The Accrual method of accounting is recognized in accordance with Generally Accepted
Accounting Practices (GAAP).
Types of Accounts
One of the most fundamental of accounting terms is what’s referred to as an “account.” An
account is a vehicle used to keep track of the various monetary increases and decreases to
specific assets, liabilities or equity items regarding your business.
There are 9 categories of accounts. They are:
1. Asset Accounts- these accounts represent resources that your business owns such as
computers, inventory and cash.
2. Liability Accounts - these are debts that your business owes, for instance, bank
loans, money owed to vendors or Sales Tax that is due.
3. Equity Accounts- these accounts are comprised of the difference between your assets
and liabilities. These could include owner’s equity and common stock.
4. Income Accounts - these accounts handle monies received. These could include
merchandise sales, performance of a service or rental of a property. There is a
subclass of accounts within Income called Returns and Allowances which allow you
to identify amounts which reduce sales such as discounts or refunds.
4a. Returns and Allowances- these accounts represent money that is "given
back". This can be through refunds, discounts offered to customers or
chargebacks. These amounts are subtracted from sales to show you your Net
Sales.
5. Cost of Sale Accounts -these accounts accommodate the tracking of costs relating to the
sale of goods. This would include the cost of goods, associated labor and even sales
commissions.
6. Expense Accounts - these include general operating expenses incurred to run your
business such as rent, utilities and interest expenses.
7. Other Income - this is revenue generated outside the normal course of business, such as
from the sale of an asset, or even from a vending machine.
8. Other Expenses - these are costs not directly related to the normal course of business.
An example might be an account for “Flood Loss.”

General Ledger Setup
3
9. Income Taxes- These account represent the amounts that you owe in Federal and
State Income tax.
Each of these account categories are sub-divided into specialized accounts that accommodate
specific activities relating to your business. The number of individual accounts that you
establish depends on the how you want to track your cash flow.
Debits & Credits
Accounting is based upon the premise that all transactions result in a balance of funds. To
create this balance, transactions entered on the ledger contain positive and negative entries,
meaning, some add to, while others subtract from. These entries are referred to as debits and
credits. All debits and credits must equal each other. If they do not, the account is out of
balance.
Depending on what type of account you are using, a debit or credit will either increase or
decrease the account balance. The example below illustrates how each type of account is
effected based on whether the entry is a debit or a credit.
Account Types Debit Credit
Assets Increase Decrease
Cost of Sales Increase Decrease
Expenses Increase Decrease
Liabilities Decrease Increase
Equity Decrease Increase
Income Decrease Increase
Notice that for every increase in one part of an account, there is an opposite and equal
decrease in another. This is what keeps the entry in balance. Also, notice that debits are
always listed on the left while credits are always listed on the right. As you read this please
keep in mind that the terms debit and credit do not necessarily mean plus and minus.
The following example shows a sample of a simple debit/credit transaction.
Account Debit Credit
Asset Account
(Inventory)
$5
Cash Account $5
The net sum of the transaction is zero. In this case, our value of assets went up $5 while the
value of our cash account went down $5.
SuccessWare21 uses a system of double-entry debits and credits. This means that additional
accounts are used to “hold” value until the entire transaction is complete. This allows you to
account for payments as a separate transaction.
General Ledger Setup
4
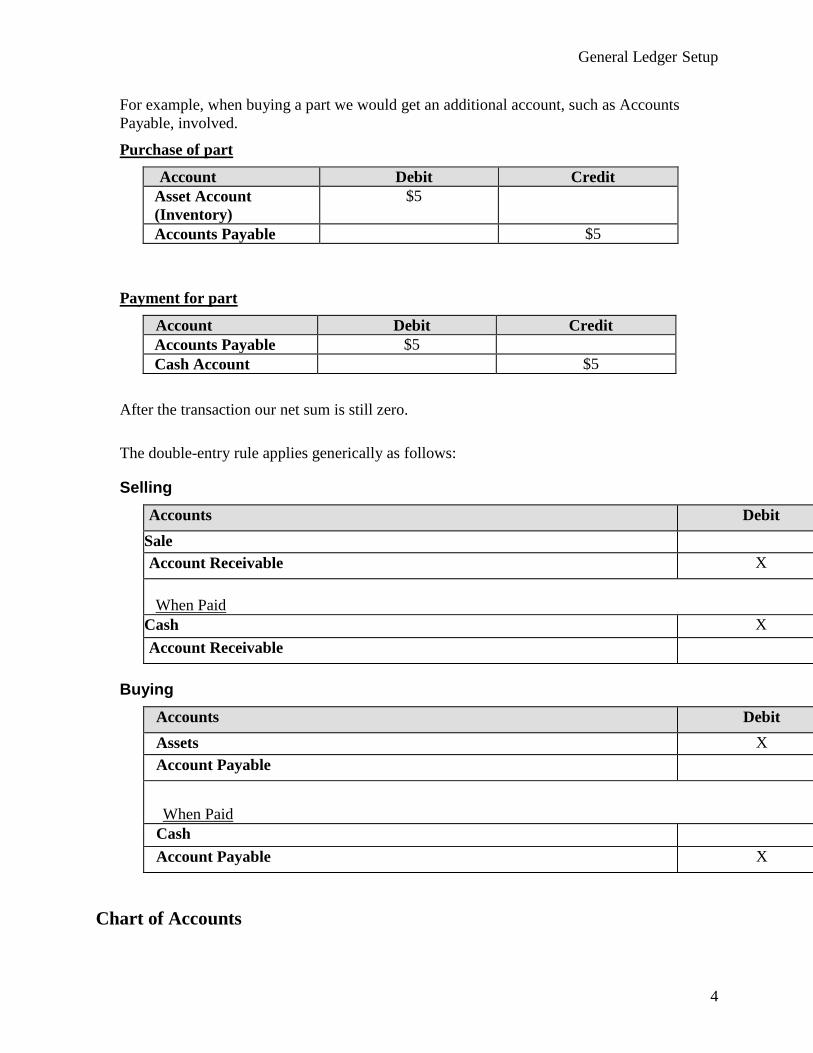
For example, when buying a part we would get an additional account, such as Accounts
Payable, involved.
Purchase of part
Account Debit Credit
Asset Account
(Inventory)
$5
Accounts Payable $5
Payment for part
Account Debit Credit
Accounts Payable $5
Cash Account $5
After the transaction our net sum is still zero.
The double-entry rule applies generically as follows:
Selling
Accounts Debit
Sale
Account Receivable X
When Paid
Cash X
Account Receivable
Buying
Accounts Debit
Assets X
Account Payable
When Paid
Cash
Account Payable X
Chart of Accounts
General Ledger Setup
5
The Chart of Accounts is a listing of all accounts that your company chooses to track. The
Chart of Account lists and divides the accounts by account categories. These categories can
be further divided into sub-categories with individual accounts listed under those sub-
categories. SuccessWare21 comes pre-loaded with a sample Chart of Accounts that you can
modify, or use as is, to meet the needs of your company. Accounts listed in the Chart of
Accounts include an account number, a class (this is the category) and a description.
All of the transactions that you perform in SuccessWare21 will be “pre-connected” to these
accounts so that at the time of entry all of the entries will be made in those accounts without
the user being prompted for additional information.
Printing the Chart of Accounts
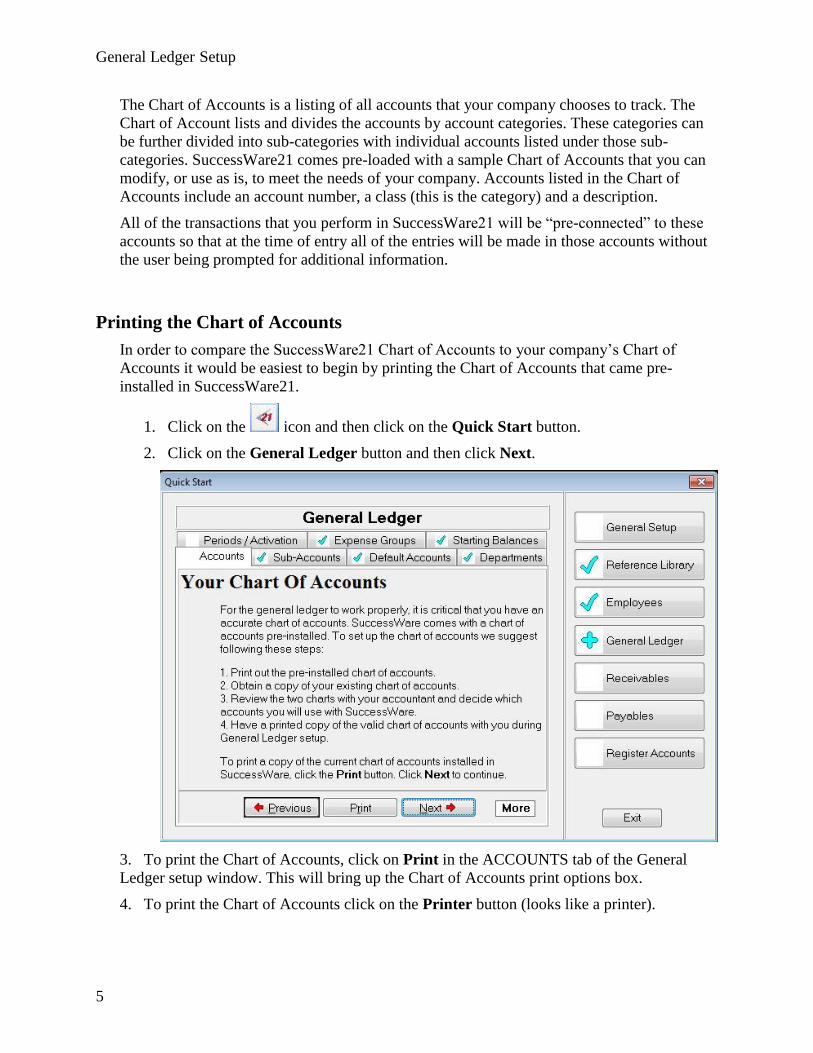
In order to compare the SuccessWare21 Chart of Accounts to your company’s Chart of
Accounts it would be easiest to begin by printing the Chart of Accounts that came pre-
installed in SuccessWare21.
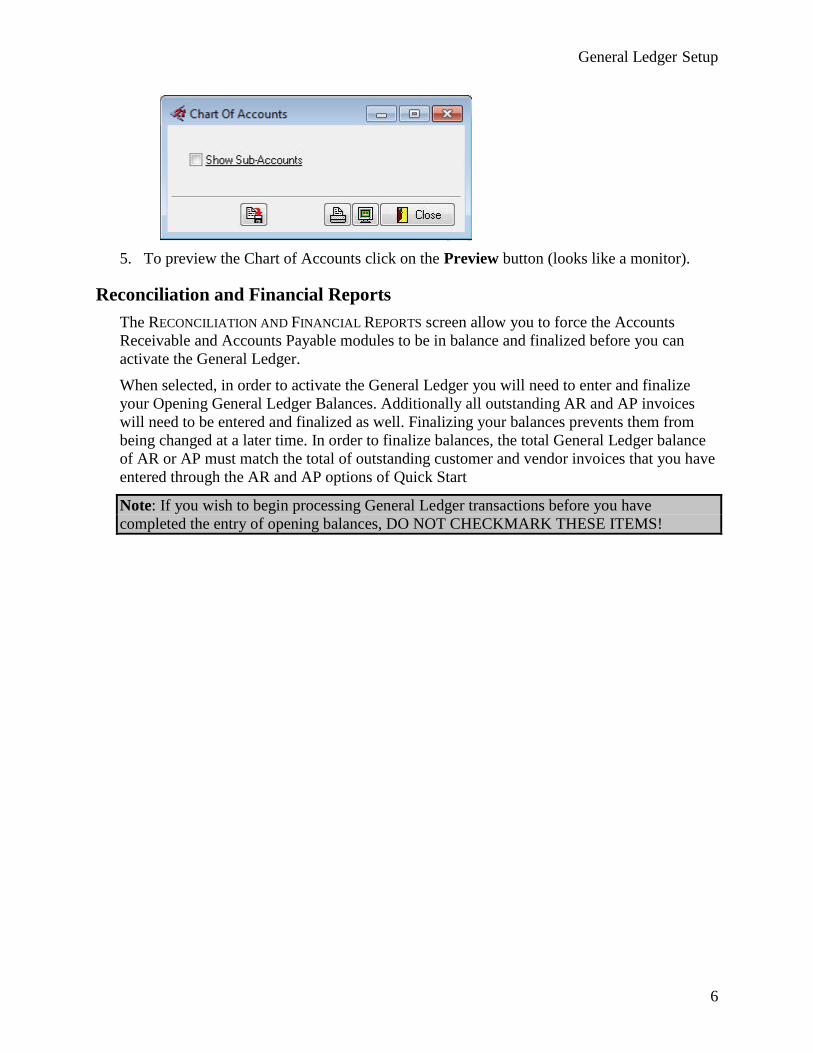
1. Click on the icon and then click on the Quick Start button.
2. Click on the General Ledger button and then click Next.
3. To print the Chart of Accounts, click on Print in the ACCOUNTS tab of the General
Ledger setup window. This will bring up the Chart of Accounts print options box.
4. To print the Chart of Accounts click on the Printer button (looks like a printer).
General Ledger Setup
6
5. To preview the Chart of Accounts click on the Preview button (looks like a monitor).
Reconciliation and Financial Reports
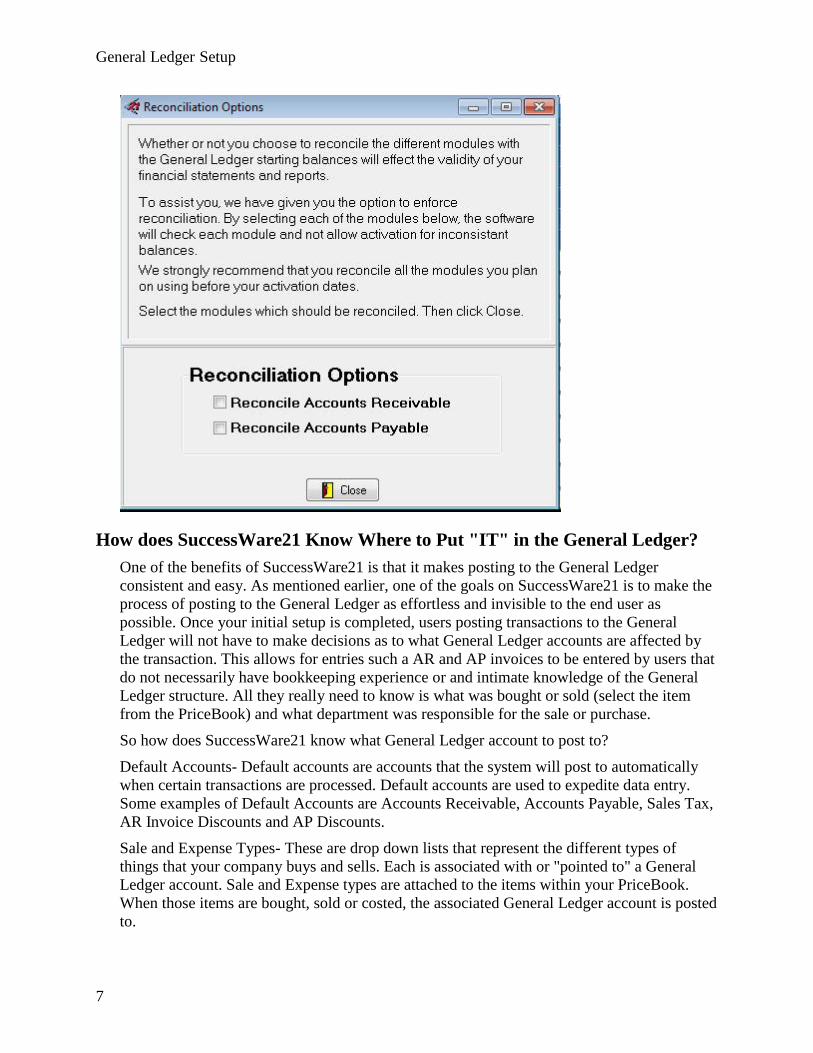
The RECONCILIATION AND FINANCIAL REPORTS screen allow you to force the Accounts
Receivable and Accounts Payable modules to be in balance and finalized before you can
activate the General Ledger.
When selected, in order to activate the General Ledger you will need to enter and finalize
your Opening General Ledger Balances. Additionally all outstanding AR and AP invoices
will need to be entered and finalized as well. Finalizing your balances prevents them from
being changed at a later time. In order to finalize balances, the total General Ledger balance
of AR or AP must match the total of outstanding customer and vendor invoices that you have
entered through the AR and AP options of Quick Start
Note: If you wish to begin processing General Ledger transactions before you have
completed the entry of opening balances, DO NOT CHECKMARK THESE ITEMS!
General Ledger Setup
7
How does SuccessWare21 Know Where to Put "IT" in the General Ledger?
One of the benefits of SuccessWare21 is that it makes posting to the General Ledger
consistent and easy. As mentioned earlier, one of the goals on SuccessWare21 is to make the
process of posting to the General Ledger as effortless and invisible to the end user as
possible. Once your initial setup is completed, users posting transactions to the General
Ledger will not have to make decisions as to what General Ledger accounts are affected by
the transaction. This allows for entries such a AR and AP invoices to be entered by users that
do not necessarily have bookkeeping experience or and intimate knowledge of the General
Ledger structure. All they really need to know is what was bought or sold (select the item
from the PriceBook) and what department was responsible for the sale or purchase.
So how does SuccessWare21 know what General Ledger account to post to?
Default Accounts- Default accounts are accounts that the system will post to automatically
when certain transactions are processed. Default accounts are used to expedite data entry.
Some examples of Default Accounts are Accounts Receivable, Accounts Payable, Sales Tax,
AR Invoice Discounts and AP Discounts.
Sale and Expense Types- These are drop down lists that represent the different types of
things that your company buys and sells. Each is associated with or "pointed to" a General
Ledger account. Sale and Expense types are attached to the items within your PriceBook.
When those items are bought, sold or costed, the associated General Ledger account is posted
to.
General Ledger Setup
8
Adjustment Codes- Adjustment codes are drop-down lists used to identify the reason that a
change is being made to an operational balance in a module of SuccessWare21. These drops
down lists of reasons are associated with general ledger accounts. When you need to make a
change to a customer's balance or a vendors balance for example, that is not associated with a
new invoice or payment, an adjustment can be recorded.
General Ledger/Accounting Key Items to Remember
Accounts keep track of monetary increases and decreases to specific assets, liabilities
and equity items.
Accounts can be divided into sub-accounts.
For every change in one account, there is an equal and opposite change in another.
SuccessWare21 uses a double-entry system that allows it to hold values until an entire
transaction is complete.
The Chart of Accounts lists all the accounts and sub-accounts that your business uses.
SuccessWare21 uses Default Account, Sales and Expense Types and Adjustment
Codes to determine where things should post in the General Ledger.
GENERAL LEDGER SETUP
General Ledger Setup
General Ledger setup consists of addressing:
Accounts—your Chart of Accounts
Sub-Accounts—break-down of the major General Ledger accounts
Default Accounts—accounts that are posted to automatically during certain default
functions (A/R Trade, A/P Trade, Sales Tax, Warranty Reserve, Deferred Revenue,
etc.)
Departments—your company’s profit centers for all income statement transactions
Periods/Activation—your company’s fiscal periods and activation dates (the dates
you start posting to the General Ledger in SuccessWare21).
Expense Groups—groups of operating expense accounts that enable you to see sub-
totals on your income statement (advertising, vehicle, etc.)
Opening Balances—your entire list of General Ledger starting balances (from your
trial balance) as of your General Ledger activation date. Make sure these numbers
are accurate before you enter them. You do not have to have your starting balances
entered in order to start posting to the General Ledger in SuccessWare21.
When you set-up the General Ledger in SuccessWare21 you can perform the setup from two
areas of the application:
Quick Start, or
General Ledger Setup
9
the Setup button in the Main Menu.
We recommend you set-up the Chart of Accounts using the Quick Start utility.
Accounts
The first step in setting up the General Ledger is to setup your Chart of
Accounts. SuccessWare21 already comes with a standard Chart of Accounts installed. To
set a Chart of Accounts up for your company, compare the installed Chart of Accounts to
your existing accounts and determine what changes need to be made. You will then:
Delete unnecessary accounts, and Deactivate accounts
Change accounts, and/or
Add accounts.
When stepping through Quick Start, the system will go through the Chart of Accounts based
on the account types (i.e. assets – current assets, fixed assets and other assets, then liabilities,
etc.) You will then make the necessary deletions, changes and additions for each account
type.
Click Next and then Previous to move between account types, and press Start to edit the
accounts in that section.
Adding New Accounts
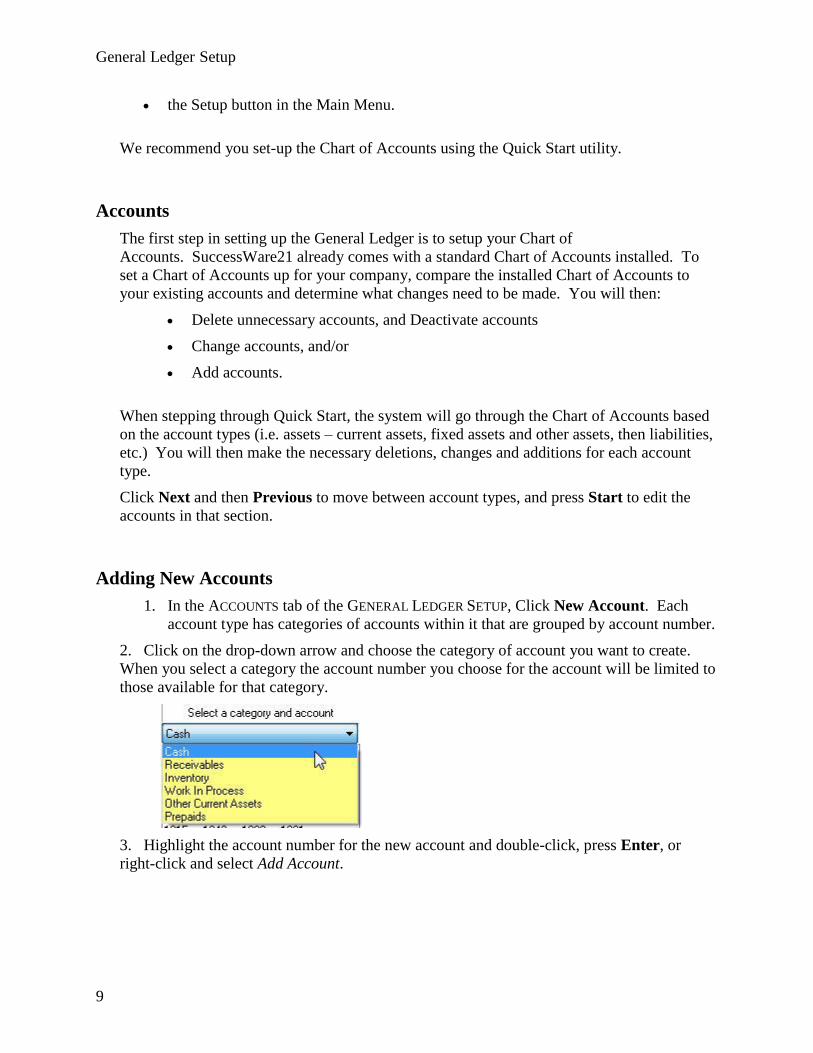
1. In the ACCOUNTS tab of the GENERAL LEDGER SETUP, Click New Account. Each
account type has categories of accounts within it that are grouped by account number.
2. Click on the drop-down arrow and choose the category of account you want to create.
When you select a category the account number you choose for the account will be limited to
those available for that category.
3. Highlight the account number for the new account and double-click, press Enter, or
right-click and select Add Account.

General Ledger Setup
10
4. Enter a name for the new account and click Save.
Editing an Account
If you want to leave an account, but make a change to its name, you can do this by editing the
account. For example, you may wish to change account 1002 – Cash Local Bank, to a
specific bank’s name, i.e., Cash – Bank of America, Checking.
1. To change the description for an account, right-click on the account and select Edit
Account.

General Ledger Setup
11
2. Enter the new description and click Save.
NOTE: Select the MUST PRINT checkbox to print the account numbers on financial
reports, even if the balance is zero.
Deleting Accounts
It is recommended that you delete any accounts your company will not be using before you
edit existing accounts or add new ones. Once an account has transaction posted against it, the
account can NEVER be deleted. If you no longer wish to use a GL account and it has posted
transaction history, you can right click on the account and Deactivate it.
1. To delete an account, highlight the account you would like to delete.
2. Right-click and select Delete Account. Make sure to confirm the deletion.
General Ledger Setup
12
Activating and Deactivating Accounts
If an account at one time carried a balance and you do not plan to use the account anymore,
you may choose to deactivate the account. Deactivating the account removes it from the
active account list and does not allow any further posted transactions against the account,
however any posted history within the account remains available for reporting purposes.
Accounts can be reactivated if necessary if you need to process additional transaction using
the account in the future.
Generally accounts are deactivated when they will no longer be used. For example, if you
were to change the bank where you keep your checking account, you would not want to
simply change the name of the existing GL account that represents the checking account, but
rather, would deactivate the existing account and create a new GL account to represent the
new checking account.
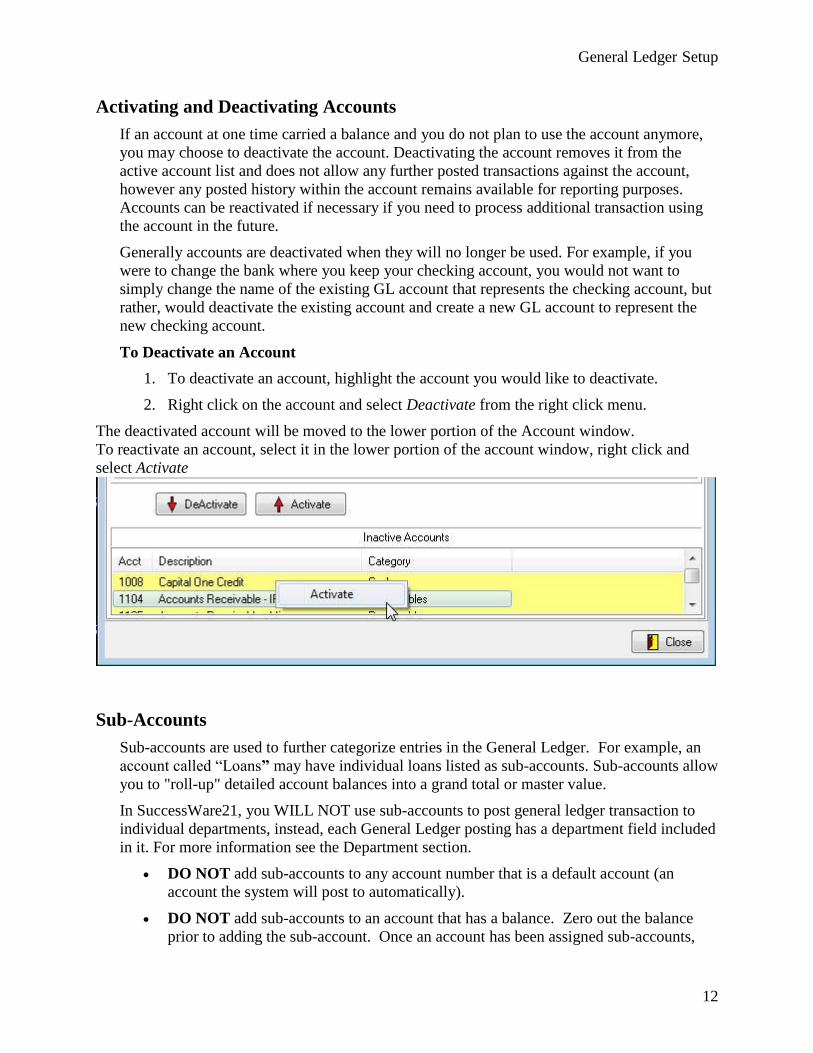
To Deactivate an Account
1. To deactivate an account, highlight the account you would like to deactivate.
2. Right click on the account and select Deactivate from the right click menu.
The deactivated account will be moved to the lower portion of the Account window.
To reactivate an account, select it in the lower portion of the account window, right click and
select Activate
Sub-Accounts
Sub-accounts are used to further categorize entries in the General Ledger. For example, an
account called “Loans” may have individual loans listed as sub-accounts. Sub-accounts allow
you to "roll-up" detailed account balances into a grand total or master value.
In SuccessWare21, you WILL NOT use sub-accounts to post general ledger transaction to
individual departments, instead, each General Ledger posting has a department field included
in it. For more information see the Department section.
DO NOT add sub-accounts to any account number that is a default account (an
account the system will post to automatically).
DO NOT add sub-accounts to an account that has a balance. Zero out the balance
prior to adding the sub-account. Once an account has been assigned sub-accounts,

General Ledger Setup
13
the master account will no longer accept direct posting, a sub-account must be
selected every time the account is used.
Adding Sub-Accounts
1. In the SUB-ACCOUNTS tab of the GENERAL LEDGER SETUP, select the ACCOUNT
CLASS that contains the account you want to add a sub-account to.
2. Highlight that account.
3. Click on the New Subaccount button located at the top right side of the form, or right-
click and select New Sub-Account from the drop-down menu.
4. Enter the ID to use for the SUB ACCOUNT and the DESCRIPTION. The ID can be letters
and/or numbers.
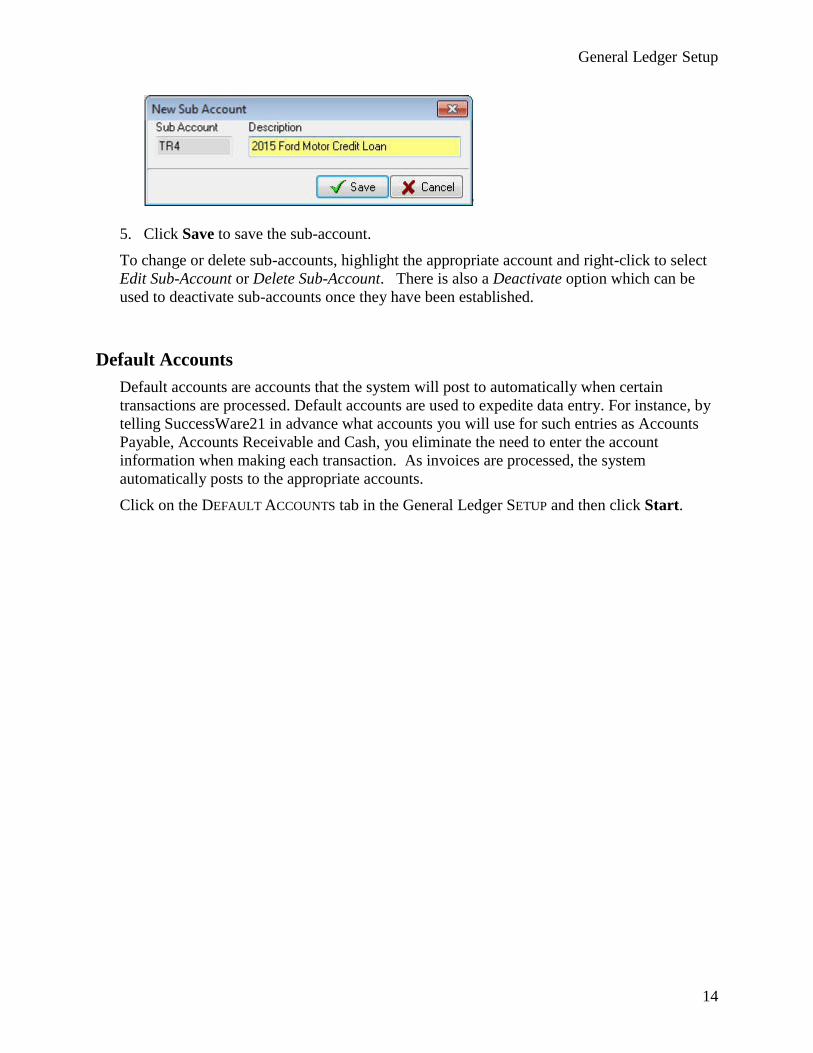
General Ledger Setup
14
5. Click Save to save the sub-account.
To change or delete sub-accounts, highlight the appropriate account and right-click to select
Edit Sub-Account or Delete Sub-Account. There is also a Deactivate option which can be
used to deactivate sub-accounts once they have been established.
Default Accounts
Default accounts are accounts that the system will post to automatically when certain
transactions are processed. Default accounts are used to expedite data entry. For instance, by
telling SuccessWare21 in advance what accounts you will use for such entries as Accounts
Payable, Accounts Receivable and Cash, you eliminate the need to enter the account
information when making each transaction. As invoices are processed, the system
automatically posts to the appropriate accounts.
Click on the DEFAULT ACCOUNTS tab in the General Ledger SETUP and then click Start.

General Ledger Setup
15
SuccessWare21 displays the list of default types in the DEFAULT TYPE window, including the
accounts that are selected for those defaults.
The right side of the form will list all account numbers that can be used for the highlighted
default type. A red arrow will precede the account that has been selected.
Defining the Default Types
The following list defines the roll played by each of the default types included in the Default
Account Setup.
Accounts Payable Trade- This default points to the account into which postings and
adjustments of AP Invoices, as well as adjustments and payments to a vendor account
via the Payables Manager or Vendor Account History will be made. This default
points to a liability account
Accounts Receivable Trade- This default points to the account into which postings
and Adjustments of AR Invoices as well as adjustments and payments from
customers recorded via the Receivables Manager or Billing Account History will be
recorded. This default points to an asset account.
General Ledger Setup
16
Agreement Deferred Revenue- If you sell an agreement and indicate that you wish
to Defer Revenue, the amount that you defer at the time of activating the agreement
as well as the amount posted on future periodic invoices related to the agreement will
post to this default account. When visits are performed revenue will be released from
this account as current revenue (into the default account for Agreement Revenue-
Maint)
Agreement Reserve- If you sell an agreement and indicate that you wish to hold
Service Reserve, the amount that you chose to reserve will be placed in the default
account associated with Agreement Reserve. Agreement Reserve is also reduced
when you charge against an Agreement. Increases and decreases of Agreement
Reserve are countered with entries to the default account for Agreement Expense.
Warranty Reserve- Installs- If you add an in-house warranty to a piece of
equipment you may choose to set aside warranty reserve against that warranty. This
default will be associated with a liability account. This default will be charged against
when you charge items on an AR Invoice against the in-house warranty. Entries
against this account are countered with an entry to the default account associated with
Warranty Expense.
AR Invoice Discounts- This account is posted to when you apply a discount to an
Account Receivable invoice using the Set Discount button at the bottom of the AR
Invoice form
Agreement Expense Excess- This default is used to identify the account you wish to
post against when charges against an Agreement are in excess of the amount set aside
in Agreement Reserve. This default points to a Direct Cost account. You may choose
to point this default to the same account used for Agreement Expense.
Agreement Expense- This default is used to identify increases and decreases in
agreement related expense associated with additions to and subtractions from your
Agreement Reserve account. This default points to a Direct Cost account.
Agreement Revenue- Maint- This Default is used when revenue is recognized
related to maintenance agreements. Entries are made in this account when payments
are taken against the agreement if deferred revenue is not being used, or when the
agreement visit is included on a posted AR invoice if deferred revenue is being used.
This default account points to a Sale account.
Agreement Revenue- Service- This default identifies the account into which you
will post agreement revenue related to the service portion of an agreement. This
account points to a Sale account
Finance Charge- Finance charges posted from Accounts Receivable will be posted
against this Default Account.
Inventory- If you have activated inventory, this account will be used to maintain the
asset value of the stock in your warehouses.
Inventory Adjustment Overflow- This default is used to identify the account into
which balances will be posted related to Overflow inventory adjustment. You need to
make a value change to a quantity of inventory items, but don’t have that full quantity

General Ledger Setup
17
available on hand in inventory. In this case the available items will have their average
cost value changed, but the remaining adjustment amount will be posted to Inventory
Adjustment Overflow.
Payables Discounts Taken- If you apply discountable terms when paying an
Accounts Payable invoice, the amount of the discount will be posted to the default
account you associate with Payables Discounts Taken.
Payables Pending- This account will be posted to when you post a receipt which
contains “valued” inventory items. It will be countered with a posting to your default
Inventory account. Once the associated AP Invoice is posted, the amount will be
removed from Pending Payables and moved to the default AP Account.
Payroll- Accrued- This default is used to identify the account where total payroll
liability will accrue once the payroll period is posted. This account will be cleared
when payroll is reconciled. This default is only used if Payroll has been activated.
Payroll- Burden Applied- This default will define the account into which Estimated
Labor Burden will be posted at the time that the payroll period is posted. This default
is only used if Payroll has been activated and you select to post labor burden to the
default ELB account when setting up payroll. This default type points to a Direct Cost
account.
Payroll- Est. Labor Burden- This default is used to identify the account into which,
at the time that the payroll period is reconciled, the system will post (credit) the total
Estimated Labor. This account is only used if Payroll has been activated and you have
selected post labor burden to G/L as indicated by pay items during payroll setup. This
default type points to an Operating Expense account.
Retainage Payables- This default identifies where retainage withheld on a posted AP
invoice will be accumulated. This account points to a liability account.
Retainage Receivables- This default identifies where retainage withheld on a posted
AR invoice will be accumulated. This account points to an Asset (Receivables)
account.
Retained Earnings- This default identifies the account into which the system will
record retained earnings when a Fiscal Year ends. Retained Earnings are calculated
when the first period of the next fiscal year is compiled.
Returns and Allowances- This default type is used to identify the account which will
be used when the Adjustment Code “Customer Refunds” is used.
Sales Tax- Sales tax associated with a line item on an Accounts Receivable invoice is
posted to this account. This default points to a liability account.
Warranty Expense Excess- Installs- This default is used to identify the account in
which expenses beyond the amount previously set aside for Warranty Reserve will be
posted. You may choose to point this default to the same account used for Warranty
Expense- Installs.
Warranty Expense- Installs- This default is used to identify the account in which
expenses related to an in-house warranty will be posted. The default points to a Direct

General Ledger Setup
18
Cost account. Entries are made to the account when Warranty Reserve is posted or
charges are made against the warranty on an AR Invoice. Entries to this default are
countered with an entry to the account associated with the Default type Agreement
Reserve.
Changing a Default Account
1. On the Default Account Tab of General Ledger Setup, highlight the default type you
want to change.
2. In the right panel of the form, double-click on the account you want to set as the
default account.
3. The red arrow moves to the newly selected account and the default type will now
include the new account number in parenthesis.
NOTE: It is important that the correct default account has been selected prior to posting
transactions. Once an account carries a balance, it cannot be changed. If you must make
a change to the default once the currently selected account has a balance, you must, using
a journal entry bring the account's balance to zero, then change the default. Now you
must, via journal entry move the original default accounts balance to the newly selected
account.
How Does SuccessWare21 Departmentalize?
Unlike some other accounting software packages, SuccessWare21 DOES NOT use sub-
accounts to departmentalize income and expenses. Instead, each transaction that posts to an
account in the general ledger contains a debit or a credit as well as a department number that
indicates what department the entry is associated with. This amounts to an additional column
being added to a general ledger account. Instead of just a "Debit" and "Credit" column, there
is also a "Department" column.
Each entry that is made to an account on the income statement must have department number
that identifies which department is responsible for the income or expense.
Each entry that posts to the balance sheet will automatically post to the default
"Administrative" department (department number "00"). This is because the balance sheet in
SuccessWare21 is not departmentalized. The Administrative department is set up in
SuccessWare21 by default and cannot be changed or deleted.
For Example, an Accounts Receivable invoice that is posted which includes a $150 sale of a
repair performed by the Residential Service department (Department 20 in my example)
would result in the following general ledger transaction:
General Ledger
Account
Department Debits Credits
1101 (AR) 00
(Administrative)
150
3005 (Sales- 20 (Residential 150

General Ledger Setup
19
Repair) Service)
This method of departmentalization allows for financial reports, such as the Income
Statement to be run separately by department by merely "filtering" the Department column
for occurrence of postings related to a particular department when running the report.
Departments
SuccessWare21 allows you to use departments to create separate profit and loss statements
for each cost center. All transactions that post to the General Ledger, whether payables,
receivables, or inventory transactions, must have a department assigned to them.
Use departments to split income and expenses for reporting purposes. A good way to
determine if a group or type of work should be considered a department is to ask if it could
be considered a profit center. Typically, a department is a “profit center” if you are going to
want to print a separate Income Statement for it.
Each transaction that is posted to an account on the income statement must reference a
department (or departments if you are splitting an expense). The Balance sheet is not
departmentalized in SuccessWare21, rather all transactions that post to asset, liability or
equity accounts are posted to the default Administrative department, which is represented by
code 00.
SuccessWare21 comes installed with a standard list of departments. As with establishing
your Chart of Accounts, compare your list of departments to the standard list included in
SuccessWare21. You will then:
Delete departments,
Deactivate Departments
Change department descriptions, and/or
Add departments.
NOTE: If there is an area of your company for which you need to track specific General
Ledger posting it needs to be created as a department.
Deleting a Department
If there are departments listed in the default department list that you do not need, they can be
deleted. Departments, like accounts cannot be deleted if they have posted general ledger
history associated with them. If you no longer need a department that has past history you
can deactivate the department instead
To Delete a Department.
General Ledger Setup
20
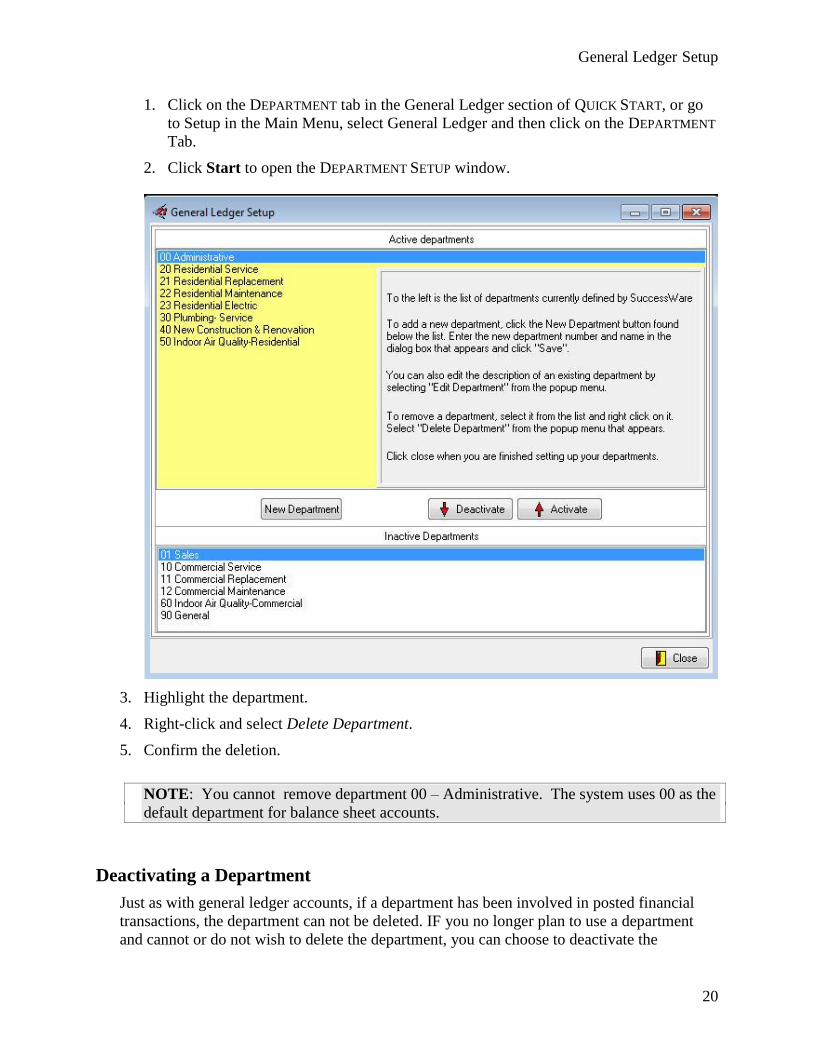
1. Click on the DEPARTMENT tab in the General Ledger section of QUICK START, or go
to Setup in the Main Menu, select General Ledger and then click on the DEPARTMENT
Tab.
2. Click Start to open the DEPARTMENT SETUP window.
3. Highlight the department.
4. Right-click and select Delete Department.
5. Confirm the deletion.
NOTE: You cannot remove department 00 – Administrative. The system uses 00 as the
default department for balance sheet accounts.
Deactivating a Department
Just as with general ledger accounts, if a department has been involved in posted financial
transactions, the department can not be deleted. IF you no longer plan to use a department
and cannot or do not wish to delete the department, you can choose to deactivate the

General Ledger Setup
21
department instead. A deactivated department can still be included in reports, but is not
available for new posted transactions.
To Deactivate or Reactivate a Department
1. Click on the DEPARTMENT tab in the General Ledger section of QUICK START, or go
to Setup in the Main Menu, select General Ledger and then click on the DEPARTMENT
Tab.
2. Right click on the Department that you want to deactivate and choose Deactivate or
select the account and select the Deactivate button near the bottom of the department
list. The department will be moved into the Inactive Departments list at the bottom of
the window.
To reactivate a department either right click on it in the INACTIVE DEPARTMENT list and select
Activate or select the department that you want to reactivate and click the Activate button.
Changing or Editing a Department Description
If you want to simply change the name of an existing department you may choose to edit.
1. Click on the DEPARTMENT tab in the General Ledger section of QUICK START, or go
to Setup in the Main Menu, select General Ledger and then click on the DEPARTMENT
Tab.
2. To change the description of a department, right-click on the department and select
Edit Department.
3. Enter the new description and click Save.
Adding a New Department
New departments added to SuccessWare21 consist of a Department Code and a Description.
The Department code must be two characters and can be any combinations of letters and
numbers.
1. Click on the DEPARTMENT tab in the General Ledger section of QUICK START, or go
to Setup in the Main Menu, select General Ledger and then click on the DEPARTMENT
Tab.
2. To add a department, click New Department or right-click anywhere in the
DEPARTMENT window and select New Department.
General Ledger Setup
22
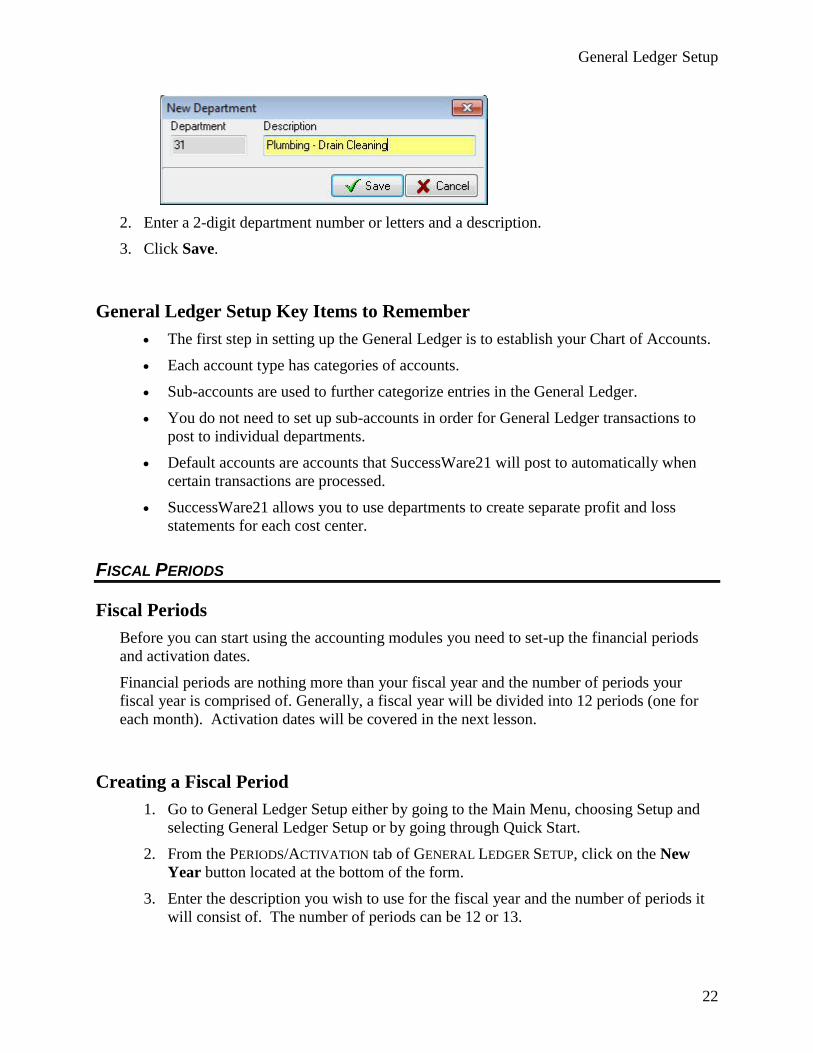
2. Enter a 2-digit department number or letters and a description.
3. Click Save.
General Ledger Setup Key Items to Remember
The first step in setting up the General Ledger is to establish your Chart of Accounts.
Each account type has categories of accounts.
Sub-accounts are used to further categorize entries in the General Ledger.
You do not need to set up sub-accounts in order for General Ledger transactions to
post to individual departments.
Default accounts are accounts that SuccessWare21 will post to automatically when
certain transactions are processed.
SuccessWare21 allows you to use departments to create separate profit and loss
statements for each cost center.
FISCAL PERIODS
Fiscal Periods
Before you can start using the accounting modules you need to set-up the financial periods
and activation dates.
Financial periods are nothing more than your fiscal year and the number of periods your
fiscal year is comprised of. Generally, a fiscal year will be divided into 12 periods (one for
each month). Activation dates will be covered in the next lesson.
Creating a Fiscal Period
1. Go to General Ledger Setup either by going to the Main Menu, choosing Setup and
selecting General Ledger Setup or by going through Quick Start.
2. From the PERIODS/ACTIVATION tab of GENERAL LEDGER SETUP, click on the New
Year button located at the bottom of the form.
3. Enter the description you wish to use for the fiscal year and the number of periods it
will consist of. The number of periods can be 12 or 13.
General Ledger Setup
23
4. Select the first date of the fiscal year on the calendar that is displayed. Use the arrow
buttons located on either side of the month and year to move to the correct month.
5. Click Save.
6. The system will display all fiscal periods for the year in the panel on the right side of
the form. All periods will be marked as Inactive.
Changing the End Date of a Period
If your fiscal periods have different ending dates you may edit the ending dates of each
period. For instance, if your fiscal periods end on the last Friday of each month rather than
the last day of the month, you will change the ending date to the actual date of the last
Friday.
1. Highlight the period and right-click to select Modify End Date.
2. Select the actual date from the calendar that is displayed. The system will
automatically change the starting date of the next period.
3. Continue to change the end date of each month until all periods are correct.
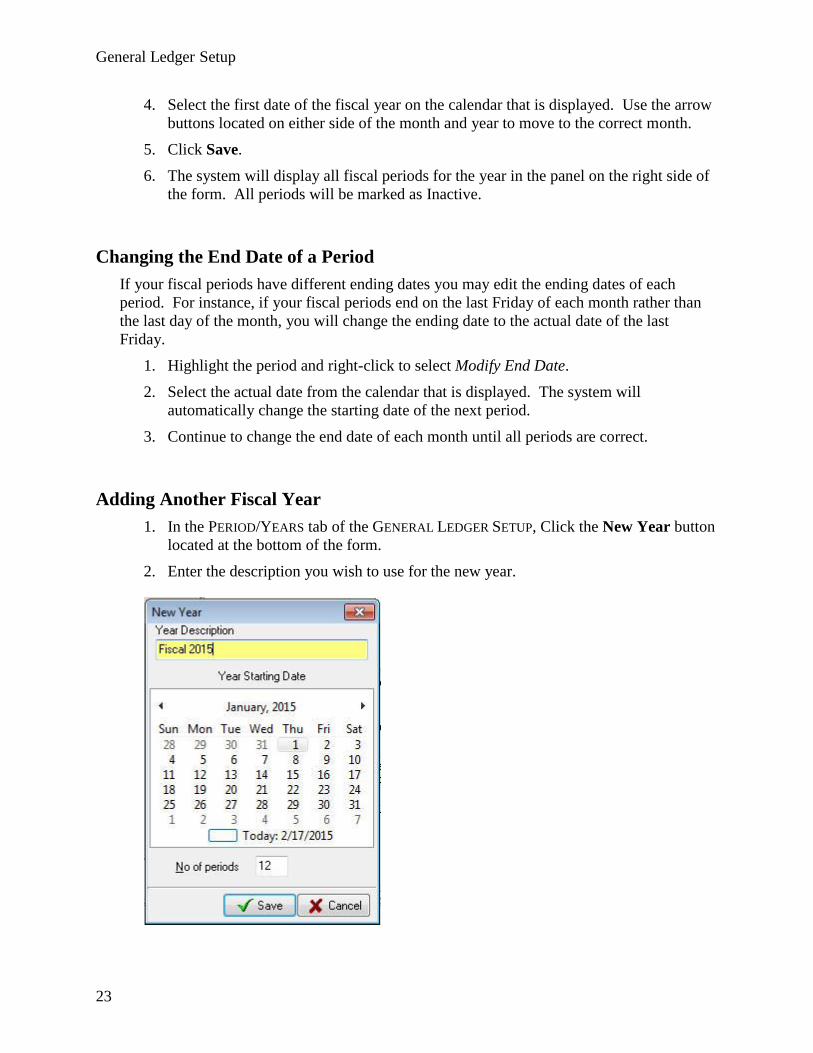
Adding Another Fiscal Year
1. In the PERIOD/YEARS tab of the GENERAL LEDGER SETUP, Click the New Year button
located at the bottom of the form.
2. Enter the description you wish to use for the new year.
General Ledger Setup
24
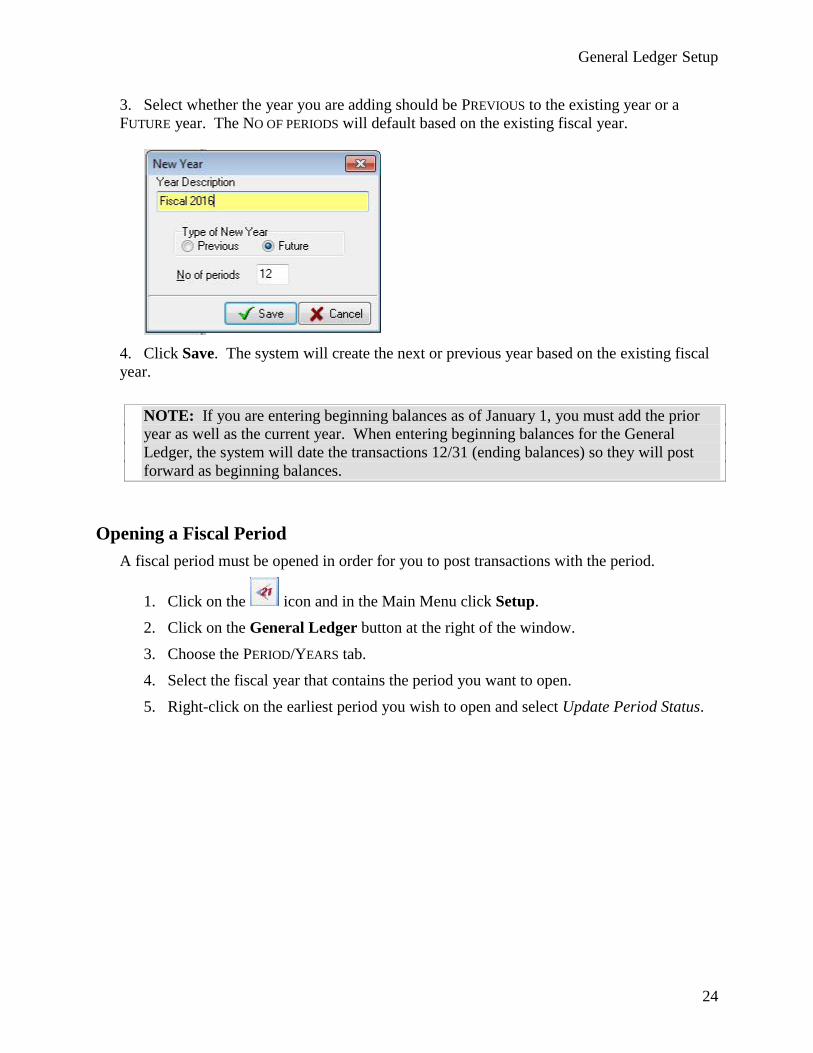
3. Select whether the year you are adding should be PREVIOUS to the existing year or a
FUTURE year. The NO OF PERIODS will default based on the existing fiscal year.
4. Click Save. The system will create the next or previous year based on the existing fiscal
year.
NOTE: If you are entering beginning balances as of January 1, you must add the prior
year as well as the current year. When entering beginning balances for the General
Ledger, the system will date the transactions 12/31 (ending balances) so they will post
forward as beginning balances.
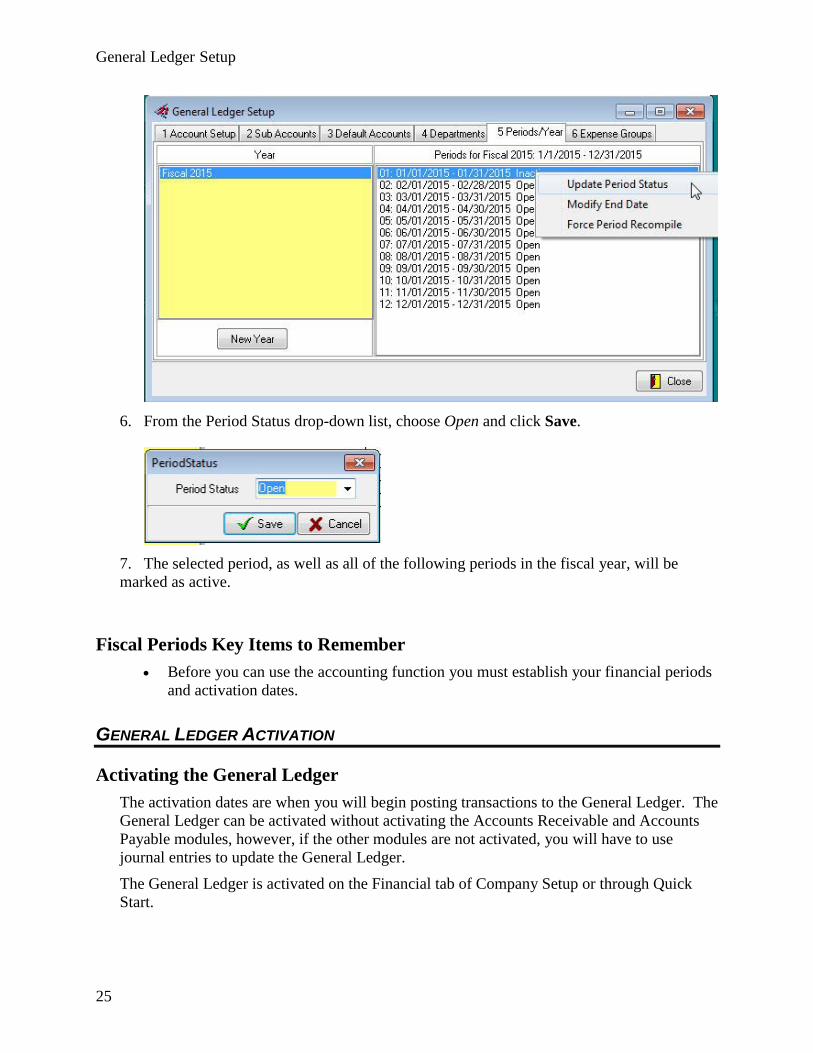
Opening a Fiscal Period
A fiscal period must be opened in order for you to post transactions with the period.
1. Click on the icon and in the Main Menu click Setup.
2. Click on the General Ledger button at the right of the window.
3. Choose the PERIOD/YEARS tab.
4. Select the fiscal year that contains the period you want to open.
5. Right-click on the earliest period you wish to open and select Update Period Status.
General Ledger Setup
25
6. From the Period Status drop-down list, choose Open and click Save.
7. The selected period, as well as all of the following periods in the fiscal year, will be
marked as active.
Fiscal Periods Key Items to Remember
Before you can use the accounting function you must establish your financial periods
and activation dates.
GENERAL LEDGER ACTIVATION
Activating the General Ledger
The activation dates are when you will begin posting transactions to the General Ledger. The
General Ledger can be activated without activating the Accounts Receivable and Accounts
Payable modules, however, if the other modules are not activated, you will have to use
journal entries to update the General Ledger.
The General Ledger is activated on the Financial tab of Company Setup or through Quick
Start.

General Ledger Setup
26
We recommend that Accounts Receivable and Accounts Payable be activated at the same
time as the General Ledger. This will update the General Ledger as A/R and A/P invoice
payments are processed. This way journal entries will not be required.
If you are unsure of the date you wish to use for activation, leave those fields
blank. You can enter data, including posting invoices and payments, to record history
without posting to the General Ledger. Once there is a date in the activation field,
you can only post items dated after the activation date.
Once you have decided on an activation date, make sure you do not enter data
dated after that date until you have established the activation date in
SuccessWare21. For instance, if you decide to make February 1st your activation
date, but do not enter it as such in the activation fields, and then later add transactions
for February 1st and 2nd, the system will not allow you to use February 1 as your
activation date. It will assign the first date that there was no activity as the activation
date, in this case February 3rd.
You do not have to enter beginning balances in order to have an activation
date. If you wish to start posting live on February 1, but do not have ending balances
for January yet, go ahead and enter February 1 as the activation date and start
processing live. You can enter your General Ledger, Accounts Receivable, and
Accounts Payable starting balances after starting live processing.
1. Establish activation dates by using the mouse or spacebar to mark the check boxes to
the left of each module. This will activate the corresponding field and allow you to
enter an activation date.
General Ledger Setup
27
2. Enter your activation date and click Save.
SuccessWare21 will change the period status on the first active period (and all following
periods) from inactive to open, provided you have not opened the period already.
General Ledger Activation Key Items to Remember
The General Ledger can be activated without activating the Accounts Receivable and
Accounts Payable modules, however, if the other modules are not activated you will
have to use journal entries to update the General Ledger. While it is not required, we
suggest that the Accounts Receivable and Accounts Payable be activated at the same
time as the General Ledger.
you do not have to enter beginning balances in order to have an activation date.
Once you have decided on an activation date, make sure you do not enter data dated
after that date until you have established the activation date in SuccessWare21.
EXPENSE GROUPS
Expense Groups
Expense Groups are a reporting tool that allow you to separate your operating expenses into
groups that will contain subtotals.
Expense Groups are used to define how you group operating expenses on your Income
Statement Report (profit & loss statement).
By default, the system will report income, direct costs, and operating expenses in separate
sections of the report. If you wish to group the operating expenses by Expense Type, you
can define that here. For instance, you may have groups for advertising, employee related
concerns, plant & equipment expenses, etc.
There are two rules for setting up Expense Groups:
All of the accounts in a group must fall in consecutive numeric order in the Chart
of Accounts, and
If any of your operating expense accounts belong to a group, ALL of the
remaining accounts must belong to a group as well.
Defining Expense Groups
1. Enter the Number of Groups that you wish to define.
2. Press Insert, or right-click and select New Group, and enter the first group’s
description.
3. Press Insert again to add the next group description and repeat until all groups have
been defined.

General Ledger Setup
28
4. Once all groups have been defined, highlight the first group in the panel on the right.
5. Use the mouse to select the accounts that belong to that group. You can click on the first
account and drag the mouse to the last account in the group, or click on the first account then
hold down the Shift key while you click on the last account in the group, to highlight all
accounts.
6. Click on the Add to group button located in the middle of the form.
7. Highlight the next group listed in the panel on the right and mark all accounts that
belong to that group. Click Add to group.
8. Continue until all accounts have been added to the appropriate groups.
9. Click Save.
Expense Groups Key Items to Remember
Expense groups are used to define how you group operating expenses on your income
(profit & loss) statement.

General Ledger Setup
29
All of the accounts in a group must fall in consecutive numeric order in the Chart of
Accounts
If any of your operating expense accounts belong to a group, ALL of the remaining
accounts must belong to that group as well.
OPENING BALANCES
Opening Balances
The last major step to setting up the General Ledger in SuccessWare21 is the entry of
opening balances. Opening balances are really your closing balances on the last day you are
using your old financial software. Those numbers are then brought into SuccessWare21 as
the starting numbers where they are then added and subtracted from as you begin processing
financials in SuccessWare21.
Opening balances do not have to be entered before you begin your actual General Ledger
processing, as you often will not have them for a couple of weeks after your GL activation
date, but they must be entered before you can begin to perform any financial reporting out of
SuccessWare21.
Opening balances cannot be entered until the General Ledger has been activated. Opening
balance entries will be dated automatically, the date that immediately precedes your General
Ledger Activation date.
Entering Opening Balances
Opening balances are entered through the Quick Start screen.
1. Press New
2. From the Account field press the down arrow key to select the account for which you
are entering a balance (If the chosen account has sub accounts, you will be prompted
to choose a sub account).
3. Tab to the Department field and enter the department
4. Tab to the Debit or Credit field and type the account’s credit or debit balance.
5. Press the Save button to save the entry.
6. Press New to add another opening balance
7. Continue to add all balances for your accounts
NOTE: At any time, you can review a list of the accounts you have entered, as well as a
total of all debits and credits, by pressing the review button. In order for you to post your
opening balances to the General Ledger, debits and credits must balance to zero.
General Ledger Setup
30
8. Once all of your balances have been entered and reviewed, press the Post button to post
them to the General Ledger.
9. Press the Finalize button to lock the balances from being changed.
AR Beginning Balances
When entering you General Ledger Opening balances you will enter a total outstanding
Accounts Receivable balance. After entering the total outstanding AR balance you will need
to enter your individual Accounts Receivable beginning balances. This will be an individual
listing of all of the outstanding items owed to you by your customers.
Once all of the outstanding items have been entered and posted you will Finalize the list. The
list of outstanding Receivable items cannot be finalized unless the total of the outstanding
items equals the Accounts Receivable opening balance that you have entered.
Once the outstanding items have been entered, they will be available to process like any other
open Receivables item on customers billing account.
Receivables beginning balances are entered through the SuccessWare21 Quick Start utility,
which will guide you through the necessary setup steps.
1. Click the 21 Icon to open the Main Menu
2. Select the Setup button
General Ledger Setup
31
3. Click Quick Start
4. Click the Receivables button and select the Customers Balances tab
5. Select Start, then New to enter the first billing customer.
6. Follow the on-screen instructions to enter the information. If the customer you enter is
already in the system, it will display in the AUTO SEARCH RESULTS panel located at the top
right corner of the window. To avoid entering duplicate billing accounts, be sure to watch
the AUTO SEARCH RESULTS display. When complete, select Save.
Note: To search for an existing billing account, enter part of the acount information (such as
ID or name) and press Tab. The results will display in the AUTO SEARCH RESULTS panel.
To search through all Billing Accounts, delete the system-assigned ID number, and press
Tab to search.
7. Select Add Inv to add the first outstanding invoice for the Billing Account. The invoice
date MUST be prior to the activation date.
8. After posting the first invoice, select Add Inv to add another invoice for the same
customer, or New to add (or select) the next billing account.
9. Complete the steps until all billing accounts and invoices have been entered.
General Ledger Setup
32
10. Use the Show Invoices button to review the invoices that have been entered for the
current Billing Account, and Show All Invoices to review the invoices that have been
entered for all Billing Accounts.
11. If an invoice was entered incorrectly, highlight the invoice in one of the SHOW INVOICE
display grids, and right-click to delete it. Re-enter the invoice correctly.
12. When all Billing Accounts and invoices have been entered, select Summary to preview
and/or print a list of the information that was entered. Verify that all invoices and accounts
are correct AND that the total is the same as the Accounts Receivable balance in General
Ledger.
13. Once all data is correct, select Finalize to post the starting balances. Once you have
Finalized the balances, you will not be able to use Quick Start to enter outstanding invoices.
AP Beginning Balances
When entering you General Ledger Opening balances you will enter a total outstanding
Accounts Payable balance. After entering the total outstanding AP balance you will need to
enter your individual Accounts Payable beginning balances. This will be an individual listing
of all of the outstanding items you owe to your vendors.
Once all of the outstanding items have been entered and posted you will Finalize the list. The
list of outstanding Payables items cannot be finalized unless the total of the outstanding items
equals the Accounts Payable opening balance that you have entered.
Once the outstanding items have been entered, they will be available to process like any other
open payables item on vendors account.
Vendor beginning balances are entered through the SuccessWare21 Quick Start utility, which
will guide you through the necessary setup steps.
1. Click the 21 Icon to open the Main Menu
2. Select the Setup button
3. Click Quick Start
4. Click the Payables button and select the Vendor Balances tab
5. Select Start, then New to enter the first vendor.

General Ledger Setup
33
6. Follow the on-screen instructions to enter the information. If the vendor you enter is
already in the system, it will display in the AUTO SEARCH RESULTS panel located at the top
right corner of the window. To avoid entering duplicate vendors, be sure to watch the AUTO
SEARCH RESULTS display. When complete, select Save.
Note: To search for an existing vendor, enter part of the vendor information (such as ID or
name), and press Tab. The results will display in the AUTO SEARCH RESULTS panel. To
search through all vendors, delete the system-assigned ID number, and press Tab to search.
7. Select Add Inv to add the first outstanding invoice for the vendor. The invoice date
MUST be prior to the activation date.
8. After posting the first invoice, select Add Inv to add another invoice for the same
vendor, or New to add (or select) the next vendor.
9. Complete the steps until all vendors and invoices have been entered.
10. Use the Show Invoices button to review the invoices that have been entered for the
current vendor, and Show All Invoices to review the invoices that have been entered for all
vendors.
General Ledger Setup
34
11. If an invoice was entered incorrectly, highlight the invoice in one of the SHOW INVOICE
display grids, and right-click to delete it. Re-enter the invoice correctly.
12. When all vendors and invoices have been entered, select Summary to preview and/or
print a list of the information that was entered. Verify that all invoices and vendors are
correct AND that the total is the same as the Accounts Payable balance in General Ledger.
13. Once all data is correct, select Finalize to post the starting balances. Once you have
Finalized the balances, you will not be able to use Quick Start to enter outstanding invoices.
Opening Balances Key Items to Remember
Opening Balances can be entered after you have begun to post to the General Ledger.
To enter opening balances a period must be created before your General Ledger
activation date
In order to post your opening balances, all entered debits and credits must balance out
to zero.
SALE & EXPENSE TYPES
Sale & Expense Types
Two of the Reference Tables that must be set up in SuccessWare21 are the Sale Type and
Expense Type tables.
Sale Types identify the different types of things that you sell, such as labor, equipment, parts,
and flatrate service. Sale Types are then attached to items in your PriceBook that could be
included on an Accounts Receivable Invoice. Items that are included on AR Invoices include
tasks, parts and labor items as well as coupons and discounts. Therefore, Sale Types are
pointed to Income accounts in the General Ledger as well as Returns and Allowances
accounts.
Expense Types Identify the different types of things you have to pay for. These can be either
Expenses (direct cost or overhead) or can be related to outstanding liabilities such as a loan.
Expense Types are attached to items in your PriceBook that can be included on AP Invoices,
Inventory transactions and even Pay Items such as Commissions and Hourly Wage items.
Sale and Expense Types in SuccessWare21 serve as "Pointers" to General Ledger accounts.
These pointers are used by SuccessWare21 to determine where to post the General Ledger
entry associated with each line item on a posted transaction.
When the PriceBook items are included in Accounts Receivable and Accounts Payable
invoices, or inventory transactions, the appropriate debits and credits will automatically be
applied to the correct accounts based upon the Sales or Expense Type, at the time of posting .
While the creation of Expense and Sale Types is not actually part of General Ledger set-up,
we highly recommend that you create them at this time.
General Ledger Setup
35
Creating Sale and Expense Types
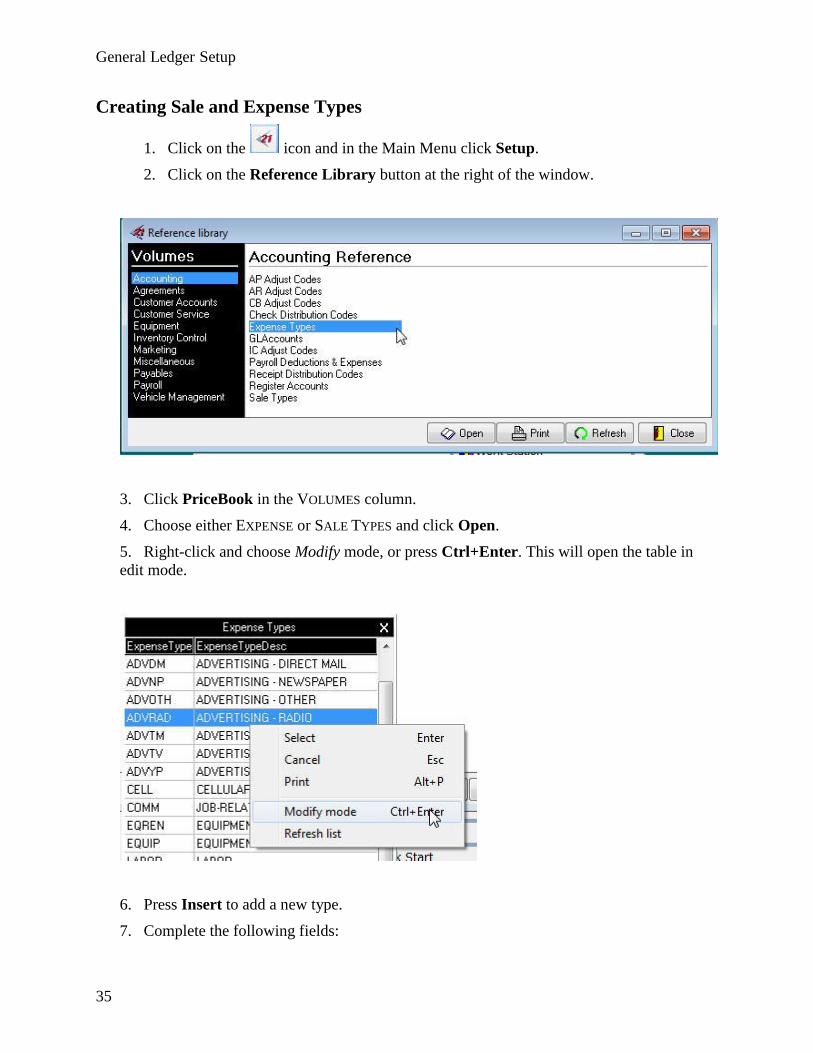
1. Click on the icon and in the Main Menu click Setup.
2. Click on the Reference Library button at the right of the window.
3. Click PriceBook in the VOLUMES column.
4. Choose either EXPENSE or SALE TYPES and click Open.
5. Right-click and choose Modify mode, or press Ctrl+Enter. This will open the table in
edit mode.
6. Press Insert to add a new type.
7. Complete the following fields:

General Ledger Setup
36
Field Description
Expense Type/Sale Type This is the name you will give to the
Expense or Sale Type. This type name will
then be used when creating PriceBook
items.
GL_Account Enter the General Ledger account number
that this type will represent. You can create
multiple types that point to the same
General Ledger account.
SubAccount If the General Ledger account is a master
account (has sub-accounts), you must
choose the sub-account that the type will
represent.
Department If this type almost always posts to a
particular department you can add the
department here. When the type is used the
department will then default, but can be
changed. If you do not include a department
you will be prompted to enter one each time
an item with the Sale or Expense Type is
used.
Expense Type Desc. This allows you to enter a more complete
description of the type.
IsJobCost (Expense Type
Only)
Items marked with an “x” will be listed on
job estimates when using project
management.
IsActive This field will be marked with an “x” by
default. If an item is not marked active, it
will not be available to assign to items
created in the PriceBook.
8. Press Enter to save the new Expense or Sale Type.
9. Continue to add additional items, or click Close to leave edit mode.
General Ledger Setup
37
Sale & Expense Types Key Items to Remember
Each item in your PriceBook will be assigned a Sale Type, and Expense Type, or
both.
Sale and expense types allow you to apply transactions to specific accounts
automatically.
Adjustment Codes
Adjustment codes are drop-down lists used to identify the reason that a change is being made
to an operational balance in a module of SuccessWare21. These drops down lists of reasons
are associated with general ledger accounts. When you need to make a change to a customer's
balance or a vendors balance for example, that is not associated with a new invoice or
payment, an adjustment can be recorded. When making an adjustment you will identify the
amount of the adjustment and then choose an adjustment code which will identify why you
are making the change and what general ledger account will be affected by the transaction.
There are six adjustment codes that are used in SuccessWare21
Accounts Receivable Adjustment Codes- These codes are used to make adjustments to
customer AR balances from within the customer Billing Account History screen (F4).
Account Payable Adjustment Codes- These adjustment codes are used to make adjustments
to Vendor balances from within the Vendor Account History screen (F4)
Cash Box or Check Book Adjustment Codes- These adjustment codes are used within your
register accounts to make adjustments to account balances. Examples include Credit Card
fees, bank fees, interest earned and finance charges.
Inventory Adjustment Codes- These adjustment codes are used to make changes to the asset
value of your inventory to account for such things as physical counts or product loss.
Receipt Distribution Codes- These adjustment codes are used when recording Miscellaneous
Cash Receipts from the Receivables Manger. They represent the reasons miscellaneous cash
is being received into the system.
Check Distribution Codes- These adjustment codes are used when recording miscellaneous
payments made from one of your register accounts.


