Document Number R-201 1 June 2019 Overview PROMAS can be licensed and run in the cloud or in house on an office network or stand alone. PROMAS - The Professional Landlord was developed drawing on more than twenty years of experience with property management software. You will be Getting Acquainted with an integrated application with features that will free up your time and increase your productivity. The Professional Landlord was developed for professional property managers and investors. It offers easy access to transactions; reports that are comprehensive; statements that owners can easily understand; detailed financial reporting; and owner and tenant portals to view statements, documents and activity. The Professional Landlord consists of a number of integrated modules - Profiles, Receivables, Payables, General Ledger, Reports, Mailings, Setup, Help, Maintenance, Commercial (optional), PROMAS Central (optional). Information entered through the Setup and Profile menus controls the handling of accounts, the processing of transactions, and the preparation of reports. We have done our best to design a product that is easy to learn and and easy to use. The on-line help is very detailed. It will familiarize you with the workings of the program; its definitions and its terminology. The Professional Landlord is capable of handling an unlimited number of owners, properties, units and tenants, including multiple owners per property and multiple tenants per unit. The licensing agreement sets the limit on the number of units. The full functionality of the program is available regardless of the number of units licensed. The basic program is the same for everyone. Increasing the unit license limit is done by placing a call to our support group who will provide codes to make the change. We have made a conscious effort to minimize the use of cryptic codes and to mask the accounting details from the user. Instead of “debit ledger 1010” and “credit ledger 4063” the user deals with a tenant payment for rent and late fees or a check to a vendor for plumbing. It is equally useable both for the experienced accounting person and the accounting challenged person who wants the program to handle the debit/credit details for them. The program is very flexible in the design of statements, letters, management fees and late fee structures. In most cases, you will be able to define them to your exact operational needs. In addition, all of the “batch” postings (charge rents, late fees, invoice checks, distribution checks, etc.) produce “candidates” that you can edit prior to posting - thus minimizing the need to fix unnecessary postings later. Getting Acquainted
Transcript
Document Number R-201 1 June 2019
Overview PROMAS can be licensed and run in the cloud or in house on an office network or stand alone. PROMAS - The Professional Landlord was developed drawing on more than twenty years of experience with property management software. You will be Getting Acquainted with an integrated application with features that will free up your time and increase your productivity. The Professional Landlord was developed for professional property managers and investors. It offers easy access to transactions; reports that are comprehensive; statements that owners can easily understand; detailed financial reporting; and owner and tenant portals to view statements, documents and activity. The Professional Landlord consists of a number of integrated modules - Profiles, Receivables, Payables, General Ledger, Reports, Mailings, Setup, Help, Maintenance, Commercial (optional), PROMAS Central (optional). Information entered through the Setup and Profile menus controls the handling of accounts, the processing of transactions, and the preparation of reports. We have done our best to design a product that is easy to learn and and easy to use. The on-line help is very detailed. It will familiarize you with the workings of the program; its definitions and its terminology. The Professional Landlord is capable of handling an unlimited number of owners, properties, units and tenants, including multiple owners per property and multiple tenants per unit. The licensing agreement sets the limit on the number of units. The full functionality of the program is available regardless of the number of units licensed. The basic program is the same for everyone. Increasing the unit license limit is done by placing a call to our support group who will provide codes to make the change. We have made a conscious effort to minimize the use of cryptic codes and to mask the accounting details from the user. Instead of “debit ledger 1010” and “credit ledger 4063” the user deals with a tenant payment for rent and late fees or a check to a vendor for plumbing. It is equally useable both for the experienced accounting person and the accounting challenged person who wants the program to handle the debit/credit details for them. The program is very flexible in the design of statements, letters, management fees and late fee structures. In most cases, you will be able to define them to your exact operational needs. In addition, all of the “batch” postings (charge rents, late fees, invoice checks, distribution checks, etc.) produce “candidates” that you can edit prior to posting - thus minimizing the need to fix unnecessary postings later.
This guide will take you through some of the modules and functions that comprise The Professional Landlord rental software. This document can be used by new employees to become familiar with the program and potential new users who are in the process of choosing a package. What you have downloaded is a current release. The commercial module, which is optional, is not enabled - if you want to have it enabled call our support number (800-397-1499). Contact us if you would like an on-line demo. The last page of this manual has instructions on how to register; how to get started using the Quickstart database to begin entering your data; and how to contact us if you have questions.
To Purchase PROMAS Professional Landlord
All it takes is a phone call to 800-397-1499 or 703-255-1400.
The demo is the real program. When you are ready to purchase, all you have to do is call us and register to license the program.
SUPPORT
When you purchase The Professional Landlord license it entitles you to a 12 month subscription agreement with free telephone support and any upgrades that we release during that time
period.
After the initial agreement, annual subscription agreements are available for a reasonable fee which includes all upgrades released while the support agreement is in effect, and toll free
telephone support.
Subscription is included for users who lease and run in the Cloud.
Warrranty The Professional Landlord license comes with a 60 day money back guarantee.
Transaction Accessibility Tenant History, Receipt History, General Ledger History, Bank Account History, Invoice History, Check History, Vendor History - these are not reports but recorded transactions that can be viewed, edited, filtered, voided, NSFed and reversed. Highlighting a receipt or a check shows what was paid for or paid off. Editing a deposit shows what receipts were in the deposit.
Controlled Automatic Postings Rent charges, Late Fee charges, Owner Distribution checks (including ACH), Invoice checks, Recurring checks/invoices, Rent Increases automatically post through the date you select. Prior to posting the “candidates” are displayed along with sufficient data to determine if amounts should be edited or line items skipped.
Common Sense Owner Statements Ten different body styles; selectable information before and after the body; your choice of column labels, title and balance presentation. Every owner can have a unique statement. Single unit owners, multiple property owners, shared ownership - they all get what best suits their needs.
Statements and Documents - Owner and Tenant Portals Upload owner statements, documents and activity for the owner to view and print thru a secure logon or email them without uploading. You can do the same for tenants. Email notification to owners with link to the statement. Every combination of delivery method is available: publish; publish and email; email; print.
Extensive Profile Information Part-time owner addresses; normal, part-time, emergency phone numbers; foreign address and phone number accommodation; formal/informal salutations for correspondence; alternate owner check address; scheduled notes; owner statements and distribution checks; unlimited add-to information including documents, pictures, scanned documents can be attached; user defined reminders; alert information for invoices, receipts, work orders and move outs; mail merge to Microsoft Word.
Comprehensive Delinquent Tenant Handling The Late Fee profile sets the parameters. Every tenant can be handled as you want. A grace period, fixed/percentage/per day (or combination) fee based on any combination of rent and other charges determines the candidates. Candidate data includes balance due, balance late, days late, times late, last date charged, last amount charged and basis for the candidate charge. You can edit the amount or skip prior to posting. The suggested notice letter (one of four) for each candidate is based on the number of days late. Letter content is customizable per tenant.
Management Company Fee Recordkeeping Fees that are due to the Management Company are recorded in the Management Group ledger. These include management fees on rent, leasing fees, late fees, NSF check fees, application fees - all fees that are charged to the owner or received directly from the tenant. Detailed or summary statements can be printed for any time period. Checks can be written for undisbursed fees at your discretion. You have the same control over this important area as you do with owner accounts.
Overview and Definitions Using PROMAS - The Professional Landlord involves setting up the accounting and processing parameters found in the Setup functions and then entering the information about your owners, properties, units, tenants and vendors in the Profile functions. With this base of information in place, you will charge the tenants rent. When the tenants make payments (check, direct debit, on-line) you will record them. As you receive invoices you will enter the information so they can be paid. You will write checks for what is owed. You will record all the financial transactions that take place so the financial and management reports can be produced as needed. To assist in managing, The Professional Landlord lets you prepare statements that can be delivered via email or an on-line owner portal, financial reports and letters to go to owners and tenants; keeps track of ledger balances for owners and properties, and maintains the specifics of what the tenant has paid and still owes; records information about your vendors and the work they have performed; prints numerous reports that keep track of what was done; and helps in the decision making process. The Professional Landlord is the information center for managing your rental units.
Definitions Unit - The unit is the rentable entity that you are managing. A unit can be a house, condo, apartment unit, office, self storage unit, parking place, etc. A unit is linked to either an owner ledger or a property ledger. Owner - An owner is a person or entity who owns a share in one or more units. Owners can have on-line acctss to statements, document and activity via an on-line portal (PROMAS Central). Property - The property profile serves a dual purpose. It allows for more than one owner to share ownership of a unit, and allows multi-unit properties with like ownership to be separated financially. The property level is optional for an owner with one or more single family units. Tenant - A tenant is a person or organization who may be responsible for paying rent for a unit. A unit may have multiple tenants. Each tenant has his own profile where you define rent amounts for which he is responsible. Future and past tenants are kept in the database for purposes of receiving money owed, refunding security deposits and retaining access to their transaction history. Tenants can have on-line access to statements, activity, making payments via a tenant portal (PROMAS Central). Management Group - The management group is a ledger just like an owner or property. In a fee-based environment, the management group is the recipient of all fees collected from owners and properties. Checks to the company are written from the management group ledger. Non fee-based operations generally do not use the management group ledger. Ledger - A ledger is maintained for each owner, each property, and each management group. All transactions are maintained by ledger.
Posting - Posting is the process of recording the information you have entered plus recording all the associated transactions that the information generates. For example, when a tenant’s check is returned for insufficient funds, you would mark that payment as an NSF. When you click the Post button, the tenant’s payment is reversed, the receipt to the owner ledger is reversed; a fee may be charged to the tenant; a bank service fee may be charged to the management group or owner. Note: Terminology used by property managers in different parts of the country may not be the same. Accountants and office personnel may not use the same words. The key to a good system is to make it understandable and useable for all parties. We think we have accomplished that. If in fact we did, you will find that out by reviewing The Professional Landlord.
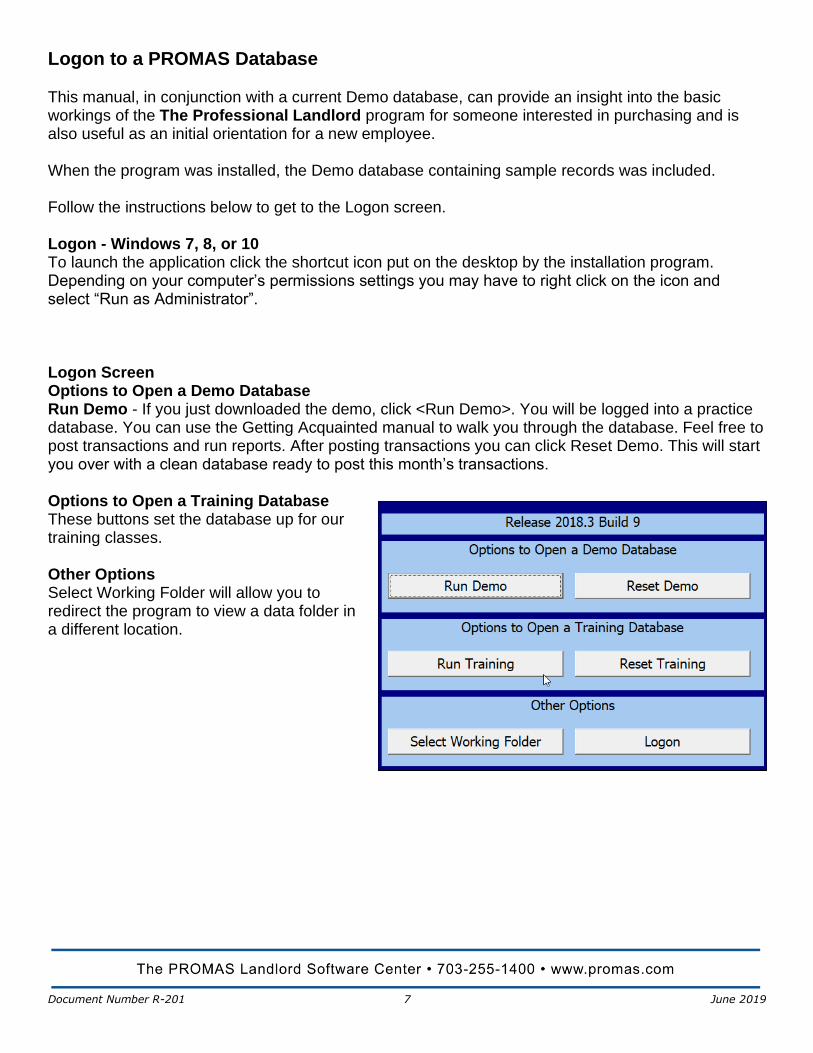
Logon to a PROMAS Database This manual, in conjunction with a current Demo database, can provide an insight into the basic workings of the The Professional Landlord program for someone interested in purchasing and is also useful as an initial orientation for a new employee. When the program was installed, the Demo database containing sample records was included. Follow the instructions below to get to the Logon screen. Logon - Windows 7, 8, or 10 To launch the application click the shortcut icon put on the desktop by the installation program. Depending on your computer’s permissions settings you may have to right click on the icon and select “Run as Administrator”. Logon Screen Options to Open a Demo Database Run Demo - If you just downloaded the demo, click <Run Demo>. You will be logged into a practice database. You can use the Getting Acquainted manual to walk you through the database. Feel free to post transactions and run reports. After posting transactions you can click Reset Demo. This will start you over with a clean database ready to post this month’s transactions. Options to Open a Training Database These buttons set the database up for our training classes. Other Options Select Working Folder will allow you to redirect the program to view a data folder in a different location.
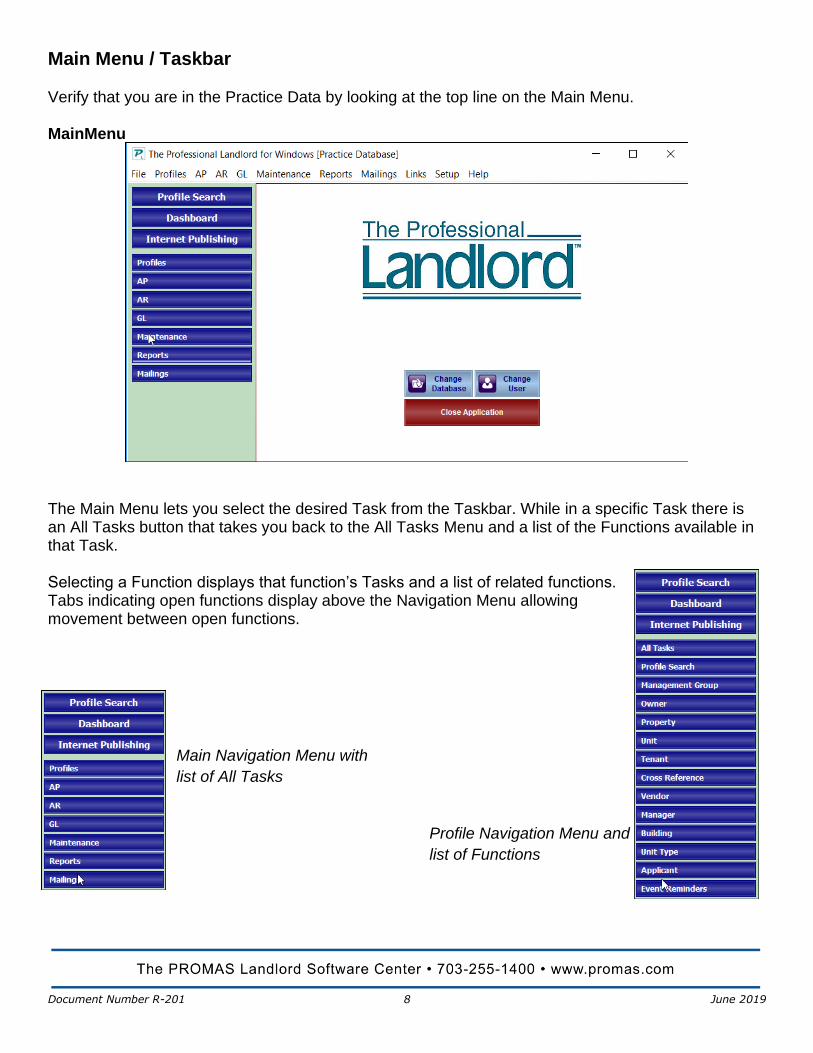
Main Menu / Taskbar Verify that you are in the Practice Data by looking at the top line on the Main Menu. MainMenu
The Main Menu lets you select the desired Task from the Taskbar. While in a specific Task there is an All Tasks button that takes you back to the All Tasks Menu and a list of the Functions available in that Task. Selecting a Function displays that function’s Tasks and a list of related functions. Tabs indicating open functions display above the Navigation Menu allowing movement between open functions.
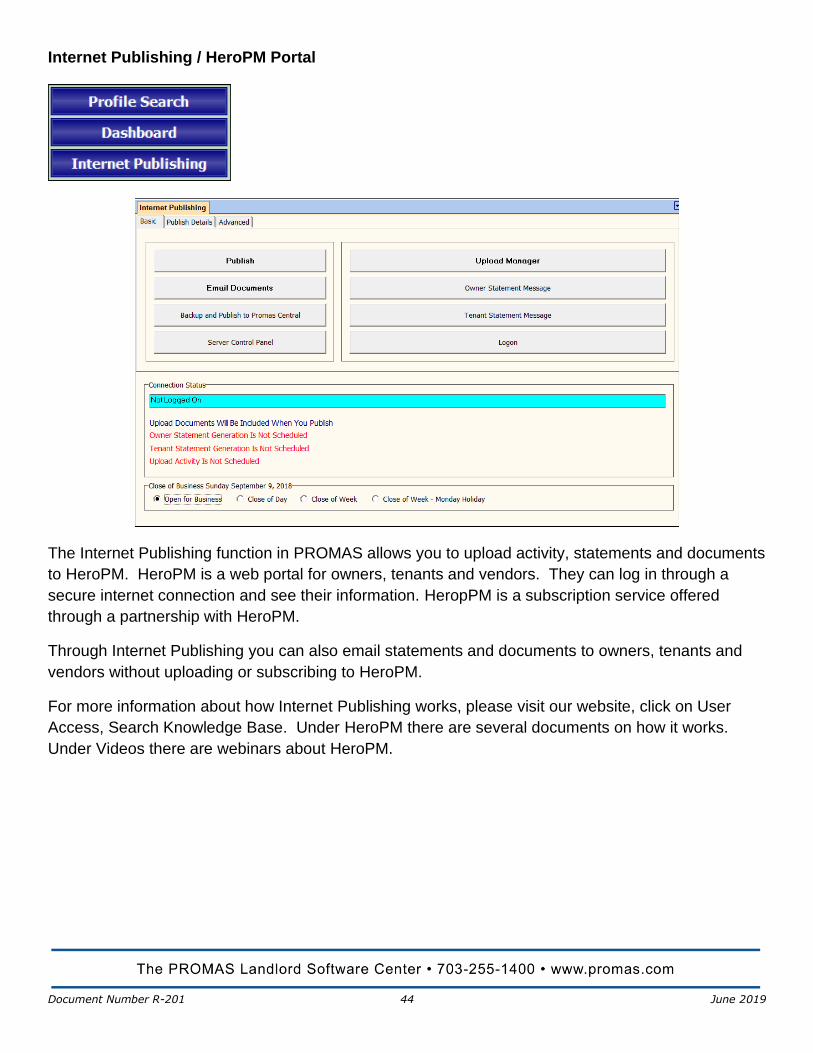
Links – Dropdown only Clicking on one of the items on the Links drop-down list will connect you directly to that location on our website or other pertinent sites and give you access to often used PDF documents and the PROMAS Central control panel that controls the owner and tenant statement portals.
Mailings Mailings covers corresponding with the owners - statements
and letters, corresponding with tenants - late notices and
letters, corresponding with vendors and preparing the end of
year statement and 1099 information.
Setup – dropdown only It contains functions that let you customize your Chart of
Accounts; establish your bank accounts; customize the layout of
your statements; define your management fee and late fee
structure; and set defaults that cut down on data entry when
Navigating Selecting a Function From the All Tasks Navigation Menu select a Task. The functions related to that task will be listed. Choose one. A tab will display at the top of the menu indicating the function screen you are on and the related functions will be listed.
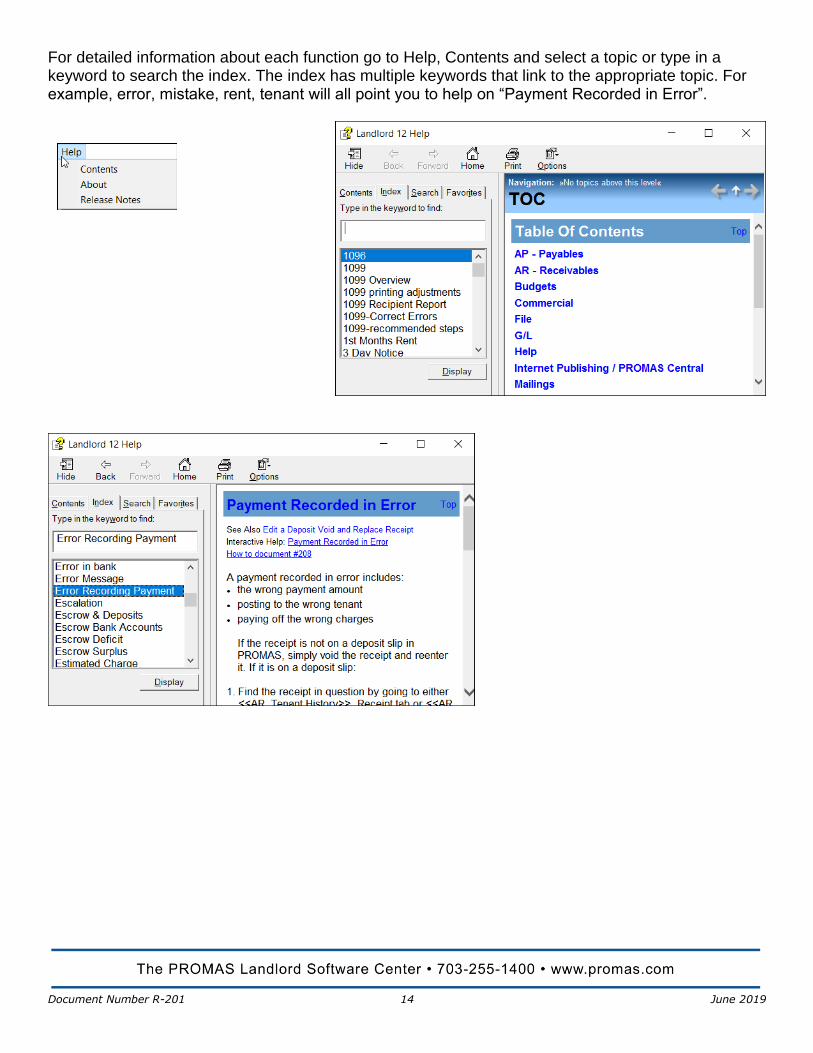
For detailed information about each function go to Help, Contents and select a topic or type in a keyword to search the index. The index has multiple keywords that link to the appropriate topic. For example, error, mistake, rent, tenant will all point you to help on “Payment Recorded in Error”.
Moving Around The Tab key moves you from one field to another. To move between fields or to select an option you can move the mouse pointer and click the field/option or press <Alt> and the underlined letter in the label of the field. The folder button lets you open the related profile or enter a new profile. The flashlight button brings up the Find List so you can choose a profile. Windows that are open display as tabs across the top of the screen. You can jump to any open window without closing the current one by clicking on the tab.
Saving - Posting - Getting Out The buttons to get out of each function are on the bottom right of the window (e.g. Save, Post, New, Close, Cancel).
• NEW - Saves the information you have entered and provides a blank screen to enter another.
• SAVE or POST - Saves the information you have entered and exits the function.
• CANCEL or CLOSE - Lets you exit the function without saving any changes that were made.
• COMPILE - Used when there is an intermediate step before posting in automatic functions like Scheduled Receivables, Invoice Checks and Scheduled Payables. It produces a list of candidates which can be reviewed prior to automatic posting.
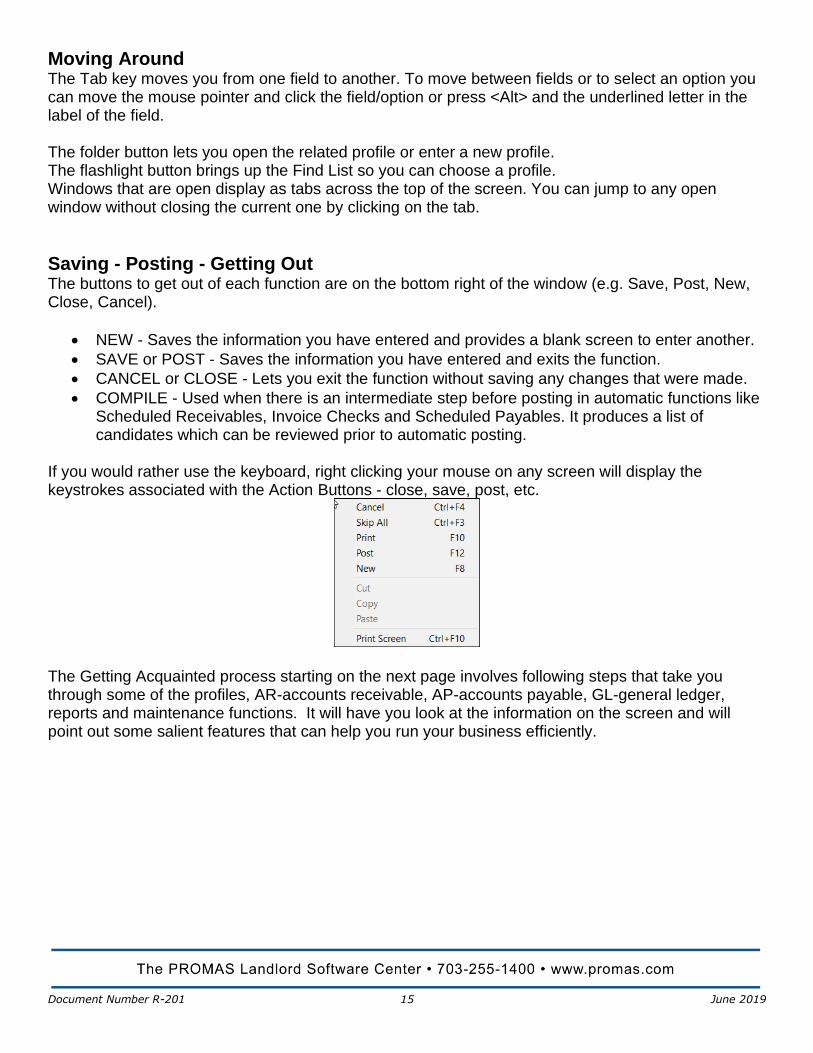
If you would rather use the keyboard, right clicking your mouse on any screen will display the keystrokes associated with the Action Buttons - close, save, post, etc.
The Getting Acquainted process starting on the next page involves following steps that take you through some of the profiles, AR-accounts receivable, AP-accounts payable, GL-general ledger, reports and maintenance functions. It will have you look at the information on the screen and will point out some salient features that can help you run your business efficiently.
PROFILES Overview Click on the Profiles button on the Navigation Menu. The profiles contain information that is used by the processing functions. A separate profile is set up for each Owner, Property, Unit and Tenant. This minimizes redundant entries when an owner has more than one unit or a unit has more than one tenant.
Selecting a profile displays the profile Find List which is a list of all entries for that profile type. The list is in ID sequence. Starting to type the ID gets the one you want on the Find List so you can select it to edit. Note: Usually two or three characters of the ID is sufficient to move to the desired profile. Clicking on the Sort by Name radio button sorts the list by Name for searching. Select the one you want by any of the following methods:
(a) highlight the item and press <Enter> or <F12> (b) highlight the item, click the Edit or Select button (c) double click the item.
ID and Name (Long Description) Each profile has an ID (up to 20 characters) and Name (Long Description - up to 40 characters). They are used to identify and/or find the profile. For owners and tenants the ID is usually the last name (or part of it) while the Name (Long Description) is the full name, for example, GOLDEN for ID and Harrison S. Golden for Name. The unit ID’s are usually 4 or 5 characters of the street name followed by the street number or the property name followed by a unit number. The Name is the full street address or building and apartment number. For example, Fair436 for ID and 436 Fairway Drive for the Name. Note: You can construct the ID and Name as you please. The ID is the sort sequence and primary selection criteria of the records in the profile while the Name is what is printed on reports. You can make these whatever you want - numbers, names, abbreviations, codes. If you change your mind you can change the Record ID or Long Description whenever you want. Note: The profile setup for single family units, including an owner of more than one single family unit, is generally owner-unit-tenant. For apartments and other multi-unit buildings, and units with multiple owners, it is owner-property-unit-tenant.
• Choose Golden from the Find List and click the <Edit> or <Select> button.
The Address screen (tab 1) is displayed. (This page tab is in the lower left of the screen.) Look over the information on this page.
Items of Note
• Addresses can be in US zip code format or in 4 line foreign format. Mark the Foreign checkbox to view the foreign format, then click it again to go back to standard format.
• A zip code table is maintained thus eliminating redundant typing of city and state. Entering the zip code gets the city and state from the table. Click the Zip button to view the Zip Code Table. Click the <Cancel> button.
• Phone number fields - up to 9 different phone numbers - are large enough for out of country numbers.
• Accounting method can be cash, modified cash or accrual. You can switch whenever you want. The system simultaneously maintains records to report for each of these reporting methods.
• Click on the Management tab (2) near the bottom of the screen.
Items of Note
• The management agreement information for the owner can be tracked. There is a management agreement expiration report available.
• If an owner wants correspondence sent to another address temporarily you can do it easily. Correspondence goes to the specified address automatically for the time period selected.
• Clicking the <Send> button associated with the email address will take you to your email screen to compose the message. Multiple email addresses can be entered in this field separated by commas. Field length can be up to 120 characters.
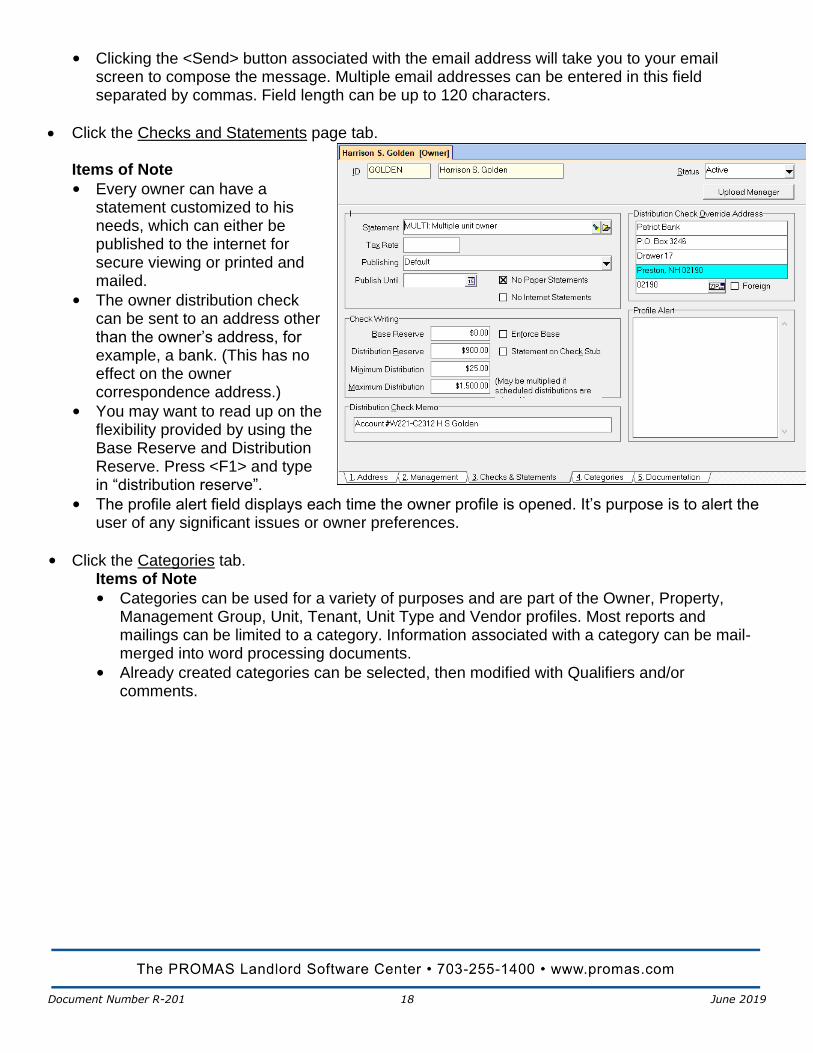
• Click the Checks and Statements page tab.
Items of Note
• Every owner can have a statement customized to his needs, which can either be published to the internet for secure viewing or printed and mailed.
• The owner distribution check can be sent to an address other than the owner’s address, for example, a bank. (This has no effect on the owner correspondence address.)
• You may want to read up on the flexibility provided by using the Base Reserve and Distribution Reserve. Press <F1> and type in “distribution reserve”.
• The profile alert field displays each time the owner profile is opened. It’s purpose is to alert the user of any significant issues or owner preferences.
• Click the Categories tab. Items of Note
• Categories can be used for a variety of purposes and are part of the Owner, Property, Management Group, Unit, Tenant, Unit Type and Vendor profiles. Most reports and mailings can be limited to a category. Information associated with a category can be mail-merged into word processing documents.
• Already created categories can be selected, then modified with Qualifiers and/or comments.
• You can attach documents and pictures to a profile by double clicking the <Load> button and selecting a document. The comment further identifies the document. Afterwards, clicking the <Open> button will display the attachment.
• Using the Internet Publishing function, documents can be uploaded to the internet where the owner can access them via a secure portal.
• Click the <Save> button to exit the Owner Profile.
Property Profile Click the Property function. Choose Nuzig from the Find List and click <Edit>. A property may have one or more owners with varying percentages of ownership. Setting up properties is optional. Generally, single family units do not need to be associated with a property. Multi-unit buildings usually involve a property.
Ledger - a ledger is maintained for each owner and each property. Funds are shared by units within a ledger. Click the <Save> button to exit the property profile. Unit Profile Click the Unit function. Choose FAIR436:436 Fairway Drive from the find list and click <Edit>. The Unit Description page is displayed. Each unit is associated with a ledger (owner or property). All financial transactions for the unit and its tenants are reflected in that ledger. The Management Fee and Rent amount fields are used to determine the Fee Summary in the lower right of the screen. The Management Fee Profile contains the fee particulars - click on the Folder (see next page). The alternative is to click Setup, Management Fees, Edit.
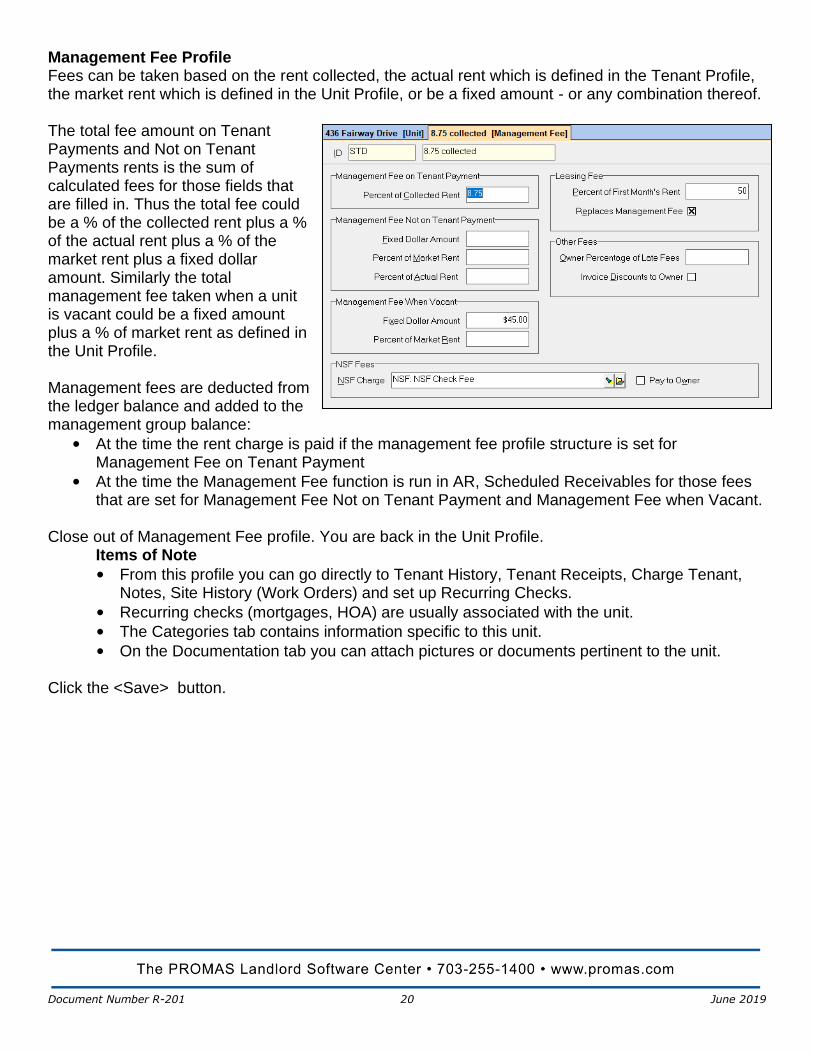
Management Fee Profile Fees can be taken based on the rent collected, the actual rent which is defined in the Tenant Profile, the market rent which is defined in the Unit Profile, or be a fixed amount - or any combination thereof. The total fee amount on Tenant Payments and Not on Tenant Payments rents is the sum of calculated fees for those fields that are filled in. Thus the total fee could be a % of the collected rent plus a % of the actual rent plus a % of the market rent plus a fixed dollar amount. Similarly the total management fee taken when a unit is vacant could be a fixed amount plus a % of market rent as defined in the Unit Profile. Management fees are deducted from the ledger balance and added to the management group balance:
• At the time the rent charge is paid if the management fee profile structure is set for Management Fee on Tenant Payment
• At the time the Management Fee function is run in AR, Scheduled Receivables for those fees that are set for Management Fee Not on Tenant Payment and Management Fee when Vacant.
Close out of Management Fee profile. You are back in the Unit Profile.
Items of Note
• From this profile you can go directly to Tenant History, Tenant Receipts, Charge Tenant, Notes, Site History (Work Orders) and set up Recurring Checks.
• Recurring checks (mortgages, HOA) are usually associated with the unit.
• The Categories tab contains information specific to this unit.
• On the Documentation tab you can attach pictures or documents pertinent to the unit. Click the <Save> button.
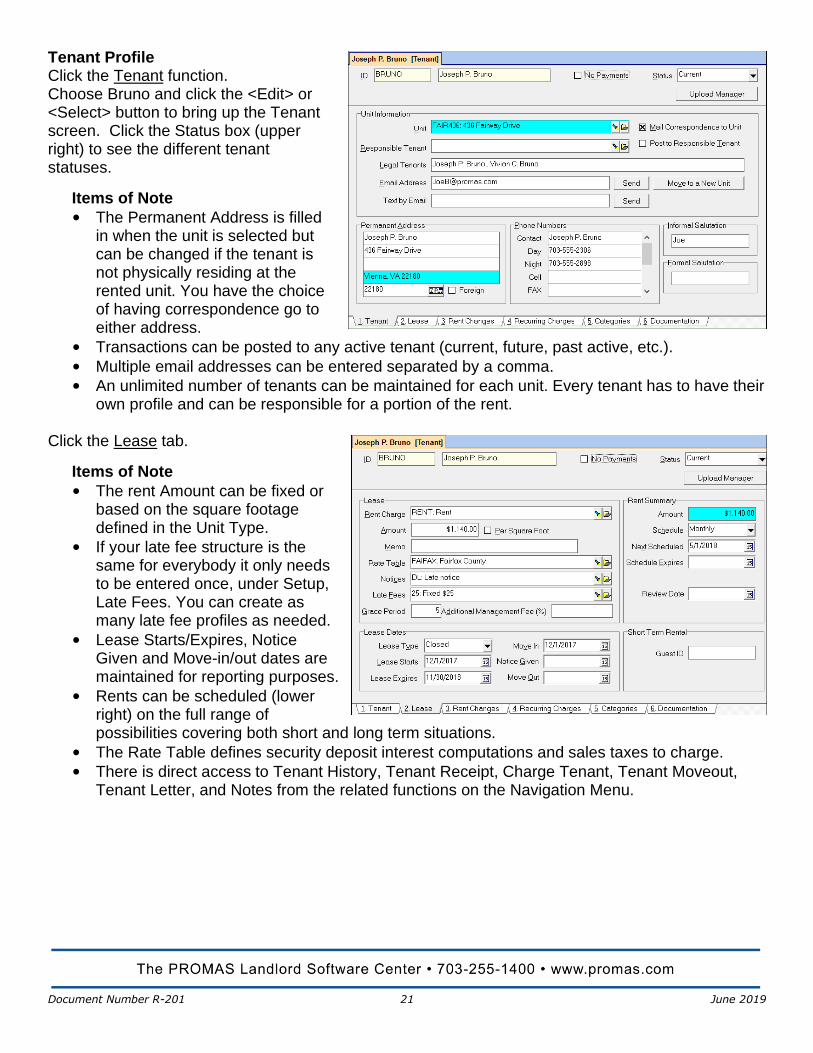
Tenant Profile Click the Tenant function. Choose Bruno and click the <Edit> or <Select> button to bring up the Tenant screen. Click the Status box (upper right) to see the different tenant statuses.
Items of Note
• The Permanent Address is filled in when the unit is selected but can be changed if the tenant is not physically residing at the rented unit. You have the choice of having correspondence go to either address.
• Transactions can be posted to any active tenant (current, future, past active, etc.).
• Multiple email addresses can be entered separated by a comma.
• An unlimited number of tenants can be maintained for each unit. Every tenant has to have their own profile and can be responsible for a portion of the rent.
Click the Lease tab.
Items of Note
• The rent Amount can be fixed or based on the square footage defined in the Unit Type.
• If your late fee structure is the same for everybody it only needs to be entered once, under Setup, Late Fees. You can create as many late fee profiles as needed.
• Lease Starts/Expires, Notice Given and Move-in/out dates are maintained for reporting purposes.
• Rents can be scheduled (lower right) on the full range of possibilities covering both short and long term situations.
• The Rate Table defines security deposit interest computations and sales taxes to charge.
• There is direct access to Tenant History, Tenant Receipt, Charge Tenant, Tenant Moveout, Tenant Letter, and Notes from the related functions on the Navigation Menu.
• Future rent changes can be entered. Changes take place automatically.
• Click the Recurring Charges tab.
• Item of Note
• Tenant charges other than rents can be set up to post automatically per the schedule. If the tenant pays a quarterly trash charge for a fixed amount, this is the place to record it. Recurring rent concessions are handled using this function. For one time tenant charges see Charge Tenant in AR (accounts receivable).
Click the Categories tab.
Item of Note
• The Payment Note, which was set up as a Category with a Receipt Alert, will display in the Tenant Receipt function when this tenant is selected.
• Click the <Save> button.
Vendor Profile Click the Vendor function. Choose Garcia from the Find List and click the <Edit> or <Select> button.
Items of Note
• A default Bill Code can be selected.
• The Check Limit determines how many invoices can be consolidated on one check. The default is 10.
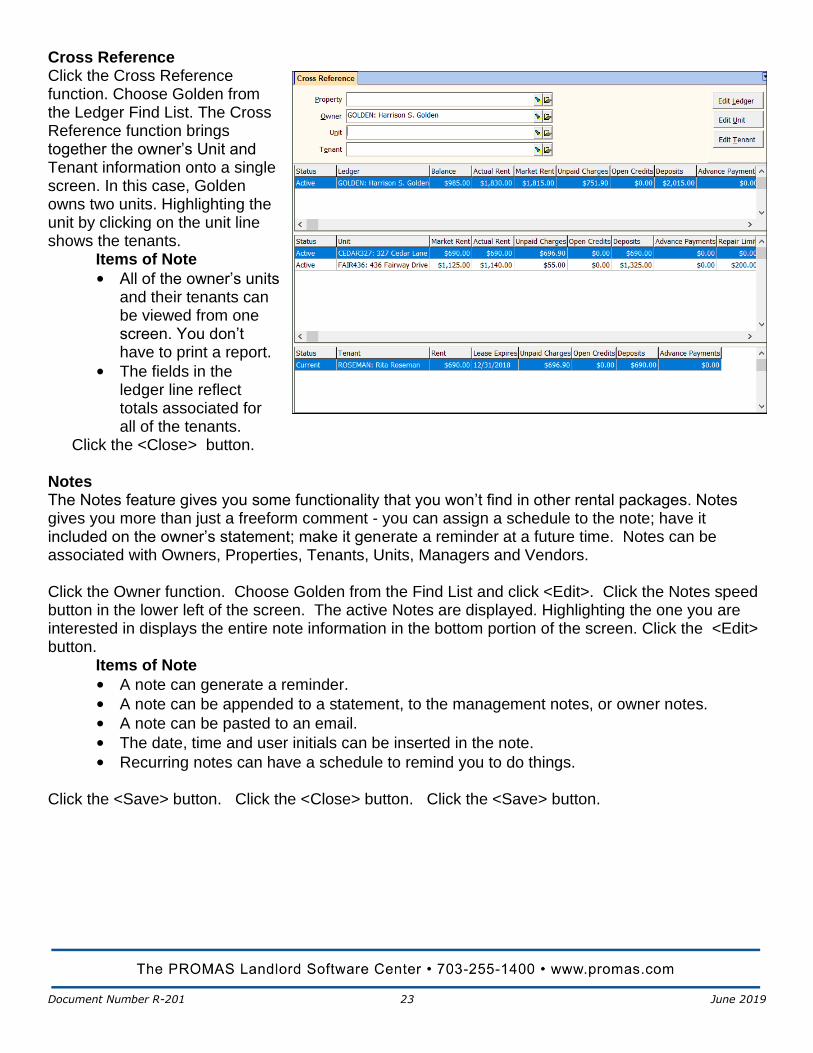
Cross Reference Click the Cross Reference function. Choose Golden from the Ledger Find List. The Cross Reference function brings together the owner’s Unit and Tenant information onto a single screen. In this case, Golden owns two units. Highlighting the unit by clicking on the unit line shows the tenants.
Items of Note
• All of the owner’s units and their tenants can be viewed from one screen. You don’t have to print a report.
• The fields in the ledger line reflect totals associated for all of the tenants.
Click the <Close> button. Notes The Notes feature gives you some functionality that you won’t find in other rental packages. Notes gives you more than just a freeform comment - you can assign a schedule to the note; have it included on the owner’s statement; make it generate a reminder at a future time. Notes can be associated with Owners, Properties, Tenants, Units, Managers and Vendors. Click the Owner function. Choose Golden from the Find List and click <Edit>. Click the Notes speed button in the lower left of the screen. The active Notes are displayed. Highlighting the one you are interested in displays the entire note information in the bottom portion of the screen. Click the <Edit> button.
Items of Note
• A note can generate a reminder.
• A note can be appended to a statement, to the management notes, or owner notes.
• A note can be pasted to an email.
• The date, time and user initials can be inserted in the note.
• Recurring notes can have a schedule to remind you to do things. Click the <Save> button. Click the <Close> button. Click the <Save> button.
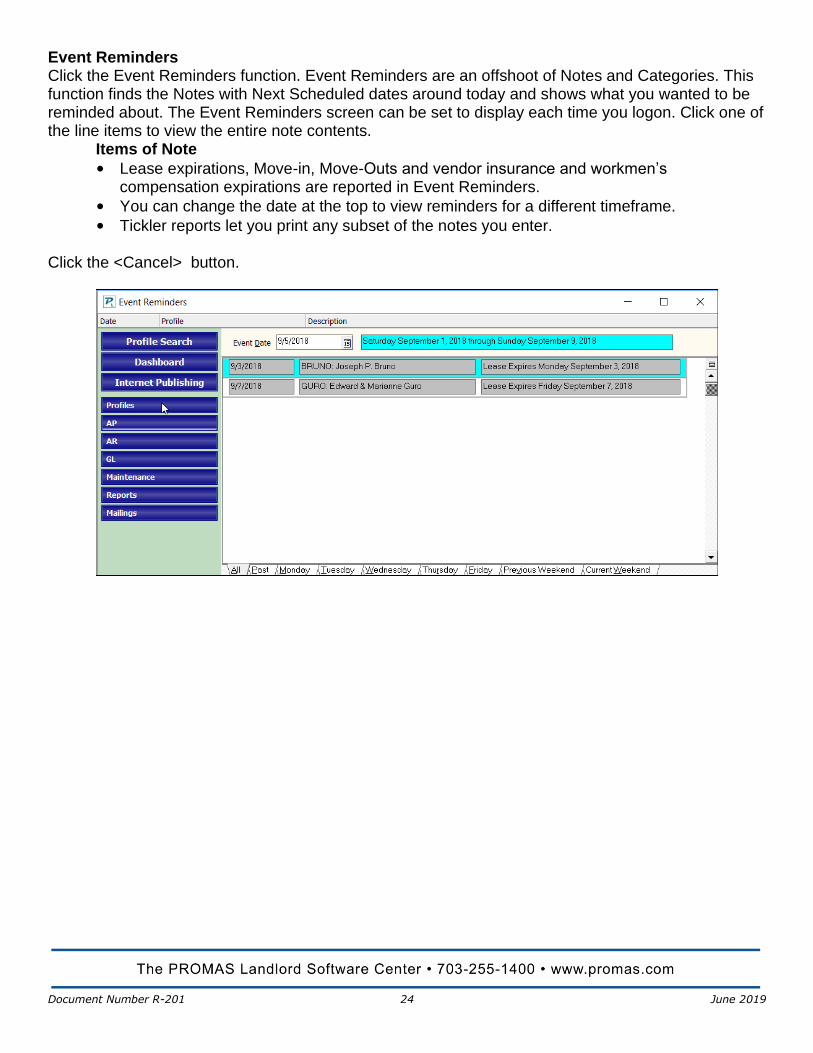
Event Reminders Click the Event Reminders function. Event Reminders are an offshoot of Notes and Categories. This function finds the Notes with Next Scheduled dates around today and shows what you wanted to be reminded about. The Event Reminders screen can be set to display each time you logon. Click one of the line items to view the entire note contents.
Items of Note
• Lease expirations, Move-in, Move-Outs and vendor insurance and workmen’s compensation expirations are reported in Event Reminders.
• You can change the date at the top to view reminders for a different timeframe.
• Tickler reports let you print any subset of the notes you enter. Click the <Cancel> button.
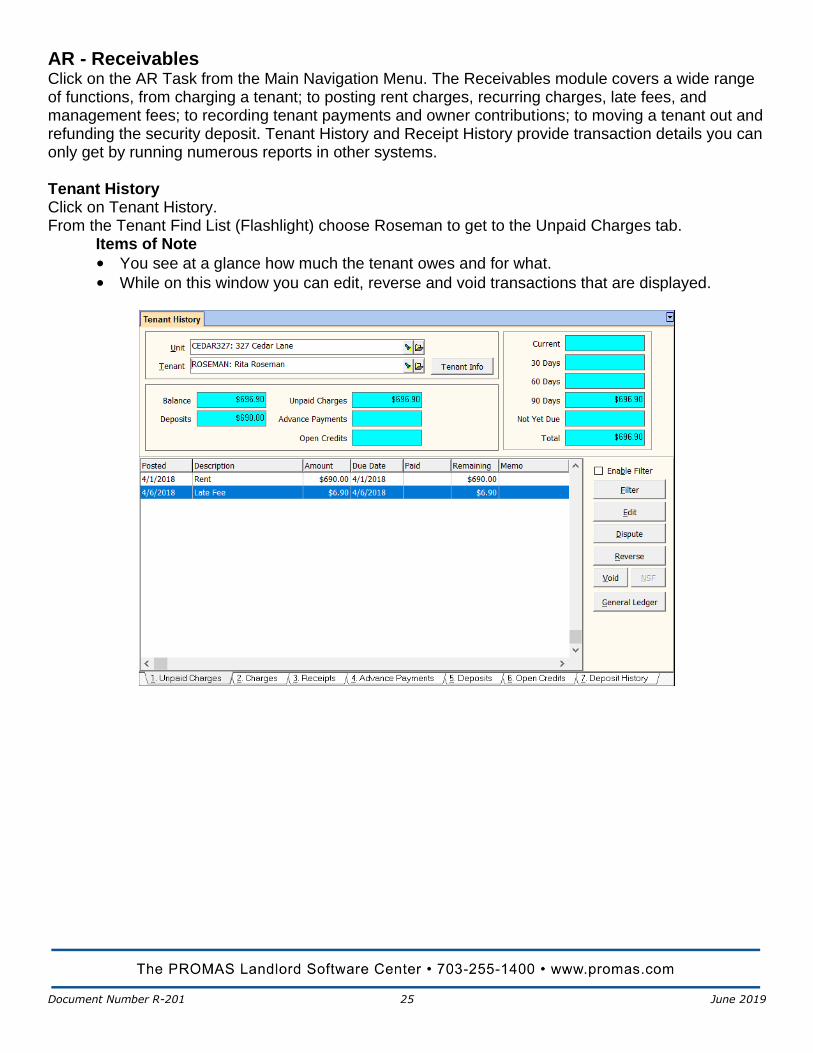
AR - Receivables Click on the AR Task from the Main Navigation Menu. The Receivables module covers a wide range of functions, from charging a tenant; to posting rent charges, recurring charges, late fees, and management fees; to recording tenant payments and owner contributions; to moving a tenant out and refunding the security deposit. Tenant History and Receipt History provide transaction details you can only get by running numerous reports in other systems. Tenant History Click on Tenant History. From the Tenant Find List (Flashlight) choose Roseman to get to the Unpaid Charges tab.
Items of Note
• You see at a glance how much the tenant owes and for what.
• While on this window you can edit, reverse and void transactions that are displayed.
Click the Charges tab. This displays the entire tenant ledger of charges from day one.
Item of Note
• You can filter (weed out all transactions that don’t match the selection criteria) and edit any transaction, even ones you put in months ago.
Click the Filter button. Using the filter you can select almost any subset of the charge history. Click the Save button. Click the Receipts tab to see a payment history for the tenant.
Item of Note
• The NSF button will initiate the entire process for posting the necessary NSF (returned check) transactions required to undo the payment, the rent to the owner and any management fees charged to the owner.
• From the Edit Receipt screen you can view the deposit slip that contained this receipt.
Click the Deposits tab to see the Security Deposits being held. Click <Close>.
Receipt History Click on Receipt History. Receipt History contains all receipts from all sources in date sequence. Highlighting a line item on the list displays a breakdown of what charges were paid off with the money received. Receipt history is used when you are dealing with an owner receipt or looking for a misposted tenant receipt.
Items of Note
• You can filter, edit, void and NSF here.
• A separate page tab lets you see just those receipts that have been returned by the bank for insufficient funds (NSF).
Click the Filter button.
Item of Note
• You can filter on a date range; a particular tenant, unit, ledger; amount; or anything in the memo field.
Enter 980 in the Amount field. Click the Filter Active checkbox. Click the <Save> button. Now the only transactions that are listed are those for $980. Highlight some of the payments in the top section and you will see the charges paid off in the bottom section. Click the Enable Filter checkbox to clear it and all the receipts are displayed again. Click the <Close> button.
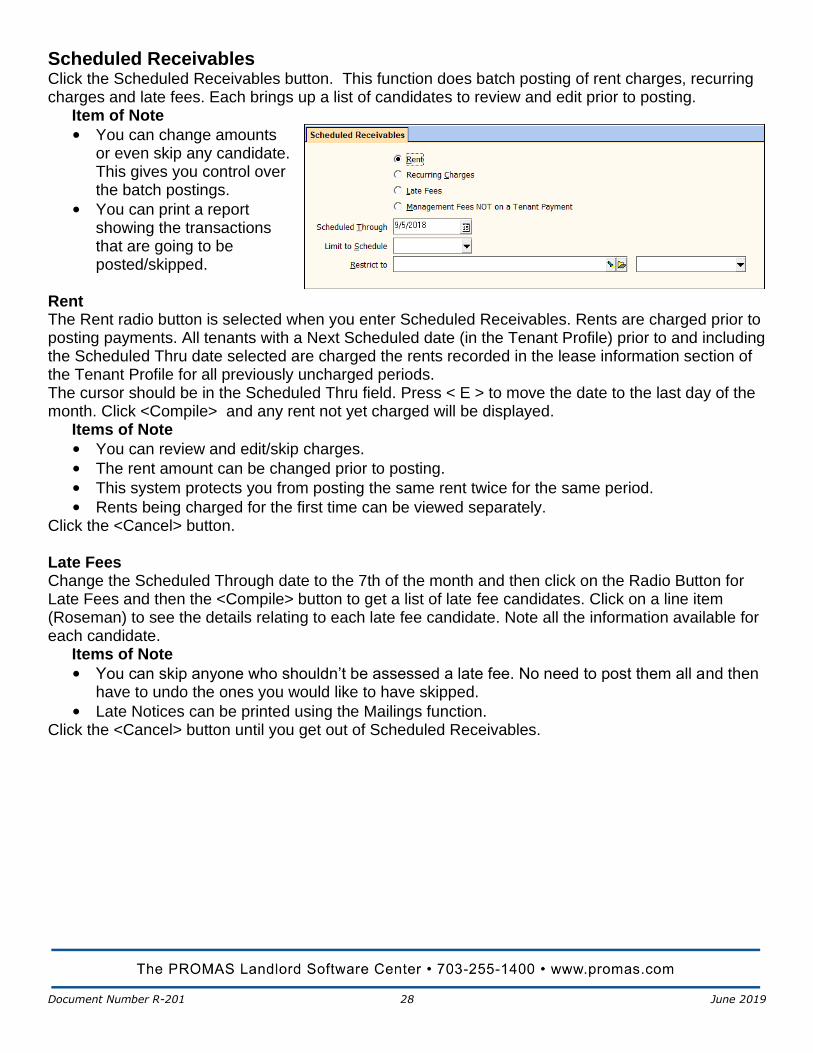
Scheduled Receivables Click the Scheduled Receivables button. This function does batch posting of rent charges, recurring charges and late fees. Each brings up a list of candidates to review and edit prior to posting.
Item of Note
• You can change amounts or even skip any candidate. This gives you control over the batch postings.
• You can print a report showing the transactions that are going to be posted/skipped.
Rent The Rent radio button is selected when you enter Scheduled Receivables. Rents are charged prior to posting payments. All tenants with a Next Scheduled date (in the Tenant Profile) prior to and including the Scheduled Thru date selected are charged the rents recorded in the lease information section of the Tenant Profile for all previously uncharged periods. The cursor should be in the Scheduled Thru field. Press < E > to move the date to the last day of the month. Click <Compile> and any rent not yet charged will be displayed.
Items of Note
• You can review and edit/skip charges.
• The rent amount can be changed prior to posting.
• This system protects you from posting the same rent twice for the same period.
• Rents being charged for the first time can be viewed separately. Click the <Cancel> button. Late Fees Change the Scheduled Through date to the 7th of the month and then click on the Radio Button for Late Fees and then the <Compile> button to get a list of late fee candidates. Click on a line item (Roseman) to see the details relating to each late fee candidate. Note all the information available for each candidate.
Items of Note
• You can skip anyone who shouldn’t be assessed a late fee. No need to post them all and then have to undo the ones you would like to have skipped.
• Late Notices can be printed using the Mailings function. Click the <Cancel> button until you get out of Scheduled Receivables.
Payments from Tenants, Contributions from Owners As checks (payments) come in they must be recorded as received and then consolidated onto a deposit slip and put in the bank. The receipt process is two steps: one of recording the receipts to pay off charges and the second of designating the receipts which constitute a deposit slip transaction. Payments from tenants are recorded in Tenant Receipt and Security Deposit Receipts. All other receipts are recorded in Ledger Receipt. Tenant Receipt Click on Tenant Receipt and select Roseman from the Find List (flashlight or down arrow). The Payment amount defaults to the amount owed. To post you would click <New> or <Post>. This will result in a number of transactions being posted. These include recording the payment in the tenant ledger, crediting the payments for the owner ledger, charging the owner for any management fees due, crediting the management fee amount to the management group ledger - all with you doing nothing more than posting the rent payment. When finished recording, the application will present you with a cleared screen ready to start the next receipt if you clicked the <New> button or will exit Tenant Receipt and return to the previous function if you clicked the <Post> button. Payments for rent received in advance can either be posted as open credits or recorded as advance payments. The method used depends on when you want the payment to be credited to the owner/property ledger and when you want to have the management fee charged to the ledger. Items of Note
• All pertinent information to let you correctly post a receipt is available.
• The payment is distributed by the payoff priority and then by date.
• Unmarking the Distribute checkbox will undo the distribution amounts to let you distribute manually.
• New charges being paid can be recorded; prepayments can be posted.
• Prepayments for rent can be recorded - even crossing calendar years.
• It’s easy to add a memo or record the check number.
• A receipt that can be given to the tenant can be printed.
• You can post payments in excess of the amount owed. They can be recorded as tenant Open Credits to be applied against future charges.
• Charges being paid off that were not previously posted can be recorded using the Charge Tenant speedbutton or the New Charges tab.
• When you finish entering receipts for a deposit slip you can go directly to Deposit Receipts using the button in the taskbar.
• Batch Receipt posting for lockbox and direct debit posting is available via the AR drop-down menu.
When finished click the <Cancel> button. Security Deposit Receipt Click on Security Deposit Receipt. Select tenant Schrader. The security deposit receipt process records both the charge and payment at the time of receipt. Recording a security deposit receipt can be done as a tenant receipt, but this function has been streamlined to handle the process more efficiently.
Items of Note
• The Bank Account defaults to the one set in the Posting Table. This facilitates deposits that are kept in a separate bank account.
• Any unpaid deposit amount is displayed.
• Only charges marked as “Use to Track Deposits” are selectable. Tenant Moveout Click on Tenant Moveout. Select tenant Bruno. The moveout process involves verifying current charges and adding new charges, so that when the deposit is released it pays off those charges. A tenant refund check can be printed for the unused portion of the security deposit.
Items of Note
• The tenant security deposit can be used to pay off existing charges.
• Funds can be withheld to pay off charges not yet received.
• The refund check can be written from any bank account.
• Interest can be calculated and added to the refund.
• Released security deposits, if not immediately used, become open credits and can be used to pay off future charges.
• A tenant statement detailing the refund transactions can be printed. Click <Cancel> to exit.
AP – Payables Select AP from the Main Navigation Menu. The AP module allows you to enter and pay invoices received from vendors; post and print recurring checks (mortgages, HOA and condo fees); write distribution checks to owners (owner draw); record checks that were written manually; write tenant refund checks and transfer security deposit funds from one bank account to another. There are also Invoice History, Check History and Vendor History functions. Invoices Click on Invoice. Enter an Invoice # VG206. Select Garcia from the Payee Find List. If you do not enter the Due Date, it is assumed to be the same date as the Invoice Date.
Items of Note
• If the payee is not in the Vendor file, you can click the Folder button to add this vendor to the file. Alternately you can put the vendor in as a one-time vendor on the invoice.
• You can set the payoff priority for the invoice by changing the priority from Normal (the default).
• A completed work order can be turned into an invoice.
• An invoice can contain multiple line items. They are added by clicking in the open area below those already entered.
Select Main212 from the Bill To Find List. The Bill To is usually a unit. Select Painting from the Find List for Bill Code. Enter 34.82 in the Amount field. Click <Post> to record the invoice.
Items of Note
• If you try to enter a duplicate invoice number you get a warning. You can cancel and change the Invoice # or you can choose OK to ignore the warning.
• After entering an invoice you can view it in Invoice History. Invoices are paid in the Scheduled Payables function.
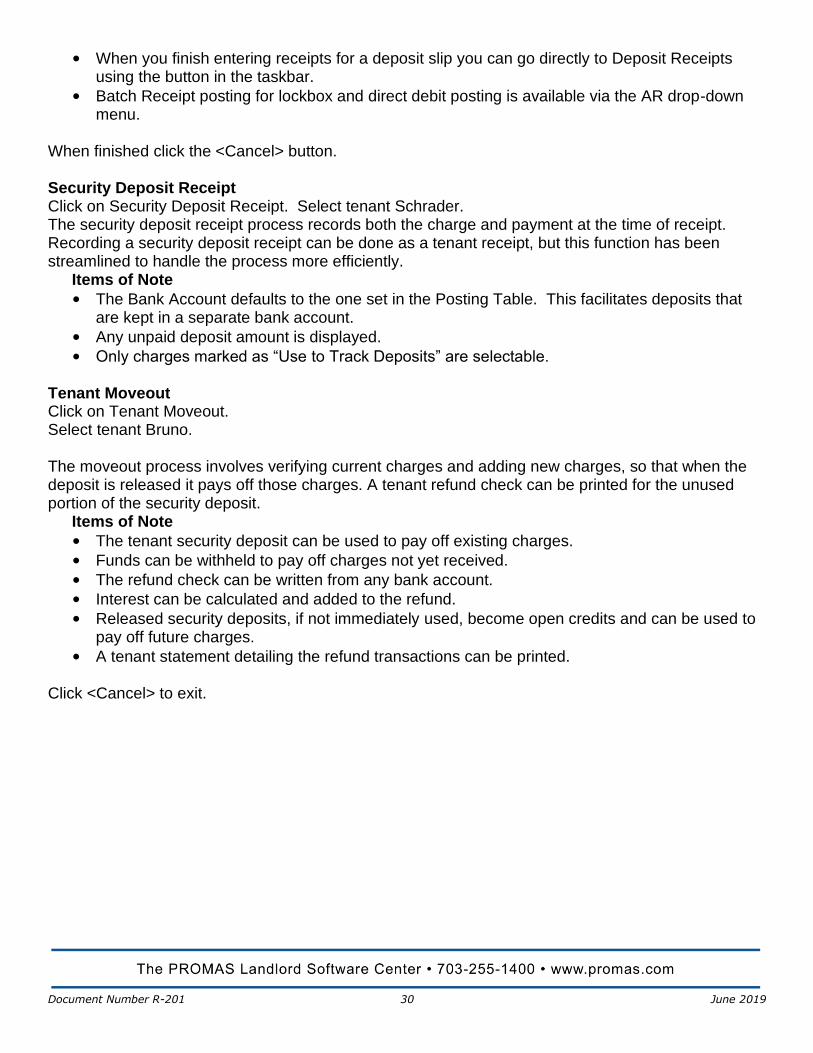
Invoice History Click on Invoice History. Highlighting an invoice from the list displays the line items associated with that invoice.
Items of Note
• The <Filter> will let you review invoices by vendor, by dollar amount, by invoice number and more.
• The tabs break out the unpaid invoices from all recorded invoices.
Click the <Close> button. If you want to look at Check History or Vendor History follow the same process as for Invoice History. Scheduled Payables Click on Scheduled Payables. This function covers compiling, posting and printing invoice checks, recurring checks (mortgages, HOA and condo fees), and distribution (owner, property) checks. In addition, property surpluses can be distributed to the owners, deficits can be collected and, in lieu of printing the distribution checks, an ACH file for electronic transfer of funds can be generated. Recurring checks can be posted and printed directly - in which case one check per payable is printed. To have recurring checks consolidated you have the option to turn recurring checks into invoices so they can be posted and printed as invoice checks.
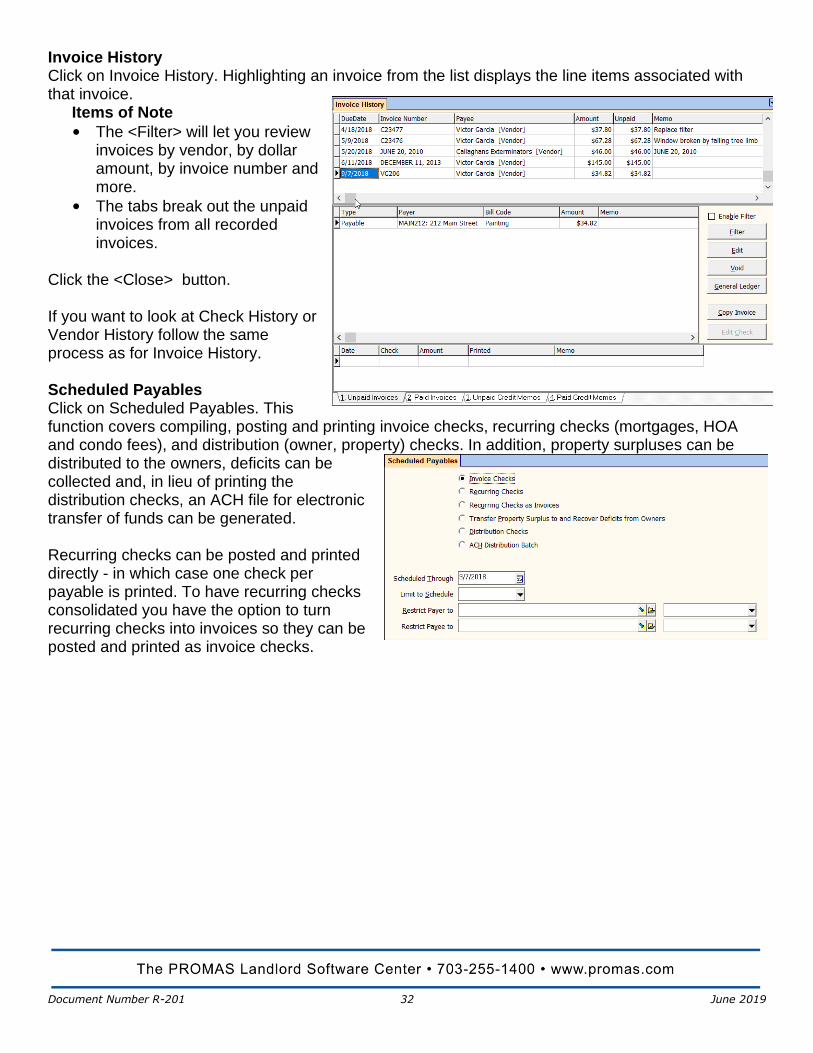
Invoices Click the <Compile> button to bring up the list of invoices waiting to be paid.
Items of Note
• Candidates for payment are displayed and can be edited prior to printing and posting.
• Click on a line item. A breakdown of the ledger’s financial status is displayed. The list displays all line items. If there is not enough money available for the ledger to pay the invoices based on the reserve rules, the line item will be marked Skip.
Click the <Cancel> button. Distribution Checks Click on the Radio Button for Distribution Checks. Click on <Compile> to get a list of owners who are candidates for a distribution check.
Item of Note
• Candidates for payment are displayed and can be edited prior to printing and posting.
• Click on a line item. You can see all the balances that affect the amount to the owner.
Click the <Cancel> button until you exit Scheduled Payables.
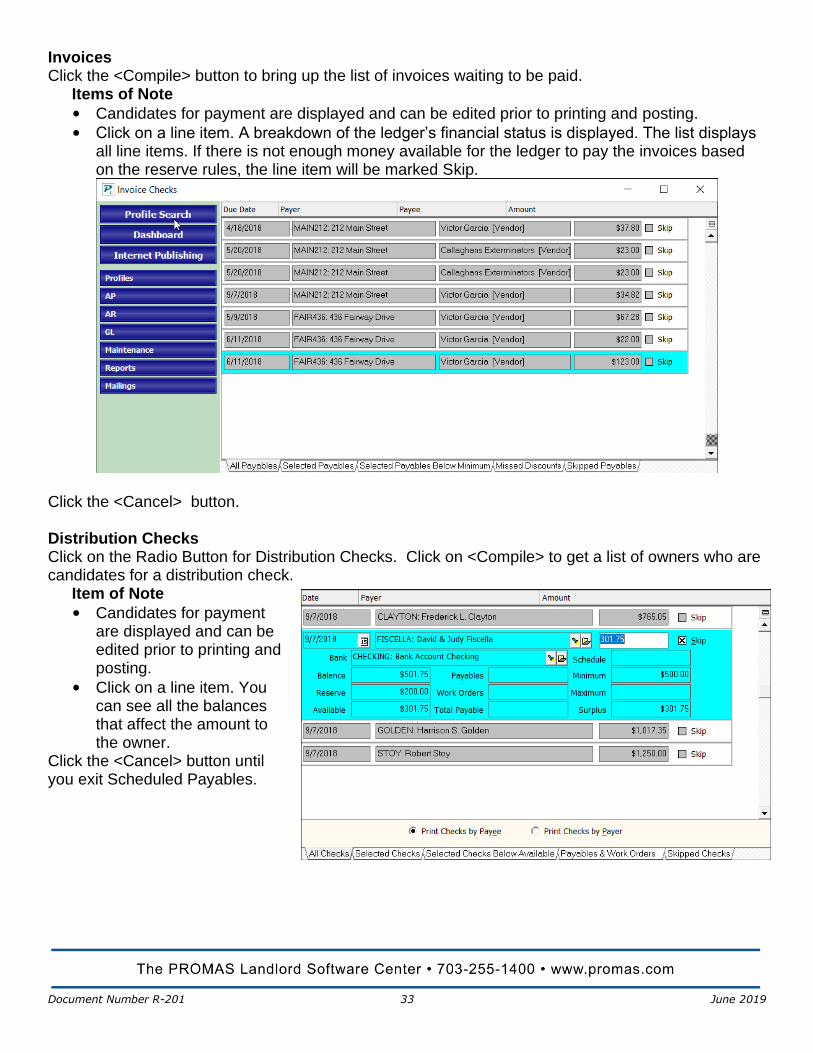
Write Checks Single Check Click on Single Check. Writing a single check or recording checks that were handwritten can be done using this function. The stub portion of a single check shows the breakdown of line items being paid.
Items of Note
• You can write a single check for any purpose including recording a handwritten check.
• Checks can be posted and held for printing later or printed immediately after they are posted.
• MICR checkwriting (using blank check stock) is a standard feature. Checks can be printed against multiple bank accounts in a single run.
• If the check you are writing will draw the ledger balance below $0 a warning screen will display.
Click the <Cancel> button to exit this function. Refund Check Click on Refund Check.
Items of Note
• Tenant refund checks are part of the Tenant Move Out function as well as being a separate Refund Check function.
• The recipient information for the refund can be changed prior to posting and printing. Click the <Cancel> button to exit this function. Print Checks This function is used when checks are not printed at the time of posting to the ledger and when checks need to be reprinted.
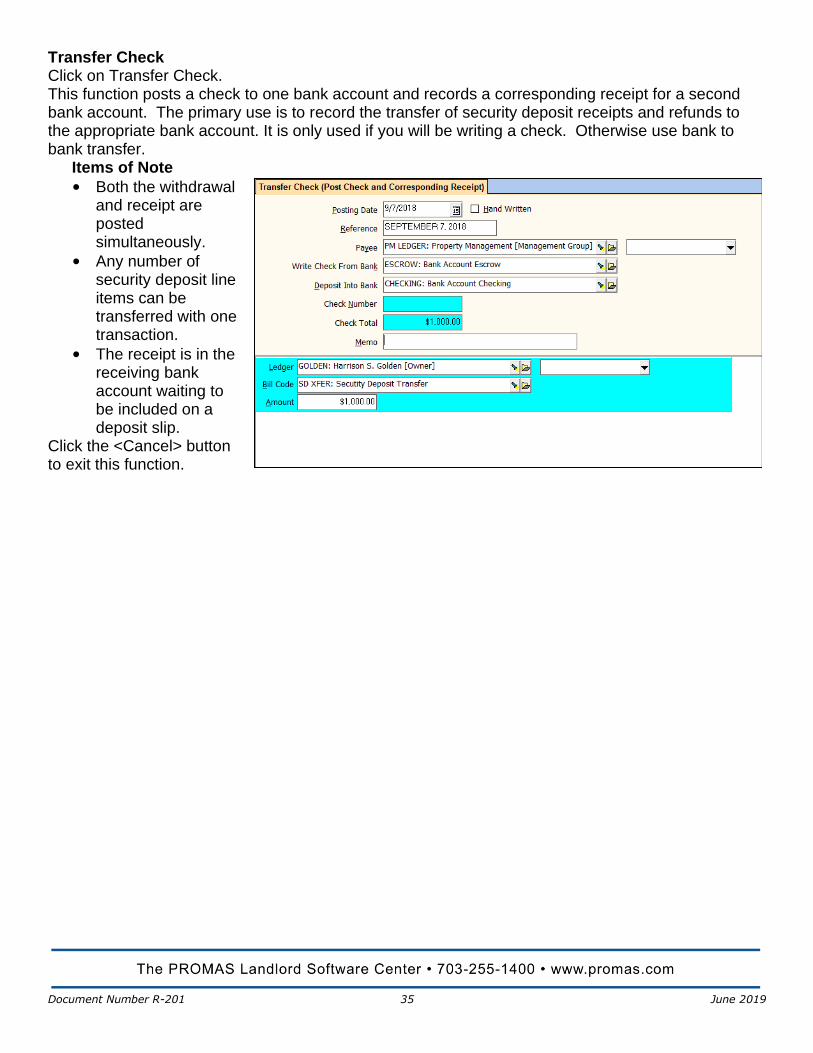
Transfer Check Click on Transfer Check. This function posts a check to one bank account and records a corresponding receipt for a second bank account. The primary use is to record the transfer of security deposit receipts and refunds to the appropriate bank account. It is only used if you will be writing a check. Otherwise use bank to bank transfer.
Items of Note
• Both the withdrawal and receipt are posted simultaneously.
• Any number of security deposit line items can be transferred with one transaction.
• The receipt is in the receiving bank account waiting to be included on a deposit slip.
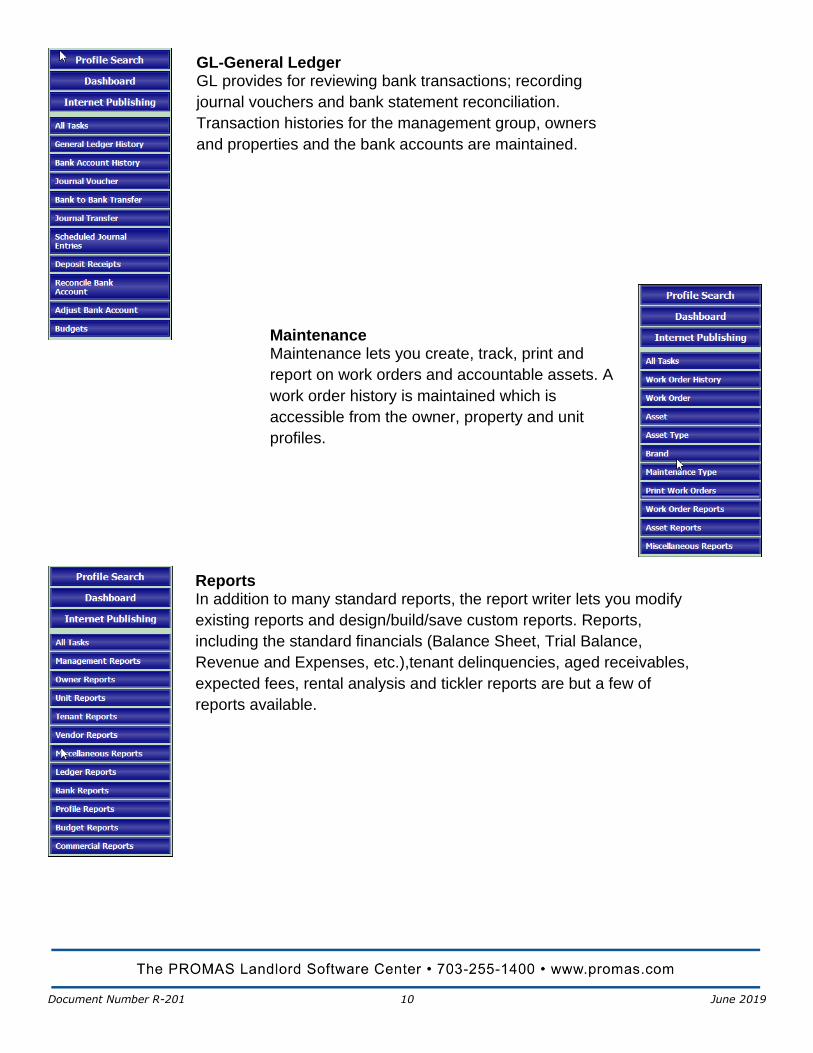
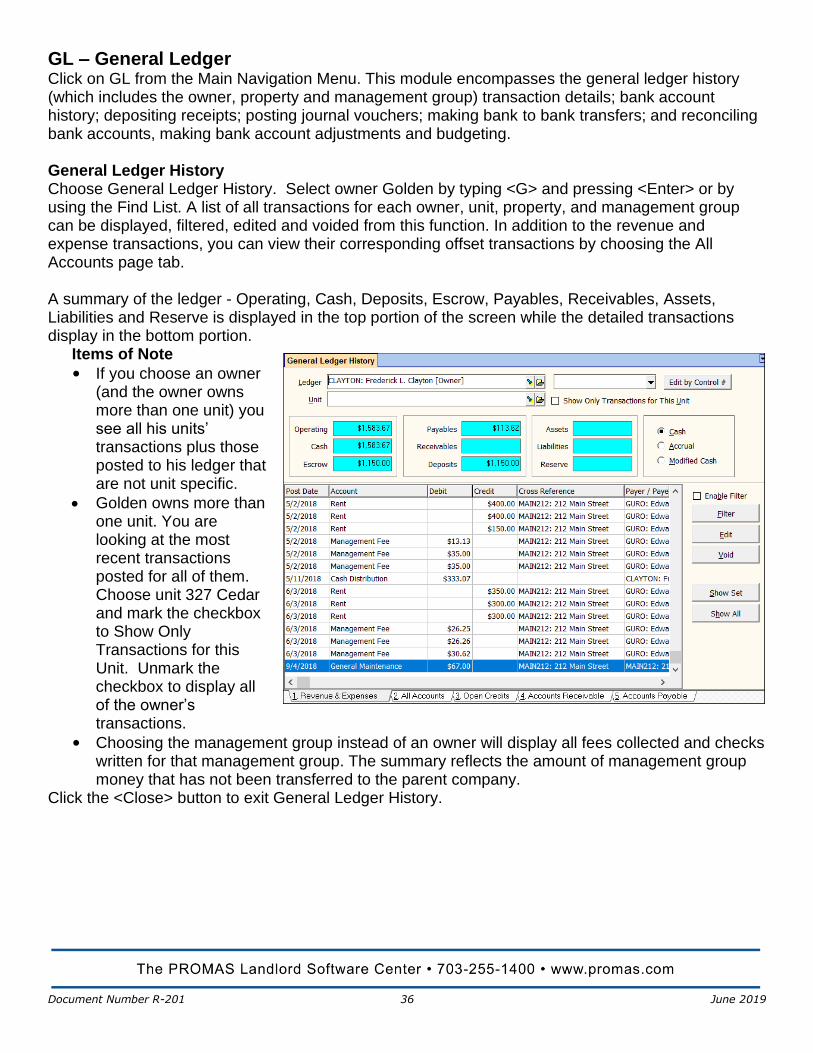
GL – General Ledger Click on GL from the Main Navigation Menu. This module encompasses the general ledger history (which includes the owner, property and management group) transaction details; bank account history; depositing receipts; posting journal vouchers; making bank to bank transfers; and reconciling bank accounts, making bank account adjustments and budgeting. General Ledger History Choose General Ledger History. Select owner Golden by typing <G> and pressing <Enter> or by using the Find List. A list of all transactions for each owner, unit, property, and management group can be displayed, filtered, edited and voided from this function. In addition to the revenue and expense transactions, you can view their corresponding offset transactions by choosing the All Accounts page tab. A summary of the ledger - Operating, Cash, Deposits, Escrow, Payables, Receivables, Assets, Liabilities and Reserve is displayed in the top portion of the screen while the detailed transactions display in the bottom portion.
Items of Note
• If you choose an owner (and the owner owns more than one unit) you see all his units’ transactions plus those posted to his ledger that are not unit specific.
• Golden owns more than one unit. You are looking at the most recent transactions posted for all of them. Choose unit 327 Cedar and mark the checkbox to Show Only Transactions for this Unit. Unmark the checkbox to display all of the owner’s transactions.
• Choosing the management group instead of an owner will display all fees collected and checks written for that management group. The summary reflects the amount of management group money that has not been transferred to the parent company.
Click the <Close> button to exit General Ledger History.
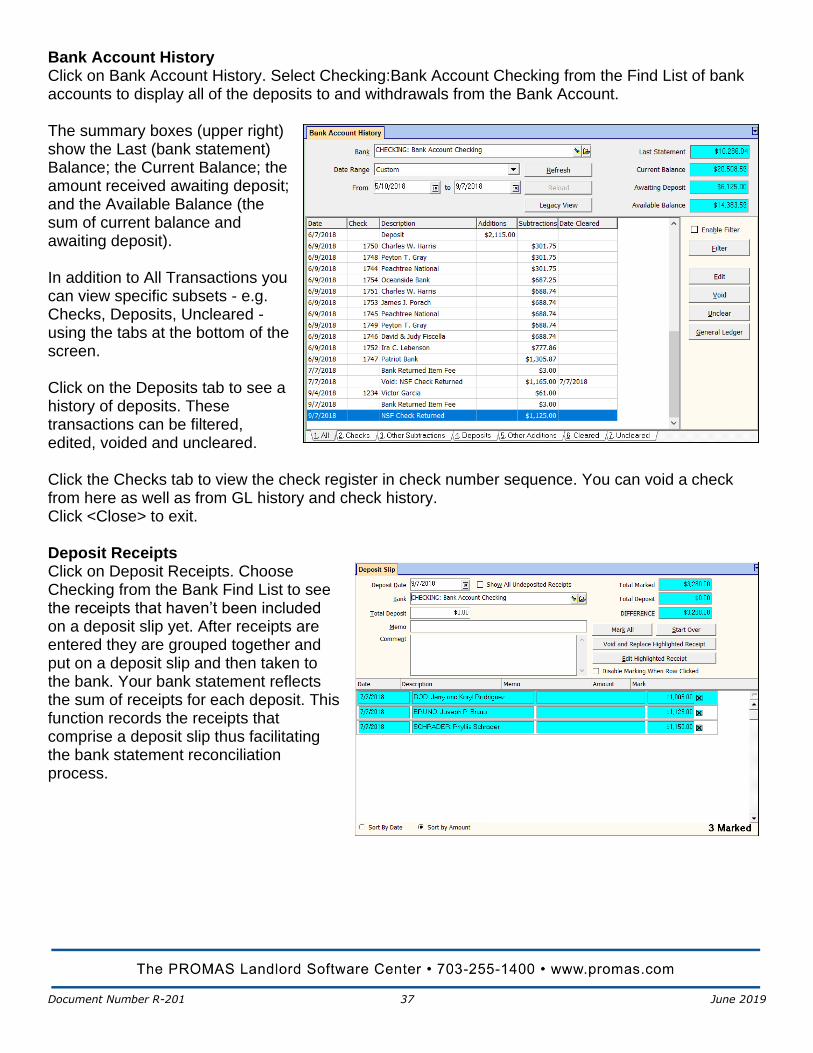
Bank Account History Click on Bank Account History. Select Checking:Bank Account Checking from the Find List of bank accounts to display all of the deposits to and withdrawals from the Bank Account. The summary boxes (upper right) show the Last (bank statement) Balance; the Current Balance; the amount received awaiting deposit; and the Available Balance (the sum of current balance and awaiting deposit). In addition to All Transactions you can view specific subsets - e.g. Checks, Deposits, Uncleared - using the tabs at the bottom of the screen. Click on the Deposits tab to see a history of deposits. These transactions can be filtered, edited, voided and uncleared. Click the Checks tab to view the check register in check number sequence. You can void a check from here as well as from GL history and check history. Click <Close> to exit. Deposit Receipts Click on Deposit Receipts. Choose Checking from the Bank Find List to see the receipts that haven’t been included on a deposit slip yet. After receipts are entered they are grouped together and put on a deposit slip and then taken to the bank. Your bank statement reflects the sum of receipts for each deposit. This function records the receipts that comprise a deposit slip thus facilitating the bank statement reconciliation process.
The Deposit process involves entering the Total Deposit Amount and then verifying that those marked are part of the deposit. The deposit amount is entered as a transaction in the appropriate bank account. This is what you will see on a bank statement. The Deposit Receipts function also provides a second level of verification that the amounts received were recorded in the correct amount. If they were not, your deposit slip amount won’t match the actual amount. When errors are discovered it is easy to fix them after as well as prior to posting the deposit slip amount.
Items of Note
• The <Print> button will prepare a deposit slip that can eliminate manual entry of receipt information on a deposit slip.
• Posting errors (wrong tenant, wrong amount, wrong charge code) can be corrected from this function.
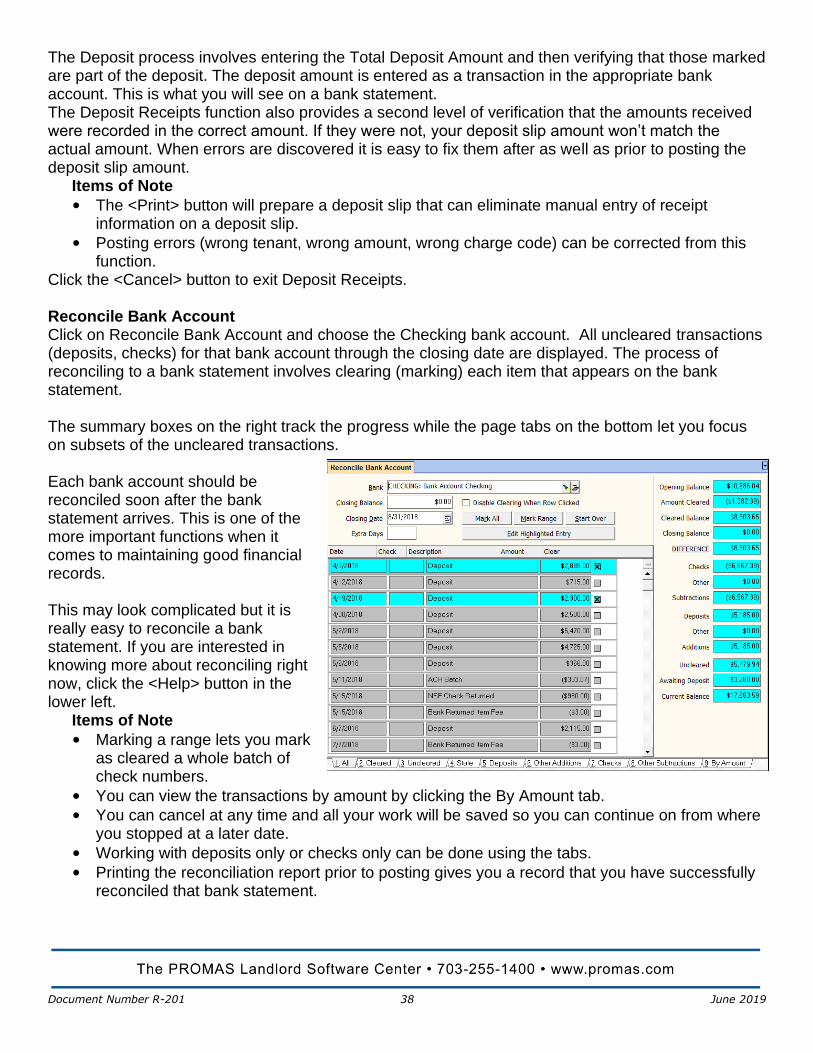
Click the <Cancel> button to exit Deposit Receipts. Reconcile Bank Account Click on Reconcile Bank Account and choose the Checking bank account. All uncleared transactions (deposits, checks) for that bank account through the closing date are displayed. The process of reconciling to a bank statement involves clearing (marking) each item that appears on the bank statement. The summary boxes on the right track the progress while the page tabs on the bottom let you focus on subsets of the uncleared transactions. Each bank account should be reconciled soon after the bank statement arrives. This is one of the more important functions when it comes to maintaining good financial records. This may look complicated but it is really easy to reconcile a bank statement. If you are interested in knowing more about reconciling right now, click the <Help> button in the lower left.
Items of Note
• Marking a range lets you mark as cleared a whole batch of check numbers.
• You can view the transactions by amount by clicking the By Amount tab.
• You can cancel at any time and all your work will be saved so you can continue on from where you stopped at a later date.
• Working with deposits only or checks only can be done using the tabs.
• Printing the reconciliation report prior to posting gives you a record that you have successfully reconciled that bank statement.
Click the Checks page tab to view the uncleared checks in check number sequence. Click <Cancel> to exit. Adjust Bank Account Click on Adjust Bank Account.
Items of Note
• This function is used to record interest earned and record bank service charges.
• It can also be used to record owner and property opening balances. Click <Cancel> to exit. Journal Voucher / Journal Transfer These are used when transactions need to be posted that don’t have any other way of being recorded. Journal vouchers are for transactions that affect one ledger while journal transfers are when more than one ledger is affected.
Maintenance Click on Maintenance from the Main Navigation Menu. The maintenance module consists of the Work Order function, Work Order History and Asset Management functions. Work Orders Click on Work Order History. Highlight one of the work orders, click <Edit>.
Items of Note
• The work order function can track a reported problem through the entire cycle and be turned into an invoice here or from the Invoicing function. A work order can be printed and sent to the vendor, owner, tenant or produce a file copy. Tenant and Owner invoices can be printed.
• When you select the site (unit) any work order alerts will display. For example, you can be reminded that this is a Home Warranty or there are Preferred Vendors for the unit.
• Work orders can be edited and printed from Work Order History.
• The unit profile has a speedbutton to view Site Repair History
• The work description information can be turned into a note appended to the owner statement.
• Work Order History has tabs to view five different categories of invoice statuses. Click on Status to see the various stages a work order can go through.
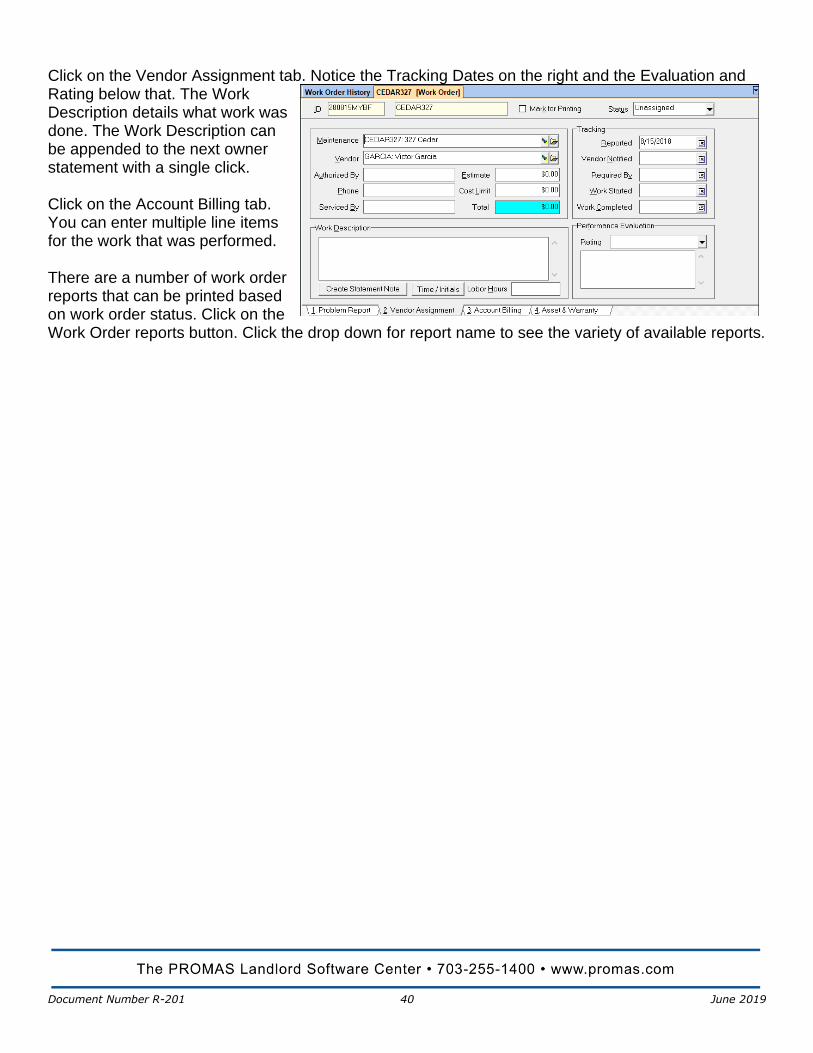
Click on the Vendor Assignment tab. Notice the Tracking Dates on the right and the Evaluation and Rating below that. The Work Description details what work was done. The Work Description can be appended to the next owner statement with a single click. Click on the Account Billing tab. You can enter multiple line items for the work that was performed. There are a number of work order reports that can be printed based on work order status. Click on the Work Order reports button. Click the drop down for report name to see the variety of available reports.
Reports There are a number of reports that can be printed while you are in a processing function. For example, in Scheduled Receivables you can print a list of rent charges, late fees, management fees; in Payables you can print reports prior to paying invoices, recurring and distribution checks; in General Ledger you can print the deposit slip list prior to posting and print bank reconciliation reports. The Reports module breaks down reports by Owner, Property, Tenant, Unit, Vendor, Management Group, General Ledger, Bank, Profile, Event Reminder and Miscellaneous. You can modify existing reports and create new reports. Click on Reports from the Main Navigation Menu. After selecting the function and the report name you have the ability to set parameters to produce the report content you want. Click on Tenant Reports. Select the Tenant Balances report. Click on “Run Highlighted Report”. Click <Preview>.The report will display on the screen. Close out of the report by clicking the <Close> button.
Items of Note
• Reports can be created for the entire set for any date range.
• Content can be limited by setting parameters
• Reports can be modified and saved permanently or just for the particular run.
• Output can be reviewed on the screen prior to printing or published as a pdf.
• Reports can be exported, published, printed and previewed.
• They can be printed on plain paper or letterhead.
• Reports can be in color, shaded gray or plain.
• New reports can be created and saved to the Report List.
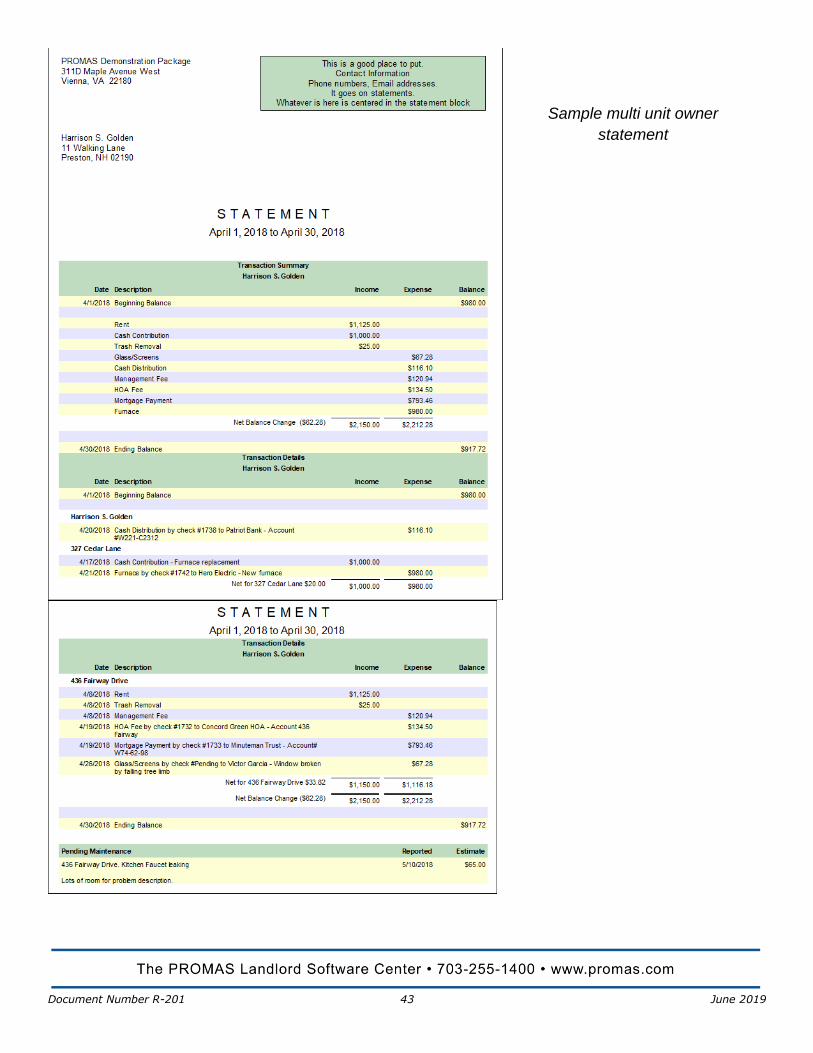
Mailings Mailings includes owner and tenant statement - printed, published and emailed; notices; letters to owners, tenants, vendors - either printed or mail-merged into Word or Open Office; and tax reporting - 1099s, TIN matching and substitute 1099s. Owner Statements - the statement style the owner gets is set in each owner’s profile. Thus each owner can be setup for a statement style that best suits their needs. The choices on what can be included in a statement are extensive. You can decide what is best for any owner - right down to the names of the column headings - Income, Expense / Receipts, Disbursements / Debit, Credit - whatever the owner is comfortable with. In addition, you can include a reminder when the owner needs to send you funds; list unpaid invoices and in-progress work orders; show what security deposits are being held or when leases are due to expire. Personalized notes can be appended and general comments can be made part of all statements. Every statement is formatted to look professional. Internet Publishing - A partnership with HeroPM allows publishing owner statements, documents, and activity via Internet Publishing to the internet and allows owners to view their property transactions through a secure internet connection. Printed and published statements have the same format.
Letters (such as Delinquent Notices, Lease Renewals) can be predefined and include the ability to insert profile specific information (balance due, lease expiration date, unit address, salutations, etc.) into the letter body. Letters can also be used to create a merge file for a mail-merge with Microsoft Word or Open Office or LandlordSource. Owner Statements Click on Mailings from the Main Navigation Menu. Click on Owner Statements. Change the statement dates to the first day of last month through today. Click <Preview>. Click the <Close> button.