Page 1
support.planwithvoyant.com [email protected] AdviserGo Tutorial 1, Create Your First Client Case | Page 1 Need Help?
GETTING STARTED
An Introduction to Voyant AdviserGo
Tutorial - Build Your First Client Case
About This Guide
The following guide is designed to help new users begin building financial plans for their clients, whilst learning some of
the main functionality of the system. AdviserGo is versatile software, loaded with powerful features. There are other
training materials available, see below for more details such as how to access our inline help.
To follow this exercise, all you will need is: a computer, the latest version of a common internet browser (Google
Chrome, Microsoft Edge, Apple Safari, or Mozilla Firefox), an internet connection, an active AdviserGo UK user account
(as either a triallist or as a subscriber), and a desire to learn more about how to create effective and fully interactive
cases for your clients.
In this tutorial we will show you how to create a new client case file from scratch. In doing so, we will introduce to you
many of the key concepts and features of the software, including spending time on the assumptions used in the plan as
these form the foundation of your cash flow model. Further features including the Let's See charts, reports and insights
are covered in the next guide. We also hope to demonstrate that creating new plans for your clients is far less daunting
than it may first appear to be.
At the end of this document is an Index and the Fact Find used to build this plan. You may wish to print the Fact Find out
to have as you work through this guide. A link to our introductory learning track is here with a range of useful articles.
An Important Note About the Numbers
AdviserGo is not a standstill programme. It is constantly being developed and updated to ensure that the software models
UK taxation, pension, and other product-related rules as accurately as possible. The results shown in this guide were
generated when the tutorial was written. Even with matching preferences and duplicate entries, future changes to tax code
and pension rules and subsequent updates to the software may result in discrepancies between the results shown in your
test client case and those illustrated in this guide. We therefore encourage you to think of this tutorial not as a test. Its
purpose is to acquaint you with AdviserGo, not to determine whether you entered the Campbells’ client case correctly.
Questions, Assistance?
If you have any questions when building your first client case file, please feel free to contact our support staff by emailing
[email protected] .
Page 2
support.planwithvoyant.com [email protected] AdviserGo Tutorial 1, Create Your First Client Case | Page 2 Need Help?
Let's Begin – Open AdviserGo
There are two ways to launch AdviserGo: either directly, by going to the software’s address and signing in, or by logging
into Voyant UK website and launching it from the site’s landing page. Let’s begin with the former.
Option 1 – Launch AdviserGo directly
The first option for opening AdviserGo (and the one we think the most convenient) is to simply open your browser and
go to www.planwithvoyant.co.uk/advisergo to log into AdviserGo directly.
Tip, Supported Browsers - AdviserGo will work in latest release of any common browser will work, such as Google
Chrome, Microsoft Edge, Apple Safari, or Mozilla Firefox. We do not generally recommend Internet Explorer (IE), however,
because it has been largely superseded by Microsoft Edge.
Sign into the software using your username and password.
Option 2 - Launch AdviserGo from the Voyant UK website
AdviserGo can also be launched from
our Voyant UK website. Go to our UK
website www.planwithvoyant.co.uk
and click the link to “Log in”, top right.
Once you have signed in, the landing
page will show a link to AdviserGo, as shown below.
Launch the software by clicking the button to “Go to Voyant AdviserGo”.
Tip – Problems Logging In?
You will be logging into AdviserGo using the
same credentials you chose when
registering on our UK website -
www.planwithvoyant.co.uk.
If you are unable to recall your credentials,
click “Can’t log in?” to use our website's
username and password assistance tools.
Contact Voyant Support
Contact us at [email protected]
if after using these tools you are still unable
to sign in.
Page 3
support.planwithvoyant.com [email protected] AdviserGo Tutorial 1, Create Your First Client Case | Page 3 Need Help?
The Home Screen The software’s Home screen, pictured below, will list your client cases. Later, as you build a store of client cases, this will
be the screen to visit to access them.
My Clients - The My Clients tab will show all of the client cases that you’ve created to date and, in some cases, client files
that colleagues have shared directly with you – i.e. client cases that you “co-own” with their creators.
Tip – Access Your Client List Anytime
As you work in AdviserGo, you can return to your
client list, here in on the home screen, at any time
by clicking the profile menu (the silhouette button
top right) and selecting Home.
Page 4
support.planwithvoyant.com [email protected] AdviserGo Tutorial 1, Create Your First Client Case | Page 4 Need Help?
Start New Client Case
1. Click the plus button (+) bottom right to begin work on a new client case.
Tip, Always look for the plus (+) button – Whenever you need to add anything to a plan, simply click the plus button (+)
bottom right. This button is found on every screen in AdviserGo that involves plan building.
Page 5
support.planwithvoyant.com [email protected] AdviserGo Tutorial 1, Create Your First Client Case | Page 5 Need Help?
Click Create Client option for purposes of this tutorial.
Tip – Importing client information from third-party integrations
Voyant has integrations with numerous third-party data and service
providers, including Intelligent Office, IRESS, FinaMetrica (for risk profiling),
Time4Advice (Curo), Morningstar (for investment valuations) and several
others. Through these integrations, the software can pull client information
and, in some cases, risk profiles, investment holdings and their latest
valuations. Information from these external sources can be used to
supplement or update client information you have already entered in
AdviserGo or in some cases, could be used as a foundation upon which to
build entirely new client plans in AdviserGo. Read more about integrations
in AdviserGo.
Feel free to contact Voyant Support for further assistance. We will gladly
switch on any of these integration services for our subscribers and triallists,
provided they have made whatever arrangements are necessary with the
integration partner as subscribers or triallists of their services.
Page 6
support.planwithvoyant.com [email protected] AdviserGo Tutorial 1, Create Your First Client Case | Page 6 Need Help?
Clients – John and Julia Campbell
To get the new client case started, enter the following
details about John Campbell.
John Campbell
1. First Name / Last Name: Enter "John Campbell"
2. Birth Year: Enter 1978.
3. Gender: Select Male.
4. Country: Select England as where John is resident for
tax purposes.
5. Is John already retired? Select No.
6. Retirement Age: Select 65 if it is not already set as the default retirement age.
7. Click Save.
Tip – Autosaving, AdviserGo saves as you go
The details left (and pictured below) are all that are
needed to begin a new client case. Once you click
Save, a new client case for the Campbell family will
be created and saved automatically.
Autosaving is one of many convenient features in
Adviser Go. Whenever you add or change anything
in the plan the software will automatically save your
work. There is no need to remember to click a Save
button. Auto-saving ensures that your work will not
be lost in the event of a dropped internet
connection.
Page 7
support.planwithvoyant.com [email protected] AdviserGo Tutorial 1, Create Your First Client Case | Page 7 Need Help?
Tip – How to switch on inline help
As you begin acquainting yourself with AdviserGo, it might be helpful to switch on the software’s inline help . This setting is found under
the profile menu (the silhouette button top right). Select Preferences and switch on the Inline Help option.
Once the inline help is switched on, the labeling of certain items in the software will be underlined, indicating a linked help topic. Click
underlined text and a pop-up window will display. Help could be a brief clarification of a field entry, full step-by-step instructions. links
to articles in our knowledge base, and in some cases even embedded videos.
Page 8
support.planwithvoyant.com [email protected] AdviserGo Tutorial 1, Create Your First Client Case | Page 8 Need Help?
The Dashboard
With John’s details entered and saved, the software will now display the Dashboard screen. This is the screen on which
you will do the bulk of your work as you build the Campbell family’s plan. The Dashboard has everything you will need to
set up, build, and review your plans. The top section of the Dashboard will be blank initially, as you begin the case. Soon,
this is where the charts will be displayed, showing the results of the plan as you build it.
Data entry options are all accessed from the plus (+) menu bottom right.
In addition to entering information, the Dashboard will show the plan’s results in the charts at the top of the screen. The
charts will be blank initially, that is until you begin entering the family’s incomes, assets, debts, and expenses into the
plan. Once you begin entering information, the charts will show the plan’s results as you build it.
An overview of everything entered in the plan will be shown in bottom half of the screen in a series of expandable
categories. This is where you will go to later whenever you need to select an item to view, edit or delete from a plan. The
up/down arrows at the top of this overview section of the screen will allow you to quickly expand or collapse all
categories of information.
Page 9
support.planwithvoyant.com [email protected] AdviserGo Tutorial 1, Create Your First Client Case | Page 9 Need Help?
Let’s Continue – Enter Details About the Campbell Family
Let’s continue by entering the basic details of the other members of the Campbell family.
Click the plus button (+) bottom right and select
People.
Tip, Always look for the plus (+) button –
Whenever you need to add anything to a plan,
simply click the plus button (+) bottom right. You
will find this button on every screen in AdviserGo
that involves plan building. The options shown in
this menu will vary depending on the context of
the screen. The main menu for entering items into
a plan is found on the Dashboard, while on the
Timeline screen the plus menu will allow you to
add events and goals.
Julia Campbell
1. First Name / Last Name:
Enter "Julia Campbell"
2. Person type: Select Spouse.
3. Birth Year: Enter 1982.
4. Gender: Select Female.
5. Is Julia already retired?
Select No.
6. Retirement Age: Select 65 if it
is not already set as the default
retirement age.
7. Click Done.
Page 10
support.planwithvoyant.com [email protected] AdviserGo Tutorial 1, Create Your First Client Case | Page 10 Need Help?
John and Julia have two children, Martina, and Alex. Let’s enter their basic details into the plan.
Martina Campbell
1. Click the plus button (+) bottom right
and select People.
2. First Name / Last Name: Enter
"Martina Campbell".
3. Person type: Select Child.
4. Birth Year: Enter 2010.
5. Gender: Select Female.
6. Click Save.
Alex Campbell
1. Click the plus button (+) bottom right and select
People.
2. First Name / Last Name: Enter "Alex Campbell"
3. Person type: Select Child.
4. Birth Year: Enter 2007.
5. Gender: Select Male.
6. Click Save.
Congratulations. You've now completed all the basics
needed to start building the Campbells’ client file and to
start building the Campbells’ financial plan.
You can see the People you’ve entered in Dashboard
view by clicking on People to expand that section.
Tip - Colour Coding
As you enter basic personal details about the members of the
Campbell family, notice how each person is assigned a colour.
This randomly assigned colour coding will appear throughout
AdviserGo and in reports to show which person is connected to
certain events and goals.
For example, the event marking Martina’s future wedding would
in this case be displayed in magenta. Colour coding is also used
to indicate the ownership of investments, incomes and other
items in the plan on the Dashboard.
Page 11
support.planwithvoyant.com [email protected] AdviserGo Tutorial 1, Create Your First Client Case | Page 11 Need Help?
Next, let’s check the plan’s default settings.
Page 12
support.planwithvoyant.com [email protected] AdviserGo Tutorial 1, Create Your First Client Case | Page 12 Need Help?
Carryover Assumptions
At the bottom of the Dashboard are two important, general
categories of settings, which control many of the software’s future
calculations – the Carryover Assumptions and the Plan Settings.
1. Click Carryover Assumptions, the link second from last on
the Dashboard.
You will find on the Carryover Assumptions screen all manner of
client-specific assumptions that predate the beginning of the plan. This is where to enter information specific to
individuals within the plan that the software could not otherwise ascertain. Every person in the plan will has their own set
of carryover assumptions.
Carryover Assumptions include capital losses carried over from prior the plan’s start, tax rebates due from the year prior
to the plan’s start, settings related to your client’s lifetime allowance and carryforward annual contribution allowance for
pensions. For clients who are widows or widowers, carryover assumptions are available to note their eligibility for the
transfer of nil rate bands (personal and residence) from a deceased spouse or civil partner.
A standard carryover assumption is your client’s Country of residence within the United Kingdom. This setting is used to
determine tax jurisdiction, primarily to capture the differences in the income tax rates and bands depending on where
the client lives. When you started this plan by entering the basics about John, you were asked for his Country of
residence, which you were to set as being England. This setting is initially assumed to be the same for everyone in the
Campbell family but could be changed for individuals here on the Carryover Assumptions screen.
We are not going to change any
of these Carryover Assumptions
for this case, but just note where
they are for future reference. The
screen shot opposite shows an
example.
Click Cancel to Exit back to
Dashboard view without making
changes.
Page 13
support.planwithvoyant.com [email protected] AdviserGo Tutorial 1, Create Your First Client Case | Page 13 Need Help?
Plan Settings
Let’s now look at Plan Settings to check the software's default growth rates, account fees and calculation settings. We will
change a couple of the default assumptions for this plan. Note the assumptions that come with Voyant are placeholders
and we recommend that you review and set these defaults as a firm, prior to use, see the Tip below.
1. Click Plan Settings, the bottommost link on the Dashboard.
It is in the Plan Settings that you can view and edit the software’s default
assumptions about things such as the growth rates for savings and
investments, inflation rate, the future growth of earnings (National Average
Earnings) and property growth rates (Property Growth/Depreciation Rate).
Furthermore, the Default Tax Table Assumption determines the rate at which
the tax bands increase beyond the known.
Tip - About Default Plan Settings
It is quite likely that some of the
software’s initial default assumptions
will differ from the position you would
choose to take. Voyant is not a data
provider. In fact, other than its tax
calculations and coded rules for
pensions and products, the software is
designed to be data agnostic. Apart
from the default market assumptions,
which in our standard UK release of the
software have been kindly provided to
our users by the Rayner Spencer Mills
Group, you might think of these default
assumptions merely as placeholders to
get you started with the software.
We encourage you and your firm to
review and update these assumptions
to values that you consider reasonable
and justifiable. The Plan Settings are a
good place to begin as you start using
Voyant as these assumptions will act as
the foundation for your plans.
Page 14
support.planwithvoyant.com [email protected] AdviserGo Tutorial 1, Create Your First Client Case | Page 14 Need Help?
Plan Settings Define the Software’s Default Assumptions
Although preferences provide the defaults, many of these settings, including growth and inflat ion rates, can still be
modified for items individually, within the plan.
Expenses, for example, are grown using a default Inflation Rate, which is taken initially from the Plan Preferences.
If an individual expense needs to be inflated at a rate higher or lower than this general default, then simply change this
Inflation Rate setting as you enter or edit the expense. Once edited at the item level, the default inflation rate will be
overwritten for that expense and will remain so, even if you were to change the overall default inflation rate for the plan.
You can, however, easily revert the expense back to the default Inflation Rate, as it is set in the Plan Settings, by clicking
the Use Defaults button to the right of the Inflation Rate, as
shown right.
Page 15
support.planwithvoyant.com [email protected] AdviserGo Tutorial 1, Create Your First Client Case | Page 15 Need Help?
A Quick Check for Matching Default Settings (Plus a Few Minor Changes)
The results shown in this tutorial were created using the latest version of AdviserGo at time of publication, which was left
configured with the software’s standard set of default assumptions. Your results do not need to match those in this
guide. However, if you want the results of your plan to come close to matching those shown in this guide, be sure that
your assumptions match those shown in this section of the tutorial. Note if you have a white label version of AdviserGo
you may wish to keep these settings as your company defaults. This following information on default assumptions will
still be useful for you to become more acquainted with the where the Plan Settings are and what they do.
Default Inflation / Growth Rates
1. The first set of plan settings shown will be the default Inflation / Growth rates.
Let’s change one of these defaults - the default Savings Growth Rate.
2. Highlight and edit the default Savings Growth Rate, changing this default to
1%.
Tip – More About the Inflation,
Growth Settings
Articles explaining how these and
other assumptions are used in the
software can be found in our
searchable knowledge base.
Below are links to articles in our
knowledge base about the individual
Inflation/Growth settings.
• Inflation Rate
• Savings Growth Rate
• Investment Growth Rate
• Reinvest Investment Yield
• Property Growth/Depreciation Rate
• National Average Earnings (NAE)
• Annuity Assumed Interest Rate
• CPI (Consumer Price Index)
• RPI (Retail Price Index)
• Default Tax Table Assumptions
Page 16
support.planwithvoyant.com [email protected] AdviserGo Tutorial 1, Create Your First Client Case | Page 16 Need Help?
Default Account Fees and Taxation Settings
3. Select Fees & Taxation, to the left, and verify that the settings on your computer match the following.
Let’s change one of these defaults, the default fees for Cash Savings.
4. Highlight and edit the default fees for Cash Savings, changing this default to 0%.
Tip – More About the Fees &
Taxation Settings
Articles explaining how these
and other assumptions are
used in the software can be
found in our searchable
knowledge base.
Below are links to articles in
our knowledge base about the
individual Inflation/Growth
settings.
• Default Account Fees
• Account Liquidation Annually
• Onshore Bond Default
Internal Tax Rate
Page 17
support.planwithvoyant.com [email protected] AdviserGo Tutorial 1, Create Your First Client Case | Page 17 Need Help?
Default Liquidation Order
5. Select Liquidation Order, to the left, and verify that the settings on your computer match the following.
Let’s change the Liquidation Order for this particular plan:
6. Select the Tax Free category in Current Liquidation order to the right.
7. Use the up arrow (↑) to move Tax Free accounts (ISAs) to be liquidated after Taxable accounts (unwrapped
investments) and before Tax Deferred accounts.
Pensions are passed to inheritors outside of their owner’s estate. Changing this ordering will give the Campbells’
inheritors, which the software will assume initially to be their children, the potential IHT shelter granted to money
purchases and drawdown pensions, provided they don’t entirely spend down their pensions in retirement.
Tip – More About the Default
Liquidation Order
An article explaining the liquidation
order is here.
More information about the
software’s default Liquidation Order
and its Expense fulfillment logic in
general can be found here.
Page 18
support.planwithvoyant.com [email protected] AdviserGo Tutorial 1, Create Your First Client Case | Page 18 Need Help?
Default Savings Order
8. Select Savings Order, to the left, and verify that the settings on your computer match the following.
Tip – More About the Default
Savings Order
Articles explaining how these and other
assumptions are used in the software
can be found in our searchable
knowledge base.
More information about the software’s
default Savings Order can be found
here.
Page 19
support.planwithvoyant.com [email protected] AdviserGo Tutorial 1, Create Your First Client Case | Page 19 Need Help?
Calculation Settings
9. Select Calculation Settings, to the left, and verify that the settings on your computer match the following. All of the
options on this panel should be switched off (set to “No”) for purposes of this tutorial.
10. Finally, click Save, top-right,
to save your changes to the
Plan Settings that we have
just made in each tab.
Tip – More About the Software’s
Calculation Settings
Articles explaining how these and other
assumptions are used in the software can be
found in our searchable knowledge base.
Below are links to articles in our knowledge
base about the individual Calculation Settings.
• Is surplus income spent or saved?
• Grow all investment and retirement
accounts using asset allocation
• Grow all savings and cash accounts using
100% cash allocation
• Crystallise final salary before money
purchase
Page 20
support.planwithvoyant.com [email protected] AdviserGo Tutorial 1, Create Your First Client Case | Page 20 Need Help?
The Planning Timeline
Let’s go now to the Timeline screen. The Campbells’ planning
timeline will display, as shown below.
Shown in the top half of this screen is the Campbells’ timeline and their future planning events. This timeline was devised
as you entered the Campbells’ planning basics a few moments ago. We will fill out this timeline with additional events as
we proceed through this tutorial.
About the Timeline
Consider this timeline the framework of the Campbells’ plan. On this screen you will use events to visually depict their
goals, aspirations, concerns, and other future milestones. It is here on the timeline that you can bring your client's
financial goals to life, emphasise key points in time, and most importantly, make the plan one that is both personal and
unique.
Notice the numbers along the axis of the timeline. These are John and Julia’s future ages. John’s ages will be shown the
top row because he was the first person you entered in the plan. Julia’s ages will be shown in the second row. These ages
will also be shown along the x-
axis of charts on the
Dashboard and Let’s See
screens, and in printable
reports.
Page 21
support.planwithvoyant.com [email protected] AdviserGo Tutorial 1, Create Your First Client Case | Page 21 Need Help?
Adding Events to the Timeline
To illustrate how events are added to the timeline and used to schedule items in the plan, let’s add two events onto the
timeline. There first will be used to show John’s plan to purchase a sports car at age 55. The other event will be used to
plan for their daughter Martina’s future wedding.
There are several ways to add and change events to the timeline, which we will demonstrate throughout this guide. Just
know that adding events is quick and easy. Let’s begin by adding John’s planned sportscar event using the plus menu on
the Timeline screen.
Use the Plus (+) Menu to Add an Event for a Future Purchase – John’s Sports Car
1. Click the plus button (+) bottom right.
2. Select Event. The Event dialogue will display.
3. Name: Enter a name for the event, “John’s Sports Car”.
4. Owner: Select John. Any future ages shown for the timing of the event will be those of
the event’s owner, John. The event will also be shown on the timeline in John’s colour.
5. Type: Select in the event icon palette an appropriately representative symbol for the
event. Considering this is a sports car purchase at age 55, the Mid-life Crisis event
seems appropriate.
Page 22
support.planwithvoyant.com [email protected] AdviserGo Tutorial 1, Create Your First Client Case | Page 22 Need Help?
6. Edit Timing: Use the slider at the bottom of the dialogue to set the event at age 55. At you move the slider to the
right, notice how the future Year and Age to the left change to show the year/age in which the slider is positioned.
Move the slider until age 55 is shown in the Age field to the left.
7. Tip – If you prefer, rather than use the slider you could instead click the Year or Age fields to position the event by
selecting the appropriate future year or future age of the event’s owner. Again, the future ages shown will be those
of the event’s owner, John.
8. Click Save, top right.
The event will be added to the timeline in the year (and at the age) selected. It will also be shown in the list of events to the
bottom right of the Timeline screen, as shown below.
We will use this event in a moment to schedule the purchase of this sports car as a future milestone goal.
Page 23
support.planwithvoyant.com [email protected] AdviserGo Tutorial 1, Create Your First Client Case | Page 23 Need Help?
Note, The events you add are only placeholders, at least initially - It is important to understand that for the most
part, events you add to the timeline serve initially only as markers. Adding events to the timeline will not automatically
add goals or expenses to the plan. Rather, events highlight when these goals or expenses are to occur in the future. We
will use these events for timing later, when we add to the plan milestone goals for John’s sportscar and Martina’s
wedding and the costs associated with them.
Page 24
support.planwithvoyant.com [email protected] AdviserGo Tutorial 1, Create Your First Client Case | Page 24 Need Help?
Tip – Editing Events
If you need to edit this or any other event on the timeline, simply click the event icon on the Timeline screen. This will
display the Event dialogue, shown below, on which you can change the event’s name, owner, icon, and position on the
timeline.
Double-Click to Add an
Event for a Future Celebration – Martina’s Wedding
The Campbells would also like to set aside funds to one day pay for their daughter’s wedding. Let’s add an event to the
timeline to plan for this future goal.
In addition to using the Event option in the plus (+) menu, events can also be
added by double-clicking any bar above the timeline. Let’s add an event
using this option, as shown right.
1. Double click any bar above the timeline. The add Event dialogue will
display, as shown below.
2. Name: Enter a name for the event, “Martina’s Wedding”.
3. Owner: Select Martina. Any future ages shown for the timing of the event will be those of the event’s owner, Martina.
The event will also be shown on the timeline in Martina’s colour, which in this plan is pink.
4. Type: Select in the event icon palette the Wedding icon.
Page 25
support.planwithvoyant.com [email protected] AdviserGo Tutorial 1, Create Your First Client Case | Page 25 Need Help?
5. Edit Timing: Use the slider at the bottom of the dialogue to set the event at age 25. At you move the slider to the
right, notice how the future Year and Age to the left change to show the year/age in which the slider is positioned.
Move the slider until age 25 is shown in the Age field to the left.
Granted, we don’t know when Martina will be married in the future, but like many things in planning, age 25 is deemed to
be a reasonable assumption based on our discussion with the Campbells. Moreover, there will always be the option to
move or even remove this event, as their situation changes, during future reviews of the case with the Campbells.
6. Tip – If you prefer, rather than use the slider you could instead click the Year or Age fields to position the event by
selecting the appropriate future year or future age of the event’s owner. Again, the future ages shown will be those
of the event’s owner, Martina.
7. Click Save, top right.
The event will be added to the timeline in the year (and at the age) selected. It will also be shown in the growing list of
events to the bottom right of the Timeline screen, as shown below.
We will use this event in a moment to schedule the Martina’s wedding as a future milestone goal.
Page 26
support.planwithvoyant.com [email protected] AdviserGo Tutorial 1, Create Your First Client Case | Page 26 Need Help?
In your plan the Campbells’ timeline should now look something like the one shown below. Bear in mind that colour
assignments are random. The client specific colours in your client case may be different from the ones shown below
based on the order in which you entered people into the plan and in some cases, possibly based on your firm’s
rebranding of the software.
Remember, The events you add are only placeholders, at least initially. It is important to understand that for the
most part, events you add to the timeline serve initially only as markers. Adding events to the timeline will not
automatically add goals or expenses to the plan. Rather, events highlight when these goals or expenses are to occur in
the future.
We will use these events for timing later, when we add to the plan milestone goals for John’s sportscar and Martina’s
wedding and the costs associated with them.
Page 27
support.planwithvoyant.com [email protected] AdviserGo Tutorial 1, Create Your First Client Case | Page 27 Need Help?
Employment Income
Let's return to the Dashboard and continue by filling in the details from our interview with John and Julia, beginning with
their incomes.
1. Click Dashboard in the top
navigation.
2. Click the plus button (+)
bottom right.
3. Select Income.
4. Select Employment.
Page 28
support.planwithvoyant.com [email protected] AdviserGo Tutorial 1, Create Your First Client Case | Page 28 Need Help?
Enter John's Employment
John is an architect with Christie + Kiel, a privately-
owned architectural firm.
5. Owner: Select John. As the first person entered
when creating this plan, John should already be
selected, initially, as the default income earner.
6. Name: Enter "Christie + Kiel".
7. Source: Select Employed.
8. Current Salary: Enter £125,000, John's gross annual salary before pension contributions and taxes.
9. Leave the default frequency Annually selected to indicate that these are his annual earnings.
10. Bonuses / Commissions: John is not receiving regular bonuses, commissions. Leave this field blank.
11. Benefits in Kind: John is not receiving benefits in kind. Leave this field blank.
12. Growth Rate: Leave in place the default income growth rate of 3%.
Tip – Salary, Enter Gross Earnings
Always enter earnings in gross amounts. Enter employment income
in pre-tax amounts, before the deduction of any pension
contributions. AdviserGo will do the tax calculations for you. Pension
contributions made from supporting salaries will also be deducted
from this gross income. You may need to "gross up" income in cases
where your client has provided a net income figure.
If you have a client who has earnings that are not subject to U.K.
income taxes (e.g. your client works in another country with earnings
subject to its tax jurisdiction), then enter these separately on the
Other Income screen, as a non-taxable (i.e. net of taxes) amount.
Page 29
support.planwithvoyant.com [email protected] AdviserGo Tutorial 1, Create Your First Client Case | Page 29 Need Help?
Tip – Change the Growth Assumption for Earnings
John’s income is projected to grow over the course of his career. The default growth settings for incomes are set based on National
Average Earnings, a setting found in the software’s Plan Preferences. If you needed to edit the future growth assumptions specifically
for John’s earnings, you would click the Edit button next to the Growth Rate.
13. Next, click Timing in the left navigation.
Timing – Schedule the Beginning and End of John’s Income
The events selected on the Timing tab are used to set the time span over which the income will be earned.
The software assumes that John will have earnings from Christie + Kiel from the beginning of the plan (the Start event)
until his planned retirement (the “Retirement (John)” event) at age 65. These default event selections are shown above
the timeline in the Employment Starts and Employment Ends boxes.
The period over which these earnings are expected are also highlighted in the timeline as are the events that set the
beginning and end of the earnings.
Page 30
support.planwithvoyant.com [email protected] AdviserGo Tutorial 1, Create Your First Client Case | Page 30 Need Help?
Note – As a rule, items such as earnings, are set to start at the beginning of the year of their start event. The same applies to their end.
John’s salary, in this case, will end at the beginning of the year in which he turns 65, based on the selected end event. Adv iserGo does
not do partial year calculations in pro rata amounts. Only full year calculations are performed to keep things focused on big picture,
broad stroke financial planning.
14. Leave these default event selections in place and click Save. The Dashboard will display again.
View the Plan as You Build It on the Dashboard
Once you click Save, John’s income will be shown in the Cash Flow chart at the top of the Dashboard. His income will also
be shown as a new item under the expandable Income section of the overview in the centre of the screen. In this way
the Dashboard brings together data entry, an overview of your entries, and the plan’s results, all on a single screen.
The Cash Flow chart consists of blue bars with each bar representing a future year in the plan. These blue bars represent
incomings, which at moment represent John’s earnings, the only income we’ve entered so far.
We will now spend some time looking at this chart and understanding what it is showing us so far.
Page 31
support.planwithvoyant.com [email protected] AdviserGo Tutorial 1, Create Your First Client Case | Page 31 Need Help?
Cash Flow - The Need Line
Running across the blue bars of the Cash Flow chart is a
black line. This is the Need Line. It represents the
Campbells’ total expenditure for each year of the plan. It also
represents visually what is being spent and saved each year
versus surplus income.
The portion of the bar that falls
beneath the black Need Line
represents money that is either
being spent or planned to be
saved. We will be entering
planned savings later in the plan. For now, this portion of
the bar is strictly expenditure.
The portion of the bar above the black Need Line is surplus income. This money is neither being spent on planned
expenditures (or expenses calculated automatically by the software) nor do the Campbells have plans to save it. You
could think of this surplus as being representative of what the Campbell’s could save (savings potential) or as their
random discretionary expenditure – i.e. they spend what they don’t plan to save. Read more about what AdviserGo
assumes happens to surplus income.
Considering we’ve yet to enter any goals or expenses into the plan , what expense could the black line represent at the
moment? It’s taxes: AdviserGo will automatically calculate income taxes and National Insurance for you.
Escalating Future Incomes and Expenditures
Notice how the bars of the chart grow over time along with the need line before both
drop off at an event. Click the event marker and you will see that this event is John’s
Retirement.
Income and expenses grow over time based on assumptions set in the Plan Settings,
which were discussed in detail earlier in this guide.
John’s income, the blue bars in the chart, will grow based on the National Average Earnings assumption taken f rom plan
settings. You also have the option to change this growth rate for incomes individually. The black Need Line is going up in
line with income until John’s Retirement when both the bars of income and the need line drop out of the plan. The more
John earns the more he will pay in income taxes as currently shown in the black line.
Page 32
support.planwithvoyant.com [email protected] AdviserGo Tutorial 1, Create Your First Client Case | Page 32 Need Help?
Charts – Move Your Cursor Over the Chart to See the Year’s Overview, Yearly Totals
For a high-level overview of the numbers behind the bars of the chart and its need line, simply move your cursor over
any bar of the chart. Each bar represents a future year in the plan.
We can now check what is going on in each year of the cash flow chart by looking at the yearly chart details.
Page 33
support.planwithvoyant.com [email protected] AdviserGo Tutorial 1, Create Your First Client Case | Page 33 Need Help?
View the Numbers Behind the Charts - Access the Yearly Chart Details
To view the numbers behind the charts, either double click any bar of the chart (if you are using a tablet, long press the
bar) or click the Year View button top right.
The chart details will be shown, as pictured to
the right. If you accessed the chart details by
double-clicking a bar of the chart, the details
for the year you selected will be shown
initially. Otherwise, select a year using the
slider bar.
Page 34
support.planwithvoyant.com [email protected] AdviserGo Tutorial 1, Create Your First Client Case | Page 34 Need Help?
The chart details allow you to easily access all the annual transactions and calculation details behind the charts, which
are arranged by category into the following tabs.
Note - While it will be up to you to enter the Campbell’s goals and expenses, taxes are one of several types of expenses that the
software will calculate and create for you based on what you have entered in their plan. Other examples include mortgage payments,
premiums for protection policies, contributions to pensions, savings and investments, and future property purchases. Keep this in mind
later when we go enter the Campbells’ goals and other expenses. Read more
Tip – Escalating Future Tax Bands and Allowances
If while viewing the Taxes Details you use the slider to move to future years of the plan, you will see that the tax
brackets and the Capital Gains Allowance escalate as you move into the future. These tax related assumptions are
escalated using the Default Tax Table Assumption, another important assumption found in the Plan Settings.
As a rule, Voyant software is coded to account for legislated rules and only escalates tax-related assumptions once we
move beyond the known. For example, if the government were to announce that the annual contribution allowance
for ISAs, which is currently £20,000 in the 2020/2021 tax year, is to be frozen at this level until 2024, the software
would account for this and would only begin the escalation of the £20,000 contribution allowance from 2024 onward.
Note - For firms and enterprises who use Voyant’s white labelling/rebranding service, the option is available to
escalate these tax related assumptions independently of one another, using different rates or possibly to exclude
some from escalation. By default, AdviserGo is set to escalate all tax related assumptions using a single Default Tax
Table Assumption, which is currently set to escalate assumptions at 4% per annum. The option is available, however,
to manage these assumptions separately.
Page 35
support.planwithvoyant.com [email protected] AdviserGo Tutorial 1, Create Your First Client Case | Page 35 Need Help?
Switch Off the Chart Details View and Return to the Dashboard
To leave the chart details and return to the Dashboard, simply toggle off the Year View button (top-right) or click
Dashboard, top-left.
Enter Julia’s Employment
Let's return to the Dashboard and continue by filling in the details of Julia’s income.
1. With the Dashboard selected in the top navigation,
2. Click the plus button (+) bottom right.
Page 36
support.planwithvoyant.com [email protected] AdviserGo Tutorial 1, Create Your First Client Case | Page 36 Need Help?
3. Select Income.
4. Select Employment.
Julia is a partner in a graphic design firm and earns a gross salary of £5,000 per month.
5. Owner: Select Julia, as pictured below.
6. Name: Enter "Graphic Designer".
7. Source: Select Company Owner.
Tip – When Company Owner is selected as the income Source, an additional field is displayed for the entry of any Dividends
received from the company. Dividend tax rules will apply to this dividend income.
8. Current Salary: Enter £5,000, Julia’s gross monthly income before the deduction o taxes and any pension
contributions.
9. Frequency (the “Annually” dropdown): Select Monthly, as pictured right, to indicate her
earnings are being entered as a monthly amount.
10. Bonuses / Commissions: Julia is not receiving regular bonuses, commissions. Leave this
field blank.
11. Dividend: Julia is not receiving dividend income from her company. Leave this field
blank.
12. Benefits in Kind: Julia is not receiving benefits in kind. Leave this field blank.
Page 37
support.planwithvoyant.com [email protected] AdviserGo Tutorial 1, Create Your First Client Case | Page 37 Need Help?
13. Growth Rate: Leave in place the default income growth rate of 3%.
14. Next, click Timing in the left navigation on the left panel.
Timing – Schedule the Beginning and End of Julia’s Income
The events selected on the Timing tab are used to set the time span over which the income will be earned.
Page 38
support.planwithvoyant.com [email protected] AdviserGo Tutorial 1, Create Your First Client Case | Page 38 Need Help?
The software assumes that Julia will have earnings from her graphic design firm from the beginning of the plan (the Start
event) until her planned retirement, which is marked by the “Retirement (Julia)” event at age 65. These default event
selections are shown above the timeline in the Employment Starts and Employment Ends boxes.
The period over which these earnings are expected is also highlighted in the timeline as are the events that set the
beginning and end of the earnings.
15. Leave these default event selections in place and click Save.
The Dashboard will display again.
Julia’s income will be added alongside John’s in the Cash Flow chart at the top of the Dashboard.
Julia’s income will also be shown as a new item under the expandable Income section of the Dashboard overview in the
centre of the screen.
These blue bars represent incomings, which at moment represent John ’s and now also Julia’s earnings.
Page 39
support.planwithvoyant.com [email protected] AdviserGo Tutorial 1, Create Your First Client Case | Page 39 Need Help?
The Campbells’ family income now extends past John’s retirement, until Julia retires at age 65. In this way the Dashboard
shows their plan as you construct it.
Page 40
support.planwithvoyant.com [email protected] AdviserGo Tutorial 1, Create Your First Client Case | Page 40 Need Help?
Goals and Expenses
A few steps ago we added a couple of events to the timeline. One event marked the future wedding of John and Julia’s
daughter, Martina. It is very important to the Campbells that they have enough saved to help pay for their daughter’s
future wedding. John would also like to purchase his dream car, a Porsche 911, when he turns 55. An event marks the
year/age of his planned car purchase.
The events marking these future goals in the timeline do nothing for now. They are merely signposts marking major future
purchases. Let’s now put them to use, to schedule these two major future expenses as goals.
What is the Difference Between a Goal and an Expense?
A key feature of AdviserGo is the ability to differentiate between expenses and goals. A goal is a trackable expense,
designed to demonstrate visually whether you are on track to achieve your goal. Goals are typically used to highlight
standout, often aspirational expenditures – things that may require special planning, such as additional savings –
whereas expenses are used to account for one’s regular planned expenditures.
No firm rules govern what should be classified as either a goal or an expense or whether these should be categorised as
essentials (basics), leisure spending, luxuries, or milestones. This is up to you and how your client thinks of these
expenditures. The decision as to what to model as a goal should be driven by the conversation you have with your client
when establishing what is key to them.
The most important distinction between expenses and goals is that goals offer unique features in the software, which
are intended to help spotlight them during presentations, whereas expenses are at work mostly in the background as
the software calculates the future cashflow. Consider the following special features as you choose what is a goal and
what is an expense in your client cases.
Page 41
support.planwithvoyant.com [email protected] AdviserGo Tutorial 1, Create Your First Client Case | Page 41 Need Help?
For more information on goals, click
on the word ‘Timeline’ in the
Timeline section, as shown right, for
a video guide.
Milestone Goal – Enter Martina’s
Wedding
Let’s continue by entering Martina’s wedding as one of the Campbells’ milestone goals. The Campbells want to know if
they will have enough income or enough saved to cover the costs of their daughter’s future wedding. As a present-day
amount, John and Julia estimate that they might spend about £35,000 on their daughter’s wedding. The software will
inflate this future expense between now and the age at which Marina might marry, which we have set to age 25 only as
an estimate.
Goals can be entered either from either the
Dashboard or Timeline screens.
1. Select the Dashboard or the Timeline link in the top
navigation,
2. Click the plus button (+) bottom right.
Pictured below are the plus (+) menus from the
Dashboard, left, and the Timeline screen, right.
3. Select Goals.
Page 42
support.planwithvoyant.com [email protected] AdviserGo Tutorial 1, Create Your First Client Case | Page 42 Need Help?
4. Select Milestone Goal.
5. Owner: John and Julia will be selected as the default owners of the goal since they are the clients in this case. While
true, they will be paying for this future goal, it relates specifically to Martina and
we want to highlight it as such in the timeline, on the Dashboard, and in
reports.
First, select Martina as the owner of the goal. Then deselect John and Julia as
owners (untick their names), as pictured right.
6. Name: Enter "Martina’s Wedding".
7. Amount: Enter £35,000. As a one-off, milestone goal, the amount entered is assumed an annual one.
8. Note the Inflation Rate at the bottom of this screen. Leave this inflation rate in place.
Tip - This is the default Inflation Rate from Plan Preferences. The software is set to assume the amount scheduled for Martina’s
wedding is a present value, meaning it will inflate the cost of the wedding by the rate shown between now and the year the purchase is
Page 43
support.planwithvoyant.com [email protected] AdviserGo Tutorial 1, Create Your First Client Case | Page 43 Need Help?
scheduled to occur. You could click the adjacent Edit button to modify this rate, setting it higher or lower, or you could set the Inflation
Rate to 0% if the value entered should be assumed a future value.
9. Select the Timing tab in the left navigation.
Your selection on the Timing tab will be used to schedule Martina’s wedding as a future expenditure.
Tip - It is important to understand that that the default timings for each Goal type are merely suggestions. For example, you could
select a Pre-Retirement or Retirement goal and still start and end that goal at any time in the future, using any events selected form the
timeline. Moreover, you can add and select events to the timeline on the fly as you add the goal.
10. Either - Select the event icon for " Martina’s Wedding" in the timeline and drag and drop the icon into Milestone
Timing box above the timeline (as shown below).
Or - Click the event icon for " Martina’s Wedding" and select “Set as Start Event” (as pictured below).
Page 44
support.planwithvoyant.com [email protected] AdviserGo Tutorial 1, Create Your First Client Case | Page 44 Need Help?
11. Click Save. The newly added goal will be shown on the Dashboard beneath a new section for Goals. A green
progress bar will show that for the moment at least, the Campbells’ appear to have the income needed to pay for
Martina’s wedding, A spike in the black need line over the event marking Martina’s wedding indicates the Campbells’
expenses will be much greater in the year they intend to pay for Martina’s wedding.
Page 45
support.planwithvoyant.com [email protected] AdviserGo Tutorial 1, Create Your First Client Case | Page 45 Need Help?
Tip – Introducing the Light Blue “Basic Need” Line
Notice a bit of light blue line is now exposed in the Cash Flow
chart, only in the year of Martina’s wedding. This light blue Basic
Need line represents the Campbells’ Basic Expenses entered,
including income tax and NICs. The black need line, on the other
hand, represents their total expenditure for the year, including
planned savings.
While Martina’s wedding is a very important milestone goal, it is a
non-essential cost. The blue Basic Need line is used to
differentiate between fundamental expenditures and other
discretionary spending and planned savings.
Martina’s Wedding and the bar indicating their progress toward achieving this goal are also shown on Timeline screen.
Here you can highlight the goal in the timeline by moving your cursor over its listing, lower left.
Page 46
support.planwithvoyant.com [email protected] AdviserGo Tutorial 1, Create Your First Client Case | Page 46 Need Help?
Milestone Goal – Enter the Purchase of John’s Sports Car
As though anticipating his own mid-life crisis, at age 55, John plans to celebrate this milestone in style with the purchase
of his dream car - a Porsche 911, which is currently valued at £135,000.
Note - For such a hypothetical future purchases, we probably would, in most cases, explore its feasibility first in a what-if
scenario. But John is resolute, so we will include his aspiration in the Campbells’ Base Plan.
Again, goals can be entered either from either the
Dashboard or Timeline screens.
1. With the Dashboard or the Timeline screen selected
in the top navigation,
2. Click the plus button (+) bottom right.
3. Select Goals.
4. Select Milestone Goal.
Page 47
support.planwithvoyant.com [email protected] AdviserGo Tutorial 1, Create Your First Client Case | Page 47 Need Help?
5. Owner: John and Julia will be selected as the default owners of the goal since they are the clients in this case.
However, this goal is strictly John’s. and we want to highlight it as such in the timeline, on the Dashboard, and in
reports. Moreover, if we model his early mortality when checking for adequate protection, his personal goals and
expenses will drop from the plan whereas jointly owned goals and expenses
are assumed to continue in the plan
Leave John selected as the owner of the goal. Deselect Julia as an owner
(untick her name), as pictured right.
6. Name: Enter "John’s Porsche 911".
7. Amount: Enter £135,000. As a one-off, milestone goal, the amount entered is assumed an annual one.
8. Note the Inflation Rate at the bottom of this screen. Leave this inflation rate in place.
9. Select the Timing tab in the left navigation.
Your selection on the Timing tab will be used to schedule the purchase of John’s Porsche as a future expenditure.
10. Either - Select the event icon for "John’s Sports Car" in the timeline and drag and drop the icon into Milestone Timing
box above the timeline
Or - Click the event icon for " John’s Sports Car " and select “Set as Start Event”
11. Click Save.
Page 48
support.planwithvoyant.com [email protected] AdviserGo Tutorial 1, Create Your First Client Case | Page 48 Need Help?
The newly added goal will be shown on the Dashboard beneath Goals, as pictured below.
A yellow progress bar shows that for the moment at least, the Campbells will not have the income needed to cover the
full cost of John’s future Porsche. John and Julia have some but not all the money needed to buy his dream car.
A spike in the black need line over
the event marking the purchase of
John’s Porsche indicates the
Campbells’ expenses will be greater
in this year and would exceed their
income. Since we’ve yet to enter any
savings or investments that could
help cover this sizable expense, a
shortfall is exposed.
Shortfalls are always shown in bright
red on the Cash Flow chart. One of our major goals from a planning perspective is to help prevent these future shortfalls
through proactive planning.
Granted, John could forego this purchase or maybe dampen his ambitions and purchase a less extravagant car. But
perhaps there are practical measures he could start undertaking today to make his goal a more feasible one, like saving
Page 49
support.planwithvoyant.com [email protected] AdviserGo Tutorial 1, Create Your First Client Case | Page 49 Need Help?
more, investing smarter, or spending less. Also, when examining this purchase in the context of their broader plan, which
will include meeting their living costs and travel expenses in retirement, is buying this Porsche a good idea in the first
place? We will have clearer answers to these and other questions once their picture is complete, once we have their
other details entered in the plan.
John’s Porsche 911 and the bar indicating their progress toward achieving this goal are also shown on Timeline screen.
Here you can highlight the goal in the timeline by moving your cursor over its listing, lower left.
Page 50
support.planwithvoyant.com [email protected] AdviserGo Tutorial 1, Create Your First Client Case | Page 50 Need Help?
Education Goals – Enter Education Goals for Alex and Martina
Education is also a priority for the Campbells and John and Julia want to be sure they have enough saved to pay for Alex and
Martina’s university costs. Although we can’t be certain that both children will ultimately attend university, we think it safe to
assume that Alex and Martina both might pursue a three-year post-secondary degree.
Alex’s University Goal
Education goals can be entered either from either the Dashboard or Timeline screens.
1. With the Dashboard or the Timeline selected in the top navigation:
2. Click the plus button (+) bottom right.
Pictured right is the plus (+) menu from the Dashboard, left, and the Timeline screen, right.
3. Select Goals.
4. Select Education Goal.
5. Owner: John will be selected as the default owner of the goal. While
true, John and Julia will be paying for this future goal, it relates specifically
to Alex and we want to highlight it as such in the timeline, on the
Dashboard, and in reports.
Select Alex as the owner of the goal.
6. Name: Enter "Alex’s University".
7. Amount: Enter £10,000. The amount entered is assumed an annual one.
Page 51
support.planwithvoyant.com [email protected] AdviserGo Tutorial 1, Create Your First Client Case | Page 51 Need Help?
8. Note the Inflation Rate at the bottom of this screen. Leave this inflation rate in place.
9. Select the Timing tab in the left navigation.
When you add an education goal to the plan, the software can automatically create a pair of events, a “University” event,
to mark when the education costs are to begin and a “Graduation” event to indicate when they will end, when the
student hopefully earns her or his degree and graduates.
Note – When adding this pair of events to the timeline, notice that the software assumes a three-year degree programme. It is
assumed that Alex will begin university in the year he turns 18 and will graduate at the start of the year he turns 21, which will result in
three years of education costs. Once you have clicked Yes, allowing the software to add these events to the timeline, you can later
reposition them to model a longer or shorter education programme, or change when in the timeline they begin.
When modelling education costs, you can either click Yes to use these default events and if necessary, rename or reposition them later
or click No to add and select your own events from the timeline when modelling education costs.
10. Click Yes to have the software add this pair of events to the timeline.
Page 52
support.planwithvoyant.com [email protected] AdviserGo Tutorial 1, Create Your First Client Case | Page 52 Need Help?
11. Click Save,
top right.
The newly added goal will be shown on the Dashboard beneath Goals, as pictured below. The green bar next to the goal
indicates that they should have the income to cover these expenses, at least so far. A slight jump in the black need line
on the chart shows three years of increased expenditure caused by Alex’s university fees.
Note that education goals, while important, are assumed to fall above the light blue basic expenses line – in the black
need line.
Page 53
support.planwithvoyant.com [email protected] AdviserGo Tutorial 1, Create Your First Client Case | Page 53 Need Help?
Tip – Modelling Longer Degree Programmes or Other Education Costs
The default timing for Education goals and expense assumes a three-year university programme. If you are planning for longer post-
secondary programmes such as medical and legal degrees or if you are using Education goals or
expenses to model primary or secondary school or even a child’s lifetime of education costs,
these can be modelled moving the University and Graduation events to a different age.
The Graduation event can be moved by either dragging and dropping the event icon up or down
the Timeline or once you’ve added the goal, visit the Timeline screen and click the event icon.
On the edit event dialogue, change the age or year of the end event. Double clicking the event
icon also gives you options for changing the name of the event and its icon, which can be useful
if you are modelling other types of education expense not related to university.
Note - Events marking the end of an item, such as the Graduation event for an Education goal, will end at the beginning of the selected
year. A three-year programme, for example, would usually have a University starts event at age 18 and a Graduation event at 21,
meaning the education expense end at the start of the year the child turns 21.
Page 54
support.planwithvoyant.com [email protected] AdviserGo Tutorial 1, Create Your First Client Case | Page 54 Need Help?
Martina’s University Goal
Let’s continue by also entering an education goal to plan for Martina’s years at university. Again, these education goals
can be entered either from either the Dashboard or Timeline screens.
1. With the Dashboard or the Timeline selected in the top navigation,
2. Click the plus button (+) bottom right.
3. Select Goals.
4. Select Education Goal.
5. Owner: John will be selected as the default owner of the goal. While true, John and Julia will be paying for this future
goal, it relates specifically to Martina and we want to highlight it as such in the timeline, on the Dashboard, and in
reports.
Select Martina as the owner of the goal.
6. Name: Enter "Martina’s University".
7. Amount: Enter £10,000. The amount entered is assumed an annual one. This will be an annual expense between
the dates selected in the Timing screen.
8. Note the Inflation Rate at the bottom of this screen. Leave this inflation rate in place.
Page 55
support.planwithvoyant.com [email protected] AdviserGo Tutorial 1, Create Your First Client Case | Page 55 Need Help?
9. Select the Timing tab in the left navigation.
When modelling education costs, you can either use these default events and if necessary, rename or reposition them
later or click No to add and select your own events from the timeline when modelling education costs.
10. Click Yes to have the software add this pair of events to the timeline.
11. Click Save, top right.
The newly added education goal for Martina will be shown on the Dashboard beneath Goals, as pictured below. The
green bar next to the goal indicates that they should have the income to cover these expenses, at least so far. A slight
jump in the black need line on the chart shows six years of increased expenditure caused by Martina and Alex’s
university fees, which coincidentally run back to back.
Note that education goals, while important, are assumed to fall above the light blue basic expenses line.
Page 56
support.planwithvoyant.com [email protected] AdviserGo Tutorial 1, Create Your First Client Case | Page 56 Need Help?
Page 57
support.planwithvoyant.com [email protected] AdviserGo Tutorial 1, Create Your First Client Case | Page 57 Need Help?
Martina and Alex’s education goals and the bars indicating the Campbells likelihood to be able to cover these future
education costs are also shown on Timeline screen. Here you can highlight the goal in the timeline by moving your cursor
over its listing, lower left. Hovering your cursor over the progress bar will show the number of years the goal is being
met.
The University and Graduation events the software created as you entered Alex and Martina’s education goals will be
shown in the list of events bottom-right. As with the list of goals, here you can highlight the event in the timeline by
moving your cursor over its listing, lower right.
Page 58
support.planwithvoyant.com [email protected] AdviserGo Tutorial 1, Create Your First Client Case | Page 58 Need Help?
Expenses
Expenses are used to account for regular planned expenditures whereas goals are typically used to highlight standout,
often aspirational expenditures – things that may require special planning, such as additional savings. No firm rules
govern what should be classified as either a goal or an expense or whether these should be categorised as essentials
(basics), leisure spending, luxuries, or milestones. This is up to you and how your cl ient thinks of these expenditures.
The most important distinction between expenses and goals is that goals offer unique features in the software, which
are intended to help spotlight them during presentations, whereas expenses are at work mostly in the background as
the software calculates the future cashflow.
Categories of Expenses (and Goals)
As you begin entering expenses (and, also when you enter Retirement
and Pre-Retirement goals), you will have the option to select from among
a variety of expense categories.
Categories are used primarily to distinguish essentials from non-essential
expenditures and to determine which expenses receive priority when
being fulfilled. Basic expenses, for example, are fulfilled before leisure.
Certain types of expenses involve special handling when it comes to how
they are scheduled. Milestone expenses are assumed to be one-off, while
education expenses come equipped with default university (start) and
graduation events. For Legacy expenses, which are used to model
charitable giving and personal gifts, special rules are applied regarding tax deductions and potentially exempt estate
transfers (PETs).
Tip – Don’t Double Account, Some Expenses Are Created Automatically
Some expenses are created automatically by the software when certain types of items are entered into a plan. The timing of these
expenses will be controlled by the timing of their parent items. For example, if you enter a debt into a plan you will notice, when visiting
the Expenses > Basics screen, that a debt payment expenses is shown on screen. This expense was created automatically and is linked
to the debt, meaning that when the mortgage is paid off the expense will end.
Page 59
support.planwithvoyant.com [email protected] AdviserGo Tutorial 1, Create Your First Client Case | Page 59 Need Help?
The Campbells’ Basic Expenses
Let’s continue by entering the Campbells’ expenses, beginning with their essentials - their basic expenses. Expenses are
entered from the Dashboard screen.
1. With the Dashboard selected in the top navigation:
2. Click the plus button (+) bottom right.
3. Select Expenses.
4. Select the Basic Expense type.
5. Owner: Notice the checkmarks next to John and Julia’s names. The
software is defaulted to assume that expenses are co-owned by
couples. Leave these default ownership selections in place to indicate
that these are John and Julia's combined living expenses.
6. Name: Enter "General Living Expenses".
Page 60
support.planwithvoyant.com [email protected] AdviserGo Tutorial 1, Create Your First Client Case | Page 60 Need Help?
7. Amount: Enter £4,500.
8. Frequency (the “Annually” dropdown): Select Monthly selected to indicate the amount
entered is a monthly one.
9. Tax Deductible: Leave the default set to No.
Note – You may use this Tax Deductible setting in the future to enter tax deductible expenses,
apart from charitable contributions, which would be entered separately as Legacy expenses.
10. Note the Inflation Rate at the bottom of this screen. Leave this inflation rate in place, which will escalate the
Campbells’ expenses into the future in line with the assumed inflation rate.
Tip – This default inflation rate, which is taken from the Plan Settings, can be edited on a per-expense basis for certain expenses that
increase in price at a rate higher than the normal inflation rate. Long term care costs or education costs could be example of such
exceptions, where a higher escalation rate might be needed.
Page 61
support.planwithvoyant.com [email protected] AdviserGo Tutorial 1, Create Your First Client Case | Page 61 Need Help?
11. Select the Timing tab in the left navigation.
The events selected on the Timing tab are used to set the time span over which the expense will be active in the plan.
The software assumes that the Campbells’
General Living Expenses start at
beginning of the plan (the Start event) and
are active until the end of the plan - the
final Mortality event, Julia’s, which is set
presently at age 90. These default event
selections are shown above the timeline
in the Expense Starts and Expense Ends
boxes.
The period over which this expense will be
active in the plan is also highlighted in the
timeline as are the events that set the
beginning and end of the expense.
12. Leave these default event selections
in place an click the Save.
Tip – Consider Replacing Current Spending with a Future
Retirement Spending Goal at Retirement
AdviserGo assumes, by default, that your current spending habits will
continue to some degree throughout your lifetime. The Steps option can be
used to increase or decrease (step up or down) spending at various points
in time. Steps are scheduled using events.
This is only one approach, however. Some advisers prefer to end current
spending on most essential living expenses at retirement, which for
couples of different ages is usually at the latter of the two Retirement
events so there is no overlap. Then at the same Retirement event, replace
their regular pre-retirement expenses with a Retirement Spending Goal.
This retirement goal will then be given more emphasis, highlighted in
reports and on screen with a progress bar.
Page 62
support.planwithvoyant.com [email protected] AdviserGo Tutorial 1, Create Your First Client Case | Page 62 Need Help?
The Dashboard will display again with the Cash Flow chart at the top of the screen now showing a preponderance of red
during the Campbells’ retirement years. These shortfalls are appearing because the Campbells’ expenses now stretch
past Julia’s retirement. We’ve yet to enter the family’s retirement savings and other sources of retirement income such as
their state pension benefit.
Part of what AdviserGo will be testing for is the Campbells’ coverage of their future retirement expenses. Are they saving
enough? Is the rate of return on these investments adequate to meet their long-term goals and expenses? Let’s see how
well they are doing once we enter their assets into the plan.
The Campbells’ general living expenses will also be shown as a new item under the expandable Expenses section of the
overview in the centre of the screen, as shown below.
Page 63
support.planwithvoyant.com [email protected] AdviserGo Tutorial 1, Create Your First Client Case | Page 63 Need Help?
Page 64
support.planwithvoyant.com [email protected] AdviserGo Tutorial 1, Create Your First Client Case | Page 64 Need Help?
Personal Expenses
In addition to their essentials, which we assume are shared costs, John and Julia have their own individual personal
expenses for various things such as clothing, gym memberships, and entertainment. Rather than rolling these into their
overall shared expenses, for couples, we generally recommend setting aside their personal expenses as two separate
entries. These do not need to be itemised expenses, but it can be helpful to keep these personal costs separate and
owned only by the individual.
John’s Personal Expenses
Let’s continue by entering the John’s personal expenses.
1. With the Dashboard selected in the top navigation:
2. Click the plus button (+) bottom right.
3. Select Expenses.
4. Select the Basic Expense type.
5. Owner: Checkmarks will be shown next to John
and Julia’s names. The software is defaulted to
assume that expenses are co-owned by couples.
Deselect Julia’s name leaving only John selected as
the owner of this expense.
6. Name: Enter "John’s Personal Expenses".
Tip – Why Enter Personal Expenses Separately?
Once we complete the Campbells’ plan we will want to run
various Insights, including the Life Needs insight, to
determine whther John and Julia have adequate protection
in the event of an unforeseen early death.
If a death occurs in a plan, expenses and goals that are co-
owned, such as their General Living Expenses, will continue
in the plan at previously set levels. The software makes no
assumptions about which expenses should decrease since
plans usually include a mix of expenses, some of which
should not be decreased. The Campbells’ mortgage
payment, for example, would not decrease if John or Julia
were to die, whereas their living expenses, probably would.
Expenses and goals that have a single owner, on the other
hand, will be dropped autoamtically from the plan when the
owner of the expnese dies. For example, John has a goal to
buy a Porsche when he turns 55. If we run the Life Needs
analysis, which assumes John dies in the first year of the
plan, this goal and any other expenses that are ony his
(expenses and goals owned solely by John) will drop from the
plan after his death. These expenses will not figure into
Julia’s future needs.
Bearing this in mind, it can be a good strategy to enter
personal costs separately. In this case Julia’s personal
spending will be entered as a separate expense, owned
solely by Julia, and John’s total personal expenses will be
entered separately and owned only by John. As a result, their
overall spending will be reduced automatically upon his
death or hers, which can result in a much more realistic
result from the Life Needs insight.
Page 65
support.planwithvoyant.com [email protected] AdviserGo Tutorial 1, Create Your First Client Case | Page 65 Need Help?
7. Amount: Enter £600
8. Frequency (the “Annually” dropdown): Select Monthly selected to indicate the amount
entered is a monthly one.
9. Tax Deductible: Leave the default set to No.
10. Note the Inflation Rate at the bottom of this screen. Leave this inflation rate in place, which
will escalate the Campbells’ expenses into the future in line with the assumed inflation rate.
11. Select the Timing tab in the left navigation.
The events selected on the Timing tab are used to set the time span over which the expense will be active in the plan.
The software will assume that John’s personal expenses start at beginning of the plan (the Start event) and are active
until his Mortality event, which is set presently at age 90. These default event selections are shown above the timeline in
the Expense Starts and Expense Ends boxes.
The period over which this expense will be active in the plan is also highlighted in the timeline as are the events that set
the beginning and end of the expense.
12. Leave these default event selections in place and click Save.
Page 66
support.planwithvoyant.com [email protected] AdviserGo Tutorial 1, Create Your First Client Case | Page 66 Need Help?
Julia’s Personal Expenses
Now let’s enter Julia’s personal expenses.
1. With the Dashboard selected in the top navigation:
2. Click the plus button (+) bottom right.
3. Select Expenses.
4. Select the Basic Expense type.
5. Owner: Checkmarks will be shown next to John and Julia’s names. The software is defaulted to assume that
expenses are co-owned by couples. Deselect John’s name leaving only Julia selected as the owner of this expense.
6. Name: Enter "Julia’s Personal Expenses".
7. Amount: Enter £600
8. Frequency (the “Annually” dropdown): Select Monthly selected to indicate the
amount entered is a monthly one.
9. Tax Deductible: Leave the default set to No.
10. Note the Inflation Rate at the bottom of this screen. Leave this inflation rate in place, which will escalate the
Campbells’ expenses into the future in line with the assumed inflation rate.
11. Select the Timing tab in the left navigation.
Page 67
support.planwithvoyant.com [email protected] AdviserGo Tutorial 1, Create Your First Client Case | Page 67 Need Help?
The events selected on the Timing tab are used to set the time span over which the expense will be active in the plan.
The software will assume that Julia’s personal expenses start at beginning of the plan (the Start event) and are active
until her Mortality event, which is set presently at age 90. These default event selections are shown above the timeline
in the Expense Starts and Expense Ends boxes.
The period over which this expense will be active in the plan is also highlighted in the timeline as are the events that set
the beginning and end of the expense.
12. Leave these default event selections in place and click Save.
Leisure Expense – Travel
Travel is a major priority for John and Julia. They enjoy spending their leisure time travelling and hope to journey the
globe once their children are away and especially after they have both retired. Travel is important although not strictly
essential, so let’s enter their travel expenditure as a Leisure expense.
1. With the Dashboard selected in the top navigation:
2. Click the plus button (+) bottom right.
3. Select Expenses.
4. Select Leisure Expense.
5. Owner: Notice the checkmarks next to John and Julia’s names.
The software is defaulted to assume that expenses are co-
owned by couples. Leave these default ownership selections in
place to indicate that these are John and Julia's combined
travelling expenses.
6. Name: Enter "Travel".
7. Amount: Enter £7000.
8. Frequency (the “Annually” dropdown): Leave Annually selected to indicate the amount entered is an annual one.
9. Tax Deductible: Leave the default set to No.
Page 68
support.planwithvoyant.com [email protected] AdviserGo Tutorial 1, Create Your First Client Case | Page 68 Need Help?
10. Note the Inflation Rate at the bottom of this screen. Leave this inflation rate in place, which will escalate the
Campbells’ expenses into the future in line with the assumed inflation rate.
The events selected on the Timing tab are used to set the overall time span over which the travel expense will be active
in the plan. The Campbells want to travel, at least to some degree, throughout their lives.
The software will assume their Travel expenses start at beginning of the plan (the Start event) until the final Mortality
event, Julia’s, which is set presently at age 90. These default event selections are shown above the timeline in the
Expense Starts and Expense Ends boxes. The period over which this expense will be active in the plan is also highlighted
in the timeline as are the events that set the beginning and end of the expense.
Let’s leave this default timing in place. Do not press Save yet, as we are going next to the Steps screen.
Page 69
support.planwithvoyant.com [email protected] AdviserGo Tutorial 1, Create Your First Client Case | Page 69 Need Help?
Stepping Future Travel Spending Up and Down
The Campbells’ travel spending will need to be adjusted, however,
at various points in the future as their travel needs change. These
future adjustments are called Steps in AdviserGo.
11. Select the Steps tab in the left navigation.
Currently, John and Julia have limited time for holidays due to their
busy careers and active home life. Once they retire and their
children are away, they want to use their newfound free time to
travel the globe. To do this they will need to double up their travel budget. Later in their lives we think it safe to assume
that they will start slowing down, spending more time at home and less on travel, perhaps when John, the older of the
two, turns 75.
These two future steps will be scheduled using Events. Events might already be present on the timeline or new ones can
be added as we make the step. Let’s review the events shown on the timeline shown at the top of the Steps screen. Here
events can be added as you create the Step, without leaving your work in progress.
An event is already available in the timeline to schedule our first step. We will increase the Campbells’ travel spending at
Julia’s Retirement.
12. Since we already have an event in the timeline to schedule this step, click + Add Step.
Page 70
support.planwithvoyant.com [email protected] AdviserGo Tutorial 1, Create Your First Client Case | Page 70 Need Help?
The Amount field will show the original cost of the Travel expense, £7,000, which is the amount you will be adjusting. The
Campbells plan to double up on their travel expenses once they retire.
13. Amount: Enter £14,000.
Note – When entering a stepped amount, always be sure to enter the full adjusted amount, not the difference between the original
value and the adjusted one.
Tip – The amount you enter at the step is assumed to be a present value. AdviserGo will work out the inflationary difference for you.
Notice the Inflation Rate. The software will apply this rate to escalate not only the original amount, but also any future stepped values.
By the time the step is made in the future, at Julia’s retirement, the £14,000 you entered will be an inflated amount, inflated at 2.5% per
annum from the beginning of the plan until the step is made, and thereafter.
14. Click Timing.
15. Either select Julia’s retirement event and drag and drop it into the Step Occurs box above, as shown below…
…or click Julia’s retirement event icon and select Set as Step Timing.
Click Save, top right.
Page 71
support.planwithvoyant.com [email protected] AdviserGo Tutorial 1, Create Your First Client Case | Page 71 Need Help?
The Steps screen will show the newly added step, listing the value that will be modified at this step, which will be the
annual amount of the travel expense. Again, the amount shown is a present value. When the step is made in a future,
travel expenses will step up to an inflated £14,000 annually and the expense will continue inflating from then onward.
The event used to schedule the step (Julia’s retirement event) is highlighted in the timeline above.
Look further down the timeline to age 75. John’s future ages are shown in the top row running below the timeline while
Julia’s future ages are displayed in the lower row. There is no event in this year of the plan, which is when we plan to
decrease their travel spending, so let’s add one.
16. Double click the bar above age 75 on the timeline within the Steps screen.
Options to add a new event to the timeline will display. The event you are adding will appear in the timeline below.
17. Name: Enter a name for the new event, “Slowing Down”.
18. Type: Either accept the default icon or select in the event icon palette an icon of your choice, such as the sailboat.
Page 72
support.planwithvoyant.com [email protected] AdviserGo Tutorial 1, Create Your First Client Case | Page 72 Need Help?
Tip – If you need to move this new event to a different year or age,
click the event icon and drag it up or down the timeline, dropping it
on the appropriate year/age. The ages shown as you move the event
will be those of the default event owner, John, who was the first
person entered when we first created this plan.
19. Click + Create a New Step.
The Amount field will show the original cost of the Travel expense, £7,000, as a point of reference. At this future point in
time the Campbells plan to slow down and travel less, primarily to see their future grandchildren.
20. Amount: Enter £1,500.
Page 73
support.planwithvoyant.com [email protected] AdviserGo Tutorial 1, Create Your First Client Case | Page 73 Need Help?
Since you began this step by adding a new event to the timeline to schedule it, there is no need to click the Timing tab,
that is, unless you want to select a different event.
21. Click Save, top right, to save the new step.
The Steps screen will show the two future steps in travel
spending, listing the value that will be modified at each step,
which will be the annual amount of the travel expense. Again,
that the amounts shown are present values. When the step
is made in a future, travel expenses will step up to an inflated
£14,000 annually and the expense will continue inflating
from then onward. Later the Campbells’ travel spending will step down to an inflated £1,500 annually. The events used to
schedule these steps, Julia’s retirement event and the event you added called “Slowing Down”, are highlighted in the
timeline above.
22. Click Save, top right, to save the travel expense and its steps.
Returning to the Dashboard, the Campbells’ essential expenses (basics) and travel expenses (leisure) are both shown in
the Expenses section of the overview.
Their goals, together with progress
bars indicating their likelihood of
achieving them, will be shown higher
up the overview where they are
given more prominence.
Page 74
support.planwithvoyant.com [email protected] AdviserGo Tutorial 1, Create Your First Client Case | Page 74 Need Help?
In the Cash Flow chart at the top of the screen the light blue Basic Need Line now spans the entire timeline. This line
now runs from the start of the plan to its end because we have a non-essential expense that is active for the duration of
the plan, the Campbells’ travel, which we categorised as a Leisure expense.
Falling below this blue line are the Campbells’ essential expenditures, which you entered a moment ago, together with
their taxes, which are calculated automatically by the software.
Above the blue Basic Need Line, between blue line and black, are Campbells’ important yet non-essential expenditures.
In addition to their travel, earlier in the plan are education costs for Alex and Martina’s future years at university. Two
spikes indicate their milestone goals, the future purchase of John’s dream car and Martina’s future wedding, which are
two large one-off expenditures. All these non-essentials fall in the space between the blue Basic Need Line and the black
Total Need Line, which represents their overall annual needs.
The black Total Need Line is an
annual benchmark representing the
Campbells’ total allocated income. It
shows a total of all their expenses,
taxes, and planned savings, which we
will be entering in a moment.
Page 75
support.planwithvoyant.com [email protected] AdviserGo Tutorial 1, Create Your First Client Case | Page 75 Need Help?
In years where the bars of the chart exceed the Total Need
Line, the Campbell are projected to have unallocated surplus
income. This surplus income could be a planning opportunity,
showing their capacity to save more to pensions,
investments or savings, something you the adviser might
explore with them in a Let’s See scenario.
In years where the Campbells’ incomings fail to meet their
planned spending, the red underlying the chart is exposed to
indicate shortfalls.
Once we enter the Campbells’ savings, investments and
pensions, the software will take withdrawals from these liquid
assets automatically to fill any gaps between total income and
total need. In this way the software will attempt to work out the
future cash flow for you.
In the Year View, you will find on the Expenses tab a
complete list of the year’s expenses. Column headings
in this view are clickable, allowing expenses to be sorted
Page 76
support.planwithvoyant.com [email protected] AdviserGo Tutorial 1, Create Your First Client Case | Page 76 Need Help?
by category, name, owner, or any other heading shown. Reclick the column header to switch between descending and
ascending order. You can check your expenses are set up correctly for each year here.
Click the Taxes tab. Here the software shows a
detailed breakdown of income taxes and NICs on
earnings, Capital Gains Tax (CGT) on investments,
dividend and income tax on investment income,
taxes on pensions that exceed the Lifetme
Allowance (LTA).
The Taxes tab presents, in a worksheet format, an
annual taxation breakdown for each person in the
plan.
Due to the considerable amount of information
presented on this tab, we have it organized into
several sections, which are expandable and
collapsible to make it easier to get to the information you need.
Expand All / Collapse All buttons are top-right to allow you to quickly hide to reveal all sections.
Note – AdviserGo is not a regulated tax planning tool. It is intended to be used as a financial planning platform. To aid in
this, the software does perform general, indicative tax calculations on an annual basis. The software does not perform
tax calculations at the tax code level. It does, however, apply rules for the personal allowance, the phase out of this
allowance for higher earners, the Capital Gains tax-free allowance, the annual exemption on gifts as well as the rules for
Potentially Exempt Transfers (PETs) and Chargeable Lifetime Transfers (CGTs), Lifetime Allowance (LTA) on pensions, and
the nil-rate band (NRB), both personal and residential, when calculating inheritance tax (IHT).
Switch Off the Chart Details View and Return to the Dashboard
To leave the chart details and return to the Dashboard or Let’s See chart, simply toggle off the Year View button (top-
right) or click Dashboard, top-left.
In the next section of this tutorial, we will enter John and Julia’s assets as well as their future state pension benefits. With
the Details view toggled on, we will see these types of assets layered onto the Cash Flow chart by category, as they
become sources of future retirement income. This concludes our entry of goals and expenses.
Page 77
support.planwithvoyant.com [email protected] AdviserGo Tutorial 1, Create Your First Client Case | Page 77 Need Help?
Cash Sweep Accounts
Before we move on to enter the Campbells’ assets, let’s take a moment to discuss what the software does with surplus
income.
In the centre of the Dashboard screen, in the overview of items in the plan, expand the Savings & Investments section.
Until now, we have only entered information about the John, Julia and their children, their earnings, and their goals and
expenses. Although we have yet to enter the Campbells’ assets, which we are about to do, you will find that there is
already a set of “cash sweep accounts”, one for each person in the plan.
What is a Cash Sweep Account?
Cash sweep accounts are created automatically by the software for each person in the plan. When you build a new plan,
each person in the plan will be given a default cash sweep account - e.g. John’s Cash, Susan’s Cash. These accounts
cannot be deleted. Each cash sweep account will start with an initial balance of £0 and serves as an empty container
awaiting future cash inflows.
Modelled as standard savings accounts, default cash accounts are designed to hold future cash on hand. If at the end of
a future planning year a surplus remains - once expenses are paid and contributions are made to pensions, investments
Page 78
support.planwithvoyant.com [email protected] AdviserGo Tutorial 1, Create Your First Client Case | Page 78 Need Help?
and savings - the remaining cash could be swept into the owner’s default cash account, depending on the source of the
surplus and other settings, which we will discuss in this article.
This surplus cash will be grown at the software ’s default Savings Growth Rate, which is set in Plan Settings. But like any
account in AdviserGo, you can open the account and edit the growth settings for these default cash accounts
individually. Settings edited at the individual account level will override those set initially from the Plan Settings.
Once funds are swept into a default cash account, they will usually remain in this account until they are needed to pay
expenses. You can see funds in these accounts in Year View > Investments tab. You also have the option to set up a
special sweeps rule to automatically sweep all future deposits out of surplus cash and into one or more actual accounts
(pensions, investments, or savings) in the plan. The funds on deposit in these sweep accounts serve as ready cash and
will be the first stop for expense fulfilment once annual cash inflows have been exhausted.
Note - Cash sweep accounts are not intended to hold your client’s current savings. If you are entering information about
a client who currently has cash on deposit in a bank account or even ready cash on hand, enter these funds separately,
in a savings or current account. Cash sweep accounts are meant only to serve as a temporary holding place for future
surplus incomes that are otherwise unallocated – i.e. surplus that is neither spent nor saved. These accounts do not
have all the features of a regular savings account and are handled differently in the cash flow, as we will discuss in a
moment.
Page 79
support.planwithvoyant.com [email protected] AdviserGo Tutorial 1, Create Your First Client Case | Page 79 Need Help?
Savings
We now have information entered about the members of the Campbell family. We have also entered their earnings,
future goals, and expenses.
Let’s continue by entering their assets, including their savings, investments, pensions, and their home. These assets will
largely determine the kind of lifestyle they might enjoy after they retire. Are the Campbells saving enough today to
maintain the lifestyle they desire once they retire? Will they also have enough saved to afford their near and long-term
goals. Let’s see.
We will start by entering their savings.
1. With the Dashboard selected in the top navigation:
2. Click the plus button (+) bottom right.
3. Select Savings & Investments.
4. Select Savings.
Joint Savings Account – John and Julia’s Rainy-Day Fund
John and Julia have a joint savings account, which they treat primarily as a rainy-day fund.
• They don’t normally pay for expenses from this account, although they might dip into it occasionally in years in which
they have large purchases planned.
• No matter what, they want to maintain a minimum balance of £20,000 in this account to have on hand for
emergencies and other unforeseen circumstances.
Page 80
support.planwithvoyant.com [email protected] AdviserGo Tutorial 1, Create Your First Client Case | Page 80 Need Help?
• They save seldomly to this account, but on average they deposit about £1,200 per year to it and plan to do so while
they continue to work.
5. Owner: This is a joint savings account. First,
confirm that John is selected. As the first
person entered when setting up this plan, John
should already be selected by default.
Also select Julia to indicate that this is a jointly
held account. Checkmarks should appear next
to both of their names, as pictured below.
6. Type: Select Savings Accounts.
7. Name: Enter “Family Savings – Rainy Day Fund”.
8. Balance £: Enter £21,000, the current balance
of the savings account at the beginning of the
plan.
Tip – Names, Make Them Personal, But Not Too Personal
AdviserGo is intended for use in holistic, high-level planning. We
do not require, nor do you need to enter any sensitive personal
information such as you clients’ addresses, e-mail addresses, and
telephone numbers. Some firms even opt to encode the names of
special clients.
When naming assets, you are not required to enter actual account
names or numbers, nor do we recommend you enter this level of
detailed. sensitive information. Make the plan personal by
choosing names that you and your client will understand and
relate to, but there is no need to enter any truly sensitive
identifiers such as account numbers. The same goes for your
client’s Property. You do not have to enter their actual address.
Tip – Joint ownership of savings accounts
By indicating that this account is held jointly, AdviserGo will know
to split between its two owners any income tax due on the interest
the account earns. The software will also apply John and Julia’s
respective personal savings allowances when calculating the taxes
on their individual savings incomes.
Not all types of assets can be owned jointly. Money purchases and
ISAs, for example, can have only one owner whereas savings and
current accounts and unwrapped investments can be owned
jointly.
Page 81
support.planwithvoyant.com [email protected] AdviserGo Tutorial 1, Create Your First Client Case | Page 81 Need Help?
9. Grow this account by: Leave the default Entered Interest Rate selected.
10. Interest Rate: Leave the default value of 1% in place.
Note - Default Interest Rate - The default fixed Interest Rate, shown initially in this field, is taken from the Savings Growth
Rate assumption, which is set in your Plan Settings.
Tip – Options for Setting the Interest Rate on Savings Accounts
The interest rate for savings and current accounts can be set using a simple, fixed interest rate that you enter - the
“entered interest rate” option shown below.
Alternatively, the interest rate could instead be derived from the software’s underlying market assumptions for cash
(i.e. using a 100% cash asset allocation) - the “portfolio/holdings” option pictured below.
The market assumptions for cash and other underlying asset categories (including the names and number of asset
categories themselves) may vary depending on whether your firm uses a rebranded (white labelled) version of the
software – one that includes a custom set of market assumptions – or if you are using our standard release. Our
standard release in the UK uses market assumptions kindly provided to our users by the Rayner Spencer Mills Group,
If your firm subscribes to Voyant’s optional rebranding (white labeling) service and you are interested in adding your
own bespoke set of market data to the software, contact Voyant Support for further details on the data that would be
needed. More about our rebranding/white labelling service can be found here.
Page 82
support.planwithvoyant.com [email protected] AdviserGo Tutorial 1, Create Your First Client Case | Page 82 Need Help?
John and Julia set aside about £100 per month to this account and intend to continue doing so at least until they retire.
11. Contribution Type: Select Amount.
Tip - Contributions can also be set to increase in the future (Amount With Inflation), indexed to inflation, or set to a
percentage of the owners’ earnings (Percent of Income), in which case future contributions would be indexed to
increases (or decreases) in the owners’ earnings.
12. Contribution Amount £: Enter £100.
13. Frequency (the “Annually” dropdown): To the right of this field, select Monthly to indicate that this is a monthly
contribution amount.
14. Select the Timing tab in the left navigation.
Tip, Timing Contributions – Whenever you schedule
future contributions to accounts, you will be required
specify when these contributions are to begin and
end. This is done on the Timing tab. If you try saving
an account with contributions without specifying
when these contributions are to begin and end, you
will receive the error shown here.
Page 83
support.planwithvoyant.com [email protected] AdviserGo Tutorial 1, Create Your First Client Case | Page 83 Need Help?
One exception to this rule are Money Purchase pensions. We think it safe to assume initially that any future
contributuons to money purchases will be made from the beginning of the plan until the owner’s Retirement event. The
schedule for these contributions can still be changed when needed.
Your selection on the Timing tab will be used to schedule when contributions to this savings account are to begin and
end. John and Julia plan to make deposits to this account from now until retirement. Let’s begin with the start event.
15. Contributions Start: Select from the timeline an event to schedule the start of these contributions.
Either – Click the plan “Start” event icon and select “Set as Start Event” (as shown right).
Or - Select the event icon for the "Start" event in the timeline and drag and drop the icon into the Contributions Start
box above the timeline (as shown right).
Page 84
support.planwithvoyant.com [email protected] AdviserGo Tutorial 1, Create Your First Client Case | Page 84 Need Help?
16. Contributions End: Next, select an event to schedule the end of these contributions.
Either – Click the icon for "Julia’s Retirement" event and select “Set as End Event”.
Or – Select the event icon for the "Julia’s Retirement" event in the timeline and drag and drop the icon into the
Contributions End box above the timeline.
With your contribution events now selected, the Timing tab should now highlight the selected contribution period, the
selected contribution start event (the plan’s Start) and end event (Julia’s Retirement).
17. Next, select the Withdrawal Limit tab in the left
navigation.
John and Julia want to maintain a minimum balance of £20,000 in this account, to have on hand for emergencies and
other unforeseen circumstances.
To maintain this minimum balance – a rainy day fund of £20,000 – we will set a withdrawal limit on the account. We will
reserve within this savings account a minimum balance of £20,000 to always have on hand. If the account balance
exceeds this minimum reserve, as it currently does by £1,000, the software will be allowed to tap any excess balance
above the reserved minimum whenever additional funds are needed to meet expenses.
Tip – What are Withdrawal Limits?
AdviserGo normally takes withdrawals from liquid assets,
such as this savings account, as needed, whenever your
client’s future incomes fail to completely meet their annual
expenditures. Whenever there is an income gap, assets are
drawn upon automatically. The order in which assets are
selected for top-up withdrawals is based on a default
Liquidation Order, which is set in the software’s Plan
Settings.
Withdrawal Limits give you the option to ringfence certain
accounts, either in their entirety or to place certain limits on
the software’s ability to liquidate assets as needed.
Withdrawal limits can be set, when needed, at the account
level.
We generally recommend that you stick with the ‘As Needed’
default in most cases as doing so will save you time and
allow you to avoid artificial future shortfalls. Read more
about withdrawal limits here.
Page 85
support.planwithvoyant.com [email protected] AdviserGo Tutorial 1, Create Your First Client Case | Page 85 Need Help?
18. Limit Starts: Leave the default event, the plan’s “Start” event, selected in this box at the top of the screen. By
choosing the Start event, the minimum balance will go into effect immediately, as of the beginning of the plan.
19. Type: Select Minimum Balance.
20. Amount £: Enter £20,000. This means a minimum balance of this amount will be held on reserve in this account
throughout the plan.
21. Click the Save button to add this new savings account to the plan.
Page 86
support.planwithvoyant.com [email protected] AdviserGo Tutorial 1, Create Your First Client Case | Page 86 Need Help?
Assets Chart
To start viewing how John and Julia’s assets are being modelled
as we add them to the plan, switch to the Assets chart. Leave
the Details button toggled on (green), which will show these
assets individually on the chart.
Notice how the balance in their rainy-day fund builds until additional funds are needed, first to pay for John’s Porsche
and second to help pay for their expenses in retirement. The software will normally withdraw funds as needed whenever
incomes in given year are not sufficient to fully meet planned expenditures. However, within the rainy-day fund we have
placed on reserve a minimum balance of £20,000 to have available for unforeseen circumstances.
After retirement, the account levels out, as the account maintains its minimum ringfenced balance of £20,000 and no
further contributions are being made to it. The account balance shown in the chart details is an end of year amount,
inclusive of interest, which is being spent in the following year in years the Campbells have no other income sources, at
least not yet.
Page 87
support.planwithvoyant.com [email protected] AdviserGo Tutorial 1, Create Your First Client Case | Page 87 Need Help?
Investments
Next, let's enter John and Julia's investments.
John and Julia’s ISAs
Two years ago, John and Julia both opened ISAs to start setting aside a little money every month to grow tax free.
• Each account currently has a balance of £5,000.
• Both are invested in stocks and shares.
• They plan to continue making contributions of £200 per month to each of their ISAs until retirement.
John and Julia are well under their contribution maximums and might consider saving more, maximising his and her
allowable ISA contributions. This is a strategy that we might consider discussing with the Campbells later, as we begin to
explore various possibilities in what-if planning scenarios.
Julia’s ISA
First, let’s enter Julia’s stocks and shares ISA.
1. With the Dashboard selected in the top navigation:
2. Click the plus button (+) bottom right.
3. Select Savings & Investments.
4. Select Investment.
5. Owner: Select Julia as the owner of the account. Be sure to also deselect the checkmark next to John. A checkmark
should appear only next to Julia’s name, as pictured right.
6. Type: Select Stock Market ISA / Junior ISA.
7. Name: Enter “Julia’s ISA”.
8. Balance £: Enter £5,000, the current balance of the ISA at the beginning of the plan.
9. Purchase Value: Leave this field blank.
Tip, Puchase Value - The purchase value is the cost basis for the account, which is very important when entering
Page 88
support.planwithvoyant.com [email protected] AdviserGo Tutorial 1, Create Your First Client Case | Page 88 Need Help?
taxable investments with capital gains subject to Capital Gains Tax (CGT). ISAs are tax-free wrappers; therefore, no
Purchase Value is needed.
Julia sets aside £200 per month into her ISA and intends to continue doing so at least until she retires.
10. Contribution Type: Select Amount.
11. Contribution Amount £: Enter £200.
12. Frequency (the “Annually” dropdown): To the right of this field, select Monthly to indicate that this is a monthly
contribution amount.
13. Select the Timing tab in the left navigation.
Your selection on the Timing tab will be used to schedule when contributions to this savings account are to begin and
end. Julia plans to make deposits to her ISA from now until her retirement. Let’s begin with the start event.
14. Contributions Start: Select from the timeline an event to schedule the start of these contributions.
Either – Click the plan “Start” event icon and select “Set as Start Event”.
Or - Select the event icon for the "Start" event in the timeline and drag and drop the icon into the Contributions Start
box above the timeline (as shown right).
15. Contributions End: Next, select an event to schedule the end of these contributions.
Either – Click the icon for "Julia’s Retirement" event and select “Set as End Event”
Page 89
support.planwithvoyant.com [email protected] AdviserGo Tutorial 1, Create Your First Client Case | Page 89 Need Help?
Or – Select the event icon for the "Julia’s Retirement" event in the timeline and drag and drop the icon into the
Contributions End box above the timeline (as shown right).
With your contribution events now selected, the Timing tab should now highlight the selected contribution period, the
selected contribution start event (the plan’s Start) and end event (Julia’s Retirement), as shown below.
Select the Growth tab in the left navigation.
16. Grow this account by: Leave the default Entered Growth Rate selected.
17. Interest Rate: Leave the default value of 6% in place.
Page 90
support.planwithvoyant.com [email protected] AdviserGo Tutorial 1, Create Your First Client Case | Page 90 Need Help?
Note - Default Interest Rate - The default fixed Interest Rate, shown initially in this field, is taken from the Investment Growth Rate
assumption, which is set in your Plan Settings. This default value may vary if you are currently using a white labelling/rebranding
version of the software that contains your firm’s alternative, bespoke set of default assumptions.
18. Capital Gains Realised Annually, Dividends, Interest and Reinvest Yield: Leave these fields blank or in the case
of Reinvest Yield, set to its default of Yes. These fields will become important later as we enter a taxable investment.
ISA are tax-free investments, so their underlying income/growth components do not need to be set.
19. Click the down arrow next to the Done button, top-right, and select
Save
+
Add
Another. This
drop- down option will
save Julia’s ISA into the
plan and allow us to
continue entering
additional
investments.
Tip, Save + Add
Another - Save + Add Another is a convenient little timesaving feature that will save you several clicks when entering
several items under the same category, in this case investments.
Page 91
support.planwithvoyant.com [email protected] AdviserGo Tutorial 1, Create Your First Client Case | Page 91 Need Help?
John’s ISA
Next, let’s enter John’s stocks and shares ISA. If you clicked Done a moment ago rather than Save + Continue, start by
clicking the plus menu (+), bottom-right, select Savings & Investments, and then select Investment.
1. Owner: Select John. As the first person entered when creating this plan, John should already be selected by default.
2. Type: Select Stock Market ISA / Junior ISA.
3. Name: Enter “John’s ISA”.
4. Balance £: Enter £5,000, the current balance of the ISA at the beginning of the plan.
5. Purchase Value: Leave this field blank.
John sets aside £200 per month into his ISA and intends to continue doing so at least until she retires.
6. Contribution Type: Select Amount.
7. Contribution Amount £: Enter £200.
8. Frequency (the “Annually” dropdown): To the right of this field, select Monthly to indicate that this is a monthly
contribution amount.
9. Select the Timing tab in the left navigation.
Page 92
support.planwithvoyant.com [email protected] AdviserGo Tutorial 1, Create Your First Client Case | Page 92 Need Help?
Your selection on the Timing tab will be used to schedule when contributions to this savings account are to begin and
end. John plans to make deposits to this account from now until his retirement. Let’s begin with the start event.
10. Contributions Start: Select from the timeline an event to schedule the start of these contributions.
Either – Click the plan “Start” event icon and select “Set as Start Event” (as shown right).
Or - Select the event icon for the "Start" event in the timeline and drag and drop the icon into the Contributions Start
box above the timeline (as shown below).
11. Contributions End: Next, select an event to schedule the end of these contributions.
Either – Click the icon for "John’s Retirement" event and select “Set as End Event” (as shown right and below).
Or – Select the event icon for the "John’s Retirement" event in the timeline and drag and drop the icon into the
Contributions End box above the timeline (as shown right).
With your contribution events now selected, the Timing tab should now highlight the selected contribution period, the
selected contribution start event (the plan’s Start) and end event (John’s Retirement), as shown below.
12. Select the Growth tab in the left navigation.
13. Grow this account by: Leave the default Entered Interest Rate selected.
14. Interest Rate: Leave the default value of 6% in place.
15. Capital Gains Realised Annually, Dividends, Interest and Reinvest Yield: Leave these fields blank or in the case
of Reinvest Yield, set to its default of Yes. These fields will become important later as we enter a taxable investment.
ISA are tax-free investments, so their underlying income/growth components do not need to be set.
16. Click the down arrow next to the Done button, top-right, and select
Save + Add Another. This drop-down option will save John’s ISA into
the plan and allow us to continue entering additional investments.
University Savings for Alex and Martina - Junior ISAs
John and Julia have plans to aside money for their children’s university education.
Page 93
support.planwithvoyant.com [email protected] AdviserGo Tutorial 1, Create Your First Client Case | Page 93 Need Help?
• Last year they opened a Junior ISA for Alex who is now 13 and nearer his university years than Martina who is 10.
They initially deposited £5,000 into his account to help cover his future university costs.
• They plan to continue contributing £5,000 annually into Alex’s junior ISA from now until the year he turns 18 and
potentially begins university.
• In two years, they plan to also open a Junior ISA for Martina, when she turns 12.
• Once opened, they plan to also contribute £5,000 annually into her Junior ISA as well, until the year she turns 18 and
begins university.
• Alex’s Junior ISA is invested in stocks and shares as will be Martina’s .
Alex’s Junior ISA
Let’s enter Alex’s Junior stocks and shares ISA. If you clicked Done a moment ago, rather than Save + Continue, start by
clicking the plus menu (+), bottom-right, select Savings & Investments, and then select Investment.
1. Owner: Select Alex as the owner of the account. Be sure to also deselect the checkmark
next to John. A checkmark should appear only next to Alex’s name, as pictured right.
2. Type: Select Stock Market ISA / Junior ISA.
3. Name: Enter “Junior ISA - Alex”.
4. Balance £: Enter £5,000, the current balance of the ISA at the beginning of the plan.
5. Purchase Value: Leave this field blank.
John and Julia contribute £5,000 per annum into Alex’s Junior ISA and intend to continue doing so until he turns 18 and
starts University.
6. Contribution Type: Select Amount.
7. Contribution Amount £: Enter £5,000.
8. Frequency (the “Annually” dropdown): To the right of this field, leave Annually selected to indicate that this is a yearly
contribution amount.
Page 94
support.planwithvoyant.com [email protected] AdviserGo Tutorial 1, Create Your First Client Case | Page 94 Need Help?
9. Select the Timing tab in the left navigation.
Your selection on the Timing tab will be used to schedule when contributions to this savings account are to begin and
end. John plans to make deposits to this account from now until Alex goes to university. Let’s begin with the start event.
10. Contributions Start: Select from the timeline an event to schedule the start of these contributions.
Click the plan “Start” event icon and select “Set as Start Event”
Contributions End: Next, select an event to schedule the end of these contributions.
Either – Click the icon for "Alex’s University" event and select “Set as End Event” (as shown right and below).
Or – Select the event
icon for the "Alex’s
University" event in the
timeline and drag and
drop the icon into the
Contributions End box
above the timeline (as
shown right).
With your contribution
events now selected, the
Page 95
support.planwithvoyant.com [email protected] AdviserGo Tutorial 1, Create Your First Client Case | Page 95 Need Help?
Timing tab should now highlight the selected contribution period, the selected contribution start event (the plan’s Start)
and end event (Alex’s University), as shown below.
11. Select the Growth tab in the left navigation.
12. Grow this account by: Leave the default Entered Interest Rate selected.
13. Interest Rate: Leave the default value of 6% in place.
14. Capital Gains Realised Annually, Dividends, Interest and Reinvest Yield: Leave these fields blank or in the case
of Reinvest Yield, set to its default of Yes. These fields will become important later as we enter a taxable investment.
ISA are tax-free investments, so their underlying income/growth components do not need to be set.
15. Click the down arrow next to the Done button, top-right, and select
Save + Add Another. This drop-down option will save Alex’s ISA into
the plan and allow us to continue entering additional investments.
Martina’s Junior ISA
Page 96
support.planwithvoyant.com [email protected] AdviserGo Tutorial 1, Create Your First Client Case | Page 96 Need Help?
Next, let’s enter Martina’s future Junior stocks and shares ISA. If you clicked Done a moment ago, rather than Save +
Continue, start by clicking the plus menu (+), bottom-right, select Savings & Investments, and then select Investment.
1. Owner: Select Martina as the owner of the account. Be sure to also deselect the
checkmark next to John. A checkmark should appear only next to Martina’s name, as
pictured right.
2. Type: Select Stock Market ISA / Junior ISA.
3. Name: Enter “Junior ISA - Martina”.
4. Balance £: John and Julia plan to open this Junior
ISA for Martina in two years from now, when she
turns 12.
As with any hypothetical future account, leave the
current balance set to £0. The account has no
balance at the beginning of the plan but will be
funded in the future through planned
contributions.
5. Purchase Value: Leave this field blank.
Tip – Account Balances of Planned Future Investments
Whenever entering a hypothetical future investment -- an
investment that you don’t own today, as of the plan’s start -- leave
the Balance £ field set to £0. This field is used only to record the
current value of an account at the beginning of the plan. A
hypothetical future account, not having been funded yet, would
have no current value and should not figure into your current net
worth.
Future accounts can then be funded though planned contributions,
scheduled transfers from other accounts, or sweeps and transfers
from surplus income, in years when lump sum inflows are expected
– e.g. from the sale of a property or a pension commencement lump
sum (PCLS) withdrawal from a money purchase.
.
Page 97
support.planwithvoyant.com [email protected] AdviserGo Tutorial 1, Create Your First Client Case | Page 97 Need Help?
In two years, they plan to open this Junior ISA for Martina, when she turns 12. Once opened, they plan to also contribute
£5,000 annually into her Junior ISA as well, until the year she turns 18 and begins university.
6. Contribution Type: Select Amount.
7. Contribution Amount £: Enter £5,000.
8. Frequency (the “Annually” dropdown): To the right of this field, leave Annually selected to indicate that this is a yearly
contribution amount.
9. Select the Timing tab in the left navigation.
Your selection on the Timing tab will be used to schedule when contributions to this savings account are to begin and
end. John plans to make deposits to this account from now until Martina’s university event. Let’s begin with the start
event.
Contributions Start: In two years, John and Julia plan to open this Junior ISA for Martina, when she turns 12. There is not
an event already on the timeline to select to schedule the future start of these contributions, so let’s add one as we go.
10. Double-click any bar above the timeline.
The add Event dialogue will display.
11. Enter a Name for the event, “Open Martina’s Junior ISA”.
12. Choose an appropriate icon to represent it in the timeline, as shown below.
Check the position of the event on the timeline below by hovering over it. The ages shown will be Martina’s in the year
the event is positioned because the event will be assumed to have the same owner as the Junior ISA.
Page 98
support.planwithvoyant.com [email protected] AdviserGo Tutorial 1, Create Your First Client Case | Page 98 Need Help?
John and Julia intend to open Martina’s ISA and begin contributions to it when she turns 12. The event will need to be
positioned in the year she turns 12. If the event needs to be repositioned to this age, select the new event’s icon, and
drag and drop it up or down the timeline to the appropriate age.
As you move the event, the future age of
its owner, Martina, will be shown
beneath the timeline – the owner’s age in
the event’s original position and the
owner’s age for the year over which the
event is repositioned. Move the event
until age 12 is shown.
Note - You can also easily reposition this event later, on the Timeline screen
13. Click Set as Start Event.
16. Contributions End: Next, select an event to schedule the end of these contributions.
Either – Click the icon for "Martina’s University" event and select “Set as End Event” (as shown right and below).
Or – Select the event icon for the "Martina’s University" event in the timeline and drag and drop the icon into the
Contributions End box above the timeline (as shown right).
With your contribution events now selected, the Timing tab should now highlight the selected contribution period, the
selected contribution start event “Open Martina’s Junior ISA” and end event Martina’s University, as shown below.
Page 99
support.planwithvoyant.com [email protected] AdviserGo Tutorial 1, Create Your First Client Case | Page 99 Need Help?
17. Select the Growth tab in the left navigation.
18. Grow this account by: Leave the default Entered Interest Rate selected.
19. Interest Rate: Leave the default value of 6% in place.
20. Click the Done button, top-right, to save these changes.
Page 100
support.planwithvoyant.com [email protected] AdviserGo Tutorial 1, Create Your First Client Case | Page 100 Need Help?
John’s General Investment Account (GIA)
In addition to their ISAs and savings for retirement, John likes to dabble a bit in the stock market. He sets aside about
£1,000 a year into his general investment account (GIA) and plans to continue doing so at least until he retires. GIAs, unit
trusts, any taxable investment account that does not have a special tax free or tax deferred status is usually modelled in
the software as an unwrapped investment.
Start by clicking the plus menu (+), bottom-right, select Savings & Investments, and then select Investment.
1. Owner: Select John. As the first person entered when creating this plan, John should already be selected by default.
2. Type: Select Unwrapped Investment.
3. Qualifies for Entrepreneur’s Relief: Leave the default value “No” selected.
4. Name: Enter “John’s GIA”.
5. Balance £: Enter £15,000, the current balance of the ISA at the beginning of the plan.
6. Purchase Value: Enter £11,000.
Tip, Puchase Value - The purchase value is the cost basis for the account, which is a very important entry when
entering taxable investments with capital growth subject to Capital Gains Tax (CGT). The purchase value should
include any money invested into the account to date plus any capital gains realised to date. The software will then
know that any capital growth above this cost basis is subject to CGT, respective of the owner’s annual gains
allowance and any carryover losses. Read more.
John invests £1,000 per annum into his GIA and intends to continue doing so until he retires.
7. Contribution Type: Select Amount.
8. Contribution Amount £: Enter £1,000.
9. Frequency (the “Annually” dropdown): To the right of this field, leave Annually selected to indicate that this is a yearly
contribution amount.
Page 101
support.planwithvoyant.com [email protected] AdviserGo Tutorial 1, Create Your First Client Case | Page 101 Need Help?
10. Select the Timing tab in the left navigation.
Your selection on the Timing tab will be used to schedule when contributions to this investment account are to begin
and end. John plans to invest in this account from now until his retirement. Let’s begin with the start event.
11. Contributions Start: Select from the timeline an event to schedule the start of these contributions.
Either – Click the plan “Start” event icon and select “Set as Start Event” (as shown right).
Or - Select the event icon for the "Start" event in the timeline and drag and drop the icon into the Contributions
Start box above the timeline (as shown right).
12. Contributions End: Next, select an event to schedule the end of these contributions.
Either – Click the icon for "John’s Retirement" event and select “Set as End Event” (as shown right and below).
Or – Select the event icon for the "John’s Retirement" event in the timeline and drag and drop the icon into the
Contributions End box above the timeline (as shown right).
With your contribution events now selected, the Timing tab should now highlight the selected contribution period,
the selected contribution start event (the plan’s Start) and end event (John’s Retirement) .
13. Select the Growth tab in the left navigation.
14. Grow this account by: Leave the default Entered Interest Rate selected.
Page 102
support.planwithvoyant.com [email protected] AdviserGo Tutorial 1, Create Your First Client Case | Page 102 Need Help?
15. Interest Rate: Leave the default value of 6% in place.
16. Capital Gains Realised Annually, Dividends, Interest and Reinvest Yield: Leave these fields blank or in the case
of Reinvest Yield, set to its default of Yes.
17. Click the Done button, top-right, to save your changes.
Page 103
support.planwithvoyant.com [email protected] AdviserGo Tutorial 1, Create Your First Client Case | Page 103 Need Help?
Retirement Savings - Money Purchase Pensions
Let's continue by filling in the details of John and Julia’s pensions. Both
participate in employer-sponsored money purchase pension schemes.
1. With the Dashboard selected in the top navigation
2. Click the plus button (+) bottom right.
3. Select Pensions.
4. Select Money Purchase.
Page 104
support.planwithvoyant.com [email protected] AdviserGo Tutorial 1, Create Your First Client Case | Page 104 Need Help?
John's Employer Sponsored Pension
John makes regular contributions from his income into a group personal pension. These contributions are being
matched by his company.
• John plans to contribute 4% of his salary to this pension.
• His company in turn matches 100% of his pension contributions and would potentially match contributions up to
10% of his annual salary.
Tip - Should John wish to take full advantage of his company's programme, he might consider increasing his
contributions to 10% of his salary. This is something that we could explore later in a what-if planning scenario.
5. Owner: Confirm that John is selected. As the first person entered when setting up this
plan, John should already be selected by default, as pictured right.
Enter the following details about John's pension and schedule his future contributions to it.
6. Type: Select Group Personal Pension.
7. Name: Enter “John's Money Purchase”.
8. Balance £: Enter £150,000, the current balance of the pension at the beginning of the plan.
9. Contribution Type: Select Percent of Income. This option will display the Percentage of Salary field.
10. Percentage of Salary: Enter 4%. John plans to contribute four percent of his future salary to this pension.
11. Employer Contribution: Select Yes to indicate that John's company also makes contributions to his pension.
12. Type: Select Matching.
13. Matching Contribution: Enter 100%. This entry indicates that John’s employer will match one hundred percent of
John's contributions. However, these contributions are capped to a certain percentage of his salary, based on the
next entry.
14. Matching Income: Enter 10% to indicate that John’s employer will match his contributions up to a maximum of 10%
of John's salary.
Page 105
support.planwithvoyant.com [email protected] AdviserGo Tutorial 1, Create Your First Client Case | Page 105 Need Help?
15. Next, select the Growth in the left navigation.
Here you can review and potentially change the growth assumptions for the John’s pension.
16. The initial default Growth Rate will be taken from the default Investment Growth Rate in the Plan Settings. You could
edit this growth rate for the pension individually, if necessary, but leave this default setting in place for now.
Page 106
support.planwithvoyant.com [email protected] AdviserGo Tutorial 1, Create Your First Client Case | Page 106 Need Help?
Tip - Options for Calculating the Future Rate of Return on Investments
This assumed rate of return (investment growth, or interest) is always a nominal value in AdviserGo. An individual’s expenses will be
inflated independently from the growth on investments.
It is the case for all accounts – savings, investment & retirement savings (defined contribution pensions) – that the assumed rate of
growth might be:
1. Based on a simple, fixed rate of growth, or
2. The growth assumption might be derived from a portfolio (asset allocation) - i.e. growth of an account may be a function of the
underlying assumptions relating to the asset classes comprising the portfolio.
An asset allocation (portfolio) refers to how an investment is split by underlying asset classes. For example, we could define an
investment as being made up of 60% UK Mid and Small Cap Stocks, 10% EU Stocks, and 30% Investment Grade Bonds. Unlike a fixed
growth rate, which is entirely deterministic, asset allocations permit of a range of possible returns. For normal purposes, however, the
software's assumed investment return (for any given asset allocation) will correspond to the 50th percentile return (i.e. the 'mean'
return). This 'mean' return will, typically, be the weighted average of the individual asset classes within the portfolio.
The software will also calculate an upside and downside range of likely returns (for a given portfolio), with each value being two
standard deviations from the 50th percentile. This range of return can also be equated to a level of risk. Also note that the estimated
maximum upside, and downside for a given asset allocation (i.e. portfolio) will take account of the assumed correlations between the
asset classes of which the portfolio is made up, i.e. a portfolio that comprises negatively-correlated asset classes will have a lower
potential upside, as well as less potential downside.
Page 107
support.planwithvoyant.com [email protected] AdviserGo Tutorial 1, Create Your First Client Case | Page 107 Need Help?
Timing – Schedule the Beginning and End of John’s Pension Contributions
17. Next, click Timing in the left navigation.
The events selected on the Timing tab are used to set the time span over which contributions will be made to John’s
money purchase scheme.
The software will assume that John’s pension contributions mirror his employment, beginning with the start of the plan
(the Start event) and lasting until his planned retirement (the “Retirement (John)” event) at age 65. These default event
selections are shown above the timeline in the Contributions Start and Contributions End boxes.
The period over which these earnings are expected are also highlighted in the timeline as are the events that set the
beginning and end of the earnings.
Note – The option is always available to begin or end these contributions earlier or later in the plan. To change the
scheduling of these contributions, add and select alternative start or end events in the timeline. Double click any bar
above the timeline to get started.
21. Click the down arrow next to the Done button, top-right, and select
Save + Add Another. This drop-down option will save John’s money
purchase into the plan and allow us to continue entering additional
money purchases.
Page 108
support.planwithvoyant.com [email protected] AdviserGo Tutorial 1, Create Your First Client Case | Page 108 Need Help?
Julia's Personal Pension
Next, enter the details of Julia’s money purchase. Julia makes regular contributions from her salary into a personal
pension. Julia plans to contribute 5% of her income annually.
1. Owner: Select Julia, as pictured right.
Enter the following details about Julia's pension and schedule her future contributions to it.
2. Type: Select Personal Pension.
3. Account Name: Enter “Julia’s Personal Pension”.
4. Balance: Enter £45,000.
5. Annual Contribution: Enter 5%. Julia plans to contribute five percent of her salary to this pension.
6. Employer Contribution: Leave this field set to “No”.
7. Click Save.
Julia and John’s money purchases will be shown under Pensions in the overview, located in the lower centre section of
the Dashboard.
Page 109
support.planwithvoyant.com [email protected] AdviserGo Tutorial 1, Create Your First Client Case | Page 109 Need Help?
Notice also that each
money purchase has a
corresponding
drawdown pension of
the same name, each
with a starting balance
of 0, as pictured right.
These future drawdown accounts are created automatically by the software whenever a money purchase is entered in a
plan as a place to store and manage future crystallised amounts that are not taken as withdrawals.
For example, if the client were to crystallise their entire money purchase to take their full 25% in pension
commencement lump sum (PCLS) payment, and retain the rest of the money in the pension for future income, the
remaining 75% would be moved automatically into the money purchase’s linked drawdown account.
You can also use these drawdown accounts to enter amounts that have already been crystallised as of the beginning of
the plan but that have yet to be taken as income.
Existing drawdown accounts that do not relate to any uncrystallized funds, such as an inherited drawdown pension, can
be entered into the plan separately as drawdown pensions.
Tip – How will income be taken from these money purchases in retirement?
Before continuing to State Pension benefits, let’s take a moment to discuss what the software will assume happens to these
money purchases in the future, after retirement.
AdviserGo is designed to allow you to create a robust plan in a matter of minutes without delving into the advanced settings.
Money purchases are set by default to be crystallised as needed after the owner's Retirement event. Each time money is
withdrawn from the money purchase, 25% of each withdrawal will be taken as tax free cash. Retirement income is initially set to
be taken as needed in what are effectively a series of Uncrystallised Funds Pension Lump Sum (UFPLS) withdrawals.
Withdrawals are taken from money purchases in accordance with the software’s Liquidation Order. Even if you allow the
software to withdraw pension income as needed, you still have the option to set planned incomes from pensions or to limit
withdrawals, if needed. Read more.
Other options are available to schedule planned withdrawals using a flexi-access drawdown, which grosses each crystallisation
amount up by 75%, allowing you to schedule withdrawals strictly from the client’s tax-free allowance before moving on to tax
deferred drawdown income. The option for scheduling flexi-access withdrawals is available under Planned Withdrawals.
Page 110
support.planwithvoyant.com [email protected] AdviserGo Tutorial 1, Create Your First Client Case | Page 110 Need Help?
State Pension Benefits
John and Julia have provided their current pension estimates from the Pension Service.
1. To enter their future benefits, select Pensions > State Pensions via the + button in Dashboard.
John's State Pension Benefit
John's current state pension estimate is £9,100 per annum. He plans to begin taking these benefits at the normal benefit
age which is currently 68.
2. Owner: Check the person selected. As the primary client, John is already selected by default.
3. Start Age: Check it is 68 to indicate that John's benefits will commence at the normal benefits age (at date of guide).
4. Basic State Pension, Amount £: Enter £9,100
5. Click Save.
The pension benefit will be shown in the list of pension benefits in Dashboard view
Page 111
support.planwithvoyant.com [email protected] AdviserGo Tutorial 1, Create Your First Client Case | Page 111 Need Help?
Julia's State Pension Benefit
Julia's current state pension estimate is also £9,100. She wishes to defer her benefit for two years and start at age 70.
Via the + button bottom right in Dashboard, select Pensions, then State Pension
1. Owner: Select Julia from the drop-down list
2. Start Age: Enter 70, indicating that Julia wishes to defer her benefits for two years.
3. Basic State Pension, Amount £: Enter £9,100
4. Click Save.
Tip - This future benefit estimate will be escalated by the triple lock and will also reflect the increased pension due to
deferral. Read more
Note – we will check all our entries against the Fact Find once everything has been entered.
Page 112
support.planwithvoyant.com [email protected] AdviserGo Tutorial 1, Create Your First Client Case | Page 112 Need Help?
Property / Assets
John and Julia co-own a home which is presently worth £525,000. They have owned their home for 10 years and
purchased it originally for £510,000.
1. To enter their home into the plan, select Property in the + button bottom right in the Dashboard
2. Owner: The property is jointly owned. Check both John and Julia are selected and shown in the owner window.
3. Property Name: Enter "Home".
4. Type: Select Main Residence, the default.
5. Market Value £: Enter £525,000, the present market value of the home.
6. Effective Purchase Value £: Enter £510,000, the total original purchase value of the home, including any portion of
the home's cost that was financed.
7. Growth Rate: The property’s market value will increase over time at this rate. The default rate is taken from Plan
Settings > Inflation/ Growth > Property Growth/ Depreciation Rate. You can change it for individual properties in this
box. Leave as the default here.
8. Timing: Go to the Timing section. Selections on this panel are used to set the time span over which the home will
be owned and to schedule the eventual sale or distribution of the property through the last surviving owner's estate.
Page 113
support.planwithvoyant.com [email protected] AdviserGo Tutorial 1, Create Your First Client Case | Page 113 Need Help?
The default is that the house is owned for the entirety of the plan, starting at Start and ending at Mortality. Leave these
defaults in place.
9. Click Save. The Campbells’ home will be shown in the Dashboard overview under Property.
By viewing the Assets chart you will now see a ‘Non liquid’ asset in there, growing in value over time (see Growth Rate
above). This is their family home.
Page 114
support.planwithvoyant.com [email protected] AdviserGo Tutorial 1, Create Your First Client Case | Page 114 Need Help?
Debts
John and Julia’s home was financed with a mortgage, on which they owe currently owe £430,000. The mortgage has an
interest rate of 4.5% and a minimum monthly payment of £3,000.
1. To enter their mortgage into the plan, select Debts & Loans from the + button bottom right in Dashboard. Then
select Debt.
2. Owner: As the primary client, John is already selected as the debt owner, by default. Julia co-owns this debt with
John. Select Julia's name in the drop down so it is jointly owned.
Make the following entries and selections in the fields to the left side of the screen.
3. Name: Enter "Home Mortgage".
4. Set the Type as Mortgage.
5. Balance £: Enter £430,000, the current balance of the Campbells’ mortgage.
6. Interest Rate %: Enter 4.5%, the current interest rate on the mortgage.
7. Payment Type: Select Repayment mortgage.
8. Payment £: Enter £36,000. This is their annual payment amount. A monthly amount could also be entered instead.
9. Applied: Select Annually.
Page 115
support.planwithvoyant.com [email protected] AdviserGo Tutorial 1, Create Your First Client Case | Page 115 Need Help?
10. Click the Linked Properties > Link to an Existing Property
11. Click on the property in the list to link the mortgage to the family home.
12. A link icon is shown next to the debt in Dashboard view indicating items in the plan are linked to this property.
Note - Since the debt is linked to a property (the Campbells’ home), there is no need to select a start event for it. Notice
that the Timing area is now greyed out. The debt has inherited its timing from the linked property meaning that
Page 116
support.planwithvoyant.com [email protected] AdviserGo Tutorial 1, Create Your First Client Case | Page 116 Need Help?
whenever this property is liquidated, if any balance remains due on the debt, proceeds from the sale will be applied first
to paying off the balance of the linked debt.
If you were entering an unsecured debt, a start event would need to be selected on the Time panel to indicate when the
debt is to become active in the plan.
Multiple mortgages could be entered and linked to a single property if necessary.
13. Press Save
We have now finished entering all the details from the Fact Find. Let’s check our entries. While we are doing these checks
it is also familiarising ourselves with the cash flow model for the Campbells.
Note – You may prefer creating the Debt whilst entering the Property. When entering the Property click ‘+ Create and
Link a New Debt’. In here you can create the mortgage and as it is created in the Property section it will already be linked
to the Property.
Check your Entries
Check and Familiarise 1 – Check the first year of the cash flow plan against the Fact Find
Click now on the Year View.
Make sure the slider is in the first year of the plan. Look at each tab to check things are set up as we expect. Make sure
the values in the Year View match the Fact Find.
For example:
1. Click the Expenses tab
2. Start in the first year of the plan using the scroll bar. Check expenses entered and their Value against the fact
find.
3. Also check the owners are correct in the Owner column against the Fact Find.
Page 117
support.planwithvoyant.com [email protected] AdviserGo Tutorial 1, Create Your First Client Case | Page 117 Need Help?
Move the slider under the chart to check the Travel expense goes up at Julia’s Retirement and then down at John’s
age 75.
Note - expenses will inflate in line with inflation set in Plan Settings, as we didn’t change any of the expense inflation rates
individually in this case.
4. Now back in the first year of the plan, look at the Investment and Pension tabs to check the asset values and
ownership against the Fact Find. Check Net Growth, Contributions and Withdrawals for each one. Clicking on the
asset’s name reveals more details.
Note - The Contributions column displays the Planned and Actual contributions made to each account. For example,
the Campbells may plan to contribute £3,500 annually to Julia's cash ISA, but if these funds were needed instead to
meet
expenses,
less would be
deposited
into the ISA. A
discrepancy
would be
shown
between the
planned and
actual
contribution.
Page 118
support.planwithvoyant.com [email protected] AdviserGo Tutorial 1, Create Your First Client Case | Page 118 Need Help?
Check and Familiarise 2 – Check Year View for Events and Spikes in the Cash Flow Chart
Go to Let’s See > Single chart.
We will now check the years where there are spikes to check the cash flow chart is working as expected. These spikes
may be against an event or not e.g. Lifetime allowance charge. Click on the Year View to find out why there is a spike in
the plan and what income and assets Voyant is using to meet this higher need.
1. Let’s go to the John’s Sport Car purchase year. Double click on this bar on the chart so see the Year View
Page 119
support.planwithvoyant.com [email protected] AdviserGo Tutorial 1, Create Your First Client Case | Page 119 Need Help?
2. In Expenses you should see the reason for the big spike – the car purchase. Go to Cash Flow and Investments
tab and
see
which
assets
Voyant
is using
to meet
this
expense.
Page 120
support.planwithvoyant.com [email protected] AdviserGo Tutorial 1, Create Your First Client Case | Page 120 Need Help?
3. In Cash Flow details you will see the money that is being used to meet the additional expense. Tax credits will be
in the plan to show tax relief on pension contributions for higher or additional rate taxpayers.
Check and
Familiarise 3 – Let’s See: Revealing Income and assets used in the plan
1. Click on Let’s See > Single chart
2. Select Details
3. Select Hide All in the options top right. The chart will turn red. This is the total need profile for the plan.
4. Bring in each income and asset class in one at a time by clicking on their names at the top of the screen e.g.
‘Employment’. Think about the following checks for this case:
• Select Employment – does it start at the Start and end at their
respective Retirements? Click on the markers to see the Event names.
Page 121
support.planwithvoyant.com [email protected] AdviserGo Tutorial 1, Create Your First Client Case | Page 121 Need Help?
• Select State pensions – do they start at age 68 and 70 for John and Julia respectively?
• Select Money Purchase
Pensions and Savings and
Investments – are they being
used in retirement to meet the shortfall that isn’t met by the State Pension?
• Finally select Tax Credits – do these appear just in the pre-retirement years when they have pension contributions
and tax relief on these contributions?
Check and Familiarise 4 – Compare Cash Flow chart to Assets chart
Let’s compare the Cash Flow Chart to the Assets chart. This is especially important when there is a shortfall – have all the
assets been used or are there any remaining?
1. Select Let’s See > Dual chart
2. Select Cash Flow as the top chart and Assets as the bottom chart.
Page 122
support.planwithvoyant.com [email protected] AdviserGo Tutorial 1, Create Your First Client Case | Page 122 Need Help?
3. Hover over the years when there is a shortfall, and you can check that the only assets remaining in the plan are
the Rainy-day fund in Savings and their Property (non-liquid asset).
Check and Familiarise 5 – Debts chart
As there is a mortgage in the plan, we can check when it is being paid off in the Debts screen. Select the Debts chart
from the drop-down list.
As we set up a Repayment mortgage we should see the value of the debt decrease until it is totally paid off. We expect
the mortgage to be paid off by John’s age 59 (Note: this age may differ from yours either because of a different plan start
date or different Plan Settings).
Page 123
support.planwithvoyant.com [email protected] AdviserGo Tutorial 1, Create Your First Client Case | Page 123 Need Help?
Check and Familiarise 6 – Taxes chart
The Taxes chart can be used to check which types of taxes you see and when. Are these the types of taxes you expect to
see and when you expect to see them?
In this case income tax steps down at John’s retirement which is what we would expect given that he is no longer earning
money via employment.
The pink bars are ‘Other taxes’ which in this case are National Insurance Contributions which reduce at John’s retirement
and then stop completely at Julia’s retirement as expected.
There are ongoing income taxes due in retirement due to State pension and UFPLS withdrawals used to meet their
retirement spending needs in this plan. How to create What if scenarios to cover different income withdrawal strategies
are covered in other guides e.g. Planned Withdrawals.
Quick check on Dashboard at any time
In the Dashboard. Expand to see all the details entered by clicking on the downward arrow. Shown below
Page 124
support.planwithvoyant.com [email protected] AdviserGo Tutorial 1, Create Your First Client Case | Page 124 Need Help?
Here you can check the owner by hovering over the person symbol on the left and double check all entries are in with
the correct values.
After the timeline screen you can show clients this view to display, and check with them, what assets and income form
the basis of their plan.
Let's See – View the Campbell’s plan after data entry
The Campbell case file is now complete. Let's view the results.
Page 125
support.planwithvoyant.com [email protected] AdviserGo Tutorial 1, Create Your First Client Case | Page 125 Need Help?
You can see the earnings increasing over time during pre-retirement. The Campbell’s with this current plan do not
currently have enough money to purchase the sports car and have a shortfall at the end of their plan.
In Retirement the State Pension is not enough to meet their needs, so they need to use their Money Purchase pension
and Investments. In Plan Settings we set the liquidation order to be Tax deferred last i.e. pensions last. You can see the
orange MP pension is the last asset to be used until they run out of assets.
This could be a starting point for your discussions with the client, future modelling, running insights and creating What ifs
with your recommendations. For example, the Annual Savings Insights gives an indication of how much money the
Campbells would need to save each year to eliminate the red at the end of their plan (not accounting for affordability i.e.
whether that money is available to be saved or not).
Page 126
support.planwithvoyant.com [email protected] AdviserGo Tutorial 1, Create Your First Client Case | Page 126 Need Help?
Job Well Done!
Congratulations! You have inputted your first client case file in AdviserGo.
Where to find more information, additional resources, and assistance
This concludes our data entry tutorial for AdviserGo. If you are eager to continue, more can be learned about the
software using the guides, tutorials and instructional videos found in our knowledge base. And please feel free to contact
the Voyant Support Team at [email protected] if you need further assistance.
What’s Next
This tutorial covers data entry. Your next tutorial will look at what we can do next. This includes: Changing and adding
goals, creating a plan of your recommendations, running insights, and generating reports.
The Fact Find for the Campbells is below
Page 127
support.planwithvoyant.com [email protected] AdviserGo Tutorial 1, Create Your First Client Case | Page 127 Need Help?
Fact Find for the Campbells This is the Fact Find which sits alongside the AdviserGo Introductory tutorial for building your first client case.
People in the plan
Name Birth year
John Campbell 1978
Julia Campbell 1982
Alex Campbell 2007
Martina Campbell 2010
Expected Retirement age is 65 for both John and Julia Goals
Description Owner Amount Date/s
John's Porsche 911
Martina's
John £135,000 One off when John is age
55
Wedding £35,000 Martina £35,000 One off when Martina is
age 25
Alex's University Alex £10,000 / year Alex’s age 18 to 21
Martina's University Martina £10,000/ year Martina’s age 18 to 21
Income
Employment Name Owner Amount
Christie + Kiel Employment John £125,000 / year
Graphic Designer Julia £60,000 / year
Savings and Investments
Description Owner/s Type Value Gross
Growth
Rate
Notes
Family
Savings -
Rainy-Day
Fund
John C
and Julia
(Joint)
Savings
Account
£21,000 1% Ring-fence £20,000 as an emergency
fund minimum balance, so not spent
in the plan.
£100/month contributions between
the Start of the plan and Julia’s
Retirement.
Julia’s ISA Julia Stock Market
ISA/Junior
ISA
£5,000 6% Contributions of £200/ month
between the Start of the plan and
Julia’s Retirement
Page 128
support.planwithvoyant.com [email protected] AdviserGo Tutorial 1, Create Your First Client Case | Page 128 Need Help?
John’s ISA John Stock Market
ISA/Junior
ISA
£5,000 6% Contributions of £200/ month
between the Start of the plan and
John’s Retirement
John’s
General
Investment
Account
John Unwrapped
Investments
£15,000
Purchase
value was
£11,000
6% £1,000/ year contributions between
the start of the plan and John’s
Retirement
Junior ISA –
Alex
Alex Stock Market
ISA/Junior
ISA
£5,000 6% Contributions of £5,000 until Alex is
18 and starts University
Junior ISA -
Martina
Martina Stock Market
ISA/Junior
ISA
£0 6% Contributions of £5,000 starting when
Martina is 12 until she is 18 and
starts University
Retirement Accounts
Description Owner/s Type Value Gross
Growth
Rate
Notes
John’s
Pension
John Money
Purchase
Pension
£150,000 6% 4% of salary personal contribution
100% employer matching up to 10%
Julia’
Pension
Julia Money
Purchase
Pension
£45,000 6% 5% of salary personal contributions
State
Pension
John State
Pension
£9,100
State
Pension
Julia State
Pension
£9,100 Deferred until age 70
Property
Description Type Value
Family Home Main Residence £525,000
Debt
Description Balance Interest Rate Payment
Mortgage on Family Home
entered in Property
£430,000 4.5%
Repayment Mortgage
£36,000 / year
Expenses
Description Owner Type Value / year
General Living Expenses Joint Basic £54,000
Travel Joint Leisure £7,000
Will go up to £14,000 at Julia’s
Retirement
Will go down to £1,500 at John’s age 75
Page 129
support.planwithvoyant.com [email protected] AdviserGo Tutorial 1, Create Your First Client Case | Page 129 Need Help?
John’s Personal Expenses John Leisure £7,200
Julia’s Personal Expenses Julia Leisure £7,200
Default Assumptions for this mock case study*
Inflation/ Growth Rates
Type Value
Inflation 2.5%
Savings Growth Rate 1%
Investment Growth Rate 6%
Property Growth Rate 2.5%
Salary Growth Rate 3%
Annuity Assumed Interest Rate 4%
Tax Table Assumptions 4%
Consumer Price Index 3%
Retail Price Index 3%
15 year Gilt Rate 6%
Nil Rate Band 4%
Life Insurance Expense 1.5%
Investment Fees
Type Rate
Investments 0.5%
Savings 0%
Tax Deferred 0.5%
Tax Free Savings Account 0.5%
Liquidation vs Savings
Liquidation order
Taxable
Tax Free
Tax Deferred
Savings Order
Tax Free
Tax Deferred
Taxable
* It is quite likely that some of the software’s initial default assumptions will differ from the position you would choose to
take out with this training. Voyant is not a data provider. In fact, other than its tax calculations and coded rules for
pensions and products, the software is designed to be data agnostic. Apart from the default market assumptions, which
in our standard UK release of the software have been kindly provided to our users by the Rayner Spencer Mills Group,
you might think of these default assumptions merely as placeholders to get you started with the software.
We encourage you and your firm to review and update these assumptions to values that you consider reasonable and
justifiable. The Plan Settings are a good place to begin as you start using AdviserGo as these assumptions will act as the
foundation for your plans.
Page 130
support.planwithvoyant.com [email protected] AdviserGo Tutorial 1, Create Your First Client Case | Page 130 Need Help?
Page 131
support.planwithvoyant.com [email protected] AdviserGo Tutorial 1, Create Your First Client Case | Page 131 Need Help?
Index
About This Guide .............................................................................................................................................. 1
An Important Note About the Numbers ........................................................................................................................... 1
Questions, Assistance? .................................................................................................................................... 1
Let's Begin – Open AdviserGo .......................................................................................................................... 2
Option 1 – Launch AdviserGo directly ............................................................................................................................... 2
Tip – Problems Logging In? ............................................................................................................................................ 2
Tip – Access Your Client List Anytime ........................................................................................................................... 3
Start New Client Case ...................................................................................................................................... 4
Tip – Importing client information from third-party integrations ............................................................................. 5
Clients – John and Julia Campbell .................................................................................................................... 6
Tip – Autosaving, AdviserGo saves as you go .............................................................................................................. 6
John Campbell ..................................................................................................................................................................... 6
Tip – How to switch on inline help ................................................................................................................................ 7
The Dashboard ................................................................................................................................................. 8
Let’s Continue – Enter Details About the Campbell Family............................................................................ 9
Julia Campbell ...................................................................................................................................................................... 9
Martina Campbell ............................................................................................................................................................. 10
Tip - Colour Coding ....................................................................................................................................................... 10
Alex Campbell .................................................................................................................................................................... 10
Carryover Assumptions ................................................................................................................................. 12
Plan Settings ................................................................................................................................................... 13
Tip - About Default Plan Settings ................................................................................................................................ 13
Plan Settings Define the Software’s Default Assumptions ........................................................................................... 14
A Quick Check for Matching Default Settings (Plus a Few Minor Changes) ................................................................ 15
Default Inflation / Growth Rates ..................................................................................................................................... 15
Tip – More About the Inflation, Growth Settings ...................................................................................................... 15
Default Account Fees and Taxation Settings .................................................................................................................. 16
Tip – More About the Fees & Taxation Settings......................................................................................................... 16
Default Liquidation Order ................................................................................................................................................ 17
Tip – More About the Default Liquidation Order ...................................................................................................... 17
Default Savings Order....................................................................................................................................................... 18
Tip – More About the Default Savings Order ............................................................................................................. 18
Page 132
support.planwithvoyant.com [email protected] AdviserGo Tutorial 1, Create Your First Client Case | Page 132 Need Help?
Calculation Settings .......................................................................................................................................................... 19
Tip – More About the Software’s Calculation Settings .............................................................................................. 19
The Planning Timeline ................................................................................................................................... 20
About the Timeline ........................................................................................................................................................... 20
Adding Events to the Timeline ......................................................................................................................................... 21
Use the Plus (+) Menu to Add an Event for a Future Purchase – John’s Sports Car .................................................... 21
Tip – Editing Events ...................................................................................................................................................... 24
Double-Click to Add an Event for a Future Celebration – Martina’s Wedding ............................................................ 24
Employment Income ...................................................................................................................................... 27
Enter John's Employment ................................................................................................................................................. 28
Tip – Salary, Enter Gross Earnings .............................................................................................................................. 28
Timing – Schedule the Beginning and End of John’s Income ........................................................................................ 29
View the Plan as You Build It on the Dashboard ............................................................................................................ 30
Cash Flow - The Need Line ............................................................................................................................................... 31
Escalating Future Incomes and Expenditures ................................................................................................................ 31
Charts – Move Your Cursor Over the Chart to See the Year’s Overview, Yearly Totals .............................................. 32
View the Numbers Behind the Charts - Access the Yearly Chart Details .................................................................... 33
Tip – Escalating Future Tax Bands and Allowances................................................................................................... 34
Switch Off the Chart Details View and Return to the Dashboard ................................................................................ 35
Enter Julia’s Employment ................................................................................................................................................. 35
Timing – Schedule the Beginning and End of Julia’s Income ......................................................................................... 37
Goals and Expenses ....................................................................................................................................... 40
What is the Difference Between a Goal and an Expense? ............................................................................................ 40
Milestone Goal – Enter Martina’s Wedding .................................................................................................................... 41
Tip – Introducing the Light Blue “Basic Need” Line ................................................................................................... 45
Milestone Goal – Enter the Purchase of John’s Sports Car ............................................................................................ 46
Education Goals – Enter Education Goals for Alex and Martina ................................................................................... 50
Alex’s University Goal ....................................................................................................................................................... 50
Tip – Modelling Longer Degree Programmes or Other Education Costs ................................................................ 53
Martina’s University Goal ................................................................................................................................................. 54
Expenses ............................................................................................................................................................................ 58
Categories of Expenses (and Goals) ................................................................................................................................ 58
Tip – Don’t Double Account, Some Expenses Are Created Automatically .............................................................. 58
The Campbells’ Basic Expenses ....................................................................................................................................... 59
Tip – Consider Replacing Current Spending with a Future Retirement Spending Goal at Retirement ................ 61
Personal Expenses ............................................................................................................................................................ 64
Tip – Why Enter Personal Expenses Separately? ....................................................................................................... 64
Page 133
support.planwithvoyant.com [email protected] AdviserGo Tutorial 1, Create Your First Client Case | Page 133 Need Help?
John’s Personal Expenses ................................................................................................................................................. 64
Julia’s Personal Expenses ................................................................................................................................................. 66
Leisure Expense – Travel .................................................................................................................................................. 67
Stepping Future Travel Spending Up and Down ............................................................................................................ 69
Cash Sweep Accounts .................................................................................................................................... 77
What is a Cash Sweep Account? ...................................................................................................................................... 77
Savings ............................................................................................................................................................ 79
Joint Savings Account – John and Julia’s Rainy-Day Fund .............................................................................................. 79
Tip – Joint ownership of savings accounts ................................................................................................................... 80
Tip – Names, Make Them Personal, But Not Too Personal ......................................................................................... 80
Tip – Options for Setting the Interest Rate on Savings Accounts ............................................................................ 81
Tip – What are Withdrawal Limits? ............................................................................................................................... 84
Investments .................................................................................................................................................... 87
John and Julia’s ISAs .......................................................................................................................................................... 87
Julia’s ISA ............................................................................................................................................................................ 87
John’s ISA ............................................................................................................................................................................ 91
University Savings for Alex and Martina - Junior ISAs ................................................................................................... 92
Alex’s Junior ISA ................................................................................................................................................................. 93
Martina’s Junior ISA........................................................................................................................................................... 95
Tip – Account Balances of Planned Future Investments ............................................................................................. 96
John’s General Investment Account (GIA) ..................................................................................................................... 100
Retirement Savings - Money Purchase Pensions ....................................................................................... 103
John's Employer Sponsored Pension ............................................................................................................................. 104
Tip - Options for Calculating the Future Rate of Return on Investments ............................................................. 106
Timing – Schedule the Beginning and End of John’s Pension Contributions ............................................................. 107
Julia's Personal Pension .................................................................................................................................................. 108
Tip – How will income be taken from these money purchases in retirement? .................................................... 109
State Pension Benefits ................................................................................................................................. 110
John's State Pension Benefit .......................................................................................................................................... 110
Julia's State Pension Benefit .......................................................................................................................................... 111
Property / Assets .......................................................................................................................................... 112
Debts ............................................................................................................................................................. 114
Check your Entries ....................................................................................................................................... 116
Let's See – View the Campbell’s plan after data entry ............................................................................... 124
Page 134
support.planwithvoyant.com [email protected] AdviserGo Tutorial 1, Create Your First Client Case | Page 134 Need Help?
Job Well Done! .............................................................................................................................................. 126
Where to find more information, additional resources, and assistance .................................................. 126
What’s Next .................................................................................................................................................. 126
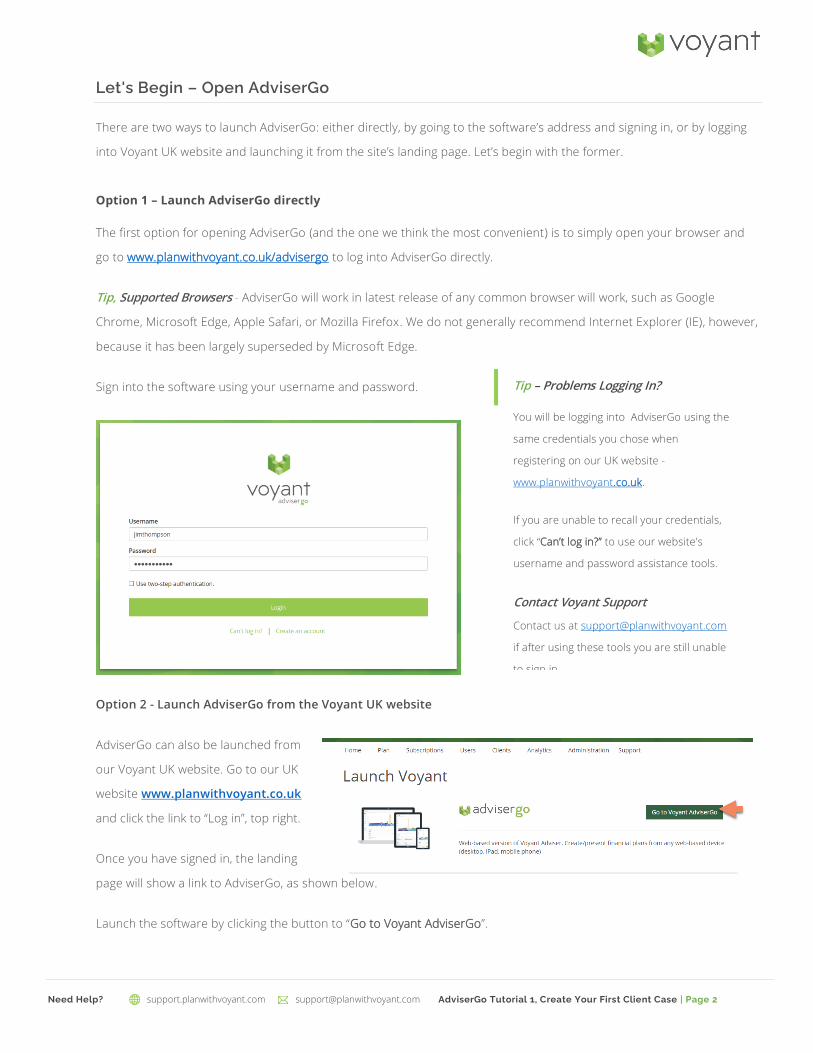


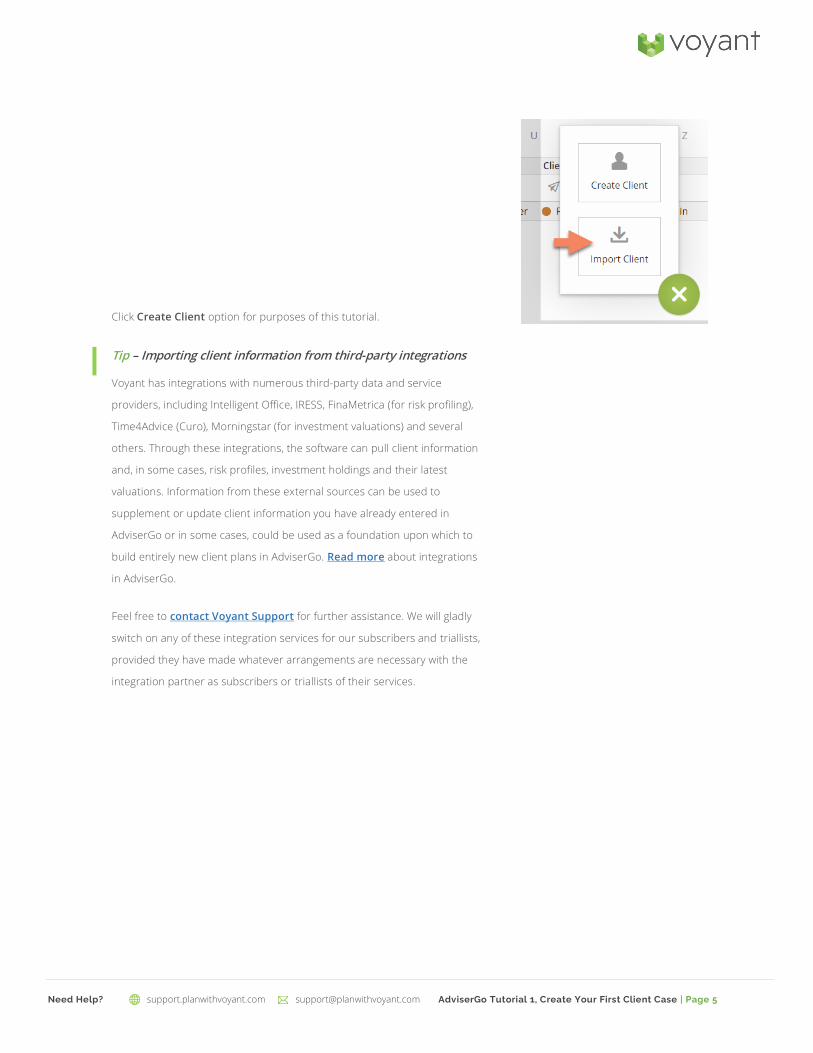


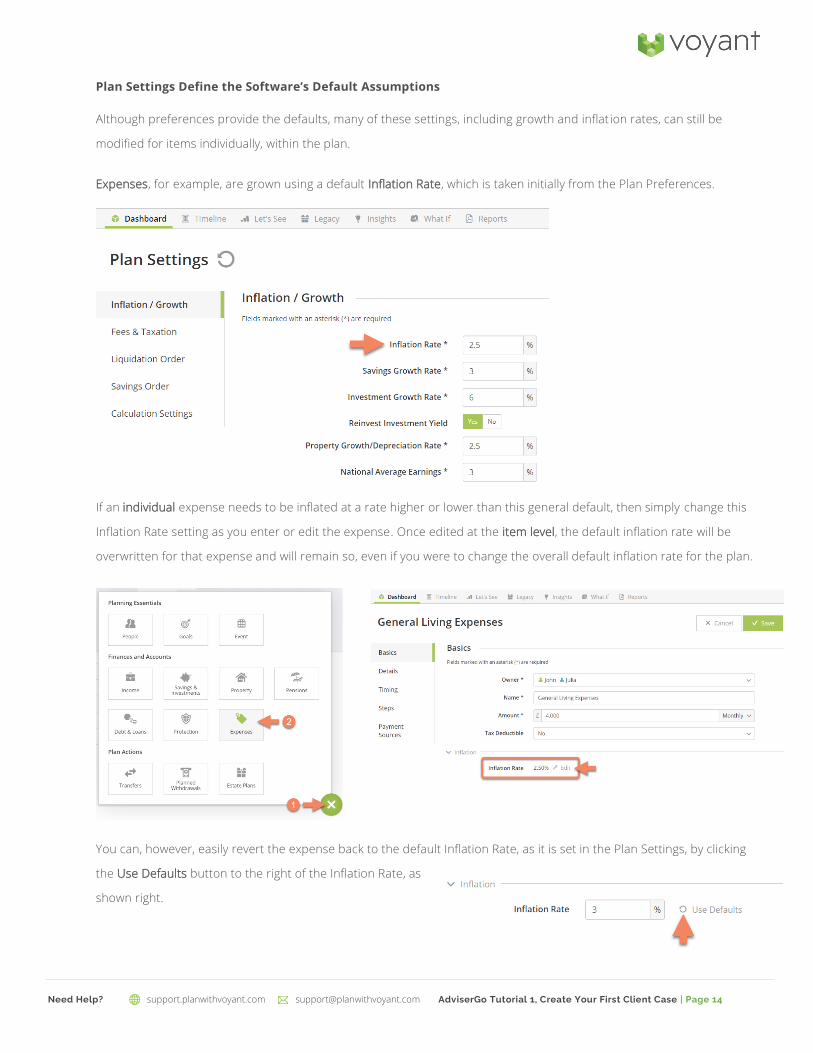
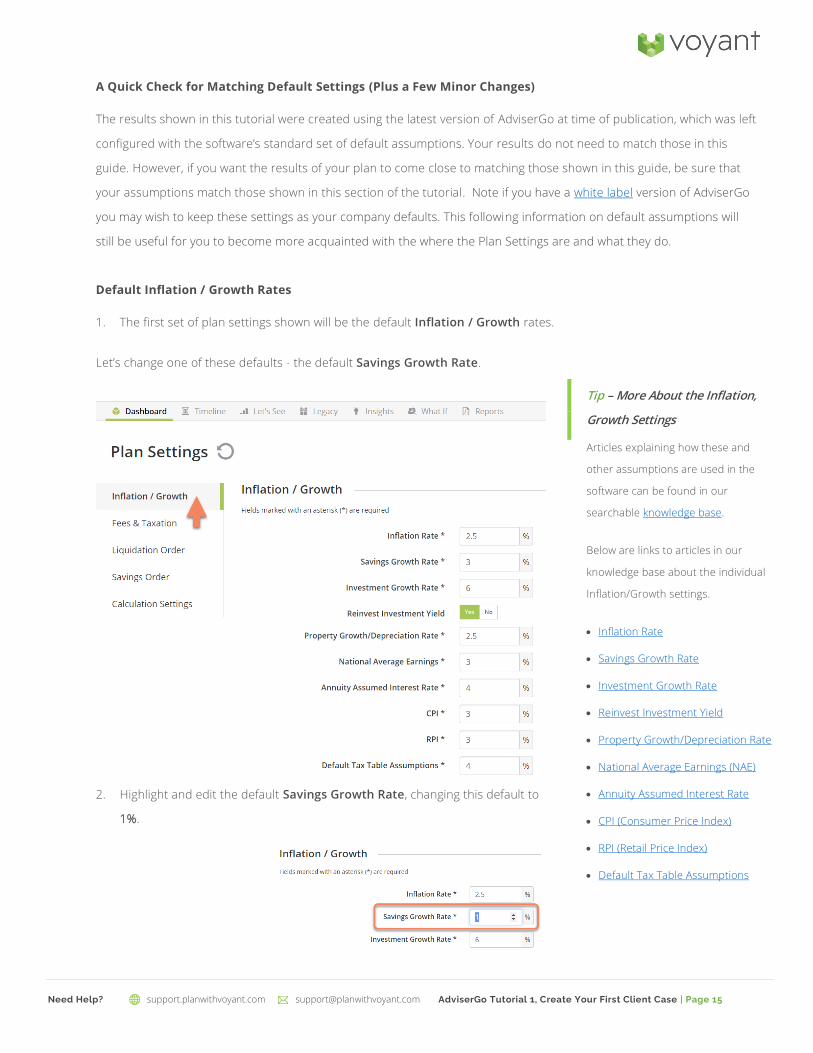


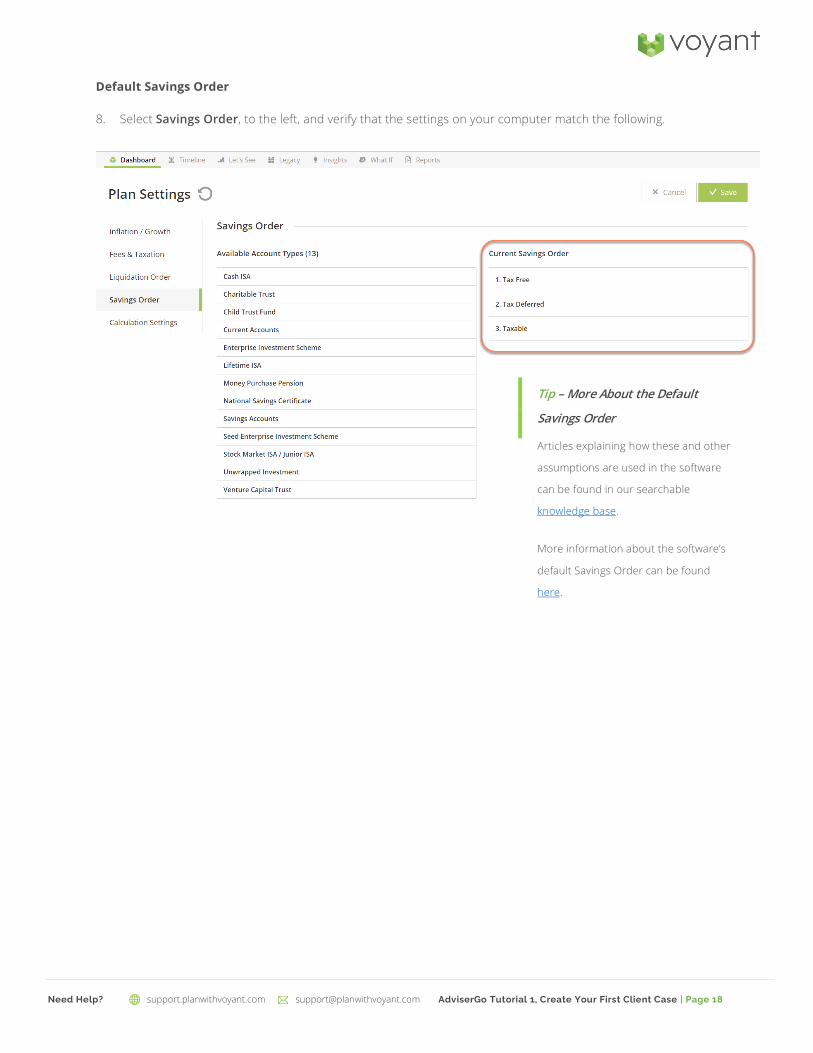
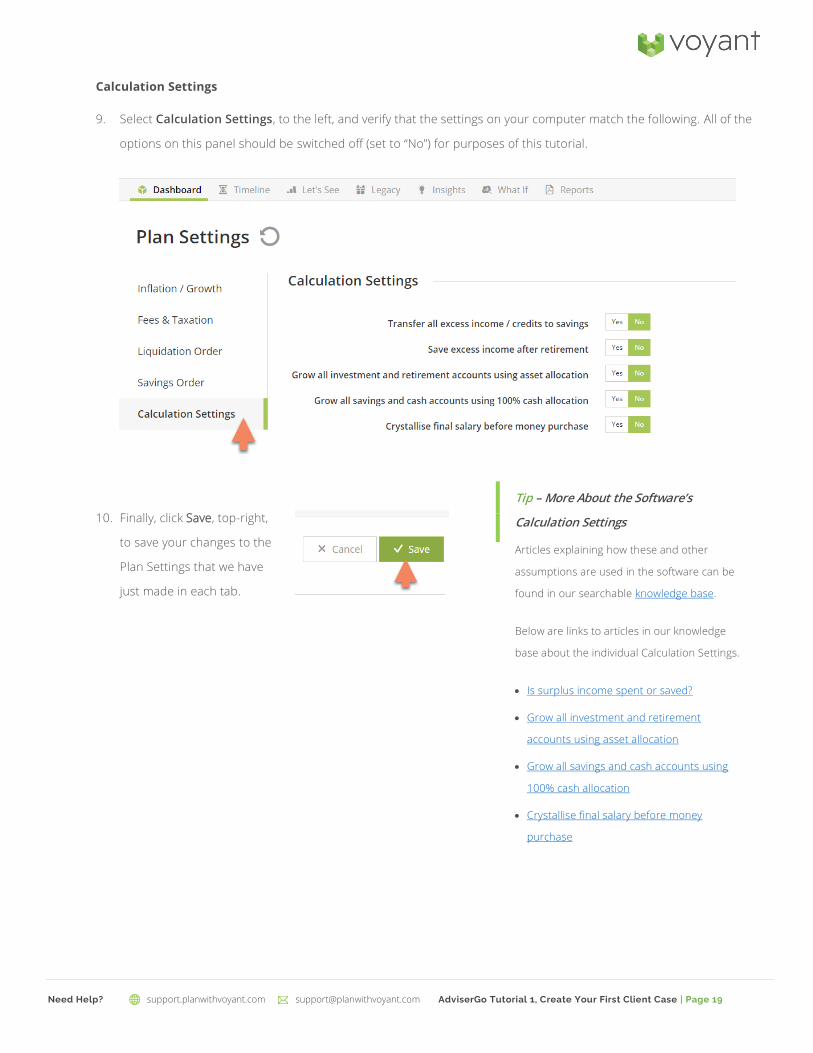

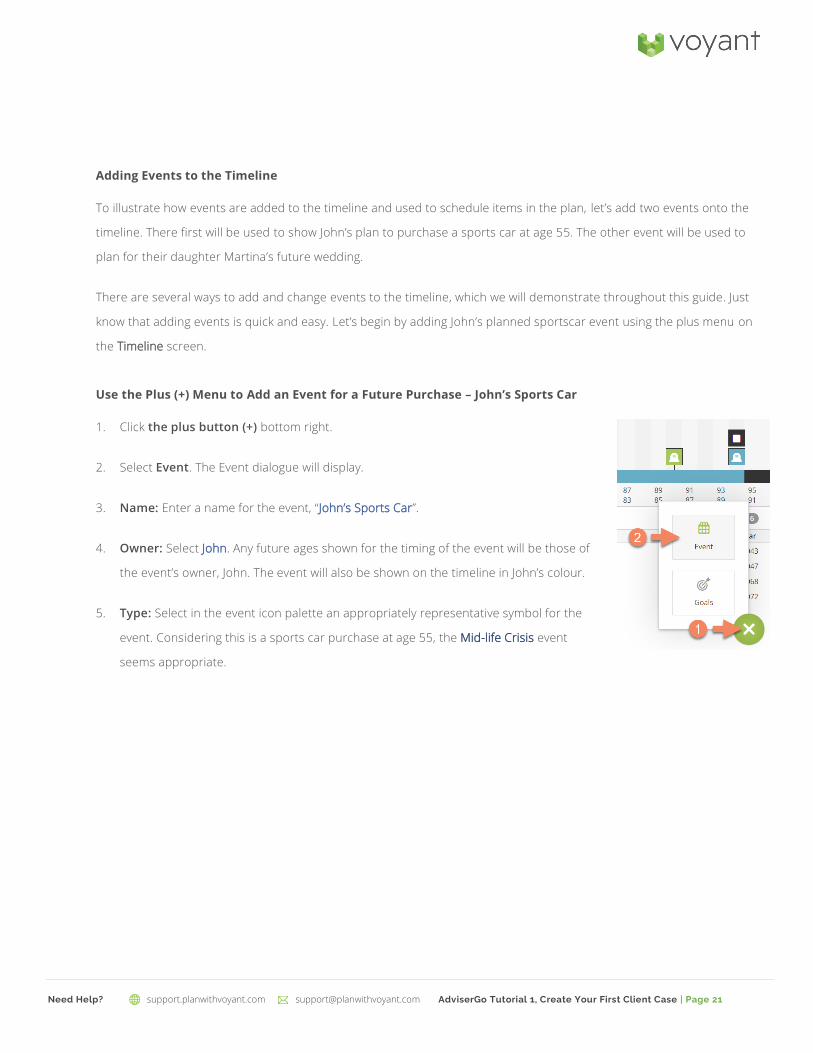
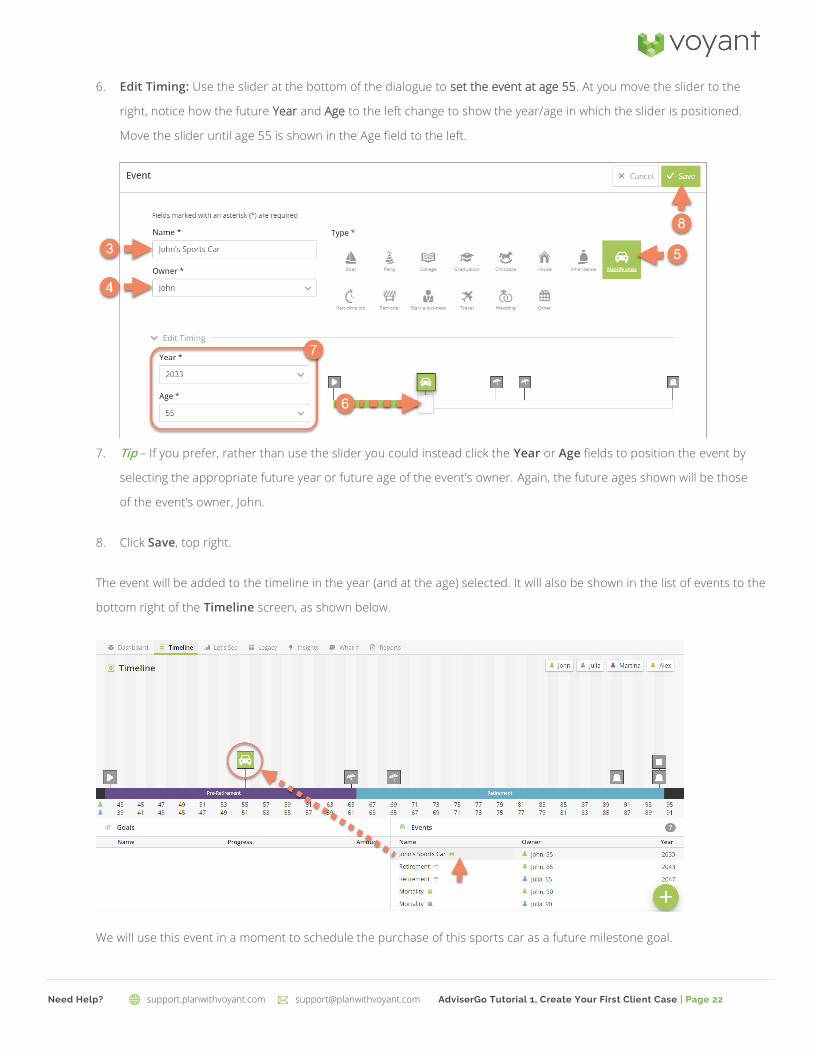


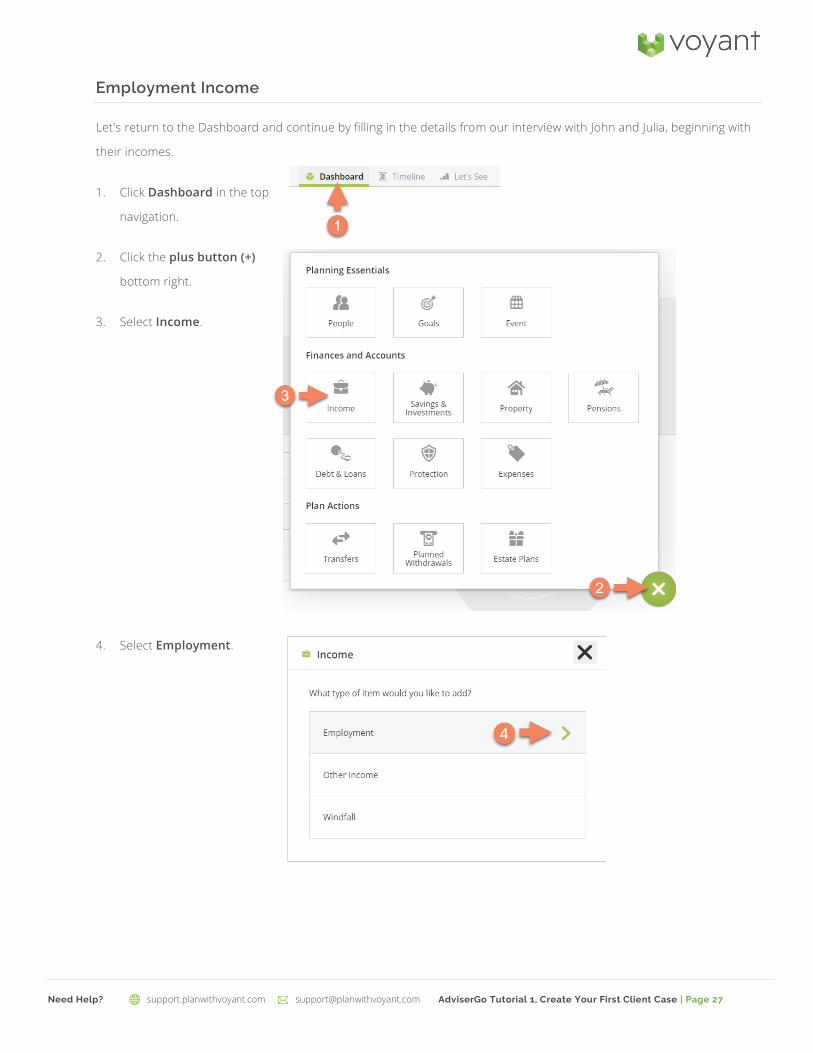
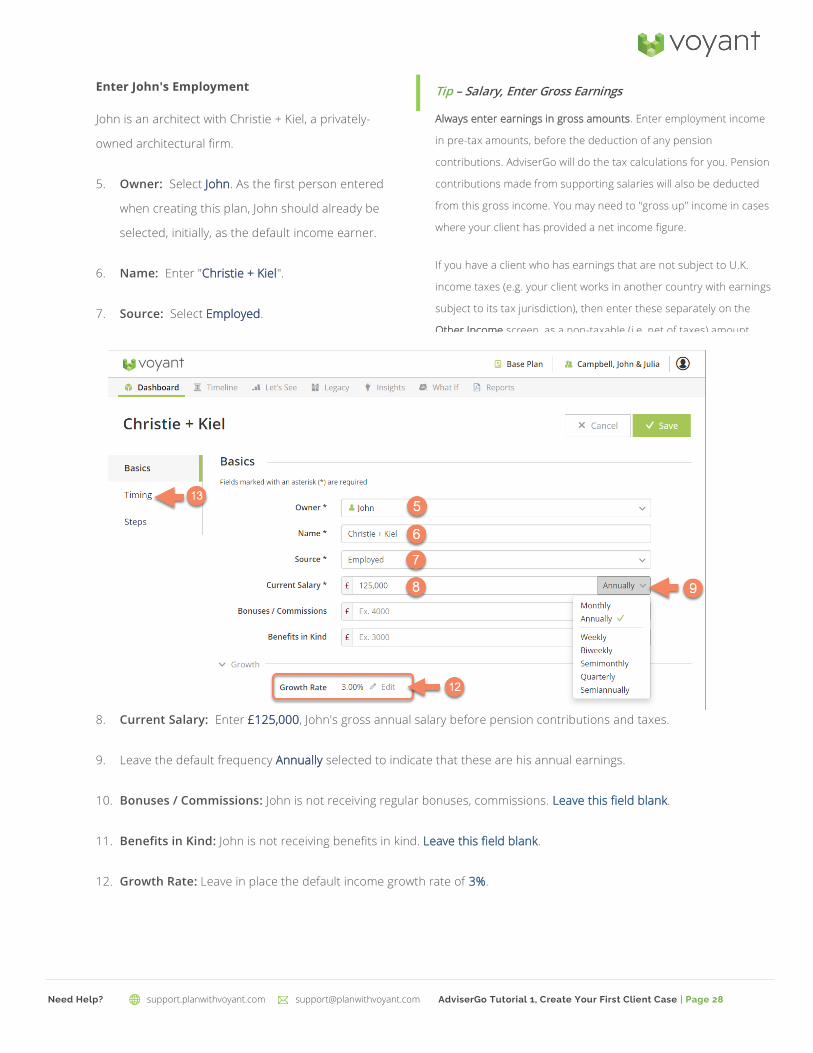
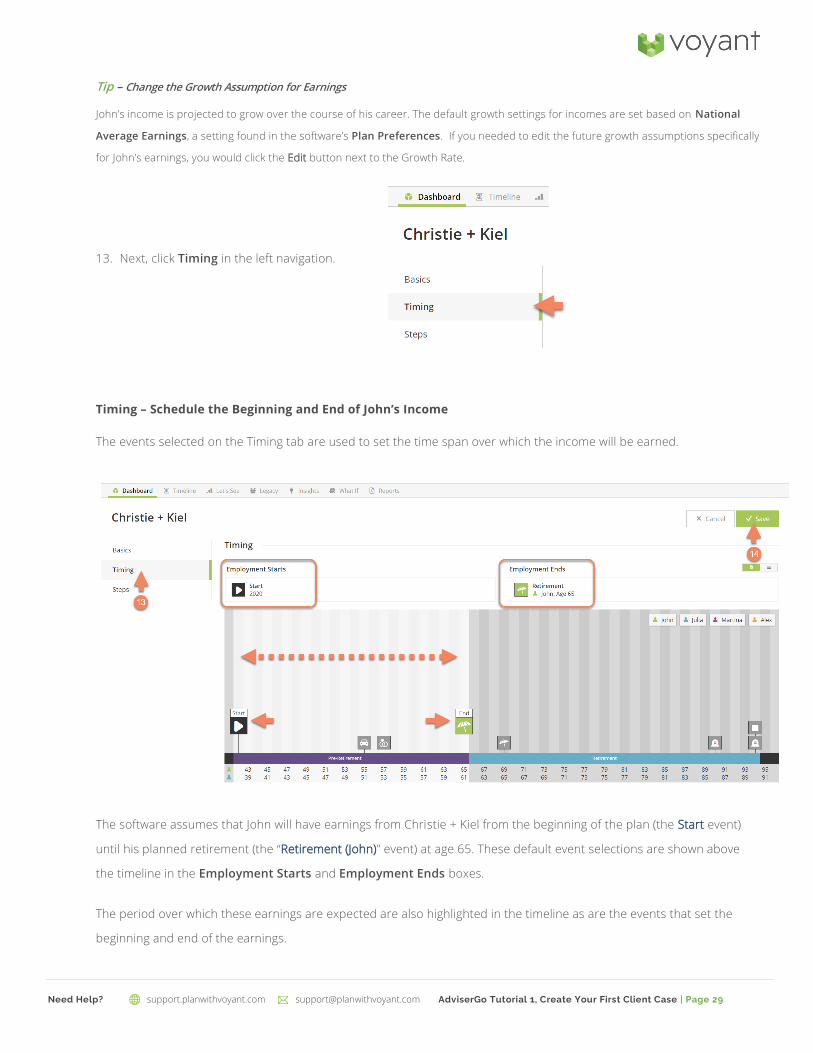
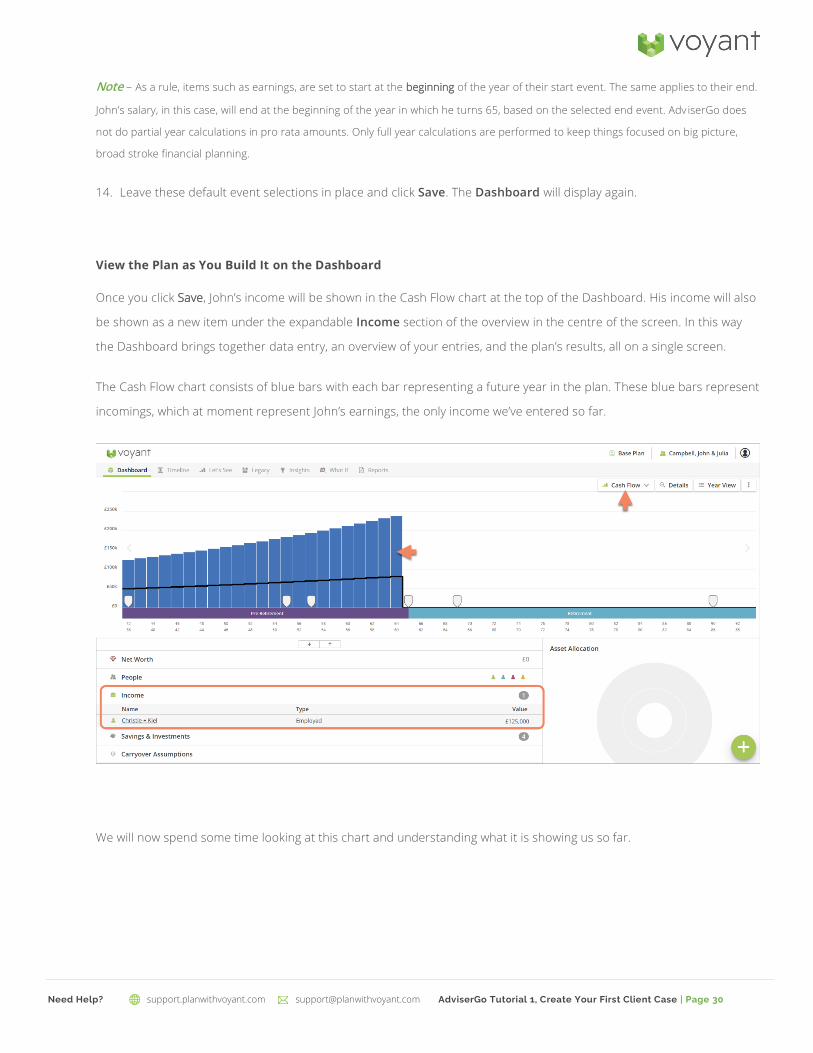

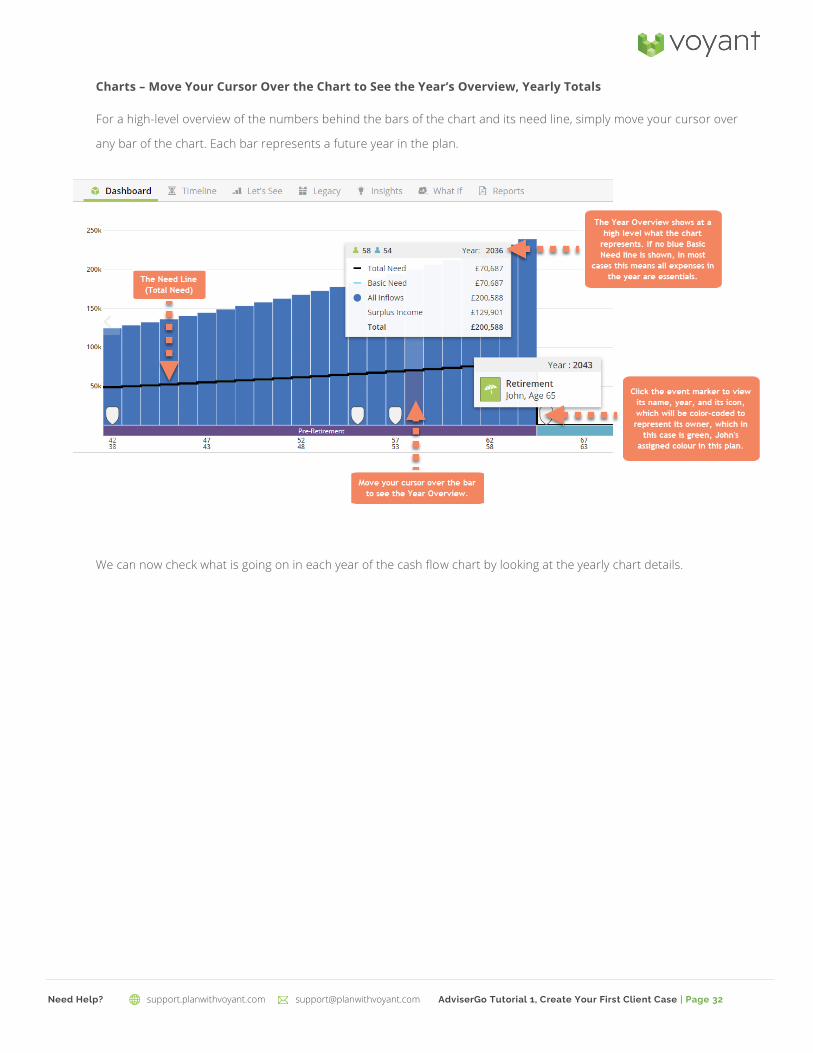

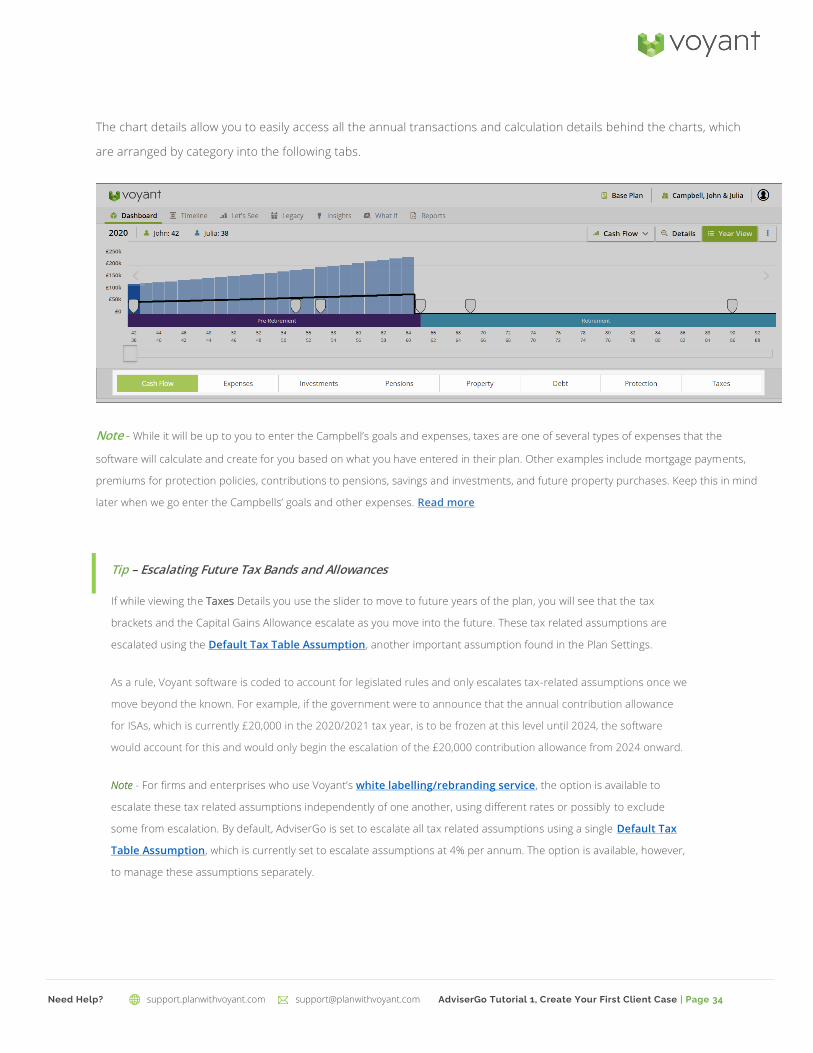


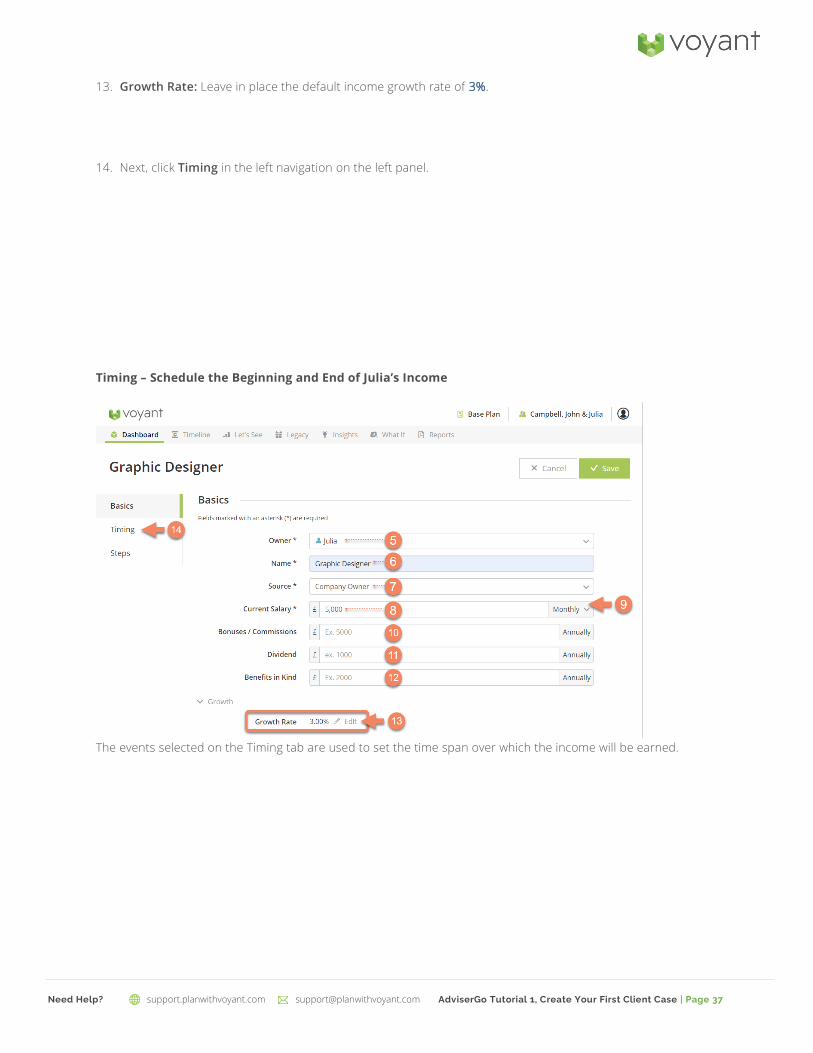


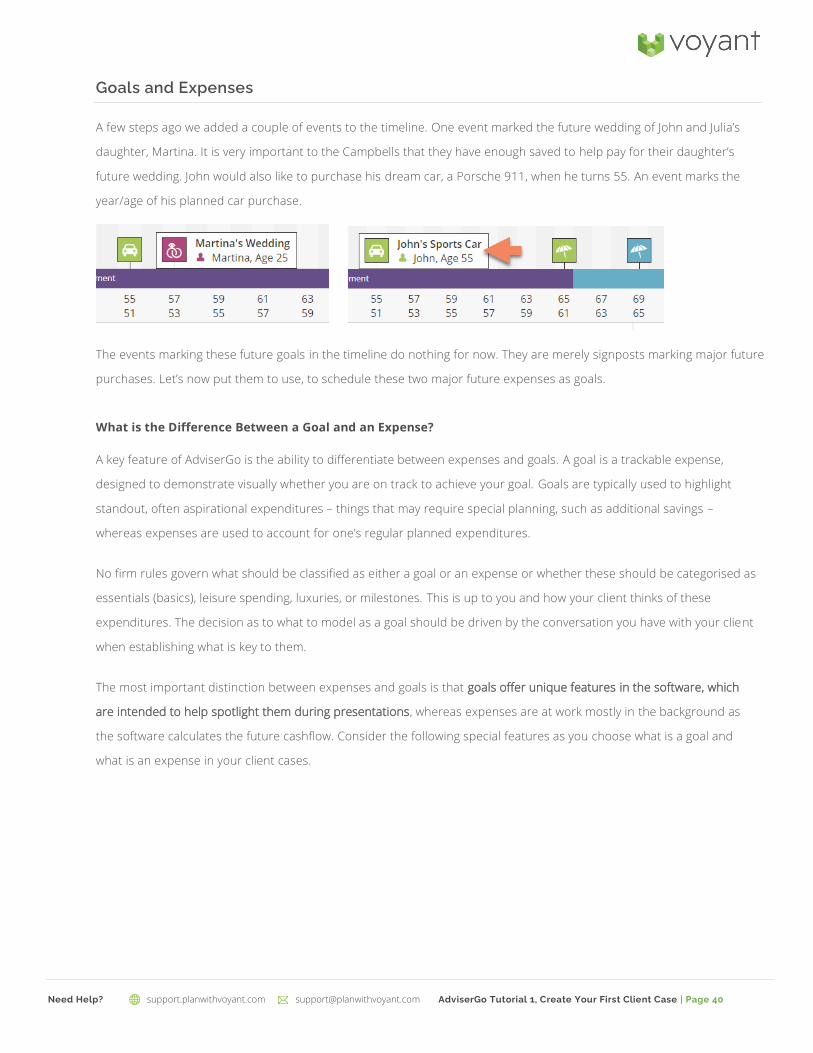

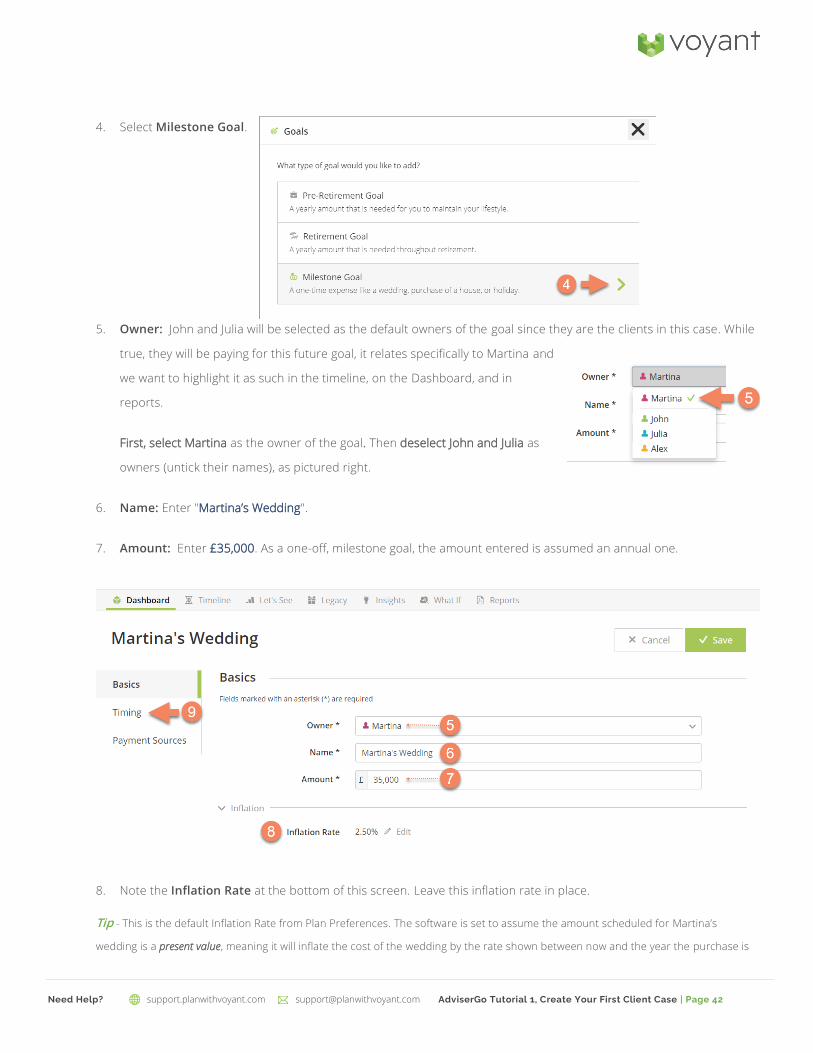


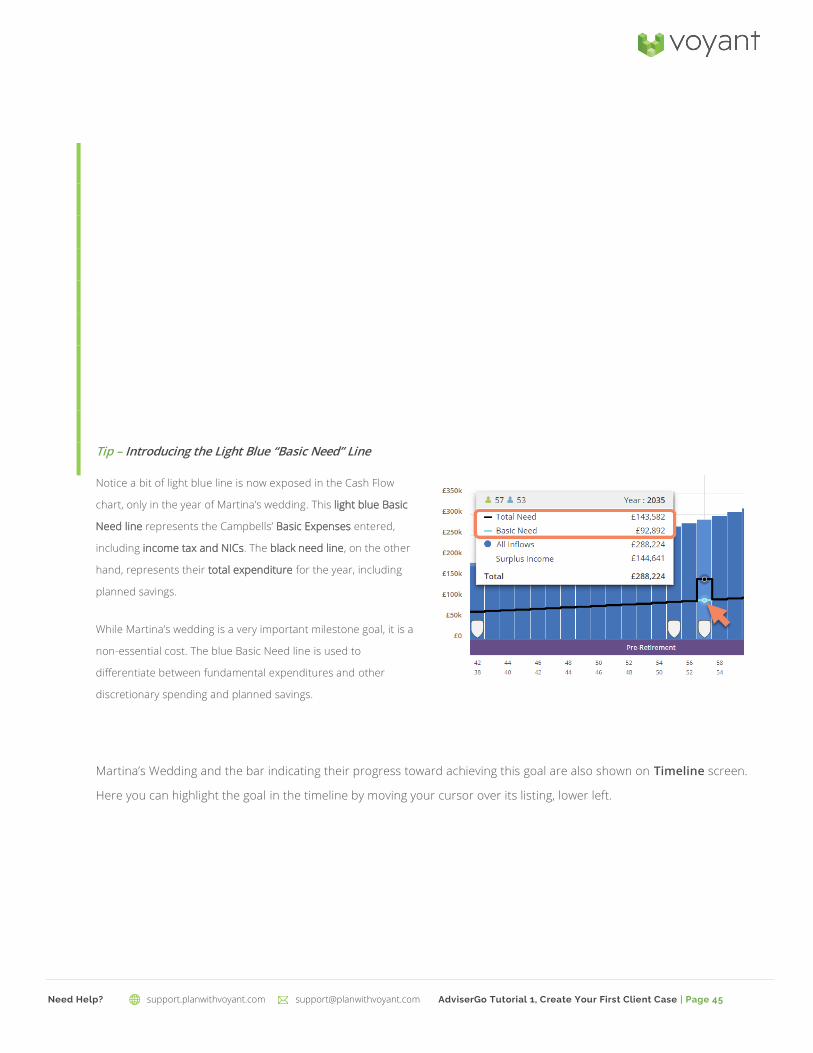
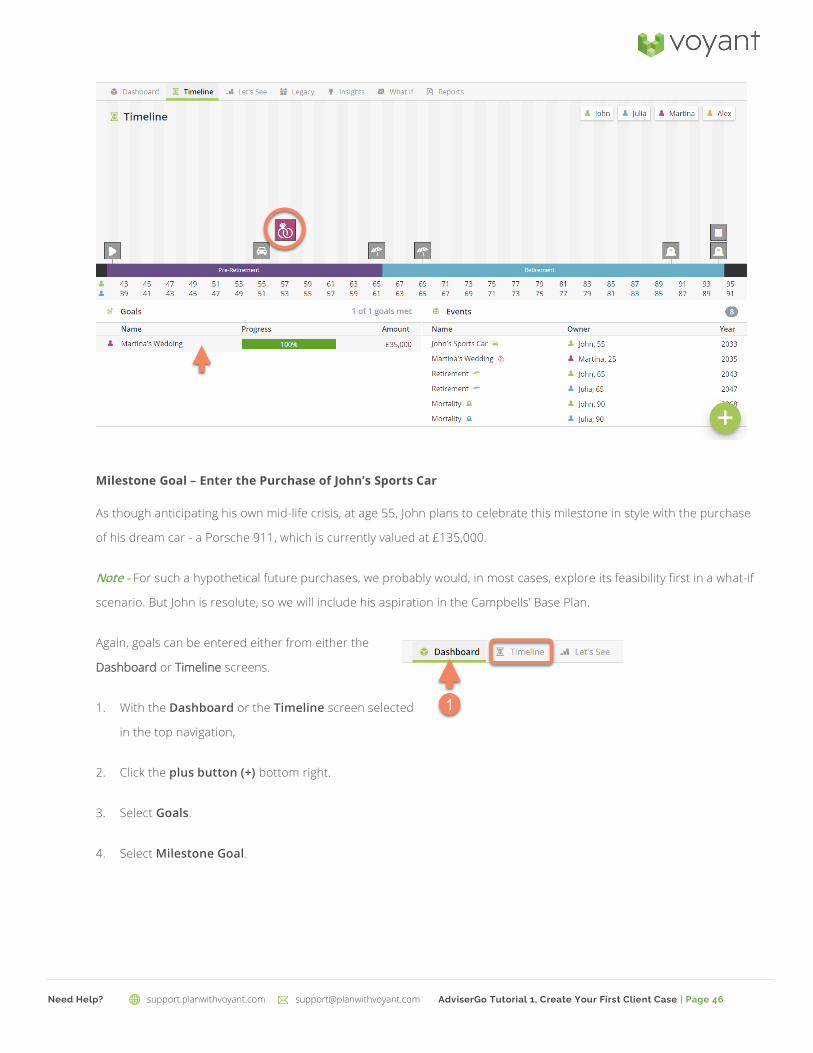

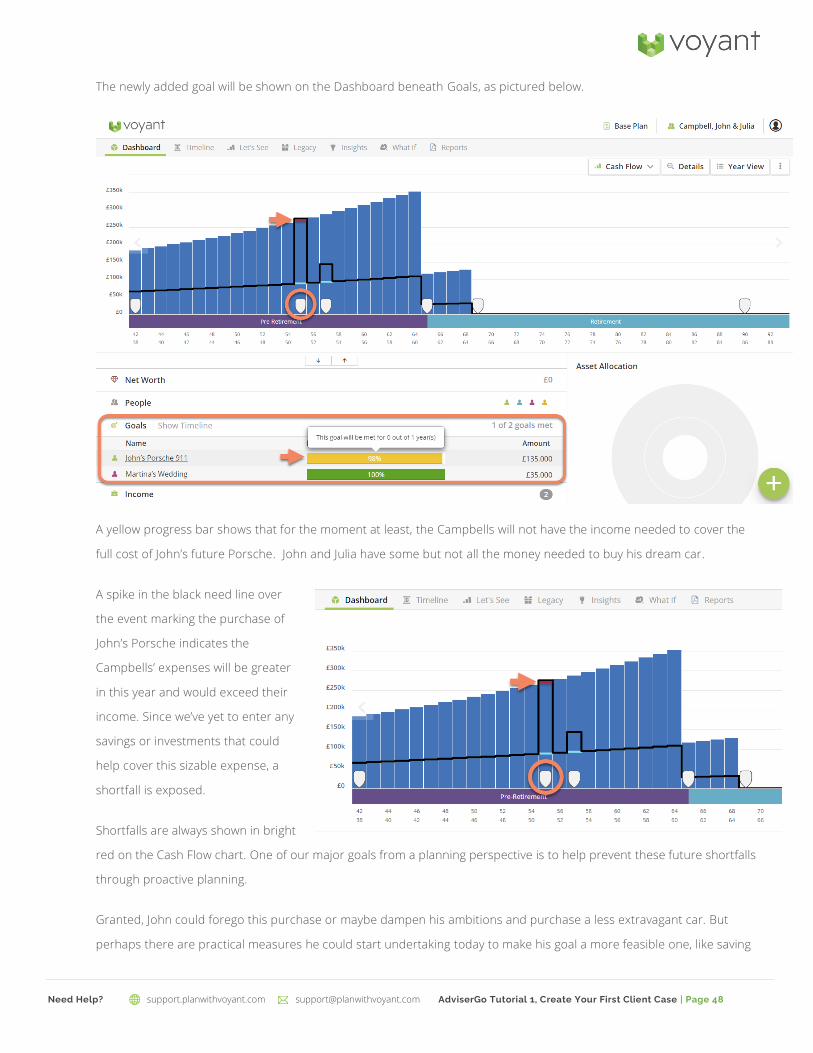


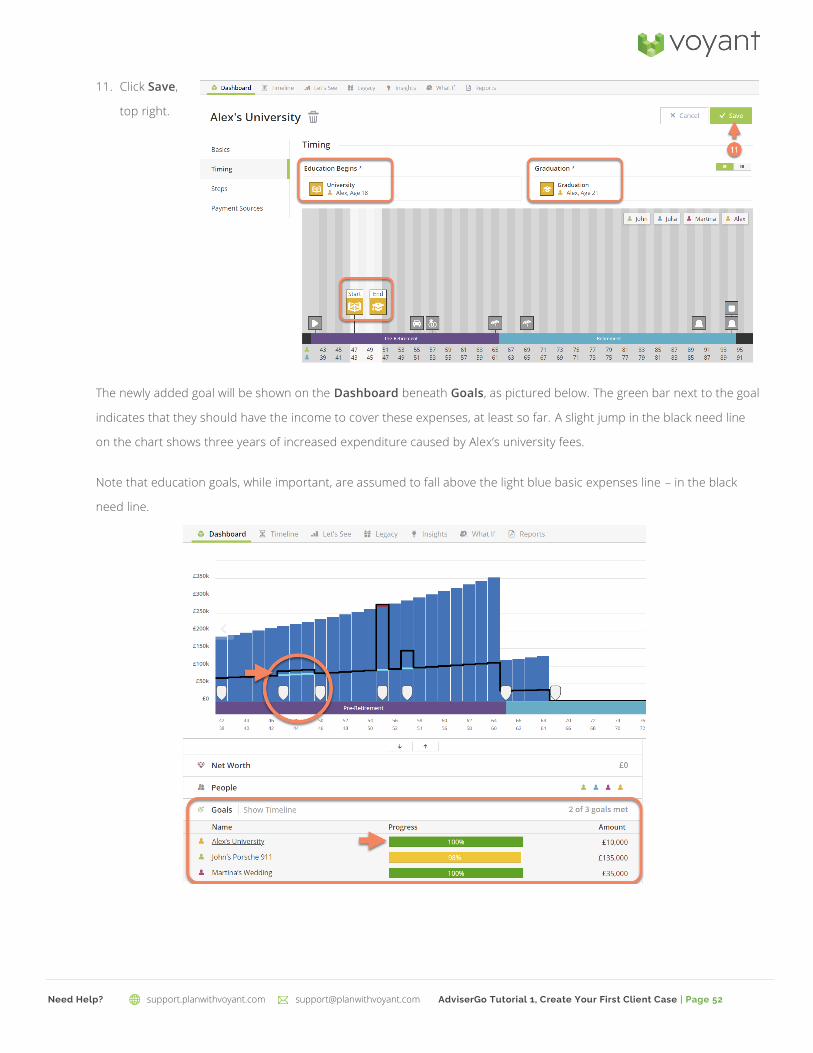


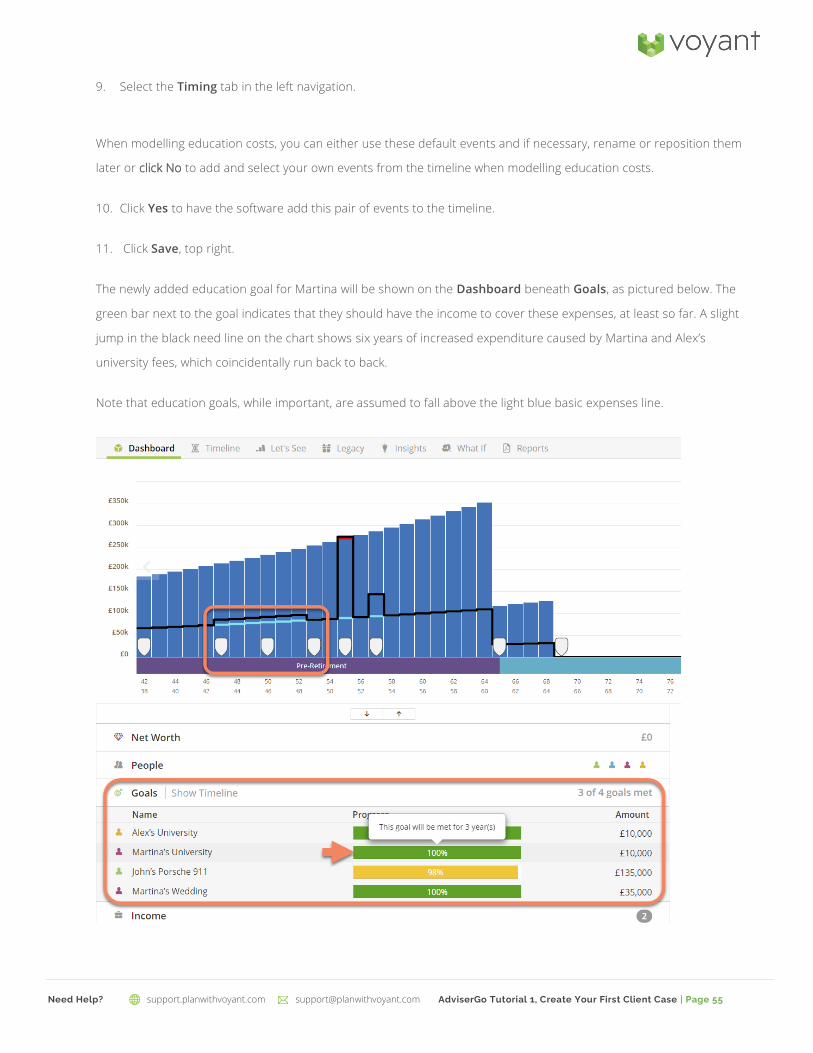


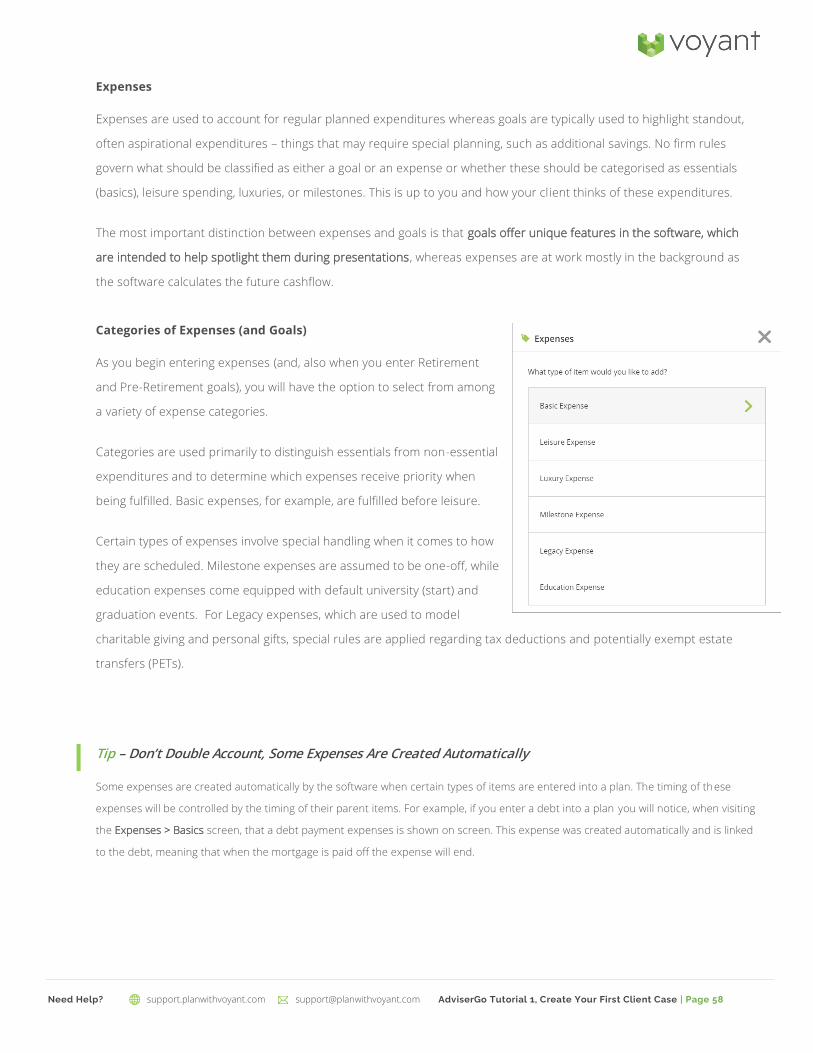
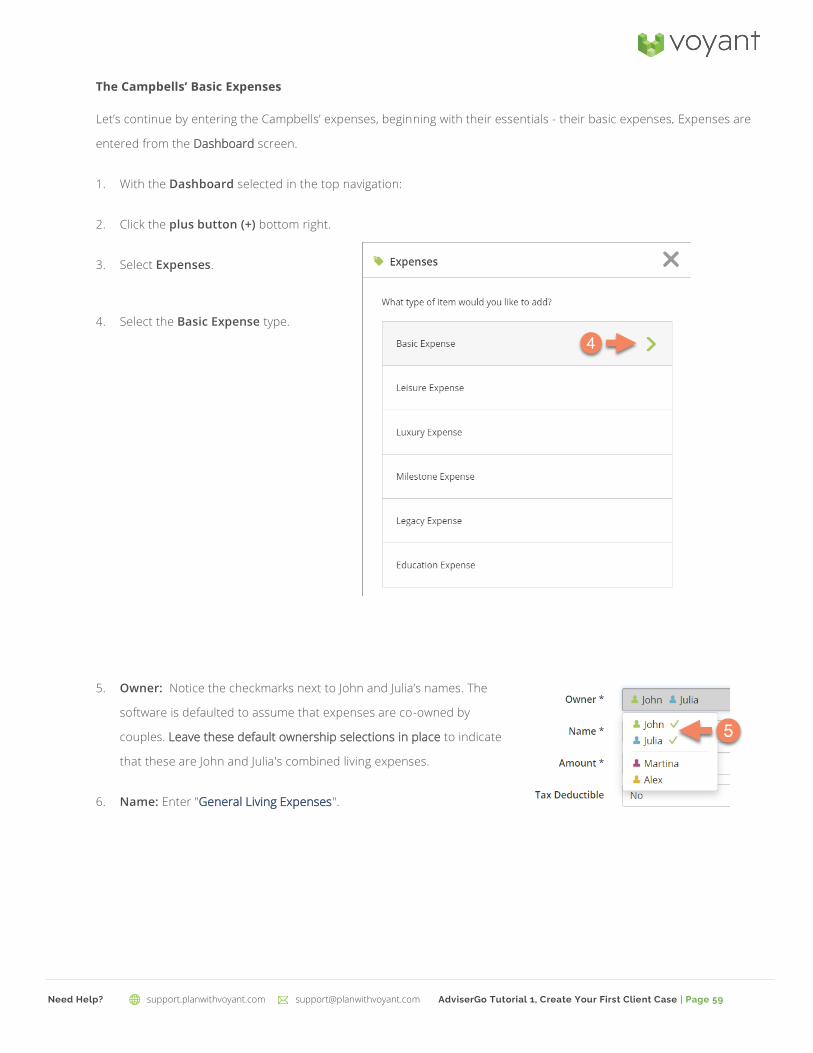

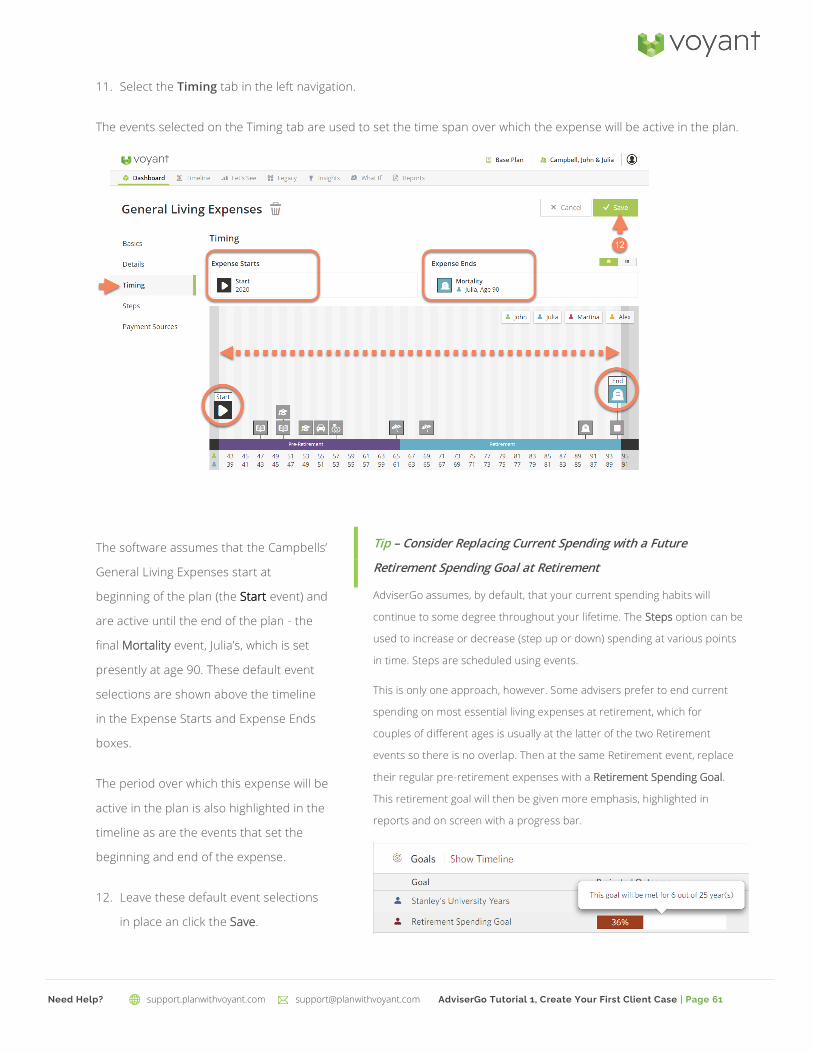


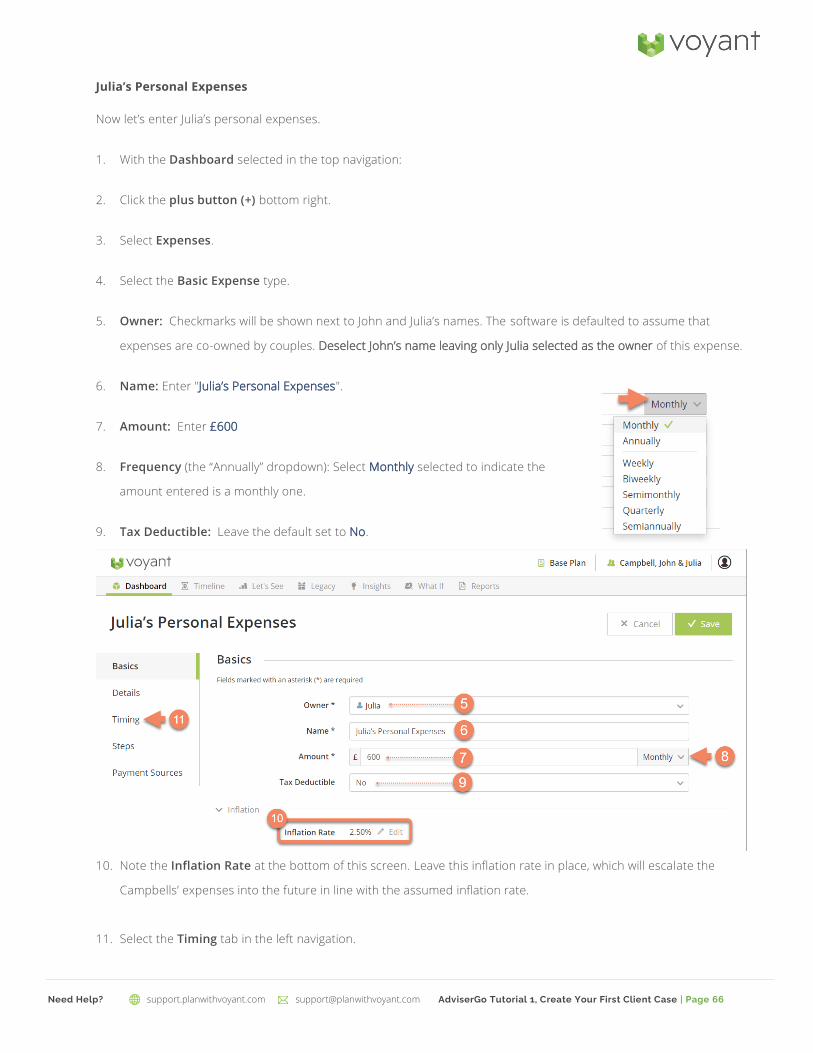
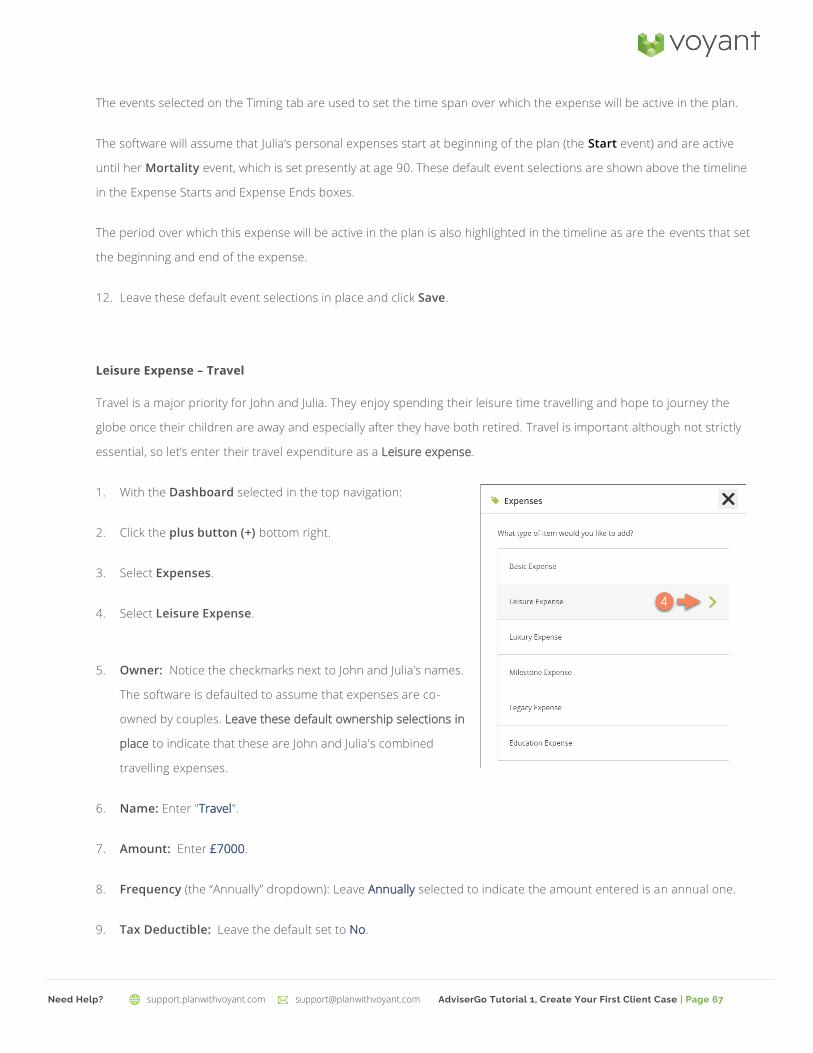
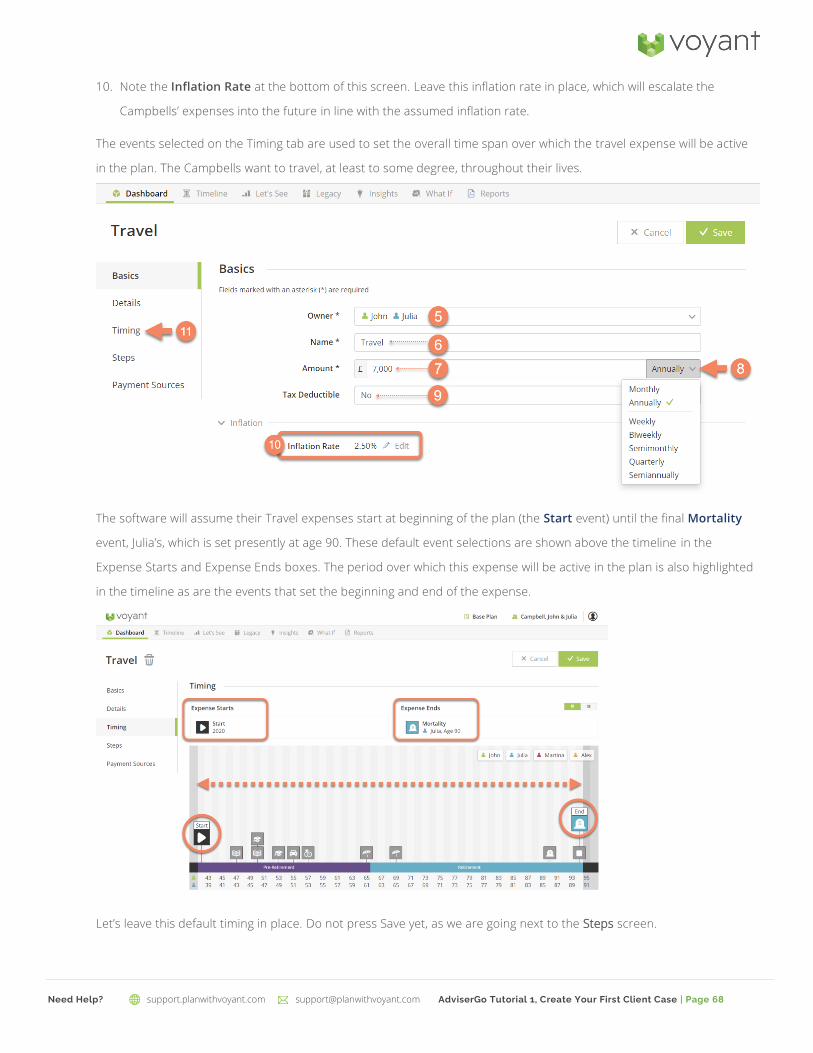

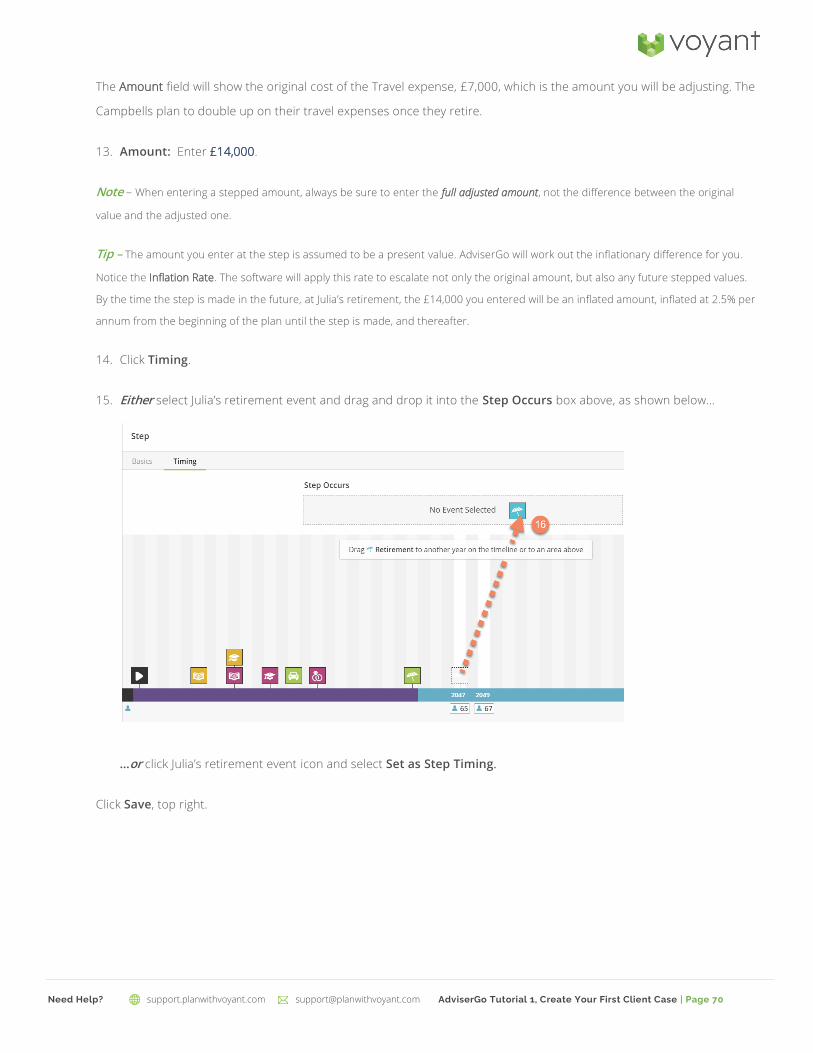
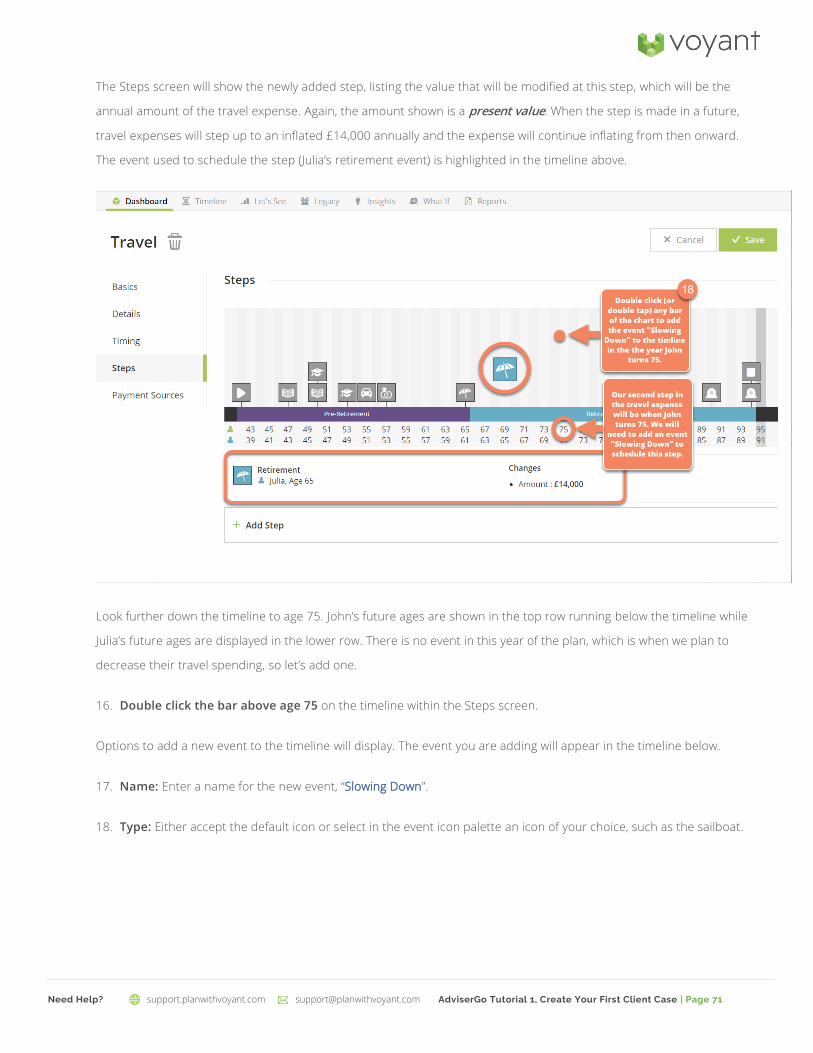
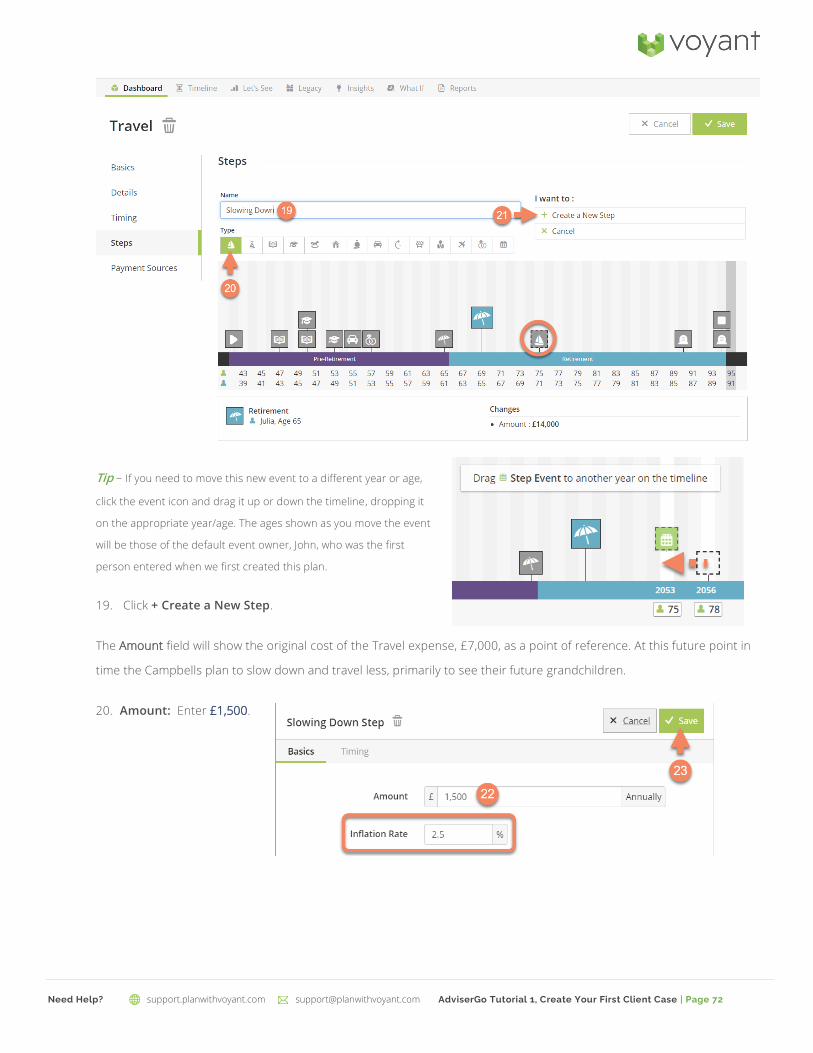
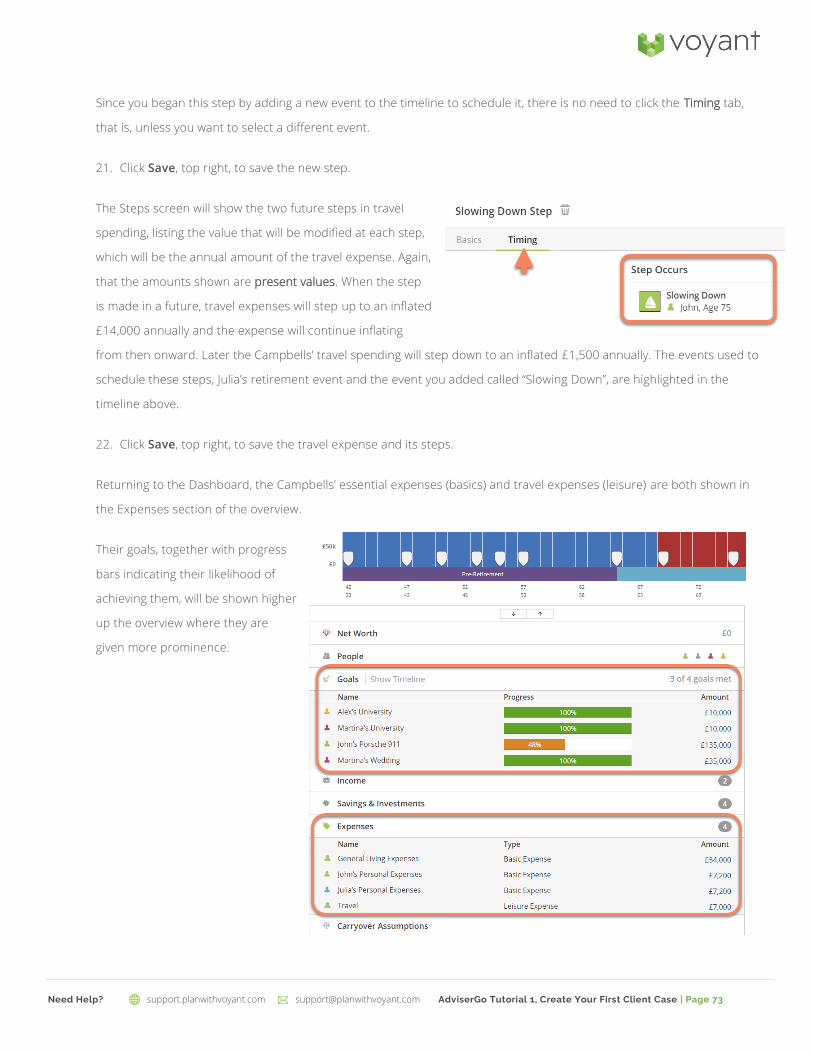


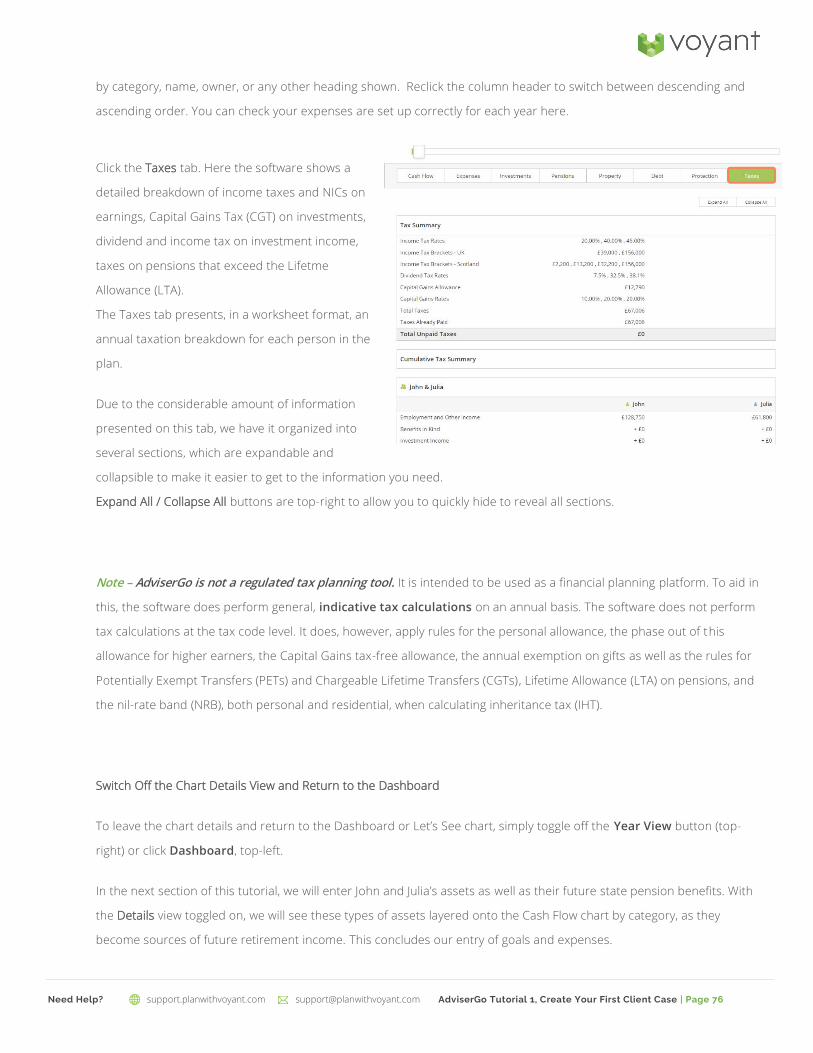
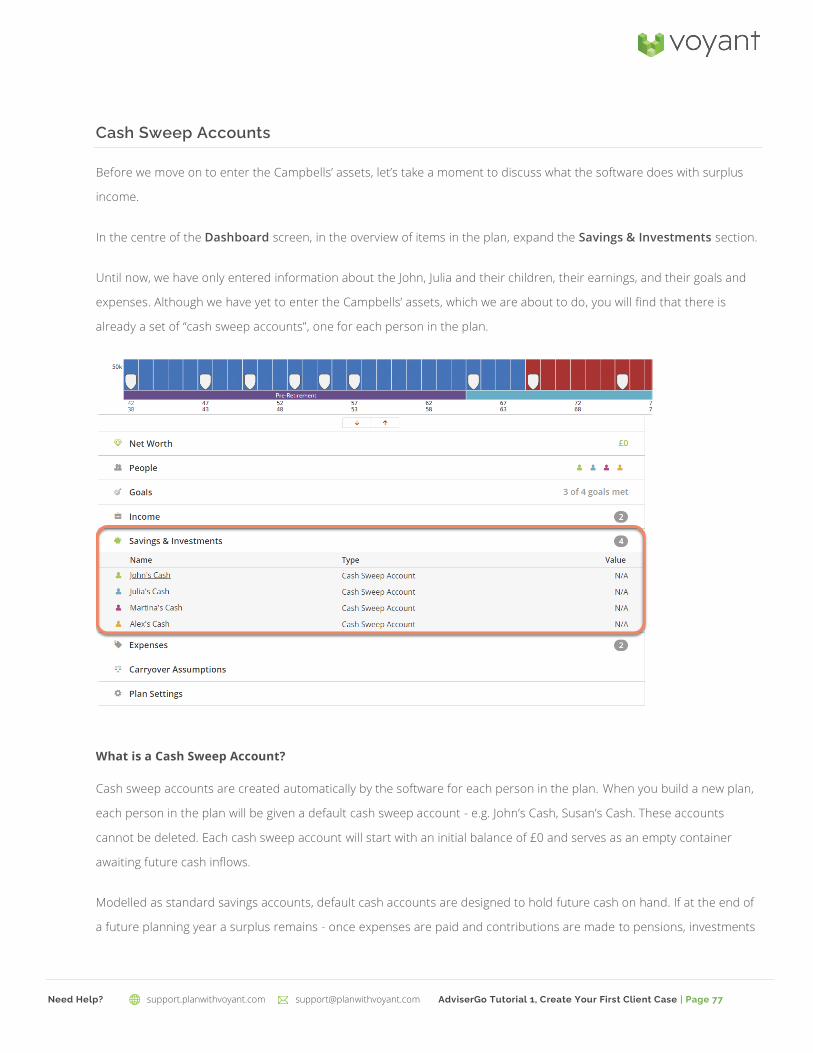

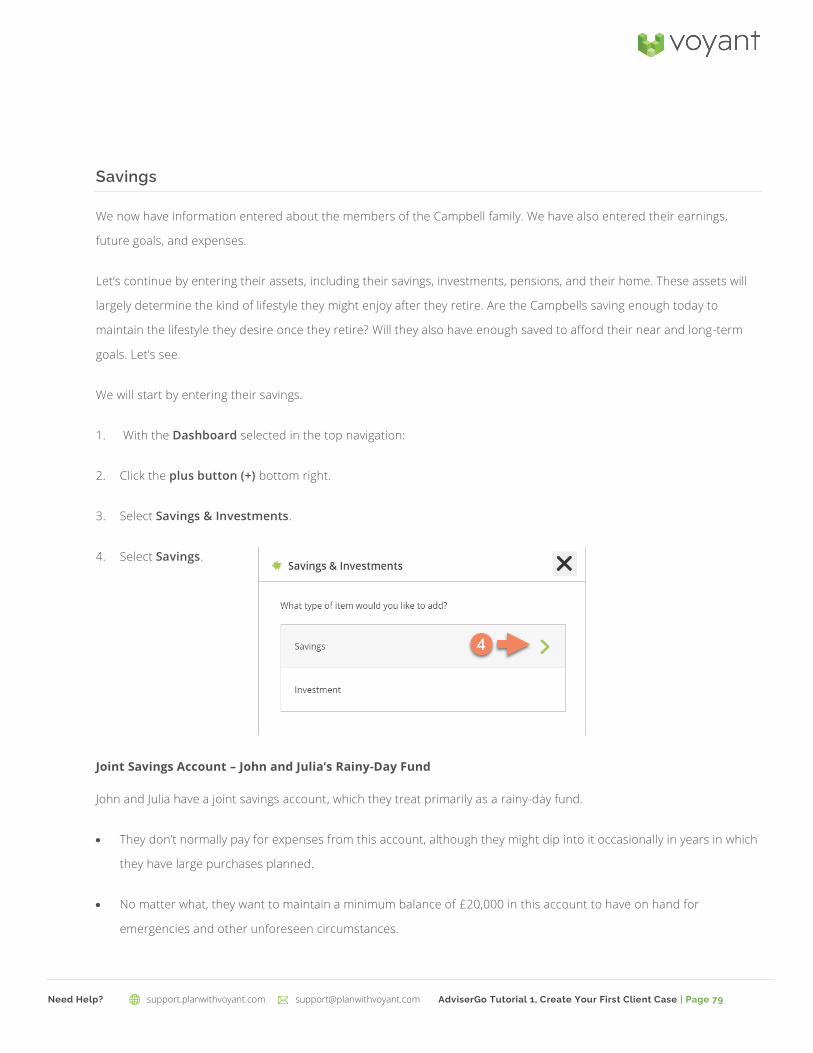
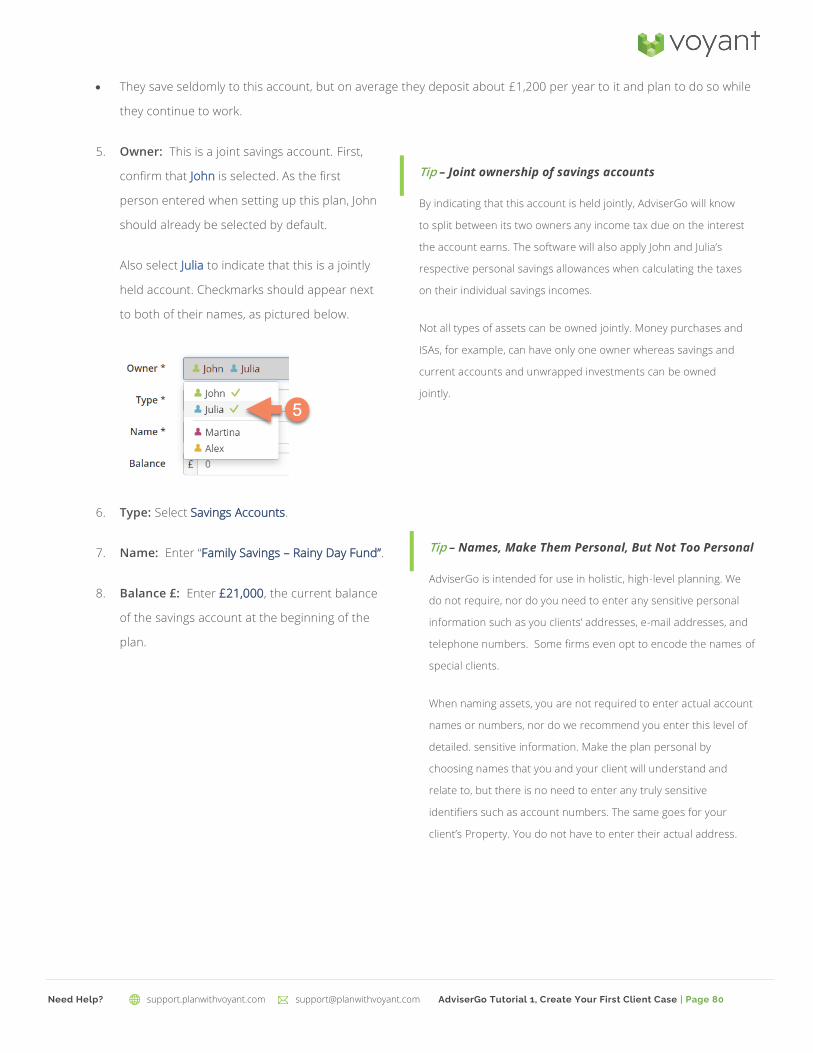


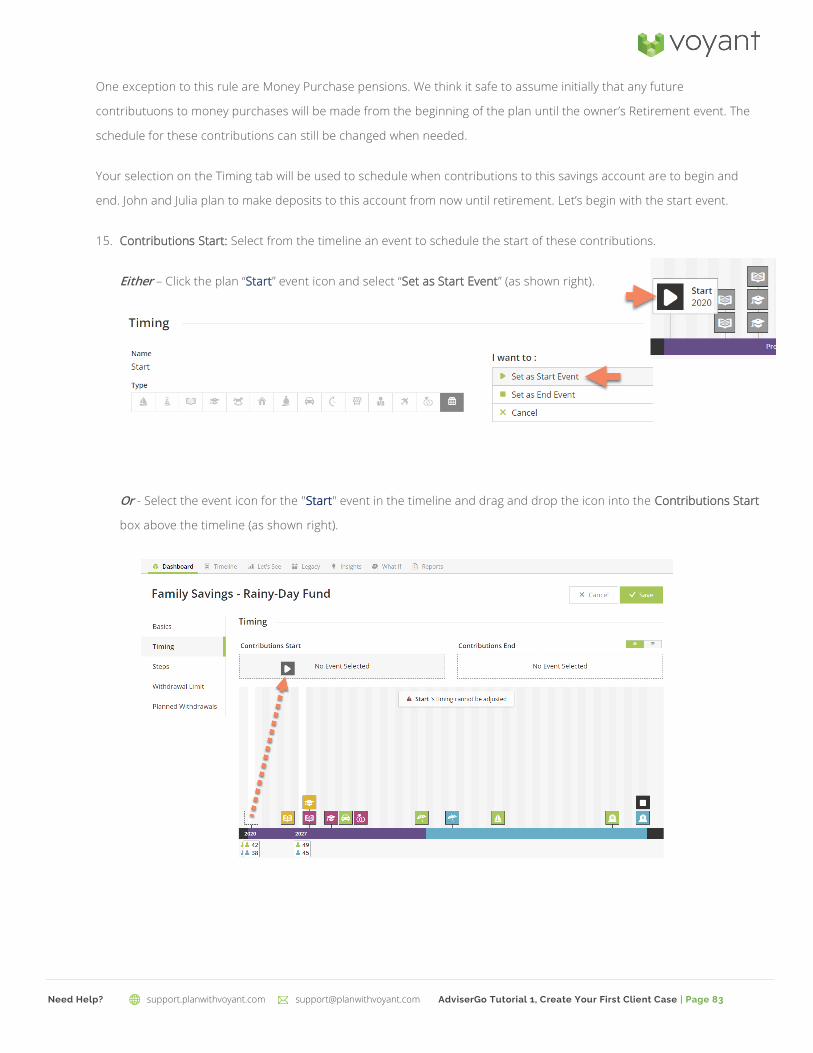
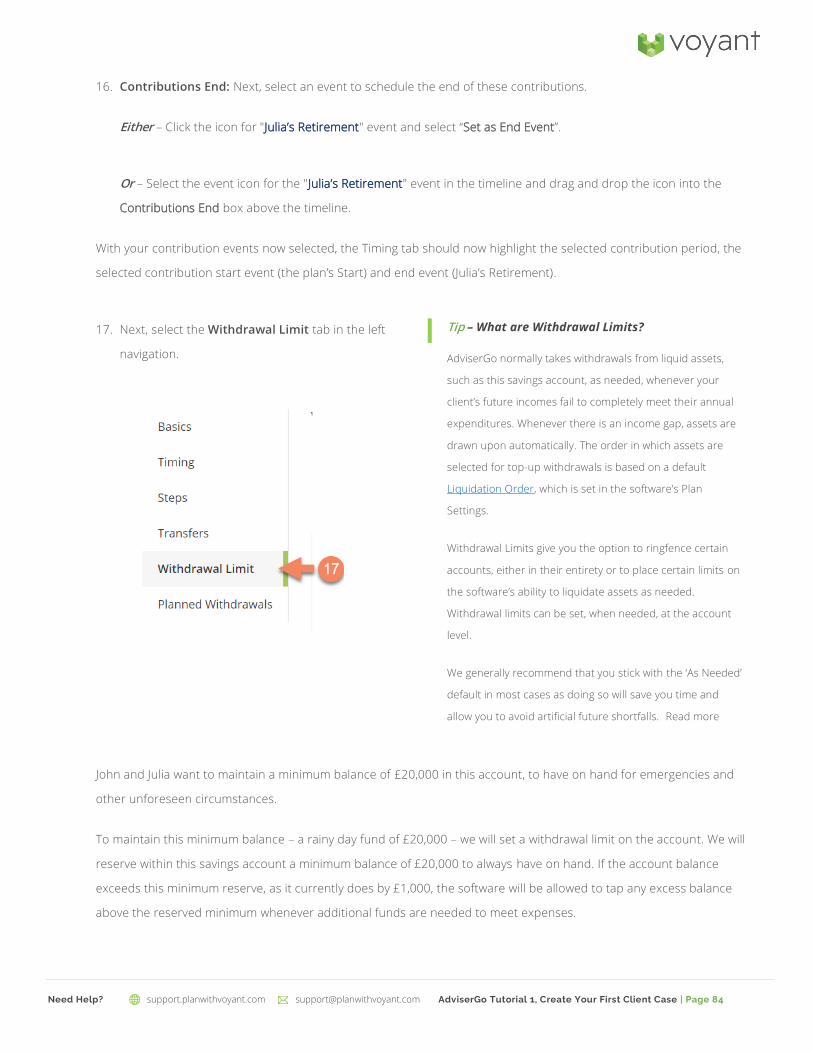


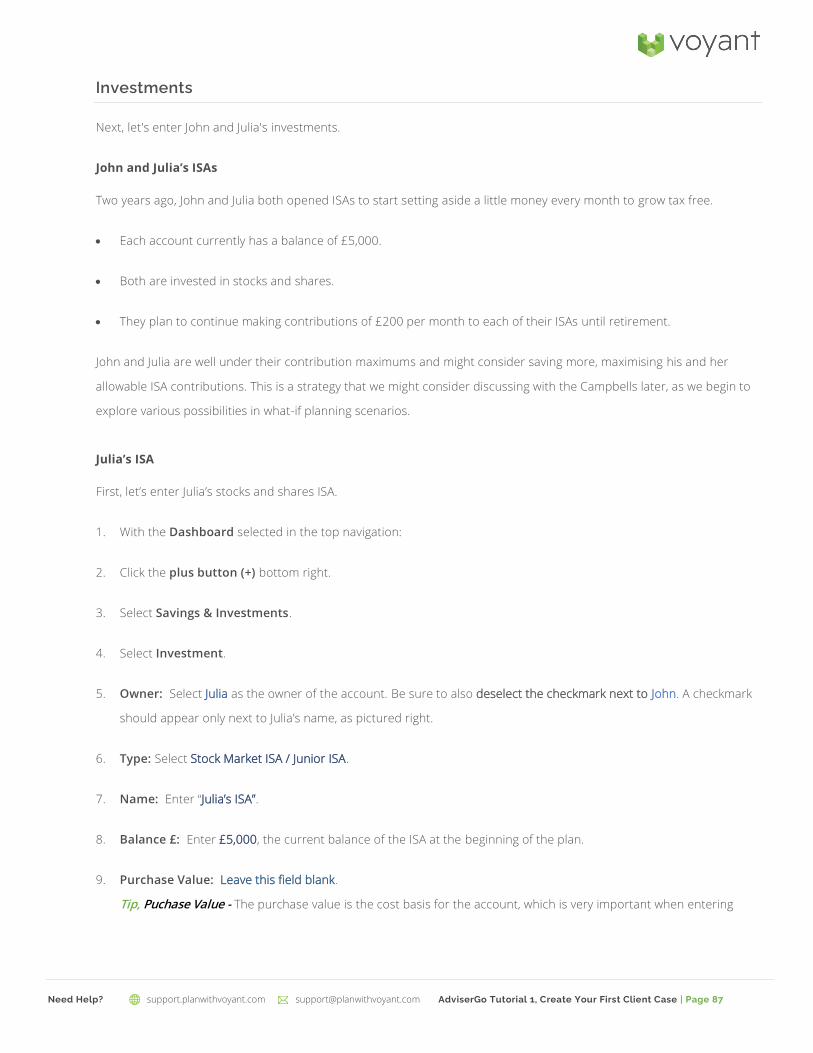


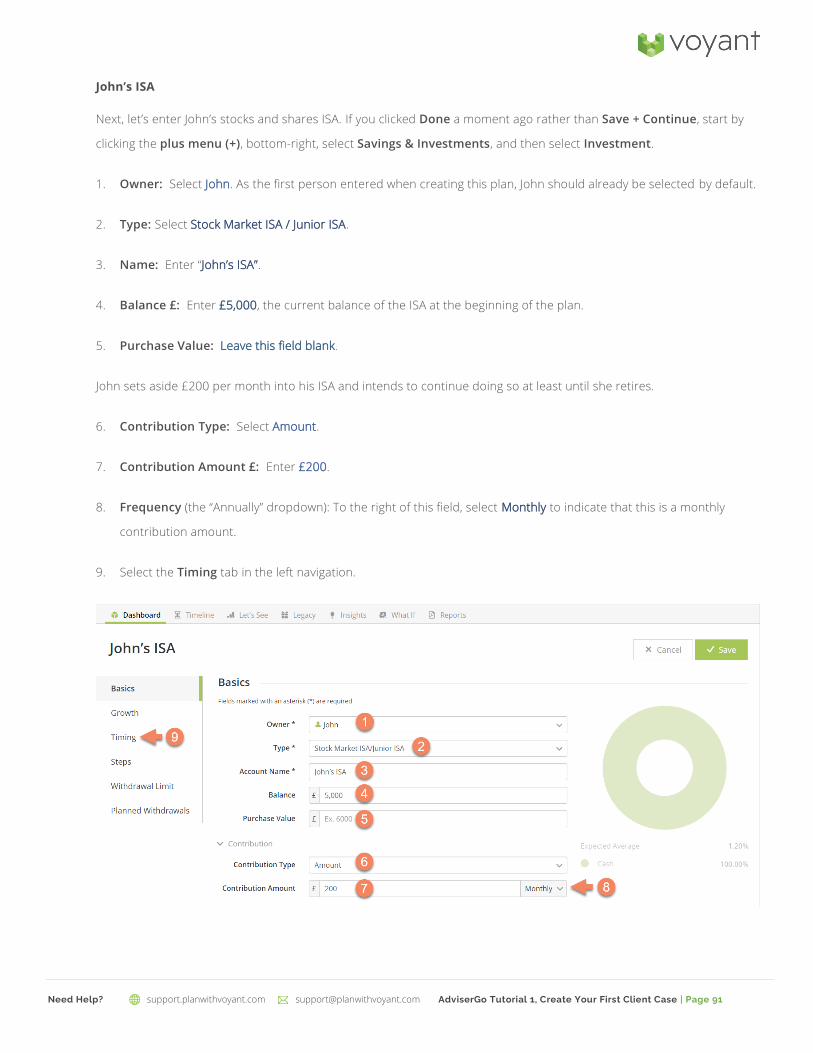

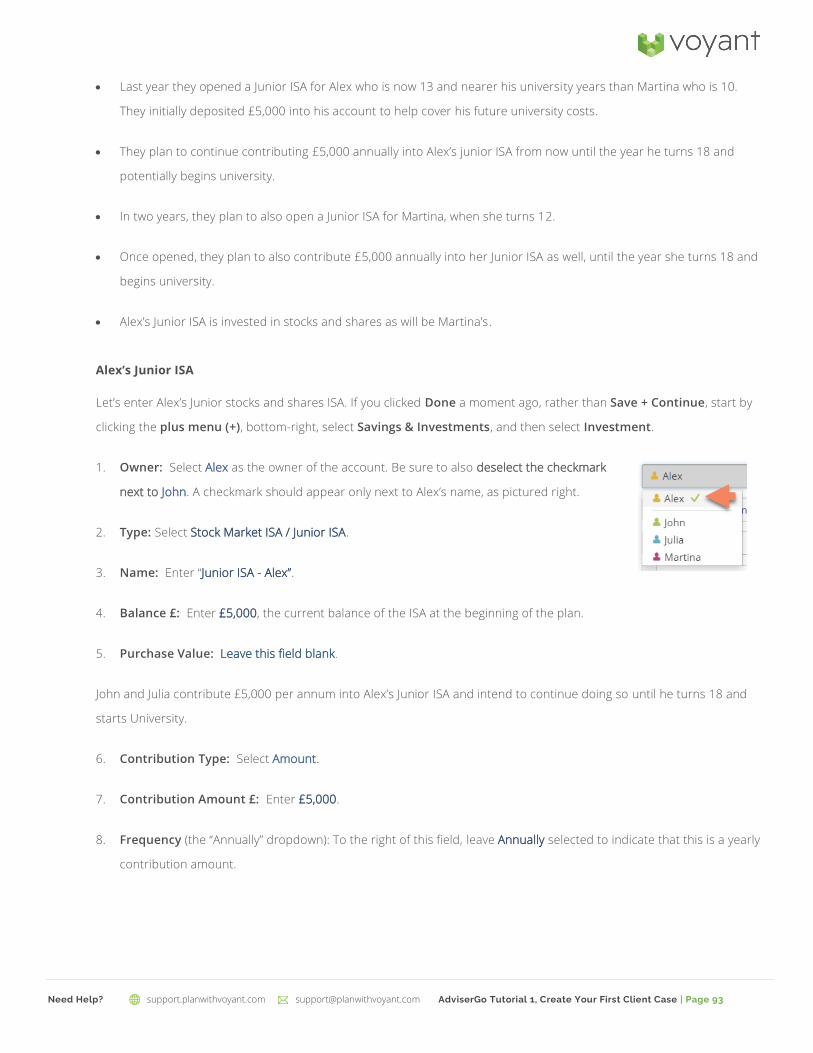

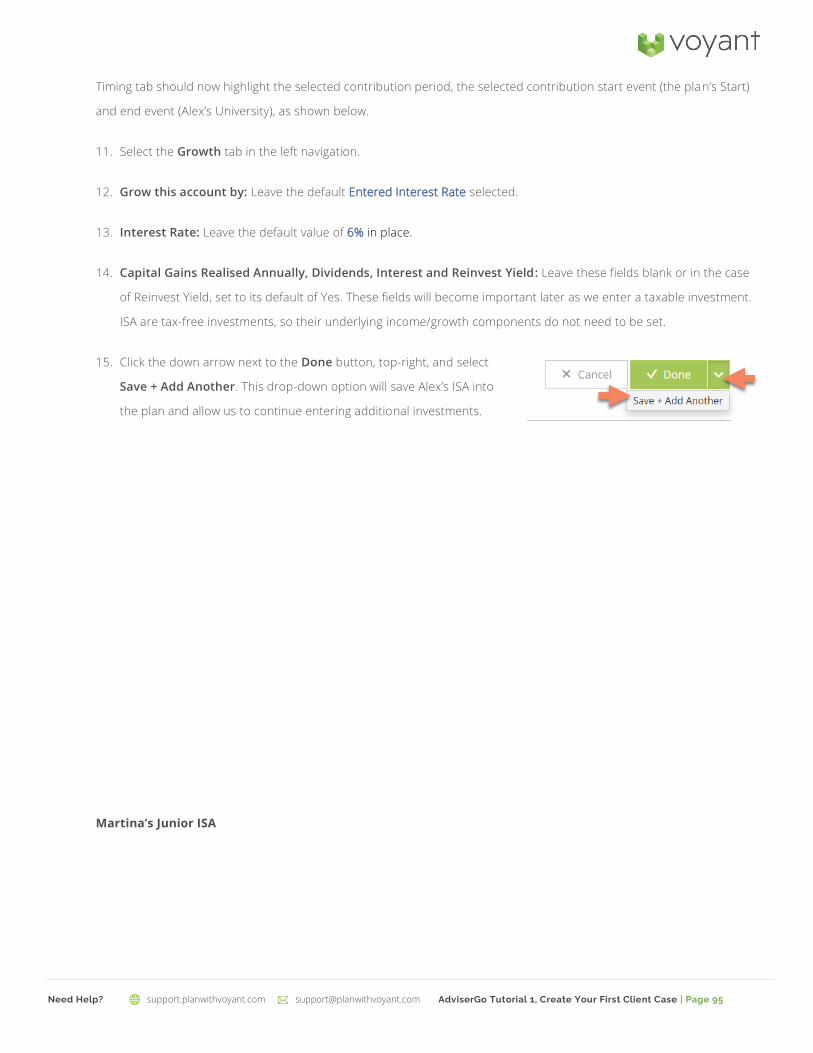
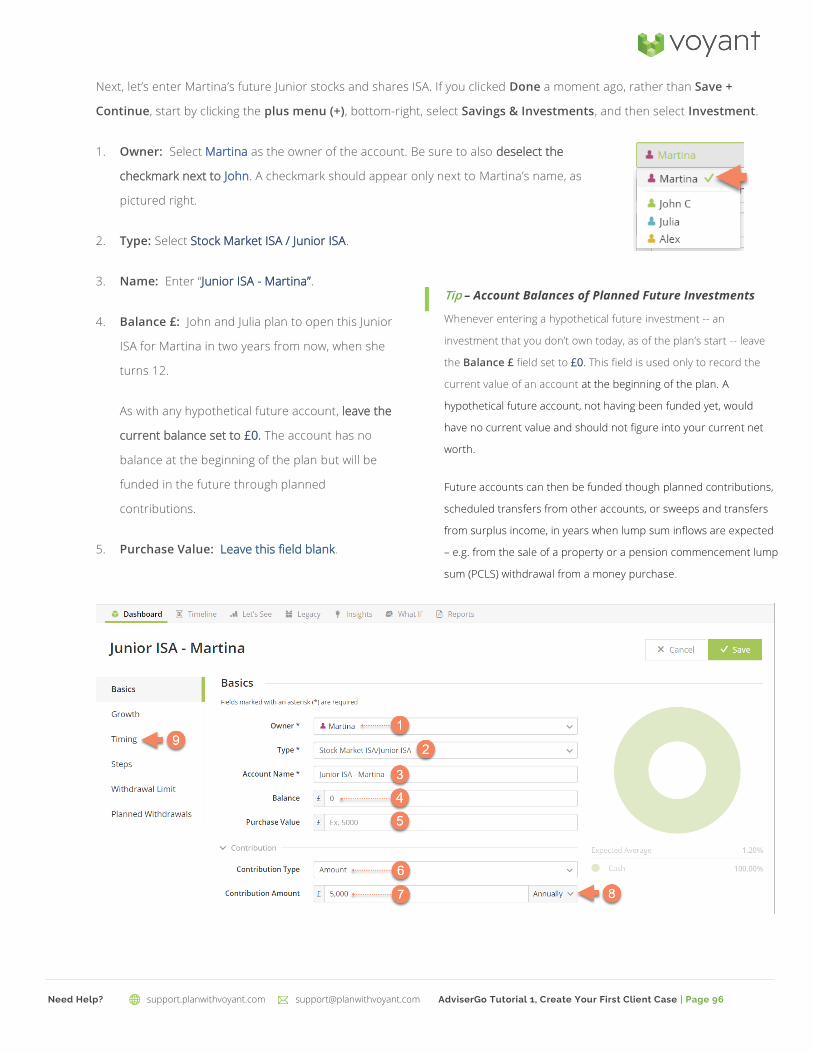

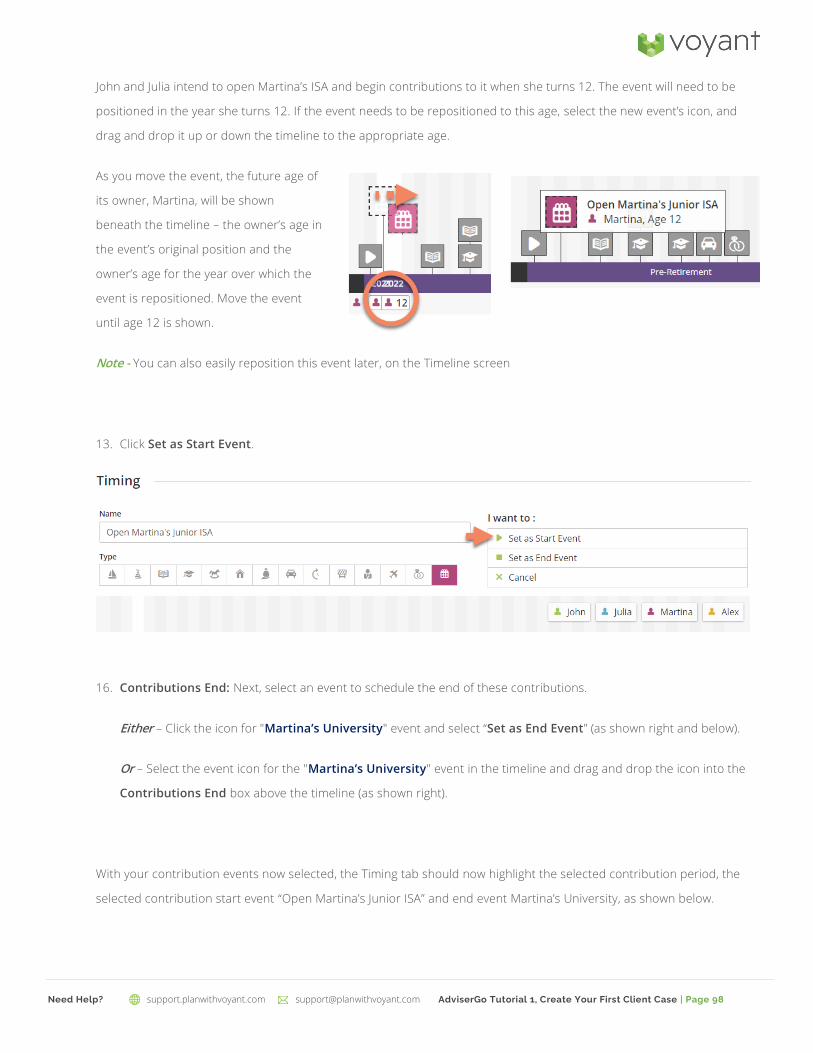
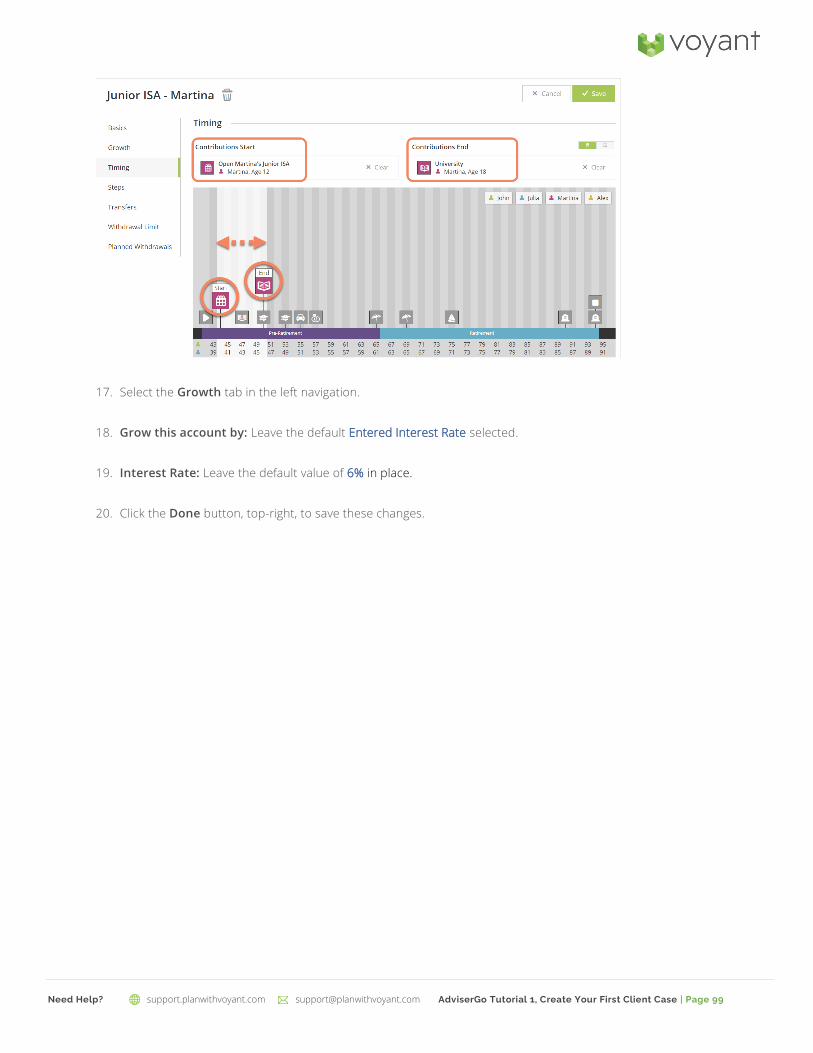


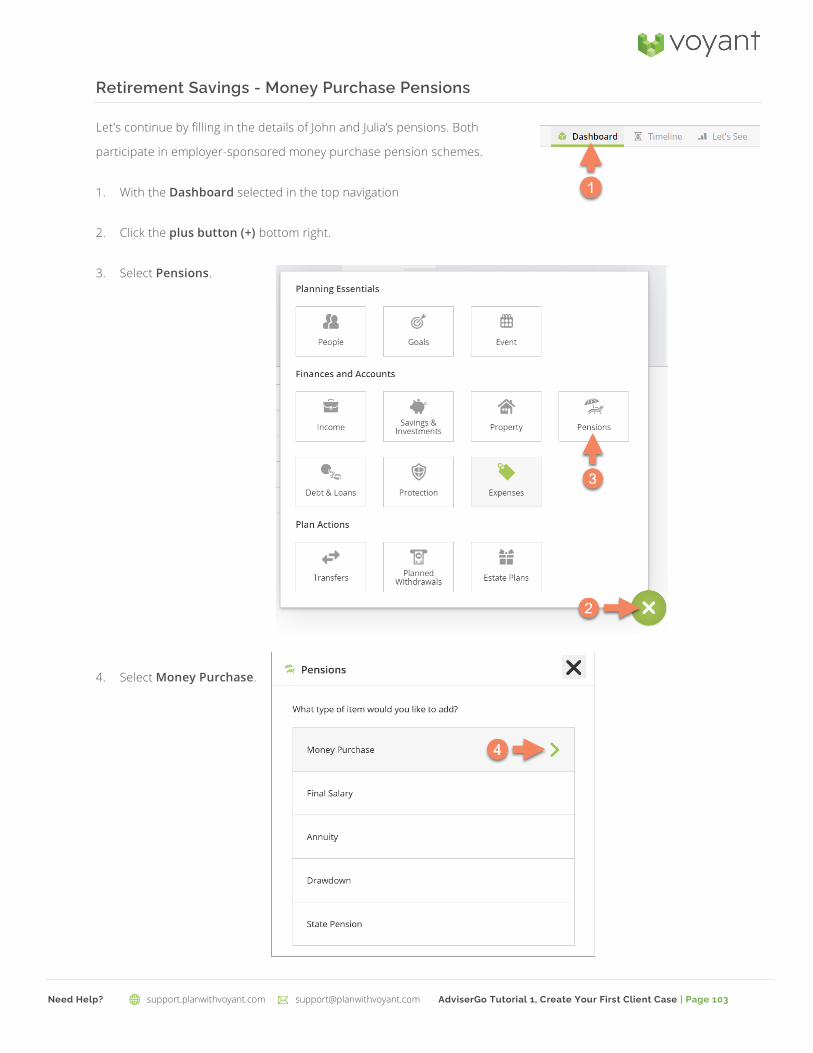
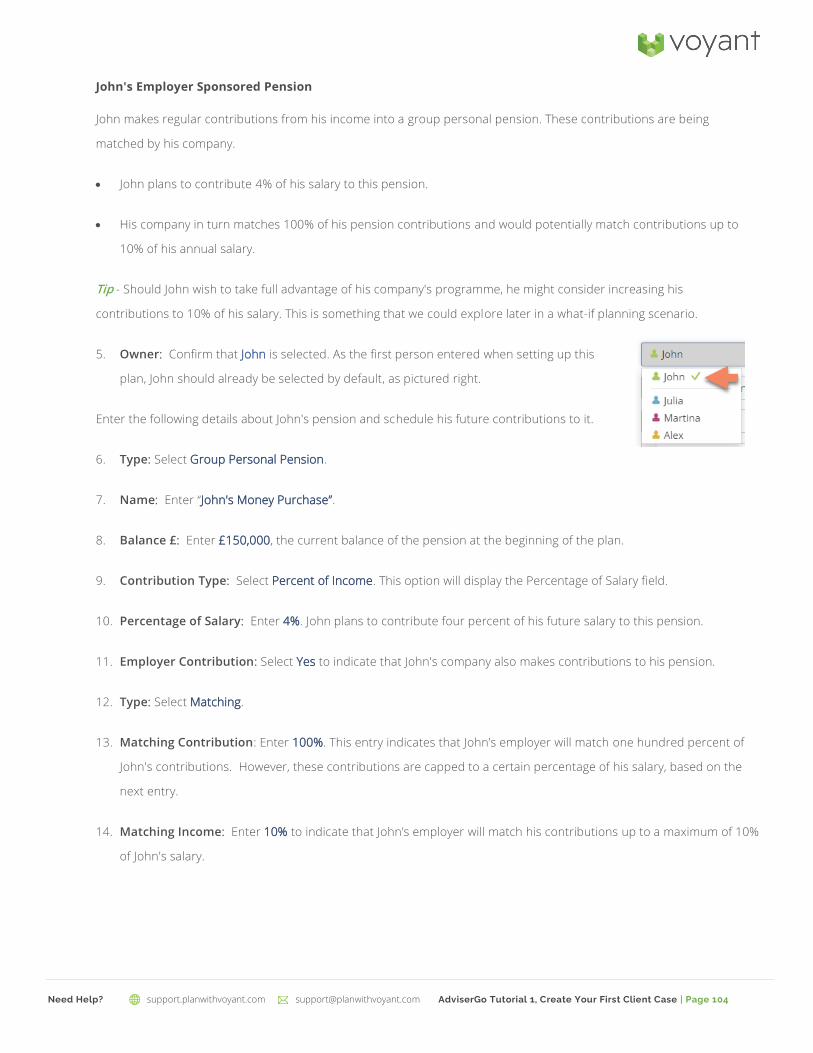
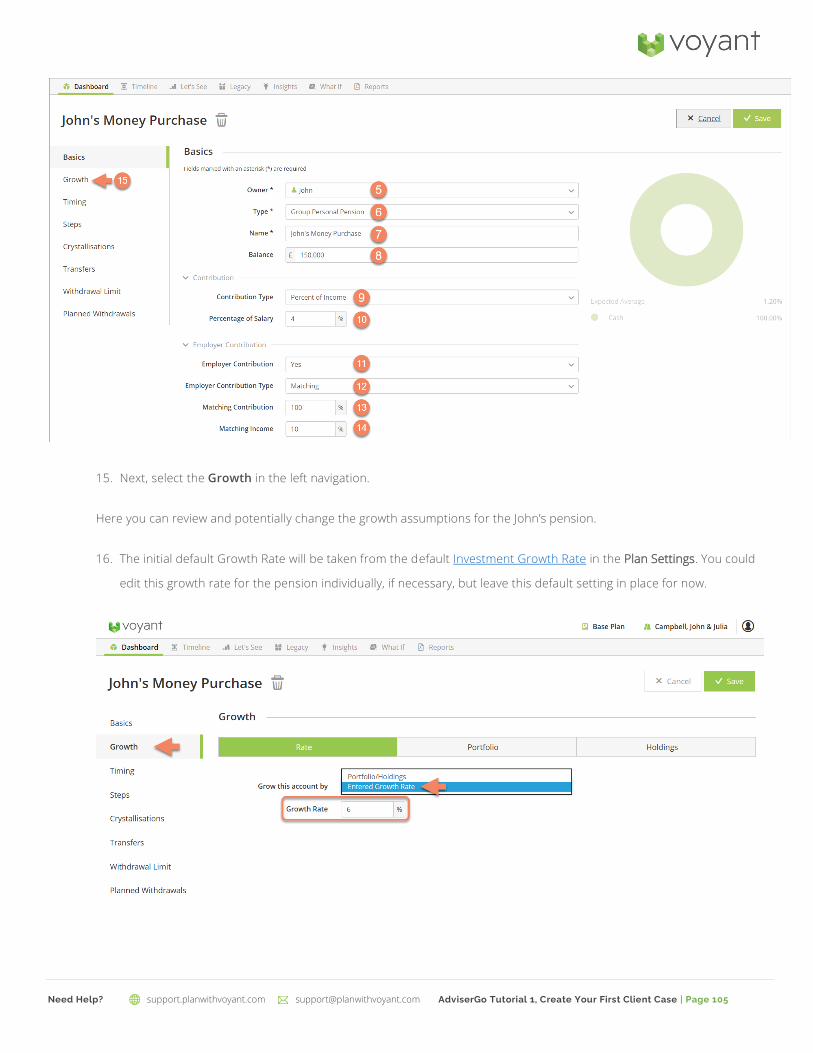

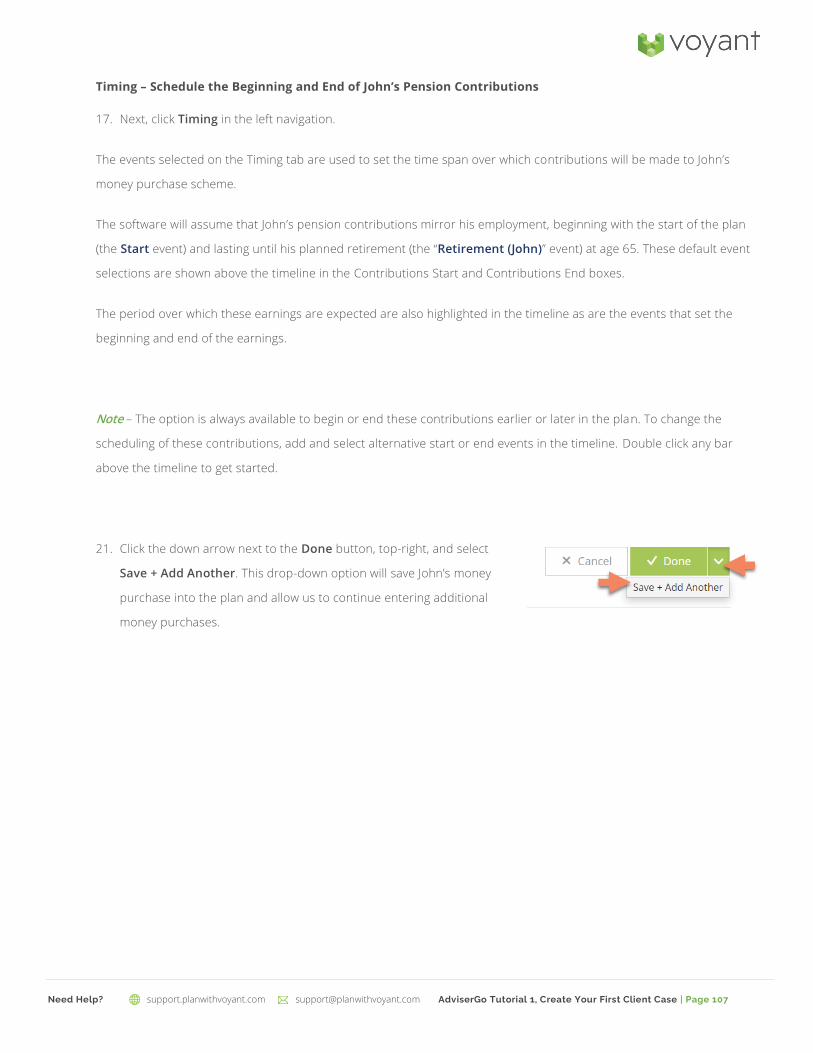


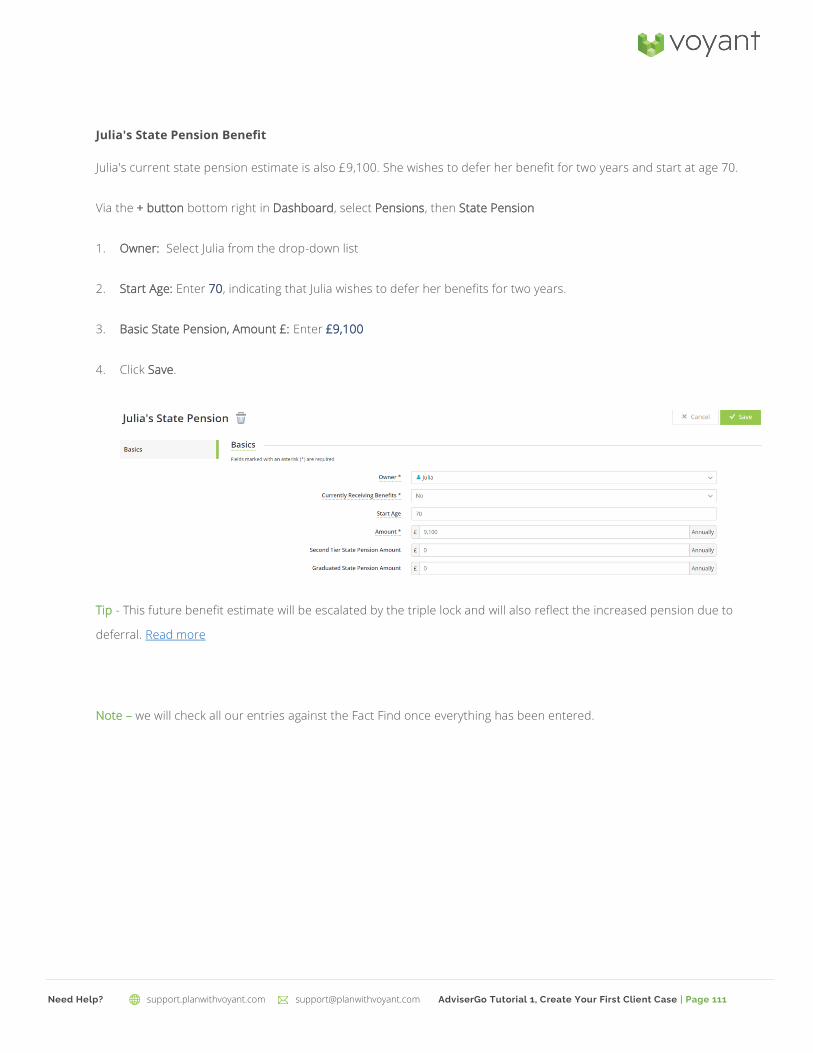
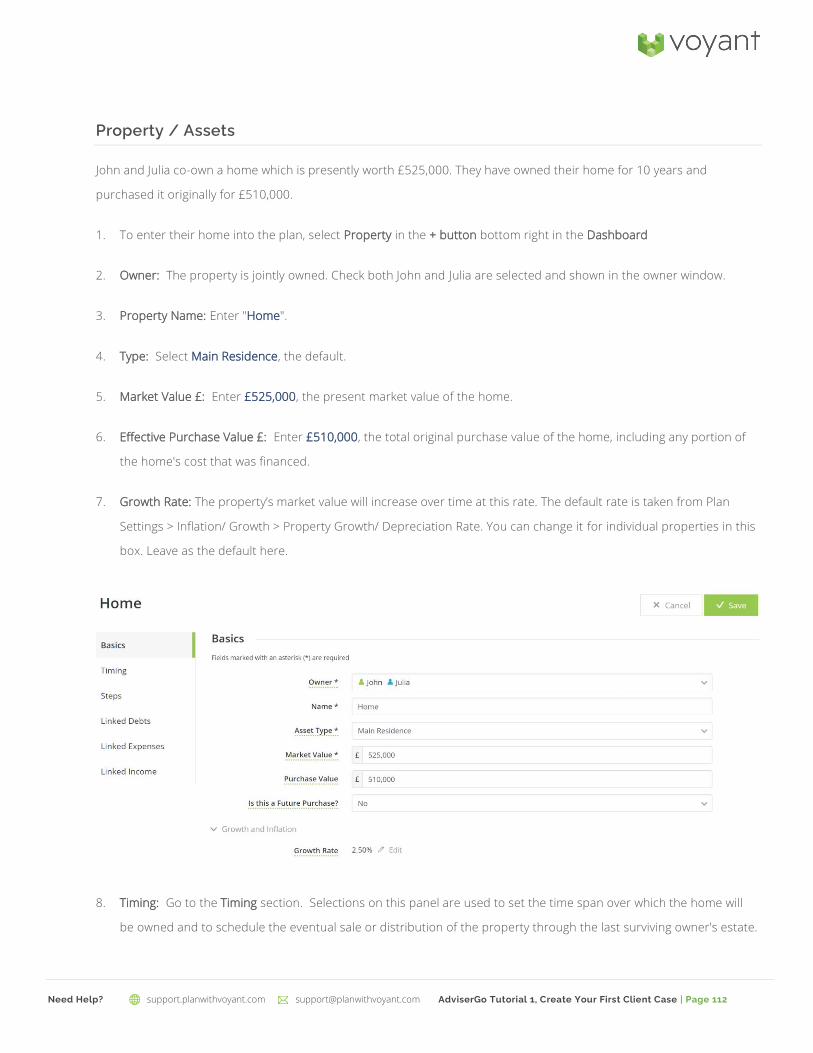
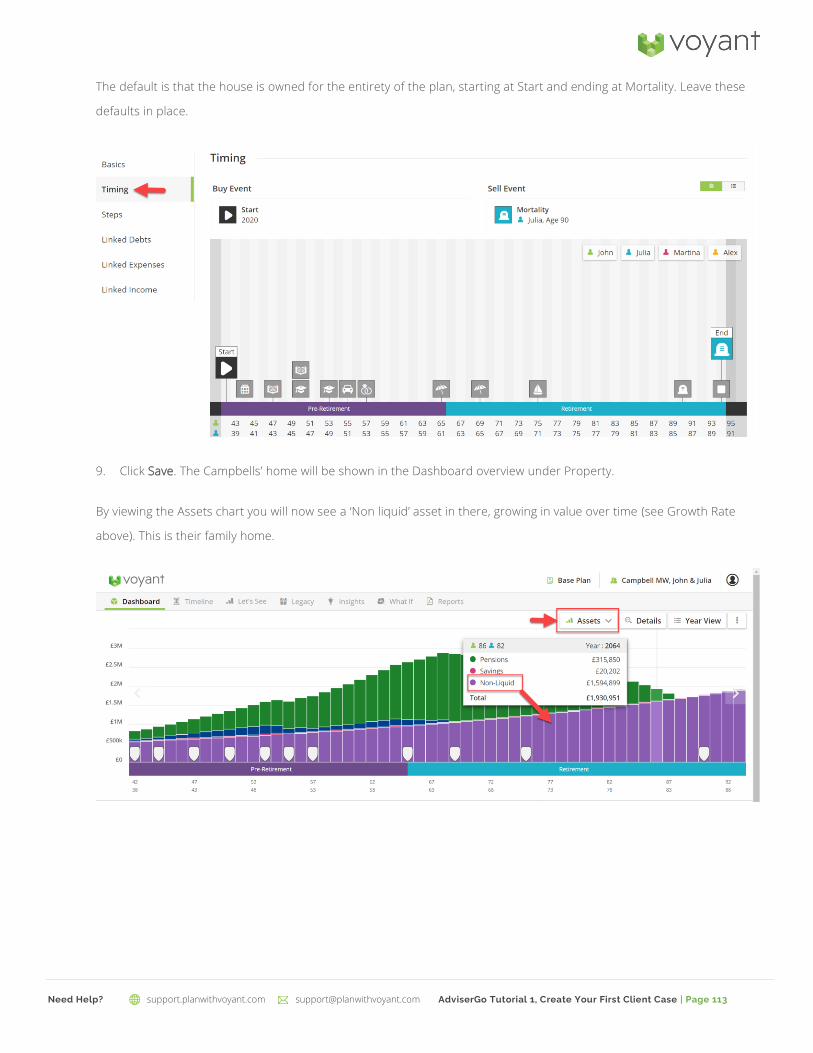

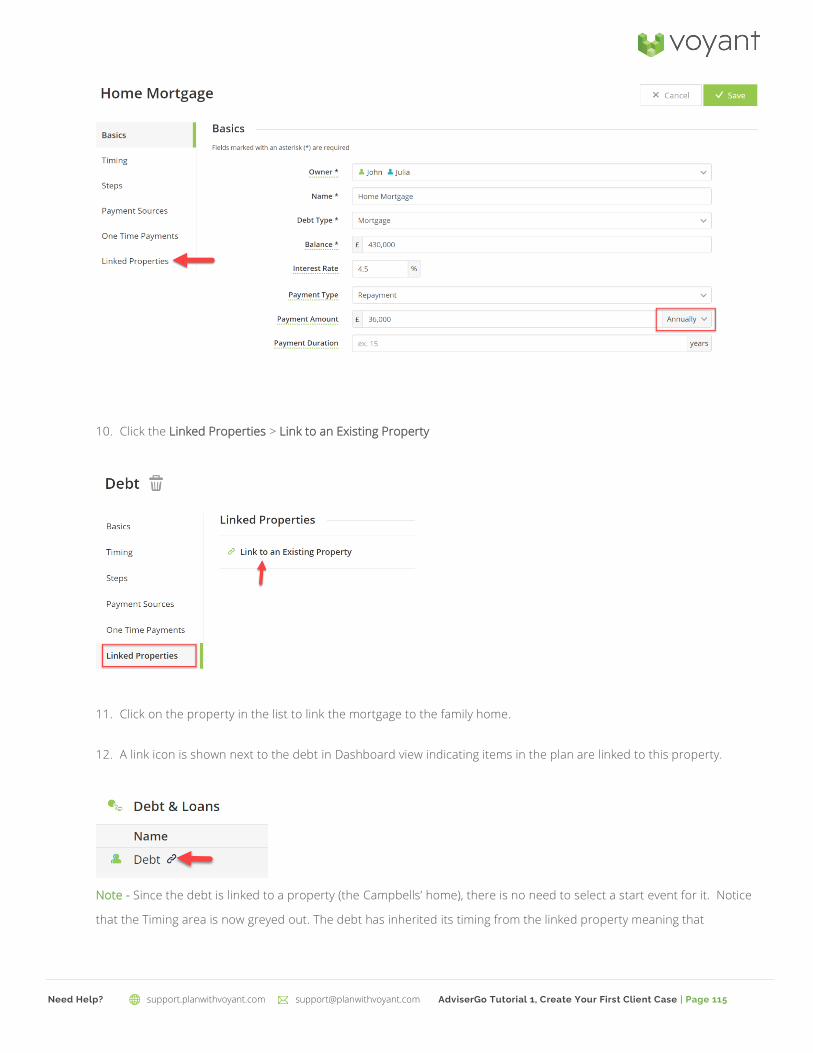

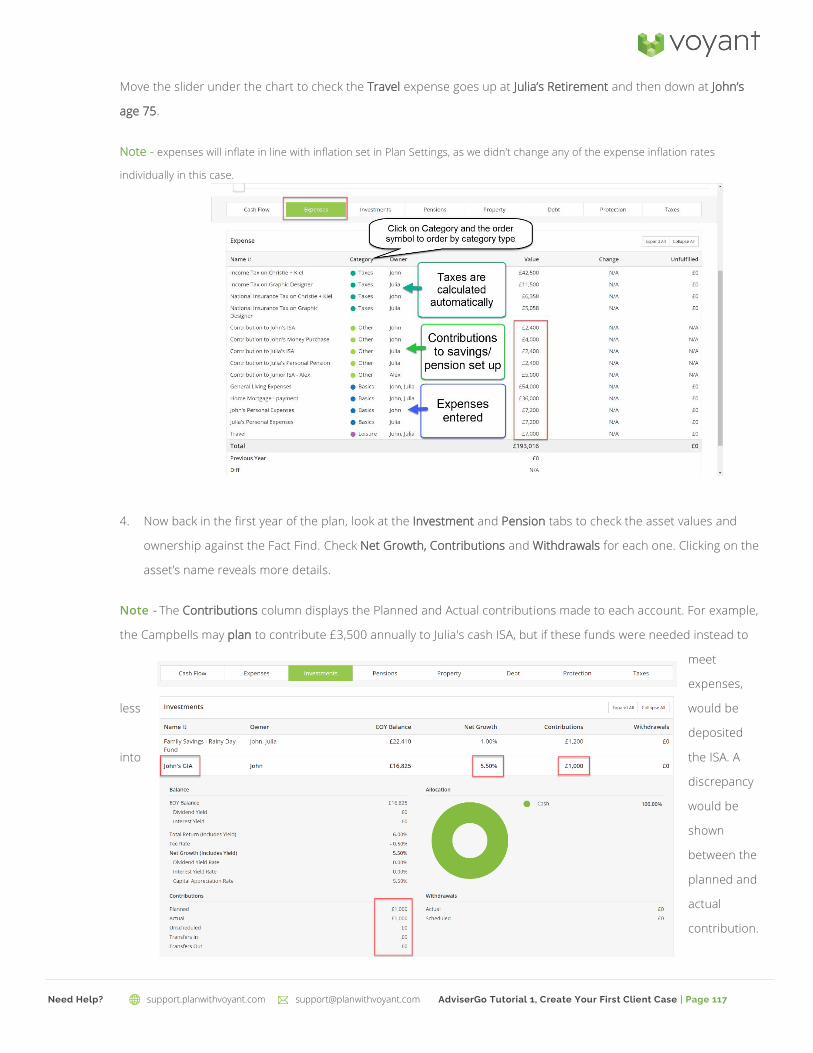


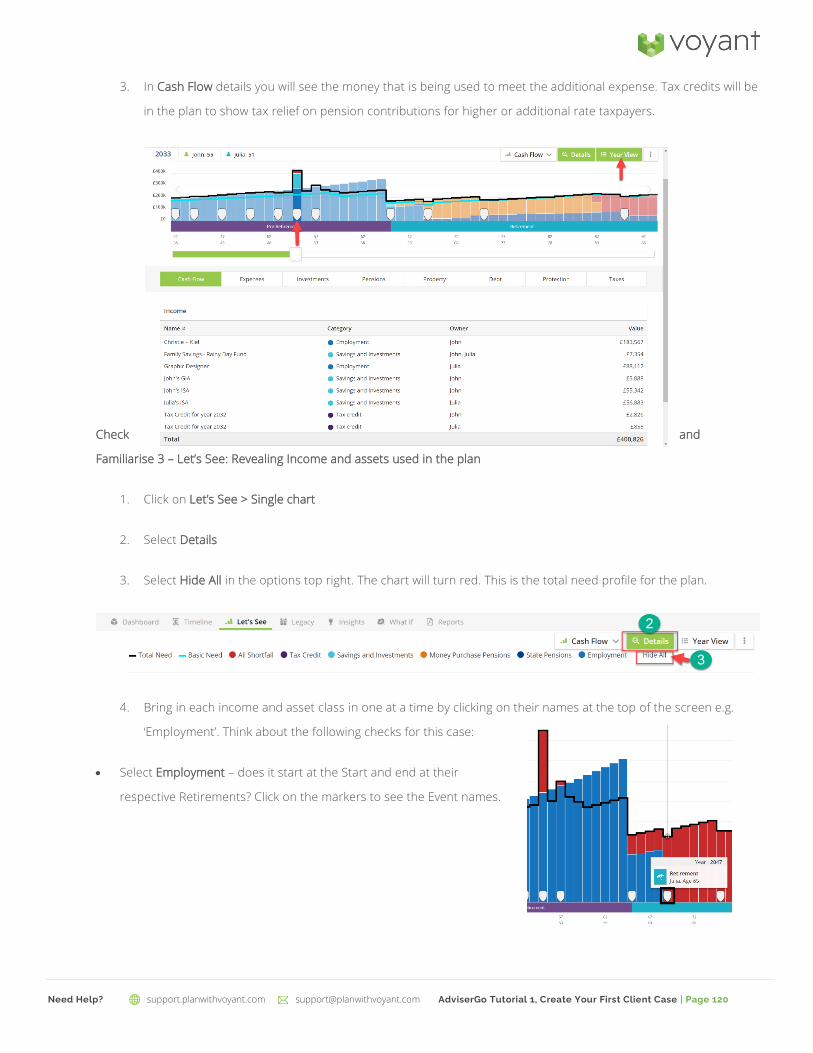


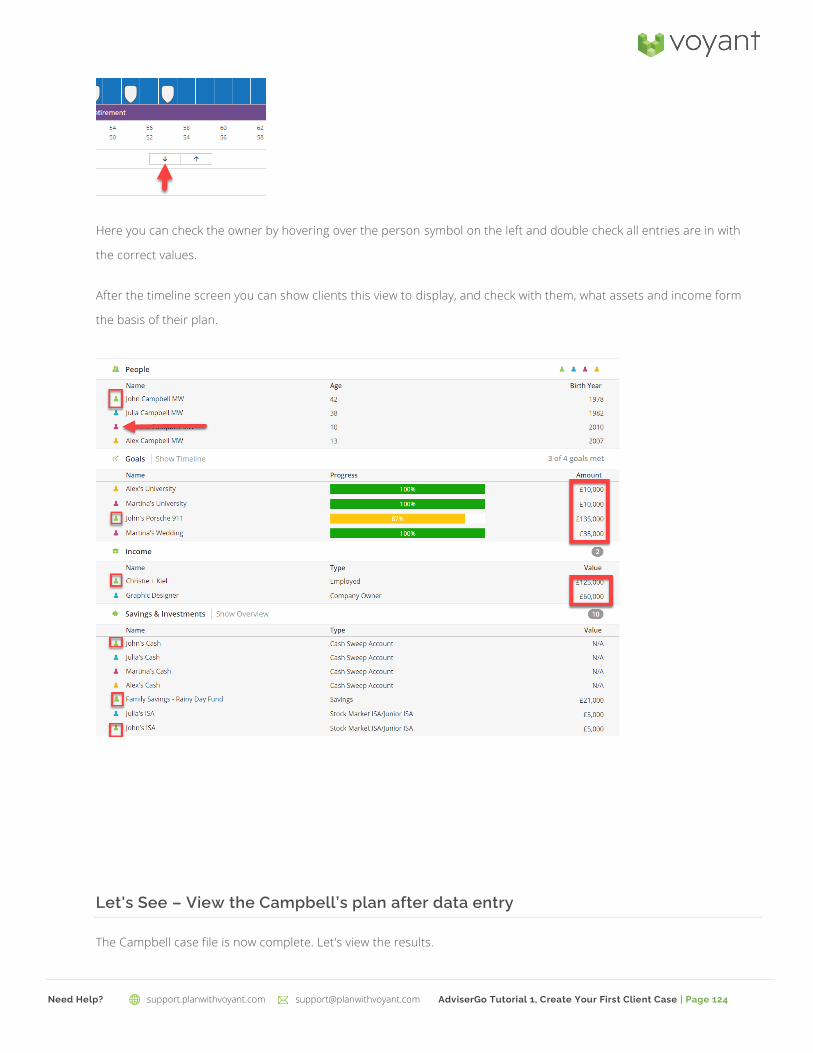
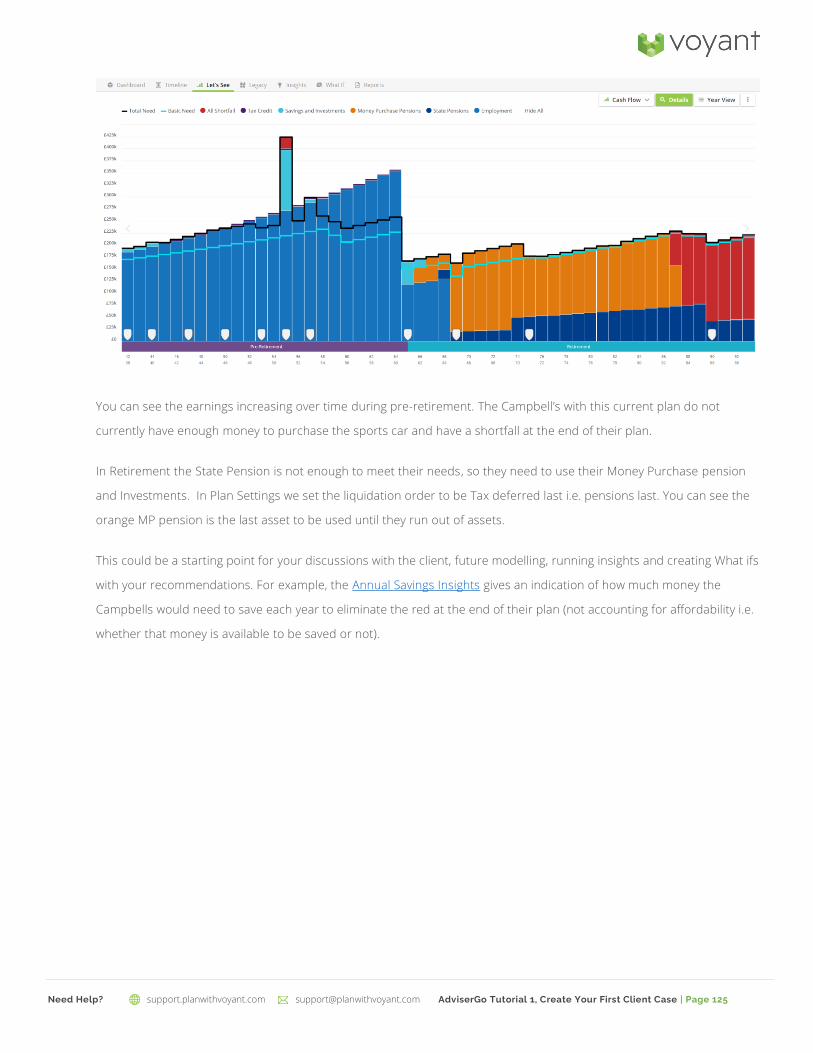


![Skaffold - storage.googleapis.com · [getting-started getting-started] Hello world! [getting-started getting-started] Hello world! [getting-started getting-started] Hello world! 5.](https://static.documents.pub/doc/80x56/5ec939f2a76a033f091c5ac7/skaffold-getting-started-getting-started-hello-world-getting-started-getting-started.jpg)


