37
Getting Started with Eclipse Juno Rodrigo Fraxino Araujo Vinicius H. S. Durelli Rafael M. Teixeira Chapter No. 3 "Unit Testing with JUnit and Debugging"

Getting Started with Eclipse Juno
Rodrigo Fraxino Araujo Vinicius H. S. Durelli Rafael M. Teixeira
Chapter No. 3 "Unit Testing with JUnit and Debugging"

In this package, you will find: A Biography of the authors of the book
A preview chapter from the book, Chapter NO.3 "Unit Testing with JUnit and Debugging"
A synopsis of the book’s content
Information on where to buy this book
About the Authors Rodrigo Fraxino Araujo is a Ph.D. candidate in Computer Science at the University of São Paulo, Brazil. He has spent a year as a visiting scholar at the Institute National de Recherche en Informatique et Automatique, Rocquencourt, France. He is also a software engineer and since 2011, is working at IBM.
I would specially like to thank Carolina, who gave me the strength to work on this book.
For More Information: www.packtpub.com/getting-started-eclipse-juno/book

Vinicius H. S. Durelli is a Ph.D. candidate in Computer Science at the University of São Paulo, Brazil. As part of his doctoral studies, from 2011 to 2012, he was a visiting scholar at the George Mason University, Virginia, USA. He received his M.S. in Computer Science from the Federal University of São Carlos in 2008. He has been a Sun Certified Java Programmer since 2006. Also, he has been using Eclipse since circa 2004, which makes him feel old. When he is not writing or programming, Vinicius enjoys playing video games (especially Mario and Zelda games) and practicing Brazilian Jiu Jitsu.
I would like to express my deepest gratitude to my friend Simone Borges for placing food in front of me in order to keep me going while I was trying to hit deadlines related to this book and my ongoing Ph.D. studies.
Rafael M. Teixeira currently works as a Software Engineer at IBM Linux Technology Center, developing code for Eclipse open source projects. He's currently taking a MSc program in University of São Paulo, where he also received his Computer Engineering degree. Rafael's favorite hobby is running, but also enjoys some occasional video gaming.
I would like to thank my family for their caring and support, which made everything possible. I would also like to thank Bianca Teixeira, whose motivating and sweet words have kept me going for the last 7 years and will hopefully do so for many others. I dedicate this work to the memory of Luis Fernando Teixeira.
For More Information: www.packtpub.com/getting-started-eclipse-juno/book
Getting Started with Eclipse Juno The first version of Eclipse was released in the November of 2001. Since then, it has come a long way in terms of enhancements and number of users. Due to the many improvements it has undergone, over time Eclipse has become popular and received a great deal of praise. Nowadays, Eclipse is arguably the most widely used integrated development environment (IDE) for developing Java applications. It is free and open source, and is shipped with plugins for performing lots of software-development-related activities. In addition, more plugins can be easily downloaded and installed according to your personal needs and preferences. Another plus is that, since Eclipse is written mostly in Java, it is cross-platform.
If you have been using Java without the help of an IDE, you must have realized by now that Java can be rough and unnerving at times. Most of the time, the compiler (javac) does not display helpful error messages. Even something as simple as an omitted semicolon may cause it to display a lengthy list of error messages. Inside an IDE, this sort of problem can be spotted before you try to run the program. An IDE can even suggest solutions before you start scratching your head. Undoubtedly, using a full-fledged IDE provides a range of benefits. For instance, an IDE provides autocompletion of your code, it helps you to format your code properly, and some of them come with nifty plugins for testing, debugging, and keeping track of the changes that you make to your code.
However, despite all the benefits involved in using an IDE, let's be upfront; learning how to use one of these high-end development tools is no bed of roses. IDEs have a steep learning curve, which means that mastering such a tool usually takes time and effort. To make matters worse, sometimes, many developers try to learn a new programming language and an IDE in tandem.
This book will help you to overcome Eclipse's steep learning curve. After reading this book, you will be grounded in performing many development activities using Eclipse.
For More Information: www.packtpub.com/getting-started-eclipse-juno/book
What This Book Covers In this book, we cover Eclipse Juno that is, at of the time of this writing, the latest stable version of the IDE (it was released in June 2012). The book starts off by showing how to perform the most basic activities related to implementing Java applications (such as creating and organizing Java projects, refactoring, and setting launch configurations), working up to more sophisticated topics as testing, web development, GUI programming, and extending Eclipse's editors to suit your needs.
This book takes a hands-on approach, diving straight into using Eclipse without getting you bogged down in technical details. Here are some of the topics covered in this book:
• Effectively using Eclipse to write Java code
• Integrating JUnit 4 into Eclipse, develop, and run JUnit-based test methods
• Managing your project using the version control system Git/EGit
• Developing GUI applications using SWT
• Advanced GUI development with examples
• Using Eclipse WTP plugin to develop and deploy web-based Java applications
• Extending Eclipse by developing new editors, views, and contributing to existing elements of the IDE
Chapter 1, Introduction, covers how to get started with Eclipse. It goes from how to get Eclipse up and running to a brief overview of the new and noteworthy features of Eclipse Juno.
Chapter 2, Java Development, covers basic Java development using Eclipse. To beginners, Eclipse can be quite intimidating. The main window contains lots of smaller windows and some of the smaller windows have a bunch of buttons and drop-down menus. This chapter is all about getting to know the main features of Eclipse for developing Java programs. We will go through all the steps to get you going from creating Java projects, detailing the Eclipse views used for Java development, Java code generation, to building and running Java projects, which involves setting up launch configurations. Also, we cover some refactorings, so that you will be able to improve your Java code – as you tackle more complicated projects will you see that refactoring is a very important aspect of Java development.
For More Information: www.packtpub.com/getting-started-eclipse-juno/book

Chapter 3, Unit Testing with JUnit and Debugging, introduces JUnit, the most widely used framework for implementing unit tests in Java. You will learn how to set JUnit up so that it can be used in conjunction with Eclipse. In addition, this chapter describes the creation of test methods using JUnit's annotations. As you will see, annotations can also be used to inform JUnit when to skip a particular test method and whether or not a given method is expected to throw an exception. The chapter wraps up with an introduction on how to use Eclipse's debugger to pinpoint tough to find problems in your code.
Chapter 4, Version Control Systems, explains using Eclipse in conjunction with version control systems. When working on a complex software project (or one that involves more than one person), you need to use a tool that manages and tracks different version of the software project in question. This book covers CVS, SVN, and Git, and how to use it inside Eclipse through native and external plugins. After reading this chapter, you will be able to use them inside Eclipse to support collaborative development.
Chapter 5, SWT, covers graphical user interface (GUI) development with the Standard Widget Toolkit (SWT). This chapter introduces the most basic widgets as, for example, buttons, labels, and combos. In a way, this chapter lays the foundation for Chapter 6, More SWT.
Chapter 6, More SWT, builds on top of the previous chapter, showing how to make more appealing GUIs by introducing advanced widgets as, for example, toolbars and tables. This chapter also features a full-blown example.
Chapter 7, Web Development Using Eclipse WTP, is concerned with using Eclipse to develop basic web applications. Throughout this chapter we show how Eclipse, along with a set of plugins called Web Tools Platform (WTP), can be used to support the development of web applications that are based on two basic web technologies, namely, servlets and JavaServer Pages (JSP).
Chapter 8, Eclipse Development, covers a more advanced topic: extending Eclipse. You will learn how Eclipse's architecture is organized. Further, by reading this chapter, you will see how extension points can be harnessed in order to create your own plugin, editor, or even extend a particular view.
Chapter 9, Eclipse Rich Client Platform, shows how you can leverage what you have learned in the previous chapter to develop your own rich client application using the Eclipse Rich Client Platform. By creating a sample application, you will learn how to add views, menus, and panels, as well as make them interact with each other. We will also cover how to brand and package your application, allowing you to build a fully functional, cross-platform application using the Eclipse platform.
Appendix, Keyboard Shortcuts, contains all keyboard shortcuts presented throughout the book, plus other useful ones that can greatly improve your productivity with Eclipse.
For More Information: www.packtpub.com/getting-started-eclipse-juno/book

Unit Testing with JUnit and Debugging
By now, you are past the basics and should be familiar with developing Java applications using the Eclipse IDE. Although you must be feeling very confi dent with your recent acquired skills, before we go any further, you should know that the more you code, the higher are the chances of you introducing a bug into your code. Even with all the facilities provided by Eclipse, things are bound to go wrong as Java applications scale up. So, we need to build a safety net whenever our application code starts to become nontrivial to manage. One way of doing this is to test our programs, and testing is one of the things that we are going to cover in this chapter.
In an ideal world, all problems detected by our tests would be easy to track down and fi x. Nevertheless, this is not always the case. It turns out that nasty bugs might make their way into our code. As mentioned, having a good set of tests helps us to spot problems, however, sometimes the feedback provided by the test set is not enough, and we need to dig deeper to uncover problems. The act of understanding why the software is not behaving properly and working out a fi x for it is called debugging. Debugging is covered later in this chapter.
When it comes to testing and debugging Java programs, Eclipse has got you covered. It comes with built-in features for automating the creation and execution of JUnit tests, and it features an impressive Java debugger.
We will cover the following topics in this chapter:
• Confi guring JUnit inside Eclipse• Organizing, developing, and running unit tests using JUnit inside Eclipse• Using Eclipse's built-in debugger when bugs arise and understanding that
only test methods are not enough to pinpoint the problem cause
For More Information: www.packtpub.com/getting-started-eclipse-juno/book

Unit Testing with JUnit and Debugging
[ 44 ]
Testing with JUnit – getting startedBefore describing JUnit, we believe that some words about unit testing are in order. When carrying out unit testing activities, emphasis is given to small chunks of code. In other words, you are not trying to cover the whole program with a single test. Rather, you are testing the foundations of your programs by writing a suite of tests per class, one or more tests per method. Writing tests while you are working on the code at hand has a host of benefi ts. For instance, it is easier to fi nd bugs when unit testing. This is the case because each unit test should evaluate exactly one functional unit, which makes the scope one has to hunt for bugs signifi cantly smaller than searching the whole program for bugs. However, according to Robert C. Martin, to reap the full benefi ts of unit testing, your test suite has to comply with the following principles (also known as the FIRST acronym):
• Fast: The tests should be fully automatic and should be able to check their own results. But most importantly, you should be able to execute them fast so that they can be frequently executed.
• Independent: The tests should not depend on each other you should be able to run your tests in any particular order.
• Repeatable: You should be able to execute your tests in any environment (not only production) and as frequently as required.
• Self-validating: The tests should produce a Boolean outcome, that is, they should either pass or fail; there should be nothing in between. In fact, it boils down to avoiding subjective outputs that require manual evaluation.
• Timely: According to Robert C. Martin, unit tests should be written before the code implements the feature that they evaluate. According to him, it is harder to write tests after implementing the production code. From an academic perspective, there is no substantial evidence regarding the benefi ts of writing tests before, in comparison to writing tests after implementing the code that they evaluate. This is clearly a controversial topic, we do not seek to infl uence you in favor of a particular approach. Try writing tests before and after implementing the code and see which works best for you.
In case you think that writing tests before implementing code suits you better, you should read about Test Driven Development (TDD). While you are at that, you might also want to study refactoring, which consists of improving your code without changing its external behavior.
For More Information: www.packtpub.com/getting-started-eclipse-juno/book
Chapter 3
[ 45 ]
Now that you have a basic understanding of the philosophy that backs up unit testing, you are ready to take the next step towards writing your own tests—learning how to use a unit testing framework. Since JUnit is arguably the most popular testing framework in the Java community, we will cover it here.
More specifi cally, JUnit is an open source testing framework, which was initially contrived by Kent Beck and Erich Gamma (www.junit.org). As of the time of this writing, the latest stable version of this framework (and the one bundled with the IDE) is Version 4.10. Due to the fact that Erich led the design of the Eclipse Java Development Tools (JDT), JUnit is well-integrated into the IDE. Eclipse already ships with a bundled JUnit JAR. So, as long as you are planning on using JUnit 4.10, there is not much to say about installing it. However, it is also possible to use a different JUnit version. The steps for setting up the default and a non-default JUnit JAR are covered in the following sections.
Although the duo, JUnit and Eclipse, supports and automates most of the testing process, you still need to write your own test fi les manually. Since Eclipse leaves the organization of your test fi les up to you, a word about how to organize these fi les is in order.
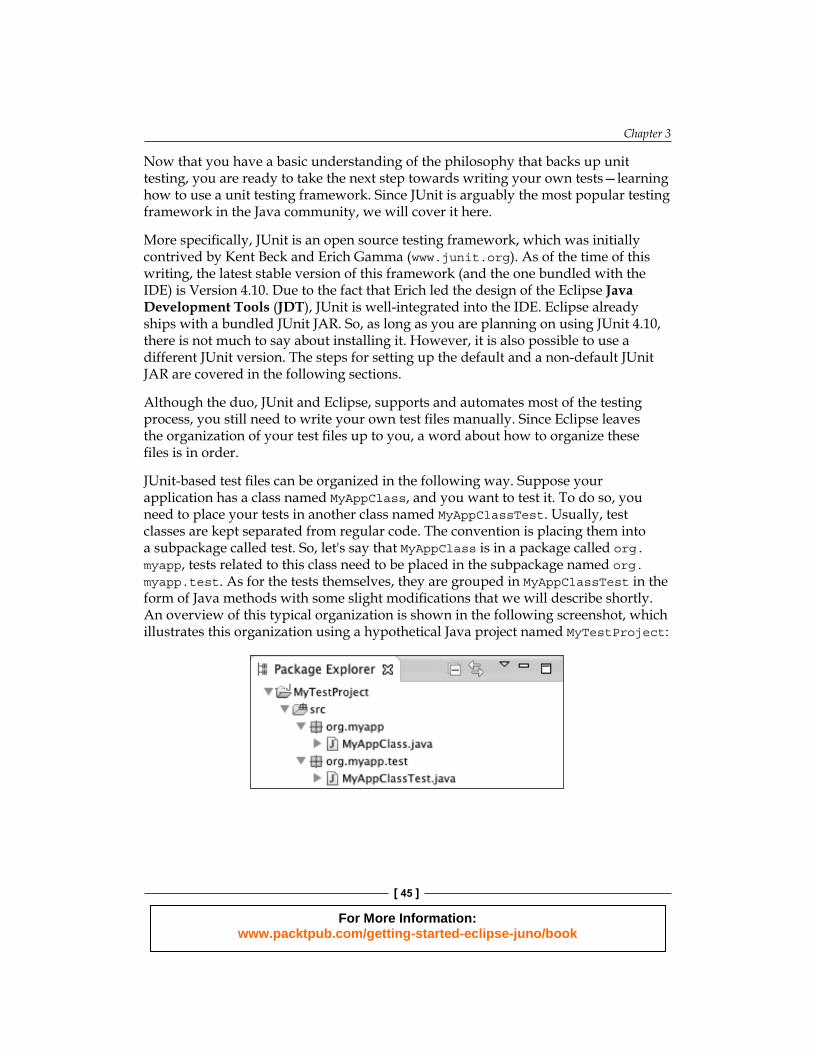
JUnit-based test fi les can be organized in the following way. Suppose your application has a class named MyAppClass, and you want to test it. To do so, you need to place your tests in another class named MyAppClassTest. Usually, test classes are kept separated from regular code. The convention is placing them into a subpackage called test. So, let's say that MyAppClass is in a package called org.myapp, tests related to this class need to be placed in the subpackage named org.myapp.test. As for the tests themselves, they are grouped in MyAppClassTest in the form of Java methods with some slight modifi cations that we will describe shortly. An overview of this typical organization is shown in the following screenshot, which illustrates this organization using a hypothetical Java project named MyTestProject:
For More Information: www.packtpub.com/getting-started-eclipse-juno/book

Unit Testing with JUnit and Debugging
[ 46 ]
It is worth mentioning that neither JUnit nor Eclipse enforces this naming convention. The creation of separate folders/subpackages for tests is not mandatory either. However, following these conventions is a good programming practice. It is also worth mentioning that another widely used convention to organize test code is the maven convention. By following this convention, you need to create separate folders for regular Java code and test code, src/main/java and src/test/java. Also, the test classes are placed in the same package in which the classes they test are placed.
Setting up JUnitIn order to use JUnit with Eclipse, you need to add junit.jar to your project's build path. To do this, right-click on your project, and navigate to Build Path | Add Libraries…, as shown in the following screenshot:
The following screenshot shows the options listed by Eclipse. Select the second option JUnit. You can select either JUnit Version 3 or Version 4.
For More Information: www.packtpub.com/getting-started-eclipse-juno/book

Chapter 3
[ 47 ]
Throughout this chapter we are going to use JUnit 4 (4.10 to be more specifi c); so go ahead and select JUnit 4 as shown in the following screenshot:
There is a striking difference between JUnit 3 and JUnit 4, mostly due to the fact that JUnit 4 heavily relies on the new features introduced by the most recent versions of Java. To be more specifi c, the main difference between JUnit 3 and JUnit 4 is that the latter relies on annotations rather than hierarchies and method-name conventions. If you are familiar with JUnit 3, but have not used JUnit 4 yet, you will notice that the latter is simpler and easier to use than the former.
By choosing JUnit 4, Eclipse adds JUnit 4.10 to your project's build path. If you need to use a different JUnit version, you can download that particular version from JUnit's website and add it to your project's build path. To do that, download the desired version from JUnit's website, right-click on your project name, and navigate to Build Path | Confi gure Build Path…, as illustrated in the following screenshot:
For More Information: www.packtpub.com/getting-started-eclipse-juno/book

Unit Testing with JUnit and Debugging
[ 48 ]
The project properties window will appear, showing the project's build path current confi gurations (shown in the following screenshot). Select the Libraries tab, click on Add External JARs…, locate and select your recently downloaded JAR, and then click on OK. Click on OK again to close the properties window. Done, now you have JUnit up and running. We are all set to create JUnit-based tests. It is worth mentioning that through the project properties window you can also add JUnit 4 by clicking on the Add Library… option. Selecting this option opens the pop-up window shown in the earlier screenshot.
Adding a new JAR to the build path can be done in a myriad of ways. In this section we just covered two. If you followed the fi rst approach, the JUnit JAR fi le is going to be placed under JUnit 4 as shown in (a) in the following screenshot. Otherwise, the JAR fi le is going to appear under Referenced Libraries as shown in (b). Keep on reading to discover an even easier approach for setting up JUnit.
For More Information: www.packtpub.com/getting-started-eclipse-juno/book
Chapter 3
[ 49 ]
Testing with JUnitUsing JUnit, it is remarkably simple to write repeatable tests. Actually, from day one, being simple to use was a key design decision made by Kent and Erich. According to them, if JUnit was not easy to learn and execute, programmers would not actually use it.
Basically, when you need to test something using JUnit, you perform these basic actions:
1. Create the Java class that is going to enclose all your tests. Make sure to name it according to the convention we described in the previous section.
2. Create a method and annotate it with @org.junit.Test.3. Write the code related to the behavior that you want to test inside the
previously created method.4. To check whether the code under test yielded the expected result, import
org.junit. Assert statically, and invoke one of the methods of the Assert family (assertTrue, assertEquals, and so on) to compare the result of your test with the expected result.
The JUnit framework has several other features, but these are the ones you will need to understand in order to get started. So, let's dive into the technical details of these basic features by testing a Java class that implements a basic calculator.
First, we need a new Java project for our calculator class. So, inside Eclipse navigate to File | New | Java Project. To give our project a name, type BasicCalculatorProject in the Project name fi eld, and then click on Finish. You might be prompted to switch to the Java Perspective. If this happens, answer Yes. After performing all these steps, the Package Explorer view should show your new Java project. However, if something goes wrong and you can run into problems, go back to the previous chapter and review how to create a Java project.
Inside our recently created Java project, create a new package. To create a package named chapter3.basiccalc, select the src folder, right-click on it, and navigate to New | Package. Enter the package name, and click on the Finish button.
For More Information: www.packtpub.com/getting-started-eclipse-juno/book

Unit Testing with JUnit and Debugging
[ 50 ]
Let's create a class named BasicCalculator. Right-click on your recently created package and navigate to New | Class. Our class under test is as follows:
package chapter3.basiccalc;
public class BasicCalculator { private static int[] tempVars; //acts as an array of temp variables private static int result; public void add(int n) { result += n; }
public void subtract(int n) { result -= n; }
public void addResultToTempAt(int index) { tempVars[index] = result;// BUG: tempVars wasn't initialized properly }
public void squareRoot(int n) { //not implemented yet }
public void divide(int n) { result /= n; }
public void multiply(int n) { result = n * n; }
public void clear() { result = 0; }
public void clearTemps() { for (int i =0; i < tempVars.length; i++) { tempVars[i] = 0; } }
For More Information: www.packtpub.com/getting-started-eclipse-juno/book

Chapter 3
[ 51 ]
public int getResult() { return result; }
}
Downloading the example codeYou can download the example code fi les for all Packt books you have purchased from your account at http://www.PacktPub.com. If you purchased this book elsewhere, you can visit http://www.PacktPub.com/support and register to have the fi les e-mailed directly to you.
Our calculator implementation contains two faults, but do not mind about them yet. Using a buggy implementation will make our example more interesting.
The purpose of the BasicCalculator class is to perform elementary arithmetic operations (addition, subtraction, multiplication, and division) and calculate the square root; while storing the result after each operation. Apart from the result variable, an array is used to store preliminary results; making it possible to reuse it in subsequent calculations. Methods for reusing the values stored in this array are not implemented yet. So far, our calculator can only store preliminary results (which are kept in the tempVars array) and clean its memory (by assigning zero to all elements of tempVars). Further, notice that the method that should calculate the square root is not implemented either.
Well, our class should calculate the square root, however, as you saw, this particular feature has not been implemented yet. Do not worry about that, we did not implement this particular feature for demonstration purposes. Later in this chapter, we will show you how to make JUnit skip a test case for which either there is no implementation or the current implementation has been acting up.
Since we are sticking to the naming convention we presented in the previous section, before testing BasicCalculator, you should create a package called chapter3.basiccalc.test. The class containing all test cases should be created inside this package.
Now that you have set your Java project up and dealt with all scaffolding around your test code, you can either add JUnit to your project build path following the aforementioned directions, or keep reading and discover an even easier way of adding JUnit to the build path (as we mentioned, there are many ways of doing operations in Eclipse).
For More Information: www.packtpub.com/getting-started-eclipse-juno/book

Unit Testing with JUnit and Debugging
[ 52 ]
Right-click on BasicCalculator and navigate to New | JUnit Test Case. The window shown in the following screenshot will appear:
After selecting the JUnit Test Case option, a new window will pop up with the name of the test case already fi lled out (BasicCalculatorTest). It also shows the class under test (BasicCalculator). You only need to type the test package name in the Package fi eld. So go ahead and type chapter3.basiccalc.test as we did in the following screenshot (or click on the Browse button and select the desired package).
For More Information: www.packtpub.com/getting-started-eclipse-juno/book
Chapter 3
[ 53 ]
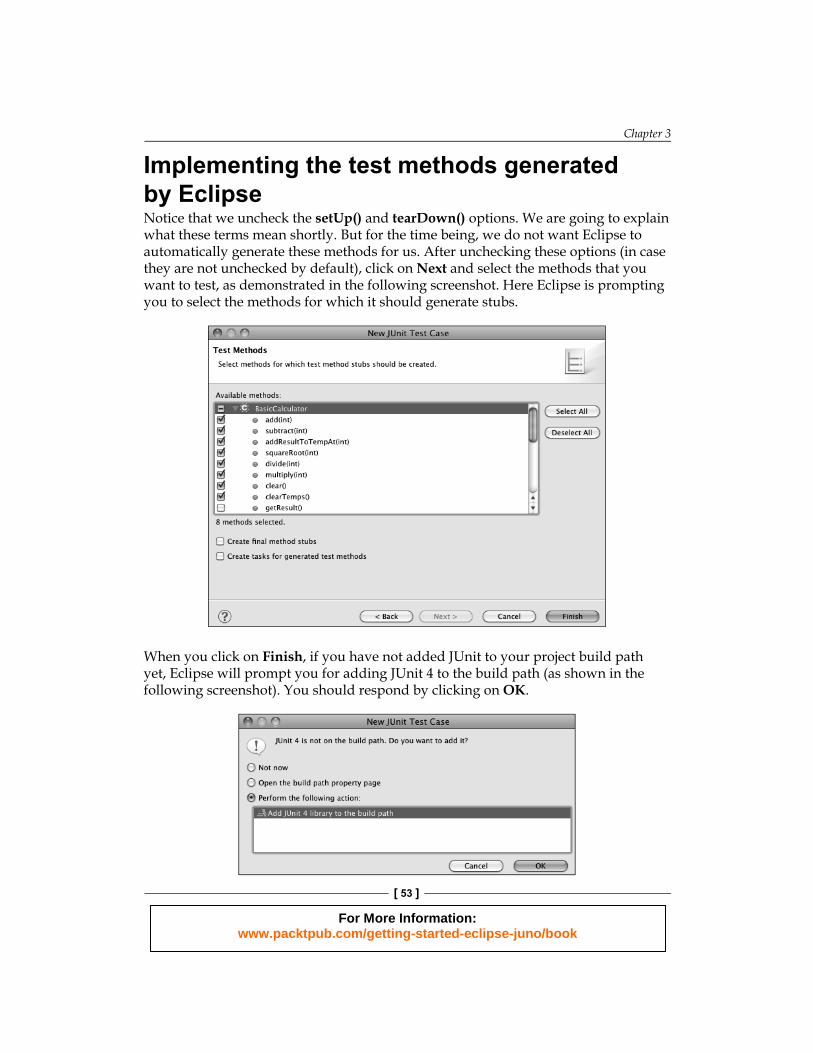
Implementing the test methods generated by EclipseNotice that we uncheck the setUp() and tearDown() options. We are going to explain what these terms mean shortly. But for the time being, we do not want Eclipse to automatically generate these methods for us. After unchecking these options (in case they are not unchecked by default), click on Next and select the methods that you want to test, as demonstrated in the following screenshot. Here Eclipse is prompting you to select the methods for which it should generate stubs.
When you click on Finish, if you have not added JUnit to your project build path yet, Eclipse will prompt you for adding JUnit 4 to the build path (as shown in the following screenshot). You should respond by clicking on OK.
For More Information: www.packtpub.com/getting-started-eclipse-juno/book

Unit Testing with JUnit and Debugging
[ 54 ]
Eclipse will then generate the following code for you:
package chapter3.basiccalc.test;
import static org.junit.Assert.*;import org.junit.Test;
public class BasicCalculatorTest {
@Test public void testAdd() { fail("Not yet implemented"); }
@Test public void testSubtract() { fail("Not yet implemented"); }
@Test public void testAddResultToTempAt() { fail("Not yet implemented"); }
@Test public void testSquareRoot() { fail("Not yet implemented"); }
@Test public void testDivide() { fail("Not yet implemented"); }
@Test public void testMultiply() { fail("Not yet implemented"); }
For More Information: www.packtpub.com/getting-started-eclipse-juno/book

Chapter 3
[ 55 ]
@Test public void testClear() { fail("Not yet implemented"); }
@Test public void testClearTemps() { fail("Not yet implemented"); }}
As you can see, Eclipse generated a lot of boilerplate code automatically. To be more specifi c, Eclipse generated all test methods (one for each method of our class under test), annotated then with org.junit.Test (@Test), and statically imported the assert methods.
The @Test annotation is used to indicate to JUnit that the annotated method should be run as a test case. Prior to running each test case, JUnit creates an instance of the class and then invokes the test case method on that instance. Later in this chapter, we will see how JUnit allows programmers to take advantage of this characteristic to initialize the context for test method that needs objects created before they can be executed.
If a test throws an exception, JUnit reports it as a failure. As you might have already fi gured out, all test method stubs generated by Eclipse are failing test methods. In fact, our test methods are failing because they invoke the fail() method from org.junit.Assert, which signals the failure of a test method by throwing an AssertionError.
In order to execute a JUnit-based test class, right-click on it and navigate to Run As | JUnit Test, as shown in the following screenshot:
For More Information: www.packtpub.com/getting-started-eclipse-juno/book
Unit Testing with JUnit and Debugging
[ 56 ]
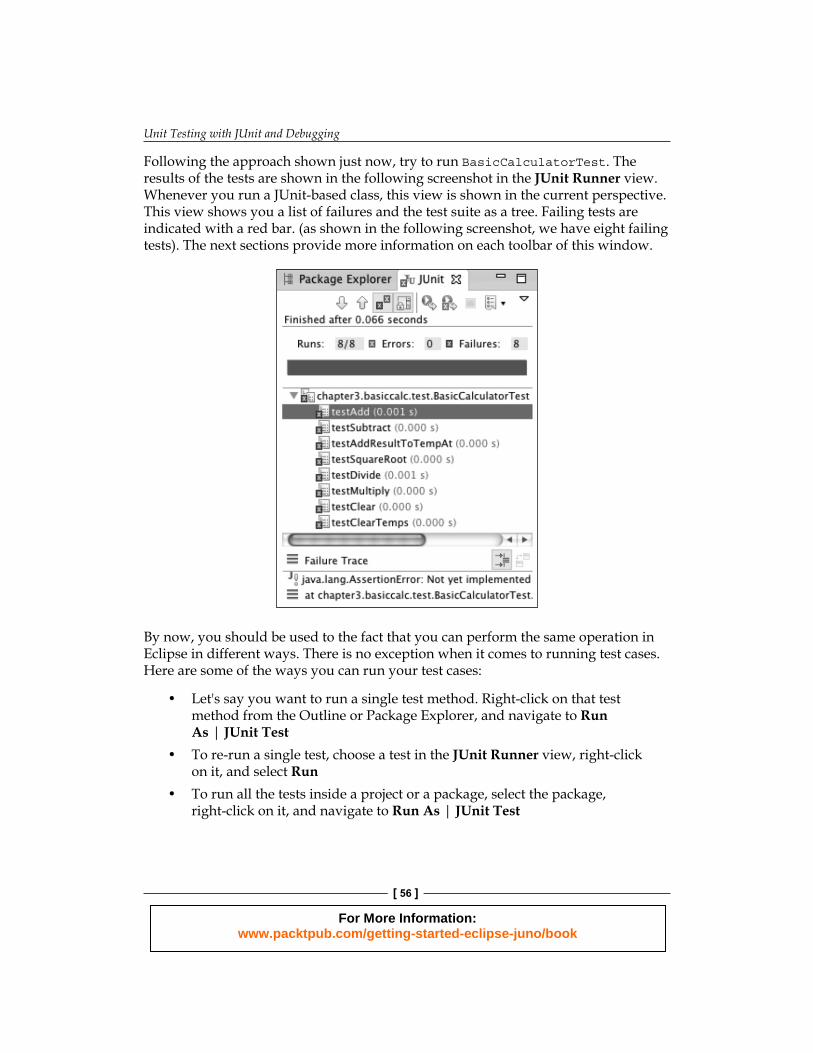
Following the approach shown just now, try to run BasicCalculatorTest. The results of the tests are shown in the following screenshot in the JUnit Runner view. Whenever you run a JUnit-based class, this view is shown in the current perspective. This view shows you a list of failures and the test suite as a tree. Failing tests are indicated with a red bar. (as shown in the following screenshot, we have eight failing tests). The next sections provide more information on each toolbar of this window.
By now, you should be used to the fact that you can perform the same operation in Eclipse in different ways. There is no exception when it comes to running test cases. Here are some of the ways you can run your test cases:
• Let's say you want to run a single test method. Right-click on that test method from the Outline or Package Explorer, and navigate to Run As | JUnit Test
• To re-run a single test, choose a test in the JUnit Runner view, right-click on it, and select Run
• To run all the tests inside a project or a package, select the package, right-click on it, and navigate to Run As | JUnit Test
For More Information: www.packtpub.com/getting-started-eclipse-juno/book

Chapter 3
[ 57 ]
In order to check out what a passing test looks like, comment the body of the method testAdd() as in the following code snippet, and using the approach described just now, run only testAdd():
@Testpublic void testAdd() { //fail("Not yet implemented");}
You should see a green bar; as illustrated in the following screenshot. To be more specifi c, it shows that testAdd() is a passing test method and the other test methods were not executed.
Before implementing tests that really evaluate the behavior of our calculator, it is worth taking a closer look at the JUnit Runner view, because you are going to be interacting with it throughout this chapter.
An overview of the Eclipse JUnit Runner viewAfter executing the JUnit-based classes, the JUnit Runner view is shown. In addition to indicating whether the recently run tests succeeded or failed, this view also shows why the failing tests failed and some useful toolbar commands. The JUnit Runner view has two panes, the tests pane and the failure trace pane. The tests pane lists all the executed tests as a tree. Upon selecting a failed test, the failure trace pane shows information on why the selected test failed. The following table presents a description of each toolbar command in the tests pane:
Icon Description
Moves the selection to the next failing test
Moves the selection to the previous failing test
For More Information: www.packtpub.com/getting-started-eclipse-juno/book
Unit Testing with JUnit and Debugging
[ 58 ]
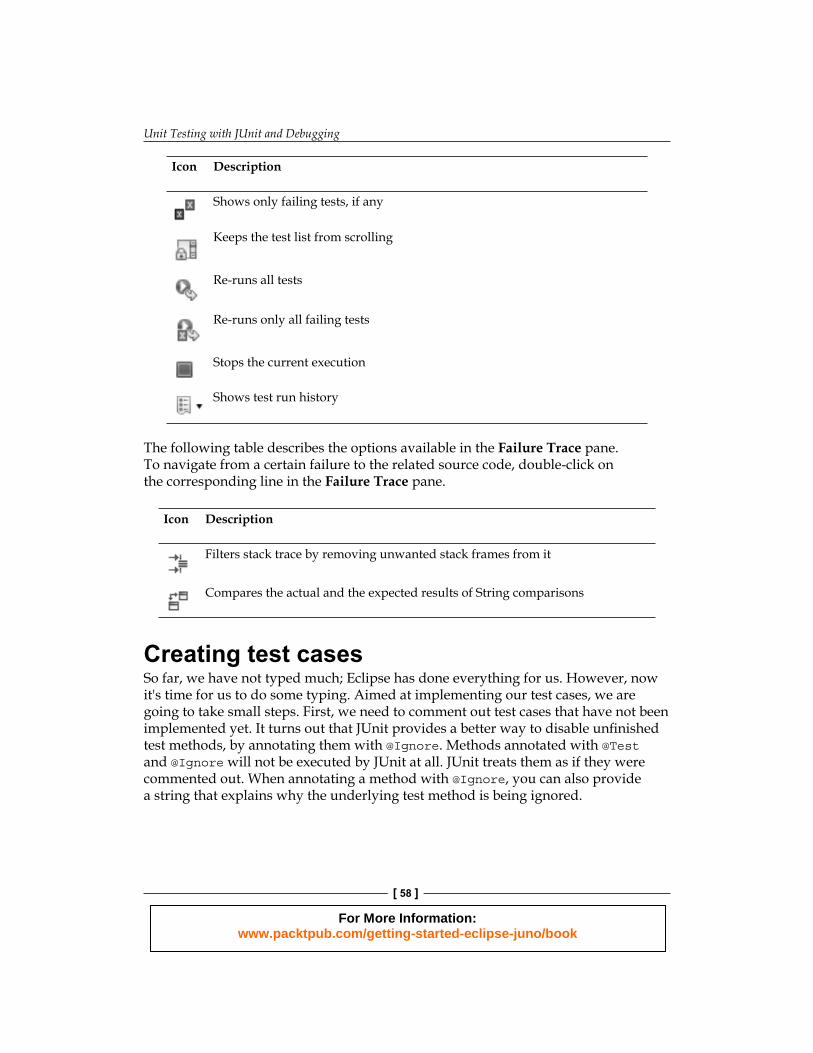
Icon Description
Shows only failing tests, if any
Keeps the test list from scrolling
Re-runs all tests
Re-runs only all failing tests
Stops the current execution
Shows test run history
The following table describes the options available in the Failure Trace pane. To navigate from a certain failure to the related source code, double-click on the corresponding line in the Failure Trace pane.
Icon Description
Filters stack trace by removing unwanted stack frames from it
Compares the actual and the expected results of String comparisons
Creating test casesSo far, we have not typed much; Eclipse has done everything for us. However, now it's time for us to do some typing. Aimed at implementing our test cases, we are going to take small steps. First, we need to comment out test cases that have not been implemented yet. It turns out that JUnit provides a better way to disable unfi nished test methods, by annotating them with @Ignore. Methods annotated with @Test and @Ignore will not be executed by JUnit at all. JUnit treats them as if they were commented out. When annotating a method with @Ignore, you can also provide a string that explains why the underlying test method is being ignored.
For More Information: www.packtpub.com/getting-started-eclipse-juno/book
Chapter 3
[ 59 ]
In order to use @Ignore, you have to import org.junit.Ignore. Once imported, @Ignore can be used to annotate the methods, as illustrated in the following code. In the following code, we are telling JUnit to ignore testSubtract, because it has not been properly implemented yet. Go ahead and mark all methods but testAdd() with @Ignore. Executing our test suite now will result in no failures.
@Ignore("Not implemented yet")@Testpublic void testSubtract() { fail("Not yet implemented");}
Now that the other test cases won't get in our way, let's start implementing testAdd(). Fortunately, writing unit tests is very straightforward. You just need to call chunks of your application's code, get the results back, and then check if they are exactly what you expected. Instead of having to write lots of if statements to compare the results when using JUnit, you can rely on the assert methods. Using assert methods, you specify the expected outcome, and then pass the actual result from invoking your application code.
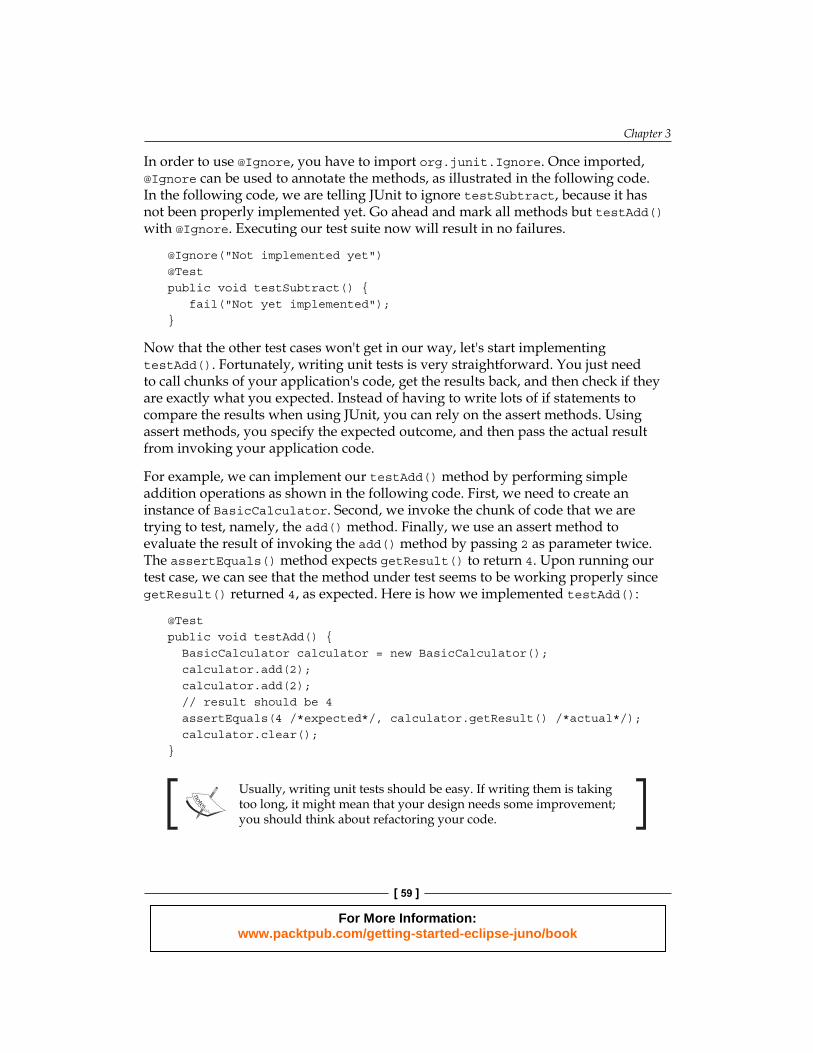
For example, we can implement our testAdd() method by performing simple addition operations as shown in the following code. First, we need to create an instance of BasicCalculator. Second, we invoke the chunk of code that we are trying to test, namely, the add() method. Finally, we use an assert method to evaluate the result of invoking the add() method by passing 2 as parameter twice. The assertEquals() method expects getResult() to return 4. Upon running our test case, we can see that the method under test seems to be working properly since getResult() returned 4, as expected. Here is how we implemented testAdd():
@Testpublic void testAdd() { BasicCalculator calculator = new BasicCalculator(); calculator.add(2); calculator.add(2); // result should be 4 assertEquals(4 /*expected*/, calculator.getResult() /*actual*/); calculator.clear();}
Usually, writing unit tests should be easy. If writing them is taking too long, it might mean that your design needs some improvement; you should think about refactoring your code.
For More Information: www.packtpub.com/getting-started-eclipse-juno/book
Unit Testing with JUnit and Debugging
[ 60 ]
Before implementing more tests, a few more words about assert methods are in order. As you can see in the previous example, assertEquals() takes two parameters, the expected result and the value to check against the expected result. In our code, we are referring to this method through static import (check out the static import statement that Eclipse autogenerated for us). If we were to use assertEquals() without statically importing it, we would have to do more typing: Assert.assertEquals(4, calculator.getResult()).
The test for subtraction operations is similar to the one for addition operations. Again, we create an instance of the class under test, invoke the chunk of code under test, and check if the invoked code yielded the expected outcome. Go ahead and implement testSubtract() as shown in the following code snippet. Note that our testSubtract() method relies on add() to set the stage for subtract(). More specifi cally, add() is invoked to store the value 35 into the calculator's result variable. Then we subtract 5 from the result and use an assert method to evaluate whether after performing these arithmetic operations the result contains the value 30.
@Testpublic void testSubtract() { BasicCalculator calculator = new BasicCalculator(); calculator.add(35); calculator.subtract(5); assertEquals(30, calculator.getResult()); calculator.clear();}
As you can see, all tests start by creating an instance of BasicCalculator (the one upon which the methods under test are invoked) and conclude with an invocation to calculator.clear() (in order to clear the value stored in result, so that it will not tamper with the results yielded by the other test methods). It is always a good idea to eliminate duplicated code from both your application and test code. We can extract this duplicated code into a method that does all the initialization and confi guration of the test environment, and a method that contains the cleanup code. In JUnit 4, in order to have a method executed before each test case, simply denote it with @Before (org.junit.Before). Here is how we can remove part of the duplicated code:
private BasicCalculator calculator;
@Beforepublic void setup() { calculator = new BasicCalculator();}
@Test
For More Information: www.packtpub.com/getting-started-eclipse-juno/book
Chapter 3
[ 61 ]
public void testAdd() { calculator.add(2); calculator.add(2); // result should be 4 assertEquals(4/*expected*/, calculator.getResult()/*actual*/); calculator.clear();}
Note that calculator is now an instance variable, and neither testAdd() nor testSubtract() (not shown in the code snippet) need to instantiate a local version of BasicCalculator; they simply use the calculator instance variable. Also note that all initialization code was moved to the setup method, which JUnit makes sure to invoke before executing each test method. Normally, methods that contain the initialization code needed for exercising the program under test are named setup. Likewise, methods containing the cleanup code are named teardown. Given that each test case now uses its own instance of BasicCalculator, if result were not a static variable, we would not need to invoke clear() on those instances. So, we would be able to safely get rid of all calls to clear(). However, since it is a static variable, we still need to invoke clear() after each test method.
Since methods noted with @Before run before each test case, there are no side effects among test runs.
In our example, the cleanup code should be extracted into a method denoted with @After. By doing so, this method will be executed after each test case. Go ahead and implement the cleanup code as follows:
@Afterpublic void teardown() { calculator.clear(); calculator = null; //this isn't really necessary}
Looking closely at our code, we can see that we do not need a new BasicCalculator object before executing our test methods. We can re-use one instance of BasicCalculator as long as we invoke clear() on that instance, after the execution of each test method. You might be wondering how to achieve this using JUnit. Actually, it is quite straightforward. JUnit provides an annotation that allows us to signal what methods must be executed prior to running all the test methods. The annotation that makes this possible is @BeforeClass. To be annotated with @BeforeClass, a method must be declared as public as well as static, and it can take no parameters. We no longer need our previous setup() method, so let's tweak it so that it will be executed only once for all the test cases (note that our teardown() method is still invoked after each test method to reset the result of calculator):
For More Information: www.packtpub.com/getting-started-eclipse-juno/book
Unit Testing with JUnit and Debugging
[ 62 ]
private static BasicCalculator calculator;
@BeforeClasspublic static void setup() { calculator = new BasicCalculator();}
@Afterpublic void teardown() { calculator.clear();}
Now, let's move on to more challenging arithmetic operations. Let's get down to tackling the test of the multiply() and divide() methods. Luckily for us, testing multiply is straightforward, as shown in the following code snippet:
@Testpublic void testMultiply() { calculator.add(10); calculator.multiply(3); assertEquals(30, calculator.getResult());}
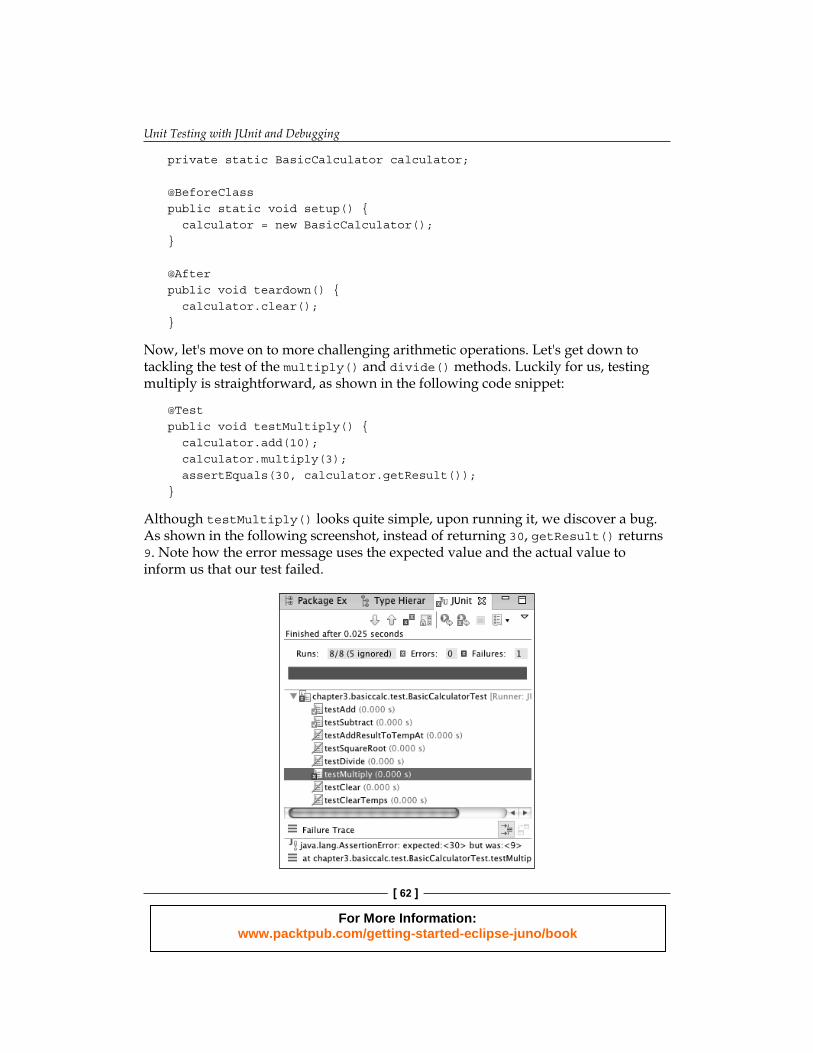
Although testMultiply() looks quite simple, upon running it, we discover a bug. As shown in the following screenshot, instead of returning 30, getResult() returns 9. Note how the error message uses the expected value and the actual value to inform us that our test failed.
For More Information: www.packtpub.com/getting-started-eclipse-juno/book

Chapter 3
[ 63 ]
Puzzled, we take a look at the implementation of multiply to discover that rather than multiplying result by the parameter n, we are multiplying n by itself and assigning this value to result. Fortunately, the fi x is easy:
public void multiply(int n) { result *= n;}
As you can see, even simple test methods are effective weapons against the bugs that lurk in our code. Nevertheless, so far we just wrote test methods that exercise the happy path of the code of our BasicCalculator. Sometimes we need to write test methods that exercise edge cases of the chunk of code under test. In Java, inputs that cause a certain method to throw an exception can be considered edge cases. For example, an edge case that our calculator has to cope with is division by zero.
In Java, an attempt to divide an integer by zero will lead to an ArithmeticException. If it is expected from our calculator to throw an ArithmeticException whenever there is a division by zero, we need to explicitly state this expectation in our tests.
Fortunately, JUnit provides a way to deal with these edge cases and the associated expected exceptions effectively. The @Test annotation supports two optional parameters. The fi rst, expected, specifi es that a test method should throw an exception. If the underlying method throws no exception or the thrown exception is different than the one specifi ed, the test fails.
For instance, we can use this annotation to implement an edge case of our testDivision() method as in the following code. It specifi es that the method divide() from BasicCalculator should throw an exception (ArithmeticException) whenever a division by zero takes place. Note that we do not need to use any assert method since the only outcome that we are expecting is an ArithmeticException. It is worth mentioning that the class passed as parameter to expected must be a subclass of java.lang.Throwable.
@Test(expected=ArithmeticException.class)public void testDivide() { calculator.add(10); calculator.divide(0);}
For More Information: www.packtpub.com/getting-started-eclipse-juno/book

Unit Testing with JUnit and Debugging
[ 64 ]
There is yet another way of achieving the same behavior. You can go about declaring expected exceptions through JUnit's ExpectedException rule. First, let us give you a crash course in JUnit rules.
In earlier versions of the test framework, it was not possible to modify or augment JUnit's internal knowledge about a given test suite. Using the current version, we can use rules to modify test results, change a test in a certain way before running it, and add information to test results. We will use the @Rule annotation to inform JUnit which rules to apply to the underlying test.
By using ExpectedException in conjunction with @Rule, you can specify in-test expectations regarding the exceptions that should be thrown for a particular test method. It takes more typing than expected, however, as shown here, you have more control over what is expected. For instance, you can even specify the message what the expected exception should contain.
@Rulepublic ExpectedException thrown = ExpectedException.none();
@Testpublic void testDivide() { thrown.expect(ArithmeticException.class); thrown.expectMessage("/ by zero"); //specify the expected message calculator.add(10); calculator.divide(0);}
As for the second optional parameter of @Test, timeout, it causes a test method to fail if it takes longer than a specifi ed amount of milliseconds to execute. To give you an example, let's say that we implemented testSquareRoot as an infi nite loop, which fails after 1 second. Upon running the code below you should get a red bar along with a java.lang.Exception containing the following message: "test timed out after 1000 milliseconds".
@Test(timeout=1000)public void testSquareRoot() { while(true);}
For More Information: www.packtpub.com/getting-started-eclipse-juno/book
Chapter 3
[ 65 ]
Okay, by now, we believe that you got the gist of writing test methods using JUnit and Eclipse. We even were able to uncover a bug in our calculator. Granted, it was a very simple, easy-to-spot bug.
We are sorry to say that not every bug is simple to uncover. Sometimes you might get a red bar that leaves you at a loss to fi gure out how to fi x the problem. In other words, when a test fails, and you just cannot fi gure out why, even after spending quite some time staring at the code, you need to turn to a debugger. To illustrate this somehow, let's implement the test method, testAddResulToTempAt. The addResultToTemp method should perform the following operation: add the current value of store in the variable result to a position in the tempVars array, according to the index passed as parameter. During the implementation of this test method, we realized that we did not implement a method to get this array of temporary results back. When implementing unit tests, realizing that you forgot something happens more often than not. To set this matter right, we add a simple get method, named getTemps, which simply returns the variable tempVars.
public int[] getTemps() { return tempVars;}
As for our test method, which uses our recently implemented getTemps, we implemented it as the following:
@Testpublic void testAddResultToTempAt() { calculator.add(9); calculator.addResultToTempAt(1); int[] temps = calculator.getTemps(); assertEquals(9, temps[1]);}
For More Information: www.packtpub.com/getting-started-eclipse-juno/book

Unit Testing with JUnit and Debugging
[ 66 ]
As you can see, we once again use add to store the value 9 into the variable result. Afterwards, in order to store 9 into the slot number 1 of the temporary memory, we invoke addResultToTempAt and pass 1 as parameter. The expected behavior is that the array that represents the calculator's temporary memory now contains the value 9 at index 1. However, the test fails (as shown in the following screenshot). Instead of the expected behavior, we get a NullPointerException. The only clue we got from observing the Failure Trace pane is that the exception is thrown at line number 16 of our BasicCalculator class. Just by looking at this line there is no way you can guess what is wrong (well, it also depends on your Java experience). It is for problems like this that the debuggers exist. So, we will not spoil the fun of discovering the root cause of this problem. Rather, we are going to go over the tools of the trade. That is, we are going to explain how to use Eclipse built-in Java debugger so that you can fi nd and fi x this bug by yourself.
For More Information: www.packtpub.com/getting-started-eclipse-juno/book

Chapter 3
[ 67 ]
Debugging when problems ariseIf you have been a programmer for a while, chances are that you are familiar with the classic debugging technique known as trace code . In case you are not familiar with trace code, let's break it down for you. In this debugging technique we introduce println or print statements throughout the code under inspection in order to show information regarding variables or whether the program has taken a certain path. With this defi nition in mind, you might be wondering, why would you need a debugger? The answer is simple and twofold. First, using a debugger you can achieve the same results without too much fuss. When applying trace code, you need to include print statements, recompile the program (or the particular chunk under inspection), run, and analyze the output of the trace code. Also, after fi nding the bug, you have to remove all trace code. Without mentioning that whenever a bug appears, you have to repeat the procedure all over again. Trace code is a cumbersome technique. In contrast, when using a debugger, achieving all that is just several clicks away. Second, you can get a lot more from debuggers; they allow you to peruse aspects of your program that would be quite diffi cult to fi gure out just by looking at the output.
As we mentioned, Eclipse ships with a full-blown debugger . This built-in Java debugger provides all debugging support functionality; it is possible to execute programs step-by-step, set breakpoints, inspect variables and values, and pause and resume threads.
There are many ways to launch a Java program in the debug mode. One option is to select the Java class fi le with the main method that you want to debug in the Package Explorer view and then click on the Debug [ ] button in the workbench toolbar (or select Run | Debug from the workbench menu bar). It is also possible to achieve the same thing by selecting Run | Debug as | Java Application from the workbench menu bar, or by clicking on Debug as | Java Application in the Package Explorer pop-up menu or in the drop-down menu on the Debug toolbar button. During debugging activities, Eclipse switches to the Debug Perspective, but before switching to it, the window shown in the following screenshot asks whether you want to change from the current perspective to the Debug Perspective.
For More Information: www.packtpub.com/getting-started-eclipse-juno/book

Unit Testing with JUnit and Debugging
[ 68 ]
Run confi gurations and debug confi gurations are shared, that is to say, any run confi guration that you used to run your application should be available in the debug-related menu.
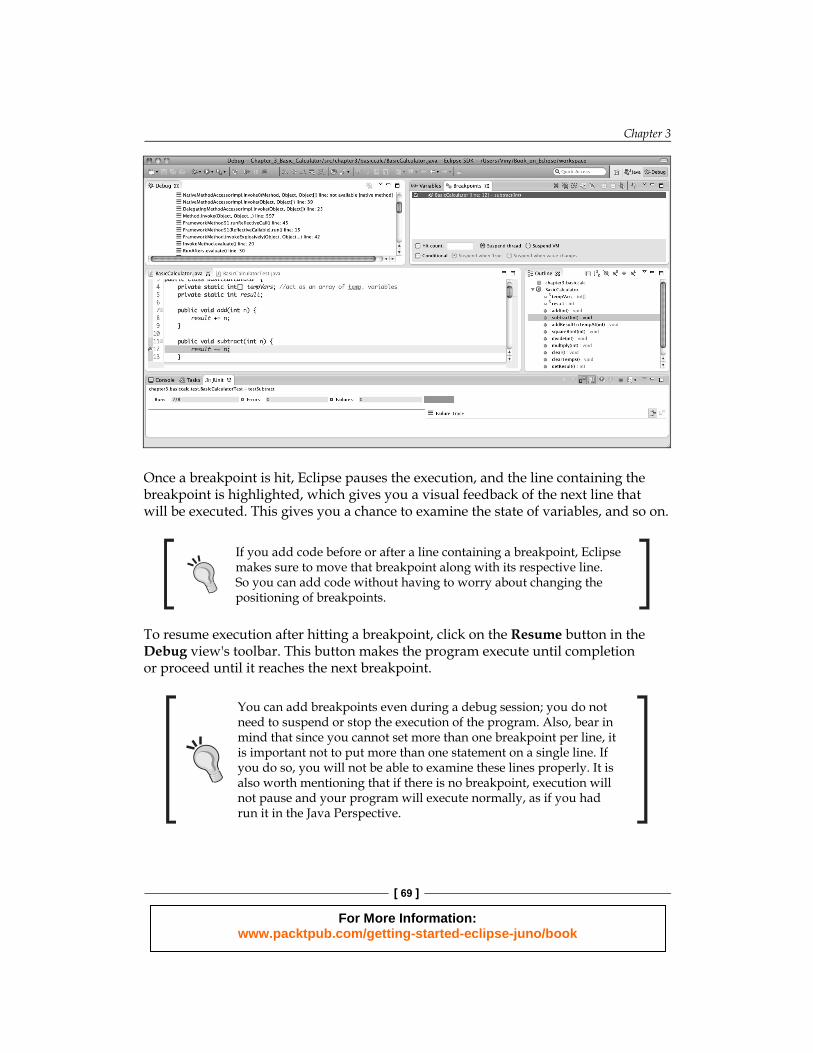
When you click on yes, the Debug Perspective appears, as illustrated in the following screenshot. This perspective allows you to control all threads of execution of the program under inspection. In the Debug Perspective: the call stack in the top-left corner indicates the methods of your program that were invoked, in the top-right corner you can manage the breakpoints and inspect the content of variables. These views are updated as you interact with your running program by stepping through its execution and adding and removing breakpoints.
The basic way of interacting with the debugger is by setting breakpoints. A breakpoint is a way of indicating to the debugger the line of code where you want the execution to pause. To set a breakpoint, while in the Java perspective, select the source code fi le you want to debug and open it in the editor (by double-clicking ). Skim through the code and place your cursor on the marker bar, which is along the left-hand side edge of the editor area, on the line that you want execution to stop. Then, double-click to set the breakpoint. Alternatively, you can right-click on this position and select Toggle Breakpoint.
Apart from regular breakpoints, there are conditional breakpoints. Conditional breakpoints are activated when the Boolean expressions associated to them evaluate to true.
For More Information: www.packtpub.com/getting-started-eclipse-juno/book
Chapter 3
[ 69 ]
Once a breakpoint is hit, Eclipse pauses the execution, and the line containing the breakpoint is highlighted, which gives you a visual feedback of the next line that will be executed. This gives you a chance to examine the state of variables, and so on.
If you add code before or after a line containing a breakpoint, Eclipse makes sure to move that breakpoint along with its respective line. So you can add code without having to worry about changing the positioning of breakpoints.
To resume execution after hitting a breakpoint, click on the Resume button in the Debug view's toolbar. This button makes the program execute until completion or proceed until it reaches the next breakpoint.
You can add breakpoints even during a debug session; you do not need to suspend or stop the execution of the program. Also, bear in mind that since you cannot set more than one breakpoint per line, it is important not to put more than one statement on a single line. If you do so, you will not be able to examine these lines properly. It is also worth mentioning that if there is no breakpoint, execution will not pause and your program will execute normally, as if you had run it in the Java Perspective.
For More Information: www.packtpub.com/getting-started-eclipse-juno/book

Unit Testing with JUnit and Debugging
[ 70 ]
Aimed at inspecting the behavior of your program, Eclipse Debugger allows for stepping into the code line by line through the program execution. This can be done through two commands: step into (F5) and step over (F6). The difference between these two commands is only noticeable when the next instruction is a method call. Selecting step over makes the debugger execute the method (without entering it) and proceed to the next statement following the method call. It is worth mentioning that even though the debugger does not show the method's body, it will be executed normally. On the other hand, if you choose the step into command, the debugger will proceed to the fi rst line of the underlying method.
After stepping into a method call it is still possible to skip the rest of it: use the step return command (F7). The debugger will proceed to the next line after the method call. The following table gives an overview of the main commands in the Debug toolbar.
Icon Description
Disable all breakpoints.
Resume execution.
Stop the current debug session by terminating the current execution.
Proceed to the next statement of the program under inspection. If the next statement is a method call, this command will step into the method body code.
Proceed to the next statement of the program under inspection. If the next statement is a method call, this command will execute the method body without entering it.Exit the current method and go to the calling code.
Re-enters the selected stack frame in the Debug view. Since it relies on the existence of an stack frame, it is not possible to use this option when debugging native methods.
For More Information: www.packtpub.com/getting-started-eclipse-juno/book
Chapter 3
[ 71 ]
As you step through your program execution, it is also possible to peruse and modify the state of your program. You can examine the contents of local variables, parameters, and visible fi elds by looking at the Variables window. It is also possible to investigate the contents of a variable by hovering the mouse pointer over it in the Java editor. As for non-primitive variables, they can be expanded in order to examine their individual elements. Apart from inspecting the value of variables, you can also examine the value of Java expressions in the editor in the Debug Perspective. Select an expression, then right-click on it, and choose Display. Eclipse evaluates the selected expression, taking the current scope into account, and shows the result in a pop-up window.
During a debug session, you can also modify the value of variables. To do so, select the variable that you want to modify in the Variables view; this will make its value appear in the bottom-half window of the Variables view, so that you can edit it. After editing, right-click and choose Assign Value.
Let's say that during your debug session you found a bug, and luckily, you also know how to fi x it right away. Do you need to stop the debug session to start fi xing the program? The answer is no. Thanks to a feature called hot code replace, editing and debugging can be carried out in tandem; you can edit your program without having to stop your debug session. The only side effect is that after modifying a method, Eclipse has to throw away the previous stack frame and begin the method again from the fi rst line.
It is likely that you have been using a Java virtual machine 1.5 or later, but we should warn you that hot code replace is only supported by Java virtual machines later than 1.4.2.
We covered the main functionalities of the debugger, now, armed with this debugging knowledge, go back and try to pinpoint the problem with testAddResultToTempAt.
For More Information: www.packtpub.com/getting-started-eclipse-juno/book
Unit Testing with JUnit and Debugging
[ 72 ]
SummaryIn this chapter, we presented the basic of creating unit tests using Eclipse and JUnit. You saw how Eclipse is able to generate test method stubs and automate the execution of these methods by seamlessly integrating the JUnit. Moreover, we also gave an overview of the main JUnit features as, for example, the most commonly used annotations. Apart from unit tests, this chapter also briefl y covered how to use the Java built-in Eclipse debugger.
Keep in mind that there are some testing-related topics which we did not cover in this chapter. Earlier on in the chapter, we mentioned that tests need to be independent from each other so that you can re-run them in any order that you wish. Sometimes, however, objects interact with other objects, which makes the creation of independent test methods more complex. In a unit test, when there are objects that may compromise the independence of the test or whose complexity may make the use of the real objects impractical, mock objects are used. These mock objects simulate the behavior of real objects. Luckily, there are frameworks that automate most of the process involved in creating mock objects. We encourage the interested reader to read about Mockito (http://code.google.com/p/mockito/).
Apart from a good set of test methods, whenever you set out to develop a reasonable-sized application, you need to have a back-up strategy. Usually, for code projects, this strategy includes using a version control program. A program that keeps track of different versions of programs is called version-control system. The next chapter describes an example of version-control system, namely, Git.
For More Information: www.packtpub.com/getting-started-eclipse-juno/book

Where to buy this book You can buy Getting Started with Eclipse Juno from the Packt Publishing website: http://www.packtpub.com/getting-started-eclipse-juno/book. Free shipping to the US, UK, Europe and selected Asian countries. For more information, please read our shipping policy.
Alternatively, you can buy the book from Amazon, BN.com, Computer Manuals and most internet book retailers.
www.PacktPub.com
For More Information: www.packtpub.com/getting-started-eclipse-juno/book


