GIMSIS FOR STUDENTS AND PARENTS INSTRUCTIONS FOR USE IMPORTANT Screenshots in this »Instructions for use« manual are for the Slovenian version of Microsoft Windows and other software, so the labels on buttons and other elements are all in the Slovenian language. The labels on buttons and other elements in your version of Microsoft Windows and other software will most likely be different so use the screenshots in this »Instructions for use« as guides. GIMSIS FOR STUDENTS AND PARENTS – INSTRUCTIONS FOR USE
Transcript
GIMSIS FOR STUDENTS AND PARENTS
INSTRUCTIONS FOR USE
IMPORTANT
Screenshots in this »Instructions for use« manual are for the Slovenian version of Microsoft Windows
and other software, so the labels on buttons and other elements are all in the Slovenian language. The
labels on buttons and other elements in your version of Microsoft Windows and other software will
most likely be different so use the screenshots in this »Instructions for use« as guides.
GIMSIS FOR STUDENTS AND PARENTS – INSTRUCTIONS FOR USE
2
GimSIS for students and parents – instructions for use
Log in ............................................................................................................................................................... 3
Log in with a certificate ................................................................................................................................ 3
Log in without a certificate........................................................................................................................... 3
Home page ...................................................................................................................................................... 5
The school calendar ..................................................................................................................................... 7
Selecting the student ................................................................................................................................... 9
Editing your profile and log-off....................................................................................................................10
Registering another child ........................................................................................................................12
Editing personal data ..............................................................................................................................13
How to change your password ................................................................................................................14
A list of prospective assessments ................................................................................................................17
Calendar of assessment ..............................................................................................................................18
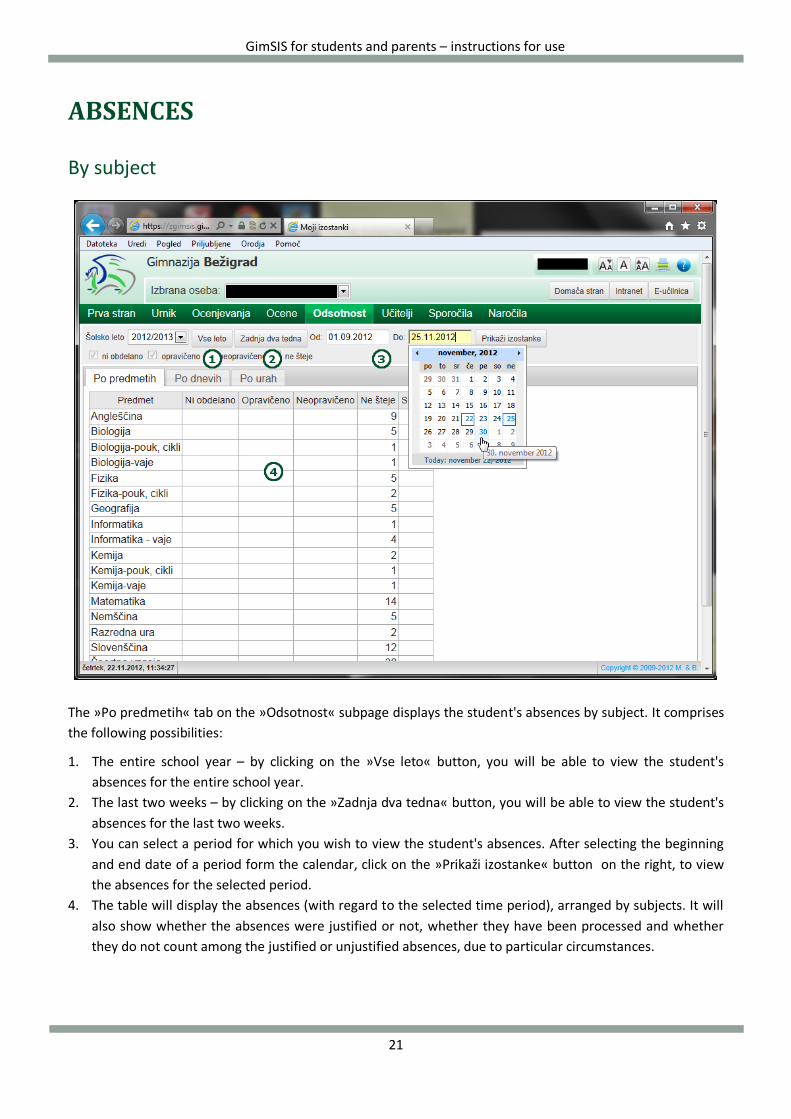
By subject ...................................................................................................................................................21
By day .........................................................................................................................................................22
By period ....................................................................................................................................................23
GimSIS for students and parents – instructions for use
Enter the following:
1. Your username (for students: »name.surname«, and for parents »s.child's name.surname«)
2. Your password
3. Click on the »Prijava« button.
5
GimSIS for students and parents – instructions for use
HOME PAGE
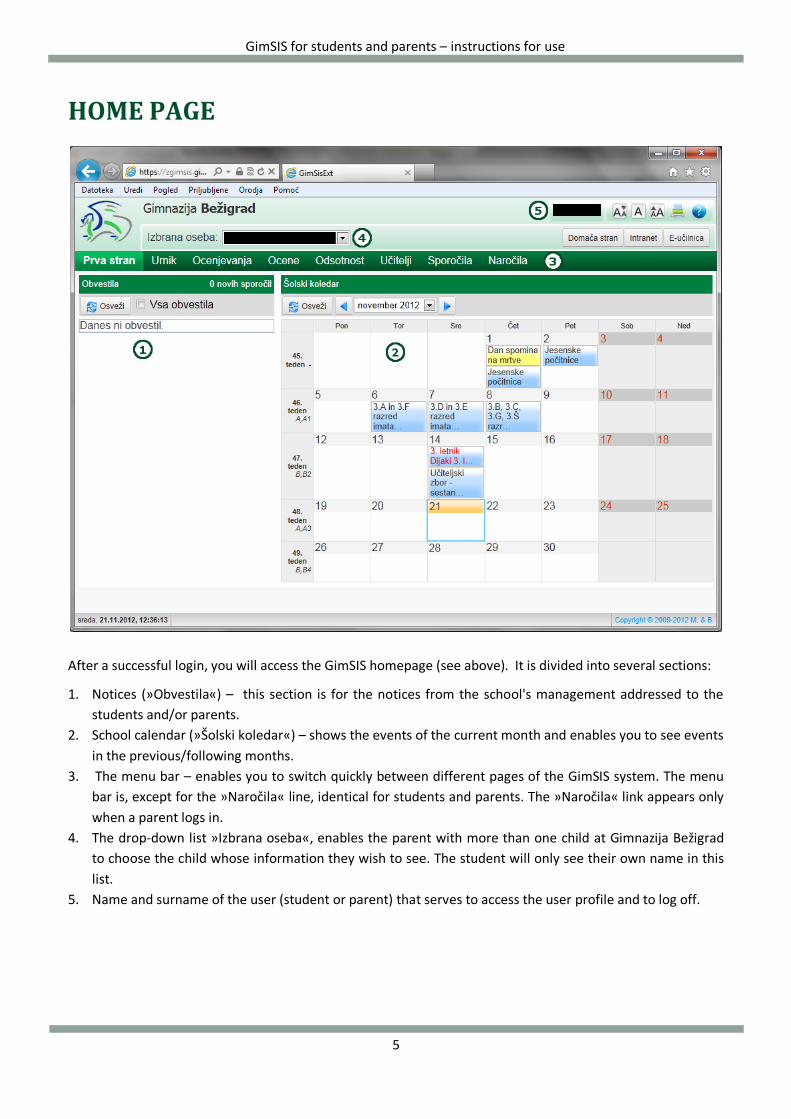
After a successful login, you will access the GimSIS homepage (see above). It is divided into several sections:
1. Notices (»Obvestila«) – this section is for the notices from the school's management addressed to the
students and/or parents.
2. School calendar (»Šolski koledar«) – shows the events of the current month and enables you to see events
in the previous/following months.
3. The menu bar – enables you to switch quickly between different pages of the GimSIS system. The menu
bar is, except for the »Naročila« line, identical for students and parents. The »Naročila« link appears only
when a parent logs in.
4. The drop-down list »Izbrana oseba«, enables the parent with more than one child at Gimnazija Bežigrad
to choose the child whose information they wish to see. The student will only see their own name in this
list.
5. Name and surname of the user (student or parent) that serves to access the user profile and to log off.
6
GimSIS for students and parents – instructions for use
Notices
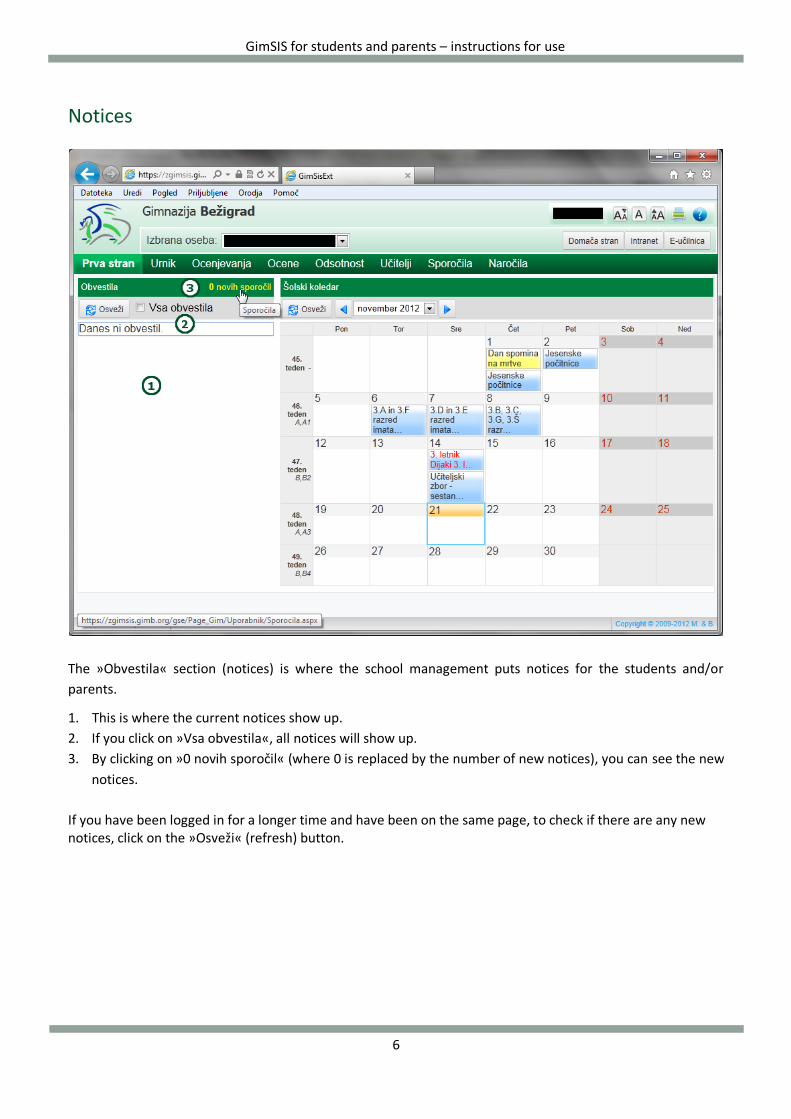
The »Obvestila« section (notices) is where the school management puts notices for the students and/or
parents.
1. This is where the current notices show up.
2. If you click on »Vsa obvestila«, all notices will show up.
3. By clicking on »0 novih sporočil« (where 0 is replaced by the number of new notices), you can see the new
notices.
If you have been logged in for a longer time and have been on the same page, to check if there are any new notices, click on the »Osveži« (refresh) button.
7
GimSIS for students and parents – instructions for use
The school calendar
In the »Šolski koledar« section particular events of the current month are shown:
1. The calendar shows all the school events for the current or selected month.
2. The drop-down list in which you can select a particular month of the current school year.
3. The arrow buttons allow you to select the previous or following month.
8
GimSIS for students and parents – instructions for use
If you click on a particular event in the calendar, a window with detailed information about that event will pop
up.
9
GimSIS for students and parents – instructions for use
Selecting the student
Parents with more than one child at Gimnazija Bežigrad can select a child form the drop-down list »Izbrana
oseba« (up – on the left).
Parents with only one child at Gimnazija Bežigrad do not have this possibility since only one name will appear
in the drop-down list (their child's name).
Students cannot select another person as only their name will appear in the drop-down list. Even in cases
when their siblings attend Gimnazija Bežigrad, students cannot select their sibling's name.
10
GimSIS for students and parents – instructions for use
Editing your profile and log-off
By clicking on the username (upper right hand corner) the user can access the »Uredi profil« button (Edit
profile). A click on this button will open the page with the user's profile.
To log-off from GimSIS, click on the »Odjava« (log-off) button.
11
GimSIS for students and parents – instructions for use
With a click on the »Uredi profil« button, you will access your user profile. On this page, the parents can
register or un-register a child. All users (parents and students) can manage their data and certificate.
The parents can:
1. See the list of their registered children (who are enrolled in Gimnazija Bežigrad).
2. Register another child by clicking on the »Prijavi novega otroka« button.
3. Un-register a child by clicking on the suitable button.
The user (parent or student) can:
4. Manage their certificate (order a new one or request a new password for the existing certificate).
5. Change their data by clicking on the »Spremeni podatke« button.
6. Change their password by clicking on the »Spremeni geslo« button.
7. View their data.
12
GimSIS for students and parents – instructions for use
Registering another child
Fill in the relevant fields in the »Prijava novega otroka« (registering another child) window and click on the
»Shrani« (Save) button.
1. Write your child's name in the »Ime« (name) field.
2. Write your child's surname in the »Priimek« (surname) field.
3. Write your access code in the »Pristopna koda« field (note that if you have more than one child at
Gimnazija Bežigrad, each has a unique access code).
Relevant instructions, including tips on how to correct the mistakes, will appear on the right-hand side each
time you click in one of the fields.
NOTE: For parents who are registering more than one child.
When registering a second and every other child (in your user profile), after a completed registration the »v
postopku« (pending) status will appear. It is part of the security steps and means that your second and every
other child has to confirm that you are their parent.
The child can do this by logging-in into GImSIS and confirming you as their parent in their user profile.
13
GimSIS for students and parents – instructions for use
Editing personal data
Fill in the relevant fields in the »Moji osebni podatki« window and click on the »Shrani« window.
1. Write your name in the »Ime« field.
2. Write your surname in the »Priimek« field.
3. Choose your sex from the »Spol« drop-down list.
4. Write you e-mail address in the »E-pošta« field and tick the relevant option , if you wish to receive notices
by e-mail.
5. Write your phone number in the »Telefon« field. This field is optional.
Relevant instructions, including tips on how to correct the mistakes, will appear on the right-hand side each
time you click in one of the fields.
14
GimSIS for students and parents – instructions for use
How to change your password
Fill in the relevant fields in the »Sprememba gesla« window and click on the »Shrani« button.
1. Write your current password in the »Sedanje geslo« field.
2. Write your new password in the »Novo geslo« field.
3. Write your new password in the »Ponovi novo geslo« (confirm new password) field.
Relevant instructions, including tips on how to correct the mistakes, will appear on the right-hand side each
time you click in one of the fields.
15
GimSIS for students and parents – instructions for use
Links
There are three buttons on the right-hand side, above the menu bar. By clicking on one of them, you will open
a one of the below sites in a new window of your browser:
1. »Domača stran« (home page) – a click on this button will open the Gimnazija Bežigrad home page
(http://www.gimb.org).
2. »Intranet« – a click on this button will open the Gimnazija Bežigrad intranet site
(https://intranet.gimb.org), which includes various information for students, parents and employees.
3. »E-učilnica« – a click on this button will open the Gimnazija Bežigrad e-classrooms site