17
Graded Project Microsoft Word

Graded Project
Microsoft Word

INTRODUCTION 1
CREATE AND EDIT A COVER LETTER 1
CREATE A FACT SHEET ABOUT WORD 2013 6
USE A FLIER TO GENERATE PUBLICITY 9
DESIGN A REGISTRATION FORM 12
REVIEW YOUR WORK AND SEND IT TO THE SCHOOL 13
INSPECT YOUR COMPLETED FILES 13
PREPARE YOUR FILES FOR SUBMISSION 14
iii
Conte
nts
Conte
nts

1
INTRODUCTION
Now that you’ve learned how to use Microsoft Word, it’s timeto put your skills into practice. You’ll use many of the con-cepts and techniques featured in your studies to completethis project, which your instructor will grade.
This project involves a case study based on a fictional firm.You’ll assume the role of a director of training (Jo Bill)responsible for creating promotional literature for the firm,named Learn-2-Compute, Inc. The promotional documentswill be mailed to a potential customer of the firm. The cus-tomer is being personally invited to a training seminar on thenew features of Word 2013.
For this project, you’ll complete four sections of the promo-tional literature package. The sections consist of a cover letterintroducing the firm and inviting the potential customer tothe training session, a fact sheet highlighting the new fea-tures of Word 2013, a flier promoting the training, and aregistration form. Detailed instructions for completing andediting the promotional items follow.
CREATE AND EDIT A COVER LETTER
1. Open a new document and save it with a new name.
• Open Word and start a new document. The goal ofthis project is to make you thoroughly familiar withhow to plan and format a letter from scratch. Note,however, that various templates are available inWord for generating already formatted business documents. After completing the project, feel free toexplore the templates.
• Save the new document as cover letter.
Microsoft Word

Microsoft Word
• Remember to save the document periodically as youwork on it. You can set Word’s AutoRecover featurefor a short cycle. This doesn’t take the place ofsaving the document yourself, so consider alsogetting into the habit of pressing Ctrl + S to saveyour work whenever you pause while typing.
2. Click on the Show/Hide ¶ button on the main toolbarto display the hard returns in your document.
3. Set the paragraph style (font), line spacing, and marginsfor the entire document, as follows:
• From the Font group, select Times New Romanfont. If you don’t have this font, you maychoose a similar font. Select Automatic (black)for the Font color. Select a 12-point size.
• From the Paragraph group, click the LineSpacing button and select 1.0.
• From the Page Layout tab, click Margins andselect Normal for 1" margins (Figure 1).
4. Now type the text in Figure 2 as the promotional package’s cover letter.
5. Insert the current date at the top on the leftedge of the page.
• You’ll insert the date as a field that will updateautomatically. First highlight and delete thecurrent date of the letter. From the Insert tab,click Date and Time. Choose the Month,Date, Year format, the third selection. Makesure Update Automatically is checked(Figure 3). Click OK. The Date and Time dia-log box will reflect your system’s current date.
6. Emphasize key text with special formatting.
• Convert the list of new features into a bul-leted list. Place a hard return after the colonfollowing the word “features” in the firstparagraph. Delete the space and the colon.Also place a hard return after each item sep-arated by a comma. Delete the commas, theword “and,” the period after “Web,”and anyextra spaces.
2
FIGURE 1—You can increase ordecrease the size of a margin.

Graded Project 3
(current date)
Jane LoomisDirector, Human ResourcesSmith, Jones & Brown, Inc.346 Parkway DriveBlue Smoke, ID 83300
Dear Ms. Loomis:
Whether your employees are novices or seasoned professionals at word processing,the new Word 2013 offers features to improve productivity, professionalism, and per-formance in your organization. Here are a few of these new or improved features:Reading mode designed for tablet users, bookmarks for tracking where you last read,the ability to edit PDFs in Word, simpler markups for tracking changes, and insert-ing pictures from the Web.
For more details on the features of Word 2013, refer to the enclosed fact sheet.
LEARN-2-COMPUTE, INC., a training company in Idaho with a ten-year track record,offers one-day seminars in the new features of Word 2013. A series of these trainingsessions will be held in the conference room at the Blue Smoke Shilo Inn the week ofNovember 10. Now is the time to start planning for your employees to attend.
To alert your employees to the new features of Word 2013 and to this unique hands-on training, I am enclosing fifteen copies of a flier that you can distribute. I have alsoenclosed fifteen registration forms so you can pre-register anyone who is interested.Space is limited to fifteen people in each daylong session, so get your registrations inearly! The cost is only $175 per participant.
If I can provide you with more details or information, please call me at our LEARN-2-COMPUTE, INC. main office: 1-888-444-3467, ext. 4471.
Sincerely,
Jo Bill
Director of Training
FIGURE 2—Cover Letter

• Capitalize the first word of every bullet item. Thenhighlight the list—beginning with “Reading” andending with “Web”—and click on the Bullet buttonon the Home tab. Select the option for round, blackbullets (Figure 4) from the Bullet drop-down listarrow, if it’s not already selected.
Microsoft Word4
FIGURE 4—Select the bullet type.
FIGURE 3—Select howthe date will appear inyour document.

Graded Project
• Make every mention of the company name, LEARN-2-COMPUTE, Inc., into bold and italic. Try usingWord’s Navigation feature to search for the phrasethroughout the document.
When reformatted, the bulleted list in the letter should looklike Figure 5.
7. Adjust wording.
• After reviewing your on-screen document, you decidethat you prefer the word “seminar” to “session” or“sessions.” Use Word’s Find/Replace feature tosearch for every instance of “session” or “sessions,”and replace with the word “seminar” or “seminars”(Figure 6).
8. Adjust the closing to leave more room for the signature.
• You should have three hard returns after the word“Sincerely.”
9. Check the spelling and grammar, and make any appropriate corrections.
10. After some time has passed, proofread the entire docu-ment. Inspect the overall layout, and try to spot and correct any errors that Word’s grammar checker mayhave missed.
5
FIGURE 6—Word’sFind and ReplaceFeature
FIGURE 5—TheFormatted Bullet List
Note: If the signtureruns over to a secondpage, check the spacingon the inside address.Highlight the addressand click on the downarrow in the paragraphpanel. Change theBefore and After spac-ing to 0 pts.

CREATE A FACT SHEET ABOUT WORD 20131. Create a new document and name the document fact
sheet.
2. Type the text from Figure 7. Note that each system isdifferent, so your document may appear slightly different.Type the entire document in Times New Roman, 12 point,double-spaced. Be sure to save your work frequently.
Microsoft Word6
FIGURE 7—Fact Sheet
New in Word 2013
Fact Sheet
Reading Mode
This view allows users to flip through documents like a book, without Word toolbarsas distractions. This is a handy tool for tablet users.
Bookmarks
Bookmarks are placed where you last read. So when you reopen a document, youcan continue where you left off.
Edit text in PDFs in Word
You can edit PDF documents directly in Word. This is a feature many have requestedin the past.
Simple Markup Tracking
If you’ve worked with Word’s Track Changes in other versions of Word, you’ll notethere’s a new feature called Simple Markup. It’s a cleaner version showing proposedchanges. The traditional view of track changes is still there if you choose to view AllMarkup.
Inserting Online Pictures and Video
Besides inserting pictures from your computer, you can also search online using theBing search engine. You can also insert online videos directly into Word documents.
To learn these new features, attend a one-day training seminar the week ofNovember 10. For complete details and registration materials, call Jo Bill at 1-888-555-3467, ext. 4471.

3. Select the first two lines and format them as the title ofthe fact sheet.
• Capitalize the first line of the title. Change the fontto Arial.
• The first line should be italic and the second lineshould be regular. Both lines should be in bold.
• Center the title.
4. Add a horizontal line by pressing the Enter key after theend of Fact Sheet, and then in the Borders and Shadingdialog box, click Horizontal Line. After setting yourtitle, it should appear similar to Figure 8.
5. Select Shapes from the Insert tab and choose a symbolfrom the Shapes collection and place it to the left of yourtitle. We chose the four-point star. You’ll need to resizethe symbol you choose to fit between the borders.Repeat the process to insert a matching symbol on theother side (Figure 9).
6. Apply the Heading 1 style to the following lines:
• Reading Mode
• Bookmarks
• Edit Text in PDFs in Word
• Simple Markup Tracking
• Inserting Online Pictures and Video
Graded Project 7
FIGURE 8—Your Updated Title
FIGURE 9—Inserting Shapesinto Your Heading
After formatting the first line, you can use the FormatPainter feature on the other lines. Delete extra linesbetween headings and normal text.
6. Format the descriptive text beneath the headings withNormal style and then change the spacing to 1.5.
7. Format the last two lines of text as Normal style andthen change the font to Calibri (Body), 12 point, bold.Use center alignment for these lines.
8. Check the spelling and grammar, and make anyappropriate corrections.
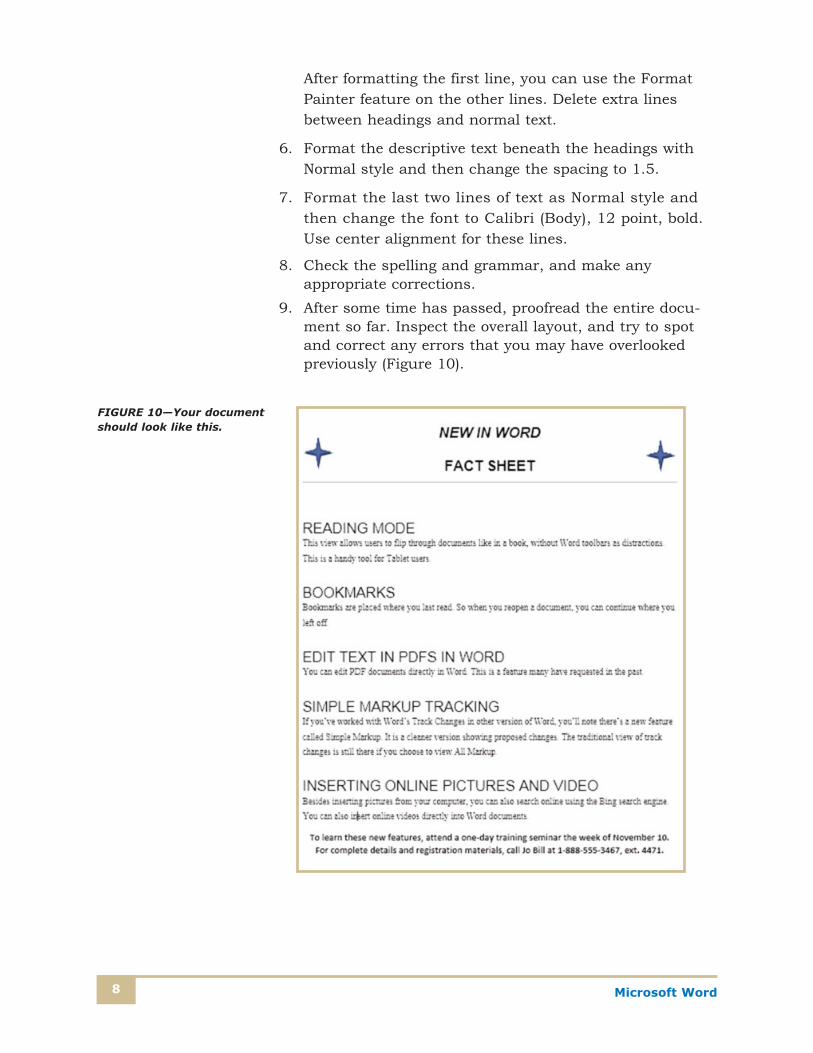
9. After some time has passed, proofread the entire docu-ment so far. Inspect the overall layout, and try to spotand correct any errors that you may have overlooked previously (Figure 10).
Microsoft Word8
FIGURE 10—Your documentshould look like this.

USE A FLIER TO GENERATE PUBLICITY1. Enter the text for the flier from Figure 11. Type the
document in Normal style, single spaced. Save thedocument as flier.
2. Create a special heading. Insert five hard returnsbetween the first line of text “Learn What’s New in Word2013” and the second line “Attend a daylong. . . .”
Use WordArt to create the heading. First, delete the firstline of text. Then, click WordArt from the Insert tab.Choose the WordArt style in the top row, second columnfrom the left (Figure 12). When the WordArt text boxappears, move the text box so that it’s centered andapproximately 1½ inches from the top of the page. Typethe heading into the text box. Set the font as 28-pointArial.
3. Emphasize key information with special formatting.
• Format the next two lines, beginning with “Attend adaylong . . .” and ending with “new features,” andset the font at 18 point. Insert a hard return after“new features.”
Graded Project 9
FIGURE 11—Text for the Flier
Learn What’s New in Word 2013
Attend a daylong, hands-on workshop conducted by LEARN-2-COMPUTE, Inc.
Workshop covers these new features: Reading Mode, Bookmarks, editing text in
PDFs in Word, Simple Markup Tracking, and inserting online pictures and video
directly in Word.
To learn these new features, attend a one-day training seminar the week of
November 10. All workshops conducted in the conference room at the Blue
Smoke Shilo Inn.
For complete details and registration materials, call Jo Bill at 1-888-555-3467,
ext. 4471.

Microsoft Word
• Convert the list of features of the workshop to a bulleted list. In the Bullets list, choose the four-small-diamond design (Figure 13). Format the text of thelist at 16 point, bold. Change the spacing to 2.0.
10
FIGURE 12—Choose theWordArt in the top row,second from left.
FIGURE 13—Use the Bullets featureto enhance your bulleted list.

• Insert three hard returns before the lastthree lines of text on the flier.
4. Format the remaining text at 16 point, bold,italic. Center align the text.
5. Insert text into a table format.
• Place the cursor in front of the word“To” in the first line. From the Inserttab, click Table and then Insert Table.Change the number of columns androws to 1 (Figure 14). A 1 × 1 tableshould now appear above the text youselected.
• Cut and paste the lines of text inside thetable. You may need to add a hardreturn to center the text.
6. Select Online Pictures from the Insert menuand choose an appropriate image. Figure 15shows the image we chose. Use the Picturetools to insert, resize, and position theimage to the right of the bulleted list. Note:Please refer back to your Microsoft Wordstudy unit if you’re having trouble movingthe image.
7. Save your work, making sure the flier fits onone page.
8. Check the spelling and grammar, and make any appro-priate corrections.
9. After some time has passed, proofread the entire docu-ment so far. Inspect the overall layout, and try to spotand correct any errors that you may have overlookedpreviously.
Graded Project 11
FIGURE 14—The Insert Table dialogbox allows you to customize the sizeof the table.

DESIGN A REGISTRATION FORM
1. Prepare to enter text on a new page by inserting a pagebreak at the end of the flier you created.
2. Create a table to organize the registration form.
• On the new page, insert a table consisting of fivecolumns and seven rows.
• Select the first row of the table. Under the TableTools layout tab, click on Merge Cells. The cell bor-ders will disappear, leaving one long row. UsingFigure 16 as your guide, continue adjusting andmerging the cells to form the remainder of the form.
3. Enter the text into the form as it appears in Figure 16.You may need to adjust the size of the cells to create avisually pleasing and useful form.
Microsoft Word 12
FIGURE 15—Insert an image tothe right of the bulleted list.

4. Check the spelling and grammar, and make any appropriate corrections.
5. After some time has passed, proofread the entire document. Inspect the overall layout, and try to spot and correct any errors that you may have overlookedpreviously.
REVIEW YOUR WORK AND SEND IT TO THE SCHOOL
Congratulations! Now that you’ve completed the Word 2013project, you’re ready to apply all you’ve learned about wordprocessing in your own enterprises. All you have left to dowith the project is to review your completed work one lasttime and send it to the school for grading.
INSPECT YOUR COMPLETED FILES
1. Proofread your work.
• If you have a printer, check a hard copy of yourwork for errors. If you don’t have a printer, youshould still check your work carefully by reviewingit line-by-line on your computer screen.
Graded Project 13
FIGURE 16—The Completed Registration Form
• Your project grade will be based on the accuracywith which you entered and edited the information.Make sure your final document is free of errors,and that you closely followed the instructions forany changes.
2. Check the layout.
• Check that all bullets, margins, and any special formatting are laid out correctly. Depending on theproperties of your printer, you may need to makeadjustments in spacing or pagination to fit the doc-ument neatly on a printout.
• Even if your computer isn’t connected to a printer,you can still inspect your work using Print Previewfrom the File tab.
PREPARE YOUR FILES FOR SUBMISSIONFollow this procedure to submit your project online:
1. Log on to the Penn Foster website and go to “My Courses.”
2. Click on Take Exam next to Microsoft Word.
3. Attach your file or files as follows:
a.Click on the Browse box.
b.Locate the file you wish to attach.
c.Double-click on the file.
d.Click on Upload File.
e.Since you have more than one file to attach, clickon the Browse box again, and repeat steps b, c,and d for each file.
4. Enter your e-mail address in the box provided. (Note:This information is required for online submission.)
5. If you wish to tell your instructor anything specificregarding this assignment, enter it in the Message box.
6. Click on Submit File.
Microsoft Word14

Be sure to send three files: the cover letter, the fact sheet,and the flier.
Your instructor will grade your project according to the following guidelines.
Creating and editing the cover letter 20 points _____
Creating the fact sheet about Word 2013 30 points _____
Creating the publicity flier 25 points _____
Designing the registration form 25 points _____
Total _____
Graded Project 15


