60
Hardlock End Users’ Manual © 2002 Aladdin Document: Hardlock End Users’ Manual Revision: 1.4 Date: November 28, 2002

Hardlock End Users’ Manual
© 2002
Aladdin Document: Hardlock End Users’ Manual Revision: 1.4
Date: November 28, 2002
Contents
1
Contents
Using Protected Software.................................................................... 5 Necessary steps................................................................................ 5 This manual....................................................................................... 5
Installing Hardware and Drivers ......................................................... 7 Hardlock modules and ports ............................................................. 7 Drivers............................................................................................... 7 Installing on the parallel port ............................................................. 8 Installing on the serial port ................................................................ 9 Installing on the USB port ............................................................... 10 Installing on the ISA slot.................................................................. 11
Installing the Hardlock drivers ................................................. 11 Preparing the hardware ........................................................... 11 Installing the card .................................................................... 12
Installing on the PCI slot ................................................................. 13 Installing the Hardlock drivers ................................................. 14 Preparing the hardware ........................................................... 14 Installing the card .................................................................... 14 Installing the drivers for the parallel port.................................. 15
Installing on the PCMCIA port......................................................... 17 FAQs for installation........................................................................ 18
License Update................................................................................... 19 Basic terminology............................................................................ 19 Update with an EXE File ................................................................. 20 Update with VTC block/VTC file and HL-Upgrade .......................... 21 Update with VTC block/VTC file and Aladdin Monitor..................... 22 Collecting license information ......................................................... 23
Hardlock in a Network........................................................................ 27 Prerequisites ................................................................................... 27

Contents
2
Method of function........................................................................... 28 Basic terminology ............................................................................ 29 Necessary steps.............................................................................. 29 Operating systems and protocols.................................................... 30 HL-Server under Windows 95/98/ME.............................................. 31 HL-Server under Windows NT/2000/XP.......................................... 31 HL-Server under DOS..................................................................... 32 HL-Server under Novell................................................................... 33 Aladdin Monitor ............................................................................... 34
Setting Environment Variables ......................................................... 37 Controlling the search (IP address, port and protocol).................... 40 Defining the search using HL_SEARCH ......................................... 40 Excluding IP from the search .......................................................... 42 Optimizing the search via TCP/IP ................................................... 42 Controlling repeat attempts ............................................................. 42 Defining serial port usage................................................................ 43 Defining port access........................................................................ 43 Search for ALF license file .............................................................. 44
Aladdin DiagnostiX............................................................................. 47 Installing Aladdin DiagnostiX........................................................... 47 Starting Aladdin DiagnostiX............................................................. 47 Using Aladdin DiagnostiX................................................................ 47
Diagnostic Tools ...................................................................... 48 Checking the Hardlock module ....................................................... 48 Results of the Hardlock module check ............................................ 49 Creating Reports ............................................................................. 50
Create Report Settings ............................................................ 50 Creating a Report .................................................................... 51
Linking DiagnostiX to external reporting tools ................................. 52
Problems and Solutions .................................................................... 53 Hardlock module not found ............................................................. 53

Contents
3
I/O address conflict ......................................................................... 55 Protected program does not run ..................................................... 55 Automatic dial up networking connection established..................... 55 Printout does not function correctly................................................. 56
Index .................................................................................................... 57


Using Protected Software
5
Using Protected Software
You have purchased software which is licensed with hardware. The software will not run with its full range of functions unless you have the appropriate hardware, a Hardlock module.
Necessary steps
• Install the drivers for the hardware, unless they are already integrated in the installation routine of the protected program.
• Connect the protection hardware to a suitable port.
• Install the network software if the licenses are made available in a local area network.
This manual
This manual is intended to facilitate using the protected software. It provides answers to the following questions:
• What do I need to use the protected software?
• How can I install the hardware and the drivers?
• How can I update licenses?
• How can I use HL-Server to make the purchased licenses available in a network?
• What tools are available to help me?
• How can I avoid making mistakes?
• How can I solve problems?
Note Please note that the conditions for use are largely dependent on how the software vendor has protected the software. As a result, the procedures explained here may differ from the actual situation. If in doubt, follow the instructions given by the software vendor.


Installing Hardware and Drivers
7
Installing Hardware and Drivers
Hardlock modules and ports Hardlock module Interface
Hardlock E-Y-E Standard Parallel
Hardlock E-Y-E Memo Parallel
Hardlock Twin Standard Parallel, serial
Hardlock Twin Memo Parallel, serial
Hardlock USB USB
Hardlock Internal Memo ISA slot or PCI slot
Hardlock PC-Card Memo PCMCIA slot
Hardlock Server External Parallel, USB
Hardlock Server Internal ISA bus slot or PCI slot
Drivers
The appropriate drivers must be installed in order to use the Hardlock modules. To do this, run the EXE file for your operating system (see below).
Note Driver installation may already have been integrated in the installation routine for the protected software. This means there is no need to perform the installation again. Contact your software vendor if you have any doubts.
Operating systems and drivers Operating system With graphical user
interface Command lines
Windows 3.x HLDRV16.EXE INSTVXD.EXE
Windows 95/98/ME, NT/2000/XP
HLDRV32.EXE HLDINST.EXE
Note The drivers for Hardlock modules are continuously being updated and adapted to new operating systems. To obtain the latest drivers, go to the Setup Programs section of the

Installing Hardware and Drivers
8
download area at http://www.aladdin.de.
Installing on the parallel port
The following Hardlock modules are installed on a parallel port:
• Hardlock E-Y-E with and without memory
• Hardlock Twin with and without memory
• Hardlock Server External (see also the "Hardlock in a Network" section on page 27)
Installing the Hardlock module
1. Install the driver for the Hardlock module. To do this, follow the instructions in the "Drivers" section on page 7 and the instructions provided by your software vendor.
2. Connect the Hardlock module to a parallel port.
Make sure the arrowhead (Hardlock E-Y-E, Hardlock Server External) or the lettering PARALLEL (Hardlock Twin) is oriented towards the computer.
Following installation, the protected software can access the Hardlock module.
Computer
Hardlock E-Y-EHardlock Server Extern
Hardlock Twin
PA
RA
LLE
L
Printer
Installing Hardware and Drivers
9
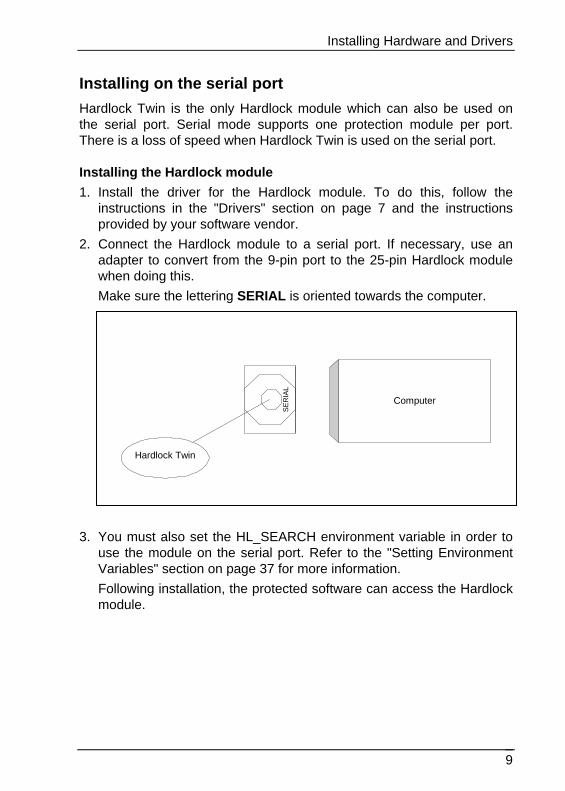
Installing on the serial port
Hardlock Twin is the only Hardlock module which can also be used on the serial port. Serial mode supports one protection module per port. There is a loss of speed when Hardlock Twin is used on the serial port.
Installing the Hardlock module
1. Install the driver for the Hardlock module. To do this, follow the instructions in the "Drivers" section on page 7 and the instructions provided by your software vendor.
2. Connect the Hardlock module to a serial port. If necessary, use an adapter to convert from the 9-pin port to the 25-pin Hardlock module when doing this.
Make sure the lettering SERIAL is oriented towards the computer.
3. You must also set the HL_SEARCH environment variable in order to use the module on the serial port. Refer to the "Setting Environment Variables" section on page 37 for more information.
Following installation, the protected software can access the Hardlock module.
Computer
SE
RIA
L
Hardlock Twin

Installing Hardware and Drivers
10
Installing on the USB port
Hardlock USB can be used with the following operating systems: Windows 95 from OSR 2.5, Windows 98/2000/XP.
Installing the Hardlock module
1. Install the driver for the Hardlock module. To do this, follow the instructions in the "Drivers" section on page 7 and the instructions provided by your software vendor.
2. Connect the Hardlock module to a USB port.
Following installation, the protected software can access the Hardlock module.
Computer
Hardlock USB

Installing Hardware and Drivers
11
Installing on the ISA slot
The following Hardlock modules are installed on an ISA slot:
• Hardlock Internal (ISA)
• Hardlock Server Internal (ISA)
Necessary steps
• Install the Hardlock drivers
• Prepare the hardware
• Install the hardware
Installing the Hardlock drivers
Install the driver for the Hardlock module. To do this, follow the instructions in the "Drivers" section on page 7 and the instructions provided by your software vendor.
Preparing the hardware
1. Use a wrist grounder to ground yourself or briefly touch a metal part of the computer housing.
2. Carefully unpack the card. Avoid touching any components or connection contacts when doing this. If you do, there is a risk of irreparable damage to components due to static discharges.
3. Use the jumpers to set the configuration appropriate to your computer. Select a free start address which is not yet occupied by a parallel port. The permitted addresses are given in hexadecimal notation on the card and there is also a symbolic representation of the switch configurations.
Plug-in contact for the ISA port
Installing Hardware and Drivers
12
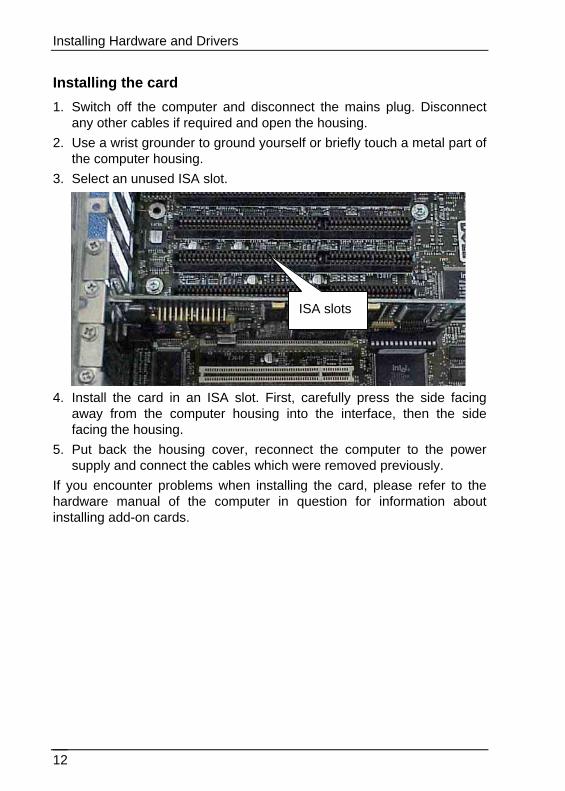
Installing the card
1. Switch off the computer and disconnect the mains plug. Disconnect any other cables if required and open the housing.
2. Use a wrist grounder to ground yourself or briefly touch a metal part of the computer housing.
3. Select an unused ISA slot.
4. Install the card in an ISA slot. First, carefully press the side facing away from the computer housing into the interface, then the side facing the housing.
5. Put back the housing cover, reconnect the computer to the power supply and connect the cables which were removed previously.
If you encounter problems when installing the card, please refer to the hardware manual of the computer in question for information about installing add-on cards.
ISA slots

Installing Hardware and Drivers
13
Installing on the PCI slot
The following cards are installed on a PCI slot:
• Hardlock Internal PCI
• Hardlock Server Internal PCI
Hardlock modules for the PCI slot also serve as a special parallel card which gives you the following options:
• You can connect additional Hardlock modules to the parallel slot on the card.
• You can connect the installed Hardlock modules to the external interface using the supplied cable. This gives you an extra parallel port which you can use for additional protection modules or a printer, for example.
Necessary steps
• Install the Hardlock drivers
• Install the hardware
• Install the drivers for the additional parallel port
Slot cover
Parallel port for further protection modules
Plug-in contact for the PCI port

Installing Hardware and Drivers
14
Installing the Hardlock drivers
Install the driver for the Hardlock module. To do this, follow the instructions in the "Drivers" section on page 7 and the instructions provided by your software vendor.
Preparing the hardware
1. Use a wrist grounder to ground yourself or briefly touch a metal part of the computer housing.
2. Carefully unpack the card. Avoid touching any components or connection contacts when doing this. If you do, there is a risk of irreparable damage to components due to static discharges.
3. If required connect additional protection modules to the parallel port on the card and tighten the screws.
Note: We cannot guarantee that it will be possible to daisy-chain protection modules made by other manufacturers.
4. Use the supplied cable to connect the last protection module and the slot cover on the card together. This step is only necessary if you wish to use the card externally as an extra parallel port.
Installing the card
1. Switch off the computer and disconnect the mains plug. Disconnect any other cables if required and open the housing.
2. Use a wrist grounder to ground yourself or briefly touch a metal part of the computer housing.

Installing Hardware and Drivers
15
3. Select an unused PCI slot and remove the corresponding slot cover from the computer housing.
4. Install the card into the PCI slot. Make sure the slot cover is pointing towards the housing. First, carefully press the side facing away from the computer housing into the interface, then the side facing the housing.
5. Tighten the slot cover onto the computer housing.
6. Put back the housing cover, reconnect the computer to the power supply and connect the cables which were removed previously.
Installing the drivers for the parallel port
After installing the hardware you need to install the drivers for the parallel port. This step is always required, even if you do not want to use the parallel port. The procedure depends on the operating system.
Windows NT4
To install drivers under Windows NT you need to be logged on as an administrator.
1. Start the computer.
2. Start the supplied installation wizard for installing the drivers, ACPCI_INSTALL.EXE. The PCIAKS.INF and PCIAKS.SYS files must be in the same folder.
3. Follow the instructions of the installation wizard.
PCI slots
Installing Hardware and Drivers
16
4. Shut down the computer and restart it.
The card will now be detected automatically. The new parallel port is generally assigned to LPT2.
Windows 95/98/2000/XP
To install drivers under Windows 2000/XP you need to be logged on as an administrator.
1. Start the computer.
A message appears informing you that new hardware has been detected. The device driver installation wizard opens.
2. Follow the instructions in the wizard. Search for the file automatically or enter the name of the folder in which the AKSPCI.INF and AKSPCI2.INF driver files are located. The files are provided by your software vendor. The AKSPPUI.DLL and AKSPP.VXD files must be in the same folder (not with Windows 2000/XP).
3. Repeat the procedure if required.
4. Restart the computer following driver installation. This step is not required with Windows 2000/XP.
The card will now be detected automatically. The new parallel port is generally assigned to LPT2.
A random address is assigned to the parallel port under Windows NT4/2000/XP. Address 0x378, if available, is assigned with Windows 95/98/ME. Otherwise, address 0x278 is assigned.

Installing Hardware and Drivers
17
Installing on the PCMCIA port
The Hardlock PC-Card is the space-saving version for notebook computers.
Installing the Hardlock module
1. Install the driver for the Hardlock module. To do this, follow the instructions in the "Drivers" section on page 7 and the instructions provided by your software vendor.
2. Connect the Hardlock PC-Card to the PCMCIA slot.
Make sure the Aladdin logo is pointing upwards and the arrowhead is pointing towards the computer.
A message appears informing you that new hardware has been detected. The device driver installation wizard opens.
3. Specify the folder where the HLPCMCIA.INF file is located.
4. Restart the computer following driver installation. This step is not required with Windows 2000/XP.
Computer
Hardlock PC-Card

Installing Hardware and Drivers
18
FAQs for installation
I need the parallel port for other devices. Can I connect other hardware to the Hardlock module?
Hardlock modules for the parallel port are transparent. This means you can connect additional hardware such as a printer. Please refer to the "Problems and Solutions" section on page 53 for proposed solutions if you encounter any problems.
Alternatively, you can use a Hardlock module for another port (USB, PCI, ISA). Please ask your software vendor.
Can I subsequently connect the Hardlock module to another computer?
Yes, you can plug in the Hardlock module somewhere else. However, remember that the driver must also be installed on the other computer. Please refer to the information in the "Hardlock in a Network" section on page 27 if you want to connect a Hardlock Server module somewhere else.
Can I disconnect the Hardlock module from the computer?
You can disconnect the Hardlock module at any time if you are not currently using the protected software.
I don't have a driver. What should I do?
It may be that the software vendor has integrated the driver installation in the software installation routine. Consequently, first check whether the Hardlock module is recognized once the protected software has been installed.
Ask your software vendor if the Hardlock module is not found.
In addition, to obtain the latest drivers, go to the Setup Programs section of the download area at http://www.aladdin.de.

License Update
19
License Update If your software vendor uses the Hardlock LiMaS licensing system, you can alter your licenses without having to send back the Hardlock module. The license update is performed by a file which you obtain from your software vendor.
There are various methods of performing the license update:
• Using an EXE file
• Using a data block (VTC) which is applied to the Hardlock module by an additional program
The software vendor may require information about your licenses in order to perform a license update. You can export the license information from the Hardlock module for this purpose (see the "Collecting license information" section on page 23).
Note The software vendor can design the license update procedure individually. Therefore, first follow the instructions given by the software vendor.
Basic terminology
RUS Remote Update System. System for modifying licenses without re-encoding the Hardlock module.
CTV Customer-To-Vendor. Licensing information which you export from the Hardlock module and send to the vendor. CTV file or CTV data block.
VTC Vendor-To-Customer. License update which you receive from the vendor and apply to your Hardlock module. VTC file or VTC data block.
HL-Upgrade Program for performing the license update.
ALF Aladdin License File. File containing license information for use with HL-Server.
License Update
20
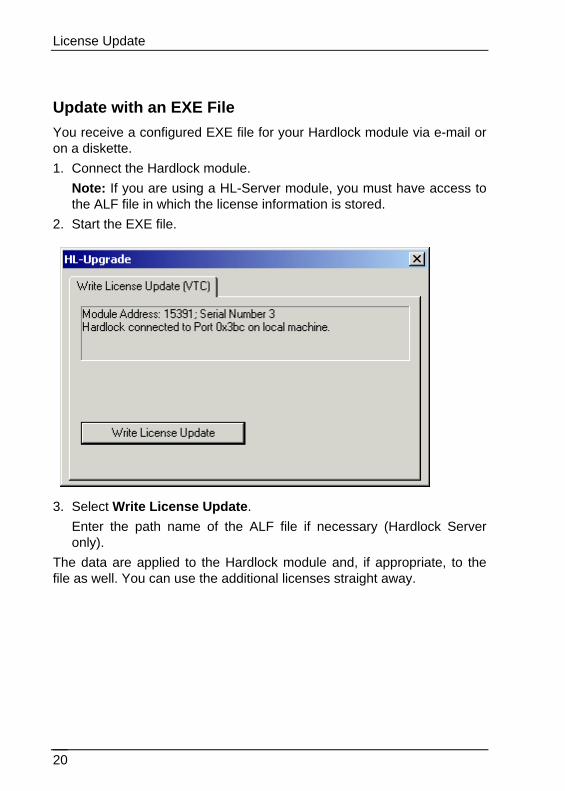
Update with an EXE File
You receive a configured EXE file for your Hardlock module via e-mail or on a diskette.
1. Connect the Hardlock module.
Note: If you are using a HL-Server module, you must have access to the ALF file in which the license information is stored.
2. Start the EXE file.
3. Select Write License Update.
Enter the path name of the ALF file if necessary (Hardlock Server only).
The data are applied to the Hardlock module and, if appropriate, to the file as well. You can use the additional licenses straight away.
License Update
21
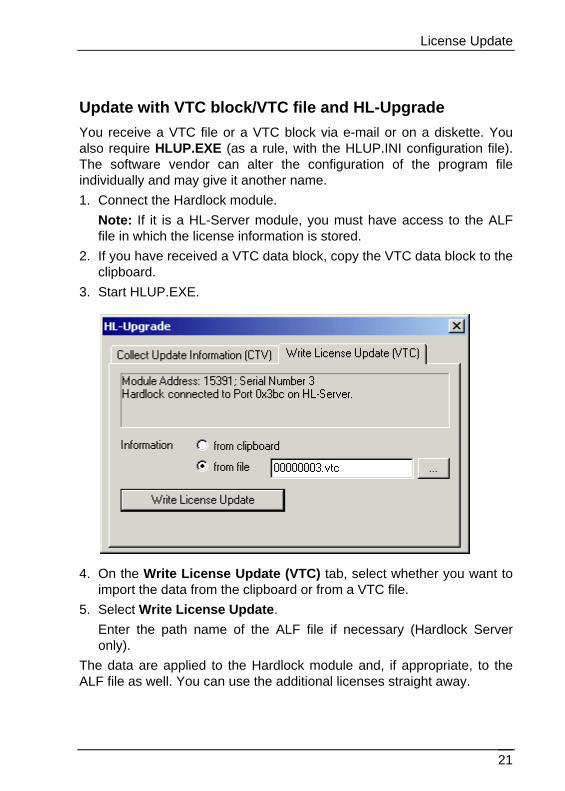
Update with VTC block/VTC file and HL-Upgrade
You receive a VTC file or a VTC block via e-mail or on a diskette. You also require HLUP.EXE (as a rule, with the HLUP.INI configuration file). The software vendor can alter the configuration of the program file individually and may give it another name.
1. Connect the Hardlock module.
Note: If it is a HL-Server module, you must have access to the ALF file in which the license information is stored.
2. If you have received a VTC data block, copy the VTC data block to the clipboard.
3. Start HLUP.EXE.
4. On the Write License Update (VTC) tab, select whether you want to import the data from the clipboard or from a VTC file.
5. Select Write License Update.
Enter the path name of the ALF file if necessary (Hardlock Server only).
The data are applied to the Hardlock module and, if appropriate, to the ALF file as well. You can use the additional licenses straight away.

License Update
22
Update with VTC block/VTC file and Aladdin Monitor
If you are using Hardlock in a network and you have installed Aladdin Monitor, you can also perform the update directly using Aladdin Monitor.
You receive a VTC file or a VTC block via e-mail or on a diskette.
1. Connect the Hardlock module.
2. Make sure the license file with the ALF file extension is located in the correct folder, otherwise it cannot be updated.
3. If you have received a VTC data block, copy the VTC data block to the clipboard.
4. Start Aladdin Monitor.
5. In the left-hand part of the window, click the Hardlock module into which you want to import an update.
Note: If the module is not displayed, first double-click the HL-Server which is making the module available, or refresh the view by selecting File/Rescan.The login information is displayed in the right-hand part of the window.
6. Select Update.
The Update dialog box opens.

License Update
23
7. Select whether you have obtained the data as a VTC file or if you want it taken from the clipboard.
8. Select Write License Update.
The data are applied to the Hardlock module and the license file, and the license data are updated.
Collecting license information
Occasionally for the purposes of a license update, it may be necessary for you to collect the current license information from the Hardlock module and send it to your software vendor.
You require HL-Upgrade or Aladdin Monitor in order to collect the license information.
Collecting license information with HL-Upgrade
HL-Upgrade may be individually configured by the software vendor and adapted for your Hardlock module; it may have a different name. If in doubt, follow the instructions given by the software vendor.
As a rule, you receive
• the HLUP.EXE program file,
License Update
24
• the HLUP.INI configuration file which contains the module address of your Hardlock module, together with other information.
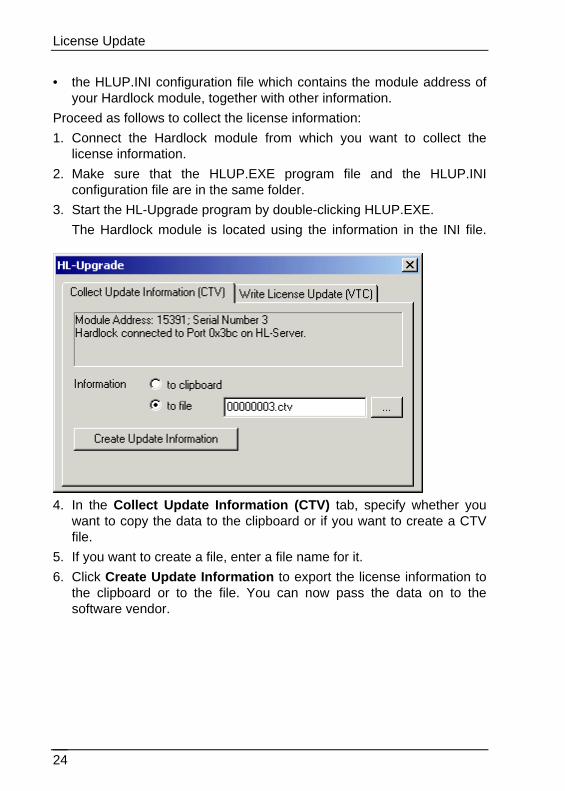
Proceed as follows to collect the license information:
1. Connect the Hardlock module from which you want to collect the license information.
2. Make sure that the HLUP.EXE program file and the HLUP.INI configuration file are in the same folder.
3. Start the HL-Upgrade program by double-clicking HLUP.EXE.
The Hardlock module is located using the information in the INI file.
4. In the Collect Update Information (CTV) tab, specify whether you want to copy the data to the clipboard or if you want to create a CTV file.
5. If you want to create a file, enter a file name for it.
6. Click Create Update Information to export the license information to the clipboard or to the file. You can now pass the data on to the software vendor.
License Update
25
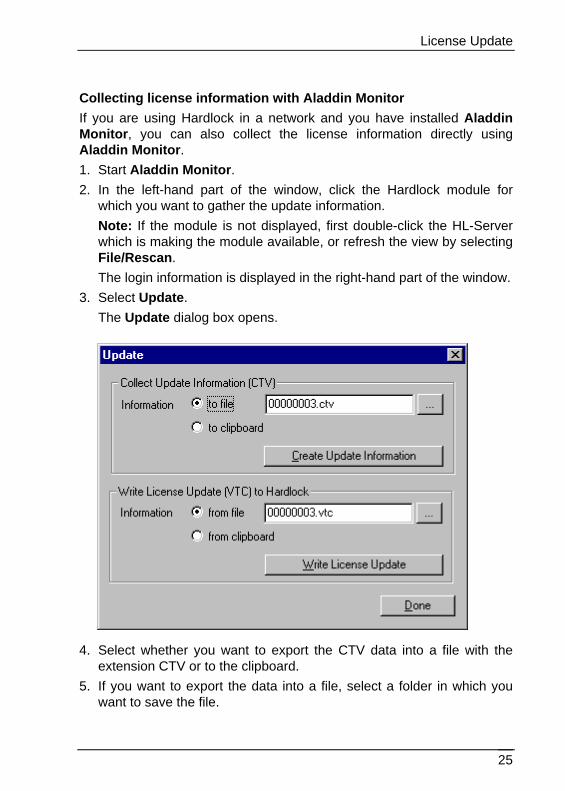
Collecting license information with Aladdin Monitor
If you are using Hardlock in a network and you have installed Aladdin Monitor, you can also collect the license information directly using Aladdin Monitor.
1. Start Aladdin Monitor.
2. In the left-hand part of the window, click the Hardlock module for which you want to gather the update information.
Note: If the module is not displayed, first double-click the HL-Server which is making the module available, or refresh the view by selecting File/Rescan.
The login information is displayed in the right-hand part of the window.
3. Select Update.
The Update dialog box opens.
4. Select whether you want to export the CTV data into a file with the extension CTV or to the clipboard.
5. If you want to export the data into a file, select a folder in which you want to save the file.

License Update
26
Note: The default name contains the unique serial number of the Hardlock module. The vendor can use this number for allocating the file. As a result, you should only change this name after contacting the software vendor.
6. Click Create Update Information to save the data as a file or copy it to the clipboard. You can now pass the data on to the software vendor.

Hardlock in a Network
27
Hardlock in a Network
Prerequisites
You require the following in order to use Hardlock in a network:
• a functioning network,
• Hardlock Server Internal or External hardware,
• the module address of the Hardlock module (in particular for installation under DOS and Novell, as well as for troubleshooting),
• the drivers for the Hardlock modules,
• installed HL-Server software to control access to the Hardlock module (as a Win32 application, Windows NT service, DOS TSR or NLM),
• optionally, Aladdin Monitor for centrally administrating several HL-Servers in the network.
You must be logged on as administrator in order to perform the installation.
Note The installation should only be performed by an experienced network administrator.

Hardlock in a Network
28
Method of function
Hardlock modules for a network can be connected to any computer in the network. They are managed there by the local HL-Server software or by a local HL-Server service and are made available within the network.
The individual HL-Servers can provide up to ten or three (under DOS and Novell) Hardlock modules in the network. Login tables are created for accesses to the individual Hardlock modules. You can administrate the various HL-Servers centrally in the network using Aladdin Monitor, which you can install on any Windows computer in the network.
HL-Server with Aladdin Monitor
Client
Client
Client
HL-Server HL-Server

Hardlock in a Network
29
Basic terminology
Hardlock Server Internal Hardlock module, internal slot for the ISA port or the PCI port.
Hardlock Server External External module for the parallel or USB port
HL-Server Software which provides licenses in a network
Aladdin Monitor Win32 software for administrating several HL-Servers
Server Computer which provides services in a network.
Here: Computer which provides licenses for the protected software.
Client Computer which uses the services provided by a server.
Here: Computer which requests licenses for the protected software.
Necessary steps
Necessary steps on the server computer
• Install the hardware (Hardlock Server Internal or External) and the drivers (see the "Installing Hardware and Drivers" section on page 7).
• Install the HL-Server software on the same computer (see below).
• Install Aladdin Monitor on any Windows computer in the network (recommended).
Necessary steps on the client computer
• Install the drivers (if required by the software vendor).
• Specify the search sequence (recommended in case of problems).
Hardlock in a Network
30
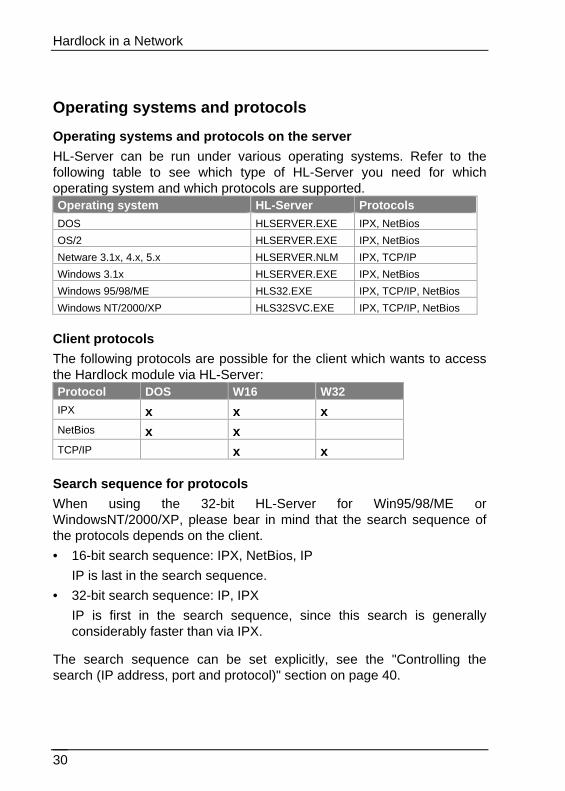
Operating systems and protocols
Operating systems and protocols on the server
HL-Server can be run under various operating systems. Refer to the following table to see which type of HL-Server you need for which operating system and which protocols are supported. Operating system HL-Server Protocols
DOS HLSERVER.EXE IPX, NetBios
OS/2 HLSERVER.EXE IPX, NetBios
Netware 3.1x, 4.x, 5.x HLSERVER.NLM IPX, TCP/IP
Windows 3.1x HLSERVER.EXE IPX, NetBios
Windows 95/98/ME HLS32.EXE IPX, TCP/IP, NetBios
Windows NT/2000/XP HLS32SVC.EXE IPX, TCP/IP, NetBios
Client protocols
The following protocols are possible for the client which wants to access the Hardlock module via HL-Server: Protocol DOS W16 W32
IPX x x x NetBios x x TCP/IP x x
Search sequence for protocols
When using the 32-bit HL-Server for Win95/98/ME or WindowsNT/2000/XP, please bear in mind that the search sequence of the protocols depends on the client.
• 16-bit search sequence: IPX, NetBios, IP
IP is last in the search sequence.
• 32-bit search sequence: IP, IPX
IP is first in the search sequence, since this search is generally considerably faster than via IPX.
The search sequence can be set explicitly, see the "Controlling the search (IP address, port and protocol)" section on page 40.
Hardlock in a Network
31
HL-Server under Windows 95/98/ME
HL-Server can be loaded once on each computer. Up to ten Hardlock modules are supported on each HL-Server.
Your software vendor supplies you with the HLSW32.EXE file for installing HL-Server under Windows 95/98/ME.
1. Install the hardware, see the "Installing Hardware and Drivers" section on page 7.
2. Start the HLSW32.EXE installation program.
3. Follow the instructions of the installation wizard.
The program installs HL-Server and the Hardlock drivers.
4. If necessary, copy the license file with the ALF file extension into the folder where the HL-Server software is located, or set the search sequence (see the "Search for ALF license file" section on page 44).
You can test the installation from any computer in the network. Use Aladdin DiagnostiX to do this, see the "Aladdin DiagnostiX" section beginning on page 47.
HL-Server under Windows NT/2000/XP
HL-Server is installed as a service under Windows NT/2000/XP. You need to be logged on as administrator in order to install HL-Server under WindowsNT/2000/XP.
You can either install the service with the HLSW32.EXE file or with Aladdin Monitor.
Installing the HL-Server service with HLSW32.EXE
1. Install the hardware, see the "Installing Hardware and Drivers" section on page 7.
2. Start the HLSW32.EXE installation program.
3. Follow the instructions of the installation wizard.
The program installs HL-Server and the Hardlock drivers.
You can test the installation from any computer in the network. Use Aladdin DiagnostiX to do this, see the "Aladdin DiagnostiX" section beginning on page 47.

Hardlock in a Network
32
Installing the HL-Server service with Aladdin Monitor
1. Install the hardware, see the "Installing Hardware and Drivers" section on page 7.
2. Install Aladdin Monitor with AKSMON32.EXE, see the "Aladdin Monitor" section on page 34.
3. Install the drivers.
4. Start Aladdin Monitor.
5. Install the service using Services/Hardlock/Install HL-Server Service.
6. Start the service using Services/Hardlock/Start HL-Server Service.
You can test the installation from any computer in the network. Use Aladdin DiagnostiX to do this, see the "Aladdin DiagnostiX" section beginning on page 47.
HL-Server under DOS
HL-Server can be loaded once on each computer. Up to three Hardlock modules are supported on each HL-Server.
Your software vendor supplies you with the HLSERVER.EXE, HLSERVER.OVL and HLSERVER.HLP files for installing HL-Server under DOS.
Installation
1. Copy the files into a folder (e.g. HLSERVER).
2. Load the protocol drivers (e.g. IPX and/or NetBios).
3. Install the hardware and the drivers, see the "Installing Hardware and Drivers" section on page 7.
HL-Server can now be started, e.g. in command line mode:
1. Change to the folder in which you installed the HL-Server software.
2. Start the software by entering the program name and the module address (in this example, the module address of the demo module):
HLSERVER -i -m:29809
Following this, the installation can be tested from a client computer.
Operation and control

Hardlock in a Network
33
Prior to its use in the network, HL-Server must be loaded as a resident program with the required parameters. Only stable applications should be run on the HL-Server computer, which do not cause the computer to crash as a result of malfunctions.
Programs running in the background for network operation purposes are handled with priority by the computer. The amount of computing time required for this means that applications running in the foreground may have to wait longer (depending on the size of the network and the frequency of network requests).
HL-Server can be controlled directly from the command line layer using straightforward entries. HL-Server can also be used with a menu interface.
HL-Server under Novell
HL-Server can be loaded once on each computer. Up to three Hardlock modules are supported on each HL-Server.
Your software vendor supplies you with the HLSERVER.NLM (and optionally HLSERVER.CFG and HLSERVER.NFC) files for installing HL-Server under Novell.
Note The current version of the CLIB.NLM and STREAMS.NLM files is needed for correct operation. Updates can be downloaded from the vendors' websites.
Prerequisites for installation
• You need access to the server console in order to install the NLM. Make sure that you have the appropriate access rights under Netware.
• The HLSERVER.NLM file must be located on a network drive in order for the NLM to be started. If you copy the file into the [server name]/SYS:SYSTEM folder on your NetWare servers, you do not need to enter a path when starting the NLM.
• Connect the Hardlock module to any printer port (LPT port) on the computer, or install HL-Server Internal (see the "Installing Hardware and Drivers" section on page 7).

Hardlock in a Network
34
Installation
HL-Server can now be installed and started from the system console of the server:
LOAD HLSERVER
Following this, the installation can be tested from a client computer.
Control
HL-Server can be controlled directly from the command line layer using straightforward entries. This makes it possible to implement HL-Server functions in batch programs (NCF). The various functions are input in the form of switches when the program is activated. HL-Server for NLM can also be operated using a standard Novell user interface.
Aladdin Monitor
Aladdin Monitor permits centralized administration of the various HL-Server programs and the Hardlock modules they provide.
In detail, the following options are available:
• Checking and editing the properties of HL-Servers in the network.
• Checking, adding and removing Hardlock modules.
• Collecting and writing information for a license update.
• Installing, starting, stopping and uninstalling the local HL-Server service
Call the online help for the program using the main menu or by pressing F1 in order to obtain information about how to operate the program.
Hardlock in a Network
35
Installing Aladdin Monitor
You can install Aladdin Monitor on any computer running under Windows 95/98/ME and Windows NT/2000/XP. You need to be logged on as administrator in order to install Aladdin Monitor under Windows NT/2000/XP.
1. Start the AKSMON32.EXE file.
2. Follow the instructions of the installation wizard.
3. The program is installed under Program Files\Aladdin\Monitor. The HL-Server service is installed at the same time.
4. You have to install the Hardlock driver as well if you want to use the HL-Server service on this computer. Refer to the "HL-Server under Windows NT/2000/XP" section on page 31 for information about installing the HL-Server service.

Setting Environment Variables
37
Setting Environment Variables When you use Hardlock in a network or when you encounter problems accessing the Hardlock module, it may be necessary to set environment variables in order to improve performance and enhance the program's stability.
Note Do not set environment variables unless you are an experienced network administrator.
You can do the following things with environment variables:
• Define the protocol used, with HL_SEARCH (see page 40).
• Define the port used, with HL_SEARCH (see page 40).
• Define the IP address, with HLS_IPADDR (see page 40).
• Define the time before a login attempt is repeated, with HLS_WAIT (see page 42).
• Define the number of repeat attempts, with HLS_RETRY (see page 42).
• Define the use of the serial port, with HL_SEARCH (see page 43).
• Define the mode of accessing the port, with HL_SEARCH (see page 43).
• Control the search for the licence file (ALF), with HL_LICENSEDIR (see page 44).

Setting Environment Variables
38
Environment variables under Windows 95/98/ME
You can set the environment variables in the AUTOEXEC.BAT file under Windows 95/98/ME. This file is generally located in the root directory C:\.
1. Open the AUTOEXEC.BAT file.
2. Specify the environment variable as follows:
SET VARIABLE=value
Example
SET HL_LICENSEDIR=C:\MYAPP\LICENSE
3. Save the changes and close the file.
The changes take effect next time the computer is started.
Environment variables under WindowsNT/2000/XP
You need to be logged on as administrator in order to set environment variables under WindowsNT/2000/XP.
1. In the Control Panel, select System/Environment (under Windows NT) or System/Advanced/Environment Variables (under Windows 2000/XP).
2. Under Windows 2000/XP click New in the System Variables panel to enter a new variable.
Under Windows NT click the System Variables box.

Setting Environment Variables
39
3. Enter the required environment variable in the Variable box and the required value in the Value box, then click Set.
The variable appears in the System variables box.
4. The changes take effect when the computer has been restarted.
Setting Environment Variables
40
Controlling the search (IP address, port and protocol)
The default search sequence for the Hardlock module is as follows:
• On USB port
• On parallel port 378
• On parallel port 278
• On parallel port 3BC
• Via the IPX protocol (16-bit) or IP protocol (32-bit)
• Via the NetBIOS protocol (16-bit) or IPX protocol (16-bit)
• Via the IP protocol (16-bit)
The following search sequence applies to IP addresses:
• Environment variable HLS_IPADDR
• If no environment variable has been defined, the search takes place via DNS or HOSTS for the station HLSERVER.
• If no address has been found, the search takes place via broadcast in the local sub-network.
You can alter the search using the environment variables HL_SEARCH and HLS_IPADDR.
Defining the search using HL_SEARCH
Using HL_SEARCH, you can define
• which port is searched for the Hardlock module,
• which protocol is used in the search,
• what the search sequence should be.
The syntax is as follows:
HL_SEARCH=[Port],...,[Protocol],...

Setting Environment Variables
41
[Port] comprises the I/O address in hexadecimal form and a port ID:
Port ID Meaning
usb USB port
p = parallel Normal parallel port
s = serial Normal serial port
e = ECP Parallel port in ECP mode
n = NEC (Japan) Japanese NEC models have a different port assignment. Consequently, this switch enables a special handling routine to be activated. This means a separate NEC API is not required.
C = Compaq Contura docking base
The multiplexer of the docking base (used for switching between the parallel port and Ethernet adapter) is reset to the parallel port for querying a Hardlock.
i = IBM PS/2 The IBM PS/2 ID corrects an error when reprogramming the port of certain video drivers under Windows. (The system cannot find Hardlock once Windows is started). Previously, this was done internally by the Hardlock API. This function can now only be activated by using the environment variable.
[Protocol] defines the protocol used for accessing HL-Server. The following parameters are available:
Protocol Meaning
IPX HL-Server searched for via IPX or SAP.
IP HL-Server searched for via TCP/IP.
NetBIOS HL-Server searched for via NETBIOS.
Refer to the "Setting Environment Variables" section on page 37 for general information about setting environment variables.
Example
SET HL_SEARCH=IPX,278p
The Hardlock module is first searched for via IPX. If the search is not successful, a local search is performed on the parallel port with the address 278.

Setting Environment Variables
42
Excluding IP from the search To transfer IP packets, Winsock calls are used with a corresponding (16 or 32 bit) WINSOCK.DLL. Please note that during installation many Internet clients install their own WINSOCK.DLL (CompuServe, AOL, T-Online). In this case, accessing IP can cause the Internet service provider to be dialed if the HL-Server is not found via IPX and NetBios. You then need to exclude IP from the search with the following command:
SET HL_SEARCH=IPX,NetBios
Optimizing the search via TCP/IP You can use HLS_IPADDR to specify one or more IP addresses or names if you want to optimize the search via TCP/IP. In contrast to the situation with HL_SEARCH, however, it is not possible to predict which of the specified HL-Servers will actually be used when several addresses are specified at the same time.
Example
SET HLS_IPADDR=192.9.209.17,luzie.aladdin.de
HLS IPADDR can also be used to specify broadcast addresses if required:
SET HLS_IPADDR=192.9.209.255,192.9.201.255
Refer to the "Setting Environment Variables" section on page 37 for general information about setting environment variables.
Controlling repeat attempts If you are using Hardlock in a network, the run-time variances within the network may lead to the client being unable to find the Hardlock module on the HL-Server, although it is there. You can use HLS_WAIT and HLS_RETRIES to control repeat attempts if this problem occurs. The default values are set so that the HL-Server should be found with an existing 64 KBit connection.
Setting Environment Variables
43
• Set the environment variable as follows in order to control the waiting time between repeat attempts:
SET HLS_WAIT=<Waiting time in milliseconds>
Possible values: 200 to 30,000.
Default setting: TCP/IP 1000, IPX 200.
• Set the environment variable as follows in order to control the number of repeat attempts:
SET HLS_RETRIES=<Number of repeat attempts>
Possible values: 2 to 30.
Default setting: 5.
Refer to the "Setting Environment Variables" section on page 37 for general information about setting environment variables.
Defining serial port usage
If you are using Hardlock Twin on the serial port, you have to specify that the Hardlock module should be searched for there. Set the environment variable as follows:
SET HL_SEARCH=2F8s,3F8s
Refer to the "Setting Environment Variables" section on page 37 for general information about setting environment variables.
Defining port access
Problems may arise when accessing a Hardlock module on the parallel port if this port communicates in ECP/EEP mode. In this case, you can change the mode during access to the Hardlock module from ECP/EEP to standard (automatic mode).
SET HL_SEARCH=278e,378e,3BCe
Automatic mode may lead to problems if a printer is connected after the Hardlock module. Refer to the "Printout does not function correctly" section on page 56 for information about solutions.
Refer to the "Setting Environment Variables" section on page 37 for general information about setting environment variables.

Setting Environment Variables
44
Search for ALF license file
HL-Server searches for the license information in the folder where HL-Server itself is located. This is generally the system folder. If the Hardlock module is first searched for locally, then the file is looked for in the same folder as the protected program. The search behavior can be altered by specifying an environment variable.
Under WindowsNT/2000/XP
You need to be logged on as administrator in order to set environment variables under WindowsNT/2000/XP.
1. Follow the instruction in the "Setting Environment Variables" section on page 37.
2. Enter HL_LICENSEDIR as the Variable and the required folder as the Value, then click Set.
Note: You can only specify local folders for the service because the HL-Server service cannot access other folders via the network.
3. Changes take effect the next time the service is started or after the computer has been restarted.
HL-Server then searches the specified folder looking for files with the ALF extension (Aladdin License File). It detects the correct license by means of the serial number.

Setting Environment Variables
45
Under Windows 95/98/ME
1. Open the AUTOEXEC.BAT file.
2. Specify the environment variable as follows:
SET HL_LICENSEDIR=[directory]
Example
SET HL_LICENSEDIR=C:\MYAPP\LICENSE
3. Save the changes.
The changes take effect next time the computer is started.
HL-Server then searches the specified folder looking for files with the ALF extension (Aladdin License File). It detects the correct license by means of the serial number.


Aladdin DiagnostiX
47
Aladdin DiagnostiX You can use Aladdin DiagnostiX to obtain the relevant information for your system and to check Hardlock modules. This information helps you and your software vendor to solve problems which may occur during the use of the protected software.
Use Aladdin DiagnostiX for the following tasks:
• To check a Hardlock module.
• To create a report containing data about Hardlock modules and relevant information about your system.
• To set Hardlock Environment parameters.
Installing Aladdin DiagnostiX
Your software vendor supplies you with the DIAGNOSTIX.EXE installation wizard in order to install Aladdin DiagnostiX.
1. Start: DIAGNOSTIX.EXE.
2. Follow the instructions of the installation wizard.
The program is installed in the Program Files\Aladdin\DiagnostiX folder or in another folder of your choosing. It is displayed in the start menu under Program Files/Aladdin/DiagnostiX.
Starting Aladdin DiagnostiX
Start the program from the start menu using Program Files/Aladdin/DiagnostiX or double-click the program file, e.g. in Explorer.
Using Aladdin DiagnostiX
The Aladdin DiagnostiX interface is divided into three sections :
• Menus for settings, creating reports and exiting the utility.
• A Diagnostic Tools pane listing available diagnostic tools.
• A display area for an activated diagnostic tool.

Aladdin DiagnostiX
48
Diagnostic Tools
The following are provided in the Diagnostic Tools Pane:
• The System Info icon uploads a screen containing information on your system and available Hardlock devices. This information is collected as soon as the Aladdin DiagnostiX utility is activated.
• The Hardlock icon uploads the Check Hardlock screen in the display area.
• The Hardlock Environment icon uploads a screen enabling you to configure Hardlock environment settings.
Checking the Hardlock module
1. Activate the Check Hardlock tool by clicking the Hardlock icon in the Diagnostic Tools pane.
Check Hardlock Tool

Aladdin DiagnostiX
49
2. Select the Access Mode.
Select Local (parallel, PC-Card, USB) to check a Hardlock module which is connected locally.
Select Network (HL-Server) to check a Hardlock module connected in the network.
Select Both (locally first) to check for a Hardlock module locally first and then in the network.
3. Specify the module address of the Hardlock module which you want to check.
Ask your software vendor if you do not know the module address.
Select Demo Module Address if you want to check a demo module.
4. You can optionally use the HL_SEARCH field to modify the Hardlock search environment settings. Note: All modifications to the HL_SEARCH parameter will only affect subsequent key access attempts during the current activation of Aladdin DiagnostiX. System settings will not be affected.
5. Check Save memory to report file if you want data in Hardlock module memory to be read and stored in a report file. You can send this information to your software vendor for analysis.
6. Click Check Key.
Details of the access are displayed in the Key Access History table below the Check Hardlock display.
Results of the Hardlock module check
The results of the Hardlock module check is displayed in the Key Access History pane. If there have been multiple accesses to Hardlock modules, the latest is displayed at the top.
Key Access History Pane

Aladdin DiagnostiX
50
Module Address
Address of the Hardlock module checked.
Access local The module was found on a local port.
remote The module was found on a remote port.
API Return API return value. If the login was successful the return value is 0. For information on other return values please contact your software vendor for more information about the return values..
Port Address of the port to which the checked Hardlock module is connected.
RUS ID Serial ID for RUS Hardlock.
Addit. Info Any relevant additional information.
Creating Reports
You can use Aladdin DiagnostiX to create reports containing information on the following:
• Hardlock devices
• System information including Win16 and DOS subsystems
• Information pooled by external reporting tools
• Memory of Hardlock modules
If you are experiencing a problem with your Hardlock device or have difficulties in accessing a protected application, create reports on any of the above and send the results to your software vendor for further analysis.
Create Report Settings
The content and format of the reports generated by Aladdin DiagnostiX is set in the Create Report tab of the Aladdin DiagnostiX Settings dialog.
The settings listed below appear in the Create Report tab.

Aladdin DiagnostiX
51
Aladdin DiagnostiX Create Report Tab
Report format: offers three format possibilities - XML, HTML, and TEXT.
The Aladdin DiagnostiX reporting feature may generate multiple files. To zip the generated files check the Zip all output files box.
To include information on Win16 and DOS subsystems in the generated reports, check the Include Win16/DOS box. Aladdin DiagnonstiX will generate two separate report files for each subsystem.
Creating a Report
To create a report follow the instructions below:
1. Review the Create Report settings outlined in the preceding section.
2. Use one of the following methods to create a report:
a) Click the Create Report icon.
b) Select Create Report from the Edit menu.
c) [Ctrl] + R
d) Click Create Report button under the System Info screen.
A message box appears indicating the location and the contents of the report file(s).
Aladdin DiagnostiX
52
Linking DiagnostiX to external reporting tools
Aladdin DiagnostiX allows you to define settings for up to two separate external reporting tools such as msinfo32. The reports generated by these external tools can be zipped and stored in a single file. Use the procedure below to link Aladdin DiagnostiX to external reporting tools:
1. Open the Reporting Tools tab in the Aladdin DiagnostiX Settings dialog.
2. Check the Reporting tool 1 box. The Execute and Output File fields should be activated.
3. In the Execute field, either specify the command line path to the target reporting tool, or browse for the tool using the button. Add additional command-line parameters to run the tool in ‘silent mode’ and specify the output DiagnostiX file.
4. Use the Output File field to specify the name of the file generated by the external tool. Specify the path to the destination directory, or browse for the file by clicking the button.
5. To define settings for a second external reporting tool, check the Reporting Tool 2 box and repeat steps 2- 4. You can optionally set a time limit for the external tool to generate a report. Check the Reporting tool time limit box and specify a time. If the reporting tool does not generate its report within the allocated time frame, it will be terminated.
6. Click OK to exit

Problems and Solutions
53
Problems and Solutions
Hardlock module not found
This fault can be caused by various things. Check the following aspects step-by-step to solve the problem.
Is the hardware installed correctly?
1. Check the connection between the Hardlock module and the computer.
2. If the Hardlock module is connected to the computer via an extension cable, try connecting the module directly to the computer instead. Alternatively, use a different extension cable.
3. Alter the module sequence if you are using several protection modules from different software vendors.
Are the drivers installed?
1. Ask your software vendor for the latest driver.
2. Download the latest driver installation (HLDRV32.EXE) and install it.
The drivers for Hardlock modules are continuously being updated and adapted to new operating systems. To obtain the latest drivers, go to the Setup Programs section of the download area at http://www.aladdin.de (German) or http://www.aks.com/hardlock (English).
3. Check the access using the Aladdin DiagnostiX program. Contact your software vendor, who can give you the program and the necessary information.

Problems and Solutions
54
Has the search for the Hardlock module been defined?
• A Hardlock module will only be found on the serial port if the search is defined using the HL_SEARCH environment variable. Refer to the "Defining port access" section on page 43 for information about setting HL_SEARCH.
• If you are using Hardlock in a network (HL-Server), it may be necessary to define environment variables for the protocol and the port in order for the Hardlock module to be found. Refer to the "Controlling the search (IP address, port and protocol)" section on page 40 for information about setting the environment variables.
• If you are using the licensing system of Hardlock, you also need a license file with the filename extension ALF in addition to the Hardlock module. Make sure that you have received this file and that it is located in the correct folder. You can also control the search using the HL_LICENSEDIR environment variable, see the "Search for ALF license file" section on page 44.
Which mode is the parallel port set to?
Communication with the Hardlock module may be disrupted if the parallel port is set to ECP mode.
• In the BIOS, check which mode the parallel port is set to. Change the setting to Standard or Normal. You can access the BIOS by pressing the appropriate key combination when your computer is starting (generally DEL or F1).
Alternatively, you can use automatic mode. In this case, communication with the Hardlock module is changed over from ECP mode to standard mode when the module is being accessed. However, communication with the printer may be disrupted during this time.
• Set the HL_SEARCH environment variable as follows (see also the "Defining port access" section on page 43:
SET HL_SEARCH=278e,378e,3BCe

Problems and Solutions
55
I/O address conflict
The Hardlock module is searched for on all three parallel port addresses (278h, 378h, 3BCh). An address conflict occurs if an ISA card is configured to use one of these addresses.
• Redefine the address of the parallel port to which the Hardlock module is connected and set the HL_SEARCH environment variable to this address.
Protected program does not run
Although the Hardlock module is found, the protected program does not run. This may be because other programs are running on the computer which the protected program is interpreting as hostile (debuggers, virus scanners).
• Stop the programs in question and try to start the protected program again.
Automatic dial up networking connection established
The computer attempts to establish a dial-up networking connection when the Hardlock module is accessed via the network (HL-Server). This is because the name HLSERVER cannot be resolved. In this case, you must allocate an address to the name HLSERVER on the client.
• On the client computer, open the HOSTS file in the %WINDIR%\SYSTEM32\DRIVERS\ETC folder (under Windows NT/2000/XP) or in the %WINDIR% folder (under Windows 95/98/ME) and insert the following line:
<IP address of the HL-Server computer> HLSERVER
Alternatively, you can also control the search using the HLS_IPADDR environment variable, see the "Optimizing the search via TCP/IP" section on page 42.
Problems and Solutions
56
Printout does not function correctly
The printout may not function correctly if the printer port is set to automatic mode by HL_SEARCH. In automatic mode, communication with the Hardlock module is changed over from ECP mode to standard mode when the module is being accessed. This can result in data on the buffer being lost. You can solve this problem by changing the mode in the BIOS. However, you should expect printing to take longer.
• In the BIOS, change the setting for the printer port to Standard or SSP or Normal. You can access the BIOS by pressing the appropriate key combination when your computer is starting (generally DEL or F1).
In the event of long-term problems with this, you should consider not having the Hardlock module and the printer on the same port. Instead, you can adopt other solutions such as having a Hardlock module for another port (USB, PCI, ISA) or for the network (Hardlock Server).

Index
57
Index Aladdin DiagnostiX, 47
Checking Hardlock modules, 48
Create Report Tab, 51
Creating a Report, 51
Diagnostic Tools, 48
Installing, 47
Key Access History Pane, 49
Linking to reporting tools, 52
Starting, 47
Aladdin Monitor
Collecting license information, 23, 25
Functions, 34
Installing, 34
License update, 22
ALF file, 19
Client, 29
CTV, 19
DiagnostiX program, 47
DIAGNOSTIX.EXE, 47
Dial up networking connection established, 55
Dongle not found, 53
Drivers
Download, 7
Installation, 7
Types, 7
Environment variables
Automatic mode, 43
ECP/EEP mode, 43
Excluding IP, 42
HL_LICENSEDIR, 44
IP address, 37, 40
License file, 37, 44
Optimizing search, 42
Port, 37, 40
Printer communication, 43
Protocol, 37, 40
Repeat attempts, 42
Serial port, 43
Setting, 37
Under Windows 95/98/ME, 38
Under Windows NT/2000/XP, 31
Under WindowsNT/2000/XP, 38
Hardlock E-Y-E, 8
Hardlock in a Network, 27
Hardlock Internal
ISA, 11
PCI, 13
Hardlock LiMaS, 19
Hardlock module, 5
Checking, 47
Controlling the search, 40
Drivers, 7
ISA slot, 11
License update, 19
Not found, 53
Parallel port, 8
PCI slot, 13
PCMCIA slot, 17

Index
58
Reconnecting, 18
Removing, 18
Serial port, 9
Transparency, 18
Types, 7
Update, 19
USB port, 10
Hardlock PC-Card, 17
Hardlock PCMCIA, 17
Hardlock Server, 27
Hardlock Server External, 8
Hardlock Server Internal
ISA, 11
PCI, 13
Hardlock Twin
Parallel port, 8
Serial port, 9
Hardlock USB, 10
HL_LICENSEDIR, 37, 44
HL_SEARCH, 37
ECP/EEP mode, 43
Excluding IP, 42
Port, 40
Protocol, 40
Serial port, 43
HLDINST.EXE, 7
HLDRV16.EXE, 7
HLDRV32.EXE, 7
HLS_IPADDR, 37, 40, 42
HLS_RETRY, 37, 42
HLS_WAIT, 37, 42
HL-Server, 27
Central administration, 34
Installing service, 31
Method of function, 28
Prerequisites, 27
Protocols, 30
Types, 30
Under DOS, 32
Under Novell, 33
Under Windows 95/98/ME, 31
Under Windows NT/2000/XP, 31
HLUP.EXE, 19
HL-Upgrade, 19
Collecting license information, 23
Importing a license update, 21
I/O address, 55
I/O address conflict, 55
Installation
Aladdin DiagnostiX, 47
ISA slot, 11
Parallel port, 8
PCI slot, 13
PCMCIA slot, 17
Questions, 18
Serial port, 9
USB port, 10
INSTVXD.EXE, 7
IP address, Defining, 37, 40
ISA slot, 11
License
Collecting information, 19
Performing an update, 19
Reading in information, 19
License file, 19
Searching, 37, 44

Index
59
License update, 19
With Aladdin Monitor, 22
With HL-Upgrade, 21
With VTC block, 21, 22
With VTC file, 21, 22
Licensing software, 5
Licensing system, 19
Monitor, 34
Parallel card, 13
Parallel port, 8
PC-card, 17
PCI slot, 13
PCMCIA slot, 17
Port
Defining, 40
Port, Defining, 37
Printer problem, 56
Protection hardware, 5, 7
Protection module, 7
Protocol, Defining, 37, 40
Remote Update System, 19
Report
Creating, 47
RUS, 19
Search sequence for protocols, 30
Serial port, 9
Environment variable, 43
Server, 29
Software protection, 5
Update
Creating information, 23
With Aladdin Monitor, 22
With configured EXE file, 20
With HL-Upgrade, 21
With VTC block, 21, 22
With VTC file, 21, 22
USB port, 10
VTC, 19


